

Page 1
Remote Control Devices
Page 2

Revision and Quality Control:
Cristina Bachmann, Heiko Bischoff, Marion Bröer, Sabine Pfeifer
The information in this document is subject to change without notice and does not represent a commitment on the part
of Steinberg Media Technologies GmbH. The software described by this document is subject to a License Agreement
and may not be copied to other media except as specifically allowed in the License Agreement. No part of this publication may be copied, reproduced or otherwise transmitted or recorded, for any purpose, without prior written permission
by Steinberg Media Technologies GmbH.
All product and company names are ™ or ® trademarks of their respective owners. Windows XP is a trademark of
Microsoft Corporation. Windows Vista is either a registered trademark or trademark of Microsoft Corporation in the
United States and/or other countries. The Mac logo is a trademark used under license. Macintosh and Power Macintosh
are registered trademarks.
Release Date: January 30, 2008
© Steinberg Media Technologies GmbH, 2008.
All rights reserved.
Page 3

Table of Contents
Page 4

5 Remote controlling Cubase Essential
6 About this manual
6 Setting Up
7 Operations
8 The Generic Remote device
10 The supported remote control devices
16 Index
4
Table of Contents
Page 5

1
Remote controlling Cubase Essential
Page 6
About this manual
It is possible to control Cubase Essential via MIDI. A large
number of MIDI control devices is supported. This manual
describes how to set up Cubase Essential for remote control, and lists the supported devices.
• There is also a Generic Remote Device option, allowing
you to use any MIDI controller to remote control Cubase
Essential.
How to set this up is described in the section “The Generic Remote de-
vice” on page 8.
Setting Up
Connecting the remote device
Connect the MIDI Out on the remote unit to a MIDI In on
your MIDI interface. Depending on the remote unit model,
you may also need to connect a MIDI Out on the interface
to a MIDI In on the remote unit (this is necessary if the remote unit features “feedback devices” such as indicators,
motorized faders, etc.).
If you will be recording MIDI tracks, you don’t want any
MIDI data from the remote unit to accidentally be recorded
as well. To avoid this, you should also make the following
setting:
1. Open the Device Setup dialog from the Devices menu.
2. Select “MIDI Port Setup” in the list to the left.
3. Check the table to the right and locate the MIDI input
to which you have connected the MIDI remote unit.
4. Deactivate the check box in the “In ’All MIDI Inputs’”
column for that input, so that the State column reads “Inactive”.
5. Click OK to close the Device Setup dialog.
Now you have removed the remote unit input from the “All
MIDI Inputs” group. This means that you can record MIDI
tracks with the “All MIDI Inputs” port selected without risking to record the data from the remote unit at the same time.
Selecting a remote device
1. Pull down the Devices menu and select Device Setup.
A dialog window opens with a list of device categories and devices shown
in the left part of the window.
2. If you can’t find the remote device you are looking for,
click on the plus sign in the top left corner and select the
device from the pop-up that appears.
The selected device is added to the Devices list.
• Note that it is possible to select more than one remote
device of the same type.
If you have more than one remote device of the same type, these will be
numbered in the Devices list. For example, to be able to use a Mackie
Control Extender, you must install a second Mackie control device.
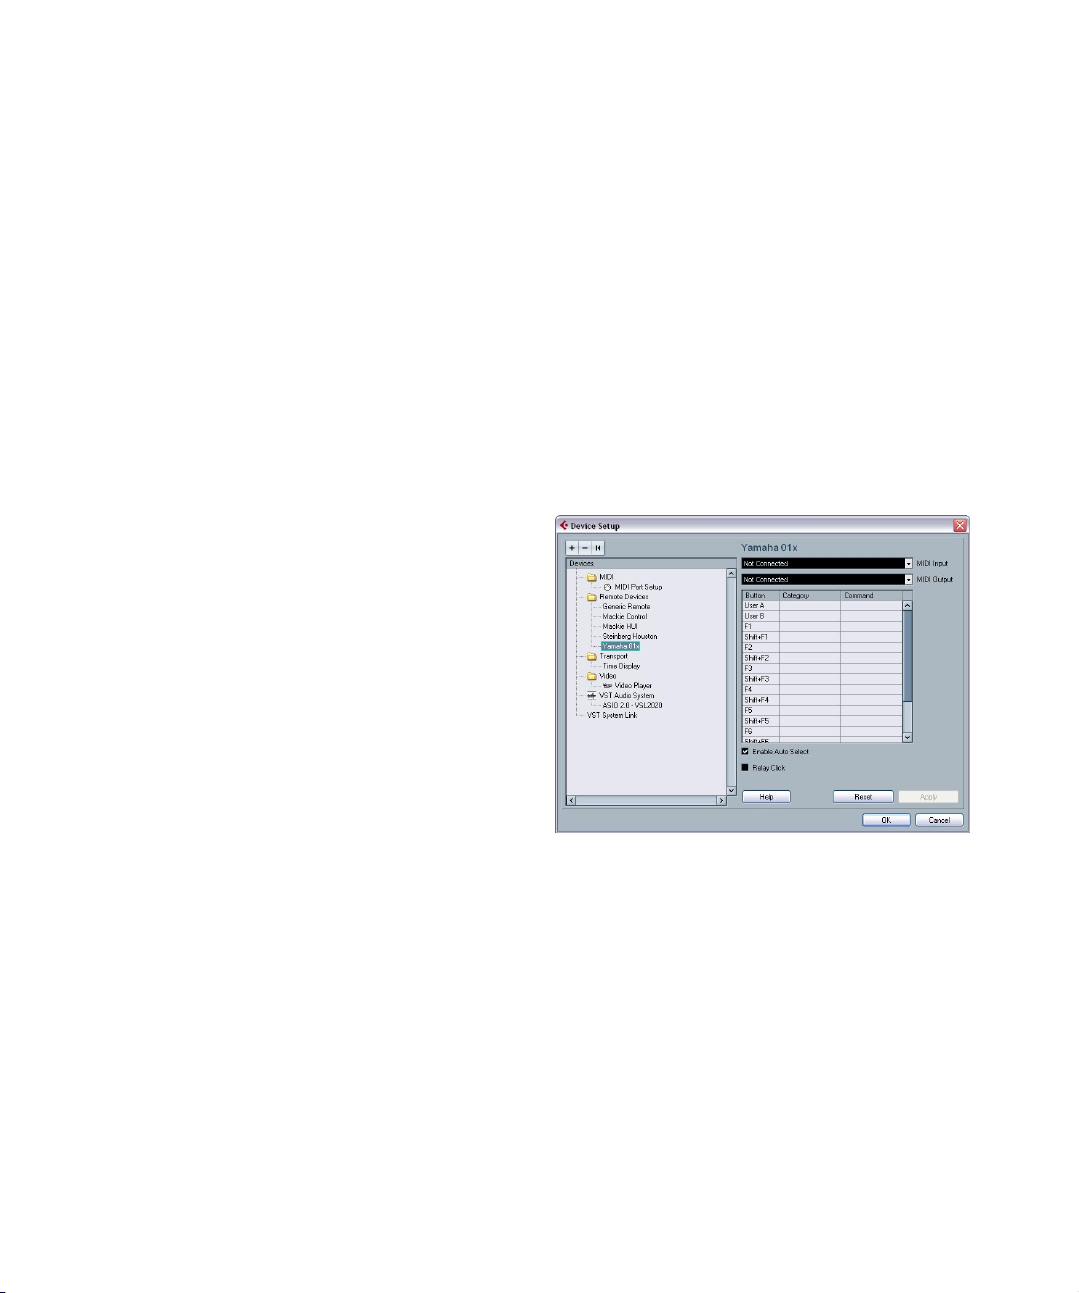
3. Now select your MIDI control device model from the
Devices list.
Depending on the selected device, either a list of programmable function
commands or a blank panel is shown in the right half of the dialog window.
A Yamaha 01x selected as remote control device.
4. Select the correct MIDI input from the pop-up menu.
If necessary, select the correct MIDI output from the pop-up menu.
6
Remote controlling Cubase Essential
Page 7

5. Click OK to close the dialog.
You can now use the MIDI control device to move faders and knobs, activate Mute and Solo, etc. The exact parameter configuration depends on
which external MIDI control device you are using.
!
This is only relevant when you are using a remote
control device and Write mode is activated in the
mixer.
!
Sometimes communication between Cubase Essential and a remote device is interrupted or the handshaking protocol fails to create a connection. To reestablish communication with any device in the Devices list, select it and click the Reset button in the
Device Setup dialog. Also, the “Send Reset Message
to all Devices” button at the top of the dialog will reset
every device in the Devices list.
Operations
Writing automation using remote controls
Automating the mixer using a remote control device is done
in the same way as when you operate on-screen controls in
Write mode. However, when it comes to replacing existing
automation data, there is one important difference:
• If you activate Write mode and move a control on the remote control device, all data for the corresponding parameter is replaced from the position where you moved the
control, up until the position where playback is stopped!
In other words, as soon as you move a control in Write mode, it remains
“active” until you stop playback. The reason for this is explained below.
As a consequence, an additional precaution must be taken:
• Make sure you move only the controller you want to replace!
In order to replace existing automation data for a control,
the computer needs to know how long the user actually
“grabbed” or used the control. When doing this “on
screen”, the program simply detects when the mouse button is pressed and released. When you are using an external remote control device, however, there is no mouse
button involved, and Cubase Essential cannot tell whether
you “grab and hold” a fader, or simply move it and release
it. Instead, you have to indicate that you have “released”
the control by stopping playback.
!
The above does not apply to the Mackie Control or
any other remote control device with touch sensitive
controls. These devices will stop writing as they have
touch sensitive faders, which means that they stop
writing as soon as you release the fader.
Assigning remote key commands
For some of the supported remote devices, you can assign any Cubase Essential function (to which a key command can be assigned) to generic buttons, wheels or
other controls. As of this writing, these devices are:
•Tascam US-428
• Yamaha 01x
• Yamaha DM 2000v2
• Yamaha DM 1000v2
•Steinberg Houston
Proceed as follows:
1. Open the Device Setup dialog and select one of the
remote devices that support this feature.
On the right side of the window you will find a three column table. This is
where you assign commands.
2. Use the “Button” column to locate a remote device control or button to which you wish to assign a Cubase Essential function.
3. Click in the “Category” column for the control, and select one of the Cubase Essential function categories from
the pop-up menu that appears.
4. Click in the “Command” column, and select the desired
Cubase Essential function from the pop-up menu that appears.
The available items on the pop-up menu depend on the selected category.
5. Click “Apply” when you are done.
The selected function is now assigned to the button or
control on the remote device.
A note about remote controlling MIDI tracks
While most remote control devices will be able to control
both MIDI and audio channels in Cubase Essential, the
parameter setup may be different. For example, audiospecific controls (such as EQ) will be disregarded when
controlling MIDI channels.
7
Remote controlling Cubase Essential
Page 8

The Generic Remote device
If you have a generic MIDI controller, you can use this for
remote control of Cubase Essential by setting up the Generic Remote device:
1. Open the Device Setup dialog on the Devices menu.
If the Generic Remote device isn’t on the Devices list, you need to add it.
2. Click the “+” sign in the top left corner and select the
“Generic Remote” device from the pop-up menu.
• When the Generic Remote device is added in the Device
Setup dialog, you can open the corresponding window by
selecting “Generic Remote” from the Devices menu.
The Generic Remote window
3. Select the Generic Remote device in the Devices list
to the left.
The settings for the Generic Remote device are displayed, allowing you
to specify which control on your device should control which parameter
in Cubase Essential.
5. Use the pop-up menu to the right to select a bank.
Banks are combinations of a certain number of channels, and are used
because most MIDI devices can control only a limited number of channels at a time (often 8 or 16). For example, if your MIDI control device has
16 volume faders, and you are using 32 mixer channels in Cubase Essential, you would need two banks of 16 channels each. When the first
bank is selected you control channel 1 to 16; when the second Bank is
selected you control channel 17 to 32. Since you can control Transport
functions as well, you may need several banks.
6. Set up the table at the top according to the controls
on your MIDI control device.
The columns have the following functionality:
Column Description
Control Name Double clicking this field allows you to enter a descriptive
MIDI Status Clicking in this column pulls down a pop-up menu, allow-
MIDI Channel Clicking in this column opens a pop-up menu, allowing
Address The Continuous Controller number, the pitch of a note or
Max. Value The maximum value the control will transmit. This value is
Flags Clicking in this column pulls down a pop-up menu, allow-
name for the control (typically a name written on the console). This name is automatically reflected in the Control
Name column in the lower table.
ing you to specify the type of MIDI message sent by the
control. The options are Controller, Program Change,
Note On, Note Off, Aftertouch and Polyphonic Pressure.
Also available are Continuous Control NRPN and RPN, a
way to extend the available control messages. ??The
“Ctrl JLCooper” option is a special version of a Continuous Controller where the 3rd byte of a MIDI message is
used as address instead of the 2nd byte (a method supported by various JL-Cooper remote devices).
you to select the MIDI channel on which the controller is
transmitted.
the address of a NRPN/RPN Continuous Controller.
used by the program to “scale” the value range of the
MIDI controller to the value range of the program parameter.
ing you to activate or deactivate three flags:
Receive – activate this if the MIDI message should be
processed on reception.
Transmit – activate this if a MIDI message should be
transmitted when the corresponding value in the program
changes.
Relative – activate this if the control is an “endless” dial,
which reports the number of turns instead of an absolute
value.
4. Use the MIDI Input and Output pop-up menus to select the MIDI port(s) to which your remote device is connected.
Remote controlling Cubase Essential
• If you find that the table at the top holds too many or too
few controls, you can add or remove controls with the Add
and Delete buttons to the right of the table.
8
Page 9

• If you are uncertain of which MIDI message a certain
controller sends, you can use the Learn function:
Select the control in the upper table (by clicking in the Control Name column), move the corresponding control on your MIDI device and click the
Learn button to the right of the table. The MIDI Status, MIDI Channel and
Address values are automatically set to those of the moved control.
7. Use the table at the bottom to specify which Cubase
Essential parameters you want to control.
Each row in the table is associated to the controller in the corresponding
row in the first table (as indicated by the Control Name column). The
other columns have the following functionality:
Column Description
Device Clicking in this column pulls down a pop-up menu, used
Channel/
Category
Value/Action Clicking in this column pulls down a pop-up menu, allow-
Flags Clicking in this column pulls down a pop-up menu, allow-
for determining which device in Cubase Essential should
be controlled. The special option “Command” allows you
to perform certain command actions by remote control.
One example of this is the selection of remote banks.
This is where you select the channel to be controlled or, if
the “Command” Device option is selected, the Command
category.
ing you to select the parameter of the channel to be
controlled (typically, if the “VST Mixer” Device option is
selected you can choose between volume, pan, send
levels, EQ, etc.).
If the “Command” Device option is selected, this is where
you specify the “Action” of the category.
ing you to activate or deactivate three flags:
Push Button – When activated, the parameter is only
changed if the received MIDI message shows a value
unequal to 0.
Toggle – When activated, the parameter value is
switched between minimum and maximum value each
time a MIDI message is received. The combination of
Push Button and Toggle is useful for remote controls
which do not latch the state of a button. One example is
controlling mute status with a device on which pressing
the Mute button turns it on, and releasing the Mute button
turns it off. If Push Button and Toggle are activated, the
Mute status will change between on and off whenever
the button is pressed on the console.
Not Automated – When activated, the parameter will not
be automated.
9. When you are finished, close the Device Setup window.
Now, you can control the specified Cubase Essential parameters from
the MIDI remote device. To select another bank, use the pop-up menu in
the Remote Status window (or use a control on the MIDI remote device,
if you have assigned one for this).
Importing and exporting remote setups
The Export button in the top right corner of the Generic
Remote Setup window allows you to export the current
setup, including the Control configuration (the table at the
top) and all banks. The setup is saved as a file (with the
Windows file extension “.xml”). Clicking the Import button
allows you to import saved remote setup files.
• The last imported or exported remote setup will automatically be loaded when the program starts or the Generic Remote control is added in the Device Setup dialog.
8. If necessary, select another bank and make settings
for it.
Note that you only need to make settings in the bottom table for this bank.
The table at the top is already set up according to the MIDI remote device.
• If necessary, you can add banks by clicking the Add
button below the Bank pop-up.
Clicking the Rename button allows you to assign a new name to the currently selected bank, and you can remove an unneeded bank by selecting it and clicking the Delete button.
Remote controlling Cubase Essential
9
Page 10

The supported remote control devices
In the following sections, the remote control devices supported by Cubase Essential are listed along with a brief
description of the corresponding feature set.
Apple Remote (Macintosh only)
Many Apple computers come with an Apple Remote Control, a small hand-held device akin to TV remote controls. It
allows you to remotely control certain features in Cubase
Essential.
1. Open the Device Setup dialog and select Apple Remote Control from the Add Device pop-up.
2. In the list on the right, the Apple Remote’s buttons are
listed. For each button you can open a pop-up menu from
which you can select a Cubase Essential parameter.
The parameter you select will be assigned to the corresponding button
on the Apple Remote.
Steinberg Houston
Houston is a MIDI/USB remote control device designed
especially for use with VST audio applications such as
Cubase Essential. With clearly laid out controls (including
touch sensitive motorized faders, rotary knobs, transport
controls and a jog/shuttle wheel) Houston allows you to
control Cubase Essential, without having to use the computer keyboard or mouse.
• For details about parameters and hands-on mixing techniques, please see the Houston documentation.
In this version of Cubase Essential, the following functions
have been added:
[Dyn/User1]: Studio Send for selected channel
•Page 01 – Level
•Page 02 – Enable
• Page 03 – Pre/Post
• Page 04 – Pan Left/Right
[User2]: Instrument for selected channel (Instrument
tracks and MIDI track to VSTi from the Rack)
• Page 1 – Select instrument
• Page 2-n – Instrument parameter
Fader Set Section:
• [Shift]+[FX Send1]: Studio Send 1
• [Shift]+[FX Send2]: Studio Send 2
• [Shift]+[FX Send3]: Studio Send 3
• [Shift]+[FX Send4]: Studio Send 4
• Page 1 – Level
• Page 2 – Enable
• Page 3 – Pre/Post
• Page 4 – Pan Left/Right
By default, the Apple Remote always controls the application that currently has the focus on your Macintosh computer (provided that this application supports the Apple
Remote).
• When the option “Disable when application is not in
front” is not selected, the Apple Remote will control Cubase Essential even if it does not have the focus.
Remote controlling Cubase Essential
Mackie Control
Mackie Control is an automated touch-sensitive control
surface. It is a nine-fader (eight channels and master) MIDI
controller that provides in-depth mixing, editing, automation and navigational control for any supported digital audio workstation.
A special Lexan overlay that shows all Steinberg-specific
key assignments for the Mackie Control device is available
to customize the controller for Cubase Essential.
10
Page 11

• For details about parameters and hands-on mixing techniques, please see the separate pdf documentation describing the use of Mackie Control with Cubase Essential.
Mackie HUI
Mackie HUI can control any number of channels in groups
of 8.
• Use the left and right Bank buttons to select channels
1–8, 9–16 etc.
• Use the left and right Channel buttons to shift the fader
assignment in steps of one channel.
• The Fader button in the Auto Enable section is used to
disable/enable the motors.
• The Mute, Pan, Send, Plug In and Send Mute buttons in
the Auto Enable section are currently not supported.
• Use the Rec/Rdy buttons to arm a track for recording.
• Use the Select buttons to select a single track for de-
tailed settings.
• With the Mute and Solo buttons you can mute or solo a
track.
• Use the Default button to un-solo all tracks.
• Use the Assign button to un-mute all tracks.
• To the right of the time display, you find an LED labeled
“Rude Solo Light”. This LED lights up as soon as any
channel is soloed.
• Use the Insert buttons to bypass all inserts of one track.
Pan button in the Select Assign section:
• Fader Set: panning left/right or panning front/rear. Press button repeatedly to cycle through the assignments (the eight VPots control the pan parameters).
• V-Sel button in the Select Assign section: monitor track.
Send A to Send E buttons in the Select Assign section:
• Fader Set: Send 1 level to Send 8 level (Send A to Send D
assigns Send 1 to Send 4, Send E assigns Send 5 to Send 8:
press button repeatedly to cycle through the assignments).
• V-Sel button in the Select Assign section: send on/off switch
(depending on selected Send).
• V-Sel button with Shift in the Select Assign section selected:
pre/post fader switch (depending on selected Send).
• The SELECT ASSIGN four character display in the Select Assign section displays Send or Pan assignment for
V-Pots and V-Sel buttons.
• The four character displays above the Select buttons
display the assigned track names.
• The Bypass button in the Select Assign section is always selected to indicate the bypass function of the Insert
buttons.
• The Mute, Rec/Rdy All, Input and Output buttons in the
Select Assign section are currently not supported.
• Use the Auto buttons to control the status of the Read
and Write buttons in the Mixer of Cubase Essential, depending on the Read/Write status in the Auto Mode section.
• Use the Off button in the Auto Mode section to control
the Read All or Write All button in the mixer of Cubase Essential, depending on the Read/Write status in the Auto
Mode section.
• The Touch, Latch and Trim buttons in the Auto Mode
section are currently not supported.
• Use the Transport button in the Window section to
open or close the Transport panel.
• Use the Edit button in the Window section to bring the
current Project window to the front.
• Use the Status button in the Window section to open or
close the VST Performance window.
• Use the Mix button in the Window section to open or
close the Mixer window.
• Use the Mem-Loc button in the Window section to
open the Marker window.
• The Alt button in the Window section is used for userassigned functions.
• The Undo button in the Keyboard Shortcuts section undoes the last performed operation in Cubase Essential.
Hold down the Shift button and press Undo to redo the last undone operation.
• Press the Save button in the Keyboard Shortcuts section to save the current project.
Hold down the Shift button and press the Save button to save a backup
copy of the current project.
11
Remote controlling Cubase Essential
Page 12

• The Edit Mode, Edit Tool, Option/All, Ctrl/Clutch and
Alt/Fine buttons in the Keyboard Shortcuts section are
currently not supported.
• The Cut, Copy, Paste and Delete buttons in the Edit
section control the equivalent Cubase Essential functions.
• The Capture and Separate buttons in the Edit section
are currently not supported.
• The buttons in the Status/Group section are currently
not supported.
• Use the In and Out buttons above the transport controls
to set the project cursor to the positions of the left or right
locators.
Hold down the Shift button and press the In or Out button to move the
left or right locator to the current project cursor position.
• Use the RTZ and END buttons to set the project cursor
to the beginning or the end of the project.
• Press the Quick Punch button to switch automatic
punch in on or off.
Hold down the Shift button and press the Quick Punch button to switch
automatic punch out on or off.
• Press the Loop button to switch Cycle mode on or off.
• Press the On Line button to switch Synchronization on
or off.
• The Audition, Pre and Post buttons are used for user
assignable functions (see function keys F1 to F7).
• The Mackie HUI Play, Stop, Record, Rewind and Fast
Forward transport controls control the equivalent functions in Cubase Essential.
• The jog wheel is used for moving the project cursor po-
sition in Cubase Essential.
• The Scrub and Shuttle buttons are currently not sup-
ported.
• Pressing the cursor keys located to the left of the jog
wheel is the same as pressing the arrow keys on your
computer keyboard.
When the Mode button is selected, pressing the cursor keys will control
zooming in the Project window.
• Use the Scroll control in the DSP Edit/Assign section to
scroll through the pages of one parameter group.
• Use the Compare button in the DSP Edit/Assign section for page up.
Hold down the Shift button in the Keyboard Shortcuts section and press
the Compare button to jump to the last page.
• Use the Bypass button in the DSP Edit/Assign section
for page down.
Hold down the Shift button in the Keyboard Shortcuts section and press
the Bypass button to jump to the first page.
• Use the Insert/Param button in the DSP Edit/Assign
section to switch the display of names of the available
parameters in the lower row on or off.
F1 button: Selected Channel: EQ
• Page 1 – Gain, Frequency, Q and Enable for the lo band
• Page 2 – Gain, Frequency, Q and Enable for the lo mid band
• Page 3 – Gain, Frequency, Q and Enable for the hi mid band
• Page 4 – Gain, Frequency, Q and Enable for the hi band
• Buttons above dials: bypass EQs
F2 button: Selected Channel: Sends
• Pages 1 to 8 – Level, Enable, Pre/Post and Bus for Sends 1
to 8
• Buttons above dials: bypass sends
F3 button: Selected Channel: Routing
• Page 1 – Output Bus, Monitor, Input Bus, Input Gain
•Page 2 – Input Phase
• Buttons above dials: monitor
• For a description of the functionalities for the F4 button:
Selected Channel: Inserts, F5 button: Global mode Send
Effects, F6 button: Global mode Master Effects, F7 button: Global mode Instruments, see the separate pdf document “Mackie Control and Cubase Essential”.
• Use the Locate/Numerics buttons to set the project cur-
sor position.
• Immediately after you enter a numeric character, the Mackie
HUI time display will no longer show the project cursor position, but the new value.
• You don’t have to enter decimal points, colons, or semicolons
for a new value.
• Use the CLR button to delete the last character. Holding
down Shift (in the Keyboard Shortcuts section) and pressing
the CLR button will delete the new value.
• Press the Enter button to set the project cursor to the position
according to the new value.
12
Remote controlling Cubase Essential
Page 13

• Use the “+” and “-” buttons to shift the project cursor position
forward or backward by the amount of time set with the new
value.
• The three LEDs left of the time display indicate whether
Bars+Beats (BEATS), a frame based timecode (TIME
CODE), Feet+Frames (FEET) or Samples (all LEDs off) is
selected.
In this version of Cubase Essential, the following functions
have been added:
F8 button: Selected channel: Instrument
• Page 1 – Select instrument
• Page 2-n – Instrument parameter
Tascam US-428
Specifications
The US-428 can remote control up to 64 mixer channels.
• When the Tascam US-428 device is added in the Device
Setup dialog, you can open the Remote Status window by
selecting “Tascam US-428” from the Devices menu.
This indicates which bank (group of eight channels in Cubase Essential)
is currently being controlled by the remote device. To select another
bank, use the pop-up menu in the window or use the Bank Left/Right
buttons on the remote device.
• The US-428 transport keys will have the equivalent
functionality in Cubase Essential.
• To set markers, hold down “Set” while pressing a loca-
tor key.
• If you hold down the function key [Null] and move a
fader, the Select and Rec indicators above the fader will
indicate whether the fader position is below or above the
current fader level in Cubase Essential.
If the upper indicator is lit, the fader position on the panel is above the
fader level in Cubase Essential and vice versa. When both indicators are
dark, fader positions are matched for that channel.
!
The US-428 supports “MIDI Feedback”, allowing for
mute/solo, channel selection, EQ band, Aux 1 to 4
and transport status to be indicated on the panel. For
this (and the fader position indication described
above) to work, you need to select the “US-428
Control” port as input and output.
Cubase Essential mixer
The following US-428 controls will remote control the following mixer parameter for each channel strip:
• Fader: volume
• Mute/Solo: mute and solo (selected via the Solo switch)
• Select: selects channel for editing
• Pan-Dial: pan
• EQ-Gain
Controls the EQ gain for each band selected with the Low, LoMid, HiMid
and High buttons. These correspond to the four EQ bands in Cubase
Essential, starting from the leftmost band.
• EQ-Freq
Controls the EQ frequency for each band selected with the Low, LoMid,
HiMid and High buttons. These correspond to the four EQ bands in Cubase Essential, starting from the leftmost band.
• EQ-“Q”
Controls the EQ “Q” for each band selected with the Low, LoMid, HiMid
and High buttons. These correspond to the four EQ bands in Cubase
Essential, starting from the leftmost band.
• Aux 1 to Aux 4 and shuttle wheel:
The effect send levels for sends 1 to 4.
• The shuttle wheel will act as position shuttle if no Aux
send button is selected.
Press the activated button to deselect it.
• Holding down the “Asgn” button and pressing the Low,
LoMid, HiMid and High EQ buttons switches the corresponding EQ band “On” button status.
• Holding down the “Asgn” button and pressing the Aux1
to Aux4 buttons switches the corresponding Effect Send
1–4 “On” button status.
13
Remote controlling Cubase Essential
Page 14

Yamaha 01V
The Yamaha 01V can remote control Cubase Essential.
Before you can initiate remote control operation, the 01V
must be set up in the following way:
• MIDI Parameter Change and Receive must be enabled.
• MIDI Control Change and Receive must be disabled.
• Device ID / MIDI Channel Receive must be set to “1”.
• Local Control should be set to “Off”.
As soon as Local Control is set to “Off”, remote control is enabled.
The 01V remote operation of Cubase Essential is very
straightforward, with (almost) every parameter having the
equivalent parameter controller in the 01V mixer. The current status of all controllable parameters is fed back to the
01V and indicated on the panel, using the motorized faders, indicators, etc. (for this to work, you need a two-way
MIDI connection between the 01V and Cubase Essential).
To facilitate 32 channel remote control, two separate control “Layouts” are used, each controlling 16 mixer channels. The “Memory” button on the 01V is used to switch
between VST layout 1 and 2. Page 1 displays VST Layout
1, and page 2 VST Layout 2.
The following parameters are remote controllable for
channels 1–32 in the mixer:
!
The value ranges for the parameters in the 01V may
not match the ranges for the corresponding parameters in all cases.
• Fader level, mute and pan.
01V controls for these parameters control the equivalent Cubase Essential parameters.
• Effect sends 1–6.
01V Aux 1–4 control effect send 1–4, 01V effect 1 and 2 control effect
send 5 and 6.
• EQ Frequency, Gain and Q (4 bands).
01V controls for these parameters control the equivalent Cubase Essential parameters.
• Stereo Master Volume.
The 01V control for this parameter controls the equivalent Cubase Essential parameter.
• Send effects master volume 1–4 are controlled by 01V
Aux Master 1–4. Send effects master 5 and 6 are controlled by 01V effect master 1 and 2.
With Layout 1 the 01V controls the following channels:
• Channel 1–12, 13/14 and 15/16 will control channels
1–14.
• 01V Return 1 and 2 will control channels 15 and 16.
With Layout 2 the 01V controls the following channels:
• Channel 1–12, 13/14 and 15/16 will control channels
17–30.
• 01V Return 1 and 2 will control channels 31 and 32.
Yamaha DM2000/DM 2000v2
The Yamaha DM2000 is a digital mixing console that provides full automation of virtually all console parameters. It
is designed to integrate effectively with digital audio workstations such as Cubase Essential.
• For detailed information about features, parameters,
etc., please see the documentation which comes with the
Yamaha DM2000.
In this version of Cubase Essential, the following functions
have been added:
Automix Section
User defined
keys
#3 Abort Drop out mode Touch
#4 Auto rec Drop out mode Latch
#5 Return Drop out mode X-Over
#6 Relative Trim mode
#7 Touch sense Toggle Write Enable All Tracks
• [Auto]: write enable
• [Set] + [Auto]: read enable
• Studio 1–4 added as [Aux9]–[Aux12] to the DM2000 -
Operation is identical to Sends (volume, on/off, pre/post
supported)
• Matrix [Aux9]–[Aux12] will assign Studio 1–4 to the encoders above the faders
• Selected Channel Aux9–12 will assign Studio 1–4
DM 2000 Button Cubase Essential function
14
Remote controlling Cubase Essential
Page 15

Yamaha DM1000v2
The Yamaha DM1000v2 is a digital mixing console that
provides full automation of virtually all console parameters.
It is designed to integrate effectively with digital audio
workstations such as Cubase Essential.
• For detailed information about features, parameters,
etc., please see the documentation which comes with the
Yamaha DM1000v2.
Yamaha 01v96v2
The Yamaha 01v96v2 is a digital mixing console that provides full automation of virtually all console parameters. It
is designed to integrate effectively with digital audio workstations such as Cubase Essential.
• For detailed information about features, parameters,
etc., please see the documentation which comes with the
Yamaha 01v96v2.
Yamaha 02r96v2
The Yamaha 02r96v2 is a digital mixing console that provides full automation of virtually all console parameters. It
is designed to integrate effectively with digital audio workstations such as Cubase Essential.
• For detailed information about features, parameters,
etc., please see the documentation which comes with the
Yamaha 02r96v2.
[Instruments]: Instrument for selected channel (Instrument
tracks and MIDI track to VSTi from the Rack)
• Page 1 – Select instrument
• Page 2-n – Instrument parameter
• [Shift]+[Instruments]: VST Instrument Rack access (as v3.x)
Yamaha 01x
The Yamaha 01x is a digital mixing console that provides
full automation of virtually all console parameters. It is designed to integrate effectively with digital audio workstations such as Cubase Essential.
• For detailed information about features, parameters,
etc., please see the documentation which comes with the
Yamaha 01x.
In this version of Cubase Essential, the following functions
have been added:
[Shift]+[Send FX]: Studio Sends for selected channel
• Page 1 – Level
• Page 2 – Enable
•Page 3 – Pre/Post
• Page 4 – Pan Left/Right
Remote controlling Cubase Essential
15
Page 16

Index
Page 17

A
Apple Remote 10
G
Generic Remote Device 8
H
Houston 10
M
Mackie Control 10
Mackie HUI 11
R
Remote control
Key commands 7
Setting up 6
Writing automation 7
T
Tascam US-428 13
Y
Yamaha 01V 14
Yamaha 01v96v2 15
Yamaha 01x 15
Yamaha 02r96v2 15
Yamaha DM1000v2 15
Yamaha DM2000/DM2000v2 14
17
Index
 Loading...