

Page 1
Quick Start Guide
Page 2

Cristina Bachmann, Heiko Bischoff, Marion Bröer, Sabine Pfeifer, Heike Schilling,
Benjamin Schütte
This PDF provides improved access for vision-impaired users. Please note that due to
the complexity and number of images in this document, it is not possible to include text
descriptions of images.
The information in this document is subject to change without notice and does not represent a commitment on the part of Steinberg Media Technologies GmbH. The software
described by this document is subject to a License Agreement and may not be copied to
other media except as specifically allowed in the License Agreement. No part of this pub
lication may be copied, reproduced, or otherwise transmitted or recorded, for any purpose, without prior written permission by Steinberg Media Technologies GmbH.
Registered licensees of the product described herein may print one copy of this docu
ment for their personal use.
All product and company names are ™ or ® trademarks of their respective owners. Windows 7 is a registered trademark or trademark of Microsoft Corporation in the United
States and/or other countries. The Mac logo is a trademark used under license. Macin
tosh and Power Macintosh are registered trademarks. MP3SURROUND and the
MP3SURROUND logo are registered trademarks of Thomson SA, registered in the US
and other countries, and are used under license from Thomson Licensing SAS.
Release Date: July 18, 2011
© Steinberg Media Technologies GmbH, 2011.
All rights reserved.
-
-
-
Page 3

Table of Contents
Page 4

6 Introduction
7 Welcome!
8 About the documentation and the help
9 About the program versions
11 Key command conventions
11 How you can reach us
12 System requirements and installation
13 About this chapter
13 Minimum requirements
16 Installing Cubase
17 License activation and registration
19 Hardware installation
21 Creating your first project
22 About this chapter
22 The Project Assistant dialog
23 Saving, closing, and opening projects
25 Selecting the driver for your audio device
26 Setting up the VST connections
29 Recording audio
30 About this chapter
30 Creating a mono track
31 Turning on the metronome click
32 Setting levels
35 Recording
36 Playback
38 Recording MIDI
39 About this chapter
39 Creating an instrument track
40 Browsing sounds
42 Recording
4 — Table of Contents
Page 5

44 Mixing and effects
45 About this chapter
45 Setting levels for the mix
46 Setting panorama
47 Mute and solo
47 Adding EQ
50 Audio effects
53 Exporting a mixdown
Table of Contents — 5
Page 6

1
Introduction
Page 7

Welcome!
Congratulations and thank you for purchasing a high-quality Steinberg product!
Building on the core technologies used in the Cubase 6 advanced music pro-
duction system, Cubase Elements 6 and the hardware-bundled versions,
Cubase AI 6 and Cubase LE 6, offer all the basic tools for composing, recording, editing, and mixing your latest idea into a true masterpiece. Combining the
very best sound quality, intuitive handling, and a vast range of highly advanced
audio and MIDI tools, the sixth version of the Cubase family condenses over
years of Steinberg development into the cutting-edge line of digital audio
25
workstations used by countless musicians, producers, and composers all over
the globe.
Cubase provides the latest computer and audio technologies inviting you to
venture into new artistic territory and give your creativity free reign. Whether
you are a professional, a hobby musician, a student, or a teacher, Cubase has
it all covered and supports you through every stage of music production, from
the inception of the first fleeting idea and its development, right down to the
final mix. And because it has been built to support individual creativity, Cubase
owners are among the most successful artists in just about any musical genre
or activity conceivable — from engineers recording and mixing rock albums to
dance DJs, hip-hop producers, songwriters creating pop hits, and film com
posers scoring for Hollywood blockbusters. If you are entirely new to Cubase,
you have just become a member of this large community of professionals and
music enthusiasts! Check out the official Cubase community for tips and tons
of other useful information at www.steinberg.net/forum.
Please don’t forget to register your Cubase version on MySteinberg in order to
gain access to online support offers and additional exclusive services.
We wish you musical inspiration when working with your brand-new Cubase
DAW.
See you around! Your Steinberg Cubase Team
-
Introduction — 7
Page 8

About the documentation and the help
The Cubase documentation is divided into several sections, as listed below.
The documents are available in Adobe Acrobat format (extension .pdf) and can
be accessed as follows:
• You can open the PDF documents from the Documentation submenu on the
Help menu in the program.
• Under Windows you can also open these documents from the Cubase Documentation subfolder on the Windows Start menu.
• Under Mac OS X the PDF documents are located in the folder “/Library/
Documentation/Steinberg/Cubase 6”.
Ö
To read the PDF documents, you need to have a suitable PDF reader appli-
cation installed on your computer.
The Quick Start Guide
This is the document you are reading. It covers the following areas without
going into details:
• Computer requirements, installation procedure, and license activation.
• Setting up your system for audio and MIDI work.
• Creating a project, recording, and mixing.
The Operation Manual
The Operation Manual is the main Cubase reference documentation, with
detailed descriptions of operations, parameters, functions, and techniques.
Plug-in Reference
This document describes the features and parameters of the included VST
plug-ins and VST instruments.
HALion Sonic SE
This document describes the features and parameters of the included VST
instrument HALion Sonic SE.
8 — Introduction
Page 9

Remote Control Devices
This document lists the supported MIDI remote control devices.
Menu Reference
This document provides a list of all menus and their options with a brief
description, for quick reference.
The dialog help
To get information about the active dialog, click its Help button.
About the program versions
The documentation covers three program versions, Cubase Elements, Cubase
AI, and Cubase LE, for two different operating systems or “platforms”, Windows and Mac OS X. Whenever the program is only called “Cubase” in this
document, this refers to all three program versions.
Some features described in the documentation are not applicable to all three
Cubase versions. Whenever this is the case, it is clearly indicated in the head
ing of the related subject. For example, if a heading is followed by “(Cubase
Elements only)”, the corresponding feature is not available in Cubase AI and
Cubase LE. Likewise, if you see “(not in LE)”, the corresponding feature is only
available in Cubase Elements and Cubase AI.
-
Introduction — 9
Page 10

In some cases the difference between the five available versions of Cubase is
not the presence or absence of a feature, but rather how often an element (e.
g.
a certain track type) can be used in a project:
Maximum
number of
Audio tracks unlimited 64 48 32 16
MID tracks unlimited 128 64 48 24
Instrument tracks unlimited 32 24 16 8
VST instrument
slots
Group channels 256 32 16 8 8
FX channels 64 64 8 4 4
Audio channel
insert slots
Audio channel
send slots
MIDI inserts/
sends
Physical I/Os* 256 32 24 16 8
Max. audio
resolution
* This determines the number of input and output busses that can be defined in the VST Connections window (256 I/Os equal 128 stereo or 256 mono busses, for example).
Cubase Cubase
Artist
64 32 16 8 0
8884 4
8884 4
4400 0
192 kHz 96 kHz 96 kHz 96 kHz 96 kHz
Cubase
Elements
Cubase AI Cubase LE
Some features and settings are also specific to one of the platforms. This is
clearly stated in the applicable cases. If nothing else is said, all descriptions
and procedures in the documentation are valid for both Windows and Mac
X.
OS
The screenshots are taken from the Windows version of Cubase Elements.
10 — Introduction
Page 11

Key command conventions
Many of the default key commands in Cubase use modifier keys, some of which
are different depending on the operating system. For example, the default key
command for Undo is [Ctrl]-[Z] under Windows and [Command]-[Z] under Mac
OS X.
When key commands with modifier keys are described in this manual, they are
shown with the Windows modifier key first, in the following way:
[Win modifier key]/[Mac modifier key]-[key]
For example, [Ctrl]/[Command]-[Z] means “press [Ctrl] under Windows or
[Command] under Mac OS X, then press [Z]”.
Similarly, [Alt]/[Option]-[X] means “press [Alt] under Windows or [Option]
under Mac OS X, then press [X]”.
Ö
This manual often refers to right-clicking, for example, to open context
menus. If you are using a Mac with a single-button mouse, hold down [Ctrl] and
click.
How you can reach us
On the Help menu in Cubase you will find items for getting additional information and help.
The menu contains links to various Steinberg web pages. Selecting a menu
item automatically launches your browser and opens the page. On these pages
you can find support and compatibility information, answers to frequently asked
questions, information about updates and other Steinberg products, etc. This
requires that you have a web browser installed on your computer, and a work
ing Internet connection.
-
Introduction — 11
Page 12

2
System requirements and installation
Page 13

About this chapter
In this chapter the requirements and installation procedures for the Windows
version and the Mac version of Cubase are described.
Minimum requirements
To use Cubase (32-bit or 64-bit version), your computer must meet the following minimum requirements:
Windows
• Windows 7 (32-bit or 64-bit)
• Intel or AMD dual-core processor
•2 GB RAM
•4 GB of free hard-disk space
• Windows-compatible audio hardware (ASIO-compatible audio hardware recom-
mended for low-latency performance)
• Display resolution of 1280 x 800 pixels recommended
• DVD ROM dual-layer drive required for installation
• QuickTime 7.1 and video card supporting OpenGL 1.2 (OpenGL 2.0 recommended)
• Internet connection required for license activation and registration
Mac OS X
• Mac OS X 10.6 (32-bit or 64-bit)
•
Intel dual-core
•2 GB RAM
•4 GB of free hard-disk space
• CoreAudio compatible audio hardware
• Display resolution of 1280 x 800 pixels recommended
• DVD ROM dual-layer drive required for installation
• Video card supporting OpenGL 1.2 (OpenGL 2.0 recommended)
• Internet connection required for license activation and registration
processor
System requirements and installation — 13
Page 14

Starting Cubase 64-bit on a 64-bit Mac OS X system
!
When you install Cubase on a 64-bit Mac OS X system, the program is set to
start in 32-bit mode.
• To start Cubase in 64-bit mode, right-click the application symbol in the Mac
OS X Finder, select “Get Info” and deactivate the “Open in 32-bit mode” option
in the dialog that appears.
General notes on how to set up your system
On the Steinberg web site, under “Support–DAW Components”, you can
find detailed information on what to consider when setting up a computer
system dedicated to audio work.
• RAM – There is a direct relation between the amount of available RAM and
the number of audio channels that you can have running.
The amount of RAM specified above is the minimum requirement, but as a general rule “the more
the better” applies.
• Hard-disk size – The size of the hard disk determines how many minutes of
audio you will be able to record.
Recording one minute of stereo CD quality audio requires 10 MB of hard-disk space. That is, eight
stereo tracks in Cubase use up at least 80
• Hard-disk speed – The speed of the hard drive also determines the number
of audio tracks you can run.
That is the quantity of information that the hard disk can read, usually expressed as “sustained
transfer rate”. Again, “the more the better” applies.
• Wheel mouse – Although a mouse without a wheel will work fine with
Cubase, we recommend that you use a wheel mouse.
This will speed up value editing and scrolling considerably.
MB of disk space per recording minute.
MIDI requirements
If you intend to use the MIDI features of Cubase, you need the following:
• A USB MIDI keyboard or a MIDI instrument and a MIDI interface to connect external
MIDI equipment to your computer
• Any audio equipment required to listen to the sound from your MIDI devices
14 — System requirements and installation
Page 15

Audio requirements
In music production it is very important to work with low latencies. Therefore we
recommend you to use a dedicated ASIO audio interface. Although Cubase
can run with many audio cards that are installed in a computer, they might not
offer you low enough latencies. For an overview of the audio hardware offered
by Steinberg, see http://www.steinberg.net/products/hardware.html.
Cubase will run with audio hardware that meets the following specifications:
•Stereo.
•16 bit.
• Support of at least the 44.1kHz sampling rate.
• Windows – If there is no dedicated ASIO driver available, you can also use the
Generic Low Latency ASIO Driver.
• Mac – The audio hardware must be supplied with Mac OS X-compatible drivers
(CoreAudio or ASIO).
Using the built-in audio hardware of Macintosh computers
Depending on your preferences and requirements, using the built-in audio
hardware may be sufficient for use with Cubase. It is always available for selec
tion in Cubase – you do not have to install any additional drivers.
-
System requirements and installation — 15
Page 16

Installing Cubase
Starting the installation
The installation procedure puts all files in the right places, automatically.
Depending on your system, the Start Center program on the DVD may start
automatically. If no interactive start center appears, open the DVD and doubleclick the file “Start_Center.exe” (Win) or “Start_Center.app” (Mac). From the
Start Center you can initiate the installation of Cubase and browse through the
additional options and information presented there.
In case you do not want to install Cubase via the interactive Start Center, follow the procedure below.
Windows
1. Double-click the file “Setup.exe”.
2. Follow the instructions on screen.
Macintosh
1. Double-click the file “Cubase LE AI Elements 6.mpkg”.
2. Follow the instructions on screen.
16 — System requirements and installation
Page 17

License activation and registration
!
The process for license activation is described in detail on the Steinberg
web site. To open the corresponding page, follow the Activation & Registration link in the Start Center.
Cubase Elements, Cubase AI, and Cubase LE use a software-based copy protection scheme. The so-called Soft-eLicenser is installed automatically with
your version of Cubase. It can be accessed via the eLicenser Control Center
application that is installed automatically with the product.
Cubase Elements
After installation, you need to activate your product. If you purchased Cubase
Elements in a shop, the product package contains the “Essential Product
License Information” sheet which contains an activation code and describes
the process in detail.
If you purchased the download version of Cubase Elements, you receive an email with the activation code and a description of the activation process.
Register Cubase Elements
We encourage you to register your software! By doing so you are entitled to
technical support and kept aware of updates and other news regarding
Cubase.
• To register your software, open the Help menu in Cubase and select the
Registration option.
The Registration page of the Steinberg web site opens in your web browser. Continue by following
the instructions on screen.
Ö
You can also directly go to www.steinberg.net/mysteinberg, log in to the
exclusive MySteinberg online customer portal and register your product by fol
lowing the instructions on screen.
-
System requirements and installation — 17
Page 18

Cubase AI and Cubase LE
The Soft-eLicenser that came with your product allows you to use the program
out-of-the-box for 30 days. After this period, you have to register your program
and activate your license permanently.
When you start Cubase AI or Cubase LE, a dialog opens that informs you for
how much longer you can use the program without registration and activation.
When you click the Register Now button in this dialog, the standard web
browser of your computer opens the MySteinberg section on the Steinberg
web site.
• Follow the instructions on screen. Once you have registered, you receive all
information required for activation of your product.
When you have successfully registered and activated your product, you are
entitled to technical support and kept aware of updates and other news
regarding Cubase.
18 — System requirements and installation
Page 19

Hardware installation
!
Installing the audio hardware and its driver
1. Install the audio hardware and related equipment in the computer, as
described in the hardware documentation.
2. Install the driver for the audio hardware.
A driver is a piece of software that allows a program to communicate with a certain piece of hardware. In this case, the driver allows Cubase to use the audio hardware. Depending on the operating
system of your computer, there are different types of drivers that can be used.
Dedicated ASIO drivers
Professional audio hardware often comes with an ASIO driver written especially for the device. This allows for direct communication between Cubase and
the audio hardware. As a result, the devices with specific ASIO drivers can
provide lower latency (input-output delay), which is crucial when monitoring
audio via Cubase or using VST instruments. The ASIO driver may also provide
special support for routing, synchronization, etc.
ASIO drivers are provided by the audio hardware manufacturers. Make sure to
check the manufacturer’s web site for the latest driver versions.
If your audio hardware comes with a specific ASIO driver, we strongly
recommend that you use this.
Generic Low Latency ASIO driver (Windows only)
On Windows systems, you can use the Generic Low Latency ASIO driver. This
is a generic ASIO driver that provides ASIO support for any audio hardware
supported by Windows 7, thus allowing for low latency. The Generic Low
Latency ASIO driver provides the Windows Core Audio technology in Cubase.
No additional driver is needed. This driver is included with Cubase and does
not require any special installation.
Ö
This driver should be used if no specific ASIO driver is available. Although
the Generic Low Latency ASIO driver supports all audio devices, you might get
better results with on-board audio cards than with external USB audio inter
faces.
-
System requirements and installation — 19
Page 20

DirectX drivers (Windows only)
DirectX is a Microsoft “package” for handling various types of multimedia data
under Windows. Cubase supports DirectX, or to be more precise, DirectSound, which is a part of DirectX used for playing back and recording audio.
This requires one of the following types of drivers:
• A DirectX driver for the audio device, allowing it to communicate with DirectX.
If the audio hardware supports DirectX, this driver should be supplied by the
manufacturer. If it is not installed with the audio hardware, please check the
manufacturer’s web site for more information.
• The ASIO DirectX Full Duplex driver, allowing Cubase to communicate with
DirectX. This driver is included with Cubase, and does not require any special
installation.
Mac OS X drivers (Mac only)
If you are using a Macintosh computer, make sure that you are using the latest
Mac OS X drivers for your audio hardware. Follow the manufacturer’s instructions to install the driver.
Testing the audio hardware
To make sure that the audio device works as expected, perform the following
tests:
• Use any software included with the hardware to make sure that you can
record and play back audio without problems.
• If the hardware is accessed via a standard operating system driver, try playing back audio using the computer’s standard audio application (e. g. Windows
Media Player or Apple iTunes).
Installing a MIDI interface or USB MIDI keyboard
Although many USB MIDI keyboards and MIDI interfaces are plug&play devices,
you may have to install a dedicated device driver. Please follow the installation
procedure described in the documentation that came with the device.
Ö
You should also make sure to check the manufacturer’s web site for the latest driver updates.
20 — System requirements and installation
Page 21

3
Creating your first project
Page 22

About this chapter
In this chapter you will learn how to create a new project, save a project, and
open a saved project. You will also learn how to set up your audio device in
Cubase.
The Project Assistant dialog
To create a new project, proceed as follows:
1. Start Cubase.
The Project Assistant dialog opens. It allows you to open existing projects and create new projects,
which can either be empty or based on a project template.
Ö
If Cubase is already running, you can open the Project Assistant by selecting the “New Project…” command from the File menu.
22 — Creating your first project
Page 23

2. In the “Project folder” field, enter a name for the project folder (e. g. “My first
!
The name of the
project
project”).
3. If you want to start with a preconfigured project for a specific purpose
instead, select a template from one of the categories (Recording, Scoring, Pro
duction, or Mastering).
If you do not select a template, a blank new project is created.
4. Click Create.
You are looking at your very first project in Cubase. Congratulations! If you look
at the top of the window (called the Project window), you will see that the name
of this project is “Untitled1”.
You are not done yet! So far you have created a new Cubase project.
There is a new folder on the hard drive, but the actual Cubase project has
not been saved yet.
Saving, closing, and opening projects
Saving a project
1. On the File menu, select the Save command.
If your project has not been saved before, this opens the Save As dialog. You will notice that the
folder you created earlier (“My First Project”) is already selected. This is where you want to save
your project.
2. Type in a name for your project (e. g. “My First Cubase Project”).
3. Click “Save” – and that’s it!
Ö
If a project has been saved before, the shortest way to save is pressing
[Ctrl]/[Command]-[S].
-
Creating your first project — 23
Page 24

Closing a project
1. Make sure that the Project window is selected.
The Project window is the main window that you work in.
2. On the File menu, select the Close command.
If you have made any changes to the project since you last saved it, you will be prompted to “Save”,
“Don’t Save”, or “Cancel”. Click Save if you want your changes saved.
Opening a project
After you have saved and closed your project, you have several possibilities to
open it again.
Opening a project using the Open command
1. On the File menu, select the “Open…” command.
2. Navigate to the folder containing the project that you want to open.
3. Select the project and click Open.
The project is loaded in the Project window.
Opening a project using the Project Assistant dialog
In the Recent category in the Project Assistant dialog, you will find a list of
recently opened projects. When you select a project in this category, the Cre
ate button changes to an Open button and is used to load the corresponding
project.
Opening a project using the “Recent Projects” submenu
Cubase remembers recently opened projects and lists them in the “Recent
Projects” submenu of the File menu. On this menu, you can select a project
name to load that project.
-
24 — Creating your first project
Page 25

Selecting the driver for your audio device
Before you can set up the routing for your audio signals and start recording,
you need to make sure that the correct ASIO driver is selected:
1. Open the Devices menu and select the “Device Setup…” option.
2. In the Device Setup dialog, click on the “VST Audio System” entry in the list
on the left.
The VST Audio System page is shown on the right.
3. On the ASIO Driver pop-up menu, select the driver that you want to use.
The different types of drivers are described in the section “Hardware installation” on page 19.
Creating your first project — 25
Page 26

Setting up the VST connections
The VST Connections window allows you to set up the routing of input and
output signals between Cubase and your audio hardware. These connections
are called “busses”. In this section you will learn how to set up the busses so
that you can get playback and recording working.
Adding outputs
In this section you will learn how to set up the outputs for playing back audio in
Cubase. Let’s start from scratch and remove any outputs that were automati
cally added by Cubase:
1. Open the Devices menu, and select “VST Connections”.
The VST Connections window opens. The default key command for this is [F4].
2. Select the Outputs tab.
3. In the “Bus Name” column, right-click the top entry and select “Remove
Bus” from the context menu.
If necessary, repeat this step for any further busses.
-
Now that the “Bus Name” column is empty, your are ready to set up the output
that you need:
1. Click the “Add Bus” button.
The Add Output Bus dialog opens.
2. Choose “Stereo” for Configuration and “1” for Count.
26 — Creating your first project
Page 27

3. Click OK.
A new stereo bus (Left and Right) is added, allowing you to have audio in Cubase routed to your
audio hardware.
4. If you want to change the output ports that were selected automatically,
open the “Device Port” pop-up menu and select different ports.
Depending on your audio hardware, more than two output ports might be available. For most cases
we recommend to use the main stereo outputs.
Adding inputs
In this section you will learn how to set up the inputs for recording into Cubase
from scratch:
1. In the VST Connections window, select the Inputs tab.
2. In the “Bus Name” column, right-click the top entry and select “Remove
Bus” from the context menu.
If necessary, repeat this step for any further busses.
3. Click the “Add Bus” button.
The Add Input Bus dialog opens.
4. Choose “Stereo” for Configuration and “1” for Count.
5. Click OK.
A new stereo bus (Left and Right) is added, allowing you to have audio from your audio device’s
input routed to Cubase for recording.
Creating your first project — 27
Page 28
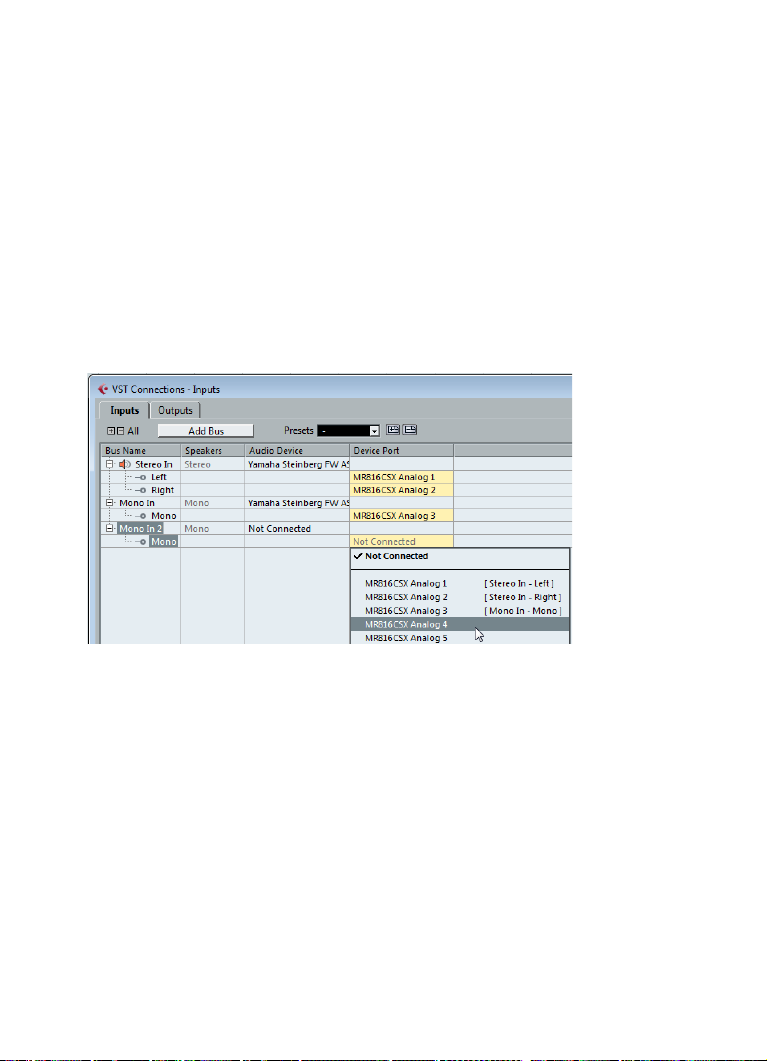
Having a stereo input is useful for recording audio with two channels, for example, to record a keyboard with a left and a right audio channel. If you want to
record with two mono channels instead, you can set up separate mono busses:
6. Click the “Add Bus” button.
The Add Input Bus dialog opens.
7. Choose “Mono” for Configuration and “2” for Count.
8. Click OK.
Two new mono busses are added.
9. Click in the “Device Port” column to select the audio inputs of your audio
device for the stereo and mono inputs.
That’s it! You are now ready to record audio in Cubase and play it back.
28 — Creating your first project
Page 29

4
Recording audio
Page 30

About this chapter
In this chapter you will learn how to record a bass guitar in mono from the
“Mono In” input. Make sure that you have your audio hardware set up and you
have read through the section
You also need an empty project, see “Creating your first project” on page 21.
“Setting up the VST connections” on page 26.
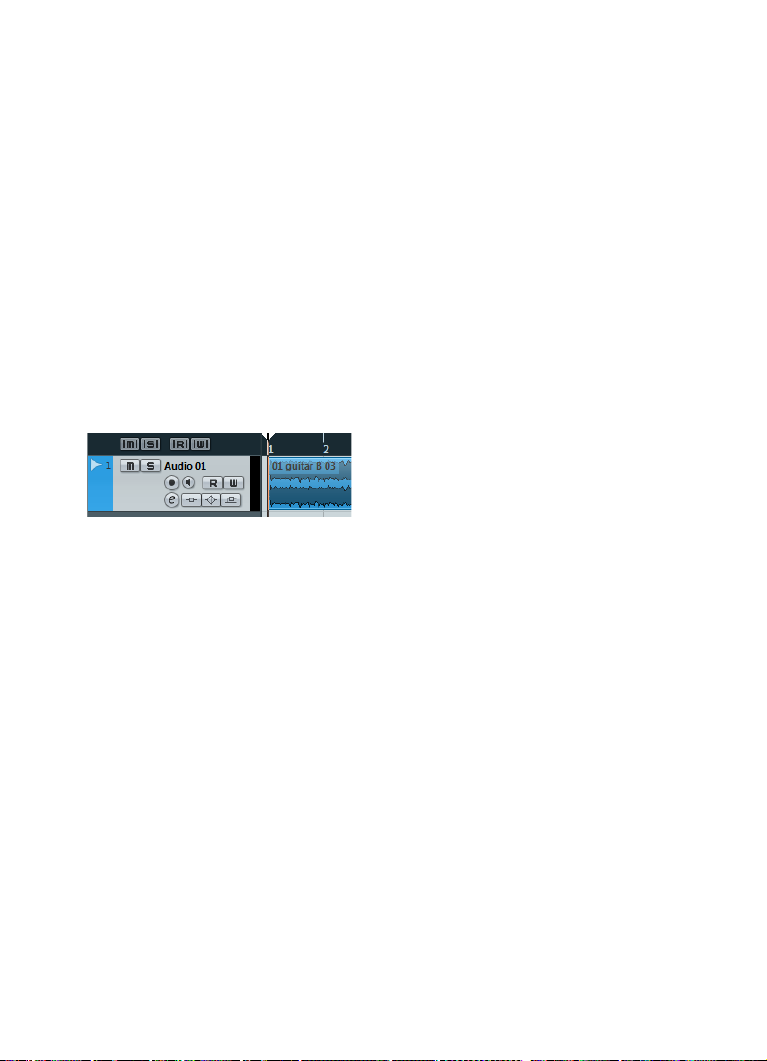
Creating a mono track
Let’s create an audio track for recording:
1. On the Project menu, open the “Add Track” submenu, and select the
“Audio” option.
2. Choose “Mono” for Configuration and “1” for Count. Click “Add Track”.
This adds a mono audio track to the Project window.
3. Click on the new track you have created and take a look at the Inspector.
The Inspector allows you to see and manipulate a lot of information for the selected track.
30 — Recording audio
Page 31

4. Open the “Input Routing” pop-up menu and select “Mono In” for the audio
track’s input.
By selecting “Mono In”, you will be able to record the audio from the left input of the audio device.
5. Open the “Output Routing” pop-up menu and select “Stereo Out” for the
audio track’s output.
Setting the output to “Stereo Out” allows you to hear what you are recording. See the chapter
“VST Connections” in the Operation Manual for more detailed information.
Turning on the metronome click
To have a click or metronome play in the background so that your recording
aligns with the bars and beats in Cubase, proceed as follows:
1. On the Transport panel, activate the “Metronome/Click” button.
2. If you would like to hear a two bar count in before you record, also activate
the “Precount/Click” button.
Next you have to set the speed or the tempo for your project. This will directly
affect how fast the click plays.
Recording audio — 31
Page 32

3. Click the Tempo button so that the text field to the right reads “Fixed”
Audio coming into this track.
(instead of “Track”), then click in the value field and enter a new tempo value.
The tempo is set in bpm (beats per minute).
Setting levels
For this example, we assume that you have an instrument playing through an
amplifier with a microphone in front of the amplifier’s speaker. This microphone
is plugged directly into the audio device’s input. The level has to be set so that
there is enough volume without clipping. Proceed as follows:
1. Make sure that the “Record Enable” button on the track is enabled.
This way Cubase knows that you want to record on this track.
2. Click the Monitor button so that you can hear the instrument playing.
You should now see and hear the incoming audio signal.
32 — Recording audio
Page 33

3. In the Inspector, open the Channel tab.
Click here to display the channel fader.
This will display the channel fader for the selected track.
4. Do the best you can to send the maximum amount of volume to the audio
inputs of your audio device, but avoid distortion.
Most audio devices show some kind of level or volume indication. If yours does not, don’t worry,
you can change the amount using the channel fader.
Recording audio — 33
Page 34

5. Move the fader up or down so that the volume is loud enough without going
This is the safe area for recording.
Do not allow the audio level to go past this line!
into the red on the channel meter.
If the meter goes into the red, clipping or distortion can occur. You will see a line near the top of the
channel meter – make sure that the level does not go over this line!
Once the level is set, you are ready to record!
34 — Recording audio
Page 35
Recording
To record the instrument you are playing (in our example a bass guitar), proceed as follows:
1. Position the cursor at the beginning of the project.
This will make sure you start recording on bar 1.
2. Click the Record button to start recording.
Since the “Precount/Click” button is activated, you will hear two bars of click before recording
begins.
3. Click Stop when you are finished.
4. Turn off the Monitor and “Record Enable” buttons on the track.
By turning off the “Record Enable” button you make sure that you do not accidentally record on the
track again.
Congratulations! You have just recorded your first piece of audio in Cubase.
Move ahead to the next section to learn how to play back audio.
Recording audio — 35
Page 36

Playback
Double-click in this area.
In this section, you will learn how to play back in Cubase. You might think this is
very simple – just hit Play. It is actually this simple, but there are a few tricks to
learn so that you will be playing back what you want with precision.
Starting playback
There are a few ways you can start playback in Cubase:
• Click the Play button on the Transport panel.
Playback starts at the project cursor position.
• Press the [Enter] key on the numeric keypad.
Playback starts at the project cursor position.
• Press [Space] on your computer keyboard.
This toggles between start and stop.
• Double-click in the lower half of the ruler.
Playback starts from the position where you clicked.
36 — Recording audio
Page 37

Stopping playback
The left locator is set to “1”.
The right locator is set to “5”.
Cycle activated.
There are also several ways to stop playback in Cubase:
• Click the Stop button on the Transport panel.
Clicking the Stop button twice moves the cursor to the position in the project where you started
playback.
• Press [Space] on your computer keyboard.
This toggles between stop and start.
• Press the [0] key on the numeric keypad.
Cycle playback
In Cubase, you can play back a section of your project in a continuous cycle or
loop. Proceed as follows:
1. On the Transport panel, set the left locator to “1” and the right locator to “5”.
This tells Cubase that you want to cycle between the beginnings of bars 1 and 5. That way you will
get a 4-bar cycle.
2. Make sure that the Cycle button is activated.
3. Click the Play button.
Cubase will repeat the cycle over and over until you stop playback.
• To playback the selected audio event or MIDI part in a cycle, you can also
select the event or part and choose “Loop Selection” from the Transport menu.
This is the quickest way to set up a cycle and start playback; the default key command for this is
[Shift]-[G].
Recording audio — 37
Page 38

5
Recording MIDI
Page 39
About this chapter
In this chapter you will learn how to record MIDI. You can record MIDI with virtual instruments, i. e. a synthesizer inside your computer, or using a hardware
keyboard. This chapter describes how to use virtual instruments.
Creating an instrument track
Before you start, you need to create a new project, see “Creating your first
project” on page 21. You can then add an instrument track and select a virtual
instrument. Proceed as follows:
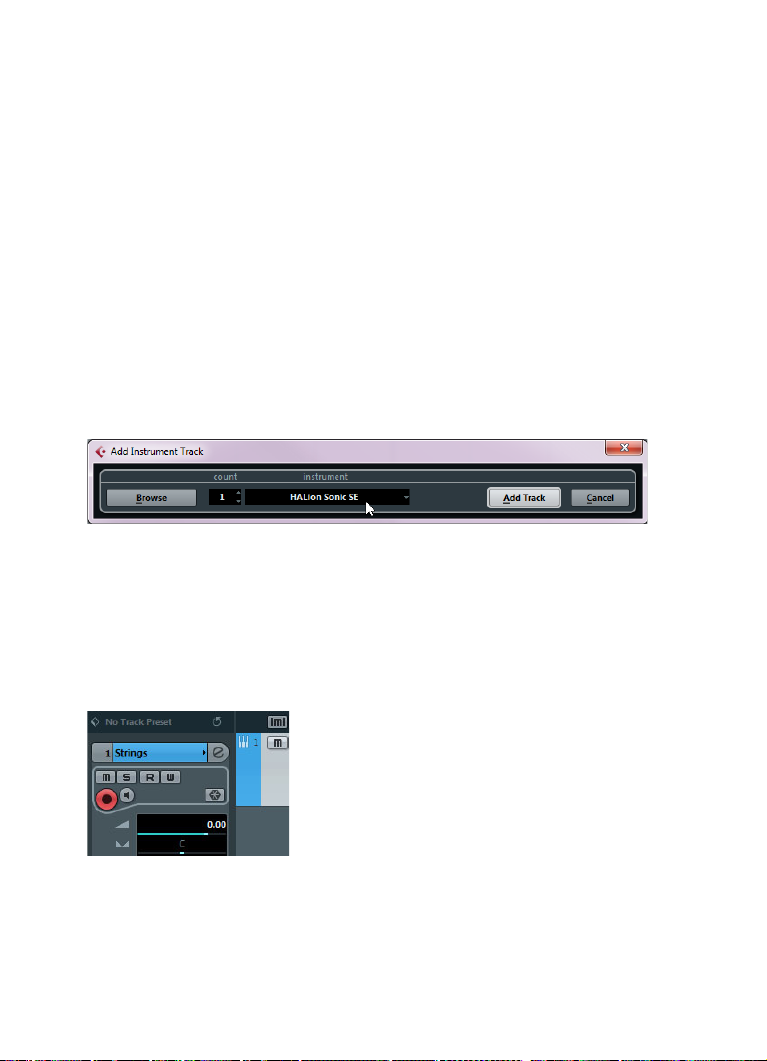
1. On the Project menu, open the “Add Track” submenu, and select the Instrument option.
The Add Instrument Track dialog opens.
2. On the Instrument pop-up menu, select “HALion Sonic SE”, and click the
“Add Track” button.
An instrument track is created.
3. In the track list, click on the new track to select it.
4. In the Inspector, double-click in the name field of the instrument track
(HALion Sonic SE 01) and change it to “Strings”.
Recording MIDI — 39
Page 40

5. Click the “Edit Instrument” button.
The control panel for HALion Sonic SE opens.
Browsing sounds
In this section you will learn how to load sounds into the virtual instrument
HALion Sonic SE:
1. At the top of the HALion Sonic SE plug-in panel, click in the Presets field.
The Preset browser opens.
40 — Recording MIDI
Page 41

2. Click the “Set Up Window Layout” button in the bottom left corner of the
Preset browser and activate the Filters option.
The Preset browser expands. It now has a Filter section.
3. In the Category column in the Filters section select “Strings”.
This filters the list on the right to only show string sounds.
4. In the preset list on the right, double-click on the string sound that you want
to use.
The sound is applied and the Preset browser closes.
Recording MIDI — 41
Page 42
Recording
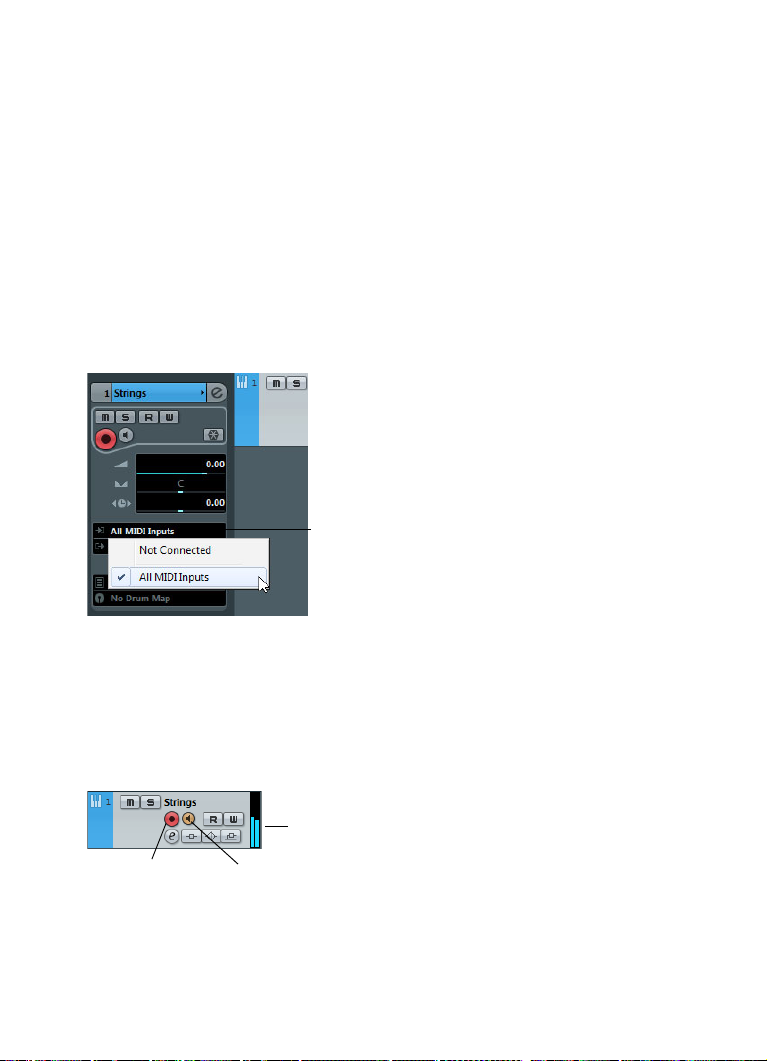
The MIDI Input Routing
pop-up menu
Record Enable Monitor
Incoming MIDI signal
Now that you have selected a sound, you can record something. You will learn
how to route a MIDI keyboard to your track so that HALion Sonic SE plays the
sound you selected. Proceed as follows:
1. Connect a MIDI keyboard to your computer.
This can be done directly through USB or via a MIDI interface.
2. In the Inspector, on the Input Routing pop-up menu, choose the MIDI input
that you want to use.
If you are not sure which input to choose, leave this set to “All MIDI Inputs”. That way, all available
MIDI inputs are taken into account.
Below the Input Routing pop-up menu, you can see the MIDI output. This is set
to “HALion Sonic SE”.
3. Activate the “Record Enable” and Monitor buttons on the track and play
some notes on your MIDI keyboard.
Record enabling the track lets Cubase know that you want to record on this track. You can have
many tracks record enabled at a time. You should see and hear the MIDI signals coming in.
42 — Recording MIDI
Page 43

4. Press [1] on the numeric keypad of your computer keyboard.
The project cursor jumps to the left locator.
5. Click the Record button and record a few bars of music.
6. Click the Stop button when you are finished.
7. Turn off the Monitor and “Record Enable” buttons on the track.
By turning off the “Record Enable” button you make sure that you do not accidentally record on the
track again.
Congratulations! You have just created your first MIDI recording in Cubase.
Playing back MIDI is identical with playing back audio in Cubase. This is
described in detail in the section
“Playback” on page 36.
Recording MIDI — 43
Page 44

6
Mixing and effects
Page 45
About this chapter
In this chapter you will learn how to get a mix ready with proper levels, EQs,
and effects. Afterwards you will export the audio. To complete the steps
described here, start with a project that contains recorded data (e.
standard rock song) and is ready to be mixed.
g. for a
Setting levels for the mix
The first thing you want to do is to set the levels for your project. This helps you
get a preliminary balance of the mix so you can add EQ and effects later. Proceed as follows:
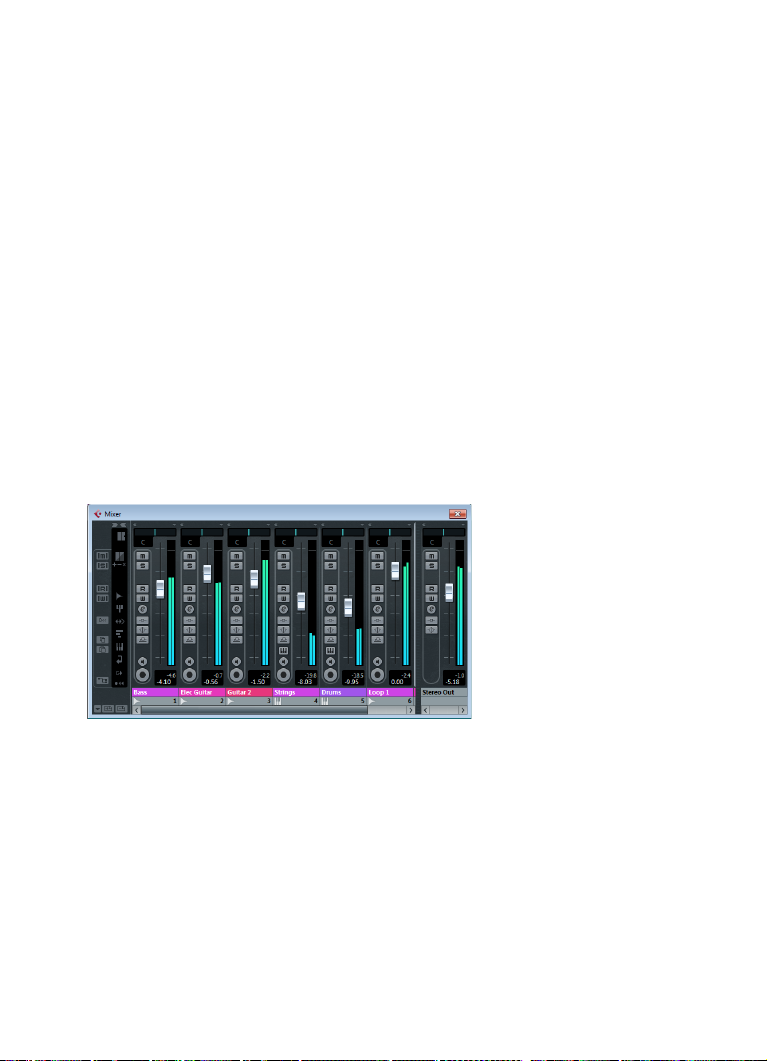
1. Open the Mixer.
You can open the Mixer from the Devices menu or by pressing [F3].
2. Click the Play button on the Transport panel and listen to your recording.
3. Move the level faders for each channel until you are satisfied with the mix.
• You can also change a fader setting by double-clicking on the “Channel
Level” value and entering the level manually.
• You can reset a fader back to 0 dB (default setting) by [Ctrl]/[Command]clicking in the fader area.
Do not raise the level faders too high! Be sure to keep levels at a good volume
so that they are as loud as possible without clipping. If the CLIP indicator lights
up for the output channel, lower your levels until CLIP is no longer displayed.
Mixing and effects — 45
Page 46

Setting panorama
The panorama (pan) settings allow you to move the position of each channel in
the stereo mix. By positioning some of the instruments on the left or right, you
can create a rich and spacious sound. Pan settings depend greatly on the
actual position of the instruments on a stage and on personal preferences.
• To set the panorama for a channel, click on the pan control above the channel fader in the Mixer and move it to the right or left.
The pan position is also indicated as a numerical value below the pan control.
• To get a panner back to the center position (default), [Ctrl]/[Command]-click
anywhere in the panner area.
In the following, you will find a few tips and guidelines about positioning different instruments:
• Bass drum (kick), bass guitar, rhythm guitar and lead vocals are normally
kept in the center position.
• Lead guitar, keyboard, and drums (except for the bass drum) are often
panned left or right.
• Instruments that are available in pairs (e. g. guitars) can be panned left and
right.
46 — Mixing and effects
Page 47
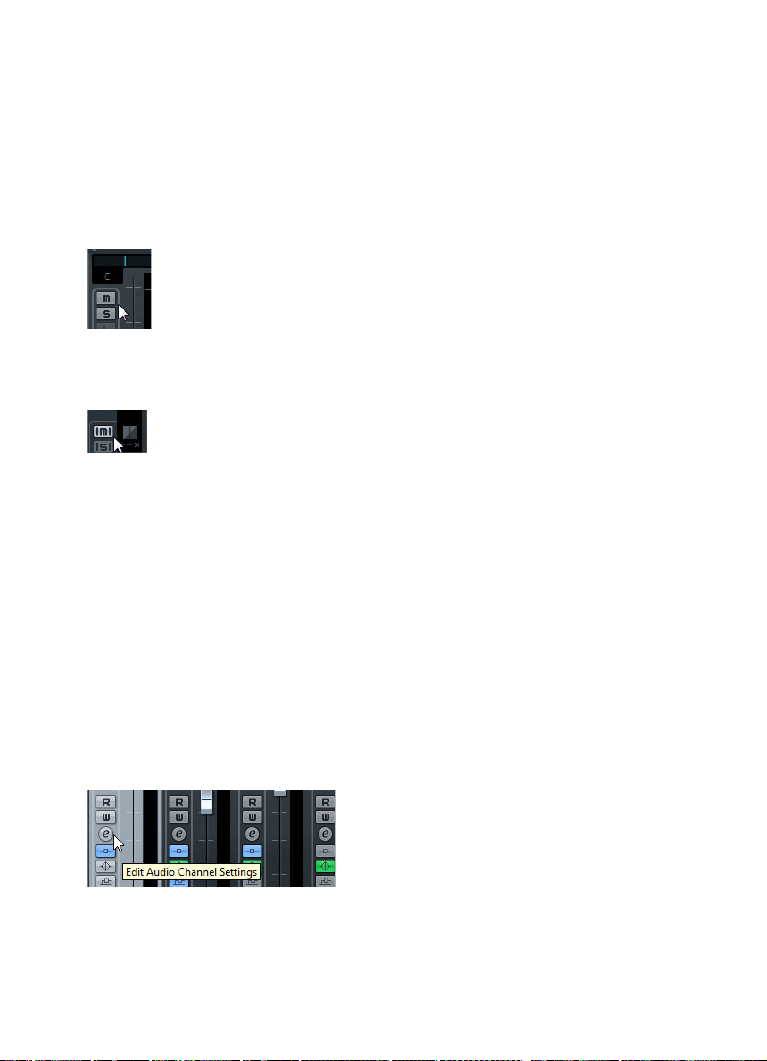
Mute and solo
Each track has a Mute (M) and Solo (S) button. Activating Mute prevents you
from hearing the track. When you solo a track, the other tracks become muted
so that you hear only the soloed track(s). You can have several tracks muted or
soloed at a time.
• If you want to deactivate all the mutes or solos, click the “Deactivate all Mute”
or “Deactivate all Solo” buttons in the common panel on the left side of the Mixer.
Adding EQ
EQ or equalization amplifies or attenuates frequencies so that you can place
each instrument correctly in the mix. EQ settings depend greatly on the style of
music that you are mixing. In this section you will get to know the EQ features
in Cubase. Proceed as follows:
1. In your project, select an audio track with a drum recording.
2. Set up a cycle and play it back so that you can hear the EQ changes you
are making.
3. Open the Mixer.
4. Solo the track and click the “Edit Audio Channel Settings” button.
Mixing and effects — 47
Page 48

The VST Audio Channel Settings window opens, where you can make your EQ
settings. There are four EQ bands on each track.
5. In the Equalizers section, activate the EQs by clicking the corresponding
“EQ Band Active” buttons.
You can also click in the EQ curve area to turn on an EQ.
6. Click and move the EQ point in the display.
• Set up the gain by moving the EQ point up or down.
The gain makes that particular EQ louder or softer.
• Set up the frequency by moving the EQ point right or left.
Ö
If you hold down [Ctrl]/[Command], you can restrict the movement of the
EQ to vertical adjustment. If you hold down [Alt]/[Option], you can restrict the
movement of the EQ to horizontal adjustment.
• Change the quality (Q) of the EQ by holding down [Shift] and moving the EQ
curve up or down.
• You can bypass the EQs by clicking on the “Bypass Equalizers” button.
48 — Mixing and effects
Page 49

• You can reset the EQ settings by [Alt]/[Option]-clicking the “Bypass Equalizers” button.
Experiment with the EQs on all your tracks. It is usually better to take away EQ
(lower the gain) than to add it.
Using EQ presets
If you do not want to set up your EQs from scratch, you can load a preset
instead:
1. Click the “Preset Management” button and choose a sound from the list.
2. Adjust the settings to your liking.
3. Store the EQ settings as a new preset by clicking the “Preset Manage-
ment” button again and selecting the “Save Preset…” option.
A dialog opens, allowing you to enter a name and save the new preset.
Mixing and effects — 49
Page 50
Audio effects
Click here to open the
effects pop-up menu.
You will now learn to use some effects. You can add effects by inserting them
directly on a track or by creating an FX channel and using the auxiliary sends of
each track to send the audio to that FX channel.
Insert effects
Insert effects let you apply an effect to a single channel. In this example, you will
apply compression to a bass track to smooth it out. Proceed as follows:
1. Open the Mixer.
2. Set up a cycle using the left and right locators.
3. Make sure that the Cycle button is activated and start playback.
That way you can hear the changes you make. Cycle playback is described in the section “Cycle
playback” on page 37.
4. Select the bass track of your recording and click its “Edit Audio Channels
Settings” button.
The VST Audio Channel Settings window opens.
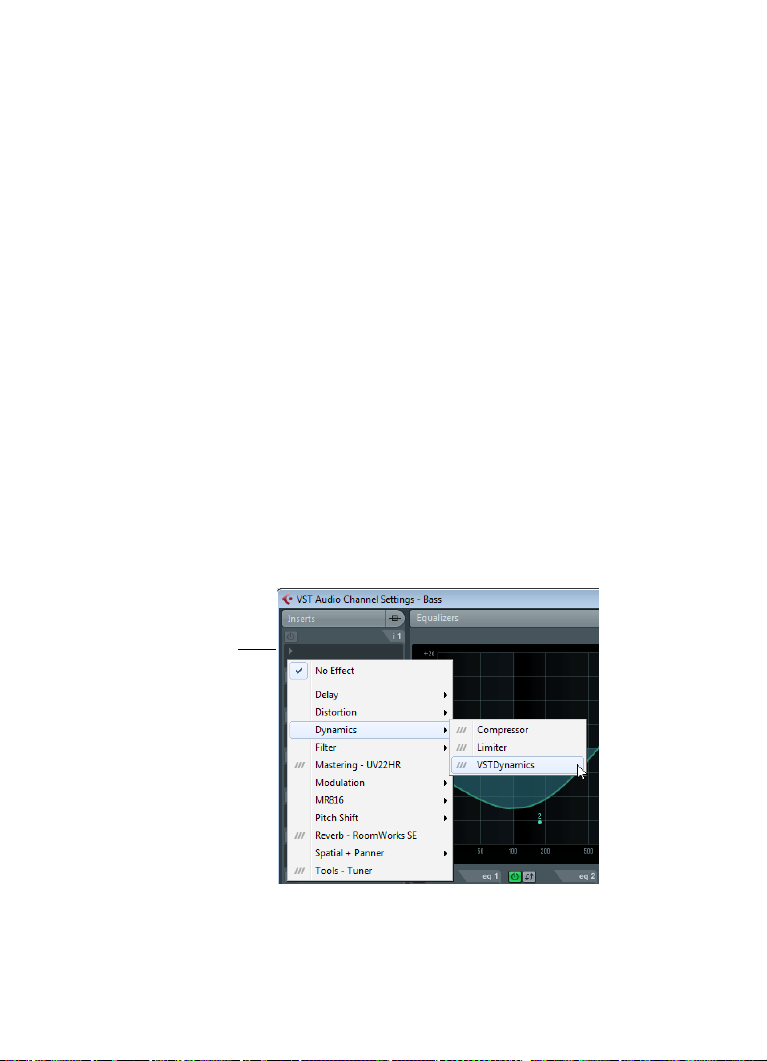
5. In the Inserts section, click on the first insert slot.
The effects pop-up menu opens.
50 — Mixing and effects
Page 51

6. Select “VSTDynamics” from the Dynamics submenu.
The VSTDynamics plug-in is loaded into the insert slot and the plug-in panel opens.
7. Set up the parameters in the Compressor section to your liking.
The plug-in parameters are described in detail in the PDF document “Plug-In Reference”.
FX channels
In this section you will learn how to create and use FX channels. This is very
useful if you want to apply an effect to several channels at once. In this example, you will add reverb to several tracks of a project:
1. Open the Project menu and select “FX Channel” from the Add Track submenu.
The Add FX Channel Track dialog opens.
2. Select the “RoomWorks SE” effect from the Reverb category, choose “Stereo” for Configuration, and click the “Add Track” button.
Mixing and effects — 51
Page 52
3. Experiment with the reverb settings until you get the room ambience that
you want.
The effect parameters are described in detail in the PDF document “Plug-In Reference”.
4. Open the Mixer and click the “Edit Audio Channels Settings” button of one
of your audio tracks.
The VST Audio Channel Settings dialog opens.
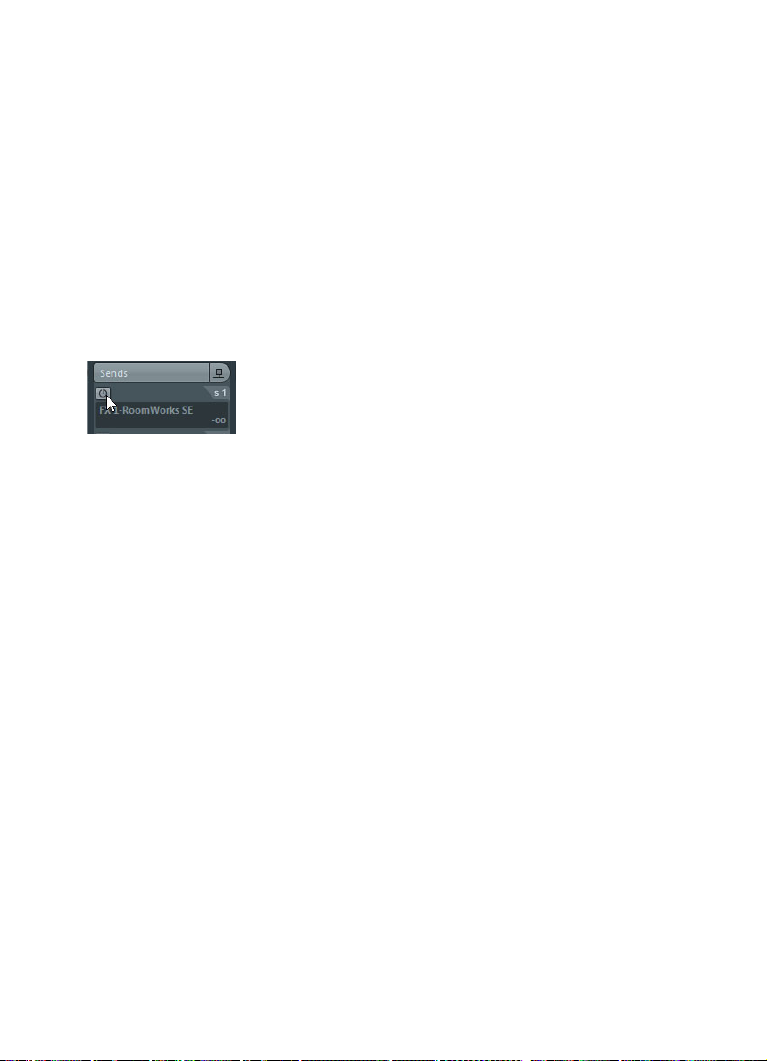
5. In the Sends section, click on the first effect slot and choose “FX1-RoomWorks SE” from the pop-up menu.
The FX channel is loaded into the send effect slot.
6. Click the On/Off button above the effect slot to activate the send.
7. Move the slider to the right to raise the level of the send to the “Room-
Works SE” effect. You will notice the ambience created by the reverb effect.
Ö
By soloing the track you will be able to hear this effect more clearly.
8. Repeat the previous four steps for any channels to which you want to apply
the reverb effect.
The great thing about FX channels is that they look and feel just like regular
audio channels. If you set an EQ for an FX channel, only the effect will be
changed by the EQ.
52 — Mixing and effects
Page 53

Exporting a mixdown
Now that the project is mixed, you can export it so that it can be imported into
another program such as a CD burning application. Proceed as follows:
1. On the Transport panel, make sure that the left and right locators are set to
the beginning and the end of your recording, respectively.
Cubase will export the section between the left and right locators.
2. Open the File menu, and on the Export submenu select “Audio Mixdown…”.
The Export Audio Mixdown dialog opens. This dialog is described in detail in the chapter “Export
Audio Mixdown” in the Operation Manual.
3. In the Channel Selection section, choose the main output channel “Stereo
Out” for export.
The exported file will be generated through the main stereo output.
4. In the File Location section, enter a file name in the Name field.
5. Open the “Path Options” pop-up menu to the right of the Path field and
select “Choose…” to specify the folder in which the mixdown will be saved.
Use the option “Use Project Audio Folder” if you want to store the exported file in your project’s
audio folder. This is one of the best places to keep it so it will not accidentally become erased or lost.
Mixing and effects — 53
Page 54

6. In the File Format section, select the file type.
Most common is the “Wave File” format. Which format to choose depends on the application that
you want to use the exported file in.
7. In the “Audio Engine Output” section, choose the sample rate and bit depth
for your export.
44.100 kHz and 16 bit are common for CD burning.
8. In the “Import into Project” section, activate the Pool and “Audio Track”
options.
That way the audio is imported back into Cubase after the export and placed on a new audio track.
9. Activate the “Real-Time Export” option.
This ensures that the MIDI data is sent to the external MIDI instrument in realtime and recorded
back in properly.
10. Click the Export button.
Your audio is exported to the specified location and imported on a new audio track in your project.
You can check if the audio mixdown sounds the way you want it by soloing the
mixdown track.
54 — Mixing and effects
 Loading...