


Warmluft-Hände- und Haartrockner
...mehr als Sie denken!
Händetrockner T 80, T 80 E
Haartrockner TH 80 Z
D |
Montageund |
E |
Instrucciones de |
FIN Asennusja |
|
Gebrauchsanleitung |
|
montaje y de uso |
käyttöohje |
|
Seite 55– |
|
Páginas 1721– |
Sivu 29 |
GB |
Mounting Instructions and |
P Manual de Instruções de |
NL Montageen |
|
|
Directions for Use |
|
Montagem e Utilização |
gebruikershandleiding |
|
Pages 89–12 |
|
Página 202 |
blz. 32 |
F |
Instructions de montage |
DK Monteringsog |
GR δηγία συναρµ λ γησης |
|
|
et de service |
|
brugsanvisning |
και ρήσης |
|
Page 1113–16 |
|
Side 232 |
Σελίδα 35 |
I |
Istruzioni per il montaggio |
S |
Monteringsoch |
|
|
e l’uso |
|
bruksanvisning |
|
|
Pagina 1417–2 |
|
Sidan 263 |
|
Dieses Gerät nicht ohne Beachtung der Gebrauchsanleitung verwenden.
Abmessungen T 80 / T 80 E |
|
Abmessungen TH 80 Z |
||
|
164 |
|
|
164 |
|
|
|
|
203 |
|
203 |
|
|
|
282 |
226 |
|
282 |
226 |
|
1150 |
|
|
2000 |
|
|
|
|
|
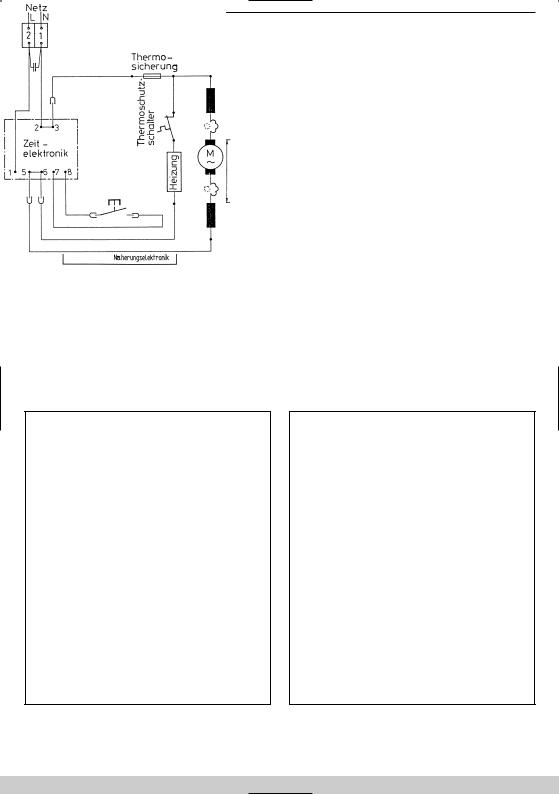
Schaltplan T 80 |
Schaltplan T 80 E |
schwarz
Näherungselektronik
2

Schaltplan TH 80 Z |
D |
Achtung! Vor Netzanschluß Prüfleitungen |
– soweit vorhanden – aus Netzklemme entfernen. |
||
|
GB |
Warning! Remove test lines (where applicable) from |
|
the mains terminal before connecting to the mains. |
|
|
F |
Attention! Avant de brancher l’appareil, enlever les |
|
câbles d’essai de la borne de connexion – s’il y en a. |
|
|
I |
Attenzione! Prima di collegare l’apparecchio alla rete, |
|
rimuovere dal morsetto di rete i cavetti di prova, |
|
|
|
se presenti. |
|
E |
!Atención! Antes de conectar a la red, desembornar |
|
las líneas de comprobación – mientras se dispongan |
|
|
|
de ellas – del borne de la red. |
|
P |
Atenção! Antes de ligar à rede, remover os fios de |
|
prova (se existirem) do borne da rede. |
|
|
DK |
Bemærk! Inden prøveledningerne sluttes til, fjernes |
|
netklemmen (hvis en sådan findes!) |
|
|
S |
Varning! Avlägsna sävida förhanden provledningar |
|
ur nätklämman innan nätanslutningen. |
|
|
FIN |
Huomio! Irrota koestusjohdot – mikäli käytössä – |
|
verkkoliitännästä ennen verkkovirran kytkemistä. |
|
|
NL |
Attentie! Voor aansluiting aan het net testleidingen – |
|
indien van toepassing – uit de netklem verwijderen. |
|
|
GR |
Πρoσ ή! Πριν συνδεθεί µε τ ρεύµα να |
|
απ µακρύνετε τ υς αγωγ ύς ελέγ υ – ε ‘ σ ν |
υπάρ υν – απ τ δίκυ .
Sicherheitsabstände für die Montage: nach VDE 0100 und VDE 0107
DSicherheitsabstände für die Montage
GB Safety distance for mounting
Écartements de sécurité pour
Fle montage
IDistanze di sicurezza per il montaggio
Distancias de seguridad para
Eel montaje
Distâncias de segurança para
Pa montagem
Sikkerhedsafstande i forbindelse
DK med monteringen
SSäkerhetsavstånd för monteringen
Asennuksen yhteydessä huomioitavat
FIN turvaetäisyydet
NL Veiligheidsafstanden voor de montage
Απ στάσεις ασ αλείας για την GR τ π θέτηση
3
1
|
4 |
2 |
5 |
|
|
|
3 |
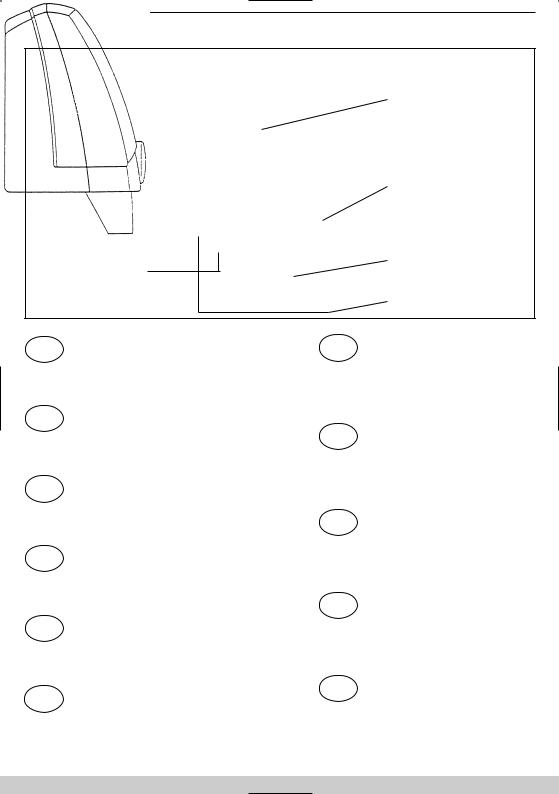
D |
Oberteil |
Ansaugfilter |
|
|
Unterteil |
|
Tasterknopf (entfällt bei T 80 E) |
|
Ausblasstutzen |
GB |
Top section |
Intake filter |
|
|
Base section |
|
Push-button (not on model T 80 E) |
|
Blow-out outlet |
F |
Capot |
Filtre d’aspiration |
|
|
Socle |
|
Bouton poussoir (n’existe pas sur le T 80 E) |
|
Buse de soufflerie |
I |
Parte superiore |
Filtro di aspirazione |
|
|
Parte inferiore |
|
Manopola (non presente nel T 80 E) |
|
Bocchetta soffiante |
E |
Parte superior |
Filtro de aspiración |
|
|
Parte inferior |
|
Pulsador (no en el modelo T 80 E) |
|
Tubo de expulsió de aire |
P |
Parte superior |
Filtro de aspiração |
|
|
Parte inferior |
|
Botão interruptor (inexistente no T 80 E) |
|
Bocal de saída do ar |
DK |
Overdel |
Indsugningsfilter |
|
|
Underdel |
|
Betjeningsknap (ikke på T 80 E) |
|
Udblæsningsstuds |
S |
Överdel |
Insugningsfilter |
|
|
Underdel |
|
Tryckknapp (ej på T 80 E) |
|
Utblåsningsmuff |
FIN |
Yläosa |
Imusuodatin |
|
|
Alaosa |
|
Painokytkin (ei mallissa T 80 E) |
|
Puhallusaukko |
NL |
Bovengedeelte |
Filter |
|
|
Ondergedeelte |
Knop (niet bij T 80 E)Blaasstuk
Επάνω τµήµα GR Φίλτρ αναρρ ησης
Κάτω τµήµα
∆ιακ πτης επα ής ( ι στ µ ντ. T 80 E)Ακρ ύσι
4

DHändetrockner T 80, T 80 E Haartrockner TH 80 Z
Wir haben diese Gebrauchsanleitung erstellt, damit Sie Ihr neues Gerät schnell und umfassend kennenlernen.
●Bitte lesen Sie vor Inbetriebnahme des Gerätes diese Anleitung aufmerksam durch. Sie gibt wichtige Hinweise für die Sicherheit, den Gebrauch, die Wartung und Entsorgung.
●Machen Sie sich in der Reihenfolge dieser Gebrauchsanleitung mit Ihrem neuen Gerät und seinen verschiedenen Funktionen vertraut.
●Beachten Sie alle Hinweise und Erklärungen, die sich auf die richtige Bedienung und Behandlung beziehen. Damit erreichen Sie ständige Einsatzbereitschaft und eine lange Lebensdauer Ihres Gerätes.
●Besonders sind die Hinweise zu berücksichtigen, die die Sicherheit betreffen. Sie helfen, Unfälle zu verhüten und Ihr Gerät vor Schaden zu schützen.
●Bewahren Sie die Gebrauchsanleitung auf, sie kann Ihnen auch später noch in manchen Fällen ein nützlicher Helfer sein.
Dieses Gerät entspricht den anerkannten Regeln der Technik und den einschlägigen Sicherheitsbestimmungen für Elektrogeräte. Der Hersteller haftet nicht für evtl. Schäden, die durch nicht bestimmungsgemäßen Gebrauch oder falsche Bedienung verursacht werden.
1.Sicherheitshinweise. 
●Prüfen Sie vor Anschluß des Gerätes, ob die auf dem Typenschild angegebene Spannung mit derjenigen Ihres Hausanschlusses übereinstimmt.
●Bei Positionierung des Gerätes sind die nach VDE 0100 und VDE 0107 vorgeschriebenen Sicherheitsabstände unbedingt einzuhalten.
●Das Gerät ist über einen Schalter mit mindestens 3 mm allpoliger Kontaktöffnung vom Netz zu trennen.
●Die Installation hat nach den Richtlinien des zuständigen Energieversorgungsunternehmens zu erfolgen und ist folglich mit einem vorgeschriebenen Personenschutz-FI- Schalter abzusichern.
●Bitte beachten Sie, daß beim unsachgemäßen Umgang mit Elektrogeräten Gefahren entstehen können, die möglicherweise von Kindern nicht erkannt werden.
●Die Geräte sind grundsätzlich ohne Beeinträchtigung des Ansaugund Ausblasluftstromes zu betreiben.
●Schalten Sie grundsätzlich vor allen Eingriffen und Reinigung die Netzzuleitung allpolig ab. Keinen Wasserstrahl, nassen Schwamm oder sonstige Reinigungsarten anwenden, deren Reinigungsflüssigkeit in das Gerät eindringen kann oder die Gehäuseoberfläche angreift. Bei Eindringen von Flüssigkeit besteht Stromschlaggefahr und möglicher Geräteschaden.
●Eingriffe sind wegen Gefahr eines Stromschlages nur vom Fachpersonal durchzuführen.
●Plastikbeutel gehören nicht in Kinderhände (Erstickungsgefahr), sondern müssen dem Recyclingprozess zugeführt werden.
●Übergeben Sie diese Gebrauchsanleitung auch anderen Benutzern des Gerätes, damit auch diese sich über alle Funktionen und Hinweise informieren können.
5

2. Technische Daten.
|
|
|
Warmluft- |
|
Warmluft- |
|||
|
|
|
Händetrockner |
|
Haartrockner |
|||
|
|
|
|
|
|
|
|
|
|
|
T 80 |
|
T 80 E |
|
TH 80 Z |
||
|
|
|
|
|
|
|
|
|
Nennleistung |
Watt |
1400 |
|
1400 |
1800 |
|||
Heizleistung |
Watt |
1200 |
|
1200 |
1600 |
|||
Motorleistung |
Watt |
200 |
|
200 |
200 |
|||
Luftstrom |
l/s |
31 |
|
31 |
31 |
|||
relative Trocknungszeit |
s |
26 |
|
26 |
|
– |
||
Abmessungen (in mm): |
|
|
|
|
|
|
|
|
B x T x H |
mm |
203 x 164 x 282 |
|
203 x 164 x 282 |
203 x 164 x 282 |
|||
Gewicht |
kg |
2,2 |
|
|
2,3 |
2,2 |
||
Prüfzeichen: |
|
|
|
|
|
|
|
|
v g c e q IP 23 |
|
X |
|
|
X |
|
X |
|
|
|
|
|
|
|
|
|
|
3. Technical features. |
|
|
|
|
|
|
|
|
|
|
|
|
|
|
|
|
|
|
|
|
T 80 |
|
T 80 E |
|
TH 80 Z |
|
Electronic short-path timer |
|
|
30 – 60 sec. |
|
|
0,5 – 8 min. |
||
Adjustable running time |
|
|
|
|
|
|
|
|
Automatic switch-off |
|
|
X |
|
|
|
X |
|
Automatic no-touch ON/OFF switching |
|
|
|
|
|
|
|
|
Safety temperature limiter |
|
|
|
|
|
X |
|
|
Thermal fusible cut-out |
|
|
X |
|
X |
|
X |
|
Air intake grille that can be cleaned |
|
|
X |
|
X |
|
X |
|
by suction |
|
|
X |
|
X |
|
X |
|
|
|
|
|
|
|
|
|
|
4. Mounting instructions.
The hot-air dryers should always be installed by an authorized specialist to ensure that all requisite
safety requirements are observed. A line-protecting switch or cut-out should be integrated into the electrical installation for the T 80 and TH 80 Z. A 2-pole circuit breaker with a contact opening of at least 3 mm at each pole must be envisaged for the electrical installation.
6

5.Montagereihenfolge.
1.Blende unter dem Ausblasstutzen 5 (über dem Leistungsschild) mit Schraubendreher ausrasten.
Die beiden Schrauben im Ansaugfilter 2 herausdrehen und den Ausblasstutzen etwas nach hinten schieben.
2.Oberteil 1 nach oben schwenken und aushängen.
3.Nach Festlegung des Anbringungsortes mit Montageschablone die Bohrlöcher für die 3 Dübel anzeichnen, bohren (8 mm Ø) und Dübel einsetzen. Dübel und Schrauben liegen dem Gerät bei. Die günstigste Montagehöhe ist 1,15 m (Fußboden bis Ausblasstutzen) bei T 80, T 80 E bzw. 2,0 m bei TH 80 Z. Eintrittsöffnung für Netzzuleitung entsprechend Montageschablone beachten.
4.Netzzuleitung einführen, Geräteunterteil an der Wand festsschrauben. Netzzuleitung mit Wasserabtropfschlaufe verlegen und links oben an der Netzklemme anschließen. Elektrischer Anschluß nach Schaltplan.
5.Die Laufzeit des elektronischen Zeitschalters bei T 80 ist auf ca. 0,5 min., bei TH 80 Z auf 4 min, eingestellt. Sie kann durch verdrehen der Potistellschraube (zugänglich bei geöffnetem Oberteil durch die Bohrung über die Heizung) im Uhrzeigersinn verlängert werden.
Einstellbereich ca. 0,5–8 min.
Der Schaltabstand bei T 80 E – Abstand zwischen Geräteunterkante und Hände beziehungsweise Kopf – kann vom Fachmann durch verdrehen der Potistellschraube links (verkürzen) und rechts (verlängern) verändert werden (zugänglich bei geöffnetem Oberteil, unter der Heizung).
6.Vor Schließen des Gerätes Ansaugfilter 2 und Ausblasstutzen 5 in die entsprechenden Führungen einsetzen. Oberteil 1 auf Unterteil 3 setzen und fest andrücken. Ausblasstutzen ganz nach vorne schieben und die beiden Schrauben (+ Scheiben) eindrehen.
7.Blende über Leistungsschild wieder eindrücken.
Aus Sicherheitsgründen während aller Eingriffe Netzsicherung ausschalten.
Probelauf nur mit geschlossener Haube durchführen, da sonst die Heizung nicht ausreichend gekühlt wird.
6.Höheneinstellungen für Starmix Haartrockner TH 80 Z.
Die formschöne robuste Stramix Höheneinstellung THH 800, Bestell-Nr. 111001, ermöglicht es, den Haartrockner stufenlos und individuell der Körpergröße anzupassen. Dadurch wird besonders Kindern und Rollstuhlfahrern das Haartrocknen wesentlich erleichtert.
Alternativ zur Höheneinstellung können Sie auch zwei Haartrockner in einem Höhenunterschied von 40 cm montieren.
7. Reinigung und Pflege.
Den Ansaugfilter 2 an der Geräteunterseite zur Reinigung von anhaftenden Flusen und Staub in
größeren Zeitabständen mit Staubsauger-Fugendüse absaugen. Festhaftende Verschmutzung in den Filteröffnungen mit Bürste entfernen.
7

GB |
Hand Dryers T 80, T 80 E |
Hair Dryer TH 80 Z |
These Operating Instructions have been drawn up to enable you to quickly familiarise yourself with your new appliance.
●Please read the following carefully before the appliance is used for the first time. These instructions contain important information for the use, safety, maintenance/care of the appliance.
●Familiarise yourself with the different functions of your new appliance in the same sequence as described in these instructions.
●Observe all instructions and explanations concerning the correct operation and use of the appliance. This will ensure that the appliance is always ready for use, and a long service life.
●Ensure that all remarks and instructions concerning safety are observed. This will help prevent accidents and protect your appliance from damage.
●Keep these Operating Instructions in a safe place so that, if required, they can be consulted at a later date.
The appliance complies with the accepted rules of technology and the current appliance safety laws. No liability is accepted for damage resulting from improper use of the appliance, or if it was not correctly operated.
1.Safety instructions. 
●Check before the appliance is connected to the mains that the voltage specified on the rating plate is identical to the mains voltage.
●When positioning the appliance it is imperative to ensure that the safety distances specified in VDE 0100 and VDE 0107 are observed.
●A switch with a contact opening of at least 3 mm must be integrated into the electrical installation for all-pole disconnection of the appliance from the mains.
●The appliance must be installed in conformity with the regulations of the responsible local power supply company and it must be protected by a mandatory earth-leakage circuit breaker.
●Please note that improper use of electrical appliances can give rise to hazards which children cannot recognize.
●When operating the appliance it must be ensured that the intake and outlet are not restricted in any manner.
●Always completely disconnect the appliance from the mains prior to care, maintenance and repairs. Do not use a water jet, wet sponge or other forms of cleaning in which cleaning fluid could enter the appliance or attack the case surface. Liquid entering the appliance will create a dangerous electric shock hazard and could damage the appliance.
●Due to the electric shock hazard, all repairs and maintenance work on the appliance must only be carried out by competent specialist personnel.
●Keep plastic bags well out of reach of children (danger of suffocation) and ensure that they are returned for recycling.
●Pass on these operating instructions to subsequent owners of this appliance for their information.
8
2. Technical data.
|
|
|
Hot-air |
|
|
|
Hot-air |
|
|
|
|
hand dryer |
|
hair dryer |
|||
|
|
|
|
|
|
|
|
|
|
|
T 80 |
|
T 80 E |
|
TH 80 Z |
||
|
|
|
|
|
|
|
|
|
Rated Power |
Watt |
1400 |
|
1400 |
1800 |
|||
Heating capacity |
Watt |
1200 |
|
1200 |
1600 |
|||
Motor output |
Watt |
200 |
|
200 |
200 |
|||
Air volume |
l/s |
31 |
|
31 |
31 |
|||
Relative drying time |
s |
26 |
|
26 |
|
– |
||
Dimensions |
|
|
|
|
|
|
|
|
w x d x h |
mm |
203 x 164 x 282 |
|
203 x 164 x 282 |
203 x 164 x 282 |
|||
Weight |
kg |
2,2 |
|
|
2,3 |
2,2 |
||
Test symbols: |
|
|
|
|
|
|
|
|
v g c e q IP 23 |
|
X |
|
|
X |
|
X |
|
|
|
|
|
|
|
|
|
|
3. Technical features. |
|
|
|
|
|
|
|
|
|
|
|
|
|
|
|
|
|
|
|
|
T 80 |
|
T 80 E |
|
TH 80 Z |
|
Electronic short-path timer |
|
|
30 – 60 sec. |
|
|
0,5 – 8 min. |
||
Adjustable running time |
|
|
|
|
|
|
|
|
Automatic switch-off |
|
|
X |
|
|
|
X |
|
Automatic no´touch |
|
|
|
|
|
|
|
|
ON/OFF switching |
|
|
|
|
|
X |
|
|
Safety temperature limiter |
|
|
X |
|
X |
|
X |
|
Thermal fusible cut-out |
|
|
X |
|
X |
|
X |
|
Air intake grille that can be cleaned by suction |
|
|
X |
|
X |
|
X |
|
|
|
|
|
|
|
|
|
|
4. Mounting instructions.
The hot-air dryers should always be installed by an authorized specialist to ensure that all requisite safety requirements are observed. A line-protecting switch or cut-out should be integrated into the electrical installation for the T 80 and TH 80 Z. A 2-pole circuit breaker with a contact opening of at least 3 mm at each pole must be envisaged for the electrical installation.
9

5.Mounting sequence.
1.Use a screwdriver to disengage the panel under the blow-out connection 5 (above the rating plate). Unscrew the two screws in the air intake filter 2 and push back the blow-out outlet slightly.
2.Swivel up the top section 1 and remove.
3.After the installation point has been decided, use the mounting stencil to mark out the drilling holes (8 mm dia.) for 3 dowels. The appliance is supplied with screws and dowels. The most favourable mounting height is 1.15 m (blow-out outlet from the floor) for the
T 80 and T 80 E appliances, and 2.0 m for the TH 80 Z. Observe the mounting stencil for the power supply cable entry point.
4.Insert the power supply cable. Secure the base section 3 to the wall. Conduct the power supply cable with a water run-off loop and connect to the mains terminal at the top on the left-hand side. Refer to the circuit diagram for the electrical connection.
5.The running time of the electronic timer is works
adjusted to approx. 0.5 min for the T 80, and to 4 minutes for the TH 80 Z. This setting can be changed between a range of 0.5-8 min by turning the potentiometer setting screw clockwise (accessible through the hole over the heater when the top section is open).
The switching distance for the T 80 E – The distance between the bottom edge of the device and the hands or head. An expert can change this distance by turning the adjusting screw (accessible under the heater when the upper section is open) anti-clockwise (shorten) or clockwise (lengthen).
6.Insert the air intake filter 2 and blow-out outlet 5 in the corresponding guides before the appliance is closed. Place the top section 1 on the base section 3 and press firmly together.
Push the blow-out outlet right to the front and secure with the two screws (+ washers).
7.Press the panel over the rating plate back in.
For safety reasons always ensure that mains fuses are switched off prior to all interventions.
Trial runs must only be completed with a closed hood, otherwise the heater will not be sufficiently cooled.
6.Setting the height for the Starmix TH 80 Z hair dryer.
The robust, attractively styled Starmix THH 80 height adjustment, Order No. 11 10 01, ensures
that the hair dryer can be easily set to the height of any individual. This also greatly simplifies hair drying for children and people in wheelchairs.
As an alternative it is also possible to mount two hair dryers with 40 cm difference in height.
7. Cleaning and care.
The suction filter 2 at the base must be cleaned periodically with a vacuum cleaner crevice nozzle to remove fluff and dust. Use a brush to remove grime firmly adhering in the filter openings.
10
FSèche-mains T 80, T 80 E Sèche-cheveux TH 80 Z
Nous avons rédigé ce mode d’emploi qui vous permettra de vous familiariser rapidement et facilement avec votre nouvel appareil.
●Étudiez attentivement ce mode d’emploi avant de mettre l’appareil en marche. Vous y trouverez d’importantes informations concernant la sécurité, I’usage, I’entretien et l’élimination de l’appareil usagé.
●Familiarisez-vous au fur et à mesure de la lecture avec votre nouvel appareil et avec ses diverses fonctions.
●Faites attention à toutes les informations et explications se référant au maniement et à l’entretien. Cela vous garantira la disponibilité permanente et une longue durée de service de votre appareil.
●Considérez notamment les informations relatives à la sécurité afin de prévenir d’éventuels accidents et d’éviter tout endommagement de votre appareil.
●Conservez le mode d’emploi. Vous pouvez éventuellement en avoir besoin plus tard.
Cet appareil est conforme aux règles reconnues de la technique et aux réglementations de sécurité pour appareils électriques. Le fabricant ne répond pas d’endommagements éventuels provoqués par une utilisation non appropriée et par un maniement incorrect.
1.Consignes de sécurite. 
●Avant de procéder au raccordement de l’appareil, vérifiez si la tension indiquée sur la plaque signalétique correspond bien à celle de la prise d’alimentation secteur domestique.
●Lors du positionnement de l’appareil, il est indispensable que vous respectiez les distances de sécurité prescrites par les réglementations nationales (en Allemagne, p. ex. la norme VDE 0100 et VDE 0107).
●L’appareil doit être coupé de l’alimentation secteur par un interrupteur présentant une ouverture de contact d’au moins 3 mm sur tous les pôles.
●L’installation doit s’effectuer conformément aux directives de la compagnie d’électricité compétente et doit par conséquent être dotée du disjoncteur de protection des personnes prescrit.
●Sachez que l’utilisation non conforme d’appareils électriques est susceptible d’être une source de risques méconnus par les enfants.
●Les appareils doivent dans tous les cas être utilisés sans entraver le flux d’air d’aspiration et le flux d’air soufflé.
●Avant toute intervention sur l’appareil et nettoyage, il est indispensable de toujours déconnecter la ligne d’alimentation du secteur sur tous les pôles. Ne jamais utiliser de jet d’eau, d’éponge mouillée ou d’autres modes de nettoyage dont le liquide nettoyant risquerait de pénétrer dans l’appareil ou d’attaquer la surface de son boîtier. En effet, en cas de pénétration de liquide, il y a risque d’électrocution et l’appareil risque d’être endommagé.
●Toute intervention doit être exclusivement confiée à un personnel qualifié.
●Ne jamais laisser de sacs en plastique entre les mains d’enfants (risque d’étouffement). Les sacs en plastique doivent être éliminés en vue de leur recyclage.
●Veuillez remettre ces instructions de service également à d’autres utilisateurs de l’appareil afin qu’ils puissent se familiariser avec toutes les fonctions et informations concernant son utilisation.
11

2. Caractéristiques techniques.
|
|
|
Sèche-mains |
|
Sèche-cheveus |
|||
|
|
|
à air chaud |
|
à air chaud |
|||
|
|
|
|
|
|
|
|
|
|
|
T 80 |
|
T 80 E |
|
TH 80 Z |
||
|
|
|
|
|
|
|
|
|
Puissance nominale |
Watt |
1400 |
|
1400 |
1800 |
|||
Puissance de chauffe |
Watt |
1200 |
|
1200 |
1600 |
|||
Puissance du moteur |
Watt |
200 |
|
200 |
200 |
|||
Débit d’air |
l/s |
31 |
|
31 |
31 |
|||
Temps de séchage relatif |
s |
26 |
|
26 |
|
– |
||
Dimensions |
|
|
|
|
|
|
|
|
L x P x H |
mm |
203 x 164 x 282 |
|
203 x 164 x 282 |
203 x 164 x 282 |
|||
Poids |
kg |
2,2 |
|
|
2,3 |
2,2 |
||
Labels de conformité: |
|
|
|
|
|
|
|
|
v g c e q IP 23 |
|
X |
|
|
X |
|
X |
|
|
|
|
|
|
|
|
|
|
3. Equipement. |
|
|
|
|
|
|
|
|
|
|
|
|
|
|
|
|
|
|
|
|
T 80 |
|
T 80 E |
|
TH 80 Z |
|
Minuterie électronique courte durée |
|
|
30 – 60 sec. |
|
|
0,5 – 8 min. |
||
Durée de fonctionnement réglable |
|
|
|
|
|
|
|
|
Coupure automatique |
|
|
X |
|
|
|
X |
|
Mise en marche et arrêt entièrement automatiques |
|
|
|
|
|
|
|
|
par interrupteur de proximité |
|
|
|
|
|
X |
|
|
Limiteur de température de sécurité |
|
|
X |
|
X |
|
X |
|
Coupe-circuit thermique à lame de plomb |
|
|
X |
|
X |
|
X |
|
Grille d’aspiration d’air |
|
|
X |
|
X |
|
X |
|
|
|
|
|
|
|
|
|
|
4. Instructions de montage.
Le montage du sèche-mains et du sèche-cheveux à air chaud doit être confié à un spécialiste pourgarantir que le raccordement de l’appareil est conforme aux prescriptions de sécurité. Pour le T 80 et le TH 80 Z, prévoir dans l’installation électrique un commutateur LS ou un fusible de sécurité. Prévoir également un dispositif bipolaire de séparation du secteur avec un intervalle de coupure d’au moins 3 mm à chaque pôle.
12
 Loading...