

Page 1

MobileMapper® 20
Getting Started Guide
Page 2

Copyright Notice
opyright 2013 Trimble Navigation Limited.
C
All rights reserved.
Trademarks
All product and brand names mentioned in this publication are trademarks of their respective holders.
SPECTRA PRECISION LIMITED WARRANTY TERMS
AND CONDITIONS
PRODUCT LIMITED WARRANTY - Su bject to the fo l-
lowing terms and conditions, Spectra Precision warrants that for a period of one (1) year from date of
purchase this Spectra Precision product (the “Product”) will substantially conform to Spectra Precision’s publicly available specifications for the
Product and that the hardware and any storage media
components of the Product will be substantially free
from defects in materials and workmanship.
PRODUCT SOFTWARE - Product software, whether
built into hardware circuitry as firmware, provided as
a standalone computer software product, embedded
in flash memory, or stored on magnetic or other media, is licensed solely for use with or as an integral
part of the Product and is not sold. If accompanied
by a separate end user license agreement (“EULA”),
use of any such software will be subject to the terms
of such end user license agreement (including any
differing limited warranty terms, exclusions, and limitations), which shall control over the terms and conditions set fo rth in this lim ited warranty.
SOFTWARE FIXES - During the limited warranty period you will be entitled to receive such Fixes to the
Product software that Spectra Precision releases and
makes commercially available and for which it does
not charge separately, subject to the procedures for
delivery to purchasers of Spectra Precision products
generally. If you have purchased the Product from a
Spectra Precision Authorized Distribution Partner
rather than from Spectra Precision directly, Spectra
Precision may, at its option, forward the software Fix
to the Spectra Precision Authorized Distribution
Partner for final distribution to you. Minor Updates,
Major Upgrades, new products, or substantially new
software releases, as identified by Spectra Precision,
are expressly excluded from this update process and
limited warranty. Receipt of software Fixes or other
enhancements shall not serve to extend the limited
warranty period.
For purposes of this warranty the following definitions shall apply: (1) “Fix(es)” means an error correction or other update created to fix a previous software
version that does not substantially conform to its
Spectra Precision specifications; (2) “Minor Update”
occurs when enhancements are made to current features in a software program; and (3) “Major Upgrade”
occurs when significant new features are added to
software, or when a new product containing new features replaces the further development of a current
product line. Spectra Precision reserves the right to
determine, in its sole discretion, what constitutes a
Fix, Minor Update, or Major Upgrade.
WARRANTY REMEDIES - If the Spectra Precision
Product fails during the warranty period for reasons
covered by this limited warranty and you notify Spectra Precision of such failure during the warranty period, Spectra Precision will repair OR replace the
nonconforming Product with new, equivalent to new,
or reconditioned parts or Product, OR refund the
Product purchase price paid by you, at Spectra Precision’s option, upon your return of the Product in accordance with Spectra Precision’s product return
procedures then in effect.
HOW TO OBTAIN WARRANTY SERVICE - To obtain
warranty service for the Product, please contact your
local Spectra Precision Authorized Distribution Partner. Alternatively, you may contact Spectra Precision
to request warranty service at +1-303-323-4100 (24
hours a day) or e-mail your request to support@spec-
traprecision.com. Please be prepared to provide:
• your name, address, and telephone numbers
• proof of purchase
• a copy of this Spectra Precision warranty
• a description of the nonconforming Product including the model number
• an explanation of the problem
The customer service representative may need additional information
from you depending on the nature of the problem.
WARRANTY EXCLUSIONS AND DISCLAIMER - This Product limited warranty shall only apply in the event and
to the extent that (a) the Product is properly and correctly installed, configured, interfaced, maintained,
stored, and operated in accordance with Spectra Precision’s applicable operator's manual and specifications, and; (b) the Product is not modified or
misused. This Product limited warranty shall not apply to, and Spectra Precision shall not be responsible
for, defects or performance problems resulting from
(i) the combination or utilization of the Product with
hardware or software products, information, data,
systems, interfaces, or devices not made, supplied,
or specified by Spectra Precision; (ii) the operation of
the Product under any specification other than, or in
addition to, Spectra Precision standard specifications for its products; (iii) the unauthorized installation, modification, or use of the Product; (iv) damage
caused by: accident, lightning or other electrical discharge, fresh or salt water immersion or spray (outside of Product specifications); or exposure to
environmental conditions for which the Product is
not intended; (v) normal wear and tear on consumable parts (e.g., batteries); or (vi) cosmetic damage.
Spectra Precision does not warrant or guarantee the
results obtained through the use of the Product, or
that software components will operate error free.
NOTICE REGARDING PRODUCTS EQUIPPED WITH
TECHNOLOGY CAPABLE OF TRACKING SATELLITE
SIGNALS FROM SATELLITE BASED AUGMENTATION SYSTEMS (SBAS) (WAAS/EGNOS, AND
MSAS), OMNISTAR, GPS, MODE RNIZED GPS OR
GLONASS SATELLITES, OR FROM IALA BEACON
SOURCES: SPECTRA PRECISION IS NOT RESPON-
SIBLE FOR THE OPE RATION OR FAILURE OF OPERATION OF ANY SATELLITE BASED POSITIONING
SYSTEM OR THE AVAILABILITY OF ANY SATELLITE
BASED POSITIONING SIGNALS.
THE FOREGOING LIMITED WARRANTY TERMS
STATE SPECTRA PRECISION’S ENTIRE LIABILITY,
AND YOUR EXC LUSIVE REMED IES, RELATING TO
THE SPECTRA PRECISION P RODUCT. EXCEPT AS
OTHERWISE EXPRESSLY PROVIDED HEREIN, THE
PRODUCT AND ACCOMPANYING DOCUMENTATION AND MATERIALS ARE PROVIDED “AS-IS”
AND WTHOUT EXPRESS OR IMPLIED WARRANTY
Page 3

OF ANY KIND , BY EITHER SPECTRA PREC ISION
OR ANYONE WHO HAS BEEN INVOLVED IN ITS
CREATION, PRODUCTION, INSTALLATION, OR DISTRIBUTION, INCLUDING, BUT NOT LIMITED TO,
THE IMPLIED WARRANTIES OF MERCHANTABILITY AND FITNESS FOR A PARTICULAR PUR POSE,
TITLE, AND NONINFRINGEM ENT. THE STATED EXPRESS WARRANTIES ARE IN LIEU OF ALL OBLIGATIONS OR LIABILITIES ON THE PART OF
SPECTRA PRECISION ARISING OUT OF, OR IN
CONNECTION WITH, ANY PRODUCT. BECAUSE
SOME STATES AND JURISDICTION S DO NOT AL LOW LIMITATIONS ON DURATION OR THE EXCLUSION OF AN IMPLIED WARRANTY, THE ABOVE
LIMITATION MAY NOT APPLY OR FULLY APPLY TO
YOU.
LIMITATION OF LIABILITY - SPECTRA PRECISION’S ENTIRE LIABILITY UNDER ANY PROVISION HEREIN SHALL BE LIMITED TO THE
AMOUNT PAID BY YOU FOR THE PRODUCT. TO
THE MAXIMUM EXTENT PERMITTED BY APPLICABLE LAW, IN NO EVENT SHA LL SPECTRA PRECISION OR ITS SUPPLIERS BE LIABLE FOR ANY
INDIRECT, SPECIAL, INCIDENTAL, OR CONSEQUENTIAL DAMAGE WHATSOEVER UNDER ANY
CIRCUMSTANCE OR LEGAL THEORY RELATING IN
ANYWAY TO THE PRODUCTS, SOFTWARE, AND ACCOMPANYING DOCUMENTATION AND MATERIALS,
(INCLUDING, WITHOUT LIMITATION, DAMAGES
FOR LOSS O F BUSINESS PROFITS, BUSINESS I NTERRUPTION, LOSS OF DATA, OR ANY OTHER PECUNIARY LOSS), REGARDL ESS OF WHETHER
SPECTRA PREC ISION HAS BEE N ADVISED OF THE
POSSIBILITY OF A NY SUCH LOSS AN D REGARDLESS OF THE COURS E OF DEALING WHI CH DEVELOPS OR HAS DEVELOP ED BETWEEN YOU AND
SPECTRA PRECISION. BECAUSE SOME STATES
AND JURISDICTIONS DO NOT ALLOW THE EXCLUSION OR LIMITATION OF LIABILITY FOR CONSEQUENTIAL OR I NCIDENTAL DAMAGES, THE
ABOVE LIMITATION MAY NOT APPLY OR FULLY APPLY TO YOU.
PLEASE NOTE: THE ABOVE SP ECTRA PRECIS ION
WARRANTY PROVISIONS WILL NOT APPLY TO
PRODUCTS PURCHASED IN TH OSE JURISDICTIONS (E.G., MEMBER STATES OF THE EUROPEAN
ECONOMIC AREA) IN WHICH PRODUCT WARRANTIES ARE TH E RESPONSBI LITY OF THE LOCAL
SPECTRA PRECISION AUTHORIZED DISTRIBUTION PARTNER FROM WHOM THE PRODUCTS ARE
ACQUIRED. IN SUCH A CASE, PLEASE CONTACT
YOUR LOCAL SPECTRA PRECISION AUTHORIZED
DISTRIBUTION PARTNER FOR APPLICABLE WARRANTY INFORMATION.
PRODUCT SAFETY WARNINGS
Use responsibly. Read all instructions and safety information before use to avoid injury.
The maximum operating ambient temperature of the
equipment declared by the manufacturer is 60°C.
Battery safety
harge battery only at ambient temperatures ranging
C
from 0°C to 45°C.
(1)CAUTION: Danger of explosion if battery is incorrectly replaced. Replace only with the same or equivalent type of battery recommended by the
manufacturer. Dispose of used batteries according to
battery manufacturer’s instructions.
(2)CAUTION: RISK OF EXPLOSION IF BATTERY IS
REPLACED BY A N INCORRECT TY PE. DISPOSE OF
USED BATTERIES ACCORDING TO THE INSTRUCTIONS.
(2)CAUTION: RISK OF EXPLOSION IF BATTERY IS
REPLACED BY A N INCORRECT TY PE. DISPOSE OF
USED BATTERIES ACCORDING TO THE INSTRUCTIONS.
Wi-Fi Safety
Turn Wi-Fi off in areas where Wi-Fi use is prohibited
or when it may cause interference or danger, such as
in airplanes while flying.
Care & Maintenance
Excessive sound pressure from earphones and headphones can cause hearing loss.
USB data cables
CAUTION: Use of USB data cables is restricted to
standard USB version 2.0 or higher. Powered USB is
prohibited.
Hand Strap
Use the hand strap responsibly. It is primarily designed to ease handheld use of the product (limbworn). The hand strap should not be used to attach
the product next to the body.
OFFICIAL LANGUAGE - THE OFFICIAL LANGUAGE
OF THESE TERMS AND CONDITIONS IS ENGLISH.
IN THE EVENT OF A CONFLICT BETWEEN ENGLISH AND OTHER LANGUAGE VERSIONS, THE
ENGLISH LANGUAGE SHALL CONTROL.
REGISTRATION - To receive information regarding
updates and new products, please contact your local
Spectra Precision Authorized Distribution Partner or
visit the Spectra Precision website at www.spectra-
precision.com/register. Upon registration you may
select the newsletter, upgrade, or new product information you desire.
Page 4

Page 5

Table of Contents
First-Time Use .................................................................................... 1
Unpacking ..................................................................................... 1
Inserting the Battery Into the Receiver.............................................. 1
Turning the Receiver On .................................................................. 2
Using the AC Adapter to Charge the Battery ...................................... 3
Using the Quick Toolbar .................................................................. 4
Switching the Receiver Manually to Suspend Mode............................ 4
Adjusting Backlight Level and Idle Time ........................................... 4
Power Management......................................................................... 5
Setting Time & Date ....................................................................... 5
Regional Settings ........................................................................... 6
Locking the Screen and the Keypad.................................................. 6
How to Hold the Receiver ................................................................ 7
Turning the Receiver Off ................................................................. 7
Receiver Description............................................................................ 8
Front View ..................................................................................... 8
Rear View ...................................................................................... 9
Bottom View................................................................................. 10
GNSS Toolbox................................................................................... 11
GNSS Settings ............................................................................. 11
GNSS Status ................................................................................ 11
Reset .......................................................................................... 12
About .......................................................................................... 12
Advanced Features ............................................................................ 13
Power Modes ................................................................................ 13
Internal Battery ............................................................................ 13
USB Connection ........................................................................... 15
Wireless Communication ............................................................... 16
Motion Sensor .............................................................................. 17
Using the Camera ......................................................................... 18
Making a Video ............................................................................. 20
E-Compass Calibration ....................................................................... 23
Platform Specifications...................................................................... 24
GNSS Characteristics .................................................................... 24
Accuracy Specifications ................................................................ 24
Processor ..................................................................................... 24
Operating System ......................................................................... 24
Communication ............................................................................ 24
Physical Characteristics................................................................. 25
User Interface .............................................................................. 25
Memory ...................................................................................... 25
Environmental Characteristics ........................................................ 25
Power Requirements ..................................................................... 25
Multimedia & Sensors ................................................................... 25
Software Options .......................................................................... 25
Standard Accessories .................................................................... 26
Page 6

Page 7
First-Time Use
Unpacking Open the receiver box and unpack the following items:
• Receiver
• Battery
• Universal AC adapter
•USB cable
• Hand strap
•Lanyard
•Stylus
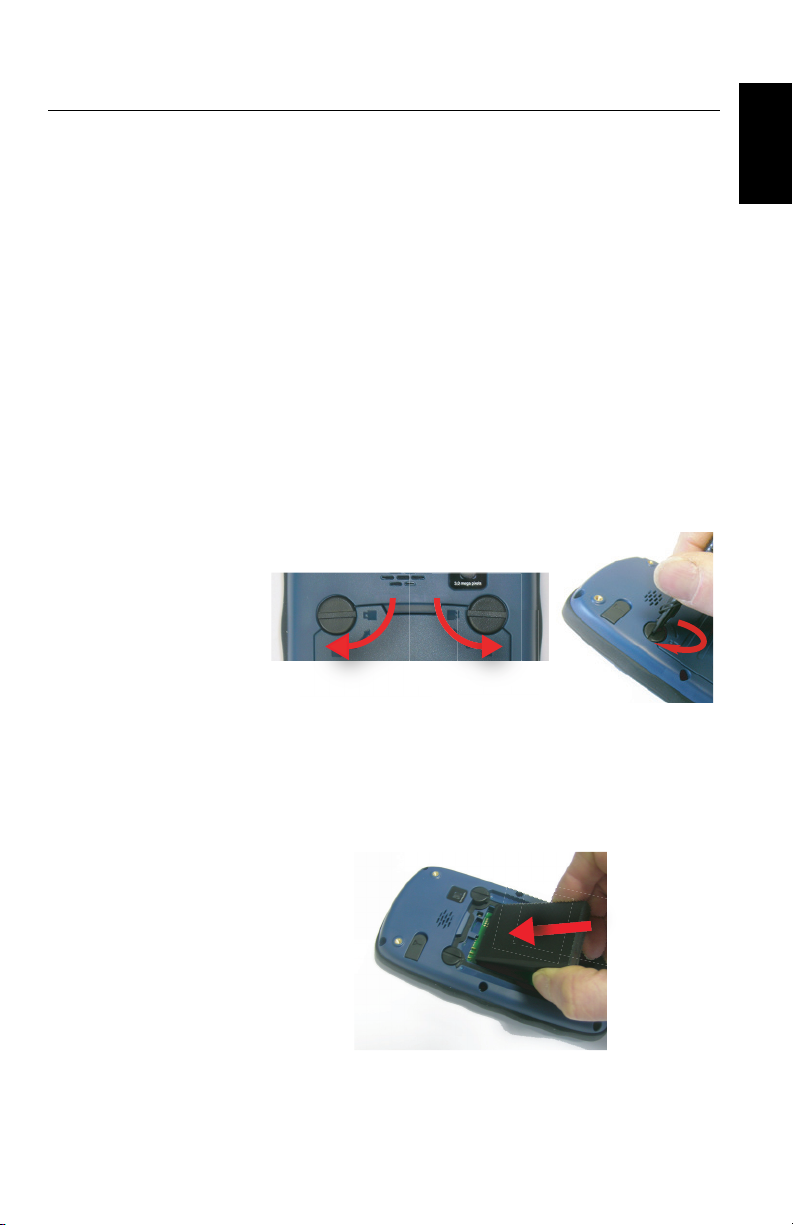
Inserting the
Battery Into the
Receiver
Follow the instructions below:
• Turn over the receiver.
• Using the top end of the stylus (or a coin), rotate the two
screws to open the trap door: turn the left-hand one
clockwise by a quarter turn, and the right-hand one
anticlockwise, also by a quarter turn.
• Pull the trap door open.
• Insert the battery as shown. Orientate the battery so that
its electric contacts can come into contact with those at
the bottom of the battery compartment. Insert the upper
part of the battery first, as shown, then push the battery
in.
English
• Put the trap door back into place by first inserting the two
lugs located at the bottom of the trap door.
1
Page 8

English
[1]
• Then push the door against the receiver case and rotate
the two screws back in their initial positions to seal the
battery compartment.
Turning the
Receiver On
• Press the Power key [1] for a couple of seconds until you
feel a vibration in your hand, then release the key.
[1]
Let the receiver run its boot sequence. Wait until the
screen displays the Windows Embedded Hand Held
Home screen. At this stage, you may be asked to
nitialize the receiver (screen alignment, etc.). Just follow
i
the instructions on the screen to complete this step.
The operating system used in the receiver is Microsoft
Windows
on how to use the different applications, you can visit
the Microsoft web site at:
http://www.microsoft.com/windowsembedded/en-us/windowsembedded-handheld-6-5.aspx
Depending on how long your product was stored in its
package before being shipped to you, the remaining power in
the battery may be too low to allow the receiver to operate for
your entire working session. For this reason, the first thing to
do is to check the battery charge status:
• Tap on the title bar at the top of the screen. The Quick
Toolbar appears just underneath.
• Tap on the Battery icon. This opens the Power window and
simultaneously closes the Quick Toolbar.
he Power window shows the status of the battery (see also
T
Internal Battery on page 13). If the remaining power is
greater than 50%, then you can use the receiver without
having to charge the battery first (with 50% of remaining
charge, you can use the receiver for several hours). Skip
the next section and go directly to Adjusting Backlight
Level and Idle Time on page 4.
• If it less, Spectra Precision recommends you first charge
the battery as explained in Using the AC Adapter to Charge
the Battery on page 3.
Embedded Hand Held. For more information
2
Page 9
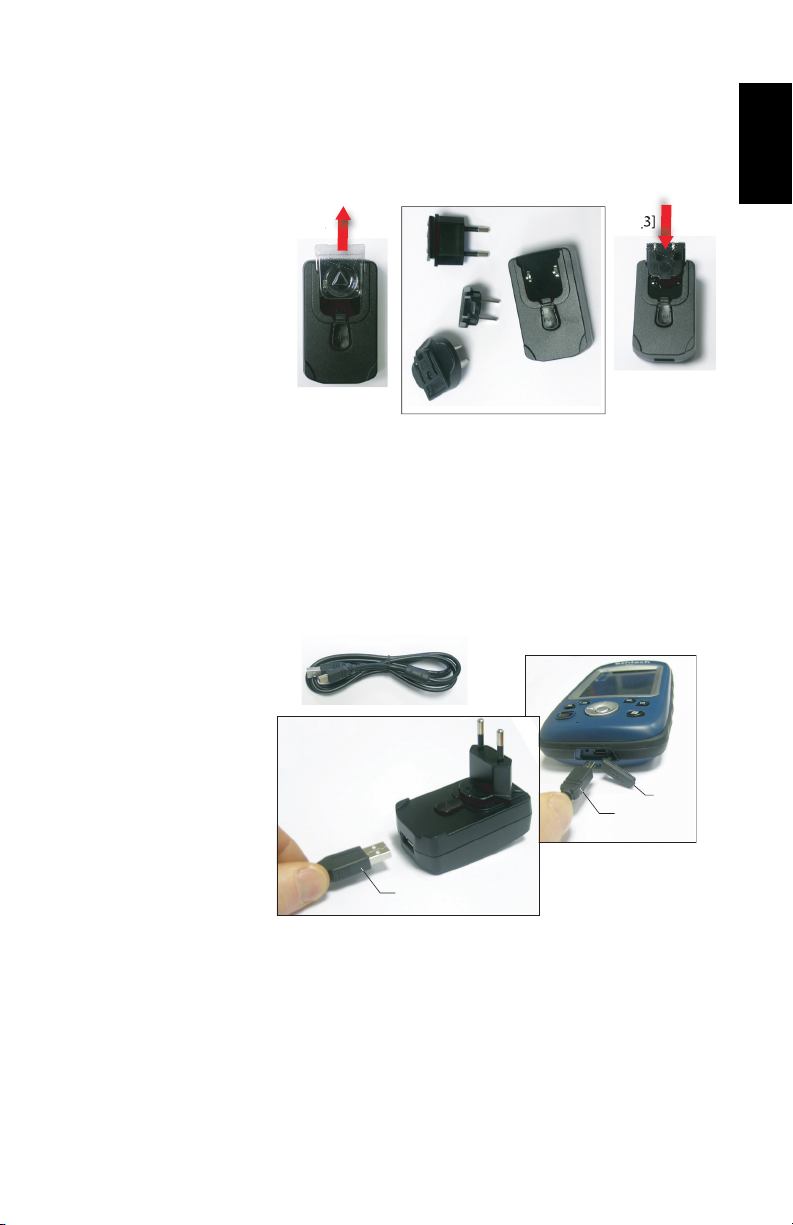
Using the AC
[4]
[4]
[4]
[3][3]
[5]
Adapter to Charge
the Battery
Follow the instructions below.
• Prepare the AC adapter:
– Remove the protective cover [1] by pushing the button
then sliding the cover forward.
[1] [2] [3]
– Choose the plug that fits your country’s AC outlet
standard (see [2]) and slide it into the AC adapter [3].
(A “click” must be heard when fully inserted.)
• Take the USB cable provided [4]. Connect the end fitted
with a standard USB connector to the AC adapter.
Connect the other end (fitted with a mini-USB connector)
to the bottom side of the receiver (open the flap [5] first).
English
• Connect the AC adapter to an electric outlet. After about
4 seconds, the receiver screen lights up. An icon shows up
indicating that the battery is being charged. The screen is
then turned back off after about 10 seconds. After this
time, battery charging will continue at the same rate until
the battery is fully charged (charging time: 4 hours max.).
3
Page 10

English
• To read the battery charging status using the Quick
Toolbar, refer to the instructions in Turning the Receiver
On on page 2 (see also Using the Quick Toolbar on
page 4).
Using the Quick
Toolbar
Switching the
Receiver Manually
to Suspend Mode
Windows offers a
access frequently used functions (zoom, Bluetooth, WiFi,
phone, sound volume, battery power and clock).
• Tap on the title bar at the top of the screen. The quick
toolbar appears just underneath.
• Run the desired function by just tapping on the
corresponding icon. This runs the requested function and
simultaneously closes the quick toolbar.
The zoom function enlarges the screen content, which
means only part of the screen is shown at a time, and so
you should drag the stylus over the screen to scroll through
the whole display.
To return to 1:1 zoom, tap on the title bar again to re-open
the quick toolbar, then tap on the zoom function again.
Switching the receiver to Suspend mode is the right thing to
do when you need to make a short pause in your work and you
want to save the operating time of your battery. You sho uld
not however switch the receiver to Suspend mode when it is
collecting raw data.
In Suspend mode, the receiver is idle, using the minimum of
energy required to save the use context.
To switch to Suspend mode, just press briefly on the Power
button [1]. The receiver screen is turned off instantly.
To wake up the receiver, just press briefly the same button
again. This will instantly switch the screen back on and
restore the use context in which the receiver was before
entering the Suspend mode.
quick toolbar allowing you to quickly
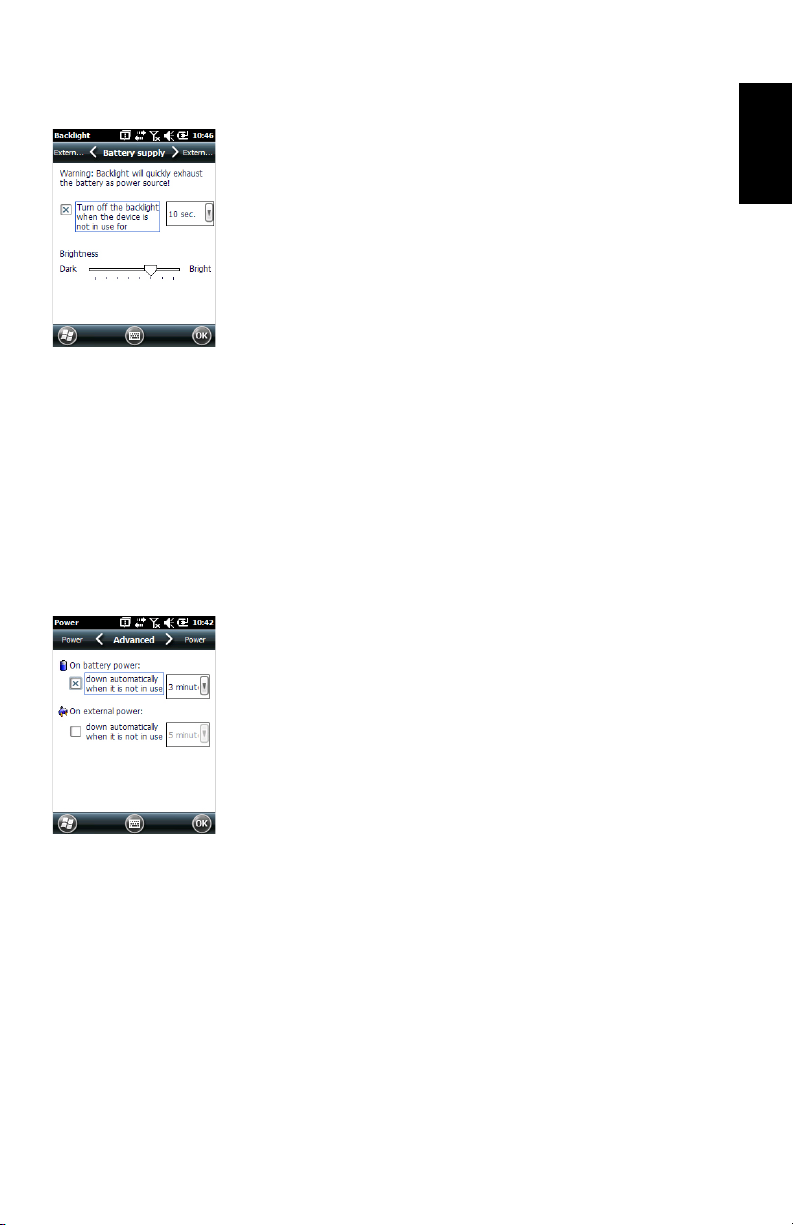
Adjusting
Backlight Level
and Idle Time
4
Backlight Level: The screen backlight may be adjusted to
match the ambient light for optimized visibility. You don’t
need the same level of screen backlight in dark areas than in
hot sun.
Backlight Idle Time: One way of saving the battery is to avoid
those periods of time during which the screen backlight is
unnecessarily on. As the receiver automatically counts the
time during which neither the keypad nor the touch screen is
active, you can set the receiver to turn off the backlight
automatically after a certain idle time.
Page 11
Follow the instructions below to set these two parameters:
• Press the Windows key and tap successively on Settings,
System and Backlight.
• Tap on the Battery Power tab.
• Drag the cursor to the right or left to set the screen
backlight to the desired level (between Dark and Bright).
The resulting brightness is obtained when you release the
cursor.
•Tick the Turn off backlight if device... check box and then
choose the idle time before the backlight is turned off
(10 seconds, 30 seconds or 1 to 5 minutes)
Note that the backlight level and idle time can be set to
different values for when the receiver is operated from an
external power source instead of its internal battery. You
can make these settings after tapping on the External
Power tab.
•Tap OK to save all your changes and return to the previous
screen.
English
Power
Management
Setting Time & Date
Another way of saving the battery is to allow the receiver to
switch automatically to Suspend mode after a certain period
of inactivity.
• Press the Windows key and tap successively on Settings,
System and Power.
• Tap on the Advanced tab. This tab allows you to ask for the
receiver to switch automatically to Suspend mode if it
stays idle for the period of time you choose. You may
choose a different setting depending on whether the
receiver is powered from the internal battery or from an
external power source.
•Tap OK to save the settings and return to the previous
screen.
Remember that the receiver should NOT be allowed to switch
automatically to Suspend mode if it is expected to collect
data for a long period of time and you know the keyboard will
be left idle during this time.
• Press the Windows key and tap successively on
Settings,and Clock & Alarms.
•On the Time tab, select your time zone and then enter the
local date and time.
•Tap OK to save your settings.
5
Page 12

English
Regional Settings
It’s a good idea to customize your receiver so that it complies
with a number of local preferences, such as country’s
currency, decimal point representation, time and date
formats, etc.
• Press the Windows key and tap successively on Settings,
System and Regional Settings.
•On the Region tab, select your country.
• Use the other tabs to set your local settings:
– Number format
– Currency choice
– Time and date formats
•Tap OK to save the settings and return to the Today screen.
Locking the
Screen and the
Keypad
At some stage in your work, you may need to lock the receiver
to make sure no user intervention from the screen or keypad
can affect the work in progress.
• Press the Windows key.
• In the task bar at the bottom of the screen, tap on the
padlock icon (see screen below). As a result, the touch
screen and keypad are made inactive.
• To unlock the touch screen and keypad, just drag the on-
screen slide button either to the left or right. This will take
you back to the Home screen.
6
Page 13

How to Hold the
Receiver
Tracking satellites with your receiver requires that you use the
receiver outdoor and hold it in an appropriate manner.
The receiver will have the best view of the sky when you hold
it at an angle of around 45 degrees from horizontal and not
too close to your body.
You can check that your receiver is tracking enough satellites
by running the GNSS Toolbox, and more particularly the
GNSS Status function (see GNSS Status on page 11). When
enough satellites are tracked, you can start using your
receiver and run your application software.
English
Turning the
Receiver Off
After you have finished your work, turn off your receiver by
holding the Power button [1] pressed until a Warning
message is displayed on the screen asking you to confirm the
power-off request. Tap Yes. The receiver will shut down in the
next couple of seconds after a duo-tone sound has been
heard.
7
Page 14

Receiver Description
English
Front View Power Key
[8]
[9]
Use the Power key [1] to turn on or off the receiver.
To turn on the receiver, press the Power key [1] until you can
feel a vibration in your hand, meaning the receiver has started
a power-on procedure. You can then release the key.
To turn off the receiver press the Power key [1] until a sound
is heard and a warning message pops up on the screen asking
you to confirm the power shutdown request. Tap Yes on the
screen. A two-tone sound can then be heard just before the
receiver shuts down.
Windows key
The Windows key [2] is used to give immediate and
unconditional access to the Windows Start menu.
Display Screen
The display screen [3] is a 3.5-inch, VGA, 256-color (18-bit
GB) touch screen (240 x 320 pixels).
R
[3]
[1] [7] [4] [5] [2] [6]
8
Scroll / Enter keys
The Enter button [4] is used to accept highlighted input and
initiate various functions.
The Scroll button [5] is the ring around the Enter button. It
is used to move the cursor on the screen, from one data field
to the next on a parameter screen, from one option to another
in a menu, from one geographical location to another on a
map screen.
Function keys
The receiver is fitted with four function keys [6]. The specific
function of each of them is given in the table below.
Button Function
The keypad includes two of these buttons, one on the right, the other
on the left.
Each of them is a convenient alternative to tapping on the functions
appearing just above in the task bar at the bottom of the screen (e.g.
Notifications, Contacts, Menu, Log, etc.).
In Spectra Precision applications with a map screen displayed, use this
button to zoom in. In Windows Embedded, displays the Start menu.
In Spectra Precision applications with a map screen displayed, use
this button to zoom out. In Windows Embedded, displays the
Phone screen.
Page 15

Rear View
[10]
[11]
[12]
[13] [14]
[15] [16]
Microphone
A microphone is used by the voice recorder. Keep the small
aperture [7] clear when recording a vocal comment.
Built-in GPS Antenna
The receiver incorporates a built-in GPS antenna [8]. The
receiver should be held properly to optimize satellite
reception.
Earpiece
As a multi-media device, the receiver includes an earpiece
[9], which can be used by any voice-based software
application.
External GPS Antenna Input
Use this input [10] to connect an external GPS antenna to the
receiver. When an external antenna is connected, the built-in
GPS antenna is automatically disconnected from the receiver
input.
The antenna input connector is protected by a rubber flap.
Spectra Precision recommends you keep the flap close when
no external antenna is used.
Loudspeaker
The back of the receiver incorporates a high-quality
loudspeaker [11].
English
[17]
Camera Lens
Keep the camera lens [12] clear when taking pictures or
recording videos.
Hand strap
The hand strap provided may be attached to the back of the
receiver through two threaded holes [13] and [14] and the
two recesses located at the bottom of the receiver (see
Bottom View below).
The hand strap may also accommodate the stylus, which can
also be attached to the leather strip of the hand strap using
the lanyard provided.
9
Page 16

English
[19][18]
[22] [21][20]
[23]
[23]
[24]
Battery Compartment
The receiver makes use of a rechargeable Li-Ion battery pack.
Loosen the quarter-turn screws [15] [16] using the stylus (or
a coin) to access the battery compartment [17]. The two
screws use opposite directions of rotation for opening and
closing the trap door.
The battery compartment can also accommodate a SIM card
[18] and a micro SD card [19].
When putting back the trap door, insert the bottom first, push
the trap door against the back of the receiver and seal the
battery compartment by fully rotating the two screws in the
opposite direction.
Information on battery charging: see Internal Battery on
page 13.
Bottom View
The bottom view provides access to a standard mini-USB
connector [20]. You first need to open the protective rubber
flap [21], using a finger nail or a sharp and rigid tip to pull
the flap from its left-hand side.
The mini-USB port is used to connect the receiver to the AC
adapter, for a fast battery charging cycle, or to a computer for
file transfer through Microsoft ActiveSync. In both cases, you
need to use the USB cable provided.
Information on battery charging: see Internal Battery on
page 13.
The bottom part of the receiver also accommodates a Reset
button [22], which is accessible after you have opened the
rubber flap [21]. Should the receiver get stuck, you can press
that button using a sharp tool to restart the receiver.
Warning! Never use the Reset button while the receiver is
operating normally or you would definitively lose all the data
you are collecting.
The bottom view also shows the two recesses [23] in which
the hand strap [24] can be anchored.
10
Page 17

GNSS Toolbox
GNSS Settings
GNSS Toolbox is used to control and monitor important
functions in your receiver. These are listed and detailed
below.
• GNSS Settings: Constellations and frequencies used in the
receiver.
• GNSS Status: Views GNSS reception monitoring screens.
• Reset: Resets the receiver.
• About: Provides the software version of GNSS Toolbox.
•Open the GNSS Toolbox and tap on GNSS Settings. This
opens a new window where you can make the following
settings:
– Tracking mode: Only the “GPS L1” option is available,
which means the receiver can only operate from the L1
signal of the GPS constellation.
– Use SBAS check box: Check this box to enable SBAS
reception, clear it otherwise.
•Tap OK to confirm your choices and return to the GNSS
Toolbox window.
English
GNSS Status •Open the GNSS Toolbox and tap on GNSS Status.
The default Position tab shows the latitude, longitude and
altitude of the current position, as computed by the
receiver, as well the number of satellites used and the
current PDOP value.
11
Page 18

English
If SBAS is used, the screen also shows the position status
(SDGPS).
The unit used to express the current altitude (meters or
feet) depends on the region (language and country) you
selected in Start, Settings, System, Regional Settings.
• The Satellites tab displays a polar diagram showing the
locations in the sky of the tracked satellites. Different
colors are used to display the numbers of the visible
satellites:
– Yellow characters: GPS satellites used
– Grey characters: Visible SBAS satellites. Also rejected
GPS satellites, because unhealthy or under the
elevation mask.
• The Signal tab shows the signal level for each of the
tracked satellites:
– Dark blue bars for all GPS satellites used
– Red bars for all SBAS satellites used
– Grey bars for all tracked, but not used, GPS satellites
GPS satellites are numbered from 1 to 32 and SBAS
satellites from 120 to 138.
Reset •Open the GNSS Toolbox and tap on Reset. A message then
asks you if you want to reset the receiver now. Use this
option only if you think the receiver is not working
properly.
Using this function results in a cold reset of the receiver.
Through a cold reset, all the GNSS settings, including
almanac data, are cleared making it necessary for you to
restore each of them manually. A few minutes are needed
after a cold reset before the receiver is back to work.
Using the Reset function is recommended when only the
GNSS Toolbox (and not other field software) is running on
the platform.
12
About This function provides the software version of GNSS Toolbox,
followed by the Spectra Precision legal line.
Page 19

Advanced Features
Power Modes The receiver has three power modes:
• Shutdown: The receiver is off.
• On: The receiver is fully powered
• Suspend: In this mode, the screen content and backlight
are turned off to save power and the use context is saved.
When quitting the Suspend mode, the use context is
restored instantly. Typically this mode is used in the field
to allow a quick restart after a pause.
The receiver can also enter the Suspend mode
automatically in case of a very low battery after dismissing
successively the two “low battery” alerts, or after an idle
time that you can set through a press on the Windows key,
and selecting Settings, Power (Advanced tab) (See also
Power Management on page 5).
Suspend Mode
The receiver can be switched to Suspend mode. This is a
power saving mode typically used in the field to allow a quick
restart after a pause. In this mode, only some parts of the
receiver are powered for the sole purpose of restoring the
context of use in which the receiver was when it was switched
to Suspend mode. The receiver should NOT however be used
in that mode while collecting raw data.
The receiver can also enter the Suspend mode automatically
in case of a very low battery after dismissing successively the
two “low battery” alerts, or after an idle time that you can set
through a press on the Windows key, then Settings, System and
Power (Advanced tab) (See also Power Management on
page 5). When collecting raw data, please clear this option so
that the receiver can never enter this mode.
English
Internal Battery
Monitoring the Battery Discharging Status
he receiver will continuously inform you of the current
T
status of the battery through an icon located in the Windows
Embedded title bar (on the right). The different shapes of
this icon indicate the current discharging status, as listed
below:
13
Page 20

English
Icon Meaning
Battery high: Remaining power ranges between approximately 75
and 100% of full charge.
Approx. 50-75% remaining
Approx 25-50% remaining
Approx. 10-25% remaining
Battery low: Remaining power is less than 5%.
Receiver powered from external source (AC adapter, computer via
USB line)
At any time you can read more in detail the battery status by
pressing the Windows key and then selecting Settings, System,
Power (see screen example).
When the remaining power drops below 10% of full charge
(orange area), you will see the message “Main Battery Low”
prompting you to replace or recharge the battery. Tap Dismiss
in the task bar. You should consider replacing the battery for
a fresh one but you may still continue to use the receiver for
a while.
With only about 5% of remaining power (red area), a new
message will pop up: “Main Battery Very Low”. Tap Dismiss in
the task bar to continue using the receiver. Spectra Precision
however recommends that you turn off the receiver and
replace the battery.
With only about 1% of remaining power, the receiver will
switch off, meaning the battery is no longer charged enough
to ensure proper operation of the receiver. Spectra Precision
recommends you do not go that far in the use of the internal
battery as there is a risk of losing part of your field data.
In case of long-time storage, remember Li-Ion batteries must
always be recharged regularly, about every six months. This is
to prevent irreversible damage of the batteries.
14
Battery Charging Scenarios
The battery can be charged in two different ways:
• From the power line, through the AC adapter and USB
cable provided. This configuration offers fast battery
charging, with around 700 mA of DC charging current.
• From an office computer connected to the receiver
through a USB line, using the same USB cable provided.
According to the USB 2.0 specification, the DC current
delivered will be limited to 500 mA, which means it will
Page 21

take longer to charge the battery from a computer’s USB
port than from the AC adapter.
You can ask the receiver not to allow the charging of the
battery through the USB port when this port is connected
to a computer. To do this:
– Press the Windows key
– Select Settings, System, Power
– Clear the option: When equipment opens and links to PC,
do not carry out battery charging
–Tap OK.
Extracting the Battery from the Compartment
Lever the battery out of its compartment using the stylus or a
flat screwdriver. (The flat end of the stylus is inserted in the
groove located on the bottom side of the battery, as shown
below.)
English
Likewise, extracting the SIM card or micro SD card from the
battery compartment requires the use of a spiky-tipped tool
to pull the card out of its slot.
USB Connection By default, the mini-USB connector is set to allow a
connection to a computer using Active Sync. You just need to
connect the USB cable provided between the receiver’s miniUSB connector and any computer fitted with a standard USB
connector. Provided Microsoft ActiveSync has been installed
on the computer, a serial connection will be initiated
automatically when you plug the cable. You can then use this
connection to exchange files, explore the receiver’s file
15
Page 22

English
system, install new applications directly from the computer,
etc.
If you want to make a different use of the receiver’s USB
output, press the Windows key, go to Settings>Connections>
USB to PC and change the settings accordingly.
Wireless
Communication
The receiver incorporates three wireless communication
devices:
•Bluetooth
•WiFi
• GSM/GPRS Modem
The three devices can be controlled from the Wireless
Manager icon (press the Windows button and go to
Settings>Connections>Wireless Manager).
Bluetooth
Follow the procedure below to turn on Bluetooth and make a
connection with another system, which is supposed to have
its Bluetooth been turned on and made visible to others.
• Press the Windows key and tap successively on Settings
and Bluetooth.
• Tap on the Mode tab.
• Activate Turn on Bluetooth.
• Tap on the Devices tab.
• Tap on Add new device. Wait until the external system is
found
• Tap on the name of this system, tap Next, enter a passcode
(optional) and then choose the Bluetooth service available
on this system that you would like to use now.
• Complete the connection setup as instructed.
16
Being only a Bluetooth client, the receiver will not offer any
Bluetooth services to external systems.
WiFi
The integrated Wi-Fi device allows you to access the Internet
through a wireless connection.
• Press the Windows key and tap successively on Settings,
Connections and Wi-Fi.
• Tap on the Wireless tab.
Page 23

• Tap on Search for Networks to turn on Wi-Fi and start
searching for the networks that are available from your
location.
• Choose one, then follow the instructions until you are
given access to the Internet.
GSM/GPRS Module
Provided the appropriate SIM card has previoulsy been
inserted in the battery compartment, the GSM/GPRS modem
allows you to:
• Make a phone call (modem used in GSM mode)
• Establish an Internet connection (modem used in GPRS
mode).
Motion Sensor Enabling Automatic Screen Rotation
By default, the receiver screen is used in portrait format.
Rotating the receiver by 90° will not cause the screen format
to switch to landscape format.
Operating the receiver this way is usually what you expect
from your receiver because you need to keep it always in
portrait position, with an angle of 45° for best satellite
reception.
You can however ask the receiver to rotate the display
automatically, depending on the position you give to the
receiver.
• Press the Windows key and tap successively on Settings,
System and Motion Sensor.
• Tap on the switch tab
• Enable the Screen rotation function. Using the Sensitivity
cursor, you can also adjust the sensitivity with which the
receiver will react to motion.
•Tap OK to validate all your settings.
English
Disabling Automatic Screen Rotation
Just before disabling the Screen rotation function (see above),
make sure the current screen format (portrait or landscape) is
the one you wish to use. If it’s not, first rotate the receiver
accordingly so you get this screen format, and then you can
disable the Screen rotation function.
17
Page 24

English
Scrolling through Your Picture Gallery
By setting the motion sensor as a switch, you can easily go
through all your pictures or audio files, just using the hand
that holds the receiver, leaving your other hand free.
After you have opened the MyPictures folder for example and
tapped on the first picture to view it, you just need to shake
the receiver briefly to view the next one, and so forth until all
the pictures in the folder have been viewed.
To set the motion sensor as a switch:
• Press the Windows key and tap successively on Settings,
System and Motion Sensor.
• Tap on the switch tab
• Enable the Switch songs or pictures function and tap OK.
Fall Alarm
You may set the receiver to produce a sound alarm when it
falls down:
• Press the Windows key and tap successively on Settings,
System and Motion Sensor.
• Tap on the Fall Alarm tab
• Enable the Fall Alarm function and tap OK.
Using the Camera Taking a Picture
• Press the Windows key and tap Pictures & Videos. This
opens the “My Pictures” folder in which you can see the
list of existing images and videos. The first item in the list
is the Camera, the tool you will now be using to take
pictures. The light-blue background means the camera is
currently selected.
•Tap Camera, or press the Enter button, to turn on the
camera. Wait a couple of seconds until the center of the
window displays the viewfinder of the camera.
• Now use the receiver as a camera. Look at the viewfinder
to frame the picture you want to take.
• When you are ready, stay as still as possible and press the
Enter button to take the picture. When you hear the click
of the camera, stay still for another two seconds until the
screen displays the picture you have just taken.
•Tap OK to come back to the viewfinder, then tap anywhere
on the screen to re-activate the task bar a the bottom of
the screen.
18
Page 25

•Tap OK to turn off the camera and close the window. The
picture you have taken is now visible in the “My Pictures”
folder.
Renaming a Picture
• With the “My Pictures” folder open, tap on the desired
picture. This opens a new window showing the picture.
•Tap Menu and Properties.
• Rename the file and tap OK.
Rotating a Picture
• With the “My Pictures” folder open, tap on the desired
picture (or tap on View in the task bar). This opens a new
window showing the picture.
•Tap Menu and Edit.
•Tap Rotate in the task bar. This rotates the image 90°
clockwise. Repeat the operation until the image has the
right orientation.
•Tap OK to save the image.
Cropping a Picture
• With the “My Pictures” folder open, tap on the desired
picture (or tap on View in the task bar). This opens a new
window showing the picture.
•Tap Menu and Edit.
•Tap Menu again and select Crop.
• As instructed, drag a rectangle on the picture representing
what the final image should be like, then tap inside the
rectangle to complete the crop operation. If you’re not
happy with the result, you can always come back to the
initial image by selecting Menu and Revert to Saved.
•Tap OK to save the picture.
English
Auto-correcting a Picture
• With the “My Pictures” folder open, tap on the desired
picture (or tap on View in the task bar). This opens a new
window showing the picture.
•Tap Menu and Edit.
•Tap Menu again and select Auto Correct. This refines the
picture’s brightness, contrast and colors.
•Tap OK to save the picture.
19
Page 26

English
Deleting a Picture
• With the “My Pictures” folder open, tap and hold the
desired picture.
• Select Delete in the context-sensitive menu.
•Tap Yes to confirm file deletion.
Changing Picture Settings
• Press the Windows key and tap Pictures & Videos. This
opens the “My Pictures” folder.
•Tap Camera to turn on the camera. Wait a couple of
seconds until the center of the window displays the
viewfinder of the camera.
• Tap on the screen to re-activate the task bar, tap Menu,
then Resolution. Choose one of the dimensions available
(expressed in pixels). The resolution setting impacts the
quality and size of the picture you take.
•Tap Menu, then Mode. Choose between Normal (one picture
taken), Burst (five pictures taken at a one-second interval
once you have pressed Enter) and Timer (picture taken 5
seconds after pressing Enter).
Making a Video Setting the Duration of a Video Film
• Press the Windows key and tap Pictures & Videos. This
opens the “My Pictures” folder in which you can see the
list of existing images and videos.
•Tap Menu, To ols and then Options.
• Tap on the Video tab.
• The audio track may, or may not be included in your video
files. Clear or check the Include Audio.. option as needed.
• Tap within the Time limit for videos. field and select one of
the options below:
– No limit: Choose this option to be able to film a video
over an unlimited period of time.
– 15 seconds: Choose this option to limit the duration of
every video you’ll film to 15 seconds.
– 30 seconds: Choose this option to limit the duration of
every video you’ll film to 30 seconds.
•Tap OK to accept the changes and close the Options
window.
20
Page 27

Starting a Video
•Tap Camera to turn on the camera. Wait a couple of
seconds until the center of the window displays the
viewfinder of the camera.
• Tap anywhere on the screen to make the task bar visible
at the bottom of the screen
• When you are ready to film, tap Menu and then Video.
• Press the Enter button to start filming.
Ending a Video
• Depending on the video settings, the video camera will
stop filming as explained below:
– With a preset time limit (15 or 30 seconds), the video
camera will stop filming automatically and close the
video file after this time has elapsed. A down counter
under the viewfinder will keep you informed of the
remaining time as you film.
– With no time limit, the video camera will film
indefinitely. A counter under the viewfinder will tell
you the current duration of the video. To stop filming
and close the video file, press the Enter button again.
• At the end of the video shooting, the viewfinder freezes
while the end of the video is being processed.
• Again, tap anywhere on the screen to make the task bar
visible at the bottom of the screen and then tap OK to turn
off the camera and close the window. The video file you
have created is now listed in the “My Pictures” folder.
English
Playing Back a Video
• With the “My Pictures” folder open, tap on the desired
video file. This will automatically launch the Windows
Media player.
• Tap to close Windows Media player and return to the
“My Pictures” folder.
Renaming a Video
• With the “My Pictures” folder open, select the desired
video file using the Scroll button.
•Tap Menu, To ols and then Properties.
• Rename the file and tap OK.
21
Page 28

English
Deleting a Video
• With the “My Pictures” folder open, tap and hold the
desired video file.
• Select Delete in the context-sensitive menu.
•Tap Yes to confirm file deletion.
22
Page 29

E-Compass Calibration
• Press on the Windows key.
• Scroll down until you see the Compass icon.
• Tap on the Compass icon to open the Compass utility.
• Tap on the Calibration tab.
• Put the receiver down on a table to give it a horizontal
position (see picture [1] below).
• Tap on the Start button located in the task bar to start the
calibration process.
First horizontal calibration is ready to go.
• Slowly rotate the receiver by a couple of turns while
keeping it horizontal (see picture [1] below).
Wait until the receiver indicates that horizontal calibration
is complete and prompts you to start vertical calibration
(“Ready” displayed underneath the Vertical calibration
button).
• Take the receiver in your hands (see picture [2] below),
put it in vertical position then slowly rotate it by a couple
of turns, in the vertical plane. Then gently put it back
down on the table.
• Wait until calibration is complete before proceeding.
English
[1] [2]
23
Page 30

Platform Specifications
English
GNSS
Characteristics
Accuracy
Specifications
20 channels
• GPS L1 C/A
• SBAS: WAAS/EGNOS/MSAS
• External antenna connector
•NMEA Output
All specified values are horizontal RMS, handheld accuracy
performance achieved in good conditions (open sky) with
PDOP < 3 and more than seven satellites in view.
• Real-time SBAS: < 2 m typical
• Post-processed: < 50 cm typical
Processor •ARM9™
• Clock frequency: 600 MHz
Operating System • Microsoft Windows
• Installed language at delivery: English, French, Spanish,
German, Portuguese, Italian, Simplified & Traditional
Chinese, Greek, Japanese or Korean. Installed OS
language cannot be changed once the product has been
shipped in a given language.
• Software package includes:
– Internet Explorer
– Microsoft Office Mobile
– ActiveSync
– Transcriber (handwriting recognition)
®
Embedded Hand Held.
®
Communication Cellular:
24
•
lt-in cell modem
Bui
Bands: Depending on MobileMapper 20 P/N an
•
n
etwork:
- P/N 802168-00: 3.5G: 900 and 2100 MHz
G: 850, 900 and 1800 MHz
P/N 802168-10: 3.5G: 850 and 900 MHz
-
etooth: 2.1 with EDR
Blu
WiFi: Integrated
Interface: USB
2
G: 850, 900, 1800 and 1900 MHz
2
d detected
Page 31

Physical
Characteristics
• Receiver size: 169 x 88 x 25 mm
• Receiver weight, alone: 310 g
• Receiver weight (batteries included): 380 g
User Interface Keyboard:
• Alphanumeric virtual keyboard
• Four-direction Scroll and Enter button, Zoom In/Out keys
+ context-sensitive keys
• Illuminated keyboard with touch screen
• Virtual keyboard
Display:
•
Color TFT, VGA, high-resolution display, sunlight
readable,
• Size: 3.5”
• Colors: 262 k
English
with touch screen, LED backlight
Memory •
Environmental
Characteristics
Power
Requirements
Multimedia &
Sensors
256-MB SDRAM
•
512-MB NAND Flash (non-volatile)
•
• Operating temperature: -10° to +60°C (14 to 140°F)
• Storage temperature: -30° to +70°C (-13 to 158°F)
• Humidity: 95% non condensing
• Waterproofness: IP54
• Free drop: 1.2 m to concrete
• Battery life: > 20 hours @ 20 ºC, with GPS on, Bluetooth
• Charging time: 4 hours
• Removable battery
• 3-Megapixel camera
•E-Compass
•G-Sensor
• Speaker
•Microphone
o SDHC™ memory card (up to 32 GB)
Micr
and WiFi disabled, screen backlight used at minimum
level 20% of the time.
Software Options • Spectra Precision MobileMapper Field and Office software
25
Page 32

English
• Post-processing
• ESRI ArcPad software bundle (USA only)
Standard
Accessories
•Stylus
• Hand strap
• Universal AC adapter
• USB cable.
26
Page 33

Index
A
Accessories 26
Adjusting backlight 5, 6, 16, 17, 18
Alignment 2
B
Battery compartment 10
Battery life 25
Battery status icon 13
Bluetooth 24
Burst 20
C
Calibration (screen) 2
Camera 18
Camera lens 9
Camera settings 20
D
Delete picture 20
Delete video file 22
Display screen 25
E
Earpiece 9
Environmental characteristics 25
External antenna 9
External antenna input 9
G
GNSS reception characteristics 24
GNSS settings 11
GNSS status 11
GNSS Toolbox 11
GPS antenna (built-in) 9
H
Holding the receiver properly 7
I
Inserting battery 1
K
Keyboard 25
L
Lock keypad 6
Long time battery storage 14
M
Main Battery Low 14
Main Battery Very Low 14
Memory 25
Microphone 9
Mini-USB 10
Modem (internal) 24
O
Opening battery door 1
Operating system 2, 24
OPP (Object Push Profile) 24
P
1
PDOP 1
Play back video 21
POGO cable 14
Power modes 14
Processor 24
Q
QVGA 8
R
Rename picture 19
Rename video file 21
Reset 12
Resolution 20
S
SBAS 11
Screen alignment 2
Sensors 25
Standby 21
Start shooting video 21
Stop shooting video 21
Suspend mode 4, 13
T
Time limit (video) 20
Timer 20
Tracking mode 11
U
Universal AC adapter 1
USB 10
V
Video (duration setting) 20
VGA 8
English
Page 34

MobileMapper® 20
Getting Started Guide
Contact Information:
AMERICAS
Spectra Precision Division
10368 Westmoor Drive,
Westminster, CO 80021,
USA
www.spectraprecision.com
©2013 Trimble Navigation Limited. All rights reserved. Spectra Precision is a Division of Trimble Navigation Limited. Spectra Precision and the Spectra
Precision logo are trademarks of Trimble Navigation Limited or its subsidiaries. P/N 631675-01A.
EUROPE, MIDDLE EAST & AFRICA
Spectra Precision Division
Rue Thomas Edison
ZAC de la Fleuriaye, BP 60433
44474 Carquefou Cedex, FRANCE
ASIA-PACIFIC
Spectra Precision Division
80 Marine Parade Road
#22-06, Parkway Parade
Singapore 449269, Singapore
 Loading...