


Operating Instructions
APX 320/530/740

Operating Instructions
Foreword
We are pleased to welcome you as a new Sophos APX Series customer.
Sophos APX Series access points are high performance wireless products using the latest 802.11ac Wave 2 technology for a best-in-class user experience. The APX Series models can be easily managed in Sophos Central, our cloud-based security management platform. All you need to do is set up a Sophos Central account and plug in the device anywhere in your network. The access point
will find the cloud-based controller automatically and become operable within seconds. Management of these APX Series models in Sophos XG Firewall will be available in a maintenance release of version 17.5.
These operating instructions will help you setup your Sophos Central account, install and configure your Sophos APX Series access point and also provide detailed technical specifications. In addition, please also see the following documents that contain useful information on safety, regulatory compliance, and configuration options:
ÌÌ Sophos APX Series Safety Instructions and Regulatory Information
ÌÌ Sophos APX Series Quick Start Guide
The instructions must be read carefully prior to using the device and should be kept in a safe place. You can download all user manuals and additional documentation from the Sophos Knowledgebase under
www.sophos.com/en-us/support/knowledgebase.aspx or from
www.sophos.com/get-started-ap.
Security Symbols
The following symbol and its meaning appears in the Quick Start Guide, Safety
Instructions and in these Operating Instructions.
Caution and Important Note. If these notes are not correctly observed:
ÌÌ This is dangerous to life and the environment
ÌÌ The access point may be damaged
ÌÌ The functions of the access point will be no longer guaranteed
ÌÌ Sophos shall not be liable for damages arising from a failure to comply with the Safety Instructions
Designed Use
The access point must be installed pursuant to the current installation notes. Otherwise failure-free and safe operation cannot be guaranteed. The EU declaration of conformity is available upon request from the following address:
Sophos Technology GmbH Amalienbadstr. 41/Bau 52 76227 Karlsruhe Germany
APX 320/530/740 |
1 |
Operating Instructions
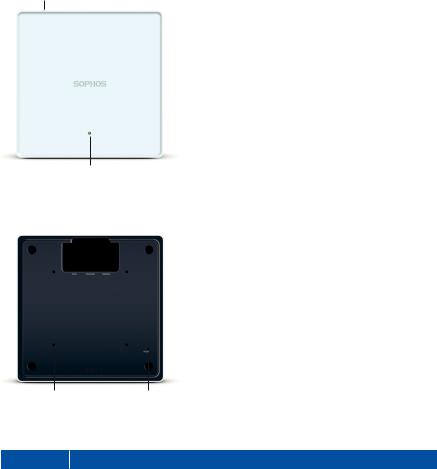
Operating Elements and Connections
APX 320/530/740*
Kensington Lock
LED
ETH0 (PoE) Port
ETH1 Port |
Console (RJ45) Port |
||
(APX 530/740 only) |
|
|
|
|
|
|
|
Mounting Bracket holes |
Reset button |
* The displayed images show the APX 740. Other APX models may vary slightly.
Component Descriptions
Component |
|
Description |
Status LED |
|
The Status LED indicates the operational state of your access point such as boot |
|
||
|
|
status, firmware updates and error states. For details, see table “LED Status” below. |
Eth0 (PoE) |
|
Eth0 is the primary Ethernet port to connect your access point to your network. This |
and ETH1 |
|
port needs to be connected to a PoE capable source (PoE Injector or PoE switch) |
ports |
|
to power your access point. There is no dedicated DC power source available. |
|
|
Sophos offers suitable PoE injectors for purchase as an optional accessory. |
|
|
Eth1 (on APX 530/740 only) can be used as an alternative |
|
|
Ethernet port but does not receive power. |
|
|
Both Ethernet ports are 10/100/1000 Mbps compatible and auto-negotiate |
|
|
to the speed and halfand full-duplex of the connecting device. |
Console port |
|
For debugging purposes, support staff can access the CLI by |
|
|
making a serial connection to the RJ-45 console port. |
|
|
For details, see “Serial Console Connection” below. |
Reset button |
|
The reset button allows you to reboot the device and reset its configuration |
|
|
to the factory default. For details, please see section “Reboot & Reset” |
Kensington |
|
You can physically secure the AP by attaching a lock and cable (such |
Lock |
|
as a Kensington® notebook lock) to the device lock slot. |
APX 320/530/740 |
2 |

Operating Instructions
LED Status
LED on Front
Off |
Off |
AP is off or reboot started |
Green |
Solid |
Normal operation |
|
Flashing |
AP is booting & connecting to wireless controller* |
Red |
Solid |
Error, no wireless controller found. AP will reboot (if not yet claimed |
|
|
by a controller). Check network connection if error persists. |
|
|
If reset button pressed: AP preparing configuration reset |
|
|
|
|
Flashing |
Configuration reset in progress* |
|
slowly |
|
|
Flashing |
Firmware update in progress* |
|
fast |
Note: Do not disconnect from power |
|
|
* Your AP should recover from this state after a maximum of 5 minutes.
Connection and Configuration
Your access point can either be managed by a wireless controller either located in Sophos Central or within your XG Firewall. The initial connection of your access point to your network and the wireless controller is described in the APX Quick Start Guide which was been shipped with your device or is available under www. sophos.com/get-started-ap.
For the access point to communicate with Sophos Central servers the following ports will need to be open on your firewall:
ÌÌ 443 (HTTPS)
ÌÌ 80 (HTTP)
ÌÌ 123 (NTP)
After successful connection you can start your initial configuration.
Setting up your access point in Sophos Central
You will need a Sophos Central account to manage your access points from Sophos Central. Please go to https://central.sophos.com to sign in under your account or create a new account.
After signing in select Wireless from the popup screen or click on Wireless in the left navigation to get started.
Follow the Onboarding Wizard to register your access point.
For more information, please see the Sophos Central Admin Help.
Setting up your access point in XG Firewall
Please note: support for the APX 320/530/740 will be added in a maintenance release of v17.5.
Instructions on how to set up a wireless network and add access points in XG are provided in this video https://vimeo.com/271657858
APX 320/530/740 |
3 |
Operating Instructions
Reboot & Reset
Your access point can be rebooted with the installed configuration or reset to the factory default configuration depending on how long you press and hold the reset button.
Reboot with current image and configuration
1.Press reset button
2.Release reset button
3.AP reboots (LED will go off, then will turn to solid green)
Reboot with current image and clear configuration
1.Press and hold reset button
2.AP reboots (LED will go off and then switch to green briefly)
3.LED will turn solid red for 5 sec. You can still cancel the configuration clearance process by releasing the reset button before the LED starts blinking
4.LED will blink red (configuration will be cleared)
5.Release reset button
6.AP reboots with factory default settings
Reset |
Released |
Reboot |
|
Reboot clear config |
Button |
|
|
|
|
|
Pressed |
|
|
5 Sec |
|
|
|
|
|
Status LED |
|
|
|
|
|
Off |
Solid |
Solid |
Blinking |
APX 320/530/740 |
4 |

Operating Instructions
Technical specifications
APX 320
Environment
Power consumption |
11.5 W (max.) |
Power over Ethernet |
802.3af |
(PoE) requirements |
|
Operating temperature |
0°-40° C |
Storage temperature |
-40°-70° C |
Humidity |
10-95% non-condensing |
Hazardous substances |
RoHS-2 and REACH compliant |
|
|
Physical specification |
|
|
|
I/O ports |
1x RJ45 connector console serial port |
|
1x RJ45 10/100/1000 Ethernet w/PoE (802.3af) |
|
1x Reset button |
|
1x Kensington security slot |
Memory |
512 MByte DDR3L |
|
512 Mbyte NAND Flash |
|
4 Mbyte SPI NOR Flash |
Mounting |
Desktop |
|
Wall-mount hang |
|
Ceiling (15/16, 9/16, 3/8 inch ceiling tracks) |
Dimensions |
155x155x38 mm |
(Width x Depth x Height) |
|
Weight |
0,474 kg |
|
|
Wireless specification |
|
|
|
Radios |
1x 2.4 GHz/5 GHz dual-band |
|
1x 5 GHz single band |
|
1x Bluetooth low energy (BLE) |
Antennas |
2x internal dual band antenna for Radio-1 (omni-directional) |
|
2x internal 5 GHz antenna for Radio-2 (omni-directional) |
|
1x internal 2.4 GHz antenna for BLE |
Antenna Peak Gain |
3.7 dBi at 2.4 GHz, 6.7 dBi at 5 GHz |
MIMO capabilities |
2x2:2 |
Supported WLAN standards |
IEEE 802.11 a/b/g/n/ac Wave 2 |
SSIDs |
8 per radio, 16 in total |
Max. Throughput |
867 Mbps (5G) + 867 Mbps (5G) |
|
|
APX 320
Band/Mode |
Data Rate |
TX Power |
RX Sensitivity |
|
|
Maximum |
(dBm) |
|
|
EIRP (dBm) |
|
2.412-2.472 GHz |
1 Mbps |
23 |
-99 |
(11b) |
2 Mbps |
23 |
-96 |
|
|||
|
5.5 Mbps |
23 |
-94 |
|
11 Mbps |
23 |
-91 |
2.412-2.472 GHz |
6 Mbps |
23 |
-94 |
(11g) |
9 Mbps |
23 |
-92 |
|
|||
|
12 Mbps |
22 |
-91 |
|
18 Mbps |
22 |
-89 |
|
24 Mbps |
21 |
-86 |
|
36 Mbps |
21 |
-82 |
|
48 Mbps |
19 |
-78 |
|
54 Mbps |
19 |
-76 |
|
|
|
|
APX 320/530/740 |
5 |

Operating Instructions
APX 320
2.412-2.472 GHz |
MCS 0 |
23 |
-93 |
(11n HT20) |
MCS 1 |
23 |
-90 |
|
|||
|
MCS 2 |
22 |
-88 |
|
MCS 3 |
22 |
-85 |
|
MCS 4 |
21 |
-82 |
|
MCS 5 |
21 |
-78 |
|
MCS 6 |
19 |
-76 |
|
MCS 7 |
19 |
-75 |
|
MCS 8 |
18 |
-71 |
5.180-5.825 GHz |
6 Mbps |
22 |
-91 |
(11a) |
9 Mbps |
22 |
-90 |
|
|||
|
12 Mbps |
21 |
-90 |
|
18 Mbps |
21 |
-88 |
|
24 Mbps |
20 |
-85 |
|
36 Mbps |
20 |
-82 |
|
48 Mbps |
18 |
-77 |
|
54 Mbps |
18 |
-76 |
5.180-5.825 GHz |
MCS0 |
22 |
-91 |
(11ac VHT20) |
MCS1 |
22 |
-89 |
|
|||
|
MCS2 |
21 |
-87 |
|
MCS3 |
21 |
-85 |
|
MCS4 |
20 |
-82 |
|
MCS5 |
20 |
-78 |
|
MCS6 |
18 |
-76 |
|
MCS7 |
18 |
-74 |
|
MCS8 |
17 |
-70 |
5.180-5.825 GHz |
MCS0 |
22 |
-89 |
(11ac VHT40) |
MCS1 |
22 |
-86 |
|
|||
|
MCS2 |
21 |
-85 |
|
MCS3 |
21 |
-82 |
|
MCS4 |
20 |
-79 |
|
MCS5 |
20 |
-75 |
|
MCS6 |
18 |
-73 |
|
MCS7 |
18 |
-72 |
|
MCS8 |
17 |
-68 |
|
MCS9 |
17 |
-66 |
5.180-5.825 GHz |
MCS0 |
22 |
-87 |
(11ac VHT80) |
MCS1 |
22 |
-84 |
|
|||
|
MCS2 |
21 |
-82 |
|
MCS3 |
21 |
-79 |
|
MCS4 |
20 |
-76 |
|
MCS5 |
20 |
-72 |
|
MCS6 |
18 |
-70 |
|
MCS7 |
18 |
-69 |
|
MCS8 |
15 |
-65 |
|
MCS9 |
14 |
-63 |
|
|
|
|
APX 320/530/740 |
6 |
 Loading...