

Page 1

3-238-177-11 (1)
FM/AM
Cassette Car Stereo
Operating Instructi on s
Mode d’emploi
Owner’s Record
The model and serial numbers are located on the bottom of the unit.
Record these numbers in the space provided below.
Refer to these numbers whenever you call upon your Sony dealer regarding this product.
Model No. XR-CA430X Serial No.
For installation and connections, see the supplied installation/connections manual.
En ce qui concerne l’installation et les connexi ons, consulter le manuel d’installation/de
raccordement fourni.
US
FR
XR-CA430X
© 2002 Sony Corporation
Page 2

Warning
–
–
–
–
Welcome !
This equipment has been tested and found to
comply with the limits for a Class B digital
device, pursuant to Part 15 of the FCC Rules.
These limits are designed to provide reasonable
protection against harmful interference in a
residential installation. This equipment
generates, uses, and can radiate radio frequency
energy and, if not installed and used in
accordance with the instructions, may cause
harmful interference to radio communications.
However, there is no guarantee that interference
will not occur in a particular installation. If this
equipment does cause harmful interference to
radio or television reception, which can be
determined by turning the equipment off and on,
the user is encouraged to try to correct the
interference by one or more of the following
measures:
Reorient or relocate the receiving antenna.
Increase the separation between the equipment
and receiver.
Connect the equipment into an outlet on a
circuit different from that to which the receiver
is connected.
Consult the dealer or an experienced radio/TV
technician for help.
You are cautioned that any changes or
modifications not expressly approved in this
manual could void your authority to operate this
equipment.
Thank you for purchasing this Sony Cass et te
Player. You can enjoy its various features even
more with:
• Optional CD/MD units (both changers and
players)*
• CD TEXT information (displayed when a CD
TEXT disc *
CD unit with the CD TEXT function).
*1 This unit works with Sony products only.
*2 A CD TEXT disc is an audio CD that includes
The “XM Ready” logo indicates that this product
will control a Sony XM tuner module (sold
separately).
Please see your nearest authorized Sony dealer
for details on the XM tuner module.
For instructions on XM tuner operation, please
refer to the XM tuner module’s included
instruction manual.
1
.
2
is played on a connected optional
information such as the disc name, artist name,
and track names. This information is recorded on
the disc.
2
Page 3

Table of Contents
Location of controls . . . . . . . . . . . . . . . . . . . 4
Precautions . . . . . . . . . . . . . . . . . . . . . . . . . . 5
Notes on Cassettes . . . . . . . . . . . . . . . . . . . . 5
Getting Started
Resetting the unit . . . . . . . . . . . . . . . . . . . . . 6
Detaching the front panel . . . . . . . . . . . . . . . 6
Setting the clock . . . . . . . . . . . . . . . . . . . . . . 7
Cassette Player
Listening to a tape . . . . . . . . . . . . . . . . . . . . 8
Playing a tape in various functions . . . . . . . . 9
Radio
Storing stations automatically
— Best Tuning Memory (BTM). . . . . . . . 9
Storing only the desired stations . . . . . . . . . 10
Receiving the stored stations . . . . . . . . . . . 10
Other Functions
Adjusting the soun d characteristics . . . . . . 11
Quickly attenuating the sound . . . . . . . . . . 11
Changing the sound and display settings
— Menu . . . . . . . . . . . . . . . . . . . . . . . . . 11
Selecting th e sound position
— My Best sound Position (MBP). . . . . 12
Boosting the bass sound
— D-bass . . . . . . . . . . . . . . . . . . . . . . . . 12
CD/MD Unit (optional)
Playing a CD or MD . . . . . . . . . . . . . . . . . 1 3
Display items . . . . . . . . . . . . . . . . . . . . . . . 13
Playing tracks repeatedly
— Repeat Play . . . . . . . . . . . . . . . . . . . . 14
Playing tracks in random order
— Shuffle Play. . . . . . . . . . . . . . . . . . . . 14
MP3 playable CD Unit (optional)
Listening to an MP3 file . . . . . . . . . . . . . . 15
Display items . . . . . . . . . . . . . . . . . . . . . . . 15
Playing tracks repeatedly
— Repeat Play . . . . . . . . . . . . . . . . . . . . 16
Playing tracks in random order
— Shuffle Play. . . . . . . . . . . . . . . . . . . . 16
Additional Information
Maintenance . . . . . . . . . . . . . . . . . . . . . . . . 17
Removing the unit . . . . . . . . . . . . . . . . . . . 17
Specifications . . . . . . . . . . . . . . . . . . . . . . . 18
Troubleshooting . . . . . . . . . . . . . . . . . . . . . 19
Error displays . . . . . . . . . . . . . . . . . . . . . . . 20
3
Page 4

Location of controls
Refer to the pages listed for details.
ATT
SOURCE
RELEASE
VOL
MODE
SEL
+
DISC
–
SENS
123456
REP
SHUF BL
SKIP/ ALBM
-+/ATA
MTL
BTM
SEEK
AMS
XR-CA430X
D-BASS
MBP
OFFDSPL
a SOURCE (Power on/Tape/Radio/CD/
MD) select button
b MODE (o) button
Selecting the source.
c VOL +/– button
d ATT (attenuate) button
e Display window
f Z (eject) button 8
g SEEK/AMS button
Tape:
Fast-forwarding, reversing a tape.
Radio:
Tuning in stations automatically.
Finding a station manually.
CD (MP3 files)/MD:
Skipping tracks.
h MBP (My Best sound Position) button
12
i D-BASS button 12
j RELEASE (front panel release) button
k SEL (select) button
Selecting items.
l RESET button (located on t he fron t side of
the unit, behind the fr ont panel) 6
m SENS button
Storing the stations with the strongest
signals.
n Number buttons
Tape:
(3): REP (Repeat)
(5): BL SKIP (Blank Skip)
(6): ATA (Automatic Tuner Activation)
Radio:
Storing the desired station on each number
button.
CD (MP3 files)/MD:
(1): DISC –
(2): DISC +
(3): REP (Repeat)
(4): SHUF (Shuffle)
MP3 files:
(5): ALBM –
(6): ALBM +
o BTM/MTL (Best Tuning Memory/Metal)
button 9
p DSPL (display mode change) button
q OFF (Stop/Power off) button*
* Warning when installing in a car without
an ACC (accessory) position on the
ignition switch
After turning off the ignition, be sure to press
(OFF) on the unit for 2 seconds to turn off
the clock display.
Otherwise, the clock display does not turn off
and this causes battery dra in .
4
Page 5
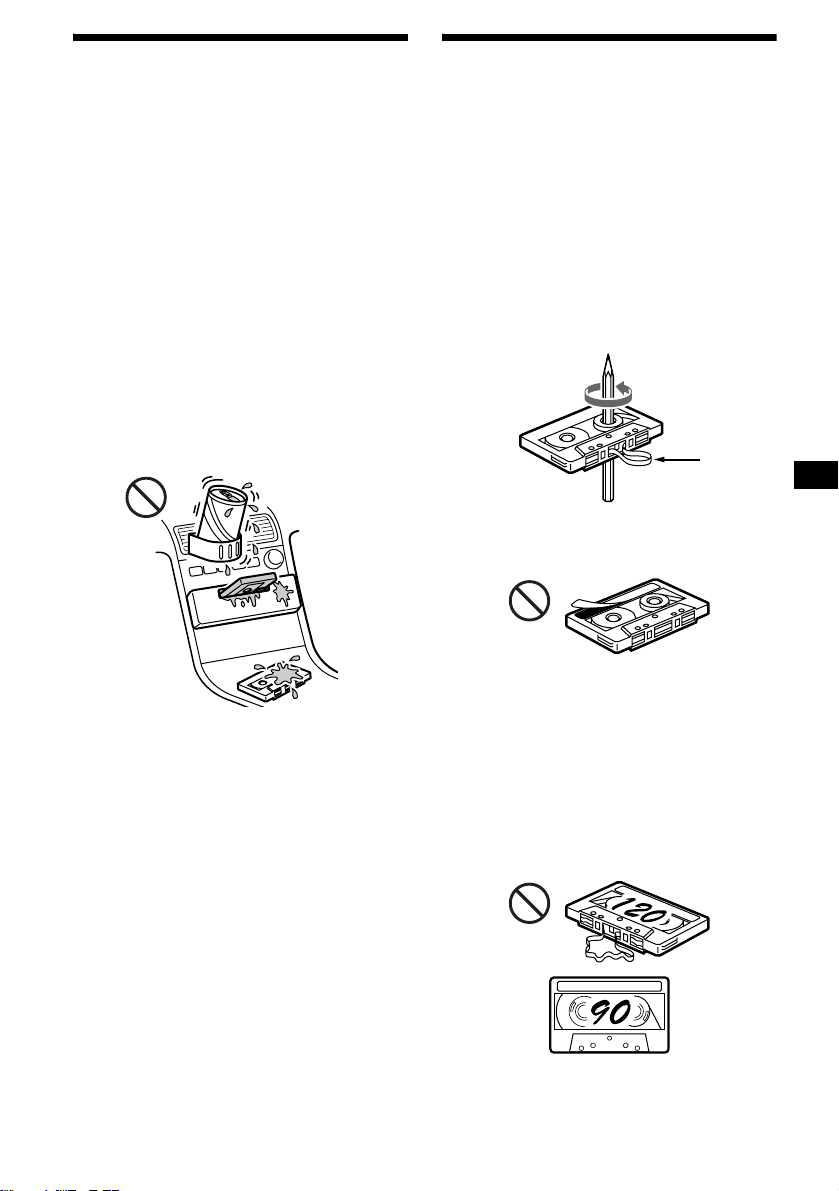
Precautions
Notes on Cassettes
• If your car was pa rked in direct sunlig ht , allow
the unit to cool off before operating it.
• If no power is being supp lied to the unit, check
the connections first. If everything is in order,
check the fuse.
• If no sound comes from the speakers of a twospeaker system, set the fader control to the
center position.
• When a tape is pl ayed back for a lon g period,
the cassette may become warm because of the
built-in power amplifier . However, this is not a
sign of malfunction.
If you have any questions or pr obl ems
concerning your unit that are not covered in this
manual, please consult your nearest Sony dealer.
To maintain high quality sound
Be careful not to splash juice or other soft drinks
onto the unit or tapes.
Cassette care
• Do not touch the ta pe surface of a cassette, as
any dirt or dust will contaminate the head s.
• Keep cassettes away fr om equipment with
built-in mag ne t s su ch as speakers and
amplifiers, as erasure or distortion on the
recorded tape co ul d occur.
• Do not expose cassettes to direct sunlight,
extremely cold temperatures, or moisture .
• Slack in the tape may cause the tape to be
caught in the machine. Before you insert the
tape, use a pencil or similar object to turn the
reel and take up any slack.
Slack
• Distorted ca ssettes and loose labels can cause
problems when ins erting or ejecting tap es .
Remove or replace loose labels.
• The sound may become distorted while playing
the cassette. The cassette player head should be
cleaned after each 50 hours of use.
The use of cassettes longer than 90 minutes
is not recommended except for long
continuous pla y
The tape used for these cassettes is very thin and
tends to stretch easily.
Frequent playi ng and stopping of thes e ta pes
may cause them to become entangled in the
cassette deck me ch anism.
5
Page 6

Getting Started
Detaching the front panel
You can detach the front panel of this unit to
protect the unit fr om being stolen.
Resetting the unit
Before operating the unit for the first time or
after replacing the car battery, you must reset the
unit.
Remove the front panel and pres s the RESET
button with a pointed object, such as a ball-point
pen.
RESET button
Note
Pressing the RESET button will er ase the clock setting
and some stored contents.
Caution alarm
If you turn the ignition switch to the OFF
position withou t removing the front panel, t he
caution alarm will beep for a few seconds.
If you connect an optional amplifier and do not
use the built-in amplifier, the beep sound will be
deactivated.
1 Press (OFF)*.
Tape playback or radio reception stops (the
key illumination and displ ay r em ain on).
* If your car has no ACC position on the ignition
switch, be sure to turn the unit off by pressing
(OFF) for 2 seconds to avoid car battery drain.
2 Press (RELEASE), then slide the front
panel a little to the left, and pull it off
towards you.
(OFF)
(RELEASE)
Notes
• Be sure not to drop the panel when detaching it from
the unit.
• If you detach the panel while the unit is still turned
on, the power will turn off automatically to prevent
the speakers from being damaged.
• When carrying the front panel with you, use the
supplied front panel case.
6
Page 7

Attaching the front panel
Attach part A of the front panel to part B of the
unit as illustrated and push the left side into
position until it clicks.
Setting the clock
The clock uses a 12-hour digital indication.
Example: To set the clock to 10:08
1 Press (DSPL) for 2 seconds.
A
B
Notes
• Be sure not to attach the front panel upside down.
• Do not press the f ron t p anel to o ha rd again st the uni t
when attaching it.
• Do not press too hard or put excessive pressure on
the display window of the front panel.
• Do not expose the front panel to direct sunlight or
heat sources such as hot air ducts, and do not leave
it in a humid place. Never leave it on the dashboard
of a car parked in direct sunlight or where there may
be a considerable rise in temperature.
The hour indication flashes.
1 Press either side of (VOL) to set the
hour.
to go forward
VOL
to go back
2 Press (SEL).
The minute indication flashes.
3 Press either side of (VOL) to set the
minute.
to go forward
VOL
to go back
2 Press (DSPL).
The clock starts.
After the clock setting is completed, the
display returns to normal play mode.
7
Page 8

Cassette Player
Listening to a tape
Insert a cassette.
Playback starts automatically.
If a cassette is already inserted, to start playback,
press (SOURCE) repeatedly until “TAPE”
appears.
The side facing up is played
Fast-winding the tape
During playback, press and hold either
side of (SEEK/AMS).
Fast-forward
SEEK
AMS
Rewind
To start playback during fast-forwarding or
rewinding, press (MODE) (o).
Locating a specific track
— Automatic Music Sensor (AMS)
During playback, press either side of
(SEEK/AMS) momentarily for each
track you want to skip.
You can skip up to nine tracks at one time.
To locate succeeding tracks
SEEK
AMS
To locate preceding tracks
The side facing down is played
To Press
Stop playba ck (OFF)
Eject the cassette Z
8
Note
The AMS function may not work when:
– the blanks between tracks are shorter than four
seconds.
– there is noise between tracks.
– there are long sections of low volume or quiet
sections.
Page 9

Playing a tape in various
functions
You can play the tape in various functions:
• REP (Repeat Pl ay) repeats the current track.
• BL SKIP (Blank Skip) skips blanks longer than
8 seconds.
• ATA (Automatic Tuner Acti vation) turns on t he
tuner automatically when fast-win ding the tape.
• MTL (Metal) lets you play a metal or CrO
tape.
During tape playback, press the
desired function button repeatedly
until “ON” in the display appears.
Function buttons
(3): REP
(5): BL SKIP
(6): ATA
(BTM): MTL
Example: ATA function
+
DISC
–
SENS
123456
REP
SHUF BL
SKIP/ ALBM
-+/ATA
ATA function starts.
To return to nor m al playback function, select
“OFF.”
MTL
BTM
2
Radio
The unit can store up to 6 stations per band
(FM1, FM2, FM3, AM1, an d AM 2).
Caution
When tuning in stations while driving, use Best
Tuning Memory to prevent accidents.
Storing stations
automatically
— Best Tuning Memory (BTM)
The unit selects the stations with the strongest
signals within the selected band, and stores them
in the order of their frequency.
1 Press (SOURCE) repeatedly to select
the radio.
2 Press (MODE) repeatedly to select the
band.
3 Press (BTM) for 2 seconds.
A beep sounds whe n th e setting is stored.
Notes
• If only a few stations can be received due to weak
signals, some number buttons will retain their former
settings.
• When a number is indicated in the display, the unit
starts storing stations from the one currently
displayed.
9
Page 10

Storing only the desired
stations
You can manually preset th e desired stations on
any chosen number button.
1 Press (SOURCE) repeatedly to select
the radio.
2 Press (MODE) repeatedly to select the
band.
3 Press either side of (SEEK/AMS) to
tune in the station that you want to
store.
4 Press the desired number button ((1)
to (6)) for 2 seconds until “MEM”
appears.
The number button indication appears in the
display.
Note
If you try to store another station on the same number
button, the previously stored station will be erased.
Receiving the stored stations
1 Press (SOURCE) repeatedly to select
the radio.
2 Press (MODE) repeatedly to select the
band.
3 Press the number button ((1) to (6))
on which the desired station is stored.
If preset tuning does not work
— Automatic tuning/Local Seek Mode
Automatic tuning:
Press eith er side of (SEEK/AMS) to
search for the station (automatic
tuning).
Scanning stops when the unit receives a
station. Repeat until the desired station is
received.
Local Seek Mode:
If the automatic tuning stops too
frequently, press (SENS) repeatedly
until “LOCAL-ON” appears.
“LCL” indicator is displayed
Only the stations with relatively strong
signals will be tuned in.
To cancel the local seek mode, select “L O CALOFF.”
Tip
If you know the frequency of the station you want to
listen to, press and hold either side of (SEEK/AMS) to
locate the approximate frequency, then press
(SEEK/AMS) repeatedly to fine adjust to the desired
frequency (manual tuning).
If FM stereo reception is poor
— Monaural Mode
During radio reception, press (SENS)
repeatedly until “MONO-ON” appears.
10
“MONO” indicator is displayed
The sound improves, but become s monaura l
(“ST” disappears).
To return to normal mode, select “MONO-OFF.”
Page 11

Other Functions
Adjusting the sound
characteristics
You can adjust the bass, treble, balance, and
fader.
1 Select the item you want to adjust by
pressing (SEL) repeat edly.
Each time you p re ss (SEL), the item changes
as follows:
BAS (bass) t TRE (treble) t BAL (left-
t FAD (front-rear)
right)
2 Adjust the selected item by pressing
either side of (VOL).
Note
Adjust within 3 seconds after selecting the item.
Quickly attenuating the
sound
Press (ATT).
After “ATT-ON” momentarily appears, the
“ATT” appears in t he display.
To restore the previous volume level, press
(ATT) again.
Changing the sound and
display settings
— Menu
The following items can be set:
SET (Set Up)
• A.SCRL (Auto Scroll)* (page 13).
• M.DSPL (Mot io n D i splay)
– the demonstration mode which appears when
the tape is ejected an d no source is selecte d
(e.g., tuner is turned off) .
• BEEP — to turn the beeps on or off.
Selecting the desired item
Press (SEL) and the desired preset
number button simultaneously.
(SEL) + (3): A.SCRL*
(SEL) + (4): M.DSPL
(SEL) + (6): BEEP
* When no CD or MD is playing, this item will not
appear.
After the mode setting completed, the display
returns to normal play mode.
Note
The displayed item will differ depending on the source.
To cancel the item, press (SEL) and the preset
number button simultaneously again.
11
Page 12
Selecting the sound position
— My Best sound Position (MBP)
When you drive without passengers, you can
enjoy the most comfortable sound environment
with “My Best sound Position.”
“My Best sou nd Po sit ion” has tw o pr eset s, wh ich
are best suited for the front seat s. You can select
one very easily with the MB P button.
MBP-A: best suited for the person in the frontMBP-B: best suited for the person in the front-
To cancel the MBP function, select “MBP-OFF.”
If you want to adjust t h e s ound characteris tics
more precisely, you can do it using the (SEL)
button (see “Adjusting the sound characteris t i cs”
on page 11).
Notes
• If you adjust any sound characteristics by using the
• When MBP is set to OFF, the sound setting you
left seat.
right seat.
Press (MBP) repeatedly for the desired
listening position.
After 1 second, the display goes back to the
normal playback mode.
(SEL) button (page 11), the MBP setting returns to
OFF.
adjusted (page 11) is activated.
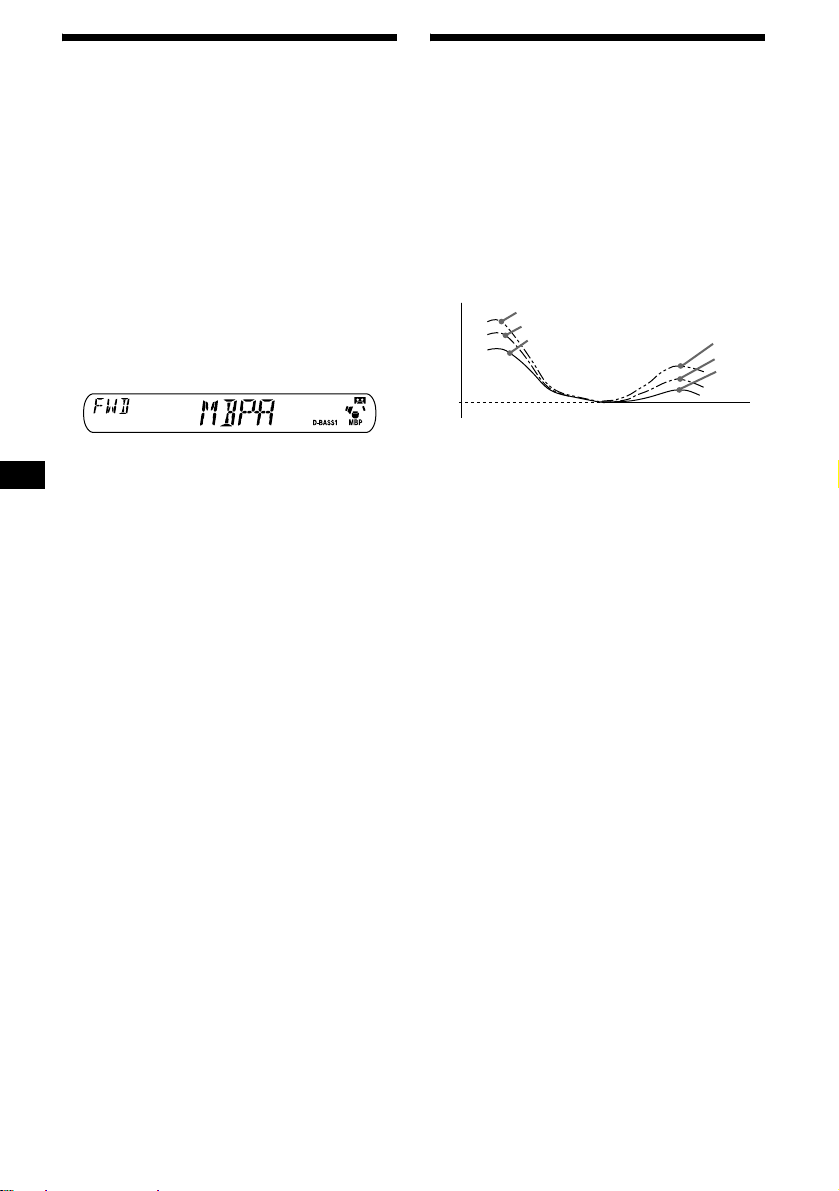
Boosting the bass sound
— D-bass
Yo u can enjoy a clear and powerf u l bass sound.
The D-bass functi on boosts the low frequency
signal and high fr equency signal with a sharper
curve than conventional bass boost.
You can hear the bass line more clearly even
while the vocal volume remains the same. You
can emphasize and adjust the bass sound easily
with the D-BASS button .
D.BASS-3
Level
0dB
Adjusting the bass curve
Press (D-BASS) repeatedly to select
the desired bass curve.
As the D-BASS number in crease s so doe s the
effect.
D.BASS-1 t D.BASS-2 t D.BASS-3 t
D.BASS-OFF
Note
The bass sound may distort at same volume. If the
bass sound distorts, select less effective bass curve.
D.BASS-2
D.BASS-1
Frequency (Hz)
D.BASS-3
D.BASS-2
D.BASS-1
12
Page 13

CD/MD Unit (optional)
This unit can control external CD/MD units
(optional).
If you connect an o pt io nal CD unit with the CD
TEXT function, the CD TEXT information will
appear in the di sp la y whe n you pl ay a CD TEXT
disc.
If you connect MP3 playable CD units (e.g. MP3
CD changer), you c an pl ay MP3 files;
compressed audio files wit h quality of sound.
See “MP3 playable CD Unit (optional) ” on page
15.
Playing a CD or MD
1 Press (SOURCE) repeatedly to select
“CD” or “MD (MS*).”
2 Press (MODE) repeatedly until the
desired unit appears.
CD/MD playback starts.
* MS: MG Memory Stick System-up Player MGS-X1
Cautions when connecting MGS-X1 and MD unit(s)
This unit recognizes MGS-X1 as an MD unit.
• When you want to play MGS-X1, press (SOURCE) to
select “MS” or “MD. ” If “MS” appears in the source
display, MGS-X1 starts to play. If “MD” appears in
the source display, press (MODE) to select “MS,” to
start playback.
• When you want to pl a y an MD u ni t, pr ess (SOURCE)
to select “MD” or “MS.” If your desired MD unit
appears in the source display, it starts to play . If “MS”
or another MD unit appears in the source display,
press (MODE) to select your desired MD unit, to
start playback.
Display items
When the disc/track changes, any prerecorded
1
title*
of the new disc/track is automatically
displayed (if the Auto Scroll function is set to
“ON,” names exceeding 8 characters will be
scrolled).
Displayable ite m s
• Music source
•Function
Disc number
Displayable ite m s
•Clock
• Elapsed playback time
• Disc name
•Track title*
To Press
Switch display
item
Selecting “A.SCRL-ON”
During playback, press (SEL) and (3)
simultaneously.
After 2 seconds, the display goes back to the
normal playback mode.
To select “A.SCRL-OFF”, press (SEL) and (3)
simultaneously again.
*1 “NO NAME” indicates there is no prerecorded
name to display.
*2 Only for CD TEXT discs with the artist name.
Notes
• Some characters cannot be displayed. Characters
and signs which cannot be displayed appear as “ *.”
• For some CD TEXT discs with very many
characters, information may not scroll.
• This unit cannot display the artist name for each
track of a CD TEXT disc.
Tip
When Auto scroll is set to OFF and the disc/track
name is changed, the disc/track name does not scroll.
1
*
/artist name*
2
(DSPL)
2
continue to next page t
13
Page 14

Locating a specific track
— Automatic Music Sensor (AMS)
During playback, press either side of
(SEEK/AMS) momentarily for each
track you want to skip.
To locate succeeding tracks
SEEK
AMS
To locate preceding tracks
Locating a specific point in a track
— Manual Search
During playback, press and hold either
side of (SEEK/AMS). Release when you
have found the desired point.
To search forward
SEEK
AMS
To search backward
Switching to other discs
During playback, press (1) (DISC –) or
(2) (DISC +) button.
The desired disc in the current unit begins
playback.
(1) (DISC –): For preceding discs
(2) (DISC +): For succeeding discs
Disc number
Playing tracks repeatedly
— Repeat Pla y
Yo u can select:
• REP-TRACK — to repeat a t ra ck.
• REP-DISC* — t o repeat a disc.
* Available only when one or more optional CD (MD)
units are connected.
During playback, press (3) (REP)
repeatedly until the desired setting
appears in the display.
Repeat Play starts.
To return to normal play mode, select “REPOFF.”
Playing tracks in random
order
— Shuffle Play
Yo u can select:
• SHUF-DISC*
current disc in ra ndom order.
• SHUF-CHGR*
current optional CD (MD) unit in random
order.
• SHUF-ALL*
connected CD (MD ) uni ts in random order.
*1 Available only when one or more optional CD (MD)
units are connected.
*2 Available only when two or more optional CD (MD)
units are connected.
During playback, press (4) (SHUF)
repeatedly until the desired setting
appears in the display.
Shuffle Play starts.
1
— to play the tracks on the
1
— to play the tracks in the
2
— to play all the tracks in all th e
14
Track number
To return to normal play mode, select “SHUFOFF.”
Note
“SHUF-ALL” will not shuffle tracks between CD units
and MD units.
Page 15

MP3 playable CD Unit
(optional)
This unit can control external MP3 playable CD
units. If you connect optional MP3 playabl e CD
units, you can play a di sc containing MP3 files.
Display items
Displayable ite m s
• Music source
•Function
Listening to an MP3 file
1 Press (SOURCE) repeatedly to select
“CD.”
2 Press (MODE) repeatedly until the
appropriate indica tion for the MP3
playable CD unit (“CD1,” “CD2,” etc.)
appears.
Playback starts.
To Press
Stop playba ck (OFF)
Skip discs
–Disc selection
Skip albums
–album selection
Skip tracks
–Automatic
Music Sensor
Fast-forward/
reverse
–Manual Search
When the last file on the disc is over
The file number indication returns to “1,” and
playback restar ts fr om the first file of the disc.
Notes
• If a disc with no MP3 files (tracks) is inserted, “CD”
appears in the disc type display to start playback but
there will be no sound.
• Before playing a track, this unit reads all track and
album information on the disc. Depending on the
track structure, it may take more than a minute
before play begins. During this time, “READ” is
displayed. Please wait for play to start automatically
when the reading is complete.
(1) (–)
(2) (+)
(5) (–)
(6) (+)
(SEEK/AMS) (./>)
[once for each tr ack]
(SEEK/AMS) (m/M)
[hold to desired p o i nt ]
Album*1 (Disc) number
Displayable ite m s
•Clock
• Elapsed playback t im e
• Disc name
• Album name*
• Track title*
•ID3 tag*
To Press
Switch display
*
2
2
2
2
(DSPL)
item
Selecting “A.SCRL-ON”
During playback, press (SEL) and (3)
simultaneously.
In two seconds the normal display
automatically appears.
To select “A.SCRL-OFF”, press (SEL) and (3)
simultaneously again.
*1 While displaying an ID3 tag, the album number
does not appear.
*2 When pressing (DSPL), “NO NAME” indicates that
there is no disc name, album name, or track title,
and “NO ID3” indicates that there is no ID3 tag.
Notes
• Some characters cannot be displayed. Characters
and signs which cannot be displayed appear as “ *.”
• For some ID3 tags with very many characters,
information may not scroll.
• This unit cannot display the artist name for each
track of an album.
Tip
When Auto scroll is set to OFF and the album/track
name is changed, the album/track name does not
scroll.
continue to next page t
15
Page 16

Locating a specific track
— Automatic Music Sensor (AMS)
During playback, press either side of
(SEEK/AMS) momentarily for each
track you want to skip.
To locate succeeding tracks
SEEK
AMS
To locate preceding tracks
Locating a specific point in a track
— Manual Search
During playback, press and hold either
side of (SEEK/AMS). Release when you
have found the desired point.
To search forward
SEEK
AMS
To search backward
Switching to other discs
During playback, press (1) (DISC –) or
(2) (DISC +) button.
The desired disc in the current unit begins
playback.
(1) (DISC –): For preceding discs
(2) (DISC +): For succeeding discs
Switching to other albums.
During playback, press (5) (ALBM –)
or (6) (ALBM +) button.
The desired album in the current unit begins
playback.
(5) (ALBM –): For preceding albums
(6)
(ALBM +): For succeeding albums
Album (Disc) number
Playing tracks repeatedly
— Repeat Play
Yo u can select:
• REP-TRACK — to repeat a track.
• REP-ALBM*
• REP-DISC*
*1 Available only when optional CD unit with the MP3
file control function is connected.
*2 Available only when one or more optional CD/MD
units are connected.
1
— to repeat an album.
2
— to repeat a disc.
During playback, press (3) (REP)
repeatedly until the desired setting
appears in the display.
Repeat Play starts.
To return to normal play mode, select “REPOFF.”
Playing tracks in random
order
— Shuffle Play
Yo u can select:
• SHUF-ALBM*
current optional CD unit with the MP3 data
control function in random order.
• SHUF-DISC*
current disc in ra ndom order.
• SHUF-CHGR*
current optional CD (MD) unit in random
order.
• SHUF-ALL*
connected CD (MD ) uni ts in random order.
*1 Available only when optional CD unit with the MP3
file control function is connected.
*2 Available only when one or more optional CD (MD)
units are connected.
*3 Available only when two or more optional CD units,
or two or more optional MD units are connected.
During playback, press (4) (SHUF)
repeatedly until the desired setting
appears in the display.
Shuffle Play starts.
1
— to play the albums in the
2
— to play the tracks on the
2
— to play the tracks in the
3
— to play all the tracks in all the
16
Track num ber
To return to normal play mode, select “SHUFOFF.”
Note
“SHUF-ALL” will not shuffle tracks between CD units
and MD units.
Page 17

Additional Information
Maintenance
Fuse replacement
When replacing t he fuse, be sure to use on e
matching the amperage rating stated on the
original fuse. If the fuse blows, check the power
connection and replace the fuse. If the fuse blows
again after replacement, there may be an internal
malfunction. In su ch a case, consult your nearest
Sony dealer.
Fuse (10 A)
Notes
• Fo r safety, turn off the ignition before cleaning the
connectors, and remove the key from the ignition
switch.
• Ne ver touch the connectors directly with your fingers
or with any metal device.
Removing the unit
1 Remove the front cover
1 Detac h the front panel (page 6).
2 Press the clip insid e the front cover
with a thin screwdriver.
Warning
Never use a fuse with an amperage rating
exceeding the one supplied with the unit as this
could damage the u ni t.
Cleaning the connectors
The unit may not function properly if the
connectors between the unit and the front panel
are not clean. In order to prevent this, detach the
front panel (p age 6) and clean the connectors
with a cotton swab dipped in alco hol. Do not
apply too much force. Otherwise, th e connectors
may be damaged.
Main unit
Back of the front panel
3 Repeat step 2 for the other side.
2 Remove the unit
1 Use a thin screwdriver to push in
the clip on the left side of the unit,
then pull out the left side of the unit
until the catch clears the mounting.
4 mm
2 Repeat step 1 for the right side.
3 Slide the unit out of its mounting.
17
Page 18

Specifications
A
UDIO POWER SPECIFICATIONS
POWER OUTPUT AND TOTAL HARMONIC DISTORTION
23 watts per channel minimum continuous average power into 4 ohms,
4 channels driven from 20 Hz to 20 kHz with no more than 5% total
harmonic distortion.
Cassette Player section
Tape track 4-track 2-channel stereo
Wow and flutter 0.08 % (WRMS)
Frequency response 30 – 18,000 Hz
Signal-to-noise ratio
Cassette type
TYPE II, IV 61 dB
TYPE I 58 dB
Tuner section
FM
Tuning range 87.5 – 107.9 MHz
Antenna terminal External antenna connector
Intermediate frequency 10.7 MHz
Usable sensitivity 11 dBf
Selectivity 75 dB at 400 kHz
Signal-to-noise ratio 65 dB (stereo),
Harmonic distortion at 1 kHz
Separation 33 dB at 1 kHz
Frequency response 30 – 15,000 Hz
68 dB (mono)
0.7 % (stereo),
0.5 % (mono)
AM
Tuning range 530 – 1,710 kHz
Antenna terminal External antenna connector
Intermediate frequency 10.7 MHz/450 kHz
Sensitivity 30 µV
Power amplifier section
Outputs Speaker outputs
Speaker impedance 4 – 8 ohms
Maximum power output 50 W × 4 (at 4 ohms)
(sure seal connectors)
General
Outputs Audio outputs (1)
Inputs BUS control input terminal
Tone controls Bass ±10 dB at 20 Hz
Power requirements 12 V DC car battery
Dimensions Approx. 178 × 50 × 178
Mounting dimensions Approx. 182 × 53 × 161
Mass Approx. 1.2 kg (2 lb 10 oz)
Supplied accessories Parts for installation and
Optional accessories BUS cable (supplied with
Optional equipment CD changer (10 discs)
Note
This unit cannot be connected to a digital preamplifier
or an equalizer.
Design and specifications are subject to chan ge
without notice.
Power antenna relay control
terminal
Power amplifier control
terminal
BUS audio input terminal
Antenna input terminal
Treble ±10 dB at 20 kHz
(negative ground)
1
mm (7
/8 × 2 × 71/8 in.)
(w/h/d)
1
mm (7
/4 × 21/8 × 63/8 in.)
(w/h/d)
connections (1 set)
Front panel case (1)
an RCA pin cord)
RC-61 (1 m), RC-62 (2 m)
CDX-757MX, CDX-656
CD changer (6 discs)
CDX-T70MX, CDX-T69
MD changer (6 discs)
MDX-66XLP
MG Memory Stick
System-up Player
MGS-X1
Source selector
XA-C30
18
Page 19

Troubleshooting
The following checklist will help you remedy
problems you may encounter with your un it.
Before going t hrough the checkl ist belo w, check
the connection and operating procedures.
General
No sound.
• Adjust the volume with (+).
• Cancel the ATT function.
• Set the fader control to the ce nter position f or
a 2-speaker system.
The contents of the memory have been
erased.
• The RESET button has been pressed.
t Store again into the memory.
• The power cord or battery has been
disconnected.
• The power connecting cord is not connecte d
properly.
No beep sound.
The beep sound is canc el ed (page 11).
Indications di sappe ar fr om /do n ot app ear i n
the display.
• The clock displ ay disappears if you press
(OFF) for 2 seconds.
t Press (OFF) again for 2 sec o nds to
display the clock.
• Remove the front panel and clean the
connectors. See “Cleaning the connectors”
(page 17) for details.
Stored stations and correct time are erased.
The fuse has blown.
Makes noise when the ignition key is in the
ON, ACC, or OFF position.
The leads are not matched correctly with the
car’s accessory power connec to r.
No power is being supplied to the unit.
• Check the connection. If everything is in
order, check the fuse.
• The car does not have an ACC positio n.
t Press (SOURCE) (or insert a cassette) to
turn on the unit.
The power is continuously supplied to the
unit.
The car does not have an ACC position.
The power antenna does not extend.
The power antenna does not have a relay box.
Tape playback
The sound is distorted.
The tape head is contaminated.
t C l ean the head with a com m ercially
available dry-tape cleaning cas se tt e.
The AMS does not operate correctl y.
• There is noise in the space between tracks.
• A blank space is too short (less than 4
seconds).
• A long paus e, or a passage of low
frequencies or very low sound level is treated
as a blank space.
Radio reception
Preset tuning is not possible.
• Store the correct frequency in the memory.
• The broadcast sig nal is too weak.
The stations cannot be received.
The sound is hampered by noises.
• Connect a power an tenna control lead (blue)
or accessory power supply lead (red) to the
power supply lead of a car’s antenna booster.
(Only when your car has built-in FM/AM
antenna in the rear/side glass.)
• Check the connection of the car antenna.
• The auto an t enna will not go up.
t Ch eck the connection of t he power
antenna contro l lea d.
• Check the fr equency.
Automatic tuning is not possible.
• The local seek mode is set to “ON.”
t Set the local seek mode to “OFF” (page
10).
• The broadcast sig nal is too weak.
t Perform manual tuning.
The “ST” indication flashes.
• Tune in the frequency accurately.
• The broadcast sig nal is too weak.
t Set to the monaural reception mode (page
10).
A program broadcast in stereo is heard in
monaural.
The unit is in monaural reception mode.
t Cancel monaural reception mode (page
10).
CD/MD playback
The sound skips.
Dirty or defective disc.
19
Page 20

Error displays
(when an optional CD/MD unit is connected)
Error displays
The following indications will flash for about 5
seconds, and an alarm sound will be heard.
NO MAG
The disc magazine is not inserted in the CD/
MD unit.
t Insert the magazine in the CD/MD unit.
NO DISC
No disc is inserted in the CD/MD unit.
t Insert discs in the CD/MD unit.
NO MUSIC
A CD which is not a music file is inserted in
the MP3 playable CD un it.
t Insert a music CD in the MP3 playable CD
unit.
ERROR*
BLANK*
RESET
NOT READY
HI TEMP
*1 When an error occ urs during playback of a CD or
*2 The disc number of the disc causing the error
1
• A CD is dirty or inse rted upside down.*
2
t Clean or insert the CD correctly.
• An MD does not pl ayback because of so me
problem.*
2
t Insert another MD.
• A CD/MD cannot pl a y because of some
problem.
t Insert another CD/MD.
1
No tracks have been reco rded on an MD.*
2
t Play an MD with recorded tracks on it.
The CD/MD unit cannot be operated because
of some problem.
t Press the RESET button on the unit.
The lid of the MD unit is open or the MDs are
not inserted properly.
t Close the lid or insert the MDs properly.
The ambient temperature is more than 50°C
(122°F).
t Wait until the temperature goes down
below 50°C (122°F).
MD, the disc number of the CD or MD does not
appear in the display.
appears in the display.
If these solutions do not help improve the
situation, consult your nearest Sony dealer.
20
Page 21

Page 22

Félicitations !
Merci d’avoir acheté ce lecteur de cassette Sony.
Vous profiterez encore davantage des multiples
fonctions de cet appareil à l’aide des fonctions et
des accessoire s ci -dessous :
• Lecteurs CD /M D en option (changeurs et
lecteurs)*
• Informations CD TEXT (affichées lors de la
lecture d’ un CD TEX T*
option connecté, do té de l a fonction CD
TEXT).
*1 Cet appareil fonctionne uniquement avec des
*2 Un disque CD TEXT est un CD audio contenant
Le logo "XM Ready" indique que ce produit
commande un tuner XM Sony (vendu
séparément).
Consultez votre revendeur agréé Sony le plus
proche pour obtenir plus d'informations sur le
tuner XM.
Pour en savoir plus sur le fonctionnement du
tuner XM, reportez-vous au manuel utilisateur
fourni avec le tuner XM
1
.
2
avec un lecteur CD en
produits Sony.
des informations telles que le nom du disque, le
nom de l’artiste et les noms des pistes. Ces
informations sont enregistrées sur le disque.
.
2
Page 23

Table des matières
Emplacement des commandes . . . . . . . . . . . 4
Précautions . . . . . . . . . . . . . . . . . . . . . . . . . . 5
Remarques sur les cassettes . . . . . . . . . . . . . 5
Préparation
Réinitialisation de l’appareil . . . . . . . . . . . . . 6
Retrait de la façade . . . . . . . . . . . . . . . . . . . . 7
Réglage de l’horloge . . . . . . . . . . . . . . . . . . . 8
Lecteur de cassette
Écoute d’une cassette . . . . . . . . . . . . . . . . . . 8
Diverses fonctions de lecture
d’une cassette . . . . . . . . . . . . . . . . . . . . . . 9
Radio
Mémorisation automatique des stations
— Mémorisat i on des meilleurs acc or ds
(BTM). . . . . . . . . . . . . . . . . . . . . . . . . . . 10
Mémorisation des stations souhaitées
uniquement . . . . . . . . . . . . . . . . . . . . . . . 10
Réception des stations mémorisées . . . . . . 10
Autres fonctions
Réglage des caractéristiques du son . . . . . . 11
Atténuation rapide du son . . . . . . . . . . . . . . 11
Modification des réglages du son et de
l’affichage
— Menu . . . . . . . . . . . . . . . . . . . . . . . . . 12
Sélection de la position du son
— Fonction de meilleure position du son
(MBP) . . . . . . . . . . . . . . . . . . . . . . . . . . . 12
Accentuation des graves
— Fonction D-bass. . . . . . . . . . . . . . . . . 13
Lecteur CD/MD (en option)
Lecture d’un CD ou d’un MD . . . . . . . . . . 13
Rubriques d’affichage . . . . . . . . . . . . . . . . 1 4
Lecture répétée de plages
— Lecture répétée . . . . . . . . . . . . . . . . . 15
Lecture des plages au hasard
— Lecture aléatoire . . . . . . . . . . . . . . . . 1 5
Lecteur CD compatible MP3
(en option)
Écoute d’un fichier MP3 . . . . . . . . . . . . . . 1 5
Rubriques d’affichage . . . . . . . . . . . . . . . . 1 6
Lecture répétée de plages
— Lecture répétée . . . . . . . . . . . . . . . . . 17
Lecture des plages au hasard
— Lecture aléatoire . . . . . . . . . . . . . . . . 1 7
Informations complémentaires
Entretien . . . . . . . . . . . . . . . . . . . . . . . . . . . 18
Démontage de l’appareil . . . . . . . . . . . . . . 18
Caractéristiques techniques . . . . . . . . . . . . 19
Dépannage . . . . . . . . . . . . . . . . . . . . . . . . . 20
Affichage des erreurs . . . . . . . . . . . . . . . . . 21
3
Page 24

Emplacement des commandes
Pour plus de détails, reportez-vous aux pages indiquées.
ATT
MODE
SEL
VOL
+
DISC
–
SENS
123456
REP
SHUF BL
SOURCE
RELEASE
SKIP/ ALBM
-+/ATA
MTL
BTM
SEEK
AMS
XR-CA430X
D-BASS
MBP
OFFDSPL
a Touche de sélection SOURCE (Mise
sous tension/Cassette/Radio/CD/MD)
b Touche MODE (o)
Sélection de la source.
c Touche VOL +/–
d Touche ATT (atténuation du son)
e Fenêtre d’affichage
f Touche Z (éjection) 8
g Touche SEEK/AMS
Cassette :
A v ance et rembobinage rapide d’une cassette.
Radio :
Syntonisation automatique des statio ns .
Recherche manuelle d’une station.
CD (fichiers MP3)/MD :
Saut de plages.
h Touche MBP (fonction de meilleure
position du son) 12
i Touche D-BASS 13
j Touche RELEASE (déverrouillage de
la façade)
k Touche SEL (sélection)
Sélection d’éléments.
l Touche RESET (située à l’avant de
l’appareil, derrière la façade) 6
m Touche SENS
Mémorisatio n des stations dont le signal est
le plus puissant.
4
n Touches numériques
Cassette :
(3) : REP (lecture répétée )
(5) : BL SKIP (saut de zones vides)
(6) : ATA (activation automatique du
syntoniseur)
Radio :
Mémorisation de la station souhaitée sur
chaque touche num érique.
CD (fichiers MP3)/MD :
(1) : DISC –
(2) : DISC +
(3) : REP (lecture répétée )
(4) : SHUF (lecture aléatoire)
Fichiers MP3 :
(5) : ALBM –
(6) : ALBM +
o Touche BTM/MTL (mémorisation des
meilleurs accords/métal) 9, 10
p Touche DSPL (modification du mode
d’affichage)
q Touche OFF (Arrêt/Mise hors
tension)*
* Avertissement en cas d’installation de
l’appareil dans une voiture dont le
contact ne comporte pas de position
ACC (accessoires)
Après avoir coupé le moteur, n’oubliez pas
d’appuyer sur (OFF) pendant 2 secondes
pour désactiver l’affichage de l’horloge.
Sinon, l’affichage n’est pas désactivé et cela
décharge la batterie.
Page 25

Précautions
Remarques sur les cassettes
• Si votre voiture est restée stationnée en plein
soleil, laissez refroidir l’a p pa re il avant de
l’utiliser.
• Si aucune alimentation ne parvie nt à l’ap pareil,
vérifiez d’abord les raccordements. Si tout est
en ordre, vérifiez le fus ib le .
• Si aucun son n’ est émis par les haut- parleurs
d’une chaîne à deux haut-parleurs, réglez la
commande d’équilibre avant-arrière à la
position médiane.
• Après une longue période de lecture, la cassette
peut devenir chaude à cau se de l’amplificateur
intégré. Ceci es t n o r m al et n’est pas le signe
d’un problème de fonctionnement.
Si vous avez des questions ou de s pr oblèmes
concernant le fonctionnement de cet appareil qui
ne sont pas abordés dans ce manuel , co nsultez
votre détaillant Sony le plus proche.
Pour conserver un s on de haute qualité
Veillez à ne pas renverser de jus de fruit ou de
boissons sucrées sur l’app areil ou sur les
cassettes.
Entretien des cassettes
• Ne touchez pas la surface de la ba nde des
cassettes. En effet, toute saleté ou poussière
pourrait souiller les têtes de lecture.
• Tenez les cassettes à l’écart d’appareils
comportant des aimants intégrés, par exemple
les haut-parleurs et les amplificateurs. Ceux-ci
pourraient en effet effacer le contenu de la
bande ou causer une di st orsion du son
enregistré.
• Ne soumettez pas les cassettes au rayonnement
direct du soleil, à d es températures
extrêmement basses ni à l’humidité.
• Une bande mal t en du e po ur rai t s ’e mmêl er da ns
le mécanisme de l’appareil. Avant d’insérer une
cassette, tendez bie n la bande en faisa nt tourne r
les bobines à l’aide d’un crayon ou d’un aut re
objet similaire.
Bande
distendue
• Une cassette défo rm é e ou qui porte une
étiquette qui se décolle pe ut causer des
problèmes lors de l’insertion ou de l’éjection.
Retirez ou remplacez les étiquettes mal collées.
• Le son de la cas sette en lecture peu t, après
quelque temps, venir à présenter une distorsion.
Nettoyez la tête de lecture du lecteur de cassette
toutes les 50 heures d’utilisation.
suite à la page suivante t
5
Page 26

L’utilisation de cassettes de plus de
90 minutes n’est pas recommandée, sauf
pour une lecture en continu pendant de
longues périodes.
La bande de ce t ype de cass et tes es t tr ès mi nce e t
se détend facilement.
Avec la lecture et l’arrêt répétés, ce type de
bande pourrait s’emmêler dans le mécanisme du
lecteur de cassette.
Préparation
Réinitialisation de l’appareil
Avant la première mise en service de l’appareil
ou après avoir remplacé la batterie du véhicule,
vous devez réinitialiser l’appareil.
Retirez la façade et appuyez sur la to uche
RESET avec un objet pointu, com m e un stylo à
bille.
To uche RESET
Remarque
Une pression sur la touche RESET efface le réglage
de l’heure et certaines fonctions mémorisées.
6
Page 27

Retrait de la façade
Vous pouvez retirer la façade de cet appareil pour
le protéger contre le vol.
Avertisseur
Si vous mettez la clé de contact en position OFF
sans ôter la façade, l’alarme retentit pendant
quelques secondes.
Si vous raccordez un am pl i ficateur en option et
que vous n’utilis ez pas l’amplificateur in té gr é, le
bip est désactivé.
1 Appuyez sur (OFF)*.
La lecture de la ca ssette ou la réception radio
est interrompue (l’éclairage de s touches et
l’affichage demeurent act i fs ).
* Si le contact de votre voiture n’est pas équipée
d’une position ACC (accessoire), veillez à mettre
l’appareil hors tension en appuyant sur (OFF)
pendant 2 secondes pour empêcher la décharge
de la batterie du véhicule.
2 Appuyez sur (RELEASE), glissez
légèrement la façade vers la gauche,
puis tirez doucement le côté gauche
de la façade vers vous.
(OFF)
Pose de la façade
Fixez la pièce A de la façade à la pièce B de
l’appareil, tel qu’illustré, puis appuyez sur la
partie gauche de la façade jusqu’au déclic
indiquant qu’elle est en place.
A
B
Remarques
• Veillez à ne pas fixer la façade à l’envers.
• N’appuyez pas trop fort sur la façade lorsque vous la
fixez à l’appareil.
• N’exercez pas de pression excessive sur la fenêtre
d’affichage de la façade.
• Ne soumettez pas la façade au rayonnement direct
du soleil ou à des sources de chaleur, telles que des
bouches d’air chaud, et ne la laissez pas dans un
lieu humide. Ne laissez jamais la façade sur le
tableau de bord d’une voiture stationnée en plein
soleil, ni dans un endroit soumis à des
augmentations importantes de température.
(RELEASE)
Remarques
• Veillez à ne pas échapper la façade lorsque vous la
retirez de l’appareil.
• Si vous retirez la façade alors que l’appareil est
toujours sous tension, l’alimentation est
automatiquement coupée de manière à éviter
d’endommager les haut -pa r leu rs.
• Lorsque vous transportez la façade, glissez-la dans
l’étui fourni à cet effet.
7
Page 28

Réglage de l’horloge
L ’horloge numérique fonctionne suivant un cycle
de 12 heures.
Lecteur de cassette
Exemple : Pour régler l’horloge à 10:08
1 Appuyez sur (DSPL) pendant
2 secondes.
L’indication des heu re s clignote.
1 Appuyez sur l’un des côtés de la
touche (VOL) pour régler l’heure.
pour avancer
VOL
pour reculer
2 Appuyez sur (SEL).
L’indication des minutes cligno te.
3 Appuyez sur l’un des côtés de la
touche (VOL) pour régler les
minutes.
pour avan cer
VOL
Écoute d’une cassette
Insérez une cassette dans le lecteur.
La lecture commence automatiquement.
Si une cassette se trouve déjà dans l’apparei l ,
pour lancer la lecture, appuyez plusieurs fois sur
(SOURCE) jusqu’à ce que l’indication “TAPE”
s’affiche.
La face tournée vers le haut est en lecture
La face tournée vers le bas est en lecture
Pour Appuyez sur
interrompre la
lecture
éjecter la cassette Z
(OFF)
pour reculer
2 Appuyez sur (DSPL).
L’horloge commence à fonctionner.
Une fois le réglage d e l’horloge terminé , la
fenêtre d’affichage revient au mode de lecture
normal.
8
Page 29

Avance rapide ou rembobinage de la
cassette
Pendant la lecture, maintenez enfoncé
l’un des côtés de la touche
(SEEK/AMS).
Avance rapide
SEEK
AMS
Rembobinage
Pour lancer la lecture pendant l’avance rapide ou
le rembobinage, appuyez sur (MODE) (o).
Recherche d’une plage spécifique
— Accès automatique aux titres (AMS)
Pendant la lecture, appuyez
brièvement sur l’un d es c ô té s de
(SEEK/AMS) pour chaque plage que
vous souhaitez sauter.
Vous pouvez sauter jusqu’ à neuf plages à la
fois.
Pour rechercher parmi les plages
suivantes
SEEK
AMS
Pour rechercher parmi les plages
précédentes
Diverses fonctions de lecture
d’une cassette
Il existe diverses fonctions de lecture des
cassettes :
• REP (lecture répétée) lecture en boucle de la
plage en cours.
• BL SKIP (saut de zones vides) saut des zones
vides de plus de huit secondes.
• ATA (activation automatique du syntoniseur)
mise en fonction automatique de la radio lors
du rembobinage ou d e l’ avance rap id e de la
cassette.
• MTL (métal ) permet la lecture d’une cassette
métal ou CrO
En cours de lecture, appuyez
plusieurs fois sur la touche
correspondant à la fonction souhaitée
jusqu’à ce que “ON” apparaisse dans
la fenêtre d’affichage.
Touches de foncti ons
(3) : REP
(5) : BL SKIP
(6) : ATA
(BTM) : MTL
Exemple : fonction A TA
2.
Remarque
La fonction AMS peut ne pas fonctionner lorsque :
– les zones vides entre les plages durent moins de
quatre secondes.
– il y a des parasites entre les plages.
– il y a de longues sections à faible volume.
+
DISC
–
SENS
123456
REP
SHUF BL
SKIP/ ALBM
-+/ATA
MTL
BTM
La fonction ATA démarre.
Pour revenir à la fonction de lecture normale,
sélectionnez “O FF”.
9
Page 30

Radio
L’appareil peut mémoriser jusqu’à 6 stations
pour chaque bande de fréquences (FM1, FM2,
FM3, AM1 et AM2).
Attention
Pour syntoniser des stations pendant que vous
conduisez, nous vous conseillons d’utiliser la
fonction de mémorisation des meille ur s acco rd s
(Best T uni ng Memo ry ou BTM) de faço n à év iter
les accidents.
Mémorisation automati que
des stations
— Mémorisatio n de s me illeurs accords
(BTM)
L’appareil sélectionne les stations émettant les
signaux les plus pu is sants pour la bande
sélectionnée et les mémorise selon l’ordre des
fréquences.
1 Appuyez plusieurs fois sur (SOURCE)
pour sélectionner la radio.
2 Appuyez plusieurs fois sur (MODE)
pour sélectionner la bande.
3 Appuyez sur (BTM) pendant
2 secondes.
Un bip retentit lorsque le réglage est
mémorisé.
Remarques
• Si quelques stations seulement peuvent être
captées en raison de la faiblesse des signaux,
certaines touches numériques conser vent leur
réglage précédent.
• Si un numéro est indiqué dans la fenêtre d’affichage,
l’appareil commence la mémorisation des stations à
partir de la station affichée.
Mémorisation des stations
souhaitées uniquement
Vous pouvez présélection ner les stations
souhaitées manuellement sur la touche
numérique de votre choi x.
1 Appuyez plusieurs fois sur (SOURCE)
pour sélectionner la radio.
2 Appuyez plusieurs fois sur (MODE)
pour sélectionner la bande.
3 Appuyez sur l’un des côtés de
(SEEK/AMS) pour syntoniser la station
que vous voulez mémoriser.
4 Appuyez sur la touche numérique
((1) à (6)) souhaitée pendant
2 secondes jusqu’à ce que l’indication
“MEM” apparaisse.
Le numéro de la touche apparaît dans la
fenêtre d’affichage.
Remarque
Si vous essayez de mémoriser une autre station sur la
même touche, la station mémorisée précédemment
est effacée.
Réception des stations
mémorisées
1 Appuyez plusieurs fois sur (SOURCE)
pour sélectionner la radio.
2 Appuyez plusieurs fois sur (MODE)
pour sélectionner la bande.
3 Appuyez sur la touche numérique
((1) à (6)) sur laquelle la station
souhaitée est mémo ri sée.
10
Page 31

Si la syntonisation présélectionnée ne
fonctionne pas
— Syntonisation auto ma tiq ue/Mode de
recherche locale
Autres fonctions
Syntonisation automatique :
Appuyez sur l’un des côtés de
(SEEK/AMS) pour rechercher la station
(syntonisation automatique) .
Le balayage s’interrompt lorsque l’appareil
capte une station. Répétez cette opération
jusqu’à ce que vous captiez la station
souhaitée.
Mode de recherche locale :
Si la syntonisation automatique
s’arrête trop fréquemment, appuyez
sur (SENS) à plusieurs reprises
jusqu’à ce que l’indication “LOCALON” s’affiche.
L’indicateur “LCL” s’affiche
Seules les stations émettant des signaux
relativement puissant seront syntonisées.
Pour annuler le mode de recherche locale,
sélectionnez “LOCAL-OFF”.
Conseil
Si vous connaissez la fréquence de la station que
vous désirez écouter, maintenez enfoncé l’un des
côtés de (SEEK/AMS) pour localiser la fréquence
approximative, puis appuyez plusieurs fois sur
(SEEK/AMS) pour ajuster la syntonisation de la
fréquence souhaitée (syntonisation manuelle).
Réglage des caractéristiques
du son
Vous p ouvez régler les graves, les a iguës, la
balance gauche-droite et l’éq uilib re avant-arrière.
1 Sélectionnez le paramètre que vous
souhaitez régler en appuyant
plusieurs fois sur (SEL).
À chaque pressio n sur la touche (SEL), le
paramètre change de la façon suivante :
BAS (graves) t TRE (aiguës) t BAL
(gauche-droite)
t FAD (avant-arrière)
2 Réglez le paramètre séle ct ion né en
appuyant sur l’un des côtés de la
touche (VOL).
Remarque
Effectuez ce réglage dans les 3 secondes après avoir
sélectionné le paramètre.
Atténuation rapide du son
Appuyez sur (ATT).
L’indication “ATT-ON” s’affiche brièvement,
puis “ATT” s’affiche.
Pour restaurer le niveau de volume précédent,
appuyez une nouvel le fois sur la touche (ATT).
Si la réception stéréo FM est mauvaise
— Mode mono
En cours de réception radio, appuyez
à plusieurs reprises sur (SENS)
jusqu’à ce que l’indication “MONOON” s’affiche.
L’indicateur “MONO” s’affiche
La qualité sonore est améliorée, mais le son
est diffusé en mode mono (l’i ndi c at io n “ST”
disparaît).
Pour rev enir au mode de lect ure normal,
sélectionnez “MONO-OFF”.
11
Page 32

Modification des réglages du
son et de l’affichage
— Menu
Les paramètres suivants peuvent être réglés :
SET (configuration)
• A.SCRL (défilement automatique)* (page 14).
• M.DSPL (affichage animé)
– le mode de démonstration qui apparaît
lorsque la cassette est éjectée, qu’aucune
source n’est sélectionnée et que la ra di o es t
éteinte.
• BEEP — pour activer ou désactiver le bip.
Sélection du paramètre souhaité
Appuyez simultanément sur la touch e
(SEL) et sur la touche numérique de
présélection souhaitée.
(SEL) + (3) : A.SCRL*
(SEL) + (4) : M.DSPL
(SEL) + (6) : BEEP
* S’il n’y a pas de CD ou de MD en cours de
lecture, ce paramètre ne s’affiche pas.
Sélection de la position du
son
— Fonction de meilleure position du son
(MBP)
Lorsque vous roulez sans passager, la fonction
“Meilleure pos i tion du son” vous permet de
profiter du meilleur environnement sonore
possible.
Il existe deux prérég l ages pour la fonction
“Meilleure position du son”, qui perm ettent
d’optimiser l’env ironnement d’écoute pour les
sièges avant. La touche MBP vous permet de
sélectionner facilement l’un de ces modes.
MBP-A : réglage idéal pour la perso nne assise
dans le siège avant gauche.
MBP-B : réglag e id éal pour la personne as sise
dans le siège avant droit.
Appuyez plusieurs fois sur (MBP)
pour sélectionner la position d’écoute
souhaitée.
Une fois le réglage du mode terminé, la fenêtre
d’affichage revient au mode de le ct ure normal.
Remarque
Le paramètre affiché diffère selon la source.
Pour annuler le param ètre, appuyez de nouveau
simultanément sur la touche (SEL) et sur la
touche numérique de présélection
correspondante.
12
Après 1 seconde, l ’a ffichage revien t en m ode
de lecture normal.
Pour annuler la fonction MBP, sélectionnez
“MBP-OFF”.
Si vous souhaitez régle r les caractéristiques du
son plus précisément, appuyez sur la touche
(SEL) (voir “Réglage des caractéristiques du
son” à la page 11).
Remarques
• Lorsque vous réglez une caractéristique du son à
l’aide de la touche (SEL) (page 11), le réglage MBP
revient en position OFF.
• Lorsque la fonction MBP est réglée sur OFF, le
réglage du son q ue vous avez eff ect ué ( pag e 11) est
réactivé.
Page 33

Accentuation des graves
— Fonction D-bass
La fonction D-bass vous offre un son de graves
clair et puissant. Il amplifie les basses et les
hautes fréquences du signal selon un e courbe
plus accentuée que les systèmes d’amplification
des graves classiques.
Les sons de basse s ont plus clairs, alors que le
volume des voix demeure au même niveau. La
touche D-BASS permet d’accentuer et de régle r
facilement les graves.
D.BASS-3
D.BASS-2
Niveau
0dB
D.BASS-1
Fréquence (Hz)
D.BASS-3
D.BASS-2
D.BASS-1
Lecteur CD/MD (en
option)
Cet appareil permet de commander des lecteurs
CD/MD externes (en option).
Si vous raccordez un le ct eur CD en option
disposant de la fonction CD TEXT, les
informations CD TEXT apparaissent dans la
fenêtre d’affichage lors que vous écoutez un
disque CD TEXT.
Si vous raccordez des lecteurs CD compatibles
MP3 (p. ex. un changeur CD MP3), vous pouvez
lire des fichiers MP3, des fichiers audio
comprimés offrant une grande qualit é sonore.
Voir “Lecteur CD compatible MP3 (en option)” à
la page 15.
Lecture d’un CD ou d’un MD
Réglage de la courbe des graves
Appuyez plusieurs fois sur (D-BASS)
pour sélectionner la courbe des
graves souhaitée.
Plus le numéro de la fonction D-BASS
augmente, plus l’effet est prononcé.
D.BASS-1 t D.BASS -2 t D.BASS-3 t
D.BASS-OFF
Remarque
Le son des graves peut être déformé si le volume
reste le même. Si une telle distorsion se produit,
sélectionnez une courbe des graves moins
prononcée.
1 Appuyez plusieurs fois sur la touche
(SOURCE) pour sélectionner “CD” ou
“MD (MS*)”.
2 Appuyez plusieurs fois sur (MODE)
jusqu’à ce que l’appareil souhaité
apparaisse.
La lecture de CD/MD démarre.
* MS : lecteur MG Memory Stick System-up MGS-X1
Précautions à prendre lors du raccordement
d’appareils MGS-X1 ou MD
Cet appareil reconnaît les appa reil s MGS- X 1 comm e
étant des appareils MD.
• Lorsque vous souhaitez lire des disques sur un
lecteur MGS-X1, appuyez sur (SOURCE) pour
sélectionner “MS” ou “MD”. Si “MS” s’affiche comme
source, le MGS-X1 entame la lecture. Si “MD”
s’affiche comme source, appuyez sur (MODE) pour
sélectionner “MS” et lancer la lecture.
• Lorsque vous souhaitez lire des disques sur un
lecteur MD, appuyez sur (SOURCE) pour
sélectionner “MS” ou “MD”. Si l’appareil MD
souhaité s’affiche comme source, la lecture
commence. Si “MS” ou un autre appareil MD
s’affiche comme source, appuyez sur (MODE) pour
sélectionner l’appareil MD souhaité et lancer la
lecture.
13
Page 34

Rubriques d’affichage
Lorsque le disque ou la plage chan ge, tout titre
préenregistré*
nouvelle pla g e es t auto mat iqu eme nt affiché (si la
fonction de défilement automati que, Auto Scroll,
est réglée à “ON”, le s noms de plus de
8 caractères défilent dans la fenêtre d’affichage).
Rubriques affichables
• Source de musique
•Fonction
Rubriques affichables
• Horloge
• Durée de lecture écoulée
• Nom du disque*1/Nom de
• Titre de la plage*
1
du nouveau disque ou de la
Numéro de disque
l’artiste
2
*
2
Conseil
Lorsque le défilement automatique est désactivé et
que le nom du disque ou de la plage est modifié, ce
dernier ne défile pas.
Recherche d’une plage spécifique
— Accès automatique aux titres (AMS)
Pendant la lecture, appuyez
brièvement sur l’un des côtés de
(SEEK/AMS) pour chaque plage que
vous souhaitez sauter.
Pour rechercher parmi les plages
suivantes
SEEK
AMS
Pour rechercher parmi les plages
précédentes
Recherche d’un point spécifique dans
une plage
— Recherche manuelle
Pendant la lecture, maintenez enfoncé
l’un des côtés de la touche
(SEEK/AMS). Relâchez-la lorsque vous
avez trouvé le point souhaité.
Pour Appuyez sur
passer d’une
(DSPL)
rubrique
d’affichage à
l’autre
Activation du défilement automatique
(réglage de A.SCRL à ON)
Pendant la lecture, appuyez
simult anément sur (SEL) et (3).
Après 2 secondes, l’affichage revient en mode
de lecture normal .
Pour désactiver le défilement automatique
(réglage de A.SCRL à OFF), appuyez de
nouveau simul tanément sur (SEL) et (3).
*1 L’indication “NO NAME” indique qu’il n’y a pas de
nom préenregistré à afficher.
*2 Uniquement pour les disques CD TEXT contenant
le nom de l’artiste.
Remarques
• Certains caractères ne peuvent pas être affiché s.
Les caractères et signes qui ne peuvent être
affichés sont représentés par le symbole “ *”.
• Pour certains disques CD TEXT contenant
beaucoup de caractères, le défilement automatique
peut être inopérant.
• Cet appareil ne peut pas afficher le nom de l’artiste
de chaque plage d’un disque CD TEXT.
14
Pour rechercher vers l’avant
SEEK
AMS
Pour rechercher vers l’arrière
Passer à un autre disque
Pendant la lecture, appuyez sur l a
touche (1) (DISC –) ou (2) (DISC +).
La lecture du disque souhaité dans l’appareil
sélectionné com m ence.
(1) (DISC –) : pour les disques
précédents
(2) (DISC +) : pour les disques
suivants
Numéro de disque
Numéro de plage
Page 35

Lecture répétée de plages
— Lecture répé tée
Vous po uvez sélectionner :
• REP-TRACK — pour la lect ur e en boucle
d’une plage.
• REP-DISC* — pour la lecture en bo ucle d’un
disque.
* Disponible uniquement lorsqu’un ou plusieurs
lecteurs CD (MD) en option sont raccordés.
En cours de lecture, app uyez
plusieu rs f ois sur (3) (REP) j usqu’ à ce
que le réglage souhaité apparaisse
dans la fenêtre d’af f ichage.
La lecture répétée commence.
Pour rev enir au mode de lect ure normale,
sélectionnez “REP-OFF”.
Lecture des plages au hasard
— Lecture aléato ir e
Vous po uvez sélectionner :
•SHUF-DISC*
disque en cours de lecture dans un ordre
aléatoire.
• SHUF-CHGR*
lecteur CD (MD) en option utilisé dans un
ordre aléatoire.
•SHUF-ALL*
de tous les appar eils CD (MD) raccordé s dans
un ordre aléatoire.
*1 Disponible uniquement lorsqu’un ou plusieurs
lecteurs CD (MD) en option sont raccordés.
*2 Disponible uniquement lorsque deux ou plusieurs
lecteurs CD (MD) en option sont raccordés.
En cours de lecture, app uyez
plusieurs fois sur (4) (SHUF) jusqu’à
ce que le réglage souhaité apparaisse
dans la fenêtre d’af f ichage.
La lecture aléatoi re commence.
Pour rev enir au mode de lect ure normale,
sélectionnez “SHUF-OFF”.
Remarque
La fonction “SHUF-ALL” ne passera pas de façon
aléatoire des plages de lecteurs CD aux plages de
lecteurs MD.
1
— pour écouter les plages du
1
— pour écouter les plages du
2
— pour écou ter to ut es le s pl ag es
Lecteur CD compatible
MP3 (en option)
Cet appareil permet de commander les lecteurs
CD compatibles MP3 externes. Si vo us raccordez
un lecteur CD MP 3 en option, vous pouvez lire
un disque contenant des fichiers MP3.
Écoute d’un fichier MP3
1 Appuyez plusieurs fois sur la touche
(SOURCE) pour sélectionner “CD”.
2 Appuyez plusieurs fois sur (MODE)
jusqu’à ce que l’indication appropriée
pour le lecteur CD compa tible MP3
(“CD1”, “CD2”, etc.) s’affiche.
La lecture commence.
Pour Appuyez sur
interrompre la
lecture
passer d’un disq ue
à l’autre
– Sélection d’un
disque
sauter des albums
– Sélection d’un
album
sauter des plages
– Accès
automatique
aux titres
avancer
rapidement ou
rembobiner
– Recherche
manuelle
(OFF)
(1) (–)
(2) (+)
(5) (–)
(6) (+)
(SEEK/AMS) (./>)
[une fois pour chaque plage]
(SEEK/AMS) (m/M)
[maintenir la touc he
enfoncée jusq u’ à l ’endroit
souhaité]
suite à la page suivante t
15
Page 36

Lorsque la lectu re du de rnier fic hier du
disque est terminée
L ’ind ication du numér o de fichie r re vient à “1” et
la lecture reprend à partir du premier fichier du
disque.
Remarques
• Si un disque sans fichiers (plages) MP3 est inséré,
l’indication “CD” apparaît dans l’affichage en tant
que type de disque et la lecture commence, mais
aucun son ne se fait entendre.
• Avant de lancer la lecture d’une plage, ce lecteur lit
toutes les informations concernant les plages et les
albums du disque. Selon la structure des plages, ce
processus peut prendre plus d’une minute avant que
la lecture ne commence. Pendant ce temps,
l’indication “READ” est affichée. Attendez que le
processus soit terminé et que la lecture commence
automatiquement.
Rubriques d’affichage
Rubriques affichables
• Source de musique
• Fonction
Numéro de l’album*1 (du disque)
Rubriques affichables
• Horloge
• Durée de lecture écoulée
• Nom du disque
•Nom de l’album*
• Titre de la plage*
•Étiquette ID3*
Pour Appuyez sur
passer d’une
rubrique
d’affichage à
l’autre
2
*
2
2
(DSPL)
2
16
Activation du défilement automatique
(réglage de A.SCRL à ON)
Pendant la lecture, appuyez
simultanément sur (SEL) et sur (3).
En deux secondes, l’affichage normal
apparaît automatiquement.
Pour désactiver le défilement auto matique
(réglage de A.SCRL à OFF) , a ppuyez de
nouveau simultan ém ent sur (SEL) et sur (3).
*1 Lorsqu’une étiquette ID3 est affichée, le numéro de
l’album ne s’affiche pas.
*2 Lorsque vous appuyez sur la touche (DSPL),
l’indication “NO NAME” signifie qu’il n’y a pas de
nom de disque, d’album ni de plage et l’indication
“NO ID3” signifie qu’il n’y a pas d’étiquette ID3.
Remarques
• Certains caractères ne peuvent pas être affichés.
Les caractères et signes qui ne peuvent être
affichés sont représentés par le symbole “ *”.
• Pour certaines étiquettes ID3 contenant beaucoup
de caractères, le défilement automatique peut ne
pas fonctionner.
• Cet appareil ne peut pas afficher le nom de l’artiste
pour chaque plage d’un album.
Conseil
Lorsque le défilement automatique est désactivé et
que le nom de l’album ou de la plage est modifié, ce
dernier ne défile pas.
Page 37

Recherche d’une plage spécifique
— Accès automatique aux titres (AMS)
Pendant la lecture, appuyez
brièvement sur l’un des côtés de
(SEEK/AMS) pour chaque plage que
vous souhaitez sauter.
Pour rechercher parmi les plages
suivantes
SEEK
AMS
Pour rechercher parmi les plages
précédentes
Recherche d’un point spécifique dans
une plage
— Recherche manu elle
Pendant la lecture, maintenez enfoncé
l’un des côtés de la touche
(SEEK/AMS). Relâchez-la lorsque vous
avez trouvé le point souhaité.
Lecture répétée de plages
— Lecture répétée
Vous pouvez sélectionner :
• REP-TRACK — pour lire u ne plage en boucle.
• REP-ALBM*
• REP-DISC*
*1 Disponible uniquement lorsqu’un lecteur CD
compatible MP3 en option est raccordé.
*2 Disponible uniquement lorsqu’un ou plusieurs
lecteurs CD/MD en option sont raccordés.
En cours de lecture, appuyez
plusieurs fois sur (3) (REP) jusqu’à ce
que le réglage souhaité apparaisse
dans la fenêtre d’affichage.
La lecture répétée commence.
Pour revenir au mode de lecture normale,
sélectionnez “ REP-OFF”.
1
— pour lire un album en boucle.
2
— pour lire un disq ue en boucle.
Pour rechercher vers l’avant
SEEK
AMS
Pour rechercher vers l’arrière
Passage à un autre disque
Pendant la lecture, appuyez sur la
touche (1) (DISC –) ou (2) (DISC +).
La lecture du disque souhaité dans l’ appareil
sélectionné commence.
(1) (DISC –) : pour les disques
précédents
(2) (DISC +) : pour les disques
suivants
Passage à un autre album.
Pendant la lecture, appuyez sur la
touche (5) (ALBM –) ou (6) (AL B M +).
La lecture de l’album souhaité dans l’appareil
sélectionné commence.
(5) (ALBM –) : pour les albums
précédents
(6)
(ALBM +) : pour les albums
suivants
Numéro de l’album (du disque)
Numéro de plage
Lecture des plages au hasard
— Lecture aléatoire
Vous pouvez sélectionner :
• SHUF-ALBM*
lecteur CD MP3 en opt io n ut il is é dan s un or dr e
aléatoire.
• SHUF-DISC*
disque en cours de le cture dans un ordre
aléatoire.
• SHUF-CHGR*
lecteur CD (MD) en option utilisé dans un
ordre aléatoire.
• SHUF-ALL*
plages de tous les appareils CD (MD) raccordés
(y compris cet appareil) dans un ordre aléatoire.
*1 Disponible uniquement lorsqu’un lecteur CD
compatible MP3 en option est raccordé.
*2 Disponible uniquement lorsqu’un ou plusieurs
lecteurs CD (MD) en option sont raccordés.
*3 Disponible uniquement lorsque deux ou plusieurs
lecteurs CD en option ou deux ou plusieurs
lecteurs MD en option sont raccordés.
En cours de lecture, appuyez
plusieurs fois sur (4) (SHUF) jusqu’à
ce que le réglage souhaité apparaisse
dans la fenêtre d’affichage.
La lecture aléatoire commence.
Pour revenir au mode de lecture normale,
sélectionnez “SHUF-OFF”.
Remarque
La fonction “SHUF-ALL” ne passera pas de façon
aléatoire des plages de lecteurs CD aux plages de
lecteurs MD.
1
— pour écouter les albums du
2
— pour écouter les plages du
2
— pour écouter les plages du
3
— pour écouter toutes les
17
Page 38

Informations
complémentaires
Remarques
• Pour plus de sécur ité, étei gne z le moteur avant de
nettoyer les connecteurs et retirez la clé du contact.
• Ne touchez jamais les connecteurs directement
avec les doigts ou avec un outil métallique.
Entretien
Remplacement du fusible
Lors du remplacement du fusible, veillez à
utiliser un fusible de capacité égale à celle du
fusible d’origine. Si le fusible fond , vérifiez le
branchement de l’alimentation et remplacez le
fusible. Un fusible qui fond à nouveau après le
remplacement peut être le signe d’un problème
de fonctionnement interne. Dans ce cas,
contactez votre détaillant Sony.
Fusible (10 A)
Avertissement
N’utilisez jamais de fusible dont la capacité
dépasse celle du fusible fourni avec l’appareil,
car vous risqueriez d’endommager l’appareil.
Nettoyage des connecteurs
L’appareil peut ne pa s f o nctionner correct ement
si les connecteurs entre la façade et l’ appareil ne
sont pas propres. Pour éviter tout problème de ce
genre, retirez la façade (page 7) et nettoyez les
connecteurs à l’aide d’un coton-tige h um ecté
d’alcool. N’appu yez pas trop fort sur les
connecteurs, c ar vous ri squeriez de les
endommager.
Démontage de l’appareil
1 Retrait du panneau avant.
1Retire z l a façade (page 7 ).
2Appuyez sur l’attache située dans le
panneau avant avec un tournevis
fin.
3Répétez l’étape 2 de l’autre côté.
2 Retrait de l’appareil
1Utilisez un tournevis fin pour
enfoncer l’attache du côté gauche
de l’app a reil, puis tirez le c ô té
gauche de l’appareil vers l’extérieur
jusqu’à son dégagement complet.
4 mm
2Répétez l’étape 1 du côté droit.
3Faites glisser l’appareil en dehors
de son support.
18
Appareil principal
Arrière de la façade
Page 39

Caractéristiques techniques
Lecteur de cassette
Piste de cassette 4 pistes, 2 canaux stéréo
Pleurage et scintillement 0,08 % (W eff.)
Réponse en fréquence 30 à 18.000 Hz
Rapport signal/bruit
Type de cassette
Types II et IV 61 dB
Type I 58 dB
Radio
FM
Plage de syntonisation 87,5 à 107,9 MHz
Borne d’antenne Connecteur d’antenne
Fréquence intermédiair e 10,7 MHz
Sensibilité utile 11 dBf
Sélectivité 75 dB à 400 kHz
Rapport signal/bruit 65 dB (stéréo)
Distorsion harmonique à 1 kHz
Séparation 33 dB à 1 kHz
Réponse en fréquence 30 à 15.000 Hz
externe
68 dB (mono)
0,7 % (stéréo)
0,5 % (mono)
AM
Plage de syntonisation 530 à 1,710 kHz
Borne d’antenne Connecteur d’antenne
Fréquence intermédiaire 10,7 MHz/450 kHz
Sensibilité 30 µV
externe
Amplificateur de puissance
Sorties Sortie des haut-parle ur s
Impédance des haut-parleurs
Émission maximale de courant
(connecteurs de sécurité)
4 à 8 ohms
50 W × 4 (à 4 ohms)
Généralités
Sorties Sorties audio (1)
Entrées Borne d’entrée de
Commandes de tonalité Graves ± 10 dB à 20 Hz
Alimentation requise Batterie de voiture 12 V CC
Dimensions Env. 178 × 50 × 178 mm
Dimensions du support Env. 182 × 53 × 161 mm
Poids Env. 1,2 kg (2 liv 10 on)
Accessoires fournis Pièces d’installation et de
Accessoires en option Câble BUS (fourni avec un
Appareils en option Changeur CD (10 disques)
Remarque
Cet appareil ne doit pas être branché sur un
préamplificateur numérique ou un égaliseur.
La conception et les caractéristiques techniques sont
sujettes à modification sans préavis.
Borne de commande de
relais d’antenne électriq ue
Borne de commande
d’amplificateur de
puissance
commande BUS
Borne d’entrée audio BUS
Borne d’entrée de l’antenne
Aiguës ± 10 dB à 20 kHz
(masse négative)
1
(7
/8 × 2 × 71/8 po)
(l/h/p)
1
(7
/4 × 21/8 × 63/8 po)
(l/h/p)
raccordement (1 jeu)
Étui pour la façade (1)
câble avec con n ecteurs à
broche RCA)
RC-61 (1 m), RC-62 (2m)
CDX-757MX, CDX-656
Changeur CD (6 disques)
CDX-T70MX, CDX-T69
Changeur MD (6 disques)
MDX-66XLP
Lecteur MG Memory Stick
System-up
MGS-X1
Sélecteur de source
XA-C30
19
Page 40

Dépannage
La liste de contrôle suivante vous aidera à
remédier aux problèmes que vous pourriez
rencontrer avec cet ap pareil.
Avant de passer en revue la li st e de contrôle cidessous, vérifiez les procédures de raccordement
et d’utilisation.
Généralités
Aucun son.
• Réglez le volume à l’aide de la touche (+).
• Désactivez la fonction ATT.
• Pour un système à 2 haut-parleu rs , r églez la
commande d’équilibre avant-arrière sur la
position médiane.
Le contenu de la mémoire a été effacé.
• La touche de réinitialisation (RESET) a été
enfoncée.
t Recommencez la procédure
d’enregistrement da ns la mémoire.
• Le cordon d’alimentation ou la batterie a été
déconnecté.
• Le cordon d’alimentation n’est pas raccordé
correctement.
Aucun bip ne se fait e ntendre.
Le bip est désact ivé (pag e 12).
Les indications disparaissent ou aucune
indication n’apparaît dans la fenêtre
d’affichage.
• L’affichage de l’horloge di s paraît si vous
appuyez sur (OFF) pendant deux seconde s.
t Ap puyez sur la touche (OFF) pendant
2 secondes pour afficher l’horloge.
• Retirez la façade et n etto yez le s co nnecteur s.
Reportez-vous à la section “Nettoyage des
connecteurs” (page 18) pour plus de d ét ails.
Les stations mémorisées et l’heure correcte
sont effacées.
Le fusible est fondu.
Émission de bruits lorsque la clé de contact
est en position ON, ACC ou OFF.
Les fils ne sont pas raccordés correctement au
connecteur d’alimentation de la voit ure destiné
aux accessoires.
L’appareil n’est pas alimenté.
• Vérifiez les raccordements. Si tout est en
ordre, vérifiez le fusible .
• La voiture n’est pas équ i pée d’une position
ACC.
t Appuyez sur (SOURCE) (ou insérez une
cassette) pour activer l’appareil.
L’appareil est alimenté en continu.
La voiture n’est pas équipé e d’une positio n
ACC.
L’antenne électrique ne se déploie pas.
L’antenne électri que ne dispose pas de rel ai s .
20
Lecture d’une cassette
Une distorsion du son se produit.
La tête de lecture est souillée.
t Nettoyez la tête de lect ur e avec une
cassette de nettoyage à sec disponible dans
le commerce.
La fonction d’accès automatique aux titres
(AMS) ne fonctionne pa s c or r e c tement.
• Il y a des parasites dans les zones vides entre
les plages.
• Une des zones vides est trop courte (moins
de 4 secondes).
• L’enregistrement présente une longue pause
ou un passage comportant des basses
fréquences ou u n très faible niveau de
volume et ces passages sont traités c o m m e
étant des zones vi de s.
Réception radio
Impossible de syntoniser une présélection.
• Enregistrez la fréquence correc te dans la
mémoire.
• Le signal capté est trop faible.
Impossible de recevoir les stations.
Le son comporte des parasites.
• Raccordez un fil de commande d’antenne
électrique (bleu) ou un fil d’alimentation
d’accessoire (rouge) au câble d’alimentation
de l’amplificateur d’ antenne de la voiture
(uniquement lorsque votre véhicule es t d ot é
d’une antenne FM/AM intégrée dans la
fenêtre arrière/latérale).
• Vérifiez le raccordement de l’antenne de la
voiture.
• L’antenne automatique ne se lève pas.
t V érifiez le raccordemen t du fil de
commande de l’antenne électrique.
• Vérifiez la fréquence.
La syntonisation automatique est
impossible.
• Le mode de recherche locale est réglé sur
“ON”.
t R églez le mode de recherche locale sur
“OFF” (page 11).
• Le signal capté est trop faible.
t U t ilisez la syntonisati on m anuelle.
L’indication “ST” clignote.
• Syntonisez la fr équence plus précisément.
• Le signal capté est trop faible.
t Activez le mode de réception mono
(page 11).
Une émission en stéréo est entendue e n
mono.
L’appareil est en mode de réception mono.
t Désactivez le mode de réception mono
(page 11).
Page 41

Lecture de CD ou de MD
Le son saute.
Le disque est encrassé ou défectueux.
Affichage des erreurs
(Lorsqu’un lecteur CD/MD en option est
raccordé)
Affichage des erreurs
Les indications suivantes clignotent pendant
environ 5 secondes et une al arme retentit.
NO MAG
Le chargeur n’a pas é té inséré dans le lecteur
CD/MD.
t Insérez le chargeur dans le lecteur CD/MD.
NO DISC
Aucun disque n’a été inséré dans le lecte ur
CD/MD.
t
Insérez des disques dans le lecteur CD/MD.
NO MUSIC
Un CD non enregistré au format audio a ét é
inséré dans un lecteur CD compatible MP3.
t Insérez un disque audio dans le lecteur CD
MP3.
ERROR*
BLANK*
RESET
NOT READY
HI TEMP
*1 Lorsqu’une erreur se produit lors de la lecture d’un
*2 Le numéro du disque qui a provoqué l’erreur
Si ces solutions ne permettent pas d’améliorer la
situation, consultez votre détaillant Sony le plus
proche.
1
• Un CD est sale ou inséré à l’ envers .*
2
t Nettoyez-le ou insérez-le correctement.
• La lecture d’un MD ne se fait pas en raison
de certains prob l èmes.*
2
t Re tirez-le et insérez un autre disque.
• Un CD/MD ne peut pas être lu en raison de
certains prob lèmes.
t Re tirez-le et insérez un autre disque.
1
Aucune plage n’a été enregistrée sur un MD.*
t Effect ue z la lecture d’un MD comportant
des plages enregist rées.
Le lecteur CD/MD ne peut pas fonctionn er en
raison de certains pr obl èmes.
t Appuyez sur la touche RESET de
l’appareil.
Le couvercle du lecteur MD est ouvert ou les
MD ne sont pas in sérés correctem ent.
t Fermez le couvercle ou insérez
correctemen t l es MD.
La température ambiant e est sup érieure à 50°C
(122°F).
t A t te ndez que la températ ure descende en
dessous de 50°C (122°F).
CD ou d’un MD, le numéro de disque du CD ou du
MD ne s’affiche pas.
apparaît dans l’affichage.
2
21
Page 42

Page 43

Page 44

Sony Corporation Printed in Thailand
 Loading...