

Sony XR-CA370X, XR-CA370 User Manual
3-246-852-42 (1)
FM/MW/LW
Cassette Car Stereo
Operating Instructions
Bedienungsanleitung
Mode d’emploi
Istruzioni per l’uso
Gebruiksaanwijzing
Wichtig!
Bitte nehmen Sie sich etwas Zeit, um den Geräte-Pass
vollständig auszufüllen. Dieser befindet sich auf der
hinteren Umschlagseite dieser Bedienungsanleitung.
Si dichiara che l’apparecchio è stato fabbricato in conformità all’art. 2, Comma 1 del
D.M. 28.08.1995 n. 548.
For installation and connections, see the supplied installation/connections
manual.
Zur Installation und zum Anschluss siehe die mitgelieferte Installations-/
Anschlussanleitung.
En ce qui concerne l’installation et les connexions, consulter le manuel
d’installation/connexions fourni.
Per l’installazione e i collegamenti, fare riferimento al manuale di istruzioni di
installazione/collegamenti in dotazione.
Zie voor het monteren en aansluiten van het apparaat de bijgeleverde handleiding
“Installatie en aansluitingen”.
GB
DE
FR
IT
NL
XR-CA370X
XR-CA370
2003 Sony Corporation

Welcome !
Precautions
Thank you for purchasing this Sony Cassette
Player.
In addition to the cassette playback and radio
operations, you can expand your system by
connecting an optional CD/MD unit*1.
When you operate this unit or a connected
optional CD unit with the CD TEXT function,
the CD TEXT information will appear in the
display when you play a CD TEXT disc*2.
*1You can connect a CD changer, an MD changer,
a CD player, or an MD player.
2
A CD TEXT disc is an audio CD that includes
*
information such as the disc name, artist name,
and track names.
This information is recorded on the disc.
• If your car was parked in direct sunlight
resulting in a considerable rise in
temperature inside the car, allow the unit to
cool off before operating it.
• If no power is being supplied to the unit,
check the connections first. If everything is in
order, check the fuse.
• If no sound comes from the speakers of a
2-speaker system, set the fader control to the
centre position.
• When a tape is played back for a long period,
the cassette may become warm because of
the built-in power amplifier. However, this is
not a sign of malfunction.
If you have any questions or problems
concerning your unit that are not covered in
this manual, please consult your nearest Sony
dealer.
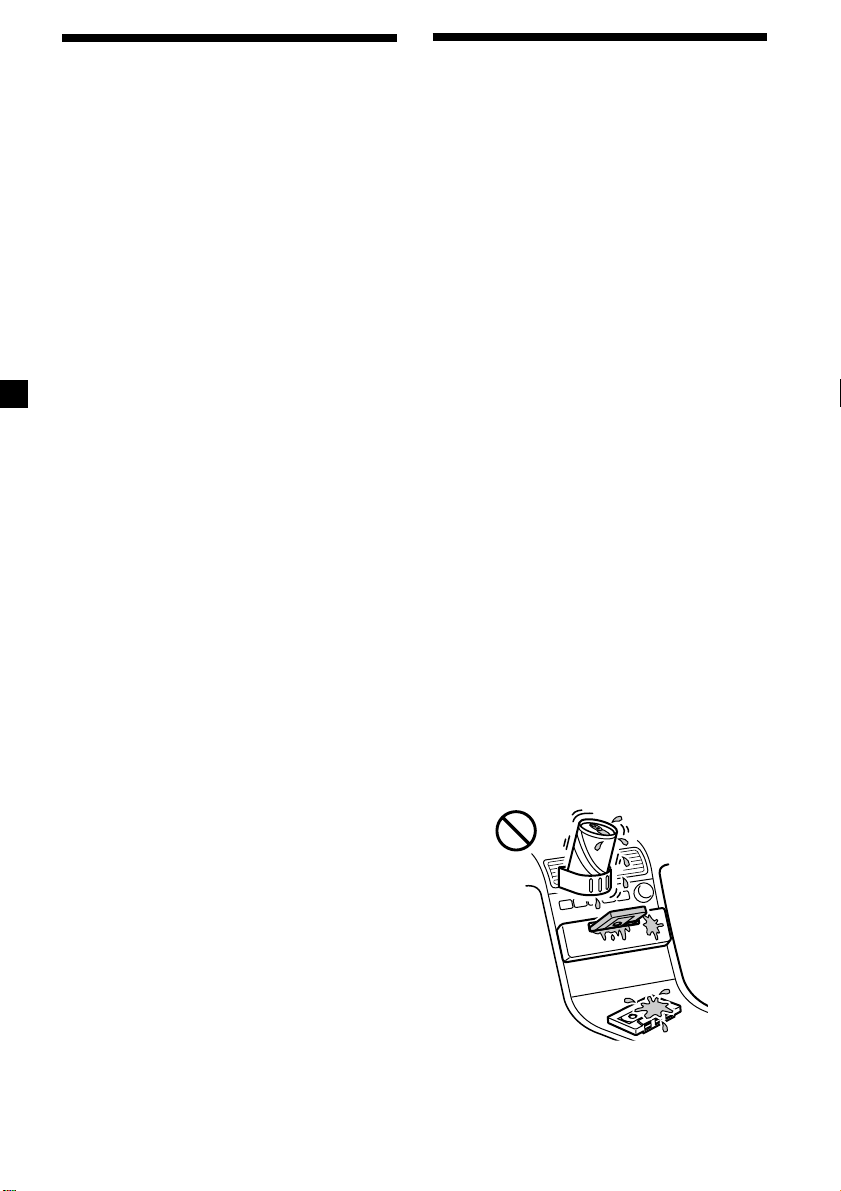
To maintain high quality sound
If you have drink holders near your audio
equipment, be careful not to splash juice or
other soft drinks onto the car audio. Sugary
residues on this unit or cassette tapes may
contaminate the playback heads, reduce the
sound quality, or prevent sound reproduction
altogether.
Cassette cleaning kits cannot remove sugar
from the tape heads.
22
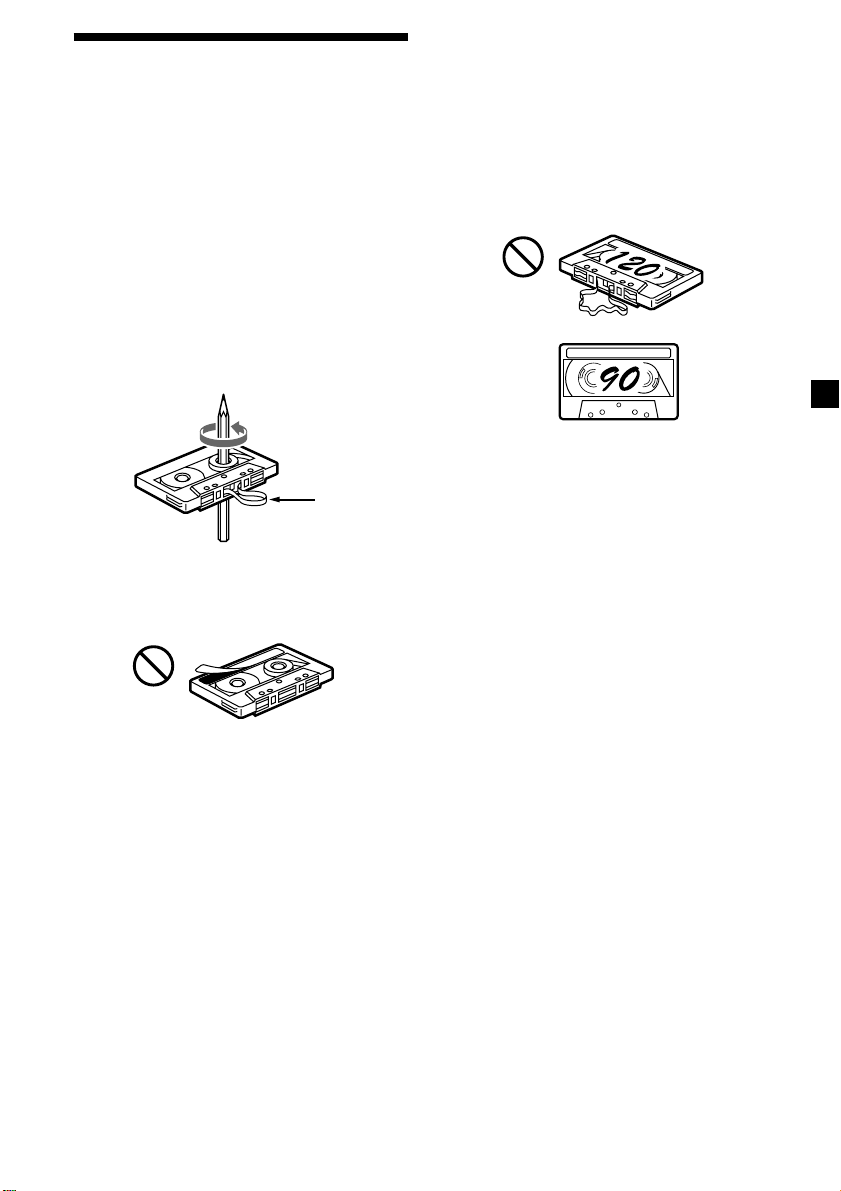
Notes on Cassettes
Cassette care
• Do not touch the tape surface of a cassette, as
any dirt or dust will contaminate the heads.
• Keep cassettes away from equipment with
built-in magnets such as speakers and
amplifiers, as erasure or distortion on the
recorded tape could occur.
• Do not expose cassettes to direct sunlight,
extremely cold temperatures, or moisture.
• Slack in the tape may cause the tape to be
caught in the machine. Before you insert the
tape, use a pencil or similar object to turn the
reel and take up any slack.
Slack
• Distorted cassettes and loose labels can cause
problems when inserting or ejecting tapes.
Remove or replace loose labels.
Cassettes longer than 90 minutes
The use of cassettes longer than 90 minutes is
not recommended except for long continuous
play. The tape used for these cassettes is very
thin and tends to stretch easily. Frequent
playing and stopping of these tapes may cause
them to become entangled in the cassette deck
mechanism.
• The sound may become distorted while
playing the cassette. The cassette player head
should be cleaned after each 50 hours of use.
33

Table of Contents
Location of controls ................................................. 5
Getting Started
Resetting the unit ................................................ 6
Detaching the front panel .................................. 6
Setting the clock .................................................. 7
Cassette Player
Listening to a tape ............................................... 7
Radio reception during fast-forwarding or
rewinding of a tape
— Automatic Tuner Activation (ATA) ........ 8
Radio
Storing stations automatically
— Best Tuning Memory (BTM) .................... 8
Storing only the desired stations ...................... 9
Receiving the stored stations ............................. 9
RDS
Overview of the RDS function ........................ 10
Displaying the station name ............................ 10
Retuning the same programme automatically
— Alternative Frequencies (AF) ................ 10
Listening to traffic announcements ................ 12
Presetting the RDS stations with the AF and
TA data ......................................................... 13
Locating a station by programme type .......... 13
Setting the clock automatically ....................... 14
With Optional EquipmentThis Unit Only
CD/MD Unit
Playing a CD or MD ......................................... 17
Playing tracks repeatedly
— Repeat Play .............................................. 18
Playing tracks in random order
— Shuffle Play .............................................. 18
Other Functions
Adjusting the balance and fader ..................... 15
Attenuating the sound ..................................... 15
Changing the sound and display settings ..... 15
Setting the equalizer
— EQ3............................................................ 16
44
Additional Information
Maintenance ....................................................... 19
Removing the unit ............................................ 20
Specifications ..................................................... 21
Troubleshooting guide ..................................... 22

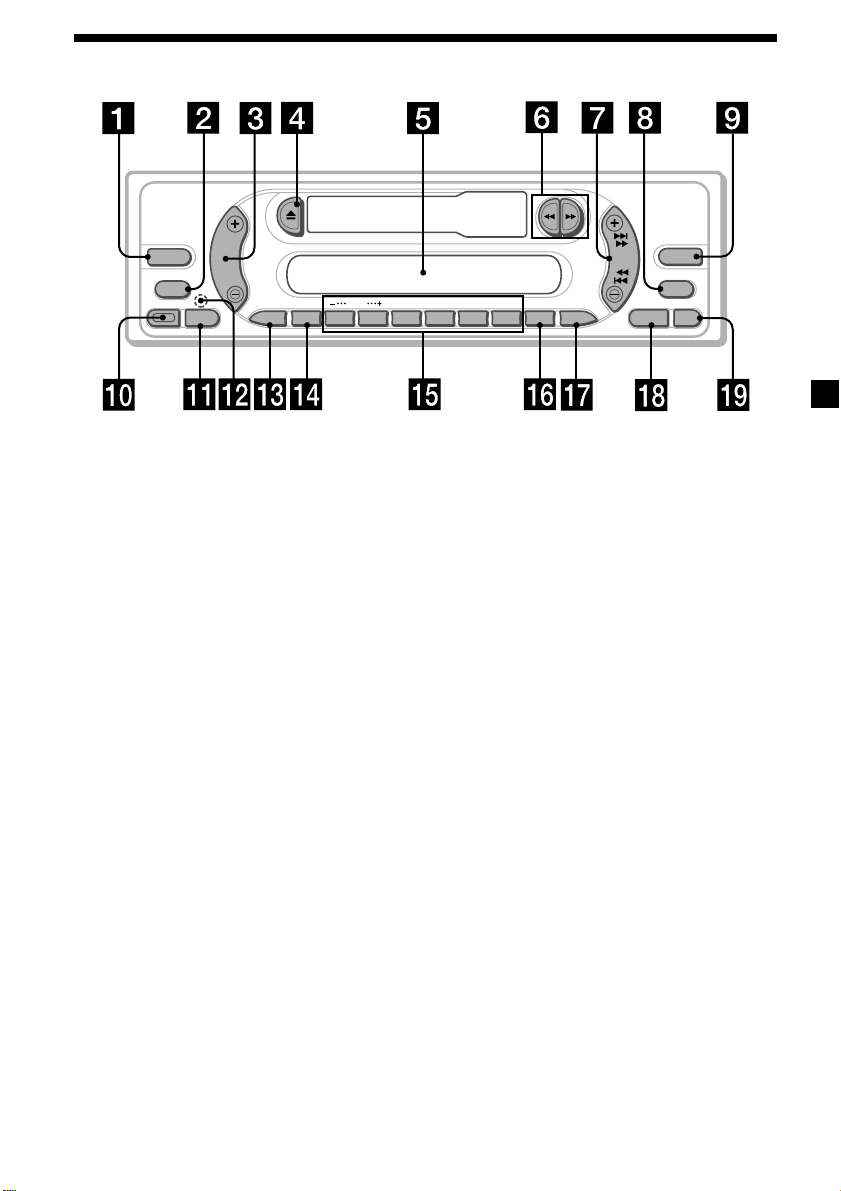
Location of controls
SOURCE
MODE
RELEASE
SEL
AF ATT
DISC
123456
Refer to the pages listed for details.
1 SOURCE (Radio/CD/MD) button
8, 9, 16, 17
2 MODE button
During radio reception:
Band select 8, 9
During CD/MD playback:
CD/MD unit select 17
3 Volume +/– button 7, 12, 15, 16
4 Z (eject) button 7, 8, 9, 17
5 Display window
6 m/M (fast winding)/DIR (tape
transport direction change) buttons 7, 8
7 SEEK button
Seek 9, 11, 14
Automatic Music Sensor 18
Manual search 18
8 DSPL (display mode change) button
7, 10, 17
9 EQ3 button 16
q; RELEASE (front panel release) button
6, 19
qa SEL (select) button 7, 14, 15, 16, 17
qs RESET button (located on the front side
of the unit behind the front panel) 6
DIR
SEEK
SHUF
REP
XR-CA370X/CA370
ATA
TAPTY
qd AF button 10, 11, 13
qf ATT (attenuate) button 15
qg Number buttons 14, 15, 17
During radio reception:
Preset number select 9, 11, 13
During CD/MD playback:
(1) DISC – 18
(2) DISC + 18
(3) REP 18
(4) SHUF 18
qh PTY (programme type)/ATA button
8, 14
qj TA button 12, 13
qk SENS/BTM button 8, 9, 13
ql OFF button* 6
* Warning when installing in a car
without ACC (accessory) position on
the ignition key switch
Be sure to press (OFF) on the unit for 2
seconds to turn off the clock display after
turning off the engine.
When you press (OFF) momentarily, the
clock display does not turn off and this
causes battery wear.
BTM
EQ3
DSPL
OFFSENS
55
Getting Started
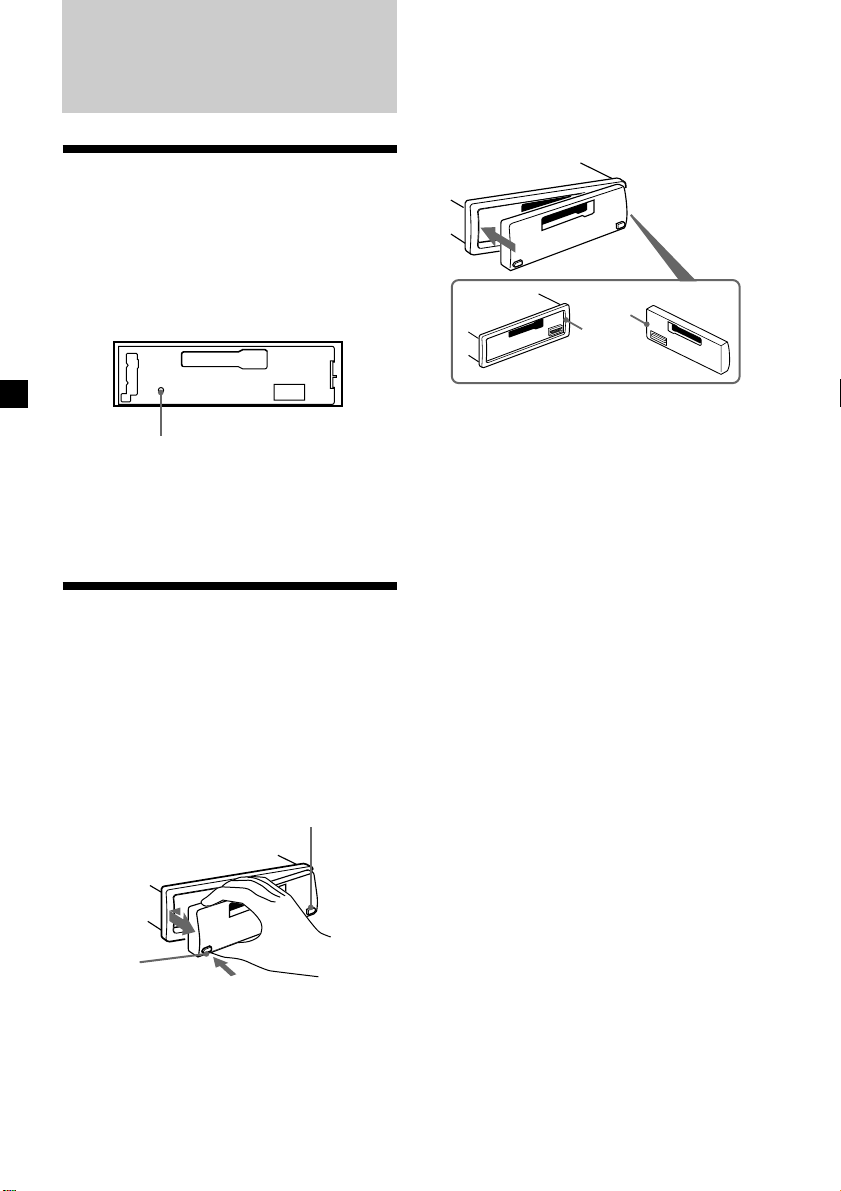
Resetting the unit
Before operating the unit for the first time, or
after replacing the car battery or changing the
connections, you must reset the unit.
Remove the front panel and press the RESET
button with a pointed object, such as a
ballpoint pen.
RESET button
Note
Pressing the RESET button will erase the clock
setting and some memorized functions.
Detaching the front panel
You can detach the front panel of this unit to
protect the unit from being stolen.
1 Press (OFF).
2 Press (RELEASE), then slide the front
panel a little to the left, and pull it off
towards you.
(OFF)
Attaching the front panel
Attach part A of the front panel to part B of
the unit as illustrated and push the left side
into position until it clicks.
A
B
Notes
• Be sure not to attach the front panel upside
down.
• Do not press the front panel too hard against the
unit when attaching it.
• Do not press too hard or put excessive pressure
on the display window of the front panel.
• Do not expose the front panel to direct sunlight
or heat sources such as hot air ducts, and do not
leave it in a humid place. Never leave it on the
dashboard of a car parked in direct sunlight or
where there may be a considerable rise in
temperature.
Caution alarm
If you turn the car ignition off without
removing the front panel, the caution alarm
will beep for a few seconds.
If you connect an optional power amplifier and
do not use the built-in amplifier, the beep
sound will be deactivated.
(RELEASE)
Notes
• Be sure not to drop the panel when detaching it
from the unit.
• If you detach the panel while the unit is still
turned on, the power will turn off automatically
to prevent the speakers from being damaged.
• When carrying the front panel with you, use the
supplied front panel case.
66
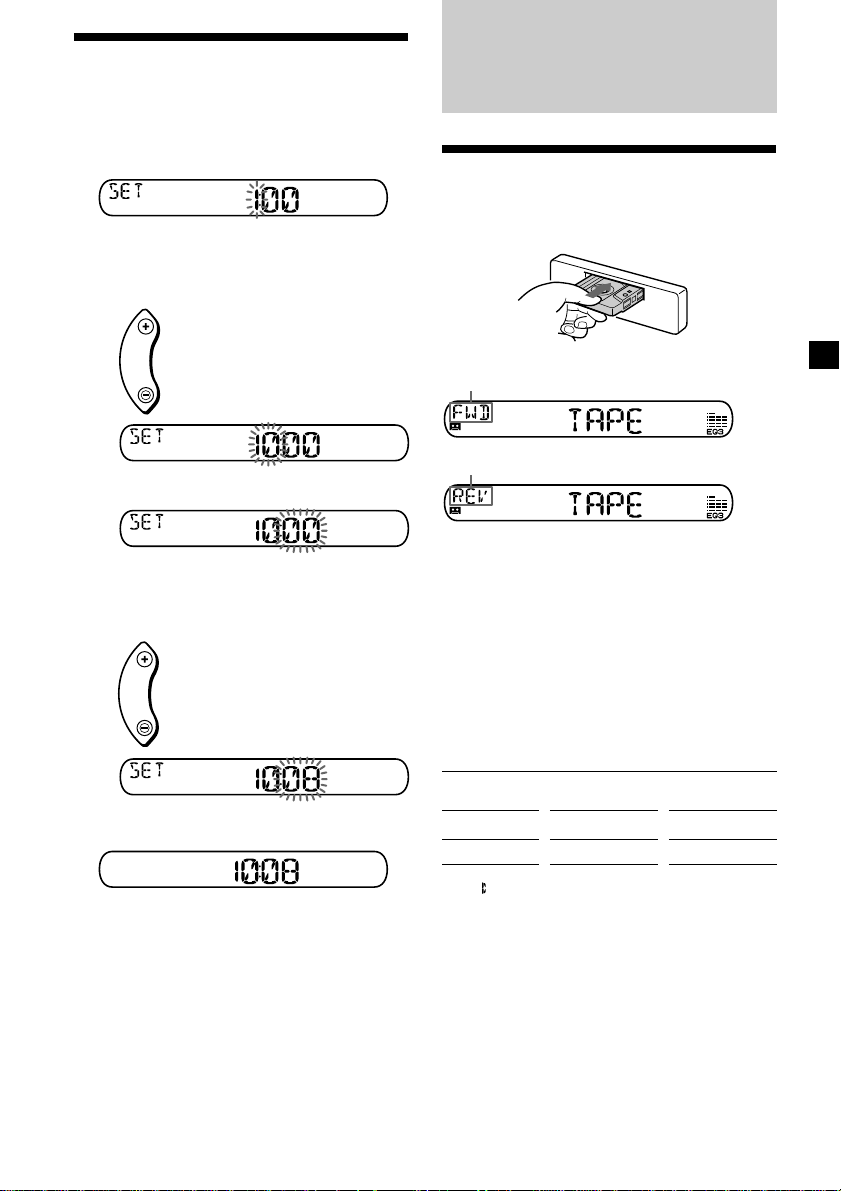
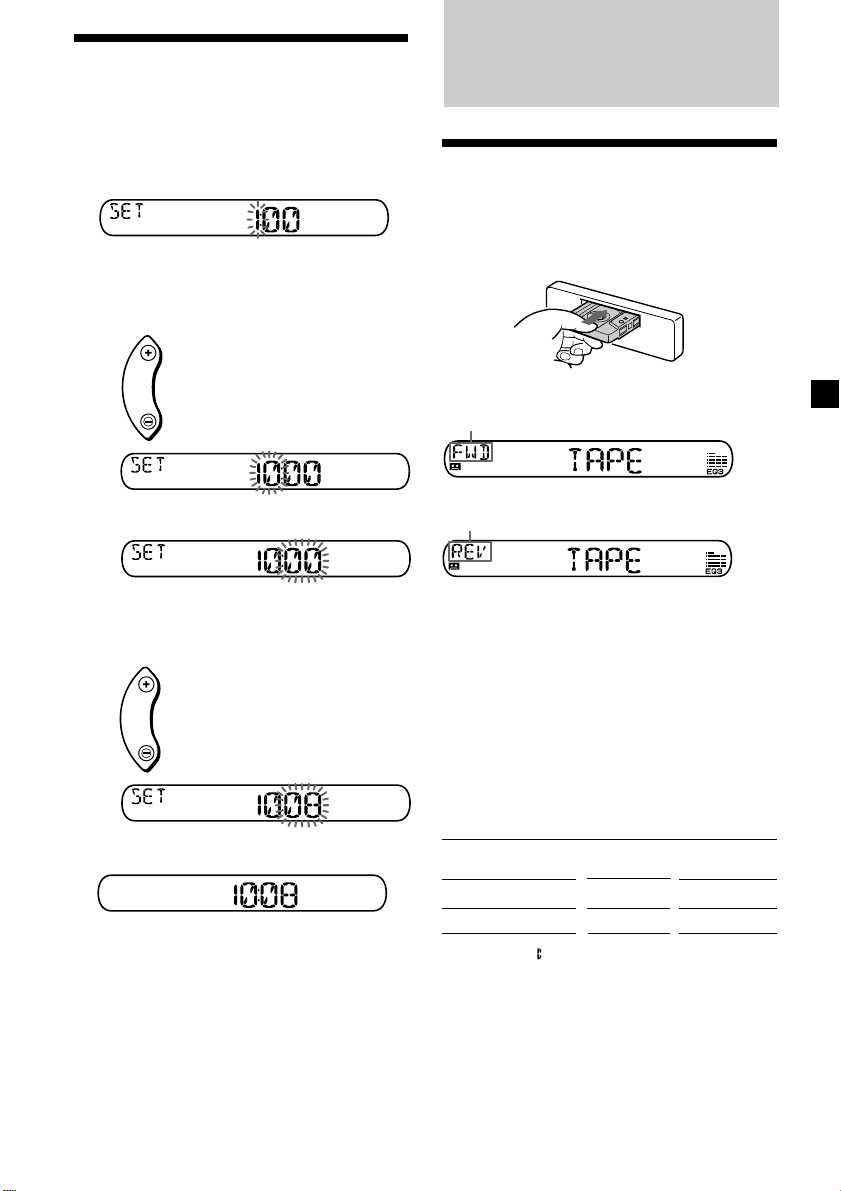
Setting the clock
The clock uses a 24-hour digital indication.
Example: To set the clock to 10:08
1 Press (DSPL) for 2 seconds.
Cassette Player
Listening to a tape
The hour indication flashes.
1 Press either side of the volume button
to set the hour.
to go forward
to go back
2 Press (SEL).
The minute indication flashes.
3 Press either side of the volume button
to set the minute.
to go forward
to go back
2 Press (DSPL).
Insert a cassette.
Playback starts automatically.
The side facing up is played.
The side facing down is played.
Tip
To change the tape‘s playback direction, press m
and M.
To stop playback and eject the
cassette
Press Z.
Fast-winding the tape
During playback, press m or M.
Direction
indicator*
FWD
REV
To advance
M
m
To rewind
m
M
The clock starts.
After the clock setting is complete, the
display returns to normal play mode.
Tip
You can set the clock automatically with the RDS
feature (page 14).
* The indicator will flash while fast-winding the
tape.
To start playback during fast-forwarding or
rewinding, press the other fast-winding button
partially until the locked button is released.
77
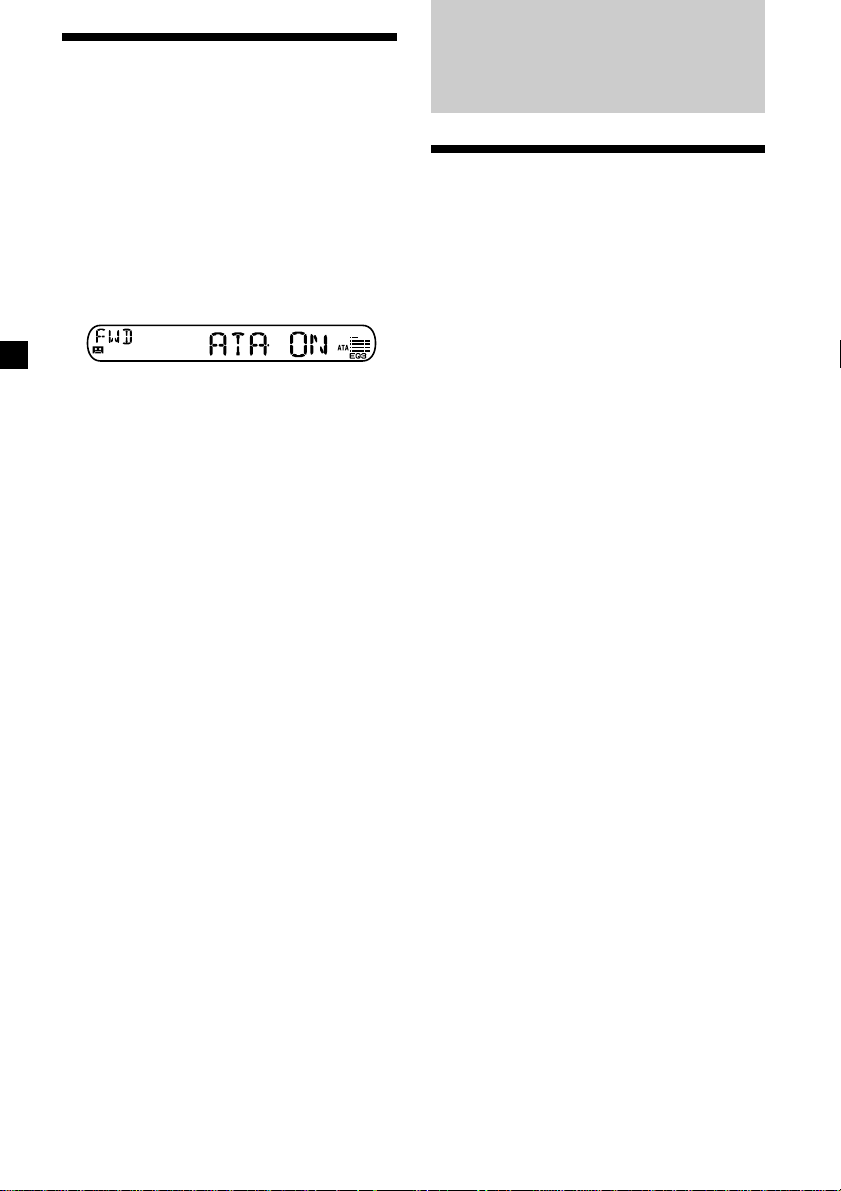
Radio reception during
fast-forwarding or
rewinding of a tape
— Automatic Tuner Activation (ATA)
When fast-forwarding or rewinding with the
m or M button, the radio will turn on
automatically.
During playback, press (PTY) (ATA)
repeatedly until “ATA-ON” in the display
appears.
ATA-ON y ATA-OFF
ATA mode starts.
To return to normal play mode, select “ATAOFF.”
Radio
Storing stations
automatically
— Best Tuning Memory (BTM)
The unit selects the stations with the strongest
signals and stores them in the order of their
frequencies. You can store up to 6 stations on
each band (FM1, FM2, FM3, MW, and LW).
Caution
When tuning in stations while driving, use
Best Tuning Memory to prevent accidents.
1 Press (SOURCE) repeatedly to select the
radio.
In case of tape playback, press Z to eject the
tape.
Each time you press (SOURCE), the source
changes as follows:
Radio t CD* t MD*
* If the corresponding optional equipment is
not connected, this item will not appear.
2 Press (MODE) repeatedly to select the
band.
Each time you press (MODE), the band
changes as follows:
FM1 t FM2 t FM3 t MW t LW
3 Press (SENS) (BTM) for 2 seconds.
The unit stores stations in the order of their
frequencies on the number buttons.
A beep sounds when the setting is stored.
Notes
• The unit does not store stations with weak
signals. If only a few stations can be received,
some number buttons will retain their former
setting.
• When a number is indicated in the display, the
unit starts storing stations from the one currently
displayed.
88
Storing only the desired
stations
You can preset up to 18 FM stations (6 each for
FM1, 2, and 3), up to 6 MW stations, and up to
6 LW stations in the order of your choice.
1 Press (SOURCE) repeatedly to select the
radio.
In case of tape playback, press Z to eject the
tape.
2 Press (MODE) repeatedly to select the
band.
3 Press either side of (SEEK) to tune in the
station that you want to store on the
number button.
4 Press the desired number button ((1) to
(6)) until “MEM” appears.
The number button indication appears in
the display.
Note
If you try to store another station on the same
number button, the previously stored station will
be erased.
Receiving the stored
stations
1 Press (SOURCE) repeatedly to select the
radio.
In case of tape playback, press Z to eject the
tape.
2 Press (MODE) repeatedly to select the
band.
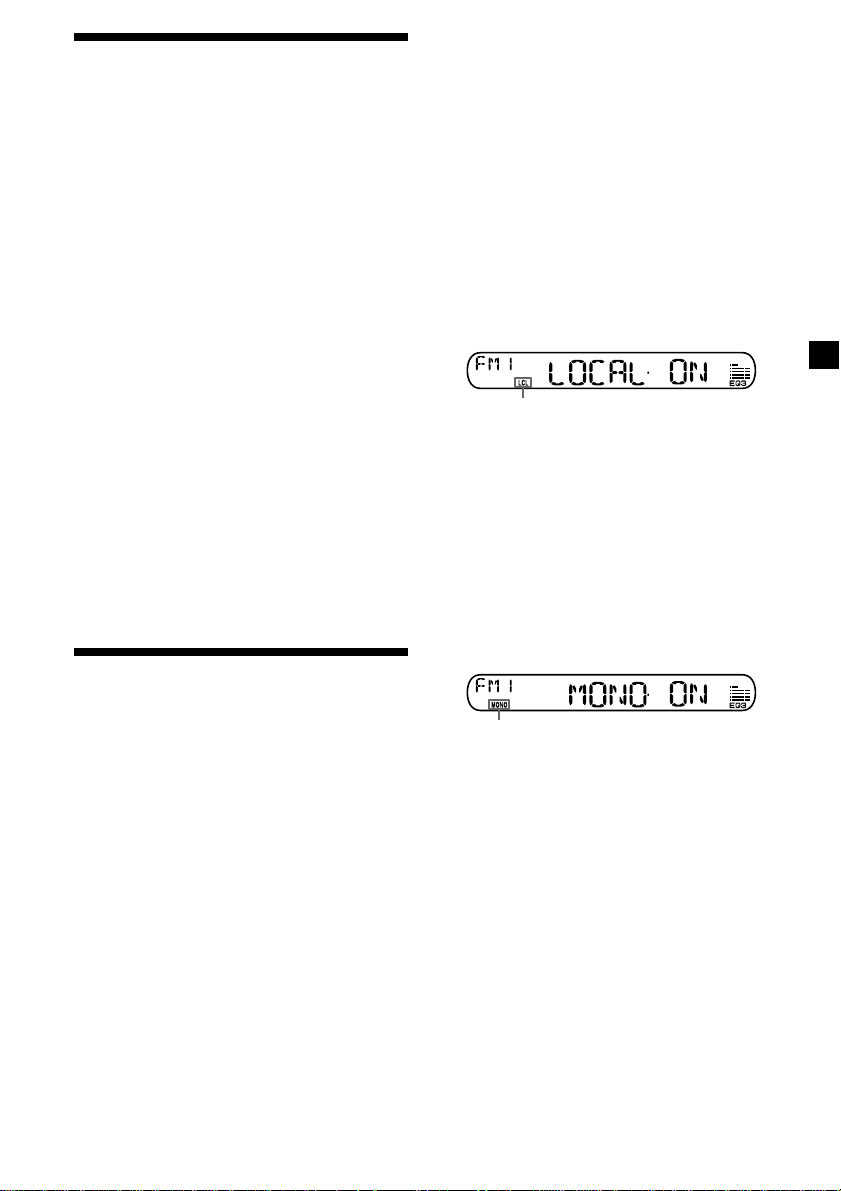
If you cannot tune in a preset
station
— Automatic tuning/ Local Seek Mode
Automatic tuning:
Press either side of (SEEK) to search for
the station.
Scanning stops when the unit receives a
station. Press either side of (SEEK)
repeatedly until the desired station is
received.
Local Seek Mode:
If the automatic tuning stops too
frequently, press (SENS) repeatedly until
“LOCAL-ON” appears.
“LCL” indicator is displayed.
Only the stations with relatively strong
signals will be tuned in.
Tip
If you know the frequency of the station you want
to listen to, press either side of (SEEK) until the
desired frequency appears (manual tuning).
If FM stereo reception is poor
— Monaural Mode
During radio reception, press (SENS)
repeatedly until “MONO-ON” appears.
“MONO” indicator is displayed.
The sound improves, but becomes
monaural (“ST” disappears).
To return to normal radio reception mode,
select “MONO-OFF.”
3 Press the number button ((1) to (6)) on
which the desired station is stored.
99
RDS
Overview of the RDS
function
Radio Data System (RDS) is a broadcasting
service that allows FM stations to send
additional digital information along with the
regular radio programme signal. Your car
stereo offers you a variety of services. Here are
just a few: retuning the same programme
automatically, listening to traffic
announcements, and locating a station by
programme type.
Notes
• Depending on the country or region, not all of
the RDS functions are available.
• RDS may not work properly if the signal strength
is weak or if the station you are tuned to is not
transmitting RDS data.
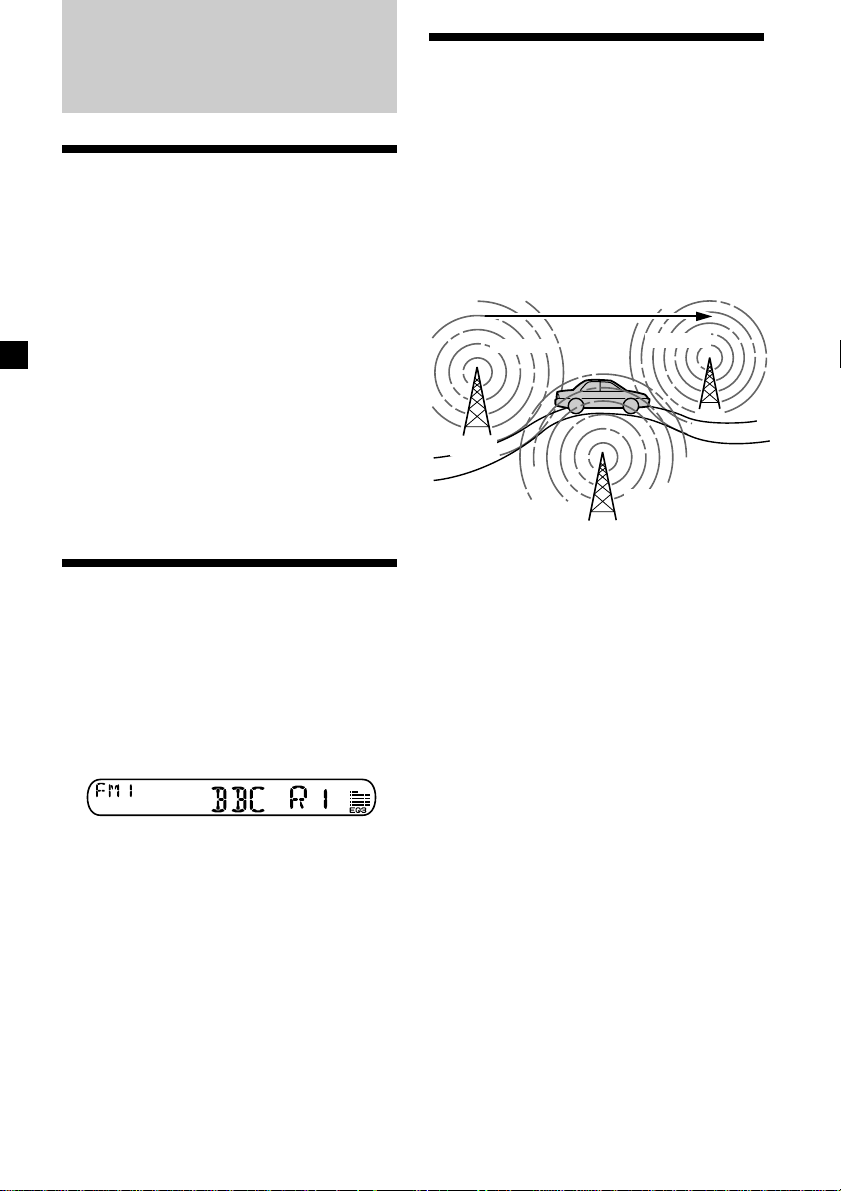
Retuning the same
programme automatically
— Alternative Frequencies (AF)
The Alternative Frequencies (AF) function
automatically selects and retunes the station
with the strongest signal in a network. By
using this function, you can continuously
listen to the same programme during a longdistance drive without having to retune the
station manually.
Frequencies change automatically.
98.5MHz
Station
1 Select an FM station (page 8).
96.0MHz
102.5MHz
Displaying the station
name
The name of the current station lights up in the
display.
Select an FM station (page 8).
When you tune in an FM station that
transmits RDS data, the station name
appears in the display.
Note
The “*” indication means that an RDS station is
being received.
Changing the display item
Each time you press (DSPL), the item changes
as follows:
Station Name* (Frequency) y Clock
* When you tune in an FM station that transmits
RDS data, the station name appears.
Note
“NO NAME” appears if the received station does
not transmit RDS data.
10
2 Press (AF) repeatedly until “AF-ON”
appears.
The unit starts searching for an alternative
station with a stronger signal in the same
network.
Note
When there is no alternative station in the area
and you do not need to search for an alternative
station, turn the AF function off by pressing (AF)
repeatedly until “AF-OFF” appears.

Changing the display item
Each time you press (AF), the item changes as
follows:
AF-ON y AF-OFF
Notes
• When “NO AF” and the station name flash
alternately, it means that the unit cannot find an
alternative station in the network.
• If the station name starts flashing after selecting
a station with the AF function on, this indicates
that no alternative frequency is available. Press
either side of (SEEK) while the station name is
flashing (within 8 seconds). The unit starts
searching for another frequency with the same PI
(Programme Identification) data (“PI SEEK”
appears and no sound is heard). If the unit
cannot find another frequency, “NO PI” appears,
and the unit returns to the previously selected
frequency.
Listening to a regional programme
The “REG-ON” (regional on) function lets you
stay tuned to a regional programme without
being switched to another regional station.
(Note that you must turn the AF function on.)
The unit is factory preset to “REG-ON,” but if
you want to turn off the function, do the
following.
During radio reception, press (AF) for 2
seconds until “REG-OFF” appears.
Note that selecting “REG-OFF” might cause
the unit to switch to another regional
station within the same network.
Local link function
(United Kingdom only)
The Local Link function lets you select other
local stations in the area, even if they are not
stored on your number buttons.
1 Press a number button that has a local
station stored on it.
2 Within 5 seconds, press the number
button of the local station again.
3 Repeat this procedure until the desired
local station is received.
To return to regional on, select “REG-ON.”
Note
This function does not work in the United
Kingdom and in some other areas.
Changing the display item
Each time you press (AF) for 2 seconds, the
item changes as follows:
REG-ON y REG-OFF
11

Listening to traffic
announcements
The Traffic Announcement (TA) and Traffic
Programme (TP) data let you automatically
tune in an FM station that is broadcasting
traffic announcements even if you are listening
to other programme sources.
Press (TA) repeatedly until “TA-ON”
appears.
The unit starts searching for traffic
information stations. “TP” appears in the
display when the unit finds a station
broadcasting traffic announcements.
When the traffic announcement starts,
“TA” flashes. The flashing stops when the
traffic announcement is over.
Tip
If the traffic announcement starts while you are
listening to another programme source, the unit
automatically switches to the announcement and
goes back to the original source when the
announcement is over.
Notes
“NO TP” flashes for 5 seconds if the received
•
station does not broadcast traffic announcements.
Then, the unit starts searching for a station that
broadcasts it.
• When “EON” appears with “TP” in the display,
the current station makes use of broadcast traffic
announcements by other stations in the same
network.
Presetting the volume of traffic
announcements
You can preset the volume level of the traffic
announcements beforehand so you won’t
miss the announcement. When a traffic
announcement starts, the volume will be
automatically adjusted to the preset level.
1 Press the volume button to adjust the
desired volume level.
2 Press (TA) for 2 seconds.
“TA” appears and the setting is stored.
Receiving emergency
announcements
If an emergency announcement comes in while
you are listening to the radio, the programme
will automatically switch to it. If you are
listening to a source other than the radio, the
emergency announcements will be heard if
you set AF or TA to ON. The unit will then
automatically switch to these announcements
no matter which source you are listening to at
the time.
To cancel the current traffic
announcement
Press (TA).
To cancel all traffic announcements, turn off
the function by pressing (TA) until
“TA-OFF” appears.
12

Presetting the RDS
stations with the AF and
TA data
When you preset RDS stations, the unit stores
each station’s data as well as its frequency, so
you don’t have to turn on the AF or TA
function every time you tune in the preset
station. You can select a different setting (AF,
TA, or both) for individual preset stations, or
the same setting for all preset stations.
Presetting the same setting for all
preset stations
1 Select an FM band (page 8).
2 Press (AF) and/or (TA) to select “AF-ON”
and/or “TA-ON.”
Note that selecting “AF-OFF” or “TA-OFF”
stores not only RDS stations, but also nonRDS stations.
3 Press (SENS) (BTM) until “BTM” flashes.
Presetting different settings for
each preset station
1 Select an FM band, and tune in the
desired station.
2 Press (AF) and/or (TA) to select “AF-ON”
and/or “TA-ON.”
3 Press the desired number button until
“MEM” appears.
Repeat from step 1 to preset other stations.
Tip
If you want to change the preset AF and/or TA
setting after you tune in the preset station, you
can do so by turning the AF or TA function on or
off.
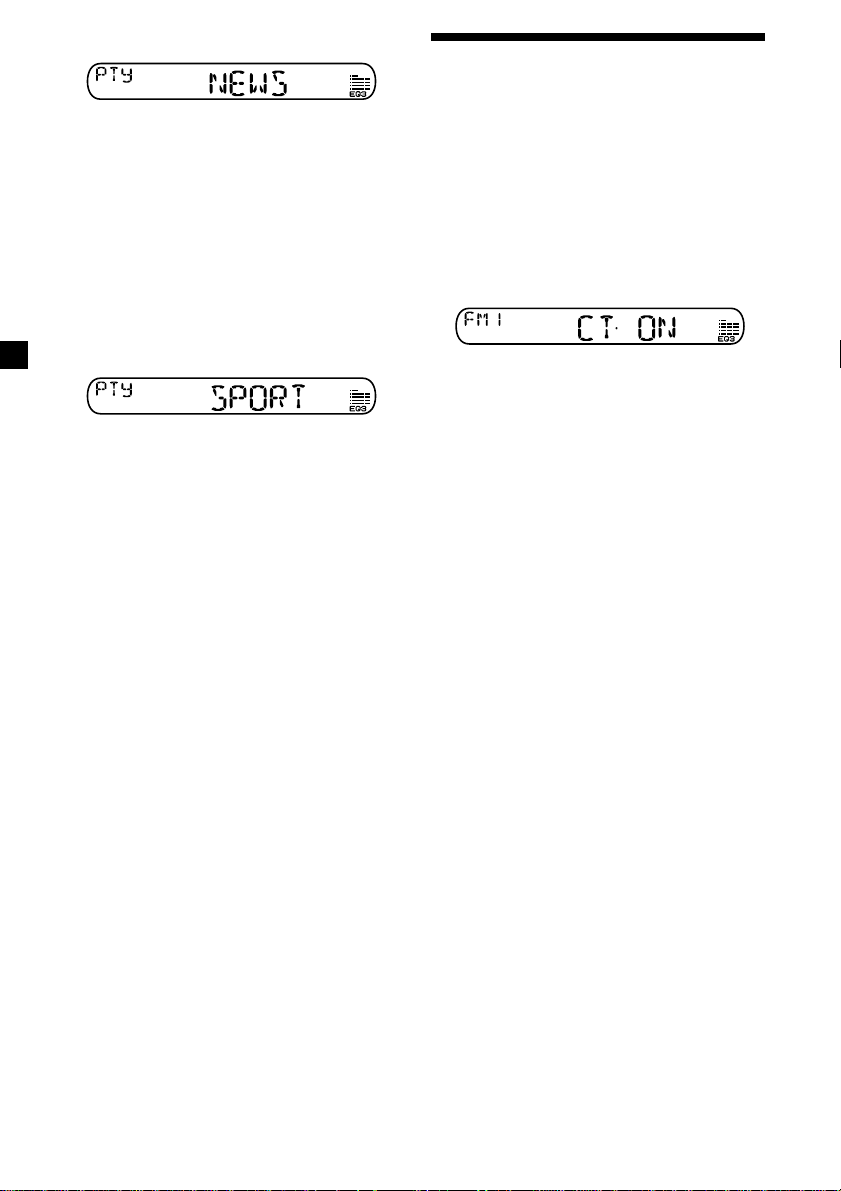
Locating a station by
programme type
You can locate the station you want by
selecting one of the programme types shown
below.
Programme types Display
News NEWS
Current Affairs AFFAIRS
Information INFO
Sports SPORT
Education EDUCATE
Drama DRAMA
Culture CULTURE
Science SCIENCE
Varied VARIED
Popular Music POP M
Rock Music ROCK M
Easy Listening EASY M
Light Classical LIGHT M
Classical CLASSICS
Other Music Type OTHER M
Weather WEATHER
Finance FINANCE
Children’s Programmes CHILDREN
Social Affairs SOCIAL A
Religion RELIGION
Phone In PHONE IN
Travel TRAVEL
Leisure LEISURE
Jazz Music JAZZ
Country Music COUNTRY
National Music NATION M
Oldies Music OLDIES
Folk Music FOLK M
Documentary DOCUMENT
Not specified NONE
Note
You cannot use this function in some countries
where no PTY (Programme Type selection) data is
available.
continue to next page t
13
1 Press (PTY) during FM reception.
The current programme type name appears
if the station is transmitting the PTY data.
“- - - - -” appears if the received station is
not an RDS station, or if the RDS data has
not been received.
If the TA function is ON, the unit starts
searching for the next station.
2 Press (PTY) repeatedly until the desired
programme type appears.
The programme types appear in the order
shown in the above table. Note that you
cannot select “NONE” (Not specified) for
searching.
Setting the clock
automatically
The CT (Clock Time) data from the RDS
transmission sets the clock automatically.
1 During radio reception, press (SEL) and
(2) simultaneously.
2 Press (2) repeatedly until “CT-ON”
appears.
The clock is set.
In 2 seconds the normal display
automatically appears.
3 Press either side of (SEEK).
The unit starts searching for a station
broadcasting the selected programme type.
When the unit finds the programme, the
programme type appears again for 5
seconds.
“NO” and the programme type appear
alternately for 5 seconds if the unit cannot
find the programme type. It then returns to
the previously selected station.
To cancel the CT function
Select “CT-OFF” in step 2.
Notes
• The CT function may not work even though an
RDS station is being received.
• There might be a difference between the time
set by the CT function and the actual time.
14

Other Functions
Adjusting the balance and
fader
You can adjust the balance and fader.
1 Press (SEL) repeatedly until “BAL” or
“FAD” appears.
Each time you press (SEL), the item
changes as follows:
LOW* t MID* t HIGH* t
BAL (left-right) t FAD (front-rear)
* When EQ3 is activated (page 16).
2 Press either side of the volume button to
adjust the selected item.
Adjust within 3 seconds after selecting the
item.
Attenuating the sound
Press (ATT).
After “ATT-ON” momentarily flashes, the
“ATT” indication appears in the display.
Changing the sound and
display settings
The following items can be set:
•CT (Clock Time) (page 14).
•A.SCRL (Auto Scroll)* (page 17).
•M.DSPL (Motion Display)
– the demonstration mode which appears
when the tape is ejected and no source is
selected (e.g., tuner is turned off).
•BEEP – to turn the beep sound on or off.
1 Press (SEL) and the desired preset
number button simultaneously.
(SEL) + (2): CT
(SEL) + (3): A.SCRL*
(SEL) + (4): M.DSPL
(SEL) + (6): BEEP
* When no CD or MD is playing, this item will
not appear.
Note
The displayed item will differ depending on the
source.
2 Press (SEL) and the preset number
button repeatedly to select the desired
setting (Example: ON or OFF).
GB
To restore the previous volume level, press
(ATT) again.
“ATT-OFF” flashes momentarily.
15
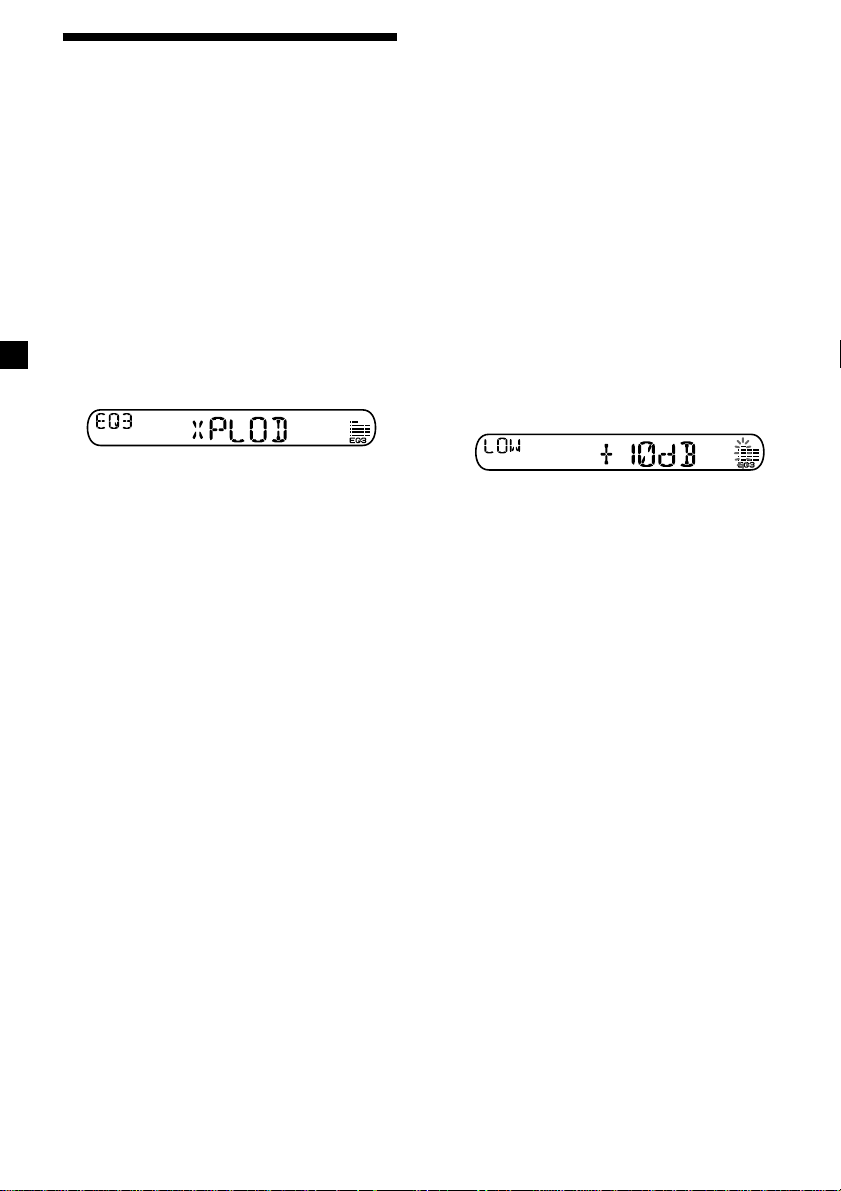
Setting the equalizer
— EQ3
You can select an equalizer curve for 7 music
types (XPLOD, VOCAL, CLUB, JAZZ, NEW
AGE, ROCK, CUSTOM, and OFF (equalizer
OFF)).
You can store a different equalizer setting for
each source.
Selecting the equalizer curve
1 Press (SOURCE) to select a source
(Radio, CD or MD) or insert a cassette.
2 Press (EQ3) repeatedly to select the
desired equalizer curve.
Each time you press (EQ3), the item
changes.
To cancel the equalizing effect, select
“OFF.”
Adjusting the equalizer curve
You can store and adjust the equalizer settings
for different tone ranges.
1 Press (SOURCE) to select a source (Radio,
CD or MD) or insert a cassette.
2 Press (EQ3) repeatedly to select the
desired equalizer curve.
3 Adjusting the equalizer curve.
1 Press (SEL) repeatedly to select the
desired tone range.
Each time you press (SEL), the tone
range changes.
LOW t MID t HI (t BAL t FAD)
2 Press either side of the volume button
repeatedly to adjust to the desired
volume level.
The volume level is adjustable by 1 dB
steps from –10 dB to +10 dB.
3 Repeat step 1 and 2 to adjust the
equalizer curve.
To restore the factory-set equalizer
curve, press (SEL) for 2 seconds.
After 3 seconds, the display returns to
normal play mode.
16
Note
When EQ3 is set to “OFF,” you cannot adjust the
equalizer settings.

With Optional Equipment
CD/MD Unit
This unit can control external CD/MD units.
If you connect an optional CD unit with the
CD TEXT function, the CD TEXT information
will appear in the display when you play a CD
TEXT disc.
Playing a CD or MD
1 Press (SOURCE) repeatedly to select CD
or MD.
In case of tape playback, press Z to eject the
tape.
2 Press (MODE) until the desired unit
appears.
CD/MD playback starts.
When a CD/MD unit is connected, all the
tracks play from the beginning.
Tip
With the optional MG Memory Stick System-up
Player MGS-X1 connected to this unit, press
(SOURCE) to select “MD,” then press (MODE) to
select the unit number of the MD (MD1 or MD2,
etc.).
Automatically scrolling a display
item — Auto Scroll
If the disc name, artist name, or track name on
a CD TEXT disc or MD exceeds 8 characters
and the Auto Scroll function is on, information
automatically scrolls across the display as
follows:
• The disc name appears when the disc has
changed (if the disc name is selected).
• The track name appears when the track has
changed (if the track name is selected).
If you press (DSPL) to change the display
item, the disc or track name of the CD TEXT or
MD disc is scrolled automatically whether you
set the function ON or OFF.
During playback, press (SEL) and (3) to
select “A.SCRL-ON.”
To cancel Auto Scroll, select “A.SCRL-OFF.”
Note
For some discs with very many characters, the
following cases may happen:
— Some of the characters are not displayed.
— Auto Scroll does not work.
continue to next page t
GB
Changing the display item
Each time you press (DSPL) during CD, CD
TEXT, or MD playback, the item changes as
follows:
Elapsed playback time t
Disc name*1/Artist name*2 t Track name*3 t
Clock
*1If you have not labelled the disc or if there is no
disc name prerecorded on the MD, “NO NAME”
appears in the display.
2
If you play a CD TEXT disc, the artist name
*
appears in the display after the disc name. (Only
for CD TEXT discs with the artist name.)
3
If the track name of a CD TEXT disc or MD is not
*
prerecorded, “NO NAME” appears in the
display.
17
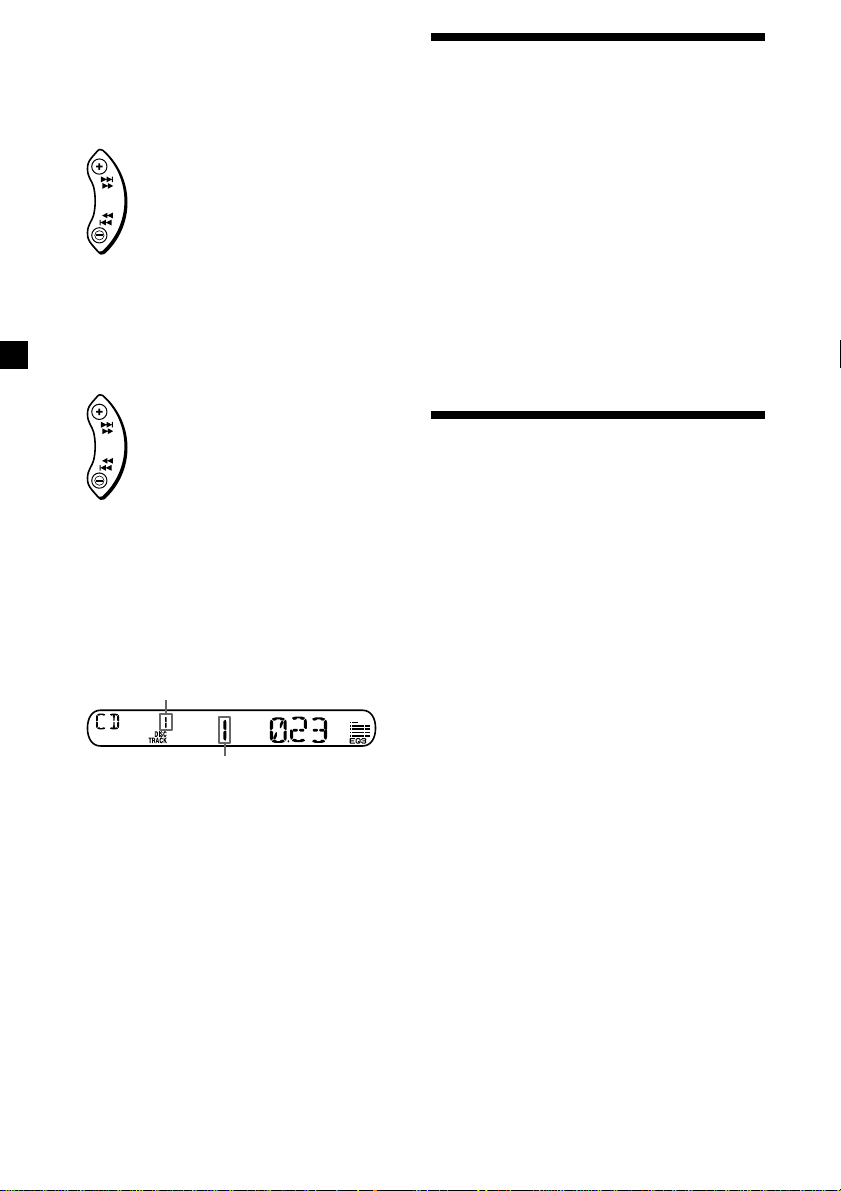
Locating a specific track
— Automatic Music Sensor (AMS)
During playback, press either side of
(SEEK) momentarily for each track you
want to skip.
To locate succeeding tracks
Playing tracks repeatedly
— Repeat Play
You can select:
•REP-TRACK – to repeat a track.
•REP-DISC – to repeat a disc.
SEEK
To locate preceding tracks
Locating a specific point in a track
— Manual Search
During playback, press and hold either
side of (SEEK). Release when you have
found the desired point.
To search forward
SEEK
To search backward
Switching to other discs
During playback, press (1) (DISC –) or
(2) (DISC +) button.
The desired disc in the current unit begins
playback.
(1) (DISC –): For preceding discs
(2) (DISC +): For succeeding discs
Disc number
Track number
During playback, press (3) (REP)
repeatedly until the desired setting
appears.
REP-TRACK t REP-DISC t REP-OFF
Repeat Play starts.
To return to normal play mode, select “REPOFF.”
Playing tracks in random
order — Shuffle Play
You can select:
•SHUF-DISC – to play the tracks on the
current disc in random order.
•SHUF-CHGR – to play the tracks in the
current unit in random order.
•SHUF-ALL* – to play all the tracks in all the
units in random order.
During playback, press (4) (SHUF)
repeatedly until the desired setting
appears.
SHUF-DISCt SHUF-CHGR t SHUF-ALL*
t SHUF-OFF
Shuffle Play starts.
18
* “SHUF-ALL” is only available when you
connect two or more optinal CD/MD units.
To return to normal play mode, select “SHUFOFF.”
Additional
Information
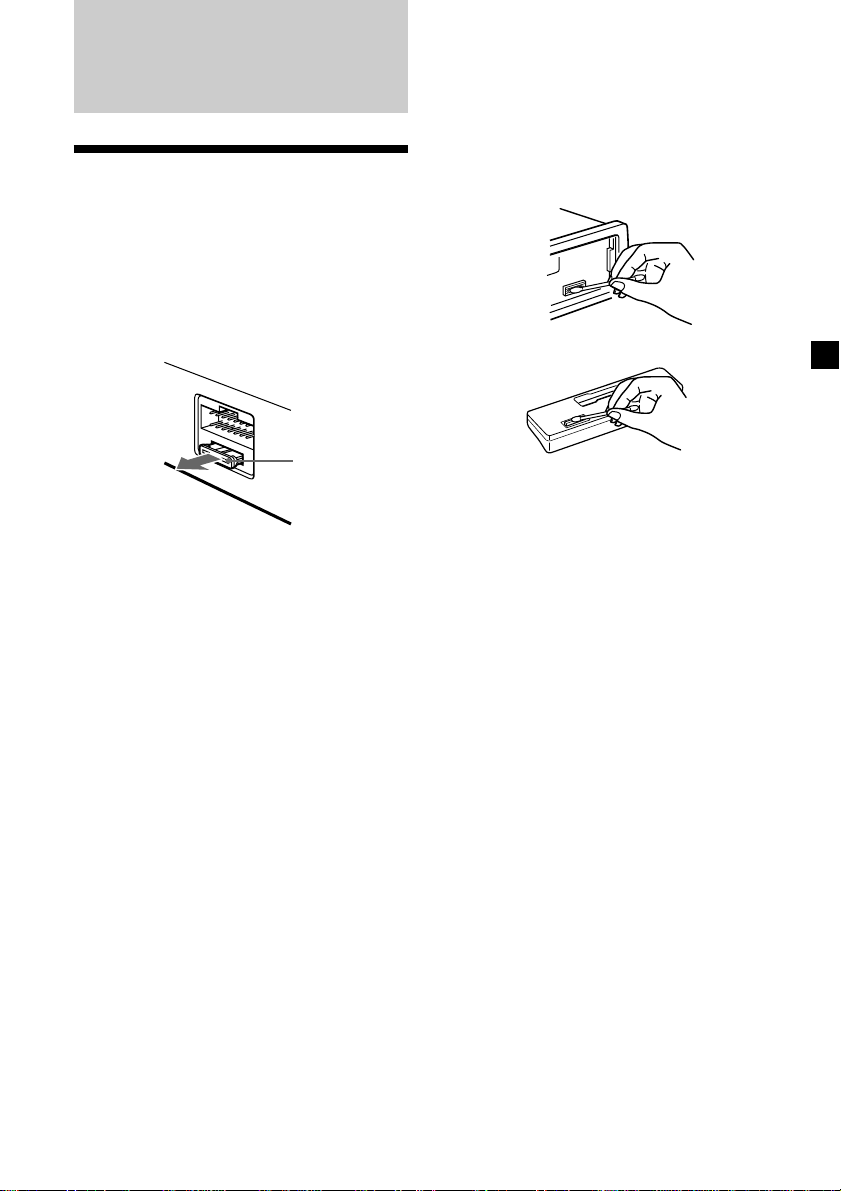
Maintenance
Fuse replacement
When replacing the fuse, be sure to use one
matching the amperage rating stated on the
original fuse. If the fuse blows, check the
power connection and replace the fuse. If the
fuse blows again after replacement, there may
be an internal malfunction. In such a case,
consult your nearest Sony dealer.
Cleaning the connectors
The unit may not function properly if the
connectors between the unit and the front
panel are not clean. In order to prevent this,
open the front panel by pressing (RELEASE),
then detach it and clean the connectors with a
cotton swab dipped in alcohol. Do not apply
too much force. Otherwise, the connectors may
be damaged.
Main unit
Fuse (10 A)
Warning
Never use a fuse with an amperage rating
exceeding the one supplied with the unit as
this could damage the unit.
Back of the front panel
Notes
• For safety, turn off the engine before cleaning
the connectors and remove the key from the
ignition switch.
• Never touch the connectors directly with your
fingers or any metal device.
19
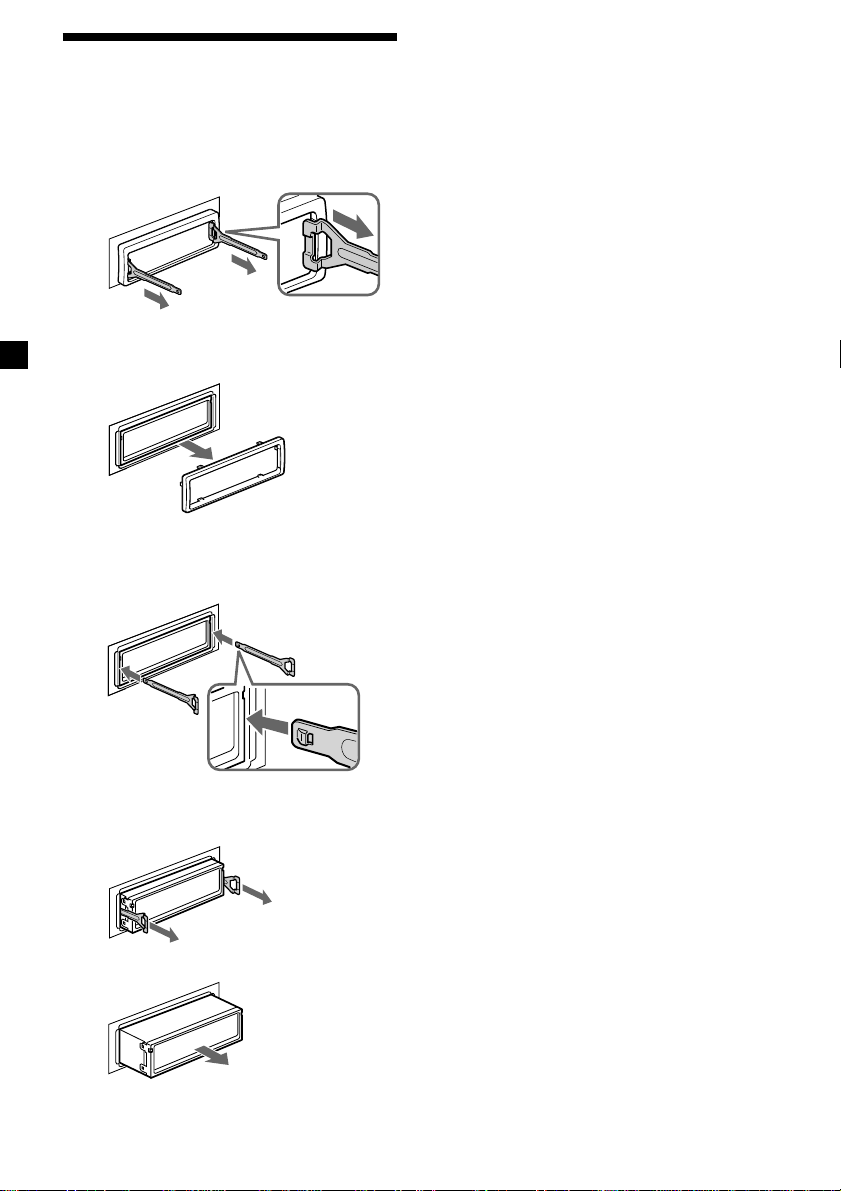
Removing the unit
1 Remove the protection collar.
1 Detach the front panel (page 6).
2 Engage the release keys together
with the protection collar.
Orient the release
key correctly.
3 Pull out the release keys to remove
the protection collar.
2 Remove the unit.
1 Insert both release keys together until
they click.
Face the hook
inwards.
2 Pull the release keys to unseat the
unit.
3 Slide the unit out of the mounting.
20

Specifications
Cassette player section
Tape track 4-track 2-channel stereo
Wow and flutter 0.13 % (WRMS)
Frequency response 30 – 15,000 Hz
Signal-to-noise ratio 55 dB
Tuner section
FM
Tuning range 87.5 – 108.0 MHz
Aerial terminal External aerial connector
Intermediate frequency 10.7 MHz/450 kHz
Usable sensitivity 9 dBf
Selectivity 75 dB at 400 kHz
Signal-to-noise ratio 67 dB (stereo),
Harmonic distortion at 1 kHz
Separation 35 dB at 1 kHz
Frequency response 30 – 15,000 Hz
69 dB (mono)
0.5 % (stereo),
0.3 % (mono)
MW/LW
Tuning range MW: 531 – 1,602 kHz
Aerial terminal External aerial connector
Intermediate frequency 10.7 MHz/450 kHz
Sensitivity MW: 30 µV
LW: 153 – 279 kHz
LW: 40 µV
Power amplifier section
Outputs Speaker outputs
Speaker impedance 4 – 8 ohms
Maximum power output 45 W × 4 (at 4 ohms)
(sure seal connectors)
General
Outputs Audio output
Inputs BUS control input terminal
Tone controls Low:
Power requirements 12 V DC car battery
Dimensions Approx. 178 × 50 × 178 mm
Mounting dimensions Approx. 182 × 53 × 161 mm
Mass Approx. 1.2 kg
Supplied accessories Parts for installation and
Optional accessories BUS cable (supplied with
Optional equipment CD changer (6 discs)
Power aerial relay control
terminal
Power amplifier control
terminal
BUS audio input terminal
±10 dB at 60 Hz (Xplod)
Mid:
±10 dB at 1 kHz (Xplod)
High:
±10 dB at 10 kHz (Xplod)
(negative earth)
(w/h/d)
(w/h/d)
connections (1 set)
Front panel case (1)
an RCA pin cord)
RC-61 (1 m), RC-62 (2 m)
CDX-T69
MD changer (6 discs)
MDX-66XLP
MG-MS System-up player
MGS-X1
Source selector
XA-C30
AUX-IN Selector
XA-300
Design and specifications are subject to change
without notice.
21
Troubleshooting guide
The following checklist will help you remedy the problems you may encounter with your unit.
Before going through the checklist below, check the connections and operating procedures.
General
Problem
No sound.
The contents of the memory
have been erased.
Indications do not appear
in the display.
Tape playback
Problem
The sound is distorted.
Radio reception
Problem
Preset tuning is not possible.
Automatic tuning is not
possible.
The stations cannot be
received.
The sound is hampered by
noises.
The “ST” indication flashes.
Cause/Solution
•Cancel the ATT function (page 15).
•Set the fader control to the centre position for 2-speaker
systems.
•Adjust the volume with (+).
• The power cord or battery has been disconnected.
• The RESET button was pressed.
t Store again into the memory.
•Remove the front panel and clean the connectors. See
“Cleaning the connectors” (page 19) for details.
•The clock display disappears if you press (OFF) for 2
seconds.
t Press (OFF) again for 2 seconds to display the clock.
Cause/Solution
The tape head is contaminated.
t Clean the head with a commercially available dry-type
cleaning cassette.
Cause/Solution
•Store the correct frequency in the memory.
•The broadcast signal is too weak.
•The broadcast signal is too weak.
t Use manual tuning.
•The local seek mode is set to ON.
t Set the local seek mode to OFF (page 9).
Connect an power aerial control lead (blue) or accessory power
supply lead (red) to the power supply lead of a car’s aerial
booster. (When your car has built-in FM/MW/LW aerial in the
rear/side glass only.)
•Tune in the frequency accurately.
•The broadcast signal is too weak.
t Set to monaural mode (page 9).
22
RDS
Problem
The SEEK starts after a few
seconds of listening.
No traffic announcements.
PTY displays “NONE.”
Cause/Solution
The station is non-TP or has a weak signal.
t Press (AF) or (TA) repeatedly until “AF-OFF” or
“TA-OFF” appears.
•Activate “TA.”
•The station does not broadcast any traffic announcements
despite being TP.
t Tune to another station.
The station does not specify the programme type.
CD/MD playback
Problem
The sound skips.
Cause/Solution
A dirty or defective disc.
Error displays (when an optional CD/MD unit is connected)
The following indications will flash for about 5 seconds, and an alarm sound will be heard.
Display
NO MAG
NO DISC
ERROR
BLANK
RESET
NOT READY
HI TEMP
*1 When an error occurs during playback of a CD or MD, the disc number of the CD or MD does not appear
in the display.
2
The disc number of the disc causing the error appears in the display.
*
If the above-mentioned solutions do not help improve the situation, consult your nearest Sony
dealer.
Cause
The disc magazine is not inserted in
the CD/MD unit.
No disc is inserted in the CD/MD unit.
A CD is dirty or inserted upside
2
down.*
1
An MD does not play because of some
*
problem.*
A CD/MD cannot play because of
some problem.
1
No tracks have been recorded on an
*
MD.*
The CD/MD unit cannot be operated
because of some problem.
The lid of the MD unit is open or MDs
are not inserted properly.
The ambient temperature is more than
50°C.
2
2
Solution
Insert the disc magazine in the CD/
MD unit.
Insert discs in the CD/MD unit.
Clean or insert the CD correctly.
Insert another MD.
Insert another CD/MD.
Play an MD with tracks recorded on
it.
Press the RESET button of the unit.
Close the lid or insert the MDs
properly.
Wait until the temperature goes
down below 50°C.
23
Willkommen! Sicherheitsmaßnahmen
Danke, dass Sie sich für dieses
Autokassettenradio von Sony entschieden
haben.
Ihnen stehen zusätzlich zur
Kassettenwiedergabe und zum Radioempfang
weitere Funktionen zur Verfügung, wenn Sie
die Anlage um ein gesondert erhältliches CD/
MD-Gerät*1 erweitern.
Bei diesem Gerät und auch, wenn Sie ein
gesondert erhältliches CD-Gerät mit CD TEXTFunktion anschließen, erscheinen bei der
Wiedergabe einer CD mit CD TEXT*2 die CD
TEXT-Informationen im Display.
*1Sie können einen CD-Wechsler, einen MD-
Wechsler, einen CD-Player oder einen MD-Player
an das Gerät anschließen.
2
Eine CD mit CD TEXT ist eine Audio-CD, die
*
Informationen wie den Namen der CD, den
Namen des Interpreten und die Namen der Titel
enthält.
Diese Daten sind auf der CD aufgezeichnet.
•Wenn Sie Ihr Auto direkt in der Sonne
geparkt haben und die Temperatur im
Wageninneren sehr hoch ist, lassen Sie das
Gerät zunächst etwas abkühlen, bevor Sie es
benutzen.
•Wenn die Stromversorgung des Geräts
unterbrochen ist, überprüfen Sie zunächst die
Anschlüsse. Sind diese in Ordnung,
überprüfen Sie die Sicherung.
•Wenn bei einem 2-Lautsprecher-System über
diese Lautsprecher kein Ton ausgegeben
wird, stellen Sie den Fader-Regler in die
mittlere Position.
•Wenn die Kassette längere Zeit
wiedergegeben wird, kann sie sich aufgrund
des integrierten Endverstärkers erwärmen.
Dabei handelt es sich jedoch nicht um eine
Fehlfunktion.
Wenn Sie Fragen haben oder an Ihrem Gerät
Probleme auftauchen, die in dieser
Bedienungsanleitung nicht behandelt werden,
wenden Sie sich bitte an Ihren Sony-Händler.
So vermeiden Sie eine
Verringerung der Klangqualität
Ist neben der Autostereoanlage ein
Getränkehalter angebracht, so achten Sie
darauf, keine Säfte oder andere zuckerhaltige
Getränke auf die Anlage zu verschütten.
Zuckerrückstände in der Anlage oder auf den
Kassettenbändern können die
Wiedergabeköpfe verschmutzen, zu einer
verringerten Klangqualität führen oder die
Wiedergabe ganz unmöglich machen.
Zuckerrückstände lassen sich auch mit
Reinigungskassetten nicht von den Tonköpfen
entfernen.
2
Umgang mit Kassetten
Pflege von Kassetten
•Berühren Sie nicht das Band in einer
Kassette. Andernfalls lagern sich Schmutzoder Staubpartikel auf den Tonköpfen ab.
•Halten Sie Kassetten von Geräten mit
eingebauten Magneten, zum Beispiel
Lautsprechern und Verstärkern, fern.
Andernfalls kann die Aufnahme auf dem
Band gelöscht oder beschädigt werden.
•Setzen Sie Kassetten weder direktem
Sonnenlicht noch großer Kälte oder
Feuchtigkeit aus.
•Wenn das Band nicht gespannt ist, kann es
sich im Gerät verfangen. Straffen Sie deshalb
vor dem Einlegen einer Kassette das Band,
indem Sie die Spule mit einem Stift oder
einem ähnlichen Gegenstand drehen.
Nicht
gespannt
•Beschädigte Kassetten und lose Aufkleber
können beim Einlegen oder Auswerfen von
Kassetten Probleme verursachen. Entfernen
Sie lose Aufkleber oder tauschen Sie sie aus.
Kassetten mit einer Spieldauer von über
90 Minuten
Es empfiehlt sich, Kassetten mit einer
Spieldauer von über 90 Minuten - wenn
überhaupt - nur für langes, ununterbrochenes
Wiedergeben zu verwenden. Das Band in
diesen Kassetten ist sehr dünn und leicht zu
überdehnen. Häufiges Starten und Stoppen
kann bei diesen Bändern dazu führen, dass sie
in den Kassettendeckmechanismus
hineingezogen werden.
•Während der Wiedergabe der Kassette kann
es vorkommen, dass der Ton verzerrt ist. Der
Tonkopf des Kassettenrecorders sollte nach
jeweils 50 Gebrauchsstunden gereinigt
werden.
3

Inhalt
Anleitung für dieses Gerät
Lage und Funktion der Teile und
Bedienelemente ........................................................ 5
Vorbereitungen
Zurücksetzen des Geräts.................................... 6
Abnehmen der Frontplatte ................................ 6
Einstellen der Uhr ............................................... 7
Kassettendeck
Wiedergeben einer Kassette .............................. 7
Radioempfang während des Spulens einer
Kassette
— Automatische Tuner-
Aktivierung (ATA) ......................................... 8
Radio
Automatisches Speichern von Radiosendern
— Speicherbelegungsautomatik
(BTM-Funktion) ............................................. 8
Speichern bestimmter Radiosender ................. 9
Einstellen gespeicherter Sender ........................ 9
RDS
Überblick über die RDS-Funktion .................. 10
Anzeigen des Sendernamens .......................... 10
Automatisches Neueinstellen eines Senders
— Alternativfrequenzen (AF-Funktion) ... 10
Empfangen von Verkehrsdurchsagen ............ 12
Speichern von RDS-Sendern mit AF- und
TA-Daten ....................................................... 13
Suchen eines Senders nach Programmtyp .... 13
Automatisches Einstellen der Uhr.................. 14
Weitere Funktionen
Einstellen von Balance und Fader .................. 15
Dämpfen des Tons ............................................ 15
Wechseln der Klang- und
Anzeigeeinstellungen .................................. 15
Einstellen des Equalizers
— EQ3............................................................ 16
Wenn zusätzliche Geräte
angeschlossen sind
CD/MD-Gerät
Wiedergeben einer CD oder MD .................... 17
Wiederholtes Wiedergeben von Titeln
— Repeat Play .............................................. 18
Wiedergeben von Titeln in willkürlicher
Reihenfolge
— Shuffle Play .............................................. 18
Weitere Informationen
Wartung .............................................................. 19
Ausbauen des Geräts ........................................ 20
Technische Daten .............................................. 21
Störungsbehebung ............................................ 22
4
Lage und Funktion der Teile und Bedienelemente
SOURCE
MODE
RELEASE
SEL
AF ATT
DISC
123456
Näheres finden Sie auf den angegebenen Seiten.
1 Taste SOURCE (Radio/CD/MD)
8, 9, 16, 17
2 Taste MODE
Beim Radioempfang:
Frequenzbereichauswahl 8, 9
Bei der CD-/MD-Wiedergabe:
Auswahl des CD/MD-Geräts 17
3 Lautstärketaste +/– 7, 12, 15, 16
4 Taste Z (Auswerfen) 7, 8, 9, 17
5 Display
6 Tasten m/M (Spulen)/DIR (Ändern
der Bandtransportrichtung) 7, 8
7 Taste SEEK
Suchen 9, 11, 14
Automatischer Musiksensor 18
Manuelle Suche 18
8 Taste DSPL (Ändern des Anzeigemodus)
7, 10, 17
9 Taste EQ3 16
q; Taste RELEASE (Entriegelung der
Frontplatte) 6, 19
qa Taste SEL (Wählen) 7, 14, 15, 16, 17
qs Taste RESET (an der Gerätevorderseite,
unter der Frontplatte) 6
DIR
SEEK
SHUF
REP
XR-CA370X/CA370
ATA
TAPTY
qd Taste AF 10, 11, 13
qf Taste ATT (Dämpfen) 15
qg Zahlentasten 14, 15, 17
Beim Radioempfang:
Stationstasten 9, 11, 13
Bei der CD-/MD-Wiedergabe:
(1) DISC – 18
(2) DISC + 18
(3) REP 18
(4) SHUF 18
qh Taste PTY (Programmtyp)/ATA 8, 14
qj Taste TA 12, 13
qk Taste SENS/BTM 8, 9, 13
ql Taste OFF* 6
* Warnhinweis zur Installation des
Geräts in einem Auto mit
Zündschloss ohne Zubehörposition
ACC oder I
Drücken Sie am Gerät unbedingt
2 Sekunden lang (OFF), um die
Uhrzeitanzeige auszuschalten, nachdem
Sie den Motor ausgeschaltet haben.
Wenn Sie (OFF) nur kurz drücken, wird die
Uhrzeitanzeige nicht ausgeschaltet und der
Autobatterie wird Strom entzogen.
BTM
EQ3
DSPL
OFFSENS
5
Vorbereitungen
Zurücksetzen des Geräts
Bevor Sie das Gerät zum ersten Mal benutzen
oder wenn Sie die Autobatterie ausgetauscht
oder die Verbindungen geändert haben,
müssen Sie das Gerät zurücksetzen.
Nehmen Sie die Frontplatte ab und drücken
Sie die Taste RESET mit einem spitzen
Gegenstand, wie z. B. einem Kugelschreiber.
Taste RESET
Hinweis
Wenn Sie die Taste RESET drücken, werden die
eingestellte Uhrzeit und einige weitere
gespeicherte Einstellungen gelöscht.
Abnehmen der Frontplatte
Um einem Diebstahl des Geräts vorzubeugen,
kann die Frontplatte abgenommen werden.
1 Drücken Sie (OFF).
2 Drücken Sie (RELEASE), schieben Sie die
Frontplatte dann ein wenig nach links
und ziehen Sie sie auf sich zu heraus.
(OFF)
Anbringen der Frontplatte
Bringen Sie Teil A der Frontplatte wie auf der
Abbildung zu sehen an Teil B des Geräts an
und drücken Sie das linke Ende der
Frontplatte an, bis diese mit einem Klicken
einrastet.
A
B
Hinweise
• Achten Sie beim Anbringen der Frontplatte
darauf, dass sie richtigherum ausgerichtet ist. Die
Frontplatte kann nicht andersherum angebracht
werden.
• Drücken Sie die Frontplatte beim Anbringen
nicht zu stark gegen das Gerät.
• Drücken Sie nicht zu stark auf das Display an der
Vorderseite der Frontplatte.
• Schützen Sie die Frontplatte vor direktem
Sonnenlicht, vor Wärmequellen wie
Warmluftauslässen und vor Feuchtigkeit. Lassen
Sie sie nie auf dem Armaturenbrett eines Autos
liegen, das in direktem Sonnenlicht geparkt ist,
oder an einem anderen Ort, an dem die
Temperatur stark ansteigen kann.
Warnton
Wenn Sie die Zündung des Wagens
ausschalten, ohne die Frontplatte abzunehmen,
ertönt einige Sekunden lang ein Signalton.
Wenn Sie einen gesondert erhältlichen
Endverstärker anschließen und den
integrierten Verstärker nicht benutzen, wird
der Signalton deaktiviert.
(RELEASE)
Hinweise
• Lassen Sie die Frontplatte nicht fallen, wenn Sie
sie vom Gerät abnehmen.
• Wenn Sie die Frontplatte bei eingeschaltetem
Gerät abnehmen, schaltet sich das Gerät
automatisch aus, um eine Beschädigung der
Lautsprecher zu vermeiden.
• Bewahren Sie die Frontplatte im mitgelieferten
Behälter auf, wenn Sie sie bei sich tragen.
6
Einstellen der Uhr
Die Uhr zeigt die Zeit digital im 24-StundenFormat an.
Kassettendeck
Beispiel: Einstellen der Uhr auf 10:08
1 Drücken Sie (DSPL) 2 Sekunden lang.
Die Stundenanzeige blinkt.
1 Stellen Sie mit einer der Seiten der
Lautstärketaste die Stunden ein.
vorwärts
rückwärts
2 Drücken Sie (SEL).
Die Minutenanzeige blinkt.
3 Stellen Sie mit einer der Seiten der
Lautstärketaste die Minuten ein.
vorwärts
rückwärts
2 Drücken Sie (DSPL).
Die Uhr beginnt zu laufen.
Wenn Sie die Uhreinstellung vorgenommen
haben, erscheint im Display wieder die
Anzeige für den normalen
Wiedergabemodus.
Tipp
Mithilfe der RDS-Funktion können Sie die Uhr auch
automatisch einstellen lassen (Seite 14).
Wiedergeben einer
Kassette
Legen Sie eine Kassette ein.
Die Wiedergabe beginnt automatisch.
Die nach oben weisende Seite wird
wiedergegeben.
Die nach unten weisende Seite wird
wiedergegeben.
Tipp
Mit m und M können Sie die Bandrichtung
wechseln.
So stoppen Sie die Wiedergabe und
lassen die Kassette auswerfen
Drücken Sie Z.
Spulen einer Kassette
Drücken Sie während der Wiedergabe
m oder M.
Richtungsanzeige
FWD
REV
* Die Anzeige blinkt, während die Kassette
gespult wird.
Wenn Sie die Wiedergabe während des
Vorwärts- oder Zurückspulens starten wollen,
drücken Sie die jeweils andere Taste zum
Spulen so weit, bis die gedrückte Taste
herausspringt.
*
Vorwärts-
spulen
M
m
Zurückspulen
m
M
7

Radioempfang während
des Spulens einer Kassette
— Automatische Tuner-Aktivierung (ATA)
Beim Vorwärts- oder Zurückspulen mit der
Taste m oder M schaltet sich das Radio
automatisch ein.
Drücken Sie während der Wiedergabe
(PTY) (ATA) so oft, bis „ATA-ON“ im
Display erscheint.
ATA-ON y ATA-OFF
Der ATA-Modus beginnt.
Wenn Sie wieder in den normalen
Wiedergabemodus schalten möchten, wählen
Sie „ATA-OFF”.
Radio
Automatisches Speichern
von Radiosendern
— Speicherbelegungsautomatik
(BTM-Funktion)
Das Gerät wählt die Sender mit den stärksten
Signalen aus und speichert diese in der
Reihenfolge ihrer Frequenzen. In jedem
Frequenzbereich (FM1, FM2, FM3, MW und
LW) können Sie bis zu 6 Sender speichern.
ACHTUNG - UNFALLGEFAHR!
Wenn Sie während der Fahrt Sender einstellen
wollen, benutzen Sie, um Unfälle zu
vermeiden, bitte die BTM-Funktion.
1 Drücken Sie mehrmals (SOURCE), um das
Radio auszuwählen.
Falls gerade eine Kassette wiedergegeben
wird, lassen Sie diese mit Z auswerfen.
Mit jedem Tastendruck auf (SOURCE)
wechselt die Tonquelle folgendermaßen:
Radio t CD* t MD*
* Wenn kein Zusatzgerät angeschlossen ist,
erscheint auch die entsprechende Anzeige
nicht.
2 Drücken Sie mehrmals (MODE), um den
gewünschten Frequenzbereich
einzustellen.
Mit jedem Tastendruck auf (MODE)
wechselt der Frequenzbereich
folgendermaßen:
FM1 t FM2 t FM3 t MW t LW
3 Drücken Sie (SENS) (BTM) 2 Sekunden
lang.
Das Gerät speichert die Sender in der
Reihenfolge ihrer Frequenzen auf den
Zahlentasten.
Ein Signalton ist zu hören, und die
Einstellung wird gespeichert.
Hinweise
• Sender, die nicht in guter Qualität zu empfangen
sind (zu schwache Signale), werden nicht
gespeichert. Wenn nur wenige Sender in guter
Qualität zu empfangen sind, bleiben auf einigen
Zahlentasten die vorher gespeicherten Sender
erhalten.
• Wird im Display eine Zahl angezeigt, beginnt das
Gerät beim Speichern von Sendern mit der
angezeigten Nummer.
8
 Loading...