

Remote Commander
Operating Instructions
Mode d’emploi
Manual de instrucciones
Bedienungsanleitung
©2017 Sony Corporation
Printed in China
http://www.sony.net/
RM-X8S
Support site
If you have any questions or for the
latest support information on this
product, please visit the web site below:
Sitio Web de soporte
técnico en línea
Para resolver cualquier duda u obtener
la información más reciente sobre el
soporte técnico de este producto, visite
el siguiente sitio Web:
Sito di assistenza clienti
In caso di domande o per le informazioni
più aggiornate sul presente prodotto,
visitare il seguente sito Web:
http://www.sony.eu/support
Register your product online now at:
Merci d’enregister votre produit en ligne sur:
Registre su producto online en:
Registrieren Sie Ihr Produkt jetzt bei:
Registra online il tuo prodotto su:
Registreer uw product nu online via:
Istruzioni per l’uso
Gebruiksaanwijzing
Site d’assistance
Si vous avez des questions ou si vous souhaitez
consulter les toutes dernières informations
techniques sur ce produit, rendez-vous sur
le site Web suivant :
Support-Website
Wenn Sie Fragen haben oder die neuesten
Support-Informationen zu diesem Produkt
abrufen möchten, rufen Sie bitte folgende
Website auf:
Ondersteuningssite
Als u vragen hebt of de recentste
ondersteuningsinformatie over dit product
wilt hebben, gaat u naar de onderstaande
website:
http://www.sony.eu/mysony
Customers in Latin America:
Clientes en Latinoamérica:
http://esupport.sony.com/ES/LA/
Customers in Asia Pacific:
Clientes en Asia-Pacífico:
http://www.sony-asia.com/section/support
http://www.sony-asia.com/caraudio/
http://www.sony-asia.com/section/support
http://www.sony-asia.com/caraudio/
4-698-375-11(1)
English
Before operating the system, please read
this guide thoroughly and retain it for
future reference.
Made in China
The information indicating operating
voltage, etc., is located on the bottom of
the remote commander.
The validity of the CE marking is restricted
to only those countries where it is legally
enforced, mainly in the countries EEA
(European Economic Area).
Notice for customers: the following
information is only applicable to
equipment sold in countries applying EU
Directives
Manufacturer: Sony Corporation, 1-7-1
Konan Minato-ku Tokyo, 108-0075 Japan
For EU product compliance: Sony Belgium,
bijkantoor van Sony Europe Limited, Da
Vincilaan 7-D1, 1935 Zaventem, Belgium
Disposal of waste batteries
and electrical and electronic
equipment (applicable in
the European Union and
other European countries
systems)
This symbol on the product, the battery or
on the packaging indicates that the
product and the battery shall not be
treated as household waste. On certain
batteries this symbol might be used in
combination with a chemical symbol. The
chemical symbols for mercury (Hg) or lead
(Pb) are added if the battery contains more
than 0.0005% mercury or 0.004% lead. By
ensuring these products and batteries are
disposed of correctly, you will help prevent
potentially negative consequences for the
environment and human health which
could otherwise be caused by
inappropriate waste handling. The recycling
of the materials will help to conserve
natural resources.
In case of products that for safety,
performance or data integrity reasons
require a permanent connection with an
incorporated battery, this battery should be
replaced by qualified service staff only. To
ensure that the battery and the electrical
and electronic equipment will be treated
properly, hand over these products at
end-of-life to the applicable collection
point for the recycling of electrical and
electronic equipment. For all other
batteries, please view the section on how
to remove the battery from the product
safely. Hand the battery over to the
applicable collection point for the recycling
of waste batteries. For more detailed
information about recycling of this product
or battery, please contact your local Civic
Office, your household waste disposal
service or the shop where you purchased
the product or battery.
The remote commander contains a coin/
button cell battery.
If the coin/button cell battery is swallowed,
it can cause severe internal burns in just 2
hours and can lead to death.
Keep new and used batteries away from
children.
If the battery compartment does not close
securely, stop using the product and keep it
away from children.
If you think batteries might have been
swallowed or placed inside any part of the
body, seek immediate medical attention.
Note on the lithium battery
Do not expose the battery to excessive
heat such as direct sunlight, fire or the like.
If you have any questions or problems
concerning your unit that are not covered
in this manual, consult your nearest Sony
dealer.
with separate collection
WARNING: Do not ingest
battery, Chemical Burn Hazard.
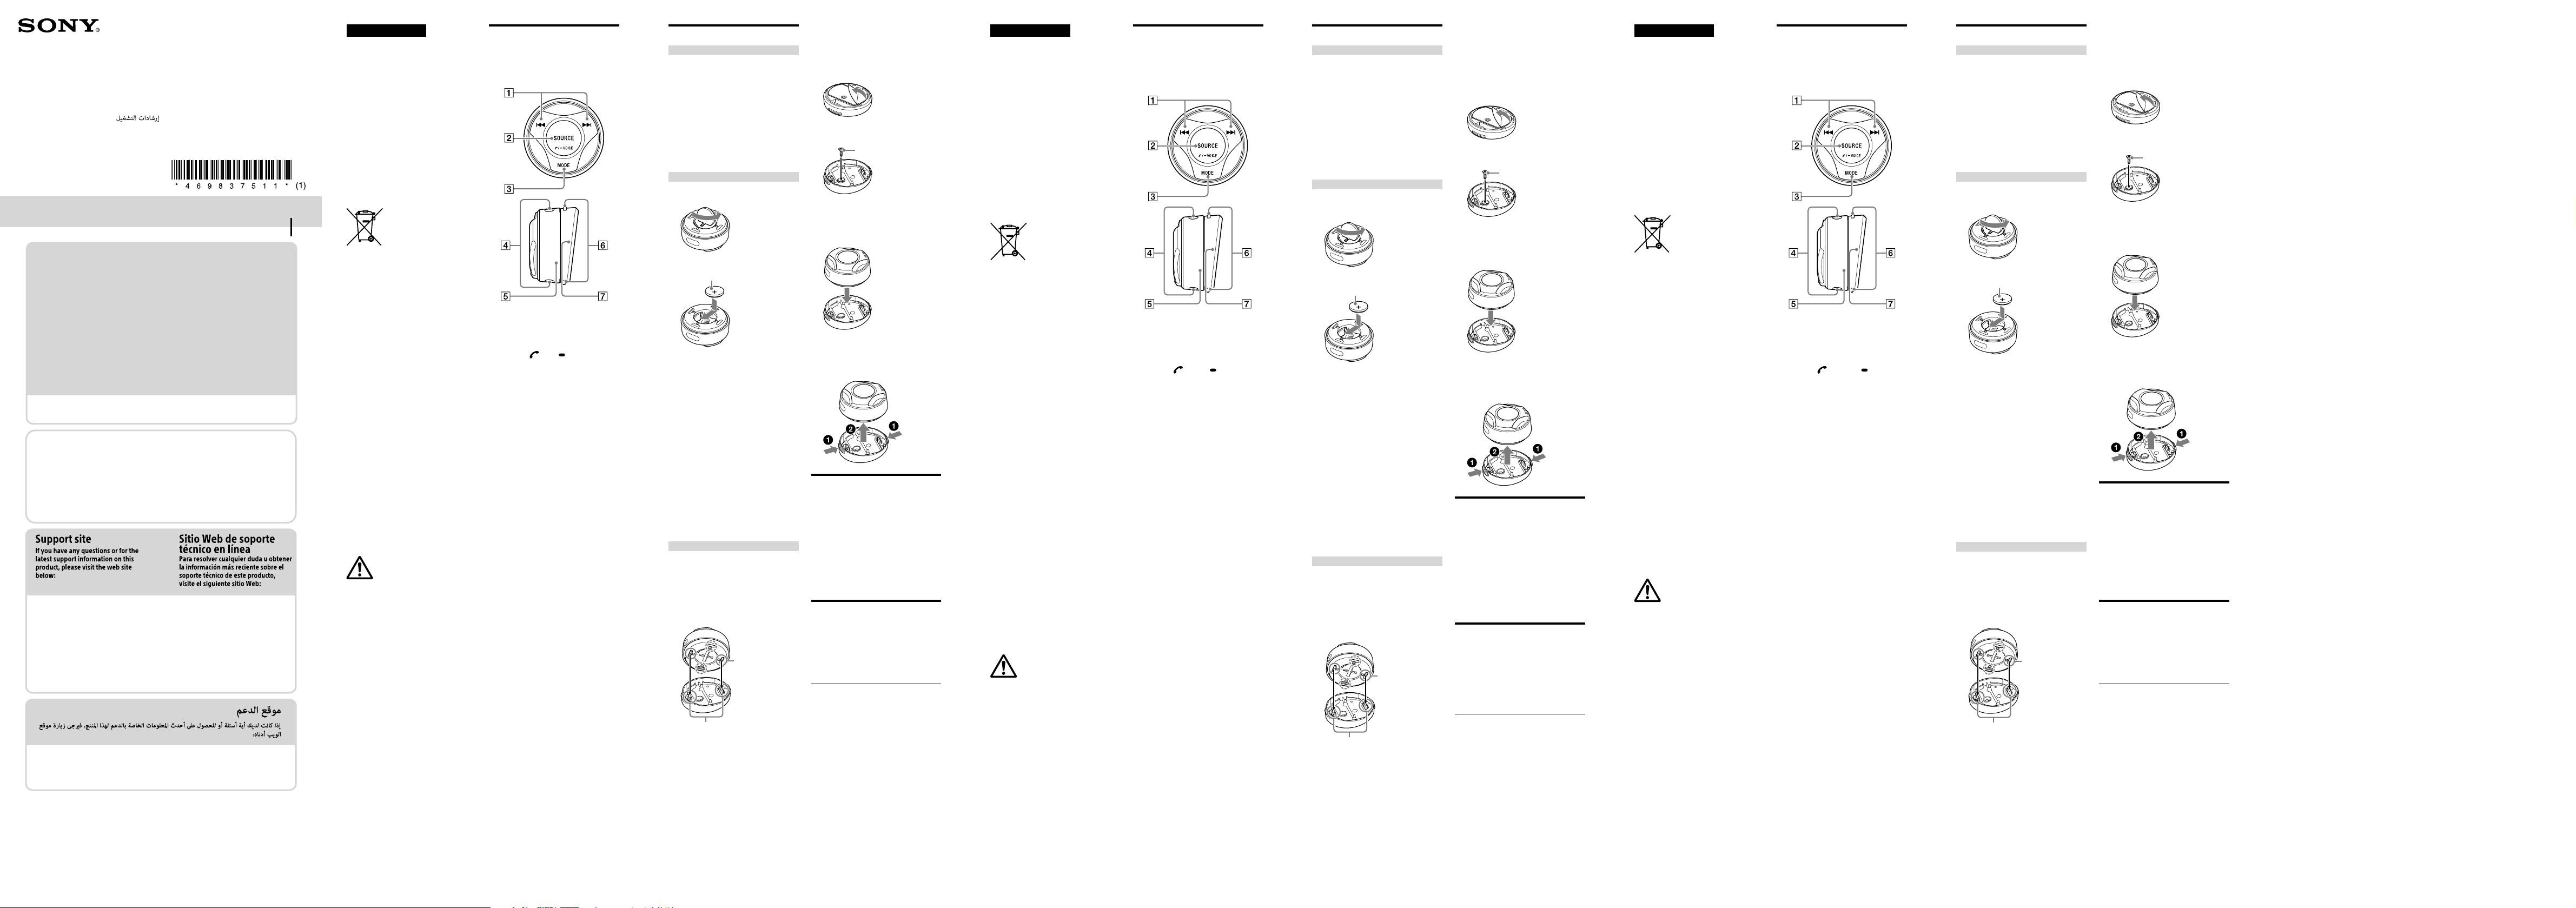
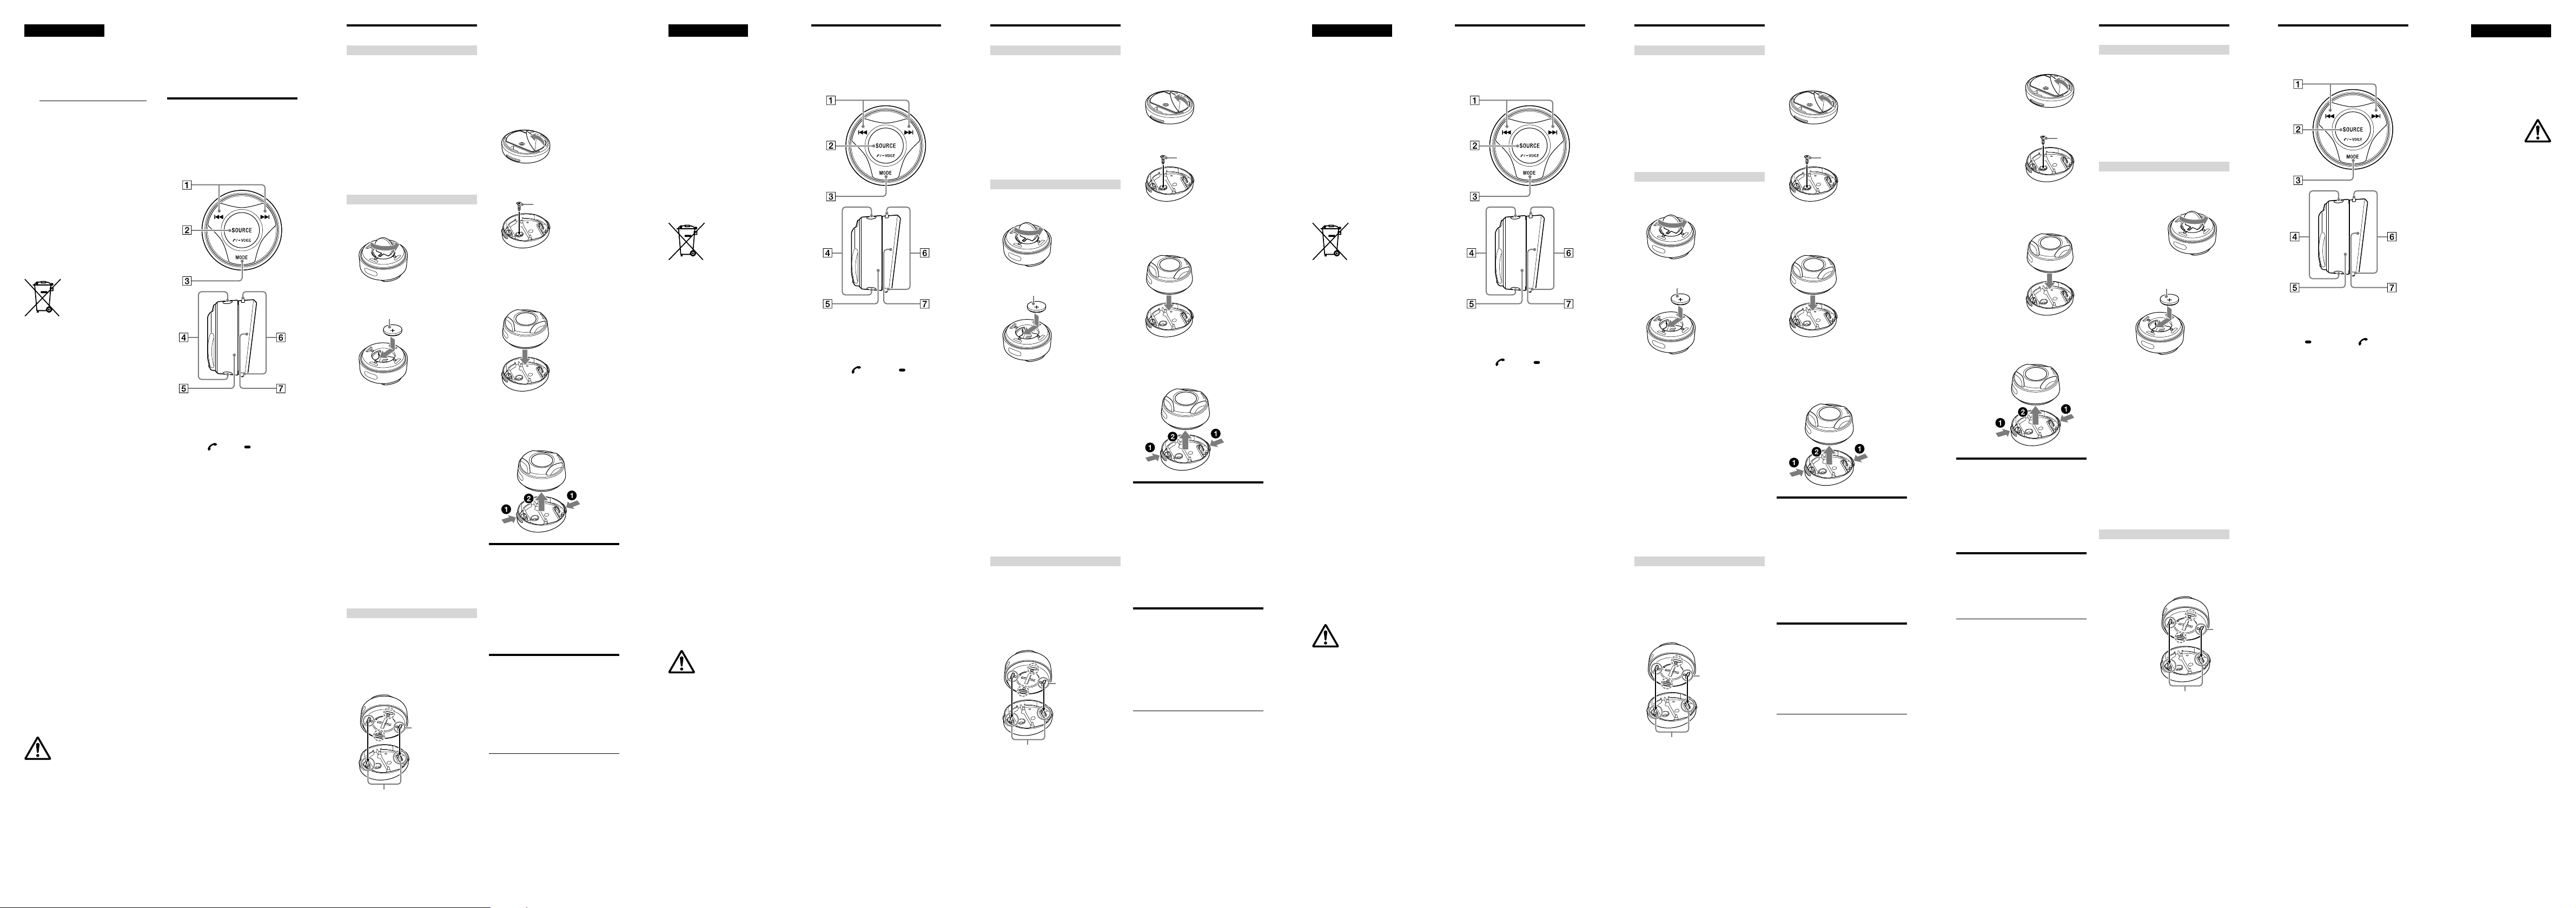
Guide to Parts and
Controls
The buttons on the remote commander
have the same function as buttons on the
head unit. For details, refer to the operating
instructions supplied with the head unit.
/ (seek –/+)
Switching the mode may be required
depending on the head unit. For
details, see “About Mode 1 and Mode
2.”
SOURCE/
The following operations are available
depending on the head unit.
• When making a call:
• When receiving a call:
• When talking:
• Press and hold to activate voice dial.
MODE (mode/enter)
Depending on the head unit, this
button can enter the selected item
when selecting the source.
Emitter of infrared rays
Volume +/–
Holder release button
Holder
About Mode 1 and Mode 2
This remote commander corresponds to 2
modes, [Mode 1] and [Mode 2]. The default
setting is [Mode 1]. If the seek function
does not work when pressing and holding
/, switch the mode as follows:
- While pressing SOURCE, press , ,
and MODE in that order, then press and
hold for 2 seconds. The mode is
switched to [Mode 2].
- Be sure to reverse/forward a track
properly when pressing /.
To return the mode to [Mode 1], operate as
follows:
- While pressing SOURCE, press , ,
and MODE in that order, then press and
hold for 2 seconds.
(call)/ VOICE
– Press to stop the call.
– Press to receive a call.
– Press and hold to reject the call.
– Press to end a call.
– Press and hold to switch to another
call.
Installation
Cautions
Be sure to keep the remote commander
ˎ
from interfering with your driving
operations.
Avoid installing the remote commander
ˎ
in areas subject to dust, dirt, excessive
vibration, or high temperature, such as in
direct sunlight, on the dashboard or near
heater ducts.
Do not place obstacles between the
ˎ
remote commander and head unit
because it may interfere with
communication with infrared rays.
Do not cover the emitter on the remote
ˎ
commander with your fingers.
Installing the lithium battery
1 Open the cover on the bottom of
remote commander with a coin, etc.
2 Install the supplied lithium battery to
the remote commander.
Lithium battery
To replace the lithium battery
Under normal conditions, the battery will
last approximately 1 year. (The service life
may be shorter, depending on the
conditions of use.)
When the battery becomes weak, the
range of the remote commander becomes
shorter.
CAUTION
Danger of explosion if battery is incorrectly
replaced. Replaced only with the same or
equivalent type.
Notes on the lithium battery
• Keep the lithium battery out of the reach of
children. Should the battery be swallowed,
immediately consult a doctor.
• Wipe the battery with a dry cloth to ensure a
good contact.
• Be sure to observe the correct polarity when
installing the battery.
• Do not hold the battery with metallic
tweezers, otherwise a short-circuit may
occur.
Installing the remote commander
Before installing
Make sure that the angle of slant at the
ˎ
holder or the direction of remote
commander is suitable for the installation
site. There are 4 grooves on the remote
commander and 2 hooks on the holder,
and depending on the situation, you can
install the remote commander four
different ways.
To prevent making unnecessary holes or
ˎ
attaching tape to an unsuitable site of
the car, install the remote commander to
a site where the head unit can definitely
receive the IR signal.
Note
Be careful to do not damage cables and other
items in the car when making a hole on the car
or tightening the screw.
+ side up
Groove
Hooks
1 Make a hole with a diameter of 2 mm
on the installation site of your car.
2 Peel the tape on the bottom of the
holder and attach it on the installation
site.
Fix the hole of the holder on the hole
of the car.
3 Install the supplied screw to the hole
of the holder and secure it to the
installation site.
4 Set the remote commander with the
lithium battery to the holder.
Insert the groove of the remote
commander in the hook of the holder,
and push the remote commander until
it clicks.
To remove the remote commander
1 Pull the remote commander while
pressing holder release buttons on
both sides of the holder at the same
to remove from the holder.
Screw
Specifications
Dimensions Approx. ø 54 mm × 34
Mass Approx. 42 g (2 oz)
Package contents Remote commander
Design and specifications are subject to
change without notice.
mm (ø 2 / in × 1 /
in)
(1)
CR2032 lithium battery
(1)
Parts for installation
and connections (1 set)
Troubleshooting
The following checklist will help you
remedy problems you may encounter with
your remote commander.
Before going through the checklist below,
check the connection and operating
procedures.
If the problem is not solved, visit the
support site.
The head unit does not work.
q Check that the emitter on the remote
commander is not covered with your
fingers.
q Check that the remote commander is
installed to a site where the head unit
can receive the IR signal of the remote
commander.
q Check that the battery of remote
commander becomes full.
Français
Avant de faire fonctionner le système,
veuillez lire ce guide en entier et
conservez-le pour référence future.
Fabriqué en Chine
Les informations indiquant la tension
d’alimentation, etc. se trouvent sur le
dessous de la télécommande.
La validité du libellé CE se limite
uniquement aux pays où la loi l’impose,
principalement les pays de l’EEE (Espace
économique européen).
Avis à l’attention des clients : les
informations suivantes s’appliquent
uniquement aux appareils vendus dans
des pays qui appliquent les directives de
l’Union Européenne
Fabricant : Sony Corporation, 1-7-1 Konan
Minato-ku Tokyo, 108-0075 Japon
Pour toute question relative à la conformité
des produits dans l’UE : Sony Belgium,
bijkantoor van Sony Europe Limited, Da
Vincilaan 7-D1, 1935 Zaventem, Belgique
Elimination des piles et
accumulateurs et des
Equipements Electriques et
Electroniques usagés
(Applicable dans les pays
aux autres pays européens disposant de
systèmes de collecte sélective)
Ce symbole apposé sur le produit, la pile ou
l’accumulateur ou sur l’emballage, indique
que le produit et les piles et accumulateurs
fournis avec ce produit ne doivent pas être
traités comme de simples déchets
ménagers.
Sur certains types de piles, ce symbole
apparaît parfois combiné avec un symbole
chimique. Les symboles pour le mercure
(Hg) ou le plomb (Pb) sont rajoutés lorsque
ces piles contiennent plus de 0,0005% de
mercure ou 0,004% de plomb. En vous
assurant que les produits, piles et
accumulateurs sont mis au rebut de façon
appropriée, vous participez activement à la
prévention des conséquences négatives
que leur mauvais traitement pourrait
provoquer sur l’environnement et sur la
santé humaine. Le recyclage des matériaux
contribue par ailleurs à la préservation des
ressources naturelles.
Pour les produits qui pour des raisons de
sécurité, de performance ou d’intégrité de
données nécessitent une connexion
permanente à une pile ou à un
accumulateur, il conviendra de vous
rapprocher d’un Service Technique qualifié
pour effectuer son remplacement.
En rapportant votre appareil électrique, les
piles et accumulateurs en fin de vie à un
point de collecte approprié vous vous
assurez que le produit, la pile ou
l’accumulateur incorporé sera traité
correctement.
Pour tous les autres cas de figure et afin
d’enlever les piles ou accumulateurs en
toute sécurité de votre appareil,
reportez-vous au manuel d’utilisation.
Rapportez les piles et accumulateurs, et les
équipements électriques et électroniques
usagés au point de collecte approprié pour
le recyclage.
Pour toute information complémentaire au
sujet du recyclage de ce produit ou des
piles et accumulateurs, vous pouvez
contacter votre municipalité, votre
déchetterie locale ou le point de vente où
vous avez acheté ce produit.
La télécommande contient une pile de type
bouton/en forme de pièce de monnaie.
L’ingestion de la pile de type bouton/en
forme de pièce de monnaie peut causer en
2 heures seulement des brûlures internes
très graves pouvant entraîner la mort.
Conservez les piles neuves et usagées hors
de portée des enfants.
Si le logement de la pile ne se ferme pas
correctement, cessez d’utiliser le produit et
conservez-le hors de portée des enfants.
Si vous pensez que des piles ont été
avalées ou placées à l’intérieur d’une
quelconque partie du corps, consultez
immédiatement un médecin.
Remarque sur la pile au lithium
N’exposez pas la pile à une chaleur
excessive, comme en plein soleil, près d’un
feu ou autre.
Si vous avez des questions ou des
problèmes concernant cet appareil qui ne
sont pas abordés dans ce mode d’emploi,
contactez votre revendeur Sony.
de l’Union Européenne et
AVERTISSEMENT : Ne pas
ingérer la pile - risque de
brûlure chimique.
Emplacement des
commandes
Les touches de la télécommande
possèdent les mêmes fonctions que celles
de l’appareil principal. Pour de plus amples
détails, reportez-vous au mode d’emploi
fourni avec l’appareil principal.
/ (recherche –/+)
Le changement de mode peut être
requis en fonction de l’appareil
principal. Pour de plus amples détails,
reportez-vous à la section «À propos
du Mode 1 et du Mode 2».
SOURCE/
Les opérations suivantes sont
disponibles en fonction de l’appareil
principal.
• Pendant l’émission d’un appel:
• Pendant la réception d’un appel:
• Pendant la communication:
• Appuyez et maintenez enfoncé pour
MODE (mode/entrée)
Selon l’appareil principal, cette touche
permet d’accéder à l’élément
sélectionné pendant le choix de la
source.
Émetteur de rayons infrarouges
Volume +/–
Bouton de libération du support
Support
À propos du Mode 1 et du Mode 2
Cette télécommande correspond à 2
modes, [Mode 1] et [Mode 2]. Le réglage
par défaut est [Mode 1]. Si la fonction de
recherche ne fonctionne pas quand vous
appuyez sur / et que vous
maintenez enfoncé, changez de mode
comme suit:
- Pendant que vous appuyez sur SOURCE,
appuyez sur , , puis sur MODE,
dans cet ordre, puis appuyez sur et
maintenez enfoncé pendant 2 secondes. Le
mode bascule sur [Mode 2].
- Veillez à reculer/avancer correctement la
piste en appuyant sur /.
Pour revenir en [Mode 1], procédez comme
suit:
- Pendant que vous appuyez sur SOURCE,
appuyez sur , , puis sur MODE,
dans cet ordre, puis appuyez sur et
maintenez enfoncé pendant 2 secondes.
(appel)/ VOICE
– Appuyez pour mettre fin à l’appel.
– Appuyez pour recevoir l’appel.
– Appuyez et maintenez enfoncé
pour refuser l’appel.
– Appuyez pour mettre fin à l’appel.
– Appuyez et maintenez enfoncé
pour basculer vers un autre appel.
activer la numérotation vocale.
Installation
Attention
Veillez à empêcher la télécommande
ˎ
d’interférer avec votre conduite.
Évitez d’installer la télécommande dans
ˎ
des endroits exposés à la poussière, à la
saleté, à des vibrations excessives ou à
des températures élevées, notamment
celles des rayons directs du soleil, sur le
tableau de bord ou à proximité des
conduites de chauffage.
Ne placez aucun obstacle entre la
ˎ
télécommande et l’appareil principal, car
cela pourrait perturber la transmission
des rayons infrarouges.
Ne recouvrez pas l’émetteur de la
ˎ
télécommande avec vos doigts.
Installation de la pile au lithium
1 Ouvrez le couvercle au dos de la
télécommande avec une pièce de
monnaie ou autre.
2 Installez la pile au lithium fournie
dans la télécommande.
Pile au lithium
Pour remplacer la pile au lithium
En temps normal, la durée de vie de la pile
est d’environ 1 an. (Elle peut être plus
courte, en fonction des conditions
d’utilisation.)
Lorsque la pile faiblit, la portée de la
télécommande se réduit.
ATTENTION
Il y a un risque d’explosion si le
remplacement n’est pas effectué
correctement. Utilisez un type de pile
identique ou équivalent.
Remarques concernant la pile au lithium
• Conservez la pile au lithium hors de portée
des enfants. En cas d’ingestion, consultez
immédiatement un médecin.
• Essuyez la pile avec un chiffon sec afin
d’assurer un bon contact.
• Veillez à respecter les polarités lors de
l’installation de la pile.
• Ne manipulez pas la pile avec une pince fine
métallique. Cela est susceptible de
provoquer un court circuit.
Installation de la télécommande
Avant de procéder à l’installation
Assurez-vous que l’angle d’inclinaison du
ˎ
support ou que l’orientation de la
télécommande sont adaptés à l’endroit
choisi pour l’installer. La télécommande
comporte 4 rainures et 2 crochets sur le
support; en fonction de la configuration,
vous pouvez installer la télécommande
de quatre façons différentes.
Crochets
Afin d’éviter de percer des trous inutiles
ˎ
ou de fixer l’adhésif dans un endroit
inadapté à l’intérieur de la voiture,
installez la télécommande à un endroit
où l’appareil principal peut recevoir le
signal IR sans aucun problème.
Remarque
Veillez à ne pas endommager de câbles ou
autres éléments à l’intérieur de la voiture
lorsque vous percez un trou ou que vous serrez
la vis.
pôle + vers le haut
Rainure
1 Percez un trou de 2 mm de diamètre à
l’endroit choisi pour l’installation à
l’intérieur de votre voiture.
2 Décollez la protection de l’adhésif
situé sur le dessous du support et
fixez-le sur l’endroit choisi pour
l’installation.
Faites correspondre le trou du support
avec le trou percé à l’intérieur de la
voiture.
3 Insérez la vis fournie dans le trou du
support et vissez-la sur l’emplacement
choisi pour l’installation.
4 Installez la télécommande équipée de
la pile au lithium sur le support.
Insérez la rainure de la télécommande
dans le crochet du support, et poussez
la télécommande jusqu’à ce que vous
entendiez un clic.
Pour retirer la télécommande
1 Tirez sur la télécommande tout en
appuyant sur le bouton de libération
du support de part et d’autre du
support pour la retirer de son support.
Vis
Spécifications
Dimensions Environ ø 54 mm ×
Poids Environ 42 g
Contenu de l’emballage
La conception et les spécifications sont
sujettes à modification sans préavis.
34mm
Télécommande (1)
Pile au lithium
CR2032(1)
Composants destinés
à l’installation et au
raccordement (1 jeu)
Dépannage
La liste de contrôles suivante vous aidera à
remédier aux problèmes que vous pourriez
rencontrer avec votre télécommande.
Avant de passer en revue la liste de
contrôles ci-dessous, vérifiez les
procédures de raccordement et
d’utilisation.
Si le problème n’est pas résolu, consultez le
site d’assistance.
L’appareil principal ne fonctionne pas.
q Vérifiez que vos doigts ne recouvrent
pas l’émetteur de la télécommande.
q Vérifiez que la télécommande est
installée à un endroit où l’appareil
principal peut recevoir le signal IR de la
télécommande.
q Vérifiez la charge de la pile de la
télécommande.
Español
Antes de operar el sistema, lea esta guía
cuidadosamente y guárdela para consultas
en el futuro.
Fabricado en China
La información que indica el voltaje de
funcionamiento, etc., está situada en la
parte inferior el control remoto.
La validez de la marca CE está limitada a
aquellos países en los que la legislación la
impone, principalmente los países del EEE
(Espacio económico europeo).
Aviso para los clientes: la información
siguiente resulta de aplicación solo a los
equipos comercializados en países
afectados por las directivas de la UE
Fabricante: Sony Corporation, 1-7-1 Konan
Minato-ku Tokyo, 108-0075 Japón
Para la conformidad del producto en la UE:
Sony Belgium, bijkantoor van Sony Europe
Limited, Da Vincilaan 7-D1, 1935 Zaventem,
Bélgica
Tratamiento de las baterías
y equipos eléctricos y
electrónicos al final de su
vida útil (aplicable en la
Unión Europea y en países
tratamiento selectivo de residuos)
Este símbolo en el producto, en la batería o
en el embalaje indica que el producto y la
batería no pueden ser tratados como un
residuo doméstico normal. En algunas
baterías este símbolo puede utilizarse en
combinación con un símbolo químico.
El símbolo químico del mercurio (Hg) o del
plomo (Pb) se añadirá si la batería contiene
más del 0,0005% de mercurio o del 0,004%
de plomo. Al asegurarse de que estos
productos y baterías se desechan
correctamente, usted ayuda a prevenir las
consecuencias potencialmente negativas
para el medio ambiente y la salud humana
que podrían derivarse de la incorrecta
manipulación. El reciclaje de materiales
ayuda a conservar los recursos naturales.
En el caso de productos que por razones
de seguridad, rendimiento o
mantenimiento de datos sea necesaria una
conexión permanente con la batería
incorporada, esta batería solo deberá ser
reemplazada por personal técnico
cualificado para ello. Para asegurarse de
que la batería será tratada correctamente,
entregue estos productos al final de su vida
útil en un punto de recogida para el
reciclado de aparatos eléctricos y
electrónicos. Para las demás baterías,
consulte la sección donde se indica cómo
extraer la batería del producto de forma
segura. Deposite la batería en el
correspondiente punto de recogida para el
reciclado de baterías. Para recibir
información detallada sobre el reciclaje de
este producto o de la batería, póngase en
contacto con el ayuntamiento, el punto de
recogida más cercano o el establecimiento
donde ha adquirido el producto o la
batería.
El mando a distancia contiene una pila de
botón.
La ingestión de la pila de botón puede
provocar quemaduras internas graves en
solo 2 horas que pueden llegar a causar la
muerte.
Mantenga siempre las pilas nuevas y
usadas lejos del alcance de los niños.
Si el compartimento de la pila no se cierra
correctamente, deje de usar el producto y
guárdelo lejos del alcance de los niños.
Si cree que una pila puede haberse
ingerido o alojado en alguna parte del
cuerpo, solicite asistencia médica de forma
inmediata.
Nota sobre la pila de litio
No exponga la pila a fuentes de calor
excesivo como luz solar directa, fuego o
similar.
Si desea realizar alguna consulta o
solucionar algún problema relativo a la
unidad que no se trate en este Manual de
instrucciones, póngase en contacto con el
distribuidor Sony más cercano.
europeos con sistemas de
ADVERTENCIA: No ingiera la
pila, ya que existe riesgo de
quemadura química.
Guía de componentes y
controles
Los botones del mando a distancia tienen
las mismas funciones que los de la unidad
principal. Para obtener más información,
consulte el manual de instrucciones
suministrado con la unidad principal.
/ (búsqueda –/+)
En función de la unidad principal, es
posible que deba cambiar de modo.
Para obtener más información,
consulte “Acerca del Mode 1 y el Mode
2”.
SOURCE/
Las siguientes operaciones están
disponibles en función de la unidad
principal.
• Al realizar una llamada:
• Al recibir una llamada:
• Durante la conversación:
• Mantenga pulsado para activar la
MODE (modo/intro)
En función de la unidad principal, este
botón puede usarse para acceder a la
opción seleccionada al elegir la fuente.
Emisor de rayos infrarrojos
Volumen +/–
Botón de desbloqueo del soporte
Soporte
Acerca del Mode 1 y el Mode 2
Este mando a distancia puede tener 2
modos: el [Mode 1] y el [Mode 2]. El ajuste
predeterminado es [Mode 1]. Si la función
de búsqueda no funciona al mantener
pulsado /, cambie el modo de la
forma siguiente:
- Mientras pulsa SOURCE, pulse , y
MODE en este orden y, a continuación,
mantenga pulsado durante 2
segundos. El modo cambiará al [Mode 2].
- Asegúrese de que la pista avanza o
retrocede correctamente al pulsar
/.
Para volver al [Mode 1], siga los pasos
descritos a continuación:
- Mientras pulsa SOURCE, pulse , y
MODE en este orden y, a continuación,
mantenga pulsado durante 2
segundos.
(llamada)/ VOICE
– Pulse para detener la llamada.
– Pulse para recibir una llamada.
– Mantenga pulsado para rechazar la
llamada.
– Pulse para finalizar una llamada.
– Mantenga pulsado para cambiar a
otra llamada.
marcación por voz.
Instalación
Precauciones
Evite que el mando a distancia interfiera
ˎ
con la conducción.
Nunca instale el mando a distancia en
ˎ
zonas expuestas al polvo, la suciedad,
vibraciones excesivas o temperaturas
elevadas, como bajo la luz directa del sol,
en el salpicadero o cerca de salidas de la
calefacción.
No coloque obstáculos entre el mando a
ˎ
distancia y la unidad principal, ya que
podrían interferir en la comunicación por
infrarrojos.
No tape el emisor del mando a distancia
ˎ
con los dedos.
Instalación de la pila de litio
1 Abra la tapa de la parte inferior del
mando a distancia con una moneda,
etc.
2 Instale la pila de litio suministrada en
el mando a distancia.
Pila de litio
Sustitución de la pila de litio
En condiciones normales, la pila tiene una
duración aproximada de 1 año. (La vida útil
puede ser inferior, en función de las
condiciones de utilización.)
Si la pila pierde carga, el alcance del mando
a distancia se reduce.
PRECAUCIÓN
Si la pila no se sustituye correctamente,
existe peligro de explosión. La pila solo
debe sustituirse por otra exactamente igual
o equivalente.
Notas sobre la pila de litio
• Mantenga la pila de litio lejos del alcance de
los niños. En caso de ingestión de la pila,
acuda inmediatamente a un médico.
• Frote la pila con un paño seco para garantizar
un buen contacto.
• Respete siempre la polaridad correcta al
colocar la pila.
• No sujete la pila con pinzas metálicas, ya que
podría producirse un cortocircuito.
Instalación del mando a distancia
Antes de la instalación
Asegúrese de que el ángulo de
ˎ
inclinación del soporte o la dirección del
mando a distancia son adecuados para el
lugar de instalación. El mando a distancia
presenta 4 ranuras y el soporte 2
ganchos y, en función de la situación,
puede instalar el mando a distancia de
cuatro formas diferentes.
Ganchos
Para no tener que perforar orificios
ˎ
innecesarios ni pegar cinta adhesiva en
una zona del vehículo poco adecuada,
instale el mando a distancia en un punto
en el que la unidad principal pueda
recibir correctamente la señal infrarroja.
Nota
Extreme las precauciones para evitar dañar
cables y otros elementos del vehículo al
perforar un orificio en el vehículo o apretar un
tornillo.
Cara + hacia arriba
Ranura
1 Perfore un orificio de un diámetro de
2mm en el punto de instalación de su
vehículo.
2 Retire la película de protección de la
parte inferior del soporte y fíjela en el
punto de instalación.
Fije el orificio del soporte en el orificio
del vehículo.
3 Instale el tornillo suministrado en el
orificio del soporte y fíjelo en el punto
de instalación.
4 Monte el mando a distancia con la pila
de litio en el soporte.
Encaje la ranura del mando a distancia
con el gancho del soporte y presione el
mando a distancia hasta que escuche
un clic.
Desmontaje del mando a distancia
1 Tire del mando a distancia mientras
pulsa los botones de desbloqueo en
ambos lados del soporte al mismo
tiempo para retirarlo del soporte.
Tornillo
Especificaciones
Dimensiones Aprox. ø 54 mm ×
Masa Aprox. 42 g
Contenidos del paquete
El diseño y las especificaciones pueden
variar sin previo aviso.
34mm
Mando a distancia (1)
Pila de litio CR2032 (1)
Componentes de
instalación y
conexiones (1 juego)
Solución de problemas
La siguiente lista de verificación le ayudará
a solucionar problemas que puedan surgir
con su mando a distancia.
Antes de repasar la siguiente lista,
compruebe la conexión y los
procedimientos operativos.
Si el problema no se resuelve, visite el sitio
de asistencia.
La unidad principal no funciona.
q Compruebe que no esté tapando con los
dedos el emisor del mando a distancia.
q Asegúrese de que el mando a distancia
está instalado en un lugar en el que la
unidad principal pueda recibir la señal
infrarroja del mando a distancia.
q Compruebe que la pila del mando a
distancia esté a su nivel máximo de
carga.
Deutsch
Lesen Sie diese Anleitung vor
Inbetriebnahme des Systems bitte genau
durch und bewahren Sie sie zum späteren
Nachschlagen sorgfältig auf.
Für mögliche spätere Service-Anfragen,
notieren Sie sich bitte vor der Installation
Ihres Gerätes hier die Seriennummer:
S/N:
Hinweis: Die 7-stellige Seriennummer
finden Sie oben auf der Verpackung des
Gerätes oder unten auf dem Gerät selber.
Hergestellt in China
Die Informationen zu Betriebsspannung
usw. befinden sich an der Unterseite der
Fernbedienung.
Die Gültigkeit des CE-Zeichens beschränkt
sich auf Länder, in denen es gesetzlich
vorgeschrieben ist, hauptsächlich in
Ländern des Europäischen
Wirtschaftsraums (EWR).
Hinweis für Kunden: Die folgenden
Informationen gelten nur für Geräte, die
in Ländern verkauft werden, in denen
EURichtlinien gelten
Hersteller: Sony Corporation, 1-7-1 Konan
Minato-ku Tokio, 108-0075 Japan
Für EU Produktkonformität: Sony Belgium,
bijkantoor van Sony Europe Limited, Da
Vincilaan 7-D1, 1935 Zaventem, Belgien
Entsorgung von
gebrauchten Batterien und
Akkus und gebrauchten
elektrischen und
elektronischen Geräten
Ländern der Europäischen Union und
anderen europäischen Ländern mit
einem separaten Sammelsystem für
diese Produkte)
Das Symbol auf der Batterie/dem Akku,
dem Produkt oder der Verpackung weist
darauf hin, dass das Produkt oder die
Batterie/der Akku nicht als normaler
Haushaltsabfall zu behandeln sind. Ein
zusätzliches chemisches Symbol Pb (Blei)
oder Hg (Quecksilber) unter der
durchgestrichenen Mülltonne bedeutet,
dass die Batterie/der Akku einen Anteil von
mehr als 0,0005% Quecksilber oder 0,004%
Blei enthält.
Durch Ihren Beitrag zum korrekten
Entsorgen des Produktes und der Batterie
schützen Sie die Umwelt und die
Gesundheit Ihrer Mitmenschen. Umwelt
und Gesundheit werden durch falsches
Entsorgen gefährdet. Materialrecycling hilft,
den Verbrauch von Rohstoffen zu
verringern.
Bei Produkten, die auf Grund ihrer
Sicherheit, der Funktionalität oder als
Sicherung vor Datenverlust eine ständige
Verbindung zur eingebauten Batterie
benötigen, sollte die Batterie nur durch
qualifiziertes Servicepersonal ausgetauscht
werden.
Um sicherzustellen, dass das Produkt und
die Batterie korrekt entsorgt werden, geben
Sie das Produkt zwecks Entsorgung an einer
Annahmestelle für das Recycling von
elektrischen und elektronischen Geräten ab.
Für alle anderen Batterien entnehmen Sie
die Batterie bitte entsprechend dem Kapitel
über die sichere Entfernung der Batterie.
Geben Sie die Batterie an einer
Annahmestelle für das Recycling von
Batterien/Akkus ab.
Weitere Informationen über das Recycling
dieses Produkts oder der Batterie erhalten
Sie von Ihrer Gemeinde, den kommunalen
Entsorgungsbetrieben oder dem Geschäft,
in dem Sie das Produkt gekauft haben.
Hinweis für Lithiumbatterien: Bitte geben
Sie nur entladene Batterien an den
Sammelstellen ab.
Wegen Kurzschlussgefahr überkleben Sie
bitte die Pole der Batterie mit Klebestreifen.
Sie erkennen Lithiumbatterien an den
Abkürzungen Li oder CR.
Die Fernbedienung enthält eine
Knopfzellenbatterie.
Wenn die Knopfzellenbatterie verschluckt
wird, kann sie bereits innerhalb von 2
Stunden schwere innere Verätzungen
verursachen, die zum Tod führen können.
Halten Sie neue und gebrauchte Batterien
von Kindern fern.
Wenn das Batteriefach nicht sicher schließt,
verwenden Sie das Produkt nicht weiter
und halten Sie es von Kindern fern.
Wenn Sie befürchten, dass Batterien
verschluckt worden oder anderweitig in
den Körper gelangt sein könnten, wenden
Sie sich umgehend an einen Arzt.
(anzuwenden in den
ACHTUNG: Batterie nicht
verschlucken, es besteht die
Gefahr von Verätzungen.
Hinweis zur Lithiumbatterie
Schützen Sie die Batterie vor übermäßiger
Hitze, wie z. B. direktem Sonnenlicht, Feuer
o. Ä.
Sollten an Ihrem Gerät Probleme auftreten
oder sollten Sie Fragen haben, auf die in
dieser Anleitung nicht eingegangen wird,
wenden Sie sich bitte an Ihren Sony-Händler.
Lage und Funktion der
Teile und
Bedienelemente
Die Tasten auf der Fernbedienung haben
dieselbe Funktion wie die Tasten am
Hauptgerät. Näheres dazu schlagen Sie
bitte in der mit dem Hauptgerät gelieferten
Bedienungsanleitung nach.
/ (Suchlauf –/+)
Je nach Hauptgerät muss eventuell der
Modus gewechselt werden.
Erläuterungen dazu finden Sie unter
„Hinweis zu Mode 1 und Mode 2“.
SOURCE/
Je nach Hauptgerät stehen die
folgenden Funktionen zur Verfügung.
• Beim Tätigen eines Anrufs:
• Beim Entgegennehmen eines Anrufs:
• Während eines Anrufs:
• Zum Aktivieren der Spracherkennung
MODE (Modus/Eingabe)
Je nach Hauptgerät können Sie mit
dieser Taste beim Auswählen der
Tonquelle das ausgewählte Element
bestätigen.
Infrarotsender
Lautstärke +/–
Halterlösetaste
Halter
Hinweis zu Mode 1 und Mode 2
Diese Fernbedienung unterstützt 2 Modi,
und zwar [Mode 1] und [Mode 2]. Die
Standardeinstellung ist [Mode 1]. Wenn
kein Suchlauf ausgeführt wird, obwohl Sie
/ gedrückt halten, wechseln Sie
den Modus wie folgt:
- Halten Sie SOURCE gedrückt, drücken Sie
nacheinander , und MODE und
halten Sie dann 2Sekunden lang
gedrückt. Der Modus wechselt zu [Mode 2].
- Vergewissern Sie sich, dass der Vorlauf/
Rücklauf im Titel ordnungsgemäß erfolgt,
wenn Sie / drücken.
Gehen Sie wie folgt vor, um wieder zum
Modus [Mode 1] zu wechseln:
- Halten Sie SOURCE gedrückt, drücken Sie
nacheinander , und MODE und
halten Sie dann 2Sekunden lang
gedrückt.
(Anruf)/ VOICE
– Zum Abbrechen des Anrufs
drücken.
– Zum Entgegennehmen des Anrufs
drücken.
– Zum Ablehnen des Anrufs gedrückt
halten.
– Zum Beenden des Anrufs drücken.
– Zum Wechseln zu einem anderen
Anruf gedrückt halten.
gedrückt halten.
Installation
Vorsichtsmaßnahmen
Achten Sie unbedingt darauf, dass die
ˎ
Fernbedienung beim Fahren nicht
hinderlich ist.
Installieren Sie die Fernbedienung nicht
ˎ
an einer Stelle, an der sie Staub, Schmutz,
übermäßigen Erschütterungen oder
hohen Temperaturen ausgesetzt ist, wie
z.B. in direktem Sonnenlicht, auf dem
Armaturenbrett oder in der Nähe der
Heizung.
Achten Sie darauf, dass sich zwischen der
ˎ
Fernbedienung und dem Hauptgerät
keine Hindernisse befinden, die die
Kommunikation über Infrarotstrahlen
stören könnten.
Decken Sie den Sender an der
ˎ
Fernbedienung nicht mit den Fingern ab.
Einlegen der Lithiumbatterie
1 Öffnen Sie die Abdeckung an der
Unterseite der Fernbedienung mit
einer Münze o.Ä.
2 Legen Sie die mitgelieferte
Lithiumbatterie in die Fernbedienung
ein.
Lithiumbatterie
So tauschen Sie die Lithiumbatterie aus
Unter normalen Bedingungen hält die
Batterie etwa 1Jahr. Die Lebensdauer der
Batterie kann je nach Gebrauch des Geräts
jedoch auch kürzer sein.
Wenn die Batterie schwächer wird, verkürzt
sich die Reichweite der Fernbedienung.
VORSICHT
Bei einer falschen oder falsch eingelegten
Batterie besteht Explosionsgefahr.
Tauschen Sie die Batterie nur gegen den
gleichen oder einen vergleichbaren
Batterietyp aus.
Hinweise zur Lithiumbatterie
• Bewahren Sie die Lithiumbatterie außerhalb
der Reichweite von Kindern auf. Sollte eine
Lithiumbatterie verschluckt werden, ist
umgehend ein Arzt aufzusuchen.
• Wischen Sie die Batterie mit einem trockenen
Tuch ab, um einen guten Kontakt zwischen
den Batteriepolen und -anschlüssen
sicherzustellen.
• Achten Sie beim Einlegen der Batterie auf die
richtige Polarität.
• Halten Sie die Batterie nicht mit einer
Metallpinzette. Dies könnte zu einem
Kurzschluss führen.
Installieren der Fernbedienung
Vorbereitungen
Vergewissern Sie sich, dass die Schräge
ˎ
am Halter bzw. die Ausrichtung der
Fernbedienung für die Montagestelle
geeignet ist. An der Fernbedienung
befinden sich 4Kerben und am Halter
2Haken und Sie haben gegebenenfalls
vier verschiedene Möglichkeiten, die
Fernbedienung zu installieren.
Um eine unnötige Bohrung oder das
ˎ
Anbringen von Klebeband an einer nicht
geeigneten Stelle im Fahrzeug zu
vermeiden, installieren Sie die
Fernbedienung an einer Stelle, an der das
Hauptgerät die IR-Signale definitiv
empfangen kann.
Haken
Mit der Seite +
nach oben
Kerbe
Hinweis
Achten Sie beim Bohren im Fahrzeug oder
Anziehen der Schraube darauf, keine Kabel
oder etwas anderes im Fahrzeug zu
beschädigen.
1 Bohren Sie an der Montagestelle im
Fahrzeug ein Loch mit einem
Durchmesser von 2mm.
2 Ziehen Sie das Klebeband an der
Unterseite des Halters ab und bringen
Sie es an der Montagestelle an.
Richten Sie die Bohrung am Halter an
der Bohrung am Fahrzeug aus.
3 Schrauben Sie die mitgelieferte
Schraube in die Bohrung des Halters
und befestigen Sie diesen an der
Montagestelle.
4 Setzen Sie die Fernbedienung mit der
Lithiumbatterie auf den Halter.
Setzen Sie die Kerbe der
Fernbedienung in den Haken des
Halters und drücken Sie auf die
Fernbedienung, bis sie mit einem
Klicken einrastet.
So nehmen Sie die Fernbedienung ab
1 Halten Sie die Halterlösetasten an
beiden Seiten des Halters gedrückt
und ziehen Sie gleichzeitig an der
Fernbedienung, um sie vom Halter
abzunehmen.
Schraube
Technische Daten
Abmessungen ca. ø 54 mm × 34 mm
Gewicht ca. 42 g
Lieferumfang Fernbedienung (1)
Änderungen, die dem technischen
Fortschritt dienen, bleiben vorbehalten.
CR2032Lithiumbatterie (1)
Montageteile und
Anschlusszubehör
(1Satz)
Störungsbehebung
Anhand der folgenden Checkliste können
Sie die meisten Probleme, die
möglicherweise an der Fernbedienung
auftreten, selbst beheben.
Bevor Sie die folgende Checkliste
durchgehen, überprüfen Sie bitte zunächst,
ob Sie das Gerät richtig angeschlossen und
bedient haben.
Wenn das Problem sich nicht beheben
lässt, besuchen Sie die Support-Website.
Das Hauptgerät funktioniert nicht.
q Vergewissern Sie sich, dass der Sender
auf der Fernbedienung nicht mit den
Fingern abgedeckt ist.
q Vergewissern Sie sich, dass die
Fernbedienung an einer Stelle installiert
ist, an der das Hauptgerät die IR-Signale
der Fernbedienung empfangen kann.
q Vergewissern Sie sich, dass die
Restladung der Batterie in der
Fernbedienung ausreicht.
Italiano
Prima di utilizzare il sistema leggere con
attenzione la presente guida e conservarla
per riferimento futuro.
Fabbricato in Cina
Le informazioni indicanti la tensione
operativa e informazioni simili sono situate
nella parte inferiore del telecomando.
La marcatura CE è valida esclusivamente
nei paesi in cui è prevista per legge,
principalmente nei paesi inclusi nello
Spazio economico europeo (EEA, European
Economic Area).
Avviso per i clienti: le seguenti
informazioni riguardano esclusivamente
gli apparecchi venduti in paesi in cui
sono applicate le direttive UE
Produttore: Sony Corporation, 1-7-1 Konan
Minatoku Tokyo, 108-0075 Giappone
Per la conformità del prodotto in ambito
UE: Sony Belgium, bijkantoor van Sony
Europe Limited, Da Vincilaan 7-D1, 1935
Zaventem, Belgio
Smaltimento delle batterie
(pile e accumulatori)
esauste e delle
apparecchiature elettriche
ed elettroniche a fine vita
dell’Unione Europea e negli altri Paesi
europei con sistema di raccolta
differenziata)
Questo simbolo sul prodotto, batteria o
imballo indica che gli stessi non devono
essere trattati come normali rifiuti
domestici. Su talune batterie questo
simbolo può essere utilizzato in
combinazione con un simbolo chimico. I
simboli chimici del mercurio (Hg) o del
piombo (Pb) sono aggiunti se la batteria
contiene più dello 0.0005% di mercurio o
dello 0.004% di piombo.
Assicurandovi che questi prodotti e le
batterie siano smaltiti correttamente,
contribuirete a prevenire potenziali
conseguenze negative per l’ambiente e per
la salute che potrebbero altrimenti essere
causate dal trattamento inappropriato dei
medesimi prodotti o batterie. Il riciclo dei
materiali aiuterà a preservare le risorse
naturali.
Nel caso di prodotti che per ragioni di
sicurezza, prestazioni o integrità dei dati
richiedano una connessione permanente
con una batteria in essi incorporata, la
stessa dovrà essere sostituita
esclusivamente da personale qualificato.
Per assicurarsi che la batteria sia trattata
correttamente, si prega di consegnare i
prodotti a fine vita ad un idoneo centro di
raccolta per il riciclo di apparecchiature
elettriche ed elettroniche. Per tutte le altre
batterie, si prega di consultare la sezione
relativa alla rimozione sicura della batteria
dal prodotto. Si prega di consegnare le
batterie ad un idoneo centro di raccolta per
il riciclo delle batterie esauste. Per
informazioni più dettagliate sul riciclo di
questi prodotti o batterie, si prega di
contattare il vostro Comune, il servizio di
smaltimento rifiuti ovvero il punto vendita
presso il quale è stato acquistato il
prodotto o la batteria.
In caso di smaltimento abusivo di batterie
o di apparecchiature elettriche ed
elettroniche potrebbero essere applicate le
sanzioni previste dalla normativa vigente
(valido solo per l’Italia).
Il telecomando contiene una batteria a
celle a bottone/moneta.
Se la batteria a celle a bottone/a moneta
dovesse essere ingerita, in sole 2 ore può
causare ustioni interne così gravi da portare
al decesso della persona.
Tenere le batterie nuove e usate fuori dalla
portata dei bambini.
Se il vano batteria non si chiude in modo
sicuro, interrompere l’uso del prodotto e
tenerlo lontano dai bambini.
In caso di sospetto che una batteria possa
essere stata ingerita o introdotta in una
qualsiasi parte del corpo, richiedere
immediatamente l’intervento di un medico.
Nota sulla batteria al litio
Non esporre la batteria a fonti di calore
eccessive quali la luce solare diretta, fuoco
o simili.
Per eventuali domande o problemi
riguardanti l’apparecchio non trattati nel
presente manuale, rivolgersi al più vicino
rivenditore Sony.
(applicabile in tutti i Paesi
AVVERTENZA: Non ingerire la
batteria, pericolo di ustione da
sostanze chimiche.
Guida alle parti e ai
comandi
I tasti sul telecomando hanno la stessa
funzione dei tasti sull’unità principale. Per
ulteriori informazioni, consultare le
istruzioni per l’uso in dotazione con l’unità
principale.
/ (ricerca –/+)
Potrebbe essere necessario cambiare
modalità a seconda dell’unità
principale. Per ulteriori informazioni,
consultare “Informazioni su Mode 1 e
Mode 2”.
SOURCE/
La disponibilità delle seguenti
operazioni dipende dall’unità
principale.
• Quando si effettua una chiamata:
• Quando si riceve una chiamata:
• Durante la conversazione telefonica:
• Tenere premuto per attivare la
MODE (modalità/conferma)
A seconda dell’unità principale, questo
tasto può essere utilizzato per
confermare la voce desiderata quando
si seleziona la sorgente.
Emittente di raggi infrarossi
Volume +/–
Tasto rilascio supporto
Supporto
Informazioni su Mode 1 e Mode 2
Questo telecomando dispone di 2
modalità, [Mode 1] e [Mode 2].
L’impostazione predefinita è [Mode 1]. Se la
funzione di ricerca non funziona tenendo
premuto /, cambiare modalità
attenendosi alla procedura seguente:
- Tenendo premuto SOURCE, premere ,
e MODE in quest’ordine, quindi tenere
premuto per 2 secondi. La modalità
passa a [Mode 2].
- Accertarsi di mandare indietro/avanti il
brano correttamente quando si preme
/.
Per tornare alla modalità [Mode 1], attenersi
alla procedura seguente:
- Tenendo premuto SOURCE, premere ,
e MODE in quest’ordine, quindi tenere
premuto per 2 secondi.
(chiamata)/ VOICE
– Premere per interrompere la
chiamata.
– Premere per ricevere la chiamata.
– Tenere premuto per rifiutare la
chiamata.
– Premere per terminare la chiamata.
– Tenere premuto per passare a
un’altra chiamata.
chiamata vocale.
Installazione
Attenzione
Accertarsi che il telecomando non
ˎ
interferisca con le operazioni di guida.
Evitare di installare il telecomando dove
ˎ
sia soggetto ad alte temperature, come
sul cruscotto, esposto alla luce solare
diretta o al getto di aria calda
dell’impianto di riscaldamento, o dove
possa essere soggetto a polvere, sporco
e vibrazioni eccessive.
Non collocare ostacoli tra il telecomando
ˎ
e l’unità principale perché ciò potrebbe
interferire con la comunicazione tramite
raggi infrarossi.
Non coprire con le dita l’emittente sul
ˎ
telecomando.
Installazione della batteria al litio
1 Aprire il coperchio sul fondo del
telecomando con una monetina o un
oggetto simile.
2 Installare la batteria al litio in
dotazione nel telecomando.
Batteria al litio
Sostituzione della batteria al litio
In condizioni normali, la batteria dura circa
1 anno. (Il ciclo di vita può risultare più
breve a seconda delle condizioni di
utilizzo.)
Quando la batteria sta per scaricarsi, il
raggio d’azione del telecomando si riduce.
ATTENZIONE
Pericolo di esplosione se la batteria viene
sostituita in modo non corretto. Sostituire
solo con lo stesso tipo di batteria o con un
tipo equivalente.
Note sulla batteria al litio
• Tenere la batteria al litio fuori dalla portata
dei bambini. Se la batteria viene ingerita,
consultare immediatamente un medico.
• Pulire la batteria con un panno asciutto per
assicurare un perfetto contatto.
• Assicurarsi di rispettare la corretta polarità
durante l’inserimento della batteria.
• Non afferrare la batteria con pinze di metallo,
in quanto potrebbe verificarsi un corto
circuito.
Installazione del telecomando
Prima dell’installazione
Assicurarsi che l’angolo di inclinazione
ˎ
del supporto o che la direzione del
telecomando siano adeguati alla
posizione di installazione. Sul
telecomando sono presenti 4 scanalature
mentre il supporto dispone di 2 ganci; a
seconda della situazione, è possibile
installare il telecomando in quattro modi
diversi.
Per evitare di eseguire fori non necessari
ˎ
o di fissare il nastro in un punto non
appropriato dell’auto, installare il
telecomando in un punto in cui l’unità
principale può sicuramente ricevere il
segnale IR.
Nota
Prestare attenzione a non danneggiare i cavi e
altri componenti dell’auto mentre si esegue il
foro o mentre si serra la vite.
Lato + verso l’alto
Scanalatura
Ganci
1 Eseguire un foro del diametro di 2 mm
nel punto di installazione prescelto
nell’auto.
2 Staccare il nastro dal fondo del
supporto e fissarlo al punto di
installazione.
Fissare il foro del supporto sul foro
dell’auto.
3 Inserire la vite in dotazione nel foro
del supporto e fissarla al punto di
installazione.
4 Collocare il telecomando con la
batteria al litio sul supporto.
Inserire la scanalatura del telecomando
nel gancio del supporto, quindi
spingere il telecomando finché non
scatta in posizione.
Rimozione del telecomando
1 Tirare il telecomando tenendo premuti
contemporaneamente i tasti rilascio
supporto su entrambi i lati del
supporto per rimuoverlo dal supporto.
Vite
Caratteristiche tecniche
Dimensioni circa ø 54 mm ×
Peso circa 42 g
Contenuto della confezione
Il design e le caratteristiche tecniche sono
soggetti a modifiche senza preavviso.
34mm
Telecomando (1)
Batteria al litio CR2032
(1)
Elementi per
l’installazione e i
collegamenti (1 set)
Guida alla soluzione dei
problemi
Fare riferimento alla seguente lista di
verifica per risolvere la maggior parte dei
problemi che si potrebbero verificare
durante l’uso del telecomando.
Prima di esaminare l’elenco che segue,
verificare le procedure di collegamento e
d’uso dell’apparecchio.
Se il problema persiste, visitare il sito di
assistenza.
L’unità principale non funziona.
q Verificare che l’emittente sul
telecomando non sia coperta dalle dita.
q Verificare che il telecomando sia
installato in un punto in cui l’unità
principale possa ricevere il segnale IR del
telecomando.
q Verificare che la batteria del
telecomando sia carica.
Nederlands
Deze gebruiksaanwijzing vóór gebruik van
het systeem zorgvuldig doorlezen en goed
bewaren.
Geproduceerd in China
De informatie over de werkspanning enz.
bevindt zich onder aan de
afstandsbediening.
De geldigheid van de CE-markering is
beperkt tot alleen die landen waarin dit
wettelijk verplicht is, hoofdzakelijk in de
EER-landen (Europese Economische
Ruimte).
Opmerking voor klanten: de volgende
informatie geldt enkel voor apparatuur
verkocht in landen waar de EU-richtlijnen
van kracht zijn
Producent: Sony Corporation, 1-7-1 Konan
Minatoku Tokyo, 108-0075 Japan
Voor EU-product conformiteit: Sony
Belgium, bijkantoor van Sony Europe
Limited, Da Vincilaan 7-D1, 1935 Zaventem,
België
Verwijdering van oude
batterijen, elektrische en
elektronische apparaten
(van toepassing in de
Europese Unie en andere
afzonderlijke inzamelingssystemen)
Dit symbool op het product, de batterij of
op de verpakking wijst erop dat het
product en de batterij, niet als
huishoudelijk afval behandeld mag
worden. Op sommige batterijen kan dit
symbool gebruikt worden in combinatie
met een chemisch symbool. Het chemisch
symbool voor kwik (Hg) of lood (Pb) wordt
toegevoegd wanneer de batterij meer dan
0,0005 % kwik of 0,004 % lood bevat. Door
deze producten en batterijen op juiste
wijze af te voeren, vermijdt u mogelijke
negatieve gevolgen voor mens en milieu
die zouden kunnen veroorzaakt worden in
geval van verkeerde afvalbehandeling. Het
recycleren van materialen draagt bij tot het
behoud van natuurlijke bronnen.
In het geval dat de producten om redenen
van veiligheid, prestaties dan wel in
verband met dataintegriteit een
permanente verbinding met een
ingebouwde batterij vereisen, mag deze
batterij enkel door gekwalificeerd
servicepersoneel vervangen worden. Om
ervoor te zorgen dat de batterij, het
elektrisch en het elektronische apparaat op
een juiste wijze zal worden behandeld,
dienen deze producten aan het eind van
zijn levenscyclus overhandigd te worden
aan het desbetreffende inzamelingspunt
voor de recyclage van elektrisch en
elektronisch materiaal.
Voor alle andere batterijen verwijzen we u
naar het hoofdstuk over hoe de batterij
veilig uit het product te verwijderen.
Overhandig de batterij aan het
desbetreffende inzamelingspunt voor de
recyclage van batterijen.
Voor meer details in verband met het
recycleren van dit product of batterij, kan u
contact opnemen met de gemeentelijke
instanties, de organisatie belast met de
verwijdering van huishoudelijk afval of de
winkel waar u het product of batterij hebt
gekocht.
De afstandsbediening bevat een
knoopcelbatterij.
Als de knoopcelbatterij wordt ingeslikt, kan
dat binnen slechts 2 uur ernstige interne
brandwonden en de dood tot gevolg
hebben.
Houd nieuwe en gebruikte batterijen
buiten bereik van kinderen.
Sluit het batterijvak niet goed, gebruik het
product dan niet meer en houd het buiten
bereik van kinderen.
Als u denkt dat batterijen misschien zijn
ingeslikt of ergens in een deel van het
lichaam terecht zijn gekomen, roep dan
onmiddellijk medische hulp in.
Opmerking over de lithiumbatterij
Stel de batterij niet bloot aan extreem hoge
temperaturen, zoals direct zonlicht, vuur,
enzovoort.
Met alle vragen of problemen met
betrekking tot dit apparaat die niet aan bod
komen in deze gebruiksaanwijzing, kunt u
terecht bij uw Sony-handelaar.
Europese landen met
WAARSCHUWING: Slik de
batterij niet in, gevaar voor
chemische brandwonden.
Onderdelen en
bedieningselementen
De knoppen op de afstandsbediening
hebben dezelfde functies als de knoppen
op het hoofdapparaat. Raadpleeg de
gebruiksaanwijzing geleverd bij het
hoofdapparaat voor meer informatie.
/ (zoeken –/+)
Afhankelijk van het hoofdapparaat kan
het nodig zijn om de stand te wijzigen.
Zie "Over Mode 1 en Mode 2" voor
meer informatie.
SOURCE/
Afhankelijk van het hoofdapparaat
kunnen de volgende handelingen
worden uitgevoerd.
• Wanneer u iemand belt:
• Wanneer u een oproep ontvangt:
• Wanneer u aan het praten bent:
• Houd de knop ingedrukt om
MODE (stand/bevestigen)
Afhankelijk van het hoofdapparaat kunt
u met deze knop het geselecteerde
item bevestigen bij het selecteren van
de bron.
Zender van infraroodstralen
Volume +/–
Toets om de houder los te maken
Houder
Over Mode 1 en Mode 2
Deze afstandsbediening heeft 2 standen:
[Mode 1] en [Mode 2]. De
standaardinstelling is [Mode 1]. Als de
zoekfunctie niet werkt wanneer u /
blijft indrukken, schakelt u als volgt de
stand om:
- Druk terwijl u SOURCE ingedrukt houdt op
, en MODE (in die volgorde), en
houd vervolgens gedurende 2
seconden ingedrukt. De stand wordt
omgeschakeld naar [Mode 2].
- Zorg ervoor dat u een track correct
terugspoelt/vooruitspoelt wanneer u op
/ drukt.
Om de stand terug te schakelen naar
[Mode 1], gaat u als volgt te werk:
- Druk terwijl u SOURCE ingedrukt houdt op
, en MODE (in die volgorde), en
houd vervolgens gedurende 2
seconden ingedrukt.
(bellen)/ VOICE
– Druk hierop om de oproep te
beëindigen.
– Druk hierop om de oproep te
beantwoorden.
– Houd de knop ingedrukt om de
oproep te weigeren.
– Druk hierop om de oproep te
beëindigen.
– Houd de knop ingedrukt om over
te schakelen naar een andere
oproep.
spraakgestuurd kiezen te activeren.
Installatie
Opgelet
Zorg ervoor dat de afstandsbediening u
ˎ
niet hindert tijdens het rijden.
Installeer de afstandsbediening niet op
ˎ
plaatsen waar deze wordt blootgesteld
aan stof, vuil, overmatige trillingen of
hoge temperaturen (bv. in direct zonlicht,
op het dashboard of nabij een
verwarmingstoestel).
Plaats geen hindernissen tussen de
ˎ
afstandsbediening en het hoofdapparaat
aangezien deze de communicatie via
infraroodstralen kunnen verstoren.
Bedek de zender op de
ˎ
afstandsbediening niet met uw vingers.
De lithiumbatterij plaatsen
1 Open de klep aan de onderkant van
de afstandsbediening met behulp van
een munt enz.
2 Plaats de bijgeleverde lithiumbatterij
in de afstandsbediening.
Lithiumbatterij
De lithiumbatterij vervangen
Bij normaal gebruik heeft de batterij een
levensduur van ongeveer 1jaar (de
levensduur kan korter zijn, afhankelijk van
de gebruiksomstandigheden).
Wanneer de batterij leeg raakt, zal het
bereik van de afstandsbediening korter
worden.
LET OP
Er is explosiegevaar wanneer de batterij op
onjuiste wijze vervangen wordt. Vervang de
batterij alleen door hetzelfde of een
soortgelijk type.
Opmerkingen over de lithiumbatterij
• Bewaar de lithiumbatterij buiten het bereik
van kinderen. Indien de batterij wordt
ingeslikt, dient u onmiddellijk een arts te
raadplegen.
• Wrijf de batterij met een droge doek schoon
om voor een goed contact te zorgen.
• Houd rekening met de juiste polariteit
wanneer u de batterij plaatst.
• Houd de batterij niet met een metalen pincet
vast, anders kan er een kortsluiting ontstaan.
De afstandsbediening installeren
Vóór de installatie
Controleer of de hellingshoek aan de
ˎ
houder of de oriëntatie van de
afstandsbediening geschikt is voor de
installatieplaats. Er zijn 4gleuven op de
afstandsbediening en 2 haken op de
houder. Afhankelijk van de situatie, kunt
u de afstandsbediening op
vierverschillende manieren installeren.
Om te vermijden dat u een overbodig
ˎ
gaatje maakt of tape op een niet
passende plaats in de auto kleeft,
installeert u de afstandsbediening op
een plaats waar het hoofdapparaat zeker
het IR-signaal kan ontvangen.
Opmerking
Wees voorzichtig dat u geen kabels of andere
elementen in de auto beschadigt bij het maken
van een gaatje in de auto of bij het vastdraaien
van de schroef.
+ naar boven
Gleuf
Haken
1 Maak een gaatje met een diameter
van 2mm op de installatieplaats in de
auto.
2 Verwijder de tape aan de onderkant
van de houder en bevestig deze op de
installatieplaats.
Houd het gaatje van de houder tegen
het gaatje in de auto.
3 Installeer de bijgeleverde schroef in
het gaatje van de houder en maak
deze vast op de installatieplaats.
4 Steek de afstandsbediening met de
lithiumbatterij in de houder.
Plaats de gleuf van de
afstandsbediening in de haak van de
houder en druk op de
afstandsbediening tot deze vastklikt.
De afstandsbediening verwijderen
1 Trek aan de afstandsbediening terwijl
u de toetsen om de houder los te
maken aan beide kanten van de
houder tegelijk indrukt om de
afstandsbediening uit de houder te
verwijderen.
Schroef
Technische gegevens
Afmetingen Ong. ø 54 mm ×
Gewicht Ong. 42 g
Inhoud verpakking Afstandsbediening (1)
Wijzigingen in ontwerp en technische
gegevens voorbehouden zonder
voorafgaande kennisgeving.
34mm
CR2032-lithiumbatterij
(1)
Onderdelen voor
installatie en
aansluitingen (1 set)
Problemen oplossen
De onderstaande controlelijst kan u helpen
bij het oplossen van problemen die zich
met de afstandsbediening kunnen
voordoen.
Voordat u de onderstaande controlelijst
doorneemt, moet u eerst de aanwijzingen
voor aansluiting en gebruik controleren.
Als het probleem niet is opgelost, gaat u
naar de ondersteuningssite.
Het hoofdapparaat werkt niet.
q Controleer of u de zender op de
afstandsbediening niet met uw vingers
bedekt.
q Controleer of de afstandsbediening
geïnstalleerd is op een plaats waar het
hoofdapparaat het IR-signaal van de
afstandsbediening kan ontvangen.
q Controleer of de batterij van de
afstandsbediening vol is.
.ةرﺎﻴﺴﻟﺎﺑ
.ﺐﻴﻛﺮﺘﻟا ﻊﻗﻮﻣ ﻰﻠﻋ ﻪﺘﻴﺒﺜﺘﺑ ﻢﻗو ﻞﻣﺎﺤﻟا
.ةرﺎﻴﺴﻟا ﺔﺤﺘﻓ ﻰﻠﻋ ﻞﻣﺎﺤﻟا ﺔﺤﺘﻓ ﺖﻴﺒﺜﺘﺑ ﻢﻗ
.ﺐﻴﻛﺮﺘﻟا ﻊﻗﻮﻣ ﻰﻠﻋ ﻪﺘﻴﺒﺜﺘﺑ ﻢﻗو
ﻲﻏﺮﺑ
.ﻞﻣﺎﺤﻟا ﻰﻠﻋ مﻮﻴﺜﻴﻠﻟا
فﺎﻄﺧ ﻲﻓ ﺪﻌﺑ ﻦﻋ ﻢﻜﺤﺘﻟا ةﺪﺣو ﺰﺣ ﻞﺧدأ
ﻰﺘﺣ ﺪﻌﺑ ﻦﻋ ﻢﻜﺤﺘﻟا ةﺪﺣو ﻊﻓداو ،ﻞﻣﺎﺤﻟا
.ﺎﻬﻧﺎﻜﻣ ﻲﻓ ﺮﻘﺘﺴﺗ
ﺪﻌﺑ ﻦﻋ ﻢﻜﺤﺘﻟا ةﺪﺣو ﺔﻟازﻹ
ﻲﻓ ﻞﻣﺎﺤﻟا ﻲﺒﻧﺎﺟ ﻼﻛ ﻰﻠﻋ ﻞﻣﺎﺤﻟا ﺮﻳﺮﺤﺗ رارزأ
.ﻞﻣﺎﺤﻟا ﻦﻣ ﻪﺘﻟازﻹ ﺖﻗﻮﻟا ﺲﻔﻧ
تﺎﻔﺻاﻮﻤﻟا
ﺎًﺒﻳﺮﻘﺗ ﻢﻠﻣ 34 × ﻢﻠﻣ ø 54 دﺎﻌﺑﻷا
ﺎًﺒﻳﺮﻘﺗ ﺎًﻣاﺮﺟ
(1) ﺪﻌﺑ ﻦﻋ ﻢﻜﺤﺘﻟا ةﺪﺣو ةﻮﺒﻌﻟا تﺎﻳﻮﺘﺤﻣ
(1) CR2032 مﻮﻴﺜﻴﻠﻟا ﺔﻳرﺎﻄﺑ
42 ﺔﻠﺘﻜﻟا
تﻼﻴﺻﻮﺘﻟاو ﺐﻴﻛﺮﺘﻟا ءاﺰﺟأ
(ةﺪﺣاو ﺔﻋﻮﻤﺠﻣ)
.رﺎﻌﺷإ نوﺪﺑ ﺮﻴﻴﻐﺘﻠﻟ ﺔﺿﺮﻋ تﺎﻔﺻاﻮﻤﻟاو ﻢﻴﻤﺼﺘﻟا
ﺎﻬﺣﻼﺻإو ءﺎﻄﺧﻷا فﺎﺸﻜﺘﺳا
ﻲﺘﻟا تﻼﻜﺸﻤﻟا حﻼﺻإ ﻰﻠﻋ ﺔﻴﻟﺎﺘﻟا ﻖﻘﺤﺘﻟا ﺔﻤﺋﺎﻗ كﺪﻋﺎﺴﺘﺳ
تاءاﺮﺟإ ﻦﻣ ﻖﻘﺤﺗ ،هﺎﻧدأ ﻖﻘﺤﺘﻟا ﺔﻤﺋﺎﻗ ﻲﻓ ﻞﻘﻨﺘﻟا ﻞﺒﻗ
ةﺪﺣﻮﺑ IR ةرﺎﺷإ لﺎﺒﻘﺘﺳا ﺔﻴﺴﻴﺋﺮﻟا ةﺪﺣﻮﻠﻟ ﻪﻴﻓ ﻦﻜﻤﻳ
.ﺪﻌﺑ ﻦﻋ ﻢﻜﺤﺘﻟا ةﺪﺣو ﻊﻣ ﺎﻬﻬﺟاﻮﺗ ﺪﻗ
.لﺎﺼﺗﻻاو ﻞﻴﻐﺸﺘﻟا
.ﻢﻋﺪﻟا ﻊﻘﻣ ةرﺎﻳﺰﺑ ﻞﻀﻔﺗ ،ﺔﻠﻜﺸﻤﻟا ﻞﺣ مﺪﻋ ﺔﻟﺎﺣ ﻲﻓ
.ﻞﻤﻌﺗ ﻻ ﺔﻴﺴﻴﺋﺮﻟا ةﺪﺣﻮﻟا
.ﻚﻌﺑﺎﺻﺄﺑ ﺪﻌﺑ ﻦﻋ ﻢﻜﺤﺘﻟا
.ﺪﻌﺑ ﻦﻋ ﻢﻜﺤﺘﻟا
.ﺔﺌﻠﺘﻤﻣ
1 ﺐﻴﻛﺮﺘﻟا ﻊﻗﻮﻣ ﻰﻠﻋ ﻢﻠﻣ 2 ﺮﻄﻘﺑ ﺔﺤﺘﻓ ﻊﻨﺻا
2 ﻦﻣ ﻲﻠﻔﺴﻟا ءﺰﺠﻟﺎﺑ دﻮﺟﻮﻤﻟا ﻂﻳﺮﺸﻟا ﺮﻴﺸﻘﺘﺑ ﻢﻗ
اًﺪﻴﻌﺑ ﺪﻌﺑ ﻦﻋ ﻢﻜﺤﺘﻟا ةﺪﺣﻮﺑ ظﺎﻔﺘﺣﻻا ﻰﻠﻋ صﺮﺣا
ﻖﻃﺎﻨﻣ ﻲﻓ ﺪﻌﺑ ﻦﻋ ﻢﻜﺤﺘﻟا ةﺪﺣو ﺐﻴﻛﺮﺗ ﺐﻨﺠﺗ
ﺔﺟرد وأ ﺪﺋاﺰﻟا زاﺰﺘﻫﻻا وأ خﺎﺳوﻷا وأ ﺔﺑﺮﺗﻸﻟ ﺔﺿﺮﻌﻣ
ﻰﻠﻋ وأ ﺮﺷﺎﺒﻤﻟا ﺲﻤﺸﻟا ءﻮﺿ ﻲﻓ ﻞﺜﻣ ﺔﻴﻟﺎﻌﻟا ةراﺮﺤﻟا
ةﺪﺣﻮﻟاو ﺪﻌﺑ ﻦﻋ ﻢﻜﺤﺘﻟا ةﺪﺣو ﻦﻴﺑ ﻖﺋاﻮﻋ ﻊﻀﺗ ﻻ
3 ﻞﻣﺎﺤﻟا ﺔﺤﺘﻓ ﻰﻠﻋ دوﺰﻤﻟا ﻲﻏﺮﺒﻟا ﺐﻴﻛﺮﺘﺑ ﻢﻗ
ﺖﺤﺗ ﺔﻌﺷﻷﺎﺑ لﺎﺼﺗﻻا ﻊﻣ ﻞﺧاﺪﺘﺗ ﺪﻗ ﺎﻬﻧﻷ ﺔﻴﺴﻴﺋﺮﻟا
ﻢﻜﺤﺘﻟا ةﺪﺣو ﻰﻠﻋ دﻮﺟﻮﻤﻟا ثﺎﻌﺒﻧﻻا زﺎﻬﺟ ِﻂﻐﺗ ﻻ
.ةدﺎﻴﻘﻟا تﺎﻴﻠﻤﻋ ﻊﻣ ﻞﺧاﺪﺘﻟا ﻦﻋ
.ةﺄﻓﺪﻤﻟا ﺐﻴﺑﺎﻧأ ﻦﻣ بﺮﻘﻟﺎﺑ وأ تاداﺪﻌﻟا ﺔﺣﻮﻟ
مﻮﻴﺜﻴﻠﻟا ﺔﻳرﺎﻄﺑ ﺐﻴﻛﺮﺗ
4 ﺔﻳرﺎﻄﺒﺑ ةدوﺰﻤﻟا ﺪﻌﺑ ﻦﻋ ﻢﻜﺤﺘﻟا ةﺪﺣو ﻂﺒﺿا
،ﺔﻴﻧﺪﻌﻣ ﺔﻠﻤﻋ ماﺪﺨﺘﺳﺎﺑ ﺪﻌﺑ ﻦﻋ ﻢﻜﺤﺘﻟا ةﺪﺣو
.ﺪﻌﺑ ﻦﻋ ﻢﻜﺤﺘﻟا
مﻮﻴﺜﻴﻠﻟا ﺔﻳرﺎﻄﺑ
1 ﻰﻠﻋ ﻂﻐﻀﻟا ءﺎﻨﺛأ ﺪﻌﺑ ﻦﻋ ﻢﻜﺤﺘﻟا ةﺪﺣو ﻊﻓدا
ﺪﺣاو مﺎﻋ ةﺪﻤﻟ ﺔﻳرﺎﻄﺒﻟا موﺪﺘﺳ ،ﺔﻳدﺎﻌﻟا فوﺮﻈﻟا ﻲﻓ
ﺎًﻘﻓو ﺮﺼﻗأ ﺔﻣﺪﺨﻠﻟ ﻲﺿاﺮﺘﻓﻻا ﺮﻤﻌﻟا نﻮﻜﻳ ﺪﻗ
ﻢﻜﺤﺘﻟا ةﺪﺣو قﺎﻄﻧ ﺢﺒﺼﻳ ،ﺔﻔﻴﻌﺿ ﺔﻳرﺎﻄﺒﻟا ﺢﺒﺼﺗ ﺎﻣﺪﻨﻋ
ﺮﻴﻏ ﻞﻜﺸﺑ ﺔﻳرﺎﻄﺒﻟا لاﺪﺒﺘﺳا ﺔﻟﺎﺣ ﻲﻓ رﺎﺠﻔﻧﻻا ﺮﻄﺧ كﺎﻨﻫ
.ﺊﻓﺎﻜﻣ عﻮﻨﺑ وأ عﻮﻨﻟا ﺲﻔﻨﺑ ﻂﻘﻓ ﺎﻬﻟاﺪﺒﺘﺳا ﻢﺘﻳ .ﺢﻴﺤﺻ
.رﻮﻔﻟا ﻰﻠﻋ ﺐﻴﺒﻄﻟا ﺮﺸﺘﺳا ،ﺔﻳرﺎﻄﺒﻟا عﻼﺘﺑا ﺔﻟﺎﺣ
مﻮﻴﺜﻴﻠﻟا ﺔﻳرﺎﻄﺑ لاﺪﺒﺘﺳﻻ
مﻮﻴﺜﻴﻠﻟا ﺔﻳرﺎﻄﺑ لﻮﺣ تﺎﻈﺣﻼﻣ
ﺪﻌﺑ ﻦﻋ ﻢﻜﺤﺘﻟا ةﺪﺣو ﺐﻴﻛﺮﺗ
هﺎﺠﺗا نأ وأ ﻞﻣﺎﺤﻟا ﺪﻨﻋ ﻞﻴﻤﻟا ﺔﻳواز نأ ﻦﻣ ﺪﻛﺄﺗ
ﺪﺟﻮﺗ .ﺐﻴﻛﺮﺘﻟا ﻊﻗﻮﻤﻟ ﺐﺳﺎﻨﻣ ﺪﻌﺑ ﻦﻋ ﻢﻜﺤﺘﻟا ةﺪﺣو
ﻰﻠﻋ نﺎﻓﺎﻄﺧو ﺪﻌﺑ ﻦﻋ ﻢﻜﺤﺘﻟا ةﺪﺣو ﻰﻠﻋ زوﺰﺣ
ﻢﻜﺤﺘﻟا ةﺪﺣو ﺐﻴﻛﺮﺗ ﻚﻨﻜﻤﻳ ،ﻒﻗﻮﻤﻠﻟ ﺎًﻘﻓوو ،ﻞﻣﺎﺤﻟا
.ﺔﻔﻠﺘﺨﻣ قﺮﻃ ﺔﻌﺑرﺄﺑ ﺪﻌﺑ ﻦﻋ
ةﺪﺣو ﻰﻠﻋ ثﺎﻌﺒﻧﻻا ةﺪﺣو ﺔﻴﻄﻐﺗ مﺪﻋ ﻦﻣ ﻖﻘﺤﺗ
ﻊﻗﻮﻣ ﻰﻠﻋ ﺪﻌﺑ ﻦﻋ ﻢﻜﺤﺘﻟا ةﺪﺣو ﺐﻴﻛﺮﺗ ﻦﻣ ﻖﻘﺤﺗ
ﺖﺤﺒﺻأ ﺪﻌﺑ ﻦﻋ ﻢﻜﺤﺘﻟا ةﺪﺣو ﺔﻳرﺎﻄﺑ نأ ﻦﻣ ﻖﻘﺤﺗ
ﻒﻴﻃﺎﻄﺧ
ﻂﻳﺮﺸﻟا ﺖﻴﺒﺜﺗ وأ ﺔﻳروﺮﺿ ﺮﻴﻏ ﺔﺤﺘﻓ ﻞﻤﻋ ﻊﻨﻤﻟ
ةﺪﺣو ﺐﻴﻛﺮﺘﺑ ﻢﻗ ،ةرﺎﻴﺴﻟا ﻦﻣ ﺐﺳﺎﻨﻣ ﺮﻴﻏ ﻊﻗﻮﻤﺑ
ﺔﻴﺴﻴﺋﺮﻟا ةﺪﺣﻮﻠﻟ ﻪﻴﻓ ﻦﻜﻤﻳ ﻊﻗﻮﻤﺑ ﺪﻌﺑ ﻦﻋ ﻢﻜﺤﺘﻟا
.ﺪﻴﻛﺄﺘﻟﺎﺑ IR ةرﺎﺷإ لﺎﺒﻘﺘﺳاو لﺎﺳرإ
ﻲﻓ ىﺮﺧﻷا ﺮﺻﺎﻨﻌﻟاو تﻼﺑﺎﻜﻟا ﻒﻠﺘﺗ ﻻ ﻲﻛ صﺮﺣا
ﻲﻏﺮﺒﻟا ﻂﺑر وأ ةرﺎﻴﺴﻟا ﻰﻠﻋ ﺔﺤﺘﻓ ﻞﻤﻋ ﺪﻨﻋ ةرﺎﻴﺴﻟا
ﺐﻴﻛﺮﺘﻟا
تﺎﻬﻴﺒﻨﺗ
.ءاﺮﻤﺤﻟا
.ﻚﻌﺑﺎﺻﺄﺑ ﺪﻌﺑ ﻦﻋ
.ﻚﻟذ ﻰﻟإ ﺎﻣو
ﻰﻠﻋﻷ
+ ﺐﻧﺎﺟ
) .ﺎ
(.ماﺪﺨﺘﺳﻻا فوﺮﻈﻟ
.ﺮﺼﻗأ ﺪﻌﺑ ﻦﻋ
.ﺔﻳرﺎﻄﺒﻟا
.ﺮﺼﻗ ةﺮﺋاد ثﺪﺤﺗ
ﺐﻴﻛﺮﺘﻟا ﻞﺒﻗ
ﺔﻈﺣﻼﻣ
.مﺎﻜﺣﺈﺑ
ﺰﺣ
ﺒﻳﺮﻘﺗ
ً
ﻪﻴﺒﻨﺗ
4
ﻢﻜﺤﺘﻟا ﺮﺻﺎﻨﻋو ءاﺰﺟﻷا ﻞﻴﻟد
ﺪﻌﺑ ﻦﻋ ﻢﻜﺤﺘﻟا ةﺪﺣو ﻰﻠﻋ ةدﻮﺟﻮﻤﻟا رارزﻷا يدﺆﺗ
.ﺔﻴﺴﻴﺋﺮﻟا ةﺪﺣﻮﻟا ﻲﻓ ةدﻮﺟﻮﻤﻟا رارزﻷا ﺎﻬﻳدﺆﺗ ﻲﺘﻟا ﻒﺋﺎﻇﻮﻟا
ﺔﻘﻓﺮﻤﻟا ﻞﻴﻐﺸﺘﻟا تادﺎﺷرإ ﻰﻟإ ﻊﺟرا ،ﻞﻴﺻﺎﻔﺘﻟا ﻰﻠﻋ عﻼﻃﻼﻟ
.ﺔﻴﺴﻴﺋﺮﻟا ةﺪﺣﻮﻟﺎﺑ
ظﺎﻔﺘﺣﻻاو اًﺪﻴﺟ ﻞﻴﻟﺪﻟا اﺬﻫ ةءاﺮﻗ ﻰﺟﺮﻳ ،مﺎﻈﻨﻟا ﻞﻴﻐﺸﺗ ﻞﺒﻗ
.ﻞﺒﻘﺘﺴﻤﻟا ﻲﻓ ﻪﻴﻟإ عﻮﺟﺮﻠﻟ ﻪﺑ
ﻰﻟإ ﺎﻣو ،ﻞﻴﻐﺸﺘﻟا ﺪﻬﺟ ﻰﻟإ ﺮﻴﺸﺗ ﻲﺘﻟا تﺎﻣﻮﻠﻌﻤﻟا ﺪﺟﻮﺗ
.ﺪﻌُﺑ ﻦﻋ ﻢﻜﺤﺘﻟا ةﺪﺣو ﻦﻣ ﻲﻠﻔﺴﻟا ءﺰﺠﻟا ﻰﻠﻋ ﻚﻟذ
ﺎﻬﻘﺒﻄﺗ ﻲﺘﻟا لوﺪﻟا ﻰﻠﻋ ﻂﻘﻓ ةرﻮﺼﺤﻣ
ﺔﻴﺑﺮﻌﻟا
CE ﺔﻣﻼﻋ ﺔﻴﺣﻼﺻ
ﺔﻳدﺎﺼﺘﻗﻻا ﺔﻘﻄﻨﻤﻟا لود ﻲﻓ ﻲﺳﺎﺳأ ﻞﻜﺸﺑو ،ﻲﻧﻮﻧﺎﻗ ﻞﻜﺸﺑ
.(EEA) ﺔﻴﺑوروﻷا
ضﺮﻌﺘﻟا ﺮﻄﺧ ،ﺔﻳرﺎﻄﺒﻟا عﻼﺘﺑا ﺐﻨﺠﺗ :ﺮﻳﺬﺤﺗ
.ﺔﻴﺋﺎﻴﻤﻴﻛ قوﺮﺤﻟ
ﺔﻠﻤﻋ ﻞﻜﺷ ﻰﻠﻋ ﺔﻳرﺎﻄﺑ ﻰﻠﻋ ﺪﻌﺑ ﻦﻋ ﻢﻜﺤﺘﻟا ةﺪﺣو يﻮﺘﺤﺗ
ﺔﻳرﺎﻄﺑ
.ﻞﻜﺸﻟا ﺔﻳﺮﺋاد ﺔﻳرﺎﻄﺑ
/ﺔﻴﻧﺪﻌﻣ ﺔﻠﻤﻋ ﻞﻜﺷ ﻰﻠﻋ ﺔﻳرﺎﻄﺒﻟا عﻼﺘﺑا ﺔﻟﺎﺣ ﻲﻓ
1 ﻦﻣ ﻲﻠﻔﺴﻟا ءﺰﺠﻟا ﻰﻠﻋ دﻮﺟﻮﻤﻟا ءﺎﻄﻐﻟا ﺢﺘﻓا
ﺔﻴﻠﺧاﺪﻟا قوﺮﺤﻟا ﻦﻣ ﺪﻳﺪﻌﻟا ﺐﺒﺴﺗ ﺪﻗ ﺎﻬﻧﺈﻓ ،ﻞﻜﺸﻟا ﺔﻳﺮﺋاد
.ةﺎﻓﻮﻟا ﻰﻟإ يدﺆﺗ نأ ﻦﻜﻤﻳو ﻂﻘﻓ ﻦﻴﺘﻋﺎﺳ لﻼﺧ
/ﺔﻴﻧﺪﻌﻣ
لوﺎﻨﺘﻣ ﻦﻋ اًﺪﻴﻌﺑ ﺔﻠﻤﻌﺘﺴﻤﻟاو ةﺪﻳﺪﺠﻟا تﺎﻳرﺎﻄﺒﻟﺎﺑ ﻆﻔﺘﺣا
.لﺎﻔﻃﻷا
ﻦﻋ ﻒﻗﻮﺘﻓ ،مﺎﻜﺣﺈﺑ ﺔﻳرﺎﻄﺒﻟا ةﺮﻴﺠﺣ قﻼﻏإ مﺪﻋ ﺔﻟﺎﺣ ﻲﻓ
.لﺎﻔﻃﻷا لوﺎﻨﺘﻣ ﻦﻋ اًﺪﻴﻌﺑ ﺎﻬﺑ ﻆﻔﺘﺣاو ﺔﻳرﺎﻄﺒﻟا ماﺪﺨﺘﺳا
ﻞﺧاد ﺎﻬﻌﺿو ﻢﺗ وأ تﺎﻳرﺎﻄﺒﻟا عﻼﺘﺑا ﻢﺗ ﻪﻧأ ﺪﻘﺘﻌﺗ ﺖﻨﻛ اذإ
.ﺔﻳرﻮﻔﻟا ﺔﻴﺒﻄﻟا ﺔﻳﺎﻋﺮﻟا ﺐﻠﻃﺎﻓ ،ﻢﺴﺠﻟا ﻦﻣ ءﺰﺟ يأ
مﻮﻴﺜﻴﻠﻟا ﺔﻳرﺎﻄﺑ لﻮﺣ ﺔﻈﺣﻼﻣ
2 ةﺪﺣﻮﺑ ﺔﻘﻓﺮﻤﻟا مﻮﻴﺜﻴﻠﻟا ﺔﻳرﺎﻄﺑ ﺐﻴﻛﺮﺘﺑ ﻢﻗ
ﺲﻤﺸﻟا ءﻮﺿ ﻞﺜﻣ ﺔﻃﺮﻔﻤﻟا ةراﺮﺤﻟا ﻰﻟإ ﺔﻳرﺎﻄﺒﻟا ضﺮﻌﺗ ﻻ
.ﻪﺑﺎﺷ ﺎﻣ وأ ﻖﺋاﺮﺤﻟا وأ ﺮﺷﺎﺒﻤﻟا
ﺮﻴﻏ ةﺪﺣﻮﻟﺎﺑ ﺔﻘﻠﻌﺘﻣ تﻼﻜﺸﻣ وأ ﺔﻠﺌﺳأ ﺔﻳأ ﻚﻳﺪﻟ ﺖﻧﺎﻛ اذإ
.
(–/+ ﺚﺤﺑ) /
Sony ﻞﻴﻛو بﺮﻗأ ﺮﺸﺘﺳﺎﻓ ،ﻞﻴﻟﺪﻟا اﺬﻫ ﻲﻓ ﺔﻨﻤﻀﺘﻣ
ةﺪﺣﻮﻟا ﺐﺴﺣ ﺎًﺑﻮﻠﻄﻣ ﻊﺿﻮﻟا ﻞﻳﺪﺒﺗ نﻮﻜﻳ ﺪﻗ
لﻮﺣ » ﻊﺟار ،ﻞﻴﺻﺎﻔﺘﻟا ﻰﻠﻋ لﻮﺼﺤﻠﻟ .ﺔﻴﺴﻴﺋﺮﻟا
.«Mode 2و Mode 1
VOICE/(ﺔﻤﻟﺎﻜﻣ) /SOURCE
ةﺪﺣﻮﻟا ﺐﺴﺤﺑ ﺔﻴﻟﺎﺘﻟا ﻞﻴﻐﺸﺘﻟا تﺎﻴﻠﻤﻋ ﺮﻓﻮﺘﺗ
.ﺔﻴﺴﻴﺋﺮﻟا
:
ﺔﻤﻟﺎﻜﻣ ءاﺮﺟإ ءﺎﻨﺛأ
.ﺔﻤﻟﺎﻜﻤﻟا فﺎﻘﻳﻹ ﻂﻐﻀﻟا
:
ﺔﻤﻟﺎﻜﻣ لﺎﺒﻘﺘﺳا ءﺎﻨﺛأ
.ﺔﻤﻟﺎﻜﻣ لﺎﺒﻘﺘﺳﻻ ﻂﻐﻀﻟا
.ﺔﻤﻟﺎﻜﻤﻟا ﺾﻓﺮﻟ راﺮﻤﺘﺳﻻا ﻊﻣ ﻂﻐﻀﻟا
:
.ﺔﻤﻟﺎﻜﻣ ءﺎﻬﻧﻹ ﻂﻐﻀﻟا
ﻰﻟإ ﻞﻳﺪﺒﺘﻠﻟ راﺮﻤﺘﺳﻻا ﻊﻣ ﻂﻐﻀﻟا
لﺎﺼﺗﻻا ﻂﻴﺸﻨﺘﻟ راﺮﻤﺘﺳﻻا ﻊﻣ ﻂﻐﻀﻟا
• ﻲﻓ .لﺎﻔﻃﻷا لوﺎﻨﺘﻣ ﻦﻋ اًﺪﻴﻌﺑ مﻮﻴﺜﻴﻠﻟا ﺔﻳرﺎﻄﺒﺑ ﻆﻔﺘﺣا
•.ﺪﻴﺠﻟا ﺲﻣﻼﺘﻟا نﺎﻤﻀﻟ ﺔﻓﺎﺟ شﺎﻤﻗ ﺔﻌﻄﻘﺑ ﺔﻳرﺎﻄﺒﻟا ﺢﺴﻣا
• ﺐﻴﻛﺮﺗ ﺪﻨﻋ ﺔﺤﻴﺤﺼﻟا ﺔﻴﺒﻄﻘﻟا ﺔﻈﺣﻼﻣ ﻰﻠﻋ صﺮﺣا
• ﺪﻘﻓ ﻻإو ،ﻲﻧﺪﻌﻣ طﺎﻘﻠﻣ ماﺪﺨﺘﺳﺎﺑ ﺔﻳرﺎﻄﺒﻟا ﻚﺴﻤُﺗ ﻻ
اﺬﻫ ماﺪﺨﺘﺳا ﻦﻜﻤﻳ ،ﺔﻴﺴﻴﺋﺮﻟا ةﺪﺣﻮﻟا ﺐﺴﺤﺑ
.رﺪﺼﻤﻟا ﺪﻳﺪﺤﺗ ﺪﻨﻋ دﺪﺤﻤﻟا ﺮﺼﻨﻌﻟا لﺎﺧدﻹ رﺰﻟا
ءاﺮﻤﺤﻟا ﺖﺤﺗ ﺔﻌﺷﻷا ثﺎﻌﺒﻧا ةﺪﺣو
.ىﺮﺧأ ﺔﻤﻟﺎﻜﻣ
(لﺎﺧدإ/ﻊﺿﻮﻟا) MODE
تﻮﺼﻟا ىﻮﺘﺴﻣ
+/–
ثﺪﺤﺘﻟا ءﺎﻨﺛأ
.ﻲﺗﻮﺼﻟا
•
–
•
–
–
•
–
–
•
ﻞﻣﺎﺤﻟا ﺮﻳﺮﺤﺗ رز
ﻞﻣﺎﺤﻟا
و Mode 1 لﻮﺣ
ﻦﻴﻌﺿﻮﻟا ﻊﻣ هﺬﻫ ﺪﻌﺑ ﻦﻋ ﻢﻜﺤﺘﻟا ةﺪﺣو ﻖﻓاﻮﺘﺗ
ﻮﻫ ﻲﺿاﺮﺘﻓﻻا داﺪﻋﻹا .
Mode 2
[Mode 2]و [Mode 1]
ﻊﻣ ﻂﻐﻀﻟا ﺪﻨﻋ ﺚﺤﺒﻟا ﺔﻔﻴﻇو ﻞﻤﻌﺗ ﻢﻟ اذإ .[Mode 1]
ﻮﺤﻨﻟا ﻰﻠﻋ ﻊﺿﻮﻟا ﻞﻳﺪﺒﺘﺑ ﻢﻘﻓ ،/ ﻰﻠﻋ راﺮﻤﺘﺳﻻا
:ﻲﻟﺎﺘﻟا
و ﻰﻠﻋ ﻂﻐﺿا ،SOURCE ﻰﻠﻋ ﻂﻐﻀﻟا ءﺎﻨﺛأ -
ﻰﻠﻋ راﺮﻤﺘﺳﻻا ﻊﻣ ﻂﻐﺿا ﻢﺛ ،ﺐﻴﺗﺮﺘﻟا ﺲﻔﻨﺑ MODEو
ﻰﻟإ ﻊﺿﻮﻟا ﻞﻳﺪﺒﺗ ﺬﺋﺪﻨﻋ ﻢﺘﻳ .ﻦﻴﺘﻴﻧﺎﺛ ةﺪﻤﻟ
.[Mode 2]
ﺪﻨﻋ ﺢﻴﺤﺻ ﻞﻜﺸﺑ ﻲﺗﻮﺻ ﻊﻄﻘﻣ ﻢﻳﺪﻘﺗ/ﻊﻴﺟﺮﺗ ﻦﻣ ﺪﻛﺄﺗ -
./ ﻰﻠﻋ ﻂﻐﻀﻟا
:ﻲﻟﺎﺘﻟا ءاﺮﺟﻹا ﻊﺒﺗا ،[Mode 1] ﻰﻟإ ﻊﺿﻮﻟا ةدﺎﻋﻹ
و ﻰﻠﻋ ﻂﻐﺿا ،SOURCE ﻰﻠﻋ ﻂﻐﻀﻟا ءﺎﻨﺛأ -
ﻰﻠﻋ راﺮﻤﺘﺳﻻا ﻊﻣ ﻂﻐﺿا ﻢﺛ ،ﺐﻴﺗﺮﺘﻟا ﺲﻔﻨﺑ MODEو
.ﻦﻴﺘﻴﻧﺎﺛ ةﺪﻤﻟ
 Loading...