

Page 1
2
2-650-259-11(1)
2
2
Français
2 Fixez la pince dans le sens inverse.
Deutsch
2 Bringen Sie den clip in
entgegengesetzer Richtung an.
Remote Control
Operating Instructions
Mode d’emploi
Bedienungsanleitung
Manual de instrucciones
Gebruiksaanwijzing
Istruzioni per l’uso
RM-MC35ELK
© 2005 Sony Corporation Printed in Malaysia
English
Disposal of Old Electrical &
Electronic Equipment (Applicable in
the European Union and other
European countries with separate
collection systems)
This symbol on the product or on its
packaging indicates that this product
shall not be treated as household
waste. Instead it shall be handed
over to the applicable collection
point for the recycling of electrical
By ensuring this product is disposed of correctly,
you will help prevent potential negative
consequences for the environment and human
health, which could otherwise be caused by
inappropriate waste handling of this product.
The recycling of materials will help to conserve
natural resources. For more detailed information
about recycling of this product, please contact
your local city office, your household waste
disposal service or the shop where you
purchased the product.
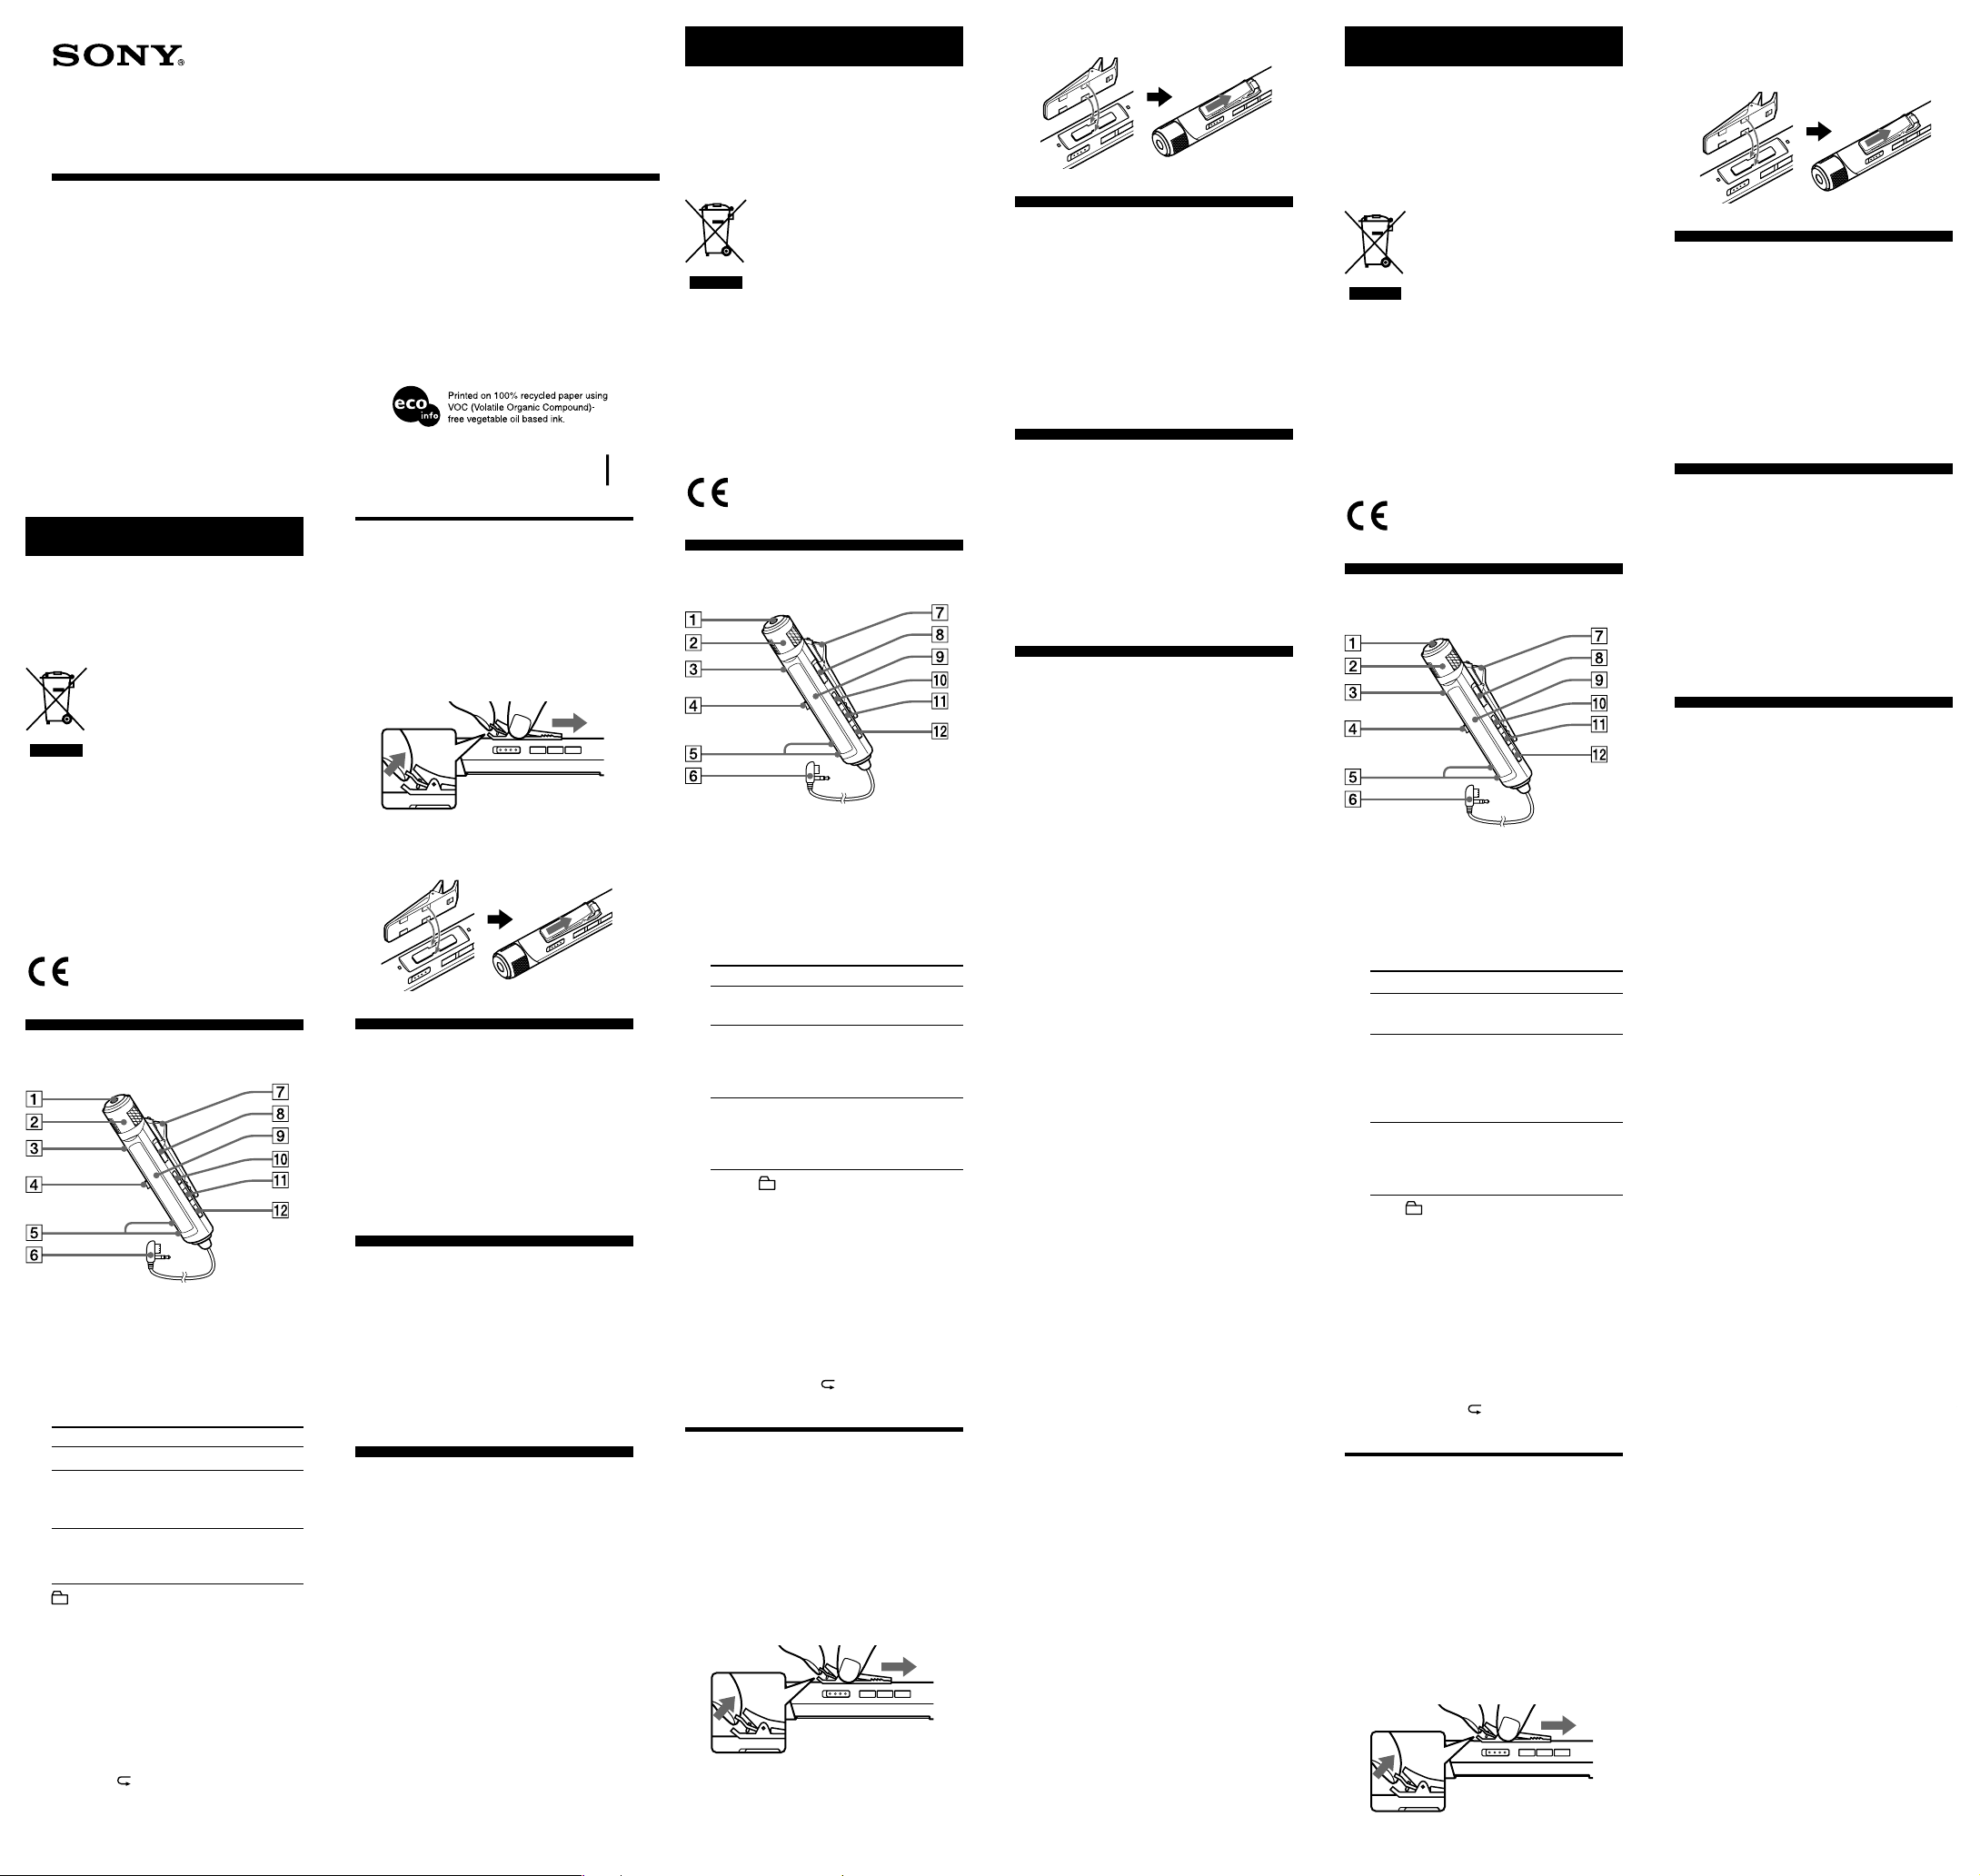
Parts and controls
1 Headphones jack
2 VOL (volume) +, – control
3 x (stop) button
4 Jog lever (.•u/ENT•>)
5 +, – button
6 Connector
7 Clip
8 HOLD switch
9 Display window
q; DISPLAY button
qa P MODE / button
qs SOUND button
and electronic equipment.
Connects optional headphones with a stereo
mini-plug.
Turn to adjust the volume.
Operation
Press u/ENT.
Press towards ..
Function
play, pause, enter
find the beginning
of the previous
track, fast rewind
Press towards >.
find the beginning
of the next track,
fast forward
Connects to the remote control jack of the
unit.
Slide the switch in the direction of the arrow
to disable the bottons on the remote control.
Using the clip for the remote
control
It may be hard for you to read the indications
in the display if the remote control is attached
upside down with the clip in its current
position. In this case, attach the clip in the
opposite direction as shown below.
1 Remove the clip.
1
2 Attach the clip in the opposite
direction.
Compatible models
To confirm which models are compatible
with the remote control, go to the following
website:
http://www.sonydigital-link.com/DNA/
For details on operations and functions, refer
to the operating instructions for the model at
the above website to which the remote control
will be connected.
Precautions
• Do not drop or bump the remote control.
This may cause the remote control to
malfunction.
•A dirty plug may cause noise or
intermittent breaks in the sound during
playback. To maintain good sound quality,
use a soft cloth to clean the plug of the
remote control.
Specifications
Connector
Stereo mini-jack/Stereo mini-plug, Quardrupole
connector
Cord length
Approx. 0.8 m
Dimensions
Approx. φ 13.5 × 84.0 mm (diameter × length, not
including clip, cord, projecting parts and
controls)
Mass
Approx. 25 g (including clip and cord)
Design and specifications are subject to change
without notice.
Traitement des appareils électriques
et électroniques en fin de vie
(applicable dans les pays de l’Union
Européenne et dans les autres pays
européens disposant de systèmes de
collecte sélective)
Ce symbole, apposé sur le produit ou
sur son emballage, indique que ce
produit ne doit pas être traité avec
les déchets ménagers. Il doit être
remis à un point de collecte
approprié pour le recyclage des
électroniques. En s’assurant que ce produit est
bien mis au rebut de manière appropriée, vous
aiderez à prévenir les conséquences négatives
potentielles pour l’environnement et la santé
humaine. Le recyclage des matériaux aidera à
conserver les ressources naturelles.
Pour toute information supplémentaire au sujet
du recyclage de ce produit, vous pouvez
contacter votre municipalité, votre déchetterie ou
le magasin où vous avez acheté le produit.
équipements électriques et
Pièces et commandes
1 Prise de casque
Permet de raccorder un casque en option à
l’aide d’une mini-fiche stéréo.
2 Commande VOL (volume) +, –
Tournez cette commande pour ajuster le
volume.
3 Touche x (arrêt)
4 Levier de sélection (.•u/ENT•>)
Opération
Appuyez sur
u/ENT.
Appuyez vers ..
Fonction
Lecture, pause,
validation
Localisation du
début de la plage
précédente/
retour rapide
Appuyez vers >.
Localisation du
début de la plage
suivante/avance
rapide
5 Touche +, –
6 Connecteur
Permet de raccorder la prise de la
télécommande de l’appareil.
7 Pince
8 Commutateur HOLD
Faites glisser le commutateur dans le sens de
la flèche pour désactiver les touches de la
télécommande.
9 Afficheur
q; Touche DISPLAY
qa Touche P MODE/
qs Touche SOUND
Utilisation de la pince pour la
télécommande
Vous éprouverez peut-être des difficultés à
lire les indications affichées si la
télécommande est fixée à l’envers avec la
pince dans sa position actuelle. Dans ce cas,
fixez la pince dans le sens inverse, comme
illustré ci- dessous.
1 Retirez la pince.
1
Modèles compatibles
Pour vérifier quels sont les modèles
compatibles avec la télécommande, consultez
le site Web suivant :
http://www.sonydigital-link.com/DNA/
Pour en savoir plus sur le fonctionnement et
les fonctions, allez sur le site Web mentionné
ci-dessus afin de consulter le mode d’emploi
relatif au modèle auquel la télécommande est
raccordée.
Précautions
• Ne faites pas tomber et ne heurtez pas la
télécommande. Elle risquerait de ne pas
fonctionner correctement.
• Une prise sale peut provoquer du bruit ou
des interruptions intermittentes de son
pendant la lecture. Pour conserver une
bonne qualité sonore, utilisez un chiffon
doux pour nettoyer la prise de la
télécommande.
Spécifications
Connecteur
Mini-prise stéréo/mini-fiche stéréo, connecteur à
quatre pôles
Longueur du cordon
Environ 0,8 m
Dimensions
Environ φ 13,5 × 84,0 mm (diamètre × longueur ;
pince, cordon, parties saillantes et commandes
non comprises)
Poids
Environ 25 g (pince et cordon compris)
La conception et les spécifications sont sujettes à
modification sans préavis.
Entsorgung von gebrauchten
elektrischen und elektronischen
Geräten (Anzuwenden in den
Ländern der Europäischen Union
und anderen europäischen Ländern
mit einem separaten Sammelsystem
für diese Geräte)
Das Symbol auf dem Produkt oder
seiner Verpackung weist darauf hin,
dass dieses Produkt nicht als
normaler Haushaltsabfall zu
behandeln ist, sondern an einer
Annahmestelle für das Recycling von
Geräten abgegeben werden muss. Durch Ihren
Beitrag zum korrekten Entsorgen dieses
Produkts schützen Sie die Umwelt und die
Gesundheit Ihrer Mitmenschen. Umwelt und
Gesundheit werden durch falsches Entsorgen
gefährdet. Materialrecycling hilft den Verbrauch
von Rohstoffen zu verringern. Weitere
Informationen über das Recycling dieses
Produkts erhalten Sie von Ihrer Gemeinde, den
kommunalen Entsorgungsbetrieben oder dem
Geschäft, in dem Sie das Produkt gekauft haben.
elektrischen und elektronischen
Teile und Bedienelemente
1 Kopfhörerbuchse
Zum Anschließen gesondert erhältlicher
Kopfhörer mit einem Stereoministecker.
2 Lautstärkeregler VOL +, –
Zum Einstellen der Lautstärke.
3 Taste x (Stopp)
4 Jog-Hebel (.•u/ENT•>)
Bedienung
Drücken Sie
u/ENT.
Drücken Sie ..
Funktion
Wiedergabe,
Pause, Eingabe
Ansteuern des
Anfangs des
vorhergehenden
Titels,
Zurückspulen
Drücken Sie >.
Ansteuern des
Anfangs des
nächsten Titels,
Vorspulen
5 Taste +, –
6 Anschluss
Zum Anschließen an die
Fernbedienungsbuchse des Geräts.
7 Clip
8 Schalter HOLD
Wenn Sie diesen Schalter in Pfeilrichtung
verschieben, werden die Tasten an der
Fernbedienung deaktiviert.
9 Display
q; Taste DISPLAY
qa Taste P MODE/
qs Taste SOUND
Verwenden des Clips an der
Fernbedienung
Es ist unter Umständen schwierig, die
Anzeigen auf dem Display zu lesen, wenn die
Fernbedienung aufgrund der Position des
clips so angebracht ist, dass die Anzeigen auf
dem Kopf stehen. In diesem Fall können Sie
den clip wie unten dargestellt abnehmen und
in entgegengesetzter Richtung anbringen.
1 Nehmen Sie den clip ab.
1
Kompatible Modelle
Die Modelle, die mit der Fernbedienung
kompatibel sind, finden Sie im Internet auf
folgender Website:
http://www.sonydigital-link.com/DNA/
Einzelheiten zur Bedienung und zu den
Funktionen finden Sie auf der oben genannten
Website in der Bedienungsanleitung zum
jeweiligen Modell, an das die Fernbedienung
angeschlossen wird.
Vorsichtsmaßnahmen
• Lassen Sie die Fernbedienung nicht fallen
und schützen Sie sie vor starken
Erschütterungen. Andernfalls können
Funktionsstörungen verursacht werden.
• Verschmutzte Stecker können Rauschen
und Tonaussetzer während der
Wiedergabe verursachen. Damit eine
einwandfreie Klangqualität gewährleistet
ist, reinigen Sie den Stecker der
Fernbedienung mit einem weichen Tuch.
Technische Daten
Anschluss
Stereominibuchse/Stereoministecker,
Vierpolanschluss
Kabellänge
ca. 0,8 m
Abmessungen
ca. φ 13,5 × 84,0 mm (Durchmesser × Länge; ohne
Clip, Kabel, vorstehende Teile und
Bedienelemente)
Gewicht
ca. 25 g (einschließlich Clip und Kabel)
Änderungen, die dem technischen Fortschritt
dienen, sind vorbehalten.
Page 2
Español
2
2
2
Tratamiento de los equipos
eléctricos y electrónicos al final de
su vida útil (Aplicable en la Unión
Europea y en países europeos con
sistemas de recogida selectiva de
residuos)
Este símbolo en su equipo o su
embalaje indica que el presente
producto no puede ser tratado como
residuos domésticos normales, sino
que deben entregarse en el
correspondiente punto de recogida
de equipos eléctricos y electrónicos.
Asegurándose de que este producto
es desechado correctamente, Ud. está ayudando
a prevenir las consecuencias negativas para el
medio ambiente y la salud humana que podrían
derivarse de la incorrecta manipulación de este
producto. El reciclaje de materiales ayuda a
conservar las reservas naturales. Para recibir
información detallada sobre el reciclaje de este
producto, por favor, contacte con su
ayuntamiento, su punto de recogida más cercano
o el distribuidor donde adquirió el producto.
Piezas y controles
2 Coloque la pinza en el dirección
opuesta.
Modelos compatibles
Para confirmar los modelos que son
compatibles con el mando a distancia, visite
el siguiente sitio Web:
http://www.sonydigital-link.com/DNA/
Para obtener más información acerca de la
utilización y las funciones, consulte el manual
de instrucciones del modelo al que se va a
conectar el mando a distancia en el sitio Web
indicado anteriormente.
Precauciones
• No deje caer ni golpee el mando a
distancia. Puede provocar un mal
funcionamiento del reproductor.
• Una clavija sucia puede provocar ruido o
cortes intermitentes en el sonido durante la
reproducción. Para mantener una buena
calidad del sonido, utilice un paño suave
para limpiar la clavija del mando a
distancia.
Nederlands
Verwijdering van Oude Elektrische
en Elektronische Apparaten
(Toepasbaar in de Europese Unie en
andere Europese landen met
gescheiden ophaalsystemen)
Het symbool op het product of op de
verpakking wijst erop dat dit
product niet als huishoudafval mag
worden behandeld. Het moet echter
naar een plaats worden gebracht
waar elektrische en elektronische
apparatuur wordt gerecycled. Als u
ervoor zorgt dat dit product op de correcte
manier wordt verwijderd, voorkomt u mogelijk
voor mens en milieu negatieve gevolgen die zich
zouden kunnen voordoen in geval van verkeerde
afvalbehandeling. De recyclage van materialen
draagt bij tot het vrijwaren van natuurlijke
bronnen. Voor meer details in verband met het
recyclen van dit product, neemt u het best
contact op met de gemeentelijke instanties, het
bedrijf of de dienst belast met de verwijdering
van huishoudafval of de winkel waar u het
product hebt gekocht.
Onderdelen en
bedieningselementen
2 Bevestig de clip in de
tegenovergestelde richting.
Compatibele modellen
Ga naar de volgende website om te
controleren welke modellen compatibel zijn
met de afstandsbediening:
http://www.sonydigital-link.com/DNA/
Raadpleeg op de bovenstaande website de
gebruiksaanwijzing voor het model waarop u
de afstandsbediening wilt aansluiten voor
meer informatie over gebruik en functies.
Voorzorgsmaatregelen
• Laat de afstandsbediening niet vallen en
behoed deze tegen heftige schokken, om
storingen in de werking te vermijden.
• Een vuile stekker kan ruis of
onderbrekingen in het geluid veroorzaken
tijdens het afspelen. Gebruik een zachte
doek om de stekker van de
afstandsbediening te reinigen om een
goede geluidskwaliteit te behouden.
Italiano
Trattamento del dispositivo
elettrico od elettronico a fine vita
(Applicabile in tutti i paesi
dell’Unione Europea e in quelli con
sistema di raccolta differenziata)
Questo simbolo sul prodotto o sulla
confezione indica che il prodotto non
deve essere considerato come un
normale rifiuto domestico, ma deve
invece essere consegnato ad un
punto di raccolta appropriato per il
riciclo di apparecchi elettrici ed
elettronici. Assicurandovi che questo prodotto
sia smaltito correttamente, voi contribuirete a
prevenire potenziali conseguenze negative per
l’ambiente e per la salute che potrebbero
altrimenti essere causate dal suo smaltimento
inadeguato. Il riciclaggio dei materiali aiuta a
conservare le risorse naturali. Per informazioni
più dettagliate circa il riciclaggio di questo
prodotto, potete contattare l’ufficio comunale, il
servizio locale di smaltimento rifiuti oppure il
negozio dove l’avete acquistato.
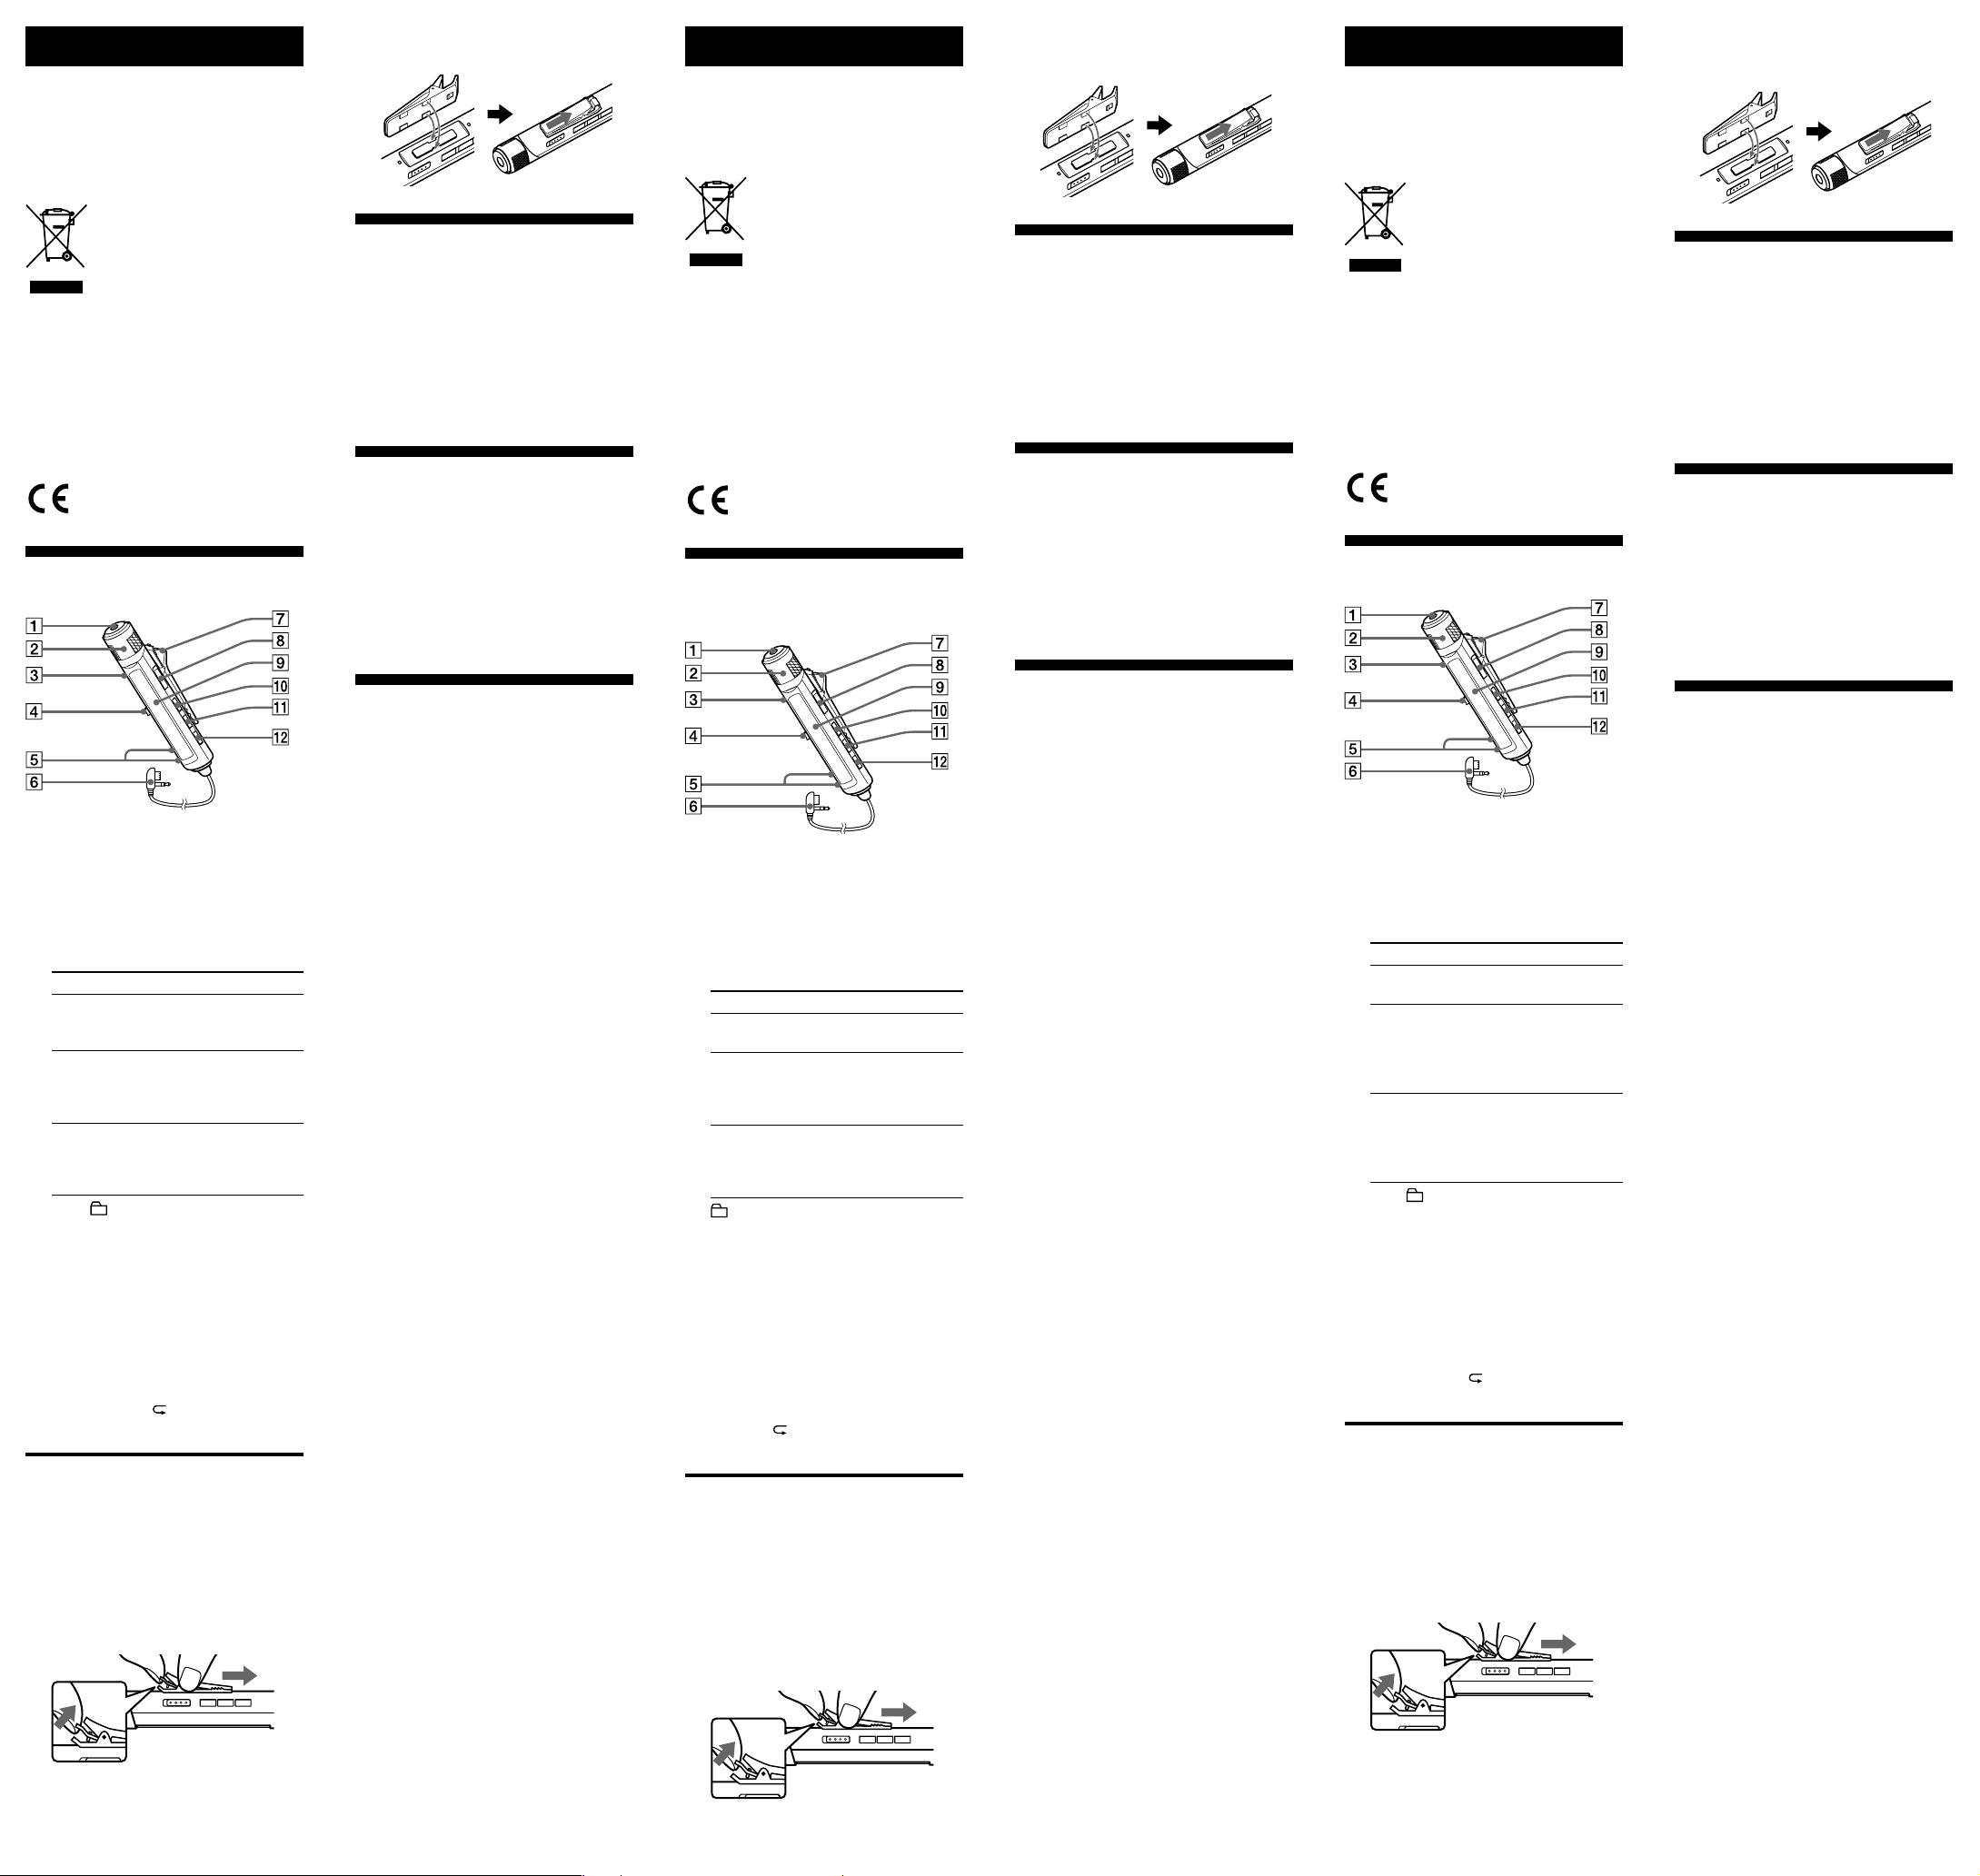
Parti e comandi
2 Collegare il gancio nella direzione
opposta.
Modelli compatibili
Per informazioni sui modelli compatibili con
il presente telecomando, visitare il sito Web
all’indirizzo:
http://www.sonydigital-link.com/DNA/
Per maggiori dettagli su operazioni e
funzioni, consultare le istruzioni per l’uso
(fornite nel sito Web indicato sopra) del
modello cui si desidera collegare il
telecomando.
Precauzioni
• Non far cadere il telecomando e non
sottoporlo a urti. Tali azioni possono
causare problemi di funzionamento del
telecomando.
• Una spina sporca può causare rumore o
salti di suono durante la riproduzione. Per
mantenere una buona qualità del suono,
usare un panno morbido per pulire la
spina del telecomando.
1 Toma de auriculares
Permite conectar auriculares opcionales con
una miniclavija estéreo.
2 Control VOL (volumen) +, –
Gírelo para ajustar el volumen.
3 Botón x (detención)
4 Mando de desplazamiento
(.•u/ENT•>)
Operación
Pulse u/ENT.
Función
reproducción,
pausa,
introducción
Pulse hacia ..
búsqueda del
principio de la
pista anterior,
rebobinado rápido
Pulse hacia >.
búsqueda del
principio de la
pista siguiente,
avance rápido
5 Botón +, –
6 Conector
Se conecta a la toma del mando a distancia
de la unidad.
7 Pinza
8 Interruptor HOLD
Deslice el interruptor en la dirección de la
flecha para desactivar los botones del
mando a distancia.
9 Visor
q; Botón DISPLAY
qa Botón P MODE/
qs Botón SOUND
Utilización del clip para el
mando a distancia
Puede que le resulte difícil leer las
indicaciones del visor si el mando a distancia
está sujeto al revés con la pinza en la posición
actual. En este caso, coloque la pinza en la
dirección opuesta como se muestra a
continuación.
1 Retire la pinza.
Especificaciones
Conector
Minitoma estéreo/miniclavija estéreo, Conector
cuádruple
Longitud del cable
Aprox. 0,8 m
Dimensiones
Aprox. φ 13,5 mm de diámetro × 84,0 mm de
longitud (sin incluir la pinza, el cable, las partes
salientes y los controles)
Peso
Aprox. 25 g (incluidos la pinza y el cable)
El diseño y las especificaciones están sujetos a
cambios sin previo aviso.
1 Hoofdtelefoonaansluiting
Voor een optionele hoofdtelefoon met een
stereo-ministekker.
2 VOL (volume) +, – regelaar
Draai de regelaar om het volume aan te
passen.
3 x (stop) knop
4 Instelknop (.•u/ENT•>)
Bediening
Druk op
u/
ENT.
Druk in de richting
van ..
Functie
afspelen,
pauzeren, Enter
naar het begin
van de vorige
track gaan, snel
terugspoelen
Druk in de richting
van >.
naar het begin
van de volgende
track gaan, snel
vooruitspoelen
5 +, – knop
6 Aansluiting
Voor het aansluiten van de
afstandsbediening van het aan te sluiten
apparaat.
7 Clip
8 HOLD schakelaar
Schuif de schakelaar in de richting van de
pijl om de knoppen op de afstandsbediening
uit te schakelen.
9 Display
q; DISPLAY knop
qa P MODE/ knop
qs SOUND knop
De clip voor de
afstandsbediening gebruiken
Het is mogelijk dat u de aanduidingen in het
display moeilijk kunt lezen als de
afstandsbediening ondersteboven is
aangesloten en de clip in de aangegeven
positie is bevestigd. Bevestig de clip in dat
geval in de tegenovergestelde richting zoals
hieronder is aangegeven.
Technische gegevens
Aansluiting
Stereo-mini-aansluiting/stereo-ministekker,
vierpolige aansluiting
Snoerlengte
Ongeveer 0,8 m
Afmetingen
Ongeveer φ 13,5 × 84,0 mm (diameter × lengte,
exclusief clip, snoer, uitstekende delen en
bedieningselementen)
Gewicht
Ongeveer 25 g (inclusief clip en snoer)
Wijzigingen in ontwerp en technische gegevens
zonder voorafgaande kennisgeving
voorbehouden.
1 Presa cuffie
Consente il collegamento di cuffie opzionali
con minispina stereo.
2 Comando VOL (volume) +, –
Ruotarlo per regolare il volume.
3 Tasto x (arresto)
4 Leva jog (.•u/ENT•>)
Operazione
Premere
u
/ENT.
Premere verso
..
Funzione
Riproduzione,
pausa, invio
Individuazione
dell’inizio del
brano precedente,
riproduzione
rapida all’indietro
Premere verso
>
.
Individuazione
dell’inizio del
brano successivo,
riproduzione
rapida in avanti
5 Tasto +, –
6 Connettore
Consente il collegamento alla presa per il
telecomando dell’apparecchio.
7 Gancio
8 Interruttore HOLD
Fare scorrere l’interruttore in direzione della
freccia per disattivare i tasti del telecomando.
9 Finestra del display
q; Tasto DISPLAY
qa Tasto P MODE/
qs Tasto SOUND
Uso del gancio per il
telecomando
Potrebbe essere difficile leggere le indicazioni
visualizzate sul display se il telecomando è
collegato al contrario con il gancio nella
posizione corrente. In questo caso, collegare il
gancio nella direzione opposta come illustrato
sotto.
1 Rimuovere il gancio.
Caratteristiche tecniche
Connettore
Minipresa stereo/minispina stereo, connettore
quadripolare
Lunghezza del cavo
Circa 0,8 m
Dimensioni
Circa φ 13,5 × 84,0 mm (diametro × lunghezza,
esclusi il gancio, il cavo, le parti sporgenti e i
comandi)
Peso
Circa 25 g (inclusi il gancio e il cavo)
Il design e le caratteristiche tecniche sono
soggetti a modifiche senza preavviso.
1
1 Verwijder de clip.
1
1
 Loading...