

Sony RM-VL900T, RM-AV2100T User Manual

3-223-015-11(1)
Integrated Remote
Commander
Operating Instructions
Gebruiksaanwijzing
RM-AV2100T
© 2000 Sony Corporation
GB
NL

GB
2

Features
The RM-AV2100T Remote Commander provides centralised control of all your AV
components from a single remote commander and saves the trouble of operating
different AV components with different remote control devices. The following are its
main features.
Centralised control of Sony AV components with this one remote commander
This Commander is preset at the factory to operate Sony brand components, so you can
use it out of the box as a control centre for your Sony AV components.
Remote control signals for non-Sony components are also preset
This Commander is preset for most major brands components including Sony. You can
remote control your components by setting their code numbers (page 8).
Learning function for programming other remote control signals you need
This Commander has a learning function, to learn remote control signals to operate
non-preset components or functions (page 16).
In addition, the Commander can learn remote control signals (infrared signals only) of
non-Audio Visual components such as air-conditioners, lights, etc. (some specific
appliances or functions may not be available) (page 38).
Reassigning new components
You can assign other Component Select Buttons to freely operate other components.
This is useful when you have more than two of the same kind of AV components (page
35).
System Control function allows one-touch operation to execute a series of
commands
You can programme up to 16 consecutive operation steps to execute a series of
operations by pressing a single button (page 23).
GB
Data can be transferred between remote commanders
You can transfer data such as learned signals, series of commands assigned to SYSTEM
CONTROL buttons and other settings between this commander and another Sony
RM-VL900T* or RM-AV2100T remote commanders.
Easy-to-operate touch key LCD with blue back light
This Commander has a touch key LCD that changes the key display according to the
selected component. The Commander is easy to operate as only the keys necessary to
operate the selected component are displayed. The display backlight allows operation
even in the dark.
* When transferring data between this commander and another Sony RM-VL900T
remote commander, some functions may not be able to be transferred (e.g. system
control function).
3
GB

Table of Contents
Getting Started
Installing the Batteries ......................................................................................................... 6
When to replace the batteries.............................................................................................. 6
Location and Function of Controls ....................................................................................... 7
Basic Operations
Setting the Code for Preset Audio and Visual Components ................................................. 8
Setting a component code ................................................................................................... 8
Checking if the code number works ................................................................................ 10
Finding a component code with the Search function.................................................... 11
Operating Your Components with the Remote Commander .............................................. 13
To control the volume ........................................................................................................ 14
Notes on operating your components ............................................................................. 15
Using Non-Preset Remote Control Operations — Learning Function ................................ 16
For accurate learning ......................................................................................................... 20
Changing or erasing the function of a taught key or button ....................................... 20
Advanced Features
Controlling the Volume of Visual Components Connected to an Audio System................. 22
Executing a Series of Commands — System Control Functions......................................... 23
Programming a series of commands to the SYSTEM CONTROL buttons ................ 24
Notes on System Control Operations .............................................................................. 27
Programming a series of commands to the Component Select buttons..................... 28
Changing the interval between operation steps ............................................................ 30
Adding an Extra Function to the Component Select Buttons .............................................31
Programming the Power-On command of the selected component
(for Sony components only) ........................................................................................... 31
Adding a command that is required when selecting a component ............................ 32
Turning Off the Power of All Components with the Touch of a Single Button
— System Power-Off Function (for Sony Components only) ........................................... 34
Assigning Other Components to the Component Select Buttons ...................................... 35
Copying the settings of a Component Select button to another button ..................... 37
Programming a Frequently Used Key Operation for SYSTEM CONTROL Buttons ............... 38
Notes on learning the signals of an air-conditioner ...................................................... 40
Transferring Data between Remote Commanders.............................................................. 41
Transferring data ................................................................................................................ 41
4
GB

Receiving the data ..............................................................................................................43
Using Other Functions
Locking the Controls — Hold Function............................................................................... 45
Protecting your settings — Preset Lock Function .............................................................. 46
Changing the Auto Power-Off Time of the Commander ..................................................... 47
Adjusting the Backlight of the Display Window................................................................. 48
Setting the Key-Touch Beep ................................................................................................49
Changing the Touch-Key Display......................................................................................... 50
Additional Information
Precautions ......................................................................................................................... 52
Maintenance ....................................................................................................................... 52
Specifications...................................................................................................................... 52
Troubleshooting.................................................................................................................. 53
Appendix
Table of Preset Functions.................................................................................................... 56
TV.......................................................................................................................................... 56
VCR 1, 2, 3............................................................................................................................ 57
DVD...................................................................................................................................... 57
VD (Video disc player)....................................................................................................... 58
CBL (Cable box) .................................................................................................................. 58
SAT (Satellite tuner) ...........................................................................................................59
AMP (Amplifier).................................................................................................................59
CD ......................................................................................................................................... 60
MD ........................................................................................................................................ 61
DAT....................................................................................................................................... 61
DECK B/A (Tape deck) ..................................................................................................... 62
FM/AM (TUNER) (FM/AM tuner) ................................................................................ 62
DSP (Digital Surround Processor) .................................................................................... 63
Quick Reference of Operations...........................................................................................64
Index ................................................................................................................................... 66
5
GB
Getting Started
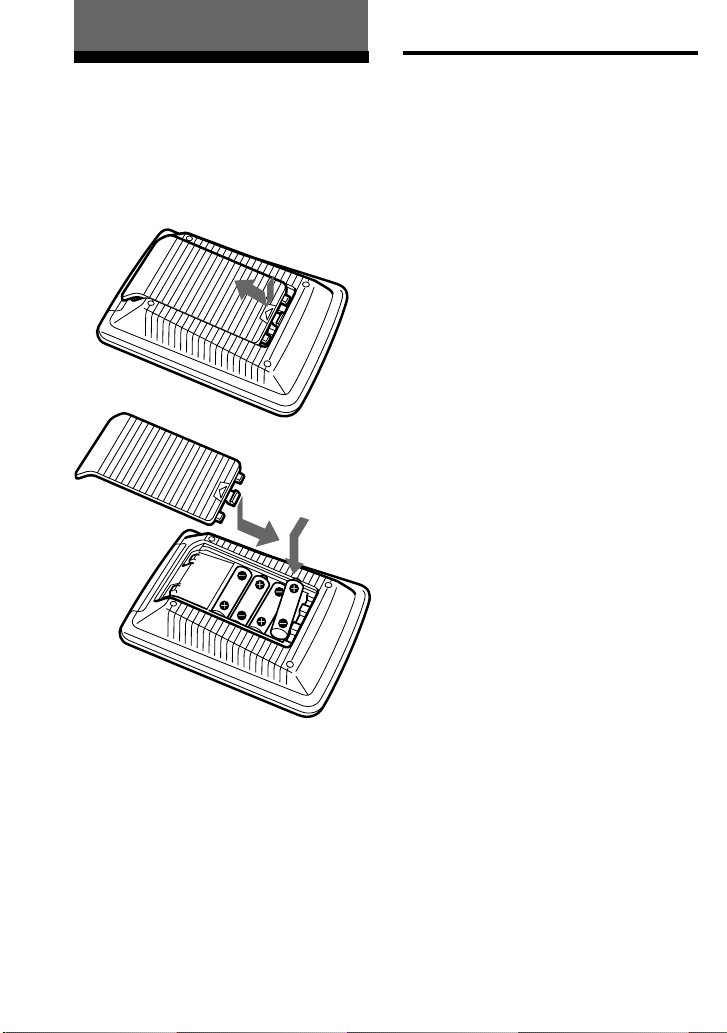
Installing the Batteries
Slide open the battery compartment lid
and insert four R6 (size AA) batteries (not
supplied). Be sure to line up the + and –
on the batteries with the + and – on the
battery compartment.
When to replace the batteries
Batteries for remote control
operation and backlight (four R6
(size AA) batteries)
Under normal conditions, batteries will
last up to 5 months. If the Commander
does not operate properly, batteries
might be worn out and E is displayed
on the LCD touch panel. When the
display dims or the backlight for the
touch keys grows dim, replace the
batteries with new ones.
Note
Do not take more than one day to replace the
batteries; otherwise, your setting of the code
numbers (page 8) and learned remote control
signals (page 16) will be erased.
Notes on batteries
•Do not mix old batteries with new ones or
mix different types of batteries together.
•If the electrolyte inside the battery should
leak, wipe the contaminated area of the
battery compartment with a cloth and replace
the old batteries with new ones. To prevent
the electrolyte from leaking, remove the
batteries when you plan not to use the
Commander for a long period of time.
GB
6

Location and Function
of Controls
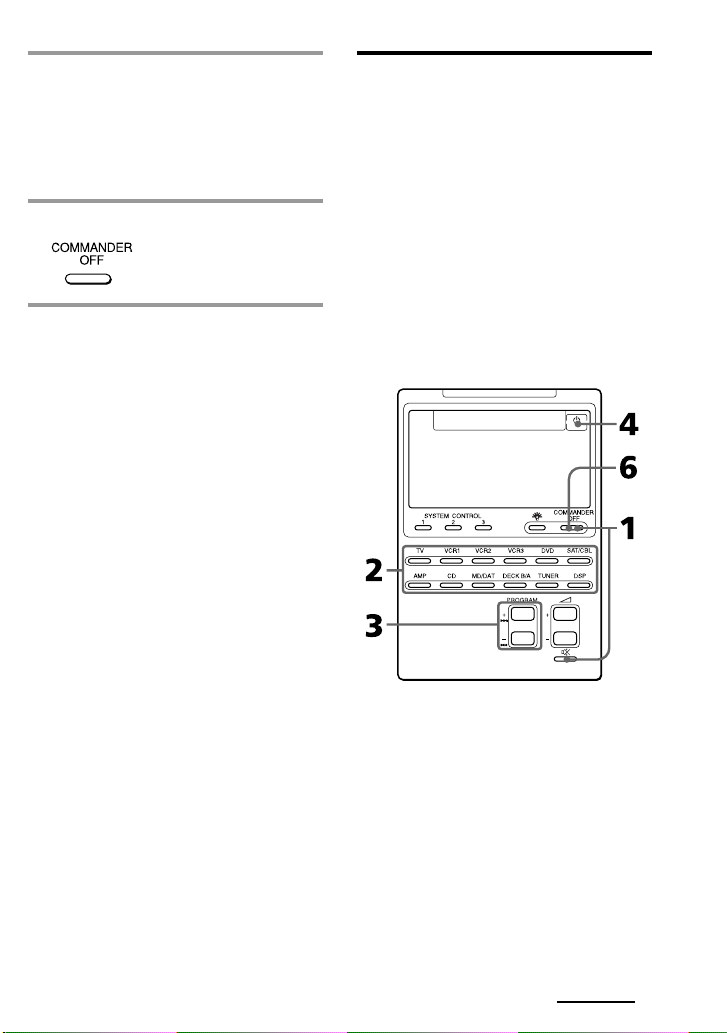
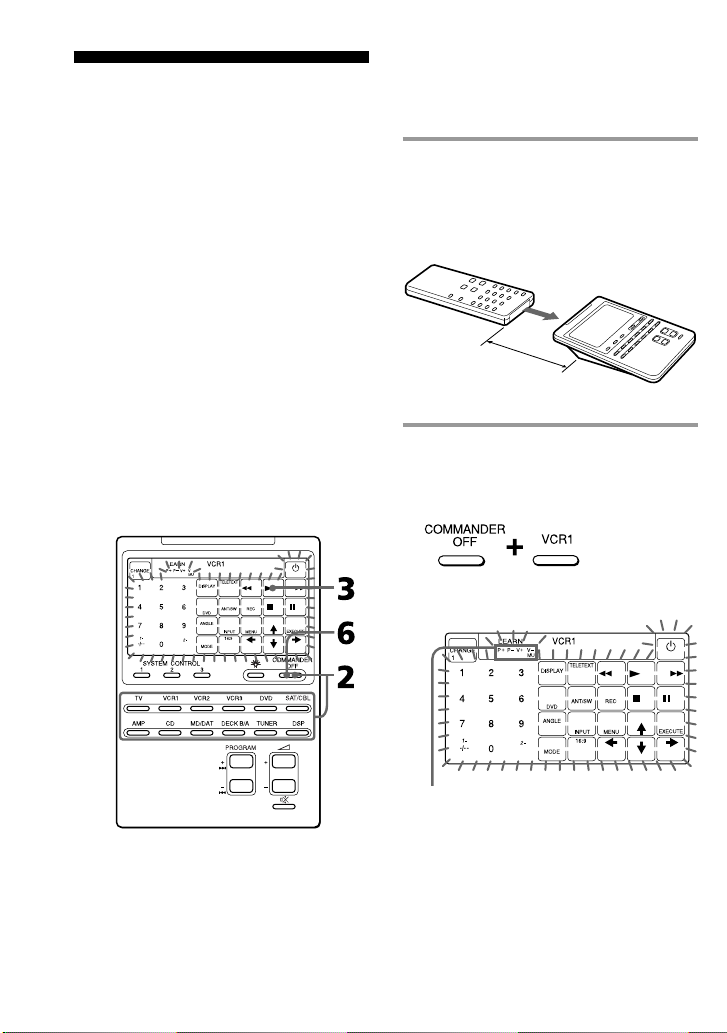
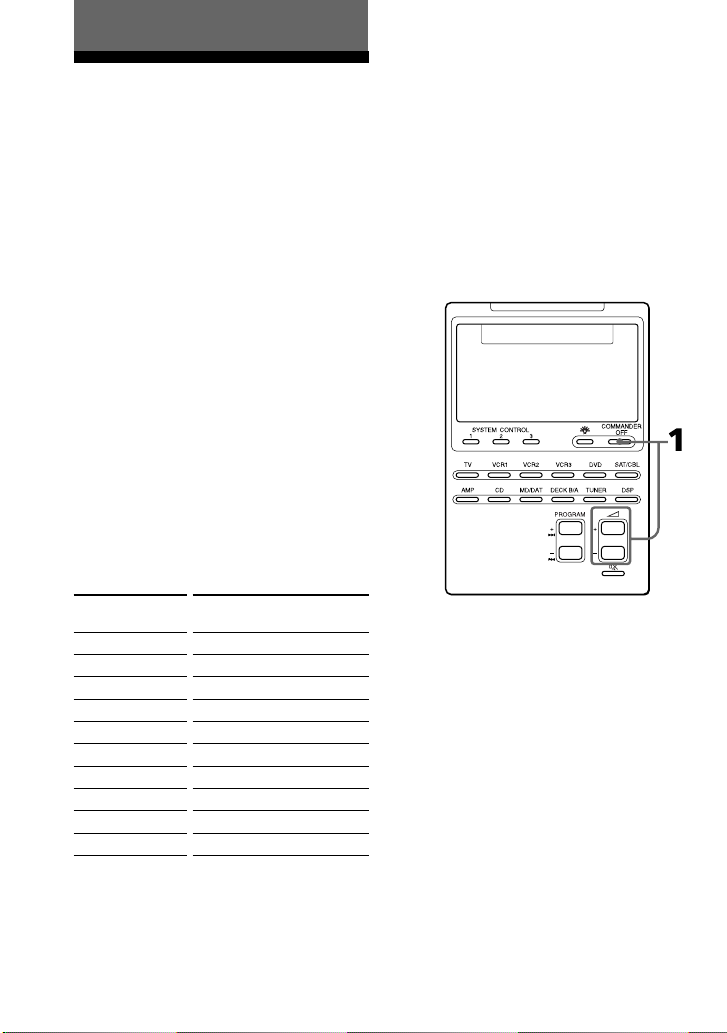
1 Component display area
Displays the name of the component
selected.
2 LCD touch key display (page 11)
The keys used for operating each
component are displayed.
Note
Do not press the touch keys using sharp
objects such as pins or ball-point pens.
3 SYSTEM CONTROL buttons (page
23)
You can programme up to 16
consecutive key operations to each of
the three SYSTEM CONTROL
buttons. You can automatically carry
out the entire programme by pressing
one button.
4 button (page 48)
Used to light up the LCD display in
the dark. Press the button once to turn
on the light, and once again to turn it
off. You can also set the backlight to
go off automatically after a certain
period of time.
5 COMMANDER OFF button
Turns the power of the Commander
off.
6 Component Select buttons
Selects the component to control.
7 2 +/– buttons* (page 14, 22)
Adjust the volume.
8 % button* (page 14, 22)
Mutes the audio. Press the button
once again to resume at the previous
volume.
9 PROGRAM +/– buttons
Select the programme.
* Note on the 2 +/– and % buttons
The Commander controls or mutes the TV’s
volume when you select a visual component.
The Commander controls or mutes the
amplifier’s volume when you select an audio
component.
You can change this setting also (page 22).
Note on the power on and off of the
Remote Commander
To turn on the power, press any button except
the COMMANDER OFF button.
To turn off, press COMMANDER OFF, or if
you don’t use the Commander, it automatically
turns off after 10 minutes. This interval can also
be changed (page 47).
7
GB
Basic Operations
Setting the Code for
Preset Audio and Visual
Components
The Commander is preset at the factory
to operate Sony brand AV components
(see the table below). If you are using the
Commander with a factory-set Sony
components, skip the following
procedures.
You can use the Commander with other
preset AV components also. To use with
other AV components, you need to follow
the procedures to set the correct codes for
each component.
Component Select
Button
TV
VCR1
VCR2
VCR3
DVD
SAT/CBL
AMP
CD
MD/DAT
DECK B/A
TUNER
DSP
* Analog audio compact cassette deck
Preset
component(s)
TV
TV/VCR Combo
VCR
VCR
VCR
DVD player
(DVD)/LD
player (VD)
Satellite tuner
(SAT)/Cable box
(CBL)
Amplifier
CD player
MD deck/DAT
deck
Cassette deck*
FM/AM tuner
Surround
processor
Factory setting
Sony TV
Sony VHS VCR
(VTR3)
Sony 8mm VCR
(VTR2)
Sony Beta VCR
(VTR1)
Sony DVD
player
Sony satellite
tuner (SAT)
Sony amplifier
Sony CD player
Sony MD deck
Sony cassette
deck
Sony FM/AM
tuner
Sony digital
surround
processor
See “Table of Preset Functions” (page 56)
for the functions of keys and buttons as
for each component.
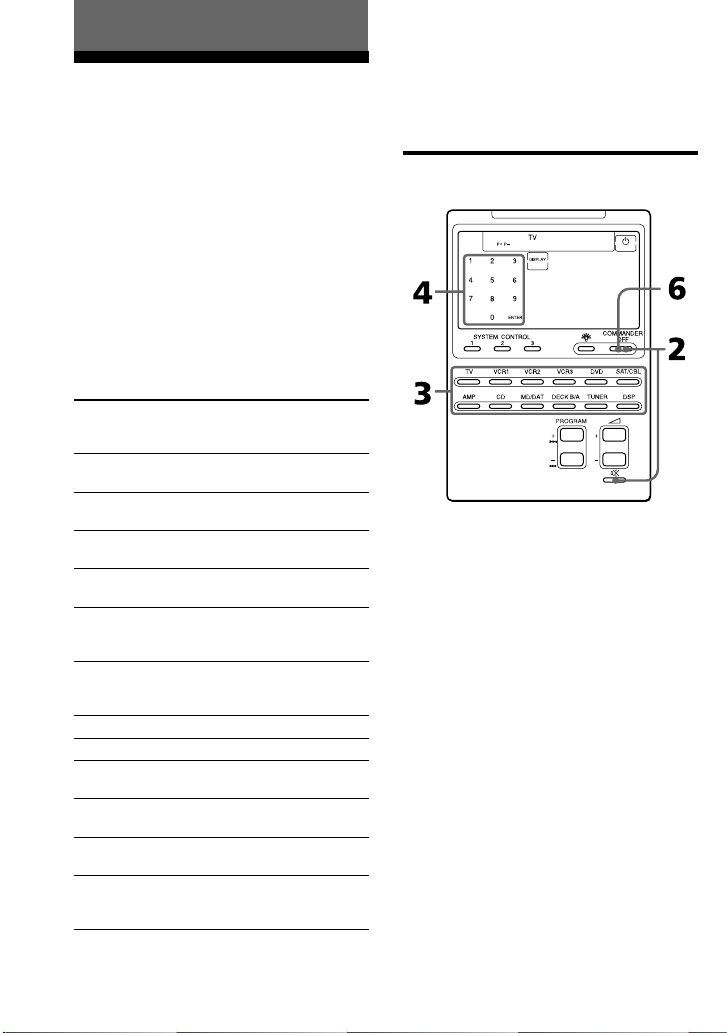
Setting a component code
GB
8
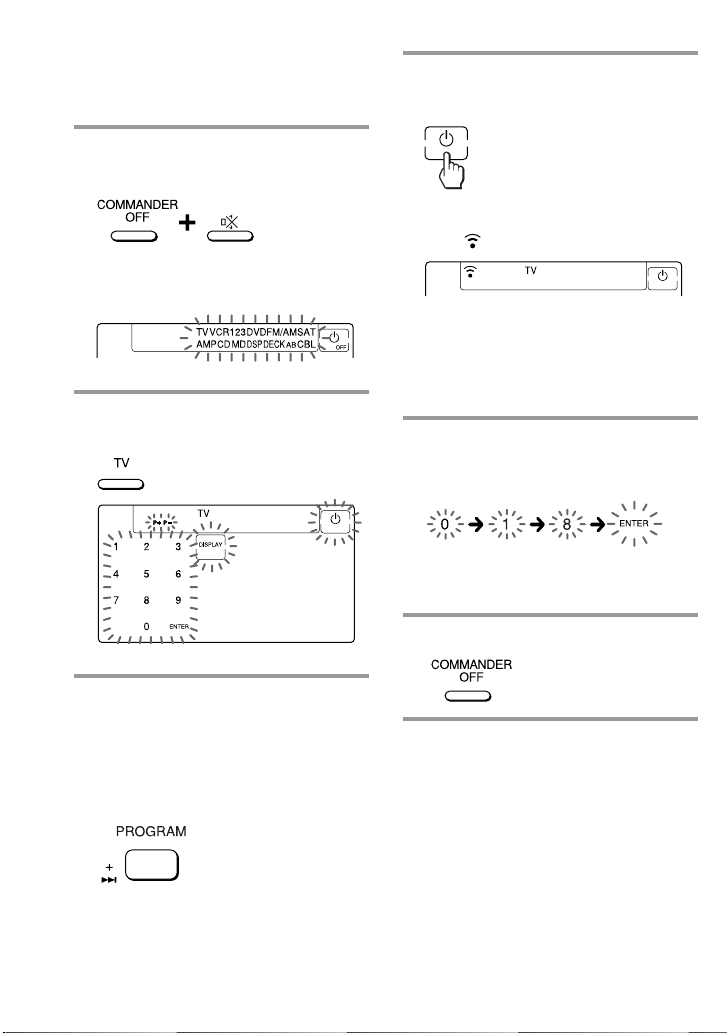
Example: To set up a Philips’ TV
1 See the tables in the supplied
“Component Code Numbers”,
and find the three-digit code
number for the desired
component.
If more than one code number is
listed, use the number that is listed
first.
For example, to set up a Philips’ TV,
you would use the code number 011.
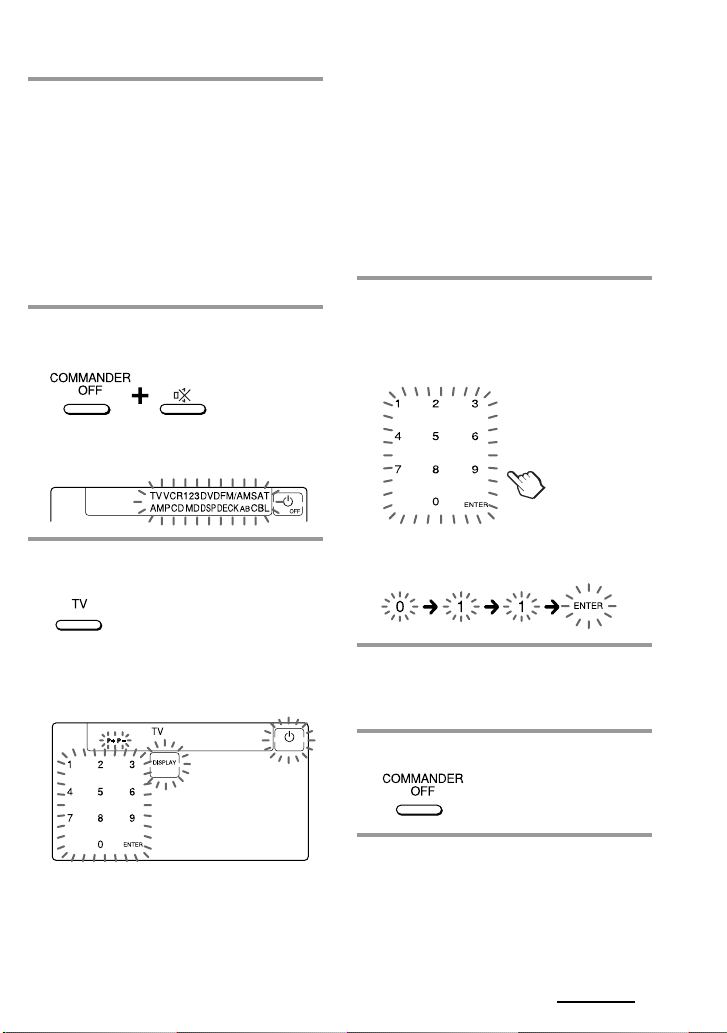
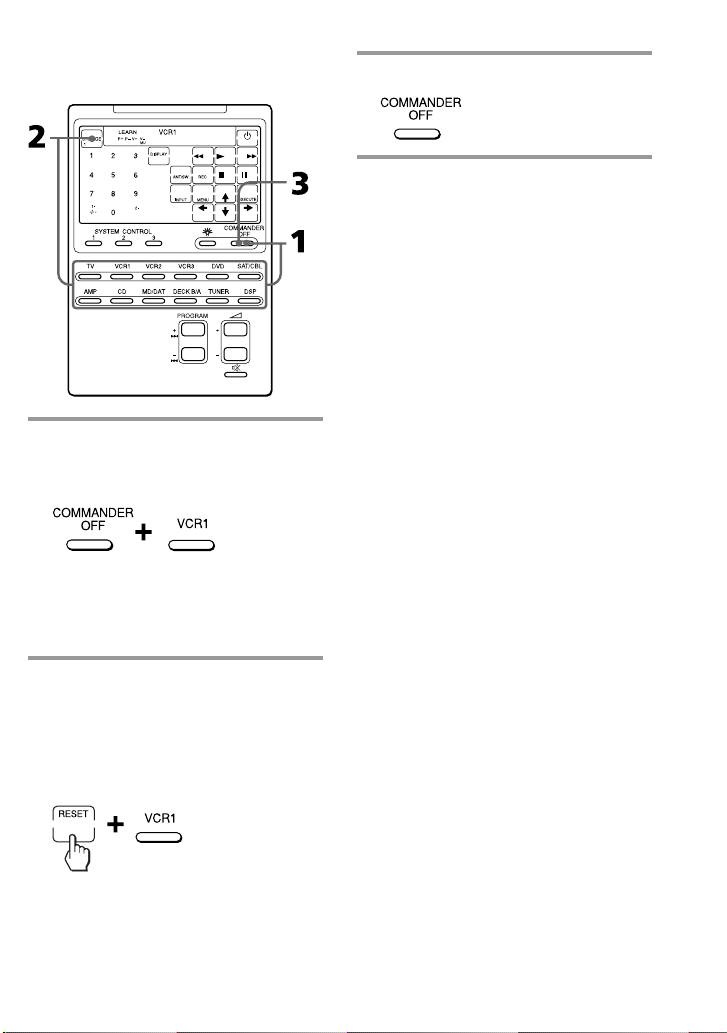
2 While pressing COMMANDER
OFF, press %.
All the component names in the
display flash.
Note on the DVD and SAT/CBL
buttons
When you set the component code of the DVD
or SAT/CBL button, press repeatedly until the
desired component is displayed (“DVD” or
“VD”, “CBL” or “SAT”).
Note on the DECK B/A button
You have to set one component code each for
DECK A and DECK B. Press the DECK B/A
button repeatedly until the desired deck is
displayed (“DECK A” or “DECK B”), and set a
component code for it.
4 Press the three-digit component
code number followed by the
ENTER key on the touch-key
display.
3 Press the Component Select
button for the desired component.
The selected component remains
displayed, and the 0 – 9, ENTER and
DISPLAY keys flash.
A beep sounds, and the code number
and “ENTER” appear twice.
5 If you want to set a code for
another component, repeat Steps
3 and 4.
6 Press COMMANDER OFF.
Continued
9
GB
Setting the Code for Preset Audio
and Visual Components
(continued)
Notes
•If you press a component code number that is
not on the table in the supplied “Component
Code Numbers”, the Commander beeps and
“NG” flashes after you press the ENTER key.
If this happens, check the component code
number, and try setting again.
•If you don’t input anything into the
Commander for over two minutes between
each step, the setup procedure will be
canceled. To set the code, you must again
press % while pressing COMMANDER OFF.
To check which code number is
set
Press the DISPLAY key in Step 3 to 5. The
code number and “ENTER” appear
twice.
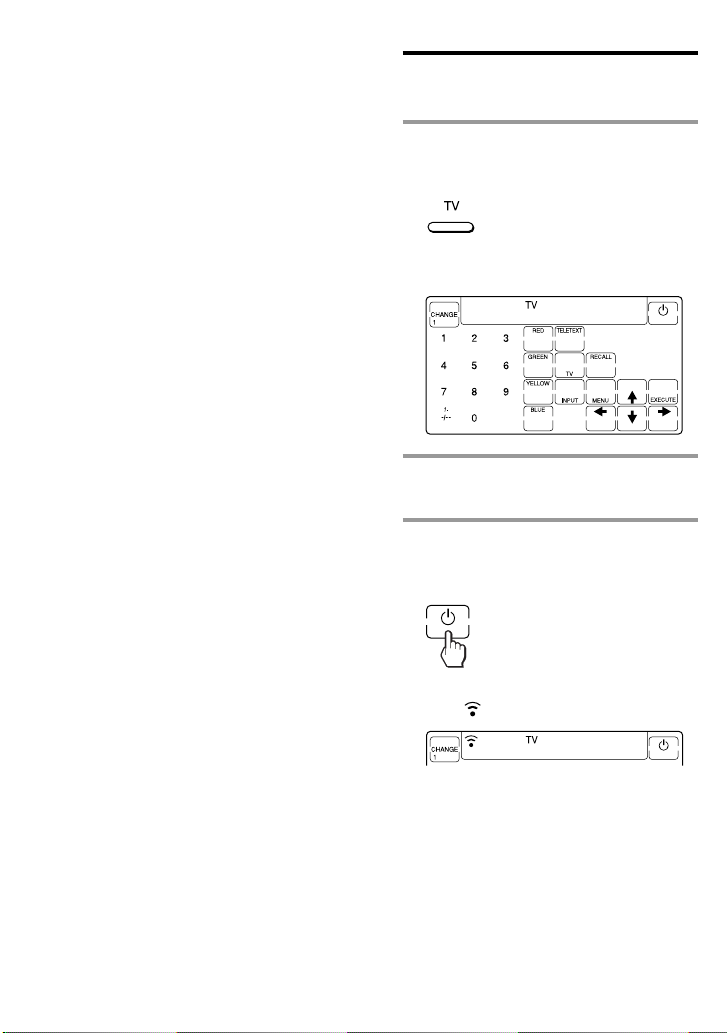
Checking if the code number
works
1 Press the corresponding
Component Select button for the
component you have set up.
The Commander turns on and the
touch-keys appear on the display.
2 Power on the component with its
power switch.
3 Aim the Commander at the
component and press the 1 key
in the touch-key display.
10
GB
When the remote control signal is
sent, is displayed on the display.
The component should power off.
4 If you have succeeded, check that
the Commander is operating the
other functions of your
component, such as programme
and volume control.
See page 13 for details.
5 Press COMMANDER OFF.
If the Commander does not seem to
be working
Try repeating these setup procedures using the
other codes listed for your components
(page 8).
Notes on keys which have
“learned” a remote control
signal already
If another signal has already been
programmed on that key or button by the
learning function (page 16), that
“learned” signal will work even after you
set the component code number. To use it
as a preset component key or button, first
erase its learned signal (page 20).
Note on the touch-key display
When you set a component code number,
only the keys that have been preset with
the signals for the desired component
will be displayed. Preset signal of each
key varies according to the brand.
By using the learning function, you can
programme remote control signals to
both the displayed keys and keys that are
not displayed (page 16).
You can also choose either the fullfunction display or the basic-function
display (page 50).
Finding a component code
with the Search function
You can find a code number available for
a component that doesn’t have one in the
supplied “Component Code Numbers”.
Before starting the Search
function
Set each component to the following
status to enable the Search function.
TV: Power-on
VCR, DVD, SAT, CBL, AMP: Power-off
VD, CD, MD, TAPE: Power-on with a
playback source (disc, cassette tape, etc.)
Continued
11
GB
Setting the Code for Preset Audio
and Visual Components
(continued)
1 While pressing COMMANDER
OFF, press %.
All the component names on the
display flash.
2 Press the Component Select
button for the desired component.
4 Aim the Commander at the
component and press the 1 key.
When the remote control signal is
sent, is displayed on the display.
If it successfully works (power-off for
TV, power-on for VCR, DVD, SAT,
CBL, AMP, and playback for VD, CD,
MD, TAPE), go to Step 5.
If it doesn’t, repeat Steps 3 and 4.
5 Press the ENTER key.
A beep sounds, and the code number
and “ENTER” appear twice.
Note
It is recommended to write down the code
number.
6 Press COMMANDER OFF.
3 Press PROGRAM + or
PROGRAM –.
Press PROGRAM + to go to the next
code number.
Press PROGRAM – to go back to the
previous code number.
12
GB
To check which code number is
set
Press the DISPLAY key in Step 2 and 5.
The code number and “ENTER” appear
twice.
Be sure to press the DISPLAY key after
you have pressed the ENTER key to set
the code number. If you press the
DISPLAY key before the code number is
set, it returns back to the first number at
which you started searching.
Operating Y our
Components with the
Remote Commander
When you operate a non-Sony
component, make sure you set the
component code first (page 8).
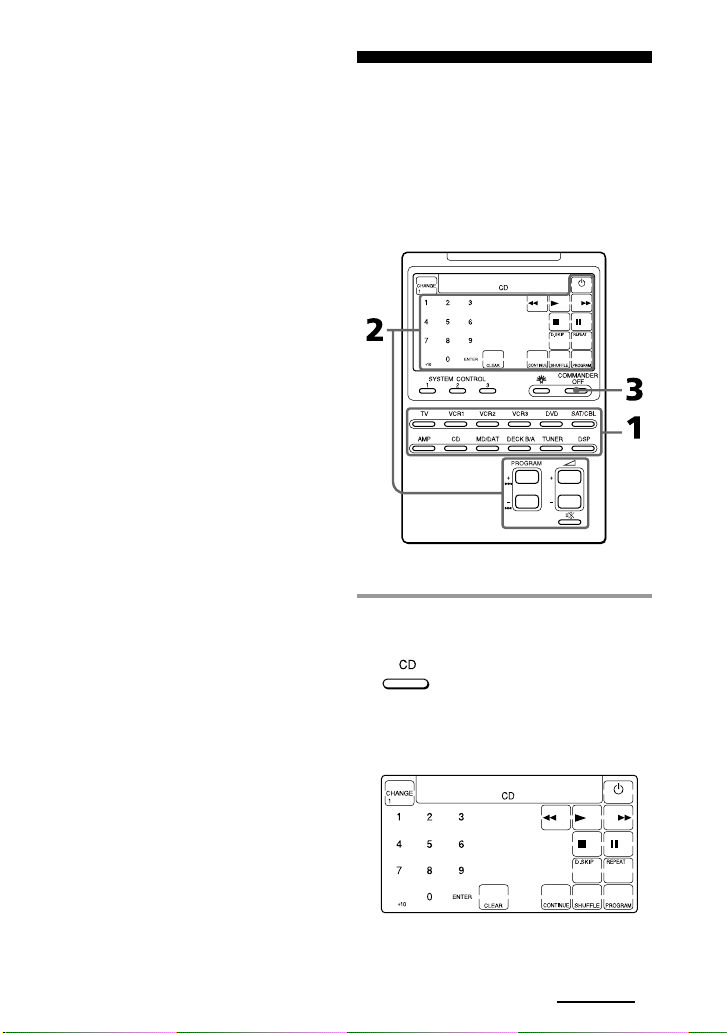
Example: To play a CD player
1 Press the desired Component
Select button.
The Commander comes on and the
keys for operating the selected
component are displayed.
Continued
13
GB
Operating Your Components with
the Remote Commander
(continued)
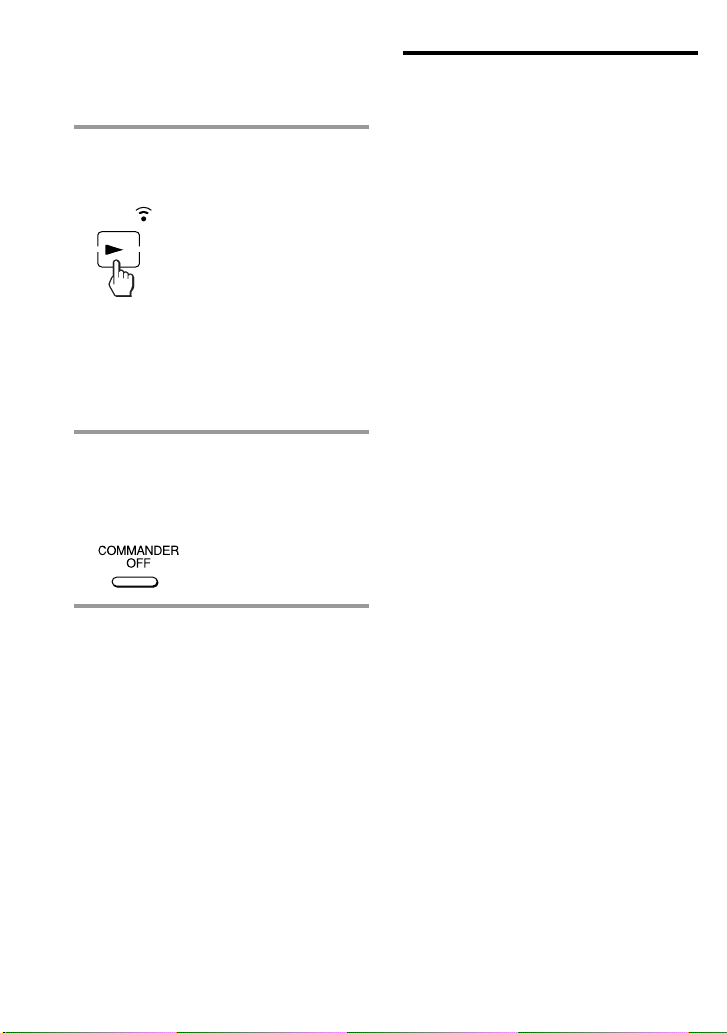
2 Press the desired key in the
touch-key display.
When the remote control signal is
sent, is displayed on the display.
You may also use the 2 +/– buttons,
the % button and the PROGRAM +/–
buttons if necessary.
See “Table of Preset Functions” (page
56) for the functions of keys and
buttons for each component.
3 When you are done using the
Commander, press
COMMANDER OFF to power off
the Commander.
Note
The remote control signals may be different for
some components or functions. In this case,
programme the remote control signals with the
learning function (page 16). Note, however,
that components and functions that do not
support the remote control of infrared signals
will not work with this Commander.
To control the volume
Press the 2 +/– buttons to control the
volume, and the % button to mute.
When you select a visual component, the
TV’s volume will be controlled, and
when you select an audio component, the
amplifier’s volume will be controlled.
You can change this setting also (page
22).
Notes
•If you have programmed any signal for the
2 or % button for any component using the
learning function (page 16), that signal will
be transmitted instead of controlling the
volume of the TV or amplifier once you select
that component.
•If you have programmed any signal for the
2 or % button of TV or AMP using the
learning function, that signal will be
transmitted only after you select TV or AMP.
When you select another components, the
preset volume control signals for TV or AMP
will be transmitted at that time.
•If you have assigned another component to
the TV or AMP button (page 35), the volume
of the TV or amplifier cannot be controlled
even when you select other components.
14
GB

Notes on operating your
components
When you use a double cassette
deck
You need to select deck A or B before
operating. To select the deck, press DECK
B/A to switch the display between
“DECK A” and “DECK B”.
Be sure that you have set a component
code each for DECK A and DECK B
(page 8).
However, if you have assigned a cassette
deck to another Component Select button
(page 35), you can only select either
DECK A or DECK B.
About the input select of a TV
Each time the INPUT key is pressed, the
input is changed in order. It is also
possible to select directly as follows
when you are connecting more than two
VCRs.
“INPUT” + “0”: TV tuner
“INPUT” + “1”: VIDEO1
“INPUT” + “2”: VIDEO2
“INPUT” + “3”: VIDEO3
“INPUT” + “4”: VIDEO4
“INPUT” + “5”: VIDEO5
“INPUT” + “6”: VIDEO6
If the above operations do not work,
programme the remote control signals of
your component on the Commander
using the learning function (page 16).
About the input select of a VCR
Each time the INPUT key is pressed, the
input is changed in order. It is also
possible to select directly as follows.
“INPUT” + “0”: Tuner
“INPUT” + “1”: LINE1
“INPUT” + “2”: LINE2
“INPUT” + “3”: LINE3
“INPUT” + “4”: LINE4
“INPUT” + “5”: DV
When you use a Sony VCR, the above
commands are preset. For other brands, it
is possible to “teach” the above doublekey operations using the learning
function (page 16).
15
GB
Using Non-Preset
Remote Control
Operations
— Learning Function
To operate non-preset components or
functions, use the following “learning”
procedure to “teach” any of the
programmable buttons and keys to
operate the functions of another remote
control. You can also use the learning
function to change the signal of
individual keys and buttons after setting
the component code number (page 8).
It is useful if you make a memo of the
learned key functions in the LCD touch
key display table (Refer to the separate
volume of “Component code numbers.”).
Note
Some specific remote control signals may not
be learned.
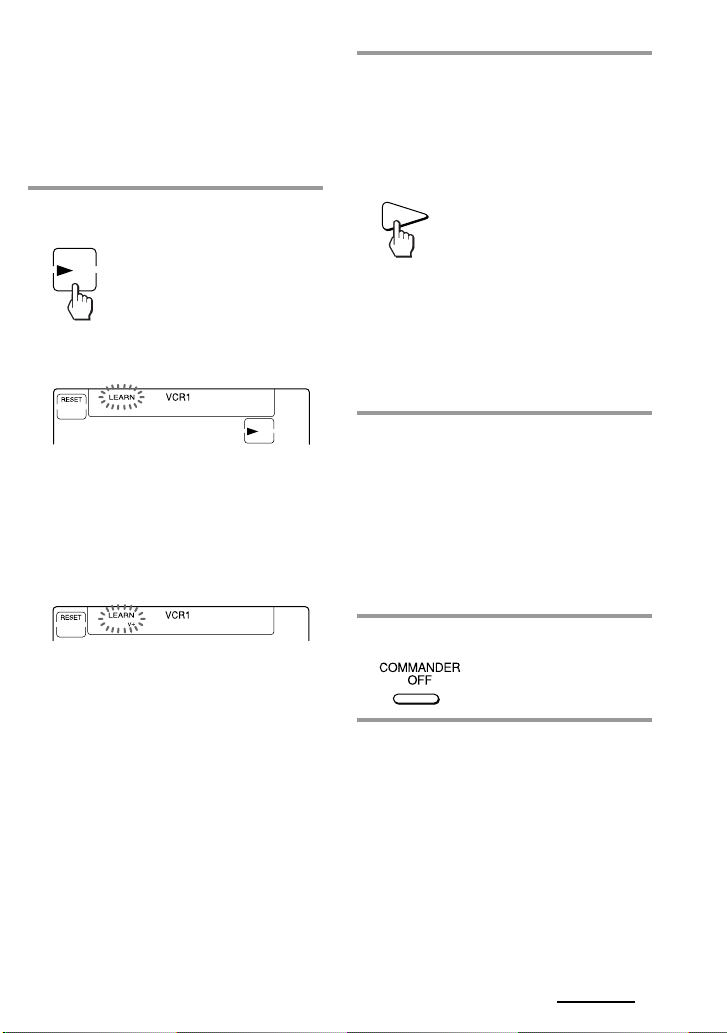
Example: To programme the N
(Play) signal of your component
to the VCR1 N (Play) key of the
Commander
1 Place the RM-AV2100T head to
head with your component’s
remote control.
Remote control for
your component
about 5 – 10 cm
(2 – 4 inches) away
RM-AV2100T
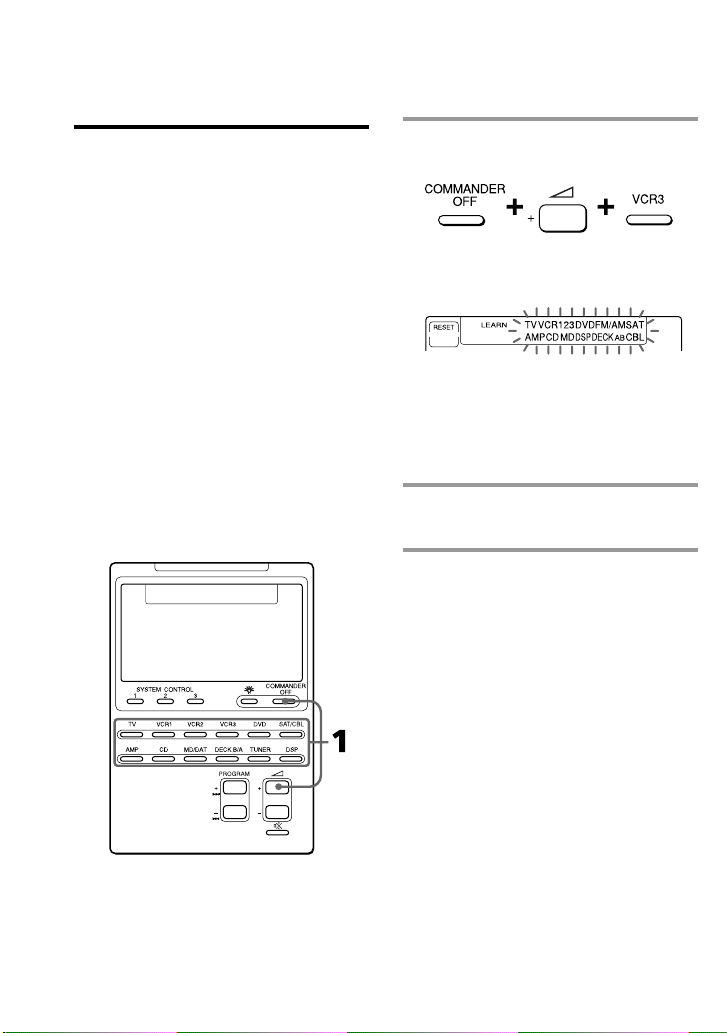
2 While pressing COMMANDER
OFF, press the Component Select
button for the component whose
signals are to be learned.
“LEARN” appears and all the
learnable keys flash.
16
GB
Display for PROGRAM, 2 and % buttons
The “P+ P- V+ V- MU” display
indicates if PROGRAM +/–, 2 +/–
and % buttons are learnable or not.
Note on the flashing display
The keys or buttons that are already preset
for that component flash twice while those
that are not preset flash once.
3 Press the key or button on the
Commander you want to “teach”.
“LEARN” flashes and the only
pressed key remains on the dislplay.
To teach on the PROGRAM +/–, 2
+/– or % buttons
Press the corresponding button. “LEARN”
flashes, and only the pressed button
remains indicated on the display (“P+,”
“P–,” “V+,” “V–,” or “MU”).
Example: When pressing the 2 + button
To change the function display of
the key
Follow the procedure on page 19.
4 Press and hold down the button
on the other remote control until
you hear a beep.
(If you release the button before you
hear a beep, the signal may not be
learned correctly.)
“LEARN” stops flashing and stays lit.
When the command has been learned
successfully, the learned keys stay lit
and the other learnable keys flash.
If “NG” flashes on the display
Learning did not succeed. Try Steps 3 and 4
again.
5 Repeat Steps 3 and 4 to teach
functions to other kyes or
buttons.
To learn another component’s
remote control signal
After positioning the two remote
commanders as in Step 1 on page 16, press
the corresponding Component Select
button, and then follow Steps 3 and 4 on
the left to perform learning.
6 Press COMMANDER OFF.
Continued
17
GB

Using Non-Preset Remote Control
Operations
— Learning Function(continued)
Notes
•If you do not perform learning steps within
two minutes, learning mode ends.
•If you do not perform Step 4 within 10
seconds after Step 3, the display turns back to
the display in Step 2. (All the learnable keys
flash.) In this case, perform Step 3 again
while the display is flashing,
•If “NG” appears while learning, the memory
is full. To free memory, clear learned
functions from keys that you do not use often
(page 20). Then continue the learning steps.
•If you touch a key by mistake in step 4, while
pressing the RESET key, press the mistaken
key. Then repeat from Step 3 to continue
learning.
If the Commander does not seem to
be working
If the learned key or button does not operate
properly, teach once again. (For example, if the
volume becomes very loud after pressing the
2 + button only once, noise may have
interfered during the learning procedure.)
If you set a component code after
learning a signal
If you have programmed any signal for a key
or button using the learning function, that
signal will remain assigned to that key or
button even after you set a component code.
When you teach the signals for a
double cassette deck
Press DECK B/A to select deck A or B.
When you teach the REC (record)
signal
If you have to press two buttons at the
same time (for example, REC and B) to
start recording on your cassette deck or
VCR, teach the REC signal in one of the
following ways.
To operate with two keys on the
Commander
In Step 3 (page 17), while pressing the REC key,
press the B key to display both keys. Then
press the two buttons on your component’s
remote control in Step 4.
To operate with one key on the
Commander
In Step 3 (page 17), press only the REC key.
Then press the two buttons on your
component’s remote control in Step 4.
When you teach signals to the 2
or % buttons
•If you have programmed any signal on
the 2 or % button for components
other than TV and AMP using the
learning function, that signal will be
transmitted only when you select that
component.
•If you have programmed any signal on
the 2 or % button for TV or AMP
using the learning function, that signal
will be transmitted only when you
select TV or AMP. When you select
other components, the preset volume
control signals for TV or AMP will be
transmitted (for the difference between
visual components and audio
components, see page 22). To use the
learned signal, you need to programme
the 2 or % button for each component
using the learning function.
18
GB
When you teach the signals of an
air-conditioner
See the notes on page 39.
To display only the frequently
used keys
You can hide keys you do not use. This
makes operations even easier to
understand, when the components have
many keys.
After Step 2 on page 16, while pressing
the RESET key, press the key you want to
hide (flashing). The pressed key changes
to slower flashing and will no longer be
displayed during remote control
operations.
To display it again, perform the same
procedure again.
Note
You can not hide a key which has “learned”
any signal.
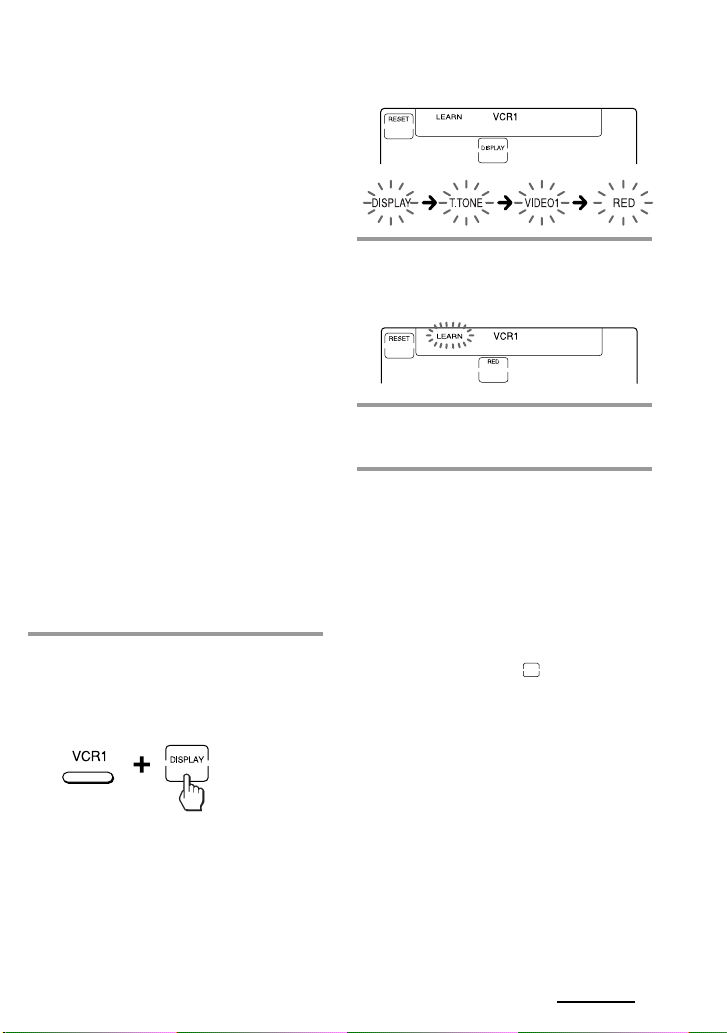
To change the function display of
a key
When you programme a signal for a key,
you can select the most suitable function
display among all the displays the key
has, and set it to the key.
1 After Step 2 (page 16), while
pressing the Component Select
button (VCR1), press the key you
want to teach repeatedly.
Each time the key is pressed, the
display is changed in order.
2 When the desired display
appears, release the Component
Select button.
3 Then follow Steps 4 to 6 (page
17).
Notes
• You can change the display of a key only
when you programme it using the learning
function. If you want to change the display of
the key that has learned a signal, clear the
signal first (page 20). Then teach the key
again using the above procedure to change its
display.
• If you don’t change the display of a key, the
default display is used.
• You cannot change the display of the keys
that are not framed with
keys 0 to 9, +10 and ENTER).
(the numeric
Continued
19
GB
Using Non-Preset Remote Control
Operations
— Learning Function (continued)
For accurate learning
•Do not move the remote units during
the learning procedure.
•Be sure to keep holding down the
button of the other remote control until
you hear the confirmation beep.
•Use fresh batteries in both remote
control units.
•Avoid learning in places under direct
sunlight or a strong fluorescent light.
•The remote control detector area may
differ depending on each remote unit. If
learning does not work, try changing
the positions of the two remote control
units.
•When you teach signals of an
interactive signal exchange system
remote control unit (supplied with
some of Sony’s receivers and
amplifiers) to the Commander, the
response signal of the main unit may
interfere with the learning of the
Commander. In such a case, move to a
place where the signals will not reach
the main unit (e.g. other rooms, etc.).
IMPORTANT
Be sure to place the Commander out
of the reach of small children or pets.
Also set the Hold function to lock the
all buttons on the Commander (page
45) when it is not used. Components
such as air conditioners, heaters,
electric appliances, and electric
shutters or curtains receiving an
infrared signal can be dangerous if
misused.
Changing or erasing the
function of a taught key or
button
To change the learned function, clear it
first and perform learning again.
To clear the learned function of a
single key or button
1 After Step 2 (page 16), while
pressing the RESET key, press the
key or button you want to erase.
The cleared key flashes together with
other learnable keys.
2 Press COMMANDER OFF.
Note
For details on the learnable remote control
signals, see “Specifications” on page 52.
20
GB
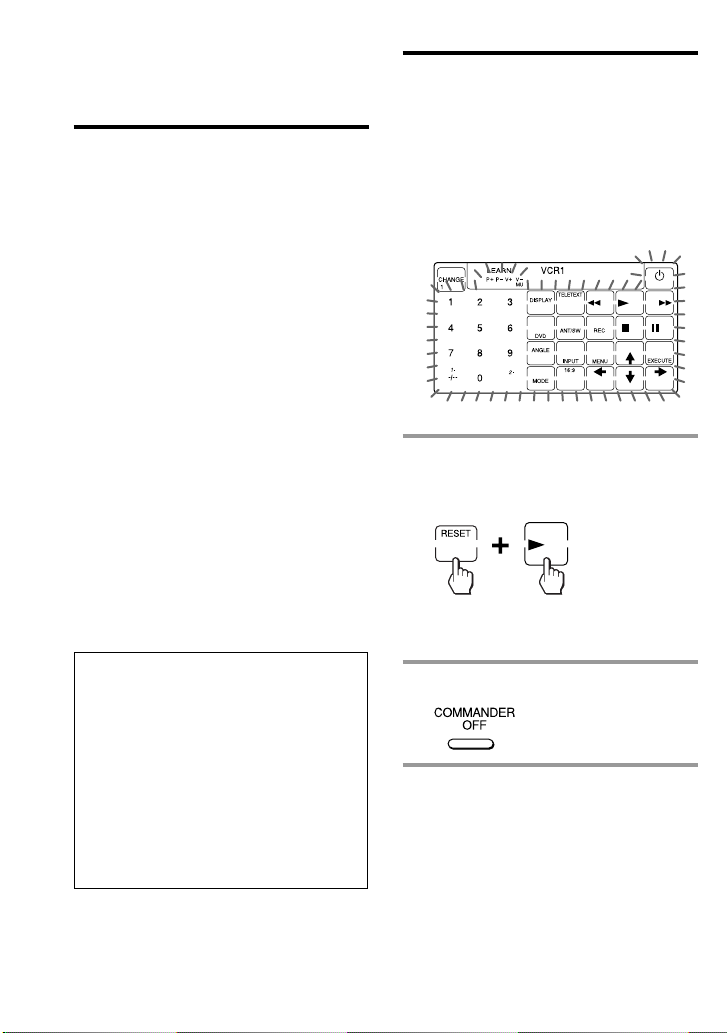
To clear all signals learned for a
specific component
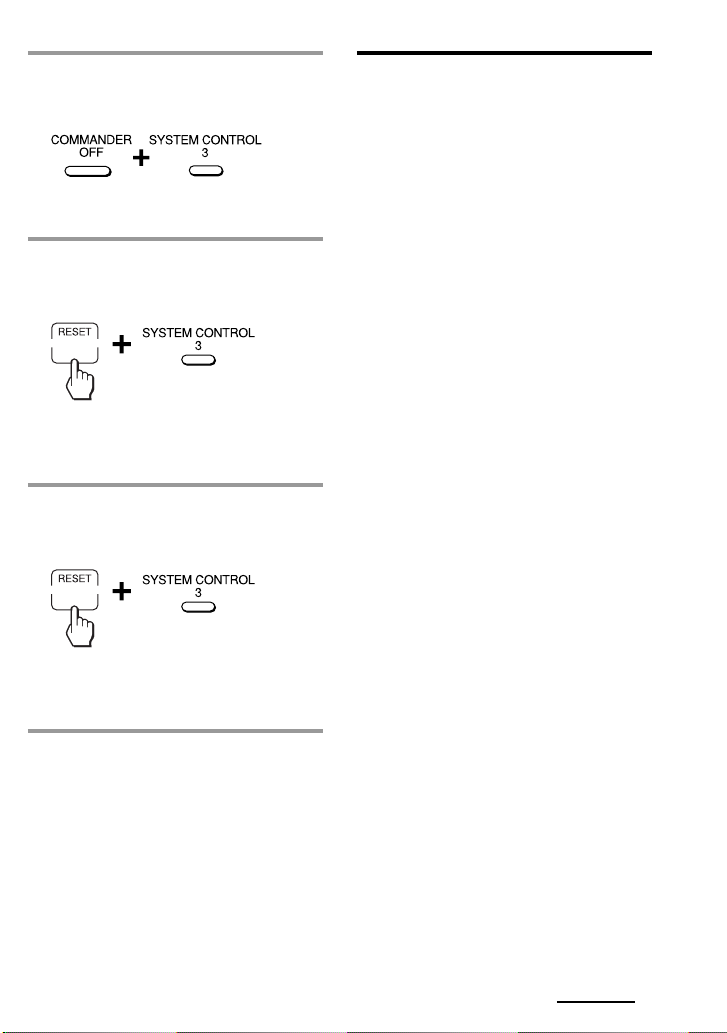
1 While pressing COMMANDER
OFF, press the corresponding
Component Select button.
When you want to clear signals
learned for DECK B/A
Press DECK B/A to display “DECK A”or
“DECK B”. You can not clear both decks at
the same time.
3 Press COMMANDER OFF.
Note
For DECK B/A, be sure to display the deck
that has a learned signal (“DECK A” or “DECK
B”) before you perform the steps above. If you
reset the wrong deck, the component codes for
both A and B will be reset to the factory
settings (page 8).
2 While pressing the RESET key,
press that Component Select
button again.
The learned contents are cleared. The
keys for the component return to their
original states before learning.
21
GB
Advanced Features
Controlling the Volume
of Visual Components
Connected to an Audio
System
The Commander is factory preset based
on the assumption that you hear the
sound of your visual components from
your TV speakers, and that you hear
sound of your audio components from
the loudspeakers connected to your
amplifier.
This feature enables you to control the
volume of your TV or amplifier without
having to select TV or AMP each time
you want to control the volume.
For example, to control the volume while
using a VCR, you don’t need to press the
TV button to control the TV volume.
The following table shows the factory
setting of which volume would be
controlled for each component.
However, if your visual components are
connected to an audio system, you
probably hear TV or VCR sound from the
loudspeakers via your amplifier, not
from your TV speakers. In this case, you
need to change the factory preset so that
you can control the volume of your
visual components without first having
to switch to the amplifier.
To change the Factory Preset of
the Volume Control
Component
Select button
TV
VCR1,2,3
SAT/CBL
DVD
AMP
CD
MD/DAT
DECK B/A
TUNER
DSP
22
GB
Controls the volume of
TV
TV
TV
TV
amplifier
amplifier
amplifier
amplifier
amplifier
amplifier
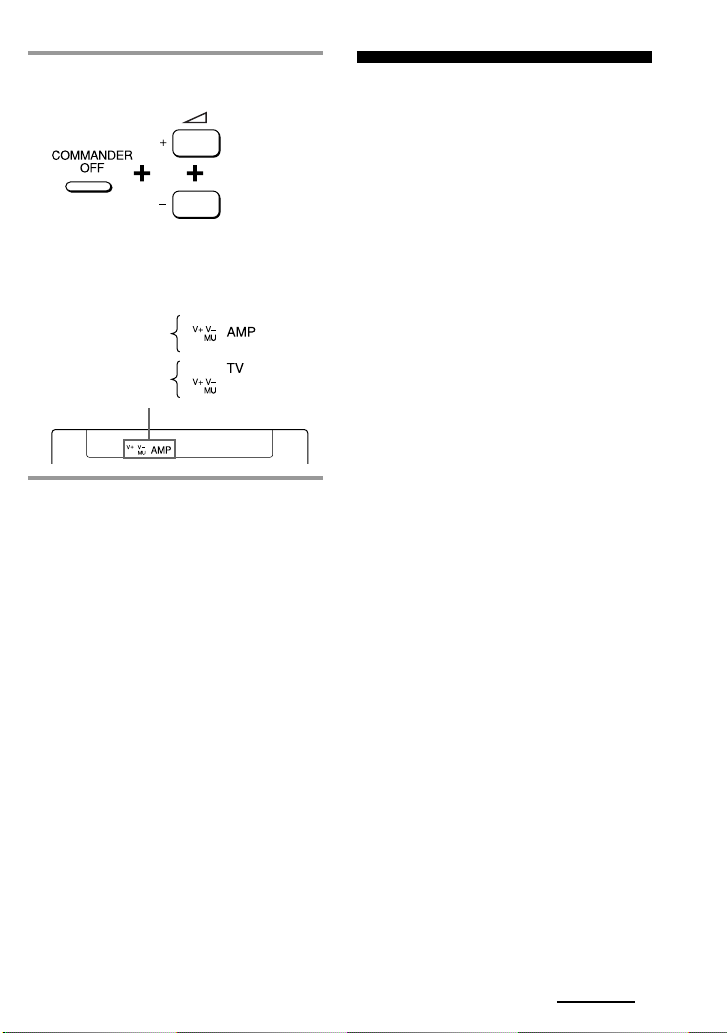
1 While pressing COMMANDER
OFF, press 2 + and 2 –.
The volume control setting of visual
components (TV, VCR1,2 and 3, SAT/
CBL, and DVD) changes to the
displayed component.
When set to
amplifier volume
When set to
TV volume
Notes
• If you have already programmed the 2 or
% button of each component any signals by
“learning”, the procedure above will not
change the function of the 2 and % buttons.
• If you have programmed volume control
signals on 2 or % buttons of TV or AMP,
you can only use that signal when you select
TV or AMP. For other component, the preset
volume control signals for TV or AMP
(depending on the above setting procedure)
will be transmitted. To use the new signals,
you need to programme each button for each
component by the learning procedure (page
16).
Executing a Series of
Commands
— System Control Functions
With the System Control function, you
can programme a series of operating
commands, and execute them by
pressing just one button.
For example, when you watch a video, a
series of operations like the ones below
are necessary.
Example:
1 Power on the TV.
2 Power on the video (VCR 1).
3 Power on the amplifier.
4 Set the input selector of the amplifier
to VIDEO 1.
5 Set the input mode of the TV to
VIDEO.
6 Start video playback
You can programme up to 16 consecutive
operation steps to each of the SYSTEM
CONTROL 1, 2 or 3 buttons.
If you have set the System Control
function for a Component Select button
(page 28), the execution of the
programmed commands begins when
you press the Component Select button
for more than 2 seconds.
While executing the programmed
commands, at the same time that each
remote control signal is transmitted, the
corresponding key is displayed.
Continued
23
GB
Executing a Series of Commands
— System Control Functions
(continued)
Programming a series of
commands to the SYSTEM
CONTROL buttons
Example: To programme the
procedure above to the SYSTEM
CONTROL 2 button
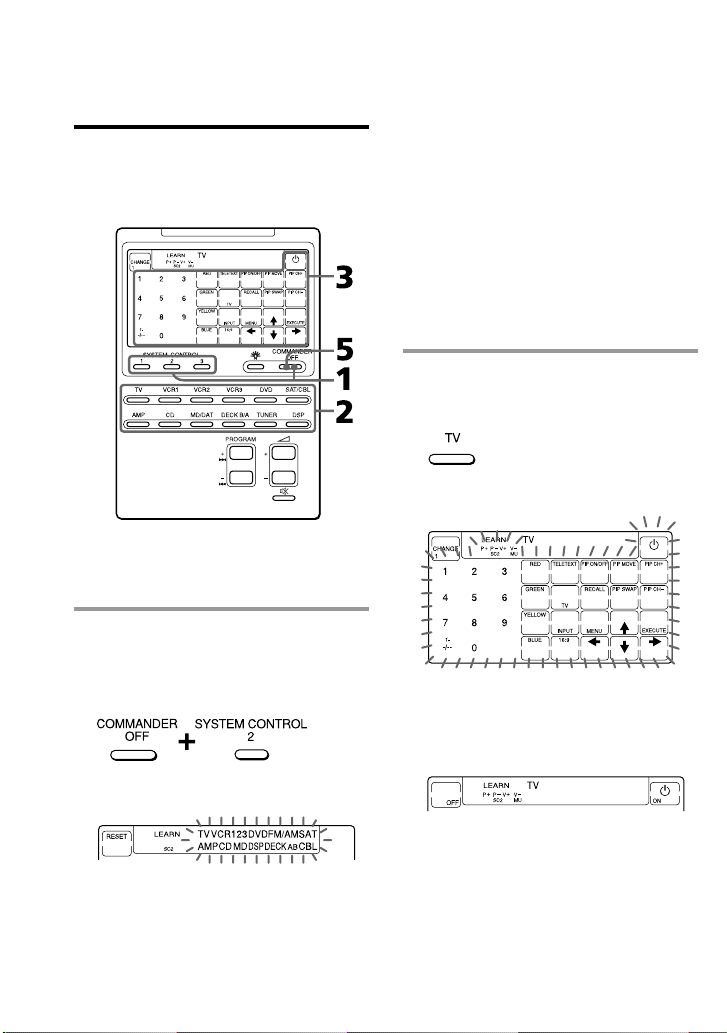
1 While pressing COMMANDER
OFF, press one of the SYSTEM
CONTROL buttons (in this case,
SYSTEM CONTROL 2).
If a series of commands is already
programmed for that button
That programme will be displayed.
(At the factory, the SYSTEM
CONTROL 1 button is preset with the
System Power-Off function for Sony
components (the same function as
explained in page 34), and the
SYSTEM CONTROL 3 button is
factory preset with standard poweron command for nearly all Sony
components.)
To programme a new series of
operations, clear the programme first
(page 26).
2 Press the Component Select
buttton for the component to
operate.
The keys for the selected component
flash.
If the component has the poweron and power-off signals
Both the OFF and ON keys are displayed
and you can select either of them to
programme.
All the component names flash.
24
GB
It is useful to set the exact command for
power-on or power-off and operate the
component regardless of its status (on/off).

3 Press key(s) or button(s) for the
desired operation.
If you want to power on the TV, press
the 1 key.
4 Repeat Steps 2 and 3 and
programme the buttons and keys
for the series of operations.
In this example, press the following
buttons and keys.
5 When you have programmed all
the keys, press COMMANDER
OFF.
Notes
• If you interrupt the procedure at any point
for over two minutes, the setting mode ends
and the series of commands will be
programmed to that point. In this case, clear
the programme (page 26) and start again
from Step 1 to set the entire programme from
the beginning. You cannot continue from
where you let off.
• If a SYSTEM CONTROL button has already
“learned” a remote control signal (page 38),
“NG”flashes and you cannot programme on
this button. Clear the learned contents first
(page 40).
•If you change the component code number
(page 8) or programme a new signal by
learning (page 16) on a key or button that has
been programmed in the series of commands
of the System Control function, the new
signal will be transmitted when you press the
corresponding SYSTEM CONTROL button.
• During Setting mode, the RESET key is not
displayed and you cannot clear any operation
step you have programmed. If you have
programmed an incorrect operation by
mistake, start again from Step 1.
Tips for programming the
System Control functions
The following information helps you to
programme a consecutive operation
steps.
About the interval between
operation steps
You can change the interval between operation
steps (page 30).
Continued
25
GB

Executing a Series of Commands
— System Control Functions
(continued)
About the order of operation steps
•Some of the components may not accept
consecutive remote control signals. For
example, a TV generally does not react to
next signal right after the Power-on signal.
So, a series of commands such as TV Poweron and input select may not work properly.
In this case, insert other signals like the
example below;
TV Power-on t VCR Power-on
t VCR play back t TV input select
•After the series of input commands is
executed, the Commander displays the
touch-keys of the component of the final step.
By programming an often-used component’s
command as the final step, you can save the
step of pressing a Component Select button
when you start operating that component. (In
the example on page 24, the touch-keys of
VCR1 are displayed.)
2 While pressing the RESET key,
press the same SYSTEM
CONTROL button (1, 2, or 3)
again.
When the contents of its programme
are cleared, all the component names
flash.
When you want to set a new
programme to this SYSTEM
CONTROL button, follow Steps 2 to 5
on pages 24 and 25.
To clear programmed commands
1 While pressing COMMANDER
OFF, press one of the SYSTEM
CONTROL 1, 2, or 3 button.
The key operations programmed for
that button are displayed in order.
26
GB
To set the SYSTEM CONTROL 1 or
3 button back to the factory
setting
At the factory, the SYSTEM CONTROL 1
button is preset with a series of power-off
commands for Sony components and the
SYSTEM CONTROL 3 button with a
series of power-on commands for Sony
components. To reset them to the factory
settings, follow the steps below.
1 While pressing COMMANDER
OFF, press the SYSTEM
CONTROL button (1 or 3).
The programmed key operations are
displayed in order.
2 While pressing the RESET key,
press the SYSTEM CONTROL
button (1 or 3).
When the contents of its programme
are cleared, all the components names
flash.
3 While pressing the RESET key,
press the SYSTEM CONTROL
button (1 or 3) again.
When it is reset to the factory setting,
the programmed operations are
displayed in order.
Notes on System Control
Operations
•If the remote control detectors of the
components are too far apart, or if
something is blocking them, some of
the components may not operate
consecutively even after you press the
SYSTEM CONTROL button.
•If some of the components did not
operate correctly because of the above
or for any other reason, always set all
the components back to the states they
were in before you pressed the SYSTEM
CONTROL button. Failure to do this
can result in incorrect operation when
you press the SYSTEM CONTROL
button again.
•Some components may not always be
powered on by the System Control
function. This is because the power of
the component gets on and off
alternatively when receiving the power
on/off signal. In this case, check the
operating component’s power on/off
state before using the system control
function.
•If the system control function does not
work correctly, see also “Tips for
programming the System Control
functions” on page 25.
Note
The interval setting (page 30) is not reset to the
factory setting, even if you perform these steps.
Continued
27
GB
Executing a Series of Commands
— System Control Functions
(continued)
Example: To programme the
procedure on page 23 for the
VCR3 button
Programming a series of
commands to the Component
Select buttons
As with the SYSTEM CONTROL buttons,
you can also programme a series of
operating commands for the Component
Select buttons (up to 16 steps).
To execute the commands programmed
on a Component Select button by the
System Control function, press the button
for more than 2 seconds.
Notes
•The programmed commands are executed
when you press a Component Select button
for more than 2 seconds. When you press the
button for less than 2 seconds, it works as
the normal Component Select button, and the
corresponding touch-keys are displayed.
•See also “Tips for programming the System
Control functions” on page 25 and “Notes on
System Control Operations” on page 27.
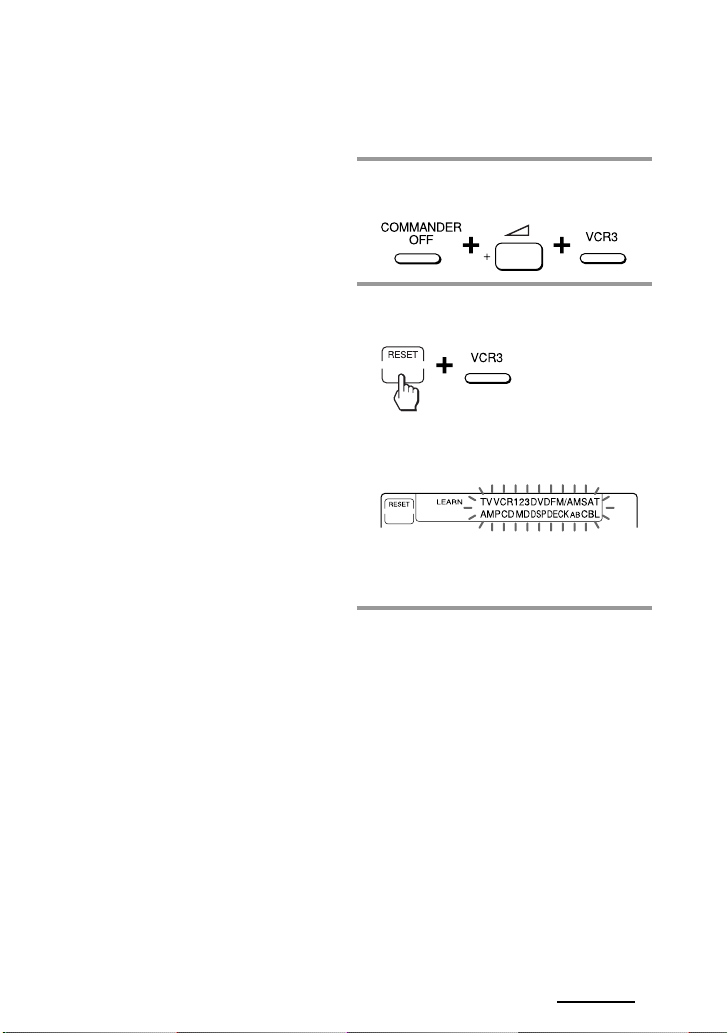
1 While pressing COMMANDER
OFF, press 2 + and VCR3.
“VCR3” stays lit, and the other
component names flash.
If a series of commands is already
programmed for that button
The programmed operations are displayed
in order. To programme a new series of
operations, clear the programme first (page
29).
2 Follow Steps 2 to 5 on pages 24
and 25.
28
GB
Notes
• You can programme the System Control
functions for a Component Select button on
which the Power-On function (page 31) has
been programmed. In this case, the Power-On
function is overwritten and cannot be used. If
you clear the System Control functions for
the button, the Power-On function is
resumed, and you can use it again.
• You cannot programme the System Control
functions for a Component Select button for
which a signal has been programmed by
“learning” (page 32). (“NG” flashes on the
display.)
• You can programme a signal for a
Component Select button by “learning” (page
32) for which the System Control functions
have been programmed. In this case, the
System Control function is overwritten and
cannot be used. If you clear the “learned”
signal on the button, the System Control
function is resumed and you can use it again.
• You can programme the Power-On function
(page 31) for a Component Select button for
which a System Control function has been
programmed, but the Power-On function
cannot be used. If you clear the System
Control function from the button, you can
use the Power-On function.
• If you interrupt the procedure at any point
for over two minutes, the setting mode ends
and the series of commands will be
programmed to that point. In this case, clear
the programme and start again from Step 1 to
set the entire programme from the beginning.
You can not continue from where you let off.
• If you change the component code number
(page 8) or programme a new signal by
learning (page 16) for a key or button that has
been programmed with the series of
commands of a System Control function, the
new signal will be transmitted when you
press the corresponding Component Select
button.
To clear a System Control
function programmed for a
Components Select buttons
Example: To clear the programmed
commands on the VCR3 button
1 While pressing COMMANDER
OFF, press 2 + and VCR3.
2 While pressing the RESET key,
press VCR3.
When the contents of its programme
are cleared, “VCR3” stays lit, and the
other component names flash.
When you want to set a new
programme to this Component Select
button, follow Steps 1 to 2 on page 28.
Continued
29
GB
Executing a Series of Commands
— System Control Functions
(continued)
Changing the interval
between operation steps
You can control the interval in 4 steps
(approx. 127 ms, 408 ms, 708 ms, 974 ms).
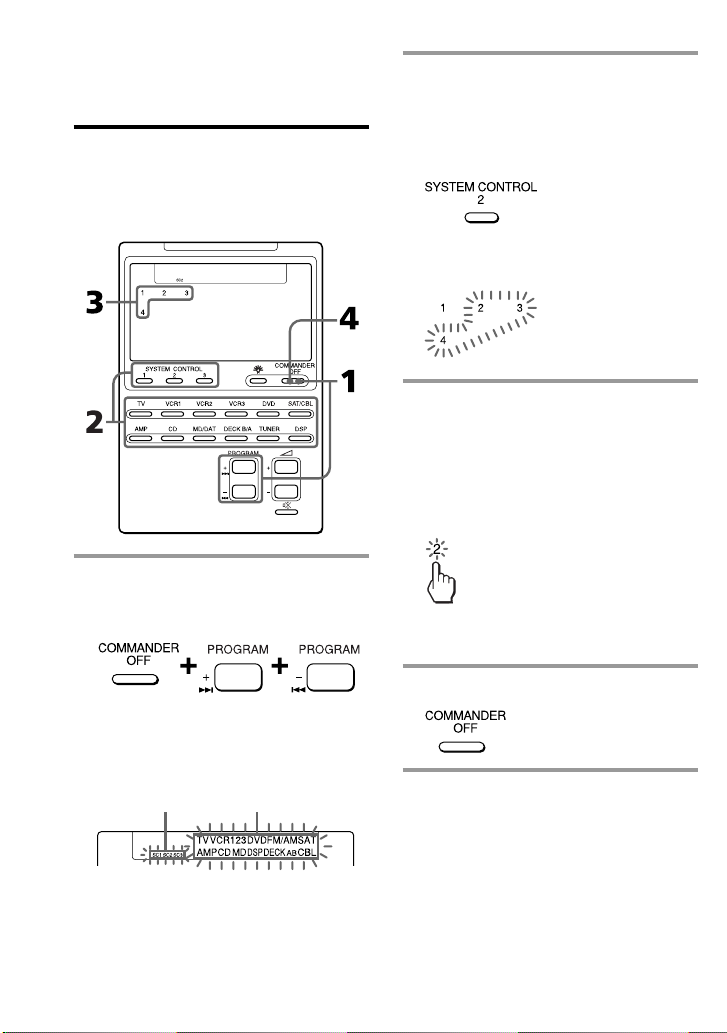
1 While pressing COMMANDER
OFF, press PROGRAM + and
PROGRAM –.
2 Press one of the SYSTEM
CONTROL buttons (1, 2, or 3) or
the Component Select button
whose interval you want to
change.
The number of the current setting
stays lit and other numbers flash.
3 Press one of the numeric keys (1 –
4) to select the interval.
1: approx. 127 ms (factory setting)
2: approx. 408 ms
3: approx. 708 ms
4: approx. 974 ms
(1 ms: 1/1000 second)
The selected number stays lit and
other numbers flash.
“SC1,” “SC2,” “SC3” and all the
component names flash.
Display for the
SYSTEM CONTROL
1, 2, 3 buttons
30
GB
4 Press COMMANDER OFF.
Component
names
 Loading...