

Page 1

Page 2
Owner’s Record
The model and serial numbers are located at
the rear of the disc compartment lid. Record
the serial number in the space provided
below. Refer to them whenever you call
upon your Sony dealer regarding this
product.
Mod el No. Q01 7-MD1
Ser ial No.
Do not install the appliance in a confined
space, such as a bookcase or built-in
cabinet.
To prevent fire, do not cover the ventilation
of the apparatus with newspapers,
table-cloths, curtains, etc. And don’t place
lighted candles on the apparatus.
To prevent fire or shock hazard, do not place
objects filled with liquids, such as vases, on
the apparatus.
WARNING
To prevent fire or shock hazard, do not
expose the unit to rain or moisture.
This symbol is intended to alert the user to
the presence of uninsulated “dangerous
voltage” within the product’s enclosure that
may be of sufficient magnitude to constitute
a risk of electric shock to persons.
Certain countries may regulate disposal of
the battery used to power this product.
Please consult with your local authority.
Caution
The use of optical instruments with this
product will increase eye hazard.
CAUTION-INVISIBLE LASER
RADIATION WHEN OPEN
DO NOT STARE INTO BEAM OR VIEW
DIRECTLY WITH OPTICAL INSTRUMENTS
Information
IN NO EVENT SHALL SELLER BE LIABLE
FOR ANY DIRECT, INCIDENTAL OR
CONSEQUENTIAL DAMAGES OF ANY
NATURE, OR LOSSES OR EXPENSES
RESULTING FROM ANY DEFECTIVE
PRODUCT OR THE USE OF ANY
PRODUCT.
This symbol is intended to alert the user to
the presence of important operating and
maintenance (servicing) instructions in the
literature accompanying the appliance.
Page 3

Product registration
Please register this product on line at
www.sony.com/productregistration
<http://www.sony.com/productregistration>
You are cautioned that any changes or
modifications not expressly approved in this
manual could void your authority to operate
this equipment.
Proper registration will e na bl e us to send you
periodic mailings about new products,
services and other important
announcements. Registering your product
will also allow us to contact you in the
unlikely event that the product needs
adjustment or modification.
Thank you.
THIS DEVICE COMPLIES WITH PART 15 OF
THE FCC RULES. OPERATION IS SUBJECT
TO THE FOLLOWING TWO CONDITIONS:
(1) THIS DEVICE MAY NOT CAUSE
HARMFUL INTERFERENCE, AND
(2) THIS DEVICE MUST ACCEPT ANY
INTERFERENCE RECEIVED,
INCLUDING INTERFERENCE THAT MAY
CAUSE UNDESIRED OPERATION.
Information
This equipment has been tested and found
to comply with the limits for a Class B digital
device, pursuant to Part 15 of the FCC
Rules.
These limits are designed to provide
reasonable protection against harmful
interference in a residential installation. This
equipment generates, uses, and can radiate
radio frequency energy and, if not installed
and used in accordance with the
instructions, may cause harmful interference
to radio communications.
However, there is no guarantee that
interference will not occur in a particular
installation. If this equipment does cause
harmful interference to radio or television
reception, which can be determined by
turning the equipment off and on, the user is
encouraged to try to correct the interference
by one or more of the following measures:
— R eorient or relocate the receiving ant enna.
— I ncrease t he separation bet we en the
equ ipment and receiver.
— C onnect the equipm ent into an outle t on a
circuit differe nt from t ha t to which the
receiver is co nnected.
— C onsult the dealer or an experience d radio/
TV technician for he lp.
RECYCLING LITHIUM-ION BATTERIES
Lithium-Ion batteries are
recyclable.
You can help preserve our
environment by returning
your used rechargeable batteries to the
collection and recycling location nearest you.
For more information regarding recycling of
rechargeable batteries, call toll free
1-800-822-8837, or visit
http://www.rbrc.org/
Caution: Do not handle damaged or leaking
lithium-ion batteries.
On this manual
These operating instructions are written
mainly for models outside of Japan. In the
case of the model for use in Japan, the
display indications may differ slightly, but
operations are identical.
Page 4

IMPORTANT SAFEGUARDS
For your protection, please read these safety
instructions completely before operating the
appliance, and keep this manual for future
reference.
Carefully observe all war nings, precautions
and instructions on the appliance and in the
operating instructions, and adhere to them.
INSTALLATION
Water and Moisture — Do not use powerline
operated appliances near water—fo r
example, near a bathtub, washbowl, kitchen
sink, or laundry tub, in a wet basement, or
near a swimming pool, etc.
Heat — Do not place the appliance near or
over a radiator or heat register, or where it is
exposed to direct sunlight.
Ventilation — The slots and openings in the
cabinet are provided for necessary
ventilation. To ensure reliable operation of
the appliance, and to protect it from
overheating, these slots and openings must
never be blocked or covered.
— N ever cover the sl ots and openings with a
clo th or other mater ials.
— N ever block the sl ots and openings by
pla cing the applianc e on a bed, sofa, rug, or
oth er similar surfac e.
— N ever place the ap pliance in a conf ined
spa ce, such as a boo kcase or built-in
cab inet, unless proper ventil at ion is
provided.
Accessories — Do not place the appliance
on an unstable cart, stand, tripod, bracket,
or table. The appliance may fall, causing
serious injury to a child or an adult, and
serious damage to the appliance. Use only a
cart, stand, tripod, bracket, or table
recommended by Sony.
USE
Power Source — This appliance should be
operated only from the type of power source
indicated on the marking label. If you are not
sure of the type of electrical power supplied
to your home, consult your dealer or local
power company. For those appliances
designed to operate from battery power, or
other sources, refer to the operating
instructions.
Grounding or Polarization — This appliance
is equipped with a polarized AC power cord
plug (a plug having one blade wider than the
other), or with a three-wire grounding type
plug (a plug having a third pin for grounding).
Follow the instructions below:
•
For the appliance with a polarized AC power
cord plug:
This plug will fit into the power outlet only
one way. This is a safety feature. If you are
unable to insert the plug fully into the
outlet, try reversing the plug. If the plug
should still fail to fit, contact your
electrician to have a suitable outlet
installed. Do not defeat the safety purpose
of the polarized plug by forcing it in.
•
For the appliance with a three-wire grounding
type AC plug:
This plug will only fit into a grounding-type
power outlet. This is a safety feature. If you
are unable to insert the plug into the outlet,
contact your electrician to have a suitable
outlet installed. Do not defeat the safety
purpose of the grounding plug.
Overloading — Do not overload wall outlets,
extension cords, or convenience receptacles
beyond their capacity, since this can result in
fire or electric shock.
When not in use — Unplug the power cord
of the appliance from the outlet when left
unused for a long period of time.
To disconnect the cord, pull it out by
grasping the plug. Never pull the plug out by
the cord.
Page 5

Power-Cord Protection — Route the power
cord so that it is not likely to be walked on
or pinched by items placed upon or against
them, paying particular attention to the
plugs, receptacles, and the point where the
cord exits from the appliance.
Lightning — For added protection for this
appliance during a lightning storm, or when
it is left unattended and unused for long
periods of time, unplug it from the wall outlet
and disconnect th e an te nn a or cable system.
This will prevent damage to the appliance
due to lightning and powerline surges.
Attachments — Do not use attachments not
recommended by Sony, as they may cause
hazards.
Cleaning — Unplug the appliance from the
wall outlet before cleaning or polishing it. Do
not use liquid cleaners or aerosol cleaners.
Use a cloth lightly dampened with water for
cleaning the exterior of the appliance. Clean
the appliance only as recommended by
Sony.
SERVICE
Damage Requiring Service — Unplug the
appliance from the wall outlet and refer
servicing to qualified service personnel under
the following conditions:
— W hen the power cord or plug i s damaged or
fra yed.
— I f liquid has been spilled or objec ts have
fal len into the appl iance.
— I f the appliance h as been exposed t o rain or
wat er.
— T he appliance does not appear to op erate
nor mally or exhibits a marked change in
per formance. —This i ndicates a need f or
ser vice.
— I f the appliance d oes not operate n ormally
whe n following the o perating instruct ions,
adj ust only those co ntrols th at are spec ified
in the operating ins tructions. Improper
adj ustment of other controls ma y result in
dam age and will ofte n require extensive
wor k by a qualified technician to restore the
app liance to normal operation.
— I f the appliance h as been subject t o
exc essive shock by b eing drop pe d, or the
cab inet has been dam aged.
Object and Liquid Entry — Never push
objects of any kind into the appliance
through openings as they may touch
dangerous voltage points or short out parts
that could result in a fire or electric shock.
Never spill liquid of any kind on the
appliance.
Servicing — Do not attempt to service the
appliance yourself as opening or removing
covers may expose you to dangerous
voltage or other hazards. Refer all servicing
to qualified service personnel.
Replacement Parts — When replacement
parts are required, be sure the service
technician has used replacement parts
specified by Sony that have the same
characteristics as the original parts.
Unauthorized substitutions may result in fire,
electric shock, or other hazards.
Safety Check — Upon completion of any
service or repairs to the appliance, ask the
service technician to perform routine safety
checks (as specified by Sony) to determine
that the appliance is in safe operating
condition.
Page 6

Page 7

Contents
9
Getting StartedOverview Playback Settings
Additional
Information
Overview
Identifying parts and controls....................................................................................... 10
Getting Started
Charging the battery........................................................................................................... 14
Playback
Checking the battery’s remaining power
Adjusting the headphones to fit your ears ...........................................................17
Playing an MD......................................................................................................................... 18
Locking the controls
Changing the playback operations ........................................................21
Changing the play mode – P-MODE/ ............................................. 22
Selecting the sound mode – V-SUR/SOUND
– HOLD..................................................................... 20
............................................ 16
..................................................... 26
8
Page 8
Settings
Changing the settings........................................................................................................ 28
Menu option............................................................................................................................. 29
“Useful” menu (Disc Memory/SpeedControl)............................................ 29
“Option” menu (AVLS/Beep/Backlight/ /Power Mode) ...... 30
Additional Information
Caring for the player ........................................................................................................... 32
Precautions
Troubleshooting
Specifications.......................................................................................................................... 41
Index .............................................................................................................................................42
............................................................................................................................... 33
..................................................................................................................... 38
Getting StartedOverview Playback Settings
Additional
Information
9
Page 9
Identifying parts and controls
11
Overview
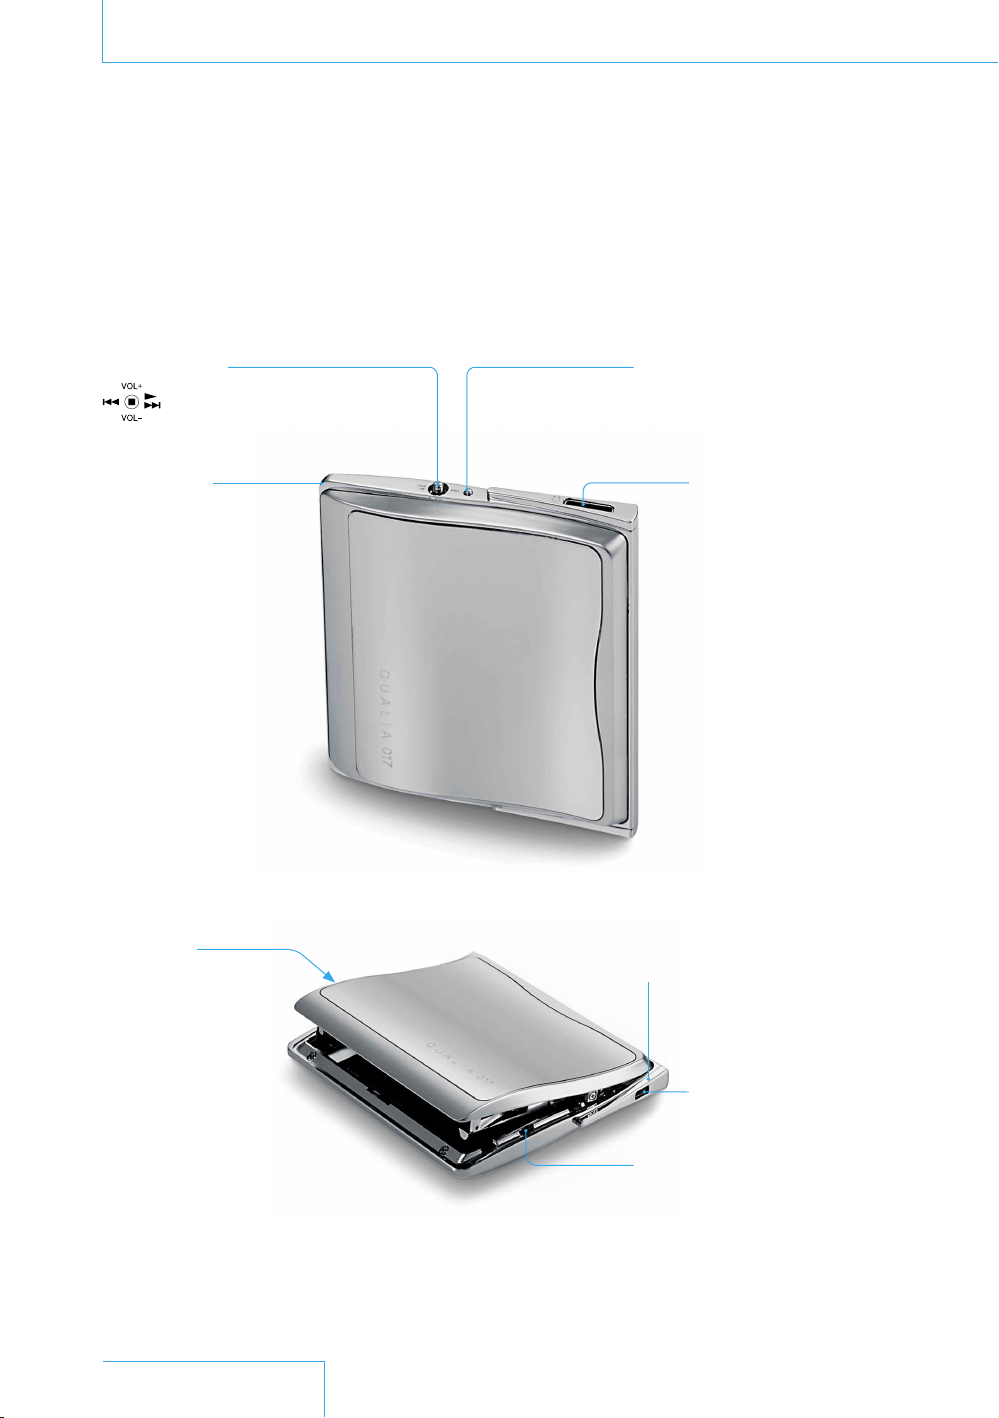
Player
5-w ay co ntrol key
Pla ys th e MD
and adju sts t he
vol ume.
Ope ratio n lam p
Dis plays the rem ainin g
pow er of the batte ry,
the play mode , etc .
Player (when lid is open)
GRO UP bu tton
Sel ects a group in an MD
to play.
( headp hones ) jack
HOL D swi tch
Preven ts ac ciden tal b utton
presse s.
10
OPE N lev er
Ope ns th e lid of t he pl ayer.
Termin als f or the
bat tery charging
sta nd
BUI LT-IN BATTERY swit ch
Swi tches the power supp ly
to the p layer on o r off.
Nor mally keep the switc h
to the O N pos ition .
Page 10

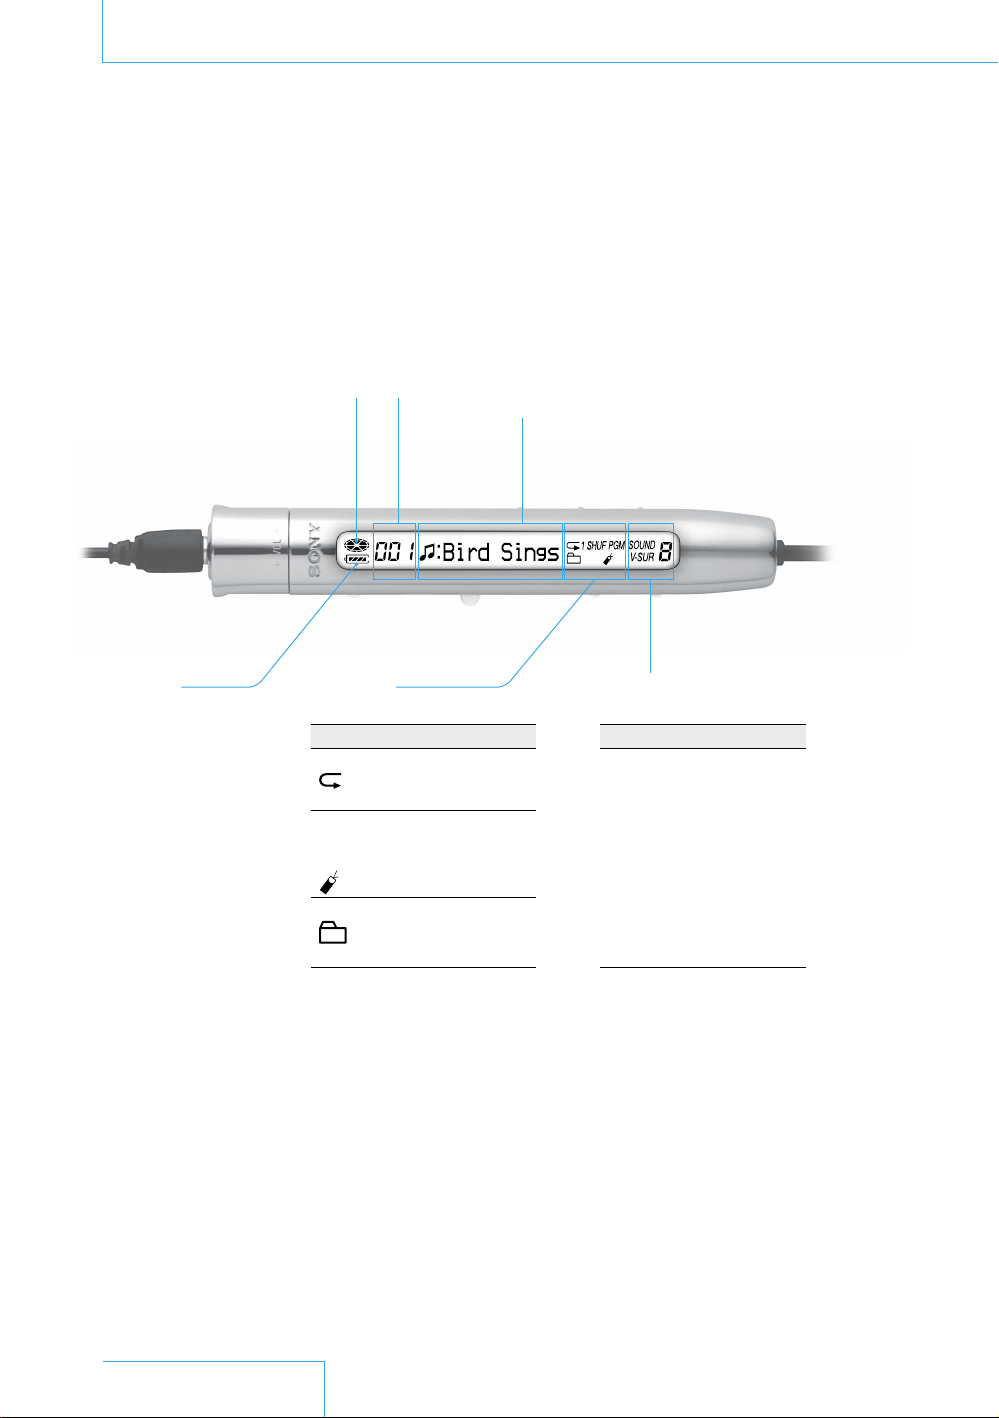
Remote Control (Remote)
Overview
HOL D but ton
Preven ts ac ciden tal b utton
presse s.
Hea dphon es
VOL UME c ontrol
Adj usts the v olume .
DIS PLAY bu tton
Cha nges the i nform ation
on the remo te di splay.
P-M ODE/ (repea t) bu tton
Cha nges the p lay m ode.
SOU ND bu tton
Cha nges the s ound mode.
Rem ote d ispla y
Dis plays the rem ainin g pow er
of the b atter y, th e pla y mod e,
and play ing s tatus .
to the p layer
(st op) b utton
Sto ps pl aybac k of an MD .
Jog leve r (· /ENT·)
Pla ys an MD a nd se lects trac ks,
ite ms, a nd se tting s.
(Group ) +/– button s
Sel ects a group in an MD
to play.
Continued on the next page
11
Page 11
Identifying parts and controls (continued)
13
Overview
Remote display
Rem ainin g
bat tery power
Pla ying statu s Track nu mber MD in forma tion/
Pla y mod e
Sho ws th e cur ren t pla y mod e.
Display Play/mode
Playing tracks
repeatedly.
1
SHUF
PGM
Playing tracks
in the option you
choose.
Playing tracks by
group as set in the
MD.
set ting infor mation
Sou nd mo de
Sho ws th e cur ren t mod e.
Display Play/mode
Heavy
H
SOUND
SOUND
SOUND
SOUND
SOUND
SOUND
V-SUR
V-SUR
V-SUR
V-SUR
Pops
P
Jazz
J
Unique
U
Custom1
1
Custom2
2
Studio
S
Live
L
Club
C
Arena
A
12
Page 12
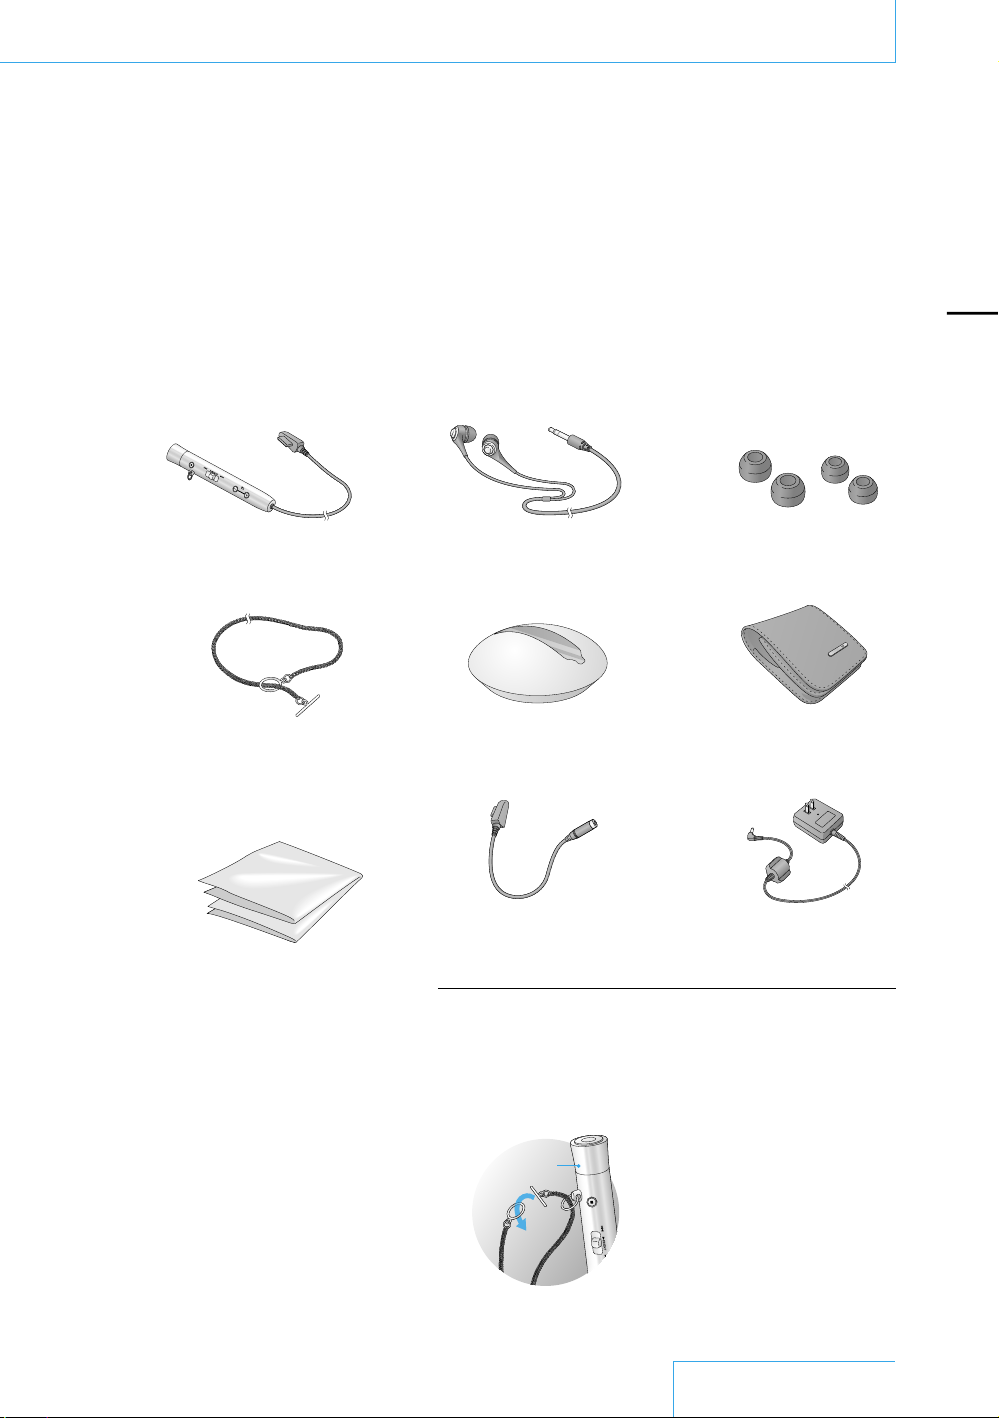
Supplied accessories
Overview
• Remo te • Head phone s
• Neck chain to t he re mote • Batt ery c harging stand • Carr ying case
• Clea ning cloth
(th e whi te cl oth t hat t he pl ayer was
wra pped in wh en yo u purcha sed i t)
(wi th me dium- sized earb uds
att ached )
• Head phone adap tor
• Earb uds
(la rge s ize/s mall size)
Use the earbu ds th at fi t the
siz e of your ears.
• AC p ower adapt or
• “Own er’s Gu ide” (t his b ook)
(su pplie d wit h a d ocume nt ca se)
Notes
• To prevent s hort- circuit, do not plac e any metal items , suc h as
coi ns, k eys, necklac es, e tc., on the batte ry ch arging stand .
• To prevent s hort- circuit, do not carr y or keep th e pla yer t ogether
wit h any meta l items , suc h as coins, keys, neck laces, etc.
• Atta ch th e nec kchain to th e remote a s sho wn be low.
Rem ote
13
Page 13
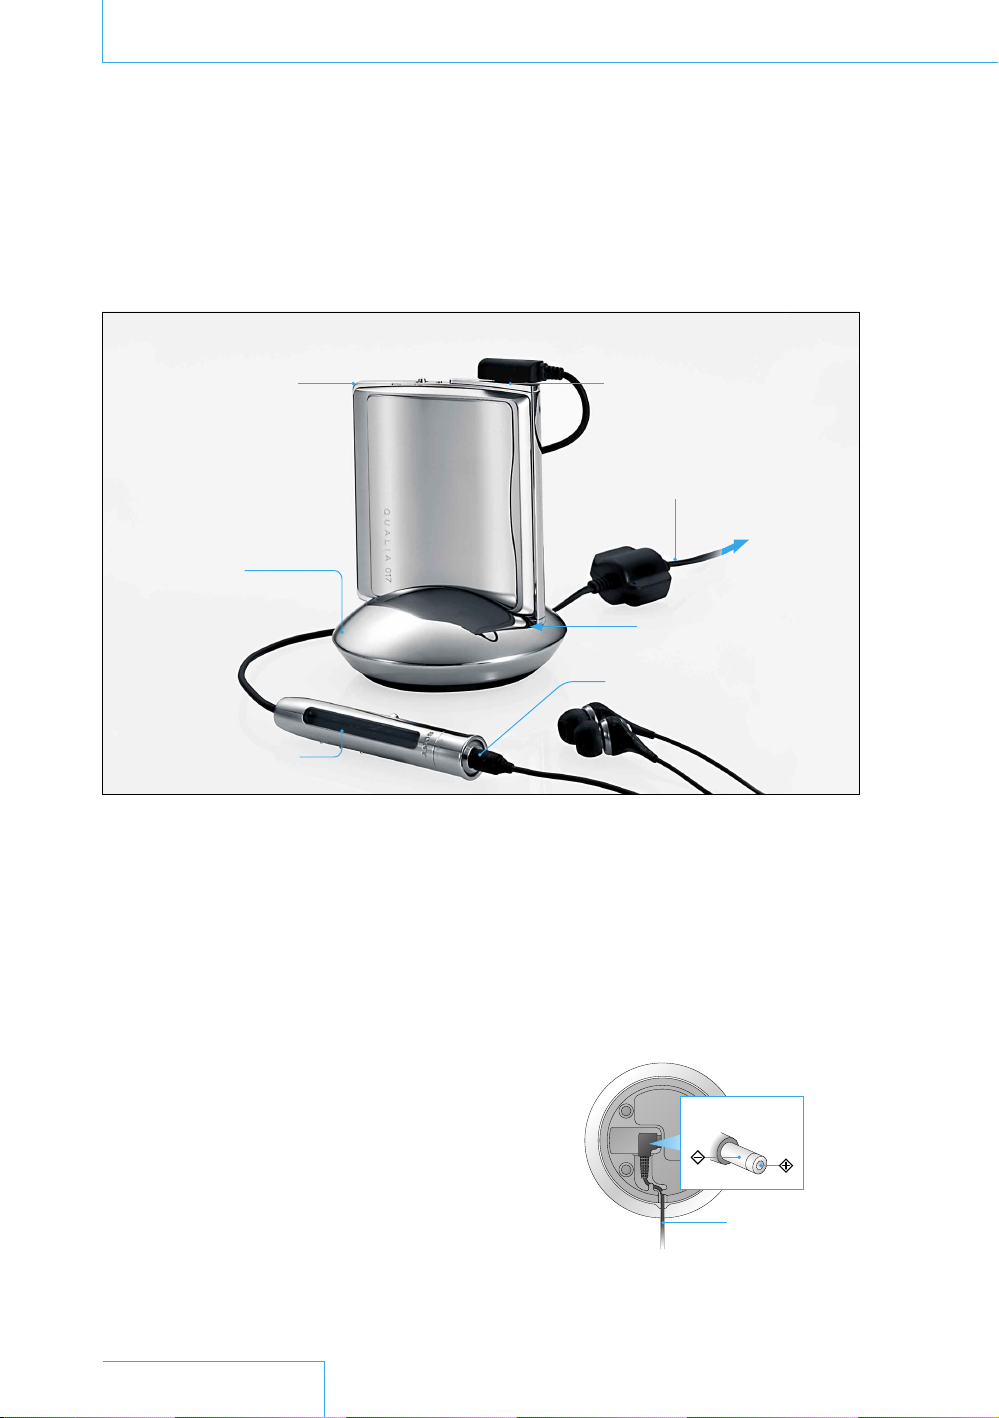
Charging the battery
14
15
Getting Started
Ope ratio n lam p
Bat tery
cha rging st and
Rem ote d ispla y
( headp hones ) jack
AC power adap tor
to a wal l
out let
Termin als f or
the batt ery c harging stand
Ste reo mini plug
To connect the AC power adaptor
to the battery charging stand
Ins ert the DC IN 6V plug on the AC
pow er adaptor securely into t he jack
on the bottom of the battery charging
sta nd. Then pass the cord alo ng the
groove at th e bottom of the b at tery
cha rging stand.
Battery charging stand (bottom view)
DC IN 6V plug
AC power adap tor
Page 14

The built-in rechargeable battery is charged
using the battery charging stand. Charge the
battery at a temperature of 0°C (+32°F) to
+40°C (+104°F).
To operate the player on power from a wall
outlet, place the player on the battery
charging stand. In this case, the built-in
rechargeable battery will not be charged.
As shown on page 14, insert the DC IN
1
6V plug on the AC power adaptor
securely into the jack on the bottom of
the battery charging stand. Then insert
the power plug on the AC power
adaptor into a wall outlet.
Use only the supplied AC power adaptor
(see the illustration on page 14 for the
polarity of the plug). If you use any other
AC power adaptor, the player may
malfunction.
Connect the headphone plug on the
2
remote to the (headphones) jack on
the player. Then connect the stereo mini
plug of the headphones to the stereo
minijack on the remote.
If the BUILT-IN BATTERY switch is set to
3
OFF, slide the switch to ON (page 32).
Place the player on the battery charging
4
stand to start charging.
The operation lamp on the player lights
up, and (disc) on the remote display
starts moving. For details on the
charging status, refer to the table on the
right.
To check the charging status
Check t he charging status with the operation
lamp on the player or the remote display,
and refer to the table below.
The display that shows the charging status
disappears when the battery is about 80%
charged. This amount is sufficient for normal
playback. If you continue charging about 2.5
hours more after the display disappears, the
battery will be fully charged, and you can
operate the player for a longer time before
the battery needs to be charged again.
Charging progress chart (approx. %)
Operation
lamp
Red CHG:65min 0% 0 hour
Orange CHG:25min 50%
Green CHG:09min 70%
Light
turns off
After light
turns off
* T he am ount of time re quired to charg e the batter y
up to ab out 8 0% is d ispla yed.
Notes
• The charg ing t ime var ies d epend ing on the room
tem perat ure .
• It m ay ta ke up to one minu te un til you can check
the char ging status with the o peratio n lam p on the
pla yer o r the (b atter y) on t he remot e displ ay,
dep endin g on the con ditio n of the rechar geabl e
bat tery.
Remote
display*
Light
turns off
After light
turns off
Charging
progress
(approx.)
80% 1 hour
Fully
charged
Charging
(approx.)
3.5 hours
time
Getting Started
Continued on the next page
15
Page 15

Charging the battery (continued)
17
Getting Started
Checking the battery’s remaining power
The battery life of the built-in rechargeable
battery varies depending on the recording
mode of the MD. For details on battery life,
refer to the following table.
Approximate playing time of the lithium-ion
built-in rechargeable battery*
(JEITA**) (when the battery is fully charged)
SP mode LP2 mode LP4 mode
21 hours 27 hours 33 hours
* Approxim ate tim e whe n “Po wer Mod e” is set to
“Po wer S ave” (page 3 1).
** Measu red in acc ord ance with th e JEI TA ( Japan
Ele ctronics and In forma tion Techn ology Indu stries
Ass ociat ion) standard ( using a Sony MDW- serie s
Min i-dis c).
Check the operation lamp on the player or
(battery) on the remote display to see
how much battery power is left. Recharge
the battery when the level of remaining
power is low.
Display of the remaining power*
Operation
lamp
Lights up There is
Lights up The number of
Flashes
slowly
Flashes
quickly
Turns off Flashes There is no
Remote
display
Remaining
power
sufficient battery
power.
black sections
decreases as the
power is used.
LightsupThe power is
low.
Flashes The power is
almost gone.
power left.
“LOW BATT”
flashes in the
display, and the
power turns off.
16
* Pre ss th e DISPL AY butt on on t he remot e when
“Po wer M ode” is set to “P ower Save” ( page 31).
(b atter y) is displa yed f or se veral s econd s.
Notes
• (batter y) may not b e dis pl ayed correctl y while
you are fas t-forwa rdi ng or fast-reve rsing .
• The batte ry li fe may vary even under t he sa me
recording mode o r the same (b atter y) disp lay,
dep endin g on the cha rging time , the o perat ing
con ditio ns, o r the room temp erature.
Page 16

Adjusting the headphones to fit your ears
To replace the earbuds
Use the supplied headphones with the
earbuds attached.
If the earbuds do not fit in your ears well,
you may not be able to hear bass sounds
properly. To enjoy better sound quality, insert
the headphones into your ears so that the
earbuds fit snugly.
If the earbuds do not fit your ears, replace
them with the large or small ones (supplied).
At the time of purchase, the medium-sized
earbuds are already attached to the
headphones.
How to attach the ea rbuds
Hea dphon es Ear buds
To use the headphone adaptor
You can connect the headphones to the
player directly without using the remote.
Connect the headphones and the
headphone adaptor as shown below.
When you use commercially available stereo
headphones, be aware of the following:
•
Headphones with a stereo mini plug can
be connected; however, headphones with
a micro plug cannot be used.
•
Some of the noise-canceling headphones
that reduce the surrounding noise may not
be able to be connected.
(For Sony models: MDR-NC20, MDRNC11, and MDR-NC5)
How to attach the he adphone adaptor
Hea dphon e ada ptor
Ste reo mini plug
Getting Started
17
Page 17

Playing an MD
19
Playback
VOL UME c ontrol DIS PLAY bu tton
(s top) butto n
OPE N lev er
HOL D swi tch
GRO UP bu tton
(G rou p)
+/– butt ons
Jog leve r
(· /ENT ·)
Press to st art
pla yback .
5-w ay co ntrol key
(· ·)
Press toward
(ri ght) to st art
pla yback .
To open the lid
Pla ce th e pla yer so that the s ide
wit h the lett ers “QU ALIA 017” faces
up. Then push down t he OP EN
lev er sl ightl y to op en th e lid .
18
OPE N lev er
Pus h dow n the back o f the lid as
sho wn ab ove t o open it wi der.
Page 18

Open the lid (see page 18).
1
Insert an MD with the label side facing
2
up, and push the MD in the direction of
the arrow. Then close the lid.
Release the HOLD function if it is on
3
(page 20).
To start playback, press the jog lever on
4
the remote.
The operation lamp on the player lights
up, and (disc) on the remote display
moves.
When you use controls on the player,
press the 5-way control key towards
(right) to start playback.
To adjust the volume, turn the volume
5
control towards VOL +/– on the remote.
The volume indicator appears on the
remote display.
When you use controls on the player,
press the 5-way control key toward + or
– (up or down) to adjust the volume.
To stop playback
Press the (stop) button on the remote.
On the player, press the 5-way control key.
Playback of the same MD starts from the
point where you last stopped playing it.
To start playback from the beginning of the
same MD, press and hold the jog lever for
two seconds or more. (On the player, press
and hold the 5-way control key towards
for two seconds or more.)
If you remove and reinsert the same MD
after pressing the (stop) button, playback
will start from the beginning.
To pause playback
During playback, press the jog lever on the
remote.
(disc) flashes on the remote display.
To resume play after pausing, press the jog
lever again.
Continued on the next page
Playback
VOL UME control 5 -way contro l key
VOL + VOL +
VOL − VOL −
19
Page 19

Playing an MD (continued)
21
Playback
To check the MD information
Press the DISPLAY button repeatedly to check
the MD information on the remote display. If
the information, such as the track name, is
longer than the display, the letters scroll from
right to left.
When “Power Mode” is set to “Power Save”
(page 31), the information is displayed only
for several seconds by pressing the DISPLAY
button.
MD information on th e display
Track nu mber/El apsed time
Track nu mber/Track n ame
The number of total tracks in the group
/Group name
The numb er of total track s/Dis c name
Track number/Group name (upper line)
/Track name (lower line)
Track nu mber/So und m ode
1)
2)
Locking the controls – HOLD
In order to prevent accidental button presses
while carrying the player, you can lock the
controls (HOLD) for the remote and the
player separately.
For example, you can operate the player by
using the remote even if the HOLD function
on the player is activated.
To lock the controls on the player
Open the lid following the steps in
1
“To open the lid” (page 18).
Slide the HOLD switch, located inside
2
on left side of the player toward .
The controls on the player are disabled.
HOL D swi tch
To unlock the controls, slide the HOLD
switch in the opposite direction of .
To lock the controls on the remote
Slide the HOLD switch on the remote toward
, so that yellow shows on the right end.
The controls on the remote are disabled.
Track number/Recording mode
(SP2/LP2/LP4/MONO)
1)
The disp lay a ppears only for a n MD wi th group
set tings .
2)
The trac k nam e appea rs on the upper l ine f or an MD
wit h no gro up sett ing.
3)
The disp lay a ppears only durin g playb ack a nd
cha nges autom aticall y to the d isplay of th e tra ck
num ber a nd th e elaps ed ti me af ter a w hile.
3)
20
HOL D swi tch
To unlock the controls, slide the HOLD
switch in the opposite direction of .
Page 20

Changing the playback operations
You can play back the track or position you
want by going to the beginning of the track,
going forward, or going backward.
To use the jog lever on the remote
Sli de to ward
(lef t) to go
bac kward from
the current point.
Sli de to ward
(rig ht) t o go
for ward from the
cur ren t poi nt.
To Do this
Go to the beginning of the
current track or the previous
Slide the jog lever toward on the remote.
On the player, press the 5-way control key toward .
track
Go to the beginning of the next
track
Search for a specific position by
fast forwarding or reversing
while viewing the elapsed time
Slide the jog lever toward on the remote.
On the player, press the 5-way control key toward .
During playback or pause, slide and hold the jog lever left or right.
While checking the elapsed time on the remote display, you can go
to the specific position you want to listen to.
(Time search)
Search for a specific track while
viewing track numbers
(Index search)
Go to the beginning of every
10th track*
During stop, slide and hold the jog lever left or right. While checking
the track number on the remote display, you can go to the specific
track you want to listen to.
Press the (group) – button on the remote to go to the beginning
of the 10th track before the current track. Press the (group) +
button on the remote to go to the beginning of the 10th track after
the current track.
Go to the beginning of every
group** (Group skip)
Press the (group) – button on the remote to go to the beginning
of the first track in the current group or the previous group. Press
the (group) + button on the remote to go to the beginning of the
first track in the next group.
On the player, press the GROUP button, and then press the 5-way
control key left or right.
To use the 5-way control key on the player
Press toward
(lef t) to go
bac kward from
the current point.
Press toward
(rig ht) t o go
for ward from the
current poi nt.
Playback
* You ca n do th is on ly fo r an MD with no g roup setti ngs.
**You ca n do th is on ly fo r an MD that has group sett ings. For de tails on t he group s ettin g, se e page 25.
Continued on the next page
21
Page 21

Playing an MD (continued)
23
Playback
P-M ODE/ but ton
Changing the play mode
– P-MODE/
Besides playing the tracks in the order
recorded on an MD (normal play), you can
also select the specific tracks you want to
listen to , and then play tracks in your favorite
order.
For details about the play mode, see page
23.
While the player is stopped, press the
1
P-MODE/ button repeatedly until the
play mode indication you want appears.
To use (bookmark track play), tracks
first need to be bookmarked. Before
pressing the P-MODE/ button, be sure
to bookmark the tracks you want (page
24).
When you select PGM (program play),
the indication flashes. Continue setting
the program from step 2 in “To listen to
tracks in the desired order” (page 24).
Press the jog lever.
2
Playback starts in the selected play
mode.
Jog leve r
(· /ENT ·)
Slide toward the left or
right to select. Press to
start playback.
To retur n to normal play, press the
P-MODE/ button repeatedly until the play
mode indication disappears.
Also, press and hold the jog lever for two
seconds or more while the player is stopped,
or open and close the lid of the player* to
retur n to normal play.
* E xcept for when th e MD infor mation has b een s tored
in the “ Disc Memory” (pag e 29) .
You can also play tracks repeatedly in the
selected play mode by using repeat play.
For details, see page 24.
22
Page 22

Play mode list
Play mode indication Description
No display
(Normal play)
1
(Single-track play)
(Bookmark track play)
SHUF
(Shuffle play)
PGM
(Program play)
**
(Group normal play)
SHUF **
(In-group shuffle play)
PGM **
(Group program play)
All the tracks on the MD are played once in a track number order.
Press and hold the jog lever for two seconds or more while the
player is stopped or open and close the lid of the player* to return
to normal play.
The current track is played once.
The tracks you bookmarked are played. For details on how to add a
bookmark, see page 24.
All the tracks on the MD are played once in random order.
The tracks are played in the order that you specified.
For details on how to set the program, see page 24.
All the tracks in all the groups are played once in a group order.
Tracks not assigned to a group are played after the tracks assigned
to groups.
All the tracks in the current group are played once in random order.
After playing the current group, the tracks in the succeeding groups
are played once in random order.
The groups are played in the order that you specified.
Up to 10 groups can be programmed.
Playback
* E xcept for when th e MD infor mation has b een s tored in t he “D isc Mem ory” (page 29).
**T he in dicat or appe ars o nly d uring p layba ck of an MD with gro up sett ings. For details abou t group se tting ,
see page 25.
Continued on the next page
23
Page 23

Playing an MD (continued)
25
Playback
To listen to selected tracks only
– Bookmark track play
To add a bookmark, play back the track
1
that you want to bookmark. Then, press
and hold the jog lever for two seconds
or more until (bookmark track play)
flashes slowly, during playback of the
track which you want to bookmark.
To bookmark another track, repeat step
2
1. You can bookmark to up to 20 tracks.
To listen to the bookmarked tracks,
3
press the P-MODE/ button repeatedly
until (bookmark track play) flashes.
“ TrPLAY?” appears.
Press the jog lever.
4
lights up and the bookmarked track
starts playback. When you bookmark
two or more tracks, the playback is in a
track number order.
To erase a bookmark, play the bookmarked
track and then press and hold the jog lever
for two seconds or more.
To erase all bookmarks, open and close the
lid of the player.
To listen to tracks in the desired order –
Program play
To program the desired order, press the
1
P-MODE/ button repeatedly until
“PGM” (program play) flashes.
Slide the jog lever left or right to select a
2
track, and then press the jog lever to
enter the selected track.
Repeat step 2 to program more tracks in
3
the order you want to play.
You can program up to 20 tracks. All
program settings are cancelled when the
lid is opened.
To listen to the tracks in the
4
programmed order, press and hold the
jog lever for two seconds or more until
“PGM” stops flashing.
Playback starts in the selected order.
To start the program play again after
changing the play mode, follow step 1 to
make “PGM” (program play) flash. Press and
hold the jog lever for two seconds or more
to start playback.
To erase the programs, open and close the
lid.
24
To play tracks repeatedly – Repeat play
Select the play mode you want to repeat
1
(page 23).
Press and hold the P-MODE/ button
2
for two seconds or more until (repeat
play) appears.
The selected play mode repeats.
To cancel repeat play, press and hold the
P-MODE/ button for two seconds or more
until (repeat play) disappears. To change
the play mode, press the P-MODE/ button
during repeat play.
Page 24

To listen to tracks using the group function
Although you cannot use this player to set
groups, you can play an MD that already has
group settings.
Operation lamp for the group settings
Using the color of the operation lamp on the
player, you can check during play whether
the MD has the group settings.
To listen to tracks using the group function,
press the P-MODE/ button rep ea te dl y until
, SHUF, or PGM lights up. Fo r de ta il s
about each play mode, see page 23.
In the (group normal play), tracks not
assigned to a group are played after the
tracks assigned to groups. In the example
“MD with group settings,” tracks 6 and 7 are
played after the tracks in Groups 1 to 3.
During playback of tracks 6 and 7,
“Group --” appears in the display.
In the SHUF (in-group shuffle play) and
PGM (group program play), tracks not
assigned to a group are not played.
About group settings
The tracks on an MD are numbered in the
recorded order.
MD with no group settings
If you use the MD recorder that can set the
groups, you can assign desired tracks to a
group as shown in the example “MD with
group settings.” For details on how to set
the groups, see the operating instructions of
the MD recorder.
MD with grou p settings
Operation
lamp
Red Playing an MD with no group
Green Playing an MD with group
Orange Going to the beginning of
Group setting status of
the MD
settings
settings
another group (page 21)
Playback
Group1 Group2 Group3
Tracks t hat are no t ass igned t o a g rou p.
25
Page 25

Selecting the sound mode – V-SUR/SOUND
27
Playback
VOL UME c ontrol DISPLAY but ton
(s top) butto n
You can select the sound mode you want
from the modes available on the player.
In “V-SUR” (Virtual Surround), there are four
sound pre-settings that let you hear the
sound as if you are in a recording studio, at
a concert, etc.
In “SOUND,” t he re are six sound pre-settings
(6 Band Equalizer). Four pre-settings
provide a specific audio range according to
the sound genre, such as jazz and pops.
Two custom settings, “Custom1” and
“Custom2,” let you set each of the six
sound ranges in up to seven increments to
give you more flexibility to achieve the
desired sound.
SOU ND bu tton
Jog leve r
(· /ENT ·)
Slide toward the left or
right to select. Pre ss to
enter the selection.
During playback, press the SOUND
1
button repeatedly until “V-SUR” or
“SOUND” appears.
Press and hold the SOUND button for
2
two seconds or more until the selected
indicator flashes.
Slide the jog lever left or right to select
3
the sound mode, and then press the jog
lever. The selected sound mode is set.
When you select “Custom1” or
“Custom2,” follow the steps in “To
customize the sound – Custom” on page
27.
To cancel the setting, press the SOUND
button repeatedly until “V-SUR” or “SOUND”
disappears.
To cancel the procedure, press and hold the
DISPLAY button or the (stop) button for
two seconds or more.
26
Page 26

Sound mode settings
Mode (underlined:
default setting)
V-SUR Studio Recreates the sound
Live Recreates the sound
Club Recreates the sound
Arena Recreates the sound
SOUND Heavy Dignified sound
Pops Light and soft sound
Jazz Emphasis on the
Unique Emphasis on both the
Custom1 Up to two kinds of
Custom2
Explanation
of a recording studio
of a concert hall
of a dance hall
of a stadium
bass tone
high and bass tones
desired sound can be
stored
To customize the sound – Custom
You can store two sound settings that are
finely adjusted in all six sound ranges.
Select “Custom1” or “Custom2” in step
1
3 of “Selecting the sound mode
– V-SUR/SOUND” on page 26, and
press the jog lever. One “-”, which
shows the sound level, flashes.
Slide the jog lever left or right to make
2
the range you want to adjust flash. The
six “-”s show the sound range of 100Hz,
250Hz, 630Hz, 1.6kHz, 4kHz, or 10kHz
from the left.
Turn the volume control toward +/– to
3
adjust the sound volume of the selected
range in a maximum of seven
increments.
The center is 0dB. Each turn toward –
increases the volume to +3dB, +6dB,
and +10dB in order, and each turn
toward + moves it to –3dB, –6dB, and –
10dB in order.
Repeat steps 2 and 3 to adjust the
4
volume for each range.
After adjusting, press the jog lever.
5
The sound setting you selected is stored
as “Custom1” or “Custom2.” Once you
have stored the sound setting, it will
remain until a new one is stored.
Playback
27
Page 27

Changing the settings
29
Settings
DIS PLAY bu tton
( stop) butt on
Press and hold the DISPLAY button for
1
two seconds or more until “Useful” or
“Option” flashes.
Slide the jog lever left or right to select
2
“Useful” or “Option,” and then press the
jog lever.
For details about the items in “Useful”
and “Option,” see “Menu option” (pages
29 to 31).
Jog leve r
(· /ENT ·)
Sli de to ward the l eft o r
ri ght t o sel ect.
Press to enter the
selection.
To continue to select items you want to
3
change, slide the jog lever again left or
right and press the jog lever.
After setting, return to the original display.
To retur n to the previous display, press the
(stop) button.
To cancel setting, press and hold the
DISPLAY button or the (stop) button for
two seconds or more.
28
Page 28

Menu option
“Useful” menu
Use the “Useful” menu to change an MD’s setup options.
Item Options (underlined: default setting)
Disc Memory The player can store the various settings of an MD (volume, play mode,
bookmark, sound mode, speedcontrol, etc.), and then retrieve them
automatically whenever the disc is inserted (Personal Disc Memory).
Settings can be stored for up to 20 MDs. Any settings stored thereafter will
replace the settings for the MD with the oldest playback data.
ENTRY Select “ENTRY?”, and then press the jog lever.
“ENTRY OK” appears and then the settings are stored.
If you add tracks or edit an MD whose settings have been
stored on the player, the MD will no longer be recognizable
by the player and the stored information is lost.
ERASE Select “ERASE?”, and then press the jog lever.
“ERASE OK” appears and the settings are erased.
If you try to erase the settings of an MD that has not been
stored, “NO ENTRY!” appears.
SpeedControl This setting changes the playback speed without changing the playback pitch
(Digital Pitch Control). You can use this function for studying languages, or for
listening to recorded speeches.
+100%
0%
−50%
During playback, slide the jog lever left or right to select the
playing speed. Then press the jog lever.
The playback speed varies in 13 steps. The speed gets
faster as the “+” number increases and slows down as the
“−” number increases.
Settings
To cancel “SpeedControl,” open and close the lid of the
player or select the normal speed (0%).
Note
• When usin g “Sp eedCont rol ,” yo u may h ear n oise or
an echo in th e playb ack. This is not a mal funct ion.
Continued on the next page
29
Page 29

Menu option (continued)
31
Settings
“Option” menu
Use the “Option” menu to change the player’s setup options.
Item Options (underlined: default setting)
AVLS This setting limits the maximum volume to prevent leakage of sound and
damage to your hearing (Auto Volume Limiter System).
AVLS Off The volume changes as the VOLUME control is turned.
AVLS On The Auto Volume Limiter System is on. If the fixed volume is
exceeded, “AVLS” flashes and the volume remains at a
moderate level.
Beep This setting lets you turn on or off the beep that is emitted when the player or
the remote is operated.
Beep On The beep sounds.
Beep Off The beep does not sound.
Backlight This setting lets you turn the remote display backlight on or off.
Auto The backlight tur ns on when you operate the remote, and
automatically turns off when the player is not used for a
while.
On The backlight stays on.
Off The backlight stays off.
This setting selects a title display on the remote, when you insert an MD with a
Japanese title.
Only the Japanese title in Japanese mode is displayed.
30
The titles in Japanese mode and English mode are displayed
alter nately.
Page 30

Item Options (underlined: default setting)
Power Mode This setting determines battery use.
Normal During playback, the operation lamp on the player and the
remote display always light up.
Power Save During playback, the operation lamp on the player and the
remote display remain turned off. This leads to a longer
battery life.
The remote display lights up for only several seconds when
the DISPLAY button is pressed.
Quick Quick response for the playback operation is given priority
over the battery life. When operating to start playback or go
to the beginning of a track, playback will start quickly.
Also during playback, the operation lamp on the player and
the remote display remain lit.
Because the battery is always used even when the player is
not operating, this leads to a shorter battery life. For this
reason, it is recommended that you charge the battery
frequently if you plan to use the “Quick” option.
Note
• If n o pla yer o peratio n (in cludi ng open ing o r clo sing
of the l id) o ccurs f or ab out 1 7 hours when “Pow er
Mod e” fu nctio n is se t to “Quic k” mode , the
respon se wh en the playe r is next us ed ma y be slow.
The play er, how ever, will retu rn to “ Quick” res ponse
aft er it has been us ed ag ain.
Settings
31
Page 31

Caring for the player
33
Additional
Information
For the player and the remote
To remove any fingerprints or dirt, it is
recommended that you wipe the player and
remote with the supplied cleaning cloth.
The cleaning cloth can be washed and
reused when it becomes dirty.
For the earbuds
To clean the earbuds, remove them from the
headphones, and then wash them by hand
with a weak solution of neutral detergent.
Wipe the earbuds thoroughly to remove any
moisture before using them.
For the supplied carrying case
Wipe the surface with the dry, supplied
cleaning cloth.
When the player is not used for three
months or more
To prevent the battery from running down,
set the BUILT-IN BATTERY switch to OFF to
disconnect the power supply to the player.
ON
OFF
BUI LT-IN BATTERY swit ch
32
Page 32

Precautions
On safety
•
Make sure to keep the player in the
supplied carrying case. If the terminals on
the player or the battery charging stand
are accidentally brought into contact with a
metallic object, they may short-circuit and
begin to heat up.
•
Keep the terminals on the player away
from metallic objects or surfaces. Such
contact may short-circuit the terminals and
cause dangerous heat generation.
•
Do not put any foreign objects in the DC IN
6V jack.
•
If you will not use the player for a long
time, be sure to disconnect the power
supply (AC power adaptor or the battery
charging stand). When disconnecting the
AC power adaptor from the electrical
outlet, grasp the adaptor plug itself; never
pull the cord.
On the AC power adaptor (for the supplied
battery charging stand)
•
For use in your house: Use the supplied
AC power adaptor. Do not use any other
AC power adaptor; it may cause the player
to malfunction.
Pol arity of t he plug
•
Connect the AC power adaptor correctly.
•
Do not touch the AC power adaptor with
wet hands.
•
Connect the AC power adaptor to an easily
accessible AC outlet. Should you notice an
abnormality in the AC power adaptor,
disconnect it from the AC outlet
immediately.
On charging
•
The supplied battery charging stand can
be used only with the QUALIA 017. It
cannot be used to charge any other
models.
•
Charge the built-in battery at a
temperature of 0°C (+32°F) to +40°C
(+104°F). The charging time will vary
according to the room temperature. (If the
room temperature is low, the required
charging time will be longer. This is a
characteristic of the built-in lithium-ion
battery.)
•
Because of the battery’s characteristics,
the capacity of the built-in rechargeable
battery may be smaller than normal when it
is used for the first time or after a long
period of disuse. In this case, charge and
discharge the battery several times. The
normal battery life will be restored.
•
If the life of the built-in rechargeable
battery drops to half the normal length, the
battery should be replaced. Contact
QUALIA Concierge.
•
If the player will not be used for a long
time, remove the player from the battery
charging stand and disconnect the AC
power adaptor from the wall outlet. If the
player will not be used for three months or
more, we also recommend that you set the
BUILT-IN BATTERY switch (for built-in
rechargeable battery) located inside right
side of the player to OFF.
Continued on the next page
Additional
Information
33
Page 33

Precautions (continued)
35
Additional
Information
On handling
•
Do not drop or bump the player. This may
cause the player to malfunction.
•
Do not pull on the remote or headphone
cords.
•
Do not leave the player in the following
places:
— An extremely hot place (over 60°C (140°F))
— A p la ce e xp os ed t o di rect sunlight or near
a heater
— I n a ca r wi th t he w in do ws rolled up
(especially in the summer)
— I n a da mp p la ce s uc h as a b at hroom
— N ea r a so urce of electromagnetic fields
such as a magnet, speaker, or TV
— I n a du st y pl ac e
On heat build-up
Heat may build up in the player when it is
charging or operated for a long time. This is
normal.
On mechanical noise
The player emits mechanical noise while
operating, which is caused by the
power-saving system of the player. This is
normal.
On installation
•
Never use the player where it will be
subjected to extremes of light,
temperature, moisture or vibration.
•
Never wrap the player in anything when it
is being used with the AC power adaptor.
Heat built-up in the player may cause
malfunction or injury.
On disposing of the player
Before you dispose of the player, remove the
built-in rechargeable battery for
environmental protection.
To remove the built-in battery
Follow the steps on page 35 to remove the
built-in rechargeable battery. When removing
the battery, use a screwdriver.
Notes
•
Before removing the built-in rechargeable
battery, make sure it is completely drained.
•
Do not remove any screw from the player
except when disposing of the player.
34
Page 34

1 Place the player on a flat place with the
embossed “QUALIA 017” facing up, and
then push down the OPEN lever slightly
to open the player lid.
OPE N lev er
2 Push down on the part of the arrow
shown below to open the lid wider.
5 Turn the player over with the embossed
“SONY” facing up. Then move the bottom
in the direction of the arrow to remove it.
6 Remove the black insulating sheet.
Ins ulati ng sh eet
3 Set the BUILT-IN BATTERY switch located
inside the right side of the player in the
direction of the arrow.
BUI LT-IN BATTERY swit ch
4 Remove the two screws from the player
as shown below.
7 Remove the built-in rechargeable battery
in the battery holder.
Bui lt-in re chargeab le
bat tery
Bat tery
hol der
8 Attach a piece of insulating tape over the
power supply board connector.
Continued on the next page
Additional
Information
35
Page 35

Precautions (continued)
37
Additional
Information
On the remote
The supplied remote is designed for use with
the QUALIA 017 only. Note also that the
player cannot be controlled by a remote for
other models.
On the MD cartridge
•
Do not touch the inter nal disc directly.
Forcing the shutter open may damage the
internal disc.
•
When transporting an MD, keep it in its
case.
•
Do not place the cartridge where it will be
subjected to light, temperature, moisture
or dust.
•
Do not affix the label outside of the
specified area on the MD. Make sure the
label is placed within the recessed space
on the disc.
On the headphones
Road safety
•
Do not use headphones while driving,
cycling, or operating any motorized
vehicle. This may lead to a traffic accident
and is illegal in many areas. It can also be
potentially dangerous to play your player at
high volumes while walking, especially at
pedestrian crossings. You should exercise
extreme caution or discontinue using the
player in potentially hazardous situations.
•
Although headphones with a stereo mini
plug can be connected, headphones with
a micro plug cannot be used.
•
Some of noise-canceling headphones that
reduce the surrounding noise may not be
able to be connected.
(For Sony models: MDR-NC20, MDRNC11, and MDR-NC5)
•
If you experience an allergic reaction to the
supplied headphones, stop using them at
once and contact QUALIA Concierge.
Preventing hearing damage
Avoid using headphones at high volumes.
Hearing experts advise against continuous,
loud and extended play. If you experience a
ringing in your ears, reduce the volume or
discontinue use.
Consideration for others
Keep the volume at a moderate level. This
will allow you to hear outside sounds and to
be considerate of the people around you.
36
Page 36

On cleaning
•
After wiping the player casing with a soft
cloth slightly moistened with water, wipe it
again with a dry cloth. Do not use any type
of abrasive pad, scouring powder or
solvent such as alcohol or benzene as this
may mar the finish on the casing.
•
Wipe the disc cartridge with a dry cloth to
remove dirt.
•
Dust on the lens may prevent the unit from
operating properly. Be sure to close the
disc compartment lid after inserting or
ejecting an MD.
•
To maintain good sound quality, use a soft
cloth to clean the plugs of the headphones
and remote. A dirty plug may cause noise
or intermittent breaks in the sound during
playback.
On the carrying case
•
Avoid leaving the carrying case in a hot
and humid place, because heat and
moisture may cause changes in its color
and shape.
•
Avoid leaving the carrying case against
other leather products or vinyl material for
a long time, because that may cause
changes in its color and quality.
If you have any questions or problems
concerning your player, please contact
QUALIA Concierge.
(If a problem occurred when the disc was in
the player, we recommend that the disc be
left in the player when you contact QUALIA
Concierge so that the cause of problem may
be better understood.)
37
Additional
Information
Page 37

Troubleshooting
39
Additional
Information
If you experience a problem with your player, try the following solutions.
Read through the symptoms and solutions on pages 38 to 40 to check your player.
1
Detach the remote and the headphones from the player, and then reattach them and
2
operate the player.
Set the BUILT-IN BATTERY switch to OFF and let the player sit for about 30 seconds.
3
Then set the BUILT- IN B ATTERY switch to ON again and operate the player.
Unplug the AC power adaptor from the battery charging stand and the wall outlet.
4
Then plug them in again and operate the player.
If the problem persists, contact QUALIA Concierge.
5
QUALIA Concierge
Toll-free number:
1 (877) QUALIA3
Symptom Cause/Solution
The built-in rechargeable
battery does not charge.
The operation lamp on the
player does not light up even
when the player is placed on
the battery charging stand.
•
The battery is charged when shipped. Check the remaining power of
the built-in rechargeable battery (page 16).
•
When “CannotCHG” appears, the room temperature is too high or too
low. Charge the battery at a temperature of 0°C (+32°F)
to +40°C (+104°F).
•
When recharging is started after using up the built-in rechargeable
battery, it may take up to one minute for the operation lamp on the
player or display indication on the remote to go on.
•
Firmly insert the plug of the AC power adaptor into the jack at the
bottom of the battery charging stand.
•
Open the lid of the player and set the BUILT-IN BATTERY switch
located inside the right side of the player to ON.
38
Page 38

Symptom Cause/Solution
The player does not work or
works poorly.
•
Open the lid of the player, and then set the BUILT-IN BATTERY switch
located inside the right side of the player to ON.
•
Make sure that the HOLD function of the player or the remote is set
off (page 20).
•
Insert an MD if “NO DISC” is displayed.
•
End the setting operation using the remote if “MENU” is displayed.
•
Recharge the built-in battery if “LOW BATT” is displayed (page 14).
•
Insert a recorded MD if “BLANKDISC” is displayed.
•
Reinsert the MD if “READ ERR” or “TOC ERR” is displayed. If the
error message continues to be displayed, replace the MD with
another one.
•
When moisture condenses inside the player, remove the MD from the
player, set the BUILT-IN BATTERY switch to OFF, and leave the player
for several hours.
If you cannot solve the problems with the methods above, or if the
problems occurred due to the following causes, follow the steps below.
— While operating, the player received a mechanical shock.
— The player was affected by strong noise caused by too much static, an
abnormal power surge due to lightning, etc.
1 Set the BUILT-IN BATTERY switch to OFF.
2 Let the player sit for about 30 seconds.
3 Set the BUILT-IN BATTERY switch to ON and reconnect the player to a
power source.
There is no sound output from
the headphones.
The volume does not
increase.
•
Firmly plug the remote into the player and the headphones into the
remote.
•
Set “AVLS” to “Off” (page 30).
Continued on the next page
39
Additional
Information
Page 39

Troubleshooting (continued)
41
Additional
Information
Symptom Cause/Solution
The MD does not play
normally.
The MD does not play from
the first track.
The playback sound skips.
Noise is heard.
Noise is briefly heard.
During playback, the
operation lamp of the player
or the remote display does
not light up.
The group settings do not
function.
•
Stop playback when another play mode is selected. Then press and
hold the jog lever for two seconds or more.
•
When the repeat play is selected, press and hold the P-MODE/
button for two seconds or more until disappears.
•
Playback with same MD starts from the point you last stopped
playing.
To start playback from the beginning of the same MD, press and hold
the jog lever on the remote for two seconds or more (or press and
hold the 5-way control key on the player toward for two
seconds or more). Or you can press
MD. Playback will start from the beginning because the player will
consider the MD to be a different one.
•
When you use the player in a location that has a lot of vibration, place
the player where the vibration is the least.
•
A very short track, such as a brief narration or introduction, may
cause sound to skip.
•
Do not continuously give strong shocks to the player.
•
Do not use a dirty or scratched MD.
•
Move the player away from a television or other source of strong
magnetism which is causing interference.
•
Because of the nature of the compression method used in the LP4
mode, noise may be output on very rare occasions during playback of
sound recorded in this mode.
•
Noise may be output when the cord of the headphones touches the
clothing, etc. This is not a malfunction.
•
When “Power Mode” is set to “Power Save,” the lamp and display do
not light up except during operation. Select “Quick” or “Normal”
(page 31).
•
Insert an MD with group settings (page 25).
(stop) button and reinsert the
40
Page 40

Specifications
Type of material Copper pyrites (brass),
palladium-plated finish
(not including
switches/remote
display)
Process method Shaped with NC
(Numerically Control)
Machine Tool
(not including the
remote display)
Audio playing system
MiniDisc digital audio
system
Laser diode properties
Material: GaAIAs
Wavelength λ=790 nm
Emission duration:
continuous
Laser output: less than
44.6 µW*
*This output is the
value measured at a
distance of 200 mm
from the objective lens
surface on the optical
pick-up block with
7mm aperture.
Revolutions Approx. 300 rpm to
2,700 rpm
Error correction ACIRC (Advanced
Cross Interleave Reed
Solomon Code)
Sampling frequency 44.1 kHz
Coding ATRAC (Adaptive
Transform Acoustic
Coding)
ATRAC3: LP2/LP4
Modulation system EFM (Eight to Fourteen
Modulation)
Number of channels 2 stereo channels
1 monaural channel
Frequency response 20 to 20,000 Hz ± 3 dB
Outputs Headphones:
dedicated headphone/
remote jack, maximum
output level 5 mW + 5
mW load impedance
Ω
16
Power requirements Lithium-ion
rechargeable battery
(Built-in: LIP-3WMB,
3.7 V, 340 mAh, Li-ion)
External power jack (for
the battery charging
stand): Power rating
6 V DC
AC power adaptor (for
the battery charging
stand, supplied), AC
120 V, 60 Hz
Battery operation time
See “Checking the
battery’s remaining
power” (page 16)
Dimensions Approx. 87.6 × 79.0 ×
11.0 mm (w/h/d)
(31/2 × 31/8 × 7/16 inches)
(not including
projecting parts and
controls)
Mass Approx. 244 g (8.7oz)
(including the built-in
rechargeable battery)
US and foreign patents licensed from Dolby
Laboratories.
Design and specifications are subject to
change without notice.
Printed on 100% recycled paper
using VOC (Volatile Organic
Compound)-free vegetable oil
based ink.
Additional
Information
41
Page 41

Index
43
Additional
Information
A
AC power adap tor . .. ..... ..... .... 14
AVLS .... ..... ..... ....... ..... ..... ...... 3 0
B
Bac kligh t ..... ..... ..... ....... ..... .... 30
Bat tery charg ing sta nd ........ ... 14
Bat tery life ..... ..... ..... ....... ..... .. 1 6
Bee p .... ....... ..... ..... ....... ..... .... 30
Boo kmark trac k play ... ..... ...... 24
BUI LT-IN
BATTE RY sw itch .... ....... . 10, 3 2
Bui lt-in re chargea ble b atter y ... 15
C
Car ing f or th e playe r .... ..... ..... 32
Cha nging the setting s .. ..... .. ... 28
Cha rging the battery .... ..... ..... 14
Cha rging progres s cha rt .. 15
Cus tom ....... ..... ..... ....... ..... .... 27
D
DC IN 6V plug .. ..... ..... ....... ..... 14
Dis k Mem ory .. ..... ....... ..... ..... . 2 9
DIS PLAY bu tton ....... ..... .. .. 11, 20
Dis play of
the re maini ng powe r ..... ..... .. 1 6
G
Go backw ard /forward.. ..... ...... 21
Go to th e beg inning of tr ack ...
GRO UP bu tton .... ....... ..... . 10, 2 1
Group funct ion. ..... ..... .. ..... ..... 25
Group norma l play . ..... ..... ...... 2 3
Group pro gram pl ay ...... ....... .. 2 3
Group skip .... ..... ..... ....... ..... .. 2 1
21
H
HOL D... ..... ..... ....... ..... ..... ...... 2 0
HOL D swi tch ...... ....... . 10, 1 1, 20
I
In- gro up sh uffle play ..... ..... .... 23
Ind ex se arc h .... ..... ..... ....... ..... 21
J
Jog leve r
(· /ENT ·) .... .... 11 , 18
M
MD infor matio n
on the displ ay ...... ..... ..... .... 20
N
Nor mal .......... ..... ..... ....... ..... .. 3 1
Nor mal p lay ..... ..... ....... ..... ..... 23
O
“Op tion” menu ........ ..... ..... ..... 30
OPE N lev er .... ....... ..... ..... .. 10, 18
Ope ratio n lam p ..... ..... ..... .. 10, 14
P
P-M ODE/ (repe at)
but ton .... ..... ..... ....... ..... . 11, 2 2
Pau se pl aybac k .. ....... ..... ..... .. 1 9
PGM (Progra m play) .... ....... .... 23
Pla ying an MD . ..... ....... ..... ..... 18
Cha nging
the playback operations .. 21
Cha nging the play mo de .. 22
Pla y mod e ..... ..... .. ..... . 12, 2 3
Pow er from a wall outle t ..... .... 15
Pow er Mo de ....... .. ..... ..... ..... .. 3 1
Pow er Sa ve ...... ..... ....... ..... .... 31
Precau tions .... ..... ..... .. ..... ..... . 3 3
Progra m pla y ....... ....... ..... ..... . 2 4
Q
Qui ck ... ..... ....... ..... ..... ....... .... 31
R
Rem ote d ispla y . ..... ..... 12, 14 , 20
Rep eat p lay ....... ..... ....... ..... ... 24
42
Page 42

S
SHU F (Sh uff le play ) ... ..... ..... .. . 23
Shu ffl e pla y ...... ..... ..... ....... .... 23
Sin gle-t rack play ....... ..... ..... ... 23
SOU ND ........ ..... ..... ....... ..... ... 26
SOU ND bu tton . ..... .. ..... .... 11 , 26
Sou nd mo de .... ..... ..... ....... 1 2, 26
Spe edCon tro l .. ..... ....... ..... ..... 29
Sto pping play back ... ..... ....... .. 19
Sup plied acce ssories .... ....... .. 13
T
Termin als f or the batte ry
ch argin g sta nd ... ..... ...... 10 , 14
Time search...... ..... ..... ....... .... 21
Troubl eshooti ng ..... ..... ..... ...... 38
U
“Us eful” menu . ..... ..... ....... ..... . 2 9
Symbol/Number
(b atter y) .... ....... ..... ..... .... 16
(bo okmar k tra ck play )... .. ... 24
(di sc)...... ..... ..... ....... ..... ... 19
(G rou p) +/ – butto ns ... .. 11 , 21
(G rou p nor mal pla y) ..... .. ... 23
( headp hones ) jack ...... ...10, 14
(s top) butto n .... ....... ..... . 11, 1 9
(repea t pla y) ...... ....... ..... .... 2 4
5-w ay co ntrol key
(· ·) ... ....... ...10, 18
6 B and E quali zer.... ....... ..... .... 26
V
V-SUR .. ..... ..... ....... ..... ..... ...... 2 6
Vir tual Surro und .. ..... ..... .. ..... .. 2 6
VOL UME c ontrol .... ..... ..... . 11, 19
43
Additional
Information
 Loading...