

Page 1
Quick Reference
Краткий справочник
PSP-3008
4-115-362-71(1)
Page 2
Introduction
Using "XMB" (XrossMediaBar)
GAME
Playing games
VIDEO
Playing video
MUSIC
Playing music
PHOTO
Displaying images
NETWORK
Connecting to the Internet
SETTINGS
Adjusting PSP™ system
settings
Icons displayed in the Home Menu vary depending
on the system software version.
2
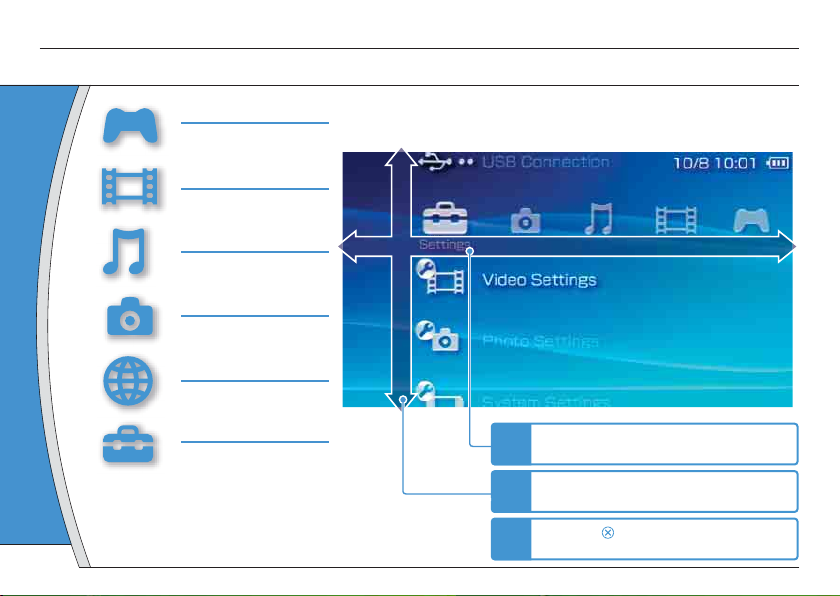
The PSP™ system includes a user interface called "XMB"
(XrossMediaBar). The main screen for "XMB" is called the “Home Menu”.
Category
Item
Home Menu
Select a category using the left or right
1
button.
Select an item using the up or down
2
button.
Press the button to confi rm the
3
selected item.
Page 3
This document describes basic operations of the PSP™ system. For detailed instructions, refer to the online user’s guide
( page 25).
GB
RU
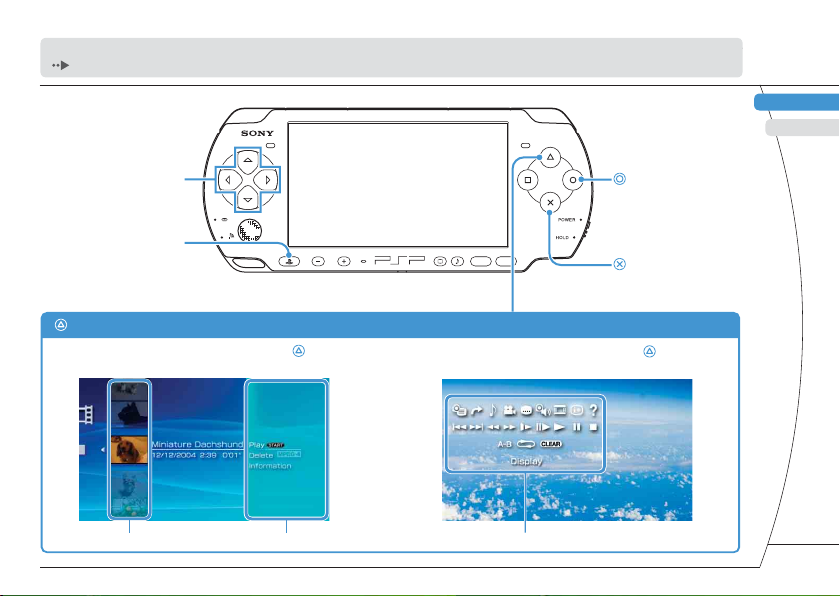
Directional buttons:
Used to select
categories/items
PS button:
Returns to the Home Menu
Quits gameplay
button: Displays the options menu/control panel
Select an icon, and then press the button
to display the options menu.
Icons Options menu Control panel
button:
Cancels selected
operations
VOL
SELECT START
button:
Confi rms selected items
DE
While playing content, press the
to display the control panel.
button
IT
NL
PT
3
Page 4
Preparation
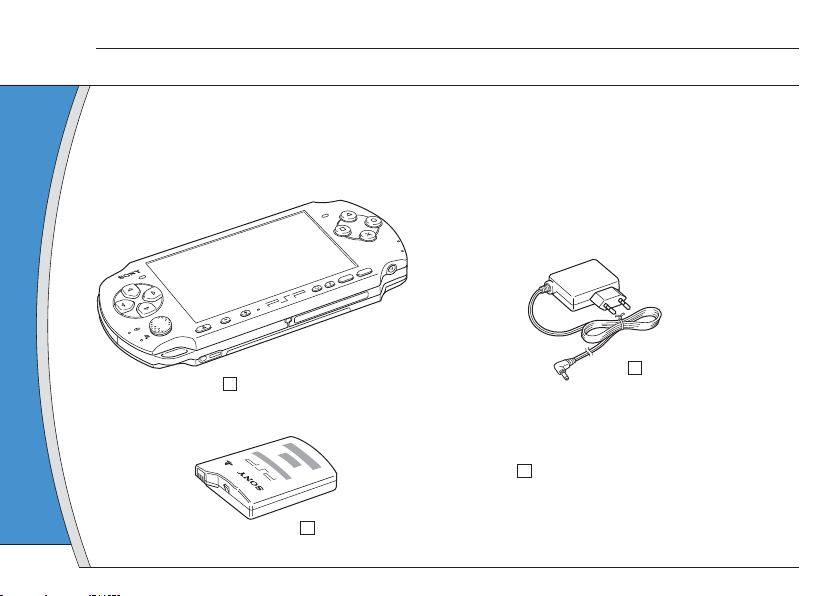
Checking the package contents
01
Check that you have all of the following items.
If any items are missing, contact the appropriate PSP™ customer service helpline which can be found within
every PSP™ format software manual.
R
E
OW
P
D
L
O
H
T
R
A
T
S
T
C
E
L
E
S
L
O
V
PSP™ (PlayStation®Portable) system
AC Adaptor
Printed Materials
Battery Pack
4
Page 5
About the PSP™ system documentation
The PSP™ system documentation includes the
following:
• Safety and Support
Before using the product, carefully read this document fi rst.
It contains safety information related to the use of the PSP™
system, troubleshooting, specifi cations and other
information.
• Quick Reference (this document)
This document contains information on basic hardware
operations of the PSP™ system.
• User’s Guide
(access from : eu.playstation.com/manuals)
This online document is accessed through the Internet and
contains detailed information related to the use of the PSP™
system software (
page 25).
Preparation
Checking the package contents
GB
RU
DE
IT
NL
PT
5
Page 6
Preparation
Preparing the PSP™ system for use
02
Charging the battery
Before using the PSP™ system for the fi rst time after
purchase, you must follow these steps to charge the
battery.
Caution
• The socket-outlet shall be installed near the equipment
and shall be easily accessible.
• Do not plug the AC Adaptor for the PSP™ system into an
electrical outlet until you have made all other
connections.
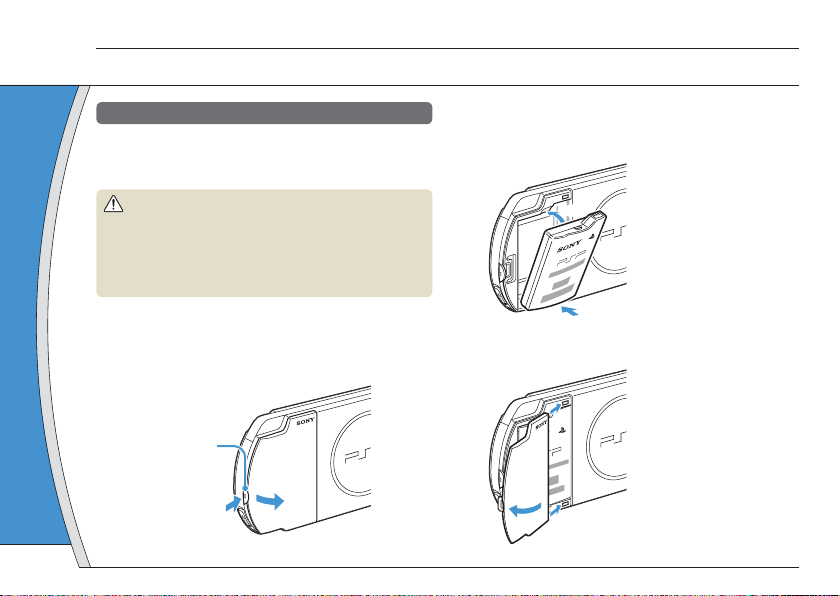
1 Remove the battery cover.
While holding down the release button, slide the battery
cover in the direction of the arrow.
Release button
1
6
2
2 Insert the Battery Pack.
Align the bottom surface of the battery pack with the
system to attach the battery.
2
1
Align the tabs of the battery cover with the system and
snap it in place.
3
4
Page 7
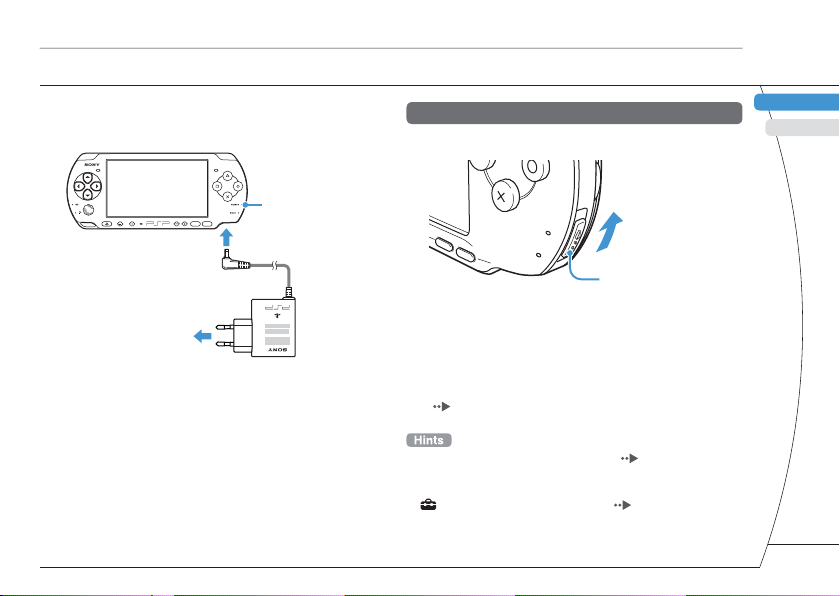
3 Attach the AC Adaptor to charge the
battery.
Preparation
Preparing the PSP™ system for use
Initial setup
1 Slide the POWER/HOLD switch up.
GB
RU
VOL
SELECT START
POWER indicator
1
To electrical outlet
The POWER indicator lights up in orange, indicating that
charging has begun. The POWER indicator will turn off when
the battery is fully charged.
2
POWE
S
E
LE
CT
ST
A
RT
R
HOL
D
POWER/HOLD switch
The POWER indicator lights up in green, and the initial
setup screen is displayed.
2 Follow the on-screen instructions to
make the initial settings.
When you have completed initial setup, the Home Menu
(
page 2) is displayed.
• See "Using the on-screen keyboard" ( page 26) for
information on entering characters.
• Settings made during initial setup can be changed later in
(Settings). See the user’s guide (
page 25) for details.
DE
IT
NL
PT
7
Page 8
Preparation
Part names and functions
03
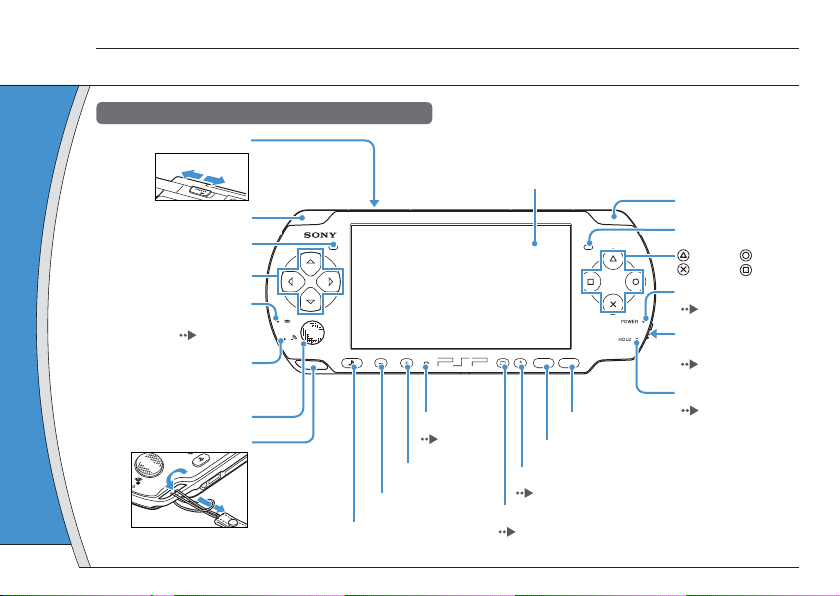
System
WLAN switch (top)
Off
Directional buttons
Memory Stick Duo™
access indicator
WLAN access indicator
Lights up when using the
wireless LAN feature
8
On
WLAN
L button
Left speaker
( page 13)
VOL
Analog stick
Strap holder
Volume + button
Volume − button
PS button*
*The PS button on this PSP™ system performs the same
functions as the HOME button on PSP-1000 and PSP-2000
series systems.
LCD screen
SELECT STAR T
Microphone
( page 12)
Display button
( page 9)
START button
SELECT button
Sound button
( page 9)
R button
Right speaker
button, button
button, button
POWER indicator
( page 10)
POWER/HOLD
switch (right side)
(
page 10)
HOLD indicator
( page 10)
Page 9
Using the sound button
Each time you press the button, the tone
Press and release
Press for more
than one second
*1 : The tone can be changed only when using headphones.
Also, the tone setting is temporarily set to “OFF” during
gameplay.
*2 : To clear muting, press the sound button again.
changes among HEAVY
JAZZ
UNIQUE OFF. *1
The sound is muted. *2
POPS
Preparation
Part names and functions
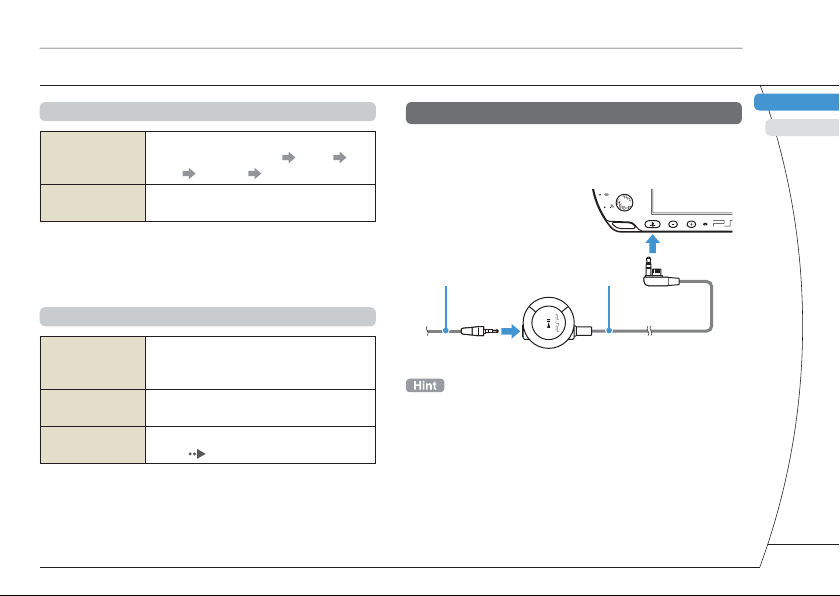
Connecting Headset
You can connect the remote control (sold separately)
to the headset connector. You can also connect the
headset (sold separately) to the remote control.
VOL
2
Headset Remote Control
GB
RU
Using the display button
Each time you press the button, the
Press and release
Press for more
than one second
Press for more
than fi ve seconds
*1 : The highest level (level 4) can be selected only while the
PSP™ system is plugged in using the AC Adaptor.
*2 : To turn the backlight back on, press any of the PSP™
system buttons.
display changes among three levels of
screen brightness. *1
The backlight turns off and the screen
goes blank. *2
The system switches to video output
mode (
page 18).
1
The PSP-1000 series headphones with remote control are not
compatible for use.
DE
IT
NL
PT
9
Page 10
Basic operations
Power and sleep mode functions
04
Use the POWER/HOLD switch to turn the system on
or off, or to put it into sleep or hold mode.
P
O
S
E
L
E
C
T
STAR
T
WER
HOL
D
POWER/HOLD switch
POWER indicator
HOLD indicator
10
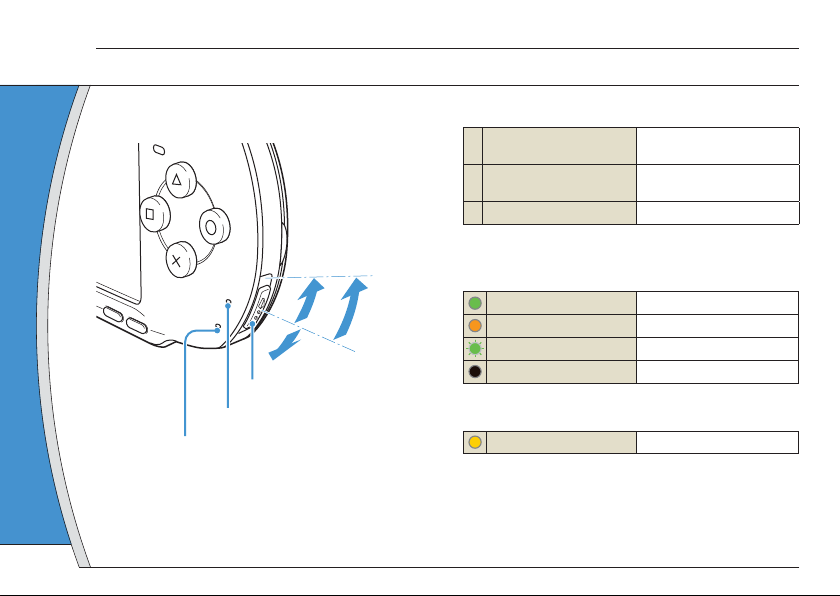
POWER/HOLD switch
Turning the system on /
A
Putting into sleep mode
B Turning the system off
C Locking the system buttons*
*All operations using system buttons are locked.
Slide up
Slide up and hold for more
than three seconds
Slide down
POWER indicator
Solid green
A
B
C
Solid orange
Flashing green
Light off
Power on
Charging
Charge level is low
Power off/in sleep mode
HOLD indicator
Solid yellow
In hold mode
Page 11
Sleep mode
If the PSP™ system is switched to sleep mode, the
software that is playing will be paused. When sleep
mode is cleared, you can begin playback from the
point where the system entered sleep mode.
• To clear sleep mode, slide the POWER/HOLD switch up
again. During video or audio playback, you can press the
button of the Remote Control to clear sleep mode.
• Some software may prevent the system from entering sleep
mode.
Basic operations
Power and sleep mode functions
GB
RU
DE
IT
NL
PT
11
Page 12
Basic operations
Playing UMD® content
05
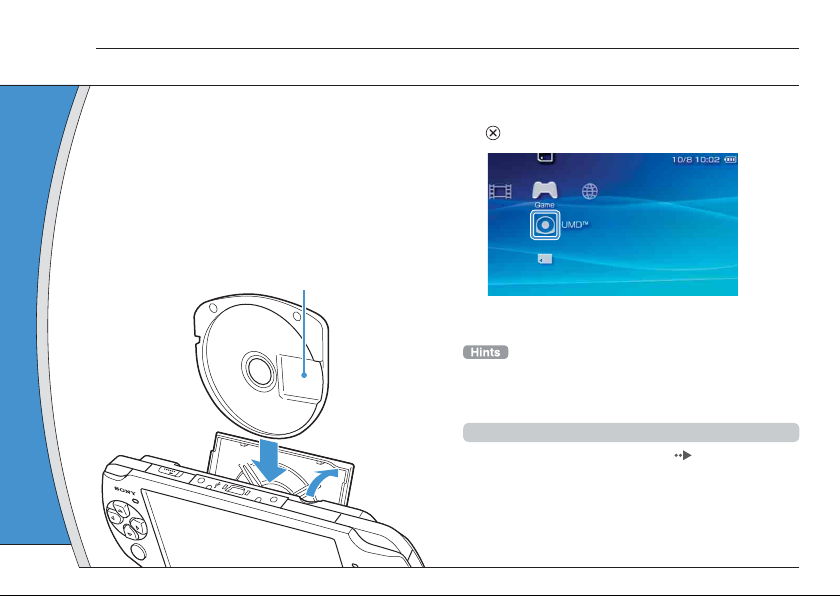
1
Place your fi nger in the indentation on
the top of the system to open the disc
cover.
2 Insert a UMD
Check that the disc cover is tightly closed. The icon is
displayed in the Home Menu.
and close the disc cover.
®
Do not touch the recorded surface.
3 Select the icon, and then press the
button.
Playback begins.
• Press the PS button to quit a game.
• To remove the UMD
cover.
®
, stop playback and then open the disc
Using the microphone
W
LA
N
12
2
1
The PSP™ system's microphone ( page 8) may be
used to play certain games and to make calls using
Go!Messenger. Refer to instructions for the software
in use and visit gomessenger.bt.com for details.
Page 13
Basic operations
Playing Memory Stick Duo™ content
06
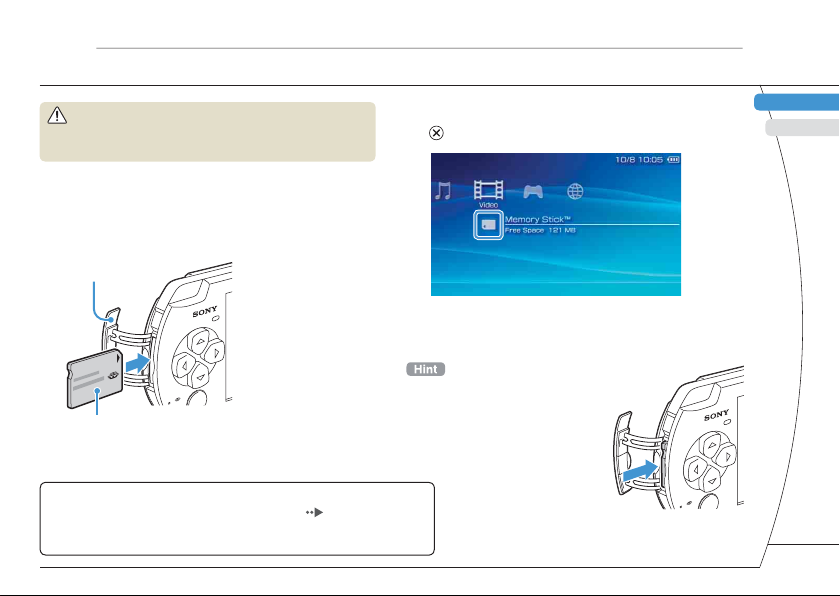
Warning
Keep Memory Stick Duo™ media out of the reach of small
children, as the media could be swallowed by accident.
1 Open the slot cover.
2 Press the Memory Stick Duo™ media
until fully inserted.
The icon is displayed in the Home Menu.
Slot cover
3 Select the icon, and then press the
button.
GB
RU
Front side
Notice
When the Memory Stick Duo™ access indicator ( page 8) is lit, do
not eject the Memory Stick Duo™ media, turn off the system, or put the
system into sleep mode. Doing so may cause data loss or corruption.
A list of content that can be played is displayed.
To remove the Memory Stick Duo™
media, press the media once in the
direction of the arrow.
DE
IT
NL
PT
13
Page 14
Basic operations
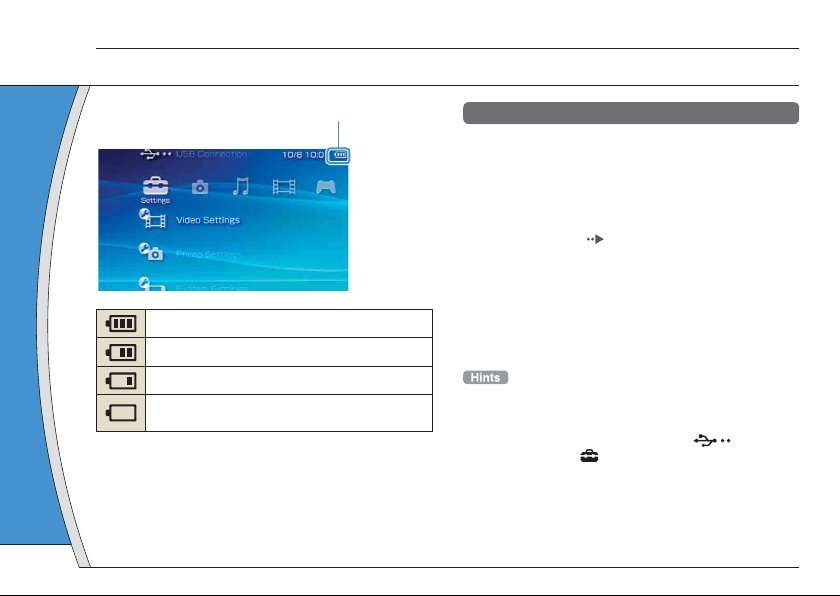
Checking the battery charge level
07
Battery charge level
There is plenty of power left.
The battery is getting low.
The battery has almost run out.
No battery power remains. The POWER indicator
fl ashes green. Recharge the battery.
Depending on the usage conditions and environmental
factors, the charge level display may vary from the actual
charge level.
14
Methods of charging the battery
You can use either of the following methods to charge
the battery.
• Using the AC adaptor
When you connect the AC adaptor to the PSP™ system and
insert the plug for the power cord into an electrical socket,
charging will begin (
• Using a USB cable (sold separately)
When you turn on the PSP™ system and then connect it to
a device (such as a PC) equipped with a USB connector,
the system will automatically switch to USB mode and the
system's battery will begin charging. The power indicator
lights up in orange while the battery is charging.
• When you connect a USB cable to the system during
certain situations, such as gameplay, the PSP™ system will
not switch to USB mode automatically.
• To switch to USB mode manually, select
Connection) under (Settings).
• You can connect a Mini-B (5-pin) type USB cable to the
USB connector of the PSP™ system.
page 6).
(USB
Page 15
Basic operations
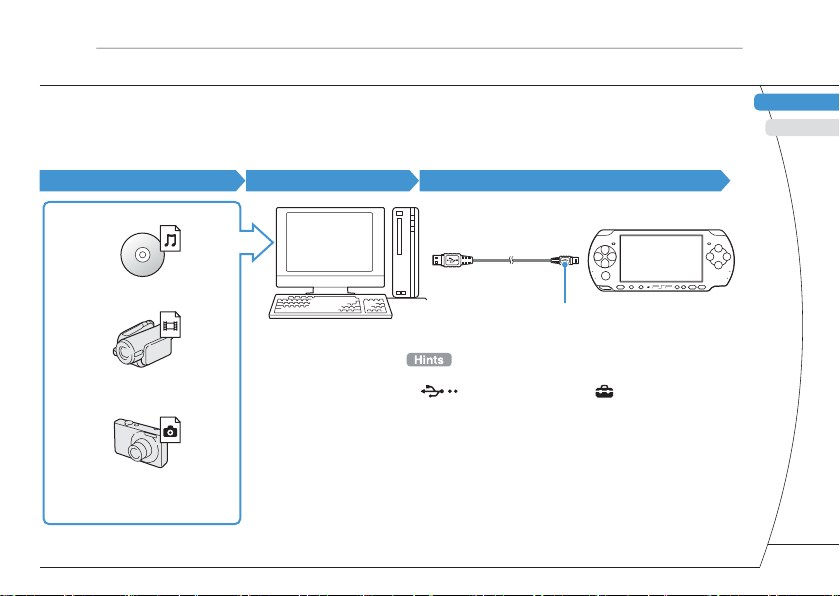
Copying music/videos/images
08
Copy music/video/image fi les to Memory Stick Duo™ media and play or view fi les on the PSP™ system.
Copy methods vary depending on the device and software in use as well as fi le type. The following instructions
are based on the most common copying methods.
GB
RU
Music/video/image source
Examples:
Audio CD
Video fi les
Digital still camera
To a PC
PC
To a PSP™ system
USB cable
Mini-B (5-pin) type
• To switch the PSP™ system to USB mode manually, select
(USB Connection) under (Settings).
• Instead of a USB cable, you can use a Memory Stick USB
reader/writer (not included) or a PC with a Memory Stick™
slot.
DE
IT
NL
PT
15
Page 16
Basic operations
Copying music/videos/images
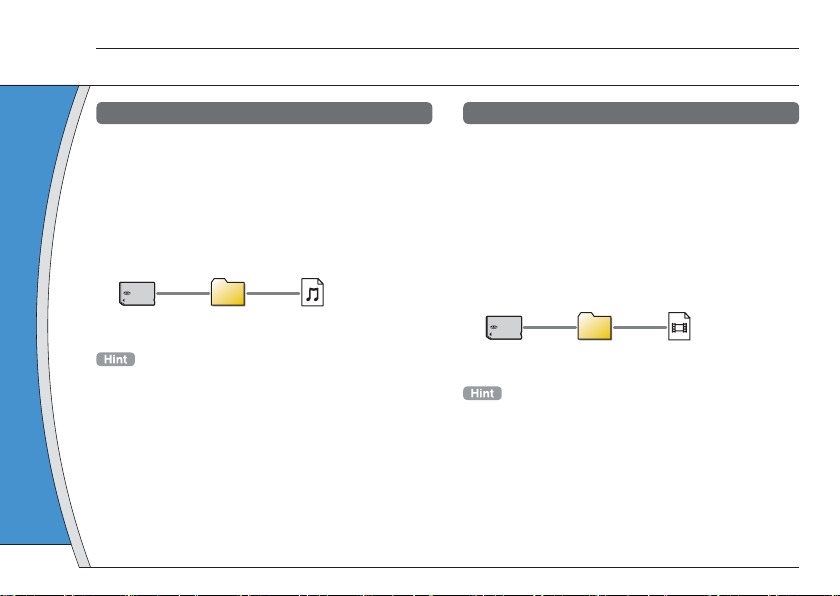
Copying music fi les
Example: Importing music tracks from an audio CD
1. Import
Use compatible software to import music tracks from an
audio CD to a PC.
2. Copy
Create a folder named "MUSIC" on Memory Stick Duo™
media using a PC, and then save music fi les in the folder.
MUSIC
You can play MP3, AAC and ATRAC format fi les.
16
Copying video fi les
Example: Downloading legally available video fi les
from the Internet
1. Download
Download video fi les to a PC.
2. Convert/Copy
Use compatible software to convert the video to a fi le
format that can be played on the PSP™ system. Then,
create a folder named "VIDEO" on the Memory Stick
Duo™ media and save the video fi les in the folder.
VIDEO
You can play some MP4 video fi les.
Page 17
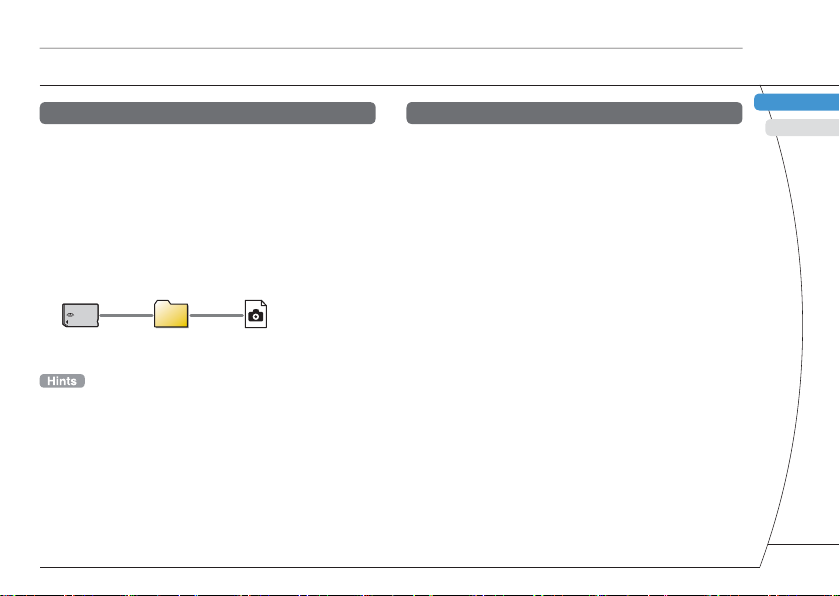
Copying image fi les
Example: Importing images from a digital still camera
1. Import
Import images to a PC.
Import methods vary depending on the device in use. For
details, refer to the instructions supplied with the device.
2. Copy
Create a folder named "PICTURE" on Memory Stick Duo™
media using a PC, and then save image fi les in the folder.
PICTURE
Basic operations
Copying music/videos/images
Conversion software
Media Manager* for PSP™(PlayStation®Portable) can
be used to convert music, video and image fi les to
the required format. When copying fi les to Memory
Stick Duo™ media, the necessary folders are created
automatically.
* Available separately
GB
RU
DE
• If using a digital still camera that supports Memory Stick
Duo™ media, you can view images by inserting the media
from the camera directly into the PSP™ system.
• You can view image fi les in formats such as JPEG (DCF 2.0/
Exif 2.21 compliant), TIFF and GIF.
IT
NL
PT
17
Page 18
Basic operations
Outputting video to a TV
09
You can output PSP™ system video to a TV using a video output cable (sold separately).
Selecting a video output cable
Select a video output cable suited for the TV in use.
Notice
The PSP™ system outputs in the NTSC video format. If a display is used which does not support the NTSC video format, no
picture will be displayed. Check with the TV manufacturer for details.
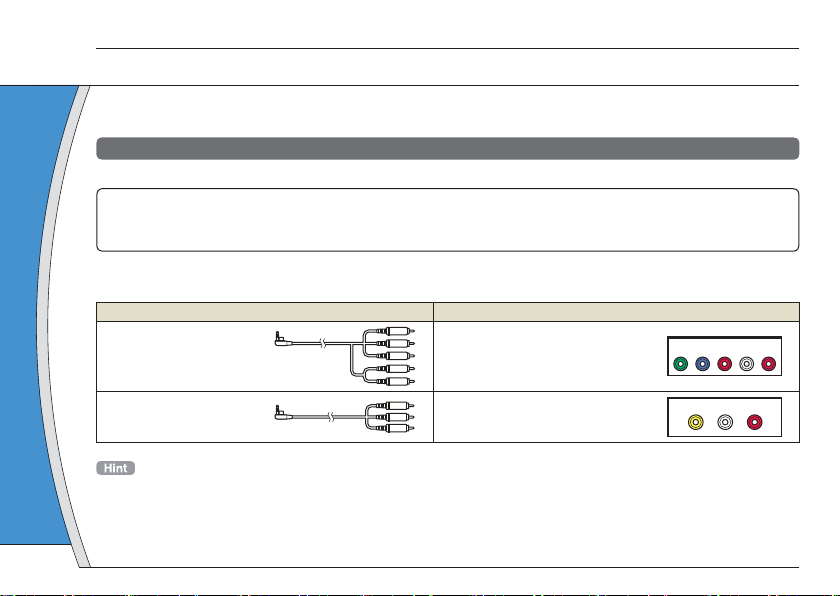
Video output cable types
Cable type Input connector on the TV
Component AV cable
Component VIDEO IN connectors
COMPONENT VIDEO IN AUDIO IN
YLRPR/CRPB/C
B
AV cable VIDEO IN connector (composite)
Image quality varies depending on the TV in use. Image quality may improve if you connect the PSP™ system to your TV using a
component AV cable instead of an AV cable.
18
VIDEO L-AUDIO-R
Page 19
Outputting to a TV
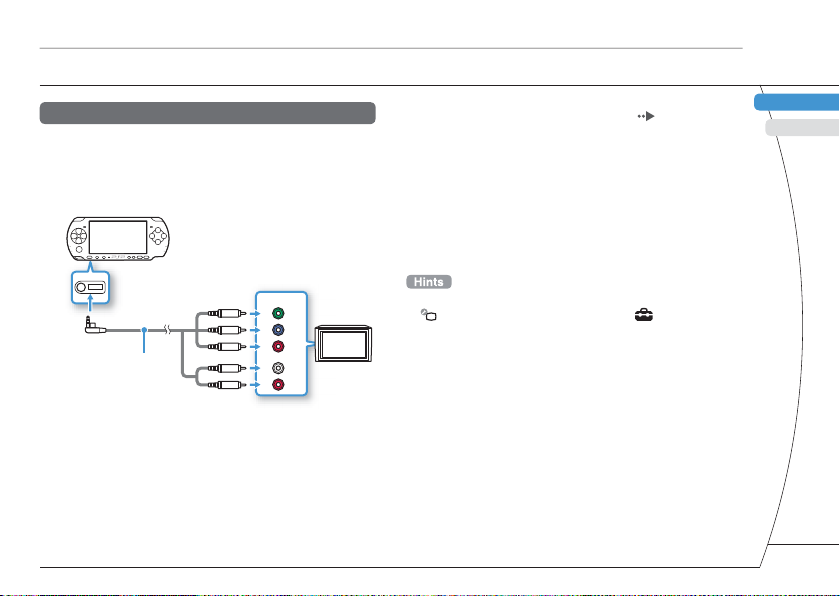
1 Connect the PSP™ system to the TV
using a video out cable (sold separately).
Example: Connecting the PSP™ system to a TV with
component video input connectors
Component VIDEO IN
connectors
COMPONENT
VIDEO IN
Y
B/CB
P
PR/C
R
Component AV cable
(sold separately)
AUDIO IN
L
R
TV
Basic operations
Outputting video to a TV
3 Turn on the PSP™ system ( page 10),
and then press and hold the display
button on the system front for at least 5
seconds.
Video from the PSP™ system will be displayed on the TV.
Clearing video output
To clear video output, press the display button again.
• You can change video output or adjust settings in
(Connected Display Settings) under (Settings).
• Because the size of the video image output to the TV for
games or Internet browser screens is predetermined,
horizontal or vertical black bars may be displayed at the
edges of the image.
GB
RU
DE
IT
2 Adjust the video input setting for the TV.
Set to the input connectors in use.
NL
PT
19
Page 20
Network
Adjusting network settings
10
Warning
Turn off the WLAN switch when in crowded places, such as
in a crowded train. If a person nearby is using a
pacemaker, it is possible that the radio waves could affect
the pacemaker.
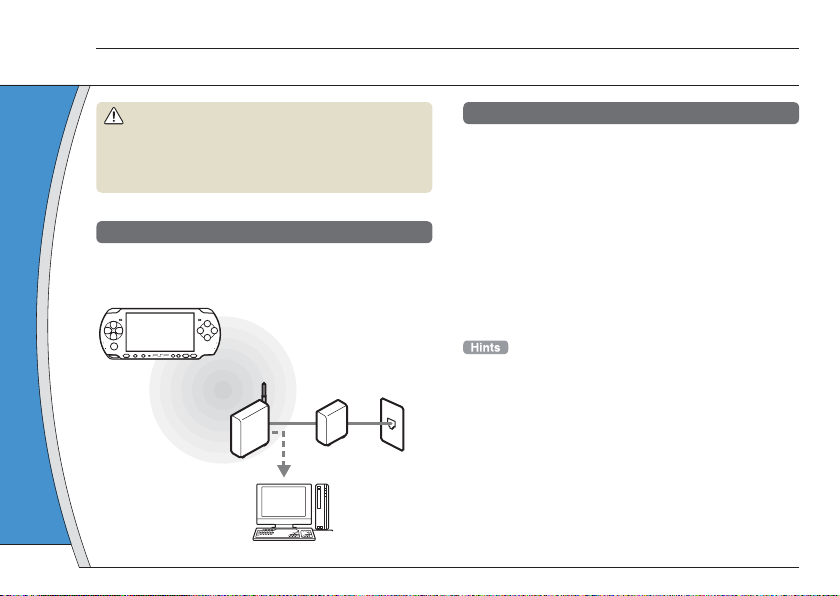
Example of a network confi guration
Network equipment connections and setup methods
vary depending on the equipment used.
Example of a common network confi guration
Access point or
wireless router
PC
20
ADSL or
cable modem
Internet line
Required items
The following items are generally required to set up
the system to connect to a network.
• Subscription to an Internet service provider
• A network device, such as a ADSL or cable
modem
• A WLAN access point or a wireless broadband
router
• Settings for the access point (SSID, WEP key, WPA
key, etc. as specifi ed when the access point was
confi gured)
• An access point is a device used to connect to a wireless
network.
• A wireless broadband router is a device that includes both
router and access point functions. A router is required if you
are connecting a PC and the PSP™ system to one Internet
line at the same time.
• SSID, WEP and WPA keys are types of wireless network
information. They may be required when connecting to an
access point or a router. This information is generally set in
the access point or router using a PC. For details, refer to
the instructions supplied with the access point or router.
Page 21

Creating a new network connection
You can adjust network settings to connect to an
access point and save the network connection data
on the system. Network settings may vary depending
on the equipment in use and the network
environment. The following instructions are based on
the most common network confi guration and may not
apply to all installations.
1 Select (Network Settings) under
(Settings) from the Home Menu, and
then press the button.
2 Select "Infrastructure Mode", and then
press the button.
3 Select "New Connection", and then press
the button.
Adjusting network settings
4 Select "Scan", and then press the
right button.
Network
GB
RU
DE
IT
NL
PT
21
Page 22

Network
Adjusting network settings
5 Select the access point that you want to
use, and then press the button.
An SSID is a code or a name that is assigned to the
access point. If you do not know which SSID to use or if
the SSID is not displayed, contact the person who set up
or maintains the access point.
6 Confi rm the SSID for the access point,
and then press the right button.
22
7 Select the security settings as
necessary, and then press the right
button.
Security settings vary depending on the access point in
use. To determine which settings to use, contact the
person who set up or maintains the access point.
8 Enter the encryption key, and then press
the right button.
The encryption key fi eld will display an asterisk (*) for
each character you enter. If you do not know the key,
contact the person who set up or maintains the access
point.
Page 23

9 Select "Easy" or "Custom" and adjust
settings as necessary.
Basic settings are set automatically.
Easy
You can manually enter detailed settings
information. For information on settings, refer
Custom
to the instructions supplied by the Internet
service provider or with the network device.
If you select “Custom”, follow the on-screen instructions
and adjust settings as necessary.
10 Check the connection name, and then
press the right button.
You can revise the connection name to use any name you
like.
Network
Adjusting network settings
11 Check the setting list.
The setting values you entered are displayed. Follow the
on-screen instructions to complete your network settings.
• If the connection test fails, follow the on-screen instructions
to check the settings. Network settings for the connection
can be changed from the options menu. For additional
information, refer to the instructions supplied with the access
point or router, or contact your Internet service provider.
• Depending on the access point in use, you may need the
MAC address for your system when connecting to a
network. You can fi nd the MAC address under (Settings)
(System Settings) "System Information".
• For additional information on network settings, refer to the
online user’s guide (
page 25).
GB
RU
DE
IT
NL
PT
23
Page 24

Network
Connecting to the Internet
11
Using the Internet browser
1 Check that you have access to a wireless
network.
2 Select (Internet Browser) under
(Network) from the Home Menu, and
then press the button.
The Internet browser starts.
3 Using the up button, select the address
bar, and then press the button.
The on-screen keyboard is displayed.
Address bar
24
Menu bar
4 Using the on-screen keyboard ( page
26), enter the address for the Web page.
After you have entered the address, the PSP™ system will
connect to the Internet. While the page is loading, the
busy icon is displayed in the lower right corner of the
screen.
When a connection is successfully established, the Web
page will be displayed.
Busy icon
Page 25

Basic operations of the Internet browser
button +
analog stick
button +
directional button
L button
button
* From the menu bar, you can access various features and
settings such as "Back" and "Close Page".
Scroll in any direction
Scroll by screen
Go back to the previous page
Toggle the menu bar* on and off
Network
Connecting to the Internet
Viewing the online user’s guide
You can use the Internet browser to view the online
user’s guide for the PSP™ (PlayStation
system.
Portable)
®
1 From the Home Menu, select (Online
Instruction Manuals) under (Network),
and then press the button.
The user’s guide page is displayed.
GB
RU
• If you try to open a Web page using the Internet browser
when a connection to the Internet has not been established,
the system will automatically try to connect to the Internet.
• With the default setting, the most recently used connection
will be automatically selected when connecting to the
Internet.
PSP™ system software user’s guide
access from :
The user’s guide can also be viewed using your PC’s Web
browser.
eu.playstation.com/manuals
DE
IT
NL
PT
25
Page 26

Keyboard
Using the on-screen keyboard
12
Cursor
Text entry fi eld
Function keys
Alphabet/symbol keys
26
(displays characters
as they are entered)
Input mode display
Text entry options
Control panel item list
Keyboard keys Function
Enters a space
When entering text in the Internet
browser address fi eld, previously
entered addresses are displayed.
Addresses are displayed only when
input mode is set to Web address
shortcuts.
Confi rms characters that have been
typed but not entered, and exits the
keyboard
Cancels characters that have been
typed but not entered, and exits the
keyboard
Moves the cursor
Deletes the character to the left of
the cursor
Displays a diagram showing the
system buttons and their usage
Switches between upper and lower
case
Enters a line break
Page 27

Switching input mode
The number of input modes available varies
depending on the language selected. Each time you
press the SELECT button, the input mode changes
among the options in the diagram below:
Input mode
display
The language for the on-screen keyboard is linked to the
System Language. You can set the system language by going
to (Settings) (System Settings) "System
Language".
Example: If "System Language" is set to "Français", you can
enter text in French.
Input mode
Letters and
numbers
Letters and
numbers (with
accented
letters)
Numbers only 1 2 3 4 5
Web address
shortcuts
Examples of characters you
can enter
a b c d e
é í ó ç ñ
.com .ne .html .gif
Keyboard
Using the on-screen keyboard
Entering characters
This section will demonstrate how to enter text using
the word "FUN" as an example.
1 Select "DEF3", and then press the
button several times until "F" is
displayed.
Each time you press the button, the character that is
entered in the text entry fi eld is switched.
2 Select "TUV8", and then press the
button several times until "U" is
displayed.
3 Select "MNO6", and then press the
button several times until "N" is
displayed.
4 Select "Enter", and then press the
button.
The characters you entered will be confi rmed. (You can
also press the PSP™ system's R button to confi rm a
character.) Select "Enter" again, and then press the
button to exit the keyboard.
If you select the a/A key while entering characters, you can
switch between upper and lower case.
GB
RU
DE
IT
NL
PT
27
Page 28

PSP™ system updates
Updating the system software
13
Software updates may include security patches, new
or revised settings and features, and other items,
which will change your current operating system. It is
recommended that you always maintain your system
to use the latest version of the system software.
Obtain update data.
Use the update data to overwrite the
existing system software.
Notice
During an update:
• Do not remove the UMD
• Do not turn off the system.
• Do not disconnect the AC Adaptor.
If an update is cancelled before completion, the system
software may become damaged, and the system may
require servicing or exchange.
28
®
.
The system software is
updated.
• For the latest information on updates, visit
eu.playstation.com/psp
• Depending on the software title, you may not be able to
play without fi rst updating the PSP™ system software.
• After you have updated the system software, you cannot go
back to an earlier version.
• Before starting, check that the battery is charged. You may
not be able to start an update if the battery charge level is
low.
Checking the system software version
You can check system software version information
by selecting
"System Information". The current version is
displayed in the "System Software" fi eld.
(Settings) (System Settings)
Page 29

Update methods
You can perform an update in any of the following
ways.
With an Internet connection
Network Update
Update using the PSP™ system’s wireless LAN
feature.
By selecting
(Settings), you can connect to the Internet and
update your system to the latest system software.
(Network Update) under
Update using a PC
Update using a PC to download update data from the
Internet. For detailed instructions, visit
eu.playstation.com/psp
PSP™ system updates
Updating the system software
Without an Internet connection
Update using a UMD
You can update using a UMD® that contains update
data.
®
1 Connect the AC Adaptor to the PSP™
system.
2 Insert a UMD
The update data icon and version number are displayed
under
that contains update data.
®
(Game) in the Home Menu.
3 Select (PSP™ Update), and then press
the button.
The update begins. Follow the on-screen instructions to
complete the update.
GB
RU
DE
IT
NL
PT
29
Page 30

Security settings
Setting the parental control level
14
The PSP™ system includes a parental control feature.
You can use this feature to set a password and limit
the playback of content restricted by a parental
control level (games, videos and other content). By
setting the parental control level on the system, you
can prevent the playback of restricted content by
children.
About parental control levels
Parental control levels on the PSP™ system
The parental control level of the system can be either
turned off or set to one of 11 different levels.
Turns off parental control
Off
Sets the level of content to be restricted. A setting
of "1" is the most restrictive; "11" is the least
11-1
restrictive.
The default setting for the menu item is "9".
The combination of the parental control levels of both
the PSP™ system and the content determine whether
the content can be viewed.
Example: If the parental control level of the system is
set to "7", content with a level from "1" to "7" can be
played on the system.
30
For further information about Parental Control Levels
and corresponding age groups, visit
http://manuals.playstation.net/document/ or refer to
PSP™ format software manual.
Page 31

Setting the parental control level
1 Select "Parental Control Level" from
(Security Settings) under
(Settings) in the Home Menu, and
then press the
The password entry screen is displayed.
button.
2 Using the directional buttons, enter the
4-digit password, and then press the
button.
When entering a password for the fi rst time after
purchase, enter "0000".
3 Select a level, and then press the
button.
The parental control level is set.
To change the password, select "Change Password" under
(Settings) (Security Settings).
Security settings
Setting the parental control level
GB
RU
DE
IT
NL
PT
31
Page 32

Введение
Использование "XMB" (XrossMediaBar)
ИГРА
Игры
ВИДЕО
Воспроизведение
видео
МУЗЫКА
Воспроизведение
музыки
ФОТО
Отображение
изображений
СЕТЬ
Подключение к
Интернету
НАСТРОЙКИ
Настройка системы
PSP™
Значки, отображаемые в главном меню, могут различаться в
зависимости от версии системного программного обеспечения.
32
Система PSP™ имеет пользовательский интерфейс, который
называется "XMB" (XrossMediaBar). Основной экран для "XMB"
называется "Главное меню".
Категория
Элемент
Главное меню
Выберите категорию с помощью
1
кнопки влево или вправо.
Выберите элемент с помощью
2
кнопки вверх или вниз.
Нажмите кнопку для
3
подтверждения выбора.
Page 33

В этом документе описаны основные операции системы PSP™. Для получения более подробных инструкций см.
электронное руководство пользователя (
Кнопки
направлений:
используются для
выбора категорий/
элементов
стр. 55).
Кнопка :
отмена выбранных
операций
Кнопка PS:
возврат к главному меню/
прекращение игры
VOL
SELECT STAR T
Кнопка :
подтверждение выбора
Кнопка . Отображение меню параметров/панели управления
Выберите пиктограмму, а затем нажмите
кнопку для отображения меню параметров.
Пиктограммы Меню параметров
При воспроизведении файла нажмите кнопку
для отображения панели управления.
Панель управления
GB
RU
DE
IT
NL
PT
33
Page 34

Подготовка
Проверка содержимого упаковки
01
Проверьте наличие следующих предметов.
Если что-либо отсутствует, обратитесь в соответствующую службу технической поддержки PSP™, адрес
которой можно найти в каждом руководстве к программному обеспечению формата PSP™.
R
E
OW
P
D
L
O
H
T
R
A
T
S
T
C
E
L
E
S
L
O
V
Адаптер
Система PSP™ (PlayStation®Portable)
Печатные материалы
Аккумулятор
34
переменного тока
Page 35

Сведения о документации системы PSP™
В документацию системы PSP™ входит
следующее:
• Безопасность и поддержка
Перед использованием продукта сначала внимательно
прочтите этот документ. В нем содержится информация
по технике безопасности, связанная с использованием
системы PSP™, по поиску и устранению
неисправностей, технические характеристики и другие
сведения.
Подготовка
Проверка содержимого упаковки
GB
RU
• Краткий справочник (этот документ)
Этот документ содержит информацию об основных
операциях системы PSP™.
• Руководство пользователя
(адрес: eu.playstation.com/manuals)
Доступ к этому электронному документу можно
получить через Интернет. Он содержит подробную
информацию по использованию системного ПО PSP™
стр. 55).
(
DE
IT
NL
PT
35
Page 36

Подготовка
Подготовка системы PSP™ к работе
02
Зарядка батареи
Перед первым включением системы PSP™ после
покупки необходимо выполнить следующие
операции для зарядки батареи:
Внимание
• Электрическая розетка должна быть расположена
рядом с оборудованием в легкодоступном месте.
• Не подключайте адаптер переменного тока системы
PSP™ к электрической розетке, пока все не будет
подключено.
1 Откройте крышку батарейного отсека.
Передвиньте крышку батарейного отсека в
направлении стрелки, нажав и удерживая защелку
фиксатора.
Защелка
фиксатора
1
36
2
2 Установите аккумулятор.
Выровняйте нижнюю поверхность аккумулятора с
системой, чтобы закрепить аккумулятор.
2
1
Выровняйте зажимы крышки батарейного отсека с
системой и защелкните крышку.
3
4
Page 37

3
Для зарядки аккумулятора
подключите адаптер переменного тока.
Подготовка
Подготовка системы PSP™ к работе
Начальная настройка
1 Сдвиньте переключатель POWER/
HOLD вверх.
GB
RU
VOL
SELECT START
Индикатор
POWER
1
К электрической
розетке
Индикатор POWER загорится оранжевым цветом, когда
начнется зарядка. Индикатор POWER отключится, когда
батарея полностью зарядится.
2
P
O
W
E
S
EL
EC
T
S
T
A
R
T
Индикатор POWER загорится зеленым цветом.
Появится экран начальной настройки.
R
HOL
D
Переключатель
POWER/HOLD
2 Следуйте инструкциям на экране для
установки первоначальных
параметров.
По окончании начальной настройки отобразится
страница главного меню (
Подсказки
• Инструкции по вводу символов приведены в разделе
"Использование экранной клавиатуры" ( стр. 56).
• Параметры, введенные при начальной настройке,
можно изменить в разделе (Настройки). Подробнее
см. в руководстве пользователя (
стр. 32).
стр. 55).
DE
IT
NL
PT
37
Page 38

Подготовка
Названия и функции основных частей
03
Система
Переключатель WLAN
(вверху)
Выкл.
Левый динамик
Кнопки направлений
Индикатор Memory
Загорается при использовании
38
Индикатор WLAN
беспроводной связи
Мини-джойстик
Крепление для ремешка
Вкл.
WL
A
N
Кнопка L
Stick Duo™
( стр. 43)
VOL
Кнопка
увеличения
громкости
Кнопка
уменьшения
громкости
Кнопка PS*
* Кнопка PS на этой системе PSP™ выполняет те же
функции, что и кнопка HOME на системах серий
PSP-1000 и PSP-2000.
ЖК-экран
SELECT STAR T
Микрофон
( стр. 42)
Кнопка ЭКРАН
( стр. 39)
Кнопка START
Кнопка SELECT
Кнопка ЗВУК
( стр. 39)
Кнопка R
Правый динамик
Кнопка
кнопка , кнопка
Индикатор POWER
( стр. 40)
Переключатель
POWER/HOLD
(справа) ( стр. 40)
Индикатор HOLD
( стр. 40)
, кнопка
Page 39

Использование кнопки ЗВУК
Краткое
нажатие
Удерживание в
течение более
1 секунды
*1
Стиль звучания можно изменять только при
использовании наушников. В режиме игры для функции
настройки звука установлено значение "OFF".
*2 Чтобы включить звук после отключения, снова
нажмите кнопку ЗВУК.
При каждом нажатии данной кнопки
стиль звучания меняется следующим
образом: HEAVY
UNIQUE
Звук отключается. *2
OFF. *1
POPS JAZZ
Использование кнопки ЭКРАН
Краткое
нажатие
Удерживание в
течение более
1 секунды
Удержание в
течение более
5 секунд
*1 Самый высокий уровень (уровень 4) можно выбрать
только при работе системы PSP™ с подсоединенным
адаптером переменного тока.
При каждом нажатии данной кнопки
меняется уровень яркости экрана (три
уровня). *1
Подсветка отключается, и экран
становится пустым. *2
Система переключается в режим
видеовыхода (
стр. 48).
Подготовка
Названия и функции основных частей
*2 Чтобы включить подсветку, нажмите любую кнопку
системы PSP™.
Подключение гарнитуры
Предусмотрена возможность подключения пульта
дистанционного управления (продается отдельно)
к разъему наушников. К пульту дистанционного
управления также можно подключить гарнитуру
(продается отдельно).
VOL
2
Гарнитура Пульт ДУ
1
Подсказка
Наушники с пультом ДУ серии PSP-1000 не подходят для
использования.
GB
RU
DE
IT
NL
PT
39
Page 40

Основные операции
Функции режима работы и энергосбережения
04
Переключатель POWER/HOLD используется для
включения и выключения системы, а также для
включения режима энергосбережения.
P
O
WE
S
E
L
E
C
T
STAR
T
R
HOL
D
Переключатель POWER/HOLD
Индикатор POWER
Индикатор HOLD
40
Переключатель POWER/HOLD
Включение системы/
включение режима
A
энергосбережения
Выключение системы
B
Блокировка кнопок
C
системы*
* Все кнопки системы заблокированы, выполнение
связанных с ними операций невозможно.
A
B
C
Индикатор POWER
Непрерывный
зеленый
Непрерывный
оранжевый
Мигающий зеленый
Выкл.
Сдвиньте вверх
Сдвиньте вверх и
удерживайте более трех
секунд
Сдвиньте вниз
Питание включено
Зарядка
Низкий уровень заряда
батареи
Питание отключено/
режим энергосбережения
Индикатор HOLD
Непрерывный
желтый
Режим энергосбережения
Page 41

Режим энергосбережения
Если система PSP™ переведена в режим
энергосбережения, выполнение текущей
программы будет приостановлено. После выхода
из режима энергосбережения можно продолжить
работу с того момента, когда система была
переведена в режим энергосбережения.
Подсказки
• Чтобы выйти из режима ожидания, снова сдвиньте
переключатель POWER/HOLD вверх. Во время
воспроизведения видео или звука для выхода из
режима ожидания можно нажать кнопку на пульте
ДУ.
• При работе отдельных программ переход системы в
режим ожидания невозможен.
Основные операции
Функции режима работы и энергосбережения
GB
RU
DE
IT
NL
PT
41
Page 42

Основные операции
Воспроизведение файлов с диска UMD
05
3
1
2 Вставьте UMD
42
Поместите палец в паз на верхней части
системы, чтобы открыть крышку лотка
для дисков.
и закройте крышку
®
лотка для дисков.
Убедитесь, что крышка лотка для дисков надежно
закрыта. В главном меню отобразится
соответствующая пиктограмма.
Не касайтесь записываемой поверхности.
W
LA
N
2
1
Выберите пиктограмму и нажмите
кнопку .
Начнется воспроизведение.
Подсказки
• Чтобы выйти из игры, нажмите кнопку PS.
• Для того чтобы извлечь UMD
воспроизведение и откройте крышку лотка для дисков.
Использование микрофона
Микрофон системы PSP™ ( стр. 38) можно
использовать в некоторых играх и для звонков с
помощью программы Go!Messenger. Более
подробная информация находится в
документации к игре и на веб-сайте
gomessenger.bt.com.
®
®
, остановите
Page 43

Основные операции
Воспроизведение файлов с карты Memory Stick Duo
06
3
Предупреждение
Храните карту Memory Stick Duo™ в недоступном для маленьких
детей месте, поскольку ребенок может случайно проглотить ее.
Выберите пиктограмму и нажмите
кнопку .
1 Откройте крышку гнезда.
2
Нажмите на карту Memory Stick Duo™ так,
чтобы она полностью вошла в гнездо.
В главном меню отобразится соответствующая пиктограмма.
Крышка гнезда
™
GB
RU
Подсказка
Чтобы извлечь карту Memory Stick
Duo™, нажмите на нее один раз в
Лицевая сторона
Примечание
Если индикатор Memory Stick Duo™ ( стр. 38) горит, не извлекайте
карту, выключите систему или переключите в режим
энергосбережения. Иначе это может привести к потере или
повреждению данных.
направлении стрелки.
Отображается список элементов содержимого,
которые могут быть воспроизведены.
DE
IT
NL
PT
43
Page 44

Основные операции
Проверка уровня заряда батареи
07
Уровень заряда батареи
Высокий уровень заряда батареи.
Уровень заряда батареи снижается.
Заряд батареи заканчивается.
Батарея разряжена. Индикатор POWER мигает
зеленым. Необходимо зарядить батарею.
Отображаемый уровень заряда батареи может отличаться
от реального уровня заряда. Это зависит от условий
использования и факторов окружающей среды.
44
Способы зарядки батарейного блока
Можно использовать любой из приведенных ниже
способов зарядки аккумулятора.
• С использованием адаптера переменного
тока
Когда адаптер переменного тока подключается к
системе PSP™ и штекер шнура питания вставляется в
электрический разъем, начинается зарядка
(
стр. 36).
• С использованием кабеля USB
(приобретается отдельно)
При включении системы PSP™ и подключении ее к
устройству, оснащенному разъемом USB (например, к
компьютеру), система автоматически перейдет в режим
USB, и начнется зарядка батареи. Индикатор питания
при этом загорится оранжевым цветом.
Подсказки
• При подключении кабеля USB к системе в некоторых
случаях – например, во время игры – система PSP™ не
перейдет в режим USB автоматически.
• Для перехода в режим USB выберите
(Соединение USB) в меню (Настройки).
• Можно подключить кабель USB типа Mini-B
(5 контактов) к разъему USB системы PSP™.
Page 45

Основные операции
Копирование музыки/видео/изображений
08
Музыкальные файлы, видеофайлы и файлы изображений можно копировать на карту Memory Stick Duo™
и воспроизводить на системе PSP™.
Способы копирования зависят от используемого устройства и программного обеспечения, а также от
типа файлов. Приведенные ниже инструкции относятся к традиционным способам копирования.
GB
RU
Источник музыки/видео/изображения
Примеры.
Музыкальный компакт-диск
Видеофайлы
Цифровой фотоаппарат
К ПК
ПК
К системе PSP™
Кабель USB
Тип мини-B (5-контактный)
Подсказки
• Для переключения системы PSP™ в режим USB
выберите (Соединение USB) в меню
(Настройки).
• Вместо кабеля USB можно использовать считывающее/
записывающее USB-устройство для карт Memory Stick™
(не входит в комплект поставки) или компьютер с
гнездом для карты Memory Stick™.
DE
IT
NL
PT
45
Page 46

Основные операции
Копирование музыки/видео/изображений
Копирование музыкальных файлов
Пример. Загрузка композиций с музыкального
компакт-диска
1. Загрузка
Используйте совместимую программу для импорта
дорожек с музыкального компакт-диска на компьютер.
2. Копирование
С помощью компьютера создайте папку с именем
"MUSIC" на карте Memory Stick Duo™ и сохраните
музыкальные файлы в этой папке.
MUSIC
Подсказка
Поддерживаются форматы файлов: MP3, AAC и ATRAC.
46
Копирование видеофайлов
Пример: Загрузка доступных видеофайлов из
Интернета
1. Загрузка
Загрузка видеофайлов на компьютер.
2. Преобразование/копирование
Используйте совместимое программное обеспечение
для преобразования видео в файловый формат,
поддерживаемый системой PSP™. Затем создайте
папку с именем "VIDEO" на карте Memory Stick Duo™ и
сохраните видеофайлы в этой папке.
VIDEO
Подсказка
Поддерживаются некоторые форматы видеофайлов MP4.
Page 47

Копирование файлов изображений
Пример. Загрузка изображений с цифрового
фотоаппарата
1. Загрузка
Загрузка изображений на компьютер.
Способы загрузки зависят от используемого
устройства. Для получения подробной информации см.
инструкции, прилагаемые к устройству.
2. Копирование
С помощью компьютера создайте папку с именем
"PICTURE" на карте Memory Stick Duo™ и сохраните
файлы изображений в этой папке.
Основные операции
Копирование музыки/видео/изображений
Программное обеспечение для
преобразования
Media Manager (Диспетчер медиа)* для PSP™
(PlayStation
преобразования файлов музыки, видео и
изображений в файлы требуемого формата. При
копировании файлов на носитель Memory Stick
Duo™ необходимые папки создаются
автоматически.
* Поставляется отдельно.
Portable) используется для
®
GB
RU
DE
Подсказки
• При использовании цифрового фотоаппарата с
поддержкой карт Memory Stick Duo™ можно
просматривать изображения, вставив карту
фотоаппарата непосредственно в систему PSP™.
• Поддерживается просмотр файлов изображений в
формате JPEG (совместимый с DCF 2.0/Exif 2.21), TIFF и
GIF.
PICTURE
IT
NL
PT
47
Page 48

Основные операции
Передача видео на телевизор
09
Предусмотрена возможность передачи видео из системы PSP™ на телевизор при помощи кабеля
видеовыхода (продается отдельно).
Выбор типа кабеля видеовыхода
Выберите кабель видеовыхода, подходящий к используемому телевизору.
Уведомление
Система PSP™ передает выходной видеосигнал в видеоформате NTSC. Если используемый телевизор не
поддерживает видеоформат NTSC, отображение видео отсутствует. Проверьте сведения производителя телевизора.
Типы выходных кабелей видео
Тип кабеля Входной разъем на телевизоре
Компонентный кабель AV
Компонентные разъемы VIDEO IN
COMPONENT VIDEO IN AUDIO IN
YLRPR/CRPB/C
B
Кабель AV Компонентные разъемы VIDEO IN
Подсказка
Качество изображения зависит от характеристик используемого телевизора. При подключении системы PSP™ к
телевизору с помощью компонентного кабеля AV, а не обычного кабеля AV, качество изображения будет выше.
48
VIDEO L-AUDIO-R
Page 49

Передача видео на телевизор
1
Подключите систему PSP™ к телевизору
при помощи кабеля видеовыхода
(приобретается отдельно).
Пример. Подключение системы PSP™ к телевизору
при помощи компонентных разъемов видеовыхода.
Компонентные
разъемы VIDEO IN
COMPONENT
VIDEO IN
Y
B/CB
P
PR/C
R
Компонентный
кабель AV
(приобретается
отдельно)
AUDIO IN
L
Телевизор
R
2 Настройка входного видеосигнала
для телевизора.
Настройка в соответствии с используемыми входными
разъемами.
Основные операции
Передача видео на телевизор
3 Включите систему PSP
затем нажмите и удерживайте кнопку
ЭКРАН на передней панели системы
не менее 5 сек.
Видео из системы PSP™ будет отображаться на
телевизоре.
Очистка видеовыхода
Для очистки видеовыхода повторно нажмите
кнопку ЭКРАН.
Подсказки
• Можно изменить видеовыход или выполнить настройку
в пункте (Настройки подсоединенного экрана) в
меню (Настройки).
• Поскольку размер выводимого на экран телевизора
изображения для игр и веб-браузера предустановлен, у
краев изображения могут отображаться вертикальные
или горизонтальные черные полосы.
™
( стр. 40),
GB
RU
DE
IT
NL
PT
49
Page 50

Сеть
Настройка сетевой конфигурации
10
Предупреждение
Выключайте переключатель WLAN в местах скопления
людей, например, в поезде. Если рядом находится
человек, использующий кардиостимулятор, возможно,
радиоволны вызовут помехи в работе прибора.
Пример сетевой конфигурации
Соединения сетевого оборудования и методы
настройки зависят от используемого
оборудования.
Пример общей сетевой конфигурации
Точка доступа или
беспроводной
маршрутизатор
ПК
50
ADSL или
кабельный модем
Линия
Интернета
Необходимые элементы
Для подключения системы к сети обычно
необходимо следующее:
• Договор на подключение к сети Интернет
• Устройство для работы в сети, например,
модем ADSL или кабельный
• Точка доступа к сети WLAN или беспроводной
широкополосный маршрутизатор
• Параметры настройки точки доступа (SSID,
WEP-ключ, WPA-ключ и т.п., как задано при
конфигурировании точки доступа)
Подсказки
• Точка доступа – это устройство, используемое для
подключения к беспроводной сети.
• Беспроводной широкополосный маршрутизатор – это
устройство, выполняющее функцию как
маршрутизатора, так и точки доступа. Маршрутизатор
необходим для одновременного подключения
компьютера и системы PSP™ к одной линии Интернета.
• Ключи SSID, WEP и WPA ключи являются типовой
информацией о сети. Они могут потребоваться при
подключении к точке доступа или маршрутизатору.
Данная информация задается на точке доступа или
маршрутизаторе с помощью компьютера. Для получения
дополнительной информации см. инструкции,
прилагаемые к точке доступа или маршрутизатору.
Page 51

Создание нового сетевого соединения
Можно настроить сетевую конфигурацию для
использования при подключении к Интернету
через точку доступа и сохранить ее в системе.
Параметры настройки сети могут различаться в
зависимости от используемого оборудования и
сетевого окружения. Приведенные ниже
инструкции относятся только к традиционным
видам сетевой конфигурации и могут оказаться
неприменимы в отдельных случаях.
Сеть
Настройка сетевой конфигурации
4 Выберите "Сканирование" и нажмите
кнопку направления вправо.
GB
RU
1 Выберите пиктограмму (Настройки
сети) в разделе (Настройки)
главного меню и нажмите кнопку .
2 Выберите "Режим инфраструктуры" и
нажмите кнопку .
3 Выберите "Новое соединение" и
нажмите кнопку .
DE
IT
NL
PT
51
Page 52

Сеть
Настройка сетевой конфигурации
5 Выберите точку доступа, которую
необходимо использовать, и нажмите
кнопку .
Идентификатор SSID – это код или имя, назначенное
для точки доступа. Если идентификатор SSID
неизвестен или не отображается, обратитесь к
специалисту, который устанавливал или обслуживает
данную точку доступа.
6 Подтвердите идентификатор SSID для
точки доступа и нажмите кнопку
направления вправо.
52
7 Выберите необходимые настройки
безопасности и нажмите кнопку
направления вправо.
Настройки безопасности различаются в зависимости
от используемой точки доступа. Для получения
информации о необходимых настройках безопасности
обратитесь к специалисту, который устанавливал или
обслуживает данную точку доступа.
8 Введите код доступа и нажмите
кнопку направления вправо.
Вместо каждого введенного символа в поле ввода
ключа будет отображаться звездочка (*). Если код
доступа неизвестен, обратитесь к специалисту,
который устанавливал или обслуживает данную точку
доступа.
Page 53

9 Выберите "Простой" или
"Специальный" и выполните
необходимые настройки.
Простой
Специальный
Если выбран пункт "Специальный", выполните
необходимые настройки, следуя инструкциям на экране.
Базовые настройки будут
установлены автоматически.
Информацию о настройках можно
ввести вручную. Для получения
информации о настройках см.
инструкции, предоставленные
поставщиком услуг Интернета, или
инструкции, прилагаемые к сетевому
устройству.
Сеть
Настройка сетевой конфигурации
10 Проверьте название соединения и
нажмите кнопку направления вправо.
Соединению можно присвоить любое имя.
11 Проверьте список настроек.
На экране отображаются введенные пользователем
значения параметров настройки. Для настройки
сетевой конфигурации следуйте инструкциям на
экране.
Подсказки
• В случае сбоя соединения следуйте инструкциям на
экране, чтобы проверить настройки. Настройки сетевой
конфигурации для соединения можно изменить в меню
параметров. Для получения дополнительной
информации см. инструкции, прилагаемые к точке
доступа или маршрутизатору, или обратитесь к
поставщику услуг Интернета.
• В зависимости от используемой точки доступа при
подключении к сети может потребоваться ввести MACадрес системы. MAC-адрес можно найти в разделе
(Настройки) (Настройки системы)
"Сведения о системе".
• Для получения дополнительной информации о
настройках сети см. интерактивное руководство
пользователя (
стр. 55).
GB
RU
DE
IT
NL
PT
53
Page 54

Сеть
Подключение к Интернету
11
Использование веб-браузера
1 Проверьте наличие доступа к
беспроводной сети.
2 Выберите пиктограмму (Веб-
браузер) в разделе
меню и нажмите кнопку .
Запустится веб-браузер.
3 С помощью кнопки направления
вверх выберите адресную строку и
нажмите кнопку .
Отобразится экранная клавиатура.
54
(Сеть) главного
Адресная строка
Строка меню
4 Используя экранную клавиатуру (
стр. 56), введите адрес веб-страницы.
После ввода адреса система PSP™ подключится к
Интернету. Во время загрузки страницы в правом
нижнем углу будет отображаться пиктограмма
активности. Когда соединение будет установлено,
отобразится веб-страница.
Пиктограмма активности
Page 55

Основные операции веб-браузера
Кнопка +
миниджойстик
Кнопка
кнопка со
стрелкой
Кнопка L
Кнопка
* Строка меню обеспечивает доступ к различным
функциям и настройкам, например, "Назад" и "Закрыть
страницу".
Подсказки
• Если подключение к Интернету не установлено, то при
попытке открытия веб-страницы с помощью веббраузера система будет автоматически пытаться
подключиться к Интернету.
• При этом по умолчанию будет использовано соединение,
которое было выбрано в последний раз.
Прокрутка в любом направлении
+
Прокрутка по экрану
Возврат к предыдущей странице
Включение и выключение строки
меню*
Сеть
Подключение к Интернету
Просмотр интерактивного руководства пользователя
С помощью веб-браузера можно просмотреть
интерактивное руководство пользователя для
системы PSP™ (PlayStation
1
В главном меню выберите (Сетевое
руководство пользователя) в разделе
(Сеть) и нажмите кнопку .
Откроется страница руководства пользователя.
Руководство пользователя системного ПО PSP™.
адрес: eu.playstation.com/manuals
Также предусмотрена возможность просмотра
интерактивного руководства пользователя в веббраузере на ПК.
Portable).
®
GB
RU
DE
IT
NL
PT
55
Page 56

Клавиатура
Использование экранной клавиатуры
12
Курсор
Функциональные
клавиши
Клавиши алфавита/
символов
56
Поле для ввода текста
(отображение символов
по мере их ввода)
Отображение
режима ввода
Параметры
ввода текста
Список элементов панели управления
Клавиши клавиатуры
Функция
Пробел
При вводе текста в адресной
строке веб-браузера отображается
последний введенный адрес.
Адреса отображаются, только
если для режима ввода
установлено значение
гиперссылки веб-адресов.
Подтверждение введенных
символов и выход из режима
клавиатуры
Отмена ввода символов и выход
из режима клавиатуры
Перемещение курсора
Удаление символов слева от
курсора
Отображение диаграммы, в
которой приведены кнопки
системы и их описание
Переключение между верхним и
нижним регистром
Разрыв строки
Page 57

Переключение режима ввода
Количество режимов ввода зависит от выбранного
языка. При каждом нажатии кнопки SELECT
выполняется переключение между режимами
ввода, приведенными в следующей диаграмме.
Отображение
режима
ввода
Подсказка
Язык экранной клавиатуры определяется параметром
"Язык системы". Язык системы устанавливается из меню
(Настройки) (Настройки системы) "Язык
системы".
Пример. Если для параметра "Язык системы" установлено
значение "Français", можно вводить текст на французском
языке.
Режим
ввода
Буквы и
цифры
Буквы и
цифры
(буквы со
знаком
ударения)
Только цифры 1 2 3 4 5
Гиперссылки
веб-адресов
Примеры символов,
которые можно
вводить
a b c d e
é í ó ç ñ
.com .ne .html .gif
Клавиатура
Использование экранной клавиатуры
Ввод символов
В данном разделе демонстрируется ввод текста
на примере слова "FUN".
1 Выберите "DEF3" и нажмите кнопку
несколько раз, пока на экране не
появится буква "F".
При каждом нажатии кнопки символ в поле ввода
текста меняется.
2 Выберите "TUV8" и нажмите кнопку
несколько раз, пока на экране не
появится буква "U".
3 Выберите "MNO6" и нажмите кнопку
несколько раз, пока на экране не
появится буква "N".
4
Выберите "Ввод" и нажмите кнопку .
Введенные символы будут подтверждены (для
подтверждения ввода символа можно также нажать
кнопку R на системе PSP™). Снова выберите "Ввод" и
нажмите кнопку
клавиатуры.
Подсказка
Для переключения между верхним и нижним регистром
при вводе символов используйте клавишу a/A.
, чтобы выйти из режима
GB
RU
DE
IT
NL
PT
57
Page 58

Обновление системы PSP™
Обновление системного ПО
13
Обновления программного обеспечения могут
содержать пакеты исправлений системы
безопасности, новые или исправленные настройки и
функции, а также другие элементы, которые изменят
текущую операционную систему. Рекомендуется
использовать для системы самую последнюю версию
системного ПО.
Получите данные для обновления.
Используйте данные для
обновления, чтобы заменить
существующее системное ПО.
Примечание
В процессе обновления:
• Не извлекайте диск UMD
• Не выключайте систему.
• Не отключайте адаптер переменного тока.
Если отменить обновление до его завершения, это
может привести к повреждению системного ПО, а
также к необходимости ремонта или замены системы.
58
®
.
Системное ПО будет
обновлено.
Подсказки
• Для получения информации о последних обновлениях
посетите веб-узел по адресу eu.playstation.com/psp
• Возможно, систему PSP™ нельзя будет использовать
без предварительного обновления программного
обеспечения. Это зависит от названия программного
обеспечения.
• После обновления ПО нельзя вернуться к его
предыдущей версии.
• Перед началом обновления проверьте заряд батареи.
Если уровень заряда батареи слишком мал, невозможно
будет выполнить обновление.
Проверка версии системного ПО
Можно проверить информацию о версии
системного ПО, выбрав
(Настройки системы) "Сведения о системе".
Текущая версия отображается в поле "Системное
ПО".
(Настройки)
Page 59

Способы обновления
Обновление можно выполнить одним из
следующих способов.
Через Интернет
Сетевое обновление
Обновление с помощью функции беспроводной
связи системы PSP™.
Выбрав
и получить последнее обновление ПО системы.
(Сетевое обновление) в разделе
(Настройки), можно подключиться к Интернету
Обновление с помощью компьютера
Использование компьютера для загрузки
последнего обновления из Интернета. Для
получения подробных инструкций посетите вебузел по адресу eu.playstation.com/psp
Обновление системы PSP™
Обновление системного ПО
Без использования Интернета
Обновление с помощью диска UMD
Можно выполнить обновление с помощью диска
, содержащего данные для обновления.
UMD
®
®
1 Подключите адаптер переменного
тока к системе PSP™.
2 Вставьте диск UMD
данные для обновления.
Значок данных для обновления и номер версии
отображаются под значком
, содержащий
®
(Игра) в главном меню.
GB
RU
DE
IT
NL
3 Выберите значок (Обновление
PSP™), а затем нажмите кнопку .
Начнется обновление. Для завершения обновления
следуйте инструкциям на экране.
PT
59
Page 60

Настройки безопасности
Установка уровня родительского контроля
14
Система PSP™ поддерживает функцию
родительского контроля. Эту функцию можно
использовать, чтобы установить пароль и
ограничить воспроизведение содержимого, для
которого выбран уровень родительского контроля
(игры, видео и другое содержимое). Если
установить уровень родительского контроля для
системы, можно предотвратить воспроизведение
содержимого, не предназначенного для детей.
Сведения об уровнях родительского контроля
Уровни родительского контроля для системы PSP™
Уровень родительского контроля системы может
быть либо отключен, либо иметь одно из 11
возможных значений.
Функция уровня родительского контроля
Выкл.
отключена.
Установка ограничения для определенного
уровня содержимого. Значение "1" – самый
11- 1
высокий уровень ограничения; "11" – самый
низкий уровень ограничения.
Значение элемента меню по умолчанию – "9".
Комбинация уровней родительского контроля,
установленных в системе PSP™ и для
содержимого, определяет доступ к просмотру
содержимого.
60
Пример. Если в системе установлен уровень
родительского контроля "7", то можно
воспроизводить содержимое с уровнем от "1" до "7".
Подробнее об уровнях родительского контроля и
соответствующих возрастных группах см. по
адресу http://manuals.playstation.net/document/ или
в руководстве по программному обеспечению
формата PSP™.
Page 61

Установка уровня родительского контроля
1 Выберите "Уровень родительского
контроля" из пункта (Настройки
безопасности) меню (Настройки) в
главном меню, затем нажмите
кнопку .
Отобразится экран ввода пароля.
2 С помощью кнопок со стрелками
введите пароль из четырех символов,
а затем нажмите кнопку .
При первом вводе пароля после приобретения следует
ввести "0000".
3 Выберите уровень, а затем нажмите
кнопку .
Уровень родительского контроля установлен.
Подсказка
Чтобы изменить пароль, выберите "Изменить пароль" в
разделе (Настройки) (Настройки безопасности).
Настройки безопасности
Установка уровня родительского контроля
GB
RU
DE
IT
NL
PT
61
Page 62

Page 63

" ", "PlayStation", "
"
XMB" and "xross media bar" are trademarks of Sony Corporation and Sony Computer Entertainment Inc.
"SONY" and " " are registered trademarks of Sony Corporation. Also "Memory Stick", "Memory Stick Duo", " ", "MagicGate"
and "ATRAC" are trademarks of the same company.
"
Go!Messenger" is a trademark of Sony Computer Entertainment Europe.
"
" and AOSS™ are the trademarks of BUFFALO INC.
" ", "PlayStation", "
Sony Computer Entertainment Inc.
"XMB" и "xross media bar" являются товарными знаками Sony Corporation и Sony Computer Entertainment Inc.
"SONY" и " " являются зарегистрированными товарными знаками корпорации Sony. "Memory Stick", "Memory Stick Duo",
" ", "MagicGate" и "ATRAC" являются товарными знаками тех же компаний.
"Go!Messenger" является товарным знаком Sony Computer Entertainment Europe.
" и AOSS™ являются товарными знаками BUFFALO INC.
"
", "
" and "UMD" are registered trademarks of Sony Computer Entertainment Inc.
", "
" и "UMD" являются зарегистрированными товарными знаками компании
Page 64

eu.playstation.com/psp
Information about system functionality and images published in this document may vary from those for your PSP™ system, depending on the
system software version in use.
Опубликованная в настоящем документе информация о функциях системы и изображения может отличаться от имеющейся системы
PSP™ в зависимости от используемой версии системного программного обеспечения.
© 2008 Sony Computer Entertainment Inc. All rights reserved.
Printed in China
 Loading...