

Page 1

4-227-887-13(1)
Mini Hi-Fi
Component
System
Operating Instructions
Owner’s Record
The model and serial numbers are located on the rear panel. Record the serial number in the
space provided below. Refer to them whenever you call upon your Sony dealer regarding this
product.
Model No. _______________ Serial No. _______________
MHC-ZX10
©2000 Sony Corporation
Page 2

WARNING
To prevent fire or shock hazard, do not
expose the unit to rain or moisture.
To avoid electrical shock, do not open the cabinet.
Refer servicing to qualified personnel only.
Do not install the appliance in a confined space,
such as a bookcase or built-in cabinet.
This appliance is classified as
a CLASS 1 LASER product.
The CLASS 1 LASER
PRODUCT MARKING is
located on the rear exterior.
NOTICE FOR THE CUSTOMERS IN
THE U.S.A.
This symbol is intended to alert the
user to the presence of uninsulated
“dangerous voltage” within the
product’s enclosure that may be of
sufficient magnitude to constitute a
risk of electric shock to persons.
INFORMATION
This equipment has been tested and found to comply with
the limits for a Class B digital device, pursuant to Part 15 of
the FCC Rules. These limits are designed to provide
reasonable protection against harmful interference in a
residential installation. This equipment generates, uses, and
can radiate radio frequency energy and, if not installed and
used in accordance with the instructions, may cause harmful
interference to radio communications. However, there is no
guarantee that interference will not occur in a particular
installation. If this equipment does cause harmful
interference to radio or television reception, which can be
determined by turning the equipment off and on, the user is
encouraged to try to correct the interference by one or more
of the following measures:
– Reorient or relocate the receiving antenna.
– Increase the separation between the equipment and
receiver.
–
Connect the equipment into an outlet on a circuit different
from that to which the receiver is connected.
– Consult the dealer or an experienced radio/TV
technician for help.
CAUTION
You are cautioned that any changes or modifications
not expressly approved in this manual could void
your authority to operate this equipment.
NOTICE FOR THE CUSTOMERS IN
CANADA
CAUTION
TO PREVENT ELECTRIC SHOCK, DO NOT USE
THIS POLARIZED AC PLUG WITH AN
EXTENSION CORD, RECEPTACLE OR OTHER
OUTLET UNLESS THE BLADES CAN BE FULLY
INSERTED TO PREVENT BLADE EXPOSURE.
FOR THE CUSTOMERS IN NORTH
AMERICA
This symbol is intended to alert the
user to the presence of important
operating and maintenance
(servicing) instructions in the
literature accompanying the
appliance.
CAUTION
The use of optical instruments with this product will
increase eye hazard.
2
ENERGY STAR
As ENERGY STAR® Partner, Sony Corporation has
determined that this product meets the ENERGY
®
STAR
This stereo system is equipped with the Dolby B-type
noise reduction system*.
* Manufactured under license from Dolby
Laboratories Licensing Corporation.
DOLBY and the double-D symbol ; are
trademarks of Dolby Laboratories Licensing
Corporation.
®
is a U.S. registered mark.
guidelines for energy efficiency.
Page 3

Table of Contents
Getting Started
Step 1: Hooking up the system ................ 4
Step 2: Setting the time ............................ 6
Step 3: Presetting radio stations ............... 8
Saving the power in standby mode ......... 10
Basic Operations
Playing a CD ........................................... 11
Recording a CD....................................... 13
Listening to the radio .............................. 14
Recording from the radio ........................ 16
Playing a tape .......................................... 17
Recording from a tape ............................. 20
The CD Player
Using the CD display .............................. 21
Playing the CD tracks repeatedly ............ 22
Playing the CD tracks in random order... 23
Programming the CD tracks.................... 24
The Tape Deck
Recording on a tape manually................. 26
Recording a CD by specifying track order
.......................................................... 27
DJ Effects
Looping part of a CD .............................. 30
Flashing part of a CD .............................. 31
Sound Adjustment
Adjusting the sound ................................ 31
Selecting the preset audio effect file ....... 32
Changing the spectrum analyzer display 34
Selecting surround effects ....................... 35
Controlling the graphic equalizer............ 36
Creating a personal audio effect file ....... 37
Other Features
Using the Radio Data System (RDS)* .... 38
Falling asleep to music............................ 40
Waking up to music ................................ 41
Timer-recording radio programs ............. 43
Optional components
Connecting audio components ................ 45
Connecting a VCR .................................. 46
Connecting surround speakers ................ 47
Connecting external antennas ................. 47
Additional Information
Precautions .............................................. 49
Troubleshooting ...................................... 50
Specifications .......................................... 53
Parts Identification for the remote .......... 55
Index........................................................ 56
Items in “Sound Mode” and “Set Up Mode”
............................................ Back cover
* European model only
3
Page 4

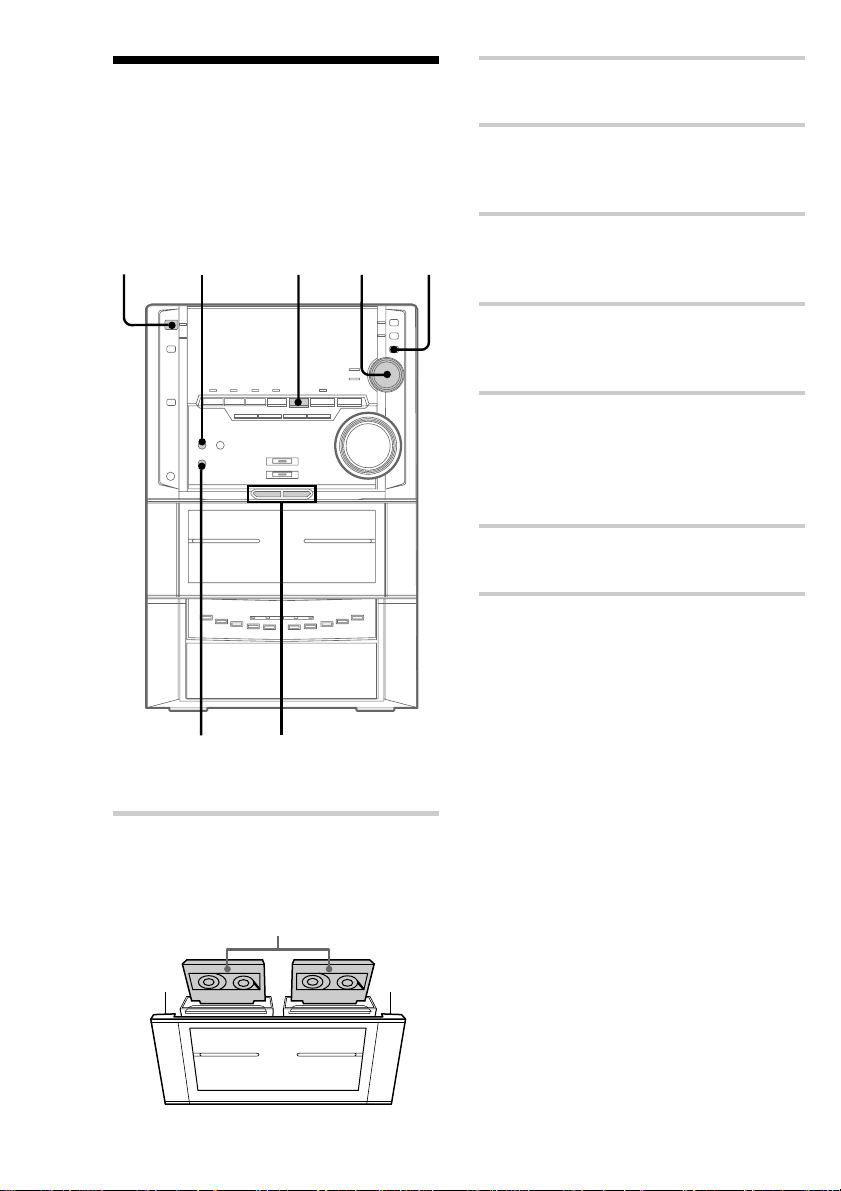
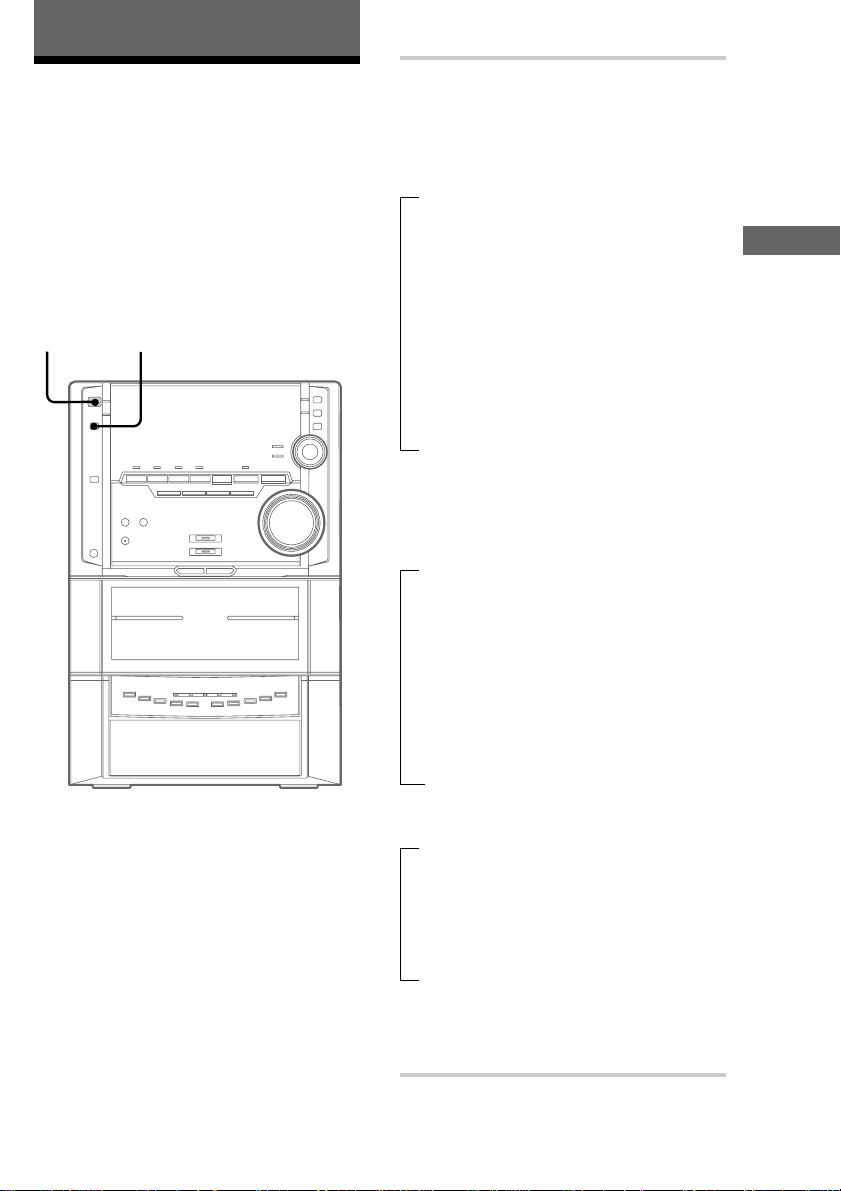
Getting Started
Step 1: Hooking up the system
Follow steps 1 through 3 of the following procedure to hook up your system using the supplied cords
and accessories.
FM antenna
AM loop antenna
2
1
Front speaker (Right)
1 Connect the front speakers.
Connect the speaker cords of the front
speakers to the FRONT SPEAKER jacks as
below.
Insert only the stripped portion.
R
+
Red/Solid
(3)
–
1
1
3
Front speaker (Left)
Note
Keep the speaker cords away from the antennas
to prevent noise.
L
Black/Stripe (#)
4
Page 5

2 Connect the FM/AM antennas.
Set up the AM loop antenna, then
connect it.
Jack type A
Extend the FM lead
AM loop antenna
antenna horizontally.
3 Connect the power cord to a wall outlet.
If the supplied adapter on the plug does not
fit your wall outlet, detach it from the plug
(only for models equipped with an adapter).
To connect optional components
See page 45.
To deactivate/activate the
FM75
demonstration
When you set the time (“Step 2: Setting the time”
AM
on page 6), the demonstration is deactivated.
To activate/deactivate the demonstration again,
press DISPLAY repeatedly while the system is
off.
Getting Started
Jack type B
AM loop antenna
Extend the FM lead
antenna horizontally.
FM75
COAXIAL
AM
continued
5
Page 6

Step 1: Hooking up the system
(continued)
To attach the front speaker pads
Attach the supplied front speaker pads to the
bottom of the speakers to stabilize the speakers
and prevent them from slipping.
Inserting two size AA (R6)
batteries into the remote
]
}
}
]
Tip
With normal use, the batteries should last for about
six months. When the remote no longer operates the
system, replace both batteries with new ones.
Note
If you do not use the remote for a long period of time,
remove the batteries to avoid possible damage from
battery leakage.
When carrying this system
Do the following to protect the CD mechanism.
Make sure that all discs are removed from the
unit.
1 Press FUNCTION repeatedly until “CD”
appears in the display.
2 Hold down V-GROOVE and press ?/1 so that
“LOCK” appears in the display.
Step 2: Setting the time
You must set the time before using the timer
functions.
The clock is on a 24-hour system for the European
model, and on a 12-hour system for other models.
For illustration purposes, the 24-hour system
model is used.
?/1
(Power)
2,3,4,5,6
1 Press MODE SELECT when the system
is turned off.
“Clock Set ?” appears.
When the system is in the Power Saving
Mode, “Clock Set ?” will not appear. Either
set Power Saving Mode off, or follow the
steps on the following page (“To change the
time”) after turning the power on.
2 Press PUSH ENTER.
The hour indication flashes.
1
6
Page 7

3 Move the multi stick toward v or V
repeatedly to set the hour.
4 Move the multi stick toward B.
The minute indication flashes.
5 Move the multi stick toward v or V
repeatedly to set the minute.
6 Press PUSH ENTER.
To cancel the menu operation
Press MODE SELECT.
Tips
• Refer to the illustration to use the multi stick. Place
your finger on the center of the multi stick and
move in the direction you want (up/down or left/
right shown v/V or b/B in this manual).
Up (v)
PUSH
Right (B)Left (b)
ENTER
To change the time
The previous explanation shows you how to set
the time while the power is off. To change the
time while the power is on, do the following:
1 Press MODE SELECT repeatedly to select “Set
Up Mode”, then press PUSH ENTER.
2 Move the multi stick toward b or B repeatedly
to select “Timer Set Up ?”, then press PUSH
ENTER.
3 Move the multi stick toward b or B repeatedly
to select “Clock Set ?”, then press PUSH
ENTER.
4 Perform steps 3 through 6 on the left.
Note
The clock settings are canceled when you disconnect
the power cord or if a power failure occurs.
Getting Started
Down (V)
• If you’ve made a mistake, start over from step 1.
7
Page 8

Step 3: Presetting radio stations
3 Press MODE SELECT repeatedly to
select “Set Up Mode”, then press PUSH
ENTER.
You can preset a total of 30 stations (20 for FM
and 10 for AM).
?/1
(Power)
. >
Multi stick
1
PUSH ENTER
2
1 Press TUNER/BAND repeatedly to
select FM or AM.
2 Press and hold m or M until the
frequency indication starts to change,
then release.
Scanning stops automatically when a station
is tuned in. “TUNED” and “STEREO” (for a
stereo program) appear.
4 Move the multi stick toward b or B
repeatedly to select “TUNER Set Up ?”,
then press PUSH ENTER.
3
5 Move the multi stick toward b or B
repeatedly to select “TUNER
Memory ?”, then press PUSH ENTER.
A preset number and the frequency appear in
the display. The stations are stored from
preset number 1 automatically.
Preset number
6 Press PUSH ENTER.
7 Repeat steps 2 through 6 to store other
stations.
To cancel the menu operation
Press MODE SELECT.
TUNED
STEREO
8
Page 9

To tune in a station with a weak
signal
Press m or M repeatedly in step 2 to tune in
the station manually.
To set another station to an
existing preset number
Start over from step 1. After step 5, press . or
> to select the preset number where you want
to store the other station, then press PUSH
ENTER.
You can preset a new station in the selected preset
number.
To erase a preset station
1 Press TUNER/BAND to select FM or AM.
2 Press MODE SELECT repeatedly to select
“Set Up Mode”, then press PUSH ENTER.
3 Move the multi stick toward b or B repeatedly
to select “TUNER Set Up ?”, then press PUSH
ENTER.
4 Move the multi stick toward b or B repeatedly
to select “TUNER Erase ?”, then press PUSH
ENTER.
5 Move the multi stick toward b or B repeatedly
to select the preset number you want to erase,
then press PUSH ENTER.
Select “TUNER Ers FM ALL” (or “TUNER
Ers AM ALL”) when you want to erase all the
preset stations.
When you erase a preset number, the preset
number decreases by one and all preset numbers
following the erased one are renumbered.
Tip
The preset stations are retained for half a day even if
you unplug the power cord or a power failure occurs.
To change the AM tuning
interval
(Except for the European model)
The AM tuning interval is factory-preset to 9 kHz
(10 kHz in some areas). To switch the AM tuning
interval, tune in any AM station first, then turn off
the power. While holding down MODE SELECT,
turn the power back on. When you switch the
interval, AM preset stations are erased. To switch
back to the original interval, repeat the same
procedure.
Getting Started
9
Page 10

Saving the power in standby mode
You can lower the power consumption to a
minimum (Power Saving Mode) and save energy
in the standby mode.
?/1
(Power)
DISPLAY
Tips
• ?/1 indicator and timer indicator (when the timer is
set) light even in the Power Saving Mode.
• The timer functions in the Power Saving Mode.
Notes
• You cannot set the time in the Power Saving Mode.
• One Touch Play function does not work in the
Power Saving Mode.
To cancel the Power Saving
Mode
Press DISPLAY once to show the demonstration,
twice to show the clock display.
, Press DISPLAY repeatedly when the
power is off.
Each time you press the button, the display
changes as follows:
t Demonstration t clock
Power Saving Mode T
The system is turned on/off by pressing ?/1.
10
Page 11

Basic Operations
Playing a CD
— Normal Play
You can play up to five CDs in a row.
?/1
(Power)
. >
CD NX
Multi stick
x
PUSH ENTER
MODE SELECT
1 Press one of the A 1~5 buttons and
place a CD on the disc tray.
If a disc is not placed properly, it will not be
recognized.
Place with the
label side up.
When you
play a CD
single (8 cm
CD), place it
on the inner
circle of the
tray.
Press the same button to close the disc tray.
To insert other CDs, press A of other
numbers to open the disc tray.
The CD presence indicator lights in the
display.
Disc presence indicator
2 Press one of the DISC 1~5 buttons.
The disc tray closes and play starts.
If you press CD NX (or CD H on the
remote) when the disc tray is closed,
playback starts from the CD loaded on the
tray whose disc pointer indicator lights.
Basic Operations
V
Bb
v
VOLUME
12
DISC SKIP
X
x
. >
m M
CD N
MODE SELECT
ENTER
VOL +/–
B/b
m M
Track numberDisc number
CD indicators
Disc presence
indicator
In “1 Disc” play mode (see page 12)
In “All Discs” play mode (see page 12)
Playing time
Disc pointor
indicator
continued
11
Page 12

Playing a CD (continued)
To
Stop play
Pause
Select a track
Find a point in
a track
Select a CD
in stop mode
Play only the
CD you have
selected
Play all CDs
Remove a CD
Exchange other
CDs while
playing
Adjust the
volume
Do this
Press x.
Press CD NX (or X on the
remote). Press again to resume
play.
During play or pause, press > (to
go forward) or . (to go back).
Press and hold down M or m
during play and release it at the
desired point.
Press one of the DISC 1~5 buttons
(or DISC SKIP on the remote).
1 Press MODE SELECT
repeatedly to select “Set Up
Mode”, then press PUSH
ENTER.
2 Move the multi stick toward b or
B repeatedly to select “CD Set
Up ?”, then press PUSH ENTER.
3 Move the multi stick toward b or
B repeatedly to select “Play
Mode Set Up ?”, then press
PUSH ENTER.
4 Move the multi stick toward b or
B repeatedly to select “Play
Mode 1 Disc”, then press PUSH
ENTER.
1 Press MODE SELECT repeatedly
to select “Set Up Mode”, then
press PUSH ENTER.
2 Move the multi stick toward b or
B repeatedly to select “CD Set
Up ?”, then press PUSH ENTER.
3 Move the multi stick toward b or
B repeatedly to select “Play
Mode Set Up ?”, then press
PUSH ENTER.
4 Move the multi stick toward b or
B repeatedly to select “Play
Mode All Discs”, then press
PUSH ENTER.
Press one of the A 1~5 buttons.
Press one of the A 1~5 buttons
to open the tray that contains
the CD that you want tochange.
When you change the CD, press the
same button to close the tray.
Turn VOLUME (or press VOL +/–
on the remote).
Tips
• Pressing CD NX when the power is off
automatically turns the power on and starts CD
playback if there is a CD in the tray (One Touch
Play). When the system is in the Power Saving
Mode, the One Touch Play function does not work.
• You can switch from another source to the CD
player and start playing a CD just by pressing
CD NX or one of the DISC 1~5 buttons
(Automatic Source Selection).
• If there is no CD in the player, “No Disc” appears
in the display.
• When a disc tray is holding a CD, the indicator for
the tray lights orange. In the display, when a disc
tray holding a CD is selected (or the CD in the disc
tray is playing), the disc pointer indicator lights.
When a disc tray holding a CD is not selected, the
disc presence indicator lights, but the disc pointer
indicator does not light. When all disc trays are
empty, all the disc pointer indicators and all the disc
presence indicators light.
Note
When a tray has not been read by the unit, the disc
presence indicator may light even though there is no
disc on the tray.
12
Page 13

Recording a CD
— CD Synchro Recording
The CD SYNC button lets you record from a CD
to a tape easily. You can use TYPE I (normal) or
TYPE II (CrO2) tapes. The recording level is
adjusted automatically.
TAPE B N indicator
3
Multi stick
x
PUSH ENTER
?/1
(Power)
TAPE B n
2 Press one of the A 1~5 buttons and
place a CD on the disc tray.
Press the same button to close the disc tray.
If the indicator for the tray you want to
record is not lit, press DISC SKIP on the
remote repeatedly until it lights.
Place with the
label side up.
When you play a
CD single (8 cm
4
CD), place it on
the inner circle of
the tray.
3 Press CD SYNC.
Deck B stands by for recording and the CD
player stands by for playback. The
TAPE B N indicator (for the front side)
lights and the REC PAUSE/START button
flashes.
4 Press MODE SELECT repeatedly to
select “Set Up Mode”, then press PUSH
ENTER.
5 Move the multi stick toward b or B
repeatedly to select “TAPE Set Up ?”,
then press PUSH ENTER.
Basic Operations
1 Press A B and insert a recordable tape
into deck B.
Insert with the
side you want to
record facing
forward.
6 Move the multi stick toward b or B
repeatedly to select “Direction Set
Up ?”, then press PUSH ENTER.
7 Move the multi stick toward b or B
18, REC PAUSE/START 2
repeatedly to select “1 Way” to record
on one side, or “Cycle” (or “Relay”) to
record on both sides, then press PUSH
ENTER.
8 Press REC PAUSE/START.
Recording starts.
continued
13
Page 14

Recording a CD (continued)
To stop recording
Press x.
To cancel the menu operation
Press MODE SELECT.
Tips
• If you want to record from the reverse side, press
TAPE B n to light its indicator after pressing CD
SYNC.
• When you record on both sides, be sure to start
from the front side. If you start from the reverse
side, recording stops at the end of the reverse side.
• When you want to reduce the hiss noise in low-level
high-frequency signals, do the following procedure
after pressing CD SYNC.
1 Press MODE SELECT repeatedly to select “Set
Up Mode”, then press PUSH ENTER.
2 Move the multi stick toward b or B repeatedly
to select “TAPE Set Up ?”, then press PUSH
ENTER.
3 Move the multi stick toward b or B repeatedly
to select “DOLBY NR Set Up ?”, then press
PUSH ENTER.
4 Move the multi stick toward b or B repeatedly
to select “On”, then press PUSH ENTER.
“DOLBY NR” appears in the display.
To return to the original setting, repeat steps 1
through 4 and select “Off” in step 4.
Note
You cannot listen to other sources while recording.
Listening to the radio
— Preset Tuning
Preset radio stations in the tuner’s memory first
(see “Step 3: Presetting radio stations” on page 8).
?/1
(Power)
m M
12
SELECT
MODE
14
V
Bb
v
VOLUME
Multi stick
PUSH ENTER
TUNER/BAND
. >
m M
VOL +/–
Page 15

1 Press TUNER/BAND repeatedly to
select FM or AM.
2 Press . or > repeatedly to tune in
the desired preset station.
Preset number*
STEREO
Frequency
* When only one station is preset, “ONE PRESET”
appears in the display.
To
Turn off the radio
Adjust the volume
To listen to non-preset radio
stations
Use manual or automatic tuning in step 2. For
manual tuning, press m or M repeatedly. For
automatic tuning, press and hold m or M.
Do this
Press ?/1.
Turn VOLUME (or press
VOL +/– on the remote).
Tips
• Pressing TUNER/BAND when the power is off
automatically turns the power on and tunes to the
last received station (One Touch Play). When the
system is in the Power Saving Mode, the One
Touch Play function does not work.
• You can switch from another source to the radio
just by pressing TUNER/BAND (Automatic Source
Selection).
• When an FM program is noisy, do the following
procedure:
1 Press MODE SELECT repeatedly to select “Set
Up Mode”, then press PUSH ENTER.
2 Move the multi stick toward b or B repeatedly
to select “TUNER Set Up ?”, then press PUSH
ENTER.
3 Move the multi stick toward b or B repeatedly
to select “Stereo Mono ?”, then press PUSH
ENTER.
4 Move the multi stick toward b or B repeatedly
to select “Mono”, then press PUSH ENTER.
“Mono” appears in the display.
There will be no stereo effect, but the reception will
improve. To restore the stereo effect, repeat steps 1
through 4 and select “Stereo” in step 4.
• To improve broadcast reception, reorient the
respective antenna.
Basic Operations
15
Page 16

Recording from the radio
You can record the radio program on a tape by
calling up a preset station. You can use TYPE I
(normal) or TYPE II (CrO2) tapes. The recording
level is automatically adjusted.
3 Press A B and insert a recordable tape
into deck B.
Insert with the
side you want to
record facing
forward.
?/1
(Power)
TAPE B n
4,9
2
x
3
1
Multi stick
PUSH ENTER
1 Press TUNER/BAND to select FM or
AM.
5
4 Press REC PAUSE/START.
Deck B stands by for recording.
5 Press MODE SELECT repeatedly to
select “Set Up Mode”, then press PUSH
ENTER.
6 Move the multi stick toward b or B
repeatedly to select “TAPE Set Up ?”,
then press PUSH ENTER.
7 Move the multi stick toward b or B
repeatedly to select “Direction Set
Up ?”, then press PUSH ENTER.
8 Move the multi stick toward b or B
repeatedly to select “1 Way” to record
on one side, or “Cycle” (or “Relay”) to
record on both sides, then press PUSH
ENTER.
9 Press REC PAUSE/START.
Recording starts.
To stop recording
Press x.
2 Press . or > repeatedly to tune in
a preset station.
Preset number
Frequency
16
To cancel the menu operation
Press MODE SELECT.
STEREO
Page 17

Tips
• If you want to record from the reverse side, press
TAPE B n to light its indicator after pressing
REC PAUSE/START in step 4.
• When you record on both sides, be sure to start
from the front side. If you start from the reverse
side, recording stops at the end of the reverse side.
• To record non-preset stations, use m and M in
step 2 to tune in the desired station manually.
• When you want to reduce the hiss noise in lowlevel high-frequency signals, do the following
procedure after pressing REC PAUSE/START in
step 4.
1 Press MODE SELECT repeatedly to select “Set
Up Mode”, then press PUSH ENTER.
2 Move the multi stick toward b or B repeatedly
to select “TAPE Set Up ?”, then press PUSH
ENTER.
3 Move the multi stick toward b or B repeatedly
to select “DOLBY NR Set Up ?”, then press
PUSH ENTER.
4 Move the multi stick toward b or B repeatedly
to select “On”, then press PUSH ENTER.
“DOLBY NR” appears in the display.
To return to the original setting, repeat steps 1
tthrough 4 and select “Off” in step 4.
• If noise is heard while recording from the radio,
move the respective antenna to reduce the noise.
Playing a tape
You can use any type of tape, TYPE I (normal),
TYPE II (CrO2) or TYPE IV (metal) , since the
deck automatically detects the tape type. You can
also use . and > to quickly search for songs
you want to hear.
?/1
(Power)
2
7
Multi stick
x
PUSH ENTER
Basic Operations
3
1
V
Bb
v
VOLUME
x
. >
m M
TAPE A N
TAPE B N
MODE SELECT
ENTER
VOL +/–
B/b
continued
m M. >
17
Page 18

Playing a tape (continued)
1 Press A A or A B and insert a recorded
tape in deck A or B.
Insert with the side
you want to play
facing forward.
7 Press TAPE A (or TAPE B) N.
Press TAPE A (or TAPE B) n to play the
reverse side. The tape starts playing.
When using the remote, press TAPE A (or
TAPE B) N to start playback. To play
reverse side, press TAPE A (or TAPE B) N
again.
* Relay play always follows the following sequence:
t
Deck A (front side) tDeck A (reverse side)
Deck B (reverse side)
T
Deck B (front side)
T
Tape presence indicator lights in the display.
Tape presence indicator
2 Press FUNCTION repeatedly to select
“TAPE A” or “TAPE B”.
3 Press MODE SELECT repeatedly to
select “Set Up Mode”, then press PUSH
ENTER.
4 Move the multi stick toward b or B
repeatedly to select “TAPE Set Up ?”,
then press PUSH ENTER.
5 Move the multi stick toward b or B
repeatedly to select “Direction Set
Up ?”, then press PUSH ENTER.
6 Move the multi stick toward b or B
repeatedly to select “1 Way” to play one
side, “Cycle” to play both sides, or
“Relay”* to play both decks in
succession, then press PUSH ENTER.
To
Stop play
Fast-forward
Rewind
Remove the cassette
Adjust the volume
* This tape deck does not have play pause function.
You cannot use X to pause tape playback.
Do this
Press x.
Press m or M.
Press m or M.
Press A A or A B.
Turn VOLUME (or press
VOL +/– on the remote).
To cancel the menu operation
Press MODE SELECT.
18
Page 19

Tips
• Pressing TAPE A (or TAPE B) N or n when the
power is off automatically turns the power on and
starts tape playback if there is a tape in the deck
(One Touch Play). When the system is in the Power
Saving Mode, the One Touch Play function does
not work.
• You can switch from another source to the tape
deck just by pressing TAPE A (or TAPE B) N or
n (Automatic Source Selection).
• When you want to reduce the hiss noise in low-level
high-frequency signals, do the following procedure:
1 Press MODE SELECT repeatedly to select “Set
Up Mode”, then press PUSH ENTER.
2 Move the multi stick toward b or B repeatedly
to select “TAPE Set Up ?”, then press PUSH
ENTER.
3 Move the multi stick toward b or B repeatedly
to select “DOLBY NR Set Up ?”, then press
PUSH ENTER.
4 Move the multi stick toward b or B repeatedly
to select “On”, then press PUSH ENTER.
“DOLBY NR” appears in the display.
To return to the original setting, repeat steps 1
through 4 and select “Off” in step 4.
Searching for the beginning of a
track (AMS*)
During playback, press . or > repeatedly to
go forward in the same direction as the n or N
indicator. Press . or > repeatedly in the
opposite direction to go back.
The search direction, + (forward) or – (back), and
number of songs being skipped (1~9) appear in the
display.
Example: searching forward 2 songs
Notes
• The deck stops automatically after repeating the
sequence five times.
• The AMS function may not operate correctly under
the following circumstances:
– When the unrecorded space between songs is
less than 4 seconds long.
– If completely different information is recorded
on the left and right channels.
– When there are continuous sections of
extremely low level or low frequency sound
(like those of a baritone sax).
– When the unit is placed near a television. (In
this case, we recommend moving the unit away
from the television or turning off the television.)
Basic Operations
* AMS (Automatic Music Sensor)
19
Page 20
Recording from a tape
— High-speed Dubbing
You can use TYPE I (normal) or TYPE II (CrO2)
tapes. The recording level is automatically
adjusted.
?/1
(Power)
2
Multi stick
PUSH ENTER
x
3
2 Press HI-DUB.
Deck B stands by for recording.
3 Press MODE SELECT repeatedly to
select “Set Up Mode”, then press PUSH
ENTER.
4 Move the multi stick toward b or B
repeatedly to select “TAPE Set Up ?”,
then press PUSH ENTER.
5 Move the multi stick toward b or B
repeatedly to select “Direction Set
Up ?”, then press PUSH ENTER.
6 Move the multi stick toward b or B
repeatedly to select “1 Way” to record
on one side, or “Cycle” (or “Relay”) to
record on both sides, then press PUSH
ENTER.
7 Press REC PAUSE/START.
Dubbing starts.
To stop dubbing
Press x.
7
1 Press A A and A B and insert a
recorded tape in deck A and a
recordable tape in deck B.
Insert with the side you want to
play/recored facing forward.
20
1
To cancel the menu operation
Press MODE SELECT.
Tips
• When you dub on both sides, start recording from
the front side. If you record from the reverse side,
recording stops at the end of the reverse side.
• If you select “Cycle” in the “Direction Set Up ?”
menu when the tapes you use have different lengths,
the tape in each deck reverses independently. If
you select “Relay”, the tapes in both decks reverse
together.
• You don’t have to set DOLBY NR, since the tape in
deck B is automatically recorded in the same state
as the tape in deck A.
Page 21
The CD Player
Using the CD display
You can check the remaining time of the current
track or that of the CD.
When a CD TEXT disc is loaded, you can check
the information stored on the disc, such as the disc
titles or artist names. When the unit detects CD
TEXT discs, the “CD TEXT” indication appears
in the display.
?/1
(Power)
DISPLAY
, Press DISPLAY.
Each time you press the button during
normal playback or when playback is
stopped, the display changes as follows:
During normal playback
t Playing time of the current track
r
Remaining time of the current track
r
Remaining time of current CD (“1 Disc”
mode) or “--m--s” display (“All Discs”
mode)
r
Title name of the current track*
r
Clock display (for eight seconds)
r
Preset file name or “EFFECT ON (OFF)”
When playback is stopped
During Program Play mode when there is a
program
t The last track number of the program and the
total playing time
r
Total number of programmed tracks
(for eight seconds)
r
Title name and the artist name of the CD*
r
Clock display (for eight seconds)
r
Preset file name or “EFFECT ON (OFF)”
The CD Player
In other conditions
t Total number of tracks and total playing time
r
Title name and the artist name of the CD*
r
Clock display (for eight seconds)
r
Preset file name or “EFFECT ON (OFF)”
* With CD TEXT discs only (certain characters
cannot be displayed). Depending on the disc, some
CD TEXT information may not appear.
21
Page 22

Playing the CD tracks repeatedly
–– Repeat Play
This function lets you repeat a single CD or all
CDs in Normal Play, Shuffle Play and Program
Play.
?/1
(Power)
12
Multi stick
PUSH ENTER
4 Move the multi stick toward b or B
repeatedly to select “Repeat Set Up ?”,
then press PUSH ENTER.
5 Move the multi stick toward b or B
repeatedly to select “Repeat 1” or
“Repeat All”, then press PUSH
ENTER.
When “Repeat 1” is selected, one track is
repeated. When “Repeat All” is selected,
playback varies according to the setting of
“Play Mode Set Up ?” menu.
Play Mode*
1 Disc
1 Shuffle
All Discs
All Shuf
Program
* To change the Play Mode setting, see page 12.
To cancel the menu operation
Press MODE SELECT.
To cancel Repeat Play
Select “Repeat Off” in step 5.
Repeat
all tracks on the current CD
up to five times
all tracks on the all CDs up to
five times
Not available
the Program up to five times
1 Press FUNCTION repeatedly until
“CD” appears in the display, then place
a CD.
2 Press MODE SELECT repeatedly to
select “Set Up Mode”, then press PUSH
ENTER.
3 Move the multi stick toward b or B
repeatedly to select “CD Set Up ?”, then
press PUSH ENTER.
22
Page 23

Playing the CD tracks in random order
–– Shuffle Play
You can play all the tracks on one CD or all CDs
in random order.
?/1
(Power)
1
DISC 1~5
Multi stick
6
PUSH ENTER
4 Move the multi stick toward b or B
repeatedly to select “Play Mode Set
Up ?”, then press PUSH ENTER.
5 Move the multi stick toward b or B
repeatedly to select “All Shuf” or “1
Shuffle”, then press PUSH ENTER.
“All Shuf” shuffles all the CDs in the player.
2
“1 Shuffle” shuffles the CD whose DISC
pointer indicator is lit.
6 Press CD NX.
All the tracks play in random order.
To cancel the menu operation
Press MODE SELECT.
To cancel Shuffle Play
1 Perform steps 1 through 4 in the above
procedure.
2 Move multi stick toward b or B repeatedly to
select “All Discs” or “1 Disc”, then press PUSH
ENTER.
The tracks continue playing in their original order.
To select a desired CD
Press DISC 1~5.
Tips
• To skip a track, press >.
• You can start Shuffle Play during Normal Play by
selecting “All Shuf” or “1 Shuffle”.
The CD Player
1 Press FUNCTION repeatedly until
“CD” appears in the display, then place
a CD.
2 Press MODE SELECT repeatedly to
select “Set Up Mode”, then press PUSH
ENTER.
3 Move the multi stick toward b or B
repeatedly to select “CD Set Up ?”, then
press PUSH ENTER.
23
Page 24

Programming the CD tracks
–– Program Play
You can make a program of up to 32 tracks from
all the CDs in the order you want them to be
played.
?/1
(Power)
12
x
10
Multi stick
PUSH ENTER
1 Press FUNCTION repeatedly until
“CD” appears in the display, then place
a CD.
2 Press MODE SELECT repeatedly to
select “Set Up Mode”, then press PUSH
ENTER.
3 Move the multi stick toward b or B
repeatedly to select “CD Set Up ?”, then
press PUSH ENTER.
4 Move the multi stick toward b or B
repeatedly to select “Program Set ?”,
then press PUSH ENTER.
5 Move the multi stick toward v or V
repeatedly to select a CD.
If you want to program all the tracks on a CD
at once, select a CD in this step, then skip
step 6 and continue with step 7.
6 Move the multi stick toward b or B
repeatedly to select the desired track.
Disc number
PROGRAM
Track number
24
v/V
V
Bb
v
x
CD N
MODE SELECT
ENTER
VOL +/–
B/b
Total playing time
(including selected track)
7 Press PUSH ENTER.
The track is programmed. When all the
tracks are selected, “AL” appears in the
display and all the tracks are programmed as
one step. The program step number appears,
followed by the total playing time.
Page 25

8 To program additional tracks, repeat
steps 5 through 7.
Skip step 5 to select tracks from the
same disc.
9 Press PUSH ENTER.
10 Press CD NX.
All the tracks play in the order you selected.
To cancel the menu operation
Press MODE SELECT.
To cancel Program Play
1 Press FUNCTION repeatedly until “CD”
appears in the display.
2 Press MODE SELECT repeatedly to select “Set
Up Mode”, then press PUSH ENTER.
3 Move the multi stick toward b or B repeatedly
to select “CD Set Up ?”, then press PUSH
ENTER.
4 Move the multi stick toward b or B repeatedly
to select “Play Mode Set Up ?”, then press
PUSH ENTER.
5 Move the multi stick toward b or B repeatedly
to select “All Discs” or “1 Disc”, then press
PUSH ENTER.
The tracks continue playing in their original order.
To add tracks to the existing
program
Follow steps 1 through 9 when playback is
stopped. Add the desired track after the last
programmed step.
To check the program
1 Press FUNCTION repeatedly until “CD”
appears in the display.
2 Press MODE SELECT repeatedly to select “Set
Up Mode” then press PUSH ENTER.
3 Move the multi stick toward b or B repeatedly
to select “CD Set Up ?”, then press PUSH
ENTER.
4 Move the multi stick toward b or B repeatedly
to select “PGM Check Clear ?”, then press
PUSH ENTER.
5 Move the multi stick toward b or B.
The disc number and the track number appears.
6 After checking the program, press MODE
SELECT.
To clear a desired step from the
program
1 Press FUNCTION repeatedly until “CD”
appears in the display.
2 Press MODE SELECT repeatedly to select “Set
Up Mode” then press PUSH ENTER.
3 Move the multi stick toward b or B repeatedly
to select “CD Set Up ?”, then press PUSH
ENTER.
4 Move the multi stick toward b or B repeatedly
to select “PGM Check Clear ?”, then press
PUSH ENTER.
5 Move the multi stick toward b or B.
The disc number and the track number appears.
6 When you want to clear the displayed track,
press PUSH ENTER.
“Clear ?” appears in the display.
7 Press PUSH ENTER again.
The track displayed in step 5 is cleared from the
program.
To clear the entire program
1 Press FUNCTION repeatedly until “CD”
appears in the display.
2 Press MODE SELECT repeatedly to select “Set
Up Mode” then press PUSH ENTER.
3 Move the multi stick toward b or B repeatedly
to select “CD Set Up ?”, then press PUSH
ENTER.
4 Move the multi stick toward b or B repeatedly
to select “PGM Check Clear ?”, then press
PUSH ENTER.
5 To clear the entire program, move the multi
stick toward b or B repeatedly to select “PGM
All Clear” then press PUSH ENTER.
6 “PGM All Clear ?” appears. Press PUSH
ENTER again. Entire program is cleared.
Tips
• You can make a program in the “Play Mode Set
Up ?” menu. Select “Play Mode Set Up ?” in step 4,
then move the multi stick toward b or B repeatedly
to select “Program” and press PUSH ENTER. Then
follow steps 5 to 10.
• The program you made remains in the system’s
memory even after it has been played back. Press
CD NX to play the same program again.
• If “--m--s” appears instead of the total playing time
during programming, this means:
– you have programmed a track number
which exceeds 20.
– the total playing time has exceeded 100 minutes.
Note
The program remains in the memory until it is cleared
by following the steps of “To clear the entire program”.
However, when using Tape Select Edit function, the
program is cleared automatically.
The CD Player
25
Page 26

The Tape Deck
Recording on a tape manually
You can record from CD, tape, or radio as you
like. For example, you can record just the songs
you want or record from the middle of the tape.
The recording level is adjusted automatically.
?/1
(Power)
2
x
Multi stick
PUSH ENTER
4
4 Press MODE SELECT repeatedly to
select “Set Up Mode”, then press PUSH
ENTER.
5 Move the multi stick toward b or B
repeatedly to select “TAPE Set Up ?”,
then press PUSH ENTER.
6 Move the multi stick toward b or B
repeatedly to select “Direction Set
Up ?”, then press PUSH ENTER.
7 Move the multi stick toward b or B
repeatedly to select “1 Way” to record
on one side, or “Cycle” ( or “Relay”) to
record on both sides, then press PUSH
ENTER.
8 Press REC PAUSE/START.
Recording starts.
9 Start playing the source to be recorded.
To Press
Stop recording x.
Pause recording REC PAUSE/START.
. >
3,8
1 Insert a recordable tape into deck B.
2 Press FUNCTION repeatedly until the
source you want to record (e.g., CD)
appears.
3 Press REC PAUSE/START.
Deck B stands by for recording. The
TAPE B N indicator (for front side) lights.
26
To cancel the menu operation
Press MODE SELECT.
1
Page 27

Tips
• If you want to record from the reverse side, press
TAPE B n to light its indicator after pressing
REC PAUSE/START in step 3.
• When you want to reduce the hiss noise in low-level
high-frequency signals, do the following procedure
after pressing REC PAUSE/START in step 3.
1 Press MODE SELECT repeatedly to select “Set
Up Mode”, then press PUSH ENTER.
2 Move the multi stick toward b or B repeatedly
to select “TAPE Set Up ?”, then press PUSH
ENTER.
3 Move the multi stick toward b or B repeatedly
to select “DOLBY NR Set Up ?”, then press
PUSH ENTER.
4 Move the multi stick toward b or B repeatedly
to select “On”, then press PUSH ENTER.
“DOLBY NR” appears in the display.
To return to the original setting, repeat steps 1
through 4 and select “Off” in step 4.
• When recording from a CD, you can use . or
> to select tracks during rec pause mode (after
pressing REC PAUSE/START in step 3 and before
pressing again in step 8).
Recording a CD by specifying track order
— Program Edit
You can record tracks from all the CDs in the
order you want. When programming, make sure
the playing times for each side do not exceed the
length of one side of the tape.
?/1
(Power)
2
12
x
3,13
The CD Player
The Tape Deck
Multi stick
PUSH ENTER
1
117
10
continued
27
Page 28
Recording a CD by specifying
track order (continued)
1 Place a CD and insert a recordable tape
into deck B.
9 To program additional tracks to be
recorded on side A, repeat steps 6
through 8.
Skip step 6 to select tracks from the same
disc.
2 Press FUNCTION repeatedly until
“CD” appears in the display.
3 Press MODE SELECT repeatedly to
select “Set Up Mode”, then press PUSH
ENTER.
4 Move the multi stick toward b or B
repeatedly to select “CD Set Up ?”, then
press PUSH ENTER.
5 Move the multi stick toward b or B
repeatedly to select “Program Set ?”,
then press PUSH ENTER.
6 Move the multi stick toward v or V
repeatedly to select a CD.
If you want to program all the tracks on a CD
at once, select a CD in this step, then skip
step 7 and continue with step 8.
7 Move the multi stick toward b or B
repeatedly to select the desired track.
Track numberDisc number
PROGRAM
10 Press X on the remote to insert a pause
at the end of side A.
“P” appears in the display and the total
playing time resets to “0m00s” in the
display.
11 Repeat steps 7 and 8 for tracks from
the same disc or steps 6 through 8 for
tracks from another disc to program the
remaining tracks to be recorded on side
B.
12 Press CD SYNC.
Deck B stands by for recording and the CD
player stands by for playback. The TAPE B
N indicator (for front side) lights and the
REC PAUSE/START button flashes.
13 Press MODE SELECT repeatedly to
select “Set Up Mode”, then press PUSH
ENTER.
14 Move the multi stick toward b or B
repeatedly to select “TAPE Set Up ?”,
then press PUSH ENTER.
8 Press PUSH ENTER.
The track is programmed. When all the
tracks are selected, “AL” appears in the
display and all the tracks are programmed as
one step. The program step number appears,
followed by the total playing time.
28
Total playing time
(including selected track)
Page 29

15 Move the multi stick toward b or B
repeatedly to select “Direction Set
Up ?”, then press PUSH ENTER.
16 Move the multi stick toward b or B
repeatedly to select “1 Way” to record
on one side, or “Cycle” (or “Relay”) to
record on both sides, then press PUSH
ENTER.
17 Press REC PAUSE/START.
Recording starts.
To stop recording
Press x.
To cancel the menu operation
Press MODE SELECT.
To check the order
1 Press FUNCTION repeatedly until “CD”
appears in the display.
2 Press MODE SELECT repeatedly to select “Set
Up Mode”, then press PUSH ENTER.
3 Move the multi stick toward b or B repeatedly
to select “CD Set Up ?”, then press PUSH
ENTER.
4 Move the multi stick toward b or B repeatedly
to select “PGM Check Clear ?”, then press
PUSH ENTER.
5 Move the multi stick toward b or B.
The disc number and the track number appears.
6 After checking the program, press MODE
SELECT.
To cancel Program Edit
1 Press FUNCTION repeatedly until “CD”
appears in the display.
2 Pres MODE SELECT repeatedly to select “Set
Up Mode”, then press PUSH ENTER.
3 Move the multi stick toward b or B repeatedly
to select “CD Set Up ?”, then press PUSH
ENTER.
4 Move the multi stick toward b or B repeatedly
to select “Play Mode Set Up ?”, then press
PUSH ENTER.
5 Move multi stick toward b or B repeatedly to
select “All Discs” or “1 Disc”, then press PUSH
ENTER.
The tracks continue playing in their original order.
Tip
When you want to reduce the hiss noise in low-level
high-frequency signals, do the following procedure
after pressing CD SYNC in step 12 in the previous
page.
1 Press MODE SELECT repeatedly to select “Set
Up Mode”, then press PUSH ENTER.
2 Move the multi stick toward b or B repeatedly to
select “TAPE Set Up ?”, then press PUSH
ENTER.
3 Move the multi stick toward b or B repeatedly to
select “DOLBY NR Set Up ?”, then press PUSH
ENTER.
4 Move the multi stick toward b or B repeatedly to
select “On”, then press PUSH ENTER.
“DOLBY NR” appears in the display.
To return to the original setting, repeat steps 1
thruogh 4 again, to select “Off” in the step 4.
continued
The CD Player
The Tape Deck
29
Page 30

V
v
Bb
LOOP
v/V
Recording a CD by specifying
track order (continued)
Selecting tape length
automatically
You can check the most suitable tape length for
recording a CD. Note that you cannot use Tape
Select Edit for discs containing over 20 tracks.
—Tape Select Edit
1 Insert a CD.
2 Press FUNCTION repeatedly until
“CD” appears in the display.
3 Press MODE SELECT repeatedly to
select “Set Up Mode”, then press PUSH
ENTER.
4 Move the multi stick toward b or B
repeatedly to select “CD Set Up ?”, then
press PUSH ENTER.
DJ Effects
Looping part of a CD
— Loop
With the Loop function, you can repeat part of a
CD during playback. This lets you create original
recordings.
30
5 Move the multi stick toward b or B
repeatedly to select “CD Edit Start ?”,
then press PUSH ENTER.
The required tape length for the currently
selected CD appears, followed by the total
playing time for side A and side B
respectively.
, Press and hold LOOP on the remote
during playback at the point you want to
start the Loop function, and release to
resume normal play.
To adjust the loop length
Press V or v repeatedly while holding LOOP on
the remote to select different loop lengths (LOOP
1~20).
Page 31

Sound Adjustment
Flashing part of a CD
— Flash
With the Flash function, you can “flash” the CD
sound during playback. This lets you create
original recordings.
FLASH
, Press and hold FLASH on the remote
during playback at the point you want to
start the Flash function, and release to
resume normal play.
V
Bb
v
v/V
Adjusting the sound
You can reinforce the bass, create a more
powerful sound, or listen with headphones.
?/1
(Power)
GROOVE-EX
GROOVE
V-GROOVE
Sound Adjustment
DJ Effect / Sound Adjustment
To adjust the flash length
Press V or v repeatedly while holding FLASH on
the remote to select different flash lengths
(FLASH 1~20).
To use LOOP and FLASH
together
Press and hold both LOOP and FLASH at the
same time.
Notes
• The loop and flash length cannot be adjusted during
this operation. Adjust the loop and flash lengths
independently beforehand if necessary.
• To record the flash effect, use the analog (MD
OUT) connections or this unit’s tape deck.
For a powerful sound (GROOVE)
Press GROOVE. The volume switches to power
mode, DBFB* is automatically set to full strength,
the equalizer curve changes, and the GROOVE
button lights. Press GROOVE again to return to
the previous volume.
* DBFB = Dynamic Bass Feedback
continued
31
Page 32

Adjusting the sound (continued)
To reinforce lower bass sound
(V-GROOVE)
Press V-GROOVE. The lower bass frequency of
the music you are listening to is powerfully
reinforced, DBFB is automatically set to full
strength, the equalizer curves changes, loudness
increases and the V-GROOVE button lights. Press
V-GROOVE again to return to the previous level.
To produce a clear sound
(GROOVE-EX)
Press GROOVE-EX. The higher frequencies of
the music you are listening to is reinforced, DBFB
is automatically set to full strength, the equalizer
curves changes, loudness increases and the
GROOVE-EX button lights. Press GROOVE-EX
again to return to the previous level.
Selecting the preset audio effect file
The audio effect file menu lets you select the
sound characteristic according to the sound you
are listening to.
Selecting the effect from the
music menu
?/1
(Power)
Multi stick
PUSH ENTER 1
32
V
Bb
v
FILE SELECT
MODE SELECT
ENTER
B/b
Page 33

1 Press MODE SELECT repeatedly to
select “Sound Mode”, then press PUSH
ENTER.
2 Move the multi stick toward b or B
repeatedly to select “File Select”, then
press PUSH ENTER.
3 Move the multi stick toward b or B
repeatedly to select the preset you
desire.
The preset name appears in the display.
See the chart “Music menu options”.
4 Press PUSH ENTER.
To cancel the menu operation
Press MODE SELECT.
Tip
When using the remote, press FILE SELECT
repeatedly until the effect name you want appears.
To cancel the effect
Select “Effect Off” in step 2.
Music menu options
Effect
ROCK
POP
JAZZ
DANCE
SOUL
ORIENTAL
ACTION
DRAMA
GAME
SF
P FILE 1~5
* The personal file function lets you store your own
effects (see “Creating a personal audio effect file”
on page 37).
For
Standard music sources
Soundtracks and special listening
situations
Personal file*
Sound Adjustment
33
Page 34
Changing the spectrum analyzer display
You can enjoy changing the display while
listening to the music.
?/1
(Power)
1 Press MODE SELECT repeatedly to
select “Set Up Mode”, then press PUSH
ENTER.
2 Move the multi stick toward b or B
repeatedly to select “Display Set Up ?”,
then press PUSH ENTER.
Multi stick
PUSH ENTER 1
4 Move the multi stick toward b or B
repeatedly to select the effect you
desire, press PUSH ENTER.
Each time you move the multi stick toward
b or B, the display changes as follows:
Spectrum 1
Y
Spectrum 2
Y
Spectrum 3
Y
Spectrum Off
To cancel the menu operation
Press MODE SELECT.
To adjust the brightness of the
display
In step 3 above, select “Dimmer Set Up ?”. Move
the multi stick toward b or B repeatedly to select
the effect you desire, press PUSH ENTER.
Each time you move the multi stick toward b or
B , the display changes as follows:
Dimmer Off
Y
Dimmer 1
Y
Dimmer 2
Y
Dimmer 3
Y
Dimmer 4
Y
Dimmer 5
To check the frequency level
The meters in the display rise and fall according to
the strength of beat (high frequency and low
frequency).
3 Move the multi stick toward b or B
repeatedly to select “Spectrum Set
Up ?”, then press PUSH ENTER.
34
Low frequency (around 100 Hz)
40Hz
100Hz
meter
High frequency (around 6 kHz)
100Hz
6kHz
meter
Page 35
Selecting surround effects
You can enjoy surround effects.
?/1
(Power)
CINEMA SPACE
Tip
If you want to memorize the effect, store it into a
personal file (see “Creating a personal audio effect
file” on page 37).
Note
When you choose other sound effects, the surround
effects will be canceled.
To adjust the parameter of
cinema space
You can adjust the surround balance and feel as if
you are there.
1 Press CINEMA SPACE to select “CINEMA
SPACE”.
2 Press MODE SELECT repeatedly to select
“Sound Mode”, then press PUSH ENTER.
3 Move the multi stick toward b or B repeatedly
to select “Cinema Space”, then press PUSH
ENTER.
4 Move the multi stick toward v or V repeatedly
to adjust the seat position to the fixed place of
the sound field (3 steps).
Sound Adjustment
, Press CINEMA SPACE repeatedly to
select the surround effect you desire.
Each time you press the button, the display
changes as follows:
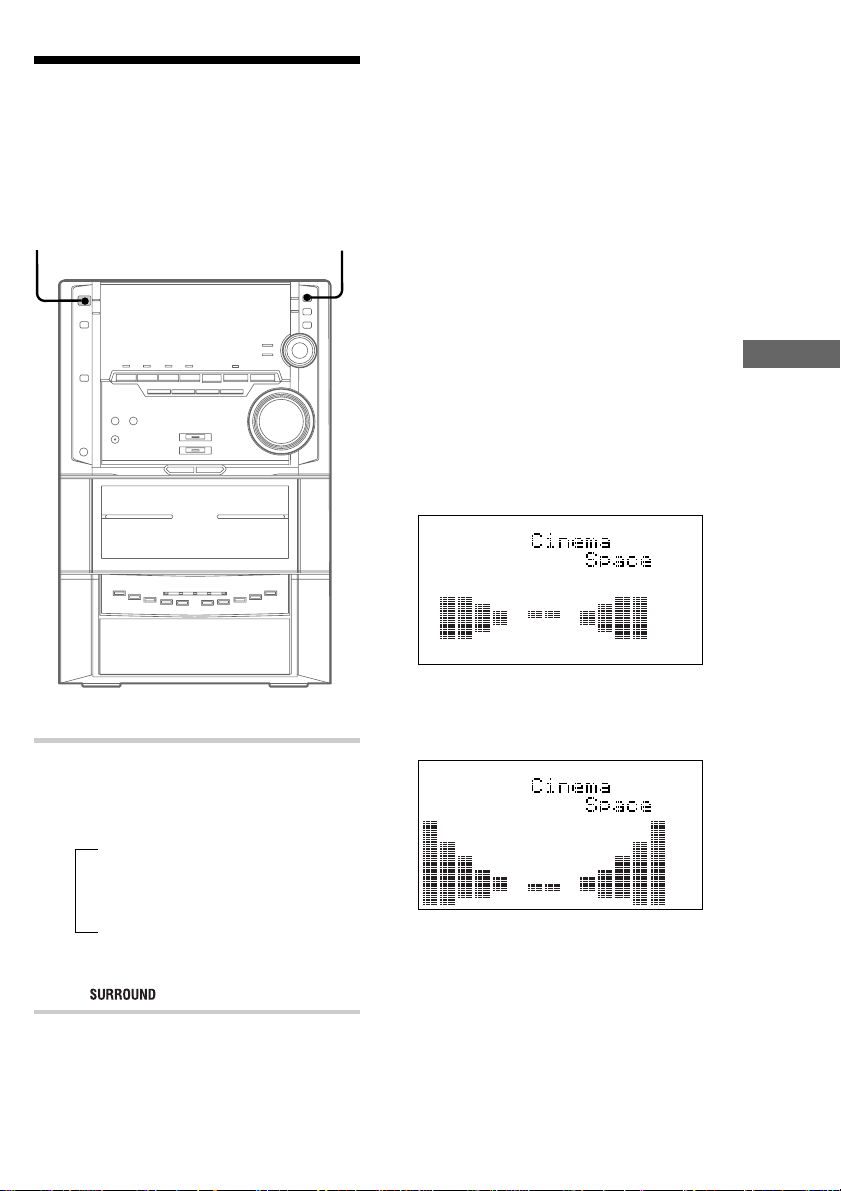
t CINEMA SPACE*
r
SURROUND ON**
r
SURROUND OFF
* CINEMA SPACE is the surround effect for
movies.
**“ ” appears in the display.
5 Move the multi stick toward b or B repeatedly
to adjust the surround level
(7 steps).
6 Press PUSH ENTER.
To cancel the menu operation
Press MODE SELECT.
Note
Under the following circumstances, CINEMA
SPACE effects will not function.
– When using headphones
– When TAPE B is in REC PAUSE mode
– When recording using TAPE B.
35
Page 36

Controlling the graphic equalizer
3 Move the multi stick toward b or B
repeatedly to select “Equalizer
Control”, then press PUSH ENTER.
You can control the sound by raising or lowering
the levels of specific frequency ranges.
Before operation, first select the audio effect you
want for your basic sound.
?/1
(Power)
Multi stick
PUSH ENTER
4 Move the multi stick toward b or B
repeatedly to select a frequency band
(5 steps).
2
5 Move the multi stick toward v or V
repeatedly to adjust the level
(9 steps).
6 Repeat steps 4 and 5.
7 Press PUSH ENTER when finished.
1 Select the audio effect you want for
your basic sound (see “Selecting the
preset audio effect file” on page 32).
2 Press MODE SELECT repeatedly to
select “Sound Mode”, then press PUSH
ENTER.
36
To cancel the menu operation
Press MODE SELECT.
Note
If you choose another audio effect (other than “Effect
Off”), the adjusted sound effect is lost. To retain the
adjusted sound effect for future use, store it in a
personal file. (See “Creating a personal audio effect
file” on page 37.)
Page 37

Creating a personal audio effect file
— Personal file
You can create a personal file of audio patterns
(surround effect and graphic equalizer) and store
them in the memory of the unit. The personal files
can later be used when you listen to a favorite
tape, CD, or radio program. You can create up to
five audio files.
Before operation, first select the audio effect you
want for your basic sound.
?/1
(Power)
1 Obtain the sound effect you want by
controling the graphic equalizer (see
page 36) and selection surround effect
(see page 35).
Multi stick
PUSH ENTER
3 Move the multi stick toward b or B
repeatedly to select “P File Memory”,
then press PUSH ENTER.
The personal file number appears in the
display.
4 Move the multi stick toward b or B
repeatedly to select the file number
(P FILE 1~5) where you want to store
the sound effect.
2
5 Press PUSH ENTER.
The adjusted sound effects are stored under
the selected file number. The settings
previously stored at this memory location are
erased and replaced by the new settings.
To cancel the menu operation
Press MODE SELECT.
To call up the personal file
1 Press MODE SELECT repeatedly to select
“Sound Mode”, then press PUSH ENTER.
2 Move the multi stick toward b or B repeatedly
to select “File Select”, then press PUSH
ENTER.
3 Move the multi stick toward b or B repeatedly
to select the file number you desire (P FILE
1~5).
4 Press PUSH ENTER.
Tip
The sound effect you stored are retained for half a day
even if you unplug the power cord or if a power
failure occurs.
Sound Adjustment
2 Press MODE SELECT repeatedly to
select “Sound Mode”, then press PUSH
ENTER.
37
Page 38

Other Features
Using the Radio Data System (RDS)
(For European model only)
What is the Radio Data
System?
Radio Data System (RDS) is a broadcasting
service that allows radio stations to send
additional information along with the regular
program signal. This tuner offers convenient RDS
features like station name display and location of
stations by program type. RDS is available only
for FM stations.*
Note
RDS may not work properly if the station you are
tuned to is not transmitting the RDS signal properly
or if the signal strength is weak.
* Not all FM stations provide RDS service, nor do
they provide the same type of services. If you are
not familiar with the RDS system, check with your
local radio stations for details on RDS services in
your area.
Receiving RDS broadcasts
To check the RDS information
Each time you press DISPLAY, the display
changes as follows:
t Station name*
r
Frequency
r
Program type*
r
Clock display
r
Preset file name or
“EFFECT ON (OFF)”
* If the RDS broadcast is not received, the station
name and program type may not appear in the
display.
Locating a station by program
type (PTY)
You can locate a station you want by selecting a
program type. The unit tunes in the type of
programs currently being broadcast from the RDS
stations stored in the tuner’s preset memory.
?/1
(Power)
Multi stick
PUSH ENTER
21
, Simply select a station from the FM
band.
When you tune in a station that provides
RDS services, the station name appears
in the display.
38
x
Page 39

1 Press FUNCTION repeatedly until
“TUNER” appears in the display.
2 Press MODE SELECT repeatedly to
select “Set Up Mode”, then press PUSH
ENTER.
3 Move the multi stick toward b or B
repeatedly to select “TUNER Set Up ?”,
then press PUSH ENTER.
4 Move the multi stick toward b or B
repeatedly to select “PTY Select ?”,
then press PUSH ENTER.
5 Move the multi stick toward b or B
repeatedly to select the program type
you want. See the “List of program
types” section below.
6 Press PUSH ENTER.
The unit starts searching the preset RDS
stations (“SEARCH” and the selected
program type are shown alternately in the
display).
When the tuner receives a program, the
preset station number flashes.
7 Move the multi stick toward b or B
repeatedly to display the preset station
number you desire.
8 Press PUSH ENTER while the preset
station number is flashing.
To cancel the menu operation
Press MODE SELECT.
To cancel PTY search
Press x.
List of program types (PTY)
NEWS
News programs.
AFFAIRS
Topical programs that expand on current
news.
INFO
Programs about consumer affairs, medical
advice.
SPORT
Sports programs.
EDUCATE
Educational programs, such as “how-to”
programs and advice.
DRAMA
Radio plays and serials.
CULTURE
Programs about national or regional culture,
language, and social concerns.
SCIENCE
Programs about the natural sciences.
VARIED
Programs containing celebrity interviews,
panel games, and comedy.
POP M
Popular music programs.
ROCK M
Rock music programs.
EASY M
Easy listening (middle of the road music).
LIGHT M
Classical music, such as instrumental, vocal,
and choral works.
CLASSICS
Performances of major orchestras, chamber
music, opera, etc.
OTHER M
Music, such as rhythm and blues and reggae.
WEATHER
Weather information.
FINANCE
Stock market reports and trading, etc.
Other Features
continued
39
Page 40

Using the Radio Data System
(RDS) (continued)
CHILDREN
Programs for young.
SOCIAL
Programs about people and the things that
affect them.
RELIGION
Programs of religious contents.
PHONE IN
Programs where members of the public
express their views by phone or in a public
forum.
TRAVEL
Programs about travel. Not for
announcements that are located TP/TA.
LEISURE
Programs on recreational activities such as
gardening, fishing, cooking, etc.
JAZZ
Jazz programs.
COUNTRY
Country music programs.
NATION M
Programs featuring the popular music of the
country or region.
OLDIES
Programs featuring oldies music.
FOLK M
Folk Music Programs.
DOCUMENT
Investigative features.
TEST
Test signal for emergency broadcasts.
ALARM
Emergency broadcasts.
NONE
Any programming not defined above.
Falling asleep to music
— Sleep Timer
You can let the system turn off at the preset time,
so you can sleep to the music. You can preset the
time to be turned off in 10 minute increments.
SLEEP
, Press SLEEP on the remote.
Each time you press the button, the minute
display (the turn-off time) changes as
follows:
Autot 90min t 80min t 70min
t … t 10min t Off t Auto …
When you choose “Auto”
The power turns off when the current CD or tape
finishes playback (for up to 100 minutes).
To check the remaining time
Press SLEEP on the remote once.
To change the time to turn off
Press SLEEP on the remote repeatedly to select
the time you want.
To cancel the Sleep Timer
function
Press SLEEP on the remote repeatedly until
“Sleep Off” appears.
Note
“No PTY” appears when the program type you
selected is not currently being broadcast.
40
Page 41
Waking up to music
— Daily Timer
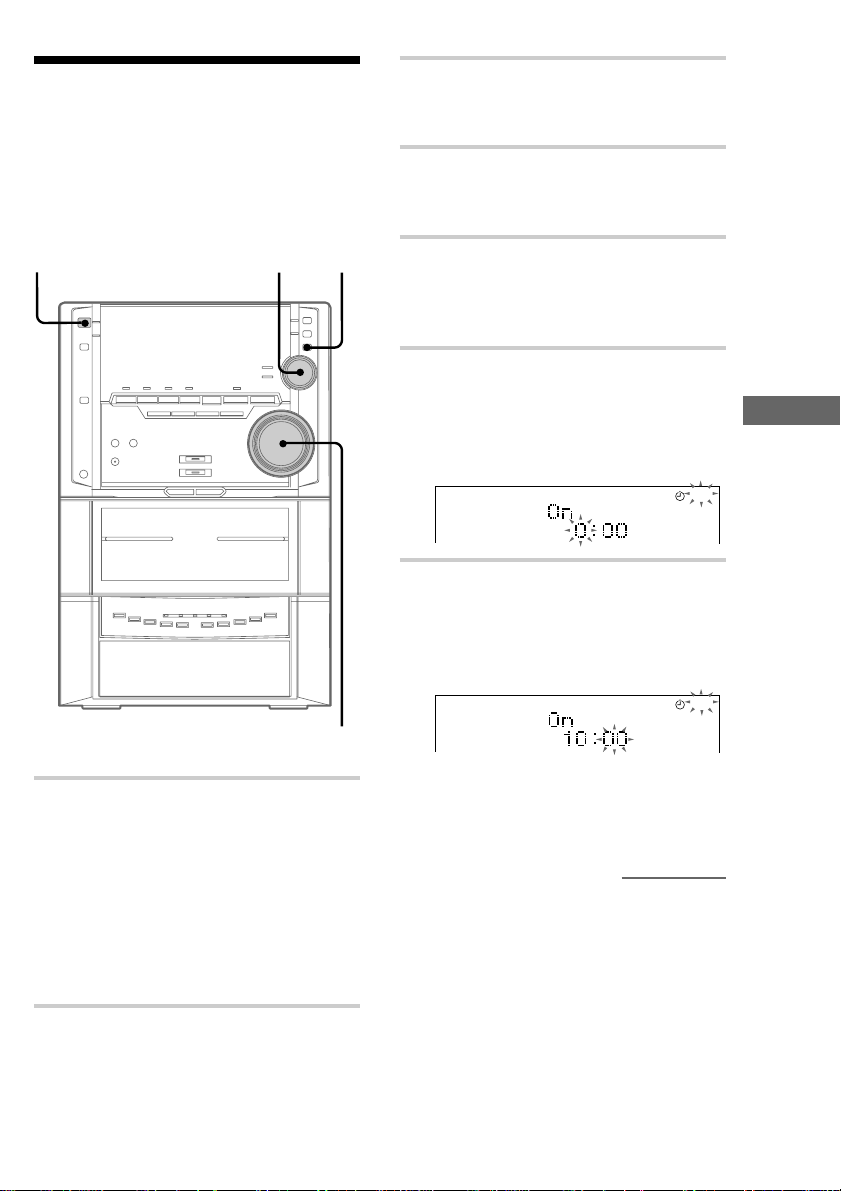
3 Press MODE SELECT repeatedly to
select “Set Up Mode”, then press PUSH
ENTER.
You can wake up to music at a preset time every
day. Make sure you have set the clock (see “Step
2: Setting the time” on page 6).
11
Multi stick
PUSH ENTER
1 Prepare the music source you want to
play.
• CD: Insert a CD. To start from a specific
track, make a program (see “Programming
the CD tracks” on page 24).
• Tape: Insert an tape with the side you
want to play facing forward.
• Radio: Tune in the preset station you
want (see “Listening to the radio” on page
14).
3
2
4 Move the multi stick toward b or B
repeatedly to select “Timer Set Up ?”,
then press PUSH ENTER.
5 Move the multi stick toward b or B
repeatedly to select “Timer Set ?”, then
press PUSH ENTER.
“Set Daily 1” appears.
6 Move the multi stick toward b or B
repeatedly to select “Daily 1 (or 2)”,
then press PUSH ENTER.
“On” appears and the hour digits flash in the
display.
7 Set the time to start playback.
Move the multi stick toward v or V
repeatedly to set the hour, then press PUSH
ENTER.
The minute digits flash in the display.
Move the multi stick toward v or V
repeatedly to set the minute, then press
PUSH ENTER.
continued
Other Features
DAILY 1
DAILY 1
2 Adjust the volume.
41
Page 42

Waking up to music (continued)
8 Set the time to stop playback following
step 7.
9 Move the multi stick toward b or B
repeatedly to select the music source
you want.
Each time you move the multi stick toward
b or B, the display changes as follows.
t TUNER y CD Play T
t TAPE Play T
10 Press PUSH ENTER.
The type of timer (Daily 1 or Daily 2),
followed by the start time, stop time and the
music source, appears, then the original
display appears.
11 Turn off the power.
To cancel the menu operation
Press MODE SELECT.
To check the setting
1 Press MODE SELECT repeatedly to select “Set
Up Mode”, then press PUSH ENTER.
2 Move the multi stick toward b or B repeatedly
to select “Timer Set Up ?”, then press PUSH
ENTER.
3 Move the multi stick toward b or B repeatedly
to select “Timer Select ?”, then press PUSH
ENTER.
4 Move the multi stick toward b or B repeatedly
to select the respective mode (“Daily 1” or
“Daily 2”), then press PUSH ENTER.
To change the setting, start over from step 1 on
page 41.
To cancel the timer operation
1 Press MODE SELECT repeatedly to select “Set
Up Mode”, then press PUSH ENTER.
2 Move the multi stick toward b or B repeatedly
to select “Timer Set Up ?”, then press PUSH
ENTER.
3 Move the multi stick toward b or B repeatedly
to select “Timer Select ?”, then press PUSH
ENTER.
4 Move the multi stick toward b or B repeatedly
to select “Timer Off”, then press PUSH
ENTER.
Tip
The power turns on 15 seconds before the preset time.
Notes
• You cannot activate DAILY 1 and DAILY 2 Timer
at the same time.
• You cannot set the timer if the starting time and
stopping time are the same.
• When you use the Sleep Timer, Daily Timer will
not turn on the system until the Sleep Timer turns it
off.
• You cannot activate Daily Timer and Timerrecording at the same time.
42
Page 43
Timer-recording radio programs
To timer-record, you must preset the radio station
(see “Step 3: Presetting radio stations” on page 8)
and set the clock (see “Step 2: Setting the time” on
page 6) beforehand.
9
Multi stick
PUSH ENTER
2
4 Move the multi stick toward b or B
repeatedly to select “Timer Set ?”, then
press PUSH ENTER.
“Set Daily 1” appears.
5 Move the multi stick toward b or B
repeatedly to select “Set REC”, then
press PUSH ENTER.
“On” appears and the hour digits flash in the
display.
6 Set the time to start recording.
Move the multi stick toward v or V
repeatedly to set the hour, then press PUSH
ENTER.
The minute digits flash in the display.
Move the multi stick toward v or V
repeatedly to set the minute, then press
PUSH ENTER.
REC
Other Features
REC
8
1 Tune in the preset radio station (see
“Listening to the radio” on page 14).
2 Press MODE SELECT repeatedly to
select “Set Up Mode”, then press PUSH
ENTER.
3 Move the multi stick toward b or B
repeatedly to select “Timer Set Up ?”,
then press PUSH ENTER.
continued
43
Page 44

Timer-recording radio programs
(continued)
7 Set the time to stop recording following
step 6.
The start time appears, followed by the stop
time, the preset radio station to be recorded
(e.g., “TUNER FM 5”), then the original
display appears.
8 Insert a recordable tape.
9 Turn off the power.
When the recording starts, the volume level
is set to the minimum.
To cancel the menu operation
Press MODE SELECT.
To check the setting
1 Press MODE SELECT repeatedly to select “Set
Up Mode”, then press PUSH ENTER.
2 Move the multi stick toward b or B repeatedly
to select “Timer Set Up ?”, then press PUSH
ENTER.
3 Move the multi stick toward b or B repeatedly
to select “Timer Select ?”, then press PUSH
ENTER.
4 Move the multi stick toward b or B repeatedly
to select “REC”, then press PUSH ENTER.
To change the setting, start over from step 1 on
page 43.
Notes
• If the power is on at the preset time, the recording
will not be made.
• You cannot set the timer if the starting time and
stopping time are the same.
• When you use the Sleep Timer, Timer-recording
will not turn on the system until the Sleep Timer
turns it off.
• You cannot activate Timer-recording and Daily
Timer at the same time.
To cancel the timer operation
1 Press MODE SELECT repeatedly to select “Set
Up Mode”, then press PUSH ENTER.
2 Move the multi stick toward b or B repeatedly
to select “Timer Set Up ?”, then press PUSH
ENTER.
3 Move the multi stick toward b or B repeatedly
to select “Timer Select ?”, then press PUSH
ENTER.
4 Move the multi stick toward b or B repeatedly
to select “Timer Off”, then press PUSH
ENTER.
44
Page 45

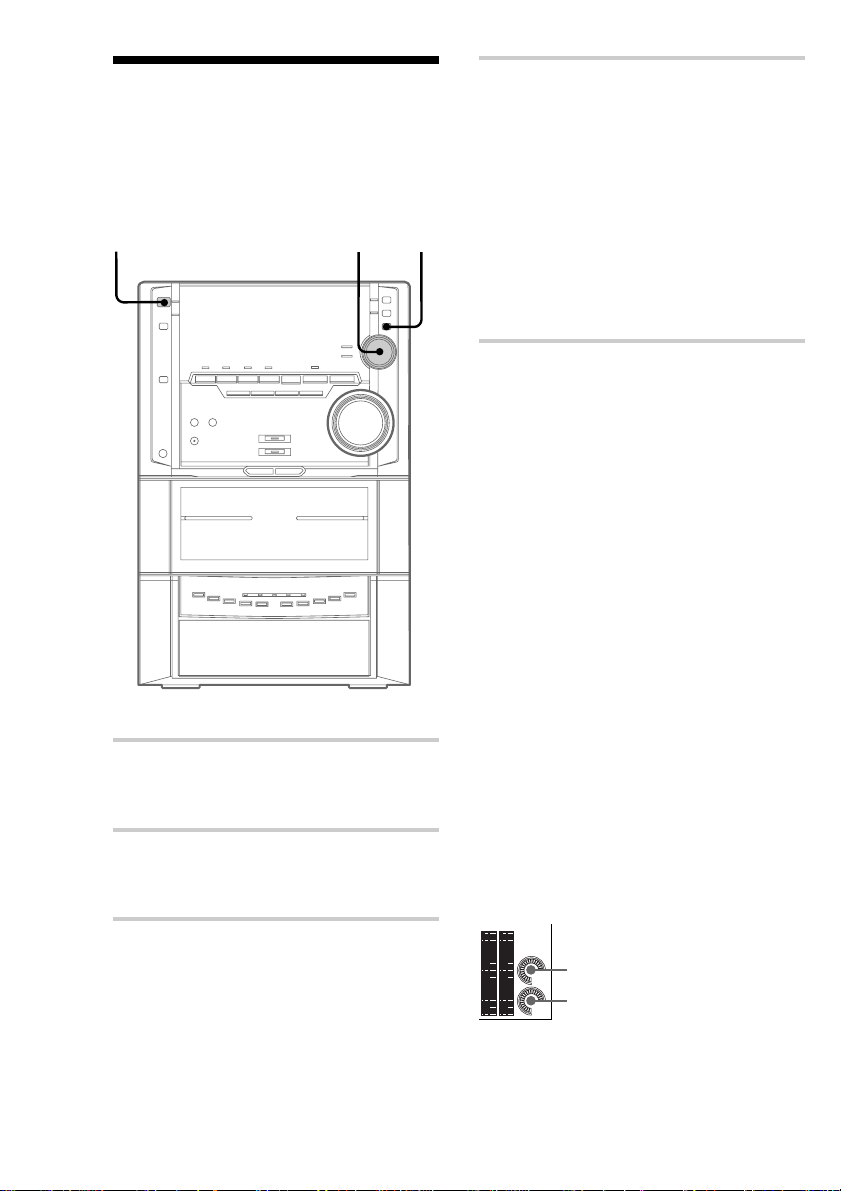
Optional components
Connecting audio components
Depending on the equipment to be connected and
the method of connecting, select one of the
following connections. Refer to the instructions of
each component.
Connecting an MD deck for
digital recording
You can record from CD into the MD deck
digitally by connecting an optical cable.
Connecting an MD deck for
analog recording
Make sure to match the color of the plugs and the
connectors. To listen to the sound of the connected
MD deck, press FUNCTION repeatedly until
“MD” appears.
To the audio output of
the MD deck
To the audio input of
the MD deck
Optional components
To the digital input of the MD deck
continued
45
Page 46

Connecting audio components
(continued)
Connecting a VCR
Connecting a super woofer
speaker
You can connect an optional super woofer
speaker.
To super woofer
Connecting headphones
Connect headphones to PHONES jack. No sound
will come out of the speakers.
?/1
(Power)
Make sure to match the color of the plugs and the
connectors. To listen to the sound of the connected
VCR, press FUNCTION repeatedly until
“VIDEO” appears. Refer to the instructions of
each component.
To the audio output of the VCR
Note
When you connect a VIDEO CD player, connect the
audio output jacks of the VIDEO CD player to the
MD IN jacks of this unit.
46
PHONES
Page 47

Connecting surround
Connecting external
speakers
Connect the speaker cords of the surround
speakers to the appropriate SURROUND
SPEAKER jacks. Connect the solid cords to the
red jacks and connect the striped cords to the
black jacks.
Keep the speaker cords away from the antennas to
prevent noise.
antennas
Connect the external antenna to improve the
reception. Refer to the instructions of each
component.
FM antenna
Connect the optional FM external antenna. You
can also use the TV antenna instead.
Jack type A
75-ohm coaxial cable
(not supplied)
Jack type B
IEC standard socket connector
(not supplied)
FM75
COAXIAL
FM75
AM
Optional components
To the surround
speaker (Right)
Note
Be sure to connect both left and right surround
speakers. Otherwise, the sound will not be heard.
To the surround
speaker (Left)
AM
continued
47
Page 48
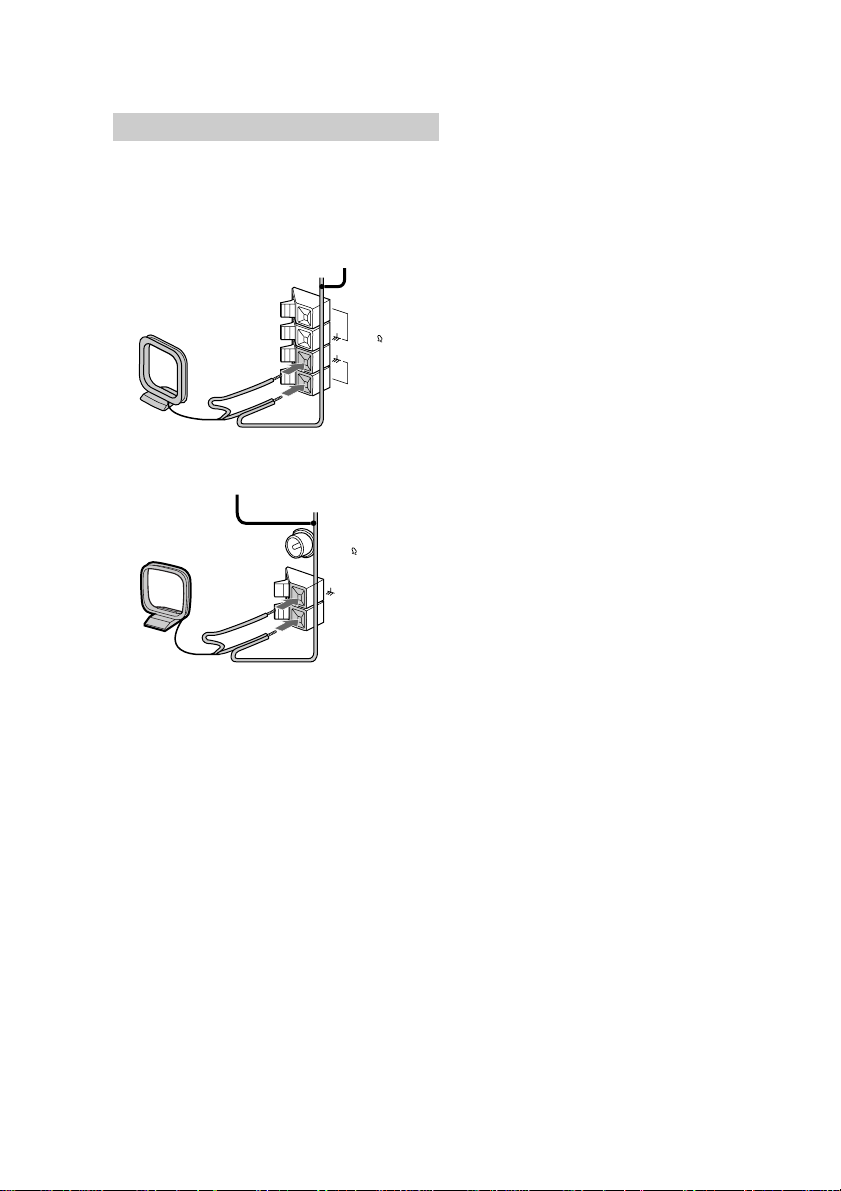
Connecting external antennas
(continued)
AM antenna
Connect a 6- to 15- meter insulated wire to the
AM antenna terminal. Leave the supplied AM
loop antenna connected.
Jack type A
Insulated wire (not supplied)
FM75
Jack type B
AM
Insulated wire (not supplied)
FM75
COAXIAL
48
Page 49

Additional Information
Precautions
On operating voltage
Before operating the system, check that the operating
voltage of your system is identical with the voltage of
your local power supply.
On safety
• The unit is not disconnected from the AC power
source (mains) as long as it is connected to the wall
outlet, even if the unit itself has been turned off.
• Unplug the system from the wall outlet (mains) if it
is not to be used for an extended period of time. To
disconnect the cord (mains lead), pull it out by the
plug. Never pull the cord itself.
• Should any solid object or liquid fall into the
component, unplug the stereo system and have the
component checked by qualified personnel before
operating it any further.
• The AC power cord must be changed only at a
qualified service shop.
On placement
• Place the stereo system in a location with adequate
ventilation to prevent heat build-up in the stereo
system.
• Do not place the unit in an inclined position.
• Do not place the unit in locations where it is;
— Extremely hot or cold
— Dusty or dirty
— Very humid
— Vibrating
— Subject to direct sunlight.
On operation
• If the stereo system is brought directly from a cold
to a warm location, or is placed in a very damp
room, moisture may condense on the lens inside the
CD player. Should this occur, the system will not
operate properly. Remove the CD and leave the
system turned on for about an hour until the
moisture evaporates.
• When you move the system, take out any discs.
If you have any questions or problems concerning
your stereo system, please consult your nearest Sony
dealer.
Notes on CDs
• Before playing, clean the CD with a cleaning cloth.
Wipe the CD from the center out.
• Do not use solvents such as benzene, thinner,
commercially available cleaners or anti-static spray
intended for vinyl LPs.
• Do not expose the CD to direct sunlight or heat
sources such as hot air ducts, nor leave it in a car
parked in direct sunlight.
• When using CDs that have glue or similar tacky
substance on the label side of the disc or that used a
special ink when the label was printed, there is a
chance that the CD or label may become attached to
parts inside this unit. When this occurs, it may not
be possible to remove the CD, and may also cause
this unit to malfunction. Be sure to check that the
label side of the CD is not sticky before using.
The following types of CD should not be used:
— Rental or used CDs with attached seals where
the glue extends beyond the seal. The perimeter
of the seal on the CD is tacky.
— CDs that have labels printed using a special ink
that feels tacky when touched.
Cleaning the cabinet
Use a soft cloth slightly moistened with mild
detergent solution.
To save a tape permanently
To prevent a tape from being accidentally recorded
over, break off the cassette tab from side A or B as
illustrated.
Detector slots
Tab of side B
If you later want to reuse the tape for recording, cover
the broken tab with adhesive tape. However, be
careful not to cover the detector slots which allow the
tape player to automatically detect the type of tape.
Tape type:
CrO2/METAL NORMAL
Detector slots
Tab of side A
Side A
Break off the
cassette tab
of side A
continued
Additional Information
49
Page 50

Precautions (continued)
Before placing a cassette in the
tape deck
Take up any slack in the tape. Otherwise the tape may
get entangled in the parts of the tape deck and become
damaged.
When using a tape longer than
90 minutes
The tape is very elastic. Do not change the tape
operations such as play, stop, and fast-winding, etc.
frequently. The tape may get entangled in the tape
deck.
Cleaning the tape heads
Clean the tape heads after every 10 hours of use.
When the tape heads become dirty;
— the sound is distorted
— there is a decrease in sound level
— the sound drops out
— the tape does not erase completely
— the tape does not record.
Make sure to clean the tape heads before you start an
important recording or after playing an old tape. Use
separately sold dry-type or wet-type cleaning cassette.
For details, refer to the instructions of the cleaning
cassette.
Demagnetizing the tape heads
Demagnetize the tape heads and the metal parts that
have contact with the tape every 20 to 30 hours of use
with a separately sold demagnetizing cassette. For
details, refer to the instructions of the demagnetizing
cassette.
Troubleshooting
If you run into any problem using this stereo
system, use the following check list.
First, check that the power cord is connected
firmly and the speakers are connected correctly
and firmly.
Should any problem persist, consult your nearest
Sony dealer.
General
The display starts flashing as soon as you
plug in the power cord even though you
haven’t turned on the power
(demonstration mode).
• Press DISPLAY once when the power is
turned off. The demonstration disappears.
The clock setting/radio presetting/timer is
canceled.
• The power cord is disconnected or a power
failure occurs longer than half a day.
Redo the followings:
— “Step 2: Setting the time” on page 6.
— “Step 3: Presetting radio stations” on page 8.
If you have set the timer, also redo “Waking
up to music” on page 41 and “Timerrecording radio programs” on page 43.
There is no sound.
• Rotate VOLUME clockwise.
• The headphones are connected.
• Insert only the stripped portion of the speaker
cord into the SPEAKER jack. Inserting the
vinyl portion of the speaker cord will obstruct
the speaker connections.
• There is no audio output during timer
recording.
50
Page 51

There is severe hum or noise.
• A TV or VCR is placed too close to the stereo
system. Move the stereo system away from
the TV or VCR.
“--:--” appears in the display.
• A power interruption occurred. Set the clock
and timer settings again.
The timer does not function.
• Set the clock correctly.
“Daily 1”, “Daily 2”, or “REC” do not
appear when you select “Timer Select ?”
menu.
• Set the timer correctly.
• Set the clock.
The remote does not function.
• There is an obstacle between the remote and
the system.
• The remote is not pointing in the direction of
the system’s sensor.
• The batteries have run down. Replace the
batteries.
There is acoustic feedback.
• Decrease the volume level.
• Move the microphone away form the speakers
or change the direction of the microphone.
The color irregularity on a TV screen
persists.
• Turn off the TV set once, then turn it on after
15 to 30 minutes. If the color irregularity still
persists, place the speakers farther away from
the TV set.
“PROTECT” and “PUSH POWER” appear
alternately.
• A strong signal was input. Press ?/1 to turn
off the power, leave the system turned off for
a while, then press ?/1 again to turn on the
power.
If “PROTECT” and “PUSH POWER” appear
alternately even after the power is turned on
again, press ?/1 to turn off the power and
check the speaker cord.
Speakers
Sound comes from one channel or
unbalanced left and right volume.
• Check the speaker connection and speaker
placement.
Sound lacks bass.
• Check that the speaker’s + and – jacks are
connected correctly.
CD Player
The CD tray does not close.
• The CD is not placed properly.
The CD will not play.
• The CD is not lying flat in the disc tray.
• The CD is dirty.
• The CD is inserted label side down.
• Moisture condensation has built up. Remove
the CD and leave the system turned on for
about an hour until the moisture evaporates.
Play does not start from the first track.
• The player is in program or shuffle mode.
Select “1 Disc” or “All Discs” in the “Play
Mode” menu (pages 23, 25).
“Over” is displayed.
• You have reached the end of the CD. Press
and hold m to return.
continued
Additional Information
51
Page 52

Troubleshooting (continued)
Tuner
Tape Deck
The tape does not record.
• No tape in the cassette holder.
• The tab has been removed from the cassette
(see “To save a tape permanently” on page
49).
• The tape has reeled to the end.
The tape does not record nor play or there
is a decrease in sound level.
• The heads are dirty. Clean them (see
“Cleaning the tape heads” on page 50).
• The record/playback heads are magnetized.
Demagnetize them (see “Demagnetizing the
tape heads” on page 50).
The tape does not erase completely.
• The record/playback heads are magnetized.
Demagnetize them (see “Demagnetizing the
tape heads” on page 50).
There is excessive wow or flutter, or the
sound drops out.
• The capstans or pinch rollers are dirty. Clean
them (see “Cleaning the tape heads” on page
50).
Noise increases or the high frequencies
are erased.
• The record/playback heads are magnetized.
Demagnetize them (see “Demagnetizing the
tape heads” on page 50).
After pressing N (n) or A, there is a
mechanical noise, “EJECT” appears in the
display, and the unit enters standby mode
automatically.
• The cassette tape was not inserted correctly.
Eject the tape and turn the power back on.
Severe hum or noise (“TUNED” or
“STEREO” flashes in the display).
• Adjust the antenna.
• The signal strength is too weak. Connect the
external antenna.
A stereo FM program cannot be received
in stereo.
• Select “Stereo” in the “Stereo Mono ?” menu.
If other troubles not described
above occur, reset the system
as follows:
1 Unplug the power cord.
2 Plug the power cord back in.
3 Press x, DISPLAY, and DISC 5 at the same
time.
4 Press ?/1 to turn on the power.
The system is reset to the factory settings. All the
settings you made, such as the preset stations,
clock, and timer are cleared. You should set them
again.
52
Page 53

Specifications
Amplifier section
AUDIO POWER SPECIFICATIONS:
(U.S.A. model only)
POWER OUTPUT AND TOTAL HARMONIC
DISTORTION:
with 8 ohm loads both channels driven, from 120–
10,000 Hz; rates 110 watts per channel minimum
RMS power, with no more than 10 % total
harmonic distortion from
250 milliwatts to rated output.
Total harmonics distortion Less than 0.07%
(8 ohms at 1 kHz, 60 W)
CD player section
System Compact disc and digital audio
Laser Semiconductor laser
Laser output Max. 44.6
Wavelength 780 – 790 nm
Frequency response 2 Hz – 20 kHz (±0.5 dB)
Signal-to-noise ratio More than 90 dB
Dynamic range More than 90 dB
CD OPTICAL DIGITAL OUT
(Square optical connector jack, rear panel)
Wavelength 660 nm
Output Level –18 dBm
system
(λ=780nm)
Emission duration: continuous
µ
*This output is the value measured
at a distance of 200 mm from the
objective lens surface on the
Optical Pick-up Block with 7 mm
aperture.
W*
Canadian model:
Continuous RMS power output (reference)
100 + 100 watts
(8 ohms at 1 kHz,
10% THD)
Total harmonics distortion
Less than 0.07%
(8 ohms at 1 kHz, 60 W)
European model:
DIN power output (rated) 80 + 80 watts
(8 ohms at 1 kHz, DIN)
Continuous RMS power output (reference)
100 + 100 watts
(8 ohms at 1 kHz,
10% THD)
Music power output (reference)
170 + 170 watts
(8 ohms at 1 kHz,
10% THD)
Inputs
VIDEO (AUDIO) IN: voltage 250 mV,
(phono jacks) impedance 47 kilohms
MD IN: voltage 450 mV,
(phono jacks) impedance 47 kilohms
Outputs
MD OUT: voltage 250 mV
(phono jacks) impedance 1 kilohms
PHONES: accepts headphones of
(stereo mini jack) 8 ohms or more
FRONT SPEAKER: accepts impedance of 8 to 16 ohms
SURROUND SPEAKER: accepts impedance of 16 ohms
SUPER WOOFER: Voltage 1 V, impedance 1 kilohms
Tape player section
Recording system 4-track 2-channel stereo
Frequency response 40 – 13,000 Hz (±3 dB),
(DOLBY NR OFF) using Sony TYPE I cassette
Wow and flutter ±0.15% W.Peak (IEC)
40 – 14,000 Hz (±3 dB),
using Sony TYPE II cassette
0.1% W.RMS (NAB)
±0.2% W.Peak (DIN)
Tuner section
FM stereo, FM/AM superheterodyne tuner
FM tuner section
Tuning range
North American model: 87.5 – 108.0 MHz (100 kHz step)
Other models: 87.5 – 108.0 MHz (50 kHz step)
Antenna FM lead antenna
Antenna terminals 75 ohm unbalanced
Intermediate frequency 10.7 MHz
AM tuner section
Tuning range
North American model: 530 – 1,710 kHz
European model: 531 – 1,602 kHz
Antenna AM loop antenna
Antenna terminals External antenna terminal
Intermediate frequency 450 kHz
(with the interval set at
10 kHz)
531 – 1,710 kHz
(with the interval set at
9 kHz)
(with the interval set at
9 kHz)
continued
Additional Information
53
Page 54

Specifications (continued)
Speaker (SS-ZX10)
Speaker system 3-way, bass-reflex type,
magnetically shielded type
Speaker units
Woofer: 17 cm, cone type
Tweeter: 5 cm, cone type
Super Tweeter: 4 cm, cone type
Nominal impedance 8 ohms
Dimensions (w/h/d) Approx. 250 x 375 x 285 mm
Mass Approx. 5.5 kg net per speaker
General
Power requirements
North American model: 120 V AC, 60 Hz
European model: 230 V AC, 50/60 Hz
Power consumption
U.S.A. model: 190 watts
Canadian model: 195 watts
European model: 200 watts
Dimensions (w/h/d) Approx. 250 x 375 x 395 mm
Mass
U.S.A. model: Approx. 11.5 kg
Canadian model: Approx. 11.5 kg
European model: Approx. 11.0 kg
Supplied accessories: AM loop antenna (1)
FM lead antenna (1)
Remote Commander (1)
Batteries (2)
Speaker cords (2)
Front speaker pads (8)
Optional accessories
Surround speaker SS-SR125
Speaker system 1-way, 1-unit,
bass-reflex type
Speaker units:
Full range 8 cm, cone type
Nominal impedance 16 ohms
Dimensions (w/h/d) Approx. 220 x 100 x 195 mm
Mass Approx. 1.0 kg net per speaker
54
For the customers in Canada
Use only the optional SS-SR125 surround speaker for
connection to the SURROUND SPEAKER connector
on the MHC-ZX10.
Design and specifications are subject to change
without notice.
Page 55
Parts Identification for the remote
You can also operate the system with the supplied
remote.
*: You can operate with the remote only.
TUNER
Remote
Button(s)
TUNER/BAND
./> (+, –)
m/M
CD
Remote
Button(s)
CD N
x
X
./>
m/M
DISC SKIP*
LOOP*
FLASH*
Function
Selects FM or AM.
Selects a preset number.
Scans for a station or selects a
preset station.
Function
Starts play back.
Stops playback.
Pauses playback.
Selects a track (AMS: Automatic
Music Sensor).
Locates a desired point in a track.
Exchanges CDs.
Activates Loop function.
Activates Flash function.
TAPE
Remote
Button(s)
TAPE A N
TAPE B N
x
./>
m/M
TIMER
Remote
Button(s)
SLEEP*
OTHERS
Remote
Button(s)
?/1
VOL +/–
B/b/V/v
ENTER
FUNCTION
MODE SELECT
FILE SELECT
Function
Starts playback.
Each time you press this button,
the tape reverses direction.
Stops playback.
Searches for the beginning of a
Track (AMS).
Fast-forwards or rewinds.
Function
Selects a sleep timer.
Function
Turns the systemon or off.
Adjusts the volume.
Use to select menu and adjust the
settings.
Selects the function.
Enters the menu mode.
Selects the preset audio effect file.
Additional Information
55
Page 56

Index
A
Adjusting
the parameter of cinema
space 35
the sound 31
the volume 12, 15, 18
Antennas 5, 47
Automatic Source Selection
12, 15, 19
B
Batteries 6
C
CD player 11, 21-25
CD Synchro Recording 13
Clock setting 6
Connecting 4-6, 45-48
D
Daily Timer 41
Dimmer 34
Display 21
E
Edit 27, 30
L
Listening to the radio 14
Loop 30
M
Multi stick 7
N
Normal Play 11
O
One Touch Play 12, 15, 19
P, Q
Personal file 37
Playing
a CD 11
a tape 17
tracks in random order
(Shuffle Play) 23
tracks in the desired order
(Program Play) 24
tracks repeatedly (Repeat
Play) 22
Presetting radio stations 8
Preset tuning 14
Program Edit 27
Program Play 24
Protecting recordings 49
PTY 38
S
Saving recordings 49
Selecting the audio effect file
32
Setting the time 6
Shuffle Play 23
Sleep Timer 40
Sound adjustment 31
GROOVE 31
GROOVE-EX 32
V-GROOVE 32
Station name 38
T, U, V, W, X, Y, Z
Tape Select Edit 30
Timer
falling asleep to music 40
timer recording 41
waking up to music 40
Troubleshooting 50
Tuner 8, 14, 38
Tuning interval 9
F, G
Flash 31
H, I, J, K
High-speed Dubbing 20
Hooking up
optional components 45-48
the antennas 5, 47
the power 5
the system 4
56
R
Radio Data System 38
Radio stations
presetting 8
tuning in 14
Recording
a CD 13
a radio program 16
timer recording 43
Repeat Play 22
Resetting the system 52
Page 57

Additional Information
57
Page 58

58
Page 59

Additional Information
59
Page 60

Items in “Sound Mode” and “Set Up Mode”
The numbers in parenthesis denotes the page number for the item.
Sound Mode
Effect OnpOff/OffpOn (33)
File Select (33)
P File Memory (37)
Equalizer Control (36)
Cinema Space (35)
*
Set Up Mode
CD Set Up ?
*
Repeat Set Up ? (22)
Play Mode Set Up ? (12)
CD Edit Start ? (30)
Program Set ? (24, 27)
PGM Check Clear (25, 29)
*
1)
2)
Mode End
• To cancel the menu
operation, press MODE
SELECT.
• The items with asterisk (*)
cannot be selected depending on
the situation.
• The items in double box are not
in the menu. In order to select the
doublebox items, press the
corresponding buttons on the
front panel or on the remote.
• Select “Mode End” to finish the
menu operation.
1)
Cannot be selected during CD
playback.
2)
Cannot be selected during CD
program playback.
TUNER Set Up ?
TAPE Set Up ?
Timer Set Up ?
Display Set Up ?
Mode End
*
Stereo Mono ? (15)
PTY Select ? (38)
*
*
TUNER Memory ? (8)
TUNER Erase ? (9)
*
Mode End
Direction Set Up ? (13, 16, 18, 20)
DOLBY NR Set Up ? (14, 17, 19)
Mode End
Clock Set ? (6)
Timer Set ? (41, 43)
Timer Select ? (42, 44)
*
*
Mode End
Spectrum Set Up ? (34)
Sony Corporation Printed in Malaysia
Dimmer Set Up ? (34)
Mode End
Mode End
 Loading...