

Page 1
3-856-197-42(1)
Mini Hi-Fi
Component System
Operating Instructions
Manual de Instruções
K
C
EN
EN
1
P
K
C
MHC-V800
©1996 by Sony Corporation
Page 2
English
WARNING
To prevent fire or shock hazard, do not
expose the unit to rain or moisture.
To avoid electrical shock, do not open the cabinet. Refer servicing to
qualified personnel only.
Do not install the appliance in a confined space, such as a bookcase
or built-in cabinet.
Laser component in this product is capable of emitting radiation
exceeding the limit for Class 1.
This appliance is classified as a
CLASS 1 LASER product. The
CLASS 1 LASER PRODUCT
MARKING is located on the rear
exterior.
This caution
label is located
inside the unit.
Welcome!
Thank you for purchasing the Sony Mini Hi-Fi Component System.
This series is packed with fun features. Here are just a few:
•In addition to audio CDs, you can play video CDs and CD-Gs to
enjoy both moving and graphic pictures
•DBFB (Dynamic Bass Feedback) system that boosts low frequency
range audio provide deep, powerful bass sound
•A preset feature that lets you store and recall up to 20 FM stations,
10 MW stations, and 10 SW stations of your favorite radio stations
•An amplifier that lets you adjust the audio quality to fit a variety of
music types and environments
•A timer that lets you set the CD player, tape player or radio to turn
on and off whenever you want
•A dual tape deck that lets you record from the radio, CD player or
from the other tape deck and relay play from both decks
•A CD player that lets you play up to three CDs in a row and
seamlessly advance (or reverse) through all the tracks on all the
discs on the disc tray
•A remote that lets you control your system from your seat
This system can play the following discs:
VIDEO CDs Audio CDs CD-Gs
Disc logo
f
(CD-Graphics)
f
EN
2
Before Using This Unit
The demo mode appears in the display
when you connect the AC power cord to
a wall outlet. To deactivate the demo
mode, press DISPLAY/DEMO when the
system power is off.
Contents Audio + Video Audio Audio + Video
(moving (graphic
pictures) pictures)
Disc size 12 cm/8 cm 12 cm/8 cm 12 cm/8 cm
Play time 74 min./ 74 min./ 74 min./
20 min. 20 min. 20 min.
Note on VIDEO CDs
This system conforms to VIDEO CDs without PBC functions (Ver.
1.1) and VIDEO CDs with PBC functions (Ver. 2.0) of VIDEO CD
standards. You can enjoy two kinds of playback according to the
disc type.
Disc type You can
VIDEO CDs without Enjoy video playback (moving pictures) as
PBC functions well as audio CDs.
(Ver. 1.1 discs)
VIDEO CDs with Play interactive software using menu
PBC functions screens displayed on the TV screen (menu
(Ver. 2.0 discs) playback), in addition to the video playback
function of VIDEO CDs without PBC
functions.
Moreover, you can play high or standard
quality still picture.
* PBC = PlayBack Control
The MHC-V800 consists of following:
— Main unit: HCD-V800
— Speaker system: Front speakers SS-H991G
Surround speakers SS-SR991G
Page 3

Table of Contents
Chapter 1: Setting Up
Connecting the Stereo 4
Inserting the Batteries 6
Setting the Clock 7
Chapter 2: the Video CD/CD-G/CD
Player
Basic Operations
Playing VIDEO CDs and CD-Gs 8
Playing CDs 10
Using the Display
Checking the Remaining Time 10
Using the On-Screen Display 11
Special Functions
Locating a Specific Part of a Disc (special menu) 12
Selecting the Graphic Channels on CD-Gs 14
Playing a VIDEO CD From Where it Was Last Stopped
(resume play) 14
Playing CDs in Various Modes
Playing Tracks in Random Order (shuffle play) 15
Playing Tracks in the Desired Order (program play) 15
Playing Tracks Repeatedly (repeat play) 16
Chapter 7: Additional Features
Falling Asleep to Music 29
Waking Up to Music 29
Timer-Recording Radio Programs 30
Connecting Optional Equipment 31
For Your Information
Precautions 33
Troubleshooting Guide 33
Maintenance 35
Specifications 35
Glossary 36
Index to Parts and Controls 36
Index 38
EN
3
Chapter 3: the Radio
Listening to the Radio 17
Presetting Radio Stations 18
Playing Preset Radio Stations 18
Chapter 4: the Tape Player
Playing a Tape 19
Recording a CD 20
Recording a CD: Specifying Tape Length (time edit) 21
Recording From the Radio 22
Recording From Another Tape (dubbing) 22
Chapter 5: Sound Adjustment
Adjusting the Sound 24
Selecting the Audio Emphasis 24
Adjusting the Audio Emphasis 25
Making a Personal Audio Emphasis File (personal file)
26
Switching the Speaker Formation (sonic formation) 26
Chapter 6: Karaoke
Karaoke: Singing Along 27
Recording the Karaoke (microphone mixing) 28
Page 4
EN
Chapter 1:
Setting
Up
Connecting the Stereo
Inserting the Batteries
Setting the Clock
Connecting the
Stereo
Use the illustrations below to connect your
stereo.
If you want to connect any optional
components to the stereo, see “Connecting
Optional Equipment” in Chapter 7.
STEP 1
Connecting the
Speakers
After arranging both ends of the speaker
cables, connect all speakers to the unit.
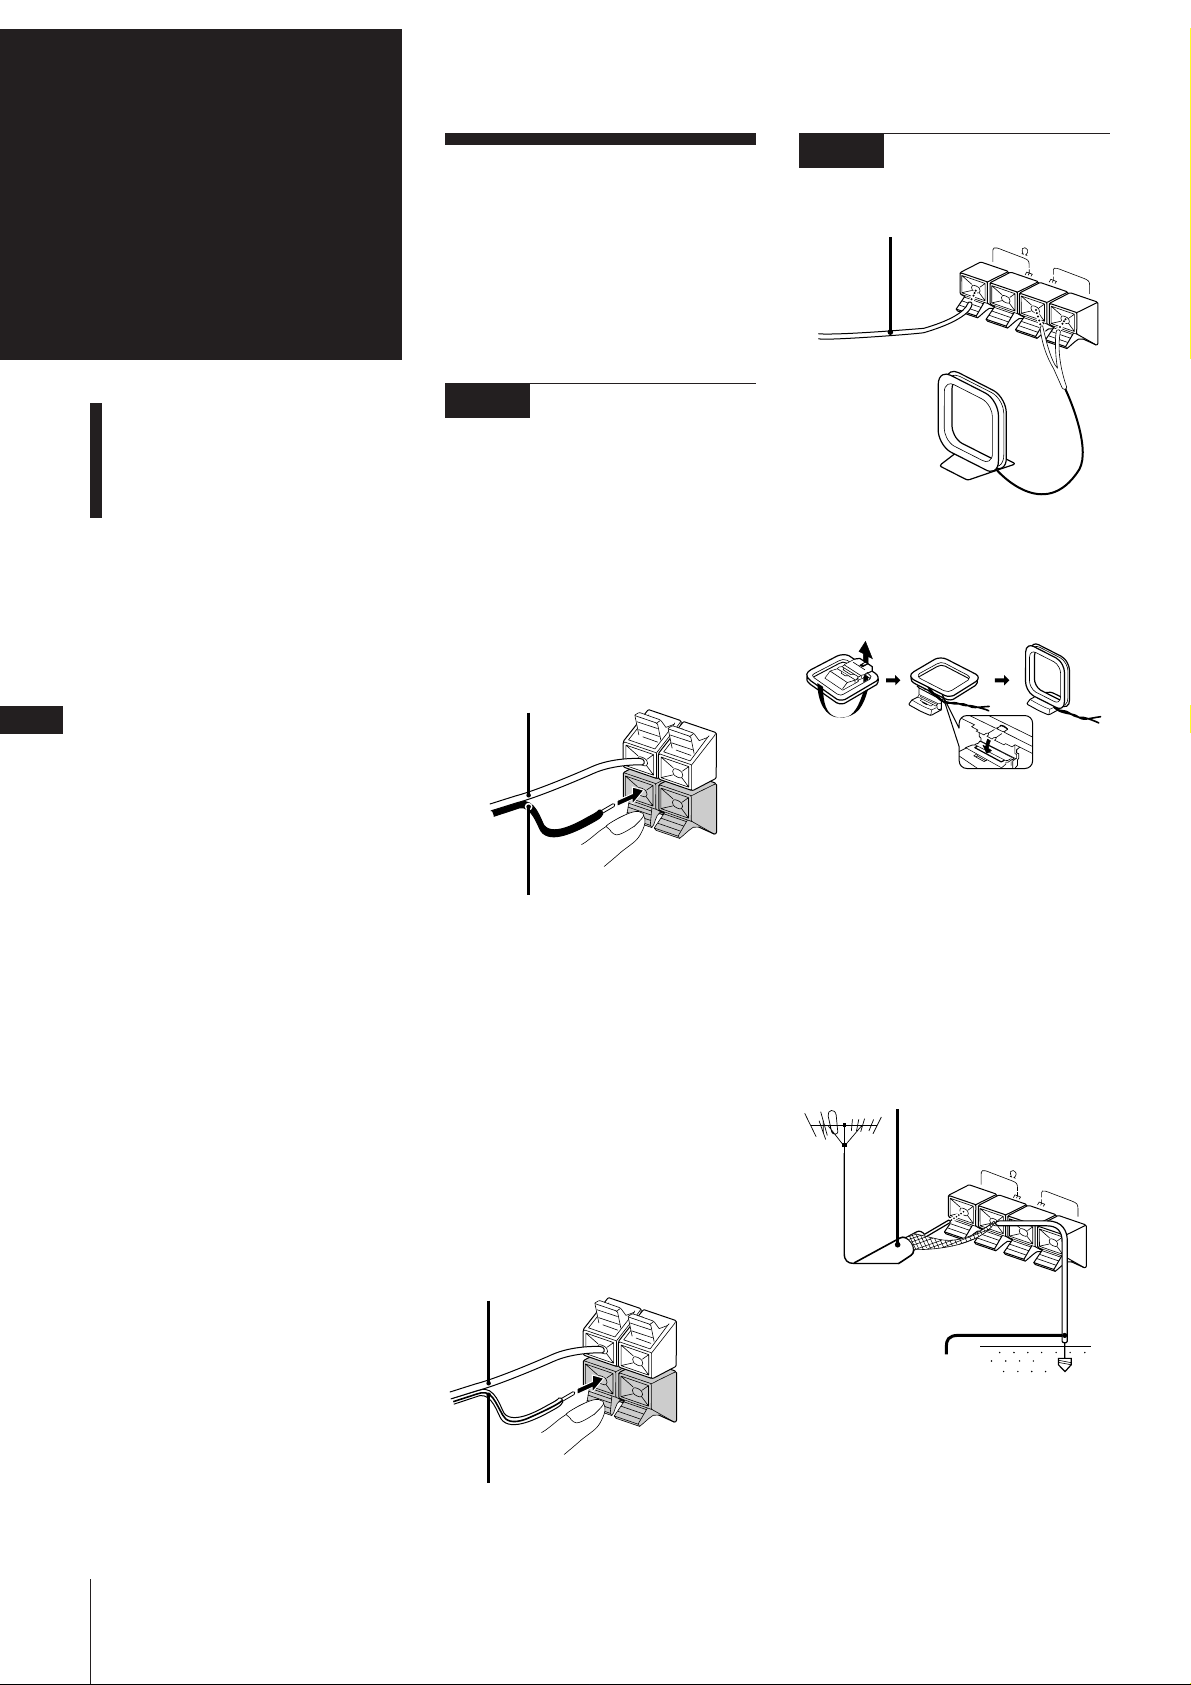
To connect the front speakers
Connect the right front speaker to the
SPEAKER R connectors and the left front
speaker to the SPEAKER L connectors with
the red cords to ‘ and the black cords to
’ .
Red cord to ‘ (red)
SPEAKER
R
L
STEP 2
Connecting the
Antennas
FM lead antenna* (supplied)
AM loop antenna (supplied)
* Note: Extend it horizontally
AM loop antenna connection
Connect the supplied loop antenna to the
AM and the y terminals.
FM 75
AM
4
To improve the FM reception
Connect an external FM antenna to the
FM 75 Ω and y terminals, using a 75-ohm
Black cord to ’ (black)
To connect the surround/sub
speakers
Connect the right rear speaker to the
SURROUND/SUB SPEAKER R connectors
and the left rear speaker to the
SURROUND/SUB SPEAKER L connectors
with the gray cords to ‘ and the gray with
black stripes cords to ’.
Note
Do not place the surround speakers on top
of a TV. This may cause distortion of the
colors in the TV screen.
SURROUND/SUB SPEAKER
Gray cord
to ‘ (Gray)
R
L
coaxial cable.
Important
Ground the external antenna from y
terminal against lightning with the screw
clamp. To prevent a gas explosion, do not
connect the ground wire to a gas pipe.
75-ohm coaxial cable
(not supplied)
FM 75
AM
Chapter 1: Setting Up
Ground wire
(not supplied)
Black-lined cord to ’ (black)
Page 5
Rear speaker (right)
(Do not place on top of
a TV.)
Front speaker
(right)
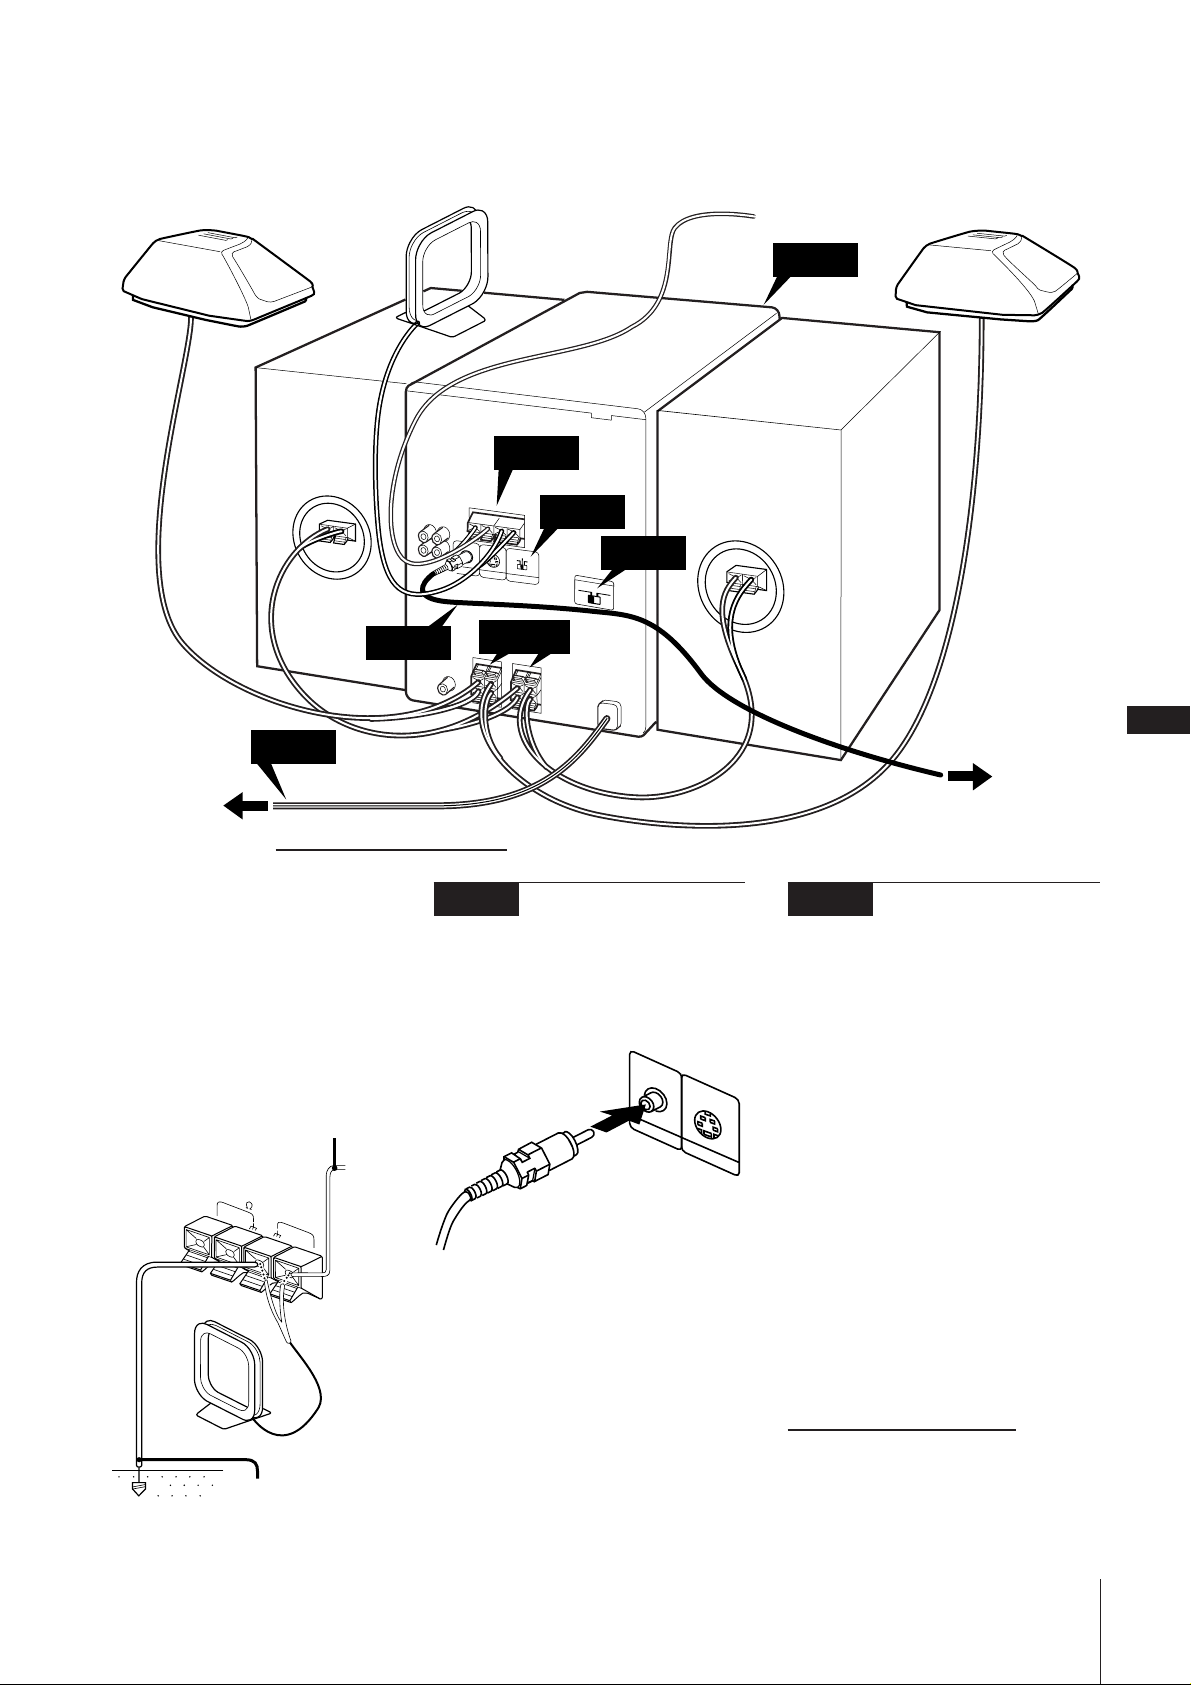
AM loop antenna (supplied)
STEP 2
STEP 4
FM lead antenna (supplied)
Front speaker
(left)
STEP 5
Rear speaker (left)
(Do not place on top of
a TV.)
STEP 7
STEP 6
to a wall outlet
!Do this connection last!
To improve the AM reception
After you connect the AM antenna, connect
a 6- to 15-meter insulated wire to the AM
terminal. Connect the y terminal to earth.
Important
Ground the external antenna against
lightning from the y terminal. To prevent a
gas explosion, do not connect the ground
wire to a gas pipe.
Insulated wire
(not supplied)
FM 75
AM
Ground wire
(not supplied)
STEP 3
STEP 1
STEP 3 STEP 4
Connecting a TV
Color System (NTSC/PAL)
Connect the video input jack of a TV to the
VIDEO OUT jack on the rear panel of the
system with the supplied video connecting
cable.
VIDEO OUT
S VIDEO OUT
When using a TV
Turn on the TV and select the video input
so that you can view the pictures from this
system.
Note
For even higher quality video images, you
can use an optional S-VIDEO cord to
connect the S-VIDEO input jack on your TV
to the S-VIDEO OUT jack on the rear panel
of the system.
This system conforms to the NTSC and
PAL color systems. Set SYSTEM SELECT
(color system) on the rear of the system to
the appropriate position, according to your
TV.
SYSTEM SELECT was set to AUTO in
factory
• If your TV automatically changes the color
system according to the input signal:
The factory setting (AUTO) automatically
changes the color system of video output
according to the color system of the
VIDEO CD to be played. In this case, the
color system selected remains until you
turn off the system, or you play another
VIDEO CD with a different color system.
If you turn off the system, the color
system will be set to NTSC automatically
when you turn on the system again.
continue to next page ➔
EN
5
Selecting the
Chapter 1: Setting Up
Page 6
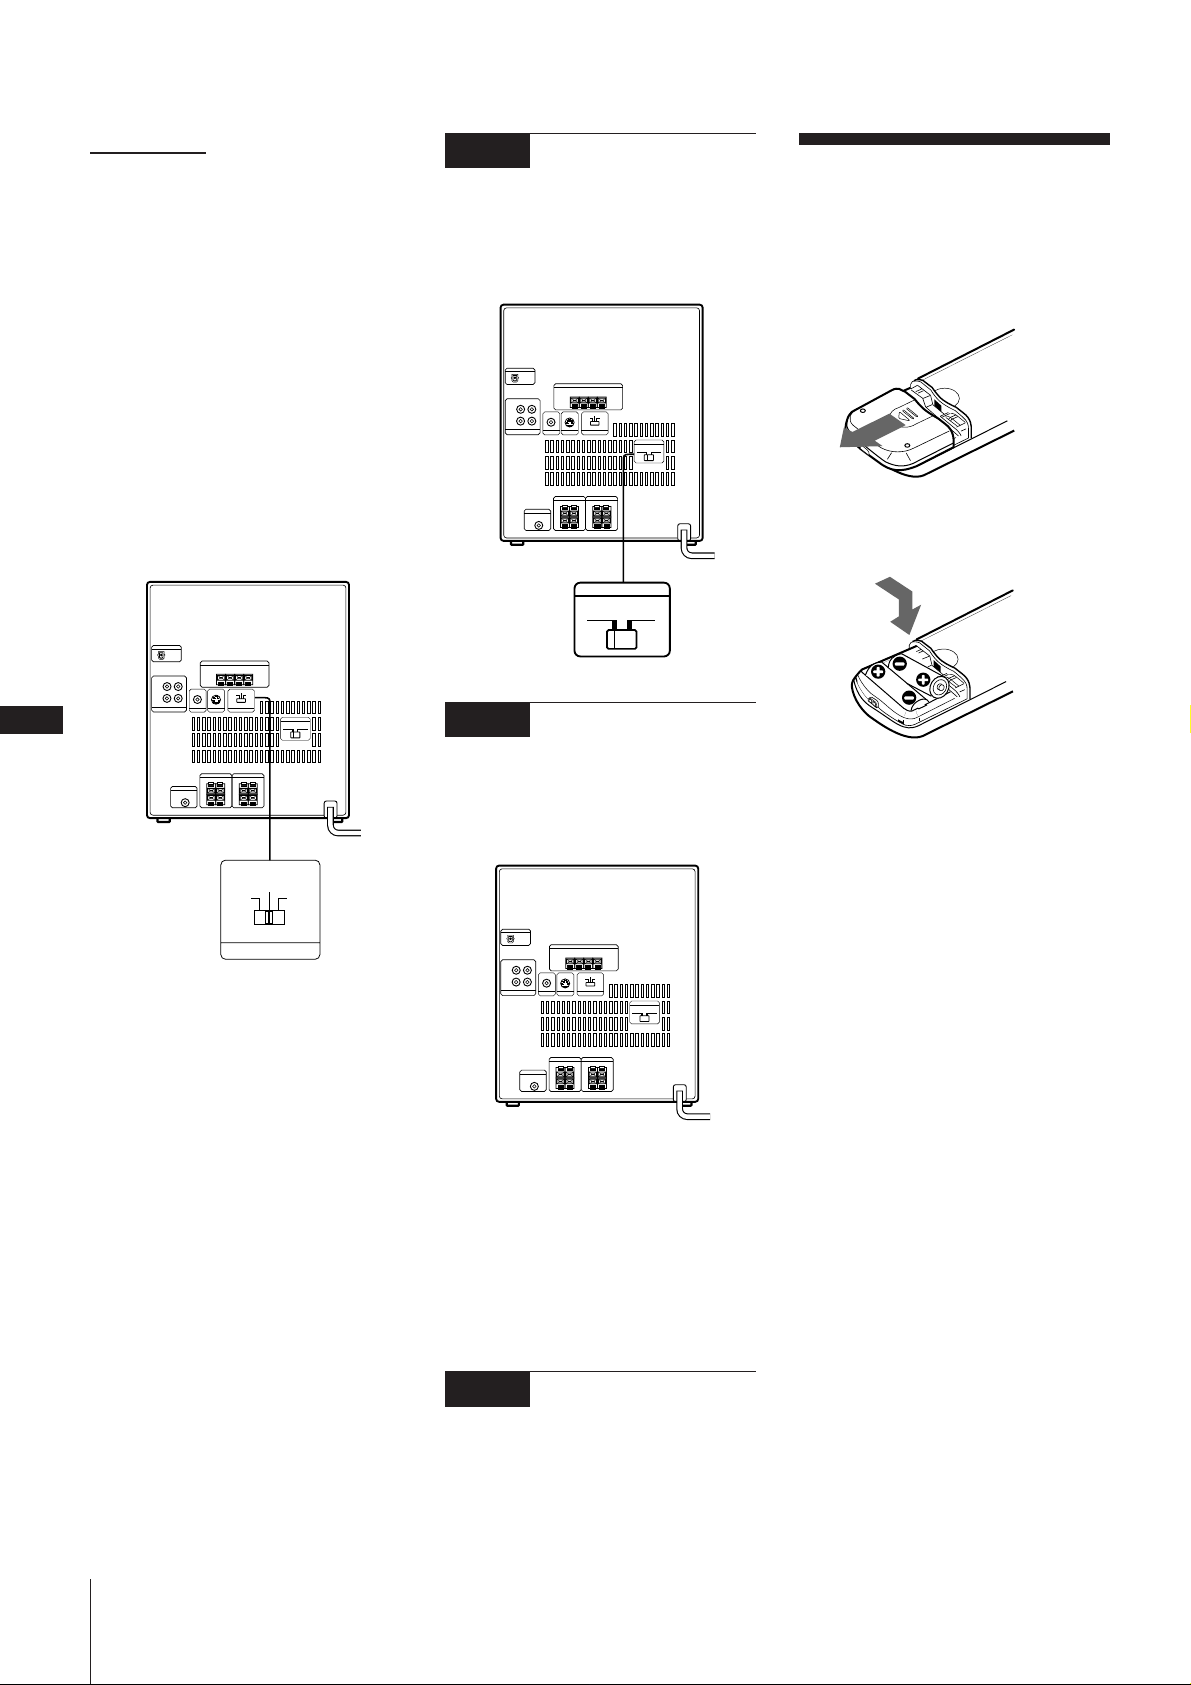
➔ continued
• If the color system of your TV is NTSC:
Set SYSTEM SELECT to NTSC.
When you play a VIDEO CD recorded in
the PAL color system, the picture will be
stretched vertically and will be displayed
with the upper and lower parts of the
picture cut off.
• If the color system of your TV is PAL:
Set SYSTEM SELECT to PAL.
When you play a VIDEO CD recorded in
the NTSC color system, the picture will be
stretched horizontally and will be
displayed with the upper and lower parts
of the screen masked in black.
STEP 5
Adjusting the
Operating Voltage
Before connecting the power, set the
VOLTAGE SELECTOR to the position of
your local power line voltage.
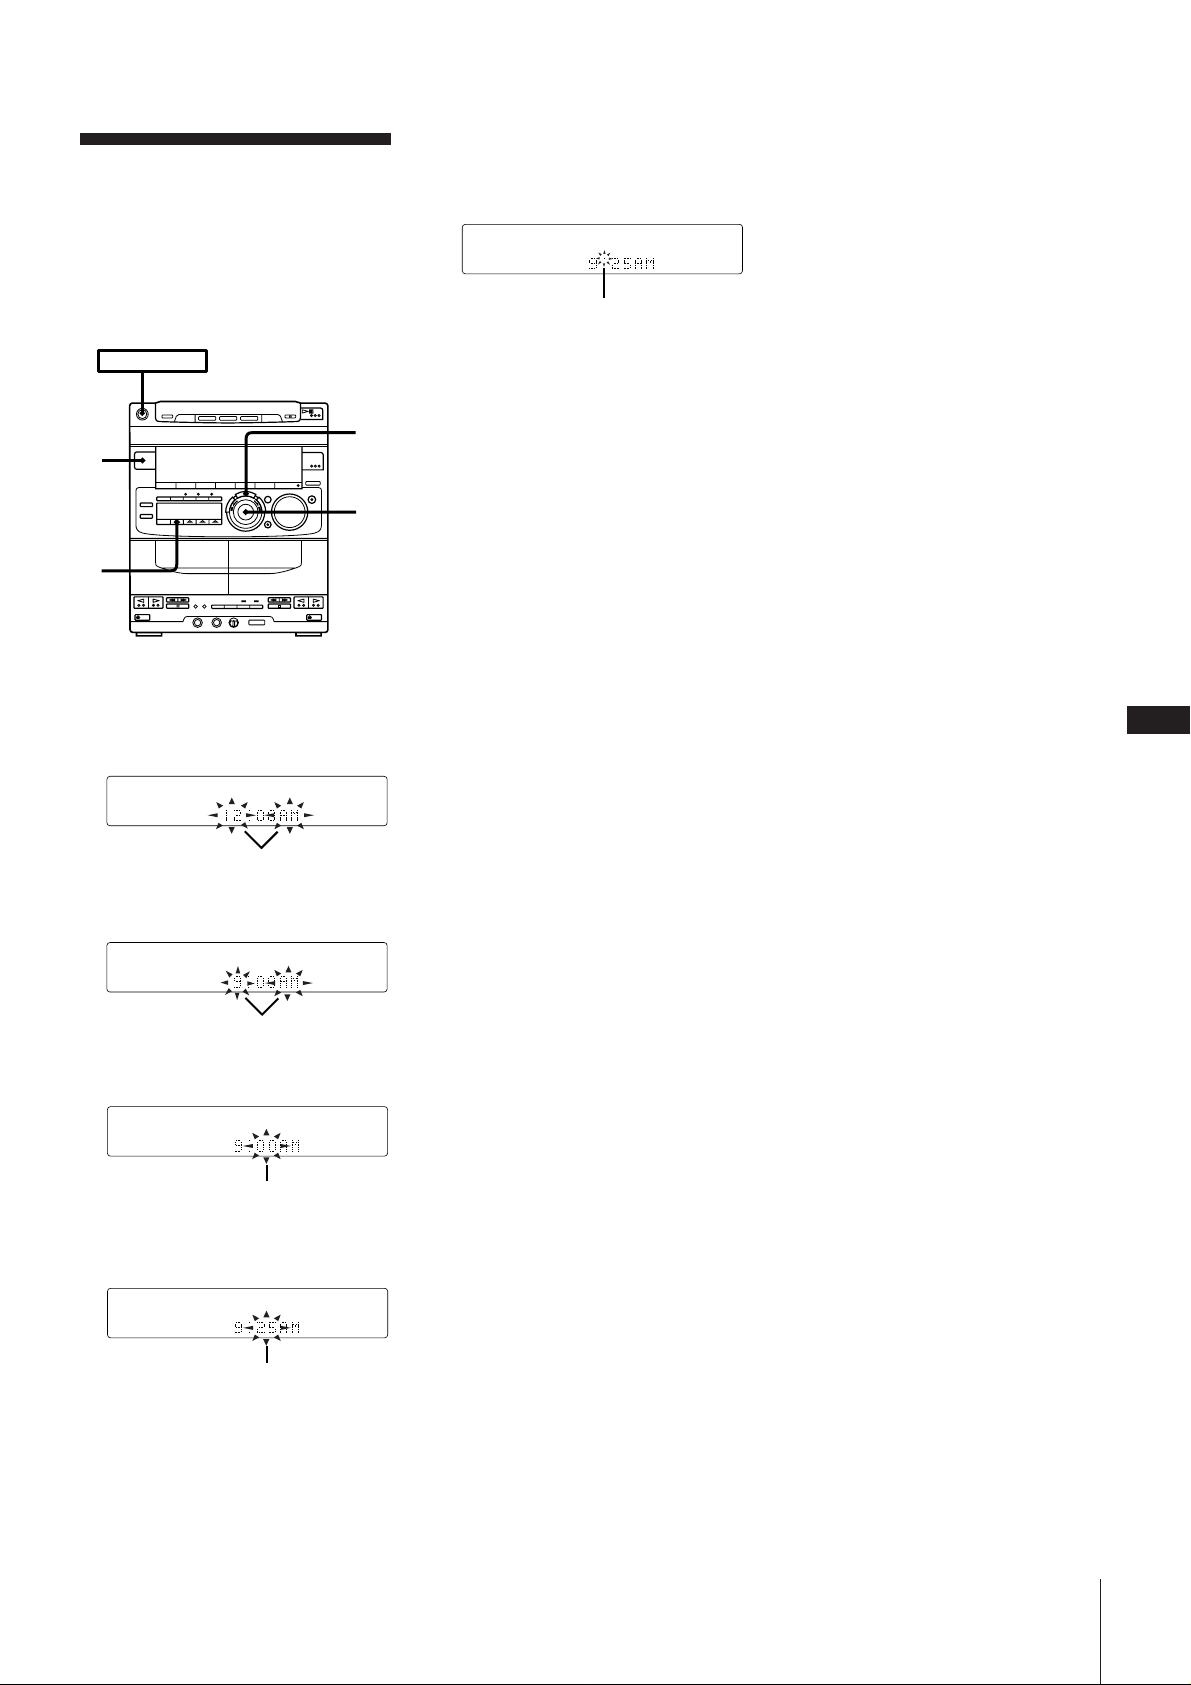
Inserting the
Batteries
Install two R6 (size AA) batteries in the
supplied remote for remote control.
1Open the lid.
EN
Be sure to turn the system off when
changing the setting of the SYSTEM
SELECT.
6
AUTO
PALNTSC
SYSTEM SELECT
VOLTAGE SELECTOR
110-120V 220-240V
STEP 6
Connecting the
Power
Connect the AC Power cord to a wall outlet
after you have made all the above
connections.
2Insert two R6 (size AA) batteries.
Match the + and – indications to the
diagram in the battery compartment.
3Close the lid.
Battery life
You can expect the remote to operate for
about six months (using Sony SUM-3 (NS)
batteries) before the batteries run down.
When the batteries no longer operate the
remote, replace all the batteries with new
ones.
To avoid battery leakage
If you are not going to use the remote for a
long time, remove the batteries to avoid
damage caused by corrosion from battery
leakage.
Chapter 1: Setting Up
to a wall outlet
The demo mode appears in the display
when you connect the AC power cord to a
wall outlet.
Plug Adapter (only for the model
supplied with the plug adapter)
If the plug of this unit does not fit your wall
outlet, detach the supplied adapter on to
the plug.
STEP 7
Deactivating the
/
Demo mode
To deactivate the demo mode, press
DISPLAY/DEMO with the system power
turned off.
Page 7
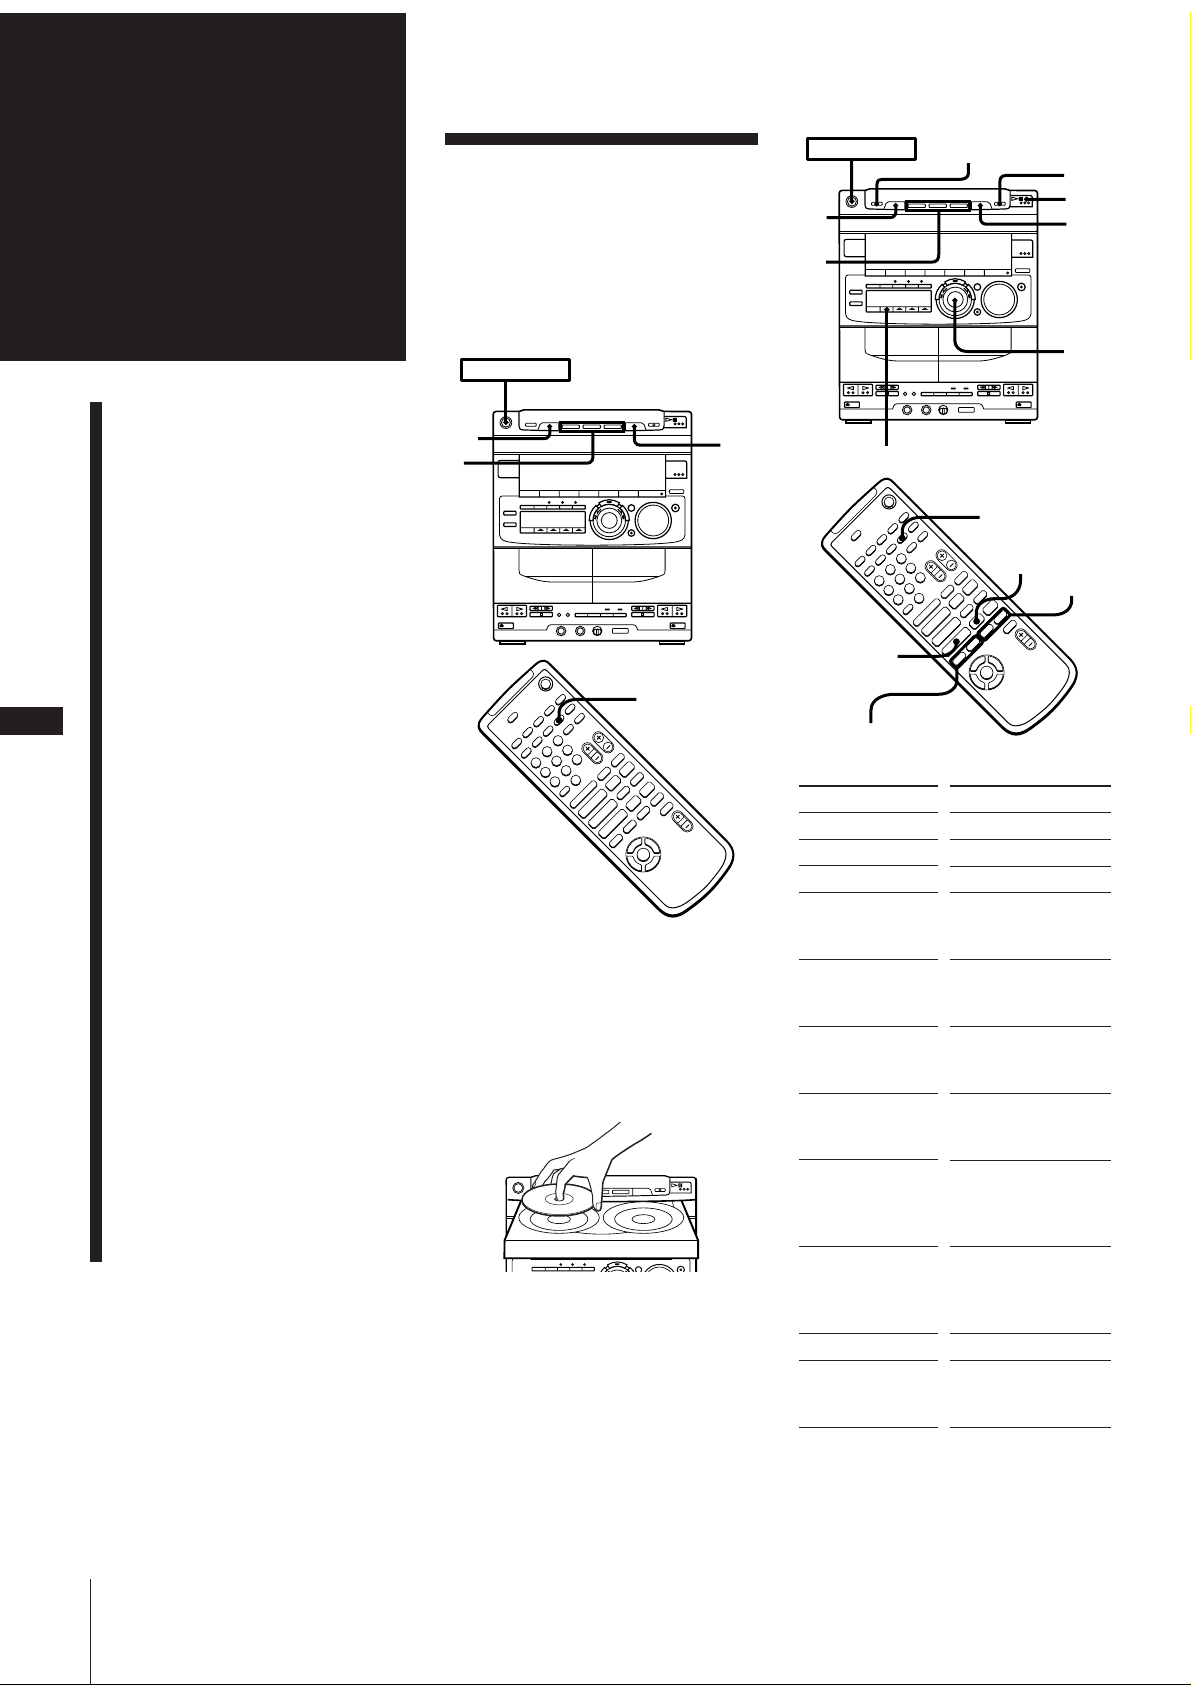
Setting the Clock
The built-in clock shows the time in the
display even if the power is off. You need
to set the clock to utilize the timer-activated
features of your system.
Use the buttons on the unit to do this
operation.
POWER m ON
4,6
1
3,5
2
1 Press TIMER.
The upper dot flashes for the first half of
a minute (0 to 29 seconds), and the
lower dot flashes for the last half of a
minute (30 to 59 seconds).
flashing
To check the time
Press DISPLAY/DEMO a few times.
The current time is displayed for eight
seconds.
To correct the clock setting
Repeat steps 1 through 6.
2 Press CLOCK SET.
The “AM” and hour indication begin
flashing.
flashing
3 Set the current hour by turning the JOG
dial until the correct hour appears.
flashing
4 Press ENTER/NEXT.
The minutes indication begins flashing.
flashing
5 Set the current minute by turning the
JOG dial until the correct minute
appears.
EN
7
flashing
6 Press ENTER/NEXT.
The clock starts running and the upper
dot flashes. Use the time signal to set the
clock accurately.
Chapter 1: Setting Up
Page 8
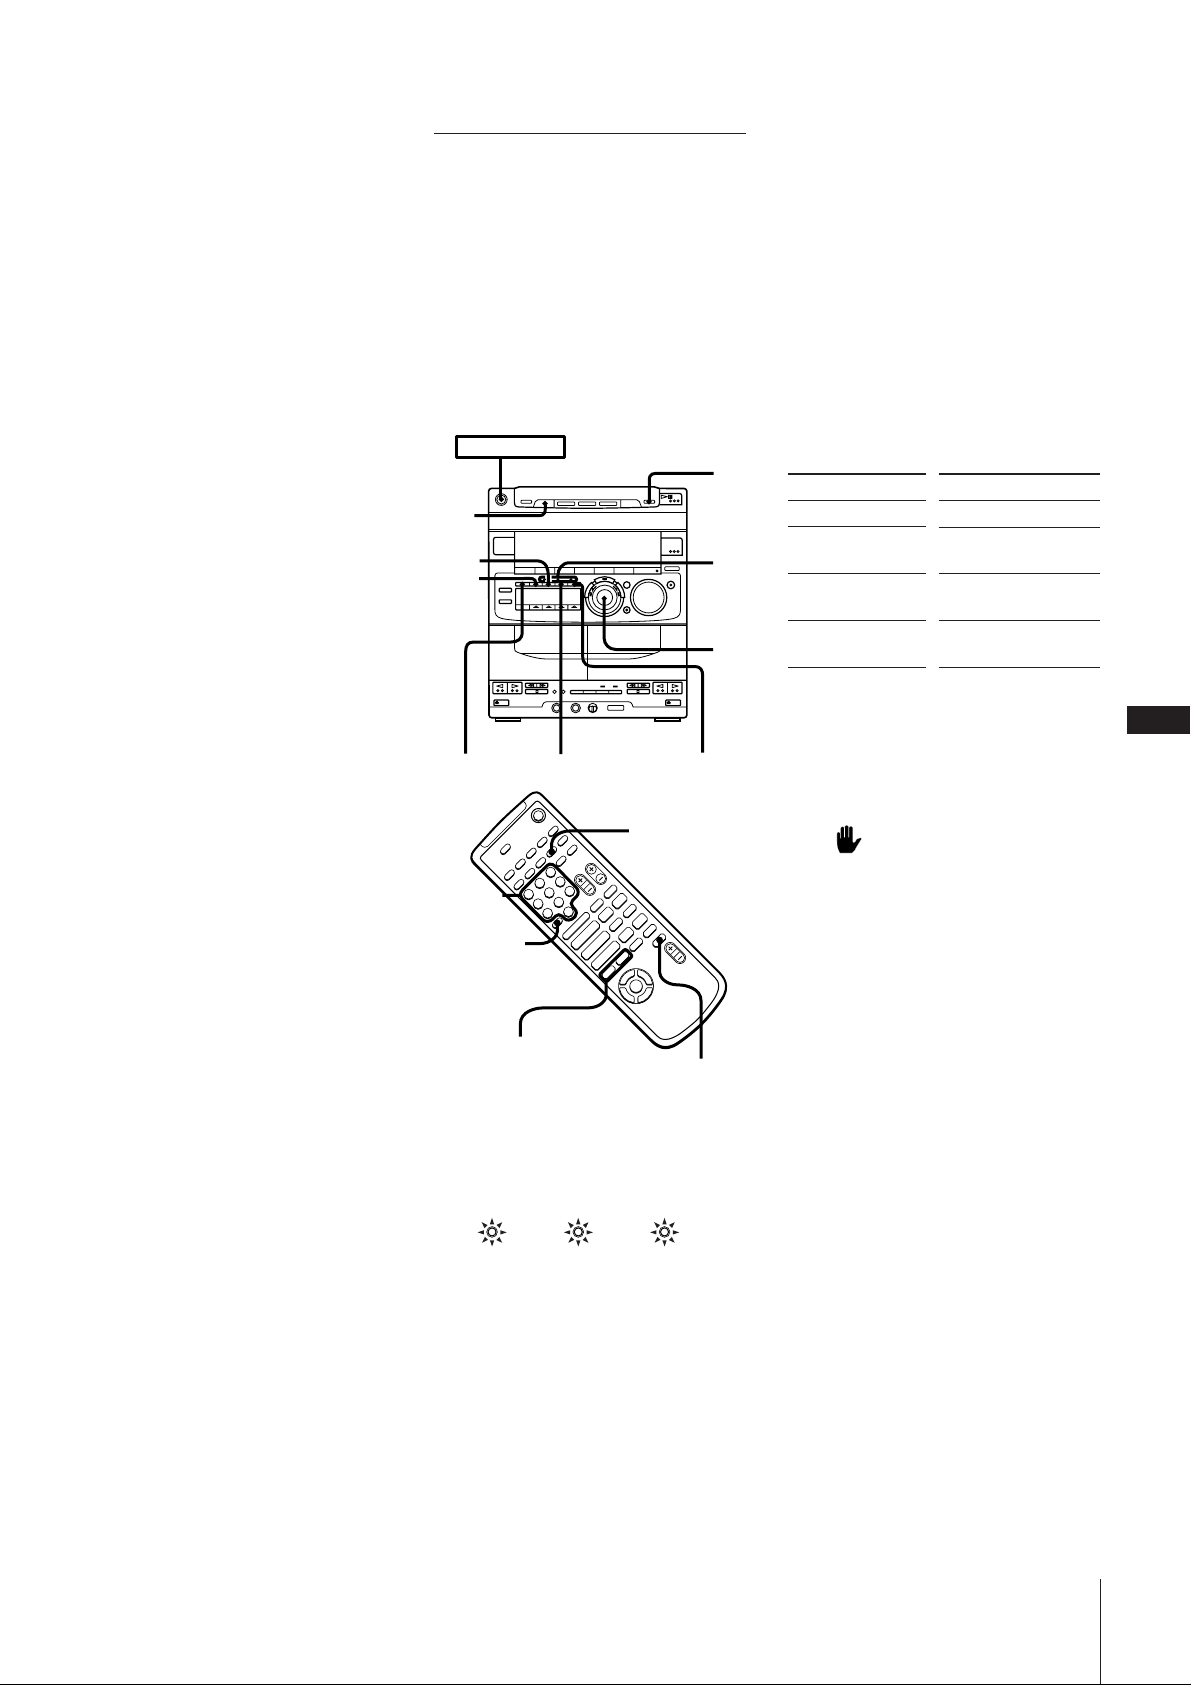
Chapter 2:
the Video
CD/CD-G/
CD Player
Playing VIDEO CDs
and CD-Gs
You can play both VIDEO CDs without
PBC functions (Ver 1.1) and VIDEO CDs
with PBC functions (Ver 2.0).
You can enjoy two kinds of playback
according to the disc type.
POWER m ON
POWER m ON
DISC
SKIP
DISC
1~3
EX-CHANGE
p
Æ‚
⁄OPEN
/CLOSE
JOG
EN
Basic Operations
Playing VIDEO CDs and
DISC
SKIP
3
2
1/ALL DISCS
CD-Gs
Playing CDs
–
Using the Display
Checking the Remaining
Time
CDÆ
Using the On-Screen
Display
–
8
Special functions
Locating a Specific Part of a
Disc (special menu)
Selecting the Graphic
Channels on CD-Gs
Playing a VIDEO CD From
Where it Was Last
Stopped (resume play)
Playing CDs in Various
Modes
Playing Tracks in Random
1 Turn on your TV and select the video
input.
Refer to the operating instructions
supplied with your TV if you need help.
2 Press § OPEN/CLOSE and place
VIDEO CDs/CD-Gs (label side facing
up) on the disc tray.
Order (shuffle play)
D.SKIP
+
+
p
–
)0
P
pP
Æ»
)0+=
Æ»
Æ
4
$
PREV=/NEXT+
To
Stop play
Pause
Resume play
Go forward to
another track or
scene
Go back to a
previous track or
scene
Locate a specific
part a track or
scene
Select a particular
CD
Playing Tracks in the
Desired Order
(program play)
Playing Tracks Repeatedly
(repeat play)
To insert a third disc
Press DISC SKIP (or D.SKIP on the
remote). The disc tray rotates so you can
insert another VIDEO CD/CD-G.
3 Press DISC 1 ~ 3 to select a disc.
The disc tray closes automatically, and
playback starts from the selected VIDEO
CD/CD-G.
If no disc was loaded on the selected
tray, the player automatically switches
to the next disc .
Watch only the
currently selected
disc
Watch all the discs
Remove the CD
Switch the other
discs during
playback
*1Only for CD-Gs and VIDEO CDs
without PBC functions (Ver 1.1).
When the player is set to “ALL DISCS”
you can use JOG to search through all
the tracks on all the discs loaded in the
player (seamless feature).
D.SKIP
+
P
+
p
–
)0
P
pP
Æ»
)0+=
Æ»
Æ
4
$
Press (on remote)
p
· (P*2)
· (CD ·or P*2)
NEXT (NEXT +*2)
or turn the JOG dial
clockwise*1.
PREV (PREV =*2)
or turn the JOG dial
counterclockwise*1.
and hold 0 or )*2.
DISC 1 ~ 3*3 or press
DISC SKIP (D.SKIP)
repeatedly.
1/ALL DISCS
repeatedly until “1
DISC” appears in the
display.
1/ALL DISCS
repeatedly until “ALL
DISCS” appears in the
display.
§ OPEN/CLOSE
EX-CHANGE
0/)
Chapter 2: the Video CD/CD-G/CD Player
Page 9
*2There may be some disturbance in the
video image.
*3If no disc is loaded at that number, the
tray will emerge.
One Touch Play feature
Press · on the CD player (or CD · on
the remote) when the power is off. If a
VIDEO CD/CD-G is loaded in the player,
you will be able to start watching the
VIDEO CD/CD-G without pressing any
other buttons.
Automatic Source Selection
If you press · or the DISC 1 ~ 3 buttons
while you are listening to other sound
source, the CD player is selected and the
last played VIDEO CD or CD-G starts
playing automatically.
If the CD player has been in the program
play mode, only · can be used for this
function.
If there is no CD in the player
“CD NO DISC” appears in the display.
Press · (or CD · on the remote) while
the indication is on, then the disc tray will
open automatically.
If you have a Sony TV
You can use the following buttons on the
remote to control your TV:
TV POWER: turns the TV on or off.
TV/VIDEO: switches the TV’s video input.
CH: switches the TV channels.
TV VOL: adjusts the volume of the TV
speaker(s).
What the green DISC 1 ~ 3 button
indicators indicate
Indicators are provided on the DISC
buttons for each of the respective disc trays
(DISC 1 ~ 3).
•A green indicator shows that the tray is
selected (either during playback or
standby, or when the tray is open) no
matter if there is a CD inside or not.
To watch VIDEO CDs with
PBC functions (Ver 2.0)
(PBC play)
VIDEO CDs with PBC functions (Ver 2.0)
are equipped with PBC. The PBC (PlayBack
Control) function provides menu displays
on your TV screen to let you enjoy
interactive software.
Be sure to read the instructions supplied
with each disc for details regarding its use
since different discs have different menu
formats and structures .
POWER m ON
DISC
SKIP
NEXT
PREV
PBC OFF/ON
Numeric
buttons
>10
RETURN SELECT
D.SKIP
+
–
+
p
–
)0
P
pP
Æ»
)0+=
Æ»
Æ
4
$
PREV=/NEXT+
RETURN
1 Start playing a VIDEO CD with PBC
functions (Ver 2.0).
All of the following indicators light up
and a PBC menu appears on your TV.
VIDEO CD PBC AUTO PBC
VIDEO CD indicator
Lights during playback of a VIDEO CD.
PBC indicator
Lights during playback of a VIDEO CD
with PBC functions (Ver 2.0) (even if the
PBC play function is not being used).
p
•VIDEO
CD
•PBC
•AUTO
PBC
JOG
2 Select an item from the menu.
Using the CD player
Turn the JOG dial to select a number,
then press SELECT.
Using the remote
Use the numeric buttons to enter the
number. To enter numbers greater than
10. Press >10 first, then press the
corresponding numeric buttons.
e.g. For 30, press >10 m 3 m 10/0.
3 Continue according to the instructions
on the following menus to enjoy
interactive playback.
To
Stop play
See the rest of a
menu
Go back to the top
of a menu
Go back to a
previous menu
To cancel menu guided playback
(turning off PBC play)
Press PBC OFF/ON so that the AUTO PBC
indicator goes out.
Still images, such as the menu screens, will
not be shown.
When appears on the TV screen
You have pressed an invalid button. Press a
button indicated by the instructions on the
menu screen.
When you press NEXT (or NEXT + on the
remote) during menu playback or while
playing moving pictures
You can go to the next scene according to
the disc. Also refer to the instructions
supplied with the disc.
Notes
•During menu playback, you cannot go to
the next disc, even if you’ve selected
“ALL DISCS”.
Press DISC SKIP (or D.SKIP on the
remote) to go to the next disc.
•The CD player will stop playing in the
following cases;
–When you press PBC OFF/ON during
playback.
–When you press PLAY MODE during
playback.
Press (on remote)
p
NEXT (NEXT +)
PREV (PREV =)
ˆ RETURN
(RETURN ˆ)
EN
9
AUTO PBC indicator
Lights during menu playback of a
VIDEO CD with PBC functions (Ver 2.0).
Chapter 2: the Video CD/CD-G/CD Player
Page 10
EN
10
Playing CDs
After loading up to three CDs, you can play
all tracks or discs in the original order
consecutively.
POWER m ON
EX-CHANGE
p
DISC
SKIP
Æ‚
1
2
1/ALL DISCS JOG
D.SKIP
+
p
–
)0
P
pP
Æ»
Æ»
Æ
4
P
)0+=
0/)
$
CDÆ
+
–
=/+
1 Press § OPEN/CLOSE and place CDs
(label side facing up) on the disc tray.
To insert a third disc
Press DISC SKIP (or D.SKIP on the
remote). The disc tray rotates so you can
insert another CD.
2 Press DISC 1 ~ 3 to select a disc.
The disc tray closes automatically and
playback starts from the selected CD.
If no disc was loaded on the selected
tray, the plater automatically switches to
the next disc .
To
Stop play
Pause
Resume play
Go forward to
another track
Go back to a
previous track
Press (on remote)
p
· (P )
· (CD ·or P)
Turn JOG dial
clockwise*1 (+).
Turn JOG dial
counterclockwise*
1
( = ).
Locate a specific
(hold 0 or )).
part of a track
Select a particular
CD
DISC 1 ~ 3*2 or press
DISC SKIP (D.SKIP)
repeatedly.
Listen to only the
currently selected
disc
1/ALL DISCS
repeatedly until “1
DISC” appears in the
display.
Listen to all the
discs
1/ALL DISCS
repeatedly until “ALL
DISCS” appears in the
display.
Remove the CD
Switch the other
§ OPEN/CLOSE
EX-CHANGE
discs during
playback
*1When the player is set to “ALL DISCS”
you can use JOG to search through all
the tracks on all the discs loaded in the
player (seamless feature).
*2If no disc is loaded at that number, the
tray will emerge.
One Touch Play feature
Press · on the CD player (or CD · on
the remote) when the power is off. When a
CD is in the player, you will be able to start
listening to the CD without pressing any
other buttons.
Automatic Source Selection
If you press · or the DISC 1 ~ 3 buttons
while you are listening to other sound
source, the CD player is selected and the
last played CD starts playing automatically.
If the CD player has been in the program
play mode, only · can be used for this
function.
If there is no CD in the player
“CD NO DISC” appears in the display.
Press · (or CD · on the remote) while
the indication is on, then the disc tray will
open automatically.
Checking the
Remaining Time
You can check information about the
current CD using the front panel display.
POWER m ON
DISPLAY/DEMO
To check the remaining time
Press DISPLAY/DEMO (or DISPLAY on
the remote) during playback.
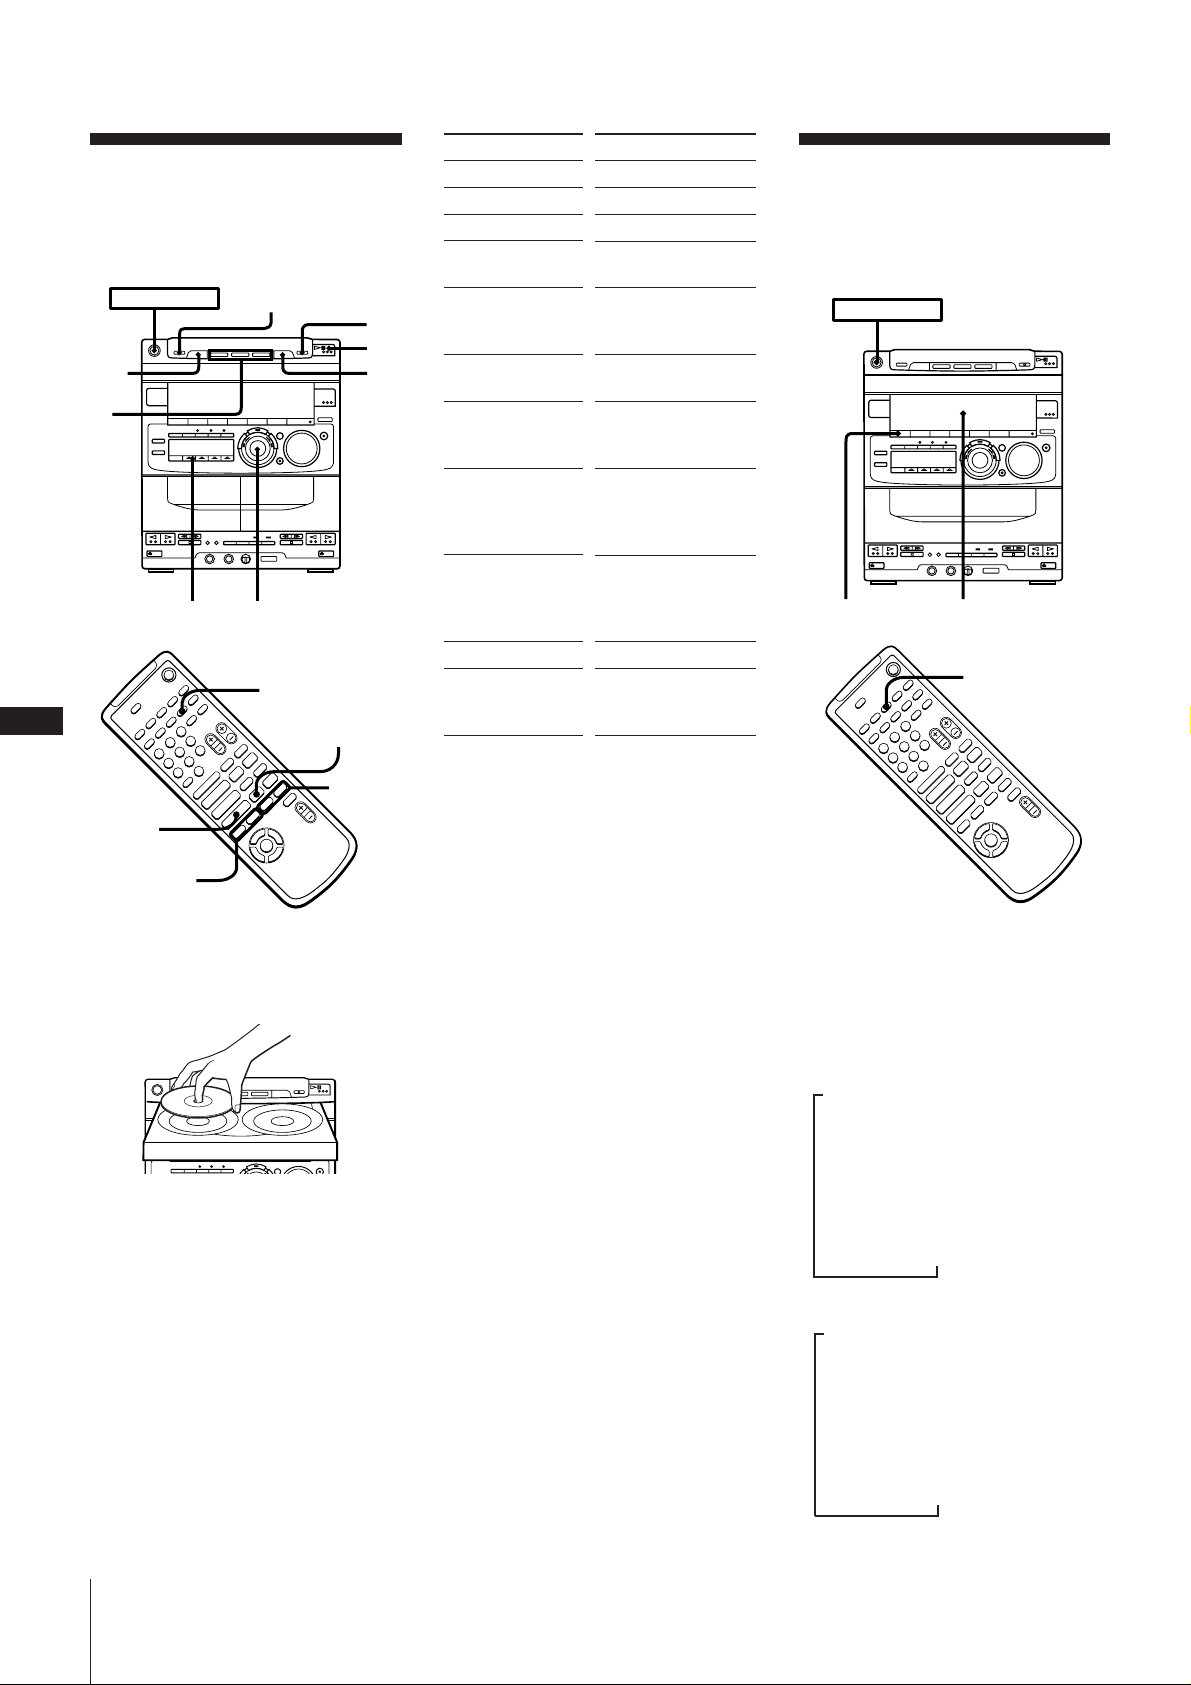
Each time you press the button, the display
changes as follows:
(ALL DISCS mode)
m Playing time on current track
Remaining time on current track
“Play” display
Clock display (for eight seconds)
Effect (or P FILE) name
(1 DISC mode)
m Playing time on current track
Remaining time on current track
Remaining time on current CD
Clock display (for eight seconds)
Effect (or P FILE) name
Front panel display
DISPLAY
+
–
+
p
–
)0
P
pP
Æ»
)0+=
Æ»
Æ
4
$
µ
µ
µ
µ
µ
µ
µ
µ
Chapter 2: the Video CD/CD-G/CD Player
Page 11
(VIDEO CDs with PBC functions (Ver 2.0))
PROGRAM
(
1. DISC 1-3
2. DISC 2-4
3. DISC 1-5
1
2
NTSC
PLAY
DISC 1-3 index 1 Audio
0.04
m Disc number
µ
Clock display (for eight seconds)
µ
Effect (or P FILE) name
Notes
•Track numbers from 1 to 20 are displayed
in the front panel display (Music
Calendar). Tracks numbered in excess of
20 are not displayed.
•“--.--” appears in the display when the
total playing time is 100 minutes or more.
Information displayed while playing
an audio CD, CD-G, or a VIDEO CD
without PBC functions (Ver 1.1)
The current track number, playing time of
current track, and the music calendar
appear. The track numbers in the music
calendar disappear after they are played.
Current track number
Disc number
CD
12345
678
ALL DISC S
12563 250 500 1k 2k 4k 8k 16k(Hz)
DOLBY NR
VOLUME
OFF
Playing timeMusic calendar
Information displayed while playing
VIDEO CDs with PBC functions
(Ver 2.0)
The track numbers and music calendar do
not appear. However, while the menu
screen is displayed on the TV screen, the
item numbers you can select in the menu
appear in the music calendar.
Using the On-Screen
Display
You can check the current operating status
and disc information of VIDEO CDs,
CD-Gs or audio CDs during play or stop
mode by superimposing a display on top of
the images on your TV screen.
+
–
+
p
–
)0
P
pP
Æ»
)0+=
ON SCREEN
Press ON SCREEN.
Each time you press the button, the onscreen display changes as follows:
ON SCREEN 1 m ON SCREEN 2
µ
ON SCREEN OFF M ON SCREEN 3
ON SCREEN 1 display
Momentary display of operating status
when you perform an operation (like
starting playback, etc.).
Æ»
Æ
4
$
PLAY
1
ON SCREEN 2
Momentary display of operating status
when you perform an operation (like
starting playback, etc.).
During playback, either the elapsed time or
remaining time on the current track is
usually displayed.
0.04
1
1 Elapsed time or remaining time on
the current track
“PLAY” when you start playback
“STOP” when you stop playback
“PAUSE” when you pause playback
• During stop mode in Program Play
Display is the same as ON SCREEN 1.
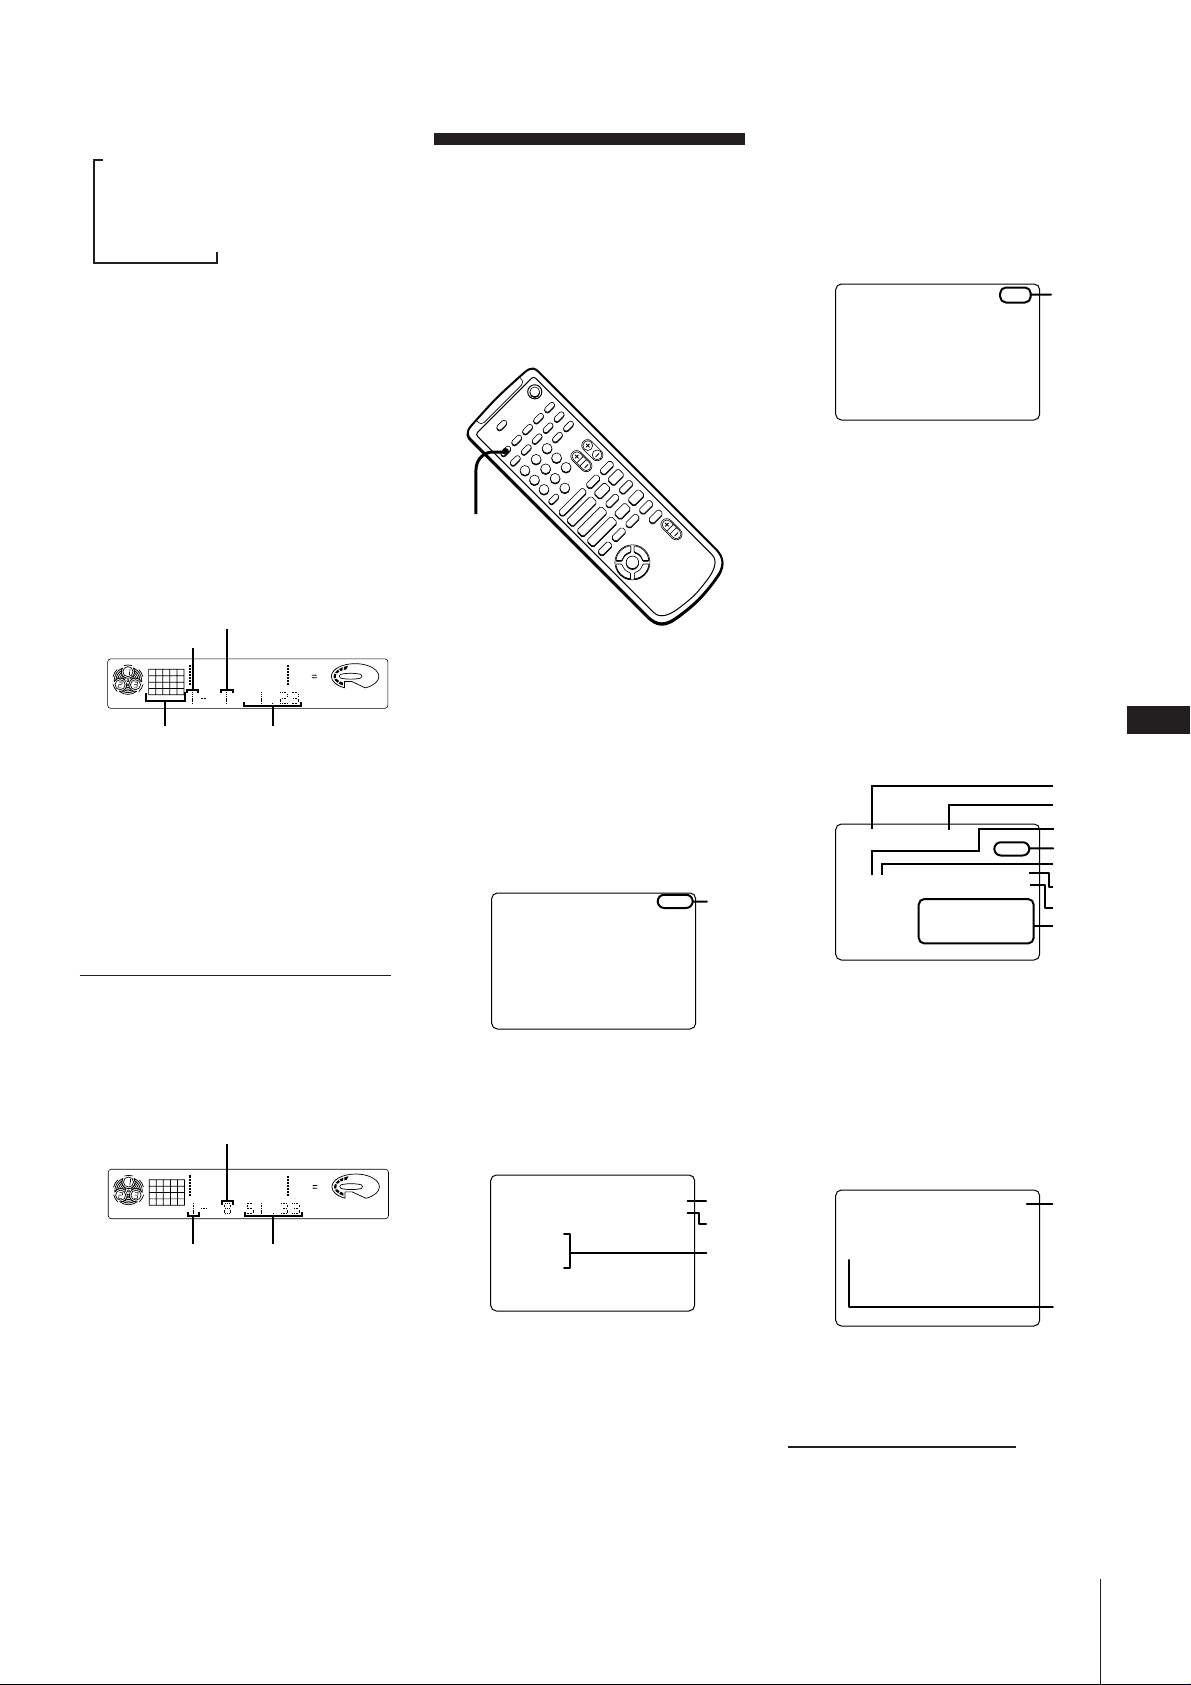
ON SCREEN 3
During playback, this screen displays the
operating status.
During stop mode, it displays information
about the CD(s) on the disc tray.
• In Normal or Shuffle Play mode
1
2
CONTINUE ALL DISCS PLAY
DISC 1-3 index 1
**345
678910
11 12 13 14 15
NTSC
Audio
0.55
3
4
5
6
7
8
EN
11
To check the total playing
time and the total number
of the tracks
Press DISPLAY during stop mode.
Total number of tracks
CD
12345
678
12563 250 500 1k 2k 4k 8k 16k(Hz)
ALL DISC S
Total playing timeDisc number
The information also appears when you
press § OPEN/CLOSE to close the disc
tray.
DOLBY NR
1 Play mode
2 “ALL DISCS” or “1 DISC”
3 Current disc number
1 Operating status
“PLAY” when you start playback
“STOP” when you stop playback
“PAUSE” when you pause playback
4 Color system
5 Current track number
6 Type of the disc
7 Elapsed time on the current track
8 Music calendar
• During stop mode in Program Play
VOLUME
OFF
PROGRAM
1. DISC 1-3
2. DISC 2-4
3. DISC 1-5
STOP
NTSC
TOTAL 10.04
1
2
3
• In Program Play
1 Color system
2 Total playing time of the program
3 Programmed disc and track numbers
1 “PLAY” when you start playback
“PAUSE” when you pause playback
2 Indicates the current track
continue to next page ➔
Chapter 2: the Video CD/CD-G/CD Player
Page 12
EN
SCENE- (1-312)
1
12
• During menu playback of a PBC equipped
VIDEO CD
SCENE 1 0.55
1
2
1 Elapsed time on the scene
2 Scene number
• During stop mode (except for the Program
Play)
1
CONTNUE
DISC 1
DISC 2
DISC 3
ALL DISCS STOP
•••••••
Video
Audio
TRK
TRK
NTSC
Audio
47.55DISC 3
1-15
1- 8
2
3
4
5
1 Play mode
2 For a disc that has not been played
3 For a VIDEO CD
4 Track numbers on the disc
5 For an audio CD or a CD-G
• During stop mode in Program Play
Display is the same as ON SCREEN 1.
ON SCREEN OFF
No display (except for special menu).
Notes on the On-Screen Display
•Normally, leave the display mode set to
either ON SCREEN 1, 2, or 3. When you
select ON SCREEN OFF, you cannot
check the operating status while operating
the CD player. In this case, check the
information in the front panel display.
•When you record video signals played
back from this system onto a VCR (etc.)
make sure to select ON SCREEN OFF.
Otherwise, the display information will
also be recorded on the VCR.
• The color system display does not appear
if the SYSTEM SELECT switch is set to
“NTSC” or “PAL”.
Locating a Specific
Part of a Disc (special
menu)
This player has 5 different search features.
Select the search features from the
SPECIAL MENU according to the type of
search you desire.
The monitor TV must be ON to use these
functions.
Use the remote for the following
operations.
+
–
+
SPECIAL
MENU
Numeric
buttons
> 10
p
–
)0
P
pP
Æ»
)0+=
Æ»
Æ
4
$
SELECT
Locating by Scene Number
(scene search)
On VIDEO CDs with PBC functions (Ver
2.0), the menu screens, moving pictures,
and still pictures are divided into “scenes”
and each scene has an assigned scene
number. This function lets you start
playback from a specific scene.
When you come across a scene you like,
make a note of the screen number by
displaying it on-screen during playback.
Then, the next time you want to watch that
scene, you can use the number to go
straight to it.
Note
This functions is only available during
playback of VIDEO CDs with PBC
functions (Ver 2.0).
Use the remote for the following
operations.
1 Start playing a VIDEO CD with PBC
functions (Ver 2.0).
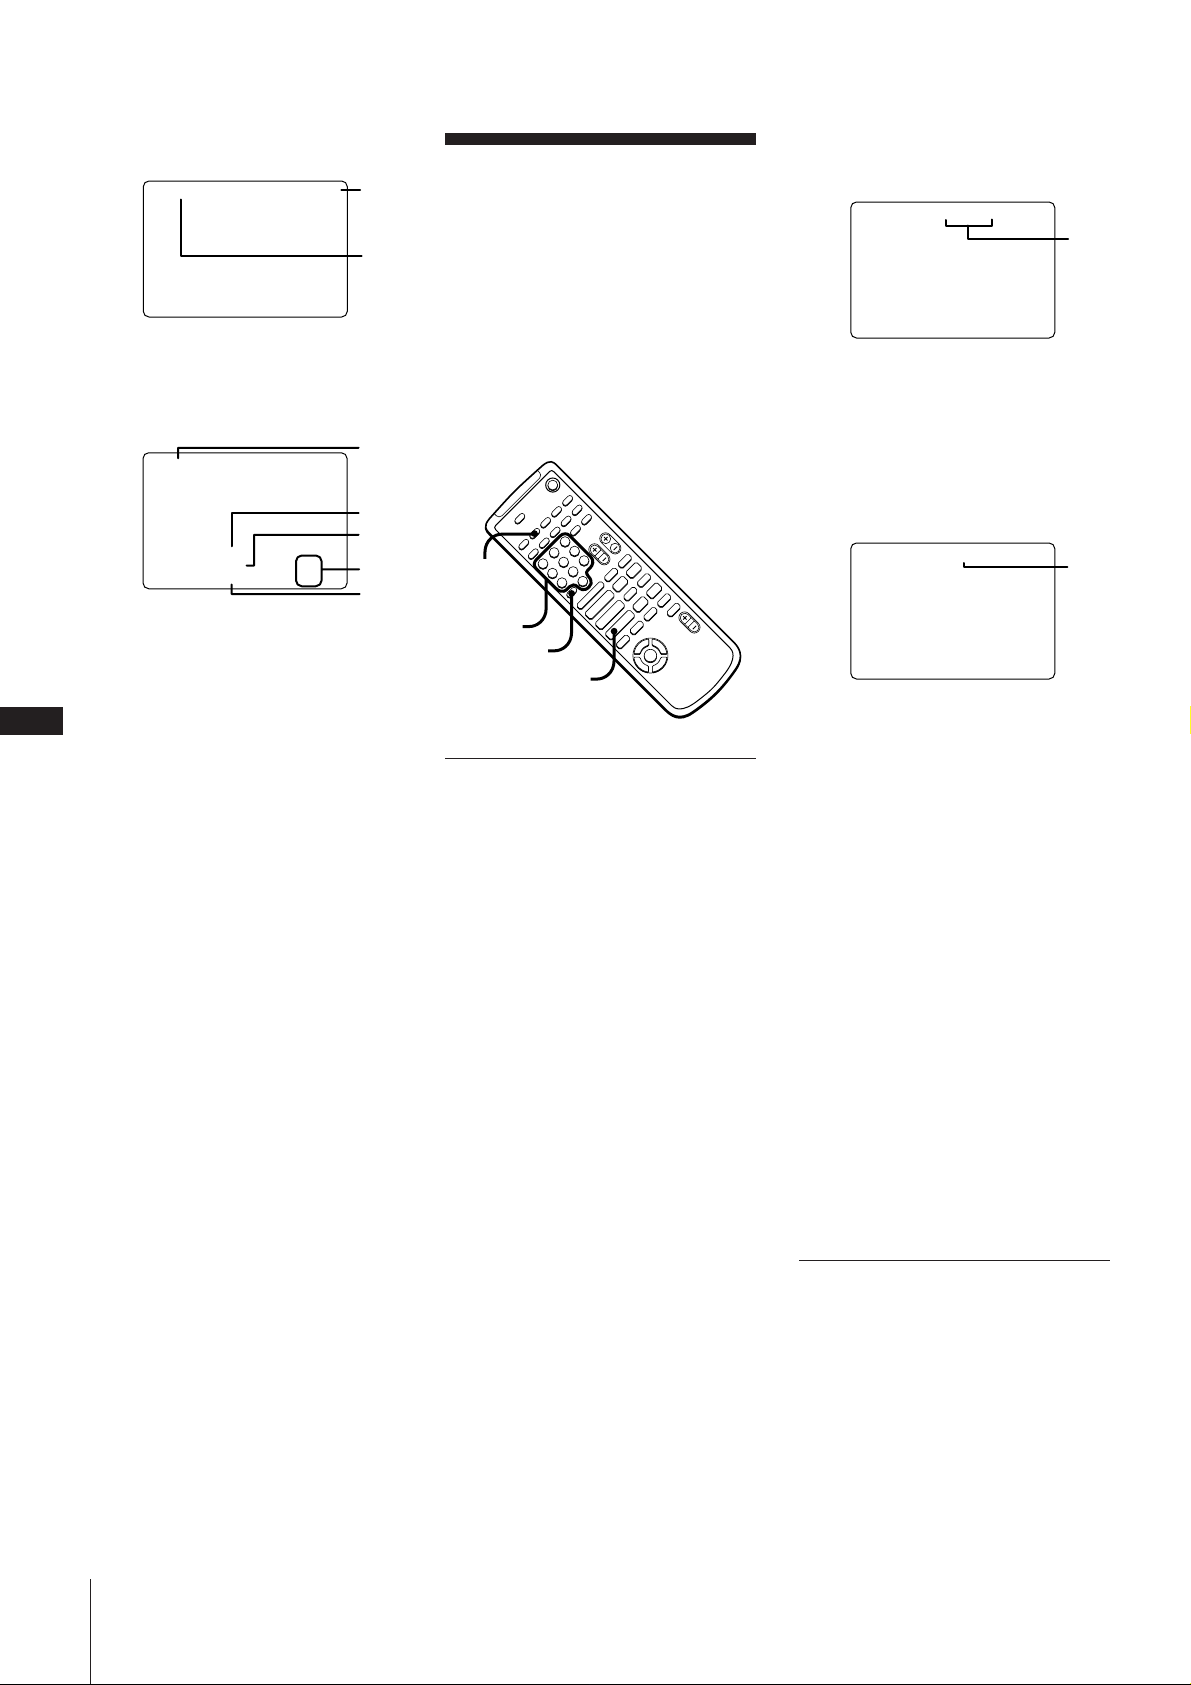
3Press 1 to select “1) SCENE SEARCH”.
“SCENE –” and the total number of
scenes appear on the TV screen.
1 Total number of scenes
(example for a disc with 312 scenes)
4Use the numeric buttons (1 – 10/0) to
select the scene you desire.
e.g. For scene 103, press 1 m 10/0 m 3.
The selected scene number appears on
the TV screen.
SCENE 103 (1-312)
1
1 Selected scene number
5Press CD · SELECT.
Playback starts from the selected scene.
To stop playback
Press p.
To check the scene number during
play mode
Press ON SCREEN repeatedly to select the
ON SCREEN 3 display mode. The scene
number appears on the TV screen. (See
“Using the On-Screen Display” for details.)
Notes
• On some CDs, you may not be able to
start playing from the scene you selected
because starting playback from certain
scenes is prohibited.
In this case, the play either starts from
scene 1 (during stop mode) or continues
from the current scene (during playback).
• Some CDs may not display scene you
selected on the TV screen.
Locating by Index Number
(index search)
Chapter 2: the Video CD/CD-G/CD Player
2 Press SPECIAL MENU.
“Index” is a number that divides a track or
a disc into smaller sections, so you can
easily locate the point you want. The index
of a VIDEO CD is called a “Video Index”.
Music CDs, CD-Gs, and VIDEO CDs may
incorporate index numbers. You can use
the index numbers to find the part of a
track you want to play.
Page 13
Index search can only be used with discs
that have index numbers. Likewise, index
search can not be used to skip between
adjacent tracks.
Note
This function cannot be used during menu
playback of VIDEO CDs with PBC
functions (Ver 2.0).
Use the remote for the following
operations.
1Press SPECIAL MENU.
2Press 3 to select “3) TIME SEARCH”.
3Use the numeric buttons (1 – 10/0) to
enter the time (in minutes) for the
section you desire.
3 Use the numeric buttons (1 – 10/0) to
select the track you desire.
To enter track numbers greater than 10.
Press >10 first, then press the
corresponding numeric buttons.
e.g. For 30, press >10 m 3 m 10
To stop playback
Press p.
Use the remote for the following
operations.
1 Start playing a VIDEO CD (etc.).
2 Press SPECIAL MENU.
3 Press 2 to select “2) V-INDEX SEARCH”
(or “2) INDEX SEARCH” for CD-Gs or
music CDs).
4 Use the numeric buttons (1 – 10/0) to
select the index you desire.
Playback starts from the selected index.
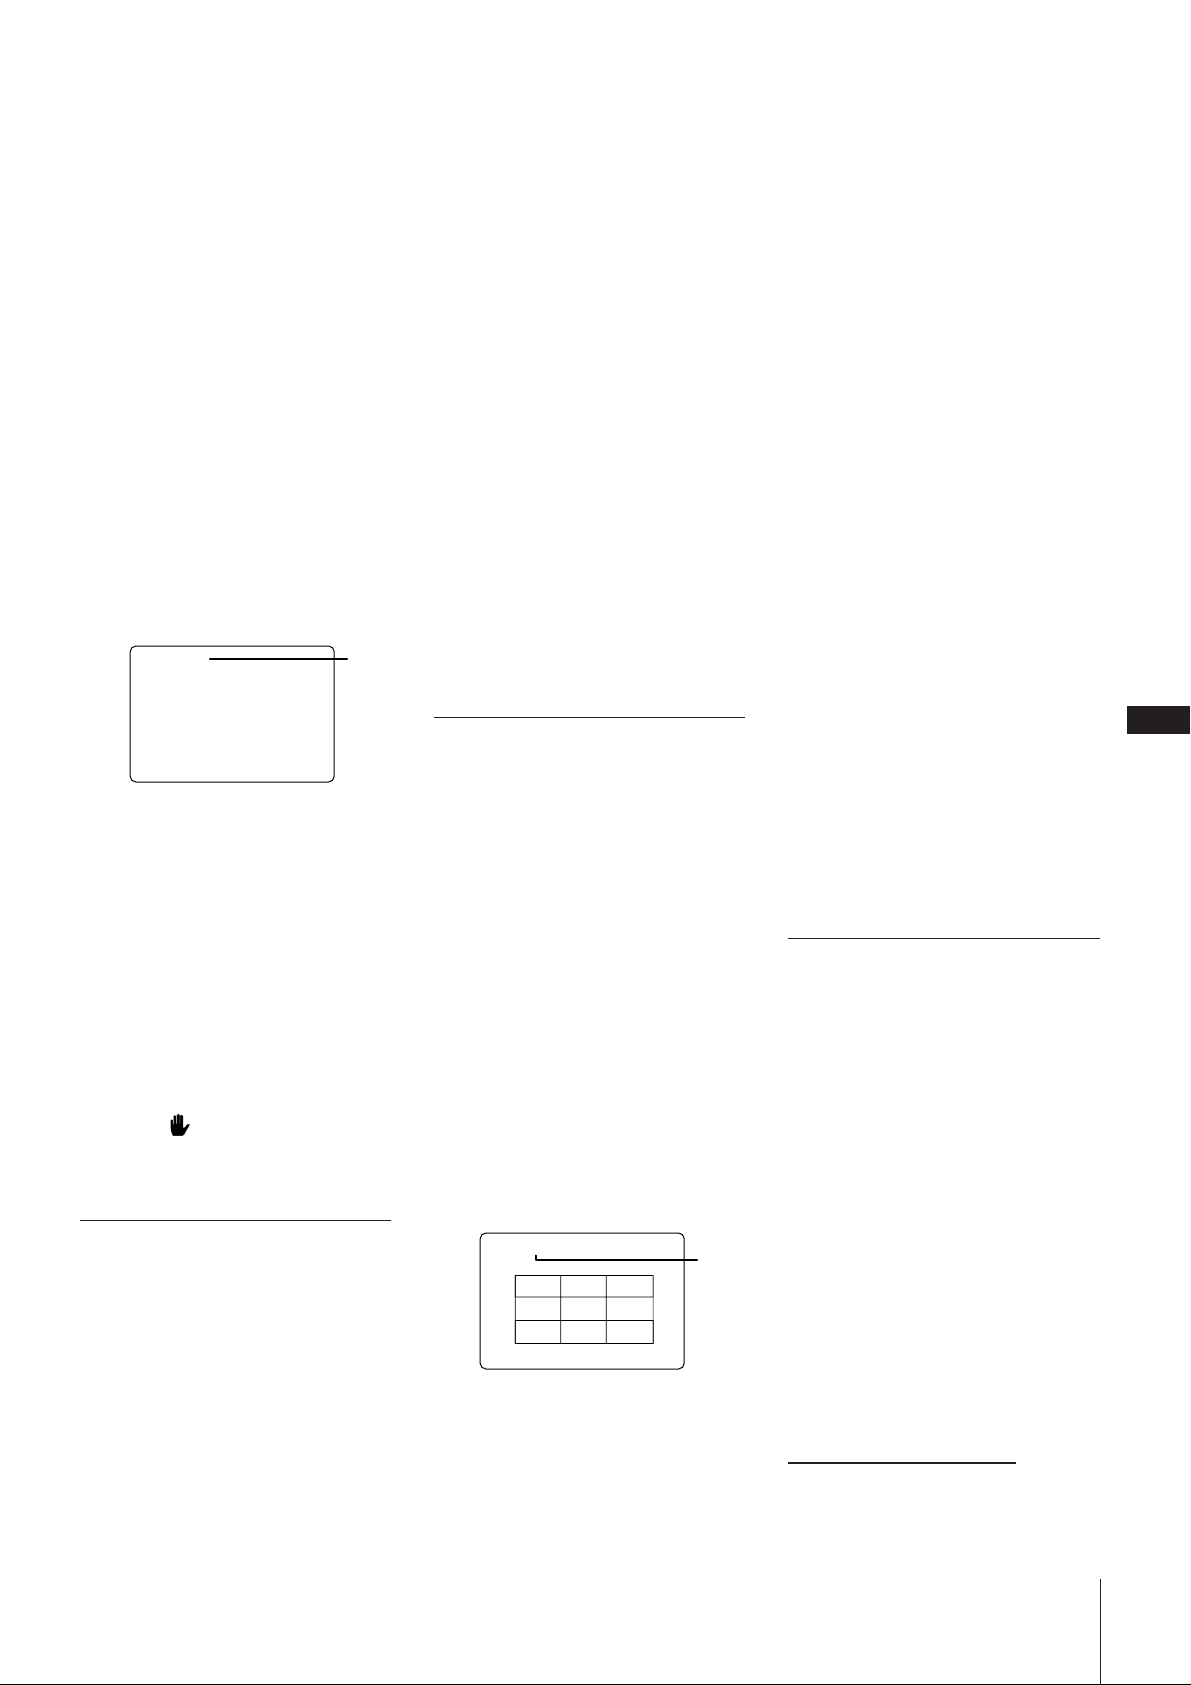
V - index 2
1 Video index
1
5 Press CD · SELECT.
Playback starts from the selected index.
To stop playback
Press p.
To use index search with VIDEO CDs
with PBC functions (Ver 2.0)
Stop playback and press PBC OFF/ON so
that the AUTO PBC indicator goes out
before step 1.
Note
If there are no more indexes while playing a
VIDEO CD, appears on the TV screen
and the player continues playing.
Locating by elapsed time
(time search)
This function lets you use elapsed time as a
guide to find a certain parts of VIDEO CDs
without PBC functions (Ver 1.1), CD-Gs,
and music CDs. “Elapsed time” means the
time from the beginning of the disc. It is not
the playing time of the current track as
shown in the display.
It is especially useful when playing discs
that only have a few track divisions.
Note
This function cannot be used during menu
playback of VIDEO CDs with PBC
functions (Ver 2.0).
e.g. For 10 minutes, press 1 m 10/0.
The selected elapsed time appears on
the TV screen.
4Press CD · SELECT.
Playback starts from the selected time.
To stop playback
Press p.
To use time search with VIDEO CDs
with PBC functions (Ver 2.0)
Stop playback and press PBC OFF/ON so
that the AUTO PBC indicator goes out
before step 1.
Locating the track you
want (disc digest)
You can select the track you desire by
viewing the first frame of each track. Up to
9 different tracks can be displayed on the
TV screen at one time.
Notes
•This function cannot be used during
menu playback of VIDEO CDs with PBC
functions (Ver 2.0).
•Video images will not be shown for music
CDs or CD-Gs.
Use the remote for the following
operations.
1Press SPECIAL MENU.
2Press 4 to select “4) DISC DIGEST”.
The first frame of tracks 1 ~ 9 on the
current disc are displayed on-screen.
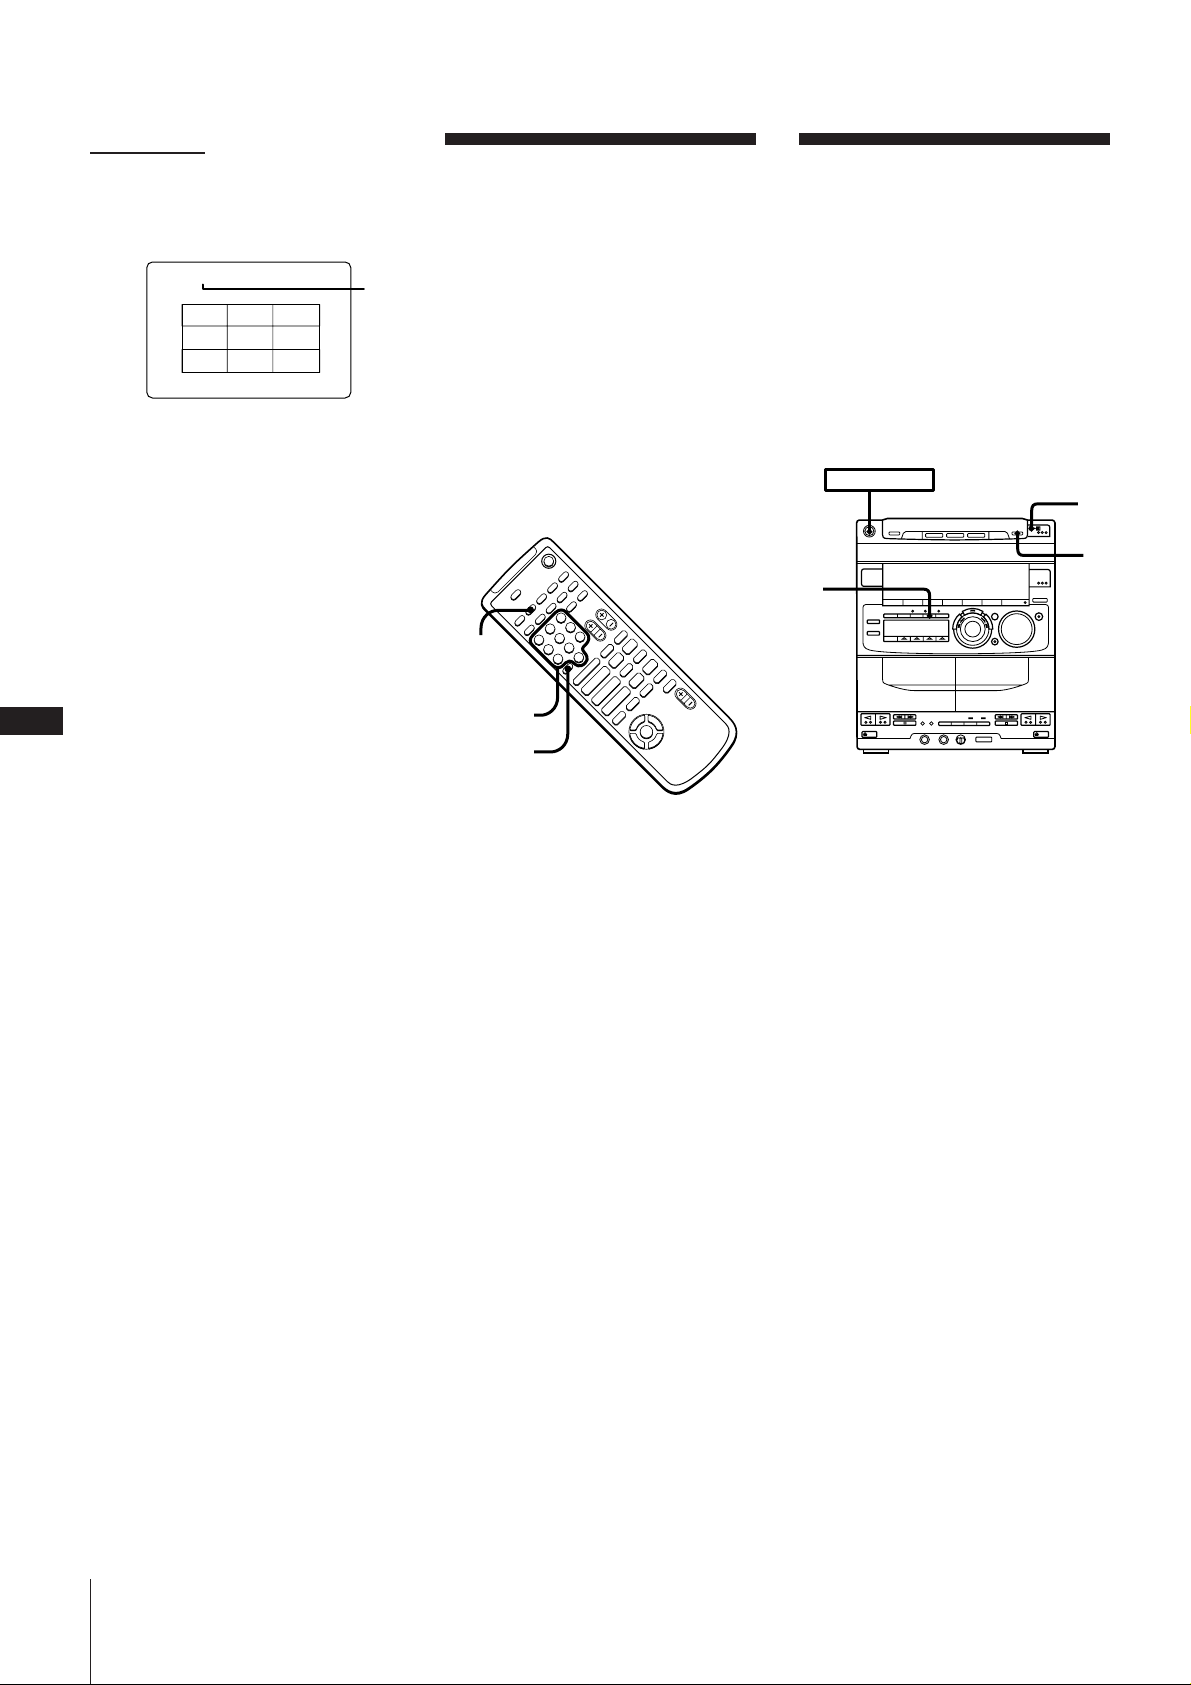
DISC 1 DIGEST
1
12 3
4 5 6
7 8 9
1 Number of current disc
To display the next 9 tracks.
Press NEXT +. The first frame of
tracks 10 ~ 18 are displayed.
When there are more tracks in the disc,
“+” appears in the upper right corner
of the TV screen.
To display the previous tracks, press
= .
In step 2, you can select tracks that
have not been displayed before all
the tracks are displayed.
Use the numeric buttons to select the track
you desire.
In step 2, you can play a track you
desire immediately after the first
frame is displayed
Press CD · SELECT immediately after the
first frame is displayed.
To switch to the digest of another
disc during disc digest
Press DISC SKIP during disc digest.
To use disc digest with VIDEO CDs
with PBC functions (Ver 2.0)
Stop playback and press PBC OFF/ON so
that the AUTO PBC indicator goes out
before step 1.
Note
The play mode automatically switches to
normal mode if you start disc digest during
shuffle or program play.
Locating a section within a
track (track digest)
You can have the CD player divide a
VIDEO CD track into 9 different sections
and display the first scene of each section
on the TV screen. This might be useful
when playing discs with few track
divisions, such as a movies.
Note
This function cannot be used during menu
playback of VIDEO CDs with PBC
functions (Ver 2.0).
Use the remote for the following
operations.
1 Start playing the VIDEO CD track you
desire.
2 Press SPECIAL MENU.
continue to next page ➔
Chapter 2: the Video CD/CD-G/CD Player
EN
13
Page 14
EN
14
➔ continued
3 Press 5 to select “5) TRACK DIGEST”.
The current track is divided into 9
sections and the first frame of each
section is displayed on-screen.
TRACK 1 DIGEST
1 2 3
4 5 6
7 8 9
1 Number of current track
1
4 Use the numeric buttons to select the
section you desire.
Playback starts from a point near the
selected frame.
To stop playback
Press p.
In step 3, you can select sections that
have not been displayed before all
the sections are displayed.
Use the numeric buttons to select the
section you desire.
In step 3, you can play a section you
desire immediately after the first
frame is displayed
Press CD · SELECT immediately after the
first frame is displayed.
To can switch to the digest of
another track during track digest
Press = or + during track digest.
To use track digest with VIDEO CDs
with PBC functions (Ver 2.0)
Stop playback and press PBC OFF/ON so
that the AUTO PBC indicator goes out
before step 1.
Note
Tracks less than 40 seconds long may not be
divided into less than 9 sections.
Chapter 2: the Video CD/CD-G/CD Player
Selecting the Graphic
Channels on CD-Gs
CD-Gs have 16 channels (0 to 15) called
“graphic channels” that let you select the
video image to be shown on the TV screen.
When you first plug the power cord into a
wall outlet the CD player is factory preset
to channels 1 and 0. However, channel 1
can be switched to a different channel.
Since the channel you can select may differ
for each disc, be sure to refer to the
instructions or package (etc.) accompanying
the CD-G.
Use the remote for the following
operations.
+
–
+
SPECIAL
MENU
Numeric
buttons
> 10
p
–
)0
P
pP
Æ»
)0+=
Æ»
Æ
4
$
1 Press SPECIAL MENU during playback
or stop mode of CD-G.
2 Press 6 to select “6) GRAPHIC
CHANNEL”.
“G-CH” appears on the TV screen.
3 Use the numeric buttons to select the
channel you desire.
To enter a numbers greater than 10.
Press >10 first, then press the
corresponding numeric buttons.
e.g. For 10, press >10 m 1 m 10/0
Note
While playing a CD-G, the picture may
distort when you press the following
buttons. However, this doesn’t indicate the
malfunction of the player.
– = / +
– 0 /)
– P
Playing a VIDEO CD
From Where it Was
Last Stopped
(resume play)
When playing a VIDEO CD, the CD player
will remember where playback was
stopped. Therefore, you can play a VIDEO
CD starting from the point where it was last
stopped.
Resume play does not work with music
CDs and CD-Gs.
POWER m ON
3
1
2
1Press p to stop the VIDEO CD.
The CD player remembers this position.
2Press ˆ RETURN (or RETURN ˆ on
the remote) during stop mode.
“RESUME” flash in the display and
appears in the TV screen for about 16
seconds.
If “RESUME” does not flash
Resume play is not possible.
3Press · (or CD · SELECT on the
remote) while “RESUME” is flashing.
Playback resumes from the point where
it was stopped in step 1.
If “RESUME” stops flashing before you
press · , press ˆ RETURN again.
To watch a VIDEO CD from the
beginning
•Press · when “RESUME” is not
flashing.
•Press ˆ RETURN again when
“RESUME” is flashing.
Notes
• Resume play does not work during
shuffle or program play.
• Depending on where you stop playback,
resume play may not resume from the
exact same point or may not work.
• The following operations will erase the
resume memory:
– Removing the disc
– Pressing DISC SKIP
– Unplugging the power cord
– Switching the play mode
– Pressing p on the CD player during
stop mode
Page 15
Playing Tracks in
12563 250 500 1k 2k 4k 8k 16k(Hz)
DOLBY NR
OFF
CD
DISC PROGRAM
3
VOLUME
12563 250 500 1k 2k 4k 8k 16k(Hz)
DOLBY NR
OFF
CD
1DISC PROGRAM
12345
678
VOLUME
Random Order
(shuffle play)
You can play all the tracks on one CD or all
CDs in random order.
This function cannot be used during menu
playback of VIDEO CDs with PBC
functions (Ver 2.0).
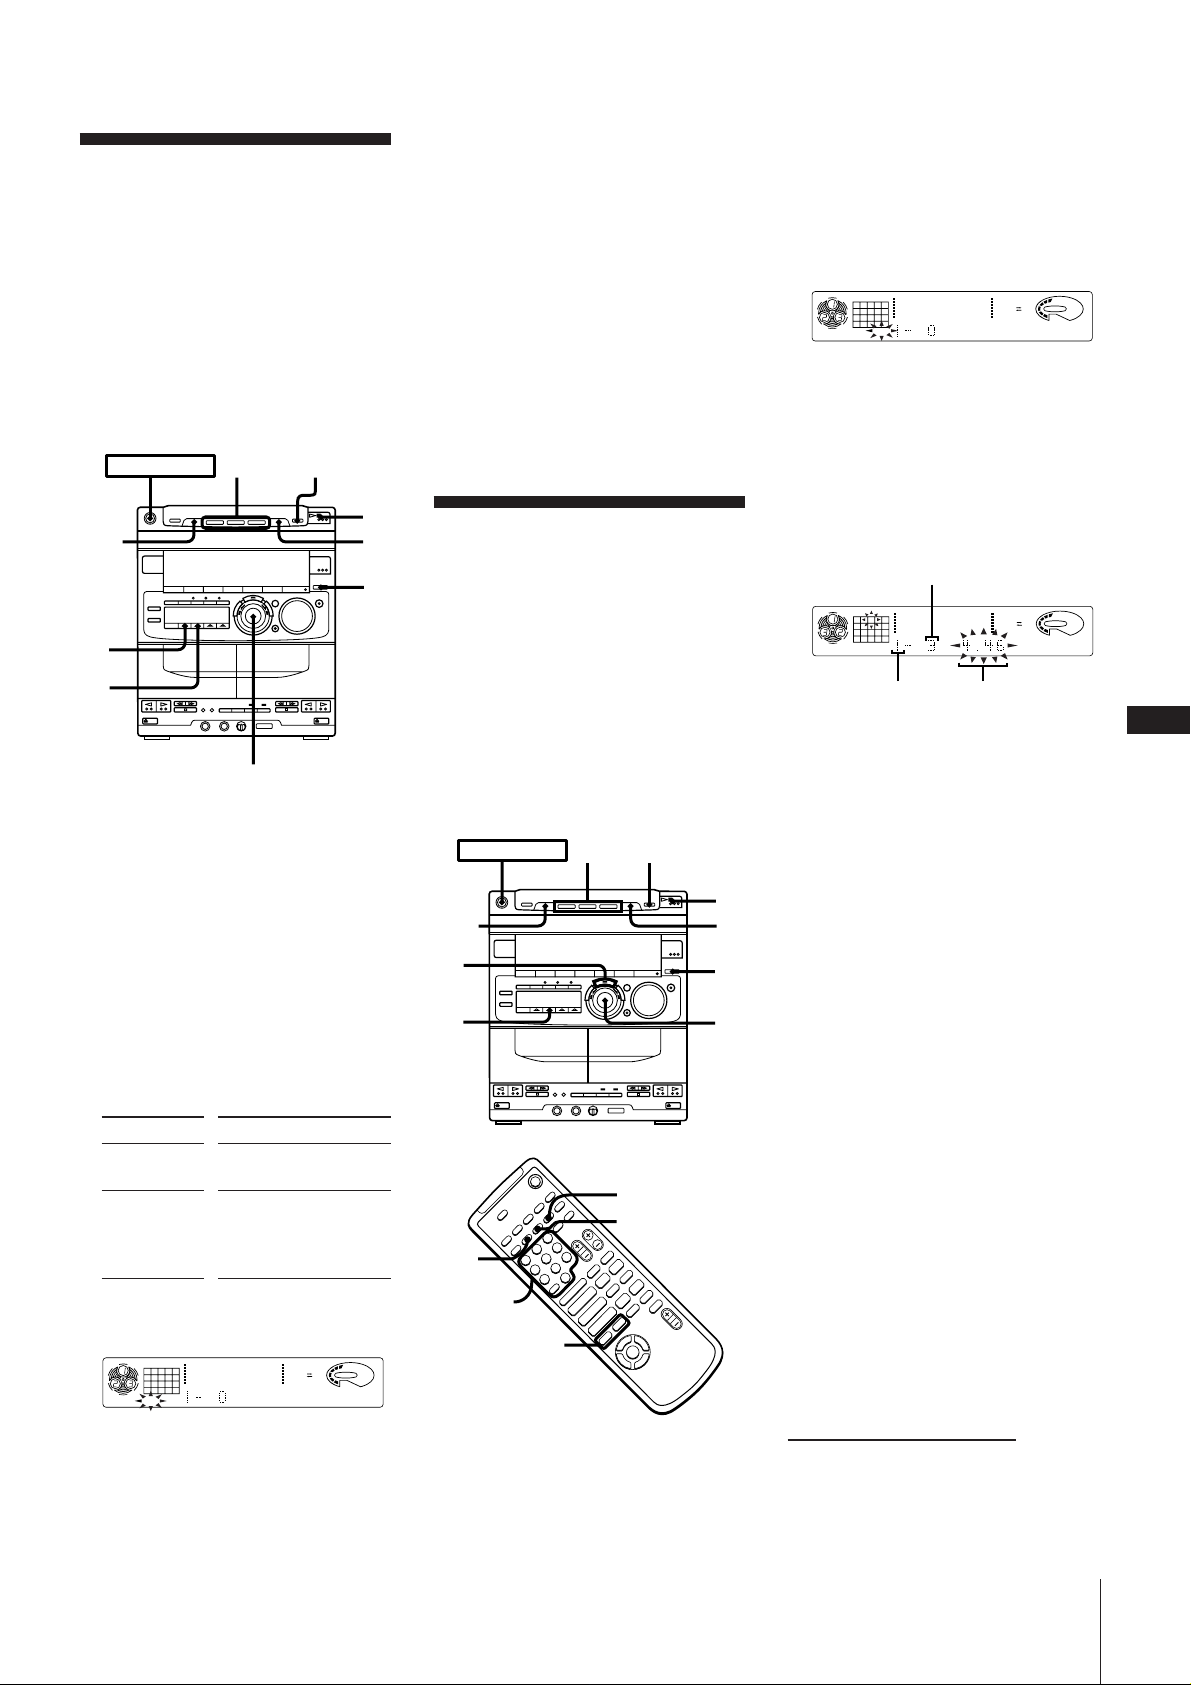
Use the buttons on the unit to do this
operation.
POWER m ON
DISC
SKIP
DISC 1~3
p
5
2
1
To cancel shuffle play
Press PLAY MODE repeatedly until
“SHUFFLE” and “PROGRAM” disappear
from the display. The tracks continue
playing in their original order.
If you are playing VIDEO CDs with PBC
functions (Ver 2.0), the CD player stops.
To select the desired CD
Press DISC 1 ~ 3 during shuffle play.
To skip an undesired track
Turn the JOG dial clockwise (or press +
on the remote).
Playing Tracks in the
Desired Order
(program play)
To insert a third disc
Press DISC SKIP (or D.SKIP on the
remote). The disc tray rotates so you can
insert another CD.
3 Press PLAY MODE repeatedly until
“PROGRAM” appears in the display.
4 Press DISC 1 ~ 3 to select a CD.
The disc number appears in the display.
5 Turn the JOG dial (or press =/+
on the remote) to choose a track.
The track number and the total playing
time including the selected track flashes
in the display. (The program is not
entered at this time.)
Track number
3
4
JOG
1 Press FUNCTION repeatedly until “CD”
appears in the display.
2 Press § OPEN/CLOSE and place CDs
on the disc tray.
To insert a third disc
Press DISC SKIP (or D.SKIP on the
remote). The disc tray rotates so you can
insert another CD.
3 Press 1/ALL DISCS repeatedly to
choose whether to play “1 DISC” or
“ALL DISCS”.
Choose To play
1 DISC Only the currently
selected disc
ALL DISCS All discs in consecutive
order (according to disc
number). Empty trays
are skipped.
4 Press PLAY MODE repeatedly until
“SHUFFLE” appears in the display.
CD
12345
678
1DISC
SHUFFLE
12563 250 500 1k 2k 4k 8k 16k(Hz)
DOLBY NR
VOLUME
OFF
5 Press · .
“ J ” appears and the tracks
play in random order.
To stop playing shuffle play
Press p.
You can make a program of up to
32 tracks from all the CDs in the order you
want them to be played.
This function cannot be used during menu
playback of VIDEO CDs with PBC
functions (Ver 2.0).
Use the buttons on both the unit and the
remote to do this operation.
POWER m ON
4
p
DISC
SKIP
6
3
D.SKIP
+
–
CHECK
Numeric
buttons
=/+
CLEAR
+
p
–
)0
P
pP
Æ»
)0+=
Æ»
Æ
4
$
1Press FUNCTION repeatedly until “CD”
appears in the display.
2Press § OPEN/CLOSE and place CDs
on the disc tray.
8
2
1
5
Disc number
Total playing time
6 Press ENTER/NEXT.
The chosen track number lights up in
the music calendar and the STEP
indicator appears in the display. If the
track number disappears before you
press ENTER/NEXT, go back to step 4.
If you program the wrong track.
Press CLEAR, and select another track.
7 To program additional tracks from the
same CD, repeat steps 5 and 6.
To program additional tracks from
another CD, repeat steps 4 to 6.
8 Press · .
All the tracks play in the order you have
chosen.
To cancel program play
Press PLAY MODE repeatedly until
“PROGRAM” and “SHUFFLE” disappear
from the display. The tracks continue
playing in their original order.
If you are playing VIDEO CDs with PBC
functions (Ver 2.0), the CD player stops.
To select a track using the remote
Use the numeric buttons to enter the track
number. Skip step 6.
To enter a track number greater than 10.
Press >10 first, then press the
corresponding numeric buttons.
e.g. For 30, press >10 m 3 m 10/0.
continue to next page ➔
EN
15
Chapter 2: the Video CD/CD-G/CD Player
Page 16
EN
➔ continued
To check the contents of the
program (from remote only)
Press CHECK before starting playback.
Each time you press CHECK the next step
appears in the display.
When the last step “CHECK END” is
displayed and the normal display returns.
To change the contents of the
program
To Press
Erase a specific CHECK repeatedly so
track that the number of the
track lights up, and
press CLEAR
Erase a track from CLEAR in stop mode
the end
Add a track at 1.Turn the JOG dial
the end of the until the desired
program track number
appears in the
display.
2.Press ENTER/NEXT.
Erase the entire p once in stop mode
program and twice while
playing
Playing Tracks
Repeatedly
(repeat play)
The repeat play function repeats a single
CD or all CDs in normal play, shuffle play
and program play.
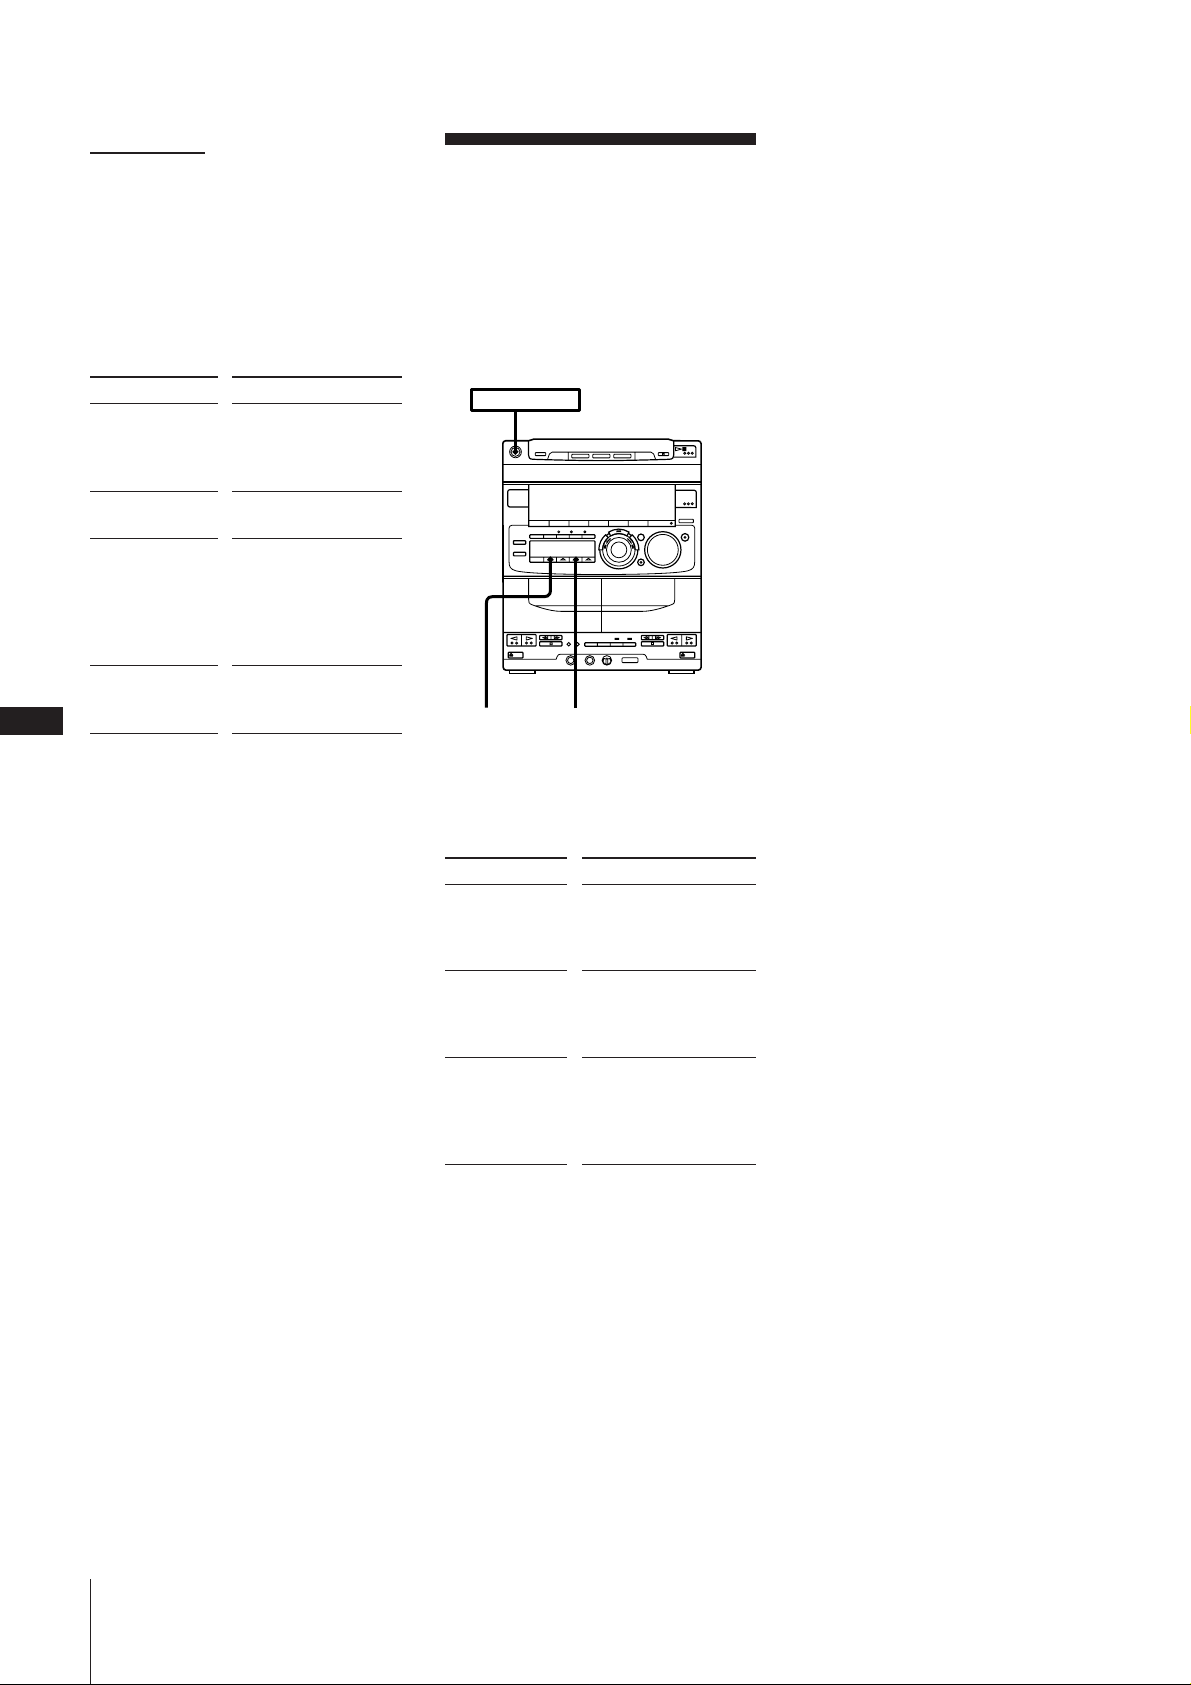
Use the buttons on the unit to do this
operation.
POWER m ON
1/ALL DISCS
REPEAT
16
Notes
•The program you made still remains in
the CD player, so you can play the same
program again.
•If “--.--” appears instead of the total
playing time during programming, this
means you have programmed a track
numbered greater than 20, or the total
playing time has exceeded 100 minutes.
Repeating all the tracks
1 Press REPEAT repeatedly until
“REPEAT” appears in the display.
2 Press · .
To
Repeat all the
tracks on the
current CD
Repeat all the
tracks on all CDs
Repeat only one
track
To cancel repeat play
Press REPEAT repeatedly until “REPEAT”
or “REPEAT 1” disappears from the
display.
Note
You can not repeat a single track during
shuffle or program play.
Press
1/ALL DISCS
repeatedly until “1
DISC” appears in the
display.
1/ALL DISCS
repeatedly until “ALL
DISCS” appears in the
display.
REPEAT repeatedly
until “REPEAT 1”
appears in the display
while playing the track
you want to repeat.
Chapter 2: the Video CD/CD-G/CD Player
Page 17
Chapter 3:
the
Radio
Listening to the Radio
Presetting Radio Stations
Playing Preset Radio
Stations
Listening to the
Radio
When you want to play a radio program,
you can have the tuner automatically scan
the radio frequencies and tune in the
stations with clear signals. This feature
saves you time in searching for stations
with clear signals. However, stations with
weak signals may be skipped by automatic
tuning. Manually tune in the ones skipped
by automatic tuning.
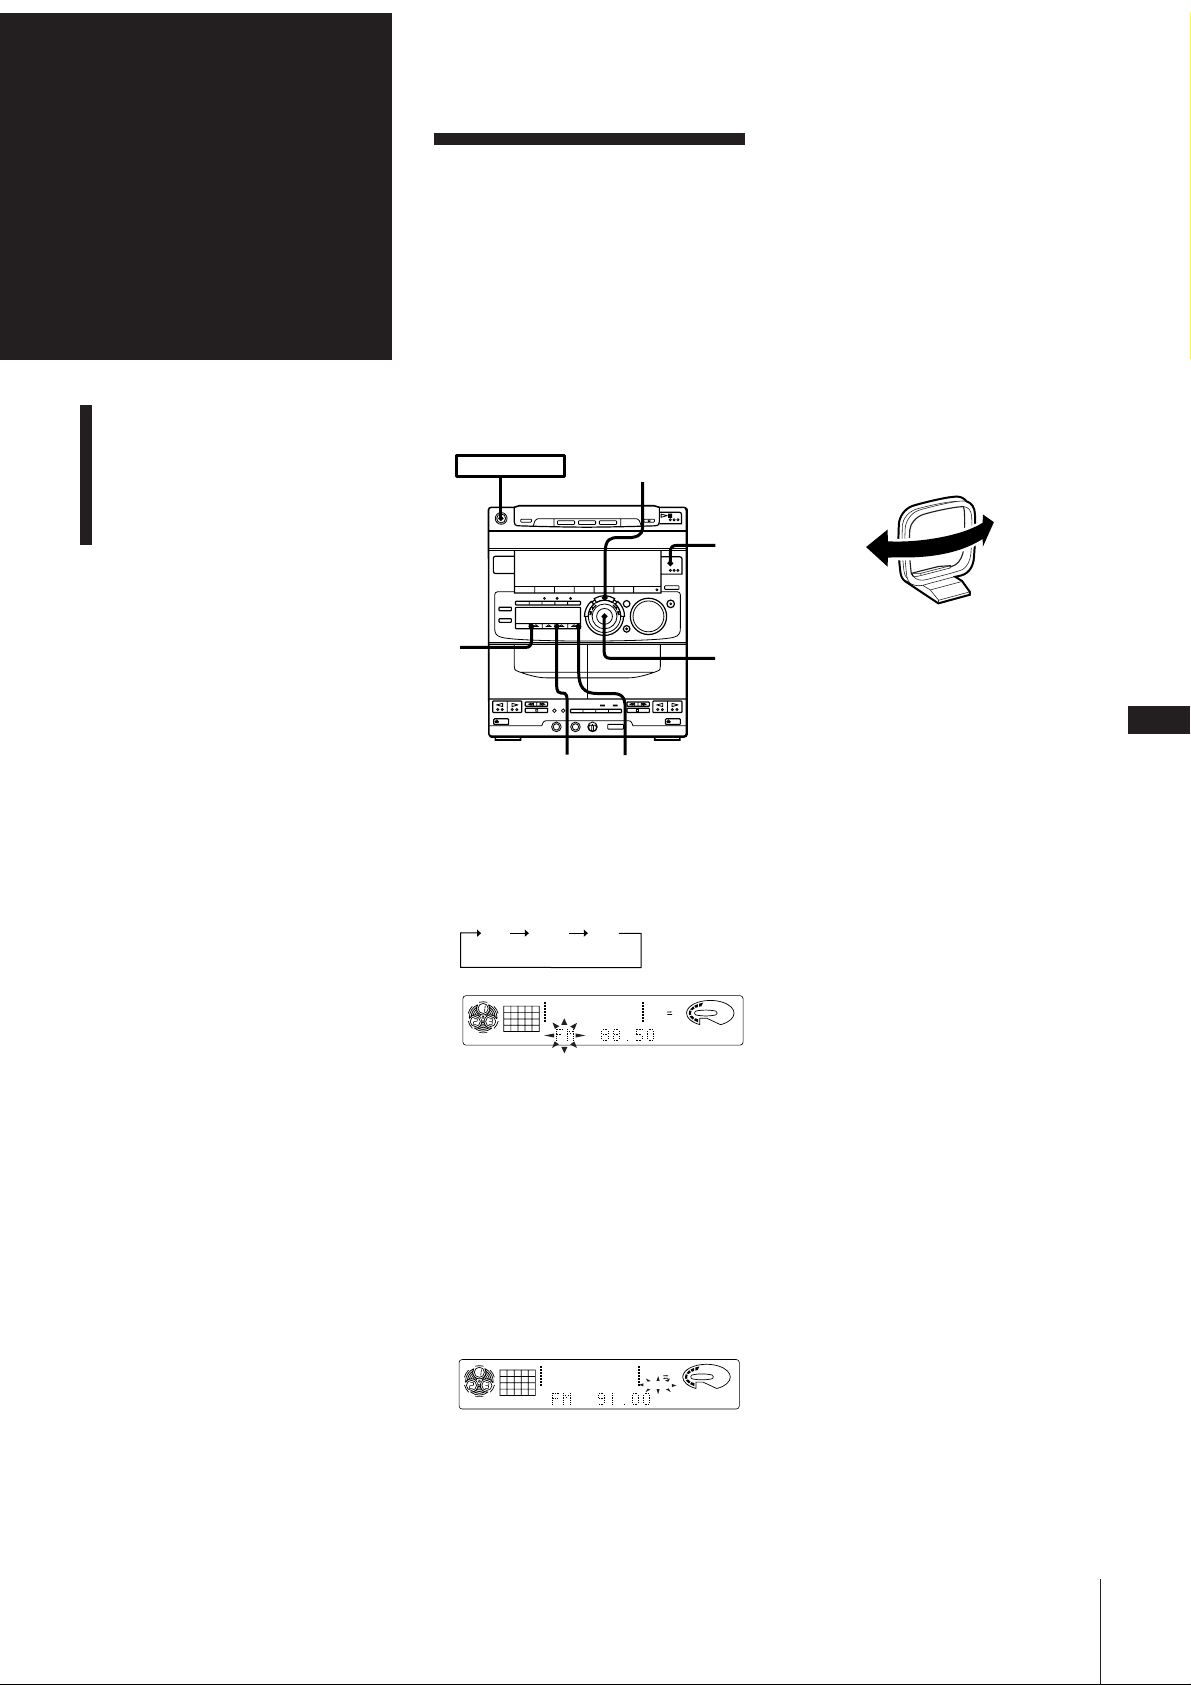
POWER m ON
ENTER/NEXT
1
2
3,
4
STEREO MONO
1Press TUNER/BAND repeatedly until
the band you want appears in the
display.
As you press TUNER/BAND, the band
changes as follows:
FM MW SW
4 If you do not want to listen to the station
selected, turn the JOG dial again to
restart the scan.
When the desired station is not
tuned in
Automatic tuning may skip stations with a
weak signals. Tune in the station manually.
1 Press TUNING MODE repeatedly until
“MANUAL” appears in the display.
2 Keep turning the JOG dial until the
desired station is tuned in.
To improve MW/SW (AM) broadcast
reception
Reorient the supplied AM loop antenna for
MW/SW (AM).
MW/SW (AM)
To change the MW tuning interval
The MW tuning interval is preset to
9 kHz (some models are preset to 10 kHz)
in the factory. If you need to change the
interval to 10 kHz (9 kHz), do as follows:
1 Turn on the power.
2 Change the band to MW (AM).
3 Turn off the power.
4 Turn the power back on while pressing
ENTER/NEXT.
After changing the MW (AM) tuning
interval, reset the preset radio stations. To
reset the interval to the factory setting,
follow the same procedure.
EN
17
TUNER
12563 250 500 1k 2k 4k 8k 16k(Hz)
DOLBY NR
VOLUME
OFF
MANUAL
MHz
2Press TUNING MODE repeatedly until
“AUTO” appears in the display.
3Turn the JOG dial clockwise to scan for
higher frequency stations. To scan for
lower frequency stations, turn the JOG
dial counterclockwise.
The tuner starts scanning radio
frequencies, and stops automatically
when it finds a clear station.
“TUNED” appears in the display.
“STEREO” also appears if the tuned FM
station is broadcasting in stereo.
TUNER
12563 250 500 1k 2k 4k 8k 16k(Hz)
DOLBY NR
TUNED
VOLUME
OFF
STEREO
AUTO
MHz
When an FM program is not clear to receive
Press MONO so that “MONO” appears in
the display. There will be no stereo effect,
but the reception will improve. Press
STEREO to restore the stereo effect.
One Touch Play feature
Press TUNER/BAND when the power is
off. You can listen to the last received
station without pressing any other buttons.
Automatic Source Selection
If you press TUNER/BAND while you are
listening to other sound source, the tuner is
selected and the last received station plays
automatically.
Chapter 3: the Radio
Page 18
Presetting Radio
Stations
Playing Preset Radio
Stations
EN
18
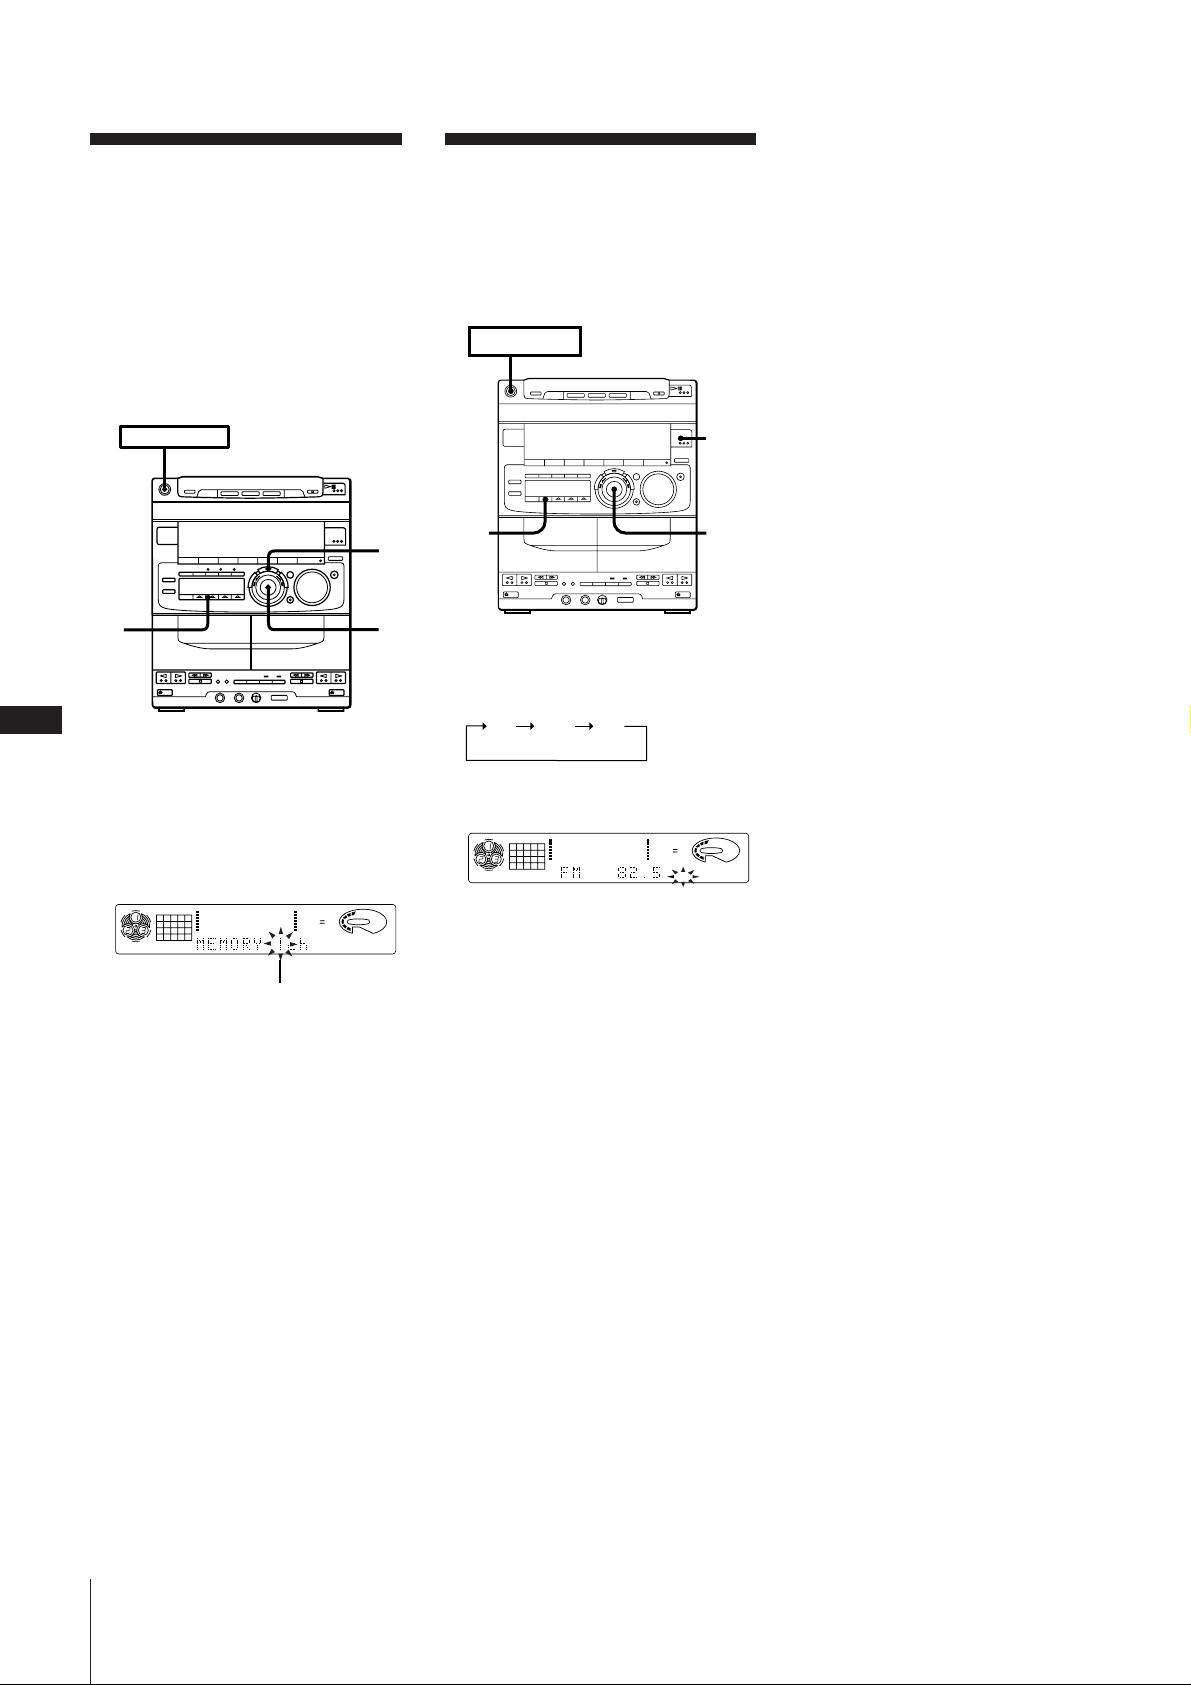
You can store radio frequencies in the
tuner’s memory to tune in your favorite
stations quickly. You can preset up to
20 FM stations, 10 MW stations, and 10 SW
stations in any order.
Use the buttons on the unit for presetting
stations.
POWER m ON
2
1 Tune in a station you want to store in
the preset memory.
2 Press TUNER MEMORY.
“MEMORY” and the preset channel
number appear in the display.
TUNER
1
12563 250 500 1k 2k 4k 8k 16k(Hz)
Preset channel number
DOLBY NR
VOLUME
OFF
AUTO
4
3
Once you have preset the stations, use the
JOG dial to quickly tune in your favorite
stations.
POWERnON
1
2
3
1 Press TUNER/BAND repeatedly to
select the band you want.
FM MW SW
2 Press TUNING MODE so that
“PRESET” appears in the display.
TUNER
ALL DISC S
12563 250 500 1k 2k 4k 8k 16k(Hz)
DOLBY NR
VOLUME
OFF
MHz
PRESET
3 Turn the JOG dial (or press + or - on the
remote) to tune in a preset station.
The station frequency appears and the
station begins broadcasting.
3 Turn the JOG dial to select a preset
channel number.
4 Press ENTER/NEXT.
The station is stored at the preset
channel number you have decided on.
5 Repeat steps 1 to 4 for each station you
want to store.
To erase a stored station
Store a new station at a previously used
preset channel number. It will erase the old
station and replace it with the new station.
If you have trouble storing a station or if
you made a mistake
Make sure “MEMORY” is lit in the display.
If not, press TUNER MEMORY again so
that “MEMORY” appears (for about eight
seconds) in the display, and then proceed
with steps 3 and 4.
Chapter 3: the Radio
Page 19
Chapter 4:
the Tape
Player
Playing a Tape
Recording a CD
Recording a CD: Specifying
Tape Length (time edit)
Recording From the Radio
Recording From Another
Tape (dubbing)
Playing a Tape
You can use TYPE I (normal), TYPE II
(CrO2) and TYPE IV (metal) tapes. When
you insert a tape, the deck detects the tape
type automatically.
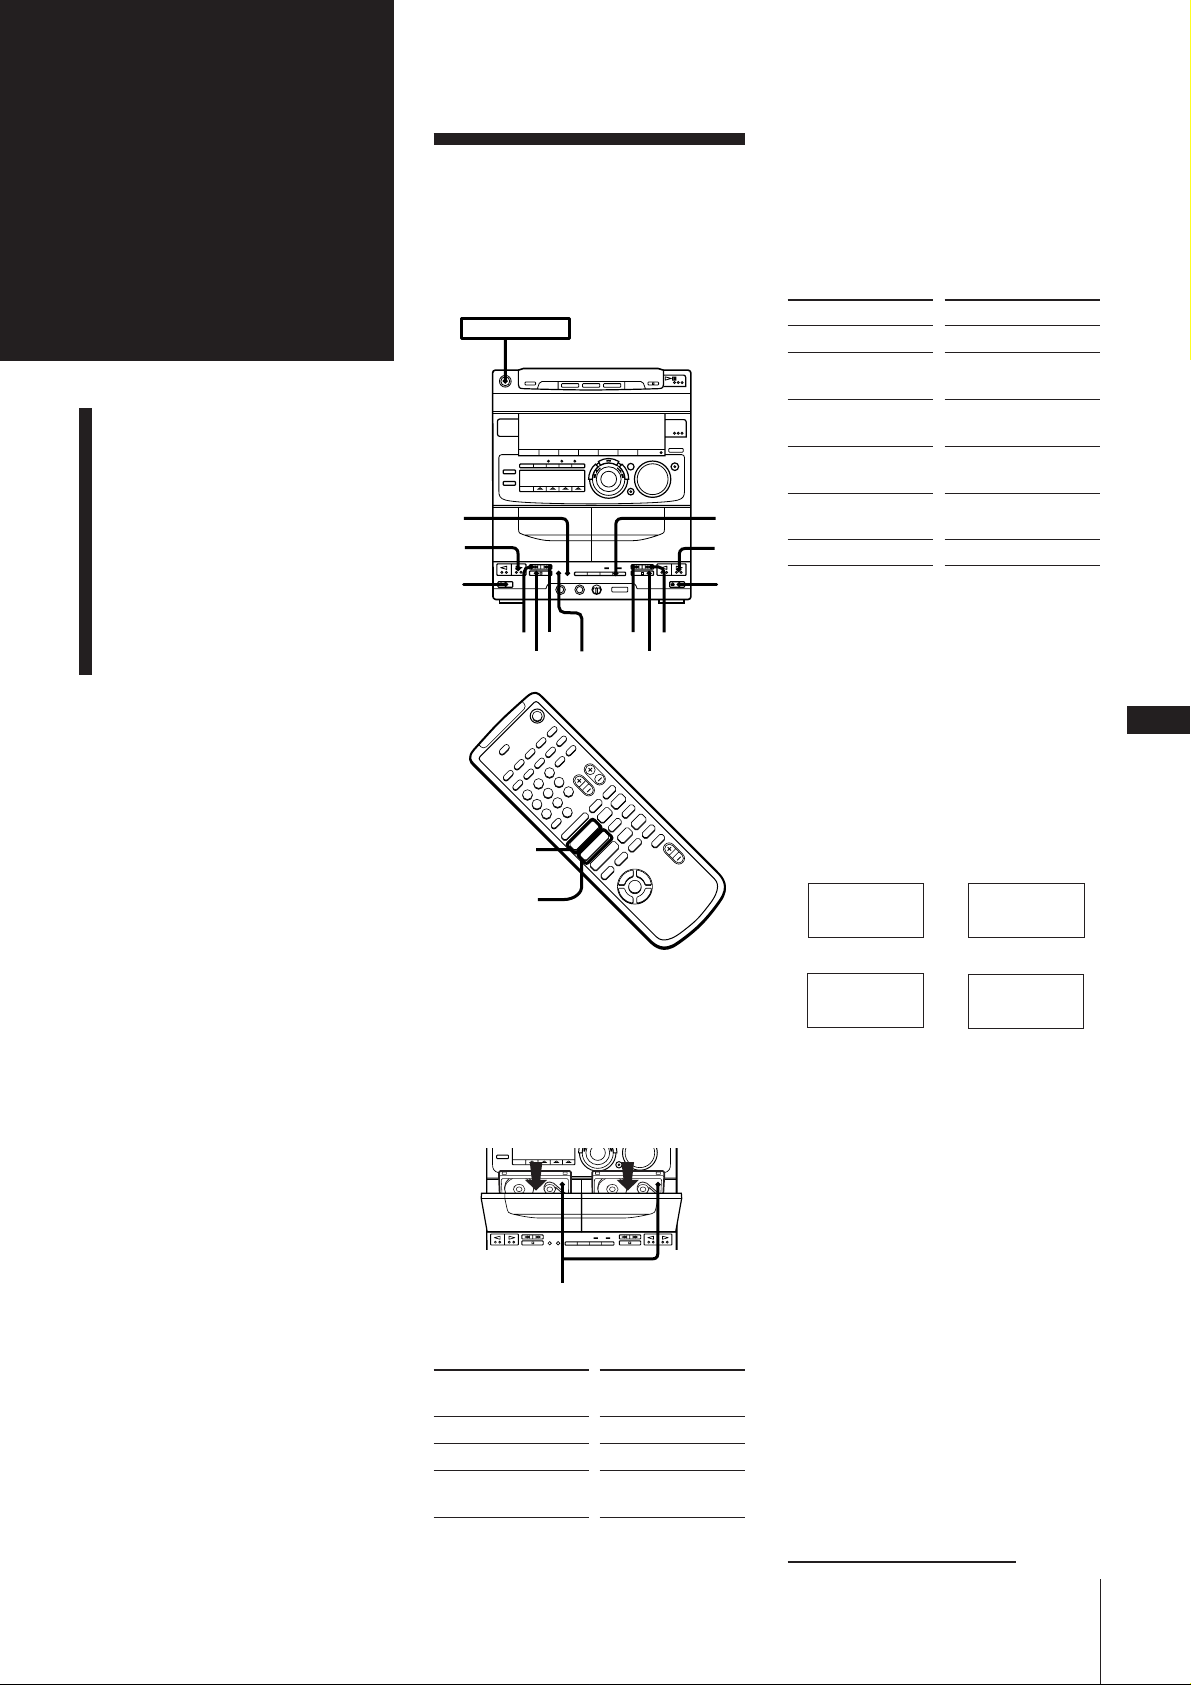
POWER m ON
2
3
1
DECK A » Æ
DECK B » Æ
)00)
p
DOLBY NR
+
–
p
+
p
–
)0
P
pP
Æ»
)0+=
Æ»
Æ
4
$
3
1
*1The deck stops automatically after
repeating the sequence five times.
*2See “To play both decks in succession
(relay play)”.
3 Press · (to play the front side) or ª
(to play the reverse side).
The tape starts playing.
To
Stop play
Pause
Resume play after
pause
Fast forward
P
Rewind
Remove the cassette
Using the remote
1 Press DECK A ª · or DECK B
ª · during stop mode. The deck
starts playing the front side. Press again
to play the reverse.
2 Press the desired operation button.
To play both decks in succession
(relay play)
Relay play always follows the following
sequence. When the reverse side of the tape
in deck B finishes playing, the following
sequence continues four more times.
Deck A Deck A
(Front side) m (Reverse side)
Press (on remote)
p
P PAUSE (P)
(Deck B only)
P PAUSE (P) (Deck
B only), ª or ·
) for front side
0 for reverse side
0 for front side
) for reverse side
§ EJECT
EN
19
1 Press § EJECT to open tape
compartment.
Insert a recorded tape in deck A or B
with the tape side down and the side
you want to play facing forward. Push
to close the compartment. The tape will
start playing from the front side.
Playing side facing forward
2 Select dual or single-sided recording.
To play
One side of the tape
Both sides*
Both decks in
succession*
1
2
Press DIRECTION
to select
A
ß
RELAY
µ
Deck B Deck B
(Reverse side) M (Front side)
1 Press § EJECT and insert recorded tapes
in both decks.
2 Press DIRECTION repeatedly until
“RELAY” appears in the display.
3 Press ª or · on either deck.
To stop relay play, press p.
To cancel relay play
Press DIRECTION repeatedly until “A”
or “ß” appears in the display.
When listening to a tape recorded with the
Dolby* B-type noise reduction system
Press DOLBY NR button so that “DOLBY
NR B” appears in the display.
The setting affects both decks. Dolby noise
reduction system reduces tape hiss noise in
low-level high-frequency signals.
* Dolby noise reduction manufactured
under license from Dolby Laboratories
Licensing Corporation.
“DOLBY” and the double-D symbol a
are trademarks of Dolby Laboratories
Licensing Corporation.
continue to next page ➔
Chapter 4: the Tape Player
Page 20
EN
POWER m ON
p
3
6
7
1
4
5
2
8
20
➔ continued
One Touch Play feature
Press · or ª (or DECK A ª · or
DECK B ª · on the remote) when the
power is off.
You can listen to the tape without pressing
any other buttons when a tape is in the
deck. When a tape is not in the deck, the
system will just turn on.
Automatic Source Selection
If you press · or ª (or DECK A ª ·
or DECK B ª · on the remote) while
you are listening to other sound source, the
tape deck is selected and play starts
automatically.
Recording a CD
You can record from a CD to a tape.
Use TYPE I (normal) or TYPE II (CrO2)
tapes. Do not use TYPE IV (metal) tapes for
recording.
To listen to other sources, you must stop
recording.
Recording a CD
Automatically
By using CD SYNCHRO, you can record
from a CD to a tape quickly.
Use the buttons on the unit to do this
operation.
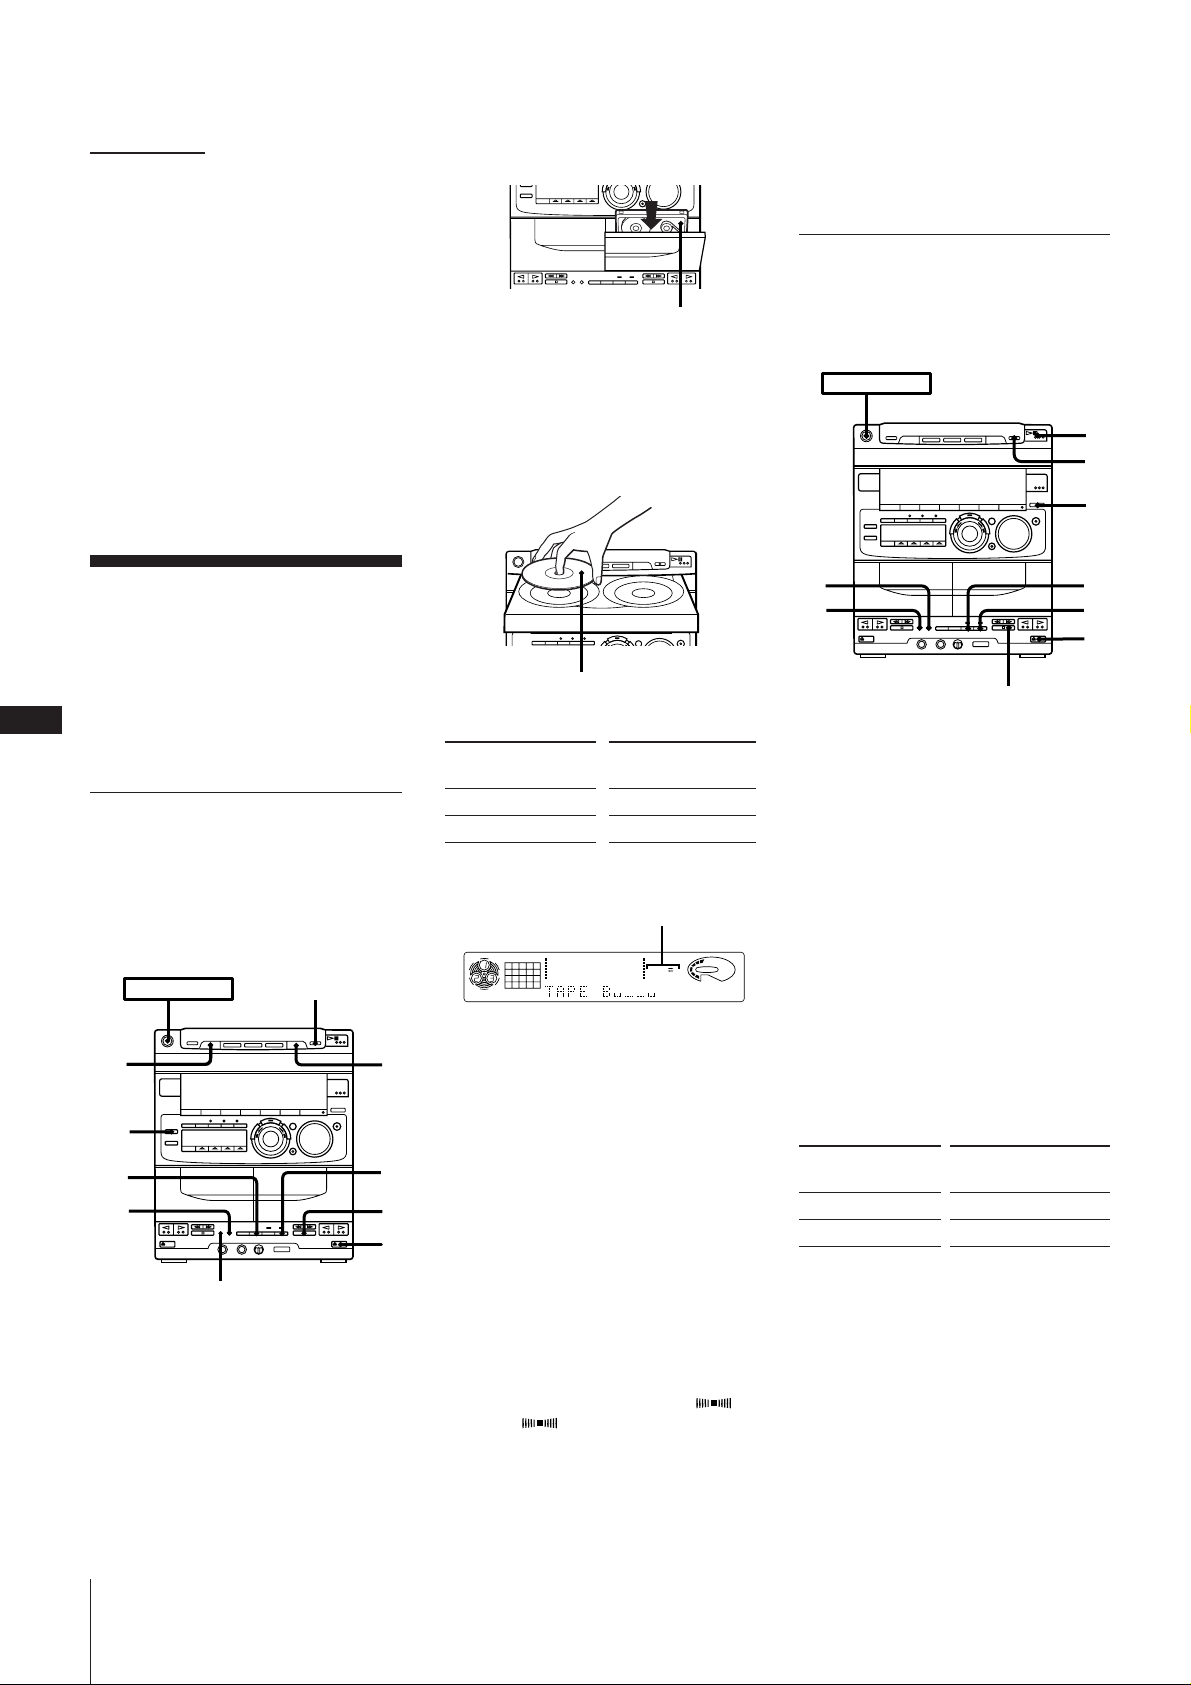
POWER m ON
DISC
SKIP
DSP
p
5
3
4
1 Press § EJECT and insert a blank tape
into deck B with the side you want to
record on facing forward.
Recording will start from the front side
of the tape, unless you have changed the
playing direction before recording.
Chapter 4: the Tape Player
2
6
1
Make sure the tabs on the cassette have
not been removed.
Recording side facing forward
2 Press § OPEN/CLOSE and place a CD.
Then, press § OPEN/CLOSE again to
close the disc tray.
If the button for the disc tray containing
the CD you want to record is not lit
green, press DISC SKIP repeatedly so
that it lights green.
Label side up
3 Select dual or single-sided recording.
To record
One side of the tape
Both sides*
* Recording always stops at the end of the
reverse side. Be sure to start from the
front side.
CD
1
ALL DISC S
Press DIRECTION
to select
A
ß or RELAY
DIRECTION indication
12563 250 500 1k 2k 4k 8k 16k(Hz)
4 When you want to reduce the hiss noise
in low-level high-frequency signals,
press DOLBY NR so that “DOLBY NR
B” appears in the display.
5 Press CD SYNCHRO.
Deck B stands by for recording.
6 Press P PAUSE to release recording
p
pause.
Recording starts.
After about 10 seconds, the CD starts
playing.
To stop recording
Press p on deck or the CD player.
To add the surround effect
Press DSP repeatedly until “SUR 1
or “SUR 2
To start recording without a 10
second space
First, playback or record on deck B for a
few seconds, then press CD SYNCHRO.
The CD starts playing immediately after
”
appears in the display.
DOLBY NR
recording starts.
This will not work if you press § on deck B
before recording.
Recording a CD Manually
You can record a CD as you like, for
instance, record just the songs you want or
record from the middle of the tape.
1 Press § EJECT and insert a blank tape
into deck B with the side you want to
record on facing forward.
Recording will start from the front side
of the tape, unless you have changed the
playing direction before recording.
Make sure the tabs on the cassette have
not been removed.
2 Press § OPEN/CLOSE and place a CD.
Then, press § OPEN/CLOSE again to
close the disc tray.
VOLUME
OFF
If the button for the disc tray containing
the CD you want to record is not lit
green, press DISC SKIP repeatedly so
that it lights green.
3 Press FUNCTION to select the CD
player.
4 Select dual or single-sided recording.
To record
One side of the tape
Both sides*
* Recording always stops at the end of the
reverse side. Be sure to start from the
front side.
Press DIRECTION to
select
A
ß or RELAY
5 When you want to reduce the hiss noise
in low-level high-frequency signals,
”
press DOLBY NR so that “DOLBY NR
B” appears in the display.
6 Press r REC.
Deck B stands by for recording.
7 Press P PAUSE to release recording
pause.
Recording starts.
Page 21
Press · on the CD player.
8
The CD starts playing.
To
Stop recording
Pause recording
Stop CD play
Pause CD play
Press
p on deck
P PAUSE
p on the CD player
· on the CD player
Recording a CD:
Specifying Tape
Length (time edit)
You can have the stereo system create
programs based on the tape length. The CD
player makes programs that will fit the tape
length. For example, if you use a 40-minute
tape to record a 46-minute CD, the CD
player will automatically choose tracks that
will fit within the 40-minutes, filling as
much of the tape as possible. The player
will not program those tracks beyond track
number 20. Use the buttons on both the
unit and the remote to do this operation.
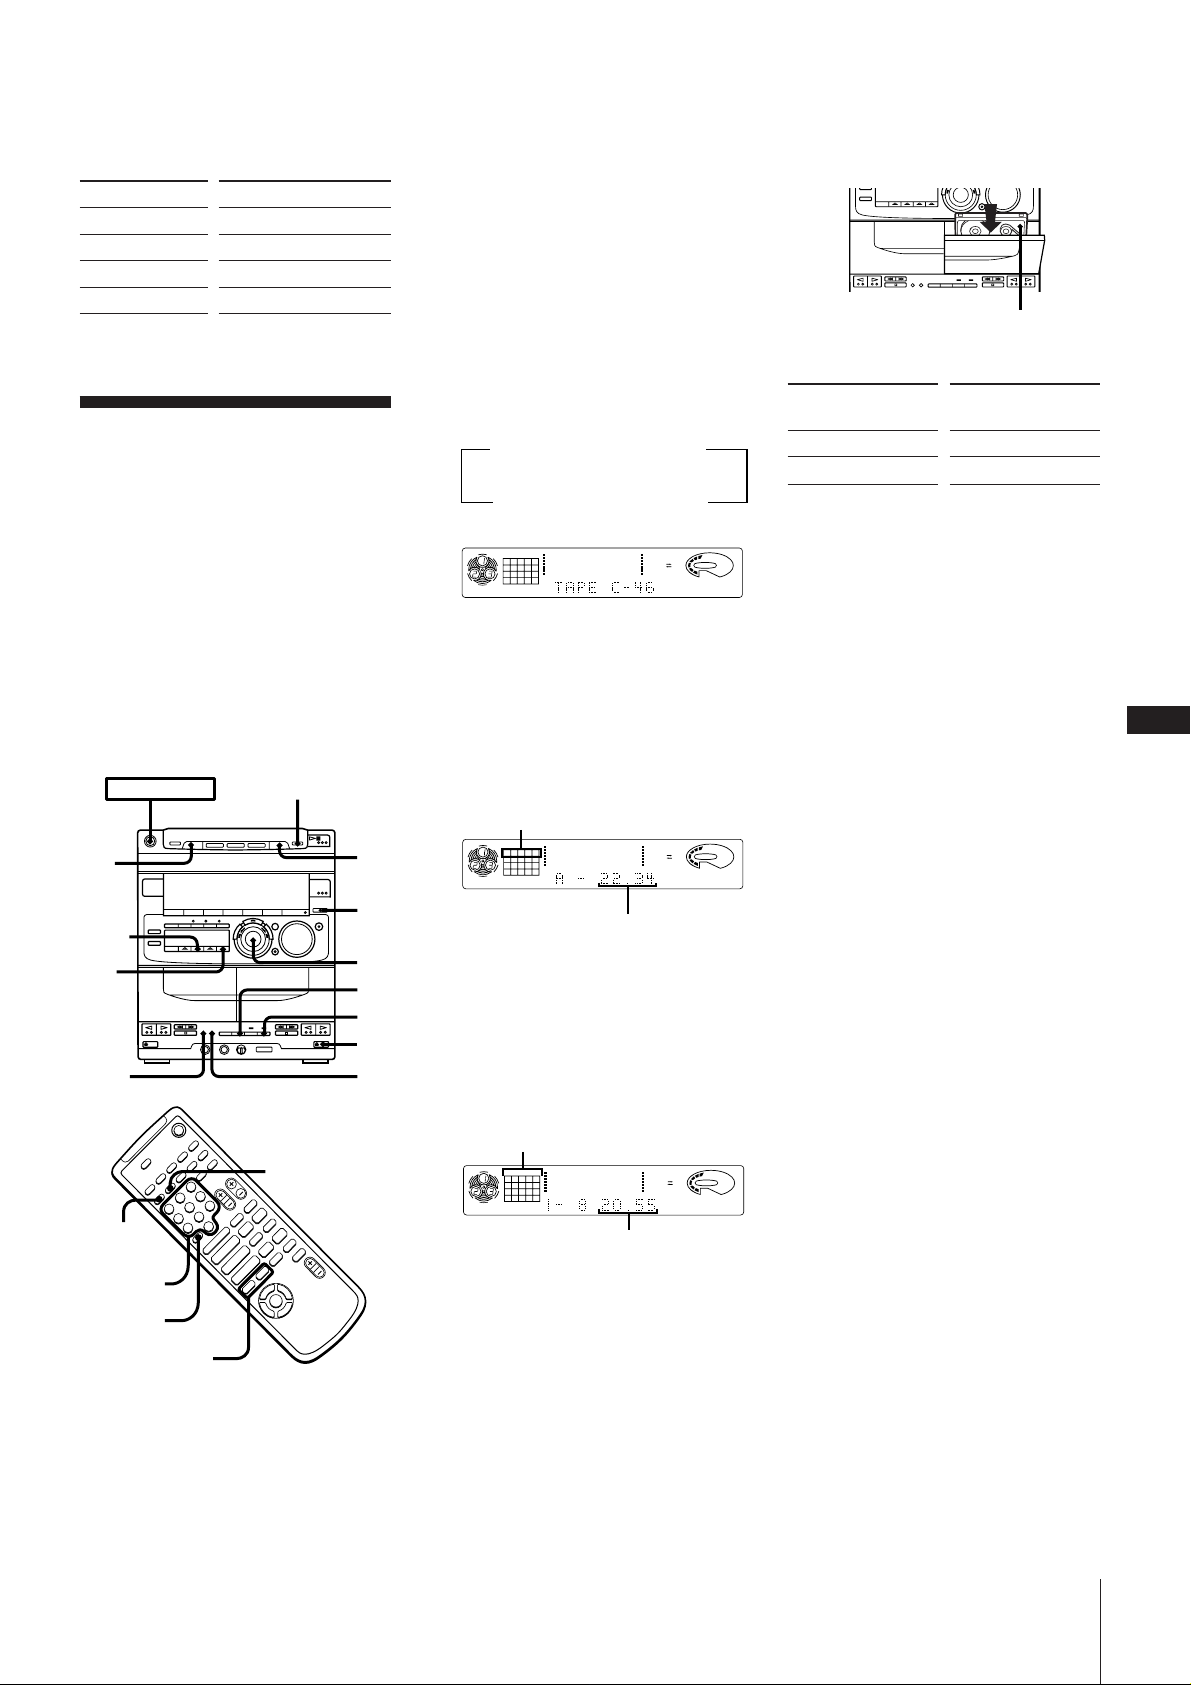
POWER m ON
DISC
SKIP
PLAY
p
2
1
MODE
3,
5,
6
DOLBY
NR
EDIT
Numeric
buttons
> 10
+
–
CHECK
+
p
–
)0
P
pP
Æ»
)0+=
Æ»
Æ
4
$
4
9
10
7
8
=/+
1 Press FUNCTION repeatedly until “CD”
appears in the display.
If the button for the disc tray containing
the CD you want to record is not lit
Make sure the tabs on the cassette have
not been removed.
green, press DISC SKIP repeatedly so
that it lights green.
3Press EDIT twice.
“TIME EDIT” appears in the display.
Then “SELECT” and “TIME” appear
alternately in the display.
4Turn the JOG dial (or press PREV =
or NEXT + on the remote) to choose
the indication that corresponds to the
length (in minutes) of your tape.
The indications change as follows:
nN
HALF
C-90
(23:00)
C-90
nN
(45:00)
CD
12345
678
DISC PROGRAM
C-74
(37:00)
12563 250 500 1k 2k 4k 8k 16k(Hz)
C-54
(27:00)
C-60
(30:00)
DOLBY NR
OFF
VOLUME
REC
Choose “HALF” if you want the CD
player to half the total playing time of
the CD. You cannot select “HALF”
when recording CDs with more than 20
tracks.
8 Select dual or single-sided recording.
To record
One side of the tape
Both sides*
* Recording always stops at the end of the
reverse side. Be sure to start from the
front side.
9 Press CD SYNCHRO.
Deck B stands by for recording.
10 Press P PAUSE to release recording
pause.
Recording starts.
After about 10 seconds, the CD starts
playing.
5Press EDIT.
The CD player determines the tracks to
be recorded on side A automatically.
Tracks to be recorded on side A
CD
123 5
DISC PROGRAM
12563 250 500 1k 2k 4k 8k 16k(Hz)
DOLBY NR
VOLUME
OFF
Total playing time on side A
6When you want to record on both sides,
press EDIT again.
The CD player determines the tracks to
be recorded on side B.
When you want to record only on side
A, press p on the CD player to stop the
indication from flashing.
Tracks to be recorded
both side A and B
CD
12345
678
DISC PROGRAM
12563 250 500 1k 2k 4k 8k 16k(Hz)
DOLBY NR
VOLUME
OFF
Total playing time on side B
7Press § EJECT and insert a blank tape
into deck B with the side you want to
record on facing forward.
Recording will start from the front side
of the tape, unless you have changed the
playing direction before recording.
To stop recording
Press p on the tape deck or CD player.
To cancel time edit
Press p on the CD player and then press
PLAY MODE.
To check the order
Press CHECK on the remote repeatedly.
Each time you press CHECK, the number
of the next programmed tracks appears in
the display.
To select the desired tracks
beforehand
You can place priority on some tracks to be
recorded by selecting them before
programming (only up to 20 tracks). See
“Playing Tracks in the Desired Order
(program play)”.
To start recording without a 10
second space
First, playback or record on deck B for a
few seconds, then press CD SYNCHRO.
The CD starts playing immediately after
recording starts.
This will not work if you press § on deck B
before recording.
To activate DOLBY NR
When you want to reduce the hiss noise in
low-level high-frequency signals, press
DOLBY NR so that “DOLBY NR B” appears
in the display after step 8.
Recording side facing forward
Press DIRECTION to
select
A
ß or RELAY
EN
21
2 Press § OPEN/CLOSE and place a CD.
Then, press § OPEN/CLOSE again to
close the disc tray.
Chapter 4: the Tape Player
Page 22
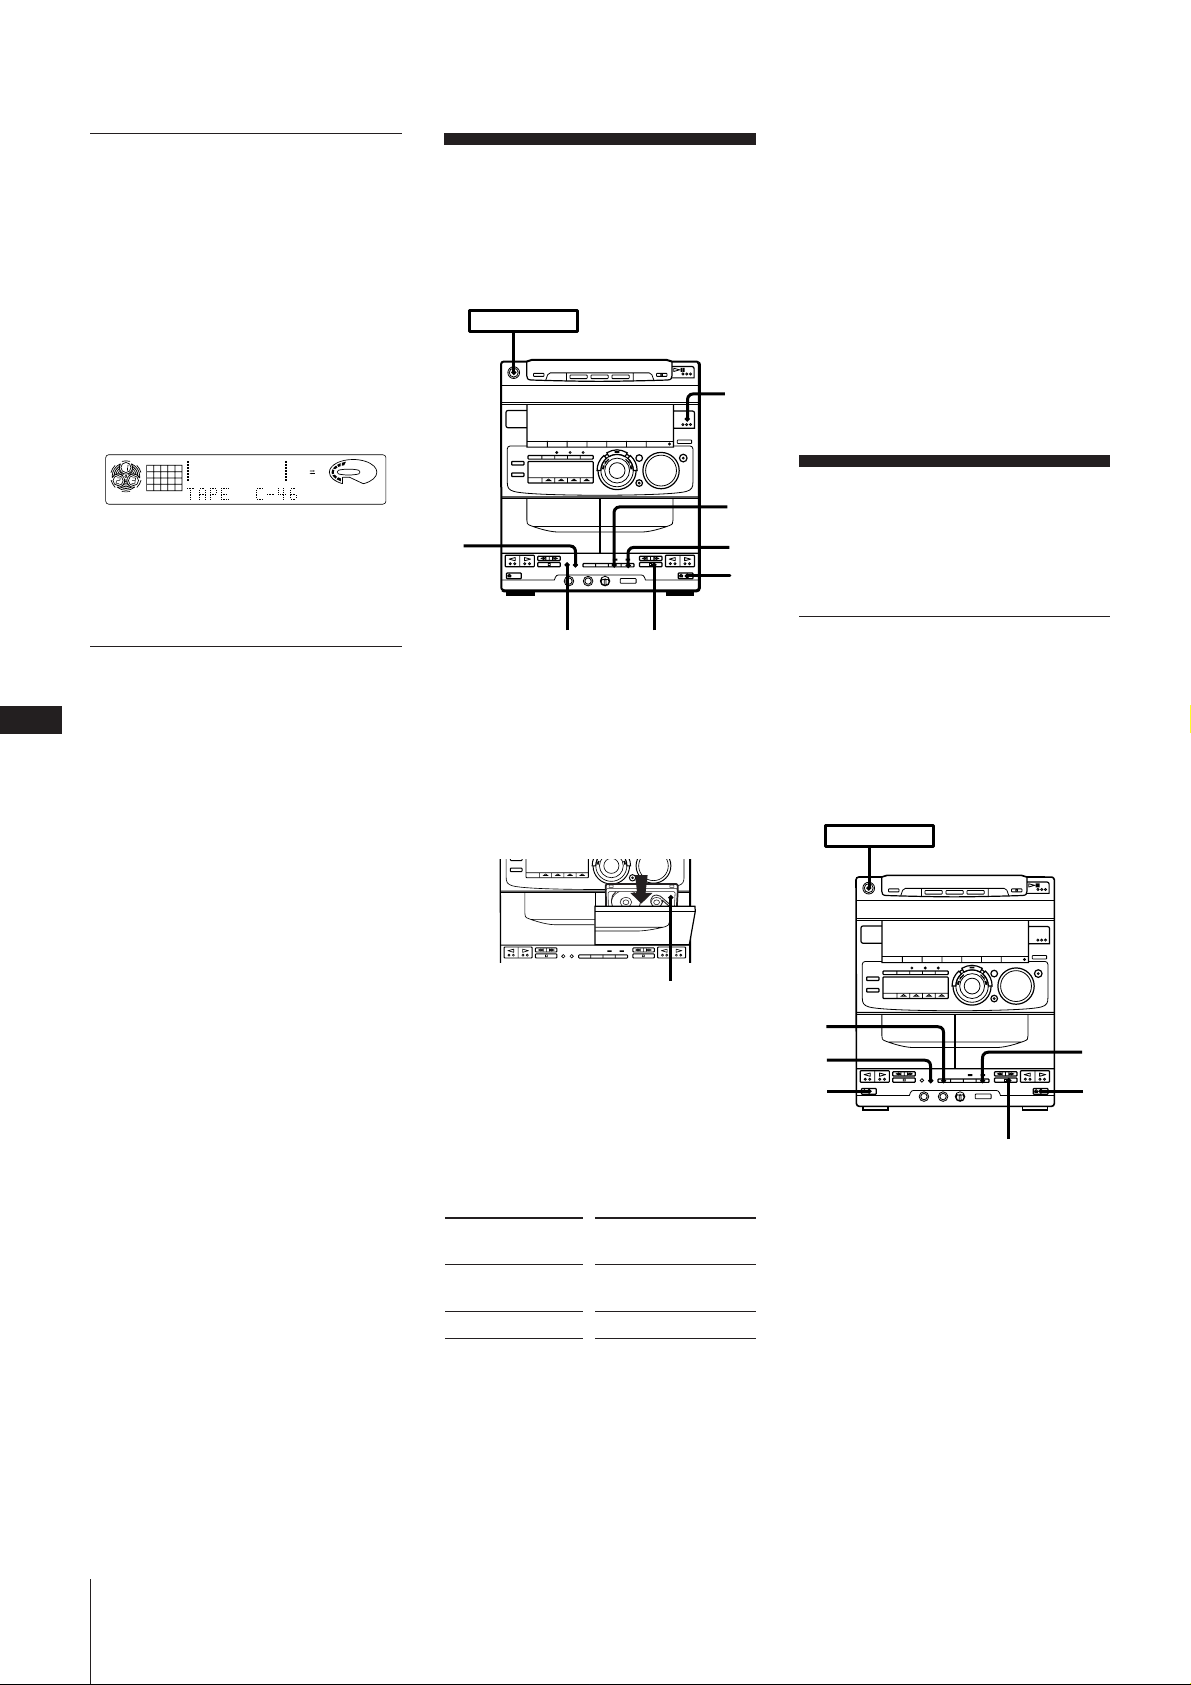
Recording a CD: Selecting
POWER m ON
1 1
4
2
3
p
Tape Length Automatically
(tape select edit)
After inserting CDs, press EDIT in step 3 so
that “TAPE SELECT” appears in the
display.
The player divides the selections for both
side A and B automatically and makes two
programs of almost the same length. The
track order remains the same as the
original. After programming, the most
suitable tape length is indicated in the
display.
CD
12345
678
12563 250 500 1k 2k 4k 8k 16k(Hz)
DISC PROGRAM
Note
You cannot use the tape select edit if you
have selected the desired tracks
beforehand.
DOLBY NR
VOLUME
REC
Recording From the
Radio
You can record from the tuner onto a tape.
Use TYPE I (normal) or TYPE II (CrO2)
tape.
POWER m ON
4
2
1
5
6
To stop recording
Press p on the cassette deck.
To reduce noise during MW (AM)
recording
If a whistling noise is heard while
recording, reorient the AM loop antenna for
optimum reception.
To activate DOLBY NR
When you want to reduce the hiss noise in
low-level high-frequency signals, press
DOLBY NR so that “DOLBY NR B” appears
in the display after step 4.
Recording From
Another Tape
(dubbing)
EN
22
Recording a CD: Specifying
Track Order (program edit)
You can adjust the total recording time to
the tape length while making a program.
1 Do steps 1 through 7 of “Playing Tracks
in the Desired Order (program play)”,
then press P on the remote to pause
recording at the end of side A.
“P” appears and the total playing time is
reset to 0.00.
2 Repeat steps 4 through 7 to make a
program for side B.
3 After programming, do step 7 through
10 of “Recording a CD: Specifying Tape
Length (time edit)”.
Note
If the last portion of the track is recorded on
the leader at the end of the tape, recording
may be incomplete.
DOLBY NR
p
1 Press § EJECT and insert a blank tape
into deck B with the side you want to
record on facing forward.
Recording will start from the front side
of the tape, unless you change the
playing direction before recording.
Make sure the tabs on the cassette have
not been removed.
Recording side facing forward
2 Press TUNER/BAND several times until
the desired radio band appears.
3 Tune in the radio station you want to
record. (See “Listening to the Radio”, or
“Playing Preset Radio Stations” for
details.)
4 Select dual or single-sided recording.
To record
One side of the
tape
Both sides*
* Recording always stops at the end of the
reverse side. Be sure to start from the
front side.
Press DIRECTION to
select
A
ß or RELAY
Dubbing Another Tape
Automatically
You can record the whole tape onto another
automatically by using high speed dubbing.
Use the buttons on the unit to do this
operation and TYPE I (normal) or TYPE II
(CrO2) tape for dubbing.
1 Press § EJECT and insert a recorded
tape in deck A with the side you want to
play facing forward.
Also, insert a blank tape in deck B with
the side you want to record on facing
forward.
Recording and playback will start from
the front side of the tape, unless you
change the playing direction before
recording.
Chapter 4: the Tape Player
5 Press r REC.
Deck B stands by for recording.
6 Press P PAUSE to release recording
pause.
Recording starts.
Page 23
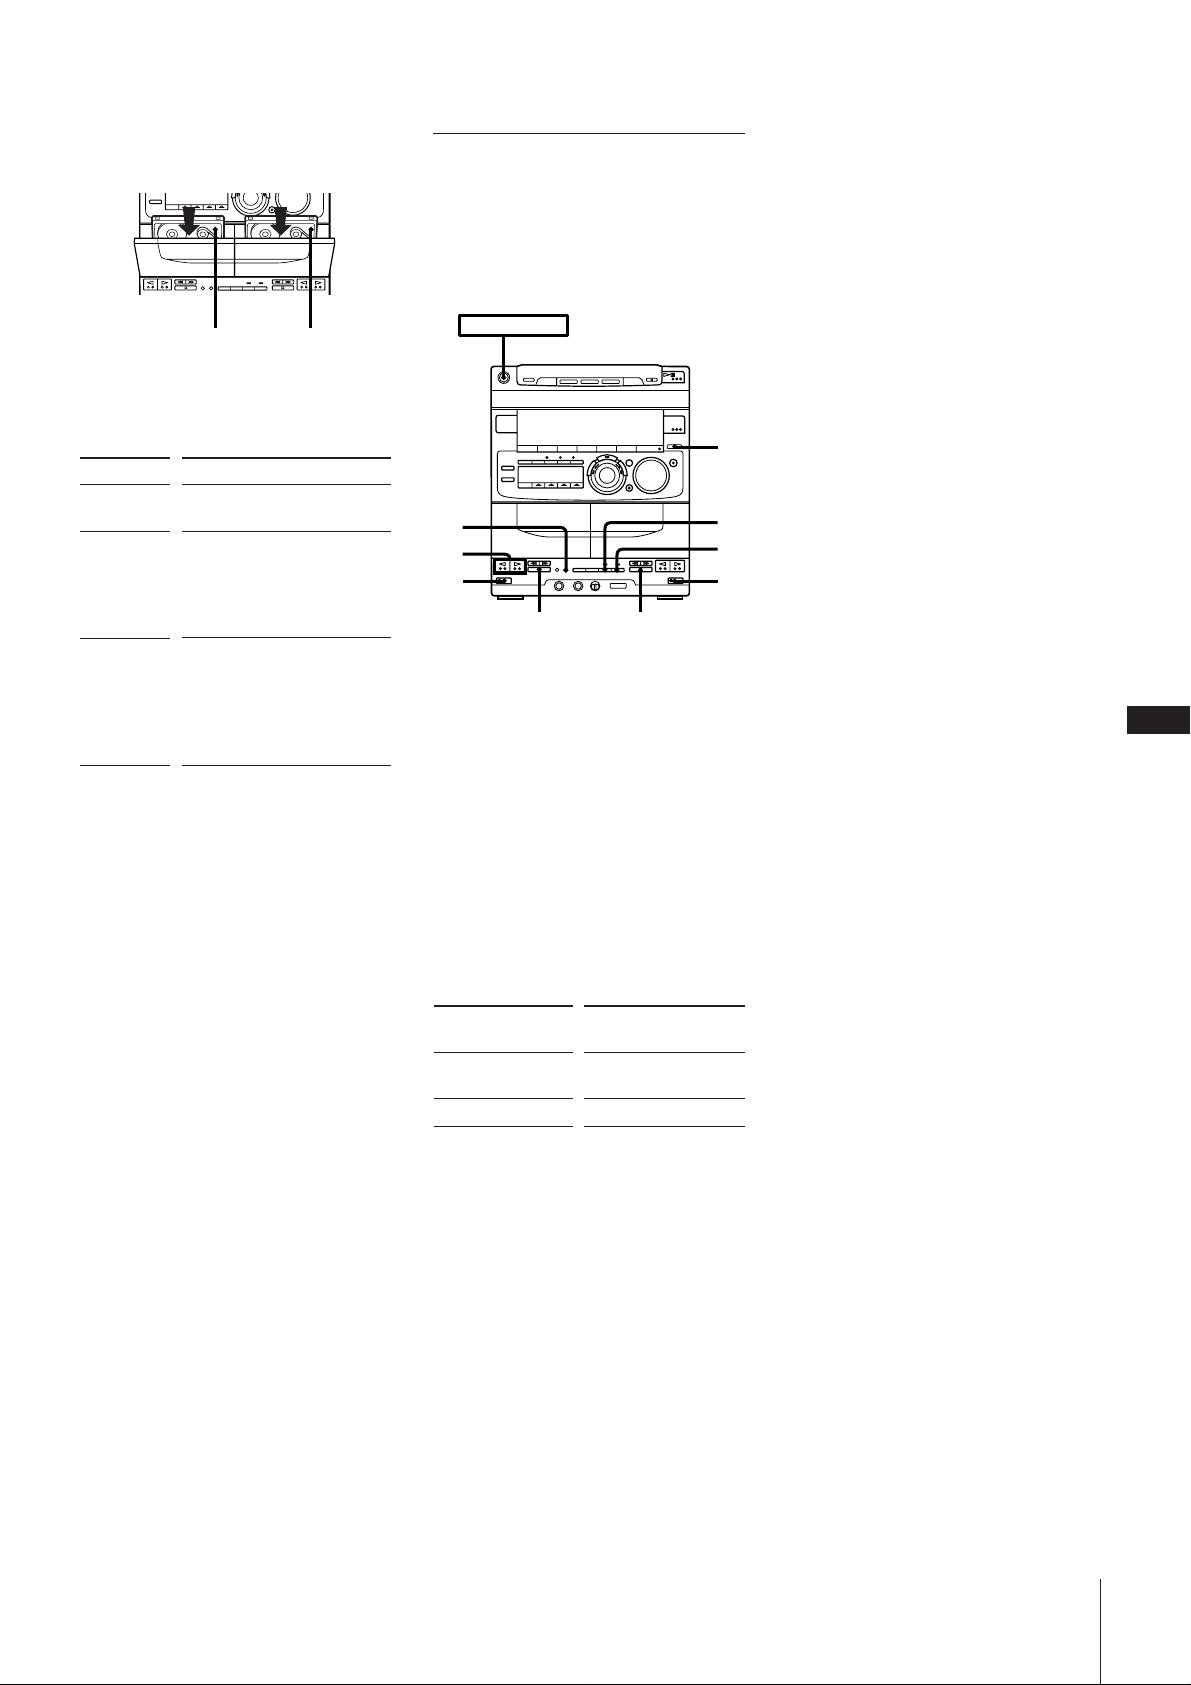
Make sure the tabs on the cassette have
not been removed.
Playing side
facing forward
Recording side
facing forward
2 Choose how you want the tape to record
and press DIRECTION.
Indication
A
ß
RELAY
Operation
Dubbing stops at the end of
one side.
When the tape in one deck
comes to the end of the front
side, it reverses immediately
regardless of the tape
position in the other deck.
When the tape in one deck
reaches its end of the front
side, it stops until the other
tape come to its end, and
then both tapes reverse
together.
3 Press HIGH SPEED DUBBING.
Deck B stands by for recording.
4 Press P PAUSE.
The tape starts dubbing.
If you set the DIRECTION mode to ß
or RELAY, recording always stops at the
end of the reverse side.
Dubbing Another Tape
Manually
When you want to dub only part of the
tape, dub manually at normal speed. Use
TYPE I (normal) or TYPE II (CrO2) tape for
recording.
POWER m ON
3
6
1
p
p
1 Press § EJECT and insert a recorded
tape in deck A with the side you want to
play facing forward.
Also, insert a blank tape in deck B with
the side you want to record on facing
forward.
Recording and playback will start from
the front side of the tape, unless you
change the playing direction before
recording.
Make sure the tabs on the cassette have
not been removed.
2 Press FUNCTION repeatedly until
“TAPE” appears in the display.
Notes
•When dubbing tapes originally recorded
with Dolby NR B, the dubbed tape is
automatically recorded with Dolby NR B.
•When you want to record a tape recorded
without Dolby NR B onto another tape
using Dolby NR B, press DOLBY NR so
that “DOLBY NR B” appears in the
display before recording.
2
4
5
1
EN
23
To stop dubbing
Press p on deck B.
You do not have to press DOLBY NR for
high speed dubbing
The tape in deck B is automatically
recorded in the same state as the tape in
deck A.
3 Select dual or single-sided recording.
To record
One side of the
tape
Both sides*
* Recording always stops at the end of the
reverse side. Be sure to start from the
front side.
Press DIRECTION to
select
A
ß or RELAY
4 Press r REC.
Deck B stands by for recording.
5 Press P PAUSE to release recording
pause.
Recording starts.
6 Press · or ª on deck A to start
playback.
To stop recording
Press p on deck A and B.
Chapter 4: the Tape Player
Page 24
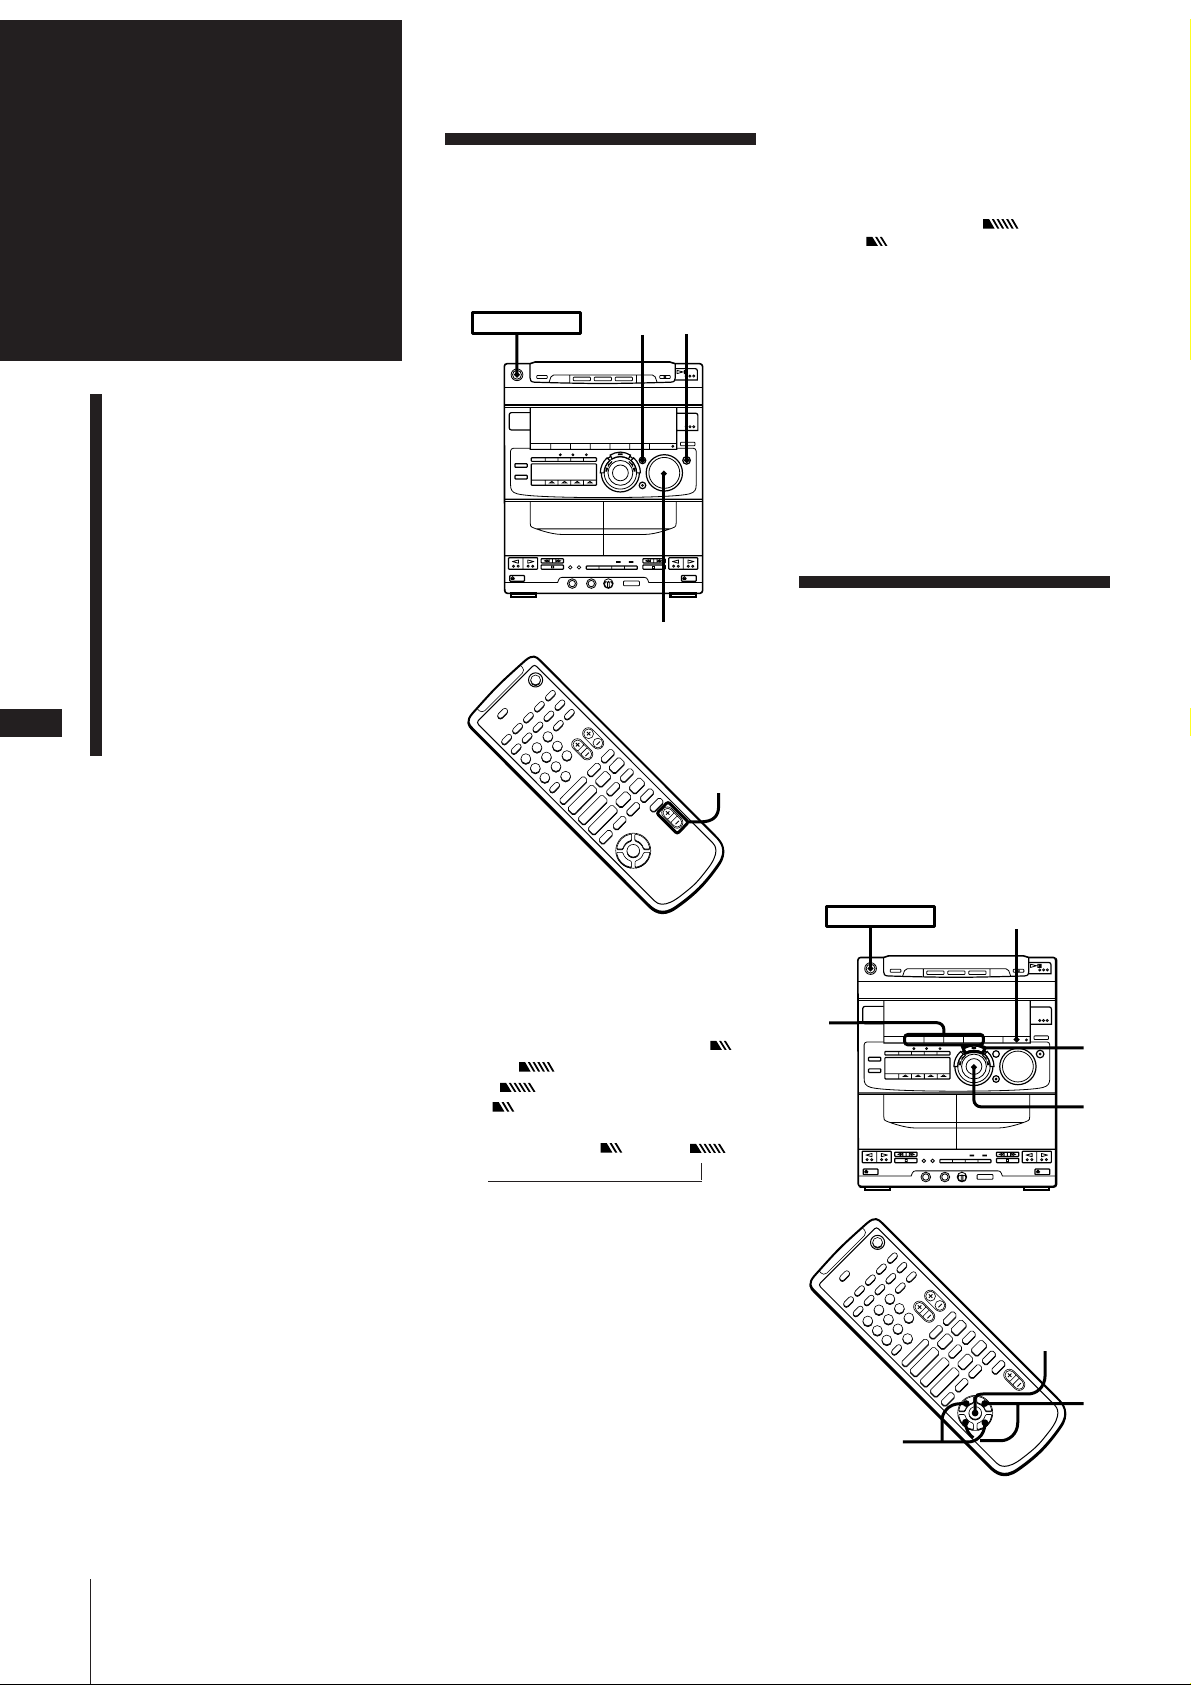
Chapter 5:
–
+
–
p
+
P
)0
pP
)0+=
Æ
Æ»
Æ»
4
$
POWER m ON
EFFECT ON/OFF
1
3
2
1
2
MUSIC MENU
ON/OFF
Sound
Adjustment
Adjusting the Sound
Selecting the Audio
Emphasis
Adjusting the Audio
Emphasis
Adjusting the Sound
To fully enjoy the sound coming from your
stereo system, make the following audio
adjustments. See the following sections for
additional sound adjustments.
POWER m ON
DBFB GROOVE
Notes
•Cancelling GROOVE does not cancel the
DBFB level or equalizer curve.
To cancel the DBFB level, press DBFB
repeatedly until “DBFB ” or
“DBFB ” disappears from the display.
Adjust the equalization to obtain the effect
you desire.
•The sound may be distorted with DBFB or
GROOVE activated when connecting an
optional super woofer (Sony SA-W10G,
etc.) to the unit.
In this case, set DBFB off and adjust the
sound of a super woofer.
To listen through the headphones
Connect the headphones to PHONES jack.
No sound will come from the speakers.
EN
24
Making a Personal Audio
Emphasis File
(personal file)
Switching the Speaker
Formation
(sonic formation)
VOLUME
+
–
+
p
–
)0
P
Æ»
Æ»
Æ
4
VOL+/–
pP
)0+=
$
To adjust the volume
Turn VOLUME on the unit or press
VOL (+/–) on the remote.
To reinforce bass
Press DBFB* repeatedly until “DBFB ”
or “DBFB ” appears in the display.
“DBFB ” is more effective than “
DBFB ” .
display off n DBFB n DBFB
n
* DBFB = Dynamic Bass Feedback
If you use the DBFB System with the
graphic equalizer
If the bass is too strong, the music will
sound distorted. Adjust the bass slowly
while listening to music so that you can
monitor the effect of the adjustment.
Selecting The Audio
Emphasis
Your stereo system is provided with 20
different preset effects (music menu)
created from different graphic equalizer
and surround effect settings.
With the press of a single button, you can
choose between a variety of effects
according to musical genre or use. The
personal file function (see “Making a
Personal Audio Emphasis File (personal
file)”) lets you store your own effects.
Chapter 5: Sound Adjustment
To get a powerful sound (GROOVE)
Press GROOVE.
The volume switches to power mode, DBFB
is automatically set to full strength, the
equalizer curve changes, and the
“GROOVE” button lights up. Press
GROOVE again to return to the previous
volume.
1Press one of the MENU buttons (or
MUSIC MENU 4 /$ on the remote) to
select a MENU.
Page 25
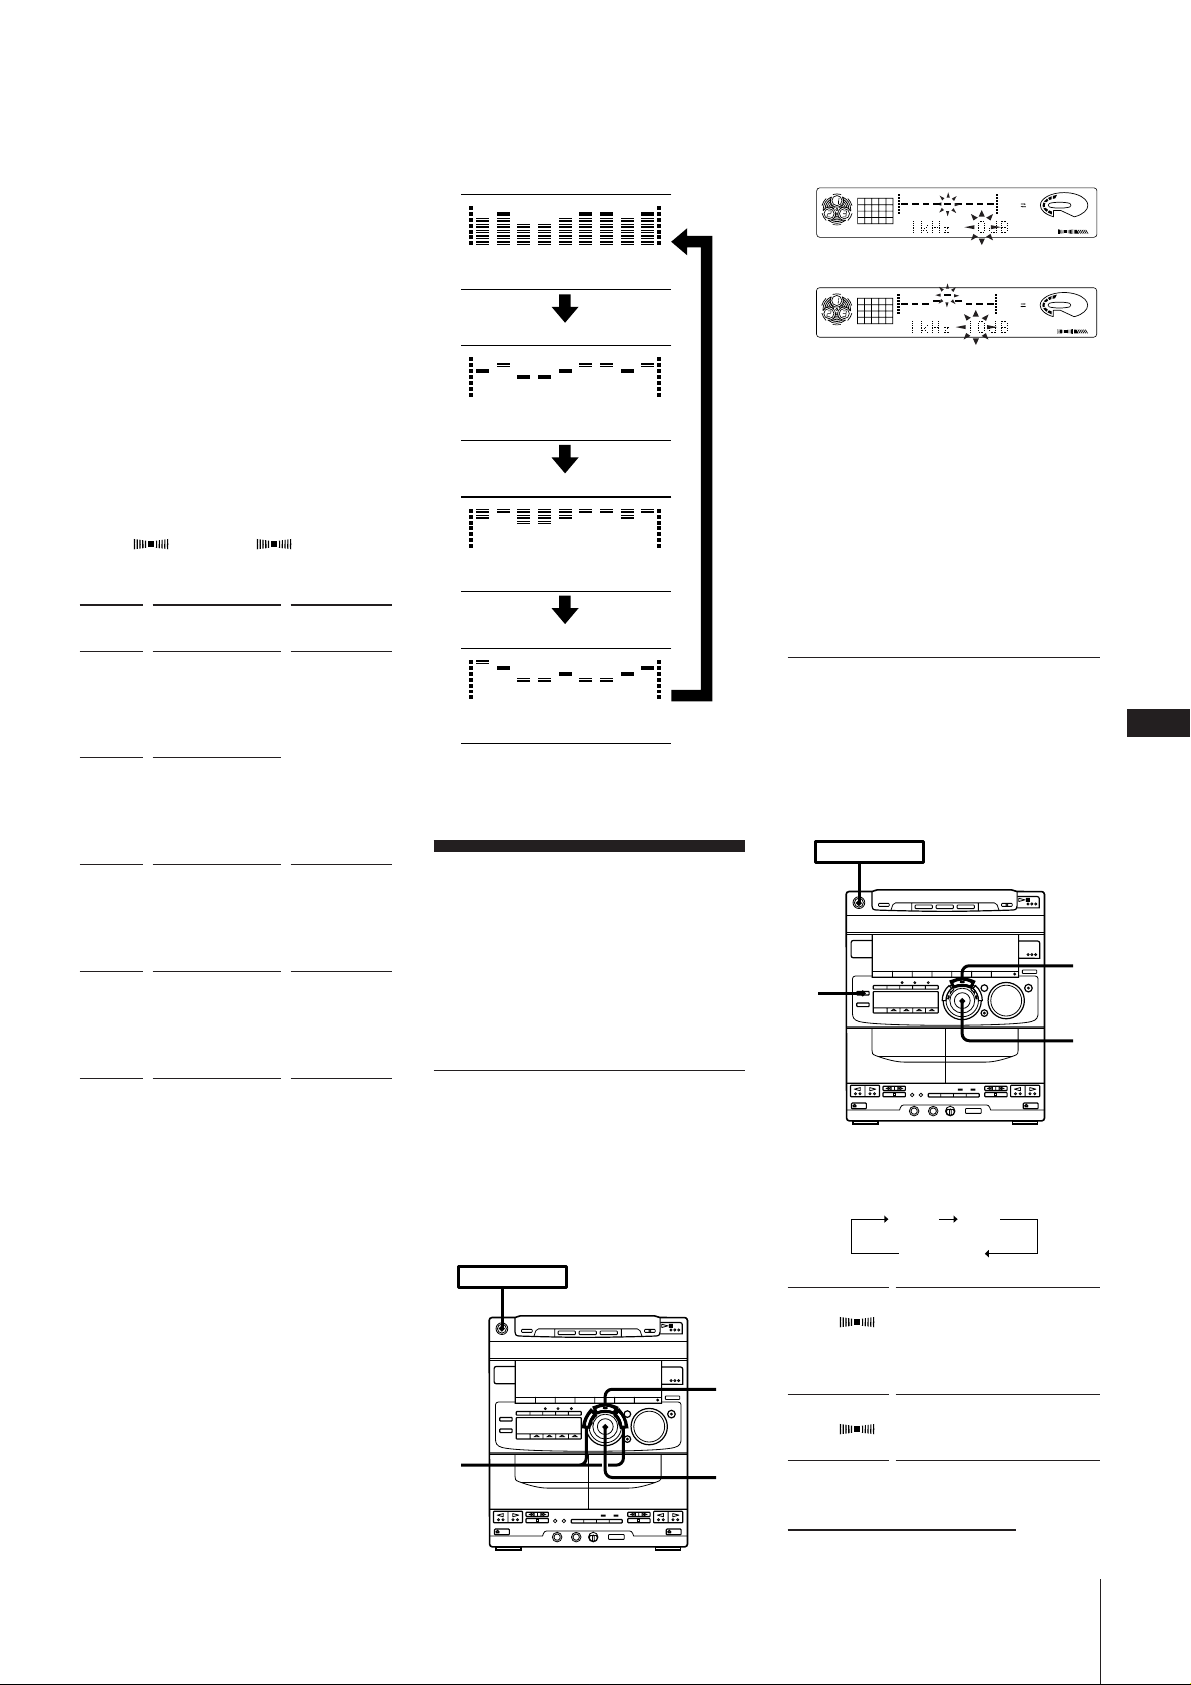
See the chart “Music menu options” on
12563 250 500 1k 2k 4k 8k 16k(Hz)
DOLBY NR
OFF
CD
1DISC
VOLUME
DBFB
SUR1
DOLBY NR
OFF
CD
1DISC
DBFB
SUR1
VOLUME
12563 250 500 1k 2k 4k 8k 16k(Hz)
the following page. The last effect
chosen from that menu appears in the
display.
the four displays below.
Spectrum analyzer 1
1 Press FREQUENCY + or – to select a
frequency band.
2 Use the JOG dial (or press MUSIC
MENU “ /” on the remote repeatedly)
to select the preset you desire.
The preset name appears in the display.
3 Press ENTER/NEXT.
You don't need to press ENTER/NEXT
when you use the remote.
To cancel the effect
Press EFFECT ON/OFF repeatedly (or
MUSIC MENU ON/OFF on the remote) so
that “EFFECT OFF” appears in the display.
Music menu options
“SUR 1 ” or “SUR 2 ” appears if
you select an effect with surround effects.
MENU
button
MENU 1
MENU 2
MENU 3
MENU 4
To change the equalizer display
Each time you press and hold down
DISPLAY/DEMO for a few seconds, the
equalizer display changes to show one of
Effect
ROCK
POPS
JAZZ
CLASSIC
DANCE
SALSA
REGGAE
BALLADE
OLDIES
SOUL
GAME
MOVIE
NIGHT
MORNING
PARTY
L.HALL
STADIUM
STUDIO
CHURCH
CLUB
For
standard
music sources
listening
situations
special
listening
situations
12563 250 500 1k 2k 4k 8k 16k(Hz)
Spectrum analyzer 2
12563 250 500 1k 2k 4k 8k 16k(Hz)
Spectrum analyzer 3
12563 250 500 1k 2k 4k 8k 16k(Hz)
Graphic equalizer curve
12563 250 500 1k 2k 4k 8k 16k(Hz)
Adjusting the Audio
Emphasis
You can adjust the audio emphasis using
the following two functions:
•Graphic Equalizer
•Surround Effect
Adjusting the Sound
(graphic equalizer)
You can adjust the sound by raising or
lowering the levels of specific frequency
ranges.
Before operation, first select the audio
emphasis you want for your basic sound.
POWER m ON
1
4
2
2 Turn the JOG dial to adjust level.
3 Repeat steps 1 and 2.
4 Press ENTER/NEXT when finished.
Note
If you choose another menu audio
emphasis (other than “EFFECT OFF”) the
adjusted sound effect is lost. To retain the
adjusted sound effect for future use, store it
in a personal file. (See “Making a Personal
Audio Emphasis File (personal file)”.)
Activating the Sound Field
(surround effect)
You can adjust the surround effect. First
select from the two types of programmed
surround effects according to the type of
software you have.
POWER m ON
4
1,
2
3
1 Press DSP repeatedly until your desired
surround effect appears in the display.
HALL
(SUR 1 )
LIVE
(SUR 2 )
HALL
You can hear the naturally
acoustic sound having a
reverberation effect that is
produced in a large-size
concert hall.
You can feel such a sense of
presence as if you were in a
live concert.
LIVE
no display
EN
25
continue to next page ➔
Chapter 5: Sound Adjustment
Page 26
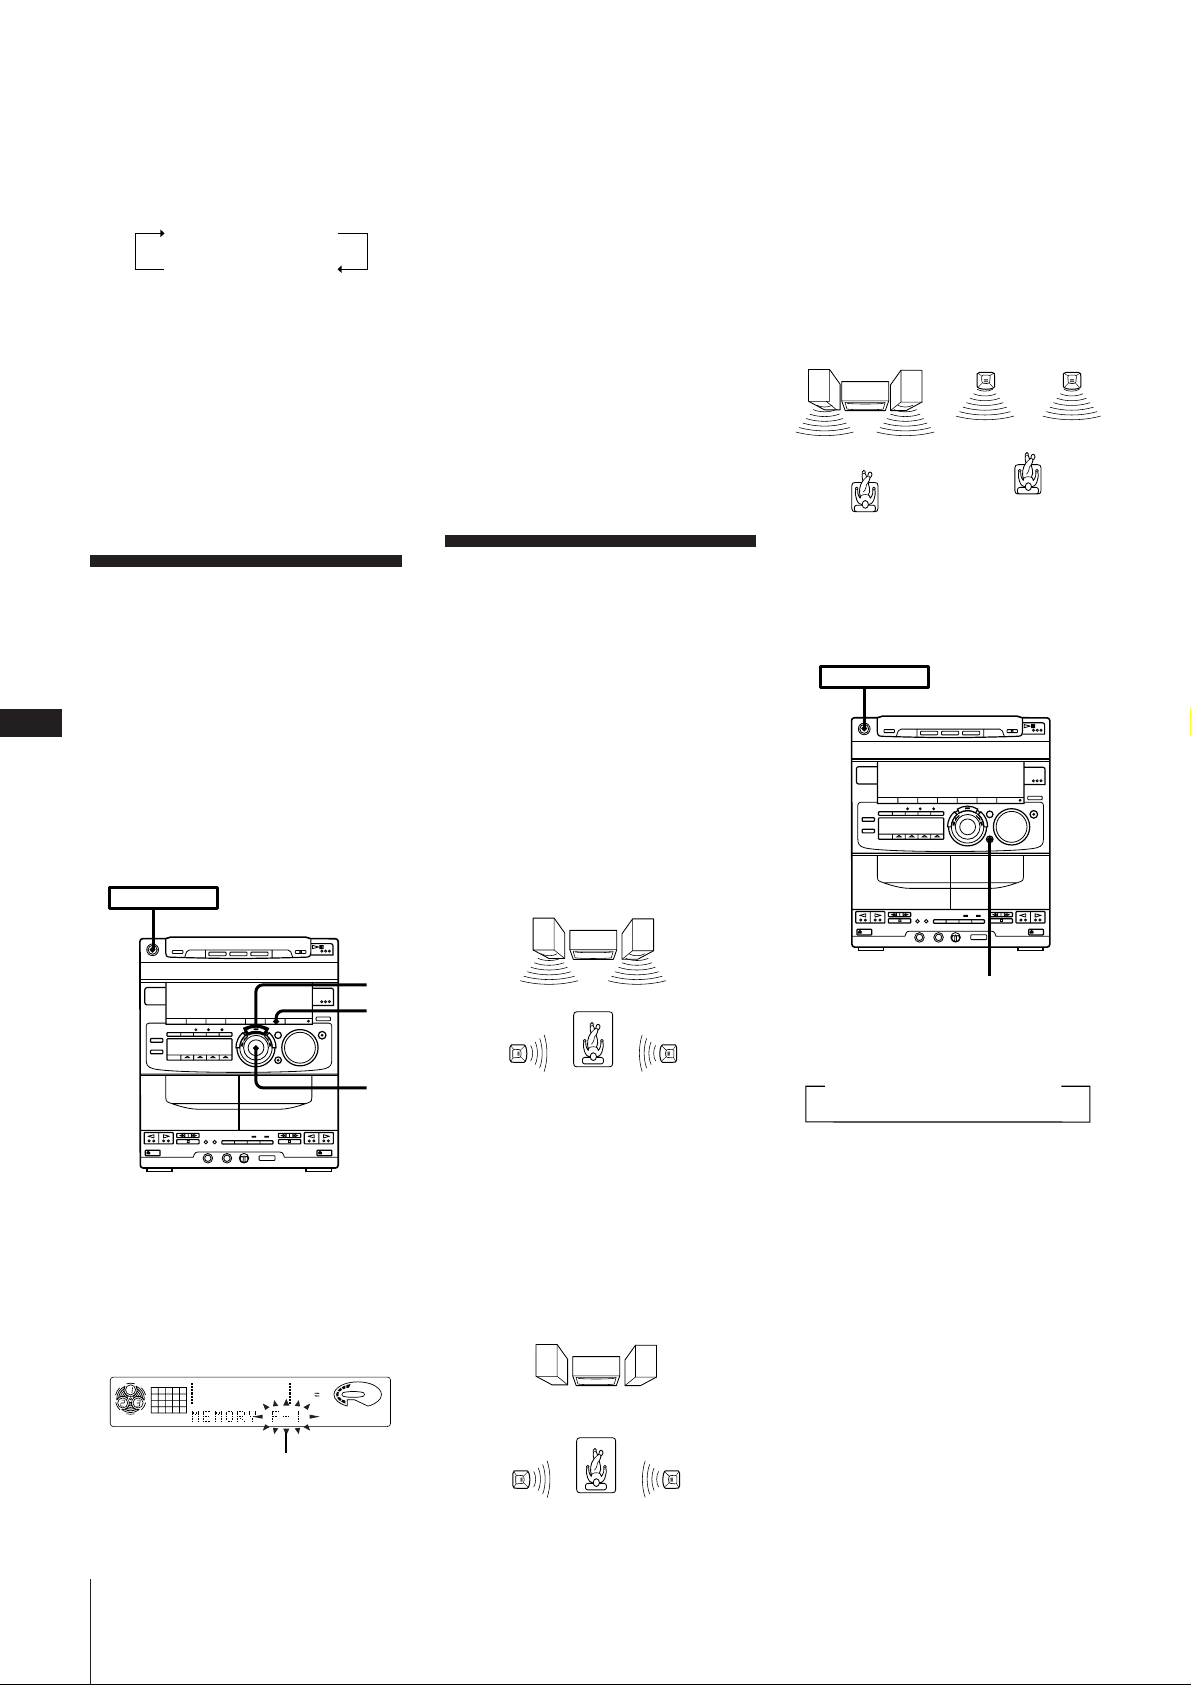
2 Press and hold down DSP for more than
WHISPER
NORMALLINK
nn
a second, then turn the JOG dial to
choose the surround level you want.
The display changes as follows:
LEVEL 0
LEVEL 3 LEVEL 2
The surround effect becomes stronger as
the level number increases.
n
N
LEVEL 1
3 Press ENTER/NEXT.
Note
When you choose other sound effects, the
surround effects will be canceled. If you
want to memorize the effect, store it into a
personal file (see “Making a Personal
Audio Emphasis File (personal file)”).
4 Press ENTER/NEXT.
The adjusted sound effects are stored
under the selected file number. The
settings previously stored at this
memory location are erased and
replaced by the new settings.
To call up the personal file
1 Press P FILE (or MUSIC MENU 4 /$ on
the remote repeatedly) to display the
last selected personal file.
2 Use the JOG dial (or press MUSIC
MENU “ /” on the remote repeatedly)
to select the personal file you desire.
3 Press ENTER/NEXT.
You don’t need to press ENTER/NEXT
when you use the remote.
LINK mode
The same sound is output from the front
speakers and surround/sub speakers. For
instance, when you want to listen to the
same sound in two rooms, it is suitable to
set the front speakers and the surround/
sub speakers in each room.
FRONT
SPEAKER
(L)
FRONT
SPEAKER
(R)
SURROUND/
SUB SPEAKER
(L)
SURROUND/
SUB SPEAKER
(R)
EN
26
Making a Personal
Audio Emphasis File
(personal file)
You can create a personal file of audio
patterns (surround effect and graphic
equalizer) and store them in the memory of
the unit. Later call up an audio pattern to
play a favorite tape, CD, or radio program.
Create up to five audio files.
Before operation, first select the audio
emphasis you want for your basic sound.
POWER m ON
4
2
3
Switching the
Speaker Formation
(sonic formation)
In addition to the normal four-speaker
system, you can select from two other
speaker formations depending on your
listening situation.
NORMAL mode
The rear speakers provide reverberation
and reflective sound effects that emphasize
the sound from the front speakers.
FRONT
SPEAKER (L)
SURROUND/SUB
SPEAKER (L)
FRONT
SPEAKER (R)
SURROUND/SUB
SPEAKER (R)
To select the formation mode
Press SONIC FORMATION repeatedly
until the mode you want appears in the
display.
POWER m ON
SONIC FORMATION
As you press SONIC FORMATION, the
mode changes as follows:
1 Obtain the sound effect you want by
using the graphic equalizer and
surround effect.
2 Press and hold down P FILE for more
than a second.
The personal file number appears in the
display.
CD
12563 250 500 1k 2k 4k 8k 16k(Hz)
1DISC
File number
3 Use the JOG dial to select the file
number (P FILE) where you want to
store the sound effect.
Chapter 5: Sound Adjustment
DOLBY NR
WHISPER mode
The sound from the front speakers is cut off
and output from the surround/sub speaker
with its sound decreased. For instance,
when you want to listen to the sound in
bed, it is suitable to set the surround/sub
speakers on either side of the bed.
FRONT
SPEAKER (L)
VOLUME
OFF
SURROUND/SUB
SPEAKER (L)
FRONT
SPEAKER (R)
SURROUND/SUB
SPEAKER (R)
To return to the normal mode
Press SONIC FORMATION repeatedly
until “NORMAL” appears in the display.
Note
Do not place the surround speakers on top
of a TV. This may cause distortion of the
colors in the TV screen.
Page 27
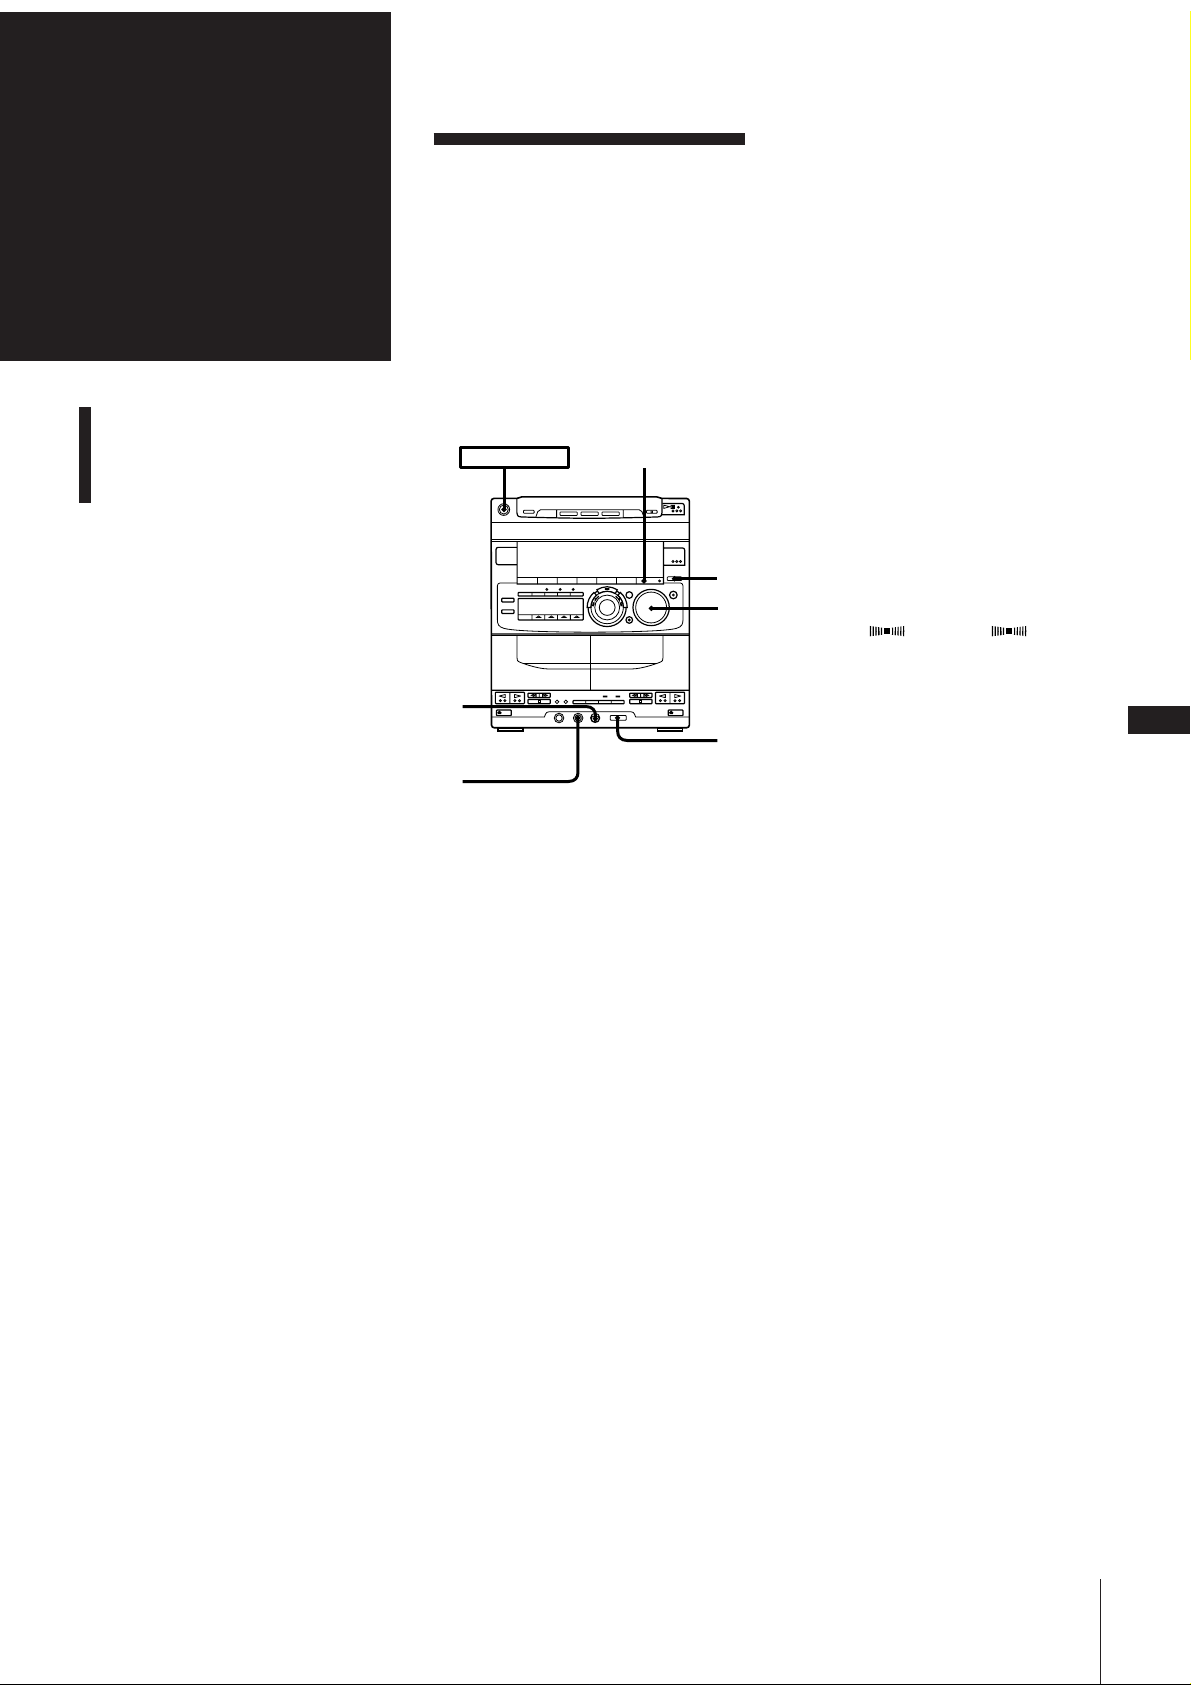
Chapter 6:
Karaoke
Karaoke: Singing Along
Recording the Karaoke
(microphone mixing)
Karaoke: Singing
Along
This stereo system lets you sing along with
a variety of different sources, including
VIDEO CD, CD-G, music CD and cassette
tape.
Also, you can minimize the singer’s voice,
“vocal reduction,” so you can sing along
with any stereo CD or tape or you can sing
along using a microphone (not supplied)
while playing a multiplex disc or tape.
POWER m ON
EFFECT ON/OFF
6 Adjust VOLUME.
7 Sing or speak into the microphone.
8 Use MIC LEVEL to adjust the
microphone volume level.
When you finish singing karaoke
1 Set MIC LEVEL to MIN.
2 Disconnect the microphone and press
KARAOKE PON/MPX repeatedly until
“h PON”, “h MPX R” and “h MPX L”
disappear from the display.
To hear both channels (the
instruments and the recorded
singer's voice) of an MPX source
Press KARAOKE PON/MPX repeatedly so
that “h PON”, “h MPX R” or “ h MPX L”
disappear from the display.
4
6
2,
8
5
3
1 When using VIDEO CDs or CD-Gs, turn
on your TV and switch it to the
appropriate video input.
Refer to the operating instructions
supplied with your TV for details.
2 Turn MIC LEVEL to MIN to turn down
the microphone control level.
3 Connect a microphone at the MIX MIC
jack.
4 Press FUNCTION several times to select
a sound source, then start playback.
5 Press KARAOKE PON/MPX.
For multiplex sources
Press repeatedly until “h MPX R” or
“h MPX L” appears in the display
(choose right (R) or left (L) according to
the encoding on your MPX software).
You can hear your voice through the
microphone and the instruments.
For normal karaoke sources
You don’t need to press KARAOKE
PON/MPX.
If you press EFFECT ON/OFF or recall a
sound effect with the MENU buttons
The karaoke mode is cancelled.
The SUR 1 and SUR 2 surround
effects are automatically cancelled when
using KARAOKE PON/MPX.
Notes on vocal reduction with normal
stereo sources
The singer’s voice may not be reduced
completely for the following reasons:
•Monaural recorded source (Instruments
may also be reduced.)
•Only a few instruments are playing in the
stereo recorded source.
•A duet is being played.
•The source has strong echoes or chorus.
•The singer’s voice on the source deviates
from the center.
•The voice on the source is singing in high
soprano or tenor.
Notes
•If you hear acoustic feedback, turn the
volume down, move the microphone
away from the speakers or change the
direction of the microphone.
Acoustic feedback occurs when the sound
from speakers is picked up by a
microphone and amplified and
reproduced again.
• You cannot use both surround effects and
digital echo at the same time.
•The picture may be distorted when you
keep pressing down 0 or ) on the
remote.
•The CD player supports only TV mode for
CD-Gs. Other modes cannot be used.
EN
27
For normal stereo sources
Press repeatedly until “h PON”
appears in the display.
Chapter 6: Karaoke
Page 28
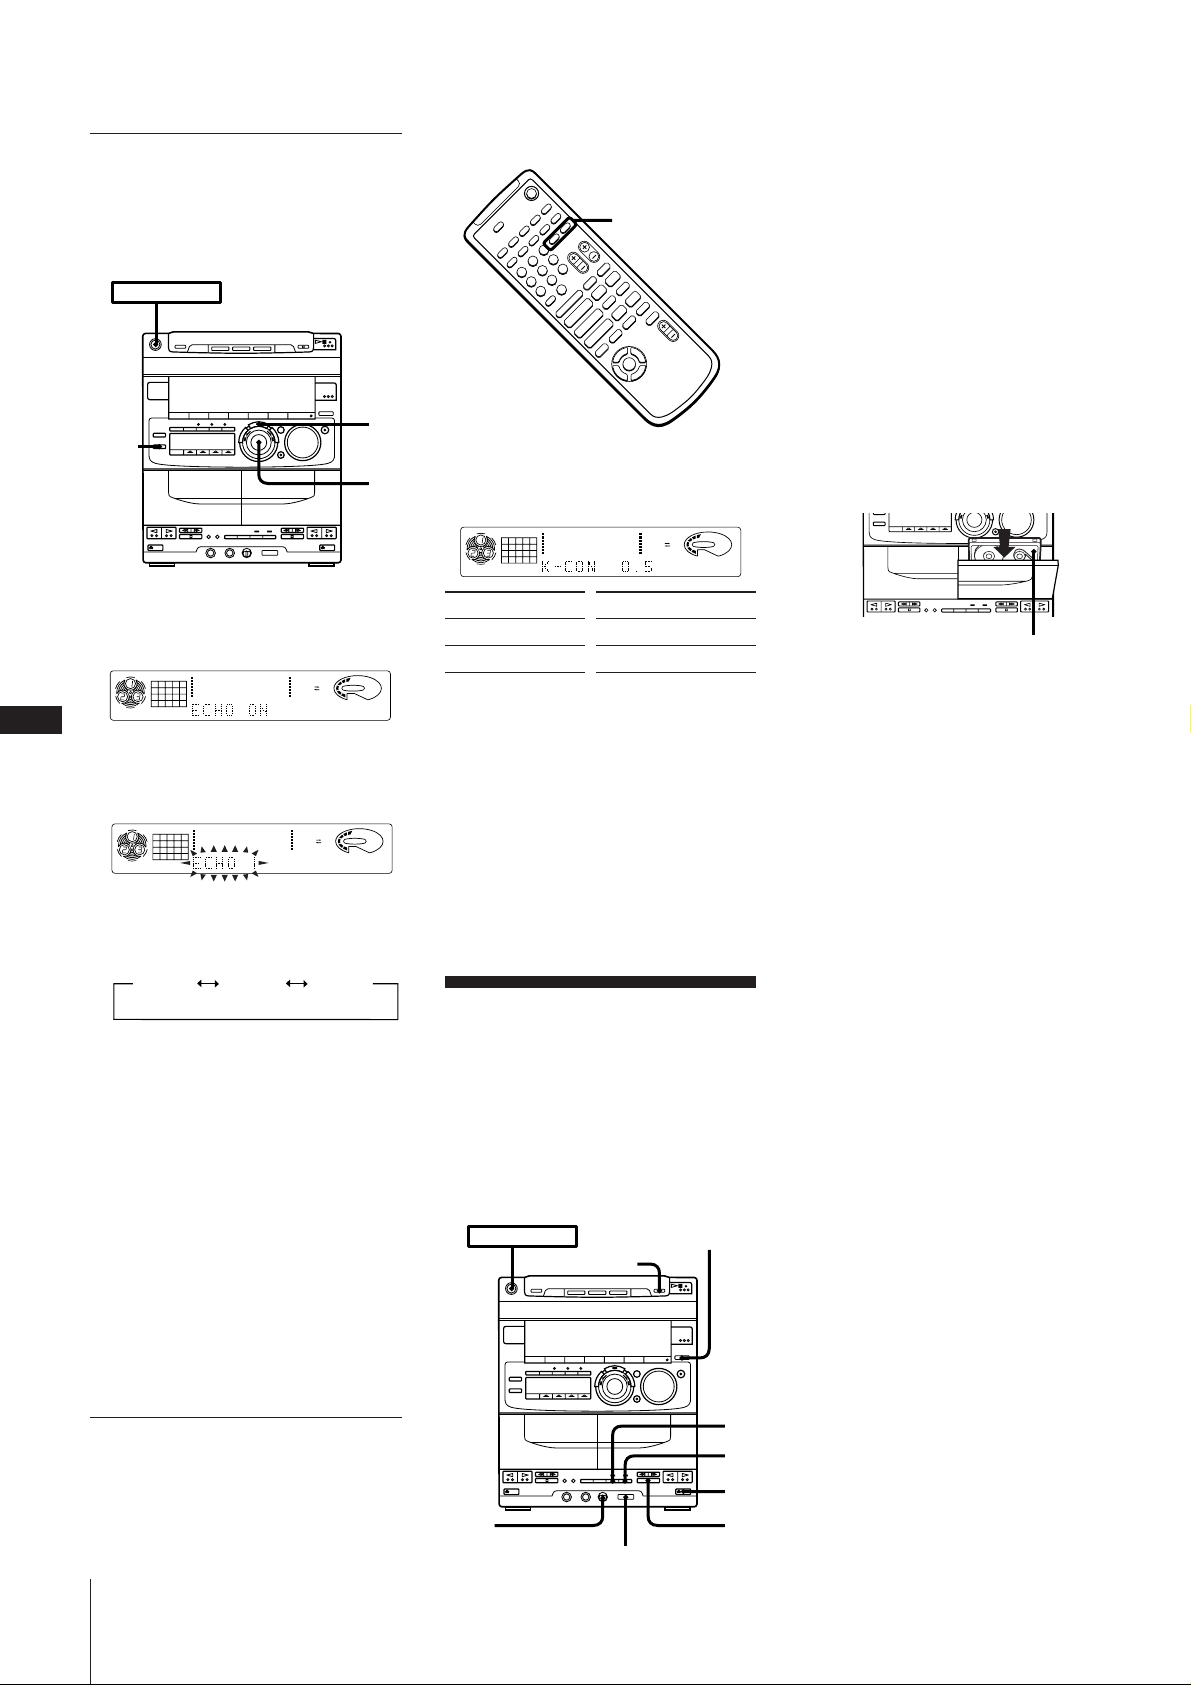
Adding an Echo effect
(digital echo)
You can add an echo effect to the sound
coming from the microphone.
POWER m ON
1,2
4
3
the original key) to suit your vocal range.
KEY CONTROL +/–
+
–
+
p
–
)0
P
pP
Æ»
)0+=
Æ»
Æ
4
$
Press KEY CONTROL (+/–) repeatedly to
find the key that suits your vocal range.
The key control step appears in the display.
CD
12345
678
1DISC
12563 250 500 1k 2k 4k 8k 16k(Hz)
DOLBY NR
VOLUME
OFF
1Do steps 1 to 6 in “Karaoke: Singing
Along”.
2After adjusting the volume, choose the
track you want to record and set the CD
player to play pause mode.
When you sing with tape, choose the
track in deck A and set the deck to stop
mode.
3Press § EJECT and insert a blank tape
into deck B with the side you want to
record on facing forward.
Recording will start from the front side
of the tape, unless you have changed the
playing direction before recording.
Make sure the tabs on the cassette have
not been removed.
EN
28
1 Press DIGITAL ECHO.
ECHO ON appears in the display.
CD
1DISC
12563 250 500 1k 2k 4k 8k 16k(Hz)
DOLBY NR
VOLUME
OFF
2 Hold down DIGITAL ECHO for more
than a second.
ECHO level flashes in the display.
CD
1DISC
12563 250 500 1k 2k 4k 8k 16k(Hz)
DOLBY NR
VOLUME
OFF
3 Turn the JOG dial to choose the ECHO
level you want.
The display changes as follows:
ECHO 1
ECHO 3ECHO 2
Larger numbers indicate a stronger
effect.
4 Press ENTER/NEXT.
To cancel the echo effect
Press DIGITAL ECHO again.
“ECHO OFF” appears in the display and
the DIGITAL ECHO button goes out.
Note
Surround effect is cancelled when the
DIGITAL ECHO is turned on. The
surround effect does not automatically
return to the previous setting when the
DIGITAL ECHO is turned off. Press DSP to
turn the surround effect back on.
To Press
Raise the key KEY CONTROL +
Lower the key KEY CONTROL –
To restore the original key
Press KEY CONTROL repeatedly until
“K-CON OFF” appears in the display.
Notes
•Audio is monaural when using KEY
CONTROL.
•The key control setting returns to “KCON OFF” automatically when you turn
the power off.
Recording the
Karaoke
(microphone mixing)
You can “mix” sounds by playing one of
the components and singing or speaking
into a microphone (not supplied). The
mixed sounds can then be recorded on a
tape.
POWER m ON
FUNCTION
p
Recording side facing forward
4Press r REC.
Deck B stands by for recording.
5Press P PAUSE to release recording
pause.
Recording starts.
Recording always stops at the end of the
reverse side if you set the direction to
ß or RELAY.
6Start playing the sound source and sing
into the microphone.
Press fl on the CD player when you
sing with CD.
Press · on deck A when you sing with
tape.
To stop recording
Press p on deck B and CD player (or deck
A).
When you finish mixing
1 Set MIC LEVEL to MIN.
2 Disconnect the microphone and press
KARAOKE PON/MPX repeatedly until
“h PON”, “h MPX R” and “h MPX L”
disappear from the display.
To record from the microphone only
1 Press FUNCTION repeatedly until “CD”
appears in the display. If a CD is being
played, press p on the CD player to
stop playing.
2 Start recording.
3 Sing or speak into the microphone.
To change the key (key
control)
You can adjust the key through 13 semitone
steps (6 steps higher or 6 steps lower than
Chapter 6: Karaoke
MIC
LEVEL
4
5
3
p
KARAOKE PON/MPX
Page 29
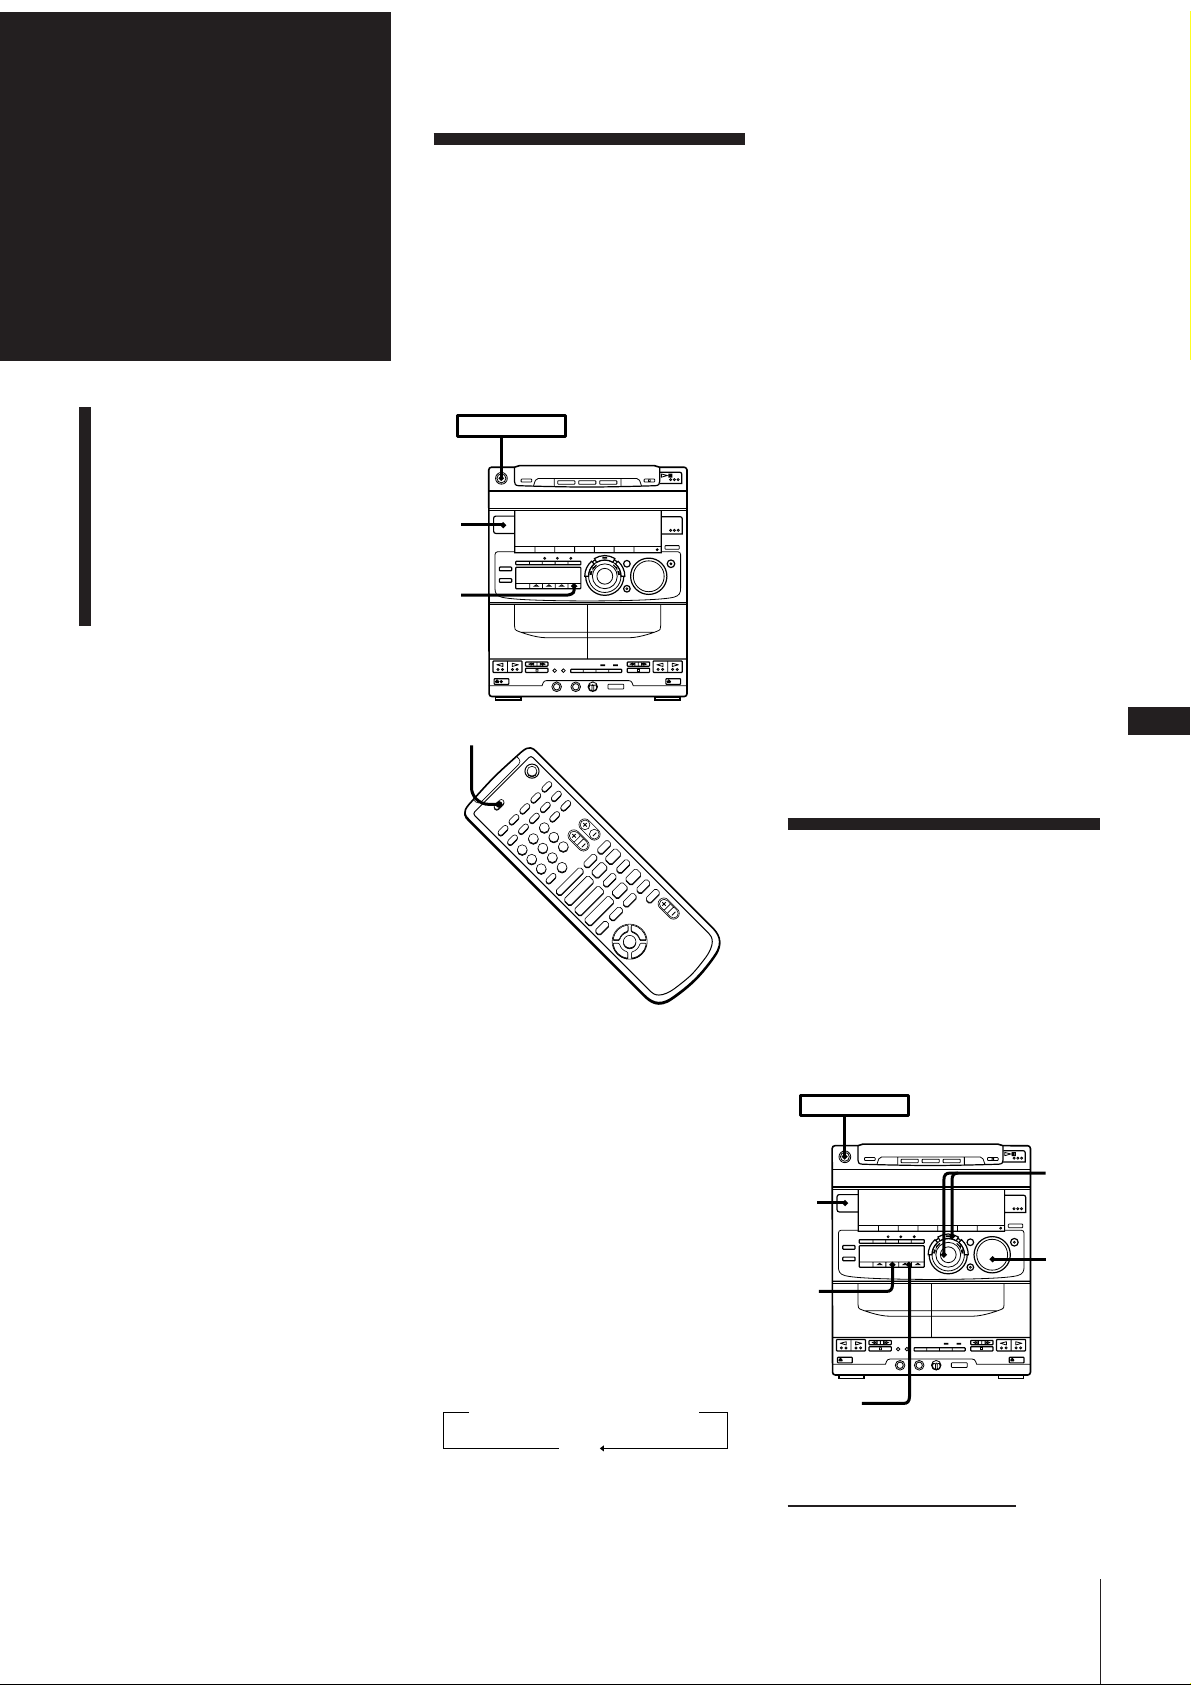
Chapter 7:
POWER m ON
,10
tSELECT
3
4
2
5,6,
7,8,
9
Additional
Features
Falling Asleep to Music
Waking Up to Music
Timer-Recording Radio
Programs
Falling Asleep to
Music
You can set the stereo system to turn off
automatically so you can go to sleep to
music (sleep timer).
You can set the sleep timer even if you have
already set the wake-up timer or
timer-recording.
Before setting the sleep timer, make sure
the clock has been set correctly.
POWER m ON
2
The power turns off, even if you pause the
tape or stop playing CD or tape.
To cancel the sleep timer
Press TIMER and then press SLEEP (or
press SLEEP on the remote) repeatedly
until “OFF” appears in the display.
To check the remaining time before
the sleep timer turns off the system
Press TIMER and then press SLEEP once
(or press SLEEP on the remote once.).
The remaining time is displayed in minutes
for several seconds.
To change the remaining time while
the sleep timer is on
Press TIMER and then press SLEEP (or
press SLEEP on the remote) several times
until the indication for the length of time
you desire appears.
Connecting Optional
Equipment
3
SLEEP
+
–
+
p
–
)0
P
pP
Æ»
)0+=
Æ»
Æ
4
$
1Play your favorite sound source (a
tape, the tuner or a CD).
2Press TIMER.
You don’t need to press TIMER when
you use the remote.
Notes
•The daily and recording timer functions
can not activate during the sleep count
down.
•When SLEEP is set to “AUTO”, the power
turns off automatically if you do one of
the following operations;
- stop CD or tape playback.
- pause tape playback.
Waking Up to Music
You can wake up to music at the preset
time. You only need to set the timer once.
Before setting the timer, make sure the
clock has been set correctly. The preset
timer activates at the same time every day.
To wake up to the sound of the radio, be
sure to preset the station you want to listen
to beforehand. (See “Presetting Radio
Stations”.)
EN
29
3Press SLEEP repeatedly while the source
is playing to choose how long you want
the music to play. (When you use the
remote, you don’t have to press TIMER.)
“SLEEP” and minutes indication appear
in the display. As you press SLEEP, the
indication decreases by ten minutes
from 90 to 10.
The power will turn off after 90 to 10
minutes depending on the length of
time you chose.
nnn
AUTO
OFF
When you choose AUTO
The power turns off when the current CD
or tape finishes play back (for up to 100
minutes).
70 •••10
8090
1 Prepare the sound source.
continue to next page ➔
Chapter 7: Additional Features
Page 30
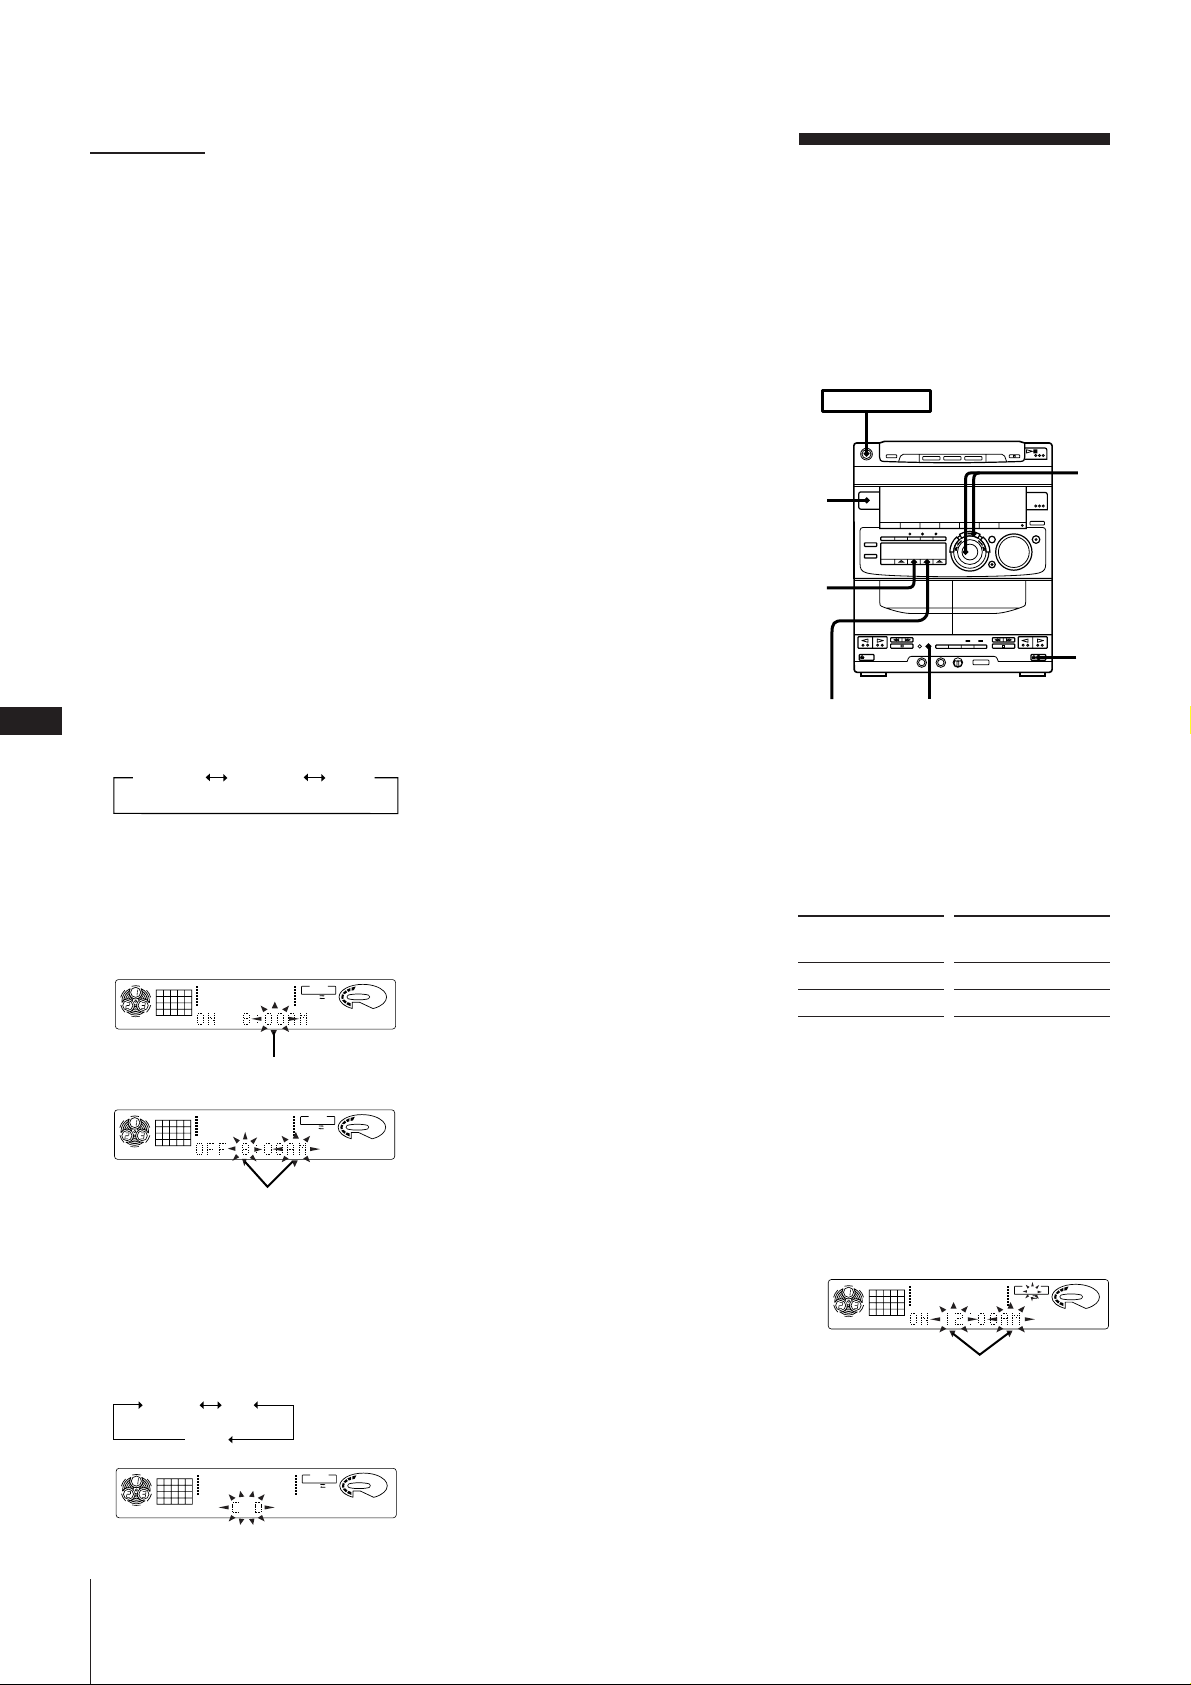
EN
30
➔ continued
To wake up to the radio
Tune in the preset station you want.
To wake up to a CD
Insert a CD. If you want to play it from a
desired track, do the necessary
procedures for programmed CD play.
(see “Playing Tracks in the Desired
Order (program play)”.)
To wake up to a tape
Insert the tape with the side you want to
play facing forwards you. If you insert
the tapes in both decks, you will hear the
sound from deck A.
2 Turn VOLUME to adjust the volume.
The music will start playing with the
adjusted volume when the preset time
comes.
3 Press TIMER.
4 Press t SET.
5 Use the JOG dial to select either DAILY
1 or 2 and press ENTER/NEXT.
“ON” appears and the hour digits flash
in the display.
DAILY 1
RECDAILY 2
6 Use the JOG dial to set the hour you
want the system to turn on and press
ENTER/NEXT.
Set the minutes in the same way. “OFF”
appears and the hour digits flash in the
display.
CD
12345
678
1DISC
CD
12345
678
DISC
12563 250 500 1k 2k 4k 8k 16k(Hz)
flashing
.
12563 250 500 1k 2k 4k 8k 16k(Hz)
DAILY1
DOLBY NR
DAILY1
DOLBY NR
TIMER
VOLUME
OFF
TIMER
VOLUME
OFF
flashing
7 Use the JOG dial to set the hour you
want the system to turn off and press
ENTER/NEXT.
Set the minutes in the same way.
8 Use the JOG dial to select a sound
source.
The display changes as follows:
TUNER
CD
12345
678
1DISC
CD
TAPE
12563 250 500 1k 2k 4k 8k 16k(Hz)
DAILY1
DOLBY NR
TIMER
VOLUME
OFF
9 Press ENTER/NEXT.
The preset items appear in the display
sequentially.
10 Press POWER to turn off the system.
The power comes on at the preset time
and the music will play at the volume
you selected in step 2. At the turn-off
time, the power will go off again.
To change the preset timer settings
Start over from step 1.
To check the preset timer settings
1 Press TIMER.
2 Press t SELECT and use the JOG dial to
choose the mode you want to check.
3 Press ENTER/NEXT.
The preset items appear in the display
sequentially, then the original display
returns.
To change the timer
Select the timer display you desire in step 2
of “To check the preset timer settings”.
To cancel the timer
1 Press TIMER.
2 Press t SELECT and use the JOG dial to
choose “TIMER OFF.”
3 Press ENTER/NEXT.
The next time you want to use the timer,
select the timer display you used in step
2 (DAILY 1 or DAILY 2) and press
ENTER/NEXT.
Notes
•You cannot set the timer so that the timer
ON and OFF times are the same.
•The timer operation starts 15 seconds
before the timer ON time, if you perform
another operation during that period, the
timer operation may not be performed
correctly.
•You cannot activate wake-up timer and
timer-recording at the same time.
•The daily timer function can not activate
during the sleep count down.
If you want to wake up to different tracks
on a CD
Create another program (see “Playing
Tracks in the Desired Order (program
play)”.) and turn off the power.
Timer-Recording
Radio Programs
You can set the timer to record from the
radio at a certain time. This timer works
only once for each setting.
Make sure the clock has been set correctly.
Be sure to preset the station you want to
listen to beforehand. (See “Presetting Radio
Stations”.)
POWER m ON
,9
6,
4
7,
8
5
1
tSELECT
3
1Press § EJECT and insert a blank tape in
deck B with the side you want to record
on facing forward.
2Tune in a preset station you want to
record.
3Select dual or single-sided recording.
To record
One side of the tape
Both sides*
* Recording always stops at the end of the
reverse side. Be sure to start from the
front side.
Press DIRECTION to
select
A
ß or RELAY
4Press TIMER.
5Press t SET.
6Use the JOG dial to select REC and press
ENTER/NEXT.
“ON” appears and the hour digits flash
in the display.
CD
12345
678
1DISC
12563 250 500 1k 2k 4k 8k 16k(Hz)
DOLBY NR
TIMER
REC
VOLUME
OFF
flashing
7Use the JOG dial to set the hour you
want the system to turn on and press
ENTER/NEXT.
Chapter 7: Additional Features
Page 31
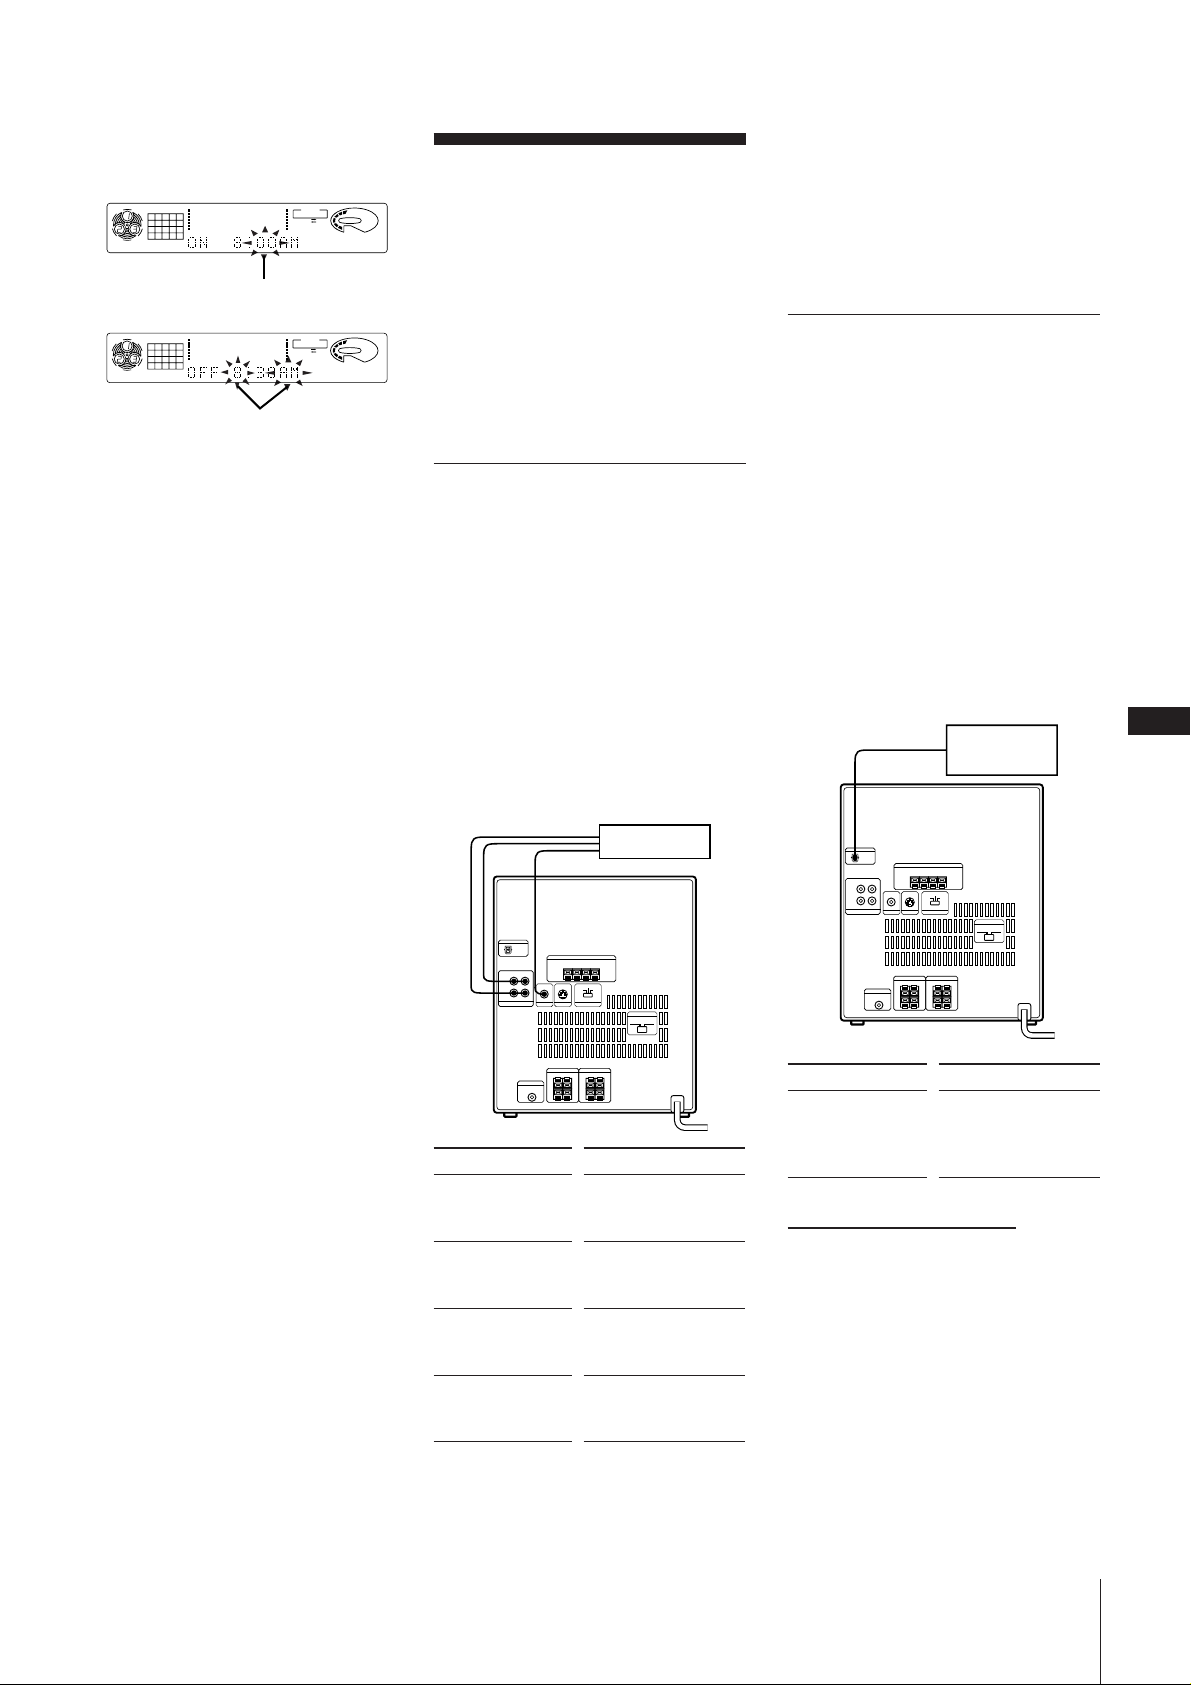
Set the minutes in the same way. “OFF”
appears and the hour digits flash in the
display.
CD
12345
678
1DISC
CD
12345
678
1DISC
12563 250 500 1k 2k 4k 8k 16k(Hz)
flashing
.
12563 250 500 1k 2k 4k 8k 16k(Hz)
DOLBY NR
DOLBY NR
TIMER
REC
VOLUME
OFF
TIMER
REC
VOLUME
OFF
flashing
8Use the JOG dial to set the hour you
want the system to turn off and press
ENTER/NEXT.
Set the minutes in the same way.
9Press POWER to turn off the system.
The power will go on 15 seconds before
the preset time and the volume level is
automatically set to the minimum.
To change the preset timer settings
Start over from step 1.
To check the preset times settings
1 Press TIMER.
2 Press t SELECT and use the JOG dial to
select “REC”.
3 Press ENTER/NEXT.
The preset items appear in the display
sequentially, then the original display
returns.
Connecting Optional
Equipment
For greater enjoyment of your stereo
system, you can connect other components
to the stereo. You can connect:
•a VCR
•an MD recorder
•a turntable
•a super woofer
•headphones
Connecting a VCR
By connecting the audio outputs terminals
from your VCR to the AUDIO IN terminals
on the rear of the stereo system you can
enjoy your videos in powerful stereo
sound. Make sure you connect the plugs to
jacks of the same color.
By connecting the AUDIO OUT and VIDEO
(or S-VIDEO) OUT terminals to the input
terminals on your VCR, you can record the
audio and video signals from VIDEO CD
and CD-G on video tape. See the operating
instructions supplied with your video deck
for details.
rear panel
VCR
If you cannot select “VIDEO” by pressing
FUNCTION
Select “MD” and turn the power off. Then,
press POWER while holding down
FUNCTION.
“MD” will be switched to “VIDEO”.
To return to “MD”, repeat this procedure.
Connecting an MD or DAT
Deck
Select one of the following two connections,
depending on the equipment to be
connected and the method of recording.
•an MD or DAT deck for digital recording
•an MD or DAT deck for analog recording
When recording VIDEO CDs, be sure to use
the connections for analog recording
To connect an MD or DAT deck for
digital recording
You can record from the CD into the MD
recorder digitally.
rear panel
MD or
DAT deck
EN
31
To cancel the timer
1 Press TIMER.
2 Press t SELECT and use the JOG dial to
choose “TIMER OFF.”
3 Press ENTER/NEXT.
The timer indicators disappear from the
display.
If the power is on at the preset time
The sound source will automatically
change to the tuner, but tuner recording
will not start.
Notes
•You cannot set the timer so that the timer
ON and OFF times are the same.
•You cannot activate wake-up timer and
timer-recording at the same time.
•The timer operation starts 15 seconds
before the timer ON time, if you perform
another operation during that period, the
timer operation may not be performed
correctly.
Connect
AUDIO LINE OUT
jacks of the VCR
With
AUDIO IN jacks
(using an audio cord)
(not supplied)
AUDIO LINE IN
jacks of the VCR
AUDIO OUT jacks
(using an audio cord)
(not supplied)
VIDEO LINE IN
jack of the VCR
VIDEO OUT jack
(using a supplied
video cord)
S-VIDEO LINE IN
jack of the VCR
S-VIDEO OUT jack
(using an S-VIDEO
cord) (not supplied)
To listen to sound from the VCR
Press FUNCTION repeatedly to select
“VIDEO”.
Connect
DIGITAL IN
(OPTICAL) jack of
the MD or DAT
deck
With
CD DIGITAL OUT
OPTICAL (using an
optical cable)
(not supplied)
continue to next page ➔
Chapter 7: Additional Features
Page 32
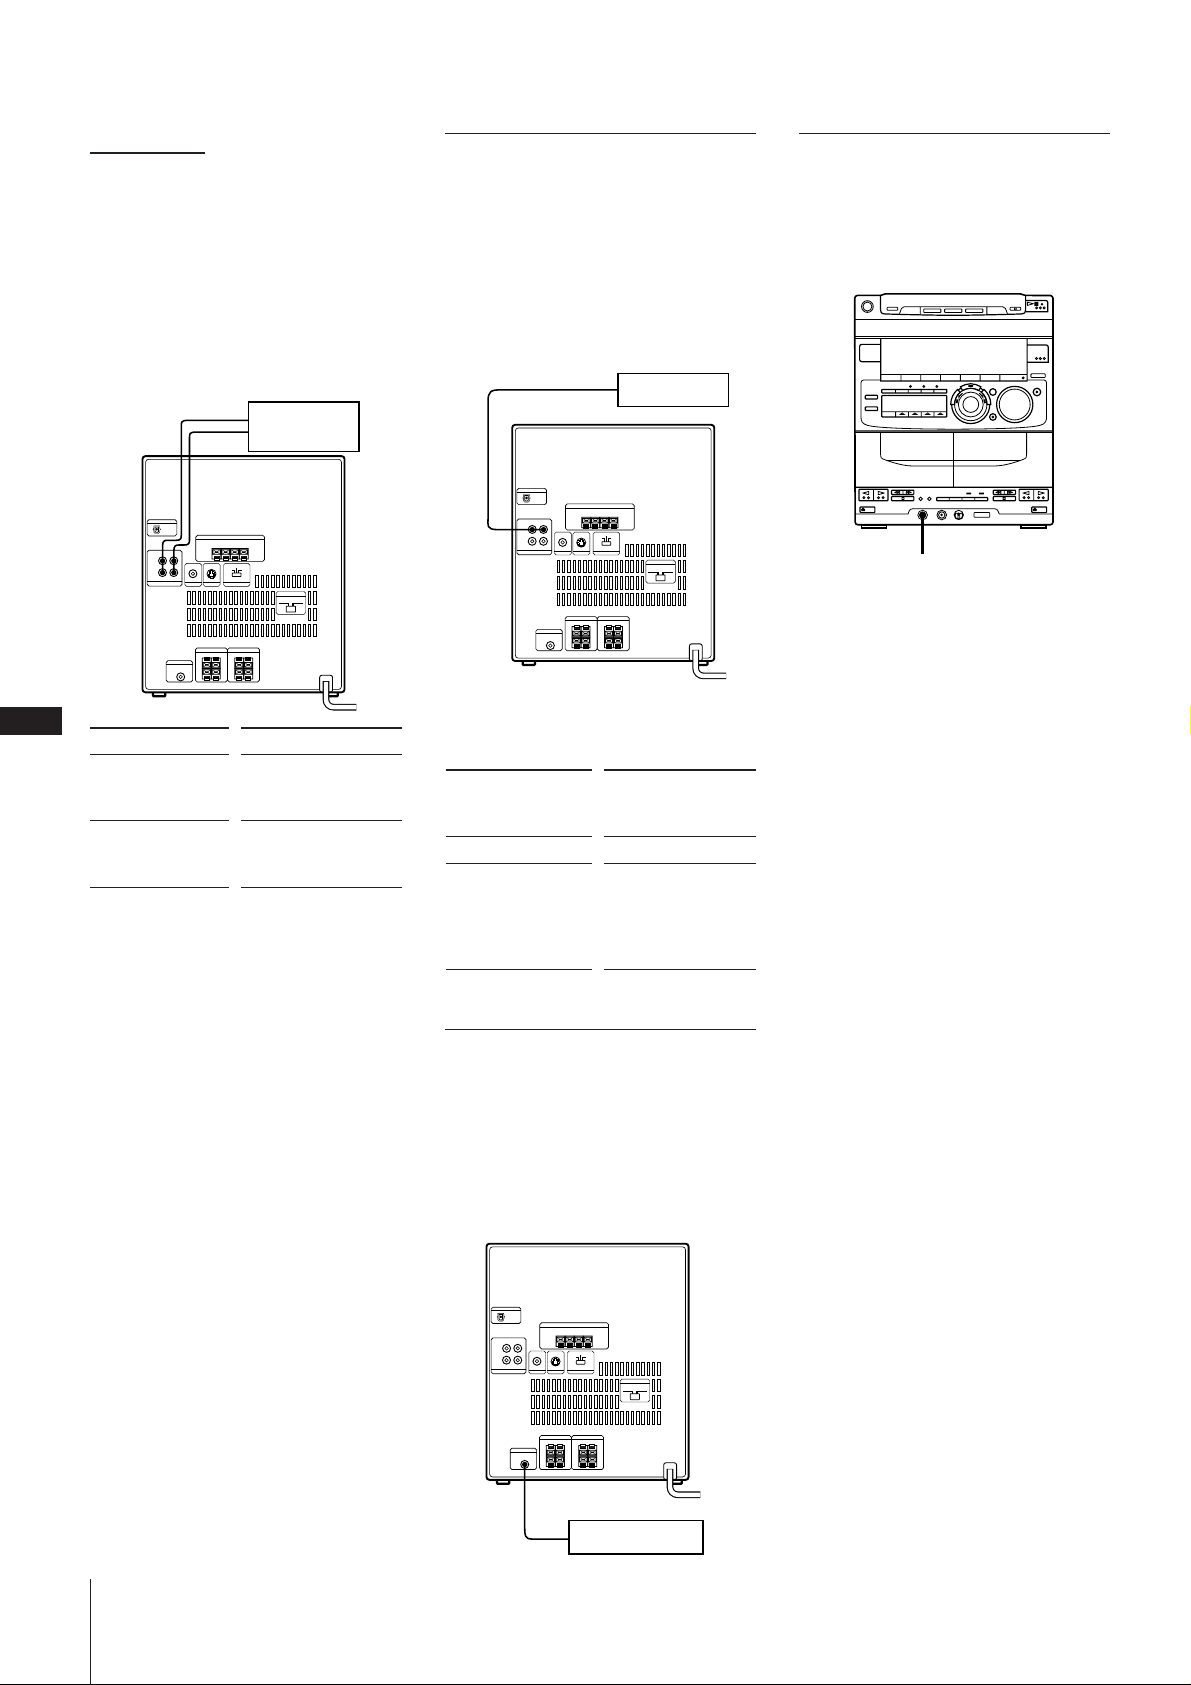
➔ continued
To connect an MD or DAT deck for
analog recording
You can record from the various sound
sources of the stereo system to an MD or
DAT deck in analog sound. Make sure you
connect the plugs to jacks of the same color.
You can listen to the sound from the MD
deck by pressing FUNCTION repeatedly to
select MD.
rear panel
MD or
DAT deck
Connecting a Turntable
You can connect a turntable to AUDIO IN
jacks.
Before you connect, check which type of
turntable you have.
See the operating instructions supplied
with your turntable (and MM cartridge
equalizer) for details.
rear panel
a turntable
Connecting Headphones
You can connect a pair of headphones to
the PHONES jack.
front panel
PHONES
EN
32
Connect
LINE OUT jacks of
the MD or DAT
deck
LINE IN jacks of
the MD or DAT
deck
To listen to sound from the MD or
DAT deck
Press FUNCTION repeatedly to select
“MD”.
If you cannot select “MD” by pressing
FUNCTION
Select “VIDEO” and turn the power off.
Then, press POWER while holding down
FUNCTION.
“VIDEO” will be switched to “MD”.
To return to “VIDEO”, repeat this
procedure.
Note
You cannot record the sound effects created
by “music menu”, “DBFB”, or “GROOVE”
with analog recording from the AUDIO
OUT jacks. However, you can record the
sound created by “KARAOKE PON/
MPX”, “surround effect” and “key control”.
With
AUDIO IN jacks
(using an audio cord)
(not supplied)
AUDIO OUT jacks
(using an audio cord)
(not supplied)
To listen to sound from the turntable
Press FUNCTION repeatedly to select
“VIDEO”.
Is the turntable
supplied with a
phono equalizer?
Yes
No
Connect with
AUDIO IN jacks
AUDIO IN jacks
using a MM
cartridge equalizer
and connecting cable
(not supplied)
Connecting a
Super Woofer
You can connect a super woofer to SUPER
WOOFER jack.
See the operating instructions supplied
with your super woofer for details.
rear panel
Chapter 7: Additional Features
a super woofer
Page 33
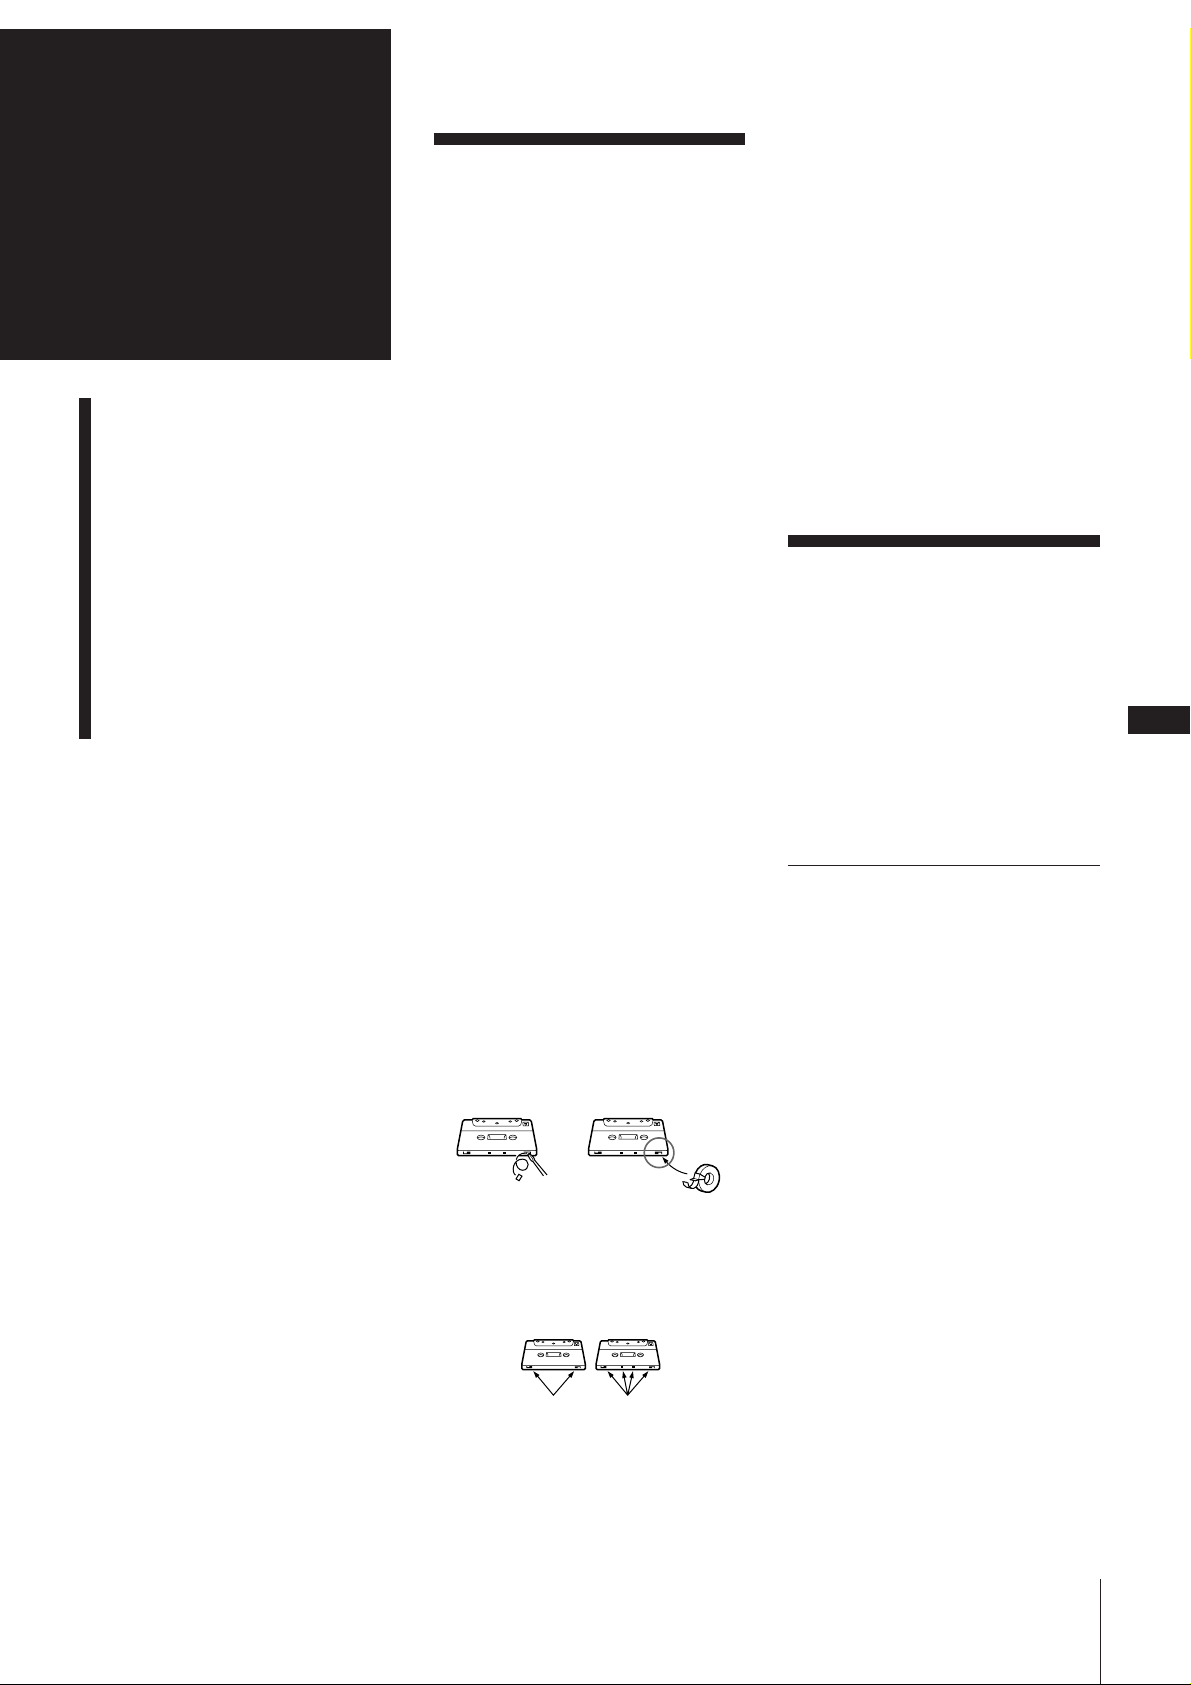
For Your
Information
Precautions
Troubleshooting Guide
Maintenance
Specifications
Glossary
Index to Parts and
Controls
Index
Precautions
If you have any questions or problems
concerning your stereo system, please
consult your nearest Sony dealer.
On safety
•The unit is not disconnected from the AC
power source (mains) as long as it is
connected to the wall outlet, even if the
unit itself has been turned off.
•Unplug the system from the AC power
outlet if it is not to be used for an
extended period of time. To disconnect
the AC power cord, pull it out by the
plug. Never pull the cord itself.
•Should any solid object or liquid fall into
the component, unplug the stereo system
and have the component checked by
qualified personnel before operating it
any further.
•AC power cord must be changed only at
the qualified service shop.
On installation
Place the stereo system in a location with
adequate ventilation to prevent heat buildup in the stereo system.
On condensation in the CD player
component
If the system is brought directly from a cold
to a warm location, or is placed in a very
damp room, moisture may condense on the
lens inside the CD player. Should this
occur, the CD player will not operate.
Remove the CD and leave the system
turned on for about an hour until the
moisture evaporates.
To save a tape permanently
To prevent a tape from being accidentally
recorded over, break off the cassette tab
from side A or B as illustrated. If you later
want to reuse the tape for recording, cover
the broken tab with adhesive tape.
Side A
In case color irregularity is observed on
nearby TV screen
With the magnetically shielded type of
speaker system, the speakers can be
installed near a TV set. However, color
irregularity may still be observed on the TV
screen depending on the type of your TV
set.
If color irregularity is observed...
Turn off the TV set once, then turn it on
after 15 to 30 minutes.
If color irregularity is observed again...
Place the speakers farther away from the
TV set.
Troubleshooting
Guide
If you run into any problem using this
stereo system, use the following check list.
And first check the following points:
•The power cord is connected firmly.
•The speakers are connected correctly and
firmly.
Should any problem persist after you have
made the checks below, consult your
nearest Sony dealer.
Tuner
“TUNED” flashes in the display.
➔Adjust the antenna.
“STEREO” flashes in the display.
➔Adjust the antenna.
Severe hum or noise.
➔Adjust the antenna.
➔The signal strength is too weak.
Connect the external antenna.
➔Connect the ground wire.
EN
33
Tab of
side B
When you are using a TYPE II (CrO2) or
TYPE IV (metal) cassette, be careful not to
cover the detector slots which allow the
tape player to automatically detect the type
of tape.
Tab of side A
TYPE II
Detector slots
A stereo FM program cannot be
received in stereo.
➔Press STEREO so that “STEREO”
appears.
For Your Information
Page 34

EN
34
Tape Player
The tape does not record.
➔No tape in the cassette holder.
➔The tab has been removed from the
cassette.
➔The tape has reeled to the end.
The tape does not record or playback
or there is a decrease in sound level.
➔The heads are dirty. Clean them.*
➔Magnetic deposits have built-up on
the record/playback heads.*
There is excessive wow or flutter, or
the sound drops out.
➔The capstans or pinch rollers are
contaminated.*
The tape does not erase completely.
➔Magnetic deposits have built-up on
the record/playback heads.*
Noise increases or the high
frequencies are erased.
➔Magnetic deposits have built-up on
the record/playback heads.*
*See “Maintenance.”
Video CD/CD-G/CD Player
There is no picture.
➔ Check that the player is connected
securely.
➔ Make sure you operate the TV
correctly.
➔ Make sure you set the SYSTEM
SELECT correctly, according to
your TV (color) system.
➔ Press FUNCTION repeatedly until
“CD” is displayed.
The disc tray does not close.
➔The CD is not placed correctly.
The CD will not play.
➔The CD is dirty.
➔The CD is inserted label side down.
➔The player is in pause mode.
➔Moisture condensation has built
up.
Leave the system turned on for
about an hour until the moisture
evaporates.
“CD NO DISC” is displayed.
➔There is no CD in the player.
Play does not start from the first
track.
➔The player is in program or shuffle
mode. Press PLAY MODE so that
“PROGRAM” or “SHUFFLE” goes
out.
“ ” is displayed.
➔) on the remote was repeatedly
pressed at the end of the CD. Turn
the jog dial counterclockwise (or
press = on the remote) to return
to the normal display.
Microphone Mixing/
Karaoke
No microphone sound.
➔Turn VOLUME or MIC LEVEL to
adjust the microphone volume.
➔Make sure that the microphone is
set to ON.
You hear acoustic feedback when
using the microphone.
➔Turn MIC LEVEL to MIN.
➔Move the microphone away from
the speakers or change the direction
of the microphone.
Timer
The timer cannot be set.
➔The clock has not been set.
“SET TIMER” flashes when you press
t SELECT after pressing TIMER.
➔None of the timer functions have
been set. Set one of the timers
before selecting.
General
The indicators and display start
flashing as soon as you plug in the
power cord even though you haven’t
turned on the power (demonstration
mode).
➔Press DISPLAY/DEMO.
The demonstration mode appears
automatically the first time you
plug in the power cord, or if there
is a power outage lasting longer
than half a day.
Redo the following:
•Setting the Clock (p. 7)
•Presetting radio stations (p. 18)
•Setting the Timer (p. 29, 30)
There is no sound.
➔Rotate VOLUME clockwise.
➔The headphones are connected.
Disconnect them.
➔WHISPER mode is selected. Press
SONIC FORMATION repeatedly to
select “NORMAL”.
Sound comes from one channel or
unbalanced left and right volume.
➔ Check the speaker connections of
the inoperative channel.
The left and right sound is reversed.
➔ Check the speaker connection and
speaker placement.
Bass is lacking or the location of the
musical instruments seems
imprecise.
➔Check the speaker connection for
proper phasing.
Bass is distorted when you connect
an optional super woofer.
➔Press DBFB so that the DBFB
indicator goes out, and adjust the
super woofer volume.
The sound from an optional super
woofer (Sony SA-W10G, etc.) is
distorted.
➔ Set DBFB off.
➔ Adjust the sound of a super
woofer.
There is severe hum or noise.
➔A TV or VCR is too close to the
stereo system. Move the stereo
system away from the TV or VCR.
Demo mode appears in the display
after deactivating the demo mode.
➔When a power interruption occurs
for longer than half a day. Set the
music clips, timer settings and
tuner presets again.
“12:00 AM” flashes in the display.
➔A power interruption occurred. Set
the clock again.
The remote does not function.
➔The batteries have run down.
Replace both batteries.
➔There is an obstacle between the
remote and the system. Remove the
obstacle.
Restoring the Factory
Settings
If you cannot solve the problems after you
have made the checks above, do the
following operation.
(A micro-computer controls all of this
system operations. Some troubles may
occur because of electrical noises from the
AC power.)
1 Turn POWER off.
2 Hold down DISPLAY/DEMO,
TUNER/BAND and MENU 3 at the
same time.
The micro-computer is reset and the clock
setting, timer setting, and radio station
presets are restored to the factory settings.
Redo the settings according to your needs.
For Your Information
Page 35
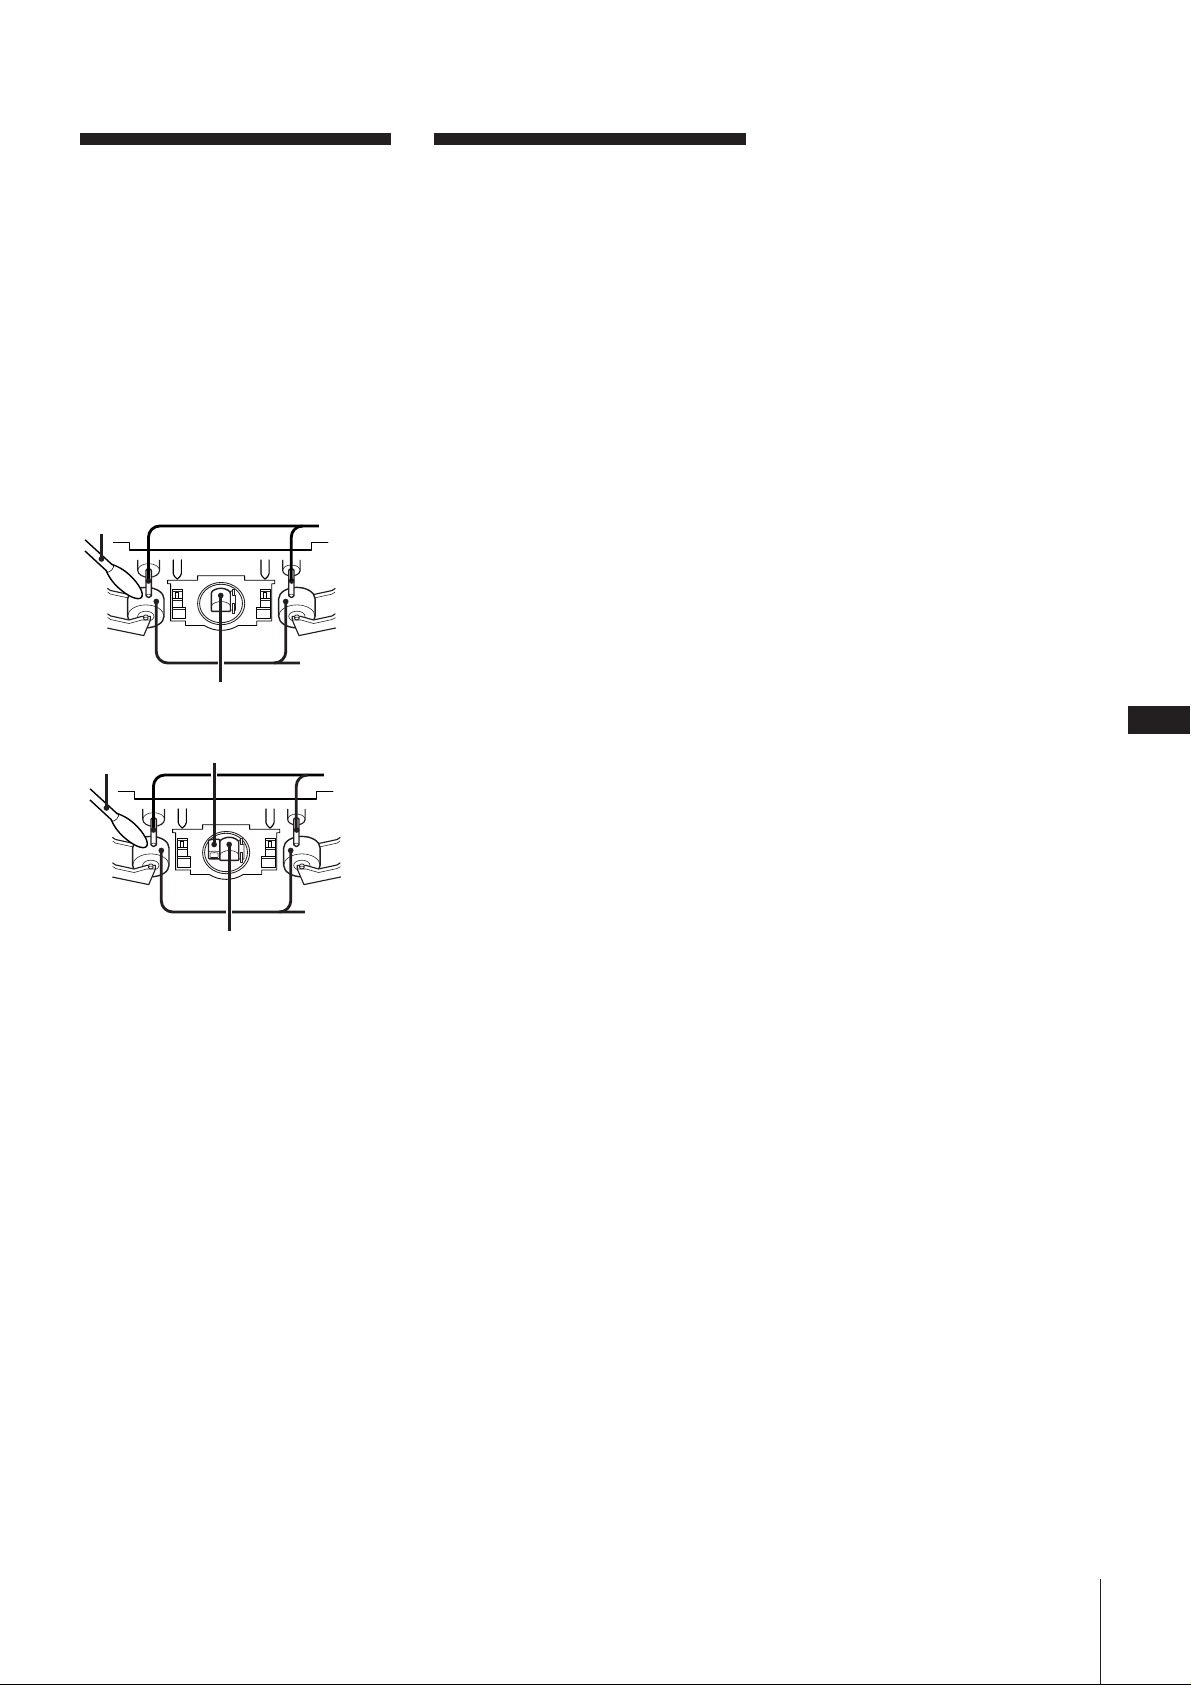
Maintenance
To clean the tape heads and tape
path
Contaminated tape heads cause poor
recording or sound drop-out in playback.
We recommend cleaning after every
10 hours of operation.
Open the tape compartment and wipe the
heads, the pinch rollers and the capstans
with a cleaning swab slightly moistened
with cleaning fluid or alcohol. Wipe the
parts shown below:
Deck A
Cleaning
swab Capstan
Pinch roller
Playback head
Deck B
Cleaning
swab
Insert a tape when the areas cleaned are
completely dry.
To demagnetize the tape heads
After 20 to 30 hours of use, enough residual
magnetism will have built up on the heads
to begin to cause loss of high frequencies
and hiss. At this time, demagnetize the
heads and all metal parts in the tape path
with a commercially available tape head
demagnetizer. Refer to the instructions of
the demagnetizer.
To clean the cabinet
Use a soft cloth slightly moistened with
mild detergent solution.
To clean the CD
When a CD is dirty, clean it with a cleaning
cloth. Wipe the CD from the center out.
Notes on CD
•Do not use solvents such as benzene,
thinner, commercially available cleaners,
or antistatic spray intended for vinyl LPs.
•If there is a scratch, dirt or fingerprints on
the CD, these may cause a tracking error.
Erase head
Capstan
Pinch roller
Record/playback head
Specifications
Video CD/CD-G/CD player section
System Compact disc digital audio
and video system
Laser Semiconductor laser
(λ = 780 nm)
Emission duration:
continuous
Laser output Max 44.6 µW*
* This output is the value
measured at a distance of
200 mm from the
objective lens surface on
the Optical Pick-up Block
with 7 mm aperture.
Wavelength 780 - 790 nm
Audio
Frequency response:
2 Hz - 20 kHz
Signal-to-noise ratio:
More than 90 dB
Dynamic range:
More than 90 dB
Video
Color system format:
NTSC, PAL
Tuner section
FM stereo, FM/AM superheterodyne
tuner
FM tuner section
Tuning range 87.5 – 108.0 MHz
(50 kHz step)
Antenna FM lead antenna
Antenna terminals
75 ohm unbalanced
Intermediate frequency
10.7 MHz
AM tuner section
Tuning range
MW: 531 - 1,602 kHz
(with the interval set
at 9 kHz)
530 - 1,710 kHz
(with the interval set
at 10 kHz)
SW: 5.95 -17.90 MHz
Antenna AM loop antenna,
External antenna terminals
Intermediate frequency
450 kHz
Timer section
System Quartz-locked
Setting time With an interval of 1 min.
Sleep timer Up to 90 min. with an
interval of 10 min. (Max.
100 min. at AUTO OFF)
Amplifier section
Peak music power output
1200 W
Continuous RMS power output
80 W + 80 W (8 ohms at 1
kHz, 5 % THD)
Inputs
AUDIO (phono jacks):
voltage 450 mV,
impedance 47 kilohms
MIX MIC (phone jacks):
sensitivity 1 mV,
impedance 10 kilohms
Outputs
AUDIO (phono jacks):
voltage 250 mV,
impedance 1 kilohm
PHONES (stereo phone jack):
accepts headphones of
8 ohms or more
CD DIGITAL OUT OPTICAL
(Square optical connector
jack, rear panel)
Wavelength 660 nm
Output Level –18 dBm
SPEAKER:
accepts impedance of 8 to 16
ohms
SURROUND/SUB SPEAKER:
accepts impedance of
16 ohms
SUPER WOOFER:
voltage 1 V, impedance
1 kilohms
VIDEO (phono jack):
max. output level 1 Vp-p,
unbalanced, sync negative,
load impedance 75 ohms
S-VIDEO (4-pin, min-DIN jack)
Y: 1 Vp-p, unbalanced, sync
negative
C: 0.286 Vp-p,
load impedance 75 ohms
Tape player section
Recording system
4-track 2-channel stereo
Frequency response
(DOLBY NR OFF)
40 – 13,000 Hz (±3 dB),
using Sony TYPE I cassette
40 – 14,000 Hz (±3 dB),
using Sony TYPE II cassette
Wow and flutter
±0.15% W. Peak (IEC)
0.1% W. RMS (NAB)
±0.2% W. Peak (DIN)
Speaker
SS-H991G
Speaker system
3-way system, bass reflex
type, magnetically shielded
Speaker units
Woofer: 17 cm dia., cone type
Tweeter: 5 cm dia., cone type
Super tweeter: 2 cm dia., dome type
Nominal impedance
8 ohms
Dimensions Approx. 220 × 325 × 275 mm
(w/h/d)
Mass Approx. 5 kg per speaker
EN
35
For Your Information
Page 36
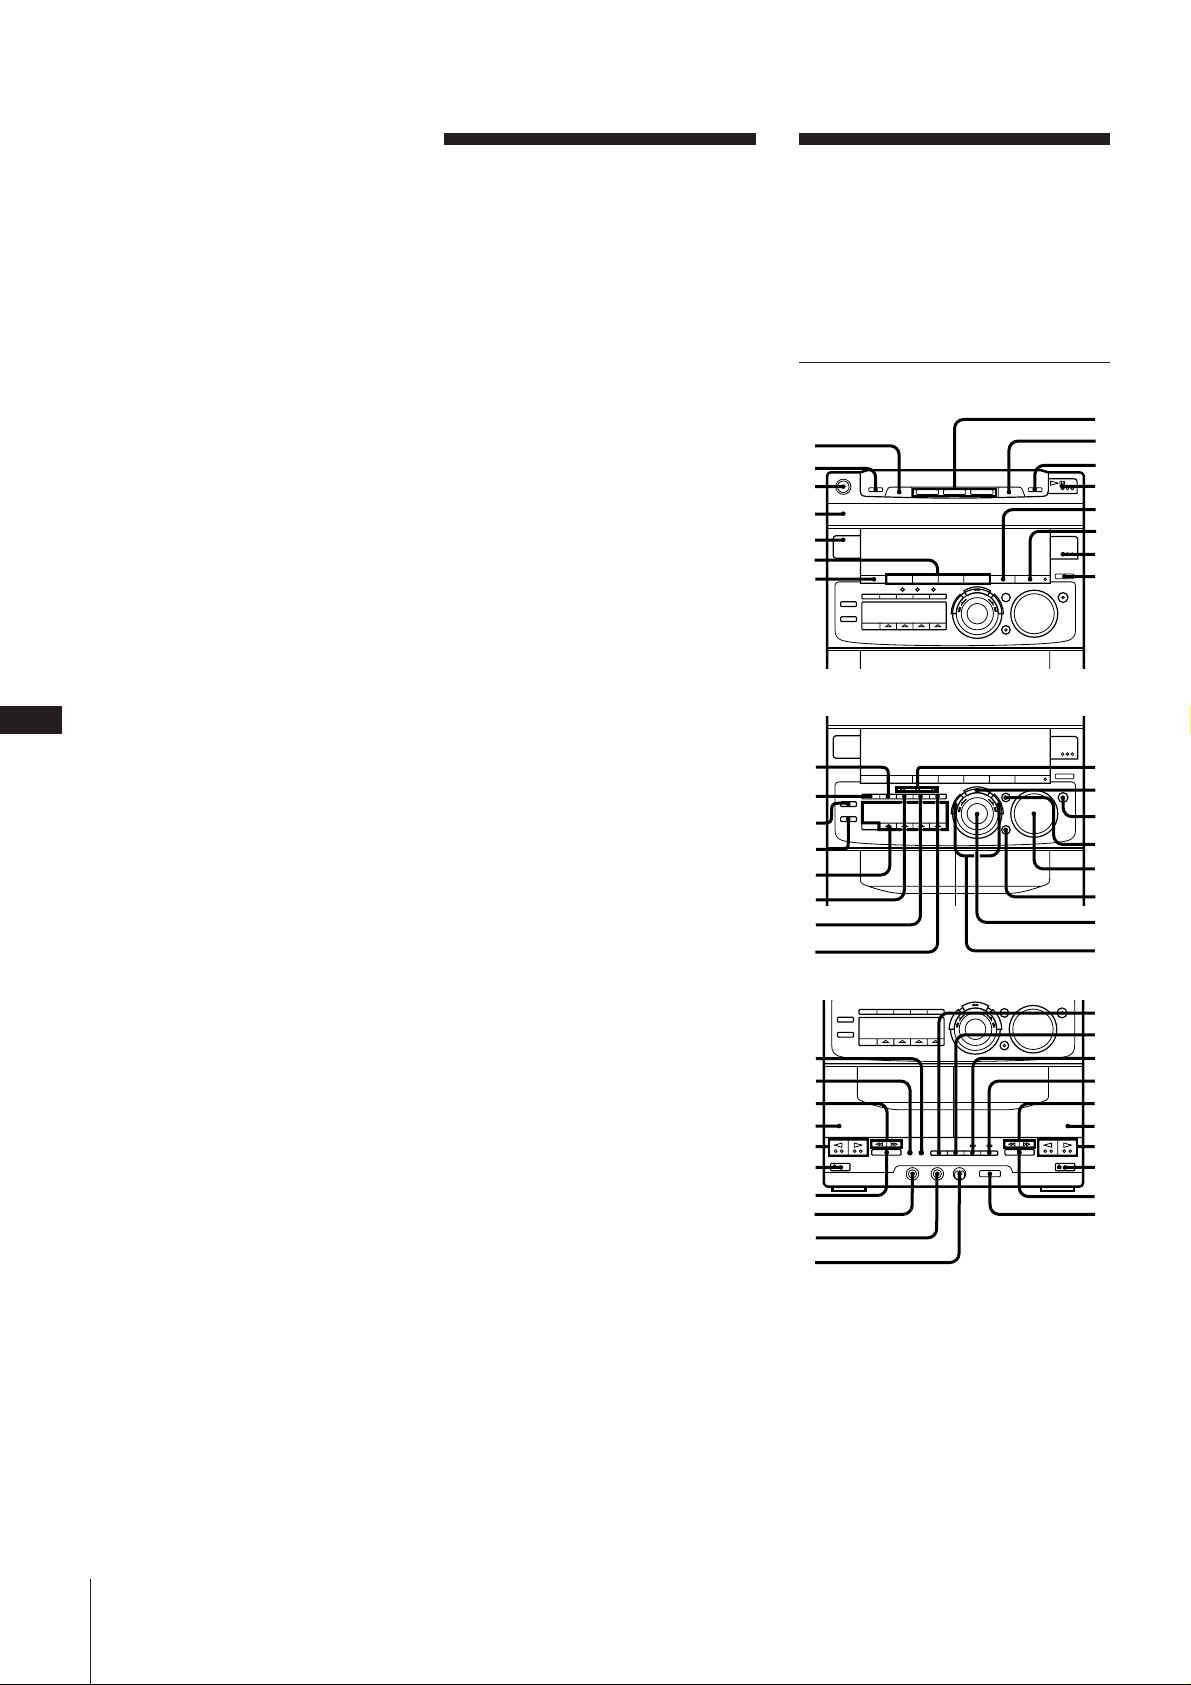
EN
1
2
3
4
5
6
7
8
9
0
!`
!“
!£
!¢
!
!⁄
!ƒ
!¥
!»
@…
@`
@ƒ
@¥
@»
#…
#`
@“
@£
@
@⁄
@¢
SS-SR991G
Speaker system
Full range system, bass
reflex type
Speaker unit 10 cm dia., cone type
Nominal impedance
16 ohms
Dimensions Approx. 200 × 90 × 235 mm
(w/h/d)
Mass Approx. 1 kg per speaker
Supplied accessories
AM loop antenna (1)
Remote RM-SV800 (1)
Sony SUM-3 (NS) batteries (2)
Video cord (1)
FM lead antenna (1)
Speaker cords (4)
General
Power requirements
Australian model:
240 V AC, 50/60 Hz
Mexican model:
120 V AC, 60 Hz
Other models:
110-120 V or 220-240 V AC,
50/60 Hz
Adjustable with the voltage
selector
Power consumption
36
Dimensions Approx. 280 × 325 × 360 mm
Mass Approx. 10.6 kg
Design and specifications are subject to
change without notice.
For Your Information
190 W
(w/h/d)
incl. projecting parts and
controls
Glossary
Auto Pause
While playing a VIDEO CD, the CD player
automatically pauses according to the
signal encoded on the disc. If the CD player
does not resume play for a long time, press
fl (or CD · SELECT on the remote) to
resume play manually.
CD Graphics (CD-G)
A compact disc which contains graphic
pictures.
The picture information is recorded in the
sub code area of audio CDs. Because the
memory for picture information is limited,
CD-Gs can contain only the graphical
pictures of restricted quality, such as in a
picture book.
Menu Playback
Playback using the menu screens recorded
on VIDEO CDs with PBC functions. You
can enjoy simple interactive software using
the menu playback function.
Playback Control (PBC)
Signals encoded on VIDEO CDs (Version
2.0) to control playback.
By using menu screens recorded on VIDEO
CDs with PBC functions, you can enjoy
playing simple interactive software,
software with search functions, and so on.
When you select a VIDEO CD with PBC
functions on this player, PBC indicator light
up.
Track
A disc is divided into sections of a picture
or a music piece called “tracks.” Each track
is assigned with a track number to locate
the track you want.
VIDEO CD
A compact disc which contains moving
pictures.
VIDEO CDs contain compact picture
information using the MPEG 1 format, one
of the world wide standards of digital
compact technology. The picture
information is compressed about 120 times.
Consequently, a 12 cm VIDEO CD can
contain up to 74 minutes of moving
pictures.
VIDEO CDs also contain compact audio
information. Sounds outside the range of
human hearing are compressed while the
sounds we can hear are not compressed.
VIDEO CDs can hold six times the audio
information of conventionel audio CDs.
There are two versions for VIDEO CDs as
follows:
Version 1.1 (VIDEO CDs without PBC
functions):
You can play only moving pictures and
sounds.
Version 2.0 (VIDEO CDs with PBC
functions):
You can play still pictures and enjoy PBC
functions.
This player conforms to both versions.
Index to Parts and
Controls
Refer to the pages indicated in parentheses
for details on how to use the controls.
Controls with an asterisk have indicators
on themselves.
Front Panel
#“
#£
#¢
#
#⁄
#ƒ
#¥
#»
$…
$`
1 DISC SKIP button (8, 20)
2 EX-CHANGE button (8)
3 POWER switch (8)
4 Disc tray (8, 20)
5 TIMER button (7, 29)
6 MENU 1 ~ 4 buttons (24)
7 DISPLAY/DEMO button (6, 10)
8 DISC 1 ~ 3 buttons (8)
9§ OPEN/CLOSE button (8, 20)
0p (CD stop) button (8, 20)
!¡· (play /pause) button* (8, 21)
!™ P FILE button (26)
!£EFFECT ON/OFF button* (24, 25)
$“
$£
$¢
$
#¢
$⁄
#⁄
#ƒ
#¥
$ƒ
Page 37
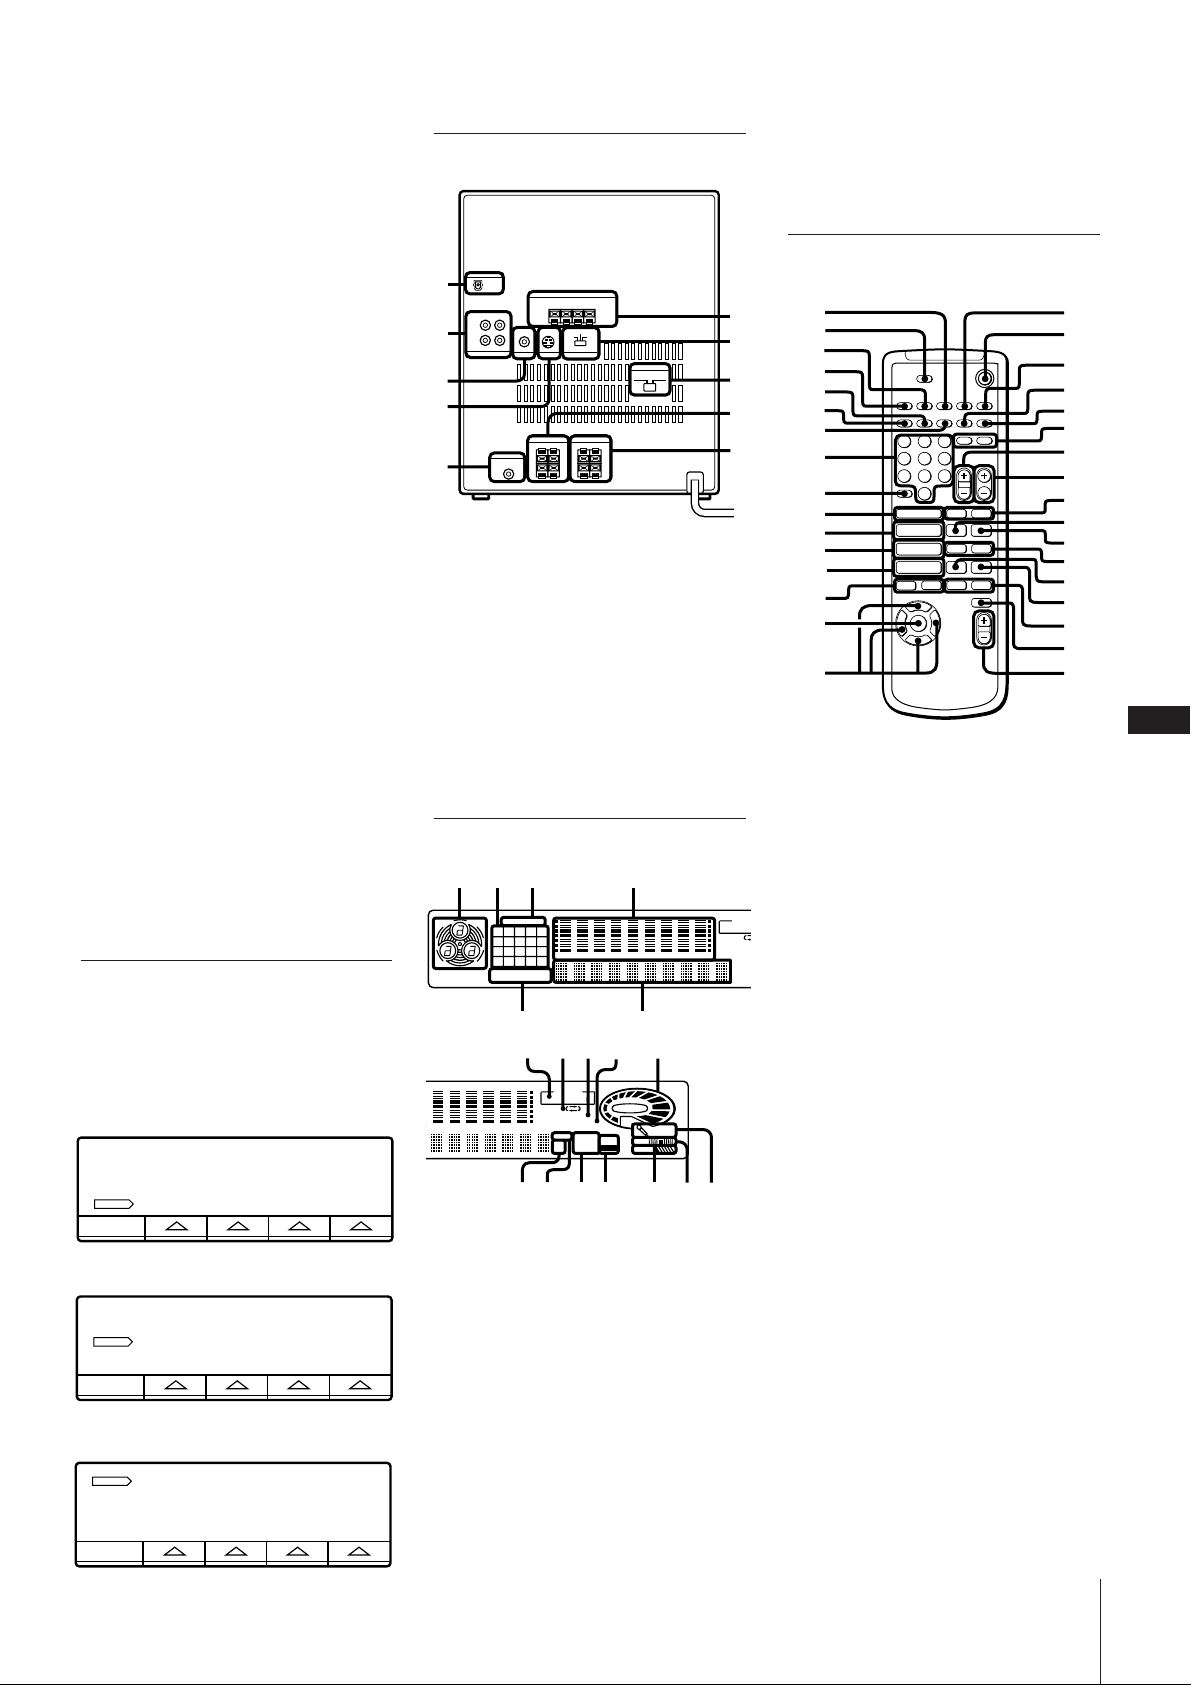
!¢TUNER/BAND button* (17)
! FUNCTION button (15, 20, 27, 31, 32)
!§PREV button (8)
!¶PBC OFF/ON button (9)
!•DSP button* (25)
!ªDIGITAL ECHO button* (28)
@º MULTI FUNCTION CONTROL buttons
(7, 8, 17, 21, 29)
@¡ NEXT button (8)
@™ˆ RETURN button (9)
@£SELECT button (9)
@¢VIDEO CD/PBC/AUTO PBC indicator
(9)
@ ENTER/NEXT button (7, 15, 17, 25, 28,
30)
@§GROOVE button* (24)
@¶ DBFB button (24)
@• VOLUME control (24)
@ª SONIC FORMATION button* (26)
#ºJOG dial (7, 8, 17, 21, 25, 28, 30)
#¡FREQUENCY –/+ buttons (25)
#™DIRECTION button (19)
#£DOLBY NR button (19)
#¢0/) (rewind/fast forward) buttons
(19)
# Deck A (19)
#§ ª/· (reverse side play
/front side play) buttons* (19)
#¶§ EJECT buttons (19)
#•p (tape stop) button (19)
#ªPHONES jack (24, 32)
$ºMIX MIC jack (27)
$¡MIC LEVEL knob (27)
$™HIGH SPEED DUBBING button (23)
$£CD SYNCHRO button (20)
$¢r REC button (20)
$P PAUSE button (19)
$§Deck B (19)
$¶KARAOKE PON/MPX button (27)
MULTI FUNCTION CONTROL
buttons
TUNER
MEMORY
123
CD TUNER
12345
678910
1514131211
2019181716
ALL1DISC S PROGRAM
SHUFFLE REPEAT1
5
STEREO MONO
The buttons you can operate the CD player,
tuner and the timer light up.
CD player
1/ALL DISCSC D PLAY MODE REPEAT EDIT
Tuner
TUNER
TUNING
MODE
Timer
CLOCK SETTIMER tSET tSELECT SLEEP
Rear panel
1
2
3
4
5
1 CD DIGITAL OUT OPTICAL jack (31)
2 AUDIO IN/OUT jacks (31, 32)
3 VIDEO OUT jack (5, 31)
4 S VIDEO OUT jack (5, 31)
5 SUPER WOOFER jack (32)
6 ANTENNA terminals (4)
7 SYSTEM SELECT switch (5)
8 VOLTAGE SELETOR (6)
9 SURROUND/SUB SPEAKER L/R
connectors (4)
0 SPEAKER L/R connectors (4)
Display Window
1423
CD TUNER
12345
678910
1514131211
12563 250 500 1k 2k 4k 8k 16k(Hz)
2019181716
ALL1DISC S PROGRAM
SHUFFLE REPEAT1
5
7
8
TIMER
DAILY12
REC SLEEP
RELAY
DOLBY NR
B OFF
TUNED
12563 250 500 1k 2k 4k 8k 16k(Hz)
STEREO MONO
STEP
AUTO
KHz
MANUAL
MHz
PRESET
!
“
!
£
!
1 Disc tray indicator
2 Music calendar (11)
3 CD/TUNER indicator (11, 17)
4 Graphic Equalizer indicator (25)
5 CD playback indicators (8, 15, 16)
6 Multi display (11, 17, 20, 25, 28, 30)
7 Timer indicators (30)
8 Direction mode indicators (19)
9 DOLBY NR indicator (19)
0 Tuning indicators (17)
!¡VOLUME indicators
!™ kHz/MHz indicator (17)
!£STEP indicator (15)
!¢Tuner indicators (17)
! SYNC REC indicator (20)
6
0!`9
VOLUME
SYNC
SUR
REC
DBFB
¢
!!⁄
PONLR
MPX
!ƒ !¥
6
7
8
9
0
TIMER
DAILY12
RELAY
DOLBY NR
TUNED
STEP
KHz
MHz
!§DBFB indicator (24)
!¶SUR indicators (25)
!•Karaoke PON/MPX indicators (27)
Remote
1
2
3
4
5
6
7
8
9
0
!`
!“
!£
!¢
!
!⁄
1 DISPLAY button (10)
2 SLEEP button (29)
3 SPECIAL MENU button (12)
4 ON SCREEN button (11)
5 CHECK button (15, 21)
6 EDIT button (21)
7 CLEAR button (15)
8 numeric buttons (9)
9 >10 button (9)
REC SLEEP
0 TUNER/BAND button (17)
VOLUME
B OFF
!¡DECK A ª· button (19)
STEREO MONO
AUTO
MANUAL
PRESET
MPX
PONLR
SYNC
!™ DECK B ª· button (19)
SURSD
REC
M
DBFB
!£CD · SELECT button (8)
!¢CD PREV =/NEXT + buttons (8)
! MUSIC MENU ON/OFF button (24)
!§MUSIC MENU “/” / 4/$ buttons (24)
!¶TV/VIDEO button (9)
!•POWER switch (8)
!ªTV POWER switch (9)
@º D.SKIP button (8)
@¡ FUNCTION button
@™ KEY CONTROL +/– buttons (28)
@£ TV VOL +/– buttons (9)
@¢ CH +/– buttons (9)
@ BAND +/– buttons (18)
@§ DECK P button (19)
@¶ DECK p button (19)
@• DECK 0/) buttons (19)
@ª CD P button (8)
#ºCD p button (8)
#¡CD 0/ ) buttons (8)
#™ RETURN ˆ button (9)
#£VOL (+/–) button (24)
–
+
–
p+P
Æ»
)0
Æ»
Æ
4
$
pP
)0+=
!ƒ
!¥
!»
@…
@`
@“
@£
@¢
@
@⁄
@ƒ
@¥
@»
#…
#`
#“
#£
EN
37
For Your Information
Page 38

EN
38
Index
Adjusting
the audio emphasis 25
the front panel display 10
the on-screen display 11
the operating voltage 6
the sound 24
the volume 24
Antennas 4
Automatic source selection 9, 17, 20
Batteries 6
CD player 8
CD synchro recording 20
Clock setting 7
Connecting
a super woofer 32
a turntable 32
a TV 5
headphones 32
optional equipment 31
the antennas 4
the power 6
the speakers 4
the stereo 4
DBFB 24
Deactivating the demo mode 6
Digest
disc 13
track 13
Digital echo 28
Dolby NR (noise reduction) 19
DSP 25
Dubbing
another tape automatically 22
another tape manually 23
EX-change 8, 10
Graphic channels on CD-Gs 14
Graphic equalizer 25
Groove 24
Karaoke 27
Key control 28
Maintenance 35
Microphone mixing 28
Multiplex 27
Music calendar 11
One touch play 9, 17, 20
Parts identification 36
Playing
a tape 19
CDs 10
CD-Gs 8
preset radio stations 18
tracks in random order
(shuffle play) 15
tracks in the desired order
(program play) 15
tracks repeatedly (repeat play) 16
VIDEO CDs 8
Precautions 33
Program play 15
P FILE 26
Radio stations
presetting 18
tuning in 17
Recording
a CD (program edit) 22
a CD (tape select edit) 22
a CD (time edit) 21
a CD automatically 20
a CD manually 20
a radio 22
another tape (dubbing) 22
the karaoke 28
timer recording 30
Relay play 19
Remote 37
Repeat play 16
Restoring the factory settings 34
Saving a recording 33
Searching
Index search 12
Scene search 12
Time search 13
Selecting the color system 5
Shuffle play 15
Sonic formation 26
Sound adjusting 24
Speakers 4
Special menu 12
Specifications 35
Supplied accessories 36
Surround effect 25
Tape player 19
Timer
falling asleep to music 29
timer recording 30
waking up to music 29
Troubleshooting guide 33
Tuner 17
For Your Information
Page 39
Português
ADVERTÊNCIA
Para evitar o risco de incêndio ou de
choque eléctrico, não exponha o aparelho
à chuva nem à humidade.
Para evitar descargas eléctricas, não abra o aparelho. Solicite
assistência somente a técnicos especializados.
Não instale o aparelho num espaço fechado, como por exemplo, uma
estante ou um armário embutido.
O componente laser deste produto é capaz de emitir radiações
superiores aos limites para a Classe 1.
Este aparelho é classificado
como produto LASER CLASSE
1. A etiqueta CLASS 1 LASER
PRODUCT MARKING está
localizada na parte posterior
externa do aparelho.
Este etiqueta de
advertência está
localizada no
interior do
aparelho.
•Um temporizador que possibilita o ajuste do leitor de discos
compactos, do leitor de cassetes ou do rádio para ligar-se ou
desligar-se na hora desejada.
•Um duplo deck de cassetes que permite a gravação de sinais do
rádio, do leitor de discos compactos ou do outro deck de cassetes,
além da leitura encadeada de ambos os decks.
•Um leitor de discos compactos que possibilita a reprodução de até
três CDs em sequência e o avanço (ou retrocesso) ininterrupto
através de todas as faixas de todos os CDs na bandeja de discos.
•Um telecomando que permite o controlo do seu sistema sem sair
do assento.
Este sistema pode reproduzir os seguintes
discos:
Logotipo do
disco
Conteúdo
Tamanho do
disco
Tempo de
reprodução
CDs de Vídeo
áudio + vídeo
(imagens em
movimento)
12 cm/8 cm
74 min./20 min.
CDs de áudio
f
áudio
12 cm/8 cm
74 min./20 min.
CD-Gs (CDs
gráficos)
f
áudio + vídeo
(imagens gráficas)
12 cm/8 cm
74 min./20 min.
P
2
Antes de utilizar este aparelho
O modo de demonstração aparece no
mostrador quando se liga o cabo de
alimentação CA a uma tomada da rede.
Para desactivar o modo de
demonstração, carregue em DISPLAY/
DEMO com a alimentação do sistema
desligada.
Bem-vindo!
Gratos pela aquisição deste Sistema de Minicomponentes Hi-Fi
Sony. Esta série vem equipada com uma variedade de características.
Para citar apenas algumas:
•Em adição aos CDs de áudio, podem-se reproduzir CDs de vídeo e
CD-Gs para desfrutar de imagens tanto gráficas quanto em
movimento.
•Sistema DBFB (Realimentação Dinâmica de Graves) que reforça o
áudio da gama das baixas frequências para prover sons graves
potentes e profundos.
•Uma função de programação que possibilita o armazenamento e a
rechamada de um total de 20 estações em FM, 10 em MW e 10 em
SW dentre as suas estações de rádio favoritas.
•Um amplificador que permite o ajuste da qualidade de áudio para
adequar a uma variedade de ambientes e tipos musicais.
Nota acerca de CDs de Vídeo
Este sistema está em conformidade com CDs de vídeo sem funções
PBC (Ver. 1.1) e CDs de vídeo com funções PBC (Ver.2.0) dos
padrões VIDEO CD. Pode-se desfrutar de dois tipos de reprodução,
de acordo com o tipo de disco.
Tipo de disco
CDs de vídeo
sem funções PBC
(Discos Ver. 1.1)
CDs de vídeo
com funções PBC
(Discos Ver. 2.0)
* PBC = Controlo de Reprodução
O MHC-V800 consiste do seguinte:
— Aparelho principal: HCD-V800
— Sistema de altifalantes: Colunas frontais SS-H991G
Pode-se
desfrutar da reprodução de vídeo (imagens em
movimento), bem como CDs de áudio.
reproduzir software interactivo, usando-se écrans
de menu indicados no écran do televisor
(reprodução com menu) em adição à função de
reprodução de vídeo dos CDs de vídeo sem
funções PBC.
Mais ainda, podem-se reproduzir imagens
estáticas de qualidade alta ou padrão.
Colunas perimétricas SS-SR991G
Page 40

Índice
Secção 1: Preparativos iniciais
Ligação do sistema estéreo 4
Inserção de pilhas 6
Acerto do relógio 7
Secção 2: O leitor de CDs/CD-Gs/CDs de
Vídeo
Operações básicas
Reprodução de CDs de Vídeo e CD-Gs 8
Reprodução de CDs 10
Utilização do mostrador
Verificação do tempo restante 10
Utilização do mostrador no écran 11
Funções especiais
Localização de um trecho específico de um disco (menu
especial) 12
Selecção de canais gráficos nos CD-Gs 14
Reprodução de um CD de vídeo a partir da última
paragem (retomada de reprodução) 14
Reprodução de CDs em vários modos
Reprodução de faixas em ordem aleatória (reprodução
aleatória) 15
Reprodução de faixas na ordem desejada (reprodução
programada) 15
Reprodução de faixas repetidas (reprodução
repetida) 16
Secção 6: Karaokê
Karaokê: Acompanhamento musical para canto 27
Gravação de Karaokê (mistura com microfone) 28
Secção 7: Características adicionais
Adormecer ao som de músicas 29
Despertar ao som de músicas 29
Gravação temporizada de programas de rádio 30
Ligação de equipamentos opcionais 31
Generalidades
Precauções 33
Guia para solução de problemas 33
Manutenção 35
Especificações 35
Glossário 36
Localização das partes e dos controlos 36
Índice remissivo 38
P
3
Secção 3: O rádio
Audição do rádio 17
Programação de estações de rádio 18
Sintonização de estações de rádio programadas 18
Secção 4: O leitor de cassetes
Reprodução de uma cassete 19
Gravação de um CD 20
Gravação de CDs: Especificação da duração da fita
(edição por tempo) 21
Gravação de sinais do rádio 22
Gravação de uma outra cassete (duplicação) 22
Secção 5: Ajustamento de Som
Ajustes de som 24
Selecção de efeitos sonoros 24
Ajuste de efeitos sonoros 25
Criação de um arquivo de efeito sonoro pessoal
(arquivo personalizado) 26
Comutação da formação dos altifalantes (formação
sónica) 26
Page 41
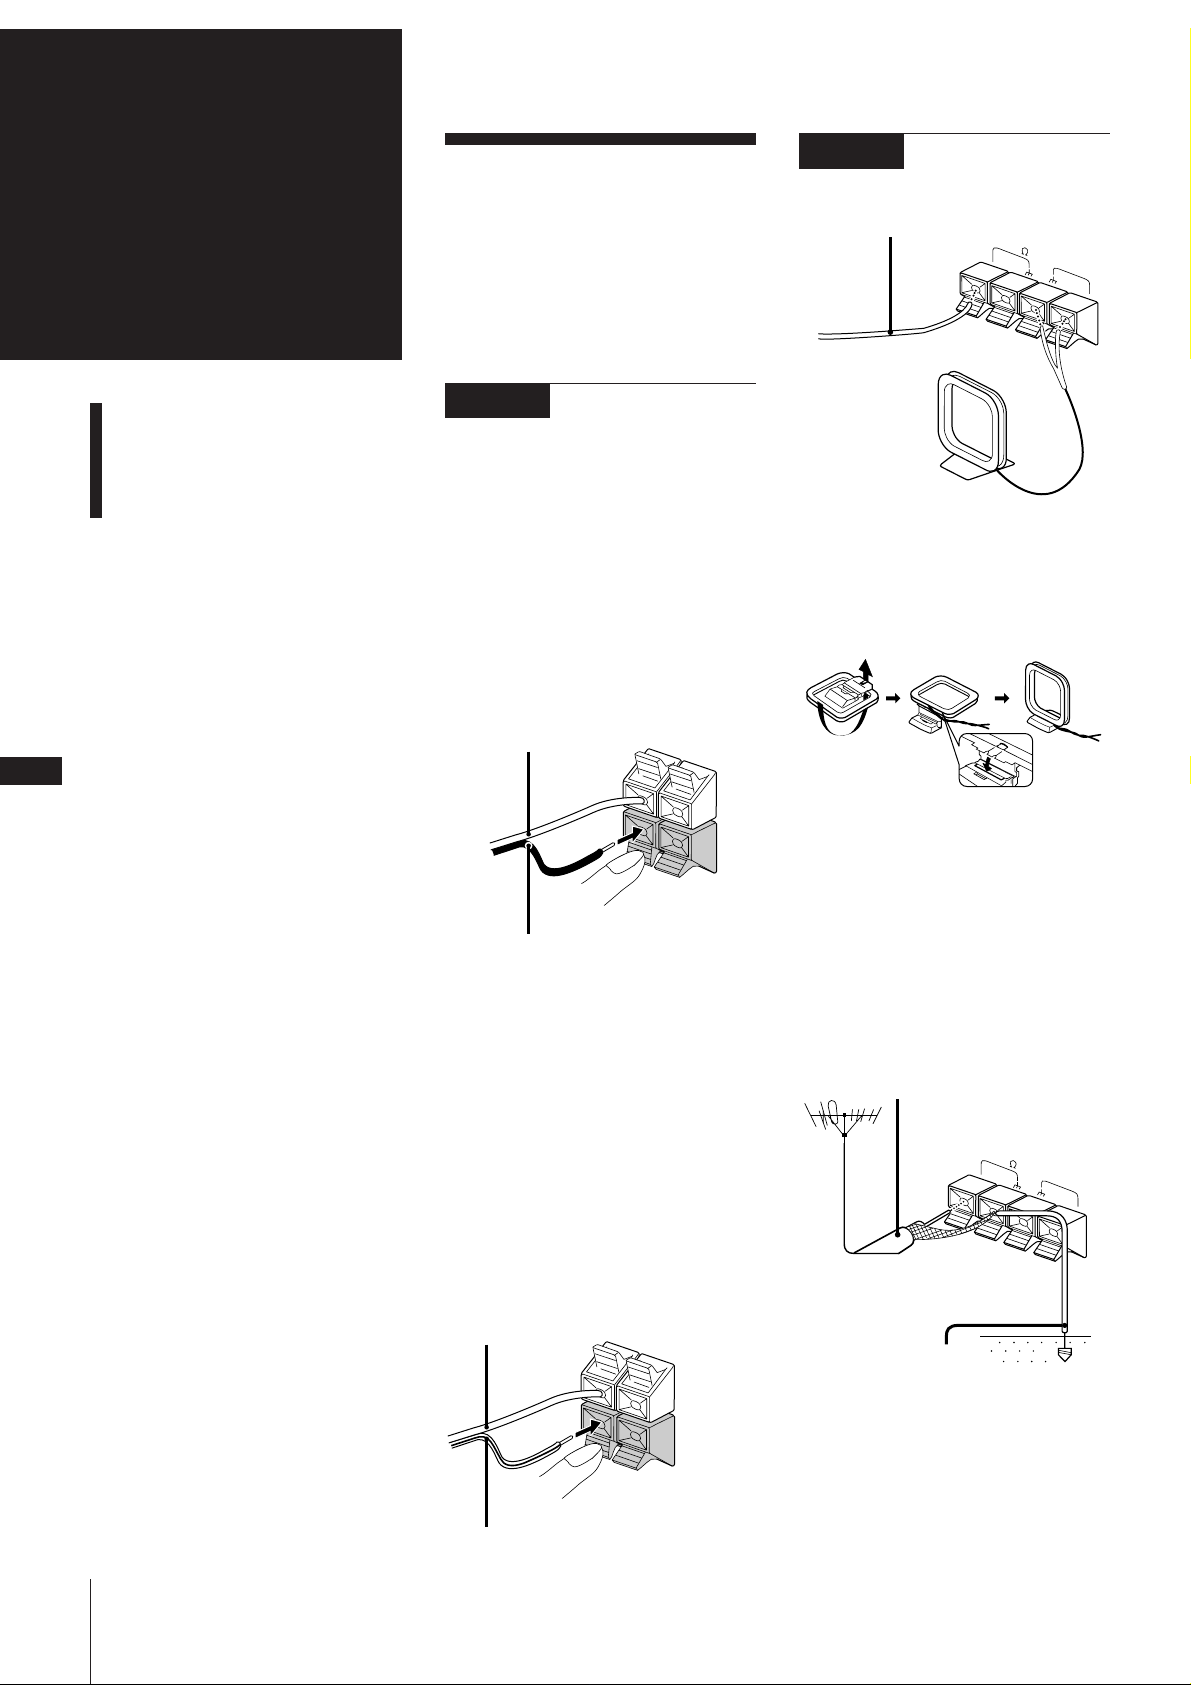
Secção 1:
Preparativos
iniciais
Ligação do sistema
estéreo
Utilize as ilustrações abaixo para ligar o seu
sistema estéreo.
Caso queira ligar alguns componentes
opcionais ao sistema, consulte «Ligação de
equipamentos opcionais» na secção 7.
PASSO 2
Ligação das
antenas
Antena filiforme FM* (fornecida)
FM 75
AM
Ligação do sistema estéreo
PASSO 1
Ligação dos
altifalantes
Inserção de pilhas
Acerto do relógio
Após arranjar ambas as extremidades dos
cabos de altifalante, ligue todas as colunas
ao aparelho.
Para ligar as colunas de altifalantes
frontais
Ligue a coluna frontal direita aos
conectores SPEAKER R, e a coluna frontal
esquerda aos conectores SPEAKER L, com
os fios vermelhos a ‘ e os fios pretos a ’.
Fio vermelho a ‘
(vermelho)
SPEAKER
R
L
Antena de quadro AM (fornecida)
* Nota: Estire-a horizontalmente.
Ligação da antena de quadro AM
Ligue a antena de quadro AM fornecida aos
terminais AM e y.
P
4
Para aprimorar a recepção de FM
Ligue uma antena externa FM aos terminais
FM 75 Ω e y, através de um cabo coaxial de
75 ohms.
Fio preto a ’ (preto)
Para ligar as colunas perimétricas/
auxiliares
Ligue a coluna posterior direita aos
conectores SURROUND/SUB SPEAKER R,
e a coluna posterior esquerda aos
conectores SURROUND/SUB SPEAKER L,
com os fios cinza a ‘ e os fios cinza com
listras pretas a ’.
Nota
Não coloque os altifalantes perimétricos no
topo de um televisor. Do contrário, poderá
ocasionar distorções de cores no écran do
televisor.
SURROUND/SUB SPEAKER
Fio cinza a
‘ (cinza)
R
L
Importante
Aterre a antena externa pelo terminal y
contra relâmpagos, com o prendedor de
parafuso. Para evitar explosões de gás, não
ligue o fio terra a uma tubulação de gás.
Cabo coaxial de 75 ohms
(venda avulsa)
FM 75
AM
Fio terra
(venda avulsa)
Secção 1: Preparativos iniciais
Fio com linhas pretas a ’ (preto)
Page 42
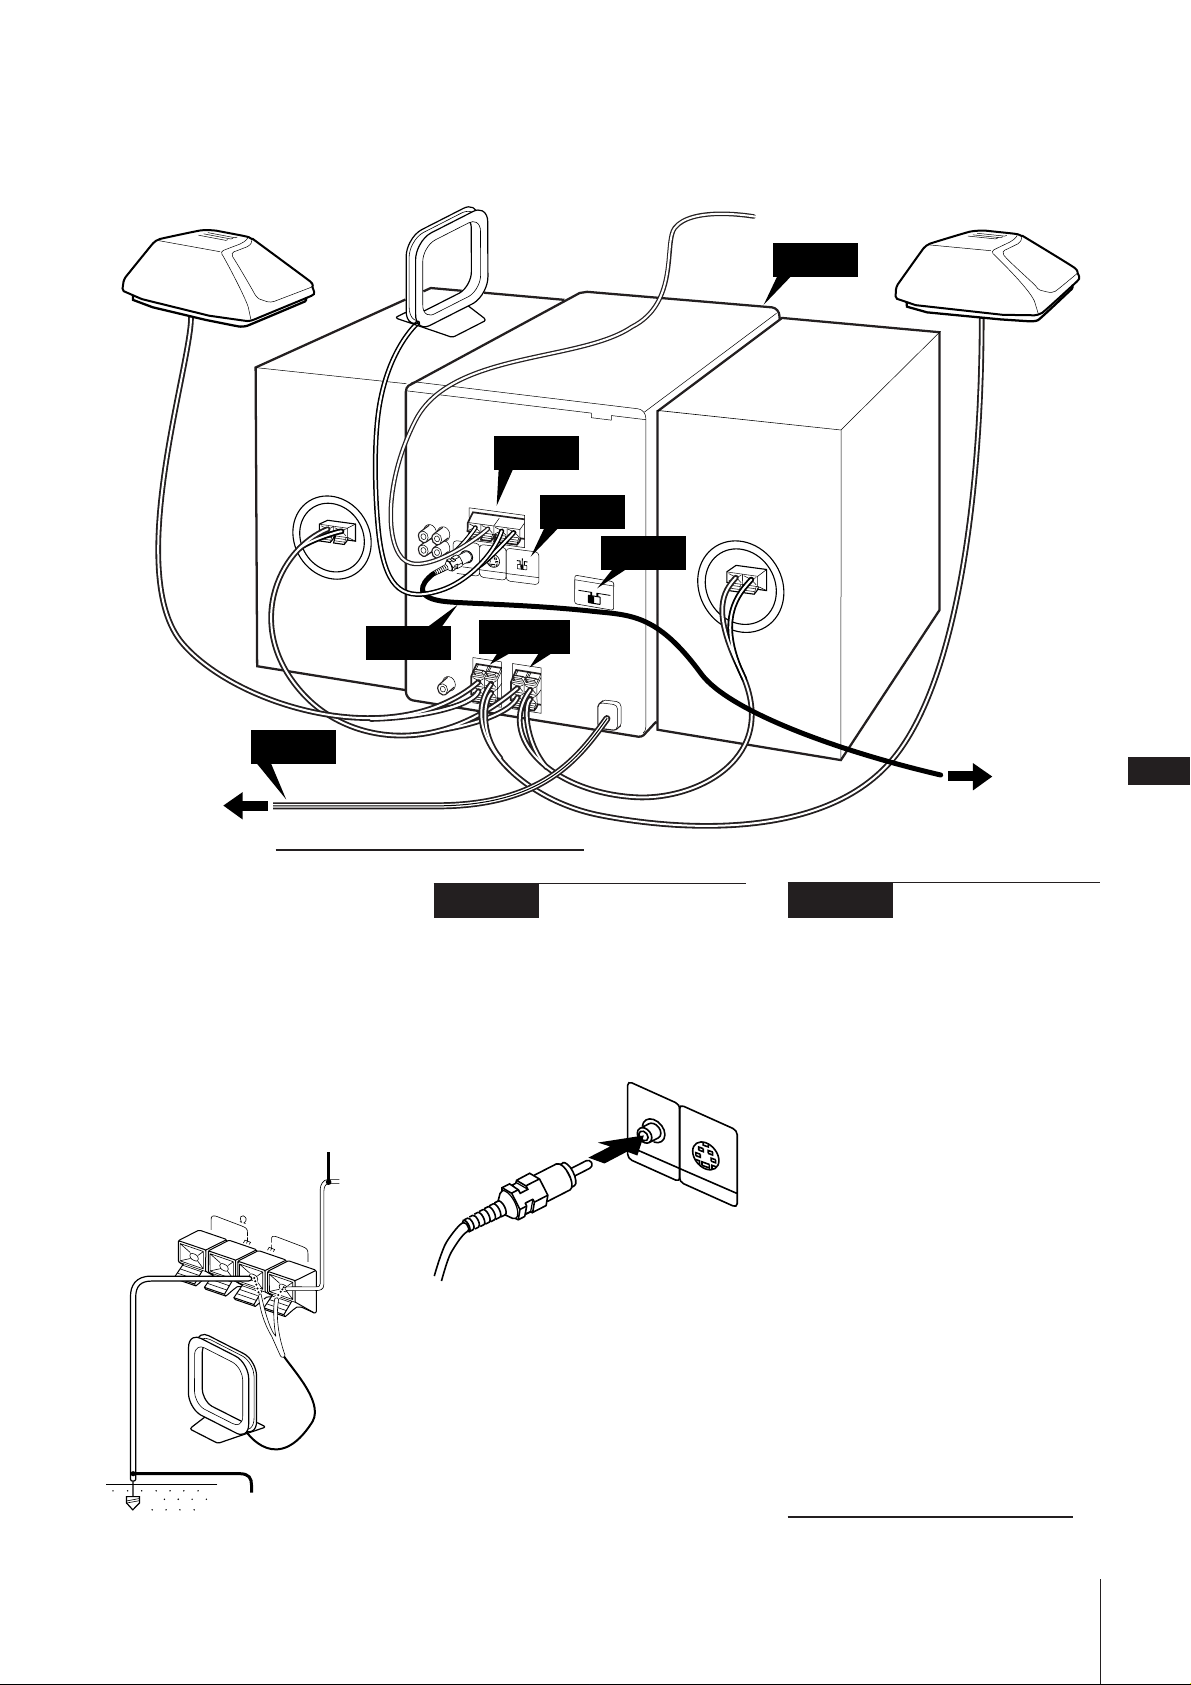
Coluna posterior (direita)
(Não a coloque sobre o
topo de um televisor.)
Coluna frontal
(direita)
Antena de quadro AM (fornecida)
Antena filiforme FM (fornecida)
PASSO 7
Coluna posterior (esquerda)
(Não a coloque sobre o
topo de um televisor.)
PASSO 3
PASSO 6
a uma tomada
da rede
Para aprimorar a recepção de AM
Após ligar a antena AM, ligue um fio
isolado de 6 a 15 metros ao terminal AM.
Efectue a ligação terra do terminal y.
Importante
Efectue a ligação terra da antena externa
contra relâmpagos pelo terminal y. Para
evitar explosões de gás, não ligue o fio terra
a uma tubulação de gás.
!Efectue esta ligação por último!
PASSO 2
Coluna frontal
(esquerda)
PASSO 4
PASSO 5
PASSO 1
PASSO 3
Ligação de um
televisor
Ligue a tomada de entrada de vídeo de um
televisor à tomada VIDEO OUT no painel
posterior do sistema através do cabo de
ligação de vídeo fornecido.
PASSO 4
Selecção do
sistema de cores (NTSC/
PAL)
Este sistema está em conformidade com os
sistemas NTSC e PAL. Ajuste SYSTEM
SELECT (sistema de cores) na parte
posterior deste sistema para a posição
apropriada, de acordo com o seu televisor.
P
5
Fio isolado
(venda avulsa)
FM 75
AM
Fio terra
(venda avulsa)
VIDEO OUT
S VIDEO OUT
Na utilização de um televisor
Ligue o televisor e seleccione a entrada de
vídeo, de forma que se possam assistir às
imagens a partir deste sistema.
Nota
Para obter imagens de vídeo com qualidade
ainda maior, utilize um cabo S-VIDEO
opcional para ligar a tomada de entrada SVIDEO do seu televisor à tomada S-VIDEO
OUT no painel posterior deste sistema.
SYSTEM SELECT vem ajustado em
AUTO da fábrica
• Caso o seu televisor altere
automaticamente o sistema de cores de
acordo com o sinal de entrada:
O ajuste de fábrica (AUTO) altera
automaticamente o sistema de cores de
saída de vídeo de acordo com o sistema
de cores do CD de vídeo a ser
reproduzido. Neste caso, o sistema de
cores seleccionado é mantido até que se
desligue o sistema ou se reproduza um
outro CD de vídeo com um sistema de
cores diferente. Caso desligue o sistema, o
sistema de cores será automaticamente
ajustado a NTSC quando se ligar o
sistema novamente.
continua na próxima página ➔
Secção 1: Preparativos iniciais
Page 43
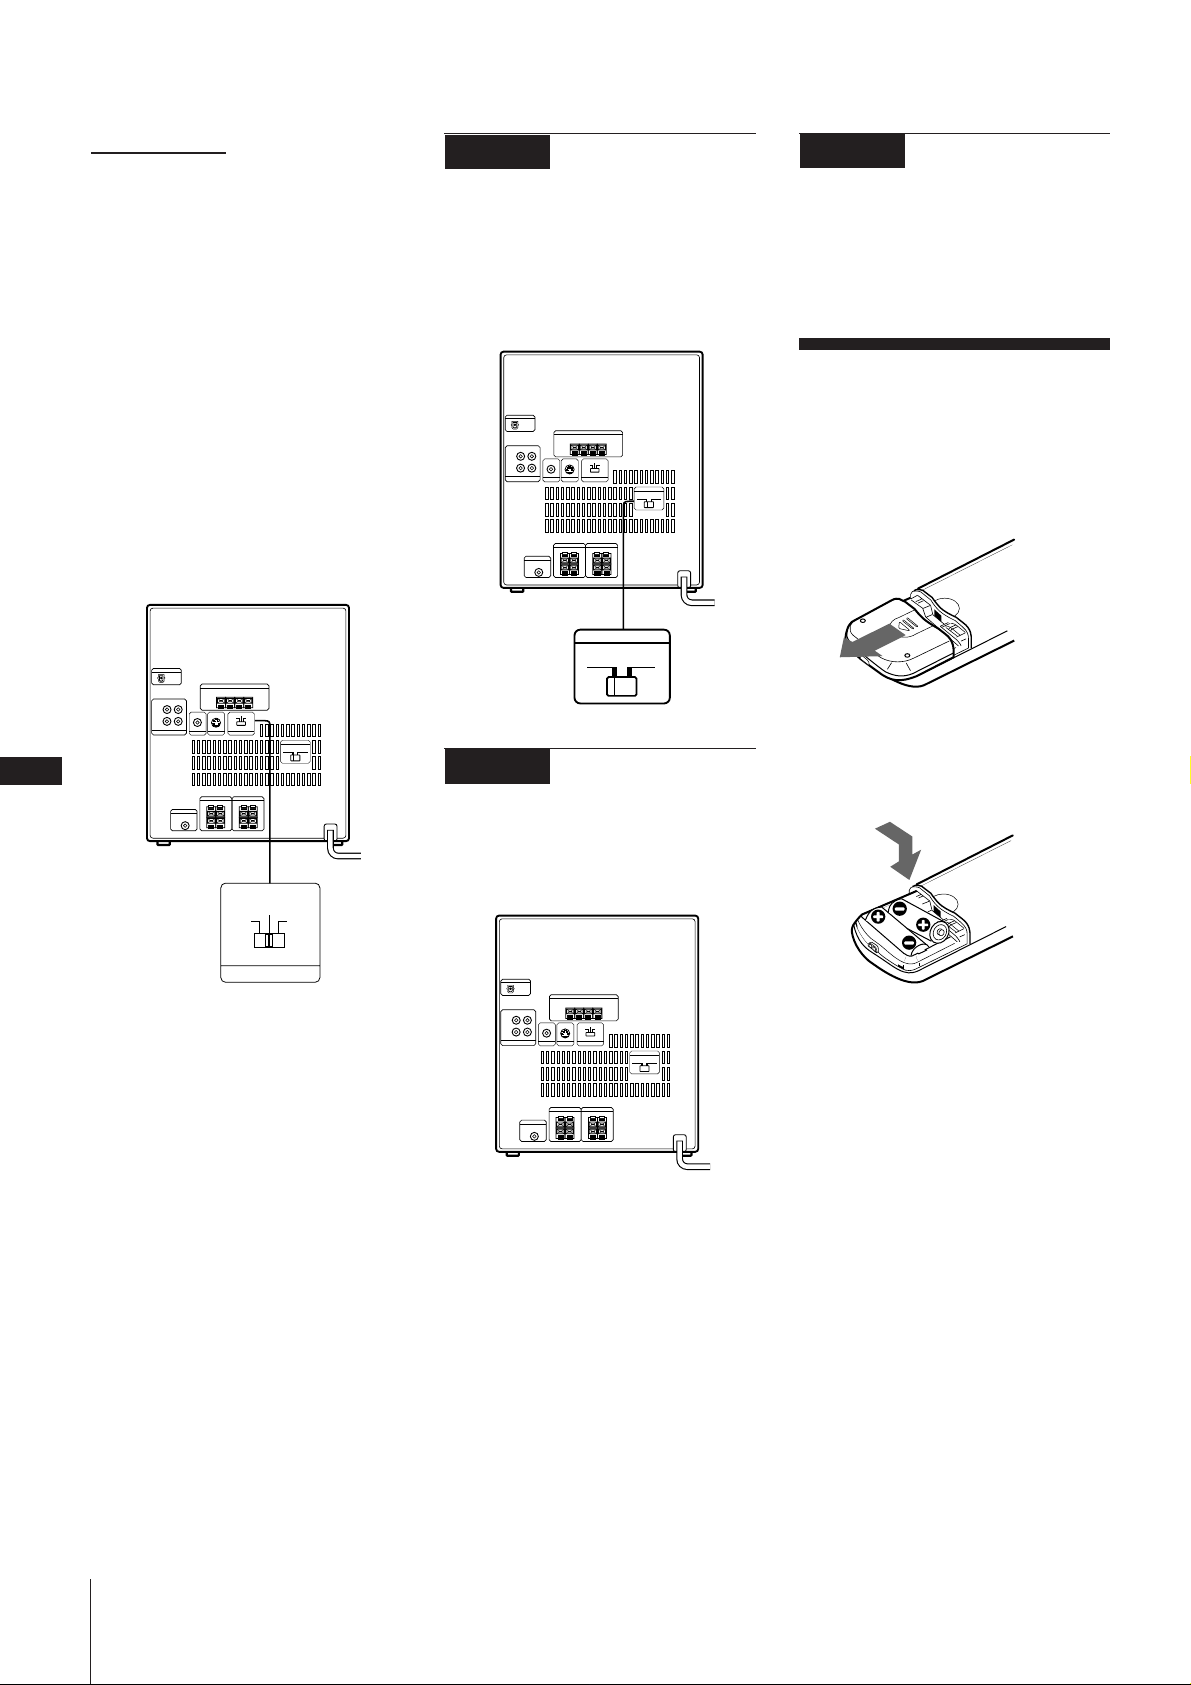
➔ continuação
• Caso o sistema de cores do seu televisor
seja NTSC:
Ajuste SYSTEM SELECT a NTSC.
Ao reproduzir um CD de vídeo gravado
pelo sistema de cores PAL, a imagem será
alargada verticalmente e mostrada com as
partes superior e inferior cortadas.
• Caso o sistema de cores do seu televisor
seja PAL:
Ajuste SYSTEM SELECT a PAL.
Quando se reproduz um CD de vídeo
gravado pelo sistema de cores NTSC, a
imagem será alargada horizontalmente e
mostrada com as partes superior e inferior
do écran ocultas em negro.
Certifique-se de desligar o sistema
quando alterar o ajuste de SYSTEM
SELECT.
PASSO 5
Ajuste da
voltagem de
funcionamento
Antes de ligar a alimentação, ajuste
VOLTAGE SELECTOR à posição
correspondente à tensão da linha eléctrica
local.
VOLTAGE SELECTOR
110-120V 220-240V
PASSO 7
Desactivação do
modo de demonstração
Para desactivar o modo de demonstração,
carregue em DISPLAY/DEMO com a
alimentação do sistema desligada.
Inserção de pilhas
Instale duas pilhas R6 (tamanho AA) no
telecomando fornecido para o controlo à
distância.
1Abra a tampa.
2Insira duas pilhas R6 (tamanho AA).
Observe a correspondência dos pólos + e
P
6
AUTO
PALNTSC
SYSTEM SELECT
PASSO 6
alimentação
Ligue o cabo de alimentação CA a uma
tomada da rede após ter feito todas as
ligações acima.
Ligação da
– com as respectivas indicações no
diagrama do compartimento de pilhas.
3Feche a tampa.
Duração das pilhas
Pode-se contar com o funcionamento do
telecomando por cerca de seis meses
(usando-se pilhas Sony SUM-3 (NS)) antes
de as pilhas se exaurirem. Quando as pilhas
a uma tomada da rede
/
O modo de demonstração aparece no
mostrador quando se liga o cabo de
alimentação CA a uma tomada da rede.
Adaptador de ficha (somente no
modelo fornecido com o adaptador
de ficha)
Caso a ficha do seu aparelho não se encaixe
na tomada da rede local, encaixe o
adaptador fornecido na ficha.
não mais operarem o telecomando,
substitua todas por outras novas.
Para evitar vazamentos de pilhas
Caso não vá utilizar o telecomando por um
longo intervalo, remova as pilhas a fim de
evitar avarias decorrentes de corrosão por
fuga de electrólito das pilhas.
Secção 1: Preparativos iniciais
Page 44
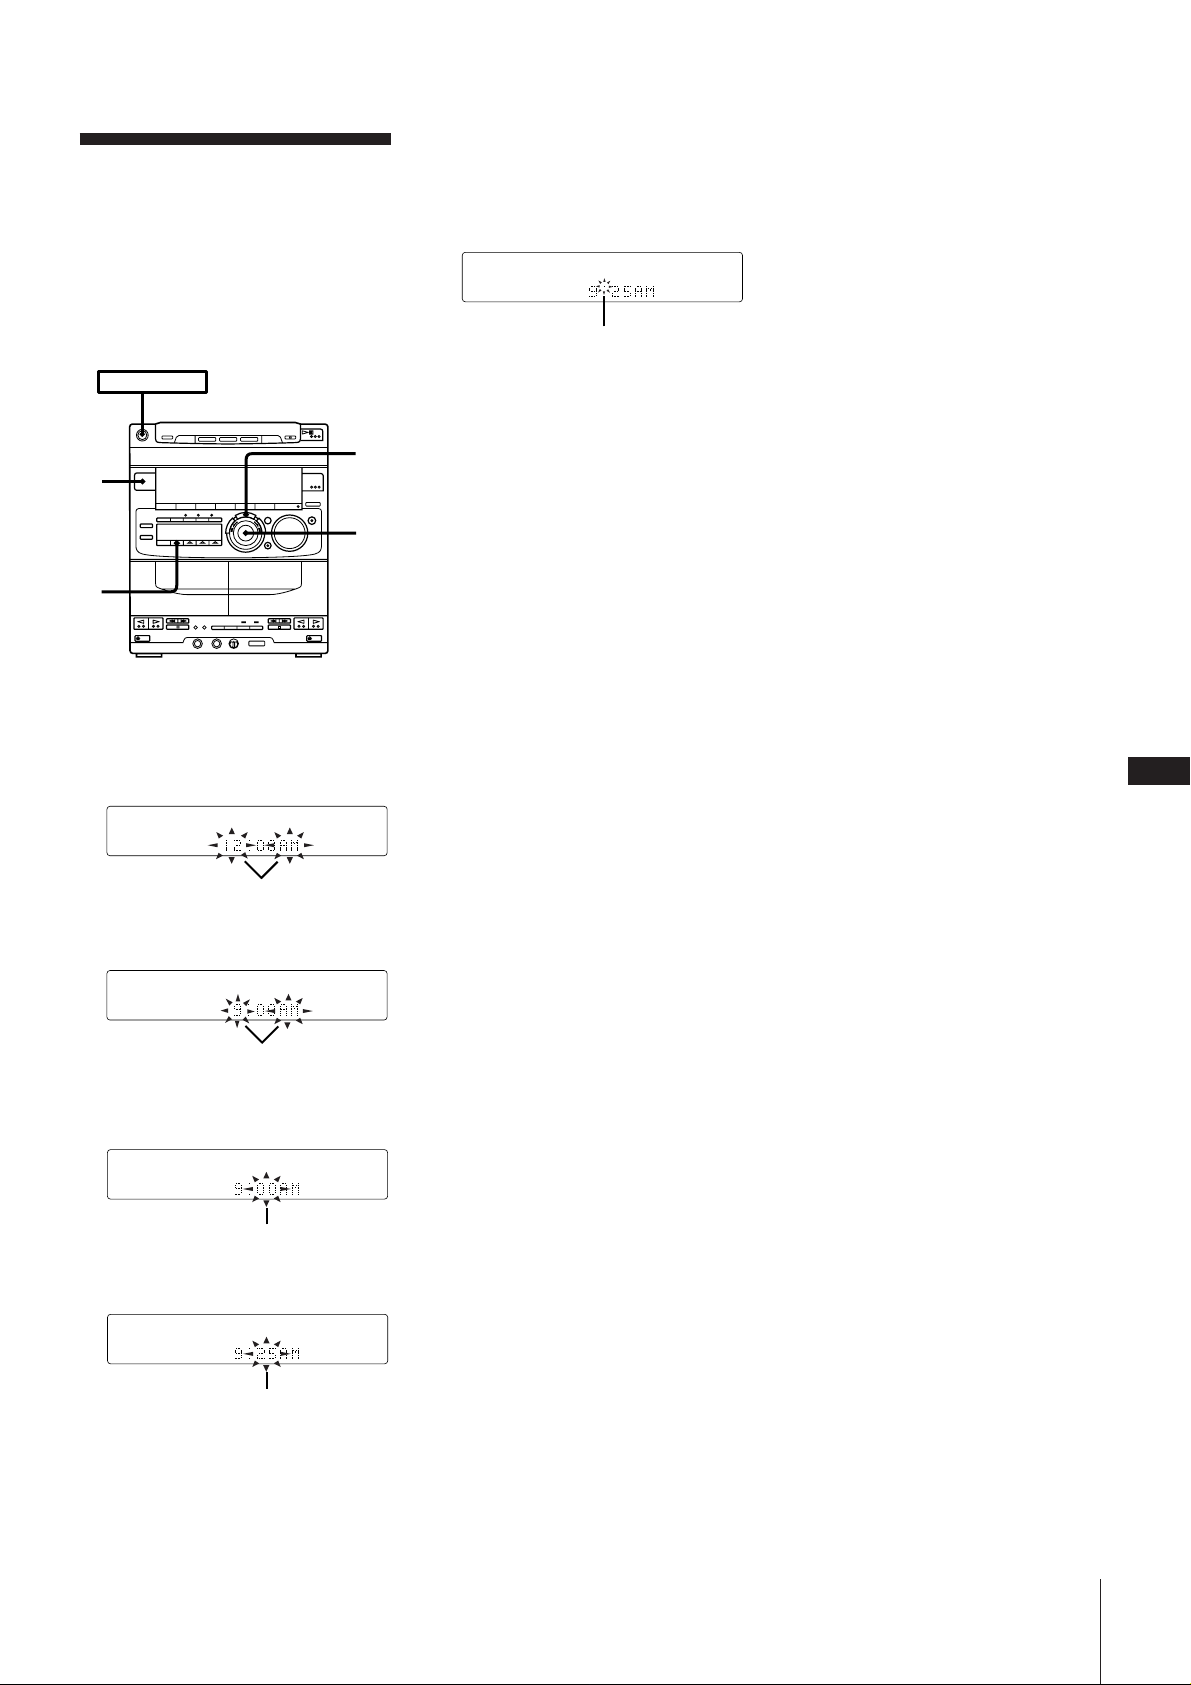
Acerto do relógio
O relógio incorporado mostra a hora no
mostrador, mesmo com a alimentação
desligada. É necessário acertar o relógio
para utilizar as funções activadas por
temporizador no seu aparelho.
Use as teclas do aparelho para executar esta
operação.
O ponto superior pisca durante a
primeira metade de um minuto (0 a 29
segundos), e o ponto inferior pisca
durante a última metade de um minuto
(30 a 59 segundos).
Pisca
POWER m ON
1
2
1 Carregue em TIMER.
2 Carregue em CLOCK SET.
«AM» e a indicação da hora passam a
piscar.
Pisca
3 Ajuste a hora corrente girando o anel
JOG até que a hora correcta apareça.
4,6
3,5
Para confirmar a hora
Carregue em DISPLAY/MEMO algumas
vezes. A hora corrente é indicada por oito
segundos.
Para corrigir o ajuste do relógio
Repita os passos de 1 a 6.
P
7
Pisca
4 Carregue em ENTER/NEXT.
A indicação dos minutos começa a
piscar.
Pisca
5 Ajuste o minuto corrente girando o anel
JOG até que o minuto correcto apareça.
Pisca
6 Carregue em ENTER/NEXT.
O relógio começa a funcionar e o ponto
superior pisca. Use um sinal de hora
para ajustar o relógio com precisão.
Secção 1: Preparativos iniciais
Page 45
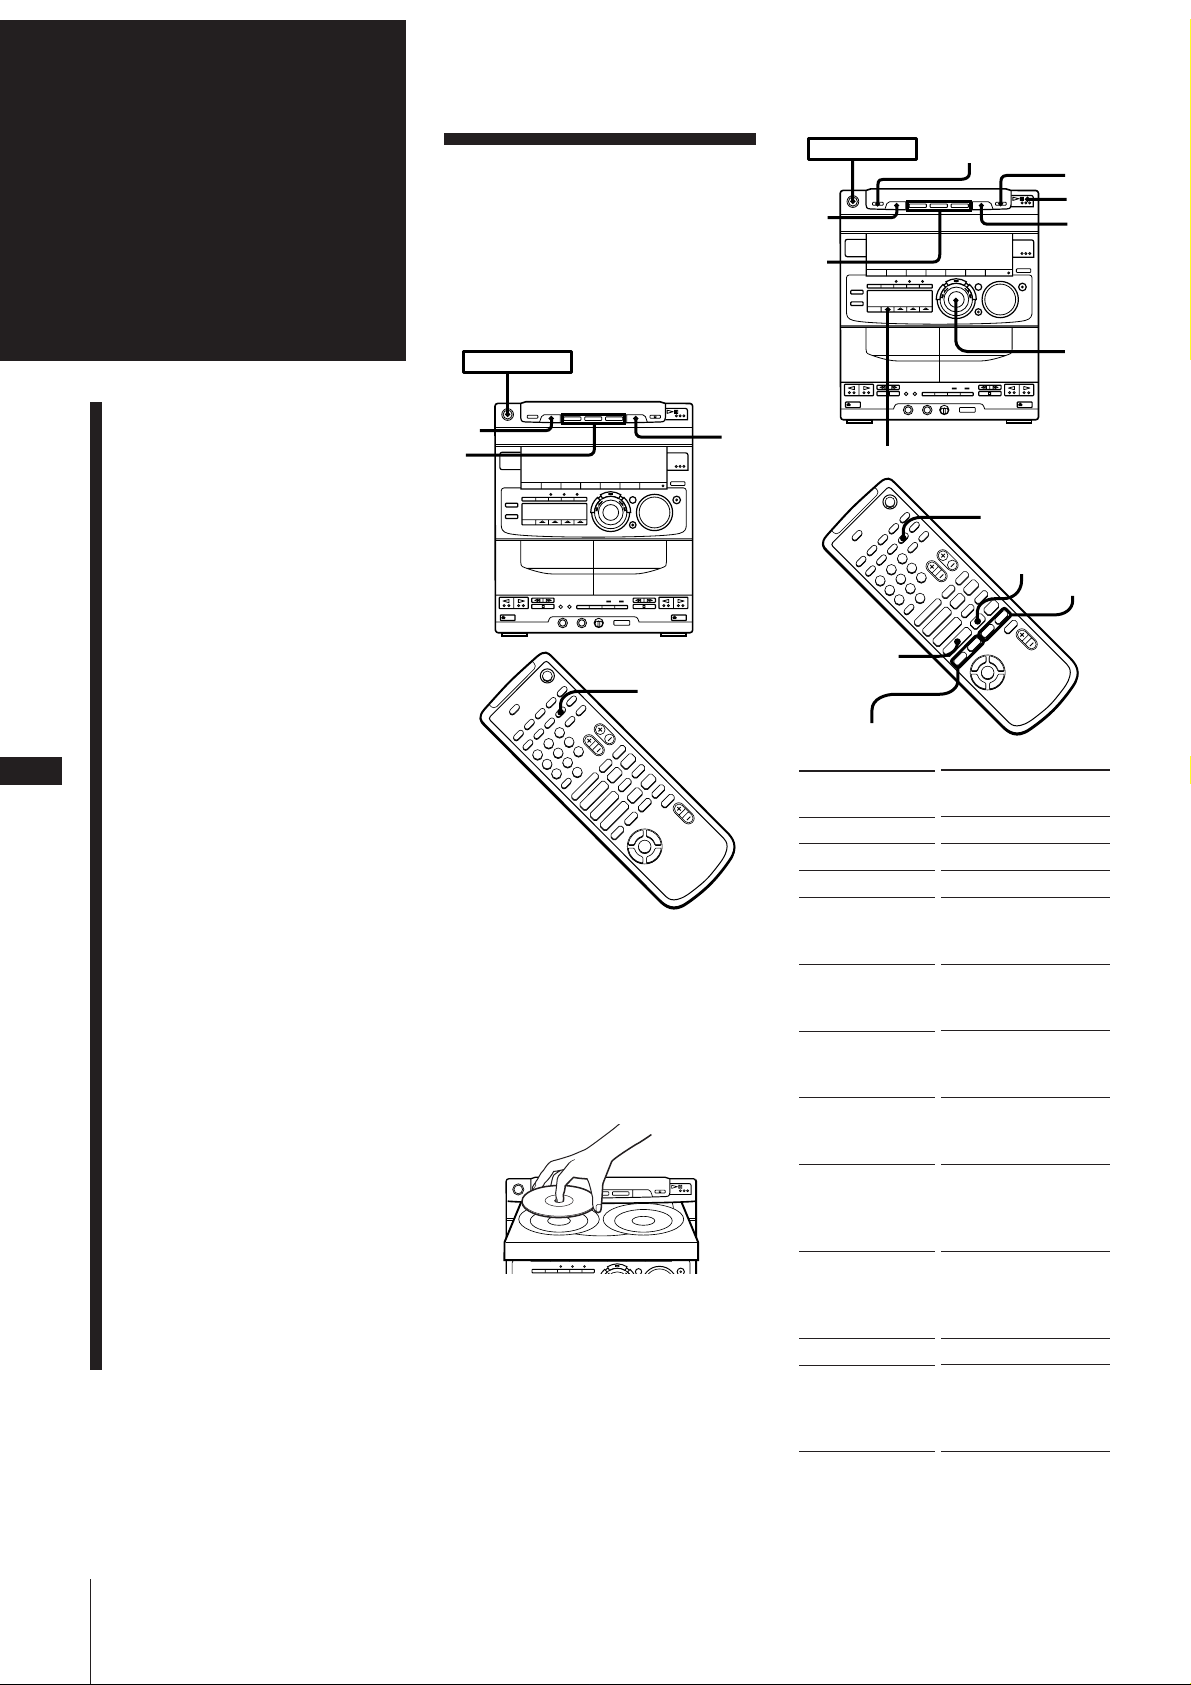
Secção 2:
O leitor de
CDs/CD-Gs/
CDs de Vídeo
Reprodução de CDs
de Vídeo e CD-Gs
Podem-se reproduzir tanto CDs de vídeo
sem funções PCB (Ver. 1.1) quanto CDs de
vídeo com funções PCB (Ver. 2.0).
Pode-se desfrutar de dois tipos de
reprodução, de acordo com o tipo de disco.
POWER m ON
POWER m ON
DISC
SKIP
DISC
1~3
EX-CHANGE
p
Æ‚
⁄OPEN
/CLOSE
JOG
Operações básicas
Reprodução de CDs de Vídeo
DISC
SKIP
3
2
1/ALL DISCS
e CD-Gs
Reprodução de CDs
–
Utilização do mostrador
Verificação do tempo
restante
Utilização do mostrador no
écran
–
P
8
Funções especiais
Localização de um trecho
específico de um disco
(menu especial)
D.SKIP
+
+
p
–
)0
P
pP
Æ»
)0+=
Æ»
Æ
4
$
Selecção de canais gráficos
nos CD-Gs
Reprodução de um CD de
vídeo a partir da última
paragem (retomada de
reprodução)
1 Ligue o seu televisor e seleccione a
entrada de vídeo.
Consulte as instruções de operação
fornecidas juntamente com o seu
televisor, caso necessite de auxílio.
2 Carregue em § OPEN/CLOSE e
Reprodução de CDs em
vários modos
coloque os CDs de vídeo/CD-Gs (lado
impresso voltado para cima) na bandeja
de discos.
CDÆ
PREV=/NEXT+
Para
cessar a leitura
pausar
retomar a leitura
avançar para outra
faixa ou cena
retroceder para
uma faixa ou cena
prévia
localizar um trecho
específico de uma
faixa ou cena
seleccionar um CD
particular
Reprodução de faixas em
ordem aleatória
(reprodução aleatória)
Reprodução de faixas na
ordem desejada
(reprodução programada)
Reprodução de faixas
repetidas (reprodução
repetida)
Secção 2: O leitor de CDs/CD-Gs/CDs de Vídeo
Para inserir um terceiro disco
Carregue em DISC SKIP (ou D.SKIP no
telecomando). A bandeja de discos gira
para que se possa inserir um outro CD
de vídeo/CD-G.
3 Carregue em DISC 1 ~ 3 para seleccionar
um disco.
A bandeja de discos fecha-se
automaticamente e a reprodução iniciase a partir do CD de vídeo/CD-G
seleccionado.
Caso nenhum disco esteja inserido na
bandeja seleccionada, o leitor
automaticamente comuta para o
próximo disco.
assistir apenas ao
disco seleccionado
correntemente
assistir a todos os
discos
remover o CD
comutar aos
outros discos
durante a
reprodução
*1Somente para CD-Gs e CDs de vídeo
sem funções PCB (Ver. 1.1).
Quando o leitor estiver ajustado a «ALL
DISCS», pode-se usar JOG para
pesquisar todas as faixas em todos os
discos inseridos no leitor (função sem
emendas).
D.SKIP
+
P
+
p
–
)0
P
Æ»
Æ»
Æ
4
Carregue em
(no telecomando)
p
· (P *2)
· (CD · ou P*2)
NEXT (NEXT +*2) ou
gire o anel JOG para a
direita*1.
PREV (PREV =*2) ou
gire o anel JOG para a
esquerda*1.
0 ou ) *2 e
mantenha pressionada.
DISC 1~3*3 ou carregue
em DISC SKIP (D.SKIP)
repetidamente.
1/TODOS OS DISCOS
repetidamente até que
«1 DISC» apareça no
mostrador.
1/TODOS OS DISCOS
repetidamente até que
«ALL DISCS» apareça
no mostrador.
§ OPEN/CLOSE
EX-CHANGE
0/)
pP
)0+=
$
Page 46
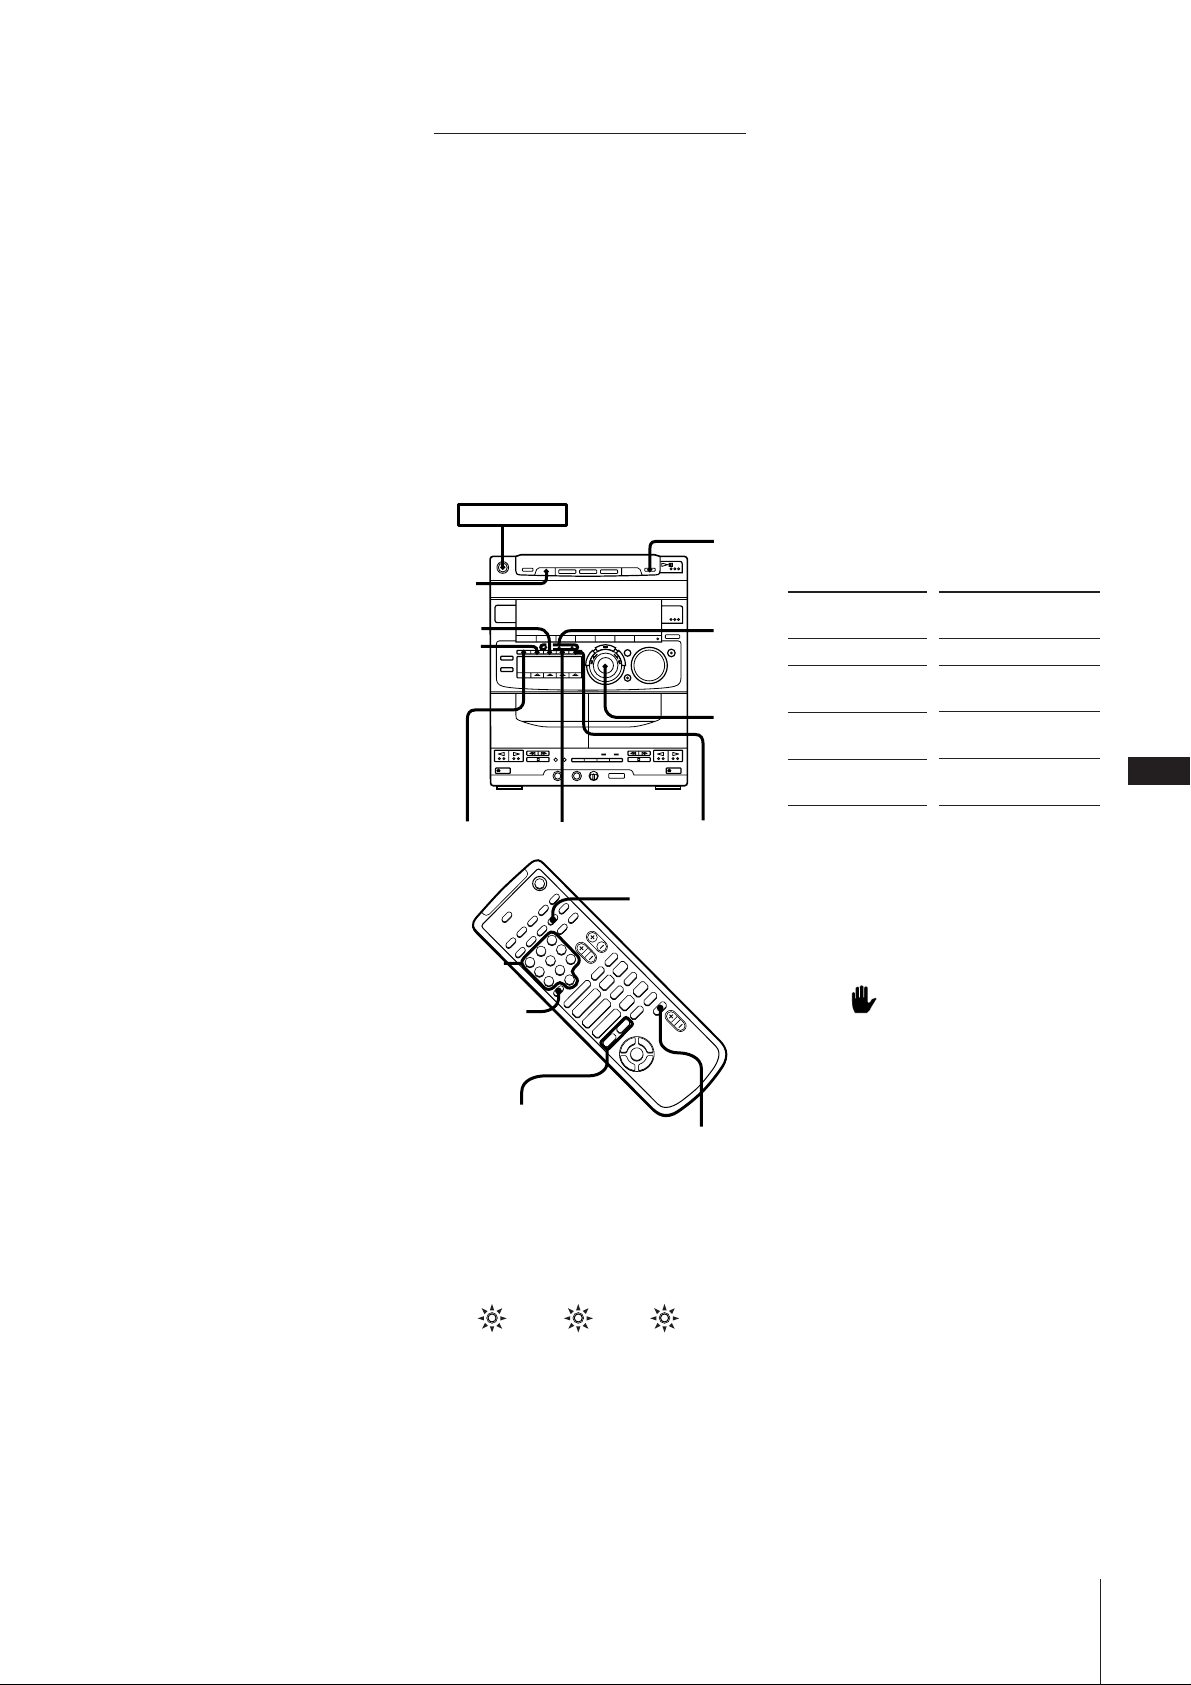
*2Pode haver algum distúrbio na imagem
do vídeo.
*3Caso nenhum disco esteja inserido em
tal número, a bandeja emergirá.
Função de reprodução a um toque
Carregue em · no leitor de CDs (ou CD
· no telecomando) quando a alimentação
estiver desligada. Caso um CD de vídeo/
CD-G esteja inserido no leitor, poder-se-á
começar a assistir ao CD de vídeo/CD-G
sem se pressionar nenhuma outra tecla.
Selecção Automática da Fonte
Caso carregue em · ou nas teclas DISC
1 ~ 3 durante a audição de outra fonte
sonora, o leitor de CDs é seleccionado e o
último CD de vídeo ou CD-G reproduzido
começa a reproduzir-se automaticamente.
Caso o leitor de CDs esteja no modo de
reprodução programada, somente ·
poderá ser usada para esta função.
Caso não haja CD inserido no leitor
«CD NO DISC» aparece no mostrador.
Carregue em · (ou CD · no
telecomando) enquanto a indicação estiver
acesa, e então a bandeja de discos se abrirá
automaticamente.
Caso possua um televisor Sony
Pode-se usar as seguintes teclas no
telecomando para controlar o seu televisor:
TV POWER: liga ou desliga o televisor.
TV/VIDEO: comuta a entrada de vídeo no
televisor.
CH: comuta os canais de TV.
TV VOL: ajusta o volume do(s) altifalante(s)
do televisor.
O que indicam os indicadores verdes da
tecla DISC 1 ~ 3
Os indicadores estão localizados nas teclas
DISC para cada uma das respectivas
bandejas (DISC 1 ~ 3).
•Um indicador verde indica que a faixa
está seleccionada (durante a reprodução
ou espera, ou quando a tampa da bandeja
estiver aberta) independentemente de
existir um CD inserido ou não.
Para assistir a CDs de
vídeo com funções PBC
(Ver. 2.0) (Reprodução com
PCB)
CDs de vídeo com funções PBC (Ver. 2.0)
estão equipados com PCB. A função PCB
(Controlo de Reprodução) proporciona
indicações do menu no écran do seu
televisor para que possa desfrutar do
sofware interactivo.
Certifique-se de ler as instruções fornecidas
com cada disco quanto aos pormenores
relacionados ao seu uso, visto que discos
diferentes tem formatos e estruturas
diferentes de menu.
POWER m ON
DISC
SKIP
NEXT
PREV
PBC OFF/ON
Numeric
Teclas
buttons
numéricas
>10
RETURN SELECT
+
–
D.SKIP
+
p
–
)0
P
pP
Æ»
)0+=
Æ»
Æ
4
$
•VIDEO
CD
•PBC
•AUTO
PREV=/NEXT+
RETURN
1 Inicie a reprodução de um CD de vídeo
com funções PBC (Ver. 2.0).
Todos os indicadores a seguir acendemse e um menu PBC aparece no seu
televisor.
VIDEO CD PBC AUTO PBC
Indicador VIDEO CD
Acende-se durante a reprodução de um
CD de vídeo.
Indicador PBC
Acende-se durante a reprodução de um
CD de vídeo com funções PBC (Ver. 2.0)
(mesmo que a função de reprodução
PBC não esteja sendo utilizada).
p
PBC
JOG
Indicador AUTO PBC
Acende-se durante a reprodução com
menu de um CD de vídeo com funções
PBC (Ver. 2.0).
2 Seleccione um item do menu.
Utilização do leitor de CDs
Gire o anel JOG para seleccionar um
número e então pressione SELECT.
Utilização do telecomando
Use as teclas numéricas para introduzir
o número. Para introduzir números
maiores que 10. Carregue em >10
primeiro, e então pressione as teclas
numéricas correspondentes.
Ex.: Para 30, carregue em >10 m 3 m 10/
0.
3 Prossiga de acordo com as instruções
dos menus a seguir para desfrutar da
reprodução interactiva.
Para
parar a reprodução
ver o restante de
um menu
retroceder ao topo
de um menu
retroceder a um
menu prévio
Para cancelar a reprodução
conduzida por menu (desligamento
da reprodução com PBC)
Carregue em PBC OFF/ON para que o
indicador AUTO PBC desapareça.
Imagens estáticas, tais como os écrans de
menu, não serão indicadas.
Quando aparece no écran do televisor
Deve-se ter pressionado uma tecla inválida.
Pressione uma tecla indicada pelas
instruções no écran de menu.
Quando se pressiona NEXT (ou NEXT +
no telecomando) durante a reprodução com
menu ou durante a reprodução de imagens
em movimento
Pode-se prosseguir à próxima cena de
acordo com o disco. Consulte também as
instruções fornecidas com o disco.
Notas
•Durante a reprodução com menu, não se
pode prosseguir ao próximo disco,
mesmo que se tenha seleccionado «ALL
DISCS».
Carregue em DISC SKIP (ou D.SKIP no
telecomando) para prosseguir ao próximo
disco.
•O leitor de CDs interromperá a
reprodução nos seguintes casos:
– Quando se pressiona PBC OFF/ON
durante a reprodução.
– Quando se pressiona PLAY MODE
durante a reprodução.
Carregue em (no
telecomando)
p
NEXT (NEXT +)
PREV (PREV =)
ˆ RETURN
(RETURN ˆ)
P
9
Secção 2: O leitor de CDs/CD-Gs/CDs de Vídeo
Page 47
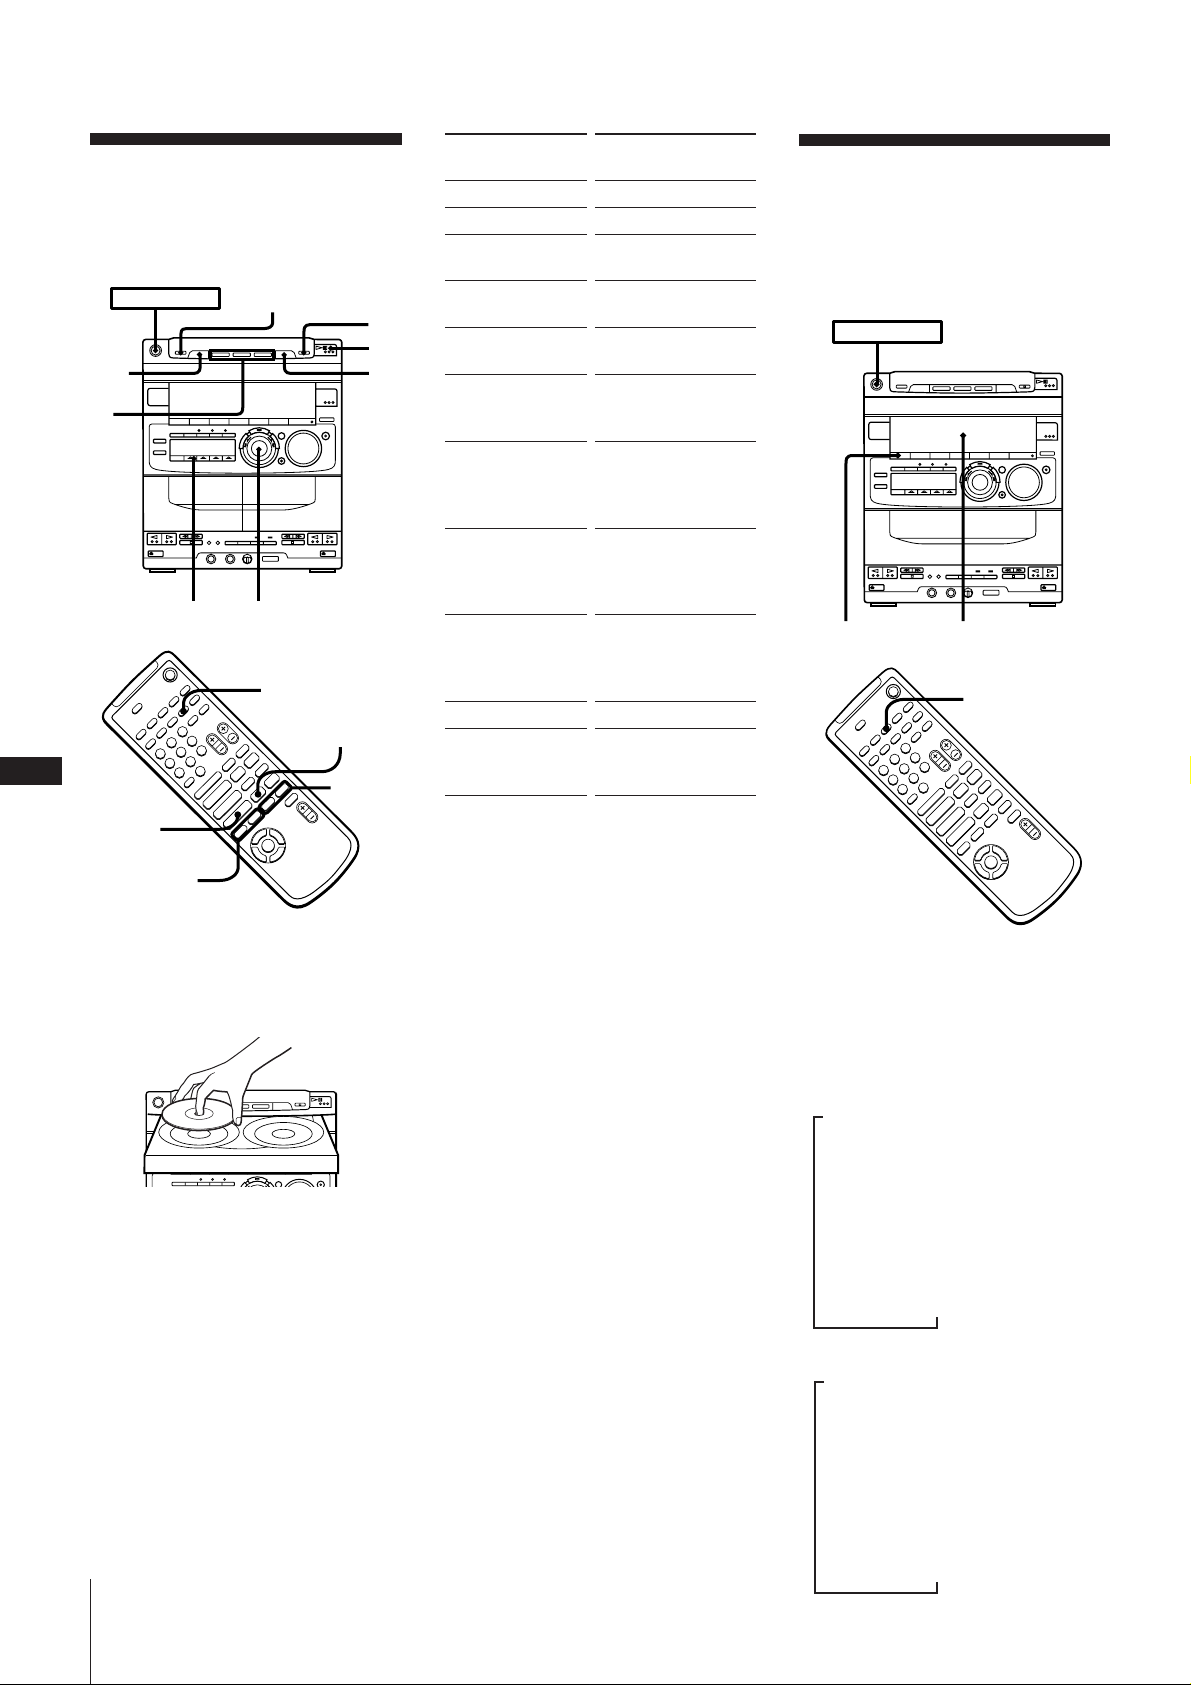
Reprodução de CDs
Após inserir até três CDs, podem-se
reproduzir todas as faixas ou discos na
ordem original consecutivamente.
POWER m ON
EX-CHANGE
DISC
SKIP
2
1/ALL DISCS JOG
D.SKIP
+
p
–
)0
P
Æ»
Æ»
Æ
4
P
10
CDÆ
+
–
=/+
1 Carregue em § OPEN/CLOSE e
coloque os CDs (lado impresso voltado
para cima) na bandeja de discos.
Para inserir um terceiro disco
Carregue em DISC SKIP (ou D.SKIP no
telecomando). A bandeja de discos gira
para que se possa inserir um outro CD.
2 Carregue em DISC 1 ~ 3 para seleccionar
um disco.
A tampa da bandeja de discos fecha-se
automaticamente e a reprodução iniciase a partir do CD seleccionado.
Caso nenhum disco esteja inserido na
bandeja de discos, o prato
automaticamente comuta-se para o
próximo disco.
Secção 2: O leitor de CDs/CD-Gs/CDs de Vídeo
1
p
Æ‚
Para
parar a reprodução
pausar
retomar a
reprodução
avançar para outra
faixa
retroceder a uma
faixa prévia
localizar um trecho
específico de uma
faixa
seleccionar um CD
particular
Carregue em (no
telecomando)
p
· (P )
· (CD · ou P)
Gire o anel JOG para a
direita*1 (+).
Gire o anel JOG para a
esquerda*1 (=).
(mantenha
pressionada 0 ou
) ).
DISC 1 ~ 3*2 ou
carregue em DISC
Verificação do tempo
restante
Podem-se verificar informações sobre o CD
corrente, usando-se o mostrador do painel
frontal.
POWER m ON
SKIP (D.SKIP)
repetidamente.
ouvir somente o
disco seleccionado
correntemente
1/ALL DISCS
repetidamente até que
«1 DISC» apareça no
mostrador.
ouvir todos os
discos
1/ALL DISCS
repetidamente até que
DISPLAY/DEMO
Front panel display
Mostrador do
painel frontal
«ALL DISCS» apareça
no mostrador.
remover o CD
P
pP
)0+=
0/)
comutar os outros
discos durante a
reprodução
§ OPEN/CLOSE
EX-CHANGE
*1Quando o leitor está ajustado a «ALL
$
DISCS», pode-se usar JOG para
pesquisar todas as faixas em todos os
DISPLAY
+
–
+
p
–
)0
P
pP
Æ»
)0+=
Æ»
Æ
4
$
discos inseridos no leitor (função sem
emendas).
*2Caso nenhum disco esteja inserido em
tal número, a bandeja emergirá.
Função de reprodução a um toque
Carregue em · no leitor de CDs (ou CD
· no telecomando) quando a alimentação
estiver desligada. Quando um CD estiver
inserido no leitor, estar-se-á apto para
começar a escutar o CD sem se pressionar
nenhuma outra tecla.
Selecção Automática da Fonte
Caso pressione · ou as teclas DISC 1 ~
3 durante a audição de uma outra fonte
sonora, o leitor de discos compactos é
seleccionado e o último CD reproduzido
passará a ser reproduzido
automaticamente.
Se o leitor de discos compactos estiver no
modo de reprodução programada, somente
Para verificar o tempo restante
Carregue em DISPLAY/DEMO (ou
DISPLAY no telecomando) durante a
reprodução.
Cada vez que a tecla é pressionada, o
mostrador altera-se como segue:
(Modo ALL DISCS)
m Tempo de reprodução da faixa
corrente
µ
Tempo restante na faixa corrente
µ
Indicação «Play»
µ
Indicador de relógio (por oito
segundos)
µ
Nome do Efeito (ou P FILE)
· poderá ser usada para esta função.
Caso não haja CD inserido no leitor
«CD NO DISC» aparece no mostrador.
Carregue em · (ou CD · no
telecomando) enquanto a indicação estiver
acesa, e então a tampa da bandeja de discos
se abrirá automaticamente.
(Modo 1 DISC)
m Tempo de reprodução da faixa
corrente
µ
Tempo restante na faixa corrente
µ
Tempo restante no CD corrente
µ
Indicador de relógio (por oito
segundos)
µ
Nome do Efeito (ou P FILE)
Page 48
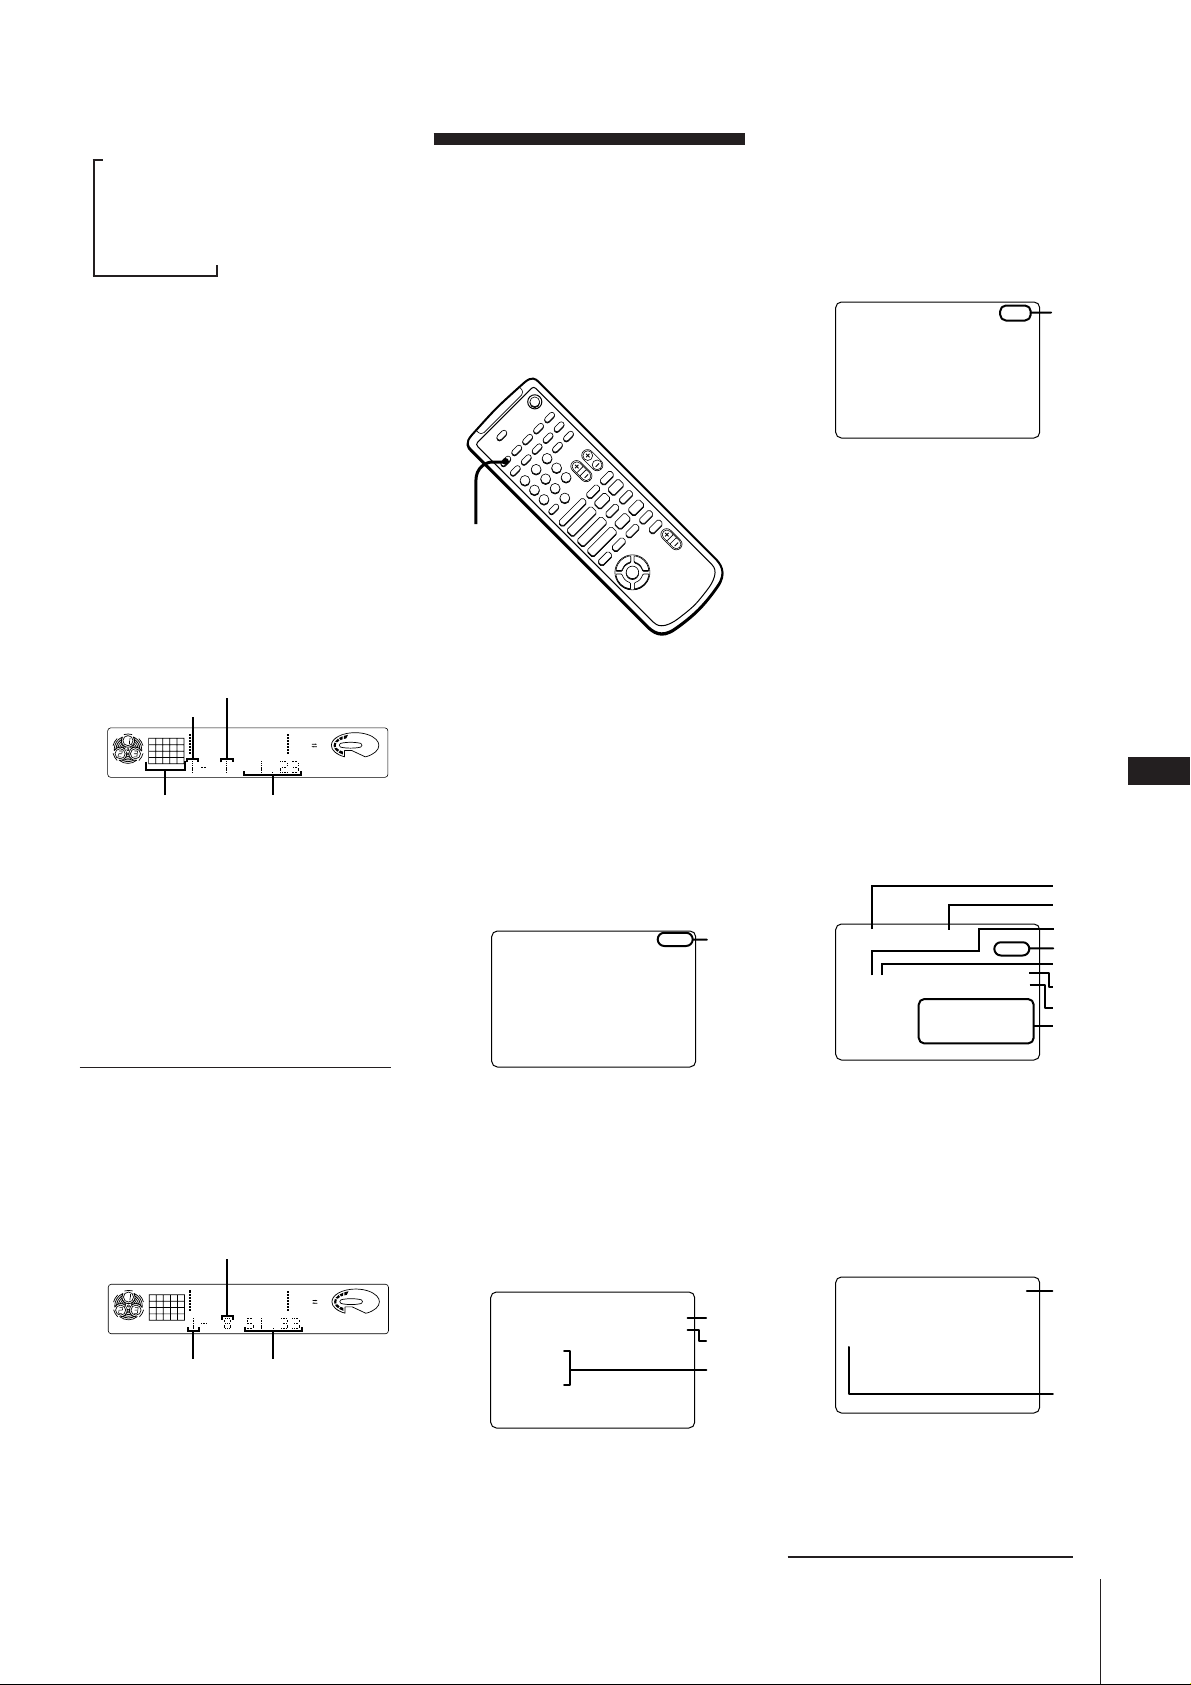
(CDs de vídeo com funções PBC (Ver. 2.0)
PROGRAM
(
1. DISC 1-3
2. DISC 2-4
3. DISC 1-5
1
2
NTSC
PLAY
DISC 1-3 index 1 Audio
0.04
m Número do disco
µ
Indicador do relógio (por oito
segundos)
µ
Nome do Efeito (ou P FILE)
Notas
•Os números de faixa de 1 a 20 estão
indicados no mostrador do painel frontal
(Matriz Musical). As faixas de números
superiores a 20 não são indicadas.
•«--.--» aparecerá no mostrador quando o
tempo de reprodução total for 100
minutos ou mais.
Informações indicadas durante a
reprodução de um CD de áudio, CDG, ou CD de vídeo sem funções PBC
(Ver. 1.1)
O número da faixa corrente, o tempo de
reprodução da faixa corrente e a matriz
musical aparecem. Os números de faixa na
matriz musical desaparecem após a
reprodução das respectivas faixas.
Número da faixa corrente
Número do disco
CD
12345
678
ALL DISC S
Matriz musical
12563 250 500 1k 2k 4k 8k 16k(Hz)
Tempo de reprodução
DOLBY NR
VOLUME
OFF
Informações indicadas durante a
reprodução de CDs de vídeo com
funções PBC (Ver. 2.0)
Os números de faixa e a matriz musical não
aparecem. Entretanto, enquanto o écran de
menu estiver indicado no écran do
televisor, os números dos itens que podem
ser seleccionados no menu aparecem na
matriz musical.
Utilização do
mostrador no écran
Pode-se verificar o estado operacional
corrente e a informação de disco dos CDs
de vídeos, CD-Gs ou CDs de áudio durante
a reprodução ou modo de paragem pela
superposição de um mostrador no topo das
imagens no écran do seu televisor.
+
–
+
p
–
)0
P
pP
Æ»
)0+=
ON SCREEN
Carregue em ON SCREEN.
Cada vez que a tecla é pressionada, o
mostrador no écran altera-se como se
segue:
ON SCREEN 1 m ON SCREEN 2
µ
ON SCREEN OFF M ON SCREEN 3
Mostrador ON SCREEN 1
Indicação momentânea do estado
operacional quando se executa uma
operação (por exemplo, início de
reprodução, etc.).
Æ»
Æ
4
$
PLAY
1
ON SCREEN 2
Indicação momentânea do estado
operacional quando se executa uma
operação (por exemplo, início de
reprodução, etc.).
Durante a reprodução, o tempo decorrido
ou o tempo restante na faixa corrente é
normalmente indicado.
0.04
1
1 Tempo decorrido ou tempo restante
na faixa corrente
«PLAY» quando se inicia a
reprodução
«STOP» quando se pára a reprodução
«PAUSE» quando se pausa a
reprodução
• Durante o modo de paragem na
reprodução programada
A indicação é a mesma que em ON
SCREEN 1.
ON SCREEN 3
Durante a reprodução, este écran indica o
estado operacional.
Durante o modo de paragem, este écran
indica informações acerca do(s) CD(s) na
bandeja de discos.
• No modo de reprodução normal ou
aleatório
1
2
CONTINUE ALL DISCS PLAY
DISC 1-3 index 1
**345
678910
11 12 13 14 15
NTSC
Audio
0.55
3
4
5
6
7
8
P
11
Para verificar o tempo de
reprodução total e o
número total de faixas
Carregue em DISPLAY durante o modo de
paragem.
Número total de faixas
CD
12345
678
12563 250 500 1k 2k 4k 8k 16k(Hz)
ALL DISC S
Número do
disco
A informação também aparece quando se
pressiona § OPEN/CLOSE para fechar a
tampa da bandeja de discos.
Tempo de
reprodução total
DOLBY NR
1 Estado operacional
«PLAY» quando se inicia a
reprodução
«STOP» quando se pára a
reprodução
«PAUSE» quando se pausa a
reprodução
• Durante o modo de paragem na
Reprodução Programada
VOLUME
OFF
PROGRAM
1. DISC 1-3
2. DISC 2-4
3. DISC 1-5
STOP
NTSC
TOTAL 10.04
1
2
3
1 Sistema de Cores
2 Tempo de reprodução total do
programa
3 Disco programado e números de
faixa
1 Modo de reprodução
2 «ALL DISCS» ou «1 DISC»
3 Número do disco corrente
4 Sistema de cores
5 Número da faixa corrente
6 Tipo de disco
7 Tempo decorrido na faixa corrente
8 Matriz musical
• Na reprodução programada
1 «PLAY» quando se inicia a
reprodução
«PAUSE» quando se pausa a
reprodução
2 Indica a faixa corrente
continua na próxima página ➔
Secção 2: O leitor de CDs/CD-Gs/CDs de Vídeo
Page 49
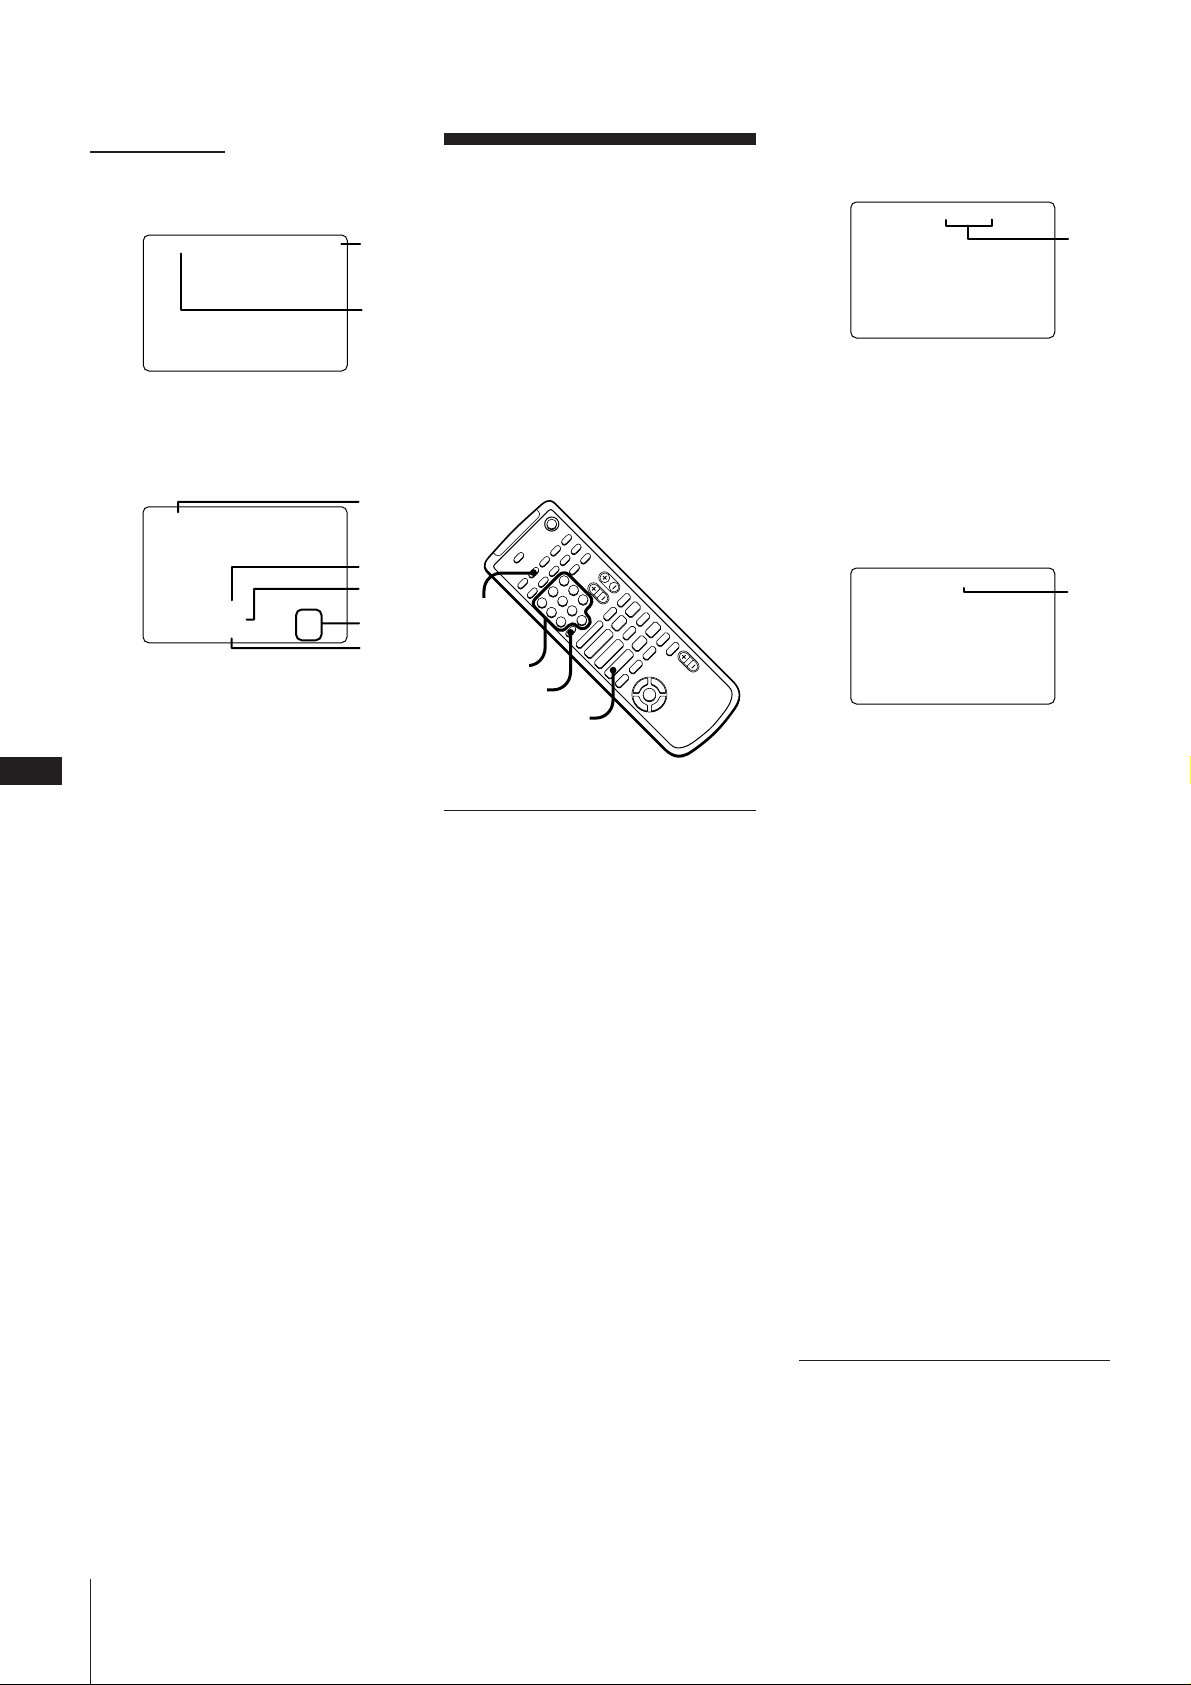
SCENE- (1-312)
1
➔ continuação
•Durante a reprodução com menu de um
CD de vídeo equipado com PBC
SCENE 1 0.55
1
Localização de um
trecho específico de
um disco (menu
especial)
3 Pressione 1 para seleccionar «1) SCENE
SEARCH». «SCENE-» e o número total
de cenas aparecem no écran do televisor.
1 Tempo decorrido na cena
2 Número de cena
• Durante o modo de paragem (excepto
para a reprodução programada)
1 Modo de reprodução
2 Para um disco que não tenha sido
3 Para um CD de vídeo
P
12
4 Números de faixa no disco
5 Para um CD de áudio ou um CD-G
• Durante o modo de paragem na
reprodução programada
A indicação é a mesma que em ON
SCREEN 1.
ON SCREEN OFF
Sem indicação (excepto para menu
especial).
Notas acerca do mostrador no écran
•Normalmente, deixe o modo de indicação
ajustado a ON SCREEN 1, 2 ou 3. Quando
se selecciona ON SCREEN OFF, não se
pode verificar o estado operacional
durante a operação do leitor de CDs.
Neste caso, verifique a informação no
mostrador do painel frontal.
•Durante a gravação de sinais de vídeo
reproduzidos a partir deste sistema em
um videogravador (etc.) certifique-se de
seleccionar ON SCREEN OFF.
Caso contrário, a informação no
mostrador também será gravada no
videogravador.
•A indicação do sistema de cores não
aparece caso o interruptor SYSTEM
SELECT esteja ajustado a «NTSC» ou
«PAL».
Secção 2: O leitor de CDs/CD-Gs/CDs de Vídeo
CONTNUE
DISC 1
DISC 2
DISC 3
reproduzido
ALL DISCS STOP
•••••••
Video
Audio
TRK
TRK
NTSC
Audio
47.55DISC 3
1-15
1- 8
2
Este leitor tem 5 diferentes funções de
busca. Seleccione as funções de busca do
SPECIAL MENU de acordo com o tipo de
busca desejada.
O monitor de TV deve estar ajustado a ON
para se utilizar estas funções.
Use o telecomando para as seguintes
operações.
1
1 Número total de cenas
(exemplo para um disco com 312
cenas)
4 Use as teclas númericas (1 - 10/0) para
seleccionar a cena desejada.
Ex.: Para a cena 103, pressione 1 m 10/0
m 3. O número da cena seleccionada
+
2
3
4
5
SPECIAL
MENU
Numeric
Teclas
buttons
numéricas
> 10
–
+
p
–
)0
P
pP
Æ»
)0+=
Æ»
Æ
4
$
SELECT
aparece no écran do televisor.
SCENE 103 (1-312)
1 Número da cena seleccionada
1
5 Carregue em CD · SELECT.
A reprodução começa a partir da cena
seleccionada.
Localização por número de
cena (busca por cenas)
Nos CDs de vídeos com funções PBC (Ver.
2.0), os écrans de menu, as imagens em
movimento e as imagens estáticas são
divididas em «cenas» e cada cena tem um
número de cena designado. Esta função
permite-lhe começar a reprodução de uma
cena específica.
Ao encontrar uma cena desejada, anote o
Para parar a reprodução
Pressione p.
Para verificar o número de cena
durante o modo de reprodução
Carregue em ON SCREEN repetidamente
para seleccionar o modo de indicação ON
SCREEN 3. O número de cena aparece no
écran do televisor. (Consulte «Utilização do
mostrador no écran» quanto aos
pormenores.)
número do écran através da indicação deste
no écran durante a reprodução.
Assim, da próxima vez que desejar assistir
a tal cena, poderá usar o número para
chegar directamente a ela.
Notas
• Em alguns CDs, pode não ser possível
começar a reprodução a partir da cena
seleccionada porque começar a
reprodução a partir de certas cenas é
Nota
Esta função é disponível somente durante a
reprodução de CDs de vídeo com funções
PBC (Ver. 2.0).
proibido.
Neste caso, o leitor começa a partir da
cena 1 (durante o modo de paragem) ou
continua a partir da cena corrente
(durante a reprodução).
• Alguns CDs podem não mostrar a cena
Use o telecomando para as operações a
seleccionada no écran do televisor.
seguir.
1 Comece a reproduzir um CD de vídeo
com funções PBC (Ver. 2.0).
2 Carregue em SPECIAL MENU.
Localização pelo número
de índex (busca por índex)
«Índex» é um número que divide uma faixa
ou um disco em secções menores, de modo
que se possa localizar facilmente o ponto
desejado. O índex de um CD de vídeo é
chamado «Índex de Vídeo».
Page 50
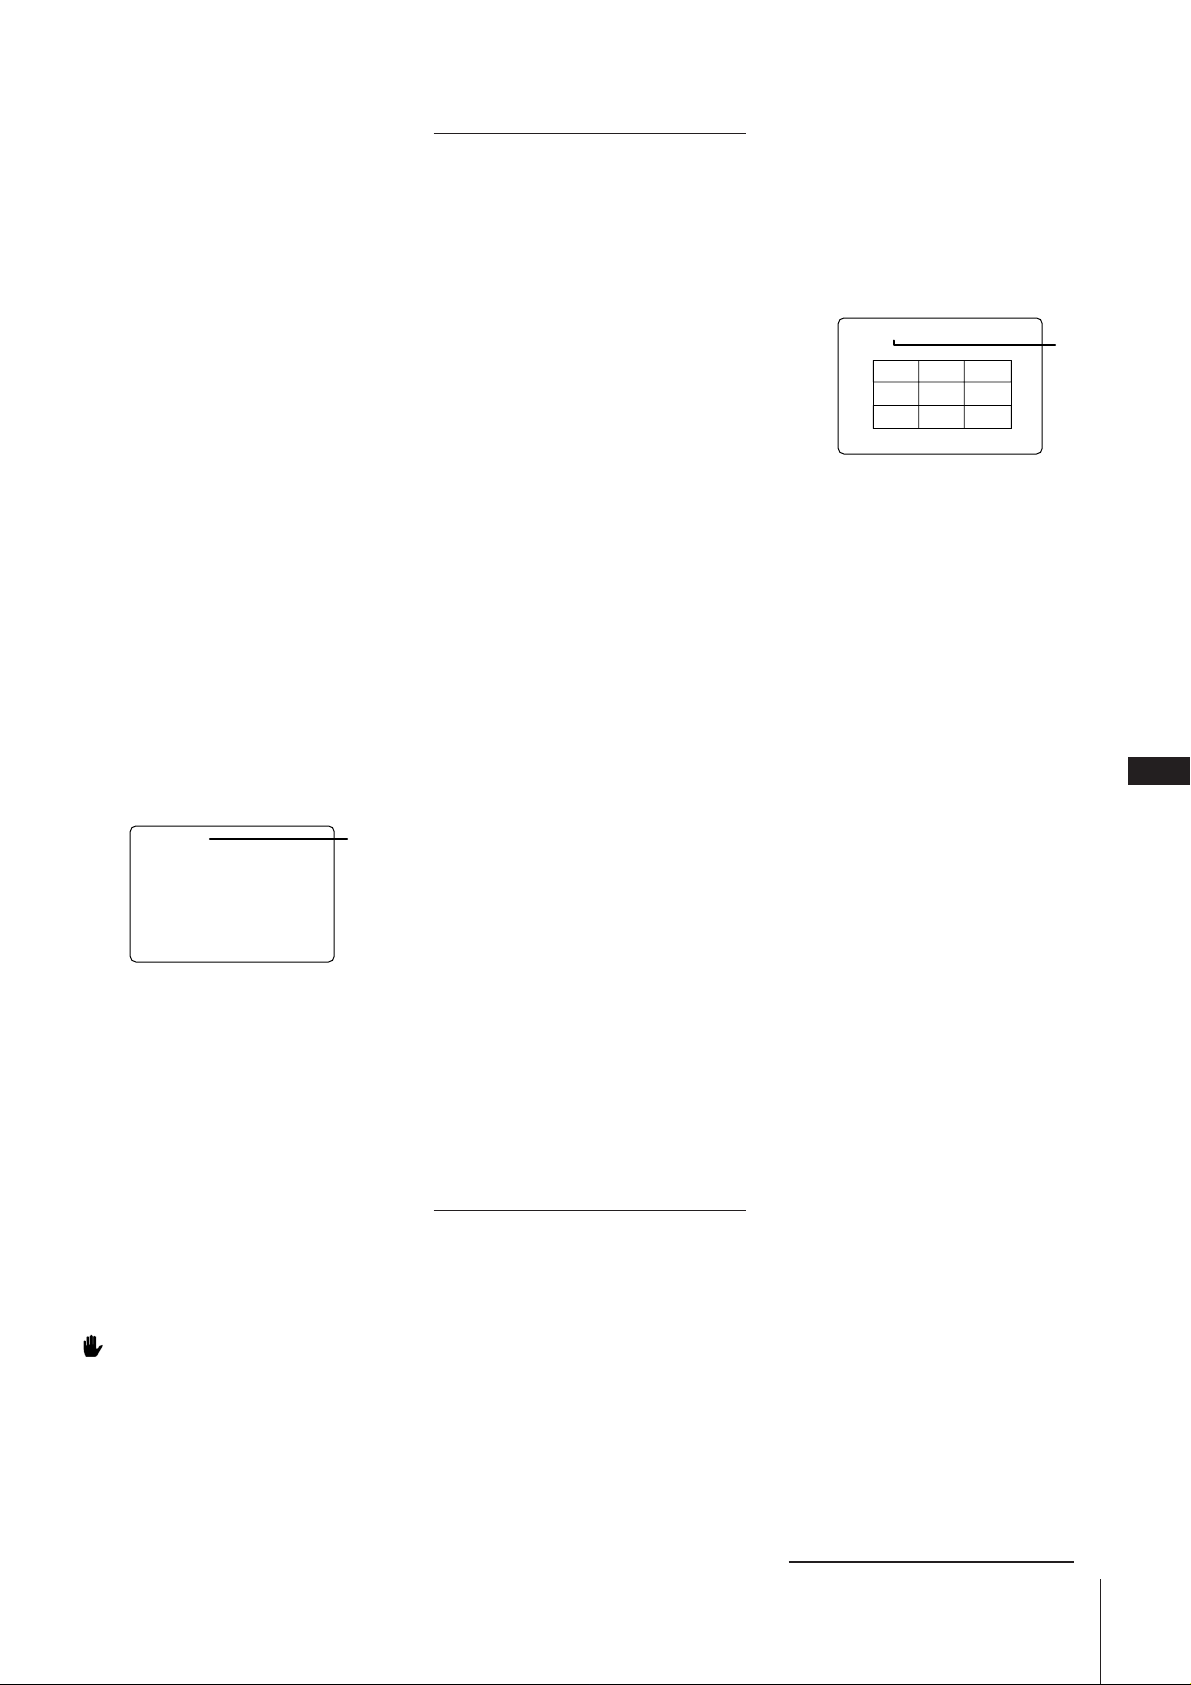
CDs de música, CD-Gs e CDs de vídeo
podem incorporar números de índex. Podese usar os números de índex para encontrar
o trecho de uma faixa que se deseja
reproduzir.
A busca por índex pode ser usada somente
com discos que possuam números de índex.
Da mesma forma, a busca por índex não
pode ser usada para saltar entre faixas
adjacentes.
Nota
Esta função não pode ser usada durante a
reprodução de CDs de vídeo com funções
PBC (Ver. 2.0).
Use o telecomando para as seguintes
operações.
1 Comece a reproduzir um CD de vídeo
(etc.)
2 Carregue em SPECIAL MENU.
3 Pressione 2 para seleccionar «2) V-
INDEX SEARCH» (ou «2) INDEX
SEARCH» para CD-Gs ou CDs de
música).
4 Use as teclas númericas (1 - 10/0) para
seleccionar o índex desejado.
A reprodução começa a partir do índex
seleccionado.
V - index 2
1 Índex de vídeo
1
5 Carregue em CD · SELECT.
A reprodução começa a partir do índex
seleccionado.
Para parar a reprodução
Pressione p.
Para usar a busca por índex em CDs
de vídeo com funções PBC (Ver. 2.0)
Pare a reprodução e carregue em PBC OFF/
ON para que o indicador AUTO PBC
desapareça antes do passo 1.
Nota
Caso não exista mais índex durante a
reprodução de um CD de vídeo,
aparece no écran do televisor e o leitor
continua a reprodução.
Localização por tempo
decorrido (busca por
tempo)
Esta função permite-lhe usar o tempo
decorrido como um guia para encontrar
certos trechos de CDs de vídeo sem as
funções PBC (Ver. 1.1), CD-Gs e CDs de
música. «Tempo decorrido» significa o
tempo a partir do início do disco. Não
significa o tempo de reprodução da faixa
corrente conforme aparece no mostrador.
É especialmente útil quando se reproduz
discos que possuem poucas divisões de
faixas.
Nota
Esta função não pode ser usada durante a
reprodução com menu de CDs de vídeo
com funções PBC (Ver. 2.0).
Use o telecomando para as seguintes
operações.
1 Carregue em SPECIAL MENU.
2 Pressione 3 para seleccionar «3) TIME
SEARCH».
3 Use as teclas numéricas (1 - 10/0) para
introduzir o tempo (em minutos) na
secção desejada.
Ex.: Para 10 minutos, Pressione 1 m 10/0
O tempo decorrido seleccionado aparece
no écran do televisor.
4 Carregue em CD · SELECT.
A reprodução começa a partir do tempo
seleccionado.
Para parar a reprodução
Pressione p.
Para usar a busca por tempo em CDs
de vídeo com funções PBC (Ver. 2.0)
Pare a reprodução e carregue em PCB OFF/
ON para que o indicador AUTO PBC
desapareça antes do passo 1.
Localização da faixa
desejada (compilação de
discos)
Pode-se seleccionar a faixa desejada por
meio da monitorização do primeiro quadro
de cada faixa. Até 9 faixas diferentes por
vez podem ser mostradas no écran do
televisor.
Use o telecomando para o procedimento a
seguir.
1 Carregue em SPECIAL MENU.
2 Pressione 4 para seleccionar «4) DISC
DIGEST». O primeiro quadro das faixas
1 ~ 9 no disco corrente são mostrados no
écran.
DISC 1 DIGEST
1
12 3
4 5 6
7 8 9
1 Número do disco corrente
Para mostrar as próximas 9 faixas.
Carregue em NEXT +. O primeiro
quadro das faixas 10 ~ 18 são mostrados.
Quando existem mais faixas no disco,
«+» aparece no canto superior direito
do écran do televisor.
Para mostrar as faixas prévias, carregue
em = .
3 Use as teclas numéricas (1 - 10/0) para
seleccionar a faixa desejada.
Para introduzir números de faixa
maiores que 10.
Pressione >10 primeiro, e então
pressione as teclas dos números
correspondentes.
Ex.: Para 30, pressione >10 m 3 m 10
Para parar a reprodução
Pressione p.
No passo 2, podem-se seleccionar
faixas que não foram mostradas
antes de todas as faixas serem
mostradas.
Use as teclas numéricas para seleccionar a
faixa desejada.
No passo 2, pode-se reproduzir uma
faixa desejada imediatamente após
o primeiro quadro ser mostrado.
Carregue em CD · SELECT
imediatamente após o primeiro quadro ser
mostrado.
Para comutar à compilação de outro
disco durante a compilação de discos
Carregue em DISC SKIP durante a
compilação de discos.
Para usar a compilação de discos em
CDs de vídeo com funções PBC (Ver.
2.0)
Pare a reprodução e carregue em PBC OFF/
ON para que o indicador AUTO PBC
desapareça antes do passo 1.
P
13
Notas
•Esta função não pode ser usada durante a
reprodução com menu em CDs de vídeo
com funções PBC (Ver. 2.0).
•Imagens de vídeo não serão mostradas
por CDs de música ou CD-Gs.
Nota
O modo de reprodução comuta-se
automaticamente ao modo normal, caso
queira iniciar a compilação de discos durante
a reprodução aleatória ou programada.
continua na próxima página ➔
Secção 2: O leitor de CDs/CD-Gs/CDs de Vídeo
Page 51
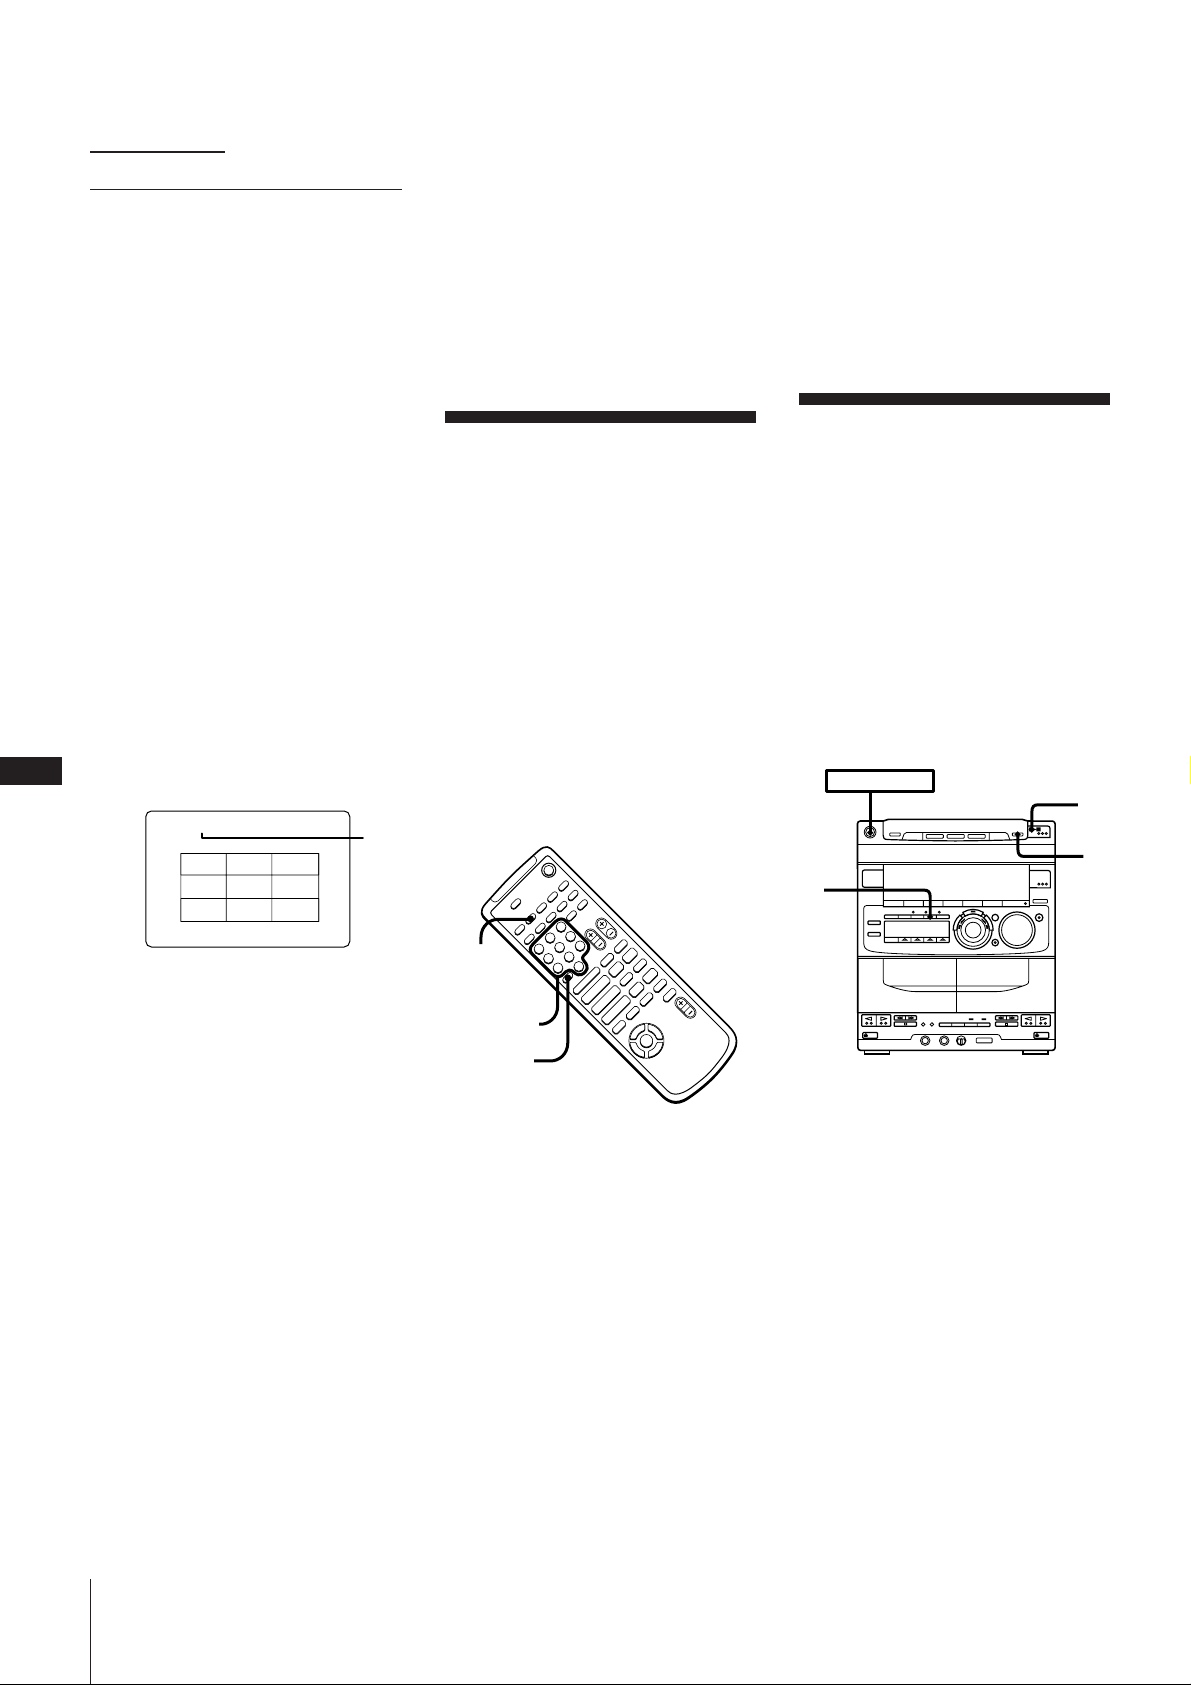
P
1
3
2
POWER m ON
14
➔ continuação
Localização de um trecho
dentro de uma faixa
(compilação de faixas)
Pode-se ter o leitor de CDs a dividir uma
faixa de CD de vídeo em 9 secções
diferentes e mostrar a primeira cena de
cada trecho no écran do televisor. Isto pode
ser útil na reprodução de discos com
poucas divisões, tais como filmes.
Nota
Esta função não pode ser usada durante a
reprodução com menu em CDs de vídeo
com funções PBC (Ver. 2.0).
Use o telecomando para executar o
procedimento a seguir.
1 Accione a reprodução da faixa do CD de
vídeo desejada.
2 Carregue em SPECIAL MENU.
3 Pressione 5 para seleccionar «5) TRACK
DIGEST». A faixa corrente é dividida em
9 secções e o primeiro quadro de cada
secção é mostrado no écran.
TRACK 1 DIGEST
1 2 3
4 5 6
7 8 9
1 Número da faixa corrente
1
4 Use as teclas numéricas para seleccionar
a secção desejada.
A reprodução começa de um ponto
próximo ao quadro seleccionado.
Para parar a reprodução
Pressione p.
No passo 3, podem-se seleccionar
secções que não foram mostradas
antes de todas as secções serem
mostradas.
Use as teclas numéricas para seleccionar a
secção desejada.
No passo 3, pode-se reproduzir uma
secção desejada imediatamente após
o primeiro quadro ser mostrado
Carregue em CD · SELECT
imediatamente após o primeiro quadro ser
mostrado.
Para poder comutar à compilação de
outra faixa durante a compilação de
faixas
Carregue em = ou + durante a
compilação de faixas.
Para usar a compilação de faixas em
CDs de vídeo com funções PBC (Ver.
2.0)
Pare a reprodução e carregue em PBC OFF/
ON para que o indicador AUTO PBC
desapareça antes do passo 1.
Nota
Faixas menores que 40 segundos de
duração não podem ser divididas em
menos que 9 secções.
Selecção de canais
gráficos nos CD-Gs
CD-Gs possuem 16 canais (0 a 15)
chamados «canais gráficos» que permitemlhe seleccionar a imagem de vídeo a ser
mostrada no écran do televisor.
Quando se liga pela primeira vez o cabo de
alimentação CA a uma tomada da parede, o
leitor de CDs se encontra pré-ajustado da
fábrica nos canais 1 e 0. Contudo, o canal 1
pode ser comutado a um canal diferente.
Visto que o canal que se pode seleccionar
pode diferir para cada disco, certifique-se
de consultar as instruções ou a embalagem
(etc.) que acompanham o CD-G.
Use o telecomando para executar o
procedimento a seguir.
+
–
+
SPECIAL
MENU
Numeric
Teclas
buttons
numéricas
> 10
p
–
)0
P
pP
Æ»
)0+=
Æ»
Æ
4
$
1 Carregue em SPECIAL MENU durante
a reprodução ou o modo de paragem do
CD-G.
2 Pressione 6 para seleccionar «6)
GRAPHIC CHANNEL».
«G-CH» aparece no écran do televisor.
3 Use as teclas numéricas para seleccionar
o canal desejado.
Para introduzir números maiores que 10.
Pressione >10 primeiro, e então pressione
as teclas numéricas correspondentes.
Ex.: Para 10, pressione >10 m 1 m 10/0
Nota
Durante a reprodução de um CD-G, a
imagem pode sofrer distorções quando se
pressionam as seguintes teclas. Contudo,
isto não significa mau funcionamento do
leitor.
– = / +
– 0 /)
– P
Reprodução de um
CD de vídeo a partir
da última paragem
(retomada de
reprodução)
Na reprodução de um CD de vídeo, o leitor
de CDs memorizará o ponto onde a
reprodução foi parada. Por essa razão,
pode-se reproduzir um CD de vídeo a
partir do último ponto em que a
reprodução foi parada.
A retomada de reprodução não funciona
com CDs de música e CD-Gs.
1 Pressione p para parar o CD de vídeo.
O leitor de CDs memoriza esta posição.
2 Carregue em ˆ RETURN (ou RETURN
ˆ no telecomando) durante o modo de
paragem.
«RESUME» pisca no mostrador e
aparece no écran do televisor por cerca
de 16 segundos.
Caso «RESUME» não pisque
A retomada de reprodução não é
possível.
3 Carregue em · (ou CD · SELECT
no telecomando) enquanto «RESUME»
estiver a piscar.
A reprodução é retomada a partir do
último ponto de paragem no passo 1.
Caso «RESUME» pare de piscar antes de
se pressionar · , pressione ˆ
RETURN novamente.
Secção 2: O leitor de CDs/CD-Gs/CDs de Vídeo
Page 52
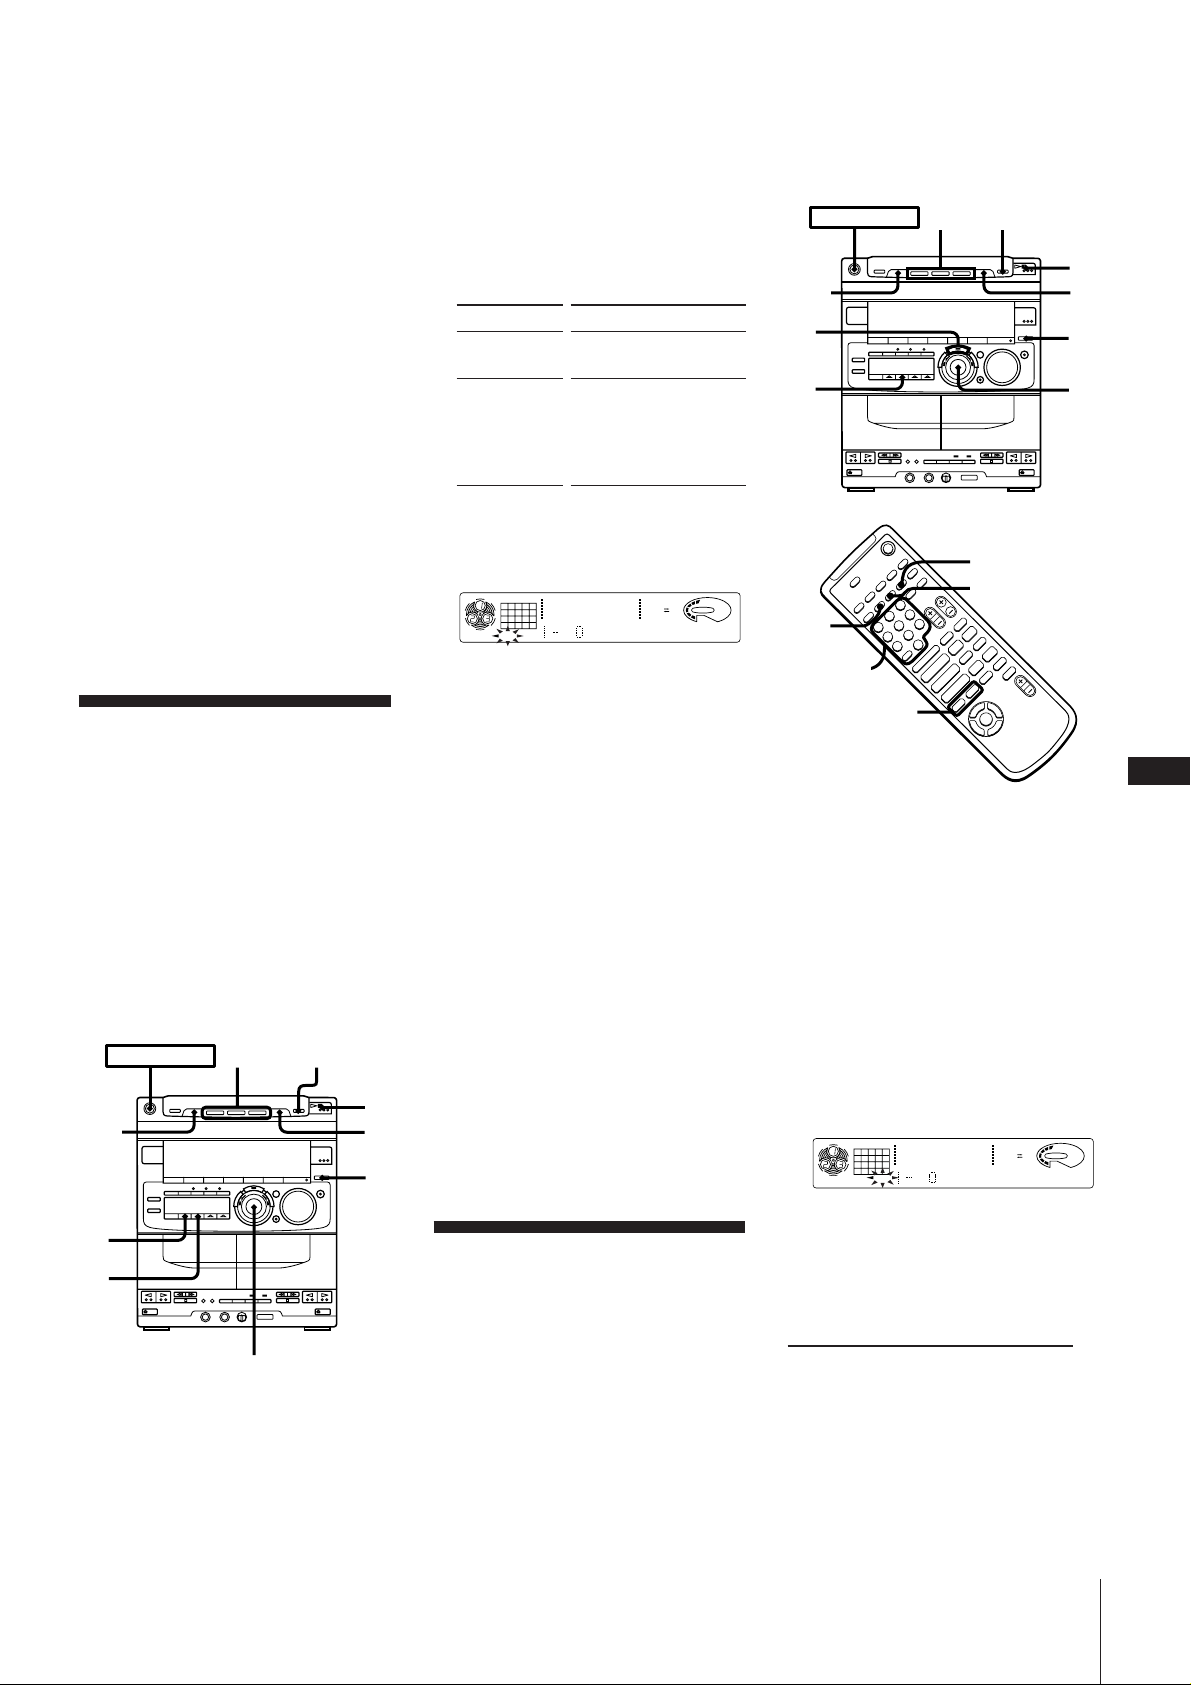
4
–
+
–
p
+
P
)0
pP
)0+=
Æ
Æ»
Æ»
4
$
POWER m ON
8
2
1
5
6
3
p
CLEAR
CHECK
=/+
Numeric
buttons
D.SKIP
DISC
SKIP
12563 250 500 1k 2k 4k 8k 16k(Hz)
DOLBY NR
OFF
CD
1DISC PROGRAM
12345
678
VOLUME
Para assistir a um CD de vídeo a
partir do início
•Carregue em · quando «RESUME»
não estiver a piscar.
•Carregue em ˆ RETURN novamente
quando «RESUME» estiver a piscar.
Notas
• A retomada de reprodução não funciona
durante a reprodução aleatória ou
programada.
• Conforme o ponto de paragem da
reprodução, a retomada de reprodução
pode não ocorrer exactamente a partir do
mesmo ponto, ou pode não funcionar.
• As seguintes operações apagarão a
memória de retomada:
– Remoção do disco
– Pressionamento de DISC SKIP
– Desligamento do cabo de alimentação
CA
– Comutação do modo de reprodução
– Pressionamento de p no leitor de CDs
durante o modo de paragem
Reprodução de faixas
em ordem aleatória
(reprodução
aleatória)
Podem-se reproduzir todas as faixas em um
CD ou todos os CDs em ordem aleatória.
Esta função não pode ser usada durante a
reprodução com menu em CDs com
funções PBC (Ver. 2.0).
Use as teclas do aparelho para efectuar esta
operação.
POWER m ON
DISC
SKIP
DISC 1~3
p
3
4
JOG
1 Carregue em FUNCTION repetidamente
até que «CD» apareça no mostrador.
2 Carregue em § OPEN/CLOSE e
coloque os CDs na bandeja de discos.
5
1
2
Para inserir um terceiro disco
Carregue em DISC SKIP (ou D.SKIP no
telecomando). A bandeja de discos gira
para que se possa inserir um outro CD.
3 Carregue em 1/ALL DISCS
repetidamente para optar entre a
reprodução «1 DISC» ou «ALL DISCS».
Escolha
1 DISC
ALL DISCS
Para reproduzir
Somente o disco
seleccionado corrente
Todos os discos em
ordem consecutiva
(conforme o número do
disco). Bandejas vazias
são saltadas.
4 Carregue em PLAY MODE
repetidamente até que «SHUFFLE»
apareça no mostrador.
CD
12345
678
1DISC
SHUFFLE
12563 250 500 1k 2k 4k 8k 16k(Hz)
DOLBY NR
VOLUME
OFF
5 Carregue em · .
« J » aparece e as faixas são
reproduzidas em ordem aleatória.
Para parar a reprodução aleatória
Pressione p.
Para cancelar a reprodução aleatória
Carregue em PLAY MODE repetidamente
até que «SHUFFLE» e «PROGRAM»
desapareçam do mostrador. As faixas
continuam a ser reproduzidas na sua
ordem original.
Caso esteja a reproduzir CDs de vídeo com
funções PBC (Ver. 2.0), o leitor de CDs pára.
Para seleccionar o CD desejado
Carregue em DISC 1 ~ 3 durante a
reprodução aleatória.
Para saltar uma faixa indesejada
Gire o anel JOG para a direita (ou carregue
em + no telecomando).
Reprodução de
faixas na ordem
desejada
(reprodução
programada)
Pode-se efectuar uma programação de até
32 faixas de todos os CDs na ordem que se
deseja reproduzi-las.
Esta função não pode ser usada durante a
reprodução com menu em CDs de vídeo
com funções PBC (Ver. 2.0).
Use as teclas tanto do aparelho quanto do
telecomando para realizar esta operação.
Teclas
numéricas
P
15
1 Carregue em FUNCTION
repetidamente até que «CD» apareça no
mostrador.
2 Carregue em § OPEN/CLOSE e
coloque os CDs na bandeja de discos.
Para inserir um terceiro disco
Carregue em DISC SKIP (ou D.SKIP no
telecomando). A bandeja de discos gira
para que se possa inserir um outro CD.
3 Carregue em PLAY MODE
repetidamente até que «PROGRAM»
apareça no mostrador.
4 Pressione DISC 1 ~ 3 para seleccionar
um CD.
O número do disco aparece no
mostrador.
continua na próxima página ➔
Secção 2: O leitor de CDs/CD-Gs/CDs de Vídeo
Page 53
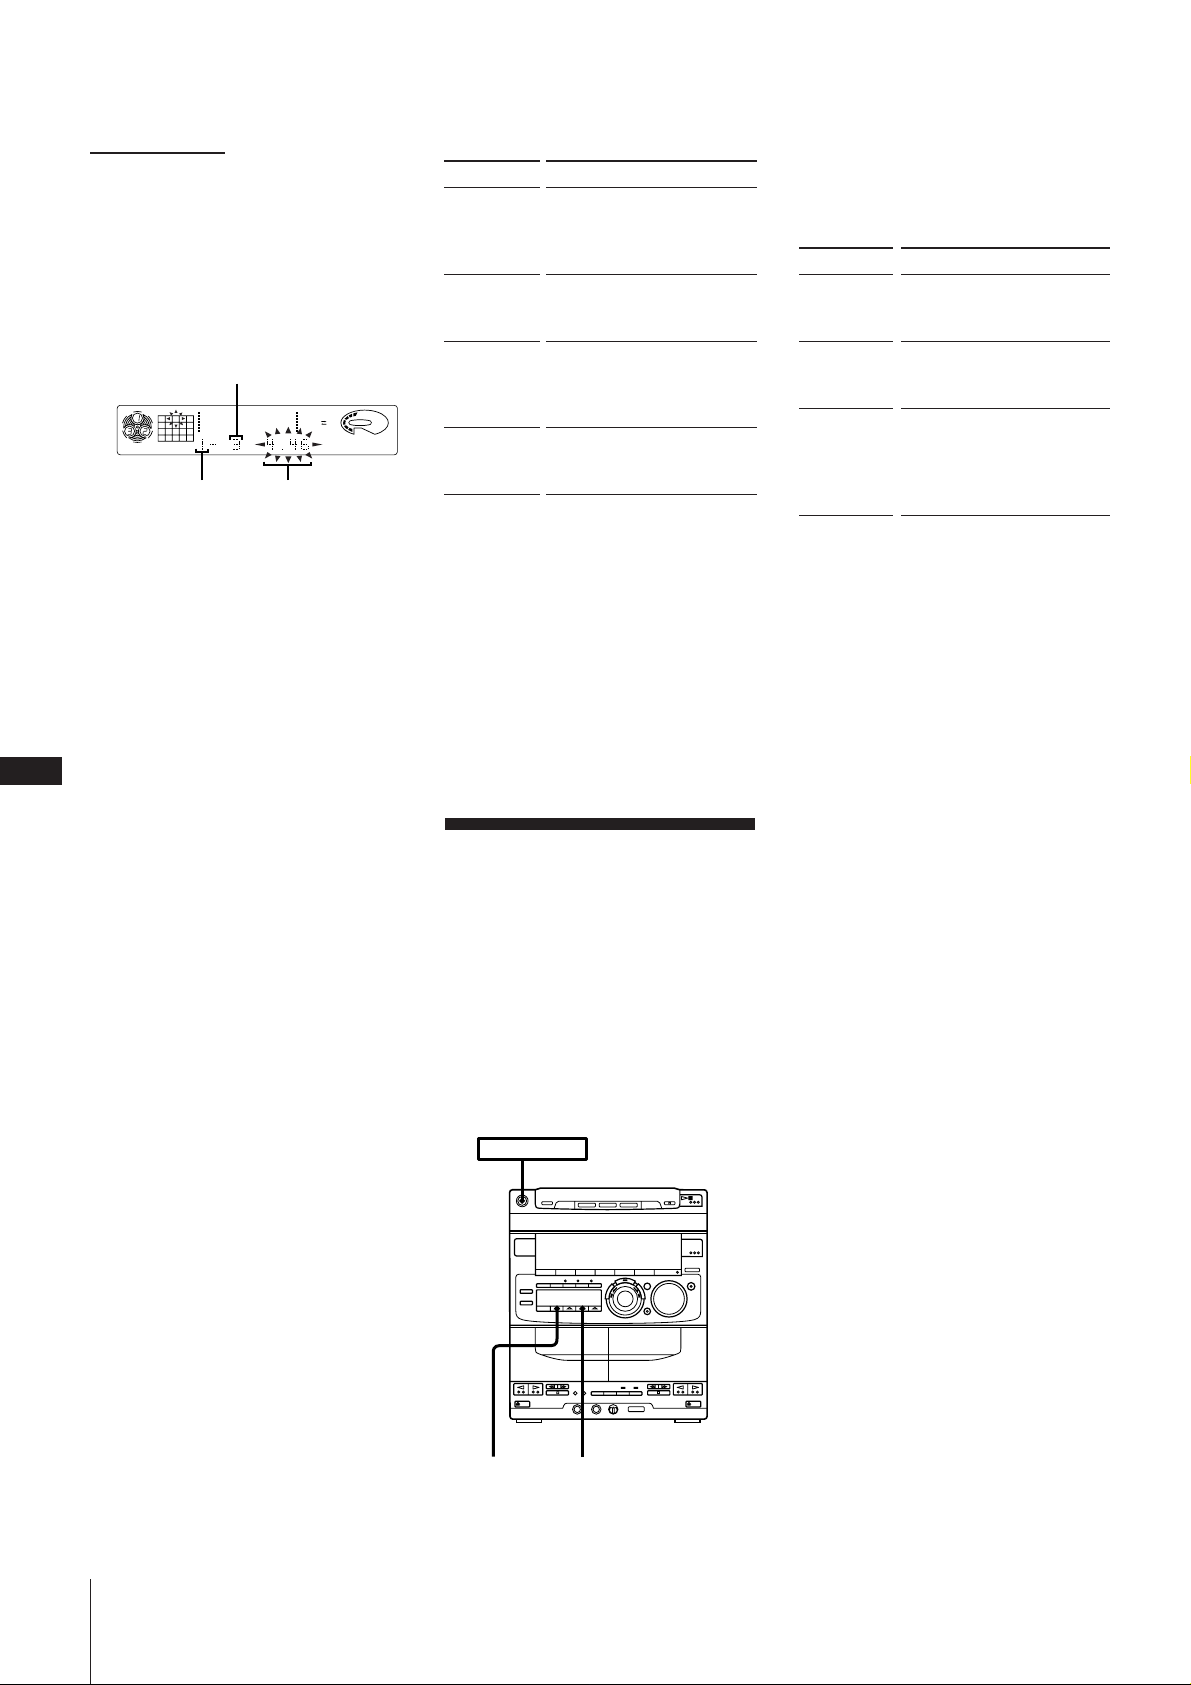
➔ continuação
5
Gire o anel JOG (ou pressione =/+
no telecomando) para escolher uma
faixa.
O número de faixa e o tempo de
reprodução total incluindo as faixas
seleccionadas passam a piscar no
mostrador. (O programa não foi
introduzido desta vez).
Número de faixa
CD
3
12563 250 500 1k 2k 4k 8k 16k(Hz)
DISC PROGRAM
Número
do disco
Tempo de
reprodução total
6 Carregue em ENTER/NEXT.
O número de faixa escolhido pisca na
matriz musical e o indicador STEP
aparece no mostrador. Caso o número
de faixa desapareça antes de se
pressionar ENTER/NEXT, volte para o
passo 4.
Caso programe a faixa errada
Pressione CLEAR, e seleccione outra
faixa.
P
7 Para programar faixas adicionais do
16
mesmo CD, repita os passos 5 e 6.
Para programar faixas adicionais de
outro CD, repita os passos de 4 a 6.
8 Carregue em · .
Todas as faixas são reproduzidas na
ordem escolhida.
Para cancelar a reprodução
programada
Carregue em PLAY MODE repetidamente
até que «PROGRAM» e «SHUFFLE»
desapareçam do mostrador. As faixas
continuam a ser reproduzidas na sua
ordem original.
Caso esteja a reproduzir CDs de vídeo com
funções PBC (Ver. 2.0), o leitor de CDs pára.
Para seleccionar uma faixa usando o
telecomando
Use as teclas numéricas para introduzir o
número de faixa. Salte o passo 6.
Para introduzir um número de faixa maior
que 10.
Pressione >10 primeiro, e então pressione
as teclas numéricas correspondentes.
Ex.: Para 30, pressione >10 m 3 m 10/0.
DOLBY NR
Para alterar o conteúdo do programa
Para
Apagar uma
faixa
específica
Apagar uma
faixa a partir
do final
Adicionar
uma faixa ao
final do
VOLUME
OFF
programa
Apagar todo
o programa
Notas
•O programa criado permanece ainda no
leitor de CDs, de forma que se possa
reproduzir o mesmo programa
novamente.
•Caso «--.--» apareça em vez do tempo de
reprodução total durante a programação,
isto quer dizer que se programou um
número de faixa maior que 20, ou o
tempo de reprodução total superou 100
minutos.
Carregue em
CHECK repetidamente até
que o número da faixa passe
a piscar, e então pressione
CLEAR
CLEAR no modo de paragem
1. Gire o anel JOG até que o
número de faixa desejado
apareça no mostrador.
2. Pressione ENTER/ENTER.
p uma vez no modo de
paragem e duas vezes
durante a reprodução
Repetição de todas as faixas
1 Carregue em «REPEAT» repetidamente
até que «REPEAT» apareça no
mostrador.
2 Carregue em · .
Para
Repetir todas
as faixas no
CD corrente
Repetir todas
as faixas em
todos os CDs
Repetir
somente
uma faixa
Para cancelar a reprodução repetida
Pressione REPEAT repetidamente até que
«REPEAT» ou «REPEAT 1» desapareça do
mostrador.
Nota
Não se pode repetir uma faixa simples
durante a reprodução aleatória ou
programada.
Carregue em
1/ALL DISCS repetidamente
até que «1 DISC» apareça no
mostrador.
1/ALL DISCS repetidamente
até que «ALL DISCS»
apareça no mostrador.
REPEAT repetidamente até
que «REPEAT 1» apareça no
mostrador enquanto se
reproduz a faixa que deseja
repetir.
Reprodução de
faixas repetidas
(reprodução
repetida)
A função de reprodução repetida repete
um CD simples ou todos os CDs na
reprodução normal, aleatória e
programada.
Use as teclas do aparelho para efectuar esta
operação.
POWER m ON
Para verificar o conteúdo do
programa (somente com o
telecomando)
Carregue em CHECK antes de iniciar a
reprodução.
Cada vez que pressionar CHECK, o
próximo passo aparecerá no mostrador.
Alcançado o último passo, «CHECK END»
é indicado e o mostrador normal retorna.
Secção 2: O leitor de CDs/CD-Gs/CDs de Vídeo
1/ALL DISCS
REPEAT
Page 54
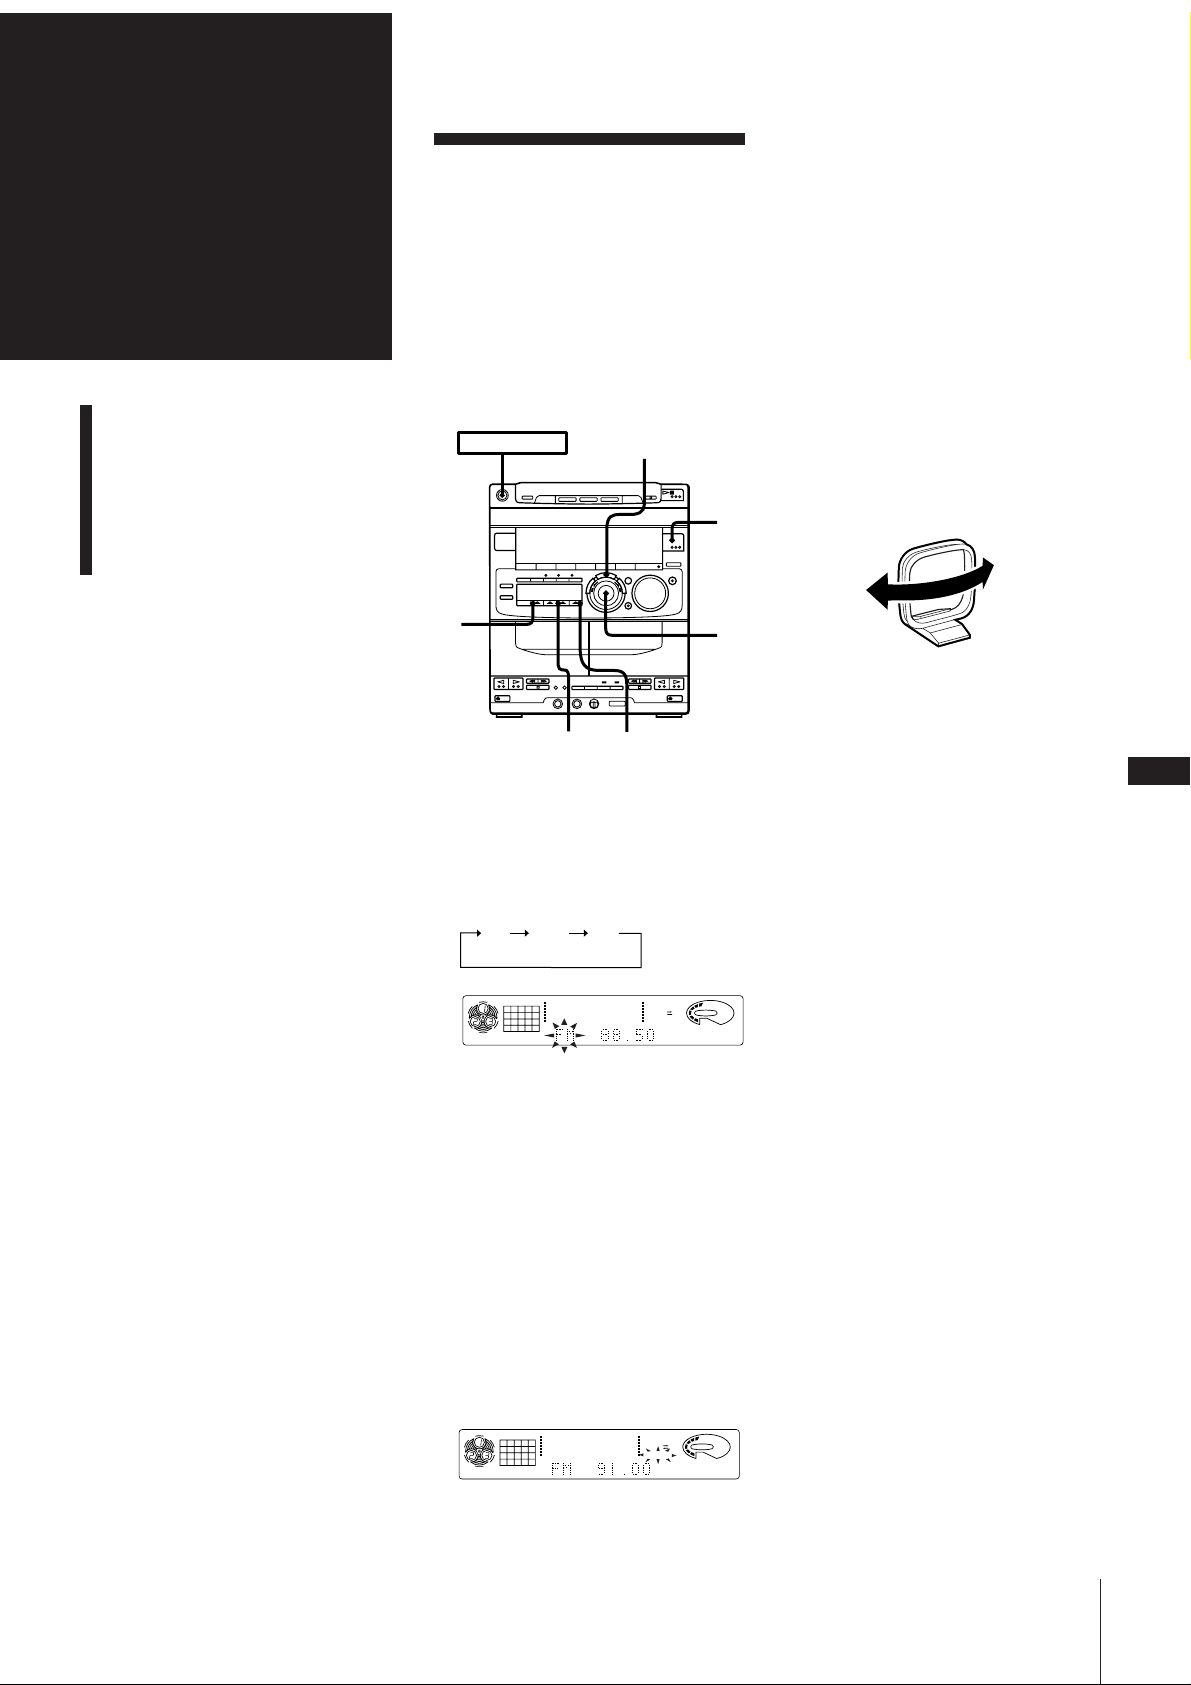
Secção 3:
Audição do rádio
4 Caso não queira ouvir a estação
seleccionada, gire o anel JOG novamente
para reiniciar a pesquisa.
O rádio
Audição do rádio
Programação de estações
de rádio
Sintonização de estações
de rádio programadas
Quando se deseja reproduzir um programa
de rádio, pode-se ter o sintonizador a
pesquisar automaticamente frequências de
rádio e sintonizar as estações com sinais
nítidos. Esta função economiza-lhe tempo
na pesquisa de estações com sinais claros.
Contudo, estações com sinais fracos podem
ser saltados pela sintonização automática.
Sintonize manualmente as estações saltadas
pela sintonização automática.
POWER m ON
ENTER/NEXT
1
2
3,
4
STEREO MONO
1Carregue em TUNER/BAND
repetidamente até que a banda desejada
apareça no mostrador.
À medida que se pressiona TUNER/
BAND, a banda se altera conforme o
seguinte:
FM MW SW
TUNER
12563 250 500 1k 2k 4k 8k 16k(Hz)
DOLBY NR
VOLUME
OFF
MANUAL
MHz
Quando a estação desejada não é
sintonizada
A sintonização automática pode saltar
estações com sinais fracos. Sintonize a
estação manualmente.
1 Carregue em TUNING MODE
repetidamente até que «MANUAL»
apareça no mostrador.
2 Continue a girar o anel JOG até que a
estação desejada seja sintonizada.
Para melhorar a recepção da
transmissão MW/SW (AM).
Reoriente a antena de quadro AM fornecida
para MW/SW (AM).
MW/SW (AM)
Para alterar o intervalo de
sintonização MW
O intervalo de sintonização MW é préajustado na fábrica para 9 kHz (alguns
modelos estão pré-ajustados para 10 kHz).
Caso necessite alterar o intervalo para 10
kHz (9 kHz), execute o seguinte:
1 Ligue a alimentação.
2 Altere a banda para MW (AM).
3 Desligue a alimentação.
4 Religue a alimentação enquanto
pressiona ENTER/NEXT.
Após alterar o intervalo de sintonização
MW (AM), refaça a programação de
estações de rádio. Para reajustar o intervalo
ao ajuste de fábrica, siga o mesmo
procedimento.
P
17
2Carregue em TUNING MODE
repetidamente até que «AUTO» apareça
no mostrador.
3Gire o anel JOG para a direita para
pesquisar estações de frequência mais
alta. Para pesquisar estações de
frequência mais baixa, gire o anel JOG
para a esquerda.
O sintonizador começa uma exploração
das frequências de rádio, parando
automaticamente ao encontrar uma
estação nítida.
«TUNED» aparece no mostrador.
«STEREO» também aparece, caso a
estação FM sintonizada esteja a
transmitir em estéreo.
TUNER
12563 250 500 1k 2k 4k 8k 16k(Hz)
DOLBY NR
TUNED
OFF
STEREO
AUTO
MHz
VOLUME
Quando a recepção de um programa FM
não é nítida
Carregue em MONO até que «MONO»
apareça no mostrador. Não haverá nenhum
efeito estéreo, mas a recepção melhorará.
Pressione STEREO quando quiser restaurar
o efeito estéreo.
Função de reprodução a um toque
Carregue em TUNER/BAND quando a
alimentação estiver desligada. Pode-se
ouvir a última estação recebida sem
pressionar nenhuma outra tecla.
Selecção Automática da Fonte
Caso carregue em TUNER/BAND durante
a audição de outra fonte sonora, o
sintonizador é seleccionado e a última
estação recebida passa a ser recebida
automaticamente.
Secção 3: O rádio
Page 55
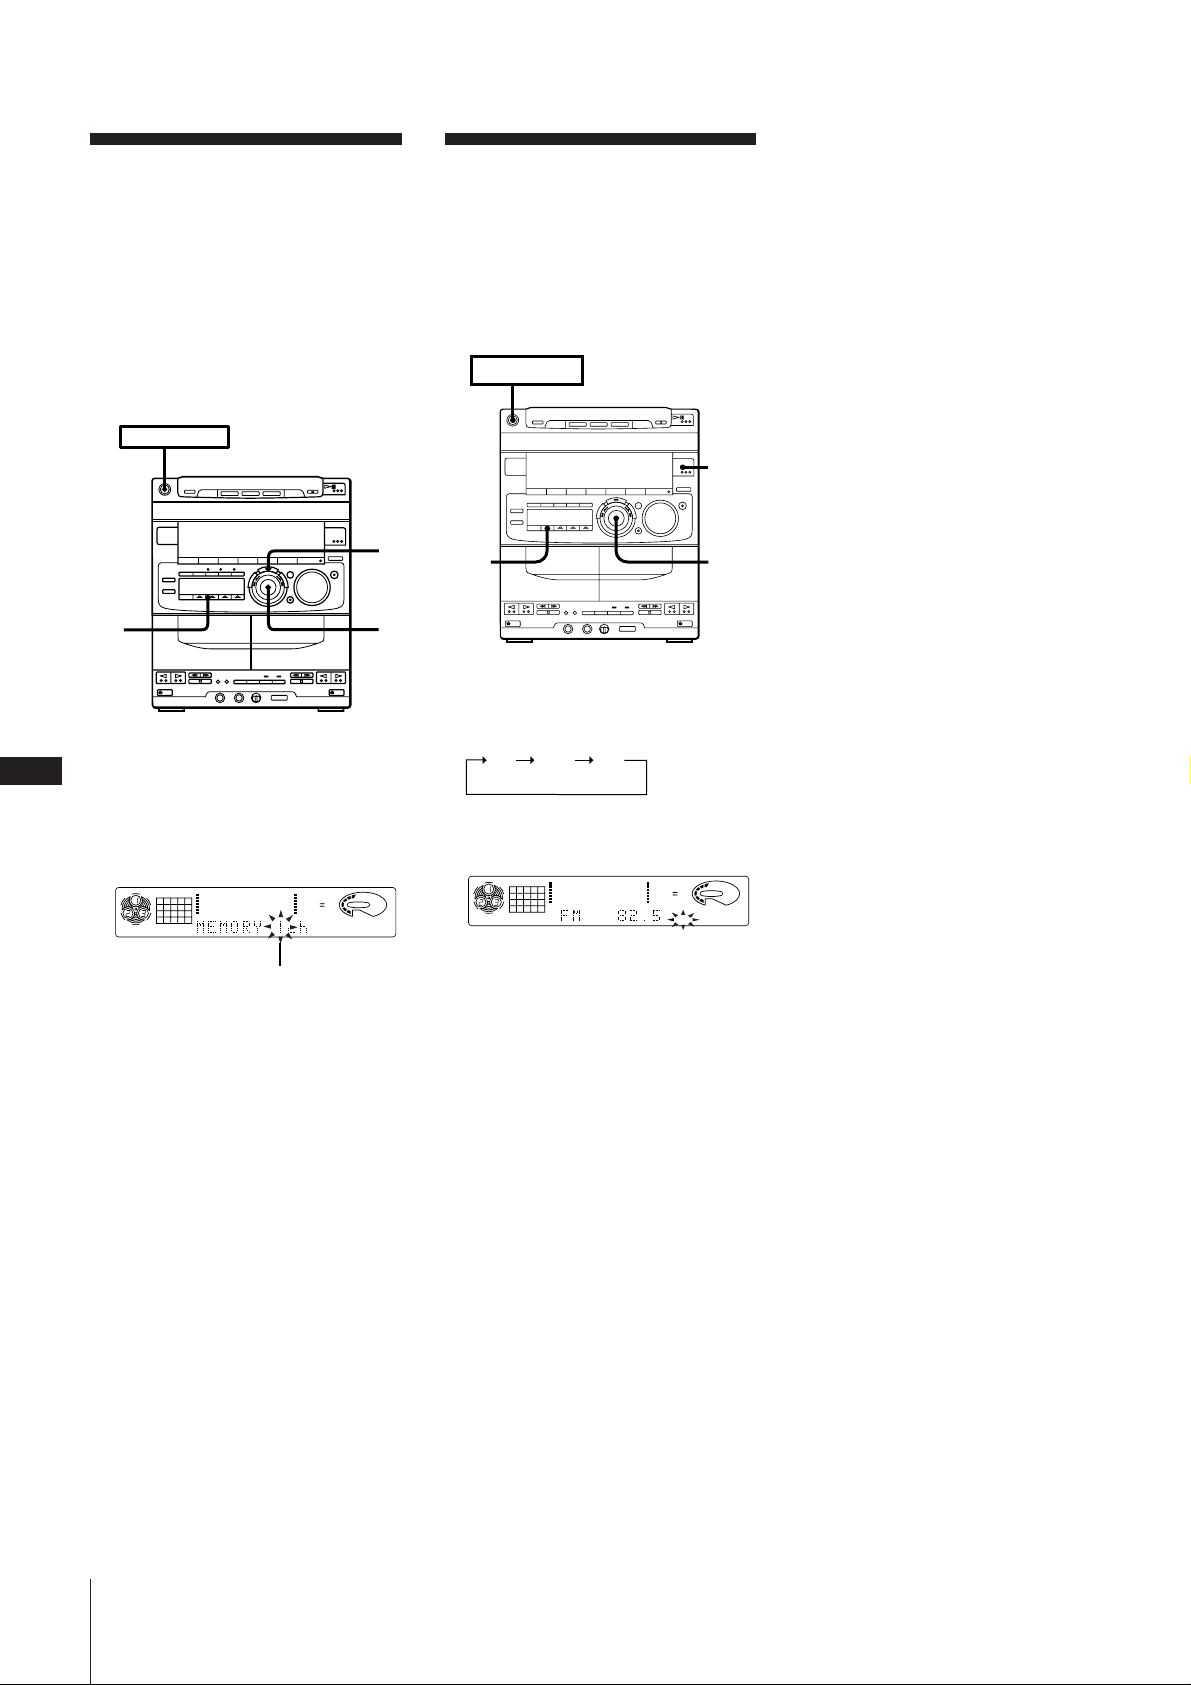
Programação de
estações de rádio
Podem-se armazenar frequências de rádio
na memória do sintonizador para a rápida
sintonização posterior daquelas estações
favoritas. Pode-se programar um máximo
de 20 estações em FM, 10 estações em MW,
e 10 em SW em qualquer sequência.
Use as teclas do aparelho para a
programação de estações.
POWER m ON
Sintonização de
estações de rádio
programadas
Uma vez programadas as estações, use o
anel JOG para sintonizar rapidamente as
suas estações favoritas.
POWERnON
1
2
1 Sintonize uma estação que deseja
P
18
armazenar na memória programada.
2 Carregue em TUNER MEMORY.
«MEMORY» e o número de memória
aparecem no mostrador.
TUNER
1
12563 250 500 1k 2k 4k 8k 16k(Hz)
Número de memória
3 Gire o anel JOG para seleccionar um
número de memória.
4 Carregue em ENTER/NEXT.
A estação é armazenada no número de
memória que se decidiu programar.
DOLBY NR
4
2
3
3
1 Carregue em TUNER/BAND
repetidamente para seleccionar a banda
desejada.
FM MW SW
2 Carregue em TUNING MODE para que
«PRESET» apareça no mostrador.
TUNER
VOLUME
OFF
AUTO
ALL DISC S
12563 250 500 1k 2k 4k 8k 16k(Hz)
DOLBY NR
VOLUME
OFF
MHz
PRESET
3 Gire o anel JOG (ou pressione + ou – no
telecomando) para sintonizar uma
estação programada.
A frequência da estação aparece e a
estação começa a transmissão.
5 Repita os passos de 1 a 4 para cada
estação que deseja armazenar.
Para apagar uma estação
armazenada
Armazene uma nova estação em um
número de memória previamente ocupado.
Isto apagará a estação anterior,
substituindo-a pela nova estação.
Caso tenha problemas ao armazenar uma
estação ou caso tenha cometido um erro
Certifique-se de que «MEMORY» esteja
acesa no mostrador.
Em caso negativo, carregue em TUNER
MEMORY novamente para que
«MEMORY» apareça (por cerca de oito
segundos) no mostrador, e então prossiga
com os passos 3 e 4.
Secção 3: O rádio
Page 56
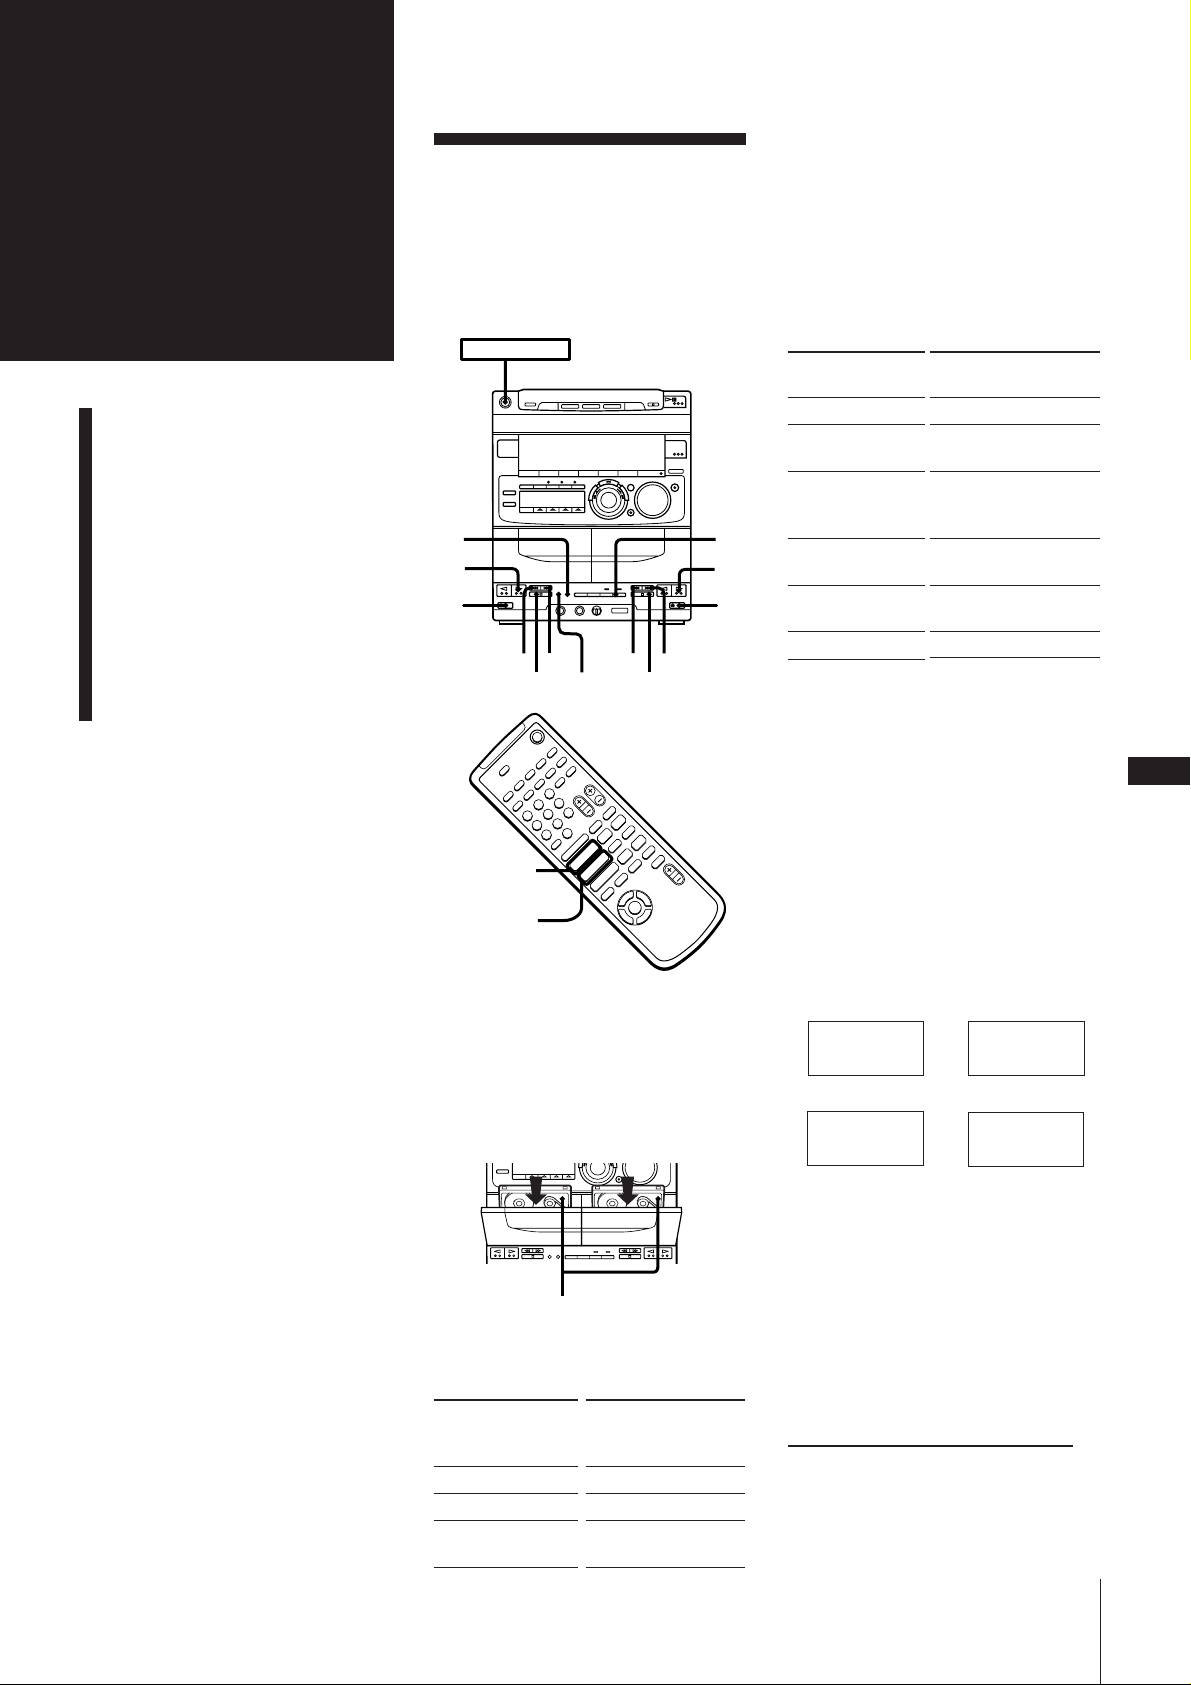
Secção 4:
O leitor de
cassetes
Reprodução de uma cassete
Gravação de um CD
Gravação de CDs:
Especificação da duração
da fita (edição por
tempo)
Gravação de sinais do rádio
Gravação de uma outra
cassete (duplicação)
Reprodução de uma
cassete
Podem-se usar cassetes TYPE I (normal),
TYPE II (crómio) e TYPE IV (metal).
Quando se insere uma cassete, o deck
detecta o tipo de fita automaticamente.
POWER m ON
2
3
1
DECK A » Æ
DECK B » Æ
)00)
p
DOLBY NR
+
–
p
+
p
–
)0
P
pP
Æ»
)0+=
Æ»
Æ
4
$
1 Carregue em § EJECT para abrir o
compartimento de cassetes.
Insira uma cassete gravada no deck A
ou B com o lado da fita voltado para
baixo e o lado que se deseja reproduzir
voltado para frente. Empurre para
fechar o compartimento. A reprodução
da fita começará a partir do lado frontal.
3
1
*1O deck pára automaticamente após
repetir a sequência cinco vezes.
*2Consulte «Reprodução de ambos os
decks em sucessão (reprodução
encadeada)».
3 Carregue em · (para reproduzir o
lado frontal) ou ª (para reproduzir o
lado reverso).
A cassete começa a ser reproduzida.
Para
Parar a reprodução
Pausar
Retomar a
reprodução após
P
pausar
Avançar
rapidamente
Rebobinar
Remover a cassete
Utilização do telecomando
1 Carregue em DECK A ª · ou DECK
B ª · durante o modo de paragem.
O deck começa a reprodução do lado
frontal. Pressione novamente para
reproduzir o reverso.
2 Pressione a tecla de operação desejada.
Para reproduzir ambos os decks em
sucessão (reprodução encadeada)
A reprodução encadeada sempre segue a
seguinte sequência. Quando o lado reverso
da cassete no deck B termina a reprodução,
a seguinte sequência continua por mais
quatro vezes.
Deck A Deck A
(Lado frontal) m (Lado reverso)
µ
Deck B Deck B
(Lado reverso) M (Lado frontal)
Pressione (no
telecomando)
p
P PAUSE (P)
(somente Deck B)
P PAUSE (P)
(somente Deck B),
ª ou ·
) para o lado frontal
0 para o lado reverso
0 para o lado frontal
) para o lado reverso
§ EJECT
P
19
Lado de reprodução
voltado para frente
2 Seleccione entre gravação de ambos e de
um único lado da fita.
Para reproduzir
Um lado da cassete
Ambos os lados*
Ambos os decks em
sucessão*
2
Pressione
DIRECTION para
seleccionar
A
1
ß
RELAY
1 Carregue em § EJECT e insira as
cassetes gravadas em ambos os decks.
2 Pressione DIRECTION repetidamente
até que «RELAY» apareça no mostrador.
3 Pressione ª ou · em um deck.
Para parar a reprodução encadeada,
pressione p.
Para cancelar a reprodução encadeada
Pressione DIRECTION repetidamente até
que «A» ou «ß» apareça no mostrador.
continua na próxima página ➔
Secção 4: O leitor de cassetes
Page 57
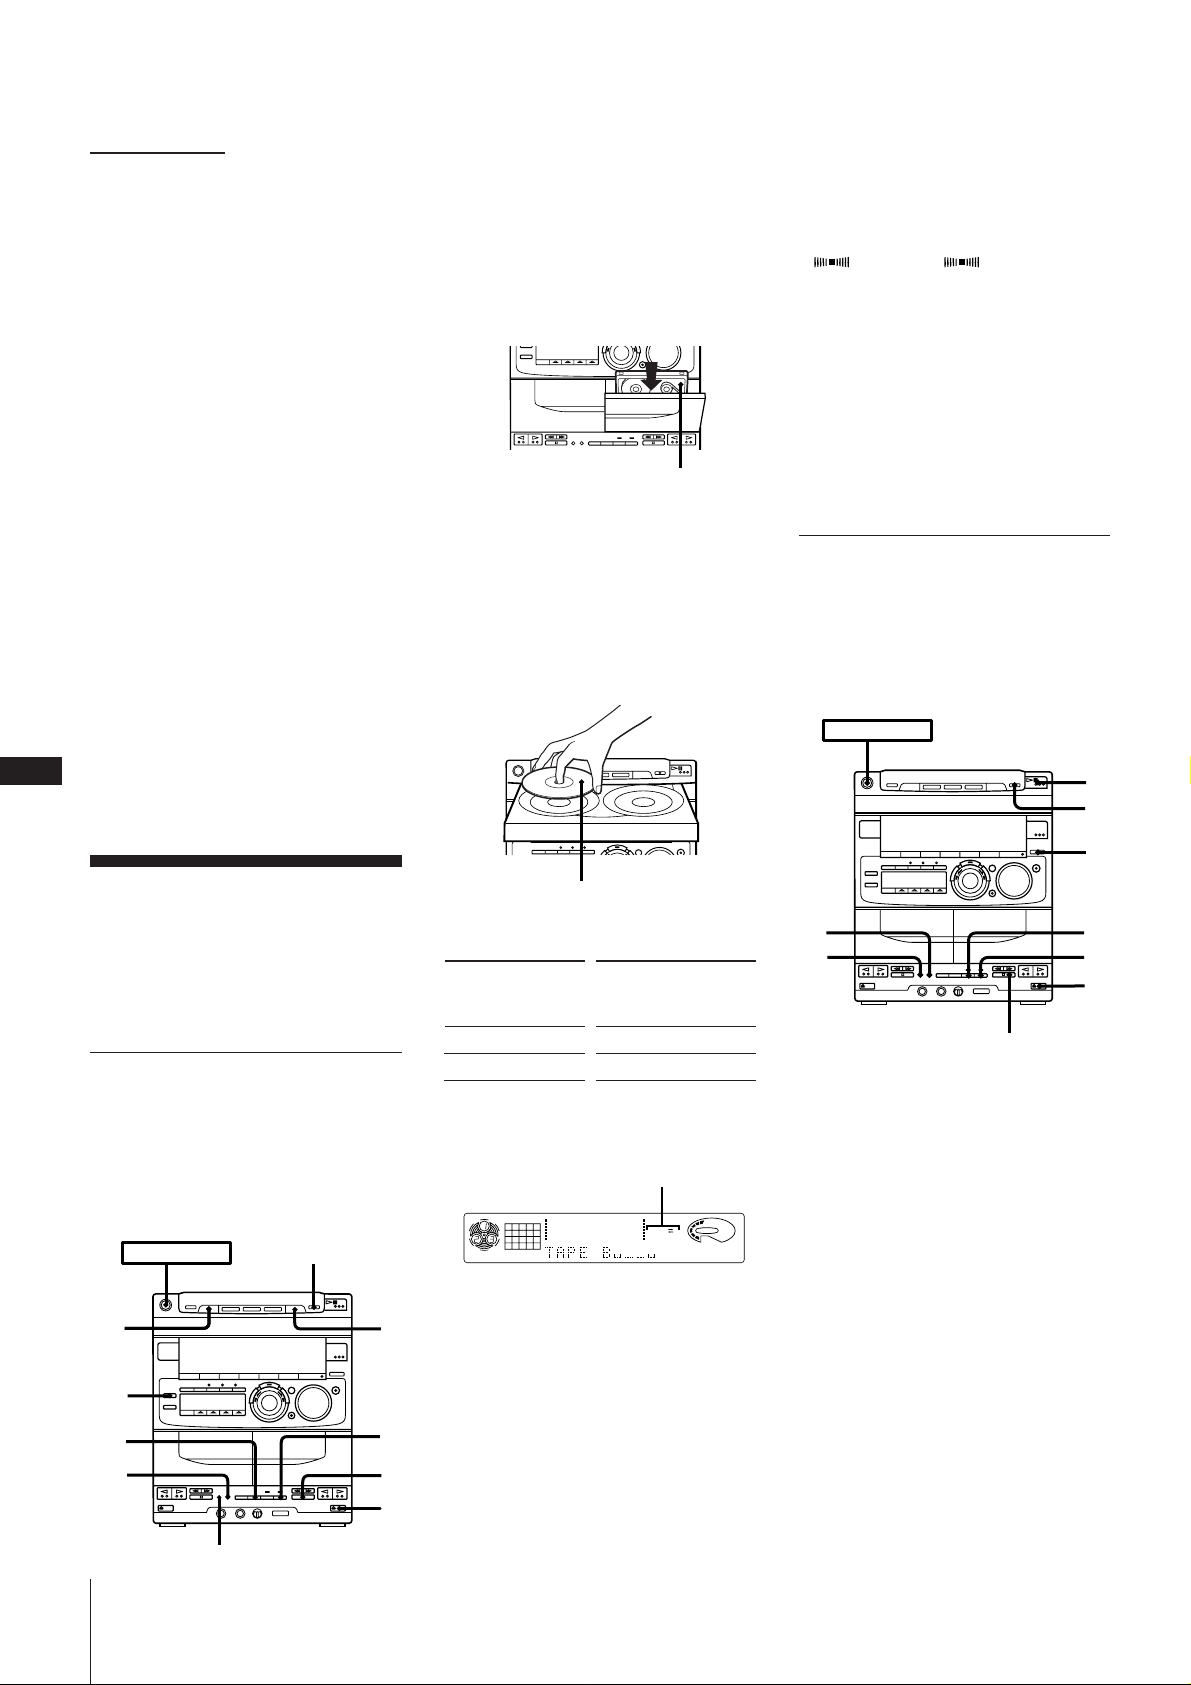
➔ continuação
Na audição de uma cassete gravada com o
sistema de redução de ruídos DOLBY* tipo
B
Carregue na tecla DOLBY NR para que
«DOLBY NR B» apareça no mostrador.
O ajuste afecta ambos os decks. O sistema
de redução de ruídos DOLBY reduz o ruído
sibilante da cassete em sinais de baixo nível
e alta frequência.
* Redução de ruído Dolby fabricada sob
licença de Dolby Laboratories Licensing
Corporation.
DOLBY e o símbolo dos dois D a são
marcas de Dolby Laboratories Licensing
Corporation.
Função de reprodução a um toque
Carregue em · ou ª (ou DECK A ª
· ou DECK B ª · no telecomando)
quando a alimentação estiver desligada.
Pode-se ouvir a cassete sem pressionar
nenhuma outra tecla, quando houver uma
cassete inserida no deck. Quando não
houver cassete no deck, o sistema apenas
ligar-se-á.
Selecção Automática da Fonte
Caso carregue em · ou ª (ou DECK A
ª · ou DECK B ª · no telecomando)
durante a audição de outra fonte sonora, o
P
deck de cassetes será seleccionado e a a
reprodução iniciar-se-á automaticamente.
20
1 Carregue em § EJECT e insira uma
cassete em branco no deck B com o lado
que deseja gravar voltado para frente.
A gravação começará a partir do lado
frontal da cassete, a menos que se tenha
alterado a direcção de reprodução antes
da gravação.
Certifique-se que as linguetas de
segurança da cassete não foram
removidas.
Lado da gravação voltado para frente
2 Carregue em § OPEN/CLOSE e
coloque um CD. E então, carregue em §
OPEN/CLOSE novamente para fechar a
bandeja de discos.
Caso o indicador da tecla
correspondente à bandeja de disco a
conter o CD que deseja gravar não esteja
aceso em verde, pressione DISC SKIP
repetidamente, até acendê-lo em verde.
Para parar a gravação
Pressione p no deck ou no leitor de CDs.
Para acrescentar um efeito
perimétrico
Pressione DSP repetidamente até que «SUR
1 » ou «SUR 2 » apareçam no
mostrador.
Para iniciar a gravação sem um
espaço de 10 segundos
Primeiro, reproduza ou efectue a gravação
no deck B por alguns segundos, e então
pressione CD SYNCHRO. A reprodução do
CD inicia-se imediatamente após a
gravação começar.
Isto não funcionará, caso pressione § no
deck B antes da gravação.
Gravação manual de um
CD
Pode-se gravar um CD conforme a
preferência pessoal, por exemplo, apenas
com as músicas desejadas ou a partir do
meio da cassete.
POWER m ON
8
2
Gravação de um CD
Pode-se gravar a partir de um CD para uma
cassete. Use as cassetes TYPE I (normal) ou
TYPE II (CrO2). Não use as cassetes TYPE
IV (metal) para gravação.
Para ouvir outras fontes, deve-se parar a
gravação.
Gravação automática de
um CD
Usando-se CD SYNCHRO, pode-se gravar
a partir de um CD em uma cassete
rapidamente.
Use as teclas do aparelho para efectuar esta
operação.
POWER m ON
DISC
SKIP
DSP
p
5
3
4
Secção 4: O leitor de cassetes
2
6
p
1
Lado impresso voltado para cima
3 Seleccione gravação de ambos ou de um
único lado.
Para gravar
Um lado da cassete
Ambos os lados*
* A gravação sempre cessa no final do
lado reverso. Certifique-se de iniciá-la,
portanto, a partir do lado frontal.
CD
1
ALL DISC S
Pressione
DIRECTION para
seleccionar
A
ß ou RELAY
Indicação DIRECTION
DOLBY NR
12563 250 500 1k 2k 4k 8k 16k(Hz)
OFF
VOLUME
4 Quando se deseja reduzir o ruído
sibilante em sinais de baixo nível e alta
frequência, carregue em DOLBY NR
para que «DOLBY NR B» apareça no
mostrador.
5 Carregue em CD SYNCHRO.
O deck B entra no modo de espera para
gravação.
6 Carregue em P para liberar a pausa da
gravação.
A gravação se inicia.
Após cerca de 10 segundos, o CD inicia
a reprodução.
3
4
5
6
7
1
p
1Carregue em § EJECT e insira uma
cassete em branco no deck B com o lado
onde se deseja gravar voltado para
frente.
A gravação se iniciará a partir do lado
frontal da cassete, a menos que se tenha
alterado o sentido de reprodução antes
da gravação.
Certifique-se que as linguetas de
segurança da cassete não tenham sido
removidas.
2Carregue em § OPEN/CLOSE e
coloque um CD. E então, carregue em §
OPEN/CLOSE novamente para fechar a
bandeja de discos.
Caso o indicador da tecla
correspondente à bandeja de disco a
conter o CD que deseja gravar não esteja
aceso em verde, pressione DISC SKIP
repetidamente, até acendê-lo em verde.
3Pressione FUNCTION para seleccionar o
leitor de CDs.
Page 58
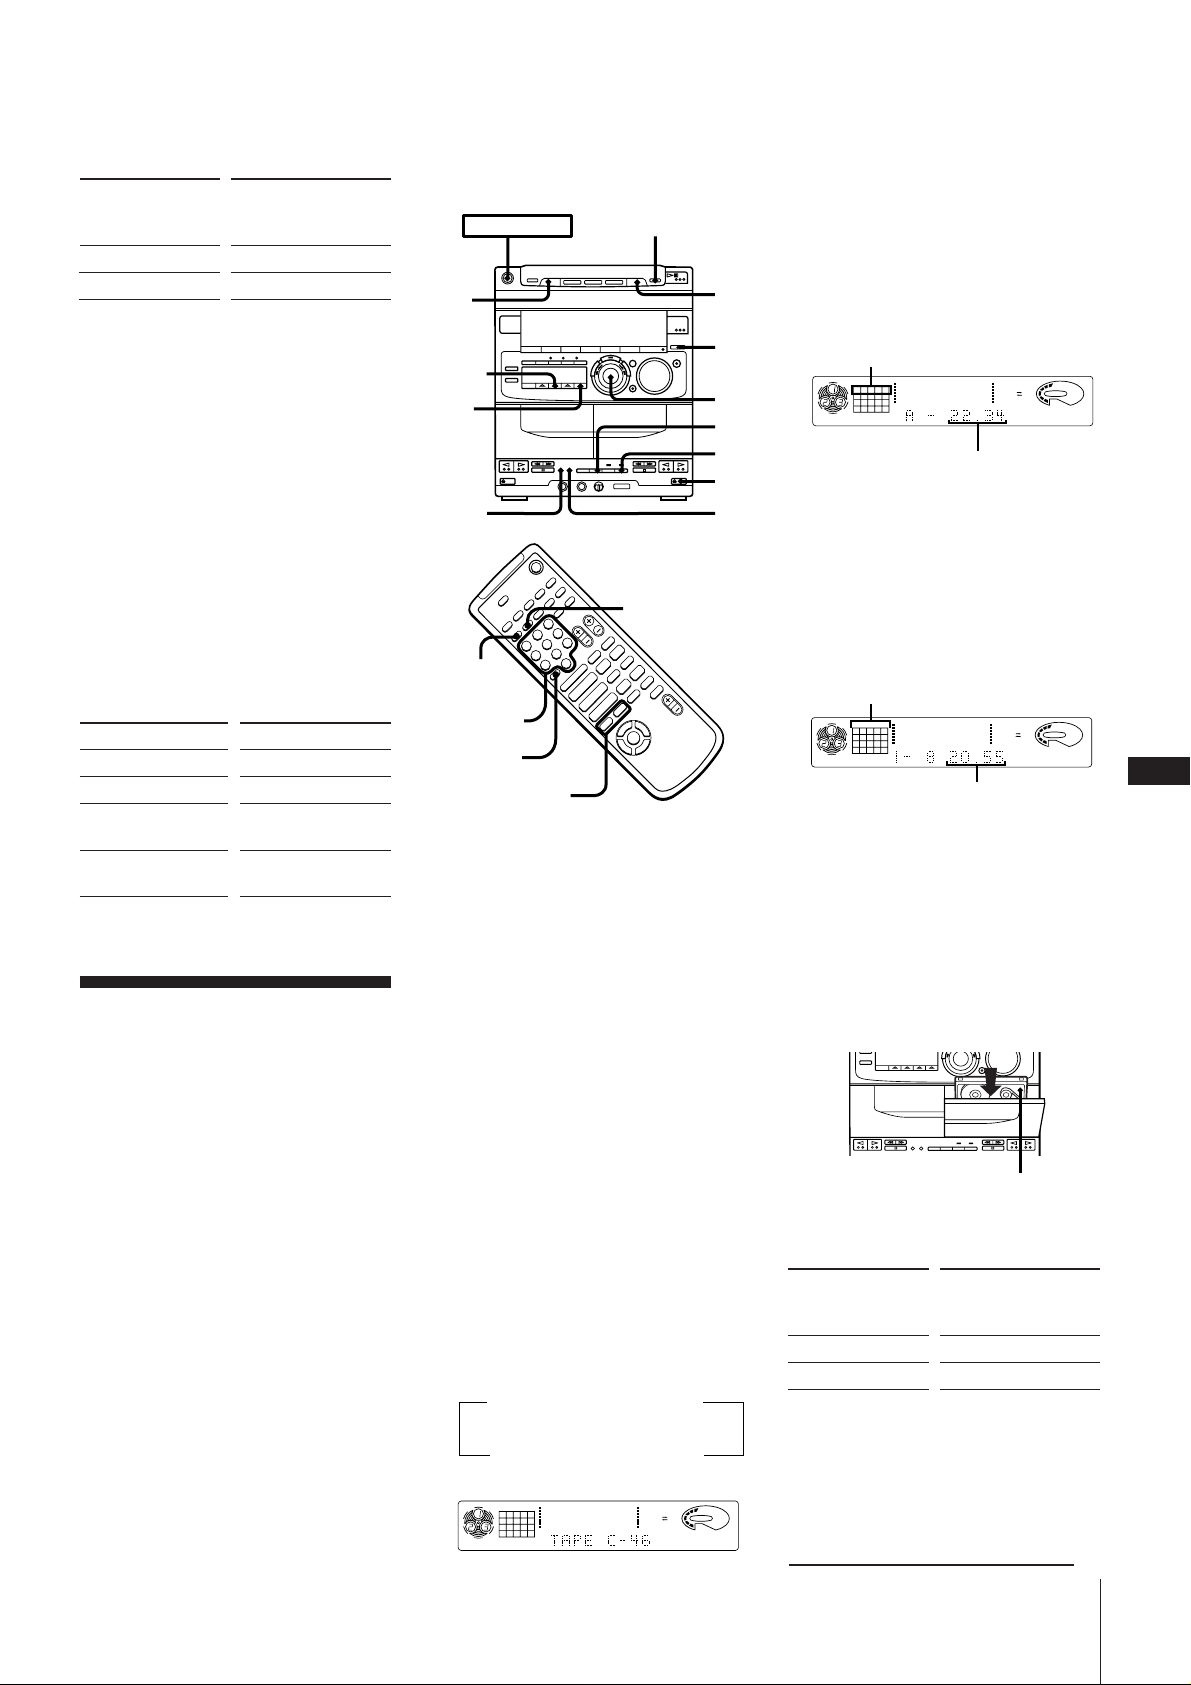
Seleccione a gravação de ambos ou de
12563 250 500 1k 2k 4k 8k 16k(Hz)
DOLBY NR
OFF
CD
DISC PROGRAM
123 5
VOLUME
12563 250 500 1k 2k 4k 8k 16k(Hz)
DOLBY NR
OFF
CD
DISC PROGRAM
12345
678
VOLUME
4
um único lado.
Para gravar
Um lado da cassete
Ambos os lados*
Pressione
DIRECTION para
seleccionar
A
ß ou RELAY
* A gravação sempre pára no final do lado
reverso. Certifique-se, portanto, de
iniciá-la a partir do lado frontal.
5 Quando se deseja reduzir o ruído
sibilante de sinais em baixo nível e alta
frequência, pressione DOLBY NR para
que «DOLBY NR B» apareça no
mostrador.
6 Pressione r REC.
O deck B entra no modo de espera para
a gravação.
7 Pressione P PAUSE para liberar a pausa
de gravação.
A gravação se inicia.
8 Carregue em · no leitor de CDs.
Inicia-se a reprodução do CD.
Para
cessar a gravação
pausar a gravação
cessar a reprodução
Carregue em
p no deck
P PAUSE
p no leitor de CDs
do CD
pausar a reprodução
do CD
· no leitor de
CDs
Gravação de CDs:
Especificação da
duração da fita
(edição por tempo)
Utilize as teclas tanto do aparelho quanto
do telecomando para executar esta
operação.
POWER m ON
p
DISC
SKIP
PLAY
MODE
3,
5,
6
DOLBY
NR
+
CHECK
+
p
–
)0
P
pP
Æ»
)0+=
Æ»
Æ
4
$
EDIT
Numeric
Teclas
buttons
numéricas
> 10
–
=/+
1Carregue em FUNCTION
repetidamente, até que «CD» apareça no
mostrador.
2Pressione § OPEN/CLOSE e coloque
um CD.
A seguir, carregue em § OPEN/CLOSE
novamente para fechar a bandeja de
CDs.
Caso o indicador da tecla
correspondente à bandeja de disco a
conter o CD que deseja gravar não esteja
aceso em verde, pressione DISC SKIP
repetidamente, até acendê-lo em verde.
2
1
4
9
10
7
8
Seleccione «HALF», caso deseje repartir
ao meio o tempo total de reprodução do
CD. Não é possível seleccionar «HALF»
para a gravação de CDs com mais de 20
faixas.
5 Carregue em EDIT.
O leitor de discos compactos determina
automaticamente as faixas a serem
gravadas no lado A.
Faixas a serem gravadas no lado A
Tempo total de leitura no lado A
6 Para gravar em ambos os lados,
carregue em EDIT novamente. O leitor
de discos compactos determina as faixas
a serem gravadas no lado B.
Caso queira gravar somente no lado A,
carregue em p no leitor de discos
compactos para cessar o piscamento da
indicação.
Faixas a serem gravadas
tanto no lado A quanto no B
Tempo total de leitura no lado B
7 Pressione § EJECT e insira uma fita em
branco no deck B, com o lado onde
deseja gravar voltado para frente.
A gravação tem início a partir do lado
frontal da fita, a menos que se altere o
sentido de reprodução antes da
gravação.
Certifique-se que as linguetas de
segurança da cassete não foram
removidas.
P
21
Este sistema estéreo pode criar programas
baseados na duração da fita. O leitor de
discos compactos cria programas que se
adequem à duração da fita. Por exemplo,
caso utilize uma fita de 40 minutos para
gravar um CD de 46 minutos, o leitor de
discos compactos irá automaticamente
seleccionar faixas que se encaixem dentro
dos 40 minutos, preenchendo o máximo
possível a fita. O leitor não programará as
faixas cujo número seja superior a 20.
3Pressione EDIT duas vezes.
«TIME EDIT» aparece no mostrador. A
seguir, «SELECT» e «TIME» aparecem
alternadamente no mostrador.
Lado a ser gravado voltado para fora
8 Seleccione a gravação em ambos ou em
4Gire o anel JOG (ou pressione PREV
= ou NEXT + no telecomando)
para seleccionar a indicação que
corresponda à duração (em minutos) da
sua fita.
As indicações alteram-se na seguinte
sequência:
nN
HALF
C-90
(23:00)
C-90
nN
(45:00)
CD
12345
678
DISC PROGRAM
C-74
(37:00)
12563 250 500 1k 2k 4k 8k 16k(Hz)
C-54
(27:00)
C-60
(30:00)
DOLBY NR
OFF
VOLUME
REC
um único lado da fita.
Para gravar
Um lado da cassete
Ambos os lados*
* A gravação sempre pára no final do lado
reverso. Certifique-se, portanto, de
iniciá-la a partir do lado frontal.
9 Carregue em CD SYNCHRO.
O deck B entra no modo de espera para
a gravação.
continua na próxima página ➔
Pressione
DIRECTION para
seleccionar
A
ß ou RELAY
Secção 4: O leitor de cassetes
Page 59
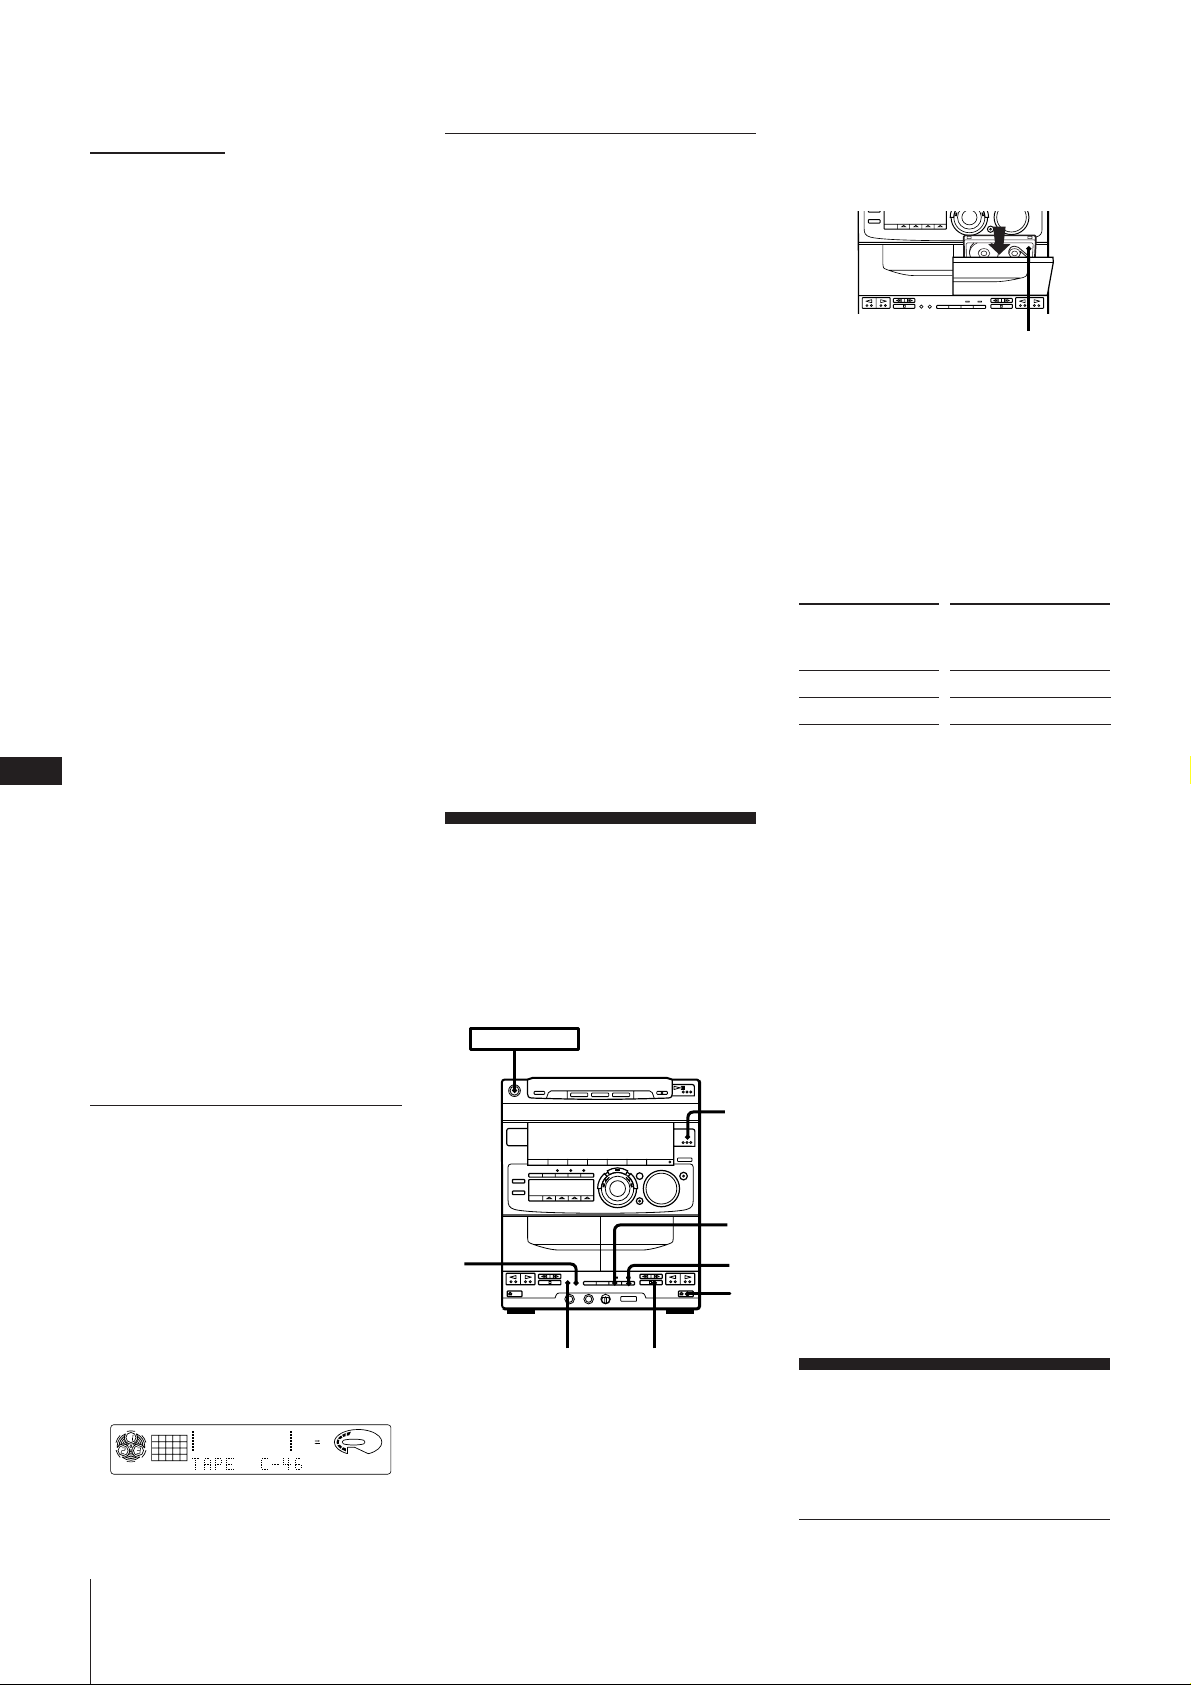
➔ continuação
10 Carregue em P PAUSE para liberar a
pausa de gravação.
Inicia-se a gravação.
Após cerca de 10 segundos, o CD passa
a ser reproduzido.
Para cessar a gravação
Carregue em p no leitor de cassetes ou no
leitor de discos compactos.
Para cancelar a edição por tempo
Carregue em p no leitor de CDs e então
pressione PLAY MODE.
Para verificar a ordem de edição
Carregue em CHECK no telecomando
repetidamente.
Cada vez que se pressiona CHECK, os
números das próximas faixas programadas
aparecem sequencialmente no mostrador.
Para seleccionar as faixas desejadas
de antemão
Podem-se gravar certas faixas (num total de
20) primeiro, mediante a sua selecção antes
da edição por tempo. Consulte
«Reprodução de faixas na ordem desejada
(reprodução programada)».
Para iniciar a gravação sem um
P
espaço de 10 segundos
Primeiro, reproduza ou grave no deck B
22
por alguns segundos, e então carregue em
CD SYNCHRO. O CD passa a ser
reproduzido imediatamente após o início
da gravação.
Isto não funcionará, se § for pressionada
no deck B antes da gravação.
Para accionar DOLBY NR
Quando desejar reduzir o ruído sibilante de
fundo da fita em sinais de baixo nível e alta
frequência, pressione DOLBY NR de modo
a obter «DOLBY NR B» no mostrador após
o passo 8.
Gravação de CDs: Selecção
da duração da fita (edição
por selecção da fita)
Após inserir CDs, carregue em EDIT no
passo 3, de forma que «TAPE SELECT»
apareça no mostrador.
O leitor divide as faixas para ambos os
lados , A e B, automaticamente e cria dois
programas de quase a mesma duração. A
ordem das faixas permanece a mesma da
original. Após a programação, a duração de
fita mais adequada é indicada no
mostrador.
CD
12345
678
12563 250 500 1k 2k 4k 8k 16k(Hz)
DISC PROGRAM
Nota
Não é possível utilizar a edição por selecção
da fita, caso tenham sido seleccionadas as
faixas desejadas de antemão.
Secção 4: O leitor de cassetes
DOLBY NR
Gravação de CDs:
Especificação da ordem
Certifique-se que as linguetas de
segurança da cassete não foram
removidas.
das faixas (edição
programada)
Pode-se ajustar o tempo total de gravação
para a duração da fita durante a criação de
um programa.
1 Execute os passos de 1 a 7 de
«Reprodução de faixas na ordem
desejada (reprodução programada)», e
então carregue em P no telecomando
para pausar a gravação no final do lado
A.
«P» aparece e o tempo total de leitura é
reajustado a 0.00.
2 Repita os passos de 4 a 7 para criar um
programa para o lado B.
3 Após a programação, execute os passos
de 7 a 10 de «Gravação de CDs:
Especificação da duração da fita (edição
por tempo)».
Nota
Caso o último trecho da faixa seja gravado
na fita guia do final da fita, a gravação pode
ficar incompleta.
Lado de gravação voltado para fora
2Carregue em TUNER/BAND várias
vezes, até que a banda de rádio desejada
apareça.
3Sintonize a estação de rádio que deseja
gravar. (Consulte «Audição do rádio»
ou «Sintonização de estações de rádio
programadas» quanto aos detalhes.)
4Seleccione a gravação de ambos ou de
apenas um dos lados da fita.
Para gravar
Um lado da cassete
Ambos os lados*
* A gravação sempre pára no final do lado
reverso. Certifique-se, portanto, de
iniciá-la a partir do lado frontal.
Pressione
DIRECTION para
seleccionar
A
ß ou RELAY
5Carregue em r REC.
Gravação de sinais
O deck B entra no modo de espera para
a gravação.
do rádio
6Carregue em P PAUSE para liberar a
Podem-se gravar sinais do sintonizador
numa fita.
Utilize cassetes TYPE I (normal) ou TYPE II
(crómio).
POWER m ON
2
5
4
6
pausa de gravação.
Tem início a gravação.
Para cessar a gravação
Carregue em p no deck de cassetes.
Para reduzir ruídos durante a
gravação de MW (AM)
Caso um ruído sibilante seja produzido
durante a gravação, reoriente a antena de
quadro AM até obter uma recepção óptima.
Para accionar DOLBY NR
Quando desejar reduzir o ruído sibilante de
fundo da fita em sinais de baixo nível e alta
frequência, pressione DOLBY NR de modo
a obter «DOLBY NR B» no mostrador após
o passo 4.
1
DOLBY NR
1 Pressione § EJECT e insira uma cassete
VOLUME
REC
em branco no deck B, com o lado onde
deseja gravar voltado para frente.
A gravação inicia-se a partir do lado
frontal da cassete, a menos que se altere
o sentido de reprodução antes da
gravação.
p
Gravação de uma
outra cassete
(duplicação)
Duplicação automática de
uma outra fita
Page 60
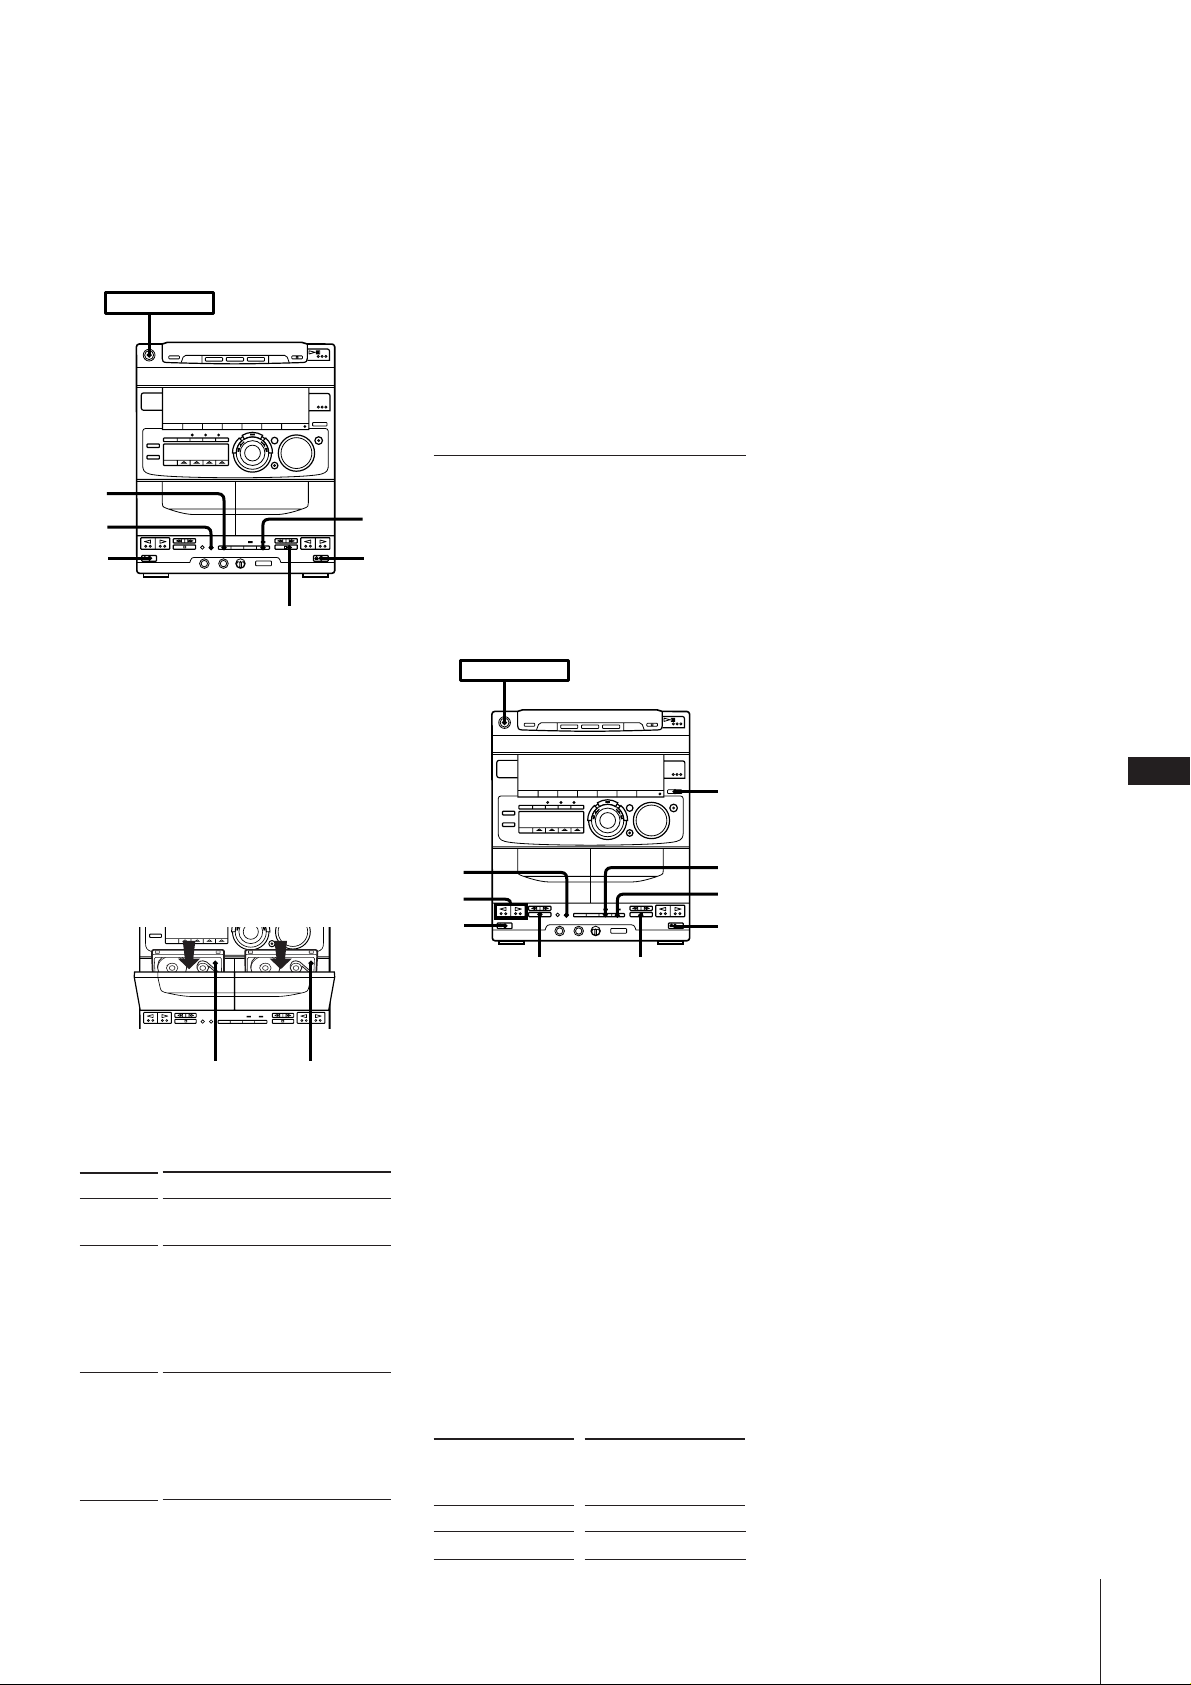
Pode-se gravar uma fita inteira numa outra
cassete automaticamente, mediante a
utilização da duplicação em alta
velocidade.
Utilize as teclas do aparelho para executar
esta operação, e cassetes TYPE I (normal)
ou TYPE II (crómio) para a duplicação.
POWER m ON
3
2
4
1 1
p
1 Pressione § EJECT e insira uma cassete
gravada no deck A, com o lado que
deseja reproduzir voltado para frente.
Além disso, insira uma cassete em
branco no deck B com o lado onde
deseja gravar voltado para frente.
A gravação inicia-se a partir do lado
frontal da cassete, a menos que se altere
o sentido de reprodução antes da
gravação.
Certifique-se que as linguetas de
segurança da cassete não foram
removidas.
4 Pressione P PAUSE.
A fita inicia a duplicação.
Caso ajuste DIRECTION para ß ou
RELAY, a gravação sempre cessará no
final do lado reverso.
Para cessar a duplicação
Carregue em p no deck B.
Não é necessário pressionar DOLBY NR na
duplicação em alta velocidade
A fita no deck B é automaticamente
gravada com as mesmas condições da fita
no deck A.
Duplicação manual de uma
outra fita
Quando desejar duplicar somente parte da
fita, execute a duplicação manualmente à
velocidade normal. Utilize fitas TYPE I
(normal) ou TYPE II (crómio) para
gravações.
POWER m ON
2
3
6
1
4
5
1
* A gravação sempre cessa no final do
lado reverso. Certifique-se, portanto, de
iniciá-la a partir do lado frontal.
4 Carregue em r REC.
O deck B entra no modo de espera para
a gravação.
5 Pressione P PAUSE para liberar a pausa
de gravação.
Inicia-se a gravação.
6 Carregue em · ou ª no deck A para
iniciar a reprodução.
Para cessar a gravação
Carregue em p nos decks A e B.
Notas
•Na duplicação de cassetes originalmente
gravadas com Dolby NR B, a fita
duplicada é automaticamente gravada
com Dolby NR B.
•Quando desejar duplicar uma fita
gravada sem Dolby NR B numa outra fita
usando Dolby NR B, pressione DOLBY
NR de modo que «DOLBY NR B» apareça
no mostrador antes da gravação.
P
23
Lado de reprodução
voltado para fora
Lado de gravação
voltado para fora
2 Escolha como deseja gravar a fita e
pressione DIRECTION.
Indicação
A
ß
RELAY
Operação
A duplicação cessa no final de
um lado.
Quando a fita em um deck
atinge o final do lado frontal, a
mesma reverte-se
imediatamente,
independentemente da posição
da fita no outro deck.
Quando a fita em um dos decks
atinge o final do lado frontal, a
mesma pára o movimento até
que a outra fita chegue ao fim,
para então ambas reverterem-se
simultaneamente.
3 Carregue em HIGH SPEED DUBBING.
O deck B entra no modo de espera para
a gravação.
p
p
1 Carregue em § EJECT e insira uma
cassete gravada no deck A, com o lado
que deseja reproduzir voltado para
frente.
Além disso, insira uma cassete em
branco no deck B, com o lado onde
deseja gravar voltado para frente.
A gravação inicia-se a partir do lado
frontal da cassete, a menos que se altere
o sentido de reprodução antes da
gravação.
Certifique-se que as linguetas de
segurança da cassete não foram
removidas.
2 Carregue em FUNCTION
repetidamente, até que «TAPE» apareça
no mostrador.
3 Seleccione a gravação de ambos ou de
somente um dos lados da fita.
Para gravar
Um lado da cassete
Ambos os lados*
Pressione
DIRECTION para
seleccionar
A
ß ou RELAY
Secção 4: O leitor de cassetes
Page 61
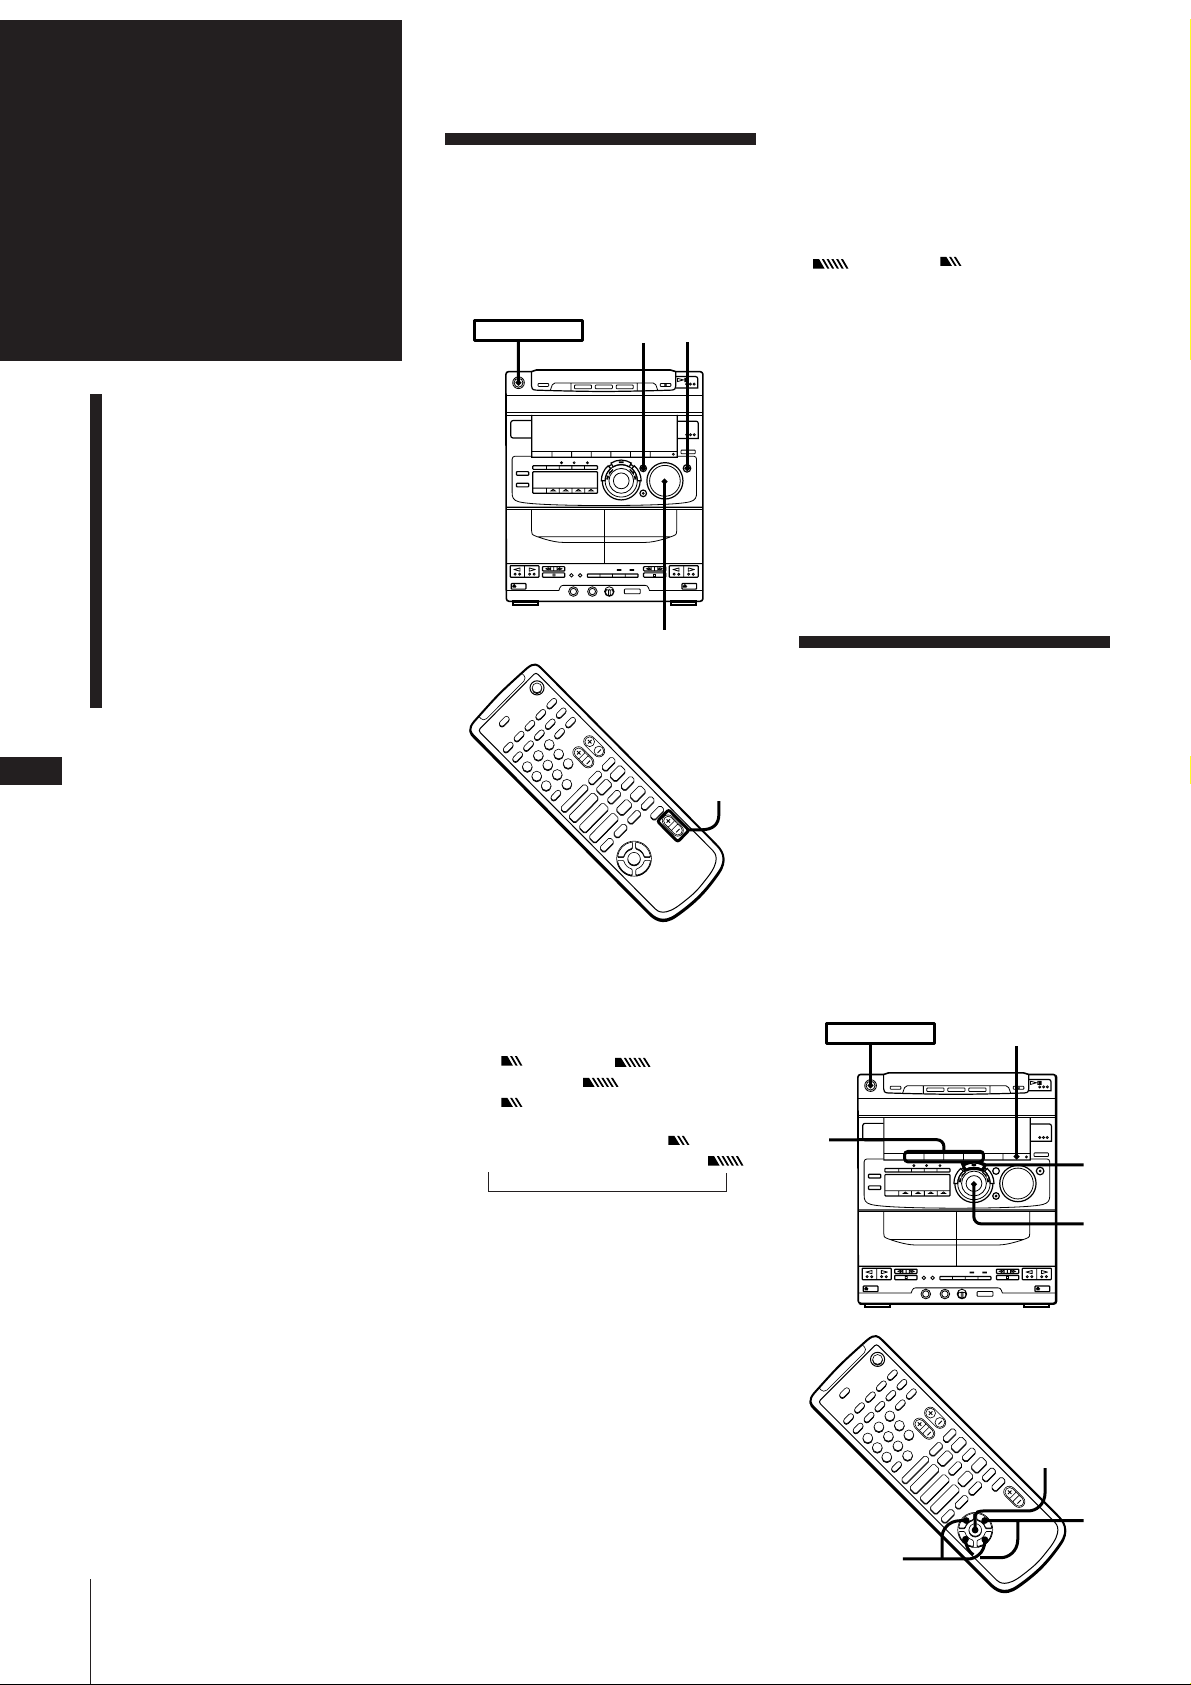
Secção 5:
–
+
–
p
+
P
)0
pP
)0+=
Æ
Æ»
Æ»
4
$
POWER m ON
EFFECT ON/OFF
1
3
2
1
2
MUSIC MENU
ON/OFF
Ajustamento
de Som
Ajustes de som
Selecção de efeitos sonoros
Ajuste de efeitos sonoros
Criação de um arquivo de
efeito sonoro pessoal
(arquivo personalizado)
Ajustes de som
Para desfrutar completamente do som
proveniente do seu sistema estéreo, efectue
os ajustamentos de áudio a seguir. Consulte
as secções subsequentes quanto aos ajustes
adicionais de áudio.
POWER m ON
DBFB GROOVE
Nota
•O cancelamento de GROOVE não
cancelará o nível DBFB ou a curva de
equalização.
Para cancelar o nível DBFB, carregue em
DBFB repetidamente, até que «DBFB
» ou «DBFB » desapareça do
mostrador. Ajuste a equalização de forma
a obter o efeito desejado.
•O som pode ser distorcido com DBFB ou
GROOVE activado quando se liga um
superaltifalante de graves opcional (Sony
SA-W10G, etc.) ao aparelho.
Neste caso, desligue DBFB e ajuste o som
do superaltifalante de graves.
Para a audição através dos
auscultadores
Ligue os auscultadores à tomada PHONES.
Nenhum som será emanado pelos
altifalantes.
P
24
Comutação da formação
dos altifalantes
(formação sónica)
VOLUME
+
–
+
p
–
)0
P
Æ»
Æ»
Æ
4
VOL+/–
pP
)0+=
$
Para ajustar o volume
Gire VOLUME no aparelho ou pressione
VOL (+/–) no telecomando.
Para reforçar os graves
Carregue em DBFB* repetidamente, até que
«DBFB » ou «DBFB » apareça no
mostrador. «DBFB » é mais eficaz que
«DBFB ».
indicação desligada n DBFB n DBFB
n
* DBFB = Realimentação Dinâmica de
Graves
Caso utilize o sistema DBFB com o
equalizador gráfico
Se os graves estiverem demasiadamente
intensos, a música soará distorcida. Ajuste
os graves lentamente durante a audição da
música, de forma a poder monitorizar o
efeito do ajuste.
Selecção de efeitos
sonoros
Este sistema estéreo está provido de 20
diferentes efeitos programados (menu
musical) criados a partir de diferentes
ajustes de equalizador gráfico e efeitos
perimétricos.
Com o pressionamento de uma única tecla,
pode-se optar entre uma variedade de
efeitos, de acordo o género musical ou
aplicação. A função de arquivo
personalizado (consulte «Criação de um
arquivo de efeito sonoro pessoal (arquivo
personalizado)» permite-lhe armazenar os
seus próprios efeitos.
Secção 5: Ajustamento de Som
Para obter um som potente (GROOVE)
Carregue em GROOVE.
O volume comuta-se ao modo de
alimentação, DBFB é automaticamente
ajustado à intensidade total, a curva de
equalização altera-se e a tecla «GROOVE»
acende-se. Pressione GROOVE novamente
para retornar ao volume prévio.
Page 62
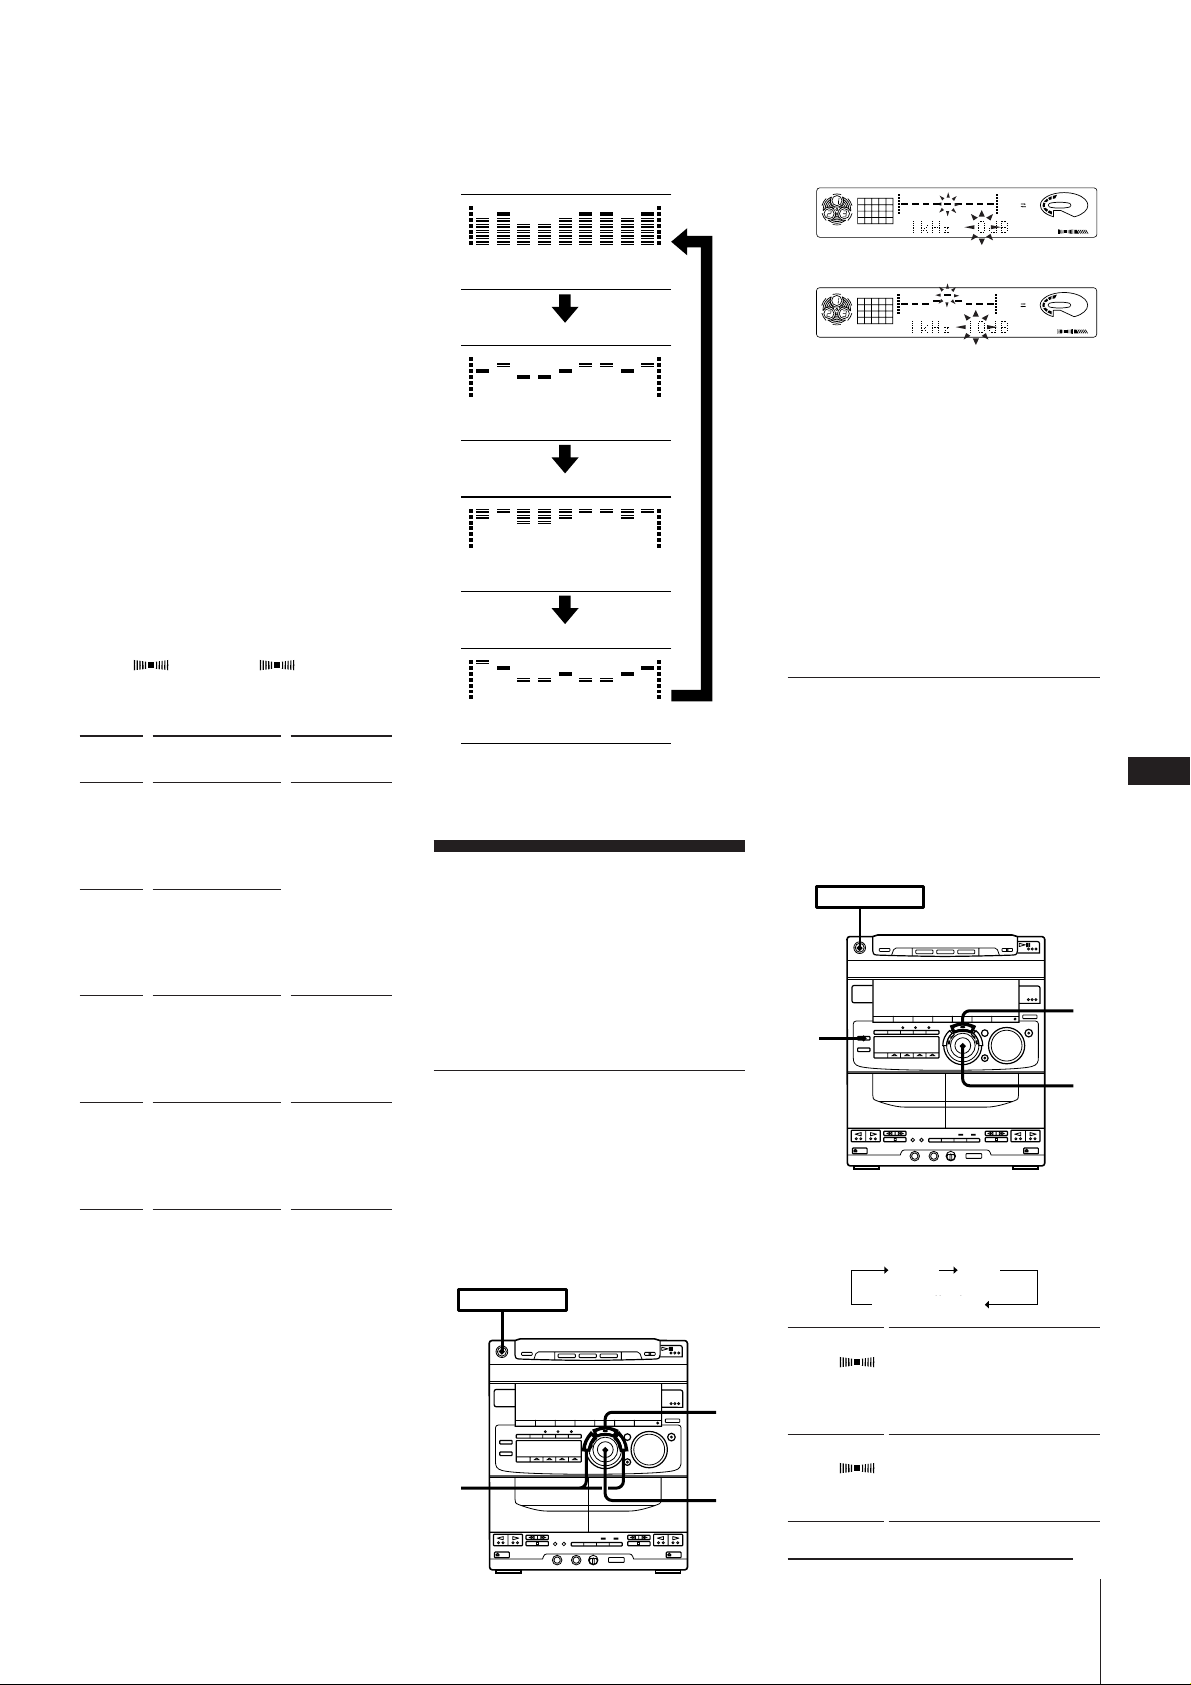
12563 250 500 1k 2k 4k 8k 16k(Hz)
DOLBY NR
OFF
CD
1DISC
VOLUME
DBFB
SUR1
DOLBY NR
OFF
CD
1DISC
DBFB
SUR1
VOLUME
12563 250 500 1k 2k 4k 8k 16k(Hz)
4
3
1,
2
POWER m ON
1 Carregue em uma das teclas MENU (ou
MUSIC MENU 4 /$ no telecomando)
para seleccionar um MENU.
Consulte o quadro «Opções do menu
musical» na página a seguir. O último
efeito seleccionado de tal menu
aparecerá no mostrador.
2 Utilize o anel JOG (ou carregue em
MUSIC MENU “ /” no telecomando
repetidamente) para seleccionar o préajuste desejado.
O nome do pré-ajuste aparecerá no
mostrador.
3 Carregue em ENTER/NEXT.
Não é necessário pressionar ENTER/
NEXT quando se usa o telecomando.
Para cancelar o efeito
Carregue em EFFECT ON/OFF
repetidamente (ou MUSIC MENU ON/
OFF no telecomando) de forma que
«EFFECT OFF» apareça no mostrador.
Opções do menu musical
«SUR 1 » ou «SUR 2 » aparece,
caso se seleccione um efeito com efeitos
perimétricos.
Tecla
MENU
MENU 1
MENU 2
MENU 3
MENU 4
Para alterar a indicação do
equalizador
Cada vez que se mantém pressionada
DISPLAY/DEMO por alguns segundos, a
indicação do equalizador altera-se para
Efeito
ROCK
POPS
JAZZ
CLASSIC
DANCE
SALSA
REGGAE
BALLADE
OLDIES
SOUL
GAME
MOVIE
NIGHT
MORNING
PARTY
L.HALL
STADIUM
STUDIO
CHURCH
CLUB
Para
fontes
musicais
padrão
situações de
áudio
situações
especiais de
áudio
mostrar uma das quatro indicações abaixo.
Analisador de espectros 1
12563 250 500 1k 2k 4k 8k 16k(Hz)
Analisador de espectros 2
12563 250 500 1k 2k 4k 8k 16k(Hz)
Analisador de espectros 3
12563 250 500 1k 2k 4k 8k 16k(Hz)
Curva do equalizador gráfico
12563 250 500 1k 2k 4k 8k 16k(Hz)
Ajuste de efeitos
sonoros
Pode-se ajustar o efeito sonoro, usando-se
as seguintes duas funções:
•Equalizador gráfico
•Efeito perimétrico
Ajuste do som
(equalizador gráfico)
Pode-se ajustar o som pelo aumento ou
diminuição dos níveis de gamas de
frequências específicas.
Antes da operação, seleccione primeiro o
efeito de som que deseja para o seu áudio
básico.
POWER m ON
1
4
2
1 Carregue em FREQUENCY + ou – para
seleccionar uma banda de frequências.
2 Gire o anel JOG para ajustar o nível.
3 Repita os passos 1 e 2.
4 Carregue em ENTER/NEXT quando
finalizado.
Nota
Caso escolha um outro efeito de áudio do
menu (que não «EFFECT OFF»), o efeito
sonoro ajustado é perdido. Para reter o
efeito sonoro ajustado para utilização
futura, armazene-o em um arquivo
personalizado. (Consulte «Criação de um
arquivo de efeito sonoro pessoal (arquivo
personalizado)».
Activação de campos
acústicos (efeito
perimétrico)
Pode-se ajustar o efeito perimétrico.
Primeiro, seleccione dentre os dois tipos de
efeito perimétrico programado, de acordo
com o tipo de software que possui.
1 Carregue em DSP repetidamente, até
que o efeito perimétrico desejado
apareça no mostrador.
HALL
sem indicação
HALL
(SUR 1 )
LIVE
(SUR 2 )
Pode-se escutar o som
naturalmente acústico com
um efeito de reverberação
que é produzido em uma sala
de concertos de grande porte.
Pode-se sentir tamanha
sensação de presença, como
se se estivesse presente num
concerto ao vivo.
continua na próxima página ➔
Secção 5: Ajustamento de Som
LIVE
no display
P
25
Page 63
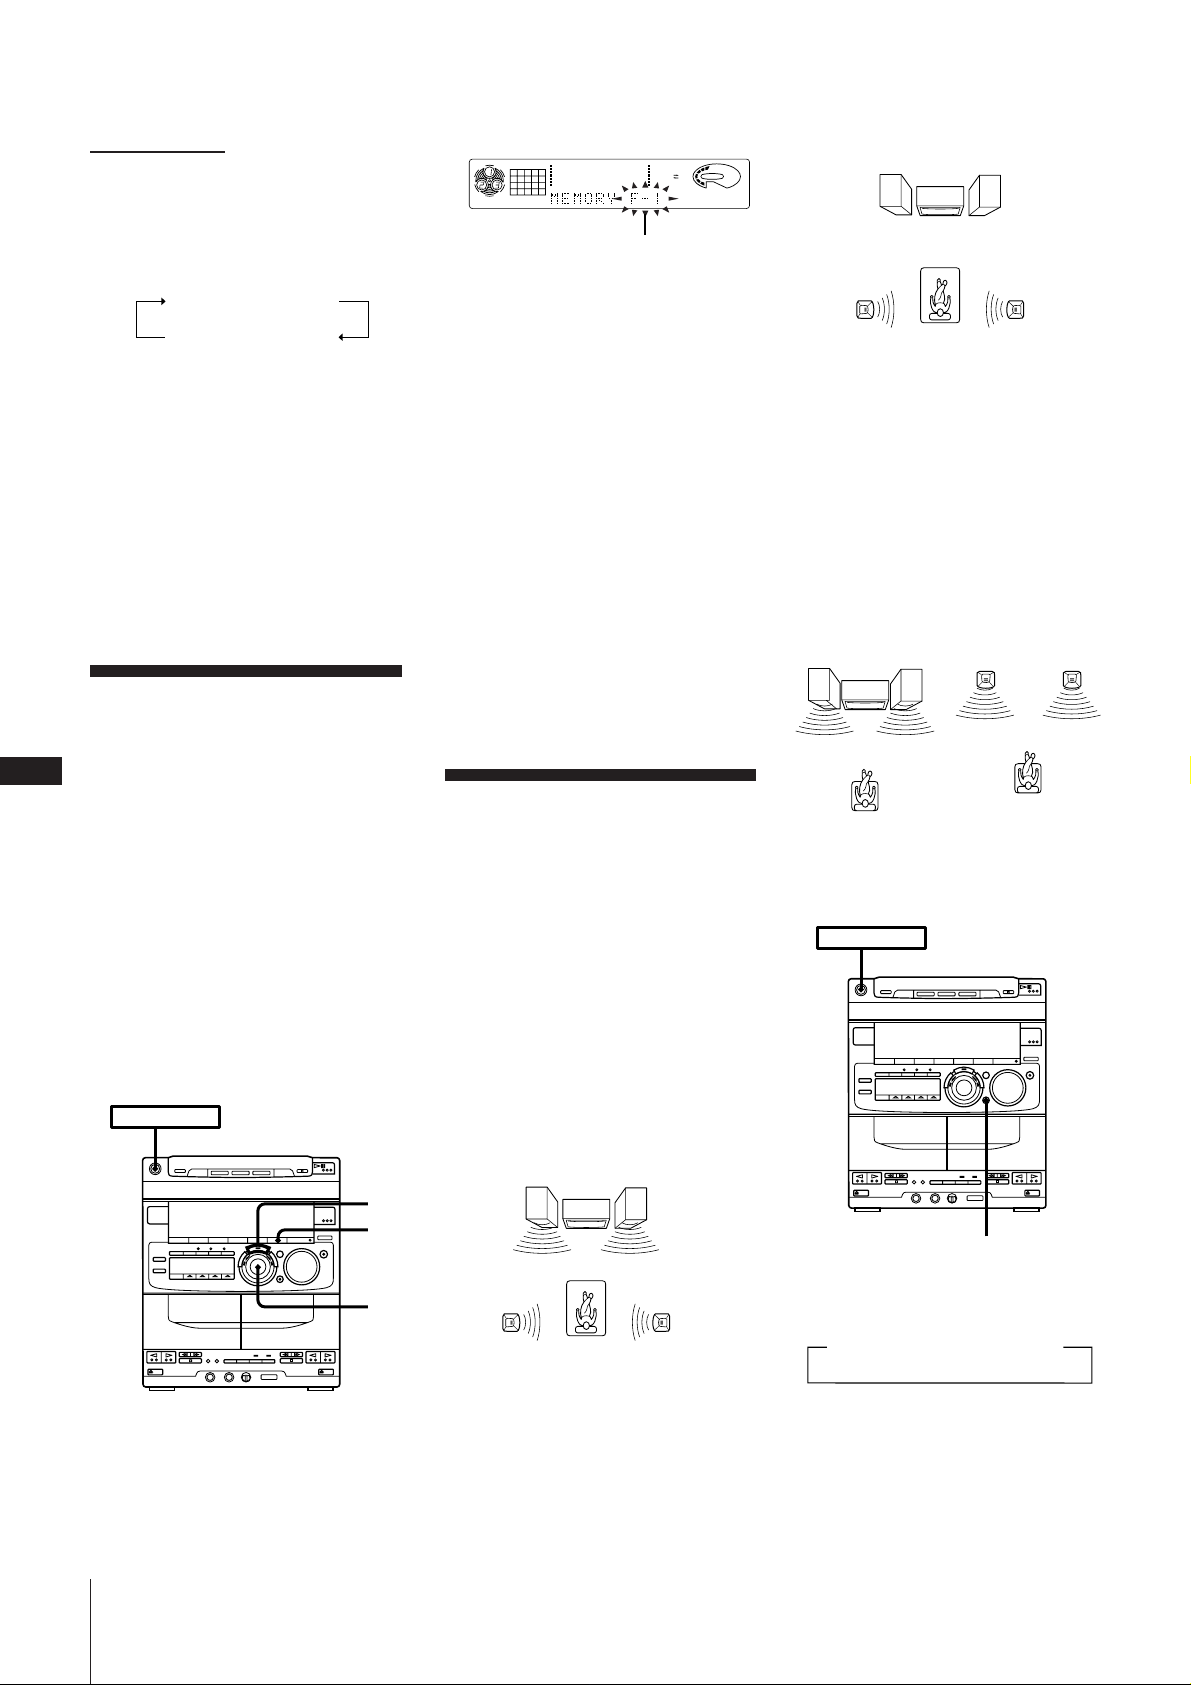
➔ continuação
2 Mantenha pressionada DSP por mais de
um segundo, e então gire o anel JOG
para escolher o nível perimétrico
desejado.
A indicação altera-se como segue:
LEVEL 0 nNLEVEL 1
LEVEL 3 LEVEL 2
O efeito perimétrico torna-se mais
intenso à medida que o número do nível
aumenta.
3 Carregue em ENTER/NEXT.
Nota
Na escolha de outros efeitos sonoros, os
efeitos perimétricos serão cancelados. Caso
queira memorizar o efeito, armazene-o em
um arquivo personalizado (consulte
«Criação de um arquivo de efeito sonoro
pessoal (arquivo personalizado)»).
Criação de um
arquivo de efeito
sonoro pessoal
P
(arquivo
26
personalizado)
Pode-se criar um arquivo personalizado de
padrões de áudio (efeito perimétrico e
equalizador gráfico) e armazená-los na
memória do aparelho. Posteriormente,
chame um padrão de áudio para reproduzir
uma fita, um CD ou um programa de rádio
favorito. Crie um máximo de cinco
arquivos de áudio.
Antes da operação, seleccione primeiro o
efeito sonoro que deseja para o seu áudio
original.
POWER m ON
aparecerá no mostrador.
CD
1DISC
12563 250 500 1k 2k 4k 8k 16k(Hz)
Número do arquivo
DOLBY NR
VOLUME
OFF
3 Utilize o anel JOG para seleccionar o
número do arquivo (P FILE) onde deseja
armazenar o efeito sonoro.
4 Carregue em ENTER/NEXT.
Os efeitos sonoros ajustados são
armazenados sob o número do arquivo
seleccionado. Os ajustes previamente
armazenados nesta posição de memória
são apagados e substituídos pelos novos
ajustes.
Para chamar o arquivo personalizado
1 Carregue em P FILE (ou MUSIC MENU
4 /$ no telecomando repetidamente)
para obter a indicação do último arquivo
personalizado seleccionado.
2 Utilize o anel JOG (ou pressione MUSIC
MENU “ /” no telecomando
repetidamente) para seleccionar o
arquivo personalizado desejado.
3 Carregue em ENTER/NEXT.
Não é necessário pressionar ENTER/
NEXT quando se usa o telecomando.
Comutação da
formação dos
altifalantes
(formação sónica)
Em adição ao sistema normal de quatro
altifalantes, pode-se optar entre duas outras
configurações de altifalantes, de acordo
com a situação de áudio.
Modo NORMAL
As colunas de altifalantes posteriores
proporcionam efeitos sonoros reflexivos e
de reverberação que enfatizam o som das
colunas frontais.
COLUNA FRONTAL
ESQUERDA (L)
COLUNA FRONTAL
DIREITA (R)
COLUNA FRONTAL
ESQUERDA (L)
COLUNA
PERIMÉTRICA/
AUXILIAR
ESQUERDA (L)
Modo LINK
O mesmo som é emanado pelas colunas
frontais e pelas colunas perimétricas/
auxiliares. Por exemplo, quando se deseja
escutar o mesmo som em dois recintos,
recomenda-se ajustar as colunas frontais e
as colunas perimétricas/auxiliares em cada
recinto.
COLUNA
FRONTAL
ESQUERDA
(L)
Para seleccionar o modo de formação
Carregue em SONIC FORMATION
repetidamente, até que o modo desejado
apareça no mostrador.
POWER m ON
COLUNA
FRONTAL
DIREITA
COLUNA FRONTAL
DIREITA (R)
COLUNA
PERIMÉTRICA/
AUXILIAR
ESQUERDA (L)
(R)
COLUNA
PERIMÉTRICA/
AUXILIAR
DIREITA (R)
COLUNA
PERIMÉTRICA/
AUXILIAR
DIREITA (R)
4
2
3
1 Obtenha o efeito sonoro desejado pela
utilização do equalizador gráfico e do
efeito perimétrico.
2 Mantenha pressionada P FILE por mais
de um segundo.
O número do arquivo personalizado
Secção 5: Ajustamento de Som
COLUNA
PERIMÉTRICA/
AUXILIAR
ESQUERDA (L)
Modo WHISPER
O som das colunas frontais é cortado e
emanado pela coluna perimétrica/auxiliar
com o seu som diminuído. Por exemplo,
quando se deseja escutar o som na cama, é
recomendável ajustar as colunas
perimétricas/auxiliares de cada lado da
cama.
COLUNA
PERIMÉTRICA/
AUXILIAR
DIREITA (R)
SONIC FORMATION
Cada vez que se pressiona SONIC
FORMATION, o modo altera-se como
segue:
WHISPER
Para retornar ao modo normal
Carregue em SONIC FORMATION
repetidamente, até que «NORMAL»
apareça no mostrador.
Nota
Não coloque os altifalantes perimétricos no
topo de um televisor. Do contrário, poderá
ocasionar distorções de cores no écran do
televisor.
nn
NORMALLINK
Page 64
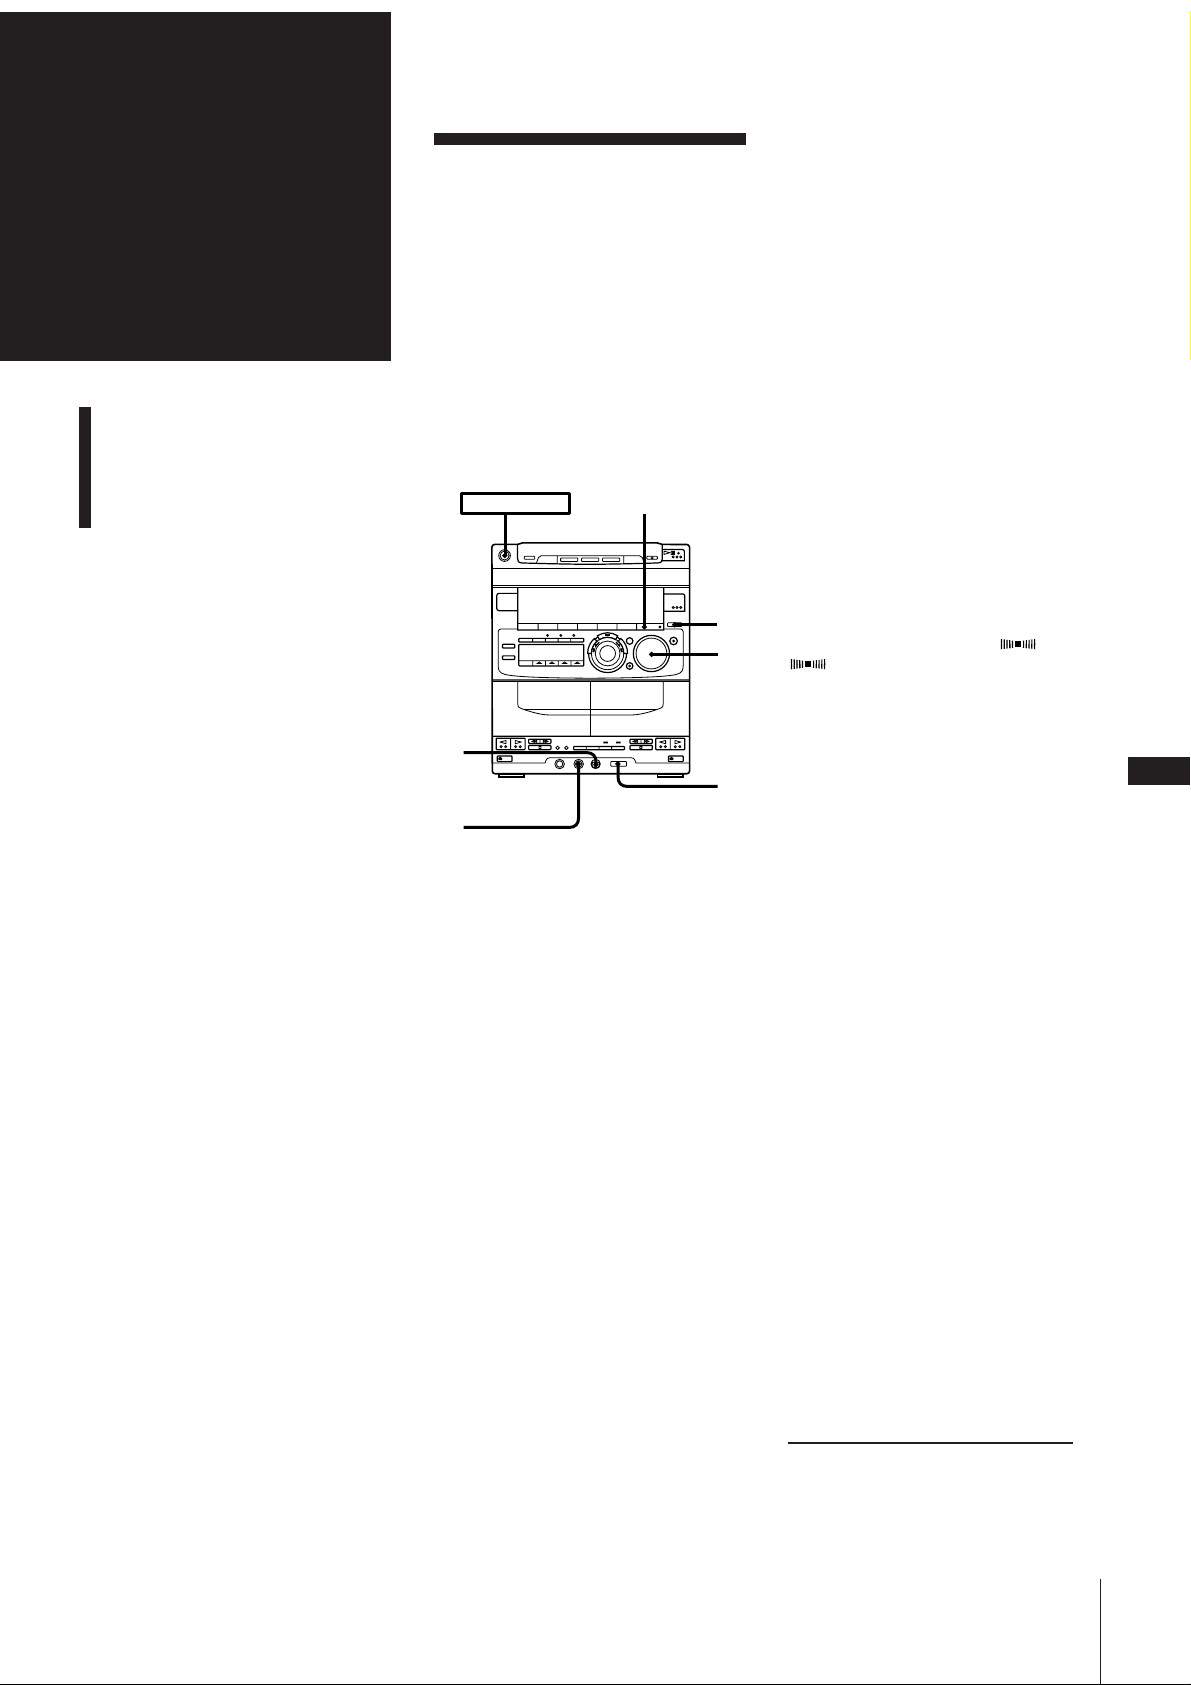
Secção 6:
Karaokê
Karaokê: Acompanhamento
musical para canto
Gravação de Karaokê
(mistura com microfone)
Karaokê:
Acompanhamento
musical para canto
Este sistema estéreo permite-lhe cantar ao
longo de uma variedade de fontes
diferentes, incluindo CD de vídeo, CD-G,
CD musical e fita cassete.
Além disso, pode-se minimizar a voz do
cantor -- «redução do vocal» -- de forma a
poder cantar junto com algum CD ou
cassete ou usando um microfone (venda
avulsa) durante a reprodução de uma
cassete ou disco multiplex.
POWER m ON
EFFECT ON/OFF
4
6
6 Ajuste o VOLUME.
7 Cante ou fale ao microfone.
8 Utilize MIC LEVEL para ajustar o nível
de volume do microfone.
Ao terminar o canto Karaokê
1 Ajuste MIC LEVEL a MIN.
2 Desligue o microfone e carregue em
KARAOKE PON/MPX repetidamente,
até que «h PON», «h MPX R» e
«h MPX L» desapareçam do mostrador.
Para escutar ambos os canais (os
instrumentos e a voz gravada do
cantor) de uma fonte MPX
Carregue em KARAOKE PON/MPX
repetidamente, de forma que «h PON»,
«h MPX R» ou «h MPX L» desapareça do
mostrador.
Caso pressione EFFECT ON/OFF ou rechame
um efeito sonoro com as teclas MENU
O modo karaokê é cancelado.
Os efeitos perimétricos SUR1 e SUR 2
são automaticamente cancelados
quando se usa KARAOKE PON/MPX.
2,
8
3
1 Na utilização de CDs de vídeo ou CD-
Gs, ligue o seu televisor e comute-o à
entrada de vídeo apropriada.
Consulte o manual de instruções
fornecido com o seu televisor quanto aos
pormenores.
2 Gire MIC LEVEL até MIN para reduzir
o nível de controlo do microfone.
3 Ligue um microfone na tomada MIX
MIC.
4 Carregue em FUNCTION várias vezes
para seleccionar uma fonte sonora, e
então accione a reprodução.
5 Pressione KARAOKE PON/MPX.
Para fontes multiplex
Pressione repetidamente até que
«h MPX R» ou «h MPX L» apareça no
mostrador(seleccione direita (R) ou
esquerda (L) de acordo com a
codificação do seu software MPX). Podese escutar a própria voz através do
microfone e os intrumentos.
Para fontes de karaokê normal
Não é necessário pressionar KARAOKE
PON/MPX.
5
Notas sobre a redução do vocal com fontes
estéreo normais
A voz do cantor pode não ser reduzida
completamente pelas seguintes razões:
•a fonte gravada é monofónica (também os
instrumentos podem ser reduzidos);
•somente alguns poucos instrumentos
estão em reprodução na fonte gravada
estéreo;
•está em reprodução um dueto;
•a fonte possui fortes ecos ou coro;
•a voz do cantor na fonte desvia-se do
centro;
•a voz na fonte está a cantar em alto
soprano ou tenor.
Notas
•Caso escute realimentação acústica,
reduza o volume, afaste o microfone dos
altifalantes ou altere o direccionamento
do microfone.
A realimentação acústica ocorre quando o
som dos altifalantes é captado por um
microfone, amplificado, e então
novamente reproduzido.
•Não é possível utilizar os efeitos
perimétricos e o eco digital
simultaneamente.
•A imagem pode ser distorcida quando se
mantém pressionada 0 ou ) no
telecomando.
•O leitor de discos compactos suporta
somente o modo TV para CD-Gs. Outros
modelos não podem ser utilizados.
continua na próxima página ➔
P
27
Para fontes estéreo normais
Pressione repetidamente, até que
«h PON» apareça no mostrador.
Secção 6: Karaokê
Page 65
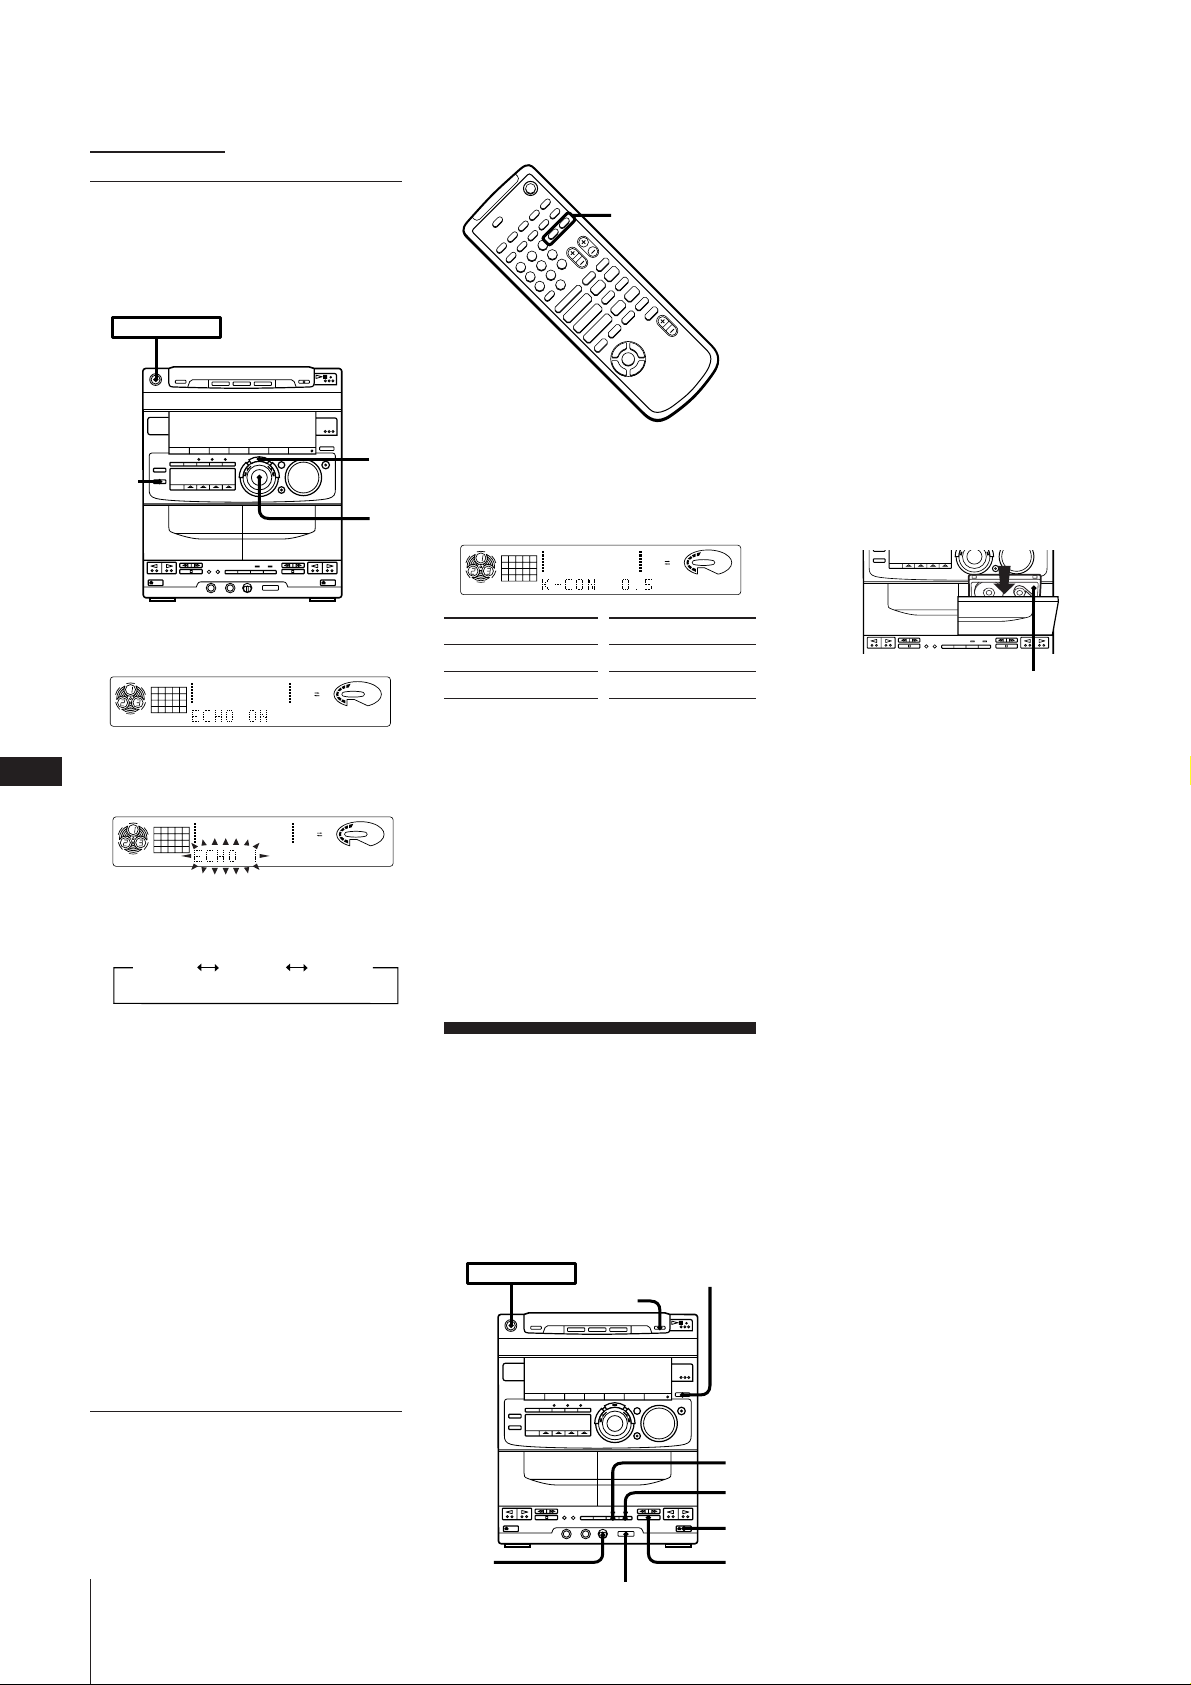
➔ continuação
para adequar-se à sua gama vocal.
1Execute os passos de 1 a 6 em «Karaokê:
Acompanhamento musical para canto».
Adição de um efeito de
eco (eco digital)
Pode-se adicionar um efeito de eco ao som
proveniente do microfone.
POWER m ON
1,2
1 Carregue em DIGITAL ECHO.
«ECHO ON» aparece no mostrador.
CD
12563 250 500 1k 2k 4k 8k 16k(Hz)
1DISC
2 Mantenha pressionada DIGITAL ECHO
P
28
por mais de um segundo.
O nível de ECHO pisca no mostrador.
CD
12563 250 500 1k 2k 4k 8k 16k(Hz)
1DISC
3 Gire o anel JOG para seleccionar o nível
de ECHO desejado.
O mostrador altera-se como segue:
ECHO 1
Números maiores indicam um efeito
mais intenso.
4 Carregue em ENTER/NEXT.
Para cancelar o efeito de eco
Pressione novamente DIGITAL ECHO.
«ECHO OFF» aparece no mostrador e a
tecla DIGITAL ECHO apaga-se.
Nota
O efeito perimétrico é cancelado quando
DIGITAL ECHO é ligada. O efeito
perimétrico não retorna automaticamente
ao ajuste prévio quando DIGITAL ECHO é
desactivada. Carregue em DSP para voltar
a activar o efeito perimétrico.
Para alterar a gradação
(controlo de gradação)
Pode-se ajustar a gradação através de 13
níveis de semitons (6 níveis mais altos ou 6
níveis mais baixos que a gradação original)
Secção 6: Karaokê
DOLBY NR
DOLBY NR
KEY CONTROL +/–
+
–
+
p
–
)0
P
pP
Æ»
)0+=
Æ»
Æ
4
$
2Após ajustar o volume, seleccione a
faixa que deseja gravar e ajuste o leitor
de discos compactos ao modo de
reprodução em pausa.
Ao cantar ao longo da fita, seleccione a
faixa no deck A e ajuste o deck ao modo
de paragem.
3Carregue em § EJECT e insira uma
cassete em branco no deck B, com o lado
onde deseja gravar voltado para frente.
A gravação será iniciada a partir do lado
frontal da fita, a menos que se tenha
alterado o sentido de movimento da fita
antes da gravação.
Certifique-se que as linguetas da cassete
não tenham sido removidas.
4
3
Carregue em KEY CONTROL (+/–)
repetidamente para localizar a gradação
mais apropriada à sua gama vocal.
O nível do controlo de gradação aparece no
mostrador.
CD
12345
678
12563 250 500 1k 2k 4k 8k 16k(Hz)
1DISC
Para Pressione
DOLBY NR
VOLUME
OFF
aumentar a gradação KEY CONTROL +
VOLUME
OFF
reduzir a gradação KEY CONTROL –
Para restaurar a gradação original
Carregue em KEY CONTROL
repetidamente, até que «K-CON OFF»
Lado de gravação voltado para frente
4Carregue em r REC.
O deck B entra no modo de pausa para a
gravação.
apareça no mostrador.
5Carregue em P PAUSE para liberar a
VOLUME
OFF
Notas
•O áudio é monofónico quando se usa KEY
CONTROL.
•O ajuste do controlo de gradação retorna
a «K-CON OFF» automaticamente
quando se desliga a alimentação.
pausa de gravação.
Tem início a gravação.
A gravação sempre cessa no final do
lado reverso, caso ajuste o modo
direccional para ß ou RELAY.
6Inicie a reprodução da fonte sonora e
ECHO 3ECHO 2
Gravação de Karaokê
(mistura com
microfone)
Pode-se «misturar» sons mediante a
reprodução de um dos componentes e o
canto ou o discurso ao microfone (venda
avulsa). Os sons misturados podem, então,
ser gravados numa cassete.
POWER m ON
FUNCTION
p
4
5
cante junto ao microfone.
Carregue em fl no leitor de discos
compactos quando for cantar com um
CD.
Carregue em · no deck A quando for
cantar com uma cassete.
Para cessar a gravação
Carregue em p no deck B e no leitor de
discos compactos (ou no deck A).
Ao finalizar a mistura
1 Ajuste MIC LEVEL a MIN.
2 Desligue o microfone e carregue em
KARAOKE PON/MPX repetidamente,
até que «h PON», «h MPX R» e
«h MPX L» desapareçam do mostrador.
Para gravar somente a partir do
microfone
1 Carregue em FUNCTION repetidamente,
até que «CD» apareça no mostrador.
Caso um CD esteja em reprodução,
carregue em p no leitor de discos
compactos para cessar a reprodução.
2 Accione a gravação.
3 Cante ou discurse ao microfone.
3
MIC
LEVEL
KARAOKE PON/MPX
p
Page 66
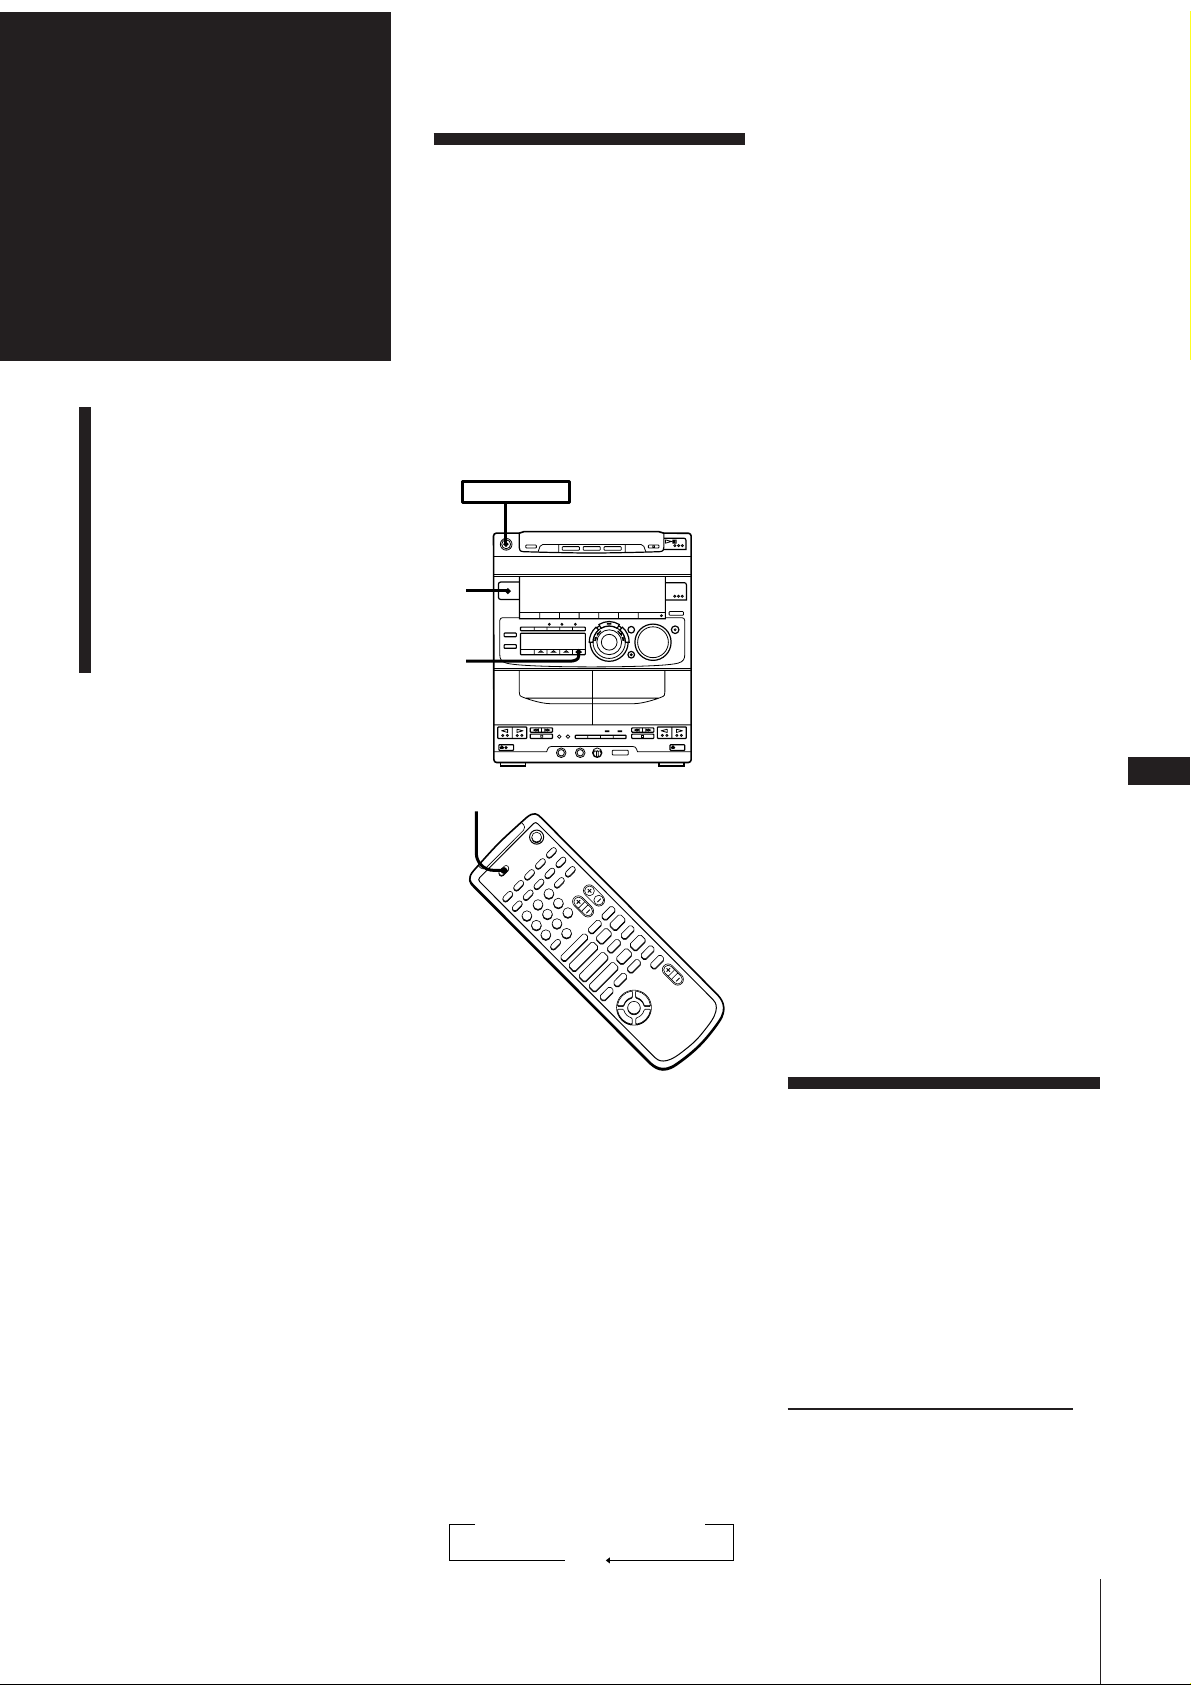
Secção 7:
Adormecer ao som
de músicas
Características
adicionais
Adormecer ao som de
músicas
Despertar ao som de
músicas
Gravação temporizada de
programas de rádio
Ligação de equipamentos
opcionais
Pode-se ajustar o sistema estéreo para
desligar-se automaticamente enquanto se
adormece ao som de músicas
(temporizador adormecedor).
Pode-se ajustar o temporizador
adormecedor, mesmo que já se tenha
ajustado o temporizador despertador ou a
gravação temporizada.
Antes de ajustar o temporizador
adormecedor, certifique-se que o relógio
esteja correctamente acertado.
2
3
POWER m ON
SLEEP
Quando se selecciona AUTO
A alimentação desliga-se quando acaba a
reprodução do CD ou da fita corrente (para
um máximo de 100 minutos).
A alimentação desliga-se, mesmo que se
pause a fita ou se pare a reprodução do CD
ou fita.
Para cancelar o temporizador
adormecedor
Pressione TIMER e então carregue em
SLEEP (ou pressione SLEEP no
telecomando) repetidamente, até que
«OFF» apareça no mostrador.
Para verificar o tempo restante antes
do desligamento do sistema pelo
temporizador adormecedor
Pressione TIMER e então carregue em
SLEEP uma vez (ou pressione SLEEP no
telecomando uma vez).
O tempo restante (em minutos) é indicado
por alguns segundos.
Para alterar o tempo restante
durante o funcionamento do
temporizador adormecedor
Carregue em TIMER e então pressione
SLEEP (ou pressione SLEEP no
telecomando) repetidamente, até que
apareça o tempo restante desejado.
Notas
•As funções de temporizador diário e
gravação temporizada não podem ser
activadas durante a contagem regressiva
+
–
+
p
–
)0
P
pP
Æ»
)0+=
Æ»
Æ
4
$
do adormecedor.
•Quando SLEEP é ajustada a «AUTO», a
alimentação desliga-se automaticamente,
caso execute uma das seguintes
operações:
- paragem da reprodução de CD ou fita;
- pausa da reprodução de cassete.
P
29
1Reproduza a sua fonte sonora favorita
(uma fita, o sintonizador ou um CD).
2Carregue em TIMER.
Não é necessário pressionar TIMER
quando se usa o telecomando.
3Pressione SLEEP repetidamente durante
a reprodução da fonte, para seleccionar
a duração desejada de reprodução da
música. (Quando se usa o telecomando,
não é necessário pressionar TIMER.)
«SLEEP» e a indicação dos minutos
aparecem no mostrador. A cada
pressionar de SLEEP, a indicação
decresce em intervalos de dez minutos,
de 90 a 10.
A alimentação desligar-se-á após 90 a 10
minutos, conforme a duração
seleccionada.
AUTO
nnn
OFF
70 •••10
8090
Despertar ao som de
músicas
Pode-se despertar ao som de músicas numa
hora pré-ajustada. O temporizador precisa
ser ajustado somente uma vez. Antes de
ajustar o temporizador, certifique-se que o
relógio está correctamente acertado. O
temporizador programado activa-se à
mesma hora todos os dias. Para despertar
ao som do rádio, certifique-se de programar
de antemão as estações que deseja escutar.
continua na próxima página ➔
Secção 7: Características adicionais
Page 67
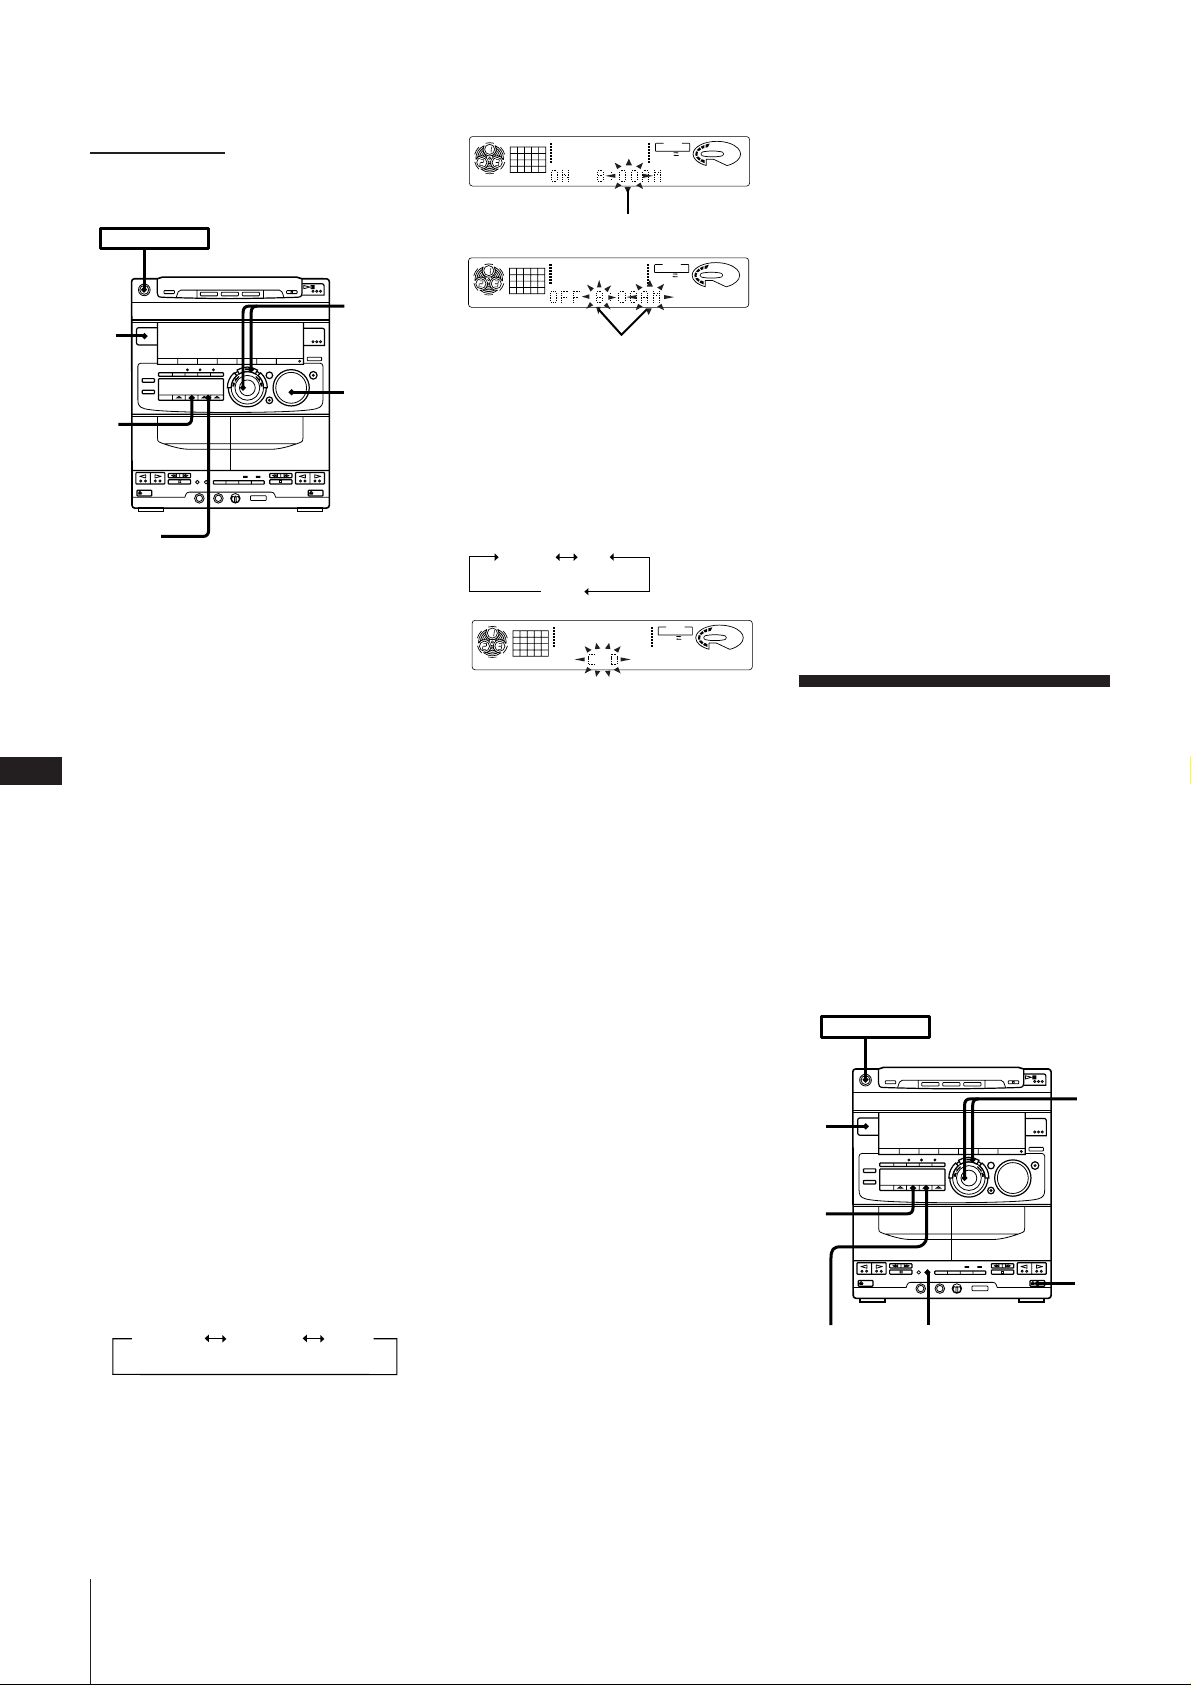
➔ continuação
(Consulte «Programação de estações de
rádio».)
POWER m ON
,10
5,6,
3
7,8,
9
2
4
Pisca
DAILY1
DOLBY NR
DAILY1
DOLBY NR
TIMER
VOLUME
OFF
TIMER
VOLUME
OFF
CD
12345
678
1DISC
CD
12345
678
DISC
12563 250 500 1k 2k 4k 8k 16k(Hz)
.
12563 250 500 1k 2k 4k 8k 16k(Hz)
Pisca
7 Utilize o anel JOG para ajustar a hora
desejada de desactivação do sistema, e
carregue em ENTER/NEXT.
Ajuste os minutos da mesma maneira.
Notas
•Não é possível ajustar o temporizador de
forma que as horas de activação (ON) e
desactivação (OFF) sejam idênticas.
•A operação do temporizador começa 15
segundos antes da hora de activação (ON)
programada. Caso execute uma outra
operação durante tal período, a operação
do temporizador poderá não ser
executada correctamente.
•Não se pode activar o temporizador
despertador e a gravação temporizada
simultaneamente.
•A função do temporizador diário não
pode se activada durante a contagem
regressiva do adormecedor.
tSELECT
1 Prepare a fonte sonora.
Para despertar com o som do
rádio
Sintonize a estação programada
desejada.
Para despertar ao som de um CD
Insira um CD. Caso deseje reproduzir a
P
30
partir de uma faixa específica, execute o
procedimento necessário para a
reprodução programada de CDs
(consulte «Reprodução de faixas na
ordem desejada (reprodução
programada)»).
Para despertar ao som de uma
cassete
Insira a cassete com o lado que deseja
reproduzir voltado para frente. Caso
insira cassetes em ambos os decks, será
emanado o som do deck A.
2 Gire VOLUME para ajustar o volume.
A música passará a ser reproduzida com
o volume ajustado quando chegar a hora
pré-ajustada.
3 Carregue em TIMER.
4 Pressione t SET.
5 Utilize o anel JOG para seleccionar entre
DAILY 1 e 2, e carregue em ENTER/
NEXT.
«ON» aparece e os dígitos da hora
piscam no mostrador.
DAILY 1
6 Utilize o anel JOG para ajustar a hora
desejada de activação do sistema, e
pressione ENTER/NEXT.
Ajuste os minutos da mesma maneira.
«OFF» aparece e os dígitos da hora
piscam no mostrador.
8 Utilize o anel JOG para seleccionar um
fonte sonora.
A indicação altera-se como segue:
TUNER
CD
12345
678
1DISC
CD
TAPE
12563 250 500 1k 2k 4k 8k 16k(Hz)
DAILY1
DOLBY NR
TIMER
VOLUME
OFF
9 Carregue em ENTER/NEXT.
Os itens programados aparecem no
mostrador sequencialmente.
10 Carregue em POWER para desligar o
sistema.
Na hora programada, a alimentação
ligar-se-á e a música será reproduzida
ao volume seleccionado no passo 2. Na
hora de desactivação, a alimentação
desligar-se-á.
Para alterar os ajustes programados
no temporizador
Comece de novo a partir do passo 1.
Para verificar os ajustes
programados no temporizador
1 Carregue em TIMER.
2 Pressione t SELECT e utilize o anel
JOG para seleccionar o modo que deseja
verificar.
3 Carregue em ENTER/NEXT.
Os itens programados aparecem no
mostrador sequencialmente, e então a
indicação original retorna.
Para alterar o temporizador
Seleccione a indicação do temporizador
desejada no passo 2 de «Para verificar os
ajustes programados no temporizador».
RECDAILY 2
Para cancelar o temporizador
1 Carregue em TIMER.
2 Pressione t SELECT e utilize o anel
JOG para seleccionar «TIMER OFF».
3 Pressione ENTER/NEXT.
Na próxima vez que desejar utilizar o
temporizador, seleccione a indicação do
mostrador utilizada no passo 2 (DAILY
1 ou DAILY 2) e carregue em ENTER/
NEXT.
Caso queira despertar ao som de diferentes
faixas de um CD
Crie um outro programa (consulte
«Reprodução de faixas na ordem desejada
(reprodução programada)») e desligue a
alimentação.
Gravação
temporizada de
programas de rádio
Pode-se ajustar o temporizador para gravar
os sinais do rádio a uma determinada hora.
Este temporizador funciona somente uma
vez para cada ajuste.
Assegure-se que o relógio foi correctamente
acertado. Certifique-se de programar de
antemão a estação que deseja escutar
(consulte «Programação de estações de
rádio»).
POWER m ON
,9
6,
4
7,
8
5
1
tSELECT
3
1Carregue em § EJECT e insira uma
cassete em branco no deck B, com o lado
onde deseja gravar voltado para fora.
2Sintonize uma estação programada que
deseja gravar.
3Seleccione a gravação de ambos ou de
apenas um dos lados.
Secção 7: Características adicionais
Page 68
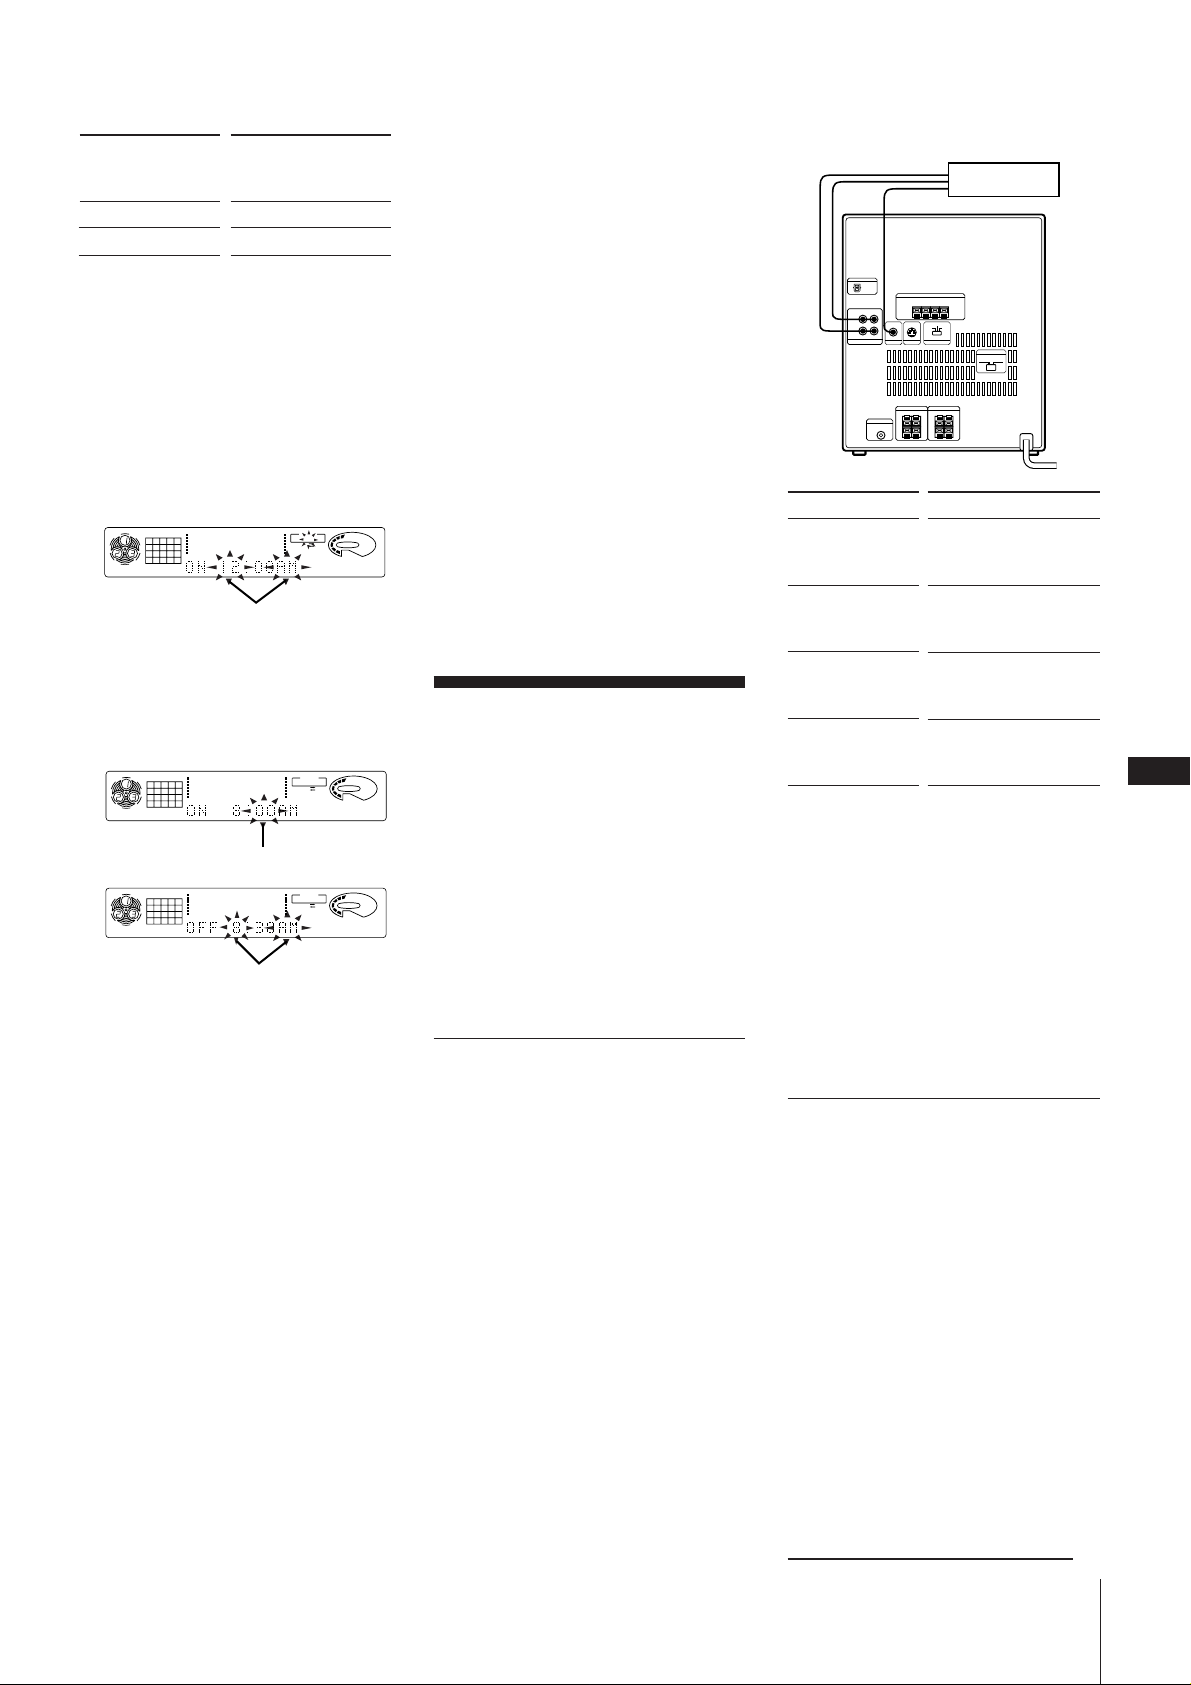
Para gravar
Pressione
DIRECTION para
seleccionar
Um lado da cassete
Ambos os lados*
A
ß ou RELAY
* A gravação sempre cessa no final do lado
reverso. Certifique-se de iniciá-la,
portanto, a partir do lado frontal.
4 Carregue em TIMER.
5 Pressione t SET.
6 Utilize o anel JOG para seleccionar REC
e pressione ENTER/NEXT.
«ON» aparece e os dígitos da hora
passam a piscar no mostrador.
CD
12345
678
1DISC
12563 250 500 1k 2k 4k 8k 16k(Hz)
DOLBY NR
TIMER
REC
VOLUME
OFF
Pisca
7 Utilize o anel JOG para ajustar a hora
desejada de activação do sistema, e
carregue em ENTER/NEXT.
Ajuste os minutos da mesma maneira.
«OFF» aparece e os dígitos da hora
passam a piscar no mostrador.
Pisca
DOLBY NR
DOLBY NR
TIMER
REC
VOLUME
OFF
TIMER
REC
VOLUME
OFF
CD
12345
678
1DISC
CD
12345
678
1DISC
12563 250 500 1k 2k 4k 8k 16k(Hz)
.
12563 250 500 1k 2k 4k 8k 16k(Hz)
Pisca
8 Utilize o anel JOG para ajustar a hora
desejada de desactivação do sistema e
pressione ENTER/NEXT.
Ajuste os minutos da mesma maneira.
9 Carregue em POWER para desligar o
sistema.
A alimentação activar-se-á 15 segundos
antes da hora programada e o nível de
volume será automaticamente ajustado
ao mínimo.
Para alterar os ajustes programados
no temporizador
Inicie novamente a partir do passo 1.
Para verificar as horas pré-ajustadas
no temporizador
1 Carregue em TIMER.
2 Pressione t SELECT e utilize o anel
JOG para seleccionar «REC».
3 Carregue em ENTER/NEXT.
Os itens programados aparecem no
mostrador sequencialmente, e então
retorna a indicação original.
Para cancelar o temporizador
1 Pressione TIMER.
2 Carregue em t SELECT e utilize o anel
JOG para seleccionar «TIMER OFF».
3 Pressione ENTER/NEXT.
Os indicadores do temporizador
desaparecem do mostrador.
Caso a alimentação esteja ligada na hora
pré-ajustada
A fonte sonora irá automaticamente alterarse para o sintonizador, mas a gravação dos
sinais do sintonizador não se iniciará.
Notas
•Não é possível ajustar o temporizador,
caso as horas de activação (ON) e de
desactivação (OFF) sejam as mesmas.
•Não é possível activar o temporizador
despertador e a gravação temporizada
simultaneamente.
•A operação do temporizador inicia-se, na
verdade, 15 segundos antes da hora de
activação programada. Caso execute uma
outra operação durante tal período, a
operação do temporizador poderá não ser
desempenhada correctamente.
Ligação de
equipamentos
opcionais
Para um maior desfruto deste sistema
estéreo, outros componentes podem ser
ligados ao mesmo. Pode-se ligar:
•um videogravador;
•um gravador de minidiscos.
•um gira-discos;
•um superaltifalante de graves;
•auscultadores.
Ligação de um
videogravador
Mediante a ligação dos terminais de saída
de áudio do seu videogravador aos
terminais AUDIO IN na parte posterior
deste sistema estéreo, poderá desfrutar dos
seus vídeos com sons estéreo potentes.
Certifique-se de ligar as fichas às tomadas
de mesma cor.
Mediante a ligação dos terminais AUDIO
OUT e VIDEO (ou S-VIDEO) OUT aos
terminais de entrada do seu videogravador,
poderá gravar os sinais de áudio e vídeo
provenientes de CD de vídeo e CD-G em
fita de vídeo. Consulte o manual de
instruções fornecido com o seu deck de
vídeo quanto aos pormenores.
painel posterior
Videogravador
Ligue
tomadas AUDIO
LINE OUT do
videogravador
tomadas AUDIO
LINE IN do
videogravador
tomada VIDEO
LINE IN do
videogravador
tomada S-VIDEO
LINE IN do
videogravador
Com
tomadas AUDIO IN
(usando um cabo de
áudio) (venda avulsa)
tomadas AUDIO OUT
(usando um cabo de
áudio) (venda avulsa)
tomada VIDEO OUT
(usando um cabo de
vídeo fornecido)
tomada S-VIDEO OUT
(usando um cabo SVIDEO) (venda avulsa)
Para escutar o som do videogravador
Carregue em FUNCTION repetidamente
para seleccionar «VIDEO».
Caso não possa seleccionar «VIDEO» pelo
pressionamento de FUNCTION
Seleccione «MD» e desligue a alimentação.
A seguir, carregue em POWER enquanto
mantém pressionada FUNCTION.
«MD» será comutada a «VIDEO».
Para retornar ao «MD», repita este
procedimento.
Ligação de um gravador de
minidiscos
Seleccione uma das duas ligações, conforme
o equipamento a ser ligado e o método de
gravação.
•um deck de MDs ou DAT para gravação
digital
•um deck de MDs ou DAT para gravações
analógicas
Na gravação de CDs de vídeo, certifique-se
de utilizar as ligações para gravações
analógicas
Para ligar um deck de MDs ou DAT
para gravações digitais
Pode-se gravar do leitor de CDs ao
gravador de MDs digitalmente.
continua na próxima página ➔
Secção 7: Características adicionais
P
31
Page 69
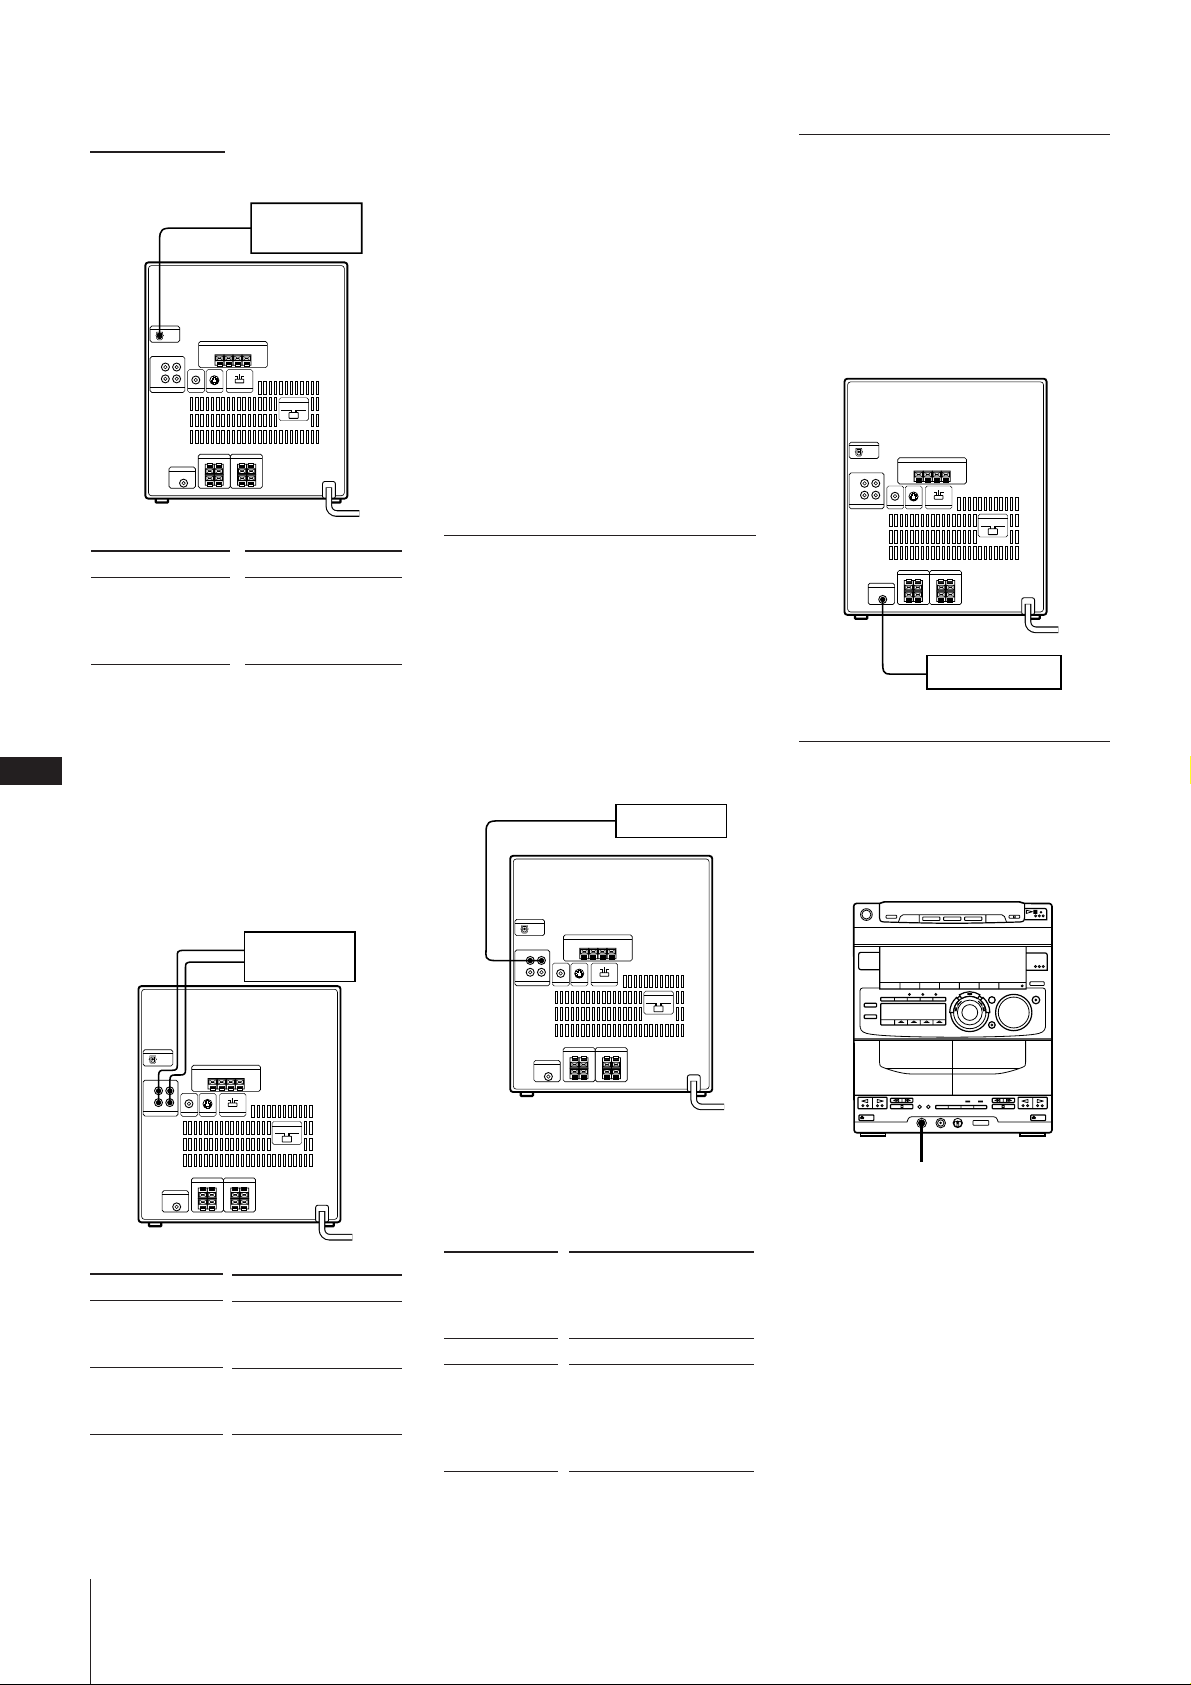
➔ continuação
painel posterior
Deck de MDs
ou DAT
Caso não possa seleccionar «MD» com o
pressionamento de FUNCTION
Seleccione «VIDEO» e desligue a
alimentação. A seguir, pressione POWER
enquanto mantém pressionada
FUNCTION.
«VIDEO» será comutada a «MD». Para
retornar a «VIDEO», repita este
procedimento.
Ligação de um
superaltifalante de graves
Pode-se ligar um superaltifalante de graves
à tomada SUPER WOOFER.
Consulte o manual de instruções fornecido
com o seu superaltifalante de graves quanto
aos pormenores.
Ligue
a tomada DIGITAL
IN (OPTICAL) do
deck de MDs ou
DAT
Para ligar um deck de MDs ou DAT
para gravações analógicas
Podem-se gravar sinais de várias fontes
sonoras do sistema estéreo a um deck de
P
MDs ou DAT em som analógico.Certifiquese de ligar as fichas às tomadas de mesma
32
cor. Pode-se escutar o som do deck de MDs
pelo pressionamento repetido de
FUNCTION para seleccionar MD.
painel posterior
Com
CD DIGITAL OUT
OPTICAL (usando
um cabo óptico)
(venda avulsa)
Nota
Não é possível gravar os efeitos sonoros
criados pelo «menu musical», «DBFB» ou
«GROOVE» com gravação analógica pelas
tomadas AUDIO OUT. Entretanto, pode-se
gravar o som criado por «KARAOKE
PON/MPX», «efeito perimétrico» e
«controlo de gradação».
Ligação de um gira-discos
Pode-se ligar um gira-discos às tomadas
AUDIO IN.
Antes de efectuar a ligação, verifique qual o
tipo de gira-discos que possui.
Consulte o manual de instruções fornecido
com o seu gira-discos (e equalizador de
célula fonocaptadora MM) quanto aos
pormenores.
painel posterior
um gira-discos
painel posterior
um superaltifalante
de graves
Ligação de auscultadores
Pode-se ligar um par de auscultadores à
tomada PHONES.
painel frontal
Deck de MDs
ou DAT
Ligue
as tomadas LINE
OUT do deck de
MDs ou DAT
as tomadas LINE
IN do deck de
MDs ou DAT
Para a audição do som do deck de
MDs ou DAT
Carregue em FUNCTION repetidamente
para seleccionar «MD».
Com
tomadas AUDIO IN
(usando um cabo de
áudio) (venda avulsa)
tomadas AUDIO OUT
(usando um cabo de
áudio) (venda avulsa)
Para a audição do som proveniente
do gira-discos
Carregue em FUNCTION repetidamente
para seleccionar «VIDEO».
O gira-discos
vem fornecido
com um fonoequalizador?
Sim
Não
Ligue com
tomadas AUDIO IN
tomadas AUDIO IN
usando um equalizador
com célula fonocaptadora
MM e cabo de ligação
(venda avulsa)
PHONES
Secção 7: Características adicionais
Page 70
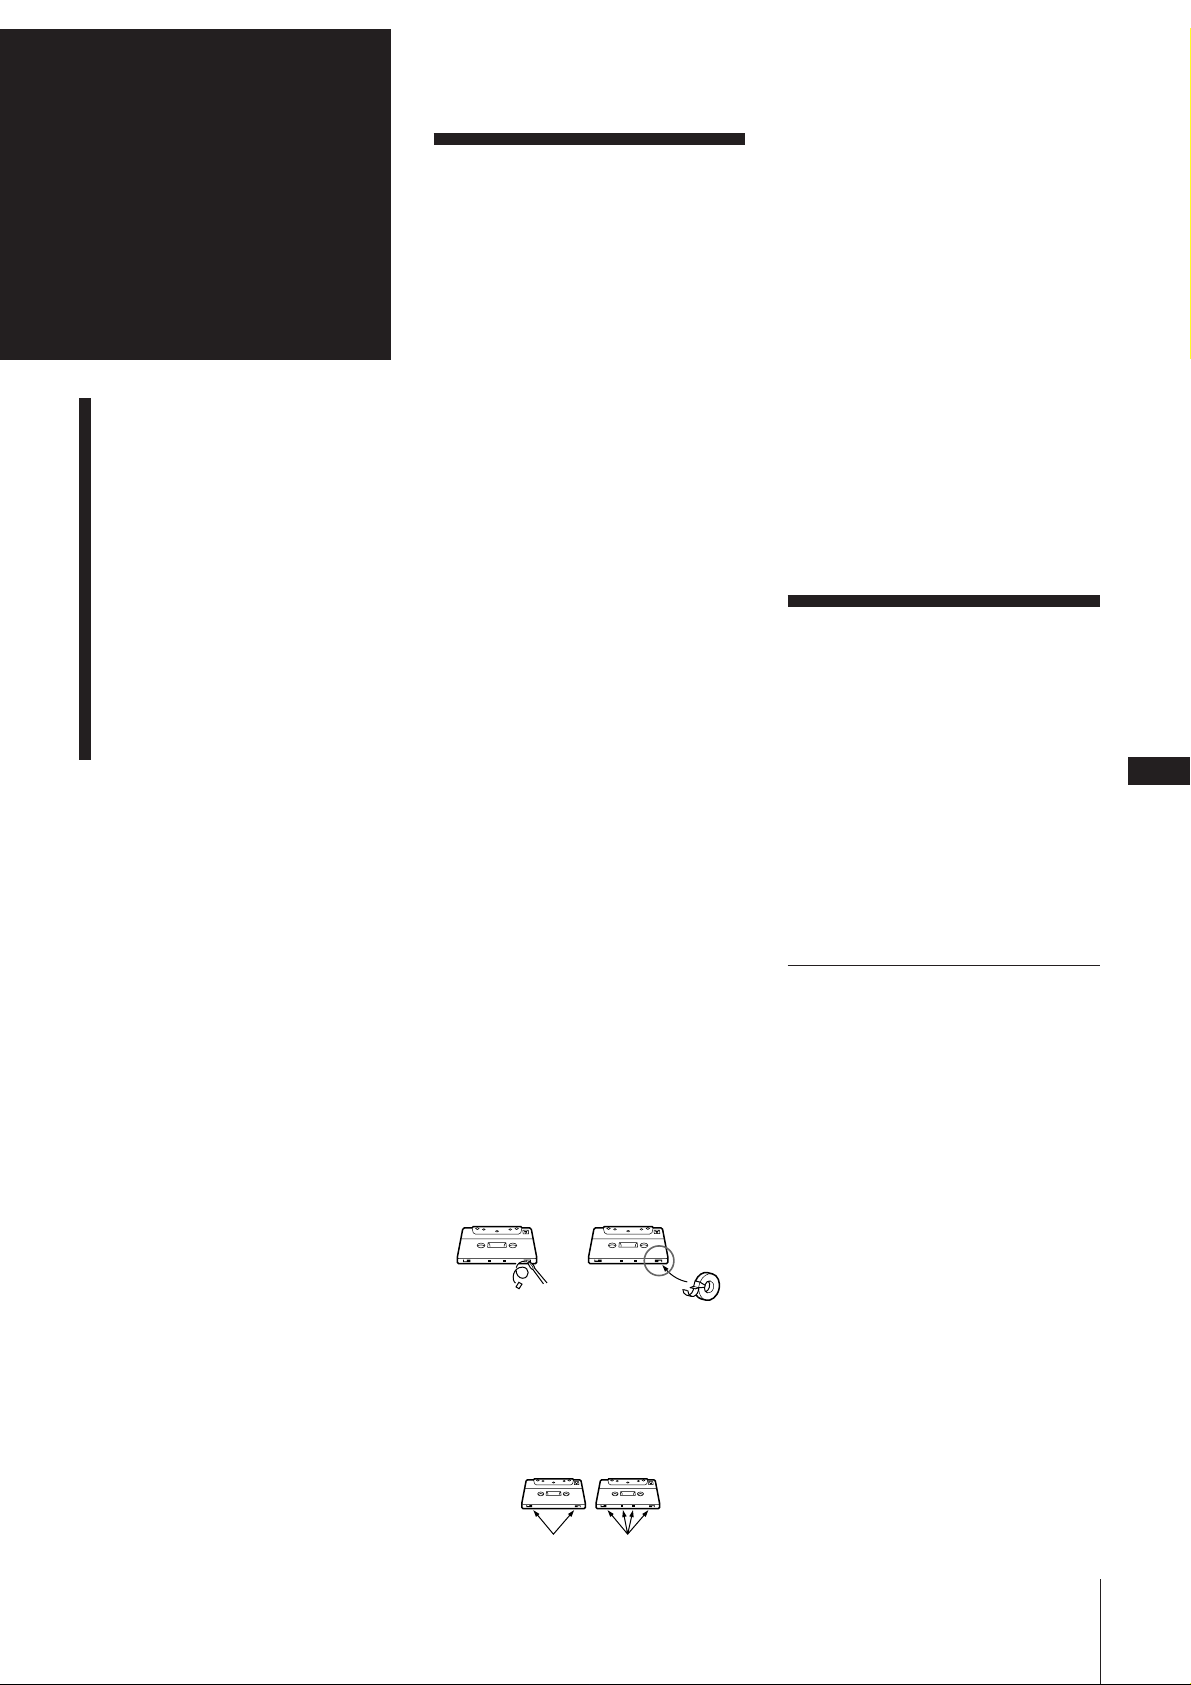
Generalidades
Precauções
Precauções
Caso surjam dúvidas ou problemas
concernentes ao seu sistema estéreo,
consulte o seu mais próximo agente Sony.
Segurança
•Mesmo que o interruptor de alimentação
•Desligue o sistema da tomada da rede
Guia para solução de
problemas
Manutenção
•Caso algum objecto sólido ou um líquido
Especificações
Glossário
•O cabo de alimentação deve ser
Localização das partes e
dos controlos
Índice remissivo
Instalação
Instale o sistema estéreo em um local com
ventilação adequada para evitar o seu
sobreaquecimento interno.
Condensação de humidade na secção
do leitor de discos compactos
Se o sistema for transportado directamente
de um local frio para um quente, ou for
instalado em um recinto muito húmido,
poderá ocorrer a condensação de humidade
na lente do interior do leitor de discos
compactos. Caso isto ocorra, o leitor de
discos compactos não mais funcionará.
Retire o disco compacto e deixe o sistema
ligado por cerca de uma hora até que a
humidade evapore.
Protecção permanente de gravações
Para evitar gravações acidentais sobre uma
fita, quebre a lingueta do lado A ou B da
cassete como ilustrado. Caso deseje
reutilizar posteriormente a fita para
gravações, cubra a abertura da lingueta
removida com fita adesiva.
Lingueta
do lado B
Na utilização de cassetes TYPE II (crómio)
ou TYPE IV (metal), seja cuidadoso(a) para
não cobrir as aberturas de detecção que
possibilitam ao leitor de cassetes detectar
automaticamente o tipo de fita.
do sistema seja desactivado, este não
estará desligado da rede eléctrica
enquanto o cabo de alimentação estiver
ligado a uma tomada da rede.
eléctrica, caso preveja não o utilizar por
um período prolongado. Para desligar o
cabo de alimentação, puxe-o pela ficha.
Nunca puxe pelo próprio cabo.
penetre no interior dos componentes,
desligue o aparelho e tenha-o verificado
por técnicos qualificados antes de o
utilizar novamente.
substituído somente por serviços técnicos
qualificados.
Lado A
Lingueta do lado A
Caso observe irregularidades de cor no
écran de um televisor localizado nas
cercanias
Com o sistema de altifalantes do tipo
magneticamente blindado, os altifalantes
podem ser instalados nas proximidades de
um televisor. Entretanto, irregularidades de
som podem ainda ser observadas no écran
do televisor, conforme o tipo de televisor
em utilização.
Na ocorrência de irregularidades de cor...
Desligue o televisor uma vez e volte a ligálo após 15 a 30 minutos.
Caso irregularidades de cor voltem a
aparecer...
Aumente a distância entre os altifalantes e o
televisor.
Guia para solução de
problemas
Caso depare com algum problema na
utilização do sistema estéreo, verifique a
lista abaixo, após confirmar primeiro os
seguintes pontos:
•O cabo de alimentação deve estar
firmemente ligado.
•Os altifalantes devem estar ligados firme e
correctamente.
Caso persista algum problema após
concluir a verificação dos pontos abaixo,
consulte o seu mais próximo agente Sony.
Sintonizador
«TUNED» pisca no mostrador.
➔Ajuste a antena.
«STEREO» pisca no mostrador.
➔Ajuste a antena.
Zumbidos ou ruídos intensos.
➔Ajuste a antena.
➔A intensidade do sinal é
demasiadamente fraca.
Ligue a antena externa.
➔Efectue a ligação terra.
Não é possível receber um programa
FM estéreo em estéreo.
➔Carregue em STEREO de modo a
obter a indicação «STEREO».
P
33
TYPE II
Aberturas de detecção
Generalidades
Page 71

Leitor de cassetes
Não é possível gravar na fita.
➔Ausência de fita no compartimento
de cassete.
➔Foi removida a lingueta de
segurança da cassete.
➔A fita foi bobinada até o seu fim.
Não é possível gravar nem
reproduzir a fita, ou ocorre uma
diminuição do nível de áudio.
➔As cabeças estão contaminadas.
Limpe-as.*
➔Depósitos de magnetismo residual
estão acumulados nas cabeças de
gravação/reprodução.*
Presença de choro e flutuação
excessivos, ou perdas de som.
➔Os veios de arrasto ou os roletes
pressores estão contaminados.*
Apagamento incompleto da fita.
➔Depósitos de magnetismo residual
estão acumulados nas cabeças de
gravação/reprodução.*
Aumento de ruídos ou apagamento
das altas frequências
P
34
➔Depósitos de magnetismo residual
estão acumulados nas cabeças de
gravação/reprodução.*
*Consulte «Manutenção».
Leitor de CD de vídeo/CDG/CD
Ausência de imagem.
➔ Verifique se o leitor está
firmemente ligado.
➔ Certifique-se que está a operar o
televisor correctamente.
➔ Certifique-se de ajustar SYSTEM
SELECT correctamente, de acordo
com o seu sistema de TV (cores).
➔ Carregue em FUNCTION
repetidamente, até que «CD» seja
indicada.
A bandeja de CD não se fechará.
➔ O CD não está inserido
correctamente.
Não se consegue reproduzir um CD.
➔ O CD está sujo.
➔ O CD está inserido com o lado
impresso voltado para baixo.
➔ O leitor está no modo de pausa.
➔ Ocorreu condensação de
humidade.
Deixe o sistema ligado por cerca de
uma hora até que a humidade
evapore.
«CD NO DISC» está indicada.
➔ Não há CD inserido no leitor.
Generalidades
A reprodução não se inicia a partir
da primeira faixa.
➔ O leitor está no modo programado
ou aleatório. Carregue em PLAY
MODE de forma que «PROGRAM»
ou «SHUFFLE» se apague.
« » é indicada.
➔ ) no telecomando foi pressionada
repetidamente no final do CD. Gire
o anel JOG para a esquerda (ou
pressione = no telecomando) para
reobter a indicação normal.
Misturas com microfone/
Karaokê
Ausência de som do microfone.
➔ Gire VOLUME ou MIC LEVEL para
ajustar o volume do microfone.
➔ Certifique-se que o microfone está
ajustado a ON.
Escuta-se realimentação acústica
quando se usa o microfone.
➔ Gire MIC LEVEL até MIN.
➔ Afaste o microfone dos altifalantes
ou altere o direccionamento do
microfone.
Temporizador
Não se consegue ajustar o
temporizador.
➔ O relógio não foi acertado.
«SET TIMER» pisca quando se
pressiona t SELECT após o
pressionamento de TIMER.
➔ Nenhuma função do temporizador
foi ajustada. Ajuste um dos
temporizadores antes da selecção.
Generalidades
Os indicadores e o mostrador
começam a piscar, assim que se liga
o cabo de alimentação CA a uma
tomada da rede, mesmo que não se
tenha ligado a alimentação (modo de
demonstração).
➔ Carregue em DISPLAY/DEMO.
O modo de demonstração aparece
automaticamente na primeira vez
que se liga a ficha do cabo de
alimentação CA, ou caso ocorra um
corte de alimentação de duração
maior que meio dia.
Refaça o seguinte:
•Acerto do relógio (pág. 7)
•Programação de estações de rádio
(pág. 18)
•Ajuste do temporizador (pág. 29,
30)
Ausência de som.
➔Gire VOLUME ao sentido dos
ponteiros de um relógio.
➔Os auscultadores estão ligados.
Desligue-os.
➔O modo WHISPER é seleccionado.
Carregue em SONIC FORMATION
repetidamente para seleccionar
«NORMAL».
O som vem de somente um dos
canais ou os volumes esquerdo e
direito estão desbalanceados.
➔Verifique as ligações dos
altifalantes do canal inoperativo.
Os sons esquerdo e direito estão
invertidos.
➔ Verifique a ligação dos altifalantes
e a localização dos mesmos.
Graves reduzidos ou localização
virtual imprecisa dos instrumentos
musicais.
➔ Verifique a ligação dos altifalantes
para um faseamento apropriado.
Os graves são distorcidos quando se
liga um superaltifalante de graves
opcional.
➔Carregue em DBFB de forma que o
indicador DBFB se apague, e ajuste
o volume do superaltifalante de
graves.
O som de um superaltifalante de
graves opcional (Sony SA-W10G, etc.)
está distorcido.
➔ Desactive DBFB.
➔ Ajuste o som do superaltifalante de
graves.
Presença de zumbidos ou ruídos
intensos.
➔Um televisor ou videogravador está
localizado demasiadamente
próximo do sistema estéreo.
Aumente a distância entre o
sistema estéreo e o televisor ou
videogravador.
O modo de demonstração aparece no
mostrador após a desactivação do
modo de demonstração.
➔Ocorreu um corte de alimentação
por um período maior que meio
dia. Volte a ajustar os clips
musicais, as programações do
temporizador e do sintonizador.
«12:00 AM» pisca no mostrador.
➔Ocorreu um corte de alimentação.
Volte a acertar o relógio.
O telecomando não funciona.
➔As pilhas estão exauridas.
Substitua ambas as pilhas.
➔Presença de um obstáculo entre o
telecomando e o sistema. Remova o
obstáculo.
Restauração dos ajustes de
Page 72
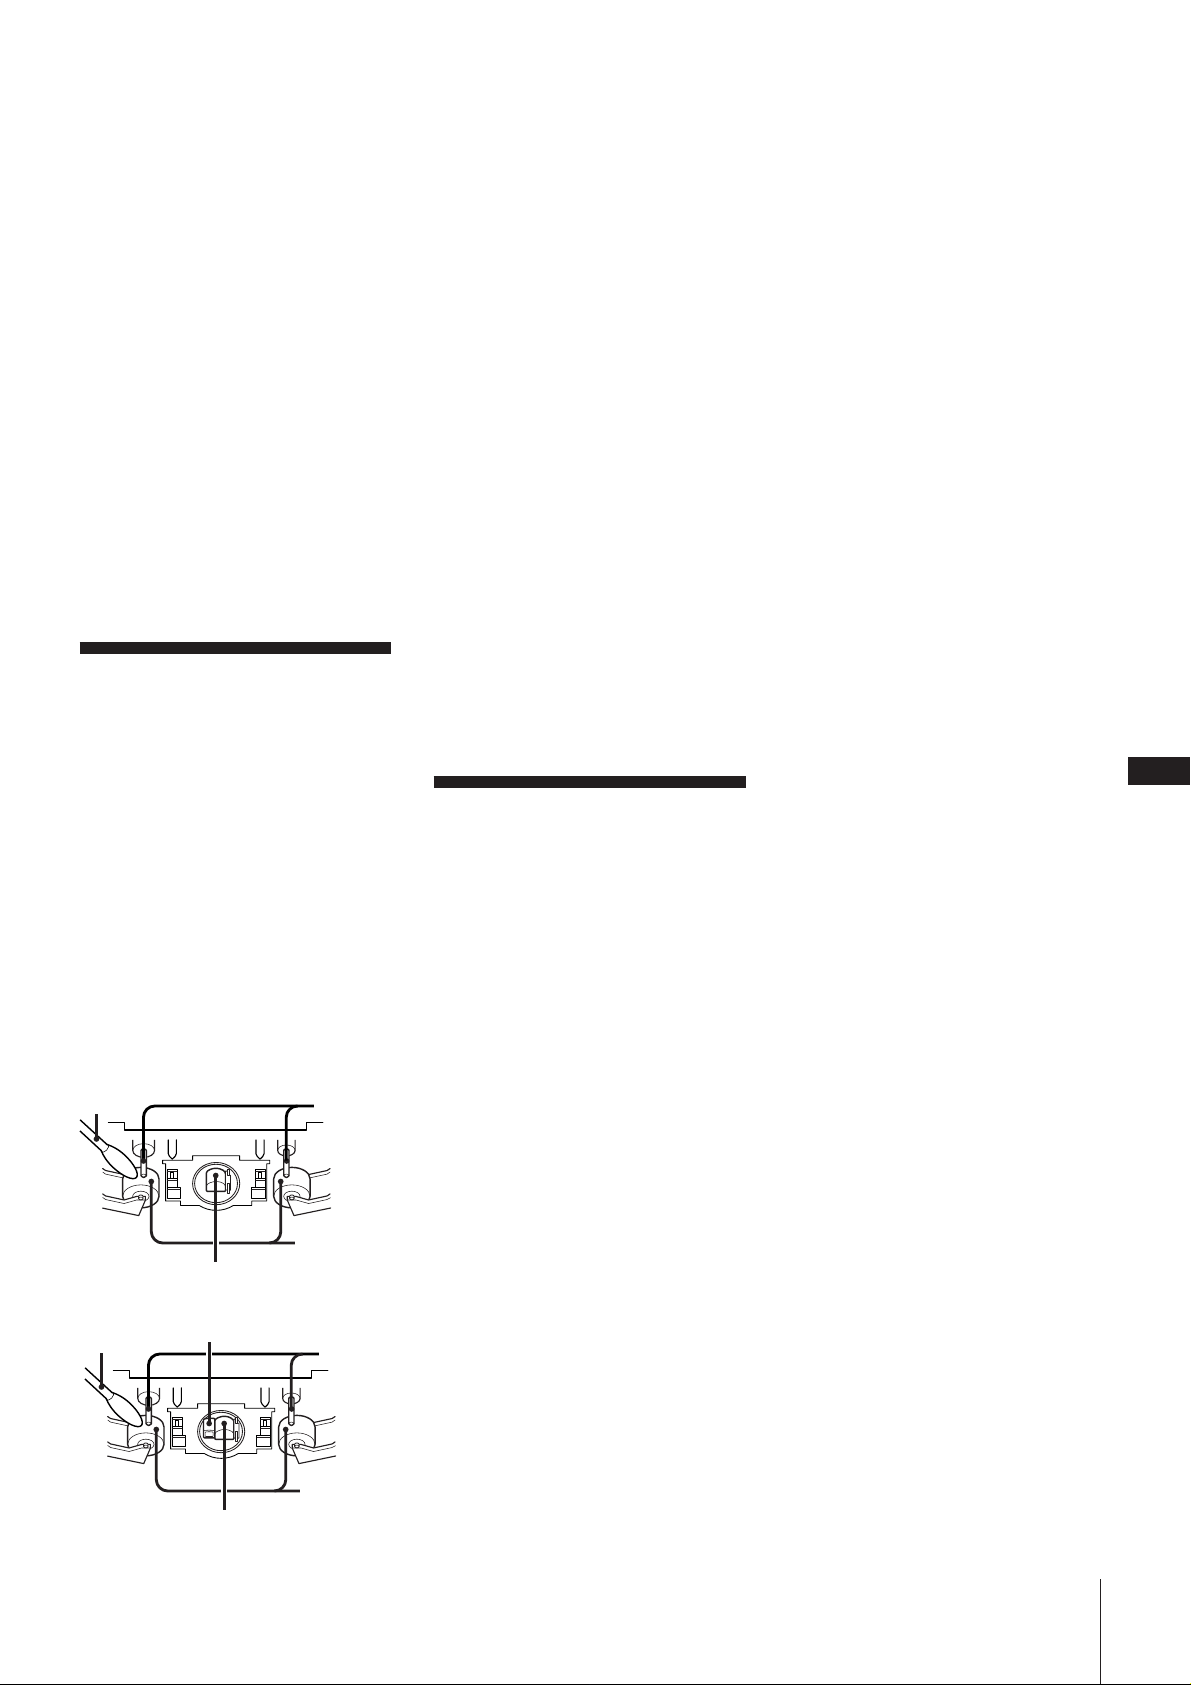
fábrica
Caso não seja possível solucionar os
problemas após as verificações acima,
execute a operação a seguir.
(Um microcomputador controla todas as
operações deste sistema. Alguns problemas
podem ocorrer devido a interferências
eléctricas do cabo de alimentação CA.)
1 Desligue POWER.
2 Mantenha DISPLAY/MEMO, TUNER/
BAND e MENU 3 pressionadas
simultaneamente..
O microprocessador foi reiniciado e o
acerto do relógio, o ajuste do temporizador
e a programação de estações de rádio
retornaram aos ajuste de fábrica. Reexecute
os ajustes de acordo com as suas
necessidades.
Manutenção
Limpeza das cabeças e do trajecto da
fita
Cabeças sujas causam gravações
insatisfatórias ou perdas de som durante a
reprodução. Recomenda-se limpar as
cabeças e o trajecto da fita após cada 10
horas de utilização.
Abra o compartimento de cassetes e limpe
as cabeças, os roletes pressores e os veios de
arrasto com uma haste de algodão
levemente humedecida com um líquido de
limpeza ou álcool. Limpe as partes
ilustradas abaixo:
Deck A
Haste de
limpeza
Cabeça de reprodução
Deck B
Haste de
limpeza
Insira uma cassete somente quando todas
as partes limpas estiverem completamente
secas.
Desmagnetização das cabeças
Após 20 ou 30 horas de utilização,
Cabeça de apagamento
Cabeça de gravação/reprodução
Veio de
arrasto
Rolete pressor
Veio de
arrasto
Rolete pressor
magnetismo residual suficiente terá se
acumulado nas cabeças, causando perdas
de altas frequências e ruídos. Desmagnetize
as cabeças e todas as partes metálicas no
trajecto da fita com um desmagnetizador de
cabeças comercializado no mercado.
Quanto aos procedimentos de
desmagnetização, consulte o manual de
instruções do desmagnetizador.
Limpeza da parte externa do sistema
Empregue um pano macio levemente
humedecido com solução de detergente
suave.
Limpeza de discos compactos
Quando um disco compacto apresentar
sujidades, limpe-o com um pano de
limpeza, do centro para o exterior.
Notas acerca dos discos compactos
•Não empregue para a limpeza de discos
compactos solventes tais como benzina,
diluentes, limpadores comercializados no
mercado, tampouco aerosóis antiestáticos
destinados a discos analógicos.
•Riscos, sujidades e/ou impressões digitais
no disco podem causar erros de rastreio.
Especificações
Secção do leitor de CD de vídeo/CDG/CD
Sistema Sistema de vídeo e áudio
digital para disco compacto
Laser Laser semiconductor
(λ = 780 nm)
Duração da emissão:
contínua
Saída do laser Máx. de 44,6 µW*
* Esta saída corresponde ao
valor mensurado a uma
distância de 200 mm a
partir da superfície da
lente objectiva no bloco de
leitura óptica com 7 mm
de abertura.
Comprimento de onda
780 - 790 nm
Áudio
Resposta de frequência:
2 Hz - 20 kHz
Relação sinal/ruído:
Superior a 90 dB
Gama dinâmica:
Superior a 90 dB
Vídeo
Formato do sistema de cores:
NTSC, PAL
Secção do sintonizador
Estéreo FM, sintonizador super-heteródino
AM/FM
Secção do sintonizador de FM
Gama de sintonização
87,5 - 108,0 MHz
(intervalos de 50 kHz)
Antena Antena filiforme FM
Terminais de antena
75 ohms desbalanceados
Frequência intermediária
10,7 MHz
Secção do sintonizador de AM
Gama de sintonização
MW: 531 - 1.602 kHz
(com intervalo
ajustado em 9 kHz)
530 - 1.710 kHz (com
intervalo ajustado em
10 kHz)
SW: 5,95 - 17,90 MHz
Antena Antena de quadro AM,
terminais de antena externa
Frequência intermediária
450 kHz
Secção do temporizador
Sistema Retenção a quartzo
Tempo de ajuste
Com um intervalo de 1
min.
Temporizador adormecedor
Até 90 min. com um
intervalo de 10 min. (máx.
de 100 min. a AUTO OFF)
Secção do amplificador
Potência de saída de pico musical
1.200 W
Potência de saída eficaz contínua
80 W + 80 W (8 ohms a
1 kHz, 5% de D.H.T.)
Entradas
AUDIO (tomadas fónicas):
Tensão de 450 mV,
impedância de 47 kohms
MIC MIX (tomadas universais):
Sensibilidade de 1 mV,
impedância de 10 kohms
Saídas
AUDIO (tomadas fónicas):
Tensão de 250 mV,
impedância de 1 kohm
PHONES (tomada universal estéreo):
Aceita auscultadores de 8
ohms ou mais
CD DIGITAL OUT OPTICAL
(tomada com conector
óptico quadrado, painel
posterior)
Comprimento de onda de
660 nm
Nível de saída de –18 dBm
SPEAKER:
Aceita impedância de 8 a 16
ohms
SURROUND/SUB SPEAKER:
Aceita impedância de 16
ohms
SUPER WOOFER
Tensão de 1 V, impedância
Generalidades
P
35
Page 73
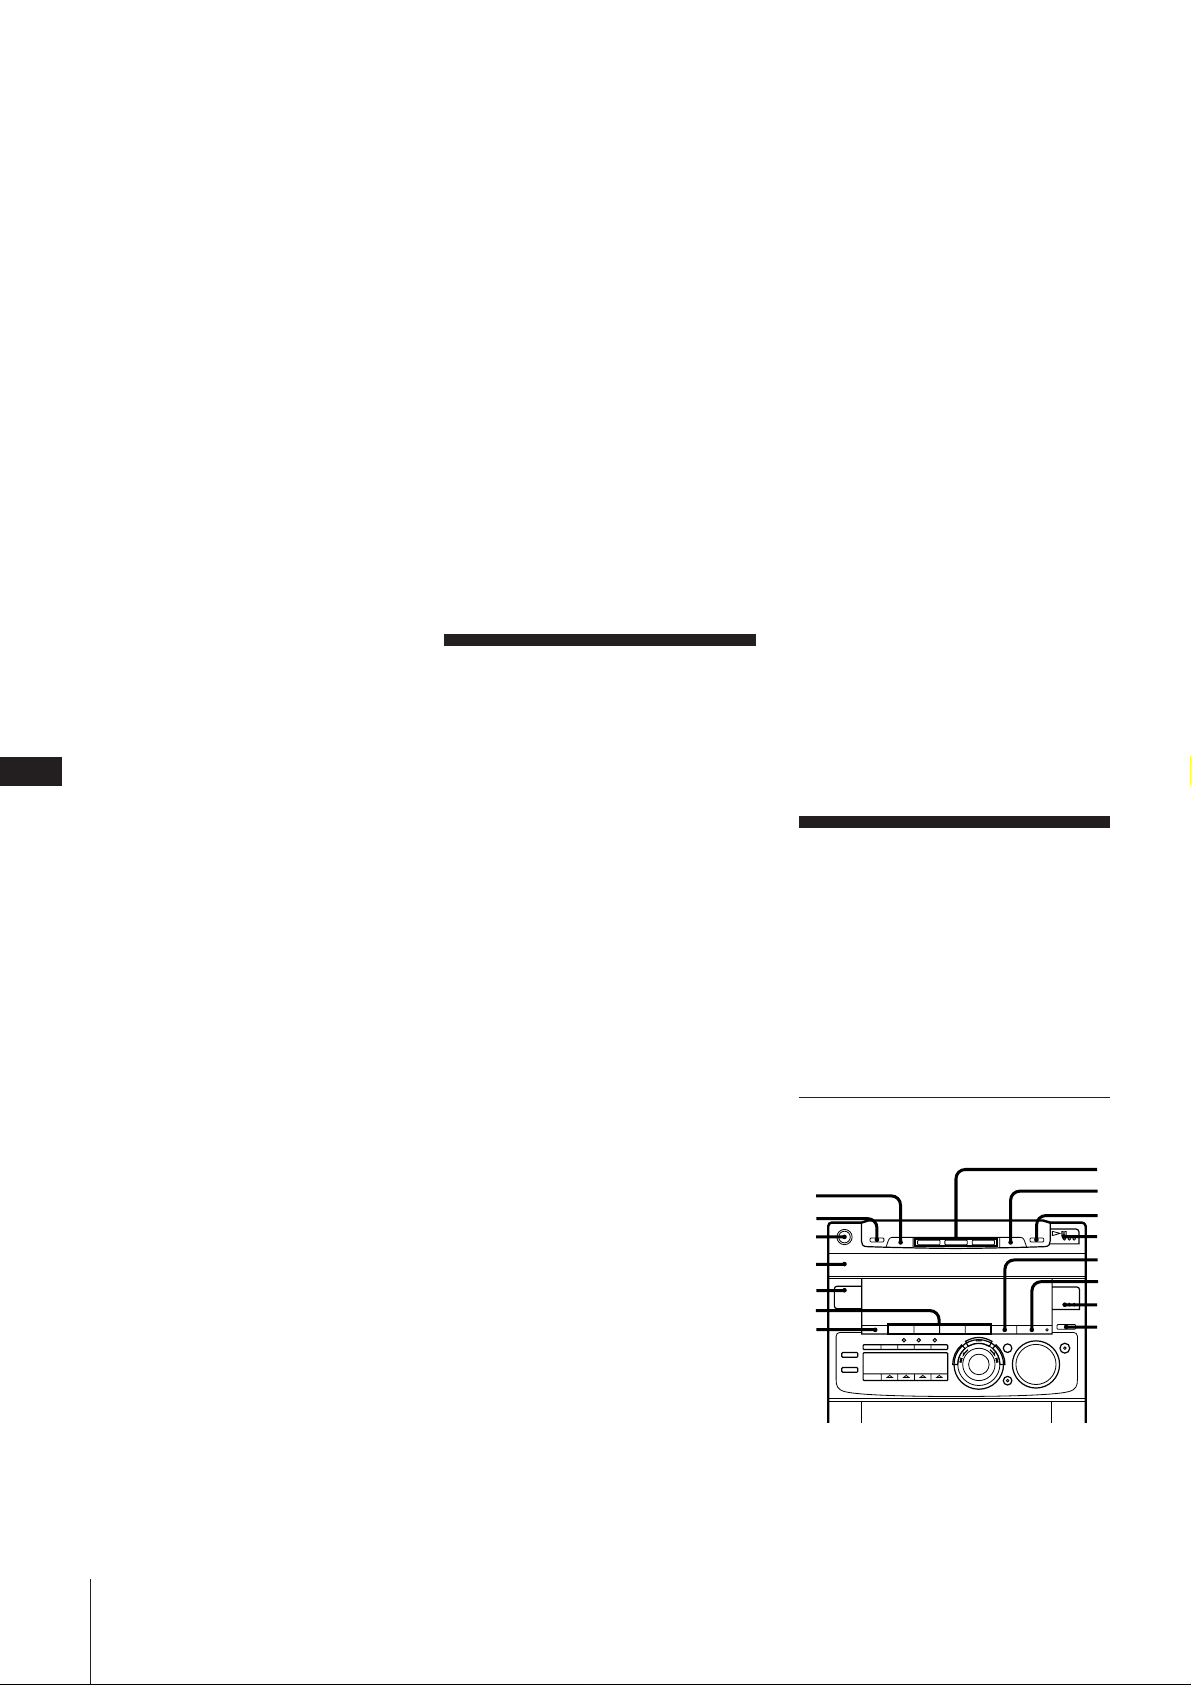
de 1 kohm
VIDEO (tomada fónica):
Nível de saída máx. 1 Vp-p,
desbalanceada, sincronia
negativa, impedância de
carga de 75 ohms
S-VIDEO (tomada mini-DIN de 4
terminais):
Y: 1 Vp-p, desbalanceada,
sincronia negativa
C: 0,286 Vp-p, impedância
de carga de 75 ohms
Secção do leitor de cassetes
Sistema de gravação
estéreo de 4 pistas e 2
canais
Resposta de frequência
(DOLBY NR OFF)
40 - 13.000 Hz (±3 dB), com
cassetes Sony TYPE I
40 - 14.000 Hz (±3 dB), com
cassetes Sony TYPE II
Choro e flutuação
±0,15% pico ponderado
(IEC)
0,1% eficaz ponderado
(NAB)
±0,2% pico ponderado
(DIN)
Altifalante
P
SS-H991G
Sistema de altifalantes
36
Unidades de altifalante
De graves: 17 cm de diâm., tipo cónico
De agudos: 5 cm de diâm., tipo cónico
De superagudos: 2 cm de diâm., tipo
dómico
Impedância nominal
Dimensões Aprox. 220 x 325 x 275 mm
Peso Aprox. 5 kg por coluna
SS-SR991G
Sistema de altifalantes
Unidade de altifalantes
Impedância nominal
Dimensões Aprox. 200 x 90 x 235 mm
Peso Aprox. 1 kg por coluna
Acessórios fornecidos
Antena de quadro AM (1)
Telecomando RM-SV800 (1)
Pilhas Sony SUM-3(NS) (2)
Cabo de vídeo (1)
Antena filiforme FM (1)
Cabos de altifalante (4)
Generalidades
Sistema de 3 vias, do tipo
reflexão de graves,
magneticamente blindado
8 ohms
(l/a/p)
Sistema de gama completa,
do tipo reflexão de graves
10 cm de diâm., do tipo
cónico
16 ohms
(l/a/p)
Generalidades
Alimentação requerida
Modelo australiano:
240 V CA, 50/60 Hz
Modelo mexicano:
120 V CA, 60 Hz
Outros modelos:
110 - 120 V ou 220 - 240 V
CA, 50/60 Hz
Ajustável com o selector de
voltagem
Consumo de energia
190 W
Dimensões Aprox. 280 × 325 × 360 mm
(l/a/p)
incluindo controlos e partes
salientes
Peso Aprox. 10,6 kg
Design e especificações sujeitos a alterações
sem aviso prévio.
Glossário
Pausa automática
Durante a reprodução de um CD de vídeo,
o leitor de discos compactos pausa
automaticamente, de acordo com o sinal
codificado no disco. Caso o leitor de discos
compactos não retome a reprodução por
um longo período, carregue em fl (ou CD ·
SELECT no telecomando) para retomar a
reprodução manualmente.
CD Gráfico (CD-G)
Um disco compacto que contém imagens
gráficas.
A informação de imagem é gravada na área
de subcódigo dos CDs de áudio. Visto que
a memória para informação de imagem é
limitada, os CD-Gs podem conter somente
as imagens gráficas de qualidade restrita,
tal como num livro de imagens.
Reprodução com Menu
Reprodução usando os écrans de menu
gravados nos CDs de vídeo com funções
PBC. Pode-se desfrutar do software
interactivo simples através da função de
reprodução com menu.
Controlo de Reprodução (PBC)
Sinais codificados em CDs de vídeo (versão
2.0) para controlar a reprodução.
Mediante a utilização de écrans de menu
gravados em CDs de vídeo com funções
PBC, pode-se desfrutar a reprodução de
software interactivo simples, software com
funções de busca, etc. Quando se selecciona
um CD de vídeo com funções PBC neste
leitor, o indicador PBC acende-se.
Faixa
Um disco é dividido em secções de uma
imagem ou uma peça musical denominadas
«faixas». Cada faixa é designada com um
número de faixa para poder ser
posteriormente localizada.
CD de vídeo
Um disco compacto a conter imagens em
movimento.
CDs de vídeo contêm informações de
imagem compactas usando o formato
MPEG 1, um dos padrões mundiais de
tecnologia compacta digital. A informação
de imagem é comprimida cerca de 120
vezes. Consequentemente, um CD de vídeo
de 12 cm pode conter até 74 minutos de
imagens em movimento.
CDs de vídeo também contêm informações
de áudio compactas. Os sons fora da gama
de audição do ouvido humano são
comprimidos, enquanto os sons audíveis
não o são.
CDs de vídeo podem conter seis vezes a
informação de áudio de CDs de áudio
convencionais. Há duas versões para CDs
de vídeo, como segue:
Versão 1.1 (CDs de vídeo sem funções
PBC):
Somente sons e imagens em movimento
podem ser reproduzidos.
Versão 2.0 (CDs de vídeo com funções
PBC):
Podem-se reproduzir imagens estáticas e
desfrutar funções PBC.
Este leitor está em conformidade com
ambas as versões.
Localização das
partes e dos
controlos
Consulte as páginas indicadas entre
parênteses quanto aos pormenores de como
utilizar os controlos. Controlos com um
asterisco vêm acompanhados de um
indicador.
Painel frontal
1
2
3
4
5
6
7
8
9
0
!`
!“
!£
!¢
!
Page 74
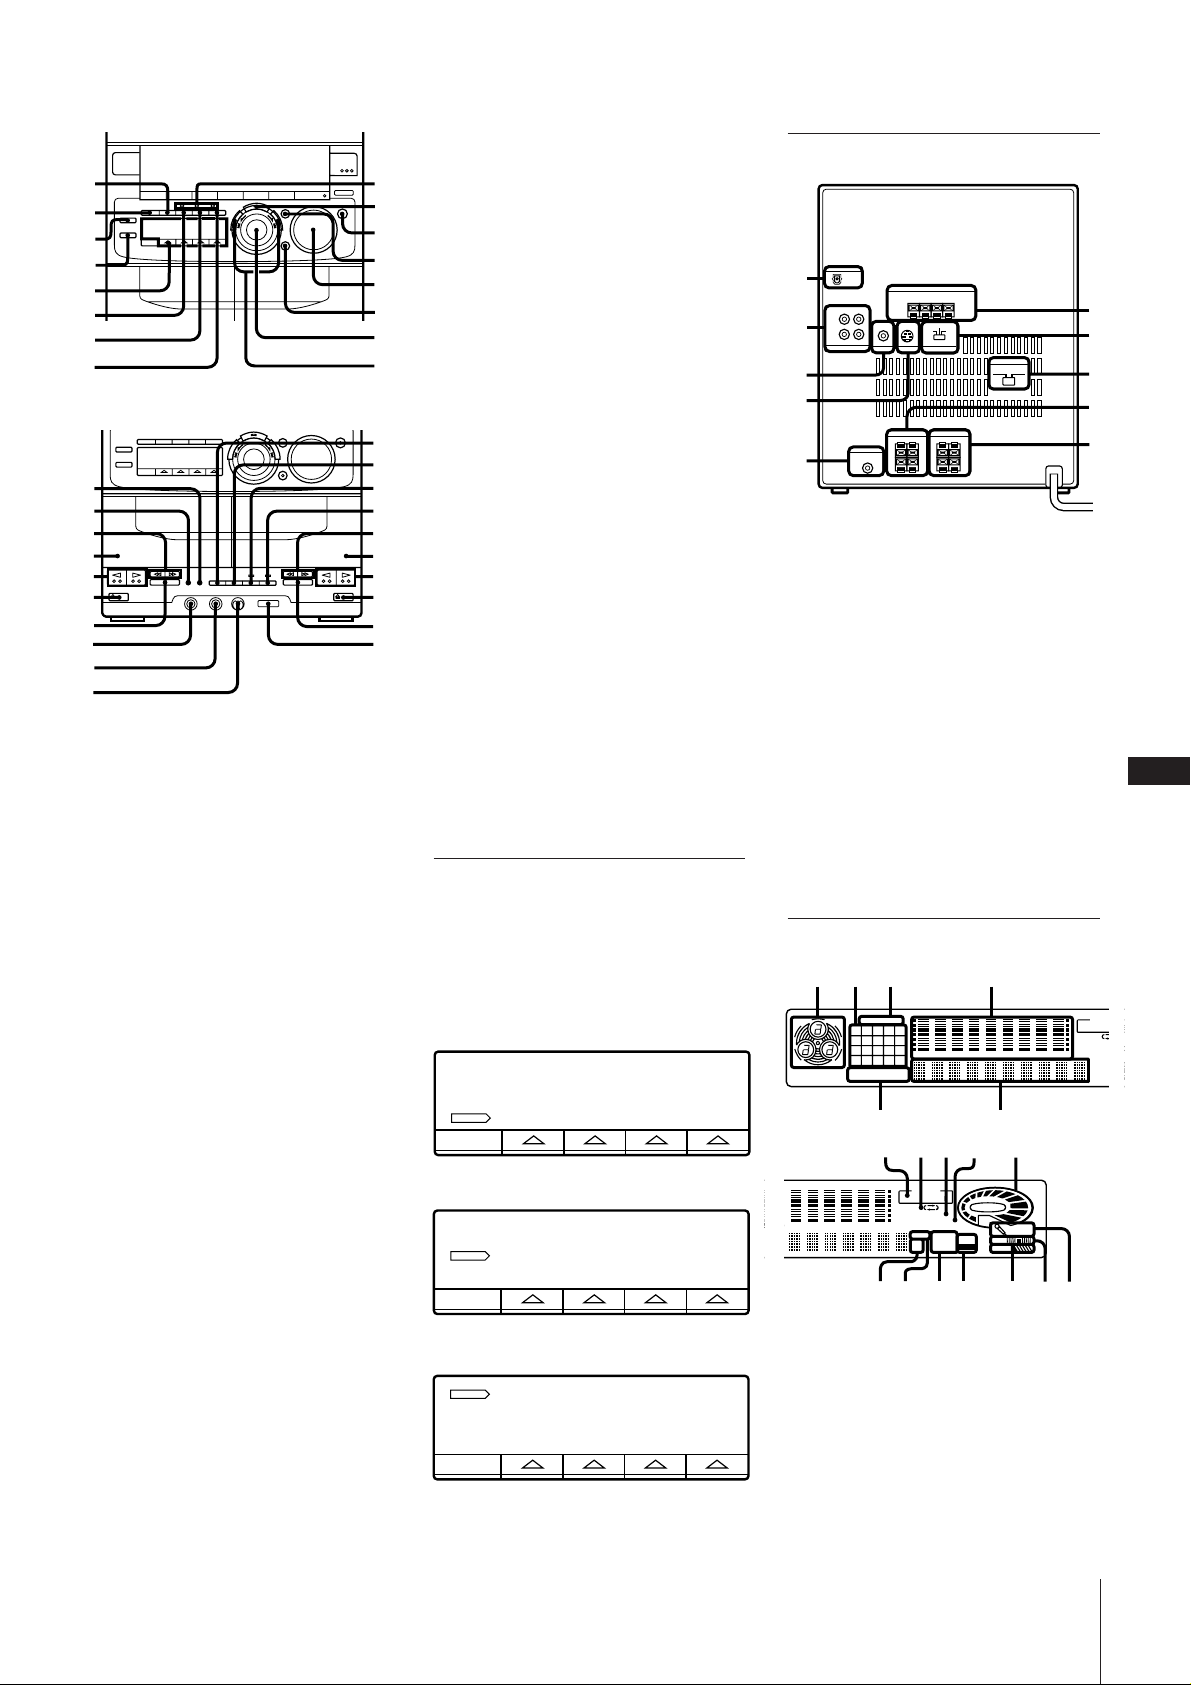
@¶ Tecla DBFB de realimentação
1
2
9
0
6
5
3
7
4
8
E
O
O
U
S
5
Painel posterior
!⁄
!ƒ
!¥
!»
@…
@`
@“
@£
@¢
@
@⁄
@ƒ
@¥
@»
#…
#`
dinâmica de graves (24)
@•Controlo VOLUME (24)
@ªTecla SONIC FORMATION* de
formação sónica (26)
#º Anel JOG de avanço/retrocesso (7, 8, 17,
21, 25, 28, 30)
#¡ Teclas FREQUENCY –/+ de frequência
(25)
#™ Tecla DIRECTION de modo
direccional (19)
#£ Tecla DOLBY NR de redução de ruídos
Dolby (20)
#¢ Teclas 0/) de rebobinagem/avanço
rápido (19)
# Deck A (19)
#§ Teclas ª/· de reprodução do lado
reverso/lado frontal* (19)
#¶ Teclas § EJECT de ejecção (19)
#• Tecla p de paragem de cassetes (19)
#ª Tomada PHONES dos auscultadores
(24, 32)
$º Tomada MIX MIC de mistura com
microfone (27)
$¡ Botão MIC LEVEL do nível do
microfone (27)
$™ Tecla HIGH SPEED DUBBING de
duplicação a alta velocidade (23)
$£ Tecla CD SYNCHRO de gravação
sincronizada com leitor de CDs (20)
$¢ Tecla r REC de gravação (21)
$ Tecla P PAUSE de pausa (19)
$§ Deck B (19)
$¶ Tecla KARAOKE PON/MPX (27)
Teclas MULTI FUNCTION
CONTROL
As teclas que podem operar o leitor de
discos compactos, o sintonizador e o
temporizador acendem-se.
Leitor de discos compactos
1/ALL DISCSC D PLAY MODE REPEAT EDIT
1 Tomada CD DIGITAL OUT OPTICAL
(32)
2 Tomadas AUDIO IN/OUT (31, 32)
3 Tomada VIDEO OUT (5, 31)
4 Tomada S VIDEO OUT (5, 31)
5 Tomada SUPER WOOFER do altifalante
de graves (32)
6 Terminais ANTENNA (4)
7 Interruptor SYSTEM SELECT de
alimentação do sistema (5)
8 VOLTAGE SELECTOR (6)
9 Conectores SURROUND/SUB
SPEAKER L/R de altifalante
perimétrico/auxiliar esquerdo/direito
(4)
0 Conectores SPEAKER L/R de coluna
esquerda/direita (4)
Mostrador
1423
CD TUNER
12345
678910
1514131211
2019181716
ALL1DISC S PROGRAM
SHUFFLE REPEAT1
5
7
12563 250 500 1k 2k 4k 8k 16k(Hz)
6
0!`9
8
DAILY12
RELAY
DOLBY NR
TUNED
STEP
KHz
MHz
TIMER
REC SLE
B OFF
STEREO M
P
37
AUT
MAN
PRE
#“
#£
#¢
#
#⁄
#ƒ
#¥
#»
$…
$`
1 Tecla DISC SKIP de salto de discos (8,
20)
2 Tecla EX-CHANGE de comutação de
discos (8)
3 Interruptor POWER de alimentação (8)
4 Bandeja de disco (8, 20)
5 Tecla TIMER do temporizador (7, 29)
6 Teclas MENU 1 ~ 4 (25)
7 Tecla DISPLAY/DEMO de indicação/
demonstração (6, 10)
8 Teclas DISC 1 ~ 3 (8)
9 Tecla § OPEN/CLOSE de abertura/
fechamento (8, 20)
0 Tecla p de paragem de CD (8, 20)
!¡ Tecla · de reprodução/pausa* (8, 21)
!™Tecla P FILE de arquivo personalizado
(26)
!£ Tecla EFFECT ON/OFF* de efeito
ligado/desligado (25)
!¢ Tecla TUNER/BAND do sintonizador/
banda* (17)
$“
$£
$¢
$
#¢
$⁄
#⁄
#ƒ
#¥
$ƒ
! Tecla FUNCTION (15, 20, 27, 31, 32)
!§ Tecla PREV de item prévio (8)
!¶ Tecla PBC OFF/ON (9)
!• Tecla DSP* do processador de sinal
digital (25)
!ª Tecla DIGITAL ECHO* (28)
@ºTeclas MULTI FUNCTION CONTROL
Sintonizador
TUNER
TUNING
MODE
TUNER
MEMORY
250 500 1k 2k 4k 8k 16k(Hz)
STEREO MONO
!
“
TIMER
DAILY12 RECSLEEP
RELAY
DOLBY NR
B OFF
TUNED
STEREO MONO
STEP
AUTO
KHz
MANUAL
MHz
PRESET
!
£
!
VOLUME
PONLR
SYNC
SUR
REC
DBFB
¢
!!⁄
MPX
!ƒ !¥
de controlo multifuncional (7, 8, 17, 21,
29)
@¡Tecla NEXT do próximo item (8)
@™ Tecla ˆ RETURN de retorno (9)
@£ Tecla SELECT (9)
Temporizador
CLOCK SETTIMER tSET tSELECT SLEEP
@¢ Indicador VIDEO CD/PBC/AUTO
PBC de CDs de vídeo/controlo de
reprodução/PBC automático (9)
@ Tecla ENTER/NEXT de
introdução/próximo item (7, 16, 17, 25,
28, 30)
@§ Tecla GROOVE* de graves
profundos (24)
1 Indicador da bandeja de disco
2 Matriz musical (11)
3 Indicador CD/TUNER do leitor de
CDs/sintonizador (11, 17)
4 Indicador do equalizador gráfico (25)
5 Indicadores de reprodução de CDs (8,
15, 16)
6 Multivisor (11, 17, 20, 25, 28, 30)
7 Indicadores do temporizador (30)
8 Indicadores do modo direccional (19)
9 Indicador DOLBY NR de redução de
ruídos Dolby (20)
Generalidades
Page 75
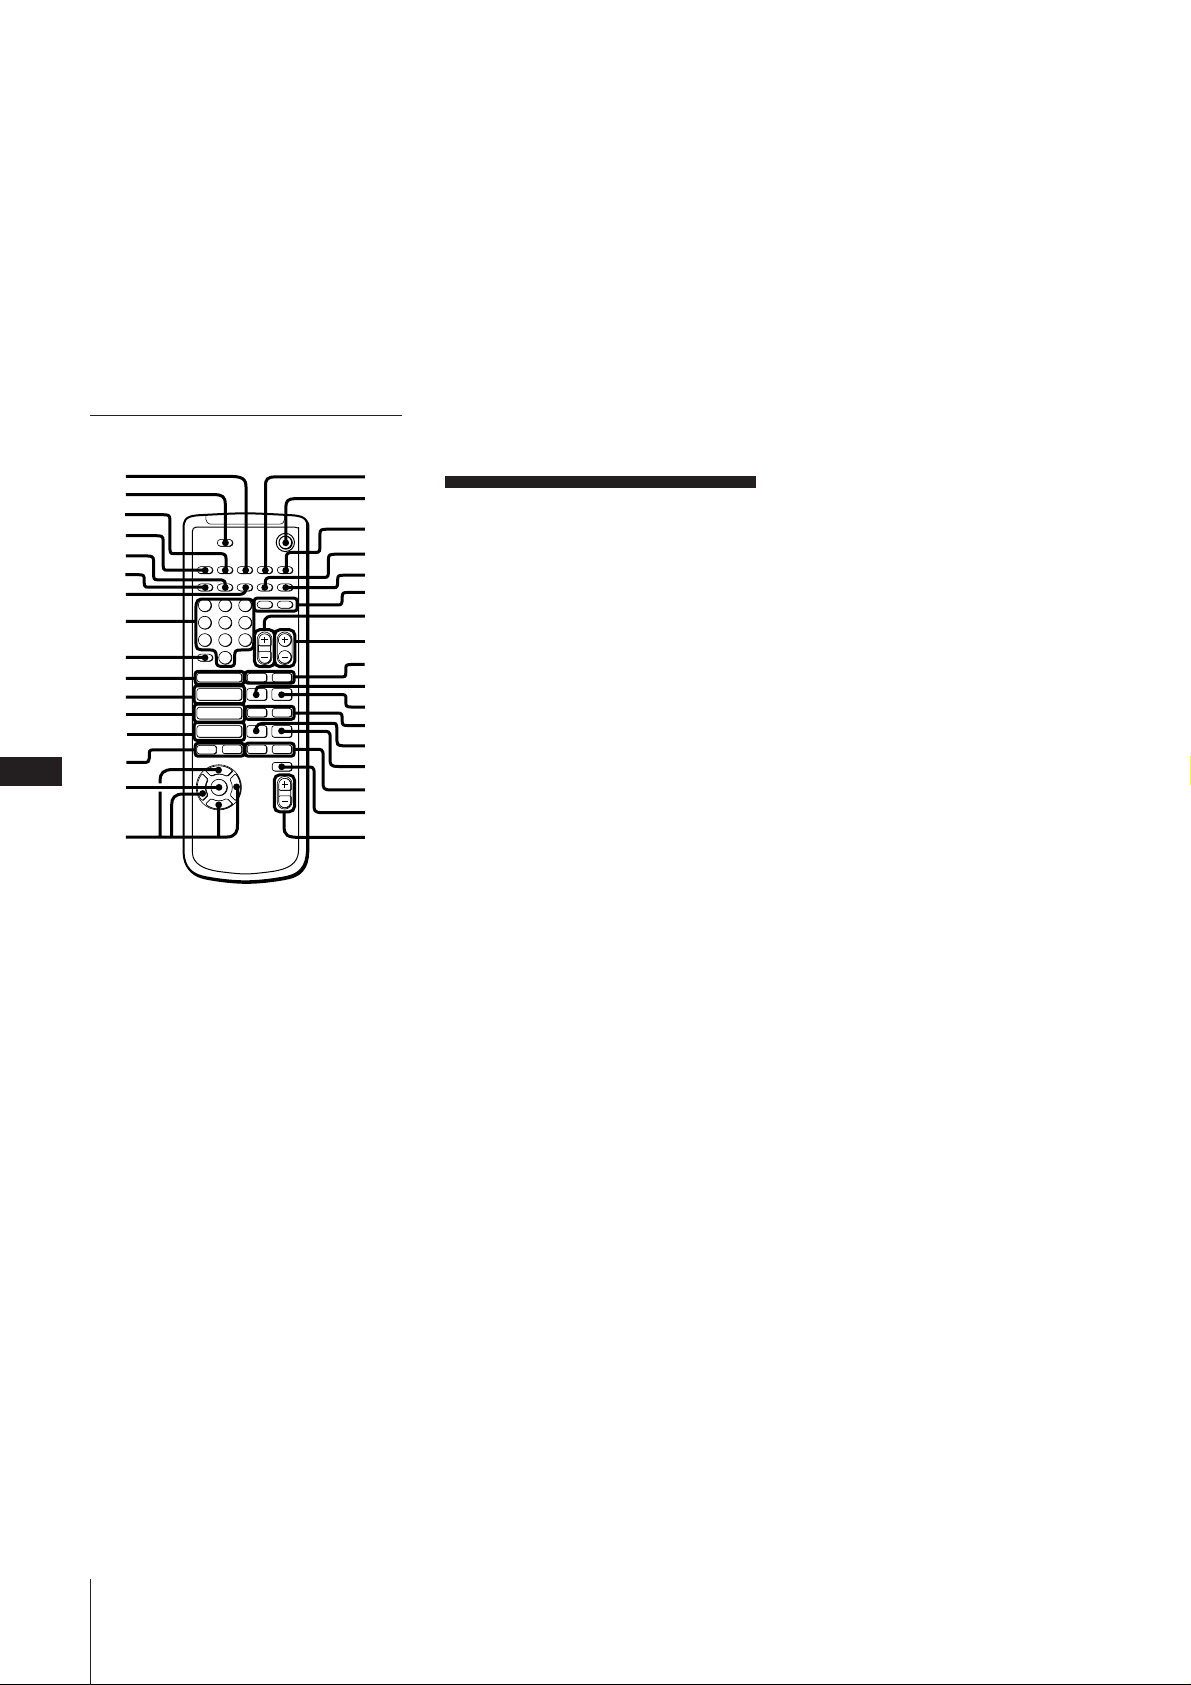
0 Indicadores de sintonização (17)
!¡ Indicadores VOLUME
!™Indicador kHz/MHz (17)
!£ Indicador STEP de passo (15)
!¢ Indicadores do sintonizador (17)
! Indicador SYNC REC de gravação
sincronizada (20)
!§ Indicador DBFB de realimentação
dinâmica de graves (24)
!¶ Indicadores SUR de efeito perimétrico
(25)
!• Indicadores PON/MPX de karaokê (27)
Telecomando
1
2
3
4
5
6
7
8
9
0
!`
!“
!£
P
!¢
!
Æ
38
!⁄
1 Tecla DISPLAY de indicação (10)
2 Tecla SLEEP do temporizador
adormecedor (29)
3 Tecla SPECIAL MENU (12)
4 Tecla ON SCREEN de indicações no
écran (11)
5 Tecla CHECK de verificação (16, 22)
6 Tecla EDIT de edição (21)
7 Tecla CLEAR de cancelamento (16)
8 Teclas numéricas (9)
9 Tecla >10 (9)
0 Tecla TUNER/BAND do sintonizador/
banda (17)
!¡ Tecla DECK A ª· (19)
!™Tecla DECK B ª· (19)
!£ Tecla CD · SELECT de selecção de CD
(8)
!¢ Teclas CD PREV =/NEXT + de prévio/
próximo item (8)
! Tecla MUSIC MENU ON/OFF de menu
musical ligado/desligado (25)
!§ Teclas MUSIC MENU “/” /4/$ de
selecção de menu (25)
!¶ Tecla TV/VIDEO (9)
!• Interruptor POWER de alimentação (8)
!ª Interruptor TV POWER de alimentação
do televisor (9)
@ºTecla D.SKIP de salto de discos (8)
@¡Tecla FUNCTION
@™ Teclas KEY CONTROL +/– do
controlo de gradação (28)
@£ Teclas TV VOL +/– (9)
@¢ Teclas CH +/– de canais (9)
–
–
Æ»
Æ»
4
$
@ Teclas BAND +/– (18)
@§ Tecla DECK P de pausa do deck
(19)
@¶ Tecla DECK p de paragem do deck
(19)
@•Teclas DECK 0/) de rebobinagem/
avanço rápido (19)
@ªTecla CD P de pausa de CD (8)
#º Tecla CD p de paragem de CD (8)
#¡ Teclas CD 0/) de busca regressiva/
progressiva (8)
#™ Tecla RETURN ˆ de retorno (9)
#£ Tecla VOL (+/–) (24)
manual de um CD 20
temporizada 30
Gravação sincronizada com leitor de CDs
20
Graves Groove (profundos) 24
Guia para solução de problemas 33
Identificação das partes 36
Karaokê 27
Leitor de cassetes 19
Leitor de discos compactos 8
Ligação
da alimentação 6
de antenas 4
de auscultadores 32
de equipamentos opcionais 31
de um gira-discos 32
!ƒ
!¥
!»
@…
@`
+
@“
@£
@¢
@
p+P
)0
pP
)0+=
@⁄
@ƒ
@¥
@»
#…
#`
#“
#£
Índice remissivo
Acerto do relógio 7
Acessórios fornecidos 36
Ajuste
da indicação do painel frontal 10
da voltagem de funcionamento 6
de efeito sonoro 25
do mostrador no écran 11
do som 24
do volume 24
Ajustes do som 24
Altifalantes 4
Antenas 4
Busca
por cenas 12
por índex 12
por tempo 13
Canais gráficos em CD-Gs 14
Compilação
de discos 13
de faixas 14
Comutação de discos 8, 10
Controlo de gradação 28
DBFB 24
Desactivação do modo de demonstração 6
Dolby NR (redução de ruídos) 20
DSP 25
Duplicação
automática de uma outra fita 22
manual de uma outra fita 23
Eco digital 28
Efeito perimétrico 25
Equalizador gráfico 25
Especificações 35
Estações de rádio
programação de 18
de um superaltifalante de graves 32
de um televisor 5
do sistema estéreo 4
dos altifalantes 4
Manutenção 35
Matriz musical 11
Menu especial 12
Misturas com microfone 28
Multiplex 27
P FILE 26
Pilhas 6
Precauções 33
Protecção de gravações 33
Reprodução
de CDs 10
de CD-Gs 8
de CDs de vídeo 8
de faixas em ordem aleatória
(reprodução aleatória) 15
de faixas na ordem desejada
(reprodução programada) 15
de faixas repetidas (reprodução
repetida) 16
de uma cassete 19
Reprodução aleatória 15
Reprodução a um toque 9, 17, 20
Reprodução encadeada 19
Reprodução programada 15
Reprodução repetida 16
Restauração dos ajustes de fábrica 35
Selecção automática da fonte 9, 17, 20
Selecção do sistema de cores 5
Sintonização de estações de rádio
programadas 18
Sintonizador 17
Telecomando 37
Temporizador
Adormecer com música 29
Despertar com música 29
Gravação temporizada 30
sintonização de 17
Formação sónica 26
Gravação
automática de um CD 20
de karaokê 28
de sinais de rádio 22
de um CD (edição programada) 22
de um CD (edição por selecção da
fita) 22
de um CD (edição por tempo) 21
de uma outra cassete (duplicação) 22
Generalidades
Page 76
§§§Â
ƒµßi
¨®æ§ı®a©Œƒ q¶M¿I°A–§ ˝æ˜æ®¸´BO©Œm
©ÛºÈ¿„B°C
¨ ¡ßKƒ q¶M¿I°A –§ •¥}春fl°A ˚ ©e¶´´˘¶ ÍÆʙè ±z
™A»°C
ßOß‚æ˜æ¶wÀ¶bÆ—¨[©Œæ¿oµ•ØUØ™¶a§Ë°C
•ª£´~§ ™ pÆg§•Û؇©Ò•X WL§@Ø ´ ™Ægu°C
•ªÀmQ§¿˛¨§@Ø pÆg £
´~°CCLASS 1 LASER PRODUCT
°]§@Ø pÆg£´~°^º–ß”¶Ï©Ûæ˜æ
I ±°C
w™Ô¥fU°I
P¡¬±zøÔ¡ Sony gßA Hi-Fi ’¶® µ T®tŒ°C•ª®t¶Cßt¶ ÿ ÿ¶ Ï
™•\؇°C oöC¡|®‰§§¥X ”°G
°E £§F µT CD •H•~°A¡Ÿ•i•H©Òºv CD ©M¿R CD ˝±z™Y‡¨° ™
©M¿Rœºv °C
°E DBFB°] AßCµ§œıX°^®t Œ•i•[±jßC¿WdÚµT°A£•Õ±j¶ §O™
´ßC µ°C
°E w¨˘•\؇ ˝±z¶s§J°A¥_ ’•Xöh20 ” FM q•x°A10 ” MW q•x°A©M
10 ” SW q•xµ•±z©“fl w¶¨ •™ q•x°C
°E ©Ò§jæ •i’æ„ µË®œæA¶X¶Uÿ µº÷´¨¶°©M¿Ù“°C
°E ©wÆ…æ•i ]©w CD ¤æ˜°A œ±a¤æ˜©Œ¶¨µæ˜©Û¨Y©“ n™Æ…®Ë•¥}©Œ
ˆ±º q °C
°E ¬˘•dÆy•i•H±q¶¨ µæ˜°ACD ¤æ˜©Œ±q•t§@•dÆyi¶Êø˝ µ©Œ®‚•dÆy§¨
ß@±µ§O©Òµ°C
°E CD ¤æ˜•i sƒÚ©Ò öh3±i CD ® •i§£°¬_¶a i´e°]©Œ Àh°^¶a©Òß
©“¶ À¶b CD ¶´ L§W™ ¤ –°C
°E ±z•iߧ¶bÆy¶Ï§W§£• æ ¶”•Œªª±±æ •h±±®Ó•ª®t Œ°C
•ª™` Nº–±¨O
K¶bæ˜æ § °°C
®œ•Œ•ªæ˜´e
C
̱zß‚ AC q u±µ¥°®Ï¿§W¥°ÆyÆ…°A„•‹æßY
•X {•‹ dº“¶° „•‹°C n•høE¨°°] ˆ±º°^•‹ dº“¶°
2
Æ…°A–¶b®tŒˆµ¤ q Æ…´ˆ§U DISPLAY/
DEMO°C
•ª®t Œ•i•H©Ò§U¶C¶Uÿ¤–°G
ºv CD µ T C D ¿R CD
(VIDEO CD) °]CD-G°^
¤–¨•Æʺ– —
f
§Æ e µT°œºv µT µ T°œºv
°] qºv°^ °]¿R °^
¤ –§ÿ§o 12 cm/8 cm 12 cm/8 cm 12 cm/8 cm
©ÒtÆ…° 74§¿°˛20§¿ 74§¿°˛20§¿ 74§¿°˛20§¿
ºv CD ™æ
•ª®t Œ ¶XµL PBC*ºv CD°]1.1´¨°^©M PBC t ™ ºv CD°]2.0´¨°^
™ºv CD º– «°C•iÆ⁄æ⁄ ¤ –´¨¶°•h™Y ‡®‚ ÿ©Òt°C
¤ –´¨¶° •i•H
µL PBC ºv CD ™Y‡©Òºv°] qºv°^©Mµ T CD°C
°]1.1´¨ ¤ –°^
PBC t ºv CD ßQ•Œ „•‹©Û qµ¯´Ã ı™ µ•ÿ Ê´Ã ı
°]2.0´¨ ¤ –°^ °] µ•ÿ Ê©Ò t°^©Ò•Ê§¨©™ n•Û°C £§FµL
PBC ºv CD ™ ©Òºv•\؇§ß•~°A¡Ÿ•i•H©Ò ™´~
Ë™°A©Œº–«´~Ë™¿R °C
f
* PBC=©Òt±±®Ó
MHC-V800•]ßt°G
°X•D昰GHCD-V800
°X¥¡næ ®tŒ°G ´e¥ ¡næ SS-H991G
¿Ù¬ ¡n¥¡næ SS-SR991G
Page 77

•ÿø˝
ƒ1 °G’©w
s±µ•fl È¡n µT®tŒ 4
À q§l 6
]©wÆ…ƒ¡ 7
ƒ2 °G ºv CD °]VIDEO CD°^ / ¿R CD
°]CD-G°^ / CD ¤æ˜
򥻾ާ@
©Òºv CD°]VIDEO CD°^©M¿R CD °]CD-G°^ 8
©Ò CD°] pÆg ¤–°^ 10
®œ•Œ„•‹æ
¿À¨d—ælÆ…° 10
®œ•Œ™¨™p´Ã ı„•‹ 11
ØSÆÌ•\؇
߉•X ¤–§W¨YØS©w °§¿°]ØSÆÌ µ•ÿÊ°^ 12
¶b¿R CD°]CD-G°^§WøÔæ‹œ•‹¿WD 14
±q§W¶ ±§Ó BƒÚ©Òºv CD°]VIDEO CD°^
°]´Ï¥_©Ò t°^ 14
•Œ ÿ ÿº“¶°©Ò CD
•Ù N ß«©Ò¶±§l°]•Ù N©Òµ°^ 15
´ˆß ±Ê™ ß«©Ò¶±§l°]µ{ß«©Ò µ°^ 15
§œ¥_©Ò¶±§l°]§œ¥_©Ò µ°^ 16
ƒ6 °G•d©‘¢›¢Ÿ
•d©‘ OK°G t ¤ 27
•d©‘ OK ø˝ µ°] ¡ßJ V¿W°^ 28
ƒ7 °G™˛•[•\؇
•µ¤ µº÷§J Œ 29
•Œ µº÷æxøÙ 29
µLuqºsº `•ÿ™ ©wÆ…æø˝ µ 30
s±µøÔ¡ •Û ] 31
—¶“ÍÆ
®œ•Œ´e ™` N 33
¨GªŸ±¥¥M 33
˚ 35
WÆÊ 35
Nªy s 36
°•Û©M±±®Óæ Ø¡§fi 36
Ø¡§fi ´ ©
C
3
ƒ3 °G¶¨µæ˜
•¶¨ µæ˜ 17
w¨˘µL u qºsº q•x 18
©Ò w¨˘ q•x 18
ƒ4 °G œ±a ¤æ˜
©Ò œ±a 19
±q CD°] pÆg ¤ –°^ø˝ µ 20
±q CD ø˝ µ°G´¸©w œ±a™¯´°]Æ… ° søË°^ 21
±q¶¨ µæ˜ø˝ µ 22
±q®‰•L œ±aø˝ µ°]´˛®©ø˝ µ°^ 22
ƒ5 °G¡n µ ’æ„
’æ„¡n µ 24
øÔæ‹¡n¿W•[±j 24
’æ„¡n¿W•[±j 25
ß@§@ ”§H¡n¿W•[±j®˜©v°] ”§H®˜©v°^ 26
¬‡¥´¥ ¡næ ™ ’¶®°]¡n µ ’¶®°^ 26
Page 78
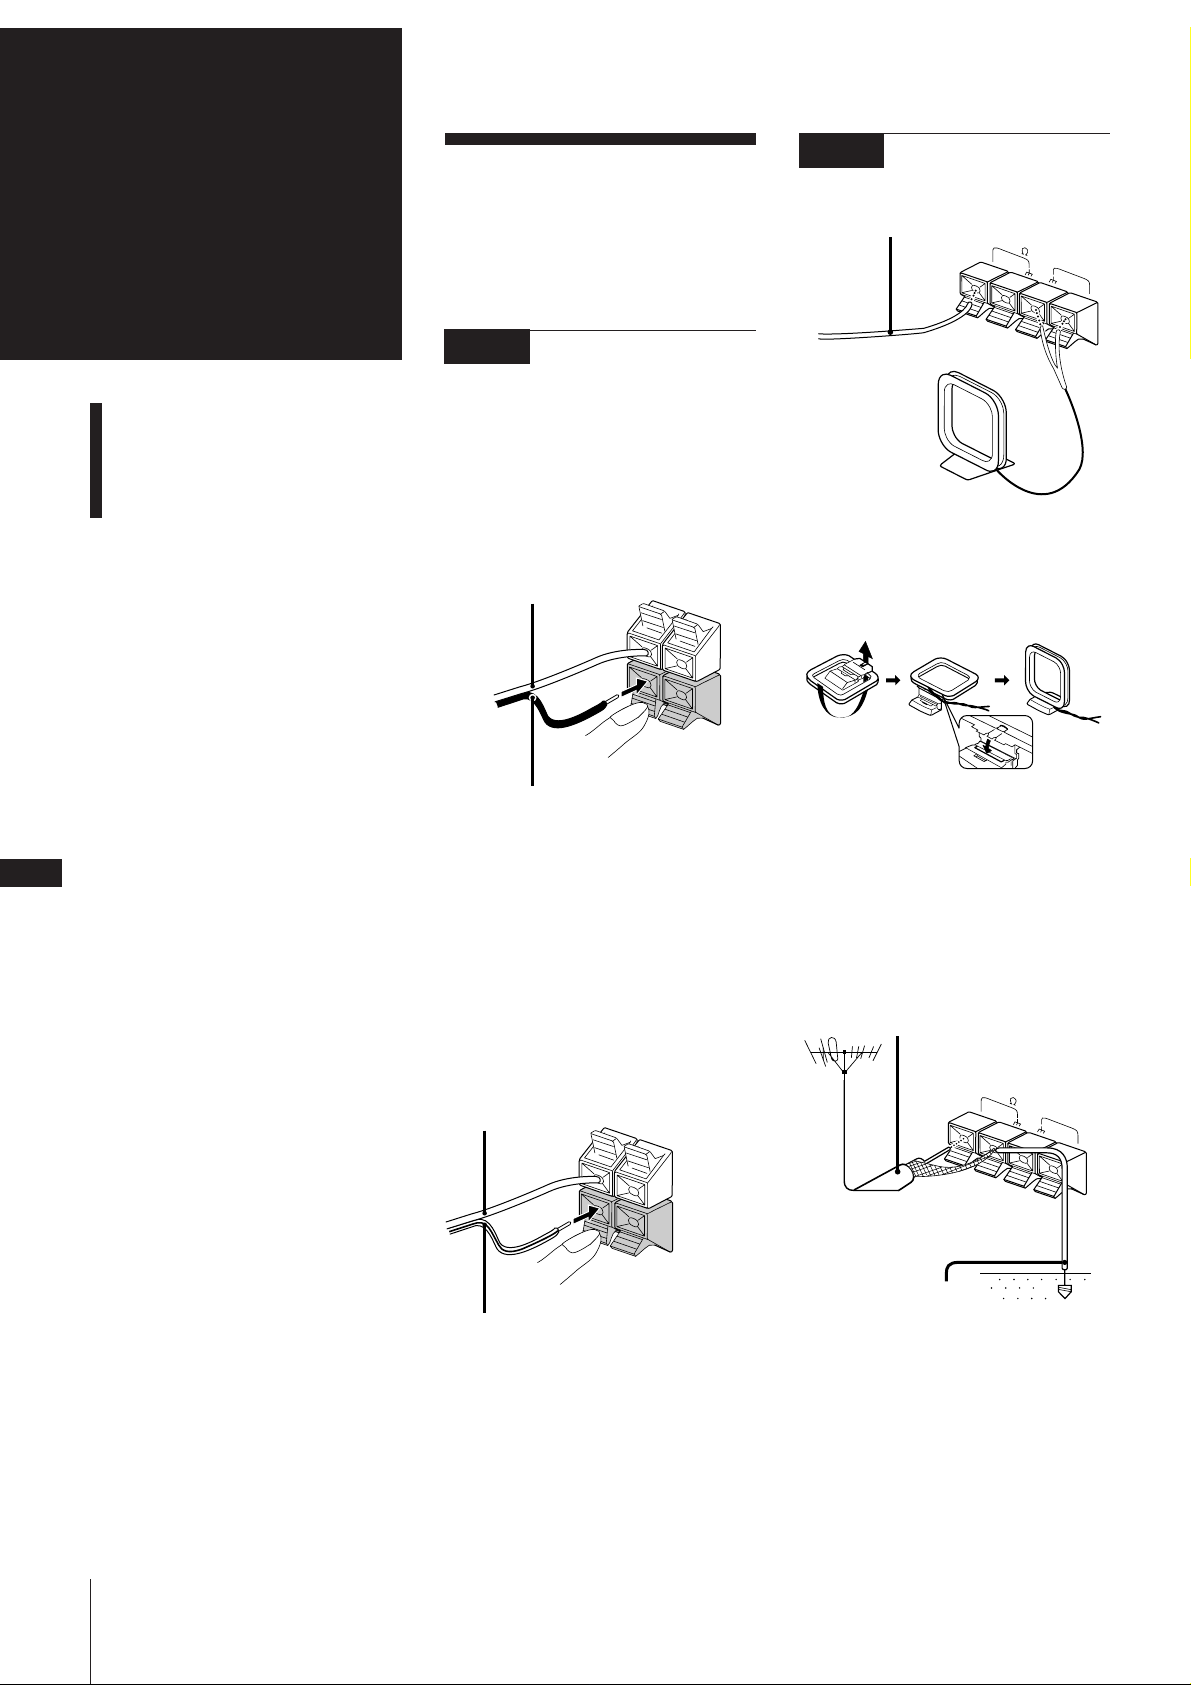
ƒ1 :
s±µ•fl È¡nµ T®t Œ
®BJ2 s±µ§—u
’©w
s±µ•fl È¡nµT®tŒ
Àq§l
]©wÆ…ƒ¡
´ˆ ”§Uœ©“•‹ s±µ•flÈ¡n µ T®tŒ°C
¶p™Gn±N•Ù¶ÛøÔ¡ •Û’¶® ʧ s±µ®Ï•fl
È¡nµT®tŒ°A–—”ƒ7 ™°ßs±µøÔ¡ •Û
] °®°C
®BJ1 s±µ¥¡næ
¶w± ¶n¥¡næ q l™ ®‚ ›°A±N©“¶ ¥¡n
æ s±µ®Ïæ˜æ°C
s±µ´e¥ ¡næ
±N•k´e¥ ¡næ s±µ®Ï SPEAKER R ±µ¿Y°A
±N•™¥ ¡næ s±µ®Ï SPEAKER L ±µ¿Y°A ˝¨ı
u±µ®Ï ‘°A ¬ u±µ®Ï ’°C
SPEAKER
¨ı u±µ®Ï ‘°]¨ı¶‚°^
R
L
FM W´e§— u*°]™˛±a°^
AM ¿Ùߌ§— u°]™˛±a°^
s±µ AM ¿Ùߌ§— u
±N™˛±a™ ¿Ùߌ§— u s±µ®Ï AM ©M y ›
§l°C
FM 75
*µ˘°G§Ù•¶˘™
AM
¬ u±µ®Ï ’°] ¬¶‚°^
C
4
ns±µ¿Ù¬ ¡n°˛ ¥¡næ Æ…
±N•k´·¥ ¡næ s±µ®Ï SURROUND/SUB
SPEAKER R ±µ¿Y°A±N•™´·¥ ¡næ s±µ®Ï
SURROUND/SUB SPEAKER L ±µ¿Y°A ˝¶«u
±µ®Ï‘¶” ˝±a ¬±¯Øæ™ ¶« u±µ®Ï ’°C
µ˘
§£nß‚¿Ù¬ ¡n¥¡næ ©Ò¶bqµ¯æ˜§W ±°C
¶]¨ •i؇®œqµ¯ºv ™ ±m¶‚µo•Õ•¢Øu°C
SURROUND/SUB SPEAKER
¶« u±µ®Ï ‘
°]¶«¶‚°^
¬±¯Ø涫 u±µ®Ï ’°] ¬¶‚°^
R
L
ßÔµ FM ¶¨µ
–•Œ75º⁄¶P bq l±N´«•~ FM §—u s±µ
®Ï75Ω©M y ›§l°C
´n® µ
•Œ¡ ±¤ß®±N´«•~§—u™ y ›§l±µ¶a•H®æ
pq°C¨ ßK—Æ z¨µ¶M¿I°A –§ß‚¶a u±µ®Ï
—Æ tfi§W°C
75º⁄¶P b q l°]µL™˛±a°^
FM 75
AM
±µ¶au
°]µL™˛±a°^
ƒ1 °G’©w
Page 79
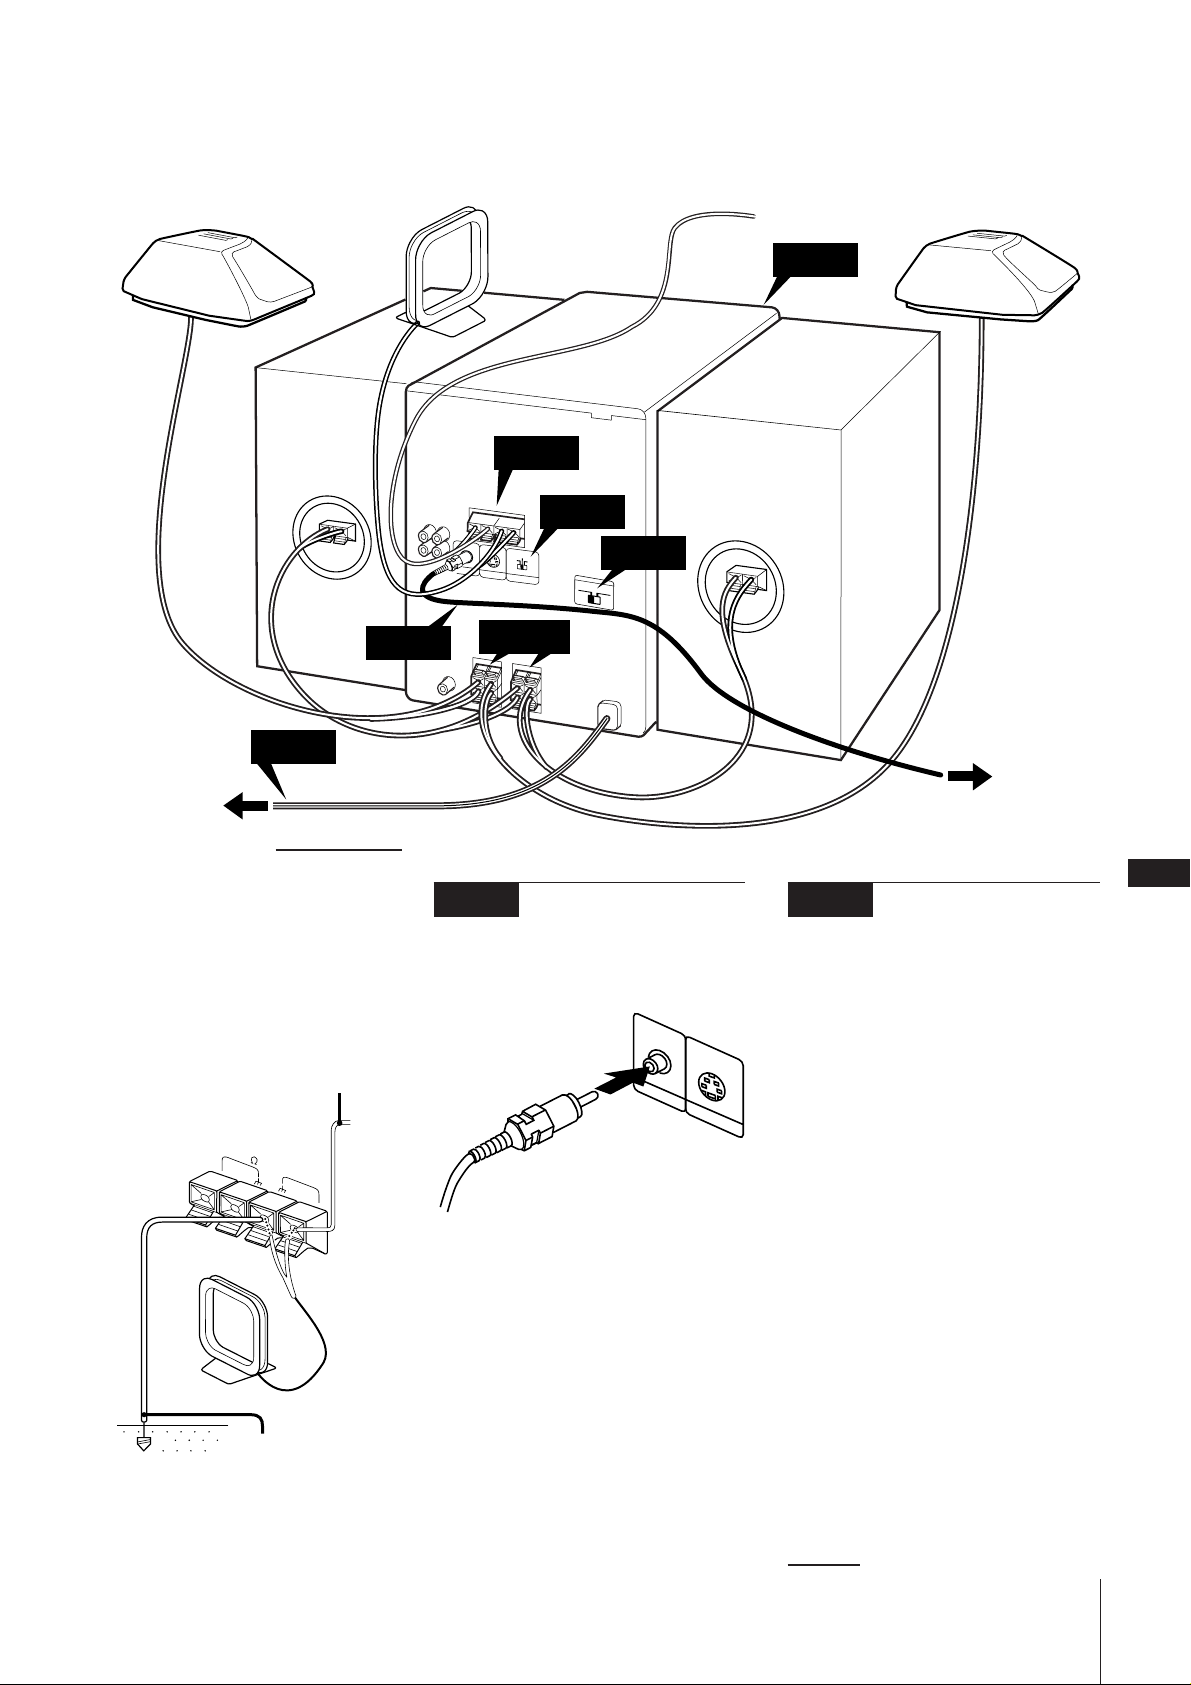
´·¥ ¡næ °]•k°^
°]§£ n©Ò¶b qµ¯æ˜§W°C°^
AM ¿Ùߌ§—u°]™˛±a°^
´e¥ ¡næ °]•k°^
FM W´e§— u°]™˛±a°^
´·¥ ¡næ °]•™°^
°]§£ n©Ò¶b qµ¯æ˜§W°C°^
®B J 7
®B J 6
¶‹¿§W¥°Æy
°I ô·§~ s±µ°I
ßÔµ AM ¶¨µ
±µ¶n AM §—u§ß´·°A – s±µ§@±¯6®Ï15¶Ã
™ µ¥ t q u®Ï AM ›§l°C¶”±N y ›§l±µ¶a°C
´n® µ
´«•~§— u™ y ›§l±µ¶a•H®æ pq°C¨ ®æ
—Æ z¨µ¶M¿I°A–§±N¶a u±µ®Ï—Æ tfi°C
®B J 2
®B J 4
®B J 3
®B J 1
®BJ3 s±µ qµ¯æ˜
•Œ™˛±a™µ¯¿W s±µql±N qµ¯æ˜™µ¯¿W
øȧJ¥°§’ s±µ®Ï®tŒ´· ±™O™ VIDEO OUT
¥°§’°C
®B J 5
´e¥ ¡næ °]•™°^
®BJ4 øÔ拱m¶‚®tŒ
(NTSC/PAL)
•ª®t Œ ¶X NTSC ©M PAL ±m¶‚®t Œ°C–
Æ⁄æ⁄±z™ qµ¯æ˜±N®t Œ´·±™ SYSTEM
SELECT°]±m¶‚®tŒ°^ ]©w©ÛæAÌ™ ¶Ï m°C
C
5
FM 75
±µ¶au
°]µL™˛±a°^
µ¥tqu
°]µL™˛±a°^
AM
VIDEO OUT
S VIDEO OUT
®œ•Œqµ¯æ˜Æ…
•¥ } qµ¯°AøÔ拵¯¿WøȧJ´K•i¨›®Ï®”¶¤
•ª®t Œ™ºv °C
µ˘
¨¿Ú±oßÛ ™´~˺v °A±z•ißQ•ŒøÔ¡ •Û
™ S- µ¯¿Wæ… u±Nqµ¯æ˜§W™ S-VIDEOøȧJ¥°
§’ s±µ®Ï®tŒ´· ±™O§W™ S-VIDEO OUT ¥°
§’°C
SYSTEM SELECT ™ §uºt ]©w¨O]©w¶b
AUTO
•
¶p™G±z™ qµ¯æ˜Ø‡¶¤ ¶aÆ⁄æ⁄øȧJ´H ¶”ßÔ
‹±m¶‚®tŒ°G
§uºt ]©w (AUTO) •iÆ⁄æ⁄©“©Òºv CD ™
±m¶‚®tŒ¶¤ ßÔ ‹µ¯¿WøÈ•X™±m¶‚®tŒ°C
¶Æ…°A©“øÔ±m¶‚®t Œ±N˚´˘®Ï ˆ±º®tŒ q
©ŒßÔ©Ò®‰•L®œ•Œ§£¶P±m¶‚®tŒ™ºv
CD ¨§Ó°C ˆ±º®tŒÆ…°A±m¶‚®t Œ±N¶¤
¶a ]©w¨ NTSC ¶”¶b§U¶ ¶A•¥}®t ŒÆ…°A
´K§Sße NTSC ®tŒ°C
•
¶p™G±z™ qµ¯æ˜™±m¶‚®t Œ¨O NTSC°G
ßY±N SYSTEM SELECT ]©w©Û NTSC°C
Ì©Ò•Œ PAL ±m¶‚®t Œø˝™ºv CD Æ…°A
ºv ±N Q´´™©‘¶˘°A¨Gºv ™ §W°A§U°§¿
™ „•‹±N Q I¬_°C
•
¶p™G±z™ qµ¯æ˜™±m¶‚®t Œ¨O PAL°G
–±N SYSTEM SELECT ]©w©Û PAL°C
Ì©Ò•Œ NTSC ±m¶‚®tŒ™ ºv CD Æ…°Aºv
±NQ§Ù• Æiºe¶”´Ãı§W°A§U °§¿±NQ ¬
¶‚ ı±ª™°C
±µ§U m
ƒ1 °G’©w
Page 80
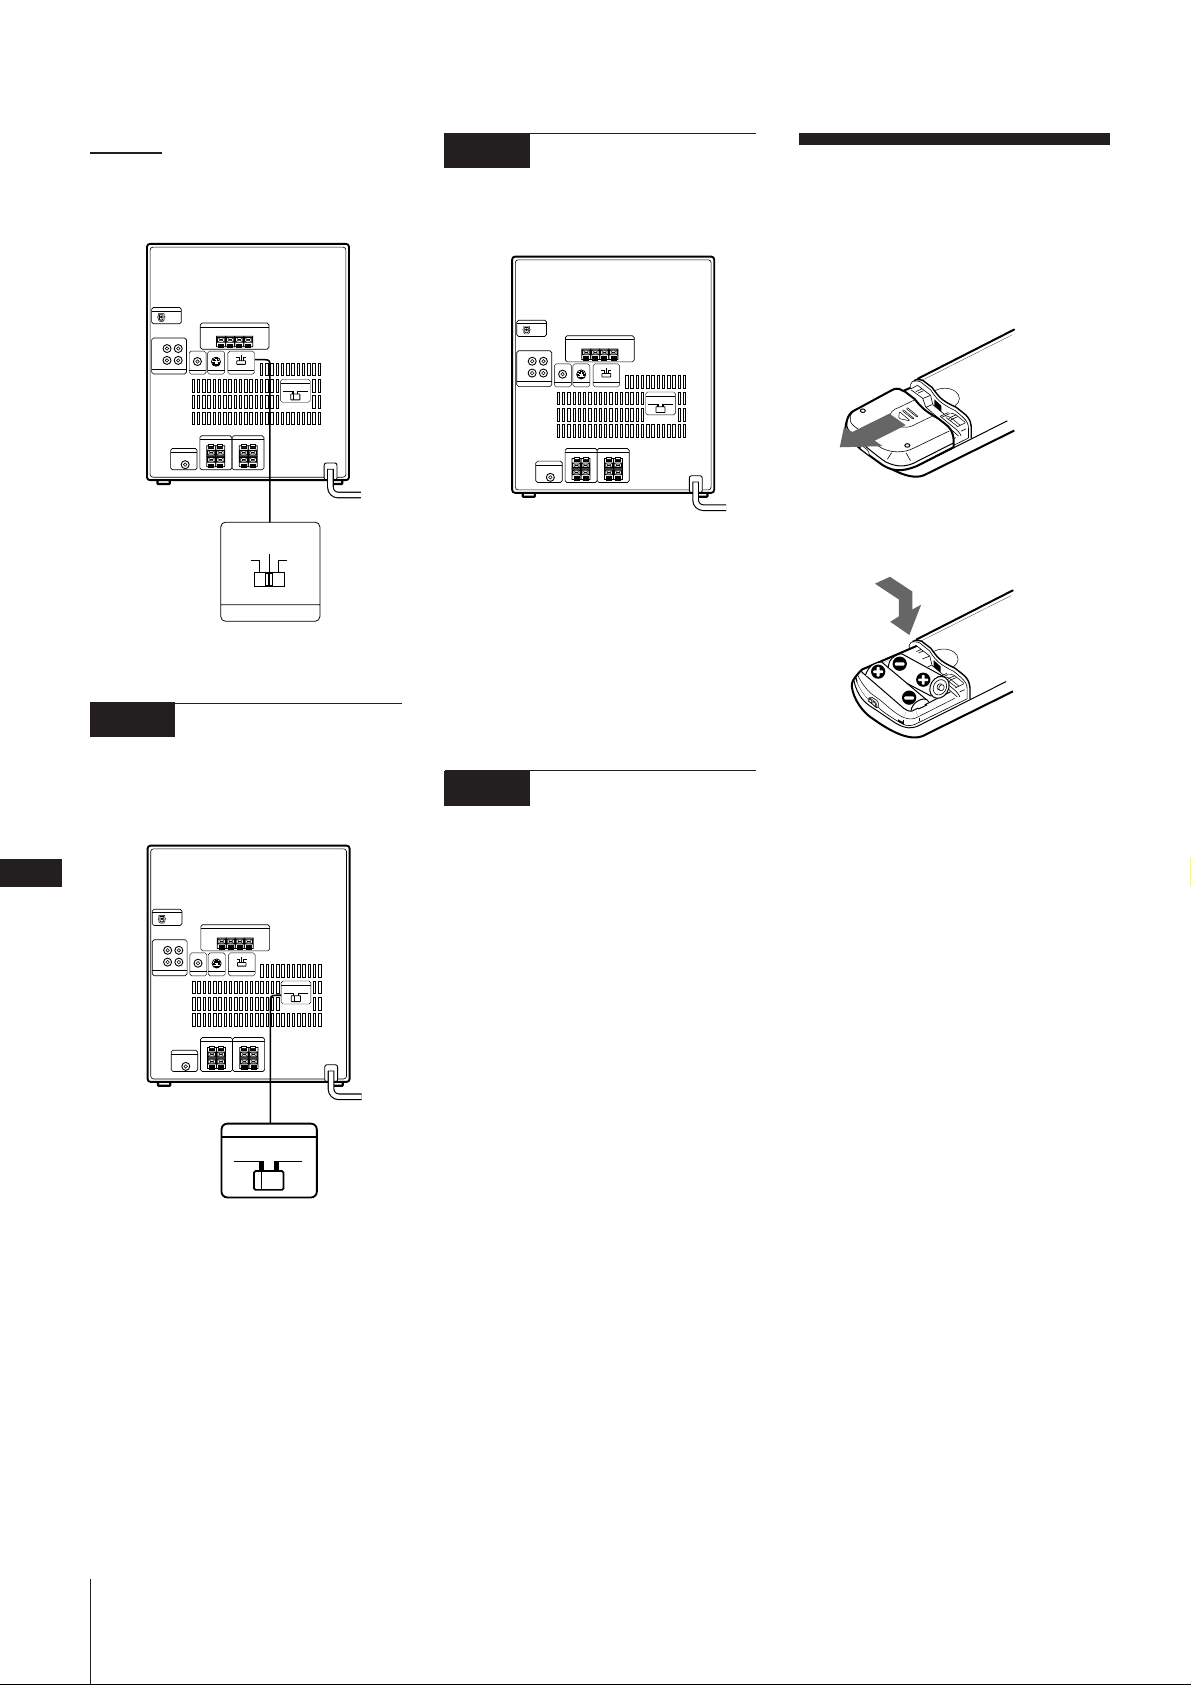
m ±µ§W
nßÔ ‹ SYSTEM SELECT ]©wÆ…°A§@©w n
ˆ±º®tŒ q °C
AUTO
PALNTSC
SYSTEM SELECT
®BJ5 ’æ„æfiß@q¿£
®BJ6 s±µ q
s±µ¶n§W ±§@§¡±µu´·°A ô·§~±N AC
q us±µ®Ï¿ §W q ¥°Æy°C
¶‹¿§Wq ¥°Æy
Ìß‚ AC q u s±µ®Ï¿§W q ¥°Æy
Æ…°A „•‹æ§W±N•X {•‹dº“¶°°C
¥°¿Y¬‡±µæÅ°]™˛±a¶ ¥°¿Y¬‡±µæ™´¨ ¨
°^
•ªæ˜¥°¿Y¶p™G§£æA¶X±z™¿¥°ÆyÆ…°A–
ß‚™˛±a™¬‡±µæ À®Ï¥°¿Y§W°C
Àq§l
±N®‚ ” R6°]3 °^ q¶¿ À§Jªª±±æ •Œ•H
ªª±±°C
1 •¥ }ª\§l°C
/
2 À§J®‚ ” R6°]3 °^ q¶¿°C
˝°œ©M°–™ q •´¸•‹Ô « q¶¿´«§§™ œ
•‹°C
±µ¥° q ´e°A •˝ß‚ VOLTAGE
SELECTOR ]©w©Û ¶X̶a q u Ùq¿£™
¶Ïm°C
C
6
VOLTAGE SELECTOR
110-120V 220-240V
®BJ7 •høE¨°°] ˆ±º°^•‹
dº“¶°
n•høE¨°•‹ dº“¶°Æ…°A–¶b ˆµ¤®tŒ q
Æ…´ˆ§UDISPLAY/DEMO°C
3 ˆ§Wª\§l°C
q¶¿ÿ©R
ªª±±æ®C À§@¶ q¶¿°]®œ•Œ Sony SUM-3
(NS) q¶¿°^§j¨˘•i®œ•Œ6 ”§Î§ß§[°C Ì q¶¿
§£Ø‡¶Aæfiß@ªª±±æÆ…°AßY–ßÛ¥´sq¶¿°C
¨ßKq¶¿|G
« ™¯¥¡ °§£®œ•Œªª±±æ Æ…°A –ß‚ q¶¿
®¯§U•H®æ¶] q¶¿|Glaæ˜æ °C
ƒ1 °G’©w
Page 81
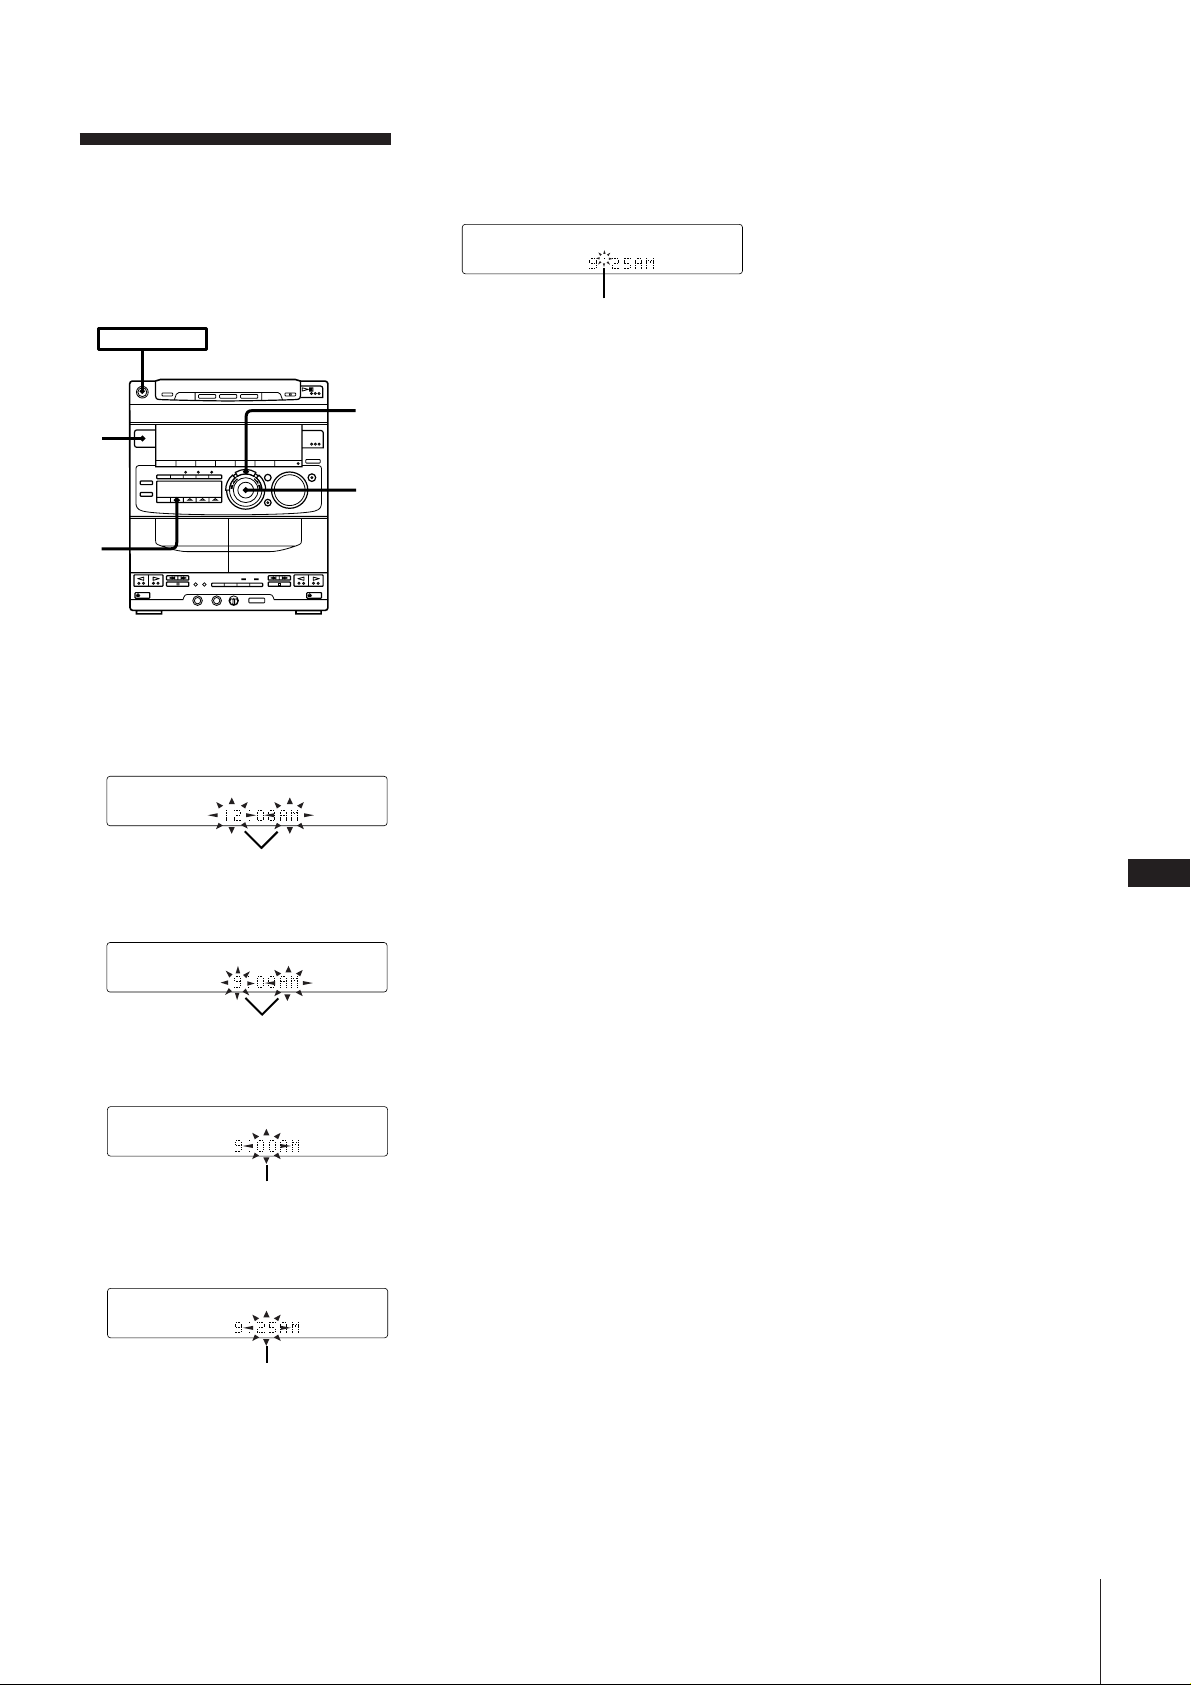
]©wÆ…ƒ¡
ßY®œˆ±º§F q °A§ À™ Æ…ƒ¡§¥µM„•‹
µ¤Æ…°°C• ]©w¶nÆ…ƒ¡•H´KßQ•Œ®t Œ™ øE
¨°§F™©wƅ晕\؇°C
–•Œæ˜æ§W™¡‰sß@¶æfiß@°C
POWER m ON
1
2
1 ´ˆ§U TIMER°]©wÆ…æ °^°C
2 ´ˆ§U CLOCK SET°]Æ…ƒ¡ ]©w°^°C
°ßAM°®©M¬Iƒ¡´¸•‹ }©l { {°C
4,6
3,5
´e•b§¿Æ…®Ë èO§W ͬI{ {°]0®Ï29
¨Ì°^°A§U•b§¿Æ…®Ë°]30®Ï59¨Ì°^ èO§UÍ
¬I { {°C
{{
n¨dÆ…°Æ…
´ˆ¥X¶ DISPLAY/DEMO°A {¶bÆ…®Ë´K•i
„•‹8¨Ì°C
nßÛ•øÆ…ƒ¡]©wÆ…
–§œ¥_®BJ1®Ï6°C
{{
3 ±¤¬‡ JOG ´ L¶‹•X {•ø T™¬Iƒ¡•H ]©w
{¶bÆ…®Ë™¬Iƒ¡º °C
{{
4 ´ˆ§U ENTER/NEXT°]øȧJ°˛®‰¶ °^°C
§¿ƒ¡´¸•‹ }©l { {°C
{{
5 ±¤¬‡ JOG ´ L¶‹•X {•ø T™ §¿ƒ¡ „•‹•H
]©w{¶bÆ…®Ë™ §¿ƒ¡º°C
{{
6 ´ˆ§U ENTER/NEXT°C
Æ…ƒ¡ßY}©lB¬‡¶”§Wœ_{{°CßQ•Œ ¯Æ…
´H Ô«Æ…°]©w¶nÆ…ƒ¡°C
C
7
ƒ1 °G’©w
Page 82
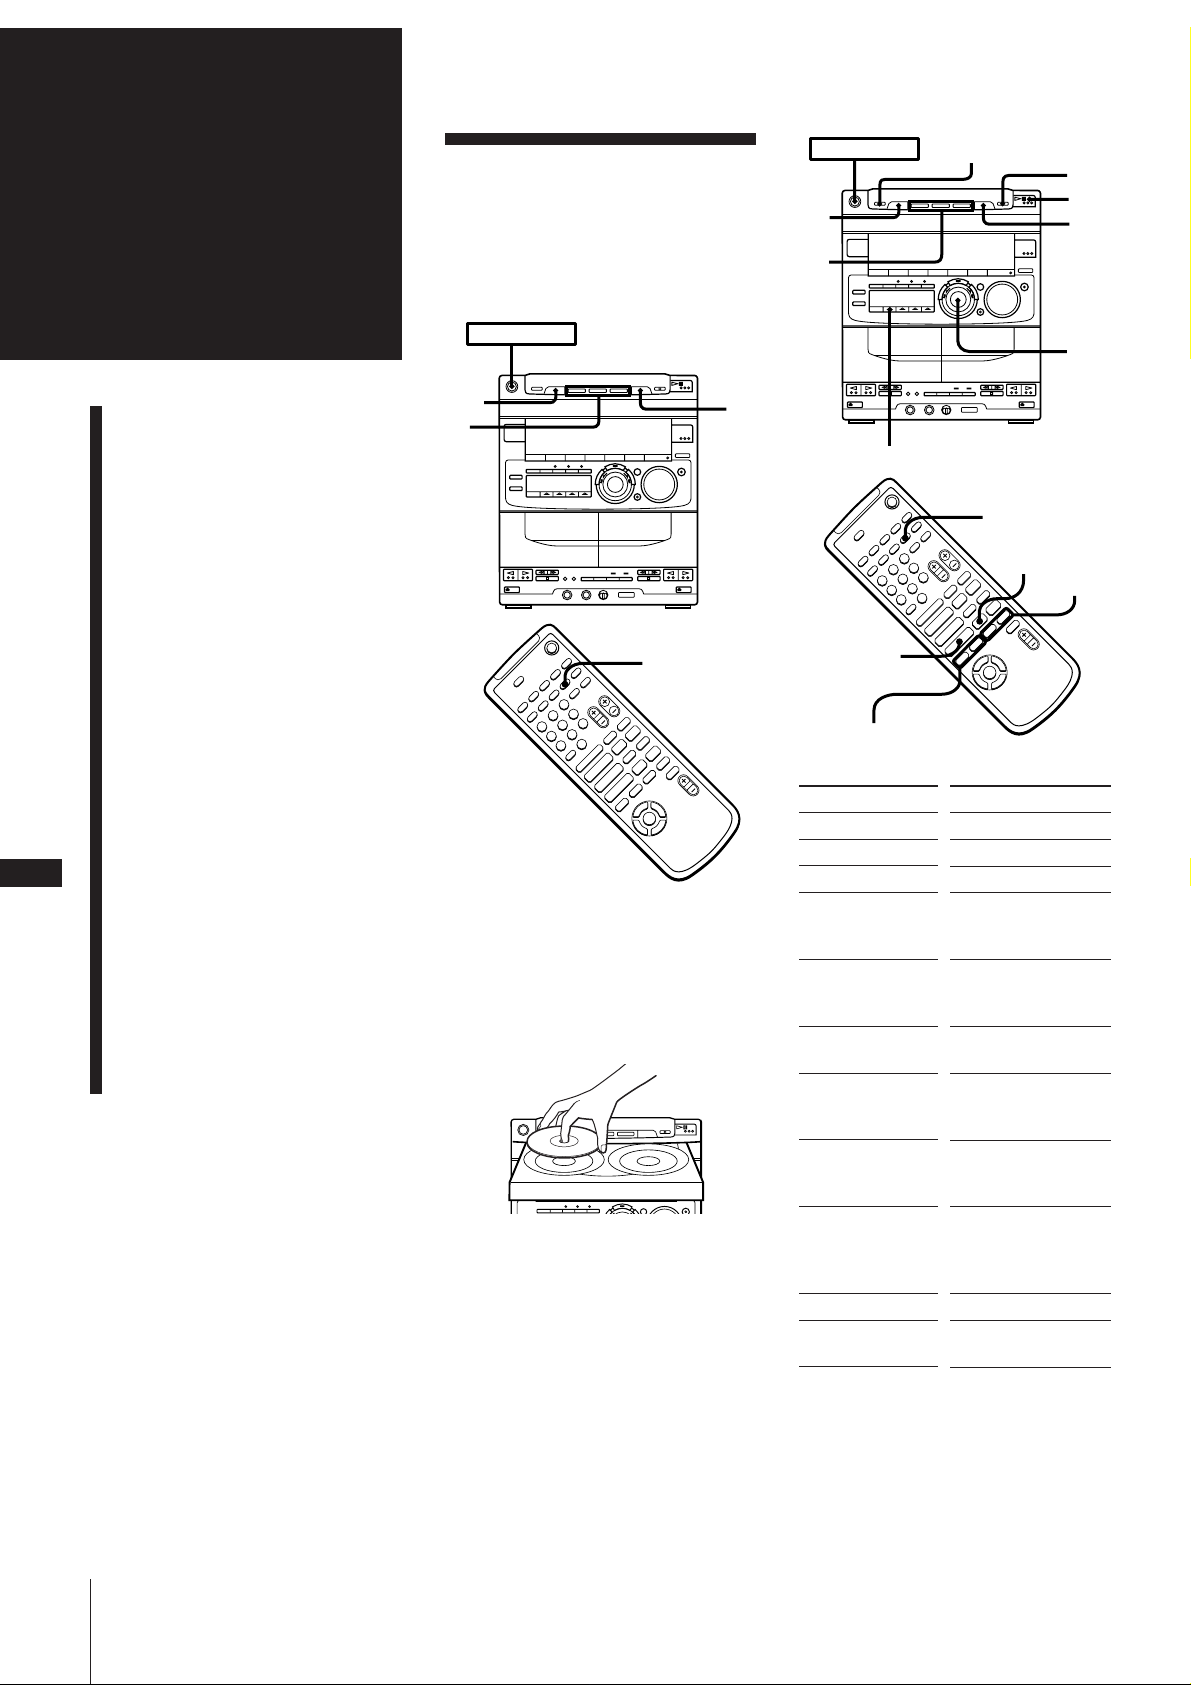
ƒ2 °G
ºv CD °]VIDEO
CD°^ / ¿R CD
°]CD-G°^ / CD ¤æ˜
©Òºv CD °]VIDEO CD°^
©M¿R CD °]CD-G°^
•i•H©ÒµL PBC ºv CD°]1.1´¨°^©M PBC
t ™ ºv CD°]2.0´¨°^°C
•iÆ⁄æ⁄ ¤ –´¨¶°™Y‡®‚ ÿ©Ò t°C
POWER m ON
DISC
SKIP
DISC
1~3
EX-CHANGE
p
Æ‚
⁄OPEN
/CLOSE
POWER m ON
JOG
DISC
򥻾ާ@
©Òºv CD°]VIDEO CD°^ ©M
SKIP
3
2
1/ALL DISCS
¿R CD°]CD-G°^
©Ò CD°] pÆg ¤ –°^
–
®œ•Œ„•‹æ
¿À¨d—ælÆ…°
®œ•Œ™¨™p´Ãı„•‹
D.SKIP
+
ØSÆÌ•\؇
߉•X¤–§W¨YØS©w°§¿
°]ØSÆÌ µ•ÿ Ê°^
¶b¿R CD°]CD-G°^§WøÔæ‹
œ•‹¿WD
–
+
p
–
)0
P
pP
Æ»
)0+=
Æ»
Æ
4
$
±q§W¶ ±§Ó BƒÚ©Òºv CD
C
8
°]VIDEO CD°^
°]´Ï¥_©Ò t°^
1 •¥ }qµ¯æ˜®øÔ拵¯¿WøȧJ°C
•Œ ÿ ÿº“¶°©Ò CD
•ÙN ß«©Ò¶±§l°]•Ù N©Ò µ°^
´ˆß ±Ê™ ß«©Ò¶±§l
°]µ{ß«©Ò µ°^
§œ¥_©Ò¶±§l°]§œ¥_©Òµ°^
• nÆ…°A•i —¶“±z™ qµ¯æ˜™ ®œ•Œª°©˙
Æ—°C
2 ´ˆ§U § OPEN/CLOSE°Aß‚ºv CD°˛¿R
CD À¶b ¤–¶´ L§W°]Kº– ±±¥¬§W°^°C
nÀ©Òƒ§T±i¤–Æ…
´ˆ§U DISC SKIP°]©Œªª±±æ§W™
D. SKIP°^°C ¤ –¶´LßY±¤¬‡ ˝±z؇ À©Ò•t
§@±iºv CD°˛¿R CD°C
CDÆ
PREV=/NEXT+
n
±§Ó©Òt
º» ±
´Ï¥_©Ò t
´e i®Ï®‰•L¶±§l©Œ
ı±Æ…
h®Ï´e ±¶±§l©Œı
±Æ…
߉•X§@¶±©Œı±§§
¨YØS©w°§¿
øÔ拧@ØS©w CD
•u¨› {¶b©“øÔ ¤ –
¨›•˛ ¤ –
ªª±± CD
©Ò t§§§¡¥´®ÏßO™
¤–
D.SKIP
+
P
+
p
–
)0
P
pP
Æ»
)0+=
Æ»
Æ
4
$
–´ˆ§U°]ªª±±æ §W™ °^
p
· (P*2)
· (CD · ©Œ P*2)
NEXT (NEXT +*2)
©Œ Æ…w§Ë¶V±¤¬‡ JOG
´L *1°C
PREV (PREV =*2)
©ŒfÆ…w§Ë¶V *1±¤¬‡
JOG ´L *1°C
´ˆ¶Ì 0 ©Œ )*2°C
DISC 1 ~ 3*3 ©Œ§œ¥_´ˆ
§U DISC SKIP
(D.SKIP)°C
§œ¥_´ˆ§U1/ALL DISCS
¶‹°ß1 DISC°®°]1±i ¤
–°^•X {©Û„•‹æ §W°C
§œ¥_´ˆ§U1/ALL DISCS
¶‹°ßALL DISCS°®°]©“
¶ ¤ –°^•X {©Û „•‹
æ° C
§ OPEN/CLOSE
EX-CHANGE
0/)
3 ´ˆ§U DISC 1~3 •HøÔæ‹ ¤–°C
¤ –¶´L¶¤ ¶a ˆ§W°A¶” }©l¶¤©“øÔºv
CD°˛¿R CD }©l©Ò t°C
¶p™G©“øÔ¶´L§W®SÀ ¤–°A¤æ˜´K¶¤ ¶a
§¡¥´®Ï§U ±§@±i ¤ – }©l©Ò t°C
*1©Û¿R CD ©MµL PBC ºv CD°C
Ì ¤æ˜]©w©Û°ßALL DISCS°®º“¶°Æ…°A´K
•i•Œ JOG ´ L•h¥M߉©“¶ À©Ò¶b ¤æ˜
°]µL¡_•\؇°^§W•˛°¤–™©“¶™¶±§l°C
*2ºv •i؇ |£•Õ§@®«§z¬Z°C
*3¶p” §W®SÀ¤ –°A¶´LßY±N±•X°C
ƒ2 °Gºv CD°]VIDEO CD°^/ ¿R CD°]CD-G°^/ CD ¤æ˜
Page 83
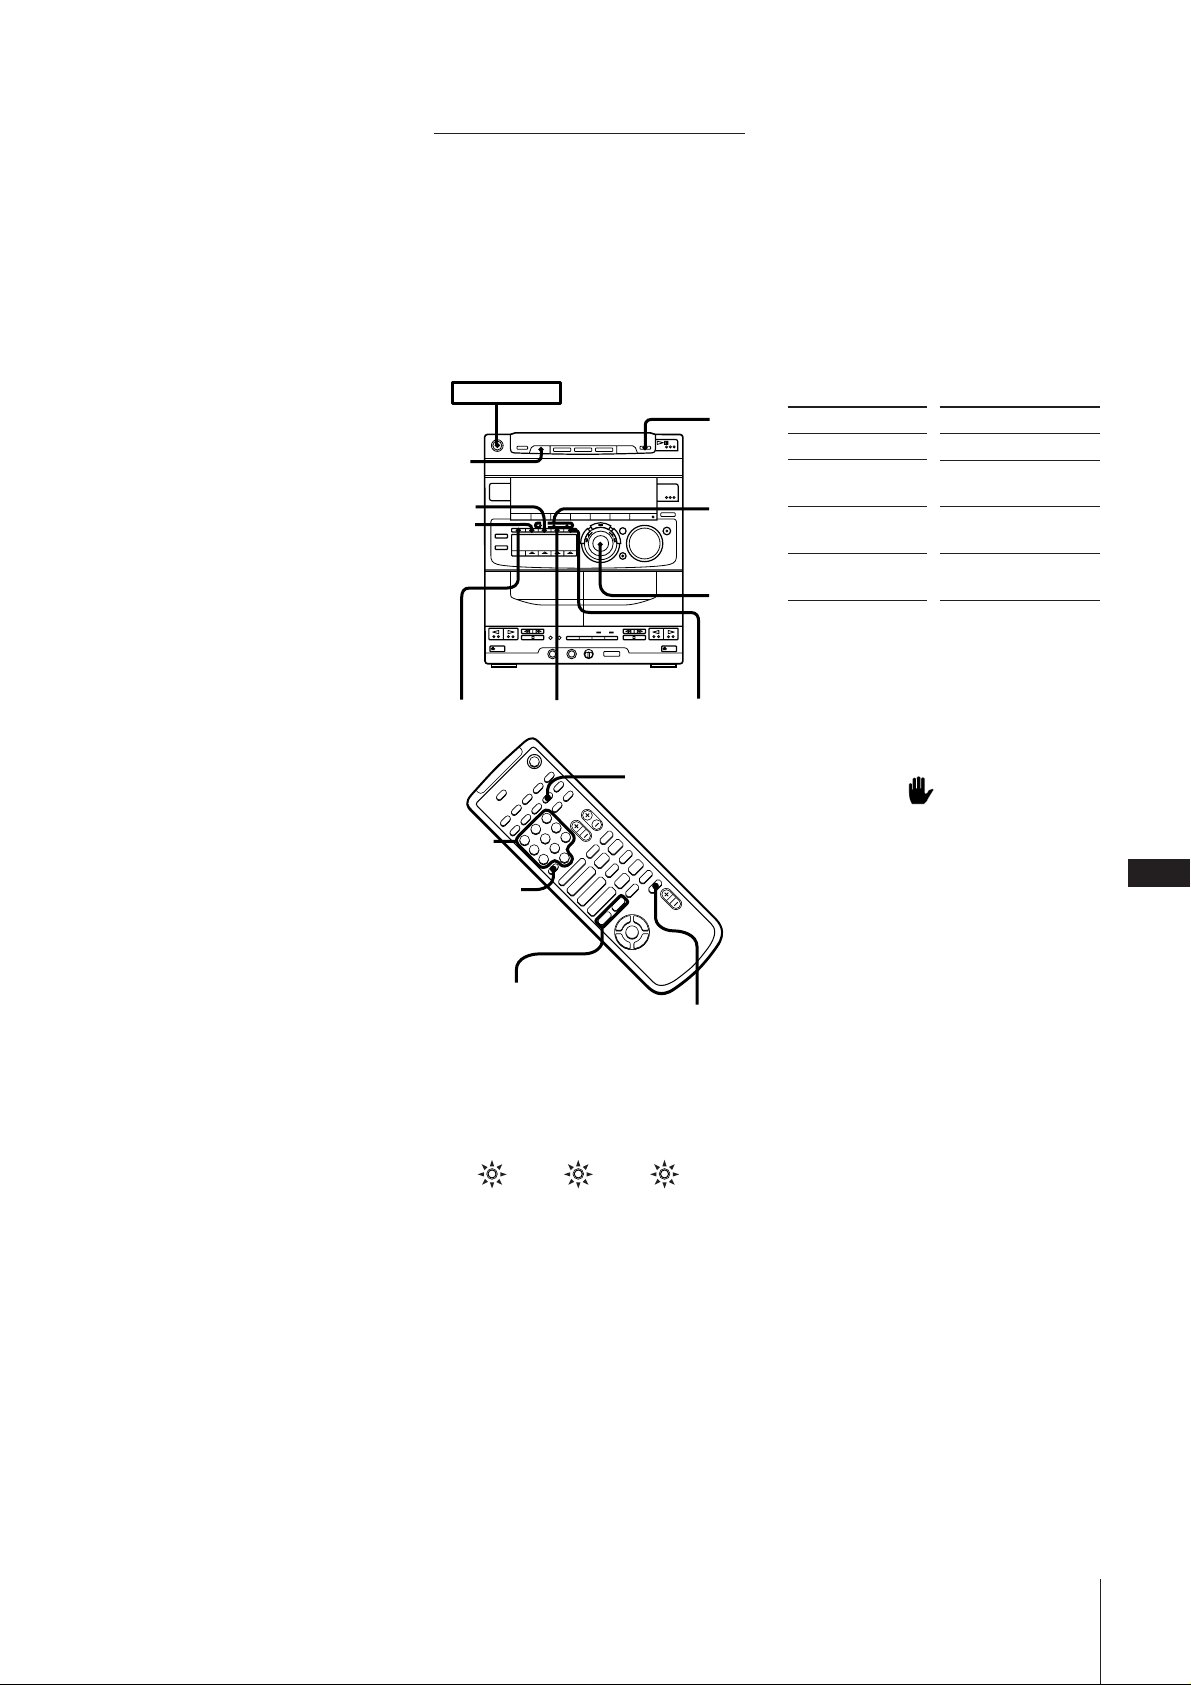
ʃ ©Òt•\؇
q ˆµ¤Æ…°A´ˆ§U CD ¤æ˜§W™ ·
°]©Œªª±±æ§W™ CD ·°^°C¶ Æ…¶p™G¤æ˜§W
À¶ ºv CD/¿R CD°A´K•i§£• ¶A´ˆ•Ù¶Û¡‰
s¶” }©l [‡ºv CD°˛¿R CD°C
¶¤ ´H øÔæ‹
̱z•ø¶b¶¨ •ßO™ µº÷¡n Æ…°A•u n´ˆ
§U · ©Œ DISC 1~3¡‰°A´K•iøÔæ‹ CD ¤
昰A¶”¶¤ ¶a }©l©Ò´e¶ ô·©Ò™ ºv CD
©Œ¿R CD°C
¶p™G CD ¤æ˜ßeµ{ß«©Òµº“¶°°A´K•u¶
· •i•Œ©Û¶ •\؇°C
¤æ˜¶p™G®SÀ CD
„•‹æ ßY•X {°ßCD NO DISC°®°]CD ¤
昮S ¤ –°^™ „•‹°C –¶b „•‹§§´ˆ§U ·
°]©Œªª±±æ §W™ CD ·°^°ACD ¶´ LßY¶¤
¶a•¥ }°C
¶p™Gæ÷¶ Sony µP qµ¯æ˜
´K•i•Œ§U¶C™ªª±±æ §W™¡‰s•h±±®Ó q
µ¯æ˜°G
TV POWER°G•¥ }©Œˆ±º qµ¯æ˜q °C
TV/VIDEO°G§¡¥´ qµ¯æ˜™µ¯¿WøȧJ°C
CH°G§¡¥´qµ¯æ˜™ ¿WD°C
TV VOL°G’ ` qµ¯æ˜¥¡næ ™ µ q°C
DISC 1~3¡‰™ Ò¶‚´¸•‹øO´¸•‹™ ¨O§ ªÚ
¶U ¤–¶´ L™ DISC ¡‰ (DISC 1~3)°A¶U¶
®‰¨¤¿ ™ ´¸•‹øO°C
• Ò¶‚´¸•‹øO™Ì•‹ ”¶´L¨O©“øÔ™ ¶´ L°]©Ò
t°A •Œ™¨ A©Œ¶´L}µ¤Æ…°^µL À§£À
CD°C
n¨› PBC t ™ ºv CD
°]VIDEO CD°^Æ…°]PBC ©Ò
t°^
PBC t ™ ºv CD°]2.0´¨°^ t ¶
PBC°CPBC°]©Ò t±±®Ó°^•\؇•i¶b±z™ qµ¯
昴à ı§W „•‹ µ•ÿ Ê ˝±z™Y ‡•Ê§¨© n•Û°C
§£¶P™ ¤ –¶U¶ §£¶P™ µ•ÿ ÊÆʶ°©M c
y°A¨G–§@©wnæ\ ™¶U ÿ¤ –™˛±a™ ª°©˙Æ—
•Hz —®‰‘”™•Œ™k°C
POWER m ON
DISC
SKIP
NEXT
PREV
PBC OFF/ON
º ¶r¡‰
>10
RETURN SELECT
D.SKIP
+
–
+
p
–
)0
P
pP
Æ»
)0+=
Æ»
Æ
4
$
p
•VIDEO
CD
•PBC
•AUTO
PBC
JOG
2 ±q µ•ÿʧ§øÔ拧@ ”µ•ÿ°C
®œ•Œ CD ¤æ˜
±¤¬‡ JOG ´ LøÔ拧@ ”º°AµM´·´ˆ§U
SELECT°C
®œ•Œªª±±æ
•Œº¶r¡‰øȧJº ¶r°CnøȧJ§j©Û10Æ…°A–
•˝´ˆ°÷10°AµM´·¶A´ˆ§U¨¤ Ì™ º ¶r¡‰°C
®“¶p°A nøȧJ30°A•i´ˆ§U°÷10m3m10/0°C
3 ±µµ¤ –´ˆ”§U¶C µ•ÿÊ™ ª°©˙•h™Y‡•Ê§¨
©™©Òt°C
n
±§Ó©Òt
–—”µ•ÿÊ®‰æl
°§¿
¶^®Ï µ•ÿʪ°
¶^®Ï´e ±§@” µ•ÿ
Ê
n— £µ•ÿ ʧfiæ…©ÒtÆ…°] ˆ±º PBC ©Ò
t°^
´ˆ§U PBC OFF/ON ®œ AUTO PBC ´¸•‹øO
¿°C
±N§£ „•‹¶p µ•ÿÊ´Ã ıµ•¿R °C
Ì qµ¯æ˜´Ãı•X { „•‹Æ…
™Ì•‹±z´ˆ§F§@ ”µLƃ™¡‰°C –´ˆ§Uµ•ÿ
Ê´Ã ı§Wª°©˙´¸©w™¡‰°C
¶bµ•ÿ Ê©Òt©Œ©Òqºv§§°A±z¶p™G´ˆ§U§F
NEXT°]©Œªª±±æ §W™ NEXT +°^
´K•iÆ⁄æ⁄ ¤–¶”¬‡®Ï§U§@”ı±°C–—
”¤ –™˛±a™ª°©˙Æ—°C
´ˆ§U°]ªª±±æ §W™°^
p
NEXT (NEXT +)
PREV (PREV =)
ˆ RETURN
(RETURN ˆ)
C
9
PREV=/NEXT+
RETURN
1 }©l©Ò PBC •\؇°]2.0´¨°^ t ™ ºv
CD°C
©“¶ §U¶C™´¸•‹øO £¬I´G®¶b±z™ qµ¯æ˜
§W „•‹ PBC µ•ÿ Ê°C
VIDEO CD PBC AUTO PBC
VIDEO CD °]ºv CD°^ ´¸•‹øO
©Òºv CD Æ…¬I´G°C
PBC°]©Ò t±±®Ó°^´¸•‹øO
©Ò PBC •\؇°]2.0´¨°^ t ™ ºv CD Æ…
¬I´G°]ßY®œ®®S®œ•Œ PBC ©Òµ•\؇°^°C
AUTO°]¶¤ °^PBC ´¸•‹øO
¶b PBC •\؇°]2.0´¨°^ t ºv CD ™ µ
•ÿ Ê©Ò t§§¬I´G°C
µ˘
• µ•ÿ Ê©Ò t§§°AßY®œøÔ§F°ßALL DISCS°®
º“¶°§]¨O§£Ø‡¬‡®Ï§U§@±i ¤–™ °C–´ˆ§U
DISC SKIP°]©Œªª±±æ §W™ D. SKIP°^•H´K
¬‡®Ï§U§@±i¤ –°C
• ¶b¶p§U™¨™pÆ…°ACD ¤æ˜±N ±§Ó©Òµ°G
°X©Ò µ§§°A±z´ˆ§U§F PBC OFF/ON°C
°X©Ò µ§§°A±z´ˆ§U§F PLAY MODE°C
ƒ2 °Gºv CD°]VIDEO CD°^/ ¿R CD°]CD-G°^/ CD ¤æ˜
Page 84
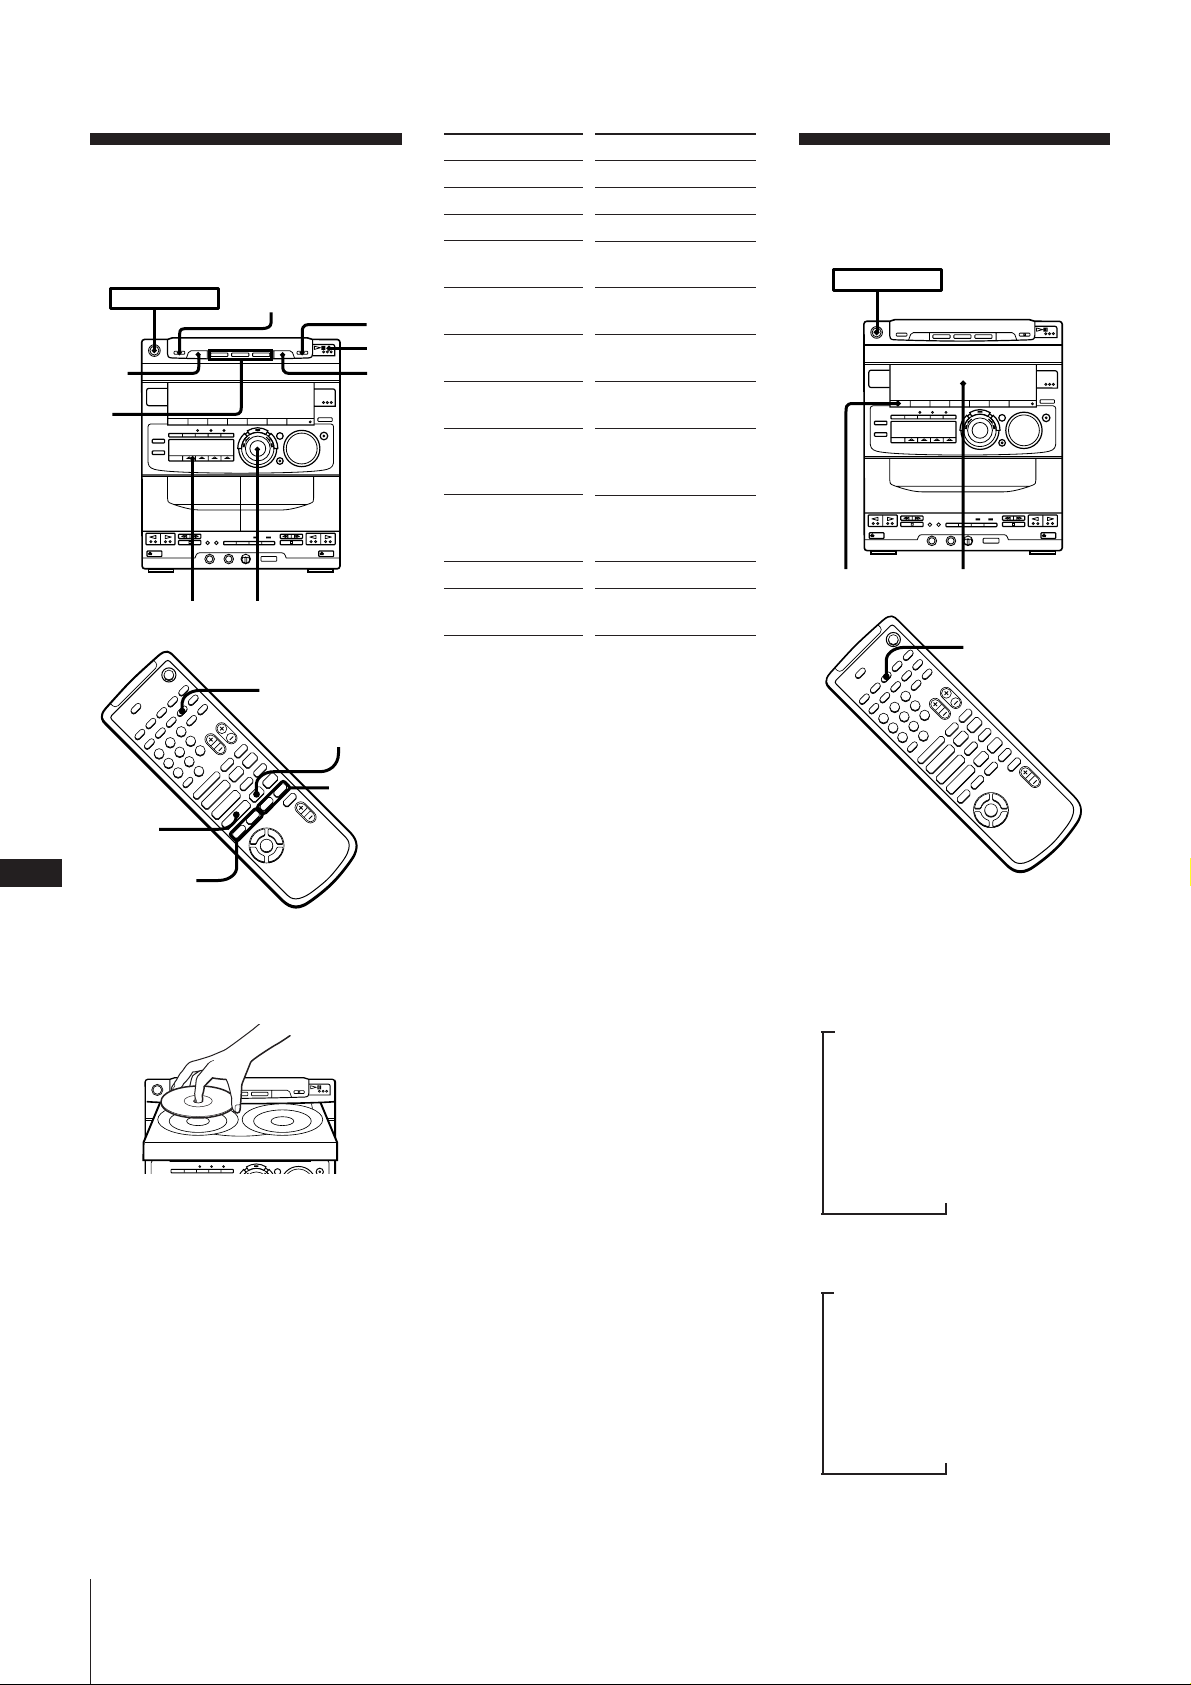
©Ò CD°] pÆg ¤ –°^
¶b ¤æ˜§WÀ©Ò§F3±i CD §ß´·°A±z´K•i´ˆ
Ï®” ß« sƒÚ©Òß©“¶ ¤ –§W™•˛ °™¶±
§l°C
POWER m ON
EX-CHANGE
DISC
SKIP
2
1/ALL DISCS JOG
+
–
+
p
–
P
Æ»
Æ»
CDÆ
C
=/+
Æ
10
1 ´ˆ§U § OPEN/CLOSE ® ß‚ CD°] Kº–± ±
¥¬§W°^À©Ò¶b¤ –¶´L§W°C
D.SKIP
)0
pP
)0+=
4
$
P
0/)
1
p
Æ‚
n
±§Ó©Òµ
º» ±
´Ï¥_©Ò µ
i´e®Ï•t§@¶±
–´ˆ§U°]ªª±±§W™ °^
p
· (P )
· (CD · ©Œ P)
Æ…w§Ë¶V±¤¬‡ JOG
´L*1(+).
h®Ï´e ±¶±§l
fÆ…w§Ë¶V±¤¬‡ JOG
´L*1(=).
߉•X§@¶±§W™ØS©w
(´ˆ¶Ì 0 ©Œ )).
¬I
øÔæ‹ØS©w™ CD
DISC 1~3
©Œ§œ¥_´ˆ§U
*2
DISC SKIP (D. SKIP)°C
•u • {¶b©“øÔ ¤ –
§œ¥_´ˆ§U1/ALL DISCS
¶‹°ß1 DISC°®•X { „
•‹°C
•©“¶ ¤ –
§œ¥_´ˆ§U1/ALL DISCS
¶‹°ßALL DISCS°®•X {
„•‹°C
®¯§U CD
©Òµ§§§¡¥´®‰•L ¤
§ OPEN/CLOSE
EX-CHANGE
–
*1
Ì ¤æ˜ ]©w©Û°ßALL DISCS°®Æ…°A±z•i•Œ
JOG •h¥M߉©“¶ À©Ò¶b ¤æ˜§W¤–™ •˛°
™ ¶±§l°]µL¡_•\؇°^°C
*2
¶p™G” X®SÀ¤–°A¶´ LßY±N±•X°C
ʃ©Ò µ•\؇
ˆµ¤ q ¶”´ˆ§U CD ¤æ˜™ · °]©Œªª
±±æ§W™ CD · °^Æ…°A¶p™G ¤æ˜§§ À¶
CD°A´K•i§£• ¶A´ˆ•Ù¶Û¡‰ s¶”}©l • CD ©Ò
µ°C
¶¤ ¡n øÔæ‹°C
̱z¶b •®‰•L¡n Æ…¶p™G´ˆ§U · ©Œ
DISC 1~3°A´KøÔæ‹ CD ¤æ˜¶”¶¤ ¶a }©l©Ò
´e¶ ô·©Ò™ CD°C
¶p™G CD ¤æ˜ßeµ{ß«©Òµº“¶°°A´h•u¶
· ؇•Œ©Û•ª•\؇°C
¶p™G¤æ˜§§•º À CD
„•‹æ ßY•X {°ßCD NO DISC°®„•‹°C
¶b „•‹µ¤§W ±´¸•‹§§´ˆ§U · °]©Œªª±±
æ §W™ CD ·°^°AµM´·°ACD ¶´ LßY±N¶¤
•¥ }°C
¿À¨d—ælÆ…°
•ißQ•Œ´e ±™O„•‹æ ¿À¨d{¶b©Ò µ§§ CD
™¶ ˆÍT°C
POWER m ON
DISPLAY/DEMO
n¿À¨d—ælÆ…°Æ…
•i¶b©Ò µ§§´ˆ§U DISPLAY/DEMO°]©Œªª
±±æ §W™ DISPLAY°^°C
®C¶´ˆ§U¶ ¡‰°A„•‹ßYß@¶p§UßÔ ‹°C
°]ALL DISCS º“¶°°^
m
{¶b©Òµ¶±§l™©Ò µÆ…°
{¶b©Òµ§§¶±§l™ —ælÆ…°
°ßPLAY°®°]©Ò µ°^ „•‹
Æ…ƒ¡ „•‹°]8¨Ì°^
ƃ؇°]©Œ P ®˜©v°^¶WŸ
Front panel display
´e ±™O„•‹
DISPLAY
+
–
+
p
–
)0
P
pP
Æ»
)0+=
Æ»
Æ
4
$
µ
µ
µ
µ
nÀ©Òƒ§T±i¤–Æ…
´ˆ§U DISC SKIP°]©Œªª±±æ §W™
D. SKIP°^°C¤ –¶´ L±¤¬‡¶”˝±z•i À©Ò
•t§@±i CD°C
2 ´ˆ§U DISC 1~3•HøÔ拧@±i ¤–°C
¤ –¶´L¶¤ ˆ ¨® ±q©“øÔ CD }©l©Ò
µ°C©“øÔ¶´L§W¶p™G®SÀ¤ –°A¤æ˜ßY¶¤
§¡¥´®Ï§U§@±i ¤–°C
ƒ2 °Gºv CD°]VIDEO CD°^/ ¿R CD°]CD-G°^/ CD ¤æ˜
°]1 DISC º“¶°°^
{¶b©Òµ§§¶±§l™©Ò µÆ…°
m
{¶b©Òµ§§¶±§l™ —ælÆ…°
{¶b©Òµ§§ CD ™ —ælÆ… °
Æ…ƒ¡ „•‹°]8¨Ì°^
ƃ؇°]©Œ P ®˜©v°^¶WŸ
µ
µ
µ
µ
Page 85
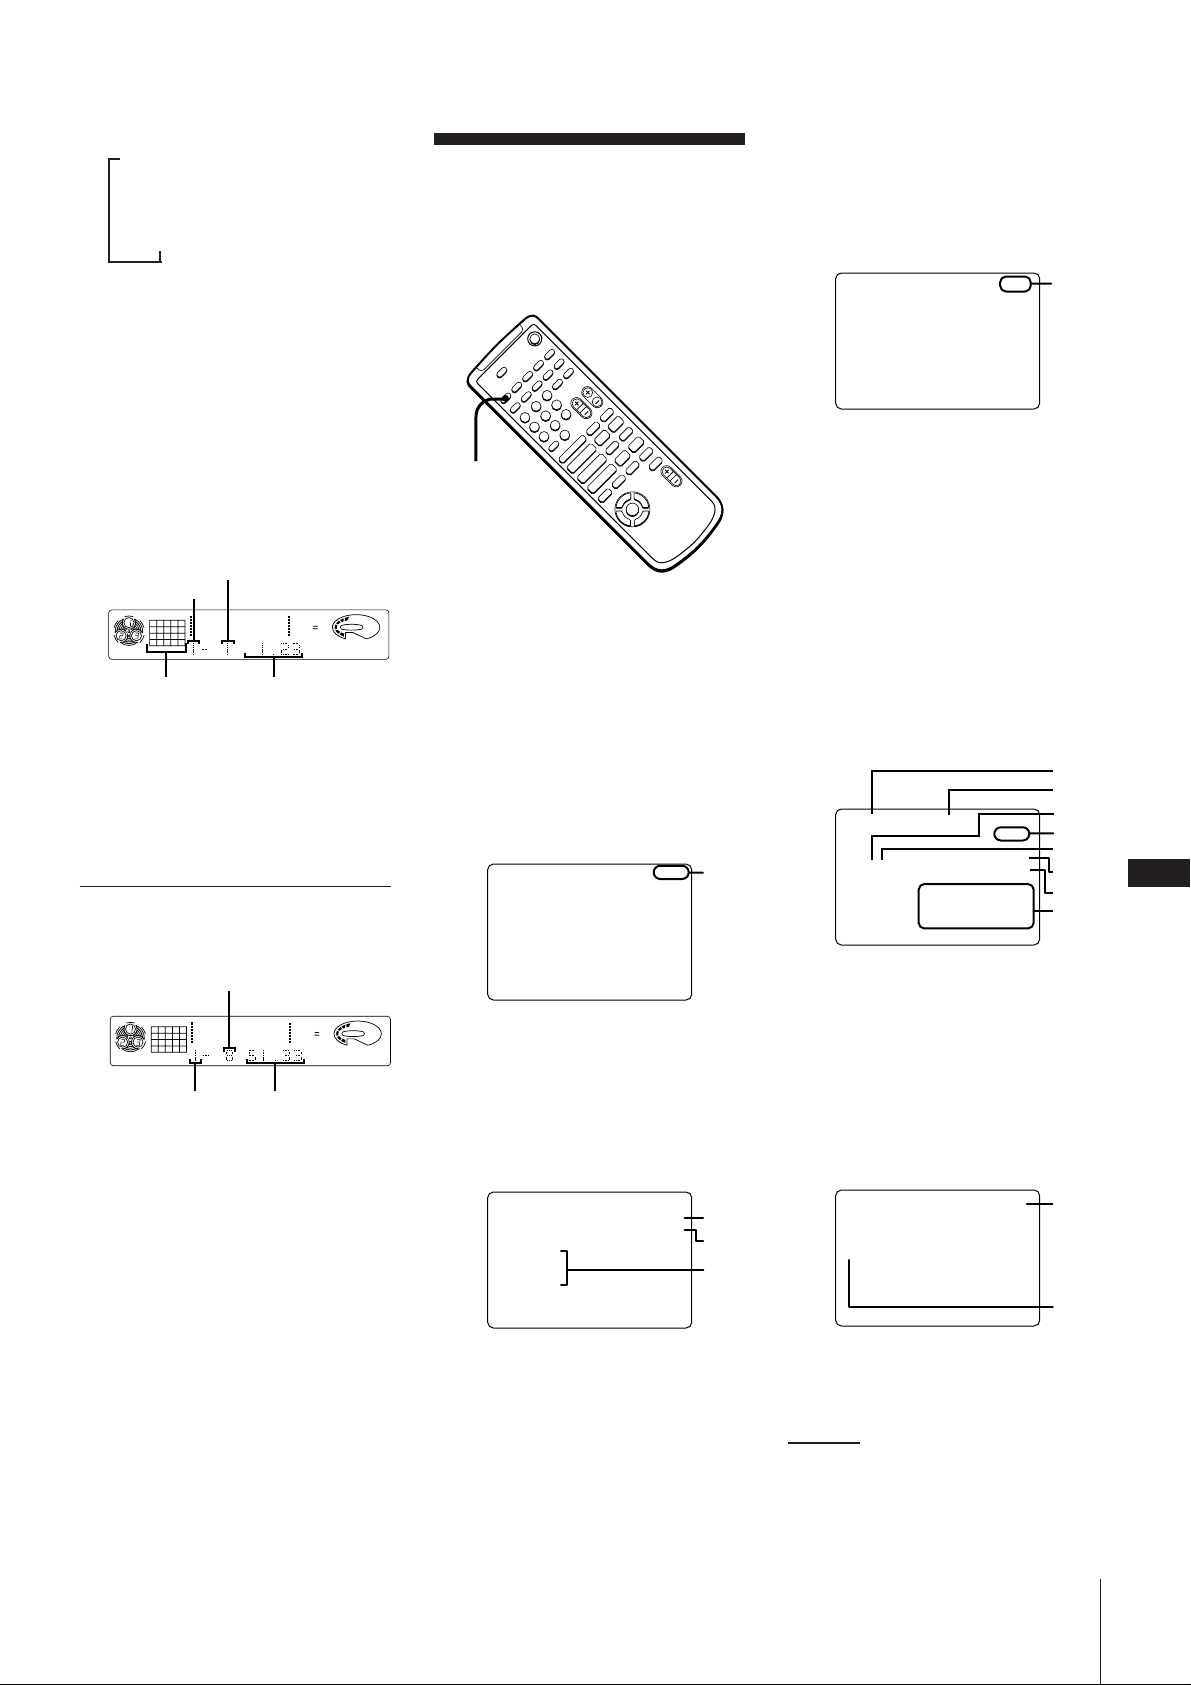
PROGRAM
(
1. DISC 1-3
2. DISC 2-4
3. DISC 1-5
1
2
NTSC
PLAY
DISC 1-3 index 1 Audio
0.04
°]PBC •\؇°]2.0´¨°^ t ™ ºv CD°^
¤–
m
µ
Æ…ƒ¡ „•‹°]8¨Ì°^
µ
ƃ؇°]©Œ P ®˜ß °^¶WŸ
µ˘
• ¶± 1®Ï20±N „•‹¶b´e±™O „•‹æ §W°] µ
º÷§È扰^°CW L20™¶± §£Ø‡„•‹°C
• ¡`©ÒµÆ…°100§¿•H§WÆ…°A „•‹æ±N•X
{°ß--.--°® „•‹°C
©Ò µT CD°A¿R CD°A©ŒµL PBC •\؇°]1.1
´¨°^ºv CD Æ…™ ©“ „•‹Í T
„•‹ {¶b©Òµ§§¶±§l™ ¶± °A {¶b©Òµ
§§¶±§l™©ÒµÆ…°°A©Mµº÷§È扰Cµº÷§Èæ‰
§§™¶± °A§Z©Òß™¶±§l°A®‰¶± §]¿Hµ¤Æ¯
•¢°C
{¶b©Òµ§§¶±
¤–
CD
12345
678
ALL DISC S
12563 250 500 1k 2k 4k 8k 16k(Hz)
DOLBY NR
VOLUME
OFF
©ÒµÆ… °µº÷§Èæ‰
©Ò PBC •\؇°]2.0´¨°^ t ™ ºv CD Æ…™
©“ „•‹ Í T
§£ „•‹¶± ©M µº÷§È扰C¶˝Ì µ•ÿÊ´Ã
ı „•‹¶bqµ¯æ˜´Ã ıÆ…°A؇¶bµ•ÿ ʧ§øÔæ‹
™ µ•ÿ ±N „•‹¶bµº÷§È执§°C
n¿À¨d¡`©ÒµÆ…°©M¡`¶±ºÆ…
®œ•Œ™¨™p´Ãı„•‹
•ißQ•Œ±z qµ¯æ˜™™¨™p´Ã ı„•‹•H¿À¨d
CD ¤æ˜™ æfiß@™¨™p©M¶ ˆ{¶b©Ò µ§§ ¤–
™ ÍT°C
+
–
+
p
–
)0
P
pP
Æ»
)0+=
ON SCREEN
´ˆ§U ON SCREEN°C
®C´ˆ§U¶¡‰°A™¨™p´Ã ı„•‹±Nß@¶p§U ‹
§° G
ON SCREEN 1 m ON SCREEN 2
µ
ON SCREEN OFF M ON SCREEN 3
ƒ1™¨™p´Ã ı „•‹ (ON SCREEN 1)
®C ÌͨI§@ µæfiß@°]®“¶p}©l©Ò t
µ•°^°A´K±Nß@¿˛Æ…™æfiß@™¨™p„•‹°C
Æ»
Æ
4
$
PLAY
ƒ2™¨™p´Ã ı „•‹ (ON SCREEN 2)
®C ÌͨI§@ µæfiß@°]®“¶p}©l©Ò t
µ•°^°A´K±Nß@¿˛Æ…™æfiß@™¨™p„•‹°C
{¶b©Òt§§™Æ|Ò™ ©Òt gLÆ…°©M—æl
Æ… °q±` £¶ „•‹°C
0.04
1
1 {¶b©Òµ§§¶±§l™ g LÆ… °©Œ—æl
Æ…°
°ßPLAY°® }©l©Ò tÆ…
°ßSTOP°®±§Ó©ÒtÆ…
Å °ßPAUSE°®º»±©Ò tÆ…
•
±§Óº“¶°§§™µ{ß«©Ò µ
„•‹¶P ƒ1™¨™p´Ã ı„•‹°C
ƒ3™¨™p´Ã ı „•‹ (ON SCREEN 3)
©Ò t§§°A¶´Ã ı„•‹æfiß@™¨ A°C
±§Óº“¶°§§°A´h „•‹¤ –¶´ L§W CD ™
¶ ˆ ÍT°C
•
•ø±`©Œ•ÙN©Ò µº“¶°§§
1
2
CONTINUE ALL DISCS PLAY
1
DISC 1-3 index 1
**345
678910
11 12 13 14 15
NTSC
Audio
0.55
3
4
5
6
C
7
8
11
¶b ±§Óº“¶°§§–´ˆ§U DISPLAY°C
¡`¶±º
CD
12345
678
12563 250 500 1k 2k 4k 8k 16k(Hz)
ALL DISC S
¤–
¡`©ÒµÆ…°
Ì´ˆ§U § OPEN/CLOSE°A ˆ§W ¤ –¶´ L
Æ…§]±N•X{ÍT„•‹°C
DOLBY NR
1 ©Ò µº“¶°
2 °ßALL DISCS°®©Œ°ß1 DISC°®
3 {¶b©Ò µ§§¤–
VOLUME
OFF
1æfiß@™¨™p
°ßPLAY°® }©l©Ò tÆ…
°ßSTOP°®±§Ó©ÒtÆ…
°ßPAUSE°®º»±©Ò tÆ…
•
±§Óº“¶°§§™µ{ß«©Ò µ
PROGRAM
1. DISC 1-3
2. DISC 2-4
3. DISC 1-5
STOP
NTSC
TOTAL 10.04
1
2
3
1 ±m¶‚®t Œ
2 µ{ß«™ ¡`©ÒµÆ…°
3 sµ{ ¤ –©M¶±
4 ±m¶‚®t Œ
5 {¶b©Ò µ§§¶±
6 ¤ –´¨¶°
7 {¶b©Ò µ§§¶±§l™ §wgLÆ… °
8 µº÷§Èæ‰
•
µ{ß«©Òµ
1 °ßPLAY°® }©l©ÒµÆ…
°ßPAUSE°®º»±©ÒµÆ…
2 ´¸•‹ {¶b©Òµ§§¶±
±µ§U m
ƒ2 °Gºv CD°]VIDEO CD°^/ ¿R CD°]CD-G°^/ CD ¤æ˜
Page 86
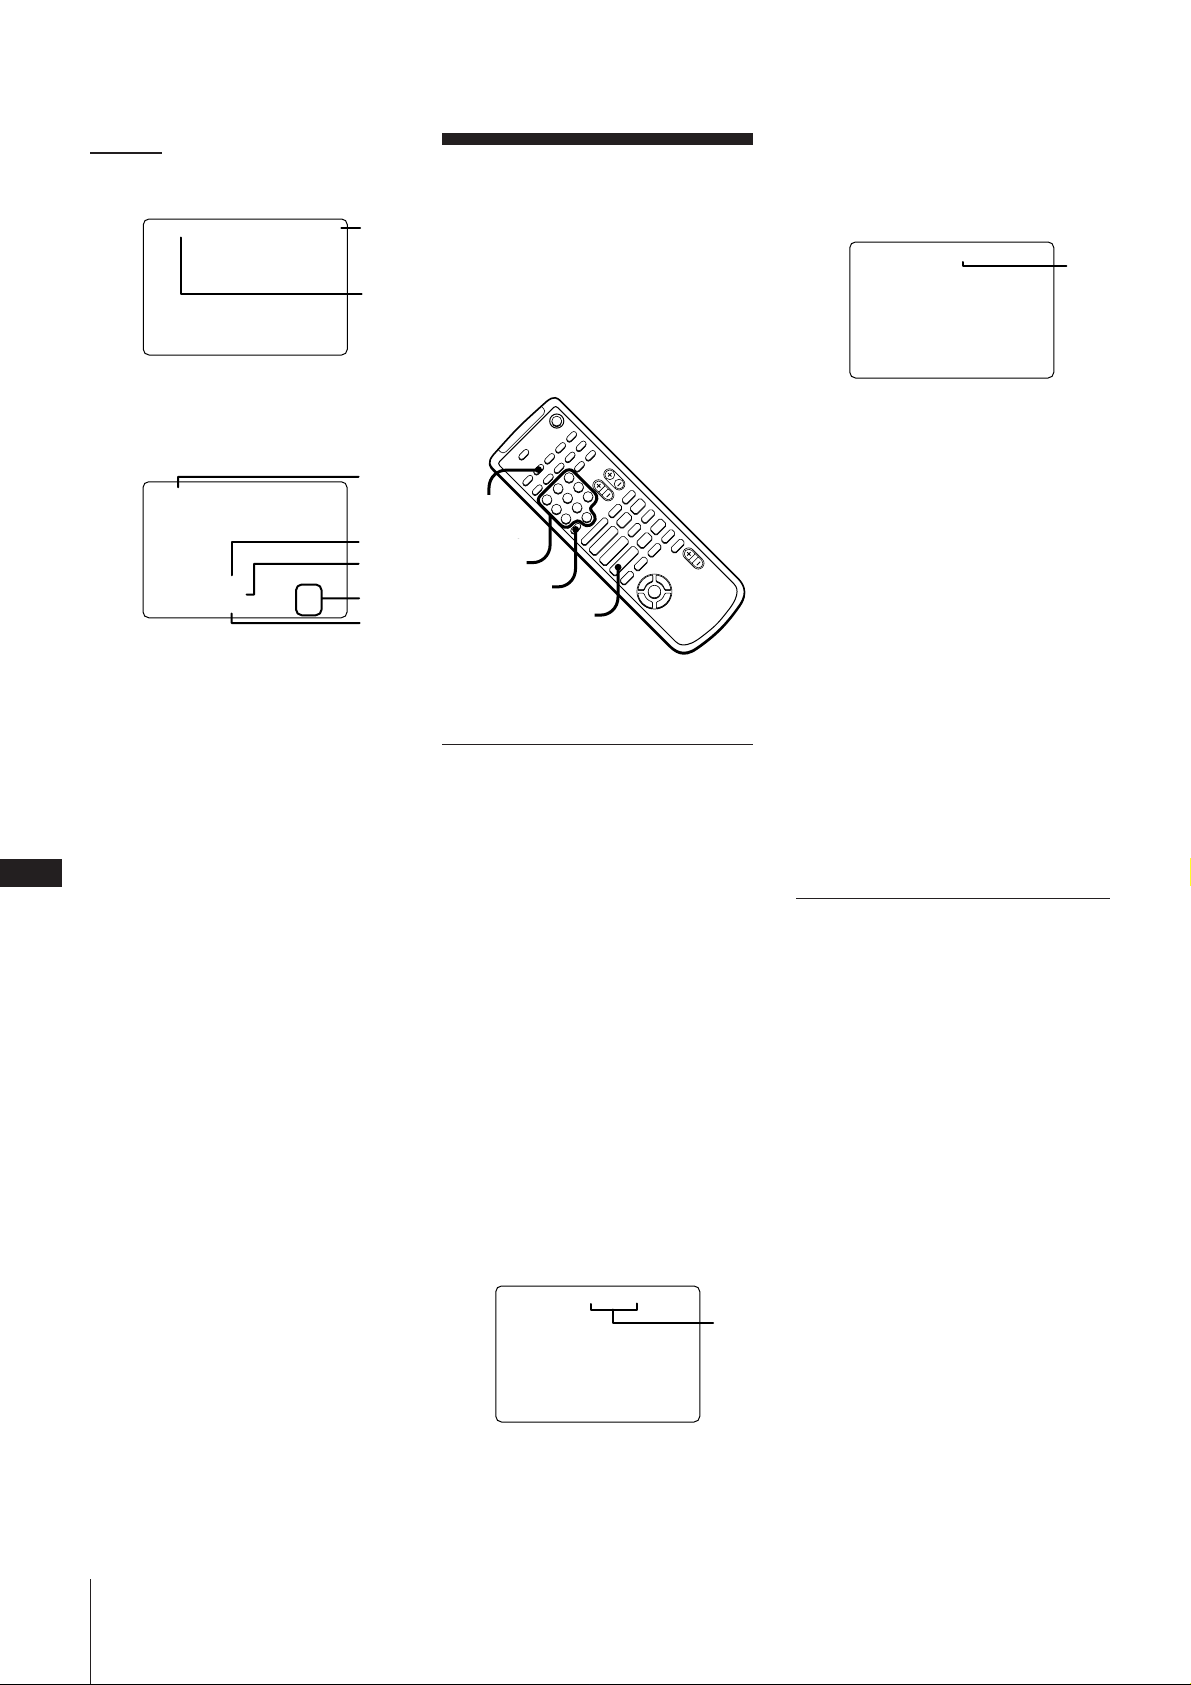
m ±µ§W
•
PBC À ºv CD ™ µ•ÿ Ê©Ò t§§
SCENE 1 0.55
1 ¨ Yı±™§ wgLÆ …°
2ı±
•
±§Óº“¶°§§°]µ{ß«©Ò t £•~°^
CONTNUE
DISC 1
DISC 2
DISC 3
ALL DISCS STOP
•••••••
Video
Audio
1 ©Ò tº“¶°
2 •º©Ò t™ ¤ –
3ºv CD
4 ¤–§W¶±
5µT CD ©Œ¿R CD
•
±§Óº“¶°§§™ µ{ß«©Òt
„•‹©M ON SCREEN 1 ¨¤¶P°C
ON SCREEN OFF°]™¨™p´Ã ı „•‹¬_ }°^
C
µL „•‹°]ØSÆÌ µ•ÿÊ £•~°^°C
12
™¨™p´Ãı „•‹ ™æ
• • Æ…°A–ß‚ „•‹º“¶°]©w©Û ON SCREEN
1°A2©Œ3°C¶p™G¨O]©w©Û ON SCREEN
OFF°AÌæfiß@ CD ¤æ˜Æ…°M´K§£Ø‡¿À¨dæfi
ß@™¨™p§F°C¶Æ…°M•u؇¶b´e±™O„•‹æ •h
¿À¨d¶ ˆ ÍT°C
• ̱N•ª®tŒ™ µ¯¿W©Ò t´H ø˝®Ïø˝ºv昵•
™Æ… ‘°M§@©w–øÔ ON SCREEN OFF °C
ß_´h°M „•‹ÍÆ §]±NQø˝®Ïø˝ºv昧§™ œ
±a§W°C
• Yß‚ SYSTEM SELECT }ˆ ]©w©Û
°ßNTSC°®©Œ°ßPAL°®°A±m¶‚®tŒßY§£•X
{ „•‹°C
TRK
TRK
NTSC
Audio
47.55DISC 3
1-15
1- 8
4 •Œº ¶r¡‰°]1°„10/0°^øÔæ‹©“n™ ı ±°C
߉•X¤–§W¨YØS©w°§¿
°]ØSÆÌ µ•ÿ Ê°^
1
•ª¤æ˜¶ 5ÿ§£¶P™ ¥M߉•\؇°C
•i´ˆ ”±z߱ʙ ¥M߉´¨¶°±q SPECIAL
2
1
2
3
4
5
MENU°]ØSÆ̵•ÿ Ê°^ÃøÔæ‹¥M߉•\؇°C
•¥ } µ¯ qµ¯æ˜•H´KßQ•Œ o®«•\؇°C
•Œªª±±æß@¶p§U™æfiß@°C
+
–
+
SPECIAL
MENU
Numeric
buttons
º ¶r¡‰
> 10
p
–
)0
P
pP
Æ»
)0+=
Æ»
Æ
4
$
SELECT
•Œı± ߉•X°]ı±¥M߉°^
PBC •\؇°]2.0´¨°^ t ºv CD°M µ•ÿ
Ê´Ã ı°Mqºv°M©M¿R ß°§¿¶®¶hº ™ ı±°ß
scenes°®°M®C§@”ı±£§¿t¶ ı± °Co”
•\؇•i ˝±z±q¨YØS©w™ ı ± }©l©Ò t°C
©Ò t§§ Ì®”®Ï§F©“ n™ ı ±Æ…°M´K•H„
•‹®‰™¨™p´Ã ıµ•[µ˘´Ã ı °CµM´·°M̧U¶
n¨›” ı±Æ…°M±z´K•i•Œº •ÿ¶r™±µß‰®Ï¶P
ı ±°C
µ˘
•ª•\؇•u¶b©Ò PBC •\؇°]2.0´¨°^ À ™
ºv CD Æ…¶ ƃ°C
•Œªª±±æß@¶p§U™æfiß@°C
1 }©l©Ò PBC •\؇°]2.0´¨°^ À ™ ºv
CD°C
2 ´ˆ§U SPECIAL MENU°]ØSÆÌ µ•ÿ Ê°^°C
3 ´ˆ§U1•HøÔæ‹°ß1°^SCENE SEARCH°®°M
°ßSCENE-°®°M ı±™ ¡`ºßY•X {©Û qµ¯
昙´Ã ı§W°C
SCENE- (1-312)
1
®“°G߉ı ±103°M–´ˆ§U1 m10/0m3°C
©“øÔ ı± ßY•X {©Û qµ¯´Ãı°C
SCENE 103 (1-312)
1
1 ©“øÔ ı±
5 ±µ§U CD · SELECT°C
ßY±q©“øÔ™ ı ± }©l©Òt°C
n±§Ó©ÒtÆ…
´ˆ§U p °C
¶b©Ò tº“¶°§§n¿À¨d ı± Æ…
§œ¥_´ˆ§U ON SCREEN •HøÔæ‹ ON
SCREEN 3 „•‹º“¶°°Cı ± ßY•X {©Û qµ¯æ˜
´Ãı°M°]‘”–—”°ß®œ•Œ™¨™p´Ã ı
„•‹°®°C°^
µ˘
• ¨Y®« ÿ CD ¨O§£Ø‡±q±z©“øÔ ı± }©l©Ò
™ °M¶]¨ Q T§Ó±q¨Y ı ±}©l©Ò t°C
¶Æ…°M©Ò t±N±qı ±1°]±§Óº“¶°§§°^©Œ
ƒ~ƒÚ±q {¶b©Ò t§§™ ı ±°]©Ò t§§°^ }
©l°C
• ¨Y®« CD •i؇§£Ø‡¶b qµ¯æ˜´Ãı§W „•‹±z
øÔæ‹™ ı±°C
•ŒØ¡§fi ߉•X°]Ø¡§fi¥M߉°^
°ßØ¡§fi°®¨O§@ ÿº¶r°M¨Oß‚§@ ¶±§l©Œ
§@±i°N ¤–§¿ j¶® \¶h§p °§¿°M˝±z•i•H¬
´K¶a߉•X©“ n™¬I°Cºv CD ™ Ø¡§fi´K•s
µ°ßºv Ø¡§fi°®°C
µº÷ CD°M¿R CD°M©Mºv CD •i؇ V
¶XØ¡§fi °C±z•ißQ•ŒØ¡§fi •h߉•X q¶±µ•™
n©Ò t™ °§¿°C
Ø¡§fi¥M߉•\؇•u؇•Œ¶b±a¶Ø¡§fi ™ ¤
–°CØ¡§fi¥M߉§]§£Ø‡•Œ©Ûı V©ÛæF±µ¶±§l§ß
°°C
µ˘
PBC •\؇°]2.0´¨°^ À ™ ºv CD ™ µ
•ÿ Ê©Òt§§°M§]§£Ø‡ßQ•Œ•ª•\؇°C
1 ¡`ı±º
ƒ2 °Gºv CD°]VIDEO CD°^/ ¿R CD°]CD-G°^/ CD ¤æ˜
°]®“¶p§@±ißt¶ 312”ı±™ ¤–°^
Page 87
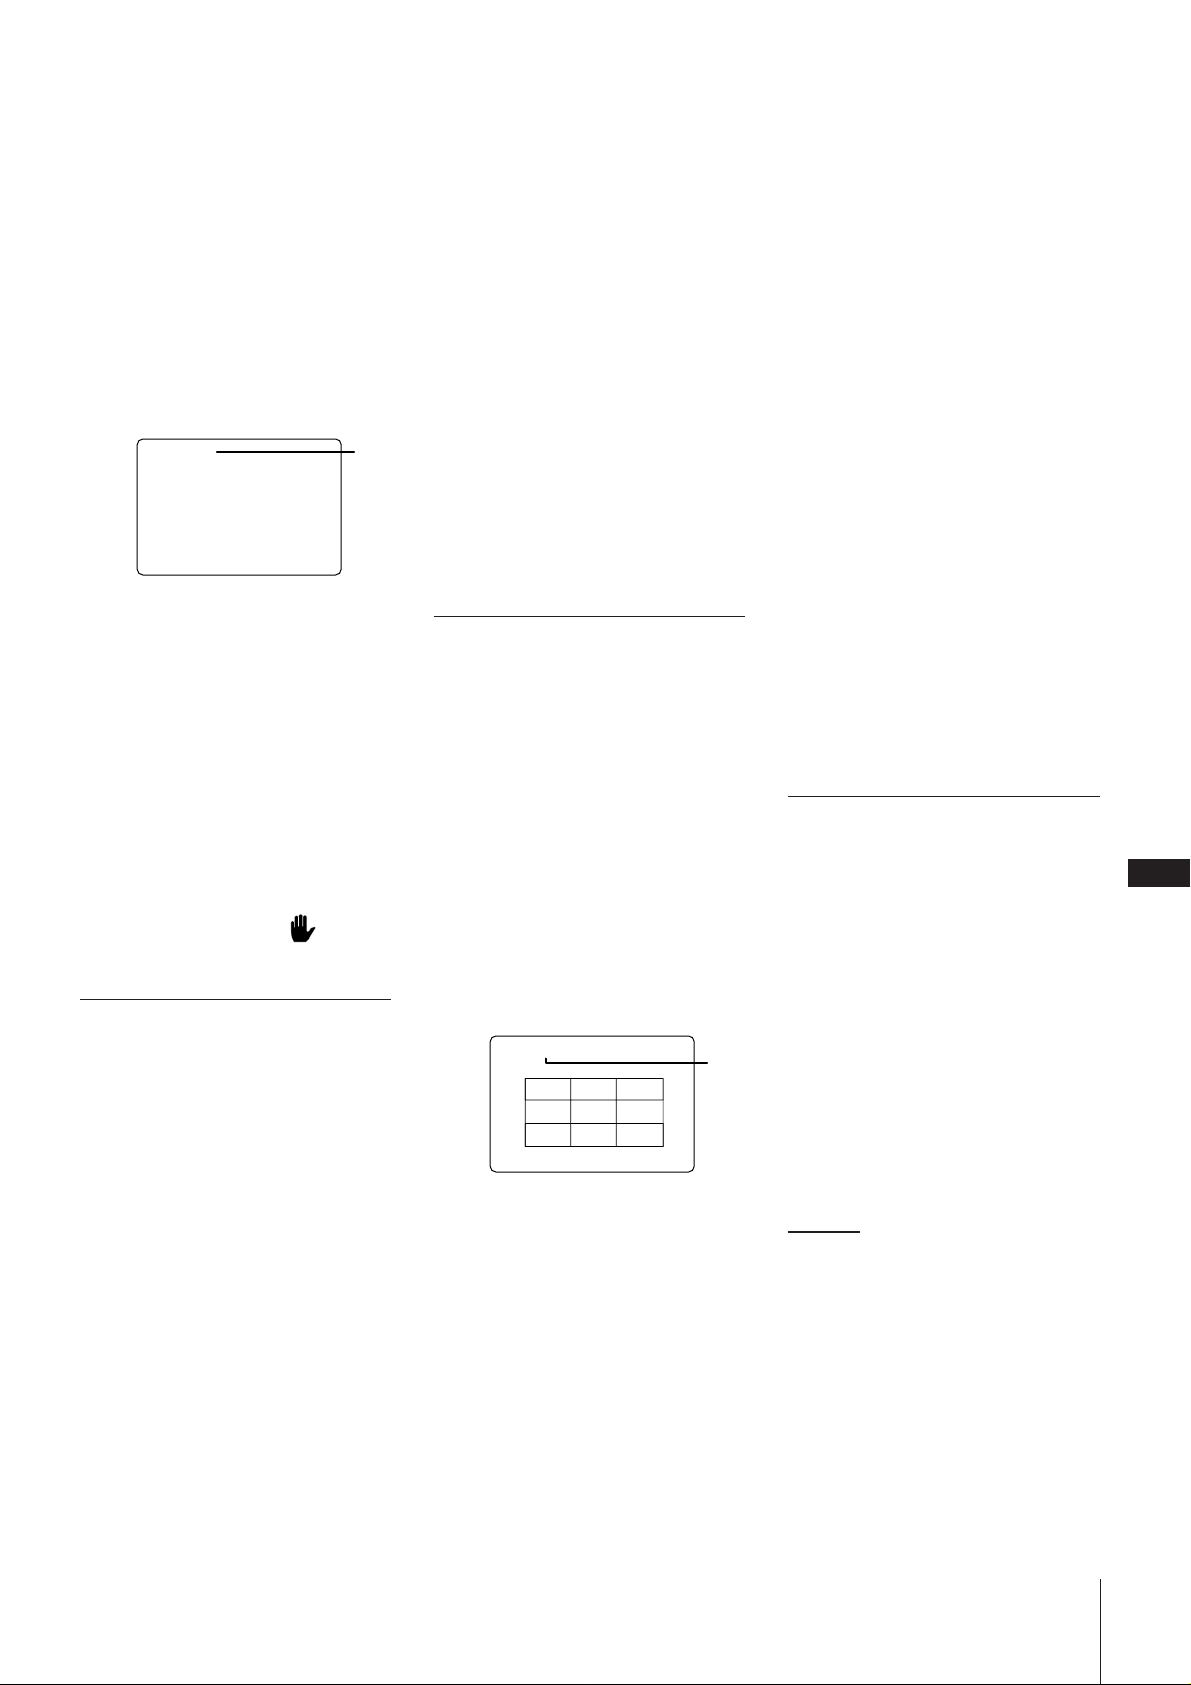
•Œªª±±æß@¶p§U™æfiß@°C
•Œªª±±æß@¶p§U™æfiß@°C
3 •Œº ¶r¡‰°]1°„10/0°^•HøÔæ‹©“nÆ| Ò°C
1 }©l©Òºv CD°]µ•°^°C
2 ´ˆ§U SPECIAL MENU°]ØSÆÌ µ•ÿ
Ê°^°C
3 ´ˆ§U2•HøÔæ‹°ß2°^V-INDEX SEARCH°®
°]©Œ°ß2°^INDEX SEARCH°®•Œ©Û¿R CD
©Œ µº÷ CD°^°C
4 •Œº ¶r¡‰°]1°„10/0°^•HøÔæ‹©“nØ¡§fi°C
ßY±q©“øÔØ¡§fi }©l©Òt°C
V - index 2
1 ºv Ø¡§fi
1
5 ´ˆ§U CD · SELECT°C
ßY±q©“øÔØ¡§fi }©l©Òt°C
n±§Ó©ÒtÆ…
´ˆ§U p°C
n•ŒØ¡§fi¥M߉©Û PBC •\؇°]2.0´¨°^ À ™
ºv CD Æ…
±§Ó©Ò t®´ˆ§U PBC OFF/ON ®œ AUTO
PBC ´¸•‹øO¶b®B J1§ß´e ¿°C
µ˘
©Òºv CD°]VIDEO CD°^Æ…¶p™G§£¶A¶
Ø¡§fi¶s¶bÆ…°M qµ¯´ÃıßY•X { ¶”¤æ˜±N
ƒ~ƒÚ©Òt°C
•Œ§wgL™Æ…°ß‰•X°]Æ…°¥M
߉°^
•ª•\؇˝±zßQ•Œ©Ò tg LÆ…°Ì§fiæ…•h
߉•XµL PBC •\؇°]1.1´¨°^ºv CD°M¿R
CD°M©Mµº÷ CD™ ¨Y°§¿°C°ß§w gLÆ…°°®
N´¸±q ¤– }¿Y™Æ… °°C®§£¨O „•‹æ „•‹
™ {¶b©Ò µ§§¶±§l™©ÒµÆ…°°C Ì©Ò¶±§l œ
§¿§÷™ ¤ –Æ…°M•ª•\؇ØSßO§Ë´K¶•Œ°C
µ˘
¶b©Ò PBC •\؇°]2.0´¨°^ À ºv CD ™
µ•ÿÊ©Ò tÆ…°M¨O§£Ø‡©M•Œ•ª•\؇™
1 ´ˆ§U SPECIAL MENU°]ØSÆÌ µ•ÿ Ê°^°C
2 ´ˆ§U3•HøÔæ‹°ß3°^TIME SEARCH°®°C
3 •Œº ¶r¡‰°]1°„10/0°^øȧJ©“n °§¿™ g
LÆ… °°]•H§¿ƒ¡p°^°C
®“°GnøȧJ10§¿ƒ¡ BÆ…°M–´ˆ§U1 m10/0°C
©“øÔg LÆ…°ßY•X{©Û qµ¯æ˜´Ãı°C
4 ´ˆ§U CD · SELECT°C
ßY±q©“øÔg LÆ…°B }©l©Ût°C
n±§Ó©ÒtÆ…
–´ˆ§U p°C
n•ŒÆ… °¥M߉•\؇©Û PBC •\؇°]2.0´¨°^ À
™ºv CD Æ…
±§Ó©Ò t®´ˆ§U PBC OFF/ON°M®œ AUTO
PBC´¸•‹øO¶b®B J1§ß´e ¿°C
߉•X©“ n™Æ|Ò°]¤–Kn°^
•i•Œ[¨›¶UÆ| Ò™ ƒ§@¥V•høÔ拱z©“n
™Æ| Ò°C§@¶ öh•i¶b qµ¯æ˜´Ã ı§W¶PÆ…„
•‹9 ”Æ| Ò°C
µ˘
• PBC •\؇°]2.0´¨°^ À ºv CD ™ µ•ÿ Ê
©Òt§§¨O§£Ø‡®œ•Œ•ª•\؇™ °C
• µº÷ CD ©Œ¿R CD ¨O§£ „•‹ºv ™ °C
•Œªª±±æß@¶p§U™æfiß@°C
1 ´ˆ§U SPECIAL MENU°]ØSÆÌ µ•ÿ Ê°^°C
2 ´ˆ§U4•HøÔæ‹°ß4°^DISC DIGEST°®°] ¤ –
K n°^°C{¶b©Ò t§§¤ –™Æ| Ò1°„9™ ƒ
§@¥VßY„•‹¶b™¨™p´Ã ı°C
DISC 1 DIGEST
1
12 3
4 5 6
7 8 9
1 {¶b©Ò t§§™ ¤ –
n„•‹¶§@”9Æ|ÒÆ…
´ˆ§U NEXT +°CßY „•‹Æ| Ò10°„18™ ƒ
§@¥V°C
¶p™G¤–§W¡Ÿ¶ ßÛ¶hÆ|Ò°MßY¶bqµ¯æ˜´Ã
ı™ •k§W®§•X {°ß +°®°C
n „•‹´e±™ Æ| ÒÆ…°M –´ˆ§U =°C
nøȧJ§j©Û10™Æ|Ò Æ…°C
•˝´ˆ§U°÷10°MµM´·´ˆ§U¨¤¿ ™ º ¶r¡‰°C
®“°GnøÈ30Æ…°M–´ˆ§U°÷10 m3m10
n±§Ó©ÒtÆ…
–´ˆ§U p°C
¶b®B J2§§°M•iøÔ拶b•˛Æ|Ò £„•‹§ß´e•
Q„•‹™ Æ|Ò°C
•Œº¶r¡‰øÔæ‹©“n™ Æ|Ò°C
¶b®B J2§§°M•i©Ò˶b ƒ§@¥V„•‹§F§ß´·™
±z©“n™Æ|Ò
˶b „•‹§F ƒ§@¥V§ß´·ßY´ˆ§U CD ·
SELECT°C
¶bi¶Ê¤–Kn§§°M n§¡¥´®Ï®‰•L ¤–™ K
nÆ…
i¶Ê¤–Kn§§´ˆ§U DISC SKIP°C
n•Œ ¤ø“ Kn•\؇©Û PBC •\؇°]2.0´¨°^ À
™ºv CD Æ…
±§Ó©Ò t®´ˆ§U PBC OFF/ON ®œ AUTO
PBC ´¸•‹øO©Û®BJ1§ß´e ¿°C
µ˘
¶p™G¶b•ÙN©Œµ{ß«©Ò t§§}©l¤–Kn
•\؇°M©Ò tº“¶°±N¶¤ ¶a§¡¥´®Ï•ø±`™ º“
¶°°C
¶b§@”Æ|ÒÃ߉•X§@¨q°]Æ|ÒK
n°^
CD ¤æ˜•i±N§@ºv CD Æ|Ò§¿¶®9 ”§£
¶P™ ¨q®® ¶bqµ¯´Ã ı§W„•‹¶U ”¨q®™ ƒ
§@ı ±°C¶•\؇¶b©ÒÆ| Ò§¿¨q§÷™ ¤ –°M®“
¶p qºv§˘Æ…¨O´‹§Ë´K™ °C
µ˘
¶b PBC •\؇°]2.0´¨°^ À ºv CD ™ µ
•ÿ Ê©Òt§§¨O§£Ø‡ßQ•Œ•ª•\؇™ °C
•Œªª±±æß@¶p§U™æfiß@°C
1 }©l©Ò©“ n™ºv CD Æ| Ò°C
2 ´ˆ§U SPECIAL MENU°]ØSÆÌ µ•ÿ Ê°^°C
±µ§U m
C
13
ƒ2 °Gºv CD°]VIDEO CD°^/ ¿R CD°]CD-G°^/ CD ¤æ˜
Page 88
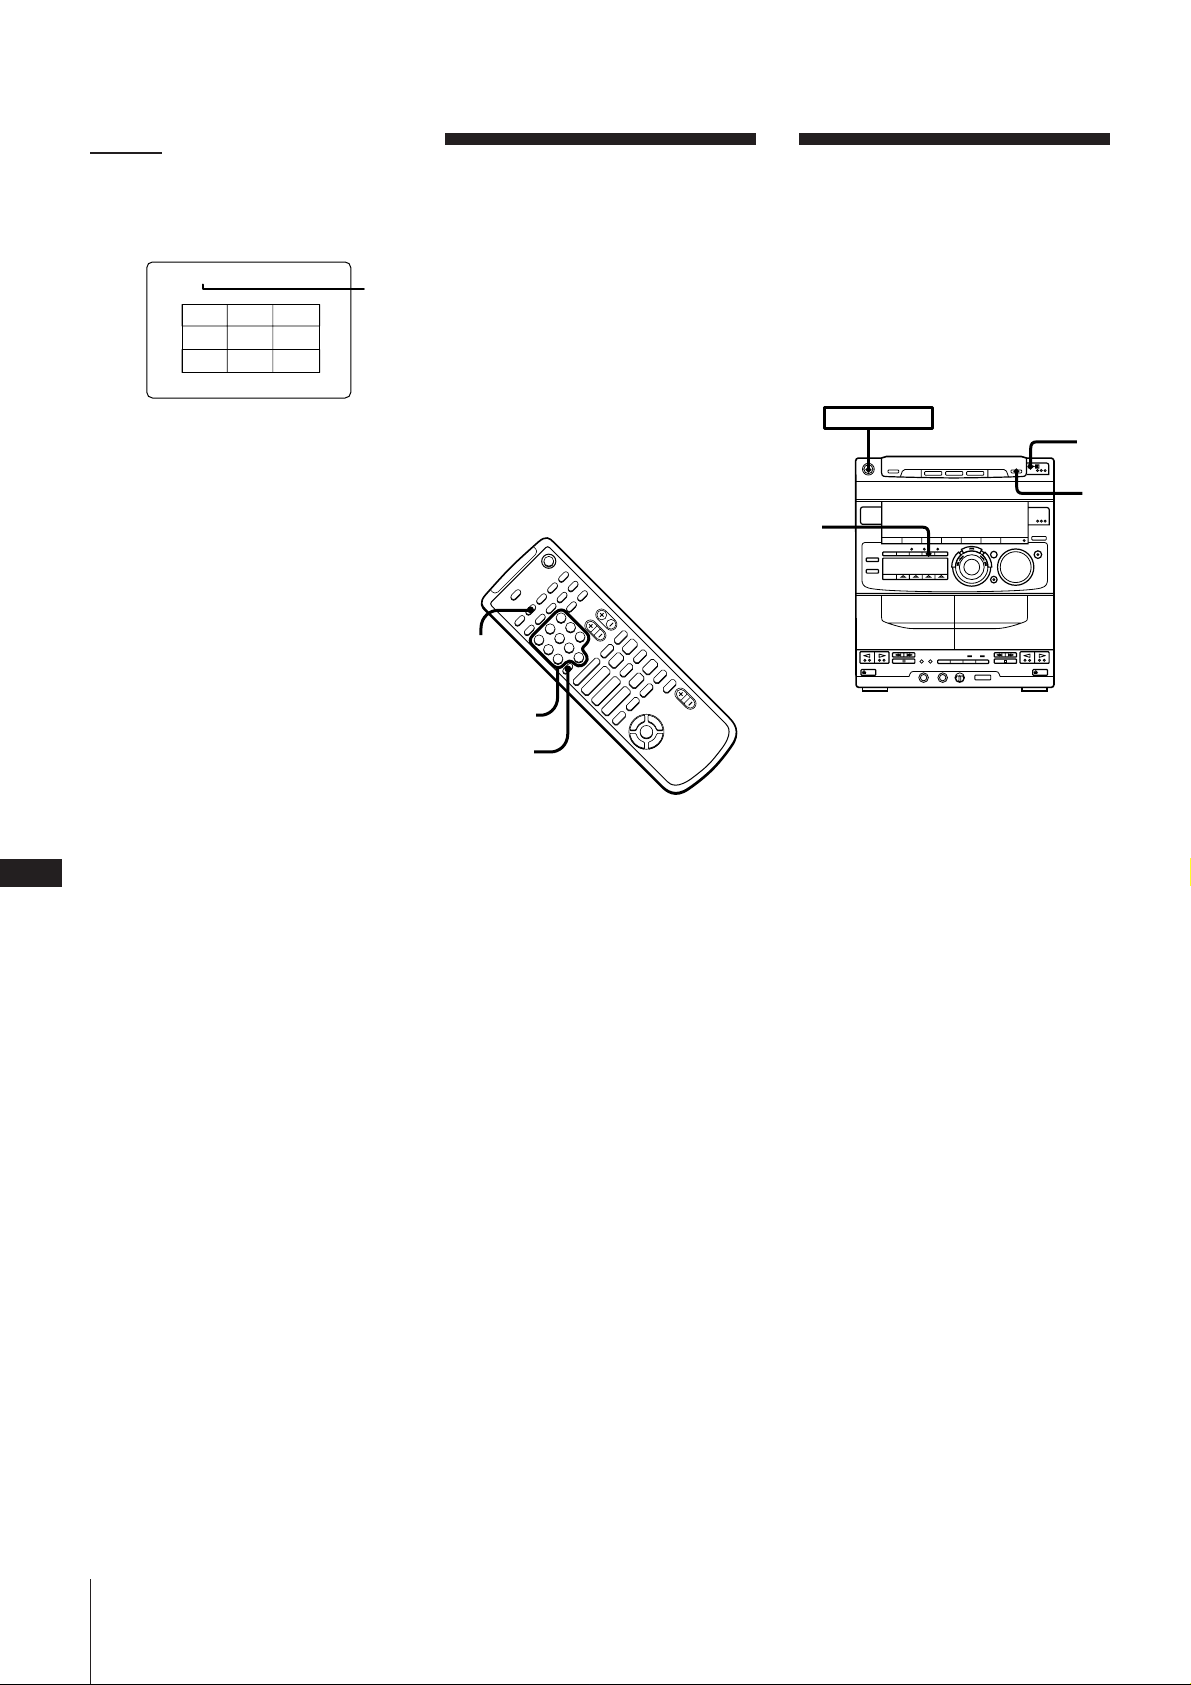
m ±µ§W
3 ´ˆ§U5•HøÔæ‹°ß5°^TRACK DIGEST°®°]Æ|
Ò K n°^°C{¶b©Ò t§§Æ|ÒßY§¿¶®9 ”¨q
®¶”®C§@¨q®™ ƒ§@¥VßY„•‹©Û™¨™p´Ã ı
§W°C
TRACK 1 DIGEST
1 2 3
4 5 6
7 8 9
1 {¶b©Ò t§§Æ|Ò
4 •Œº¶r¡‰øÔæ‹©“ n™¨q®°C
ßY±qæa™Ò©“øÔ¥VB }©l©Òt°C
n±§Ó©ÒtÆ…
–´ˆ§U p°C
¶b®B J3§§°M•iøÔ拶b©“¶¨q ®£ „•‹§F§ß
´e® •º „•‹™ ¨q®°C
•Œº¶r¡‰øÔæ‹©“ n™¨q®°C
¶b®B J3§§°M•i©ÒË „•‹§Fƒ§@¥V´·™ ©“n
™¨q®°C
˶b „•‹§F ƒ§@¥V§ß´·°M –´ˆ§U CD ·
SELECT°C
i¶ÊÆ| Ò K n•\؇§§°M•i§¡¥´®Ï®‰•LÆ| Ò™
Kn
Æ| Ò Knæfiß@§§°M´ˆ§U = ©Œ +°C
®œ•ŒÆ|Ò Kn©Û PBC À ºv CD
C
14
±§Ó©Ò t®´ˆ§U PBC OFF/ON ®œ AUTO
PBC ´¸•‹øO©Û®B J1§ß´e ¿°C
µ˘
§p©Û40¨Ì™¯™Æ| Ò•i؇§£Ø‡§¿¶®§p©Û9”
¨q®°C
¶b¿R CD°]CD-G°^§W
øÔæ‹œ•‹¿WD
¿R CD ¶ 16”¿W D°]0®Ï15°^•s µ°ß œ
1
•‹¿W D°®•i ˝±zøÔ拺v „•‹©Û qµ¯´Ãı°C
̱zƒ§@¶ß‚q u±µ¥°®Ï¿§W¥°ÆyÆ…°MCD
¤æ˜™§uºt w’¨O¿WD1©M0°C¶˝¨O°M¿W D1•i
§¡¥´®Ï§£¶P™¿W D°C
±z؇øÔ™¿WD•i؇¶U¤ –§£¶P°C–§@©w
— ”¿R CD ™ ª°©˙©Œ•] À°]µ•°^§W™º–
±q§W¶ ±§ÓBƒÚ©Ò
ºv CD°]VIDEO CD°^
°]´Ï¥_©Ò t°^
©Òºv CD°]VIDEO CD°^Æ…°M CD ¤æ˜
•i Oæ–±§Ó©Ò t¬I°C¶]¶ °M±z´K•i•H±q´e¶
±§Ó¬I±µ§U }©l©Ò ºv CD°C
´Ï¥_©Ò t•\Ø‡Ô µº÷ CD ©M¿R CD ¨O§£
µo•Õß@•Œ™°C
•‹°C
•Œªª±±æß@¶p§U™æfiß@°C
POWER m ON
3
1
2
+
–
+
SPECIAL
MENU
Numeric
buttons
º ¶r¡‰
> 10
1 ¿R CD°]CD-G°^™ ©Ò t©Œ±§Óº“¶°§§°M
´ˆ§U SPECIAL MENU°]ØSÆÌ µ•ÿÊ°^°C
2 ´ˆ§U6•HøÔæ‹°ß6°^ GRAPHIC CHANNEL°®
°] œ•‹¿WD°^°C
°ßG-CH°®ßY•X {©Ûqµ¯´Ã ı°C
3 •Œº¶r¡‰øÔæ‹©“ n™ ¿WD°C
nøȧJ§@§j©Û10™º¶rÆ…°C
–•˝´ˆ§U°÷10°MµM´·±µ§U¨¤¿ ™º ¶r¡‰°C
®“°GøȧJ10°M–´ˆ§U°÷10 m1m10/0
µ˘
©Ò¿R CD°]CD-G°^Æ…°M¶p™G´ˆ§U§F§U
¶C™¡‰Æ…°M¿R •i؇•¢Øu°C¶˝¨O°Mo® §£¨O
¤æ˜¨GªŸ°C
°X =/+
°X 0/)
°X P
p
–
)0
P
pP
Æ»
)0+=
Æ»
Æ
4
$
1 ´ˆ§U p •H±§Óºv CD°]VIDEO CD°^°C
CD ¤æ˜ßYOæ–§U o”¶Ïm°C
2 ¶b ±§Óº“¶°§§´ˆ§U ˆ RETURN°]©Œªª±±
æ §W™ RETURN ˆ °^°C
°ß RESUME°®°]´Ï¥_°^ßY¶b „•‹æ §§ { {
® •X {©Û qµ¯´Ã ı§W§j¨˘16¨Ìƒ¡°C
¶p™G°ßRESUME°®§£ { {
ßY™Ì•‹§£Ø‡ i¶Ê´Ï¥_©Òt°C
3 ¶b°ßRESUME°® { {§§°M¶PÆ…´ˆ§U ·
°]©Œªª±±æ §W™ CD · SELECT°^°CßY±q
®B J1§§±§Ó¬I´Ï¥_©Ò t°C
¶p™G¶b±z´ˆ§U · §ß´e°M°ßRESUME°®
´K ±§Ó§F{ {°M´h–¶A´ˆ§U
ˆ RETURN°C
n±q¿Y¨›§@±iºv CD°]VIDEO CD°^Æ…
• ¶b§£ { {°ßRESUME°®Æ…´ˆ§U · °C
• Ì°ßRESUME°®{ {µ¤Æ…°M–¶A´ˆ§U
ˆ RETURN°C
µ˘
• ¶b•Ù N©Œµ{ß«©Òt§§°M´Ï¥_©Ò t•\؇®§£
_ß@•Œ°C
• ¶]±z ±§Ó©Ò t¬I™§£¶P°M´Ï¥_©Ò t•i؇§£
˱q ͪ⁄±§Ó B }©l´Ï¥_©Ò t©ŒÆ⁄•ª§£µo
•Õß@•Œ°C
• §U¶C¥X ÿæfiß@£±N©Ÿ•h´Ï¥_©Òt Oæ–°G
°X ®¯§U ¤–
°X ´ˆ§U DISC SKIP
°X ©fi§Uq u
° X §¡¥´©Ò tº“¶°
°X ¶b ±§Óº“¶°§§°A´ˆ§U CD ¤æ˜™ p
ƒ2 °Gºv CD°]VIDEO CD°^/ ¿R CD°]CD-G°^/ CD ¤æ˜
Page 89
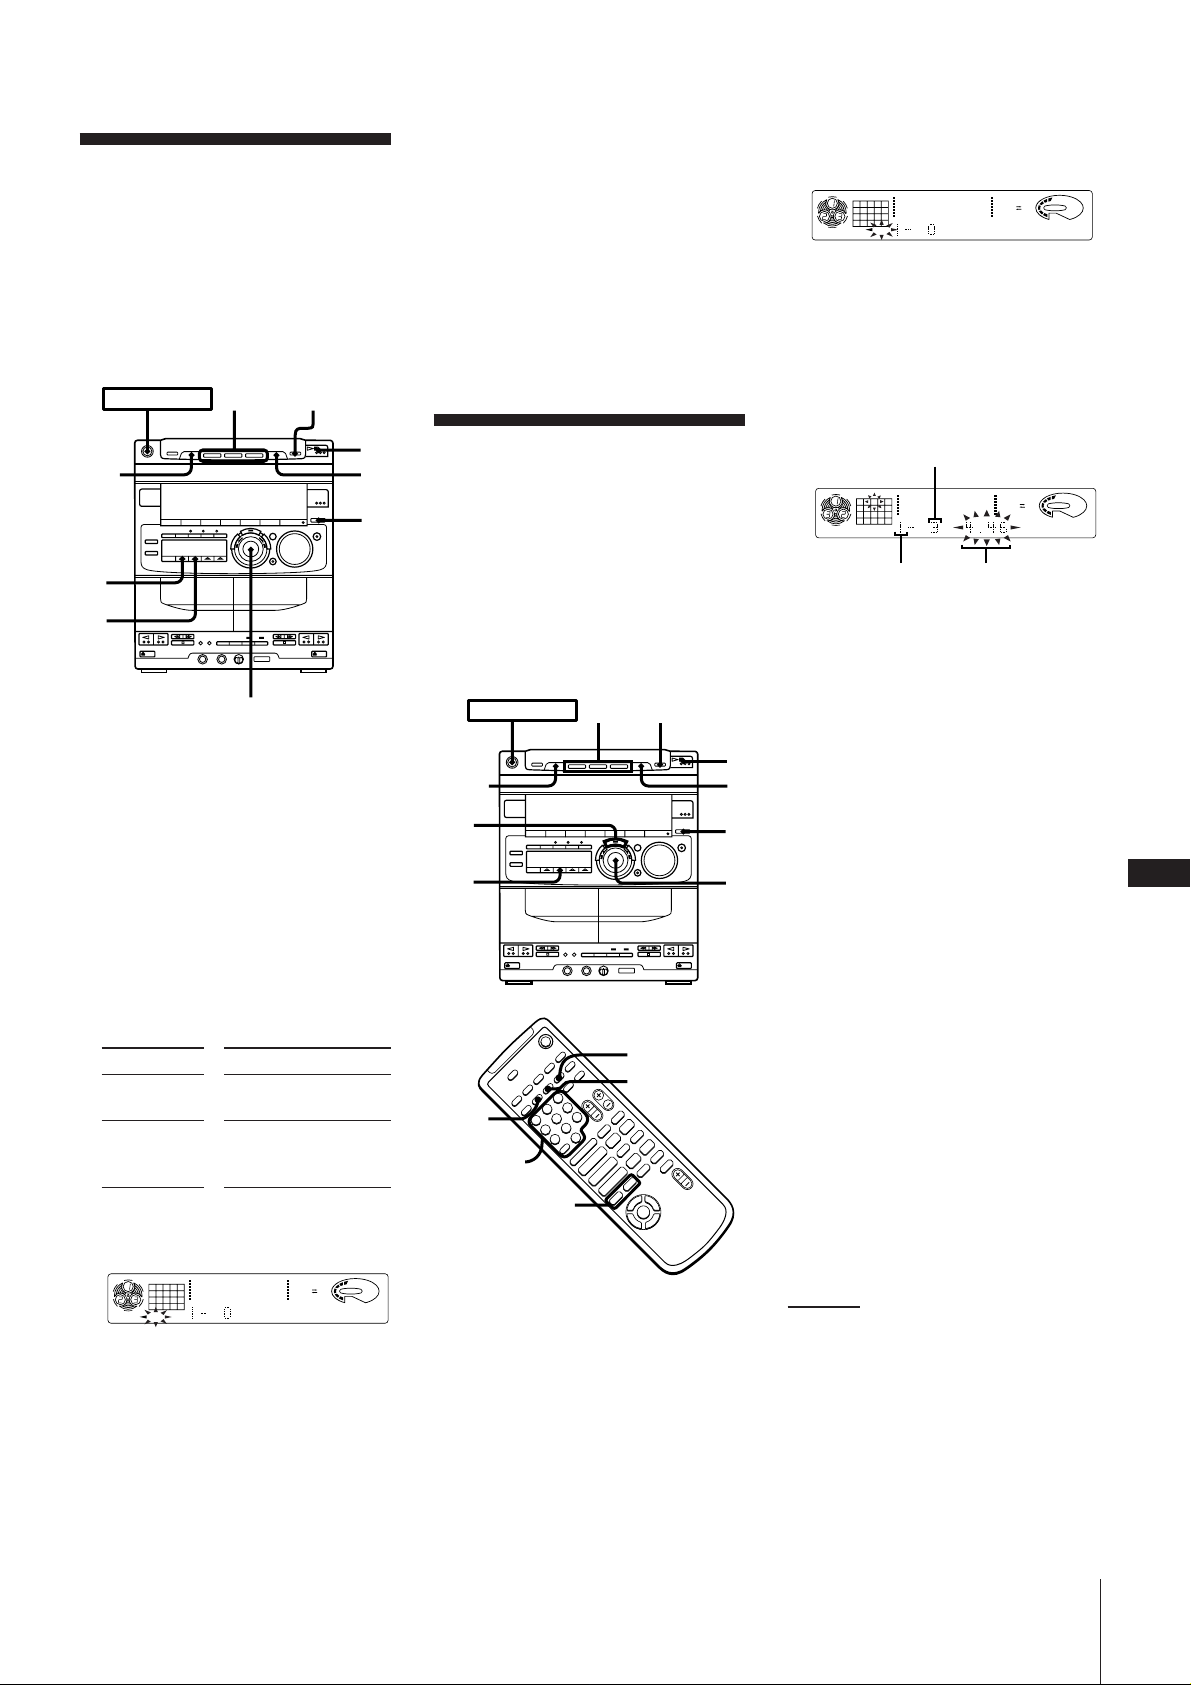
•ÙN ß«©Ò¶±§l°]•ÙN©Ò
12563 250 500 1k 2k 4k 8k 16k(Hz)
DOLBY NR
OFF
CD
1DISC PROGRAM
12345
678
VOLUME
12563 250 500 1k 2k 4k 8k 16k(Hz)
DOLBY NR
OFF
CD
DISC PROGRAM
3
VOLUME
µ°^
•i•ÙN ß«¶a©Ò§@±i CD §W™ °A©Œ©“¶
CD ™ •˛ °™¶±§l°C
¶b PBC •\؇°]2.0´¨°^ À ™ ºv CD ™
µ•ÿ Ê©Ò t§§¨O§£Ø‡®œ•Œ•ª•\؇™°C
®œ•Œ•D昧W™¡‰sß@¶æfiß@°C
POWER m ON
DISC
SKIP
DISC 1~3
p
5
2
¶p™G±z¨O¶b©Ò PBC •\؇°]2.0´¨°^À ºv
CD°]VIDEO CD°^°ACD ¤æ˜ßY ±§Óæfi
ß@°C
nøÔæ‹©“n™ CD Æ…
¶b•Ù N©Òµ§§°A –´ˆ§U DISC 1~3°C
nı V§£n•™ ¶±§lÆ…
Æ… w§Ë¶V±¤¬‡ JOG ´ L°]©Œ´ˆ§Uªª±±
æ §W™ +°^°C
´ˆß ±Ê™ ß«©Ò¶±§l°]µ{
ß«©Ò µ°^
3 §œ¥_´ˆ§U PLAY MODE°]©Ò µº“¶°°^¶‹
°ßPROGRAM°®°]µ{ß«°^•X {©Û„•‹æ °C
4 ´ˆ§U DISC 1~3•HøÔ拧@±i CD°C
¤– ßY•X {©Û„•‹æ §W°C
5 ±¤¬‡ JOG ´ L°]©Œ´ˆ§Uªª±±æ §W™
=/+°^•HøÔ拧@ ¶±§l°C
¶± ©M•]ßt©“øÔ¶±§l™ ¡`©Ò µÆ… °ßY { {
©Û „•‹æ §W°C°]¶ Æ…°A¡Ÿ®S¶ øȧJµ{
ß«°C°^
¶±
3
4
JOG
1 §œ¥_´ˆ§U FUNCTION ¶‹°ßCD°®•X {©Û „
•‹æ °C
2 ´ˆ§U § OPEN/CLOSE°Aß‚ CD À©Ò¶b ¤–
¶´L§W°C
nÀƒ§T±i¤ –Æ…
–´ˆ§U DISC SKIP°]©Œªª±±æ §W™
D. SKIP°^°C ¤ –¶´L¬‡ ˝±z؇ À©Ò•t
§@±i CD°C
3 §œ¥_´ˆ§U 1/ALL DISCS •HøÔæ‹©Ò
°ß1 DISC°®°]1±i ¤–°^©Œ°ßALL DISCS°®
°]©“¶ ¤ –°^°C
øÔæ‹ ©Òµ
1 DISC •u©Ò {¶bøÔ©Ò™§@±i¤
–
ALL DISCS sƒÚ©Ò©“¶ ™ ¤ –°]´ˆ
”¤ – °^°C™ ¶´L±N
Q ı VL•h°C
4 §œ¥_´ˆ§U PLAY MODE ¶‹°ßSHUFFLE°®
°]•Ù N©Òµ°^•X {©Û„•‹æ °C
1
•i±q©“¶ CD §W´ˆ ”©“ß ±Ê™ ©Ò µ ß«
öh s¶®32¶±™ µ{ß«°C
¶˝¶b PBC •\؇°]2.0´¨°^ À ºv CD
°]VIDEO CD°^™ µ•ÿ Ê©Ò t§§¨O§£Ø‡ßQ•Œ¶
•\؇™ °C
•i•Œ•D昧W™©Mªª±±æ§W™¡‰ sß@¶ æfi
ß@°C
POWER m ON
4
p
DISC
SKIP
6
3
D.SKIP
+
CLEAR
+
p
–
)0
P
pP
Æ»
)0+=
Æ»
Æ
4
$
CHECK
Numeric
º ¶r¡‰
buttons
–
=/+
¤–
6 ´ˆ§U ENTER/NEXT°]øȧJ°˛®‰¶ °^°C
©“øÔ¶± ¬I´G¶b µº÷§È执§¶” STEP ´¸•‹
øOßY•X{©Û „•‹æ§W°C¶p™G¶b±z´ˆ§U
ENTER/NEXT §ß´e°A¶± §wƯ•¢ „•‹°A´K
¶^®Ï®BJ4 ´s¶Aß@°C
8
2
1
¶p™G±z sø˘§F¶±§lµ{ß«°C
–´ˆ§U CLEAR°] M £°^°AµM´·øÔæ‹•øT
™ ¶±§l°C
7 n±q¶P§@±i CD •t s¶±§lµ{ß«Æ…°A–§œ¥_
®BJ5©M6°C
n±qßO™ CD •[ s¶±§lµ{ß«Æ…°A´h–§œ¥_
5
®BJ4®Ï6°C
8 ´ˆ§U · °C
©“¶ ¶±§lßY´ˆ ”±zøÔ©w™ ß«©Ò µ°C
n— £µ{ß«©Ò µÆ…
§œ¥_´ˆ§U PLAY MODE ¶‹ „•‹æ§W™
°ßPROGRAM°®©M°ßSHUFFLE°®Æ¯•¢ „•‹°C
¶±§l±Nƒ~ƒÚ•H Ï®”™ ß«©Ò µ°C
¶p™G±z¨O©Ò PBC •\؇°]2.0´¨°^ À ºv
CD°]VIDEO CD°^°ACD ¤æ˜ßY±N ±§Ó§U®”°C
n•Œªª±±æøÔ拶±§lÆ…
•Œº¶r¡‰øȧJ¶± °C ıL®BJ6°C
nøȧJ§j©Û10™¶± Æ…°A–•˝´ˆ§U
°÷10°AµM´·´ˆ§U¨¤¿ ™º ¶r¡‰°C
®“¶pnøȧJ30™¶± Æ…°AßY–´ˆ§U
°÷10m3m10/0°C
¡`©ÒµÆ…°
C
15
CD
12345
678
12563 250 500 1k 2k 4k 8k 16k(Hz)
1DISC
SHUFFLE
5 ´ˆ§U · °C
ßY•X {°ß J°® „•‹¶”•H•ÙN ß«©Ò¶±§l°C
n ±§Ó•ÙN©Ò µÆ…
–´ˆ§U p°C
n—£•ÙN©ÒµÆ…
§œ¥_´ˆ§U PLAY MODE ¶‹ „•‹æ§W™
°ßSHUFFLE°®©M°ßPROGRAM°®Æ¯•¢ „•‹°C
¤æ˜±N•H Ï®”¶± ƒ~ƒÚ©Ò¶±§l°C
DOLBY NR
VOLUME
OFF
±µ§U m
1§œ¥_´ˆ§U FUNCTION ¶‹„•‹æ §W•X {
°ßCD°®°C
2 ´ˆ§U § OPEN/CLOSE ® ¶b¤ –¶´ L§W À
©Ò CD°C
nÀ©Òƒ§T±i¤–Æ…
–´ˆ§U DISC SKIP°]©Œªª±±æ§W™
D. SKIP°^°C ¤–¶´ L±¤¬‡ ˝±z•i À©Ò•t
•~§@±i CD°C
ƒ2 °Gºv CD°]VIDEO CD°^/ ¿R CD°]CD-G°^/ CD ¤æ˜
Page 90
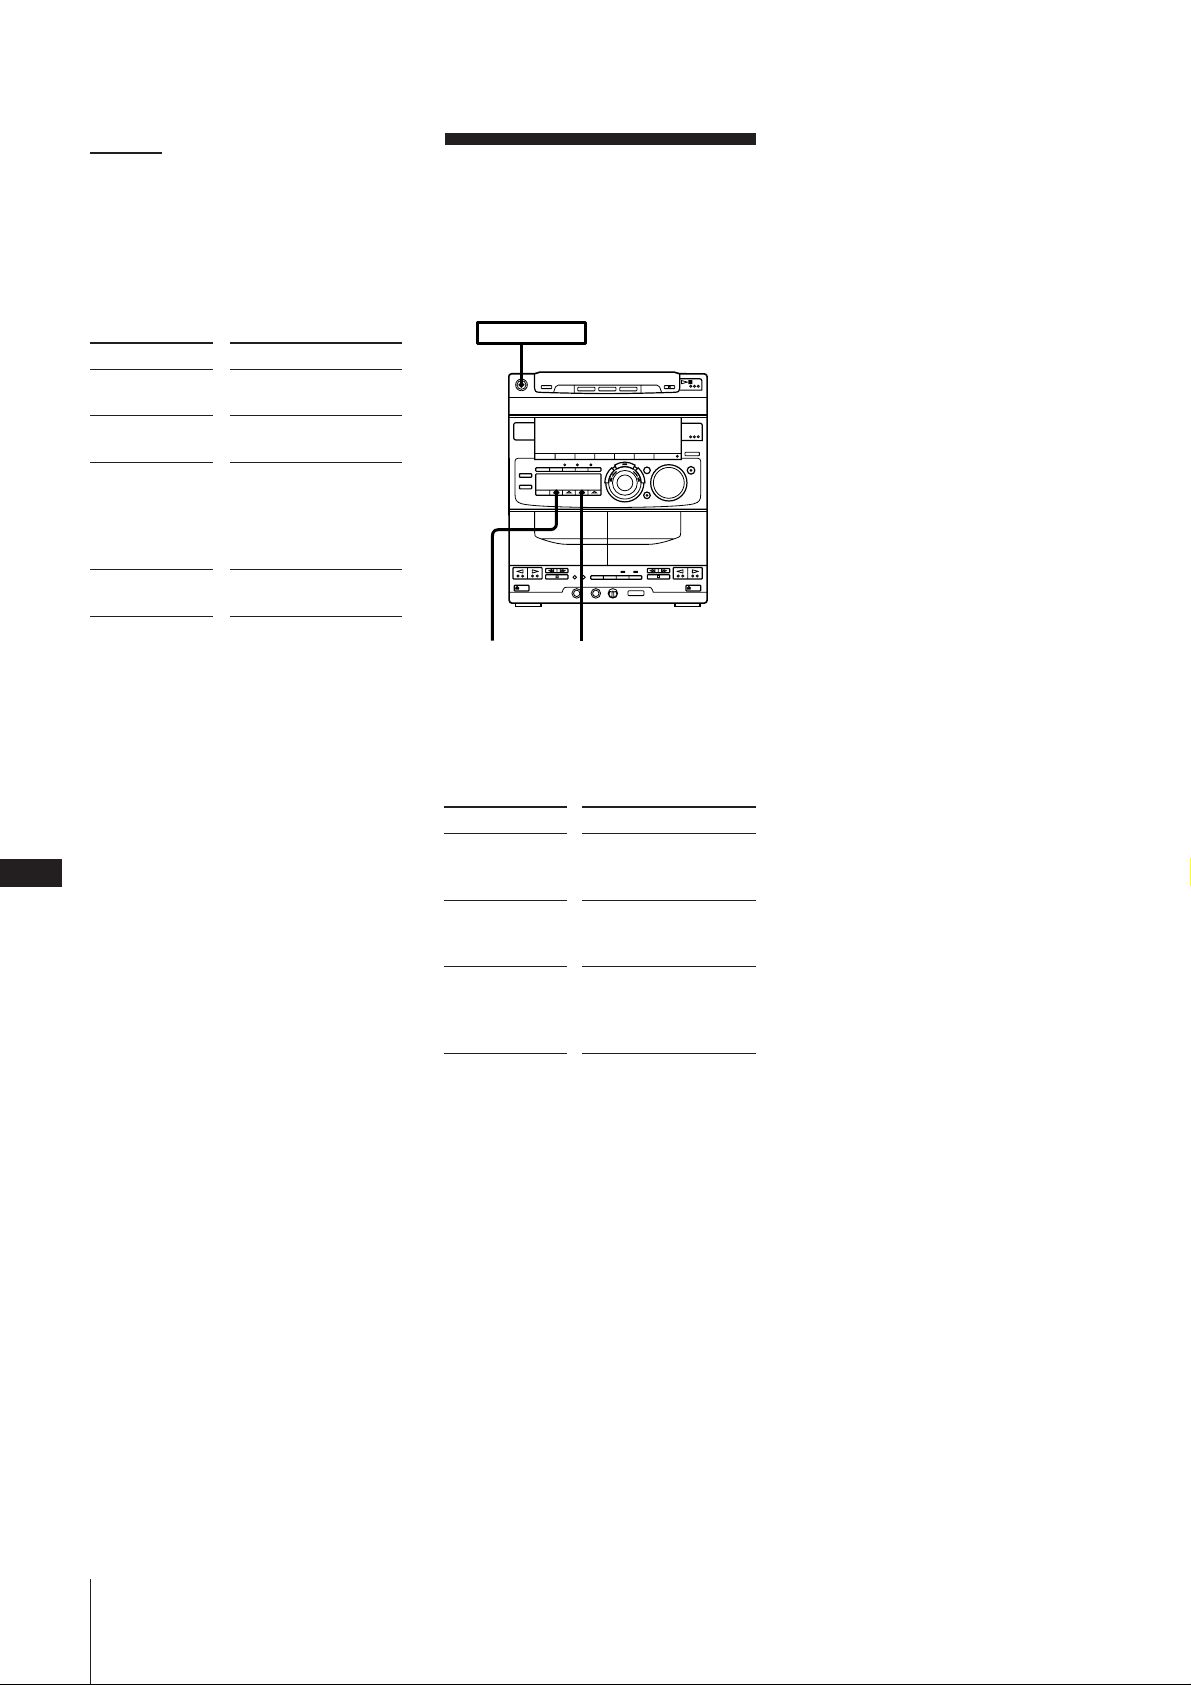
m ±µ§W
n¿À¨dµ{ß«§ÆeÆ…°] ®œ•Œªª±±æ °^°C
}©l©Ò µ´e•˝´ˆ§U CHECK°C
®C¶´ˆ§U CHECK°A§U§@®B JßY•X{©Û „
•‹æ §W°CÌ „•‹§Fô·™ ®B J°ßCHECK
END°®°AßY§S¶^®Ï•ø±`™ „•‹°C
nßÔ‹µ{ß«§ÆeÆ…
n –´ˆ§U
©Ÿ•h§@´¸©w¶±§l §œ¥_´ˆ§U CHECK ®œ¶±
¬I´G°A® ´ˆ§U CLEAR
±q• ›©Ÿ•h§@¶± ¶b ±§Óº“¶°§§´ˆ§U
CLEAR
¶bµ{ß«• ›•[ 1. ±¤¬‡ JOG ´ L¶‹©“ n
§W§@¶± ™ ¶± •X {© Û „•‹æ
§W°C
2 . ´ˆ§U ENTER/NEXT
°]øȧJ°˛®‰¶ °^°C
©Ÿ•hæ„ ”µ{ß« ¶b ±§Óº“¶°§§´ˆ§@
¶ p°A©Ò µ§§´h´ˆ®‚¶
§œ¥_©Ò¶±§l°]§œ¥_©Òµ°^
§œ¥_©Ò µ•\؇•i•H§œ¥_§@±i CD ©Œ©“¶
CD ™ ¶±§l•H•ø±`©Ò µ°A•Ù N ß«©Ò µ©Mµ{
ß«©Òµ°C
–•Œ•D昧W™¡‰sß@¶æfiß@°C
POWER m ON
µ˘
°E ©“ß@™ µ{ß«§¥´OØd¶b CD ¤æ˜°C±z•i¶A©Ò
¨¤¶P™ µ{ß«°C
°E sµ{ß«§§°A¶p™G•X{°ß--.--°®¶”§£¨O¡`©Ò
µÆ…°Æ…°AßY™Ì•‹±z§ws§F WL20 ¶±
§l°A©Œ¡`©ÒµÆ… °§w WL100§¿ƒ¡°C
C
16
1/ALL DISCS
§œ¥_©“¶™ ¶±§l
1 §œ¥_´ˆ§U REPEAT ¶‹°ßREPEAT°®•X {©Û
„•‹æ§W°C
2 ´ˆ§U · °C
n
§œ¥_{¶b©Ò µ§§
CD ™ ©“¶¶±§l
§œ¥_©“¶ CD ™
•˛ °©“¶ ¶±§l
•u§œ¥_§@ ¶±§l
n— £§œ¥_©ÒµÆ…
§œ¥_´ˆ§U REPEAT ¶‹ „•‹æ§W™
°ßREPEAT°®©Œ°ßREPEAT 1°®Æ¯•¢§F „•‹°C
µ˘
¶b•Ù N ß«©Œµ{ß«©Ò µ§§¨O§£Ø‡§œ¥_©Ò
§@ ¶±§l™ °C
REPEAT
–´ˆ§U
§œ¥_´ˆ§U1/ALL DISCS
¶‹°ß1 DISC°®•X {©Û „•‹
æ§W°C
§œ¥_´ˆ§U1/ALL DISCS
¶‹°ßALL DISCS°®•X {©Û
„•‹æ§W°C
©Òµ¤©“n§œ¥_™ ¶±§l
Æ…°A§œ¥_´ˆ§U REPEAT
¶‹°ßREPEAT 1°®•X{©Û
„•‹æ °C
ƒ2 °Gºv CD°]VIDEO CD°^/ ¿R CD°]CD-G°^/ CD ¤æ˜
Page 91
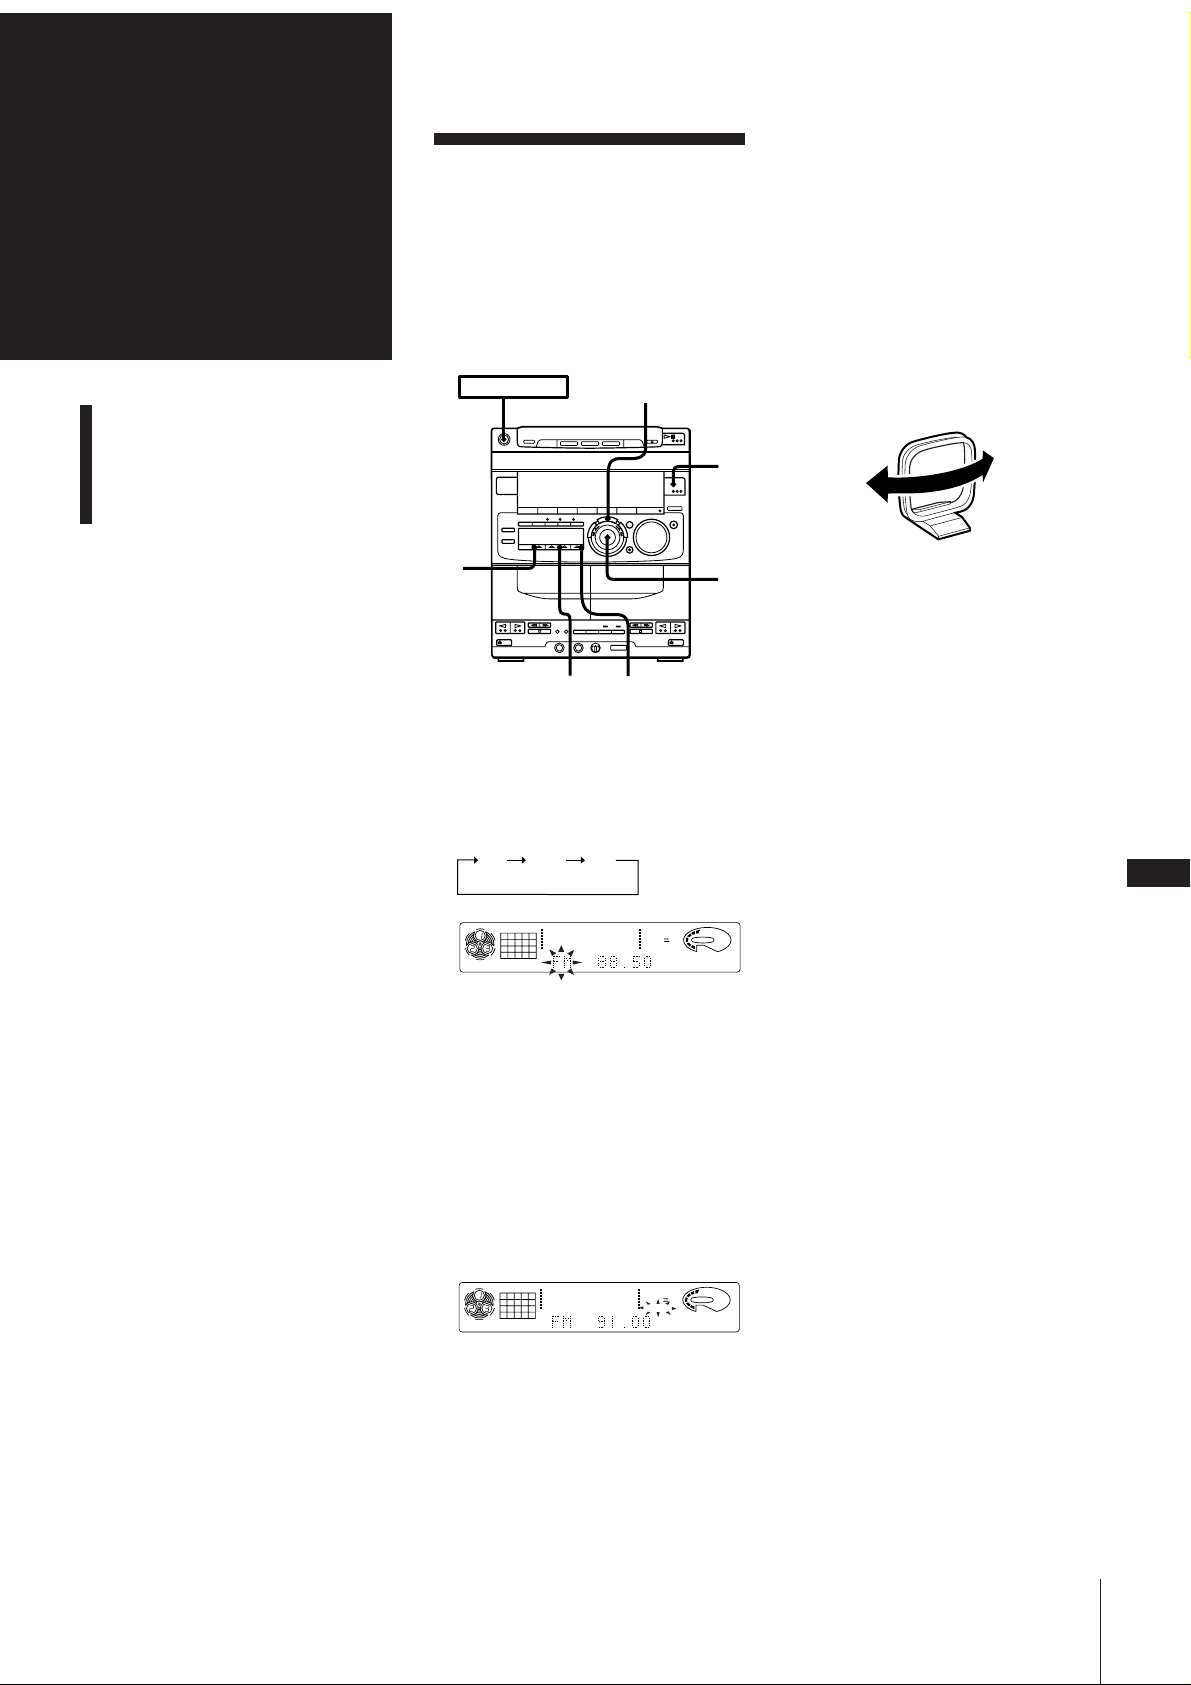
ƒ3 °G
¶¨ µæ˜
•¶¨ µæ˜
•¶¨ µæ˜
n¶¨ •µLuºsº `•ÿÆ…°A ’ø”æ•i¶¤
±¥y q•x¿Wv® ’§J´H M°™ q•x°C o”
•\؇•i¥¿±z`¨Ÿ§@§@¥M߉´H M°™ q•x™
¬–©MÆ… °°C¶˝¨O°A¶¤ ’ø”±NıVL ´H
˚Æz™ q•x°C¶Æ…°A –•Œ§‚ ’ø” ’§JQ¶¤
’ø” ıV™ q•x°C
POWER m ON
ENTER/NEXT
4 ¶p™G§£ Q¶¨•©“øÔ q•x°A•i¶A±¤¬‡ JOG
´ L ´ si¶Ê± ¥y°C
§£Ø‡’§J©“ n¶¨•™ q•xÆ…
¶¤ ’ø”•i؇ ıV´H LÆz™ q•x°C –
•Œ§‚ ’ø” ’§J°C
1 §œ¥_´ˆ§U TUNING MODE ¶‹
°ßMANUAL°®•X {©Û„•‹æ °C
2 ±¤¬‡ JOG ´ L¶‹ ’§J©“n q•x°C
¨ ßÔµ MW/SW (AM) ºsº¶¨ µ
´±™˛±a™ AM ¿Ùߌ§— u®œ MW/SW
(AM) ؇¿Ú ˚¶n¶¨ µ°C
w¨˘µL u qºsº q•x
©Ò w¨˘ q•x
1
2
3,
4
STEREO MONO
1 §œ¥_´ˆ§U TUNER/BAND ¶‹©“ n™™i¨q•X
{©Û„•‹æ §W°C
®C Ì´ˆ§U TUNER/BAND°A™i¨qßYß@¶p§U
‹§ °G
FM MW SW
TUNER
12563 250 500 1k 2k 4k 8k 16k(Hz)
2 §œ¥_´ˆ§U TUNING MODE ¶‹°ßAUTO°®•X
{©Û „•‹æ°C
DOLBY NR
VOLUME
OFF
MANUAL
MHz
MW/SW (AM)
nßÔ ‹ MW ’ø” ° jÆ…
MW ™ ’ø” ° j™§uºt w ’¨ 9 kHz°]§@
°§¿´¨ ´h w ’¨10 kHz°^°C¶p ßÔ‹°j
¨ 10 kHz (9 kHz) Æ…°A –´ˆ”¶p§U§Ë™kß@°G
1 •¥}q °C
2 ±N™i¨qßÔ ‹¨ MW (AM)
3 ˆ±º q °C
4 ´ˆµ¤ ENTER/NEXT ¶PÆ…¶A•¥} q °C
ßÔ ‹§F MW (AM) ™ ’ø”§ß´·°A–´s]
©w w¨˘ q•x°C n´Ï¥_ ]©w¨ ϧuºt ]©w™ ’
ø”° jÆ…°A–´ˆ”¶P™kß@°C
FM ºsº ™¶¨µ§£ M°Æ…
–´ˆ§U MONO ®œ°ßMONO°®•X {©Û„•‹
æ°C¶ Æ…°AßYµL•flÈ¡nƃ™G°A¶˝•ißÔµ¶¨µ
™¨™p°Cn´Ï¥_•flÈ¡nƃ™GÆ…°A –´ˆ§U
STEREO°C
ʃ©Ò µ•\؇
ˆµ¤ q Æ…°A´ˆ§U TUNER/BAND°A±z´K
•i¶¨ •´e¶ ô·¶¨ •™ q•x¶”§£• ¶A´ˆ•Ù¶Û
ßO™¡‰s°C
C
17
3 Æ… w§Ë¶V±¤¬‡ JOG ´ L•H±¥y ˚™¿W
v™ q•x°C n±¥y˚ßC¿W vq•xÆ…°A– f
Æ…w§Ë¶V±¤¬‡ JOG ´ L°C
’ø”æ }©l± ¥yq•x¿W v°A®¶bµo{M°
™ q•xÆ…°AßY¶¤ ±§Ó± ¥y¶”¶b„•‹æ§W
•X {°ßTUNED°®°]§w ’ø”°^ „•‹°C
¶p™G ’§J™ FM q•x¨O•Œ•fl È¡nºsº™ °A
´h±N•X {°ßSTEREO°® „•‹°C
TUNER
12563 250 500 1k 2k 4k 8k 16k(Hz)
DOLBY NR
TUNED
OFF
STEREO
AUTO
MHz
¶¤ ¡n øÔæ‹
Ì•ø¶b¶¨ •®‰•L¡n ¶”´ˆ§U TUNER/
BAND Æ…°AßY•iøÔ ’ø”涔¶¤ ©Ò´e¶ ô·
¶¨ •™ q•x°C
VOLUME
ƒ3 °G¶¨ µæ˜
Page 92
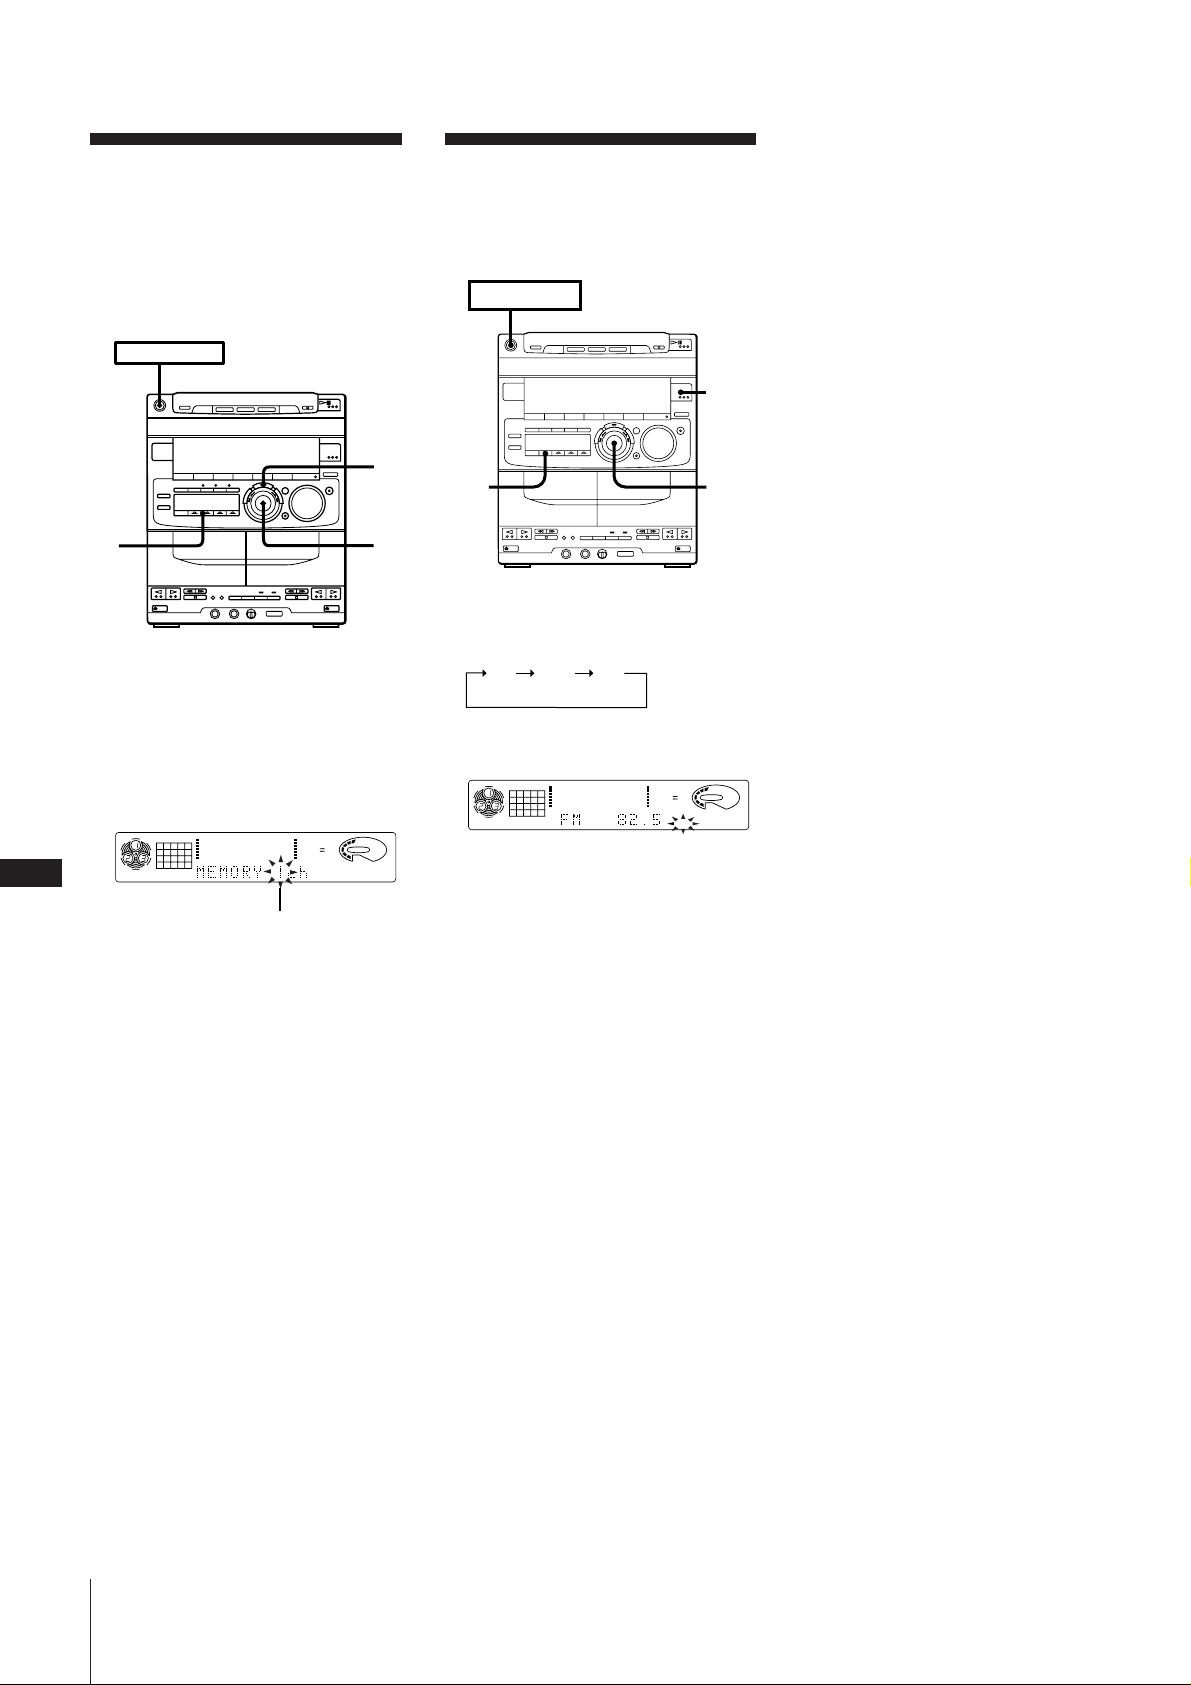
w¨˘µL u qºsº q•x
©Ò w¨˘ q•x
•i¶b ’ø”¶s¿xæ ös§J flw™ q•x¿W v
•H´K® t ’§J¶¨ •°C±z•i´ˆ ”•Ù¶Û™ ß« Ã
¶h؇ w¨˘20” FM q•x°A10 ” MW q•x°A©M
10” SW q•x°C–•Œ•D昧W™ ¡‰sß@¶ æfi
ß@°C
POWER m ON
2
1 ’§J Qn¶s§J w¨˘¶s¿x槧™ q•x°C
2 ´ˆ§U TUNER MEMORY°] ’ø”¶s¿xæ °^°C
°ßMEMORY°®©Mw¨˘¿W D ßY•X {©Û„
•‹æ °C
TUNER
1
C
12563 250 500 1k 2k 4k 8k 16k(Hz)
18
w¨˘¿WD
DOLBY NR
§@• w¨˘¶n q•x°A•H´·´K•i•Œ JOG ´ L
® t ’§Jfl w¶¨ •™ q•x°C
POWERnON
1
4
2
3
3
1 §œ¥_´ˆ§U TUNER/BAND •HøÔæ‹©“ n™™i
¨q°C
FM MW SW
2 ´ˆ§U TUNING MODE ®œ°ßPRESET°®•X {
©Û „•‹æ °C
TUNER
12563 250 500 1k 2k 4k 8k 16k(Hz)
ALL DISC S
VOLUME
OFF
AUTO
3 ±¤¬‡ JOG ´ L°]©Œ´ˆ§Uªª±±æ ™°œ©Œ
°–°^•H ’§J w¨˘ q•x°C
ßY „•‹” w¨˘q•x™ ¿W v® }©l©Ò q•xº
µ°C
DOLBY NR
VOLUME
OFF
MHz
PRESET
3 ±¤¬‡ JOG ´ L•HøÔæ‹ w¨˘¿WD °C
4 ´ˆ§U ENTER/NEXT°]øȧJ°˛®‰¶ °^°C
q•xßY¶si§FøÔ©w™ w¨˘¿W D °C
5 §œ¥_®B J1®Ï4•H¶s§J®‰•L flw™ q•x°C
n©Ÿ•h¶s§J™ q•xÆ…
•un¶b§w¶s¶ q•x™ w¨˘¿W D §W¶A¶s
§J§@ s q•x°A´K•i©Ÿ•h•˝´e™ q•x¶”•N§ß•H
s q•x°C
¶p™G¶s§Jq•xµo•Õ ›D©ŒßÀø˘§F§‚ƒÚ
§@©w – Tª{¨Oß_•X{°ßMEMORY°® „
•‹°C¶p™G®S°AßY¶A´ˆ§@¶ TUNER MEMORY
®œ°ßMEMORY°®•X {©Û „•‹æ§W°]§j¨˘ „•‹
8¨Ì°^°AµM´·i¶Ê®B J3©M4™æfiß@°C
ƒ3 °G¶¨ µæ˜
Page 93
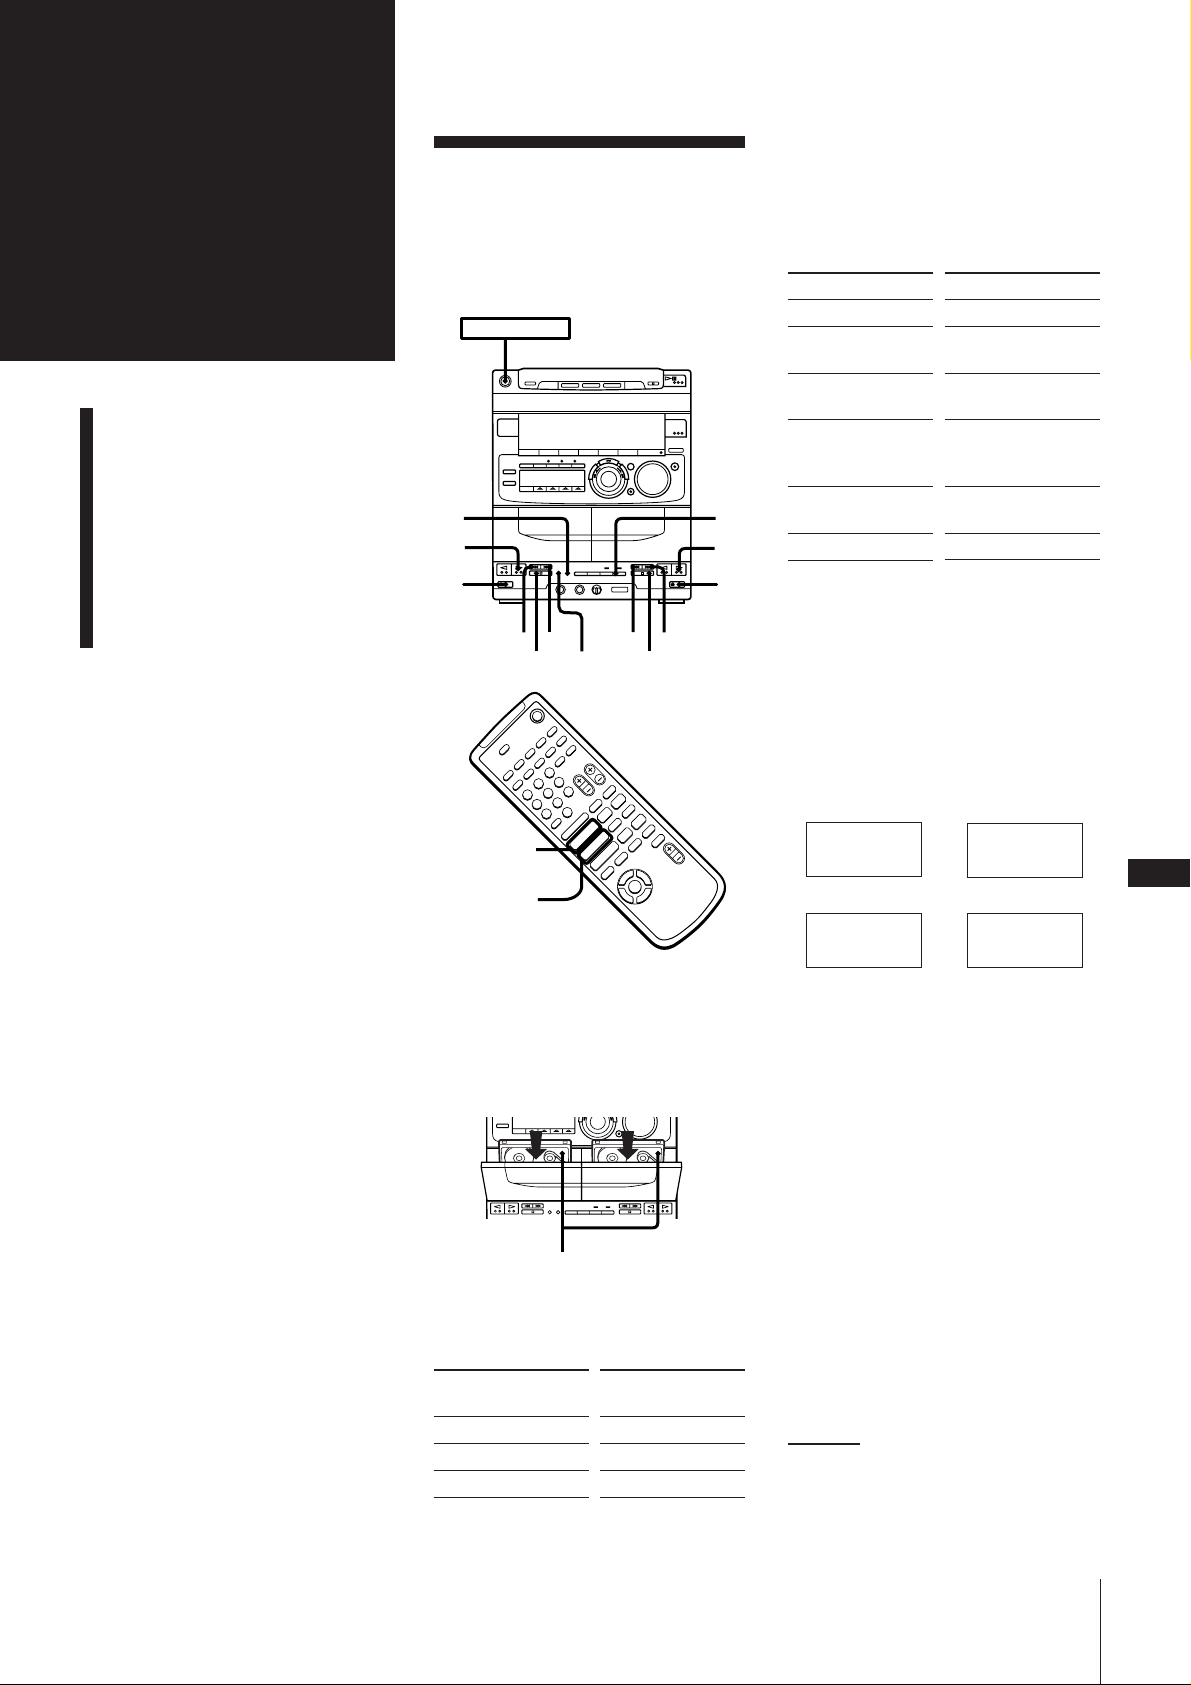
ƒ4 °G
œ±a¤æ˜
©Òœ±a
±q CD°] pÆg ¤ –°^ø˝ µ
±q CD ø˝ µ°G´¸©w œ±a™¯´
°]Æ…°søË°^
±q¶¨ µæ˜ø˝ µ
±q®‰•L œ±aø˝ µ°]´˛®©ø˝ µ°^
©Òœ±a
•i©Ò TYPE I°]º– «°^°ATYPE II°]CrO 2°^
©M TYPE IV°]™˜ƒ›°^ œ±a°C ÌÀ§J œ±aÆ…°A
•dÆyßY¶¤ ¶a¿À¥˙ œ±a™´¨¶°°C
POWER m ON
2
3
1
)00)
p
DOLBY NR
p
3
1
*1
´ˆ ß«§œ¥_5¶ •H´·°A•dÆyßY¶¤ ±§Ó°C
*2
°ßsƒÚ©Ò¬˘•dÆy°]±µ§O©Ò µ°^°®°C
3 ´ˆ§U ·°] n©Ò•ø ±Æ…°^©Œ ª°] n©Ò À
¬ ±Æ…°^°C
œ±aßY}©l©Ò µ°C
n
±§Ó©Òµ
º»±©Òµ
º» ±´·´Ï¥_©Ò µ
ß÷ i¬
´¬
P
®¯§U•d±a
®œ•Œªª±±æ
1 ±§Óº“¶°§§´ˆ§U DECK A ª · ©Œ
DECK B ª · °C
•dÆyßY}©l©Ò œ±a•ø ±°C¶A´ˆ§@¶ •H©Ò À
¬ ±°C
2 ´ˆ§U©“n™æfiß@¡‰°C
´ˆ§U°]ªª±±æ §W™ °^
p
P PAUSE (P)
°]•dÆy B ¨ °^
P PAUSE (P)°]•dÆy
B ¨ °^ , ª ©Œ ·
ß÷¬ •ø±°A –´ˆ§U
)°Fß÷¬ À¬ ±°A
–´ˆ§U 0
•ø ±°A –´ˆ§U 0 °F
À¬ ±°A –´ˆ§U )
§ EJECT
+
–
+
p
–
)0
P
Æ»
DECK A » Æ
DECK B » Æ
Æ»
Æ
4
1 ´ˆ§U § EJECT •H•¥ } œ±a´«°C
¶b•dÆy A ©Œ B À§Jø˝ µ±a®œœ±a ±¶V
§U°A˝ n©Ò™§@ ±¶V•~°C´ˆˆ§W œ±a´«°C
œ±aßY±q•ø ± }©l©Ò µ°C
n©Òµ ±¥¬•~
2 øÔ括˘©ŒÊ ±ø˝µ°C
n©Ò
œ±a™§@±
*1
¬˘ ±
sƒÚ¶a©Ò®‚•dÆy
´ˆ§U DIRECTION •H
øÔæ‹
A
ß
*2
RELAY
sƒÚ©Ò®‚•dÆy°]±µ§O©Òµ°^
±µ§O©Ò µ±`¿H¶p§U ß«°C Ì•dÆy B œ±a
™ À¬ ±©Òß´·°AßY´ˆ¶p§U ß«ƒ~ƒÚ©Ò4¶ °C
pP
)0+=
•dÆy A •dÆy A
°]•ø ±°^ m °] À ¬ ±°^
C
$
µ
19
•dÆy B •dÆy B
°]•ø ±°^ M °] À ¬ ±°^
1 ´ˆ§U § EJECT°A¶b®‚•dÆy§W¶UÀ§J§@ ”
ø˝ µ±a°C
2 §œ¥_´ˆ§U DIRECTION ¶‹°ßRELAY°®•X {
©Û„•‹æ §W°C
3 ´ˆ§U•Ù§@•dÆy§W™ ª ©Œ · °C
n±§Ó±µ§O©Ò µÆ…°A–´ˆ§U p °C
n—£±µ§O©ÒµÆ…
§œ¥_´ˆ§U DIRECTION ¶‹°ßA°®©Œ
°ßß°®•X {©Û „•‹æ °C
•§@”•Œß˘§Ò*B ¥Óæ®t Œø˝™ ø˝ºv±aÆ…
´ˆ§U DOLBY NR ¡‰®œ°ßDOLBY NR B°®
•X {©Û„•‹æ §W°C•ª]©w®‚•dÆyß°¶ ƃ°Cߢ
§Ò¥Óæ®tŒ•i¥Óª¥ œ±a¶bßC q• ™¿Wv´H
Æ…µo•Õ™ºRºRæ¡n°C
°Ø
ߢ§Òæ µ¥ÓßCæ gߢ§ÒÍ Áµ˝©˙§•q±¬v
®Óy°C
ߢ§Ò°ADOLBY°A§Œ¬˘Dº– a¨ß˘§Ò Í
Áµ˝©˙§ •q§ß”º–°C
±µ§U m
ƒ4 °Gœ±a ¤æ˜
Page 94
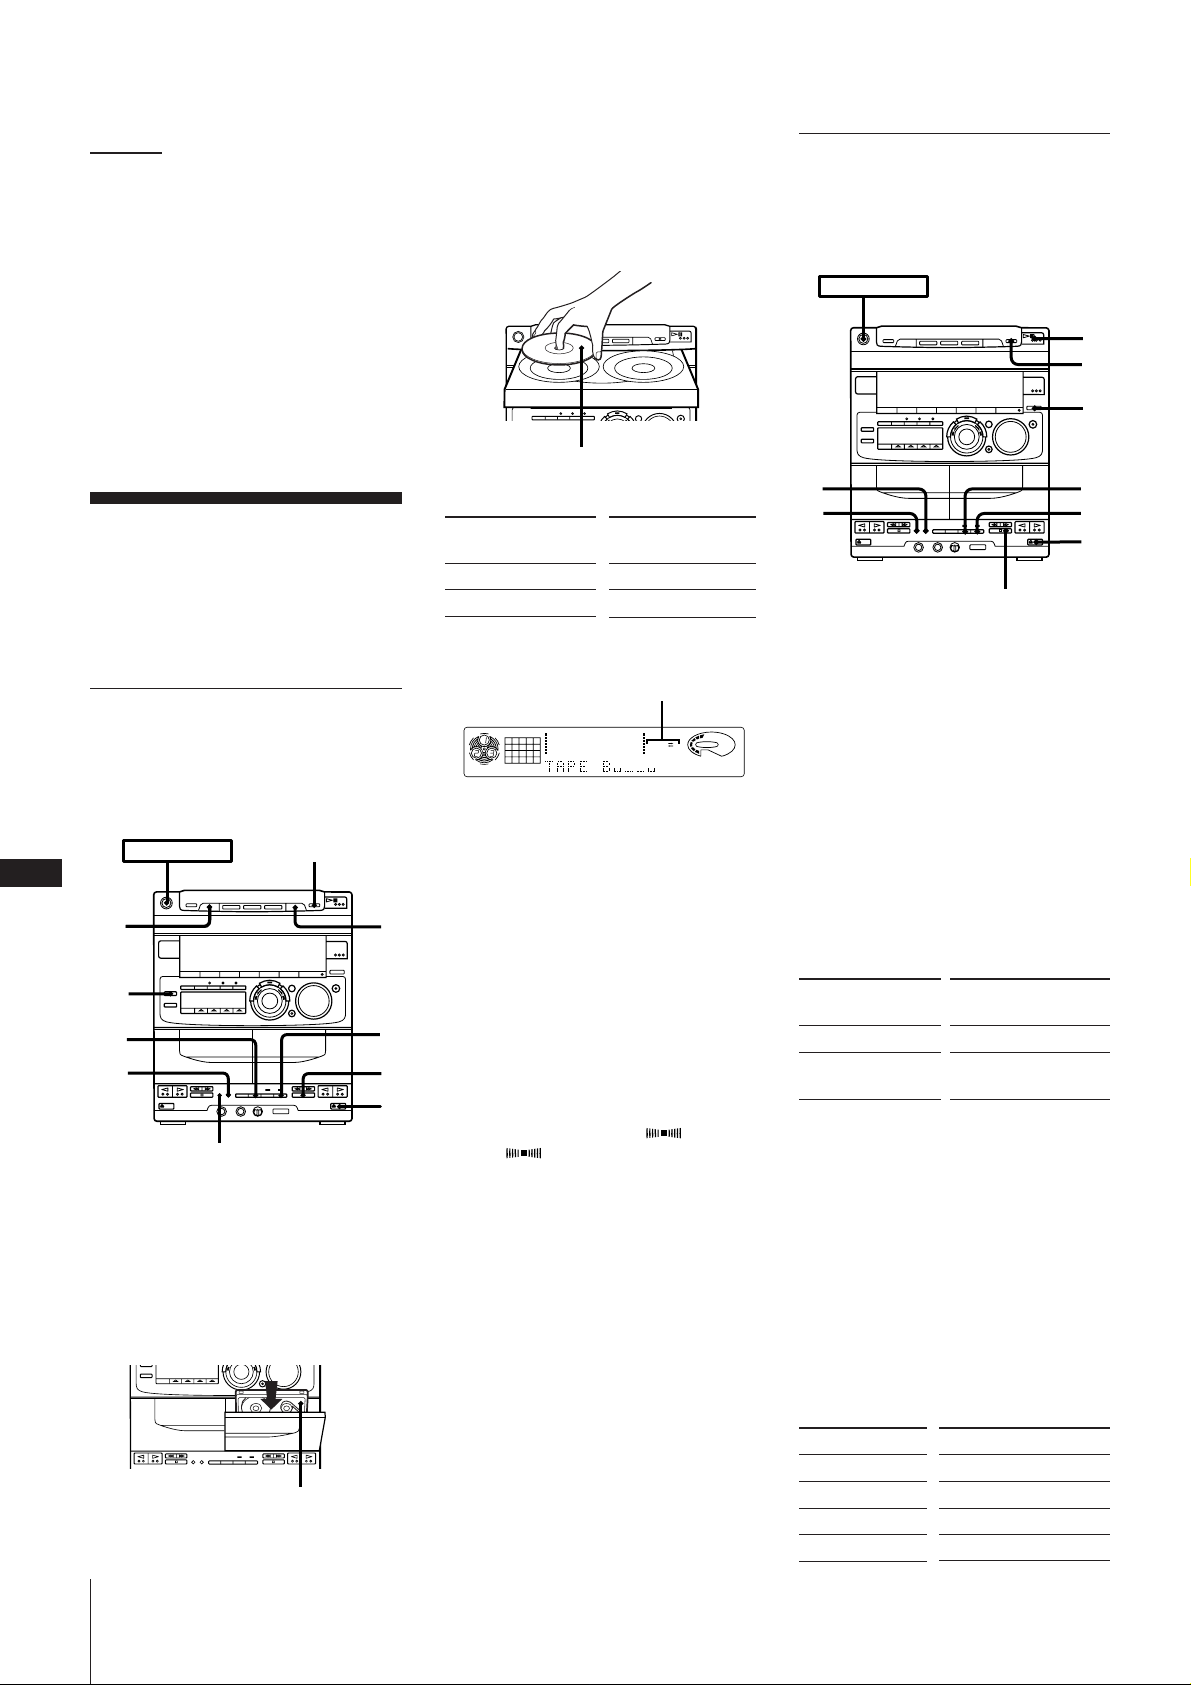
POWER m ON
p
3
6
7
1
4
5
2
8
m ±µ§W
ʃ©Ò µ•\؇
ˆµ¤ q Æ…°A´ˆ§U ª ©Œ · °]©Œªª±±
æ §W™ DECK A ª · ©Œ DECK B
ª · °^°C
¶p™G•dÆy§§§w À¶ œ±a°A´K•i§£• ¶A´ˆ
ßO™ ¡‰ s¥N•i •œ±a©Ò µ°C¶p™G•dÆy§§•ºÀ
œ±a°A´K•u¨O•¥ }§Fæ˜æ ™ q °C
¶¤ ¡n øÔæ‹
¶b •ßO™¡n Æ…°A¶p™G´ˆ§U§F ª©Œ ·
°]©Œªª±±æ §W™ DECK A ª · ©Œ DECK B
ª · °^°A´KøÔæ‹•dÆy¶”¶¤ }©l©Ò œ±a°C
±q CD°] pÆg ¤ –°^ø˝ µ
•i±q CD ø˝®Ï œ±a§W°C•i•Œ TYPE I°]º–
«°^©Œ TYPE II °]CrO 2°^ œ±a°C¶˝–ßO•Œ
TYPE IV°]™˜ƒ›°^ œ±aø˝ µ°C
n•ßO™ ¡n Æ…°A´K ±±ºø˝ µ°C
¶¤ ¶a±q CD ø˝ µ
®œ•Œ CD SYNCHRO°]CD ¶P®B°^°A´K•i
® t¶a±q CD ø˝®Ï œ±a°C
–•Œ•D昧W¡‰sß@¶æfiß@°C
POWER m ON
C
20
DISC
SKIP
DSP
5
3
4
1 ´ˆ§U § EJECT ¶”¶b•dÆy B §§À§@™ œ
±a°A ˝ nø˝ µ™§@ ±¥¬•~°C
£´D¶bø˝ µ´e±zßÔ‹§F©Ò µ§Ë¶V°Aß_´hø˝
µ £±N±qœ±a•ø ±}©l°C
• Tª{•d±a§W™ §p¡l§¥´O´˘ßæ„•º QßÈ
£°C
ø˝ µ±¥¬•~
ƒ4 °Gœ±a ¤æ˜
2 ´ˆ§U § OPEN/CLOSE ® À©Ò§@±i CD°CµM
´·¶A´ˆ§@¶ § OPEN/CLOSE •H ˆ§W¤ –
¶´ L°C
¶p™G À¶ nø˝ CD ™ ¤ –¶´L™ ¡‰§£¬I´G
Ò¶‚°AßY –§œ¥_´ˆ§U DISC SKIP ®œØ‡¬I´G
Ò¶‚°C
Kº–± ±¥¬§W
§‚ ±q CD ø˝ µ
•i´ˆ ”¶¤§v fl w•h±q CD ø˝ µ°A®“¶p°A
±z•i•H•uø˝ flw™ ¶±§l©Œ±q œ±a§§~ i¶Êø˝
µ°C
3 øÔ括˘±©Œ ʱø˝µ°C
nø˝ µ
œ±a™§@±
¬˘ ±*
* ø˝ µ£±¶b À¬ ±™ • ›°C¨G§@©w –±qœ
±a™ •ø ± }©lø˝°C
CD
1
ALL DISC S
´ˆ§U DIRECTION •H
øÔæ‹
A
ß ©Œ RELAY
DIRECTION°]§Ë¶V°^´¸•‹øO
VOLUME
DOLBY NR
12563 250 500 1k 2k 4k 8k 16k(Hz)
OFF
1 ´ˆ§U § EJECT ® À§J§@™ •’œ±a©Û•dÆy
B §§ ˝ nø˝™ ±¥¬•~°C £´D¶bø˝ µ´eßÔ ‹
§F©Òµ§Ë¶V°Aß_´h°Aø˝ µ£±N±q œ±a™•ø
± }©l°C
• Tª{•d±a§W™ §p¡l¨O´O´˘ßæ„•º QßÈ
£°C
2 ´ˆ§U § OPEN/CLOSE ® À§W§@±i CD°CµM
´·¶A´ˆ§@¶ § OPEN/CLOSE •H ˆ ¨ CD
4 n¥Óª¥ßC q• ™¿W v´H ™ºRºRæ ¡nÆ…°A
p
–´ˆ§U DOLBY NR ®œ°ßDOLBY NR B°®•X
{©Û „•‹æ°C
5 ´ˆ§U CD SYNCHRO°]CD ¶P®B°^°C
2
•dÆy B ßYßeø˝ µ •Œ™¨ A°C
¶´ L°C¶p™G À¶ nø˝ µ CD ™ ¤–¶´ L™
¡‰ s§£¬I´GÒ¶‚°AßY –§œ¥_´ˆ§U DISC
SKIP ®œØ‡¬I´G Ò¶‚°C
3 ´ˆ§U FUNCTION •HøÔæ‹ CD ¤æ˜°C
4 øÔ括˘ ±©ŒÊ±ø˝µ°C
6 ´ˆ§U P PAUSE •Hƒ¿©Òø˝ µº» ±°C
6
p
1
}©lø˝ µ°C
§j¨˘10¨Ì´·°ACD ßY }©l©Ò µ°C
n±§Óø˝µÆ…
–´ˆ§U•dÆy§W™ °A©Œ CD ¤æ˜§W™ p °C
n•[§J¿Ù¬¡nƃ™GÆ…
§œ¥_´ˆ§U DSP ¶‹°ßSUR 1 °®©Œ
°ßSUR 2 °®•X {©Û „•‹æ°C
n }©lø˝µ¶”§£ m10¨Ì™•’Æ…
•˝¶b•dÆy B ©Ò µ©Œø˝µ®‚§T¨Ì°AµM´·´ˆ
§U CD SYNCHRO°]CD ¶P®B°^°CCD ßY¶b Ë}
©l œ±aø˝µ´·ßY }©l©Ò µ°C
¶˝¶p™G¶bø˝ µ´e´ˆ§U§F•dÆy B ™ § ´K§£
؇_§Wz•\؇ß@•Œ°C
nø˝
œ±a™§@±
¬˘ ±*
* ø˝ µ£ ±¶bÀ¬ ±™ • ›°C¨G§@©w –•ø±
}©lø˝°C
´ˆ§U DIRECTION •HøÔ
æ‹
A
ß ©Œ RELAY°]±µ
§O°^
5 n¥Óª¥ßCq• ™¿W v´H ™ºRºR¡nÆ…°A–
´ˆ§U DOLBY NR ®œ°ßDOLBY NR B°®•X {
©Û„•‹æ §W°C
6 ´ˆ§U r REC°C
•dÆy B ßYßeø˝ µ •Œ™¨ A°C
7 ´ˆ§U P PAUSE •Hƒ¿©Òø˝ µº» ±°C
ßY }©lø˝µ°C
8 ´ˆ§U CD ¤æ˜§W™ · °C
CD°] pÆg¤ –°^ßY}©l©Ò µ°C
n
±§Óø˝µ
º» ±ø˝µ
±§Ó CD ©Ò µ
º» ± CD ©Ò µ
–´ˆ§U
•dÆy§W™ p
P PAUSE°]º» ±°^
CD ¤æ˜§W™ p
CD ¤æ˜§W™ ·
Page 95
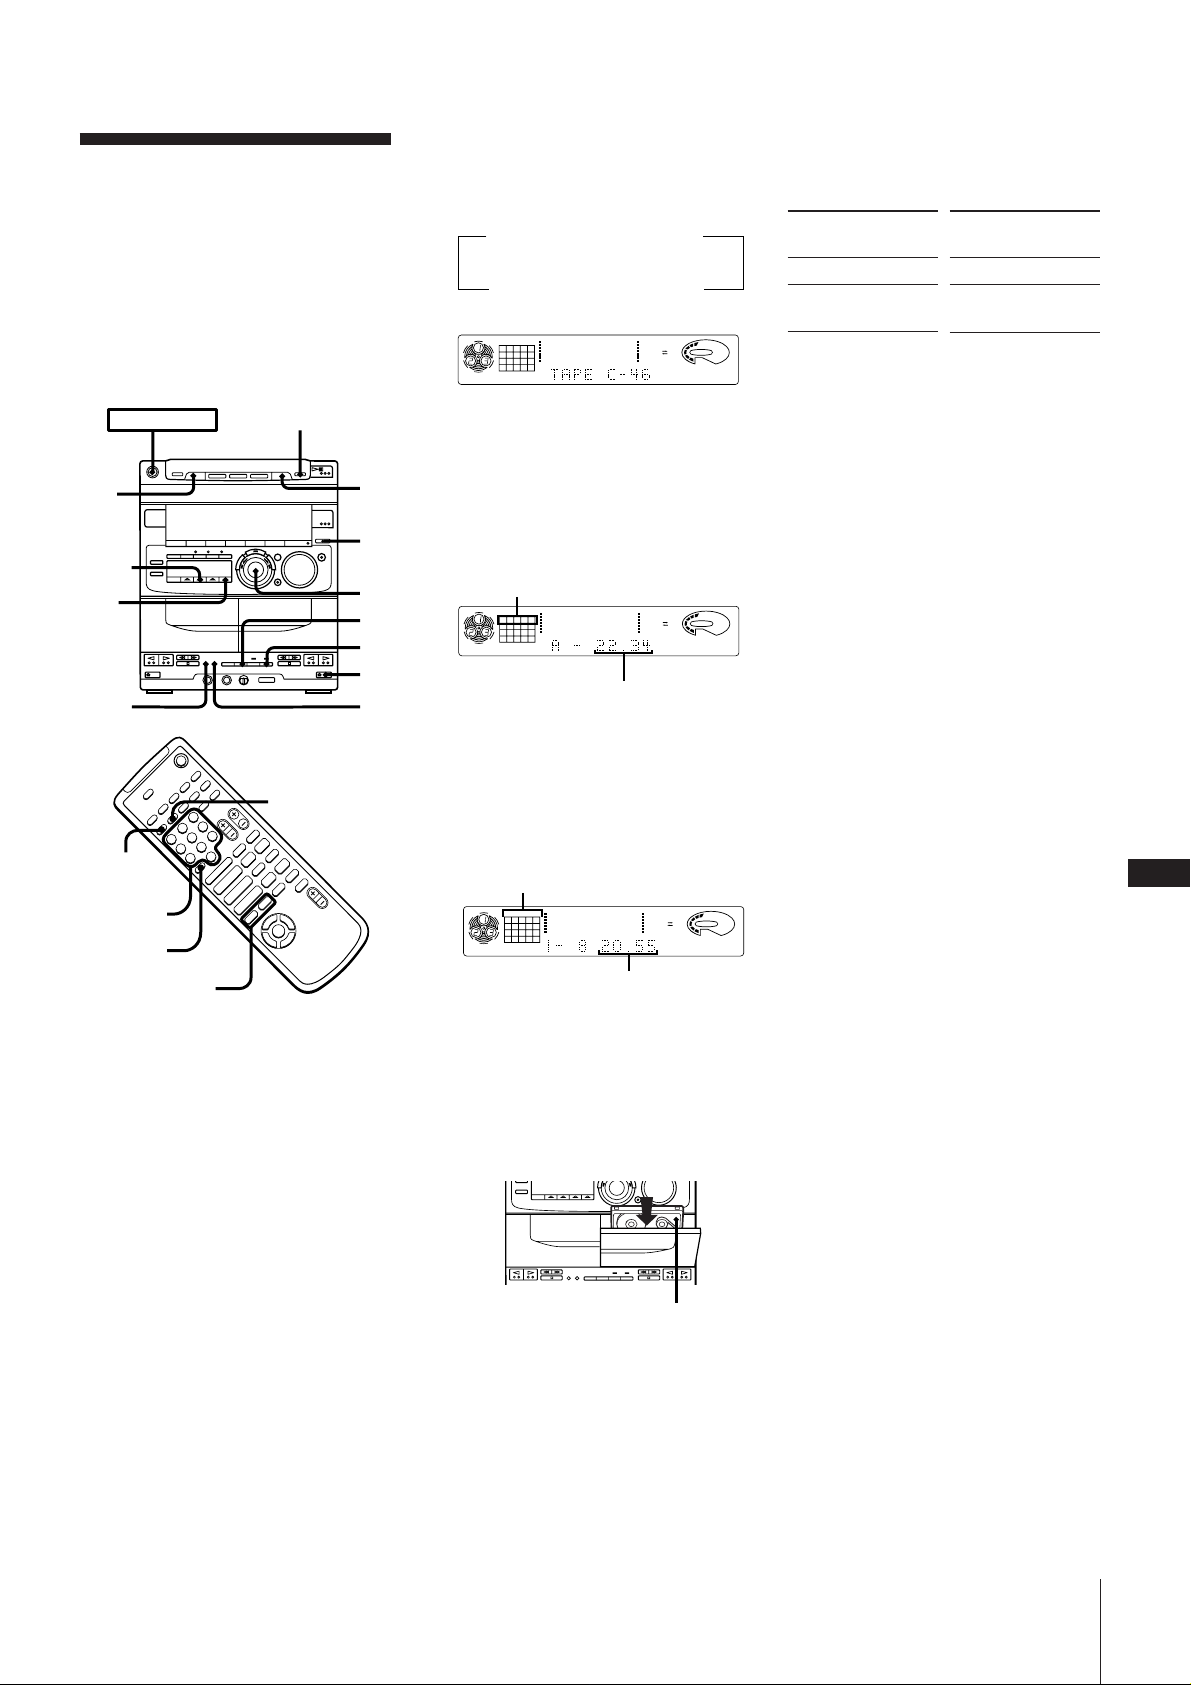
±q CD ø˝ µ°G´¸©w œ±a™¯
´ °]Æ… ° søË°^
•iÆ⁄æ⁄ œ±a™™¯´ sµ{ß«°CßY CD ¤æ˜
•is§@µ{ß«•HæA¶X§@©w™ œ±a™¯´°C®“¶p±z
•Œ§@ ”40§¿ƒ¡™¯™ œ±a•hø˝§@±i46§¿ƒ¡™ CD
Æ…°ACD ¤æ˜ßY؇¶¤ øÔ•X¶±§l®œ¡`¶@Æ… °
¶b40§¿ƒ¡•H§ ® …•i؇ø˝ °40§¿ƒ¡™ œ±a°C
¤æ˜§£Ø‡sµ{ WL20¶± ™ ¶±§l°C–•Œ•Dæ˜
©Œªª±±æ§W™¡‰sß@¶æfiß@°C
4 ±¤¬‡ JOG ´ L°]©Œ´ˆ§Uªª±±æ ™ PREV
=©Œ NEXT + °^•HøÔæ‹ ¶X œ±a™¯
´ °]§¿ƒ¡°^™ ´¸•‹°C
8 øÔ括˘±©Œ ʱø˝µ°C
ø˝µ £±§Ó¶bÀ¬ ±™ • ›°C¨G§@©w –±q
œ±a•ø ± }©lø˝°C
´¸•‹±Nß@¶p§U ‹§°G
nN
HALF
C-90
(23:00)
C-90
nN
(45:00)
CD
12345
678
DISC PROGRAM
C-74
(37:00)
12563 250 500 1k 2k 4k 8k 16k(Hz)
C-54
(27:00)
C-60
(30:00)
DOLBY NR
OFF
VOLUME
REC
nø˝
œ±a™§@±
¬˘ ±*
* ø˝ µ£±¶b À¬ ±™ • ›°C¨G§@©w–•ø ±
}©lø˝°C
´ˆ§U DIRECTION •H
øÔæ‹
A
ß ©Œ RELAY°]±µ
§O°^
POWER m ON
DISC
SKIP
PLAY
MODE
3,
5,
6
DOLBY
NR
EDIT
Numeric
buttons
º ¶r¡‰
> 10
=/+
p
¶p™Gn CD ¤æ˜§G§¿§@ CD ™ ¡`©ÒµÆ…
°°A•iøÔæ‹°ßHALF°®°C¶˝ Ìø˝§@±iæ÷¶
9 ´ˆ§U CD SYNCHRO°C
•dÆy B ßYßeø˝ µ •Œ™¨ A°C
20¶±•H§W™ CD Æ…°A´K§£Ø‡øÔ°ßHALF°®
2
1
4
9
10
§F°C
5 ´ˆ§U EDIT°C
CD ¤æ˜Ø‡¶¤ øÔ©wø˝¶b A ±™ ¶±§l°C
nø˝¶b A ±§W™¶±§l
CD
123 5
DISC PROGRAM
12563 250 500 1k 2k 4k 8k 16k(Hz)
DOLBY NR
VOLUME
OFF
10 ´ˆ§U P PAUSE •Hƒ¿©Òø˝ µº» ±°C
}©lø˝ µ°C
§j¨˘10¨Ì´·°ACD ßY }©l©Ò µ°C
n±§Óø˝µÆ…
–´ˆ§U•dÆy©Œ CD ¤æ˜§W™ p °C
n—£Æ…°søËÆ…
–´ˆ§U CD ¤æ˜™ p °A¶A´ˆ§U PLAY
MODE°C
7
8
A ±™¡`©Ò µÆ…°
6 ÌQ nø˝¶b¬˘±Æ…°A –¶A´ˆ§@¶ EDIT°C
+
–
CHECK
+
p
–
)0
P
pP
Æ»
)0+=
Æ»
Æ
4
$
CD ¤æ˜±NøÔ©w nø˝¶b B ±§W™¶±§l°C
Ì•u nø˝¶b A ±Æ…°A –´ˆ§U CD ¤æ˜§W™
p •H ±§Ó´¸•‹™ { {°C
nø˝¶b A ±©M
B ±™ ¶±§l
CD
12345
678
DISC PROGRAM
12563 250 500 1k 2k 4k 8k 16k(Hz)
DOLBY NR
OFF
B ±™¡`©Ò µÆ…°
VOLUME
n¿À¨d ß«Æ…
–§œ¥_´ˆ§Uªª±±æ§W™ CHECK°C®C¶ ´ˆ
§U CHECK°A§U§@ sµ{¶±§l™ XßY•X {©Û„
•‹æ °C
nw•˝øÔæ‹©“ n¶±§lÆ…
•i¶b sµ{´e•˝øÔæ‹ n¿u•˝ø˝ µ™ ¶±§l
°] öh20¶±°^°C— ”°ß´ˆ ”©“n ß«©Ò¶±§l
°]µ{ß«©Ò µ°^°®°C
n }ø˝µ¶”§£ n10¨Ì™ •’Æ…
•˝¶b•dÆy B ©Ò µ©Œø˝µ®‚§T¨Ì°AµM´·´ˆ
§U CD SYNCHRO°]CD ¶P®B°^°CCD ßY¶b Ë}
©l œ±aø˝µ´·ßY }©l©Ò µ°C
¶˝¶p™G¶bø˝ µ´e´ˆ§U§F•dÆy B ™ § ´K§£
؇_§Wz•\؇™ß@•Œ°C
C
21
1 §œ¥_´ˆ§U FUNCTION ¶‹°ßCD°®•X {©Û „
•‹æ °C
2 ´ˆ§U § OPEN/CLOSE ® À©Ò§@±i CD°CµM
´·¶A´ˆ§@¶ § OPEN/CLOSE •Hˆ¨¤–
¶´ L°C
¶p™G À¶ nø˝ CD ™¶´ L™¡‰ s®S¬I´GÒ
¶‚°AßY –§œ¥_´ˆ§U DISC SKIP ®œ¬I´GÒ
¶‚°C
3 ´ˆ®‚¶ EDIT°] søË°^°C
°ßTIME EDIT°®ßY•X {©Û „•‹æ°AµM
´·°A°ßSELECT°®©M°ßTIME°®•Ê§¨•X {„
•‹°C
7 ´ˆ§U § EJECT ® ¶b•dÆy B §W À§J§@™•’
œ±a°A ˝nø˝ µ ±¥¬•~°C
£´D±z¶bø˝ µ´eßÔ ‹§F©Ò µ§Ë¶V°Aß_´h°A
ø˝ µ£±N±q œ±a™ •ø± }©lø˝°C
Tª{•d±a§W§p¡l¨Oß_´O´˘ß æ„•ºQßÈ
£°C
ø˝ µ±¥¬•~
nøE¨°°]•¥}°^ߢ§Ò¥Óæ Æ…
¶p™GQn¥Óª¥ßCq• ™¿W´H™ºRºRæ
¡n°AßY –¶b®B J8§ß´·´ˆ§U DOLBY NR°]ߢ
§Ò¥Óæ °^®œ°ßDOLBY NR B •X{©Û „•‹æ°C
ƒ4 °Gœ±a ¤æ˜
Page 96
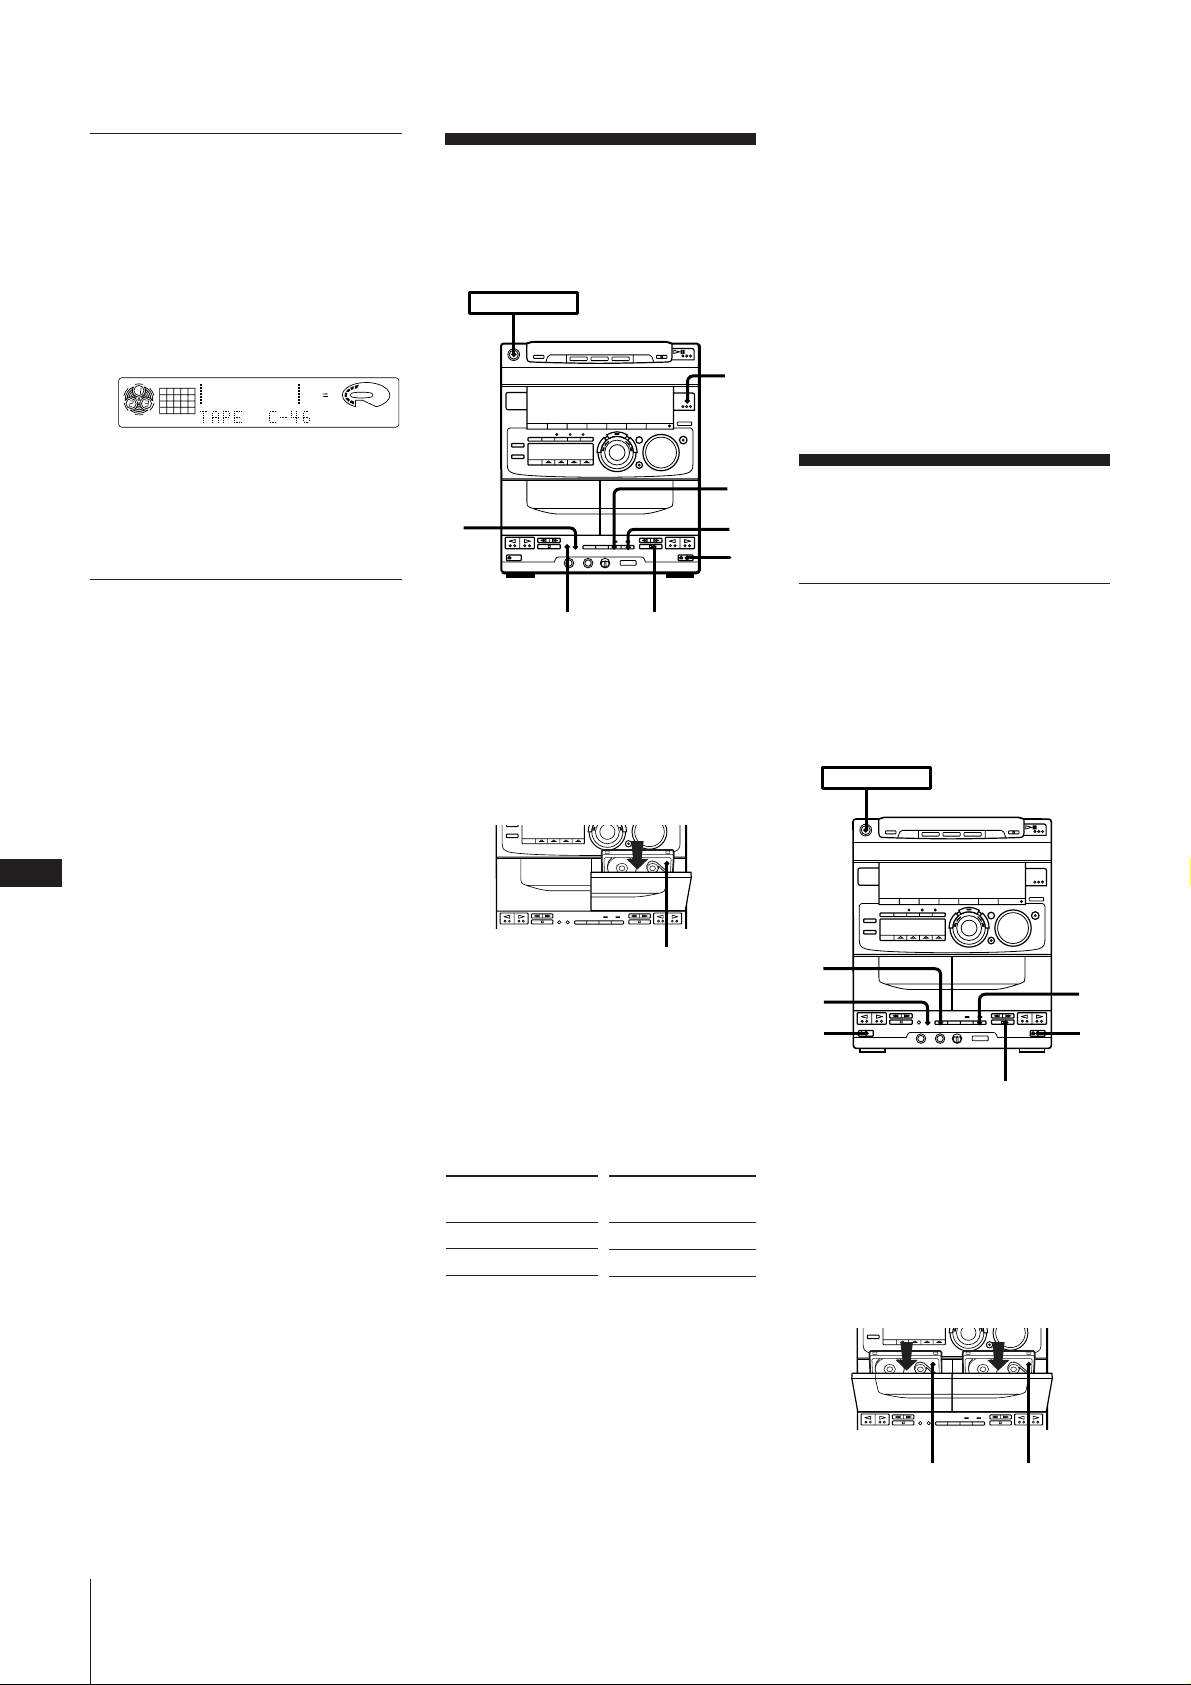
±q CD ø˝ µ°G¶¤ øÔæ‹ œ±a™¯´
POWER m ON
1 1
4
2
3
p
°]œ±aøÔæ‹søË°^
®B J3§§Ì À¶n CD ´·°AßY´ˆ§U EDIT
®œ°ßTAPE SELECT°®•X{©Û „•‹æ °C
¤æ˜ßY¶¤ øÔ§¿¶±§l§¿ßOø˝¶b A ±©M B
±® ®œ®‚±©“ sµ{ß«§j P¨¤µ•™¯´ °C¶±§l
ß«±N´O´˘ Ï®”™ ß«°C sµ{´·°A±N¶b„•‹æ
§W„•‹ ÃæA©y™ œ±a™¯´ °C
CD
12345
678
DISC PROGRAM
12563 250 500 1k 2k 4k 8k 16k(Hz)
DOLBY NR
VOLUME
REC
±q¶¨ µæ˜ø˝ µ
•i±N®”¶¤ ’ø”æ™ ºsº `•ÿø˝¶b œ±a
§W°C –®œ•ŒTYPE I°]º– «°^©Œ TYPE II (CrO 2)
œ±a°C
POWER m ON
2
n±§Óø˝µÆ…
–´ˆ§U•dÆy§W™ p °C
i¶Ê MW (AM) ø˝ µÆ…¨ §F¥Ó§pæ ¡n
ø˝ µ§§¶p™G •®ÏºS¡n°MßY – ´ s¶w±
AM ¿Ùߌ§— u•H߉•X ¨ µ™ ¶Ï m°C
nøE¨°°]•¥ }°^ߢ§Ò¥Óæ Æ…
¶p™G n¥Óª¥ßC q• ™¿W v´H Æ…µo•Õ™
ºRºRæ ¡nÆ…°MßY –¶b®B J4´·´ˆ§U DOLBY
NR°]ߢ§Ò¥Óæ °^®œ°ßDOLBY NR B°®•X {©Û
„•‹æ °C
µ˘
¶p™G±z§ww•˝øÔ拧F©“ n¶±§lÆ…°A´K§£
؇®œ•Œœ±aøÔæ‹sø˧F°C
±q CD ø˝ µ°G´¸©w¶±§l ß«°]µ{
ß«søË°^
sµ{ß«Æ…°M•i’æ„¡`ø˝ µÆ…°•HæA¶Xœ
±a™¯´ °C
1 ß@°ß´ˆß±Ê™ ß«©Ò¶±§l°]µ{ß«©Ò µ°^°®
™®B J1®Ï®BJ7°MµM´·´ˆ§Uªª±±æ§W™
P •H´K¶bA ±™• ›º» ±ø˝ µ°C
°ßP°®•X {„•‹¶”¡`©Ò µÆ…°´’¨
0.00°C
2 §œ¥_®BJ4®Ï7°M¨ B ± sµ{ß«°C
3 sß µ{ß«´·°Mi¶Ê°ß±q CD ø˝ µ°G´¸©w œ
C
22
±a™¯´°]Æ… °søË°^°®™ ®B J7®Ï10°C
µ˘
¶p™G¶±§l ô·™ °§¿ø˝¶b œ±a• ›™ œ
±a¿Y§W°MßY™Ì•‹ø˝ µ•i؇®§£ß •˛°C
4
DOLBY NR
1 ´ˆ§U § EJECT°M¶b•dÆy B À§@™ •’ œ±a
˝ nø˝µ ±¥¬•~°C
£´D±z¶bø˝ µ´eßÔ ‹§F©Ò µ§Ë¶V°Mß_´hø˝
µ £±N±qœ±a™ •ø± }©l™°C
– Tª{•d±a§W™§p¡l¨Oß_´O´˘ß æ„•ºQßÈ
£°C
2 ´ˆ§Uº ¶ TUNER/BAND ¶‹•X{©“ nø˝ µ
™ ¶¨µæ˜™i¨q°C
p
ø˝ µ ±¥¬´e
1
5
6
±q®‰•L œ±aø˝ µ°]´˛®©ø˝
µ°^
¶¤ ´˛®©®‰•L œ±a
•i•Œ ™ t´˛®©•\؇±Næ„ ”ø˝ µ±a¶¤ ¶a
ø˝®ÏßO™ œ±a§W°C•ª•\؇ •Œ•D昧W¡‰ sæfi
ß@°C –•Œ TYPE I°]º– «°^©Œ TYPE II (CrO 2)
œ±a i¶Ê´˛®©ø˝µ°C
ƒ4 °Gœ±a ¤æ˜
3 ’§J nø˝™ ºsº q•x°C°]‘–—”°ß•¶¨
µæ˜°®©Œ°ß©Òw¨˘ q•x°®°C°^
4 øÔ括˘±©Œ ʱø˝µ°C
nø˝ µ
œ±a™§@±
¬˘ ±*
* ø˝ µ£±§Ó¶b À¬ ±™ • ›°C¨G–§@©w±q
•ø ± }©lø˝°C
´ˆ§U DIRECTION •H
øÔæ‹
A
ß ©Œ RELAY
5 ´ˆ§U r REC°C
•d±a B ßYßeø˝ µ •Œ™¨ A°C
6 ´ˆ§U P PAUSE •Hƒ¿©Òø˝ µº» ±°C
}©lø˝ µ°C
1 ´ˆ§U § EJECT ¶@¶b•dÆy A À§Jø˝ µ±a ˝
n©Òµ™§@ ±¥¬•~°C
§S¶b•dÆy B §W À§@™•’ œ±a˝ nø˝µ ±
¥¬•~°C
£´D±z¶bø˝ µ´eßÔ ‹©Òµ§Ë¶V°Mß_´h°Mø˝
µ©M©Òµ £±N±qœ±a™ •ø ±}©l°C
– Tª{•d±a§W™§p¡l¨Oß_´O´˘ß æ„•ºQßÈ
£°C
©Òµ ±¥¬•~ ø˝ µ ±¥¬•~
Page 97
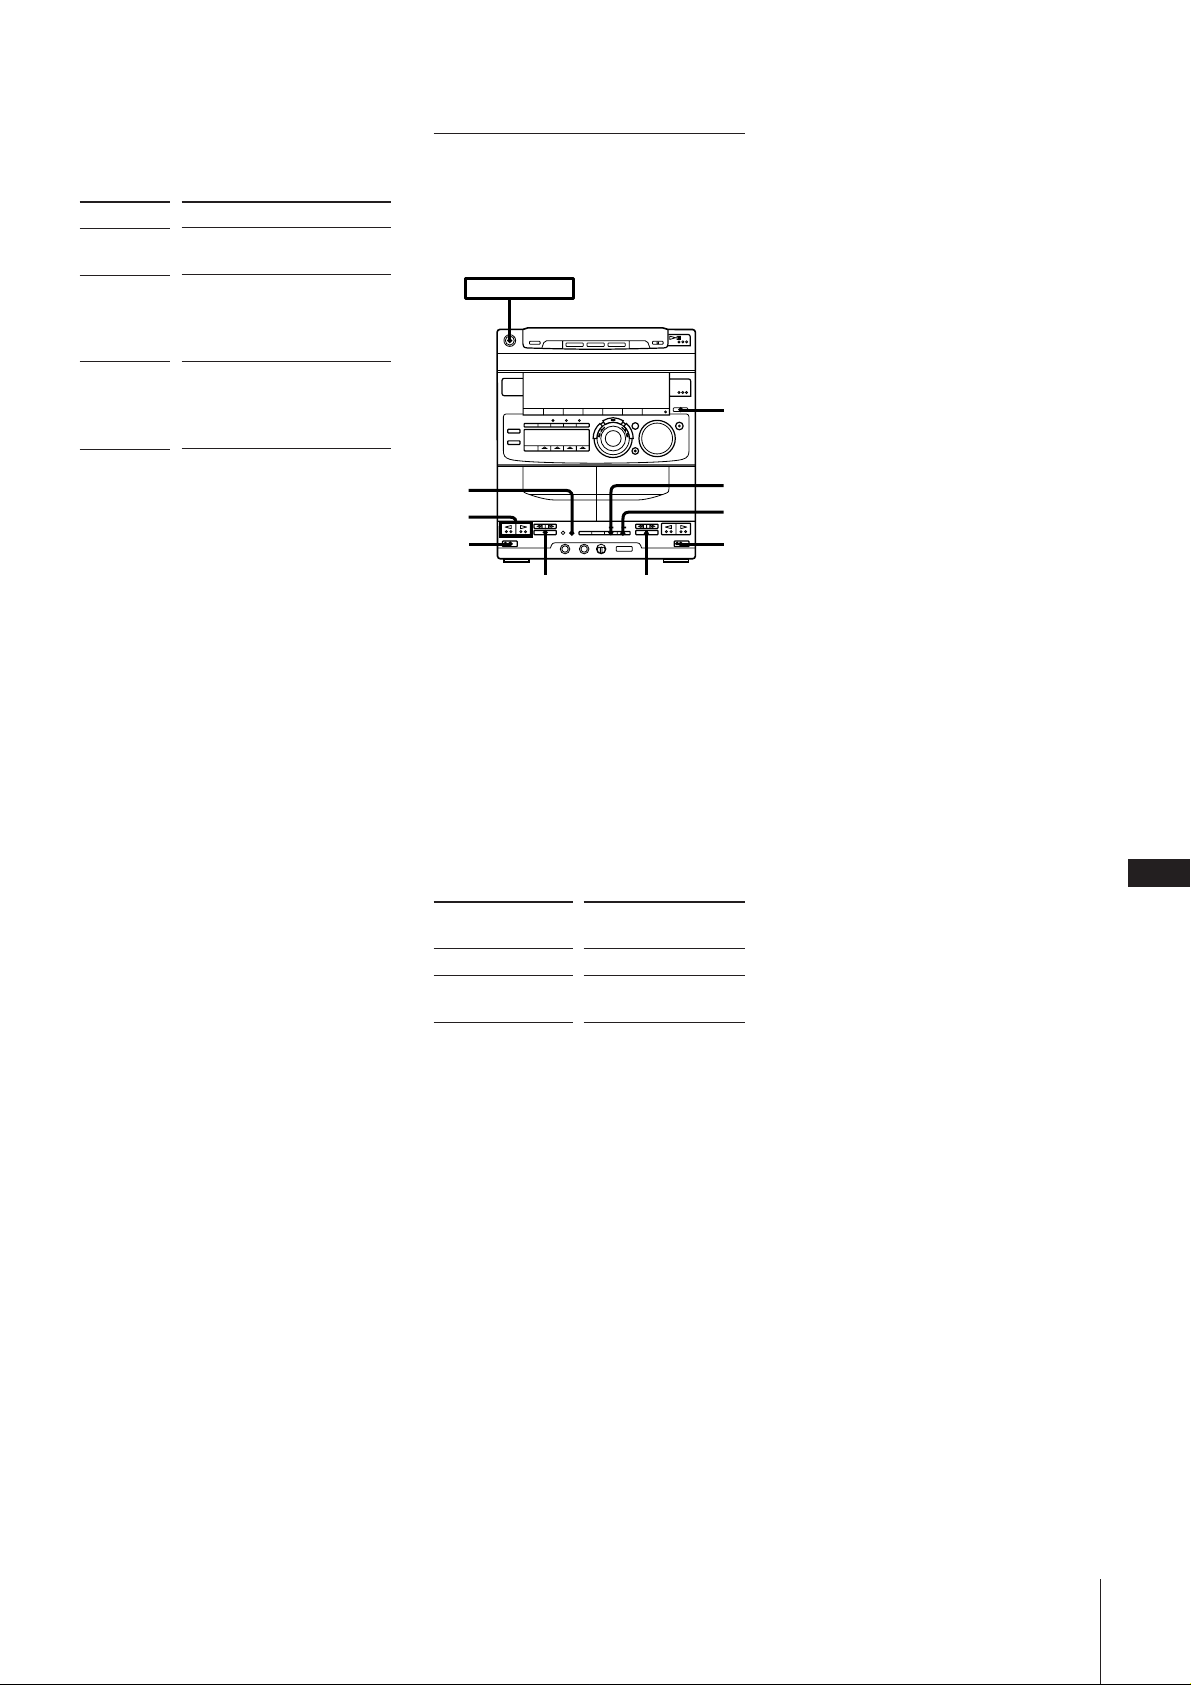
2 øÔæ‹ Q¶p¶Ûø˝œ±a°MµM´·´ˆ§U
DIRECTION°C
§‚ ´˛®©®‰•L œ±a
´¸•‹
A
ß
RELAY
æfiß@
´˛®©ø˝µ±N ±§Ó¶b§@±™•
›°C
̧@”•dÆy§W™ œ±a¬ ®Ï§F•ø
±™• ›Æ…°MµL •t§@•dÆy§W
™ œ±a¬®Ï§ ªÚ¶Ïm°M £±N•fl
ßYßÔ‹¨ À¬ °C
§@”•dÆy§W™ œ±a¬®Ï•ø ±™
• ›Æ…°M±N ±§Ó¶‹•t§@•dÆy™
œ±a§]¬ ®Ï• ›°MµM´·§~§@_
}©l À¬ °C
3 ´ˆ§U HIGH SPEED DUBBING°] ™ t´˛®©
ø˝ µ°^°C
•dÆy B ßYßeø˝ µ •Œ™¨ A°C
4 ´ˆ§U P PAUSE°C
œ±aßY}©l´˛®©ø˝ µ°C¶p™G±N
DIRECTION º“¶° ]©w©Û°] ß°^©Œ
RELAY°Mø˝ µ£±N ±¶bÀ¬ ±™ • ›°C
n±§Ó´˛®©ø˝µÆ…
–´ˆ§U•dÆy B ™ p°C
™ t´˛®©ø˝µÆ…°M§£• ´ˆ§U DOLBY NR
•dÆy B ™ œ±a |¶¤ ¶a•Œ©M•dÆy A ™œ
±a¨¤¶P™¨ Ai¶Êø˝ µ°C
•un´˛®©œ±a§§™ §@ °§¿§ÆeÆ…°M–•Œ
±` t§‚ ¶a i¶Ê´˛®©°C –•Œ TYPE I°]º– «°^
©Œ TYPE II (CrO2) œ±aø˝µ°C
POWER m ON
3
6
1
p
1 ´ˆ§U § EJECT ® ¶b•dÆy A À§Jø˝ µ±a ˝
n©Òµ™§@ ±¥¬•~°C
§S¶b•dÆy B À§@™•’ œ±a˝ nø˝µ ±¥¬
•~°C £´D±z¶bø˝ µ´eßÔ‹§F©Ò µ§Ë¶V°Cß_
´h°Mø˝µ©M©Ò µ£±N±q œ±a™•ø ±}©l°C
– Tª{•d±a§W™§p¡l¨Oß_´O´˘ß æ„•ºQßÈ
£°C
2 §œ¥_´ˆ§U FUNCTION ¶‹°ßTAPE°®•X {©Û
„•‹æ °C
p
2
4
5
1
3 øÔ括˘±©Œ ʱø˝µ°C
nø˝
œ±a™§@±
¬˘ ±*
* ø˝ µ£±N ±§Ó¶b À¬ ±™ • ›°C¨G –£±q
œ±a™ •ø± }©lø˝°C
´ˆ§U DIRECTION •HøÔ
æ‹
A
ß ©Œ RELAY°]±µ
§O°^
4 ´ˆ§U r REC
•dÆy B ßYßeø˝ •Œ™¨ A°C
5 ´ˆ§U P PAUSE •Hƒ¿©Òø˝ µº»±°C
}©lø˝ µ°C
6 ´ˆ§U•dÆy A §W™ · ©Œ ª •H }©l©Ò
µ°C
n±§Óø˝µÆ…
–´ˆ§U•dÆy A ©M B ™ p °C
µ˘
• ¶p™G´˛®©•ŒÏø˝ µ±a¨O•Œß˘§Ò¥Óæ B ø˝
™°M´˛®©™ œ±a§] |¶¤ ¶a•Œß˘§Ò¥Óæ B
ƃ™Gø˝µ°C
• ¶p™GQ•Œß˘§Ò¥Óæ B ƃ™G±N§@”®•º•Œ
ߢ§Ò¥Óæ B ƃ™G™ Ïø˝ µ±a´˛®©®Ï•t§@
œ±aÆ…°M –¶bø˝µ´e´ˆ§U DOLBY NR
®œ°ßDOLBY NR B°®•X {©Û„•‹æ °C
C
23
ƒ4 °Gœ±a ¤æ˜
Page 98
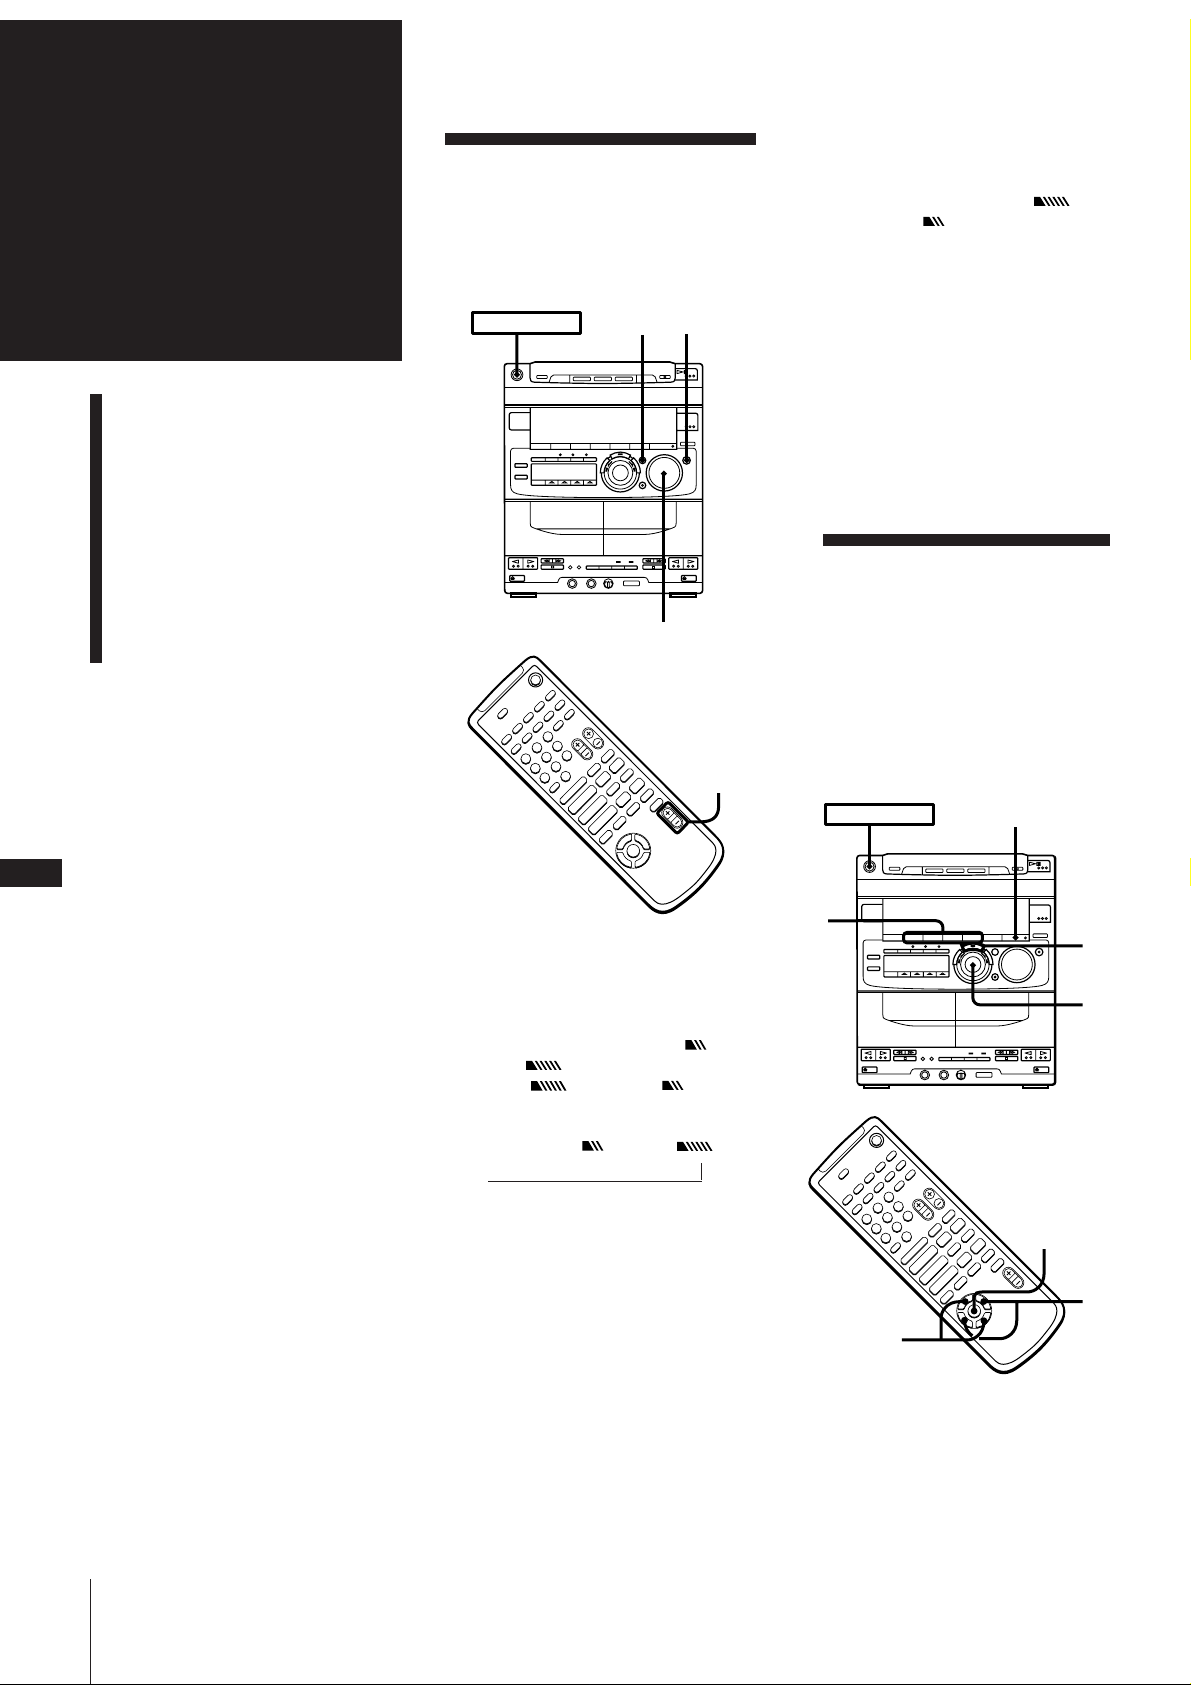
ƒ5 °G
–
+
–
p
+
P
)0
pP
)0+=
Æ
Æ»
Æ»
4
$
POWER m ON
EFFECT ON/OFF
1
3
2
1
2
MUSIC MENU
ON/OFF
¡n µ ’æ„
’æ„¡n µ
¨ §Fµo¥ß•ª•flÈ¡n µ T®tŒ™ •\؇ ˝±z
¿Ú±o°N™ µT®…®¸°M–ß@¶p§U™ µ T’
æ„°C– —”§U¶C™˛•[µ T’æ„™ ¶U`ª°©˙°C
POWER m ON
DBFB GROOVE
µ˘
°E — £ GROOVE ®§£—£ DBFB q•©Œ
ß°ø¶±u°Cn—£ DBFB q•Æ…°M –
§œ¥_´ˆ§U DBFB ¶‹°ßDBFB °®
©Œ°ßDBFB °®Æ¯•¢©Û „•‹æ°M ’æ„
ß°øæ•H¿Ú©“߱ʙƃ™G°C
°E Ì•ªæ˜±µ•Œ¶ øÔ¡•Û™ WßC µ¥¡næ
°]Sony SA-W10G µ•°^Æ…°M¶pøE¨°°]•¥
}°^DBFB ©Œ GROOVE •\؇°M¡n µ•i
؇ ‹•¢Øu°C
¶Æ…°M –ˆ±º DBFB ®æA Ì’æ„ WßC
µ¥ ¡næ ™¡n µ°C
C
24
’æ„¡n µ
øÔæ‹¡n¿W•[±j
’æ„¡n¿W•[±j
ß@§@ ”§H¡n¿W•[±j®˜©v°]”§H
®˜©v°^
¬‡¥´¥ ¡næ ™ ’¶®°]¡n µ ’
¶®°^
VOLUME
+
–
+
p
–
)0
P
pP
Æ»
)0+=
Æ»
Æ
4
$
n’愵qÆ…
±¤¬‡•D昙 VOLUME ©Œ´ˆ§Uªª±±æ ™
VOL°]+/–°^°C
n•Œ¶’昕ƅ
±N¶’æ˜ s±µ®Ï PHONES ¥°§’°C¶Æ…¥
¡næ ßY§£µo¡n°C
øÔæ‹¡n¿W•[±j
•ª•fl È¡n µ T®tŒæ÷¶ 20ÿ§£¶P™ w
’ƃ™G°]µº÷ µ•ÿÊ°^¨O•—§£¶P™¶h¿W
µ’…¿væ©M¿Ù¬¡nƃ™G]©wc¶®°C
•iÆ⁄æ⁄ µº÷™´¨¶°©M•Œ ~°M±z•u n´ˆ
§U§@”¡‰´K•i±q§§øÔæ‹Æƒ™GßQ•Œ°C•ißQ
•Œ”§H®˜©v•\؇°] —”°ßß@§@” ”§H•Œ
¡n¿W•[±j®˜©v°] ”§H®˜©v°^°®°^¶s§Jƒ›
©Û¶¤§w™ µTƃ™G°C
VOL+/–
ƒ5 °G¡n µ ’æ„
n•[±jßCµÆ…
–§œ¥_´ˆ§U DBFB *¶‹°ßDBFB °®
©Œ°ßDBFB °®•X{©Û „•‹æ °C
°ßDBFB °®§Ò°ßDBFB °®®„¶ ßÛ
§j™ßCµÆƒ™G°C
ˆ±º „•‹ n DBFB n DBFB
n
* DBFB = AßC µ§œıX°]Dynamic Bass
Feedback°^
¶p™G®œ•Œ±a¶h¿Wµ’… ¿v æ™ DBFB ®tŒ
ßC µ§”±j°M µº÷¡nµ |•¢Øu°C–§@ ‰•
µ¤ µº÷§@‰ CC¶a ’æ„ßCµ•H´K •µ¤ ’æ„
™Æƒ™G°C
n¶±j§O™ µTÆ…°] ¨A°^
´ˆ§U GROOVE °] ¨A°^
ß‚ µ q§¡®Ï±j§Oº“¶°°MDBFB ßY¶¤ ¶a ]
©w©Û•˛±j´ °Mß°ø¶± u ‹§¶”¬I´G
°ßGROOVE°®¡‰°C¶A´ˆ§@¶ GROOVE •H´Ï¥_
•H´e™ µ q°C
1 ´ˆ§U MENU °] µ•ÿ Ê°^¡‰§§™§@ ”
°]©Œªª±±æ §W™ MUSIC MENU 4/$°^
•HøÔæ‹ MENU°C
—”§U ™ œ™Ì°ßµº÷µ•ÿ Ê
шФж‹°®°C±qµ•яКшФж‹™ Г´·™Жƒ™G
•X {©Û„•‹æ °C
Page 99
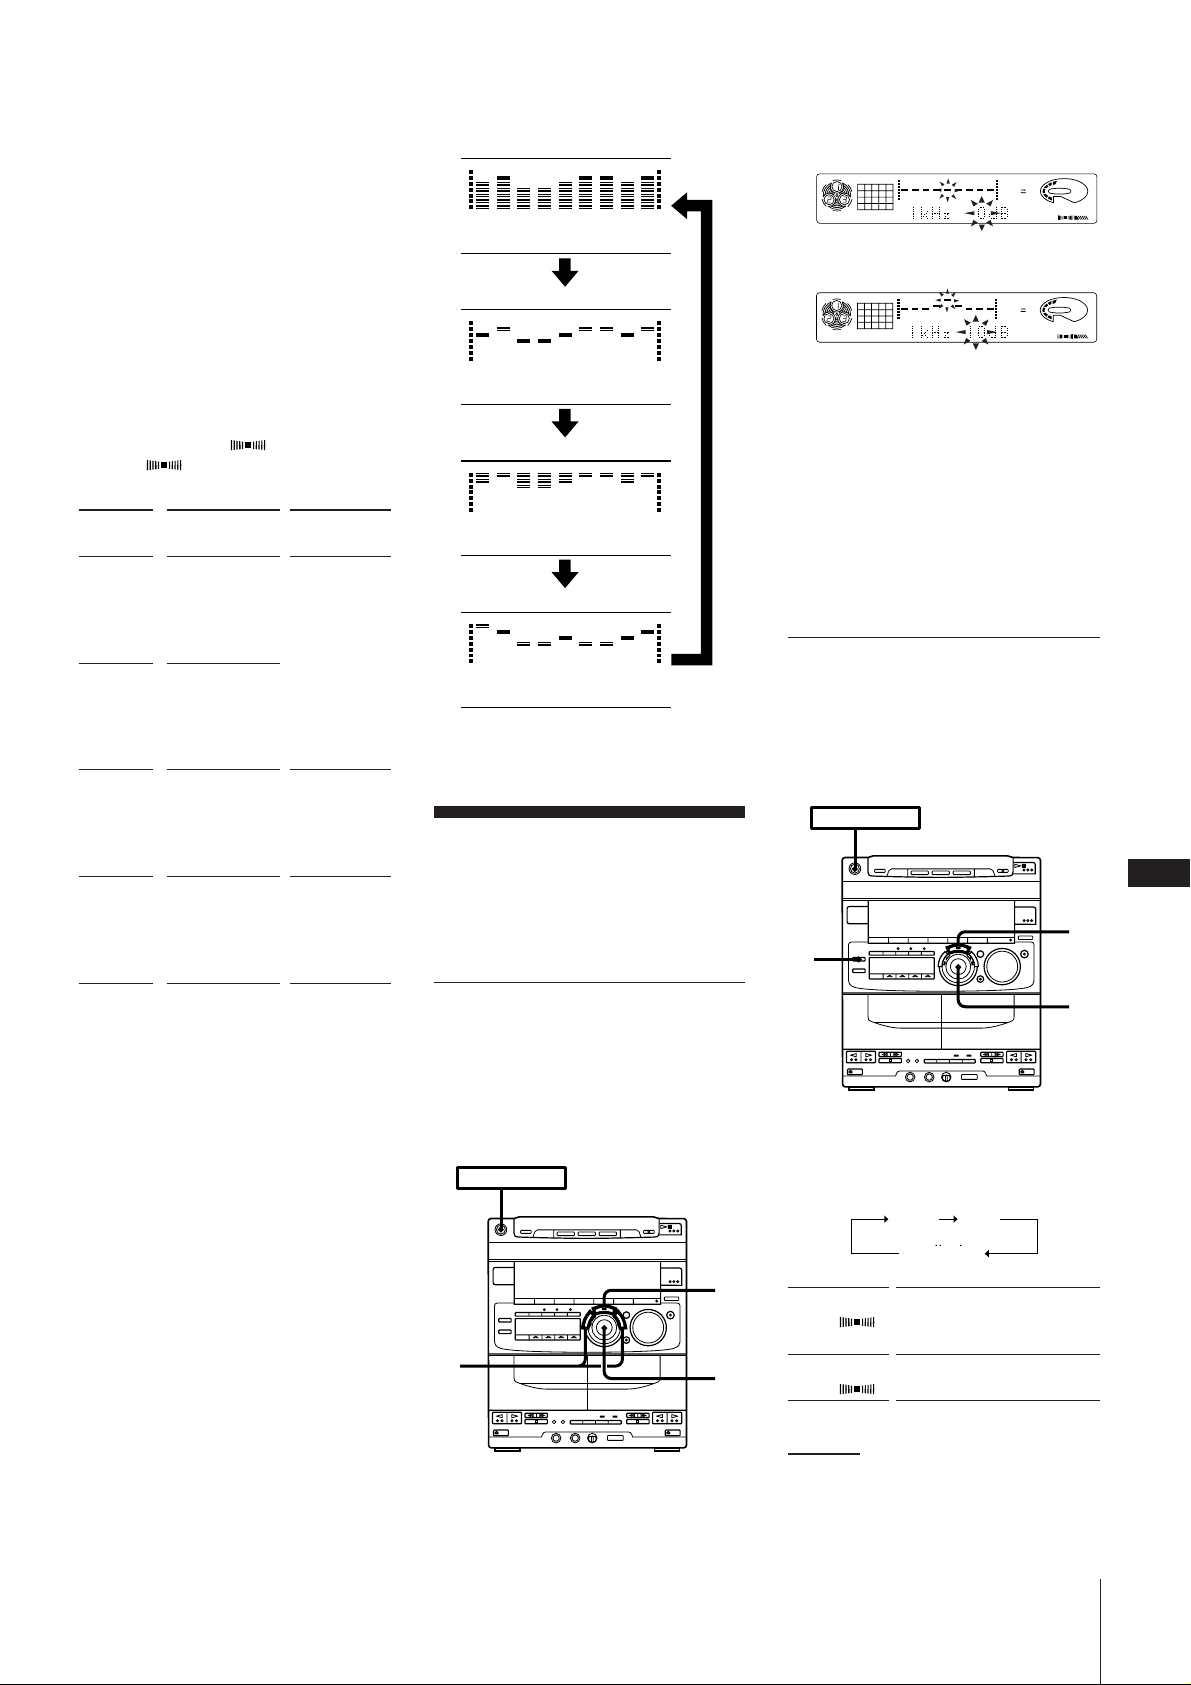
2 •Œ JOG ´ L°]©Œ§œ¥_´ˆ§Uªª±±æ§W™
12563 250 500 1k 2k 4k 8k 16k(Hz)
DOLBY NR
OFF
CD
1DISC
VOLUME
DBFB
SUR1
DOLBY NR
OFF
CD
1DISC
DBFB
SUR1
VOLUME
12563 250 500 1k 2k 4k 8k 16k(Hz)
MUSIC MENU “/”°^•HøÔæ‹nw’™Æƒ
™G°Cw ’™¶WŸßY•X {©Û„•‹æ°C
3 ´ˆ§U ENTER/NEXT°]øȧJ/®‰¶ °^°C
¶p™G¨O•Œªª±±æ °M´K§£ ´ˆ§U ENTER/
NEXT §F°C
n—£Æƒ™GÆ…
–§œ¥_´ˆ§U EFFECT ON/OFF °]©Œªª±±æ
§W™ MUSIC MENU ON/OFF°^®œ°ß EFFECT
OFF°®•X {©Û„•‹æ °C
µº÷ µ•ÿ ÊøÔæ‹
¶p™GøÔ拧F±a¶¿Ù¬¡nƃ™G™µTƃ™G
Æ…°MßY±N•X{°ßSUR 1 °®©Œ
°ßSUR 2 °® „•‹°C
MENU
°] µ
•ÿ Ê°^
MENU 1
ƃ™G
¡‰
ROCK
POPS
JAZZ
CLASSIC
DANCE
MENU 2
SALSA
REGGAE
BALLADE
OLDIES
SOUL
MENU 3
GAME
MOVIE
NIGHT
MORNING
PARTY
MENU 4
L.HALL
STADIUM
STUDIO
CHURCH
CLUB
nßÔ‹ß°ø æ „•‹Æ…
®C´ˆ¶Ì DISPLAY/DEMO ®‚§T¨Ì°Mß°ø æ
„•‹±NßÔ ‹¨§U¶C4 ÿ „•‹§ß§@°C
•Œ©Û
º– «µº÷¡n
¶¨ •±°™p
ØSÆ̶¨•±°™p
¿W –§¿™Rªˆ 1
12563 250 500 1k 2k 4k 8k 16k(Hz)
¿W–§¿™Rªˆ 2
12563 250 500 1k 2k 4k 8k 16k(Hz)
¿W–§¿™Rªˆ 3
12563 250 500 1k 2k 4k 8k 16k(Hz)
¶h¿Wµ’…¿v涱u
12563 250 500 1k 2k 4k 8k 16k(Hz)
’æ„¡n¿W•[±j
•i•Œ§U¶C®‚ ÿ•\؇ ’æ„¡n¿W•[±j°G
°E ¶h¿Wµ’…¿væ
°E ¿Ù¬¡nƃ™G
’æ„¡nµ°]¶h¿Wµ’…¿væ °^
•ißQ•Œ§…™©Œ ßC´¸©w™¿WvdÚ™q
• •h ’æ„¡nµ°C
æfiß@´e°M–•˝øÔ©w©“ nÚ•ª¡n™ ¡n¿W•[
±j°C
1 ´ˆ§U FREQUENCY+©Œ–øÔæ‹¿W±a
2 ±¤¬‡ JOG ´ L•H ’æ„q• °C
3 §œ¥_®BJ1©M2°C
4 ß ¶®Æ…°M –´ˆ§U ENTER/NEXT°]øȧJ/®‰
¶°^°C
µ˘
¶p™GøÔ§F®‰•Lµ•ÿ Ê¡n¿W•[±j
°]°ßEFFECT OFF°® £•~°^©“’™ ¡nµÆƒ™GßY
Ư•¢°CYQ´OØd©“’æ„¡nµÆƒ™G®—±N®”ßQ•Œ
Æ…°M´K ß‚•¶¶s§J ”§H®˜©v°C°]—”°ßß@§@
”§H¡n¿W•[±j®˜©v°] ”§H®˜©v°^°®°C°^
øE¨°°]•¥ }°^¡n ı°]¿Ù¬ ¡nƃ
™G°^
•i•H ’æ„¿Ù¬ ¡nƃ™G°CÆ⁄æ⁄±z´˘¶ ™ n
•Û´¨¶°°M•˝±q®‚ ÿ´¨¶°™©“ sµ{¿Ù¬ ¡nƃ™G
§§øÔ©w§@ÿ°C
POWER m ON
C
25
4
1,
2
3
1 §œ¥_´ˆ§U DSP ¶‹©“ n™¿Ù¬ ¡nƃ™G•X{
POWER m ON
4
1
2
©Û „•‹æ °C
HALL
(SUR 1 )
LIVE
(SUR 2 )
±µ§U m
HALL
LIVE
no display
µL „•‹
±z±N•i •®Ï±a¶ ¶b§j´¨ µº÷
Uã•Õ™•ÊV¶^Tƃ™G™
¶¤µM¡n°C
•iP®Ï¶pm® ©Û§@”Í™pµ
º÷|Ùƙ^°C
ƒ5 °G¡n µ ’æ„
Page 100
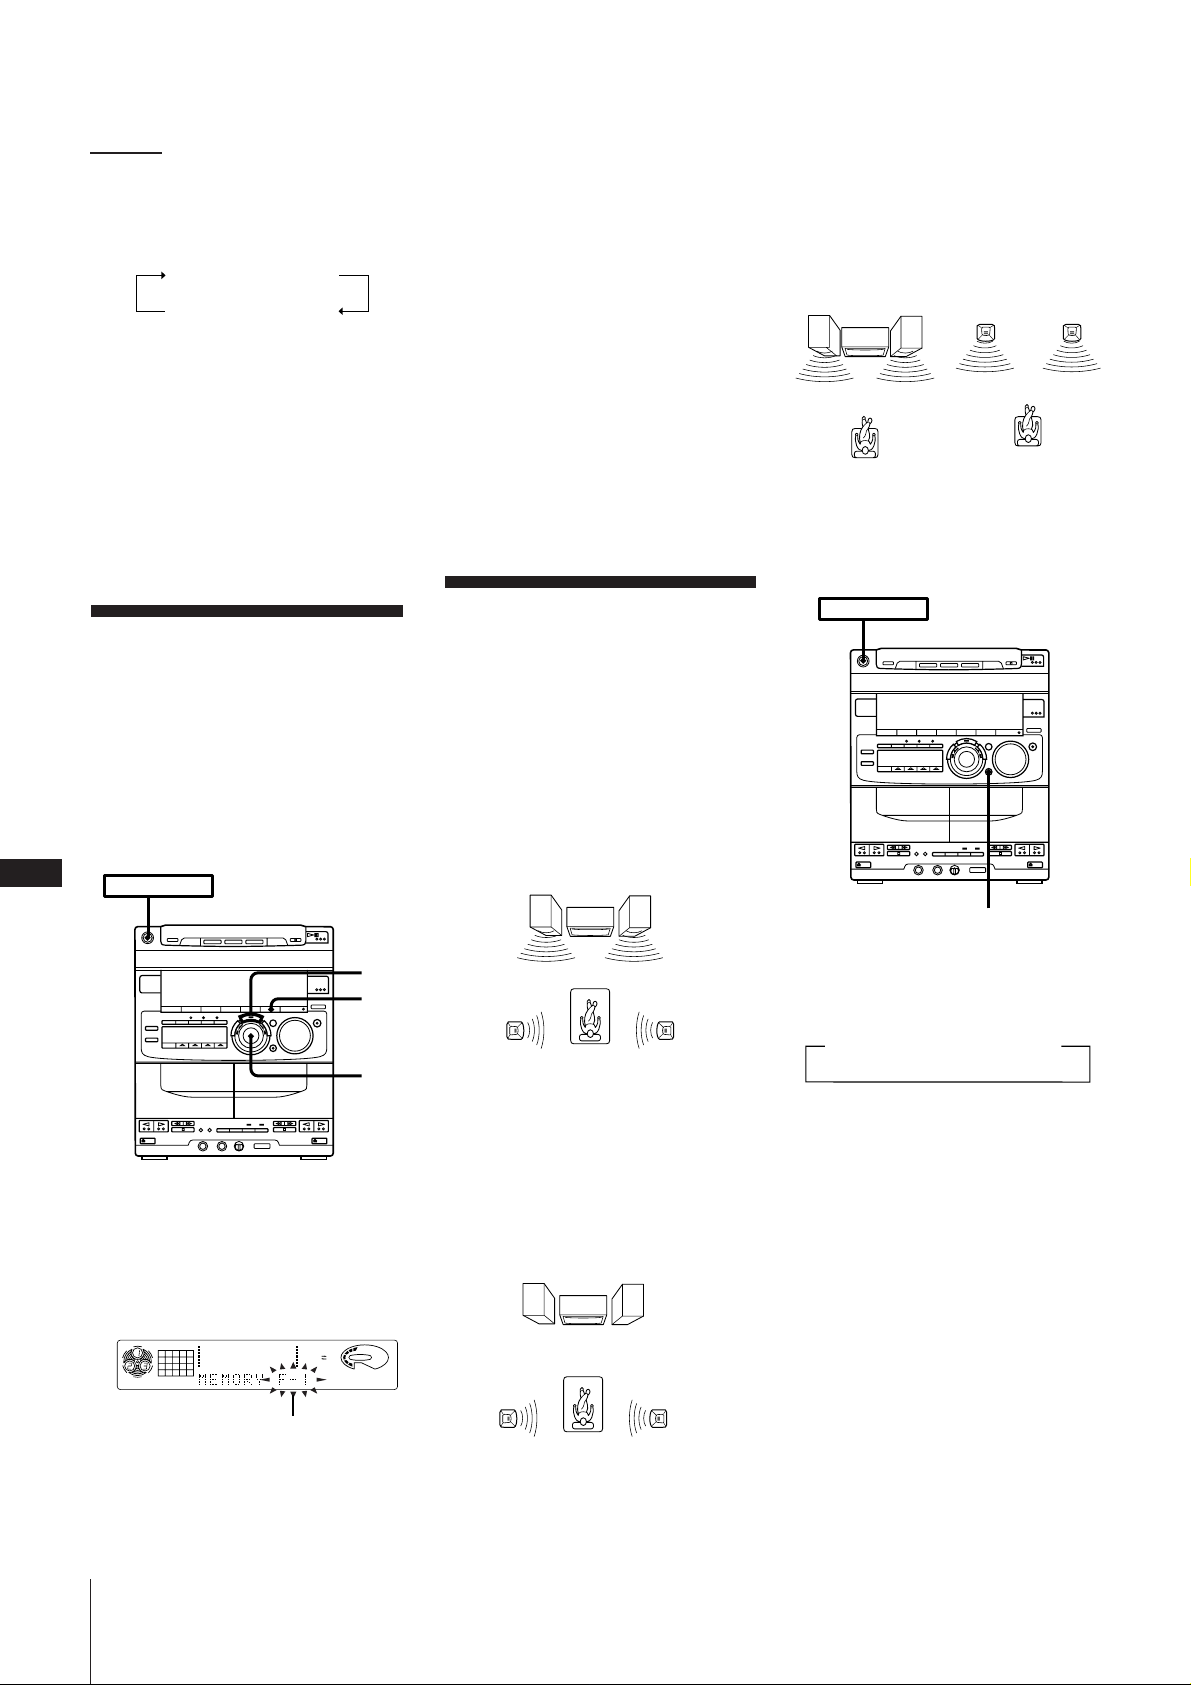
WHISPER
NORMALLINK
nn
m ±µ§W
2 ´ˆ¶Ì DSP 1¨Ì•H§W°MµM´·±¤¬‡ JOG ´ L•H
øÔæ‹©“߱ʙ ¿Ù¬¡n q•°C
„•‹±Nß@¶p§U™ ‹§ °G
LEVEL 0
LEVEL 3 LEVEL 2
q• º V§j°M¿Ù¬ ¡nƃ™G´KV±j°C
nNLEVEL 1
3 ´ˆ§U ENTER/NEXT°C
µ˘
ÌøÔæ‹®‰•L¡nµÆƒ™GÆ…°M¿Ù¬¡nƃ™GßY
Q—£°C¶p™Gn¶s¿x§U©“øÔƃ™G°M–ß‚•¶¶s
§J”§H®˜©v°] —”°ßß@§@ ”§H¡n¿W•[±j®˜©v
°] ”§H®˜©v°^°®°^°C
3 •Œ JOG ´ L•HøÔæ‹ n¶s§J¡nµÆƒ™G™ ®˜
©v °]P FILE°^°C
4 ´ˆ§U ENTER/NEXT°C
’愶n™¡nµÆƒ™G´K Q¶s§J©“øÔ®˜©v
ðC¶”•H´e¶s¿x©Û¶ §W™ ßYQ©Ÿ•h¶”•N
§ß•Hs¶s§J™¡n µÆƒ™G°C
n´©I ”§J®˜©vÆ…
1 ´ˆ§U P FILE°]©Œ§œ¥_´ˆ§Uªª±±æ§W™
MUSIC MENU 4/$°^•H „•‹ ô·©“øÔ™
”§J®˜©v°C
2 •Œ JOG ´ L°]©Œ§œ¥_´ˆ§Uªª±±æ §W™
MUSIC MENU “/”°^•HøÔæ‹©“ n™ ”§H
®˜©v°C
3 ´ˆ§U ENTER/NEXT °C
Ì®œ•Œªª±±æÆ…°M´K§£ ´ˆ§U ENTER/
NEXT °C
LINK°] s¬Í°^º“¶°
´e¥¡næ ©M¿Ù¬¡n/ ¥ ¡næøÈ•X¶PºÀ¡n
µ°C®“¶p±z¶b®‚©–°§¿ßO •®Ï¨¤¶P¡nµÆ…°M
´K•iß‚´e¥ ¡næ ©M¿Ù¬¡n/ ¥ ¡næ §¿ßO] m
©Û®‚©–°Ã°C
´e¥ ¡næ
°]•™°^
nøÔæ‹’¶®º“¶°Æ…
’¶®°^¶‹©“ n™ º“¶°•X{©Û „•‹æ °C
´e¥ ¡næ
°]•k°^
–§œ¥_´ˆ§U SONIC FORMATION°]¡n µ
¿Ù¬¡n/
¥¡næ
°]•™°^
¿Ù¬¡n/
¥¡næ
°]•k°^
ß@§@”§H¡n¿W•[±j®˜©v
°] ”§H®˜©v°^
±z•iß@§@ ”¡n¿W®Â´¨™ ”§H®˜©v°]¿Ù¬
¡nƃ™G©M¶h¿Wµ’…¿væ °^¶”±N•¶Ã¶s§Jæ˜
æ ™¶s¿xæ §§°C•H´·´K•i´©I•X§@ ”¡n¿W®Â
´¨•Œ©Û©Òœ±a°MCD°M©Œ q•xºsº `•ÿ°C öh
•iß@¶®5”¡n¿W®˜©v°Cæfiß@´e°M –•˝øÔæ‹©“n
™ ¡n¿W•[±jß@¨ Ú•ª¡n°C
C
POWER m ON
26
1 ®œ•Œ¶h¿Wµ’…¿væ©M¿Ù¬¡nƃ™G•H¿Ú±o
±zn®D™¡nµÆƒ™G°C
2 ´ˆ¶Ì P FILE 1¨Ì•H§W°C ”§J®˜©v ßY•X {
©Û „•‹æ °C
4
2
3
¬‡¥´¥ ¡næ ™ ’¶®°]¡n µ
’¶®°^
£§F¥ q™ 4¥¡næ ®tŒ•H•~°M¡Ÿ•iÆ⁄æ⁄
¶¨ •™¨™p±q•t•~®‚ÿ¥ ¡næ ’¶®§§øÔæ‹ßQ
•Œ°C
NORMAL°]•ø±`°^º“¶°
´·¥¡næ £•Õ•Ê V¶^T©M§œÆg¡nƃ™G°M
؇ºW±j®”¶¤´e¥ ¡næ™ ¡nµ°C
´e¥ ¡næ
°]•™°^
¿Ù¬¡n/ ¥ ¡næ
°]•™°^
WHISPER°]¶’ªy°^º“¶°
®”¶¤´e¥ ¡næ™ ¡nµ Q§¡¬_¶”¿Ù¬ ¡n/
¥¡n晡n¥Ó§p°C®“¶p•Œ©Û¶bß…§W¶¨ •Æ…°M
©yß‚¿Ù¬¡n/ ¥ ¡næ ] m¶bß…®‚º°C
´e¥ ¡næ
°]•™°^
´e¥ ¡næ
°]•k°^
¿Ù¬¡n/ ¥ ¡næ
°]•k°^
´e¥ ¡næ
°]•k°^
POWER m ON
SONIC FORMATION
Ì´ˆ§U SONIC FORMATION Æ…°Mº“¶°±N
ß@¶p§U‹§°G
n´Ï¥_•ø±`º“¶°Æ…
–§œ¥_´ˆ§U SONIC FORMATION ¶‹
°ßNORMAL°®°]•ø±`°^•X {©Û „•‹æ °C
µ˘
§£nß‚¿Ù¬ ¡n¥¡næ ©Ò¶bqµ¯æ˜§W ±°C
¶]¨ •i؇®œqµ¯ºv ™ ±m¶‚µo•Õ•¢Øu°C
CD
12563 250 500 1k 2k 4k 8k 16k(Hz)
1DISC
ƒ5 °G¡n µ ’æ„
®˜©v
DOLBY NR
VOLUME
OFF
¿Ù¬¡n/ ¥ ¡næ
°]•™°^
¿Ù¬¡n/ ¥ ¡næ
°]•k°^
 Loading...