

Sony HCD-GSX75, MHC-GSX75, HCD-GSX100W User Manual
4-245-586-12(2)
Mini Hi-Fi
Component
System
Operating Instructions
Owner’s Record
The model and serial num bers are located on the rear of the unit . Record the ser ial number
in the space provided below. Refer to them whenev er you c al l upon your Sony dealer
regarding this product.
Model No. ______________ Serial No. ______________
MHC-GSX100W
MHC-GSX75
©2003 Sony Corporation
WARNING
To prevent fire or shock hazard, do not
expose the unit to rain or mo ist u r e.
To prevent fire, do not cover the ventil at ion of the
apparatus with news papers, table-cloths, curtains, etc.
And don’t place lighted candle s on the apparatus.
To prevent fire or shock hazard, do not place obje c ts
filled with liquids, such as vases , on the ap pa ratus.
Do not install the appliance in a confined space,
such as a bookcase or built-in cabi ne t.
NOTICE FOR THE CUSTOMERS IN THE
U.S.A.
This symbol is intended to alert the
user to the presence of uninsulated
“dangerous voltage” within the
product’s enclosure that may be of
sufficient magnitude to constitute a
risk of electric shock to persons.
This symbol is intended to alert the
user to the presence of important
operating and maintenance (servicing)
instructions in the literature
accompanying the appliance.
CAUTION
The use of optical instruments wit h this prod uc t will
increase eye hazard.
Note to CATV system installer:
This reminder is provided to call the CATV system
installer’s attention to Article 820-40 of the NEC that
provides guidelines for proper groun ding and, in
particular, specifies that the cable ground shall be
connected to the grounding syste m of the building, as
close to the point of cable entry as pr actical.
WARNING
This equipment has been tested and found to comply
with the limits for a Class B digital device, pursuant to
Part 15 of the FCC Rules. These limits are designed to
provide reasonable protectio n against harmful
interference in a residential installation. This
equipment generates, uses, and ca n r adia te radio
frequency energy and, if not in sta ll ed and used in
accordance with the instructi ons , may cau s e harmful
interference to radio communications. However, there
is no guarantee that interference will not occur in a
particular installa tion. If this equipment does cause
harmful interference to r a dio or te le vision reception,
which can be determined by turning the equipment off
and on, the user is encouraged to try to correc t the
interference by one or more of the following measures:
– Reorient or relocate the receiv ing antenna.
– Increase the separation betw een the equipment and
receiver.
– Connect the equipment into an out le t on a cir c uit
different from that to which the receiver is
connected.
– Consult the dealer or an experienced radio/TV
technician for help.
CAUTION
You are cautioned that any changes or modif icat ions
not expressly approved in this manual could void your
authority to operate this equipm ent .
NOTICE FOR THE CUSTOMERS IN CANADA
CAUTION
TO PREVENT ELECTRIC SHOCK, DO NOT USE
THIS POLARIZED AC PLUG WITH AN
EXTENSION CORD, RECEPTACLE OR OTHER
OUTLET UNLESS THE BLADES CAN BE FULLY
INSERTED TO PREVENT BLADE EXPOSURE.
GB
2
MHC-GSX100W only
NOTICE FOR THE CUSTOMERS IN THE
U.S.A.
If you have any questions about this product, you may
call; sony customer Informati on Center
1-800-488-7669
The Number below is for the FCC related matters only.
Regulatory Information
Declaration of Conformity
Trade Name: SONY
Model No.: HCD-GSX100W
Responsible Party:Sony Electronics Inc.
Address: 680 Kinderkamack Road,
Oradell, NJ. 07649 USA
Telephone No.: 201-930-6972
This device complies with Part 15 of the FCC Rules.
Operation is subject to the following two
conditions: (1) This device may not cause harmful
interference, and (2) this device must accept any
interference received, including interference that
may cause undesired operation.
NOTICE FOR THE CUSTOMERS IN THE
CANADA
Operation is subject to the fo llowing two conditions:
(1) this device may not cause interference, and (2) this
device must accept any interference, including
interference that may cause undesired operation of the
device.
Son utilisation est au tor isée seulement aux cond itions
suivantes: (1) il ne doit pas produire de brouillage et (2)
l’utilisateur du dispositif doit être prêt à accepter tout
brouillage radioeléctrique reçu, même si ce brouillage
est susceptible de compromettre le fonctionnement du
dispositif.
NOTICE FOR THE CUSTOMERS IN THE
U.S.A AND CANADA
Replace the AC power adaptor with mo de l
AC-GSX100 only, if replacement is necessary.
E
NERGY STAR
registered mark. As an E
®
TAR
S
has determined that this product
meets the E
®
is a U.S.
NERGY
partner, S ony Corpor a tion
NERGY STAR
®
guidelines for energy efficiency.
GB
3

Table of Contents
How to use this manual...........................5
Playable discs....................... .... .... ... ........5
Getting Started
Hooking up the system...... ... ...................7
Setting the clock......................................8
Wireless
Hooking up the transmitter.....................9
(MHC-GSX100W on ly)
Listening to aud i o using wireless
system.............................................11
(MHC-GSX100W on ly)
CD/MP3 – Play
Loading a disc.......................................13
Playing a disc........................................14
— Normal Play/Shuffle Play
Playing repeatedly.................................16
— Repeat Play
Creating your own program..................16
— Program Play
Labeling a disc......................................17
— Disc Memo
Tuner
Presetting radio stations........................19
Listening to the radio............................20
— Preset Tuning
— Manual Tuning
Labeling the preset stations...................21
— Station Name
Mixing video gam e sound with other
sound source................................... 25
— Game Mixing
Timer
Falling asleep to music.........................26
— Sleep Timer
Waking up to music..............................26
— Daily Timer
Timer recording radio programs........... 27
Display
Turning off the display.........................29
— Power Saving Mode
Viewing information about the disc
in the display..................................29
Changing the Power illuminator...........30
Using an Optional Ke ybo ar d
Setting the keyboard...................... .......30
Labeling titles through the keyb oard.... 31
Operating the system through the
keyboard ......................................... 31
Optional Components
Hooking up optional components.........32
Listening to audio from a connected
component......................................33
Recording audio from a connecte d
component......................................33
Recording on a connected
component......................................33
Tape – Play
Loading a tape.......................................21
Playing a tape........................................22
Tape – Recording
Recording on a tape ..............................22
Sound Adjus t ment
Adjusting the sound..............................24
Enhancing video game sound...............25
— Game Sync
GB
4
Troubleshooting
Problems and remedies.........................34
Messages...............................................37
Additional Info rm at io n
Precautions ........................................... 38
Specifications ....................................... 39
List of button locations and
reference pages............................... 42
How to use this manual
• This manual mainly explains operations u sing
the remote, but the same operations can also
be performed using the buttons on the system
having the same or similar names.
• The following symbols are used in this
manual.
Symbol Meaning
Functions that can be used with
audio CDs
Functions that can be used with
MP3
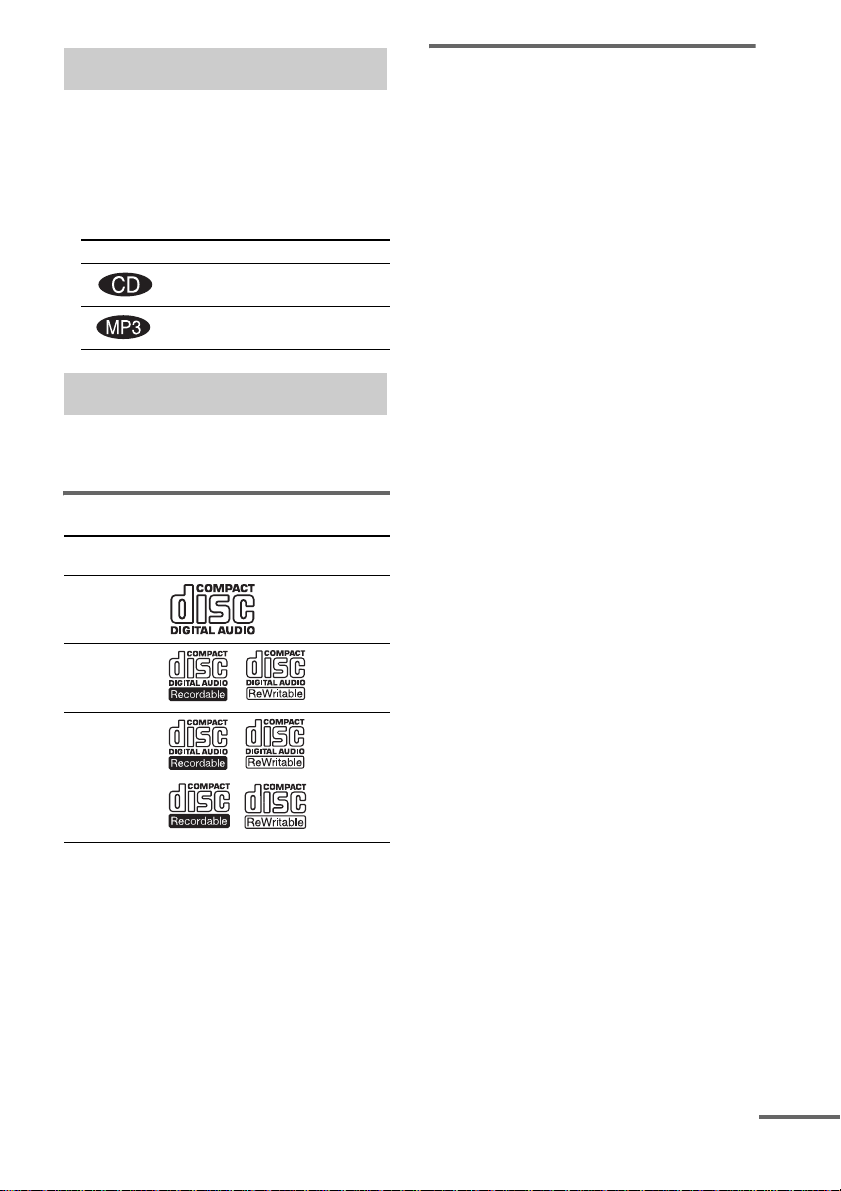
Playable discs
You can play back the following discs on this
system. Other discs cannot be played back.
List of playable discs
Format of
discs
Audio CDs Audio
CD-R/CD-RW
(audio data)
CD-R/CD-RW
(MP3 files)
Disc logo Contents
Audio
Audio
Discs that this system ca nnot
play
•CD-ROMs
• CD-Rs/CD-RWs other than those record ed in
the following formats:
– music CD format
– MP3 format that co nf orms to ISO9660*1
Level 1/Level 2, Jolie t o r M ul t i Se ss i on*
• A disc that has a non-standard shape (e.g.,
card, heart).
• A disc with paper or stickers on it.
• A disc that has the adhesive, cellophane tape,
or a sticker still left on it.
*1
ISO 9660 Format
The most common in te rnational standard for the
logical format of files and folders on a CD-ROM.
There are several specificati o n le ve ls. In Level 1,
file names must be in the 8.3 format (no more than
eight characters in the name, no more than three
characters in th e e x te nsion “.MP3”) and in capi ta l
letters. Folder names can be no long er tha n e ight
characters. There can be no more than eight nested
folder levels. Level 2 specific ations allow file
names and folder names up to 31 cha r acte r s long.
Each folder can have up to 8 trees.
For Joliet in the expansion format (file and folder
names can have up to 64 characters) make sure of
the contents of the writing software, etc.
*2
Multi Session
This is a recording method that enables adding of
data using the Track-At-Once me thod.
Conventional CDs begin at a CD control area called
the Lead-in and end at an area called Lead-out. A
Multi Session CD is a CD having multiple sessions,
with each segment from Lead-in to Lead -o u t
regarded as a single session.
CD-Extra: This format records audio (audio CD
data) on the tracks in session 1 and data on the tracks
in session 2.
Mixed CD: This format records data on the first
track and audio (audio CD data) on the se cond and
subsequent tracks of a session.
2
continued
GB
5

Notes on CD-R and CD-RW
• This system can play CD-R/C D -RW discs
edited by the user. However, note that
playback of some discs may not be possible
depending on the recording device use d for
recording or the di s c condition.
• Discs recorded on CD-R/CD-RW driv es may
not be played ba ck be ca use o f sc rat che s, d irt ,
recording condition or the driver’s
characteristics.
• CD-R and CD-RW di scs that have not been
finalized (processing to allow play by a
normal CD player) cannot be played.
• CD-R and CD-RW discs recorded in multisession that have no t en ded by “closing the
session” are not supported.
• The system ma y be unable to play MP3
format files tha t do not have the extende r
“.MP3”.
• Attempting to play non-MP 3 format f iles tha t
have the extender “.MP3” may result in noise
or malfunction.
• With formats ot her than ISO 9660 leve l 1 and
2, folder names or file names may not be
displayed correctly .
• The following discs take a longer time to start
playback.
– a disc recorded with complicated tree
structure.
– a disc recorded in Multi Session.
– a disc to which dat a can be added (non-
finalized disc).
Music discs encoded with
copyright pro tection
technologies
This product is designed to playback discs that
conform to the Compact Disc (CD) standard.
Recently, various music discs encoded with
copyright protect io n technologies are mar keted
by some record companies . Plea se be awar e that
among those discs, there are some tha t do not
conform to the CD standard and may not be
playable by this prod uct.
Cautions when playing a disc
that is recorded in Multi
Session
• If the disc begins with a CD-DA session, it is
recognized as a CD- D A (audio) disc, and
MP3 sessions are pl ayed back without sound.
• If the disc begins with an MP3 session, it is
recognized as an MP3 disc, and CD-DA
sessions are play ed back without soun d.
• The playback ra nge of an MP3 disc is
determined by the tree structure of files
produced by analyzi ng of the disc.
• A disc with a mixed CD format will be
recognized as a CD- D A (audio) disc.
GB
6
Getting Started
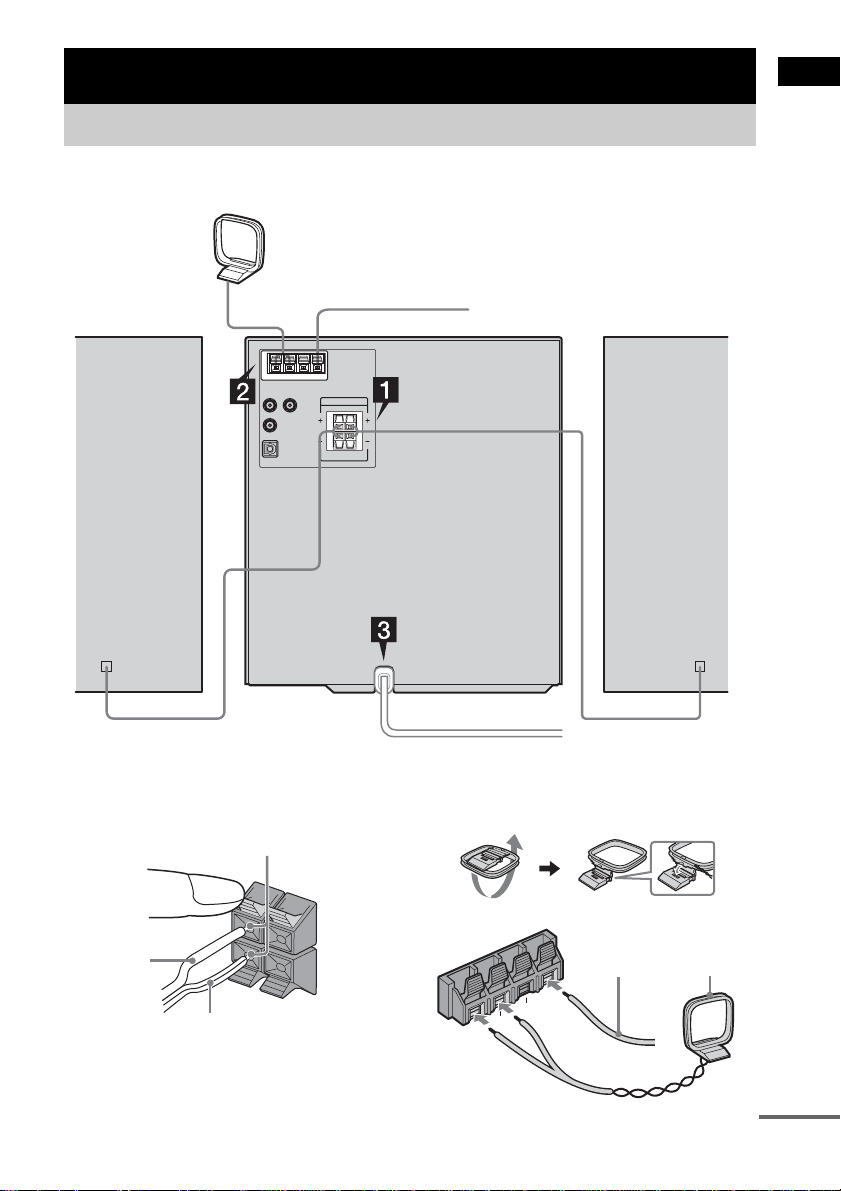
Hooking up the system
Perform the following procedures 1 to 3 to hook up your system using the supplied cords and
accessories.
AM loop antenna
FM lead antenna
Right speaker
Left speaker
Getting Started
1 Connect the speakers.
Connect the right and left speaker cords to
the SPEAKER jacks as shown below.
Insert only the stripped portion
R
L
Solid (3)
Stripe (#)
2 Connect the FM and AM antennas.
Set up the AM loop antenna, then connect
it.
+
–
U
AM
A
N
N
E
T
N
A
M
F
U
Extend the FM
lead antenna
horizontally
Ω
75
AM loop
antenna
continued
GB
7
Note
Keep the antennas away from t he speaker cords to
prevent noise.
3 Connect the power cord to a wall
outlet.
The demonstratio n appears in the display.
When you press ?/1, the system turns o n
and the demonstration automatically ends.
You can cancel the demonstration by
pressing DISPLA Y repeatedly (page 2 9).
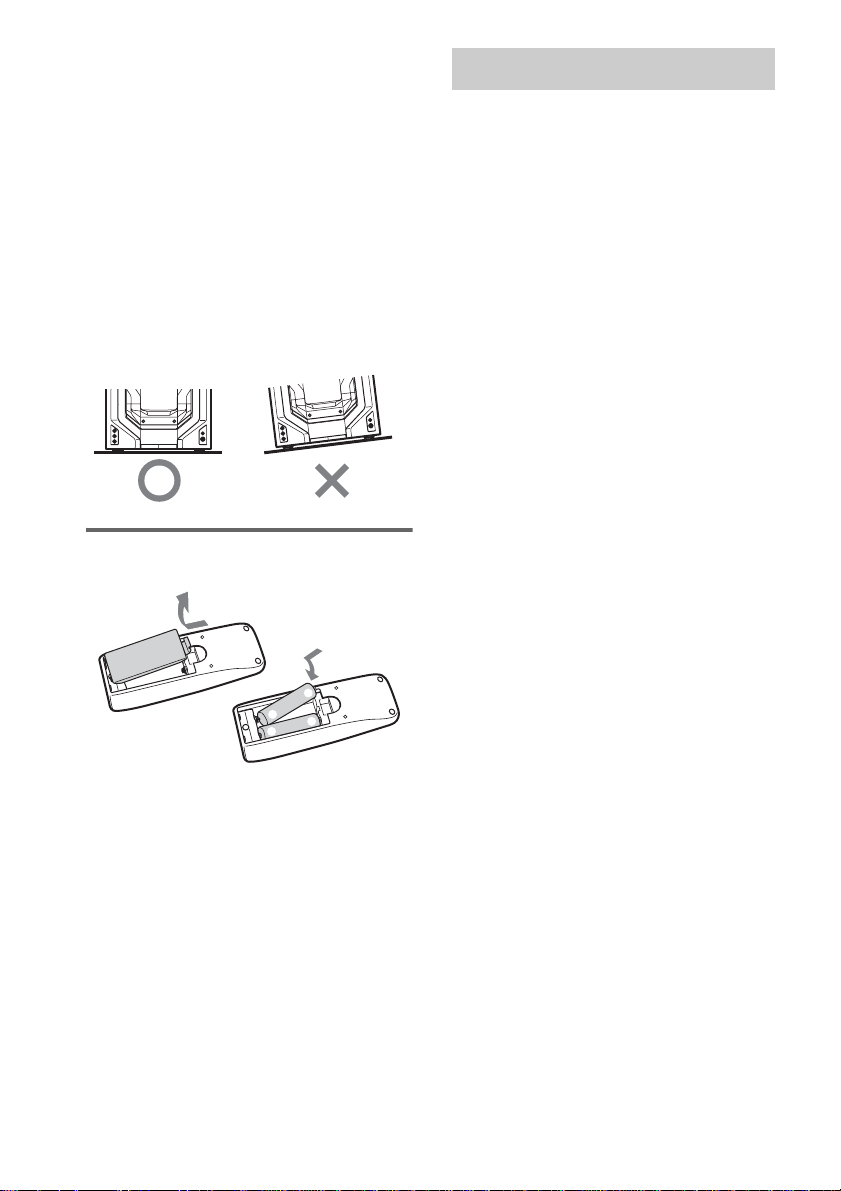
Note on placement
Be sure to place thi s un i t o n a horizontal place.
If the unit is slanted, it may cause malfunction or
damage to the system.
Inserting two size AA (R6)
batteries into the remote
Setting the clock
1 Press ?/1 to turn on the system.
2 Press CLOCK/TIMER SET.
3 Press . or > repeatedly to set the
hour.
4 Press ENTER.
5 Press . or > repeatedly to set the
minute.
6 Press ENTER.
The clock starts working.
To adjust the clock
1 Press CLOCK/TIMER SET.
2 Press . or > repeatedly to select
“CLOCK SET”, then press ENTER.
3 Do the same procedures as step 3 to 6
above.
Notes
• The clock settings are canceled when you disconnect
the power cord or if a power failure occurs.
• You cannot set the clock in Power Saving Mode.
E
e
Note
If you do not use the remote for a long period of time,
remove the batteries to avoi d possible damage from
battery leakage and corrosion.
Tip
With normal use, the bat teries should la st for about six
months. When the remote no longer operates the
system, replace both batteries with new one s.
GB
8
e
E

Wireless
Hooking up the transmitter
(MHC-GSX100W only)
1 Set the transmitter by the following
procedures.
Select the hookup depending on the jack
type of the optional component you want to
connect the transmitter to.
A To connect to the analog out jacks
B To connect to headphones jack
Transmitter
DC IN 9V
OFF ON
FILTERNOISE
Right channel
(red)
RBAL
AUDIO IN
123
CHANNEL
to AUDIO IN A jacks
Left channel
(white)
Connecting cord
(supplied)
Wireless
Transmitter
OFF ON
Left channel
(white)
FILTERNOISE
AUDIO IN
to AUDIO IN B jack
DC IN 9V
RBAL
123
CHANNEL
Connecting cord (supplied)
Right channel
(red)
to LINE OUT or REC OUT
jacks
Stereo system,
VCR, etc.
Unimatch plug
adaptor (not
supplied)
to headphones
jack (stereo
phone jack)
to headphones or
LINE OUT jack
(stereo mini jack)
Personal
computer,
WALKMAN*,
etc.
* “WALKMAN” is a registered trademark of Sony
Corporation.
“ ” is a trademark of Sony
Corporation.
continued
GB
9
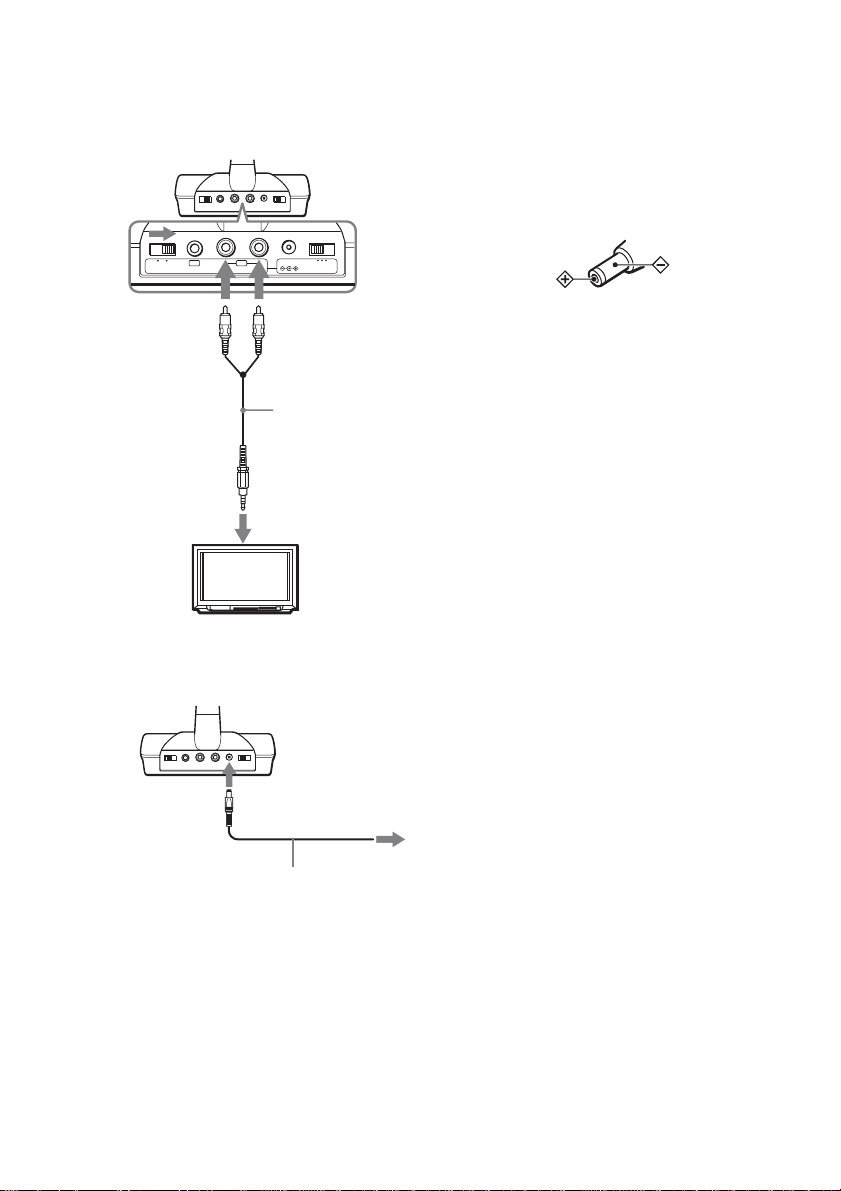
C To connect to TV, etc.
If noise occurs when the transmitter is
connected to the he adphones jack of your
TV or VCR, set the NOISE FILTER switch
on the transmitter to ON.
Transmitter
• For connections B and
C, if stereo mini jack is
connected to line out and the NOISE FILTER is set
to ON, audio output will be reduced and audio signal
may be intermittent or auto muting will activate. In
this case, set the NOIS E FILTER to OFF.
• When the transmitter is placed on or near a TV, it
may pick up a noise. In such case, pla ce th e
transmitter away from the TV.
• Use only the supplied AC power adaptor. Do not use
any other AC power adaptor.
OFF ON
FILTERNOISE
AUDIO IN
Right channel
(red)
RBAL
DC IN 9V
123
CHANNEL
to AUDIO IN A jacks
Left channel
(white)
Connecting cord
(supplied)
to stereo mini jack
TV, VCR, etc.
2 Connect the transmitter to a wall outlet
using the supplied AC power adaptor.
The transmitter automatically turns on.
Transmitter
to DC IN 9V
jack
AC power adaptor
(supplied: AC-GSX100)
Notes
• When you connect the transmitter to the analog out
jacks, do not set the NOISE FILTER to ON.
Otherwise, the volume will be limited.
• The NOISE FILTER effects the sound only in case of
such as connections B and
the switch has no effect.
to wall outlet
C. In connection A,
Polarity of the plug
• If the connected component has the AVLS
(Automatic Volume Limiter System) function, be
sure to turn off the function when using the
transmitter. Otherwis e, you will have to turn up the
volume of the speaker, and that may cause distortion.
• If the connected component has the BASS BOOST
or MEGA BASS function, be sure to turn off the
function when using the transmitter. Otherwise, the
sound from the speaker may be distorte d.
• Do n ot pl ace t he t ransmi tter near a fluo rescent lamp ,
etc. when using the system.
• When the source audio level is low or no audio signal
is input for 10 seconds or more, the tra nsmitter will
switch to auto muting mod e.
• If the transmitter does not detect an audio signal for
a few minutes, the power on the transmitter
automatically tur n s of f . W hen the transmitter
receives an audio signal again, the power
automatically tur ns on.
The effective areas of the
transmitter
Wireless system that allows yo u t o us e your
system free from the res triction of speake r cords.
The optimum signal reception range is up to
approximately 150 feet (46m) without the
system picking up some interf erence. Ho wever,
the distance may be reduced according to the
surroundings a nd environment. If the system
picks up some noise while using it within the
above mentioned distance, reduce the di stance
between the transmitter unit and the main unit,
or select another channel.
10
GB

Notes
• When you use the main unit inside the effectiv e areas
of the transmitter, the transmitter can be placed in
any direction from the listener.
• Ev en withi n the si gnal rece ption area, there ar e some
spots (dead spot) where the RF signal ca nnot be
received. This is a charact eri s tic inherent to RF
signals , a nd does not in dicate a malf unction. By
slightly moving the trans mitter, the location of the
dead spot can be changed.
Notes on receiving performance
This system component utilizes very high
frequency sign al s i n the 900 MHz band so the
receiving perfor mance may deteriorate due to
the surroundings . The following exampl es
illustrate conditions that may reduce the
possible receiving range or cause interference
with reception.
– Radio wave s generated such as cel l phones
and cordless phone systems or metal
instruments are placed on the unit.
– Inside a building with walls containing steel
beams.
– Area with many steel file cabinets, etc.
– Area with ma ny elec tri cal ap plia nces capa ble
of generating electromagnetic noise.
– Transmitter is placed on a metal instrument.
– Area facing roadways.
– Noise or interfering signals exist in the
surroundings due to radio transceiv er s i n
trucks, etc.
– Noise or interfering signals exist in the
surroundings du e to wireless communicat i on
systems installed along roadways.
– Transmitter is placed directly on floor.
Placing it up off th e floor, such as on a desk,
is recommended.
Listening to audio using wireless system
(MHC-GSX100W only)
1 Start playing the connected
component.
2 Press WIRELESS to switch the
function to WIRELESS.
When the sound is distorted
1 Move CHANNEL 1–3 on the transmitter to
select a radio frequency.
CHANNEL1: 91 3.5 MHz
CHANNEL2: 91 4.0 MHz
CHANNEL3: 91 4.5 MHz
2 Press WIRELESS.
“AUTO TUNING” appears.
If you do not hear cl ear audio, select another
channel using CHANNEL1-3, then press
WIRELESS again.
To finish using WIRELESS
function
Press any function button to select different
function and quit WIRELESS.
Notes
• You may not hear the beginning of the sound from
the main unit until the transmitter starts sending th e
RF signals after detecting an audio signal.
• If the transmitter is connected to the headphones jack
of the source component, set the volume of that
component as high as possible without distorting the
audio signal.
• If you hold the antenna of the transmitter with your
hand, noise may occur. However this is no t a
malfunction.
• When the transmitter is not to be used for a long
period of time, disconnect the AC power adaptor
from the wall outlet holding the plug. Do not pull on
the cord.
Wireless
continued
11
GB

Notes on sounds from the
transmitter
When there is no sound, do the following:
– Check the connection of the optiona l c omponent.
– Check that the optional comp one nt is turned on.
– Turn up the volume on the connected optional
component, if the tr a n smitter is connected to th e
headphones jack.
– Change the radio frequency using the CHANNEL
selector on the tran smit ter, the n press WIR ELESS
again.
– If you connect the transmitter to the a nal og out
jacks of an au dio reprodu c er, make sure that the
NOISE FILTER switch is set to OFF.
– Make sure that the NOISE FILTER switch is set to
either ON or OFF (If the switch gets stuck between
ON and OFF, the sound will be cut off).
When there is severe hum or noise, do the
following:
– If the transmitter is connected to the he adphones
jack, turn down the volume of the connected
optional component. If the connected optional
component has the BASS BOOST or MEGA
BASS function, set these function to OFF.
– If the connected optional comp o ne nt has a LINE
OUT jacks, connect its LINE OUT jacks.
– Change the radio frequency with the CHANNEL
selector on the tran sm it ter then press WIRELESS
again.
– If you connect the transmitter to the a nal og out
jacks of an au dio reprodu c er, make sure that the
NOISE FILTER switch is set to OFF.
12
GB
CD/MP3 – Play
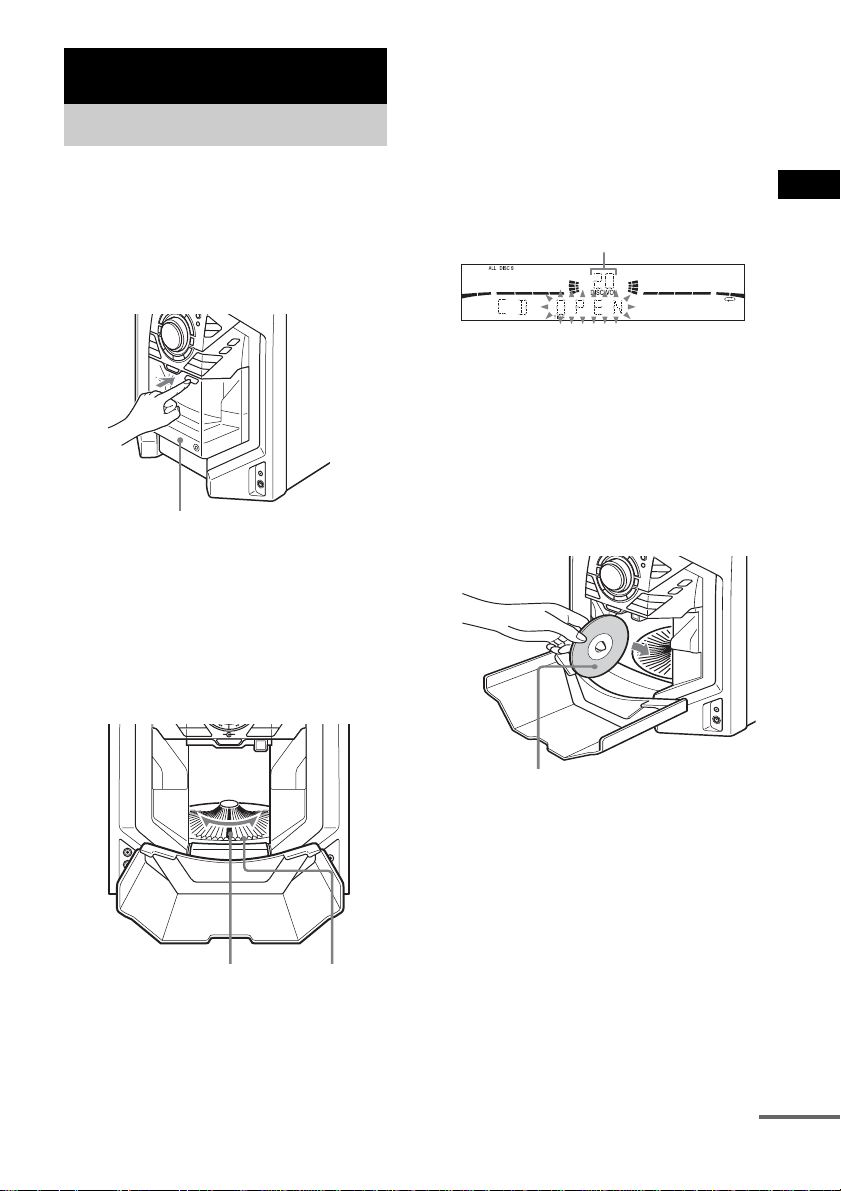
Loading a disc
You can load up to 60 discs into this unit.
Turn on the syst em before you load d i scs.
You can also load and play discs with MP3
audio tracks.
1 Open the front cover by pressing
Z PUSH on the front cover.
Front cover
* MHC-GSX100W is used for illustration
purpose.
2 Press DISC + or – (or turn DISC
SELECT on the unit) until y ou find the
disc slot where you want to insert a
disc, while checking the disc number
(written beside every slot and also
indicated in the display).
The disc number* at the loading position
appears in the display. As you press DISC +
or – (or turn DISC SELECT on the unit), the
disc number changes.
* If you have already loaded discs, the disc
number at the playing positi o n app ears . When
you press DISC + or – (or turn DISC SELECT
on the unit), the displayed disc number changes
to the one at the loading position.
Disc number
3 Insert a disc with the label side facing
right.
Notes
• Make sure you have loaded the disc into each
slot at a right angle to the rotary table. If the disc
is not put in straight, it may damage the unit or
the disc.
• Make sure the rotary table comes to a complete
stop before loading or removing discs.
CD/MP3 – Play
Disc slot at the loading
position (lo cated a t the
very front)
Disc number
With the label side facing right
4 Repeat steps 2 and 3 to load additional
discs.
continued
13
GB

5 Close the front cover by pressing
Z PUSH on the front cover.
The rotary table turns and the disc slot at the
loading position is set to the playing
position.
To remove the discs
After following step 1 of “Loading a disc” on
page 13, remove the discs. Then close the front
cover.
Notes
• Always close the front cover except when you load
or remove discs.
• Do not load an empty 8 cm CD adaptor. It may
damage the unit.
• Do not attach an yt h i ng such as seals or sleeves to
discs. It may damage the unit or the dis c .
• If you drop a disc into the unit and the disc will not
go into the slot correctly, consult your nearest Sony
dealer.
• When transporting the unit, remove all discs from the
unit.
• If you want to remove the disc played, open the front
cover. The disc comes to the loading position.
Remove the disc af te r th e r o ta r y ta ble comes to a
complete stop.
Tip
You can display the origina l Dis c Mem o s in s t ead of
total number of tracks and total playing time (see
“Labeling a disc” on page 17) to locate the disc easily
when you start playing.
Playing a disc
— Normal Play/Shuffle Play
This system lets you play discs in dif ferent pl ay
modes.
Disc number
Track number Playing time
1 Press CD to switch the function to CD.
2 When you want to specify the disc for 1
DISC, press DISC + or – (or turn DISC
SELECT on the unit) until the desired
disc number or Disc Memo appears.
3 Press PLAY MODE repeatedly in stop
mode until the mode you want appears
in the display.
Select To play
ALL DISCS
(Normal Play)
1 DISC
(Normal Play)
ALBM
(Normal Play)
ALL DISCS
SHUF
(Shuffl e Play)
1 DISC SHUF
(Shuffl e Play)
ALBM SHUF
(Shuffl e Play)
PGM
(Program Play)
All discs in the disc tra y
continuously (up to 60 discs).
The disc you have selected in
original order.
All MP3 audio tracks in the
album on the disc you have
selected in original order.
When playing a non-MP3 disc,
Album Play performs the same
operation as 1 DISC Play.
The tracks on all discs in
random or der.
The tracks on the disc you have
selected in random order.
All MP3 audio tracks in the
album on the disc you have
selected in random order.
When playing a non-MP3 disc,
Album Shuffle Play performs
the same operation as 1 DISC
Shuffle Play.
The tracks on all discs in the
order you want them to be
played (see “Creating your
own program” on page 16).
14
GB
 Loading...