

Sony MEX-1HD Operating Instruction
Audio Library
3-242-073-13 (1)
Audio Library System
System
Operating Instructi on s
Mode d’emploi
Owner’s Record
The model and serial numbers are located on the bottom of the unit.
Record these numbers in the spa ce provided below.
Refer to these numbers whenever you call upon your Sony dealer regarding this product.
Model No. MEX-1HD Serial No.
For installation and connections, see the supplied installation/connections manual.
En ce qui concerne l’installation et les connexions, consulter le manuel
d’installation/raccordement fourni.
US
FR
MEX-1HD
© 2002 Sony Corporation

Warning
–
–
–
–
Welcome !
This equipment has been tested and found to
comply with the limits for a Class B digital
device, pursuant to Part 15 of the FCC Rules.
These limits are designed to provide reasonable
protection against harmful interference in a
residential installation. This equipment
generates, uses, and can radiate radio frequency
energy and, if not installed and used in
accordance with the instructions, may cause
harmful interference to radio communications.
However, there is no guarantee that interference
will not occur in a particular installation. If this
equipment does cause harmful interference to
radio or television reception, which can be
determined by turning the equipment off and on,
the user is encouraged to try to correct the
interference by one or more of the following
measures:
Reorient or relocate the receiving antenna.
Increase the separation between the equipment
and receiver.
Connect the equipment into an outlet on a
circuit different from that to which the receiver
is connected.
Consult the dealer or an experienced radio/TV
technician for help.
You are cautioned that any changes or
modifications not expressly approved in this
manual could void your authority to operate this
equipment.
CAUTION
The use of optical instruments with this product
will increase eye hazard.
Thank you for purchasing this Sony Audio
Library Syst em .
• Storage of about 2000 tracks on the internal
HDD using the latest compression technique
(ATRAC3)*
• High-speed recording at a maximum speed
8 times*
1
2
faster than the normal speed
• Quick track search from the track list
rearranged by the number o f times played back
or in alphabetical or der
• Sorting out recorded tracks into albums and
folders
• Creating a Pla y List folders for col lecting your
favorite tracks
• Data transfer to an “MG Memory Stick” or a
Network Walkman
• Playback of MP3 file*
2
stored on a CD-R/RW
or “Memory Stick”
• Car G-PRO T ECTION
•ID3 tag*
3
version 1 and version 2 (text only)
information (displayed when an MP3 file is
played)
• CD TEXT information (displayed when a CD
TEXT disc*
• Gracenote CDDB
Service
4
is played)
SM
pre-installed
®
Music Recognition
• Optional controller accessory
Wireless rotary commander RM-X6S
Notes
• The recorded music is limited to private use only.
Use of the music beyond this limit requires
permission of the copyright holders.
• Sony is not responsible for music files that are not
saved on this unit due to unsuccessful recording
from CD or music downloading.
• Sony is not responsible for any files that are
damaged or erased from the hard disc.
*1 Analog signals from the AUX terminal or FM/AM
reception cannot be recorded.
*2 Available only for MP3 files using MPEG1 Audio
Layer-3 with a sampling frequency of 44.1kHz.
*3 ID3 tag is an MP3 file that contains information
about album name, artist name, track name, etc.
*4 A CD TEXT disc is an audio CD that includes
information such as the disc name, artist name,
and track names. This information is recorded on
the disc.
2
Car G-PROTECTION
G-PRO TECTION is origin all y developed for
W alkman and performs supreme skip -free
against sho ck. C ar G-P ROTE CTIO N is de si gned
and tuned for car au dio based on the technology
of original G-PROTECTION. Car GPROTECTION creates comfortable au di o
reproduction with supreme skip-free and the
same time, it extends the concept and the value of
G-PROTECTION from Walkman to car audio.
Specification of Car G-PROTECTION
Car G-PROTECTION has following
specification.
(a) Re-focus within 0.5 sec., if there is a missed
data.
(b) Read data with double speed or more.
Limitation of Car G-PROTECTION
Car G-PROTECTION performs supreme skipfree but it doesn’t mean th at it can guarantee the
perfect skip-free. Some skips may occur by
continuous vibrat ion and/or the installat i on
condition of this unit.
• OpenMG and its logo are trademarks of Sony
Corporation.
• “MagicGate Mem ory Stick,” , “Memory
Stick,” , are trademarks of Sony
Corporation.
• “MagicGate” and are
trademarks of Sony Corporation.
• This product includes fonts owned by ELISA
Font Project under lic ense.
• “POBox” and are trademarks of So ny
Corporation.
• Car G-PROTECTION and are
trademarks of Sony Corporation.
• US and foreign patents licensed fr om D olby
Laboratories.
• “WALKMAN” is trademark of Sony
Corporation.
Gracenote Mus i c recognition techn ol ogy and
related data are provided by Gracenote and the
Gracenote CDDB
®
Music Recognition ServiceSM.
Gracenote is the industry standard in music
recognition technology and related cont ent
delivery. For more information visit
www.gracenote.com
Gracenote is CDDB, Inc. d/b/a “Gracenote.” CD
and music-related data from Gracenote CDDB
Music Recogniti on Service
.
SM
© 2000, 2001,
®
2002 Gracenote. Gracenote CDDB Client
Software © 2000, 200 1, 2002 Gracenote. U.S .
Patents Numbers #5 , 987,525; #6,061,680 ;
#6,154,773 , a nd o th er pa te nt s i ssue d o r pend in g.
Devices manufactured under license for the
following Open Globe, Inc. United Sta tes P aten t:
#6,304,523.
CDDB is a registered t rademark of Gracenot e.
The Gracenote logo and logotype, the Gracenote
CDDB logo and lo got ype, and the “Powered by
Gracenote CDDB” logo are trademarks of
Gracenote. Music Recognition Service and MRS
are service marks of Gracenote.
All other trademar ks and registered trad em arks
are trademarks or registered trademarks of their
respective holders.
3

Table of Contents
Location of controls. . . . . . . . . . . . . . . . . . . .6
Getting Started
Resetting the unit . . . . . . . . . . . . . . . . . . . . . .8
Detaching the front panel. . . . . . . . . . . . . . . .8
Initial settings. . . . . . . . . . . . . . . . . . . . . . . . .9
Deactivating the Demonstration display . . . .9
Basic operations
Listening to a track on a CD . . . . . . . 10
Listening to the radio. . . . . . . . . . . . . 11
Recording audio CDs onto
the HDD . . . . . . . . . . . . . . . . . . . . . . 12
Listening to tracks on the HDD. . . . . 13
Listening to audio files. . . . . . . . . . . . 14
Menu display . . . . . . . . . . . . . . . . . . . . . . . .15
List display. . . . . . . . . . . . . . . . . . . . . . . . . .16
Function menu . . . . . . . . . . . . . . . . . . . . . . .17
Checking the inf ormation on the contents
selected . . . . . . . . . . . . . . . . . . . . . . . . . .18
CD/HDD/“MG Memory Stick”
Playing a track . . . . . . . . . . . . . . . . . . . . . . .18
Display items . . . . . . . . . . . . . . . . . . . . . . . .20
Playing the tracks on CD automatically. . . .20
Playing tracks re peatedly
— Repeat Play. . . . . . . . . . . . . . . . . . . . .21
Playing trac ks in random orde r
— Shuffle Play . . . . . . . . . . . . . . . . . . . .21
Locating a folder/album/track by name
— List-up. . . . . . . . . . . . . . . . . . . . . . . . . 22
Searching a track you want to listen to . . . .22
Collecting favorite tracks
— Play List . . . . . . . . . . . . . . . . . . . . . . .23
Radio
Storing stations automatically
— Best Tuning Memory (BTM) . . . . . . .24
Receiving the stored stations . . . . . . . . . . . .25
Storing only desired stations
— Manual Preset Memory . . . . . . . . . . .26
Labeling a radio station
— Station Memo . . . . . . . . . . . . . . . . . . .26
Locating a station by name
— List-up. . . . . . . . . . . . . . . . . . . . . . . . . 27
Recording and Editing HDD
Recording an album/track onto the HDD
— Track recording . . . . . . . . . . . . . . . . . 28
Labeling a folder/album/track
— Name In . . . . . . . . . . . . . . . . . . . . . . . 30
Creating a folder/album. . . . . . . . . . . . . . . . 31
Moving recorded folder/album/track
— Move function . . . . . . . . . . . . . . . . . . 32
Erasing a folder/album/track
— Erase function . . . . . . . . . . . . . . . . . . 33
Using “MG Memory Stick”
Transferring a track to an “MG Memory Stick”
— Check-Out . . . . . . . . . . . . . . . . . . . . . 34
Returning a track to the HDD from an “MG
Memory Stick”
— Check-In. . . . . . . . . . . . . . . . . . . . . . . 35
Moving a track to an “MG Memory Stick”
— Move-Out. . . . . . . . . . . . . . . . . . . . . . 36
Returning audio files to the H DD
— Move-In . . . . . . . . . . . . . . . . . . . . . . . 36
Importing audio fil es in to the HDD
— Import. . . . . . . . . . . . . . . . . . . . . . . . . 37
Storing data onto the HDD
— Backup. . . . . . . . . . . . . . . . . . . . . . . . 37
Restoring data into a “Memory Stick”
— Restore. . . . . . . . . . . . . . . . . . . . . . . . 38
Labeling an album. . . . . . . . . . . . . . . . . . . . 39
Changing the order of audio files in an “MG
Memory Stick”
— Move function . . . . . . . . . . . . . . . . . . 40
Erasing audio files in an “MG Memory Stick”
— Erase function . . . . . . . . . . . . . . . . . . 40
Formatting an “MG Memory Stick” . . . . . . 41
Using Network Walkman
Connecting a Network Walkman . . . . . . . . 41
Transferring a t ra ck t o a N etwork Walkman
— Check-Out . . . . . . . . . . . . . . . . . . . . . 42
Returning a track to the HDD from a Network
Walkman
— Check-In. . . . . . . . . . . . . . . . . . . . . . . 43
Changing order of audio files in a Network
Walkman
— Move function . . . . . . . . . . . . . . . . . . 44
Erasing audio files i n N et w or k Walkman
— Erase function . . . . . . . . . . . . . . . . . . 44
Formatting a Network Walkman. . . . . . . . . 45
4

Sound effect
Sound list display . . . . . . . . . . . . . . . . . . . . 45
Setting the Dynami c Soundstage Organizer
— DSO . . . . . . . . . . . . . . . . . . . . . . . . . . 46
Setting the equalizer
— EQ7 . . . . . . . . . . . . . . . . . . . . . . . . . . 46
Adjusting the bas s and treble
— BAS/TRE. . . . . . . . . . . . . . . . . . . . . . 47
Adjusting the balance
— BAL . . . . . . . . . . . . . . . . . . . . . . . . . . 48
Adjusting the fader
— FAD . . . . . . . . . . . . . . . . . . . . . . . . . . 48
Adjusting the subw oofer volume
— SUB . . . . . . . . . . . . . . . . . . . . . . . . . . 49
Setting the loudness
— LOUD . . . . . . . . . . . . . . . . . . . . . . . . 50
Other Function
Quickly attenuating the sound. . . . . . . . . . . 51
Changing the sound and display settings
— Menu . . . . . . . . . . . . . . . . . . . . . . . . . 51
Selecting the spectrum analyzer . . . . . . . . . 54
Editing the library . . . . . . . . . . . . . . . . . . . . 54
Installing/Uninstalling Gracenote
Connecting auxiliary audio equipment . . . . 56
Using the rotary commander. . . . . . . . . . . . 57
®
. . . . . . . . . . . . . . . . . . . . . . . . . . 55
CDDB
Additional Information
Maintenance . . . . . . . . . . . . . . . . . . . . . . . . 58
Removing the unit . . . . . . . . . . . . . . . . . . . . 60
Precautions . . . . . . . . . . . . . . . . . . . . . . . . . 60
Notes on discs . . . . . . . . . . . . . . . . . . . . . . . 61
Notes on MP3 files . . . . . . . . . . . . . . . . . . . 62
Notes on “Memory Stick”. . . . . . . . . . . . . . 63
Troubleshooting. . . . . . . . . . . . . . . . . . . . . . 64
Error displays/Messages . . . . . . . . . . . . . . . 66
Specifications . . . . . . . . . . . . . . . . . . . . . . . 69
Glossary. . . . . . . . . . . . . . . . . . . . . . . . . . . . 70
Index . . . . . . . . . . . . . . . . . . . . . . . . . . . . . . 72
5
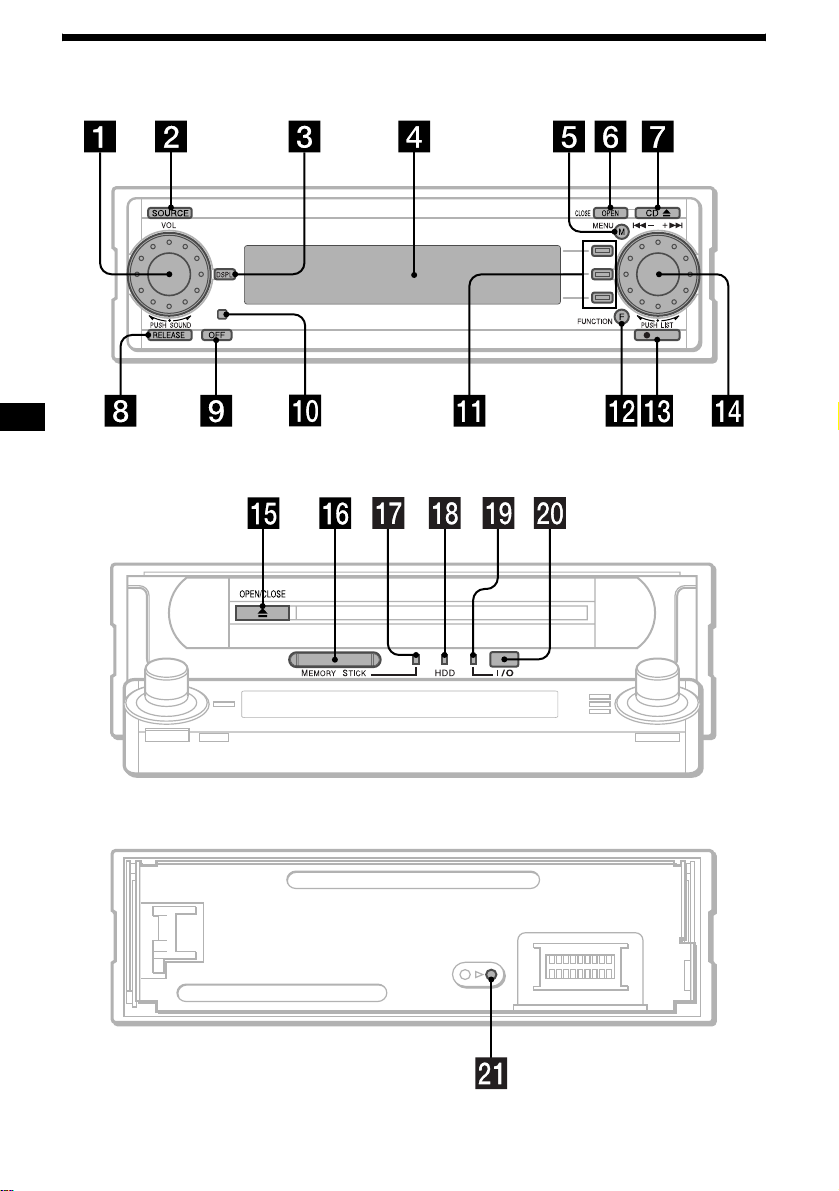
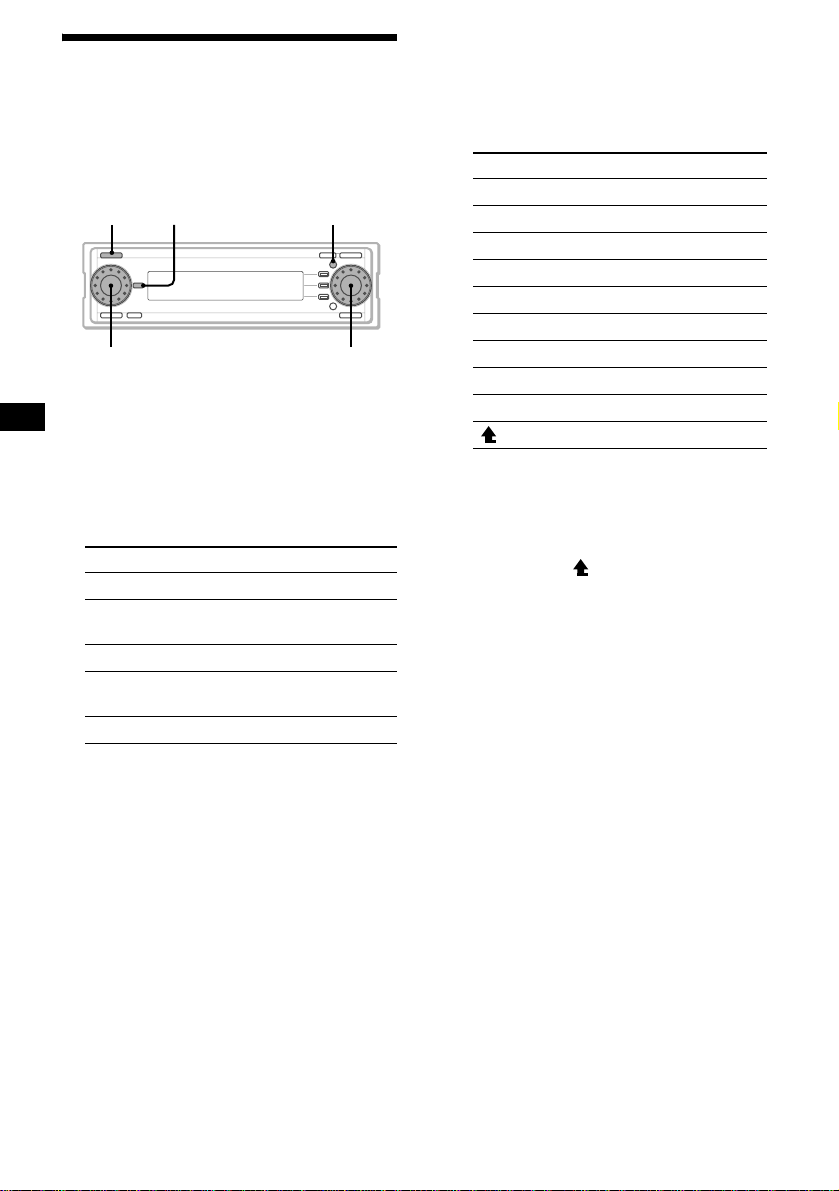
Location of controls
W
hen the front panel is opened
REC
MEX-1HD
When the front panel is removed
6

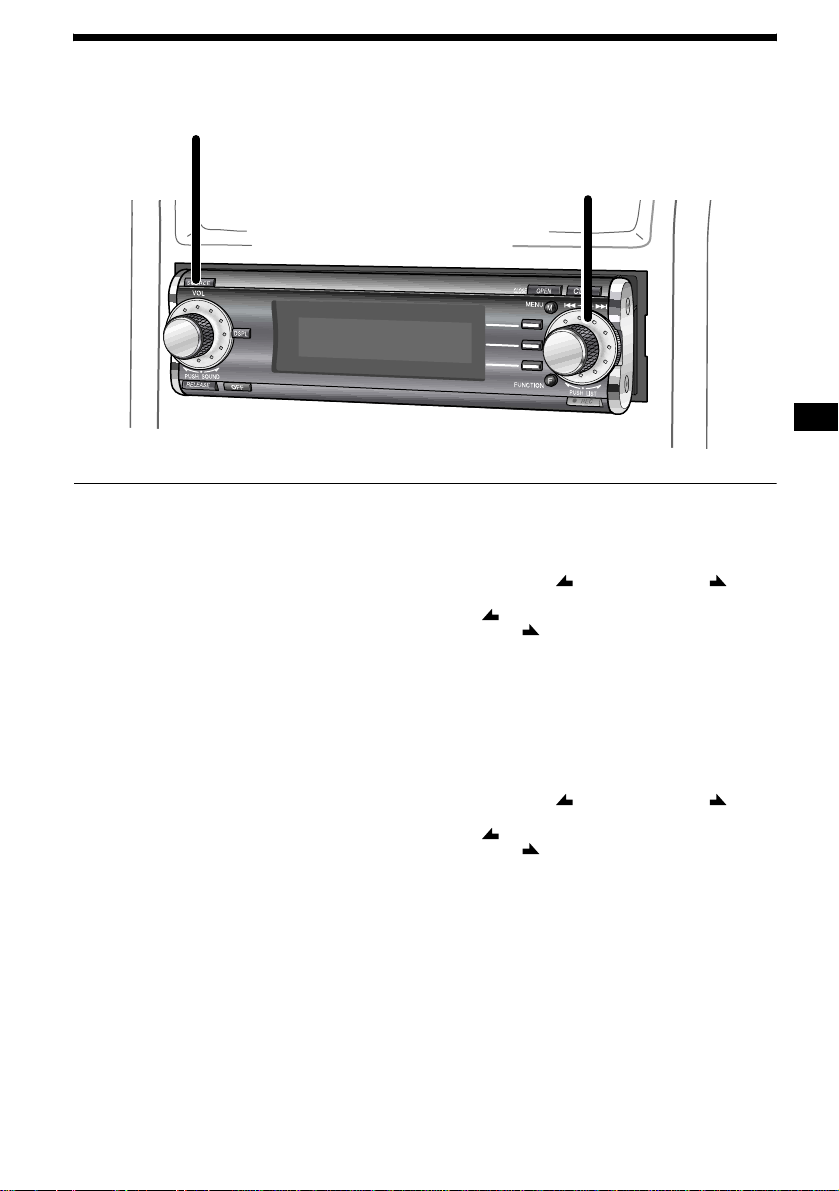
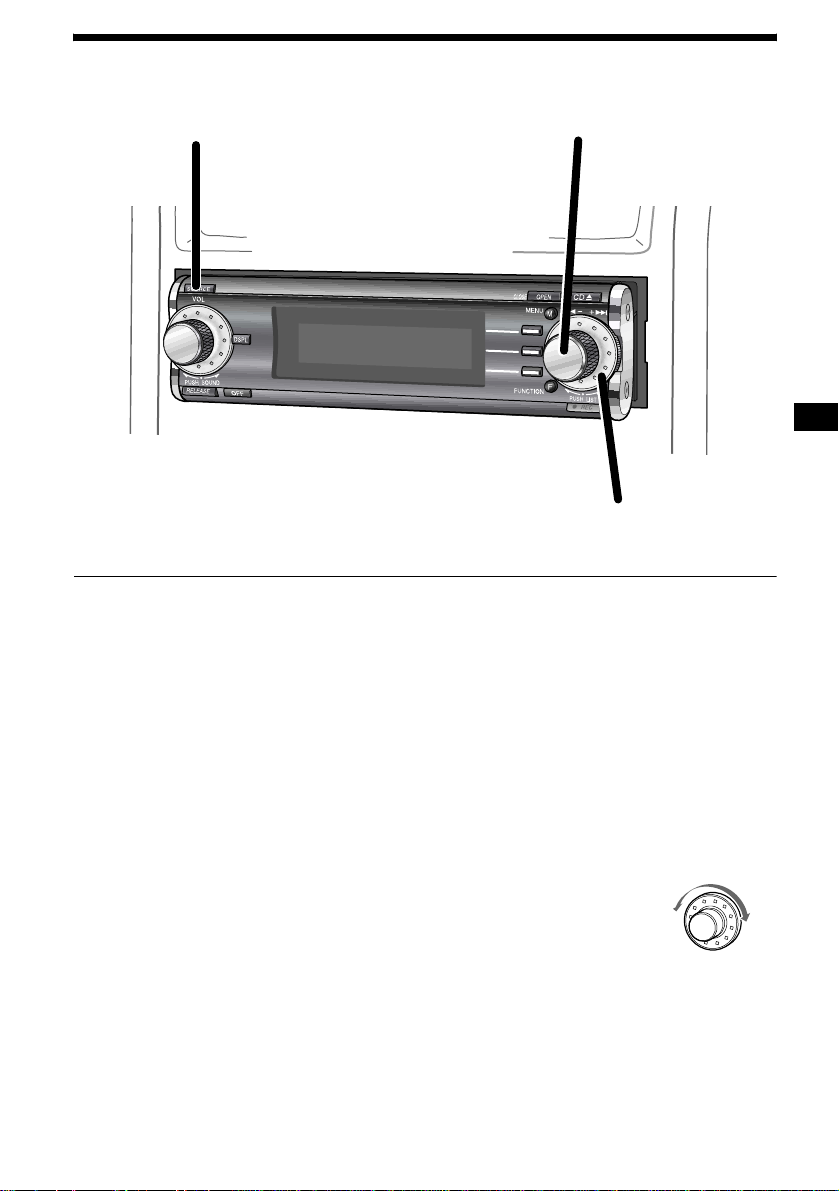
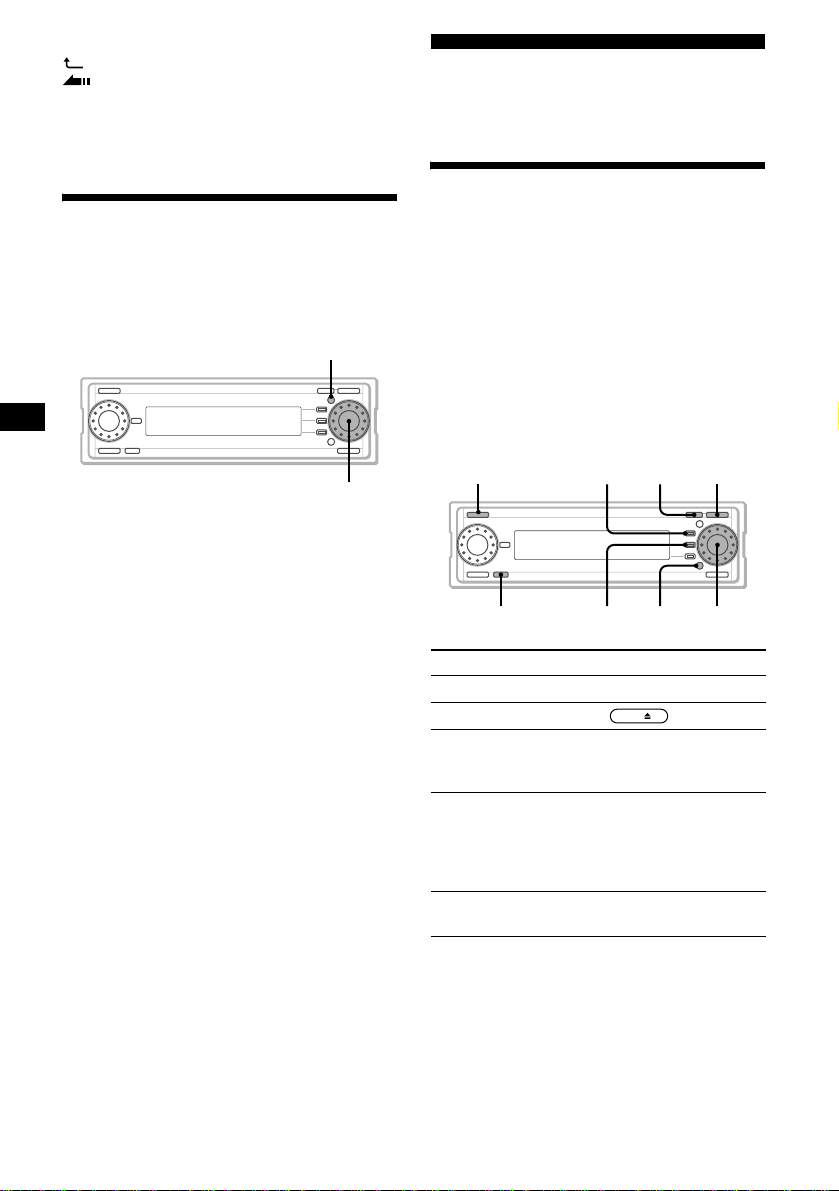
a L (left) dial
Rotate to:
– Adjust the volume
– Select a sound item
Press to:
– Display the sound menu
– Enter a setting
– Cancel the list display
b SOURCE button
To select the source.
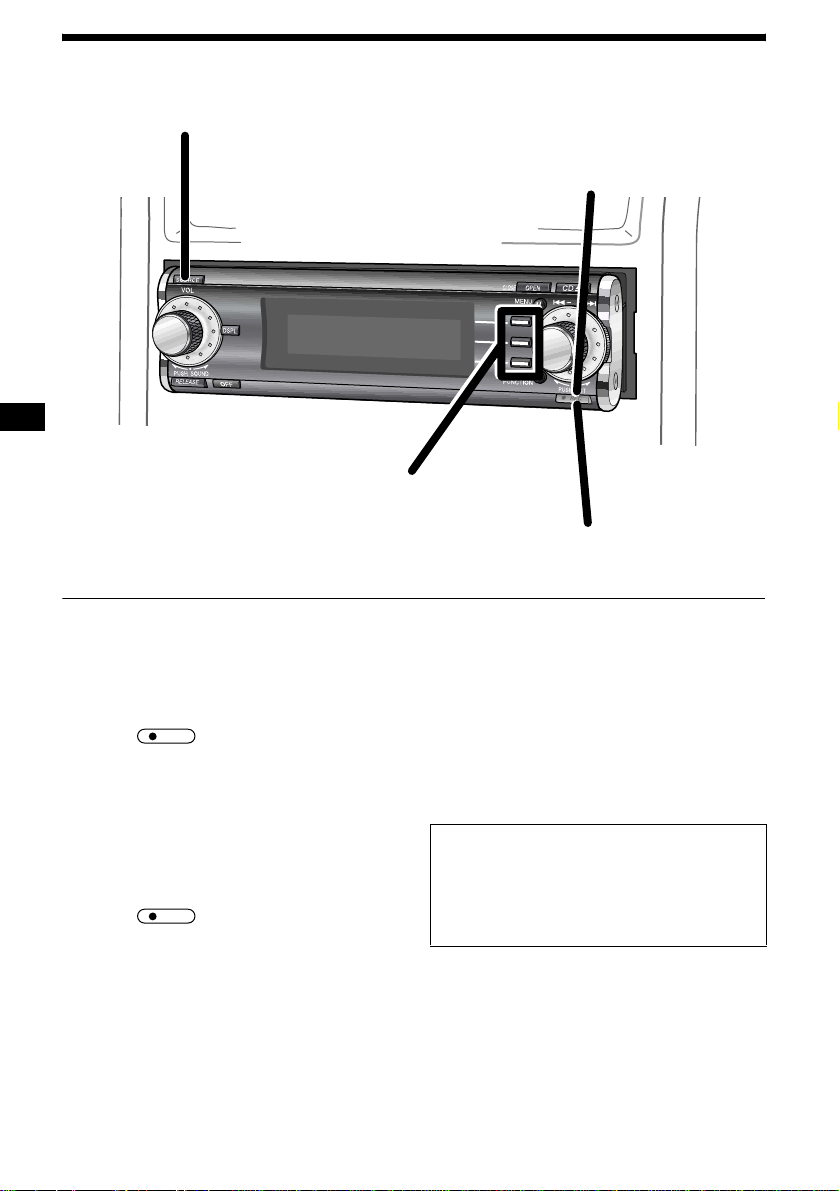
c DSPL button 10, 13, 14, 20, 27, 30, 32,
39
d Display window
e MENU button
To display the menus.
f OPEN (CLOSE) button 14, 18, 41
g CD Z (eject) button 10, 18
h RELEASE button 8
i OFF (Stop/Power of f) button* 8, 10,
14, 18
j Receptor for remote commander
k F1/F2/F3 buttons
These buttons have different functions
depending on the si tu at ion.
l FUNCTION button
To change the function menu.
m z REC button
For record settings/to start recording.
n R (right) dial
Rotate to:
– Receive preset stations
– Skip tracks
– Select a menu item
Press to:
– Display the list
– Enter a setting
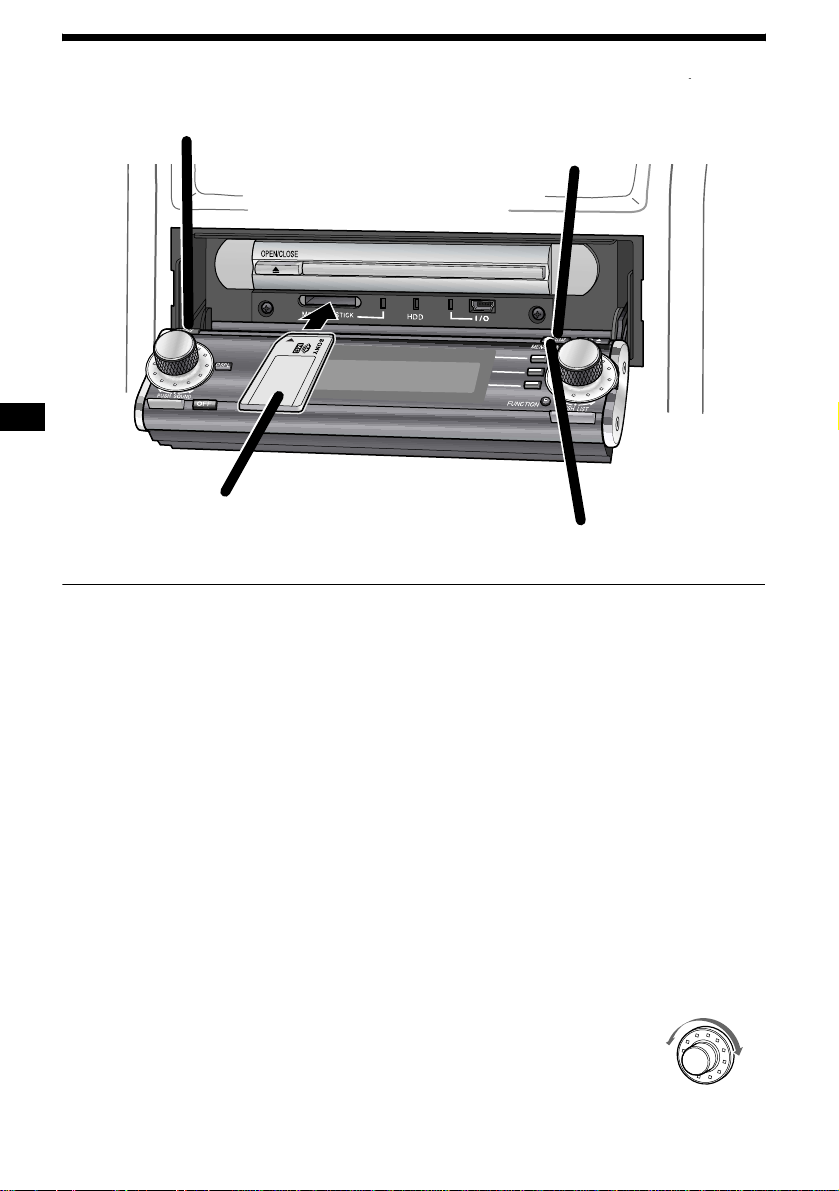
o Z (OPEN/CLOSE) 8, 19, 42
p “MG Memory Stick” Slot
q LED (“MG Memory Stick”)
Lights up while the unit is accessing the
“MG Memory Stick.”
r LED (HDD)
Lights up while the unit is accessing the
HDD.
s LED (I/O)
Lights up while the unit is accessing the
Digital I/O.
t Digital I/O terminal (4 pins)
To connect to the Network Walkman, etc.
u RESET button 8
* Warning when installing in a car without
an ACC (accessory) position on the
ignition switch
After turning off the ignit ion, be sure to press
(OFF) on the unit for 2 seconds to turn off the
clock display.
Otherwise, the clock display does not turn off
and causes batte ry drain.
7
Getting Started
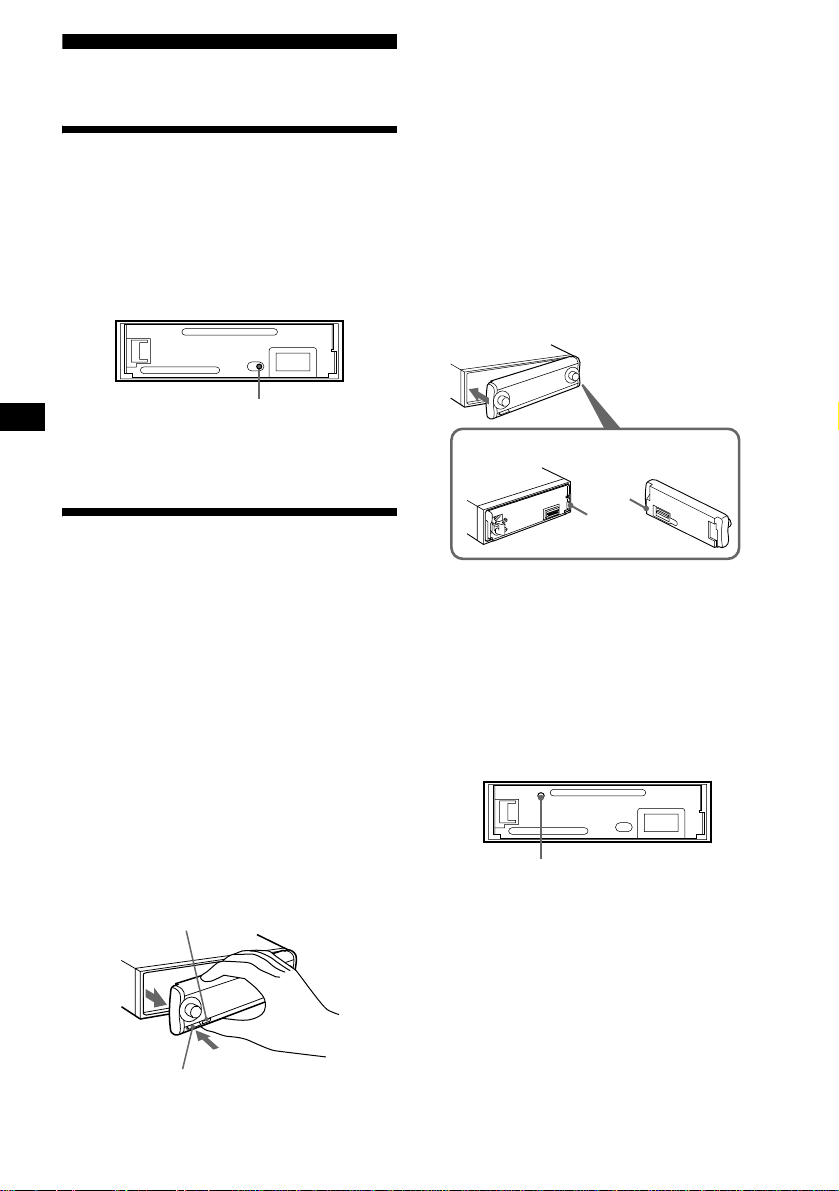
Resetting the unit
Before operating the unit for the first time, or
after replacing the car battery or chan gi ng the
connections, you must reset the unit.
Remove the front panel and pres s the RESET
button with a pointed object, such as a ball-point
pen.
RESET button
Note
Pressing the RESET button will er ase the clock setting
and some stored information.
Detaching the front panel
Notes
• If you detach the panel while the unit is still turned
on, the power will turn off automatically.
• Do not drop or put excessive pressure on the front
panel and its display window.
• Close the front panel before you detach it.
• Do not subject the front panel to heat/high
temperature or moisture. Avoid leaving it in a parked
car or on the dashboard/rear tray.
Tip
When carrying the front panel with you, use the
supplied front panel case.
Attaching the front panel
Attach part A of the front panel to part B of the
unit as illustrated and push the left side into
position until it clicks.
A
B
You can detach the front panel of this unit to
protect the unit from being stolen.
Caution alarm
If you turn the ignition switch to the OFF
position without removing the front panel, the
caution alarm wi ll beep for a few seconds.
1 Press (OFF)*.
CD, HDD, “MG Memory Stick” playback or
radio reception stops (the key illumination
and display remain on).
* If your car has no ACC position on the ignition
switch, be sure to turn the unit off by pressing
(OFF) for 2 seconds to avoid car battery drain.
2 Press (RELEASE) to open up the front
panel and pull it off towards you.
(OFF)
(RELEASE)
8
Notes
• Do not put anything on the inner surface of the front
panel.
• Do not detach the front panel during the eject
operation. If the front panel is detached during eject,
operation will stop.
To remov e the disc with the fro nt panel detached:
through hole C, press Z (OPEN/CLOSE) inside
the unit with a pointed object, such as a ballpoint pen.
C
Initial settings
The following settings are required before you
operate the unit for the first time, after replacing
the car batt ery, o r chan gi ng t he c onn ec tio n. If t he
date or the time on the unit is not set correctly,
the HDD may trace the playback history
incorrectly.
1 Press the RESET button (pag e 8) .
2 Attach th e fro n t p anel (page 8).
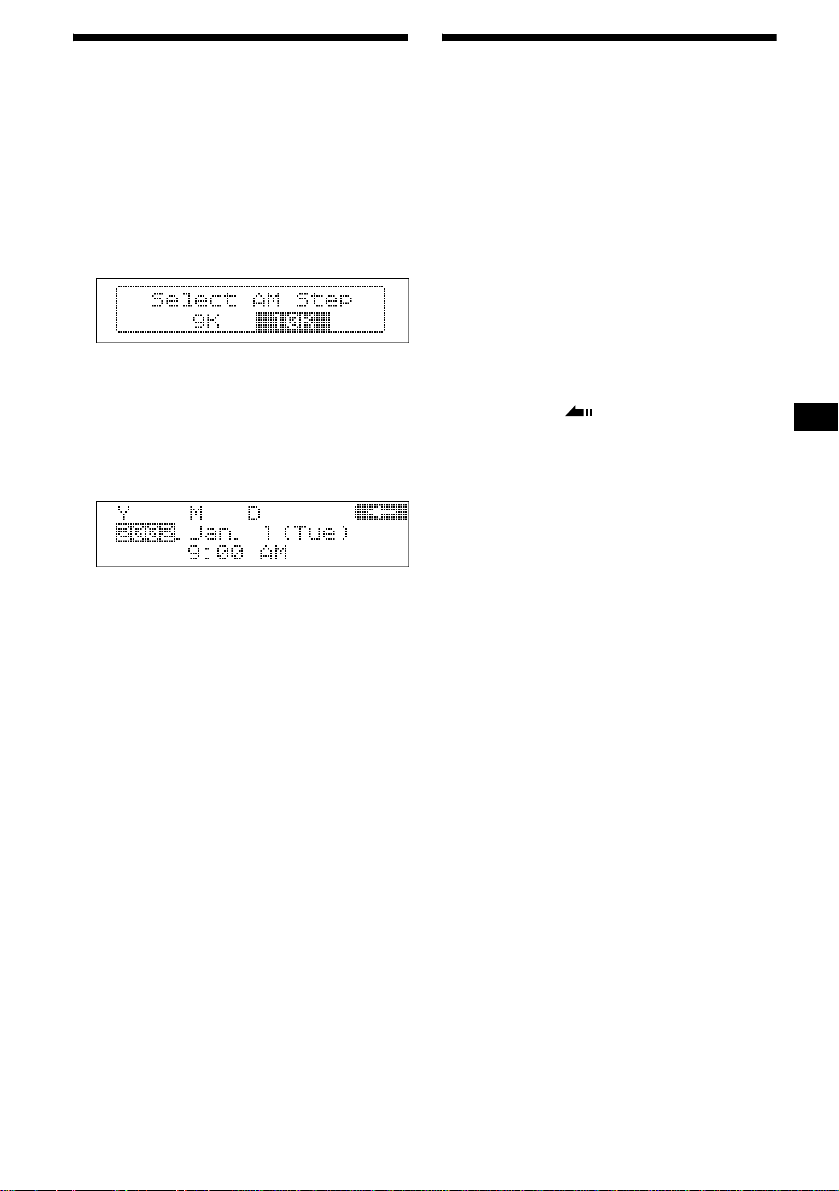
3 Rotate th e R dial to se l e ct AM Step
“9K” or “10K,” then press the R dial.
The AM (FM) tuning interval is fact ory-se t to
“10K.”
If the frequency allocation sy ste m of your
country is based on 9 kHz (50 kHz) interval,
set to “9K.”
4 Set the date and time.
1 Rotate the R di al to se l ect the year,
then press the R dial.
2 Rotate the R di al to se l ect the
month, then press the R dial.
3 Repeat steps 1 and 2 to set the
day, hour, minute.
The set date and time are displayed and the
clock appear s.
Deactivating the
Demonstration display
In the default setting, Demonstration is set to
“On” (to active the demonstration display). After
initial setting, you must set Demonstration to
“Off.”
1 Press (MENU).
2 Rotate the R dial to select “Di spl ay,”
then press the R dial.
3 Rotate the R dial to sele ct
“Demonstration,” then press the R
dial.
4 Rotate the R dial to select “O f f,” then
press the R di al.
5 Press (F3) ().
The normal display appears.
When you set the date and time after
the initial settings
Press (MENU) and select “Time S et” in “Set up ,”
then press the R dial.
Note
During the date and time setting, if Demonstration
display appears, press the R dial to display the date
and time setting display.
Tips
• The clock uses a 12-hour digital indication.
• The “AM” or “PM” indication is automatically
switched depending on the set hour.
• The indication for the day of the week changes
automatically according to the date.
• If you press (F1) in step 4, the cursor moves to the
previous item.
9
Basic operations
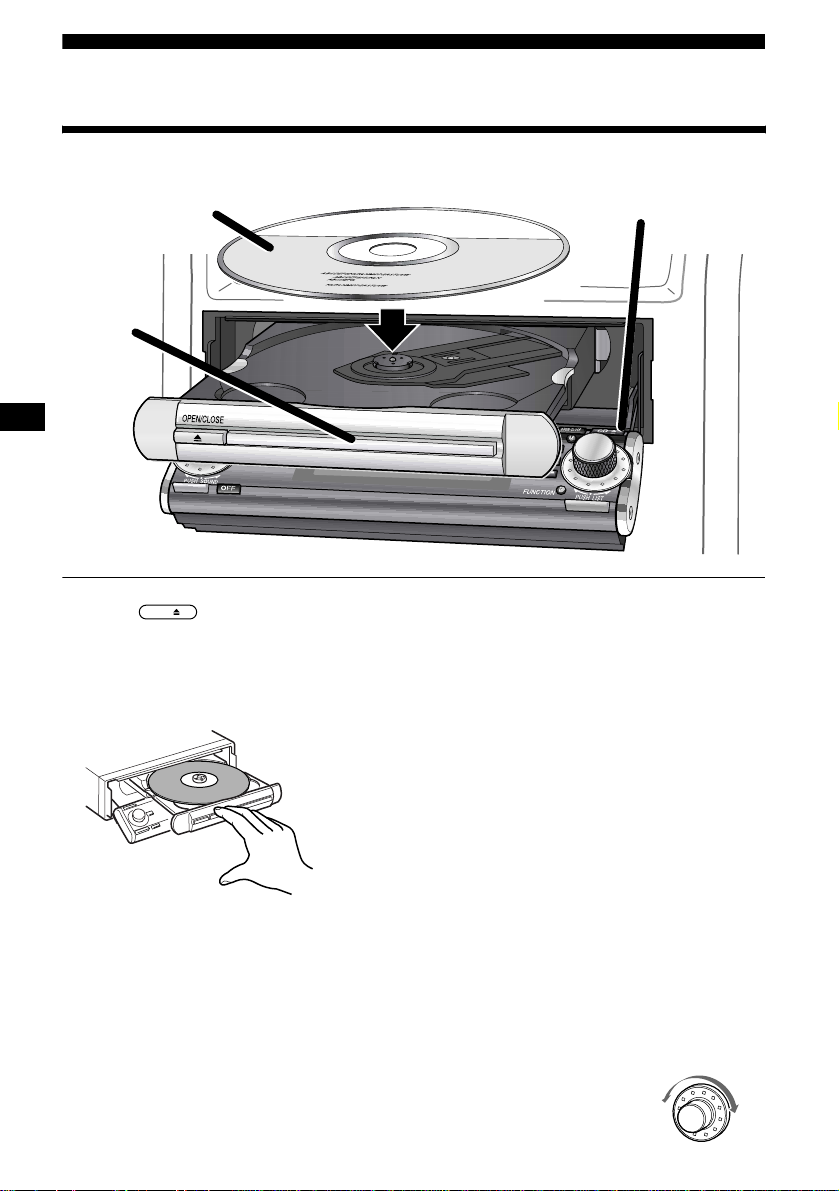
Listening to a track on a CD
2
3
1 Press .
The front panel slides down and the disc tray
slides out automatically.
2 Place a CD (labeled side up).
Set the CD on the disc tray until it clicks.
3 Push the disc tray.
CD
1
T o stop playback
Press (OFF).
When a CD is already inserted
Press (SOURCE) repeatedly to select “CD,” and
playback starts automatically.
To play back a CD auto matically
Set “CD Auto Play” (p age 20) to “On.”
The unit aut omati call y play s ba ck a CD when t he
disc tray is closed .
Playback starts automatically.
Notes
• Do not put any foreign objects between the front
panel and the unit. The front panel cannot close and
possible damage may occur to the unit.
• Do not place more than 1 disc on the disc tray.
• The disc tray and front panel closes automatically
after the caution alarm beeps.
To adjust the volume level
Rotate the L dial.
To switch the display items
Press (DSPL).
10
To locate a specific point in a track
— Manual searching
Press (FUNCTION) repeatedly to display the
function menu “m” and “M.”
(F1) (m) : To search backward
(F2) (M) : To search forward
Press and hold (F1) or (F2).
Release when you have found the desired point.
To locate a specific track
— Automatic Music Sensor (AMS)
Rotate the R dial.
L: To locate a preceding track
or the beginni ng poin t of the
current track
R: To locate a succeeding track
L
R
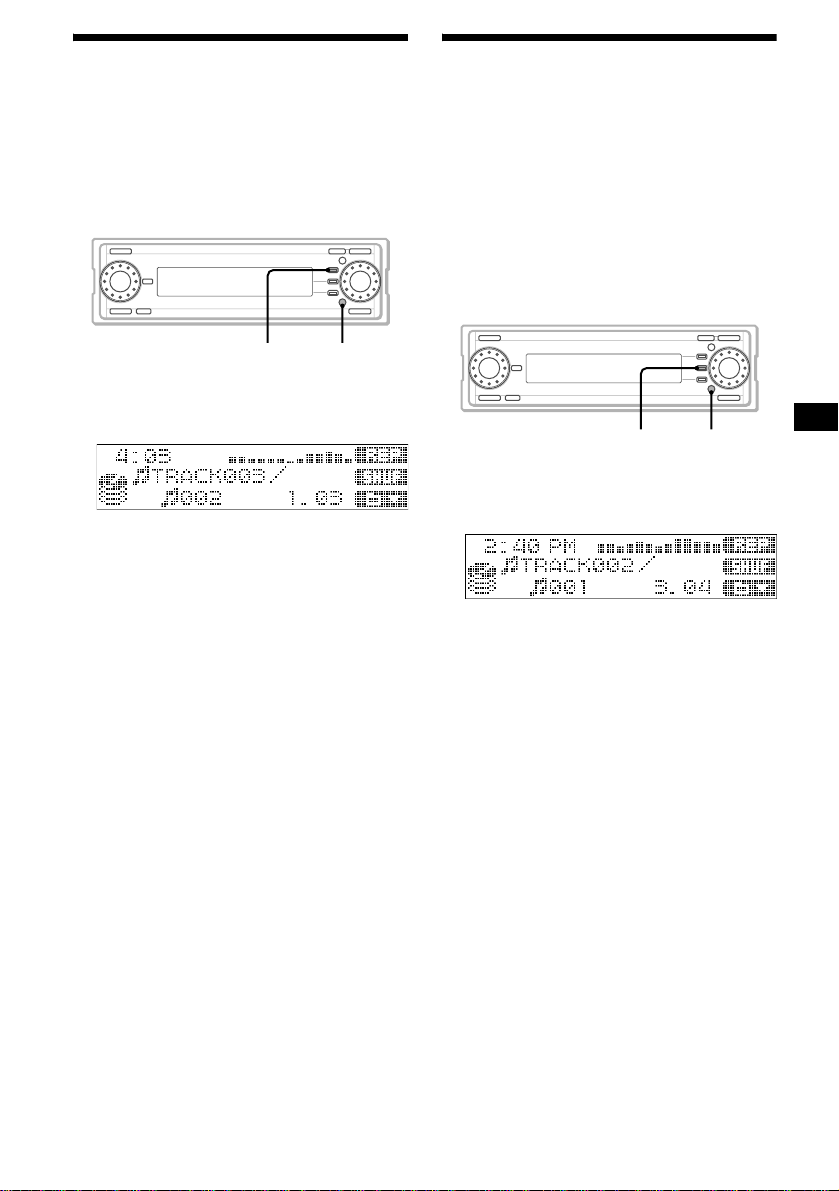
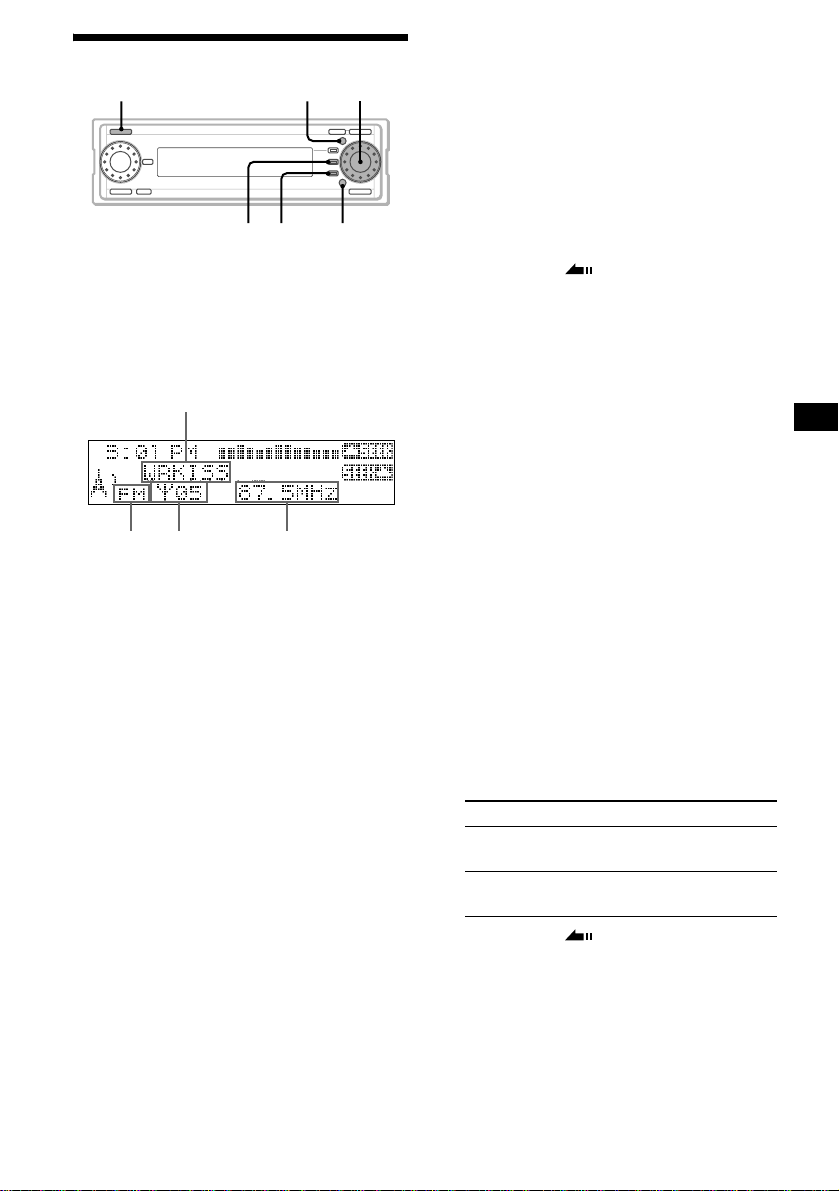
Listening to the radio
1
2
1 Press (SOURCE) to select “FM” or
“AM.”*
2 Rotate th e R dial to sel e ct the desi red
station.
You can select the station only when the
station is store d in the preset memory (page
24 or 26).
* When AM reception has been canceled, “AM” is
not displayed while you are selecting the source.
To activate the AM reception, set “AM Skip” to
“Off” (page 51).
To adjust the volume level
Rotate the L dial.
To stop listening to the radio
Press (OFF).
To receive a station automatically
— Automatic tuning
Press (FUNCTION) repeated ly to display the
function menu “ SEEK” and “SEEK .”
(F1) ( SEEK) :To search for preceding stations
(F2) (SEEK ) : To search for succeeding
Press (F1) or (F2).
Scanning stops when the unit rece ives a sta tion.
To receive the desired frequency
— Manual tuning
Press (FUNCTION) repeated ly to display the
function menu “ SEEK” and “SEEK .”
(F1) ( SEEK) : To search for a lower frequency
(F2) (SEEK ) : To search for a higher frequency
Press and hold (F1) or (F2).
Release when the unit receives the desire d
frequency.
stations
11
Recording audio CDs onto the HDD
1
3
2
4
1 Press (SOURCE) repeatedly to select
“CD.”
Note
If no CD is inserted, you cannot select “CD” as the
source.
2 Press .
The record setting display appears.
REC
3 Adjust settings for recording.
1 Press (F1) repeatedly to select the
recording bit rate, “132K” or “105K.”
2 Press (F2) repeatedly to select the
recording spee d, “HI-REC” or
“×1-REC.”
4 Press .
Recording start s.
CD playback starts automatically when all
tracks are recor ded.
To stop recording
Press (F1) (x).
REC
12
To listen to the radio while recording
Press (SOURCE) r epeatedly to select “FM” or
“AM.”
Each time you press (SOURCE), the source
changes as foll ows:
FM t AM t AUX* t CD t FM
When you select “CD,” the track being recorded
is played.
* If “AUX” is not displayed when selecting the source,
set “AUX Skip” in “Setup” to “Off” (page 56).
In the default setting, REC Continue is set to
“On” (to conti nue recording after ignition is
turned off, and turn off the unit automatically
after recording has completed). For details, see
“Changing the sound and display settings” on
page 51.
Listening to tracks on the HDD
1
1 Press (SOURCE) repeatedly to select
“HDD.”
Playback starts automatically from the first
track in the last album recorded on the HDD.
Note
When you use the HDD for the first time, or when
there is nothing recorded on the HDD, you cannot
select “HDD” as the source. In this case, record a
CD onto the HDD.
2 Press the R dial to display the list.
Each time you press the R dial, the list display
changes as follows:
Album name list t Track name list t
normal playba ck display
3 Rotate th e R dial to sel e ct the desi red
track, t h en press the R dial.
Playback starts.
To adjust the volume level
Rotate the L dial.
2
3
To locate a specific point in a track
— Manual searching
Press (FUNCTION) repeated ly to display the
function menu “m” and “M.”
(F1) (m) : To search backward
(F2) (M) : To search forward
Press and hold (F1) or (F2).
Release when you have found the desired point.
To locate a specific track
— Automatic Music Sensor (AMS)
Rotate the R dial.
L: To locate a preceding track
or the beginni ng poin t of the
current track
R: To locate a succeeding track
L
R
To switch the display items
Press (DSPL).
To stop playback
Press (OFF).
13
Listening to audio files
4
2
1
3
1 Press (OPEN).
The front panel slides down automatically.
2 Insert an “MG Memory Stick” until it
clicks.
3 Press (OPEN) again.
The front panel i s closed.
4 Press (SOURCE) repeatedly to select
“MEMORY STICK.”
Playback starts automatically.
To adjust the volume level
Rotate the L dial.
To switch the display items
Press (DSPL).
To stop playback
Press (OFF).
When an “MG Memory Stick” is already
inserted
Press (SOURCE) repeatedly to select
“MEMORY STICK.” Playback starts
automatically.
14
Note
If no “MG Memory Stick” is inserted, you cannot select
“MEMORY STICK” as the source.
Tip
“NO CONTENTS” will be displayed when there are no
audio files that can be played back.
To locate a specific point in a track
— Manual searching
Press (FUNCTION) repeatedly to display the
function menu “m” and “M.”
(F1)
(m): To search backward
(M): To search forward
(F2)
Press and hold (F1) or (F2).
Release when you have found the desired point.
To locate a specific track
— Automatic Music Sensor (AMS)
Rotate the R dial.
L: To locate a preceding
track or the beginning
point of the current track
R: To locate a succeeding track
L
R
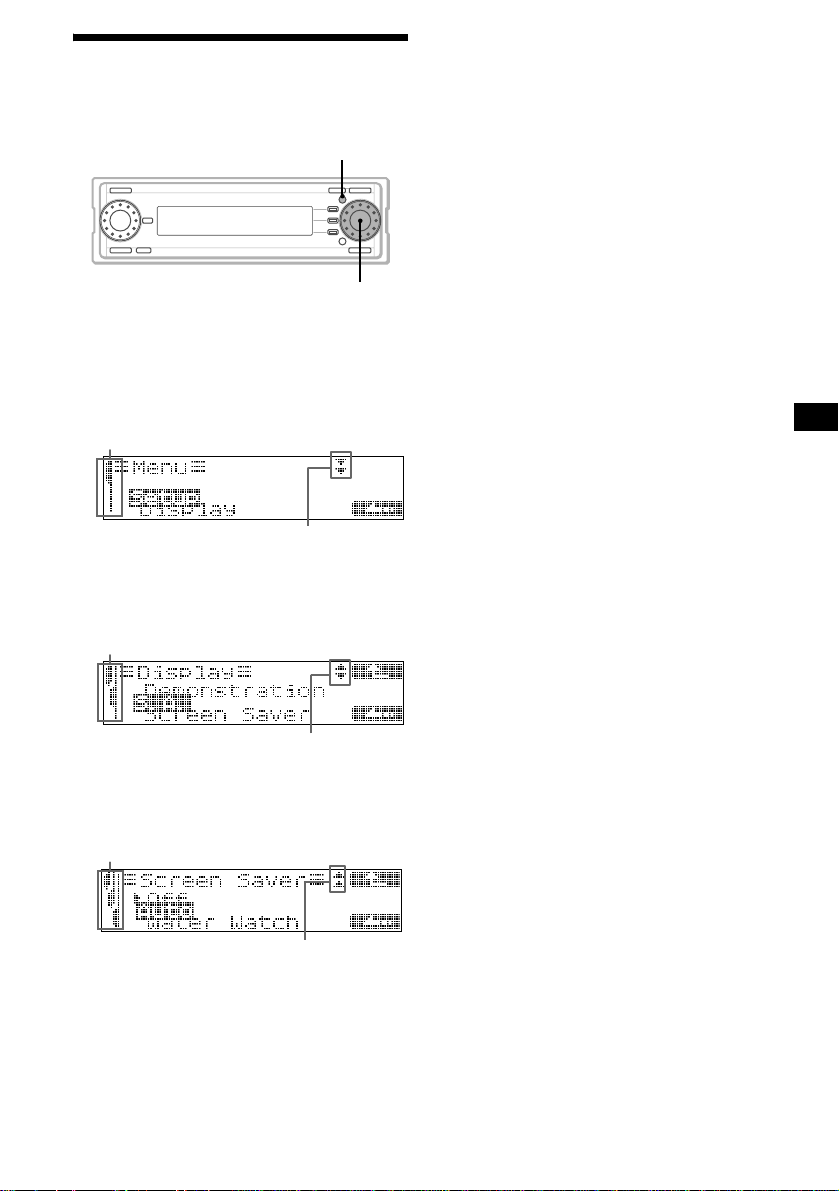
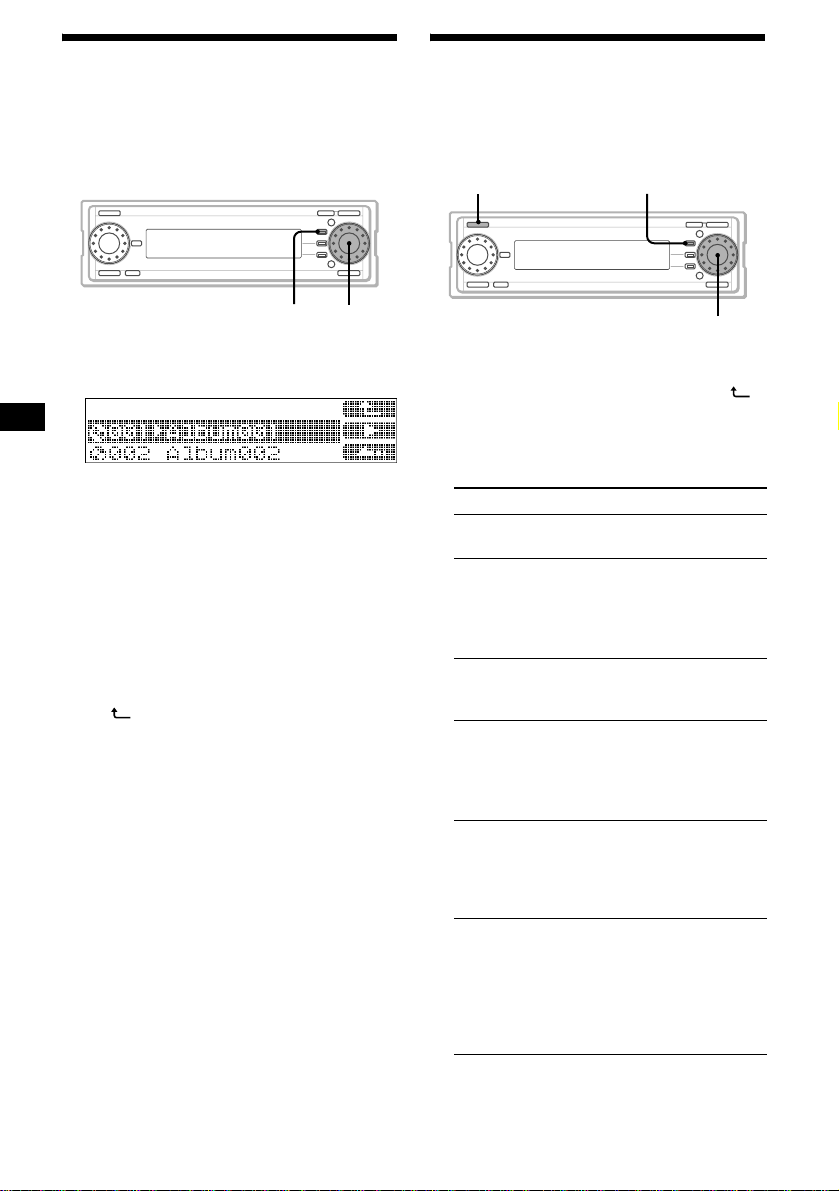
Menu display
You can change the funct i on m odes or the
various setting s of the unit acco rd in gly.
MENU
R dial
To change the settings
Example: To set “Screen Saver” to “Auto”
1 Press (MENU).
indicates you are in the first level
of the menu settings
indicates there ar e other le vels
below the current level
2 Rotate the R dial to select “Display,”
then press the R dial.
indicates you are in the second
level of the menu settings
Tip
Menu items appear depending on the source selected.
For details, see “C hanging the sound and display
settings” on page 51.
indicates there are other levels above
and below the current level
3 Rotate the R dial to select “Screen
Saver,” then press the R dial.
indicates you are in the third
level of the menu settings
indicates there are other
levels above the current level
4 Rotate the R dial to select “Auto, ” then
press the R dial.
5 Press (MENU).
The normal display appears.
15
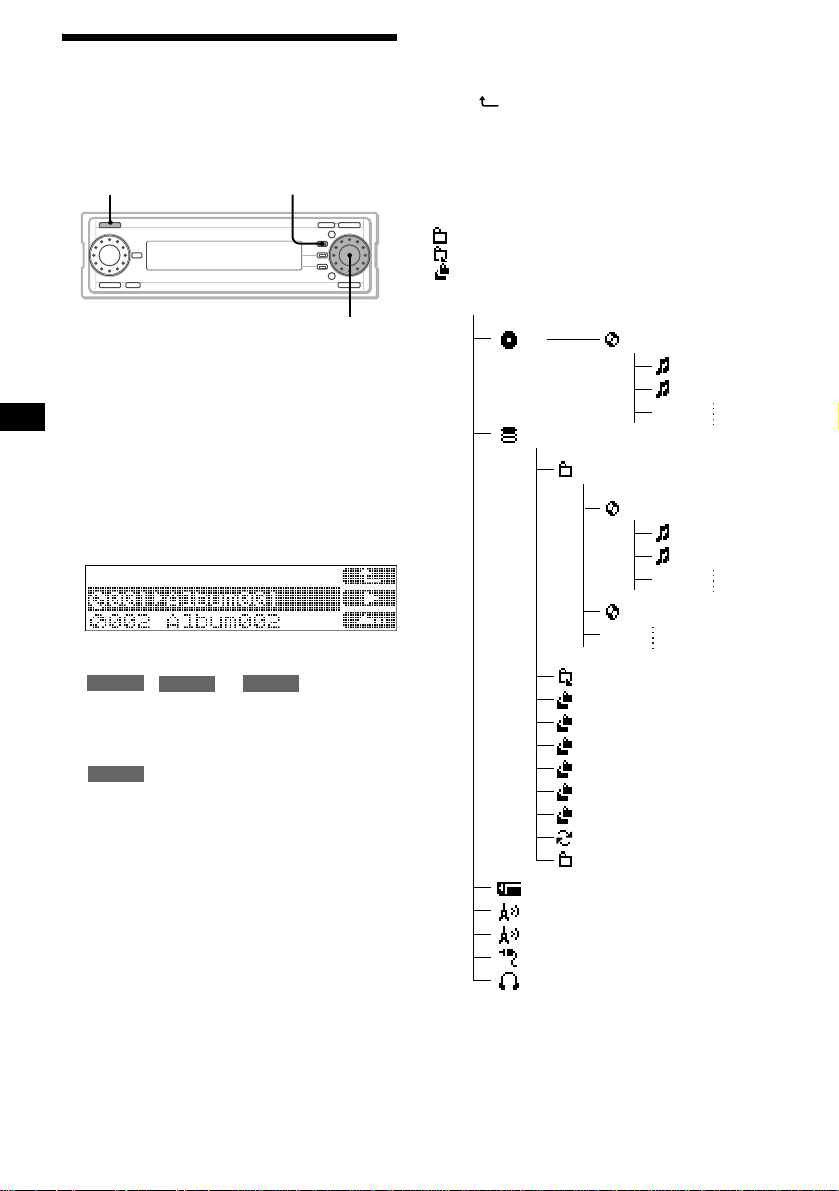
List display
The radio station names or the folder/alb um/track
names are displayed depending on the source
selected. You can simply select an item on the list
to play or listen to.
SOURCE
To select the item
1 Press (SOURCE) repeatedly to select
the source (CD , HDD, ME MOR Y STICK,
FM, AM or AUX*).
* If “AUX” is not displayed when selecting the
source, set “AUX Skip” in “Setup” to “Off” (page
56).
2 Press the R dial.
The name list display appears.
Each time you press the R dial, the list display
changes as foll ows:
, or :
HDD
Album (disc*
t Normal playback display t Album
(disc*
RADIO
CD
1
) name list t Track name list
1
) name list
:
The station nam e list appears*
*1 Available only when you select “CD.”
*2 Available only when station is stored.
3 Rotate the R dial to select th e desired
item.
4 Press the R dial.
The selected item is played/received.
Tip
You can use functions such as Move or Erase for the
selected item by pressing (MENU).
F1
MEMORY STICK
2
.
R dial
To display the folder name list, or
source list
Display the album name list in step 2, then press
(F1) ().
Each time you press (F1), the list display
changes as foll ows:
Album name list t Folder name list t Source
list
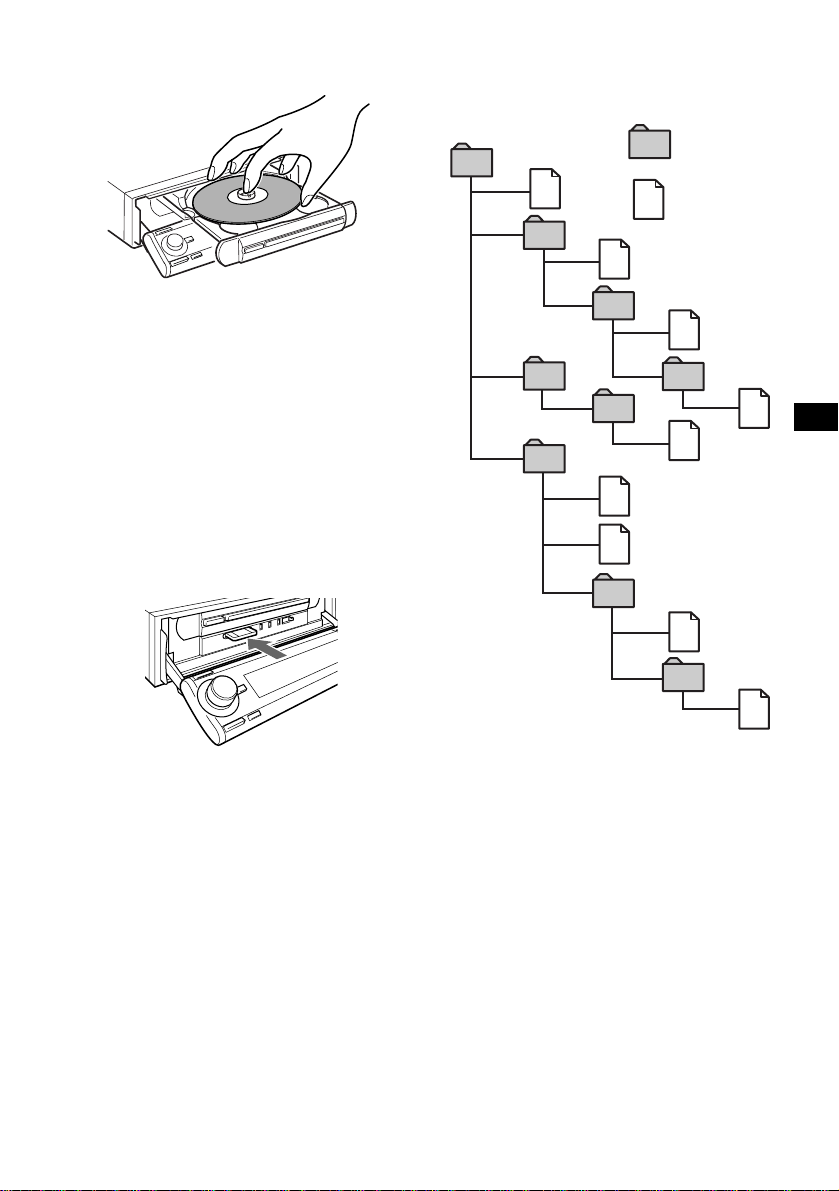
List structure
: Storage folder
:Play List folder
:Sort folder
MEX-1HD
CD
HDD
Memory Stick
FM
AM
AUX
Digital I/O
001 Album
001 TRACK
002 TRACK
001 Folder001
001 Album
001 TRACK
002 TRACK
002 Album
002 Play List
003 Artist
004 Time Stamp
005 Title
006 Access Ranking
007 Less Access Ranking
008 History
009 Recycle Bin
010 DATA
16
Function menu
The followin g items are displayed
depending on the situation
You can change the various settings or modes
easily with the function menu. Some specific
functions frequently used are assi gned to the
function buttons (F1) to (F3) according to the
source selected.
SOURCE
F1F2
FUNCTIONF3
To switch the function menu
1 Press (SOURCE) repeatedly to select
the source (CD, HDD, ME MOR Y STICK,
FM, AM o r AUX*).
* If “AUX” is not displayed when selecting the
source, set “AUX Skip” in “Setup” to “Off” (page
56).
2 Press (FUNCTION) repeatedly to
display the function menu.
Function menu
3 Press (F1) to (F3) to adjust the
settings for the functions and modes.
Each time you pr ess (FUNCTION), the
function menu changes as follows;
:
RADIO
F1: >SEEK BTM
F2: SEEK. t LOCAL t
F3: AM/FM
, or :
HDD
F1: m REP
F2: M t SHUF t
F3:
* : available only when you select “HDD.”
CDDB/CD TEXT: available only when you are
playing back a CD TEXT disc.
CDDB: available only when y ou are playing back
an audio CD where multiple possible matches of
different title information are found in the
Gracenote CDDB
AUX
F1:
F2:
F3:
CD
*
:
MEMORY STICK
®
database.
During radio reception or playback
SEEK/SEEK : searches for radio stations
manually or automatically.
BTM: stores stations with the strongest signals.
LOCAL: changes the local mode to “On” or
“Off.”
FM/AM: switches the radio band to AM or FM.
m/M: searches for a desired point in the
track.
REP: changes th e repeat playback mode.
SHUF: changes the shuffle playback mod e.
: changes the folder.
CDDB/CD TEXT: changes displayed title
information (CD TEXT or Gracenote CDDB
information) during CD TEXT disc playback
(see “Notes on Gr acenote CDDB
®
” on page 20).
®
CDDB: changes displayed title information
during playback of a n audio CD where multiple
possible matches of dif ferent tit le informat ion are
found in the Gracenote CDDB
®
database.
: changes the SA pattern (Spectrum
analyzer).
: changes the sc reen saver pattern.
: changes the display to “On” or “Off.”
During the menu setting operation
: to return to the prev ious display.
: to return to the normal display.
CANCEL: to cancel the item or the mode
selected.
ENTER: to confirm the item selected.
ALL: to select all i tem s or cancel all selected
items.
CREAT E: to create a new Folder/Album.
On the list display
: to return to the prev ious display.
B: to receive the station or start playback.
: to return to the normal display.
During the Name In operation
: to move the cursor to th e left.
: to move the cu rsor to the right.
ENTER: to store the characters entered.
CLEAR: to erase a c har acter entered.
CANCEL: to eras e all characters enter ed.
During the REC setting operation
132K/105K: to change the recording bit rate.
HI-REC/×1-REC: to select high-speed or normal
speed recordin g.
: to return to the normal display.
ALL: to confirm or cancel all selected items.
x: to stop recording.
CREAT E: to create a new Folder/Album.
continue to next page t
17
During the sound setting operation
: to return to the previous display.
: to return to the normal display.
INIT: to restore the default settings.
TUNE: to move to the tuning display.
LPF: to move to the low-pass filter display.
HPF: to move to the high-pass filter display.
Checking the information on
the contents selected
You can confirm the available HDD free space,
or the restricti ons to Check-In/O ut, etc.
1 Press the R dial to display the desire d
item list you want to check.
2 Rotate the R dial to select th e it em ,
then press (MENU).
3 Rotate the R dial to select
“Information,” then pr es s th e R dial.
The information display appears.
The items listed below are displayed
according to the source selected :
– Remaining HDD free space
– The number of fol ders, albums and tracks
– Check-In/Out is available/not available
– Move-In/Out is available/not available
– Import is available/not available
– Playback tim e
– Recording bit rate (- - - kbps/Variable bit
rate)
– The date and time that the item has been
created
– The restriction for playback count
– The restriction for playback valid period
Notes
• The playing time of a track which has not been
played back may be displayed as “--.”
• In certain cases, the album name of the track which
has not been played back may not be displayed.
• There may be a discrepancy between the playing
time displayed and the actual playing time.
• When checking a CD with a complex MP3 structure,
only the contents (folders and files) in the folder
currently selected are displayed.
To display the content information of another folder,
select the corresponding folder accordingly.
18
MENU
R dial
CD/HDD/“MG Memory
Stick”
Playing a track
When playing a music CD, a track recorded on
the HDD or “MG Memory Stick,” text
information (folder name, album name, track
name, artist name etc.) is displayed.
Press (SOURCE) repeatedly to select
“CD,” “HDD” or “MEMORY STICK.”
Playback starts automatically.
Note
When no media such as a CD or an “MG Memory
Stick” is inserted, or no audio file is on the HDD,
corresponding source indications such as “CD,” “HDD”
or “MEMORY STICK” do not appear in the display
while selecting.
SOURCE CDZOPEN
To Do this
Stop playback Pr es s (OFF).
Eject the disc Press .
Skip tracks
–Automatic
Music Sensor
Fast-forward/
reverse
–Manual Search
Open the front
panel
F1
FUNCTIONOFF F2
CD
Rotate the R dial.
Press (FUNCTION) to
display the function menu,
then press and hold (F1) or
(F2) and release at the
desired point .
Press (OPEN).
R dial
To remove the disc, press down the center
spindle, and lift up th e edge of the disc from the
relief in the disc tray.
Notes
• Do not touch the lens in the disc tray.
• Do not use a commercially available lens cleaner.
• Depending on the recording method used on the
disc, it may take a minute or more before playing the
first track.
• Depending on the condition of the disc, it may not
play back (page 61, 62).
• CD-R or CD-RW discs should be finalized.
• When the R dial is rotated while the first (or last)
track on the disc is being played, playback skips to
the last (or first) track on the CD.
• If the last track on the disc is over, playback restarts
from the first track of the disc.
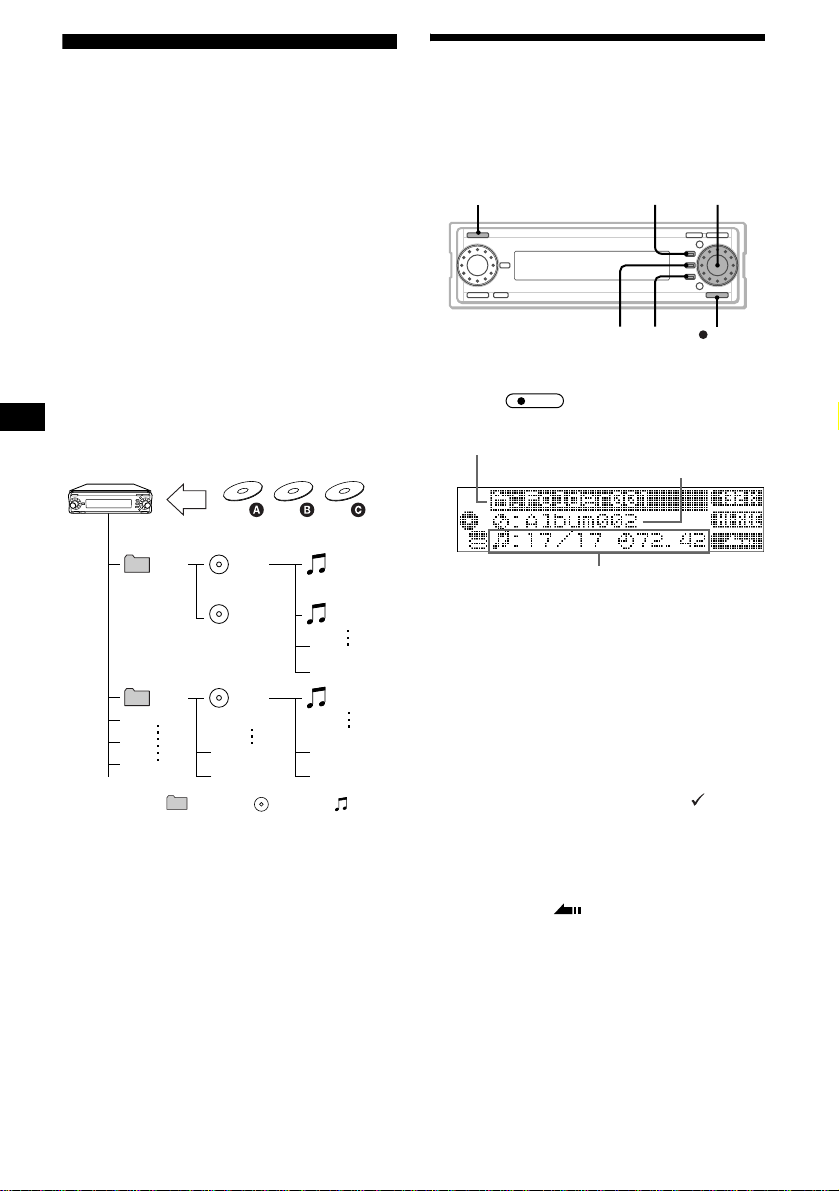
The playback order of MP3 files
The playback order of the folders a nd files is as
follows.
Example:
Folder (album)
1
1
MP3 file (track)
2
2
3
3
4
5
6
6
5
4
To eject the “MG Memory Stick,” push in the
“MG Memory Stick” lightly, then pull out.
Notes
• There is a delay of a few seconds after you press Z
(OPEN/CLOSE) before the disc tray is ejected.
• Insert the “MG Memory Stick” in the correct
direction.
• Do not forcefully remove the “MG Memory Stick.”
• The following tracks cannot be Checked-Out:
– A track whose allowable number of Check-Out
count is 0 (zero)
– A track whose playback period has expired
7
7
8
8
9
Tree 1
(root)
Notes
• A folder that does not include an MP3 file is skipped.
• Max i mum folder number: 255 (including the roo t
folder and empty folders)
• The maximum number of MP3 files and folders that
can be contained in a disc: 512
If a file/folder name contains many characters, this
number may become less than 512.
• The maximum number of trees which can be played
is 8.
• If ATRAC3 files and MP3 files are in the “MG
Memory Stick,” only ATRAC3 files are played back
(MP3 files are not played back or displayed).
• Do not store MP3 files in the HIFI folder or
CONTROL folder of the “MG Memory Stick” as they
cannot be played or recognized.
Tip
To specify a desired playback order, before the folder
or file name, input the order by number (e.g., “01,”
“02”), then record contents onto a disc. (The order
differs depending on the writing software.)
Tree 2
Tree 3
Tree 4
Tree 5
19
Display items
When the folder/album (disc)/track changes, any
prerecorded title of the new folder/album (disc)/
track is automatically displayed.
A
B
Each time you press (DSPL), items change in
order as follows.
When playing back a track on the HDD
Items
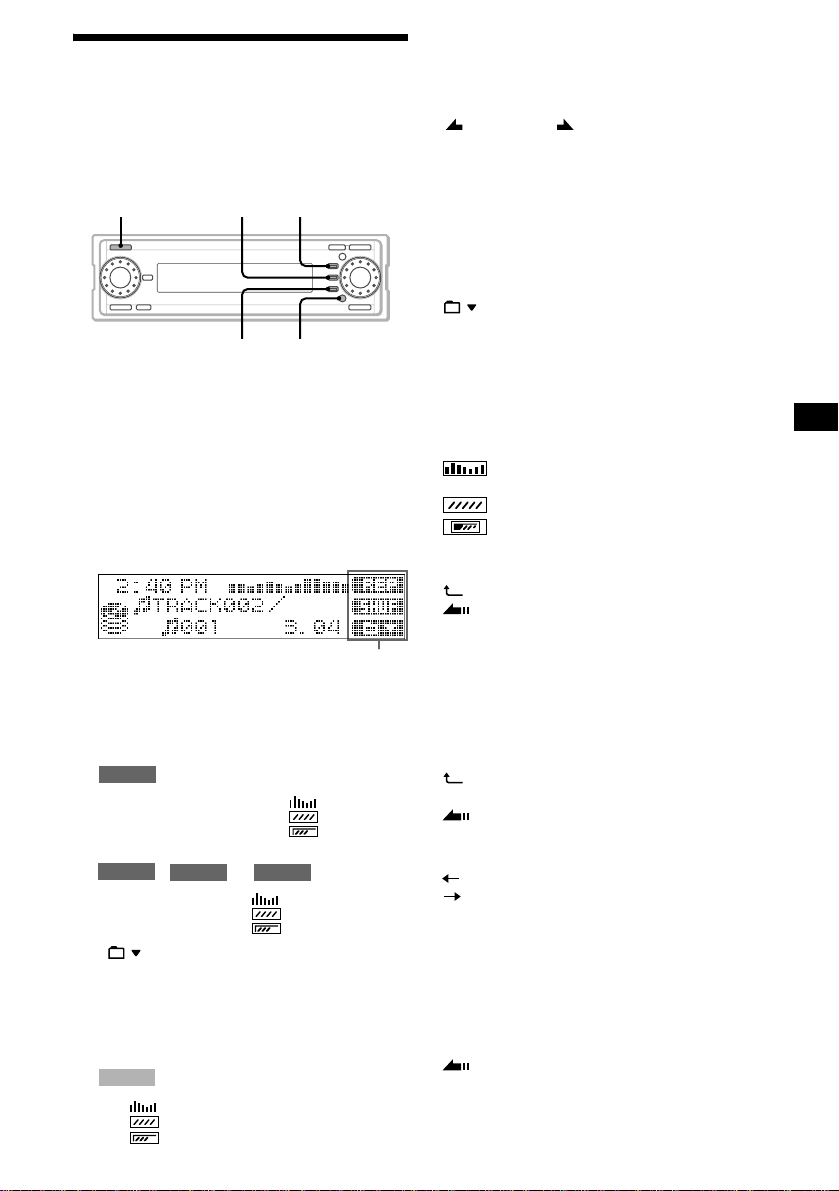
1 AClock/S.A. BTrack name/Artist name
CTrack number/Elapsed playing time
AClock/S.A. BAlbum name/Artist name
2
CTrack name/Artist name
3 AAlbum name/Artist name BTrack name/
Artist name
time
4
AFolder name BAlbum name/Artist name
CTrack name/Artist name
AFolder name BTrack name/Artist name
5
CTrack number/ Elapsed play in g time
6 AClock/S.A. BFolder name
CTrack name/Artist name
C
CTrack n um ber/Elaps ed playing
• When a CD TEXT disc is pl a ye d ba c k, C D T EXT has
priority over Gracenote CDDB ® information.
To change CD TEXT to Gracenote CDDB
information, press (FUNCTION) repeatedly to display
“CDDB,” then press (F3) (CDDB).
• Gracenote CDDB
If title information is incorrect, you can edit it with this
unit (page 30) or Mobile Library Manager (page 54).
Notes on MP3
• If an MP3 file has an ID3 tag, the ID3 tag information
has priority o ver other information.
• When an MP3 file is being played back, the disc
volume name and the folder name will be displayed
instead of the folder name and the artist name
respectively.
• ID3 tag applies only to version 1 and version 2 (text
only). If ID3 tag information ver.1 and 2 are
contained, ver.2 information will be displayed.
• In the following cases, elapsed playing time may not
be displayed accurately.
– when an MP3 file of VBR (variable bit rate) is
played
– duri ng fast-forward/reverse
®
data may contain inaccuracies.
®
Playing the tracks on CD
automatically
When you close the disc tray after inserting a
CD, the unit automatically starts playing back
from the first track of the CD.
MENU
Notes
• The names of music files on an “MG Memory Stick”
are displayed in the format compliant with ISO 9660
(page 62).
• When a folder, album or disc has no name, those
number (such as Track 001) is displayed.
• Some charact ers can not be di splayed.
• For some CD TEXT discs with very many
characters, information may not scroll.
• A track name is displayed when you play back MP3
files, a track on the HDD, “MG Memory Stick,” or
when you play back a CD TEXT disc.
Notes on Gracenote CDDB
• When an audio CD is played back, the Gracenote
®
Music Recognition ServiceSM (CD data
CDDB
base) on the unit is accessed (while accessing,
“Accessing Gracenote CDDB” appears) and the title
information (disc name/artist name/track name) is
displayed.
“Accessing Gracenote CDDB” appears, only when
the CD first starts playing.
®
20
F3
R dial
1 Press (MENU).
2 Rotate the R dial to select “Setup,”
then press the R dial.
3 Rotate the R dial to select “CD Auto
Play,” then press the R dial.
4 Rotate the R dial to select “On,” then
press the R dial.
5 Press (F3) ().
The normal display appears.
T o canc el Auto Play
Select “Off” in step 4.
Playing tracks repeatedly
— Repeat Play
The unit can repeat a track, an album, or a folder
when the item being played reaches th e end. The
followi ng repeat options are av ailable:
• Track Repeat — to repeat a track.
• Album Repeat*
• Folder Repeat*
1 During playback, press (FUNCTION)
repeatedly to display the function
menu “REP.”
2 Press (F1) (REP) repeatedly to select
the desired Repeat Play mode .
Repeat Play starts .
Each time you pr ess (F1), the Repeat Play
mode changes as follows:
Track Repeat t Album Repeat*
Folder Repeat*
*1 Available only when you select “HDD.”
*2 Available only when you select “HDD” or when you
are playing back an MP3 file.
To return to the normal playback mode
Select “Repeat Off” in step 2.
Tips
• To select the Repeat Play mode in another way,
press (MENU) during playback, then set “Repeat” in
“Play Mode” to “Off,” “Track,” “Album” or “Folder”
accordingly (page 52).
• Repeat Play mode order changes according to the
source selected.
1
— to repeat an album.
2
— to repeat a folder.
FUNCTIONF1
2
t Repeat Off
1
t
Playing tracks in random
order
— Shuffle Play
Tracks on an album, a folder (or a disc) are
played in random order. The following shuffle
options are available.
• Album Shuffle*
current album in random order.
• Folder Shuffle*
current folder in random order.
• Shuffle All — to pla y all tracks in all f olders in
random order.
1 During playback, press (FUNCTION)
repeatedly to display the function
menu “SHUF.”
2 Press (F2) (SHUF) repeatedly to select
the desired Shuffle Play mode.
Shuffl e Play starts.
Each time you press (F2), the Shuffle Play
mode changes as fol l ows:
Album Shuffle*
Shuffle All t Shuffle Off
*1 Available only when you select “HDD.”
*2 Available only when you select “HDD” or you are
playing back an MP3 file.
To return to the normal playback mode
Select “Shuffle Off” in step 2.
Note
“Shuffle All” will not shuffle tracks between CD,
“MG Memory Stick” and HDD.
Tips
• To select the “SHUF” mode in another way, press
(MENU) during playback, then set “Shuffle” in “Play
Mode” to “Off,” “Album,” “Folder” or “A ll” accor dingly
(page 52).
• Shuffle Play mode order changes according to the
source selected.
1
— to play the tracks in the
2
— to play the tracks in the
F2 FUNCTION
1
t Folder Shuffle*2 t
21
Locating a folder/album/track
by name
— List-up
You can select and pl ay back the desired music
file from the folder/album/track name list.
F1
R dial
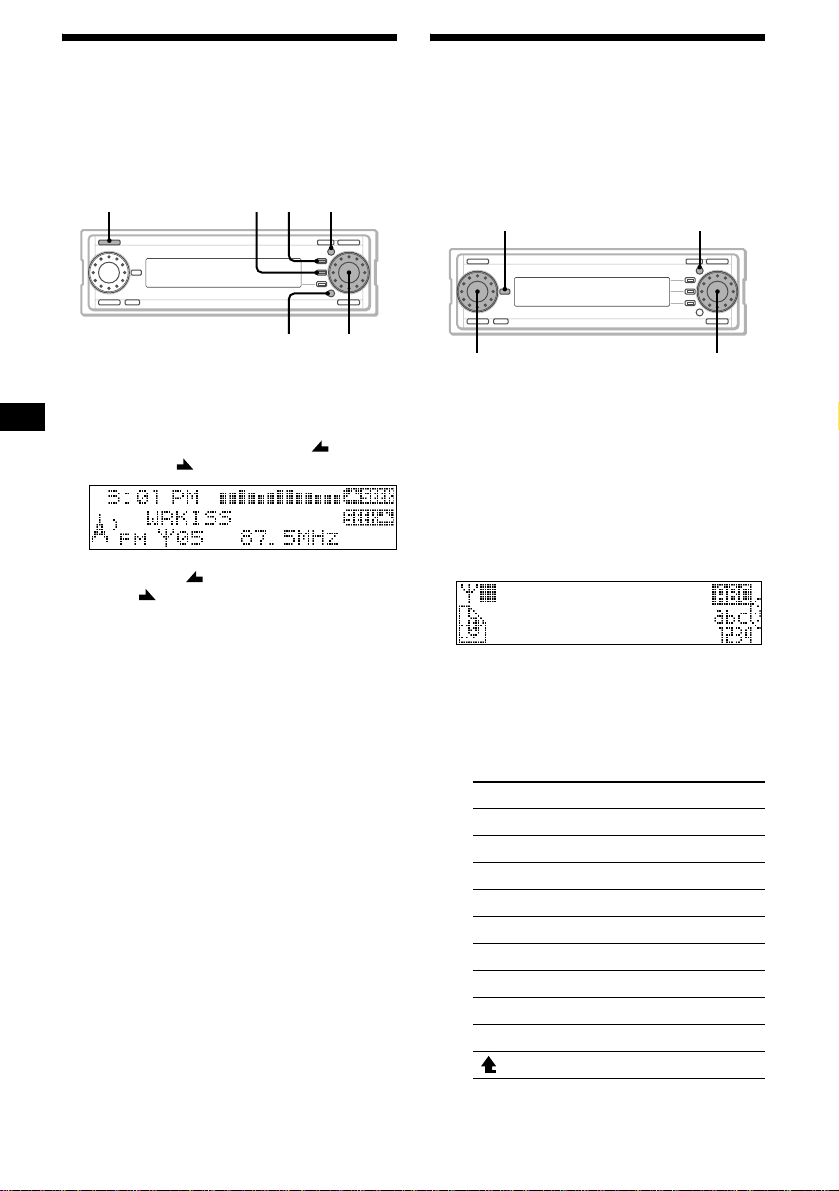
Searching a track you want to
listen to
You can find a desired track by searching it by
items such as title, artist names, etc.
SOURCE F1
R dial
1 During playback, press the R dial.
The album name list display appears.
Each time you press the R dial, the list
changes as foll ows:
Album (disc*) name list t Track name list
t Normal playback display t Album
(disc*) name list
* Available only when you select “CD.”
2 Rotate the R dial to select th e desired
item, then press the R dial .
Playback starts.
To select a folder
Display the album name list in step 1, then press
(F1) ().
Note
In the case of CD TEXT discs, some letters cannot be
displayed.
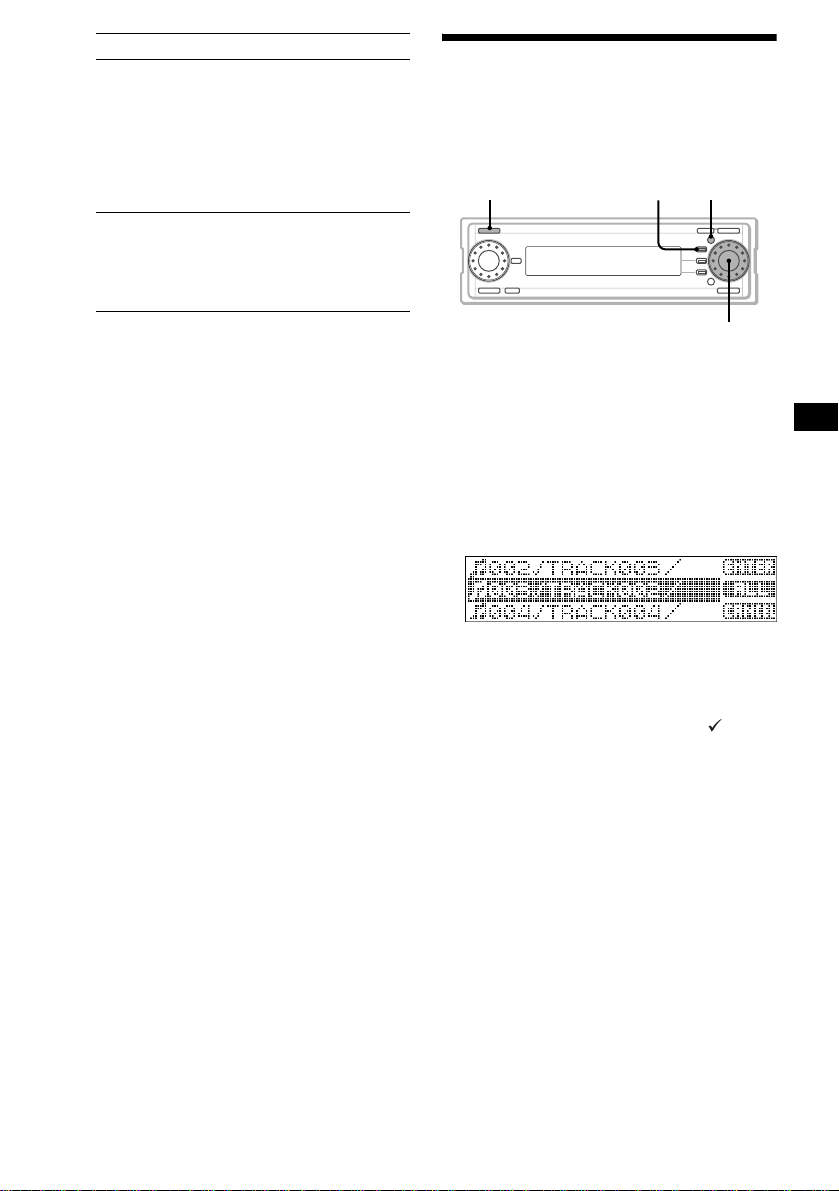
Tips
• When the selected item is available, the function
menu ( B) appears.
• “ B” is displayed to the left of the title being played.
• If you press (F2) in step 1, playback starts from
Album 001/Trac k 001.
Ex.) When Folder 003 is selected
The unit starts playback from the first track (Track
001) in the first album (Album 001) in Folder 003.
1 Press (SOURCE) to select “HDD.”
2 Press the R dial, then press (F1) ()
to display the folder name list.
3 Rotate the R dial to select the desired
sort folder, then press the R dial.
Sort type Explanation
Folder 001 plays back recorded albums/
Play List plays back only albums/tracks
Artist creates albums for each artist
Time Stamp sorts the tracks by the r ecorded
Title sorts the tracks according to
Access
Ranking
tracks sequentially.
registered to a Play List . For
details on how to register a
track, see “Coll ecting favorite
tracks” on page 23.
and sorts the tracks according
to the artist.
time. “Normal” rearranges
tracks in the order of recorded
time. “Reverse” rearranges
tracks in reverse order.
their titles. “ABC” rearranges
tracks in alphab etical order.
“Reverse” rearranges tracks in
reverse order.
sorts 50 or 10 of the most
frequently played tracks.
“T op 50,” or “T o p10 ” rank s t he
tracks in order. “Top50 (Count
down),” or “Top10 (Count
down)” ranks the tracks in
reverse order.
22
Sort type Explanation
Less Access
Ranking
History “Normal” rearr anges tracks in
sorts 50 or 10 of the least
frequently played tracks.
“Bottom50,” or “Bottom10”
ranks the tracks in order.
“Bottom50 (Count Down),” or
“Bottom10 (Count Down)”
ranks the tracks in reve rs e
order.
order of most recently played
tracks. “Reverse” rearranges
tracks in reverse order of most
recently played tr acks.
4 Rotate th e R dial to sel e ct the desi red
search item, then press the R dial.
5 Rotate th e R dial to sel e ct the desi red
track, t h en press the R dial.
The normal display appears.
Tip
The unit sequentially plays back tracks in the album in
which the selected t rack is included.
Collecting favorite tracks
— Play List
Collecting your favorite tracks in the Play List
folder enables you to play them back just by
selecting the Play List.
SOURCE MENUF1
R dial
Registering a track in the Play List
1 Press (SOURCE) to select “HDD.”
2 Press (MENU).
3 Rotate the R dial to select “Pl ay List,”
then press the R dial.
4 Rotate the R dial to select “Entry,” then
press the R di al.
The track name list app ea rs .
5 Rotate the R dial to select the track
you want to register, then press the R
dial.
The selected track i s m arked with “ .”
To cancel the item being se le ct ed, press the R
dial again.
6 Repeat step 5 until you finish selecting
all the tracks you want to register.
7 Press (F1) (ENTER).
Select a Play List folde r /a lbum on which you
want to regi st er your favorite track .
8 Rotate the R dial to select the d esired
Play List folder, then press the R dial.
9 Rotate the R dial to select the d esired
Play List album, then press the R dial.
The normal display appears.
Tips
• In the default setting, all tracks are selected in the
track name list. To select specific tracks, press (F2)
(ALL) to cancel the selection first.
• You can register up to 400 tracks in an album (Play List).
• To create a ne w Pla y Li st f old er , pres s (F2) (CREATE)
then assign a name in step 8.
23
Radio
The unit can store up to 2 0 FM stations and 10
AM stations.
Caution
When tuning in statio ns while driving, use the
Best Tuning Memory to prevent accidents .
Storing stations
automatically
— Best Tuning Memory (BTM)
The unit selects the stations with the strongest
signals within the selected band, and stores them
in order of freq uency.
SOURCE MENU
F3 F1
Erasing the stored station
1During radio reception, press th e R
dial.
The preset station name list appears.
2Rotate the R dial to select the
station you want to erase, then
press (MENU).
3Rotate the R dial t o se l ect “Erase,”
then press the R dial.
4Rotate the R dial to select “OK,”
then press the R dial.
The selected sta ti on is erased.
5Press (F3) ().
The normal reception display appe ars.
T o canc el er as ing
Select “Cancel” in step 4.
FUNCTION
1 Press (SOURCE) repeatedly to select
“FM” or “AM.”
2 Press (FUNCTION) repeatedly to
display the function menu “BTM.”
3 Press (F1) (BTM).
B.T.M. starts.
The normal reception display appe ar s w h e n
stations are stored.
Notes
• If only a few stations can be received due to weak
signals, some stored numbers will retain their former
settings.
• When a number is indicated in the display, the unit
starts storing stations from the one currently
displayed.
• When AM reception has been canceled, “AM” is not
displayed while you are selecting the source. To
activate the AM reception, set “AM Skip” to “Off”
(page 51).
Tip
To select the BTM mode in another way, press
(MENU) during reception, then select “B.T.M.” in
“Preset Edit” (page 52).
24
R dial
Receiving the stored stations
R dial
SOURCE
1 Press (SOURCE) repeatedly to select
“FM” or “AM.”
2 Rotate th e R dial to sel e ct the desi red
station.
Display items
Station name*
Preset stat ion
Radio
number
band
* Displayed only when a name is assigned. For details
on assigning a name, see “Labeling a radio station”
on page 26.
MENU
F2 FUNCTION
F3
Frequency
If FM stereo reception is poor
(Monaural mode)
1 During FM reception, press (MENU).
2 Rotate the R dial to sele ct “Receive
Mode,” then press the R dial.
3 Rotate the R dial to select “M ono,”
then press the R dial.
4 Rotate the R dial to select “O n,” then
press the R di al.
5 Press (F3) ().
The normal recepti on display appears.
The sound improves, but becomes monaural.
To cancel the Monaural mode
Select “Off” in step 4.
Tip
If FM broadcasts are difficult to hear, set DSO to “Off”
(see “Setting the Dynamic Soundstage Organizer” on
page 46).
If interference occurs during FM
reception (IF Auto mode)
This unit will automatically narrow the reception
frequency to eliminate noise. In such cases, some
FM broadcasts may become monaural while in
the stereo reception mode. To always hear FM
broadcasts in stereo, you can change the IF Auto
setting and wid en th e fr eque nc y si gnal re cep tio n.
If preset tuning does not work (Local
mode)
The Automatic Tuning function may stop
frequently whe n there are many radio st at ions in
the area. If this hap p ens, you can reduce the
sensitivity of the tuner so that only relatively
strong signals are tuned in.
1 During radio reception, press
(FUNCTION) repeatedly to display the
function menu “LOCAL.”
2 Press (F2) (LOCAL) to select “Local
On.”
To cancel the local mode
Press (F2) to select “Local Off” in step 2.
1 During FM reception, press (MENU).
2 Rotate the R dial to sele ct “Receive
Mode,” then press the R dial.
3 Rotate the R dial to select “IF S wi tch,”
then press the R dial.
4 Rotate the R dial to select the d esired
item, then press the R dial.
Item Explanation
Wide Maximizes signal reception and
improves sound quality.
Auto Switches the mode
automatically.
5 Press (F3) ().
The normal recepti on display appears.
25
Storing only desired stations
— Manual Preset Memory
You can manually preset desired stations by
specifying the frequency.
The unit can store up to 2 0 FM stations and 10
AM stations.
SOURCE MENU
F1F2
Labeling a radio station
— Station Memo
You can assign a name to each radio station and
store it in memory . The name of the station
currently tuned in appears in the display. Y ou can
assign a name using up to 31 characters per
station.
MENUDSPL
FUNCTION
R dial
1 Press (SOURCE) repeatedly to select
“FM” or “AM.”
2 Press (FUNCTION) repeatedly to
displa y t h e f unction men u “ SEE K ”
and “SEEK .”
3 Press (F1) ( SEEK) or (F2)
(SEEK ) to tune in the station you
want to store.
4 Press (MENU).
The menu display appears.
5 Rotate the R dial to select “Pr es et
Edit,” then press the R dial.
6 Rotate the R dial to select “M anual,”
then press the R dial.
7 Rotate the R dial to select the memory
number you want to store, then press
the R dial.
The normal reception display appe ar s w h e n
the station is stored.
Note
If you try to store another station on the same stored
number, the previously stored station will be erased.
R dialL dial
1 Tune in the station you want to assign
a name.
2 Press (MENU).
The menu display ap pears.
3 Rotate the R dial to select “Name In,”
then press the R dial.
4 Rotate th e R dial to sel ect “Statio n
Memo,” the n press the R dial.
5 Enter charact ers.
1Rotate the R dial to select the
desired character type , the n pr ess
the R dial.
As you ro tate the R di a l, the item c h anges
as follows:
Item Explanation
ABC Alphabet (All caps)
abc Alphabet (Small caps)
1234 Numbers
! ? # Symbo l
(OK) t o store the charac t ers entered
(<) to move the cursor to the left
(,) to move the cursor to the right
(CLR) to erase a character
(NG) to cancel name editing
( ) to back to the character menu
26

2 Rotate the dial to sel ect th e desired
character, then press the R dial.
The entries proposed appear.
To change the character types, rotate the R
dial to select “ ,” th en press the R dial.
Each time you press (DSPL), the alphabet
letter string displayed change s th e type of
letters as follows:
All capital letters t the first letter in
capitals t all small letters
3 Rotate the L dial to select the
desired entry proposed, then press
the L dial.
When there is no en tr y pr oposed, follow
steps 1 and 2 to finish entering the
name.
To move the cursor, rotate the R dial to
select “<” or “,,” then press the R dial.
To delete the entered character, rotate the
R dial to select “CLR,” then press the R
dial.
6 Rotate the R dial to sele ct “OK,” then
press the R dial.
The normal display appears.
To cancel labeling the station
Rotate the R dial to s e lect “NG” in step 6, then
press the R dial.
Tips
• Simply overwrite or en te r “
• If no memory is remaining, “MEMORY FULL”
appears in the display, and you cannot assign a
station name.
_” to corr ect or e r as e a n ame.
Locating a station by name
— List-up
You can locate a radio station by its assigned
name. For details on how to name a station, see
page 26.
R dial
1 During radio reception, press the R
dial.
The frequencies or names assigned to the
stations appear.
2 Rotate the R dial to select the d esired
station, t hen press the R di al.
The normal recepti on display appears.
Tip
“ B” is displayed to the left of the station name being
received.
27
Recording and Editing
HDD
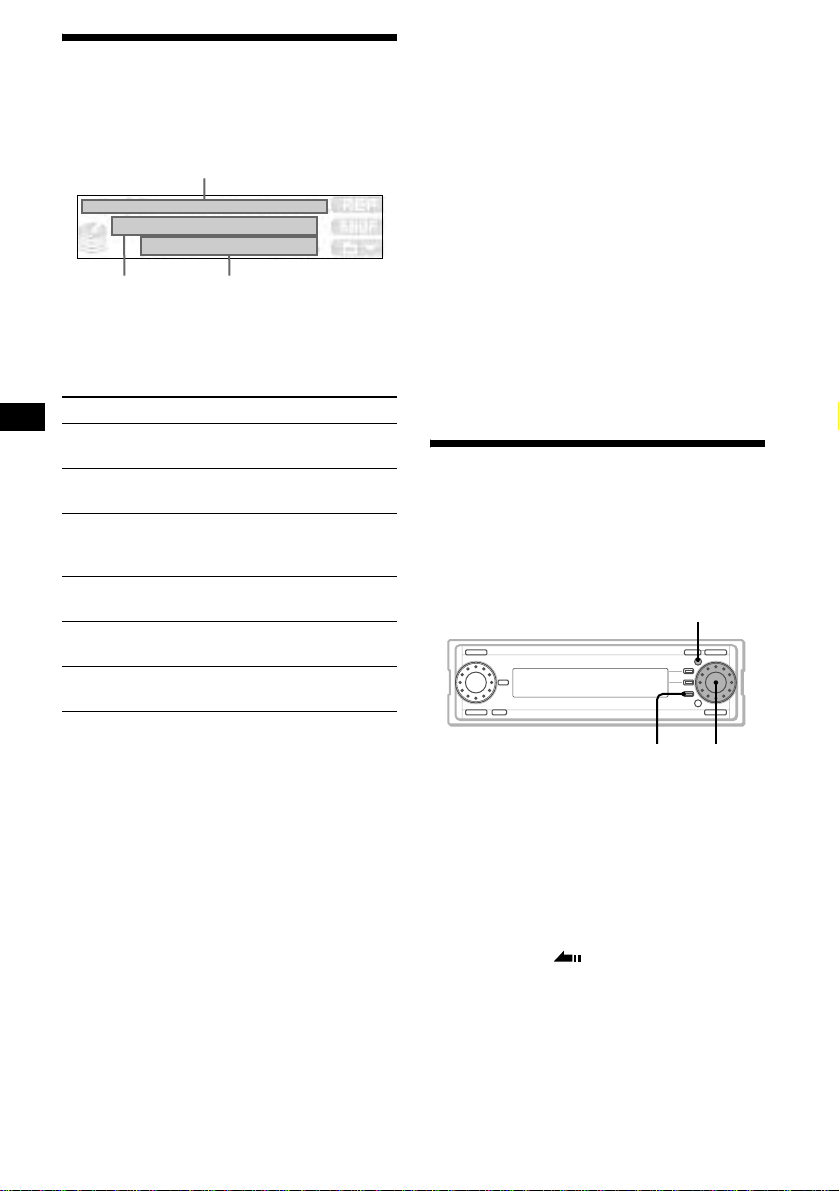
Overview of the HDD system
Recorded tracks on the HDD are sorted out by
folders as foll ows:
– When no folder is selected before recording, a
new empty album is created inside the
“Folder 001” folder and recorded tracks are
stored there automatically.
(See “CDA” and “CDB” in the diagram.)
– When a certain fo l der is selected before
recording, a new empty album is created inside
the selected fol d er and recorded tr acks are
stored there automatically.
(See “CDC” in the diagram.)
Example:
“CDA” and “CD B”: No folder is selected.
“CDC”: “Folder 002” is s elected.
REC
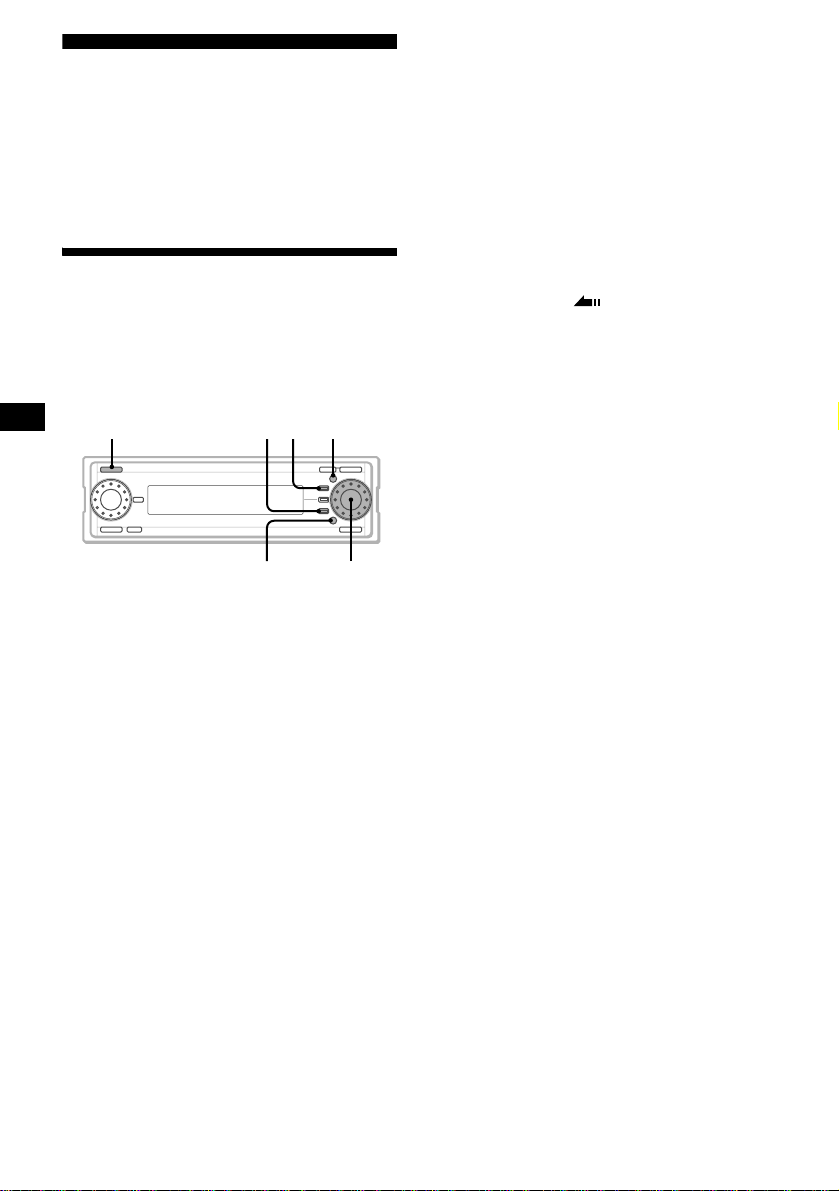
Recording an album/track
onto the HDD
— Track recording
You can select and reco rd onto the HDD an item
you want from a CD.
SOURCE
1 Press (SOURCE) to select “CD.”
2 Press .
The record setting di splay appears.
Storage folder
REC
R dial
F1
RECF3F2
Storage album
001
002
Notes
• The recorded music is limited to private use only.
Use of the music beyond this limit requires
permission of the copyright holders.
• Sony is not responsible for music files that are not
saved on this unit due to unsuccessful recording
from CD or music downloading.
• Sony is not responsible for any files that are
damaged or erased from the hard disc.
001
(CDA)
002
(CDB)
001
(CDC)
Folder Album Track
28
001
002
001
Recording source informat ion
(Selected track number/Total track number,
Total track time)
To change the recording bit rate, press (F1).
To change the recording speed, pres s (F2).
3 Rotate the R dial to select the
recording source information, then
press the R dial.
4 Rotate the R dial to select the track
you want to record, t h en press the R
dial.
The selected item is marked with “ .”
To cancel the item being s elected, press the R
dial again.
5 Repeat step 4 un til y ou fini sh select ing
all desired tracks.
6 Press (F3) ().
The record setting di splay reappears.
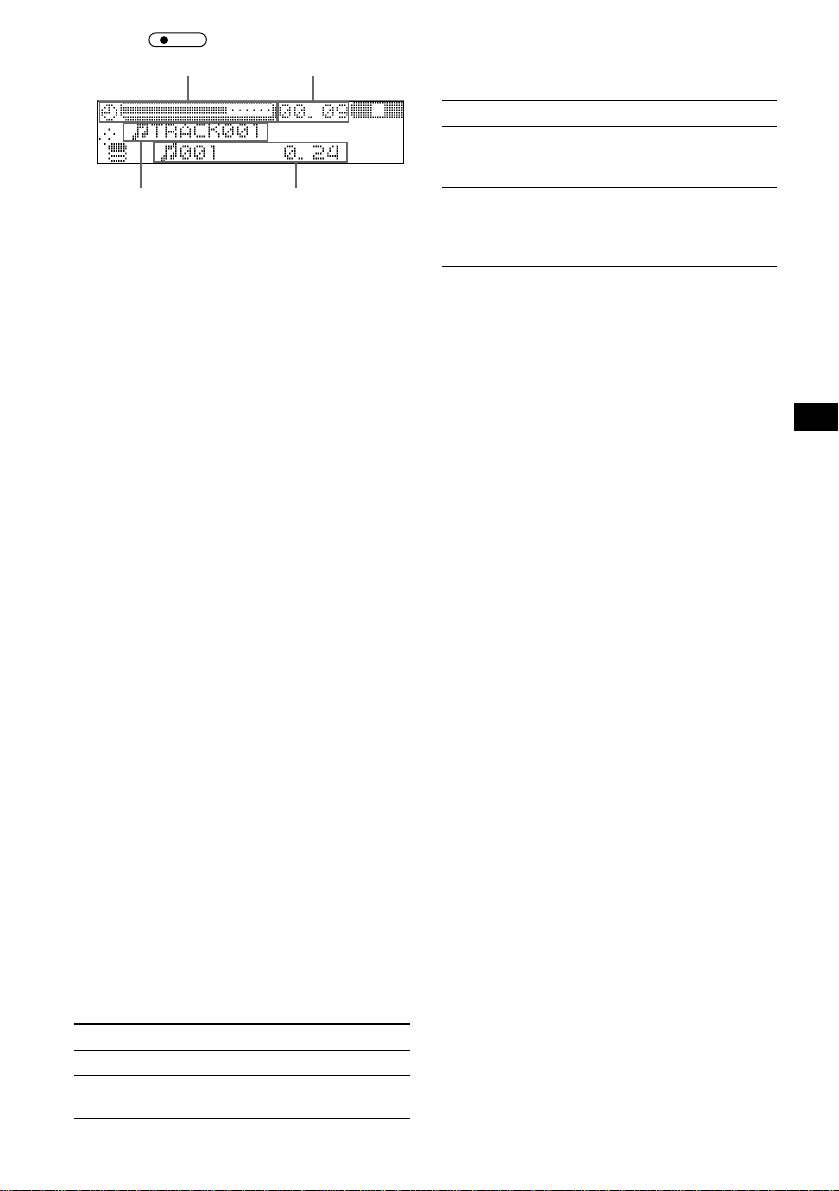
7 Press .
Track name being
recorded
REC
Remaining timeProgress bar
Track number/
Elapsed playing time
Recording starts. Playback of a disc starts
automatically when all tracks are recorded.
Notes
• If you cancel recording in the middle of a track, the
current track is not recorded. Previous tracks
remain.
• The indi ca tion of record ing ti me on the recor ding
display is approximate.
• You can record up to 200 albums in a folder and up
to 2000 albums on the HDD.
• In the default setting, REC continue is set to “On”
(page 51).
• When an audio CD is played back, the Gracenote
®
Music Recognition ServiceSM (CD data
CDDB
base) on the unit is accessed (while accessing,
“Accessing Gracenote CDDB” appears) and the title
information (disc name/artist name/track name) is
displayed.
If “No Match” appears after accessing, the
Gracenote CDDB
data for the disc. If you need title information, update
the Gracenote CDDB
the library” on page 54.
• When you record a CD TEXT disc, displayed title
information (disc name/artist name/track name) is
recorded onto the HDD. Y ou can change the
displayed title information (see “Notes on Gracenote
®
” on page 20).
CDDB
Tips
• In the default setting, all tracks are selected in the
track name list. To select specific tracks, press (F2)
(ALL) to cancel the selection first.
• You can record up to 6000 tracks on the HDD.
• Each time you press (SOURCE) during recording,
the source changes in the order of FM t AM t
AUX* t CD t FM. When you select the CD, the
track being recorded will be played.
* If “AUX” is not displayed when selecting the source,
set “AUX Skip” in “Setup” to “Off” (page 56).
®
(CD data bas e) has no ma t che d
®
(CD data base) see “Editing
To change the recording speed
Press (F2) to select the recording speed in step
2.
Item Explanation
×1-REC Re cords th e track a nd repr oduces
track sound simulta neously.
(Normal speed recording)
HI-REC* Rec ords the track up to 8 time s
faster than normal speed
recording.
(High speed re cording)
* The default setting.
T o change the fol der/album to sto re the
tracks
1 Rotate the R dia l to sel ect the
storage folder or storage album,
then press the R dial in step 2.
To create a new folder, press (F2)
(CREATE).
2 Rotate the R dia l to sel ect the
desired folder or album, then press
the R dial.
To create a new album, press (F2)
(CREATE).
To cancel recording
Press (F1) (x) in step 7.
To change the recording bit rate
Press (F1) to select the recording bit rate in step
2.
Item Explanation
105K S ta ndard recording bi t rate.
132K* Offers bet ter sound quality. But
the audio files incr ease in size.
* The default setting.
29
Labeling a folder/album/
track
— Name In
Giving album titles, tracks titles, or artist names
to the items recorded on the unit will help you
create an easy acc ess music library.
SOURCE MENUDSPL
L dial
1 Press (SOURCE) repeatedly to select
“HDD.”
2 Press (MENU).
3 Rotate the R dial to select “N ame In,”
then press the R dial.
4 Rotate the R dial to select th e desired
item, then press the R dial .
Item Explanation
Track To assign a name to a track
Track Artist To assign an artist name to a
Album To assign a name to an album
Album
Artist
Folder To assign a name to a folder
track
To assign an artist name to an
album
R dial
5 Enter charact ers.
1Rotate the R dial to select the
desired character type , the n pr ess
the R dial.
As you ro tate the R di a l, the item c h anges
as follows:
Item Explanation
ABC Alphabet (All caps)
abc Alphabet (Small caps)
1234 Numbers
! ? # Symbol
(OK) to store the characters entered
(<) to move the cursor to the left
(,) to move the cursor to the right
(CLR) to erase a character
(NG) to cancel name editing
( ) to return to the character menu
2Rotate the R dial to select the
desired character, then press the R
dial.
The proposed ent ries appear.
To change the character types, rotate the R
dial to select “ ,” then press the R dial.
Each time you press (DSPL), the alphabet
letter string displayed changes th e t ype of
letters as follows:
All capital letters t the first letter in
capitals t all small letters
3Rotate the L dial to select the
proposed entry you desired, then
press the L dial.
When there is no proposed entry, follow
steps 1 and 2 to finish entering th e
name.
To move the cursor, rotate the R dial to
select “<” or “,,” then press the R dial.
To delete the entered character, rotate the
R dial to select “CLR,” then press the R
dial.
6 Rotate the R dial to select “OK,” then
press the R dial.
The normal display appears.
30
T o canc el labe ling
Rotate the R dial to select “NG” in step 6, t h en
press the R dial.
 Loading...