

Sony MDS-302 User Manual

MiniDisc
Recorder
3-759-626-21(1)
Operating Instructions
MDS-302
■y Sony Corporation

WARNING
To prevent fire or shock
hazard, do not expose the
unit to rain or moisture.
Tills svniboi is intended to alert the user
to the presence ot uninsulated
"dangerous voltage" within the product's
enclosure that may be ot sufticient
magnitude to C(>nstitute a risk ot electric
shock to piersons.
Fins symbol is inteiidi.’d to alert the user
to the presence ot important operating
and maintmiance (servicing) instructions
m the literature accompanying the
appliance.
IMPORTANT
This equiiiment has been tessted and
touiul to compiv with the limits lor a
Class R digital device, pursuant to Part 1
ot the F'CC' Rules.
Flu'se limits are designed to provRie
re.isonable prottvtion against harmful
interierence in a residential installation.
1 his ei[uipment generates, uses, and can
radiate radio trequency energy arid, if not
installed <md used in accordance with the
instructions, rnav cause harmful
interference lo radio communications,
f lovvec'er, there is no guarantee that
interference will not occur in a particular
installation. If this equipment does cause
harmful interference to radio or television
reception, which can be determined by
turning the equipment off and on, the
user is encouraged to try to correct the
interference by one or more of the
following measures;
- Reorient or relocate the receiving
antenna.
- Increase the separation between
the equipment and receiver.
- Connect the equipment into an
outlet a circuit different from
that to which the receiver is connected.
- Consult the dealer or an
experienced radio/TV technician
for help.
Welcome!
I hank vou tc>r purchtising the Sony
.VtmiDisc Recorder. Before operating the
recorder, please read this manual
thc'roughlv and retain it tor future
reference.
About This Manual
The instructions in this manual are for
model MDS-302.
Conventions
• Controls in the instructions are those
on the recorder; these may, however,
be substituted by controls on the
remote that are similarly named or,
when different, appear in the
instructions within brackets.
• i'he following icons are used in this
Indicates a procedure that
requires use of the remote.
Indicates tips for making the task
easier and hints.
The following caution label is located
inside of the rect>rder.
DANGER
INVISIBLE L4SER
RADIATION WHEN OPEN
AND INTERLOCK
DEFEATED. AVOID
DIRECT EXPOSURE TO
BEAM.
Owner's record
DANGER
RADIATION DE LESER
INVISIBLE LORS D'OUVERTURE.
AVEC L'ENCLENCHEMENT DE
SECURITE ANNULE. EVITER
L'EXPOSITION DIRECTE AU
RAYON.
The model and serial numbers are locattxi
on the rear of the unit. Record the serial
number in the space provided below.
Refer to these numbers whenever you call
upon your Sony dealer regarding this
product.
Model No. MDS-302
Serial .No.
_______ _
CAUTION
\\)u are cautioned that any changes or
modifications not expressly approved in
this manual could void your authority to
operate this equipment.
IN NO EVENT SHALL SELLER BE
LIABLE EOR ANY DIRECT,
INCIDENTAl, OR CONSEQUENTIAL
DAMAGES OF ANY NATURE, OR
TOSSES OR EXl’ENSES RESULTING
FROM ANY DEFECTIVE PRODUCT
OR THE USE OF ANY PRODUCT.

Table of contents
Getting Started
Unpacking........................................................................................................................................4
Hooking Up the System .................................................................................................................4
Recording on MDs
Recording on an MD.......................................................................................................................6
Notes on Recording.........................................................................................................................7
Useful Tips for Recording...............................................................................................................8
Adjusting the Recording Level....................................................................................................... 8
Marking Track Numbers While Recording (Track Marking)........................................................9
Synchro-Recording With a Sony CD Player................................................................................10
Recording on an MD Using a Timer............................................................................................11
Playing MDs
Playing an MD..............................................................................................................................12
Using the Display..........................................................................................................................13
Locating a Specific Track............................................................................................................. 14
Locating a Particular Point in n Track..........................................................................................14
Playing Tracks Repcatedh-...........................................................................................................15
Playing in Random Order (Shuffle Play)......................................................................................15
Creating Your Own Program (Program Play)..............................................................................16
Repeating a Specific Portion (A-B Repent).................................................................................17
Useful Tips When Recording From MDs to Tape
Playing an MD Using a Timer......................................................................................................18
......................................................................
17
Editing Recorded MDs
Notes on Editing........................................................................................................................... 19
Erasing Recordings (Erase Function)...........................................................................................19
Dividing Recorded Tracks (Divide Function).........................(....................................................20
Combining Recorded Tracks (Combine Function)......................................................................21
Moving Recorded Tracks (Move Function) ................................................................................22
Labeling Recordings (Title Function)..........................................................................................23
Additional Information
Precautions....................................................................................................................................25
Display Messages..........................................................................................................................25
System Limitations .......................................................................................................................26
Troubleshooting............................................................................................................................27
Specifications................................................................................................................................27
Guide to the Serial Copy Management System............................................................................28
Index.................................................................................................................................................... 30

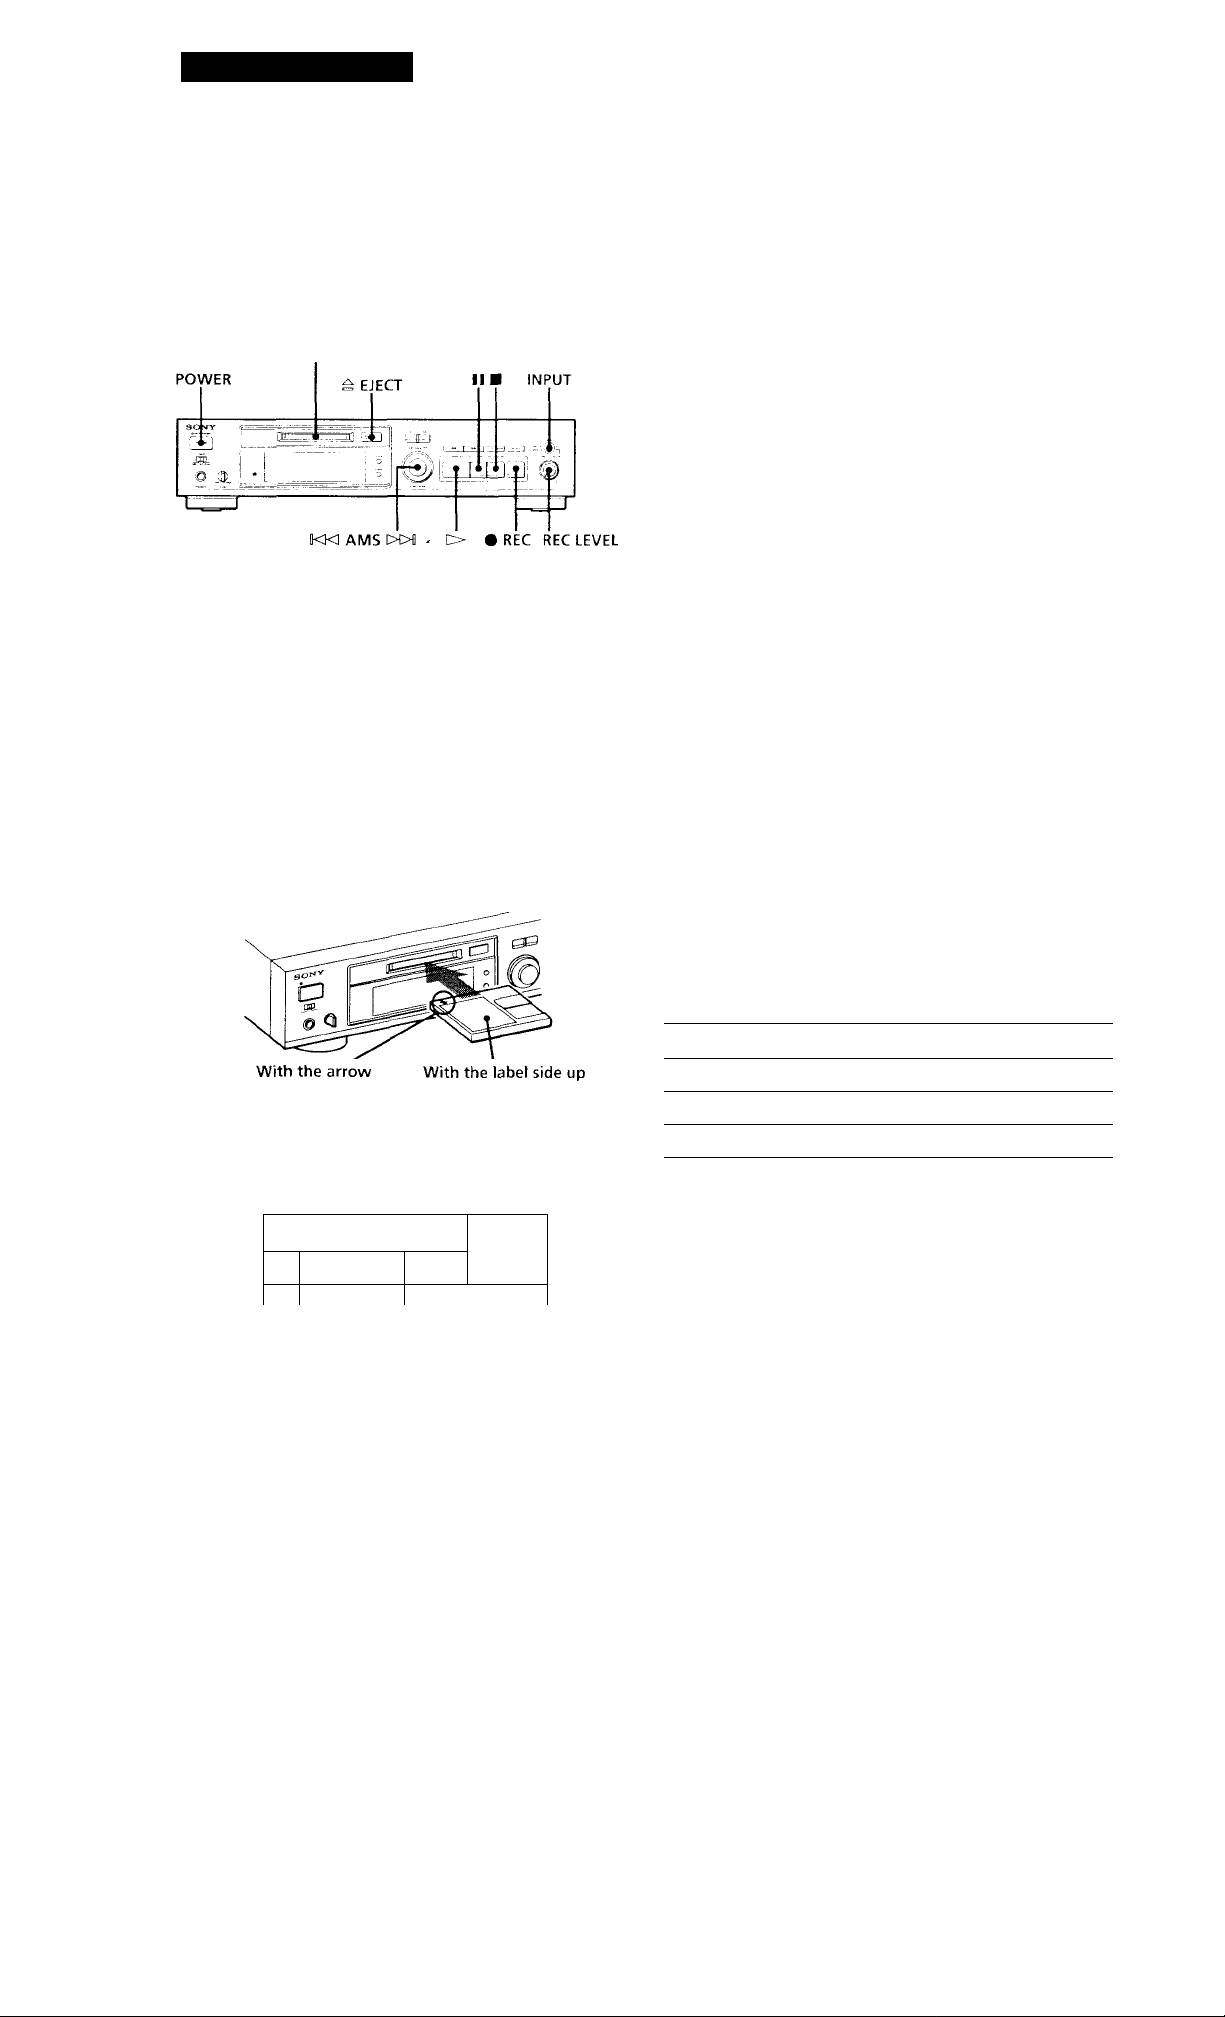
Getting^ Started
Unpacking
Chock that vou roceivi'd tlio following items:
• Audio connecting cords (2)
• Remote commander (remote) (RM-DoM) (1)
• Sonv SLJAl-3 (NS) batteries (2)
Inserting batteries into the remote
You can control the recorder using the supplied
remote.
Insert two R6 (si/.e AA) batteries by matching the e
and - on the batteries. When using the remote, point
it at the remote sensor 13 on the recorder.
Hooking Up the System
Overview
This section describes how to hoiik up the VIO rt'corder
to an amplifier or cither components such as a CD
player or DAT deek. He sure to turn off the power of
each component bi'fore connection.
to a wall outlet (or to a
timer during timer
recording or playback)
Connect only
one digital
component at
a time
'(A' When to replace batteries
With normal use, the batteries should last for about six
months. When the remote no longer operates the
recorder, replace all the batteries with new ones.
Notes
• Do not leave the remote near an extremely hot or humid
place.
• Do not drop any foreign object into the remote casing,
particularly when replacing the batteries.
• Do not expose the remote sensor to direct sunlight or
lighting apparatuses. Doing so may cause a malfunction.
• If you don't use the remote for an extended period of time,
remove the batteries to avoid possible damage from battery
leakage and corrosion.
; Signal flow
What cords will I need?
• Audio connecting cords (supplied) (2)
Optical cable (not supplied) (I )
------------------
DAT deck
or
MD recorder
-cOï

Getting Started
Hookups
Connecting the recorder to an amplifier
Connect the amplifier to the UNE IN/GUI' jacks using the
audio connecting cords (supplied), making sure to match the
color-coded Ci>rd ti> the appropriate jacks the
components; red (right) to red and white (left) to while.
Be sure to make conncHrtions firmly to prevent hum and
noise.
MD recorder
Connecting the recorder to a digital component such as a
CD player, DAT deck, digital amplifier, or another MD
recorder
Connect the component through the DIGITAL IN/OUT
connectors using the optical cable (not supplied). Take off
the cap and plug in the optical cable.
Amplifier
Connecting the AC power cord
Connect the AC power cord to a wall outlet or to the
outlet of a timer.
Note
Do not connect the AC power cord to a switched outlet.
Where do I go next?
Nou^ you're ready to iii^c your recorder.
Before using the MD recorder, turn on the amplifier and
selcet the MD recorder with the source selector on the
amplifier.
MD recorder
DIGITAL .
Digital component
‘ 7digital^‘ _ 'i
i
IN OUT
Signal flow
Notes
• Digital program sources with different sampling frequencies
cannot be recordeef through the digital input jack.
Only CD, MD (premastered) and DAT sources with a
sampling fretjuency of 44.1 kH/ can be recorded through the
digital input connector. “Din Unlock" appears in the
display when you attempt to record digital program sources
with a sampling frequency different from that of the MD
(such as 32- or 48-kHz D.AT or BS). To record these
program .sources on an MD you must connect them through
the analog LINE IN jacks and set I.NPUT to .A-NA1,CX1.
• If "Cannot Copy" appears in the display, recording through
the digital jack is not possible.
In this case, record the program source through the LINE I.N
and OUT jacks with INPUl set to .ANLALCXL
IN OUT
Recording on MDs
Recording on an MD
Before you begin, make sure you have ciirrectly and
firmly connected the recorder to an audio component
such as an amplifier or CD player as indicated on page
Disc compartment
1 Turn on the amplifier and the program source, and
set the program selector on the amplifier to the
program source.
5 I .ocate the position on the MD where vou want to
start recording.
• To record on a new (blank) recordable MD, skip
this step, and go to Step 6.
• To start recording from the end of the last
recorded track, go to Step 6, or turn AMS (or press
or ►►!) until "End" appears.
• To record over an existing irack, turn AMS (or
press or ►►!) until the number of the track to
be recorded over appears.
6 Press • REC.
The recorder is now ready for recording.
• If you are recording from the end of the last
recorded track, or using a new recordable MD,
"New" alternates with the remaining time
indication in the display.
• If you are recording over an existing track,
"TI-fACK" flashes and "Overwrite" alternates with
the remaining time indication in the display.
2 Press POWER to turn on the recorcier.
The ON/STANDBY indicator changes from red to
green.
3 Insert the recordable MD with the label side up and
the arrow pointing toward the opening into the disc
compartment until the recorder grips it.
If you insert the MD while the recorder is oft, the
recorder will turn on automatically and "Welcome"
will appear in the display.
pointing this way
The total number of recorded tracks, total recorded
time, and music calendar without a grid appear in
the display.
,3Tr,
, 1 8 m
36
t 2 3
s ,
7 When you've set INPUT to ANALOG in Step 4, turn
REC LEVEL to adjust the recording level. ('I he
fourth dot is satisfactory for most purposes.
1 knvever, for a more precise adjustment, see
"Adjusting the Recording Level" on page 8.)
8 Press 11 or O to start recording.
9 Start playing the program source you want to
record.
10 After finishing, press ■ to stop recording. Then
press = EJECT to remove the MD or press POWER
to change the recorder to standby.
To
Pause*
Resume recording after pause
Remove the MD
Whenever you pause recording, the track number increases
by one Eor example, if you paused recording while
recording on track 4, the track number increases by one and
recording continues on the new track when restarted.
Press
II
II or O
^ EJECT
Total number of Total recorded Music calendar
recorded tracks time without a grid
I
4 Set INPUT according to the input terminal
connected to the program source.
When you want to record through Set INPUT to
LINE IN .AN.Al.OG
DIGITAL IN DIGITAL

Recording on MDs
To protect a MiniDisc against accidental erasure
To make it impossible to record on an MD, slide the tab in the
dircx'tion of arrow, opening the slot. To allow recording, close
the slot.
'Q' You can start recording from the middle of a recorded
track in Step 5
I^ress O to start playback, press II where you want to
start recording, then do the procedure starting from Step 6
on page 6, Howe\'er, vou will not be able to record from
the middle of a recorded track if "PROCRAM''or
"SifUFFLH" appears in the display.
• When INFO']' is at ANALOG, the source connecteM through
UNE IN, and the "EEVEE-S^TJC" setting OF}-' (see
"Marking Track Numbers While Recording" on f>age 9) or
when recc^rding from DAT with INPUT at DIGITAL and the
source connected through DIGITAL IN, the source will be
recorded as a single track. You can divide the track
afterwards using the Dic’ide Function (see "Dividing
Recorded Tracks" on page 20) or mark track i.j.nbers during
recording by using the Track Marking Function on page 9. If
"FFVFF-SYiNC" appears in the display, the recorder
automatically marks track numbers (see "Marking track
numbers atuomatically" on page 9).
If "TRACK" flashes in the display
The recorder is recording over an existing track. "'TRACK"
lights continuously w’hen the recorder reaches the end of the
previously recorded portion.
When "TOC" flashes in the display
The recorder is currently updating the Table Of Contents
(TOC). Do not mo\'e the recorder or pull out the AC power
cord. Changes to an MD made through recording are saved
only when you update the TOC bv ejecting the MD or
changing the recorder to standby by pressing POWER.
Notes on Recording
If "Protected" appears in the display
The MO IS recva‘d-prt>iecled. Cio^e the sK>t to record on the
disc {sec- 'To prottvl a MiniDisc against accidental erasure" on
this page).
If "Din Unlock" appears in the display
• The program source is not connected to DICITAF IN even
though you've selected DIGITAL in Step 4 or the sampling
trequencv of the program source does not match that ol the
MD recorder (44.1 kldz). To continue, connect the program
source through DIGITAL IN or select ANALOG in Step 4 to
record through LINE IN.
• The digital signal has been intiTrupted (stripped) while you
were recording. To cc'ntinuo recording, restart the digital
program source. To stop recording, press ■ on the MI3
recorder.
Depending on source being recorded, track numbers are
marked in the two following ways:
• Wiien recording trom a CD or MD with I.Ni'’ljT at DIGITAI.
and the SfHirce connected to DiGiTAl. IN, the recorder
automaticalh' marks tisick number'^ in the same sequence as
the original. Ho\ve\ er, ii a track is played more than once
(i.e., b\' repealed plavb.ick during progranr play or singletrack repeat plav), the same tr<u k is recorded as a single
track n<,> matter hi'W main' tinu“' it is pl.ived.
It the source ¡s an MD, track numbers ma\ not be marked tor
tracks o! less tlian 4 seconds.
The MD recorder uses the SCMS (Serial Copy Management System on page 28)
MDs recorded through DICITAI, IN cannot be copied onto
other MDs through DlCl'kAF IN.
7
Recording on MDs
Useful Tips for Recording
...^ .J ^
.4?.
Checking the remaining recordable time on
the MD
• When you press DISPI.AY while recording, the
remaining recordable time on the MD appears.
• When you press DISPLAY repeatedly while the
recorder is stopped, the display changes as follows;
total recorcied time, remaining recordable time on
the MD, disc name (see page 13).
If "Auto Cut" appears in the display
The Auto Cut Function has been activated. This
happens when there is no sound input for more than
30 seconcis while INPUd’ is at DIGITAL and the source
connected through DIGITAL IN. The recorder changes
to recording pause and the 30 seconds of silence are
replaced bv a blank of about 3 seconds.
-è
DISPLAY
rl-t-TU u
O
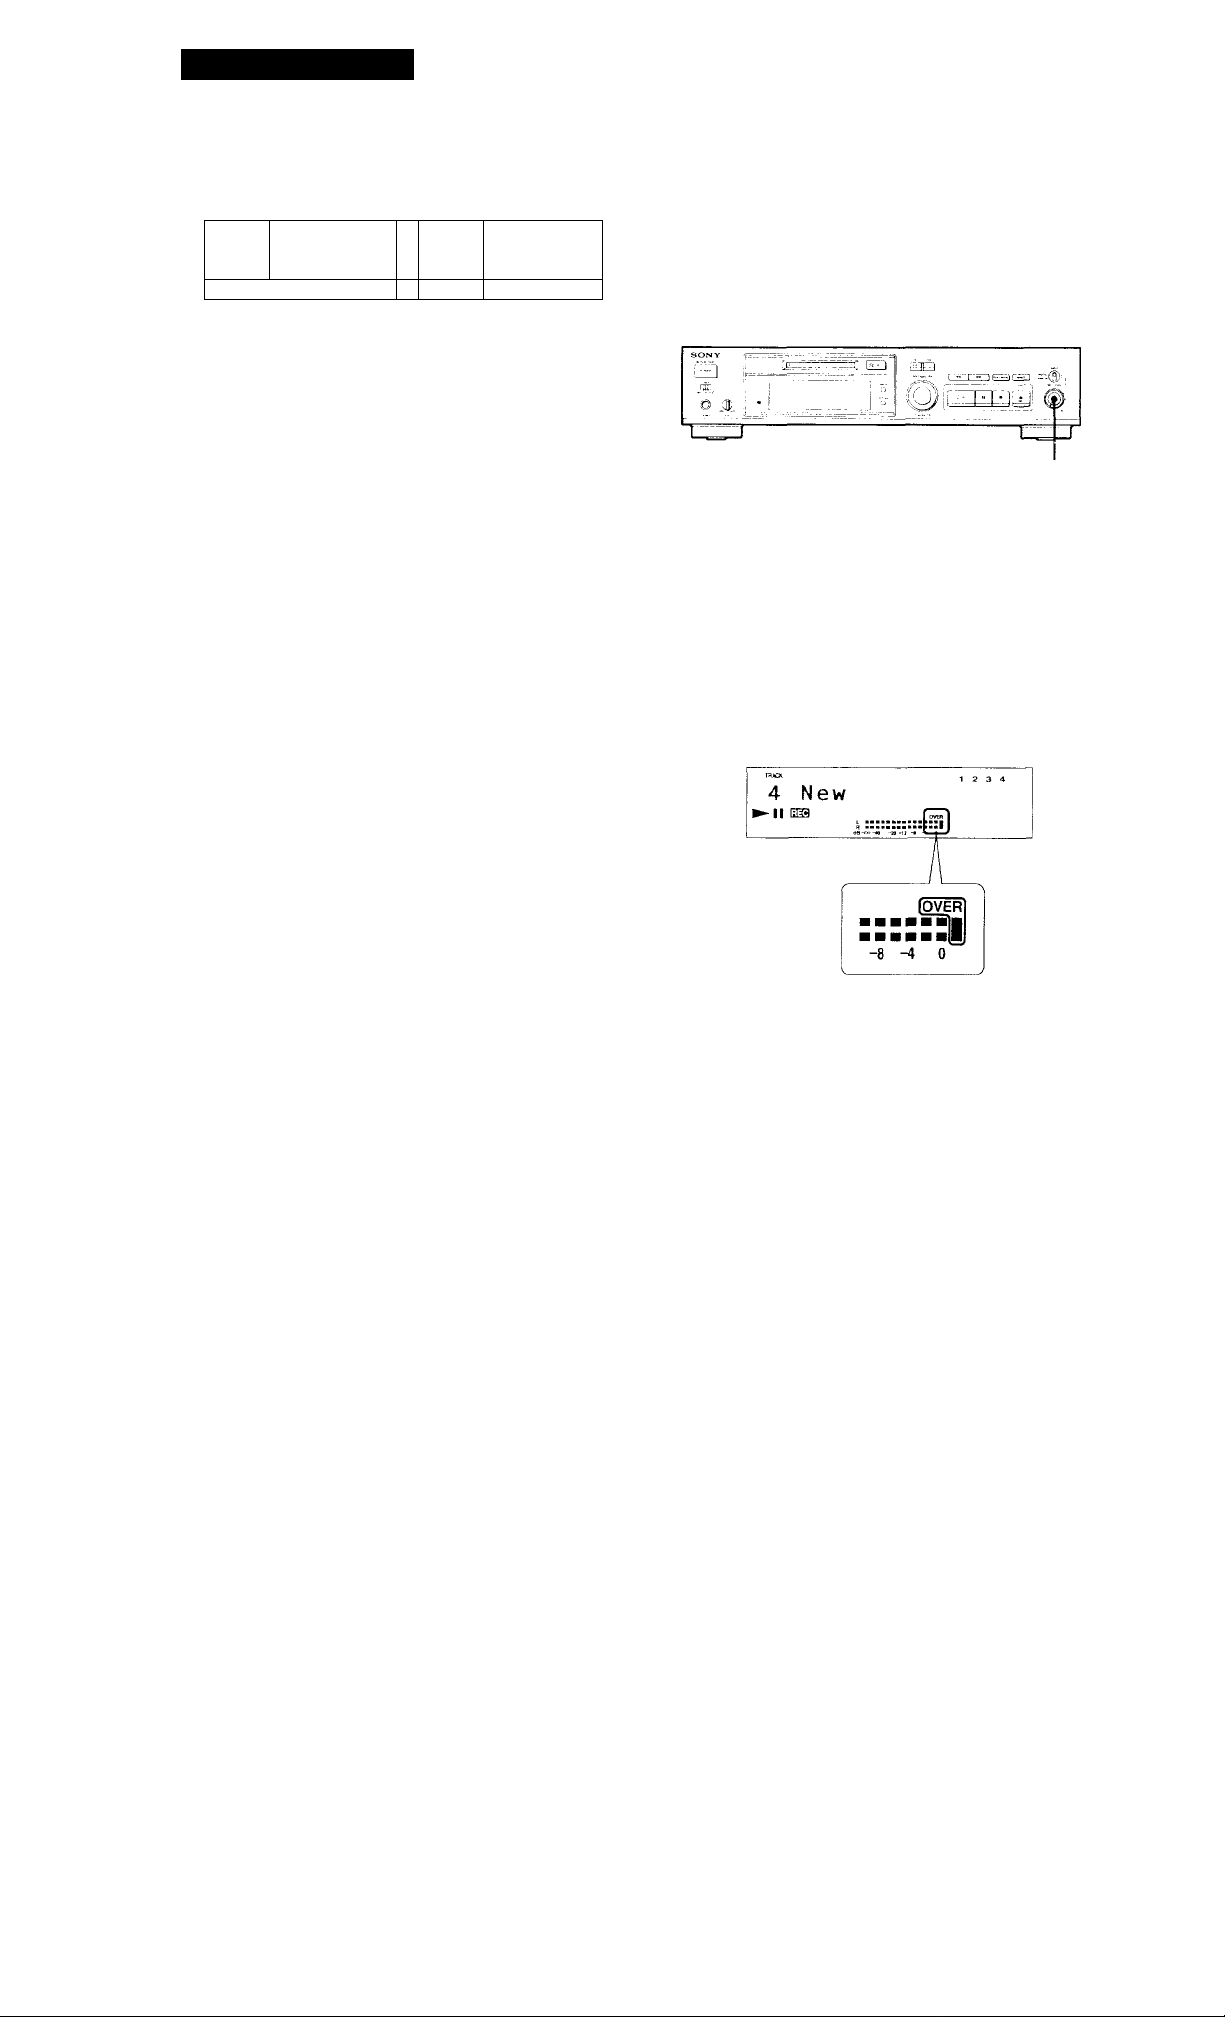
Adjusting the Recording Level
When recording a sound source while INPUT is at
.ANALOG and the source connected through LINE IN,
use REC LEVEL to adjust the recording level before
starting recording.
REC LEVEL
1 Do Steps 1 to 6 in "Recording on an MD" on page 6.
2 Play the portion of the program source with the
strongest signal level.
3 While monitoring the sound, turn REC LEVEL to
adjust the recording level so that the peak level
meters reach their highest point without turning on
the OVER indication. Occasional lighting of
"OVER" IS acceptable.
If "Smart Space" appears in the display
The Smart Space Function has been activated. This
happens w'hen there has been an extended silence (of
not more than 30 seconds) between two input signals
when INPUT is at DIGITAL and the source connected
through DIGITAL IN. The Smart Space Function
instantaneously replaces the silence with a blank of
about 3 seconds even as the recorder continues
recording.
Playing back tracks just recorded
Do this procedure to immediately playback tracks that
have just been recorded.
Press t> immediately after stopping recording.
Playback starts from the first track of the material just
recorded.
To play from the first track of the MD after recording
1 Pre.ss ■ again after stopping recording.
2 Press t>.
Playback starts from the first track of the .MD.
4 Stop playing the program source.
5 To start recording, do the procedure starting from
Step 8 of "Recording on an MD" on page 6.
8

Marking Track Numbers While Recording (Track Marking)
You can mark track numbers either manually or
automatically. Bv marking track numbers at specific
points, vou can quickly locate the points later using the
AMS Function or Editing Functions,
Recording on MDs
To cancel Automatic Track Marking
1 Press EDIT/NO during recording or recording pause.
"l.eveiSync ?" appears in the display.
2 Press YES.
3 Press EDlT/NO.
"l.e\’elSyncCi)FE'' appears in the display.
* The signal leyel must remain low for 2 or mot-- seconds
before a new track number is written.
EDIT/NO YES • REC
am-
oj3i II-
diorBljl
Marking track numbers manually (Manual
Track Marking)
You can mark track numbers at any time while
recording on an MD.
Press • REC at the place you want to add a track mark
while recording.
Marking track numbers automatically
(Automatic Track Marking)
The recorder adds track marks differently in the
following cases:
• When recording from CDs or MDs with INPUT at
DIGITAL and the source connected through
DIGITAL IN:
The recorder marks track numbers automatically.
When you record from a CD or MD, the track
numbers are written as they are found on the
original.
• When recording with INPUT at ANALOG and the
source connected through LINE IN, or when
recording from DAT with INPUT at DIGITAL and
the DAT connected through DIGITAL IN:
The recorder marks a new track number whenever
the signal level drops and rises to a certain point*
(Automatic Track Marking). If "LLVEL-SYNC" does
not light up, set the L-OvelSviic to ON as follows:
'Q' When you want to mark track numbers after you've
done the recording
Use the Divide Function (sec "Dividing Recorded Tracks"
on page 20).
1 Press EDIT,/NO to display "Lev'clSvnc /"during
recording or recording pause.
2 Press YES twice to display "LevelSvnc ON."
"LEVLl.-SY'NC" appears in the display.
 Loading...