

Page 1

2-599-667-11(1)
LocationFree Player
for PC
Operating Instructions
LFA-PC1 Pre-release version
©2005 Sony Corporation
Page 2

Pre-release version
Table of Contents
For details on setting up NetAV, refer to the NetAV Quick Start Guide.
You can view the NetAV Quick Start Guide by opening the Start
menu, selecting [All programs] ([Programs] in Windows 2000), and
then selecting [Sony LocationFree Player].
Introduction
What is LocationFree Player? ................................................4
Features of LocationFree Player.............................................
What is the NetAV Function? ................................................ 4
System Requirements ............................................................5
Configuring LocationFree Player ..........................................7
Installation
Step 1 Installing the LocationFree Player Software .............9
4
Preparations Prior to Access from a Remote Location
Step 2 Setting Up Your Computer .......................................10
Step 3 Setting Up the NetAV Function ................................10
Step 4 Getting the Base Station Ready to Register
Your Computer .......................................................... 12
Step 5 Registering Your Computer with the Base Station 13
Step 6 Configuring TV Channels .........................................17
Remote Location Setup
Step 7 Connecting Your Computer to the Internet ............19
Step 8 Establishing a Connection with the Base Station
from Your Computer .................................................19
Step 9 Configuring the On-screen Remote Control ........... 20
Configuring the TV Remote Control....................................
Configuring the Remote Control for Video 1 and Video 2... 21
Watching Video Remotely
Starting the NetAV Function ................................................23
Starting the NetAV Function................................................
Quitting the NetAV Function ............................................... 24
NetAV Basic Window ............................................................25
Displaying the Index .............................................................28
20
23
2
Page 3

Watching TV and Video ........................................................ 29
TV Channel Selection...........................................................
Volume Adjustment.............................................................. 29
Using the On-screen Remote Control .................................30
Selecting a Secondary Audio Program (SAP) ....................30
Changing the Streaming Rate .............................................. 30
Watching Video at Home with the NetAV Function
Watching Video at Home with the NetAV Function ...........31
Wired LAN Setup.................................................................
Wireless LAN Setup............................................................. 32
Others
Mouse and Keyboard Operations ........................................ 33
Removing LocationFree Player from Your Computer ....... 35
Troubleshooting ....................................................................36
Index ....................................................................................... 38
Trademarks ............................................................................ 39
Pre-release version
29
31
Contacting Sony
If, after reading these operating instructions, you have additional
questions related to the use of your Sony television, please call our
Customer Information Services Center at
1-800-222-SONY (7669) (US residents only) or
1-877-899-SONY (7669) (Canadian residents only).
Note
The screen shots used in this manual are only example images.
3
Page 4
Pre-release version
Introduction
Introduction
What is LocationFree Player?
LocationFree Player is a software application that enables video streaming over
the internet, what is known as "NetAV" on the Sony LocationFree TV. The
NetAV function allows you to stream live TV, VCR or DVDs from your home
to your computer over a broadband internet connection.
Features of LocationFree Player
Watch TV, VCR or DVDs on your computer remotely (NetAV
function (1 below))
With an Internet connection, you can use the NetAV function to watch TV, VCR
or DVDs on your computer as you would at home.
Compatible with wireless and wired LAN
You can use either a wireless or a wired LAN to establish a connection with your
base station with the NetAV function. NetAV function allows you to watch TV,
VCR or DVDs from the base station through a hotel or public wireless access LAN.
Notes
• If your base station is connected to the Internet through an analog phone line
using a dial-up router or cellular phone, the NetAV function is not accessible.
• The functions of the LocationFree Player are limited to the NetAV functions
(TV, VCR and DVDs).
* Make sure that you respect copyright laws when enjoying TV, VCR or DVDs.
* Depending on the copyright protection methods used, you may not be able
to view some materials.
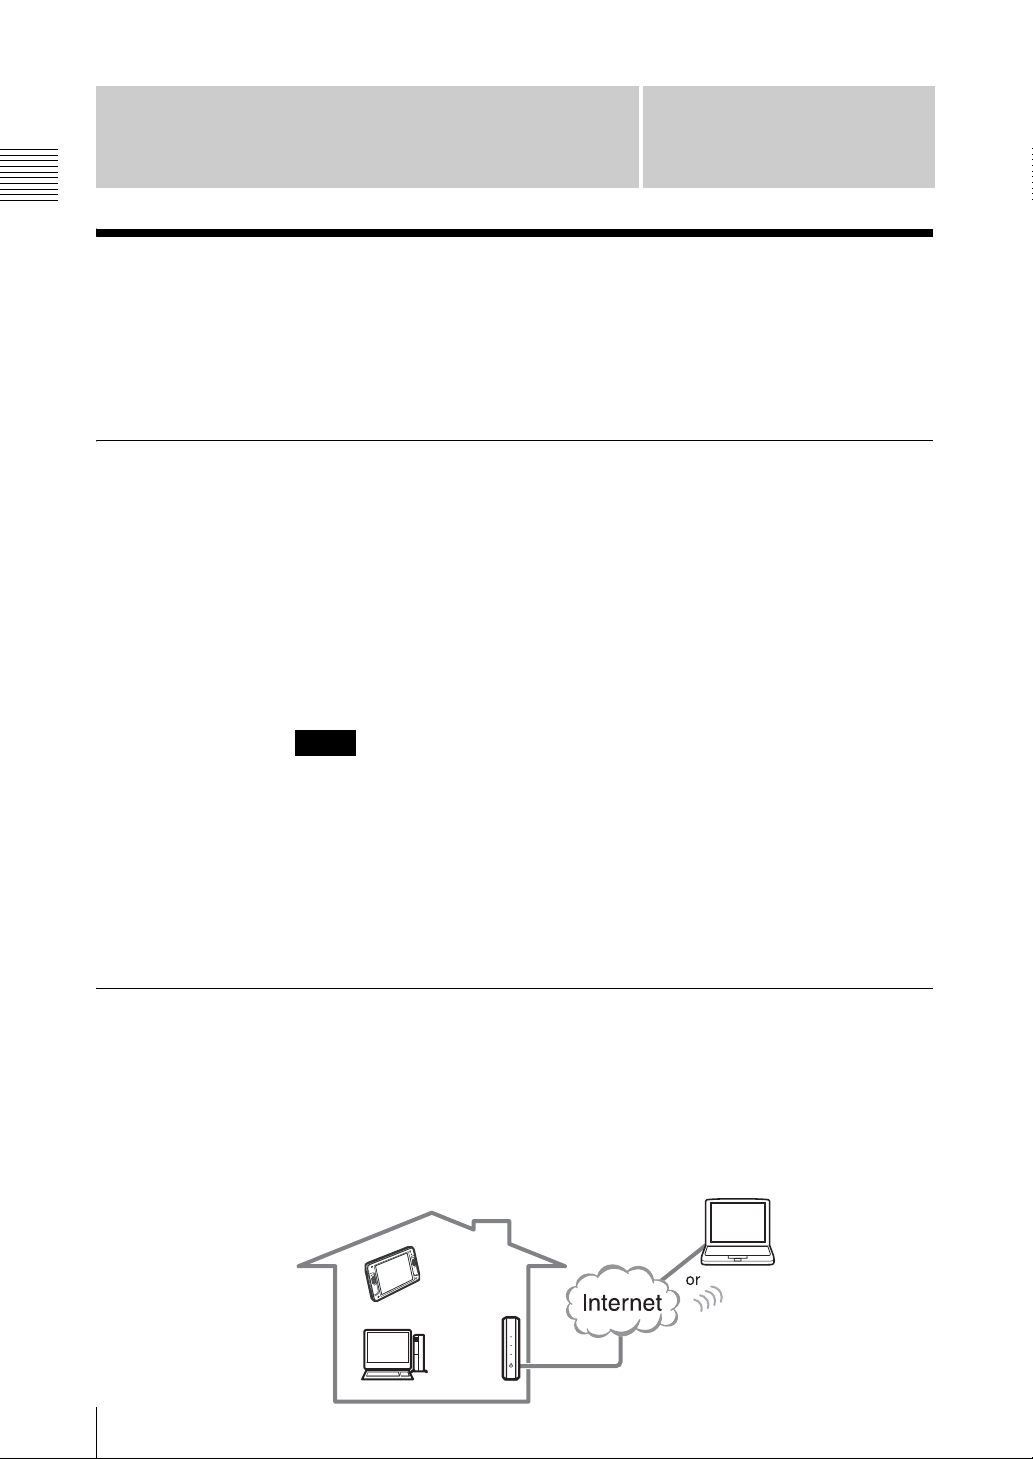
What is the NetAV Function?
While you are away from home, you can connect the registered computer to your
base station via the Internet, enjoy TV, and control the VCR or the DVD player
in your home. This is the “NetAV” function.
For example, by connecting it to a public wireless access, you can enjoy NetAV
at a cafe via the Internet. You can also enjoy NetAV at a hotel by connecting it
to the Internet via wired LAN.
What is LocationFree Player?
4
Computer B
Monitor
Base station
NetAV
Computer A
NetAV
Page 5

System Requirements
Pre-release version
You must meet the following requirements to use LocationFree Player.
For details on setting up NetAV, refer to the NetAV Quick Start Guide.
You can view the NetAV Quick Start Guide by opening the Start
menu, selecting [All programs] ([Programs] in Windows 2000), and
then selecting [Sony LocationFree Player].
Home requirements
• A LocationFree TV (LF-X1 or LF-X5) (base station and monitor).
• A broadband Internet connection
We recommend network throughput higher than 300 kbps (both uploading and
downloading).
• A static global IP address or dynamic DNS service
A global IP address* must be assigned to the home network where the base
station is installed.
* A global IP address is also known as a “Public IP address”.
Two types of service are available: static global IP address service and dynamic DNS service,
in which a global IP address is assigned dynamically.
Notes
• NetAV cannot be used over a dial-up connection or cellular phone.
• Some other line types may not allow you to connect with NetAV because of
restrictions imposed by Internet Service Providers (ISPs) or the connection
devices in use.
• If the connection speed is too slow, the picture and sound may cut out or be
affected by noise, etc.
• If a fire wall is set, you cannot use NetAV.
• You cannot connect with NetAV via proxy server.
Introduction
Computer requirements (where LocationFree Player is installed)
Sony recommended
• A computer meeting the following requirements:
• Operating system:
Windows 2000 Professional ServicePack 4 or later
Windows XP Professional/Home Edition ServicePack 1 or later
• Processor: Pentium 4, 1 GHz or more
• RAM: 256 MB or more
• Available hard disk space: 300 MB or more
• Monitor resolution: 800 x 600 pixels or more, HighColor (16 bit) or more
• LAN connector or IEEE 802.11a, b or g compatible wireless LAN device
to connect to the Internet
• A LAN cable for wired connections
• An Internet environment whose network throughput higher than 300 kbps
(both uploading and downloading)
z Tip
For details about necessary home (base station location) devices and Internet
environment requirements to use the NetAV function, refer to the LF-X1/LF-X5
operating instructions.
System Requirements
5
Page 6

Pre-release version
Introduction
Note
Even if the above requirements are satisfied, you may not be able to use the
LocationFree Player because of limitations in peripheral devices such as your
graphics card.
System Requirements
6
Page 7
Configuring LocationFree Player
Pre-release version
You must configure LocationFree Player before you can watch TV, VCR or
DVDs with the NetAV function on your computer.
Before configuring LocationFree Player
Set up the LocationFree TV base station and monitor, using the instructions that
they came with.
This manual only contains explanations about how to configure LocationFree
Player and how to use it to watch TV, VCR or DVDs on your computer using the
NetAV function. Information about the LocationFree TV configuration, Internet
connection setup, and other information can be found in the LF-X1/LF-X5
operating instructions.
For details on setting up NetAV, refer to the NetAV Quick Start Guide.
You can view the NetAV Quick Start Guide by opening the Start
menu, selecting [All programs] ([Programs] in Windows 2000), and
then selecting [Sony LocationFree Player].
Step 1 Installing the LocationFree Player software (1 page 9)
m
Steps required before access remotely (one-time setup)
Introduction
Step 2 Setting up your computer (1 page 10)
m
Step 3 Setting up the NetAV function (1 page 10)
m
Step 4 Getting the base station ready to register your computer
(1 page 12)
m
Step 5 Registering your computer with the base station (1 page 13)
m
Step 6 Configuring TV channels (1 page 17)
m
Remote location preparations
Step 7 Connecting your computer to the Internet (1 page 19)
m
Step 8 Establishing a connection with the base station from your
computer (1 page 19)
m
Step 9 Configuring the on-screen remote control (1 page 20)
m
Enjoy TV, VCR or DVDs on your computer
Configuring LocationFree Player
7
Page 8

Pre-release version
Introduction
z Tips
• When you are using the monitor to communicate with the base station in
“Home mode” to watch TV, VCR or DVDs, you cannot use the NetAV
function from computers A or B to access the base station. However, if you
select [Allow AV interception by registered monitors.] check box when you
register the monitor, even if the monitor is being used to watch TV, VCR or
DVDs, you can still initiate a NetAV connection with the base station from
computers A or B.
• While the base station is feeding TV, VCR or DVDs to a remote computer with
the NetAV function, you cannot use the NetAV function with other monitors.
In other words, while computer A is accessing the base station with NetAV,
you cannot use NetAV on computer B to access the base station. The reverse
also applies.
Computer B
Monitor
Base station
NetAV
Computer A
NetAV
Configuring LocationFree Player
8
Page 9

Installation
Step 1 Installing the LocationFree Player
Pre-release version
Software
Follow the on-screen instructions to complete the installation of the software. For
more details, refer to the “Software Installation Guide”.
z Tips
• LocationFree Player is compatible only with Windows XP and Windows 2000.
It cannot run on other operating systems.
• If the Microsoft DirectX 9.0 is not installed on the computer where you choose
to install LocationFree Player, it is installed at the same time you install
LocationFree Player.
Note
The 3ivx is installed at the same time as LocationFree Player. The 3ivx is a
software essential to the proper operation of installed at LocationFree Player, and
it should not be removed.
Installation
Step 1 Installing the LocationFree Player Software
9
Page 10
Pre-release version
Preparations Prior to Access
from a Remote Location
Step 2 Setting Up Your Computer
If you are using a personal firewall on your computer (contained in Windows XP
or on products like Norton Internet Security), or if you are using a home router,
you will need to configure your computer to use NetAV. Follow the instructions
below to complete this configuration.
Preparations Prior to Access from a Remote Location
Step 3 Setting Up the NetAV Function
Perform this step using the LF-X1 or LF-X5.
This step summarizes how to configure the base station settings to use the NetAV
function. For details, refer to the LF-X1/LF-X5 operating instructions.
1
Refer to “Setting Up NetAV” in the “What’s NetAV” section of the LF-X1/
LF-X5 operating instructions to perform the setup.
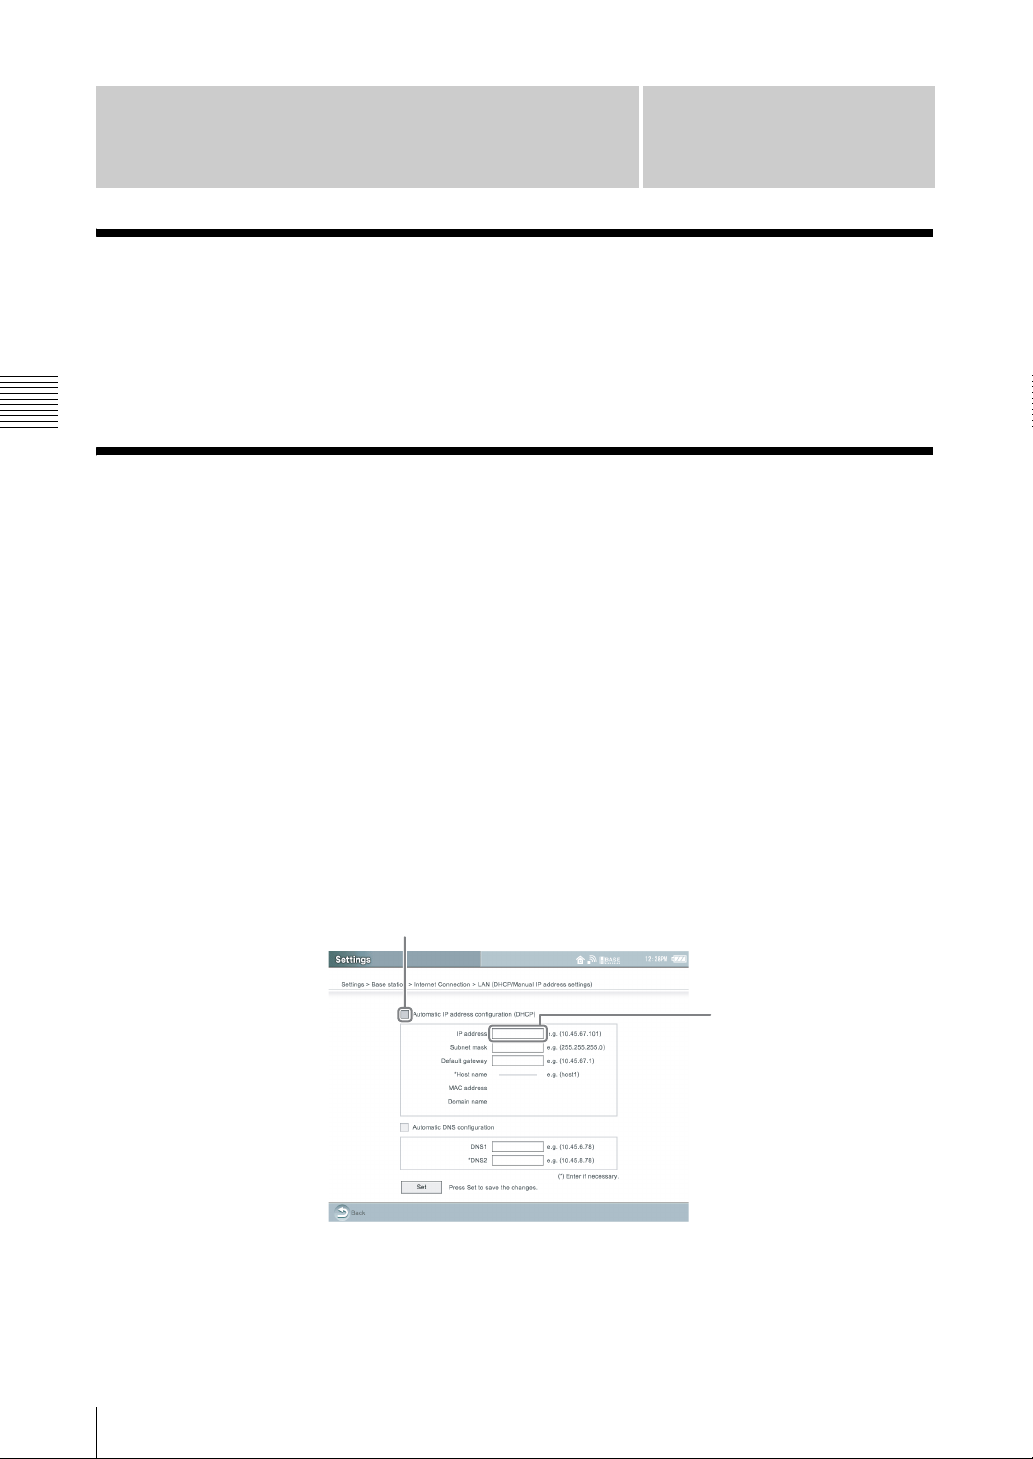
2
Specify an IP address and the other information of the base station with the
LF-X1 or LF-X5 monitor.
To use the NetAV function, you need to specify a static IP address in the
[LAN (DHCP/Manual IP address settings)] screen.
Select [Settings], [Base station], [Internet Connection], [LAN (DHCP/
.
Manual IP address settings)], and then [Settings].
Clear the
check box
Specify a static
IP address
Step 2 Setting Up Your Computer
10
(1) Make sure [Automatic IP address configuration (DHCP)] check box is
selected and jot down the information in all of the fields*.
* If the [Automatic IP address configuration (DHCP)] check box is not selected, select the
check box and click [Set]. The information in the fields appears in several seconds.
Page 11
Pre-release version
(2) Clear the [Automatic IP address configuration (DHCP)] check box.
The information in the fields will clear, which releases the “automatic”
IP settings.
(3) Enter again the information you jot down in step (1) - with one exception:
For the IP address, be sure to change the last two digits to 64*.
* If you entered a different IP address for the port forwarding or DMZ settings of your
router, make the last two digits match that address.
(4) Click [Set] to lock in the IP address and other important information on
this screen.
z Tip
Jot down the IP address that you specify. You will need it to establish a
connection to the base station from your computer.
3
Connect to the Internet to confirm that LAN settings are correct. Go to the
Web function. If the web page appears, your settings are correct. If the web
page does not appear, you may not have entered the information correctly in
Step 2. Go back and confirm that information has been entered correctly.
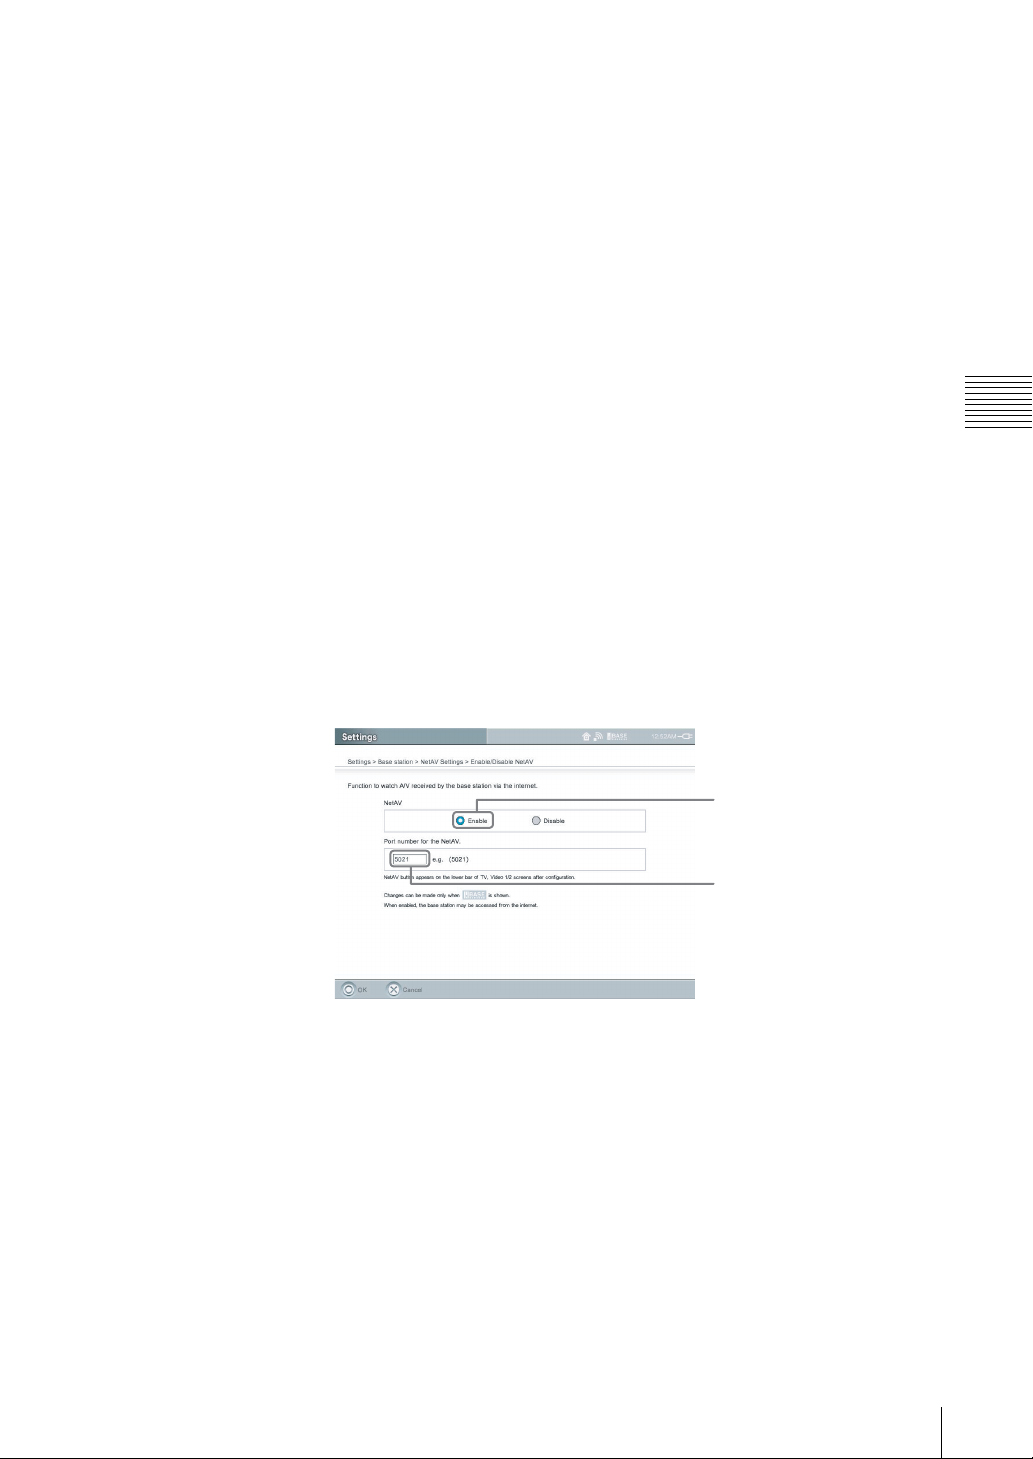
4
Configure the base station NetAV.
Select [Settings], [Base station], [NetAV Settings], and then [Enable/Disable
NetAV].
To send video from the base station to a remote computer in the [Enable/
Disable NetAV] screen as described below.
Preparations Prior to Access from a Remote Location
Select [Enable]
Specify a port number
(5021 is commonly used)
Step 3 Setting Up the NetAV Function
11
Page 12
Pre-release version
Step 4 Getting the Base Station Ready to Register
Your Computer
This step explains how to set up the base station before registering your remote
computer with it.
z Tip
While you are using the NetAV function to send video from the base station, you
cannot use the NetAV function from your home monitor or other computers to
access the base station. For details about the NetAV function and device
registration, refer to the LF-X1/LF-X5 operating instructions.
Preparations Prior to Access from a Remote Location
1
Set the monitor to the Home-Wireless setting.
Check that appears on the monitor.
2
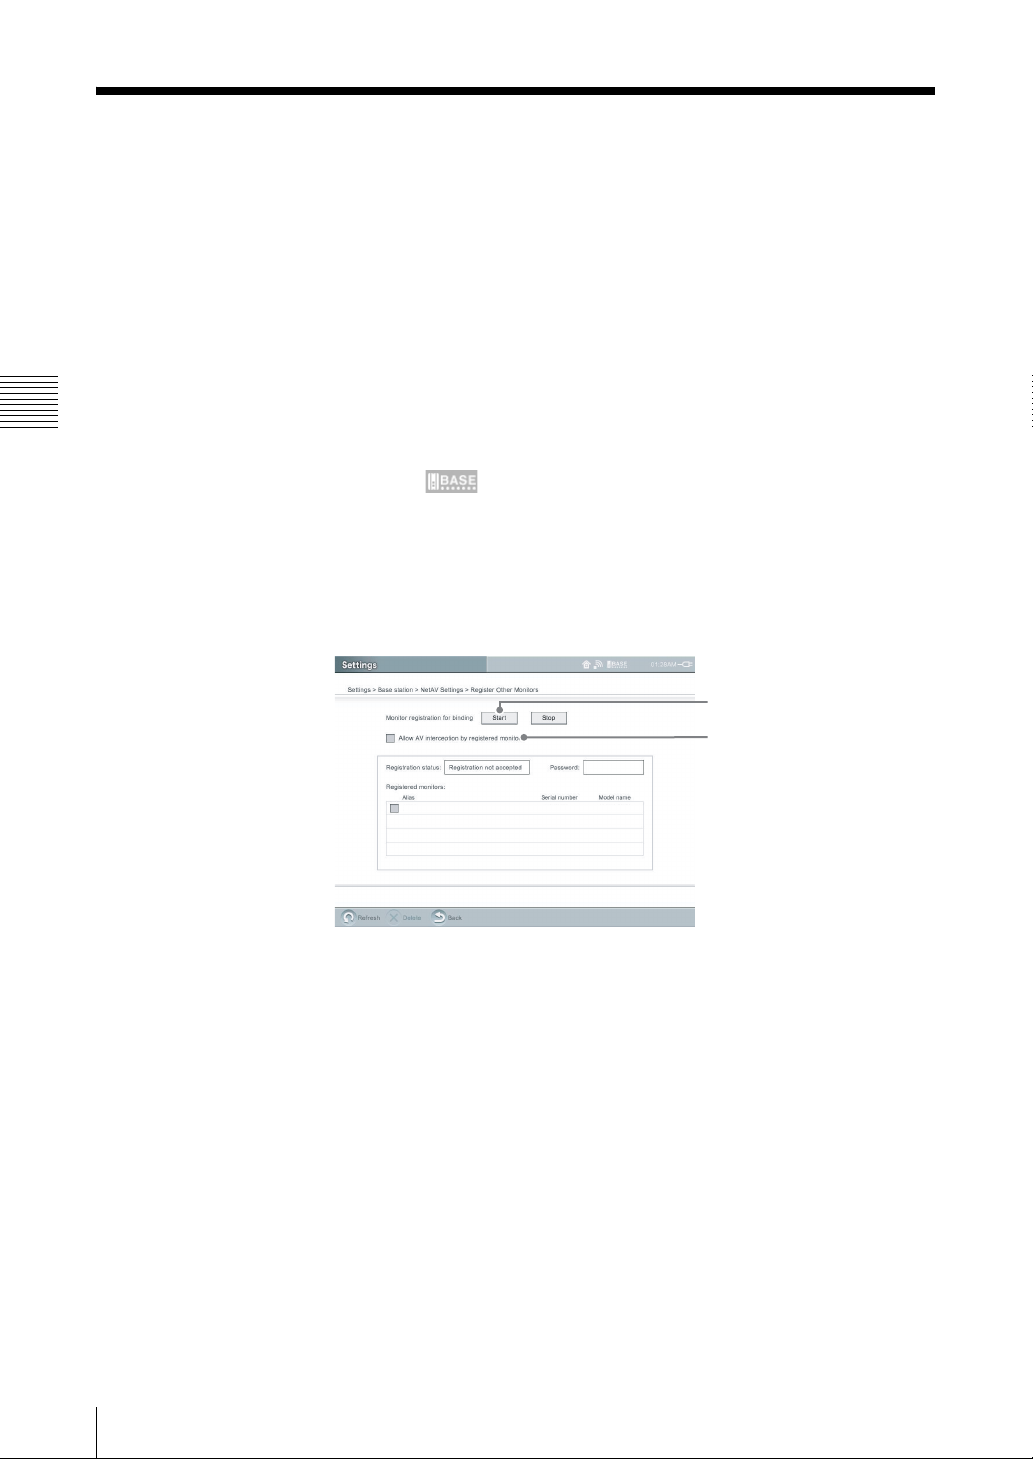
Select [Settings], [Base station], [NetAV Settings], and then [Register Other
Monitors].
The [Register Other Monitors] screen appears.
3
.
Configure each setting.
(1)
(2)
(1) Select [Start].
After you select [Start], the current device status changes from
“Registration not accepted” to “Ready for registration” and an 8-digit
password appears. Jot down the password. You will need it to register
your computer to the base station.
(2) If you want to allow your computers to access the home base station
while you are watching TV, VCR or DVDs in “Home mode”, select this
check box.
z Tip
You can resume viewing on your home monitor in “Home mode”, by
selecting [Get AV], which interrupts the transmission to the computer
connected through the NetAV function.
Step 4 Getting the Base Station Ready to Register Your Computer
12
Page 13

Pre-release version
The registration
password appears here
The name you entered
for [Name for registration]
in Step 5 appears here.
4
Select [Back].
The [NetAV Settings] screen appears again.
5
Select [Back].
The [Base station] screen appears again.
6
Select [Settings], and then select [Exit].
Step 5 Registering Your Computer with the Base
Station
This step explains how to register your remote computer with the base station.
Note
If you remove the 3ivx after installing LocationFree Player, when you start
LocationFree Player a DirectShow initialization error occurs. If this happens,
uninstall LocationFree Player and then reinstall it.
1
Connect your computer to your network through a wireless or wired LAN
connection.
Preparations Prior to Access from a Remote Location
2
Double-click (LocationFree Player) on your desktop.
You can also point to [All programs] ([Programs] in Windows 2000), [Sony
LocationFree Player], and then click [LocationFree Player] on the [Start]
menu.
.
LocationFree Player starts. The [Registration for Binding] screen appears.
Step 5 Registering Your Computer with the Base Station
13
Page 14

Pre-release version
Preparations Prior to Access from a Remote Location
3
Configure each setting.
(1)
(2)
(3)
(4)
(5)
(1) Type the domain name or static IP address of the target base station.
(2) Type the port number of the target base station (5021 is commonly used).
(3) Type the password that you received in step 4 of “Getting the Base
Station Ready to Register Your Computer” (1 page 12).
(4) Type a name for the computer you are registering (no more than 20
alphanumerical characters).
The name you type here will appear in the [Registered monitors] list of
the [Register Other Monitors] screen on the LF-X1 or LF-X5 monitor.
(5) Click [Start].
Note
The [Registration for Binding] screen only appears when you register for the
first time. For details about verifying the domain name, static IP address, and
port number of the target base station after registration has finished, refer to
“If You cannot Connect to the Base Station” (1 page 15).
A registration confirmation message appears. Select [OK] to begin
registration.
When registration is complete, the message “Registration completed.”
appears.
Step 5 Registering Your Computer with the Base Station
14
Page 15

z Tip
When the connection is established from the computer to the base station, the
computer is registered under the name that you set in (4) of the procedure above
in the [Registered monitors] list of the [Register Other Monitors] screen.
If the name of the registered computer does not appear, select [Refresh] to update
the display.
If You cannot Connect to the Base Station
If an error message appears when you click [Connect], perform the following
procedure at the base station to confirm the connection settings. Also confirm
that the base station is set to accept registration.
Pre-release version
Preparations Prior to Access from a Remote Location
1
Click [Settings] at the right bottom of the window.
Settings
The [Settings] screen appears.
Note
If the [Settings] button does not appear, enlarge the window until it does
appear.
Step 5 Registering Your Computer with the Base Station
15
Page 16

Pre-release version
Preparations Prior to Access from a Remote Location
2
Click [NetAV Settings], [NetAV Connection], and confirm the settings.
(1) Type the domain name or static IP address of the target base station.
(2) Type the port number of the target base station.
z Tip
When connected to the base station, this screen cannot be displayed.
(1)
(2)
Re-registering Your Computer with the Base Station
Perform registration again if you delete the information for a computer registered
with the base station on the LF-X1 or LF-X5 or initialize the base station.
Re-registering is necessary only if the registered computer does not appear when
you select [Settings], [Base station], [NetAV Settings], and then open the
[Register Other Monitors] screen (1 page 13) on the LF-X1 or LF-X5.
1
Perform the procedure described in “Step 4 Getting the Base Station Ready
to Register Your Computer” (1 page 12).
2
Verify that the information of the target base station is correct (1 page 16).
3
Click [Registration for Binding], and then configure all the settings.
(1)
(2)
Step 5 Registering Your Computer with the Base Station
16
Page 17

z Tip
When connected to the base station, this screen cannot be displayed.
(1) Type the password that you received in step 4 of “Getting the Base
Station Ready to Register Your Computer” (1 page 12).
(2) Type a name for the computer you are registering (no more than 20
alphanumerical characters).
The name you type here appears in the [Registered monitors] list of the
[Register Other Monitors] screen on the LF-X1 or LF-X5 monitor.
4
Click [Start].
The message “Registering this monitor to the base station?” appears.
Pre-release version
5
Click [OK].
When the registration succeeds, the message “Registration completed”
appears.
6
Click [OK] or [Apply].
Step 6 Configuring TV Channels
This step explains how to configure the TV Channels.
You can confirm which TV channels are available by selecting [Settings], [TV/
Video], [Channel Settings] on the LF-X1 or LF-X5.
1
Click [Settings] at the right bottom of the window.
If [Settings] is not present in the window, click anywhere in the window to
display it.
The [Settings] screen appears.
Note
If the [Settings] button does not appear, enlarge the window until it does
appear.
Preparations Prior to Access from a Remote Location
2
Click [TV/Video Settings], [Channel Settings], and then configure all the
settings.
(1)
(2)
Step 6 Configuring TV Channels
17
Page 18

Pre-release version
Preparations Prior to Access from a Remote Location
(1) If you subscribe to cable TV, select the [ON] option.
When [CABLE] is set to [ON], channels 1 to 125 are automatically
selected, and when [CABLE] is set to [OFF], channels 2 to 69 are
automatically selected.
(2) Clear the check boxes for channels that are not used.
You can confirm which TV channels are available by selecting
[Settings], [TV/Video], [Channel Settings], and then [Channel Skip/Add]
on the LF-X1 or LF-X5.
3
When you are done, click [OK] or [Apply].
z Tip
Buttons common to all [Settings] screens have the following functions.
[OK]: Updates the settings and closes the [Settings] screen.
[Cancel]: Closes the [Settings] screen without updating the settings.
[Apply]: Updates the settings without closing the [Settings] screen.
This is useful when you want to continue making settings.
Step 6 Configuring TV Channels
18
Page 19

Pre-release version
Remote Location Setup
Step 7 Connecting Your Computer to the Internet
Connect your computer to the Internet through a wireless or wired LAN
connection. For details about how to connect to the Internet, refer to your
computer and the Internet provider’s documentation.
Step 8 Establishing a Connection with the Base
Station from Your Computer
Start LocationFree Player, and then establish a connection with the base station.
Remote Location Setup
Note
If you remove the 3ivx after installing LocationFree Player, when you start
LocationFree Player a DirectShow initialization error occurs. If this happens,
uninstall LocationFree Player and then reinstall it.
1
Double-click (LocationFree Player) on your desktop.
You can also point to [All programs] ([Programs] in Windows 2000), [Sony
LocationFree Player], and then click [LocationFree Player] on the [Start]
menu.
.
LocationFree Player starts.
2
Click [Connect] at the left bottom of the window.
Connect
Step 7 Connecting Your Computer to the Internet
19
Page 20

Pre-release version
The system attempts to establish a connection.
When the connection is established, the base station begins to buffer and
transmit video signals, and they appear in your window.
If you cannot establish a connection, refer to “Troubleshooting” (1page 36).
Step 9 Configuring the On-screen Remote Control
If you installed the supplied IR Blaster on your external tuner (such as a set-top
box) or if you installed it on a device connected to the base station, you can
display a remote control on your screen and control the display with it.
Configuring the TV Remote Control
Before performing the following steps, click [Connect] to connect to the base
station.
1
Remote Location Setup
Click anywhere inside the window.
The index appears.
2
Click [TV].
3
Click [Settings] at the right bottom of the window.
The [Settings] screen appears.
Note
If the [Settings] button does not appear, enlarge the window until it does
appear.
4
Click [TV/Video Settings], [Remote Settings], and then [TV].
(1)
(2)
(3)
Step 9 Configuring the On-screen Remote Control
20
(4)
Page 21

Pre-release version
(1) Select the [External TV tuner] option, and then select the appropriate
channel from the pull-down list.
(2) Select the make of the connected device.
(3) Select the type of the connected device.
(4) If the configuration above is correct, each time you click [Power], your
TV should turn on or off.
After clicking [Power], it takes five seconds or more for the TV to
respond.
If it does not work, make sure that the make and model are correct, and
then try again.
Also, check the connection between the base station and connected
device, and make sure the IR Blaster is installed properly.
Notes
• Even if the power turns on and off correctly with [Power], other buttons
may not be enabled. If this happens, select [TV] from the Index. With the
on screen-remote, confirm that the buttons are enabled.
• Some devices may not have a [Power] button (e.g. DVR). In this case, as
well, use the on-screen remote to display [TV] and confirm that the buttons
are enabled.
Remote Location Setup
5
Click [OK] or [Apply].
Configuring the Remote Control for Video 1 and Video 2
Before performing the following steps, click [Connect] to connect to the base
station.
1
Click anywhere inside the window.
The index appears.
2
Click the feed for which you want to setup the remote control.
3
Click [Settings] at the right bottom of the window.
The [Settings] screen appears.
Note
If the [Settings] button does not appear, enlarge the window until it does
appear.
4
Click [TV/Video Settings], [Remote Settings], and then [Video 1] or
[Video 2].
Step 9 Configuring the On-screen Remote Control
21
Page 22

Pre-release version
(1)
Remote Location Setup
(1) Select the make of connected device.
(3)
(2)
(2) Select the type of connected device.
(3) If the configuration above is correct, each time you click [Power], your
device should turn on or off.
After clicking [Power], it takes five seconds or more for the device to
respond.
If it does not work, m ak e sure that the make and type are correct, and then
try again.
Notes
• Even if the power turns on and off correctly with [Power], other buttons
may not be enabled. If this happens, select [TV] from the Index. With the
on screen-remote, confirm that the buttons are enabled.
• Some devices may not have a [Power] button (e.g. DVR). In this case, as
well, use the on-screen remote to display [TV] and confirm that the buttons
are enabled.
When connecting two devices to the same connector
Make sure that the device connected directly to the base station is connected
as the first device.
When connecting an all-in-one video device, such as a
VCR+DVD player
The second remote control is automatically set when you select a device
displayed as all-in-one device from the [Type] list (e.g., Sony “VCR+DVD
player”). Click the [Switch] button on the on-screen remote control to switch
between the remote control of the VCR and that of the DVD player.
5
Click [OK] or [Apply].
z Tip
After configuring the remote control for Video 1 and Video 2, the [Video 1] and
[Video 2] options in the [index] window change to their set remote control names.
Step 9 Configuring the On-screen Remote Control
22
Page 23

Watching Video Remotely
Starting the NetAV Function
Start LocationFree Player, establish a connection with the base station, and then
start the NetAV function.
Note
If you remove the 3ivx after installing LocationFree Player, when you start
LocationFree Player a DirectShow initialization error occurs. If this happens,
uninstall LocationFree Player and then reinstall it.
Starting the NetAV Function
1
Double-click (LocationFree Player) on your desktop.
You can also point to [All programs] ([Programs] in Windows 2000), [Sony
LocationFree Player], and then click [LocationFree Player] on the [Start]
menu.
.
LocationFree Player starts.
Pre-release version
Watching Video Remotely
2
Click [Connect] at the left bottom of the window.
Connect
The system attempts to establish a connection.
When the connection is established, appears in the upper part of the
screen. A few moments later, the base station begins to transmit video, and
it appears in your window.
If the video feed does not appear in your window, click anywhere inside the
window to display the index, and then click the feed that you want to see.
Starting the NetAV Function
23
Page 24

Pre-release version
Quitting the NetAV Function
Closing the Connection with the Base Station
Click anywhere on the screen to display the top and bottom menu bars, and then
.
click [Disconnect] at the left bottom of the window.
Watching Video Remotely
Quitting LocationFree Player
Disconnect
Click anywhere on the screen to display the top and bottom menu bars, and then
click (Close) at the top right of the window.
Close
Starting the NetAV Function
24
Page 25

NetAV Basic Window
Overview of the LocationFree Player Window
(1) (2) (3) (4) (5)(6)
Pre-release version
(7)
(8)
(10)(11)(12)(13)(14)(15)
Note
(9)
If the desired button does not appear, enlarge the window until it does appear.
(1) TV/Video display
(2) TV channel
(3) NetAV indicator
This indication appears here when a connection is established with the base
station and you are using the NetAV function.
(4) Volume indicator
(5) Minimize button
To minimize the LocationFree Player window, use the Minimize button.
(6) Maximize/Restore button
To maximize the LocationFree Player window to fill the screen, use the
Maximize button. When the window fills the screen, use the Restore button
to restore it to its original size.
(7) Close button
To quit LocationFree Player, use this button.
(8) Index (1 page 28)
To select [TV], [Video 1] or [Video 2].
(9) Settings
To display the screen allowing you to display the [Settings] screen, use this
button.
Watching Video Remotely
NetAV Basic Window
25
Page 26

Pre-release version
(10) Volume control (1 page 29)
To control the sound volume, use these buttons.
(11) Muting
To mute the sound, use this button.
(12) SAP (1 page 30)
To switch to the secondary audio program (when and where available), use
this button.
(13) Rate (1 page 30)
To change the TV or video streaming rate according to your communication
environment, use this button.
(14) Remote (1 page 30)
To display the on-screen remote control, use this button.
(15) Connect/Disconnect
To establish a connection with the base station, click [Connect]. To close the
connection with the base station, click [Disconnect].
z Tip
You can use your mouse or keyboard to display the setting dialog box and make
any setting modification. For details, see the mouse and keyboard operations list
(1 page 33).
Watching Video Remotely
Overview of the On-screen Remote Control
Depending on your settings and the devices connected to your system, the remote
control may vary from the one illustrated here. The explanations in this section
refer to the TV on-screen remote control when using the LocationFree TV
internal tuner.
(7)
(1) (2)
(3)
(4)
(5)
NetAV Basic Window
26
(6)
Page 27

Pre-release version
(1) Remote control name
(2) Close button
To hide the remote control, use this button.
(3) Channel display
(4) Number buttons
To select a channel, use these buttons. After you enter a channel, click the
[Enter] button or wait 3 seconds to confirm.
(5) Enter
To confirm the channel entered with the number buttons.
(6) CH +/-
To immediately display the next channel, use the + button. To immediately
display the previously watched channel, use the - button.
(7) Jump
To jump from the current channel to the last channel, and then to the current
channel, use this button.
Watching Video Remotely
NetAV Basic Window
27
Page 28

Pre-release version
Displaying the Index
Use the index to switch among input feeds.
1
Click anywhere inside the window.
The index appears.
Note
If you are not connected to NetAV, the index will not appear when you click
inside the window.
2
Click the feed that you want to see.
Watching Video Remotely
The selected feed appears in the window.
Displaying the Index
28
Page 29

Watching TV and Video
Display the index (1 page 28), and then select the desired feed.
TV Channel Selection
With the On-screen Remote Control
When the on-screen remote control is configured as described on page 20, you
can display it to select a TV channel.
Click [Remote] at the left bottom of the window, use the remote control number
buttons to enter the desired channel number, and then click [Enter].
With Your Keyboard (Only when using the internal tuner)
You can only change the channel with the UP and DOWN ARROW keys on the
keyboard if you are using the LocationFree TV internal tuner.
Volume Adjustment
Pre-release version
Using the [+] and [-] volume buttons, at the right bottom to adjust the volume.
Watching Video Remotely
Volume
You can also use the LEFT (Vol -) or RIGHT (Vol +) ARROW key.
z Tip
Pressing the [+] volume button when the sound is muted releases the mute
setting.
Watching TV and Video
29
Page 30

Pre-release version
Using the On-screen Remote Control
After the on-screen remote control is configured (1 page 20), you can control
the TV or video displays.
Click [Remote] at the left bottom of the window.
The remote control appears.
Selecting a Secondary Audio Program (SAP)
The secondary audio program (SAP) mode is available for television broadcasts
that include multiple audio tracks.
When a TV program with multiple audio tracks is tuned in, select [SAP]
repeatedly at the bottom of the window to switch among audio tracks. Each time
the [SAP] button is clicked, [STEREO] or [SAP] appears on the window.
z Tip
Watching Video Remotely
To select an SAP option for external equipment, use the remote supplied with the
connected equipment.
Changing the Streaming Rate
You can change the TV or video streaming rate according to your communication
environment.
1
Click [Rate] at the bottom of the window.
The [Change Rate] screen appears.
2
Select the desired rate, and then click [OK].
The NetAV connection will be interrupted for a moment when you change
from the lowest connection bit rate to another bit rate or vice versa.
Using the On-screen Remote Control
30
Page 31

Pre-release version
Watching Video at Home
with the NetAV Function
Watching Video at Home with the NetAV Function
If you install the LocationFree Player to the home computer, you can watch video
in your room from the base station in the living room via home network.
Note
The settings of the computer is up to its operating system and your network
environment. Refer to the instruction manual with your computer for more
details.
Wired LAN Setup
You can watch video on your computer with NetAV function via wired LAN at
home.
z Tip
You need a router for this usage.
1
Connect the computer, base station and router with LAN cables (not
supplied) as shown below.
Base station
Router
LAN
port 1
2
With your LocationFree TV (LF-X1 or LF-X5), select [Settings] - [Base
station] - [Internet Connection] - [LAN (DHCP/Manual IP address Settings],
and Jot down the IP address of the base station.
LAN
port 2
WAN
port
Watching Video at Home with the NetAV Function
3
Register your computer to the base station. (1 page 13)
Watching Video at Home with the NetAV Function
31
Page 32

Pre-release version
Wireless LAN Setup
You can watch video on your computer with NetAV function via wireless LAN
at home. The base station should be used as a wireless access point.
1
.
With your LocationFree TV, select [Settings] - [Base station] - [Wireless
Access Point], and configure it as described below.
Refer to the LF-X1/LF-X5 operating instructions. For more details about
setting of wireless LAN.
Watching Video at Home with the NetAV Function
(1) Select [Allow PC connection] check box.
(2) Clear [Stealth (Hide SSID)] check box.
z Tips
• You can use this even if you do not clear the [Stealth (Hide SSID)]
check box.
• If you select the check box, you have to input the SSID and you cannot
confirm the base station radio wave status.
(3) Jot down IP address on the [IP address of the base station].
(4) Click [Set].
2
Register your computer to the base station. (1 page 13)
Watching Video at Home with the NetAV Function
32
Page 33

Others
Mouse and Keyboard Operations
You can perform the following operations with your computer’s mouse and
keyboard.
Mouse operations
Operations
Click Clicking anywhere inside the window displays the
index.
Right-click Right-clicking anywhere inside the window displays a
context menu as described below.
Items displayed by right-clicking anywhere inside the window
Pre-release version
Items Operations
Connect/Disconnect Establish a connection with the base station and close
that connection.
Remote Display and hide the on-screen remote control.
Settings Display the [Settings] screen.
Rate Change the TV or video streaming rate according to
the communication environment.
SAP Switch to the secondary audio program.
Muting Mute the sound.
Vol + Turn up the volume.
Vol - Turn down the volume.
Operating Instructions Display Operating Instructions.
Version Info Display the software version.
Quit Application Quit the program.
Always on top Display the screen on top of all other screens.
Others
Mouse and Keyboard Operations
33
Page 34

Pre-release version
Operations possible with the keyboard
Shortcut keys Operations
Ctrl+W or Alt+F4 Quit the program.
F1 Display Operating Instructions.
F5 or Ctrl+S Establish a connection with the base station and sever
that connection.
F6 or Ctrl+R Display and hide the on-screen remote control.
F7 or Ctrl+L Change the TV or video streaming rate according to
the communication environment.
F8 or Ctrl+M Mute the sound.
F12 or Ctrl+P Display the [Settings] screen.
RIGHT or LEFT ARROW Turn up or down the volume.
UP or DOWN ARROW Change channels.
Alt+SPACEBAR Display a menu relevant to the display.
Others
Mouse and Keyboard Operations
34
Page 35

Removing LocationFree Player from Your
Computer
Select [All programs] ([Programs] in Windows 2000), [Sony LocationFree
Player], and then click [Uninstall LocationFree Player] on the [Start] menu.
Follow the instructions on the screen to complete the procedure.
Note
The 3ivx is not removed automatically when LocationFree Player is removed.
Remove it manually.
Pre-release version
Removing LocationFree Player from Your Computer
Others
35
Page 36

Pre-release version
Troubleshooting
If you encounter any problems, refer to the list below for solution. Also refer to
the LF-X1/LF-X5 operating instructions for more troubleshooting tips.
For more help troubleshooting, also refer to the following URL:
http://esupport.sony.com/perl/select-lftv.pl/
Problem Solutions
Cannot register with the base station. • Verify that the domain name or static IP address for the base
station you want to register with is correct.
• Verify that the base station is set to accept registration.
• Verify that the password is correct.
• Make sure the base station has NetAV enabled.
• Verify that you are not using a single serial key on multiple
computers.
If the LocationFree Player is installed on multiple computers with
the same serial key, those computers cannot be registered to the
same base station.
Cannot establish a connection with the base
station.
Others
The TV feed is not displayed. • Verify that you have correctly configured the TV channels
The NetAV connection breaks off suddenly. • Has any security software such as anti-virus or anti-spam
• Verify that the base station is on.
• Verify that the base station domain name or static IP address are
correct (1 page 15).
• Verify that your computer is connected to a network and it can
connect to the Internet.
• Verify that your network environment meets the specified
requirements to use the NetAV function. For details, refer to the
LF-X1/LF-X5 operating instructions.
• Verify that the updating dynamic DNS is not failed.
• If you are using a personal firewall on your computer or if your
Internet network environment uses a firewall, make sure that your
computer is configured so that the NetAV function uses port
number 5021 to connect.
• You cannot connect while another monitor is connected by
NetAV. Wait awhile and try connecting again.
• Verify that the device is registered.
Refer to “Step 4 Getting the Base Station Ready to Register Your
Computer” (1 page 12).
• Verify that the device’s registration information has not been
deleted from the [Register Other Monitors] screen on the base
station.
(1 page 20).
software been installed?
If so, the software’s firewall function may have blocked NetAV.
• Does the message “AV connection started by other monitor”
appear?
If so, the NetAV connection was broken because someone
selected [Get AV] on the LF-X1/LF-X5 monitor and started
watching video.
If [Allow AV interception by registered monitors] is selected on
the [Register Other Monitors] screen of the LF-X1/LF-X5, you
can watch video by selecting [Connect] again. If this option is not
selected, a NetAV connection cannot be established while video
is being watched on the LF-X1/LF-X5 monitor.
36
Troubleshooting
Page 37

Pre-release version
Problem Solutions
The feed from a device connected to the base
station is not displayed.
• Verify that any peripheral devices are correctly connected to the
base station.
• Verify that the supplied IR Blaster is correctly installed and that
the on-screen remote control is correctly configured. For details,
refer to the LF-X1/LF-X5 operating instructions.
Assigned channels do not display. • Try changing the CABLE ON/OFF setting.
The picture is distorted. • Update to the newest display driver provided by the maker of
your monitor.
Cannot display the on-screen remote control
or cannot click [Remote].
• Verify that the supplied IR Blaster is correctly installed and that
the on-screen remote control is correctly configured. For details,
refer to the LF-X1/LF-X5 operating instructions.
• Verify that the on-screen remote control is correctly configured in
the LocationFree Player settings screen (1 page 20).
The Settings button or Vol button does not
appear.
Video does not appear when I select TV,
Video 1, or Video 2 in the [INDEX] window
• If the window size is too small, some buttons may not be shown.
Make the window larger to see the buttons.
• If you are not using the LocationFree TV internal tuner, you must
use the remote control to display video.
and click [Connect].
The remote control responds to a single
button push as though the button were pushed
several times.
• Verify that you don’t hold down the mouse button too long when
clicking. Try to keep your mouse clicks short.
• Verify that the specified rate is not too high in relation to the
actual line speed. Try lowering the rate.
Troubleshooting
Others
37
Page 38

Pre-release version
Index
C
Close button ......................25
Connect button
Context menu
.................. 26
....................33
D
Disconnect button ..............26
G
Getting the base station ......12
H
home network ...................31
I
Index ................................ 25
Index window
Installing LocationFree
Player
IR Blaster
...................28
.............................. 9
.........................20
K
Keyboard operations .......... 34
M
Maximize button ...............25
Minimize button
Mouse operations
Muting button
Index
................ 25
...................26
N
NetAV Function .................. 4
NetAV indicator
................ 25
..............33
Quitting the NetAV
function
........................ 24
R
Rate button ....................... 26
Registering the computer
Remote button
remote control
Remote control of video
Removing LocationFree
Player
Restore button
.................. 26
.................. 20
........................... 35
.................. 25
... 13
.... 21
S
SAP ................................. 30
SAP button
secondary audio program
Setting up the NetAV
function
Settings button
Starting the NetAV
function
STEREO
streaming rate
System Requirements
....................... 26
... 30
........................ 10
.................. 25
........................ 23
.......................... 30
................... 30
.......... 5
T
Troubleshooting ................ 36
TV channel
....................... 29
V
Volume adjustment ........... 29
Volume control
Volume indicator
................. 26
.............. 25
O
On-screen Remote
Control
....................20, 26
Q
Quitting LocationFree
Player
............................ 24
Index
38
Page 39

Pre-release version
Trademarks
• LocationFree is a trademark of Sony Corporation.
• Microsoft, Windows and DirextX® are registered trademarks of Microsoft Corporation in the
United States and other countries.
• Copyright 2004 Adobe Systems Incorporated. All rights reserved. Patents Pending.
• Ethernet is a registered trademark of XEROX Corporation.
• 3ivx MPEG-4 audio and video compression technologies by 3ivx Technologies. Copyright © 3ivx
Technologies Pty. Ltd., 1999-2005, All rights reserved. 3ivx is an international trademark.
• All other company names and product names mentioned here may be the trademarks or registered
trademarks of their respective companies.
• The symbols for ™ and ® are omitted in these instructions.
Trademarks
39
Page 40

 Loading...