

Page 1

3-756-987-22 (2)
Color Rear Video Projector
Operating Instructions forò models
Before operating the projection TV, p'ease read this manual
thoroughly and keep it for future reference.
KP-41EXR96 KP-46V15
KP-53V15
KP-61V15
® 1993 by Sony Corporatio*i
KP-46V16
KP-53V16
Page 2
Precautions
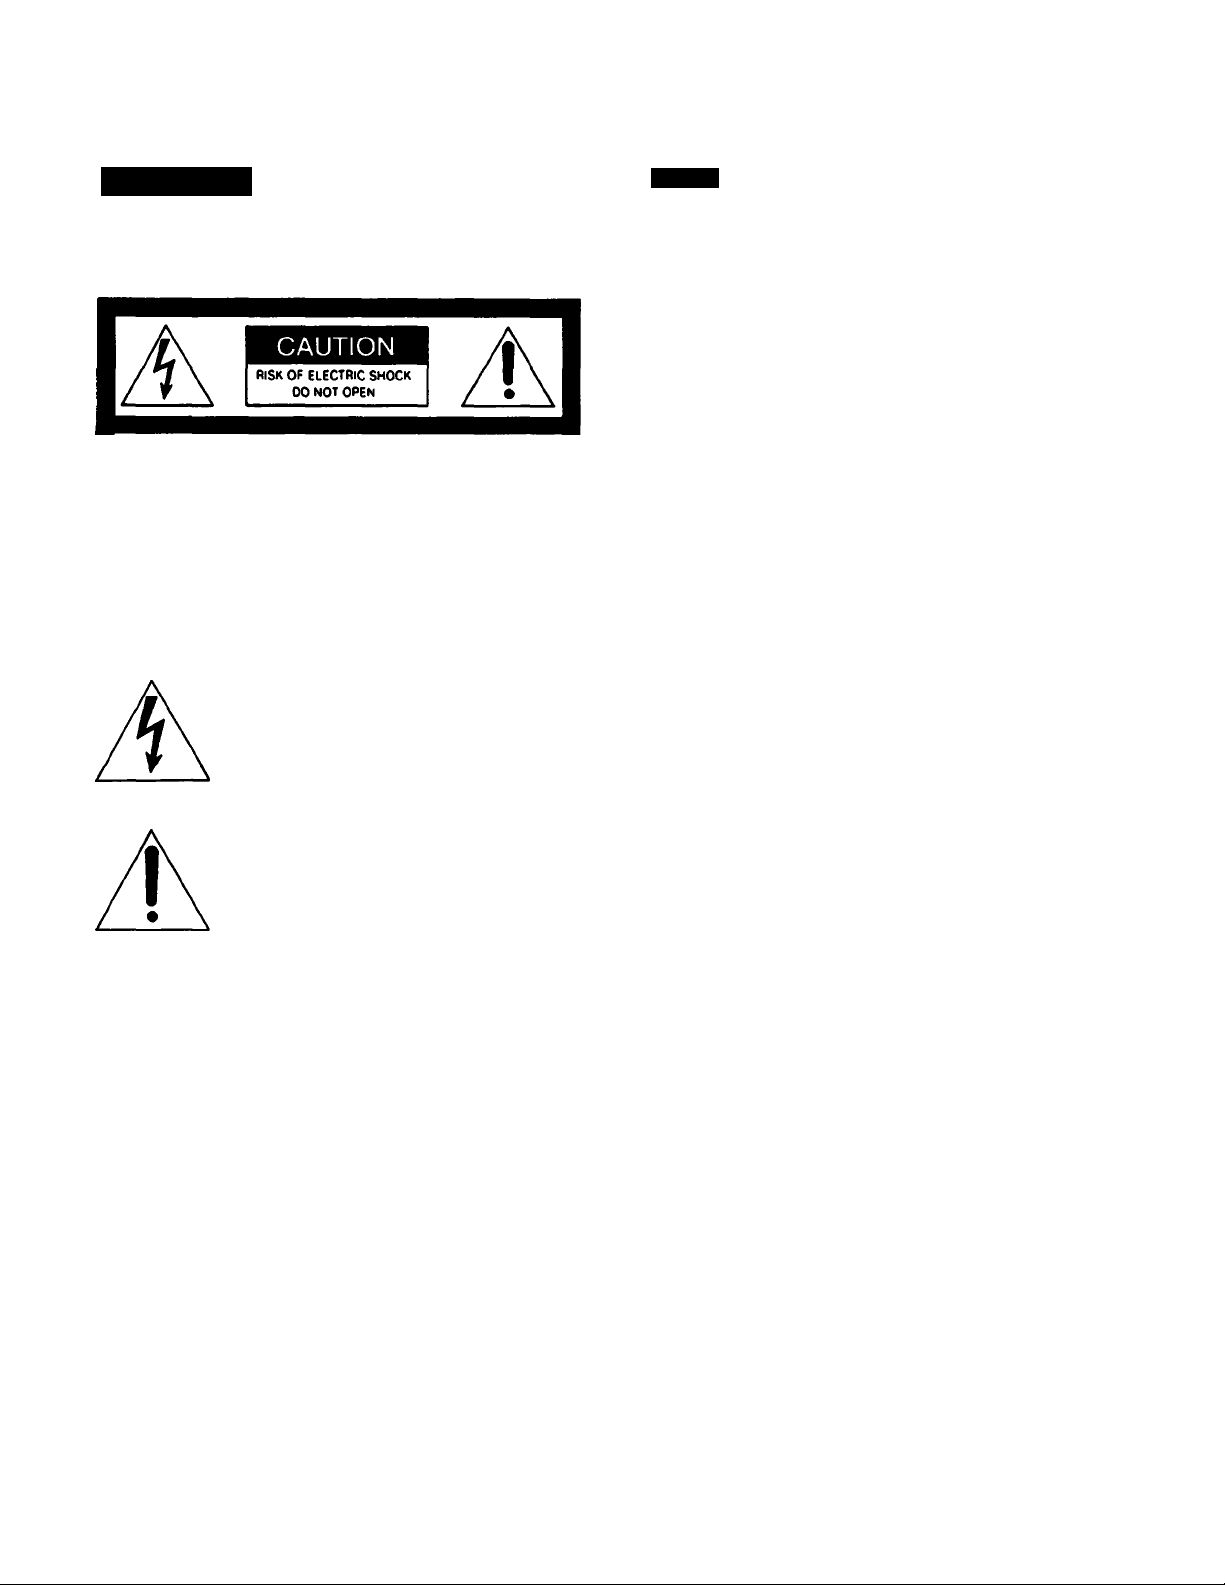
WARNING
To prevent fire or shock hazard, do not
expose the unit to rain or moisture.
CAUTION : TO REDUCE THE RISK OF ELECTRIC SHOCK.
DO NOT REMOVE COVER (OR BACK).
NO USER-SERVICEABLE PARTS INSIDE.
REFER SERVICING TO QUALIFIED SERVICE PERSONNEL
This symbol Is intended to alert the
user to the presence of uninsulated
“dangerous voltage" within the prod
uct’s enclosure that may be of suffi
cient magnitude to constitute a risk of
electric shock to persons.
Safety
• Operate the projection TV only on 120 V AC.
• One blade of the plug is wider than the other for safety
purposes and will fit into the power outlet only one way. If
you are unable to insert the plug fully into the outlet,
contact your dealer.
• If you spill or drop anything liquid or solid into the cabinet,
unplug the projection TV and have it checked by qualified
personnel before operating it any further.
• Do not place anything containing liquids (vases, coffee
cups, etc.) on the optional VCR tray. Spilled liquid may
enter and damage the projection TV.
• Unplug the projection TV from the wall outlet if you are not
going to use it for several days or more. To disconnect the
cord, puli it out by the plug. Never pull the cord itself.
If you have any questions or problems concerning the
projection TV. contact your nearest Sony dealer.
Note to CATV system Installer In the USA
This reminder is provided to call the CATV system installer's
attention to Article 820-40 of the NEC that provides
guidelines for proper grounding and, in particular, specifies
that the cable ground shall be connected to the grounding
system of the building, as close to the point of cable entry as
practical.
This symbol is intended to alert the
user to the presence of important
operating and maintenance (servicing)
instructions in the literature accompa
nying the appliance.
CAUTION:
TO PREVENT ELECTRIC SHOCK. DO NOT USE THIS
POLARIZED AC PLUG WITH AN EXTENSION CORD,
RECEPTACLE OR OTHER OUTLET UNLESS THE
BLADES CAN BE FULLY INSERTED TO PREVENT
BLADE EXPOSURE.
Use of this projection TV for other than private viewing of
programs broadcast on UHF or VHF or transmitted by cable
companies for the use of the general public may require
au№orization from the broadcaster/cable company andfor
program owner.
This projection TV receiver provides display of television
closed captioning in aocordemce with § 15.119 of the FCC
rules.
Owner’s Record
The model and serial numbers are located at the rear
of the projection TV. Record these numbers in the
spaces provided below. Refer to them whenever you
call your Sony dealer regarding this product.
Model No---------------------------------------Serial No-----------------------------------------
Preface
Page 3

Contents
Preface
Chapter 1 : Setting Up
Unpacking and Viewing Area
Locating Controls and Connectors..................................7
Making Antenna Connections......................................13
Connecting Other Equipment
Connecting a VCR, video disc player
or Camcorder equipped with
an S video output jack
Connecting a VCR, video disc player
or Camcorder not equipped with
an S video output jack
.......................................
.....................................
....................................
....................................
15
15
16
Chapter 2: Using Basic Features
Watching TV Programs.............................................34
Using Closed Caption
Using Convenient Features
Muting the sound - MUTING
Keeping the displays on-screen - DISPLAY
..............................................
........................................
...................................
....................
36
37
37
37
Precautions
Welcome
Important information..............................................5
6
Using the On-Screen Menus
Adjusting Color Registration (CONVERGENCE)....................24
Setting CABLE ON or OFF..........................................26
Presetting TV Channels............................................28
Selecting a Picture and Sound Mode
.........................................................
............................................................
Features
Connecting two VCRs (equipped with an
Connecting two VCRs (not equipped with an
Connecting an audio s^tem
Changing the menu ianguage
Setting the sleep timer - SL£EP
Switching quickly between
Previewing the features - DEMO
........................................................
S video output jack) for tape editing
8 video output jack) for ta|% editing....................18
...................................
.......................................
.................................
...............................
two channels - JUMP
......................................
..............................
..............................
..................
2
4
4
17
19
20
22
37
37
37
38
Chapter 3: Using Advanced Features
Watching Two Pictures at Once (PIP)
Adjusting the Projection TV
Adjusting the picture
Adjusting the sound............................................49
Customizing the Screen Display
Setting channel captions - CH CAPTION.......................53
Setting VIDEO LABEL........................................... 55
.......................................
..........................................
.............................
...................................
Appendix
40
44
44
53
Using Timer-Activated Functions
Setting DAYLIGHT SAVING.....................................56
Setting the clock ~ CURRENT TIME SET
Setting the ON/OFF TIMER
Setting CHANNEL BLOCK
Setting FAVORITE CHANNEL.......................................64
Using the Pre-Programmed Remote Commander.................66
Selecting a VCR mode directly—
DIRECT PLAY
Troubleshooting....................................................73
Specifications
Index
...............................................................
..............................................
......................................................
.................................
.......................
....................................
......................................
56
57
59
62
71
74
75
Preface
Page 4

Welcome
Welcome to the Sony EXR/V series. By following the instructions in this manual, you will be able to enjoy the
advanced technology which brings you useful features and high quality viewing.
About the manual
This manual covers six different models. The illustrations
are based on model KP-61 VIS. If a particular function does
not apply to your model, this will be noted in the manual.
We highly recommend that you read this manual before
using your projection TV, to set up and make connections
safely and to make maximum use of the many functions.
Then keep the manual handy for future reference.
Features
Sony’s unique features
• The multi-band VHF/UHF/CATV tuner lets you receive up
to 125 cable channels, for a total of 181 po^ble off-air
and cable channels.
• The built-in Multichannel TV Sound (MTS) decoder lets
you receive stereo programs and Second Audio Program
(SAP) broadcasts.
• You can receive superior VCR playback by connecting a
VCR with an S video output jack to the S VIDEO IN jack.
• You can receive hi-fi sound by connecting an audio
system to the audio output jacks.
• View the dosed caption and the text by using Closed
Caption.
EXRAf series speciai features
• Automatically preset all receivable channels with AUTO
PROGRAM.
• Switch quickly between two channels, using JUMP.
• Watch another TV channel, video or cable image as a
window picture, using Picture-in-Picture.
• Operate the projection TV, plus Sony and most other
manufacturers' video equipment, a cable converter box
and a Sony multi disc player with the supplied Remote
Commander, using the Pre-Programmed feature.
• Call up on-screen menus to set time-related functions
(ON/OFF TIMER, CHANNEL BLOCK. DAYLIGHT
SAVING), to customize the screen (CH CAPTION, VIDEO
LABEL) and to adjust the picture and sound.
• Set optional video equipment on the projection TV. by
mounting the optional VCR Tray (see the separate VCR
Tray installation instructions).
Preface
EXR/V series advanced technology
• Dynamic Picture^ system adjusts picture contrast
automatically to produce more detail in both bright and
dark areas of the picture.
• Velocity Modulation (VM) circuitry produces dean and
sharp black and white contrasts.
• Dynamic Focus™ drcuitry automatically focuses the
scanning electron beam for enhanced sharpness over the
entire picture, espedally at the comers.
• Trinitone™ control allows you to adjust the picture’s color
temperature (tint) for the best possible color.
Page 5
Important Information
Please read the following information on using and maintaining the projection TV, for optimum viewing quality.
Picture quality
• Poor color registration (the red, green and blue signals do
not overlap properly) may be caused by the influence of
the earth’s magnetism. Correct this with the
CONVERGENCE adjustment (pp. 24 > 25).
• Avoid touching the screen, and take care not to scratch
the surface with hard objects.
• Displaying a still picture for long periods of time, for
instance, when using the FREEZE function (p. 42) or
when operating a video game or personaU computer, may
damage the picture tube. To avoid this, keep the picture
contrast level low (PICTURE adjustment, pp. 44 - 45).
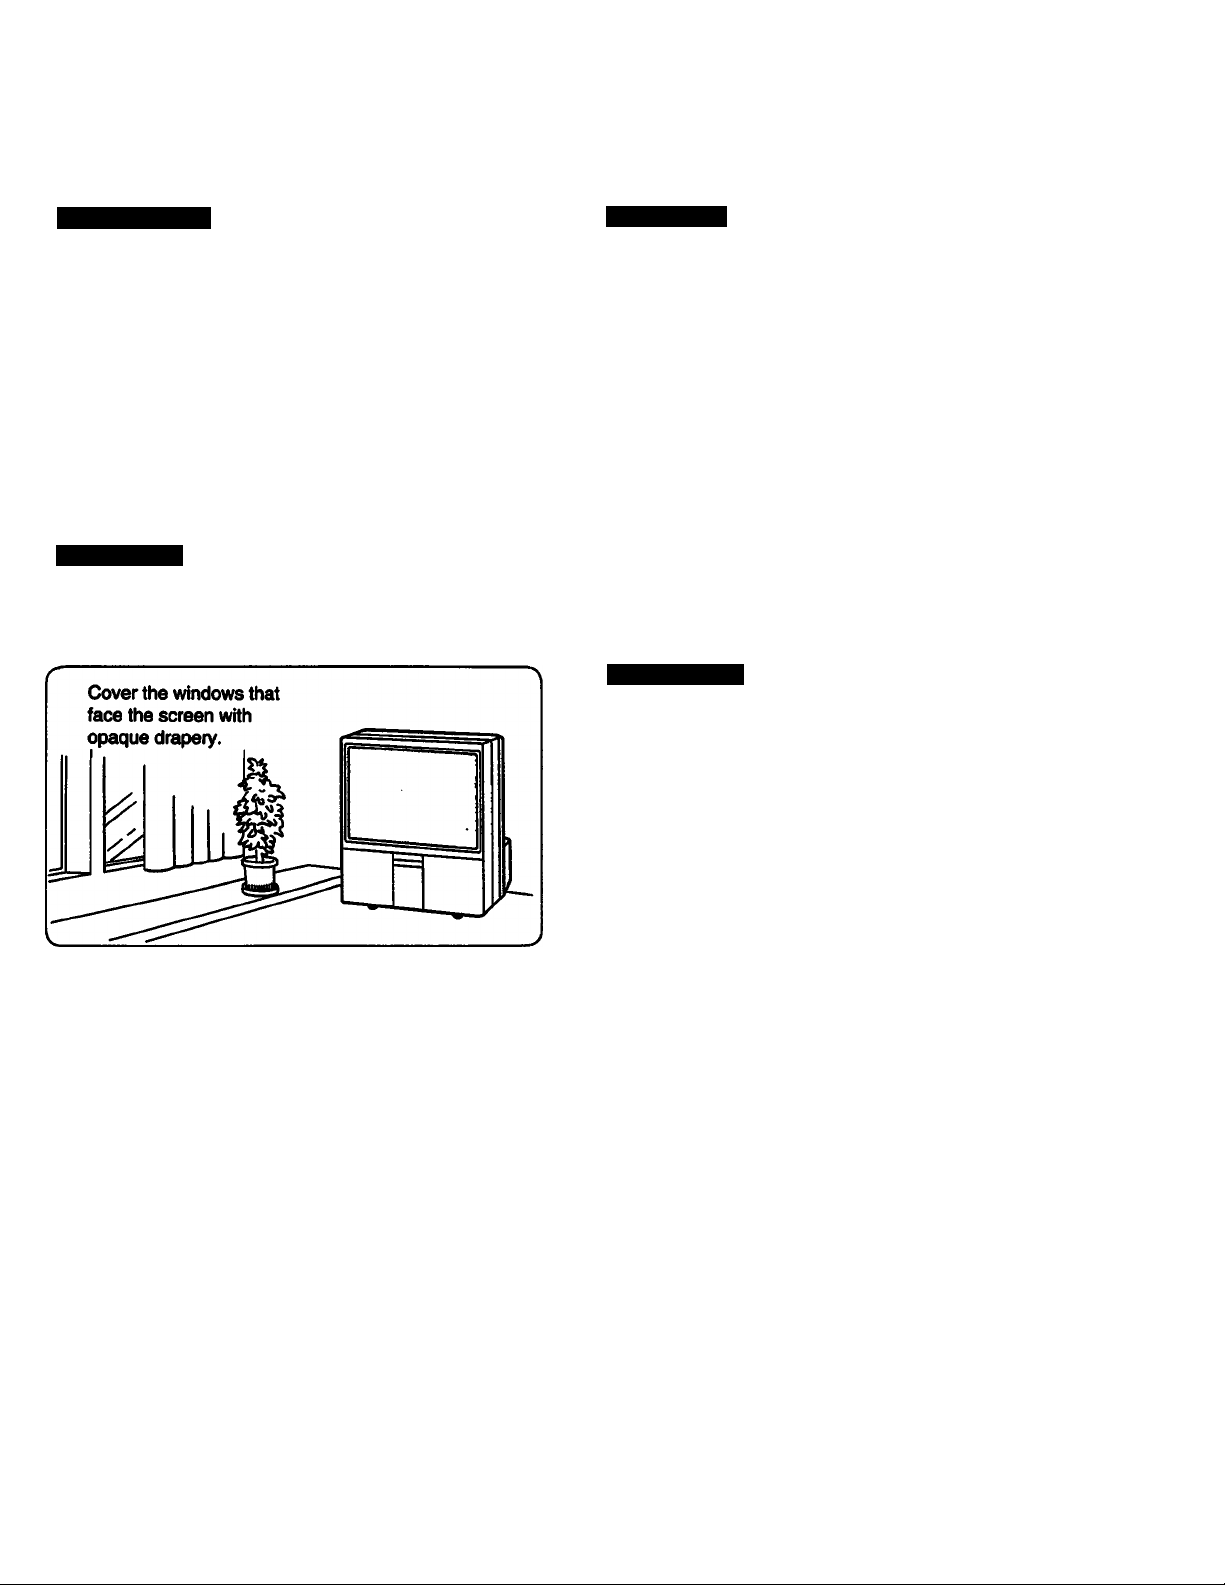
Illumination
To obtain a clear picture, do not expose the screen to direct
illumination or direct sunlight. If possible, use spot lighting
directed down from the ceiling.
The floor and walls should not be of a light>reflecting
material. If necessary, cover them with dark carpeting or
wallpaper.
Installation
• To prevent intemaü heat built-up, do not block the
ventilation openings.
• Do not instaül the projection TV in a hot or humid place, or
in a place subject to direct sunlight, excessive dust or
mechanical vibration.
• Avoid operating the projection TV at temperatures below
5*C (41 »F).
• After transporting the projection TV directly from a cold to
a wann location, or if the room temperature he» changed
suddenly, pictures may be blurred or show poor color over
portions of the picture. This is because moisture has
condensed on the mirrors or lenses inside the projection
TV. Let the moisture evaporate before using the projection
TV.
• Avoid placing the projection TV on a slanted or uneven
floor.
Maintenance
• Save the original shipping carton and packing material to
use if you ever have to ship your projection TV. For
maximum protection, repack your projection TV as it was
originally packed at the factory.
• To keep the cabinet looking brand-new, periodially deem it
with a soft cloth. Stubborn stains may be removed with a
cloth slightly dampened with a mild detergent solution.
Never use strong solvents such as thinner or benzine, or
abrasive cleansers since these will damage the cabinet.
As a safety precaution, unplug the projection TV before
cleaning it.
• To remove dust from the front of the screen, unplug the
projection TV and wipe it gently with a soft cloth slightly
dampened with water or a mild detergent solution, using
vertical strokes only. Then wipe it again with a dry, soft
cloth. Never use solvents or thinners for cleaning
purposes.
• If the picture turns dark after the projection TV has been in
use for a long period of time, it may be necessary to clean
the inside of the projection TV. Consult qualified service
personnel for this.
If
II
3.3
Preface
15
Page 6
K^napier i: oftiung up
Ë. Unpacking and Viewing Area
Carefully follow the instructions on the outside of the
packing carton to unpack the projection TV.
1
Notes
• The supplied accessories are packed in the bottom of the carton.
Be sure not to throw them away.
• Keep the original carton and packing materials to safely transport
the projection TV in the future.
A Check to make sure that the following is included:
Universal Remote Commander
RM-Y112A (1 ) (for KP-41EXR96)
RM-Y115(1) (for other models)
with 2 size AA (R6) batteries
If the Remote Commander is missing, contact your dealer.
Place the projection TV in a cool, dry place where the
ventilation openings at the sides are not blocked.
3
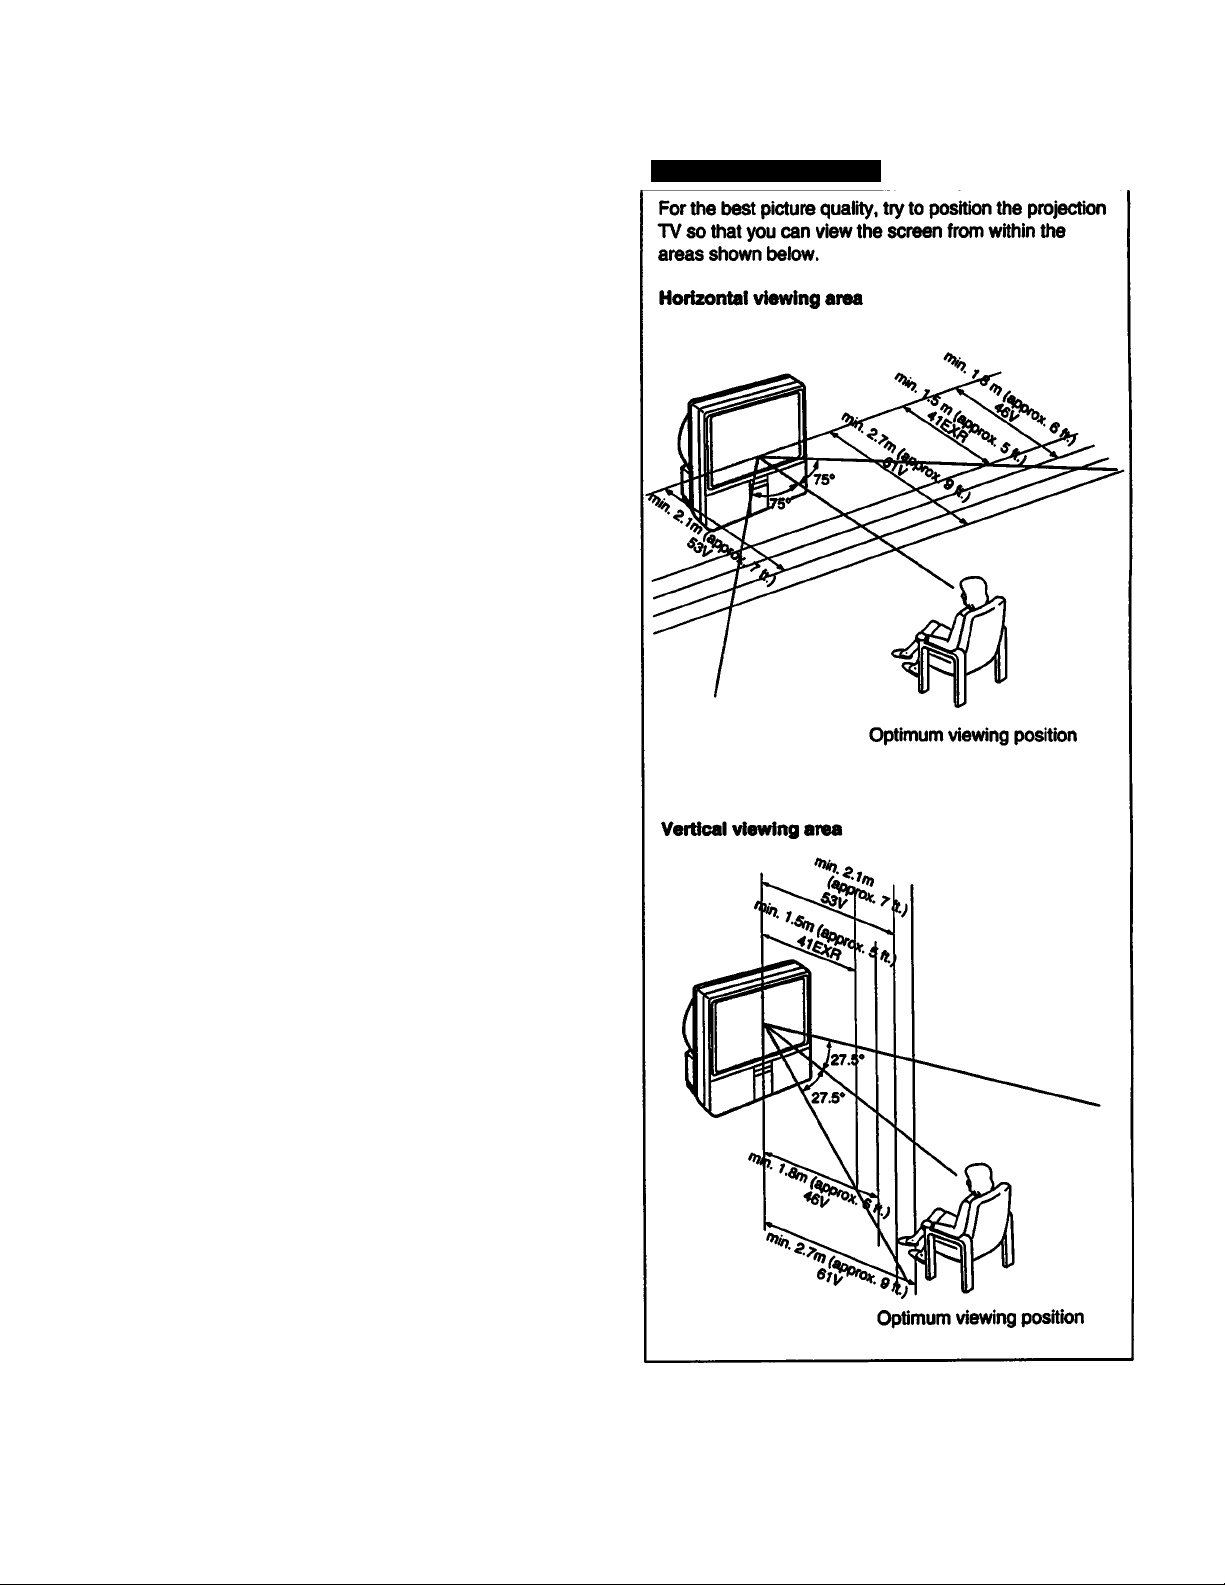
Optimum viewing area
Plug the projection TV power cord into an AC 120 volt
power outlet.
4
For further precautions, see p. 2.
Chapterl: Setting Up
Page 7

Locating Controls and Connectors
For details, see the pages Indicated by the numbered black circles #i
Front
STEREO Indicator lamp ® ®
* Buttons with the same function are also located
on the Remote Commander (p. 10).
Chapter 1: Setting Up | y
Page 8
Locating Controls and Connectors
Front inner panel
KP-61V15
■tST
-----
isr
--------
Tsr
pVIDEOaiN-,
VIDEO L-AUDIO-R
VIDEOS IN (input) jacks
(VIDEO/L(MONO)AUDIO-R) <000
DEMO RETURN ^ MENU
* Buttons with the same function are also located
on the Remote Commander (p. 10).
Note
The instructions in this numual are based for the most
part on operating the projection TV with the Renwte
Commander. You can also use the buttons on the
projection TV that have the same function.
Chapter 1: Setting Up
8
Page 9
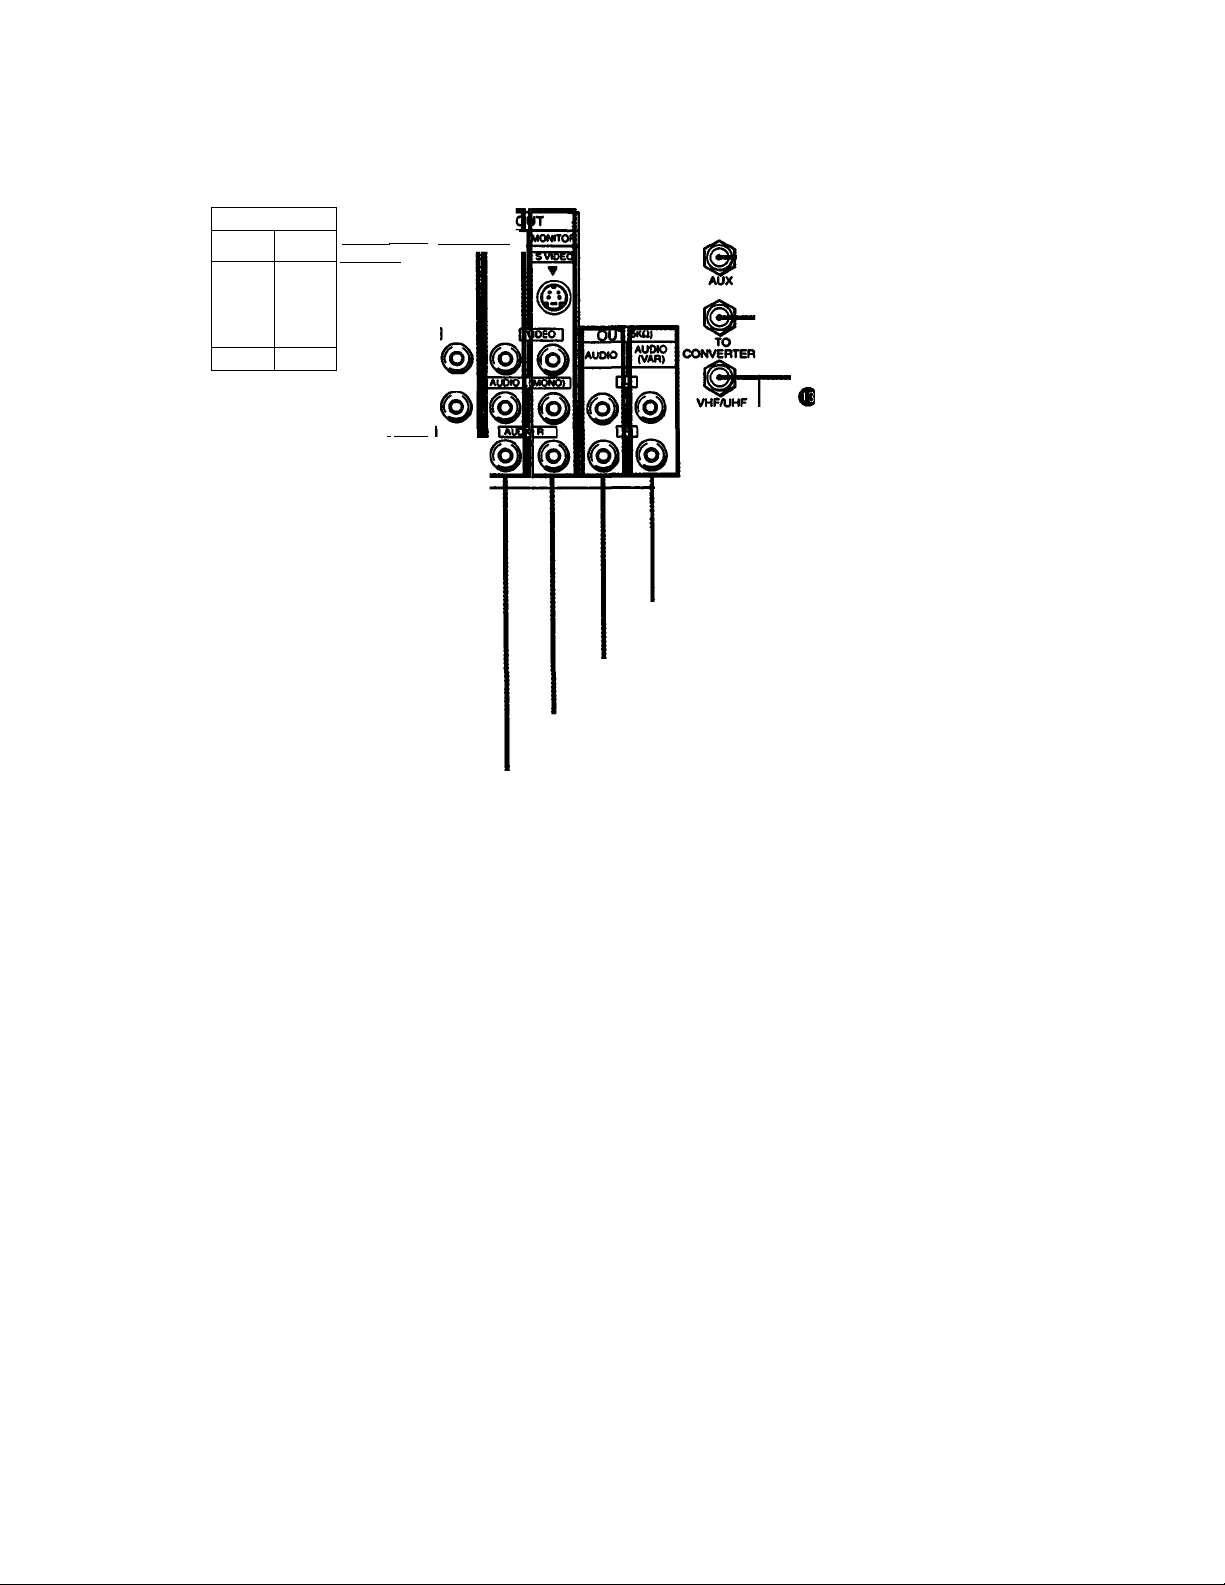
Rear
KP-61V15
IN
R
L
«||||o
30W(N0M)ImMAX)tao
VI0601
•gypgw
VIOEO! n06O
IN
vioeog
@ @
r.i53BiSft
@ © ©
AUDIO (VAR) OUT jacks
AUDIO OUT jacks O®
MONITOR OUT jacks O - ®
VIDEO 3 OUT jacks®
• AUX (auxiliary) terminal
(except for KP-41EXR96) ®
•TO CONVERTER terminal
(except for KP-41 EXR96) ®
• VHF/UHF antenna terminal
C9
I
S.
VIDE01/2/3 IN jacks ® - ® ®
CENTER SPEAKER IN terminals ®
Chapter 1: Setting Up | Q
Page 10
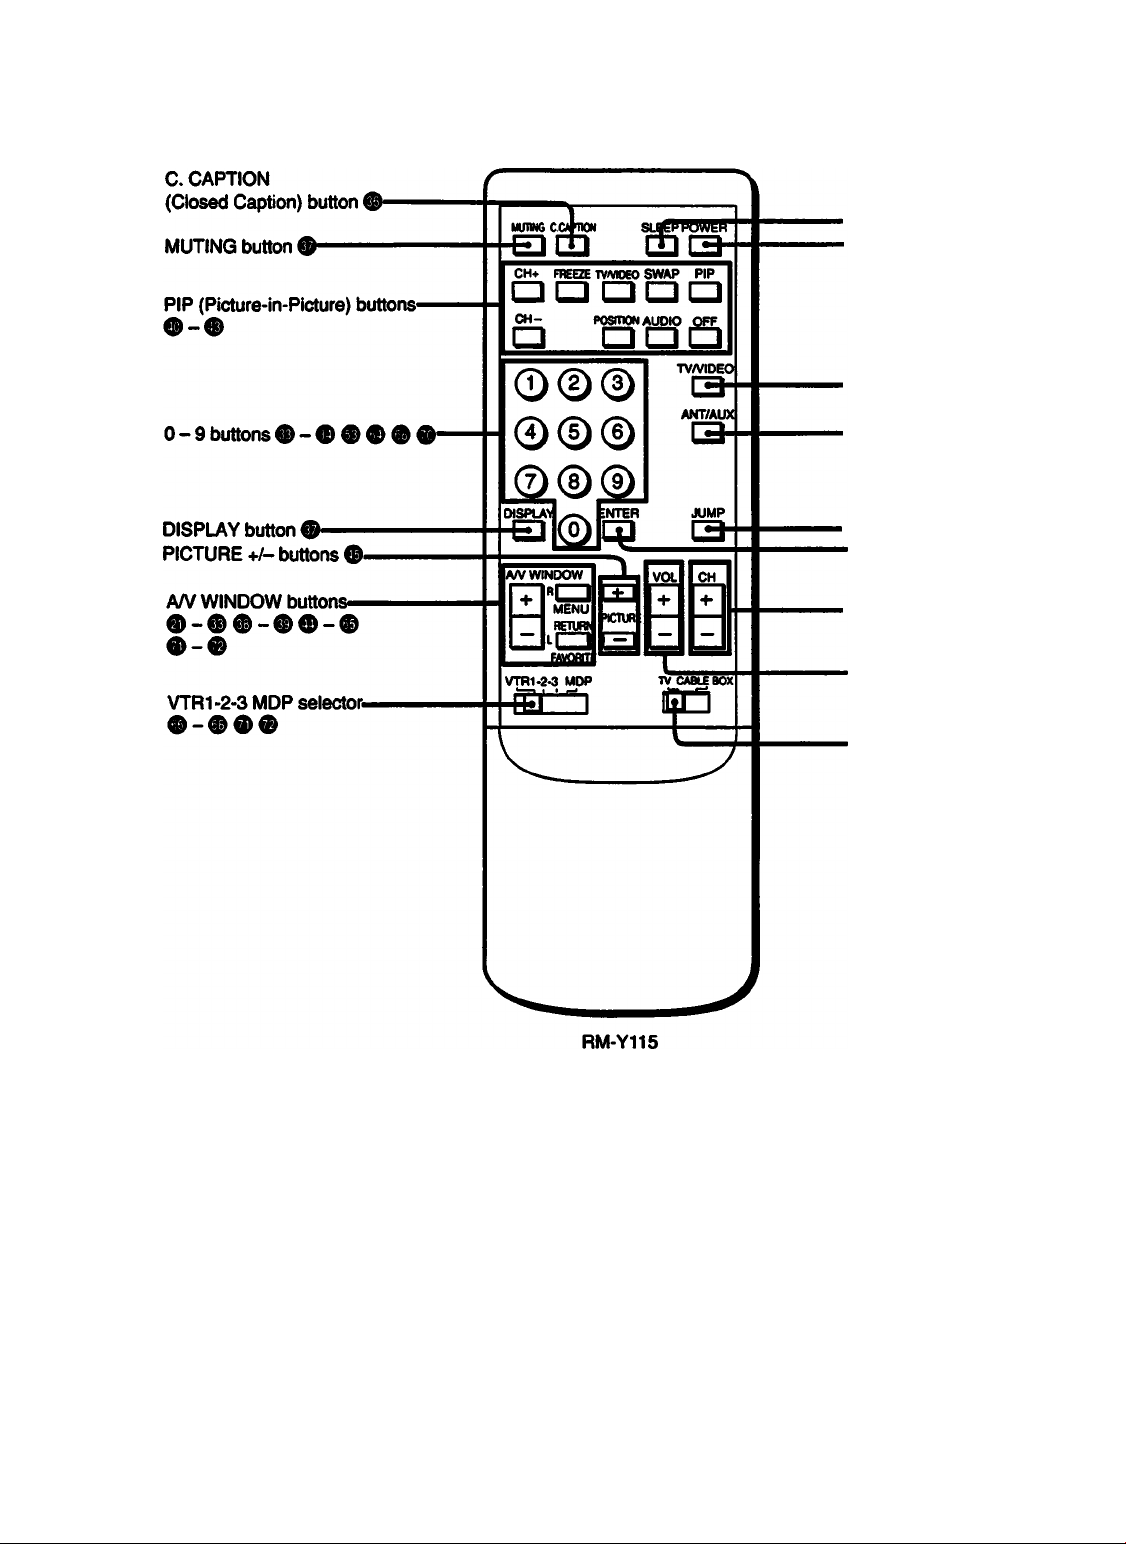
Locating Controls and Connectors
Remote Commander (with the video control cover closed)
> SLEEP button O
• POWER button*
.TV/VIDEO button*
. ANT/AUX(antenna/auxlliary)
button (RM-Y1 IS only) O Ô
•JUMP button O
•ENTER button
•CH (channel) -i-/-buttons*
RM-Y112A: KP-41EXR96
RM-Y115: KP-46V15
KP-46V16
KP-53V15
KP-53V16
KP-61V15
> VOL (volume) +/- button*
000
•TV/CABLE BOX selector
* Buttons with the same function are
also located on the projection TV
(p.7).
Note
If the TV/CABLE BOX selector is set to
CABLE BOX, the Remote Commander is
able to control a connected cable box, not
the projection TV (p. 70). Set the selector
to TV to control the projection TV with the
Remote Commander.
0
101 Chapter 1: Setting Up
Page 11
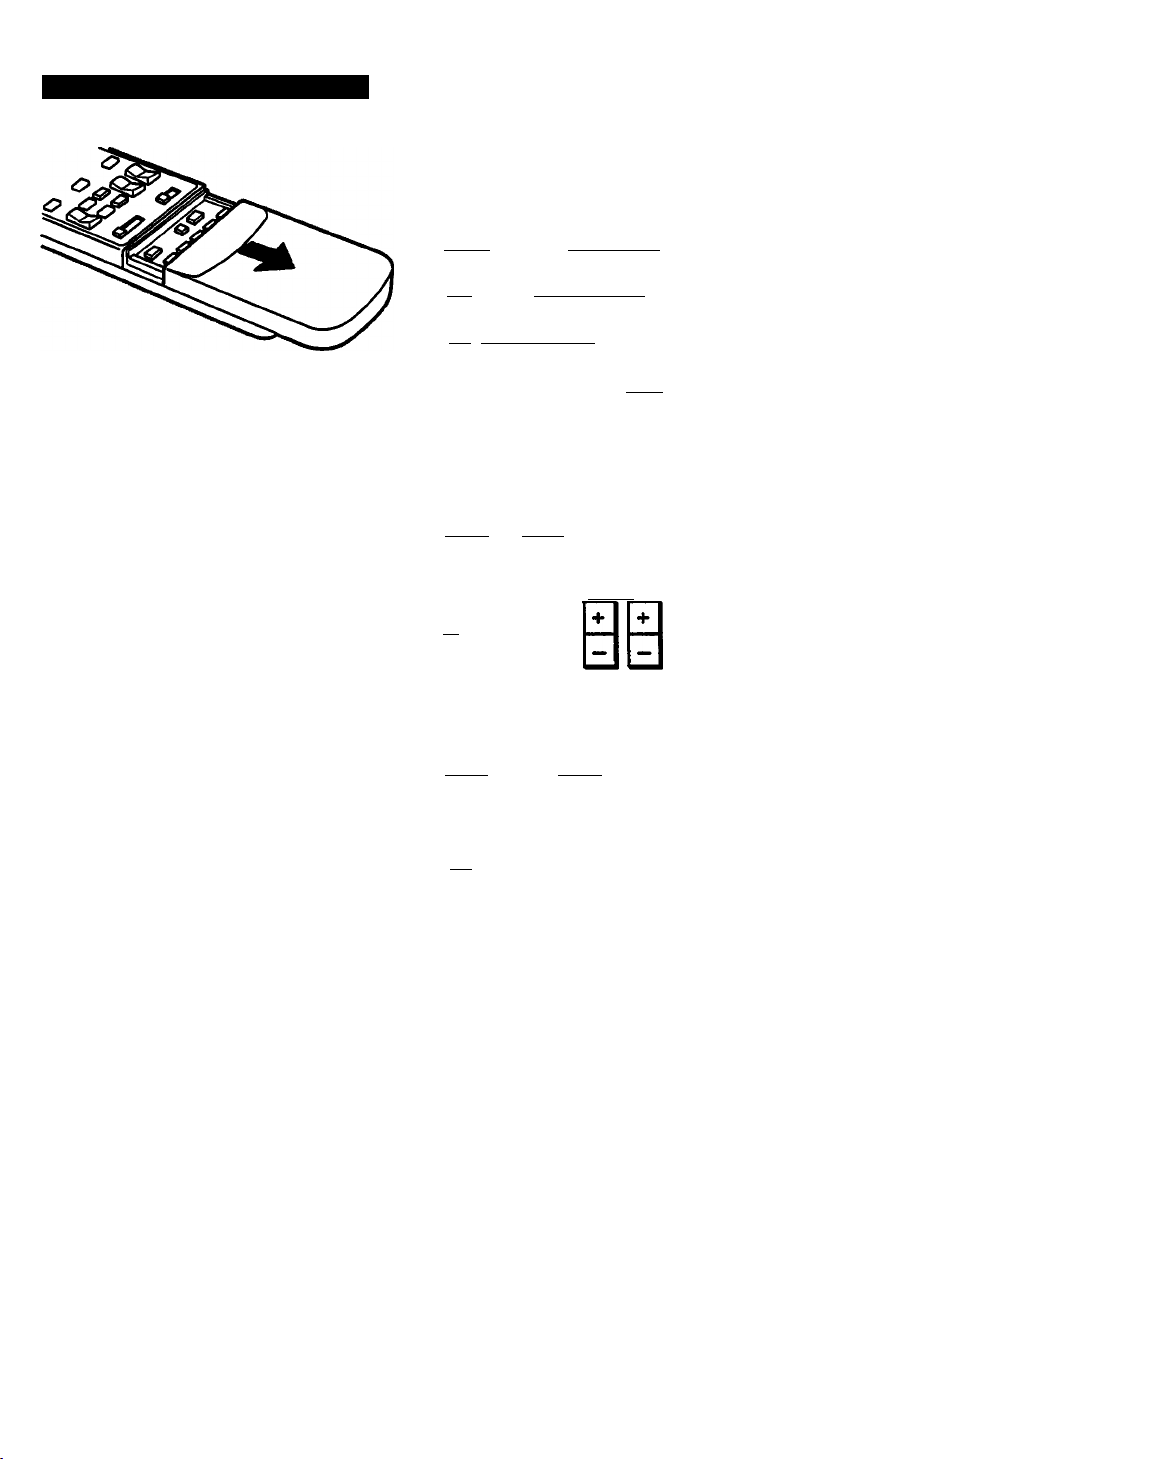
Remote Commander (with the video controi cover open)
Opening the video control cover
Slide the cover down.
MUTW6 C CAPnON SLEEP POWER
ad dd
CM* FREEZE TV/VOEO SWAP PIP
CH- posmow AUDIO OFF
i=> ooa
0©0
©® ©
©0©
MSPLAY ____ ENTEP
□ ©□
A/V WINDOW VOL CH
mna □□
I I MENU
I'-l___
a
VTR1-2-3 MDP _
ÊC3 to
TV/VTR CODE SES STANDARD
Video operating buttons ® -
CH-
i=i
RETURN
mORfTE
PICTURE
□
TV/VDEO
d
ANT/AUX
TV CABLE BOX
POWER
I(=I
—REC
(=□
‘STANDARD button ® ®
s
s
I
S'
m
s.
s
s
I
RM-Y115
Chapter 1: Setting Up | ^ ^
Page 12
Locating Controls and Connectors
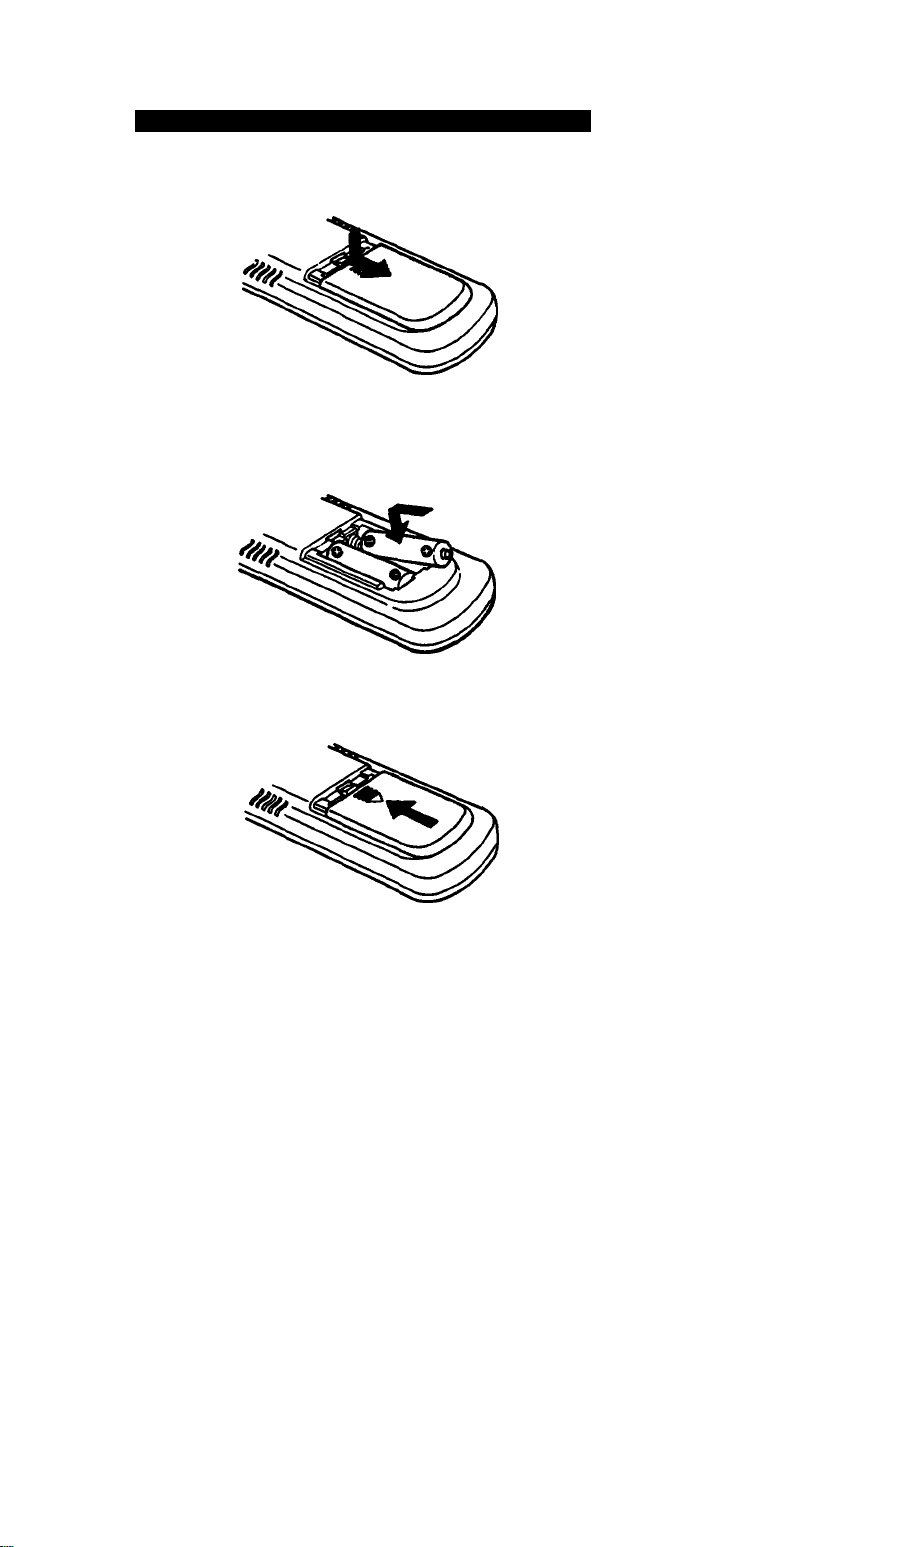
Installing batteries in the Remote Commander
Push open the lid (rear of the Remote Commander).
1
Install two size AA (R6) batteries so that the © and 0
ends are inserted as shown.
Replace the lid.
3
About battery life
Under normal operation, batteries will last up to half a year.
If the Remote Commander does not operate property, the
batteries might be worn out. Replace both of them with new
ones.
To avoid damage from possibie battery leatrage
Remove the batteries if you do not plan to use the Remote
Commander for a fairly long time.
12
Chapter 1: Setting Up
Page 13
Making Antenna Connections
Although you can use either an indoor or outdoor antenna with the projection TV, an outdoor antenna will
provide you with better picture quality.
You can receive cable TV by connecting a cable supplied by your local cable company.
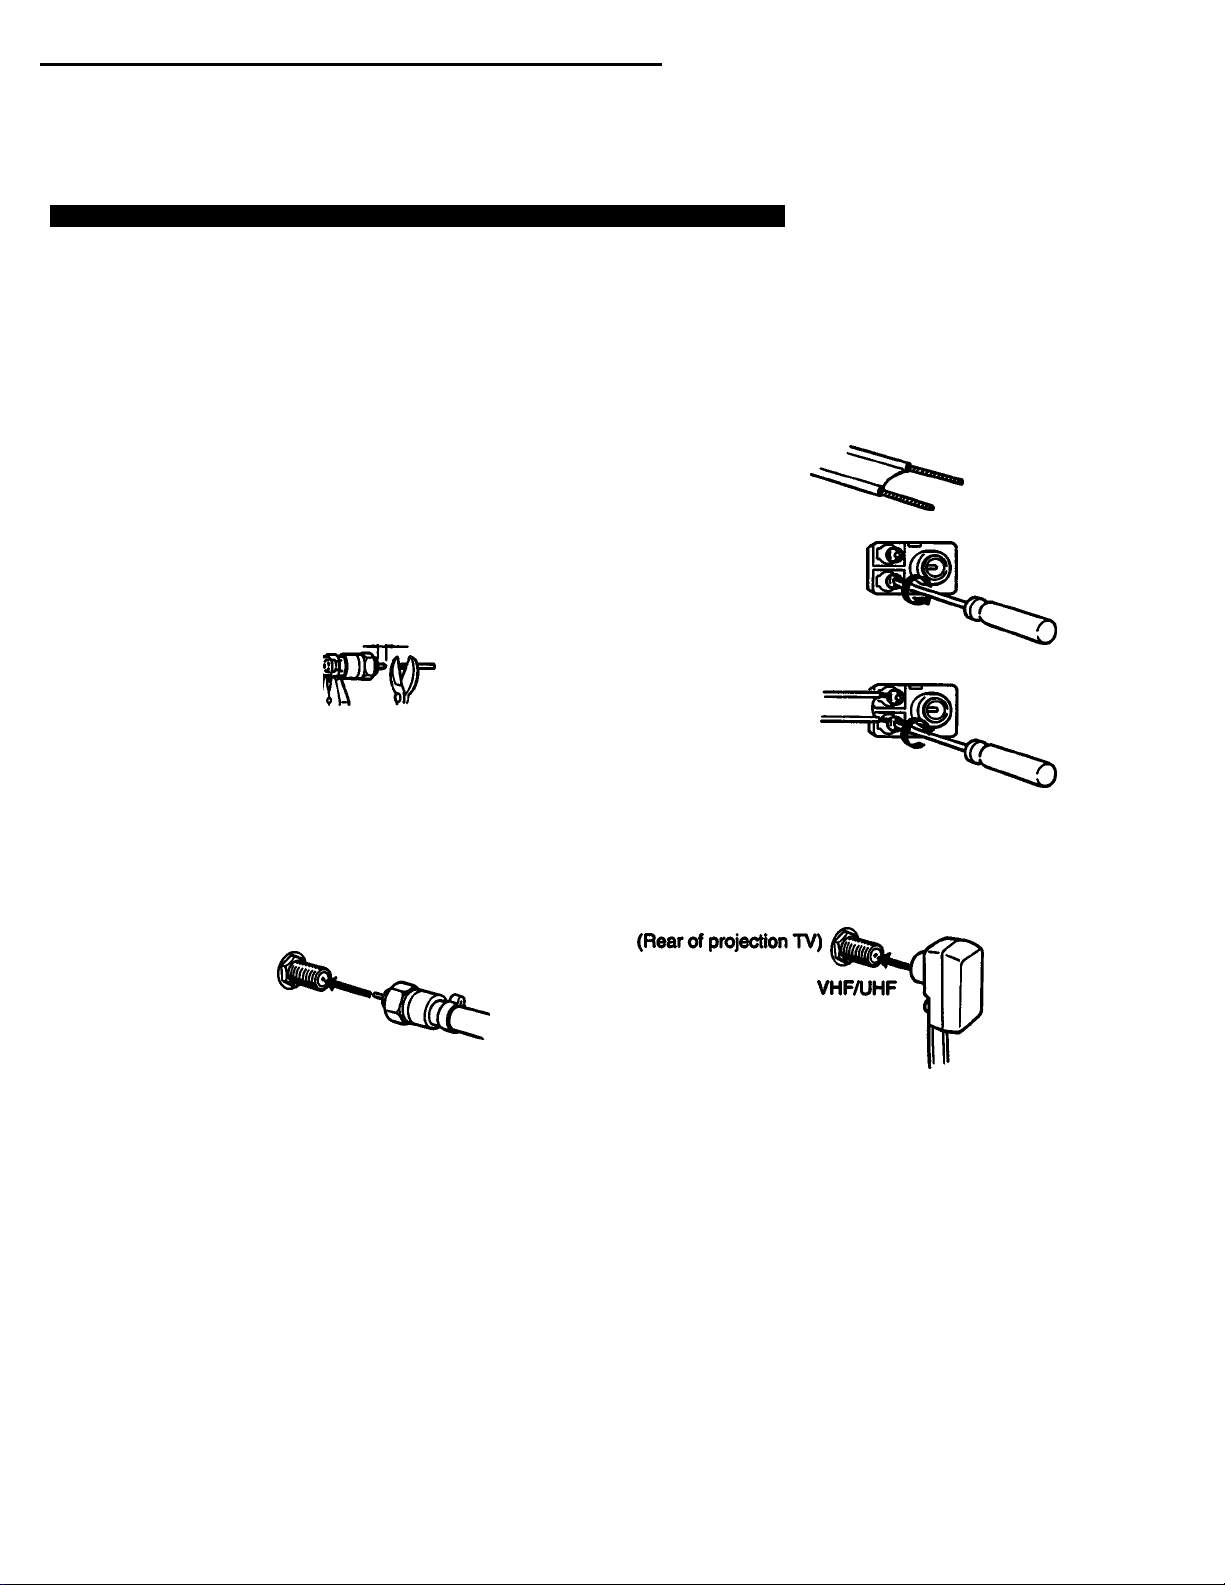
Connecting a VHF, UHF or VHF/UHF combination antenna , or CATV cable
Check your antenna cable type. If you have 75-ohm coaxial cable (round), attach an F-type connector (not
supplied). If you have 300-ohm twin-lead cable (flat), attach a 300-75 ohm adaptor (not supplied).
Using 75ohm coaxial cable (round)
Prepare the end of the cable by attaching the F-type
connector as shown below.
1
7 mm (V4 inch) 10 mm (% inch)
F-type connector
3 mm (Vft inch)
Plug the connector into the VHF/UHF terminal at the
rear of the projection TV.
2
Using 300-ohm twin>lead cable (fiat)
Prepare the end of the cable by attaching the 300-75
ohm adaptor as shown below.
1
300-75 ohm
Loosen with
a screwdriver.
Attach the
cable and
fasten with a
screwdriver.
Plug the adaptor into the VHF/UHF terminal at the rear
of the projection TV.
adaptor
Í ■ V
■■ '
•l* ■ s
(Rear of projection TV)
VHF/UHF
* Most combination antennas are equipped with a signal splitter.
Remove the splitter and attach the appropriate connector.
Chapter 1: Setting Up 113
Page 14
Making Antenna Connections
Connecting both VHF and UHF antennas
UHF
Use an EAC-66 UA/ mixer (not supplied).
VHF
Connecting both VHF/UHF antennas and
a CATV cable (except for KP-41EXR96)
AUX
t
TO
CONVERTER
9-
VHF/UHF
Note
Do not connect anything to the TO CONVERTER terminal in this
case.
Connecting a cable with a pay cable TV system
converter/decoder (except for KP-41EXR96)
-0ID=
AUX
CATV
cable
VHF/UHF
antenna cable
Prepare the VHF antenna cable using the appropriate
connector (p. 13).
1
Connect the cable to the U/V mixer.
Connect the U/V mixer to the VHFAJHF terminal.
3
When you use the U/V mixer
Snow and noise may appear in the picture when viewing
cable TV channels over 37 (W + 1).
=an>^
TO
CONVERTER
'OD=
75-ohm coaxial cable
(not supplied)
A
03
VHF/UHF
Pay cable TV systems use scrambled or encoded signals
and require special converters (decoders) in addition to the
normal cable connection.
* The special converter/decoder will be supplied by the cable
company.
CATV
C8d}le
141 Chapter 1: Setting Up
Page 15
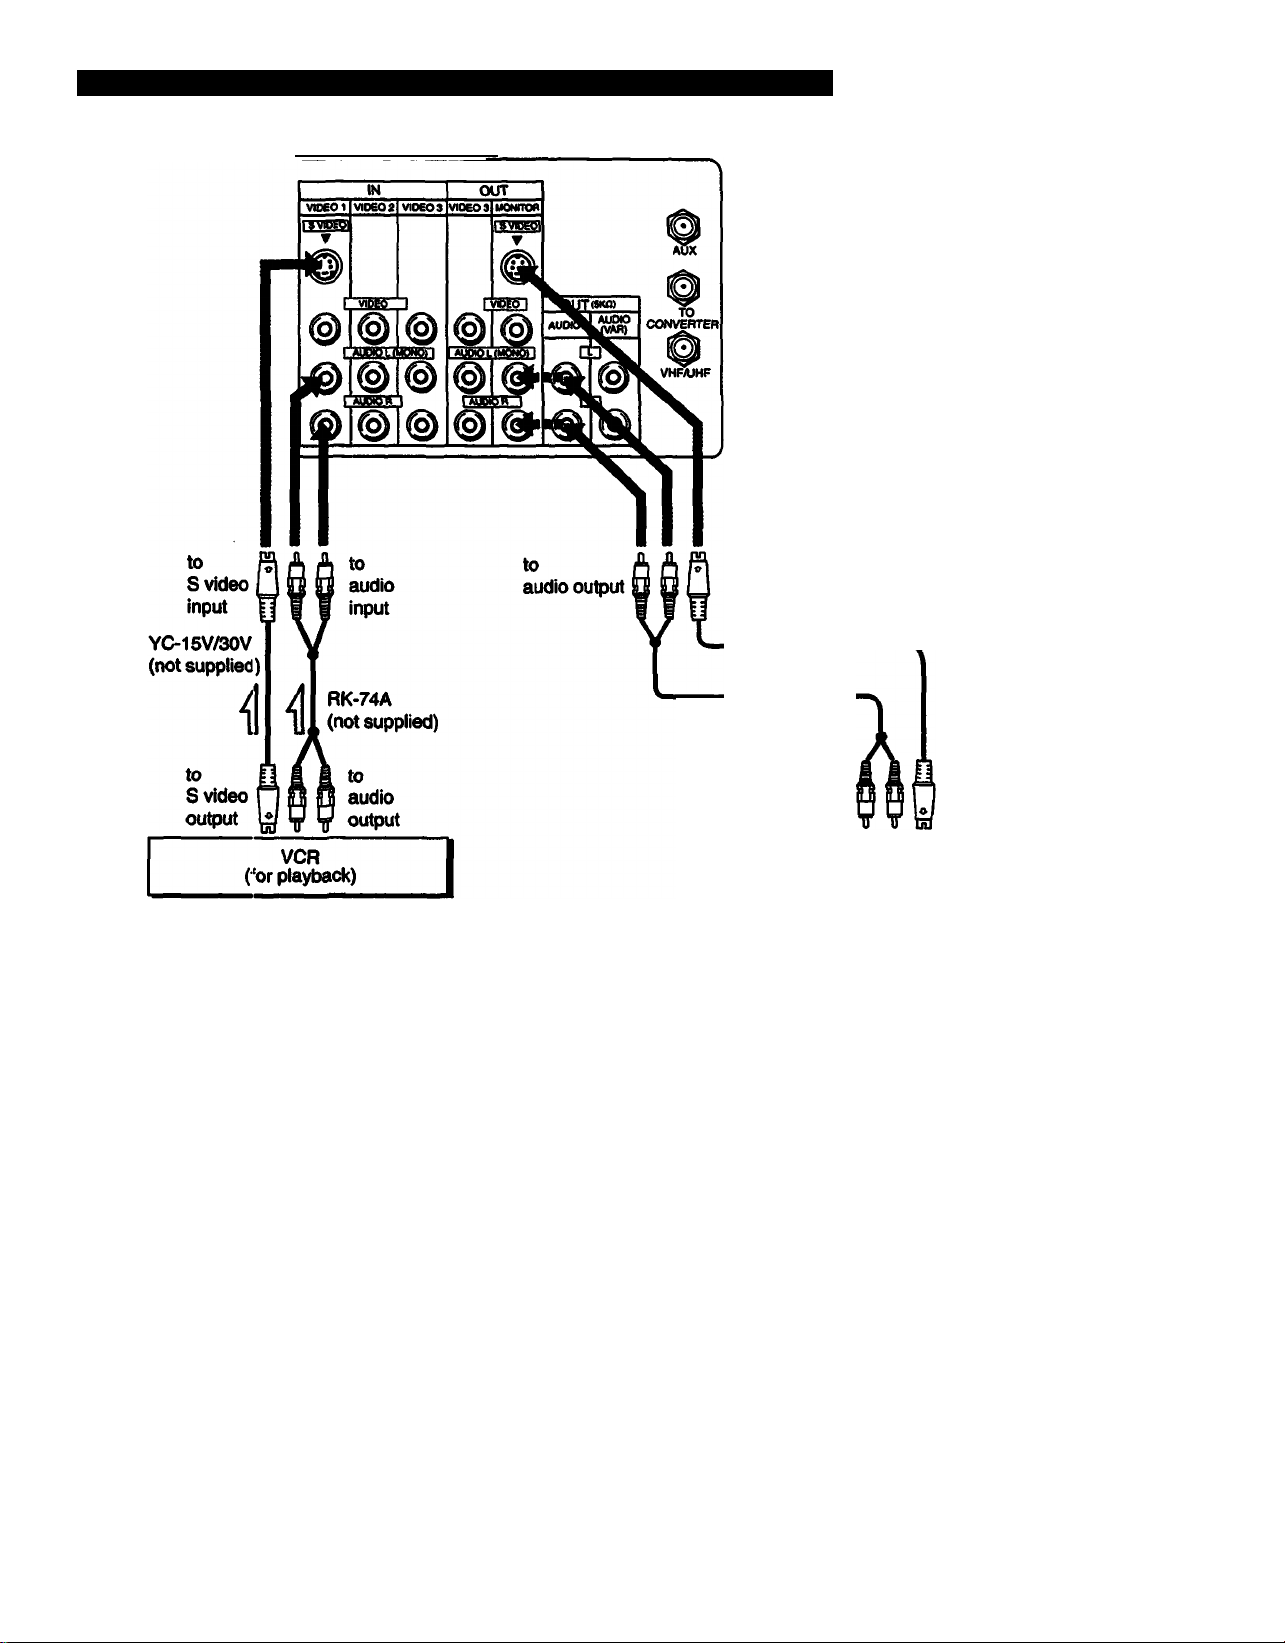
Connecting Other Equipment
After making these connections, you wiii be abie to do the foiiowing:
• View the piayback of video tapes • Record TV programs • Record one TV program whiie viewing another program
Connecting a VCR, video disc player or Camcorder equipped with an S video output jack
: Signai flow
to S video input
YC-15V/30V
(not suppiied)
to
S video
output
(Rear of projection TV)
to VHF/UHF
»
S
^9
Preparing for use
1 Turn on the projection TV.
2 SetS-VtDEOt0’’OM"(p.48).
3 Press TVAfiDEO on the projection TV or on the Remote
Commander so that ‘ViOE01” appears on the screen.
To return to TV mode
Press TV/ViDEO or CHANNEL +/- on the projection TV,
or press TV/ViDEO, CH +/- or 0 - 9 and ENTER on the
Remote Commander so that a channei number appears
on the screen.
Note
You can watch both a TV and a VCR image at once, using
Picture-in-Picture (pp. 40 •• 43).
to VHFAiHF output
Operating the equipment
To operate the video equipment, refer to the instruction
manuai that comes with the equipment.
You can operate a Sony VCR or video disc player, or
a non-Sony VCR with the supplied Remote Commander.
For details, see "Using the Pre-Programmed Remote
Commander” (pp. 66 - 72).
About S video input
Video input and output signals can be separated into Y
(luminance or brightness) and C (chroma or color) signals.
Usually these two signîüs are combined in a VCR and sent
as one signal to a projection TV. Separation of the Y and C
signals prevents them from interfering with one another,
thereby improving picture (especially color) quality.
This projection TV is equipped with S video input jacks
through which these separated signals can be input directly.
Chapter 1: Setting Up
15
Page 16
Connecting Other Equipment
Connecting a VCR, video disc player or Camcorder not equipped with an S video output jack
: Signal flow
(Rear of projection TV)
Preparing for use
1 Turn on the projection TV.
Press TV/VIDEO on the projection TV or on the Remote
Commander so that “VIDEO 1“VIDEO 2" or “VIDEO 3*
appears on the screen.
VIDE01 : for equipment connected to VIDEO 11N
VIDEO 2: for equipment connected to VIDEO 2 IN
VIDEO 3: for equipment connected to VIDEO 3 IN
Chapter t: Setting Up
16
Operating the equipment
Same as p. 15.
To return to TV mode
Press TV/VIDEO or CHANNEL +/- on the projection TV,
or press TV/VIDEO, CH +/- or 0 - 9 and ENTER on the
Remote Commander so that a channel number appears
on the i
If you try to use equipment that is connected to the front and rear
VIDEO 3 IN jacks at the same time, the picture will be distorted.
Be sure you turn off one piece of equipment first,
if you have connected to a Camoorder’s input jacks, do not
connect to the prelection TVs input jacks.
You can labei each of the video input modes (p. 55).
You do not need to select a video mode when you use the direct
play function (pp. 71 - 72).
If you connect a monaural VCR, connect the audio output of the
VCR to the L (MONO) jack of VIDEO IN (1,2 or 3). The monaural
sound will be heard from both speakers.
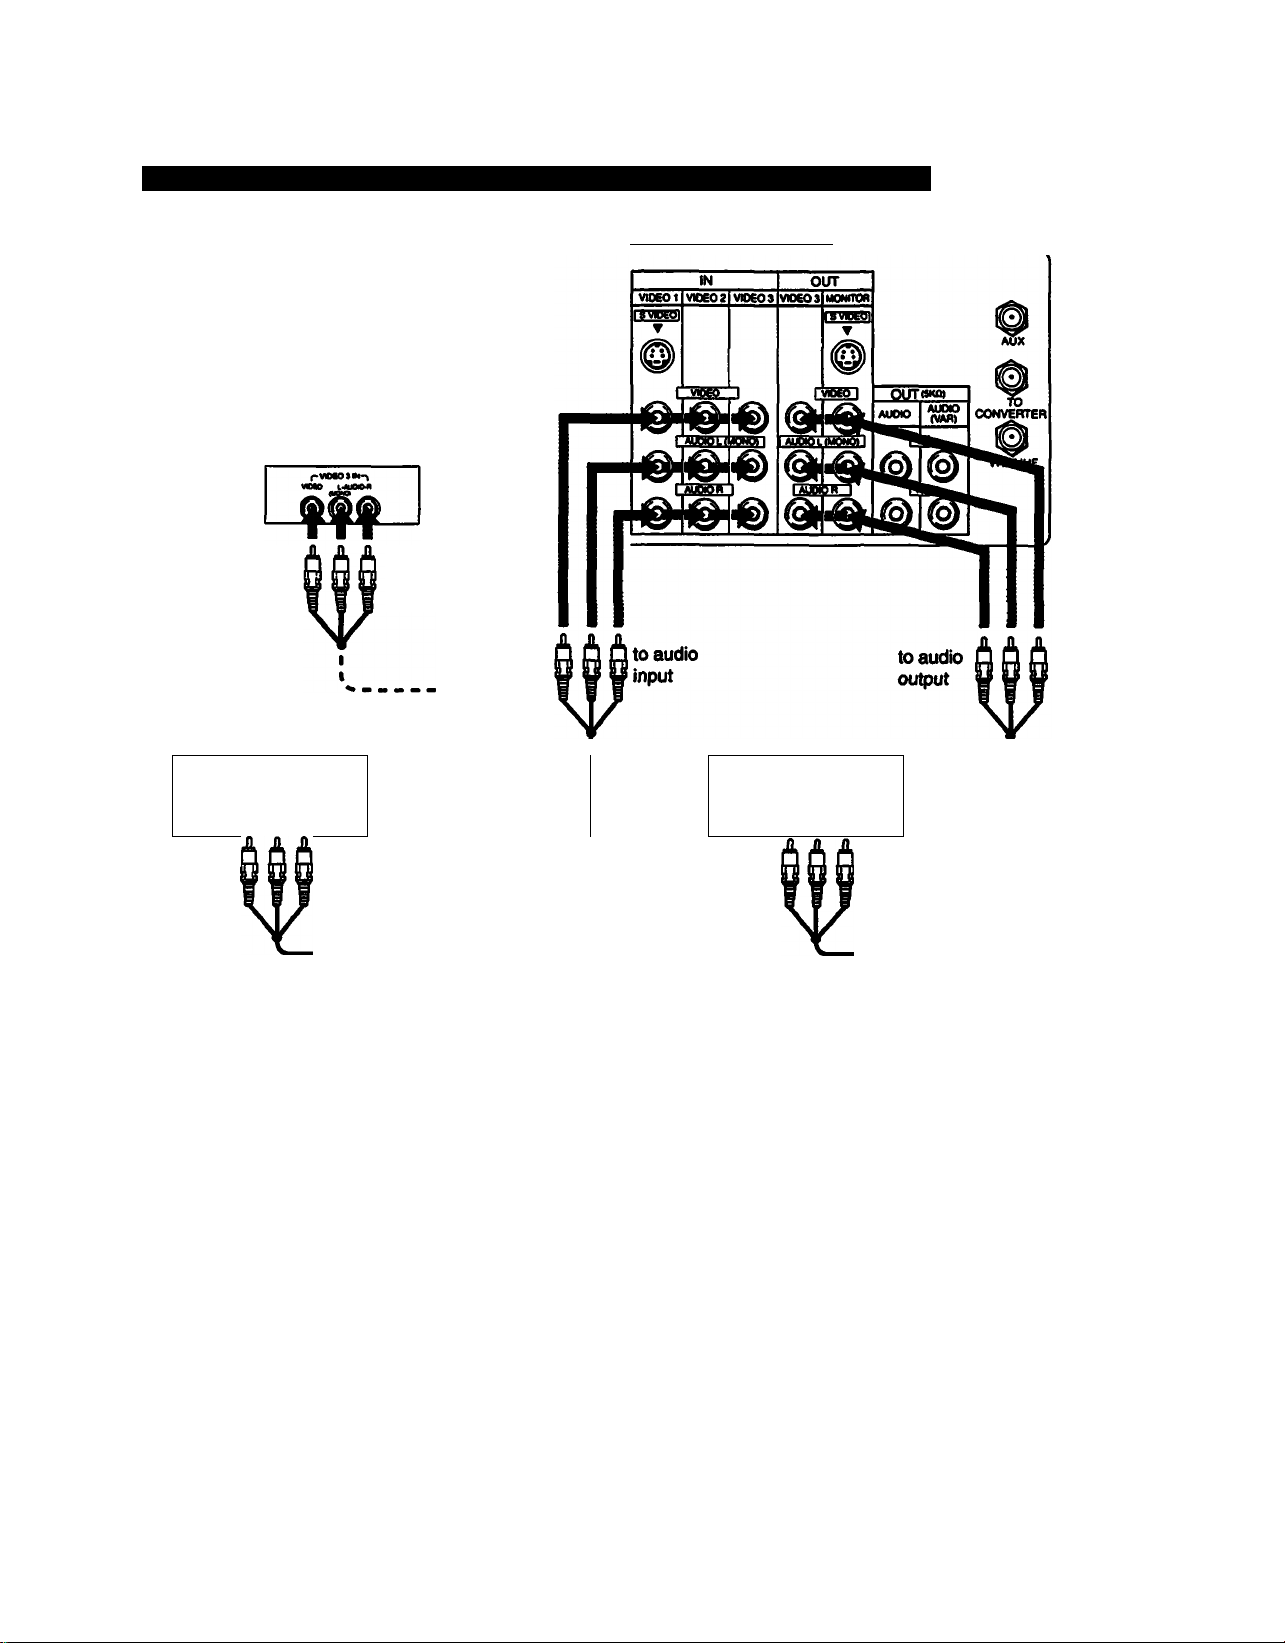
Page 17
Connecting two vCRs (equipped with an S video output jack) for tape editing
; Signal flow (Rear of projection TV)
r ■ ■
r. ■ .
f ■
\ *
Preparing for use/Operating the equipment
Same asp. IS.
* It Is not necessary to ccnnect to the MONITOR OUT 8 VIDEO
jack to receive the S video input signal. You can make the
connection as shown aiMve, or connect the MONITOR OUT
Jacks to the VCR for recording, using the VMCei0S/820S
connector (not supplied).
to
MONITOR OUT
S VIDEO*
RK-74A
(not supplied)
to audio
input
VCR
(for recording)
Nets
Do not change the input signal while editing through MONITOR
OUT, or the output signal will also change.
Caution
Video tapes and other materials may be copyrighted.
Unauthorized recording of such material may be contraty
to the provisions of the coji^ght laws.
YC-15V/30V
(not supplied)
to S video
input
s
I
ifgnai will also cnanga.
Same asp. 15.
Chapter 1: Setting Up
uu I, or me ouipui signal win aiso oriange.
Same asp. 15.
17
Page 18
Connecting Other Equipment
Connecting two VCRs (not equipped with an S video output jack) for tape editing
Signal flow
to video
input
(for playback)
to video!
output
(Front inner panel)
to audio
input
VCR
to audio
output
1
1
1
1
t
to video
input
(Rear of projection TV)
VCR
(for recording)
to video
input
to video
output
to audio
input
VMC-810S/820S
(not supplied)
Preparing for use
1 Turn on the projection TV.
2 Press TV/VIDEO on the projection TV or on the Remote
Commander so that “VIDE01“VIDEO 2" or “VIDEO 3“
appears on the screen.
VIDE01: for equipment connected to VIDE011N
VIDEO 2: for equipment connected to VIDEO 2 IN
VIDEO 3; for equipment connected to VIDEO 3 IN
Notes
• If you try to use equipment that is connected to the front and rear
VIDEO 3 IN jacks at the same time, the picture will be distorted.
Be sure you turn off one piece of equipment first.
• If you have connected to a Camcorder's input jacks, do not
connect to the projection TV’s input jacks.
• If you connect equipment to the rear VIDEO 3 IN S VIDEO jack,
you cannot receive the output signal from the VIDEO 3 OUT
VIDEO jack.
Chapter 1: Setting Up
18
VMC-810S/820S
(not supplied)
Watching a different image whiie dupiicating
The VIDEO 3 OUT jacks only output the signal from the
VIDEO 3 Input jacks.
If you connect a VCR for playback to the front or rear VIDEO
3 IN jacks, and a VCR for recording to the VIDEO 3 OUT
jacks to duplicate your recorded tapes, you can watch input
images different from the image being output for recording.
To watch a different input image
Press TV/VIDEO on the projection TV or on the Remote
Commander to select the input image you want to watch.
Page 19
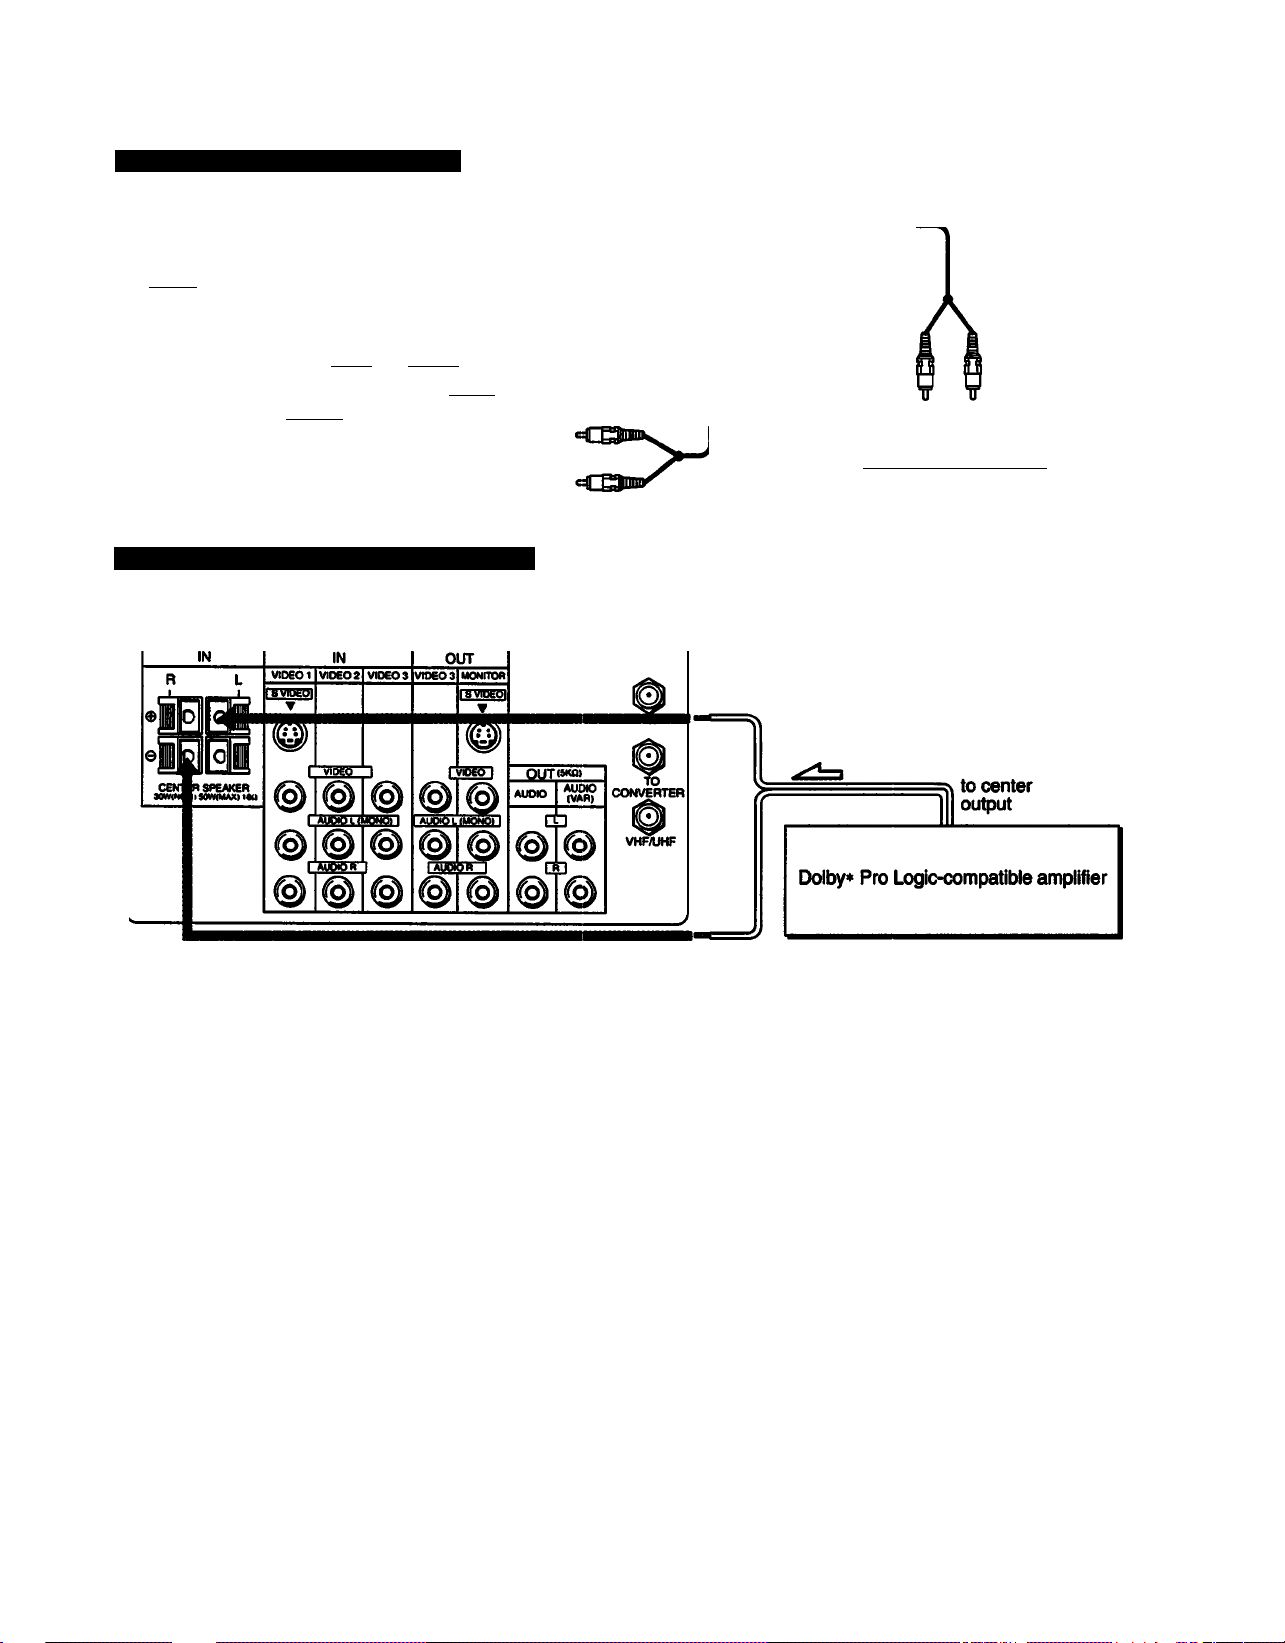
Connecting a stereo audio system
Signal flow
(Rear of projection TV)
IN
VI0EO2 VIDEOS
nnwpgn
▼
® ®
® ®
-‘SSSE
@|@|@
Using the TV speakers as center speakers
®
OUT
~roBgt
© ©
I yOEO I
OUTCKOI
AUDIO
dn
□ D
AUDIO
(WH)
:Signal flow
CONVERTER
to audio
output
(Rear of projection TV)
RK-74A
(not supplied)
Speaker
) “®_.®®sO O
l - . ^ o o HMD , o -
S
Set the amplifier's function to line input.
to left© terminal
Stereo amplifier
Speaker
cords
to line input
Speaker
S
a
a
.m
a
I
a
to light© terminal
Preparing for use Adjusting the sound level
Display the mode set menu and set SPEAKER to
“CENTER" to cut off the projection TV speaker sound
(p. 52), and listen to the projection TV’s sound solely
through the audio system speakers.
If you connect a stereo audio system to AUDIO (VAR) OUT,
leave the amplifier volume, bass and treble controls at their
mid position, and adjust the level with the VOLUME +i-
buttons on the projection TV or the VOL +/- buttons on the
Remote Commander.
Using the projection TV speakers as center speakers
You can only connect a Dolby* Pro Logic-compatible
amplifier to CENTER SPEAKER IN; always make the
connection as shown above. Never connect to the right
If you connect a stereo system to AUDIO OUT or a
monaural system to CENTER SPEAKER IN, adjust the
speaker volume with the amplifier controls.
(R ©©) or left (L ©^ terminals only.
Caution
• Always turn off the amplifier power before connecting to CENTER
SPEAKER IN.
• Always match the speaker cord and tenninal colors when making
the connection.
Manufactured under license from Dolby Laboratories Licensing
Corporation. Additionally licensed under one or more of the
Note
By connecting to AUDIO (VAR) OUT, you can adjust the bass,
treble and balance, or select an SRS (Sound Retrieval System) or
an MTS (Multichannel TV Sound) mode, using the on-screen
menus (pp. 49-51).
following patents: U.S. numbers 3,632,886,3,746,792 and
3,959,590. “DOLBY* and the double-D symbol CElare
trademarks of Dolby Laboratories Licensing Corporation.
Chapter 1: Setting Up
19
Page 20
Using the On-Screen Menus
The following flow chart shows the different levels of on-screen menus that you can use to make various adjustments and settings. See the indicated pages for instructions on using each feature.
For picture and sound quality adjustment
Main menu
PIZIPROG PALETTE'
ЕПИООЕ SET
©TIME
BSET UP
mENGLISH
BCONVERGENCE
UCT$ Ю1М luteB)
For mode adjustment
Main menu
ISPROG PALETTE
► ШМ00Е SET——
©TIME
SSET OP
mENGLISH
EICONVERGENCE
siiicT$ Kim> lilt IBS
For time-related settings
Program palette menu
(3
►■STANDARD
■HDVIE
■SPORTS
■NEWS
VIDEO —
audio —
7MENU
MODE SET screen
(pp. 48,51-52)
1ТД
►S-VIDEO
MTS
SPEAKER
7MENU
:0FF
:MAIN
:MAIN
VIDEO screen
(pp.44-47)
I3VIDE0
►PICTURE
HUE
COLOR
BRIGHT Milllllll*«"—
SHARP
TRINITONEtLON
NR:0FF
7
UUCT$' KKM апДИВ
AUDIO screen
(pp.49 - 50)
ISAUDID
►TREBLE m
BASS nilllll
BALANCE
■SRS AUTO
■SRS STEREO
■SRS OFF
?
utcciC Km> Ultima
CURRENT TIME SET screen
(pp.57 - 58)
©CURRENT TIME SET
anwwiiiini|iaimniiiH>
miiiiiiiiii—--
Adjustment screen
(p.44)
I3VI0E0
PICTURE
Adjustment screen
(p.49)
Main menu
ISPROG PALETTE
ШМ00Е SET
► ©TIME-
BSET UP
mENGLISH
BCONVERGENCE
mca^ icTuiM cmeS)
Note
Menu items that are shaded are inactive and
cannot be selected.
Chapter 1: Setting Up
20
Time menu
©
►CURRENT TIME SET
ON/OFF TIMER'
CHANNEL BLOCK —
DAYLIGHT SAVING:N0
3MENU
►_AH
DAYLIGHT SAVING
9
Set DAYLIGHT SAVING
first If needed.
KuctC an* wt8B
ON/OFF TIMER screen
(pp.59 - 60)
©ON/OFF TIMER
►1..............
--:--AM .H CH...
2..............
-:-AM .H CH...
3.................
-:-AM .H CH...
?
Select a program.
uuctC utteS
CHANNEL BLOCK screen
(pp.62 - 63)
©CHANNEL BLOCK
►.
..........
•-:--AM .H CH...
KTim Ulte
Page 21
For presetting and other functions
Main menu
9PR06 PALETTE
9M00E SET
©TIME
►eSET UP' —
OENGLISH
EIC0NVER6ENCE
uniBSt
SETUPscraen
For CONVERGENCE adjustment
►CABLE: ON
AUTO PROGRAM
CH ERASE/ADO
CH CAPTION ——
VIDEO UBEL——
DIRECT PUT—■
FAVORITE CHANNEL*
7NENU
©AUTO PROGRAM
©CH ERASE/ADO
►ERASE
ADD
?
Select the channel.
ERASE:CHANNEL +/■
ADO: ,CO-93+CENTER]
©CH CAPTION
HITflgP
?
Use [0-9]+tENTER]
to select the channel,
itttcT$ umn mtimin
23
►....
AUTO PROGRAM
aeraen
(p.29)
CH (channel)
ERA8E/A0D screen
(pp.31,33)
CH (channel)
CAPTION screen
(pp.53 - 54)
Main menu
GSPROG PALETTE
ESINOOE SET
©TIME
©SET UP
03ENGLISH
►SCONVERGENCE-
uuctC uTm WTIBB!)
CONVERGENCE screen
(pp.24 - 25)
mcoNVEi;ÍGENCE
KUCT$ m
wa mtdaan
1
5
Navigating through the menus
Remote Commander
DISPLAY ENTER
cnicr
□ ® □
A/V WINDOW
JIJmenu
LJ>^c=iœi
nWOnTE
VOL
+
To display the main menu
Press MENU.
To return to the previous menu
Press A/V WINDOW +/- until the cursor points to
“ PMENU."
Then press RETURN.
To return to the main menu
Repeat the atxnre, until you reach the main menu.
To return to the normal screen
Press MENU.
Note
The menus disappear automatically, if you do not press a
button within 90 seconds.
©VIDEO LABEL
►VIOEOl: VIDEO 1
VI0E02: VIDEO 2
VIDEOS: VIDEO 3
5
©DIRECT PLAY
Prograa your renote
with PRESET CODE before
using DIRECT PLAY
feature.
$tuci$ KTm aiTimn
©FAVORITE CHANNEL
►...
" “ *
Set the
position to
Input the
channel.
nua$ Knn
mm»
mmm
mTie¿
VIDEO LABEL
screen
(p.55)
DIRECT PLAY
screen
(pp.71-72)
FAVORITE CHANNEL
screen
(pp.64 - 65)
Chapter 1: Setting Up
21
Page 22

Using the On-Screen Menus
Changing the menu language
The menu letnguage is factory-set to ENGLISH. Follow these instructions to
change the menu language to Spanish or French, or back to English.
Press POWER to turn on the projection TV.
TIMER/STAND BY indicator blinks until the picture
1
POWER
Press MENU.
The main menu appears.
►IZIPROG PALETTE
EiMOOE SET
©TIME
aSET UP
(DEN6LISH
lacONVERGENCE
h
mRT± Miww iiitMgD
Press A/V WINDOW +/- until the cursor points to ‘‘ENGLISH.*
Then press RETURN.
3
The language disf^y turns red.
A/V WINDOW RETURN
Press A/V WINDOW +/- to select the language.
Each time you press A/V WINDOW-t/-, the •ESPAÑOL."‘FRANÇAIS’and
‘ENGLISH’ menus appear.
A/V WINDOW
T
□k
____________
uucT$ «IMII till ana
utter $ UTMa tmJUn
Huciâ unta tiirSI
KUCT$ amta ntid
QDPROG PALEHE
EÜH0DE SET
©TIME
BSET UP
CDENGLISH
EICONVERGENCE
eiAJUSTE DE MODO
©HORA
BAJUSTES
OESPAROL
lacOHVERGENCIA
ODFRANÇAIS
EICONVERGENCE
OENGLISH
^CONVERGENCE
221 Chapter 1: Setting Up
Certain parts of the *ESP/kÑOL* and ‘FRANÇAIS* menus remain in English.
Page 23

Press RETURN.
77ie language Is selected.
5
RETURN
tSSELECCION A/V
B3AJUSTE DE HODO
®H0RA
BAJUSTES
►fflESPAROL
EICONVERGENCIA
un $ wnm aiTamn
Spanish menu
To return to the normal screen.
Press MENU.
Notes eonoeming menus
• During PIP (Picture-in-Picture) mode, the
on-screen menus may overlap the window
picture.
• The menus disappear automaticaiiy, if you do
not press a button within 90 seconds.
Chapter 1: Setting Up
23
Page 24

Adjusting Color Registration (CONVERGENCE)
In a projection TV, the projection tube image appears on the screen in three color
layers (red, green and blue). If these layers are not in proper registration, the
color is poor and the picture blurs. To correct this, perform the CONVERGENCE
adjustment.
Press MENU.
The main menu appears.
1
►BOPROG PALETTE
ВамООЕ SET
©TIME
BSET UP
mENGLISH
SCONVERGENCE
ъ
Press A/V WINDOW +/- until the cursor points to “CONVERGENCE."
A/V WINDOW
S
MttcT^ MUM fiitana
IZIPROG PALETTE
БЗН00Е SET
©TIME
BSET UP
fflENGLISH
►^CONVERGENCE
nUCT$
HTM> tilt
пив
Press RETURN.
The CONVERGENCE semen and the ooloted adjustment lines appear.
3
RETURN
Press A/V WINDOW +f- until the cursor points to the symbol representing
the line you want to adjust (see the key below).
A/V WINDOW
EICONVEF[GENCE
a
► r
Bh
Adjustment line symbols key
I (red vertical; left/right adjustment)
— (red horizontal: up/down adjustment)
t (blue vertical: left/right adjustment)
—• (blue horizontal: up/down adjustment)
MU{T$ Ml
m tiitiHB
5
24
Chapter 1: Setting Up
Page 25

Press RETURN.
The ac^ustment line is selected.
5
RETURN
Press A/V WINDOW +/- until the line converges with the center green line.
Then press RETURN.
6
A/V WINDOW
I3C0NVER
tGENCE
iEUCT$ Ul5•M aiTiggn
S
Sb
To return to the previous menu
Press A/V WINDOW +f- until the cursor
points to* Z> MENU.”
Then press RETURN.
To return to the main menu
Repeat the above, until you reach the
main menu.
To return to the normal screen.
Press MENU.
r-'
To move up
To move right
To move down
To move left
Repeat steps 4 - 6 to adjust the other lines, until all the lines have
overlapped to form a white cross.
Press A/V WINDOW
Press A/V WINDOW-.
EICONVERGENCE
siucT$ MnM uit(8B>
S
s
9
s
s
I
s
s
n
Chapter 1: Setting Up I 25
Page 26

Setting CABLE ON or OFF
If you have cable connected to the projection TV, follow the steps below to set
the cable connection on or off. Set CABLE OFF to preset or watch VHF or UHF
IWTMG CCAPTOl SLEEP POWER
1=10 oo
CM* FREEZE Tvivioeo SWAP PIP
1=11=1 aacj
CH- POSItlOW AUDIO OFF
1=1 a(=)S
TV/VIDEO
0©©
©00
©©©
H8PLAY
_ _
(=1 ® a
A/V WINDOW
«r~l
MENU
BETUBN
FMmTE
VTR1-2-3 MDP
ao
ENTER
______
PICTURE
o
ANT/AUX
JUMP
o
VOL CH
TV CABLE BOX
to
o
channels, Emd set CABLE ON to preset or watch CEible TV channels.
Note
If the projection TV is in video mode, the *CABLE* dispiay is shaded and cannot be
selected.
Press TV/VIDEO to change to TV mode.
Press MENU.
The main menu appears.
1
h
Press A/V WINDOW +/- until the cursor points to “SET UP."
A/V WINDOW
HSPROG PALETTE
ESHOOE SET
©TIME
BSET UP
ODENGLISH
^CONVERGENCE
(aPROG PALETTE
fSHODE SET
©TIME
►eSET UP
03ENGLISH
^CONVERGENCE
lictS MTim uitSB)
RM-Y115
Press RETURN.
The set up menu appears, and the cursor points to "CABLE."
3
RETURN
%
Press RETURN again.
The mode display turns red
RETURN
►CABLE: ON
AUTO PROGRAM
CH ERASE/AOO
CH CAPTION
VIDEO UBEL
DIRECT PUY
FAVORITE CHANNEL
PMENU
CABLE: ON
AUTO PROGRAM
CH ERASE/ADD
CH CAPTION
VIDEO LABEL
DIRECT PLAY
FAVORITE CHANNEL
PMENU
26
Chapter 1: Setting Up
Page 27

Press A/V WINDOW +/- to select “ON" or “OFF.”
5
A/V WINDOW
CABLE: OFF
AUTO PROGRAM
CH ERASE/AOD
CH CAPTION
VIDEO LABEL
DIRECT PLAY
FAVORITE CHANNEL
7NENU
Press RETURN.
Theset№^i$cony)lete.
6
RETURN
S
►CABLE: OFF
AUTO PROGRAM
CH ERASE/ADO
CH CAPTION
VIDEO LABEL
DIRECT PLAY
FAVORITE CHANNEL
7MENU
To return to the previous menu
Press A/V WINDOW +/- until the cursor points to “ ? MENU.”
Then press RETURN.
To return to the main menu
Repeat the above, until you reach the main menu.
To return to the normal screen.
Press MENU.
Cable TV channel chart*
Cable TV systems use letters or numbers to
designate channels. To tune in a channei, refer
to the chart below.
Number on this TV
14
IS
16
17
18
19
20
21
22
23
24
25
26
27
28
29
30
31
32
33
34
35
36
37
38
Corresponding
CATV channei
A-8
A-7
A-6
M
W
W+1
W-t-2
W-ie
W+S7
94
95
96
97
98
99
100
101
102
123
124
125
Check with your kwai cabie TV company for
more compiete information on the avaiiable
channeis.
* The designation of the cabie TV channels
conforms to the EIA/NCTA recommendation.
Chapter 1:8etUno Up I 27
W-r-58
A-5
A-3
A-2
A-1
W+S9
W-»60
W+61
\N*82
W-ie3
w-te4
Page 28

Presetting TV Channels
By presetting TV channels to the projection TV, you can select channels by pressing CH (CHANNEL) +/-.
(You can select VHP channels 2-13 without presetting.)
Presetting all receivable channels automatically
MUIMG aCMnXM SLEEP POWER
ao i=ii=i
CH* FREEZE Tv/vioeo SWAP PIP
a o o [=11=)
CH- POSmON AUDIO OFF
CD OCDO
TVAflOEO
o®® □
x-v ./-s. ANT/AUXI
Q®® c
® ® ®
DISPLAY ENTER
®
A/V WINDOW
|TI"C=I 03
—4 pminF
RETURN
bJiczi CHI
nVORITE
VTR1-2-3 MDP
£t
JUMP
[=1
^1
TV CABLE BOX
Follow these instructions to preset all the receivable VHP, UHP or cable TV
channels to the projection TV.
Notes
• If the projection TV is in video mode, the *AUTO PROGRAM” display is shaded and
cannot be selected. Press TVA/IDEO to change to TV mode.
• Perform auto programming during the day rather than late at night, when some channels
may not be broadcasting.
Set the cable connection on or off (pp. 26 - 27) to select the type of
channel you want to preset, VHFAJHF or cable TV.
1
To preset VHP
or UHF channels
Press ANT/AUX to select the type of channel you want to preset, VHP/
UHF/regular cable TV, or pay cable TV connected to the AUX (auxiliary)
terminal (except for KP-41EXR96).
ANT/AUX
To preset
cable TV channels
AUX 3
RM-Y115
To preset VHP, UHF
or regular cable
TV channels
Press MENU.
The main menu appeals.
2
h
Press A/V WINDOW +/- until the cursor points to "SET UP."
3
A/V WINDOW
h
To preset pay cable
TV channels
►QIPR06 PALETTE
EliMOOE SET
©TIME
BSET UP
mENGLISH
^CONVERGENCE
HllCt $ «KM tiitH)
OgPROG PALEHE
EBHOOE SET
©TIME
►BSET UP
CDENGLISK
^CONVERGENCE
«uctC KiMi niTSm
28
Chapter 1: Setting Up
Page 29

Press RETURN.
The set up menu appears.
RETURN
3
►CABLE: ON
AUTO PR06RAH
CH ERASE/AOO
CH CAPTION
VIDEO LABEL
OIRECT PLAY
FAVORITE CHANNEL
:PMENU
Press A/V WINDOW +/- until the cursor points to ‘AUTO PROGRAM.”
5
A/V WINDOW
CABLE: ON
►AUTO PROGRAM
CH ERASE/AOO
CH CAPTION
VIDEO LABEL
DIRECT PLAY
FAVORITE CHANNEL
7HENU
Press RETURN.
6
RETURN
^3
4
Receivable channels for this projection
TV
VHP; 2-13
UHF: 14-69
Cable; 1 -125
To select TV channels without
presetting
Press the 0 - 9 buttons and ENTER.
To return to the previous menu
Press A/V WINDOW +!- until the cursor
points to“ P MENU.”
Then press RETURN.
To return to the main menu
Repeat the above, until you reach the
main menu.
To return to the normal screen.
Press MENU.
o
S’
SAUTO PROGRAM
w
‘AUTO PHOQBMA”appears on Vre screen and rec^vaUechanrwIs (other than the
channels already preset) are preset in numerical sequence. Tim channels previously
preset will not remain In the projection TV’s memory.
When no more channels are found, auto programming stops and the screen returns
automatically to the set up menu.
Press CH +/- to check or view the preset channels.
CH
Chapter 1: Settirtg Up 129
Page 30

Presetting TV Channels
Erasing TV channels
Follow these instructions to erase unnecessary TV channels, so that when you press CH -<■/-, the channel(s) are skipped.
Press MENU
The main menu appears.
1
►IZIPROG PALETTE
ШИ00Е SET
©TIME
aSET UP
03ENGLISH
BC0NVER6ENCE
5
Press A/V WINDOW +/- until the cursor points to “SET UP."
2
A/V WINDOW
Ыь
ictiCT$ wnm ИНДИИ
IBPROG PALETTE
BHODE SET
©TIME
►aSET UP
(SENGLISH
BCONVERGENCE
Я11ст$ urau инЯВ)
Press RETURN
The set up menu appears.
3
►CABLE: ON
RETURN
ъ
Press A/V WINDOW +/- until the cursor points to "CH ERASE/ADD."
4
A/V WINDOW
□h
AUTO PROGRAM
CH ERASE/ADD
CH CAPTION
VIDEO LABEL
DIRECT PLAY
FAVORITE CHANNEL
7HENU
a
CABLE: ON
AUTO PROGRAM
►CH ERASE/ADD
CH CAPTION
VIDEO UBEL
DIRECT PLAY
FAVORITE CHANNEL
:>MENU
30 I Chapter 1; Setting up
Page 31

Press RETURN.
The CH ERASE/ADD screen appears, and the cursor points to “ERASE."
5
RETURN
Press CH +h to select the channel you want to erase.
The channel display appears.
6
SCH ERASE/ADD
►ERASE
ADD
5
Se1ect the channel.
ERASE:CHANNEL +/ADD: [0-9]+[ENTER]
$iuct$ itnw ctiTWaiil
To erase another channel
Repeat steps 6-7.
To return to the previous menu
Press A/V WINDOW +/- until the cursor
points to“ MENU."
Then press RETURN.
To return to the main menu
Repeat the above, until you reach the
main menu.
To return to the normal screen
Press MENU.
QCH ERASE/ADD
►ERASE
ADD
5
Select the channel.
ERASE:CHANNEL *h
ADD: [0-9]+[ENTER]
snccie «nm nttIBB)
8
Press RETURN.
A “-“sl^ appears In front of the channel number display, hidlcatlng that the channel
Is erased; then the CH ERASE/ADD screen automaOcaBy reappears.
RETURN
eCH ERASE/ADD
► ERASE
ADD
7>
Select the channel.
ERASE:CHANNEL +/■
ADD: [0-93+CENTER]
SCUCI $ (СТЮ Ш1ДИ1
- 8
If you erase a VHP or UHF channel, the same
number cable TV channel is also erased (and
viceversa).
3
sr
Chapter 1: Setting Up
31
Page 32

Presetting TV Channels
Adding TV channels
MUIMG C CAPnON SLEEP POWER
oo ua
CH* fREEZE Tvivmeo SWAP PIP
ao oaa
CH- POSinOW AUDIO OFF
d ddO
TVATIOEO
0©(D
00©
a
ANT/AUX
d
000
IISPUY ____ ENTER
O 0C3
A/V WINDOW
7l"id ca
VTR1-2-3 MOP TV CABUeOX
EC3 CO
______
menu „„
RETURN
FWORRE
JUMP
d
VOL CH
Follow these instructions to add TV channels one by one to the selection
memory, or to replace a TV channel you previously erased (pp. 30 - 31).
Press MENU
The main menu appears.
1
► QIPROG PALETTE
MFNU
5
E9M0DE SET
©TIME
BSET UP
mENGLISH
EICONVERGENCE
»iict£ uiwa unmD
Press AN WINDOW +/- until the cursor points to “SET UP.“
A/V WINDOW
dPROG PALETTE
E3H0DE SET
©TIHE
ÌSET UP
► as
03ENGLISH
EICONVERGENCE
HUCT$ (ITMI illtH)
RM-Y115
Press RETURN.
The set up menu appears.
3
► CABLE: ON
RETURN
AUTO PROGRAM
CH ERASE/AOD
CH CAPTION
VIDEO LABEL
DIRECT PUT
FAVORITE CHANNEL
bHENU
Press AN WINDOW W- until the cursor points to “CH ERASE/ADD.*
4
A/V WINDOW
a
CABLE: ON
AUTO PROGRAM
► CH ERASE/ADD
CH CAPTION
VIDEO LABEL
DIRECT PUY
FAVORITE CHANNEL
3MENU
32 I Chapter 1: Setting Up
Page 33

Press RETURN.
The CH ERASE/ADD screen appears.
5
RETURN
%
SCH ERASE/ADD
►ERASE
ADD
?
Select the channel.
ERASE:CHANNEL H-
ADD: [0-9]+tENTER]
nime WTun ciiT(gQD
To add another channel
Repeat steps 7-8.
To return to the previous menu
Press A/V WINDOW +/- until the cursor
points to“ Z> MENU."
Then press RETURN.
To return to the main menu
Repeat the above, until you reach the
main menu.
Press A/V WINDOW +/- until the cursor points to ‘ADO.'
6
A/V WINDOW
Press 0-9 and ENTER to select the channel you want to add.
The channel display appears.
(j)®®
®®®
®®®
effgn
©a
SCH ERASE/ADD
ERASE
►ADD
5
Select the channel.
ERASEtCHANNEL +/ADD: [D-93+CENTER]
nicer $ UTun Clirnnin
SCH ERASE/ADD
ERASE
►ADD
P
Select the channel.
ERASE:CHANNEL +/■
ADD: [0-93+CENTER]
siucT$ wnm cmQQD
b
Press RETURN
A *+‘'s^aivears In hont of Ihe channel number display, indicaling that the
8
channel is added; then the CH ERASE/ADD screen automatically reappears.
To return to the normal screen
Press MENU.
If you add a VHP or UHF channel, the same
number cable TV channel is also added
(and vice versa).
ID
RETURN
%
SCH ERASE/ADD
ERASE
►ADD
P
Select the channel.
ERASE:CHANNEL +/■
ADD: [0-93+CENTER]
ttt«n otrq
+ 10
Chapter 1: Settirtg Up
33
Page 34

wiio|b/i«?i A* rcpaiuic^d
Watching TV Programs
MUIMG CCMTKIN SLEEP POWER
(=11=1 oa
CWf FREEZE Tvrtnoeo SWAP PIP
(=1 O 1=11=1 (=1
CH- POSmOH AUDIO OPF
O l=)i=ICI
TV/VIDEO
©0® C
y-N. y«-«v x-v ANT/AUXI
000 □
Make sure that the TV/CABLE BOX selector on the Remote Commander is set
to TV. In order to control the projection TV with the Remote Commander.
Press POWER to turn on the projection TV.
VMER^TAND BY indicator blinks until the ptcMe appears.
1
POWER
000
IISPLAY ^ ENTER
C3 0u
A/V WINDOW
□SSHH
I RETURM Pjj
REWHN
__________ __
LJ (=□ [=] LJ IzJ
RWOfllTE
VTR1-2-3 MDP TV CABLE BOX
RM-Y115
JUMP
1=]
VOL CH
. .
rVCABlEI
CÛ
Set the cable connection on or off (pp. 26 - 27) to select the type of
channel you want to watch, VHFAJHF or cable TV.
2
To watch VHF
or UHF channels
Press ANT/AUX to select the type of channel you want to preset, VHF/
UHF/regular cable TV, or pay csdsle TV connected to the AUX (auxiliary)
terminal (except for KP-41EXR96).
ANT/AUX
To preset VHF, UHF
or regular cable
TV channels
Select a channel in one of the following two ways:
To scan the preset channels in numerical sequence, press CH +/-.
3
CH
To watch
cable TV channels
AUX 3
To preset pay cable
TVchannels
341 Chapter 2: Using Basic Features
To select a channel directly, press 0-9 and then ENTER.
For example, to select channel 10, press 1,0 and ENTER.
©0©
©0®
©®®
□
b
Page 35

Press VOL W- to adjust the volume.
VOL
VOLUME
b
If VIDE01, VIDEO 2 or VIDEO 3 appears on the screen
Press TVA^IDEO until a TV channel number appears.
To select channels more easily
Set FAVORITE CHANNEL (pp. 64 - 65).
To turn off the projection TV
Press POWER.
Press + to increase the volume.
Press - to decrease the volume.
Chapter 2; Using Basic Features
a
I
35
Page 36

Using Closed Caption
Press C. CAPTION.
The closed caption mode appears. CC1, CC2, TEXT1,TEXT2 or CC OFF appears in
1
sequence each time you press C. CAPTION.
CC OFF
CC 1
TEXT 1 TEXT2
1
C.CAPTION
Press C.CAPTION repeatedly.
2
Select CCI or CC2 to view Capttons.
A Caption is a printed version of the dialogue or sound effects of a program
(The mode should be set to CC1 for nnost programs.)
C.CAPTION
%
Note
The closed caption system checks for errors
before captions or text appear. If an error is
found, the mistake does not appear; a white
box appears instead. In most cases, this allows
you to read the caption without difficulty. Of
course, not all errors can be found, and in
some cases mistakes may appear.
Poor reception of any TV station can cause
poor reception of the closed caption signal
causing errors or missing captions.
Chapter 2: Using Basic Features
36
Select TEXT1 or TEXT2 to view Text.
Text is information that is presented using the half to full television screen.
It is usually not related to the program.
Select CC OFF if you doni want to view Closed Caption nor Text.
Page 37

Using Convenient Features
Muting the sound — MUTING
DEMO RETURN V MENU
Q □□□D
FAVORITE - +
Front inner panel
Press MUTING.
•MUTING“ appears on the screen.
To restore the sound
Press MUTING again, or press VOL +.
Keeping the displays on-screen — DISPLAY
Press DISPLAY.
All the existing (Ssplays appear: channel nun^r, channel caption
Of set), MTS mode ("SAf^ only), window picture input mode, and
the current time (’AM"or“PM"cB$appears after about three
seconds).
To turn off the displays
Press DISPLAY again.
Setting the sleep timer — SLEEP
The sleep timer turns off the projection TV automatically after the
amount of time you select. __________
Press SLEEP.
Each time you press SLEEP, the tíme Increments
•30,-60,’•90"
and ’OFF’ mode appear In sequence.
SLEEP
qp
^ ^ I SLEEP OFF
A red •SLEEP’ (Ssplay appears about one minute before the projection TV goes off.
To cancel the setting.
Press SLEEP until OFF mode appears.
A green “SLEEP OFF" tUsfaay appears for about three seconds.
OR
Turn the projection TV off.
The sleep timer setting Is cancelled.
r
r
___
__________________
MUTING
DISPLAY
SLEEP 30
SLEEP 60
SLEEP 90
r
__
IS
S'£2
II
sS?
3iS
Switching quickly between two channels — JUMP
Use this function to keep track of two programs alternately.
To recall the channel you were watching previously
Press JUMP.
To switch back to the first channel
Press JUMP again.
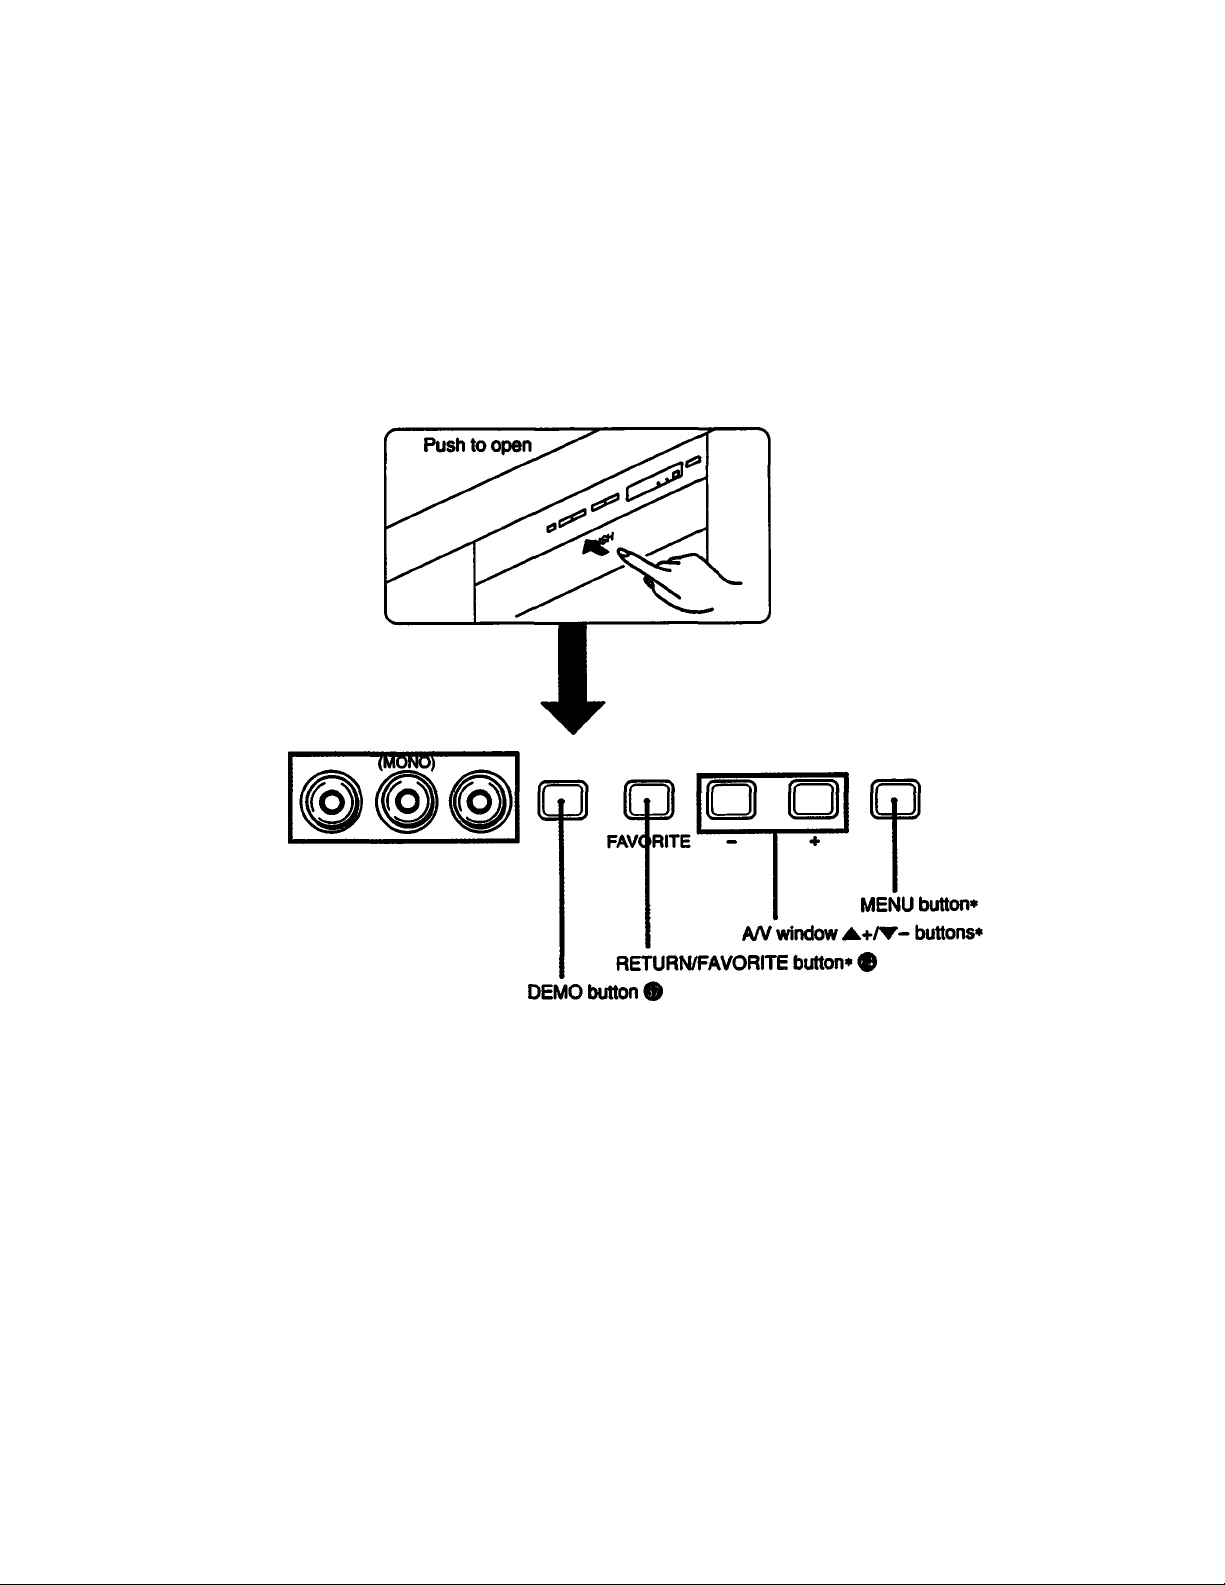
Previewing the features — DEMO
Press DEMO (front inner panel).
Functions and menus are (Bsplayài one by one.
To restart DEMO from the beginning
Press DEMO again.
To stop DEMO
Press any button.
Chapter 2: Using Basic Features 137
JUMP
DEMO
Page 38

Selecting a Picture and Sound Mode
This projection TV features four modes (STANDARD, MOVIE, SPORTS, NEWS) that offer different picture and sound qualities.
Choose the one that best suits the type of program that you want to watch.
Example: Select MOVIE mode for picture and sound that gives you the sense of being in a movie theater.
Press MENU.
The main menu appears, and the cursor points to "PROG PALETTE."
IWWGCCAPnOH
□ □
CBf fUEEZE 1VM060 SWAP PIP
CDO OOO
CH- POSmON AUDIO OFF
СИ dOO
SLEEP POWER
ТУЛЛОЕО
o® ®
ANT/AUX
® ® ®
0® ®
MSPLAY ____ ENTER
□ ® a
A/V WINDOW
Lil>^id d
nWORRE
VTB1-2-3 MOP
TV/VTR CODE
СН»
Id
CH-
PICIUBE
НГ
VOL CH
•f
TV CABLE BOX
8TANDARD
POWER
d
d
Id
—REC
1
ъ
Press RETURN.
The program palette menu appears.
RETURN
ъ
Press A/V WINDOW +/- until the cursor points to “MOVIE.*
3
A/V WINDOW
ш
□b
►OPROG PALETTE
E3H00E SET
©TIME
BSET UP
fflENGLISH
BCONVERGENCE
muctS Mnm ШТ1ЯИЙ
fS
►■STANDARD
■MOVIE
■SPORTS
■NEMS
VIDEO
AUDIO
:>MENU
GD
■STANDARD
►■MOVIE
■SPORTS
■NEWS
VIOEO
AUDIO
3HENU
(with video control
cover open)
RM-Y115
Chapter 2; Using Basic Features
38
Press RETURN.
The "MOVIE" display turns green, intScahng that MOVIE mode is selected.
RETURN
To select a different mode
Repeat steps 3-4.
GS
■STANDARO
■MOVIE
■SPORTS
■NEWS
VIOEO
AUDIO
bMENU
Page 39

Selecting standard mode (without using the menus)
Follow these Instructions to select standard mode without using the on-screen
menus.
To return to the previous menu
Press A/V WINDOW +/- until the cursor
points to“ Z> MENU."
Then press RETURN.
Press STANDARD.
STANDARD
When you select STANDARD mode
You receive standard picture and sound quality. Any video or audio adjustments
you made (“Adjusting the Projection TV." pp. 44 - 52) are cancelled and the
original factory settings are restored.
When you select MOVIE mode
You receive a fineiy detailed picture, and a theatricai audio effect.
To further adjust picture and sound qualities, foliow the instructions on
pp.44 - 52.
When you select SPORTS mode
You receive a vivid, bright picture, and sound with a sports stadium effect.
To further adjust picture and sound quaiities, follow the instructions on
pp.44 - 52.
When you select NEWS mode
Picture noise is reduced, and you receive clear voice reproduction.
To further adjust picture and sound qualities, follow the instructions on
pp. 44 - 52.
To return to the main menu
Repeat the above, until you reach the
main menu.
To return to the normal screen.
Press MENU.
S?
I
s
Chapter 2: Using Basic Features
I
39
Page 40

Watching Two Pictures at Once (PIP)
You can watch tx)th the main picture and a window picture
simultaneously, using the Picture-in-Picture (PIP) function.
KP-41EXR96 is equipped with one-tuner PIP. To watch two
TV channels simultaneously, you must first connect a VCR
to the projection TV, which will enable you to watch a
second TV channel through the VCR tuner. (See
“Connecting Other Equipment,” pp. 15-19.)
Other models are equipped with two-tuner PIP, allowing you
to watch two TV channels at once.
Picture-iivPicture special features
When watching the main picture and a window picture,
you can:
* Swap the main and window pictures (SWAP).
* Change the position of the window picture (POSITION).
* Display a still picture (FREEZE).
* Choose the sound from the main or window picture
(AUDIO).
Displaying a window picture
Remote Commander
/------
HUTMG CCAPnON 8LEEPPOWER
CH* FREEZE Tvwoeo SWAP PIP
O a l=l i=] (=1
CH-
posmow AUDIO OFF
(=1
000 o
s. TVA/ioeo
Press PIP to display a window picture
Input source mode or TV channel
for the main picture
PIP
VVsize
Input source mode or TV channel
for the window picture
Notes
• The window picture sound is aiso output from the AUDIO (VAR)
OUT jacks. The AUDIO OUT and MONITOR pUT Jacks output
the main picture sound oniy.
> The video label and channel caption wili not appear with the
window picture even if you have set them.
• H you select a blocked channel In the window picture, the display
“BLOCKED” appears with the window picture. (See “Setting
CHANNEL BLOCK,* pp. 62 - 63.)
PIP
A window pteture appears in the iast nnde you watched.
Each hme you press PtP, a 1/9or1/16siza window picture appears
attemataly.
To turn PIP function off
Press OFF.
The window piduie disappears.
To receive the window picture sound
Press AUDIO.
The J> display af^rears fora few seconds, Indicating that the
window pkrture sound & being received.
To restore the main picture sound
Press AUDIO again.
Chapter 3: Using Advanced Features
40
Page 41

Changing the window picture input mode
Displaying CATV input as a window picture
Remote Commander
Mumc c cAmoN sleep power
OO 01=1
CBf FHEEZE TV<VID60 SWAP PtP
□ □ □ □ □
CH-
(=1
/-V x-s. TV/VIDEO
posmow AUDIO
01=)
00® □
Press PIP to display a window picture.
1
PIP
Press TV/VIDEO in the Picture-in-Picture control area
to select the input mode.
Each time you press TV/VIDEO, TV.’ ’VIDEO 1,”VIDEO 2"
and "VIDEO S’appMTki sequence.
TV/VIDEO
To use Picture-in-Picture with pay cable TV input, make the
connections to your cable converter box as shown below.
(Front inner panel)
Signed flow
(Rear of projection TV)
;not supplied)
’^7=' >T\
5?}
Signal
spiitter
CATV
cable
%
To change TV channels in the window picture
Press CH +/- in the PIP control area.
VCR
After making the above connections, turn the ced)le
connection on by following the steps on pp. 26 - 27; then
continue with the steps below.
Follow steps 1 - 2 in *dianging the window S
1-2
Put your VCR on an inactive channel (channel 3 or 4).
picture input mode” on this page to select the 3
\ddeo input mode for your connected VCR. «
Decoder
DOX
3
Change pay cable TV channels with the decoder box.
To control your cable converter box with the supplied
Remote Commander
See p. 70.
Chapter 3: Using Advanced Features 141
Page 42

Watching Two Pictures at Once (PiP)
Changing the position of the window picture
Follow these Instructions to change the position of the
window picture on the screen.
Remote Commander
MUnN6CC№THN
1=1 [=]
CH* Hgm Tvwoeo swap pip
CH- posmow AUDIO OFF
O©0
Press PIP to display a window picture.
SLEEP POWER
oo
(=1 O i=l 1=1 □
1=1 aoci
TV/VIDEO
1=1
1
PIP
%
Press POSITION.
Each time you press POSITION, the window picture moves
as Illustrated.
Displaying a still picture
Use the FREEZE function to display a still picture. This
function is useful when you want to write down a recipe from
a cooking program, a displayed address or phone number
and so on.
Remote Commander
.
----------------------------
HUIM6 CCAFim 8LEEPPOWER
OO OI=l
CH> FHEEZE WIVB60 SWAP PIP
ua aaa
CH- POSmON AUDIO OFF
l=) 0(=II=l
TV/VIDEO
CD©© i:T
Press PIP to display a window picture.
1
PIP
Press FREEZE.
The window picture Image remains still on the screen.
Recipe
flour-*-2
sugar---1/2
salt
------
1/
butter--l
W
9
bett«p"l ^
POSITION
%
To restore the normal picture
Press FREEZE again.
421 Chapter 3: Using Advanced Features
Page 43

Swapping the main and window pictures
Follow these Instructions to swap the input signals of the
main and window pictures.
Remote Commander
/-----------------------------
MUIMG a»PnON SLEEP POWER
oa oo
CH+ FvezE nmoeo swap pip
CD o a a a
CH- posmow AUDIO OFF
E) CD ID (D
TVArtOEO
0® cT
Press PIP to display a window picture.
1
PIP
Press SWAP.
Each time you press SWAP, the images from the maht and
window pictures switch places.
SWAP
1
S
i
3
Chapter 3: Using Advanced Features 143
Page 44

Adjusting the Projection TV
You can adjust the picture and sound for each input mode
(TV, VIDE01, VIDEO 2, VIDEO 3) by pressing TV/VIDEO
on the projection TV or on the Remote Commander to select
the input mode, before making the adjustments. These
adjustments are retained in memory even when you turn off
the projection TV, but are cancelled after you change the
adjustments, or select a picture and sound mode
(pp.38 - 39).
Adjusting the picture
Follow these instructions to adjust PICTURE, HUE, COLOR,
BRIGHT (brightness) and SHARP (sharpness).
Remote Commander (wHh video control cover open)
Press RETURN.
The VIDEO screen appears.
(SVIOEO
►PICTURE Uiilliiiiiilii!H~
COLOR
BRIGHT
SHARP liaill№-’-''
TRINIT0HE:L0H
NR:0FF
siuctC UTwii imiBi
Press AA/ WINDOW +/- until the cursor points to the
item you want to adjust.
5
Press RETURN.
The acÿustment screen appears.
6
..
Press MENU.
The main menu appears, and the cursor points to "PROG
1
PALETTE"
►G9PR0G PALETTE
ËE9M0DE SET
©TIME
BSET UP
mENGLISH
BCONVERGENCE
scicctC UTin imfiQn
Press RETURN.
The program palette menu appears.
►■STANOARD
Press AA/ WINDOW +/- until the cursor points to
•VIDEO."
3
GE)
■MOVIE
■SPORTS
■NEWS
VIOEO
AUDIO
?MENU
Press A/V WINDOW +/- to make the adjustment.
Picture
quality
PICTURE
HUE
COLOR
BRIGHT
SHARP
Press AAT WINDOW-
For decreased picture
contrast with soft color
Skin tones become
purplish
For less color intensity
For less brightness
For less sharpness
Press A/V WINDOW
For increased picture
with vivid color
Skin tones become
greenish
For more color intensity
For more brightness
For more sharpness
Press RETURN.
The acHustment is complete, and the VIDEO screen
8
automatically reappears.
(SVIDEO
►PICTURE
HUE
COLOR
BRIGHT
SHARP
TRINITONErLOM
HR:0FF
?
HHIHIIWillllll"*'*
Illlilll*—X»
IWIIIIMH—““'“
iilllllll^
UlCCT^ ICT«M ISItgg)
Chapter 3: Using Advanced Features
44
Page 45

To adjust other items
Repeat steps 5-8.
To restore the fectory settings for aii the Hems
Select “STANDARD” on the program palette menu, and
press RETURN;
or, press STANDARD on the Remote Commander.
All the Hems, including TRINITONE (p. 46) and NR (p. 47) return to
their original factory sefl/ngs.
To adjust picture contrast
You can also adjust picture contrast with the PICTURE +/-
buttons on the Remote Commander.
PICTURE
Press -I- to increase picture contrast with vivid color.
Press - to decrease picture contrast with soft color.
The picture adjustment screen appears.
To return to the previous menu
Press A/V WINDOW +/- until the cursor points to
“ P MENU."
Then press RETURN.
To return to the main menu
Repeat the above, until you reach the main menu.
To return to the normal screen
Press MENU.
g
S
s
m
i
I
s
Chapter 3: Using Advanced Features 145
Page 46

Adjusting the Projection TV
Setting the TRINITONE mode
Color picture tubes are usually manufactured with a fixed
color temperature (tint) that determines the ’Vtarmth” (red
tint) or "coolness” (blue tint) of the picture. Use the Sony
Trinitone feature to adjust the picture color to your
preference.
Remote Commander
DISPIAY
A/V WINDOW
+
RWOnnE
VTR1.2-3 MOP
acT]
Press MENU.
The main menu appears, and the cursor points to “PROG
1
PALETTE/
ENTER JUMP
(=1 (=1
©
MENU
____
RETURN
VOL CH
+
TV CABLE BOX
m
Press RETURN.
The VIDEO screen appears.
ISVIDEO
►PICTURE Kl№liii
HUE
COLOR
BRIGHT
SHARP
TRINITONE:LOW
NR;0FF
?
nuag nnm tmana
Press A/V WINDOW +/- until the cursor points to
TRINITONE.”
5
Press RETURN.
The mode (tsplay turns red.
6
Press A/V WINDOW +/- to select “HIGH” or “LOW.*
———I.- •
niuiiii»-»»«-
■ Wllllli'«“"»»'”
.......
►IZIPROG PALETTE
ESNOOE SET
©TIME
BSET UP
mENGLISH
EICONVERGENCE
.ceT$ KTiw UII63D
Press RETURN.
The program palette menu affare.
►■STANDARD
Press A/V WINDOW +/- until the cursor points to
“VIDEO.”
3
m
■MOVIE
■SPORTS
■NEWS
VIDEO
AUDIO
7MEaU
Select “HIGH” to make the picture cool (bluish).
Select “LOW” to make the picture warm (reddish).
Press RETURN.
The setting Is complete.
8
To return to the previous menu
Press A/V WINDOW +/- until the cursor points to
“ Z> MENU.”
Then press RETURN.
To return to the main menu
Repeat the above, until you reach the main menu.
To return to the normal screen
Press MENU.
461 Chapter 3; Using Advanced Features
Page 47

Setting NR (picture noise reduction) ON or OFF
Follow these instructions to reduce picture noise.
Press A/V WINDOW +/- until the cursor points to
“NR.”
5
Remote Commander
Press MENU.
The main menu appears, and the cursor points to “PROG
1
PALETTE."
►QDPROG PALETTE
^MODE SET
©TIME
eSET UP
□3ENGLISH
EICONVERGENCE
SCUCI $ KTim CUT (SB)
IZIVIDEO
►PICTURE llliilM
HUE
COLOR
BRIGHT
SHARP
TRINIT0NE:L0W
NR:0FF
3
SCUCI C Kicn oiiiEQiD
Press RETURN.
The mode display turns red.
6
Press A/V WINDOW +/- to select “ON” or “OFF.’
Select “ON” to reduce picture noise.
Select “OFP to restore the nonnal picture.
Press RETURN.
The settlr^ Is complete.
8
liiiimii""'"«»»
Press RETURN.
The program palette menu appears.
Press A/V WINDOW +/- until the cursor points to
“VIDEO.”
3
Press RETURN.
The VIDEO screen appears.
GD
►■STANDARD
■MOVIE
■SPORTS
■NEWS
VIDED
AUDIO
PMENU
To return to the previous menu
Press A/V WINDOW +f- until the cursor points to
“ Z> MENU.”
Then press RETURN.
To return to the main menu
Repeat the above, until you reach the main menu.
To return to the normal screen
Press MENU.
a
e
s
Chapter 3: Using Advanced Features 147
Page 48

Adjusting the Projection TV
Setting S-VIDEO ON or OFF
Follow these Instructions to set S-VIDEO on or off,
depending on the kind of video equipment you have
connected to the projection TV. For instructions on
connecting video equipment, see pp. 15 -18.
Note
If the projection TV is in TV, VIDEO 2 or VIDEO 3 mode, the
'^VIDEO* display is shaded and cannot be seiected.
Press TV/VIDEO on the projection TV or on the Remote
Commander to change to VIDE01 mode.
Remote Commander
Press RETURN.
The mode display turns rad.
4
Press A/V WINDOW +/- to select “ON" or “OFF.*
Press RETURN.
The setting is complete.
6
To return to the previous menu
Press A/V WINDOW +/- until the cursor points to
“ ^ MENU.”
Then press RETURN.
To return to the main menu
Repeat the above, until you reach the main menu.
Press MENU.
The main menu appears.
1
►SIPROG PALETTE
EONODE SET
©TIME
SSET UP
mENGLISH
^CONVERGENCE
SCUCI a nima isir^S)
Press A/V WINDOW +/- until the cursor points to
“MODE SET.”
Press RETURN.
The mode set menu appears, with the cursor pointing to IS-
3
VIDEO."
EE
PS-VIDEO
MTS
SPEAKER
:>NENU
:0FF
:MAIN
:NAIN
To return to the normal screen
Piess MENU.
Chapter 3: Using Advanced Features
48
Page 49

Adjusting the sound
Follow these Instructions to adjust the TREBLE, BASS and
BAUNCE.
Remote Commander (wKh video control cover open)
AWWINDOW VOL CH
+4*
1 RETURN
тюптЕ
VTR1-2-3 MDP
PICTURE
LJlc=3(Z]
TV CABLE BOX
СЙ
ТУЛЛТ1 CODE SET STANDARD
iZD □ IZ3
C№
Press MENU.
The main menu afv>ears, and the cursor points to "PROQ
1
PALETTE.’
POWER
►ISPROG PALETTE
ШНООЕ SET
TIME
SET UP
g
uua$> KiiMa tiitUBB
IHENGLISH
Press RETURN.
The arÿustment screen appears.
6
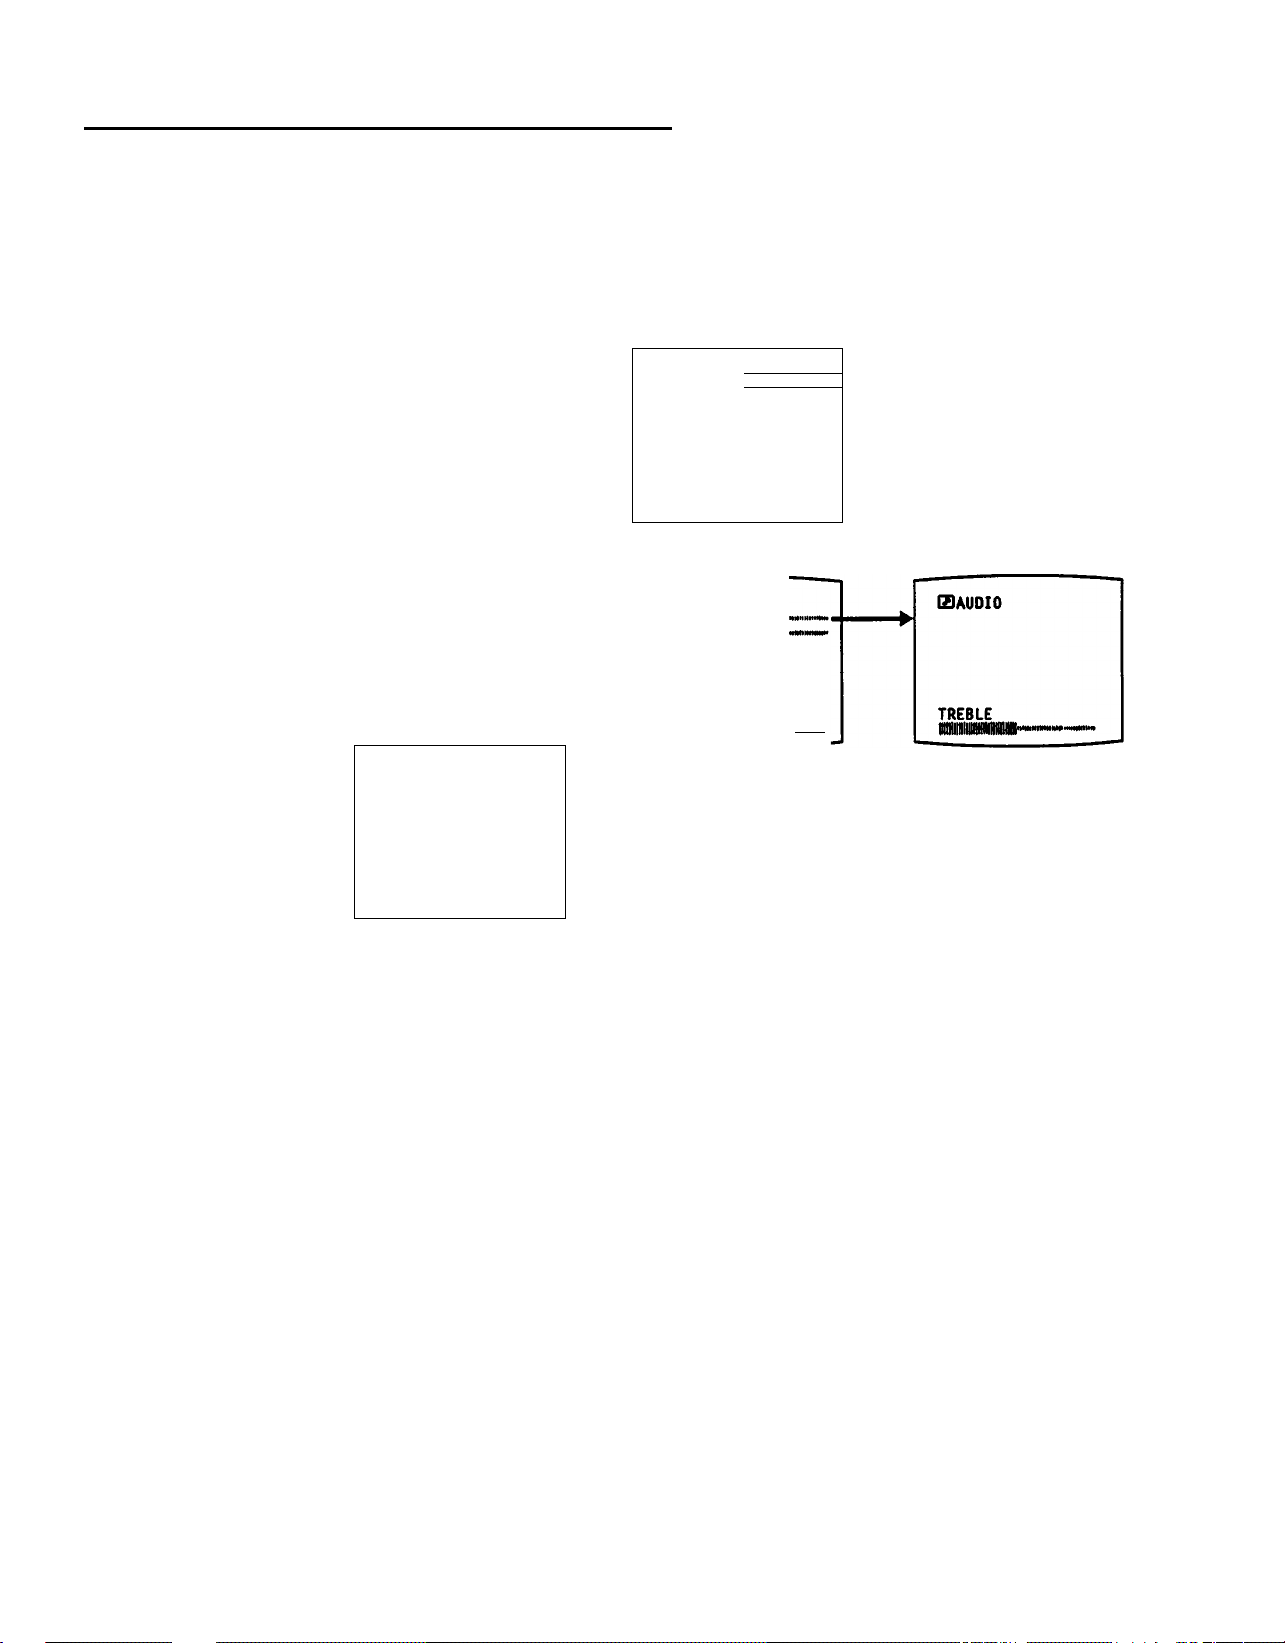
Press AN WINDOW +/- to make the adjustment.
7
Sound
quality
TREBLE
BASS To decrease the bass
BALANCE
Press RETURN.
The acfustment is con^te, and the AUDIO screen
8
automatically reappears.
Press A/V WINDOW-
To decrease the treble
response
response
To emphasize the left
speaket's volume
Press A/V WINDOW 4-
To increase the treble
response
To increase the bass
response
To emphasize the right
speaker’s volume
Press RETURN.
The program palette menu appears.
►■STANDARD
Press A/V WINDOW +/- until the cursor points to
“AUDIO."
3
Press RETURN.
The AUDIO screen appears.
4
(SAUDIO
►TREBLE
BASS
0Д^Д|||0£ NMiMMMiM|MiNnMim
■SRS AUTO
■SRS STEREO
■SRS OFF
SCtCCT$ КТШ nit ДИВ)
Ш
■MOVIE
■SPORTS
■MENS
VIDEO
AUDIO
;>MENU
(SAUDIO
TREBLE
►BASS
BALANCE "«««H'
■SRS AUTO
■SRS STEREO
■SRS OFF
?
suktC nim (lit
To adjust other Hems
Repeat steps 5-9.
To restore the factory settings for all the Items
Select “STANDARD" on the program palette menu, and
press RETURN; or, press STANDARD on the Remote
Commander.
All the Items, Indurfing SRS mode (p. SO) return to their orighial
tactory settings.
To return to the previous menu
Press AN WINDOW +/- until the cursor points to
“ D MENU."
Then press RETURN.
To return to the main menu
Repeat the above, until you reach the main menu.
S
В
&
s
Press AN WINDOW +/- until the cursor points to the
item you want to adjust.
5
To return to the normal screen
Press MENU.
Chapter 3: Using Advanced Features
49
Page 50

Adjusting the Projection TV
Selecting an SRS (Sound Retrieval System) mode
For lifelike sound reproduction, follow the instructions below
to select the SRS mode you prefer.
In SRS AUTO mode, SRS functions in both monaural and
stereo modes.
Monaural sound programs will have a ‘simulated stereo’
effect.
In SRS STEREO mode, SRS functions only when a stereo
progreun is received.
The STEREO lamp on the TV limits up whenever a stereo
broadcast is received.
Select SRS OFF mode to return to normal sound mode.
Remote Commander
Press A/V WINDOW +/- until the cursor points to
“AUDIO."
3
Press RETURN.
The AUDIO screen appears.
ISAUDIO
►TREBLE M«M-
BASS lilllil----'“BALANCE «"»«"«»'I.—
■SRS AUTO
■SRS STEREO
■SRS OFF
?
uucti
Press A/V WINDOW +/- until the cursor points to the
SRS mode you want.
Press RETURN.
The mode is selected.
6
Press MENU.
The main menu appears, and the cursor points to "PROQ
1
PALETTE.''
►I3PR06 PALETTE
E3M00E SET
©TIME
QSET UP
03ENGUSH
EICONVER&ENCE
huctC ikimii mrffB)
Press RETURN.
The program paiette menu appears.
2
Q)
^■STANDARD
■MOVIE
■SPORTS
■NEWS
VIDEO
AUDIO
7MENU
To change the SRS mode
Repeal steps 5-6.
To return to the previous menu
Press A/V WINDOW +/- until the cursor points to
“ P MENU."
Then press RETURN.
To return to the main menu
Repeat the above, until you reach the main menu.
To return to the normal screen
Press MENU.
501 Chapter 3: Using Advanced Features
Page 51

Selecting an MTS (Multichannel TV Sound) mode
Follow these instructions to select an MTS mode.
Select MAIN mode to listen to stereo sound.
The STEREO lamp on the prpjeaion TV lights up whenever a
stereo broadcast Is received.
Select SAP mode to listen to Second Audio Programs.
Select MONO mode to eliminate excessive noise during
stereo broadce^ts, caused by a weak incoming signal.
Note
If the projection TV is in video mode, the ‘MTS” display is shaded
and cannot be selected.
Press TV/VIOEO on the projection TV or on the Remote
Commander to change to TV nrade.
Remote Commander
5
6
To return to the previous menu
Press AN WINDOW +/- until the cursor points to
“ P MENU."
Then press RETURN.
Press AJV WINDOW +/- until the cursor points to
“MTS.”
Press RETURN.
The mode cSsplay turns red.
Press A/V WINDOW +/- to select the mode you want.
Each time you press A/V WINDOW’WAIN," ‘SAP’and
“MONO" appear in sequence.
Press RETURN.
The mode Is selected.
Press MENU.
The main menu appears.
1
PIZIPR06 PALETTE
OHOOE SET
©TIME
aSET UP
fflENfiLISH
^CONVERGENCE
»uct£ Knoi airffn
Press AN WINDOW +/- until the cursor points to
“MODE SET."
Press RETURN.
The mode set menu appears.
3
►S-VIDEO
MTS
SPEAKER :MA1N
;>MENU
:0FF
:MAIN
To return to the main menu
Repeat the above, until you reach the main menu.
To return to the normal screen
Press MENU.
&
i
I
â
Chapter 3: Using Advanced Features 151
Page 52

Adjusting the Projection TV
Setting SPEAKER — MAIN or CENTER
Follow these instructions to set SPEAKER to “CENTER"
when you connect an audio system (p.19), and to "MAIN”
when you want to listen to the sound from the projection TV
speakers.
Remote Commander
Press MENU.
The main menu appears.
1
►ШРКОб PALETTE
I3H0DE SET
©TIME
BSET UP
ISENGLISH
BCONVERGENCE
silici $ иппа iiiTlUa
Press RETURN.
The mode display turns red.
5
Press A/V WINDOW +/- to select "MAIN” or
"CENTER.”
6
Press RETURN.
The setthig Is crxnftìete.
To return to the previous menu
Press AA/ WINDOW *!- until the cursor points to
“ 15 MENU.”
Then press RETURN.
To return to the main menu
Repeat the above, until you reach the main menu.
To return to the normal screen
Press MENU.
Press AA/ WINDOW until the cursor points to
“MODE SET.”
2
Press RETURN.
The mode set menu appears.
3
ЕЭ
►S-VIDEO :0FF
MTS
SPEAKER :MAIN
7MENU
Press AN WINDOW +/- until the cursor points to
“SPEAKER.”
4
:MAIH
521 Chapter 3: Using Advanced Features
Page 53

Customizing the Screen Display
Setting channel captions — CH CAPTION
Follow these Instructions to caption each channel number
display with a name, for instance, the television station call
letters. (You can set up to four letters or numbers).
Example: Caption channel 15 as “NBC.'
Remote Commander
TV/VIDEO
O©0
a
ANT/AUX
©0®
000
JUMP
VOL+CH
+
Press MENU.
The main menu appears.
1
DISPLAY ^ ENTER
1=1 0(=l
A/V WINDOW
fTiRQ Œ3
1 MENU
1 BEIUHN
L=J C=) CEI
nwORTfE
Press RETURN.
The CH CAPTION screen appears.
5
eCH CAPTION
Use [0-93+IENTER]
to select the channel.
Press CH +/-, or press 1,5 and ENTER to set
channel “15."
6
QCH CAPTION
Use [0-9]+[ENTER]
to select the channel.
Press RETURN.
The first caf^lon space turns red.
23
5
uucr$ UniM clltlBBI
15
uucT$ uniM niTiag)
►IZIPR06 PALETTE
laHODE SET
©TIME
SSET UP
mENGLISH
^CONVERGENCE
HUCT$ MnM onSSD
Press AN WINDOW +/- until the cursor points to
“SET UP."
Press RETURN.
The set up menu appears.
3
Press AA/ WINDOW +/- until the cursor points
to “CH CAPTION."
►CABLE: ON
AUTO PROGRAM
CH ERASE/ADO
CH CAPTION
VIDEO LABEL
DIRECT PLAY
FAVORITE CHANNEL
:>NENU
Press AN WINDOW +/- to select “N."
Each time you press AN WINDOW-r/-, V"-'9,"‘A"-'Z,’
8
9
“ “/,' *•* and * (blank space) appear In sequence.
“âCH CAPTION
Select the 1st letter.
stiKig unm
Press RETURN.
The second caption space turns red.
IS
N...
5
HIT win
(Continued)
y
ÎI
>1
|3
M
Chapter 3: Using Advanced Features 153
Page 54

Customizing the Screen Display
Setting channel captions
(Cant'd from prcv. page)
Remote Commander
Press A/V WINDOW +/- to select “B.”
10
CH CAPTION
aCH CAPTION
Select the 2nd letter.
SCiCCT^ liCT«lll
titTgfua
15
NB..
5
Press A/V WINDOW -«7- to select a blank space.
14
QCH CAPTION
Select the 4th letter.
ntlM
Press RETURN.
15
To caption more channels
Repeat steps 6-15.
To erase unnecessary captions
Display the CH CAPTION screen, select the chtuinei with
the caption you want to erase, and select blank spaces for
the channel caption; then press RETURN.
The caption lor tttat chann^ is erased.
The setting is complete.
When you select or display the channel number, the
channel caption also appears.
NBC.
5
nil SB)
15
11
12
13
Press RETURN.
The third caption space turns ted.
Press A/V WINDOW +/- to select “C.”
QCH CAPTION
Select the 3nd letter.
iiucT^ uTm
Press RETURN.
The fourth caption space turns ted.
NBC.
b
eiiTSS)
To return to the previous menu
Press /W WINDOW +/- until the cursor points to
“ Z> MENU.’
Then press RETURN.
To return to the main menu
Repeat the above, until you reach the main menu.
To return to the normal screen
Press MENU.
IS
Note
You can set up to 32 channel captions. If the memory Is full.
The memory is full, sorry* appears on the screen. Erase any
unnecessary captions, and b^in again.
Chapter 3: Using Advanced Features
54
Page 55

Setting VIDEO LABEL
Follow these instructions to label each input mode, in order
to identify the equipment connected to each input terminal.
Example: Label VIDEO 1 IN as ‘VHS.*
Remote Commander
Press MENU.
The main menu appears.
1
►ŒIPR0G PALETTE
ESMODE SET
©TIHE
OSET UP
mENGLISH
sticcT^ KTn> aiTlIlHin
Press AA/ WINDOW +/- until the cursor points to
“SET UP.“
Press RETURN.
The set up menu appears.
3
KABLE: ON
AUTO PROGRAM
CH ERASE/AOO
CH CAPTION
VIDEO LABEL
DIRECT PLAY
FAVORITE CHANNEL
;>NENU
Press A/V WINDOW +/- until the cursor points to
“VIDEO LABEL."
Press RETURN.
The VIDEO LABEL screen appears.
5
avIOEO LABEL
►VIDEOl: VIDEO 1
VIDE02: VIDEO 2
VIDEOS: VIDEO 3
?
sciKT$ Kintt mi(
Press AA/ WINDOW +/- until the cursor points to the
input mode you want to label. (In this case, the cursor
6
is already pointing to “VIDE01.”)
Press RETURN.
The label (Ssplay turns red.
Press A/V WINDOW +/- to select “VHS.”
8
Each time you press AN WINDOW +/-, the label changes:
VIDEOl
VIDEO 1-P>BETA -^8mm-^VHS-P-LD-^S-VIDEO -i
i
___________I_________
VIDEO 2
VIDEO 2-a-BETA-
i
_____________
VIDEOS
VIDEO
►BETA —►8mm—►VHS-^LD
►8mm VHS-^LD
SVIOEO LABEL
VIDEOl: VHS
VIDE02: VIDEO 2
VIDEOS: VIDEO 3
»ucT$ UTma
3
3
Press RETURN.
The setting Is corN^ete.
9
Vl/hen you select or display the video mode, the \ddeo label
appears.
To label other input modes
Repeat steps 6-9.
To change a label
Same as above.
To return to the previous menu
Press A/V WINDOW +/- until the cursor points to
“ D MENU."
Then press RETURN.
To return to the main menu
Repeat the above, until you reach the main menu.
To return to the normal screen
Press MENU.
H
a
R*
Chapter 3: Using Advanced Features
55
Page 56

Using Timer-Activated Functions
Setting DAYLIGHT SAVING
If you live in an area that uses daylight savings time, set
DAYLIGHT SAVING to “YES" or “NO" depending on the
season, before setting the current time. At the next daylight
savings date, you will be able to automatically adjust all the
time-related settings (CURRENT TIME, ON/OFF TIMER
and CHANNEL BLOCK) simply by changing the DAYLIGHT
SAVING setting.
When setting OAYUGHT SAVING:
• After the first Sunday in April (spring daylight savings)
Set to “YES” before setting the current time.
Then, on the last Sunday in October (fall daylight
savings), set to “NO.”
All the time-related settings aulomalicaiy move one hour back.
• After the last Sunday in October (fall daylight savings)
Set to “NO” before setting the current time.
Then, on the first Sunday in April (spring daylight
savings), set to “YES.”
All the time-related settings automaticaily move one hour ahead.
Remote Commander
Press RETURN.
The time menu appears.
3
©
►CURRENT TIME "SET
ON/OFF TIMER
CHANNEL BLOCK
0AYLI6HT SAVING:NO
^ENU
Press A/V WINDOW +/- until the cursor points to
“DAYLIGHT SAVING."
4
Press RETURN.
The mode cSsplay turns red.
Press A/V WINDOW +/- to select “YES” or “NO.”
6
Follow these instructions to set DAYLIGHT SAVING to
“YES” or “NO.”
Press MENU.
The main menu appears.
1
►ISPROG PALETTE
EBHODE SET
©TIHE
BSET UP
mENGLISH
EICONVERGENCE
UUCTÀ acTuM tin JB»
Press AN WINDOW +/- until the cursor points to
“TIME.”
2
Press RETURN.
The setting Is complele.
To return to the previous menu
Press A/V WINDOW +/- until the cursor points to
“ MENU."
Then press RETURN.
To return to the main menu
Repeat the above, until you reach the main menu.
To return to the normal screen.
Press MENU.
Chapter 3: Using Advanced Features
56
Page 57

Setting the clock — CURRENT TIME SET
Follow these instructions to set the current time. The
correct current time must be set in order to use the other
time-related functions (DAYLIGHT SAVING, ON/OFF
TIMER, CHANNEL BLOCK).
Example: Set the time to 3:15 PM, Monday.
Remote Commander
Press RETURN again.
The CURRENT TIME SET screen appears, with a reminder
to set DAYLIGHT SAVING.
______________
©CURRENT TIKE SET
► ... AM
DAYLIGHT SAVING
9
Set DAYLIGHT SAVING
first If needed.
SIUCT$ unn niTatllh
If you do not need to set DAYLIGHT SAVING, press
RETURN and continue from step 5.
To set daylight saving___________________________
Press AJV WINDOW +/- until the cursor points to
a
“DAYLIGHT SAVING."
Press RETURN.
b
The time menu appears, and the cursor poin^ to
•DAYLIGHT SAVING."
Press MENU.
The main menu appears.
1
►ISPROG PALETTE
ШМООЕ SET
©TIKE
BSET UP
IXIENGLISH
BCOHVERGENCE
itiiaS «1Ш tniem
Press AJ\/ \MlNDOW +/- until the cursor points to
“TIME."
Press RETURN.
The time menu appears, and the cursor points to "CURRENT
3
TIME SET."
©
►CURRENT TIKE SET
ON/OFF TIMER
CHANNEL BLOCK
DAYLIGHT SAVING:N0
3NENU
Press RETURN.
c
Press A/V WINDOW +/- to select “YES" or “NO."
d
Press RETURN.
e
The setting is cony)lete.
To set the time, press AA/ WINDOW +/- until the cursor
points to “CURRENT TIME SET; press RETURN,
then continue from step 5.
Press RETURN.
The CURRENT TIME SET screen appears, and the "SUN"
5
display appears (tad).
Press AN WINDOW +/- to select “MON."
Each time you press AN \MNDOW-t/-, the day changes
6
consecutively.
©CURRENT TIME SET
MON 12:00 AM
START
7
Select today's day.
$(UCT$ KTwa KiTimm
s
={
3
&
s
Chapter 3: Using Advanced Features
(Continued)
57
Page 58

Using Timer-Activated Functions
Setting the clock —
(Cant'd from prev. page)
Remote Commander
Press RETURN.
The hour and am/fm displays turn red.
Press A/V WINDOW +/- to set “3:00PM."
Each №me you press AN WINDOW +/-, the hourdranges in
8
sequence beginning with ’‘12:00AM."
CURRENT TIME SET
0CURRENT TIHE SET
HON 3:00 PH
START
?
Press RETURN.
11
12
To reset the time
Display the CURRENT TIME SET screen and repeat steps
5-12.
To display the current time
Press DISPLAY.
To return to the previous menu
Press AA/ WINDOW +/- until the cursor points to
“ :> MENU."
Then press RETURN.
To return to the main menu
Repeat the above, until you reach the main menu.
To return to the normal screen.
Press MENU.
The cursor points to "START."
Check the actual time, and press RETURN to start
the clock.
The setting is complete.
Press RETURN.
The minute cSsplay turns red.
9
Press AN WINDOW +/- to select “15” (minutes).
10
Each time you press AN WINDOW +/-, the minutes
change In sequence.
Set the tine.
siucT$ unm ti'itima
©CURRENT TIHE SET
HON 3:15 PH
START
9
Set the tine.
niicT± uTwa CUT«
581 Chapter 3: Using Advanced Features
Page 59

Setting the ON/OFF TIMER
Follow these Instructions to make the program of your
choice appear on the screen at a specified time.
Example: Set the timer to turn on the projection TV every
Monday through Friday at 1:30 AM for 3 hours,
on channel 8, as PROGRAM 1. (You can set up
to three programs.)
Remote Commander
Press RETURN.
The ON/OFF TIMER screen appears, and the cursor points
5
to *f.*
©ON/OFF TIMER
►1
................
2..
3..
Select a program.
•AM .H CH..
••AM .H CH...
--ÂM .H CH...
«ucT$ MTim imlBS
To set program 1, press RETURN.
(To set program 2 or 3, press /W WINDOW +/- until
6
the cursor points to that program; then press
RETURN.)
The dayir^space turns red.
Press A/V WINDOW +/- to select 'EVERY MON-FRI”;
then press RETURN.
Each time you press A/V WINDOW-r/-, the days of the week
change as shoirni in Fig. 1 (p. 61).
©ON/OFF TIMER
1.EVERY MON-FRI
--:--AM .H CH...
2..............
;>
Set the time.
--:--AM .H CH...
'--•--AM .H CH...
siuctO птю [ИТЯга
Press AN WINDOW +/- until the cursor points to
TIME.”
Press RETURN.
The time menu appears.
3
©
►CURRENT TIME SET
ON/OFE TIMER
CHANNEL BLOCK
DAYLIGHT SAVING:NO
3MENU
Press A/V WINDOW +!- until the cursor points to
“ON/OFF TIMER."
Press A/V WINDOW *!- to select ”1:00AM"; then
press RETURN.
8
Eadh^ne you press A/V WINDOW-t/-, the hour changes in
sequence.
©ON/OFF TIMER
1.EVERY MON-FRI
1:00AM .H CH...
2
..............
--:--AM .H CH...
3
................
--:--AM .H CH...
Э
Set the time.
siiecTl ИПШ сшвВ)
(Contimted)
s
Ш
=1
a
a.
о
г
. - , . »re. . re.. .. .. I / .
, 1
The time menu âPDô3fi --Т-Ш
н"сн
The ÎM
Chapter 3: Using Advanced Features
--FTH
59
Page 60

Using Tímer>Actívated Functions
Setting the ON-OFF TIMER (Cant'd from prev. page)
Remote Commander
Press A/V WINDOW +/- to select *30” (minutes);
then press RETURN.
9
Each time you press A/VWINDOW+/-, the minutes change
in sequence.
©ON/OFF TIMER
1.EVERY HON-FRl
1:30AM .H CH...
2
.............
3
:>
Set the duration.
--:--AM .H CH...
................
--:--AM .H CH...
siting KTHM cm8B)
Press A/V WINDOW +/- to select (hour
10
duration); then press RETURN.
Each time you press A/V WINDOW +/-, the duratíon
changes from "1’ In sequence.
Press /W WINDOW +/- to select “8* (channel);
11
The display “TV WILL TURN OFF“ appears on the screen one
minute before the timer duration ends.
then press RETURN.
The TIMER/ST/tND BY lamp lights, indicating that the
setting is complete.
Each time you press AN WINDOW +/-, the channel
number changes from 1 -125 In sequence.
©OH/OFF TIMER
1.EVERY MON-FRI
1:30AM 3H CH 8
►2
............
--:--AM .H CH...
3
................
--:--AM .H CH...
7
Select a program.
scuerO «nM tiiTfOB
To set program 2 or 3.
Press RETURN and repeat steps 6-11.
To erase an ON/OFF TIMER setting
Display the ON/OFF TIMER screen, select the setting you
want to erase, and select a blank space for the day.
The ON/OFF TIMER setting is erased.
To enter a new ON/OFF TIMER setting
Display the ON/OFF TIMER screen and repeat steps 6-11.
To return to the previous menu
Press /W WINDOW +/- until the cursor points to
“ D MENU."
Then press RETURN.
To return to the main menu
Repeat the above, until you reach the main menu.
0Q I Chapters: Using Advanced Features
©ON/OFF TIMER
1.EVERY MOH-FRI
1:30AM 3H CH..
2..............
--:--AM .H CH..
3
................
--:--AM .H CH..
7
Set the channel.
scuctO uim KiT(gg)
To return to the normal screen.
Press MENU.
Note
If you unplug the projection TV ora power failure occurs, both the
clock and timer settings will be erased. Reset the current time; then
set the timer.
Page 61

Fig.1
Selecting the day(8) of the week
When you press aA/ WINDOW +, the days of the week
appear in the following order
Chapters: Using Advanced Features | 61
I
Page 62

Using Timer-Activated Functions
Setting CHANNEL BLOCK
Follow these instructions to prevent a channel from
appearing on the screen during the time that you specify.
You can use this function to prevent children from watching
unsuitable programs.
Example: Set CHANNEL BLOCK every Saturday at
4:30 PM for 1 hour, on Channel 12.
Remote Commander
6
Note
If you have not set the current time, the *CHANNEL BLOCK” display
is shaded and cannot be selected.
Press MENU.
The main menu appears.
1
►QOPROG PALETTE
EBHODE SET
©TIME
BSET UP
mENGLISH
EICONVERGENCE
uuctC utm utiRm
Press AA/ WINDOW +/- until the cursor points to
‘CHANNEL BLOCK."
Press RETURN.
The CHANNEL BLOCK screen appears, and the cursor
points to the day input space.
©CHANNEL BLOCK
►
...........
--:--AM .H CH..
?
UUCT± nniM 111! wan
Press RETURN.
The day irput space turns red.
©CHANNEL BLOCK
--:--AM .H CH.
?
Set the dey.
Kuci4 on*» uitSI
Press AA/ WINDOW +/- to dblect “EVERY SAr; then
press RETURN.
Each tbne you press A/V WINDOW +/-, the days of the week
change as shown in Fig. 1 (p. 61).
©CHANNEL BLOCK
Press AA/ WINDOW +/- until the cursor points to
TIME."
Press RETURN.
The Orne menu appears.
3
©
►CURRENT TIME SET
ON/OFF TIMER
CHANNEL BLOCK
DAYLIGHT SAVING:N0
;)NENU
Chapter 3: Using Advanced Features
62
EVERY SAT
12:00AN .H CH.
;>
Set the tine.
MIKT± iiitMI
Press A/V WINDOW +/- to select “4:00PM"; then
press RETURN.
8
Each time you press AN WiNiX>W V-, (ha hour dtanges in
sequence.
©CHANNEL BLOCK
EVERY SAT
4:00PM .H CH...
P
Set the tine.
uifCT$ MiwH tin—I»
Page 63

Press A/V WINDOW +/- to select “tSO" (minutes); then
press RETURN.
9
Each time you press A/V WINDOW */-, the minutes change
in sequence.
0CHANNEL BLOCK
EVERY SAT
4:30PM .H CH...
Э
Set the duration.
Я1СП$ MIMU nlTlIlHBl
To erase a CHANNEL BLOCK setting
Display the CHANNEL BLOCK screen and select a blank
space for the day.
The CHANNEL BLOCK setting Is erased.
To enter a new CHANNEL BLOCK setting
Display the CHANNEL BLOCK screen and repeat steps
4-10. (You can only set one CHANNEL BLOCK at a time.)
To return to the previous menu
Press AN WINDOW +/- until the cursor points to
“ D MENU."
Then press RETURN.
10
11
Press AN WINDOW +/- to select “1" (hour
duration); then press RETURN.
Each time you press A/V WINDOW-I/-, Ihedurathn
changes from "I"-"ff"In sequence.
OCHANNEL BLOCK
EVERY SAT
4:30PM IH CH...
О
Set the channel.
nuCT$ КПП aiTiBS)
Press AN WINDOW +/- to select "12" (channel);
then press RETURN.
The setiing is complete.
Each time you press A/V WINDOW +/-, the channel
number changes from T-*125" in sequence.
0CHANNEL BLOCK
►EVERY SAT
4:30PM IH CH 12
0
To return to the main menu
Repeat the above, until you reach the main menu.
To return to the normal screen.
Press MENU.
Note
If the ON/OFF TIMER is set for an overlapping time (pp. 59 - 61),
the later time setting takes precedence. For example, if CHANNEL
BLOCK is set for 2:00 PM and ON/OFF TIMER is set for 3:00 PM,
ON/OFF TIMER will take effect at 3:00 PM.
Kucr$ unm tiiramm
At the specified time, "BLOCKED* appears in red on the screen,
and the picture of the specified charmel is blocked and the sound Is
ntuted.
____________________
BLOCKED
Chapter 3: Using /Advanced Features 163
г
e
3
Page 64

Setting FAVORITE CHANNEL
By setting FAVORITE CHANNEL, you can select the
channels you use most frequently (up to seven channels)
simply by pressing RETURN.
Remote Commander
TV/VIOEO
©0®
® ® ®
o
ANTfAUX
o
® ® ®
USPLAY,^ ENTER
1=1 ® a
A/V WINDOW
rjn"d3 l±J
-—I WCTIBE
RETURN
LJ i=]
FAVORITE
Follow these instructions to set the channels.
Press MENU.
The main menu appears.
1
JUMP
VOL _CH_
+ +
—
►EIPROG PALEHE
LCCT$ KTUII l>IT(g9)
ESMODE SET
T1ME
Ë
SET UP
CDEN6LISH
^CONVERGENCE
Press RETURN.
The FAVORITE CHANNEL screen appears, and the cursor
5
points to the first channel position.
Sfavorite channel
Set the
position to
Input the
channel.
Press A/V WINDOW +/- to select the channel
position; then press RETURN.
6
Press 0-9 and ENTER to set the channel number.
SFAVORITE CHANNEL
Use[0-9]+
ENTER to
select the
channel.
MiiCT$ nnn
Press RETURN.
The set№tg Is complete.
8
oireisiucT^ UT(m
linei)
►
28
y
Press AJV WINDOW +/- until the cursor points to
“SET UP."
2
Press RETURN.
The set up menu appears.
3
Press A/V WINDOW +/- until the cursor points to
“FAVORITE CHANNEL."
S
►CABLE: ON
AUTO PROGRAM
CH ERASE/AOD
CH CAPTION
VIDEO LABEL
DIRECT PLAY
FAVORITE CHANNEL
7NENU
To set other channels
Repeat steps 6-8.
To erase a tavorite channel setting
Press AN WINDOW +/- until the cursor points to №e
channel number you want to erase; press RETURN, then
press 0 and ENTER.
To reset a favorite channel setting
Display the FAVORITE CHANNEL screen and repeat steps
6-8.
To return to the previous menu
Press AN WINDOW +/- until the cursor points to
“ Z> MENU."
Then press RETURN.
To return to the main menu
Repeat the above, until you reach the main menu.
To return to the normal screen.
Press MENU.
641 Chapter 3: Using Advanced Features
Page 65

Selecting a favorite channel
After setting the channels, follow these instructions to select
the channel you want to watch.
Press RETURN.
The FAVORITE CHANNEL ésplay appears.
1
Note
If you have set channel captions (pp. 53 - 54), the captions appear
with the channel numbers.
Press A/V WINDOW +/- to select the channel you
want to watch; then press RETURN.
2
The chatmel is selected
If you press RETURN on the Remote Commander before
setting FAVORITE CHANNEL, this screen appears.
Set your favorite
channels first.
Please go to SET UP In
the aenu.
Follow steps 1 - 8 to set your favorite channels, and then
make the selection.
♦ . •
». ♦
CA
i
s
o
Chapter 3: Using Advanced Featuies 165
Page 66

Using the Pre-Programmed Remote Commander
You can operate other video equipment (such as VCRs,
video disc piayers and cabie boxes) that have an infrared
remote detector with this suppiied Remote Commander.
Operating Sony video equipment
Foliow these instructions to operate Sony video cassette
recorders (Beta, 8 mm and VHS) and video disc piayers
(including muiti-disc piayers).
Remote Commander
(with video eontroi cover open)
CH« FHtEaiVIVBEO SWAP PIP
01=1001=)
CH- POSmOW AUDIO OFF
i=i aoo
TV/VnEO
o® ©
AWr<AUX
0
®
0
o
000
MSPLAY ____ ENTER
O0O
A/V WINDOW
1 MENU
“1 nETUHN «TURE
LJ>-[=i o
VOt
+ +
CH
mmam
Use the video operating buttons to contici the
connected equipment.
Fig. 3: Operating a VCR (VTR1,2,3)
To turn on or off
To change channeis
(when watching TV
programs through the
VCR’s tuner)
To record
To piay
To stop
To f£№t forward
To rewind the tape
To pause
To search the picture
forward and backward
To change input mode
Press POWER.
Press CH +/-.
Press • and REC
simuitaneously.
Press ►.
Press!.
Press
Press
Press II.
To resume normal playback,
press again.
Keep pressing ^ or
during piayback.
To resume normal playback,
release the button.
Press TV/VTR.
VTR1-2-3 MDP
TV CABLE BOX
m
TV/VTR CODE SET STANDARD
CH*
CH-
□ (Z3
POWER
—REC
C3
Set the VTR1-2-3 MDP seiector according to the video
equipment you want to operate.
1
VTR1-2-3 MDP
Fig. 2: Video equipment settings
If you want to operate a:
Beta, ED Beta VCR
8 mm VCR
VHS VCR
Video disc player
aetto:
VTR1
VTR2
VTR3
MDP
661 Chapter 3; Using Advanced Features
Page 67

Fig. 4: Operating a Vdeo Disc Piayar (MDP)
To turn on or off Press POWER.
To play Press ►.
To atop Press ■.
To pause Press II.
To resume normal playback,
press again.
Note
This function is effective only for
CAV (standard-play disc). With CLV
(extended-play disc), the projection TV
goes off (stan^ty mode) if you press II.
To search the
picture forward
and backward
Keep pressing P^or-^
during playback.
To tesimte nonnal fiaybtKk,
release the button.
• If the video equipment does not have a certain function, the
corresponding button on this Remote Commander will not
operate.
• If you set another manufacturer’s code to a VTR1-2-3 MDP
selector position (pp. 68 - 69), you must also set the Sony code
to operate Sony equipment.
Caution
When you replace the batteries, do so within approximately
30 minutes. Otherwise the settings you made under the
Pre-Programmed function (pp. 68 - 70) may be erased.
Chapter 3: Using Advanced Features 167
S
a
3
3
1
3
&
?
3
3
m
s.
Page 68

Using the Pre-Programmed Remote Commander
Operating non-Sony or Sony video equipment
Follow these instructions to set the memufacturer's code,
which will enable you to operate non-Sony and Sony video
equipment with the pre-programmed Remote Commander.
Example: Operate an RCA video cassette recorder
connected to the VIDEO 2 IN jacks.
Remote Commander
(with video control cover open)
CH* FBEE2E TVMOeO SWAP PIP
CH-
POSITION AUDIO OFF
(=1
TvmoEo
©
AKT/AUX
0® ®
® ® ®
MSPLAY ENTER
a® 1=1
A/V WINDOW
rQ □□
+
MENU
RETURN "CIURE
lcj
liWOflITE
VTR1-2-3 MOP
(=1
VOL CH
+ +
TV CABLE BOX
While pressing CODE SET. press 0,7 and ENTER to
set RCA’s code number. (For manufacturer code
numbers, see Figs. 5,6 and 7 on p. 69.)
CODE SET ENTER
Use the video operating buttons to operate the
connected equipment, (see Fig. 3 on p. 66 and
3
Fig. 4 on p. 67.)
Set the VTR1-2-3 MDP selector to VTR2.
VTR1-2-3 MDP
rrrn
Note
To use another manufacturer's equipment besides a Sony VCR, set
the selector to a position not being used for your Sony video
equipment.
Chapter 3; Using Advanced Features
68
Page 69

Fig. S; VCR manufacturer code numbers
MANUFACTURER CODE
SONY 01,02,03
CANON
EMERSON
FISHER
FUNAI
05
22,30,33
10,11,12,15
29
GENERAL ELECTRIC 05,08
GOLDSTAR
HITACHI
JVC
MAGNAVOX
MITSUBISHI
MULTITECH
NEC
PANASONIC
25
07,08,36
16,35
05,06,09
18,19,26,27
29
16,23,31
05,06
PHILCO 05,06
PHIUPS 05,06,09
QUASAR
RCA
05,06
07,08
SAMSUNG 24,32
SANYO
SCOTT
SHARP
SHINTOM
11,15
21
13,14
34
SYLVANIA 05,06,09
SYMPHONIC 29
TEKNIKA
TOSHIBA
28,29
20,21
TOTE VISION 25
ZENITH 17
Fig. 7: Sony Equipment and Code Numbers
SONY EQUIPMENT CODE
Beta, ED Beta VCR
8 mm VCR
VHS VCR
Video disc player
Note
01
02
03
04
In some rare cases, you may not be able to operate your non-Sony
video equipment with the supplied Remote Commander. This is
because your equipment may use a code that is not provided with
this Remote Commander. In this case, please use the equipmenfs
own remote control unit.
Rg. 6; MDP manufacturer code numbers
MANUFACTURER CODE
SONY 04
KENWOOD 58
MAGNAVOX 52
MARANZ
54
MITSUBISHI 51
PANASONIC
PHILIPS
PIONEER
RCA
SANYO
SHARP
YAMAHA
55
52
51
51
57
56
53
Chapter 3: Using Advanced Features
69
Sr
m
?
?
<a
3
3
3
n
e
3
s
Page 70

Using the Pre-Programmed Remote Commander
Operating a cable converter box
Follow these instructions to set the manufacturer’s code,
which will enable you to operate a connected cable
converter box with the pre-programmed Remote
Commander.
Example: Operate a connected Zenith cable converter box.
Remote Commander
(with video control cover open)
MUTM6 CUPTKN SLEEP POWER
OO 1=11=1
CHf FREEZE tV/VIDEO SWAP PIP
1=1 a 1=11=1 o
CH- POSITION AUDIO OFF
1=1 1=11=10
TVWIDEO
0©©
i=l
ANT/AUXl
©©©
©0®
IISPLAY —V enter
O ©O
A/VWINOOW
+
MENU
return'«™«
lC=|CE)
FWORITE
VTRL-2-3 mop
JUMP
(=]
VOL
TV CABLE BOX
CH
+
While pressing CODE SET, press 6 and 8 (Zenith's
code number — see Fig. 8) and ENTER.
2
CODE SET
ENTER
5
Use the projection TV control buttons (POWER, 0-9,
ENTER and CH +/-) to operate the cable converter
3
box.
POWER
0®®
CH
0®®
%
©®®
s
To return to the normal screen
Set the TV/CABLE BOX selector to TV; then use the
projection TV control buttons to control the projection TV.
For more details on operating the cable box
Refer to the operating instructions that come with the
cable box.
TV/VTR CODE SET STANDARD
a □ —
Set the TV/CABLE BOX selector to CABLE BOX.
1
TV CABLEBOX
Notes
• If more than one code number is listed, try entering them one by
one, until you come to the correct code for your equipment.
• If you enter a new code number, the code number you previously
entered at that setting is erased.
• In some rare cases, your equipment may use a code that is not
provided with this Remote Commander and you may not be able
to operate your cable converter box with the supplied Remote
Commander. In this case, use the equipment’s own remote
control unit.
Fig. 8: Cable box manufacturer code numbers
MANUFACTURER CODE
JERROLD 60,61,62,63,64,65
PIONEER
SCIENTIFIC ATLANTA
TOCOM 71,72
ZENITH
69,70
66,67
68
70 I Chapter 3: Using Advanced Features
Page 71

Selecting a VCR mode directly — DIRECT PLAY
Follow these instructions to switch from TV to VCR mode by
simpiy pressing the ►(piayback) button on the suppiied
Remote Commander.
Press AJ\/ WINDOW +/- until the cursor points to
“DIRECT PLAY.”
Example: Connect your VCR to the VIDEO 2 IN jacks, and
set the VTR1-2-3 MDP selector to VTTO. When
you press ►, the input mode changes to the
VCR connected to the VIDEO 2 IN jacks.
After completing the steps below, the VTR selector posibon Is
retained In the projection TV’s memory.
Remote Commander (with video control cover open)
A/V WINDOW VOL
+
MENU
BEIURN«^
1^3
nVOnTE
VTB1-2-3 MOP
+
TV CABLE BOX
mr^ Cd
TV/VTB CODE SET STANDARD
1=1 □CH
CH* ^ ^ POWER
CH-
Press MENU.
The main menu appears.
----
REC
Press RETURN.
A message screen appears.
Note
This screen reminds you to
set the manufacturer’s code, if you
have not already done so (pp. 68 - 69).
Press RETURN again.
The DIRECT PLAY screen appears.
6
aOlRECT PLAY
Progran your renote
with PRESET CODE before
using DIRECT PUY
feature.
scixctC Kim imlBB)
aoiRECT PLAY
►VIOEOl: VTR 1
VI0E02: OFF
VIDEOS: OFF
?
VTl
2 3 MOP
&
«CTVM CtfT(f
►IZIPROG PALETTE
QIHOOE SET
©TIME
aSET UP
03ENGLISH
^CONVERGENCE
uicctC nmn ciiTiBB)
Press A/V WINDOW +/- until the cursor points to
“SET UP."
Press RETURN.
The set up menu appears.
3
►CABLE: ON
AUTO PROGRAM
CH ERASE/ADD
CH CAPTION
VIDEO LABEL
DIRECT PUY
FAVORITE CHANNEL
;>MENU
Press AAf WINDOW +/- until the cursor points to the
video input mode. (When the video equipment is
connected to VIDE01 IN, select “VIDEOf.”)
Press RETURN.
The mode display turns red.
8
(Contktued)
«a
S
»
S
3
3
3
3.
3
3
Chapter 3; Using Advanced Features
71
Page 72

Using the Pre-Programmed Remote Commander
Selecting a VCR mode directly - DIRECT PLAY
(Coal'd, from prev. page)
Remote Commander
Press AJ\f WINDOW +/- to select the VTR selector
mode you have set on the Remote Commander.
9
(When the VTR1-2-3 MDP selector Is set to VTR2,
select “VTR 2.”)
Each time you press A/V WINDOW*/-, "YTR 1.-VTR2,’
WTR 3, ’ and "OFF" appear in sequence.
eoiRECT PUY
VIDEOl: VTR 2
VI0E02: OFF
VIDEOS: OFF
3
VTRL ^3 MOP
«enM tttTd
Press RETURN.
10
To set direct play for other connected video equipment
Repeat steps 7 -10.
To return to the previous menu
Press AN WINDOW +/- until the cursor points to
“ MENU.“
Then press RETURN.
To return to the main menu
Repeat tiie above, until you reach the main menu.
The direct play setting is cortvOete.
To return to the normal screen.
Press MENU.
721 Chapter 3: Using Advanced Features
Page 73

----
Troubleshooting
Disturbances in picture and sound can often be eliminated by checking the symptoms euid following the suggestions listed here.
If the problem still cannot be solved, contact your nearest senrtce facility.
Symptom
No picture (screen not lit), no sound
Poor or no picture (screen not lit), good sound
Good picture, no sound
No color for color programs
Snow and noise only
Possible causes and remedies
• Make sure POWER is switched on.
• Check the power cord connection.
• Check that the TV/VIDEO and VTR1-2-3 MDP controls are set
correctly.
• Make sure that the TV/CABLE BOX selector is set to TV.
• Adjust the picture using the VIDEO screen (pp. 44 - 47).
• Check the antenna/cable connections.
• Adjust the color registration (pp. 24 - 25).
Press VOLUME + on the projection TV or VOL + on the Remote
Commander.
Press MUTING on the Remote Commander.
Check the MTS setting (p. 51).
Check that the TVA/IDEO and VTR1 -2-3 MDP controls are set
correctly.
Make sure SPEAKER is set correctly (p. 52).
Check the HUE and COLOR settings (pp. 44 - 45).
• Check that it is an active or correct channel.
• Check the cable setting.
• Check antenna/cable connections.
Dotted lines or stripes
Double images or ghosts
Remote control does not operate
No picture and/or sound for the
connected equipment
This is often caused by local interference (for example, cars, neon
signs and hairdryers). Adjust the telescopic aerial for minimum
interference.
Reflections from nearby mountains or buildings often cause this
problem. Connecting a highly directional outdoor antenna or a
CATV cable may improve the picture.
• Check the battery in the Remote Commander.
• Check that the TV/VIDEO button is set correctly.
• Check that the connections are properly made.
• Check that the power of the connected equipment is turned on.
• Check that the connected equipment is set correctly.
Try another channel. It could be station trouble.
I
Appendix 173
Page 74

Specifications
Structure Screen and projector, rear projection type
Projection system 3 picture tubes, 3 lenses, horizontal in-line
s^em
Picture tube 7 inch high-brightness monochrome
tubes (5.5 raster size), with optical coupling
and liquid cooling system
Projection lenses High performance, large-diameter
hybrid lens F 1.0
Screen material Plastic lenticular.
Plastic Fresnel
Projected picture size (in inches, measured diagonally)
KP-41 EXR96
KP-46V15/KP-46V16 46
KP-53V15/KP-53V16
KP-61V15
Screen brightness (cd/nF)
KP-41 EXR96
KP-46V15/KP-46V16 1,600
KP-53V15«P-53V16
KP-61V15 900
Television system
Channel coverage
Antenna
Input jacks
Output jacks
American TV standards
VHF:2-13
UHF:14-69
Cable TV: 1-125
75 ohm external antenna
terminal for VHFAJHF
VIDEO IN 1
S VIDEO IN (4M)in mini DIN)
Y: 1 Vp-p, 75-ohms unbalanced,
sync negative
C: 0.286 Vp-p (Burst signal)
75-ohms
Video (phono jacks): 1 Vp-p, 75-ohms
unbalanced, sync negative
Audio (phono jacks):
500 mVrms (100% modulation)
Impedance: 47 kilohms
VIDEO IN 2 and 3
Video (phono jacks): 1 Vp-p, 75-ohms
unbalanced, sync negative
Audio (phono jacks):
500 mVrms (100% modulation)
Impedance: 47 kilohms
MONITOR OUT
S VIDEO MONITOR OUT
(4-pin mini DIN)
Y: 1 Vp-p, 75-ohms
unbalanced, sync negative
Video (phono jacks): 1 Vp-p, 75-ohms
unbalanced, sync negative
Audio (phono jacks): 500 mVrms
(100% modulation)
Impedance: 10 kilohms
2,(X)0
1.250
AUDIO (VAR) OUT
(phono jacks)
More than 900 mVrms (100%
modulation) at the maximum
volume setting (variable)
Impedance; 5 kilohms
AUDIO OUT
(phono jacks)
900 rnVrnis (100% modulation)
Impedance: 5 kilohms
Speaker
41
S3
61
Speaker output
CENTER SPEAKER input
Power requirements
Power consumption
KP-41 EXR96 930x1,185 x 505 mm
KP-46V154<P-46V16
KP-53V15ri<P-53V16
KP-61V15
Supplied accessories
Optional accessories
Design and specifications are subject to change without notice.
Two-way coaxial speaker system
Woofer 130 mm (5 inches) diameter
Tweeter 35 mm (1.4 inches) diameter
12Wx2
160 NORM. 30 W MAX 50 W
120VAC,60Hz
310 W (max.)
7 W (standby mode)
Dimension (w/h/d) Weight
65 kg
(36*/* X 46V* X 20 inches)
1,029x1,287 x 543 mm
(40*/* X 50V* X 21V* inches)
1,164x1.336 x 651 mm
(45V* X 52*/* X 25*/* inches)
1,337 X1,490 X 780 mm
(52*/* X 58*/* x30'Vi* inches)
Remote Commander
RM-Y112A (1) (KP-41EXR96 only)
RM-Y115(1) (other models)
with 2 size AA (R6) batteries
(143 lbs 5 oz)
85 kg
(187lbs6oz)
97 kg
(213lbs14oz)
142 kg
(313 lbs 1 oz)
m mixer EAC-66
Connecting cable
RK-74A
VMC-810S«20S
YC-15V/30V
VCR Tray SU-PJT1
C9> SOUND RETRIEVAL SYSTEM
The Sound Retrieval System Is manufactured by Sony
Corporation under license from the Hughes Airoaft
Company, a subsidiary of GM Hughes Electronics. It is
covered by U.S. Patent No. 4,748,669.0№er U.S. and
foreign patents pending.
C«:>, SOUND RETRIEVAL SYSTEM and SRS» are
trademarks of the Hughes Aircraft Company, a subsidiary
of GM Hughes Electronics.
741 Appendix
Page 75

Index
Adjustment
audio (balance, bass, treble)
picture (bright, color, hue, sharp)
AUDIO OUT jacks
AUDIO (VAR) OUT jacks
AUTO PROGRAM......................................28 - 29
A/V WINDOW buttons.............................21 - 33,
Cable TV channel chart.....................................27
Cable converter box
CABLE ON/OFF
CENTER SPEAKER IN terminals
CH CAPTION...............................................53-54
CH +/- buttons
Channel
adding................................................... 32-33
erasing
presetting
Closed Caption.................................................36
Connecting
antenna cable
audio system...............................................19
other equipment
CONVERGENCE
DEMO button
DIRECT PLAY
DISPLAY button...............................................37
ENTER button
..................................................
.............................................
...................................
...............................
...........................................
................................
..............................................
........................................
...................................
..........................................
..................................................
..............................................
..............................
........................
................
38 - 39,44 - 65, 71-72
........................
28 - 31,34,53
29,53,64, 68, 70
49
44
19
19
10,41,70
26-27
19
30-31
28-29
13-14
15-19
24-25
37
71-72
NR ON/OFF.......................................................47
On-screen menus
Picture +/- buttons...........................................45
Picture and sound mode
Picture-in-Picture (PIP)..............................40 - 43
POWER button................................................. 22
Pre-programmed Remote Commander
Rear.
S-VIDEO ON/OFF
SLEEP button
SRS mode
STEREO lamp
STANDARD button
Timer activated functions
channel block
current time set
daylight saving
on/off timer
TIMER/STAND BY lamp
TV/CABLE BOX selector
TV/VIDEO button
Trinitone
........................................................
...............................................................52
..........................................................
......................................
...........................
........................................
...................................................
.............................................
................................
.............................................
..........................................
...........................................
...............................................
.........................
...................................
.................
15 -18,26,28,66,68
20 - 21
38 - 39
....
66 - 72
15,48
50-51
39,45,49
22,34,60
37
50
62 - 63
57 - 58
56 - 57
59 - 60
70
46
FAVORITE CHANNEL
Front
..................................................................
JUMP button....................................................37
MONITOR OUT jacks
MTS mode.......................................................51
MUTING button...............................................37
................................
..................................
64 - 65
17-18
VCR
......................
VHF/UHF antenna terminal
7
VIDE01,2,3 IN jacks
VIDEO LABEL....................................................55
Video operating buttons
VOL+/-button.......................................19,35,37
VTR1-2-3 MDP selector
VIDEO 3 OUT jacks.....................................17-18
15-18,40-41,66-69,71 -72
..................
.............................
............................
............................
13 -16,41
15 -18,41
66 - 69
Appendix
66 - 68
\t0t
g
e
8
75
Page 76

Cohr Rear Vìdeo Projector
KP-41EXR96 KP-46V15
KP-53V15
KP-61V15
KP-46V16
KP-53V16
Sony Corooration Printed in USA
 Loading...