

Sony ICD-SX68,ICD-SX78DR9,ICD-SX88,ICD-SX68DR9,ICD-SX78 Service Manual
SERVICE MANUAL
Published by Sony Techno Create Corporation
Sony Corporation
Audio Business Group
ICD-SX68/SX68DR9/SX78/
SX78DR9/SX88
SPECIFICATIONS
IC RECORDER
9-887-998-01
2008B04-1
©
2008.02
US Model
Canadian Model
ICD-SX68/SX68DR9
AEP Model
E Model
ICD-SX68/SX78/SX78DR9
Korea Model
ICD-SX68/SX78/SX88
Ver. 1.0 2008.02
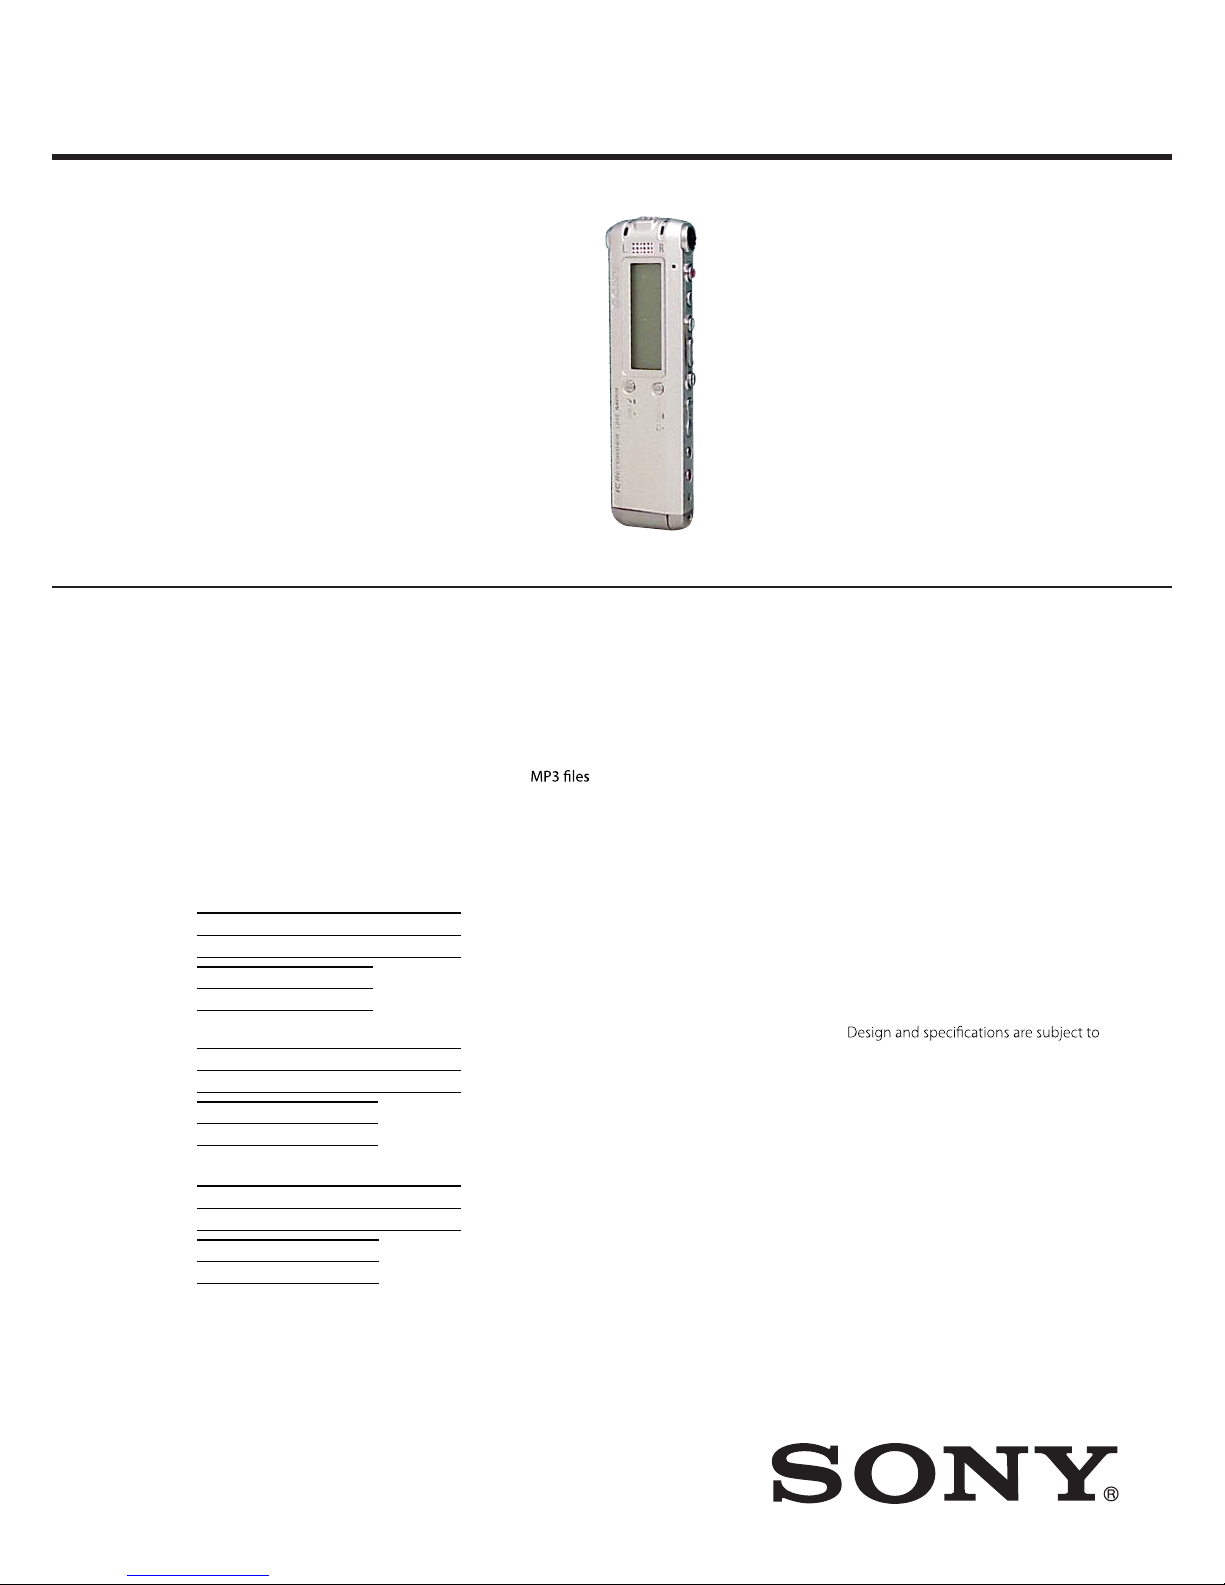
Photo : ICD-SX68
Capacity (User available capacity)
ICD-SX68/SX68DR9: 512MB
(approx. 483MB=507,346,944Byte)
ICD-SX78/SX78DR9: 1GB
(approx. 975MB=1,022,590,976Byte)
ICD-SX88: 2GB
(approx. 1.93GB=2,081,521,664Byte)
A part of the memory capacity is used as a
management area.
Recording time
Frequency range
STHQ : 80 Hz - 20,000 Hz
ST : 80 Hz - 16,500 Hz
STLP : 80 Hz - 7,000 Hz
SP : 80 Hz - 6,000 Hz
LP : 80 Hz - 3,500 Hz
•
•
•
•
•
Bit rates and sampling frequencies for
Bit rate: 32 - 320 kbps, VBR
Sampling frequencies: 16/22.05/24/32/44.1/
48 kHz
Not all encoders are supported.
Speaker
Approx. 16 mm (21/32 in.) dia.
Power output
150 mW
Input/Output
Microphone jack (minijack, stereo)
input for plug in power, minimum input
level 0.6 mV, 3 kilohms or lower impedance
microphone
Headphone jack (minijack, stereo)
output for 8 - 300 ohms headphones
USB connector
Playback speed control
+200% to –75% (DPC)
Power requirements
Two NH-AAA rechargeable batteries: 2.4 V DC
Two LR03 (size AAA) alkaline batteries: 3.0 V DC
Operating temperature
5˚C - 35˚C (41˚F - 95˚F)
•
–
•
–
•
Maximum recording time
The maximum recording time of all the
folders is as follows.
ICD-SX68/SX68DR9
STHQ mode ST mode STLP mode
8 hr. 35 min. 22 hr. 50 min. 44 hr. 00 min.
SP mode LP mode
69 hr. 40 min. 185 hr. 55 min.
ICD-SX78/SX78DR9
STHQ mode ST mode STLP mode
17 hr. 25 min. 46 hr. 5 min. 88 hr. 45 min.
SP mode LP mode
140 hr. 35 min. 374 hr. 55 min.
ICD-SX88
STHQ mode ST mode STLP mode
35 hr. 30 min. 93 hr. 55 min. 180 hr. 45 min.
SP mode LP mode
286 hr. 10 min. 763 hr. 15 min.
(hr : hours/min. : minutes)
Dimensions (w/h/d) (not incl.
projecting parts and controls)(JEITA)*
30.8 × 119.3 × 14.9 mm (1 1/4 × 4 3/4 × 19/32
in.)
Mass (JEITA)*
74 g (2.7 oz) including two NH-AAA
rechargeable batteries
* Measured value by the standard of JEITA
(Japan Electronics and Information
Technology Industries Association)
Supplied accessories
change without notice.
Rechargeable batteries (2)
Stereo headphones (1) (Except AEP)
USB connecting cable (1)
Application Software, Digital Voice
Editor (CD-ROM) (1)
Application Software, Dragon Naturally
Speaking (CD-ROM)
(2) (SX68DR9: US/SX78DR9: E)
(3) (SX68DR9: Canadian)
(4) (SX78DR9: AEP)
Cradle (1) (SX68DE9/SX78DR9)
Stand (1) (AEP, E, Korea)
Carrying pouch (1)
ICD-SX68/SX68DR9/SX78/SX78DR9/SX88
2
1. GENERAL .................................................................. 3
2. DISASSEMBLY
2-1. Knob (HOLD), Speaker Assy (SP001) ........................... 6
2-2. Chassis Assy, Case Assy ................................................. 6
2-3. Battery Case Lid ............................................................. 7
2-4. Cover (Chassis), MAIN Board ....................................... 7
2-5. Chassis ............................................................................ 8
2-6. SW Board, HPJACK Board ............................................ 8
2-7. MIC-A Assy , MIC-B Assy .............................................. 9
2-8. Liquid Crystal Display Panel, AUDIO Board ................ 9
3. TEST MODE ............................................................ 10
4. DIAGRAMS
4-1. Block Diagram - MAIN1 Section - ................................ 13
4-2. Block Diagram - MAIN2 Section - ................................ 14
4-3. Printed Wiring Board - AUDIO Board (Side A) - ......... 15
4-4. Printed Wiring Board - AUDIO Board (Side B) - ......... 16
4-5. Schematic Diagram - AUDIO Board (1/2) - .................. 17
4-6. Schematic Diagram - AUDIO Board (2/2) - .................. 18
4-7. Printed Wiring Board - MAIN Board (Side A) - ........... 19
4-8. Printed Wiring Board - MAIN Board (Side B) - ........... 20
4-9. Schematic Diagram - MAIN Board (1/5) - .................... 21
4-10. Schematic Diagram - MAIN Board (2/5) - .................... 22
4-11. Schematic Diagram - MAIN Board (3/5) - .................... 23
4-12. Schematic Diagram - MAIN Board (4/5) - .................... 24
4-13. Schematic Diagram - MAIN Board (5/5) - .................... 25
4-14. Printed Wiring Boards - HPJACK Board, SW Board - . 26
4-15. Schematic Diagram - HPJACK Board, SW Board - ...... 27
5. EXPLODED VIEWS
5-1. Overall Assy .................................................................... 38
5-2. Chassis Section ............................................................... 39
6. ELECTRICAL PARTS LIST .............................. 40
TABLE OF CONTENTS
UNLEADED SOLDER
Boards requiring use of unleaded solder are printed with the leadfree mark (LF) indicating the solder contains no lead.
(Caution: Some printed circuit boards may not come printed with
the lead free mark due to their particular size)
: LEAD FREE MARK
Unleaded solder has the following characteristics.
• Unleaded solder melts at a temperature about 40 °C higher
than ordinary solder.
Ordinary soldering irons can be used but the iron tip has to be
applied to the solder joint for a slightly longer time.
Soldering irons using a temperature regulator should be set to
about 350 °C.
Caution: The printed pattern (copper foil) may peel away if the
heated tip is applied for too long, so be careful!
• Strong viscosity
Unleaded solder is more viscou-s (sticky, less prone to fl ow)
than ordinary solder so use caution not to let solder bridges
occur such as on IC pins, etc.
• Usable with ordinary solder
It is best to use only unleaded solder but unleaded solder may
also be added to ordinary solder.
Notes on chip component replacement
• Never reuse a disconnected chip component.
• Notice that the minus side of a tantalum capacitor may be damaged by heat.
Flexible Circuit Board Repairing
• Keep the temperature of soldering iron around 270 °C during
repairing.
• Do not touch the soldering iron on the same conductor of the
circuit board (within 3 times).
• Be careful not to apply force on the conductor when soldering
or unsoldering.
CAUTION
Danger of explosion if battery is incorrectly replaced.
Replace only with the same or equivalent type.
ICD-SX68/SX68DR9/SX78/SX78DR9/SX88
3
SECTION 1
GENERAL
9
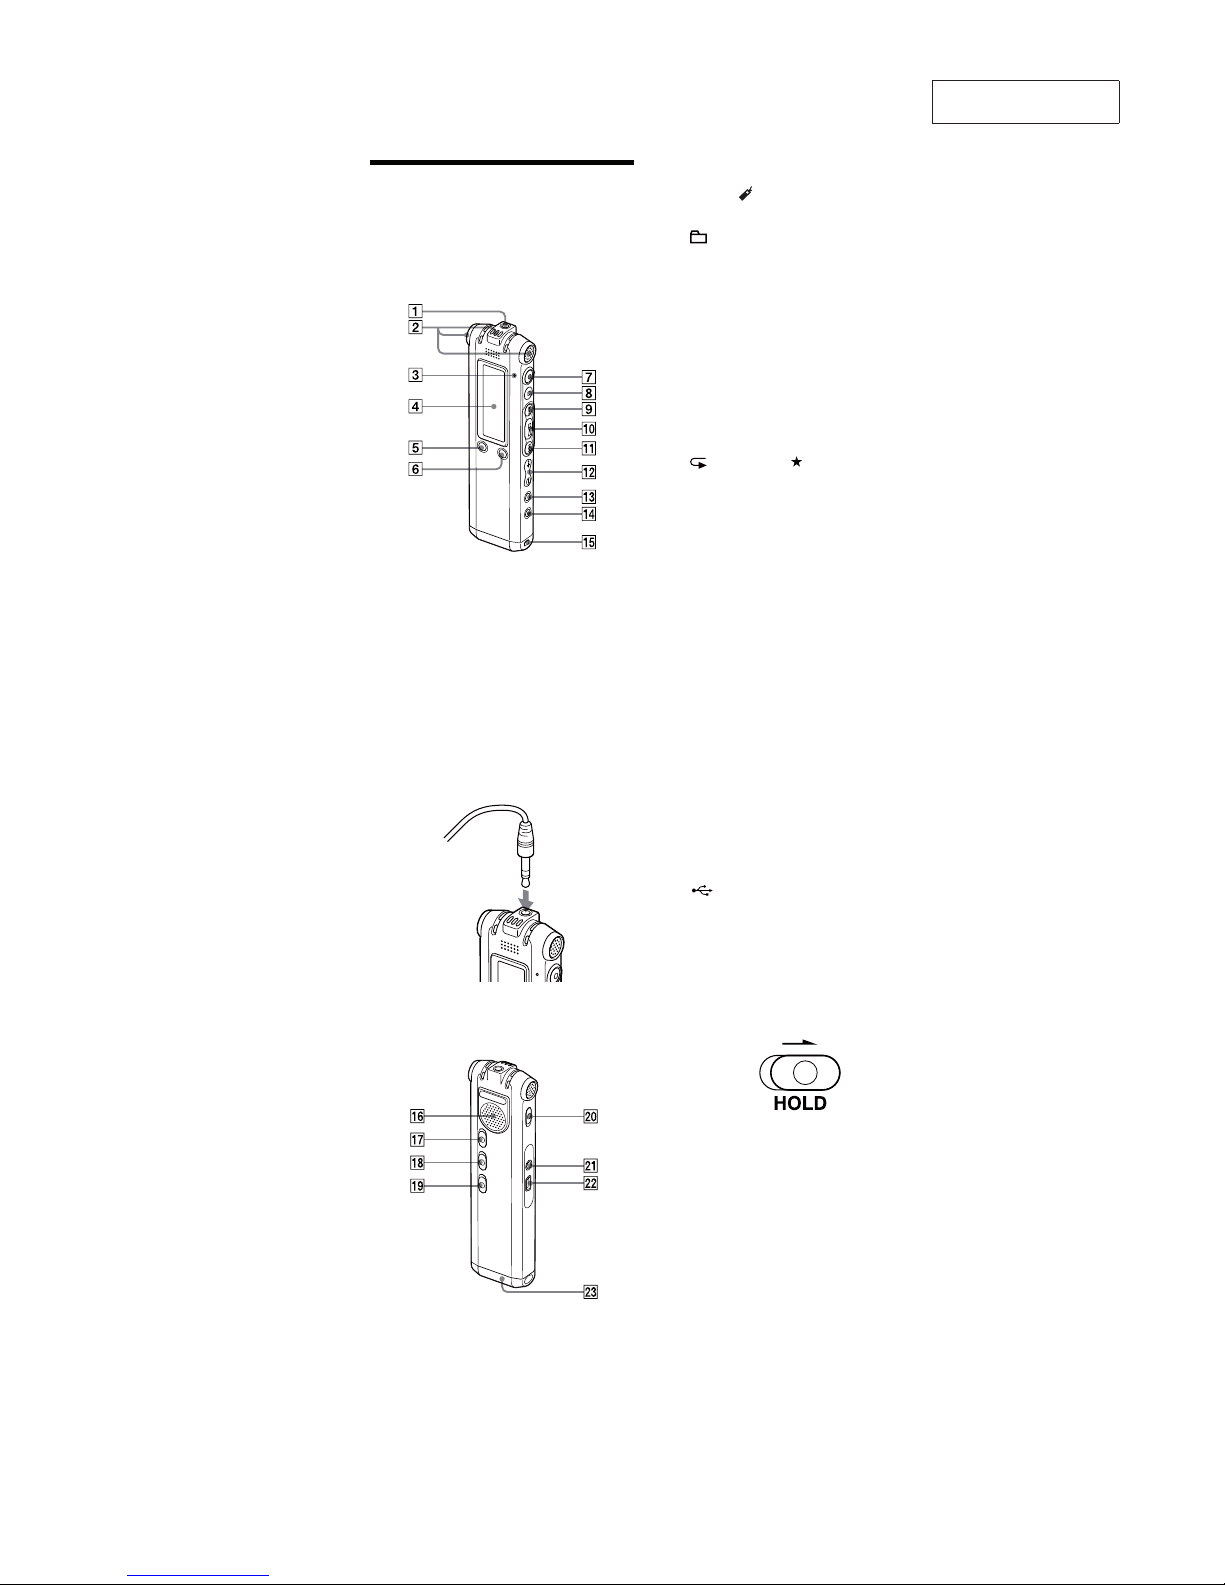
GB
* Connect stereo ear receiver or stereo
headphones supplied or not supplied to the
i (headphone) jack. If unwanted noise is
heard, wipe the headphones plug clean.
Rear
P Speaker
Q HOLD switch
**
R V-UP (Digital Voice Up) switch (37, 57)
S DPC switch (38, 51)
T DIRECTNL (directional) switch (24)
U
m (microphone) jack (31, 32)
V (USB) connector (13, 64)
W Battery compartment (13)
** Slide the HOLD switch in the direction of
the arrow to lock all the functions of all the
buttons. During stop, “POWER SAVING…”
will be displayed and the display will be
turned o to prevent battery power from
exhausting.
Index to Parts and
Controls
Refer to the pages indicated in
parentheses for details.
Front
1 i (headphone) jack* (21, 23, 34, 35,
84)
2 Built-in microphones (stereo/
directional) (21, 25, 26)
3 Operation indicator (21, 25, 27, 29, 53)
4 Display window (10, 11)
5 DIVIDE/
(bookmark) button (31, 34,
39)
6
(folder)/MENU button
7 z (record/pause) button (21, 25, 26,
27, 30)
8
x (stop) button (18, 22, 26, 28, 30, 34,
41, 43, 46, 47)
9
> (cue/fast forward) button (35)
J Nx (play/stop/enter) button
K . (review/fast backward) button
(35)
L VOL (volume) +/– button (23, 34)
M (repeat) A-B/
(priority) button
(34, 38, 46)
N ERASE button (43)
O Opning for a handstrap (A handstrap
is not supplied.)
This section is extracted
from instruction manual.
ICD-SX68/SX68DR9/SX78/SX78DR9/SX88
4
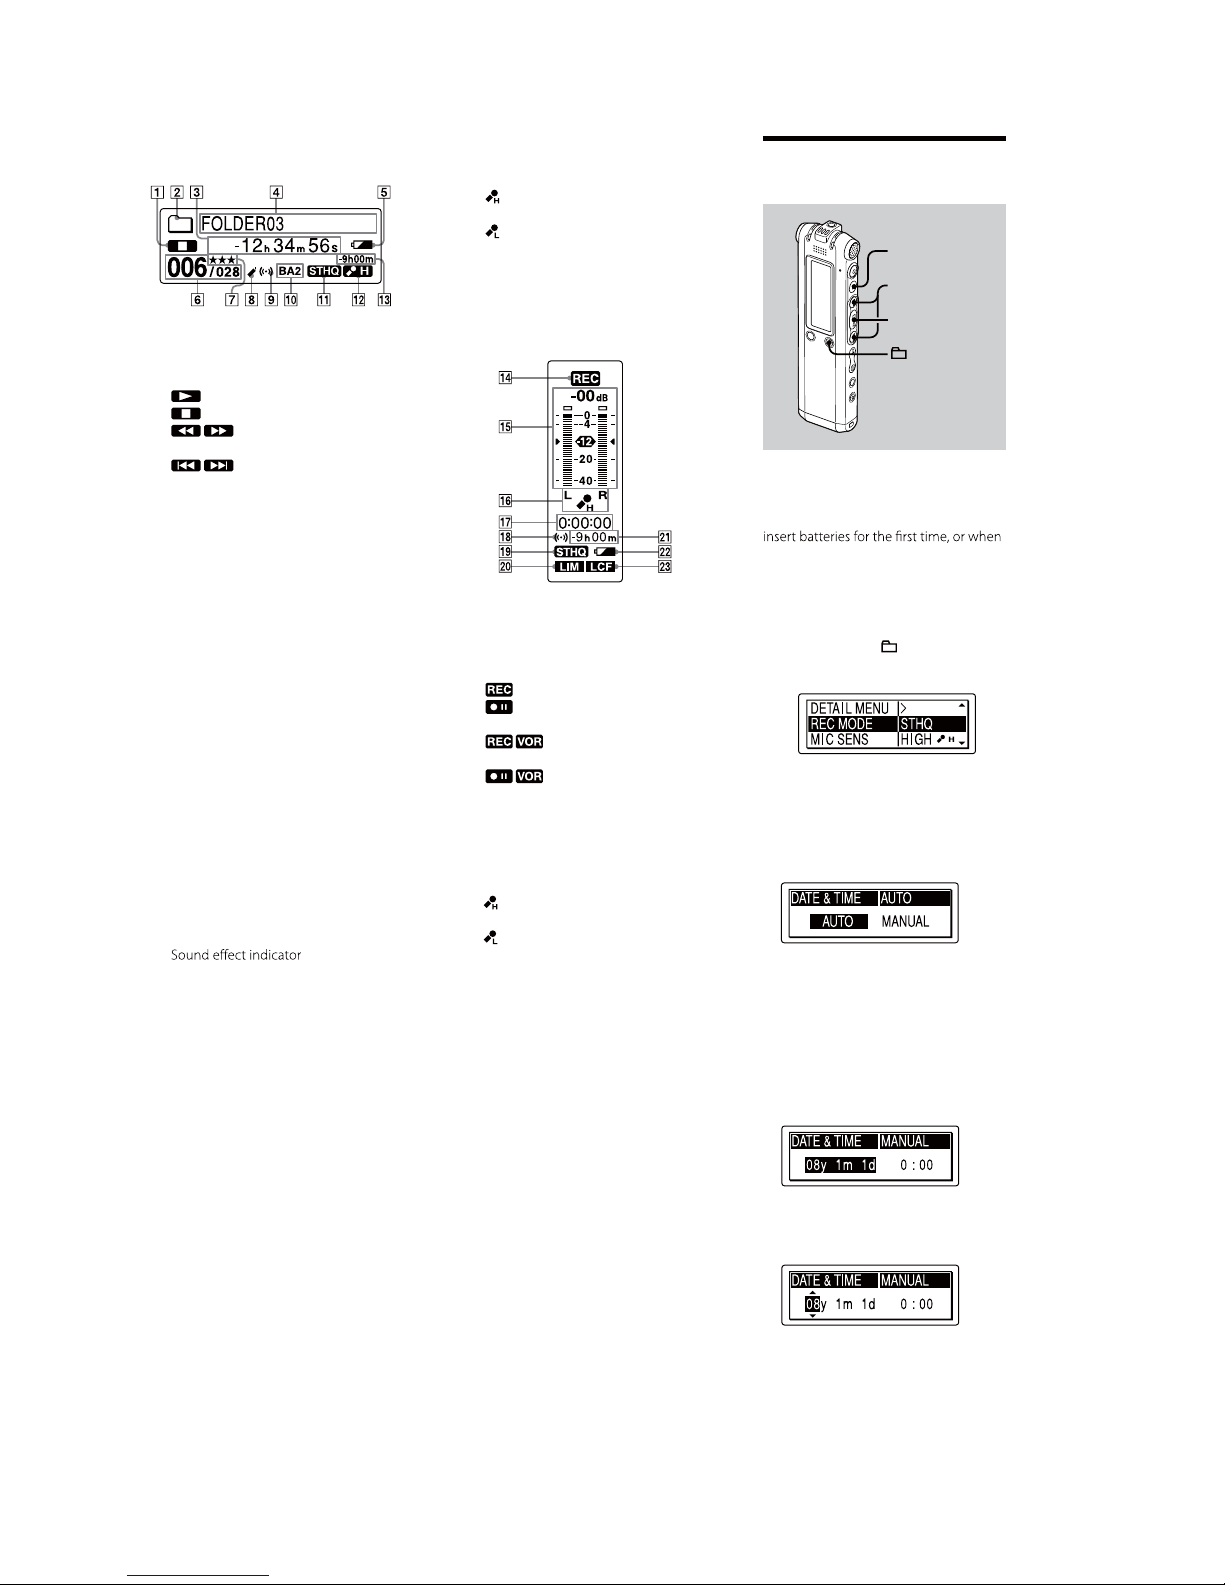
5 Remaining battery/Charging
indicator
When dry batteries are used, the
indicator shows the remaining
battery power.
While charging the rechargeable
batteries an animation appears.
6 Selected message number/Total
number of messages in the folder
7 Priority marks
Appear(s) when a message is set with
priority mark(s).
8 Bookmark indicator
Appears when a bookmark is set for
a message.
9 Alarm indicator
Appears when the alarm is set for a
message.
J
Displays the EFFECT setting in the
menu.
BA1 : The bass sound is reinforced.
BA2 : The bass sound is further
reinforced.
Display window
Display during playback and stop
1Operation mode indicator
Displays the following, depending on
the current operation mode
: playback
: stop
: review/fast backward,
cue/fast forward
: going backward/forward
continuously
2 Folder indicator
3 Elasped time/Remaining time
indication/Recording date and time
indication
4 Folder name/Message name/Artist
name indication
K Recording mode indicator
Displays the recording mode set
using the menu when the IC recorder
is in the stop mode, and displays the
current recording mode when the IC
recorder is in the playback mode.
STHQ : Standard play stereo
recording mode with high quality
sound
ST : Standard play stereo recording
mode
STLP : Long play stereo recording
mode
SP : Standard play monaural
recording mode
LP : Long play monaural recording
mode
MP3 : MP3 mode (during playback
only)
L Microphone sensitivity indicator
Displays the current microphone
sensitivity.
(high) : To record at a meeting or
in a quiet/spacious place.
(low) : To record for dictation or in
a noisy place.
MAN (manual) : To record with
microphone sensitivity set manually.
M Remaining recording time indication
Display during recording
N Operation mode indicator
Displays the following, depending
on the current operation of the IC
recorder.
: recording
: recording standby/recording
pause
: recording with the VOR
function
: recording pause with the
VOR function
O Recording level meter
P Microphone sensitivity indicator
Displays the current microphone
sensitivity when recording with AGC
(Automatic Gain Control).
(high) : To record at a meeting or
in a quiet/spacious place.
(low) : To record for dictation or in
a noisy place.
Displays the recording level during
manual recording.
Q Elapsed recording time indication
R Alarm indicator
S Recording mode indicator
Displays the recording mode (STHQ,
ST, STLP, SP, and LP) set in the menu.
T LIM (limiter) indicator
Displays the LIMITER setting in the
menu.
When “REC LEVEL” is set to “AUTOAGC,” “---” is displayed.
U Remaining recording time indication
V Remaining battery/Charging
indicator
W LCF (Low Cut Filter) indicator
Displays the LCF setting in the menu.
1 Select “DATE & TIME” in the menu.
1
Press and hold /MENU.
The menu mode will be displayed in
the display window.
2
Press . or > to select “DETAIL
MENU” and press
Nx.
3
Press . or > to select “DATE &
TIME” and press
Nx.
2 Press . or > to select “AUTO”
or “MANUAL” and press
Nx.
When you selected “AUTO,” the clock is
automatically adjusted using the clock
in the computer connected to the IC
recorder and on which the supplied
Digital Voice Editor software is started.
When you select “MANUAL,” proceed
to the next steps.
Step 2: Setting the
Clock
x
.
/>
Nx
/MENU
You need to set the clock to use the
alarm function or record the date and
time.
Clock setting display appears when you
you insert batteries after the IC recorder
has been without batteries for a certain
period of time. In this case, proceed from
step 4.
3 Press . or > to select
“08y1m1d” and press
Nx.
4 Press . or >to set the year,
month, day, hour, and minute in
sequence, and then press
Nx.
“EXECUTING….” appears and the clock
is set.
5 Press x to return to the normal
display.
Note
If you do not press Nx within one minute
of entering the clock setting data, the clock
setting mode is cancelled and the window
will return to the normal display.
P
ICD-SX68/SX68DR9/SX78/SX78DR9/SX88
5
SECTION 2
DISASSEMBLY
• This set can be disassembled in the order shown below.
2-2.CHASSIS ASSY ,
CASE ASSY
(Page 6)
2-3.BATTERY CASE LID
(Page 7)
2-4.COVER (CHASSIS),
MAIN BOARD
(Page 7)
2-5.CHASSIS
(Page 8)
2-6.SW BOARD,
HPJACK BOARD
(Page 8)
2-7.MIC-A ASSY,
MIC-B ASSY
(Page 9)
2-8.LIQUID CRYSTAL
DISPLAY PANEL,
AUDIO BOARD (Page 9)
2-1.KNOB (HOLD),
SPEAKER ASSY (SP001)
(Page 6)
SET

ICD-SX68/SX68DR9/SX78/SX78DR9/SX88
6
Note: Follow the disassembly procedure in the numerical order shown below.
2-1. KNOB (HOLD), SPEAKER ASSY (SP001)
2-2. CHASSIS ASSY, CASE ASSY
RE two screws (1.7 × 4.5)
RH speaker assy (SP001)
RB two claws
two
claws
claw
claw
RG claw
claw
claw
knob (hold)
knob (hold)
RT base
R cover (jack)
knob (hold)
knob (hold)
screw (1.4 × 2.5)
L side
faces
case assy
chassis assy
left side
bracket (chassis)
spacer (ornamental belt)
chassis assy
battery case lid assy
screw (1.7 × 3.5)
When assembling the chassis assy,
adjust the switches in the direction
of the arrow.
When assembling the chassis assy to the case assy,
orient the case assy so that its L side
faces down, and insert the chassis
assy with its left side up.
switches
switch
case assy
ICD-SX68/SX68DR9/SX78/SX78DR9/SX88
7
2-3. BATTERY CASE LID
2-4. COVER (CHASSIS), MAIN BOARD
battery case lid,
base (battery), e.t.c.
chassis (battery case lid)
screw (1.7 × 3)
battery terminal
(+–) assy
base (battery)
hinge
(battery case lid)
battery case lid
four claws
five claws
Remove the SW board
in the direction of the arrow.
cover (chassis)
Remove the
solderings.
battery terminal (+)
battery terminal (–)
MAIN board
Assembling the chassis assy
After the chassis assy has been assembled,
check that the wires of the microphone are properly
routed (without being pressed down).
board to board
connector
ICD-SX68/SX68DR9/SX78/SX78DR9/SX88
8
2-5. CHASSIS
2-6. SW BOARD, HPJACK BOARD
sheet (microphone jack)
screws
screw holes
harnesses
chassis
two claws
two claws
two claws and dowel.
Sheet (microphone jack) attachment
position is shown.
sheet
(microphone jack)
two cushions
two screws (B1.4 × 4)
Route the harness as shown below.
When installing the HPJACK board,
push the board to the very end,
and then fix it with screws.
HPJACK board
Remove
the solderings.
wire (frat type)
(CN7002)
HPJACK board
SW board
sheet (LED)
orange
black
blue
gray
Solder each lead according to the color
(black, orange, blue, gray) as shown in
the figure.
Sheet (LED) attachment position is shown.
sheet (LED)
sheet (LED)
LED
LED
SW board
SW board
ICD-SX68/SX68DR9/SX78/SX78DR9/SX88
9
2-7. MIC-A ASSY, MIC-B ASSY
2-8. LIQUID CRYSTAL DISPLAY PANEL, AUDIO BOARD
Remove the soldering.
wire (frat type)
(CN5002)
R AUDIO board
battery terminal
(detection)
light guide plate
sheet (light guide plate S)
sheet
(light guide plate L)
liquid crystal
display panel
(LCD101)
holder (LCD)
two claws
claw
Sheet (light guide plate L) attachment
position is shown.
When installing the liquid crystal display
panel to the holder (LCD), insert the liquid
crystal display panel to the holder (LCD)
from the side with claws.
Sheet
(light guide plate L)
AUDIO board
1mm
claw
liquid crystal
display panel
holder (LCD)
Remove the
solderings.
mic-A assy
(M101)
mic-A assy
(M102)
mic-B assy
(M103)
red
red
black
black yellow
black
Solder each lead according to the color
(black, red, yellow) as shown in the figure.
mic-A assy
(M101)
mic-A assy
(M102)
mic-B assy
(M103)
ICD-SX68/SX68DR9/SX78/SX78DR9/SX88
10
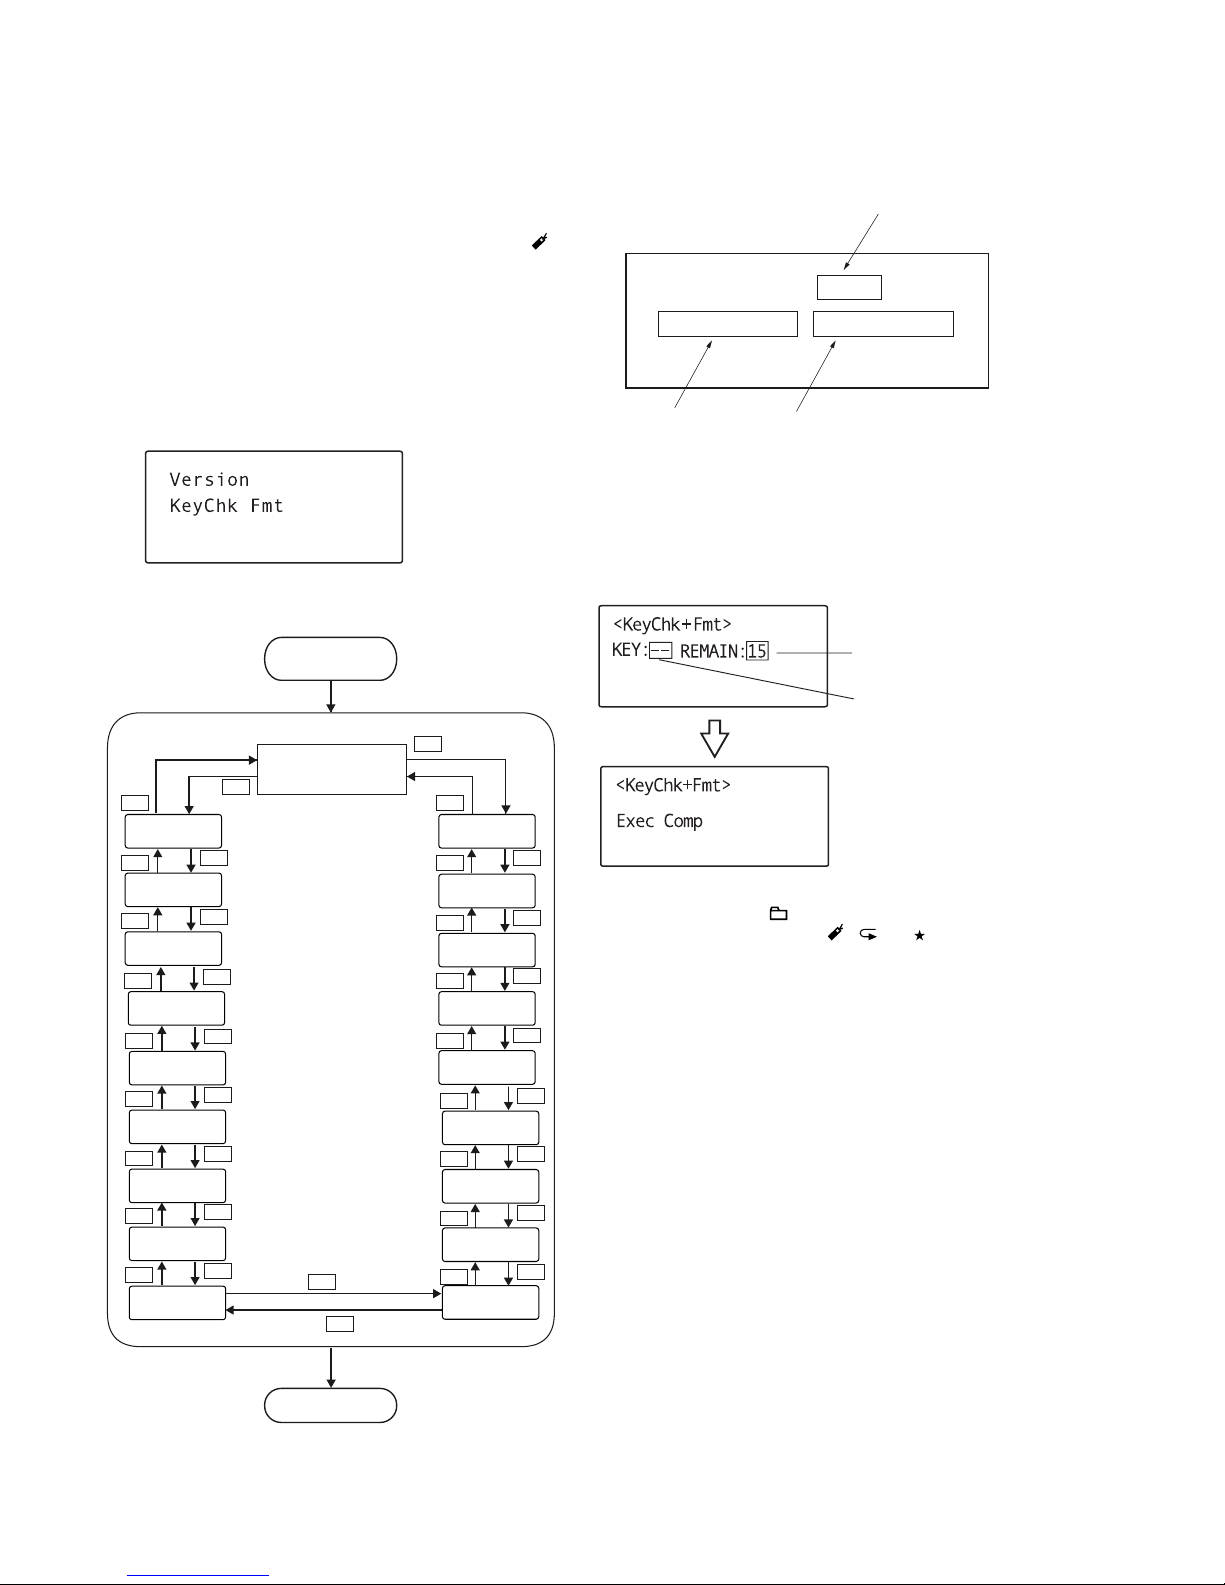
[Test Mode]
The following checks can be implemented using the Test Mode.
How to Enter the Test Mode
• Turn the power on. (by inserting batteries)
• Turn ON the [V-UP] switch while pressing the [DIVIDE/ ]
button and [VOL –] button at the same time.
How to Exit the Test Mode
Exit the test mode by turning OFF the power. (by removing the
batteries)
Initial Status of the Test Mode
When the machine enters the test mode, the LCD display appears
as shown below.
Select the desired item by using the [>]/[.] button, and
press the [Nx] button to set the selection.
1. Version test
• Version of the respective modules are verifi ed.
• Press the [x] button to return to the test mode screen.
2. Key Chk + Format test
• Perform the key check by pressing the keys. The NAND formatting (deleting all events) and the default settings of the
menus (default language and LCD contrast remain unchanged)
are executed at the same time.
* [
Nx
]/[>]/[.]/[ /MENU]/[z]/[x]/[VOL +]/
[VOL –] /[ERASE]/[DIVIDE/
]/[ A-B/ ]/
[DPC (ON/OFF)]/[V-UP (ON/OFF)]/
[DIRECTNT (ON/OFF)]/[. HOLD]
• Press the [x] button to return to the test mode screen.
SECTION 3
TEST MODE
+
Loop
Version
KeyChk+Fmt
Loop
ExtMic Cal
SetMic Cal
Beep
Lcd Cont
RTC Int
Battery
BattAC2
BattAB4
BattCnt
Menu Init
Key Check
Log Output
App LogOut
Convert
VBUS
Sleep
START
Initial status of test mode
F/W version display
TEST MODE
END
TEST MODE
Turn off the power
(Remove the batteries)
ARM X.XX .XX / DSP X.X.XX
ICX-XXX
F/W version of
CPU(DSP block)
Boot:X
Oct XX 200X XX:XX:XX
F/W version of
CPU(ARM block)
F/W version of
Boot loader
liant
The checked key is display.
When all checks are
completed, the back-Light
turns on for 0.5 seconds
The NAND formatting
(deleting all events)
and the befault settings
of the menus are completed.
Total of 15 keys* are counted.
ICD-SX68/SX68DR9/SX78/SX78DR9/SX88
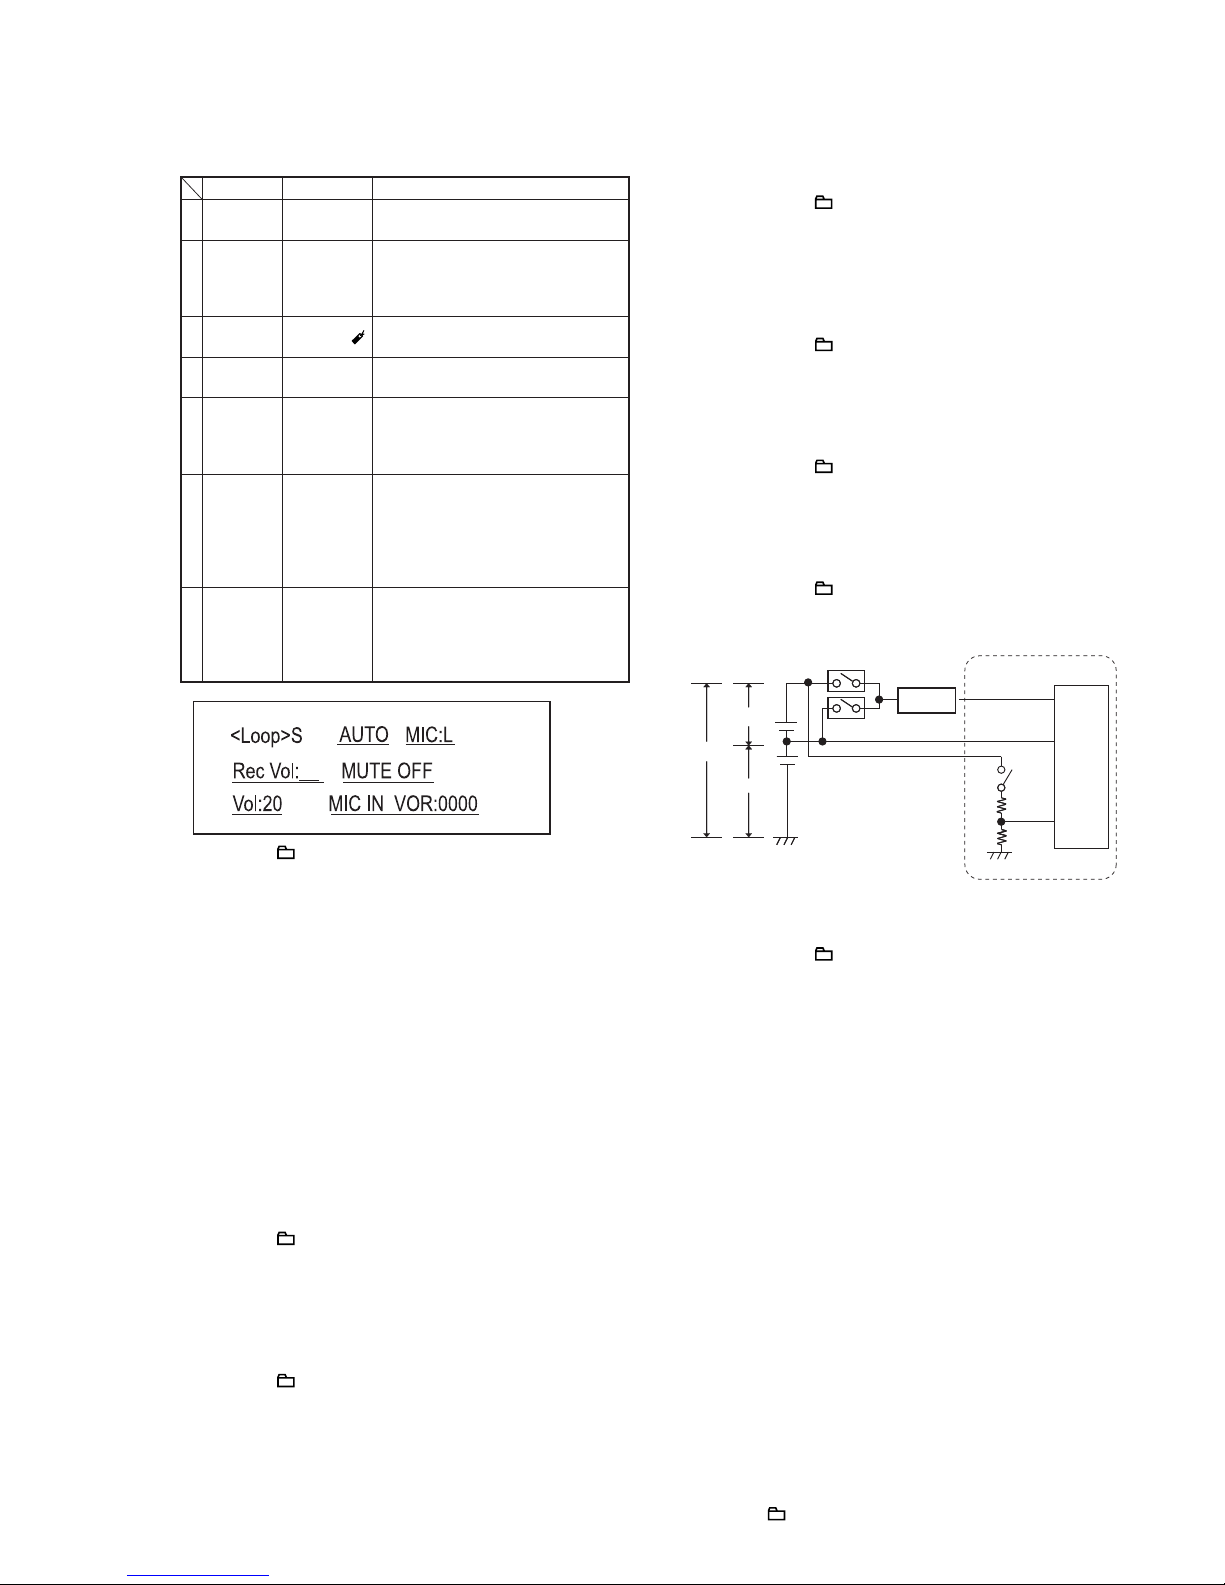
11
3. Loop test
Execute the DSP LOOP BACK.
• Press the [ /MENU] button to return to the test mode
screen.
4. ExtMic Cal
• The external microphone R and L channels level difference is
calibrated.
• Press the [Nx] button to start calibration.
• Press the [x] button to return to the test mode screen.
5. SetMic Cal
• The internal microphone R and L channels level difference is
calibrated.
• Press the [Nx] button to start calibration.
• Press the [x] button to return to the test mode screen.
6. Beep test
• Beep sound of 1.3 kHz is output.
• Press the [Nx] button to start outputting and press the [x]
button to stop.
• Press the [
/MENU] button to return to the test mode
screen.
7. LCD Cont test
• Adjust the LCD contrast.
Default value is 10.
• Adjust the LCD contrast using the [>]/[.] button.
• Press the [
/MENU] button to return to the test mode
screen.
8. RTC Interrupt test
• Perform the self test of the RTC.
• Press the [x] button to return to the test mode screen.
9. Battery test
• The detected A/D value of the battery remaining power is
checked.
• Press the [x] or [ /MENU] button to return to the test mode
screen.
10. Batt Cnt test
• The present A/D value of the center of the battery remaining is
checked.
• When the battery is not connected, NG is display.
• Press the [x] or [ /MENU] button to return to the test mode
screen.
11. Batt AC2 test
• The present A/D value of the side of VBatAC x2 on the error
amplifi ed circuit (IC1603 output) is checked.
• Press the [x] or [ /MENU] button to return to the test mode
screen.
12. Batt AB4 test
• The present A/D value of the side of VBatAB x4 on the error
amplifi ed circuit (IC1603 output) is checked.
• Press the [
x
] or [ /MENU] button to return to the test mode
screen.
* : 11, 12 items, refer to following fi g.
13. VBUS test
• The present value of the VBUS is checked.
If it is connected, OK is display.
• Press the [
x
] or [ /MENU] button to return to the test mode
screen.
14. Sleep test
• Sleep is tested.
Note: When <Sleep> is selected, the machine enter the sleep mode. To
exit the sleep mode, turn off the power, by removing the batteries
and reenter the test mode.
15. Menu lnit
• Press the [Nx] button to enter the menu initialization.
• Press the [
x
] button to return the test mode screen.
16. Key Chk test
• Key check only is executed when the key is pressed.
• Press the [
x
] button to return to the test mode screen.
17. Log Output test
• This is the log output to be used for engineering design.
Note: Not used.
• Press the [x] button to return to the test mode screen.
18. App Log Out test
• This is the app log out to be used for engineering design.
• Press the [x] button to return the test mode screen.
19. Convert test
• This is the conversion out to be used for engineering design.
• Press the [ /MENU] button to exit the test mode.
Test
Key SWITCH
Description
1
Sound volume test
[VOL +],
[VOL –]
The sound volume can be adjusted
(Default value is 20.)
2
Recording
level test
[.], [>]
Press the [.HOLD] switch to ON
for MANUAL mode.
The recording level can be adjusted
(Default value is 30.)
Muting test
[DIVIDE /
]
Muting test can be set to “ON” or
“OFF”.
6
Directivity [DIRECTNL]
“ON” or “OFF” of the switch can be
set the directivity of the microphone.
3
Setting of
recording
AUTO/
MANUAL
[.HOLD]
OFF: AUTO
ON: MANUAL
4
Sensitivity
/ Limitter
[V-UP]
AUTO ([.HOLD] SW:ON):
(OFF: Sensitivity H, ON: Sensitivity L)
MANUAL ([.HOLD] SW:ON):
(OFF: Limitter OFF, ON: Limitter
ON)
5
Selection
of the
external
microphone
[DPC]
Press the [.HOLD] switch to ON
for MANUAL mode.
OFF: MIC IN, ON: AUDIO IN
70k
110k
ADIN1
(VCCVBAT)
ErrorAmp
ADIN7
(VBAT_ERR)
ADIN8
(VBAT_CNT)
B
C
A
VBatAB
VBatBC
VBatAC
IC1001
IC1603
Q1664
Q1663
x2SIDE
x4SIDE

ICD-SX68/SX68DR9/SX78/SX78DR9/SX88
12
For Schematic Diagrams.
Note:
• All capacitors are in μF unless otherwise noted. (p: pF)
50 WV or less are not indicated except for electrolytics
and tantalums.
• All resistors are in Ω and
1
/4 W or less unless otherwise
specifi ed.
• f : internal component.
• C : panel designation.
• A : B+ Line.
• Power voltage is dc 1.5V and fed with regulated dc power
supply from battery terminal.
• Voltages are dc with respect to ground under no-signal
(detuned) conditions.
no mark : REC
( ) : PLAY
* : Impossible to measure
• Voltages are taken with a VOM (Input impedance 10
MΩ).
Voltage variations may be noted due to normal production
tolerances.
• Signal path.
F : PB
L : REC
THIS NOTE IS COMMON FOR PRINTED WIRING BOARDS AND SCHEMATIC DIAGRAMS.
(In addition to this, the necessary note is printed in each block.)
For Printed Wiring Boards.
Note:
• X : Parts extracted from the component side.
• : Pattern from the side which enables seeing.
(The other layers' patterns are not indicated.)
Caution:
Parts face side:
(SIDE A)
Pattern face side:
(SIDE B)
Parts on the parts face side seen from
the pattern face are indicated.
Parts on the pattern face side seen from
the parts face are indicated.
• Lead layouts
SECTION 4
DIAGRAMS
surface
CSP (Chip Size Package) Lead layout of conventional IC
ICD-SX68/SX68DR9/SX78/SX78DR9/SX88
ICD-SX68/SX68DR9/SX78/SX78DR9/SX88
1313
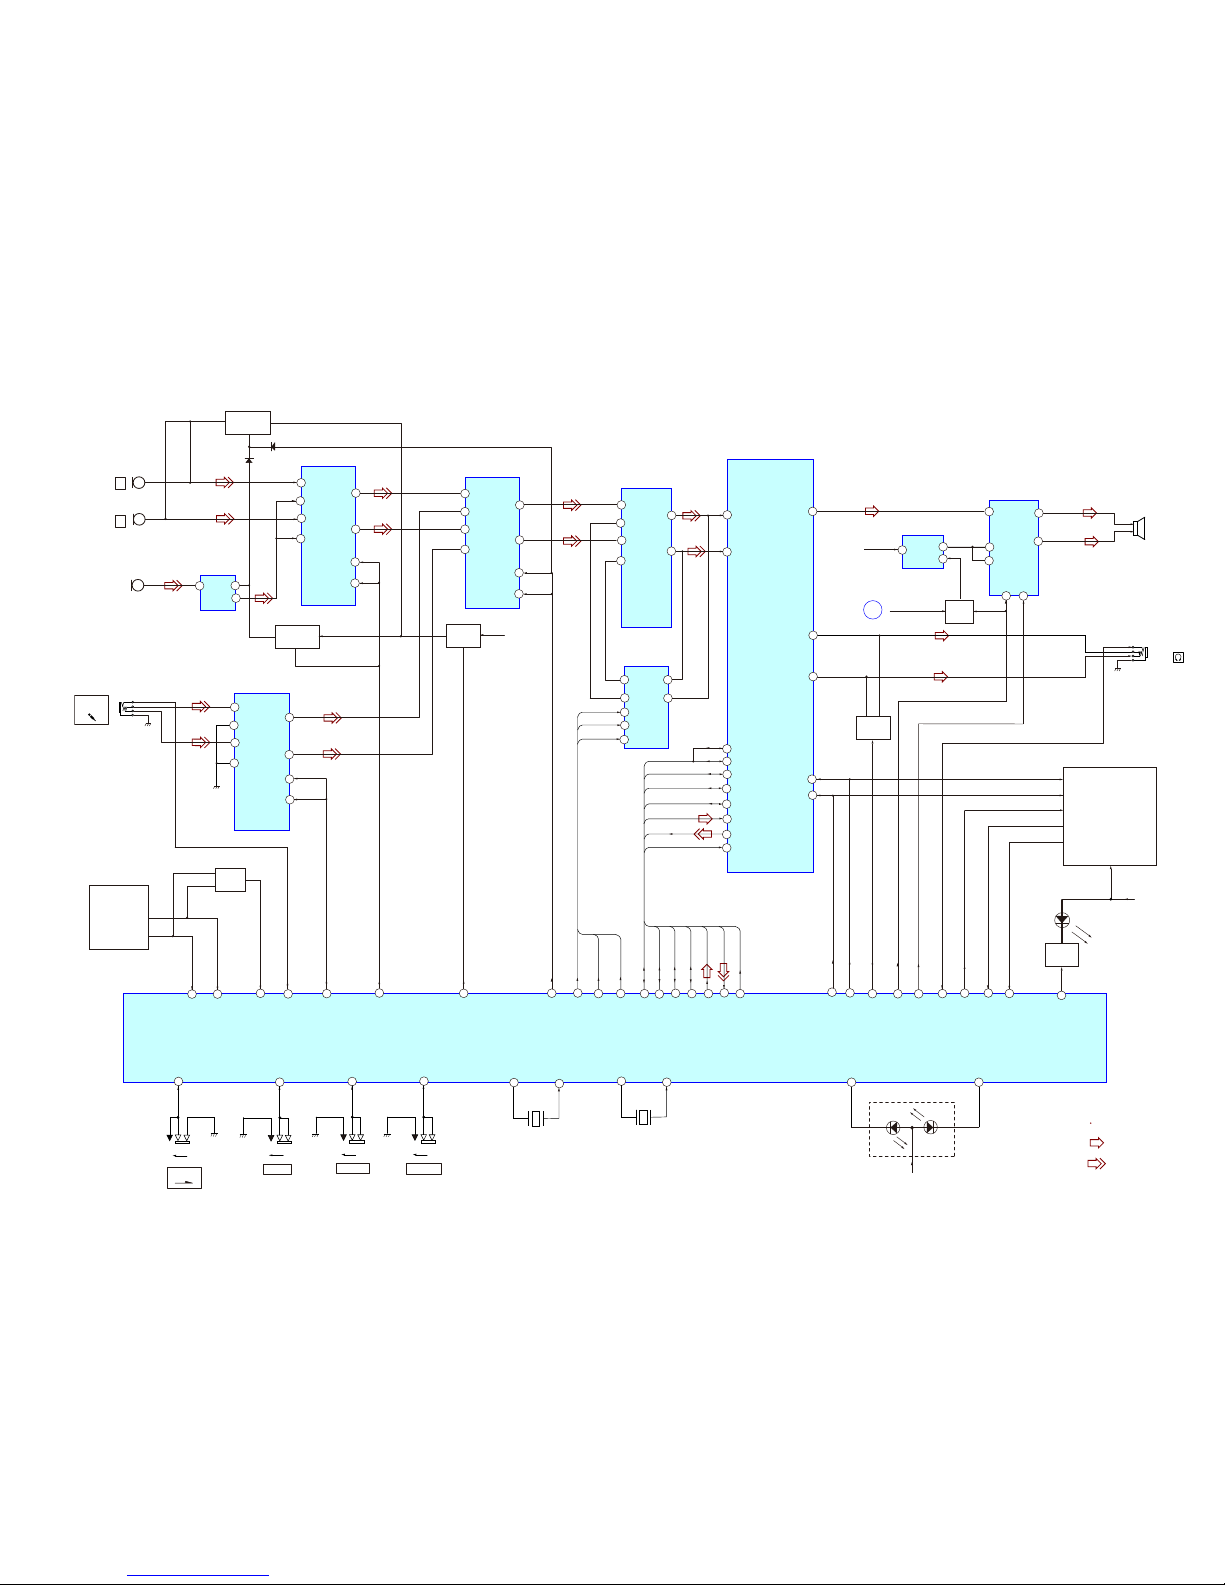
4-1. BLOCK DIAGRAM - MAIN1 SECTION -
Signal path
: REC
: PB
27
9
CS
SDA
IC3404
REG
IC1001(1/2)
SYSTEM CONTROLLER
OUTP
OUTN
Q3304
MUTE
Q5001
LED DRIVE
D5005,5004,5002
Q3402
SWITCH
J3301
(SPEAKER)
13
14
11
2
3
IC3654
VOLUME CONTROL
WA
WB
SCLK
DIN
4
CS
LA
10
LB
3
7
10
5
8
IC3203
SELECTOR
IN2
COM1
COM2
2
NO1
D3607
D3606
IN1
9
4
NC1
NO2
NC2
3
7
8
5
10
IC3655
SELECTOR
IN2
VDD_HP
COM1
COM2
4
NO1
IN1
9
2
NC1
NO2
NC2
SCK
IC3901
ADC, DAC, HEADPHONEAMP
AIN1L
30
31
MD/ADA
AS/ADR
MC/SCR
LRCK
PCM0_LRCK
BCK
PCM0_BCK
DIN
DOUT
SCKI
HPCOM/MONO
HPOL/LOR
HPOR/LOR
17
16
V10
KS-1IPS
W8
OS-1IPS
W10
OZSC-1IPS
OMWP
AC22
AD22
AB22
AC21
KLC-OMP
NES-OMP
IS-OMP
OS-OMP
U18
OKLCFER
2ZSC-OIPS
SPI1_CLK
SPI1_MOSI
AGC_XCS
KLC_1IPS
ISOM_1IPS
SCX_CGA
IDT-D
KCT-D
V17
SMT_D
NWDP
NETUM
U19
AC6
AB2
W22
AA2
0ZSC-0IPS
KS-OIPS
OS-OIPS
Y3
80IPG
AA1
AC7
AC8
AC23
AD7
110IPG
010IPG
210IPG
SP001
+
-
FUNCTION
SWITCH
R
(MIC CENTER)
IC3403
POWERAMP
IC3904
MICAMP
IN+
OUT
V+
1
5
4
J3201
PLUG IN
POWER
S6014
S6015
HOLD
23
AIN3R
AIN3L
22
29
32
22W-0A-DLCB
91U-TSRX-DLCB
6CA-SC-DLCB
2BA-TEDX-JPH
1AA-ETUM-PS
2AA-RWP-PS
3Y-ETUM-PH
7CA-KLC-OIPS
8CA-ISOM-OIPS
PWM
ADA_XCS
1
2
PCM0_DADT
3
PCM0_ADDT
7
CPU_RFFCLK0
KCRL_0MCP
KCB_0MCP
MWP
SCX_ADA
TDAD_0MCP
TDDA_0MCP
0KLCFFR_UPC
4
5
15
2
IN
VDD2
UNREG35-DET
MAIN2
SECTION
(Page 14)
VDD1
VOUT
VIN
+3.3V
CE
L
1
5
6
IC3202
AMP
A OUTPU T
B OUTPUT
3
A+INPUT
A-INPUT
B+INPUT
B-INPUT
7
2
3
7
10
5
8
IC3024
SELECTOR
COM1
COM2
2
NO1
IN1
IN2
9
4
NC1
NO2
NC2
VDD_GP2
VDD_GP2
Q3660
SWITCH
Q3657
SWITCH
Q3659
SWITCH
TEDX_CIMTXE
1LES_CIM
2LES_CIM
RWPX_CIM
LES_ENILX_CIM
1DA_YEK
0DA_YEK
EKAW-YEK
B6
4NIDA
AD4
10IPG
AD3
20IPG
C6
3NIDA
IS_1MP
OS_1MP
Q6001
SWITCH
AD5
AA3
AD20
AC20
NES_1MP
AB20
KLC_1MP
AB21
0OIPG
9OIPG
CD
RES
LIQUID
CRYSTAL
DISPLAY
26
AIN1R
12
10
14
16
1
3
OFF
ON
V-UP
OFF
ON
S6016
AD2
30IPG
DPC
OFF
ON
S6013
AC5
40IPG
T26
OKC
U26
IKC
DIRECTNL
OFF
ON
X1401
11.2896MHz
AC26
NICSO
AB26
TUOCSO
X1601
32.768KHz
W3
510IPG
GRNK
D5004
REDK
W2
410IPG
A
S6001,S6002,S6004
S6005-6008
S6010,S6012,
S6509,S6511
(MIC)
(MIC)
M101
M102
M103
LCD101
ICD-SX68/SX68DR9/SX78/SX78DR9/SX88
ICD-SX68/SX68DR9/SX78/SX78DR9/SX88
1414
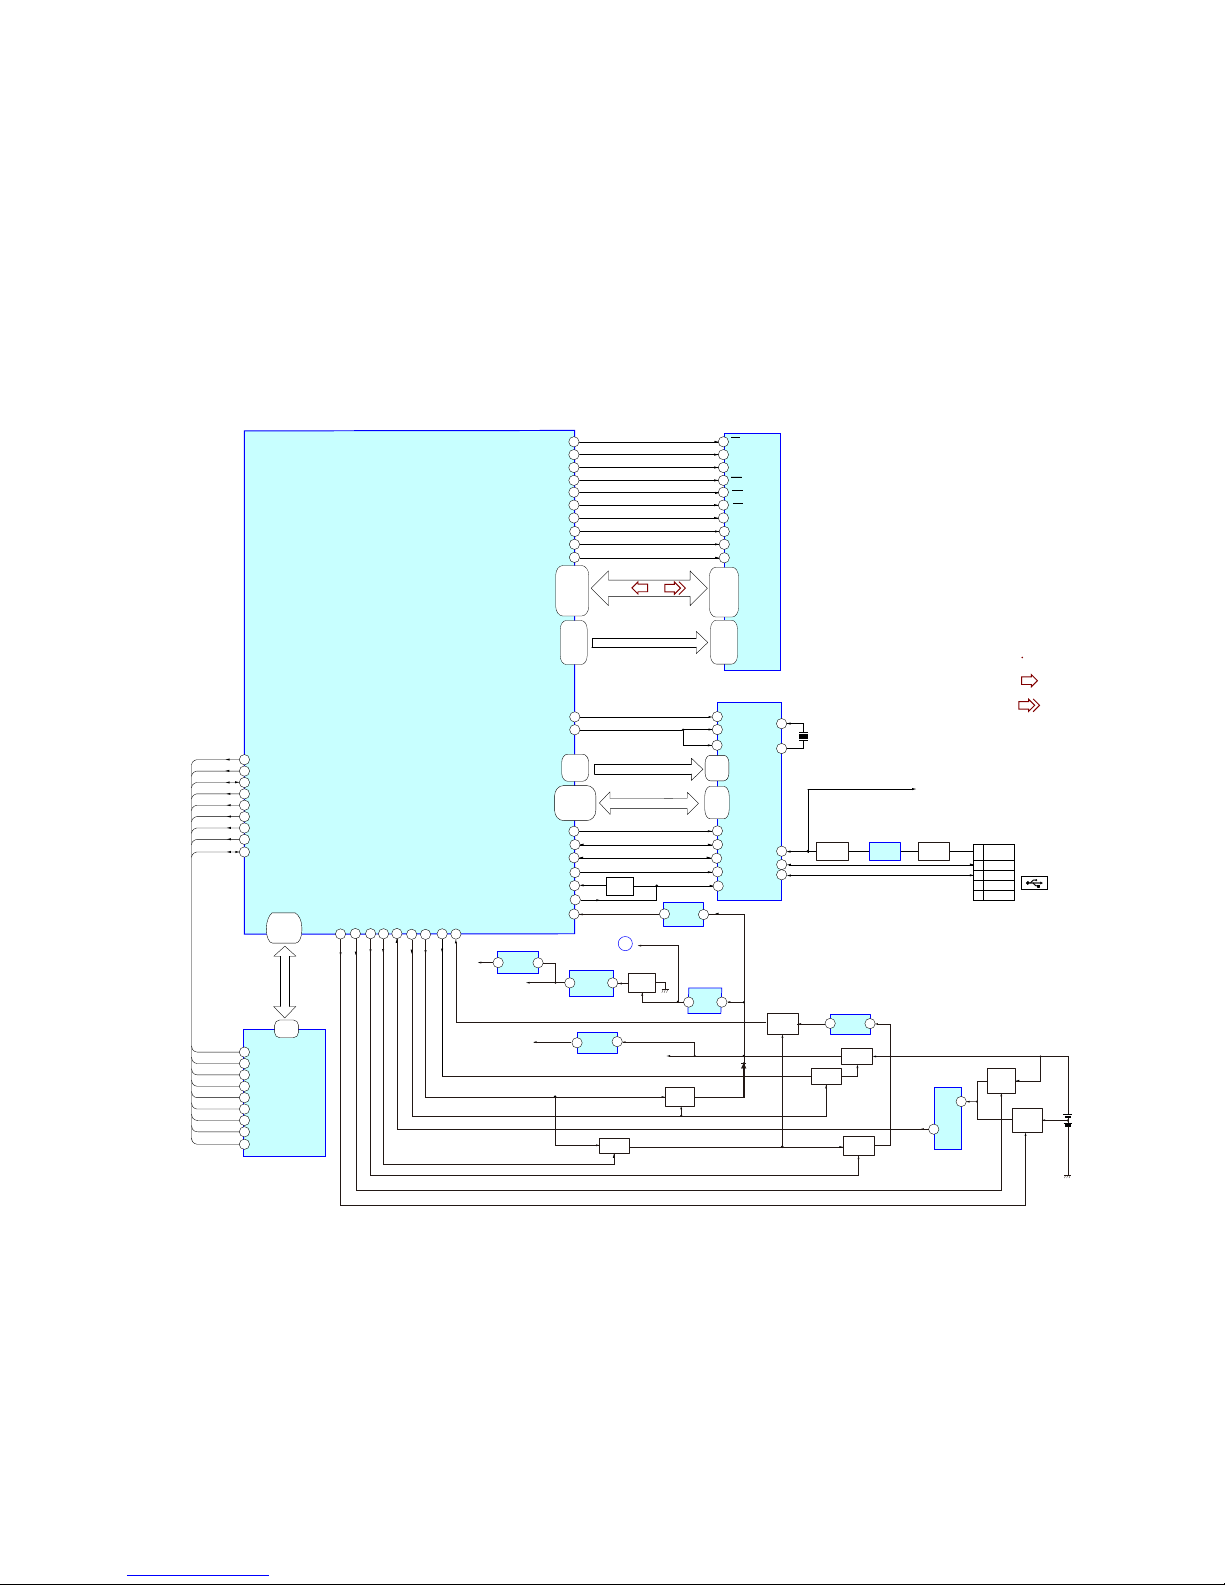
4-2. BLOCK DIAGRAM - MAIN2 SECTION -
Signal path
: REC
: PB
H4-8
G5-8
E5-7
F5-8
H22-25,F25
C25,G23-25
E25,J22-24
F24,D24,25
H2,3
G3,4
F4,E4
H18,19
D18,20
C20,E18
AB0_A25/DPQ
AB0_F24/DAK
A2,A8,B1
B2,B8,B9
C1,C2,C8
C9,D1,D2
D8,D9,E1
E9
H9-7,
H3-1,
G3,G2,
J8,7,
J3,2
U2-5,
V8,4,5
W4,5,
Y4,5,
AA4
R1,R8,N1,
N2,N3,N4,
N5N8,M4,
M5,M8,P1,
P2,P3P4,
P8,
GPI07
Q8501
SWITCH
J5
SDR_DATA30
G4
EXTRST
DQ0-7
DQ8-12
DQ13-15
F1R4
DQM1
E8
LDQM
SDR_DQM1
SDR_DQM0
SDR_DATA0-15
SDR_A0-11
P5
IC2602
SRAM
IC1001(2/2)
SYSTEM CONTOLLER
A4
NAND_WEZ
IC2701
FLASH
MEMORY
I/01-I/08
NAND_DA0-DA7
E1
E2
XIN
C2
VBUS
B1
DM
C1
1
1
4
4
DP
XOUT
X8501
24MHz
C4
A6
A0-A11
DREQO_N
D4
DACK0-N
A5
CS_N
C5
WR0_N
RST_N
SDR_DATA31
C6
4
3
1
4
2
1
4
4
INT_N
B5
WR1_N
RD_N
AB0_A1 -A6
AB0_D00 - D15
AB0_A1-A6
AB0_D0 - D15
1
2
5
VBUS
D-
GND
ID
3D+
4
IC8503
USB CONTROLLER
CN8002
(USB)
VBUS
F8
SDR_WEZ
SDR_RASZ
SDR_CASZ
SDR_CKE0
SDR_CLK
SDR_BA0
T5
F7
U8
F3
CKE
T1
F2
CLK
AA5
EXM_RDZ
J19
AB0_WRZ
H16
E3
NAND_REZ
H13
NAND_DA15
E9
NAND_CLE
NAND_XWE
NAND_XRE
NAND_XWP
NAND_CLE
NAND_ALE
NAND_XCS0
NAND_XCS1
NAND_RXBO
NAND_RBZO
D3
NAND_ALE
M9
NAND_CSZ0
NAND_CSZ1
C2
D2
NAND_RXB1
NAND_RBZ1
H8
19
XWP
18
XWE
17
ALE
16
CLE
10
XCE2
9
XCE1
8
XRE
7
R/B1
H26
PDAGHC
H17
E24
F23
AB3
A2
AB0_CSZ0
E11
TABWS_WSP
CS
G9
SDR_CSZ0
T3
BA1
G8
SDR_BA1
T4
G7
BA0
AB5
F9
R5
NAND_XWE
NAND_XRE
NAND_XWP
NAND_CLE
NAND_ALE
NAND_XCS0
NAND_XCS1
NAND_RXBO
6
R/B2
NAND_RXB1
29-32
41-44
B4,C4,D4
E4,L9,E6,
K9,E8
WE
RAS
CAS
H5
Q1665
SWITCH
Q1667
SWITCH
Q8004
SWITCH
IC8504
DETECT
Q8502
SWITCH
D1601
IC1802
DC/DC CONV.
VDD_DCCOUT33
VDD_UNREG
+3.1V
IC8501
+3.1V REG
UNREG35-DET
MAIN1
SECTION
(Page 13)
VOUT
SHDN
4
1
DRY BATTERY
SIZE "AAA"
(IEC DESIGNATION LR03)
2PCS. 3V
SWITCH
Q1608
Q1664
SW
SW
Q1663
IC8003
DETECT
Q1609
SWITCH
+1.5V
IC1603
AMP
INT+
OUT
IC8001
DETECT
VOUT
VIN
IC8502
+1.5VREG
IC8002
RESET
SWITCH
Q1668
A17
SUBV
E15
SUBVWS_WSP
K26
GHC
D15
2SUB-WS_WSP
G22
3ZSC-0BA
2ZSC-0BA
F22
C8
7NIDA
SWITCH
Q1603
A
SWITCH
Q1601
 Loading...