

Page 1
3-272-389-12(1)
2007 © Sony Corporation
Page 2
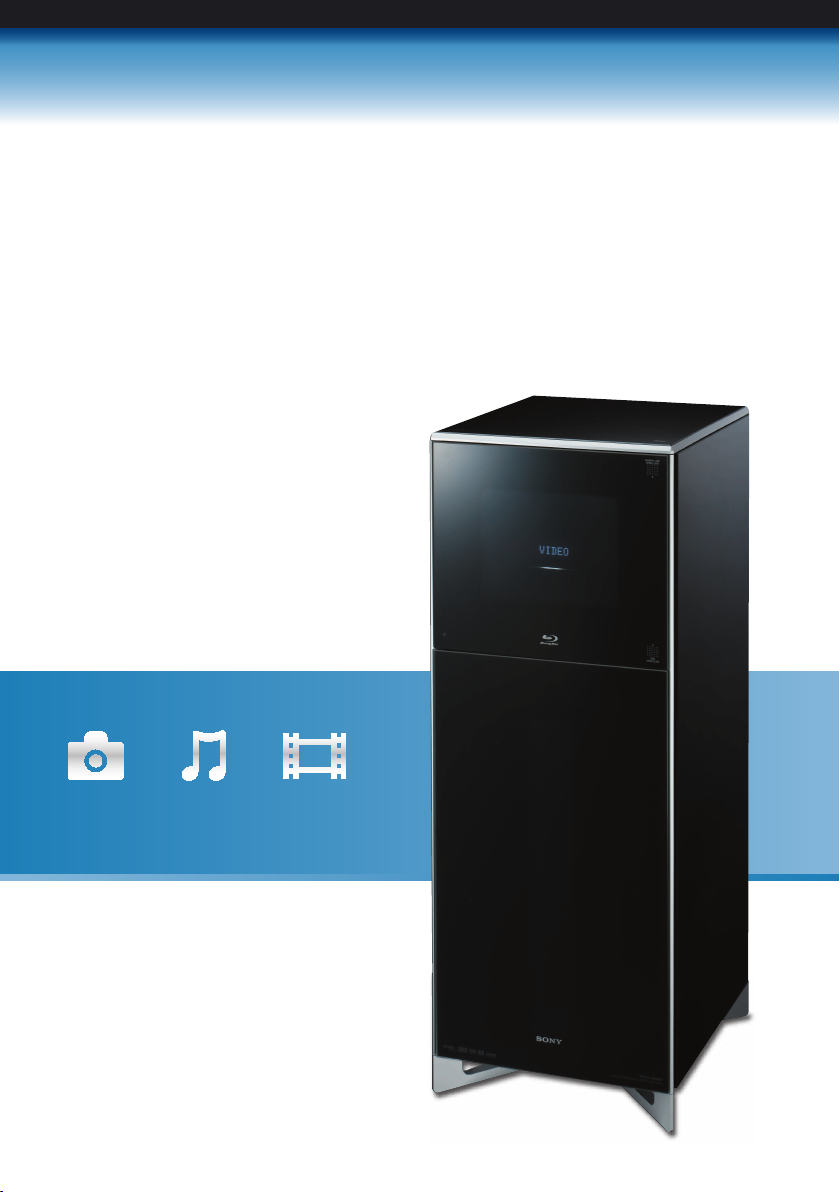
Home Entertainment Server
Welcome to the World of
Thank you for purchasing Sony home entertainment server HES-V1000.
This guide introduces the server’s main features and basic uses.
Photo Music Video
Your family movies, memories, music, and videos, all in one.
Page 3
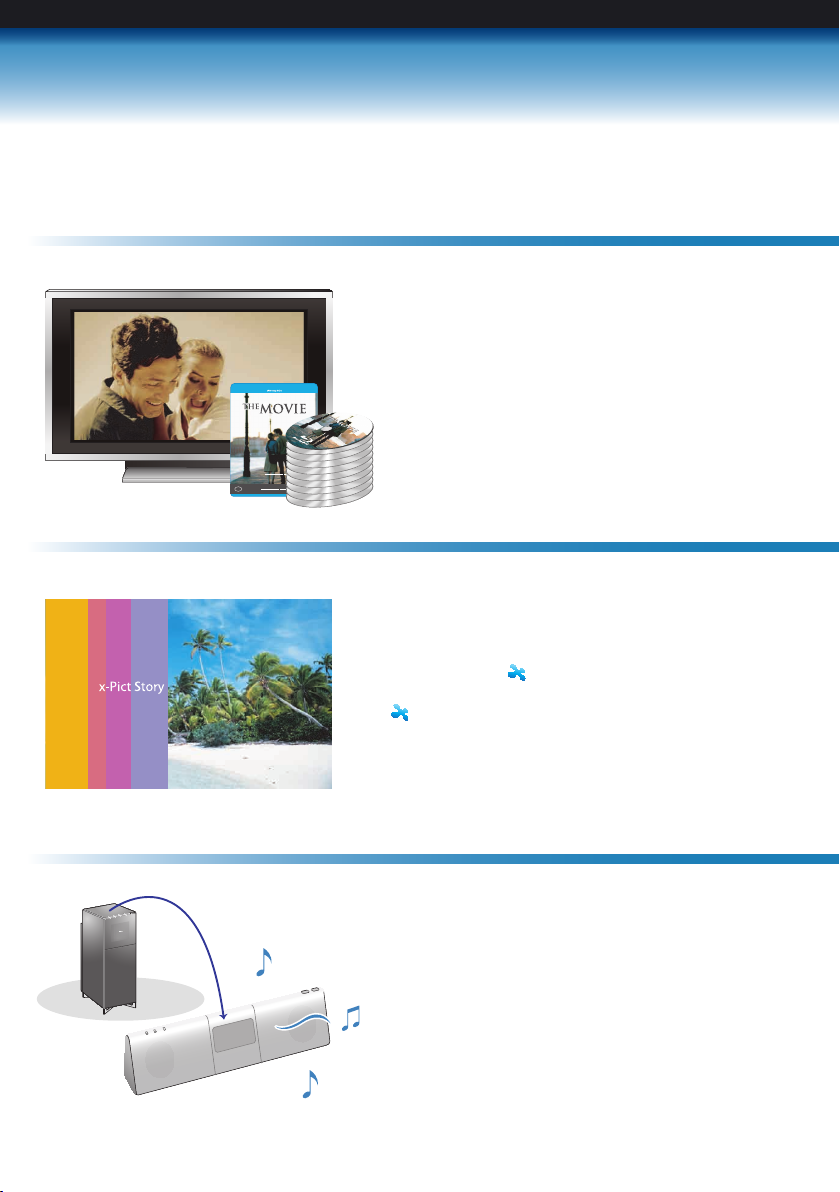
High quality Blu-ray DiscTM playback
Music file storage equivalent to
approximately 2,000 music CDs
Create original personal movies from your photo
collection using “ x-Pict Story HD”, or explore
your memories in a digital scrapbook using
“ x-ScrapBook”.
By connecting to the network, you can listen to
music on the HDD throughout the house.
Also, track names and cover art are retrieved with
a simple operation.
High quality sound and pictures that fill your home
with the ambience of a movie theater.
Blu-ray DISC
Photo Storage for the family
Page 4
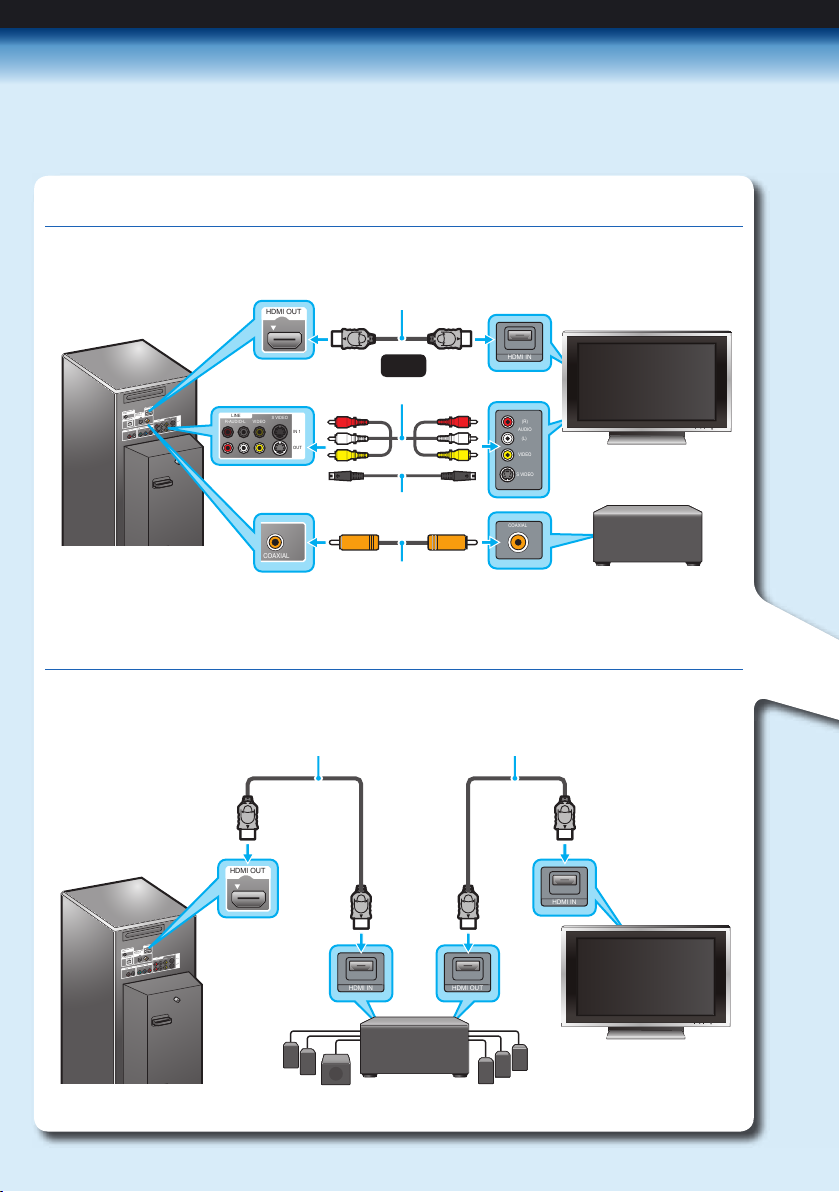
STEP1 Preparing the Server
Connecting a TV and Audio Devices
Connecting a TV and Audio Devices with HDMI cable
HDMI IN HDMI OUT
CONT
R
OL S IN/
IR IN
HDMI OUT
COMPONENT VIDE
O OUT
AUDIO OUT
R
L
R-
A
UDIO-L
VIDEO
LINE
S
VIDEO
Y
P
B
P
R
LAN
(
10/100
)
OPTICAL
C
O
AXIAL
DIGI
T
AL OUT
PCM/DTS/
DOLBY DIGI
T
AL
IN 1
OUT
HDMI OUT
HDMI IN
CONT
R
OL S IN/
IR IN
HDMI OU
T
COMPONENT
VIDEO O
UT
AUDIO OUT
R
L
R-
A
UDIO-L
VIDEO
LINE
S
VIDEO
Y
P
B
P
R
LAN
(
10/100
)
OPTIC
AL
C
O
AXIAL
DIGI
T
AL OUT
PC
M/DTS/
DO
LBY DIGI
T
AL
IN 1
OUT
SVIDEO
(L)
AUDIO
(R)
VIDEO
HDMI IN
HDMI OUT
R-AUDIO-L VIDEO
IN 1
OUT
S VIDEO
LINE
COAXIAL
COAXIAL
TV
Server
HDMI cable (supplied)
Audio/video cable (supplied)
S Video cable (not supplied)
Audio DevicesServer
HDMI cable (supplied)
or
Coaxial digital cable
(not supplied)
Audio Devices
Connect the server and TV with a suitable cable.
Connecting only to the TV, sounds can be output from the connected TV.
Using only an HDMI cable, you can output both high quality images and sound.
TV
HDMI cable (not supplied)
Page 5

Living Room
Connect your TV to watch movies, to
playback music, to view photos.
Page 6

Bedroom
Enjoy music on a wireless audio system.
Study
Upload your music collection from PCs.
Page 7

Connecting a Wireless Audio System
Connecting a PC
LAN1
CONT
R
OL S IN/
IR IN
HDMI OUT
COMPONENT VIDE
O OUT
AUDIO OUT
R
L
R-
A
UDIO-L
VIDEO
LINE
S
VIDEO
Y
P
B
P
R
LAN
(
10/10
0
)
OPTICAL
C
O
AXIAL
DIGI
T
AL OUT
PCM/DTS/
DOLBY DIGI
T
AL
IN 1
OUT
LAN
(
10/100
)
LAN1
CONT
R
OL S IN/
IR IN
HDMI OUT
COMPONENT
VIDEO OUT
AUDIO OUT
R
L
R-
A
UDIO-L
VIDEO
LINE
S
VIDEO
Y
P
B
P
R
LAN
(
10/10
0
)
OPTICAL
C
O
AXIAL
DIGI
T
AL OUT
PC
M/DTS/
DO
LBY DIGI
T
AL
IN 1
OUT
LAN
(
10/100
)
Wireless
Audio System
(sold separately)
Wireless Router Server
LAN cable (supplied)
PC
Server
Internet
Internet
Wireless Router
LAN cable (supplied)
Page 8

STEP2 Connecting the Power Cord
STEP3 Easy Setup
ETHER
WAN
LAN1
LAN2
LAN3
PUSH/OPEN
CONTROL S IN/
IR IN
R
R-AUDIO-L VIDEO
IN 1
OUT
S VIDEO
Y PBP
R
OPTICAL COAXIAL
L
DIGITAL OUT
PCM/DTS/
DOLBY DIGITAL
HDMI OUT
LINE
AUDIO OUT
COMPONENT VIDEO OUT
AC IN
LAN
(
10/100
)
to AC outlet
Power cord
Server
Connect the power cord last, after all connections are
complete.
1. Connect the power cord to the AC IN terminal on
the rear of the server.
2. Connect the other end to an AC outlet.
Make the basic settings to start using the server.
1. Turn on the TV.
2. Switch the TV’s input to the line connected to
the server.
3. Press on the server.
Easy Setup starts.
Select [Start] to proceed.
4. Select the option to access music and movie
related date.
5. Set [Music Server function] to [On].
DHCP is set automatically.
When using a fixed IP address, refer to
“Changing the Server Settings” in the
Operating Instructions.
Easy Setup steps you through the basic setup.
You can manually change the configurations later in the Settings category.
- Date and Time Settings
- All Media Guide Settings
- Music Server Settings
RETUR N
Fini sh
Easy Setup
Start
Set the Music Server functions.
If you are not using select [Off].
RETUR N
Retu rn
Easy Setup - Music Server Settings 3/4
OffOn
Page 9

STEP4
Importing Videos, Photos and Music
Inserting Discs
Press here
Importing Music
Home network
You can insert BDs, DVDs and CDs.
1. Press DISC OPEN/CLOSE on the bottom right of
the front panel.
2. Place the disc on the disc tray with the playback/
recording side facing down.
3. Press DISC OPEN/CLOSE on the bottom right of
the front panel.
The server loads the disc.
When inserting multiple discs, refer to “Inserting/
Removing Discs and Memory Cards” in the
Operating Instructions.
Importing music from music CDs.
Importing audio tracks from music CDs.
When the server is connected to the network, you can access to the music related data.
Transferring music files from a PC.
1. Install “Music Transfer” software using the supplied CD.
2. Upload music files that you have saved on your PC.
Refer to the online help for more information.
Refer to “Importing Music” of “Importing to HDD” in the
Operating Instructions.
Page 10

Importing Personal Videos
1. Connect a camcorder to the HDV 1080i/DV IN jack.
2. Press IMPORT SELECT on the unit repeatedly until
“i.LINK” appears on the display window.
3. Press IMPORT.
Refer to “Importing videos from HDV/DV
camcorders” of “Importing to HDD” in the Operating
Instructions.
CONT
R
OL S IN/
IR IN
HDMI OUT
COMPONENT VIDEO OUT
AUDIO OUT
R
L
R-
A
UDIO-L
VIDEO
LINE
S
VIDEO
Y
P
B
P
R
LAN
(
10/100
)
OPTICAL
C
O
AXIAL
DIGI
T
AL OUT
PCM/D
TS/
DOLBY
DIGI
T
AL
IN 1
OUT
Press here• IMPORT SELECT
• IMPORT
Importing Photos
1. Insert a memory card into the corresponding card slot.
2. Press IMPORT SELECT on the unit repeatedly until the
card type appears on the display window.
3. Press IMPORT.
Refer to “Importing Photos” of “Importing to HDD” in
the Operating Instructions.
Press here • IMPORT SELECT
• IMPORT
Importing photos from memory cards.
Camcorder that can be connected to this server using the i.LINK jack.
Page 11

STEP5
To play the imported contents
OPEN/CLOSE
RM SET UP MACRO 1 MACRO 2 MACRO 3
SERVER TV AMP SAT/CABLE
SET
CLEAR
VCR CUSTOM
TOP MENU POP UP/MENU
RED
PREV NEXT
PLAY
VOL CH
PAUSE
REPLAY
SCENE SEARCH
MUTING
STOP
ADVANCE
GREEN BLUE YELLOW
INPUT
AV
RETURN OPTIONS
Navigating the XrossMediaBar
TM
1. Press to view the Home Menu.
Horizontal axis:
Categories such as
photo and video
Vertical axis:
Contents and utilities
Others
Number of Discs:1
Music
2. Press to select the desired category icon.
Video
Others
Number of Discs:1
3. Press to select a folder or album
and press ENTER.
Video
Personal Video
Number of Titles:26
4. Press to select the content to
play and press ENTER.
Video
HDV 8/10/2007 0:57PM - 1:06PM
8/10/2007 0:57PM ( 0H09M) HDV
ORG
HDV 7/13/2007 3:50PM - 4:08PM
7/13/2007 3:50PM ( 0H18M) HDV
ORG
HDV 8/10/2007 0:57PM - 1:06PM
8/10/2007 0:57PM ( 0H09M)
PL
HDV 8/10/2007 1:10PM - 1:20PM
8/10/2007 1:10PM ( 0H10M) HDV
ORG
HDV 7/13/2007 3:34PM - 3:35PM
7/13/2007 3:34PM ( 0H01M) HDV
ORG
HDV 7/13/2007 2:20PM - 2:40PM
7/13/2007 2:20PM ( 0H10M) HDV
ORG
HDV 7/13/2007 3:38PM - 3:45PM
7/13/2007 3:38PM ( 0H07M) HDV
ORG
HDV 7/13/2007 3:38PM - 3:45PM
7/13/2007 3:38PM ( 0H07M)
PL
HDV 8/10/2007 1:26PM - 1:32PM
When is pressed
The previous display re-appears.
When is pressed
A list of available options appears.
To select an option, tilt the Joystick up
and down, then press it down to enter.
OPTIONS
RETURN
1
2, 3, 4
When is pressed
The displayed titles are sorted.
YELLOW
RETURN OPTIONS
Enter
Page 12

Printed in Japan
Printed on 70% or more recycled paper.
3-272-389-12(1)
�”Blu-ray Disc” and “Blu-ray Disc” logo are trademarks.
� is a registered trademark of Sony Corporation.
�“xross media bar” is a trademark of Sony Corporation and Sony Computer Entertainment Inc.
 Loading...