

Sony HDR-UX20, HDR-UX10 Owner’s Manual
SONY
Digital HD Video Camera Recorder
Getting Started
Operating Guide
HDR-UX I O/UX20
AVCHD
R/rw DVO +R_Wri_e
-- _'l)l"_oLIT"l"_{_ I-'IEIITI|
Mem_rYstle_ ,_
S£RIB
Editing
Utilizing the media
Customizing your
camcorder
Performing with a
computer
Troubleshooting
Additional Information
Quick Reference
Spanish Quick Guide/
Guia r_tpida en espahol
© 2008 Sony Corporation
To reduce fire or shock hazard, do
not expose the unit to rain or
moisture.
CAUTION¸TOa_UO_ THFRISKOF_ _CTalCS_IOCK
DO NOTR_MOVECOVER(OR_AC_.
_OUSER-SERVICEABLEPAaTSI_SlDE.
R_FERSERVlClN_TOaUAUFEDSEnVlCEPERSONNEL
the iiser to lhe presence of
unhlsulated "dangerous
voltage" within the producl_s
This symbol is intended to alert
enchlsure l]lal lllay be of
sufficient lnagnimde to
constilute a risk of electric
shock to persons.
This symbol is intended to alert
the user 1otile presence of
important operating and
maintenance (servicing)
instructions in tile lilerature
accompanying the appliance.
IMPORTANTSAFEGUARDS
For your protection, please read these safety
instructions completely before operating
the appliance, attd keep this manual for
future reference.
Carefully observe all warnings, precautions
and iustructions oil the appliance, or the one
described in the operating iuslructi(ms attd
adhere to them.
PowerSources
This set sllould be operated ()Ill}' Ii'om tile type ol
power source indicated on tile marking label. It
you are nol sure oI tile type of electrical power
supplied to your home, consult your dealer or
local power company. For those sets designed to
operate Ironl baUel y power, or other sources, l'el_r
tO tile operiflillg illstrtlcliolls.
Polarization
This set may be equipped with a polarized _1c
power coM phlg (a plug Ila_ing one blade wider
titan the olher),
This plug will fil inlo the power outlel only one
way. This is a salety leature. If you are unable to
insert tile plug lully into tile outlet, lly reversing
the phlg. If the plug should still lifil to fit, contact
your electrician to have a suitable outlet installed.
Do not dellrat the salety purpose of the polarized
plug by lorcing it in.
Overloading
Do noI o_,erload wall outlets, extensioll cords or
comenience receptacles beyond their c_,pacity,
since lids cml result ill lirc or electric shock.
ObjectandLiquidEntry
Ne_er push objects of ally kind into tile set
tln'ough openings _ts they may touch dangerous
_,oltiJge points Ill" short out parts t]lat could rt2sllJ[
in a fire or electric shock, Never spill liquid of any
kind on lhe set.
Attachments
Do llOl use _ltt_lcblllents Hot rcCOlllnlended by tile
iilanllI;iC[llrcr, as they may cause ]lazards.
Cleaning
Unplug tile set fi'om tile wall outlet belore
cleaning or polishing it. Do not use liqukl cleaners
or aerosol cleaners. Use a clolll lightly dampened
with water lot cleaning tile exterior ()1 tile set.
WaterandMoisture
Do noI use power-line operiaed _ts lleitl w_lter
Ior example, near a bathtub, wasbbowl, kitchen
sink, or laundry tub, in a wet basen/enL or near a
swimming pool, etc.
Power-CordProtection
Route tile power cord SO thilt it is llOI likely to be
walked on or pinched by ilems placed upon or
against them, paying particular altenli(ln lo file
plugs, lvccptacles, and lhe point where file cord
exits Ir(nn tile appliance.
Accessories
Do not pl*,ce tile set Oil illl ilnstable carl, Sta,n(I,
tripod, bracket, or table. The set may tall, causing
serious in july to a child or an adult, and serious
damage to tile set. Use only a cart, stand, tripod,
bracket, or table reconnnended by file
ii/anuI_lCt/lrcr,
Ventilation
The slols and openings in llle cabinet arc prm ided
Ior necessmy ventilatkm. To ensure reliable
operation ol tile set, and tO protect it h'oll/
overheglling, lhese slots and openings nlusl never
be blocked or covered.
Never cover the slots and openings wil]l a cloth
or oilier nlalerials.
Never block tile slots and openings by placing
tile set on a bed, sol_,, rug, or other similar
Sllrl_lce.
Never place tile set in a confined space, such as
a bookcuse, or built-in cabinel, unless proper
venlilation is provided.
Do not place the set near or over a radiator or
Ileal register, or wllerc il is exposed to direct
sunlig]a.
Continued._ 3
_?ORTANT SAFEGUARDS(go_i_ed}
Lightning
For added protection t_>rthis _t during _Llighming
slornl, or wllen it is lefi unatlended and unused fi)r
long periods ol time. unplug it hxml tile wall
oullet and disconnect lhe illltelllla or citble systellL
This will prevenl damage to tile set due to
lighming and power-line surges.
DamageRequiringService
Unplug the sel fixml tile wall outlel and rcl_:r
sel_ icing to qualified _r_ice personnel under lhe
tollowing conditions:
When the power cord or plug is damaged or
frayed.
If liquid Ilas been spilled or objects have fallen
into the set.
If the _t has been exposed to rain or water.
If file set has been subject to excessive shock by
being dropped, or the cabinet has been
damaged.
If the set does not opert_te nornlally when
li_llowing the operating instructions. A(liust
only those controls that are specified in the
operating instructions, hnproper adjustment of
other controls nlay resull in damage and will
ol}en require exlensive work by a qualified
technician 1o restol_ the set to normal operalJon,
When the set exhibits a distinct change in
perlormance this indicates a need fi)r service.
Servicing
Do nol alttelnpl to serxice tile sel yourself glS
opening or r_nloving covers may expose you lo
dangerous voltage or olller hazards.
Reler all servicing to qualified service personnel.
Replacementparts
Wllen replacement pal'ls are required, be sure lhe
service technician has used replacement parts
specified by tile manufacturer lhat have tile sanle
cllaracteristics as tile original parls.
Unauthorized substitutions may rcsull ill fire.
electric shock, or olher hazards.
SafetyCheck
Upon conlpletion of _uly selvice or repairs to tile
set. ask the service technician to l_erlbrnl routine
salbty checks (as specilied by tile manulacturer)
to determine tlliLt the set is ill siLle operathlg
condition.

Readthisbeforeoperatingyourcamcorder
Before operating the unit, please read this
manual thoroughly, and retain it for future
reference.
Do not expose the batteries to
excessive heat such as sunshine,
fire or the like.
CAUTION
Tile use of optical inslrumenls with this product
will increase eye haznrd. Use of controls or
adjustlncnts or perlornlance (if procedures olher
than those specified herein nmy resull in
hazardous radiation exposure.
Replace the battery with the
specified type only. Otherwise, fire
or injury may result.
Owner'sRecord
The model and serial numhers my located on the
6OUOln. Record tile serial lmlnber in the space
provkled below, Rellrr to these numbers whenex er
you call upon your Sony de_der regarding this
product.
Model No. HDR-
Serial No.
Model No. A¢'-
No,
RECYCLINGLITHIUM-10NBATTERIES
Lilhium-lon baueries are
recyclable. You can help preserve
our ellvirOlllllelll by relurllillg
your used rechargeable baueries
to the colleclkln and recycling
h)cation nearest you.
For morn inlormation regarding recycling of
rechargeable balteries, call toll liee 1-800-822-
8837, or visil hltp://www.rbrc.org/
Caution: Do nol handle damaged or leaking
Lithium-Ion baueries.
o
If you have any questions abom this product, you
may call:
Sony ('ustonler Inlorlnation Center
I-8(10-222-SONY (7669).
The number below is lot the FCC rclalcd mallcrs
only.
RegulatoryInformation
Declaration of Conformity
Trade Name: SONY
Model N0,: HDR- U X 1(t
Responsible Party:Sony Eleclronics Inc.
Address: 16530 Via Esprillo, San Diego, CA
92127 U.S.A.
Telephone NO,: 858-942-2230
This device complies with Part 15 of the FCC
Rules. Operation is subject to the lollowing lwo
condilkms: (1) This device may not cau_
harmflfl interlcrence, and (2) this device musl
accept any intcllcrence received, including
inlerlcrence lhlu may cause undesired operalkm,
Declaration of Conformity
Trade Name: SONY
Model No.: HDR-UX20
Responsible Party:Sony Electronics Inc.
Address: 16530 Via E_,prillo, San Diego, CA
92127 U.S.A.
Telephone No.: 858-942-2230
This device complies with Part 15 of tile FCC
Rules. Operation is subject to the lollowing lwo
conditkms: (1) This device may not cau_
harnlflll interlcrence, and (2) this device must
accept any intellcrencc received, including
interlcrence that may cause undesired operatkm.
CAUTION
You are cautioned that any changes or
modifications not expressly approved in this
manual could void your authorily to operale lhis
equiplnenl,
Continued._ 5
RsaS this b÷fs_÷ sD÷rati_N ys_[_samssN÷r {gssti[_s÷S}
Note
This e(tuipment has been tested and Iomld to
comply with the limits Ior a (_'lass B digital
device, pursuanl to Part 15 of the FI_T"Rules.
These linlils are designed lo provide reasonable
protection againsl harnlful interlcmncc ill a
residential inslallation. This equil?nlent generates,
uses. and call radiale radio Irequency energy and.
if nol installed and used in accordance with the
inslruclions, inay cause barll]lll] illtcrlt2rclll2e to
radio comnnmicutions.
However, their is no guarantee thai interlelvnce
will not occur in a i?articular installation. If this
equipment does cause harmhfl interlbrcnce to
radio or television reception, which can be
deternlined by turning file equipment oll and on,
tile user is encouraged to tit' to correct tile
interim:fence by one or nlorc of tile Iollowing
Illeasures:
Reorient or relocate the receiving antenna.
Increase the separalion belween file equipnlent
and receiver.
('(lllllect tile equipnlent inlo an oullet on a
circuit dill?rent honl lhat to which file receiver
is connected.
Consult the dealer or an experienced radio/TV
lechnician R_r help.
Tile supplied intclqlacv cable must be used with the
equipmenl ill order 1o conlply with the limits lot a
digital device pursuanl to Subparl B of Parl 15 of
FCC Rules.
Forthe State of California, USAonly
Pcrcldorate Material - special handling nlay
apply. See
ww w.dlsc.ca.gov/hazardou swasle/perchlorale
Percldorale Material: Lithimn ballcry contains
perchlorate.
Your camcorder is supplied with two
kinds of operations guides.
"C'peratittg Guide" (This manual)
"PMB Guide" for using your camcorder
with a computer connected (stored on the
supplied CD-ROM) (p. 105).
Types of the disc you can use in your
camcorder
You c:ut use the following discs only.
8 cm DVD-RW
8 cm DVD+RW
8 cm DVD-R
8 cm DVD+R DL
Use the discs with marks listed below. See
page 16 for details.
For reliability and durability of recording/
playback, we recommettd that you use Sony
discs or discs with an _{_o *(for
VIDEO CAMERA/ mark for your
canlcorder.
* Depending on tile place you bought, file disc has
a_2_,_g_'.. mark.
0 Notes
• Using a disc other than aboxe Ill,iNcause tile
unsatistactory recording/playback or you may
no[ be able to renlove the disc Ironl your
camcorder.
DVD÷RDL
Typesof"Memory Stick" you canuse
inyourcamcorder
• For recoMh/g movies, it is recommended
tllat you use a "]k_elllory Stick PRO Duo"
of 1 GB or larger marked with:
MEMORYSTIERPRD [100 ("Memory Stick
PRO Duo") _
MEMORYSTffKPRI[]-HGOLID("Memo U Stick
PRO-HG Duo")
*Youcanuse"MemorySlickPRODuo"
whetherMark2isindicatedornot.
•Seepage33liartherecordabletimeofa
"MmuoryStickPRODuo."
"Memory Stick PRO Duo" / "Memory Stick
PRO-HG Duo"
(This size can be used with your
camcorder.)
"Memory Stick"
(You cannot use it in your camcorder.)
• "Memo U Stick PRO Duo" attd "Memo U
Stick PRO-HG Duo" are both referred to as
"Memo U Stick PRO Duo" in this manuah
• You cannot use any type of memory card
other than those mentioned above.
• "Memory Stick PRO Duo" can be used
only with "Memory Stick PRO"
compatible equipment.
• Do not attach a label or the like on a
"Mmnory Stick PRO Duo" or a Memory
Stick Duo Adaptor.
• Wlmn using a "Memory Stick PRO Duo"
with "Mmnory Stick" compatible
equipment, insert the "Mmnory Stick
PRO Duo" into the Memory Stick Duo
Adaptor.
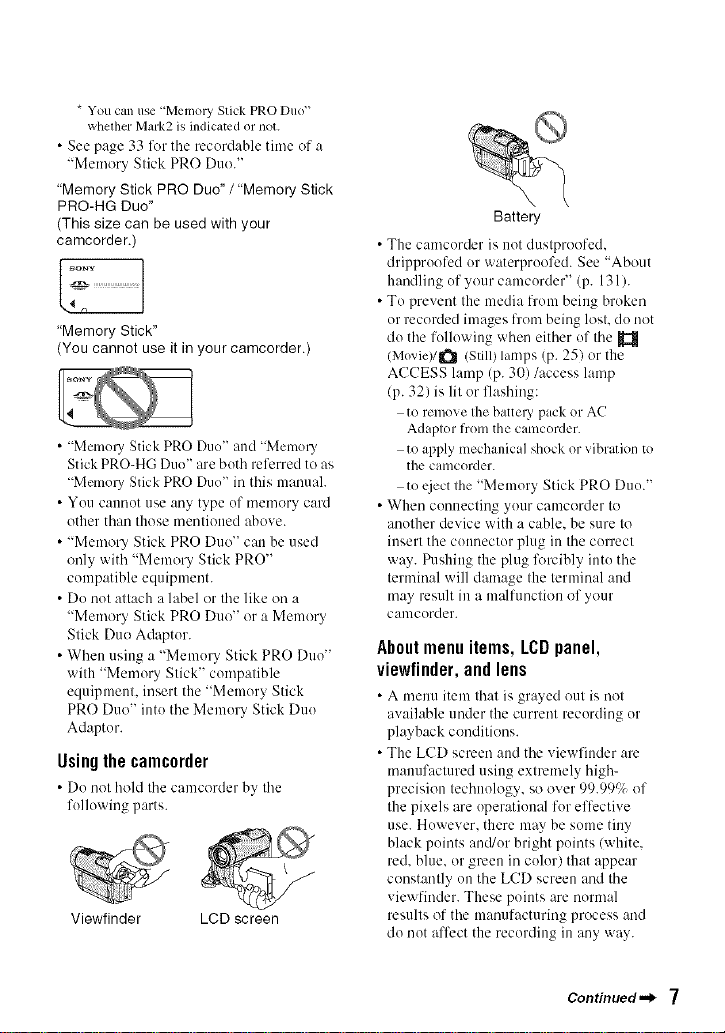
Using the camcorder
• Do m)t hohl the camcorder by the
following parts.
Viewfinder LCD screen
Battery
• The camcorder is not dustproofed.
dripproofed or waterproofed. See "About
handling of your camcorder" (p. 131).
• To prevent the media from being broken
or recorded images from being lost. do not
do the following when either of the
/Moviel/_ (Still) lamps (p. 251 or the
ACCESS lamp (p. 30)/access lamp
(p. 32) is lit or flashing:
to remove the batte U pack or AC
Adaptor from the camcorder.
to apply mechanical shock or vibration to
the camcorder.
to _.Liectthe "Memory Stick PRO Duo."
• When connecting your camcorder to
another device with a cable, be sure to
insert the connector plug in the correct
way. Pushing the plug lk_rcibly into the
terminal will damage the terminal attd
may result in a malfunction of your
camcorder.
About menu items, LCD panel,
viewfinder,and lens
• A men/i item that is gm>ed ()lit is not
available under the current recording or
playback conditions.
• The LCD screen attd the viewfinder are
manufactured using extremely high-
precision technology, so over 99.99c)_ of
the pixels are operati(mal for effective
use. However. there may be some tiny
black points and/or bright points (white.
red. blue. or green iracolor) that appear
constantly on the LCD screen and the
viewfinder. These points are normal
results of the manufacturing process and
do not alTcct the recording in any way.
Continued"=') 7
RsaS this befs_÷ spe_atiss ys_[_samssN÷_ (gsstisse_}
Ifyoucannotrecord/playback
images, format the media
If you repeat recording/deleting images for
a long time, fragmentatiou of data occurs en
the internal memory (HDR-UX20) or a
"Memory Stick PRO Duo." Images cannot
White, red, blue or
green point
• Exposing tile LCD screen, the viewfinder,
or the lens to direct sunlight for long
periods of time may cause malfunctions.
• Do not aim at the sun. Doing so might
cause your camcorder to malfunction.
Take images of the sun only in low light
conditions, such as at dusk.
Onrecording
• Before starting to record, test tile
recording fimction to make sure the nnage
and sound are recorded without any
problems.
HDR-UXI0:
It is recommeuded that you use a DVD-
RW/DVD+RW for trial recording/p. 38).
HDR-UX20:
It is recemmeuded that you use the
iuternal memory of your camcorder for
trial recording (p. 38).
• Compensation for the contents of
recordings cam/et be provided, even if
recording or playback is not possible due
to a malfimction of the camcerder, storage
media, etc.
• TV color systems differ depending on the
countries/regions. To view your
recordings on a TV, you need a NTSC
system-based TV.
• Television programs, films, video tapes,
and other materials may be copyrighted.
Unauthorized recording of such materials
may be contrary to the copyright laws.
be saved or recorded. In such a case. save
the images on other media/p. 61.68. 1051
first, then format the media (p. 78).
About changing the language setting
Tile en-screeu displays in each local
language are used lkw illustrating the
operating procedures. Change the screen
language before using your camcorder if
necessary (p. 26).
Onplayingbackrecordedimageson
other devices
• Your camcorder is compatible with
MPEG-4 AVC/H.264 High Profile for
HD (high definition) image quality
recording. Therefore. you cannot play
back images recorded with HD/high
definition) image quality on your
camcorder with the lk_llowing devices:
Other AVCHD-compalible devices which are
not compalible with High Profile
Devices which are nol compalible with the
AVCHD lormat
Noteon disposal/transfer(HDR-UX20)
Even if you format tile internal mmnory
(p. 78), you may not delete data from tile
internal memory completely. When you
transfer the camcorder, it is recommended
that yell perform [l_ EMPTY] (p. 83) to
prevent tile recovery of your data. In
addition to the above, when you dispose of
the camcorder, it is recommended that you
destroy tile actual body of tile camcerder.
Aboutthe Carl Zeiss lens
Your camcorder is equipped with a Carl
Zeiss lens. which was developed joimly by
Carl Zeiss. in Germany, and Sony
Corporation. and produces superior images.
It adopts the MTF measurement system for
video cameras and offers a quality typical
of a Carl Zeiss lens. Also. the lens for your
camcorder is T*-coated to suppress
unwauted reflections and faithfully
reproduce colors.
MTF= Modulation Transfer Function. The
number value indicates the amount of light
from a sut!ject coming into the lens.
Aboutthismanual
• The images of the L('[) screen :rod the
viewfinder used in this manual for
illustration purposes are captured using a
digital still camera, and therefore may
appear different.
• 8 cm DVD disc is referred to as "Disc" in
this manual.
• The internal memory, disc and "Memory
Stick PRO Duo" are all referred to as
"Media" in this manuah
• Design and specifications of recording
media and other accessories are sub.ject to
change without notice.
• The illustrations used on this manual are
based on the model HDR-UX20.
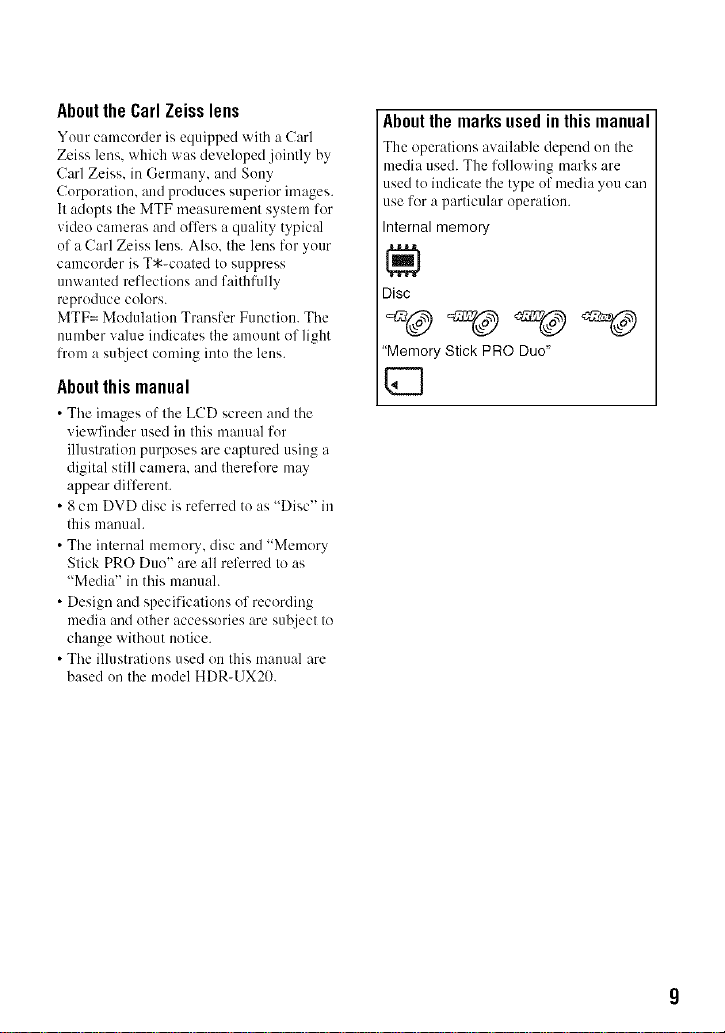
Aboutthe marksusedinthismanual
The operations available depend on the
media used. The following marks are
used to indicate the type of media you can
use for a particular operation.
Internal memory
Disc
"Memory Stick PRO Duo"
Q
Tableof Contents
IMPORTANT SAFEGUARDS ........ 3
Read this before operating your
camcorder .................................... 5
Subject examples and solutions ... 12
Enjoy using various "Media"
according to your needs ............. 13
Operation flow ............................... 14
Features of the media ................... 16
"I1_ HOME" and "o..._=OPTION"
- Taking advantage of two types of
menus ........................................ 18
Step 1: Checking supplied items
.................................................... 21
Step 2: Charging the battery pack
.................................................... 22
Step 3: Turning the power on and
setting the date and time ........... 25
Changing the language setting ..... 26
Step 4: Making adjustments before
recording .................................... 27
Step ,5:Selecting the media ......... 28
Step 6: Inserting a disc or a "Memory
Stick PRO Duo" ......................... 30
Recording and playback with ease
(Easy Handycam operation) ...... 34
Recording ..................................... 38
Zooming ........................................ 40
Recording sound with more presence
(5. lch surround recording) ......... 40
Starting recording quickly (QUICK
ON) .............................................. 41
10
Recording high quality still images
during movie recording (Dual Rec)
..................................................... 41
Recording in dark places (NightShot)
..................................................... 41
Adjusting the exposure for backlit
subjects ....................................... 42
Recording in mirror mode ............. 42
Recording the fast action in slow-
motion (SMTH SLW REC) ............ 42
Playback ....................................... 44
Searching for desired scenes by
pinpoint (Film Roll Index) ............ 47
Searching for desired scenes by face
(Face Index) ................................ 47
Searching for desired images by date
(Date Index) ................................ 48
Using PB zoom .............................. 48
Play back a series of still images
(Slide show) ................................. 49
Playing the image on a TV ........... 49
I_ (OTHERS) category ................ 56
Deleting images ............................ 57
Capturing a still image from a movie
.................................................... 59
Dubbing/copying images from one
media to another media on your
camcorder .................................. 61
Dividing movies ............................ 64
Creating the Playlist ..................... 65
Dubbing movies to other recording
devices ....................................... 68
Printing recorded still images
(PictBridge compliant printer) ..... 70
(MANAGE MEDIA) category
.................................................... 72
Making the disc compatible with
playback on other devices
(Finalizing) ................................. 73
Playingadisconotherdevices....76
Checkingthemediainformation...78
Formattingthemedia....................78
Recordingadditionalmoviesafter
finalizing.....................................80
Findingtherightdisc(DISCSELECT
GUIDE).......................................81
Repairingtheimagedatabasefile
.................................................... 82
Preventing data on the internal
memory of the camcorder from
being recovered (HDR-UX20) .... 83
Functions set in the _ OPTION
MENU ....................................... 100
What you can do with Windows
computer .................................. 105
Troubleshooting .......................... 109
Warning indicators and messages
.................................................. 120
What you can do with the
(SETTINGS) category of the
HOME MENU ............................. 84
Using the HOME MENU ................ 84
List of the _ (SETTINGS) category
items ........................................... 84
MOVIE SETTINGS ....................... 86
(Items for recording movies)
PHOTO SETTINGS ...................... 90
(Items for recording still images)
VIEW IMAGES SET ..................... 92
(Items to customize the display)
SOUND/DISP SET ....................... 93
(Items to adjust the sound and the
screen)
OUTPUT SETTINGS .................... 95
(Items for connecting other devices)
CLOC K/IAI LANG .......................... 96
(Items to set clock and language)
GENERAL SET ............................ 96
(Other setup items)
Activating functions using the _.
OPTION MENU .......................... 98
Using the OPTION MENU ............. 98
Recording items on the OPTION
MENU .......................................... 98
Viewing items on the OPTION MENU
..................................................... Be
Using your camcorder abroad .... 124
Files/folder structure on the internal
memory (HDR-UX20) and a
"Memory Stick PRO Duo". ........ 126
Precautions and maintenance .... 127
About the Disc ............................ 127
About the AVCHD format ............ 128
About the "Memory Stick" ........... 129
About the "InfoLITHIUM" battery pack
................................................... qg0
About the x.v.Color ..................... 131
About handling of your camcorder
................................................... 181
Specifications .............................. 135
Identifying parts and controls ...... 139
Indicators displayed during recording/
playback ................................... 143
Glossary ...................................... 145
Index ........................................... 146
11

Subjectexamplesandsolutions
Checking year
P,'SMTHSLW REC....................... 42
Capturing still
images during
movie recording
_.DualRec ................................... 41
Flowers in close-
up
_"PORTRAIT............................... 102
P"FOCUS.................................... 100
_'TELE MACRO.......................... 100
Focusing an the
dog onthe left
side of the screen
_'FOCUS.................................... 100
_"SPOT FOCUS.......................... 100
Qetting a good
or beach
_. Back light.................................. 42
_.BEACH.................................... 102
_.SNOW..................................... 102
A child on the
stage under a
P,"SPOTLIGHT............................ 102
Fireworks with all
its spiender
_'FIREWORKS........................... 101
_'FOCUS.................................... 100
under dim light
_. NightShot ................................. 41
_.COLOR SLOW SHTR............... 103
12
Enjoyusin9various°°M÷dia"
accordin9 to your needs
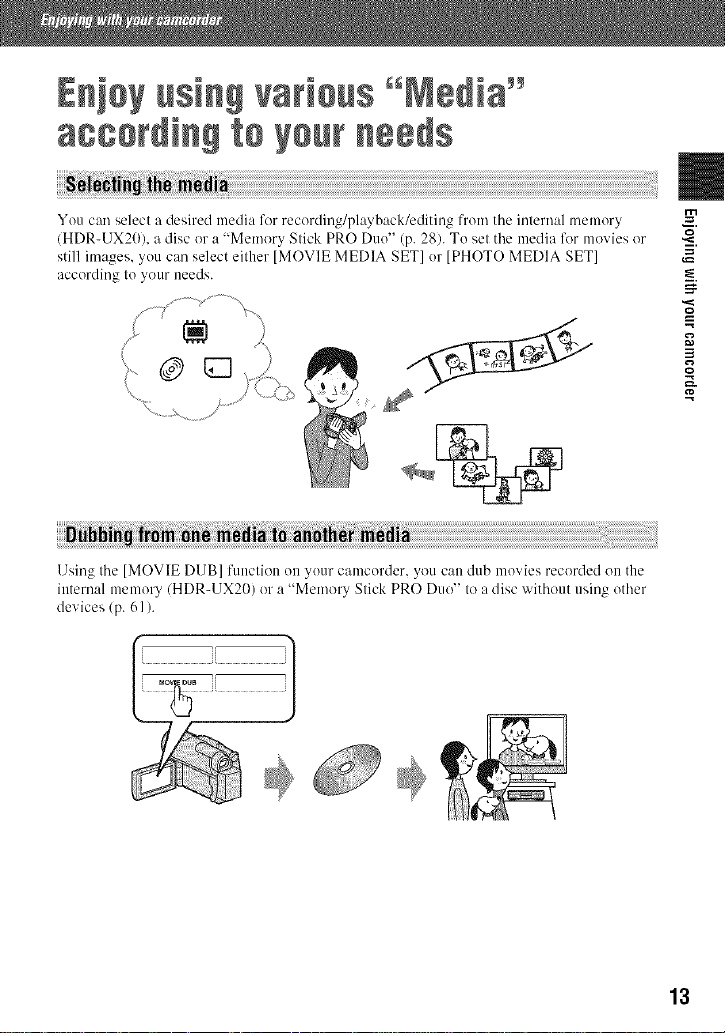
You can select a desired media for recording/playback/editing fronl tile internal memory
/HDR-UX20/. a disc or a "Memory Slick PRO Duo" (p. 28). To sel the media for movies or
still images, you carl select eifller [MOVIE MEDIA SET] or [PHOTO MEDIA SET]
according Io your needs.
@G
N F
Using tile [MOVIE DUB] function on your camcorder, youcan dub movies recorded on the
internal memory (HDR-UX20) or a "Memory Slick PRO Duo" Io a disc without using other
devices/p. 61 ).
/
13
Opsralen [[ew
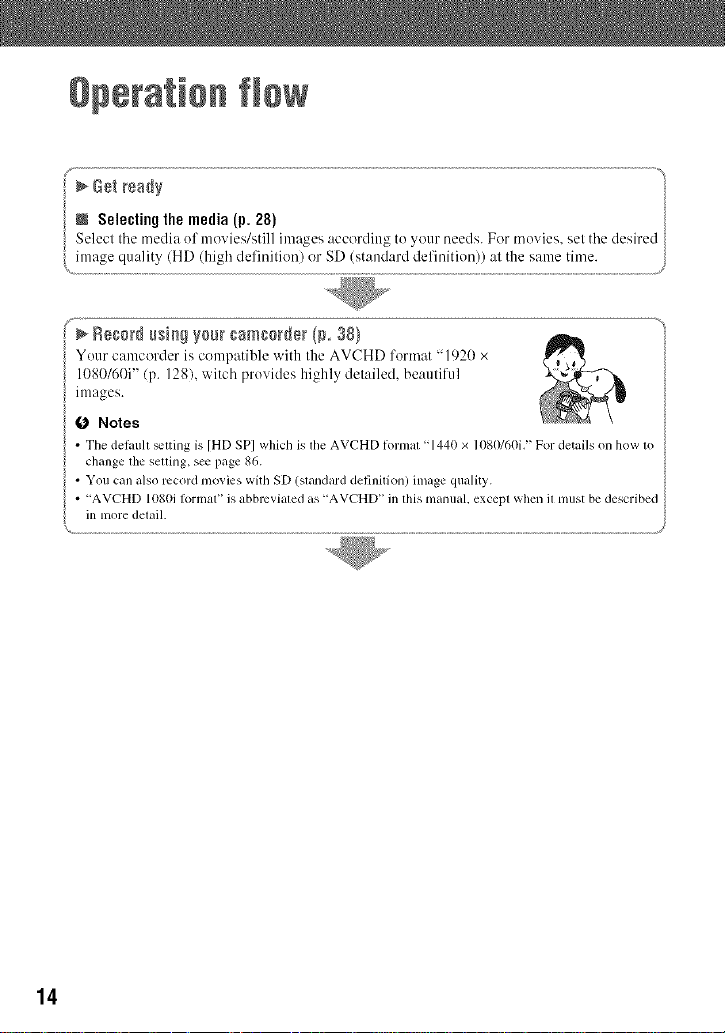
@ Selectingthe media(p. 28)
Select tile media of movies/still images according to your needs. For movies, set tile desire_
image quality (HD (high definition) or SD (standard definition)) at the same time.
f ..... %
Your camcorder is compatible with the AV('HD format "1920 x
1080/60i"/p. 128), witch provides highly detailed, beautiful
images.
Notes
• Tile det, mlt _tting is [HD SP] which is tile AVCHD tormat "1440 x 1080/60i." For det_fils on how to
ch+mge tim setting, see p+tge 86.
• You can also record movies will SD (standard definition) inlage quality.
• "AVCHD 1080i l_>rlnal" is abbreviated as "AVCHD" in Ibis manual, except when it mtlst be described
in nlore detail.
14
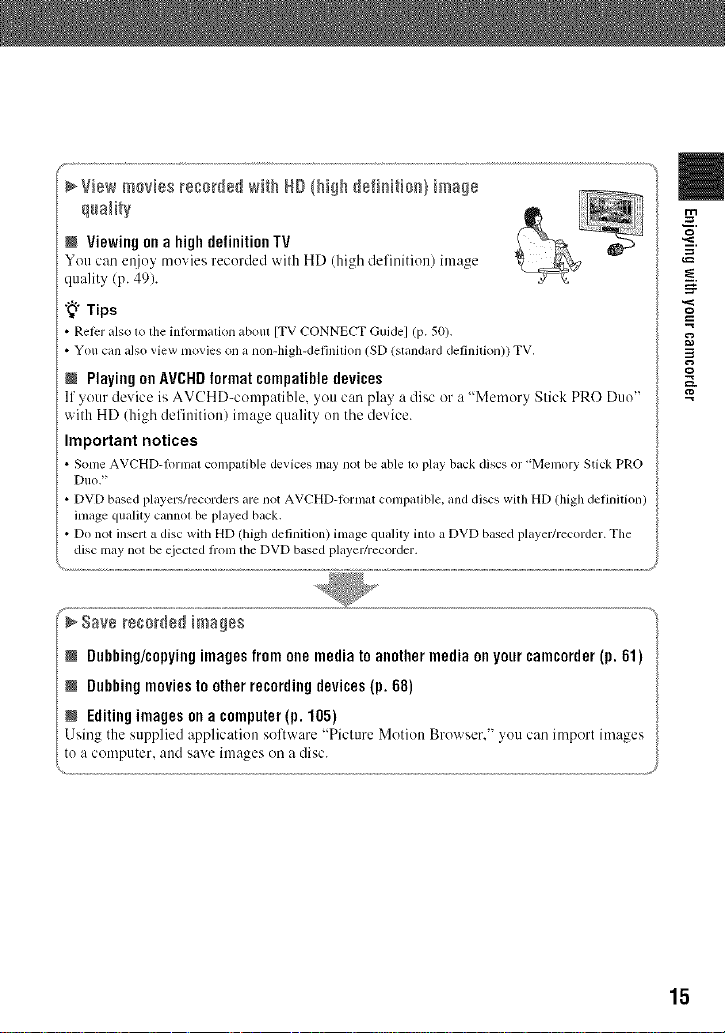
N Viewing on a high definition TV
You can e_)oy movies recorded with HD (high definition) image
quality (p. 49).
"_° Tips
Relcr also to the inlbrn/aUon about [TV ¢'ONNE('T Guide] (p. 50).
You can also view movies on a non-high-definUion (SD (standard definition)) TV,
N PlayingonAVCHDformat compatibledevices
11">our device is AVCHD-compatible, >ou c:m pla> a disc or Ii "Memury Stick PRO Duo"
with HD (high definition) image quality oll the device.
Important notices
Some AVCHD-Iormal compatible dexices may not be able 1oplay back discs or "Memory Stick PRO
DIIOi _
DVD based players/recorders are not AVCHD-lormat compalible, and discs with HD (high definiUon)
image qualily cannol be played back.
Do not insert a disc with HD (high definiUon) image qualily into a DVD based player/recorder. The
disc may not be eiected floln the DVD ba,,ed player/recorder.
N Dubbing/copyingimagesfromonemediato anothermediaonyoureamcorder(p. 61)
m Dubbingmoviesto otherrecordingdevices(p. 68)
N Editingimagesona computer(p. 105)
Using the supplied application software "Picture Motion Browser." you can import images
to a computer, and have images on a disc.
=
o
_J
/
15
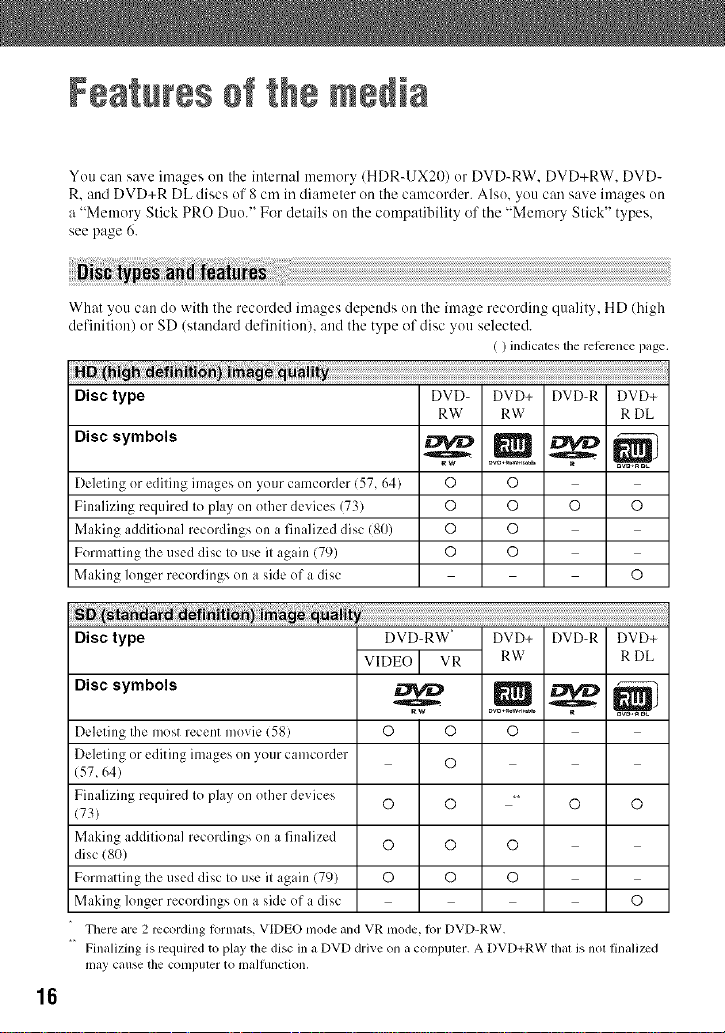
Features of the media
You can save images on the internal memory (HDR-UX20) or DVD-RW. DVD+RW. DVD-
R. and DVD+R DL discs of 8 cm in diameter on the camcorder. Also. you can save images on
a "Memory Stick PRO Duo." For details on the compatibility of the "MemoU Stick" types,
see page 6.
What you can do with the recorded images depends on Ihe image recording qualily, HD (high
definilion) or SD (standard definition), and the type o1'disc you selected.
( ) indicales the rel_rence page.
Disc type DVD- DVD+ DVD-R DVD+
Disc symbols t_w _ o_ " L_,_ _
Deleting or editing images on }our camcordcr (57, 64) © ©
Finalizing required to play on other devices (73) O O O O
Making additional recordings on a finalized disc (80) O O
Fommtting the used disc to use it again (79) O O
Making longer recordings on a side of a disc O
Disc type DVD-RW _ DVD+ DVD-R DVD+
VIDEO I VR RW R DL
Discsymbols _ o_ _ _
Deleting the most recent movie (58) O O O
Deleling or editing images on your camcorder O
(57, 64)
Finalizing required Io play on other devices 0 0 *_ 0 0
(73)
Making addiliona] recordings on a finalized 0 0 0
disc (80)
Formatling Ihe used disc Iouse ilagain (79) O O O
Making longer recordings on a side of a disc 0
There are 2 recording l_)lll/als, VIDEO mode and VR mode, 1or DVD-RW.
Finalizing is required to play the disc in a DVD drive on a compuler. A DVD+RW lhal is nol finalized
may callse the COlllplller to malfunction.
RW RW R DL
16
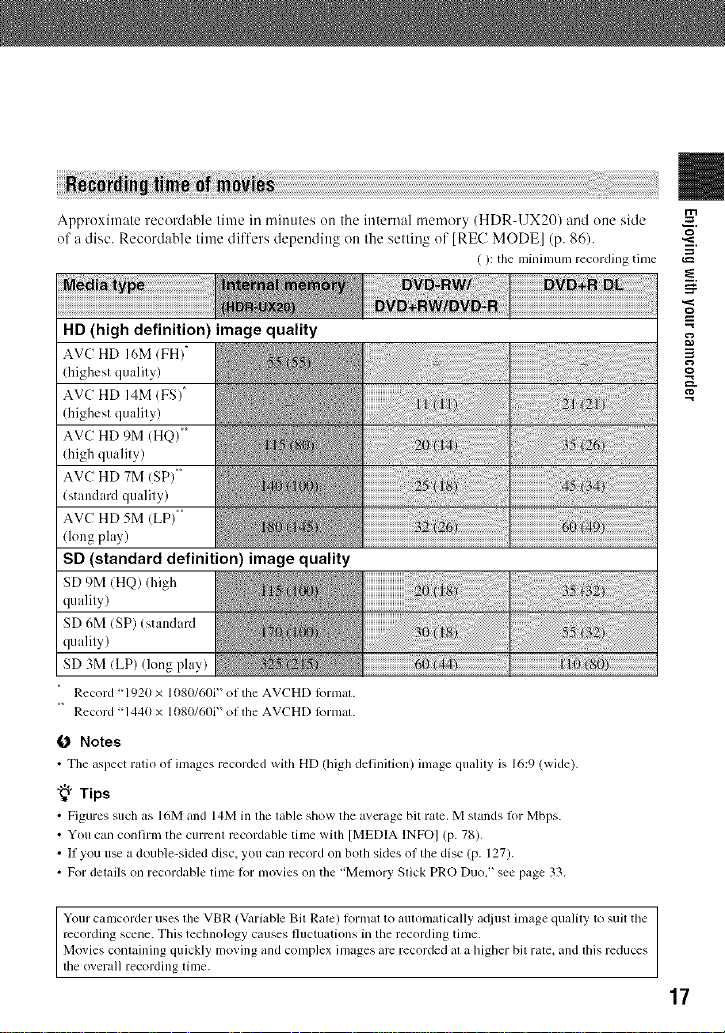
Approximate recordable time in minutes on tile internal nlemory (HDR-UX20) and one side
of a disc. Recordable time differs depending on the setting of [REC MODEl (p. 86).
( ):tile minimum recording time
HD (high definition) image quality
AVC HD 16M (FH) _
(highest quality)
AVC HD 14M (FS)*
(highest quality)
AVC HD 9M (HQ) *_
(high quality)
AVC HD 7M (SP) **
(standard quality)
AVC HD 5M (LP) *_
(long play)
SD (standard definition) image quality
SD 9M (HQ) (high
quality)
SD 6M (SP) (standard
quality)
SD 3M (LP) (long play)
Record "1920 x 1080/60i" of the AVCHD lbrmat.
Record "1440 x 1080/6{1i" of the AVCHD lbrmat.
O Notes
• Tile aspect ratio ol inlages recorded with HD (high delinition) image quality is 16:9 (wide).
"_° Tips
• Figures such as l(l[V[and 14M in tile table show the average bit rate. M stands l_)r Mbps.
• You can confirm the currant rccordable time with [MEDIA INFOI (p. 78).
• II you use a double-sided disc, you can record on both sides of the disc (p. 127).
• For delails on recordable time lor nlovies on tile "Menlory Slick PRO Duo." see page 33.
=
Your camcorder uses the VBR (Variable Bit Rate) lormat to autonlatically ac/iust inlage quality to suit the
recording scene. This technology causes fluctuations in the recording time.
Movies containing quickly moving and conlplex images arc recorded at a higher bit rate+ and this reduces
die overall recording time.
17
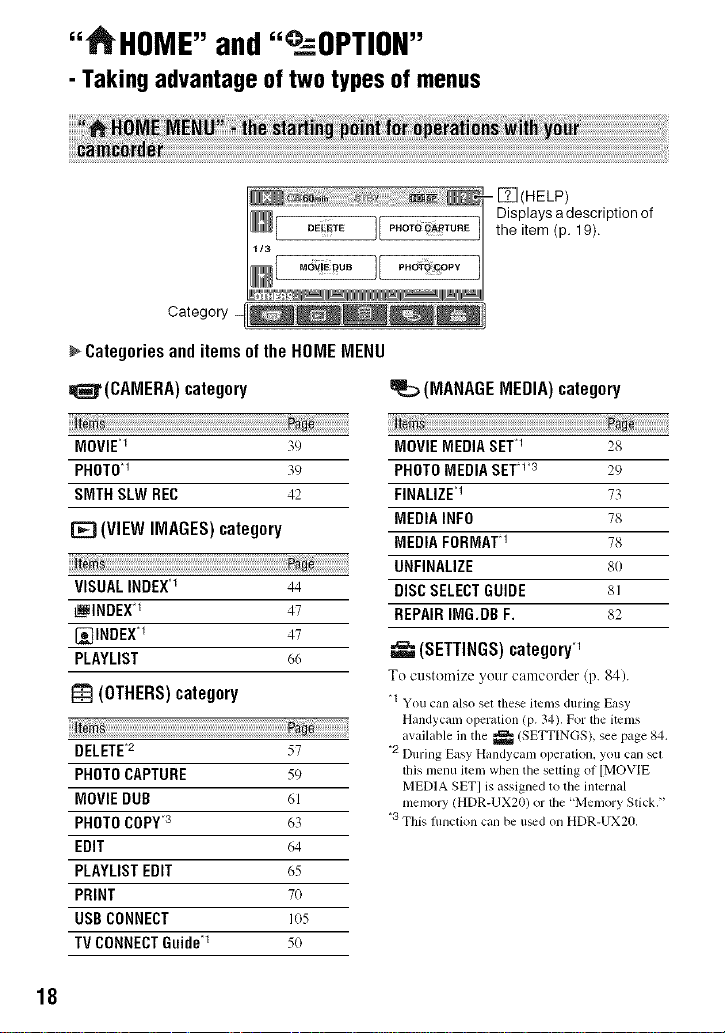
" HOME" and"°_.=OPTION"
- Taking advantage of two types of menus
Category
Categories and items of the HOME MENU
_Jr(CAMERA) category
MOVIEq 3_1
PHOTOq 39
SMTH SLW REC 42
r=_'3(VIEW IMAGES) category
VISUALINDEXq 44
_INDEX q 47
_]INDEX q 47
PLAYLIST 66
I_ (OTHERS) category
DELETE_2 57
PHOTOCAPTURE 59
MOVIE DUB 61
PHOTOCOPY_3 63
EDIT 64
PLAYLISTEDIT 65
PRINT 7(t
USBCONNECT 1(t5
TVCONNECTGuideq 5(t
(MANAGEMEDIA)category
MOVIE MEDIA SET1 28
PHOTOMEDIA SETq_3 29
FINALIZEq 73
MEDIA INFO 78
MEDIA FORMATq 78
UNFINALIZE 8o
DISCSELECTGUIDE 81
REPAIRIMG.DB F. 82
(SETTINGS) category q
To custon/ize your camcorder (p. 84).
_1 You can also sel these items during Easy
Handycam operation (p. 34), For the ittrms
available in the _ (SETT[NGS), see page 84.
_2 During Easy Handycam operalion, you can _1
this menu item when the setting of [MOVIE
MEDIA SET] is assigned to the internal
memory (HDR-UX20) or the "Memory Stick,"
_3 This fimction can be u_d on HDR-UX20,
18

4
/ While pressing the green button,
slide the POWER switch in the
direction of the arrow to turn on
the power.
2 Press _ (HOME) [] (or [_).
(HOME) []
t1_ (HOME) []
III
=-I.Touch the desired item.
Example: IEDITI
5 Follow the guide on the screen for
further operation.
To hide the HONEMENUscreen
TouchF2q.
Whenyouwantt0 knowsomething
aboutthe function0f eachitem on
the HONEMENU- HELP
1Press _(HOME).
The HOME MENU appears.
==
Q
3 Touch the desired category.
Example: _ (OTHERS) category
2 TouchD(HELP).
Tile botton/of tile [] (HELP) turns
orange.
Continued._ 19

°°@HOME"a0_ _OPT_OR"o Takio_ advaota_e of two typos of meous
•,_ Touch the item you want to learn
more about.
When you touch an item, its explanation
appears on the screen.
Tu apply the option, touch [YES],
otherwise, touch [NO].
TodeactivatetheHELP
Touch [] (HELP) again in step 2.
Just a tuuch on the screen during shooting
or playback displays the functions awulable
at that moment. You will find it easy tu
make various settings. See page 98 for
further details.
2O
@=.=-(OPTION)
Gdth_# Started
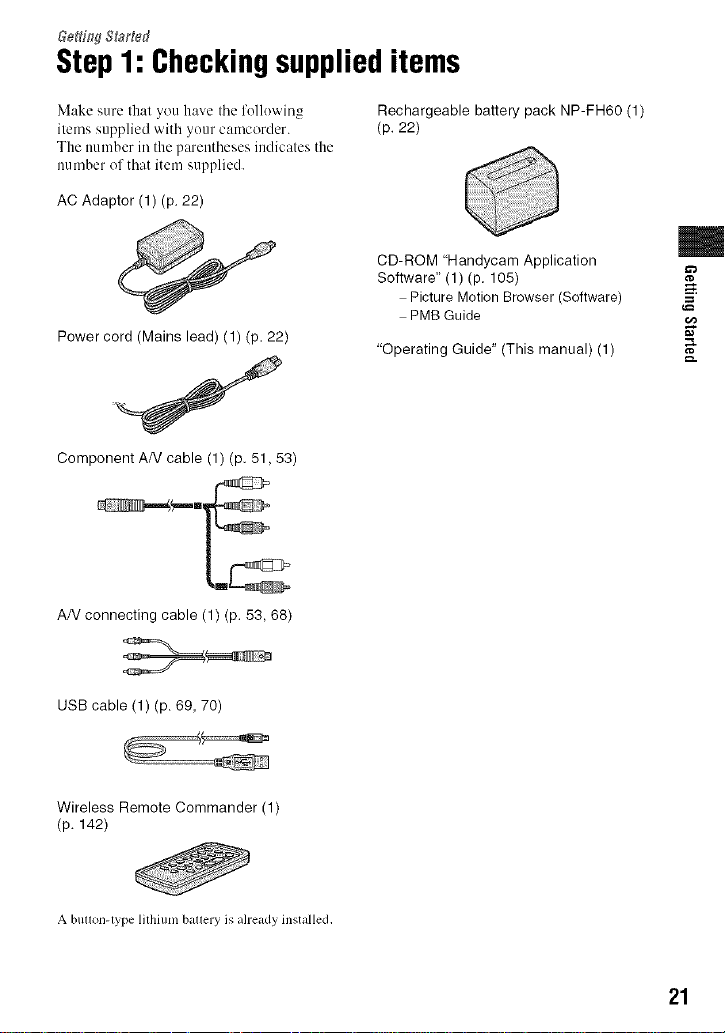
Step1: Checkingsupplieditems
Make sure that you have tile folk)wing
items supplied with your camcorder.
The number in the parentheses indicates the
uu mber of that item supplied.
AC Adaptor (1) (p. 22)
Power cord (Mains lead) (1) (p. 22)
Component AN cable (1) (p. 51,53)
AN connecting cable (1) (p. 53, 68)
Rechargeable battery pack NP-FH60 (1)
(p. 22)
m
CD-ROM "Handycam Application
Software" (1) (p. 105)
Picture Motion Browser (Software)
PMB Guide
"Operating Guide" (This manual) (1)
USB cable (1) (p. 69, 70)
Wireless Remote Commander (1)
(p. 142)
A buuoJl-typ¢ lithium bauery is aheady installed,
21
Step2: Chargingthe batterypack
POWER switch
-- Battery pack
Jack cover
DC plug
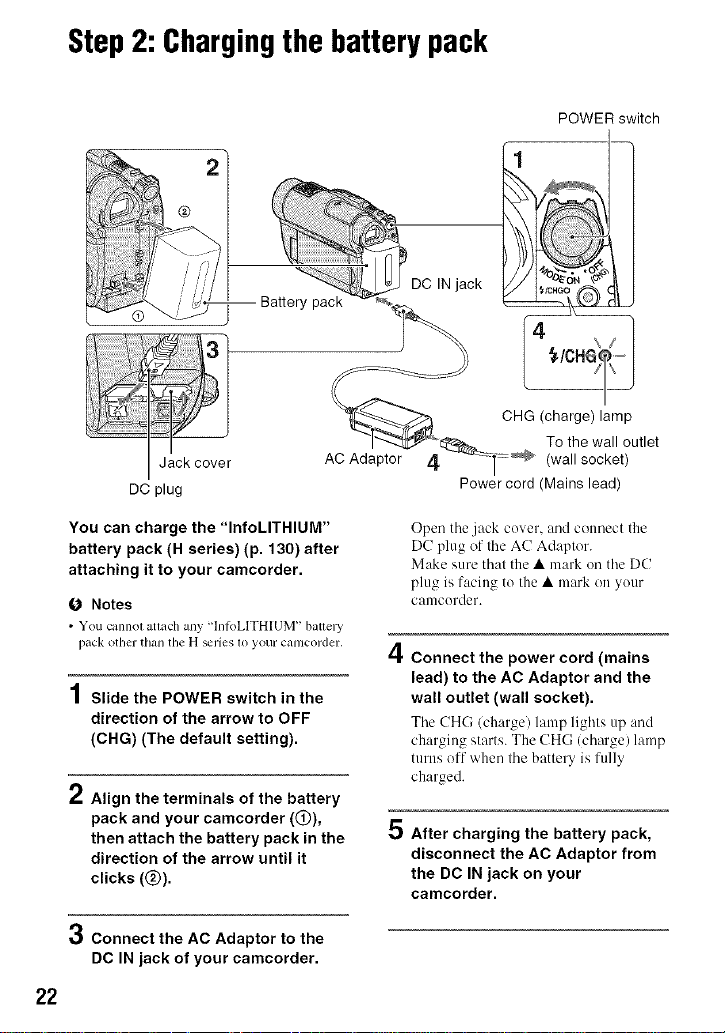
You can charge the "InfoLITHIUM"
battery pack (H series) (p. 130) after
attaching it to your camcorder.
fO Notes
• You cannot attach any 'IntoL]TH[UM _ battmy
pack othcl" th;ll] t_le H _l'iCs [o your C_[I]ICOI'deIL
4
/ Slide the POWER switch in the
direction of the arrow to OFF
(CHG) (The default setting).
Align the terminals of the battery
pack and your camcorder (O),
then attach the battery pack in the
direction of the arrow until it
clicks (Q).
INjack
CHG (charge) lamp
1_'_ To the wall outlet
AC Adaptor 4 _=_ (wall socket)
4
5
Power cord (Mains lead)
Open tile jack cover, and connect the
DC plug of tile AC Adaptor.
Make sure that the • mark oil the DC
plug is facing to the • mark on your
camcorder.
Connect the power cord (mains
lead) to the AC Adaptor and the
wall outlet (wall socket).
Tile CH(;/charge/lamp lights up :rod
charging starts. The CHG (charge) lamp
turns off when the battery is fully
charged.
After charging the battery pack,
disconnect the AC Adaptor from
the DC IN jack on your
camcorder.
3 Connect the AC Adaptor to the
DC IN jack of your camcorder.
22

O Notes
• Disconnect tim AC Adaptor hon_ tile DC IN
jack holding both the camcorder and tile DC
plug.
To removethe battery pack
(_) Slide tile POWER switch to OFF
(CHG).
(_) Press and hold the BATT (battery
release) button and remove the battery
pack in the direction of the arrow.
BATT (battery release) button
DISP
BATT INFO
After a while, the approximate recordable
time and battery information appear %r
about 7 seconds. You can view the battery
information for up to 20 seconds by
pressing DISP/BATT INFO again while the
information is displayed.
Remaining battery (approx.)
REC TIMe AVAILABLe
BATTERY INFO_ ]
LCD SCREEN: 6O rain
I...................... I
--!
Recording capacity (approx./
m
g
g.
0 Notes
• When yol/relno_,e the battery pack or
disconnect lhe AC AdaploL make sure thai tile
!Movie) lamp/_ (Still) lamp lP. 25)/
ACCESS lamp (p. 30)/access lamp (p. 32) is
turned off.
• When sloring the bauery pack. lhlly discharge
the battc W pack belorc storing it lot an extended
period (see page ]31 lot tile delails of storage).
Touseapowersourcefroma wall
outlet(wallsocket)
Make the same contlectiolls as _o/t do x.,,lien
charging the battery pack. The battery pack
will not lose its charge in this case.
To checktheremaining battery
(BatteryInfo)
Set the POWER switchto OFF (CH(-;),then
press DISP/BATT INFO.
Chargingtime
Approximate time (rain.) required when
you fidly charge a fully discharged battery
pack.
ry
NP-FH50 135
NP-FH60 (supplied) 135
NP-FH70 170
NP-FH 100 390
Availablerecordingtime
Approximate time (rain.) a_ ailable when
you use a fully charged battery pack.
"HD" stands lor high definition image qualily,
and "SD" stands lor slandard image quality.
Continued._ 23
Step 2: gha(g)_) the batte(y pack (go_ti_e_}
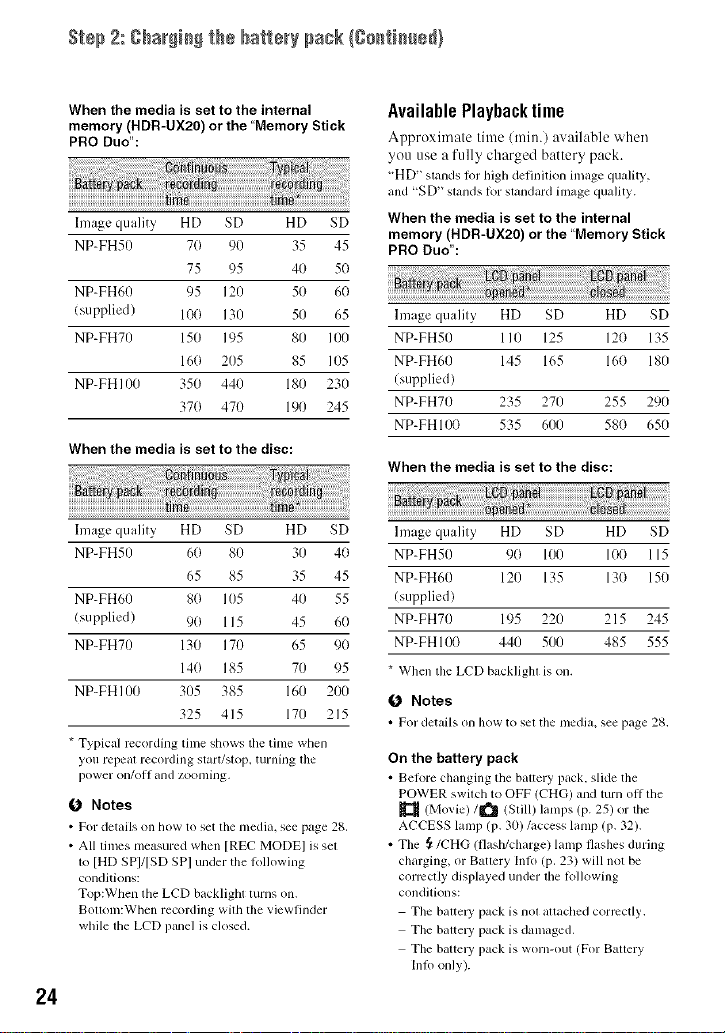
When the media is set to the internal
memory (HDR-UX20) or the "Memory Stick
PRO Duo":
hnage quality HD SD HD SD
NP-FH50 70 90 35 45
75 95 40 50
NP-FH60 95 120 50 6(}
(supplied) 100 130 50 65
NP-FH70 150 195 80 IO0
160 205 85 105
NP-FHI00 350 440 180 230
37(1 470 190 245
When the media is set to the disc:
hnage quality HD SD HD SD
NP-FH50 60 80 30 40
65 85 35 45
NP-FH60 8(1 105 40 55
(supplied) 90 115 45 60
NP-FH70 130 170 65 90
140 185 70 95
NP-FH 100 305 385 160 200
325 415 170 215
* Typical recording tinle shows tile time when
you repeat recording start/slop, turning lhe
power on/oil and zoot/lhlg,
O Notes
• For details on how to set the media, see page 28.
• All times measured when [REC MODEl is sel
to [HI) SPI/[SD SPI under the lollowing
conditions:
Top:When the LCD backlight lurns on.
Bottoln:When recording with tile viewfinder
while the LCD panel is closed.
24
AvailablePlaybacktime
Approximate time (rain.) available "_xhen
you use a fully charged battery pack.
"HD" slands lor high definition image quality,
and "SD" stands lor standard image quality.
When the media is set to the internal
memory (HDR-UX20) or the "Memory Stick
PRO Duo":
Image quality HD SD HD SD
NP-FH50 110 125 120 135
NP-FH60 145 165 16(} 180
(supplied)
NP-FH70 235 270 255 290
NP-FHI00 535 600 58(} 650
When the media is set to the disc:
Image quality HD SD HD SD
NP-FH50 90 100 100 115
NP-FH60 120 135 13(} 150
(supplied)
NP-FH70 195 220 215 245
NP-FHIO0 440 500 485 555
* When tile LCD backlighlis on.
O Notes
• For details on how to seltile media, see page 28.
On the battery pack
• Belore changing tile baltery pack. slide tile
POWER swilch to OFF (CHG) and turn ol1 lhe
(Movie) 1_ (Still) lamps (p. 25) or the
ACCESS lamp (p. 30)/access lamp (p. 32).
• The {t/CHG (flash/charge) lamp flashes during
charging, or Battery Inlo (p. 23) will not be
correctly displayed under the lollowing
conditk>ns:
The baltel T pack is nol altached correctly,
The balte W pack is danlaged.
The battcl T pack is worn-out (For Baltery
Inlo only).
•Tilepowerwillnotbesuppliedlronltilebattery
a_,longastheACAdaptorisconnectedtothe
DCINjackofyourcamcorder,evenwhenthe
powercord(nlainslead)isdisconnecledflom
thewalloutlet(wallsocke0.
•Whenaltacllinganoptionalvideolighl,ilis
mCOmlnendedtllalyouuseanNP-FH70orNP-
FH100batteU pack.
• We do not recomlnend using an NP-FH30,
which only allows shorl recording and playback
times, with yollr canlcorder.
On the charging/recording/playback time
• Tilnes ille_lsul'ed ",&hell using tile C_llllcorder _lt
25 °C (77 OF)( 10 %"to 30 %" (50 °F to 8(, OF)is
recommended).
• The recording and playback dine will be sllorter
when you use your camcorder ill low
tenlperatures.
• The recording and playback lime will be shorter
depending on the conditions under wllich you
use yollr camcorder.
On the AC Adaptor
• Us tile nemby w_dl outlet (wall socket) when
using the AC Adaptor. Disconnect tile AC
Adaptor h'onl the wall outlet (wall socket)
innnediately if ally lnalflmction occurs while
using yollr camcorder.
• Do not use tile AC Adaptor placed in a narrow
space, such as between a wall and hlrnimre.
• Do not short-circuit the DC plug of the AC
Adaptor or battery terminal with ally metallic
ot_iects. This may ctmse a malfunction.
• Even if your camcorder is turned oil, AC power
(mains) is still supplied to it while connected to
the wall out]el (wall socke0 via the AC Adaptor.
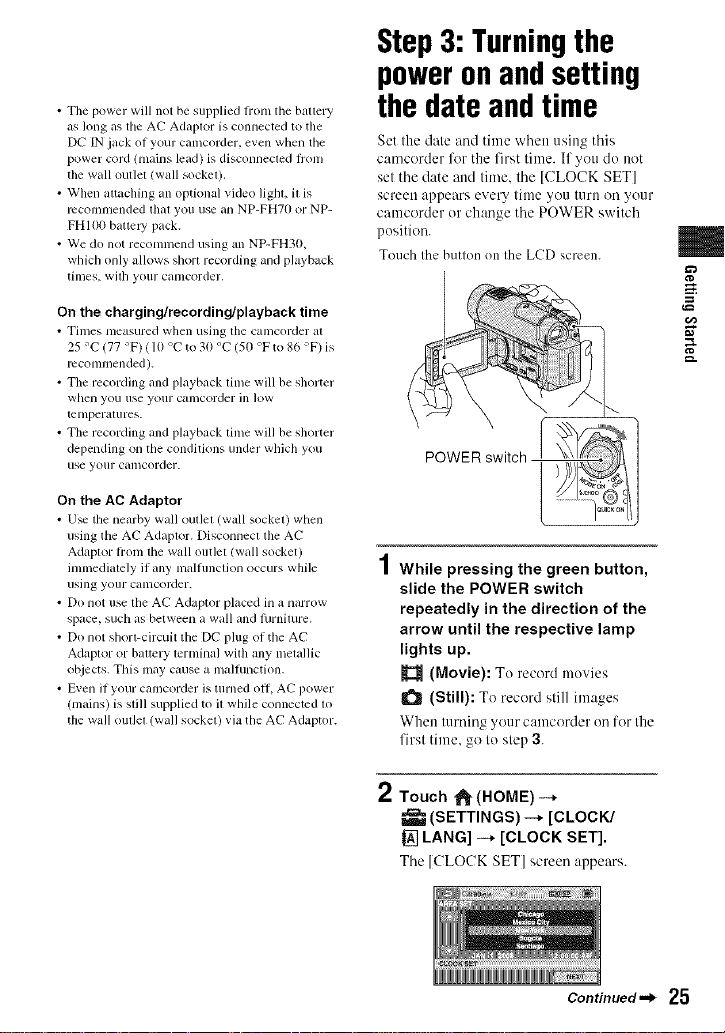
Step3: Turningthe
poweronandsetting
the dateandtime
Set the date and time when using this
camcorder %r the first time. If you do not
set the date attd time, the [CLOCK SET]
screen appears every time you turn on your
camcorder or change the POWER switch
pusition.
Touch the button on the LCD screen.
POWER switch -
While pressing the green button,
slide the POWER switch
repeatedly in the direction of the
arrow until the respective lamp
lights up.
(Movie): To record movies
(Still): To record still images
When turning your camcorder on for the
first time, go to step 3.
m
g
g.
Touch _ (HOME) --*
(SETTINGS) --+ [CLOCK/
[] LANG] --* [CLOCK SET].
The ICLO('K SETI screen appears.
Continued._ 25
S_÷p3: Tur_i_gthsp+wsr+_a_ s÷t_i_g_hs_at+a_ timeIg+_im+÷_l
0 Notes
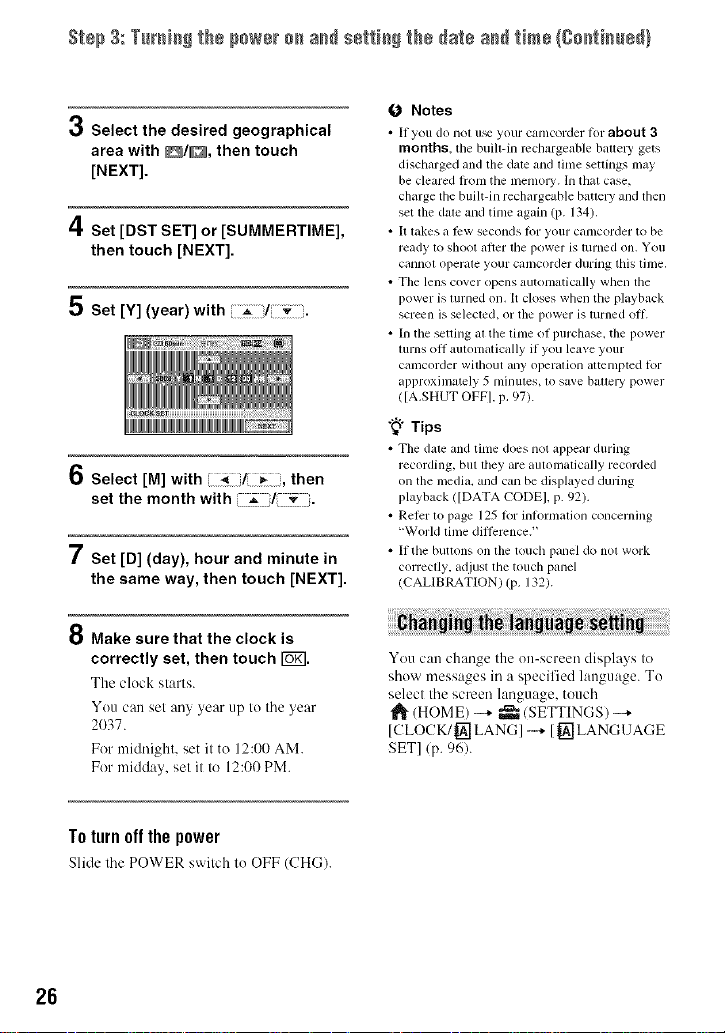
3 Select the desired geographical
area with _D, then touch
[NEXT].
4Set [DST SET] or [SUMMERTIME],
then touch [NEXT].
5 Set [Y] [year) with _ / _ .
O Select [M] with _ / _ ;,then
set the month with z / _,.
7 Set [D] (day), hour and minute in
the same way, then touch [NEXT].
• If you do not u_ your camcorder for about 3
months, the built-ill rechargeable bauely gets
discharged and the dale and time settings nlay
be cleared fi-onl the lnelnory. In that case,
charge the built-in rechargeable bauery and lhen
set the dale and tinle again (p. 134).
• It takes a l_2wseconds t(ir yollr calllColder to be
ready to shoot gtlter the power is lurned oil Votl
CilllllOt operate your Calilcorder durillg this time,
• The lens cover opens autolnatically when the
power is ltlrned on, It closes when the playback
screen is selecled, or the power is lurned off.
• [11the setthlg al the lhlle o] ptlrchase, the power
ltlrns oil autonlatically if you leave your
Calllcorder without ally operatioll attelllpted lk)r
approxinlately 5 nlinutes, to save bauery power
([A.SHUT OFFI, p. 97).
"_" Tips
• The date and tinle does not appear during
recording, but they are autolnatically recorded
on tile media, and can be disphtyed during
ph,yback ([DATA CODE], p. c)2).
• Reler to page 125 lk)r infornlafion concerning
"World time dillerence. '+
• 11the buttons on tile touch panel do not work
correctly, adjust the touch panel
(CALIBRATION) (p. 132).
8 Make sure that the clock is
correctly set, then touch r_l.
The cluck starts.
Yuu can set any year up to tile year
2(337.
For midnighl, set il to 12:00 AM.
For midday, sel it to 12:00 PM.
Totorn off the power
Slide tile POWER switch lu OFF (CHG).
26
Youcan changethe on-screen displays to
show messages in a specified language. To
select the screen language, touch
(HOME)-+ _ (SETTINGS) -+
[CLOCK/{_ LANG]--+ [{_ LANGUAGE
SET] (p. 96).
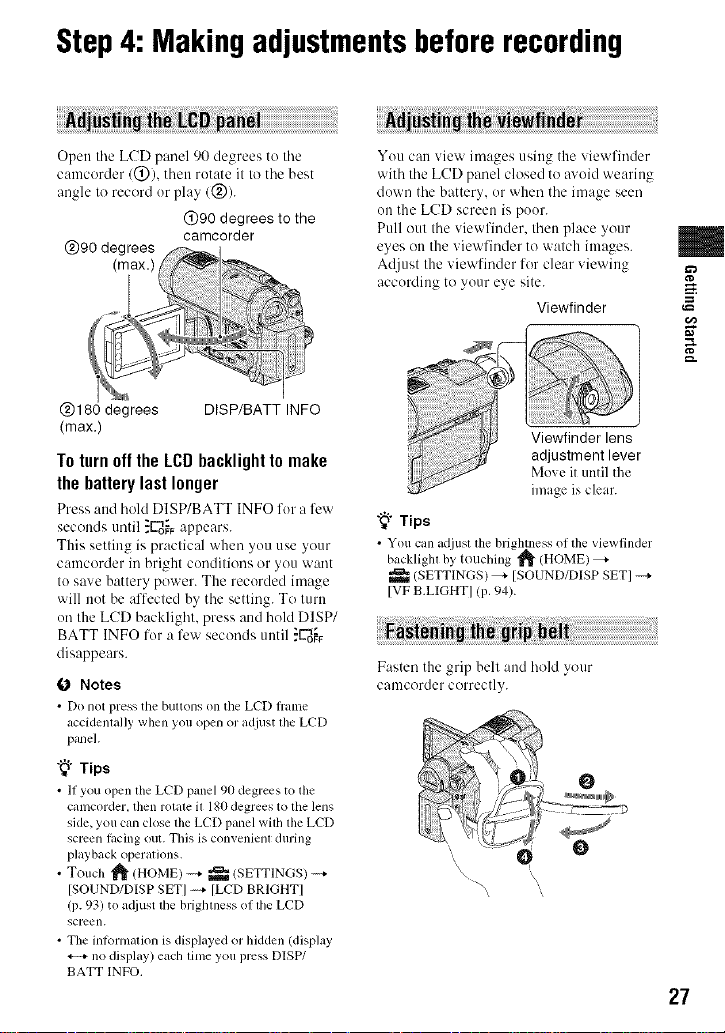
Step4: Makingadjustmentsbeforerecording
iiiiiiiii ! ]{ i! 'ii6i !ii!ii ii!i !ii! ii i i!¸iN !! i i i i! i! iiiiiiiiiiiiiiiiiiiiiiiiiiiiiiiiiiiiiiiiiiiiiiiiiiiiiiiiiiiiiiiiiiiiiiiiiiiiiiiiii!i!i ! !! !
Opett tile LCD panel 90 degrees to tile
camcorder 1@), thett rotate it to tile best
angle to record or play 1@).
@90 degrees to the
camcorder
(max.)
To turn off the LCD backlight to make
the battery last longer
Press :,ttd hold DISP/BATT INFO for a l'c'_
seconds until _C'_o_Fappears.
This setting is practical when you use your
camcorder in bright conditions or you want
to save battery power. The recorded image
will not be aflected by the setting. To turtt
on the LCD backlight, press attd hold D]SP/
BATT INFO for a few seconds until ."Udo_
disappears.
0 Notes
• Do llot press tile buuons on tile LCD l]'allle
accidenlally when you open or adjust lhe LCD
panel.
"_° Tips
• 11you open tim LCD panel 90 degrees to tim
camcorder, then rotate il 180degrees to tile lens
side, you can close lhe LCD panel wilh lhe LCD
screen lacing out. This is convenienl during
playback operalions.
• Touch _ (HOME) --+ _ (SETTINGS)--+
[SOUND/DISPSET] --+ [LCD BRIGHT]
(p. 93) to a_liustlhe brightness of lhe LCD
screen.
• The inlormalion is displayed or bidden (display
nodisplay)each lime you pressDISP/
BATT INFO.
You catt view images usittg the viewfinder
with the LCD panel closed to avoid wearittg
down the battery, or when the image seen
on the LCD screett is poor.
Pull out the viewfinder, thett place your
eyes ott the viewfinder to watch images.
Adjust the viewfinder for clear viewing
according te your eye site.
Viewfinder
image is clear.
"_° Tips
• You can adjust the brightness ol the viewlinder
backlight by tetlctling _ (HOME)
/SETTINGS) _ [SOUND/DISP SET] --+
[VF B.LIGHT] (p. 94).
s o
Fatee the __ripbell and hoM your
camcorder correctly.
", O O
\\.... \
m
g
g.
27
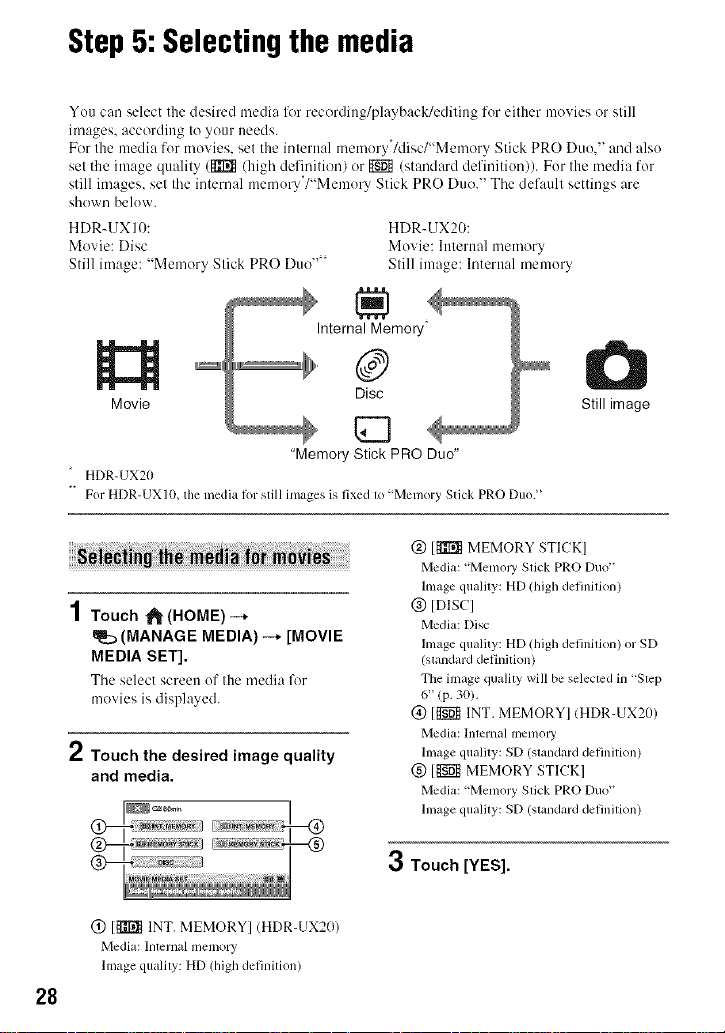
Step5: Selectingthe media
You can select the desired media lk_rrecording/playback/editing for either movies or still
images, according to your needs.
For the media for movies_ set the internal memory/disc/"Memory Stick PRO Duo." and alsu
set the image quality ([]][_ (high definition/ or _ (standard definition)). Fur the media for
still images, set the internal memory*/"Memury Stick PRO Duo." The default settings are
shown beluw.
HDR-UX l0: HDR-UX20:
Movie: Disc Movie: Internal memory
Still image: "Memory Stick PRO Duo ''_ Still image: lnterual memory
Internal Memory
@
Movie
"Memory Stick PRO Duo"
HDR-UX20
_ For HDR-UX10, the media lor still images is fixed to "Memory Stick PRO Duo.'
1Touch _(HOME)-+
_::_ (MANAGE MEDIA)-_ [MOVIE
MEDIA SET].
The select screen of the media lk_r
movies is displayed.
/ Touch the desired image quality
and media.
Disc
G
@ [P!II_ MEMORY STICKI
Media: "Memoly Stick PRO Duo"
linage quality: HD (high definition)
@ IDISC]
Media: Disc
Image quality: HD !high definilkm) or SD
(standard definitkm)
Tile image quality will be selected in '+Step
6" (p, 30).
@ 1_ INT. MEMORY] IHDR-UX20)
Media: Internal inelilOl)'
linage qualily: SD (slandard delinitkm)
(g) [gggl_ MEMORY STICK]
Media: "Memory Stick PRO Duo"
hnage qualily: SD (slandard delinilion)
Still image
(_) [_ INT. MEMORY] (HDR-UX20)
Media: lnternal memory
hnage quality: HD (high delinition)
28
3 Touch [YES].
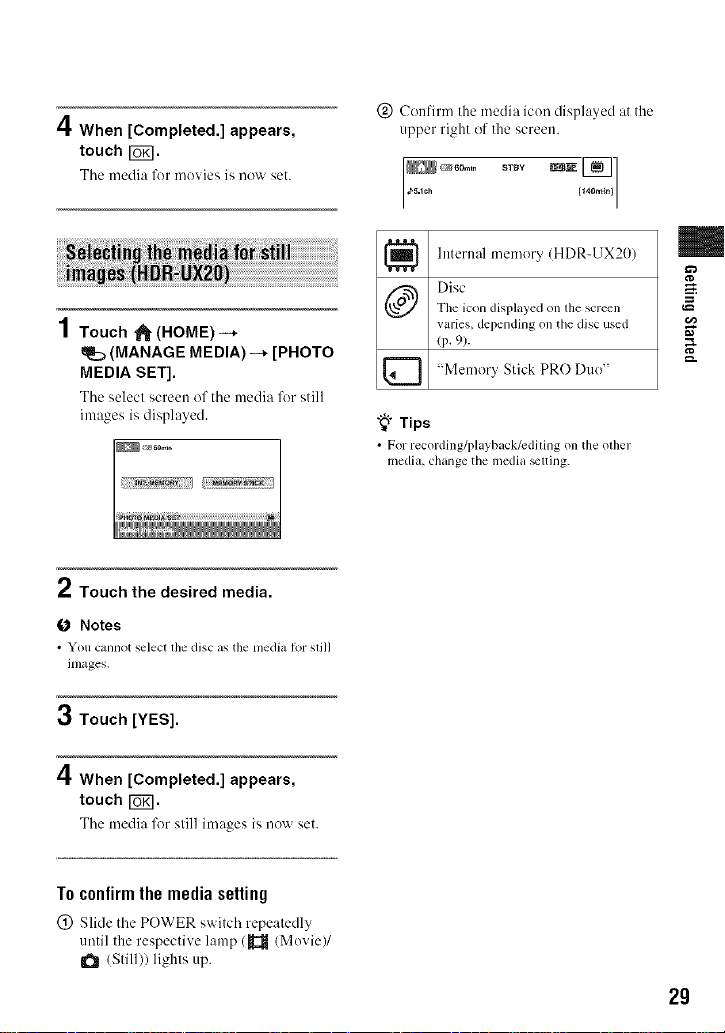
4When [Completed.] appears,
touch [_.
The media for movies is now set.
(_) (-!onfh'mthemedia icon displayed at the
upper right of the screen.
1Touch "_ (HOME)-**
(MANAGE MEDIA) -_ [PHOTO
MEDIA SET].
Tile select screen of tile media lk_rstill
images is displayed.
/ Touch the desired media.
O Notes
• You cannot select ll_e disc as the media Ior still
images.
3 Touch [YES].
4When [Completed.] appears,
touch Ira.
The media for sill] images is now set.
[_1 htternal (HDR-UX20)
{_ "Memory Stick PRO Duo"
"_° Tips
• For recording/playback/editing on the olher
media, change the media _lting.
tneli/ory
Disc
The icon displayed on the screen
varies, dependingon the disc used
(p. 9).
m
==
g.
To confirm the media setting
(_) Slide the POWER switch repeatedly
until the respective lamp/_ (Movie)/
(Still)) lights up.
29
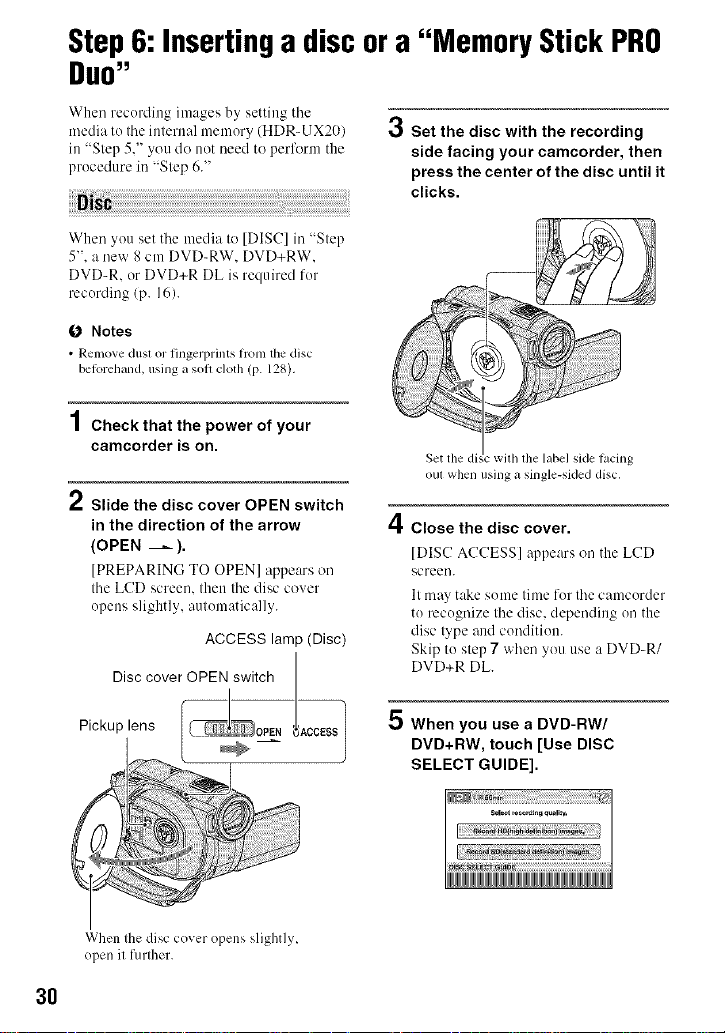
Step6: Insertinga discora "Memory Stick PRO
Duo"
When recording images by setting tile
media to tile internal memory (HDR-UX20)
in "Step 5," you do not need to perform the
procedure in "Step 6."
When you set the media to [DIS(-7]in "Step
5". a new 8cm DVD-RW. DVD+RW.
DVD-R. or DVD+R DL is required for
recording (p. 16).
O Notes
• Remove dust or lingerprints from the disc
bet_rehand, using asoil cloth (p. 128).
4
/ Check that the power of your
camcorder is on.
Slide the disc cover OPEN switch
in the direction of the arrow
(OPEN _ ).
[PREPARING TO OPEN] appears on
Ihe LCD screen, Ihen II'le disc cover
opens slightly, aulomatically.
ACCESS lamp (Disc)
Disc cover OPEN switch
Set the disc with the recording
side facing your camcorder, then
press the center of the disc until it
clicks.
Set the + c with the label side lacing
out when using a single-sided disc,
4Close the disc cover.
[DIS(-! ACCESS] appears on the LCD
screen.
Itmay take some time for the camcorder
to recognize the disc. depending on the
disc type and condition.
Skip to step 7 when you use a DVD-R/
DVD+R DL.
Pickup lens
When Ihe disc cover opens slightly
open il furlher.
3O
5 When you use a DVD-RW/
DVD+RW, touch [Use DISC
SELECT GUIDE].
 Loading...