

Page 1
Digital HD Video Camera Recorder HDR-AZ1/RM-LVR2V
How to Use
Read This First
Identifying Parts
Identifying Parts of the Camera [1]
Identifying Parts of the Remote Control [2]
Display
Camera Display [3]
Live-View Remote Display (Single Connection) [4]
Live-View Remote Display (Multi Connection) [5]
Getting Started
Checking the Bundled Items
Checking the Bundled Items [6]
Preparing to Use
Preparing to Use [7]
Preparing the Camera
Inserting/Removing the Battery Pack of the Camera [8]
Charging the Battery Pack of the Camera [9]
Page 2
Inserting/Ejecting a Memory Card to/from the Camera [10]
Memory Cards Usable with the Camera [11]
Turning On/Off the Power of the Camera [12]
Preparing the Live-View Remote
Charging the Live-View Remote [13]
Attaching the Belt to the Live-View Remote [14]
Turning On/Off the Power of the Live-View Remote [15]
Changing the Date & Time Setting by the Live-View Remote [16]
GPS Assist Data [17]
Connecting the Live-View Remote to the Camera (Single Connection)
Checking the Connection Mode of the Camera [18]
Checking the Connection Mode of the Live-View Remote [19]
Connecting the Live-View Remote to One Camera [20]
Establishing a Proper Connection [21]
Connecting the Live-View Remote to Multiple Cameras (Multi
Connection)
Connecting the Live-View Remote to Multiple Cameras [22]
Resetting the Connection Information of the Registered Cameras [23]
Connecting the Camera to Your Smartphone
Installing the App on Your Smartphone [24]
Checking the ID/Password [25]
Using One-touch Functions to Connect to an NFC-enabled Android Smartphone [26]
Connecting to an Android Smartphone [27]
Connecting to iPhone [28]
Other Preparations (Using Accessories)
Using the Tripod Adaptor [29]
Using the Waterproof Case (SPK-AZ1) [30]
Page 3
Using the Adhesive Mount [31]
Shooting
Shooting Movies or Still Images
REC HOLD (Lock) Switch [32]
Button Hold Function of the Live-View Remote [33]
Switching the Shooting Mode [34]
Movie Mode [35]
Photo Mode [36]
Interval Photo Recording Mode [37]
Recording for an Extended Time [38]
Changing the Settings of the Live-View Remote
List of Setting Items
List of Setting Items [39]
Movie Settings
Image Quality Setting [40]
SteadyShot [41]
Flip (Movies) [42]
Scene (Movies) [43]
Color Setting [44]
Movie Record Format [45]
Still Image Settings
Flip (Still Images) [46]
Scene (Still Images) [47]
Continuous Shooting [48]
Continuous Shooting Interval [49]
Page 4
Self-Timer [50]
Interval Photo Settings
Flip (Interval Photo Recording) [51]
Scene (Interval Photo Recording) [52]
Time Lapse [53]
Connecting Devices Settings
Time Code/User Bit Setting [54]
IR-Remote Controller [55]
Switching NTSC/PAL [56]
Auto Power Off [57]
Beep [58]
Format [59]
Remote Control Settings
Screen Rotation [60]
Monitor Brightness [61]
Date & Time Setting [62]
Reset Settings [63]
Version [64]
Connection Mode [65]
GPS Setting [66]
Airplane Mode [67]
Resetting the Network Settings for Multi Connection [68]
Viewing
Viewing
Playback Using the Live-View Remote [69]
Switching the Display of the Camera and the Live-View Remote
Page 5
Switching the Connection Mode of the Camera [70]
Switching the LCD Screen of the Live-View Remote [71]
Deleting
Deleting [72]
Live Streaming of Movies
Live Streaming with the Camera (Live Connection)
Live Streaming [73]
Preparing for Live Streaming [74]
Performing for Live Streaming [75]
Computer
Action Cam Movie Creator
Useful Functions of Action Cam Movie Creator [76]
Checking the Computer Environment [77]
Installing Action Cam Movie Creator [78]
Disconnecting the Computer (Windows 7/Windows 8) [79]
Disconnecting the Computer (Windows Vista) [80]
Importing GPS Assist Data
GPS Assist Data [81]
Others
Estimated Duration of Recording and Playback for the Battery Pack of
the Camera
Estimated Duration of Recording for the Battery Pack of the Camera [82]
Estimated Duration of Playback for the Battery Pack of the Camera [83]
Page 6
Recordable Time, the Recordable Number of Photos for a Memory Card
Estimated Continuous Movie Recordable Time [84]
Estimated Recordable Number of Photos [85]
Notes on Using
Notes on Handling of the Camera and the Live-View Remote [86]
On Moisture Condensation [87]
Care and Storage [88]
Notes on Optional Accessories [89]
Notes on Disposal/Transfer of the Memory Card [90]
Battery Packs of the Camera and the Live-View Remote [91]
The Limitations to Live Streaming of the Camera [92]
GPS and Wi-Fi Function in Distribution [93]
Network Connection [94]
Simultaneous Live Streaming with multiple the Cameras [95]
Influence by the Line State [96]
Connection of Live Streaming [97]
Continuous Distribution Time [98]
Connection Restriction [99]
LCD Screen of the Live-View Remote [100]
Live-View Remote Waterproof Performance [101]
GPS [102]
Disposing of the Live-View Remote [103]
Using the Camera Abroad
Using the Camera Abroad [104]
The List of the Time Difference of the Major Cities of the World [105]
Specifications
Camera [106]
Live-View Remote [107]
Page 7
Trademarks
Trademarks [108]
Notes on the Licences
On GNU GPL/LGPL Applied Software [109]
Troubleshooting
Troubleshooting
Troubleshooting
What Can I Do to Solve a Problem? [110]
Battery Pack and Power of the Camera
Cannot Turn On the Camera [111]
The Power of the Camera Turns Off Suddenly [112]
Battery Life of the Camera Is Short [113]
Cannot Charge the Camera [114]
The Remaining Charge Indicator of the Camera Is Incorrect [115]
Memory Card
Operations Using the Memory Card Cannot Be Performed [116]
Shooting images
Cannot Record Images [117]
Cannot Insert Dates on Images [118]
Viewing Images
Page 8
Cannot Play Back Images [119]
Computers
Your Computer Does Not Recognize the Camera [120]
Cannot Import Images [121]
Cannot Install Action Cam Movie Creator [122]
Action Cam Movie Creator Does Not Work Correctly [123]
Cannot Play Back Images on Your Computer [124]
Wi-Fi
It Takes Too Much Time to Transfer an Image [125]
Others
The Lens Gets Fogged [126]
The Camera and Battery Become Warm [127]
The Date or Time Is Incorrect [128]
Live-View Remote
Cannot Turn On the Live-View Remote [129]
Cannot Charge the Live-View Remote [130]
The Remaining Charge Indicator of the Live-View Remote Is Incorrect [131]
Cannot Receive a GPS Signal [132]
Excessive Error in Location Information [133]
It Takes Time to Triangulate although the GPS Assist Data is Taken In [134]
The Location Information Has Not Been Recorded [135]
Q & A
Camera
Cannot Turn On the Camera [136]
Battery Life of the Camera is Short [137]
Page 9
Live-View Remote
The Power of the Live-View Remote Turns Off Suddenly [138]
Cannot Connect the Live-View Remote and the Camera via Wi-Fi [139]
Warning Indicators and Error Indicators
Display on the Live-View Remote
01-01/02-02 [140]
01-02 [141]
01-03/01-04 [142]
03-01/03-02 [143]
02-01 [144]
04-03 [145]
05-01 [146]
05-02 [147]
05-03 [148]
04-04 [149]
10-01 [150]
Code Starting with an E or a C [151]
[1] How to Use Read This First Identifying Parts
Identifying Parts of the Camera
Page 10
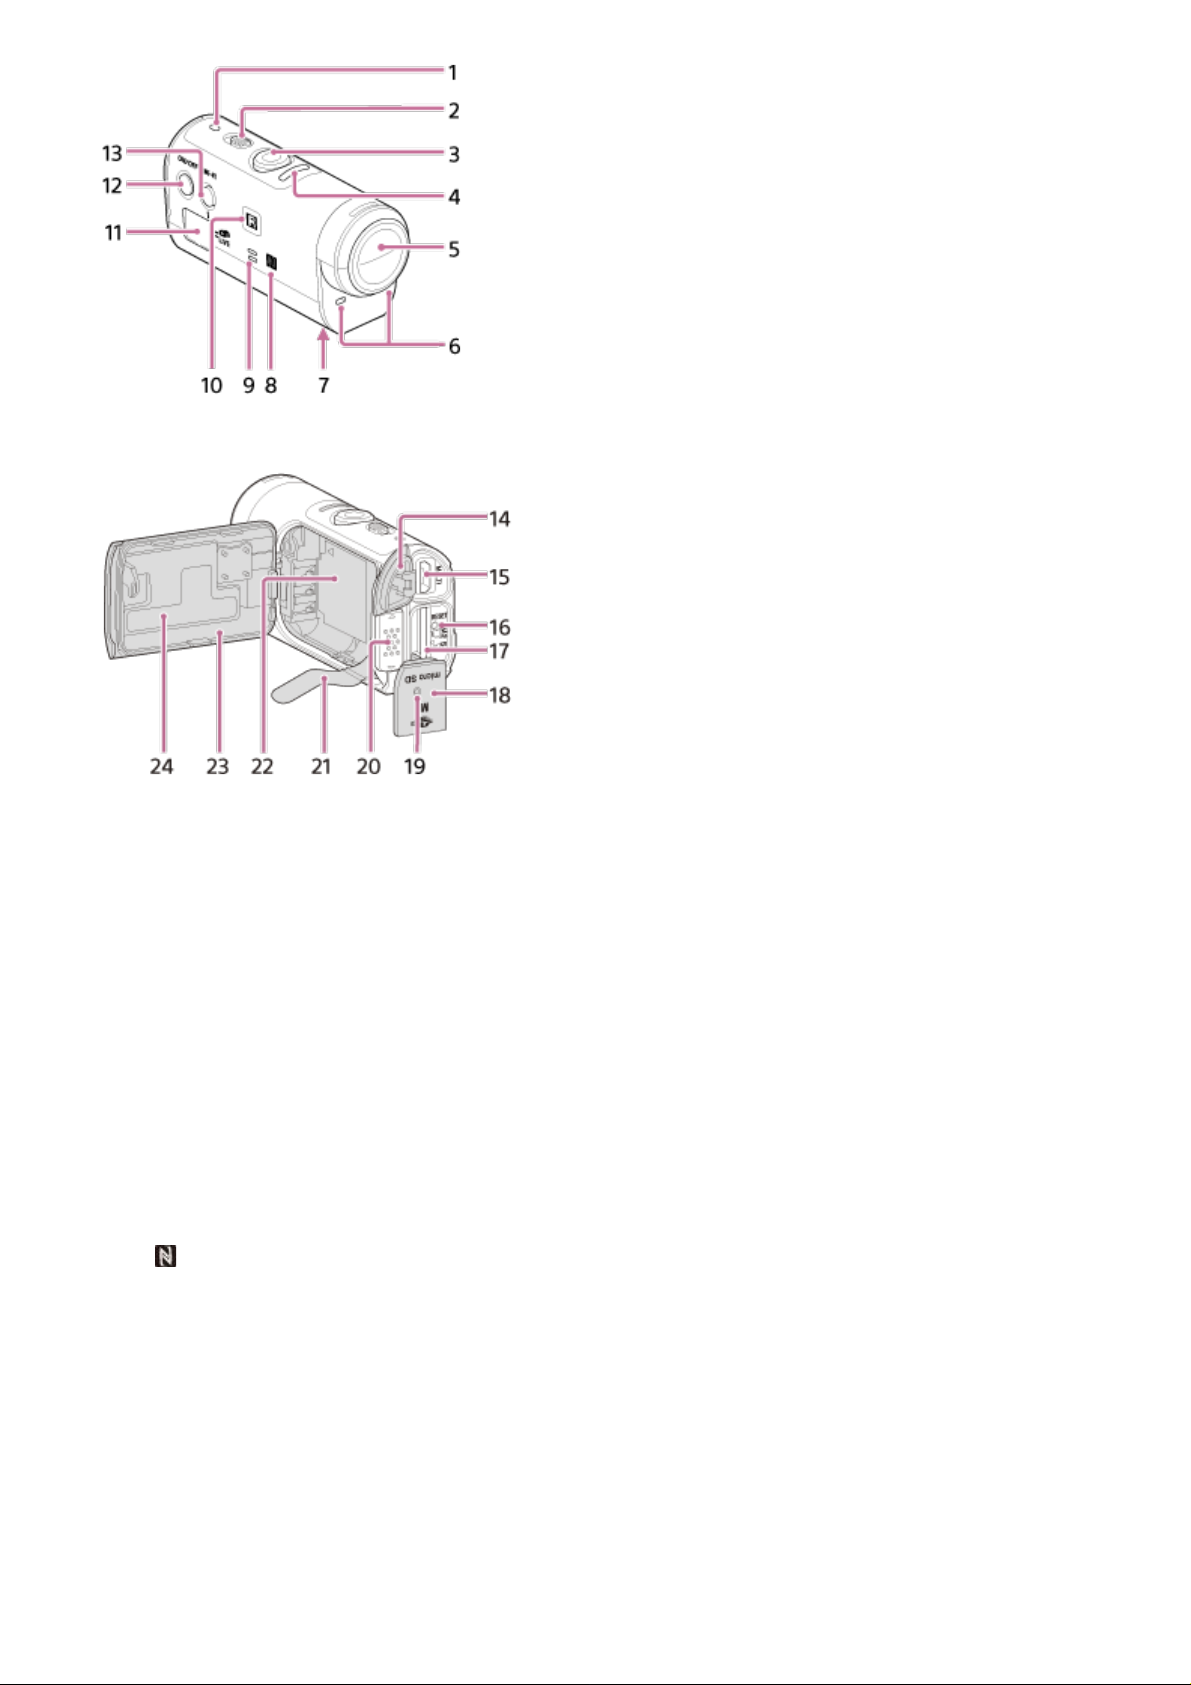
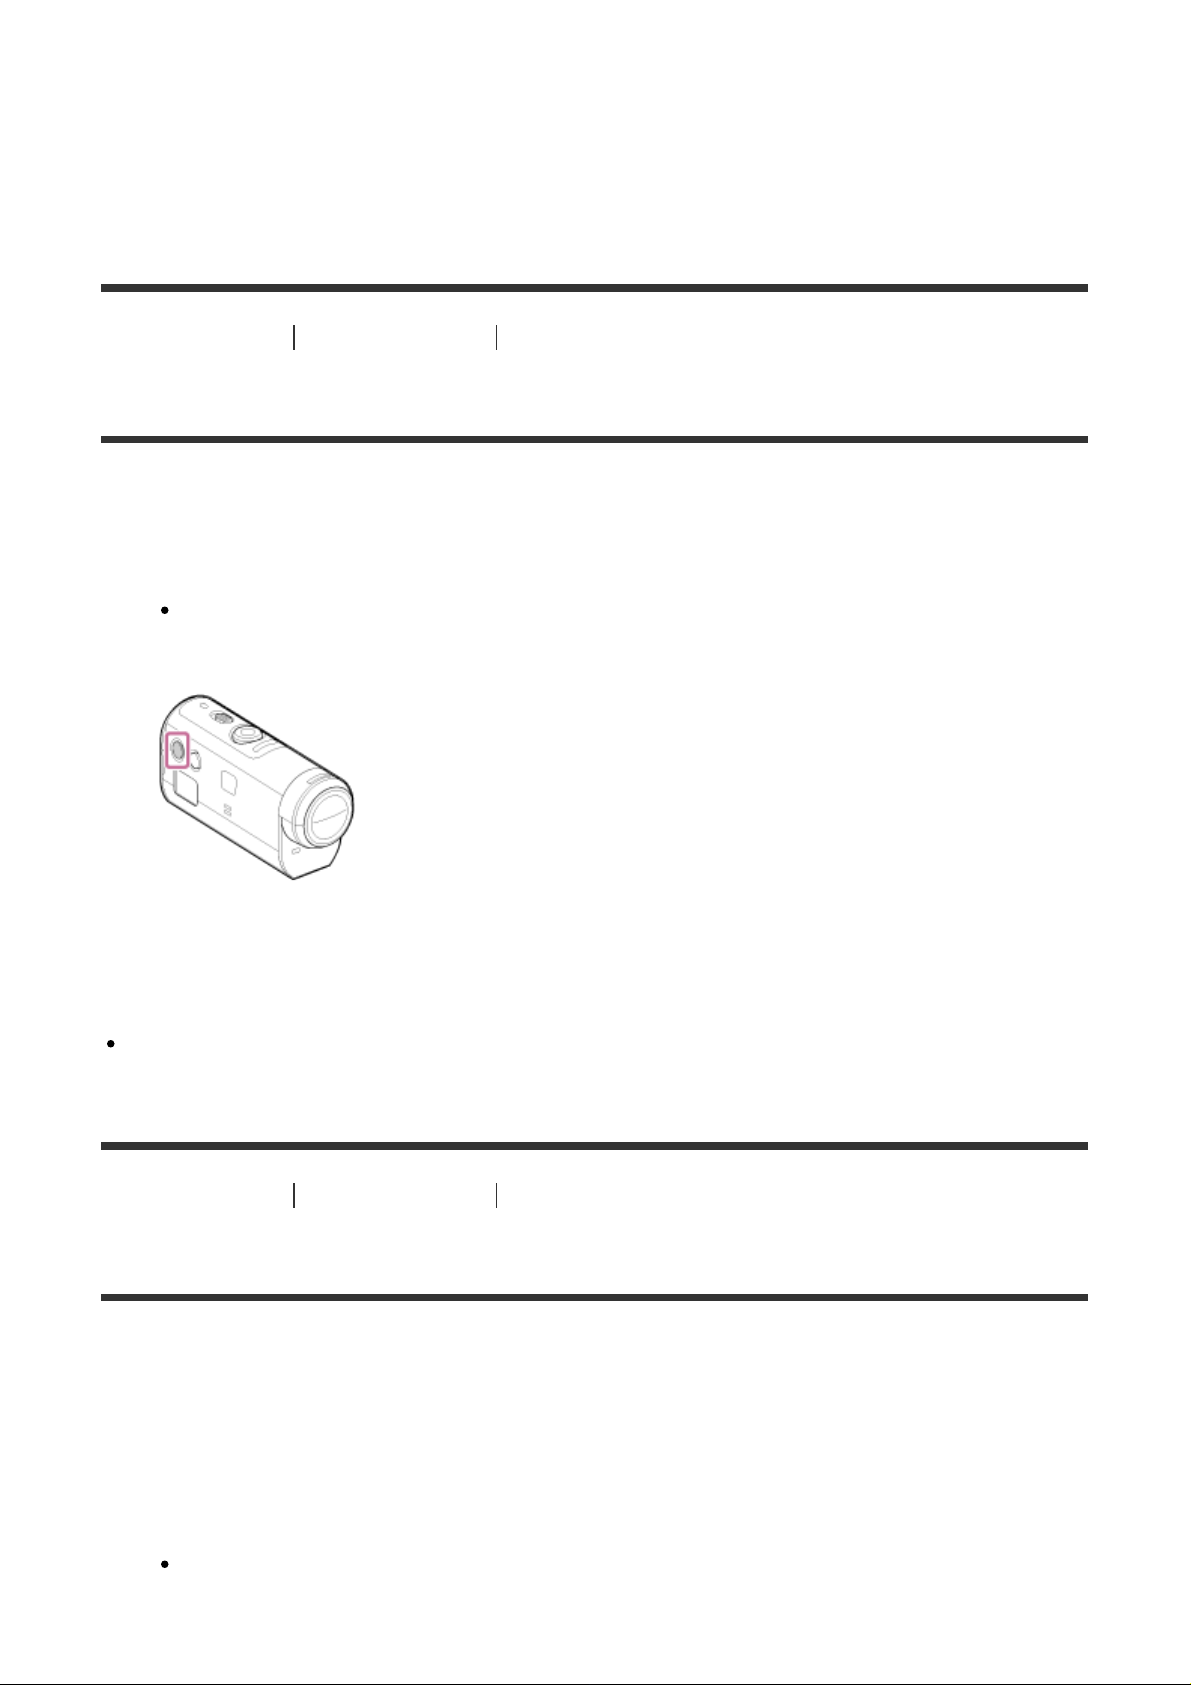
1. POWER/CHG (Charge) lamp
Supports Micro USB compatible devices.
2. REC HOLD switch
3. REC (Movie/Photo) button
4. REC lamp (red)/LIVE lamp (blue)
Light up (red): During recording
Blink (red): Error occurs
Light up (blue): During live streaming
Blink slowly (blue): During live streaming (There is an audience)
5. Lens
6. Microphones
7. Tripod adaptor attachment hole
8. (N Mark)
NFC (Near Field Communication) is an international standard of the short-range
wireless communication technology.
9. Speaker
10. IR remote receiver
11. Display panel
12. ON/OFF button
13. Wi-Fi button
14. Connector cover (USB)
15. Multi/Micro USB Terminal
Page 11
16. RESET button
17. Memory card insertion slot
18. Memory card cover
19. REC/Access lamp
20. Battery cover lock lever
21. Battery ejection sheet
22. Battery storage area
23. Battery pack cover
24. SSID label
[2] How to Use Read This First Identifying Parts
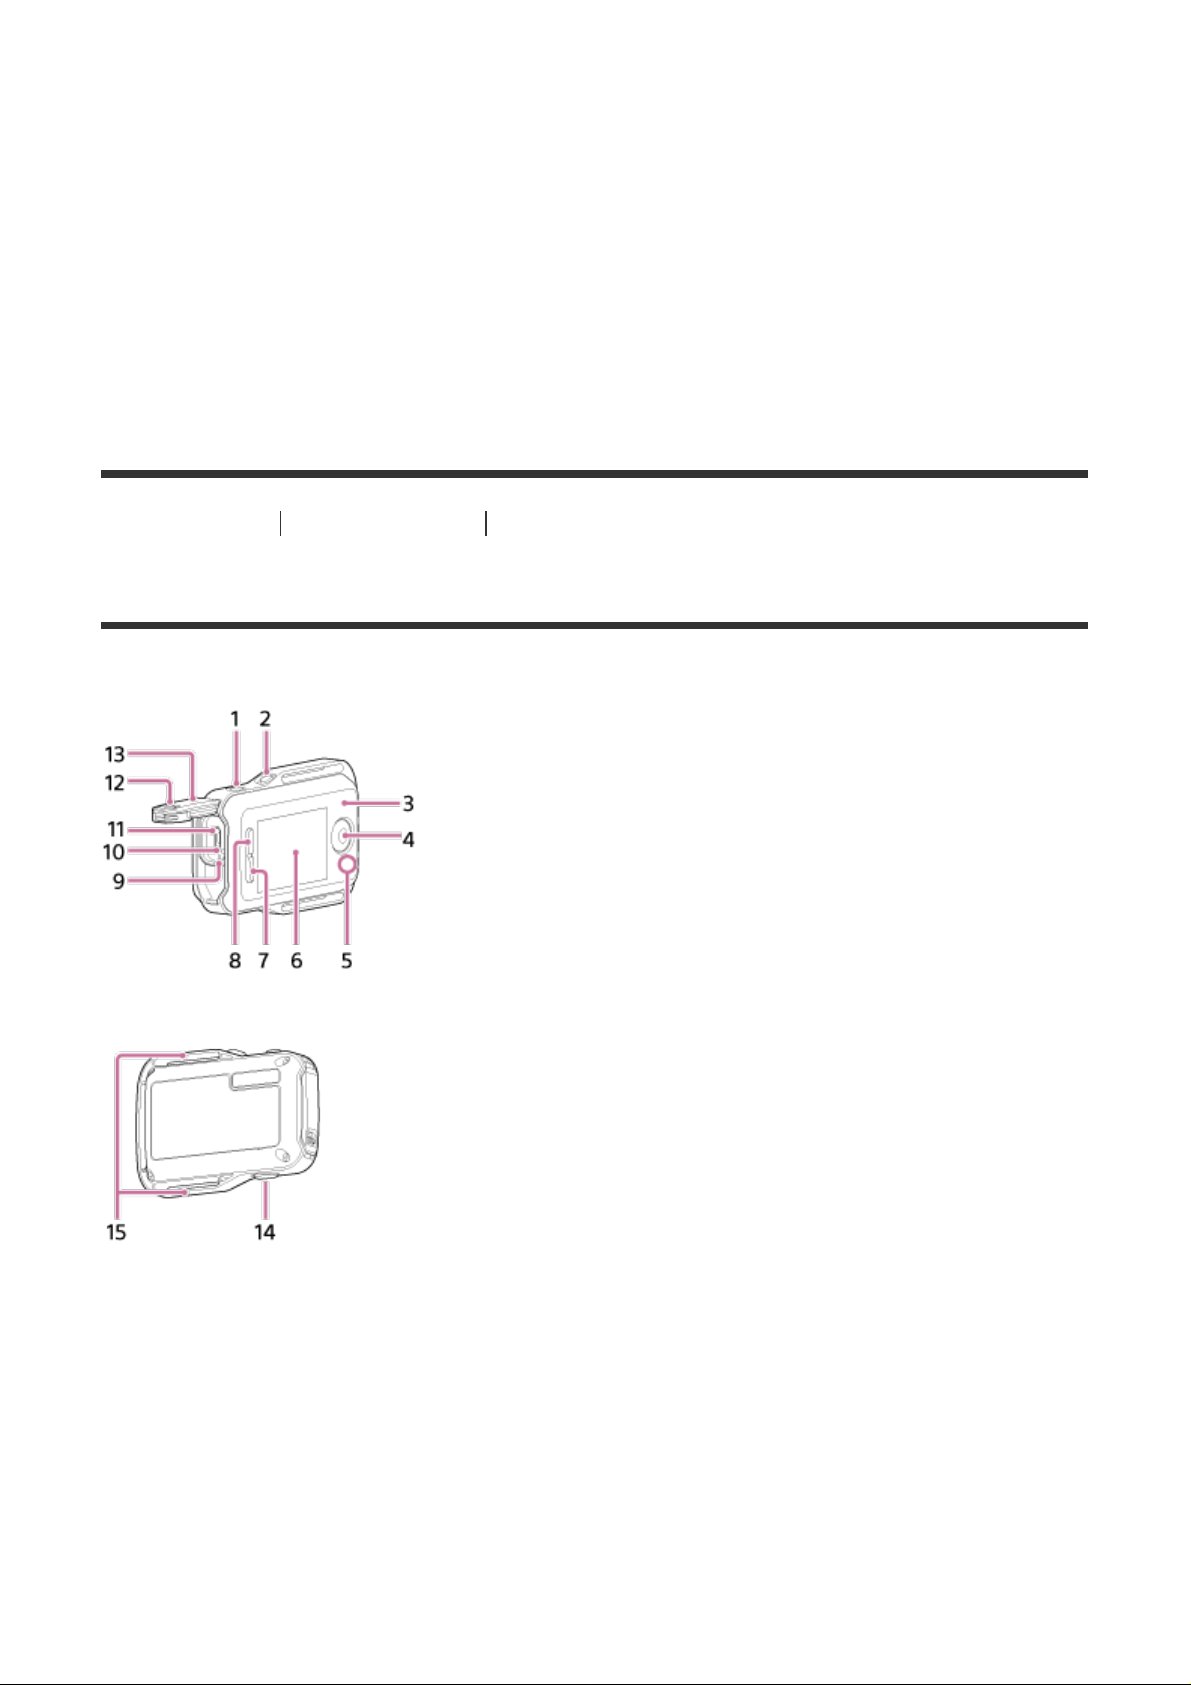
Identifying Parts of the Remote Control
1. MENU button
2. DISP button
3. GPS antenna
4. REC/ENTER button
5. REC/Wi-Fi lamp
6. LCD screen
7. DOWN button
8. UP button
9. CHG (Charge) lamp
Page 12
10. RESET (Reset) button
11. Multi/Micro USB Terminal
12. Lock lever
13. Connector cover (USB)
14. ON/OFF button
15. Loop for a belt
[3] How to Use Read This First Display
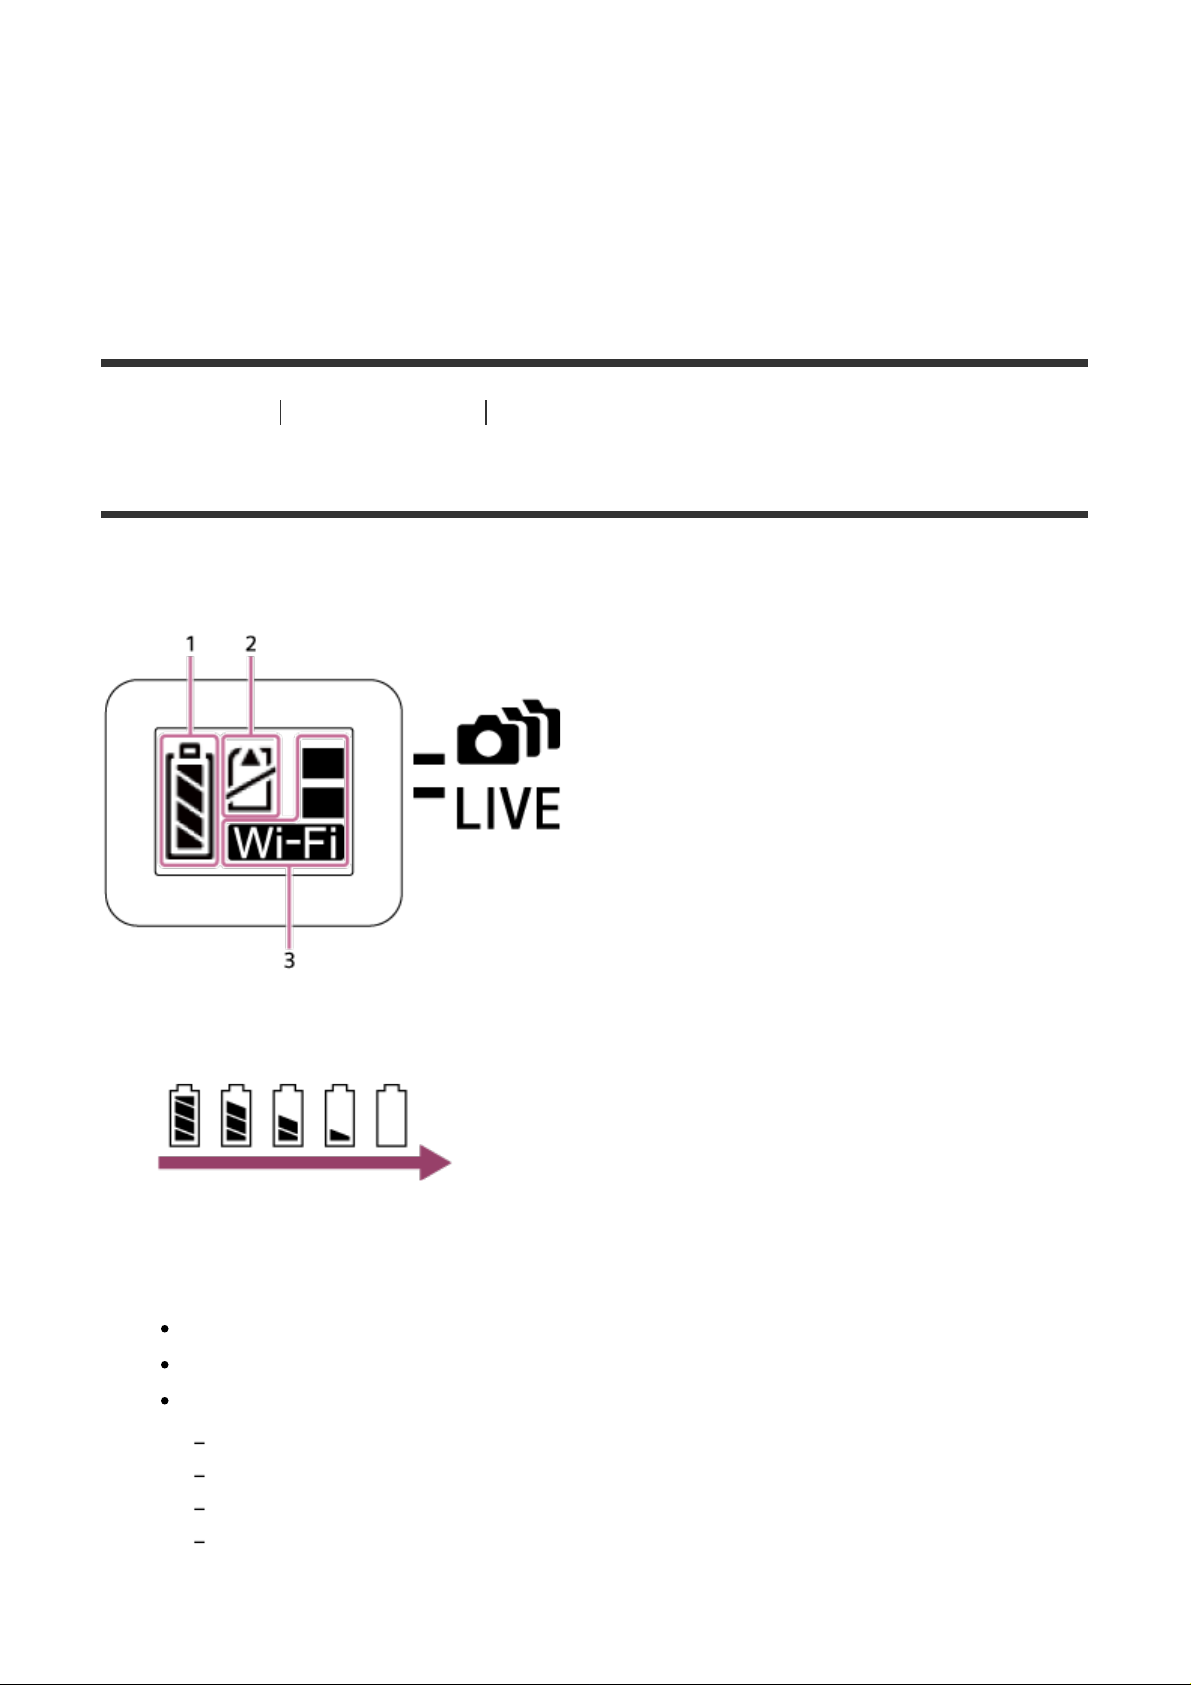
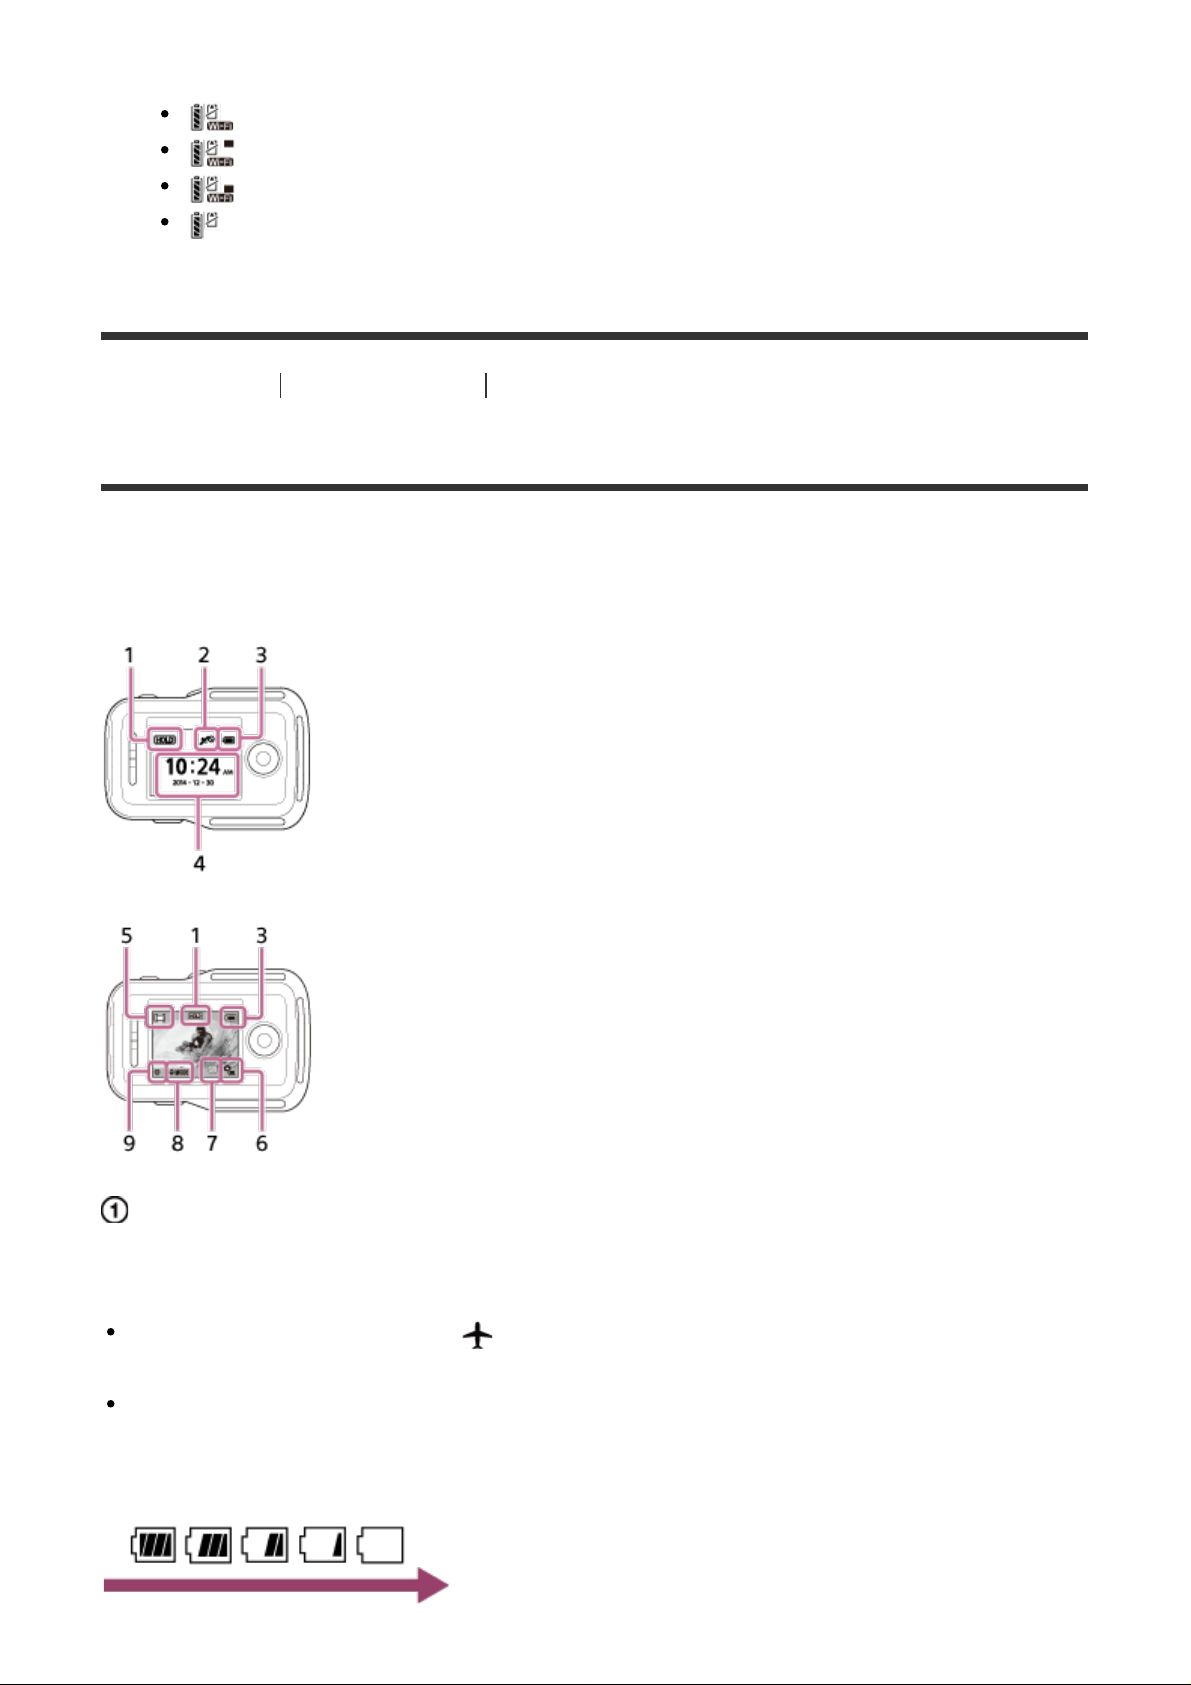
Camera Display
The following describes the icons displayed on the display panel of the camera.
1. Battery level indicator
The further right the indicator goes to, the lower the battery level is.
2. Memory card warning indicator
The memory card is uninserted (Light up)
The memory card full capacity (Light up)
The memory card error (Blink):
The memory card incompatible with the camera is inserted.
The memory card terminal is dirty.
The memory card is damaged.
The memory card is inserted in the wrong direction.
Page 13
3. Wi-Fi settings indicator
[4] How to Use Read This First Display
When Wi-Fi is set to the single connection
When Wi-Fi is set to the multi connection
When Wi-Fi is set to the live connection
When Wi-Fi is set to OFF
Live-View Remote Display (Single Connection)
The following describes the icons displayed on the LCD screen of the remote control in the
single connection.
Clock display
1 Button hold indicator
2 GPS/Airplane Mode
The icon of the airplane mode will be displayed when the airplane mode is set to ON.
The GPS icon will be displayed when the airplane mode is set to OFF.
The GPS icon changes depending on whether GPS is ON/OFF or depending on the
strength of GPS signal reception.
3 Battery level indicator of the remote control
Page 14
The further right the indicator goes to, the lower the battery level is.
4 Clock display
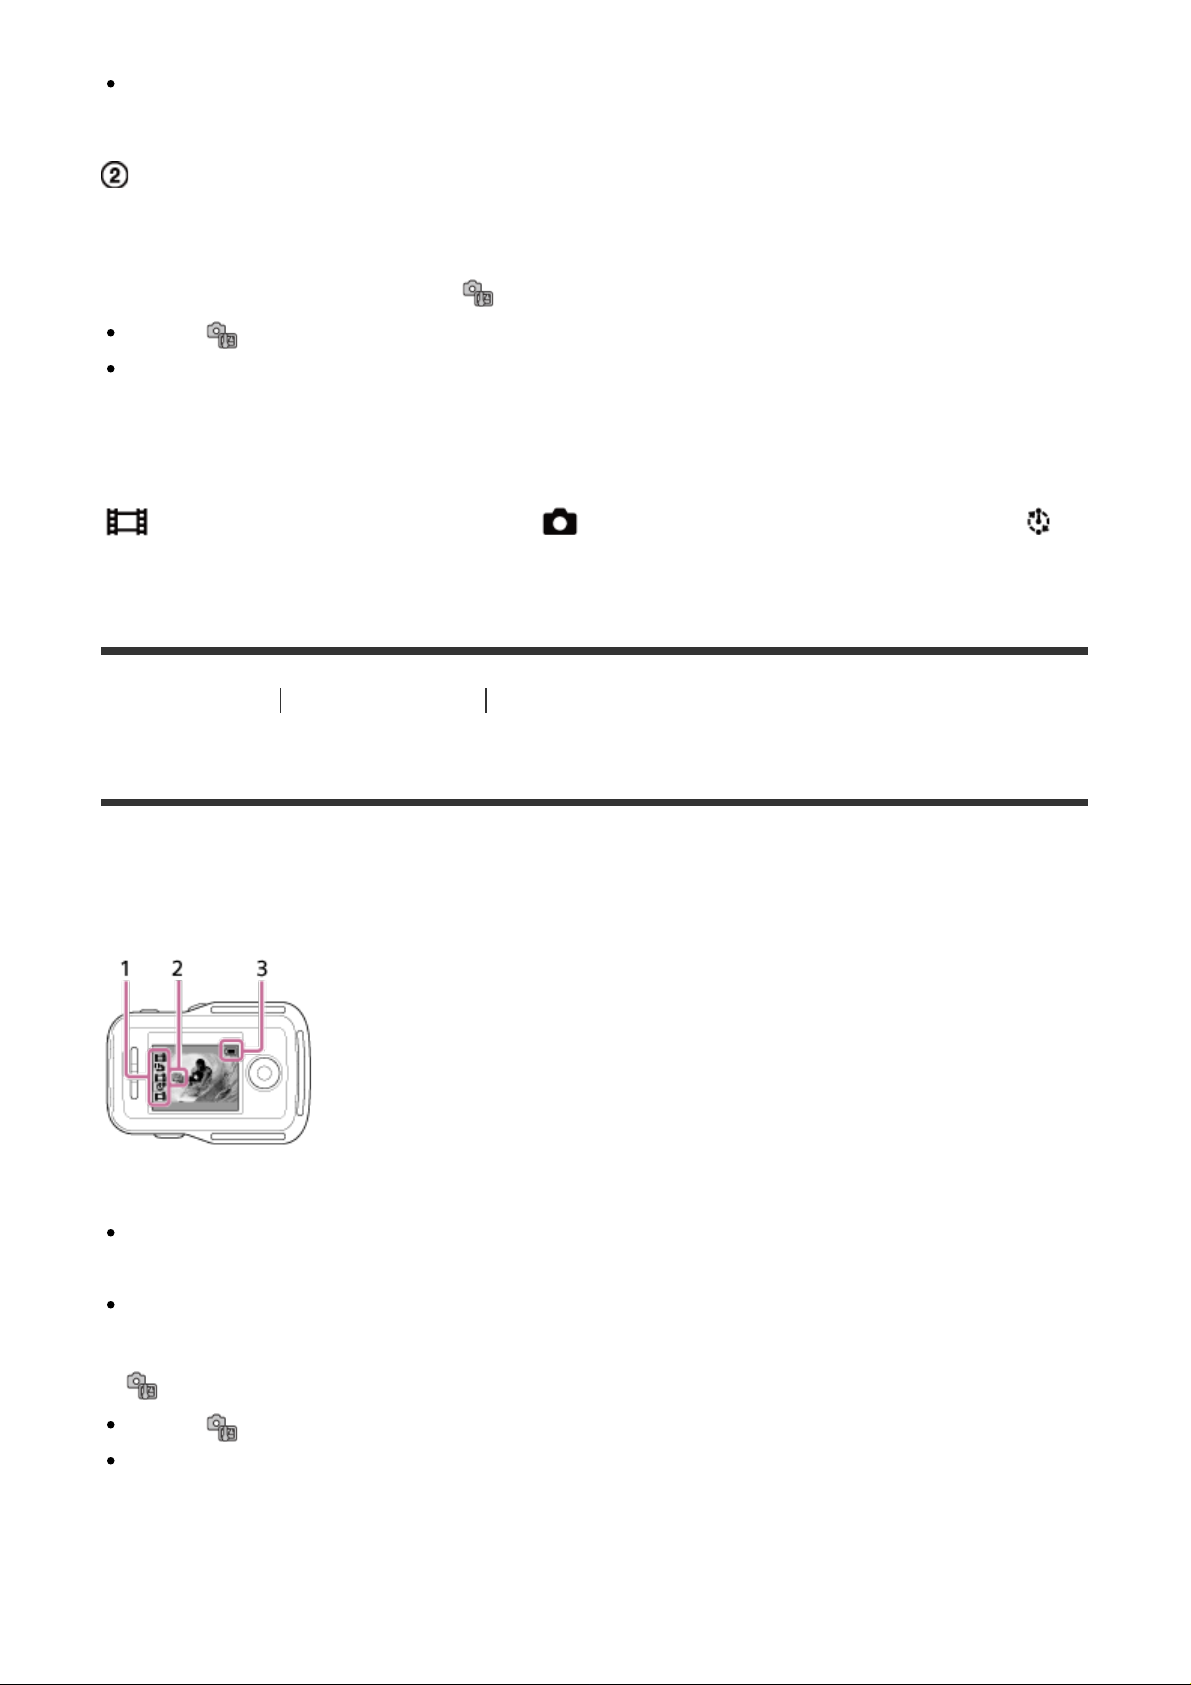
Live-View display
5 Shooting mode display
6 Battery level indicator
7 Memory card warning indicator/ Rising temperature icon
When is indicated, stop recording the movie.
If the camera stops recording due to the temperature, leave it for several minutes with the
power turned off. Start recording after the temperature inside the camera drops fully.
8 Shooting mode switching indicator
9 REC icon
is displayed during movie recording, is displayed during photo recording, and is
displayed during interval photo recording.
[5] How to Use Read This First Display
Live-View Remote Display (Multi Connection)
The icons described below are displayed on the LCD screen of the remote control in the
multi connection.
1 Shooting mode display/REC icon
The shooting mode and record status of the connected camera will be displayed. The
orange cursor indicates which camera's Live-View display is selected.
REC icon will be displayed on the right above the shooting mode display while images are
being recorded.
2 Rising temperature icon
When is indicated, stop recording the movie.
If the camera stops recording due to the temperature, leave it for several minutes with the
power turned off. Start recording after the temperature inside the camera drops fully.
3 Battery level indicator of the remote control
Page 15
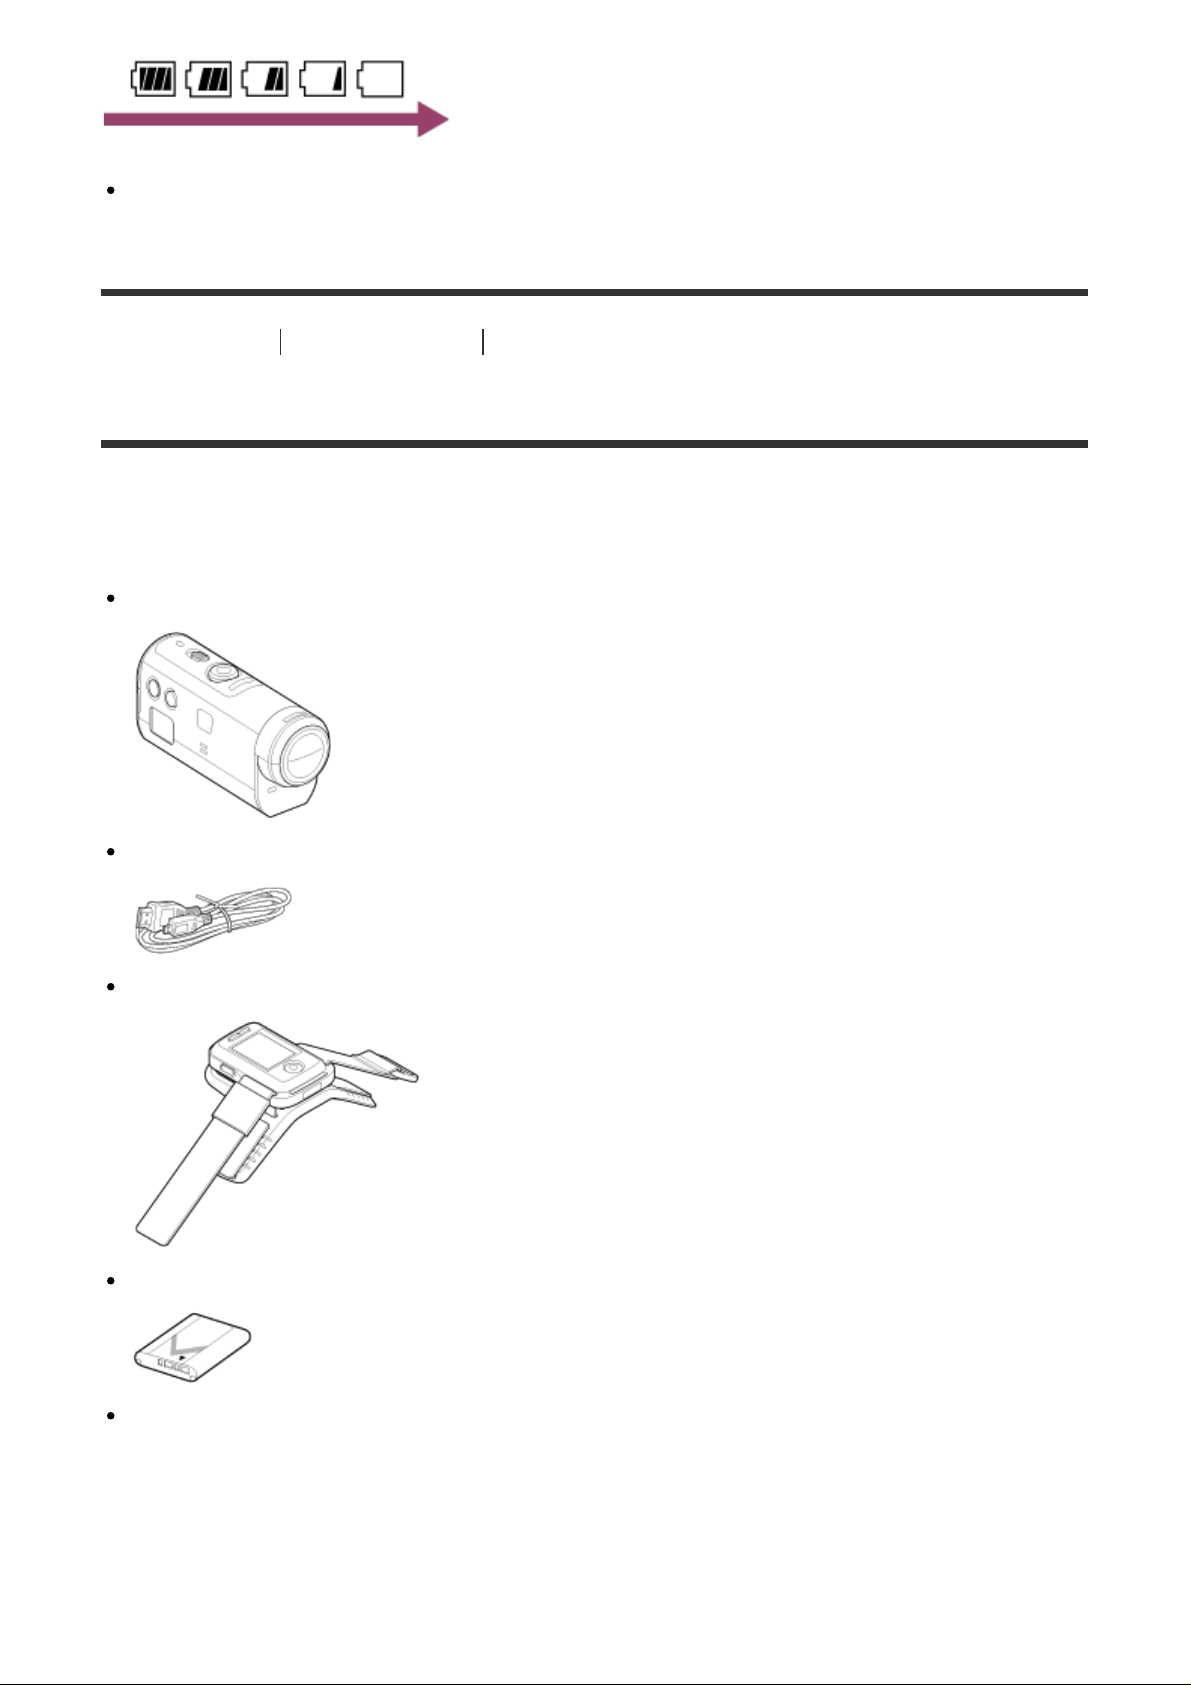
The further right the indicator goes to, the lower the battery level is.
[6] How to Use Getting Started Checking the Bundled Items
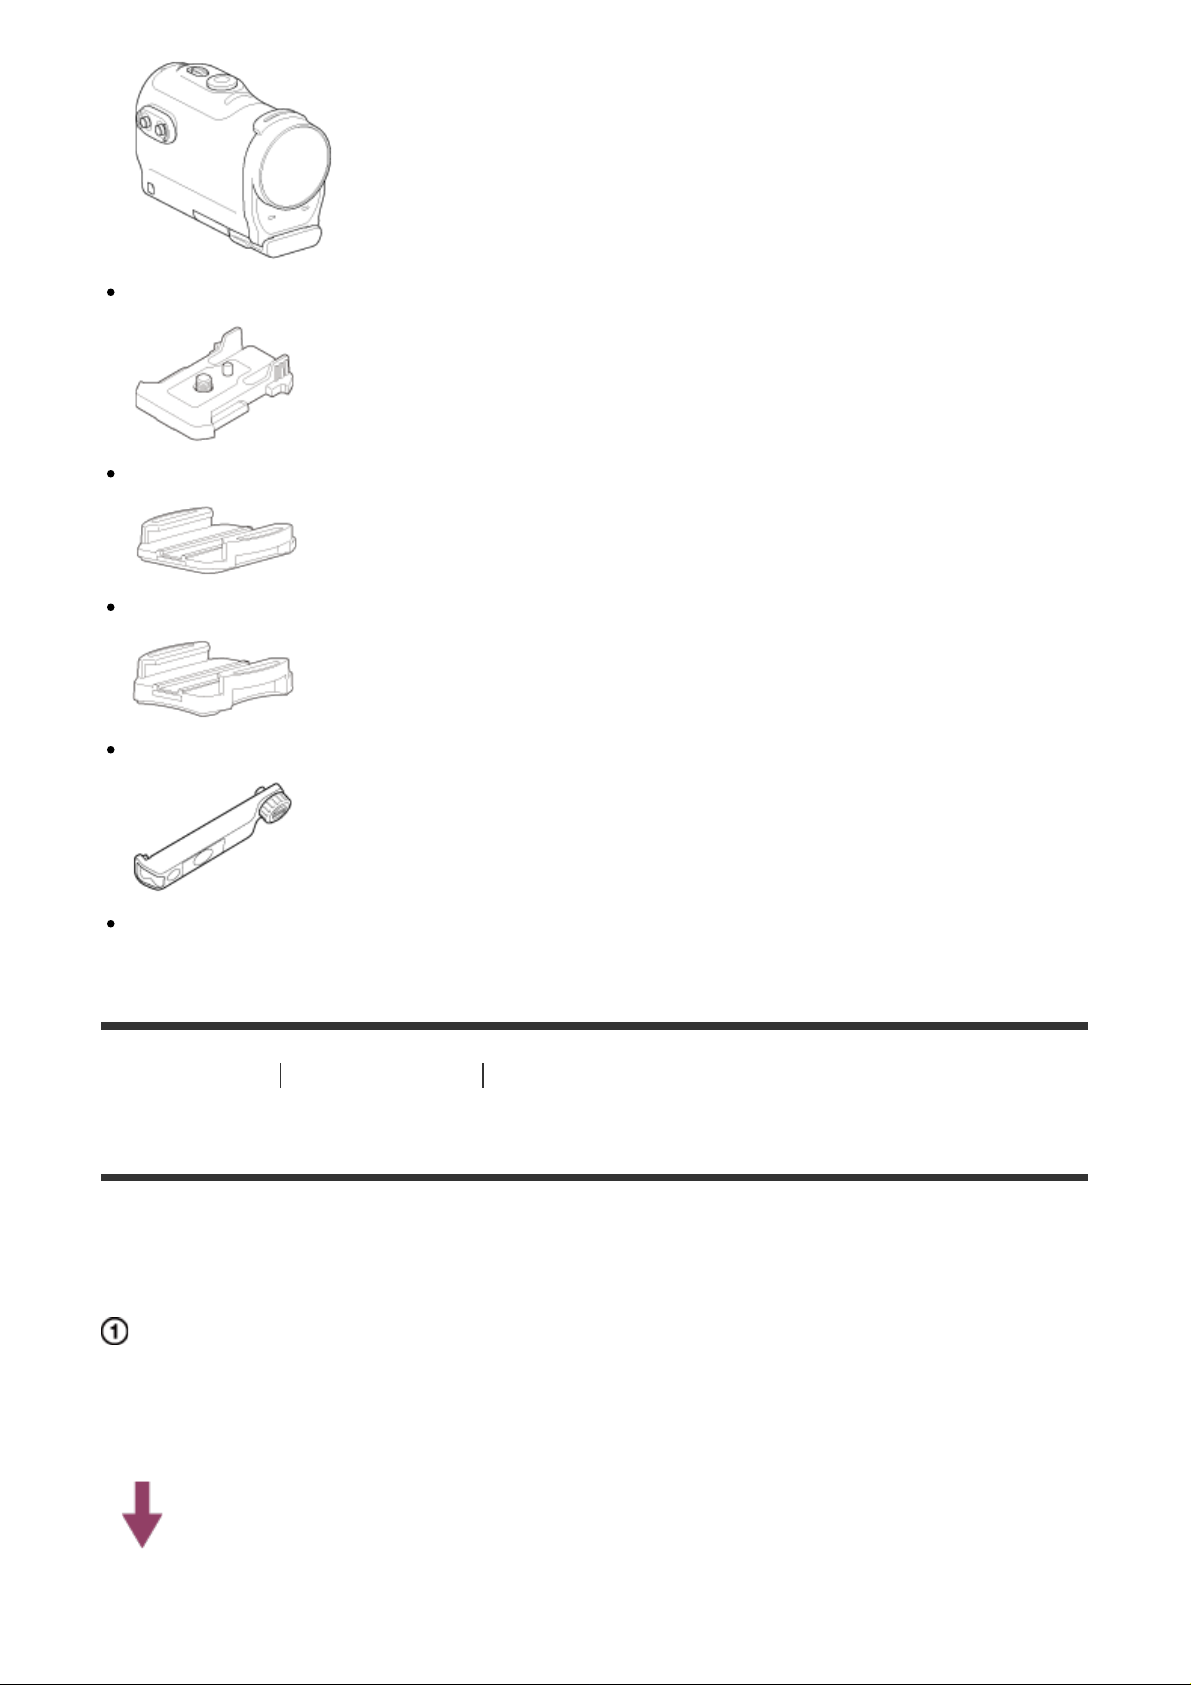
Checking the Bundled Items
Make sure that you have the following bundled items. The number in parentheses indicates
the quantity of each item bundled.
Camera (1)
Micro USB cable (1)
Live-View Remote (RM-LVR2V) (1)
Rechargeable battery pack (NP-BY1) (1)
Waterproof Case (SPK-AZ1) (1)
Page 16
Attachment Buckle (1)
Flat Adhesive Mount (1)
Curved Adhesive Mount (1)
Tripod Adaptor (1)
Set of printed documentation
[7] How to Use Getting Started Preparing to Use
Preparing to Use
The flow of what needs to be prepared in advance is summarized. Check each item for
further details.
The camera
Inserting the battery pack of the camera
Insert the battery pack confirming that the battery is correctly oriented.
Page 17
Charging the battery pack of the camera
Check the power of the camera is off and connect the micro USB cable (supplied) to a
Connecting the camera and the Live-View Remote through Wi-Fi
computer that is turned on.
Inserting a memory card into the camera
Insert the memory card into the camera, confirming that the card is correctly oriented.
Turning on the power of the camera
Press the ON/OFF button of the camera.
You can record movies by pressing the REC button of the camera.
The remote control
Charging the remote control
Check the power of the remote control is off and connect the micro USB cable (supplied) to
the computer that is turned on.
Turning on the power of the remote control
Press the ON/OFF button of the remote control.
Setting the date and time using the remote control
When the remote control is turned on for the first time, the date & time setting screen is
displayed. Use the remote control after the date & time setting is complete.
Page 18

Setting the camera using the Live-View Remote
[8] How to Use Getting Started Preparing the Camera
Inserting/Removing the Battery Pack of the Camera
Insert/remove the battery pack to/from the camera.
Inserting the battery pack
1. Open the cover
Slide the lock lever to the OPEN side.
Open the cover from .
2. Insert the battery pack
There are chances that the battery may not be ejected if the battery ejection sheet is
stored under the battery. Additionally, this may cause water leakage.
1 Align the mark of the battery with that of the camera
2 Place the battery on the battery ejection sheet and insert the battery pack
3 Insert the battery pack, aligning the mark of the battery with that of the camera
and orienting its printed side, as illustrated
3. Close the cover
Securely close the cover and slide the lock lever to the LOCK position. Make sure
that the yellow mark on the lock lever is not visible and the cover is securely closed.
Page 19
Double check that the battery ejection sheet is not pinched in the cover or sticking
out of the cover. If any foreign matter such as sand gets inside the cover, the sealing
3. Disconnect the camera from the computer when the battery is charged
gasket may be scratched, and may result in water entering the inside of the camera.
4. Remove the battery pack
Open the battery cover and pull out the battery ejection sheet to remove the battery.
[9] How to Use
Getting Started Preparing the Camera
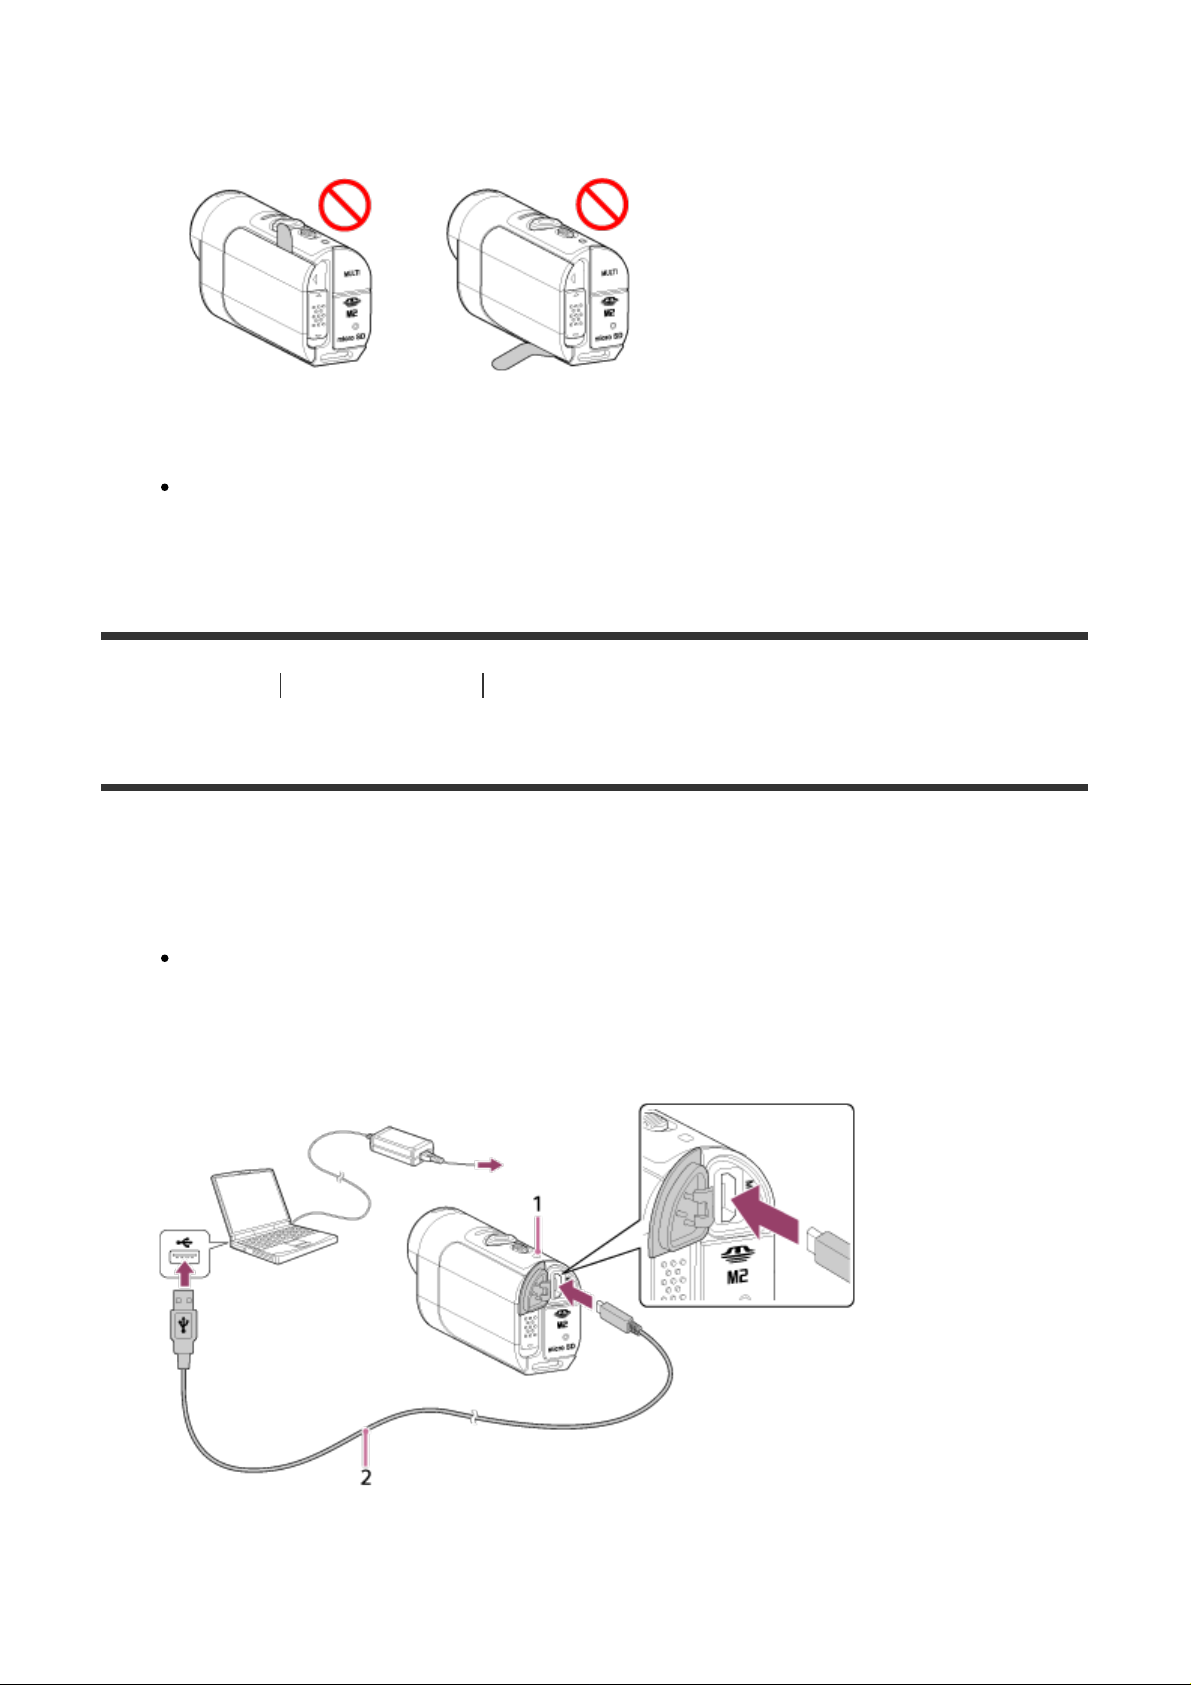
Charging the Battery Pack of the Camera
Charging the camera with a computer.
1. Check that the power of the camera is OFF
Charging is not possible when the camera is turned on. To turn off the camera, press
the ON/OFF button until the POWER lamp turns off.
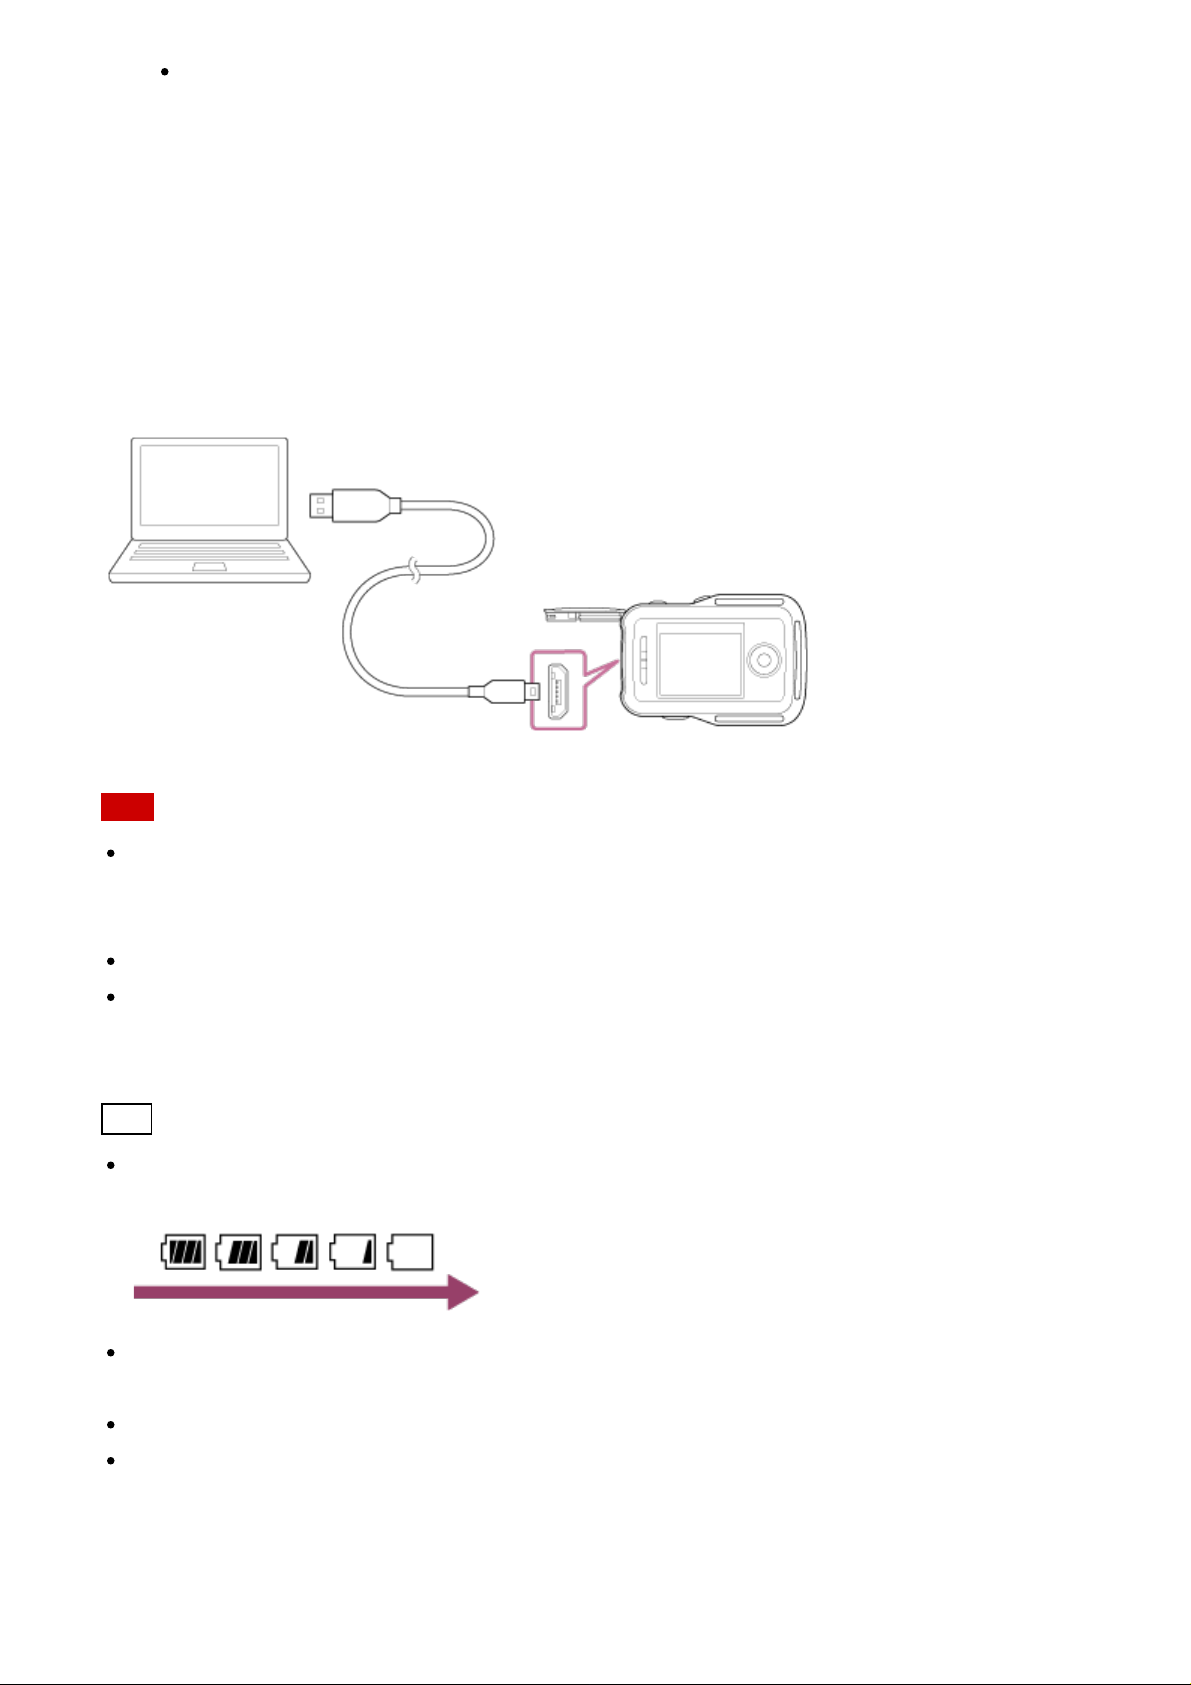
2. Connect the camera to an activated computer with the micro USB cable (supplied)
1 Lights in orange while charging
2 Micro USB cable (supplied)
Page 20
The battery is charged (full charge) when the POWER/CHG (Power) lamp is turned
on.
The charging time*1 of the battery pack NP-BY1 (supplied) is as follows.
Charging via a computer: Approx. 2 h 25 min.
Charging via AC-UD10
*1
Time required to charge a fully depleted battery pack at a temperature of 25°C (77°F). Charging
may take longer under certain circumstances or conditions.
*2
Rapid charging is possible using the USB charger AC-UD10 (sold separately). To connect to the
charger, use the micro USB cable (supplied).
Note
*2
(sold separately): Approx. 2 h 05 min.
You can use only a type Y battery with this camera.
Turn off the camera while charging the battery.
Do not apply force to the camera when you connect the camera to a computer. This may
cause damage to the camera or the computer.
When you connect the camera to a notebook computer that is not connected to an AC
power source, the battery of the notebook computer may be depleted rapidly. Do not
leave the camera connected to the computer for a long time.
Charging the battery pack or the connection with customized or hand-built computers is
not guaranteed. Depending on the type of your USB device, charging may not function
properly.
Operation with all computers is not assured.
If you do not intend to use the camera for an extended period, charge the camera once
every 6 to 12 months to maintain battery performance.
Hint
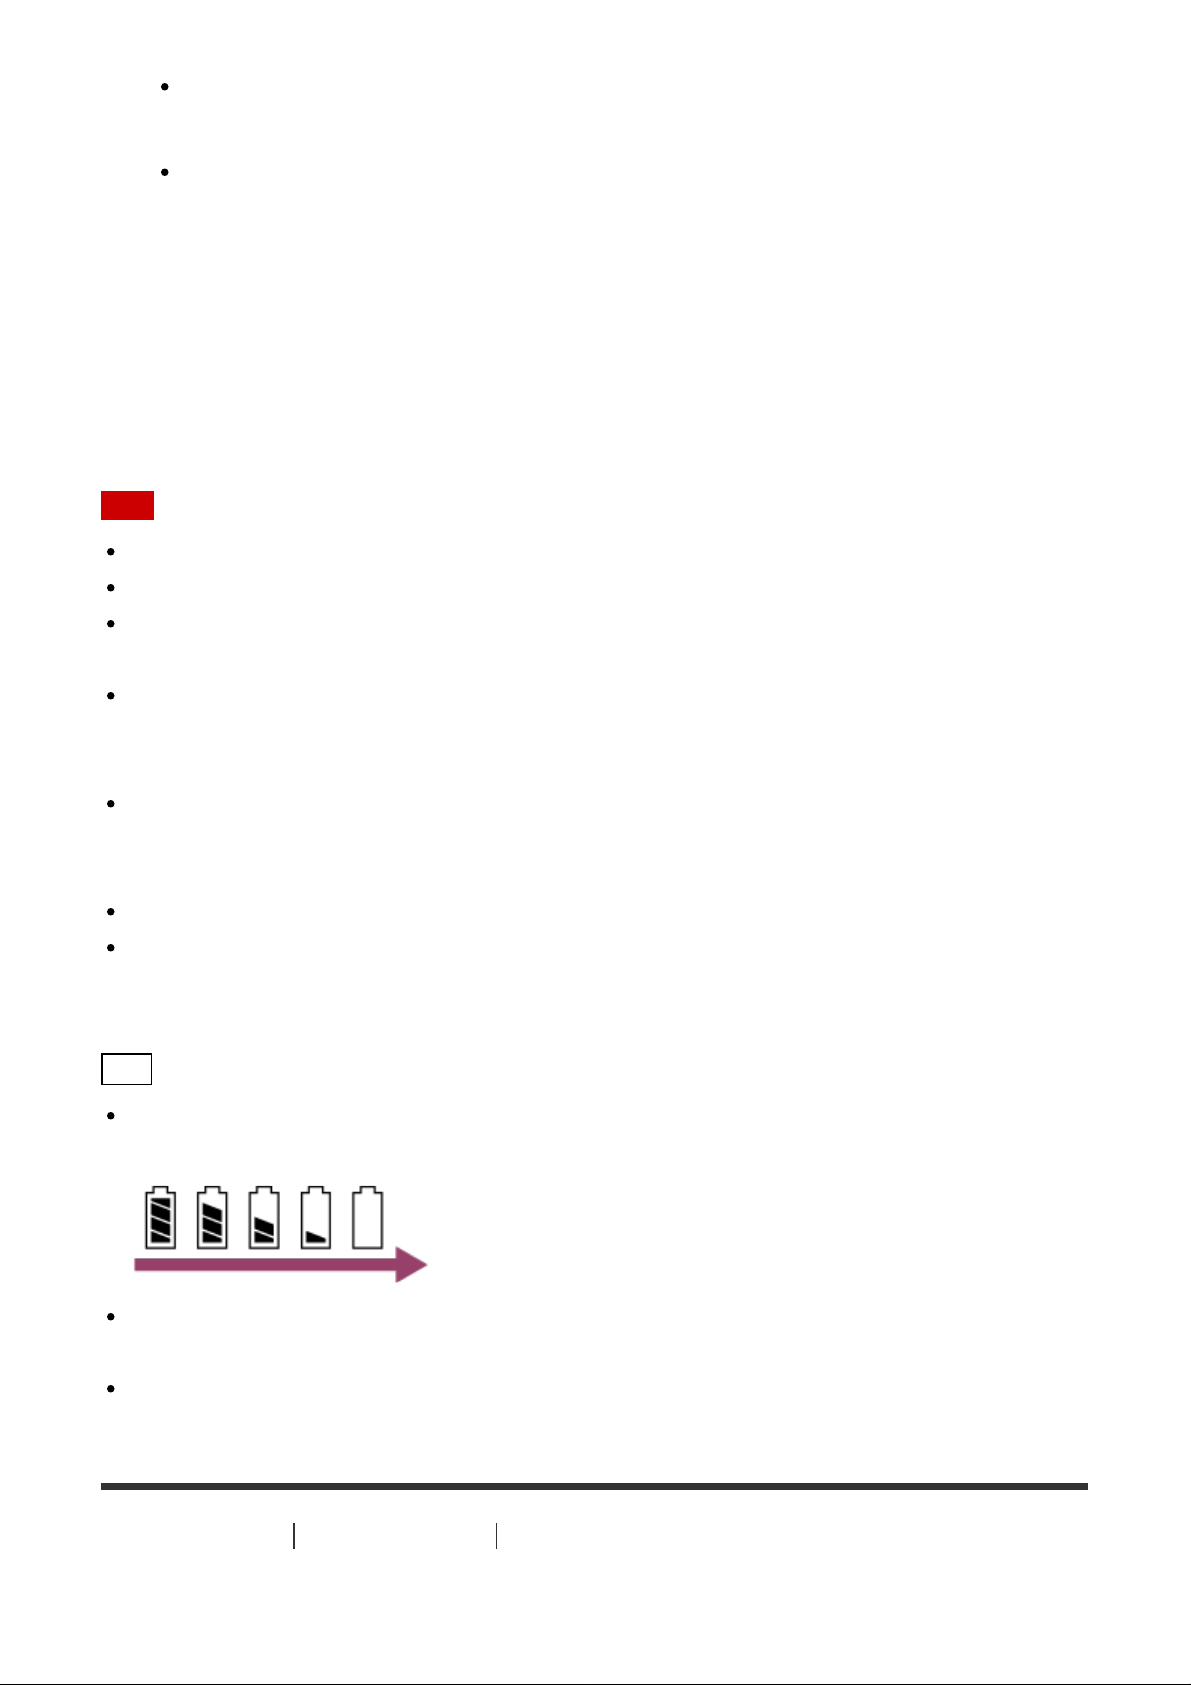
Checking the remaining battery charge
A remaining charge indicator appears on the upper left of the display panel.
The displayed remaining charge indicator may not be correct under certain
circumstances.
It takes about one minute until the correct remaining charge indicator appears.
[10] How to Use
Getting Started Preparing the Camera
Inserting/Ejecting a Memory Card to/from the Camera
Page 21
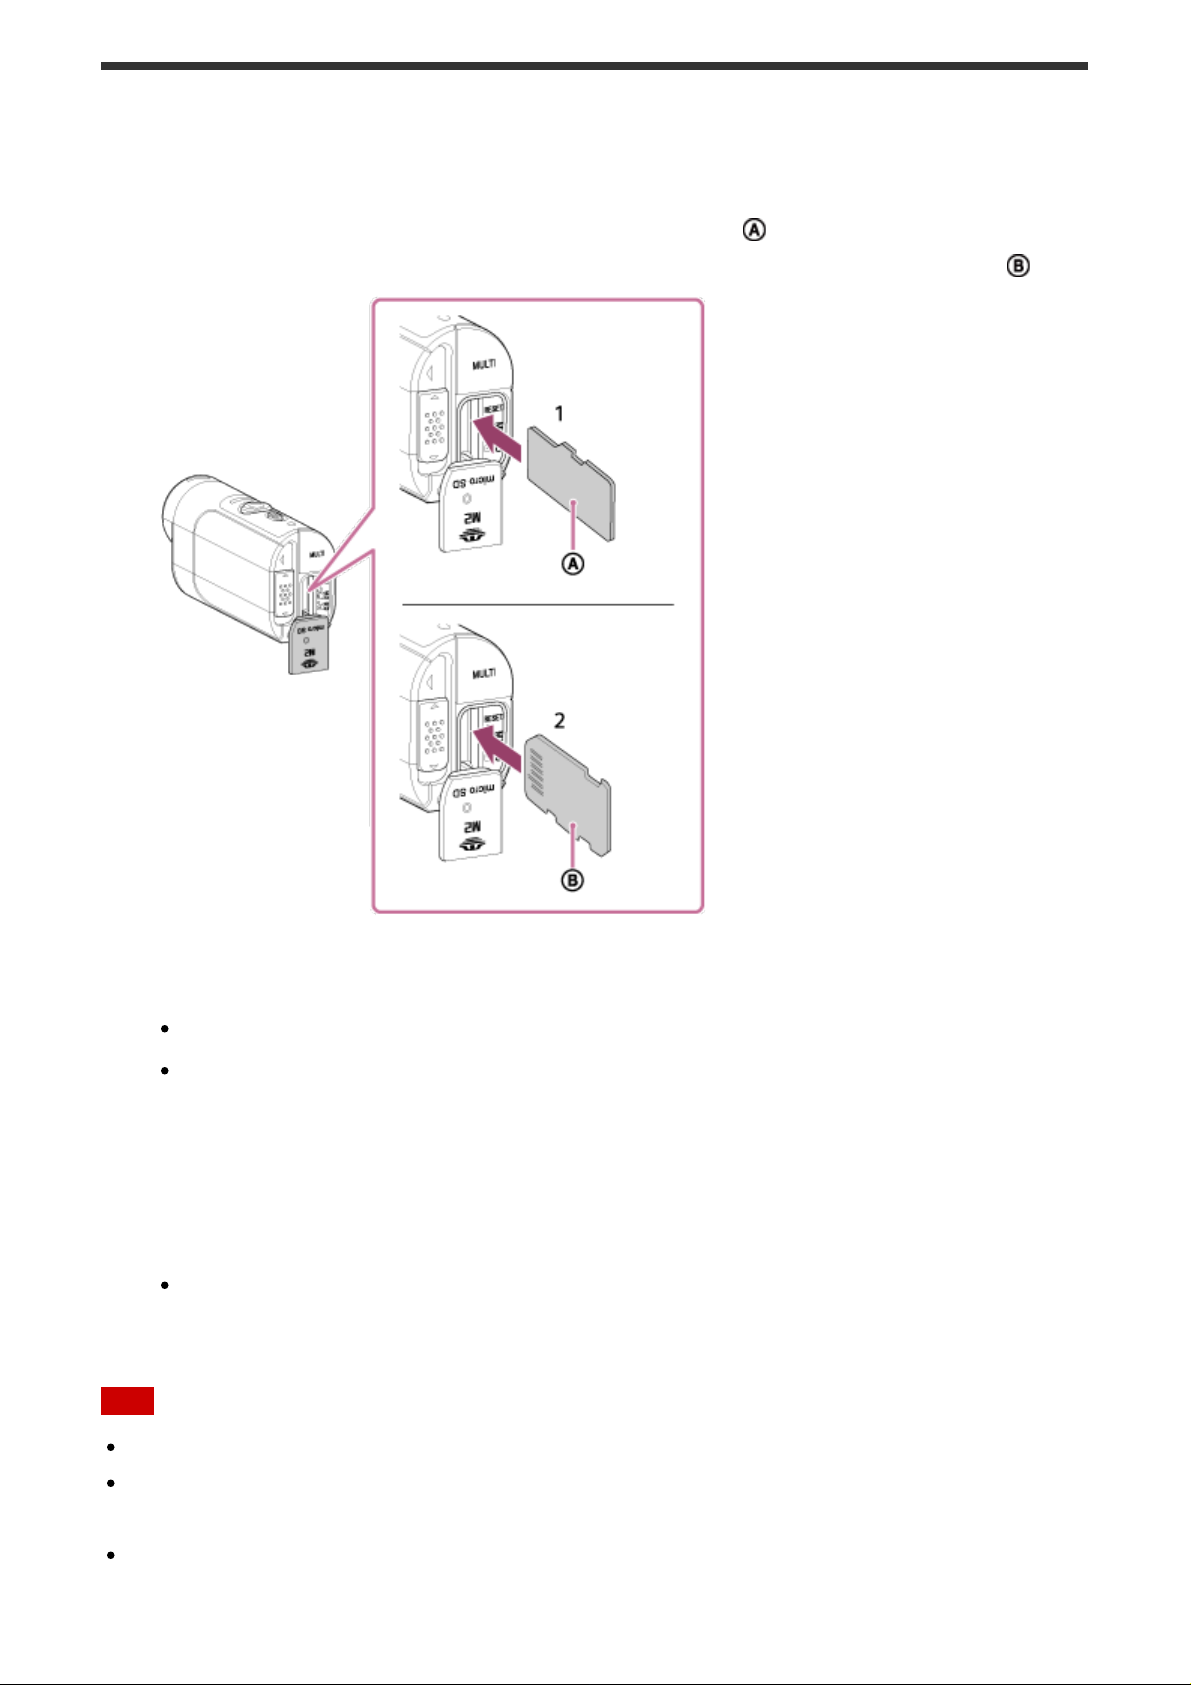
The following describes how to insert/eject a memory card.
1. Insert the memory card until it clicks
microSD card: Insert in the direction of the printed side .
Memory Stick Micro™ (Mark2) media: Insert in the direction of the terminal side .
1 microSD card/microSDHC card/microSDXC card
2 Memory Stick Micro™ (Mark2) media
Insert the memory card properly, confirming each side is facing the correct direction.
Insert a memory card squarely in the correct orientation; otherwise, the camera will
not recognize it.
2. Close the cover
3. Eject the memory card
Open the memory card cover, then lightly push the memory card once.
Note
Operation with all memory cards is not assured.
Confirm the direction of the memory card. If you forcibly insert the memory card in the
wrong direction, the memory card, memory card slot, or image data may be damaged.
To ensure stable operation of the memory card, we recommend that you use this camera
to format any memory card being used with this camera for the first time.
Page 22

Note that formatting will erase all data recorded on the memory card. This data cannot be
restored.
Be sure to back up any important data to a computer or other storage location.
Do not insert anything other than the compliant size of memory card into the memory card
slot. Otherwise, a malfunction may result.
When inserting or ejecting the memory card, be careful to prevent the memory card from
popping out and dropping.
Before you start recording, make a trial recording to make sure that the camera is working
correctly.
Turning off the camera or removing the memory card while the REC/Access lamp is lit
may cause a malfunction of the memory card. Be sure to back up any important data to a
computer or other storage locations.
Check the following when using.
That the terminal cover, memory card and battery pack cover are securely closed
That any foreign matter is not pinched in any of the covers
If any of the covers are not securely closed or any foreign matter gets inside any of the
covers, it may result in water entering the inside of the camera.
[11] How to Use
Getting Started Preparing the Camera
Memory Cards Usable with the Camera
Memory cards usable with the camera are as follows.
Use an SDXC card faster than Class10 when recording movies in XAVC S.
Memory Stick Micro™ (Mark2) media
microSD memory card
microSDHC memory card
microSDXC memory card
*1
Referred to as "Memory Stick Micro" in this Help Guide.
*2
Referred to as "microSD card" in this Help Guide.
Note
*2
*2
*2
*1
Operation with all memory cards is not assured.
Guaranteed operating temperature of the camera is from -5°C to +40°C (23°F to 104°F).
However, depending on the types of memory cards, guaranteed operating temperature
varies. For details, refer to the operating instructions supplied with the memory card.
Images recorded in a microSDXC memory card cannot be transferred or played back on a
computer or AV device that is not exFAT
*
-compatible (via USB connection). Before
Page 23
connecting, make sure that the device is exFAT-compatible. If the camera is connected to
a device that is not exFAT-compatible, a prompt to format the memory card may appear.
In this case, do not format the memory card, otherwise all its data will be lost.
*
exFAT is the file system used by microSDXC memory cards.
[12] How to Use Getting Started Preparing the Camera
Turning On/Off the Power of the Camera
Turn on the power of the camera.
1. Press the ON/OFF button
You can start recording by pressing the REC button of the camera to turn on the
power.
Turning off the power of the camera
To turn off the camera, press the ON/OFF button again.
Check that the POWER lamp has been turned off by pressing the ON/OFF button.
[13] How to Use Getting Started Preparing the Live-View Remote
Charging the Live-View Remote
Charge the remote control through a computer.
1. Check that the power of the remote control is OFF
2. Connect the remote control to an activated computer with the micro USB cable
(supplied)
The CHG (Charge) lamp of the remote control lights up in orange and charging
begins.
Page 24
The CHG (Charge) lamp goes out when charging is completed.
The charging time*1 of the battery pack on the remote control is as follows.
Via a computer: Approx. 4 h 05 min.
Via an AC-UD10
*1
Time required to charge a fully depleted battery pack at a temperature of 25°C (77°F). Charging may
take longer under certain circumstances or conditions.
*2
Rapid charging is possible using the USB charger AC-UD10 (sold separately). To connect to the
charger, use the micro USB cable (supplied).
Note
*2
: Approx. 2 h 55 min.
You can charge the remote control even if it is not completely discharged. Also, even if the
remote control is not fully charged, you can use the partial charge capacity of the battery
pack as is.
When the power of the remote control is on, it is supplied with power but not charged.
To maintain the remote control’s function, fully charge the remote control, and then fully
discharge it at least once a year while storing. And keep the remote control in a cool place
with low humidity.
Hint
Checking the remaining battery charge
A remaining charge indicator appears on the upper right of the LCD screen.
The displayed remaining charge indicator may not be correct under certain
circumstances.
It takes about 30 seconds until the correct remaining charge indicator appears.
If the battery pack runs out quickly even though the remaining charge indicator is high,
fully charge the remote control, again. The remaining charge indicator will then be
displayed correctly. Note that it may not be displayed correctly in a situation where the
remote control is used for a long time at high ambient temperature or the remote control is
left fully charged.
Page 25
[14] How to Use Getting Started Preparing the Live-View Remote
Attaching the Belt to the Live-View Remote
Attach the belt to the remote control.
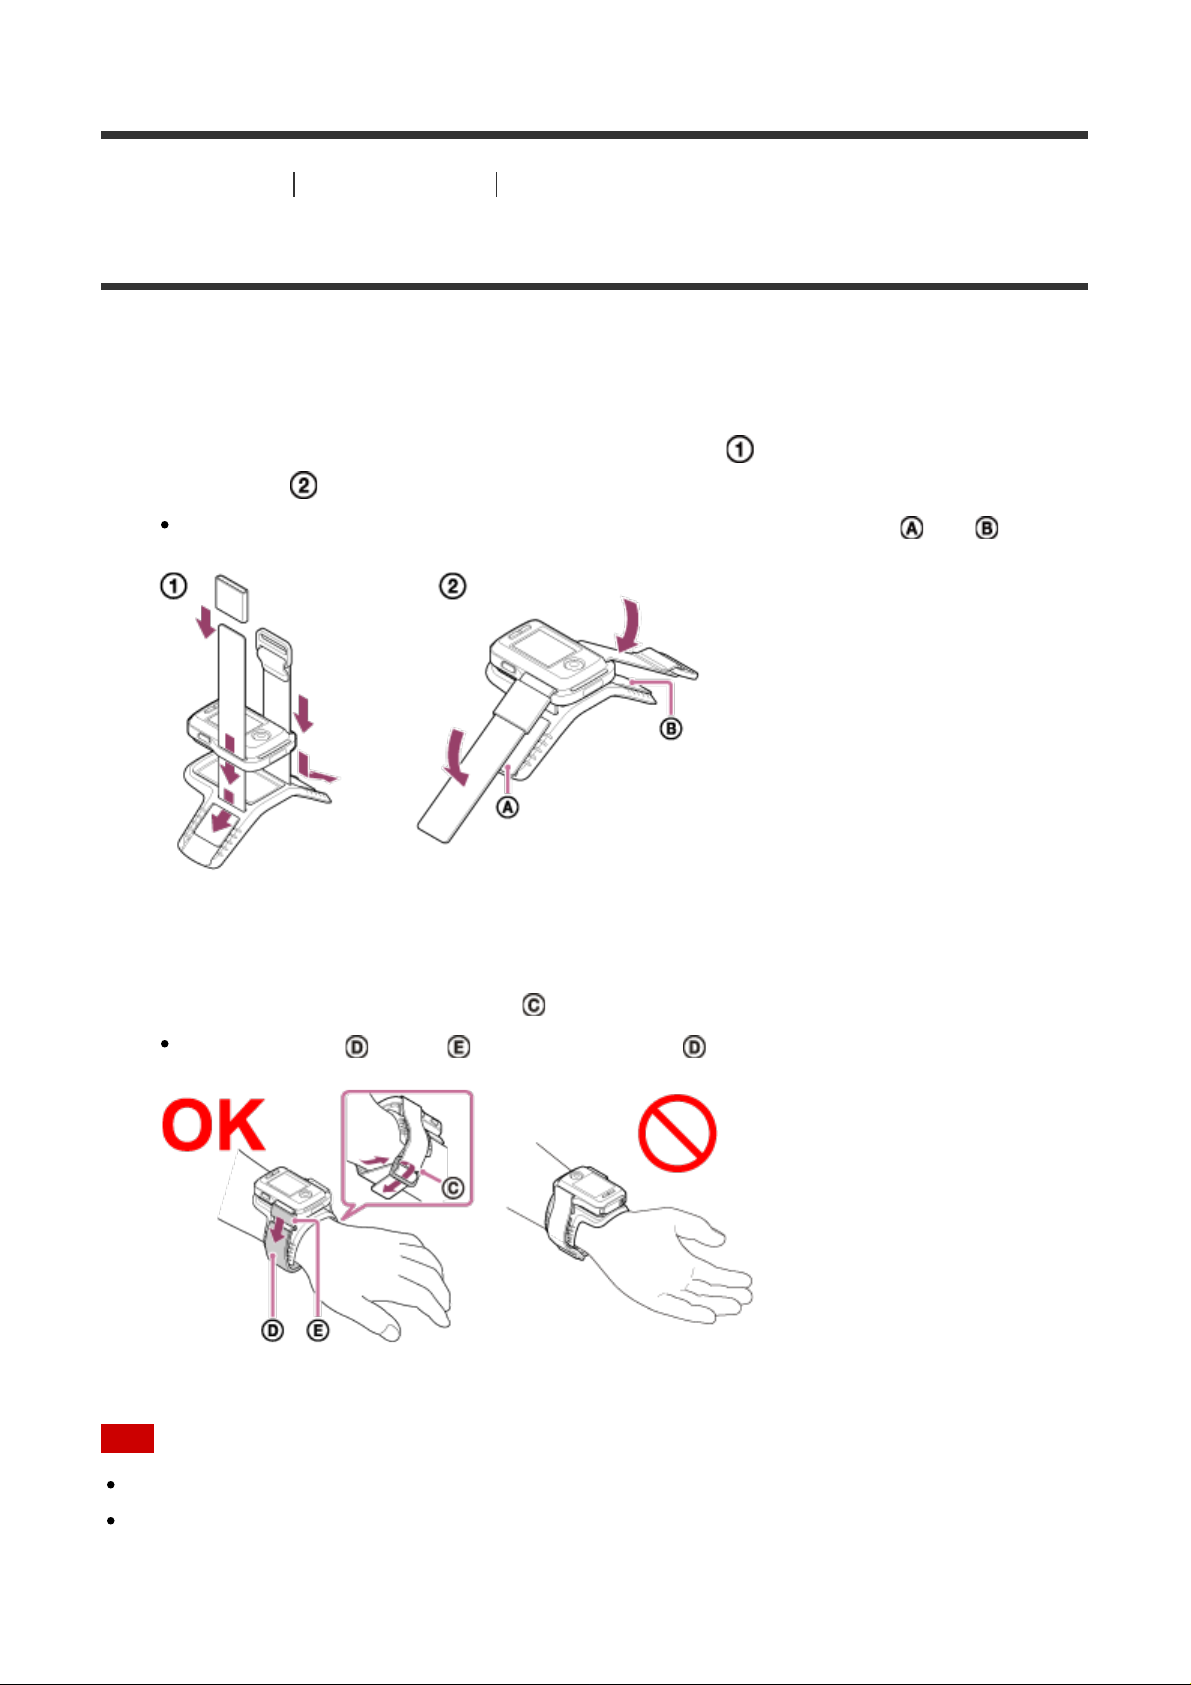
1. Place the remote control on the base plate and thread the belt through the belt loop of
the remote control and the base plate as illustrated in , and then attach it as
illustrated in .
You can adjust the belt length depending on the pasting position of and .
2. To fasten the remote control to your arm, wear the remote control with the LCD screen
parallel to the back of your hand and the REC/ENTER button facing toward your
fingertips. Thread the belt through as illustrated on the left below
After attaching , move to cover the end of .
Note
Attaching the belt incorrectly may cause injury.
The GPS antenna is built in the front of the remote control. Placing the remote control
upside down may cause positioning to take long time or may not be able to determine
your position.
Page 26
When placing the remote control on your right wrist, set the screen rotation in the remote
control settings to ON.
When using the remote control attached to your arm, always attach the supplied base
plate and belt correctly.
Be careful not to drop the remote control when unfastening the belt.
[15] How to Use
Getting Started Preparing the Live-View Remote
Turning On/Off the Power of the Live-View Remote
Turn on/off the power of the remote control.
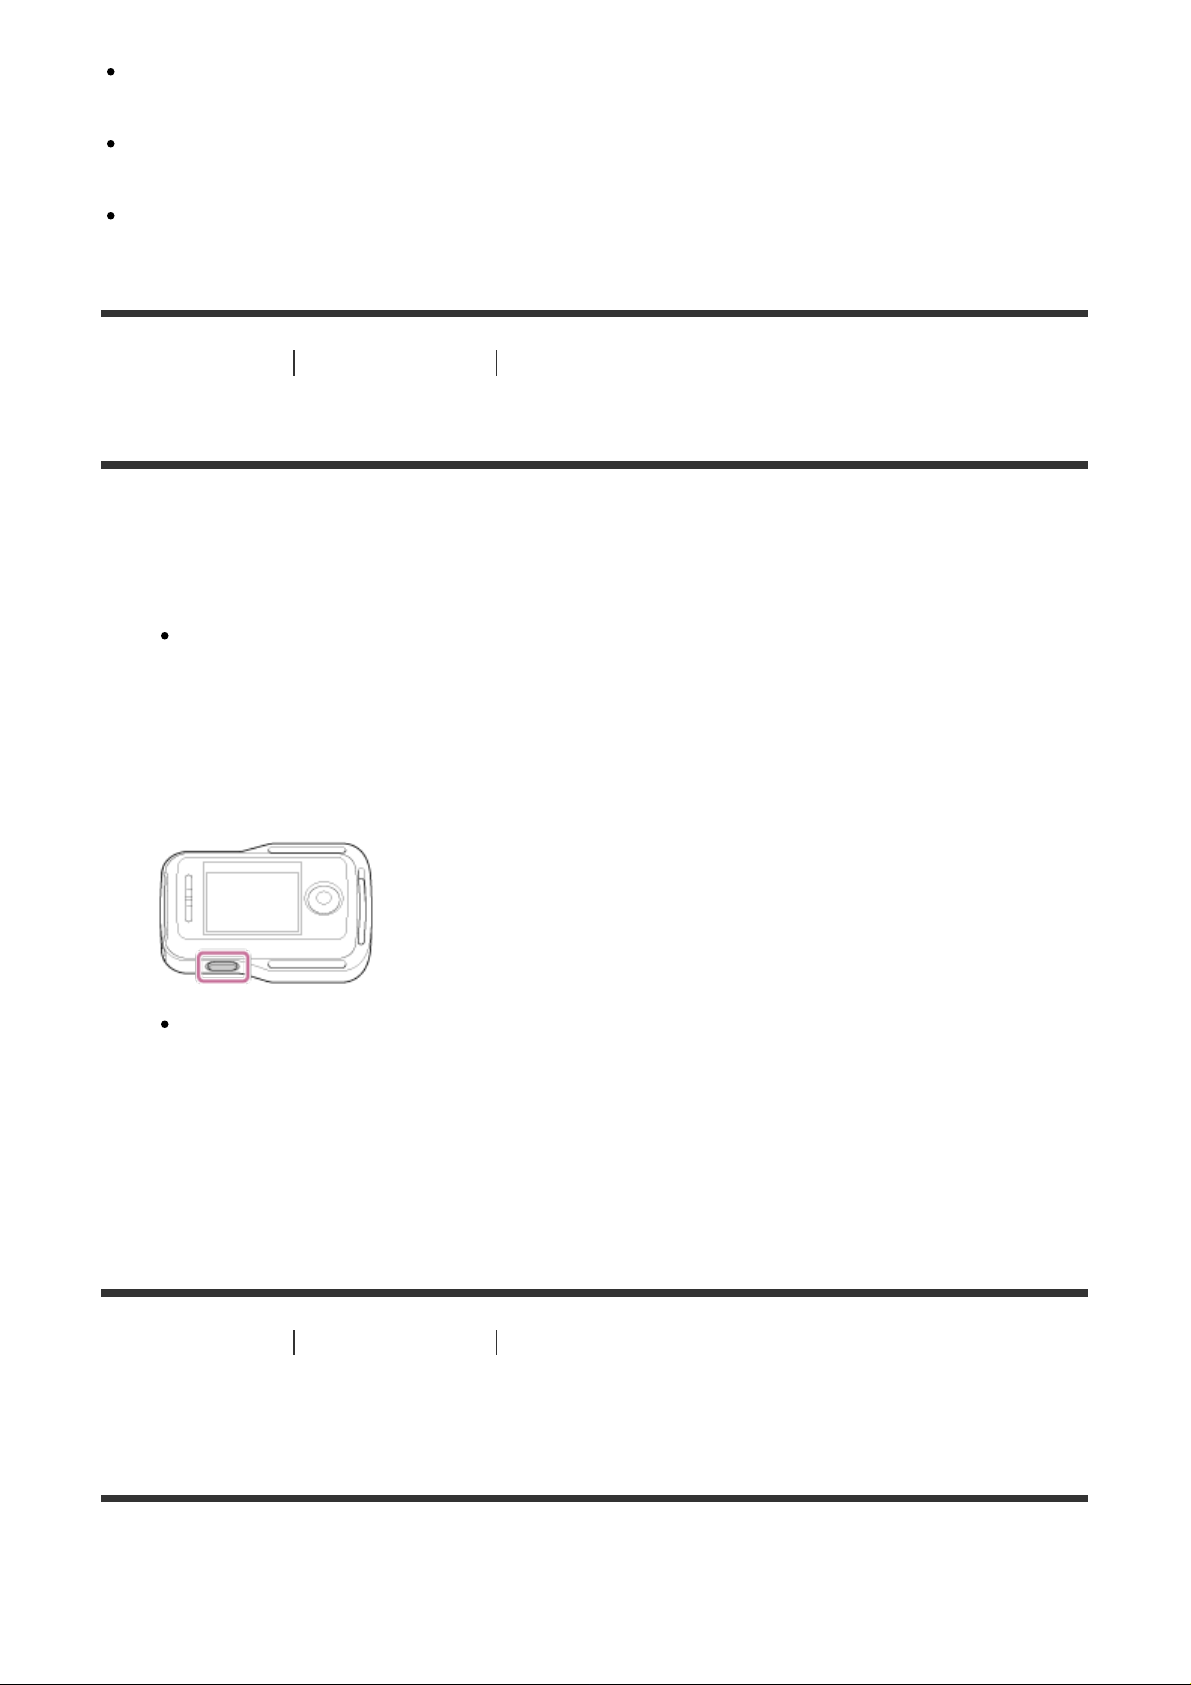
1. Be sure that the connector cover of the remote control is closed
Securely close the terminal cover until the yellow mark under the lock lever can no
longer be seen.
If any foreign matter such as sand gets inside the terminal cover, the sealing gasket
may be scratched, leading to water entering the remote control.
2. Press the ON/OFF button of the remote control
When the remote control is turned on for the first time, the date & time setting screen
is displayed.
To turn off the power of the remote control
To turn off the remote control, press the ON/OFF button again.
[16] How to Use Getting Started Preparing the Live-View Remote
Changing the Date & Time Setting by the Live-View
Remote
When you use the remote control for the first time or after updating the software, the date &
time setting screen is displayed. Use the remote control after the date & time setting is
Page 27
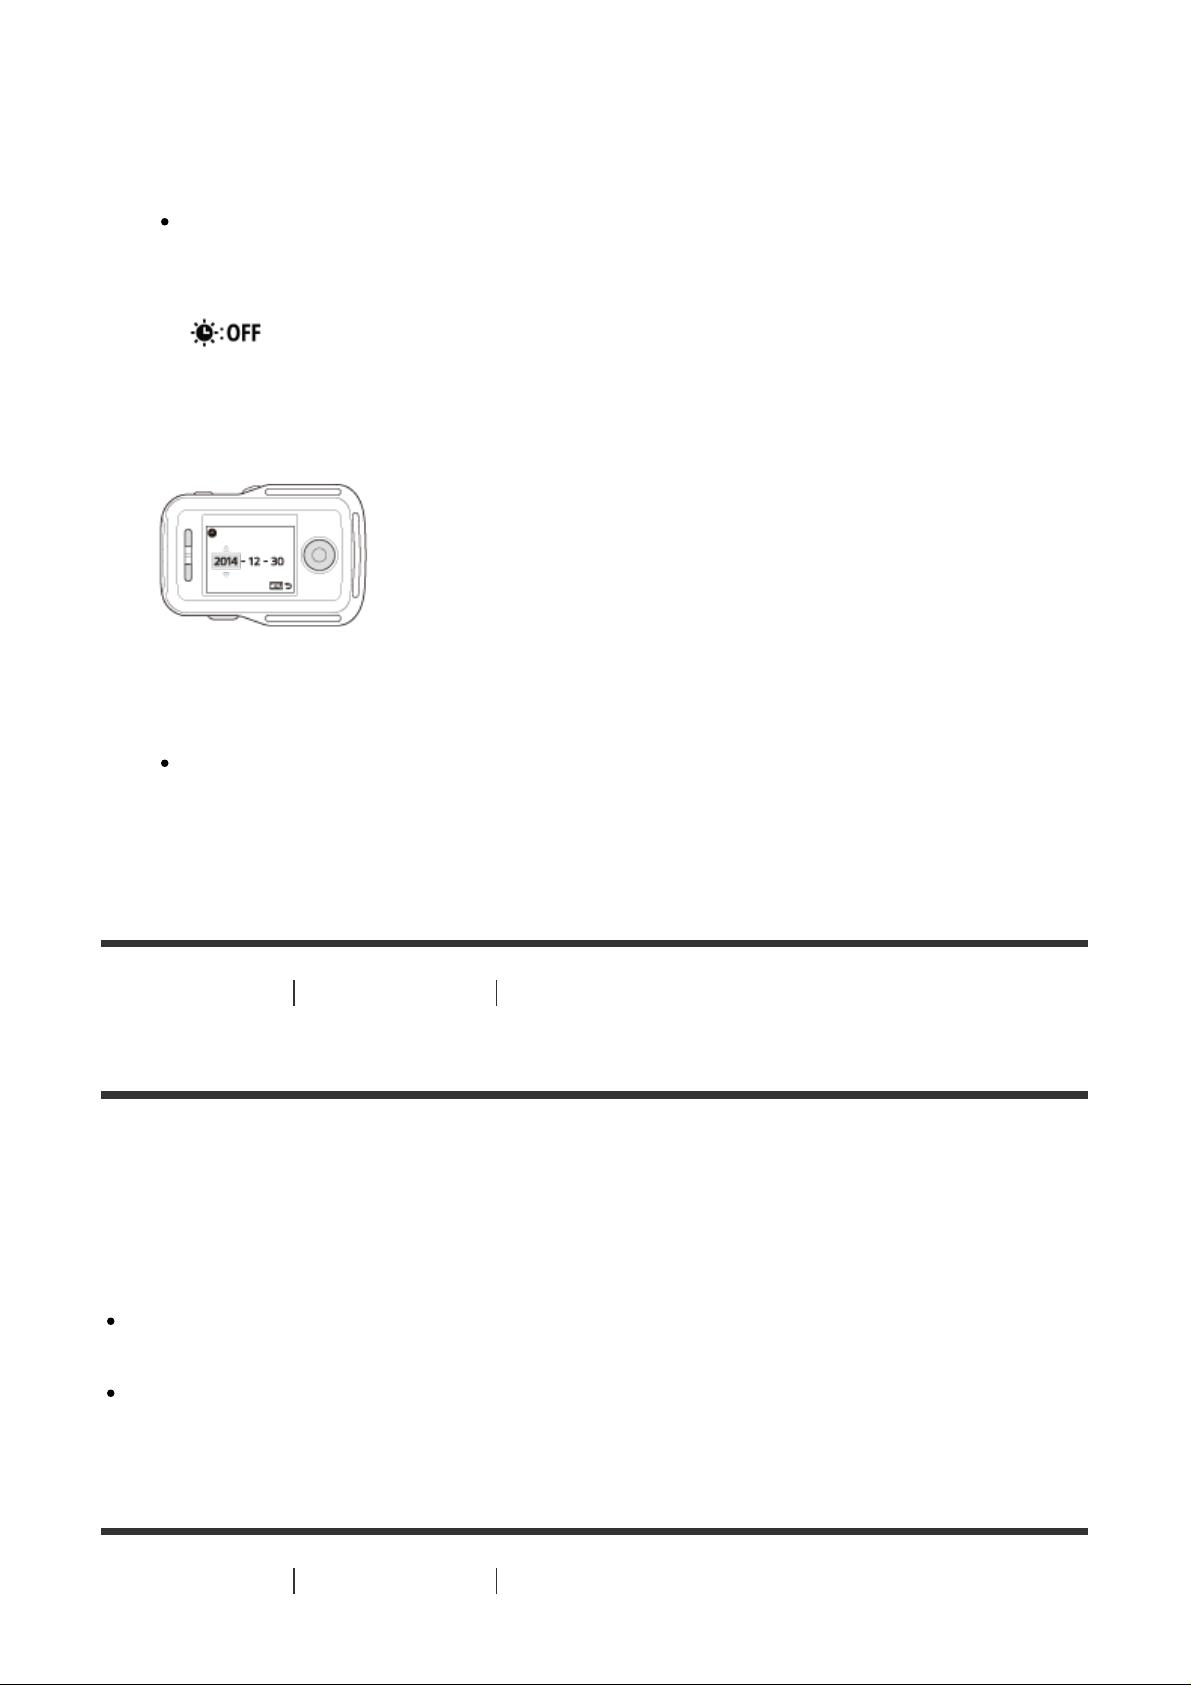
complete.
(Single Connection)
1. Press the UP button or DOWN button of the remote control to select the desired item,
2. Press the UP button or DOWN button to select the desired date and then press the
then press the REC/ENTER button
The following items will be displayed in order on the LCD screen of the remote
control.
GMT+0.0: Area setting
: Saving time (Summer time) setting
Y-M-D/M-D-Y/M(Eng)-D-Y/D-M-Y: Date and time format
Y-M-D : Date setting
00:00: Time setting
REC/ENTER button of the remote control to set the date and time
You can also switch from the MENU items of the remote control. See the Date &
Time Setting.
[17] How to Use Getting Started Preparing the Live-View Remote
GPS Assist Data
The time for the GPS to acquire the location information can be shortened by taking in GPS
assist data. If the bundled remote control RM-LVR2V is connected to a computer on the
Internet using a software Action Cam Movie Creator, the GPS assist data can be updated
automatically.
If the date & time setting is not set, or set time is shifted greatly, the time for the GPS
acquiring location information cannot be shortened.
If the term of validity of GPS assist data has run out, the time until you can record location
information cannot be shortened.
[18] How to Use Getting Started Connecting the Live-View Remote to the Camera
Page 28
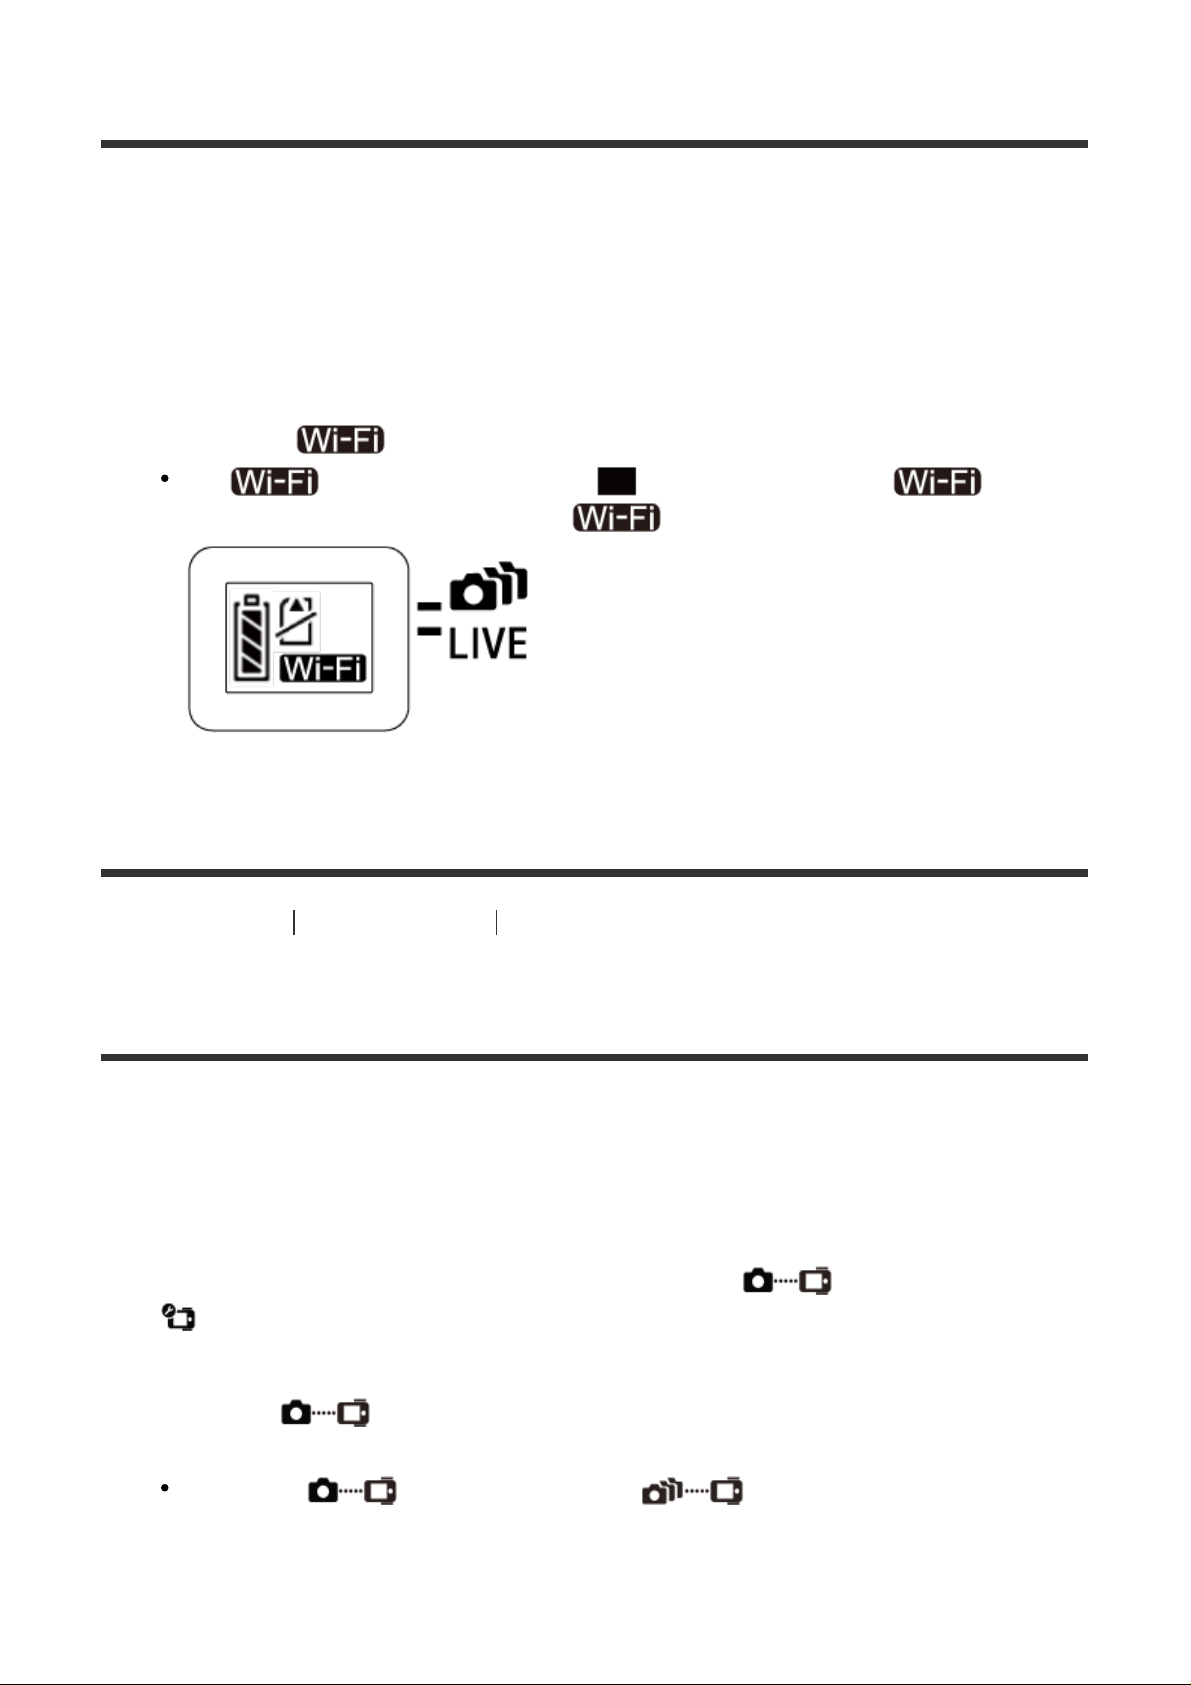
Checking the Connection Mode of the Camera
You can check the connection mode of the camera before connecting the remote control
and the camera through Wi-Fi. You can switch the Wi-Fi setting of the camera that is to be
connected to the Live-View Remote by pressing the Wi-Fi button of the camera.
Check the connection mode of the camera is set to the single connection here.
1. Turn on the power of the camera
2. Check that a mark is displayed on the display panel of the camera
If a mark is not displayed or is displayed above the mark,
press the Wi-Fi button until only the mark is displayed.
[19] How to Use Getting Started Connecting the Live-View Remote to the Camera
(Single Connection)
Checking the Connection Mode of the Live-View Remote
Check the connection mode of the remote control is set to the single connection before
connecting the remote control and the camera through Wi-Fi.
1. Turn on the power of the remote control
2. Press the MENU button of the remote control to select (Connection mode) in
(Remote control settings), then press the REC/ENTER button of the remote
control
3. Check that (Single connection) has been selected and then press the
REC/ENTER button of the remote control
Change to (Single connection) if (Multi connection) is set.
Page 29
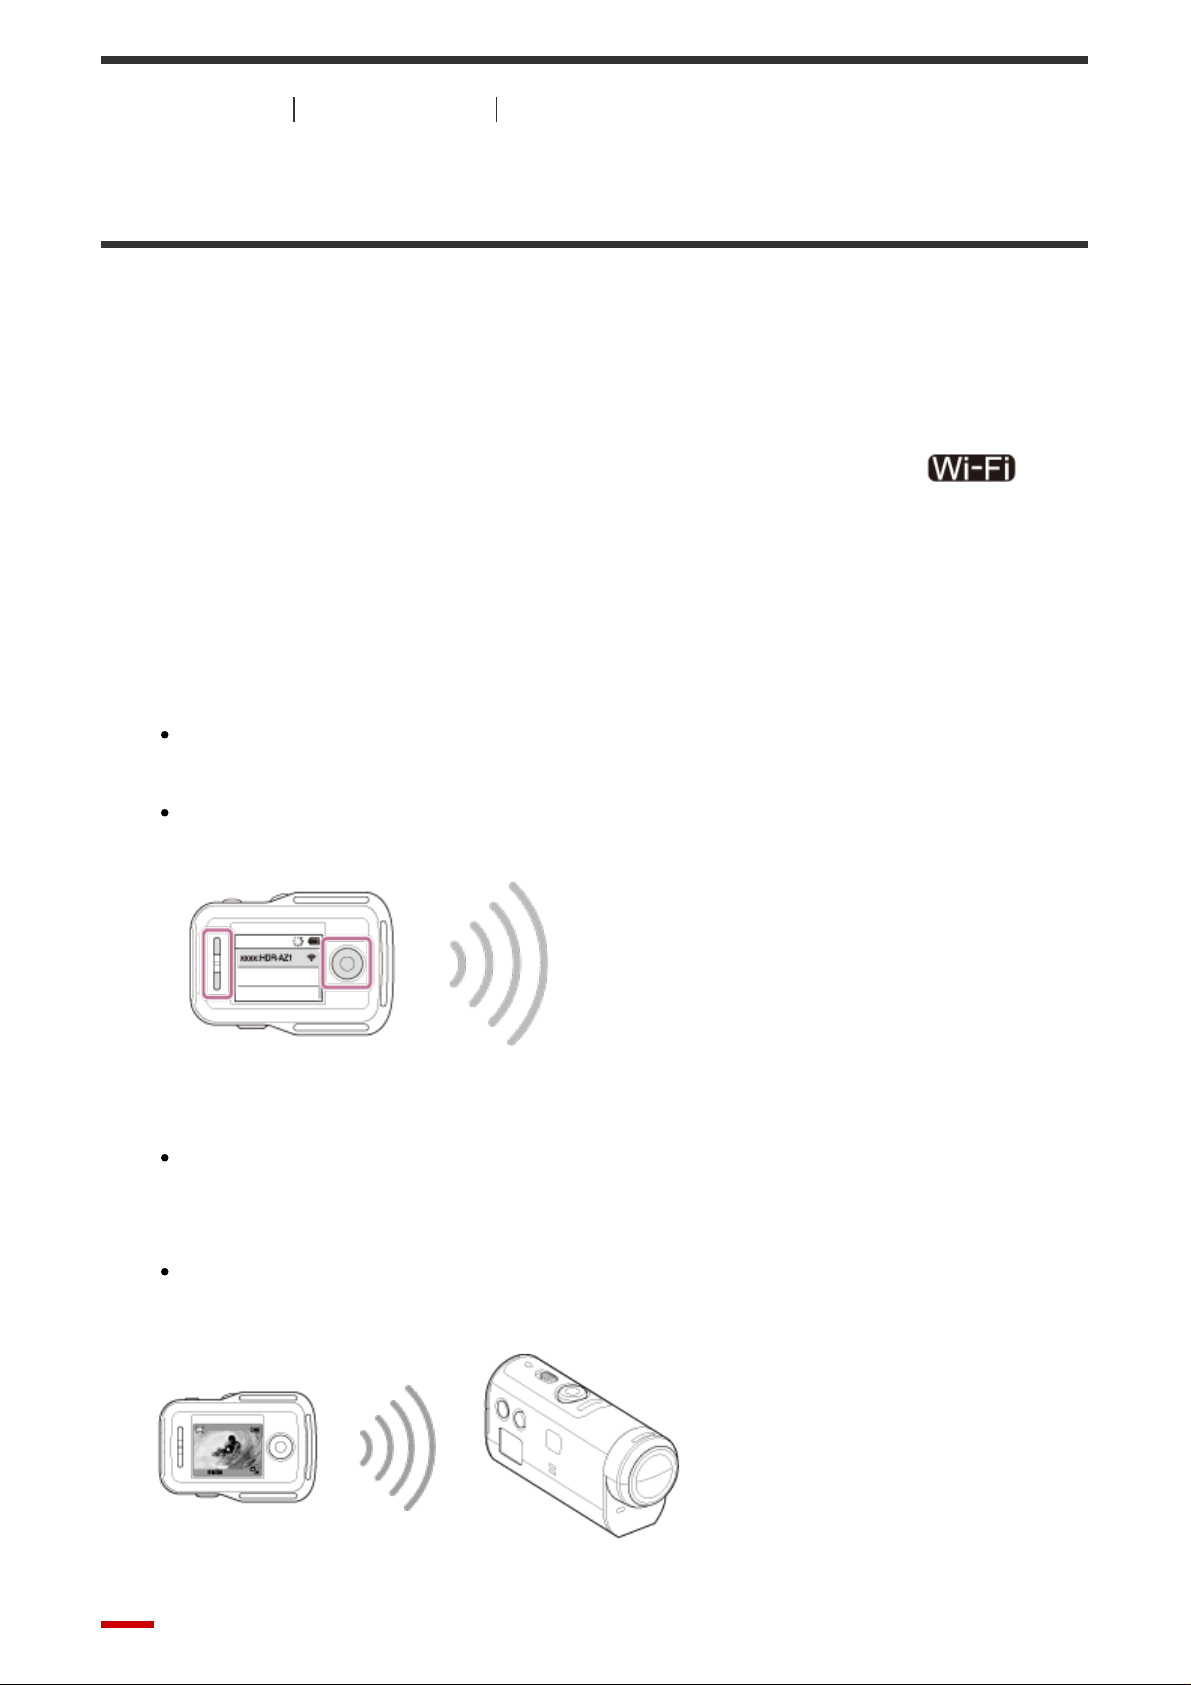
[20] How to Use Getting Started Connecting the Live-View Remote to the Camera
(Single Connection)
Connecting the Live-View Remote to One Camera
You can easily operate all the functions of the camera by connecting one camera to the
remote control through Wi-Fi.
1. Turn on the power of the camera
2. Press the Wi-Fi button of the camera to set the setting of the camera to
(Single connection)
3. Turn on the remote control
4. The Wi-Fi device selection screen is displayed on the LCD screen of the remote
control. Select the SSID of the camera you want to connect with the UP button or
DOWN button and press the REC/ENTER button.
Check that Wi-Fi of the camera is set to the single connection when SSID is not
displayed.
SSID is indicated on the sticker attached to the back side of the battery pack cover
of the camera.
5. Press and hold the Wi-Fi button of the camera when you hear the camera beep
The camera and remote control enter the waiting state for Wi-Fi certification. When
you hear a beep sound at a long interval, press and hold the Wi-Fi button. The beep
sounds at a short interval, and then connection is completed.
The display on the LCD screen of the remote control switches to the Live-View
display and the REC/Wi-Fi lamp of the remote control lights up in blue.
Page 30
Note
[DIRECT-] is omitted from the camera SSID text string when it is displayed on the LCD
screen of the remote control.
You cannot copy images recorded in the camera to the remote control.
The camera should only be connected to a smartphone or the remote control via Wi-Fi
and not to other Wi-Fi access points. If you choose to connect the camera to other Wi-Fi
access points, then you will do so at your own risk. The camera may be subject to
unauthorized access and any content communicated may be at risk of interception.
[21] How to Use
(Single Connection)
Getting Started Connecting the Live-View Remote to the Camera
Establishing a Proper Connection
Try the following operations when the camera and the remote control cannot be connected
through Wi-Fi.
Check the connection modes of the camera and remote control are set to the single
connection respectively. When both connection modes of the camera and remote control
are not set to the single connection, change the connection modes and re-establish the
connection.
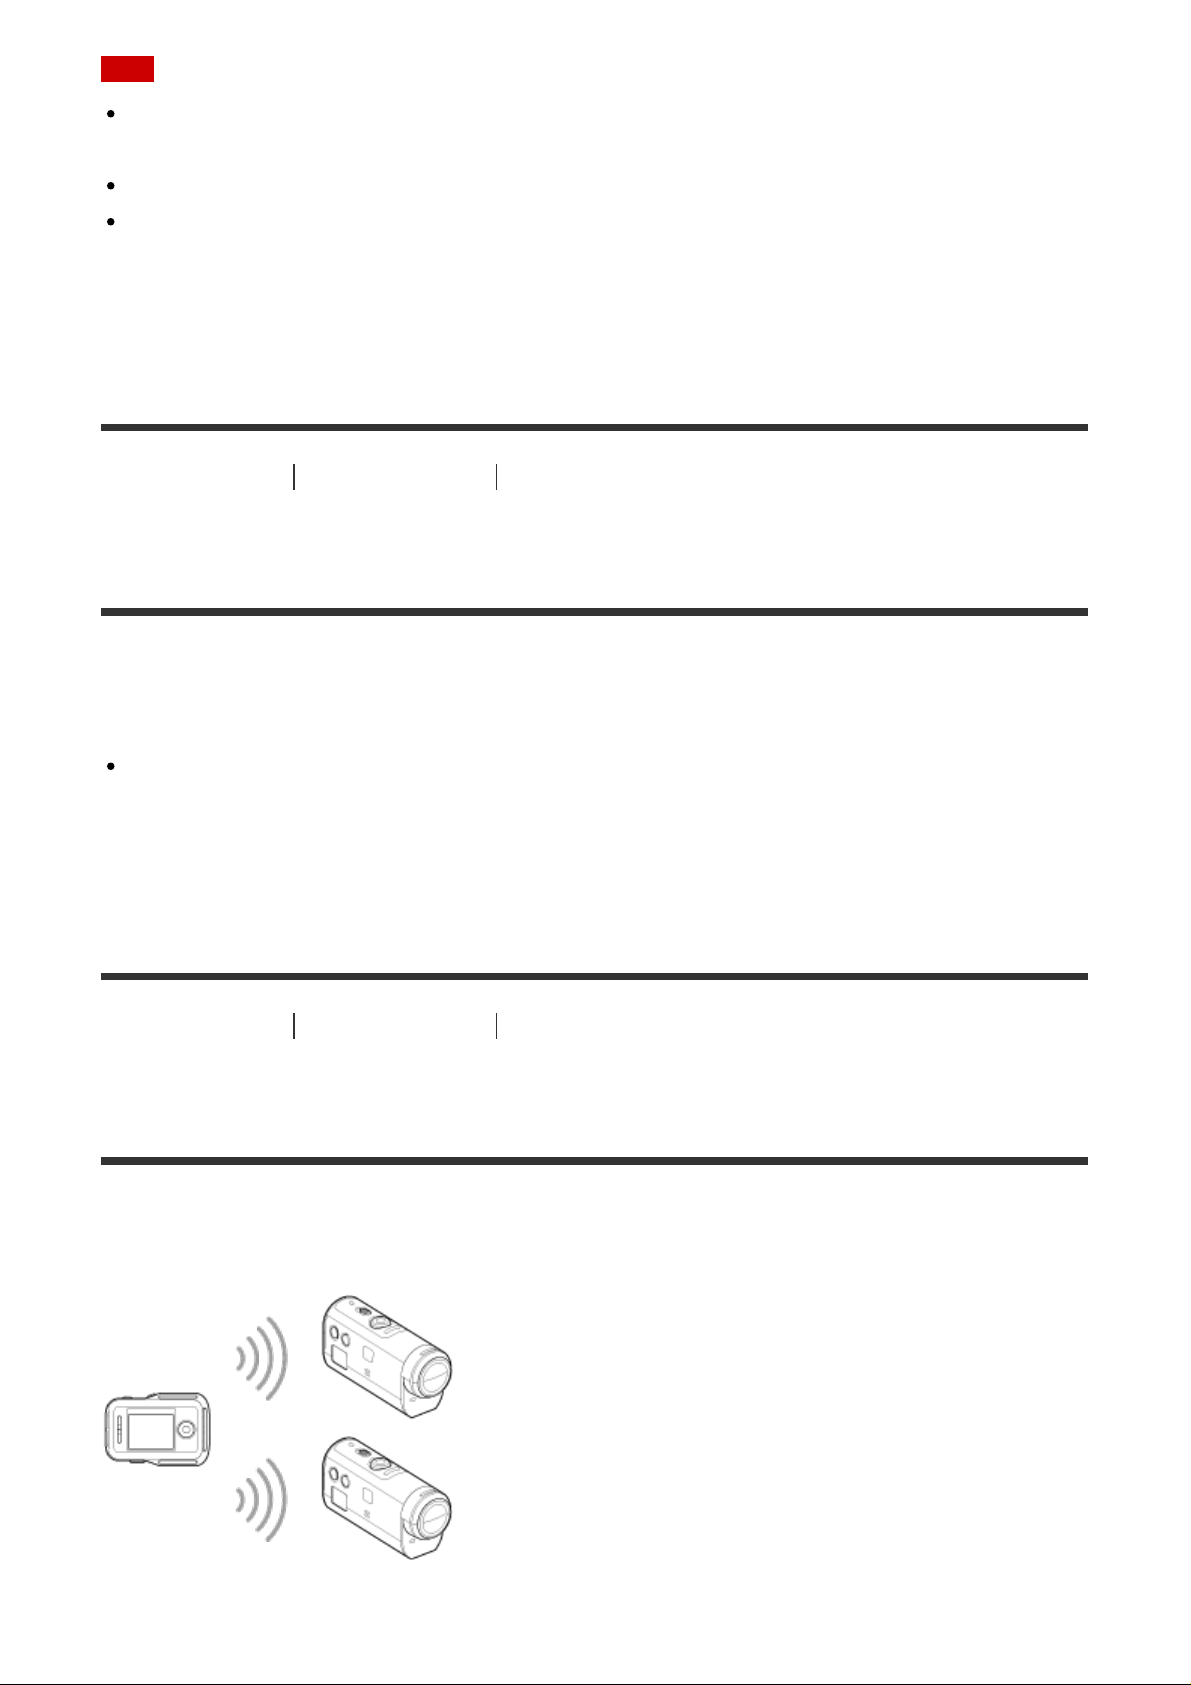
[22] How to Use Getting Started Connecting the Live-View Remote to Multiple
Cameras (Multi Connection)
Connecting the Live-View Remote to Multiple Cameras
You can connect a maximum of five cameras to the remote control and operate all cameras
simultaneously.
Page 31

1. Turn on the power of the camera
2. Press the Wi-Fi button of the camera to switch to the multi connection
3. Turn on the remote control
4. Press the MENU button to select (Connection mode) in (Remote control
setting), then select (Multi connection)
5. Press the MENU button to select (Device registration)
The device registration screen will be displayed on the LCD screen of the remote
control, and the camera and remote control enter the waiting state for the multi
connection.
6. Press and hold the Wi-Fi button of the camera
When a connection request is sent from the camera to the remote control, a beep
sounds.
7. Press the OK button displayed on the LCD screen of the remote control.
After the connection is established, the LCD screen of the remote control switches to
the Live-View display.
8. Repeat the procedure from step 1 to connect to an additional camera
Note
Register each camera before the connection standby mode of the camera is cancelled.
The multi camera control function is only available with compatible cameras.
When operating a camera that does not support the multi camera control function, set the
remote control to (Single connection).
You cannot copy images recorded in the camera to the remote control.
The WPS method is used to connect the remote control to multiple cameras. If there is
another device using the WPS method in the vicinity of the cameras, the registration may
fail. If the registration fails, reconnect by performing each step again.
The camera should only be connected to a smartphone or the remote control via Wi-Fi
and not to other Wi-Fi access points. If you choose to connect the camera to other Wi-Fi
access points, then you will do so at your own risk. The camera may be subject to
unauthorized access and any content communicated may be at risk of interception.
Page 32

[23] How to Use Getting Started Connecting the Live-View Remote to Multiple
Cameras (Multi Connection)
Resetting the Connection Information of the Registered
Cameras
This function is available only when the remote control is set to the multi connection.
1. Press the MENU button of the remote control to select (Reset network
settings) in (Remote control setting)
Select to reset the network settings. Select to cancel the resetting.
[24] How to Use Getting Started Connecting the Camera to Your Smartphone
Installing the App on Your Smartphone
Install the PlayMemories Mobile on your smartphone or tablet. Update PlayMemories Mobile
to the latest version if you have already installed it on your smartphone.
For the latest information and functional detail of PlayMemories Mobile, refer to the following
website.
http://www.sony.net/pmm/
Android OS
Search for PlayMemories Mobile on Google Play, then install it.
When using One-touch functions (NFC), Android 4.0 or later is required.
iOS
Search for PlayMemories Mobile on App Store, then install it.
Page 33

When using iOS, One-touch functions (NFC) are not available.
Note
An NFC-enabled smartphone or tablet is required for using One-touch functions (NFC) of
the camera.
The Wi-Fi function described in this Help Guide is not guaranteed to work with all
smartphones and tablets.
The operation methods and display screens for the application are subject to change
without notice by future upgrades.
[25] How to Use
Getting Started Connecting the Camera to Your Smartphone
Checking the ID/Password
Check the ID/password used to connect the camera to your smartphone.
Check the password on the sticker (SSID label) attached to the back side of the battery
pack cover.
The ID/password is not necessary for one-touch connect by a smartphone.
1. SSID label
If the sticker is peeled off or becomes difficult to be read, you can recall your user ID and
password by the following procedure.
1. Insert a charged battery pack into the camera
2. Connect the camera to a computer with the micro USB cable (supplied)
3. Press the ON/OFF button of the camera to turn on the power
Page 34

4. Display [Computer] > [PMHOME] > [INFO] > [WIFI_INF.TXT] on your computer, then
confirm the user ID and password
[26] How to Use Getting Started Connecting the Camera to Your Smartphone
Using One-touch Functions to Connect to an NFCenabled Android Smartphone
By easily connecting the camera to your smartphone, you can operate the camera with your
smartphone as well as the bundled remote control.
1. Turn on the camera
2. Press the Wi-Fi button of the camera to display (Single connection)
3. Select [Settings] on the smartphone, then select [More...] and checkmark [NFC] or
[Reader/Writer]
Page 35

4. Touch the smartphone and the camera
Cancel the sleep mode and the screen lock of the smartphone beforehand.
Touch and hold without moving until PlayMemories Mobile starts (1-2 seconds).
Touch the (N Mark) of the smartphone and the (N Mark) on the side of the
camera.
Some smartphones with e-wallet functions support NFC. For details, refer to the
operating instructions supplied with your smartphone.
If the camera and the smartphone cannot be connected by NFC, connect them in the
method described in Connecting to the Android Smartphone (connecting without
NFC).
Note
You cannot connect a smartphone to multiple cameras at the same time.
Depending on local electrical environments or the performances of smartphones, the liveview images may not be displayed smoothly.
When the airplane mode is set to [ON] on the remote control, the Wi-Fi function is not
available.
Hint
About NFC
Page 36

NFC is a technology for short-range wireless communication among various devices, such
as a mobile phone and IC tag etc. Data communication is achieved by simply touching a
specific point. NFC (Near Field Communication) is an international standard of the shortrange wireless communication technology.
[27] How to Use
Getting Started Connecting the Camera to Your Smartphone
Connecting to an Android Smartphone
By connecting the camera to your smartphone, you can operate the camera with your
smartphone as well as the bundled remote control.
If the camera and the smartphone are connected without NFC, follow the following steps for
the settings.
1. Turn on the power of the camera
2. Press the Wi-Fi button of the camera to display (Single connection)
3. Start PlayMemories Mobile on the smartphone
4. Select the SSID, as printed on the sticker attached to the back side of the battery pack
cover
Page 37

5. Input the password on the sticker attached to the back side of the battery pack cover
1. Select [Settings] on the iPhone, then select [Wi-Fi] and the SSID of the camera
(First time only)
Note
You cannot connect a smartphone to multiple cameras at the same time.
Depending on local electrical environments or the performances of smartphones, the liveview images may not be displayed smoothly.
[28] How to Use
Getting Started Connecting the Camera to Your Smartphone
Connecting to iPhone
By connecting the camera to iPhone, you can operate the camera with iPhone as well as the
bundled remote control.
Page 38

2. Input the password on the sticker attached to the back side of the battery pack cover
(First time only)
3. Confirm the connection to the SSID on the attached sticker
4. Return to the Home screen, then start PlayMemories Mobile
Page 39

Note
You cannot connect an iPhone to multiple cameras at the same time.
Depending on local electrical environments or the performances of iPhones, the live-view
images may not be displayed smoothly.
[29] How to Use
Getting Started Other Preparations (Using Accessories)
Using the Tripod Adaptor
By attaching the tripod adaptor to the camera, you can attach accessories to the camera
without using the waterproof case. Opening/closing the connector cover of the Multi/Micro
USB Terminal is also possible. This enables you to connect the camera to a computer or a
USB device while the tripod adaptor is attached.
For details about the tripod adaptor, visit the following website.
http://rd1.sony.net/help/cam/1415/h_zz/
[30] How to Use Getting Started Other Preparations (Using Accessories)
Using the Waterproof Case (SPK-AZ1)
By inserting the camera in the waterproof case, you can shoot movies under/near water.
For details about the waterproof case, visit the following website.
http://rd1.sony.net/help/cam/1415/h_zz/
Page 40

[31] How to Use Getting Started Other Preparations (Using Accessories)
Using the Adhesive Mount
The adhesive mount is used to fix the waterproof case or tripod adaptor to an item you
intend to use.
The adhesive mount is a general term for the attachment buckle, flat adhesive mount and
curved adhesive mount. Before attaching, insert the camera in the waterproof case or attach
the tripod adaptor.
For details about the adhesive mount visit the following website.
http://rd1.sony.net/help/cam/1415/h_zz/
[32] How to Use Shooting Shooting Movies or Still Images
REC HOLD (Lock) Switch
The REC button can prevent accidental operation.
Slide the switch in the direction of [HOLD] to lock the REC button. To release the lock, back
to the original position.
Before recording, release the lock.
If you lock the camera while recording, "it will continue recording*."
If you lock the camera after you stop recording, "it will remain stopped*."
*
Release the lock to change the setting.
1 REC HOLD (lock) switch
2 REC button
3 REC lamp/LIVE lamp
Page 41

[33] How to Use Shooting Shooting Movies or Still Images
Button Hold Function of the Live-View Remote
Press the MENU button of the remote control connected to the camera for 2 seconds or
more to activate the button hold function.
In the button hold function, appears on the LCD screen of the remote control. The
REC button, DISP button, UP button and DOWN button of the remote control are disabled.
To cancel the button hold function, press the MENU button of the remote control for 2
seconds or more, or press the ON/OFF button to turn off the power of the remote control.
Note
The button hold function is only available when the remote control is connected to a camera
by Wi-Fi. When the remote control is not connected, the button hold function cannot be
used.
The button hold function cannot be used while the MENU items are displayed.
When the Wi-Fi connection between the remote control and the camera is disconnected,
the button hold function is cancelled.
[34] How to Use Shooting Shooting Movies or Still Images
Switching the Shooting Mode
Switch the shooting mode by pressing the UP/DOWN button on the LCD screen of the
remote control.
The shooting mode icon will be displayed on the upper left side of the screen.
The shooting mode icons are as follows.
Movie Mode: Records movies.
Page 42

Photo mode: Records photos.
Interval photo recording mode: Continues to record photos at regular intervals.
Hint
Switch the shooting mode from the MENU items
You can also switch the shooting mode from the MENU items of the remote control. The
procedure for switching via the MENU items is as follows.
Press the MENU button of the remote control to select (Shooting mode) from the
setting items. Select a desired shooting mode by pressing the UP/DOWN button of the remote
control.
[35] How to Use Shooting Shooting Movies or Still Images
Movie Mode
Record movies.
1. Press the ON/OFF button of the camera to turn on the power of the camera
2. Slide the REC HOLD switch of the camera to release REC HOLD
If REC HOLD of the camera is released, proceed to step 3.
3. Switch the shooting mode to
the remote control
4. Press the REC button of the camera or the remote control to start recording
The REC/Wi-Fi lamp of the remote control changes from blue to red.
(Movie mode) by pressing the UP/DOWN button of
To stop recording
Press the REC button of the camera or the remote control again.
The REC/Wi-Fi lamp of the remote control changes from red to blue.
Note
Images cannot be played on the camera. To play back images, you need the supplied
remote control or a smartphone with PlayMemories Mobile installed.
During periods of extended shooting, the camera’s temperature may rise to a point where
shooting stops automatically.
The shooting mode setting is set to the movie mode by default. For PHOTO/INTVL
recording, you need the supplied remote control or a smartphone with PlayMemories
Mobile installed.
Page 43

The shooting mode set when the camera is turned off will be resumed when the camera
is turned on the next time.
[36] How to Use
Shooting Shooting Movies or Still Images
Photo Mode
Record photos.
1. Press the ON/OFF button of the camera to turn on the power of the camera
2. Switch the shooting mode to (Photo mode) by pressing the UP/DOWN button of
the remote control
3. Press the REC button of the camera or the remote control to start recording
Note
Images cannot be played on the camera. To play back images, you need the supplied
remote control or a smartphone with PlayMemories Mobile installed.
During periods of extended shooting, the camera's temperature may rise to a point where
shooting stops automatically.
The shooting mode set when the camera is turned off will be resumed when the camera
is turned on the next time.
[37] How to Use
Shooting Shooting Movies or Still Images
Interval Photo Recording Mode
After you start shooting, the camera continues to record photos at regular intervals until you
stop shooting.
1. Press the ON/OFF button of the camera to turn on the power of the camera
2. Switch the shooting mode to (Interval photo recording) by pressing the UP/DOWN
button of the remote control
3. Press the REC button of the camera or the remote control to start recording
To stop recording
Page 44

Press the REC button of the camera or the remote control.
The REC/Wi-Fi lamp of the remote control changes from red to blue.
Note
Images cannot be played on the camera. To play back images, you need the supplied
remote control or a smartphone with PlayMemories Mobile installed.
During periods of extended shooting, the camera's temperature may rise to a point where
shooting stops automatically.
The shooting mode set when the camera is turned off will be resumed when the camera
is turned on the next time.
[38] How to Use
Shooting Shooting Movies or Still Images
Recording for an Extended Time
Note the items below when recording for an extended time.
When you continue to shoot for a long time, the temperature of the camera rises. If the
temperature reaches above a certain level, shooting stops automatically. Leave the
camera alone for 10 minutes or longer to allow the temperature inside the camera to
decrease to a safe level.
Under high ambient temperatures, the temperature of the camera rises quickly.
When the temperature of the camera rises, the image quality may deteriorate. It is
recommended that you wait until the temperature of the camera drops before continuing
to shoot images.
The surface of the camera may get warm with use - this is normal.
[39] How to Use Changing the Settings of the Live-View Remote List of Setting
Items
List of Setting Items
You can check that the setting items and current setting items will be displayed and change
the settings by pressing the MENU button of the remote control while the camera and
remote control are connected through Wi-Fi.
You can select a setting from the following items.
Disconnect
Page 45

Disconnects the Wi-Fi connection and returns to the Wi-Fi device selection screen.
Connecting devices settings
Device registration
Registers a camera to connect to the remote control using the multi connection.
*6
Play mode
*2
Plays and deletes images using the remote control.
Shooting Mode
Switches between movie/still image/interval photo.
The setting items of the camera
The items listed below can be set in the movie mode.
Movie settings
Image quality setting: Sets the image resolution and frame rate to shoot movies.
SteadyShot: Activates the camera-shake reduction.
Flip: Records the image upside down.
Scene: Sets an image quality suitable for scenes.
*2
Color setting: Sets the image color tone.
Movie record format: Selects the movie record format.
The items listed below can be set in the still image mode.
Still image settings
Flip: Records the image upside down.
Scene: Sets an image quality suitable for scenes.
Continuous shooting: Sets continuous shooting (Drive mode).
Continuous shooting interval *3: Sets continuous shooting intervals for high
speed continuous shooting and motion shot LE shooting.
Self-timer: Sets the self-timer.
The items listed below can be set in the interval photo recording mode.
Interval photo setting
Flip: Records the image upside down.
Scene: Sets an image quality suitable for scenes.
Time lapse: Sets the time lapse of the interval photo recording.
The setting items of connecting devices
*2
Page 46

Time code/user bit setting*4: You can select the time code/user bit function setting.
IR-remote controller: Sets the infrared remote controller RMT-845 (sold
separately).
Switching NTSC/PAL: Selects a setting, depending on the TV system of the
country or region where you use this camera.
Auto power off: Sets the power of the camera to turn off automatically.
Beep: Sets the Beep to ON/OFF.
Format*3: Deletes all images in the memory card and restores the memory
card to its initial state.
The setting items of the remote control
Remote control settings
Screen rotation: Changes the directions of LCD monitor and UP button/DOWN
button of the remote control.
Monitor brightness: Sets LCD monitor brightness of the remote control.
Date & time setting: Sets the year/month/day and region.
Reset settings: Resets each setting value of the remote control to default setting value.
Version: Displays the software version of the remote control.
Connection mode
*1, *5
: Sets the number of cameras connected to the remote
control.
GPS setting*5: Records GPS log while recording movies and the location information
while recording photos using GPS of the Live-View Remote.
Airplane mode*1: Sets the camera to disable all functions related to the Wi-Fi
function and GPS function temporarily when you are in an airplane.
Reset network settings*6: Resets network settings for the multi connection.
*1
Not displayed when the camera and remote control are connected through Wi-Fi.
*2
Displayed only in the single connection.
*3
Displayed when a memory card is inserted.
*4
Displayed only when set to the movie mode.
*5
Not displayed when the airplane mode is set to ON.
*6
Displayed only for the multi connection.
Note
The setting items of the camera are displayed only when the camera and remote control
are connected through Wi-Fi (excluding the remote control settings).
The icons displayed in the default settings are listed.
To return to the setting item selection screen from the setting value selection screen,
select .
To perform the setting item in the selection screen or the setting value, select .
Page 47

[40] How to Use Changing the Settings of the Live-View Remote Movie Settings
Image Quality Setting
You can set the image resolution and frame rate to shoot movies.
1. Press the MENU button of the remote control
The list of setting items will be displayed.
2. Press the UP button or DOWN button of the remote control to select or
(Image quality setting) in (Movie settings), then press the REC/ENTER
button of the remote control
3. Press the UP button or DOWN button of the remote control to select the desired setting
value, then press the REC/ENTER button of the remote control
(When the movie record format is set to XAVC S)
XAVC S 50 Mbps (default)
Resolution: 1920 × 1080
Imaging frame rate: 60p
Playback frame rate: 60p
XAVC S 50 Mbps
Resolution: 1920 × 1080
Imaging frame rate: 30p
Playback frame rate: 30p
XAVC S 50 Mbps
Resolution: 1920 × 1080
Imaging frame rate: 24p
Playback frame rate: 24p
XAVC S 50 Mbps (default)
Resolution: 1920 × 1080
Imaging frame rate: 50p
Playback frame rate: 50p
*1
*1
*1
*2
XAVC S 50 Mbps
*2
Resolution: 1920 × 1080
Imaging frame rate: 25p
Playback frame rate: 25p
(When the movie record format is set to MP4)
Highest resolution (smooth image recorded at 4× frame rate)
Page 48

Resolution: 1920 × 1080
Imaging frame rate*3: 60p/50p
Playback frame rate
Highest resolution (default)
Resolution: 1920 × 1080
*3
: 60p/50p
Imaging frame rate
Playback frame rate
*3
: 30p/25p
*3
: 30p/25p
High resolution
Resolution: 1280 × 720
Imaging frame rate
Playback frame rate
*3
: 30p/25p
*3
: 30p/25p
/ High speed recording (smooth image recorded at 4× frame rate)
Resolution: 1280 × 720
Imaging frame rate
Playback frame rate
*3
: 120p/100p
*3
: 120p/100p
Super slow recording (slow motion image recorded at 4× frame rate)
Resolution: 1280 × 720
Imaging frame rate
*3
: 120p/100p
*4
*5
Playback frame rate
*3
: 30p/25p
Standard resolution
Resolution: 640 × 480
Imaging frame rate
Playback frame rate
*1
When NTSC/PAL switching is set to NTSC.
*2
When NTSC/PAL switching is set to PAL.
*3
Frame rate depends on the NTSC/PAL setting.
*4
Action Cam Movie Creator converts the frame rate to 60p/50p and plays back images at
standard speed. It also allows you to play back images in slow motion and edit them during slow
motion playback.
*5
Depending on your device and software, images are played back at 60p/50p.
Note
*3
: 30p/25p
*3
: 30p/25p
Use an SDXC card faster than Class10 when recording movies in XAVC S.
The playback frame rate shown above is the frame rate when movies are played back
using playback devices or software other than the remote control. The playback image
frame rate displayed on the LCD screen of the bundled Live-View Remote will change
Page 49

according to the Wi-Fi communication status of the camera and remote control (and it is
different from the frame rate used when shooting).
Continuous movie shooting time is approximately 13 hours. In SSLOW mode, it is
approximately 3 hours.
Audio is not recorded when images are recorded in [SSLOW] mode.
The field angle changes when the movie size is set to [VGA].
SteadyShot is not effective when the image quality setting mode is set to
[HS120]/[HS100] or [SSLOW].
[41] How to Use
Changing the Settings of the Live-View Remote Movie Settings
SteadyShot
You can activate the camera-shake reduction when shooting movies.
1. Press the MENU button of the remote control
The list of setting items will be displayed.
2. Press the UP button or DOWN button of the remote control to select
(SteadyShot) in (Movie settings), then press the REC/ENTER button of the
remote control
3. Press the UP button or DOWN button of the remote control to select the desired value,
then press the REC/ENTER button of the remote control
(default): Uses SteadyShot (Field angle: 120°)
: Does not use SteadyShot (Field angle: 170°)
Note
The field angle changes when the movie size is set to [VGA].
SteadyShot is not effective in the following settings.
When the movie size is set to [HS120]/[HS100] or [SSLOW]
In the photo mode
In the interval photo recording mode
[42] How to Use Changing the Settings of the Live-View Remote Movie Settings
Flip (Movies)
Page 50

You can flip the images vertically and record them when recording movies. This function is
useful when the camera is attached upside down.
1. Press the MENU button of the remote control
The list of setting items will be displayed.
2. Press the UP button or DOWN button of the remote control to select (Flip) in
(Movie settings), then press the REC/ENTER button of the remote control
3. Press the UP button or DOWN button of the remote control to select the desired setting
value, then press the REC/ENTER button of the remote control
: Flips vertically
(default): Does not flip vertically
[43] How to Use Changing the Settings of the Live-View Remote Movie Settings
Scene (Movies)
You can set a scene when recording movies.
1. Press the MENU button of the remote control
The list of setting items will be displayed.
2. Press the UP button or DOWN button of the remote control to select
(Scene) in (Movie settings), then press the REC/ENTER button of the remote
control
3. Press the UP button or DOWN button of the remote control to select the desired setting
value, then press the REC/ENTER button of the remote control
(default) : Shoots images in the standard quality
: Shoots images in an image quality suitable for bluish objects in such
situations as in an aquarium or near a water tank under blue lighting
Note
For details about the waterproof case, visit the following website.
http://rd1.sony.net/help/cam/1415/h_zz/
[44] How to Use
Changing the Settings of the Live-View Remote Movie Settings
Page 51

Color Setting
You can change the image color tone when shooting movies.
1. Press the MENU button of the remote control
The list of setting items will be displayed.
2. Press the UP button or DOWN button of the remote control to select
(Color setting) in (Movie settings), then press the REC/ENTER button of the
remote control
3. Press the UP button or DOWN button of the remote control to select the desired setting
value, then press the REC/ENTER button of the remote control
: Records in natural colors
You can record in colors that are easy to correct in image editing after shooting.
(default): Records in vivid colors
You can record in colors to improve a real sense of scale of active scenes.
Note
You may feel that the level of contrast is low when shooting in NUTRL. This is not a
malfunction.
[45] How to Use
Changing the Settings of the Live-View Remote Movie Settings
Movie Record Format
You can select the movie record format when shooting movies.
1. Press the MENU button of the remote control
The list of setting items will be displayed.
2. Press the UP button or DOWN button of the remote control to select (Movie
record format) in (Movie settings), then press the REC/ENTER button of the
remote control
3. Press the UP button or DOWN button of the remote control to select the desired setting
value, then press the REC/ENTER button of the remote control
: Select this to record high quality movies at a high bit-rate of approximately
50 Mbps. In addition, you can set the time code/user bit.
(default): Select this when transferring images to your smartphone or
Page 52

uploading images to a website.
Note
Use an SDXC card faster than Class10 when recording movies in XAVC S.
After selecting the movie record format, set the image quality setting as well.
[46] How to Use
Changing the Settings of the Live-View Remote Still Image Settings
Flip (Still Images)
You can flip the images vertically and record them when recording photos. This function is
useful when the camera is attached upside down.
1. Press the MENU button of the remote control
The list of setting items will be displayed.
2. Press the UP button or DOWN button of the remote control to select (Flip) in
(Still image settings), then press the REC/ENTER button of the remote control
3. Press the UP button or DOWN button of the remote control to select the desired setting
value, then press the REC/ENTER button of the remote control
: Flips vertically
(default): Does not flip vertically
[47] How to Use Changing the Settings of the Live-View Remote Still Image Settings
Scene (Still Images)
You can set a scene when recording photos.
1. Press the MENU button of the remote control
The list of setting items will be displayed.
2. Press the UP button or DOWN button of the remote control to select
(Scene) in (Still images settings), then press the REC/ENTER button of the
remote control
3. Press the UP button or DOWN button of the remote control to select the desired setting
Page 53

value, then press the REC/ENTER button of the remote control
(default) : Shoots images in the standard quality
situations as in an aquarium or near a water tank under blue lighting
Note
For details about the waterproof case, visit the following website.
http://rd1.sony.net/help/cam/1415/h_zz/
: Shoots images in an image quality suitable for bluish objects in such
[48] How to Use
Changing the Settings of the Live-View Remote Still Image Settings
Continuous Shooting
You can select either one file shooting or continuous shooting when recording photos.
1. Press the MENU button of the remote control
The list of setting items will be displayed.
2. Press the UP button or DOWN button of the remote control to select
(Continuous shooting) in (Still image settings), then press the REC/ENTER button
of the remote control
3. Press the UP button or DOWN button of the remote control to select the desired setting
value, then press the REC/ENTER button of the remote control
One file shooting (Single shoot) (default): Image size 11.9M
Records one still image.
High speed continuous shooting: Image size 11.9M
Shoots continuously at the frame rate and duration specified in the continuous shooting
interval setting.
Motion shot LE: Image size 3.0M
Automatically creates one composite photo from the images that were shot continuously at
the frame rate and duration specified in the continuous shooting interval setting.
To perform Motion shot LE well
Attempt the following methods of shooting.
Hold the camera securely to enhance steady shots.
In order to enhance steady shots, you can achieve better performances with the
combination of the remote control operations or self-timer functions of a smartphone.
Be careful not to select too big a moving object or too many objects.
Page 54

Be aware of shooting in as light a place as possible without brightness differences.
To perform high speed continuous shooting well
Attempt the following methods of shooting.
Hold the camera securely to enhance steady shots.
In order to enhance steady shots, you can achieve better performances with the
combination of the remote control operations or self-timer functions of a smartphone.
Note
[FAIL] will be displayed on the LCD screen of the remote control when the motion shot LE
composite has failed. Images may not be saved depending on the timing of displaying
[FAIL].
There is a processing time to move on to next operation after high speed continuous
shooting/motion shot LE.
Only one photo is transferred to a smartphone. In the case of high speed continuous
shooting, the last photo is transferred. In the case of motion shot LE, the composite photo
is transferred.
[49] How to Use
Changing the Settings of the Live-View Remote Still Image Settings
Continuous Shooting Interval
You can set the continuous shooting speed for high speed continuous shooting and motion
shot LE shooting.
1. Press the MENU button of the remote control
The list of setting items will be displayed.
2. Press the UP button or DOWN button of the remote control to select
(Continuous shooting interval) in (Still image settings), then press the
REC/ENTER button of the remote control
3. Press the UP button or DOWN button of the remote control to select the desired setting
value, then press the REC/ENTER button of the remote control
(8fps 1s) (default): Totally records 10 photos at a speed of 8
photos per second in 1.25 seconds
Appropriate to record comparatively fast moving objects.
(5fps 2s): Totally records 10 photos at a speed of 5 photos
per second in 2 seconds
Page 55

Appropriate to record the action of a person or people.
(2fps 5s): Totally records 10 photos at a speed of 2 photos
per second in 5 seconds
Appropriate to record comparatively slowly moving objects.
Note
[8fps], [5fps], and [2fps] are estimated maximum speeds. The speed may not reach the
maximum speed in some shooting conditions.
[50] How to Use
Changing the Settings of the Live-View Remote Still Image Settings
Self-Timer
You can use the self-timer when recording photos.
1. Press the MENU button of the remote control
The list of setting items will be displayed.
2. Press the UP button or DOWN button of the remote control to select (Selftimer) in (Still image settings), then press the REC/ENTER button of the remote
control
3. Press the UP button or DOWN button of the remote control to select the desired setting
value, then press the REC/ENTER button of the remote control
(default): Does not use the self-timer
: Sets the self-timer to after 2 seconds
: Sets the self-timer to after 10 seconds
Note
You cannot use the self-timer when recording movies.
The self-timer function is enabled until released. Set the self-timer to after using
it.
[51] How to Use
Settings
Changing the Settings of the Live-View Remote Interval Photo
Flip (Interval Photo Recording)
Page 56

You can flip the images vertically and record them during the interval photo recording. This
function is useful when the camera is attached upside down.
1. Press the MENU button of the remote control
The list of setting items will be displayed.
2. Press the UP button or DOWN button of the remote control to select (Flip) in
(Interval photo settings), then press the REC/ENTER button of the remote control
3. Press the UP button or DOWN button of the remote control to select the desired setting
value, then press the REC/ENTER button of the remote control
: Flips vertically
(default): Does not flip vertically
[52] How to Use Changing the Settings of the Live-View Remote Interval Photo
Settings
Scene (Interval Photo Recording)
You can set a scene during the interval photo recording.
1. Press the MENU button of the remote control
The list of setting items will be displayed.
2. Press the UP button or DOWN button of the remote control to select
(Scene) in (Interval photo settings), then press the REC/ENTER button of the
remote control
3. Press the UP button or DOWN button of the remote control to select the desired setting
value, then press the REC/ENTER button of the remote control
(default) : Shoots images in the standard quality
: Shoots images in an image quality suitable for bluish objects in such
situations as in an aquarium or near a water tank under blue lighting
Note
For details about the waterproof case, visit the following website.
http://rd1.sony.net/help/cam/1415/h_zz/
Page 57

[53] How to Use Changing the Settings of the Live-View Remote Interval Photo
Settings
Time Lapse
You can set the time lapse of the interval photo recording.
1. Press the MENU button of the remote control
The list of setting items will be displayed.
2. Press the UP button or DOWN button of the remote control to select (Time
lapse) in (Interval photo settings), then press the REC/ENTER button of the
remote control
3. Press the UP button or DOWN button of the remote control to select the desired setting
value, then press the REC/ENTER button of the remote control
: Continues to record photos at about 1-second intervals
(default): Continues to record photos at about 2-second intervals
: Continues to record photos at about 5-second intervals
: Continues to record photos at about 10-second intervals
: Continues to record photos at about 30-second intervals
: Continues to record photos at about 60-second intervals
Note
The first photo is recorded immediately when recording starts, without waiting for the set
interval. The second and subsequent photos are recorded at the set intervals.
The maximum number of recordable files is 40,000 in total, including movie files.
[54] How to Use
Settings
Changing the Settings of the Live-View Remote Connecting Devices
Time Code/User Bit Setting
You can use the time code/user bit when the shooting mode is set to the movie mode and
the movie record format is set to XAVC S.
1. Press the MENU button of the remote control
The list of setting items will be displayed.
2. Press the UP button or DOWN button of the remote control to select (Time
code/User bit) in (Connecting devices settings), then press the REC/ENTER
Page 58

button of the remote control
: Records the time as the user bit
3. Press the UP button or DOWN button of the remote control to select the desired setting
value, then press the REC/ENTER button of the remote control
: Sets the time code
Select 4-digit numbers, then press the REC/ENTER button of the remote control.
The time code can be selected within the following range.
When selecting 30p or 60p
00:00:00:00 (default) - 23:59:59:29
When selecting 25p or 50p
00:00:00:00 (default) - 23:59:59:24
When selecting 24p, you can set the last 2 time code digits of the frames in multiples of 4,
between 0 and 23.
You can set the items below.
TC FORMAT
(default): Records the time code in drop frame
: Records the time code in non-drop frame
In the following situation, time code is recorded in [NDF], and Format will not be
displayed.
When the TV system is [PAL].
TC RUN
: The time code advances sequentially, regardless of the operation of the
camera
(default): The time code advances only during XVAC S movie recording , and it
starts recording sequentially from the time code of the last recorded image
TC MAKE
(default): The newly set-up time code is recorded on recording media
: The last time code of the previous recording is read out from the recording
media and the new time code is recorded sequentially from the last time code.
The time code advances in the REC mode regardless of the setting of .
: Sets the user bit
Set 4-digit numbers, then press the ENTER button.
The user bit can be selected within the following range.
00:00:00:00 (default) - FF:FF:FF:FF
You can set the items below.
UB TIME REC
Page 59

(default): Does not record the time as the user bit
To reset
All of the values will be 0 if you press the DISP button of the remote control while selecting
TC PRESET or UB PRESET using the remote control. All of the values will be reset if you
press the REC/ENTER button of the remote control once again.
Note
Time code/User bit can be set only for the movie mode.
Use an SDXC card faster than Class10 when recording movies in XAVC S.
When the remote control is not connected to the camera through Wi-Fi, the camera
settings cannot be changed.
To return to the setting item selection screen from the setting value selection screen,
select .
To perform the setting item in the selection screen or the setting value, select .
Hint
About time code
Time code is a useful function for advanced image editing, by recording
hours/minutes/seconds/frames on the image data.
When TV system is set to [NTSC] and the frame rate is 30p or 60p, gaps between the
actual time and the time code occur during extended periods of recording as there is a
slight difference between the number of frames of the time code and the actual frame
frequency of NTSC image signal per second. Drop frame corrects these gaps to ensure
that the time code matches the actual time. The first frame numbers (the first 2 frame
numbers for 30p or the first 4 for 60p) are removed every minute except in every ten
minute. Time code without this correction is called non-drop frame.
About the user bit
User bit is a function that can record information (8-digit hexadecimal numbers) such as
date/time/scene number. This function is useful to edit movies using two or more
cameras.
[55] How to Use
Settings
Changing the Settings of the Live-View Remote Connecting Devices
IR-Remote Controller
You can operate the camera using an infrared remote controller (RMT-845 (sold
separately)).
Page 60

1. Press the MENU button of the remote control
The list of setting items will be displayed.
2. Press the UP button or DOWN button of the remote control to select (IRremote controller) in (Connecting devices settings), then press the REC/ENTER
button of the remote control
3. Press the UP button or DOWN button of the remote control to select the desired setting
value, then press the REC/ENTER button of the remote control
: Allows you to operate the camera using the infrared remote controller
(default): Prevents the operation of the camera using the infrared remote
controller
Note
The infrared remote controller RMT-845 (sold separately) is required to use this function.
Purchase one at a Sony service center.
You can operate only in the following settings using the RMT-845 (sold separately). Other
settings are inoperable.
Reset the time code
Start/stop recording
[56] How to Use Changing the Settings of the Live-View Remote Connecting Devices
Settings
Switching NTSC/PAL
You can select a setting, depending on the TV system of the country or region where you
use this camera.
1. Press the MENU button of the remote control
The list of setting items will be displayed.
2. Press the UP button or DOWN button of the remote control to select
(Switching NTSC/PAL) in (Connecting devices settings), then press the
REC/ENTER button of the remote control
3. Press the UP button or DOWN button of the remote control to select the desired setting
value, then press the REC/ENTER button of the remote control
: Select when the TV system is NTSC.
: Select when the TV system is PAL.
Page 61

Note
When you change the settings by remote control, the camera and remote control will be
disconnected and the camera will restart automatically. When the restart of the camera is
completed, the remote control and the camera will be automatically connected.
Recording media formatted or recorded in NTSC (PAL) cannot be recorded or played in
PAL (NTSC). After switching the NTSC/PAL setting, format the current recording media or
use another recording media.
[57] How to Use
Changing the Settings of the Live-View Remote Connecting Devices
Settings
Auto Power Off
You can change the auto power off setting of the camera.
1. Press the MENU button of the remote control
2. Press the UP button or DOWN button of the remote control to select (Auto
power off) in (Connecting devices settings), then press the REC/ENTER button of
the remote control
3. Press the UP button or DOWN button of the remote control to select the desired setting
value, then press the REC/ENTER button of the remote control
(default): Turns the power of the camera off after about 60 seconds
: Does not use the auto power off function
Note
Auto power off is not available in the following situations.
Recording data to media
Shooting movies, or shooting in the interval photo recording mode
During movie playback or live streaming
Wi-Fi connection is in process, Wi-Fi remote control is connected, or an Image is being uploaded
to a smartphone
Connecting to a mass storage device
When the remote control is not connected to the camera through Wi-Fi, the camera
settings cannot be changed.
To return to the setting item selection screen from the setting value selection screen,
select .
To perform the setting item in the selection screen or the setting value, select .
Page 62

[58] How to Use Changing the Settings of the Live-View Remote Connecting Devices
Settings
Beep
You can set the beep of the camera to ON/OFF.
1. Press the MENU button of the remote control
The list of setting items will be displayed.
2. Press the UP button or DOWN button of the remote control to select
(Beep) in (Connecting devices settings), then press the REC/ENTER button of the
remote control
3. Press the UP button or DOWN button of the remote control to select the desired setting
value, then press the REC/ENTER button of the remote control
(default): Beeps
: Does not beep
Note
When the remote control is not connected to the camera through Wi-Fi, the camera
settings cannot be changed.
To return to the setting item selection screen from the setting value selection screen,
select .
To perform the setting item in the selection screen or the setting value, select .
[59] How to Use
Settings
Changing the Settings of the Live-View Remote Connecting Devices
Format
You can delete all movies and photos in the media and reset the memory capacity of the
media.
1. Press the MENU button of the remote control
The list of setting items will be displayed.
2. Press the UP button or DOWN button of the remote control to select
(Format) in (Connecting devices settings), then press the REC/ENTER button of
Page 63

the remote control
Formatting is complete.
Select (Back), then press the REC/ENTER button to cancel the formatting.
Note
Save important images to devices such as a computer before formatting.
Do not perform any of the following operations while formatting.
Press a button
Eject the Memory card
Connect/disconnect a cable
Insert/remove the battery pack
When the remote control is not connected to the camera through Wi-Fi, the camera
settings cannot be changed.
To return to the setting item selection screen from the setting value selection screen,
select .
To perform the setting item in the selection screen or the setting value, select .
[60] How to Use
Changing the Settings of the Live-View Remote Remote Control
Settings
Screen Rotation
You can change the directions of LCD monitor and UP button/DOWN button of the remote
control. You can use the screen rotation to wear the belt on the right wrist.
1. Press the MENU button of the remote control
The list of setting items will be displayed.
2. Press the UP button or DOWN button of the remote control to select (Screen
rotation) in (Remote control settings), then press the REC/ENTER button of the
remote control
3. Press the UP button or DOWN button of the remote control to select the desired setting
value, then press the REC/ENTER button of the remote control
: Rotates the screen
(default): Does not rotate the screen
Note
Page 64

To return to the setting item selection screen from the setting value selection screen,
select .
To perform the setting item in the selection screen or the setting value, select .
[61] How to Use
Settings
Changing the Settings of the Live-View Remote Remote Control
Monitor Brightness
You can set the LCD monitor brightness of the remote control.
1. Press the MENU button of the remote control
The list of setting items will be displayed.
2. Press the UP button or DOWN button of the remote control to select (Monitor
brightness) in (Remote control settings), then press the REC/ENTER button of the
remote control
3. Press the UP button or DOWN button of the remote control to select the desired setting
value, then press the REC/ENTER button of the remote control
(default): Bright
: Dark
Note
To return to the setting item selection screen from the setting value selection screen,
select .
To perform the setting item in the selection screen or the setting value, select .
You cannot set the LCD monitor brightness when power is supplied from the Multi/Micro
USB Terminal (Fixed to “Bright”).
[62] How to Use
Settings
Changing the Settings of the Live-View Remote Remote Control
Date & Time Setting
You can set the year/month/day and region.
1. Press the MENU button to display the setting items. Then select (Date & time
Page 65

setting) in (Remote control settings)
2. Select the desired date format and then press the REC/ENTER button of the remote
control
Y-M-D: Year-Month-Day
M-D-Y: Month-Day-Year
M(Eng)-D-Y: Month (in English)-Day-Year
D-M-Y: Day-Month-Year
GMT+0.0: Sets the region
Regions are defined by the time difference from Greenwich Mean Time (GMT).
3. Press the UP button or DOWN button of the remote control to set the desired date and
then press the REC/ENTER button to set the date and time
Note
To return to the setting item selection screen from the setting value selection screen,
select .
To perform the setting item in the selection screen or the setting value, select .
[63] How to Use
Settings
Changing the Settings of the Live-View Remote Remote Control
Reset Settings
You can reset the settings of the remote control to their defaults. Even if you activate reset
settings, images will not be deleted.
The settings of the camera will not be reset even if those of the remote control are reset.
1. Press the MENU button of the remote control
The list of setting items will be displayed.
2. Press the UP button or DOWN button of the remote control to select (Reset
settings) in (Remote control settings), then press the REC/ENTER button of the
remote control
3. Press the UP button or DOWN button of the remote control to select the desired setting
value, then press the REC/ENTER button of the remote control
Note
To return to the setting item selection screen from the setting value selection screen,
Page 66

select .
To perform the setting item in the selection screen or the setting value, select .
[64] How to Use
Settings
Changing the Settings of the Live-View Remote Remote Control
Version
You can display the software version of the remote control.
1. Press the MENU button of the remote control
The list of setting items will be displayed.
2. Press the UP button or DOWN button of the remote control to select (Version) in
(Remote control settings), then press the REC/ENTER button of the remote
control
Note
To return to the setting item selection screen from the setting value selection screen,
select .
To perform the setting item in the selection screen or the setting value, select .
[65] How to Use
Settings
Changing the Settings of the Live-View Remote Remote Control
Connection Mode
1. Press the MENU button of the remote control
The list of setting items will be displayed.
2. Press the UP button or DOWN button of the remote control to select
(Connection mode) in (Remote control settings), then press the REC/ENTER
button of the remote control
3. Press the UP button or DOWN button of the remote control to select the desired setting
value, then press the REC/ENTER button of the remote control
(default): Single connection
: Multi connection
Page 67

Note
The displayed icons differ depending on the conditions of connection settings on the
remote control.
To return to the setting item selection screen from the setting value selection screen,
select .
To perform the setting item in the selection screen or the setting value, select .
[66] How to Use
Settings
Changing the Settings of the Live-View Remote Remote Control
GPS Setting
You can record the location information and the movement speed while recording movies
and the location information while recording photos using the GPS function of the remote
control, and transfer them to the camera.
Action Cam Movie Creator allows you to import movies recorded with GPS log (the location
information, the movement speed) to a computer and view them with a map.
1. Press the MENU button of the remote control
The list of setting items will be displayed.
2. Press the UP button or DOWN button of the remote control to select (GPS
setting) in (Remote control settings), then press the REC/ENTER button of the
remote control
3. Press the UP button or DOWN button of the remote control to select the desired setting
value, then press the REC/ENTER button of the remote control
(default): Records movies with the GPS log (the location information, the
movement speed) and still images with location information
: Does not use GPS function
Note
If you do not record the GPS log and the location information, set the GPS setting to
[OFF].
During takeoff and landing of an airplane, set the airplane mode to [ON].
Use GPS in accordance with regulations of countries and regions where you use it.
It may take from several tens of seconds to several minutes to record the location
information when you use the GPS for the first time or use it again after long intervals.
Triangulating time can be shortened by taking in GPS assist data.
Page 68

The GPS antenna is built in the front of the remote control. Placing the remote control
upside down may cause positioning to take long time or may not be able to determine
your position.
Sony does not collect location information and routing information.
The maximum number of log files that can be recorded is 256/day. When the maximum
number of recorded log files is reached, you can continue to shoot images, however log
files will not be recorded.
The GPS functions of the bundled remote control RM-LVR2V are not compatible with
cameras other than HDR-AZ1.
To return to the setting item selection screen from the setting value selection screen,
select .
To perform the setting item in the selection screen or the setting value, select .
[67] How to Use
Settings
Changing the Settings of the Live-View Remote Remote Control
Airplane Mode
When you are in an airplane, you can set the remote control to disable all functions related
to the Wi-Fi and GPS.
1. Press the MENU button of the remote control
The list of setting items will be displayed.
2. Press the UP button or DOWN button to select (Airplane mode) in
(Remote control settings), then press the REC/ENTER button
3. Press the UP button or DOWN button of the remote control to select the desired setting
value, then press the REC/ENTER button of the remote control
(default): Select this when you are on board an airplane
The Wi-Fi/GPS function is disabled.
(default): Select this for normal use
The Wi-Fi/GPS function is enabled.
When you are in an airplane, set the airplane mode of the remote control to ON and also set
the Wi-Fi mode of the camera to OFF.
Note
To return to the setting item selection screen from the setting value selection screen,
select .
To perform the setting item in the selection screen or the setting value, select .
Page 69

[68] How to Use Changing the Settings of the Live-View Remote Remote Control
Settings
Resetting the Network Settings for Multi Connection
You can reset multi connected network settings.
1. Press the MENU button of the remote control
The list of setting items will be displayed.
2. Press the UP button or DOWN button of the remote control to select (Reset
network settings) in (Remote control settings), then press the REC/ENTER button
of the remote control
3. Press the UP button or DOWN button of the remote control to select , then press
the REC/ENTER button of the remote control
When setting to the multi connection after the reset is completed, you are required to
register devices once again even though they have been already registered.
If (Back) is selected on the confirmation screen, the resetting is cancelled.
Note
To return to the setting item selection screen from the setting value selection screen,
select (Back).
To perform the setting item in the selection screen or the setting value, select .
[69] How to Use
Viewing Viewing
Playback Using the Live-View Remote
Play back images recorded with the camera using the remote control.
The procedure below explains how to play back movies.
1. Press the MENU button of the remote control while selecting the shooting mode, press
the UP button or DOWN button of the remote control to select (Playback
using the remote control), then press the REC/ENTER button of the remote control
2. Select the desired image by pressing the UP/DOWN button
Page 70

3. Press the REC/ENTER button of the remote control to start playback
4. Press the UP button of the remote control during movie playback
Returning to the shooting mode
To return to the shooting mode, select (Shooting Mode) and press the
REC/ENTER button of the remote control.
Note
The camera cannot play back audio.
The image frame rate displayed on the LCD screen when using the remote control for
playback will change according to the Wi-Fi communication status of the camera and
remote control. This frame rate is different from the one used when shooting.
Hint
You can fast-forward by pressing the UP button of the remote control and fast-rewind by
pressing the DOWN button.
[70] How to Use
Remote
Viewing Switching the Display of the Camera and the Live-View
Switching the Connection Mode of the Camera
Every time the Wi-Fi button of the camera is pressed, the Wi-Fi connection mode of the
camera will be switched as follows.
1 Set the Wi-Fi to ON (Single connection)
2 Connect to multiple cameras (Multi connection)
3 Perform live streaming (Live connection)
4 Switch off the Wi-Fi (OFF)
Note
The connection mode for Wi-Fi is set to the single connection by default.
Page 71

[71] How to Use Viewing Switching the Display of the Camera and the Live-View
Remote
Switching the LCD Screen of the Live-View Remote
When the remote control is connected to the camera through Wi-Fi, pressing the DISP
button of the remote control switches the LCD screen display as follows.
1 Live-View display
2 Icon off
3 Clock display
4 Screen off (only in the multi connection setting)
Shooting information is displayed in the single connection setting.
[72] How to Use Viewing Deleting
Deleting
Delete unnecessary images saved in the memory card of the camera.
1. Press the MENU button of the remote control while selecting the shooting mode, press
the UP button or DOWN button of the remote control to select (Playback
using the remote control), then press the REC/ENTER button of the remote control
2. Press the UP button or DOWN button of the remote control to select an image to
delete, then press the MENU button of the remote control
3. Select (Delete) and then press REC/ENTER button of the remote control
4. Select on the confirmation screen and press the REC/ENTER button of the
remote control to delete
Note
You can delete images only in the single connection.
Page 72

You can delete one image at a time.
Format the memory card when you want to delete all of the images.
[73] How to Use
Live Streaming of Movies Live Streaming with the Camera (Live
Connection)
Live Streaming
Live stream movies via video sharing websites such as USTREAM by using a Wi-Fi router or
smartphone that can tether the camera.
*
You can send
when starting the live distribution of movies.
*
User registration for live distribution websites or SNS is required.
distribution start messages to previously set SNS (Facebook, Twitter, etc.)
1 Wi-Fi
2 3G/LTE
3 Tethering Mode
4 USTREAM
5 Audience
6 Comments from audience
The following preparations are required for the live streaming.
Set the following distribution settings in the live streaming settings of the camera:
User registration for USTREAM
Smartphones (tethering) with cameras for Wi-Fi network connection or Wi-Fi network
environments
*
For more information about smartphone tethering settings or Wi-Fi network settings, refer to the
operating instructions supplied with the smartphone or network service. For further details about
the network environment, contact your network service provider.
[74] How to Use Live Streaming of Movies Live Streaming with the Camera (Live
Connection)
Page 73

Preparing for Live Streaming
Complete the network settings via a dedicated application “Network setting tool”, the
account registration for video distribution sites and SNS settings in advance.
Download “Network setting tool” from the following website.
http://www.sony.net/nst/
1. Enter information for USTREAM account and "Network setting tool"
2. USB
3. “Network setting tool”
4. OAuth authentication
Obtain Channel ID
Reset the network setting tool
Set the distribution settings below in the live streaming settings of the camera.
Network settings
You can set Wi-Fi network settings to which the camera is connected.
Network SSID, password, security method
Streaming settings
You can set the movie distribution method.
Destinations, channels, image quality, saving settings at destinations
Titles and descriptions
SNS settings
You can post comments when the movie distribution starts in coordination with social
network.
Connection settings for Twitter, Facebook
Comments to be posted
USTREAM
USTREAM is an online video sharing site where you can distribute and view movies with the
live streaming function of the camera.
For details, visit the USTREAM website below.
http://www.ustream.tv/
Page 74

Note
Your personal information (required for the login for USTREAM, Twitter and Facebook) is
to be set in the camera. Be sure to reset the settings of the camera by pressing the
RESET (Reset) button in boot state when transferring to third parties or disposing of the
camera. Be sure to reset the settings by pressing the RESET (Reset) button of the
camera in boot state.
[75] How to Use
Live Streaming of Movies Live Streaming with the Camera (Live
Connection)
Performing for Live Streaming
You can start the live distribution when the preparation for the live streaming is complete.
For the initial live distribution, we recommend trial distribution in a well prepared environment
after prior settings on a computer.
1. Press the Wi-Fi button of the camera to select [LIVE]
2. Press the REC button of the camera to start the live distribution
The REC lamp on the top of the camera lights up in blue.
3. Press the REC button once again to stop the live distribution
Note
It may take 10 to 20 seconds to start the actual distribution in the movie distribution site
after the distribution of the camera is started.
You can record movies that are being live distributed in the memory card of the camera.
When the memory card is already inserted, movies are recorded at the same time as the
distribution
*
.
When the capacity of the memory card is full, only the movie recording will stop without
stopping the distribution.
Only movie distributions will be performed when no memory card is inserted.
*
Simultaneously recorded movies are processed on MP4/HQ mode.
REC lamp in real-time distribution
You can check the state of live streaming distribution by the REC lamp when selecting the
live streaming mode.
Page 75

1 REC lamp
Use the micro USB cable (supplied) when connecting the camera to your computer.
OFF: Before distribution
Lights up in blue: In distribution
Blinks slowly in blue (Approx. blinks 1 time per second): In distribution (There is an
audience)
Blinks fast in red (Approx. blinks 3 times per second): Distribution error
[76] How to Use Computer Action Cam Movie Creator
Useful Functions of Action Cam Movie Creator
Action Cam Movie Creator allows you to import movies to your computer to edit and use
them in a variety of ways.
Visit the following URL to install the software.
http://www.sony.net/actioncam/support/
Two software applications, Action Cam Movie Creator, which can edit movies, and
PlayMemories Home, which can manage movies and photos, will be installed
simultaneously.
Useful functions of Action Cam Movie Creator
Editing movies and displaying them with tracking information and movement speed
Useful functions of PlayMemories Home
Import and play back movies and photos
Page 76

Note
Use PlayMemories Home when importing movies to your computer. GPS information will
be lost if movies are imported using a different method.
[77] How to Use
Computer Action Cam Movie Creator
Checking the Computer Environment
For information about the computer environment for the software, refer to the following
website.
http://www.sony.net/pcenv/
[78] How to Use Computer Action Cam Movie Creator
Installing Action Cam Movie Creator
Install Action Cam Movie Creator on your computer. Follow the steps below.
1. Turn on the computer
Log on as an Administrator.
Close all applications running on the computer before installing the software.
2. Visit the following URL with the Internet browser of the computer and install Action Cam
Movie Creator
http://www.sony.net/actioncam/
When the installation is completed, Action Cam Movie Creator starts up.
3. Connect the camera to the computer with the supplied micro USB cable
New functions may be added to Action Cam Movie Creator. Even if Action Cam
Movie Creator is already installed on your computer, connect the camera to your
computer.
Page 77

To USB jack
Do not format the memory card of the camera using a computer. If you do this, the
To Multi/Micro USB Terminal
Note
Do not disconnect the micro USB cable (supplied) from the camera while the computer
screen indicates that the camera is being operated or accessed. Doing so may cause
data corruption.
To disconnect the computer from the camera, click on the task tray, then click (icon
to remove). For Windows Vista, click on the task tray.
[79] How to Use
Computer Action Cam Movie Creator
Disconnecting the Computer (Windows 7/Windows 8)
In order to disconnect the computer from the camera, follow the steps below for Windows
7/Windows 8.
1. Click on the task tray
2. Click the disconnect icon in Customize
3. Click the device to remove
Windows 7/Windows 8
1 Disconnect icon
Note
Page 78

camera will not operate correctly.
When you access the camera from the computer, use PlayMemories Home. Do not
directly modify the files or folders on the camera from the computer. The image files may
be damaged or may not be played back.
Operation is not guaranteed if you operate the data on the memory card of the camera
from the computer.
Use PlayMemories Home when you import long movies or edited images from the camera
to a computer.
If you use other software, the images may not be imported correctly.
Drag and drop the drive icon to the "Trash" icon when you use a Mac and the camera is
disconnected from the computer. The camera will be disconnected from the computer.
[80] How to Use
Computer Action Cam Movie Creator
Disconnecting the Computer (Windows Vista)
In order to disconnect the computer from the camera, follow the steps below for Windows
Vista.
1. Double-click the disconnect icon on the task tray
2. Select (USB Mass Storage Device) and click [Stop]
3. Confirm the device to disconnect on the confirmation window, then click [OK]
Perform the procedure from step 1 to 3 below in advance.
Disconnecting the micro USB cable (supplied)
Turning off the power of the camera
Ejecting the memory card
Note
Do not format the memory card of the camera using a computer. If you do this, the
camera will not operate correctly.
When you access the camera from the computer, use PlayMemories Home. Do not
directly modify the files or folders on the camera from the computer. The image files may
be damaged or may not be played back.
Operation is not guaranteed if you operate the data on the memory card of the camera
from the computer.
Use PlayMemories Home when you import long movies or edited images from the camera
to a computer.
If you use other software, the images may not be imported correctly.
Page 79

Drag and drop the drive icon to the "Trash" icon when you use a Mac, and the camera is
disconnected from the computer. The camera will be disconnected from the computer.
[81] How to Use
Computer Importing GPS Assist Data
GPS Assist Data
The time for the GPS to acquire the location information can be shortened by taking in GPS
assist data. If the bundled remote control RM-LVR2V is connected to a computer on the
Internet using a software Action Cam Movie Creator, the GPS assist data can be updated
automatically.
If the date & time setting is not set, or set time is shifted greatly, the time for the GPS
acquiring location information cannot be shortened.
If the term of validity of GPS assist data has run out, the time until you can record location
information cannot be shortened.
[82] How to Use Others Estimated Duration of Recording and Playback for the Battery
Pack of the Camera
Estimated Duration of Recording for the Battery Pack of
the Camera
Approximate time available when you use a fully charged battery pack.
NP-BY1 (supplied)
Continuous recording time
HQ: 80 min. (85 min.)
VGA: 85 min. (100 min.)
Typical recording time
HQ: 45 min. (50 min.)
VGA: 50 min. (60 min.)
Time measured when you use the camera at 25°C (77°F). It is recommended that you
use the camera from 10°C to 30°C (50°F to 86°F).
The recording time will be shorter when you use the camera in low temperatures.
The recording time may be shorter, depending on the recording conditions.
Page 80

Typical recording time is time that is measured when you repeat such operations as the
shooting standby and switching the shooting mode.
() indicates the recording time when the Wi-Fi setting is set to [OFF].
[83] How to Use Others Estimated Duration of Recording and Playback for the Battery
Pack of the Camera
Estimated Duration of Playback for the Battery Pack of
the Camera
Approximate time available when you use a fully charged battery pack.
Playing time
HQ: 120 min.
VGA: 130 min.
Time measured when you use the camera at 25°C (77°F). It is recommended that you
use the camera from 10°C to 30°C (50°F to 86°F).
The playback time will be shorter when you use the camera in low temperatures.
The playback time may be shorter, depending on the recording conditions.
[84] How to Use Others Recordable Time, the Recordable Number of Photos for a
Memory Card
Estimated Continuous Movie Recordable Time
(XAVC S) Average shooting time
64GB
XAVC S 50 Mbps (HD resolution):
2 h 35 min.
(MP4) Average shooting time
8 GB
Highest resolution (smooth image recorded at 2× frame rate):
35 min.
Page 81

Highest resolution:
1 h
High resolution:
2 h 40 min.
/ High speed recording (smooth image recorded at 4× frame rate):
35 min.
Super slow recording (slow motion image recorded at 4× frame rate):
40 min.
Standard resolution:
4 h 55 min.
16GB
Highest resolution (smooth image recorded at 2× frame rate):
1 h 20 min.
Highest resolution:
2 h 5 min.
High resolution:
5 h 20 min.
/ High speed recording (smooth image recorded at 4× frame rate):
1 h 20 min.
Super slow recording (slow motion image recorded at 4× frame rate):
1 h 20 min.
Standard resolution:
9 h 55 min.
32GB
Highest resolution (smooth image recorded at 2× frame rate):
2 h 40 min.
Highest resolution:
4 h 10 min.
High resolution:
10 h 50 min.
/ High speed recording (smooth image recorded at 4× frame rate):
2 h 40 min.
Super slow recording (slow motion image recorded at 4× frame rate):
2 h 45 min.
Standard resolution:
20 h
64GB
Highest resolution (smooth image recorded at 2× frame rate):
5 h 20 min.
Page 82

Highest resolution:
8 h 25 min.
High resolution:
21 h 45 min.
/ High speed recording (smooth image recorded at 4× frame rate):
5 h 20 min.
Super slow recording (slow motion image recorded at 4× frame rate):
5 h 35 min.
Standard resolution:
40 h 10 min.
In the [SSLOW] setting, the above figure indicates the recordable time in shooting and
differs from actual playback time.
When using a Sony memory card.
Note
The recordable time may vary depending on the recording conditions, subjects, and
image quality setting.
Continuous movie recordable shooting time is approximately 13 hours. In [SSLOW] mode,
it will be approximately 3 hours.
VBR (Variable Bit Rate) format is used, which automatically adjusts image quality to suit
the recording scene. This technology causes fluctuations in the recording time of the
media. Movies containing quickly moving and complex images are recorded at a higher
bit-rate, and this reduces the overall recording time.
[85] How to Use
Memory Card
Others Recordable Time, the Recordable Number of Photos for a
Estimated Recordable Number of Photos
Recordable number of photos
8GB
Equivalent to approx. 2 070 000 pixels (Interval photo recording) (16:9): 9,700
Approx. 11 900 000 pixels (Still images): 1,250
16GB
Equivalent to approx. 2 070 000 pixels (Interval photo recording) (16:9): 19,000
Approx. 11 900 000 pixels (Still images): 2,500
Page 83

32GB
Equivalent to approx. 2 070 000 pixels (Interval photo recording) (16:9): 39,000
Approx. 11 900 000 pixels (Still images): 5,100
64GB
Equivalent to approx. 2 070 000 pixels (Interval photo recording) (16:9): 40,000
Approx. 11 900 000 pixels (Still images): 10,000
When using a Sony memory card.
The recordable number of photos for the memory card represents the number of photos
at the maximum image size for the camera. The actual recordable number of photos is
displayed on the LCD screen of the remote control.
The recordable number of photos for a memory card may vary depending on the shooting
conditions.
[86] How to Use Others Notes on Using
Notes on Handling of the Camera and the Live-View
Remote
Do not use/store the camera and the remote control in the following
places
In an extremely hot, cold or humid place
In places such as in a car parked in the sun, the camera or the remote control body may
become deformed, and this may cause a malfunction.
In direct sunlight or near a heater
If you store the camera or the remote control in direct sunlight or near a heater, the
camera and the remote control may become discolored or deformed, and these may
cause a malfunction.
In a location subject to strong vibration
Near strong magnetic fields
Do not use the camera near a location that generates strong radio waves or emits
radiation.
In sandy or dusty places
Be careful not to let sand or dust get into the camera directly. This may cause the camera
and the remote control to malfunction, and in some cases may be irreparable.
About dust-proof and waterproof performance
The camera is dust-proof and waterproof (Depth of water 5 m (16 feet), 30 minutes
continuously). For the notes on use of the waterproof case, refer to the instruction manual on
Page 84

the website.
http://rd1.sony.net/help/cam/1415/h_zz/
On carrying
Do not sit down in a chair or other place with the camera and the Live-View Remote in
the back pocket of your trousers or skirt, as this may cause malfunction or damage the
camera and the Live-View Remote.
Do not shake or strike the camera. It may cause a malfunction and you may not be able to
record images. Furthermore, a memory card may become unusable or image data may
be damaged.
Operating temperatures
The camera is designed for use in temperatures between -5°C and +40°C (23°F and 104°F)
and the remote control between -10°C and +40°C (14°F and 104°F).
[87] How to Use Others Notes on Using
On Moisture Condensation
If the camera and remote control are brought directly from a cold to a warm location,
moisture may condense inside or outside the camera and remote control. This moisture
condensation may cause a malfunction of the camera.
If moisture condensation occurs
Turn off the camera and wait about 1 hour for the moisture to evaporate.
Note on moisture condensation
Moisture may condense when you move the camera and the remote control from a cold
place to a warm place (or vice versa) or when you use the camera and the remote control in
a humid place, as shown below.
When you bring the camera from a ski slope into a warm place
When you bring the camera from an air conditioned car or room into a hot place outside
When you use the camera and the remote control after a squall or rain shower
When you use the camera in a hot and humid place
How to avoid condensation
Before carrying the camera or the remote control into a warmer place, put the camera in a
plastic bag and seal it airtight. Remove the bag when the air temperature inside the plastic
bag has reached the ambient temperature (after about 1 hour).
Page 85

[88] How to Use Others Notes on Using
Care and Storage
Clean the camera surface or the remote control with a soft cloth slightly moistened with
water, then wipe the surface with a dry cloth. Do not use any of the following as they may
damage the finish or the casing.
Chemical products such as thinner, benzine, alcohol, disposable cloths, insect repellent,
sunscreen or insecticide, etc.
Do not touch the camera with any of the above on your hand.
Do not leave the camera or the remote control in contact with rubber or vinyl for a long time.
Wipe the surface of the lens clean with a soft cloth in the following instances:
When there are fingerprints on the lens surface.
In hot or humid locations.
When the lens is exposed to salty air such as at the seaside.
Store in a well-ventilated location with little dirt or dust.
To prevent mold, periodically clean the lens as described above.
[89] How to Use Others Notes on Using
Notes on Optional Accessories
Genuine Sony accessories may not be available in some countries/regions.
For details on the bundled accessories, refer to the following.
http://rd1.sony.net/help/cam/1415/h_zz/
[90] How to Use Others Notes on Using
Notes on Disposal/Transfer of the Memory Card
Even if you delete data in the memory card or format the memory card on the camera or a
computer, you may not delete data from the memory card completely. When you give the
memory card to somebody, it is recommended that you delete data completely using data
deletion software on a computer. Also, when you dispose of the memory card, it is
recommended that you destroy the actual body of the memory card.
Page 86

[91] How to Use Others Notes on Using
Do not expose the battery pack to water. The battery pack is not water-resistant.
Battery Packs of the Camera and the Live-View Remote
On charging
Charge the camera the remote control before using them for the first time.
We recommend charging the camera and the remote control in an ambient temperature of
between 10 °C to 30 °C (50 °F to 86 °F) until the POWER/CHG (Charge) lamp turns off.
The camera and the remote control may not be effectively charged in temperatures
outside this range.
The POWER/CHG (Charge) lamp may blink during charging the camera in the following
situations:
Battery pack is not attached correctly
Battery pack is damaged
When the battery pack temperature of the camera is low, detach the battery pack and put
it in a warm place.
When the battery pack temperature of the camera is high, detach the battery pack and put
it in a cool place.
The CHG (Charge) lamp of the remote control may blink in the following situations.
Battery pack is damaged
If the temperature of the remote control is low, put it in a warm place.
If the temperature of the remote control is high, put it in a cool place.
Effective use of the battery pack
Battery pack performance decreases at a low ambient temperature lower than 10 °C (50
°F). In cold places, therefore, the operational time of the battery pack is shorter.
The battery pack will run out quickly if you use the playback, fast-forward, and fast-rewind
frequently.
It is recommended that you warm the battery pack in advance by keeping the pack in a
place such as a pocket and attach it to the camera right before the shooting for the safe
operation and longer lifetime.
Turn off the camera every time you do not shoot or playback on the camera. Battery pack
is wearing out when the shooting is in standby.
We recommend having spare battery packs handy for twice or three times longer than the
expected shooting time, and making trial shots before taking the actual shots.
You may not be able to turn on the camera and remote control or the battery pack may
not be effectively charged if the terminal section of the battery pack is dirty. In this case,
wipe any dust with a soft cloth lightly to clean the battery pack.
Page 87

Remaining battery charge
And monitoring via a smartphone or the remote control is not supported during live video
If the battery pack runs out quickly even though the remaining charge indicator is high,
fully charge the camera and the remote control, again. The remaining charge indicator will
then be displayed correctly. Note that it may not be displayed correctly in the following
situations:
The camera and the remote control are used for a long time at high ambient temperature
The camera and the remote control are left fully charged
The camera and the remote control are used heavily
How to store the battery pack
To maintain the battery pack's function, fully charge the battery pack and then fully
discharge it on the camera at least once a year while storing. Remove the battery pack
from the camera before storing and store it in a cool, dry place.
To prevent staining the terminal, short-circuiting, etc., be sure to use a plastic bag to keep
away from metal materials when carrying or storing.
On battery pack life
The battery pack has a limited life. Battery capacity decreases over time and through
repeated use. If decreased usage time between charges becomes significant, it is
probably time to replace it with a new one.
The battery pack life varies according to how the battery pack is used.
[92] How to Use
Others Notes on Using
The Limitations to Live Streaming of the Camera
There are the limitations to live video streaming in USTREAM. For details, visit USTREAM
website below.
[93] How to Use Others Notes on Using
GPS and Wi-Fi Function in Distribution
GPS function
GPS recording of the camera is not available during live video distribution.
Page 88

distribution.
Wi-Fi function
Use the camera and the remote control in accordance with the regulations of the area of
use.
You cannot use the Wi-Fi function of the camera and the remote control underwater.
Security in the use of wireless LAN devices
To avoid hacking, access by malicious third parties, and other vulnerabilities, confirm that
the wireless LAN is always secure.
It is very important to set up security on a wireless LAN.
If a problem occurs due to inadequate security measures or due to foreseeable
circumstances, Sony Corporation is not responsible for any resulting damage.
[94] How to Use
Others Notes on Using
Network Connection
Use a smartphone or Wi-Fi router capable of tethering for live video streaming. Operation of
all devices is not assured. Connection via public wireless LAN is not supported.
[95] How to Use Others Notes on Using
Simultaneous Live Streaming with multiple the Cameras
Live video cannot be distributed simultaneously through the same account with multiple the
cameras (more than 2 cameras). Connecting through another account is required.
[96] How to Use Others Notes on Using
Influence by the Line State
Communication may be disconnected depending on the network status when you tether your
smartphone or Wi-Fi router.
Page 89

[97] How to Use Others Notes on Using
Connection of Live Streaming
Since live video streaming has the communication time limit based on the contract of your
smartphone or Wi-Fi router, be aware of this time limit.
[98] How to Use Others Notes on Using
Continuous Distribution Time
Continuous distribution time for live video streaming by camera is limited to approximately 13
hours.
[99] How to Use Others Notes on Using
Connection Restriction
Live video distribution sites may not be connected in some countries. Use the camera
following each country's law.
[100] How to Use Others Notes on Using
LCD Screen of the Live-View Remote
Handling the LCD screen
Do not leave the LCD screen facing the sun as it may be damaged. Be careful when
placing the remote control by a window.
If the remote control is used in a cold place, horizontal lines or a residual image may
appear on the LCD screen. This is not a malfunction. The LCD screen returns to normal
Page 90

when the remote control warms up.
If a still picture or a fixed picture is displayed for a long time, an image may remain
superimposed on the LCD screen as a ghosting image.
Bright point and vanishing point of the LCD screen
The LCD panel fitted to the remote control is manufactured with high precision technology,
but a very small proportion of pixels may be “stuck”, either always off (black), always on (red,
green, or blue), or flashing. In addition, because of the physical characteristics of the liquid
crystal display, such “stuck” pixels may appear spontaneously over a long period of use.
These problems are not a malfunction.
Maintenance
Cleaning the LCD screen
The LCD screen surface is specially treated to reduce the reflection of light. Incorrect
maintenance may impair the performance of the LCD screen, so take care with respect to
the following:
Wipe the LCD screen gently with a soft cloth such as a cleaning cloth or glasses cloth.
Stubborn stains may be removed with a soft cloth such as a cleaning cloth or glasses
cloth slightly dampened with water.
Never use a solvent such as alcohol, benzene or thinner, or acid, alkaline or abrasive
detergent, or chemical cleaning cloth, as they will damage the LCD screen surface.
[101] How to Use Others Notes on Using
Live-View Remote Waterproof Performance
About the waterproof performance of the remote control
The remote control is designed to be water-proof. Damage caused by misuse, abuse, or
improper maintenance is not covered by the limited warranty.
Do not subject the remote control to pressurized water, such as from a tap.
Do not use in hot springs.
Use the remote control in the water temperature range of 0 °C to 40 °C (32 °F to 104 °F).
The remote control has continuous waterproof performance at a water depth of 3 m for 30
minutes.
Notes before using the remote control under/near water
Make sure that no foreign matter such as sand, hair, or dirt gets inside the connector
cover. Even a small amount of foreign matter may lead to water entering the remote
Page 91

control.
Confirm that the sealing gasket and its mating surfaces have not become scratched. Even
a small scratch may lead to water entering the remote control. If the sealing gasket or its
mating surfaces become scratched, consult your Sony dealer or local authorized Sony
service facility.
If dirt or sand gets on the sealing gasket or its mating surfaces, wipe the area clean with a
soft cloth that does not leave behind any fibers.
Do not open/close the connector cover with wet or sandy hands or near water. There is a
risk of sand or water getting inside of the remote control. Before opening the connector
cover, perform the procedure described in “Cleaning after using the remote control
under/near water.”
Open the connector cover when the remote control is completely dry.
Always check that the connector cover is securely locked.
Notes on using the remote control under/near water
Do not subject the remote control to shock such as by jumping into water.
Do not open and close the connector cover while under/near water.
The remote control sinks in water. Use the belt supplied with the remote control to prevent
it from sinking.
Cleaning after using the remote control under/near water
Always clean the remote control with water within 60 minutes of use, and do not open the
connector cover before cleaning is finished. Sand or water may get inside where it cannot
be seen, and will degrade waterproof performance if not rinsed out.
Allow the remote control to sit in pure water poured into a cleaning bowl for about 5
minutes. Then, gently shake this remote control and press each button under the water to
clean away any salt, sand or other matter lodged around the buttons.
After rinsing, wipe away any drops of water with a soft cloth. Allow the remote control to
dry completely in a shady location with good ventilation. Do not blow dry with a hair dryer
as there is a risk of deformation and/or degraded water-proof performance.
Wipe away any drops of water or dust from the connector cover with a soft dry cloth.
Bubbles may appear when the remote control is placed underwater. This is not a
malfunction.
The remote control body may become discolored if it comes into contact with sunscreen
or suntan oil.
If the remote control does come into contact with sunscreen or suntan oil, quickly wipe it
clean.
Do not allow the remote control to sit with salt water inside it or on its surface. This may
lead to corrosion or discoloration, and degradation of the waterproof performance.
[102] How to Use
Others Notes on Using
Page 92

GPS
On GPS
As the positions of GPS satellites vary constantly, it may take longer to determine the
location or the receiver may not be able to determine the location at all, depending on the
location and time you use the camera.
GPS is a system that determines your position by receiving signals from satellites. Avoid
using the GPS feature on your remote control in places where radio signals are blocked
or reflected, such as a shadowy place surrounded by buildings or trees, etc. Use the
remote control in open sky environments.
You may not be able to record location information at locations or in situations where
radio signals from the GPS satellites do not reach the remote control as follows.
In tunnels, indoors or under the shade of buildings
Between tall buildings or at narrow streets surrounded by buildings
In underground locations, locations surrounded by dense trees, under an elevated bridge, or in
locations where magnetic fields are generated, such as near high voltage cables
Near devices that generate radio signals of the same frequency band as the remote control: near
1.5 GHz band mobile telephones, etc.
Do not put a hand or a finger on the GPS receiver (GPS antenna part) while seeking a
satellite or determining a position. The reception sensitivity lowers and your position may
not be determined.
Depending on the mounting position of the remote control or posture, the remote control
may not receive the electric wave from the GPS satellite. Turn the GPS receiver (GPS
antenna part) toward the sky.
You may not be able to record GPS information in situations as follows.
Turn off the remote control
Disconnect the remote control and the camera
When the connection between the remote control and the camera via Wi-Fi is unstable
If you take images with the GPS log of the remote control set to [ON], and upload those
images to the Internet, the shooting location may be available to third parties. To prevent
this, set GPS log to [OFF] before shooting.
On triangulation errors
If you move to another location right after turning the remote control on, it may take a
longer time for the camera to start triangulating, compared to when you stay in the same
place.
GPS satellite error
When the remote control receives signals from more than three GPS satellites, it
determines your present position. The triangulating error allowed by the GPS satellites is
about 10 m (33 feet). Depending on the environment of the location, the triangulating
error can be greater. In this case, your actual location may not match the location on the
Page 93

map based on the GPS information. Meanwhile, the GPS satellites are controlled by the
United States Department of Defense, and the degree of accuracy may be changed
intentionally.
Error during the triangulating process
The remote control acquires location information periodically during triangulating. There is
a slight time lag between when the location information is acquired and when the location
information is recorded on an image, therefore, the actual recording location may not
match the exact location on the map based on the GPS information.
On GPS use restriction
Use GPS in accordance with the situation and regulations of the countries/regions where
you use the remote control.
[103] How to Use
Others Notes on Using
Disposing of the Live-View Remote
Remove the battery pack before disposing of the remote control.
Do not remove the screws except when disposing of the remote control. We will refuse
repairs or replacement if we judge there to have been unwarranted disassembly.
The built-in battery pack of the remote control is recyclable. When disposing of the remote
control, remove the built-in battery pack and take it to your dealer.
1. Press the ON/OFF button to turn off the power of the remote control
2. Disconnect the connected cables
3. Remove the screws with a Phillips-head screwdriver (4 screws)
4. Detach the cover
5. Push the hook outwards and remove the battery pack
Note
When removing the battery pack of the remote control, be careful of the following.
Remove the screws, etc. away from small children to prevent accidental swallowing.
Page 94

Remove the screws, etc. away from small children to prevent accidental swallowing.
Be careful not to injure your nails or fingers.
[104] How to Use Others Using the Camera Abroad
Using the Camera Abroad
On TV color systems
Before shooting, be sure to set the TV system of the country and region where you will view
recordings. The following shows which countries and regions you can view [NTSC] or [PAL]
images.
Countries and regions where you can view images when [NTSC] is set
Barbados, Bermuda, Bolivia, Canada, Chile, Columbia, Costa Rica, Cuba, Dominica,
Ecuador, El Salvador, Guam, Guatemala, Guyana, Haiti, Honduras, Japan, Mexico,
Micronesia, Myanmar, Nicaragua, Panama, Peru, Philippines, Puerto Rico, Republic of
Korea, Saint Lucia, Samoa, Suriname, Taiwan, Trinidad and Tobago, United States of
America, Venezuela etc.
Countries and regions where you can view images when [PAL] is set
Australia, Austria, Argentina, Belgium, Bulgaria, Brazil, China, Croatia, Czech Republic,
Denmark, Finland, France, French Guiana, Germany, Greece, Hong Kong, Hungary,
Indonesia, Iran, Iraq, Italy, Kuwait, Malaysia, Monaco, Netherlands, New Zealand, Norway,
Paraguay, Poland, Portugal, Romania, Russia, Singapore, Slovakia, Spain, Sweden,
Switzerland, Thailand, Turkey, Ukraine, United Kingdom, Uruguay, Vietnam etc.
[105] How to Use Others Using the Camera Abroad
The List of the Time Difference of the Major Cities of the
World
The time difference from the standard time of each city around the world. (As of 2014)
Lisbon/London
GMT
Berlin/Paris
Page 95

+01:00
Helsinki/Cairo/Istanbul
Midway
+02:00
Nairobi
+03:00
Tehran
+03:30
Moscow/Abu Dhabi/Baku
+04:00
Kabul
+04:30
Karachi/Islamabad
+05:00
Kolkata/New Delhi
+05:30
Almaty/Dhaka
+06:00
Yangon
+06:30
Bangkok/Jakarta
+07:00
Hong Kong/Singapore/Beijing
+08:00
Tokyo/Seoul
+09:00
Adelaide/Darwin
+09:30
Melbourne/Sydney
+10:00
New Caledonia
+11:00
Fiji/Wellington
+12:00
Page 96

-11:00
Hawaii
-10:00
Alaska
-09:00
San Francisco/Tijuana
-08:00
Denver/Arizona
-07:00
Chicago/Mexico City
-06:00
New York/Bogota
-05:00
Santiago
-04:00
Newfoundland
-03:30
Brasilia/Montevideo
-03:00
Fernando de Noronha
-02:00
Azores/Cape Verde Is.
-01:00
[106] How to Use Others Specifications
Camera
[System]
Video signal:
HDTV
Image device:
Page 97

1/2.3 type (7.77 mm) Exmor RTM CMOS sensor
Pixel Gross: Approx. 16.8 megapixels
Effective picture resolution (movie): Approx. 11.9 megapixels (16:9)
Effective picture resolution (still): Approx. 11.9 megapixels (16:9)
Still image max effective: Approx. 11.9 megapixels
Interval photo recording mode: Approx. 2.1 megapixels (16:9)
Lens:
ZEISS Tessar
Aperture: F2.8
Focal distance: f = 2.8 mm
Focal length (35 mm equivalent) (Movie mode): f = 17.1 mm (16:9)
FOV: 170°
*
Camera:
Exposure control: Auto
Minimum illumination: 6 lx (lux)
Image stabilization: Electronic SteadyShot image stabilization
*
*
Minimum shooting distance: Approx. 30 cm (11 7/8 in.)
File format:
Movies: MP4: MPEG-4 AVC/H.264, XAVC S: MPEG-4 AVC/H.264
Audio: MPEG-4 AAC-LC 2ch (When recording MP4 movies), LPCM 2ch (When recording
XAVC S movies)
Photo: JPEG (DCF Ver. 2.0, Exif Ver. 2.3, MPF Baseline) compliant
Recording media type:
When recording MP4 movies:
Memory Stick Micro (Mark2) media
microSD/SDHC/SDXC memory card (Class4 or faster)
When recording XAVC S movies:
microSDXC card (Class10 or faster)
*
SteadyShot set to [OFF]
[Input and Output connectors]
Multi/Micro USB Terminal*: micro-B/USB2.0 Hi-Speed
*
Supports Micro USB compatible devices.
[Power]
Power requirements:
Rechargeable battery pack: 3.7 V (NP-BY1 (supplied))
Page 98

Multi/Micro USB Terminal: 5.0 V
Charging method:
USB charging: DC 5.0 V, 500 mA
Charging time:
Via a computer
NP-BY1 (supplied): Approx. 2 h 25 min.
Via the AC-UD10 (sold separately)
NP-BY1 (supplied): Approx. 2 h 05 min.
Power supply method:
USB power supply (1.5 A or more is recommended)
Power consumption:
1.7 W (when the movie image size is [1920 × 1080/30p])
Battery:
Rechargeable battery pack: NP-BY1 (supplied)
Maximum output voltage: DC 4.2 V
Output voltage: DC 3.7 V
Maximum charge voltage: DC 4.2 V
Maximum charge current: 975 mA
Capacity: 2.4 Wh (640 mAh)
Type: Li-ion
[General]
Waterproof performance: Depth of water 5 m (16 feet), 30 minutes continuously
(In use with the waterproof case (SPK-AZ1))
Splashproof performance: Equivalent to IPX4
Operating temperature: -5 °C to +40 °C (23 °F to 104 °F)
Storage temperature: -20 °C to +60 °C (-4 °F to +140 °F)
Dimensions: Approx. 24.2 mm × 36.0 mm × 74.0 mm (31/32 in. × 1 7/16 in. × 3 in.)
(W/H/D, excluding protrusions)
Mass: Approx. 48 g (1.7 oz) (camera only)
Mass (when shooting): Approx. 63 g (2.2 oz) (including NP-BY1 (supplied))
*
Microphone: Stereo
Speaker: Monaural
*
Splashproof performance is based on standard testing by Sony.
[Wireless LAN]
Corresponding standard: IEEE 802.11b/g/n
Frequency: 2.4 GHz
Supported security protocols: WPA-PSK/WPA2-PSK
Page 99

Configuration method: WPS (Wi-Fi Protected Setup)
Access method: Infrastructure Mode
NFC: NFC Forum Type 3 Tag compliant
[Accessories]
Tripod Adaptor
Dimensions: Approx. 14.2 mm × 12.2 mm × 69 mm (9/16 in. × 1/2 in. × 2 3/4 in.)
(W/H/D, excluding protrusions)
Mass: Approx. 12 g (0.43 oz)
Waterproof Case (SPK-AZ1)
Dimensions: Approx. 36.3 mm × 53.2 mm × 80.2 mm (1 7/16 in. × 2 1/8 in. × 3 1/4 in.)
(W/H/D, excluding protrusions)
Mass: Approx. 48 g (1.7 oz)
Pressure-resistance: Depth of water 5 m (16 feet), 30 minutes continuously.
Attachment Buckle
Dimensions: Approx. 47.0 mm × 14.0 mm × 58.5 mm (1 7/8 in. × 9/16 in. × 2 3/8 in.)
(W/H/D, excluding protrusions)
Mass: Approx. 16 g (0.57 oz)
Flat Adhesive Mount
Dimensions: Approx. 53.0 mm × 12.5 mm × 58.5 mm (2 1/8 in. × 1/2 in. × 2 3/8 in.)
(W/H/D, excluding protrusions)
Mass: Approx. 14 g (0.5 oz)
Curved Adhesive Mount
Dimensions: Approx. 53.0 mm × 16.0 mm × 58.5 mm (2 1/8 in. × 21/32 in. × 2 3/8 in.)
(W/H/D, excluding protrusions)
Mass: Approx. 16 g (0.57 oz)
Design and specifications are subject to change without notice.
[107] How to Use Others Specifications
Live-View Remote
[Input terminal]
Multi/Micro USB Terminal: micro-B/USB
(For charging/taking in GPS assist data)
[Power]
Page 100

Power requirements
Rechargeable battery pack: 3.6 V (Internal battery)
Multi/Micro USB Terminal: 5.0 V
Charging method:
USB charging: DC 5.0 V, 500 mA/800 mA
Charging time:
Via a computer
Internal battery: Approx. 4 h 05 min.
Via the AC-UD20 (sold separately)
Internal battery: Approx. 2 h 55 min.
Power supply method:
USB power supply (1.5 A or more is recommended)
Power consumption:
1.0 W (when connected by Wi-Fi and during Live-View display)
Battery:
Rechargeable battery pack: Internal battery
Maximum output voltage: DC 4.2 V
Output voltage: DC 3.6 V
Maximum charge voltage: DC 4.2 V
Maximum charge current: 1.89 A
Capacity: 4.5 Wh (1,240 mAh)
Type: Li-ion
[General]
Waterproof performance: Depth of water 3 m (10 feet), 30 minutes continuously
Operating temperature: -10°C to +40°C (14°F to 104°F)
Storage temperature: -20°C to +60°C (-4°F to +140°F)
Dimensions (approx.): 72.3 mm × 50.2 mm × 20.8 mm (2 7/8 in. × 2 in. × 27/32 in.)
(W/H/D, excluding protrusions)
Mass: Approx. 67 g (2.4 oz) (only the main body)
*
Total weight in use: Approx. 98 g (3.5 oz) (including the supplied belt and base plate)
*
The waterproof performance is not guaranteed under all circumstances.
Design and specifications are subject to change without notice.
[108] How to Use Others Trademarks
Trademarks
 Loading...