

Page 1
4-659-404-11(1)
4-652-241-11(1)
© 2001 Sony Corporation
English Edition
Tutorial Guide
©2002 Sony Corporation
Page 2

Table of contents
Introduction
Before You Start ....................................................................................................... 8
About the Manuals .................................................................................................. 8
About the Online Manuals................................................................................ 8
Getting prepared ......................................................................................................8
Organization of the Tutorial Guide.........................................................................9
Let’s Create Behaviors!............................................................................................ 9
Let’s Create Actions!.............................................................................................. 10
Files in the Tutorial ................................................................................................. 12
Files of Action Composer...................................................................................... 12
Let’s Create Behaviors!
Lesson 1 Touch AIBO’s Sensor and AIBO stands up, sits down
and lies down ......................................................................................................... 14
Starting Quick Behavior Arranger....................................................................... 14
Creating a sequential-execution program .......................................................... 15
Saving the program to the “Memory Stick”....................................................... 16
Running the program on AIBO............................................................................17
Lesson 2 Press AIBO’s Head and It Sits; Say ”Start” and It Walks ...................... 18
Starting Quick Behavior Arranger....................................................................... 19
Creating a Stimulus-driven Execution program ............................................... 19
Saving the program to the “Memory Stick”....................................................... 21
Running the program on AIBO............................................................................21
2
Page 3

Lesson 3 Walk and Bow ........................................................................................ 22
Getting ready .......................................................................................................... 22
Creating a new behavior.......................................................................................23
Making action boxes ..............................................................................................24
Making a “stand” action box .......................................................................... 24
Making a “walk and bow” action box........................................................... 26
Connecting action boxes ....................................................................................... 28
Saving the program and running it on AIBO .................................................... 30
Using a wireless LAN............................................................................................ 30
Lesson 4 AIBO Bows If Head Is Pressed ............................................................... 33
Opening the file created in Lesson 3 ................................................................... 34
Making boxes.......................................................................................................... 35
Connecting the boxes to loop the program ........................................................38
Saving the program and running it on AIBO .................................................... 41
Lesson 5 Say “AIBO” and AIBO Bows and Greets You........................................ 42
Preparing an action library...................................................................................43
Collecting boxes together to make a group........................................................ 45
Moving the TOUCH_HEAD? and WAIT_1SEC boxes into a Group ....... 45
Editing a branch box and an action box........................................................ 46
Embedding an action file into a program .....................................................51
Embedding the group and completing the program........................................ 52
Saving the program and running it on AIBO .................................................... 55
Lesson 6 Doing Several Actions Simultaneously ................................................ 56
Checking the current program............................................................................. 57
Executing several actions simultaneously.......................................................... 58
Saving the program and running it on AIBO .................................................... 61
Lesson 7 Mastering Advanced Techniques .......................................................... 63
Preparing the file.................................................................................................... 63
Checking the main program................................................................................. 63
Checking the program in the “Ball Searching” group box .............................. 64
Changing the action depending on the number of the running
command................................................................................................ 66
Checking the “Kick” group program.................................................................. 67
Rearranging the terminals .................................................................................... 68
3
Page 4

Creating Actions!
Window Organization ........................................................................................... 70
Lesson 1 Let’s Create an Action Library!.............................................................. 72
Getting prepared ....................................................................................................73
Creating an action library ..................................................................................... 73
Creating an action .................................................................................................. 74
Adding a supplied action to the library ............................................................. 76
Saving to the “Memory Stick”.............................................................................. 77
Saving the library via a wireless LAN ................................................................ 78
Lesson 2 Let‘s Preview a Created Action!............................................................ 80
Previewing an action and elements on the PC ..................................................81
Preview the motion ..........................................................................................82
Preview the sound............................................................................................ 83
Previewing LEDs.............................................................................................. 84
Testing an action on AIBO .................................................................................... 85
Checking an action or elements not registered to the action library.............. 86
Checking an action...........................................................................................86
Checking elements ........................................................................................... 87
Lesson 3 Let’s Edit Elements ................................................................................. 90
Preparing elements ................................................................................................ 91
Editing a motion..................................................................................................... 92
Editing a pose ................................................................................................... 92
Adding a key frame ......................................................................................... 93
Editing a sound ...................................................................................................... 94
Editing a sound................................................................................................. 94
Adjusting the starting point of the sound .................................................... 96
Editing the LEDs .................................................................................................... 96
Adding LED data ............................................................................................. 96
Making the LEDs flash .................................................................................... 98
Saving the action file ........................................................................................... 100
4
Page 5

Lesson 4 Let’s Create Original Elements!........................................................... 101
Creating an action file ......................................................................................... 102
Creating a motion ................................................................................................ 102
Creating sounds ................................................................................................... 105
Combining elements............................................................................................ 107
Lesson 5 Let’s Light up the LEDs to the Music .................................................. 108
Lesson 6 Tips for creating actions ...................................................................... 112
General .................................................................................................................. 112
Motion ................................................................................................................... 112
Information about Each Model .......................................................................... 116
Sound: WAVE ....................................................................................................... 117
Sound: MIDI ......................................................................................................... 117
LEDs....................................................................................................................... 118
5
Page 6

6
Page 7

Introduction
Welcome to the Tutorial Guide!
In this guide, you will find three courses—Beginner,
Intermediate and Advanced—that will teach you how to
make programs using AIBO Master Studio.
We invite you to use this Tutorial Guide to learn
programming methods in a fun and effective way!
Page 8

Before You Start
The sections below describe the two manuals that are supplied with
AIBO Master Studio and the preparations that are necessary prior to
use.
About the Manuals
Two manuals are supplied with AIBO Master Studio.
Tutorial Guide (this manual)
The Tutorial Guide gives examples of AIBO Master Studio use.
First-time users of AIBO Master Studio should try out all the
operations by doing the tutorial in order to get acquainted with AIBO
Master Studio. In the process, you will learn a variety of useful tips.
User’s Guide
The User’s Guide provides an overview of AIBO Master Studio:
installation, setup and other information required to operate AIBO,
and information on the use of the programs that make up AIBO Master
Studio.
Note
The illustrations and images in these manuals are mostly of AIBO ERS-210,
with some of the AIBO ERS-220 and ERS-310 series.
About the Online Manuals
The Tutorial Guide and the User’s Guide are also available online as
PDF files. To view these files, see page 4 of the User’s Guide.
Getting prepared
Have you finished installing AIBO Master Studio and the “Memory
Stick”?
If you will be using a wireless LAN, you must set it up in advance.
If you have not done the preparations, please refer to “Preparation” on
page 17 of the User’s Guide.
8
Page 9

Organization of the Tutorial Guide
This Tutorial Guide is divided into the following two parts.
Let’s Create Behaviors!
This part teaches you how to create programs with Quick Behavior
Arranger and Behavior Arranger.
x Beginner’s Course
In Lesson 1 and 2, you will use Quick Behavior Arranger to
create a program through the use of wizards.
In Lesson 3, you’ll learn the basic operations of Behavior Arranger.
Lesson 1 Touch AIBO’s Sensor to Make AIBO Stand, Sit and Lie Down
Using Quick Behavior Arranger, you’ll create a program in just a few
simple steps that will make AIBO perform a series of specific actions!
Lesson 2 Press AIBO’s Head and It Sits; Say ”Start” and It Walks
Using Quick Behavior Arranger, you’ll create a program that will
make AIBO perform different actions when you touch its sensors or
say something to it. Since you’ll be using wizards, it will be easy!
Lesson 3 Walking and Bowing
In this lesson, you’ll learn how to use Behavior Arranger to create a
basic program and how to execute the program via a wireless LAN.
x Intermediate Course
This course is for users who understand basic Behavior Arranger
operations. By creating programs that make use of voice recognition or
unique actions, you’ll learn how to set branch conditions, create
groups, and use parameters.
Lesson 4 Make AIBO Bow when You Press Its Head
In this lesson, you’ll edit the program that you made in Lesson 3 to
create a program using branch boxes and sensor information. You will
also learn how to loop the program so that it executes repeatedly.
Lesson 5 Make AIBO Bow and Greet Your Guests when You Call Out
to It
In this lesson, you’ll learn how to create groups, use AIBO’s voice
recognition function, and embed actions made with Action Composer.
This sounds a little complicated, but you’ll learn how to do all of this
step by step!
9
Page 10

x Advanced Course
By mastering the advanced techniques, you’ll be able to create
programs that allow AIBO to function as a pet or in games!
Lesson 6 Executing Several Actions Simultaneously
You’ll learn how to program AIBO like a real robot in order to execute
several commands at once. You’ll create a program in which AIBO
changes its walking direction from forward to backward in response to
sensory information.
Lesson 7 Mastering Advanced Techniques
This lesson introduces advanced techniques for creating programs
with Behavior Arranger. You’ll learn programming methods by
following a description of a program where AIBO searches for and
plays with the pink ball.
Let’s Create Actions!
In this section, you’ll learn how to use Action Composer to create an
action library, action files and elements used with Behavior Arranger.
x Beginner’s Course
You’ll learn the basics of Action Composer operations by using and
combining supplied elements.
Lesson 1 Creating an Action Library
In this lesson, you’ll learn how to combine the supplied files to create
action files and an action library for use with Behavior Arranger.
Lesson 2 Previewing the Created Action
In this lesson, you’ll preview the action file that you created by
viewing it on the PC or by having AIBO actually perform the action.
When creating an action, it’s important to verify the sounds and
actions with your own eyes and ears!
Lesson 3 Editing Elements
You’ll learn how to edit elements and action files by modifying the
supplied action files.
10
Page 11

x Intermediate Course
This course introduces you to the creation of elements.
Lesson 4 Creating Original Elements
You’ll learn how to create elements from scratch. Once you’ve
mastered these techniques, you will be a proficient AIBO content
creator!
Lesson 5 Lighting Up LEDs to Music
This lesson takes you further by allowing you to synchronize elements.
For instance, have fun by synchronizing AIBO’s winks and mouth
movements with the sounds that it makes, or its dance movements
with music.
x Advanced Course
In this course, you’ll learn techniques for creating actions with greater
effectiveness and higher efficiency.
Lesson 6 Tips on Creating Actions
In this lesson, you’ll polish your skills by creating original actions. Tips
are presented on how to further enhance the presentation of your
AIBO programs.
11
Page 12
Files in the Tutorial
All the files you’ll be using are in the “Sample” folder.
\AIBO Master Studio installed folder\Sample
For Behavior Arranger
Sample\XXX*E
Folders for Action Composer
TutorialX**.be
\Tutorial \Materials folder
Lesson materials
\LX**_Starter folder
Folder for those who start
from a later lesson
\LX**_Reference folder
Completed files
Files of Action Composer
Before you start the tutorial, please copy the “Materials” folder to the
My Documents folder, and then use the copied files.
Please do not overwrite the files
used in this tutorial so that they
can be used again in the future.
* The folder has a name consisting
of your AIBO‘s model and “E”
(Separate folders are provided
for each model). The E indicates
that English words are
recognized.
** Lesson number
x For those who want to start from a later lesson
Copy the files in the “LX**_Starter” folder to the My Documents folder
and start from the desired lesson.
For instance, if you want to start from Lesson 2, use the “L2_Starter”
file. (Please note that some file names may differ from those used in
the lesson.)
x To check what you’ve created
The finished files (with the same contents as the files that you create
during a lesson) are placed in the “LX**_Reference” folder. Please refer
to these files to check that results are correct or not.
12
Page 13

Let’s Create Behaviors!
In this section, you will master programming with
Quick Behavior Arranger and Behavior Arranger.
To help you learn these skills effectively, seven
lessons are provided.
Lessons 1 to 3 are the beginner’s course, Lessons 4
and 5 are the intermediate course, and Lessons 6 and
7 are the advanced course. Please refer to the
“Introduction” for an overview of the contents and
start with the lesson that is appropriate for you.
Now, let’s start the lessons!
Page 14
Lesson 1 Beginner’s Course
Touch AIBO’s Sensor and AIBO stands up,
sits down and lies down
GOAL: To learn how to use Quick Behavior Arranger* to
create a sequential-execution program
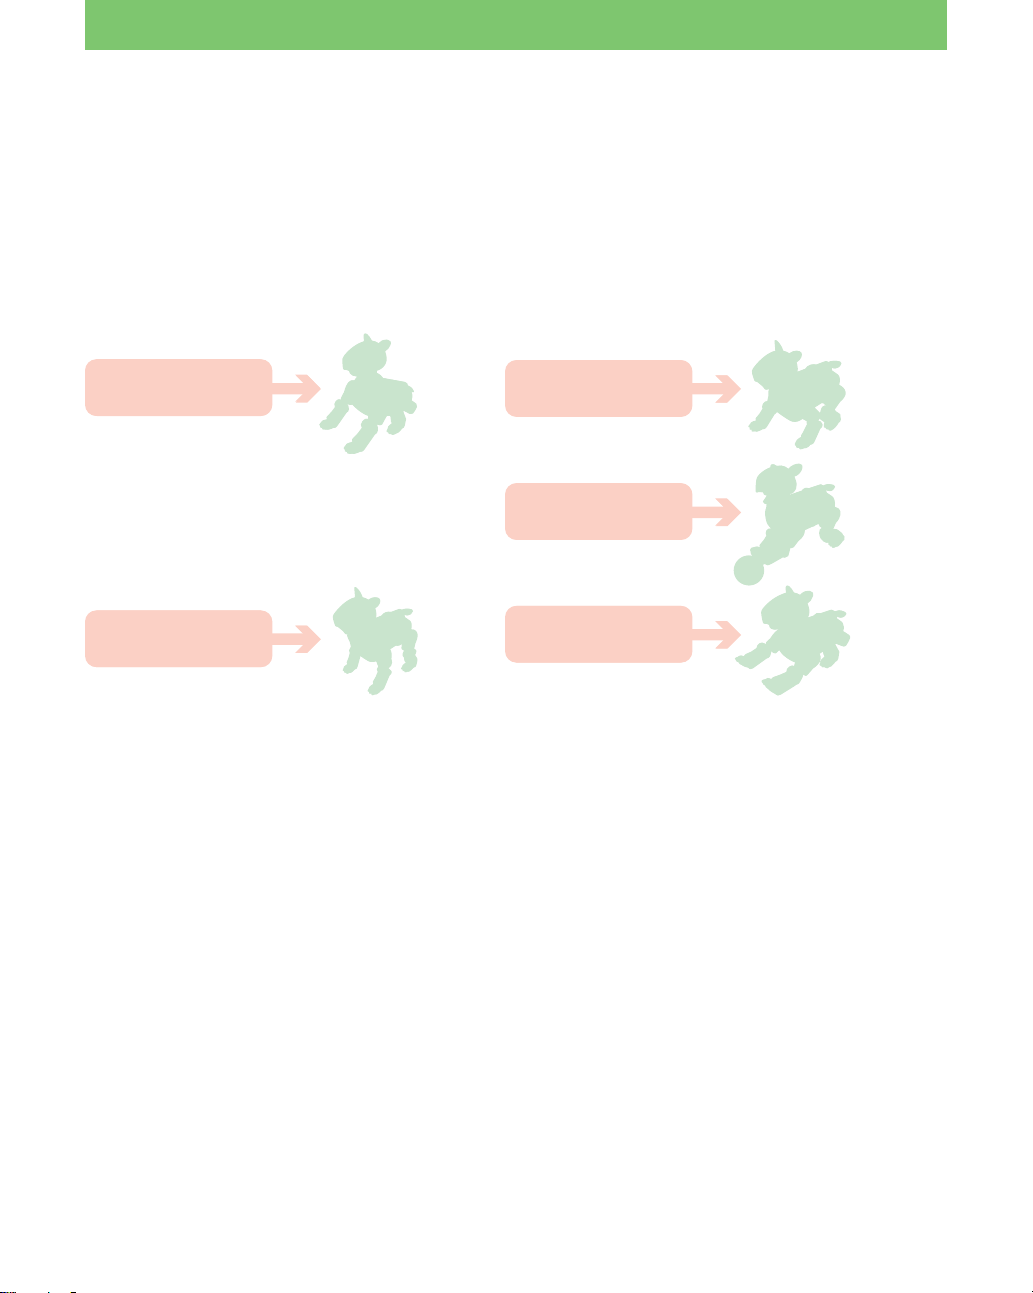
Overview of the program:
When you touch AIBO’s sensor, AIBO executes specific actions in
sequential order.
Touch Sensor
Sit
Procedures
1 Starting Quick Behavior Arranger (page 14)
2 Creating a sequential-execution program (page 15)
3 Saving the program to the “Memory Stick” (page 16)
4 Running the program on AIBO (page 17)
Stand
Lie
* If you use Quick Behavior
Arranger, you can create
programs easily through the use
of wizards. See page 25 of the
User’s Guide.
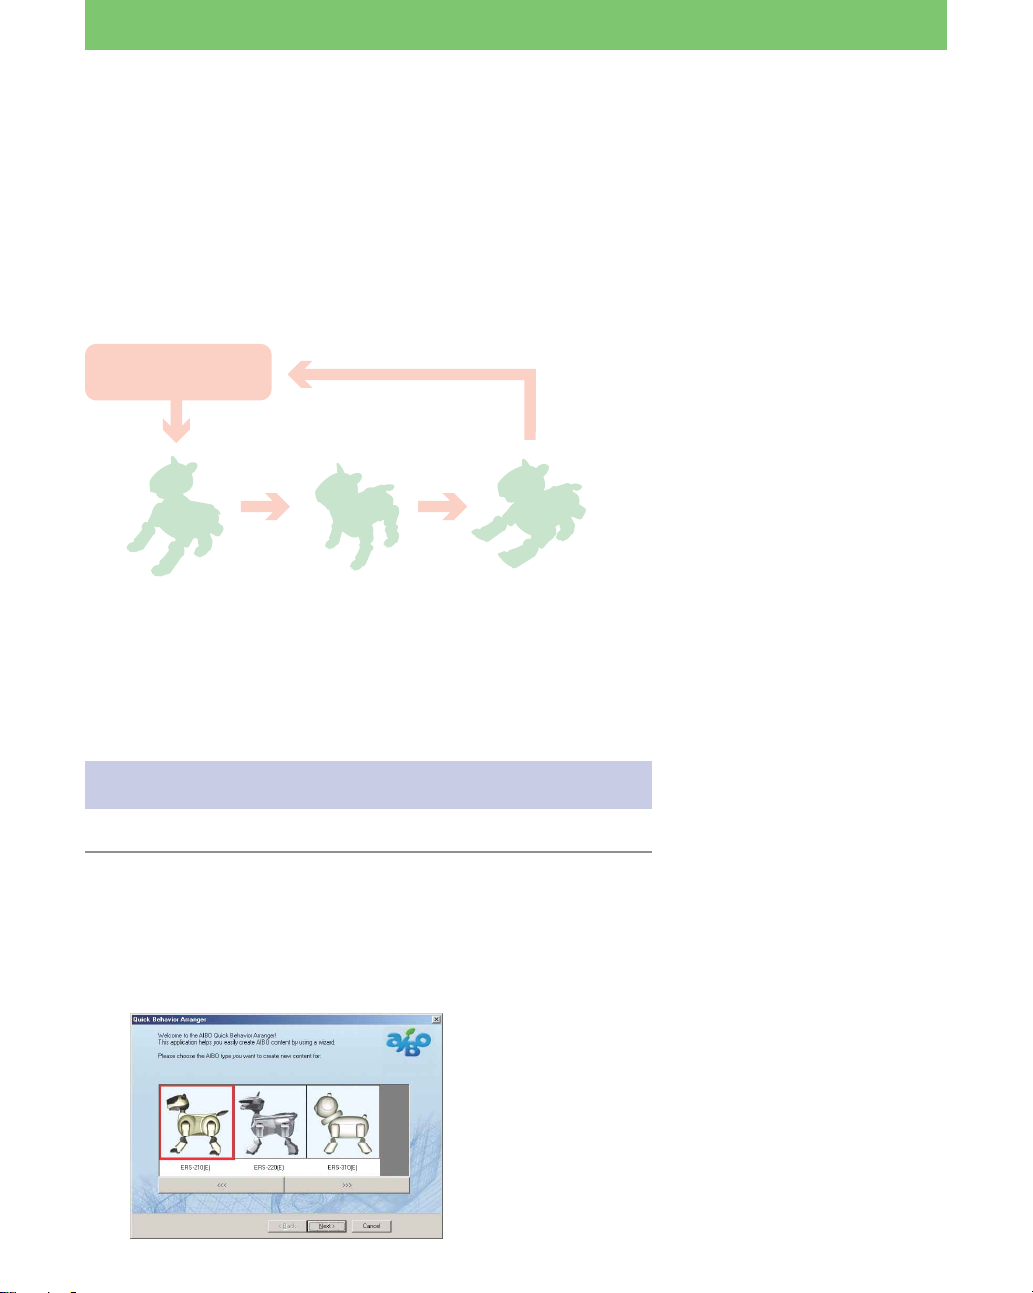
Starting Quick Behavior Arranger
1 Click the Start button in Windows, select
Programs - AIBO Master Studio and click Quick
Behavior Arranger.
Quick Behavior Arranger starts up.
A window for selecting the AIBO model appears.
14
Page 15

Lesson 1 Beginner’s Course
2 Select the model name and click Next.
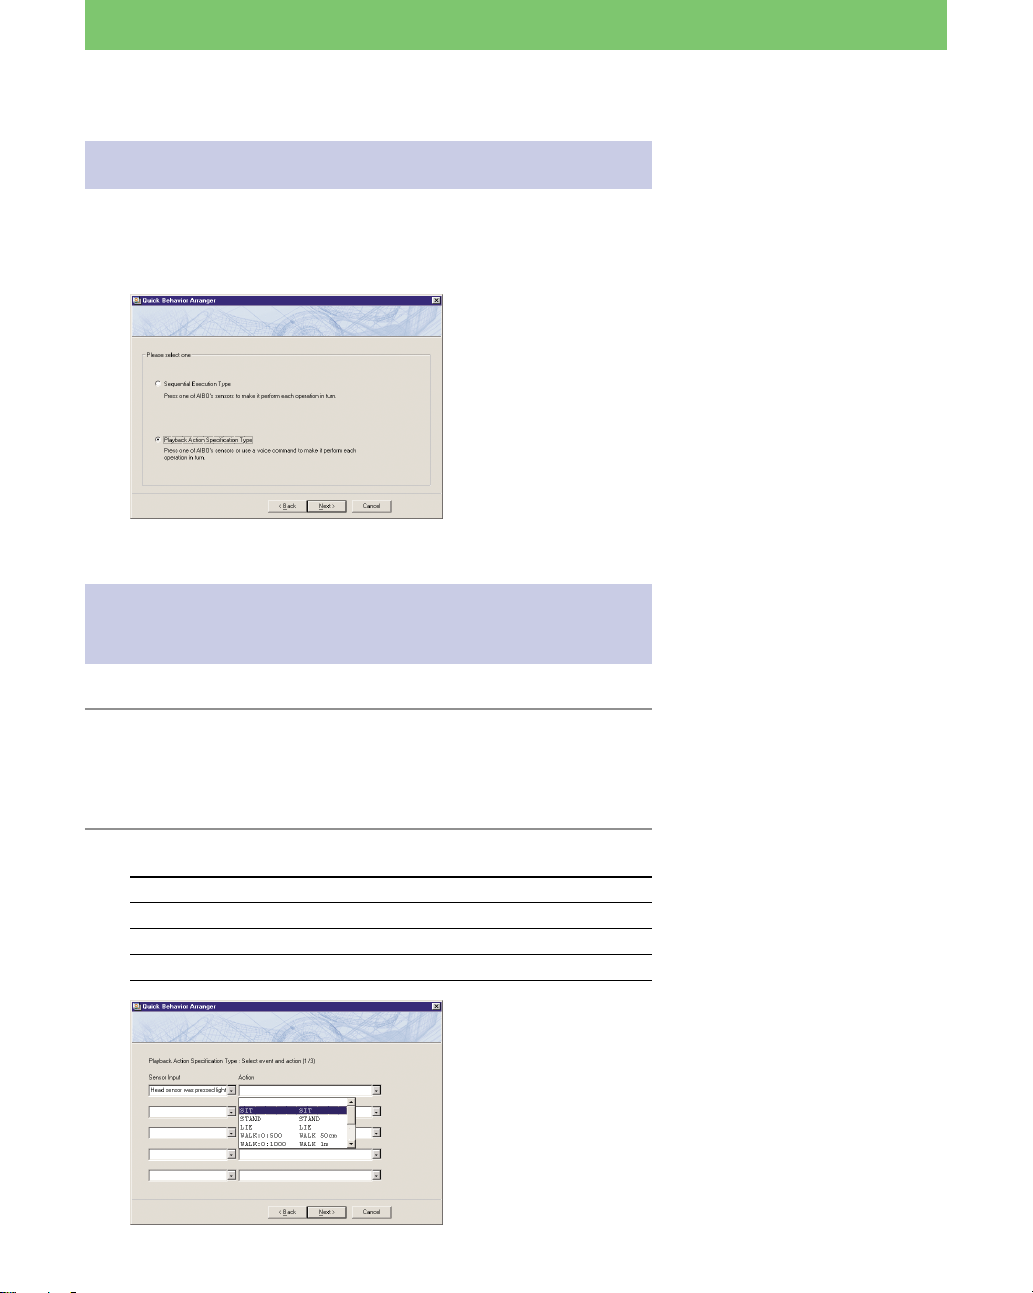
A window for selecting the type of program appears.
Creating a sequential-execution program
1 Select Sequential Execution Type and click
Next.
A window for selecting the actions appears.
The (E) indicates that English
words are recognized.
You will learn about stimulusdriven execution programs in
Lesson 2.
2 Select “SIT” in the first box.
In this step, you’ve selected the
first action that AIBO does when
you touch its sensor.
15
Page 16

Lesson 1 Beginner’s Course
3 Select “STAND” in the second box and “LIE” in
the third.
4 Click Next.
“Program creation is complete!” appears.
Saving the program to the “Memory
Stick”.
In this step, you’ve selected the
action that follows the first action
set in step 2.
1 Insert the supplied “Memory Stick” into the
drive and click Write.
The “Save with a new name” dialog box appears.
2 Name the file and save it.
Type “Lesson1.be” as a new file name and save it to the My
Documents folder.
This file can be edited with Behavior Arranger.
3 Save the program to the “Memory Stick”.
A confirmation dialog box appears. Click Yes.
16
You should make it habit to copy
the necessary system files to the
“Memory Stick” before you save
programs to it. With Quick
Behavior Arranger, when you
copy your program to the
“Memory Stick,” the system files
are also copied, if they have not
been copied yet.
CAUTION
If the “Memory Stick” drive has
not been set, a dialog box appears
asking you to set it. Type the drive
name in the box. For details, see
page 20 of the User’s Guide.
When you save the program
you’ve created to the “Memory
Stick,” it becomes possible to run it
on AIBO.
Page 17
Lesson 1 Beginner’s Course
Files saved to the “Memory Stick” cannot be edited with
Behavior Arranger.
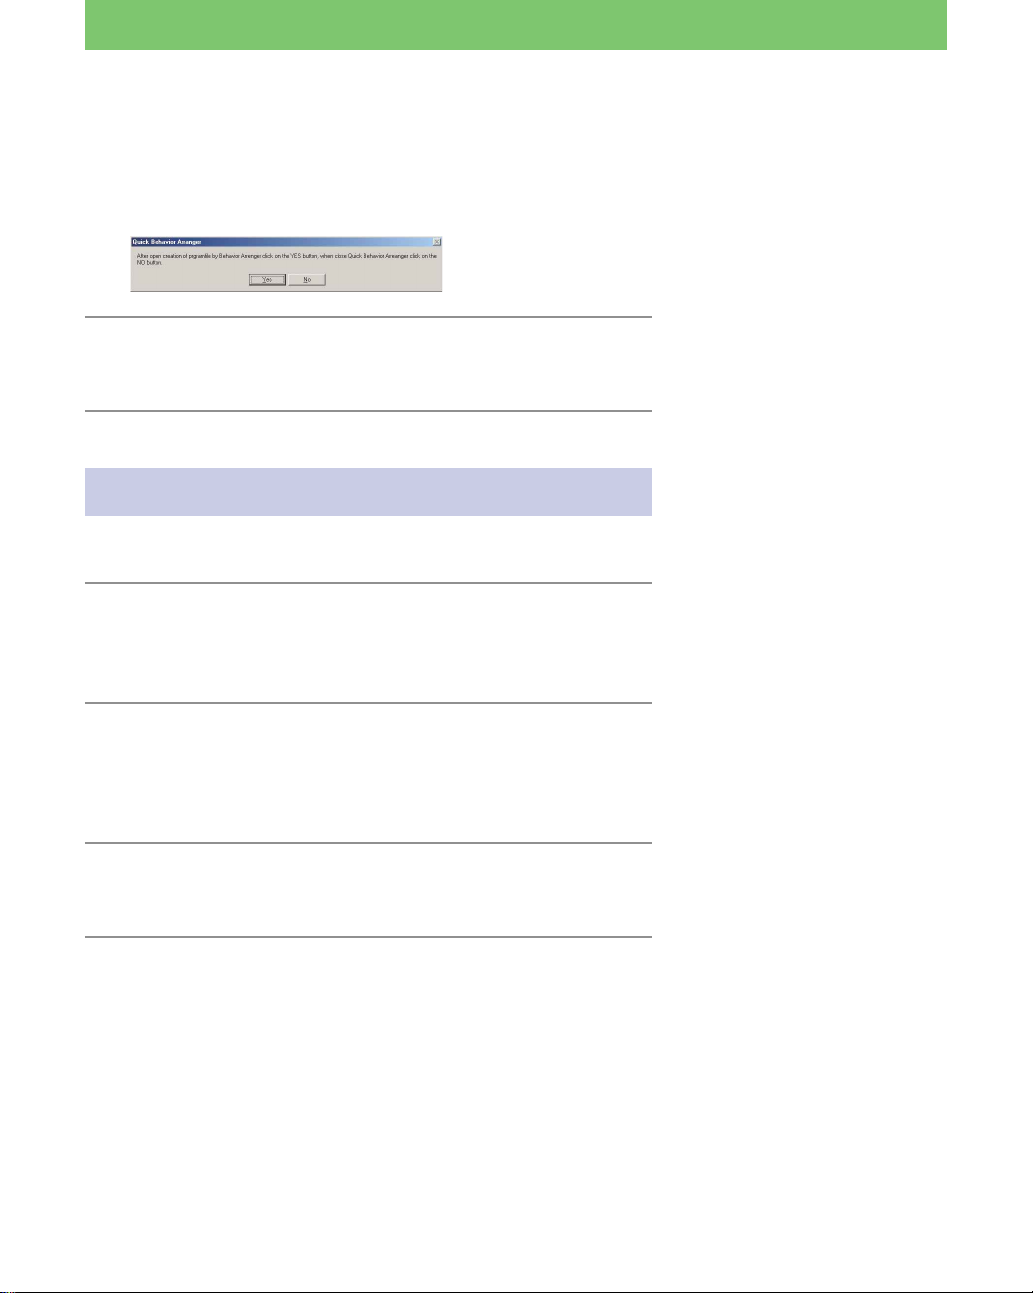
After the copying has finished, the next dialog box appears.
4 Click No.
The procedure for creating and saving the program is finished.
Running the program on AIBO
Let’s run the program you’ve created on AIBO.
1 Insert the “Memory Stick” into AIBO and start
up AIBO by pressing the pause button.
Wait until AIBO finishes booting and stretches his arms.
2 Press any of AIBO’s touch sensors.
AIBO sits, stands, and then lies down in the programmed
sequence.
AIBO stops when it has executed all the actions.
3 Press the touch sensor again.
The program runs again from the start.
In this lesson, you will not edit the
program with Behavior Arranger,
so click No.
You can press any touch sensor.
If you press a sensor while AIBO is
in motion, it stops. Touch the
sensor again and AIBO executes
the program from the beginning.
Did everything go well?
Making a program with Quick Behavior Arranger is easier
than you thought.
The Sequential-execution program allows you to make AIBO perform
a series of consecutive actions whenever you touch its touch sensor.
In the next lesson, you’ll make a program using another Quick
Behavior Arranger tool, the Stimulus-driven Execution program.
17
Page 18
Lesson 2 Beginner’s Course
Press AIBO’s Head and It Sits; Say ”Start”
and It Walks
GOAL: To learn how to make a Stimulus-driven Execution
program using Quick Behavior Arranger
Overview of the program:
AIBO performs specific actions according to the sensory input or voice
command.
Sensor Input
Touch Head
Other Input
Show the pink ball
Procedure
1 Starting up Quick Behavior Arranger (page 19)
2 Making a Stimulus-driven Execution program (page 19)
3 Saving the program to the “Memory Stick” (page 21)
4 Running the program on AIBO (page 21)
Sits
Stands
Voice Command
“Go forward”
“Left leg kick”
“Lie down”
Walks for
50 cm
Kicks
Lies
18
Page 19
Lesson 2 Beginner’s Course
Starting Quick Behavior Arranger
Start up Quick Behavior Arranger and select the AIBO model to be
used.
A window for selecting the program type appears.
Creating a Stimulus-driven Execution
program
1 Select Stimulus-Driven Execution Type and click
Next.
A window for selecting events and actions appears.
For details, see Lesson 1 (page 14).
2 Select the items below and click Next.
Sensor Input Action
ERS-210 Head sensor was pressed lightly SIT[SIT]
ERS-220 Head sensor was pressed lightly SIT[SIT]
ERS-310 series Head is pushed downward SIT[SIT]
When AIBO detects the input
selected in the left box, it performs
the action indicated in the right
box.
19
Page 20
Lesson 2 Beginner’s Course
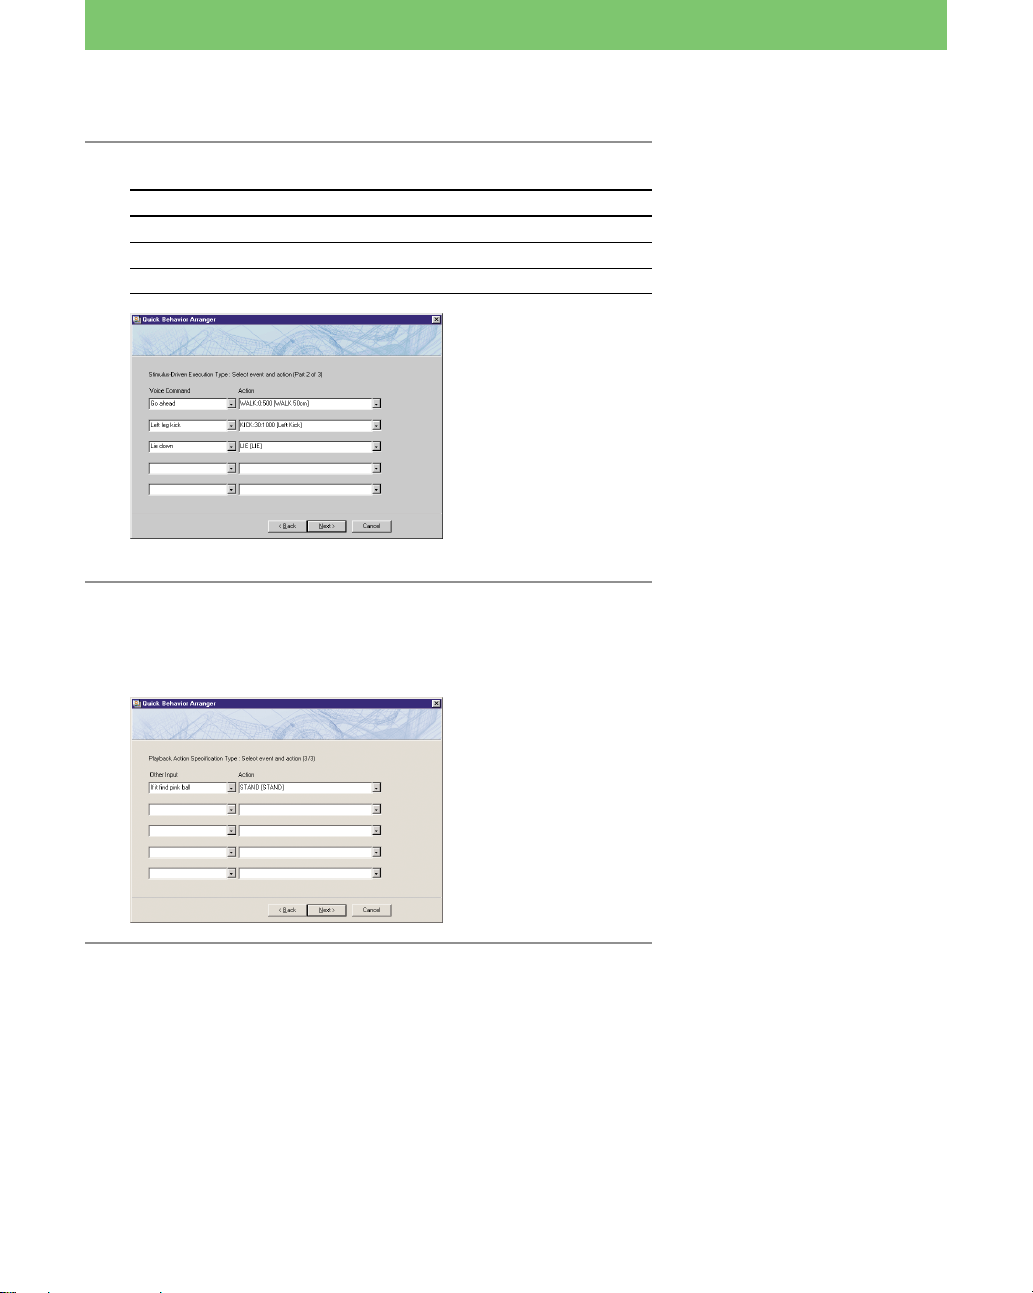
3 Select the items below and click Next.
Voice Command Action
Go forward WALK:0:500 [walks 50cm]
Left leg kick KICK:30:1000 [Left kick]
Lie down LIE [Lies]
When you say the word indicated
in the left box, AIBO performs the
action indicated in the right box.
In this step, you’ve set the
following commands.
• “Go forward” t Walks 50 cm
• “Left leg kick” t Kicks
• “Lie down” t Lies down
4 Set “if it finds a pink ball” in the “Other Input”
box and “STAND” in the “Action” box, and
then click Next.
20
If the condition in the left box are
satisfied, AIBO performs the action
indicated in the right box.
In this step, you’ve set the
command “if you show a pink ball
to AIBO, AIBO sits.”
Page 21

Lesson 2 Beginner’s Course
Saving the program to the “Memory
Stick”
Save the program to the “Memory Stick” as in Lesson 1. Save the file
with the file name “Lesson2.be”.
Running the program on AIBO
Run the program on AIBO and verify that AIBO does what it was
programmed to do!
Press its head* t sit
Say “Go forward” t walks 50cm
Say “Left leg Kick” t kicks
Say “Lie down” t lies
Show AIBO the pink ball t stands
With the above procedure, you can program AIBO to perform different
actions by sensory input or voice command.
Now you have mastered using Quick Behavior Arranger!
In the next lesson, you will make another program to learn the basic
operations of Behavior Arranger.
See “Running the program on
AIBO” in Lesson 1 (page 17).
* For details on settings, see page
19.
AIBO will not hear your voice
while it is making a sound. It is
also difficult for AIBO to hear
voices when it is moving.
21
Page 22

Lesson 3 Beginner’s Course
Walk and Bow
GOAL: To learn the following two things.
• Basic Behavior Arranger* operations and how to create a
program that causes AIBO to do a sequence of actions.
• Using a wireless LAN
Overview of the Program:
When AIBO is activated, it stands up, walks 10 cm (4 inches) and
bows.
* Behavior Arranger is a tool for
programming AIBO actions by
stringing together boxes
containing commands. For
details, see page 29 of the User’s
Guide.
Turn on AIBO
Procedure
1 Preparation (page 22)
2 Creating a new behavior (page 23)
3 Defining commands in action boxes** (page 24)
1 Stand command
2 Walk and bow command
4 Connecting the actions (page 28)
5 Saving and running the program (page 30)
6 Running the program via a wireless LAN (page 30)
Stands up
to walk
Walks forward
10 cm and bows
End
Getting ready
• Prepare the “Memory Stick” that you used in Lesson 1 and 2.
• If you use a wireless LAN, set it up in advance. For details, see page
23 of the User’s Guide.
**For details on action boxes, see
page 32 of the User’s Guide.
A wireless LAN cannot be used
with Quick Behavior Arranger.
If you started this tutorial from
Lesson 3, copy the relevant system
files for your AIBO’s model to the
“Memory Stick.”
22
Page 23

Lesson 3 Beginner’s Course
Creating a new behavior
In this lesson, you’ll create a new behavior from scratch, and then use
the behavior to create a program.
1 Click the Start button in Windows, select
Programs-AIBO Master Studio and click
Behavior Arranger.
Behavior Arranger starts up and an editing window appears.
2 From the menu, select File-New.
A window for selecting the AIBO model appears.
3 Select the AIBO model to be used.
The START and END terminal boxes* appear in the window.
The model name that
you selected appears
here.
This selection is for creating a new
behavior.
For details about the meaning of
“(E),” see page 12.
* For details on terminal boxes, see
page 33 of the User’s Guide.
23
Page 24
Lesson 3 Beginner’s Course
Making action boxes
Commands are entered in action boxes.
First you’ll make a “stand” action box, and then a “walk and bow”
action box.
Making a “stand” action box
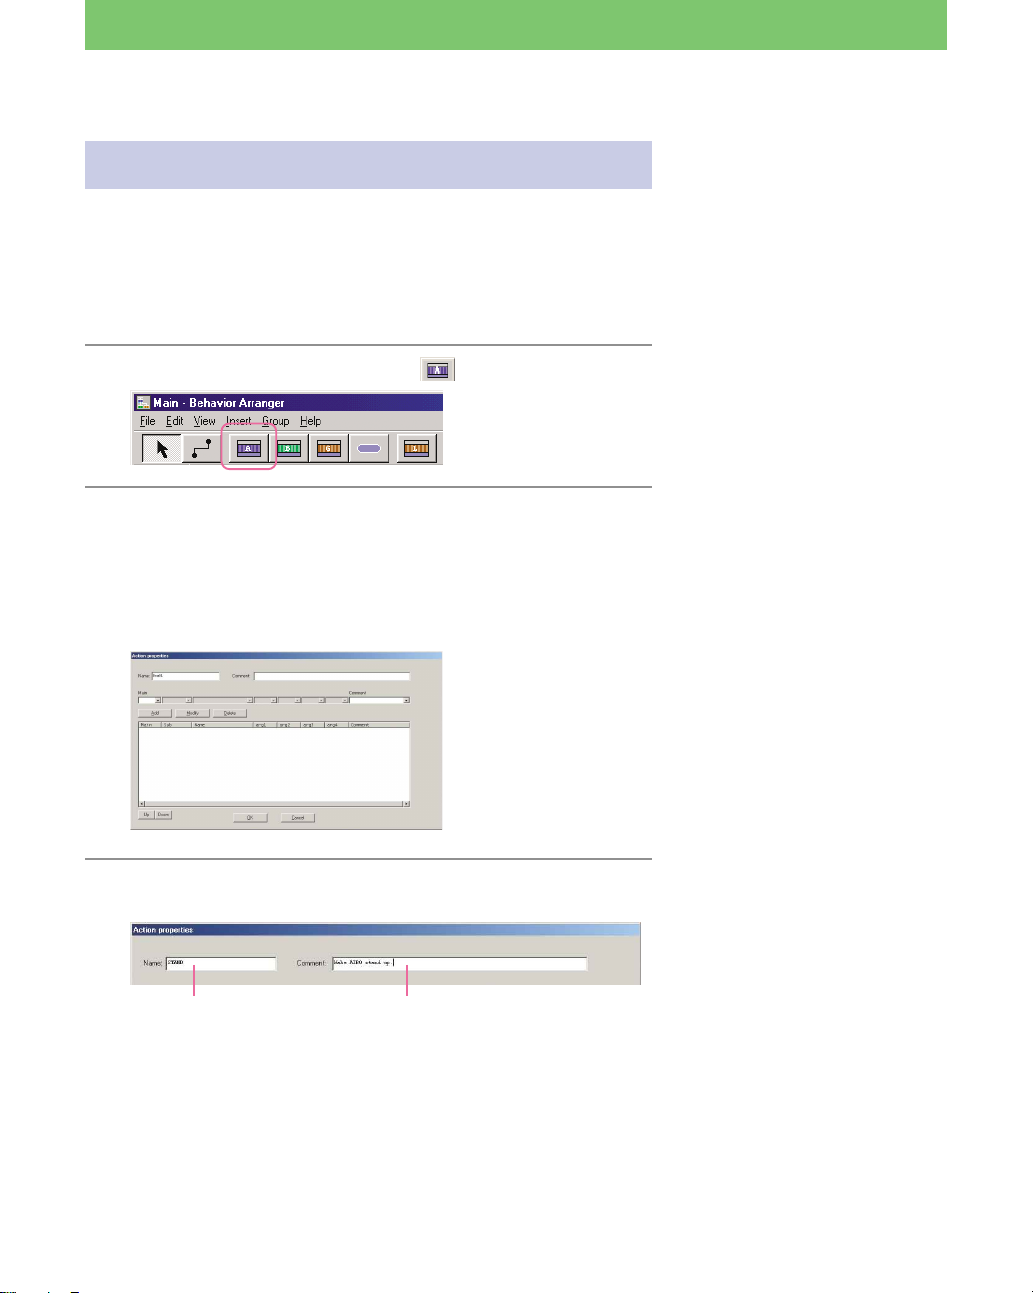
1 Click the Action box button .
2 Click between the START and END terminal
boxes in the window.
The Action box appears where you clicked.
The Action Properties dialog box is what you use to define
commands.
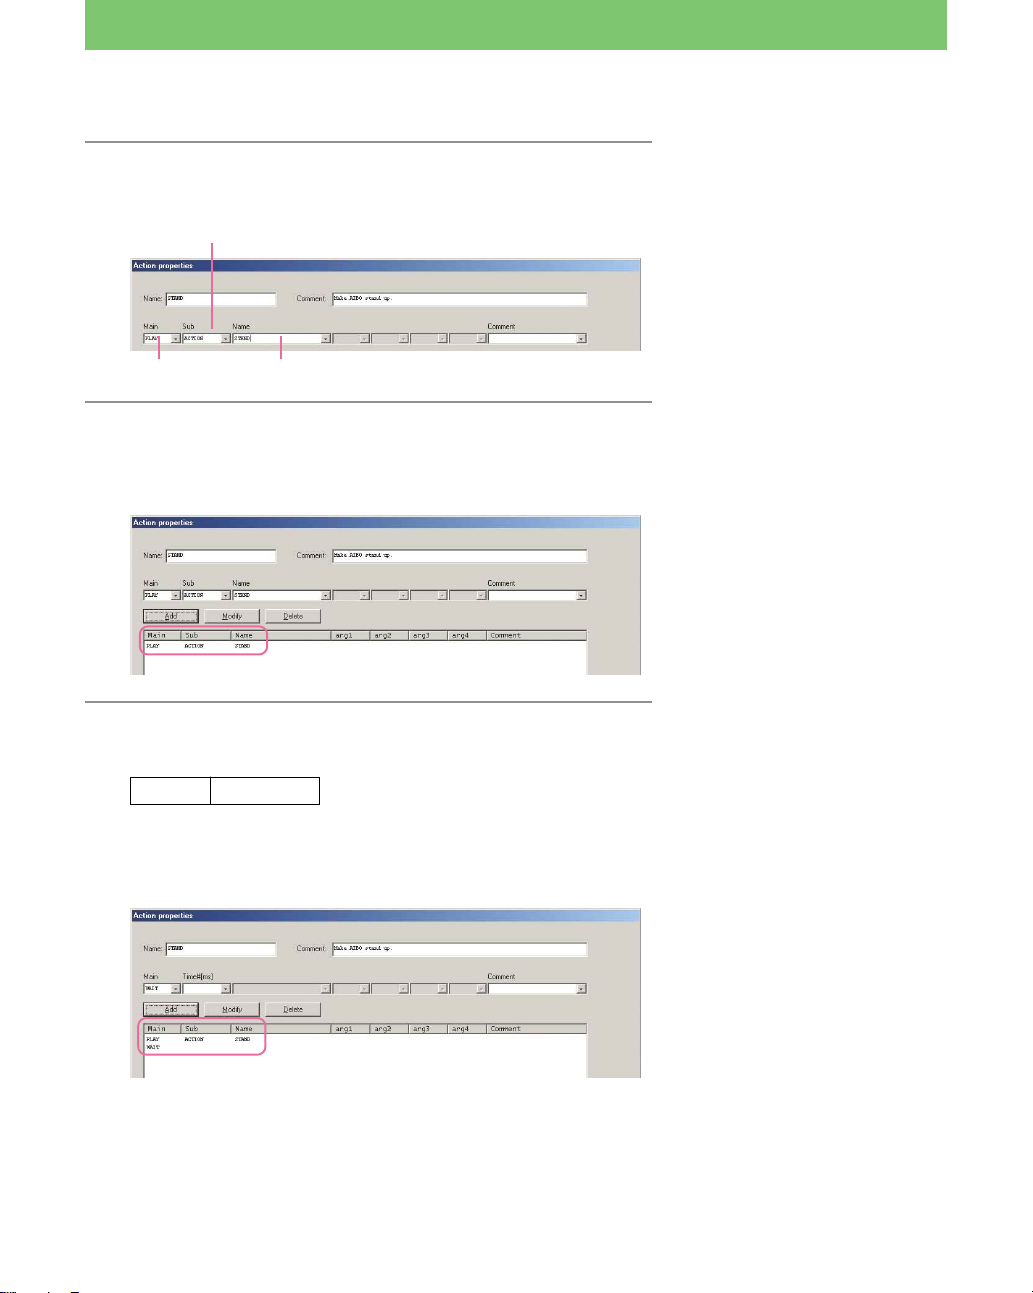
3 Type a name and comment for the action box.
Comment: Make AIBO stand up.Name: Stand
To make AIBO walk, it must first
be in a standing position. For this
reason, you’ll make a “stand”
action box.
The name that you specified in the
Name box will be displayed in the
action box. (If you enter a name
over 7 letters, it will be shortened)
It is best to add a comment if the
contents are not clearly
understood by the name of the
action box.
24
Page 25
Lesson 3 Beginner’s Course
4 Define a command to play back the supplied
“STAND” system action.
Sub: ACTION (system action)
Main: PLAY (action)
Name: STAND
5 Click Add to enter the command.
The “PLAY ACTION STAND” command defined in the previous
step appears at the bottom.
6 Next, define the following command and click
Add.
Main Time#[ms]
WAIT (blank)
The “WAIT” command appears at the bottom.
System actions are actions that are
provided in AIBO Master Studio.
Selecting PLAY-ACTION allows
you to select a system action.
To change the command after
clicking the Add button, select the
command in the bottom window
and enter another one.
Now you’ve defined a “stand”
action.
AIBO sometimes executes several
commands simultaneously. As a
result, some of the commands are
canceled mid-way or AIBO
executes an unexpected action.
If you want AIBO to postpone
executing the next command until
the previous one has completed,
then make sure the Time#[ms] box
of the WAIT command is blank.
A blank box is the same as a “0”
setting, which in programming
means “do not execute the next
command until the previous one
has completed.” It does not mean
“wait 0 second” (a zero-second
waiting time in programming is
the same as immediate execution).
The above command causes the program to wait until AIBO
finishes the PLAY-ACTION-STAND (stand) command defined
in steps 4 and 5. This means that the next command is not
executed until AIBO has finished standing up.
25
Page 26
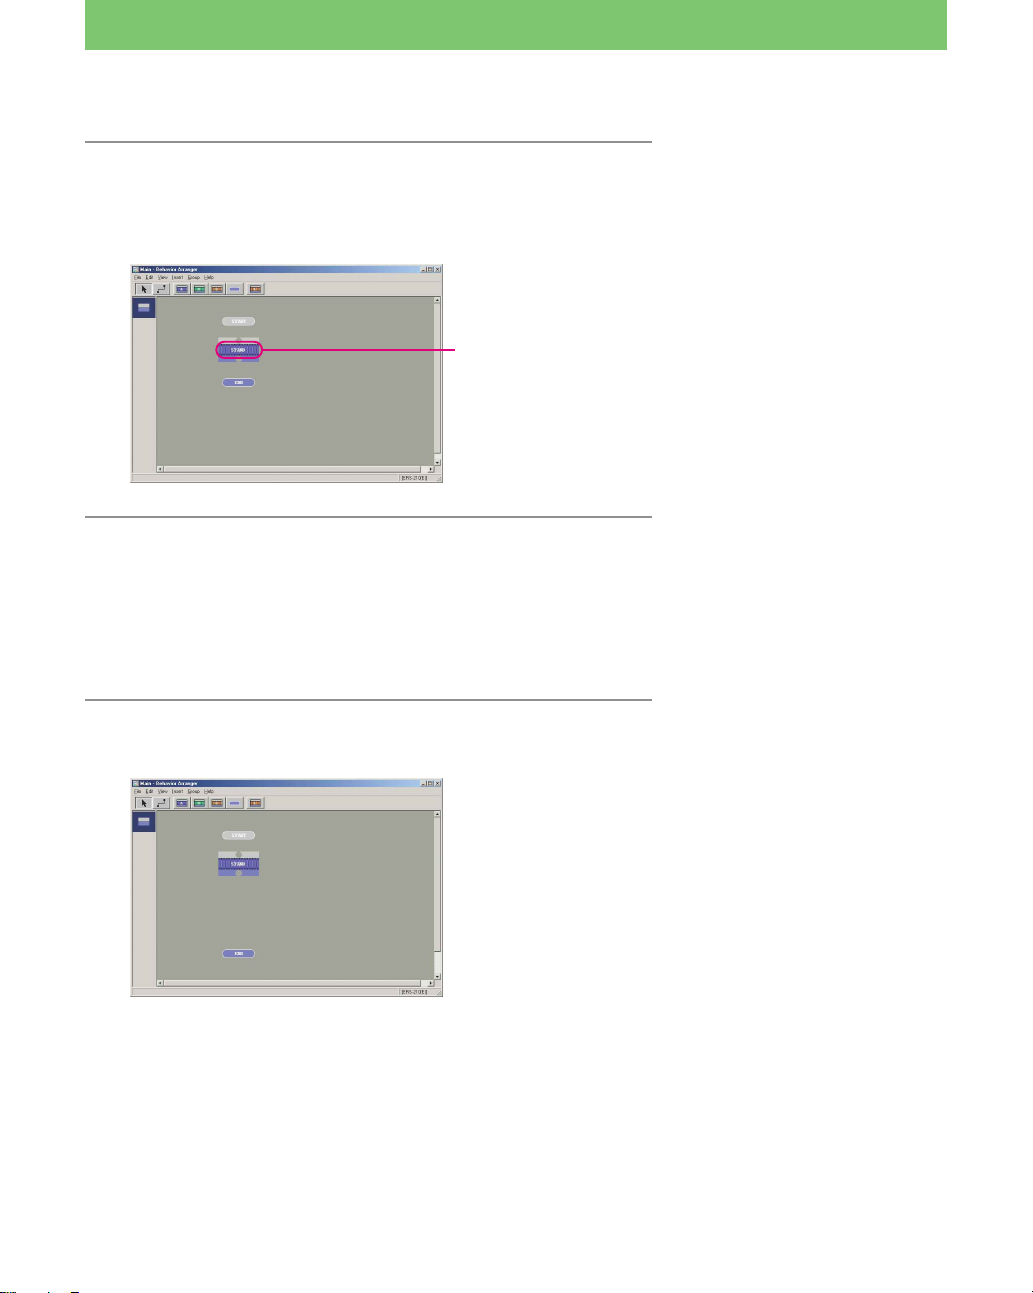
Lesson 3 Beginner’s Course
7 Click OK.
The Action Properties dialog box closes and a STAND action box
appears between the START and END terminal boxes in the
window.
The box name specified
in step 4
The STAND action box has now been completed!
Making a “walk and bow” action box
Let’s make another action box.
1 Click the END terminal box and drag it
downward.
To make more space for another
action box between a STAND
action box and the END terminal
box, move the END terminal box
downward.
26
Page 27

Lesson 3 Beginner’s Course
2 Click , and click between the STAND action
box and the END terminal box in the window.
The Action Properties dialog box appears.
3 Enter a name and a comment for the action
box.
Name: WALK_BOW
Comment: Walks 10cm and bows.
4 Define a command for walking straight for
10 cm and click Add.
Main Sub Name arg1 arg2
PLAY ACTION WALK 0 100
This commands causes AIBO to
walk for 100 mm at the angle of 0°
(straight forward).
5 Enter a WAIT command and click Add.
Main Time#[ms]
WAIT blank
This command causes AIBO
postpone executing the next
command until it has finished
walking 10 cm.
6 Define a command for bowing the head
(straight downward at an angle of –50°) and
click Add.
Main Sub Name arg1 arg2
PLAY ACTION MOVE_HEAD 0 –50*
7 As in step 5, enter a WAIT command so AIBO
does not execute the next command until it
finishes lowering its head.
8 Define a command for resetting the head to its
original position, and then click Add.
Main Sub Name arg1 arg2
PLAY ACTION MOVE_HEAD 0 0
* Fifty is not included in the list, so
type the number into the box.
This command causes AIBO to
move its head at the horizontal
angle of 0° and a vertical angle of
–50°; i.e., AIBO lowers its head
50°.
This command causes AIBO to
move its head at a horizontal angle
of 0° and a vertical angle of 0°; i.e.,
it returns its head back to the
original position.
27
Page 28

Lesson 3 Beginner’s Course
9 As in step 5, specify a WAIT command so that
AIBO does not execute the next command until
it finishes raising its head.
10 Click OK.
The “walk for 10 cm and bow” action box has been completed.
Both action boxes are completed.
Connecting action boxes
You have used system actions for
lowering and raising AIBO’s head
and making AIBO bow. You could
have also have made AIBO bow by
creating the action and applying it
with Action Composer.
Let’s connect all the action boxes to make it a series of actions
consisting of stand, walk 10 cm, and bow.
1 Click the Link mode button .
The mouse changes to link mode.
28
By connecting the boxes
containing commands with lines,
you link them as a series of
consecutive actions.
Till now, you have used the mouse
in Normal mode. For connecting
boxes, you change the mouse to
Link mode. At all other times, it
should be kept in Normal mode.
Page 29
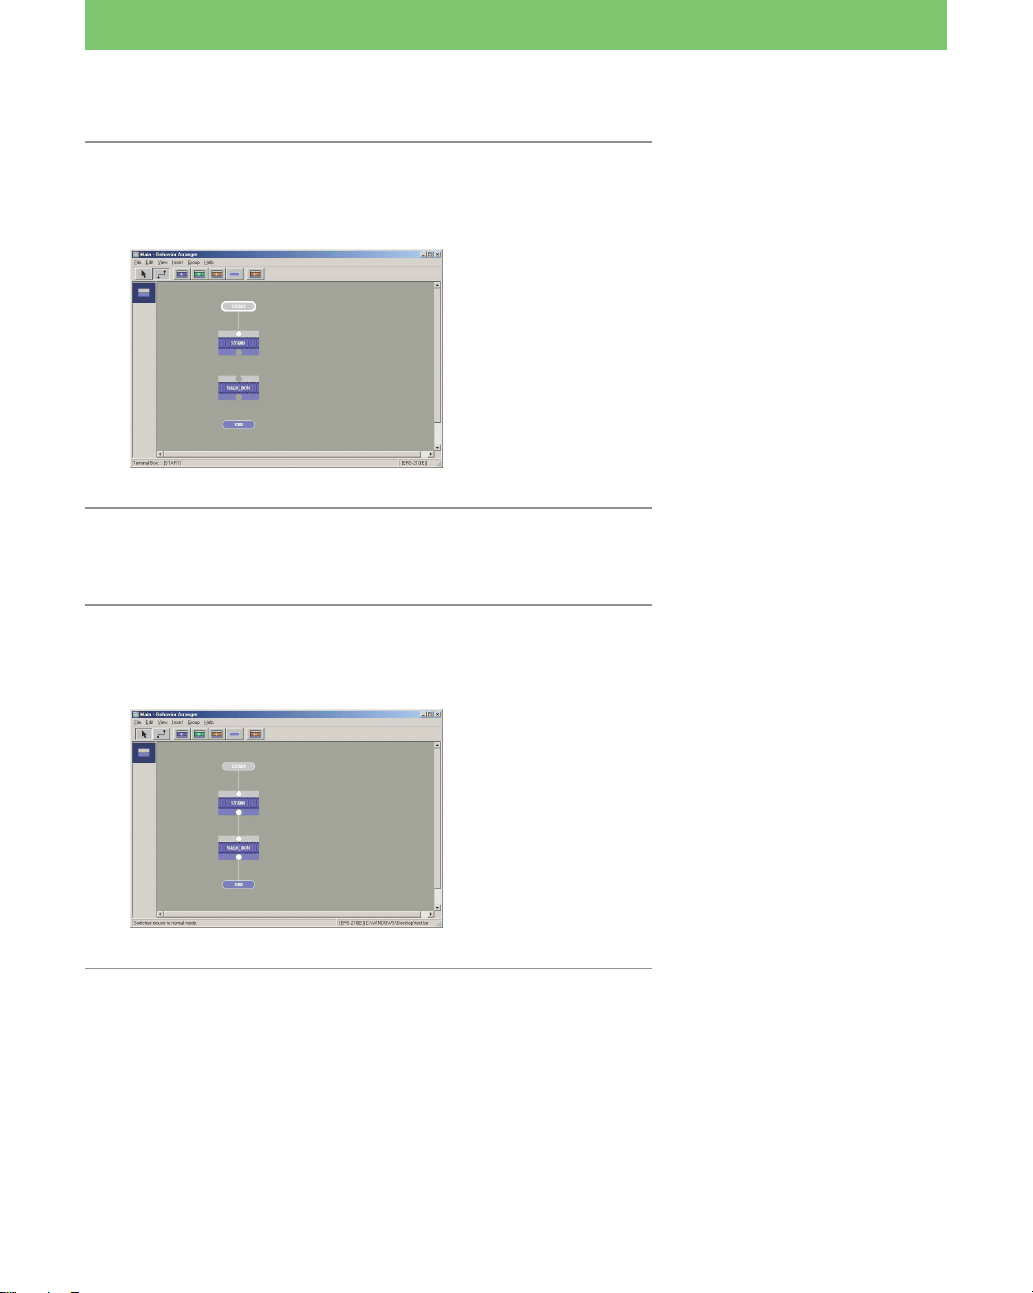
Lesson 3 Beginner’s Course
2 Click the START terminal box and drag it
toward the STAND action box.
The two boxes are connected with a line.
3 Connect the STAND and WALK_BOW boxes, as
in step 2.
4 Connect the WALK_BOW and END boxes.
All the boxes are now connected and have become a series of
consecutive actions.
In Lesson 3, you created 2 boxes,
but the same program can be made
by placing all the commands into
one action box.
29
Page 30

Lesson 3 Beginner’s Course
Saving the program and running it on
AIBO
Save the program you’ve created to the hard disk and then save it to
the “Memory Stick”.
Afterwards, run the program on AIBO.
1 From the menu, select “File- Save As.”
Save the file as “Lesson3.be”.
2 Insert the “Memory Stick” into the “Memory
Stick” drive.
3 From the menu, select “File-Save to the
Memory Stick.”
When the saving process is finished, a confirmation dialog box
appears. Click OK. Insert the “Memory Stick” containing the
program and start up AIBO. The program will run and AIBO
will stand up.
To execute the program again, restart AIBO.
Using a wireless LAN
Saving the program to the hard
disk is convenient since it allows
you to use the program again
when creating other behaviors.
If you do not use a wireless LAN,
then this completes Lesson 3.
If you use a wireless LAN, you can wireless transfer the program from
the PC to AIBO for execution.
1 Insert the “Memory Stick” into AIBO, start up
AIBO and place it within communication
distance of the PC.
30
By using a wireless LAN, you can
execute the program you created
in Lesson 3 repeatedly without
having to restart AIBO.
Moreover, whenever you create or
modify a program, you can upload
the results to the “Memory Stick”
from the PC, even while it is
inserted in AIBO.
Page 31

Lesson 3 Beginner’s Course
2 From the menu, select “File-Wireless LAN
Connection.”
The Wireless LAN Connection dialog box appears.
3 Click Write.
The program is saved to the “Memory Stick.”
4 Click Execute.
AIBO performs the actions specified in the program.
If you checked the box specifying “Trace the Box Name,” the
action boxes that have been executed are indicated on the screen.
5 When AIBO stops, click Disconnect.
Control returns to the editing window.
Although you have already saved
the program to the “Memory
Stick,” please save it again via the
wireless LAN for study purposes.
If you click the Disconnect button
while AIBO is in motion, AIBO
will continue executing the
program until it ends. This is
because the program has been
downloaded already.
If you need to stop AIBO while it
is still moving, click Normal Stop,
and then Disconnect. AIBO will
stop when it assumes a stable
pose.
If you need to stop AIBO
immediately, click Emergency
Stop, and then Disconnect. AIBO
will quit the program immediately.
However, it may stop in an
unstable pose and fall down.
31
Page 32

Lesson 3 Beginner’s Course
The programs you created in this lesson
are the same as those in the “Tutorial3.be” file in the “\Sample\model
name” folder. Check these programs to verify that they were created
correctly or not.
Has everything gone well so far?
You may have discovered that creating programs with action boxes is
easier than you had expected. You have just learned the basics of
programming with Behavior Arranger. Try creating other programs by
modifying some of the commands in the action boxes used in this
lesson.
Next, you will go on to the Intermediate course. But don’t worry!
You’ll just be editing the basic program that you made in this lesson.
See page 12.
Open the Tutorial3.be file with
Behavior Arranger and doubleclick each box to display the
Properties box and verify the
command entered in the box.
32
Page 33

Lesson 4 Intermediate Course
AIBO Bows If Head Is Pressed
GOAL: To learn the following things:
• How to edit a sample program
• How to make a program with branch boxes that define
branch conditions
• How to get sensory information
• How to make a loop in your program
Overview of the Program:
AIBO stands up, walks forward and bows each time its head is
pressed.
Waits 1 sec
No
Stands and clears
Turn on AIBO
Procedure
1 Display the file to be edit (page 34)
2 Making boxes (page 35)
1 Add a command for initializing the sensors (edit an existing box)
2 Make a branch box* defining a branch condition
3 Make a box that verifies whether AIBO’s head is pressed or not
3 Connecting boxes to loop the program (page 38)
4 Saving and running the program (page 41)
As in Lesson 3, prepare the “Memory Stick” and set up the wireless
LAN.
the sensor
information
Is the head
being pressed?
Yes
Return to the start
Walks forward
10 cm and
bow
* For details on branch boxes, see
page 32 of the User’s Guide.
33
Page 34

Lesson 4 Intermediate Course
Opening the file created in Lesson 3
1 Start up Behavior Arranger.
2 Load the program you created in Lesson 3.
Select File-Open from the menu, and then open the “Lesson3.be”
file. If you are continuing from Lesson 3, click the Normal mode
button.
If you are starting with this lesson,
make a copy of the “Tutorial3.be”
file in the “\Sample\model name”
folder (see page 12).
34
Page 35

Lesson 4 Intermediate Course
Making boxes
In this lesson, you will make and edit 3 boxes as follows.
1 Add a command to the Stand box for initializing the sensors
2 Make a branch box for the branch condition “if the head was
pressed/if the head was not pressed.”
3 Make a box for the “wait for 1 second” command (for obtaining
sensory information)
1 Add a command for initializing the sensors
Add a command to the Stand action box for initializing the sensors.
1 Click the line between the STAND and
WALK_BOW box, and delete it with the Delete
key.
A dialog box asking “Delete immediately?” appears. Click
Yes.
If a sensor parameter is set to “1”
(the presence of sensory
information means the sensor has
been touched), it will maintain this
value. For this reason, the sensor
parameter must be restored to
“0”when making a program that
loops or when the sensor was
previously used by another box.
Restoring the sensor parameter to
“0” is referred to as
“initialization.”
2 Double-click the STAND action box.
3 Add a command for initializing paw and head
sensors, and then close the Properties box.
Main Variable Var/Value
SET Head_ON* 0**
Add a command after the STAND
action box to initialize the value of
the head sensor.
Adding a command that assigns a
value of 0 to the “HEAD_ON”
parameter causes the the head
touch sensor to be initialized.
* The AIBO’s head sensor is
referred to differently according
to the model. It is the Head
sensor on ERS-210, the Head
touch sensor on ERS-220 and the
Head switch on the ERS-310
series.
The parameter name for all of the
above models is “Head_ON.”
**Head sensor parameter
1: It was touched
0: It was not touched
35
Page 36

Lesson 4 Intermediate Course
To move 2 boxes at the same time,
4 Move the WALK_BOW box and the END boxes
downward.
select them by dragging the mouse
to enclose them. Then move them
by dragging them to make a space
between the STAND and
WALK_BOW boxes.
2 Setting branch conditions in branch boxes
In this lesson, you’ll create a box defining the following branch
condition.
“If the head was pressed, AIBO bows. If not, the program jumps to
another box.”
1 Click the box and place it between the
STAND and WALK_BOW boxes.
2 Enter the box name and command, and then
close the Properties box.
Name : TOUCH_HEAD?
1 Enter the command, “if the head was pressed, jump to the
WALK_BOW action box.”
Type Variable Op Var/Value JumpTo
IF Head_ON = 1 WALK_BOW
2 Enter the command, “If the head was not pressed.”
Type JumpTo
ELSE null*
The jump destination
is specified in step 1,
so the boxes are
connected with a line
automatically.
This creates a program that
determines whether the head
sensor was pressed or not, and
then jumps to the next action.
If AIBO’s head was pressed
(HEAD_ON=1), jump to the
WALK_BOW box.
If else, jump to null.
* The box that the program jumps
to will be created at a later stage,
so select “null,” which signifies
“not yet determined.”
When you make a box and
connect the two boxes with a
line, the “null” will be
automatically changed to the
name of the connected box.
A branch box displays two
terminals since it has two branch
conditions.
36
Page 37

Lesson 4 Intermediate Course
3 Create a "Wait 1 second" action box
To check if the head was pressed or not at one-second intervals, you’ll
need to create an action box that causes AIBO to wait 1 second.
1 Click and place a new action box beside
the TOUCH_HEAD? box.
2 Enter a “Wait 1 second” command and close
the Properties box.
Name: WAIT_1SEC
Main Time#[ms]
WAIT 1000
Wait 1000 ms (1 second).
37
Page 38

Lesson 4 Intermediate Course
Connecting the boxes to loop the
program
By connecting the boxes in a loop, you can make the program one
continuous motion.
1 Check the head sensor for input every second
1 Set the mouse to link mode, and then connect
the STAND and TOUCH_HEAD? boxes.
2 Connect the lines to make a loop as follows:
1 Connect the free terminal of the TOUCH_HEAD? box to the
input terminal of the WAIT_1SEC box.
2 Connect the output terminal of the WAIT_1SEC box to the
input terminal of the TOUCH_HEAD? box.
The WAIT_1SEC action box loops and checks the input to the
head sensor every second when AIBO has not received any
input.
Checks for input to the
head sensor every
second.
If the mouse is in normal mode,
you can also connect the boxes by
clicking and dragging the mouse
while pressing the shift key.
When connecting the branch box
to the box that is the jump
destination, confirm the condition
of the terminals before connecting
the box to the correct destination
box. The branch condition is
displayed when you place the
mouse on the terminals.
By connecting the empty terminal
(ELSE) to WAIT_1SEC, you’ve set
the following condition:
“If the head was not pressed” t
Wait for 1 second (jump to the
WAIT_1SEC box).”
38
Page 39

Lesson 4 Intermediate Course
In the branch box, you’ve entered “ELSE-JumpTo:-null.” If,
however, you open the TOUCH_HEAD? properties box, you’ll
find that the “null” has changed to “WAIT_1SEC,” since you
connected the empty output terminal of the branch box to the
WAIT_1SEC box.
3 Clarifying crossing lines.
If you cannot see the flow well because of crossing lines, set the
mouse to normal mode and move the lines by dragging them.
If there are too many boxes and
you cannot see all of them on the
screen, select “View-Resize Edit
Range” to resize the editing
window.
You can select “Reduced View
(50%)” or “Reduced View (25%).”
39
Page 40

Lesson 4 Intermediate Course
2 Loop the entire program
Loop the program so that after AIBO walks and bows, the program
returns to the start and AIBO bows again when you press its head.
1 Disconnect the WALK_BOW and the END
boxes.
2 Connect the WALK_BOW and STAND boxes.
See page 35.
To loop the program, do not
connect the End box. Let it stand
alone.
By returning to the STAND box
after AIBO bows, the sensor is
initialized and AIBO waits for
input to the sensor again.
40
Page 41

Lesson 4 Intermediate Course
Saving the program and running it on
AIBO
Save the program you’ve created with the new file name “Lesson4.be,”
save it to the “Memory Stick” and run it on AIBO. When the program
is executed, AIBO stands up and waits for its head to be pressed. If you
press its head, AIBO walks forward 10 cm and bows. After that, it
stands and waits for its head to be pressed again.
To end the program, support AIBO’s body with your hands to prevent
it from falling down, and press AIBO’s pause button to turn it off.
If you are using a wireless LAN, click the Normal shutdown button to
stop AIBO’s motion and click the Disconnect button.
The program you created in this lesson is
the same as the program in the “Tutorial4.be” file in the
“\Sample\model name” folder.
Confirm that the program was created correctly or not.
In this lesson, you created a slightly complicated program containing a
branch condition. Change the commands in the branch box to set
various conditions. You will have more fun with AIBO by
programming it to do many behaviors!
See page 30.
To stop AIBO immediately, see
page 31.
See page 12.
41
Page 42

Lesson 5 Intermediate Course
Say “AIBO” and AIBO Bows and Greets You
GOAL: To learn the following points:
• How to make a group
• How to make a program with the voice recognition function
• How to embed an action made by Action Composer into a
program
Overview of the Program:
After AIBO stands, it performs different actions depending on the
words spoken to it.
Turn on AIBO
Waits 1 sec
No
Stands and clears
the sensors
Procedure
1 Preparing an action library of actions made by Action Composer
(page 43)
2 Making a group (page 45)
• Arranging boxes as one group
• Editing an action box and a branch box
• Adding an action file
3 Embedding a group into the main program (page 52)
4 Saving the program and running it on AIBO (page 55)
42
Clears the
sensors
No No
Heard “AIBO”? Heard “Hello”?
Yes
Walks forward
10 cm and bows
Say something?
Yes
Cannot understand
the words
and gets angry
Yes
Greets you
Page 43

Lesson 5 Intermediate Course
Preparing an action library
To use an action library through Behavior Arranger, you will need to
save the action library to the “Memory Stick” in advance. In this
lesson, you’ll use the supplied action library.
1 Click the Start button in Windows, select
“Programs-AIBO Master Studio” and click
“Action Composer.”
Action Composer starts up.
To use new elements or action files
that you’ve created with Action
Composer, you will need to add
them to an action library first, and
then save the action library to the
“Memory Stick.” For details, see
page 38 of the User’s Guide.
2 Select “Open Existing Library” and click OK.
43
Page 44

Lesson 5 Intermediate Course
3 Open “Sample.alb” in the folder with the same
model name and behavior.
4 Insert the “Memory Stick” into the drive, and
select “File-Save Library to Memory Stick.”
The Action library is saved to the “Memory Stick”.
5 Quit Action Composer.
The action library is stored in the
“Sample\model name” folder (see
page 12).
The model name and language for
the behavior and the action library
must be the same.
When you save an action library to
the “Memory Stick,” a copy is
saved to a certain directory in the
hard disk to allow Behavior
Arranger to reference it.
Behavior Arranger can reference
only a single library, and only one
library can be saved to the
“Memory Stick”.
If another action library is
already saved on the “Memory
Stick,” the previous library will be
overwritten.
Note
Behavior Arranger refers to the
action library saved last. If you are
using several “Memory Sticks,”
make sure the action library in the
“Memory Stick” you are using
matches the one on the hard disk.
6 Start up Behavior Arranger and open the
behavior file (Lesson4.be) that you created in
Lesson 4.
44
If you are starting from this lesson,
make a copy of the following file
for editing: “Tutorial4.be” file in
the “Sample\model name” folder
(see page 12).
Page 45

Lesson 5 Intermediate Course
Collecting boxes together to make a
group
In this lesson, you’ll learn how to use group boxes.* Put the
TOUCH_HEAD? and WAIT_1SEC action boxes together to make a
group.
Moving the TOUCH_HEAD? and WAIT_1SEC boxes
into a Group
1 Click “Group-Create New Group.”
2 Specify “Check_sensor” in the Name box, and
click OK.
A “Check_Sensor” group is created and an editing window for
the Check_Sensor group appears.
The editing window of
the Check_Sensor group
* For details on group boxes, see
page 43 of the User’s Guide.
By putting several boxes into a
group, you will have the
convenience of using those boxes
as a group in other programs.
3 Drag the RETURN box downward.
4 In the Main window, while holding down the
Ctrl key, click the TOUCH-HEAD? box, the
WAIT_1SEC box, and the two lines connecting
the two boxes in order to select them.
5 From the menu, select “Edit-Cut.”
The selected boxes and lines are cut.
Make space.
45
Page 46

Lesson 5 Intermediate Course
6 In the Check_Sensor window, select Edit-Paste.
The selected boxes and lines move to the Check_Sensor group.
Editing a branch box and an action box
Let’s edit the branch box and action box that you moved as indicated
below.
1 Change the command of the TOUCH_HEAD branch box
2 Add a command for initializing the voice recognition parameter
3 Make a branch box that branches to two boxes by voice recognition
1 Change the command in the TOUCH_HEAD branch box.
Let’s change the command in the TOUCH_HEAD branch box to one
that causes control to exit from the loop when voice input is
recognized.
You cannot move the selected
boxes or lines by dragging them to
other windows.
Using the English system,
AIBO recognizes 53 English
words. You can make programs
that use the voice recognition
function by creating actions that
react to these words. For a list of
the words, see page 59 of the
User’s Guide.
1 Open the TOUCH_HEAD branch box.
2 Change the name of the box and command in
the Properties box.
1 Change the name to “VOICE_ID?”
2 Select and change the command by clicking the displayed
“IF Head_ON = 1.”
Variable Op Var/Value JumpTo
AU_Voice* = 1 null
3 Click Modify
The command, “IF Head_ON = 1 WALK_BOW” is changed to
“IF AU_Voice = 1”.
46
* ”AU_Voice” is a voice
recognition parameter that
indicates a word was recognized.
The command changes to “if AIBO
recognizes any of the 53 words,
jump to an undefined box.” (For
details on nulls, see page 36.)
If “auto modify” is checked, skip
step 3.
Page 47

Lesson 5 Intermediate Course
3 Close the Branch Properties box by clicking OK.
2 Initializing the parameter for voice recognition
Before checking whether the voice input has been recognized or not in
the VOICE_ID? branch box, let’s make another box that initializes the
parameter.
When a parameter value of “1” has
been detected, AIBO maintains the
condition (i.e., voice recognition =
1 (voice recognition has occurred).
1 Place a new action box above the VOICE_ID?
box.
2 Enter a command for initializing the parameter,
and then close the Properties box.
Name: INIT
Main Variable Var/Value
SET AU_Voice 0
The box for initializing the voice recognition parameter is completed.
For details on initialization, see
page 35.
47
Page 48

Lesson 5 Intermediate Course
3 Branching to two terminal boxes, depending on the voice
recognition
In this lesson, you’ll make an AIBO terminal box and a Hello terminal
box. The program jumps to the AIBO terminal box when AIBO hears
“AIBO,” and to the Hello terminal box when AIBO hears “Hello.”
When AIBO hears another word, the program loops to the top of the
group box.
1 Double-click the RETURN box.
The Terminal Properties box appears.
The program that you make will
do the following:
Check for voice recognition every
1 second
r
• Recognizes “AIBO” t jump to
the AIBO box
• Recognizes “Hello” t jump to
the Hello box
• Recognizes another word t
loop (jump to the INIT box)
2 Change the name to “AIBO” and close the
Properties box.
The terminal box becomes the AIBO terminal box.
3 Click the Terminal box button and place
the box next to the AIBO box.
4 Type “Hello” in the Name box and close the
Properties box.
The Hello terminal box is created.
5 Place a new branch box below the VOICE_ID?
box.
48
In this box, you’ll enter the
command, “if AIBO recognize
“AIBO,” the program jumps to the
AIBO terminal box.”
Page 49

Lesson 5 Intermediate Course
6 Enter the name and command, and then close
the Properties box.
Name: AIBO?
Type Variable Op Var/Value JumpTo
IF AU_Voice_ID = 1 AIBO
ELSE null
Recognizes “AIBO” t jump to
AIBO terminal box
“AU_Voice_ID=1” means “word
detected by voice recognition=1
(AIBO)” (recognizes the word as
“AIBO”).
Another word t jump to the
undefined box
7 Place a new branch box next to the AIBO? box.
8 Enter the name and command, and then close
the Properties box.
Name: Hello?
Type Variable Op Var/Value JumpTo
IF AU_Voice_ID = 6 Hello
ELSE INIT
In this box, you’ll enter the
command, “if AIBO recognize
“Hello,” the program jumps to the
“Hello” terminal box.”
“AU_Voice_ID=6” means “word
detected by voice recognition =6
(Hello)” (recognizes the word as
“Hello”).
To loop the program when it
recognizes a word other than
“AIBO” or “Hello,” enter the
command, “Another word t
jump to INIT box.”
49
Page 50

Lesson 5 Intermediate Course
9 Connect the boxes.
Connect the boxes as follows:
ENTRY t INIT, INIT t VOICE_ID?, the empty terminal of
VOICE_ID? t AIBO?, the empty output terminal of AIBO? t
Hello?
You have now created a group box with the command “if the word
“AIBO” or “Hello” is recognized, jump to the AIBO box or Hello box”.
To connect the AIBO? and Hello?
boxes, you must connect the empty
output terminal of AIBO? to the
empty input terminal of Hello?. If
you try to connect them by
selecting the boxes, the Condition
window appears. Click Cancel.
Connect the terminals, not the
boxes by clicking on the empty
terminal of the AIBO box and
dragging the mouse to the
terminal of the Hello box.
If AIBO recognizes another word,
it clears the “AU_Voice”
parameter and then checks the
voice input every 1 second.
50
Page 51

Lesson 5 Intermediate Course
Embedding an action file into a program
In this lesson, you’ll learn how to embed an action file into a program
using the action library that you previously saved (page 43). By doing
so, you will give richer expression to AIBO’s movements.
In the following program, you will make AIBO express anger
whenever it recognizes a word other than “AIBO” or “Hello.”
1 Place a new action box to the lower right of
the Hello? box.
2 Enter the name and command, and then close
the Properties box.
Name: UN_RECOGNIZE
Main Sub Name
PLAY ACTION+* angry01
Wait blank**
* “ACTION+” indicates an action
file in the action library. PLAYACTION+ allows actions in the
action library to be used.
In this step, you’ll embed the
“Angry01” action file.
** The program waits until AIBO
finishes performing the action
(see page 25).
51
Page 52

Lesson 5 Intermediate Course
3 Reconnect the boxes and reorganize the lines.
Disconnect the “Hello?” and “INIT” boxes.
Then connect the right output terminal of “Hello?” to
“UN_RECOG...,” and “UN_RECOG...” to “INIT.”
4 Close the group window.
The Check Sensor group has been completed.
ELSE t jump to INIT box
Unrecognizable word t execute
angry01 t jump to INIT box
A group is not erased even after
you have closed the window.
The group you just created is not
displayed in the editing window.
You’ll embed the “Check_Sensor”
group into the program by using a
group box in the next section.
Embedding the group and completing
the program
Return to the initial editing window to complete the program, then
embed the group program that you created into the main program.
1 Click the Group box button and place it
between the STAND and WALK_BOW boxes.
The Group Properties box appears.
52
What you created in the beginning
is also a kind of group, called the
Main group. You’ll embed the
group you created into the Main
group to complete the following
action:
“AIBO” t bows
“Hello” t greets you by raising
its right front hand
Neither of the above words t
AIBO cannot recognize word, and
thus assumes an angry pose
t
Checks for word input every
second
Page 53

Lesson 5 Intermediate Course
2 Enter the name of the group box, select the
name for the group that the box invokes, and
then close the Properties box.
Type “VOICE_RECOG “ in the Name box and select
“Check_Sensor” (the name of the group you created) from the
list in the Group box.
Group box name
Name of group invoked
by this box
The group box appears.
The “group box name” and “group
name” are different. The “group
box name” is the name displayed
on the box, and the group name is
the name of the group that the
group box invokes.
The group box has two terminals
since it invokes a group that has
two terminals.
One is the output terminal of the
AIBO terminal box, and the other
the output terminal of the Hello
terminal box.
Confirm that the names of the
terminals are “AIBO” and “Hello”
by positioning the mouse on the
terminals.
53
Page 54

Lesson 5 Intermediate Course
3 Connect the AIBO terminal of the
VOICE_RECOG to the WALK_BOW box.
4 Place a new action box to the right of the
WALK_BOW box.
Enter the “greet” action command (which is executed when
AIBO hears and recognizes the word “Hello.”). You’ll use the
“Greet01” action file in the action library (see page 43) for the
greeting by AIBO.
5 Enter the box name and command, and then
close the Properties box.
Name: GREETING
1 Enter the “greeting” command on the first line.
Main Sub Name
PLAY ACTION+ greet01
2 Enter the “WAIT 0” command on the second line.
You’ve now created a program
that causes AIBO to walk and bow
when it hears the word “AIBO.”
See page 25.
54
Page 55

Lesson 5 Intermediate Course
6 Connect the boxes and reorganize the lines.
Connect STAND t VOICE_RECOG, and the “Hello” terminal
of VOICE_RECOG t GREETING, and GREETING t STAND.
Saving the program and running it on
AIBO
When AIBO recognizes the word
“Hello,” it greets you. The
program then returns to the
beginning and AIBO stands,
waiting for another word input.
If the flowchart is hard to follow,
rearrange the lines or boxes.
Save the program that you created to the “Memory Stick” as
“Lesson5.be” and run it on AIBO.
When the program is executed, AIBO repeats the following actions.
Stand t recognizes “AIBO” t walks for 10 cm and bows
recognizes “Hello” t greets you by raising its right
front leg
recognizes another word t gets angry! Poses
The program you’ve created in this lesson is
The same as the program in the “Tutorial5.be” file in the
“\Sample\model name” folder.
Confirm that the program was properly created or not.
You’ve just completed a complex program!
It might have been difficult because of all the steps, but you learned
many techniques that will allow you to make full use of Behavior
Arranger. Make use of the program that you created by changing the
embedded actions or walking distance.
See page 30.
See page 12.
55
Page 56

Lesson 6 Advanced Course
Doing Several Actions Simultaneously
GOAL: To create a program that does several actions
simultaneously.
Overview of the program:
When AIBO finds an obstacle, it walks backwards for 5 seconds
while moving its tail and head. It then walks forward again.
Wait 1 sec
No
Turn on AIBO
Procedure
1 Checking the current program (page 57)
2 Creating a program that does several actions simultaneously (page
58)
• Changing the action of the program from “go forward” to
“search for obstacles while walking forward”
• Looping the program
• Adding two actions: twirling the tail (ERS-210 only) and moving
the head sideways
3 Saving and running the program (page 61)
Stand up
to walk
Keep moving
tail & neck
Encountered
obstacle
while walking
forward?
Yes
Walk backwards
5 sec while
moving tail
and head
Point: There is only one
“walk forward”
command and it is not
included in the loop for
detecting obstacles.
56
Page 57

Lesson 6 Advanced Course
Checking the current program
In this lesson, you’ll edit the “Tutorial6a.be” file, so make a copy of the
file and open it with Behavior Arranger.
In your program, the commands will be executed sequentially (not
simultaneously).
Makes AIBO stand up.
The “Tutorial6a.be” file is stored in
the “Sample\model name” folder
(see page 12).
PLAY ACTION WALK 0 100
WAIT
Commands AIBO to walk for 100
mm. The “WAIT” command is
IF Distance < 300 BACK
If there is an obstacle within
300 mm, the program jumps
to the Back box.
ELSE GO_AHEAD
In all other cases, the
program returns to the
GO_AHEAD box.
included to prevent the next
command from being executed
until AIBO finishes walking 100
mm.
PLAY ACTION WALK 180 200
WAIT
(If there is an obstacle nearby)
AIBO walks backwards for
200 mm.
The WAIT command is inserted in
this box also to prevent the next
command from being executed
until AIBO finishes walking
backwards for 200 mm.
As shown above, the program is designed not to execute the next
command until the previous command has been completed.
57
Page 58

Lesson 6 Advanced Course
Executing several actions simultaneously
Let’s modify the existing program so that several commands are
executed simultaneously, such as AIBO searching for obstacles while
walking.
1 Open the “GO_AHEAD Action Box” Properties
box.
2 Change the walking distance.
Change the distance in the PLAY-ACTION-WALK-0-100
command from 100 mm to 10,000 mm.
3 Click WAIT, Delete, and then the OK button.
Next, we’ll loop the program so that AIBO checks for obstacles
every second when none has yet to be detected.
4 In the “OBJECT? Action Box” Properties box,
change “Else GO_AHEAD” to “Else
WAIT_1SEC,” and then close the Properties
box.
AIBO continues walking since a
long distance (10,000 mm) is
specified.
Since the WAIT command has
been deleted, the commands in
“OBJECT?” box are executed right
after the “walk forward for 10 cm”
command is executed.
AIBO then searches for obstacles
as it walks forward.
In the box, the jump destination
has been changed from
“GO_AHEAD” to “WAIT_1SEC.”
58
Page 59

Lesson 6 Advanced Course
5 Connect the output terminal of the WAIT_1SEC
box with the input terminal of OBJECT? Box,
and organize the lines.
In the end, change the “distance” parameter to a “time”
parameter with the condition that causes the program to execute
the next command after AIBO has walked backwards.
6 Open the “BACK” Properties box, change the
distance from “200 mm” to “10000 mm,” delete
the WAIT command, and then close the
Properties box.
AIBO will now search for obstacles
every second while executing the
“Go forward” command.
The point of this step is to prevent
the program from executing “go
forward” again while the
“OBJECT?” and “WAIT_1SEC”
boxes are still being executed in a
loop.
59
Page 60

Lesson 6 Advanced Course
7 Disconnect the BACK and GO_AHEAD boxes,
and connect the BACK, WAIT_5SEC and
GO_AHEAD boxes in sequential order.
Now add two more actions: twirling the tail (ERS-210 only) and
moving the head sideways.
8 In the “Back Box” Properties box, add the
commands indicated below and close the
Properties box.
Since the WAIT command has
been deleted, the WAIT_5SEC box
is executed right after the
command to go backwards.
AIBO thus walks backwards for 5
seconds, and then walks forward
afterwards.
PLAY ACTION PALONE.AUTO.TAILROT (ERS-210 only)
PLAY ACTION MOVE_HEAD 50 0
The program has now been completed.
60
Two commands, “AIBO twirling
its tail” and “AIBO inclines its
head 50°,” have been added.
Page 61

Lesson 6 Advanced Course
Saving the program and running it on
AIBO
Save the program with the name “Lesson6.be” to the “Memory
Stick” and run it on AIBO.
Let’s check the actions that you’ve altered.
When the Back box is executed, AIBO carries out the following four
actions simultaneously.
• Waits 5 seconds
• Walks backwards
• Twirls the tail (ERS-210 only)
• Inclines the head 50° to the left
Afterwards, AIBO executes the GO_AHEAD box,. Since the commands
for twirling the tail and inclining the head continue to be valid after the
execution of the GO_AHEAD command, the execution of both
commands continues thereafter.
In contrast to previous lessons, several commands can thus be
executed simultaneously by not using the WAIT command (WAIT 0).
The WAIT command should be used as required on a case by case
basis.
The program that you made in this lesson is
the same as the program in the “Tutorial6b.be” file in the
“\Sample\model name”.
Verify that the program was properly created.
Do not overwrite the
“Tutorial6a.be” file used in this
lesson so that you can use it again
in the future.
See page 12.
z HINT
• Of the system actions, the actions of waking and moving the head (WALK,
MOVE...), searching (SEARCH...), moving the ears and tail (PALONE...) and
lighting of the LED (SMESS...) are followed by the immediate execution of the
next command when a WAIT command with no parameter is not used
(overwriting of the command occurs).
If there is a need to interrupt the on-going execution of the current command
in order to execute the next command, execution of the previous command is
aborted and the new command is executed (e.g., switching from walking
forward to walking backwards).
If there is no need to interrupt the execution of the current command, the
execution of the current command continues (e.g., the commands for
twirling the tail and inclining the head are still valid even after AIBO
switches from walking forward to walking backward (or vice versa)).
Also, if a WAIT command with a no parameter is not used with system
actions other than those mentioned above and user actions created with
Action Composer, the next command is placed in the queue and is executed
immediately after the current command.
If, however, you issue more commands that are not executed immediately,
the queue may become full, resulting in an overflow that might cause the
program to run improperly.
See page 55 of the User‘s Guide.
61
Page 62

Lesson 6 Advanced Course
• To change AIBO from walking forward to walking backwards immediately
when AIBO detects an obstruction, delete “WAIT_1SEC” box, and connect
the ELSE terminal of the OBJECT? box to the input terminal of the OBJECT?
box (looping within the box itself).
This will minimize the time required for detecting an obstruction (not at onesecond intervals).
• Specifying 0 ms in the WAIT command in the WAIT_1SEC box is the same as
a WAIT command with a null parameter. This command causes AIBO to wait
until the completion of
PLAY ACTION WALK 0 10000
in the GO_AHEAD box. Note that this means AIBO will not detect any
obstructions until it finishes walking 10 meters (10,000 mm).
• If no obstructions are detected while AIBO walks forward 10 meters, the
PLAY ACTION WALK 0 10000
command will be completed and AIBO will walk no further. If you show an
obstruction to AIBO when it has stopped after walking the 10 meters, the
program will exit from the loop between the OBJECT? box and the
WAIT_1SEC box, and will then execute the BACK box, which causes AIBO to
walk backward for 5 seconds, and then forward.
62
Page 63

Lesson 7 Advanced Course
Mastering Advanced Techniques
This lesson introduces advanced techniques for creating programs
with Behavior Arranger. In it, you’ll learn programming methods by
studying a description of a “search for and kick the pink ball”
program. In this lesson you will not edit the program.
Preparing the file
Open the “Soccer.be” file with Behavior Arranger.
Checking the main program
Standing up
This program issues a “stand up” command and waits
until AIBO finishes standing up.
Searching for the pink ball
PLAY ACTION MOVE_HEAD 0 0
WAIT
After the above command causes AIBO to face forward,
the command below causes AIBO to search for the pink
ball.
PLAY ACTION SEARCH.HEAD.LOWCENT PINK_BALL
WAIT
The SEARCH command can be overwritten when it is
executed, but if there is a next command, the execution of
that command may cause AIBO to stop searching for the
ball. By adding a WAIT command, the execution of the
next command can be delayed until AIBO finds the pink
ball.
This file is stored in the
“\Sample\model name” folder
(see page 12).
63
Page 64

Lesson 7 Advanced Course
Checking the program in the “Ball
Searching” group box
Starting the search for the ball
PLAY ACTION TRACK_HEAD PINK_BALL
The above command is included, but there is no
WAIT command.
Note that the next command will be executed while
AIBO is still searching for the pink ball.
Determining whether AIBO has
lost the ball or not
IF Pink_Ball = 1 SIDE?
ELSE END_TRACKING
The above commands check whether
AIBO is still able to see the pink ball or
not. If AIBO sees the pink ball, a value of
“1” is returned to the Pink_Ball system
parameter and the program jumps to the
SIDE? Action box.
If AIBO has lost the ball, the program
jumps to the END_TRACKING box.
Quit searching for the ball
At first, let’s check what the box specifies for
AIBO when it has lost the ball.
In the END__TRACKING box, only a
“WAIT” command is defined. A “WAIT”
command with no parameter makes the
program wait until all commands have
finished.
Here, the program waits for the following
command in the START_ TRACKING box to
complete:
PLAY ACTION TRACK_HEAD PINK_BALL
The system parameter of the Pink_Ball
command is not “1,” which means AIBO has
lost the ball, but the TRACK_HEAD
command will not be completed
immediately.
Since some time passes before the command
completes, the above WAIT command is used
to cause the program to wait until the
completion of the TRACK_HEAD command.
64
Page 65

Lesson 7 Advanced Course
Changing the direction of the body
According to the location of the ball
The commands below are specified in the
SIDE? action box which the program jumps to
when AIBO sees the pink ball.
IF Head_Pan > 35
AND Wait = 1 TURN
IF Head_Pan < -35
AND Wait = 1 TURN
ELSE NEAR?
The Head_Pan system parameter indicates the
horizontal angle of AIBO’s neck. If the angle
is more than or less than 35° and the Wait
value is “1,” the program jumps to the TURN
box which changes the direction of AIBO’s
body.
The Wait value indicates the number of ongoing commands. When AIBO searches for
the ball, the following command is executed,
and so the value becomes “1.”
PLAY ACTION TRACK_HEAD PINK_BALL
Otherwise, the ball is in front of AIBO, and so
the program jumps to the “Near?” box, which
calculates the distance to the ball.
Finding the distance to the ball
IF Head_Tilt > -60
AND Wait = 1 WALK
ELSE KICK
The above command determines whether the ball is nearby or far away by the
angle of AIBO’s neck.
If the angle is more than -60°, i.e., if the head faces upward, it could be
concluded that the ball is far away.
When the Wait value is “1,” it means AIBO is still searching for the ball, and so
the program jumps to the WALK box.
If the angle is less than -60°, i.e., if the head is facing downward, it can be
concluded that the ball is near AIBO’s legs. The program then jumps to the
KICK group box.
65
Page 66

Lesson 7 Advanced Course
Turn and walk in the direction that AIBO is
facing
The following command is entered into the TURN box:
PLAY ACTION TURN Head_Pan
The following command is entered into the WALK box.
PLAY ACTION WALK Head_Pan 30
The Head_Pan represents the horizontal angle of AIBO’s
neck, i.e., the direction from which AIBO is viewing the ball.
Note that there is no “WAIT” command
after this command.
PLAY-ACTION-TRACK_HEAD-PINK_BALL
and either PLAY ACTION TURN or PLAY ACTION WALK
are executed at the same time. In other words, two
commands are executed simultaneously. If the values in the
properties box are hard to read, adjust the width of the cell.
Wait 0.01 second
WAIT 10
The program waits for 10 ms (0.01
second).
In making this program, you can
tell how many commands are in
progress by the Wait system
parameter.
Changing the action depending on the
number of the running command
IF Wait <> 1 Wait_10ms
ELSE LOST?
The Wait system parameter represents the number of
on-going commands.
When the TURN box or the WALK box completes, the
PLAY ACTION TRACK_HEAD PINK_BALL command
in the START_TRACKING box and either the PLAY
ACTION TURN Head_Pan command in the TURN box
or the PLAY ACTION WALK Head_Pan command in
the WALK box are simultaneously executed. The Wait
system parameter is therefore “2”.
In other words, until either TURN or WALK finishes,
the “Wait” value is “not equal to 1,” so the program
loops every 10 ms to check if either program has
finished or not.
When “PLAY ACTION TRACK_HEAD PINK_BALL”
becomes the only on-going command, the Wait system
value becomes “1” and the program returns to the
LOST? branch box.
Changing the action depending on
the number of on-going
commands.
66
Page 67

Lesson 7 Advanced Course
Checking the “Kick” group program
Maintaining system parameter values
SET pan Head_Pan
WAIT 500
“Pan” is a user parameter where the value of the Head_Pan
system parameter is temporarily stored. Then, the program
waits for 500 ms (0.5 seconds).
Confirm that the ball has stopped
IF Head_Pan = pan DO_KICK
ELSE Continue
This program compares the “Head_PAN” value stored
0.5 second ago with the present value. If the values are the
same, the program jumps to the DO_KICK box; if not, it
jumps to the Continue box.
If the present value is the same as the one stored 0.5 second
ago, the program concludes that the ball has not moved.
AIBO thus kicks at that location. If the values are different, it
concludes that the ball has moved. AIBO thus continues
searching for the ball.
User parameters that start with a
small letter can be defined and
used whenever necessary.
Stop tracking the ball and kick it
STOP
PLAY ACTION KICK pan 1000
WAIT
The STOP command stops the execution of on-going commands.
Until now, execution of the command in the START_TRACKING box has
continued, but it is finally stopped by the STOP command.
PLAY ACTION TRACK_HEAD PINK_BALL
PLAY ACTION KICK pan 1000
The above command causes AIBO to kick the ball 100 cm
at the angle indicated by the “pan” user parameter.
To roll the ball a long distance, AIBO is commanded to kick the top part of the
ball.
The WAIT command causes the program to wait until AIBO finishes kicking.
The distance is measured from the center of AIBO’s body to the point of contact
between the ball and the floor.
67
Page 68

Lesson 7 Advanced Course
Rearranging the terminals
Let’s now check the terminals of the KICK group box.
The KICK group box has two terminals, “Continue” on the left and
“KICK_DONE” on the right.
However, the Kick group that is invoked by the KICK group box has
the KICK_DONE terminal box placed on the left and the Continue
terminal box placed on the right.
Terminal order is determined by the terminal list. From the
menu, choose “Group-Set Order of Terminals,” and confirm the
terminal order. In the list, Continue and KICK_DONE are listed at the
top, and so the terminals for the KICK group box are listed in the same
order from left to right.
If lines cross, rearrange the terminals order to uncross them.
You have now covered all the boxes in the “soccer.be” file.
This brings your lessons about Behavior Arranger to an end!
Enjoy AIBO by making original programs using the techniques you’ve
learned.
For details on rearranging the
terminals, see page 49 of the User’s
Guide.
With the history bar on the left
side of the window, you can go to
higher and lower groups to
confirm their contents.
68
Page 69

Creating Actions!
In this section, you will learn how to create an action
library, action files and elements with Action Composer.
With Action Composer, you can create files and elements by
customizing the sample actions, or create completely new
actions on your own.
By creating and embedding actions into programs made
with Quick Behavior Arranger or Behavior Arranger, you’ll
be able to give your AIBO richer and more unique
expressions.
Now, let’s get started!
Page 70

Window Organization
Action Composer is made up of several windows, as shown below.
Each of the lessons below will teach you how the windows are used.
Motion Viewer*
Displays key frames of a
motion. Use this function to
copy key frames.
Lesson 2 Confirming key frames
Lesson 6 Copying key frames
Start
Pose
Window
MIDI
Window
Main Window
Elements and actions are
managed in a library.
Lesson 1
Creating action files
70
Action Window*
In this window, you can adjust the timing
of a motion and confirm all the elements of
an action.
Lesson 1 Creating action files
Lesson 4 Creating and combining elements
Lesson 5 Synchronizing
Lesson 6 Copying key frames
Preview Window
Open this window to preview on-screen
an action that you’ve created.
Lesson 2 Confirming motion/sound/LED
WAVE
Window
LED
Window
Page 71

Pose Window
Open this window to edit
AIBO’s poses (key frames of a
motion).
Lesson 3 Editing poses
Lesson 4 Creating elements
MIDI Window*
Open this window to create MIDI sounds for
AIBO to play back. The piano roll interface
allows you to visually confirm the
movement and length of notes.
Lesson 2 Checking MIDI sound
Lesson 4 Creating elements
Lesson 5 Synchronizing
WAVE Window*
Open this window to edit WAVE
sounds for AIBO to play back.
Notes
* These windows can also be
opened by double-clicking the
file name in the Main Window.
You can also open them from the
Start menu.
Lesson 2 Checking WAVE sounds
Lesson 3 Editing poses
Lesson 4 Creating elements
Lesson 5 Synchronizing
LED Window*
Open this window to create
AIBO LED flashing patterns.
Lesson 2 Checking the LED
Lesson 3 Editing poses
Lesson 4 Creating elements
Lesson 5 Synchronizing
71
Page 72

Lesson 1 Beginner’s Course
Let’s Create an Action Library!
GOAL: To learn how to make an action library and an action
file
In Action Composer*, you can make motions, sounds and LED
elements, action files that combine these various materials, and action
libraries that contain action files.
After creating the action libraries, you can combine them with
programs in Behavior Arranger.
Windows Used in Lesson 1
Motion Viewer
Main window
Create an action
library or an action file
Preview
Window
The number of action libraries
used by each behavior is one. You
can create an action library for
each behavior, or create a library
(for each model) to contain all the
actions that you have created.
* Action Composer is a tool for
creating original actions. For
details, see page 72 of the User’s
Guide.
Pose Window
MIDI Window
WAVE Window
Action Window
Procedure:
1 Preparations (page 73)
2 Making an action library (page 73)
3 Making an action file (page 74)
4 Adding an action file to an action library (page 76)
5 Saving an action library (page 77)
You can create action libraries, action files and materials in any order
that you like, but in this lesson, you’ll create an action library first, and
then an action file.
72
LED Window
For details on how to embed an
action into a program with
Behavior Arranger, see page 43.
Page 73

Lesson 1 Beginner’s Course
Getting prepared
• Prepare a “Memory Stick” containing the system (E) suitable for
your AIBO model.
• If you are using a wireless LAN, set it up in advance. For details, see
page 23 of the User’s Guide.
• The files you’ll use in these lessons are stored in the “Materials”
folder.
Copy the following “Materials” folder to your workspace (e.g., the
“My Document” folder) in advance.
\<folder where AIBO Master Studio is installed>\Sample\<model
name(E)>\Tutorial\Materials
For details on the files in the Tutorial folder, see “Files used in
Tutorial” (page 12).
Creating an action library
1 Click the Start button in Windows, select
Programs-AIBO Master Studio and click Action
Composer.
Action Composer starts up and a dialog box* appears.
2 Select Create New Library and click OK.
* This dialog box is called the
Navigation dialog box. If your
system has been set not to
display the box, you can display
it by choosing Window-Option
from the menu.
If the Navigation dialog box is set
not to be displayed, select FileNew Library from the menu.
73
Page 74

Lesson 1 Beginner’s Course
3 Select the AIBO model to be used and click OK.
4 Type “lesson1.alb” as the file name and save
the file in the copy of the Materials folder that
you made.
The Main window appears.
The model name (E) that
you selected in step
appears here.
The (E) indicates that English
words are recognized. (The model
name should correspond with the
system on the “Memory Stick” and
the behavior and action library.)
In Action Composer, you create a
file first, and then create the
contents of the file.
Creating an action
In this lesson, you’ll make an action file in an action library using
supplied elements.
1 Click the New Action button .
74
Page 75

Lesson 1 Beginner’s Course
2 Save the file as “dance.act.”
The action file is created and the “dance” action file appears in
the Main window.
3 Click the “dance” file created in step 2, and add
elements from the copied Materials folder.
Add a motion file
Select Elements-Add Motion, select “sit_dance01.mtn” and click
Open.
Add a sound file
Select Elements-Add Sound, select “dance01.mid” and click
Open.
Add an LED file
Select Elements-Add LED, select “dance01.led” and click Open.
An action file made from the supplied elements is completed.
The elements are added to the
selected action file.
Adding elements to an action file
does not mean that the elements
themselves are copied to the
library or action files, but only that
a reference is made to the element
files. For this reason, if you edit the
added elements (Lesson 3), this
will cause the referenced elements
themselves to be edited, so you
must be careful. Make it a habit to
make a copy of the element files in
advance.
75
Page 76

Lesson 1 Beginner’s Course
4 Add comments to the action file.
With “dance” selected, select [Action]-[Add comment], type
“dance”, and then click OK.
Comments are displayed
here.
Adding a supplied action to the library
You’ll add supplied action files (in this case, sample files) to the action
library.
1 From the menu, select Action-Add Action,
select “win.act” in the copy of the Materials
folder, and then click Open.
The action file is added to the Main window.
76
Page 77

Lesson 1 Beginner’s Course
2 Click in front of “win”.
You can check the elements added to the action file.
Click an action file. Detailed information on the action file
appears at the bottom of the window.
Action Name
Motion file
LED file
Name
Sound file
Name
Name
Action file
Name
(for ERS-210)
3 From the menu, select File-Save Library to save
the action library.
The contents of the library are updated.
Action files or elements are shown
in a tree structure in the Main
window.
Note that in the case of the
ERS-210/310, there is a LED file in
the win folder.
If you do not overwrite the library
when saving the action library, the
library contents or the actions in
the library will not be updated. To
save what you’ve created in the
Main window, you must overwrite
the contents of the library.
Saving to the “Memory Stick”
Using a “Memory Stick” that you have copied the system files on, save
the action library you’ve created to the “Memory Stick.” By saving the
library to the “Memory Stick,” the actions in the action library will
available for use in behaviors.
1 Insert the “Memory Stick” into the PC and
select “File-Save Library to Memory Stick”.
A confirmation dialog box appears.
For details on copying the system
files, see page 21 of the User’s
Guide.
If the AIBO model and the
language of the action library are
different from those of the system,
it will not be possible to save the
action library.
Only one action library can be
saved to the “Memory Stick” (see
page 44).
77
Page 78

Lesson 1 Beginner’s Course
2 Click OK.
The library is saved to the “Memory Stick” and a dialog box
appears when saving has finished. Click OK.
Saving the library via a wireless LAN
If you are using a wireless LAN, you can transmit the action library
from the PC to AIBO.
1 Insert the “Memory Stick” into AIBO and place
the activated AIBO at a place where
communication with the PC is possible.
At the same time, the library is
copied to the PC’s hard drive.
Quick Behavior Arranger and
Behavior Arranger can now refer
to the copied files, and the actions
in the library can be used in
behaviors (see page 51).
If you are not using a wireless
LAN, then this completes Lesson 1.
2 From the menu, select File-Save Library To
“Memory Stick”.
A confirmation dialog box appears.
78
The action library that you created
has already been saved to the
“Memory Stick,” but save it again
via the wireless LAN for study
purposes.
Page 79

Lesson 1 Beginner’s Course
3 Click OK.
The action library is sent to AIBO.
When the transmission finishes, a dialog box appears. Click OK.
The action library becomes
available only after you’ve
restarted AIBO. If you do not, the
You cannot make AIBO perform the action simply by saving it to
the action library. This is where Action Composer’s role ends and
the baton is passed to Behavior Arranger. But in this tutorial, let’s
learn a little more about Action Composer.
action will not play back in a
behavior program, even if you
start up Behavior Arranger and
save the behavior program to the
“Memory Stick.”
The action library you’ve created is same as the “Tutorial1.alb” file
in the L1_Reference folder. Check to see if the file is correct.
Do you now understand how to create an action library by adding
supplied actions and elements?
In Lesson 1, you created an action library without checking the
contents of the elements or actions. In Lesson 2, you will check the
contents that you add with your eyes and ears.
For details on the location of the
L1_Reference folder, see page 12 in
“Files Used in the Tutorial.”
79
Page 80

Lesson 2 Beginner’s Course
Let‘s Preview a Created Action!
GOAL: To learn how to preview an action.
Let’s find out how to view with your own eyes an action file that either
you’ve created or has been supplied to you.
There are two following ways to preview a file:
• By viewing it on the PC (page 81)
• By having AIBO perform the action (requires a wireless LAN) (see
page 85)
You will also learn how to preview an action file or elements that are
not registered to an action library.
Windows used in Lesson 2
Motion Viewer
Checking the key
frames
Pose Window
Main window
Preview Window
Checking the action
MIDI Window
Checking the MIDI
sounds
WAVE Window
LED Window
Checking the
LEDs
Action Window
80
Page 81

Lesson 2 Beginner’s Course
Previewing an action and elements on
the PC
In this lesson, you will preview motions, sounds and LEDs in the
Action Window.
1 In the Main window, select the “dance” action
file to open the action library that you used in
Lesson 1.
2 Click the Edit Action button .
The Action Window appears and the data for the selected action
file is displayed.
If you started this tutorial from
Lesson 2, open “Tutorial2.alb” in
the L2_Starter folder (see page 12).
You won’t edit the above action
library, so there is no need to copy
it.
You can also display the Action
Window in step 1 by double
clicking the action file.
The elements that are combined in
the action are listed in the Action
Window. These include the file
names and lengths of the key
frames, sounds and LEDs in the
motion.
By viewing this information in this
window, you will gain a deeper
understanding of what goes into a
particular action.
81
Page 82

Lesson 2 Beginner’s Course
Preview the motion
It’s a little difficult to imagine an action simply by viewing the file
names of its key frames, sounds and LEDs, so let’s take a look at the
action itself on the PC.
1 Click Replay button in the Action Window.
The Preview Window appears and the action starts to play back.
2 Click to close the window.
In the window, the elements that
comprise the action file (motions,
sounds and LEDs) are played back
together.
To play the action again, click
in the Preview Window.
Note
Depending on the performance of
your PC, some frames may be
skipped due to extrapolation
during the preview. We
recommend that you to check the
data for each key frame, sound
and LED one by one.
82
Page 83

Lesson 2 Beginner’s Course
Preview the sound
In the Preview Window, you can check the sound with your ears, but
now let’s check the sound with your eyes.
1 Double-click “dance01” that appears in the
sound channel in the Action Window.
The MIDI Window appears, showing the arrangement of the
MIDI data.
You can also open windows
by double clicking a sound or LED
file in the Main window.
2 Click the Playback button in the MIDI
Window.
A preview of the sounds begins.
3 Close the window.
83
Page 84

Lesson 2 Beginner’s Course
Previewing LEDs
In the same way that you previewed the sound, let’s check the LED
data with your eyes.
1 Double-click “dance01” that appears in the LED
channel in the Action Window.
The LED Window appears, showing the arrangement of the LED
data.
2 Click the Playback button in the LED
Window.
You can check the LED lighting scheme on AIBO (shown on the
left).
84
Page 85

Lesson 2 Beginner’s Course
3 Close the window.
Close the Action Window.
Testing an action on AIBO
If you are using a wireless LAN, you can check an action by having
AIBO perform it. Unlike checking an action through 3D modeling, this
test allows you to see how AIBO moves in real life.
1 Insert the “Memory Stick” into AIBO and place
AIBO at a place where communication with the
PC is possible.
2 Select an action or elements in the Main
window and play them back with the Test
menu as follows.
Testing an action
Select an action file and select Test-Test Action from the menu.
If you are not using a wireless
LAN, go to page 86, where you’ll
learn how to preview elements
and actions that are not registered
to an action library.
If you are not using a wireless
LAN, you will have to add the
action to a behavior in order to
have AIBO do a test performance
of the action.
To have AIBO test a behavior
using a wireless LAN, you must
first register the file for the
respective action or elements to the
action library in advance.
Files are not be saved to the
“Memory Stick” when doing a test
performance.
Testing a motion
Select a motion file and select Test-Test Motion.
Testing a sound
Select a sound file and select Test-Test Sound.
Testing LEDs
Select an LED file and select Test-Test LED.
3 After the data has been transferred, click Play.
See how AIBO performs the action.
To stop AIBO immediately, click
the Stop button. Note that AIBO
may fall over if AIBO is stopped in
an unstable position.
85
Page 86

Lesson 2 Beginner’s Course
4 When AIBO has stopped, click Close to close all
the windows.
You may be wondering if it is possible to check files that haven’t been
registered to the action library. No problem! Just do the following
procedure.
Checking an action or elements not
registered to the action library
In this procedure, you will open each window that comprises Action
Composer, not from the Main window, but from the Action Composer
Tool.
Checking an action
1 Click the Start button in Windows, select
Programs-AIBO Master Studio-Action
Composer Tool and click Action Window.
2 Select AIBO mode, and then click OK.
3 From the menu, select File-Open, select
“dance.act” (which you created in Lesson 1),
and then click OPEN.
From here, do the procedure on page 82.
Close the window when you finish the check.
For an action file or elements, the
language specification (English or
Japanese) is not significant (as it is
for an action library).
You need only to select the model.
If you started this tutorial from
Lesson 2, copy the L2_Starter
folder and open the Tutorial2.act
file (see page 12).
86
Page 87

Lesson 2 Beginner’s Course
Checking elements
Checking a motion
As with an action file, you can check a motion from the Action
Window by adding it to the window as an element. But in this section,
we’ll check it in another window for study purposes.
1 Click the Start button in Windows, select
Programs-AIBO Master Studio-Action
Composer Tool, and then click Motion Viewer.
The Motion Viewer appears.
2 From the menu, select File-Open, and then
open the “sit_dance01.mtn” file used in Lesson
1.
Key frames* appear. Let’s check the motion with the key frames.
In the Motion Viewer, key frames
can only be displayed; they cannot
be previewed or edited. You can
preview and edit key frames in the
Action Window. The Motion
Viewer window is convenient for
copying key frames for reuse.
You can also double click the
motion file in the Main window to
display this window.
* For details on key frames, see
page 72 of the User’s Guide.
87
Page 88

Lesson 2 Beginner’s Course
Checking the sound
1 Click the Start button in Windows, select
Programs-AIBO Master Studio-Action
Composer Tool, and then click MIDI Window.
The MIDI Window appears.
2 From the menu, select File-Open, and then
open the “dance01.mid” file used in Lesson 1.
Do the procedure on page 83.
If you click “WAVE Window” in
the menu, the WAVE Window
appears.
The sound format is the same for
all three models, so you need not
select the model. In other words,
you can use the sample files
supplied with other models.
Checking the LEDs
1 Click the Start button in Windows, select
Programs-AIBO Master Studio-Action
Composer Tool, and then click LED Window.
2 Select the AIBO model to be used.
The LED Window appears.
88
Page 89

Lesson 2 Beginner’s Course
3 From the menu, select File-Open, and then
open the “dance01.led” file used in Lesson 1.
Do steps 2 to 3 on page 84.
You have now learned how to check an action or elements.
Now you can create an action library by combining the supplied
elements and actions.
Next, you will edit files and elements to create original actions.
89
Page 90

Lesson 3 Beginner’s Course
Let’s Edit Elements
GOAL: Learning how to edit elements
In this lesson, you’ll learn how to edit action files by modifying the
supplied action files.
Windows used in Lesson 3
Pose Window
Motion Viewer
Main window
Saving a library
MIDI Window
Editing a pose
Preview
Window
Action Window
Adding key frames
Adjusting the starting point of the
sound
Saving an action
Procedures
1 Preparing elements (page 91)
2 Editing a motion file (page 92)
Change the “raise head slowly, lower head somewhat fast” motion
to a “raise and lower head fast” motion.
3 Editing a sound file (page 94)
Delete the silent parts and adjust the starting point of the sound
4 Editing an LED file (page 96)
Create a light flashing sequence that matches the motion
5 Saving an action file (page 100)
WAVE Window
Editing a WAVE
sound
LED Window
Editing LEDs
90
Page 91

Lesson 3 Beginner’s Course
Preparing elements
1 Start up Action Composer.
2 Select Open Existing Library in the Navigation
dialog box, open “lesson3.alb” in the copy of
the Materials folder.
3 Select the “greeting” action file.
4 Click the Edit Action button.
The Action Window appears.
Play back the motion and check the “raise head slowly, say
Hello, and lower head somewhat fast” motion.
If you started this tutorial from
Lesson 3, start the lesson after
copying the Materials folder (see
page 73).
If the Navigation dialog box is set
not to be displayed, select FileOpen Library in the menu.
You can also open the Action
Window by double clicking the
“greeting” action file.
You’ll edit elements in this Action
Window.
91
Page 92

Lesson 3 Beginner’s Course
Editing a motion
Let’s create the “raise head fast” motion.
Editing a pose
1 Double click the second key frame.
The Pose Window appears.
2 Select the part to be modified from the Parts
list, enter the degree in the Current setting
box, and then press the Enter key on the
keyboard.
ERS-210/220 Head: Pitch 18 deg
Tail Vertical 22 deg
ERS-310 Head: Pitch 20 deg
In this window, you’ll edit the
pose in the key frame.
You can select any part indicated
by
in the AIBO diagram at the
bottom of the window.
Enter the degree by typing the
number or moving the right slider
up or down.
3D AIBO has moved!
3 Click OK to close the Pose Window.
Confirm that the second key frame in the Action Window has
changed.
92
Page 93

Lesson 3 Beginner’s Course
Adding a key frame
1 Click “193rd frame (3.10 seconds)” on the Time/
frame channel.
The current bar moves and the current position changes.
(Time interval*: 1 sec)
2 From the menu, select Edit Motion-Change To
Key Frame.
A key frame is created for the pose that AIBO is currently in.
To change the display unit of the
Time/frame channel, select the
unit in the sec/frame box at the
bottom of the Action Window.
* The time interval is the interval
between the numbers displayed
on the Time/frame channel. Set a
longer interval to make it easier
to enter data or select a frame.
A motion is made by creating a
key frame, and then editing the
pose.
93
Page 94

Lesson 3 Beginner’s Course
3 Set the pose in the key frame.
Do steps 1 to 3 on page 92, making the following settings for each
part.
ERS-210 Head: Roll 19 deg
ERS-220 Head: Yaw 30 deg
ERS-310 series Head: Yaw 30 deg
You have now modified the motion.
From the menu, select Elements-Save Motion As, and then save the file
with the name “move_head_2.mtn”. The name of the motion in the
motion channel also changes.
Editing a sound
Editing a sound
Let’s delete the silent part in a sound.
1 Double-click the “greet” file on the sound
channel bar in the Action Window.
The WAVE Window appears.
There is the phrase “Nice to meet you,” but also a silent part at
the beginning.
The WAVE file is a large one, so
the silent parts should be removed
to the extent possible. Silent parts
should be used to draw attention
to something.
AIBO can play WAVE files in the
8-kHz, 8-bit, monaural PCM
format. Audio files recorded using
the Windows Sound Recorder or
free music files should be
converted to the proper format
before use.
94
Page 95

Lesson 3 Beginner’s Course
2 Click the 0th frame (0 second) and Shift-click
the 188th frame (3 seconds).
The silent part is selected and highlighted in white.
r
188
(Time span: 20 frames)
3 From the menu, select Edit-Cut.
The selected part is cut.
4 From the menu, select File-Save As and save
the file with the name “greet_2.wav”.
A sound file without the silent part has been created. Close the
window.
5 Delete the sound file in the Action Window,
and then add the “greet_2.wav” file to the
action.
Select Elements-Delete Sound from the menu to delete the file,
and then select Elements-Add Sound to add the abovementioned file.
Selecting Edit-Delete deletes the
sound, but leaves the length
unchanged.
When you edit sound or LED files
that have already been combined,
you have to combine them again
manually to update the action.
95
Page 96

Lesson 3 Beginner’s Course
Adjusting the starting point of the sound
Since you’ve cut out the silent part, the sound has been moved
forward. Let’s adjust the starting point of the sound.
1 In Action Window, select Elements-Set Sound
Start Point.
The Sound Start Point dialog box appears.
2 Enter 188, the number of frames that you’ve
deleted, and then click OK.
The position of the file moves and the starting point of the sound
returns to the original position.
Editing the LEDs
The LED file is short compared to the motion file. Let’s edit the LED
file.
Adding LED data
Add LED data to create a flashing pattern.
1 Double-click “flash” on the LED channel bar in
the Action Window.
The LED Window appears.
The 188th frame is the starting
point. In a large file like the a
WAVE file, the starting point of
the sound should be positioned for
maximum effect.
96
Page 97

Lesson 3 Beginner’s Course
2 Click the right-most Brightness button.
This selects the brightest level.
3 Click LED on AIBO.
The cursor changes to .
4 Position the LED data as shown below.
ERS-210
Add data to “Left
eye 2” to make
both eyes flash.
Enter here
ERS-220
Specify the highest
brightness for “Face
L1” to make the lights
flash in sequence.
Enter here Enter here
To move or change the length of data
You can move or change the length of the data by pointing and
dragging the cursor on the data. What you can do depends on
where you place the cursor, as illustrated below.
Changing the
timing
(horizontally)
Changing the LED
(vertically)
Mouse pointer
Changing the
ERS-310
Add blue to make it
pink.
(Time interval: 1/2 sec)
duration
The mouse is set to the data-input
mode. By clicking, you can see the
location within the LED channels
that corresponds with the selected
LED.
If you’ve entered data in the
wrong place
Select Edit-Undo and clear the
misplaced data.
If you try to create new LED data
where data already exists, you will
not be able to overwrite the
existing data. To create new data,
first change the length of the LED
data with blank area, and then
place the new data at the desired
location.
97
Page 98

Lesson 3 Beginner’s Course
Making the LEDs flash
Let’s learn how to make the LEDs flash and to match the flashing
duration to a motion.
1 From the menu, select Setup-Select Mode and
select LED data by dragging the mouse.
ERS-210 ERS-220 ERS-310 series
2 From the menu, select Edit-Copy.
3 Click the 165th frame (2.56 seconds) on the
Time/frame channel.
The current bar moves.
(Time interval: 1/2 sec)
Input mode is used to enter data to
a channel. To change the mouse to
Input mode, click one of AIBO’s
LEDs in the LED Window or click
a musical note in the MIDI
Window.
Select mode is used to edit data in
a channel. You can select or move
data in the channel. (To change the
mouse to Select mode, click in
the MIDI Window.)
The LEDs light again from this
frame.
98
Page 99

Lesson 3 Beginner’s Course
4 From the menu, select Edit-Paste.
The first lighting pattern is copied.
ERS-210 ERS-220 ERS-310 Series
(Time interval: 1/2 sec)
Click to check the flashing.
5 Save the file with the name “flash_2”.
6 Combine the LED file again in Action Window,
and then click
Let’s check the lighting sequence and motion in the Preview
Window.
.
See step 5 on page 95.
99
Page 100

Lesson 3 Beginner’s Course
Saving the action file
1 Save the file with File-Save in the Action
Window, and then close the window.
2 Save the action library with File-Save Library in
the Main window.
The files you’ve created are identical to the files in the L3_Reference
folder (see page 12). Check to see that the files are correct.
You have now mastered the basic operations in Action Composer and
the way to make files for use in Behavior Arranger!
You can now create your own original actions by modifying the details
in the lessons that you’ve studied.
Elements comprising the action are
replaced with the newly created
elements.
100
 Loading...