

Sony DHC-FLX7D, DHC-FLX5D Operating Instructions Manual

4-255-417-12(1)
Display Side
Hi-Fi Component
System
Operating Instructions
*
DHC-FLX7D
DHC-FLX5D
©2004 Sony Corporation
* DHC-FLX7D only
WARNING
To prevent fire or shock hazard, do not
expose the unit to rain or mo ist u r e.
To avoid electrical shock, do not open the cabinet.
Refer servicing to qualified personnel only.
Do not install the appliance in a confined space,
such as a bookcase or built-in cabi ne t.
To prevent fire, do not cover the ventil at ion of the
apparatus with news papers, table-cloths, curtains, etc.
And don’t place lighted candle s on the apparatus.
To prevent fire or shock hazard, do not place obje c ts
filled with liquids, such as vases , on the ap pa ratus.
Don’t throw away the battery with
general house waste, dispose of it
correctly as chemical was te.
This appliance is
classifie d as a CLASS 1
LASER product. This
marking is located on the
rear exterior.
Notes on DTS audio playback
Excessive noise may be heard from the speakers when
you play DTS format CDs if the decode format is set to
PCM (page 53) or monaural sound (1/L, 2/R)
(page 32). Set the volume to minim u m and be careful
not to damage your speaker system.
IMPORTANT NOTICE
Caution: This system is capable of holding a still video
image or on-screen display ima ge on your television
screen indefinitely. If you leave the still video image or
on-screen display image displayed on your TV for an
extended period of time, you risk permanent damage to
your television screen. Proje ct ion tel ev isi ons are
especially susceptible to this.
ENERGY STAR
®
ENERGY STAR® is a U.S. registered
mark.
As an E
NERGY STAR
®
partner, Sony
Corporation has determined that this
product meets the E
NERGY STAR
guidelines for energy efficiency.
This system incorporates Dolby* Dig ita l, Dolby Pro
Logic (II) adaptive matrix surround decoder, and the
DTS** Digital Surround System.
* Manufactured under license from Dolby
Laboratories. “Dolby”, “Pro Logic” and the doubleD symbol are trademarks of Dolby Laboratories.
**Manufacture d unde r lic e nse from Digital Theater
Systems, Inc. “DTS” and “DTS Digital Surround”
are registered trademarks of Digital Theater
Systems, Inc.
US and foreign patents licensed from Dolby
Laboratories.
®
GB
2

Table of Contents
This system can play the following
discs..................................................5
List of Buttons and
Reference Pa ges
Main unit.................................................6
Remote Control.......................................7
digipad operations...................................8
Getting Started
Hooking up the system............................9
Inserting three R6 (size AA) batteries into
the remote................................... ....12
Setting up your speakers.......................13
Specifying the speaker parameters........14
Setting the clock....................................15
DVD/VIDEO CD/CD/Super
Audio CD/MP3
Playing discs:
Loading a disc........................ ... .... ........16
Playing a disc........................................16
— Normal Play/Shuffle Play/
Repeat Play/Scan/Slow-motion
Play
Playing a disc with MP3 audio tracks...18
Creating your own program..................21
— Program Play
Resuming playback f rom the point you
stopped the disc ..............................22
— Resume Play
Playing repeatedly.................................23
— Repeat Play
Playing DVDs using the menu..............24
Playing VIDEO CDs with PBC functions
(Ver. 2.0).........................................24
— PBC Play
Setting up for DVD/VIDEO CD/CD:
Using the Setup Display....................... 25
Setting the display or sound track
language .........................................26
— LANGUAGE SETUP
Settings for the display.........................27
— SCREEN SETUP
Custom settings.....................................28
— CUSTOM SETUP
Speaker settings....................................29
— SPEAKER SETUP
Viewing information about the disc:
Checking the playing time and remaining
time.................................................31
Sound adjustment:
Changing the sound.............................. 32
Enjoying movies:
Searching for a title/chapter/track/
index...............................................34
Changing the angles.............................. 35
Displaying the subtitles ............... .... .....35
Using various additional functions:
Locking discs........................................36
— CUSTOM PARENTAL
CONTROL/PARENTAL
CONTROL
Tuner
Presetting radio stations........................40
Listening to the radio............................42
Tape
Loading a tape...................................... 43
Playing a tape............. ... ........................43
Recording to a tape...............................44
— CD Synchro Recording/High-
Speed Dubbing/Recording
Manually/Program Edit
Timer-recording radio programs ..........46
continued
GB
3

Sound Adjus t ment
Adjusting the sound..............................48
Selecting the sound effect.....................48
Enjoying Dolby Pro Logic II or Dolby Pro
Logic ...............................................49
Adjusting the sound effects................... 50
Creating a perso na l so un d ef fe c t fi le....51
— Personal file
Display
Turning off the display..........................52
— Power Saving Mode
Using the display........... .... ... .................52
Other Features
To adjust the brightness of the
display.............................................53
To listen to multi channel sound...........53
Using the SONY TV DIRECT
function...........................................54
Singing along: Karaoke. .... ....................55
About indicators....................................56
Falling asleep to music......... .... .............56
— Sleep Timer
Waking up to music..............................57
— Daily Timer
Troubleshooting
Problems and remedies.........................61
Additional Info rm at io n
Precautions ...........................................65
Messages............................................... 67
Specifications .......................................67
Glossary................................................ 70
Language code list................................73
Control Menu Item List........................74
Setup Display Item List..................... ...75
Optional Components
Hooking up optional com po nents.........58
Listening to audio from a connected
component ......................................59
Recording audio from a connected
component ......................................60
Recording on a connected
component ......................................60
GB
4
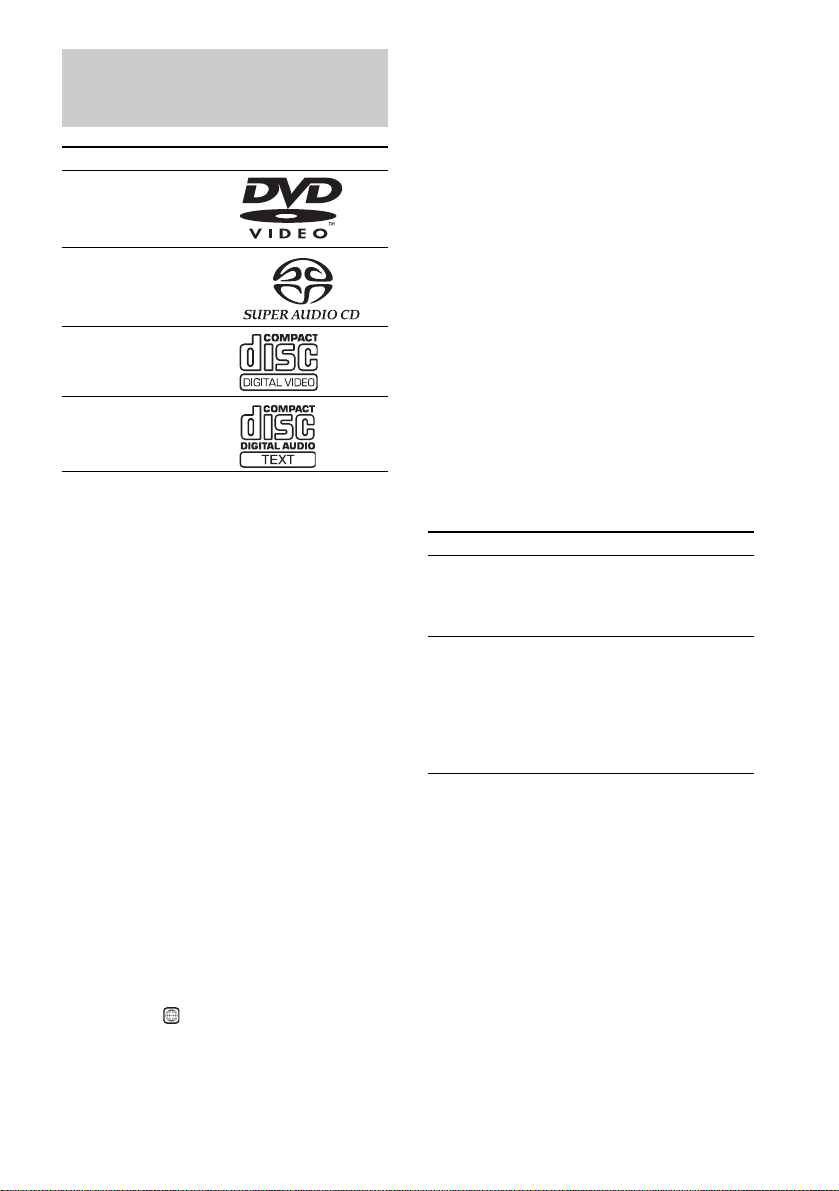
This system can play the following discs
Format of discs Disc logo
DVD VIDEO*
Super Audio CD**
VIDEO CD
Music CD
* The “DVD VIDEO” logo is a trademark.
**DHC-FLX7D only
Discs that this system cannot
play
• CD-ROMs (PHOTO CDs included)
• All CD-Rs othe r than musi c and V CD form at
CD-Rs
• Data part of C D -Extras
• DVD-ROMs
• D VD Audio discs
Note
Some CD-Rs/CD-RWs or DVD-Rs/DVD-RWs cannot
be played on this system depending upon the format or
the recording quality or physical condition of the disc,
or the characteristics of the reco rd ing device.
Furthermore, the disc will not play if it has no t be en
correctly finalized. For more information, see the
operating instructions for the recording device.
Region code of DVDs you can
play on this system
Your system has a region code printed on the
back of the unit and will only play DVDs labeled
with identical region code.
DVDs labeled will also be played on this
system.
If you try to play any other DVD, the message
“Playback prohibited by area limitations.” will
appear on the TV screen .
ALL
Depending on the DVD, no region code
indication may be la beled even though play in g
the DVD is prohibited by area restrictions.
The region code is located below the
COMPONENT VIDEO OUT jacks on the rear
panel.
Note on playback operations of
DVDs and VIDEO CDs
Some playba ck operatio ns of DVDs an d VIDEO
CDs may be intentionally set by software
producers. Since this system plays DVDs and
VIDEO CDs ac cording to the disc co nt ents the
software producers designed, som e playback
features may not be availab l e. Also, ref er to the
instructions supplied with the DVDs or VIDEO
CDs.
Note on PBC (Playback Control)
(VIDEO CDs)
This system conforms to Ver. 1.1 and Ver. 2.0 of
VIDEO CD standards. You can enjoy two kinds
of playback depending on the disc type.
Disc type You can
VIDEO CDs
without PBC
functions
(Ver. 1.1 discs)
VIDEO CDs
with PBC
functions
(Ver. 2.0 discs)
Enjoy video playback (moving
pictures) as well as music.
Play interactive software using
menu screens displayed on the TV
screen (PBC Playback), in addition
to the video playback functions of
Ver. 1.1 discs. Moreover, you can
play high-resolution still pictures, if
they are included on the disc.
Copyrights
This product inc or porates copyright prot ection
technology that is protecte d by U.S. p atents and
other in tellectua l p roperty ri g hts. Use of this
copyright pr ot ection technology must be
authorized by Macrovision, and is intended for
home and other limited viewing uses onl y unless
otherwise authorized by Macrovision. Reverse
engineering or disassembly is prohibited.
GB
5
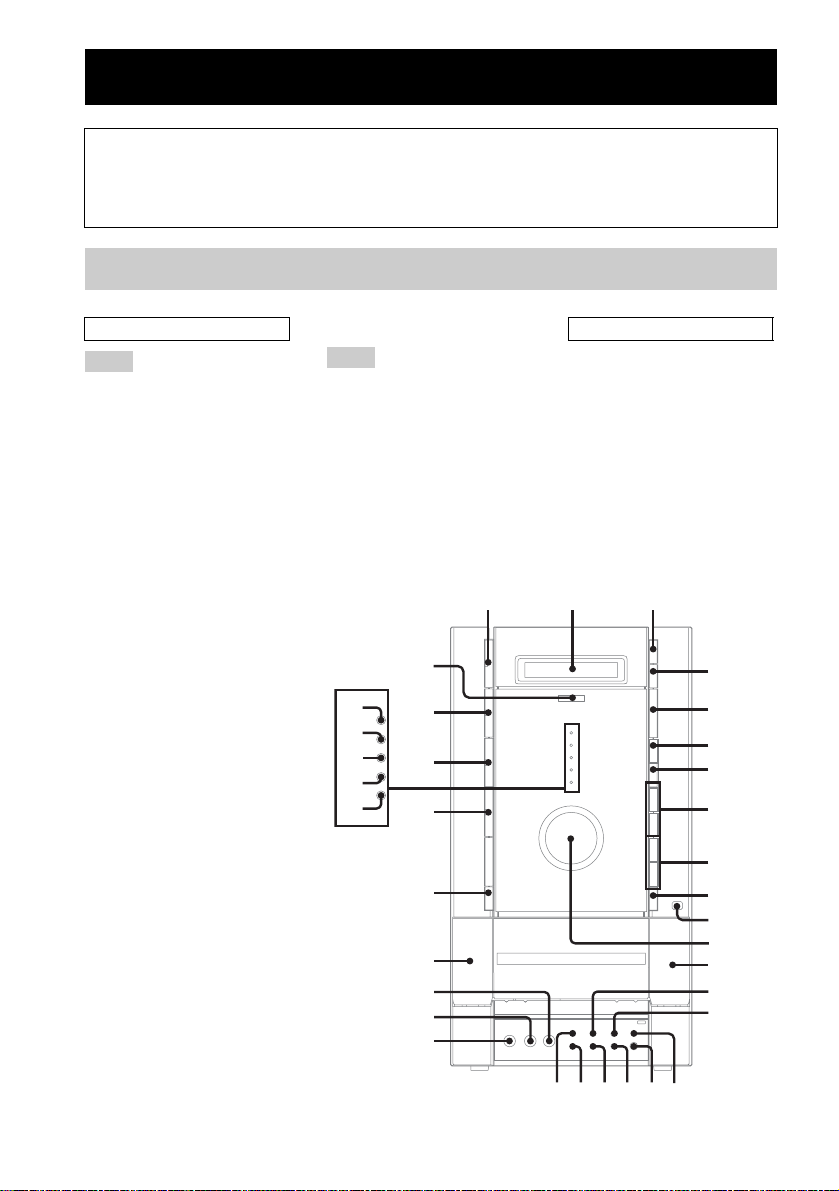
List of Buttons and Reference Pages
1 2 3
How to use this page
Use this page to find the location of bu tto ns an d oth er
parts of the system that are mentioned in the text.
Main unit
ALPHABETICAL ORDER
A – L
CD SYNC HI-DUB qg (44)
Deck A wg
Deck B qd
DIGITAL wa (59)
DISC SELECT 3 (16, 19)
DISC 1 indicator es (16)
DISC 2 indicator ea (16)
DISC 3 indicator e; (16)
DISC 4 indicator wl (16)
DISC 5 indicator wk (16)
Display window 2
DISPLAY qh (27, 52, 64)
DVD ef (12, 16, 19, 27, 41, 44,
55)
ECHO LEVEL wf (55)
EFFECT ql (55)
GROOVE qf (64)
Headphones jack qj
M – Z
MIC jack ws (55)
MIC LEVEL wd (55)
MULTI CHANNEL DECODING
indicator eg (56)
REC PAUSE/START qk (44, 55)
Remote sensor qa
TAPE A/B wj (43, 44, 55)
TUNER/BAND ed (40, 42)
VIDEO/SAT w; (59)
VOLUME qs (30)
eg
es
ef
ea
e;
ed
wl
wk
wj
wh
wg
wd
ws
Illustration number
TAPE A/B wj (43, 44, 55)
Name of button/part Reference page
?/1
Z
r
RR
BUTTON DESCRIPTIONS
?/1 (power) 1
Z (disc tray) 4
A Z (deck A) wh
Z B (deck B) 0
hH (play) 5
X (pause) 6
x (stop) 7
./> (go back/go forward)
8
–/m, M/+ (rewind, fast
forward) 9
Z
hH
X
x
>
.
+
M
m
–
Z
4
5
6
7
8
9
q;
qa
qs
qd
qf
qg
waw;wfqlqkqj
GB
6
qh
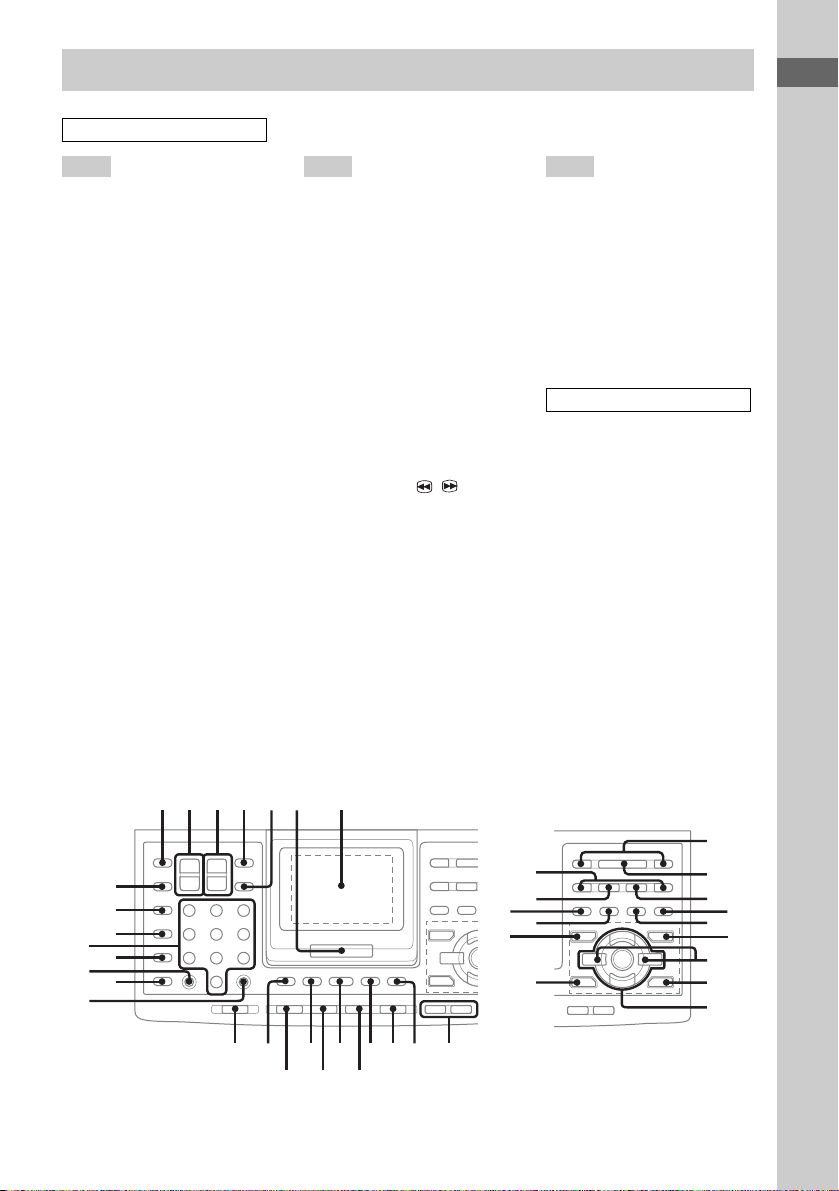
Remote Control
v
V
1 2 3 456 7
ALPHABETICAL ORDER
A – E F – S T – V
2.1CH/MULTI* e; (49, 53, 60)
ALBUM +/– ed (19)
AMP MENU 9 (13, 14, 30, 49,
53)
ANGLE ek (35)
AUDIO el (32)
CLEAR ql (22, 23, 29, 34)
CLOCK/TIMER SELECT* wf
(47, 57)
CLOCK/TIMER SET wf (15, 46,
57)
D.SKIP 5 (17)
digipad 7 (8, 50)
DISPLAY 4 (8, 31, 52)
DSP EDIT* ej (50)
DVD qh (16, 19, 21, 44)
DVD DISPLAY* qa (19, 23, 25,
31, 32, 34, 35, 36, 74)
DVD MENU qa (24)
DVD SETUP* 9 (25, 30, 37)
DVD TOP MENU qg (24)
EFFECT* es (48, 50, 55, 60)
ENTER 6 (8, 13, 14, 15, 18, 19,
21, 23, 24, 25, 32, 34, 35, 36,
40, 45, 46, 49, 50, 51, 53, 57,
64)
FUNCTION 0 (19, 59)
GAME MODE eh (48)
GROOVE* ef (48)
KARAOKE PON* eh (55)
MOVIE MODE es (48, 49)
MUSIC MODE ej (48)
Numeric buttons wd
P FILE* el (51)
PLAY MODE/DIRECTION w;
(16, 19, 21, 43, 44, 55)
PRESET +/– wj
PREV/NEXT wj
REPEAT/FM MODE ws (17, 20,
22, 42)
RETURN O e; (24, 34, 36)
SCAN/SLOW t / T ra
(17)
SELECT wk
SHIFT qd (19, 25, 30, 37, 40, 47,
48, 49, 50, 51, 53, 55, 57, 60)
SLEEP wg (56)
SONY TV DIRECT qj (54)
SUBTITLE ea (35)
TAPE A/B qs (43, 44, 55)
TOOL MODE ef (48)
TUNER MEMORY* w; (40)
TUNER/BAND qf (40, 42)
TUNING +/– ra
TV/VIDEO wh (12)
TV ?/1 1 (12)
TV CH +/– 3 (12)
TV VOL +/– 2 (12)
VOLUME +/– 8 (30)
BUTTON DESCRIPTIONS
?/1 (power) qk
hH (play) wk
X (pause) r;
x (stop) wl
. (go back) wj
> (go forward) wj
m (rewind) ra
M (fast forward) ra
V/v/B/b/ENTER eg
>10 wa
* To use these functions, press the
button while pressing SHIFT.
List of Buttons and Reference Pages
wh
wg
wf
wd
ws
wa
w;
ql
wj
ra
r;
el
ek
ej
B
eh
V
Bb
v
wk
wl
ea
ed
ef
e;
es
eg
qd
qg
qjqk
qs
qf
qh
890qa
GB
7

digipad operations
The remote is equipped with an uni que digipad multi controlling device. You can control vario us
operations with this digipad. When touching the digipad, do not use utensil whose end is sharpened.
When this unit does not respond to the di gi pad operations, press th e digipad a little harder.
DVD, TUNER, TAPE A/B functions
Basic operation DVD, TUNER, TAPE A/B
Tap once hH (Start pl ayback)*
Tap twice x (Stop playback)
* When you tap the digipad while playing a DVD/VIDEO CD/CD/Super Audio CD,
playback pauses. Tap again to resume play ba ck .
Slide from the lef t to the right > (AMS +, preset +)**
Slide from the right to the left . (AMS –, preset –)**
Slide from lower side to upper side M (Fast forward, tuning +)**
Slide from upper side to lower side m (Rewind, tuning –)**
**If you keep on moving , you can o pe rate as pressing and holding these buttons.
Adjusting the equalizer curve in EQ EDIT operations (page 50)
The curve made by sliding the finger is reflected in the displa y.
Selecting parameters in DSP EDIT and other adjustments
(page 50)
Slide in the direction until you reach the value you want (refer to each of the
operations).
A
B
Adjusting the position of the digipad
When the digipad operation is not carried out properly or when you replace the
batteries, perform the following proced ure. When carrying out this operation, make
sure to point the remote toward the main unit.
1 Turn on the system.
2 Press DISPLAY and . on the remote at the same time.
“CALIBRATION” flashes in the display.
3 Tap the dot at th e lef t upper corne r of the digipa d.
“A PUSHED” appears in the display, then “CALIBRATION” flashes.
4 Tap the dot at th e right bottom corner of the digipad.
“B PUSHED” appears in the display, then “CALIBRATION” flashes.
5 Press ENTER on the remote.
“CAL END” appears in the display.
GB
8
Getting Started
Hooking up the system
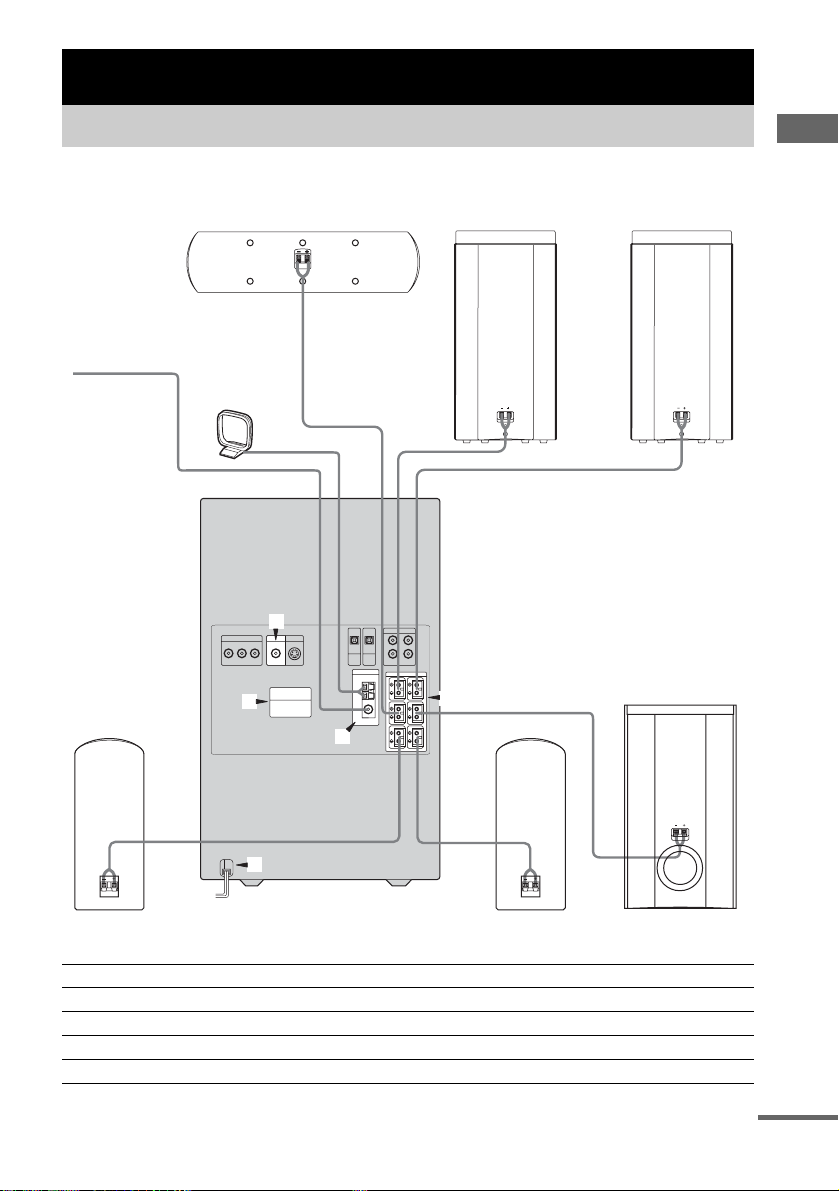
Do the foll owing proc edu re 1 to 6 to hook up your system usin g the su pplie d cord s and access orie s.
Front speaker (Right)Center speaker Front speaker (Left)
FM antenna
AM loop antenna
3
Getting Started
4
1
2
5
Rear speaker
(Right)
Connect the To the
Front speakers SPEAKER FRONT L (white) and R (red) terminals
Rear speakers SPEAKER REAR L (blue) and R (gray) terminals
Center speaker SPEAKER CENTER (green) terminal
Sub woofer SPEAKER WOOFER (purple) terminal
Rear speaker
(Left)
Sub woofer
continued
GB
9

1 Connect the speakers.
Connecting speaker cords
Main unit
3 Connect the video input jack of your TV
to the VIDEO OUT jack with the video
cable.
Speaker
Red (3)
Black (#)
Color tube
Note
Be sure to match the spea ke r cord to the appropriate
terminal on the compo nents: 3 to 3, and # to #. If
the cords are reversed, the sound will be distorted and
will lack bass.
2 Connect the FM/AM antennas.
Set up the AM loop antenna, then connect
it.
M
A
5
7
M
F
L
IA
X
A
O
C
Extend the FM lead antenna horizontally.
AM loop antenna
When using a TV
Turn on the TV and select the video input so you can
view the pictures from this system.
Tips
• For even higher quality vi de o image s;
– Use an optional component video cable to connect
the COMPONENT VIDEO input jacks on your
TV to the COMPONENT VIDEO OUT jacks of
this system. If your TV is compatibl e wit h
progressive format file signals, use this connection
and set “COMPONENT OUT” to
“PROGRESSIVE” in “SCREEN SETUP”
(page 27).
– Use a n optional S-video cable to connect the S
VIDEO input jack on your TV to the S VIDEO
OUT jack of this system.
• If you connect a video deck between this unit and the
TV, you may experience video leakage when
watching the video signal from this unit. Do not
connect a video deck between this unit and th e TV.
4 For models with a voltage selector, set
VOLTAGE SELECTOR to the posit ion
of your local power line voltage.
Refer to the print on your sys t em ’s
VOLTAGE SELECTOR for available
settings.
VOLTAGE
SELECTOR
220V 230-
120V*
* Saudi Arabian Model 120 – 127 V
240V
10
GB
5 Connect the power cord to a wall
outlet.
The demonstration appears in the display.
When you press ?/1, the system turns on
and the demonstration automatically ends.
If the supplied adapter on the plug does not
fit your wall outlet, detach it from the plug
(only for models equipped with an adapter).
6 (Except for Latin American model)
Set the color system according to your
TV.
The color syst em is factor y set to NTSC f or
region code 3 model s, and PAL for other
region code models. Each time you per form
the procedure belo w , t he color system
changes as follows:
NTSC y PAL
Use the buttons on the unit.
1 Press ?/1 to turn off the system.
2 Press ?/1 while holding down X.
The system turns on and the color system
is changed.
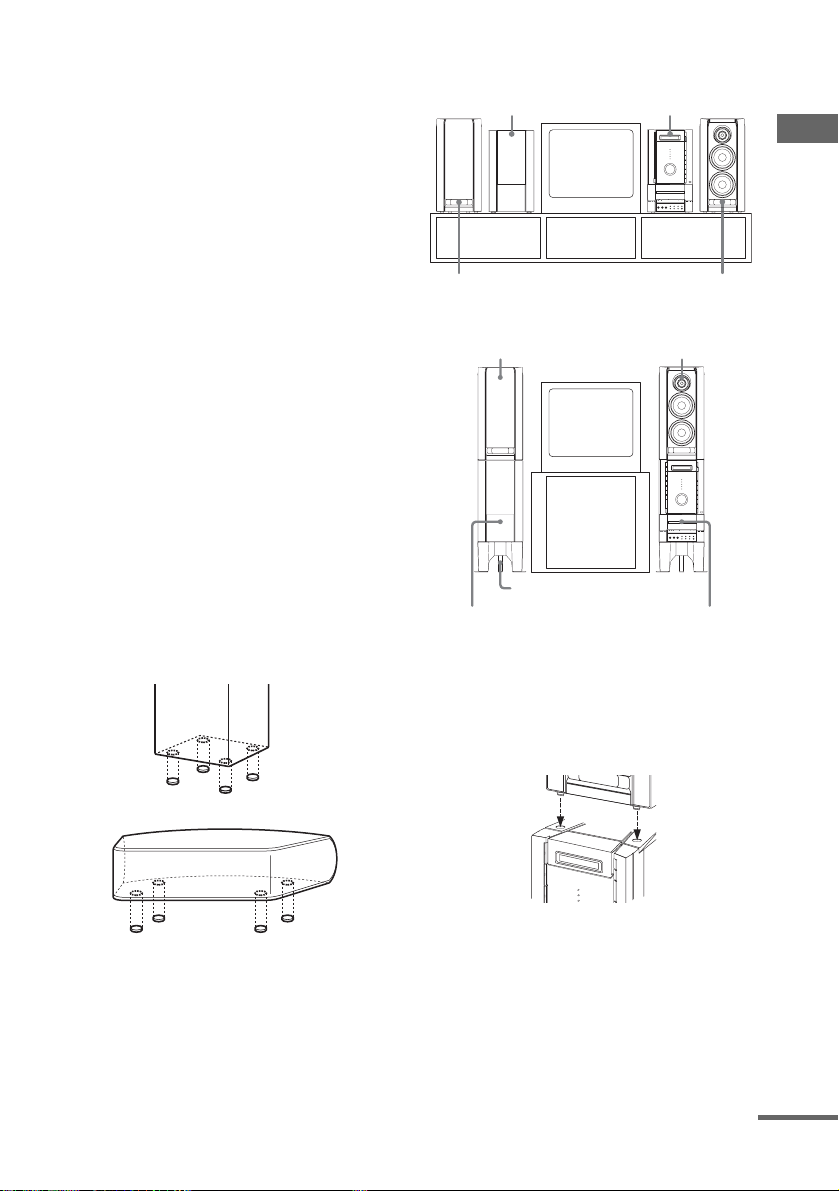
Before connecting the Center
and Rear speakers
Stick the supplied speaker pads to the bottom of
the center speaker and rear speakers to stabilize
the speakers and p re v ent them from slip pi ng.
After hooking up the s ystem, we rec om m end to
place the system as follows:
Sub woofer Main unit
?/1
Z
hH
X
x
>
.
+
M
m
–
Z
Z
Front speaker
(Left)
Front speaker
(Left)
Sub woofer
Optional stand WS-FLX9
(not supplied)
Front speaker
(Right)
Front speaker
(Right)
?/1
Z
hH
X
x
>
.
+
M
m
–
Z
Z
Main unit
Getting Started
Center speaker
Rear speaker
When placing the speakers on top of th e sub
woofer and the mai n unit, be sure to place the
foot of the speakers to fit in the hollows on top
of the sub woofer and the main unit.
Notes
• Keep the speaker cords away from the antennas to
prevent noise.
• Do not place the rear speakers on top of a TV. This
may cause color distortion in the TV scr een .
• Be sure to connect both left and right rear speakers.
Otherwise, the sound will not be heard.
continued
11
GB

To prevent the speakers from
falling
When you place the speakers on top of the sub
woofer and the main unit, do the following.
1 Place the speaker supp ort on the sub woofer
and the main unit. Tighten one of the screws
(1) lightly to temporarily fix the speaker
support, tighten the other screw to fix (2),
then tighten the first screw (1) firmly.
Speaker support
Screw (1)*
Inserting three R6 (size AA) batteries into the remote
e
E
e
e
E
E
Screw (2)*
* Main unit: Screw
Sub woofer: Screw
3 3 × 10
3 3.5 × 20
2 Insert the speaker support in th e slo t of th e
front speakers. Ti ght en two screws while
threading the rear boards of the front
speakers.
Screw*
Slot
* 3 3.5 × 14
Note
When carrying the sy stem, do not li ft the front sp eakers
only.
Operating a Sony TV
You can use the following buttons on the remot e
to operate a Sony TV .
To Press
Turn the TV on or off TV ?/1.
Switch the TV’s video input TV/VIDEO.
Change the TV channels TV CH +/–.
Adjusts the volume of the TV
speaker(s)
Tip
When the remote no longer operates the system,
replace all the batteries with new ones.
Note
If you do not use the remote for a long period of time,
remove all the batteries to avoid possible damage from
battery leakage.
TV VOL +/–.
Notice for carrying this system
Do the following to protect the DVD
mechanism. Use buttons on the unit.
1 Turn on the system , then press DVD.
Make sure that all discs are removed
from the unit.
2 Hold down DVD, then press ?/1 until
“LOCK” appears.
3 Release ?/1 first, then release DVD.
4 Unplug the AC power cord.
12
GB
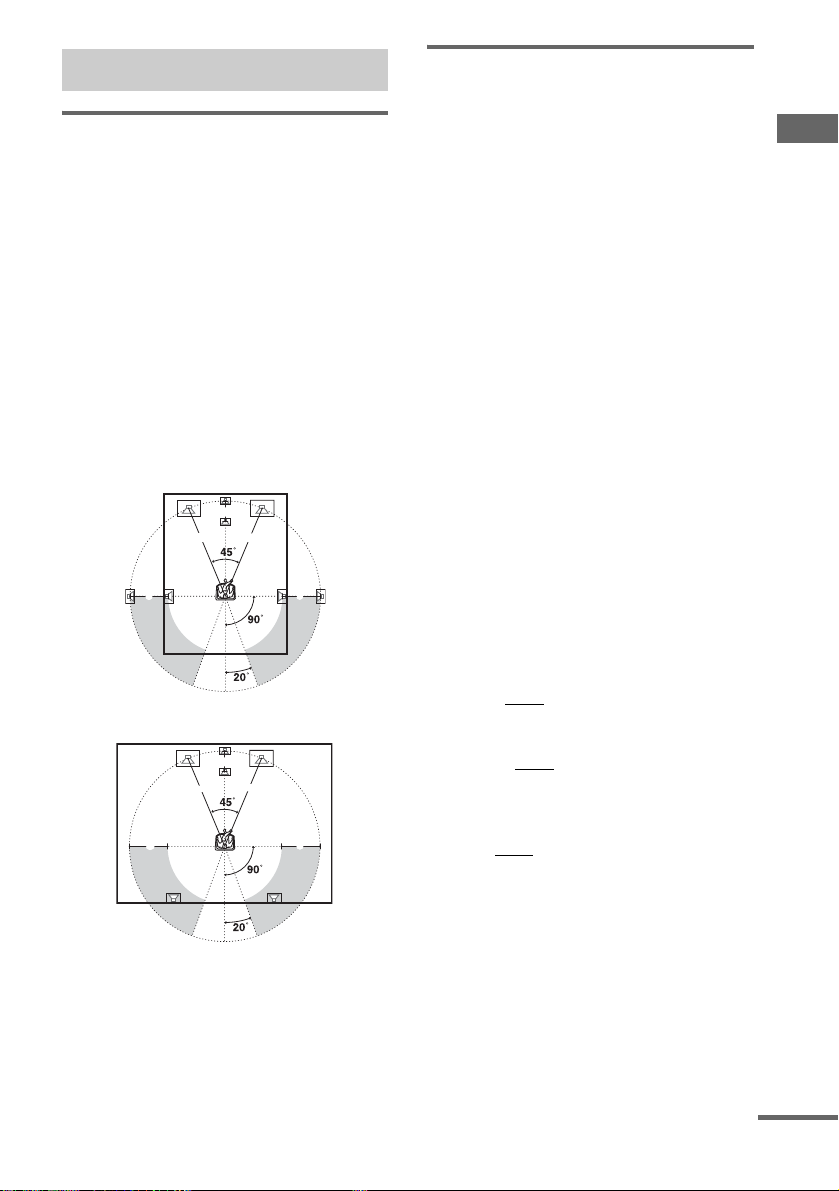
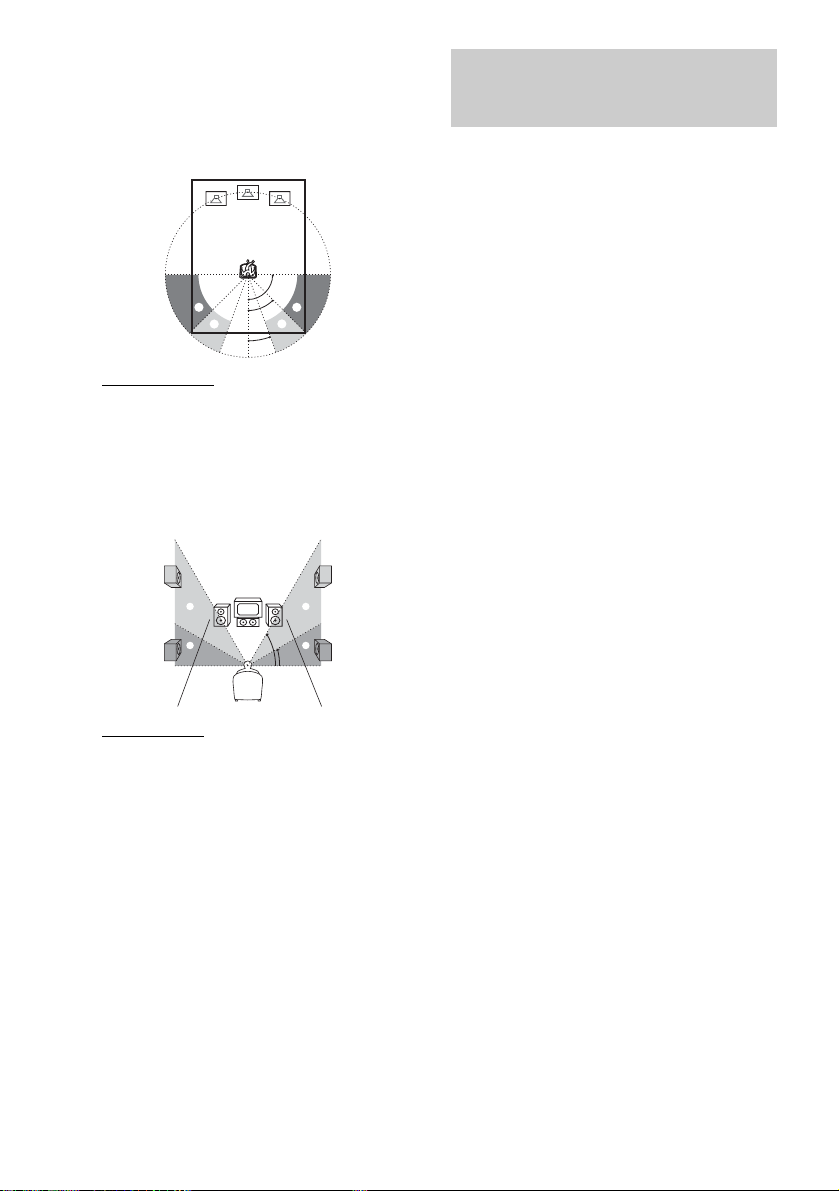
Setting up your speakers
Specifying distance, position
and height of the speakers
Positioning the speakers
For the best possib le surround sound, all the
speakers other than the sub woofer should be the
same distance from the listening posi t i on (A).
However, if necessary, this system allows you to
place the center sp eaker up to 1.5 meters closer
(B) and the rear speakers up to 4.5 meters closer
(C) to the listening position.
The front speakers can be placed from 1. 0 to
12.0 meters (A) from the listening position.
You can place the sub woofer in any position.
You can place the r ear speakers either behind
you or to the side, dependi ng on the shape of
your room, etc.
When the rear speakers are placed to the side
B
A A
C
When the rear speakers are placed behind you
B
A A
Note
Do not place the center and rea r speakers farther away
from the listening position than the fr ont speakers.
C
CC
Use the remote for the operation.
1 P r ess AMP MENU repeatedly until
“AMP MENU” appears.
2 Press ENTER.
3 Sit in your listening position and press
V or v repeatedly to select the items to
be set.
• Adjustable items
– Distan ce of the front, r ear , and center
speakers
– Positi on a nd he ight o f th e rear spe ak ers
4 Press B or b repeatedly to select the
parameter you want.
The selected parameter appears.
5 Repeat steps 3 and 4 to set other
parameters.
6 Press ENTER.
Tip
You can use the digipad instead of the cursor buttons
(V/v/B/b).
x DISTANCE
You can vary the distance of each sp eaker as
follows. The defa ul t set t i ngs are underlined.
• FRONT 2.4 m
Front speaker distance can be set in 0.1 m
steps from 1.0 to 12 . 0 m .
• CENTER 2.4 m
Center speaker di st ance can be set in 0.1 m
steps from the front speake r dist ance to 1.5 m
closer to your listen i ng position.
• REAR 1.5 m
Rear speaker distance can be set in 0.1 m steps
from a distance equal to the front spe aker
distance to a distance 4.5 m closer to your
listening position.
Note
If each of the front or rear speakers are not placed an
equal distance from your listening position, set the
distance of the closest speaker.
(front speakers distance)
(center speaker distance)
(rear speakers distance)
Getting Started
continued
13
GB
x Rear speaker position and
height
Specify the position and height of the rear
speakers. The default settings are underlined.
Position diagram
90
AA
45
BB
20
• R. PL. BEHIND
Select this if the rear speakers are located in
the section B.
• R. PL. SIDE
Select this if the rear speakers are located in
the section A.
Height diagram
CC
60
DD
30
• R. HGT. LOW
Select this if the rear speakers are located in
the section D.
• R. HGT. HIGH
Select this if the rear speakers are located in
the section C.
Specifying the speaker parameters
Use the remote for the operation.
1 From yo ur listening position, press
AMP MENU.
Adjustable menus and parameters are
described below .
2 Press V or v repeatedly until “LEVEL
MENU” appears.
3 Press ENT ER .
4 Press V or v repeatedly to select the
parameter.
5 Press B or b repeatedly to select the
setting you want.
6 Rep eat steps 4 to 5 to set other
parameters.
7 Press ENT ER .
Tips
• You can use the digipad instead of the cursor buttons
(V/v/B/b).
• You can use “SPEAKER SETUP” in the Setup
Display to specify th e ba lance, level, and test tone
parameters (page 29).
Adjustable parameters
The default settings are in the parentheses.
x BALANCE
• FRNT L___R: (center)
Balance between the front left and right
speakers.
• REAR L___R: (center)
Balance between the rear left and rig ht
speakers.
14
Range: 6 steps to the left and 6 s teps to the rig ht
(13 steps)
GB

x LEVEL
• CENTER: (0 dB)
Level of the center speaker (–6 dB to +6 dB,
1 dB steps).
•REAR: (0 dB)
Level of the rear speakers (–6 dB to +6 dB,
1 dB steps).
• SUB W.: (+2 dB)
Level of the sub woofer (–6 dB to +6 dB, 1 dB
steps).
x D.COMP.
• D.COMP.: (OFF)
Dynamic range compression.
Range: OFF, 0.1 to 0.9, STD, MAX
“OFF” does not compress the dynamic range.
“0.1” to “0.9” se tt ings al low y o u to c ompre ss
the dynamic range in small steps. “STD”
reproduces the sound track with the dyn amic
range intended b y the recording engine er.
“MAX” provides a great compression of the
dynamic range.
x TEST TONE
• TEST TONE: (OFF)
Test tone output.
Range: OFF, ON
“ON” outputs the test tone from each speaker
in sequence. Adjust the LEVEL and
BALANCE param e ters so that the volume
level of the test tone from each speaker
sounds the same using the remote from your
listening position. Sel ect “OFF” to turn of f the
test tone.
Notes
• When 2.1CH/MULTI is set to “2.1CH” (page 53),
you cannot set rear speaker balance, center level, rear
level.
• Dynamic range compression is possible with Dolby
Digital sources only.
Setting the clock
1 T u rn on the system.
2 Press CLOCK/TIMER SET on the
remote.
3 Press . or > repeatedly to set the
hour.
4 P r ess ENTER on the remote.
5 Press . or > repeatedly to set the
minutes.
6 P r ess ENTER on the remote.
To adjust the clock
1 Press CLOCK/TIMER SET on the remote.
2 Press . or > repeatedly to select
“CLOCK SET?”, then press ENTER on the
remote.
3 Do the same procedures as step 3 to 6
above.
Note
The clock settings are canceled when you disconne c t
the power cord or if a power failure occurs.
Getting Started
15
GB
DVD/VIDEO CD/CD/Super Audio CD/MP3
Playing discs
Playing a disc
— Normal Play/Shuffle Play/Repeat
Play/Scan/Slow-motion Play
Loading a disc
1 Press DISC SELECT repeatedly to
select the disc tray you want to open.
2 Press Z.
The front panel slides down and the disc
tray slides out.
3 Pl ace a disc with the label side up on
the disc tray.
When you play
a 8 cm disc,
place it on the
inner circle of
the tray.
4 Press Z to close the disc tray.
To insert other di scs, repeat the sam e
procedure.
When a disc is i nserted in the disc tray, the
corresponding disc indicator (1 to 5 fr om
top) lights up.
Note
When the disc tray slides out, you cannot open the
cassette deck.
Before playing a DVD or a VIDEO CD, turn on
your TV and select the video input. Depending
on the DVD or VIDEO CD, some operations
may be different or restr icted. Refer to the
operating instructions supplied with the disc.
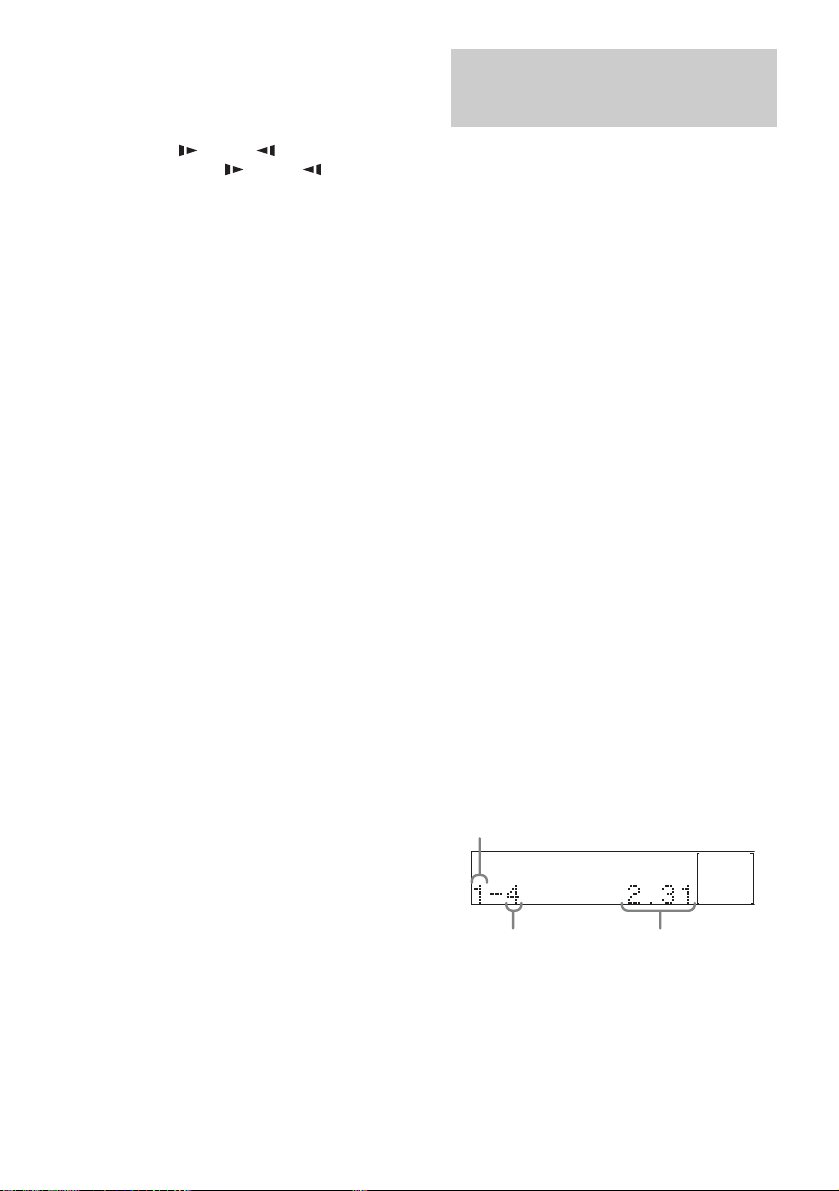
Disc tray number
1 DISC
DISC
Track numb er Playing time
1 When playback is stopped, press PLAY
MODE/DIRECTION on the remote
repeatedly until the mode you want
appears in the display.
Select To play
ALL DISCS
(Normal Play)
1DISC
(Normal Play)
ALBM
(Normal Play)
ALL DISCS
SHUF
(Shuffl e Play)
1DISC SHUF
(Shuffl e Play)
ALBM SHUF
(Shuffl e Play)
PGM
(Program Play)
All discs in the disc tray
continuously.
The tracks on the disc you have
selected in original order.
All MP3 audio tracks in the
album on the disc you have
selected in original order.
The tracks on all discs in
random order.
The tracks on the disc you have
selected in random order.
All MP3 audio tracks in the
album on the disc you have
selected in random order.
The tracks on all discs in the
order you want them to be
played (see “Creating your
own program” on page 21).
16
2 Press DIS C SELEC T repeatedly to
select the disc you want to play.
3 Press hH.
If you press hH when DVD is selected
as the function (press DVD) and the disc
tray is closed, playback starts.
GB
Notes
• You cannot change the play mode during playback.
• You cannot use 1DISC SHUF or ALBM SHUF
Shuffle Play with DVDs. You can use ALL DISCS
SHUF except for DVDs.
Other operations
To Do this
Stop playback Press x.
Pause playback Press X.
Press again to resume playback.
Select a track During playback or pause, press
Find a point in a
track
(Lock Search
function)
(Except for MP3)
Select a disc Press D.SKIP on the remote.
Exchange other
discs during
playback
Remove the disc Press DISC SELECT repeatedly
> (to go forward) or . (to
go back).
Press M or m during
playback. To return to normal
play, press hH.
For DVDs, VIDEO CDs or Super
Audio CDs, press m or M
once to start searching. Press
again to increase the searc h speed.
Each time you release and press
the button, the speed changes
sequentially:
M: FF1 t FF2 t FF1
m: FR1 t FR2 t FR1
Press DISC SELECT repeatedly
to select the disc tray that contains
the disc you want to change, then
press Z. Press Z again to close
the tray.
to select the disc tray that contains
the disc you want to remove, then
press Z.
To Do this
Play repeatedly*1
(Repeat Play)
Press REPEAT/FM MODE on the
remote during playback until
“REP” or “REP1” appears. The
repeat range changes accordin g to
the play mode:
•ALL
on all discs up to 5 times.
•1DISC
titles on a single disc.
•ALBM
single album (MP3 only).
•REP1
or track. You cannot use this
function with certain DVDs,
when playing VIDEO CDs with
PBC functions.
You cannot select “REP” during
ALL DISCS SHUF mode, but you
can select “REP1”.
To cancel Repeat Play, press
REPEAT/FM MODE on the
remote until “REP” and “REP1”
disappear.
Locate a point
quickly in fast
forward or fast
reverse (scan)
During playback, press SCAN/
SLOW t or T on the
remote. To return to normal
playback, press hH.
For DVDs, VIDEO CDs or Super
Audio CDs, two speeds are
available. Each time you pres s the
button, the indication cyclic a lly
changes as follows:
Playback direction:
FF1M
Opposite direction:
FR1m
Change the
playback speed
(Slow-motion
play)
During pause mode, press SCAN/
*3
SLOW t or T on the
remote. To return to normal
playback, press hH.
Two speeds are available. Each
time you press the button, the
indication cyclically changes as
follows:
Playback direction:
SLOW2
Opposite direction (DVD only):
SLOW2
: For all the tracks o r ti tle s
: For all the tracks or
: For all the tracks on a
: For a single title, chapter
*2
t FF2M*2
*2
t FR2m*2
*4
y SLOW1
*4
y SLOW1
DVD/VIDEO CD/CD/Super Audio CD/MP3
*4
*4
continued
17
GB
*1
You cannot select “REP1” during Program Pla y.
*2
The FF2M/FR2m playback speed is faster than
FF1M/FR1m.
*3
DVD and VIDEO CD only. Slow-motion reverse
play for DVD only.
*4
The SLOW2 /SLOW2 playback speed is
slower than SLOW1 /SLOW1 .
Note
If DVD playback is paused for approximately one
hour, the system automatically turns off.
Tips
• You can use the digipad for the disc operations.
• Pressing DVD while the power is off automatically
turns the power on.
• Depending on the disc, a menu may appear on the TV
screen. You can play the disc interacti v ely by
following the instructions on the me nu ( se e page 24
for DVD, and see page 24 for VIDEO CD).
• You can use the Control Menu to play repeatedly
(page 23).
• When disc access takes a long time, set “DVD
POWER ON” by DVD power manage function
(page 41).
To enter track number using the
remote
You can also select the track you want using the
remote during Normal Play .
Press the numeric buttons, then press ENTER.
The playback automatically starts.
Playing a disc with MP3 audio tracks
About MP3
MP3 (MPEG 1 Audio Layer-3) is a standard
technology and format for compressing a sound
sequence. The track is compressed to about 1/10
of its original size. Sounds outside the range of
human hearing are compressed while the sounds
we can hear are not c om pressed.
Notes on discs
You can play MP3 audio tracks recorded on
CD-ROMs, CD-Rs (recordable CDs), or CD-RWs
(rewritable CDs).
The disc must be in the ISO9660* level 1, level 2 or
Joliet format.
*ISO9660 Format
The most common international standard for the
logical format of tracks and alb u ms on a CD-ROM.
There are several specification levels. In Level 1, track
names must be in the 8.3 format (no more than eigh t
characters in the name, no more than three characters
in the extension “.MP3”) and in capital letters. Album
names can be no longer than eight characters. There
can be no more than eight nested album levels. Level 2
specifications allow album names and track names up
to 31 characters long.
Playing a disc
18
— Normal Play/Shuffle Play/Repeat
Play
This system lets you play the disc with MP3
audio tracks in diff erent play modes.
Disc tray number
1 DISC
DISC MP3
Track number Playing time
GB

1 Press DVD (or FUNCTION on the
remote repeatedly until “DVD” appears
in the display).
2 When playback is stopped, press PLAY
MODE/DIRECTION on the remote
repeatedly until the mode you want
appears in the display.
Select To play
ALL DISCS
(Normal Play)
1DISC
(Normal Play)
ALBM
(Normal Play)
ALL DISCS
SHUF
(Shuffle Play)
1DISC SHUF
(Shuffle Play)
ALBM SHUF
(Shuffle Play)
PGM
(Program Play)
All discs in the disc tray
continuously.
The tracks on the disc you have
selected in original order .
All MP3 audio tracks in the
album on the disc you have
selected in original order .
The tracks on all disc s in
random order.
The tracks on the disc you have
selected in random order.
All MP3 audio tracks in the
album on the disc you have
selected in random order.
The tracks on all discs in the
order you want them to be
played (see “Creating your
own program” on page 21).
3 Press DISC SELECT repeatedly to
select the disc you want to play.
4 Press hH.
Other operations
To Do this
Stop playback Press x.
Pause playback Press X.
Press again to resume playback.
Select an album
of MP3 tracks
Select a track During playback or pause, press
Use the remote for the operation.
1 Press DVD DISPLAY while
pressing SHIFT.
The Control Menu appears in
the on-screen display.
2 Press V or v repeatedly to
select (ALBUM), then
press ENTER or b.
The list of albums contained in
the disc appears.
3 Press V or v repeatedly to
select an album you want to
play, then press ENTER.
You can select an album by
pressing B or b, or ALBUM +
or – while pressing SHIFT.
4 Press V or v repeatedly to
select (TRACK), then
press ENTER.
The list of tracks contained in
the current album appears.
When the list of all tracks or
albums cannot be displayed on
the window, the jump bar
appears. Press b to select the
jump bar icon, and then scroll
the jump bar to display the rest
of the list using V/v.
5 Press V or v repeatedly to
select a track, then press
ENTER.
> (to go forward) or . (to
go back).
DVD/VIDEO CD/CD/Super Audio CD/MP3
continued
19
GB

To Do this
Play repeatedly
(Repeat Play)
Press REPEAT/FM MODE on the
remote re p eatedly during
playback until “REP”* or “REP1”
appears. The repeat r ange changes
according to the play mode:
: For all the tracks on all
•ALL
discs up to 5 times.
•1DISC
: For all the tracks on a
single disc up to 5 times.
•ALBM
: For all the tracks on a
single album up to 5 times (MP3
only).
: For a single track.
•REP1
To cancel Repeat Play, press
REPEAT/FM MODE on the
remote repeatedly u ntil “REP” and
“REP1” disappear.
* You cannot select “REP” during ALL DISCS SHUF
mode, but you can select “REP1”.
Tip
You can start playing from the desired track in Normal
Play or Program Play. After step 1, select an album by
using DVD DISPLAY while pressing SHIFT on the
remote, then press . or > repeatedly until the
desired track number appears.
Notes
• With formats other than I SO9660 level 1, 2 and
Joliet, album names or trac k n ames may not be
displayed correctly.
• When naming, be sure to add the extension “.MP3”
to the track name.
• If you use the extension “.MP3” to a track other than
MP3, the player cannot recognize the track properly
and will generate random noise that co uld da m age
your speakers.
• A disc recorded with complic ated tree structur e takes
a longer time to start playback.
• When the disc is inserted, the player reads all the
tracks on that disc. If there are many albums or nonMP3 files on the disc, it may take a long time for
player to begin or for the next MP3 audio tracks to
start play.
• We recommend that you do not save other types of
tracks or unnecessary albums than MP3 audio tracks
in the disc to be used for MP3 listening.
• An album that does not include an MP 3 aud io tra ck
is skipped.
• Maximum album number in a disc : 99 ( The
maximum number of MP3 audio tracks that can be
contained on a album is 250.)
• Tracks and albums are played in the order th ey are
recorded on the disc.
• Only the letters in the alphabe t a nd numbers can be
used for album or track names. Anything else is
displayed as a space.
• ID3 tags cannot be displa ye d in stop mode.
20
GB
Creating your own program
— Program Play
You can make a program of up to 25 tracks from
all the discs in the or der you want them to be
played.
Use the remote for the operation.
1 Press DVD w hen the playback is
stopped.
2 Press PL AY MO DE /DIR ECTION
repeatedly until “PROGRAM” appears
in the on-screen display.
The Program Display appears on the screen.
Program
1
2
3
4
5
6
7
8
9
10
3 Press b, then press V or v repeatedly to
select the disc.
The cursor moves to th e disc (in this case,
“DISC1(CD)”).
Program
1
Disc
2
DISC1(CD)
3
DISC2(CD)
4
DISC3(CD)
5
DISC4(CD)
6
DISC5(CD)
7
8
9
10
4 Press b.
The cursor moves t o th e album or track (in
this case, “ALL TRACKS”).
Program
1
Disc
2
DISC1(CD)
Track
3
DISC2(CD)
ALL TRACKS
4
DISC3(CD)
1 TRACK1
5
DISC4(CD)
2 TRACK2
6
DISC5(CD)
3 TRACK3
7
4 TRACK4
8
5 TRACK5
9
10
6 TRACK6
7 TRACK7
8 TRACK8
9 TRACK9
When the list of all tr acks or al bums c annot
be displayed on th e w indow, the jump bar
appears. Pres s b to select the jump bar i con,
and then scroll the jump bar to display the
rest of the list using V/v.
5 S e lect the album, or track you want to
program.
x When programming a VIDEO CD or
CD
For example, se le ct track “6”.
Press V/v or the numeric buttons to select
“6”, then press ENTER.
Selected track
Program
DISC 1 (CD) – TRACK 6
1
2
3
4
5
6
7
8
9
10
x When programming MP3
For example, select track “3” of album “2”.
Press V/v to select “2”, then press b.
DVD/VIDEO CD/CD/Super Audio CD/MP3
Program
1
2
3
4
5
6
7
8
9
10
Disc
Album
DISC 1 (CD)
Track
ALL ALBUMS
DISC 2 (– – – – –)
ALL TRACKS
ROOT
DISC 3 (MP3)
1. Classic
2. Jazz
3. Pops
continued
21
GB

Next, press V/v or the numeric buttons to
select “3”, then press ENTER.
Selected album and track
Program
DISC 3 (MP3) – ALBUM2 – TRACK3
1
2
3
4
5
6
7
8
9
10
6 To program other tracks, repeat steps 3
to 5.
The programmed tracks are displayed in the
selected order.
7 Press hH to start Program Play.
Program Play starts. When the program
ends, you can restart the same program
again by pressing hH.
Other operations
To Do this
Return to normal
play
Turn off the
program menu
Clear the last
programmed
track
Tips
• You can do Repeat Play of th e progra mmed tracks.
Press REPEAT/FM MODE repeatedly unt il “ REP”
appears, or set “REPEAT” in the Control Menu
display during Program Play.
• The program you made rema ins in the system’s
memory eve n af ter it has been pl ayed back. Pre ss
hH to play the same program agai n .
Notes
• The displayed numbe r of tra c ks is the same as that
recorded on the disc.
• You cannot use Program Play with DVDs.
Press CLEAR during playback.
In stop mode, press PLAY
MODE/DIRECTION to turn off
the progr am menu.
Press CLEAR in step 6. The
program is cleared from the last
programmed track.
Resuming playback from the point you stopped the disc
— Resume Play
This system memor iz es the point where you
stopped the disc so you can resume from that
point.
1 W hile playing a disc, press x to stop
playback.
“RESUME” appears in the display. If
“RESUME” does not appear, Resume Play
is not available.
2 Press hH.
The player starts playback from the point
you stopped the dis c in step 1.
To play from the beginning of the
disc
Press x twice, then press hH.
For a disc containing MP3 audio tracks, press x
one more time to return to the first album.
Notes
• Depending on where you stopped the disc, the
system may not resume playback from exactly the
same point.
• Resume play is canceled when:
– you open the disc tray.
– you cha nge the pla y mode.
22
GB

Playing repeatedly
— Repeat Play
You can play all the titles /trac ks or a si ngle title /
chapter/track on a di sc.
In Shuffle or Pro gr am Play mode, the sy st em
repeats the tracks in the shuffled or programmed
order.
Use the remote for the operation.
1 Press DVD DISPL AY while pressing
SHIFT during playback.
The Control Menu ap pears.
2 Press V or v repeatedly to select
(REPEAT), then press ENTER.
If you do not select “OFF”, the “REPEAT”
indicator lights in green.
3 Press V or v repeatedly to select the
Repeat Play setting.
x When playing a DVD
• OFF: does not play repeatedly.
• ALL: repeats all the titles.
• TITLE: repeats the current title.
• C HAPTER: repeats the current chapter.
x When playing a VIDEO CD/CD/Super
Audio CD/MP3 and when Program Play
is set to OFF
• OFF: does not play repeatedly.
• ALL: repeats all the tracks.*
• TRACK: repeats the current track.
x When Program Play is set to ON
• OFF: does not play repeatedly.
• ALL: repeats Program Play.
* When the play mode is set to “ALBM” or “ALBM
SHUF”, all the tracks in the current album is
repeated.
Notes
• When the play mode is set to “ALL DISCS SHUF”,
you can select the Repeat Play of “TITLE”,
“TRACK” or “CHAPTER” only.
• You can perform Repeat play for DVD titles that
contain chapters.
To cancel Repeat Play
Press CLEAR.
To turn off the Control Menu
Press DVD DISPLAY repeatedly while pressing
SHIFT until the Control Menu is turned off.
DVD/VIDEO CD/CD/Super Audio CD/MP3
23
GB
 Loading...