

Page 1
Mini Hi-Fi
Component
System
3-860-163-13 (1)
Operating Instructions
Manual de Instrucciones
f
T
DHC-EX77MD MHC-EX66
DHC-EX770MD MHC-EX660
EN
ES
DHC-MD77
©1997 by Sony Corporation
Page 2
WARNING
To prevent fire or shock hazard, do not
expose the unit to rain or moisture.
To avoid electrical shock, do not open the cabinet.
Refer servicing to qualified personnel only.
Do not install the appliance in a confined space,
such as a bookcase or built-in cabinet.
Laser component in this product is capable of
emitting radiation exceeding the limit for Class 1.
This appliance is classified
as a CLASS 1 LASER
product. The CLASS 1
LASER PRODUCT
MARKING is located on
the rear exterior.
This caution label is located inside the unit.
This system is equipped with Dolby Noise
Reduction* system (MHC-EX66/EX660 only).
* Dolby noise reduction manufactured under
license from Dolby Laboratories Licensing
Corporation.
“DOLBY” and the double-D symbol a are
trademarks of Dolby Laboratories Licensing
Corporation.
US and foreign patents licensed from Dolby
Laboratories Licensing Corporation.
Table of Contents
Getting Started
Step 1: Hooking up the system
For DHC-MD77/EX77MD/
EX770MD .......................................... 4
For MHC-EX66/EX660 ................... 7
Step 2: Setting the time ......................... 9
Step 3: Presetting radio stations ........ 10
Connecting the optional TC-TX77/
TX770 tape deck* ........................... 12
Connecting optional AV
components .................................... 13
Connecting optional outdoor
antennas .......................................... 16
Basic Operations
Playing a CD ......................................... 17
Recording a CD on an MD* ................ 18
Recording a CD on a tape** ................ 20
Playing an MD* .................................... 21
Playing a tape** .................................... 22
Listening to the radio........................... 24
Recording from the radio .................... 26
The CD Player
Using the CD display........................... 28
Playing the CD tracks repeatedly ...... 28
Playing the CD tracks in random
order ................................................ 29
Programming the CD tracks ............... 29
Looping part of a CD ........................... 31
The MD Deck*
– Playback
Using the MD display.......................... 32
Playing the MD tracks repeatedly ..... 33
Playing the MD tracks in random
order ................................................ 33
EN
2
Programming the MD tracks .............. 34
Page 3

– Recording
Before you start recording .................. 35
Recording on an MD manually .......... 36
Adjusting the recording level ............. 37
Recording the favorite CD tracks
on an MD ........................................ 38
Recording only the first track on
each CD ........................................... 40
Starting recording with 2 seconds of
prestored audio data ..................... 41
Making a space between tracks
3 seconds long ................................ 42
Marking track numbers ....................... 43
Monitoring the input signal................ 44
– Editing
Before you start editing ....................... 44
Erasing recordings ............................... 45
Moving recorded tracks ...................... 47
Dividing recorded tracks .................... 48
Combining recorded tracks ................ 49
Labeling an MD .................................... 50
Undoing the last edit ........................... 51
The Tape Deck**
Recording on a tape manually .......... 52
Recording the favorite CD tracks
on a tape .......................................... 54
Other Features
Adjusting the sound ............................ 55
Singing along: Karaoke ...................... 56
Labeling the preset stations ................ 58
Using the Radio Data System (RDS)
(European model only) ................. 60
Falling asleep to music ........................ 63
Waking up to music ............................. 63
Timer-recording radio programs ....... 65
Additional Information
Precautions ............................................ 66
System limitations of MDs.................. 68
Troubleshooting ................................... 70
Specifications ........................................ 73
Index....................................................... 76
* DHC-MD77/EX77MD/EX770MD only.
**MHC-EX66/EX660 or the optional TC-TX77/
TX770 users only.
EN
Checking your model number
Before you read this manual, check your model number by looking at the front of the amplifier.
Any differences in operation are clearly indicated in the text, for example, “DHC-MD77 only.”
Each model number consists of the following components:
DHC-MD77/EX77MD DHC-EX770MD MHC-EX66 MHC-EX660
CD Player CDP-EX77 CDP-EX770 CDP-EX77 CDP-EX770
Tuner ST-EX77 ST-EX770 ST-EX77 ST-EX770
MD Deck MDS-EX77 MDS-EX770 — —
Tape Deck — — TC-EX66 TC-EX660
Integrated Stereo Amplifier TA-EX77 TA-EX770 TA-EX66 TA-EX660
Speaker System SS-MD77/EX77 SS-EX880 SS-MD77/EX77 SS-EX880
Optional Tape Deck TC-TX77 TC-TX770 — —
EN
3
Page 4
Getting Started
Step 1: Hooking up the system
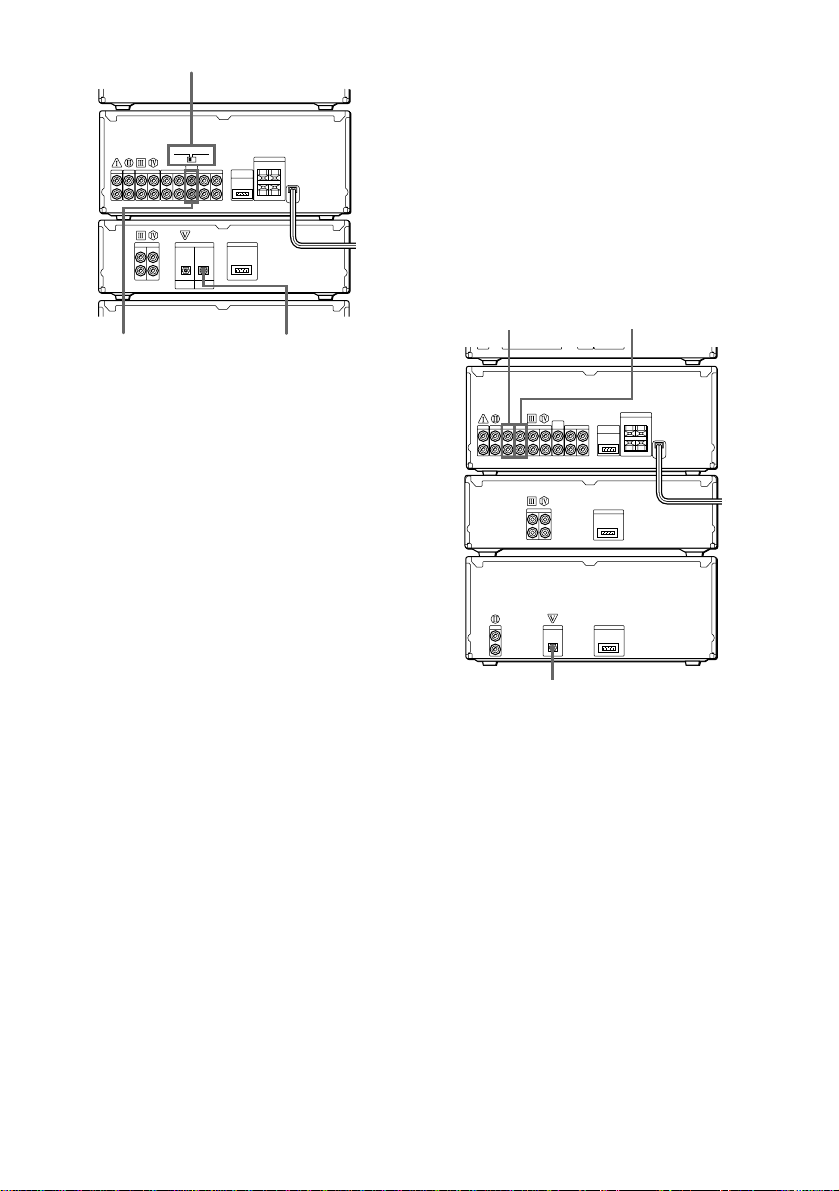
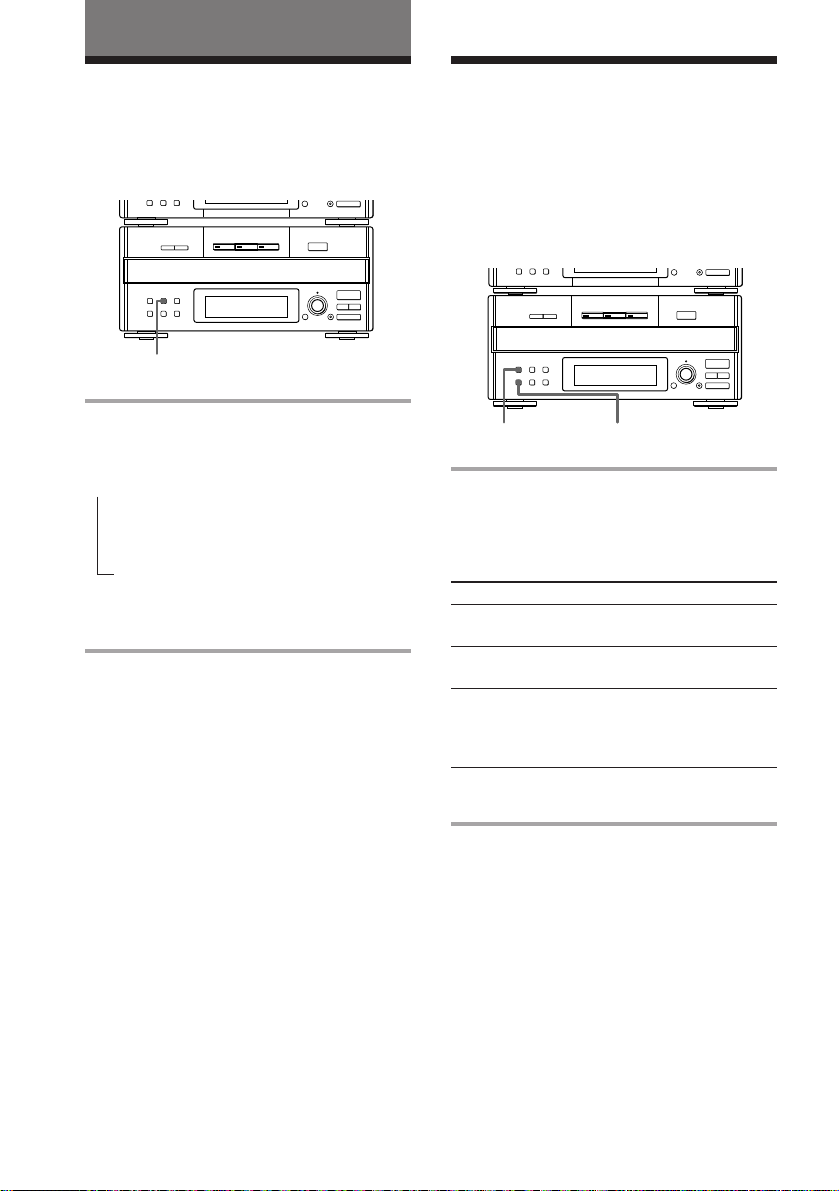
For DHC-MD77/EX77MD/EX770MD
Perform the following procedure 1 to 6 to hook up your system using the supplied cords and
accessories. To complete the setup, do steps 2 and 3 also.
FM lead antenna
Tuner
Amplifier
MD
deck
CD player
AM loop antenna
DHC-MD77/EX77MD/
EX770MD rear panel
Left speakerRight speaker
EN
4
Page 5
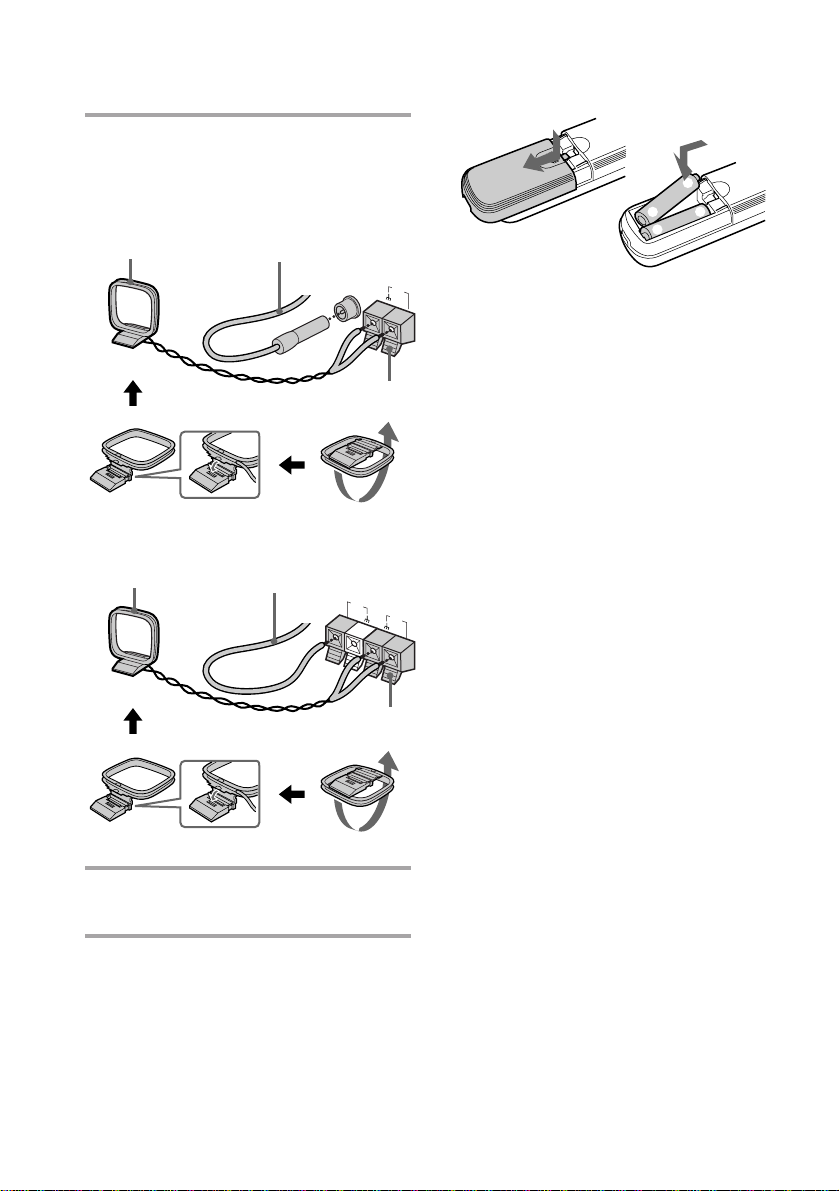
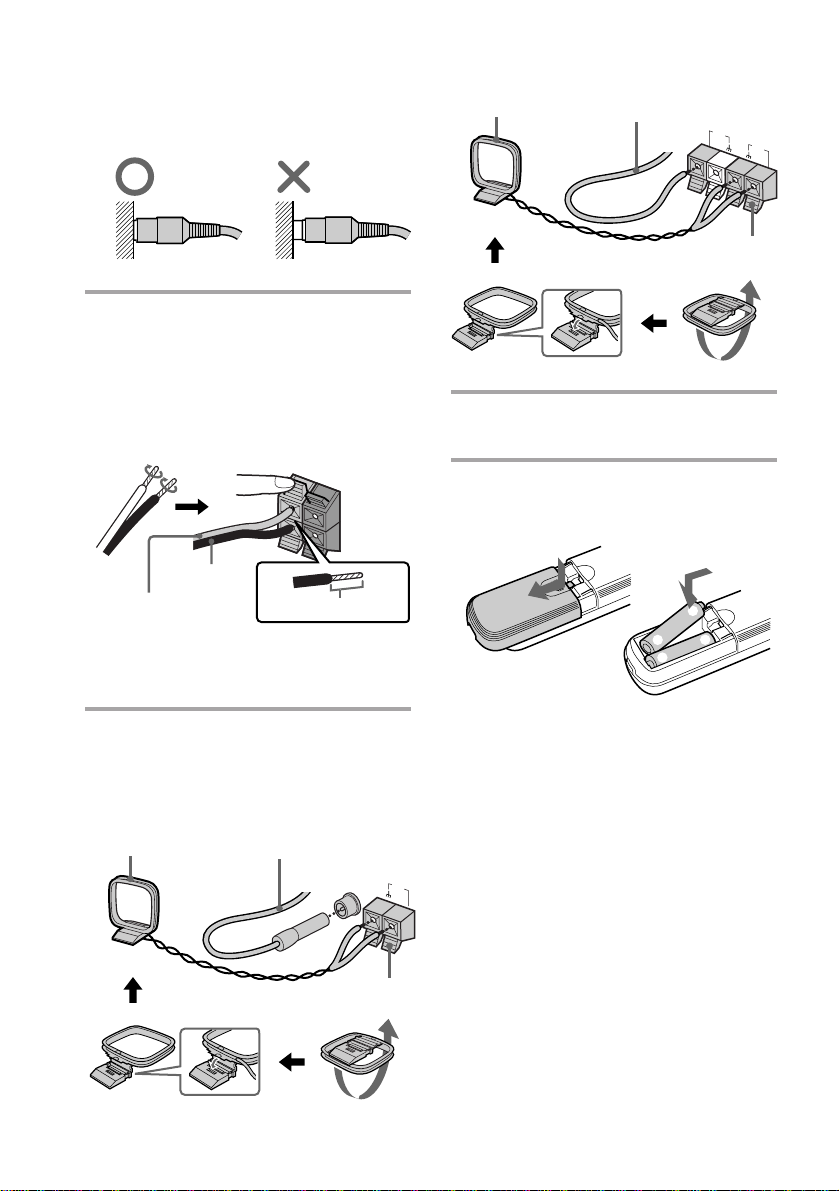
Connect the flat cord to the SYSTEM
1
CONTROL connectors on each
component with the same color
until it clicks.
To disconnect
Connect the CD player and the MD
3
deck, using the optical cable.
Note
Take the caps off the OPTICAL
connectors before connecting the optical
cable. Keep them for future use.
Connect the audio cords to the jacks
2
with the same Roman numerals
(
, , , ).
Connect the amplifier to the tuner, CD
player and MD deck, using the audio
cords (you have four). Match the color
of the plugs and the jacks.
Insert the plugs firmly, pushing them in
all the way.
Connect the speakers.
4
Connect the speaker cords to the
SPEAKER jacks of the same color.
Keep the speaker cords away from the
antennas to prevent noise.
Pull the lever toward you after
connecting the speaker cords.
R L
Black* (’)
Red* (‘)
* The color of your speaker cords might be
different. See the manual provided with your
speaker system for details.
Insert this portion.
+
–
continued
EN
5
Page 6
Step 1: Hooking up the system
(continued)
Connect the FM/AM antennas.
5
Set up the AM loop antenna, then
connect it.
For DHC-EX77MD/EX770MD
AM loop antenna
For DHC-MD77
AM loop antenna
Extend the FM lead
antenna horizontally.
FM 75Ω
COAXIAL
Pull the lever toward you after
connecting the antenna.
Extend the FM lead
antenna horizontally.
FM
75Ω
Inserting two R6 (size AA)
batteries into the remote
]
}
}
]
AM
Tip
With normal use, the batteries should last for about
six months. When the remote no longer operates
the system, replace both batteries with new ones.
Note
If you do not use the remote for a long period of
time, remove the batteries to avoid possible damage
from battery leakage.
AM
Pull the lever toward you after
connecting the antenna.
Connect the power cord to a wall
6
outlet.
EN
6
Page 7
For MHC-EX66/EX660
Perform the following procedure 1 to 5 to hook up your system using the supplied cords and
accessories. To complete the setup, do steps 2 and 3 also.
FM lead antenna
Right speaker
Tuner
Amplifier
Tape
deck
CD player
AM loop antenna
MHC-EX66/EX660
rear panel
Left speaker
Connect the flat cord to the SYSTEM
1
CONTROL connectors on each
component with the same color
until it clicks.
To disconnect
Connect the audio cords to the jacks
2
with the same Roman numerals
(
, , , ).
Connect the amplifier to the tuner,
CD player and tape deck,
using the audio cords
(you have four).
Match the color of
the plugs and
the jacks.
continued
EN
7
Page 8
Step 1: Hooking up the system
(continued)
Insert the plugs firmly, pushing them in
all the way.
Connect the speakers.
3
Connect the speaker cords to the
SPEAKER jacks of the same color.
Keep the speaker cords away from the
antennas to prevent noise.
Pull the lever toward you after
connecting the speaker cords.
Black* (’)
Red* (‘)
* The color of your speaker cords might be
different. See the manual provided with your
speaker system for details.
Connect the FM/AM antennas.
4
Set up the AM loop antenna, then
connect it.
For European model
AM loop antenna
R L
+
–
Insert this portion.
Extend the FM lead
antenna horizontally.
FM 75Ω
For other models
AM loop antenna
Extend the FM lead
antenna horizontally.
Pull the lever toward you after
connecting the antenna.
Connect the power cord to a wall
5
outlet.
Inserting two R6 (size AA)
batteries into the remote
Tip
With normal use, the batteries should last for about
six months. When the remote no longer operates
the system, replace both batteries with new ones.
Note
If you do not use the remote for a long period of
time, remove the batteries to avoid possible damage
from battery leakage.
AM
FM
75Ω
AM
]
}
}
]
COAXIAL
Pull the lever toward you after
connecting the antenna.
EN
8
Page 9
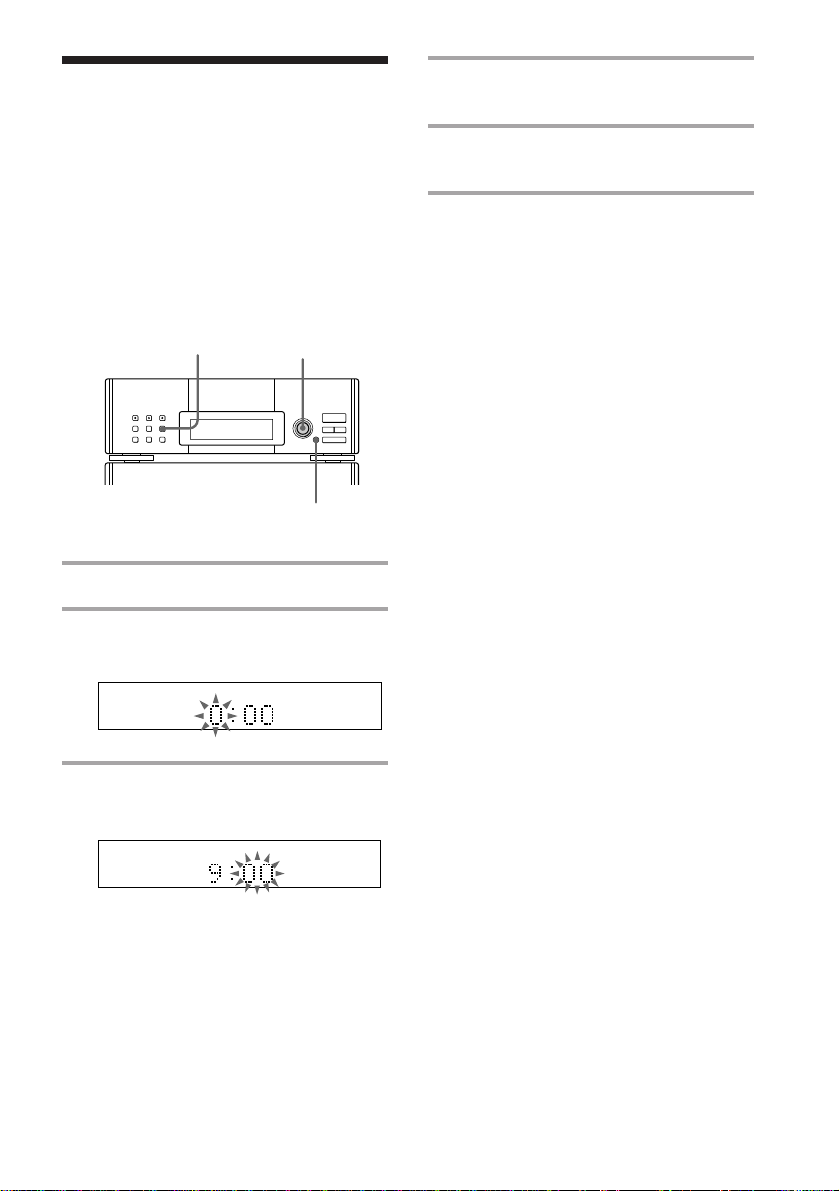
Step 2: Setting the
time
You must set the time beforehand to use the
timer function.
The clock is on a 24-hour system for the
European model, and a 12-hour system for
other models.
The European model is used for illustration
purpose.
1
2,4
3,5
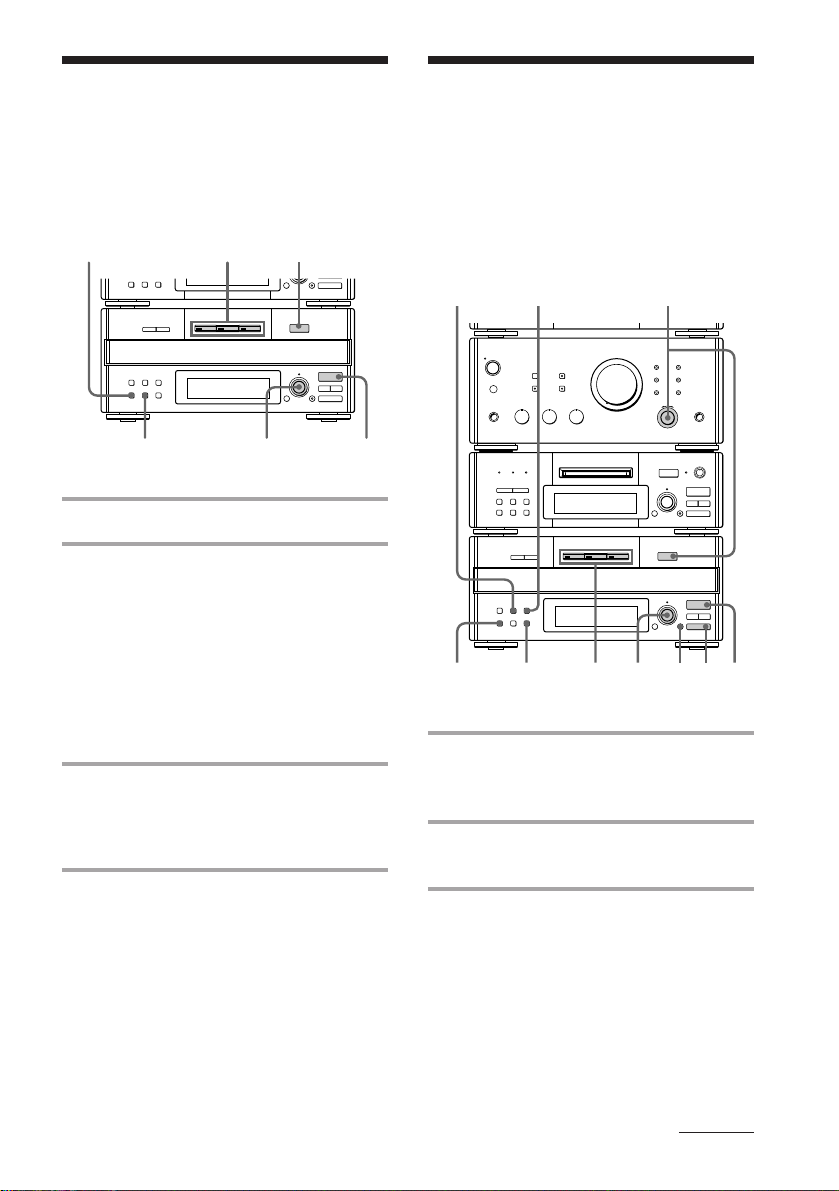
1 Press CLOCK SET.
2 Turn MULTI CONTROLLER and
set the hour.
4 Turn MULTI CONTROLLER and
set the minute.
5 Press ENTER/NEXT.
The clock starts working.
To change the preset time
Start over from step 1.
Tips
•The built-in clock shows the time in the display
while the power is off.
•The upper dot flashes for the first half of a minute
(0 to 29 seconds), and the lower dot flashes for the
last half of a minute (30 to 59 seconds).
3 Press ENTER/NEXT.
The minute indication flashes.
EN
9
Page 10
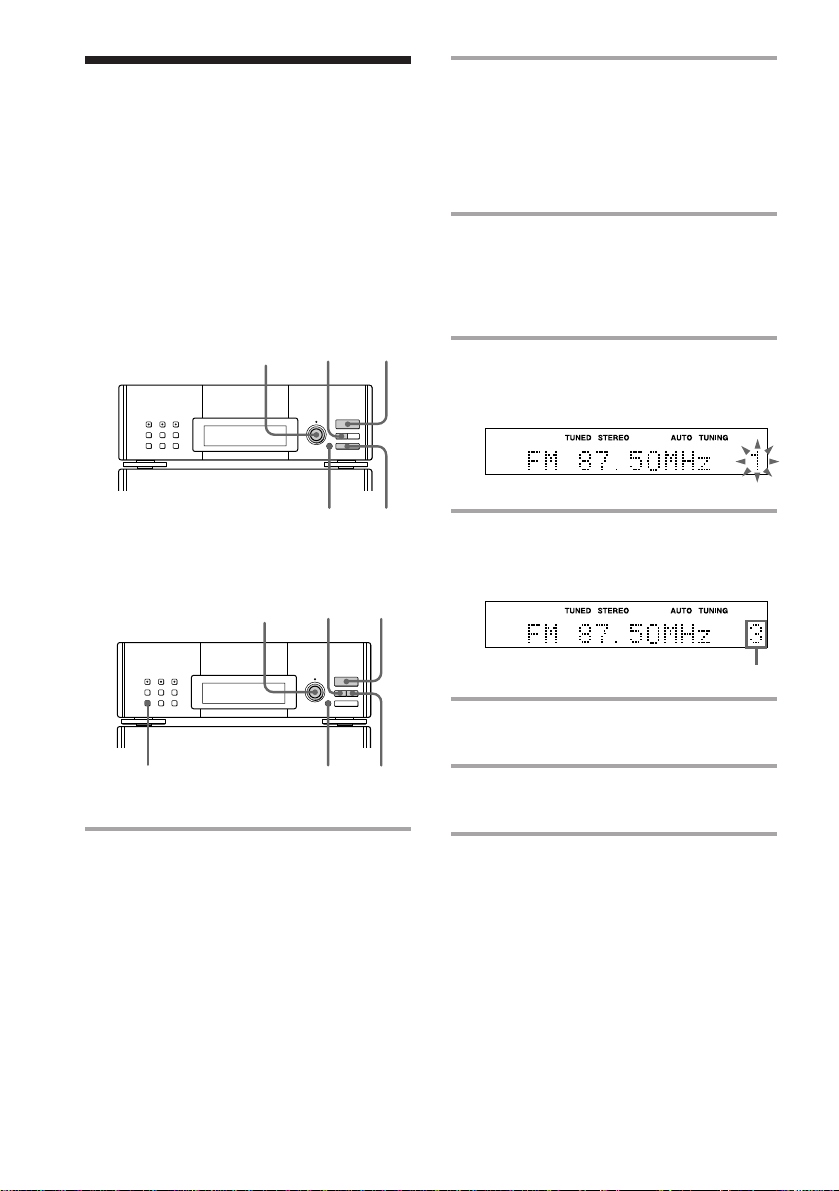
Step 3: Presetting
radio stations
2 For European model:
Press TUNING MODE repeatedly
until “AUTO TUNING” appears.
The bands you can receive vary depending
on the model you purchased.
The European model lets you preset up to 40
stations, 20 for FM, 10 for MW and 10 for LW.
The other models let you preset up to 30
stations, 20 for FM and 10 for AM.
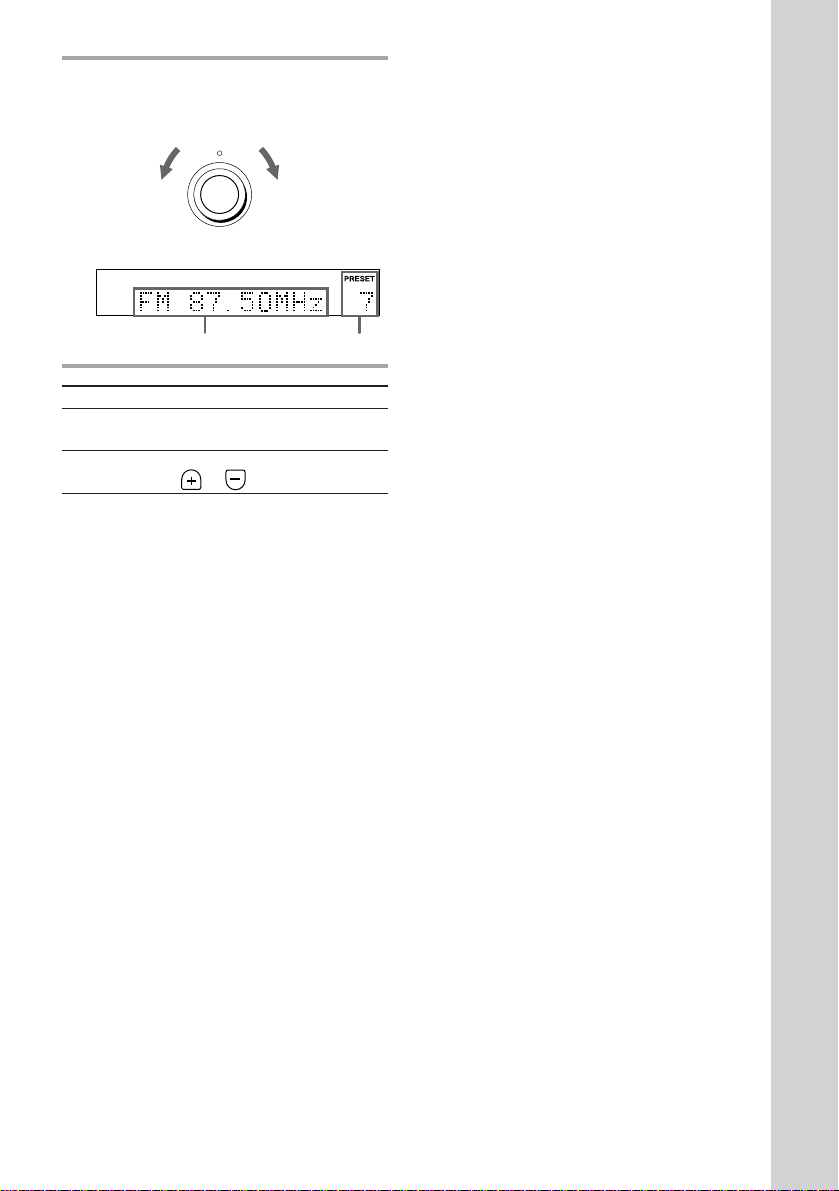
For European model
6
1
2
1MANUAL
3,5 4
For other models
3,5
For other models:
Press AUTO.
3 Turn MULTI CONTROLLER.
The frequency indication changes and
scanning stops when the system tunes in
a station. “TUNED” and “STEREO” (for
a stereo program) appear.
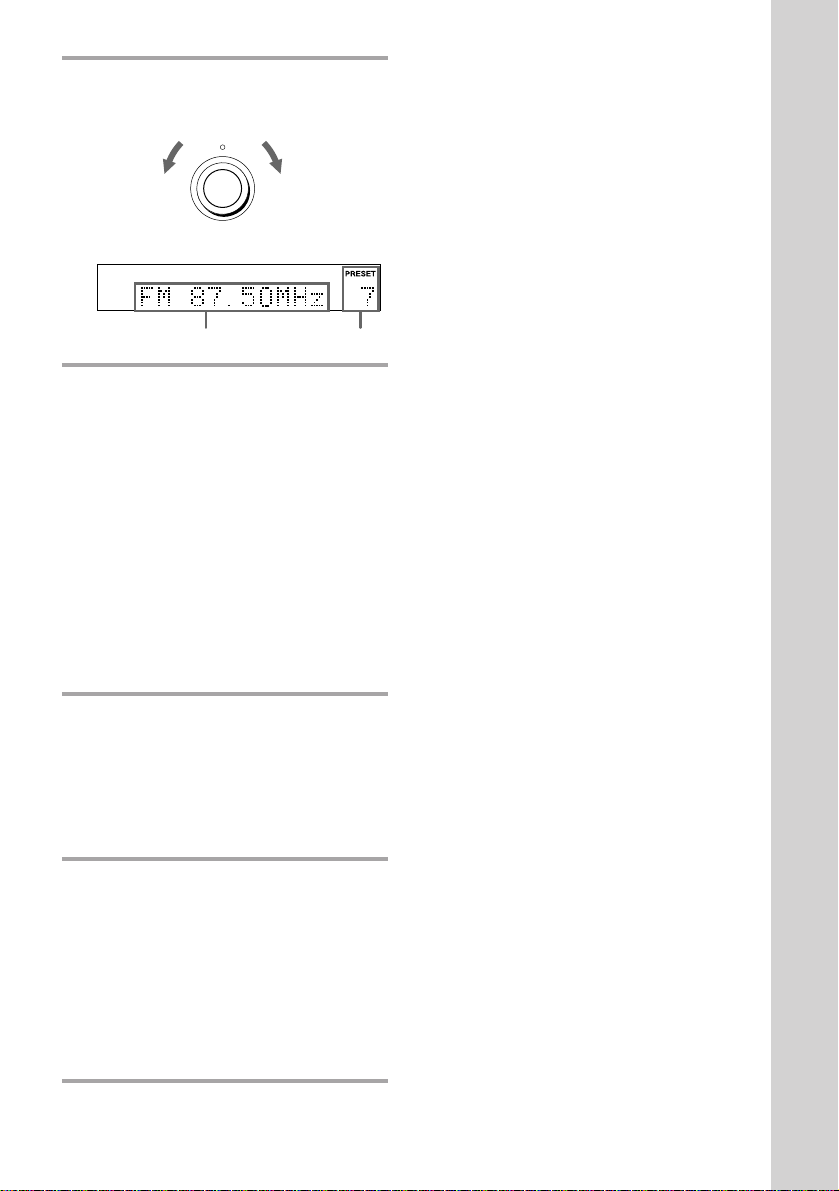
4 Press MEMORY.
A preset station number flashes for eight
seconds.
5 Turn MULTI CONTROLLER and
select the preset number you want
while it is flashing.
Preset number
6 Press ENTER/NEXT.
The station is stored.
10
1 Press TUNER/BAND repeatedly
until the band you want appears in
the display.
Each time you press the button, the band
changes as follows:
European model:
FM n MW n LW
Other models:
FM n AM
EN
642
7 Repeat steps 1 to 6 to store other
stations.
Page 11

To tune in a station with a weak
signal
For European model
Press TUNING MODE repeatedly until
“TUNING” appears in step 2, then turn
MULTI CONTROLLER to tune in the desired
station.
For other models
Press MANUAL in step 2, then turn MULTI
CONTROLLER to tune in the desired station.
To change the preset number
Start over from step 1.
To change the AM tuning interval
(except for European model)
The AM tuning interval is factory-preset to
9 kHz. To change the AM tuning interval,
tune in any AM station first, then turn off the
power. While holding down the ENTER/
NEXT button, turn the power back on. When
you change the interval, all the preset stations
will be erased. To reset the interval, repeat
the same procedure.
Tip
The preset stations are retained for a week even if
you pull off the power cord or if a power
interruption occurs.
11
EN
Page 12
Connecting the optional TC-TX77/TX770 tape
deck
(DHC-MD77/EX77MD/EX770MD only)
You can use the optional TC-TX77/TX770 tape deck, which is designed for use with the DHCMD77/EX77MD/EX770MD.
Perform the following procedure 1 to 3 to connect the TC-TX77/TX770 to your system using
the cords supplied on the TC-TX77/TX770.
Note
The TAPE IN/OUT and VIDEO IN/OUT jacks on the DHC-MD77/EX77MD/EX770MD are equipped with a
cap to prevent incorrect connections. Remove the cap before making connections, and keep it for future use.
You can divide the cap into two parts. If you do not use the VIDEO jacks, leave them capped.
To TAPE IN
TC-TX77/
TX770
rear panel
DHC-MD77/
EX77MD/
EX770MD
rear panel
To TAPE OUT
To TAPE OUT
ç
ç
To TAPE IN
12
ç : Signal flow
EN
Page 13
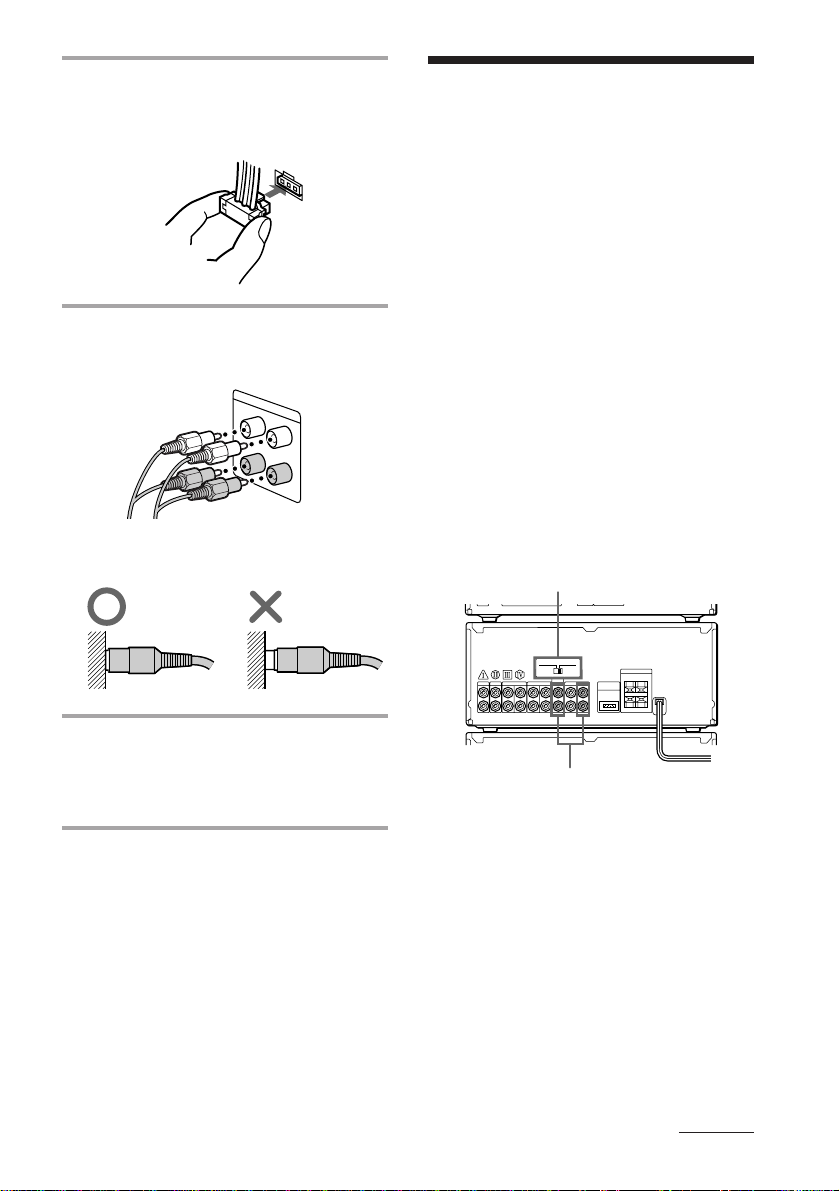
Connect the audio bus cable to the
1
AU BUS connectors on each
component until it clicks.
Connecting optional
AV components
To enhance your system, you can connect
optional components using audio cords (sold
separately). Refer to the instructions of each
component. Before making connections, take
the cap off the jacks to be used, and keep it
for future use.
Connect the audio cords.
2
Use the two audio cords, matching the
color of the plugs and the jacks.
Insert the plugs firmly, pushing them in
all the way.
Connect the power cord to a wall
3
outlet after you have made all the
connections of your system and tape
deck.
Connecting a TV/VCR
Make sure to match the color of the plugs and
the jacks.
For DHC-MD77/EX77MD/EX770MD
Connect a TV/VCR to VIDEO1, VIDEO2
(DHC-MD77) or VIDEO2/AUX (DHCEX77MD/EX770MD) on the amplifier.
Set MODE SELECTOR to ANALOG REC
when you connect a TV/VCR to VIDEO2
(DHC-MD77) or VIDEO2/AUX (DHCEX77MD/EX770MD).
MODE SELECTOR
To the audio output of a TV/VCR
continued
13
EN
Page 14
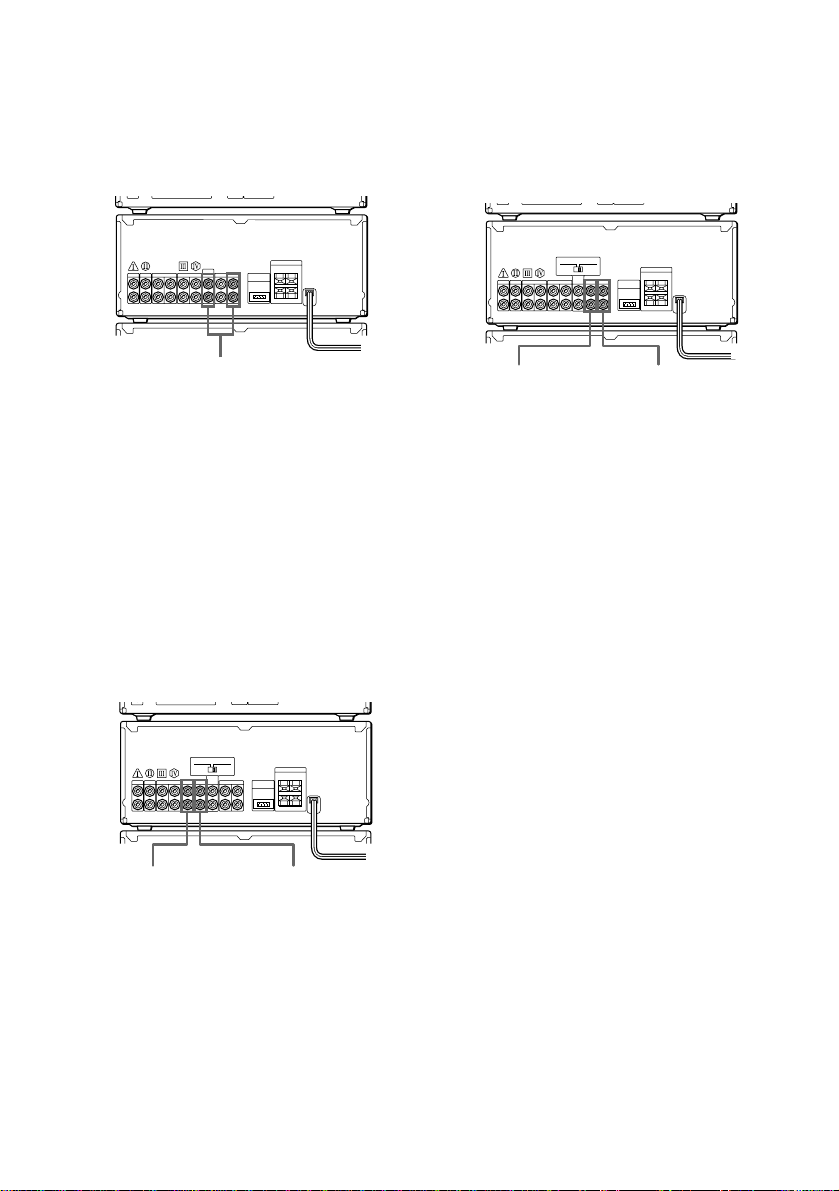
Connecting optional AV
components (continued)
For MHC-EX66/EX660
Connect a TV/VCR to VIDEO1 or VIDEO2/
AUX on the amplifier.
Connecting other analog
components
Connect an analog component to VIDEO1 on
the amplifier.
Make sure to match the color of the plugs and
the jacks.
To the audio output of a TV/VCR
To listen to the sound of TV/VCR
Turn FUNCTION until the VIDEO 1,
VIDEO 2 (DHC-MD77) or VIDEO 2/AUX
(other models) indicator lights up.
Connecting audio
components
Connecting a tape deck
Connect a tape deck to TAPE on the
amplifier.
Make sure to match the color of the plugs and
the jacks.
To the audio
input of a
tape deck
To the audio
output of a
tape deck
To the audio
input of an
analog component
To the audio
output of an
analog component
To listen to the sound of the
connected component
Turn FUNCTION until the VIDEO 1 indicator
lights up.
Connecting digital components
For DHC-MD77/EX77MD/EX770MD
You can make a digital recording onto the
system’s own MD deck from the connected
digital component (e.g., a DAT deck, BS tuner
or another MD deck).
• Connect a digital component to VIDEO 2
DIGITAL IN on the MD deck using an
optical cable.
• Connect a digital component to VIDEO2
(DHC-MD77) or VIDEO2/AUX (DHCEX77MD/EX770MD) on the amplifier
using audio cords.
• Set MODE SELECTOR to DIGITAL REC.
14
To listen to the sound of a tape
deck
Turn FUNCTION until the TAPE indicator
lights up.
EN
Page 15
MODE SELECTOR
For MHC-EX66/EX660
You can make a digital recording onto the
connected MD deck from the system’s own
CD player. You can also make an analog
recording if you connect the MD deck using
audio cords.
• Connect an MD deck to DIGITAL OUT on
the CD player using an optical cable.
• Connect an MD deck to MD on the
amplifier using audio cords.
To the analog (line)
output of a digital
component
To the digital
output of a digital
component
To listen to the sound of the
connected component
Turn FUNCTION until the VIDEO 2 (DHCMD77) or VIDEO 2/AUX (DHC-EX77MD/
EX770MD) indicator lights up.
Tip
A built-in sampling rate converter automatically
converts the sampling frequency of various digital
sources to the 44.1 kHz sampling rate of the MD
deck. This lets you record sources such as 32- and
48-kHz DAT or satellite broadcasts, as well as CDs
and other MDs.
Notes
• If “Din Unlock” or “Cannot Copy” appears in the
display, you cannot make a digital recording. In
this case, record the sound source with MODE
SELECTOR set to ANALOG REC.
• When you make a digital recording using an
optical cable, you cannot adjust the recording
level.
• When audio cords are not connected to VIDEO2
(DHC-MD77) or VIDEO2/AUX (DHC-EX77MD/
EX770MD) on the amplifier, you cannot listen to
the digital component.
To the analog
(line) input of
an MD deck
To the digital input of an MD deck
To the analog
(line) output of
an MD deck
To listen to the sound of the MD
deck
Turn FUNCTION until the MD indicator
lights up.
15
EN
Page 16
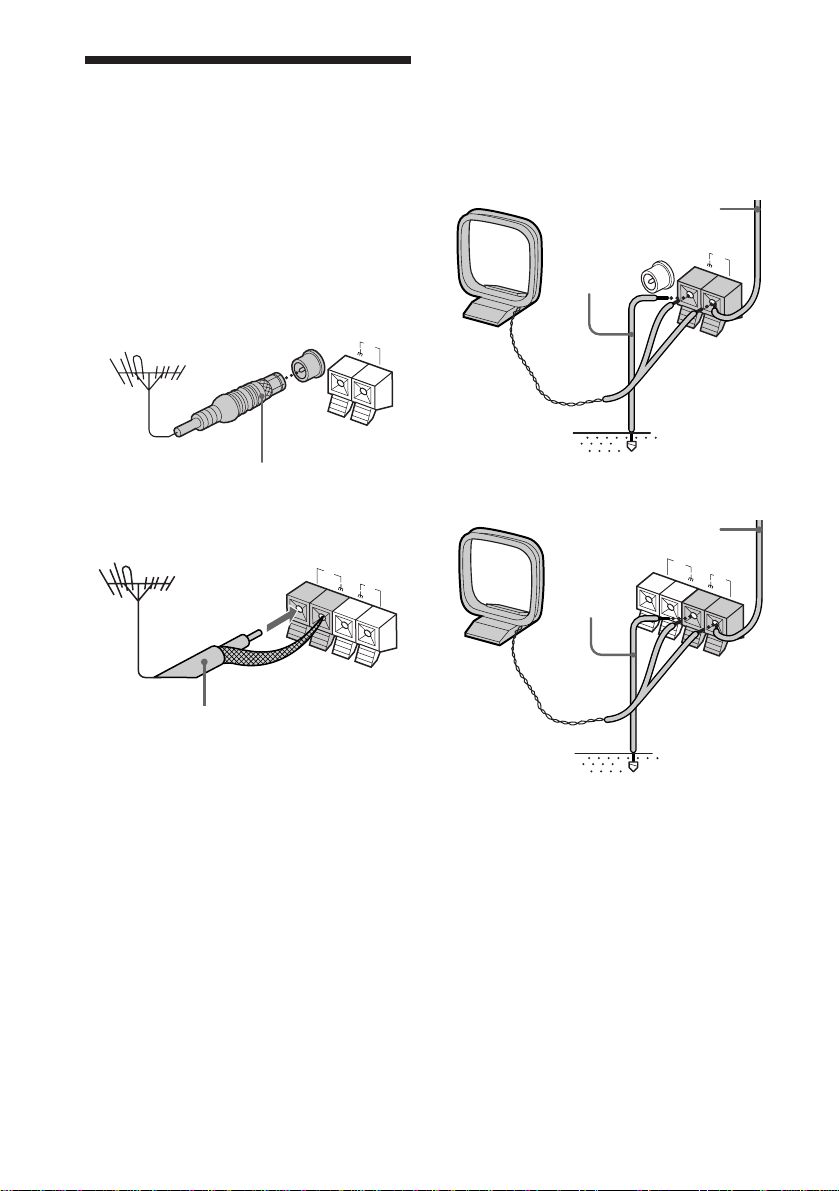
Connecting optional
outdoor antennas
Connect the outdoor antenna to improve the
reception.
FM antenna
Connect the optional FM outdoor antenna.
You can also use the TV antenna instead.
For European model
FM 75Ω
AM
COAXIAL
AM antenna
Connect a 6- to 15- meter insulated wire to
the AM antenna terminal. Leave the supplied
AM loop antenna connected.
For European model
Insulated wire
(not supplied)
Ground
wire (not
supplied)
FM 75Ω
COAXIAL
AM
IEC standard socket
connector (not supplied)
For other models
75-ohm coaxial cable
(not supplied)
For other models
Insulated wire
(not supplied)
FM
FM
75Ω
AM
Ground
wire (not
75Ω
AM
supplied)
Important
If you connect an outdoor antenna, ground it
against lightning. To prevent a gas explosion,
do not connect the ground wire to a gas pipe.
16
EN
Page 17
Basic Operations
r REC
=
SELECTOR
+
0)
p
· ∏
=
SELECTOR
+
0)
p
· ∏
§
OPEN/CLOSE
Playing a CD
You can play up to three CDs in a row.
POWER
r REC
CONTINUE
EX-CHANGE
·
2
DISC SKIP
–
·
·
ª·
VOLUME
SELECTOR
+
P+=p
P+=p
p
)0
§
EJECT
=
SELECTOR
+
§
OPEN/CLOSE
=
SELECTOR
+
P
D.SKIP
=/+
1
•
•
•
•
•
•
•
•
•
0
10
· ∏
0)
p
· ∏
0)
p
· ∏
p
0/)
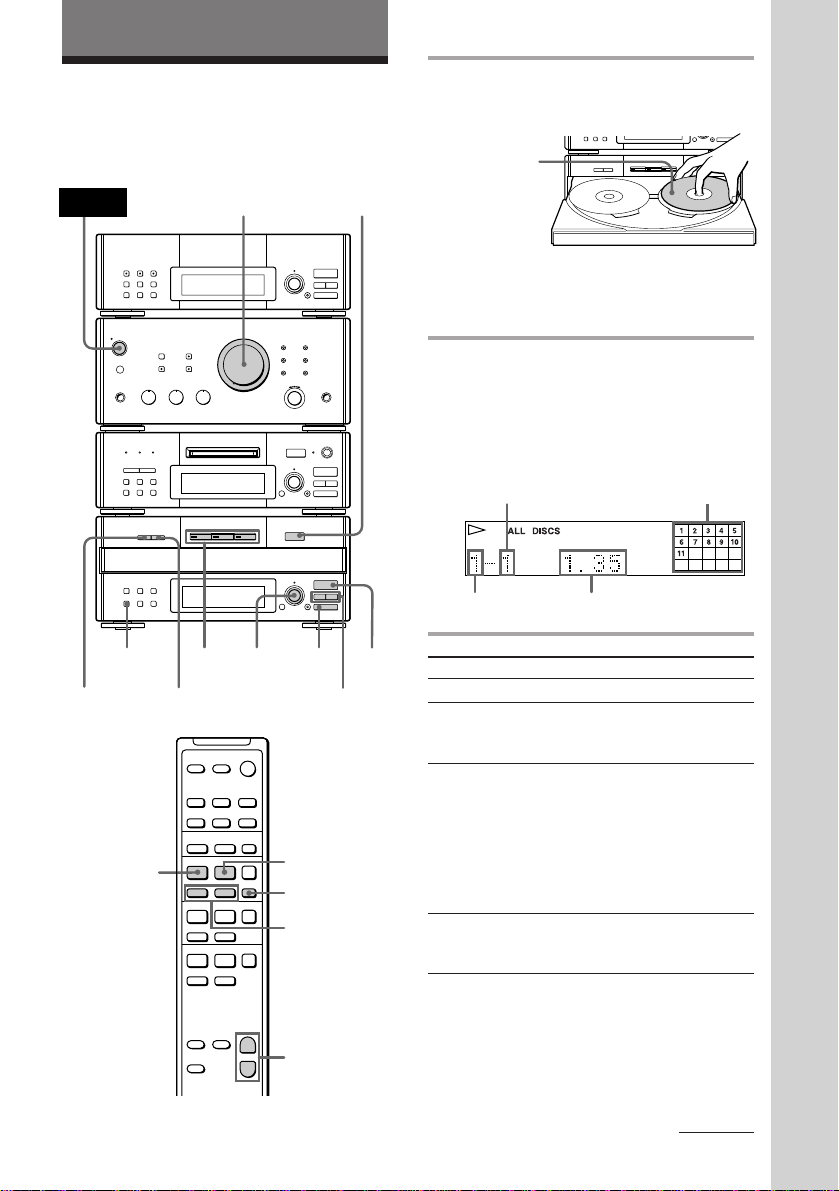
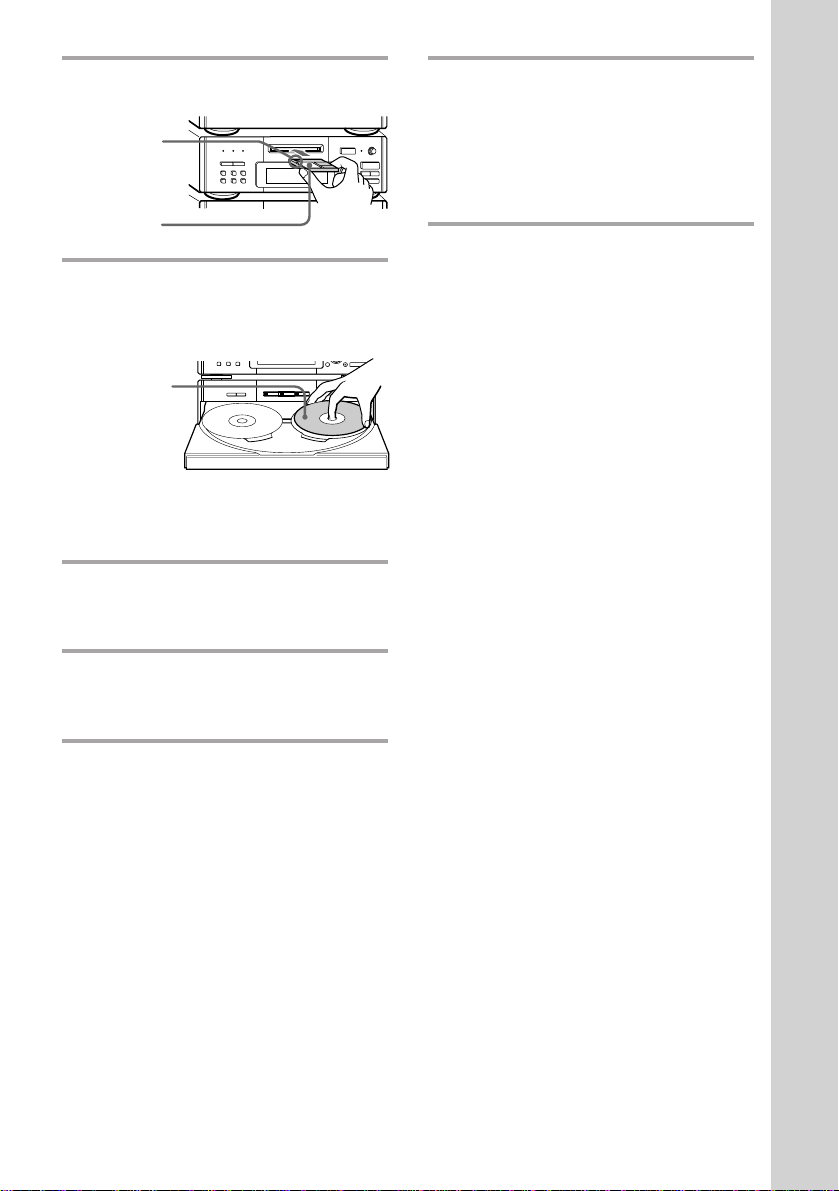
1 Press § OPEN/CLOSE and place a
CD on the disc tray.
With the label
side up. When
you play a single
CD, place it on
the inner circle
of the tray.
To place the third disc, press DISC SKIP
(or D.SKIP on the remote) to rotate the
disc tray.
2 Press one of the DISC 1 – 3 buttons.
The disc tray closes and play starts.
If you press · ∏ (or · on the remote)
when the disc tray is closed, play starts
from the CD loaded on the tray whose
button is lit green.
Track number
Disc tray number
To
Stop play
Pause
Select a track
Find a point in
a track
Playing time
Do this
Press p.
Press · ∏ (or P on the
remote). Press again to resume
play.
Turn SELECTOR clockwise (to
go forward) or counterclockwise (to go back) and
release it when you locate the
desired track (or press + or
= on the remote). Turn and
hold SELECTOR to locate other
discs.
Press ) or 0 during play
and release it at the desired
point.
Music calendar
Basic Operations
+
–
VOL (+/–)
continued
17
EN
Page 18
Playing a CD (continued)
To
Select a CD
Play only the
CD you have
selected
Play all CDs
Remove or
exchange the
CD
Exchange the
CD during
play
Adjust the
volume
Tips
•Pressing · ∏ when the power is off
automatically turns the power on and starts CD
playback if there is a CD on the tray (One Touch
Play).
•You can switch from another source to the CD
player and start playing a CD just by pressing
· ∏ or the DISC 1 – 3 buttons* (Automatic
Source Selection).
* Pressing the DISC 1 – 3 buttons works as the
Automatic Source Selection feature while
normal play or “1 DISC SHUFFLE” is appearing
in the display.
•If there is no CD in the player, “NO DISC”
appears.
•When the disc tray is selected or the CD loaded on
the tray is playing, the DISC 1 – 3 button for the
tray is lit green.
Do this
Press DISC 1 – 3 button or DISC
SKIP (or D.SKIP on the remote).
Press CONTINUE repeatedly
until “1 DISC” appears.
Press CONTINUE repeatedly
until “ALL DISCS” appears.
Press § OPEN/CLOSE.
Press EX-CHANGE. Press again
to close the disc tray.
Turn VOLUME (or press VOL
or on the remote).
Recording a CD on an
MD
(DHC-MD77/EX77MD/
EX770MD only)
— CD Synchro Recording
You can make a digital recording of a CD on
an MD, marking track numbers in the same
sequence as the original CD. In addition, you
can record a program of favorite tracks (see
page 38), record only the first track on each
CD (Hit Parade, see page 40), and edit an MD
after recording (see pages 45 to 51).
POWER
1
EJECT
=
r REC
SELECTOR
§
OPEN/CLOSE
=
SELECTOR
65
•
•
•
•
•
•
•
§
•
•
0
10
+
· ∏
0)
p
+
· ∏
0)
p
18
EN
43
–
·
·
+
P+=p
P+=p
24
p
D.SKIP
P
Page 19
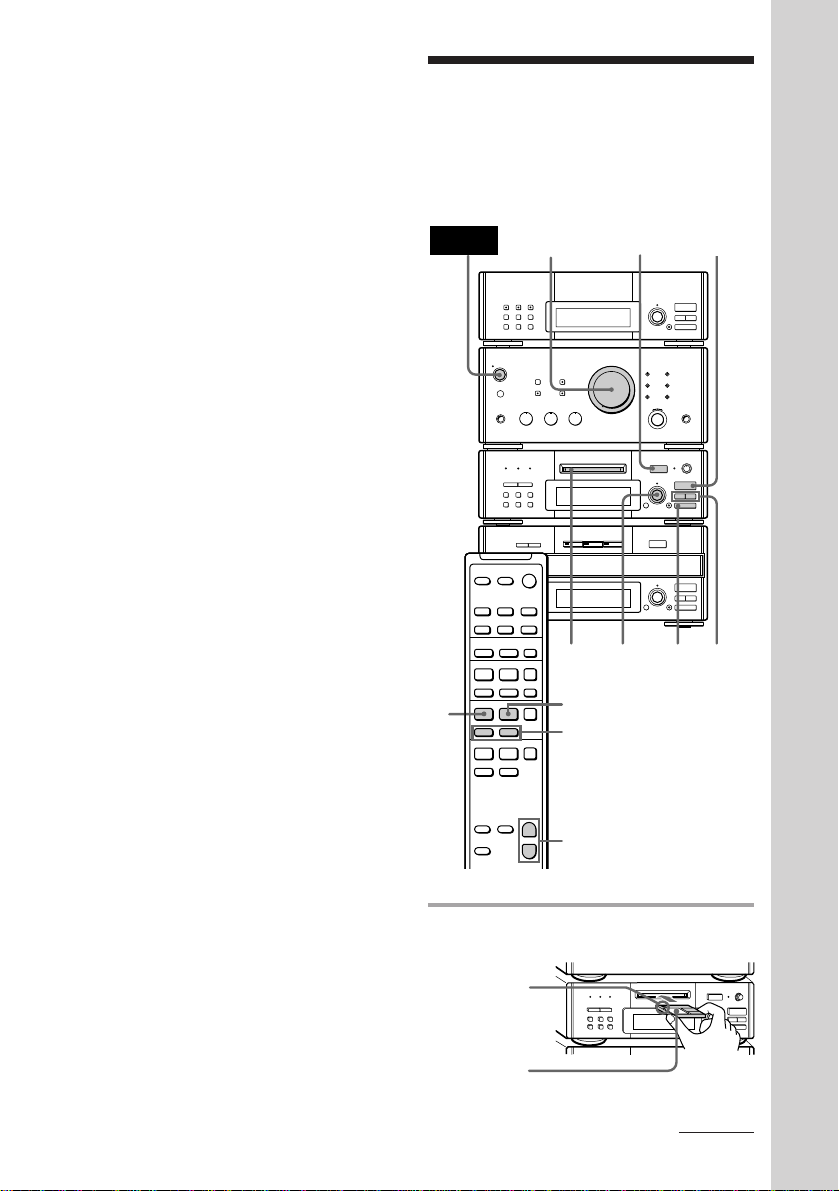
1 Insert a recordable MD.
With the arrow
pointing
toward the deck
§
EJECT
With the label
side up, sliding
the tab
rightward
2 Press § OPEN/CLOSE and place a
CD on the disc tray.
The disc tray opens.
0)
With the label
side up. When
you play a single
CD, place it on
the inner circle
of the tray.
To place the third disc, press DISC SKIP
(or D.SKIP on the remote) to rotate the
disc tray.
p
§
OPEN/CLOSE
=
SELECTOR
+
· ∏
0)
p
3 Press DISC SKIP (or D.SKIP on the
remote) repeatedly until the DISC
1 – 3 button you want lights green.
0)
6 Press · ∏ on the MD deck (or P
on the remote).
•
•
•
•
•
•
•
•
•
· ∏
p
Recording starts. The CD player stops
and the MD deck pauses automatically
when the recording is completed. If
there is no remaining recording time on
the MD, the MD deck stops.
To stop recording
Press p on the MD deck.
While “TOC” lights up or is
flashing
Do not move the deck or pull out the power
cord to ensure the complete recording. The
deck is currently updating the Table Of
Contents (TOC).
Tips
•Inserting an MD when the power is off
automatically turns the power on.
•The MD recording is complete only after all the
recording information is entered to TOC at which
point TOC stops flashing and goes out. Be careful
not to disconnect the mains lead or move the deck
before this point. Before disconnecting the mains
lead, do the following:
– Remove the MD.
– Press SYSTEM POWER, to turn off the system.
Basic Operations
4 Press CD SYNC, then turn
SELECTOR on the MD deck until
“NORMAL ?” appears.
5 Press ENTER/YES.
The MD deck stands by for recording
and the CD is in pause for playback.
19
EN
Page 20
Recording a CD on a
0)
p
=
SELECTOR
+
0)
p
· ∏
§
OPEN/CLOSE
tape (MHC-EX66/EX660 or the
optional TC-TX77/TX770 users only)
— CD Synchro Recording
The CD SYNC button lets you record from a
CD to a tape easily. You can use TYPE-I
(normal), TYPE-II (CrO
(metal) tapes. The deck detects the tape type
automatically.
MHC-EX66/EX660 is used for illustration
purpose.
2) and TYPE-IV
2 Press § OPEN/CLOSE on the CD
player and place a CD on the disc
tray.
The disc tray opens.
With the label
side up. When
you play a single
CD, place it on
the inner circle
of the tray.
To place the third disc, press DISC SKIP
(or D.SKIP on the remote) to rotate the
disc tray.
POWER
DOLBY NR
6
4
3
5
1
7
ª
§
OPEN/CLOSE
ª·
•
•
•
•
•
•
•
0)
•
•
0
10
ppP
§
OPEN/CLOSE
=
SELECTOR
+
· ∏
0)
p
2
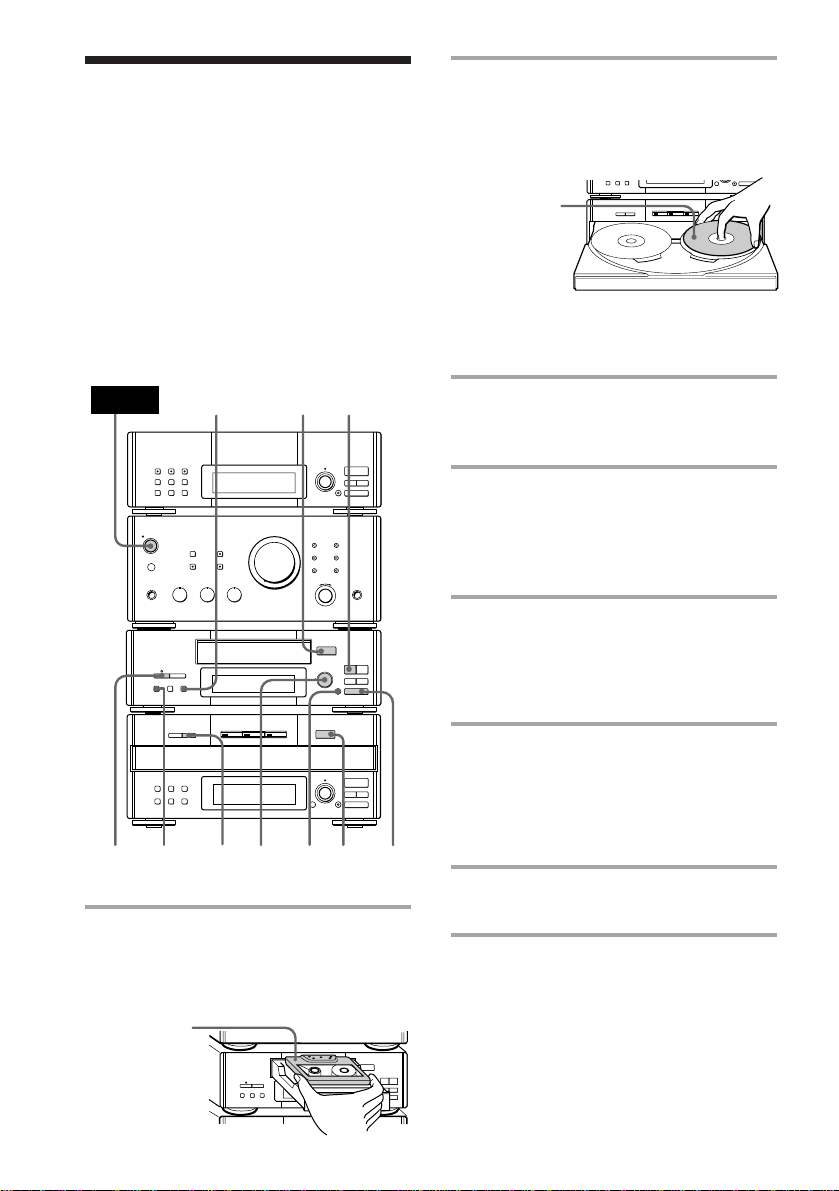
1 Press § OPEN/CLOSE on the tape
deck and insert a blank tape.
Press § OPEN/CLOSE again to close
the tray.
3 Press DISC SKIP (or D.SKIP on the
remote) repeatedly until the DISC
1 – 3 button you want lights green.
4 Press DIRECTION repeatedly to
select the side you want to record
on.
Select A to record on one side. Select
Å or a to record on both sides.
5 Turn REC LEVEL to adjust the
recording level.
The fourth dot is satisfactory for most
purposes. For details, see “Recording on
a tape manually” on page 52.
6 Press CD SYNC on the tape deck.
The tape deck stands by for recording
and the CD is in pause for playback. The
CD SYNC indicator lights up and
“PLAY · P {REC}” (for front side)
appears.
7 Press P on the tape deck.
Recording starts.
20
EN
With the side
you want to
record on
facing up
§
® REC
OPEN/CLOSE
ª·
•
•
•
•
•
•
•
0)
•
•
0
10
pP
Page 21
To stop recording
p
0)
§
EJECT
· ∏
•
•
•
•
•
•
•
•
•
Press p on the tape deck or the CD player.
Tips
• Pressing SYSTEM POWER on the DHC-MD77/
EX77MD/EX770MD automatically turns on the
TC-TX77/TX770 deck if you connect them to each
other using the audio bus cable.
• If you want to record from the reverse side, press
ª in step 6 so that “ª PLAY P {REC}” (for
reverse side) appears.
• When you record on both sides, be sure to start
from the front side. If you start from the reverse
side, recording stops at the end of the reverse side
even though you select a.
• When you want to reduce the hiss noise in lowlevel high-frequency signals, press DOLBY NR
repeatedly to select B or C before step 5. You
cannot switch DOLBY NR during recording.
• If the tape reaches the end of its front side while
dual-sided recording, the fadeout feature works so
that a track is not abruptly cut off at the end of the
tape (Fade Synchro). The track will be recorded
again from the beginning on the reverse side. The
Fade Synchro feature works during one-side
recording, too.
• You cannot perform CD Synchro Recording by
pressing the CD SYNC buttons on both the tape
deck and the MD deck at the same time.
Use the CD Synchro Recording feature for a tape
and record on an MD manually. This method is
recommended since on the MD deck, you can
erase the overlapping track recorded using the
Fade Synchro feature just by specifying its track
number (Erase Function).
Note
You cannot listen to other sources while recording.
Playing an MD
(DHC-MD77/EX77MD/EX770MD
only)
You can play an MD just like a CD.
POWER
·
+
–
P+=p
·
P+=p
·
ª·
)0
VOLUME
r REC
p
SELECTOR
1
P
=/+
§ EJECT
§
EJECT
=
SELECTOR
§
OPEN/CLOSE
=
SELECTOR
+
+
p
2
•
•
•
•
•
•
•
•
•
0
10
· ∏
0)
p
· ∏
0)
p
0/)
Basic Operations
+
VOL (+/–)
–
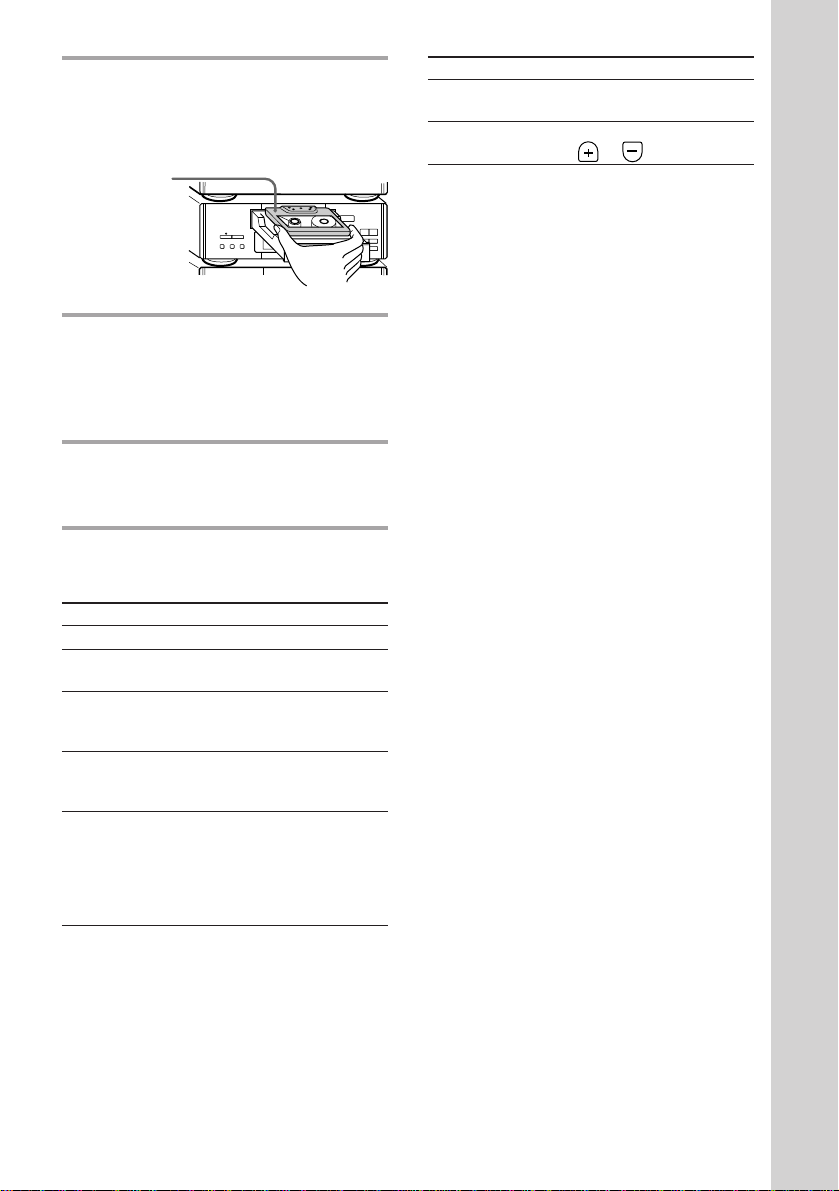
1 Insert an MD.
With the arrow
pointing
toward the
deck
With the label
side up
continued
21
EN
Page 22
+=
ª·
)0
p
+
–
VOL (+/–)
=
SELECTOR
+
0
0/)
)
p
p
· ∏
ª
§
OPEN/CLOSE
0)
ª·
pP
§
OPEN/CLOSE
•
•
•
•
•
•
•
•
•
0
10
POWER
31
2
VOLUME
DOLBY NR
P
Playing an MD (continued)
Playing a tape
2 Press · ∏ (or · on the remote).
Playback starts.
Music calendarPlaying timeTrack number
To
Stop play
Pause
Select a track
Find a point
in a track
Remove the
MD
Adjust the
volume
Do this
Press p.
Press · ∏ (or P on the
remote). Press again to resume
play.
Turn SELECTOR clockwise (to
go forward) or counterclockwise (to go back) and
release it when you locate the
desired track (or press + or
= on the remote).
Press ) or 0 during play
and release it at the desired
point.
Press § EJECT.
Turn VOLUME (or press VOL
or on the remote).
(MHC-EX66/EX660 or the optional
TC-TX77/TX770 users only)
You can use any type of tape, TYPE-I
(normal), TYPE-II (CrO
(metal), since the deck automatically detects
the tape type (ATS*).
MHC-EX66/EX660 is used for illustration
purpose.
* The Automatic Tape Selection (ATS) feature
automatically sets the equalization and bias to
match the inserted tape type.
2) and TYPE-IV
EN
22
Tips
• You can start playing from the desired track.
Before pressing · ∏ in step 2, turn SELECTOR
until the desired track appears.
•Pressing · ∏ when the power is off
automatically turns the power on and starts MD
playback if there is an MD in the deck (One Touch
Play).
•You can switch from another source to the MD
deck and start playing an MD just by pressing
· ∏ (Automatic Source Selection).
•Inserting an MD when the power is off
automatically turns the power on.
Page 23
1 Press § OPEN/CLOSE on the tape
deck and insert a recorded tape.
Press § OPEN/CLOSE again to close
the tray.
With the side
you want to
play facing up
® REC
§
OPEN/CLOSE
•
•
•
•
•
•
•
•
•
0
10
2 Press DIRECTION repeatedly to
select the side you want to play.
Select A to play one side. Select Å to
play both sides once. To play both sides
in succession, select a*.
3 Press ·.
Press ª to play the reverse side.
Playback starts.
* The deck stops automatically after repeating the
sequence five times.
To Do this
Stop play Press p.
Pause Press P. Press again to
Fast-forward Press p, then press ) (for
Rewind Press p, then press 0 (for
Select a track Press ) (to go forward) or
(AMS*) 0 (to go back) during the
resume play.
front side) or 0 (for reverse
side).
front side) or ) (for reverse
side).
front side playback.
Press 0 (to go forward) or
) (to go back) during the
reverse side playback.
ª·
0)
To Do this
Remove the Press § OPEN/CLOSE.
tape
Adjust the Turn VOLUME (or press
volume VOL or on the remote).
* The Automatic Music Sensor (AMS) feature
detects a blank space of more than four seconds
between tracks and locates the track quickly.
pP
Tips
•Pressing SYSTEM POWER on the DHC-MD77/
EX77MD/EX770MD automatically turns on the
TC-TX77/TX770 deck if you connect them to each
other using the audio bus cable.
•Pressing · or ª when the power is off
automatically turns the power on and starts tape
playback if there is a tape in the deck (One Touch
Play).
•You can switch from another source to the tape
deck just by pressing · or ª (Automatic Source
Selection).
•To start playing automatically from the beginning
of the tape after fast winding (Auto Play), press
· while holding down 0 (for front side) or
press ª while holding down ) (for reverse
Basic Operations
side).
•When you want to reduce the hiss noise in lowlevel high-frequency signals, press DOLBY NR
repeatedly to select B or C.
Notes
The AMS feature may not work properly when:
– The blank space between tracks is less than four
seconds long.
– Different material is recorded on the left and right
channels (e.g., karaoke tapes with the instrumental
music and a singer’s voice, foreign language
practice tapes, etc.).
– Very low-level signals or low-frequency signals
such as a bass saxophone are continuously
recorded on the tape.
– The system is placed too close to a TV. (Move the
system away from the TV or turn off the TV.)
23
EN
Page 24
Listening to the radio
–– Preset Tuning
Preset radio stations in the tuner’s memory
first (see page 10).
For European model
For other models
POWER
MANUAL
31
POWER
3
r REC
1
•
•
•
•
•
•
•
§
•
EJECT
•
0
10
=
SELECTOR
r REC
•
•
•
•
•
•
•
§
•
EJECT
•
0
10
=
SELECTOR
+
· ∏
0)
p
§
STEREO/MONO
OPEN/CLOSE
=
SELECTOR
+
· ∏
0)
p
1 Press TUNER/BAND (or BAND on
the remote) repeatedly until the
VOLUME
+
· ∏
0)
p
§
OPEN/CLOSE
=
SELECTOR
+
· ∏
0)
p
AUTO
2
band you want appears.
Each time you press the button, the band
changes as follows:
European model:
FM n MW n LW
Other models:
FM n AM
2 For European model:
Press TUNING MODE repeatedly
until “PRESET” appears.
·
·
–
+
P+=p
P+=p
ST/MONOVOLUME
2
PRESET (–/+)
BAND
24
EN
ª·
)0
p
+
–
For other models:
Press PRESET.
VOL (+/–)
Page 25
3 Turn MULTI CONTROLLER to
tune in the desired preset station.
Turn counterclockwise
(or press
PRESET –
on the remote)
for lower preset
numbers.
To
Turn off the
radio
Adjust the
volume
To listen to non-preset radio
stations
For European model:
Press TUNING MODE repeatedly until
“TUNING” appears in step 2, then turn
MULTI CONTROLLER to tune in the desired
station (Manual Tuning).
Press TUNING MODE repeatedly until
“AUTO TUNING” appears in step 2, then
turn MULTI CONTROLLER.
The frequency indication changes and
scanning stops when the system tunes in a
station (Automatic Tuning).
– MULTI CONTROLLER +
Frequency
Do this
Press SYSTEM POWER.
Turn VOLUME (or press VOL
or on the remote).
Turn clockwise
(or press
PRESET + on
the remote)
for higher
preset
numbers.
Preset number
For other models:
Press MANUAL in step 2, then turn MULTI
CONTROLLER to tune in the desired station
(Manual Tuning).
Press AUTO in step 2, then turn MULTI
CONTROLLER.
The frequency indication changes and
scanning stops when the system tunes in a
station (Automatic Tuning).
Tips
•Pressing TUNER/BAND when the power is off
automatically turns the power on and tunes to the
last received station (One Touch Play).
•You can switch from another source to the tuner
just by pressing TUNER/BAND (Automatic
Source Selection).
•To improve broadcast reception, reorient the
supplied antennas.
•When an FM program is noisy, press ST/MONO
(European model) or STEREO/MONO (other
models) so that “MONO” appears. There will be
no stereo effect, but the reception will improve.
Press the button again to restore the stereo effect.
Basic Operations
25
EN
Page 26
Recording from the
=
SELECTOR
+
0)
p
· ∏
§
OPEN/CLOSE
0)
ª·
pP
§
OPEN/CLOSE
•
•
•
•
•
•
•
•
•
0
10
POWER
p
ª
5
7
7
6
4
1
23
DOLBY NR
radio
You can record a radio program on an MD
(DHC-MD77/EX77MD/EX770MD) or on a
tape (MHC-EX66/EX660 or the TC-TX77/
TX770 users) by calling up the preset station.
To record after erasing all tracks on an MD,
see page 46 (DHC-MD77/EX77MD/
EX770MD only).
DHC-MD77/EX77MD/EX770MD
MHC-EX66/EX660 or the TC-TX77/TX770
users
POWER
r REC
§
EJECT
=
SELECTOR
+
§
OPEN/CLOSE
=
SELECTOR
+
p
23
· ∏
0)
0)
4
157
•
•
•
•
•
•
•
•
•
0
10
p
· ∏
p
6
1 Insert a recordable MD or a blank
tape.
To insert an MD, see page 19.
To insert a tape, see page 20.
2 Press TUNER/BAND (or BAND on
the remote) repeatedly until the
band you want appears.
3 For European model:
Press TUNING MODE repeatedly
until “PRESET” appears.
For other models:
Press PRESET.
EN
26
Page 27
4 Turn MULTI CONTROLLER to
tune in the desired preset station.
Turn counterclockwise
(or press
PRESET –
on the remote)
for lower preset
numbers.
– MULTI CONTROLLER +
Frequency Preset number
Turn clockwise
(or press
PRESET + on
the remote)
for higher
preset
numbers.
5 For DHC-MD77/EX77MD/
EX770MD:
Press r REC on the MD deck.
The MD deck stands by for recording.
For MHC-EX66/EX660 or the
TC-TX77/TX770 users:
Press DIRECTION repeatedly to
select the side you want to record on
(one side: A or both sides: Å or
a), then press r REC on the tape
deck.
The tape deck stands by for recording
and “PLAY · P {REC}” appears.
To stop recording
Press p on the MD deck or the tape deck.
Tips
•To record non-preset stations, press TUNING
MODE repeatedly until “TUNING” appears in
step 3 (European model) or press MANUAL in
step 3 (other models), then turn MULTI
CONTROLLER to tune in the desired station.
•If noise is heard while recording an AM radio
program, move the AM antenna to reduce the
noise.
Note on recording on an MD
The MD recording is complete only after all the
recording information is entered to TOC at which
point TOC stops flashing and goes out. Be careful
not to disconnect the mains lead or move the deck
before this point. Before disconnecting the mains
lead, do the following:
– Remove the MD.
– Press SYSTEM POWER, to turn off the system.
Notes on recording on a tape
•If you want to record from the reverse side, press
ª after pressing r REC on the tape deck in step
5 so that “ª PLAY P {REC}” appears.
•When you want to reduce the hiss noise in lowlevel high-frequency signals, press DOLBY NR
repeatedly to select B or C before step 5. You
cannot switch DOLBY NR during recording.
Basic Operations
6 Turn REC LEVEL to adjust the
recording level.
For details, see “Adjusting the recording
level” on page 37 (DHC-MD77/
EX77MD/EX770MD) or “Recording on a
tape manually” on page 52 (MHC-EX66/
EX660 or the TC-TX77/TX770 users).
7 For DHC-MD77/EX77MD/
EX770MD:
Press · ∏ on the MD deck (or P
on the remote).
For MHC-EX66/EX660 or the
TC-TX77/TX770 users:
Press P or · on the tape deck.
Recording starts.
27
EN
Page 28
The CD player
Using the CD display
You can check the remaining time of the
current track or that of the CD.
p
§
OPEN/CLOSE
=
SELECTOR
+
· ∏
0)
p
TIME
Press TIME repeatedly during play.
Each time you press the button, the display
changes as follows:
n Playing time on the current track
Remaining time on the current track
Remaining time on the current CD*
* The remaining time on the CD is not displayed
during Program or Shuffle Play.
To check the total playing time
and the number of tracks on the
CD
Press TIME in normal or shuffle play stop
mode.
Tips
•Tracks numbered 1 to 20 appear in the Music
Calendar Display. Tracks numbered 21 or over
are not displayed.
•“--.--” appears when you check the remaining time
of a track whose number is 21 or over.
µ
µ
Playing the CD tracks
repeatedly
–– Repeat Play
This function lets you repeat a single CD or
all CDs in normal play, Shuffle Play and
Program Play.
p
§
OPEN/CLOSE
=
SELECTOR
+
· ∏
0)
p
REPEAT CONTINUE
Press REPEAT during play until
“REPEAT” appears.
Repeat Play starts. Do the following
procedure to change the repeat mode.
To repeat
All the tracks on
the current CD
All the tracks on
all CDs
Only one track*
* You cannot repeat a single track during Shuffle
Play and Program Play.
To cancel Repeat Play
Press REPEAT repeatedly until “REPEAT” or
“REPEAT 1” disappears.
Press
CONTINUE repeatedly until
“1 DISC” appears.
CONTINUE repeatedly until
“ALL DISCS” appears.
REPEAT repeatedly until
“REPEAT 1” appears while
playing the track you want to
repeat.
28
EN
Page 29
Playing the CD tracks
Programming the CD
in random order
–– Shuffle Play
You can play all the tracks on one CD or all
CDs in random order.
•
•
•
•
•
•
•
§
•
EJECT
•
0
DISC 1 – 3CONTINUE
r REC
SELECTOR
1 Place a CD (CDs) on the disc tray.
2 Press SHUFFLE.
“SHUFFLE” appears.
Each time you press the button, the
display changes as follows:
“ALL DISCS”
(All the CDs play
in random order.)
˜ “1 DISC”
(A single CD whose
DISC 1 – 3 button
lights green plays in
random order.)
3 Press · ∏ (or · on the remote).
The sound source automatically switches
to the CD player. “J” appears, then all
the tracks play in random order.
1
=
=
10
SELECTOR
+
· ∏
0)
p
§
OPEN/CLOSE
SELECTOR
+
· ∏
0)
p
tracks
–– Program Play
You can make a program of up to 32 tracks
from all the CDs in the order you want them
to be played. You can also record the
program you made.
=
=
1
SELECTOR
OPEN/CLOSE
SELECTOR
•
•
•
•
•
•
•
§
•
EJECT
•
0
10
+
· ∏
0)
p
§
+
· ∏
0)
p
p
7
54
TIME
CLEAR
32
r REC
CONTINUE
2
1 Turn FUNCTION until the CD
indicator lights up, then place a CD
(CDs) on the disc tray.
2 Press PROGRAM.
“PROGRAM” appears.
3
To cancel Shuffle Play
Press CONTINUE.
To select a desired CD
Press DISC 1 – 3 button while “1 DISC” is
appearing in the display.
Tips
• You can start Shuffle Play during normal play by
pressing SHUFFLE.
• To skip a track, turn SELECTOR clockwise (or
press + on the remote).
3 Press one of the DISC 1 – 3 buttons
to select a CD.
continued
29
EN
Page 30
Programming the CD tracks
(continued)
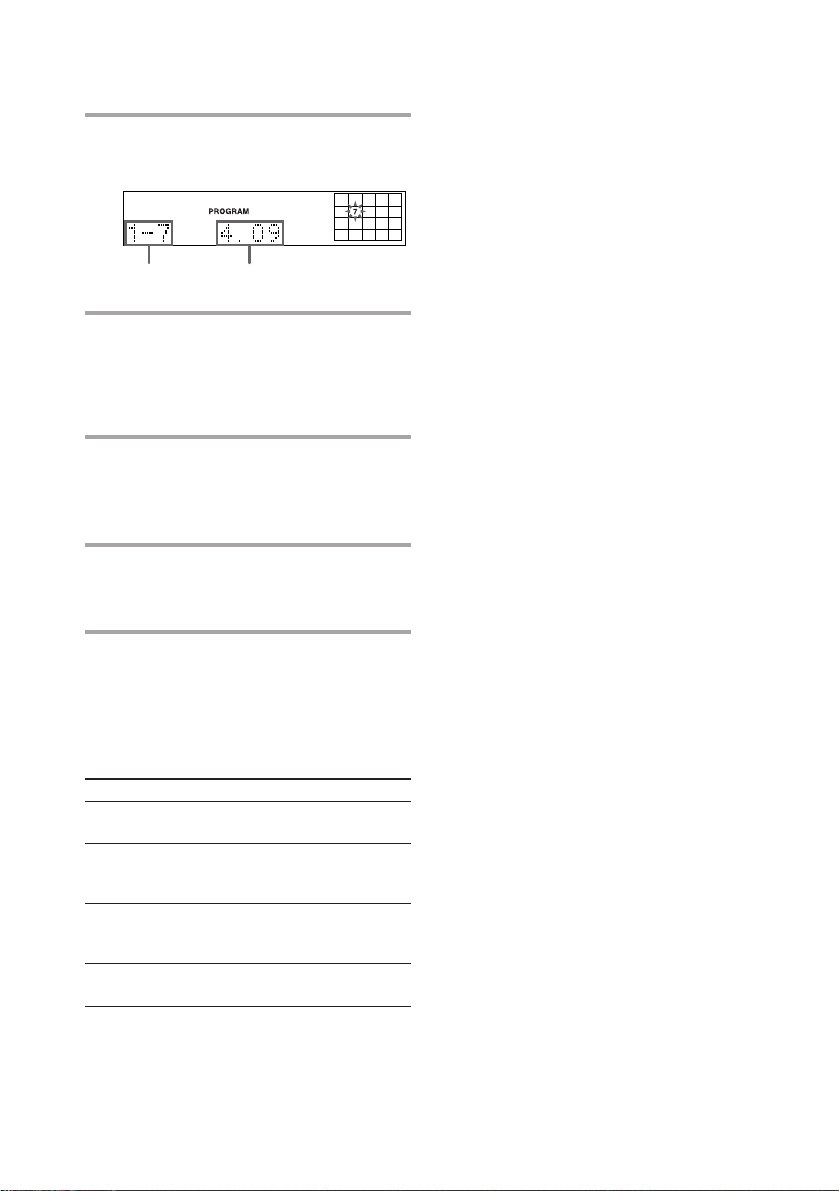
4 Turn SELECTOR until the desired
track number appears.
Selected track
Playing time
5 Press ENTER.
The track is programmed. The last
programmed track appears, followed by
the total playing time. If you have made
a mistake, press CLEAR.
6 To program additional tracks,
repeat steps 3 to 5.
Skip step 3 if you select a track from the
same disc.
7 Press · ∏ (or · on the remote).
All the tracks play in the order you
selected.
Tips
•To program the entire CD as one step of the
program, skip step 4.
•When you want to record the program, see
“Recording the favorite CD tracks on an MD” (see
page 38) or “Recording the favorite CD tracks on a
tape” (see page 54).
•The program you made remains after the Program
Play has finished. To play the same program
again, press · ∏. However, when you make a
recording with the Hit Parade feature, the
program is erased.
• The total playing time is not displayed when you
select a track whose number is 21 or over, or the
total program time exceeds 100 minutes.
30
To check the total number of the
programmed tracks
Press TIME in stop mode.
“Step” appears, followed by the total number
of the programmed tracks.
To
Cancel Program
Play
Clear a track
from the end
(in stop mode)
Add a track to
the program
(in stop mode)
Clear the entire
program
EN
Do this
Press CONTINUE.
Press CLEAR.
Do steps 3 to 5 in
“Programming the CD
tracks.”
Press p once in stop mode.
Page 31

Looping part of a CD
— Loop
The difference between NORMAL
and RHYTHM
The original track can be looped in two ways,
NORMAL and RHYTHM.
With the loop function, you can repeat part of
a CD during playback. This lets you create
original recordings.
p
§
OPEN/CLOSE
=
SELECTOR
+
· ∏
0)
p
2,43
1
1 Place a CD (CDs) on the disc tray.
2 Press LOOP repeatedly in pause or
stop mode to select
“NORMAL 1 – 5” or
“RHYTHM 1 – 5.”
Each time you press the button, the
display changes as follows:
NORMAL 1*
RHYTHM 5
NORMAL 5
RHYTHM 1*
Original
Hey, Come on everybody! …
NORMAL
Normal play resumes from the point the loop
started.
Loop length
Nn
Hey, C… C… C… C’mon everybody! …
n
Press LOOP
RHYTHM
Normal play resumes from the point the loop
ends.
Hey, C… C… C… erybody! …
nme on ev
n
Press LOOP
: Unheard portion overlapped by the
loop.
n
Release LOOP
n
n
Release LOOP
* See “The difference between NORMAL and
RHYTHM” for details.
3 Press one of the DISC 1 – 3 buttons,
then start playing.
4 Press and hold LOOP at the point
you want to start the Loop function,
and release the button to resume
normal play.
You can choose the loop length from the five
levels with the range from 0.25 to one second.
31
EN
Page 32

The MD Deck (DHC-MD77/
EX77MD/EX770MD only)
Using the MD display
You can check the remaining time of the
current track or that of the MD.
Checking the remaining
time of a track
DISPLAY/CHARACTER
•
•
•
•
•
•
•
§
•
EJECT
•
0
10
=
SELECTOR
r REC
Press DISPLAY/CHARACTER during
play.
Each time you press the button, the display
changes as follows:
+
· ∏
0)
p
§
OPEN/CLOSE
=
SELECTOR
+
· ∏
0)
p
Checking the remaining
time of an MD
Press DISPLAY/CHARACTER in stop
mode.
Each time you press the button, the display
changes as follows:
n Total playing time and the track
numbers on the MD
µ
Remaining recordable time on the MD
(only for a recordable MD)
µ
Disc title on the MD
Tips
•Tracks numbered 1 to 25 appear in the Music
Calendar Display. If the track numbers exceed 25,
” appears to the right of number 25.
•The music calendar showing the track numbers
appears within a grid if the MD is a premastered
disc, or without a grid if the MD is a recordable
disc.
Note
The correct remaining time may not be displayed
due to the MD’s system limitations.
32
n Playing time and the track number on
the current track
µ
Remaining time and the track number
on the current track
µ
Track title on the current track*
* “No Name” appears if no track title is stored.
EN
Page 33

Playing the MD tracks
Playing the MD tracks
repeatedly
— Repeat Play
This function lets you repeat a single track or
all the tracks on an MD in normal play,
Shuffle Play and Program Play.
REPEAT
•
•
•
•
•
•
•
§
•
EJECT
•
0
10
=
SELECTOR
r REC
Press REPEAT during play until
“REPEAT” (for all the tracks) or
“REPEAT 1*” (for a single track)
appears.
Repeat Play starts.
* You cannot repeat a single track during Shuffle
Play and Program Play.
To cancel Repeat Play
Press REPEAT repeatedly until “REPEAT” or
“REPEAT 1” disappears.
+
· ∏
0)
p
§
OPEN/CLOSE
=
SELECTOR
+
· ∏
0)
p
in random order
–– Shuffle Play
You can play the tracks in random order.
CONTINUE
r REC
2
1
=
SELECTOR
OPEN/CLOSE
SELECTOR
1 Insert an MD.
2 Press SHUFFLE.
“SHUFFLE” appears.
3 Press · ∏ (or · on the remote).
The sound source automatically switches
to the MD deck. “J” appears, then all
the tracks play in random order.
To cancel Shuffle Play
Press p, then CONTINUE.
Tip
To skip the tracks, turn SELECTOR clockwise (or
press + on the remote).
Note
You cannot start Shuffle Play during playback.
Press p, then SHUFFLE.
3
•
•
•
•
•
•
•
§
•
EJECT
•
0
10
+
· ∏
0)
p
§
p
33
EN
Page 34

Programming the MD
tracks
–– Program Play
You can make a program of up to 25 tracks in
the order you want them to be played.
16
•
•
•
•
•
•
•
§
•
EJECT
•
0
10
=
SELECTOR
r REC
CONTINUE
1 Turn FUNCTION until the MD
indicator lights up, then insert an
MD.
2 Press PROGRAM.
“PROGRAM” appears.
3 Turn SELECTOR until the desired
track number appears.
+
· ∏
0)
p
§
OPEN/CLOSE
p
432
4 Press ENTER/YES.
The track is programmed. The last
programmed track appears, followed by
the total playing time.
The last programmed track
Total playing time
5 To program additional tracks,
repeat steps 3 and 4.
6 Press · ∏ (or · on the remote).
All the tracks play in the order you
selected.
To
Cancel Program
Play
Add a track to
the program
(in stop mode)
Clear the entire
program
Tip
The program you made remains after the Program
Play has finished. To play the same program again,
press · ∏.
Note
You cannot start Program Play during playback.
Press p, then PROGRAM.
Do this
Press p, then CONTINUE.
Do steps 3 and 4 in
“Programming the MD
tracks.”
Press p in stop mode.
34
EN
Page 35

Before you start
recording
MDs (MiniDisc) let you digitally record and
play back music with high quality sound that
compares with the sound of CDs. Another
feature of MDs is track marking. The track
marking feature lets you quickly locate a
specific point or easily edit the recorded
tracks. However, depending on the source
you record, the recording method varies.
Also, the way the track numbers are recorded
differs depending on the source.
When the source you record from
is:
• This system’s CD player
– The digital signal from the CD is recorded
as it is (digital recording*).
– Track numbers are automatically marked
as on the original CD.
• Other digital components
(e.g., a DAT deck)
– When you set MODE SELECTOR on the
rear panel of the amplifier to DIGITAL
REC, the digital signal from the connected
component is recorded as it is (digital
recording*).
– When you set MODE SELECTOR on the
rear panel of the amplifier to ANALOG
REC, the digital signal is converted to an
analog signal once, then re-converted to a
digital signal and recorded (analog
recording).
– A track number is marked at the beginning
of a recording, but when you turn on the
Level Sync function (see page 43), track
numbers are automatically marked in sync
with the level of the input signal.
• This system’s tuner, other analog
components or a microphone
(e.g., a tape deck)
– The analog signal is converted to a digital
signal and recorded (analog recording).
– A track number is marked at the beginning
of a recording, but when you turn on the
Level Sync function (see page 43), track
numbers are automatically marked in sync
with the level of the input signal*.
* Track numbers may not be marked correctly if the
sound source is noisy.
Note on the track number of an MD
On an MD, the track number (track sequence), track
start and end point information, etc., are recorded in
the TOC* area independent of the sound
information. You can edit recorded tracks quickly
by modifying the TOC information.
* TOC: Table Of Contents
Note on recording on an MD
The MD recording is complete only after all the
recording information is entered to TOC at which
point TOC stops flashing and goes out. Be careful
not to disconnect the mains lead or move the deck
before this point. Before disconnecting the mains
lead, do the following:
– Remove the MD.
– Press SYSTEM POWER, to turn off the system.
* For details on limitations of digital recording, see
page 68.
35
EN
Page 36

Recording on an MD
manually
The system automatically locates the last
recorded portion and starts recording from
that point. Also, you can record over the
previous recording just as you would using a
tape deck.
52
•
•
•
•
•
•
•
§
•
EJECT
•
0
10
=
SELECTOR
r REC
4
13
+
· ∏
0)
p
§
OPEN/CLOSE
p
3,6
3 Select the point at which you want
to start recording. To record on a
blank MD or record from the last
recorded portion, skip this step.
To record over:
• From a specific position of the track
Play the MD and press · ∏ at the
desired point. The system changes to
recording pause.
• From the beginning of the track
Turn SELECTOR until the desired
track number appears. If you want to
record over all the tracks, select the
track number 1 here.
4 Press r REC.
The deck stands by for recording. To
mark track numbers, see “Marking track
numbers” on page 43. When recording
from this system’s CD, the track
numbers are automatically marked.
5 Turn REC LEVEL to adjust the
analog recording level.
When you record the analog input signal
(when the ANALOG IN indicator lights
up), adjust the recording level. For
details, see “Adjusting the recording
level” on page 37.
36
1 Insert a recordable MD.
2 Turn FUNCTION and select the
source (e.g., CD) you want to
record.
EN
6 Press · ∏ on the MD deck (or P
on the remote).
Recording starts.
7 Start playing the source to be
recorded.
Page 37

To stop recording
Press p on the MD deck.
If “OVER” appears in the level meter
A high-level signal was input during analog
recording. Reduce the recording level using REC
LEVEL (see this page), then re-record.
While “TOC” lights up or is flashing
Do not move the deck or pull out the power cord to
ensure the complete recording. The deck is
currently updating the Table Of Contents (TOC).
While “TRACK” is flashing
The deck is recording over an existing recording.
“TRACK” lights continuously while recording on a
blank portion of the MD.
Note
If you pause recording during CD recording, a track
number is recorded at that point. Also, note that the
tracks are recorded as a single track with a single
track number when:
• a single track of the same CD is recorded
repeatedly.
• two or more tracks with the same track number
from different CDs are recorded continuously.
Adjusting the
recording level
When the ANALOG IN indicator lights up
(analog recording), adjust the recording level
before starting recording. You cannot adjust
the recording level during digital recording.
ANALOG IN REC LEVEL
•
•
•
•
•
•
•
§
•
EJECT
•
0
10
=
SELECTOR
r REC
1 Do steps 1 to 4 in “Recording on an
MD manually” on page 36.
2 Play the portion of the source you
want to record with the strongest
signal level.
+
· ∏
0)
p
§
OPEN/CLOSE
· ∏
=
SELECTOR
+
3 Press REC LEVEL to extend the
control.
continued
37
EN
Page 38

Adjusting the recording level
(continued)
Recording the
4 Turn REC LEVEL to adjust the
recording level.
While monitoring the sound, adjust the
level so that “OVER” does not appear in
the level meter.
5 Stop playing the sound source.
6 To start recording, press · ∏ on
the MD deck (or P on the remote).
7 Start playing the source to be
recorded.
8 Press REC LEVEL again when
recording is finished.
favorite CD tracks on
an MD
You can select your favorite CD tracks with
the Program Play feature, then record the
program on an MD using the CD Synchro
Recording feature.
1798
10
•
•
•
•
•
•
•
§
•
EJECT
•
0
10
=
SELECTOR
4
+
§
OPEN/CLOSE
=
SELECTOR
+
51
· ∏
0)
p
· ∏
0)
p
p
r REC
2
3
38
Selecting the tracks
1 Turn FUNCTION until the CD
indicator lights up, then place a CD
(CDs) on the disc tray.
2 Press PROGRAM on the CD player.
“PROGRAM” appears.
EN
Page 39

3 Press one of the DISC 1 – 3 buttons
to select a CD.
4 Turn SELECTOR on the CD player
until the desired track number
appears.
Selected track
Playing time
5 Press ENTER.
The track is programmed. The last
programmed track appears, followed by
the total playing time.
6 To program additional tracks,
repeat steps 3 to 5.
Skip step 3 if you select a track from the
same disc.
Recording on an MD
7 Insert a recordable MD.
To insert an MD, see page 19.
10
Press · ∏ on the MD deck (or P
on the remote).
Recording starts from the last recorded
portion of the MD. The CD player stops
and the MD deck pauses automatically
when the recording is completed. If
there is no remaining recording time on
the MD, the MD deck stops.
To stop recording
Press p on the MD deck.
8 Press CD SYNC.
9 Turn SELECTOR on the MD deck
until “NORMAL ?” appears, then
press ENTER/YES.
The MD deck stands by for recording
and the CD is in pause for playback.
39
EN
Page 40

Recording only the
first track on each CD
— Hit Parade
Recording from four or
more CDs
You can exchange CDs without stopping or
pausing the recording.
This feature is useful when you record single
CDs in succession.
Recording from three CDs
31345
•
•
•
•
•
•
•
§
•
EJECT
•
0
10
=
SELECTOR
r REC
1 Insert a recordable MD.
2 Place CDs on the disc tray.
3 Press CD SYNC, then turn
SELECTOR on the MD deck until
“HIT PARADE ?” appears.
4 Press ENTER/YES.
+
· ∏
0)
p
§
OPEN/CLOSE
=
SELECTOR
+
· ∏
0)
p
2
p
3,4
§
EJECT
=
r REC
SELECTOR
§
OPEN/CLOSE
=
SELECTOR
p
•
•
•
•
•
•
•
•
•
0
10
+
· ∏
0)
p
+
· ∏
0)
p
2
1 Start recording according to the
procedure described in “Recording
from three CDs.”
2 Press REPEAT on the CD player
during recording until “REPEAT”
appears.
3 Press EX-CHANGE while recording
the third track.
The disc tray opens.
4 Exchange CDs, then press
EX-CHANGE again.
The disc tray closes.
40
5 Press · ∏ on the MD deck (or P
on the remote).
Recording starts from the CD loaded on
disc tray number 1 (DISC 1).
EN
5 To record additional tracks from
other CDs, repeat steps 3 and 4
while recording the last track.
To stop recording
Press p on the MD deck.
Page 41

Starting recording
with 2 seconds of
prestored audio data
— Time Machine Recording
When recording from an FM or satellite
broadcast, the first few seconds of material
are often lost due to the time it takes you to
ascertain the contents and press the record
button. To prevent the loss of this material,
the Time Machine Recording feature
constantly stores 2 seconds of the most recent
audio data in a buffer memory. When you
start recording the sound source, the
recording actually starts with the 2 seconds of
audio data stored in the buffer memory in
advance, as shown in the illustration below:
When you press
ENTER/YES in step 3
Audio data in 2-second
buffer memory
End of the source
to be recorded
Time
Recorded
portion
2 Start playing the source to be
recorded.
The most recent 2 seconds of audio data
is stored in the buffer memory.
3 Press ENTER/YES at the point you
want to start recording.
Recording of the source starts with the
2 seconds of audio data stored in the
buffer memory.
To stop Time Machine Recording
Press p on the MD deck.
Note
The MD deck starts storing audio data when the
deck is in recording pause and you start playing the
source. With less than 2 seconds of playing of the
source and audio data stored in the buffer memory,
Time Machine Recording starts with less than 2
seconds of audio data.
Beginning of the
source to be recorded
ENTER/YES
•
•
•
•
•
•
•
§
•
EJECT
•
0
10
=
SELECTOR
r REC
+
· ∏
0)
p
§
OPEN/CLOSE
p
1 Do steps 1 to 5 in “Recording on an
MD manually” on page 36.
The MD deck stands by for recording.
41
EN
Page 42

Making a space
between tracks
1 During recording pause, press
EDIT/NO repeatedly until
“S. Space ?” appears.
3 seconds long
The Smart Space and Auto Cut functions let
you make a blank space between tracks three
seconds long automatically while making a
digital recording.
Smart Space
There has been an extended silence of 4 to 30
seconds while digital recording.
The MD deck replaces the silence with a
blank of about 3 seconds and continues
recording.
Note that the tracks before and after this
three-second space may be recorded as a
single track with a single track number.
Auto Cut
There has been no sound input for 30 seconds
while digital recording.
The MD deck replaces the silence of 30
seconds with a blank of about 3 seconds and
changes to recording pause.
The Smart Space and Auto Cut functions are
both turned on at the same time. You cannot
use one of these functions without the other.
2 Press ENTER/YES within three
seconds.
“S. Space ON?” appears.
3 Press ENTER/YES again.
“S. Space ON” appears.
When “Smart Space” appears during
recording, the Smart Space function is
activated. When “Auto Cut” appears,
the Auto Cut function is activated.
To turn off the Smart Space and
Auto Cut functions
1 During recording pause, press EDIT/NO
repeatedly until “S. Space ?” appears.
2 Press ENTER/YES.
3 Press EDIT/NO so that “S. Space OFF”
appears.
Notes
•The Smart Space and Auto Cut functions are
factory set to on.
•If you turn the power off or disconnect the AC
power cord, the MD deck will recall the last
setting (on or off) of the Smart Space and Auto Cut
functions the next time you turn the power on.
42
EN
1 2,3
•
•
•
•
•
•
•
§
•
EJECT
•
0
10
=
SELECTOR
r REC
+
· ∏
0)
p
§
OPEN/CLOSE
=
SELECTOR
+
· ∏
0)
p
Page 43

Marking track
=
SELECTOR
+
0)
p
· ∏
§
EJECT
•
•
•
•
•
•
•
•
•
0
10
r REC
§
OPEN/CLOSE
53,421
numbers
When you record from this system’s CD
(digital recording), the track numbers are
automatically marked. In addition, you can
mark track numbers:
• At any point while recording.
• Automatically while analog recording.
Marking track numbers at
a specific point while
recording
You can mark track numbers at any time
while recording, regardless of the type of
sound source.
r REC
•
•
•
•
•
•
•
§
•
EJECT
•
0
10
=
SELECTOR
r REC
+
· ∏
0)
p
1 Press r REC.
The MD deck stands by for recording.
2 Press EDIT/NO repeatedly until
“LevelSync ?” appears.
3 Press ENTER/YES.
“LevelSyncON?” appears.
4 Press ENTER/YES again.
“LEVEL-SYNC” lights up.
5 Press · ∏ (or P on the remote).
Recording starts.
§
OPEN/CLOSE
Press r REC while recording at the
point you want to add a track mark.
A track number is marked at that point.
Marking track numbers
automatically while
analog recording
Track numbers are automatically marked
when the input signal continues to be under a
certain level for more than two seconds and
then returns to the previous level.
To cancel the track marking
1 Press EDIT/NO repeatedly until
“LevelSync ?” appears.
2 Press ENTER/YES.
“LevelSyncON?” appears.
3 Press EDIT/NO.
“LEVEL-SYNC” disappears.
In this way, a track number is marked only at
the beginning.
Note
You cannot mark track numbers automatically if the
sound source to be recorded is noisy (e.g., tapes or
radio programs).
43
EN
Page 44

Monitoring the input
Before you start
signal
— Input Monitor
You can monitor the signal being input to the
MD deck without recording it.
This lets you adjust the recording level of
analog sources.
12
•
•
•
•
•
•
•
§
•
EJECT
•
0
10
=
SELECTOR
r REC
1 Press § EJECT to remove the MD.
2 Press r REC.
If the input signal is analog, the
ANALOG IN indicator lights up, and
“AD-DA” appears.
If the input signal is digital, “-DA”
appears.
+
· ∏
0)
p
§
OPEN/CLOSE
=
SELECTOR
+
· ∏
0)
p
editing
When you edit recorded tracks, there is no
need for copying the MD.
• To change the order of tracks
Use the Move Function (see page 47) to
change the track numbering.
• To erase recordings
Use the Erase Function (see page 45).
This lets you erase a single track one by
one or all tracks at once.
• To locate the beginning of a specific
phrase
Use the Divide Function (see page 48) to
add track numbers. This lets you find your
favorite phrases quickly and play them
repeatedly.
• To create a medley by combining
several phrases
Use the Divide and Erase Functions to
erase unwanted portions, then put several
phrases into a single track using the
Combine Function (see page 49).
By using the editing functions in this
way, you can create original MD
albums.
Note on editing an MD
The MD editing is complete only after all the editing
information is entered to TOC at which point TOC
stops flashing and goes out. Be careful not to
disconnect the mains lead or move the deck before
this point. Before disconnecting the mains lead, do
the following:
– Remove the MD.
– Press SYSTEM POWER, to turn off the system.
44
EN
Page 45

Erasing recordings
— Erase Function
The MD system lets you erase unwanted
sound quickly and easily. The three options
to erase recordings are:
• Erasing a single track
• Erasing all tracks
• Erasing a portion of a track
Note
When “SHUFFLE” or “PROGRAM” appears in the
display, press CONTINUE so that the indication
disappears.
Erasing a single track
You can erase a track simply by specifying its
track number. When you erase a track, the
total number of tracks on the MD decreases
by one and all the tracks following the erased
one are renumbered.
Example: Erasing track B.
Track
number
Original
tracks
1
AB C D
Erase track B.
23
4
1 Turn SELECTOR until the track
number you want appears.
The track number
you want
2 Press EDIT/NO repeatedly until the
selected track number and
“2 Erase ?” appear.
3 Press ENTER/YES.
“Complete” appears for a few seconds
and the selected track and title are
erased.
To cancel the Erase Function
Press p on the MD deck.
Note
“Erase!! ?” appears when the track was recorded or
edited on another deck and is record protected. To
erase the track, press ENTER/YES while “Erase!! ?”
is displayed.
ERASE
123
AC D
12
•
•
•
•
•
§
EJECT
•
0
10
=
SELECTOR
r REC
+
· ∏
0)
p
§
OPEN/CLOSE
=
SELECTOR
+
· ∏
3
0)
p
•
•
•
p
continued
45
EN
Page 46

Erasing recordings (continued)
Erasing all tracks
You can erase the disc title, all recorded
tracks and their titles at once.
Erasing a portion of a
track
By using the Divide (see page 48), Erase (see
page 45), and Combine (see page 49)
Functions, you can erase specific portions of a
track.
2,31 p
•
•
•
•
•
•
•
§
•
EJECT
•
0
10
=
SELECTOR
r REC
1 While the deck is stopped, press
EDIT/NO repeatedly until “All
Erase ?” appears.
2 Press ENTER/YES.
“All Erase ??” appears.
To cancel the Erase Function at this time,
press p.
3 Press ENTER/YES again.
“Complete” appears for a few seconds
and all recorded tracks and their titles
are erased.
+
· ∏
0)
p
§
OPEN/CLOSE
Example: Erasing a portion of track A.
Track
number
Original
tracks
123
AB
Portion to be
erased.
Divide track A
into three parts.*
The track is
renumbered.
1234
DIVIDE
(page 48)
a
A- A- A-
b
c
Erase track A-b.
1234
ERASE
(page 45)
A-
a
A-
c
B
Combine tracks
A-a and A-c.
123
COMBINE
(page 49)
a
c
A ( + )
B
* The tracks are renumbered.
B
46
Tip
You can undo a track erasion.
See “Undoing the last edit” on page 51.
EN
Page 47

Moving recorded
tracks
— Move Function
By using the Move Function, you can change
the order of any track on the disc. When you
move tracks, the tracks are automatically
renumbered.
Example: Moving track C to position 2.
4 Turn SELECTOR until the new track
position appears.
To cancel the Move Function at this time,
press p.
The original
track number
The new track
position
Track
number
Original
tracks
123
AB C
Move track C to the
second position.
4
D
12 34
MOVE
ACBD
1,4
2
•
•
•
•
•
•
•
§
•
EJECT
•
0
10
=
SELECTOR
r REC
+
0)
§
OPEN/CLOSE
=
SELECTOR
+
3,5
· ∏
p
· ∏
0)
p
1 Turn SELECTOR until the track
number you want to move appears.
2 Press EDIT/NO repeatedly until
“Move ?” appears.
5 Press ENTER/YES.
“Complete” appears for a few seconds.
Note
When “SHUFFLE” or “PROGRAM” appears in the
display, press CONTINUE so that the indication
disappears.
p
3 Press ENTER/YES.
47
EN
Page 48

Dividing recorded
tracks
— Divide Function
You can use this function to add track
numbers to multiple tracks that are recorded
as one track. This function also lets you mark
track numbers after the recording ends. The
total number of tracks increases by one and
all the tracks following the divided ones are
renumbered.
Example: Dividing track 2 into tracks B
Track
number
Original
tracks
DIVIDE
and C.
12
AB C
3
D
Divide track 2 into
tracks B and C.
123 4
AB C
2
SELECTOR
r REC
D
•
•
•
•
•
•
•
§
•
EJECT
•
0
10
=
SELECTOR
+
· ∏
0)
p
1
3 Press ENTER/YES.
“Rehearsal” and “Position ok?” appear
alternately and the portion to be divided
is played repeatedly.
To shift the position to be divided:
1 Press EDIT/NO.
2 While monitoring the sound, turn
SELECTOR to the starting point to be
divided.
You can check the display and shift
the point between –128 and +127 (±01
is about 0.06 seconds).
To cancel the Divide Function at this
time, press p.
4 Press ENTER/YES again when you
find the point to be divided.
“Complete” appears for a few seconds
and the newly created track begins
playing.
Tip
You can also divide tracks while recording. Press
r REC at the desired point (see page 43).
Notes
•When “SHUFFLE” or “PROGRAM” appears in
the display, press CONTINUE so that the
indication disappears.
•The new track will have no track title even if the
original track was labeled.
48
§
OPEN/CLOSE
=
SELECTOR
+
3,4
1 While playing the MD, press · ∏
(or P on the remote) at the point to
be divided.
The MD deck pauses.
2 Press EDIT/NO repeatedly until the
selected track number and
“2 Divide ?” appear.
EN
· ∏
0)
p
Page 49

Combining recorded
tracks
— Combine Function
This function lets you put several tracks or
several independently recorded portions into
a single track. The total number of tracks
decrease by one and all the tracks following
the combined ones are renumbered.
Example: Combining tracks B and C.
Track
number
Original
tracks
COMBINE
2
1
34
AB
12
AB
r REC
CD
Combine tracks B
and C.
3
CD
1
2
•
•
§
EJECT
•
0
=
SELECTOR
+
· ∏
0)
•
•
•
•
•
•
10
p
3 Press ENTER/YES.
“Rehearsal” and “Track ok?” appear
alternately and the portion where the
two tracks will join (i.e., the end of the
first track and the beginning of the
second track) is played repeatedly.
To cancel the Combine Function at this
time, press p.
4 Press ENTER/YES again when you
find the portion.
“Complete” appears for a few seconds
and the tracks are combined.
Notes
•When “SHUFFLE” or “PROGRAM” appears in
the display, press CONTINUE so that the
indication disappears.
•If both of the combined tracks have track titles, the
title of the second track is erased.
•If “Sorry” appears, the tracks cannot be combined.
This happens when you have edited the same
track too many times. This is due to a technical
limitation of the MD system and is not a
mechanical error.
§
OPEN/CLOSE
=
SELECTOR
3,4
p
+
· ∏
0)
1 Turn SELECTOR until the second
track of the two to be combined
appears.
For example, to combine tracks 2 and 3,
select track 3.
2 Press EDIT/NO repeatedly until the
selected track number and
“3 Combine ?” appear.
49
EN
Page 50

Labeling an MD
You can create titles (names) for your
recorded MDs and tracks. You can use up to
1,700 characters for a disc.
4
r REC
SCROLL
5
=
SELECTOR
OPEN/CLOSE
=
SELECTOR
3,821
1 To label a disc, press p and stop
playing the disc.
To label a track, turn SELECTOR
until the desired track number
appears.
2 Press EDIT/NO repeatedly until
“Name in ?” appears.
0
§
EJECT
+
§
+
•
•
•
0
· ∏
0)
· ∏
0)
6
•
•
•
•
•
•
10
p
p
4 Press DISPLAY/CHARACTER
repeatedly until the desired type of
character appears.
Each time you press the button, the
display changes as follows:
A (Upper cases) n a (Lower cases)
n 0 (Numbers and Symbols*) n A...
*You can use the following symbols:
! ” # $ % & ’ ( ) * + , – . / : ; < = > ? @ _ `
5 Turn SELECTOR until the character
you want appears.
The selected character flashes. To enter a
blank space, press ) while the cursor
is flashing.
6 Press ) to enter the character.
The cursor shifts rightward and waits for
the input of the next character.
7 Repeat steps 4 to 6 to complete the
entire title.
If you made a mistake, press 0 or )
until the character you want to change
flashes, then repeat steps 4 to 6.
To erase the character, press EDIT/NO
while the character is flashing.
50
3 Press ENTER/YES.
The cursor starts flashing.
EN
Cursor
8 Press ENTER/YES to complete the
labeling procedure.
The titles you entered appear
sequentially.
Page 51

To cancel labeling
Press p on the MD deck.
To check the titles
To check the disc titles, press SCROLL while
the play is being stopped. To check the track
titles, press SCROLL while in play. The titles
are displayed scrolling in the display. To
stop scrolling, press SCROLL. Press the
button again to restart scrolling.
To change an existing title
Start over from step 1.
To erase all titles
1 Press EDIT/NO repeatedly until “Name
Erase ?” appears.
2 Press ENTER/YES.
All the disc titles and track titles are erased.
To cancel erasing, press p on the MD deck.
Tips
• You can label a track title while playing or
recording, but you must complete the labeling
before the track ends.
• You can undo a name erasion.
See “Undoing the last edit” on this page.
Undoing the last edit
— Undo Function
This function lets you cancel the last edit and
restore the contents of the MD to the
condition before the edit.
Note, however, that you cannot undo an edit
if you do any of the following after the edit:
• Press the r REC or CD SYNC button on
the MD deck.
• Update the TOC by turning the power off
or ejecting the MD.
• Disconnect the AC power cord.
1 2,3
•
•
•
•
•
•
•
§
•
EJECT
•
0
10
=
SELECTOR
r REC
+
· ∏
0)
p
§
OPEN/CLOSE
p
=
SELECTOR
+
1 While the deck is stopped with no
track number appearing in the
display, press EDIT/NO repeatedly
until “Undo ?” appears.
“Undo ?” does not appear if you have
done no editing.
continued
51
EN
Page 52

Undoing the last edit (continued)
The Tape Deck (MHC-EX66/
EX660 or the optional TC-TX77/
TX770 users only)
2 Press ENTER/YES.
One of the following messages appears,
depending on the last edit.
Editing done: Message:
Erasing a single
track
Erasing all tracks on
“Erase Undo?”
an MD
Dividing a track
Combining tracks
Moving a track
“Divide Undo?”
“Combine Undo?”
“Move Undo?”
Labeling a track or
an MD
Changing an existing
title
“Name Undo?”
Erasing all titles on
an MD
3 Press ENTER/YES again.
“Complete” appears for a few seconds
and the contents of the MD are restored
to the condition before the edit.
To cancel the Undo Function
Press EDIT/NO or p on the MD deck.
Recording on a tape
manually
You can record a CD or an MD as you like,
for example, recording just the tracks you
want or recording from the middle of the
tape.
ªDOLBY NR
2
1
§
OPEN/CLOSE
ª·
•
•
•
•
® REC
RESET
386
1 Insert a blank tape.
To insert a tape, see page 20.
•
•
•
0)
•
•
0
10
pP
§
OPEN/CLOSE
84
p
52
2 Turn FUNCTION to select the
sound source to be recorded.
When you record from the radio, tune in
the desired radio station.
When you record the sound of a TV or
VCR, select “VIDEO 1” or “VIDEO 2/
AUX” (or “VIDEO 2” for DHC-MD77).
See page 13 for details.
EN
Page 53

3 Press DIRECTION repeatedly to
select the side you want to record
on.
Select A to record on one side. Select
Å or a to record on both sides.
4 Press r REC on the tape deck.
The tape deck stands by for recording.
“PLAY · P {REC}” (for front side)
appears.
5 Start playing the source to be
recorded.
6 Turn REC LEVEL to adjust the
recording level.
While monitoring the sound at the
highest level, adjust the recording level
so that it falls within the range illustrated
below.
When using a TYPE-I (normal)
or TYPE-II (CrO
When using a TYPE-IV (metal) tape
2) tape
a
To Press
Stop recording p on the tape deck.
Pause recording P on the tape deck.
Tips
•Pressing SYSTEM POWER on the DHC-MD77/
EX77MD/EX770MD automatically turns on the
TC-TX77/TX770 deck if you connect them to each
other using the audio bus cable.
•If you want to record from the reverse side, press
ª in step 4 so that “ª PLAY P {REC}” (for
reverse side) appears.
•When you want to reduce the hiss noise in low-
level high-frequency signals, press DOLBY NR
repeatedly to select B or C before step 4. You
cannot switch DOLBY NR during recording.
•If you press RESET, the counter display returns to
“00 00.”
7 Stop playing the source.
8 Press P or · on the tape deck.
Recording starts.
9 Start playing the source to be
recorded.
53
EN
Page 54

Recording the
favorite CD tracks on
a tape
You can select your favorite CD tracks with
the Program Play feature, then record the
program on a tape using the CD Synchro
Recording feature.
11
191078
4 Turn SELECTOR until the desired
track number appears.
Selected track Playing time
5 Press ENTER.
The track is programmed. The last
programmed track appears, followed by
the total playing time.
6 To program additional tracks,
repeat steps 3 to 5.
Skip step 3 if you select a track from the
same disc.
§
ª·
•
•
•
•
•
•
•
0)
•
•
0
10
pP
§
OPEN/CLOSE
=
SELECTOR
+
· ∏
0)
p
51
4
2
3
Selecting the tracks
1 Turn FUNCTION until the CD
indicator lights up, then place a CD
(CDs) on the disc tray.
2 Press PROGRAM.
“PROGRAM” appears.
3 Press one of the DISC 1 – 3 buttons
to select a CD.
p
Recording on a tape
7 Insert a blank tape.
To insert a tape, see page 20.
8 Press DIRECTION repeatedly to
select the side you want to record
on.
Select A to record on one side. Select
Å or a to record on both sides.
9 Turn REC LEVEL to adjust the
recording level.
See “Recording on a tape manually” for
details.
54
EN
Page 55

10
Press CD SYNC on the tape deck.
The tape deck stands by for recording
and the CD is in pause for playback. The
CD SYNC indicator lights up and
“PLAY · P {REC}” (for front side)
appears.
Other Features
Adjusting the sound
You can adjust the bass/treble, mute the
sound or listen to the source directly.
11
Press P on the tape deck.
Recording starts.
To stop recording
Press p on the tape deck or the CD player.
Tips
• Pressing SYSTEM POWER on the DHC-MD77/
EX77MD/EX770MD automatically turns on the
TC-TX77/TX770 deck if you connect them to each
other using the audio bus cable.
• If you want to record from the reverse side, press
ª in step 10 so that “ª PLAY P {REC}” (for
reverse side) appears.
• When you record on both sides, be sure to start
from the front side. If you start from the reverse
side, recording stops at the end of the reverse side
even though you select a.
• When you want to reduce the hiss noise in lowlevel high-frequency signals, press DOLBY NR
repeatedly to select B or C before step 9. You
cannot switch DOLBY NR during recording.
• If the tape reaches the end of its front side while
dual-sided recording, the fadeout feature works so
that a track is not abruptly cut off at the end of the
tape (Fade Synchro). The track will be recorded
again from the beginning on the reverse side. The
Fade Synchro feature works during one-side
recording, too.
• You cannot perform CD Synchro Recording by
pressing the CD SYNC buttons on both the tape
deck and the MD deck at the same time.
Use the CD Synchro Recording feature for a tape
and record on an MD manually. This method is
recommended since on the MD deck, you can
erase the overlapping track recorded using the
Fade Synchro feature just by specifying its track
number (Erase Function).
DBFB
To
Adjust the
bass sound
SOURCE DIRECT
BASS
TREBLE PHONES
Do this
Turn BASS clockwise to
increase and counterclockwise
–20dB MUTING
•
•
•
•
•
•
•
§
•
EJECT
•
0
10
to decrease.
Adjust the
treble sound
Turn TREBLE clockwise to
increase and counterclockwise
to decrease.
Reinforce the
bass sound
Press DBFB* until the LOW or
HIGH** indicator lights up.
Press the button repeatedly
until the indicator turns off to
cancel.
Mute the sound
Press –20dB MUTING to turn
on the indicator. Press the
button again to return to the
original volume.
* DBFB: Dynamic Bass Feedback.
**HIGH is more effective than LOW.
To listen to music without any
audio effects
Press SOURCE DIRECT to turn on the
indicator.
The system outputs the music signals directly
without passing them through any circuit.
Press the button again to cancel.
To listen through the headphones
Connect the headphones to PHONES.
55
EN
Page 56

Singing along:
Karaoke
You can sing along with any stereo CD, MD
or tape by turning down the singer’s voice.
You need to connect an optional microphone.
2
Notes
•The instrumental sound may be reduced as well as
the singer’s voice when the sound is recorded in
monaural.
•The singer’s voice may not be reduced when:
– only a few instruments are playing.
– a duet is being played.
– the source has strong echoes or chorus.
– the singer’s voice deviates from the center.
Tip
If acoustic feedback (howling) occurs, move the
microphone away from the speakers or change the
direction of the microphone.
Mixing and recording
sounds
For DHC-MD77/EX77MD/EX770MD
•
•
•
•
•
•
•
§
•
EJECT
•
0
10
15 34
1 Connect an optional microphone to
MIX MIC.
2 Press KARAOKE PON.
The indicator lights up.
3 Select the source, then start playing.
4 Turn VOLUME to adjust the total
volume of the system.
5 Turn MIC LEVEL to adjust the
microphone volume.
When you are done
Disconnect the microphone from MIX MIC
and press KARAOKE PON to turn off the
indicator.
1846
r REC
10
23
7
§
EJECT
=
SELECTOR
+
§
OPEN/CLOSE
=
SELECTOR
+
5,9,
•
•
•
•
•
•
•
•
•
0
10
· ∏
0)
p
· ∏
0)
p
12
11
p
1 Connect an optional microphone to
MIX MIC.
2 Place a CD on the disc tray.
56
EN
Page 57

3 Insert a recordable MD.
4 Press KARAOKE PON.
The indicator lights up.
5 Start playing the CD.
6 Turn VOLUME to adjust the total
volume of the system.
7 Turn REC LEVEL to adjust the
recording level.
See “Adjusting the recording level” on
page 37.
8 Turn MIC LEVEL to adjust the
microphone volume.
9 Select the track you want on the CD
and set the CD player to pause.
10
Press r REC on the MD deck.
The MD deck stands by for recording.
11
Press · ∏ on the MD deck.
Recording starts.
For MHC-EX66/EX660
2
8
§
OPEN/CLOSE
•
•
•
•
•
•
•
•
•
0
10
§
OPEN/CLOSE
=
SELECTOR
+
6,10,
3
12
ª·
0)
pP
· ∏
0)
p
13
p
1957
® REC
11
4
1 Connect an optional microphone to
MIX MIC.
2 Place a CD on the disc tray.
12
Press · ∏ on the CD player.
CD playback starts. Start singing along
with the music.
To stop recording
Press p on the MD deck and the CD player.
3 Insert a blank tape.
4 Press DIRECTION repeatedly to
select the side you want to record
on.
5 Press KARAOKE PON.
The indicator lights up.
6 Start playing the CD.
7 Turn VOLUME to adjust the total
volume of the system.
continued
57
EN
Page 58

Singing along: Karaoke
(continued)
Labeling the preset
8 Turn REC LEVEL to adjust the
recording level.
See “Recording on a tape manually” on
page 52.
9 Turn MIC LEVEL to adjust the
microphone volume.
10
Select the track you want on the CD
and set the CD player to pause.
11
Press r REC on the tape deck.
The tape deck stands by for recording.
12
Press P or · on the tape deck.
Recording starts.
13
Press · ∏ on the CD player.
CD playback starts. Start singing along
with the music.
To stop recording
Press p on the tape deck and the CD player.
When you are done
Disconnect the microphone from MIX MIC
and press KARAOKE PON to turn off the
indicator.
Tips
•If you want to record your voice only through the
microphone, you can do so by selecting the CD
with the FUNCTION control and not playing a
CD.
•When you connect the microphone, the MD deck
performs analog recording (for DHC-MD77/
EX77MD/EX770MD).
stations
— Station Name
You can put a name of up to eight characters
(Station Name) to a preset station. The
Station Name appears when you tune in the
station.
DISPLAY
4 3,5 1
26,8
1 Press TUNER/BAND repeatedly
until the band you want appears.
European model:
FM n MW n LW*
Other models:
FM n AM
* You cannot assign a name to an LW station.
2 For European model:
Press TUNING MODE repeatedly
until “PRESET” appears.
For other models:
Press PRESET.
3 Turn MULTI CONTROLLER until
the preset number of the station you
want to label appears.
58
EN
Page 59

4 Press NAME IN.
The cursor starts flashing.
Cursor
5 Turn MULTI CONTROLLER until
the desired character appears.
The selected character is flashing.
You can use the following characters
and symbols:
A B C D E F G H I J K L M N O P Q R S T
U V W X Y Z [ \ ] - ll a b c d e f g h i j k l m
n o p q r s t u v w x y z { l } ¯ á à é è í ì ó ò
ú ù Ñ Ç S ß I IJ â ä ê ë î ï ô ö û ü ñ ç s g ¡
¸ ¸
(space) ! ” # ¤ % & ’ ( ) + , – . / 0 1 2 3 4 5
6 7 8 9 : ; < = > ? @
˘
6 Press ENTER/NEXT.
The cursor shifts rightward and starts
flashing.
To cancel labeling
Press NAME IN.
To erase the name
Start over from step 1 and enter spaces to the
characters you want to erase.
To check the name
Press DISPLAY.
Each time you press the button, the display
changes as follows:
Preset number and ˜
the frequency
Station name
(if you put one)
7 Repeat steps 5 and 6 to complete the
name.
8 Press ENTER/NEXT repeatedly
until “FILE” appears to store the
name.
59
EN
Page 60

Using the Radio Data
System (RDS)
(European model only)
What is the Radio Data
System?
Radio Data System (RDS) is a broadcasting
service that allows radio stations to send
additional information along with the regular
program signal. This tuner offers convenient
RDS features, such as monitoring traffic,
news, or information programs and locating a
station by program type (PTY). RDS is
available only on FM stations*.
Note
RDS may not work properly if the station you are
tuned to is not transmitting the RDS signal properly
or if the signal strength is weak.
* Not all FM stations provide RDS service, nor do
they provide the same types of services. If you are
not familiar with the RDS system, check with your
local radio stations for details on RDS services in
your area.
Receiving RDS broadcasts
To check the RDS information
Each time you press DISPLAY, the display
changes as follows:
n Station name
µ
Frequency
µ
Program type
µ
Radio text
Notes
•“No PTY Data” appears when the receiving
station does not broadcast the program type you
selected.
•“No Text Data” appears when the receiving
station does not broadcast the radio text data.
•“PTY Alarm” flashes when there is an emergency
announcement by governmental authorities.
Monitoring traffic, news,
or information programs
(EON)
Enhanced Other Networks (EON) allows the
tuner to automatically switch to a station
broadcasting traffic, news, or other
information. After the program ends, the
tuner switches back to the station you were
listening to (or the function you were using).
60
Simply select a station from the FM
band.
When you tune in a station that provides RDS
services, the station name appears in the
display.
EN
Press EON to select the desired EON
program.
Each time you press EON, the display
changes as follows:
n TA (Traffic Announcement)
µ
NEWS
µ
INFO (Information)
µ
(No display)
Page 61

The tuner enters the EON standby mode.
“No TA service”, “No News” or “No Info”
appears if there is no station that broadcasts
the program you selected.
When a station starts broadcasting the
program you selected, the tuner switches to
the station and an indication (“TA”, “NEWS”
or “INFO”) flashes. If you select “TA”,
“NOW TA Service” appears when the station
broadcasts the traffic announcement.
After the program ends, the unit switches
back to the station you were listening to (or
the function you were using).
To stop monitoring
Press EON once.
Tip
You can receive the incoming RDS information
while the system power is turned off. After
selecting the desired EON program (TA, NEWS or
INFO), press SYSTEM POWER to turn off the
system (“EON Wait?” and “Push EON KEY” appear
alternately). Within six seconds, press EON so that
“EON WAITING” appears.
Every time the tuner receives an EON program, the
system automatically turns on and returns to the
standby mode when the program is finished.
Notes
• The EON feature does not work while recording.
So, turn off the EON feature when you want to
record a program without interruptions, especially
when you want to do timer recording.
• Not all RDS stations provide EON service.
• The station will not switch if the current receiving
station broadcasts the program you selected.
• “Weak Signal” appears when the current EON
station cannot provide RDS data due to a weak
signal and “Returning” appears when the system
is attempting to retune the EON station.
Locating a station by
program type (PTY)
You can locate a station you want by selecting
a program type. The system tunes in the type
of programs currently being broadcast from
the RDS stations stored in the tuner’s preset
memory.
2,4
1
1 Press PTY.
“PTY Select” appears.
2 Turn MULTI CONTROLLER until
the desired program type appears.
See “List of program types (PTY).”
3 Press ENTER/NEXT.
The system starts searching for the
preset RDS stations (“PTY Search” and
the selected program type appear
alternately).
When the tuner receives a program, the
preset station number flashes.
4 Turn MULTI CONTROLLER until
the desired preset station number
flashes.
3,5
5 Press ENTER/NEXT while the
preset station number is flashing.
continued
61
EN
Page 62

Using the Radio Data System (RDS)
(continued)
List of program types (PTY)
News
News programs.
Affairs
Topical programs that expand on current
news.
Information
Programs about consumer affairs, medical
advice, and weather.
Sport
Sports programs.
Education
Educational programs, such as a “how-to”
programs and advice.
Drama
Radio plays and serials.
Culture
Programs about national or regional culture,
such as religion, language, and societal
concerns.
Science
Programs about the natural sciences.
Varied
Programs containing celebrity interviews,
panel games, and comedy.
Pop Music
Popular music programs.
Rock Music
Rock music programs.
M.O.R. Music
Easy listening (middle of the road music).
L. Classical
Classical music, such as instrumentals, and
vocal and choral works.
S. Classical
Performances of major orchestras, chamber
music, opera, etc.
Other Music
Music, such as jazz, rhythm and blues, and
reggae.
Alarm
Emergency broadcasts.
PTY undefined
Any programming not defined above.
Notes
•“PTY not found” appears when the program you
selected is not currently being broadcast.
•“PTY change” appears when the program type
you selected has ended while PTY scanning. You
will receive another station if it broadcasts the
same type of program.
•“Text waiting” appears when Radio Text Data is
not being provided.
62
EN
Page 63

Falling asleep to
music
— Sleep Timer
You can let the system turn off at a preset
time, so you can sleep to the music. You can
preset the time to be turned off by 10
minutes.
Make sure you have set the clock (see page 9).
SLEEP
Waking up to music
— Wake-up Timer
You can wake up to music at a preset time.
Make sure you have set the clock (see page 9).
2 3 4,5,6
•
•
•
•
•
•
•
§
•
EJECT
•
0
10
Press SLEEP.
Each time you press the button, the minute
display (the turn-off time) changes as follows:
90min n 80min n 70min... n 10min
n OFF
To check the remaining time
Press SLEEP once.
To change the time to turn off
Select the time you want by pressing SLEEP.
To cancel the Sleep Timer
operation
Press SLEEP repeatedly until “OFF” appears.
4,5,78
1 Prepare the sound source you want
to play.
• CD: Place a CD. To start from a
specific track, make a program (see
page 29).
• MD (DHC-MD77/EX77MD/
EX770MD only): Insert an MD.
• Tape (MHC-EX66/EX660, the optional
TC-TX77/TX770 deck only): Insert a
tape.
• Radio: Tune in a station (see page 24).
2 Press TIMER SET.
“Select timer” appears.
3 Press DAILY (for the same time
every day).
The indicator lights up and the hour
indication flashes.
continued
63
EN
Page 64

Waking up to music (continued)
4 Set the time to start playback.
Turn MULTI CONTROLLER to set the
hour, then press ENTER/NEXT.
The minute indication starts flashing.
Turn MULTI CONTROLLER to set the
minute, then press ENTER/NEXT.
“OFF” appears and the hour indication
flashes again.
5 Set the time to stop playback
following the procedure in step 4.
6 Turn MULTI CONTROLLER until
the sound source you want appears.
The indications change as follows:
CD PLAY n TUNER n TAPE PLAY
n MD PLAY
7 Press ENTER/NEXT.
The start time, followed by the stop time
and the sound source appears, then the
original display appears.
To change the setting
Start over from step 1.
To check the setting
Press DAILY to turn on the indicator. If the
indicator is already lit, press the button once
to turn off the indicator, then press it again.
The start time, followed by the stop time and
the sound source appears, then the original
display appears.
To cancel the timer operation
Press DAILY to turn off the indicator.
Tip (for DHC-MD77/EX77MD/EX770MD)
When you connect the optional TC-TX77/TX770
deck to the system with the audio bus cable (see
page 12), you can activate the wake-up timer with
the tape deck.
Notes
•Do not operate the system from the time the
power turns on until the playback starts (about 40
seconds).
•If “OFF TIME NG !” appears, the timer-on and -off
settings are the same. Change the time to turn off.
64
8 Adjust the volume and turn off the
power.
EN
Page 65

Timer-recording radio
programs
To timer-record, you must preset the radio
station (see page 10) and set the clock (see
page 9) beforehand.
For DHC-MD77/EX77MD/EX770MD
1 Tune in the preset radio station (see
page 24).
2 Press TIMER SET.
“Select timer” appears.
3 Press REC.
The indicator lights up and the hour
indication flashes.
2 3 4,5,6 4,5,7
•
•
•
•
•
•
•
§
•
EJECT
•
0
10
=
SELECTOR
r REC
+
· ∏
0)
p
§
OPEN/CLOSE
98
For MHC-EX66/EX660
23
4,5,6
4,5,7
4 Set the time to start recording.
Turn MULTI CONTROLLER to set the
hour, then press ENTER/NEXT.
The minute indication starts flashing.
Turn MULTI CONTROLLER to set the
minute, then press ENTER/NEXT.
“OFF” appears and the hour indication
flashes again.
5 Set the time to stop recording
following the procedure in step 4.
6 For DHC-MD77/EX77MD/
EX770MD:
Turn MULTI CONTROLLER and
select “TUNER to MD.”
For MHC-EX66/EX660:
Turn MULTI CONTROLLER and
select “TUNER to TAPE.”
7 Press ENTER/NEXT.
The start time, followed by the stop time,
the recording source and the preset
number appears, then the original
display appears.
§
ª·
•
•
•
•
•
•
•
0)
•
•
0
10
pP
§
OPEN/CLOSE
98
continued
65
EN
Page 66

Timer-recording radio programs
(continued)
8 For DHC-MD77/EX77MD/
EX770MD:
Insert a recordable MD.
For MHC-EX66/EX660:
Insert a blank tape.
9 Turn off the power.
To change the setting
Start over from step 1.
To check the setting
Press REC to turn on the indicator. If the
indicator is already lit, press the button once
to turn off the indicator, then press it again.
The start time, followed by the stop time and
the preset number appears, then the original
display appears.
To cancel the timer operation
Press REC to turn off the indicator.
Tip (for DHC-MD77/EX77MD/EX770MD)
When you connect the optional TC-TX77/TX770
deck to the system with the audio bus cable (see
page 12), you can activate the timer-recording with
the tape deck.
Notes
•Do not operate the system from the time the
power turns on until the recording starts (about 40
seconds).
•If “OFF TIME NG !” appears, the timer-on and -off
settings are the same. Change the time to turn off.
•When you use a brand new MD to record, the first
15 seconds will not be recorded (for DHC-MD77/
EX77MD/EX770MD).
•If the power is on at the preset time, the recording
will not be made.
•The volume is reduced to minimum during
recording.
Additional Information
Precautions
On operating voltage
Before operating the system, check that the
operating voltage of your system is identical with
the voltage of your local power supply.
On safety
•The unit is not disconnected from the AC power
source (mains) as long as it is connected to the
wall outlet, even if the unit itself has been turned
off.
•Unplug the system from the wall outlet (mains) if
it is not to be used for an extended period of time.
To disconnect the cord (mains lead), pull it out by
the plug. Never pull the cord itself.
•Should any solid object or liquid fall into the
component, unplug the stereo system and have
the component checked by qualified personnel
before operating it any further.
•The AC power cord must be changed only at the
qualified service shop.
On placement
•Place the stereo system in a location with adequate
ventilation to prevent heat build-up in the stereo
system.
•Do not place the system in an inclined position.
•Do not place the system in locations where it is;
– Extremely hot or cold
– Dusty or dirty
– Very humid
– Vibrating
– Subject to direct sunlight.
On operation
• If the stereo system is brought directly from a cold
to a warm location, or is placed in a very damp
room, moisture may condense on the lens inside
the CD player or the MD deck. Should this occur,
the system will not operate properly. Remove the
CD or MD and leave the system turned on for
about an hour until the moisture evaporates.
• When you move the system, take out the disc.
If you have any questions or problems concerning
your stereo system, please consult your nearest
Sony dealer.
66
EN
Page 67

On the speaker system
For SS-EX77/EX880
This speaker system is not magnetically shielded.
Locate the speaker system further away from the TV
set. Furthermore, be sure not to place objects in
which magnets are attached or used near the TV set,
such as audio racks, TV stands, toys etc. These may
cause magnetic distortion to the picture due to their
interaction with the system.
For SS-MD77
Although this speaker system is magnetically
shielded, there may be cases where the picture on
some TV sets becomes magnetically distorted. In
such a case, turn off the power of the TV set/
personal computer set once, and after 15 to 30
minutes turn it on again.
When there seems to be no improvement, locate
the speaker system further away from the TV set.
Furthermore, be sure not to place objects in which
magnets are attached or used near the TV set, such
as audio racks, TV stands, toys etc. These may
cause magnetic distortion to the picture due to their
interaction with the system.
Protecting a recorded MD
To record-protect an MD, slide open the tab at the
side of the MD so the tab is concealed.
In this position, the MD cannot be recorded. To
record on the MD, slide close the tab.
Tab
Slide open the
tab.
Notes on MDs
•Do not open the shutter to expose the MD. Close
the shutter immediately if the shutter opens.
Shutter
•Wipe the disc cartridge with a dry cloth to remove
dirt.
•Do not expose the MD to direct sunlight or heat
sources such as hot air ducts, nor leave it in a car
parked in direct sunlight.
Notes on CDs
•Before playing, clean the CD with a cleaning cloth.
Wipe the CD from the center out.
•Do not use solvents such as benzene, thinner,
commercially available cleaners or anti-static
spray intended for vinyl LPs.
•Do not expose the CD to direct sunlight or heat
sources such as hot air ducts, nor leave it in a car
parked in direct sunlight.
Cleaning the cabinet
Use a soft cloth slightly moistened with mild
detergent solution.
Before inserting a tape
Take up any slack in the tape, because it may
become tangled in the deck mechanism, making it
unusable.
Using tapes with extended
recording time
Tapes with recording time of more than 90 minutes
tend to stretch easily, so do not repeat cycles of
playback, stop, fast-forward, and rewind operations,
or the like. Doing so may cause the tape to become
tangled in the deck mechanism.
continued
67
EN
Page 68

Precautions (continued)
Protecting a recorded tape
To record-protect a tape, break off the tab for the
side you want.
Side A
Tab for
side B
To reuse the tape, cover the broken tab with
adhesive tape.
When you use a TYPE-II (CrO2) or TYPE-IV (metal)
tape, do not cover the detector slots. If you do so,
the tape deck cannot detect the tape type
automatically.
TYPE-II TYPE-IV
(Do not cover with adhesive tape.)
Tab for
side A
Detector slots
Cleaning tape heads
Clean the heads approximately once after every 10
hours of use.
If the heads become very dirty, problems such as
poor sound, low volume level, drop-out in the
sound, incomplete erasure of previous recordings,
or inability to record new material may occur.
Also, make sure to clean the heads before making
important recordings and after playing old tapes.
Use an optional cleaning cassette. For details, refer
to the instructions provided with the cleaning
cassette.
Demagnetizing the heads
Use a cassette type head demagnetizer (not
supplied) to demagnetize the heads and the metal
parts that come in contact with the tape once every
20 to 30 hours of use. For details, refer to the
instructions provided with the head demagnetizer.
System limitations of
MDs
The recording system in your MD deck has
limitations described below. Note, however,
that these limitations are due to the inherent
nature of the MD recording system itself and
not to mechanical causes.
“Disc Full” lights up before the
MD has reached the maximum
recording time (60 or 74 minutes)
When 255 tracks have been recorded on the MD,
“Disc Full” lights up regardless of the total recorded
time. More than 255 tracks cannot be recorded on
the MD. To continue recording, erase unnecessary
tracks or use another recordable MD.
“Disc Full” lights up before the
maximum number of tracks (255)
is reached
Fluctuations in emphasis within tracks are
sometimes interpreted as track intervals, increasing
the track count and causing “Disc Full” to light up.
The remaining recording time
does not increase even after
erasing numerous short tracks
Tracks shorter than 12 seconds long are not counted,
so erasing them may not increase the recording
time.
Some tracks cannot be combined
with others
Track combination may become impossible when
tracks are shorter than 12 seconds long.
The total recorded time and the
remaining time on the MD may
not reach the maximum recording
time (60 or 74 minutes)
Recording is done in minimum units of 2 seconds
each, no matter how short the material. The
contents recorded may thus be shorter than the
maximum recording capacity. Disc space may also
be further reduced by scratches.
68
EN
Page 69

The sound may drop-out while
searching the edited tracks
Tracks created through editing may exhibit sound
dropout during searching because high-speed
playback takes time to search for the position on the
disc when the tracks are scattered on the disc.
Track numbers cannot be marked
When “LevelSync ON” (page 43) is displayed
during analog recording, the track numbers may not
be marked at the beginning of the track:
• if the input signal is below a certain fixed level for
less than two seconds.
• if the input signal is below a certain fixed level for
more than two seconds in the middle of the track.
Guide to the Serial Copy
Management System
Digital audio components, such as CDs, MDs, and
DATs let you copy music easily with high quality,
for these digital products process music as a digital
signal.
To protect the copyrighted music programs, this
system uses the Serial Copy Management System
that allows you to make only a single copy of a
recorded digital source through digital-to-digital
connections.
You can make only a first generation copy*
through a digital-to-digital connection.
That is:
1 You can make a copy of a commercially available
digital sound program (e.g., a CD and an MD), but
you cannot make a second copy from the firstgeneration copy.
2 You can make a copy of a digital signal from a
digitally recorded analog sound program (e.g., an
analog record and a music cassette tape) or from a
digital satellite broadcast program, but you cannot
make a second copy.
* A first-generation copy means a digital recording
of a digital signal made on digital audio
equipment. For example, if you record from this
system’s CD player to this MD deck, you’d make a
first-generation copy.
Notes
•This copy management system does not apply
when you make a recording through analog-toanalog connections.
•This system’s MD deck supports 32 kHz or 48 kHz
sampling frequency of the DAT deck or digital
satellite broadcast programs as well as 44.1 kHz
sampling rate of the MD deck. You can make a
second copy from a digital recording of the
satellite broadcast program.
69
EN
Page 70

Troubleshooting
If you run into any problem using this stereo
system, use the following check list.
First, check that the power cord is connected
firmly and the speakers are connected
properly and firmly.
Should any problem persist, consult your
nearest Sony dealer.
General
There is no sound.
•Rotate VOLUME clockwise.
•The headphones are connected.
•Connect the cords and cables properly.
Insert the plugs firmly.
There is severe hum or noise.
•A TV or VCR is placed too close to the
stereo system. Move the system away
from the TV or VCR.
“0:00” (for European model) or “12:00AM”
(for other models) flashes in the display.
•A power interruption occurred. Set the
clock and timer settings again.
The timer does not function.
•Set the clock correctly.
The indicators on the DAILY and REC
buttons do not light even if you press
them.
•Set the timer correctly.
The remote does not function.
•There is an obstacle between the remote
and the system.
•The remote is not pointing in the
direction of the system’s sensor.
•The batteries have run down. Replace the
batteries.
There is acoustic feedback.
•Decrease the volume level. Move the
microphone away from the speakers or
change the direction of the microphone.
Speakers
Sound comes from one channel or
unbalanced left and right volume.
•Check the speaker connection and
speaker placement.
CD Player
The CD tray will not close.
•The CD is not placed properly.
The CD will not play.
•The CD is dirty.
•The CD is inserted with the label side
down.
•Moisture condensation has built up.
Remove the CD and leave the system
turned on for about an hour until the
moisture evaporates.
Play does not start from the first track.
•The player is in Program or Shuffle Play
mode. Press CONTINUE so that
“SHUFFLE” or “PROGRAM” disappears.
“OVER” is displayed.
•You have reached the end of the CD.
Press 0 (or = on the remote) to
return.
“REPAIR!” is displayed.
•Consult your nearest Sony dealer.
MD Deck
(DHC-MD77/EX77MD/EX770MD
only)
An incompletely inserted MD cannot be
pulled out.
•Insert the MD completely, then press
§ EJECT.
The inserted MD is pulled out.
•Insert the MD with the label side up in
the direction of the arrow.
The controls do not work.
•The MD is dirty or scratched (“Disc
Error” appears). Replace the MD with a
new one.
70
EN
Page 71

The MD will not play.
•Moisture condensation has built up.
Remove the MD and leave the system
turned on for several hours until the
moisture evaporates.
•Insert the MD with the label side up in
the direction of the arrow.
•Nothing is recorded on the MD.
Recording is not possible.
•The MD is protected against erasure
(“Protected” appears). Slide the tab to
close the slot (see page 67).
•Connect the sound source properly.
•A premastered MD is inserted in the
deck. Replace the disc with a recordable
MD.
•Replace the disc with a recordable MD
that has sufficient time remaining or erase
unnecessary tracks.
•The power cord was unplugged or a
power interruption occurred during
recording. Start recording over from the
beginning.
“OVER” is displayed.
•You have reached the end of the MD.
Press 0 (or = on the remote) to
return.
“OVER” appears in the level meter during
recording.
•A strong signal was input during analog
recording. When the sound is distorted,
reduce the recording level with REC
LEVEL, then re-record.
“Din Unlock” is displayed.
•Connect the optical cable properly.
Tape Deck (MHC-EX66/EX660 or
the optional TC-TX77/TX770 deck
only)
The tape tray will not close.
•Turn the power back on, then close the
tray.
The tape does not operate even when
buttons are pressed.
•Wait until the P indication stops flashing
before pressing any buttons. (Operation
is not possible for the first two seconds
after the power is turned on.)
•Insert the tape properly and close the tray
completely.
The tape will not play or record.
•There is slack in the tape.
•The tape heads are dirty. Clean them (see
page 68).
Recording is not possible.
•No tape is in the tray.
•The tab is removed.
•The tape is wound to the end.
There is a decrease in sound level during
playback or recording.
•The tape heads are dirty.
•The tape heads are magnetized.
Demagnetize them (see page 68).
Previous recordings cannot be erased
completely.
•The tape heads are magnetized.
The sound may drop-out.
•The capstans or pinch rollers are dirty.
There is excessive noise.
•The tape heads are magnetized.
•Move the system away from the TV or
VCR.
The sound is unbalanced.
•Make sure the Dolby NR setting matches
the setting used when the tape was
recorded.
•Move the system away from the TV, VCR
or power amplifier.
continued
71
EN
Page 72

Troubleshooting (continued)
The remote does not function./Automatic
Source Selection or One Touch Play feature
does not work (when using the optional
TC-TX77/TX770).
•Check that the audio bus cable is
properly connected.
Functions linked to the DHC-MD77/
EX77MD/EX770MD, such as CD Synchro
Recording, do not work (when using the
optional TC-TX77/TX770).
•Check that the audio bus cable is
properly connected.
Tuner
Severe hum or noise ("TUNED" or
"STEREO" flashes in the display).
•Adjust the antenna.
•The signal strength is too weak. Connect
the outdoor antenna.
A stereo FM program cannot be received in
stereo.
•Press ST/MONO (for European model)
or STEREO/MONO (for other models) so
that “STEREO” appears.
If other troubles not described
above occur, reset the system as
follows:
1 Unplug the power cord.
2 Hold down TUNER/BAND, then plug the
power cord again into the wall outlet.
The system is reset to the factory settings. All
the settings you made such as the preset
stations, clock, and timer are cleared. You
should set them again.
MD messages
(DHC-MD77/EX77MD/EX770MD
only)
One of the following messages may appear or
flash in the display during MD operation.
Auto Cut
The MD deck is pausing the recording
because silence continued for 30 seconds or
more during digital recording.
Blank Disc
The inserted recordable MD is brand new
or all tracks on the MD have been erased.
Cannot Copy
You cannot make a digital recording (see
“Guide to the Serial Copy Management
System” on page 69).
Cannot EDIT
You tried to edit in Program or Shuffle Play
mode.
Din Unlock
Check that the optical cable is properly
connected.
Disc Error
The inserted MD is damaged or does not
contain a TOC.
Disc Full
There is no time remaining on the disc (see
“System Limitations of MDs” on page 68).
Impossible
You tried to combine from the first track on
an MD, which is not possible.
Name Full
There is no more space to store track or
disc titles.
NEW
The MD deck stands by for recording on a
brand new MD or from the last recorded
portion.
NO DISC
There is no MD in the deck.
No Track
The inserted MD has a disc title but no
tracks.
72
EN
Page 73

OVER
You have reached the end of the last track
during high-speed search.
Over Write
The deck stands by for recording over
previous recordings.
Protected
The inserted MD is protected against
erasure.
Retry
The MD deck is redoing the recording
because of vibrations or disc scratches
encountered during recording.
Retry Error
Due to vibration affecting the deck or
scratches on the MD, several recording
attempts were made but with no success.
Smart Space
The signal was input again after silence
continued for 3 to 30 seconds or less during
digital recording.
Sorry
You tried to combine tracks that cannot be
combined.
Specifications
Amplifier section
(DHC-MD77/EX77MD/EX770MD:
TA-EX77/EX770
MHC-EX66/EX660:
TA-EX66/EX660)
European model:
DIN power output 45 + 45 watts
(6 ohms at 1 kHz, DIN)
Continuous RMS power output
DHC-EX77MD/EX66:
60 + 60 watts
(6 ohms at 1 kHz,
10% THD)
DHC-EX770MD/EX660:
59 + 59 watts
(6 ohms at 1 kHz,
10% THD)
Music power output 105 + 105 watts
Other models:
Continuous RMS power output
55 + 55 watts
(6 ohms at 1 kHz,
5% THD)
Inputs
CD IN, MD IN (phono jacks):
voltage 450 mV,
impedance 47 kilohms
TUNER IN, TAPE IN, VIDEO1 IN,
VIDEO2/AUX IN (except for DHC-MD77),
VIDEO2 IN (DHC-MD77 only) (phono jacks):
voltage 250 mV,
impedance 47 kilohms
MIX MIC (phone jack):
sensitivity 1 mV,
impedance 10 kilohms or
more
Outputs
MD OUT, TAPE OUT, VIDEO1 OUT
(phono jacks): voltage 250 mV,
impedance 1 kilohm
PHONES (stereo phone jack):
accepts headphones of
6 ohms or more.
SPEAKER: accepts impedance of 6 to
16 ohms.
Dimensions (w/h/d) incl. projecting parts and
controls: Approx.
280 × 122.5 × 298 mm
Mass Approx. 5.3 kg
continued
73
EN
Page 74

Specifications (continued) Tape deck section (TC-EX66/EX660)
(MHC-EX66/EX660 only)
CD player section (CDP-EX77/EX770)
System Compact disc and digital
audio system
Laser Semiconductor laser
(λ = 780 nm)
Emission duration:
continuous
Laser output Max. 44.6 µW*
* This output is the value
measured at a distance of
200 mm from the
objective lens surface on
the Optical Pick-up Block
with 7 mm aperture.
Frequency response 2 Hz to 20 kHz (±0.5 dB)
CD OPTICAL DIGITAL OUT
(Square optical connector jack, rear panel)
Dimensions (w/h/d) incl. projecting parts and
controls: Approx.
280 × 122.5 × 347 mm
Mass Approx. 3.7 kg
MD deck section (MDS-EX77/EX770)
(DHC-MD77/EX77MD/EX770MD only)
System MiniDisc digital audio
system
Laser Semiconductor laser
(λ = 780 nm)
Emission duration:
continuous
Laser output Max. 44.6 µW*
* This output is the value
measured at a distance of
200 mm from the
objective lens surface on
the Optical Pick-up Block
with 7 mm aperture.
Recording time 74 minutes max. (using
MDW-74)
Sampling frequency 44.1 kHz
Frequency response 5 Hz to 20 kHz
MD OPTICAL DIGITAL IN (CD PLAYER/VIDEO 2)
(Square optical connector jacks, rear panel)
Dimensions (w/h/d) incl. projecting parts and
controls: Approx.
280 × 90 × 288 mm
Mass Approx. 2.3 kg
Track method 4-track, 2-channel stereo
Wow & flutter 0.1% W.RMS
±0.3% W.PEAK
Fast forward time Approx. 120 seconds
(for C-60)
Frequency response
With DOLBY NR set to OFF
TYPE-IV tape: 30 – 15,000 Hz, ±3 dB
20 – 16,000 Hz, ±6 dB
TYPE-II tape: 30 – 15,000 Hz, ±3 dB
20 – 16,000 Hz, ±6 dB
TYPE-I tape: 30 – 14,000 Hz, ±3 dB
20 – 15,000 Hz, ±6 dB
Overall S/N ratio 57 dB (TYPE-IV tape)
Distortion
315 Hz, tertiary higher harmonic distortion:
1.8% (TYPE-II tape)
Recording level: 250 nWb/m
Max. recording level audio compensation
For a TYPE-IV tape
DOLBY NR C: 73 dB
DOLBY NR B: 66 dB
DOLBY NR OFF: 58 dB
Dimensions (w/h/d) incl. projecting parts and
controls: Approx.
280 × 90 × 348.5 mm
Mass Approx. 2.6 kg
Tuner section (ST-EX77/EX770)
FM stereo, FM/AM superheterodyne tuner
FM tuner section
Tuning range 87.5 – 108.0 MHz
(50 kHz step)
Antenna FM lead antenna
Antenna terminals 75 ohms unbalanced
Intermediate frequency 10.7 MHz
AM tuner section
Tuning range
European model:
MW: 531 – 1,602 kHz
(with the interval set at
9 kHz)
LW: 153 – 279 kHz
(with the interval set at
3 kHz)
Other models:
AM: 531 – 1,602 kHz
(with the interval set at
9 kHz)
530 – 1,710 kHz
(with the interval set at
10 kHz)
74
EN
Page 75

Antenna AM loop antenna,
Intermediate frequency 450 kHz
Dimensions (w/h/d) incl. projecting parts and
controls: Approx.
Mass Approx. 1.6 kg
outdoor antenna
terminals
280 × 90 × 288 mm
Speaker
(European model: SS-EX77/EX880,
Other models: SS-MD77)
Speaker system 3-way, bass-reflex type
Speaker units
Woofer: 17 cm dia., cone type
Tweeter: 2.5 cm dia., dome type
Super Tweeter: 2 cm dia., dome type
Nominal impedance 6 ohms
Dimensions (w/h/d) incl. projecting parts and
controls: Approx.
Mass Approx. 5.5 kg net per
For dimensions and mass of the SS-EX77/EX880
speaker system, refer to the speaker’s manual.
(SS-EX77/EX880)
5 cm dia., cone type
(SS-MD77)
215 × 430 × 250 mm
(SS-MD77)
speaker (SS-MD77)
General
Power requirements
European model: 220 – 230 V AC,
Other models: 220 – 240 V AC ,
Power consumption 125 watts
Supplied accessories: Remote (1)
Design and specifications are subject to change
without notice.
50/60 Hz
50/60 Hz
RM-EX77 (Europe)
RM-SE77 (Other
countries)
Sony SUM-3 (NS)
batteries (2)
AM loop antenna (1)
FM lead antenna (1)
Flat cord (1)
Audio cords (4)
Optical cable (1)
(DHC-MD77/EX77MD/
EX770MD only)
Speaker cords (2)
75
EN
Page 76

Index
A
Adjusting
the recording level
37, 53
the sound 55
the volume 18
AMS 23
Analog recording 35
Antennas 6, 8, 16
Auto Cut 42
Auto Play 23
Automatic Source Selection
18, 22, 23, 25
B
Batteries 6, 8
Before
editing 44
recording 35
C
CD player 17, 28
CD Synchro Recording
18, 20
Clock setting 9
Combine Function 49
Connecting. See Hooking up
D
DBFB 55
Digital recording 35
Display 28, 32
Divide Function 48
Dolby Noise Reduction 21
E
EON 60
Erase Function 45
Erasing
a portion of a track 46
a single track 45
all tracks on an MD 46
recordings 45
F, G
Fade Synchro Recording 21
H
Hit Parade 40
Hooking up
optional components 13
the antennas 6, 8, 16
the power 4, 7
the system 4, 7
the TC-TX77/TX770 tape
deck 12
I, J
Input monitor 44
K
Karaoke 56
L
Labeling
an MD 50
a preset station 58
Loop 31
M
MD deck 21
MD messages 72
Mixing sound 56
Move Function 47
Music calendar 28, 32
N
Normal Play 17, 21, 22
O
One Touch Play
18, 22, 23, 25
P, Q
Playing
a CD 17
an MD 21
a preset radio station 24
a tape 22
tracks in random order
(Shuffle Play) 29, 33
tracks in the desired
order (Program Play)
29, 34
tracks repeatedly
(Repeat Play) 28, 33
Precautions 66
Preset tuning 24
Presetting radio stations 10
Program Play 29, 34
Protecting recordings 67, 68
PTY 61
R
Radio stations
presetting 10
tuning in 24
RDS 60
Recording
a CD 18, 20
a radio program 26
favorite CD tracks 38, 54
manual recording 36, 52
on an MD 18
on a tape 20
only the first track 40
timer recording 65
Repeat Play 28, 33
Resetting the system 72
76
EN
Page 77

S
Saving recordings 67, 68
Serial copy management
system 69
Setting the time 9
Shuffle Play 29, 33
Sleep Timer 63
Smart Space 42
Sound adjustment 55
Source direct 55
Speakers 5, 8
Station Name 58
System limitations 68
T
Tape deck 22
Time Machine Recording 41
Timer
falling asleep to music
63
timer recording 65
waking up to music 63
TOC 19, 35, 37
Track numbers 43
Track marking 43
Troubleshooting 70
Tuner 24
Tuning interval 11
U, V
Undo Function 51
W, X, Y, Z
Wake-up timer 63
77
EN
Page 78

ADVERTENCIA
Para evitar el riesgo de incendio o de
descargas eléctricas, no exponga la unidad
a la lluvia ni a la humedad.
Para evitar descargas eléctricas, no abra la unidad.
En caso de avería, solicite los servicios de personal
cualificado solamente.
No instale la unidad en un lugar de espacio
reducido, tal como en una estantería para libros
o vitrina empotrada.
El componente lasérico de este producto puede
emitir radiación superior al límite de la clase 1.
Esta unidad está
clasificada como producto
lasérico de clase 1. La
marca CLASS 1 LASER
PRODUCT se encuentra en
la parte exterior trasera.
Esta etiqueta de precaución está ubicada en el
interior de la unidad.
Este sistema está equipado con el sistema de
reducción de ruido Dolby* (MHC-EX66/EX660
solamente).
* Reducción de ruido Dolby fabricado bajo licencia
de Dolby Laboratories Licensing Corporation.
DOLBY y el símbolo de la D doble a son marcas
de Dolby Laboratories Licensing Corporation.
Las patentes EE.UU. y extranjeras han sido
otorgadas por Dolby Laboratories Licensing
Corporation.
Índice
Preparativos
Paso 1: Conexión del sistema
Para el DHC-MD77/EX77MD/
EX770MD .......................................... 4
Para el MHC-EX66/EX660 ............. 7
Paso 2: Puesta en hora del reloj ............ 9
Paso 3: Presintonización de emisoras
de radio ........................................... 10
Conexión de la platina de cassette
opcional TC-TX77/TX770* ........... 12
Conexión de componentes de AV
opcionales ....................................... 13
Conexión de antenas exteriores
opcionales ....................................... 16
Operaciones básicas
Reproducción de un CD ...................... 17
Grabación de un CD en un MD* ........ 18
Grabación de un CD en una cinta** ... 20
Reproducción de un MD* ................... 21
Reproducción de una cinta** .............. 22
Escucha de la radio .............................. 24
Grabación de la radio .......................... 26
El reproductor de CD
Utilización del visualizador de CD ... 28
Reproducción repetida de
canciones de CD............................. 28
Reproducción de canciones de CD
en orden arbitrario......................... 29
Programación de canciones de CD .... 29
Intercalación de partes de un CD....... 31
La platina de MD*
– Reproducción
Utilización del visualizador de MD .. 32
Reproducción repetida de
canciones de MD............................ 33
Reproducción de canciones
de MD en orden arbitrario ........... 33
Programación de canciones de MD ... 34
ES
2
Page 79

– Grabación
Antes de grabar .................................... 35
Grabación manual en un MD ............. 36
Ajuste del nivel de grabación ............. 37
Grabación de las canciones favoritas
de CD en un MD ............................ 38
Grabación de la primera canción de
cada CD solamente ........................ 40
Inicio de la grabación con
2 segundos de datos de audio
prealmacenados ............................. 41
Inserción de espacios de 3 segundos
entre canciones ............................... 42
Marcación de números de
canciones ......................................... 43
Monitoreado de la señal de entrada .. 44
– Edición
Antes de editar...................................... 44
Borrado de grabaciones....................... 45
Movimiento de canciones grabadas ....
División de canciones grabadas ......... 48
Combinación de canciones
grabadas .......................................... 49
Titulación de un MD............................ 50
Anulación de la última edición .......... 51
La platina de cassette**
Grabación manual en una cinta ......... 52
Grabación de las canciones favoritas
de CD en una cinta ........................ 54
47
Otras funciones
Ajuste del sonido.................................. 55
Cantar con acompañamiento:
Karaoke ........................................... 56
Titulación de emisoras
presintonizadas.............................. 58
Utilización del sistema de datos por
radio (RDS) (Modelo para Europa
solamente)....................................... 60
Para acostarse con música................... 63
Para despertarse con música .............. 63
Grabación de programas de radio
utilizando el temporizador .......... 65
Información adicional
Precauciones.......................................... 66
Limitaciones del sistema de MD ........ 68
Solución de problemas ........................ 70
Especificaciones .................................... 73
Índice...................................................... 76
* DHC-MD77/EX77MD/EX770MD solamente.
**Para los usuarios del MHC-EX66/EX660 o del
TC-TX77/TX770 opcional solamente.
ES
Comprobación del número de modelo
Antes de leer este manual, compruebe el número de modelo de su aparato mirando en la parte
delantera del amplificador. Las diferencias en la operación se encuentran claramente indicadas en
el texto, por ejemplo, “DHC-MD77 solamente.”
Cada número de modelo se compone de los siguientes componentes:
DHC-MD77/EX77MD DHC-EX770MD MHC-EX66 MHC-EX660
Reproductor de CD
Sintonizador
Platina de MD
Platina de cassette
Amplificador estéreo integrado
Sistema de altavoces
Platina de cassette opcional
CDP-EX77 CDP-EX770 CDP-EX77 CDP-EX770
ST-EX77 ST-EX770 ST-EX77 ST-EX770
MDS-EX77 MDS-EX770 — —
— — TC-EX66 TC-EX660
TA-EX77 TA-EX770 TA-EX66 TA-EX660
SS-MD77/EX77 SS-EX880 SS-MD77/EX77 SS-EX880
TC-TX77 TC-TX770 — —
ES
3
Page 80

Preparativos
Paso 1: Conexión del sistema
Para el DHC-MD77/EX77MD/EX770MD
Realice los pasos siguientes 1 a 6 para conectar su sistema utilizando los cables y accesorios
suministrados. Para completar los preparativos, realice también los pasos 2 y 3.
Antena de cable de FM
Altavoz derecho
Sintonizador
Amplificador
Platina
de MD
Reproductor
de CD
Antena de cuadro de AM
Panel trasero del
DHC-MD77/EX77MD/
EX770MD
Altavoz izquierdo
ES
4
Page 81

Conecte el cable plano a los
1
conectores SYSTEM CONTROL del
mismo color de cada componente,
empujando hasta que suene un
chasquido.
Para desconectarlo
Conecte los cables de audio a las
2
tomas con las numeraciones
romanas iguales (
Conecte el amplificador al sintonizador,
reproductor de CD y platina de MD,
utilizando los cables de audio (tiene
cuatro). Haga coincidir los colores de las
clavijas con los de las tomas.
, , , ).
Conecte el reproductor de CD y la
3
platina de MD, utilizando el cable
óptico.
Nota
Quite los tapones de los conectores
OPTICAL antes de conectar el cable
óptico. Guárdelos para usarlos en el
futuro.
Conecte los altavoces.
4
Conecte los cables de los altavoces a las
tomas SPEAKER del mismo color.
Mantenga los cables de los altavoces
alejados de las antenas para evitar
ruidos.
Empuje la palanca hacia usted
después de insertar los cables.
R L
+
–
Inserte firmemente las clavijas,
empujándolas a fondo.
Negro* (’)
Rojo* (‘)
* Los cables de sus altavoces podrán ser de
diferente color. Para detalles, consulte el
manual entregado con el sistema de altavoces.
continúa en la página siguiente
Inserte esta porción.
ES
5
Page 82

Paso 1: Conexión del sistema
(continuación)
Conecte las antenas de FM/AM.
5
Prepare la antena de cuadro, y luego
conéctela.
Para el DHC-EX77MD/EX770MD
Antena de
cuadro de AM
Para el DHC-MD77
Antena de
cuadro de AM
Extienda la antena de cable
de FM horizontalmente.
COAXIAL
Empuje la palanca hacia usted
después de conectar la antena.
Extienda la antena de cable
de FM horizontalmente.
FM 75Ω
FM
75Ω
Introducción de dos pilas R6
(tamaño AA) en el telemando.
]
}
}
]
Observación
AM
Utilizando el telemando normalmente, las pilas
durarán al menos seis meses. Cuando el sistema no
responda a los comandos del telemando, cambie
ambas pilas por otras nuevas.
Nota
Cuando no vaya a utilizar el telemando durante
mucho tiempo, retire las pilas para evitar posibles
fugas de su líquido y los daños que podría causar.
AM
Empuje la palanca hacia usted
después de conectar la antena.
Conecte el cable de alimentación a
6
una toma de corriente de la pared.
ES
6
Page 83

Para el MHC-EX66/EX660
Realice los pasos siguientes 1 a 5 para conectar su sistema utilizando los cables y accesorios
suministrados. Para completar los preparativos, realice también los pasos 2 y 3.
Antena de cable de FM
Altavoz derecho
Sintonizador
Amplificador
Platina
de
cassette
Reproductor
de CD
Antena de cuadro de AM
Panel trasero del
MHC-EX66/EX660
Altavoz izquierdo
Conecte el cable plano a los
1
conectores SYSTEM CONTROL del
mismo color de cada componente,
empujando hasta que suene un
chasquido.
Para desconectarlo
Conecte los cables de audio a las
2
tomas con las numeraciones
romanas iguales (
Conecte el amplificador al
sintonizador, reproductor de
CD y platina de cassette,
utilizando los cables
de audio (tiene
cuatro). Haga
coincidir los
colores de las
clavijas con los de las tomas.
continúa en la página siguiente
, , , ).
ES
7
Page 84

Paso 1: Conexión del sistema
(continuación)
Inserte firmemente las clavijas,
empujándolas a fondo.
Conecte los altavoces.
3
Conecte los cables de los altavoces a las
tomas SPEAKER del mismo color.
Mantenga los cables de los altavoces
alejados de las antenas para evitar
ruidos.
Empuje la palanca hacia usted
después de insertar los cables.
R L
+
Modelos para otros países
Antena de
cuadro de AM
Extienda la antena de cable
de FM horizontalmente.
FM
75Ω
AM
Empuje la palanca hacia usted
después de conectar la antena.
Conecte el cable de alimentación a
5
una toma de corriente de la pared.
Introducción de dos pilas R6
(tamaño AA) en el telemando
–
Rojo* (‘)
* Los cables de sus altavoces podrán ser de
diferente color. Para detalles, consulte el
manual entregado con el sistema de altavoces.
Conecte las antenas de FM/AM.
4
Prepare la antena de cuadro, y luego
conéctela.
Modelo para Europa
Antena de
cuadro de AM
ES
8
Negro* (’)
Inserte esta porción.
Extienda la antena de cable
de FM horizontalmente.
Empuje la palanca hacia usted
después de conectar la antena.
FM 75Ω
COAXIAL
Observación
Utilizando el telemando normalmente, las pilas
durarán al menos seis meses. Cuando el sistema no
responda a los comandos del telemando, cambie
ambas pilas por otras nuevas.
Nota
Cuando no vaya a utilizar el telemando durante
mucho tiempo, retire las pilas para evitar posibles
fugas de su líquido y los daños que podría causar.
AM
]
}
}
]
Page 85

Paso 2: Puesta en
hora del reloj
Para poder utilizar la función del
temporizador deberá antes poner en hora el
reloj.
El modelo para Europa emplea reloj del
sistema de 24 horas y los otros modelos el
sistema de 12 horas.
Para representar las ilustraciones se utiliza el
modelo para Europa.
1
2,4
3,5
1 Presione CLOCK SET.
2 Gire MULTI CONTROLLER y
ponga la hora.
4 Gire MULTI CONTROLLER y
ponga los minutos.
5 Presione ENTER/NEXT.
El reloj comenzará a funcionar.
Para cambiar la hora
Comience de nuevo desde el paso 1.
Observaciones
•El reloj incorporado muestra la hora en el
visualizador cuando el sistema esta apagado.
•El punto de arriba parpadea durante la primera
parte de un minuto (0 a 29 segundos), y el de abajo
durante la segunda (30 a 59 segundos).
3 Presione ENTER/NEXT.
La indicación de los minutos
parpadeará.
ES
9
Page 86

Paso 3: Presintonización
de emisoras de radio
Las bandas que podrá recibir variarán en
función del modelo que haya adquirido.
El modelo para Europa le permite
presintonizar hasta 40 emisoras: 20 de FM, 10
de MW y 10 de LW.
Los modelos para otros países le permiten
presintonizar hasta 30 emisoras, 20 de FM y
10 de AM.
Modelo para Europa
6
1
2
1MANUAL
3,5 4
Modelos para otros países
3,5
2 Modelo para Europa:
Presione repetidamente TUNING
MODE hasta que aparezca “AUTO
TUNING.”
Modelos para otros países:
Presione AUTO.
3 Gire MULTI CONTROLLER.
Cuando el sistema sintonice una
emisora, la indicación de la frecuencia
cambiará y la exploración cesará.
Aparecerán “TUNED” y “STEREO”
(para programas en estéreo).
4 Presione MEMORY.
Parpadeará un número de presintonía
durante ocho segundos.
5 Gire MULTI CONTROLLER y
seleccione el número de presintonía
deseado mientras esté parpadeando.
1 Presione repetidamente TUNER/
BAND hasta que aparezca la banda
deseada en el visualizador.
Cada vez que lo presione, la banda
cambiará de la forma siguiente:
Modelo para Europa:
FM n MW n LW
Modelos para otros países:
FM n AM
ES
10
642
Número de presintonía
6 Presione ENTER/NEXT.
La emisora se memorizará.
7 Repita los pasos 1 a 6 para
memorizar otras emisoras.
Page 87

Para sintonizar una emisora de
señal débil
Modelo para Europa
Presione repetidamente TUNING MODE
hasta que aparezca “TUNING” en el paso 2,
luego gire MULTI CONTROLLER para
sintonizar la emisora deseada.
Modelos para otros países
Presione MANUAL en el paso 2, luego gire
MULTI CONTROLLER para sintonizar la
emisora deseada.
Para cambiar el número de
presintonía
Comience de nuevo desde el paso 1.
Para cambiar el intervalo de
sintonización de AM (excepto el
modelo para Europa)
El intervalo de sintonización de AM se
preajusta en fábrica a 9 kHz. Para cambiarlo,
sintonice primero cualquier emisora de AM,
luego apague el aparato. Presione ENTER/
NEXT y, sin soltarlo, vuelva a encender el
aparato. Cuando cambie el intervalo, se
borrarán todas las emisoras presintonizadas.
Para reponer el intervalo, repita el mismo
procedimiento.
Observación
Si desenchufa el cable de alimentación o si ocurre un
corte en el suministro eléctrico, las emisoras
presintonizadas seguirán en la memoria durante
una semana.
11
ES
Page 88

Conexión de la platina de cassette opcional
TC-TX77/TX770 (DHC-MD77/EX77MD/EX770MD solamente)
Usted podrá utilizar la platina de cassette opcional TC-TX77/TX770, diseñada para utilizar con el
DHC-MD77/EX77MD/EX770MD.
Realice los pasos siguientes 1 a 3 para conectar la platina TC-TX77/TX770 a su sistema
utilizando los cables suministrados con la platina TC-TX77/TX770.
Nota
Las tomas TAPE IN/OUT y VIDEO IN/OUT del DHC-MD77/EX77MD/EX770MD disponen de un tapón para
evitar conexiones incorrectas. Retire el tapón antes de hacer las conexiones, y guárdelo para usarlo en el futuro.
Usted puede dividir el tapón en dos partes. Si no utiliza las tomas VIDEO, déjelas tapadas.
A TAPE IN
Panel trasero
del TC-TX77/
TX770
Panel trasero
del DHC-MD77/
EX77MD/
EX770MD
A TAPE OUT
A TAPE OUT
ç
ç
A TAPE IN
12
ç : Flujo de la señal
ES
Page 89

Conecte el cable bus de audio a los
1
conectores AU BUS de cada
componente, empujando hasta que
suene un chasquido.
Conecte los cables de audio.
2
Utilice los dos cables de audio, haciendo
coincidir el color de las clavijas con el de
las tomas.
Inserte firmemente las clavijas,
empujándolas a fondo.
Conexión de
componentes de AV
opcionales
Para mejorar su sistema, puede conectar
componentes opcionales utilizando cables de
audio (vendidos por separado). Consulte las
instrucciones de cada componente. Antes de
hacer las conexiones, retire los tapones de las
tomas que vaya a utilizar, y guárdelos para
usarlos en el futuro.
Conexión de un televisor/
vídeo
Asegúrese de hacer coincidir el color de las
clavijas con el de las tomas.
Para el DHC-MD77/EX77MD/EX770MD
Conecte un televisor/vídeo a VIDEO1,
VIDEO2 (DHC-MD77) o a VIDEO2/AUX
(DHC-EX77MD/EX770MD) del amplificador.
Cuando conecte un televisor/vídeo a
VIDEO2 (DHC-MD77) o a VIDEO2/AUX
(DHC-EX77MD/EX770MD), ponga MODE
SELECTOR en ANALOG REC.
MODE SELECTOR
Conecte el cable de alimentación a
3
una toma de corriente de la pared
después de haber realizado todas las
conexiones de su sistema y la
platina de cassette.
A la salida de audio de
un televisor/vídeo
continúa en la página siguiente
13
ES
Page 90

Conexión de componentes de AV
opcionales (continuación)
Para el MHC-EX66/EX660
Conecte un televisor/vídeo a VIDEO1 o
VIDEO2/AUX del amplificador.
Conexión de otros componentes
analógicos
Conecte un componente analógico a VIDEO1
del amplificador.
Asegúrese de hacer coincidir el color de las
clavijas con el de las tomas.
A la salida de audio de
un televisor/vídeo
Para escuchar el sonido de un
televisor/vídeo
Gire FUNCTION hasta que se encienda el
indicador VIDEO 1, VIDEO 2 (DHC-MD77) o
VIDEO 2/AUX (otros modelos).
Conexión de
componentes de audio
Conexión de una platina de
cassette
Conecte una platina de cassette a TAPE del
amplificador.
Asegúrese de hacer coincidir el color de las
clavijas con el de las tomas.
A la entrada de
audio de una
platina de cassette
A la salida de
audio de una
platina de cassette
A la entrada de audio
de un componente
analógico
A la salida de audio
de un componente
analógico
Para escuchar el sonido del
componente conectado
Gire FUNCTION hasta que se encienda el
indicador VIDEO 1.
Conexión de componentes
digitales
Para el DHC-MD77/EX77MD/EX770MD
Usted podrá hacer una grabación digital en la
platina MD del sistema, desde el componente
digital conectado (p.ej., desde una platina
DAT, sintonizador BS u otra platina MD).
• Conecte un componente digital a VIDEO 2
DIGITAL IN de la platina MD utilizando
un cable óptico.
• Conecte un componente digital a VIDEO2
(DHC-MD77) o VIDEO2/AUX (DHCEX77MD/EX770MD) del amplificador
utilizando cables de audio.
• Ponga MODE SELECTOR en DIGITAL
REC.
Para escuchar el sonido de una
platina de cassette
Gire FUNCTION hasta que se encienda el
indicador TAPE.
ES
14
Page 91

MODE SELECTOR
A la salida analógica
(línea) de un
componente digital
A la salida digital de
un componente
digital
Para escuchar el sonido del
componente conectado
Gire FUNCTION hasta que se encienda el
indicador VIDEO 2 (DHC-MD77) o
VIDEO 2/AUX (DHC-EX77MD/EX770MD).
Observación
Un convertidor de frecuencia de muestreo
incorporado convierte automáticamente la
frecuencia de muestreo de diversas fuentes digitales
en la frecuencia de muestreo de 44,1 kHz de la
platina MD. Esto le permitirá grabar fuentes tales
como cintas DAT o emisiones vía satélite de 32 y
48 kHz, así como CDs y otros MDs.
Notas
• Si en el visualizador aparece “Din Unlock” o
“Cannot Copy”, no será posible hacer una
grabación digital. En este caso, grabe la fuente de
sonido con MODE SELECTOR puesto en
ANALOG REC.
• Cuando haga una grabación digital utilizando un
cable óptico, no podrá ajustar el nivel de
grabación.
• Cuando los cables de audio no estén conectados a
VIDEO2 (DHC-MD77) o VIDEO2/AUX (DHCEX77MD/EX770MD) del amplificador, no podrá
escuchar el sonido del componente digital.
Para el MHC-EX66/EX660
Usted podrá hacer una grabación digital en la
platina MD conectada, desde el reproductor
de CD del sistema. También podrá hacer una
grabación analógica si conecta la platina de
MD utilizando cables de audio.
• Conecte una platina de MD a DIGITAL
OUT del reproductor de CD utilizando un
cable óptico.
• Conecte una platina de MD a MD del
amplificador utilizando cables de audio.
A la entrada
analógica (línea) de
una platina de MD
A la entrada digital de
una platina de MD
A la salida
analógica (línea) de
una platina de MD
Para escuchar el sonido de la
platina de MD
Gire FUNCTION hasta que se encienda el
indicador MD.
15
ES
Page 92

Conexión de antenas
exteriores opcionales
Conecte la antena exterior para mejorar la
recepción.
Antena de FM
Conecte la antena exterior de FM opcional.
También puede utilizar una antena de TV en
su lugar.
Modelo para Europa
FM 75Ω
AM
COAXIAL
Antena de AM
Conecte un conductor aislado de 6 a 15
metros al terminal AM. Deje conectada la
antena de cuadro de AM suministrada.
Modelo para Europa
Conductor aislado
(no suministrado)
Conductor
de tierra
(no suministrado)
FM 75Ω
COAXIAL
AM
Conector hembra IEC
estándar (no suministrado)
Modelos para otros países
Cable coaxial de 75 ohmios
(no suministrado)
Modelos para otros países
Conductor aislado
(no suministrado)
Conductor
FM
75Ω
AM
de tierra
(no suministrado)
FM
75Ω
AM
Importante
Si conecta una antena exterior, conéctela a
tierra como protección contra los rayos. Para
evitar explosiones de gas, no conecte el
conductor de tierra a una tubería de gas.
16
ES
Page 93

r REC
=
SELECTOR
+
0)
p
· ∏
=
SELECTOR
+
0)
p
· ∏
§
OPEN/CLOSE
Operaciones básicas
Reproducción de un
CD
Usted podrá reproducir hasta tres discos
seguidos.
POWER
r REC
CONTINUE
EX-CHANGE
·
2
DISC SKIP
–
·
·
ª·
VOLUME
SELECTOR
+
P+=p
P+=p
p
)0
+
–
•
•
•
•
•
•
§
•
EJECT
•
0
10
=
SELECTOR
+
· ∏
0)
p
§
OPEN/CLOSE
=
SELECTOR
+
· ∏
0)
p
p
0/)
P
D.SKIP
=/+
VOL (+/–)
•
1
· ∏
1 Presione § OPEN/CLOSE y ponga
un CD en la bandeja de discos.
Con la etiqueta
hacia arriba.
Cuando
reproduzca un CD
sencillo, póngalo
en el círculo
interior de la
bandeja.
Para poner un tercer disco, presione
DISC SKIP (o D.SKIP en el telemando)
para girar la bandeja.
2 Presione uno de los botones
DISC 1 – 3.
La bandeja de discos se cerrará y la
reproducción comenzará. Si presiona
· ∏ (o · en el telemando) cuando se
cierre la bandeja, la reproducción
comenzará por el CD cargado en la
bandeja cuyo botón esté encendido en
verde.
Número de canción Calendario musical
bandeja de disco
Para
parar la
reproducción
hacer
una pausa
seleccionar
una canción
encontrar un
punto en una
canción
Tiempo de reproducciónNúmero de
Haga lo siguiente:
Presione p.
Presione · ∏ (o P en el
telemando). Para reanudar la
reproducción, vuelva a
presionarlo.
Gire SELECTOR hacia la
derecha (para avanzar) o hacia
la izquierda (para retroceder) y
suéltelo cuando localice la
canción deseada (o presione
+ o = en el telemando).
Gire y retenga SELECTOR para
localizar otros discos.
Presione ) o 0 durante la
reproducción y suéltelo en el
punto deseado.
continúa en la página siguiente
Operaciones básicas
ES
17
Page 94

Reproducción de un CD
(continuación)
Para
seleccionar
un CD
reproducir sólo
el disco
seleccionado
reproducir
todos los CDs
retirar o
cambiar el CD
cambiar el disco
durante la
reproducción
ajustar el
volumen
Observaciones
•Si presiona · ∏ cuando esté apagado el aparato,
éste se encenderá automáticamente y, si hay un
CD en la bandeja, comenzará la reproducción
(Reproducción con un solo toque).
•Usted podrá cambiar de otra fuente al reproductor
de CD y comenzar a reproducir un CD
presionando solamente · ∏ o los botones
DISC 1 – 3* (Selección automática de fuente).
* Presionando los botones DISC 1 – 3 durante la
reproducción normal o cuando “1 DISC
SHUFFLE” se encuentre en el visualizador,
funcionará como Selección automática de fuente.
•Si no hay ningún CD en la bandeja, aparecerá
“NO DISC”.
•Cuando se seleccione la bandeja de disco o esté
reproduciéndose el CD cargado en la bandeja, el
botón DISC 1 – 3 correspondiente se encenderá en
verde.
Haga lo siguiente:
Presione uno de los botones
DISC 1 – 3 o DISC SKIP (o
D.SKIP en el telemando).
Presione repetidamente
CONTINUE hasta que
aparezca “1 DISC”.
Presione repetidamente
CONTINUE hasta que
aparezca “ALL DISCS”.
Presione § OPEN/CLOSE.
Presione EX-CHANGE.
Vuelva a presionar para cerrar
la bandeja.
Gire VOLUME (o presione
VOL o en el
telemando).
Grabación de un CD
en un MD
(DHC-MD77/EX77MD/EX770MD
solamente)
— Grabación sincronizada de un CD
Usted podrá hacer una grabación digital de
un CD en un MD, marcando los números de
canciones en el mismo orden que en el CD
original. Además, podrá hacer un programa
grabando las canciones favoritas (consulte la
página 38), grabar sólo la primera canción de
cada CD (función de Hit Parade, consulte la
página 40), y editar un MD después de
grabarlo (consulte las páginas 45 a 51).
POWER
1
EJECT
=
r REC
SELECTOR
§
OPEN/CLOSE
=
SELECTOR
65
•
•
•
•
•
•
•
§
•
•
0
10
+
· ∏
0)
p
+
· ∏
0)
p
18
43
–
·
24
+
P+=p
p
D.SKIP
P+=p
ES
·
P
Page 95

1 Inserte un MD grabable.
Con la flecha
apuntando
hacia la platina
§
EJECT
Con la etiqueta
hacia arriba,
deslizando la lengüeta
hacia la derecha
2 Presione § OPEN/CLOSE y ponga
un CD en la bandeja de discos.
La bandeja se abrirá.
Con la etiqueta
hacia arriba.
Cuando
reproduzca un CD
sencillo, póngalo
en el círculo
interior de la
bandeja.
Para poner un tercer disco, presione
DISC SKIP (o D.SKIP en el telemando)
para girar la bandeja.
0)
p
§
OPEN/CLOSE
=
SELECTOR
+
· ∏
0)
p
3 Presione repetidamente DISC SKIP
(o D.SKIP en el telemando) hasta
que se encienda en verde el botón
DISC 1 – 3 que desee.
4 Presione CD SYNC, luego gire
SELECTOR en la platina de MD
hasta que aparezca “NORMAL ?”.
0)
6 Presione · ∏ en la platina de MD
(o P en el telemando).
•
•
•
•
•
•
•
•
•
· ∏
p
Se iniciará la grabación. Cuando se
complete la grabación, el reproductor de
CD se parará y la platina de MD entrará
automáticamente en pausa. Si en el MD
no queda tiempo de grabación restante,
la platina de MD se parará.
Para parar la grabación
Presione p en la platina de MD.
Mientras “TOC” esté encendido o
parpadeando
No mueva la platina o desenchufe el cable de
alimentación para garantizar la grabación
completa. La platina se encuentra
actualizando la tabla de contenidos (TOC:
Table Of Contents).
Observaciones
•Si inserta un MD estando apagado el aparato, éste
se encenderá automáticamente.
•La grabación del MD se realiza sólo después de
introducirse en TOC toda la información de
grabación, momento en el que TOC deja de
parpadear y se apaga. Tenga cuidado de no
desconectar el cable de alimentación ni mover la
platina antes de este momento. Antes de
desconectar la alimentación, realice lo siguiente:
– Extraiga el MD.
– Pulse SYSTEM POWER para apagar el sistema.
Operaciones básicas
5 Presione ENTER/YES.
La platina de MD entrará en espera para
la grabación y el CD en pausa para la
reproducción.
19
ES
Page 96

0)
p
=
SELECTOR
+
0)
p
· ∏
§
OPEN/CLOSE
Grabación de un CD
en una cinta (MHC-EX66/
EX660 o el TC-TX77/TX770 opcional
solamente)
— Grabación sincronizada de un CD
El botón CD SYNC le permite grabar
fácilmente de un CD a una cinta. Podrá
utilizar cintas TYPE-I (normal), TYPE-II
2) y TYPE-IV (metal). La platina detecta
(CrO
automáticamente el tipo de cinta.
Para representar las ilustraciones se utiliza el
MHC-EX66/EX660.
2 Presione § OPEN/CLOSE en el
reproductor de CD y ponga un CD
en la bandeja de discos.
La bandeja se abrirá.
Con la etiqueta
hacia arriba.
Cuando
reproduzca un CD
sencillo, póngalo
en el círculo
interior de la
bandeja.
Para poner un tercer disco, presione
DISC SKIP (o D.SKIP en el telemando)
para girar la bandeja.
POWER
DOLBY NR
6
4
3
1 Presione § OPEN/CLOSE en la
platina de cassette e inserte una
cinta en blanco.
Vuelva a presionar § OPEN/CLOSE
para cerrar la bandeja.
Con la cara
20
que quiera
grabar hacia
arriba
ES
5
1
ª
3 Presione repetidamente DISC SKIP
(o D.SKIP en el telemando) hasta
que se encienda en verde el botón
DISC 1 – 3 que desee.
4 Presione repetidamente
DIRECTION para seleccionar la cara
en la que quiera grabar.
Seleccione A para grabar una cara.
Seleccione Å o a para grabar ambas
caras.
§
OPEN/CLOSE
ª·
•
•
•
•
•
•
•
0)
•
•
0
10
ppP
5 Gire REC LEVEL para ajustar el
nivel de grabación.
El cuarto punto será apropiado para la
§
OPEN/CLOSE
=
SELECTOR
+
· ∏
0)
p
mayoría de los casos. Para detalles,
consulte “Grabación manual en una
cinta” en la página 52.
6 Presione CD SYNC en la platina de
cassette.
7
2
La platina de cassette entrará en espera
para la grabación y el CD estará en
pausa para la reproducción. El indicador
CD SYNC se encenderá y aparecerá
“PLAY · P {REC}” (para la cara
frontal).
7 Presione P en la platina de cassette.
Se iniciará la grabación.
§
OPEN/CLOSE
ª·
•
•
•
•
® REC
•
•
•
0)
•
•
0
10
pP
Page 97

p
0)
§
EJECT
· ∏
•
•
•
•
•
•
•
•
•
Para parar la grabación
Presione p en la platina de cassette o en el
reproductor de CD.
Observaciones
• Al presionar SYSTEM POWER del DHC-MD77/
EX77MD/EX770MD se encenderá
automáticamente la platina TC-TX77/TX770 si los
ha conectado entre sí utilizando el cable bus de
audio.
• Si quiere grabar en la cara inversa, presione ª en
el paso 6 de manera que aparezca
“ª PLAY P {REC}” (para la cara inversa).
• Cuando grabe en las dos caras, asegúrese de
comenzar por la cara frontal. Si comienza por la
cara inversa, la grabación se parará al final de la
cara inversa aunque haya seleccionado a.
• Cuando quiera reducir el ruido de siseo de las
señales de alta frecuencia y bajo nivel, presione
repetidamente DOLBY NR para seleccionar B o C
antes del paso 5. DOLBY NR no puede cambiarse
durante la grabación.
• Si la cinta llega al final de la cara frontal cuando
esté haciendo una grabación en las dos caras,
entrará en funcionamiento la función de
difuminación para que la canción no se corte
bruscamente al final de la cinta (Difuminación
sincronizada). La canción volverá a grabarse
desde el principio en la cara inversa. La función de
difuminación sincronizada funciona también al
grabar sólo una cara.
• La grabación sincronizada de un CD no puede
realizarse presionando al mismo tiempo los
botones CD SYNC de la platina de cassette y de la
platina de MD.
Utilice la función “Grabación sincronizada de un
CD” para cinta y grabe un CD manualmente en un
MD. Se recomienda este método porque en la
platina de MD puede borrar la canción solapada,
grabada utilizando la función “Difuminación
sincronizada”, especificando su número de
canción (Función de borrado).
Nota
Durante la grabación no podrá escuchar otras
fuentes.
Reproducción de un
MD
(DHC-MD77/EX77MD/EX770MD
solamente)
Usted podrá reproducir un MD exactamente
igual que un CD.
POWER
·
+
–
P+=p
·
P+=p
·
ª·
)0
VOLUME
r REC
p
+
–
SELECTOR
1
P
=/+
VOL (+/–)
§ EJECT
§
EJECT
=
SELECTOR
§
OPEN/CLOSE
=
SELECTOR
•
•
•
0
+
· ∏
0)
+
· ∏
0)
p
2
•
•
•
•
•
•
10
p
p
0/)
Operaciones básicas
1 Inserte un MD.
Con la flecha
apuntando
hacia la platina
Con la etiqueta
hacia arriba
continúa en la página siguiente
21
ES
Page 98

ª·
)0
p
+
–
VOL (+/–)
=
SELECTOR
+
0
0/)
)
p
p
· ∏
ª
§
OPEN/CLOSE
0)
ª·
pP
§
OPEN/CLOSE
•
•
•
•
•
•
•
•
•
0
10
POWER
31
2
VOLUME
DOLBY NR
P
Reproducción de un MD
(continuación)
Reproducción de una
2 Presione · ∏ (o · en el
telemando).
Se iniciará la grabación.
Número de
canción
Para
parar la
reproducción
hacer una
pausa
seleccionar
una canción
encontrar un
punto en una
canción
retirar el MD
ajustar el
volumen
Tiempo de
reproducción
Haga lo siguiente:
Presione p.
Presione · ∏ (o P en el
telemando). Para reanudar la
reproducción, vuelva a
presionarlo.
Gire SELECTOR hacia la
derecha (para avanzar) o hacia
la izquierda (para retroceder) y
suéltelo cuando localice la
canción deseada (o presione
+ o = en el telemando).
Presione ) o 0 durante la
reproducción y suéltelo en el
punto deseado.
Presione § EJECT.
Gire VOLUME (o presione VOL
o en el telemando).
Calendario
musical
cinta (MHC-EX66/EX660 o el
TC-TX77/TX770 opcional solamente)
Podrá utilizar cintas TYPE-I (normal),
TYPE-II (CrO
detecta automáticamente el tipo de cinta
(ATS*).
Para representar las ilustraciones se utiliza el
MHC-EX66/EX660.
* La función de selección automática de cinta (ATS)
ajusta automáticamente las ecualización y
polarización para adaptarlas al tipo de cinta
insertada.
2) y TYPE-IV (metal). La platina
ES
22
Observaciones
•Usted podrá comenzar la reproducción desde la
canción deseada. Antes de presionar · ∏ en el
paso 2, gire SELECTOR hasta que aparezca la
canción deseada.
•Si presiona · ∏ cuando esté apagado el aparato,
éste se encenderá automáticamente y, si hay un
MD en la platina, comenzará la reproducción
(Reproducción con un solo toque).
•Usted podrá cambiar de otra fuente a la platina de
MD y comenzar a reproducir el MD presionando
solamente · ∏ (Selección automática de fuente).
•Si inserta un MD estando apagado el aparato, éste
se encenderá automáticamente.
Page 99

1 Presione § OPEN/CLOSE en la
platina de cassette e inserte una
cinta grabada.
Vuelva a presionar § OPEN/CLOSE
para cerrar la bandeja.
Con la cara
que quiera
reproducir
hacia arriba
® REC
§
OPEN/CLOSE
ª·
•
•
•
•
•
•
•
0)
•
•
0
10
pP
2 Presione repetidamente
DIRECTION para seleccionar la cara
que quiera reproducir.
Seleccione A para reproducir una cara.
Seleccione Å para reproducir ambas
caras una vez. Para reproducir ambas
caras sucesivamente, seleccione a*.
3 Presione ·.
Presione ª para reproducir la cara
inversa.
Se iniciará la reproducción.
* La platina se parará automáticamente después de
repetir la secuencia cinco veces.
Para
parar la
reproducción
hacer una
pausa
avanzar
rápidamente
rebobinar
seleccionar
una canción
(AMS*)
Haga lo siguiente:
Presione p.
Presione P. Para reanudar la
reproducción, vuelva a
presionarlo.
Presione p, luego ) (para la
cara frontal) o 0 (para la cara
inversa).
Presione p, luego 0 (para la
cara frontal) o ) (para la cara
inversa).
Presione ) (para avanzar) o
0 (para retroceder) durante la
reproducción de la cara frontal.
Presione 0 (para avanzar) o
) (para retroceder) durante la
reproducción de la cara inversa.
Para
retirar la cinta
ajustar el
volumen
Haga lo siguiente:
Presione § OPEN/CLOSE.
Gire VOLUME (o presione VOL
o en el telemando).
* La función AMS (Sensor automático de música)
detecta los espacios en blanco de más de cuatro
segundos entre canciones y localiza rápidamente
las canciones.
Observaciones
•Al presionar SYSTEM POWER del DHC-MD77/
EX77MD/EX770MD se encenderá
automáticamente la platina TC-TX77/TX770 si los
ha conectado entre sí utilizando el cable bus de
audio.
•Si presiona · o ª cuando esté apagado el
aparato, éste se encenderá automáticamente y, si
hay una cinta en la platina, comenzará la
reproducción (Reproducción con un solo toque).
•Usted podrá cambiar de otra fuente a la platina de
cassette presionando solamente · o ª
(Selección automática de fuente).
•Para comenzar la reproducción automáticamente
desde el principio de la cinta después de bobinar
rápidamente (Reproducción automática), presione
· a la vez que presiona 0 (para la cara frontal)
o ª a la vez que presiona ) (para la cara
inversa).
•Cuando quiera reducir el ruido de siseo de las
señales de alta frecuencia y bajo nivel, presione
repetidamente DOLBY NR para seleccionar B o C.
Notas
La función AMS podrá no funcionar bien cuando:
– El espacio en blanco entre canciones sea de menos
de cuatro segundos.
– En los canales derecho e izquierdo haya grabado
diferente material (p.ej., cintas de karaoke con
música instrumental y una voz de cantante, cintas
de práctica de idiomas extranjeros, etc.).
– Se graben continuamente señales de muy bajo
nivel o baja frecuencia, tales como las de un
saxofón bajo.
– El sistema esté colocado muy cerca de un
televisor. (Aleje el sistema del televisor o apague el
televisor.)
Operaciones básicas
23
ES
Page 100

Escucha de la radio
— Presintonización
Presintonice emisoras de radio en la memoria
del sintonizador (consulte la página 10).
Modelo para Europa
Modelos para otros países
POWER
31
MANUAL
POWER
3
r REC
1
•
•
•
•
•
•
•
§
•
EJECT
•
0
10
=
SELECTOR
r REC
•
•
•
•
•
•
•
§
•
EJECT
•
0
10
=
SELECTOR
+
· ∏
0)
p
§
OPEN/CLOSE
=
SELECTOR
+
· ∏
0)
p
STEREO/MONO
1 Presione repetidamente TUNER/
BAND (o BAND en el telemando)
VOLUME
+
· ∏
0)
p
§
OPEN/CLOSE
=
SELECTOR
+
· ∏
0)
p
AUTO
2
hasta que aparezca la banda
deseada.
Cada vez que lo presione, la banda
cambiará de la forma siguiente:
Modelo para Europa:
FM n MW n LW
Modelos para otros países:
FM n AM
·
–
+
P+=p
ST/MONOVOLUME
2
PRESET (–/+)
BAND
2 Modelo para Europa:
P+=p
·
ª·
)0
p
+
–
VOL (+/–)
Presione repetidamente TUNING
MODE hasta que aparezca
“PRESET”.
Modelos para otros países:
Presione PRESET.
24
ES
 Loading...