

Page 1
3-067-426-32 (1)
Digital
Video Camera
Recorder
Operating Instructions
Before operating the unit, please read this manual thoroughly, and
retain it for future reference.
Gebruiksaanwijzing
Lees, alvorens het apparaat in gebruik te nemen, de gebruiksaanwijzing
aandachtig door en bewaar deze voor eventuele naslag.
DCR-TRV17E
DCR-TRV15E/TRV17E
©2001 Sony Corporation
Page 2
English
Nederlands
Welcome!
Congratulations on your purchase of this Sony
Digital Handycam camcorder. With your Digital
Handycam, you can capture life’s precious
moments with superior picture and sound
quality.
Your Digital Handycam is loaded with advanced
features, but at the same time it is very easy to
use. You will soon be producing home video that
you can enjoy for years to come.
To prevent fire or shock hazard, do not expose
the unit to rain or moisture.
To avoid electrical shock, do not open the
cabinet.
Refer servicing to qualified personnel only.
NOTICE ON THE SUPPLIED AC POWER
ADAPTOR FOR CUSTOMERS IN THE
UNITED KINGDOM
A moulded plug complying with BS1363 is fitted
to this equipment for your safety and
convenience.
Should the fuse in the plug supplied need to
be replaced, a 5 AMP fuse approved by ASTA
or BSI to BS1362 (i.e., marked with or
mark) must be used.
If the plug supplied with this equipment has a
detachable fuse cover, be sure to attach the
fuse cover after you change the fuse. Never
use the plug without the fuse cover. If you
should lose the fuse cover, please contact
your nearest Sony service station.
ATTENTION
The electromagnetic fields at the specific
frequencies may influence the picture and sound
of this digital camcorder.
This product has been tested and found
compliant with the limits set out in the EMC
Directive for using connection cables shorter than
3 meters. (9.8 feet)
For the customers in Germany
Directive:EMC Directive 89/336/EEC.
This equipment complies with the EMC
regulations when used under the following
circumstances:
•Residential area
•Business district
•Light-industry district
(This equipment complies with the EMC
standard regulations EN55022 Class B.)
2
WARNING
92/31/EEC
Welkom!
Gefeliciteerd met de aankoop van deze Sony
Digital Handycam camcorder. Met de superieure
beeld- en geluidskwaliteit van de Digital
Handycam kunt u de dierbare momenten in uw
leven vastleggen.
Deze camcorder biedt u een scala aan
geavanceerde functies en is toch zeer eenvoudig
te bedienen, zodat u al gauw in staat zult zijn
home-video’s te maken waar u nog jaren plezier
aan beleeft.
WAARSCHUWING
Om het gevaar van brand of elektrische
schokken te voorkomen, mag het apparaat niet
worden blootgesteld aan regen of vocht.
Om elektrische schokken te voorkomen, mag
de behuizing niet worden geopend.
Laat reparaties uitsluitend door vakkundig
personeel uitvoeren.
Dit apparaat bevat voor memory back-up een
batterij die niet vervangen hoeft te worden
tijdens de levensduur van het apparaat.
Raadpleeg uw leverancier indien na zeer
intensief of langdurig gebruik de batterij
vervangen moet worden.
Om gevaar of schade door kortsluiting te
voorkomen mag de batterij alleen vervangen
worden door vakbekwaam servicepersoneel.
Gooi de batterij niet weg maar lever deze in als
klein chemisch afval (KCA).
ATTENTIE
Elektromagnetische velden met bepaalde
frequenties kunnen het beeld en geluid van deze
digitale camcorder beïnvloeden.
Dit product heeft in tests gebleken te voldoen aan
de eisen gesteld in de Europese EMC Bepalingen
voor het gebruik van aansluitsnoeren van minder
dan 3 meter lang.
Page 3

English
Main Features
Taking moving or still images, and playing them back
•Recording a picture (p. 28)
•Recording a still image on a tape (p. 49)
•Playing back a tape (p. 41)
•Recording still images on “Memory Stick”s (p. 141) (DCR-TRV17E only)
•Recording moving pictures on “Memory Stick”s (p. 149) (DCR-TRV17E only)
•Viewing a still image recorded on “Memory Stick” (p. 159) (DCR-TRV17E only)
•Viewing a moving picture recorded on “Memory Stick” (p. 163) (DCR-TRV17E only)
Capturing images on your computer
•Viewing images recorded on “Memory Stick” using USB cable (p. 165) (DCR-TRV17E only)
Other uses
Functions to adjust exposure in the recording mode
• Back light (p. 35)
• NightShot/Super NightShot (p. 35)
• PROGRAM AE (p. 63)
• Adjusting the exposure manually (p. 66)
Functions to give images more impact
• Digital zoom (p. 33) The default setting is set to OFF. (To zoom greater than 10×, select the digital
zoom power in D ZOOM in the menu settings.)
• Fader (p. 56)
• Picture effect (p. 59)
• Digital effect (p. 60)
• Digital program editing (p. 90)
• Title (p. 106, 110)
• MEMORY MIX (p. 153) (DCR-TRV17E only)
Functions to give a natural appearance to your recordings
• Landscape mode (p. 63)
• Sports lesson mode (p. 63)
• Manual focus (p. 67)
Functions to use after recording
• END SEARCH/EDITSEARCH/Rec review (p. 39)
• DATA CODE (p. 42)
• SUPER LASER LINK (p. 48)
• Tape PB ZOOM (p. 77)/Memory PB ZOOM (p. 172) (DCR-TRV17E only)
• Zero set memory (p. 78)
• Title search (p. 79)
• HiFi SOUND (p. 116)
3
Page 4

Nederlands
Functie-overzicht
Bewegende of stilstaande beelden opnemen of weergeven
•Beelden opnemen (zie blz. 28)
•Stilstaande beelden op de band opnemen (zie blz. 49)
•Videocassettes afspelen (zie blz. 41)
•Stilstaande beelden vastleggen op een “Memory Stick” (zie blz. 141) (alleen met de DCR-TRV17E)
•Bewegende beelden vastleggen op een “Memory Stick” (zie blz. 149) (alleen met de DCR-TRV17E)
•Een stilstaand beeld op een “Memory Stick” bekijken (zie blz. 159) (alleen met de DCR-TRV17E)
•Bewegende beelden op een “Memory Stick” bekijken (zie blz. 163) (alleen met de DCR-TRV17E)
Beelden vastleggen met een personal computer
•Beelden die zijn vastgelegd op een “Memory Stick” weergeven via een USB-kabel (zie blz. 165)
(alleen met de DCR-TRV17E)
Andere toepassingen
Aanpassen van de belichting tijdens het opnemen
•Tegenlicht-opname (zie blz. 35)
•NightShot/Super NightShot nachtopname (zie blz. 35)
•PROGRAM AE belichtingsprogramma’s (zie blz. 63)
•Handmatig instellen van de belichting (zie blz. 66)
Functies die uw beelden pakkender maken
•Digitaal in-zoomen (zie blz. 33) Oorspronkelijk staat de digitale zoom met OFF uitgeschakeld. (Om
meer dan 10× op uw onderwerp in te zoomen, zult u eerst de D ZOOM functie in het instelmenu
moeten inschakelen.)
•In/uit-faden (zie blz. 56)
•Speciale beeld/kleureffecten (zie blz. 59)
•Digitale opname-effecten (zie blz. 60)
•Digitale programmamontage (zie blz. 90)
•Titelbeelden (zie blz. 106, 110)
•MEMORY MIX dubbelbeeldfuncties (zie blz. 153) (alleen met de DCR-TRV17E)
Functies die uw opnamen een natuurlijke aanblik geven
• Handmatig scherpstellen (zie blz. 63)
•Sport-belichtingsprogramma (zie blz. 63)
•Landschap-belichtingsprogramma (zie blz. 67)
Functies voor optimale weergave na het opnemen
• END SEARCH/EDITSEARCH eindzoek/opnamecontrolefuncties (zie blz. 39)
•DATA CODE opnamegegevens (zie blz. 42)
•SUPER LASER LINK afspelen zonder snoeren (zie blz. 48)
•PB ZOOM uitvergroting van foto’s op de band (TAPE, zie blz. 77)/in het geheugen (MEMORY, zie
blz. 172) (alleen met de DCR-TRV17E)
•ZERO SET MEMORY nulpunt-terugkeer (zie blz. 78)
•Titel-zoekfunctie (zie blz. 79)
4
•HiFi SOUND geluidsweergave (zie blz. 124)
Page 5
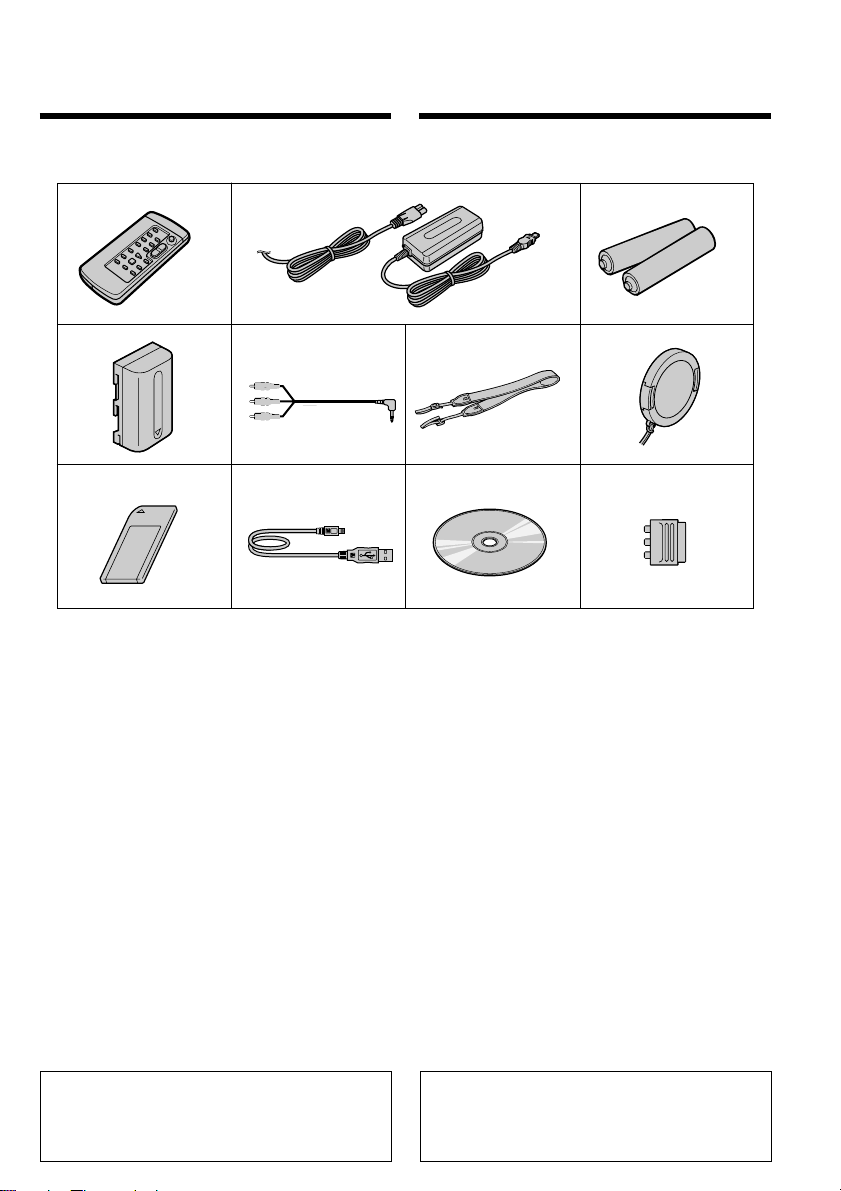
Checking supplied accessories
Controleren van het bijgeleverd toebehoren
Make sure that the following accessories are
supplied with your camcorder.
12
45
8
1 Wireless Remote Commander (1) (p. 228)
2 AC-L10A/L10B/L10C AC power adaptor
(1), Mains lead (1) (p. 18)
3 R6 (Size AA) battery for Remote
Commander (2) (p. 228)
4 NP-FM30 battery pack (1) (p. 17, 18)
5 A/V connecting cable (1) (p. 46, 86)
6 Shoulder strap (1) (p. 223)
7 Lens cap (1) (p. 28)
8 “Memory Stick” (1) (p. 131)
DCR-TRV17E only
9 USB cable (1) (p. 167)
DCR-TRV17E only
q; CD-ROM (SPVD-004, USB Driver) (1)
(p. 167)
DCR-TRV17E only
qa 21-pin adaptor (1) (p. 47)
Contents of the recording cannot be
compensated if recording or playback is not
made due to a malfunction of the camcorder,
storage media, etc.
9 q;
Controleer of de volgende accessoires alle in de
verpakking van de camcorder aanwezig zijn.
3
6
1 Draadloze afstandsbediening (1)
(blz. 228)
2 AC-L10A/L10B/L10C
netspanningsadapter (1), en Netsnoer (1)
(blz. 18)
3 R6 (AA-formaat) batterijen voor de
afstandsbediening (2) (blz. 228)
4 NP-FM30 batterijpak (1) (blz. 17, 18)
5 Audio/video aansluitsnoer (1) (blz. 46, 86)
6 Schouderband (1) (zie blz. 223)
7 Lensdop (1) (blz. 28)
8 “Memory Stick” (1) (blz. 131)
alleen bij de DCR-TRV17E
9 USB kabel (1) (blz. 167)
alleen bij de DCR-TRV17E
q; CD-ROM (met SPVD-004 USB-
besturingsprogramma) (1) (blz. 167)
alleen bij de DCR-TRV17E
qa 21-polige verloopstekker (1) (blz. 47)
Verloren gegane video-opnamen kunnen niet
worden vergoed, ook niet als er bij opnemen of
weergeven iets misgaat door een storing in de
camcorder, de videocassette e.d.
7
qa
Getting started Voorbereidingen
5
Page 6

English
Table of contents
Main Features................................................... 3
Checking supplied accessories ...................... 5
Quick Start Guide............................... 10
Getting started
Using this manual ......................................... 14
Step 1 Preparing the power supply ........... 17
Installing the battery pack..................... 17
Charging the battery pack..................... 18
Connecting to the wall socket............... 23
Step 2 Setting the date and time .................. 24
Step 3 Inserting a cassette............................ 26
Recording – Basics
Recording a picture ....................................... 28
Shooting backlit subjects
– BACK LIGHT ................................ 35
Shooting in the dark
– Night Shot/Super NightShot ..... 35
Self-timer recording ............................... 37
Checking the recording – END SEARCH /
EDITSEARCH / Rec Review ................ 39
Playback – Basics
Playing back a tape........................................ 41
Viewing the recording on TV ...................... 46
Advanced Recording Operations
Recording a still image on a tape
– Tape Photo recording ......................... 49
Adjusting the white balance manually
................................................................... 53
Using the wide mode .................................... 55
Using the fader function ............................... 56
Using special effects – Picture effect ........... 59
Using special effects – Digital effect ........... 60
Using the PROGRAM AE function............. 63
Adjusting the exposure manually............... 66
Focusing manually ........................................ 67
Interval recording .......................................... 69
Frame by frame recording
– Cut recording ....................................... 72
Advanced Playback Operations
Playing back a tape with picture effects
................................................................... 74
Playing back a tape with digital effects
................................................................... 75
Enlarging images recorded on tapes
– Tape PB ZOOM ................................... 77
6
Quickly locating a scene using the zero set
memory function .................................... 78
Searching the boundaries of recorded tape
by title – Title search .............................. 79
Searching a recording by date
– Date search ........................................... 81
Searching for a photo
– Photo search/Photo scan ................... 83
Editing
Dubbing a tape............................................... 86
Dubbing only desired scenes
– Digital program editing...................... 90
Audio dubbing............................................. 102
Superimposing a title .................................. 106
Making your own titles .............................. 110
Labelling a cassette...................................... 112
Customizing Your Camcorder
Changing the menu settings ...................... 114
“Memory Stick” Operations
(DCR-TRV17E only)
Using a “Memory Stick”
– introduction........................................ 131
Recording still images on “Memory Stick”s
– Memory photo recording ................. 141
Recording an image from a tape as a still
image ...................................................... 147
Recording moving pictures on “Memory
Stick”s
– MPEG movie recording .................... 149
Recording a picture from a tape as a moving
picture .................................................... 151
Superimposing a still picture in a “Memory
Stick” on a moving picture
– MEMORY MIX................................... 153
Copying still images from a tape
– Photo save........................................... 157
Viewing a still picture
– Memory photo playback .................. 159
Viewing a moving picture
– MPEG movie playback ..................... 163
Viewing images using computer .............. 165
Enlarging still images recorded on “Memory
Stick”s
– Memory PB ZOOM ........................... 172
Playing back images in a continuous loop
– SLIDE SHOW ..................................... 174
Preventing accidental erasure
– Image protection................................ 176
Deleting images ........................................... 178
Page 7

Table of contents
Writing a print mark
– PRINT MARK..................................... 181
Using the printer (optional) ....................... 183
Troubleshooting
Types of trouble and their solutions ......... 185
Self-diagnosis display ................................. 191
Warning indicators and messages ............ 192
Additional Information
Usable cassettes............................................ 203
About the “InfoLITHIUM” battery pack
................................................................. 206
About i.LINK................................................ 208
Using your camcorder abroad ................... 210
Maintenance information and
precautions ............................................ 211
Specifications................................................ 217
Quick Reference
Identifying the parts and controls............. 221
Index .............................................................. 232
7
Page 8

Nederlands
Inhoudsopgave
Functie-overzicht ............................................. 4
Controleren van het bijgeleverd
toebehoren ................................................. 5
Snelle startgids....................................... 12
Voorbereidingen
Omtrent deze handleiding ........................... 14
Stap 1 Voorbereiden van de
stroomvoorziening ................................. 17
Aanbrengen van het batterijpak........... 17
Opladen van het batterijpak ................. 18
Gebruik op stroom van het lichtnet ..... 23
Stap 2 Instellen van de datum en tijd ......... 24
Stap 3 Inleggen van een videocassette ....... 26
Opnemen – basisbediening
Video-opnamen maken ................................ 28
Opnemen bij tegenlicht
– BACK LIGHT ................................ 35
Opnemen in het donker
– NightShot/Super NightShot ...... 35
Opnemen met de zelfontspanner......... 37
Controleren van de gemaakte opnamen
– END SEARCH/EDITSEARCH /Rec
Review opnamecontrole ........................ 39
Afspelen – basisbediening
Afspelen van een videocassette................... 41
Aansluitingen voor videoweergave op TV
................................................................... 46
Uitgebreide opnamefuncties
Stilstaande beelden op de band opnemen
– Foto-bandopname ............................... 49
Handmatig instellen van de kleurbalans ... 53
Breedbeeld-opnamefunctie .......................... 55
Beelden in- en uit-faden................................ 56
Speciale effecten – Beeldeffect/kleurenpalet
................................................................... 59
Speciale effecten – Digitale opname-effecten
................................................................... 60
PROGRAM AE belichtingsprogramma’s .. 63
Handmatig instellen van de belichting ...... 66
Handmatig scherpstellen ............................. 67
Interval-opname ............................................ 69
Beeld-voor-beeld opname
– Animatiefilms ...................................... 72
Uitgebreide weergavefuncties
Videoweergave met beeld/kleureffecten .. 74
8
Videoweergave met digitale beeldeffecten
................................................................... 75
Beelden van een videoband vergroot
weergeven
– PB ZOOM band-uitvergroting .......... 77
Snel opzoeken van een scène met de
nulpunt-terugkeer .................................. 78
Opzoeken van een gewenste opname aan de
titel – Titel-zoekfunctie .......................... 79
Opzoeken van een gewenste opname aan de
datum – Datum-zoekfunctie ................. 81
Opzoeken van een foto-opname – Foto-
zoekfunctie/foto-serieweergave .......... 83
Videomontage
Video-opnamen overkopiëren..................... 86
Geselecteerde bandopnamen kopiëren
– Digitale programmamontage ............ 90
Nieuwe geluidsopnamen inlassen ............ 102
Een titel in beeld opnemen......................... 106
Zelf titelbeelden samenstellen ................... 110
Een videocassette van een naam voorzien
................................................................. 112
Uw camcorder naar eigen
inzicht aanpassen
Wijzigen van de oorspronkelijke menu-
instellingen ............................................ 114
“Memory Stick” functies
(alleen voor de DCR-TRV17E)
Gebruik van een “Memory Stick”
– inleiding .............................................. 131
Stilstaande beelden opnemen op een
“Memory Stick”
– MEMORY foto-opname.................... 141
Een scène van een cassette overnemen als
stilstaand beeld ..................................... 147
Bewegende beelden opnemen op een
“Memory Stick”
– MPEG filmopname............................ 149
Beelden van een cassette overnemen als
bewegende beelden.............................. 151
Een stilstaand beeld van een “Memory Stick”
samenvoegen met bewegende beelden
(MEMORY MIX) ................................... 153
Stilstaande beelden van een cassette kopiëren
– Foto-opslag ......................................... 157
Bekijken van een stilstaand beeld
– MEMORY foto-weergave ................. 159
Bekijken van bewegende beelden
– MPEG filmweergave ......................... 163
Page 9

Inhoudsopgave
Beelden bekijken met een personal computer
................................................................. 165
Stilstaande beelden van een “Memory Stick”
uitvergroten – MEMORY PB ZOOM
................................................................. 172
Weergeven van een doorlopende serie
beelden – SLIDE SHOW ...................... 174
Beveiligen tegen per ongeluk wissen
– Wispreventie ...................................... 176
Wissen van beelden..................................... 178
Markeren van af te drukken beelden
– PRINT MARK .................................... 181
Beelden afdrukken met een printer (los
verkrijgbaar) .......................................... 183
Problemen oplossen
Verhelpen van storingen ............................ 194
Zelfdiagnose-aanduidingen ....................... 200
Waarschuwingsaanduidingen en
mededelingen........................................ 201
Aanvullende informatie
Geschikte videocassettes ............................ 203
Betreffende “InfoLITHIUM” batterijen .... 206
Betreffende i.LINK ...................................... 208
Gebruik van uw camcorder in het buitenland
................................................................. 210
Onderhoud en voorzorgsmaatregelen ..... 211
Technische gegevens ................................... 219
Compleet overzicht
Plaats en functie van de bedieningsorganen
................................................................. 221
Index .............................................................. 233
9
Page 10

English
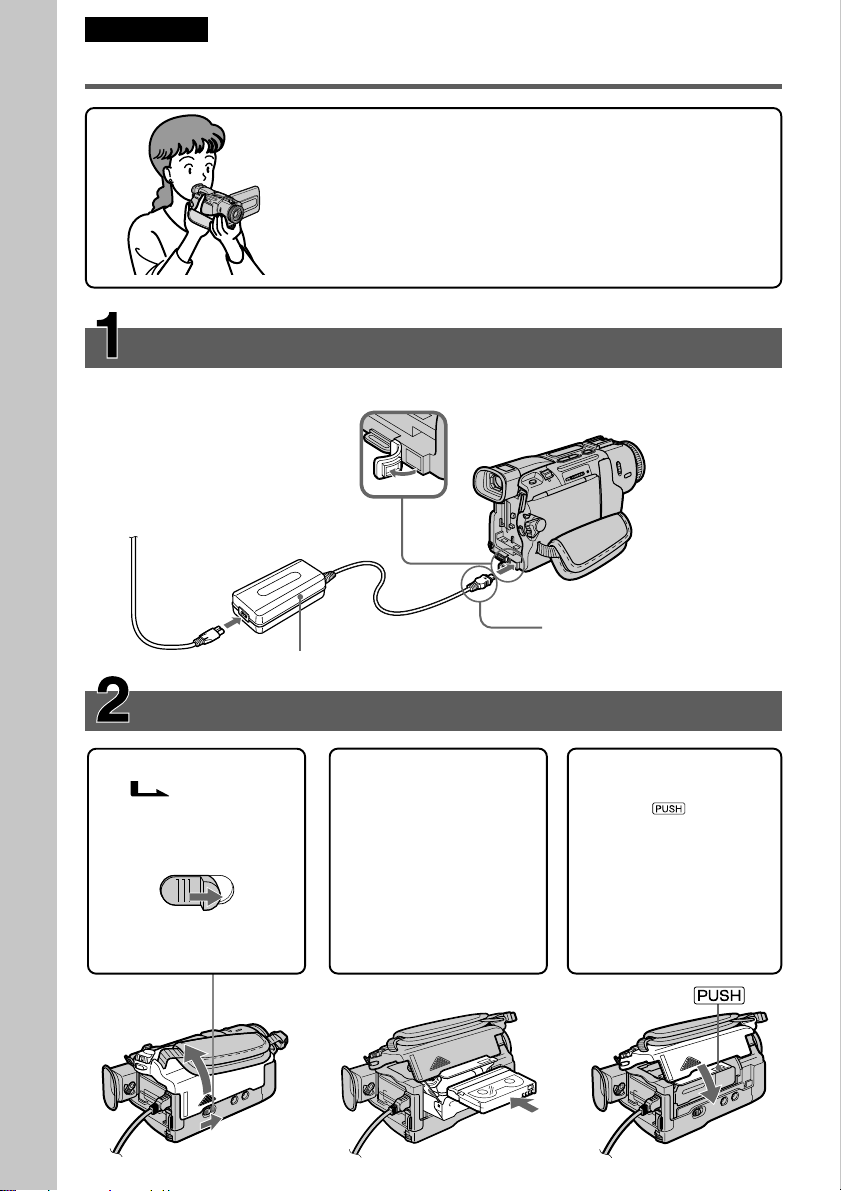
Quick Start Guide
Connecting the mains lead (p. 23)
Use the battery pack when using your camcorder outdoors (p. 17).
Open the DC IN
jack cover.
Quick Start Guide
This chapter introduces you to the basic features of your
camcorder. See the page in parentheses “( )” for more
information.
10
AC power adaptor (supplied)
Inserting a cassette (p. 26)
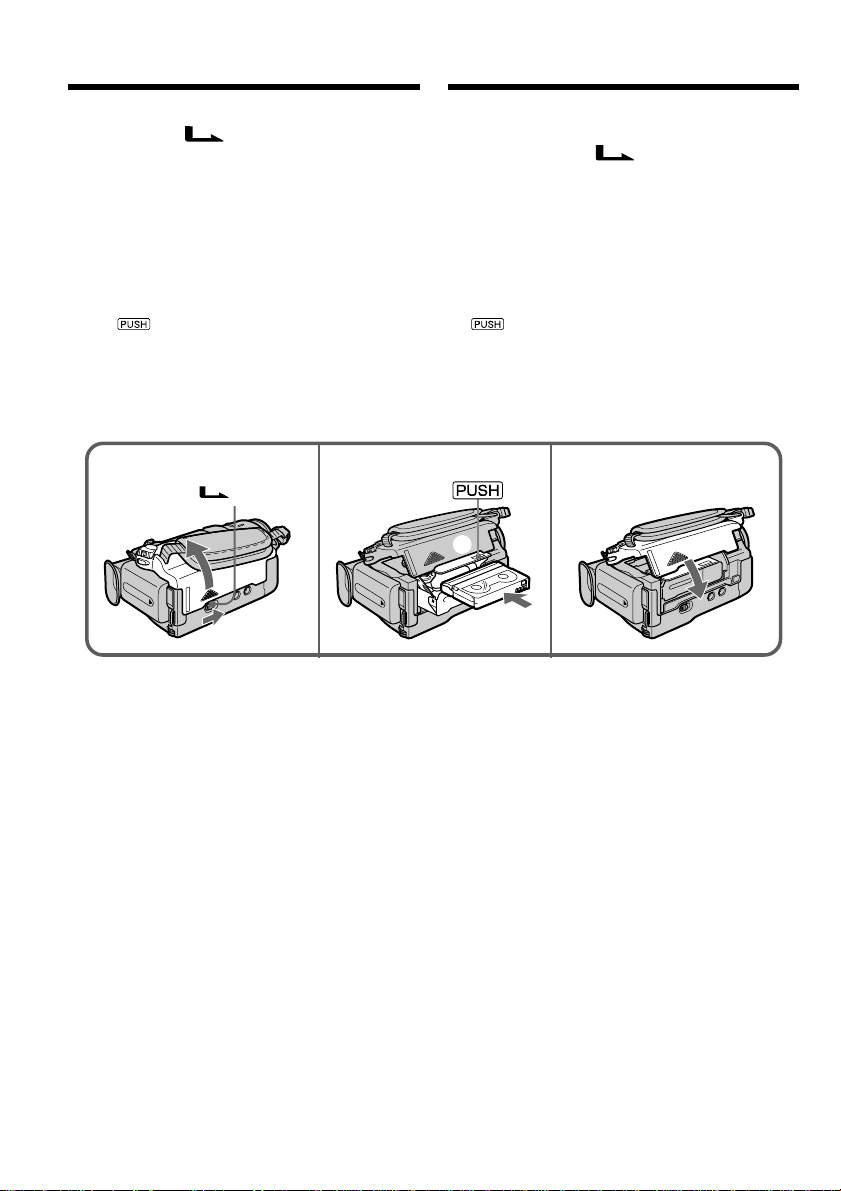
1Slide OPEN/
EJECT in the
direction of the arrow
and open the lid.
EJECT
2Push the middle
portion of the back of
the cassette to insert.
Insert the cassette in a
straight line deeply
into the cassette
compartment with the
window facing out.
Connect the plug with its v
mark facing up.
3Close the cassette
compartment by
pressing the
mark on the cassette
compartment.
After the cassette
compartment going
down completely,
close the lid until it
clicks.
Page 11
Recording a picture (p. 28)
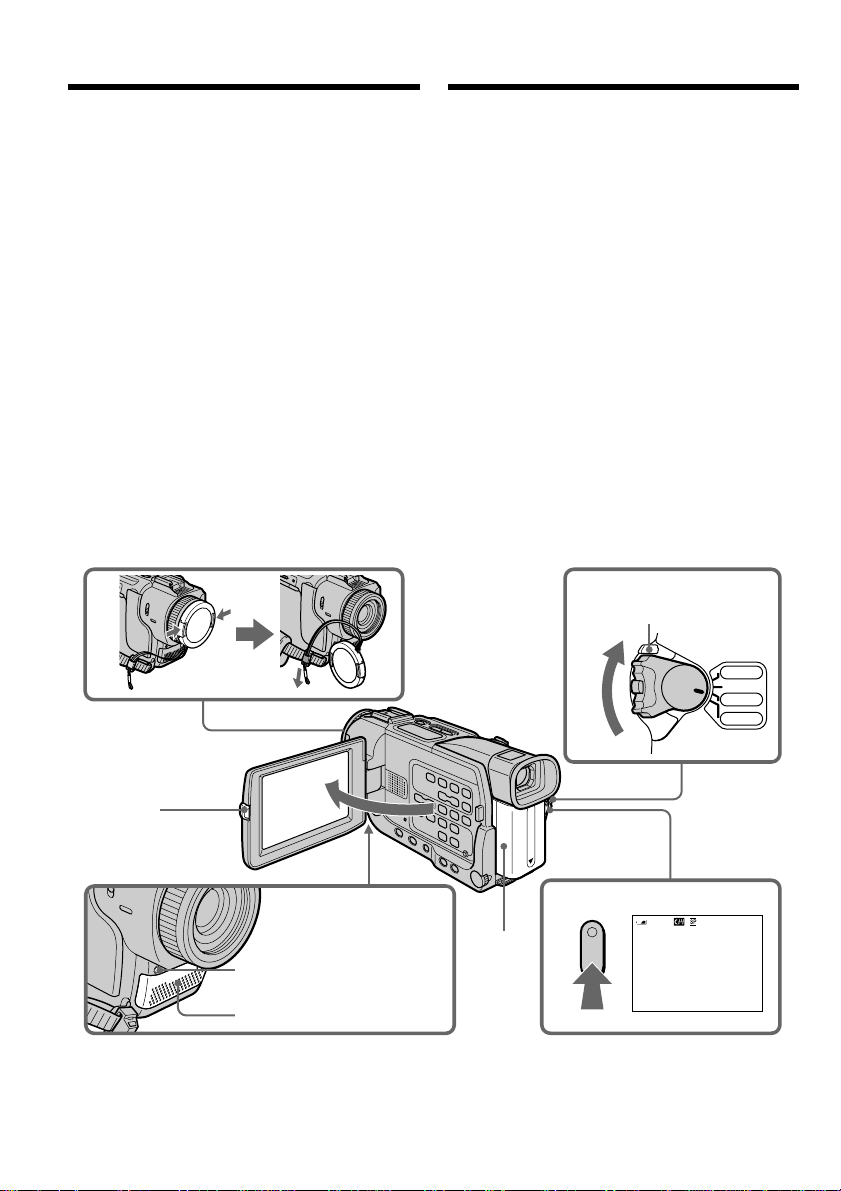
1Remove the lens cap.
2Set the POWER switch to CAMERA while
pressing the small green button.
POWER
PLAYER
OFF(CHG)
CAMERA
MEMORY
4Press START/STOP. Your camcorder starts
recording. To stop recording, press START/
STOP again.
3To open the LCD
panel, press OPEN.
The picture appears on
the screen.
When you purchase your camcorder, the clock setting is set to off. If you want to record the date
and time for a picture, set the clock setting before recording (p. 24).
Viewfinder
When the LCD panel is closed, use the viewfinder
placing your eye against its eyecup.
Monitoring the playback picture on the LCD
screen (p. 41)
1Set the POWER
switch to
PLAYER while
pressing the small
green button.
PLAYER
OFF(CHG)
ER
W
PO
CAMERA
MEMORY
2Press m to rewind the tape.
REW
Quick Start Guide
NOTE
Do not pick up your camcorder by
holding the viewfinder, the LCD
panel, or the battery pack.
3Press N to start playback.
PLAY
11
Page 12
Nederlands
Snelle startgids
Aansluiten van het netsnoer (zie blz. 23)
Voor gebruik buitenshuis dient u een batterijpak aan te brengen (zie blz. 17).
Snelle startgids
In dit hoofdstuk vindt u de eerste stappen voor het gebruik van
uw camcorder kort beschreven. Zie voor nadere bijzonderheden
de bladzijden waarnaar tussen haakjes “( )” wordt verwezen.
Open het klepje
van de DC IN
aansluiting.
12
Netspanningsadapter (bijgeleverd)
Inleggen van een videocassette (zie blz. 26)
1Schuif de OPEN/
EJECT knop in
de richting van de pijl
en open het deksel van
de cassettehouder.
EJECT
2Druk midden tegen de
rugzijde van de
videocassette om deze
in te schuiven.
Schuif de
videocassette met de
vensterzijde naar
boven recht in de
cassettehouder.
Sluit de stekker aan met het
v driehoekje boven.
3Druk op de kant van
de cassettehouder
waar staat
aangegeven om deze
te sluiten. Wanneer de
cassettehouder geheel
omlaag is geschoven,
sluit u het deksel
totdat dit vastklikt.
Page 13
Maken van een video-opname (zie blz. 28)
1Verwijder de lensdop.
2Druk het kleine groene knopje op de POWER
schakelaar in en zet de schakelaar in de
“CAMERA” stand.
POWER
PLAYER
OFF(CHG)
CAMERA
MEMORY
4Druk op de START/STOP toets. De
camcorder begint dan met opnemen. Om te
stoppen met opnemen drukt u nogmaals op
de START/STOP toets.
3Houd de OPEN toets
ingedrukt en klap het
LCD scherm open.
Het beeld van de
camera verschijnt op
het LCD scherm.
Bij aflevering van uw camcorder is de ingebouwde klok ervan nog niet ingesteld. Als u datum en
tijd van opname met de beelden wilt vastleggen, dient u voor het opnemen eerst de tijd in te
stellen (zie blz. 24).
Zoeker
Wanneer het LCD scherm gesloten is, kunt u de opgenomen
beelden in de zoeker zien, door de oogkap tegen uw oog te
plaatsen.
Controleren van de laatste opnamen op het LCD
scherm (zie blz. 41)
Snelle startgids
1Druk het kleine
groene knopje op
de POWER
schakelaar in en zet
de schakelaar in de
“PLAYER” stand.
OPMERKING
Til de camcorder nooit aan de
beeldzoeker, het LCD scherm of het
batterijpak op.
POWER
PLAYER
OFF(CHG)
CAMERA
MEMORY
2Druk op de m toets om de band
terug te spoelen.
REW
3Druk op de N toets om de
weergave te starten.
PLAY
13
Page 14

— Getting started —
Using this manual
— Voorbereidingen —
Omtrent deze
handleiding
The instructions in this manual are for the two
models listed in the table below. Before you start
reading this manual and operating your
camcorder, check the model number by looking
at the bottom of your camcorder. The DCRTRV17E is the model used for illustration
purposes. Otherwise, the model name is
indicated in the illustrations. Any differences in
operation are clearly indicated in the text, for
example, “DCR-TRV17E only”.
As you read through this manual, buttons and
settings on your camcorder are shown in capital
letters.
e.g. Set the POWER switch to CAMERA.
When you carry out an operation, you can hear a
beep sound to indicate that the operation is being
carried out.
Type of differences/Verschillen tussen de uitvoeringen
DCR- TRV15E TRV17E
MEMORY mark*
(on the POWER switch)/
MEMORY stand*
(op de POWER schakelaar)
(USB) jack/
USB aansluiting
Intelligent accessory shoe/ 8 pin/ 15 pin*2)/
Intelligente accessoireschoen 8-polig 15-polig*
z Provided/Voorzien
— Not provided/Niet voorzien
1)
1)
In deze gebruiksaanwijzing vindt u een
beschrijving van twee verschillende uitvoeringen
van de camcorder, zoals in onderstaande tabel is
aangegeven. Controleer voor het doorlezen van
deze handleiding en het in gebruik nemen van
uw camcorder eerst even uw modelnummer, dat
aan de onderkant van de camcorder vermeld
staat. De afbeeldingen in deze
gebruiksaanwijzing tonen het model DCRTRV17E, tenzij er bij de afbeelding een ander
modelnummer staat aangegeven. Verschillen in
bediening tussen de modellen worden in de tekst
duidelijk aangegeven, als bijvoorbeeld “alleen
voor de DCR-TRV17E”.
In deze gebruiksaanwijzing worden de namen
van toetsen of regelaars en instellingen op de
camcorder in hoofdletters vermeld.
Bijvoorbeeld: Zet de POWER schakelaar in de
“CAMERA” stand.
Bij bepaalde bedieningsfuncties kunnen er één of
meer pieptonen klinken, om u op het
overschakelen te attenderen en vergissingen te
voorkomen.
— z
— z
2)
*1)The model with MEMORY marked on the
POWER switch is provided with memory
functions. See page 131 for details.
*2)This intelligent accessory shoe is designed to
use a printer (optional) (p. 183).
14
*1)Het model voorzien van een MEMORY
markering op de POWER schakelaar beschikt
over een aantal geheugenfuncties. Zie blz. 131
e.v. voor nadere bijzonderheden hieromtrent.
*2)Deze intelligente accessoireschoen is geschikt
voor het aansluiten van een (los verkrijgbare)
videoprinter (zie blz. 183).
Page 15
Using this manual
Omtrent deze handleiding
Note on Cassette Memory
Your camcorder is based on the DV format. You
can only use mini DV cassettes with your
camcorder. We recommend that you use a tape
with cassette memory .
The functions which require different operations
depending on whether the tape has the cassette
memory or not are:
•End search (p. 39)
•Date search (p. 81)
•Photo search (p. 83)
The functions you can operate only with the
cassette memory are:
•Title search (p. 79)
•Superimposing a title (p. 106)
•Making your own titles (p. 110)
•Labelling a cassette (p. 112)
For details, see page 203.
You see this mark in the introduction of
the features that are operated only with
cassette memory.
Tapes with cassette memory are marked by
(Cassette Memory).
Note on TV colour systems
TV colour systems differ from country to
country. To view your recordings on a TV, you
need an PAL system-based TV.
Copyright precautions
Television programmes, films, video tapes, and
other materials may be copyrighted.
Unauthorised recording of such materials may be
contrary to the provision of the copyright laws.
Betreffende het
cassettegeheugen
Deze camcorder werkt volgens het DV-formaat
en is uitsluitend geschikt voor mini-DV
videocassettes. Wij raden u aan gebruik te maken
van videocassettes met het cassettegeheugenbeeldmerk .
De werking van de volgende functies is
afhankelijk van het cassettegeheugen van de
videocassette:
•Eindzoekfunctie (blz. 39)
•Datumzoekfunctie (blz. 81)
•Fotozoekfunctie (blz. 83)
De volgende functies werken uitsluitend bij
videocassettes met een cassettegeheugen:
•Titelzoekfunctie (blz. 79)
•Titelbeelden aanbrengen (blz. 106)
•Eigen titelbeelden maken (blz. 110)
•Betitelen (naamgeving) van een cassette
(blz. 112)
Zie voor nadere bijzonderheden blz. 203.
Dit beeldmerk zult u aantreffen bij de
beschrijving van de functies die werken
met het cassettegeheugen.
Cassettes die voorzien zijn van een
cassettegeheugen zijn te herkennen aan het
(cassettegeheugen) beeldmerk.
Verschillende televisiekleursystemen
Televisie-kleursystemen verschillen van land tot
land. Om de videobeelden van deze camcorder
op uw TV te bekijken, moet het TV-toestel
werken met het PAL kleursysteem.
Auteursrechten
Getting started Voorbereidingen
Televisieprogramma’s, films, videobanden en
ander beeldmateriaal kunnen beschermd zijn
door auteursrechten. Het zonder toestemming
opnemen van dergelijk materiaal kan in strijd
zijn met deze auteursrechten.
15
Page 16

Using this manual
Omtrent deze handleiding
Precautions on camcorder care
Lens and LCD screen/finder (on
mounted models only)
•The LCD screen and the finder are
manufactured using extremely highprecision technology so over 99.99% of the
pixels are operational for effective use.
However, there may be some tiny black
points and/or bright points (white, red, blue
or green in colour) that constantly appear on
the LCD screen and the finder. These points
are normal in the manufacturing process and
do not affect the recording in any way.
•Do not let your camcorder get wet. Keep your
camcorder away from rain and sea water.
Letting your camcorder get wet may cause your
camcorder to malfunction. Sometimes this
malfunction cannot be repaired [a].
•Never leave your camcorder exposed to
temperatures above 60 °C (140°F), such as in a
car parked in the sun or under direct sunlight
[b].
•Be careful when placing the camera near a
window or outdoors. Exposing the LCD screen,
the finder or the lens to direct sunlight for long
periods may cause malfunctions [c].
•Do not directly shoot the sun. Doing so might
cause your camcorder to malfunction. Take
pictures of the sun in low light conditions such
as dusk [d].
[a][b]
Voorzorgen bij gebruik van de
camcorder
Lens en LCD scherm/beeldzoeker
(mits hiervan voorzien)
•Het LCD scherm en de beeldzoeker van uw
camcorder zijn vervaardigd met precisietechnologie, zodat minstens 99,99% van de
beeldpunten voor gebruik beschikbaar is.
Soms kunnen er op het LCD scherm en/of in
de zoeker wel eens stippen zwart blijven, of
juist in een enkele kleur (wit, rood, blauw of
groen) oplichten. Maakt u zich geen zorgen:
deze stippen duiden niet op
fabricagefouten, en ze hebben geen enkele
invloed op uw video-opnamen.
•Laat de camcorder niet nat worden. Zorg dat er
geen regen of opspattend water, vooral
zeewater, op het apparaat komt. Water in de
camcorder kan storingen veroorzaken, soms
zodanig dat reparatie niet meer mogelijk is. [a]
•Laat de camcorder nooit achter op plaatsen
waar de temperatuur tot boven de 60 °C kan
oplopen, zoals op een vensterbank in de volle
zon of in een auto die in de zon geparkeerd
staat. [b]
•Wees voorzichtig wanneer u de camcorder in
de buurt van een raam of ergens buitenshuis
neerlegt. Als er geruime tijd lang direct zonlicht
op het LCD scherm, de beeldzoeker of de lens
valt, kan er schade aan deze vitale onderdelen
ontstaan. [c]
•Pas op dat u de camcorder niet op de zon richt.
Fel zonlicht kan storing in de werking van de
camcorder veroorzaken. Alleen bij
zonsondergang, als het licht niet meer zo fel is,
mag u de zon in beeld nemen. [d]
16
[c][d]
Page 17
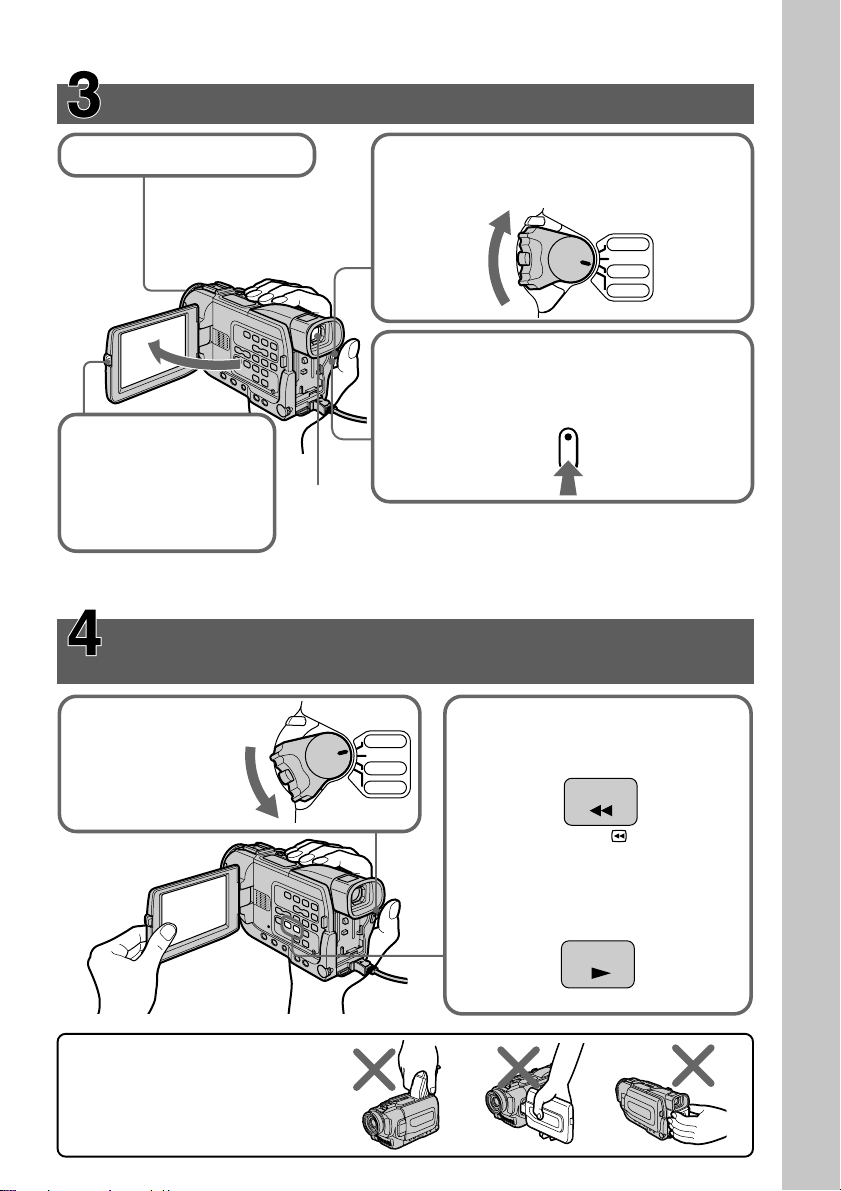
Step 1 Preparing the
power supply
Stap 1 Voorbereiden van de
stroomvoorziening
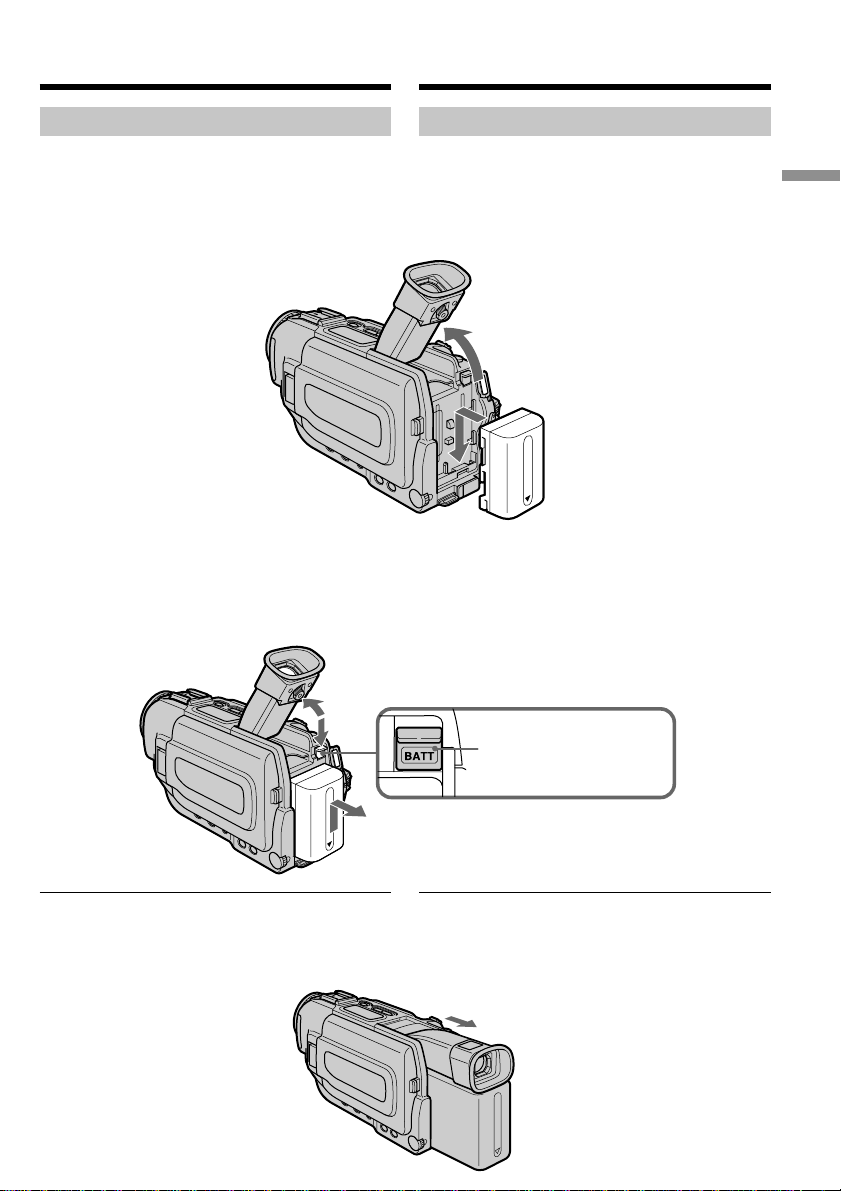
Installing the battery pack
Install the battery pack to use your camcorder
outdoors.
(1)Lift up the viewfinder.
(2)Slide the battery pack down until it clicks.
To remove the battery pack
(1)Lift up the viewfinder.
(2)Slide the battery pack out in the direction of
the arrow while pressing BATT down.
1
Aanbrengen van het batterijpak
Om uw camcorder buitenshuis te gebruiken,
brengt u er als volgt een batterijpak op aan.
(1)Klap de zoeker omhoog.
(2)Schuif het batterijpak omlaag tot het vastklikt.
1
2
Verwijderen van het batterijpak
(1)Klap de zoeker omhoog.
(2)Schuif het batterijpak los in de richting van de
pijl terwijl u het BATT ontgrendelknopje
ingedrukt houdt.
Getting started Voorbereidingen
2
If you use the large capacity battery pack
If you install the NP-FM70/FM90/FM91 battery
pack on your camcorder, extend its viewfinder.
BATT release button/
BATT ontgrendel-knopje
2
Bij gebruik van een batterijpak met hoge
capaciteit
Als u het NP-FM70/FM90/FM91 batterijpak op
uw camcorder aanbrengt, kunt u de zoeker
uitschuiven.
17
Page 18
Step 1 Preparing the power
supply
Stap 1 Voorbereiden van de
stroomvoorziening
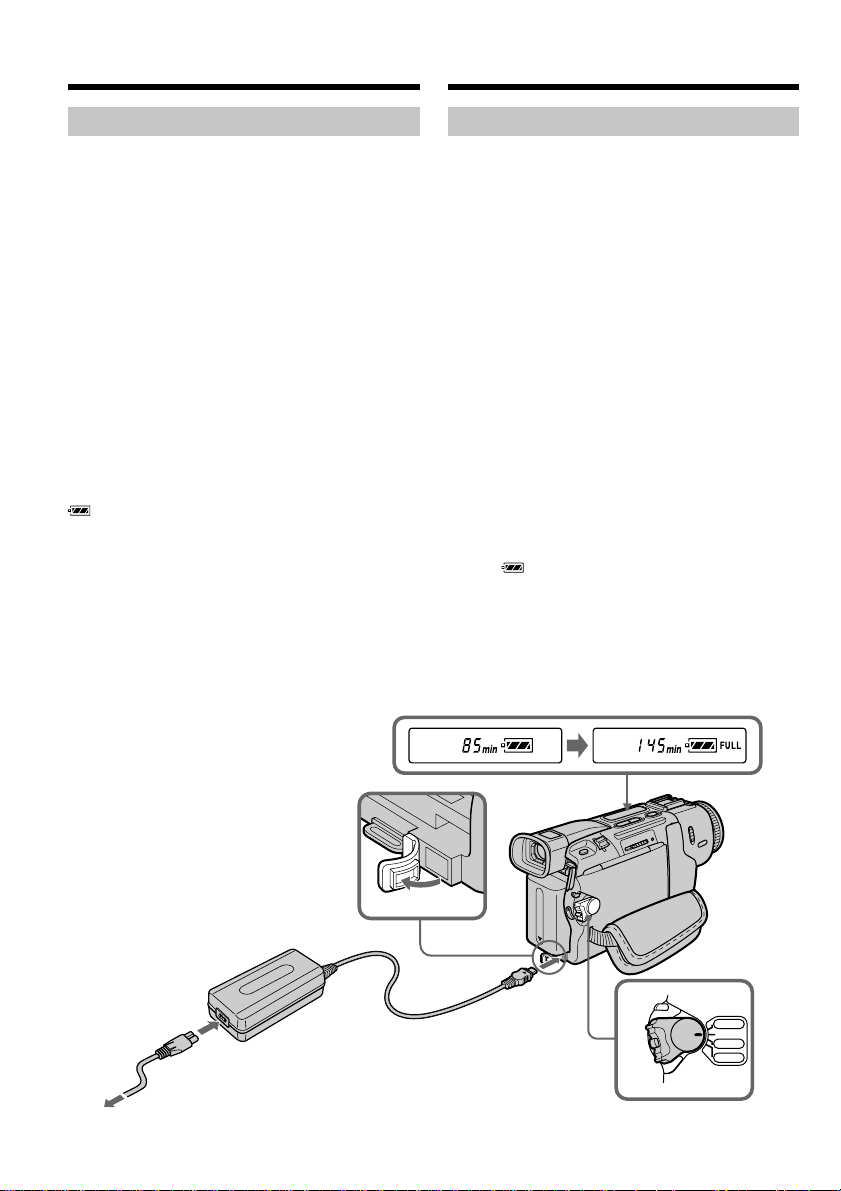
Charging the battery pack
Use the battery pack after charging it for your
camcorder.
Your camcorder operates only with the
“InfoLITHIUM” battery pack (M series).
See page 206 for details of “InfoLITHIUM”
battery pack.
(1)Open the DC IN jack cover and connect the
AC power adaptor supplied with your
camcorder to the DC IN jack on your
camcorder with the plug’s v mark facing up.
(2)Connect the mains lead to the AC power
adaptor.
(3)Connect the mains lead to the wall socket.
(4)Set the POWER switch to OFF (CHG).
Charging begins. The remaining battery time
is indicated in minutes on the display
window.
When the remaining battery indicator changes to
, normal charge is completed. To fully charge
the battery (full charge), leave the battery pack
attached for about one hour after normal charge
is completed until FULL appears in the display
window. Fully charging the battery allows you to
use the battery longer than usual.
Opladen van het batterijpak
Voordat u de camcorder op batterijspanning kunt
gebruiken, zult u eerst het batterijpak moeten
opladen.
Deze camcorder werkt alleen met
“InfoLITHIUM” batterijen (van de M-serie).
Zie blz. 206 voor nadere informatie over het
“InfoLITHIUM” batterijpak.
(1)Open het DC IN aansluitklepje en sluit de bij
uw camcorder geleverde netspanningsadapter
aan op de DC IN gelijkstroomingang, met het
v driehoekje van de stekker boven.
(2)Sluit het netsnoer aan op de
netspanningsadapter.
(3)Steek de stekker van het netsnoer in het
stopcontact.
(4)Zet de POWER schakelaar in de “OFF (CHG)”
stand.
Het opladen begint. De beschikbare batterijgebruiksduur in minuten wordt aangegeven
in het uitleesvenster.
Wanneer de batterijspanningsindicator een volle
batterij toont, is het normale opladen
voltooid. Voor maximaal of volledig opladen
laat u het batterijpak na het normale opladen nog
ongeveer een uur langer op de
netspanningsadapter zitten, totdat de aanduiding
“FULL” in het uitleesvenster verschijnt. Na
volledig opladen zult u het batterijpak extra lang
kunnen gebruiken.
2
The number in the illustration of the display
window may differ from that on your camcorder.
18
1
In het uitleesvenster van uw camcorder kunnen
andere getallen verschijnen dan in deze
afbeelding van het uitleesvenster.
4
POWER
PLAYER
OFF(CHG)
CAMERA
MEMORY
Page 19

Step 1 Preparing the power
supply
Stap 1 Voorbereiden van de
stroomvoorziening
After charging the battery pack
Disconnect the AC power adaptor from the DC
IN jack on your camcorder.
Note
Prevent metallic objects from coming into contact
with the metal parts of the DC plug of the AC
power adaptor. This may cause a short-circuit,
damaging the AC power adaptor.
When the battery pack is charged fully
“FULL” appears in the display window.
Remaining battery time indicator
The remaining battery time you record with the
viewfinder is displayed.
The remaining battery time indicator in the
display window indicates the approximate
recording time with the viewfinder.
Until your camcorder calculates the actual
remaining battery time
“– – – min” appears in the display window.
Charging time/Vereiste oplaadtijd
Battery pack/ Full charge (Normal charge)/
Batterijpak Voor volledige lading (resp. normale lading)
NP-FM30 (supplied)/
(bijgeleverd)
NP-FM50 150 (90)
NP-FM70 240 (180)
NP-FM90 330 (270)
NP-FM91 360 (300)
145 (85)
Na het opladen van het batterijpak
Maak de netspanningsadapter los van de DC IN
aansluiting van uw camcorder.
Opmerking
Zorg dat er geen metalen voorwerpen tegen de
metalen contactvlakken van de
gelijkstroomstekker komen. Dit kan kortsluiting
veroorzaken en de netspanningsadapter
beschadigen.
Wanneer het batterijpak volledig is opgeladen
Dan verschijnt de aanduiding “FULL” in het
uitleesvenster.
Resterende batterij-gebruiksduur aanduiding
De camcorder toont de beschikbare gebruiksduur
voor het opnemen met de beeldzoeker.
De resterende batterijtijd-indicator in het
uitleesvenster toont ongeveer de nog resterende
gebruiksduur voor opname met gebruik van de
beeldzoeker.
Totdat uw camcorder de resterende batterijgebruiksduur heeft berekend
Voorlopig verschijnt er “– – – min” in het
uitleesvenster.
Getting started Voorbereidingen
Approximate minutes to charge an empty battery
pack at 25 °C (77 °F).
Dit is ongeveer het aantal minuten dat het
opladen van een leeg batterijpak duurt bij een
temperatuur van 25°C.
19
Page 20

Step 1 Preparing the power
supply
Recording time/Beschikbare opnameduur
DCR-TRV15E
Recording with Recording with
the viewfinder/ the LCD screen/
Battery pack/
Batterijpak
NP-FM30 (supplied)/
(bijgeleverd)
NP-FM50 200 110 150 75
NP-FM70 415 225 310 165
NP-FM90 630 345 475 255
NP-FM91 725 395 550 290
DCR-TRV17E
Battery pack/
Batterijpak
NP-FM30 (supplied)/
(bijgeleverd)
NP-FM50 195 105 135 65
NP-FM70 400 220 275 145
NP-FM90 600 330 425 225
NP-FM91 695 380 490 255
Opnemen met Opnemen met
de zoeker het LCD scherm
Continuous*/ Typical**/ Continuous*/ Typical**/
Continu* Gemiddeld** Continu* Gemiddeld**
125 65 90 45
Recording with Recording with
the viewfinder/ the LCD screen/
Opnemen met Opnemen met
de zoeker het LCD scherm
Continuous*/ Typical**/ Continuous*/ Typical**/
Continu* Gemiddeld** Continu* Gemiddeld**
120 60 80 40
Stap 1 Voorbereiden van de
stroomvoorziening
Approximate minutes when you use a fully
charged battery
* Approximate continuous recording time at
25 °C (77 °F). The battery life will be
shorter if you use your camcorder in a cold
environment.
** Approximate number of minutes when
recording while you repeat recording start/
stop, zooming and turning the power on/off.
The actual battery life may be shorter.
20
Dit is ongeveer het aantal minuten dat u kunt
opnemen met een volledig opgeladen batterijpak.
* Gebruiksduur bij benadering, bij
ononderbroken opnemen bij een temperatuur
van 25°C. Het batterijpak zal minder lang
meegaan bij gebruik van de camcorder in een
koude omgeving.
** Gebruiksduur in minuten bij benadering, bij
filmen met herhaaldelijk starten/stoppen van
het opnemen, in/uit-zoomen en in/
uitschakelen van de stroom. De gebruiksduur
van het batterijpak kan in werkelijkheid korter
uitvallen.
Page 21

Step 1 Preparing the power
supply
Playing time/Beschikbare speelduur
DCR-TRV15E
Battery pack/ on LCD screen/ with LCD closed/
Batterijpak Speelduur op het Speelduur met het
NP-FM30 (supplied)/
(bijgeleverd)
NP-FM50 160 220
NP-FM70 335 450
NP-FM90 505 685
NP-FM91 585 785
DCR-TRV17E
Battery pack/ on LCD screen/ with LCD closed/
Batterijpak Speelduur op het Speelduur met het
NP-FM30 (supplied)/
(bijgeleverd)
NP-FM50 140 210
NP-FM70 295 430
NP-FM90 450 655
NP-FM91 520 755
Playing time Playing time
LCD scherm LCD scherm gesloten
100 135
Playing time Playing time
LCD scherm LCD scherm gesloten
85 130
Stap 1 Voorbereiden van de
stroomvoorziening
Getting started Voorbereidingen
Approximate minutes when you use a fully
charged battery
Approximate minutes when playing back at
25 °C (77 ºF). The battery life will be shorter if
you use your camcorder in a cold environment.
The recording and playing times of a normally
charged battery are about 90 % of those of a fully
charged battery.
Dit is ongeveer het aantal minuten dat u videoopnamen kunt afspelen met een volledig
opgeladen batterijpak.
Gebruiksduur bij benadering, bij ononderbroken
afspelen bij een temperatuur van 25°C. Het
batterijpak zal minder lang meegaan bij gebruik
van de camcorder in een koude omgeving.
De beschikbare opnameduur en speelduur zijn
met een normaal opgeladen batterijpak ongeveer
90% van die met een volledig opgeladen
batterijpak.
21
Page 22
Step 1 Preparing the power
supply
Stap 1 Voorbereiden van de
stroomvoorziening
If the power goes off although the battery
remaining indicator indicates that the battery
pack has enough power to operate
Charge the battery pack fully again so that the
indication on the battery remaining indicator is
correct.
What is ”InfoLITHIUM”?
The “InfoLITHIUM” is a lithium ion battery pack
which can exchange data such as battery
consumption with compatible electronic
equipment. This unit is compatible with the
“InfoLITHIUM” battery pack (M series). Your
camcorder operates only with the
“InfoLITHIUM” battery. “InfoLITHIUM” M
series battery packs have the
“InfoLITHIUM” is a trademark of Sony
mark.
TM
SERIES
Corporation.
We recommend charging the battery pack in an
ambient temperature of between 10 ˚C to 30 ˚C
(50 ˚F to 86 ˚F).
Als de stroom uitvalt, terwijl het batterijpak
volgens de batterijtijd-aanduiding nog wel
voldoende spanning kan leveren is voor
gebruik
Laad het batterijpak nog eens volledig op, dan
zal de aanduiding van de resterende batterijgebruiksduur wel weer juist zijn.
Wat is “InfoLITHIUM” ?
Het “InfoLITHIUM” batterijpak is een lithiumionen batterijpak dat geschikt is voor het
doorgeven van het gebruikstempo van de batterij
aan de hiervoor geschikte video-apparatuur.
Deze camcorder is geschikt voor elk
“InfoLITHIUM” batterijpak van de M-serie. Uw
camcorder zal alleen goed werken met dit type
“InfoLITHIUM” batterijen. Alle “InfoLITHIUM”
batterijen van de M-serie zijn te herkennen aan
het
“InfoLITHIUM” is een handelsmerk van Sony
beeldmerk.
TM
SERIES
Corporation.
Het is aanbevolen het batterijpak op te laden bij
een omgevingstemperatuur tussen 10°C en 30°C.
22
Page 23
Step 1 Preparing the power
supply
Stap 1 Voorbereiden van de
stroomvoorziening
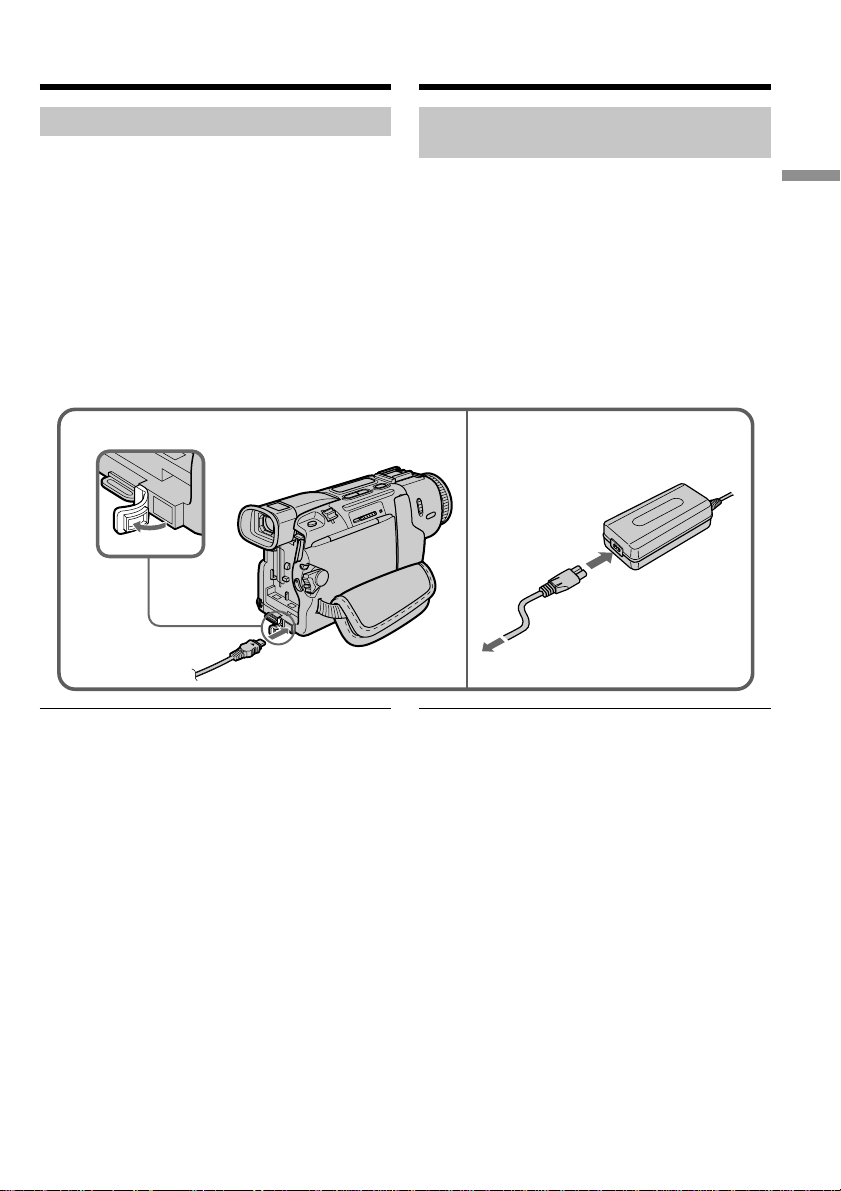
Connecting to a wall socket
When you use your camcorder for a long time,
we recommend that you power it from a wall
socket using the AC power adaptor.
(1)Open the DC IN jack cover, pulling the cover
out a little and rotating it. Connect the AC
power adaptor supplied with your camcorder
to the DC IN jack on your camcorder with the
plug’s v mark facing up.
(2)Connect the mains lead to the AC power
adaptor.
(3)Connect the mains lead to a wall socket.
1
Gebruik op stroom van het
lichtnet
Als u de camcorder geruime tijd achtereen wilt
gebruiken, is het aanbevolen het apparaat op het
lichtnet aan te sluiten via de bijgeleverde
netspanningsadapter.
(1)Open het DC IN aansluitklepje en trek het
klepje iets naar buiten. Sluit de bij uw
camcorder geleverde netspanningsadapter
aan op de DC IN gelijkstroomingang, met het
v driehoekje van de stekker boven.
(2)Sluit het netsnoer aan op de
netspanningsadapter.
(3)Steek de stekker van het netsnoer in het
stopcontact.
2, 3
Getting started Voorbereidingen
PRECAUTION
The set is not disconnected from the AC power
source (wall socket) as long as it is connected to
the wall socket, even if the set itself has been
turned off.
Notes
•Place the AC power adaptor near a wall socket.
While using the AC power adaptor, if any
trouble occurs with this unit, disconnect the
plug from the wall socket as soon as possible to
cut off the power.
•The AC power adaptor can supply power even
if the battery pack is attached to your
camcorder.
•The DC IN jack has “source priority.” This
means that the battery pack cannot supply any
power if the mains lead is connected to the DC
IN jack, even when the power cord is not
plugged into a wall socket.
Using a car battery
Use Sony DC Adaptor/Charger (optional).
Refer to the operating instractions of the DC
Adaptor/Charger for further information.
VOORZICHTIG
Zolang de stekker in het stopcontact zit, blijft de
stroomtoevoer naar het apparaat intact, ook al is
de camcorder zelf uitgeschakeld.
Opmerkingen
•Plaats de netspanningsadapter in de buurt van
een goed bereikbaar stopcontact. Als er tijdens
gebruik van de netspanningsadapter iets mis
gaat, trekt u dan zo spoedig mogelijk de stekker
uit het stopcontact.
•U kunt uw camcorder ook op stroom van de
netspanningsadapter gebruiken wanneer er een
batterijpak op de camcorder is aangesloten.
•De DC IN gelijkstroomingang heeft
“voorrang”. Dat wil zeggen dat het batterijpak
geen stroom kan leveren zolang het snoer van
de netspanningsadapter is aangesloten op de
DC IN aansluiting, ook al zit de stekker van de
netspanningsadapter niet in het stopcontact.
Gebruik op stroom van een auto-accu
Gebruik in de auto een Sony
gelijkstroomadapter/batterij-lader (los
verkrijgbaar). Zie voor nadere bijzonderheden de
gebruiksaanwijzing van de gelijkstroomadapter/
batterij-lader.
23
Page 24
Step 2 Setting the
date and time
Stap 2 Instellen van de
datum en de tijd
Set the date and time settings when you use your
camcorder for the first time. “CLOCK SET” will
be displayed each time that you set the POWER
switch to CAMERA/MEMORY (DCR-TRV17E
only) unless you set the date and time settings.
If you do not use your camcorder for about four
months, the date and time settings may be
released (bars may appear) because the built-in
rechargeable battery in your camcorder will have
been discharged (p. 212).
First, set the year, then the month, the day, the
hour and then the minute.
(1)Set the POWER switch to CAMERA or
MEMORY (DCR-TRV17E only), and then
press MENU to display the menu settings.
(2)Turn the SEL/PUSH EXEC dial to select ,
then press the dial.
(3)Turn the SEL/PUSH EXEC dial to select
CLOCK SET, then press the dial.
(4)Turn the SEL/PUSH EXEC dial to adjust the
desired year, then press the dial.
(5)Set the month, day and hour by turning the
SEL/PUSH EXEC dial and pressing the dial.
(6)Set the minute by turning the SEL/PUSH
EXEC dial and pressing the dial by the time
signal. The clock starts to move.
(7)Press MENU to make the menu settings
disappear.
Voor het eerste gebruik van uw camcorder zult u de
datum en de tijd moeten instellen. Anders zal de
aanduiding “CLOCK SET” verschijnen telkens
wanneer u de POWER schakelaar in de “CAMERA”
stand (of de “MEMORY” stand, alleen voor de DCRTRV17E) zet, net zolang totdat u de datum en de tijd
hebt ingesteld.
Als u de camcorder ongeveer vier maanden lang niet
hebt gebruikt, kan de instelling van datum en tijd
zijn vervallen (zodat er slechts streepjes verschijnen)
omdat de ingebouwde oplaadbare batterij in uw
camcorder leeg is (zie blz. 212).
Eerst kiest u het jaar, dan de maand, de dag, het uur
en tenslotte de minuut.
(1) Zet de POWER schakelaar in de “CAMERA”
stand (of de “MEMORY” stand, alleen voor de
DCR-TRV17E) en druk op de MENU toets om
het instelmenu te zien.
(2) Draai aan de SEL/PUSH EXEC regelknop, stel in
op het pictogram en druk de regelknop in.
(3) Draai aan de SEL/PUSH EXEC regelknop, stel in
op “CLOCK SET” en druk de regelknop in.
(4) Draai weer aan de SEL/PUSH EXEC regelknop,
stel in op het juiste jaartal en druk de regelknop
in.
(5) Draai steeds aan de SEL/PUSH EXEC regelknop
om de maand, het dagnummer en het juiste uur
in te stellen en druk tussendoor telkens op de
regelknop om de instelling vast te leggen.
(6) Draai aan de SEL/PUSH EXEC regelknop, stel in
op de juiste minuut en druk de regelknop in
tegelijk met het tijdsignaal van de radio, TV of
telefoon. De klok begint dan te lopen.
(7) Druk weer op de MENU toets om het instelmenu
uit beeld te laten verdwijnen.
24
4
2001 1 1
0 00
1,
7
MENU
2001 1 1
0 00
2
MANUAL SET
[MENU] : END
CLOCK SET
LTR SIZE
DEMO MODE
6
SETUP MENU
CLOCK SET – – : – – : – –
LTR SIZE
DEMO MODE
RETURN
[MENU] : END
SETUP MENU
CLOCK SET
LTR SIZE
DEMO MODE 2001
RETURN
17
[MENU] : END
3
SETUP MENU
CLOCK SET
LTR SIZE
DEMO MODE 2001
RETURN
0 00
[MENU] : END
SETUP MENU
CLOCK SET 4 7 2001
LTR SIZE 17:30:00
7 4
30
DEMO MODE
RETURN
[MENU] : END
1 1
Page 25

Step 2 Setting the date and time
Stap 2 Instellen van de datum
en de tijd
The year changes as follows:
1995 T · · · · t 2001 T · · · · t 2079
If you do not set the date and time
“– –:– –:– –” is recorded on the data code of the
tape and the “Memory Stick” (DCR-TRV17E
only).
Note on the time indicator
The internal clock of your camcorder operates on
a 24-hour cycle.
De jaaraanduiding verloopt als volgt:
Getting started Voorbereidingen
Als u de datum en tijd niet instelt
Dan wordt er in plaats daarvan bij de
opnamegegevens slechts “– –:– –:– –” opgenomen
op de band (en op de “Memory Stick”, alleen bij
de DCR-TRV17E).
Betreffende de tijdsaanduiding
De ingebouwde klok van deze camcorder geeft
de tijd aan volgens een 24-uurs cyclus.
25
Page 26
Step 3 Inserting a
cassette
Stap 3 Inleggen van een
videocassette
(1)Install the power source.
(2)Slide OPEN/ EJECT in the direction of
the arrow and open the lid. The cassette
compartment automatically lifts up and
opens.
(3)Push the middle portion of the back of the
cassette to insert.
Insert the cassette in a straight line deeply into
the cassette compartment with the window
facing out.
(4)Close the cassette compartment by pressing
the mark on the cassette compartment.
The cassette compartment automatically goes
down.
(5)After the cassette compartment going down
completely, close the lid until it clicks.
2
OPEN/ EJECT
To eject a cassette
Follow the procedure above, and take out the
cassette in step 3.
3, 4
(1)Zorg dat de camcorder van stroom wordt
voorzien.
(2)Schuif de OPEN/ EJECT knop in de
richting van de pijl en open het deksel van de
cassettehouder. Dan komt de cassettehouder
automatisch omhoog en gaat open.
(3)Druk midden tegen de rugzijde van de
videocassette om deze in te schuiven.
Schuif de videocassette met de vensterzijde
naar boven recht in de cassettehouder.
(4)Druk op de kant van de cassettehouder waar
staat aangegeven om deze te sluiten. De
cassettehouder gaat dan verder vanzelf
omlaag.
(5)Wanneer de cassettehouder geheel omlaag is
geschoven, sluit u het deksel totdat dit
vastklikt.
5
4
3
Uitnemen van de videocassette
Volg weer de bovenstaande aanwijzingen, maar
neem in stap 3 de cassette uit de houder.
26
Page 27

Step 3 Inserting a cassette
Stap 3 Inleggen van een
videocassette
Note
Do not press the cassette compartment down
forcibly. Doing so may cause a malfunction.
The cassette compartment may not be closed
when you press any part of the lid other than the
mark.
When you use cassette with cassette memory
Read the instruction about cassette memory to
use this function properly (p. 203).
To prevent accidental erasure
Slide the write-protect tab on the cassette to
expose the red mark.
When ejecting a cassette
Do not press EDITSEARCH.
Opmerking
Probeer niet de cassettehouder met de hand
omlaag te drukken. Hierdoor zou u het apparaat
kunnen beschadigen. De cassettehouder kan niet
dicht gaan wanneer u op een ander punt van het
deksel dan het teken drukt.
Gebruik van een cassette met
cassettegeheugen
Lees de aanwijzingen omtrent het
cassettegeheugen om gebruik te maken van de
beschikbare geheugenfuncties (zie blz. 203).
Voorkomen van per ongeluk wissen
Schuif het wispreventienokje van de
videocassette opzij, zodat het rode vlakje
zichtbaar wordt.
Bij het uitnemen van een cassette
Druk niet op de EDITSEARCH toets.
Getting started Voorbereidingen
27
Page 28
— Recording – Basics —
— Opnemen – basisbediening —
Recording a picture
Your camcorder automatically focuses for you.
(1)Remove the lens cap by pressing both knobs
on its sides and attatch the lens cap to the grip
strap.
(2)Install the power source and insert a cassette.
See “Step 1” to “Step 3” for more information
(p. 17 to p. 27).
(3)Set the POWER switch to CAMERA while
pressing the small green button. Your
camcorder is set to the standby mode.
(4)To open the LCD panel, press OPEN. The
viewfinder automatically turns off.
(5)Press START/STOP. Your camcorder starts
recording. The REC indicator appears. The
camera recording lamp located on the front of
your camcorder lights up. To stop recording,
press START/STOP again.
13
Video-opnamen maken
Uw camcorder zal vanzelf op uw onderwerp
scherpstellen.
(1)Verwijder de lensdop door de nokken aan
weerszijden in te drukken en bevestig de
lensdop met het koordje aan de
handgreepband.
(2)Sluit een stroombron aan en plaats een
videocassette. Zie voor nadere aanwijzingen
“Stap 1” t/m “Stap 3” (op blz. 17 t/m 27).
(3)Druk het kleine groene knopje op de POWER
schakelaar in en schuif de schakelaar in de
“CAMERA” stand. De camcorder komt dan in
de opnamepauzestand.
(4)Druk op de OPEN toets en klap het LCD
scherm open. De beeldzoeker wordt dan
automatisch uitgeschakeld.
(5)Druk op de START/STOP toets. De
camcorder begint dan met opnemen. De
aanduiding “REC” licht op. Het cameraopnamelampje voorop de camcorder gaat
branden. Om te stoppen met opnemen, drukt
u nogmaals op de START/STOP toets.
LOCK Switch/
LOCK
vergrendelknopje
28
4
Camera recording lamp/
Camera-opnamelampje
Microphone/Microfoon
2
5
40
POWER
min
REC
PLAYER
OFF(CHG)
CAMERA
MEMORY
0:00:01
Page 29

Recording a picture
Video-opnamen maken
Notes
•Fasten the grip strap firmly.
•Do not touch the built-in microphone during
recording.
Note on Recording mode
Your camcorder records and plays back in the SP
(standard play) mode and in the LP (long play)
mode. Select SP or LP in the menu settings. In the
LP mode, you can record 1.5 times as long as in
the SP mode.
When you record a tape in the LP mode on your
camcorder, we recommend playing the tape on
your camcorder.
Note on the LOCK switch (DCR-TRV17E only)
When you slide the LOCK switch to the right, the
POWER switch can no longer be set to MEMORY
accidentally. LOCK switch is set to the left before
your camcorder leaves the factory.
To enable smooth transition
Transition between the last scene you recorded
and the next scene is smooth as long as you do
not eject the cassette even if you turn off your
camcorder.
However, check the following:
•Do not mix recordings in the SP mode and ones
in the LP mode on one tape.
•When you change the battery pack, set the
POWER switch to OFF (CHG).
•When you use a tape with cassette memory,
however, you can make the transition smooth
even after ejecting the cassette if you use the
END SEARCH function (p. 39).
If you leave your camcorder in the standby
mode for five minutes while the cassette is
inserted
Your camcorder automatically turns off. This is
to save battery power and to prevent battery and
tape wear. To resume the standby mode, set the
POWER switch to OFF (CHG), and to CAMERA
again.
When you record in the SP and LP modes on
one tape or you record some scenes in the LP
mode
The playback picture may be distorted or the
time code may not be written properly between
scenes.
Opmerkingen
•Trek de handgreepband stevig aan.
•Pas op dat u tijdens opnemen de ingebouwde
microfoon niet aanraakt.
Betreffende de opnamesnelheid
Deze camcorder kan opnemen en afspelen met
de SP (standaard) opnamesnelheid of de LP
(langspeel) snelheid. Kies de stand SP of LP in
het instelmenu. Met de LP langspeelsnelheid
kunt u anderhalf (1,5) keer zo lang opnemen als
met de SP snelheid.
Een videoband die is opgenomen met de LP
langspeel-snelheid op deze camcorder, kunt u
beter ook afspelen op deze camcorder.
Betreffende het LOCK vergrendelknopje
(alleen op de DCR-TRV17E)
Wanneer u het LOCK vergrendelknopje naar
rechts schuift, kan de POWER schakelaar niet
meer per ongeluk in de “MEMORY” stand
worden gezet. Bij aflevering vanaf de fabriek is
het LOCK vergrendelknopje naar links in de vrije
stand geschoven.
Voor soepel aansluitende opnamen
Het begin van een nieuwe video-opname zal
altijd direct aansluiten op het eind van de
voorgaande opnamen, mits u de videocassette
niet uit de camcorder verwijdert.
Houd echter rekening met de volgende punten:
•Maak niet door elkaar opnamen met de SP
snelheid en LP snelheid op dezelfde
cassetteband.
•Als u tijdens het opnemen het batterijpak moet
verwisselen, zet u dan eerst de POWER
schakelaar in de “OFF (CHG)” stand.
•Bij gebruik van een videoband met
cassettegeheugen kunt u zelfs na het
verwijderen van de cassette de video-opnamen
weer perfect laten aansluiten, door gebruik van
de END SEARCH eindzoekfunctie (zie blz. 39).
Als u de camcorder, met een cassette er in,
langer dan 5 minuten in de opnamepauzestand laat staan
De camcorder wordt dan automatisch
uitgeschakeld. Dit is om het onnodig uitputten
van het batterijpak en slijtage aan de
cassetteband te voorkomen. Om de
opnamepauzestand daarna weer in te schakelen,
zet u de POWER schakelaar eerst op “OFF
(CHG)” en dan weer terug in de “CAMERA”
stand.
Als u op een enkele videocassette zowel met
de SP als de LP snelheid opneemt of als u
bepaalde scènes tussendoor opneemt met de
LP snelheid
Dan kan er bij weergave vervorming in het beeld
optreden of kan de tijdcode tussen de scènes niet
juist worden aangebracht.
Recording – Basics Opnemen – basisbediening
29
Page 30
Recording a picture
Video-opnamen maken
Recording data
The recording data (date/time or various settings
when recorded) are not displayed while
recording. However, they are recorded
automatically onto tape. To display the recording
date and time, press DATA CODE on the Remote
Commander during playback.
Adjusting the LCD screen
The LCD panel moves about 90 degrees to the
viewfinder side and about 180 degrees to the lens
side.
If you turn the LCD panel over so that it faces the
other way, the indicator appears on the LCD
screen and in the viewfinder (Mirror mode).
When closing the LCD panel, set it vertically
until it clicks, and swing it into the camcorder
body.
Note
When using the LCD screen except in the mirror
mode, the viewfinder automatically turns off.
When you use the LCD screen outdoors in
direct sunlight
The LCD screen may be difficult to see. If this
happens, we recommend that you use the
viewfinder.
Picture in the mirror mode
The picture on the LCD screen is a mirror-image.
However, the picture will be normal when
recorded.
During recording in the mirror mode
ZERO SET MEMORY on the Remote
Commander does not work.
Indicators in the mirror mode
The STBY indicator appears as Xz and REC as
z. Some of the other indicators appear mirror-
reversed and others are not displayed.
30
Opnamegegevens, datum en tijd
De opnamegegevens (datum/tijd of diverse
opname-instellingen) worden tijdens het
opnemen niet aangegeven. Deze gegevens
worden echter wel automatisch op de band
vastgelegd. Om later de opnamedatum en -tijd in
beeld te zien, drukt u tijdens afspelen op de
DATA CODE toets van de afstandsbediening.
Instellen van het LCD scherm
Het LCD scherm is horizontaal tot ongeveer 90°
uit te klappen en verticaal ongeveer 180°
draaibaar naar de lens toe.
Wanneer u het LCD scherm zo omklapt dat het
naar de voorkant van de camcorder wijst,
verschijnt er een indicator in de vorm van een
hoofdje op het LCD scherm en in de zoeker
(d.i. de spiegelstand)
180°
90°
Om het LCD scherm te sluiten, kantelt u het eerst
terug in de verticale stand tot het klikt en dan
klapt u het dicht, tegen de camcorder aan.
Opmerking
Bij gebruik van het LCD scherm in gewone stand,
dus niet in de spiegelstand, wordt de
beeldzoeker automatisch uitgeschakeld.
Als u het LCD scherm buitenshuis in de volle
zon gebruikt
In de zon kan de weergave op het LCD scherm
wel eens flets en onduidelijk zijn. In dat geval is
het aanbevolen in plaats van het LCD scherm de
gewone beeldzoeker te gebruiken.
Beeldweergave in de spiegelstand
Het beeld op het LCD scherm verschijnt in de
spiegelstand ook werkelijk in spiegelbeeld, met
links en rechts verwisseld. De opgenomen
beelden zijn echter wel normaal, dus niet in
spiegelbeeld.
Bij opnemen in de spiegelstand
Tijdens het opnemen in de spiegelstand kunt u
de ZERO SET MEMORY toets van de
afstandsbediening niet gebruiken.
Aanduidingen in de spiegelstand
De “STBY” pauze-aanduiding verschijnt als Xz
en de “REC” opname-aanduiding als z. Andere
aanduidingen verschijnen in spiegelbeeld en
sommige aanduidingen zullen in de spiegelstand
niet zichtbaar zijn.
Page 31

Recording a picture
Video-opnamen maken
Adjusting the brightness of the
LCD screen
Adjust the brightness of the LCD screen with
LCD BRIGHT in in the menu settings (p. 117).
MENU
LCD screen backlight
You can change the brightness of the backlight.
Select LCD B.L. in the menu settings
(p. 117).
Even if you adjust the LCD screen backlight or
brightness of the LCD screen
The recorded picture will not be affected.
Instellen van de helderheid van
het LCD scherm
Regel de lichtsterkte van het LCD scherm naar
wens bij via de LCD BRIGHT instelling onder
in het instelmenu (zie blz. 125).
LCD/ VF SET
LCD BR IGHT
[
] :
MENU
END
Verlichting van het LCD scherm
U kunt de helderheid van de schermverlichting
bijregelen. Kies in het instelmenu het onderdeel
LCD B.L. om de gewenste helderheid in te stellen
(zie blz. 125).
Bij aanpassen van de helderheid of de
achtergrondverlichting van het LCD scherm
De schermverlichting of helderheid heeft geen
enkele invloed op de opgenomen beelden.
Recording – Basics Opnemen – basisbediening
After recording
(1)Set the POWER switch to OFF (CHG).
(2)Close the LCD panel.
(3)Eject the cassette.
Na afloop van het opnemen
(1)Zet de POWER schakelaar terug op “OFF
(CHG)”.
(2)Sluit het LCD scherm.
(3)Neem de videocassette uit de camcorder.
31
Page 32

Recording a picture
Video-opnamen maken
Adjusting the viewfinder
If you record pictures with the LCD panel closed,
check the picture with the viewfinder. Adjust the
viewfinder lens to your eyesight so that the
indicators in the viewfinder come into sharp
focus.
Lift up the viewfinder and move the viewfinder
lens adjustment lever.
Viewfinder backlight
You can change the brightness of the backlight.
Select VF B.L. in the menu settings. (p. 117)
Instellen van het zoekerbeeld
Bij het maken van video-opnamen met het LCD
scherm gesloten kunt u het beeld controleren in
de zoeker. Om het zoekerbeeld scherp te stellen,
verstelt u het knopje er onder zo dat u de
aanduidingen optimaal scherp in beeld krijgt.
Klap de zoeker omhoog en stel het beeld
nauwkeurig scherp met het
zoekerscherpstelknopje.
Verlichting van het zoekerscherm
U kunt de lichtsterkte van de beeldzoeker
bijregelen. Kies in het instelmenu het onderdeel
VF B.L. (zie blz. 125).
32
Page 33

Recording a picture
Video-opnamen maken
Using the zoom feature
Move the power zoom lever a little for a slower
zoom. Move it further for a faster zoom.
Using the zoom function sparingly results in
better-looking recordings.
“T” side: for telephoto (subject appears closer)
“W” side: for wide-angle (subject appears farther
away)
To use zoom greater than 10×
Zoom greater than 10× is performed digitally. To
activate digital zoom, select the digital power in
D ZOOM in the menu settings. The digital zoom
function is set to OFF as a default settings.
(p. 115)
In- en uit-zoomen
Door de zoomknop voorzichtig te verschuiven
kunt u langzaam op uw onderwerp in-zoomen,
resp. uit-zoomen. Druk de zoomknop verder
opzij voor een snelle zoombeweging.
Gebruik het in- en uit-zoomen met mate, voor
een beter resultaat dat niet te onrustig oogt.
“T” kant: voor tele-opnamen (met het
“W” kant:voor groothoek-opnamen (met het
W
Voor meer dan 10× inzoomen
Zoombewegingen van meer dan 10× worden
digitaal verkregen. Om de digitale zoomfunctie
in te schakelen, kiest u de gewenste zoomfactor
onder D ZOOM in het instelmenu. Bij aflevering
staat de digitale zoomfunctie uitgeschakeld, op
“OFF” (zie blz. 123).
onderwerp “dichter bij” of groter in
beeld)
onderwerp “verder af”, klein in een
ruimer beeldveld)
T
W
T
W
T
Recording – Basics Opnemen – basisbediening
The right side of the bar shows the digital zooming zone.
The digital zooming zone appears when you select the digital
power in the menu settings./
De rechterkant van de zoombalk toont het digitale zoombereik.
Dit digitale gedeelte verschijnt alleen als u digitale zoomfunctie
in het instelmenu hebt ingeschakeld.
When you shoot close to a subject
If you cannot get a sharp focus, move the power
zoom lever to the “W” side until the focus is
sharp. You can shoot a subject that is at least
about 80 cm (about 2 feet 5/8 inch) away from
the lens surface in the telephoto position, or
about 1 cm (about 1/2 inch) away in the wideangle position.
Notes on digital zoom
•Digital zoom starts to function when zoom
exceeds 10×.
Bij moeilijk scherpstellen op een nabij
onderwerp
Als u het onderwerp niet goed scherp in beeld
krijgt, drukt u de zoomknop dan naar de “W”
kant tot het beeld scherp is. Voor scherpstelling
op dichtbijzijnde onderwerpen is in de telestand
een minimale afstand van 80 cm vereist, terwijl u
in de groothoekstand kunt scherpstellen op
voorwerpen die niet meer dan 1 cm van het
lensoppervlak verwijderd zijn.
Opmerkingen over de digitale zoomfunctie
•De digitale zoomfunctie wordt ingeschakeld
•The picture quality deteriorates as you move
the power zoom lever toward the “T” side.
•You cannot use the digital zoom when the
POWER switch is set to MEMORY (DCRTRV17E only).
•Naarmate u verder naar de “T” tele-kant
•De digitale zoomfunctie is niet te gebruiken
W
T
wanneer u meer dan 10× op uw onderwerp
inzoomt.
inzoomt, zal de beeldkwaliteit teruglopen.
wanneer de POWER schakelaar in de
“MEMORY” stand staat (alleen bij de DCRTRV17E).
33
Page 34

Recording a picture
Video-opnamen maken
Indicators displayed in the
recording mode
The indicators are not recorded on tapes.
Remaining battery time indicator/Resterende batterijspanning-aanduiding
Cassette memory indicator/Cassettegeheugen-aanduiding
This appears when using a tape with cassette memory./
Deze verschijnt wanneer u een videoband met cassettegeheugen gebruikt.
Recording mode indicator/Opnamesnelheid-aanduiding
STBY/REC indicator/STBY/REC pauze/opname-aanduiding
0:00:01
40min
4 7 2001
Remaining battery time indicator
The remaining battery time indicator roughly
indicates the recording time. The indicator may
not be correct, depending on the conditions in
which you are recording. When you close the
LCD panel and open it again, it takes about one
minute for the correct remaining battery time in
minutes to be displayed.
Time code
The time code indicates the recording or
playback time, “0:00:00” (hours : minutes :
seconds) in CAMERA mode and “0:00:00:00”
(hours : minutes : seconds : frames) in PLAYER
mode. You cannot rewrite only the time code.
Remaining tape indicator
The indicator may not be displayed accurately
depending on the tape.
Recording data
The recording data (date/time or various settings
when recorded) are not displayed while
recording. However, they are recorded
automatically onto tape. To display the recording
date and time, press DATA CODE on the Remote
Commander during playback.
34
REC
12:05:56
45min
Time code/Tape counter indicator/Tijdcode/bandteller-aanduiding
Remaining tape indicator (p. 121)/
Resterende bandlengte-aanduiding (zie blz. 129)
Time indicator/Tijdsaanduiding
The time is displayed about 5 seconds after the power is turned
on./De tijd wordt na het inschakelen ongeveer 5 seconden lang
aangegeven.
Date indicator/Datumaanduiding
The date is displayed about 5 seconds after the power is turned
on./De datum wordt na het inschakelen ongeveer 5 seconden lang
aangegeven.
Aanduidingen in beeld tijdens
het opnemen
Deze aanduidingen worden niet mee op de band
opgenomen.
Aanduiding van de resterende batterijgebruiksduur
De aanduiding van de resterende batterijgebruiksduur geeft bij benadering de beschikbare
opnameduur aan. Deze aanduiding kan wel eens
onjuist zijn, afhankelijk van de omstandigheden
van gebruik. Wanneer u het LCD scherm sluit en
weer opent, zal het ongeveer 1 minuut duren
voordat de juiste resterende batterijgebruiksduur weer aangegeven wordt.
Tijdcode
De tijdcode geeft de opnameduur of weergavespeelduur aan als “0:00:00” (uren : minuten :
seconden) in de “CAMERA” stand en als
“0:00:00:00” (uren : minuten: seconden :
beeldnummers) in de “PLAYER” stand. U kunt
deze tijdcode niet afzonderlijk wijzigen.
Resterende bandlengte-aanduiding
Deze aanduiding kan niet altijd juist worden
aangegeven, afhankelijk van de gebruikte
videocassette.
Opnamegegevens, datum en tijd
De opnamegegevens (datum/tijd of diverse
opname-instellingen) worden tijdens het
opnemen niet aangegeven. Deze gegevens
worden echter wel automatisch op de band
vastgelegd. Om later de opnamedatum en -tijd in
beeld te zien, drukt u tijdens afspelen op de
DATA CODE toets van de afstandsbediening.
Page 35

Recording a picture
Video-opnamen maken
Shooting backlit subjects
– BACK LIGHT
When you shoot a subject with the light source
behind the subject or a subject with a light
background, use the backlight function.
In CAMERA or MEMORY (DCR-TRV17E only)
mode, press BACK LIGHT.
The . indicator appears on the screen.
To cancel, press BACK LIGHT again.
If you press EXPOSURE when shooting backlit
subjects
The backlight function will be canceled.
Shooting in the dark
– NightShot/Super NightShot
The NightShot function enables you to shoot a
subject in a dark place. For example, you can
satisfactorily record the environment of
nocturnal animals for observation when you use
this function.
In CAMERA or MEMORY (DCR-TRV17E only)
mode, slide NIGHTSHOT to ON.
and “NIGHTSHOT” indicators flash on the
screen. To cancel the NightShot function, slide
NIGHTSHOT to OFF.
NIGHTSHOT
OFF
ON
SUPER
NIGHTSHOT
Opnemen bij tegenlicht
– BACK LIGHT
Voor het maken van tegenlicht-opnamen, met
achter uw onderwerp een lichtbron of een erg
lichte achtergrond, kunt u ter correctie de BACK
LIGHT tegenlichtcompensatie inschakelen.
Druk tijdens opnemen in de “CAMERA” stand
(of de “MEMORY” stand, alleen voor de DCRTRV17E) op de BACK LIGHT toets.
De . tegenlicht-indicator verschijnt op het
scherm.
Om de tegenlichtcompensatie uit te schakelen,
drukt u nogmaals op de BACK LIGHT toets.
BACK LIGHT
Als u op de EXPOSURE toets drukt tijdens het
opnemen bij tegenlicht
Dan wordt de tegenlichtcompensatie
uitgeschakeld.
Opnemen in het donker
– NightShot/Super NightShot
Met de NightShot nachtopnamefuncties kunt u
een onderwerp ook bij duisternis helder
opnemen. Zo kunt u bijvoorbeeld nachtdieren in
hun natuurlijke omgeving observeren en
opnemen.
Schuif tijdens opnemen in de “CAMERA” stand
(of de “MEMORY” stand, alleen voor de DCRTRV17E) de NIGHTSHOT schakelaar op “ON”.
De indicator en de “NIGHTSHOT”
aanduiding knipperen op het scherm. Om de
NightShot nachtopnamefunctie uit te schakelen,
schuift u de NIGHTSHOT schakelaar in de
“OFF” stand.
Recording – Basics Opnemen – basisbediening
NightShot Light emitter/
NightShot Light
infraroodlampje
35
Page 36

Recording a picture
Video-opnamen maken
Using Super NightShot
The Super NightShot mode makes subjects more
than 16 times brighter than those recorded in the
NightShot mode.
(1)In CAMERA mode, slide NIGHTSHOT to
ON. and “NIGHTSHOT“ indicators flash
on the screen.
(2)Press SUPER NIGHTSHOT. The indicator
and “SUPER NIGHTSHOT“ flash on the
screen.
To cancel the Super NightShot mode, press
SUPER NIGHTSHOT.
Using the NightShot Light
The picture will be clearer with the NightShot
Light on. To enable the NightShot Light, set N.S.
LIGHT to ON in the menu settings (p. 116).
Notes
•Do not use the NightShot function in bright
places (ex. the outdoors in the daytime). This
may cause your camcorder to malfunction.
•When you keep NIGHTSHOT set to ON in
normal recording, the picture may be recorded
in incorrect or unnatural colours.
•If focusing is difficult with the autofocus mode
when using the NightShot function, focus
manually.
While using the NightShot function, you
cannot use the following functions:
– Exposure
– PROGRAM AE
– White balance
While using the Super NightShot function
The shutter speed is automatically adjusted
depending on the brightness. At that time, the
moving picture may be slow down.
While using the Super NightShot function,
you cannot use the following functions:
– Exposure
– PROGRAM AE
– Fader
– Digital effect
– White balance
While in MEMORY mode (DCR-TRV17E only)
You cannot use the Super NightShot function.
NightShot Light
NightShot Light rays are infrared and so are
invisible. The maximum shooting distance using
36
the NightShot Light is about 3 m (10 feet).
Gebruik van de Super Nightshot
infraroodfunctie
Met de Super NightShot functie kunt u het onderwerp
meer dan 16 maal zo helder in beeld brengen dan met
alleen de NightShot nachtopnamefunctie.
(1) Schuif in de “CAMERA” stand de NIGHTSHOT
schakelaar in de “ON” stand. De
“NIGHTSHOT” aanduiding knipperen op het
scherm.
(2) Druk op de SUPER NIGHTSHOT toets. De
indicator en de aanduiding “SUPER NIGHTSHOT”
gaan knipperen op het scherm.
Om de Super Nightshot nachtlichtfunctie uit te
schakelen, drukt u nogmaals op de SUPER
NIGHTSHOT toets.
indicator en de
Voor gebruik van de NightShot Light
infraroodlamp
Met de NightShot Light verlichting kunt u helderder
beelden verkrijgen. Voor het gebruik van de NightShot
Light functie zult u eerst het onderdeel N.S.LIGHT op
“ON” moeten zetten in het instelmenu (zie blz. 124).
Opmerkingen
• Gebruik de NightShot nachtopnamefunctie niet bij
helder licht (dus niet buitenshuis overdag). Dit zou
storing in de werking van de camcorder kunnen
veroorzaken.
• Als u de NIGHTSHOT schakelaar op “ON” laat staan
en dan normale opnamen gaat maken, zullen de
kleuren daarvan waarschijnlijk onjuist of onnatuurlijk
overkomen.
• Als het scherpstellen met de autofocus bij NightShot
nachtopnamen niet goed lukt, kunt u beter handmatig
scherpstellen.
Bij het gebruik van de NightShot
nachtopnamefunctie zult u de volgende
functies niet kunnen gebruiken:
– Belichtingsregeling
– PROGRAM AE belichtingsprogramma’s
– Kleurbalansinstelling
Bij gebruik van de Super Nightshot
nachtlichtfunctie
De sluitertijd wordt automatisch aangepast aan het
aanwezige licht. Dat houdt wel in dat bewegende
beelden niet meer erg scherp kunnen worden
opgenomen.
Bij gebruik van de Super Nightshot
nachtlichtfunctie kunt u de volgende functies
niet gebruiken:
– Belichtingsregeling
– PROGRAM AE belichtingsprogramma’s
– In- en uit-faden
– Digitale opname-effecten
– Kleurbalansinstelling
Met de POWER schakelaar in de “MEMORY”
stand (alleen voor de DCR-TRV17E)
Hierbij kunt u de Super Nightshot nachtlichtfunctie niet
gebruiken.
De Nightshot Light lamp
De stralen van de NightShot Light lamp zijn infrarood
en dus onzichtbaar. De maximale reikwijdte van de
infrarode NightShot Light lichtstralen bedraagt
ongeveer 3 meter.
Page 37

Recording a picture
Video-opnamen maken
Self-timer recording
Recording with the self-timer starts in 10 seconds
automatically. You can also use the Remote
Commander for this operation.
(1)Press MENU to display the menu settings in
the standby mode.
(2)Turn the SEL/PUSH EXEC dial to select ,
then press the dial.
(3)Turn the SEL/PUSH EXEC dial to select
SELFTIMER, then press the dial.
(4)Turn the SEL/PUSH EXEC dial to select ON,
then press the dial.
(5)Press MENU to make the menu settings
disappear.
(6)Press START/STOP.
Self-timer starts counting down from 10 with
a beep sound. In the last two seconds of the
countdown, the beep sound gets faster, then
recording starts automatically. To stop
recording, press START/STOP again.
Opnemen met de
zelfontspanner
U kunt de camcorder volautomatisch laten
opnemen met de zelfontspanner. Voor optimaal
bedieningsgemak kunt u bovendien de
afstandsbediening gebruiken.
(1)Druk in de opnamepauzestand op de MENU
toets om het instelmenu te laten verschijnen.
(2)Draai aan de SEL/PUSH EXEC regelknop om
in te stellen op het pictogram en druk de
regelknop in.
(3)Draai aan de SEL/PUSH EXEC regelknop om
in te stellen op SELFTIMER en druk de
regelknop in.
(4)Draai weer aan de SEL/PUSH EXEC
regelknop om in te stellen op “ON” en druk
de regelknop in.
(5)Druk weer op de MENU toets om het
instelmenu uit beeld te laten verdwijnen.
(6)Druk op de START/STOP toets.
De zelfontspanner gaat nu terugtellen vanaf
10, met telkens een pieptoon. In de laatste 2
seconden van het aftellen klinken de
pieptonen korter achtereen en dan begint
automatisch het opnemen. Om te stoppen met
opnemen, drukt u nogmaals op de START/
STOP toets.
6 START/STOP
Recording – Basics Opnemen – basisbediening
START/STOP
1,5 MENU
To stop the countdown
Press START/STOP.
To restart the countdown, press START/STOP
again.
To record still images using the selftimer
Press PHOTO in step 6. (p. 51)
To cancel self-timer recording
Set SELFTIMER to OFF in the menu settings in
the standby mode.
3
CAMERA SET
SELF T I MER
DZOOM
:9W
IDE
16
STEADY SHOT
N
.S.
LIGHT
FRAME REC
INT.REC
RET URN
[
] :
MENU
END
OFF
ON
Stoppen van het aftellen van de
zelfontspanner
Druk op de START/STOP toets.
Om het aftellen weer te starten, drukt u opnieuw
op de START/STOP toets.
Opnemen van stilstaande beelden
met de zelfontspanner
Druk in stap 6 op de PHOTO toets (zie blz. 51).
Uitschakelen van de zelfontspanneropname
Zet in de opnamepauzestand het menuonderdeel SELFTIMER in de “OFF” stand.
37
Page 38

Recording a picture
Video-opnamen maken
Note
The self-timer recording mode is automatically
cancelled when:
– Self-timer recording is finished.
– The POWER switch is set to OFF (CHG) or
PLAYER.
Self-timer memory photo recording (DCRTRV17E only)
You can also record still images on “Memory
Stick”s with the self-timer (p. 145).
Opmerking
De zelfontspannerfunctie wordt automatisch
uitgeschakeld, wanneer:
– de zelfontspanner-opname beëindigd is;
– de POWER schakelaar op “OFF (CHG)” of
“PLAYER” wordt gezet.
Geheugenfoto-opname met de zelfontspanner
(alleen voor de DCR-TRV17E)
U kunt de zelfontspanner ook gebruiken om
stilstaande beelden op te nemen op een “Memory
Stick” (zie blz. 145).
38
Page 39

Checking the recording
– END SEARCH / EDITSEARCH / Rec
Review
Controleren van de gemaakte opnamen
– END SEARCH / EDITSEARCH / Rec
Review opnamecontrole
You can use these buttons to check the recorded
picture or shoot so that the transition between the
last recorded scene and the next scene you record
is smooth.
END SEARCH
You can go to the end of the recorded section
after you record.
Press END SEARCH in the standby mode.
The last five seconds of the recorded section are
played back and your camcorder returns to the
standby mode. You can monitor the sound from
the speaker or headphones.
EDITSEARCH
Met deze handige zoektoetsen kunt u de laatste
opgenomen beelden controleren of teruggaan
naar het punt waarvandaan u de volgende
opnamen wilt laten aansluiten.
Recording – Basics Opnemen – basisbediening
EDITSEARCH
END
SEARCH
END SEARCH eindzoekfunctie
Na het opnemen kunt u gemakkelijk het eind van
de laatste opname opzoeken.
Druk in de opnamepauzestand op de END
SEARCH toets.
Nu worden de laatste vijf seconden van de videoopnamen weergegeven en dan keert de
camcorder terug in de opnamepauzestand. Het
geluid van de opnamen kunt u beluisteren via de
luidspreker of een hoofdtelefoon.
You can search for the next recording start point.
Hold down the +/– 7 side of EDITSEARCH in
the standby mode. The recorded section is played
back.
+ : to go forward
– 7:to go backward
Release EDITSEARCH to stop playback. If you
press START/STOP, re-recording begins from
the point you released EDITSEARCH. You
cannot monitor the sound.
EDITSEARCH montagezoekfunctie
Hiermee kunt u gemakkelijk het beginpunt voor
de volgende opname opzoeken.
Houd in de opnamepauzestand de +/– 7 kant
van de EDITSEARCH toetsen ingedrukt. De
laatste opgenomen beelden worden dan
weergegeven.
+ : vooruitzoeken
– 7:terugzoeken
Laat de EDITSEARCH toets los om de weergave
te stoppen. Wanneer u op de START/STOP toets
drukt, begint het opnemen precies vanaf het punt
waar u de EDITSEARCH toets losliet. Bij deze
montage-zoekfunctie is er geen geluid te horen.
39
Page 40

Checking the recording
– END SEARCH / EDITSEARCH / Rec
Review
Controleren van de gemaakte opnamen
– END SEARCH / EDITSEARCH / Rec
Review opnamecontrole
Rec Review
You can check the last recorded section.
Press the – 7 side of EDITSEARCH momentarily
in the standby mode.
The section you have stopped most recently will
be played back for a few seconds, and then your
camcorder will return to the standby mode. You
can monitor the sound from the speaker or
headphones.
End search function
When you use a tape without cassette memory,
the end search function does not work once you
eject the cassette after you have recorded on the
tape. If you use a tape with cassette memory, the
end search function works even once you eject
the cassette.
If a tape has a blank portion in the recorded
portions
The end search function may not work correctly.
Rec Review
opnamecontrolefunctie
Hiermee kunt u controleren of de laatste
opnamen geslaagd zijn.
Druk in de opnamepauzestand de – 7 kant van
de EDITSEARCH toetsen even kort in.
Nu worden automatisch de laatste paar seconden
van de voorgaande opname weergegeven.
Hierbij kunt u het geluid via de luidspreker of
een hoofdtelefoon beluisteren.
Beperkte eindzoekfunctie zonder
cassettegeheugen
Wanneer u een videoband zonder
cassettegeheugen gebruikt, zal de
eindzoekfunctie niet meer werken als u de
cassette na het opnemen uit de cassettehouder
hebt verwijderd. Bij een videoband met
cassettegeheugen zult u de eindzoekfunctie nog
wel kunnen gebruiken, ook als de cassette al eens
uit de camcorder is verwijderd.
Als er tussen de video-opnamen een blanco of
onbespeeld
Bandgedeelte open is gebleven, kan de
eindzoekfunctie niet altijd goed werken.
40
Page 41

— Playback – Basics —
Playing back a tape
— Afspelen – basisbediening —
Afspelen van een videocassette
You can monitor the playback picture on the
screen. If you close the LCD panel, you can
monitor the playback picture in the viewfinder.
You can control playback using the Remote
Commander supplied with your camcorder.
(1)Install the power source and insert the
recorded tape.
(2)Set the POWER switch to PLAYER while
pressing the small green button.
(3)To open the LCD panel, press OPEN.
(4)Press m to rewind the tape.
(5)Press N to start playback.
(6)To adjust the volume, press either of the two
buttons on VOLUME. The speaker on your
camcorder is silent when the LCD panel is
closed.
6
VOLUME
4
U kunt uw gemaakte video-opnamen terugzien
op het scherm. Als u het LCD scherm sluit, kunt
u de beelden terugzien in de zoeker.
Voor de bediening bij het afspelen gebruikt u de
bij uw camcorder geleverde afstandsbediening.
(1)Sluit een stroombron aan en plaats een
cassette met video-opnamen in de camcorder.
(2)Druk het kleine groene knopje op de POWER
schakelaar in en schuif de schakelaar in de
“PLAYER” stand.
(3)Houd de OPEN toets ingedrukt en klap het
LCD scherm open.
(4)Druk op de m toets om de band terug te
spoelen.
(5)Druk op de N weergavetoets om te beginnen
met afspelen.
(6)Om de geluidssterkte te regelen drukt u op
een van de VOLUME toetsen. Overigens zal
de luidspreker van de camcorder geen geluid
geven wanneer het LCD scherm gesloten is.
5
REW
PLAY
Playback – Basics Afspelen – basisbediening
3
To stop playback
Press x.
2
1
Stoppen met afspelen
Druk op de x stoptoets.
POWER
PLAYER
OFF(CHG)
CAMERA
MEMORY
41
Page 42

Playing back a tape
Afspelen van een videocassette
When monitoring on the LCD screen
You can turn the LCD panel over and move it
back to the camcorder body with the LCD screen
facing out.
When you open or close the LCD panel
Make sure that the LCD panel is set vertically.
To display the screen indicators
– Display function
Press DISPLAY on your camcorder or the
Remote Commander supplied with your
camcorder.
The indicators appear on the LCD screen.
To make the indicators disappear, press
DISPLAY again.
DISPLAY button/
DATA CODE
button/
DATA CODE
toets
DISPLAY toets
Video-opnamen weergeven op het LCD
scherm
Voor afspelen van video-opnamen kunt u het
LCD scherm helemaal omkeren en dan
terugklappen tegen de camcorder aan, zodat het
LCD scherm naar buiten gericht staat.
Voor openen of sluiten van het LCD scherm
Zet het LCD scherm eerst precies verticaal voor u
het zijwaarts in- of uitklapt.
Opname-aanduidingen op het
beeldscherm zien
– DISPLAY functie
Druk op de DISPLAY toets van de camcorder of
de daarbij geleverde afstandsbediening.
De aanduidingen in het zoekerbeeld verschijnen
dan ook op het scherm. Om de beeldschermaanduidingen weer te laten verdwijnen, drukt u
nogmaals op de DISPLAY toets.
Using the data code function
Your camcorder automatically records not only
images on the tape but also the recording data
(date/time or various settings when recorded)
(Data code).
Use the Remote Commander for this operation.
Press DATA CODE on the Remote Commander
in the playback mode.
The display changes as follows:
date/time t various settings (SteadyShot, white
balance, gain, shutter speed, aperture value,
exposure mode) t no indicator
42
DISPLAY
Automatische opnamegegevens
(Data Code)
Bij het opnemen legt uw camcorder tegelijk met
de beelden automatisch ook de datum en
tijdsaanduiding (en/of diverse opnameinstellingen) op de band vast (met de Data Code
functie).
Hiervoor gebruikt u de afstandsbediening.
Druk tijdens afspelen op de DATA CODE toets
van de afstandsbediening.
De aanduidingen veranderen dan als volgt:
datum/tijd t diverse opname-instellingen
(SteadyShot beeldstabilisatie, belichting,
kleurbalans, gevoeligheid, sluitertijd, diafragma)
t geen aanduiding.
Page 43

Playing back a tape
Afspelen van een videocassette
Date/time/
Datum/tijd
4 7 2001
12:05:56
[a]SteadyShot off indicator
[b]Exposure mode indicator
[c] White balance indicator
[d]Gain indicator
[e]Shutter speed indicator
[f] Aperture value
Not to display various settings
Set DATA CODE to DATE in the menu settings
(p. 122).
The display changes as follows:
date/time y no indicator
Recording data
Recording data is your camcorder’s information
when you have recorded. In the recording mode,
the recording data will not be displayed.
When you use the data code function, bars (--
-- --) appear if:
•A blank portion of the tape is being played
back.
•The tape is unreadable due to tape damage or
noise.
•The tape was recorded by a camcorder without
the date and time set.
Data code
The data code is displayed on the TV screen if
you connect your camcorder to the TV.
Remaining battery time indicator during
playback
The indicator indicates the approximate
continuous playback time.
The indicator may not be correct, depending on
the conditions in which you are playing back.
When you close the LCD panel and open it again,
it takes about 1 minute for the correct remaining
battery time to be displayed.
Various settings/
Diverse opname-instellingen
[a]
[b]
AUTO
50 AWB
F1.7 9dB
[c]
[d]
[e]
[f]
[a]SteadyShot beeldstabilisatie UIT indicator
[b]Belichtingsfunctie-aanduiding
[c] Kleurbalans-aanduiding
[d]Gevoeligheid-aanduiding
[e]Sluitertijd-aanduiding
[f] Diafragma-aanduiding
Om de andere opnamegegevens niet te zien
Zet in het instelmenu de DATA CODE functie in
de “DATE” stand (zie blz. 130).
Dan zullen bij indrukken de aanduidingen als
volgt veranderen: datum/tijd y geen
aanduiding.
Vastgelegde gegevens bij opname
Met de opnamegegevens legt de camcorder vast
wanneer en hoe de opnamen zijn gemaakt.
Tijdens het opnemen zullen de opnamegegevens
niet worden aangegeven.
Bij het controleren van de Data Code
opnamegegevens kunnen er wel eens enkel
streepjes (-- -- --) verschijnen als:
•Er een blanco (onbespeeld) gedeelte van de
band wordt afgespeeld.
•De opnamegegevens op de band niet leesbaar
zijn, door storing of beschadiging van de band.
•Voor het opnemen de datum en/of de tijd van
de camcorder niet was ingesteld.
Opnamegegevens op TV
De opnamegegevens kunnen worden
weergegeven op het TV-scherm, als u de
camcorder aansluit op uw TV-toestel.
Resterende batterijtijd-aanduiding tijdens
afspelen
De aanduiding van de resterende batterijgebruiksduur geeft bij benadering de beschikbare
speelduur aan.
Deze aanduiding kan wel eens onjuist zijn,
afhankelijk van de omstandigheden van gebruik.
Wanneer u het LCD scherm sluit en weer opent,
zal het ongeveer 1 minuut duren voordat de
juiste resterende batterij-gebruiksduur weer
aangegeven wordt.
Playback – Basics Afspelen – basisbediening
43
Page 44

Playing back a tape
Afspelen van een videocassette
Various playback modes
To operate video control buttons, set the
POWER switch to PLAYER.
To view a still picture (playback
pause)
Press X during playback. To resume normal
playback, press N or X.
To advance the tape
Press M in the stop mode. To resume normal
playback, press N.
To rewind the tape
Press m in the stop mode. To resume normal
playback, press N.
To change the playback direction
Press on the Remote Commander during
playback to reverse the playback direction. To
resume normal playback, press N.
To locate a scene monitoring the
picture (picture search)
Keep pressing m or M during playback. To
resume normal playback, release the button.
To monitor the high-speed picture
while advancing or rewinding the
tape (skip scan)
Keep pressing m while rewinding or M while
advancing the tape. To resume rewinding or
advancing, release the button.
To view the picture at slow speed
(slow playback)
Press y on the Remote Commander during
playback. For slow playback in the reverse
direction, press , then press y on the Remote
Commander. To resume normal playback, press
N.
To view the picture at double speed
Press ×2 on the Remote Commander during
playback. For double speed playback in the
reverse direction, press , then press ×2 on the
Remote Commander. To resume normal
playback, press N.
44
Diverse afspeelfuncties
Voor het gebruik van de bandlooptoetsen dient u
eerst de POWER schakelaar in de “PLAYER”
stand te zetten.
Stilzetten van het beeld
(weergavepauze-stand)
Druk tijdens afspelen op de X pauzetoets. Om
weer bewegende beelden te zien, drukt u op de
N weergavetoets of opnieuw op de X
pauzetoets.
Vooruitspoelen van de band
Druk in de stopstand op de M
vooruitspoeltoets. Om de normale weergave te
hervatten, drukt u op de N weergavetoets.
Terugspoelen van de band
Druk in de stopstand op de m terugspoeltoets.
Om de normale weergave te hervatten, drukt u
op de N weergavetoets.
Omkeren van de weergave-richting
Druk tijdens weergave op de toets van de
afstandsbediening voor weergave in
terugwaartse richting. Om de normale weergave
te hervatten, drukt u op de N weergavetoets.
Snel opzoeken van een bepaalde
scène (beeldzoekfunctie)
Houd tijdens weergave de
snelspoeltoets ingedrukt. Om de normale
weergave te hervatten, laat u de toets op het
gewenste punt los.
Beeldweergave tijdens snelspoelen
(snelspoel-zoekfunctie)
Houd tijdens terugspoelen de m
terugspoeltoets ingedrukt, of tijdens
vooruitspoelen de M toets. Om het snelspoelen
te hervatten, laat u de toets los.
Opgenomen beelden langzamer
weergeven (vertraagde weergave)
Druk tijdens weergave op de y vertraagdeweergavetoets van de afstandsbediening. Voor
vertraagde weergave in terugwaartse richting
drukt u eerst op de toets en dan op de y
vertraagde-weergavetoets van de
afstandsbediening. Om de normale weergave te
hervatten, drukt u op de N weergavetoets.
Weergave met dubbele snelheid
Druk tijdens weergave op de ×2 toets van de
afstandsbediening. Voor versnelde weergave in
terugwaartse richting drukt u eerst op de
toets en dan op de ×2 toets van de
afstandsbediening. Om de normale weergave te
hervatten, drukt u op de N weergavetoets.
m of M
Page 45

Playing back a tape
Afspelen van een videocassette
To view the picture frame-by-frame
Press C on the Remote Commander in the
playback pause mode. For frame-by-frame
playback in the reverse direction, press c. To
resume normal playback, press N.
To search the last scene recorded
(END SEARCH)
Press END SEARCH in the stop mode. The last
five seconds of the recorded portion plays back
and stops.
In the various playback modes
•Sound is muted.
•The previous picture may remain as a mosaic
image during playback.
When the playback pause mode lasts for five
minutes
Your camcorder automatically enters the stop
mode. To resume playback, press N.
Slow playback
The slow playback can be performed smoothly
on your camcorder: however, this function does
not work for an output signal through the DV
OUT jack.
When you play back a tape in reverse
Horizontal noise may appear at the center, or the
top and bottom of the screen. This is not a
malfunction.
Beeld-voor-beeld weergave
Zet het beeld stil en druk in deze
weergavepauzestand op de C toets van de
afstandsbediening. Voor beeld-voor-beeld
weergave in terugwaartse richting drukt u op de
c toets. Om de normale weergave te hervatten,
drukt u op de N weergavetoets.
Opzoeken van de laatst opgenomen
beelden (END SEARCH
eindzoekfunctie)
Druk in de stopstand op de END SEARCH toets.
De laatste vijf seconden van de video-opnamen
worden weergegeven en dan stopt de band.
Bij de speciale weergavefuncties
•De geluidsweergave zal gedempt zijn.
•De vorige scène kan tijdens weergave wel eens
als mozaïekbeeld zichtbaar blijven.
Na langer dan 5 minuten in de
weergavepauzestand
De camcorder zal automatisch terugschakelen
naar de stopstand. Om de weergave te hervatten,
drukt u op de N weergavetoets.
Bij de vertraagde weergave
Alle opgenomen beelden kunnen op deze
camcorder zelf vertraagd worden weergegeven;
dit geldt echter niet bij weergave van een
videosignaal via de DV OUT
uitgangsaansluiting.
Playback – Basics Afspelen – basisbediening
Bij het terugwaarts weergeven
Hierbij kunnen middenin, of boven en onder in
beeld ruisbalken verschijnen. Dit duidt niet op
storing in de werking.
45
Page 46

Viewing the recording on TV
Aansluitingen voor videoweergave op TV
Connect your camcorder to your TV with the A/
V connecting cable supplied with your
camcorder to watch the playback picture on the
TV screen. You can operate the video control
buttons in the same way as when you monitor
playback pictures on the screen. When
monitoring the playback picture on the TV
screen, we recommend that you power your
camcorder from a wall socket using the AC
power adaptor (p. 23). Refer to the operating
instructions of your TV.
Open the jack cover. Connect your camcorder to
the TV using the A/V connecting cable supplied
with your camcorder. Then, set the TV/VCR
selector on the TV to VCR.
S VIDEO
OUT
A/V OUT
A/V connecting
: Signal flow/
Signaalstroom Red/Rood
cable (supplied)/
Audio/videoaansluitsnoer
(bijgeleverd)
Sluit de camcorder met het daarbij geleverde
audio/video-aansluitsnoer aan op uw TV-toestel
of videorecorder wanneer u uw video-opnamen
wilt weergeven op het TV-scherm. U kunt hierbij
het afspelen regelen met de bandlooptoetsen, net
als bij weergave op het LCD scherm. Bij het
afspelen van video-opnamen op de camcorder,
voor weergave op het TV-scherm, is het
aanbevolen het apparaat op stroom van het
lichtnet te gebruiken met behulp van de
netspanningsadapter (zie blz. 23). Zie tevens de
gebruiksaanwijzing van uw TV-toestel of
videorecorder.
Open het dekseltje van de audio/videostekkerbussen. Sluit de camcorder aan op uw TVtoestel met het bij de camcorder geleverde
audio/video-aansluitsnoer. Stel uw TV-toestel
met de TV/VIDEO schakelaar in op VIDEOweergave.
White/Wit
Yellow/
Geel
IN
S VIDEO
VIDEO
AUDIO
If your TV is already connected
to a VCR
Connect your camcorder to the LINE IN input on
the VCR by using the A/V connecting cable
supplied with your camcorder. Set the input
selector on the VCR to LINE.
If your TV or VCR is a monaural
type
Connect the yellow plug of the A/V connecting
cable to the video input jack and the white or the
red plug to the audio input jack on the VCR or
the TV. If you connect the white plug, the sound
is L (left) signal. If you connect the red plug, the
sound is R (right) signal.
46
Als uw TV-toestel al is
aangesloten op een
videorecorder
Sluit uw camcorder aan op de lijningangen van
de videorecorder (LINE IN), met behulp van het
bij uw camcorder geleverde audio/videoaansluitsnoer. Zet de ingangskeuzeschakelaar
van de videorecorder in de “LINE” stand.
Als uw TV-toestel of
videorecorder slechts geschikt
is voor mono geluid
Sluit de gele stekker van het audio/videoaansluitsnoer aan op de video-ingang en de witte
of de rode stekker op de audioingangsaansluiting van uw TV-toestel of
videorecorder. Als u de witte stekker aansluit, zal
het geluid van het linker (L) kanaal klinken. Als
u de rode stekker aansluit, klinkt het geluid van
het rechter (R) kanaal.
Page 47

Viewing the recording on TV
Aansluitingen voor
videoweergave op TV
If your TV/VCR has a 21-pin
connector (EUROCONNECTOR)
Use the 21-pin adaptor supplied with your
camcorder.
If your TV or VCR has an S video jack
Connect using an S video cable (optional) to
obtain high-quality pictures. With this
connection, you do not need to connect the
yellow (video) plug of the A/V connecting cable.
Connect the S video cable (optional) to the S
video jacks on both your camcorder and the TV
or the VCR.
This connection produces higher quality DV
format pictures.
Als uw TV/videorecorder een
21-polige (EUROCONNECTOR)
aansluiting heeft
Gebruik voor het aansluiten de bij uw camcorder
geleverde 21-polige verloopstekker.
Playback – Basics Afspelen – basisbediening
TV
Als uw TV-toestel beschikt over een S-video
ingangsaansluiting
Sluit de camcorder daarop aan met een (niet
bijgeleverd) S-video aansluitsnoer voor videoweergave van uitstekende kwaliteit. Bij deze
wijze van aansluiten hoeft u de gele (video)
stekker van het audio/video-aansluitsnoer niet
aan te sluiten. Verbind het S-video aansluitsnoer
(niet bijgeleverd) met de S-video stekkerbussen
van de camcorder en uw TV-toestel.
Door deze wijze van aansluiten zult u betere DVkwaliteit videobeelden kunnen weergeven.
47
Page 48

Viewing the recording on TV
Aansluitingen voor
videoweergave op TV
Using the AV cordless IR
receiver
Once you connect the AV cordless IR receiver
(optional) to your TV or VCR, you can easily
view the picture on your TV. For details, refer to
the operating instructions of the AV cordless IR
receiver.
SUPER LASER LINK
Super laser link emitter/
Super Laser Link signaalzender
Before operation
Attach the power supply such as the AC power
adaptor to your camcorder, and insert the
recorded tape.
(1)After connecting your TV and AV cordless IR
receiver, set the POWER switch on the AV
cordless IR receiver to ON.
(2)Set the POWER switch to PLAYER.
(3)Turn the TV on and set the TV/VCR selector
on the TV to VCR.
(4)Press SUPER LASER LINK. The lamp of
SUPER LASER LINK lights up.
(5)Press N on your camcorder to start playback.
(6)Point the super laser link emitter at the AV
cordless IR receiver. Adjust the position of
your camcorder and the AV cordless IR
receiver to obtain clear playback pictures.
Gebruik van de snoerloze infraroodontvanger voor audio/video-apparatuur
Door een snoerloze infrarood-ontvanger voor
audio/video (niet bijgeleverd) aan te sluiten op uw
videorecorder of TV-toestel, kunt u bijzonder
gemakkelijk de video-opnamen op uw TV-scherm
weergeven. Zie voor nadere bijzonderheden de
gebruiksaanwijzing van de snoerloze AV infraroodontvanger.
Voor de bediening
Sluit een stroombron zoals een netspanningsadapter
aan op uw camcorder en plaats de cassette met weer
te geven video-opnamen er in.
(1) Sluit eerst de snoerloze infrarood-ontvanger voor
audio/video aan op uw TV-toestel en zet de
POWER schakelaar van de snoerloze AV
infrarood-ontvanger op “ON”.
(2) Zet de POWER schakelaar van uw camcorder op
“PLAYER”.
(3) Zet uw TV-toestel aan en stel het met de TV/
VIDEO schakelaar in op VIDEO-weergave.
(4) Druk op de SUPER LASER LINK toets. Het
SUPER LASER LINK lampje licht op.
(5) Druk op de N weergavetoets van de camcorder
om met afspelen te beginnen.
(6) Richt de Super Laser Link signaalzender op de
snoerloze AV infrarood-ontvanger. Kies de stand
van de camcorder en de snoerloze AV infraroodontvanger zo dat de video-opnamen zo duidelijk
mogelijk op het TV-scherm verschijnen.
To cancel the super laser link
function
Press SUPER LASER LINK again. The lamp on
the SUPER LASER LINK button goes out.
If you turn the power off
The super laser link function turns off
automatically.
When the super laser link function is activated
(the SUPER LASER LINK button is lit)
Your camcorder consumes power. Press SUPER
LASER LINK to turn off the laser link function
when it is not needed.
48
is a trademark of Sony Corporation.
Uitschakelen van de Super Laser Link
weergavefunctie
Druk nogmaals op de SUPER LASER LINK toets.
Het SUPER LASER LINK lampje dooft.
Bij uitschakelen van de stroom
De Super Laser Link weergavefunctie wordt dan
automatisch geannuleerd.
Na inschakelen van de Super Laser Link
weergavefunctie (zolang het lampje van de
SUPER LASER LINK toets brandt)
Uw camcorder blijft in deze stand stroom
verbruiken. Druk op de SUPER LASER LINK toets
om de Super Laser Link signaaloverdracht uit te
schakelen wanneer u deze niet gebruikt.
is een handelsmerk van Sony Corporation.
Page 49

— Advanced Recording Operations —
— Uitgebreide opnamefuncties —
Recording a still image on a tape – Tape Photo recording
You can record a still picture like a photograph.
This mode is useful when you want to print a
picture using a video printer (optional).
You can record about 510 pictures in the SP mode
and about 765 pictures in the LP mode on a 60minute tape.
Besides the operation described here, your
camcorder can record still pictures on “Memory
Stick”s (p. 141) (DCR-TRV17E only).
(1)In the standby mode, keep pressing PHOTO
lightly until a still picture appears.
The CAPTURE indicator appears. Recording
does not start yet.
To change the still picture, release PHOTO,
select a still picture again, and then press and
hold PHOTO lightly.
(2)Press PHOTO deeper.
The still picture on the screen is recorded for
about seven seconds. The sound during those
seven seconds is also recorded.
The still image is displayed on the screen until
recording is completed.
Stilstaande beelden op de band opnemen – Foto-bandopname
Met de foto-bandopname kunt u een stilstaand
beeld op de band opnemen. Dit is handig als u de
kijker een goede blik wilt gunnen op een nietbewegend onderwerp of als u een afdruk wilt
maken met behulp van een video-fotoprinter (los
verkrijgbaar).
Op een 60-minuten videocassette kunt u met de
SP snelheid ongeveer 510 stilstaande beelden
opnemen en met de LP snelheid ongeveer 765
beelden.
Naast de hier beschreven opnamefunctie kan uw
camcorder ook stilstaande beelden opnemen op
een “Memory Stick” (zie blz. 141) (alleen voor de
DCR-TRV17E).
(1)Houd in de opnamepauzestand de PHOTO
(2)Druk nu de PHOTO toets steviger in.
Advanced Recording Operations Uitgebreide opnamefuncties
toets licht ingedrukt tot er een stilstaand beeld
verschijnt.
De aanduiding “CAPTURE” verschijnt. Het
opnemen begint nog niet.
Desgewenst kunt u nu een ander stilstaand
beeld kiezen door de PHOTO toets los te
laten, een ander beeld te kiezen en dan de
PHOTO toets opnieuw licht ingedrukt te
houden.
Het stilstaand beeld dat u op het scherm ziet
wordt nu ongeveer 7 seconden lang
opgenomen. Gedurende deze 7 seconden
loopt de geluidsopname gewoon door.
Alleen het opgenomen stilstaande beeld
verschijnt op het scherm totdat de fotobandopname is afgelopen.
Notes
•During tape photo recording, you cannot
change the mode or setting.
•When recording a still picture, do not shake
your camcorder. The picture may fluctuate.
•The PHOTO button does not work:
–while the fader function is set or in use
–while the digital effect function is set or in use
1
PHOTO
2
PHOTO
Opmerkingen
•Tijdens de foto-bandopname kunt u geen
enkele instelling van de camcorder veranderen.
•Tijdens het opnemen van een stilstaand beeld
moet u oppassen dat de camcorder niet trilt. De
trilling kan storing in het beeld veroorzaken.
•U kunt de PHOTO toets niet gebruiken:
–wanneer een in/uit-fade functie is gekozen of
ingeschakeld
–wanneer er digitale beeldeffecten zijn gekozen
of ingeschakeld.
CAPTURE
•••••••
49
Page 50

Recording a still image on a tape
– Tape Photo recording
Stilstaande beelden op de band
opnemen – Foto-bandopname
If you record a moving subject with the tape
photo recording function
When you play back the still picture on other
equipment, the picture may fluctuate.
To use the tape photo recording function
using the Remote Commander
Press PHOTO on the Remote Commander. Your
camcorder records a picture on the screen
immediately.
To use the tape photo recording function
during normal CAMERA recording
Press PHOTO deeper. The still picture is then
recorded for about seven seconds and your
camcorder returns to the standby mode. You
cannot select another still picture.
To record clear and less fluctuated still
pictures
We recommend that you record on “Memory
Stick”s. (DCR-TRV17E only)
Bij opnemen van een bewegend onderwerp
met de foto-bandopname
Wanneer u het resulterende stilstaande beeld
weergeeft met andere apparatuur kan het beeld
ietwat fluctueren.
Maken van een foto-bandopname met de
afstandsbediening
Druk op de PHOTO toets van de
afstandsbediening. Uw camcorder maakt dan een
stilstaande opname van het beeld dat op het
scherm zichtbaar is.
Opnemen van een stilstaand beeld tussen de
normale CAMERA opnamen door
Druk de PHOTO toets direct dieper in. Dan
wordt er zeven seconden lang een stilstaand
beeld opgenomen en daarna komt de camcorder
in de opnamepauzestand. U kunt hierbij niet nog
een ander stilstaand beeld kiezen.
Voor optimaal heldere beelden zonder storing
We willen u aanraden uw belangrijkste beelden
vast te leggen op een “Memory Stick” (alleen
voor de DCR-TRV17E).
50
Page 51

Recording a still image on a tape
– Tape Photo recording
Stilstaande beelden op de band
opnemen – Foto-bandopname
Self-timer recording
You can record still images on tapes with the selftimer. You can also use the Remote Commander
for this operation.
(1)In the standby mode, press MENU to display
the menu settings.
(2)Turn the SEL/PUSH EXEC dial to select ,
then press the dial.
(3)Turn the SEL/PUSH EXEC dial to select
SELFTIMER, then press the dial.
(4)Turn the SEL/PUSH EXEC dial to select ON,
then press the dial.
(5)Press MENU to make the menu settings
disappear.
(6)Press PHOTO deeper.
Self-timer starts counting down from 10 with
a beep sound. In the last two seconds of the
countdown, the beep sound gets faster, then
recording starts automatically.
PHOTO
Opnemen met de
zelfontspanner
U kunt de camcorder stilstaande beelden op de
band laten opnemen met de zelfontspanner. Voor
het bedieningsgemak kunt u bovendien de
afstandsbediening gebruiken.
(1)Druk in de opnamepauzestand op de MENU
toets om het instelmenu te zien.
(2)Draai aan de SEL/PUSH EXEC regelknop om
in te stellen op het pictogram en druk de
regelknop in.
(3)Draai aan de SEL/PUSH EXEC regelknop om
in te stellen op SELFTIMER en druk de
regelknop in.
(4)Draai weer aan de SEL/PUSH EXEC
regelknop om in te stellen op “ON” en druk
de regelknop in.
(5)Druk weer op de MENU toets om het
instelmenu uit beeld te laten verdwijnen.
(6)Druk de PHOTO toets stevig in.
De zelfontspanner gaat nu terugtellen vanaf
10, met telkens een pieptoon. In de laatste 2
seconden van het aftellen klinken de
pieptonen sneller achtereen en dan begint
automatisch het opnemen.
6
Advanced Recording Operations Uitgebreide opnamefuncties
1,5 MENU
To cancel self-timer recording
Set SELFTIMER to OFF in the menu settings in
the standby mode.
You cannot cancel the self-timer recording using
the Remote Commander.
Note
The self-timer recording mode is automatically
cancelled when:
– Self-timer recording is finished.
– The POWER switch is set to OFF (CHG) or
PLAYER.
TO
O
PH
3
CAMERA SET
SELF T I MER
DZOOM
:9W
IDE
16
STEADY SHOT
N
.S.
LIGHT
FRAME REC
.
REC
INT
RET URN
[
] :
MENU
END
OFF
ON
Stoppen van het opnemen met de
zelfontspanner
Zet in de opnamepauzestand het menuonderdeel SELFTIMER in de “OFF” stand.
U kunt de zelfontspanner in dit geval niet
uitschakelen met de afstandsbediening.
Opmerking
De zelfontspannerfunctie wordt automatisch
uitgeschakeld, wanneer:
– de zelfontspanner-opname beëindigd is;
– de POWER schakelaar op “OFF (CHG)” of
“PLAYER” wordt gezet.
51
Page 52

Recording a still image on a tape
– Tape Photo recording
Stilstaande beelden op de band
opnemen – Foto-bandopname
Printing the still picture
You can print a still picture by using the video
printer (optional). Connect the video printer
using the A/V connecting cable supplied with
your camcorder.
Connect it to the A/V OUT jack and connect the
yellow plug of the cable to the video input of the
video printer. Refer to the operating instructions
of the video printer as well.
S VIDEO OUT
A/V OUT
Afdrukken van een stilstaand
beeld
U kunt een afdruk maken van een stilstaand
beeld met behulp van een videoprinter (niet
bijgeleverd). Sluit de videoprinter aan met het bij
uw camcorder geleverde audio/videoaansluitsnoer.
Sluit dit snoer aan op de A/V OUT stekkerbus en
sluit de gele stekker van het snoer aan op de
video-ingang van de videoprinter. Zie voor
nadere bijzonderheden de gebruiksaanwijzing
van de videoprinter.
Video printer/
Videoprinter
LINE IN
VIDEO S VIDEO
: Signal flow/Signaalstroom
If the video printer is equipped with S video
input
Use the S video connecting cable (optional).
Connect it to the S VIDEO OUT jack and the S
video input of the video printer.
52
Als uw videoprinter is voorzien van een Svideo ingang
Sluit het apparaat dan aan met een S-video
aansluitsnoer (niet bijgeleverd). Verbind dat
snoer met de S VIDEO OUT uitgang en met de Svideo ingangsaansluiting van de videoprinter.
Page 53

Adjusting the white balance manually
Handmatig instellen van de kleurbalans
You can manually adjust and set the white
balance. This adjustment makes white subjects
look white and allows more natural colour
balance. Normally white balance is automatically
adjusted.
(1)In CAMERA or MEMORY (DCR-TRV17E
only) mode, select WHT BAL in in the
menu settings (p. 115).
(2)Select the desired white balance mode in the
menu settings.
n (INDOOR) :
•Lighting condition changes quickly
•Too bright place such as photography studios
•Under sodium lamps or mercury lamps
(OUTDOOR) :
•Recording a sunset/sunrise, just after sunset,
just before sunrise, neon signs, or fireworks
•Under a colour matching fluorescent lamp
HOLD :
Recording a single-coloured subject or
background
U kunt de kleurbalans handmatig bijregelen en
vaststellen. Deze instelling dient om witte
onderwerpen ook zuiver wit op te nemen en om
zo natuurlijk mogelijke huidtinten te verkrijgen.
Gewoonlijk wordt de kleurbalans automatisch
ingesteld.
(1)Kies in de “CAMERA” stand (of de
“MEMORY” stand, alleen voor de DCRTRV17E) de gewenste WHT BAL kleurbalansinstelling onder in het instelmenu
(zie blz. 123).
(2)Regel de kleurbalans naar wens bij in het
instelmenu.
n (INDOOR binnenshuis-instelling):
•Voor snel wisselende lichtomstandigheden
•Onder te fel licht, zoals van studiolampen
•Onder een natriumlamp of kwiklamp
(OUTDOOR buitenshuis-instelling):
•Voor buitenopnamen bij opkomende/
ondergaande zon, vlak voor zonsopgang, bij
neonverlichting of vuurwerk
•Onder een fluorescerende daglichtlamp
HOLD vasthoud-stand:
Voor opnemen van een geheel éénkleurig
onderwerp of achtergrond
1
MANUA L SET
PROGRAM AE
PEFFECT
DEFFECT
W
HT BA L
AUTO SHT R
RET URN
[
] :
MENU
END
AUTO
HOL D
OUT DOOR
INDOOR
Advanced Recording Operations Uitgebreide opnamefuncties
MENU
To return to the automatic white
balance mode
Set WHT BAL to AUTO in the menu settings.
If the picture is being taken in a studio lit by
TV lighting
We recommend that you record in the n indoor
mode.
When you record under fluorescent lighting
Use the automatic white balance or hold mode.
Your camcorder may not adjust the white
balance correctly in the n indoor mode.
Terugkeren naar de automatische
kleurbalans-instelling
Kies in het instelmenu voor het onderdeel WHT
BAL de “AUTO” stand.
Bij opnemen onder felle studiolampen
Hierbij is het aanbevolen de n “INDOOR”
binnenshuis-kleurbalansinstelling in te
schakelen.
Bij opnemen onder fluorescerende lampen
Gebruik de automatische kleurbalans-instelling
of de “HOLD” vasthoud-stand. De camcorder zal
met de n “INDOOR” binnenshuiskleurbalansinstelling niet de juiste kleurbalans
kunnen bereiken.
53
Page 54

Adjusting the white balance
manually
Handmatig instellen van de
kleurbalans
In the automatic white balance mode
Point your camcorder at a white subject for about
10 seconds after setting the POWER switch to
CAMERA to get a better adjustment when:
•You detach the battery for replacement.
•You bring your camcorder to the outdoors from
the interior of a house holding the exposure, or
vice versa.
In the hold white balance mode
Set the white balance to AUTO and reset to
HOLD after a few seconds when:
•You change the PROGRAM AE mode.
•You bring your camcorder to the outdoors from
the interior of a house, or vice versa.
Bij de automatische kleurbalans-instelling
Nadat u de POWER schakelaar op “CAMERA”
hebt gezet, maar voordat u gaat opnemen richt u
eerst de camcorder ongeveer 10 seconden lang op
een wit oppervlak voor de juiste instelling:
•als u de batterij hebt losgemaakt om deze te
vervangen
•als u de camcorder van binnen naar buiten hebt
gebracht of andersom, met aanhouden van
dezelfde belichting.
Bij de vasthoud-stand voor de kleurbalans
Zet de kleurbalans eerst even op “AUTO” en
enkele seconden later weer terug op “HOLD”
voor de juiste instelling:
•als u hebt gekozen voor een ander PROGRAM
AE belichtingsprogramma
•als u de camcorder van binnen naar buiten hebt
gebracht of andersom.
54
Page 55

Using the wide mode
Breedbeeldopnamefunctie
You can record a 16:9 wide picture to watch on
the 16:9 wide-screen TV (16:9WIDE).
Black bands appear on the screen during
recording in 16:9WIDE mode [a]. The picture
during a playback on a normal TV [b] or on a
wide-screen TV [c] is compressed in the
widthwise direction. If you set the screen mode
of the wide-screen TV to the full mode, you can
watch pictures of normal images [d].
[a]
16:9
WIDE
[b]
[c]
In the standby mode, set 16:9WIDE to ON in
in the menu settings (p. 115).
U kunt video-opnamen maken in een extra-breed
16:9 formaat speciaal voor weergave op een
breedbeeld-TV (16:9WIDE).
Op het LCD scherm zullen er boven en onder in
beeld zwarte balken verschijnen bij opnemen in
de “16:9WIDE” stand [a]. Bij weergave op een
gewoon TV-scherm [b] of een breedbeeldtelevisie [c] ziet u een versmald en in elkaar
gedrukt beeld. Wanneer u het breedbeeldtelevisietoestel instelt op schermvullende
weergave, verdwijnen de zwarte balken en zal
het beeld precies op het scherm passen [d].
[d]
In de opnamepauzestand zet u het onderdeel
16:9WIDE op “ON” onder in het instelmenu
(zie blz. 123).
Advanced Recording Operations Uitgebreide opnamefuncties
MENU
To cancel the wide mode
Set 16:9WIDE to OFF in the menu settings.
In the wide mode, you cannot select the
following functions:
– Old movie
– Bounce
During recording
You cannot select or cancel the wide mode. When
you cancel the wide mode, set your camcorder to
the standby mode and then set 16:9WIDE to OFF
in the menu settings.
Uitschakelen van de breedbeeldopnamefunctie
Zet het onderdeel 16:9WIDE op “OFF” in het
instelmenu.
Tijdens gebruik van de breedbeeldopnamefunctie kunt u de volgende functies
niet gebruiken:
– De OLD MOVIE movie oude-speelfilm functie
– De BOUNCE in-fader functie
Tijdens opnemen
U kunt de breedbeeld-opnamefunctie niet
tussentijds in- of uitschakelen. Om de
breedbeeld-opnamefunctie uit te schakelen, zet u
de camcorder eerst in de opnamepauzestand en
dan zet u het onderdeel 16:9WIDE op “OFF” in
het instelmenu.
55
Page 56

Using the fader function
Beelden in- en uit-faden
You can fade in or out to give your recording a
professional appearance.
[a]
FADER/
(gewoon in- en uit-faden)
M. FADER (mosaic)/
(mozaïekbeeld)
BOUNCE*/
(stuitereffect)
OVERLAP*/
(overvloeien)
WIPE*/
(gordijneffect)
Met in- en uitfaden kunt u uw video-opnamen
een professionele aanblik geven.
RECSTBY
DOT*/
(stippenpatroon)
[b]
MONOTONE
When fading in, the picture gradually changes
from black-and-white to colour.
When fading out, the picture gradually changes
from colour to black-and-white.
*Fade in only
56
RECSTBY
MONOTONE zwart/wit in/uit-faden
Bij het infaden neemt het oorspronkelijke zwart/
wit beeld geleidelijk steeds meer kleur aan.
Bij uitfaden vervagen de kleuren geleidelijk, om
te eindigen met een zwart/wit beeld.
* Alleen voor infaden
Page 57

Using the fader function
Beelden in- en uit-faden
(1)When fading in [a]
In the standby mode, press FADER until the
desired fader indicator flashes.
When fading out [b]
In the recording mode, press FADER until the
desired fader indicator flashes.
The indicator changes as follows:
FADER t M. FADER t BOUNCE t
MONOTONE t OVERLAP t WIPE t
DOT t no indicator
The last selected fader mode is indicated first
of all.
(2)Press START/STOP. The fader indicator stops
flashing.
After the fader in/out is carried out, your
camcorder automatically returns to the
normal mode.
1
FADER
FADER
(1)Voor in-faden [a]
Zet de camcorder in de opnamepauzestand en
druk op de FADER toets tot de aanduiding
voor de gewenste fader-functie gaat
knipperen.
Voor uit-faden [b]
Druk tijdens opnemen op de FADER toets tot
de gewenste fader-indicator gaat knipperen.
Bij indrukken verspringt de fader-indicator
als volgt:
FADER t M. FADER (mozaïek) t
BOUNCE (stuiteren) t MONOTONE
(zwart/wit) t OVERLAP (overvloeien)
t WIPE (gordijn-open) t DOT (stippen)
t geen aanduiding
De laatst gekozen fader-functie wordt altijd
als eerste weer aangegeven.
(2)Druk op de START/STOP toets. De fader-
indicator stopt met knipperen.
Na afloop van het in/uit-faden keert uw
camcorder automatisch terug naar de normale
werking.
Advanced Recording Operations Uitgebreide opnamefuncties
To cancel the fader function
Before pressing START/STOP, press FADER
until the indicator disappears.
Note
You cannot use the following functions while
using the fader function. Also, you cannot use
the fader function while using the following
functions:
– Digital effect
– Low lux mode of PROGRAM AE (Overlap,
Wipe, or Dot function only)(The low lux
indicator flashes.)
– Super NightShot
– Tape Photo recording
When the OVERLAP, WIPE, or DOT indicator
appear in the standby mode
Your camcorder automatically stores the image
recorded on a tape. As the image is being stored,
the indicators flash fast, and the playback picture
disappears. At this stage, the picture may not be
recorded clearly, depending on the tape
condition.
Uitschakelen van de in/uit-fader
functie
Voor het indrukken van de START/STOP toets
drukt u eerst enkele malen op de FADER toets
totdat de fader-indicator dooft.
Opmerking
Tijdens het in- en uit-faden kunt u de volgende
functies niet gebruiken. Andersom kunt u tijdens
gebruik van de onderstaande functies ook niet
het beeld in of uit laten faden:
– Digitale opname-effecten
– Het PROGRAM AE duisternis-
belichtingsprogramma (alleen bij de OVERLAP,
WIPE of DOT in-fader functie)
– De Super NightShot nachtopnamefunctie
– De foto-bandopnamefunctie
Als de OVERLAP, WIPE of DOT in-fader
aanduiding verschijnt in de
opnamepauzestand
Uw camcorder slaat het laatst op de band
opgenomen beeld automatisch op. Terwijl dit
beeld in het geheugen wordt vastgelegd, gaat de
in-fader functie-aanduiding snel knipperen en
verdwijnt het weergegeven beeld van het scherm
of uit de zoeker. Afhankelijk van de toestand van
de videoband kan het beeld niet altijd perfect
scherp worden opgenomen.
57
Page 58

Using the fader function
Beelden in- en uit-faden
While using the bounce function, you cannot
use the following functions:
– Exposure
– Focus
– Zoom
– Picture effect
Note on the bounce function
The BOUNCE indicator does not appear in the
following mode or functions:
– D ZOOM is activated in the menu settings
– 16:9 wide
– Picture effect
– PROGRAM AE
While in MEMORY mode (DCR-TRV17E only)
You cannot use the fader function.
Tijdens het infaden met de BOUNCE functie
kunt u geen gebruik maken van de volgende
functies:
– Belichtingsregeling
– Scherpstelling
– In/uit-zoomen
– Beeld/kleureffecten
Betreffende de BOUNCE in-fader functie
Bij gebruik van een van de volgende functies zal
de “BOUNCE” in-fader indicator niet
verschijnen.
– Wanneer het D ZOOM digitale zoombereik in
het instelmenu is ingeschakeld
– Bij de 16:9 breedbeeld-opnamefunctie
– Bij de speciale beeld/kleureffecten
– Bij de PROGRAM AE belichtingsprogramma’s
In de MEMORY stand (alleen voor de DCRTRV17E)
Geen van de in/uit-fader functies is hierbij
beschikbaar.
58
Page 59

Using special effects – Picture effect
Speciale effecten – Beeldeffect/kleurenpalet
You can digitally process images to obtain special
effects like those in films or on TV.
NEG. ART [a] : The colour and brightness of the
picture are reversed.
SEPIA : The picture gets sepia.
B&W : The picture appears in
monochrome (black-and-white).
SOLARIZE [b] : The light intensity is clearer, and
the picture looks like an
illustration.
SLIM [c] : The picture expands vertically.
STRETCH [d] : The picture expands
horizontally.
PASTEL [e] : The contrast of the picture is
emphasised, and the picture
looks like an animated cartoon.
MOSAIC [f] : The picture gets mosaic-
patterned.
Op digitale wijze kunt u uw video-opnamen zo
treffend maken als een speelfilm of TV-productie
met speciale effecten.
NEG. ART [a] : De kleur en helderheid van het
beeld worden omgekeerd.
SEPIA : Het beeld verschijnt in sepia, de
kleur van oude foto’s.
B&W : Het beeld is in zwart, wit en
grijstinten.
SOLARIZE [b] : De lichtintensiteit wordt
aangescherpt en uw beelden
verkrijgen een abstract effect, als
van een illustratie.
SLIM [c] : Het beeld wordt smaller, in de
hoogte uitgerekt.
STRETCH [d] : Het beeld wordt in de breedte
uitgerekt.
PASTEL [e] : Versterkt het contrast en geeft
tekenfilm-achtige kleuren.
MOSAIC [f] : Uw onderwerp komt als een
mozaïek van kleine blokjes in
beeld.
[a] [b] [c] [d] [e] [f]
(1)In CAMERA mode, select P EFFECT in in
the menu settings. (p. 115).
(2)Select the desired picture effect mode in the
menu settings.
(1)Kies in de CAMERA stand het onderdeel P
EFFECT onder in het instelmenu
(zie blz. 123).
(2)Kies in het instelmenu het gewenste kleur/
beeldeffect.
Advanced Recording Operations Uitgebreide opnamefuncties
MENU
To cancel the picture effect function
Set P EFFECT to OFF in the menu settings.
While using the picture effect function, you
cannot select the following functions:
– Old movie
– Bounce
When you turn the power off
Your camcorder automatically returns to the
normal mode.
1
MANUAL SET
PROGRAM AE
P EFFECT
D EFFECT
WHT BAL
AUTO SHTR
RETURN
[MENU] : END
OFF
NEG. ART
SEP
I
B&W
SOLAR
SL
I
M
STRETCH
PASTEL
MOSA
A
I
ZE
I
C
Uitschakelen van de beeld/
kleureffecten
Zet het onderdeel P EFFECT op “OFF” in het
instelmenu.
Tijdens gebruik van de beeld/
kleureffectfunctie kunt u de volgende functies
niet gebruiken:
– De OLD MOVIE oude-speelfilm functie
– De BOUNCE in-fader functie
Bij uitschakelen van de camcorder
Uw camcorder keert automatisch terug naar de
normale beeldweergave.
59
Page 60

Using special effects – Digital effect
Speciale effecten
– Digitale opnameeffecten
You can add special effects to recorded pictures
using the various digital functions. The sound is
recorded normally.
STILL
You can record a still picture so that it is
superimposed on a moving picture.
FLASH (FLASH MOTION)
You can record still pictures successively at
constant intervals.
LUMI. (LUMINANCEKEY)
You can swap a brighter area in a still picture
with a moving picture.
TRAIL
You can record the picture so that an incidental
image like a trail is left.
SLOW SHTR (SLOW SHUTTER)
You can slow down the shutter speed. The slow
shutter mode is good for recording dark pictures
more brightly.
OLD MOVIE
You can add an old movie type atmosphere to
pictures. Your camcorder automatically sets the
wide mode to ON and picture effect to SEPIA,
and the appropriate shutter speed.
Met de verschillende digitale functies kunt u
allerlei interessante effecten aan uw videoopnamen toevoegen. Hierbij wordt het geluid
wel normaal opgenomen.
STILL dubbelbeeld-opname
U kunt een stilstaand “achtergrondbeeld” tegelijk
met de gewone doorlopende videobeelden
opnemen.
FLASH interval-opname
U kunt met vaste intervallen stilstaande beelden
“afknippen”, voor een stroboscoop- of diaserieeffect.
LUMI. helderheidssleutel-opname
U kunt de bewegende beelden invoegen in een
helder gedeelte van een groter stilstaand beeld.
TRAIL nabeeld-opname
U kunt zorgen dat de beelden die u opneemt, een
spoor van nabeelden achterlaten.
SLOW SHTR langzame sluitertijd
U kunt de sluitertijd vertragen, om bijvoorbeeld
donkere beelden een helderder aanblik te geven.
De beelden kunnen hiermee wel iets minder
scherp worden.
OLD MOVIE oude-speelfilm sfeer
U kunt uw opgenomen beelden de sfeer van een
oude speelfilm verlenen. Hierbij schakelt uw
camcorder automatisch de breedbeeld-functie en
het SEPIA kleureffect in en kiest er de geschikte
sluitertijd bij.
60
Still picture/ Moving picture/
Stilstaand beeld Bewegende beelden
STILL
Still picture/ Moving picture/
Stilstaand beeld Bewegende beelden
LUMI.
Page 61

Using special effects
– Digital effect
Speciale effecten
– Digitale opname-effecten
(1)In CAMERA mode, select D EFFECT in in
the menu settings (p. 115).
(2)Select the desired digital effect mode in the
menu settings, then press the SEL/PUSH
EXEC dial.
The bars appear, in the STILL and LUMI.
modes. The still image is stored in memory.
(3)Turn the SEL/PUSH EXEC dial to adjust the
effect, then press the dial, then press the dial.
Items to be adjusted
STILL The rate of the still picture you
want to superimpose on the
moving picture
FLASH The interval of flash motion
LUMI. The colour scheme of the area in
the still picture which is to be
swapped with a moving picture
TRAIL The time until the incidental
image vanishes
SLOW SHTR Shutter speed. The larger the
shutter speed number, the slower
the shutter speed.
OLD MOVIE No adjustment necessary
The more bars there are on the screen, the
stronger the digital effect. The bars appear in the
following modes: STILL, FLASH, LUMI. and
TRAIL.
(1)Kies in de CAMERA stand het onderdeel D
EFFECT onder in het instelmenu
(zie blz. 123).
(2)Kies in het instelmenu het gewenste digitale
opname-effect en druk op de SEL/PUSH
EXEC regelknop.
Nu verschijnen er enkele instelbalkjes, bij de
STILL en LUMI. effecten. Er wordt een
stilstaand beeld in het geheugen vastgelegd.
(3)Draai aan de SEL/PUSH EXEC regelknop om
het digitale effect naar wens bij te regelen en
druk dan de regelknop in.
Instelmogelijkheden
STILL U kunt de intensiteit van het
toegevoegde stilstaande
achtergrondbeeld instellen.
FLASH U kunt de lengte van het interval
LUMI. U kunt het kleurschema kiezen van
tussen de stilstaande beelden kiezen.
het gebied in het stilstaande beeld
waar de bewegende beelden in
verschijnen.
TRAIL U kunt de tijdsduur voor het
vervagen van de nabeelden instellen.
SLOW SHTR U kunt de sluitertijd kiezen. Hoe
hoger het nummer dat u kiest, des te
langzamer zal de sluiter werken.
OLD MOVIE Hierbij verlopen alle instellingen
automatisch.
Hoe meer instelbalkjes u op het scherm ziet, des
te sterker zal het digitale opname-effect werken.
De instelbalkjes verschijnen bij de volgende
opname-effecten: dubbelbeeld-opname (STILL),
interval-opname (FLASH), helderheidssleutelopname (LUMI.) en nabeeld-opname (TRAIL).
Advanced Recording Operations Uitgebreide opnamefuncties
MANUA L SET
1
MENU
MANUA L SET
23
DEFFECT
OFF
ST I LL
FLASH
LUMI
.
TRA I L
W
OLS
[
] :
MENU
END
RTHS
EIVOMDLO
To cancel the digital effect function
Set D EFFECT to OFF in the menu settings.
MANUA L SET
DEFFECT
IIIIIIIIIIIIIIII
LUMI
.
[
] :
MENU
END
Uitschakelen van de digitale
opname-effecten
Zet het onderdeel D EFFECT op “OFF” in het
instelmenu.
DEFFECT
OFF
ST I LL
FLASH
LUMI
.
TRA I L
SLOWSHTR
OLD MOV I E
[
] :
MENU
END
MANUA L SET
PROGRAM AE
PEFFECT
DEFFECT
W
HT BA L
AUTO SHTR
RETU
RN
[
] :
MENU
END
LUMI.
IIIIIIIIIIIIII
61
Page 62

Using special effects
– Digital effect
Speciale effecten
– Digitale opname-effecten
Notes
•The following functions do not work during
digital effect:
– Fader
– Low lux mode of PROGRAM AE (The low lux
indicator flashes.)
– Tape photo recording
– Super NightShot
•The PROGRAM AE function does not work in
the slow shutter mode.
•The following functions do not work in the old
movie mode:
– Wide mode
– Picture effect
– PROGRAM AE
When you turn the power off
The digital effect will be automatically canceled.
When recording in the slow shutter mode
Auto focus may not be effective. Focus manually
using a tripod.
Shutter speed
Shutter speed number Shutter speed
SLOW SHTR 1 1/25
SLOW SHTR 2 1/12
SLOW SHTR 3 1/6
SLOW SHTR 4 1/3
Opmerkingen
•De volgende functies zullen niet werken tijdens
het gebruik van de digitale opname-effecten:
– In/uit-faden
– Het PROGRAM AE duisternis-
belichtingsprogramma (Hierbij knippert het
duisternis-indicatorlampje.)
– De foto-bandopnamefunctie
– De Super NightShot nachtopnamefunctie
•De PROGRAM AE belichtingsprogramma’s
zullen niet werken tijdens het gebruik van een
langzame sluitertijd
•De volgende functies zijn niet te gebruiken
tijdens het opnemen met de oude-speelfilm
functie:
– Breedbeeld-opnamefunctie
– De beeld/kleureffectfuncties
– De PROGRAM AE belichtingsprogramma’s
Bij uitschakelen van de camcorder
De digitale opname-effecten worden automatisch
uitgeschakeld.
Bij opnemen met een langzame sluitertijd
De automatische scherpstelling kan niet goed
werken. Zet de camcorder zo mogelijk op een
statief en stel handmatig scherp.
Sluitertijden
Sluitertijdnummer Sluitertijd
SLOW SHTR 1 1/25
SLOW SHTR 2 1/12
SLOW SHTR 3 1/6
SLOW SHTR 4 1/3
62
Page 63

Using the PROGRAM AE function
PROGRAM AE belichtingsprogramma’s
You can select PROGRAM AE (Auto Exposure)
mode to suit your specific shooting requirements.
Spotlight
This mode prevents people’s faces, for example,
from appearing excessively white when shooting
subjects lit by strong light in the theatre.
Soft portrait
This mode brings out the subject while creating a
soft background for subjects such as people or
flowers.
Sports lesson
This mode minimises shake on fast-moving
subjects such as in tennis or golf.
Beach & ski
This mode prevents people’s faces from
appearing dark in strong light or reflected light,
such as at a beach in midsummer or on a ski
slope.
Sunset & moon
This mode allows you to maintain atmosphere
when you are recording sunsets, general night
views, fireworks displays and neon signs.
Landscape
This mode is for when you are recording distant
subjects such as mountains and prevents your
camcorder from focusing on glass or metal mesh
in windows when you are recording a subject
behind glass or a screen.
Voor een optimale aanpassing aan de
lichtomstandigheden kunt u kiezen uit de
volgende PROGRAM AE automatische
belichtingsprogramma’s voor uw videoopnamen.
Spotlight-programma
Om te zorgen dat de gezichten van personen er
niet te bleek uitzien onder felle lampen, zoals bij
officiële gelegenheden, op het toneel, bij een
persconferentie e.d.
Portret-programma
Deze stand geeft een zachte, diffuse achtergrond
voor onderwerpen zoals bloemen of personen in
portretopnamen, met in het laatste geval ook de
beste huidtinten.
Sport-programma
Om bij snelle sportactiviteiten buitenshuis, zoals
voetbal, tennis e.d. de bal duidelijk te kunnen
volgen.
Strand- en ski-programma
Om te voorkomen dat de gezichten van personen
er te donker uitzien in taferelen met fel licht of
met sterke reflectie en schittering, zoals ‘s zomers
aan het strand of bij de wintersport, in de
sneeuw.
Schemer- en maanlicht-programma
Voor het maken van sfeervolle opnamen van een
zonsondergang, straten met neon-verlichting of
vuurwerk en andere buitenopnamen ‘s avonds.
Advanced Recording Operations Uitgebreide opnamefuncties
Low lux
This mode makes subjects brighter in insufficient
light.
Landschaps-programma
Voor veraf gelegen onderwerpen, zoals
vergezichten, berglandschappen of ook deels
belemmerde onderwerpen achter vensterglas,
vitrage of een hek, om te voorkomen dat de
camcorder op de voorgrond scherpstelt.
Duisternis-programma
Voor het helder en duidelijk opnemen van een
onderwerp in het donker.
63
Page 64

Using the PROGRAM AE function
PROGRAM AE
belichtingsprogramma’s
(1)Press MENU to display menu settings in
CAMERA or MEMORY (DCR-TRV17E only)
mode.
(2)Turn the SEL/PUSH EXEC dial to select ,
then press the dial (p. 115).
(3)Turn the SEL/PUSH EXEC dial to select
PROGRAM AE, then press the dial.
(4)Turn the SEL/PUSH EXEC dial to select the
desired mode.
MENU
To turn the PROGRAM AE function
off
Set PROGRAM AE to AUTO in the menu
settings.
Notes
•Because your camcorder is set to focus only on
subjects in the middle to far distance, you
cannot take close-ups in the following mode:
– Spotlight
– Sports lesson
– Beach & ski
•Your camcorder is set to focus only on distant
subjects in the following modes:
– Sunset & moon
– Landscape
•The following functions do not work in the
PROGRAM AE mode:
– Slow shutter
– Old movie
– Bounce
•The following functions do not work in the low
lux mode:
– Digital effect
– Overlap
– Wipe
– Dot
•While setting the NIGHTSHOT to ON, the
PROGRAM AE function does not work. (The
indicator flashes.)
64
(1)Druk in de “CAMERA” stand (of de
“MEMORY” stand, alleen voor de DCRTRV17E) op de MENU toets om het
instelmenu te laten verschijnen.
(2)Draai aan de SEL/PUSH EXEC regelknop,
stel in op het pictogram en druk de
regelknop in (zie blz. 123).
(3)Draai aan de SEL/PUSH EXEC regelknop,
stel in op het onderdeel PROGRAM AE en
druk de regelknop weer in.
(4)Draai aan de SEL/PUSH EXEC regelknop en
kies het gewenste belichtingsprogramma.
2-4
MANUA L SET
PROGRAM AE
PEFFECT
DEFFECT
WH T BA L
AUTO SHT R
RET URN
[
] :
MENU
END
AUTO
SPOTL I GHT
PORTRA I T
SPORTS
BEACH&SKI
SUNSETMOON
LANDSCAPE
LOW LUX
Uitschakelen van de PROGRAM AE
belichtingsprogramma’s
Zet het onderdeel PROGRAM AE op “AUTO” in
het instelmenu.
Opmerkingen
•Bij de volgende programma’s wordt de
camcorder automatisch scherpgesteld op
gemiddelde tot grote afstand, dus hierbij kunt u
geen close-up opnemen maken:
– Spotlight-programma
– Sport-programma
– Strand- en ski-programma
•De camcorder wordt automatisch scherpgesteld
op vergezichten, op grote afstand, bij de
volgende programma’s:
– Schemer- en maanlicht-programma
– Landschaps-programma
•De volgende functies zijn niet te gebruiken
tijdens opnemen met de PROGRAM AE
belichtingsprogramma’s:
– Langzame sluitertijden
– De oude-speelfilm functie
– De BOUNCE in-fader functie
•De volgende functies zijn niet te gebruiken
tijdens opnemen met het duisternisbelichtingsprogramma:
– Digitale opname-effecten
– OVERLAP in-faden
– WIPE in-faden
– DOT in-faden
•Met de NIGHTSHOT nachtopnameschakelaar
op “ON” zullen de PROGRAM AE
belichtingsprogramma’s niet werken. (De
programma-aanduiding knippert.)
Page 65

Using the PROGRAM AE function
PROGRAM AE
belichtingsprogramma’s
•While shooting in MEMORY mode (DCRTRV17E only), the following modes do not
work (The indicator flashes.) :
– Low lux
– Sports lesson
While WHT BAL is set to AUTO in the menu
settings
The white balance is adjusted even if the
PROGRAM AE function is selected.
Even if the PROGRAM AE function is selected
You can adjust the exposure.
If you are recording under a discharge tube
such as a fluorescent lamp, sodium lamp or
mercury lamp
Flickering or changes in colour may occur in the
following modes. If this happens, turn the
PROGRAM AE function off.
– Soft portrait
– Sports lesson
•Tijdens opnemen in de MEMORY stand (alleen
voor de DCR-TRV17E) zullen de volgende
programma’s niet werken. (De programmaaanduiding knippert.)
– Duisternis-programma
– Sport-programma
Wanneer het onderdeel WHT BAL in het
instelmenu in de “AUTO” stand is gezet
De kleurbalans zal dan nog steeds automatisch
worden ingesteld, ook na inschakelen van een
PROGRAM AE belichtingsprogramma.
Na inschakelen van een PROGRAM AE
belichtingsprogramma
U kunt de belichting nog steeds met de hand
bijregelen.
Bij opnemen onder het licht van een tl-buis,
een natriumlamp of een kwiklamp
Er kan een flikkerend effect en een zekere
kleurverschuiving optreden bij de volgende
programma’s. In dit geval kunt u de PROGRAM
AE belichtingsprogramma’s beter uitschakelen.
– Portret-programma
– Sport-programma
Advanced Recording Operations Uitgebreide opnamefuncties
65
Page 66

Adjusting the exposure manually
Handmatig instellen van de belichting
You can manually adjust and set the exposure.
Adjust the exposure manually in the following
cases:
– The subject is backlit
– Bright subject and dark background
– To record dark pictures (e.g. night scenes)
faithfully
(1)In CAMERA or MEMORY (DCR-TRV17E
only) mode, press EXPOSURE. The exposure
indicator appears.
(2)Turn the SEL/PUSH EXEC dial to adjust the
brightness.
U kunt de belichting met de hand instellen.
Onder de volgende omstandigheden kunt u
betere opnamen verkrijgen door de belichting
met de hand bij te stellen.
– Bij tegenlicht, dus met een erg heldere
achtergrond
– Als het onderwerp juist erg helder is en de
achtergrond donker
– Als u een donkere sfeer (bijv. nachtscènes)
natuurgetrouw wilt vastleggen.
(1)Druk in de “CAMERA” stand (of de
“MEMORY” stand, alleen voor de DCRTRV17E) op de EXPOSURE toets. De
belichtingsinstelbalk verschijnt in beeld.
(2)Draai aan de SEL/PUSH EXEC regelknop om
de helderheid naar wens in te stellen.
1
EXPOSURE
2
To return to the automatic exposure
mode
Press EXPOSURE again.
Note
When you adjust the exposure manually, the
backlight function does not work.
Your camcorder automatically returns to the
automatic exposure mode:
– If you change the PROGRAM AE mode.
– If you slide NIGHTSHOT to ON.
66
Terugkeren naar de automatische
belichtingsregeling
Druk nogmaals op de EXPOSURE toets
Opmerking
Bij handmatig instellen van de belichting zal de
tegenlicht-compensatie niet werken.
Uw camcorder keert dan automatisch terug
naar de automatische belichtingsregeling:
– als u een ander PROGRAM AE
belichtingsprogramma kiest
– als u de NIGHTSHOT schakelaar op “ON” zet.
Page 67

Focusing manually
Handmatig scherpstellen
You can gain better results by manually adjusting
the focus in the following cases:
•The autofocus mode is not effective when
shooting
–subjects through glass coated with water
droplets
–horizontal stripes
–subjects with little contrast with backgrounds
such as walls and sky
•When you want to change the focus from a
subject in the foreground to a subject in the
background
•Shooting a stationary subject when using a
tripod
(1)In CAMERA or MEMORY (DCR-TRV17E
only) mode, press FOCUS lightly. The 9
indicator appears.
(2)Turn the focus ring to sharpen focus.
In de volgende gevallen kunt u betere
opnameresultaten bereiken door handmatig
scherp te stellen.
•Wanneer de autofocus niet goed werkt, bij het
opnemen van:
–onderwerpen achter matglas of beslagen
vensterglas
–onderwerpen met horizontale strepen
–onderwerpen met weinig tekening of contrast,
met op de achtergrond een wand, de lucht,
enz.
•Wanneer u de scherpstelling wilt veranderen,
van een onderwerp op de voorgrond naar een
onderwerp op de achtergrond.
•Voor het opnemen van een stilstaand
onderwerp, met de camcorder op een statief.
(1)Druk in de “CAMERA” stand (of de
“MEMORY” stand, alleen voor de DCRTRV17E) licht op de FOCUS toets. De 9
scherpstelaanduiding verschijnt.
(2)Draai aan de scherpstelring tot u uw
onderwerp scherp in beeld hebt.
Advanced Recording Operations Uitgebreide opnamefuncties
2
To return to the autofocus mode
Press FOCUS lightly to turn off the indicator.
To record distant subjects
When you press FOCUS down firmly, the lens
focuses on and indicator appears. When you
release FOCUS, your camcorder returns to the
manual focus mode. Use this mode when your
camcorder focuses on near objects even though
you are trying to shoot a distant object.
1
FOCUS
Terugkeren naar de automatische
scherpstelling
Druk nogmaals licht op de FOCUS toets, zodat
de scherpstelaanduiding verdwijnt.
Opnemen van een erg ver verwijderd
onderwerp
Wanneer u de FOCUS toets stevig indrukt, wordt
de lens op maximale afstand scherpgesteld en
dan verschijnt de oneindig-aanduiding. Zodra
u de FOCUS toets loslaat, keert de camcorder
terug naar de handmatig gemaakte
scherpstelling. Gebruik deze functie bijvoorbeeld
als uw camcorder ten onrechte scherpstelt op een
obstakel op de voorgrond, terwijl u juist een
vergezicht e.d. wilt filmen.
67
Page 68

Focusing manually
Handmatig scherpstellen
To focus precisely
It is easier to focus on the subject if you adjust the
zoom to shoot at the “W” (wide-angle) after
focusing at the “T” (telephoto) position.
When you shoot close to the subject
Focus at the end of the “W” (wide-angle)
position.
9 changes as follows:
when recording a distant subject.
when the subject is too close to focus on.
Gemakkelijker nauwkeurig scherpstellen
Stel eerst in de “T” telestand scherp op uw
onderwerp en maak dan uw opnamen in de “W”
groothoek-stand. Dit is de trefzekerste manier
om precies scherp te stellen.
Scherpstellen op een onderwerp dat erg
dichtbij is
Stel scherp op uw onderwerp in de uiterste “W”
groothoek-stand.
De 9 kan plaats maken voor de volgende
aanduidingen:
bij opnemen van een ver verwijderd
onderwerp.
wanneer het onderwerp te dichtbij is om op te
kunnen scherpstellen.
68
Page 69

Interval recording
Interval-opname
You can make a time-lapse recording by setting
the camcorder to automatically record and
standby sequentially. You can achieve an
excellent recording for flowering, emergence,
etc., with this function.
Example/Voorbeeld
1 s 1 s
9 min 59 s 9 min 59 s
[a][a]
[b][b]
[a]Recording time
[b]Waiting time
(1)Press MENU to display the menu in standby
mode.
(2)Turn the SEL/PUSH EXEC dial to select ,
then press the dial.
(3)Turn the SEL/PUSH EXEC dial to select INT.
REC, then press the dial.
(4)Turn the SEL/PUSH EXEC dial to select SET,
then press the dial.
(5)Set INTERVAL and REC TIME.
1 Turn the SEL/PUSH EXEC dial to select
INTERVAL, then press the dial.
2 Turn the SEL/PUSH EXEC dial to select the
desired interval time, then press the dial.
The time: 30SEC y 1MIN y 5MIN y
10MIN
3 Turn the SEL/PUSH EXEC dial to select
REC TIME, then press the dial.
4 Turn the SEL/PUSH EXEC dial to select the
desired recording time, then press the dial.
The time: 0.5SEC y 1SEC y 1.5SEC y
2SEC
5 Turn the SEL/PUSH EXEC dial to select
RETURN, then press the dial twice.
U kunt een serie interval-opnamen maken door
de camcorder automatisch te laten opnemen en
pauzeren. Dit geeft een bijzonder treffend effect
met uitbottende knoppen, bloeiende bloemen
enzovoort.
Advanced Recording Operations Uitgebreide opnamefuncties
10 min10 min
[a]Opnameduur
[b]Wachttijd
(1)Druk in de opnamepauzestand op de MENU
toets om het instelmenu te zien.
(2)Draai aan de SEL/PUSH EXEC regelknop om
in te stellen op het pictogram en druk de
regelknop in.
(3)Draai aan de SEL/PUSH EXEC regelknop om
in te stellen op INT. REC en druk de
regelknop in.
(4)Draai weer aan de SEL/PUSH EXEC
regelknop om in te stellen op SET en druk de
regelknop in.
(5)Stel het wachttijd-INTERVAL en de REC
TIME opnameduur in.
1 Draai aan de SEL/PUSH EXEC regelknop,
stel in op INTERVAL en druk de regelknop
in.
2 Draai aan de SEL/PUSH EXEC regelknop
om het gewenste interval voor de wachttijd
te kiezen en druk dan de regelknop in.
De wachttijd: 30SEC y 1MIN y 5MIN
y 10MIN
3 Draai aan de SEL/PUSH EXEC regelknop,
stel in op REC TIME en druk de regelknop
in.
4 Draai aan de SEL/PUSH EXEC regelknop
om het gewenste aantal seconden voor de
opnameduur te kiezen en druk dan de
regelknop in.
De opnameduur: 0,5SEC y 1SEC y
1,5SEC y 2SEC
5 Draai aan de SEL/PUSH EXEC regelknop
om in te stellen op RETURN en druk
dan tweemaal op de regelknop.
69
Page 70

Interval recording
1
MENU
2-4
CAMERA SET
SELFTIMER OFF
D ZOOM
16 : 9W
I
DE
STEADYSHOT
N. S. LIGHT
FRAME REC
I
NT. REC
CAMERA SET
SELFTIMER
D ZOOM
[MENU] : END
16 : 9W
I
DE
STEADYSHOT
N. S. LIGHT
FRAME REC
I
NT. REC
RETURN
CAMERA SET
SELFTIMER
D ZOOM
[MENU] : END
16 : 9W
I
STEADYSHOT
N. S. LIGHT
FRAME REC
I
NT. REC
RETURN
[MENU] : END
OFF
DE
ON
OFF
SET
Interval-opname
5
CAMERA SET
1 2
I
NT. REC
I
NTERVAL
REC T
RETURN
[MENU] : END
CAMERA SET
3 4
I
REC T
RETURN
[MENU] : END
NT. REC
I
NTERVAL
30SEC
I
ME
1MIN
5MIN
10MIN
I
ME
0 . 5SEC
1SEC
1 .5SEC
2SEC
CAMERA SET
I
NT. REC
I
NTERVAL
REC T
I
RETURN
[MENU] : END
CAMERA SET
I
NT. REC
I
NTERVAL
REC T
I
RETURN
[MENU] : END
10MIN
ME
ME
1SEC
(6)Turn the SEL/PUSH EXEC dial to select ON,
then press the dial.
(7)Press MENU to erase the menu display. The
interval recording indicator flashes.
(8)Press START/STOP to start interval
recording. The interval recording indicator
lights up.
70
7
MENU
I
NTERVAL
(6)Draai aan de SEL/PUSH EXEC regelknop,
stel in op ON en druk de regelknop in.
(7)Druk op de MENU toets om het instelmenu te
sluiten. De intervalopname-aanduiding gaat
knipperen.
(8)Druk op de START/STOP toets om de
interval-opname te starten. De
intervalopname-aanduiding blijft nu branden.
8
CAMERA SET
6
SELFTIMER
D ZOOM
16 : 9W
I
DE
STEADYSHOT
N.S LIGHT
FRAME REC
I
NT. REC
RETURN
[MENU] : END
ON
Page 71

Interval recording
Interval-opname
To cancel the interval recording
•Set INT. REC to OFF in the menu settings.
•Set the POWER switch to OFF (CHG), PLAYER
or MEMORY (DCR-TRV17E only).
To stop the interval recording
momentarily and perform normal
recording
Press START/STOP. You can perform normal
recording only once. To cancel the normal
recording, press START/STOP again.
Note on interval recording (DCR-TRV17E only)
You cannot do interval recording in memory
mode.
On recording time
There may be a discrepancy in recording time of
up to +/– 6 frames from the selected time.
Uitschakelen van de interval-opname
•Zet het onderdeel INT. REC in het instelmenu
op “OFF”.
•Zet de POWER schakelaar in de “OFF (CHG)”,
“PLAYER” of “MEMORY” stand (alleen voor
de DCR-TRV17E).
Tijdens interval-opname eenmaal
overschakelen op normale opname
Druk op de START/STOP toets. Dan kunt u
normaal opnemen, maar dit kan slechts één
enkele keer tussendoor. Om de normale opname
te stoppen drukt u nogmaals op de START/
STOP toets.
Beperking voor de interval-opname (alleen
voor de DCR-TRV17E)
U kunt de interval-opname niet inschakelen in de
“MEMORY” geheugenopname-stand.
Betreffende de opnameduur
Er kan een geringe afwijking in de opnametijd
optreden, van +/– 6 beeldjes meer of minder dan
de gekozen opnameduur.
Advanced Recording Operations Uitgebreide opnamefuncties
71
Page 72

Frame by frame recording – Cut recording
Beeld-voor-beeld opname – Animatiefilms
You can make a recording with a stop-motion
animated effect using cut recording. To create
this effect, alternately move the subject a little
and make a cut recording. We recommend that
you use a tripod, and operate the camcorder
using the Remote Commander after step 6.
(1)Press MENU to display the menu in standby
mode.
(2)Turn the SEL/PUSH EXEC dial to select ,
then press the dial.
(3)Turn the SEL/PUSH EXEC dial to select
FRAME REC, then press the dial.
(4)Turn the SEL/PUSH EXEC dial to select ON,
then press the dial.
(5)Press MENU to erase the menu display.
The FRAME REC indicator lights up.
(6)Press START/STOP to start cut recording.
The camcorder makes a recording for about
six frames, and returns to recording standby.
(7)Move the subject, and repeat step 6.
U kunt een beeld-voor-beeld opname maken van
afzonderlijke opeenvolgende scènes, om zo
bijvoorbeeld een animatiefilm samen te stellen. U
maakt een opname, verzet uw onderwerp een
heel klein beetje, maakt de volgende opname
enzovoort. Hierbij is het aanbevolen de
camcorder op een statief te zetten en na stap 6 de
camcorder te bedienen met de afstandsbediening.
(1)Druk in de opnamepauzestand op de MENU
toets om het instelmenu te zien.
(2)Draai aan de SEL/PUSH EXEC regelknop om
in te stellen op het pictogram en druk de
regelknop in.
(3)Draai aan de SEL/PUSH EXEC regelknop om
in te stellen op FRAME REC en druk de
regelknop in.
(4)Draai weer aan de SEL/PUSH EXEC
regelknop om in te stellen op ON en druk de
regelknop in.
(5)Druk op de MENU toets om het instelmenu te
sluiten. De FRAME REC opname-aanduiding
licht op.
(6)Druk op de START/STOP toets om de beeld-
voor-beeld opname te starten.
De camcorder maakt een opname van
ongeveer zes beeldjes en komt dan weer in de
opnamepauzestand.
(7)Verstel uw onderwerp zoals u wilt en herhaal
stap 6.
72
1
2-4
CAMERA SET
[MENU] : END
MENU
SELFTIMER
D ZOOM
16 : 9W
I
DE
STEADYSHOT
N.S.LIGHT
FRAME REC
I
NT. REC
CAMERA SET
SELFTIMER
D ZOOM
16 : 9W
STEADYSHOT
N. S. LIGHT
FRAME REC
I
NT. REC
RETURN
[MENU] : END
OFF
I
DE
OFF
ON
CAMERA SET
SELFTIMER
D ZOOM
16 : 9W
I
DE
STEADYSHOT
N. S. LIGHT
FRAME REC
I
NT. REC
RETURN
[MENU] : END
6,7
5
MENU
ON
FRAME REC
Page 73

Frame by frame recording
– Cut recording
Beeld-voor-beeld opname
– Animatiefilms
To cancel the cut recording
•Set FRAME REC to OFF in the menu settings.
•Set the POWER switch to OFF (CHG), PLAYER
or MEMORY (DCR-TRV17E only).
Notes on cut recording
•The last recorded cut is longer than other cuts.
•The proper remaining tape time is not indicated
if you use this function continuously.
Uitschakelen van de beeld-voorbeeld opname
•Zet het onderdeel FRAME REC in het
instelmenu op “OFF”.
•Zet de POWER schakelaar in de “OFF (CHG)”,
“PLAYER” of “MEMORY” stand (alleen voor
de DCR-TRV17E).
Bij gebruik van de beeld-voor-beeld opname
•De laatste opname zal altijd iets langer zijn dan
de voorgaande.
•Als u deze opnamefunctie een tijd lang blijft
gebruiken, kan niet meer de juiste resterende
bandlengte worden aangegeven.
Advanced Recording Operations Uitgebreide opnamefuncties
73
Page 74

— Advanced Playback Operations —
— Uitgebreide weergavefuncties —
Playing back a tape with picture effects
During playback, you can process a scene using
the picture effect functions: NEG. ART, SEPIA,
B&W and SOLARIZE.
(1)In the playback or playback pause mode,
select P EFFECT in in the menu settings
(p. 115).
(2)Select the desired mode by turning the SEL/
5PUSH EXEC dial.
For details of each picture effect function, see
page 59.
MENU
To cancel the picture effect function
Set P EFFECT to OFF in the menu settings.
Notes
•You cannot process the picture that is input
from other equipment using the picture effect
function.
•To record pictures that you have processed
using the picture effect function, record the
pictures on the VCR, using your camcorder as a
player.
Pictures processed by the picture effect
function
Pictures processed by the picture effect function
are not output through the DV OUT jack.
When you set the POWER switch to OFF (CHG)
or stop playing back
The picture effect function is automatically
canceled.
Videoweergave met beeld/kleureffecten
Tijdens het afspelen kunt u de weergegeven
videobeelden verwerken met de volgende beeld/
kleureffect-functies: NEG.ART (kleurnegatief),
SEPIA, B&W (zwart/wit) en SOLARIZE
(solarisatie).
(1)Kies tijdens afspelen of in de weergavepauze-
stand het onderdeel P EFFECT onder in
het instelmenu (zie blz. 123).
(2)Draai aan de SEL/PUSH EXEC regelknop en
kies het gewenste beeld/kleureffect.
Zie voor nadere bijzonderheden over de
beeld/kleureffecten blz. 59.
1
Uitschakelen van de beeld/
kleureffecten
Zet het menu-onderdeel P EFFECT in de “OFF”
stand in het instelmenu.
Opmerkingen
•U kunt de beeld/kleureffecten niet toepassen
op inkomende beelden van andere videoapparatuur.
•Om de beelden met speciale beeld/
kleureffecten op te nemen, sluit u een
videorecorder aan en neemt u de beelden
daarmee op, terwijl u ze afspeelt op uw
camcorder.
Weergave van beelden met speciale beeld/
kleureffecten
De beelden die zijn aangepast met beeld/
kleureffecten worden niet uitgestuurd via de
DV OUT aansluiting.
Wanneer u de POWER schakelaar op “OFF
(CHG)” zet of stopt met afspelen
De beeld/kleureffect-functies worden dan
automatisch uitgeschakeld.
MANUAL SET
P EFFECT
D EFFECT
RETURN
[MENU] : END
OFF
NEG. ART
SEP
I
A
B&W
SOLAR
I
ZE
74
Page 75

Playing back a tape with digital effects
Videoweergave met digitale beeldeffecten
During playback, you can process a scene using
the digital effect functions: STILL, FLASH, LUMI.
and TRAIL.
(1)In the playback or playback pause mode,
select D EFFECT in in the menu settings
(p.115).
(2)Select the desired digital effect mode in the
menu settings, then press the SEL/PUSH
EXEC dial. The digital effect indicator lights
up and the bars appear. In the STILL or
LUMI. mode, the image where you press the
SEL/PUSH EXEC dial is stored in memory as
a still image, then press the dial.
(3)Turn the SEL/PUSH EXEC dial to adjust the
effect, then press the dial.
For details of each digital effect function, see
page 60.
MENU
Tijdens het afspelen kunt u de weergegeven
videobeelden verwerken met de digitale
beeldeffect-functies: “STILL” voor dubbelbeeldweergave, “FLASH” voor interval-weergave,
“LUMI.” voor helderheidssleutel-weergave en
“TRAIL” voor nabeeld-weergave.
(1)Kies tijdens weergave of in de weergavepauze-
stand het onderdeel D EFFECT onder in
het instelmenu (zie blz. 123).
(2)Kies in het instelmenu het gewenste
beeldeffect en druk op de SEL/PUSH EXEC
regelknop. De digitale beeldeffect-aanduiding
blijft nu branden en er verschijnen enkele
instelbalkjes in beeld. Bij de “STILL” en
“LUMI.” functies wordt het beeld waarbij u
de SEL/PUSH EXEC regelknop indrukt, als
stilstaand beeld in het geheugen vastgelegd.
(3)Draai aan de SEL/PUSH EXEC regelknop om
het digitale beeldeffect naar wens bij te
regelen.
Zie voor een beschrijving van de digitale
beeldeffect-functies blz. 60.
MANUA L SET
1
2
DEFFECT
OFF
ST I LL
FLASH
LUMI
.
TRA I L
[
] :
MENU
END
MANUA L SET
DEFFECT
OFF
ST I LL
FLASH
LUMI
.
TRA I L
[
] :
MENU
END
Advanced Playback Operations Uitgebreide weergavefuncties
MANUA L
PEFFECT
LUMI
3
DEFFECT
RETURN
[
] :
MENU
END
IIIIIIII
To cancel the digital effect function
Set D EFFECT to OFF in the menu settings.
Notes
•You cannot process externally input scenes
using the digital effect function.
•To record pictures that you have processed
using the digital effect function, record the
pictures on the VCR, using your camcorder as a
player.
MANUA L SET
.
••••••
DEFFECT
LUMI
.
[
] :
MENU
END
IIIIIIII
••••••••
Uitschakelen van de digitale
beeldeffecten
Zet het menu-onderdeel D EFFECT op “OFF” in
het instelmenu.
Opmerkingen
•U kunt de digitale beeldeffecten niet toepassen
op inkomende beelden van andere videoapparatuur.
•Om de beelden met digitale beeldeffecten op te
nemen, sluit u een videorecorder aan en neemt
u de beelden daarmee op, terwijl u ze afspeelt
op uw camcorder.
75
Page 76

Playing back a tape with digital
effects
Videoweergave met digitale
beeldeffecten
Pictures processed by the digital effect
function
•Pictures processed by the digital effect function
are not output through the DV OUT jack.
•You cannot use the tape PB ZOOM function for
pictures processed by digital effect function.
When you set the POWER switch to OFF (CHG)
or stop playing back
The digital effect function is automatically
canceled.
Weergave van beelden met digitale
beeldeffecten
•Beelden die zijn aangepast met digitale
beeldeffecten worden niet uitgestuurd via de
DV OUT aansluiting.
•Beelden die zijn aangepast met digitale
beeldeffecten kunnen niet worden uitvergroot
met de PB ZOOM functie.
Wanneer u de POWER schakelaar op “OFF
(CHG)” zet of stopt met afspelen
De digitale beeldeffect-functies worden dan
automatisch uitgeschakeld.
76
Page 77

Enlarging images recorded on tapes – Tape PB ZOOM
Beelden van een videoband vergroot weergeven – PB ZOOM band-uitvergroting
You can enlarge still and moving playback
pictures. You can also dub the enlarged pictures
to tapes or copy to “Memory Stick”s (DCRTRV17E only) (p. 147, 151).
You can also enlarge still playback images
recorded on “Memory Stick” (DCR-TRV17E
only) (p. 172)
(1)In the playback or playback pause mode,
press PB ZOOM on your camcorder. The
image is enlarged, and R r T t appears on
the screen.
(2)Turn the SEL/PUSH EXEC dial to move the
enlarged image, then press the dial.
R :The image moves downwards.
r :The image moves upwards.
(3)Turn the SEL/PUSH EXEC dial to move the
enlarged image, then press the dial.
t :The image moves leftward (Turn the
dial upwards.)
T :The image moves rightward (Turn the
dial downwards.)
1
PB
ZOOM
U kunt de op een videocassette opgenomen
bewegende beelden bij weergave uitvergroten.
Dergelijke vergrote beelden kunt u ook overnemen
op een andere videoband of op een “Memory Stick”
(alleen bij de DCR-TRV17E) (zie blz. 147, 151).
Naast de hier beschreven functie kan deze
camcorder ook de stilstaande beelden die zijn
vastgelegd op een “Memory Stick” op dezelfde wijze
vergroot weergeven (alleen bij de DCR-TRV17E) (zie
blz. 172).
(1) Druk tijdens afspelen of in de
weergavepauzestand op de PB ZOOM toets van
de camcorder. Het beeld wordt dan vergroot
weergegeven en er verschijnen R r T t pijlen
op het scherm.
(2) Draai aan de SEL/PUSH EXEC regelknop om het
vergrote beeld in de gewenste richting te
verplaatsen en druk de regelknop in.
R :Verplaatst het beeld omlaag
r :Verplaatst het beeld omhoog
(3) Draai aan de SEL/PUSH EXEC regelknop om het
vergrote beeld zijwaarts in de gewenste richting
te verplaatsen en druk de regelknop in.
t : Verplaatst het beeld naar rechts (Draai de
regelknop omhoog)
T : Verplaatst het beeld naar links (Draai de
regelknop omlaag)
2
PB ZOOM
[EXEC] :
Advanced Playback Operations Uitgebreide weergavefuncties
To cancel the PB ZOOM function
Press PB ZOOM.
Note
You cannot process externally input scenes using
the PB ZOOM function with your camcorder.
The PB ZOOM function is automatically
canceled when you operate the following
functions:
– Set the POWER switch to OFF (CHG)
– Stop playback
– Display the menu settings
Pictures in the PB ZOOM
Pictures in the PB ZOOM mode are not output
through the DV OUT jack.
3
PB ZOOM
[EXEC] :
Uitschakelen van de PB ZOOM
uitvergroting
Druk op de PB ZOOM toets.
Opmerking
U kunt de PB ZOOM vergroting niet toepassen op
inkomende beelden die de camcorder ontvangt
vanaf andere apparatuur.
De PB ZOOM band-uitvergroting wordt
automatisch uitgeschakeld wanneer u een van de
volgende doet:
– de POWER schakelaar op “OFF (CHG)” zet;
– stopt met afspelen;
– het instelmenu laat verschijnen.
Weergave van beelden met PB ZOOM vergroting
De beelden die met PB ZOOM zijn uitvergroot
worden niet uitgestuurd via de DV OUT
aansluiting.
77
Page 78

Quickly locating a scene using the zero set memory function
Snel opzoeken van een scène met de nulpunt-terugkeer
Your camcorder goes forward or backward to
automatically stop at a desired scene having a
tape counter value of “0:00:00”. You can do this
with the Remote Commander.
(1)In the playback mode, press DISPLAY.
(2)Press ZERO SET MEMORY at the point you
want to locate later. The tape counter shows
“0:00:00” and the ZERO SET MEMORY
indicator flashes.
(3)Press x when you want to stop playback.
(4)Press m to rewind the tape to the tape
counter’s zero point. The tape stops
automatically when the tape counter reaches
approximately zero. The ZERO SET
MEMORY indicator disappears and the time
code appears.
(5)Press N. Playback starts.
DISPLAY ZERO SET
m
x
U kunt de camcorder eenvoudig laten vooruit- of
terugspoelen en stoppen bij een gewenste scène
als u bij dat punt van tevoren de tellerstand op
“0:00:00” heeft gezet. Hiervoor kunt u de
afstandsbediening gebruiken.
(1)Druk tijdens het afspelen op de DISPLAY
toets.
(2)Druk tijdens het afspelen op de ZERO SET
MEMORY toets bij een punt waar u later naar
wilt terugkeren. De bandteller komt dan op
“0:00:00” te staan en de aanduiding “ZERO
SET MEMORY” gaat knipperen.
(3)Druk op de x stoptoets wanneer u wilt
stoppen met afspelen.
(4)Druk op de m terugspoeltoets om de band
terug te spoelen naar het teller-nulpunt. Het
terugspoelen stopt automatisch wanneer de
teller ongeveer op nul komt te staan. De
aanduiding “ZERO SET MEMORY” verdwijnt
en de tijdcode wordt aangegeven.
(5)Druk op de N weergavetoets. Het afspelen
begint dan vanaf het nulpunt op de
bandteller.
MEMORY
N
Notes
•When you press ZERO SET MEMORY before
rewinding the tape, the zero set memory
function will be canceled.
•There may be a discrepancy of several seconds
from the time code.
If a tape has a blank portion in the recorded
portions
The zero set memory function may not work
correctly.
Zero set memory functions also in the standby
mode
When you insert a scene in the middle of a
recorded tape, press ZERO SET MEMORY at the
point you want to end the insertion. Rewind the
tape to the insert start point, and start recording.
Recording stops automatically at the tape counter
zero point. Your camcorder returns to the
standby mode.
78
Opmerkingen
•Als u vóór het terugspoelen nogmaals op de
ZERO SET MEMORY toets drukt, wordt de
nulpunt-terugkeerfunctie uitgeschakeld.
•Tussen de tellerstand en het exacte punt op de
band kan een afwijking van enkele seconden
optreden.
Als er tussen de opnamen een onbespeeld
bandgedeelte is
Dan kan de nulpunt-terugkeerfunctie kan niet
altijd goed werken.
De ZERO SET MEMORY nulpuntterugkeerfunctie werkt ook in de
opnamepauzestand
Voor het inlassen van een nieuwe opname
middenin een reeds eerder opgenomen
videoband drukt u op de ZERO SET MEMORY
toets bij het punt waar de nieuwe opname moet
eindigen. Spoel vervolgens de band terug naar
het beginpunt voor de nieuwe opname en begin
daar met opnemen. Het opnemen zal
automatisch stoppen bij het nulpunt van de
bandteller. De camcorder komt dan weer in de
opnamepauzestand.
Page 79

Searching the boundaries of recorded tape by title – Title search
Opzoeken van een
gewenste opname aan de
titel – Titel-zoekfunctie
If you use a tape with cassette memory,
you can search for the boundaries of
recorded tape by title. Use the Remote
Commander for this operation.
Before operation
Set CM SEARCH in to ON in the menu
settings (p. 120). (The default setting is ON.)
(1)Set the POWER switch to PLAYER.
(2)Press SEARCH MODE on the Remote
Commander repeatedly, until the TITLE
SEARCH indicator appears.
The indicator changes as follows:
TITLE SEARCH t DATE SEARCH t
PHOTO SEARCH t PHOTO SCAN t
no indicator
(3)Press . or > on the Remote Commander
to select the title for playback.
Your camcorder automatically starts playback
of the scene having the title that you selected.
2
SEARCH
MODE
TITLE SEARCH
1 HELLO!
2 CONGRATULATIONS!
3 HAPPY NEW YEAR!
4 PRESENT
5 GOOD MORNING
6 WEDDING
Als u een videoband met
cassettegeheugen gebruikt, kunt u een
opname opzoeken aan de hand van de
titel. Voor deze titel-zoekfunctie gebruikt
u de afstandsbediening.
Voor de bediening
Zet eerst in het instelmenu het onderdeel CM
SEARCH onder in de “ON” stand
(zie blz. 128). De fabrieksinstelling voor dit
menu-onderdeel is “ON”.
(1)Zet de POWER schakelaar in de “PLAYER”
stand.
(2)Druk enkele malen op de SEARCH MODE
toets van de afstandsbediening, totdat de
aanduiding “TITLE SEARCH” oplicht.
Telkens wanneer u op deze toets drukt,
verspringt de zoekfunctie-aanduiding als
volgt:
TITLE SEARCH t DATE SEARCH t
PHOTO SEARCH t PHOTO SCAN t
geen aanduiding
(3)Druk op de . of > toets van de
afstandsbediening om de opnametitel voor
weergave te kiezen.
De camcorder begint dan automatisch met
afspelen vanaf de opname met door u
gekozen titel.
Advanced Playback Operations Uitgebreide weergavefuncties
3
To stop searching
Press x.
TITLE SEARCH
3 HAPPY NEW YEAR!
4 PRESENT
5 GOOD MORNING
6 WEDDING
7 NIGHT
8 BASEBALL
Stoppen met doorzoeken van de
band
Druk op de x stoptoets.
79
Page 80

Searching the boundaries of
recorded tape by title
– Title search
Opzoeken van een gewenste
opname aan de titel
– Titel-zoekfunctie
If you use a tape without cassette memory
You cannot superimpose or search a title.
In the mark
•The bar in the mark indicates the
present point on the tape.
•The mark in the indicates the actual
point you are trying to search.
If a tape has a blank portion between
recorded portions
The title search function may not work correctly.
To superimpose a title
See page 106.
Bij gebruik van een videoband zonder
cassettegeheugen
Hierop kunt u geen titel vastleggen of opzoeken.
Betreffende de zoekbalk
•Het streepje in de zoekbalk geeft het
huidige punt op de band aan.
•Het teken in de zoekbalk geeft het
punt aan waarnaar u zoekt.
Als er tussen de opnamen een onbespeeld
bandgedeelte is
Dan kan de titel-zoekfunctie niet altijd goed
werken.
Vastleggen van een titel
Zie blz. 106.
80
Page 81

Searching a recording
by date – Date search
Opzoeken van een
gewenste opname aan de
datum – Datum-zoekfunctie
You can automatically search for the point where
the recording date changes and start playback
from that point. Use a tape with cassette memory
for convenience. Use the Remote Commander for
this operation.
Use this function to check where recording dates
change or to edit the tape at each recording date.
Searching for the date by using
cassette memory
Before operation
•You can use this function only when playing
back a tape with cassette memory (p. 203).
•Set CM SEARCH in to ON in the menu
settings (p. 120). (The default setting is ON.)
(1)Set the POWER switch to PLAYER.
(2)Press SEARCH MODE on the Remote
Commander repeatedly, until the DATE
SEARCH indicator appears.
The indicator changes as follows:
TITLE SEARCH t DATE SEARCH t
PHOTO SEARCH t PHOTO SCAN t
no indicator
(3)Press . or > on the Remote Commander
to select the date for playback.
Your camcorder automatically starts playback
at the beginning of the selected date.
2
SEARCH
MODE
DATE SEARCH
1
5 / 9 / 01
2
6 / 9 / 01
3 24 / 12 / 01
4
1 / 1 / 02
5 11 / 2 / 02
6 29 / 4 / 02
U kunt op een cassette met video-opnamen de
eerste opname van een bepaalde dag opzoeken
om de band automatisch vanaf dat punt weer te
geven. Hiervoor kunt u het beste een videoband
met cassettegeheugen gebruiken. Voor de
bediening van deze datum-zoekfunctie gebruikt
u de afstandsbediening.
Deze functie is handig om de overgangspunten
tussen de opnamedata op te zoeken of om
aanpassingen te maken bij elke opnamedatum.
Opzoeken van een opnamedatum aan
de hand van het cassettegeheugen
Advanced Playback Operations Uitgebreide weergavefuncties
Voor de bediening
•Deze functie is alleen beschikbaar bij het
afspelen van een videoband met
cassettegeheugen (zie blz. 203).
•Zet eerst in het instelmenu het onderdeel CM
SEARCH onder in de “ON” stand
(zie blz. 128). (De fabrieksinstelling voor dit
menu-onderdeel is “ON”.)
(1)Zet de POWER schakelaar in de “PLAYER”
stand.
(2)Druk enkele malen op de SEARCH MODE
toets van de afstandsbediening, totdat de
aanduiding “DATE SEARCH” oplicht.
Telkens wanneer u op deze toets drukt,
verspringt de zoekfunctie-aanduiding als
volgt:
TITLE SEARCH t DATE SEARCH t
PHOTO SEARCH t PHOTO SCAN t
geen aanduiding
(3)Druk op de . of > toets van de
afstandsbediening om de opnamedatum voor
weergave te kiezen.
De camcorder begint dan automatisch met
afspelen vanaf de eerste opname van de door
u gekozen opnamedatum.
3
To stop searching
Press x.
DATE SEARCH
1
5 / 9 / 01
2
6 / 9 / 01
3 24 / 12 / 01
4
1 / 1 / 02
5 11 / 2 / 02
6 29 / 4 / 02
Stoppen met doorzoeken van de
band
Druk op de x stoptoets.
81
Page 82

Searching a recording by date
– Date search
Opzoeken van een gewenste
opname aan de datum
– Datum-zoekfunctie
Note
If one day’s recording is less than two minutes,
your camcorder may not accurately find the
point where the recording date changes.
In the mark
•The bar in the mark indicates the
present point on the tape.
•The mark in the indicates the actual
point you are trying to search.
If a tape has a blank portion between
recorded portions
The date search function may not work correctly.
Cassette memory
The tape cassette memory can hold six recording
date data. If you search the date among seven or
more data, see “Searching for the date without
using cassette memory” below.
Searching for the date without
using cassette memory
(1)Set the POWER switch to PLAYER.
(2)Set CM SEARCH in to OFF in the menu
settings (p. 120).
(3)Press SEARCH MODE on the Remote
Commander repeatedly, until the DATE
SEARCH indicator appears.
The indicator changes as follows:
DATE SEARCH t PHOTO SEARCH t
PHOTO SCAN t no indicator
(4)Press . on the Remote Commander to
search for the previous date or press > on
the Remote Commander to search for the next
date. Your camcorder automatically starts
playback at the point where the date changes.
Each time you press . or >, your
camcorder searches for the previous or next
date.
To stop searching
Press x.
82
Opmerking
Als de opname op een bepaalde dag niet langer
heeft geduurd dan twee minuten, zal de
datumzoekfunctie het begin- of eindpunt voor
die dag niet altijd kunnen vinden.
Betreffende de zoekbalk
•Het streepje in de zoekbalk geeft het
huidige punt op de band aan.
•Het teken in de zoekbalk geeft het
punt aan waarnaar u zoekt.
Als er tussen de opnamen een onbespeeld
bandgedeelte is
Dan kan de datum-zoekfunctie niet altijd goed
werken.
Cassettegeheugen
Het cassettegeheugen van een videoband kan
maximaal 6 verschillende opnamedata bevatten.
Voor het opzoeken van een opname op een band
met 7 of meer opnamedata volgt u de
aanwijzingen hieronder bij “Opzoeken van een
opnamedatum op een videoband zonder
cassettegeheugen”.
Opzoeken van een opnamedatum
op een videoband zonder
cassettegeheugen
(1)Zet de POWER schakelaar in de “PLAYER”
stand.
(2)Zet in het instelmenu het onderdeel CM
SEARCH onder in de “OFF” stand
(zie blz. 128).
(3)Druk enkele malen op de SEARCH MODE
toets van de afstandsbediening, totdat de
aanduiding “DATE SEARCH” oplicht.
Telkens wanneer u op deze toets drukt,
verspringt de zoekfunctie-aanduiding als
volgt:
DATE SEARCH t PHOTO SEARCH t
PHOTO SCAN t geen aanduiding
(4)Druk op de . toets van de
afstandsbediening om de vorige
opnamedatum op te zoeken of op de >
toets van de afstandsbediening om de
volgende opnamedatum op te zoeken. De
camcorder zal automatisch beginnen met
afspelen vanaf het eerstvolgende punt waar
de datum verandert. Telkens wanneer u op de
. of > toets drukt, gaat de camcorder
op zoek naar de vorige of volgende
opnamedatum.
Stoppen met doorzoeken van de
band
Druk op de x stoptoets.
Page 83

Searching for a photo
– Photo search/Photo scan
Opzoeken van een fotoopname – Foto-zoekfunctie/
foto-serieweergave
You can search for a still picture you have
recorded on a tape (photo search).
You can also search for still pictures one after
another and display each picture for five seconds
automatically regardless of cassette memory
(photo scan). Use the Remote Commander for
these operations.
Use this function to check or edit still pictures.
Searching for a photo by using
cassette memory
Before operation
•You can use this function only when playing
back a tape with cassette memory.
•Set CM SEARCH in to ON in the menu
settings (p. 120). (The default setting is ON.)
(1)Set the POWER switch to PLAYER.
(2)Press SEARCH MODE on the Remote
Commander repeatedly, until the PHOTO
SEARCH indicator appears.
The indicator changes as follows:
TITLE SEARCH t DATE SEARCH t
PHOTO SEARCH t PHOTO SCAN t
no indicator
(3)Press . or > on the Remote Commander
to select the date for playback. Your
camcorder automatically starts playback of
the photo having the date that you selected.
2
SEARCH
MODE
PHOTO SEARCH
1 5 / 9 / 01
2 6 / 9 / 01 8
3 24 / 12 / 01
4 1 / 1 / 02 23
5 11 / 2 / 02
6 29 / 4 / 02
1 7 :
1 0 :
1 6 :
1 3 :
30
:
50
30
:
25
11
45
Met deze functie kunt u zoeken naar een
stilstaande foto-opname die u hebt vastgelegd op
een mini-DV videocassette (foto-zoekfunctie).
U kunt ook een reeks stilstaande opnamen achter
elkaar doornemen, onafhankelijk van het
cassettegeheugen, om elke foto-opname
automatisch vijf seconden lang te laten
weergeven (foto-serieweergave). Gebruik voor
deze functies de afstandsbediening.
Deze functies zijn handig om stilstaande fotoopnamen te controleren of met een
montagefunctie te bewerken.
Advanced Playback Operations Uitgebreide weergavefuncties
Opzoeken van een foto-opname aan
de hand van het cassettegeheugen
Voor de bediening
•Deze functie is alleen beschikbaar bij het
afspelen van een videoband met
cassettegeheugen.
•Zet eerst in het instelmenu het onderdeel CM
SEARCH onder in de “ON” stand
(zie blz. 128). (De fabrieksinstelling voor dit
menu-onderdeel is “ON”.)
(1)Zet de POWER schakelaar in de “PLAYER”
stand.
(2)Druk enkele malen op de SEARCH MODE
toets van de afstandsbediening, totdat de
aanduiding “PHOTO SEARCH” oplicht.
Telkens wanneer u op deze toets drukt,
verspringt de zoekfunctie-aanduiding als
volgt:
TITLE SEARCH t DATE SEARCH t
PHOTO SEARCH t PHOTO SCAN t
geen aanduiding
(3)Druk op de . of > toets van de
afstandsbediening om de opnamedatum voor
weergave te kiezen.
De camcorder geeft dan automatisch de fotoopname weer met de door u gekozen
opnamedatum.
3
To stop searching
Press x.
PHOTO SEARCH
1 5 / 9 / 01
2 6 / 9 / 01 8
3 24 / 12 / 01
4 1 / 1 / 02 23
5 11 / 2 / 02
6 29 / 4 / 02
1 7 :
1 0 :
1 6 :
1 3 :
30
:
50
30
:
25
11
45
Stoppen met doorzoeken van de
band
Druk op de x stoptoets.
83
Page 84

Searching for a photo
– Photo search/Photo scan
Opzoeken van een foto-opname
– Foto-zoekfunctie/fotoserieweergave
In the mark
•The bar in the mark indicates the
present point on the tape.
•The mark in the indicates the actual
point you are trying to search.
If a tape has a blank portion between
recorded portions
The photo search/photo scan function may not
work correctly.
The available number of photos that can be
searched using the cassette memory
The available number is up to 12 photos.
However, you can search 13 photos or more
using the scanning photo function.
Searching for a photo without
using cassette memory
(1)Set the POWER switch to PLAYER.
(2)Set CM SEARCH in to OFF in the menu
settings (p. 120).
(3)Press SEARCH MODE on the Remote
Commander repeatedly, until the PHOTO
SEARCH indicator appears.
The indicator changes as follows:
DATE SEARCH t PHOTO SEARCH t
PHOTO SCAN t no indicator
(4)Press . or > on the Remote Commander
to select the photo for playback. Each time
you press . or >, your camcorder
searches for the previous or next photo.
Your camcorder automatically starts playback
of the photo.
To stop searching
Press x.
Betreffende de zoekbalk
•Het streepje in de zoekbalk geeft het
huidige punt op de band aan.
•Het teken in de zoekbalk geeft het
punt aan waarnaar u zoekt.
Als er tussen de opnamen een onbespeeld
bandgedeelte is
Dan kan de foto-zoekfunctie niet altijd goed
werken.
Aantal foto’s dat kan worden doorzocht aan
de hand van het cassettegeheugen
Met deze methode kunt u maximaal 12 foto’s
doorzoeken. Voor het doorzoeken van 13 of meer
foto’s kunt u gebruik maken van de “PHOTO
SCAN” foto-serieweergave.
Opzoeken van een foto-opname
op een videoband zonder
cassettegeheugen
(1)Zet de POWER schakelaar in de “PLAYER”
stand.
(2)Zet in het instelmenu het onderdeel CM
SEARCH onder in de “OFF” stand
(zie blz. 128).
(3)Druk enkele malen op de SEARCH MODE
toets van de afstandsbediening, totdat de
aanduiding “PHOTO SEARCH” oplicht.
Telkens wanneer u op deze toets drukt,
verspringt de zoekfunctie-aanduiding als
volgt:
DATE SEARCH t PHOTO SEARCH t
PHOTO SCAN t geen aanduiding
(4)Druk op de . of > toets van de
afstandsbediening om de foto-opname voor
weergave op te zoeken. Telkens wanneer u op
de . of > zoektoets drukt, gaat de
camcorder op zoek naar de vorige of
volgende foto-opname.
De camcorder geeft de gevonden foto dan
automatisch weer.
84
Stoppen met doorzoeken van de
band
Druk op de x stoptoets.
Page 85

Searching for a photo
– Photo search/Photo scan
Opzoeken van een foto-opname
– Foto-zoekfunctie/fotoserieweergave
Scanning photo
(1)Set the POWER switch to PLAYER.
(2)Press SEARCH MODE on the Remote
Commander repeatedly, until the PHOTO
SCAN indicator appears.
The indicator changes as follows:
DATE SEARCH t PHOTO SEARCH t
PHOTO SCAN t no indicator
(3)Press . or > on the Remote
Commander.
Each photo is played back for about five
seconds automatically.
3
Doornemen van een serie foto’s
(1)Zet de POWER schakelaar in de “PLAYER”
stand.
(2)Druk enkele malen op de SEARCH MODE
toets van de afstandsbediening, totdat de
aanduiding “PHOTO SCAN” oplicht.
Telkens wanneer u op deze toets drukt,
verspringt de zoekfunctie-aanduiding als
volgt:
DATE SEARCH t PHOTO SEARCH t
PHOTO SCAN t geen aanduiding
(3)Druk op de . of > toets van de
afstandsbediening.
Dan worden achtereenvolgens al uw fotoopnamen elk vijf seconden lang in beeld
weergegeven.
2
SEARCH
MODE
................PHOTO. 00
....................SCAN
1
POWER
PLAYER
OFF(CHG)
CAMERA
MEMORY
Advanced Playback Operations Uitgebreide weergavefuncties
To stop scanning
Press x.
Stoppen met doornemen van de
fotoserie
Druk op de x stoptoets.
85
Page 86

— Editing —
Dubbing a tape
— Videomontage —
Video-opnamen overkopiëren
Using the A/V connecting cable
You can dub or edit on the VCR connected to
your camcorder using your camcorder as a
player.
Connect your camcorder to the VCR using the
A/V connecting cable supplied with your
camcorder.
Before operation
•Set DISPLAY to LCD in the menu settings. (The
default setting is LCD.)
•Press the following buttons to make the
indicator disappear so that they will not be
superimposed on the edited tape:
– DISPLAY
– DATA CODE on the Remote Commander
– SEARCH MODE on the Remote Commander
(1)Insert a blank tape (or a tape you want to
record over) into the VCR, and insert the
recorded tape into your camcorder.
(2)Prepare the VCR for recording, then set the
input selector to LINE.
Refer to the operating instructions of the VCR.
(3)Set the POWER switch to PLAYER.
(4)Play back the recorded tape on your
camcorder.
(5)Start recording on the VCR. Refer to the
operating instructions of your VCR.
S VIDEO
OUT
Aansluiten met het audio/videoaansluitsnoer
U kunt uw eigen videoproductie samenstellen
door kopiëren en monteren van bandopnamen,
met uw camcorder als weergave-apparaat en een
andere videorecorder voor opname.
Sluit uw camcorder aan op de videorecorder met
behulp van het bij de camcorder geleverde
audio/video-aansluitsnoer.
Alvorens te gaan kopiëren
•Zet het menu-onderdeel DISPLAY op “LCD” in
het instelmenu. (De oorspronkelijke instelling is
“LCD”.)
•Druk op de volgende toetsen om de opnameaanduidingen van het scherm te verwijderen en
te voorkomen dat de aanduidingen zichtbaar
blijven in de beelden op de gekopieerde
videoband:
– DISPLAY toets
– DATA CODE toets van de afstandsbediening
– SEARCH MODE toets van de
afstandsbediening
(1)Plaats een nieuwe (of een voor opnemen
geschikte) videocassette in de videorecorder
die u voor opnemen gebruikt en plaats uw
opgenomen cassette in de camcorder.
(2)Breng uw videorecorder in gereedheid voor
opnemen en zet de ingangskeuzeschakelaar
ervan in de “LINE” stand.
Zie voor nadere bijzonderheden de
gebruiksaanwijzing van uw videorecorder.
(3)Zet de POWER schakelaar van de camcorder
in de “PLAYER” stand.
(4)Start het afspelen van de cassette met
opnamen op uw camcorder.
(5)Start de opname op de andere videorecorder.
Zie voor nadere bijzonderheden de
gebruiksaanwijzing van uw videorecorder.
IN
S VIDEO
VIDEO
A/V OUT
: Signal flow/Signaalstroom
When you have finished dubbing a
tape
Press x on both your camcorder and the VCR.
86
AUDIO
Na afloop van het kopiëren van de
video-opnamen
Druk zowel op de camcorder als op de
videorecorder de x stoptoets in.
Page 87

Dubbing a tape
Video-opnamen overkopiëren
You can edit on VCRs that support the
following systems
8 mm, Hi8, VHS, S-VHS,
VHSC, S-VHSC, Betamax,
mini DV, DV, Digital8
If your VCR is a monaural type
Connect the yellow plug of the A/V connecting
cable to the video input jack and the white or the
red plug to the audio input jack on the VCR or
the TV. When the white plug is connected, the
left channel audio is output, and the red plug is
connected, the right channel audio is output.
If your VCR has an S video jack
Connect using an S video cable (optional) to
obtain high-quality pictures.
With this connection, you do not need to connect
the yellow (video) plug of the A/V connecting
cable.
Connect an S video cable (optional) to the S video
jacks of both your camcorder and the VCR.
This connection produces higher quality DV
format pictures.
U kunt video-opnamen kopiëren met de
volgende typen videorecorders:
8 mm of Hi8, VHS, S-VHS,
VHSC, S-VHSC, Betamax,
mini DV, DV of Digital8
videorecorders.
Als uw videorecorder slechts geschikt is voor
mono geluid
Sluit de gele stekker van het audio/videoaansluitsnoer aan op de video-ingang en de witte
of de rode stekker op de audioingangsaansluiting van uw TV-toestel of
videorecorder. Als u de witte stekker aansluit, zal
het geluid van het linker kanaal klinken. Als u de
rode stekker aansluit, klinkt het geluid van het
rechter kanaal.
Als uw videorecorder een S-video aansluiting
biedt
Dan kunt u de apparatuur aansluiten met een Svideo aansluitsnoer (niet bijgeleverd) voor de
beste beeldkwaliteit.
Bij deze wijze van aansluiten hoeft u de gele
(video) stekker van het audio/videoaansluitsnoer niet aan te sluiten.
Verbind een S-video aansluitsnoer (niet
bijgeleverd) met de S-video stekkerbussen van
uw camcorder en de opname-videorecorder.
Door deze wijze van aansluiten zult u betere DVkwaliteit videobeelden kunnen weergeven.
Editing Videomontage
87
Page 88

Dubbing a tape
Video-opnamen overkopiëren
Using the i.LINK cable (DV connecting
cable)
Simply connect the i.LINK cable (DV connecting
cable) (optional) to DV OUT and to DV IN of
the DV products. With digital-to-digital
connection, video and audio signals are
transmitted in digital form for high-quality
editing. You cannot dub the titles, display
indicators or the contents of cassette memory or
letters on the “Memory Stick” index screen
(DCR-TRV17E only).
Set the input selector on the VCR to the DV input
position if the VCR is equipped with the input
selector.
(1)Insert a blank tape (or a tape you want to
record over) into the VCR, and insert the
recorded tape into your camcorder.
(2)Prepare the VCR for recording.
Set the input selector to LINE. Refer to the
operating instructions of the VCR.
(3)Set the POWER switch to PLAYER.
(4)Play back the recorded tape on your
camcorder.
(5)Start recording on the VCR. Refer to the
operating instractions of your VCR.
Via aansluiting met een i.LINK kabel
(DV-aansluitsnoer)
Sluit eenvoudigweg een i.LINK kabel (DVaansluitsnoer) (niet bijgeleverd) aan op de DV
OUT aansluiting van dit apparaat en de DV IN
aansluiting van de andere DV videorecorder. Via
deze volledig digitale aansluiting worden de
video- en audio-gegevens doorgegeven in
digitale vorm, voor de beste montagekwaliteit.
De titels, beeldscherm-aanduidingen, de inhoud
van het cassettegeheugen en de aanduidingen in
het “Memory Stick” indexscherm (alleen voor de
DCR-TRV17E) kunnen niet mee worden
gekopieerd.
Zet de ingangskeuzeschakelaar van de
videorecorder in de stand voor een DV
ingangssignaal, als uw videorecorder een
ingangskeuzeschakelaar heeft.
(1)Plaats een blanco (of voor opnemen geschikte)
videocassette in de videorecorder en plaats de
cassette met de te kopiëren opnamen in uw
camcorder.
(2)Breng uw videorecorder in gereedheid voor
opnemen en zet de ingangskeuzeschakelaar
ervan in de “LINE” stand. Zie voor nadere
bijzonderheden de gebruiksaanwijzing van
uw videorecorder.
(3)Zet de POWER schakelaar van de camcorder
in de “PLAYER” stand.
(4)Start het afspelen van de cassette met de te
kopiëren beelden op uw camcorder.
(5)Start de opname op de andere videorecorder.
Zie voor nadere bijzonderheden de
gebruiksaanwijzing van uw videorecorder.
: Signal flow/Signaalstroom
When you have finished dubbing a
tape
Press x on both your camcorder and the
88
connected DV product.
DV OUT
DV
DV IN
i. LINK cable (DV connecting cable) (optional)/
i.LINK kabel (DV-aansluitsnoer) (los verkrijgbaar)
Na afloop van het kopiëren van de
video-opnamen
Druk zowel op de camcorder als op de
aangesloten DV videorecorder de x stoptoets in.
Page 89

Dubbing a tape
Video-opnamen overkopiëren
You can connect one VCR only using the i.LINK
cable (DV connecting cable)
See page 208 for more information about i.LINK.
The following functions do not work during
digital editing:
– Digital effect
– PB ZOOM
– Picture effect
If you record a playback pause picture with
the DV OUT jack
The recorded picture becomes rough. And when
you play back the picture using the other video
equipment, the picture may jitter.
U kunt slechts één videorecorder tegelijk
aansluiten met een i.LINK kabel (DV digitaal
aansluitsnoer)
Zie blz. 208 voor nadere bijzonderheden over de
i.LINK aansluiting.
Tijdens digitale videomontage zijn de
volgende functies niet te gebruiken:
– Digitale beeldeffecten
– PB ZOOM uitvergroting
– Beeld/kleureffecten
Als u het beeld in de weergavepauzestand
overneemt via de DV OUT aansluiting
Het overgenomen beeld zal dan nogal grof en
korrelig doorkomen. Bij weergave van een
dergelijk beeld op andere video-apparatuur kan
het beeld bovendien op en neer trillen.
Editing Videomontage
89
Page 90

Dubbing only desired scenes – Digital program editing
Geselecteerde bandopnamen kopiëren – Digitale programmamontage
You can duplicate selected scenes (programmes)
for editing onto a tape without operating the
VCR.
Scenes can be selected by frame. You can set up
to 20 programmes.
Unwanted scene/
Ongewenst beeld
Unwanted scene/
Ongewenst beeld
Before operating the Digital program
editing function
Step 1 Connecting the VCR (p. 90).
Step 2 Setting the VCR for operation (p. 91, 96).
Step 3 Adjusting the synchronicity of the VCR
(p. 97).
When you dub using the same VCR again, you
can skip steps 2 and 3.
Using the Digital program editing
function
Operation 1 Making the programme (p. 99).
Operation 2 Performing Digital program editing
(dubbing a tape) (p. 101).
Step 1: Connecting the VCR
You can connect both an A/V connecting cable
and an i.LINK cable (DV connecting cable).
When you use the A/V connecting cable, connect
the devices as illustrated in page 86. When you
use an i.LINK cable (DV connecting cable),
connect the devices as illustrated in page 88.
90
U kunt een programma samenstellen van alleen
de gewenste beelden van een opgenomen band,
om deze te kopiëren naar een videorecorder,
zonder dat u die laatste rechtstreeks hoeft te
bedienen.
U kunt de gewenste scènes beeld voor beeld
kiezen. Zo kunt u maximaal 20 scènes voor
montage samenstellen.
Switch the order/
Volgorde veranderen
Alvorens de digitale
programmamontage te starten
Stap 1 Sluit uw camcorder aan op de
videorecorder (zie blz. 90).
Stap 2 Breng de videorecorder in gereedheid
voor opname (zie blz. 91 en 96).
Stap 3 Zorg dat uw camcorder en de
videorecorder synchroon lopen (zie blz.
97).
Wanneer u nogmaals kopieert naar dezelfde
videorecorder, kunt u stappen 2 en 3 achterwege
laten.
Werkwijze voor de digitale
programmamontage
Procedure 1 Stel het gewenste videoprogramma
samen (zie blz. 99).
Procedure 2 Neem het samengestelde
programma op digitale wijze over
(digitaal kopiëren) (zie blz. 101).
Stap 1: Aansluiten van de
videorecorder
Voor het aansluiten kunt u zowel een gewoon
audio/video-aansluitsnoer als een i.LINK kabel
(DV-aansluitsnoer) gebruiken.
Gebruikt u een gewoon audio/videoaansluitsnoer, dan maakt u de aansluitingen
zoals aangegeven op blz. 86. Gebruikt u een
i.LINK kabel (DV-aansluitsnoer), dan maakt u de
aansluitingen zoals aangegeven op blz. 88.
Page 91

Dubbing only desired scenes
– Digital program editing
Geselecteerde bandopnamen
kopiëren
– Digitale programmamontage
Notes
•You cannot dub titles, display indicators, or the
contents of cassette memory.
•When you connect with an i.LINK cable (DV
connecting cable), you may not be able to
operate the dubbing function correctly,
depending on the VCR.
Set CONTROL to IR in the menu settings of
your camcorder .
•When editing digital video, the operation
signals cannot be sent with LANC .
If you connect using an i.LINK cable (DV
connecting cable)
With digital-to-digital connection, video and
audio signals are transmitted in digital format for
high-quality editing.
Step 2: Setting the VCR to
operate with the A/V
connecting cable
To edit using the VCR, send the control signal by
infrared rays to the remote sensor on the VCR.
When you connect using an A/V connecting
cable, follow the procedure below, steps (1) to
(4), to send the control signal correctly.
(1) Set the IR SETUP code
1 Set the POWER switch to PLAYER on your
camcorder.
2 Turn the power of the connected VCR on,
then set the input selector to LINE.
When you connect a video camera recorder,
set its power switch to VCR/VTR.
3 Press MENU to display the menu.
4 Turn the SEL/PUSH EXEC dial to select ,
then press the dial.
5 Turn the SEL/PUSH EXEC dial to select EDIT
SET, then press the dial.
6 Turn the SEL/PUSH EXEC dial to select
CONTROL, then press the dial.
7 Turn the SEL/PUSH EXEC dial to select IR,
then press the dial.
8 Turn the SEL/PUSH EXEC dial to select IR
SETUP, then press the dial.
9 Turn the SEL/PUSH EXEC dial to select the
IR SETUP code of your VCR, then press the
dial.
Check the code in “About the IR SETUP
code.” (p. 93)
Opmerkingen
•De titels, schermaanduidingen en de inhoud van
het cassettegeheugen kunnen niet worden
overgekopieerd.
•Bij aansluiting met een i.LINK kabel (DVaansluitsnoer) kan bij bepaalde modellen
videorecorders het kopiëren niet altijd goed
verlopen.
Dan kunt u het menu-onderdeel CONTROL beter
instellen op “IR” in het instelmenu van uw
camcorder.
•Voor het monteren van digitale videobeelden
kunnen de bedieningssignalen niet via de
LANC aansluiting worden verzonden.
Bij aansluiting met een i.LINK kabel (DVaansluitsnoer)
Met deze volledig digitale aansluiting worden de
beeld- en geluidssignalen in digitale vorm
verzonden, hetgeen de beste kwaliteit oplevert.
Stap 2: De videorecorder
instellen op kopiëren via een
audio/video-aansluitsnoer
Voor het monteren met de videorecorder zendt u het
bedieningssignaal via infrarode stralen naar de
afstandsbedieningssensor van de videorecorder.
Als u de apparaten aansluit via een audio/videoaansluitsnoer dient u de onderstaande
instelprocedures van (1) t/m (4) te volgen om te
zorgen dat het infrarode bedieningssignaal juist
wordt doorgegeven.
(1) Instellen van de IR SETUP code
1 Zet de POWER schakelaar van de camcorder in
de “PLAYER” stand.
2 Zet de aangesloten videorecorder aan en zet de
ingangskeuzeschakelaar op “LINE”.
Als u een andere videocamera/recorder aansluit,
zet u de POWER schakelaar daarvan in de
“VCR/VTR” stand.
3 Druk op de MENU toets om het instelmenu te
laten verschijnen.
4 Draai aan de SEL/PUSH EXEC regelknop, stel in
op en druk de regelknop in.
5 Stel met een draai aan de SEL/PUSH EXEC
regelknop in op EDIT SET en druk de regelknop
in.
6 Stel met een draai aan de SEL/PUSH EXEC
regelknop in op CONTROL en druk de
regelknop in.
7 Stel met een draai aan de SEL/PUSH EXEC
regelknop in op IR en druk de regelknop in.
8 Stel met een draai aan de SEL/PUSH EXEC
regelknop in op IR SETUP en druk de regelknop
in.
9 Kies met een draai aan de SEL/PUSH EXEC
regelknop de juiste IR SETUP
afstandsbedieningscode voor uw merk
videorecorder en druk de regelknop in.
De juiste IR SETUP code vindt u onder “Keuze
van de IR SETUP code” (op blz. 93).
Editing Videomontage
91
Page 92

Dubbing only desired scenes
– Digital program editing
Geselecteerde bandopnamen
kopiëren
– Digitale programmamontage
1
4
5
POW
ER
PLAYER
OFF(CHG)
CAMERA
MEMORY
OTHERS
DATA CODE
BEEP
COMMANDER
DI SPLAY
VIDEO EDIT
ED I T SET
NRUTER
[
MENU] : END
OTHERS
ED I T SET
CONT RO L
ADJ TES T
”
CUT-IN
CUT-OUT
”
IR SETUP
PAUSEMODE
IR TEST
RETURN
[
] :
MENU
END
DATE / CAM
–––– –– ––
––:– –:– –
–––––
–– –––
––– –––
––– –––
IR
”
”
3
MENU
6-9
OTHERS
ED I T SET
CONT RO L
ADJ TES T
”
CUT-IN
CUT-OUT
”
IR SETUP
PAUSEMODE
IR TEST
RETURN
[
MENU
OTHERS
ED I T SET
CONT RO L
ADJ TES T
”
CUT-IN
CUT-OUT
”
IR SETUP
PAUSEMODE
IR TEST
RETURN
[
MENU
OTHERS
ED I T SET
CONT RO L
IR
i.LINK
”
”
[
] :
END
”
”
3
] :
END
MENU
OTHERS
ED I T SET
[
MENU
ADJ TES T
”
CUT-IN
CUT-OUT
”
IR SETUP
PAUSEMODE
IR TEST
RETURN
] :
END
CONT RO L
ADJ TES T
”
CUT-IN
CUT-OUT
”
IR SETUP
PAUSEMODE
IR TEST
RETURN
] :
END
IR
”
”
”
”
4
92
Page 93

Dubbing only desired scenes
– Digital program editing
Geselecteerde bandopnamen
kopiëren
– Digitale programmamontage
About the IR SETUP code
The IR SETUP code is stored in the memory of
your camcorder. Be sure to set the correct code
depending on your VCR. The default setting is
Code number 3.
IR SETUP code/
Brand/Merk Afstandsbedieningscode
(IR SETUP)
Sony 1, 2, 3, 4, 5, 6
Aiwa 47, 53, 54
Akai 62, 50, 74
Alba 73
Aristona 84
Baird 36, 30
Blaupunkt 83, 78
Bush 74
Canon 97
CGM 47, 83, 36
Clatronic 73
Daewoo 26
Ferguson 76
Fisher 73
Funai 80
Goldstar 47
Goodmans 26, 84
Grundig 83, 9
Hitachi 42, 56
ITT/Nokia Instant 36
JVC 12, 21, 15, 11
Kendo 47
Loewe 16, 47, 84
Luxor 89
Mark 26*
Matui 47, 60, 58*
Mitsubishi 28, 29
Keuze van de IR SETUP code
De gekozen IR SETUP afstandsbedieningscode
wordt vastgelegd in het geheugen van uw
camcorder. Kies zorgvuldig de juiste code voor
uw merk en type videorecorder. De
oorspronkelijke instelling is
afstandsbedieningscode 3.
IR SETUP code/
Brand/Merk Afstandsbedieningscode
(IR SETUP)
Nokia 89, 36
Nokia Oceanic 89
Nordmende 76
Okano 60, 62, 63
Orion 70, 58*
Panasonic 16, 78, 96
Philips 83, 84, 86
Phonola 83, 84
Roadstar 47
SABA 76, 21
Samsung 93, 94, 52, 22
Sanyo 36
Schneider 84, 10
SEG 73
Seleco 47, 74
Sharp 89
Siemens 10, 36
Tandberg 26
Telefunken 91, 92
Tensai 73
Thomson 76, 100
Thorn 36, 47
Toshiba 40
Universum 92, 70, 47
W.W.House 47
Watoson 83, 58
Editing Videomontage
* TV/VCR component/
TV/videorecorder-combinatie
Note on IR SETUP code
Digital program editing is not possible if the VCR
does not support IR SETUP codes.
Opmerking over de IR SETUP
afstandsbedieningscode
U zult geen digitale programmamontage kunnen
verrichten met een videorecorder die niet
geschikt is voor de IR SETUP
afstandsbedieningscodes.
93
Page 94

Dubbing only desired scenes
– Digital program editing
Geselecteerde bandopnamen
kopiëren
– Digitale programmamontage
(2)Setting the modes to cancel
recording pause on the VCR
1 Turn the SEL/PUSH EXEC dial to select
PAUSEMODE, then press the dial.
2 Turn the SEL/PUSH EXEC dial to select the
mode to cancel recording pause on the VCR,
then press the dial.
12
OTHERS
ED I T SET
CONT ROL
ADJ TES T
”
CUT-IN
”
CUT-OUT
IR SETUP
PAUSEMODE
IR TEST
RET URN
[
] :
MENU
Buttons for canceling recording pause on the
VCR
The buttons vary depending on your VCR. To
cancel recording pause:
– Select PAUSE if the button to cancel recording
pause is X.
– Select REC if the button to cancel recording
pause is z.
– Select PB if the button to cancel recording pause
is N.
(3) Setting your camcorder and the
VCR to face each other
Locate the infrared rays emitter of your
camcorder and face it towards the remote sensor
of the VCR.
Set the devices about 30 cm (12 in.) apart, and
remove any obstacles between the devices.
Infrared ray emitter/
Infraroodzender
(2)Instellen op de juiste toets voor
het uitschakelen van de
pauzestand van uw videorecorder
1 Stel met een draai aan de SEL/PUSH EXEC
regelknop in op PAUSEMODE en druk de
regelknop in.
2 Kies met een draai aan de SEL/PUSH EXEC
regelknop de juiste toets voor het uitschakelen
van de pauzestand van uw videorecorder en
druk weer de regelknop in.
OTHERS
ED I T SET
CONT ROL
ADJ TES T
”
CUT-IN
”
CUT-OUT
IR SETUP
PAUSEMODE
IR TEST
RET URN
[
MENU
”
”
PAUSE
] :
END
END
”
”
PAUSE
REC
PB
Toetsen waarmee de pauzestand van een
videorecorder kan worden uitgeschakeld
Welke toets u het best kunt kiezen, hangt af van
uw model videorecorder. Voor het uitschakelen
van de pauzestand van uw videorecorder:
– Kiest u “PAUSE” als de juiste toets voor het
uitschakelen van de pauzestand de X
pauzetoets is.
– Kiest u “REC” als de juiste toets voor het
uitschakelen van de pauzestand de z
opnametoets is.
– Kiest u “PB” als de juiste toets voor het
uitschakelen van de pauzestand de N
weergavetoets is.
(3) Plaats uw camcorder en de
videorecorder recht tegenover
elkaar
Zoek de infraroodzender van uw camcorder op
en richt deze op de afstandsbedieningssensor van
uw videorecorder. Zet de apparaten ongeveer 30
cm uit elkaar en zorg dat er geen obstakels in de
baan van de infrarode stralen zijn.
94
Remote sensor/
Afstandsbedieningssensor
A/V connecting cable/
Audio/video-aansluitsnoer
Page 95

Dubbing only desired scenes
– Digital program editing
Geselecteerde bandopnamen
kopiëren
– Digitale programmamontage
(4)Confirming VCR operation
1 Insert a recordable tape into the VCR, then set
to recording pause.
2 Turn the SEL/PUSH EXEC dial to select IR
TEST, then press the dial.
3 Turn the SEL/PUSH EXEC dial to select
EXECUTE, then press the dial.
If the VCR starts recording, the setting is
correct.
When finished, the indicator changes to
COMPLETE.
23
OTHERS
ED I T SET
CONT ROL
ADJ TES T
”
CUT-IN
CUT-OUT
”
IR SETUP
PAUSEMODE
IR TEST
RET URN
[
MENU
”
”
EGAGNE
UAESPCER
RET URN
EXECUTE
] :
END
(4)Controleren of de videorecorder
naar behoren reageert
1 Plaats een voor opnemen geschikte cassette in
uw videorecorder en zet de videorecorder in
de opnamepauzestand.
2 Stel met een draai aan de SEL/PUSH EXEC
regelknop in op IR TEST en druk de
regelknop in.
3 Stel met een draai aan de SEL/PUSH EXEC
regelknop in op EXECUTE en druk de
regelknop in.
Als de videorecorder nu begint met opnemen,
dan zijn de instellingen juist gemaakt.
Na afloop van de proefopname verandert de
aanduiding in “COMPLETE”.
OTHERS
ED I T SET
CONT ROL
ADJ TES T
”
CUT-IN
”
CUT-OUT
”
”
IR SETUP
PAUSEMODE
IR TEST
COMPL E T E
RET URN
[
] :
MENU
END
Editing Videomontage
When the VCR does not operate correctly
•After checking the code in “About the IR
SETUP code,” set the IR SETUP or the
PAUSEMODE again.
•Place your camcorder at least 30 cm (12 in.)
away from the VCR.
•Refer to the operating instructions of your VCR.
Als de videorecorder niet naar behoren
reageert
•Controleer in de lijst onder “Keuze van de IR
SETUP code” of de IR SETUP
afstandsbedieningscode en de gekozen
PAUSEMODE toets voor het uitschakelen van
de pauzestand juist zijn en maak de nodige
instelling(en) opnieuw.
•Zet de camcorder en de videorecorder
zorgvuldig 30 cm uiteen, met de
infraroodzender recht op de
afstandsbedieningssensor gericht.
•Zie tevens de gebruiksaanwijzing van uw
videorecorder.
95
Page 96

Dubbing only desired scenes
– Digital program editing
Geselecteerde bandopnamen
kopiëren
– Digitale programmamontage
Step 2: Setting the VCR to
operate with the i.LINK cable
(DV connecting cable)
When you connect using an i.LINK cable (DV
connecting cable) (optional), follow the
procedure below.
(1)Set the POWER switch to PLAYER on your
camcorder .
(2)Turn the power of the connected VCR on,
then set the input selector to DV input.
When you connect a digital video camera
recorder, set its power switch to VCR/VTR.
(3)Press MENU to display the menu.
(4)Turn the SEL/PUSH EXEC dial to select ,
then press the dial.
(5)Turn the SEL/PUSH EXEC dial to select EDIT
SET, then press the dial.
(6)Turn the SEL/PUSH EXEC dial to select
CONTROL, then press the dial.
(7)Turn the SEL/PUSH EXEC dial to select
i.LINK, then press the dial.
1
POWER
PLAYER
OFF(CHG)
CAMERA
MEMORY
Stap 2: De videorecorder
instellen op kopiëren via een
i.LINK kabel (DV-aansluitsnoer)
Als u de apparaten aansluit via een i.LINK kabel
(DV-aansluitsnoer) (niet bijgeleverd), volgt u de
onderstaande aanwijzingen.
(1)Zet de POWER schakelaar van de camcorder
in de “PLAYER” stand.
(2)Zet de aangesloten videorecorder aan en zet
de ingangskeuzeschakelaar in de digitale DV
ingangsstand.
Als u een andere digitale videocamera/
recorder aansluit, zet u de POWER schakelaar
daarvan in de “VCR/VTR” stand.
(3)Druk op de MENU toets om het instelmenu te
laten verschijnen.
(4)Stel met een draai aan de SEL/PUSH EXEC
regelknop in op en druk de regelknop in.
(5)Stel met een draai aan de SEL/PUSH EXEC
regelknop in op EDIT SET en druk de
regelknop in.
(6)Stel met een draai aan de SEL/PUSH EXEC
regelknop in op CONTROL en druk de
regelknop in.
(7)Stel met een draai aan de SEL/PUSH EXEC
regelknop in op i.LINK en druk de regelknop
in.
96
5
OTHERS
DATA CODE
BEEP
COMMANDER
DISPLAY
VIDEO EDIT
ED I T SET
NRUTER
[
MENU] : END
OTHERS
ED I T SET
CONT RO L
ADJ TES T
”
CUT-IN
CUT-OUT
”
IR SETUP
PAUSEMODE
IR TEST
RET URN
[
] :
MENU
END
DATE/ CAM
–––– –– ––
IR
”
”
–––––
3
––:––:––
––––––
––––––
MENU
6,7
OTHERS
ED I T SET
CONT RO L
ADJ TES T
”
CUT-IN
CUT-OUT
”
IR SETUP
PAUSEMODE
IR TEST
RETURN
[
MENU
OTHERS
ED I T SET
CONT RO L
ADJ TES T
”
CUT-IN
CUT-OUT
”
IR SETUP
PAUSEMODE
IR TEST
RETURN
[
MENU
OTHERS
ED I T SET
IR
”
”
] :
END
IR
i.LINK
”
”
] :
END
CONT RO L
ADJ TES T
”
CUT-IN
CUT-OUT
”
IR SETUP
PAUSEMODE
IR TEST
RETURN
[
MENU
OTHERS
ED I T SET
CONT RO L
ADJ TES T
”
CUT-IN
CUT-OUT
”
IR SETUP
PAUSEMODE
IR TEST
RET URN
[
MENU
IR
i.LINK
”
”
] :
END
i.LINK
”
”
] :
END
Page 97

Dubbing only desired scenes
– Digital program editing
Geselecteerde bandopnamen
kopiëren
– Digitale programmamontage
Step 3: Adjusting the
synchronicity of the VCR
You can adjust the synchronicity of your
camcorder and the VCR. Have a pen and paper
ready for notes. Before operation, eject the
cassette from your camcorder.
(1) Set the POWER switch to PLAYER on your
camcorder.
(2) Insert a blank tape (or a tape you want to
record over) into the VCR, then set to
recording pause.
When you select i.LINK in CONTROL, you
do not need to set to recording pause.
(3) Turn the SEL/PUSH EXEC dial to select
ADJ TEST, then press the dial.
(4) Turn the SEL/PUSH EXEC dial to select
EXECUTE, then press the dial.
IN and OUT are recorded on an image for 5
times each to calculate the numerical values
for adjusting the synchronicity.
The EXECUTING indicator flashes on the
screen.
When finished, the indicator changes to
COMPLETE.
(5) Rewind the tape in the VCR, then start slow
playback.
Take a note of the opening numerical value
for each IN and the closing numerical value
for each OUT.
(6) Calculate the average of all the opening
numerical values for each IN, and the
average of all the closing numerical values
for each OUT.
(7) Turn the SEL/PUSH EXEC dial to select
“CUT-IN”, then press the dial.
(8) Turn the SEL/PUSH EXEC dial to select the
average numerical value of IN, then press
the dial.
The calculated start position for recording is
set.
(9) Turn the SEL/PUSH EXEC dial to select
“CUT-OUT”, then press the dial.
(10) Turn the SEL/PUSH EXEC dial to select the
average numerical value of OUT, then press
the dial.
The calculated stop position for recording is
set.
(11) Turn the SEL/PUSH EXEC dial to select
RETURN, then press the dial.
Stap 3: Zorgen dat uw
camcorder en de videorecorder
synchroon lopen
Volgens de onderstaande aanwijzingen kunt u
zorgen dat uw camcorder en de videorecorder
synchroon lopen. Houd een pen en papier bij de
hand voor notities. Alvorens deze instelling te
maken, verwijdert u de cassette uit uw
camcorder.
(1) Zet de POWER schakelaar van de
camcorder in de “PLAYER” stand.
(2) Plaats een voor opnemen geschikte cassette
in de videorecorder en zet de videorecorder
in de opnamepauzestand.
Als u bij CONTROL hebt ingesteld op
i.LINK, is deze laatste stap niet nodig.
(3) Stel met een draai aan de SEL/PUSH EXEC
regelknop in op ADJ TEST en druk de
regelknop in.
(4) Stel met een draai aan de SEL/PUSH EXEC
regelknop in op EXECUTE en druk de
regelknop in.
Er wordt nu vijfmaal een opname gestart
(IN) en gestopt (OUT), om precies de
numerieke waarde te berekenen voor het
synchroniseren van de camcorder en de
videorecorder.
De aanduiding “EXECUTING” knippert op
het scherm.
Na afloop van de proefopnamen verandert
de aanduiding in “COMPLETE”.
(5) Spoel de band in de videorecorder terug
naar het beginpunt en start van daar af de
vertraagde weergave.
Noteer telkens de beginwaarde bij elk IN
startpunt en de laatste waarde bij elk OUT
eindpunt.
(6) Bereken het gemiddelde van alle IN
waarden en het gemiddelde van alle OUT
waarden.
(7) Stel met een draai aan de SEL/PUSH EXEC
regelknop in op “CUT-IN” en druk de
regelknop in.
(8) Kies met een draai aan de SEL/PUSH EXEC
regelknop de berekende gemiddelde
waarde voor IN en druk de regelknop in.
Hiermee is het beginpunt voor de opname
vastgesteld.
(9) Stel met een draai aan de SEL/PUSH EXEC
regelknop in op “CUT-OUT” en druk de
regelknop in.
(10) Kies met een draai aan de SEL/PUSH EXEC
regelknop de berekende gemiddelde
waarde voor OUT en druk de regelknop in.
Hiermee is het eindpunt voor de opname
vastgesteld.
(11) Stel met een draai aan de SEL/PUSH EXEC
regelknop in op RETURN en druk de
regelknop in.
Editing Videomontage
97
Page 98

Dubbing only desired scenes
– Digital program editing
Geselecteerde bandopnamen
kopiëren
– Digitale programmamontage
7
3,4
OTHERS
ED I T SET
CONT RO L
ADJ TES T
”
CUT-IN
”
CUT-OUT
IR SETUP
PAUSEMODE
IR TEST
[
ME
RET URN
”
EXECUTE
”
OTHERS
ED I T SET
CONT RO L
ADJ TES T
”
CUT-IN
”
CUT-OUT
IR SETUP
PAUSEMODE
IR TEST
[
ME
EGAGNE
UAESPCER
”
”
OTHERS
ED I T SET
CONT RO L
ADJ TES T
”
CUT-IN
”
CUT-OUT
IR SETUP
PAUSEMODE
IR TEST
RETURN
[
MENU
EXECUTI NG
No
2
.
IN
+
215
COMPL E T E
”
”
] :
END
Notes
•When you complete step 3, the image to adjust
the syncronicity is recorded for about 50
seconds.
•If you start recording from the very beginning
of the tape, the first few seconds of the tape
may not record properly. Be sure to allow about
10 seconds of lead before starting the recording.
OTHERS
ED I T SET
CONT RO L
ADJ TES T
”
CUT-IN
”
CUT-OUT
IR SETUP
PAUSEMODE
IR TEST
RETURN
[
MENU
”
0
”
] :
END
OTHERS
ED I T SET
CONT RO L
ADJ TES T
”
CUT-IN
”
CUT-OUT
IR SETUP
PAUSEMODE
IR TEST
RETURN
[
MENU
9
OTHERS
ED I T SET
CONT RO L
ADJ TES T
”
CUT-IN
”
”
CUT-OUT
”
IR SETUP
PAUSEMODE
IR TEST
RETURN
[
MENU
0
] :
END
Opmerkingen
•Na het voltooien van stap 3 wordt het beeld
voor het bepalen van de synchrone werking
ongeveer 50 seconden lang opgenomen.
•Als u gaat opnemen vanaf het allereerste
gedeelte van de band kunnen de eerste paar
seconden niet goed worden opgenomen. Zorg
voor een stukje van ongeveer 10 seconden
aanloopband voor u begint met opnemen.
OTHERS
ED I T SET
CONT RO L
ADJ TES T
”
CUT-IN
”
CUT-OUT
IR SETUP
PAUSEMODE
IR TEST
RETURN
[
MENU
”
0
”
] :
END
”
”
0
] :
END
98
Page 99

Dubbing only desired scenes
– Digital program editing
Geselecteerde bandopnamen
kopiëren
– Digitale programmamontage
Operation 1: Making the
programme
(1)Insert the tape for playback into your
camcorder, and insert a tape for recording
into the VCR.
(2)Press MENU to display the menu.
(3)Turn the SEL/PUSH EXEC dial to select ,
then press the dial.
(4)Turn the SEL/PUSH EXEC dial to select
VIDEO EDIT, then press the dial.
(5)Search for the beginning of the first scene you
want to insert using the video operation
buttons, then pause playback.
(6)Press the SEL/PUSH EXEC dial.
The IN point of the first programme is set,
and the top part of the programme mark
changes to light blue.
(7)Search for the end of the first scene you want
to insert using the video operation buttons,
then pause playback.
(8)Press the SEL/PUSH EXEC dial.
The OUT point of the first programme is set,
then the bottom part of the programme mark
changes to light blue.
(9)Repeat steps 5 to 8, then set the programme.
When the programme is set, the programme
mark changes to light blue.
You can set a maximum of 20 programmes.
Procedure 1: Een
videoprogramma samenstellen
(1)Plaats de af te spelen cassette in uw
camcorder en een voor opnemen geschikte
cassette in de videorecorder.
(2)Druk op de MENU toets om het instelmenu te
laten verschijnen.
(3)Stel met een draai aan de SEL/PUSH EXEC
regelknop in op en druk de regelknop in.
(4)Stel met een draai aan de SEL/PUSH EXEC
regelknop in op VIDEO EDIT en druk de
regelknop in.
(5)Zoek met de video-weergavetoetsen het begin
op van de eerste scène die u wilt overnemen
en pauzeer bij dat punt de weergave.
(6)Druk op de SEL/PUSH EXEC regelknop.
Het IN startpunt van de eerste scène wordt
vastgelegd en het bovenste deel van de
scènemarkering wordt lichtblauw.
(7)Zoek met de video-weergavetoetsen het einde
op van de eerste scène die u wilt overnemen
en pauzeer bij dat punt de weergave.
(8)Druk op de SEL/PUSH EXEC regelknop.
Het OUT eindpunt van de eerste scène wordt
vastgelegd en het onderste deel van de
scènemarkering wordt ook lichtblauw.
(9)Herhaal de stappen 5 t/m 8 en stel dan in op
de scène.
Telkens wanneer er een scène is afgebakend,
wordt de bijbehorende scènemarkering
lichtblauw.
U kunt in totaal 20 over te nemen scènes
afbakenen.
Editing Videomontage
6,8,9
VIDEO EDIT
MARK
UNDO
ERASE AL L
START
TOTAL
SCENE
[
MENU
] :
END
5,7
4
0:08:55:06
1
OUT
0:00:00:00
0
AUDIO
DUB
OTHERS
DATA CODE
BEEP
COMMANDER
DISPLAY
VIDEO EDIT
ED I TSE T
[
] :
MENU
END
VIDEO EDIT
TOTAL
SCENE
[
READY
MARK
UNDO
ERASE AL L
START
] :
MENU
END
REW
0:09:07:06
2
IN
0:00:12:13
1
PLAY
STOP
FF
PAUSE
VIDEO EDIT
MARK
UNDO
ERASE AL L
START
TOTAL
SCENE
[
] :
MENU
END
VIDEO EDIT
MARK
UNDO
ERASE AL L
START
TOTAL
SCENE
[
] :
MENU
END
0:32:30:14
1
IN
0:00:00:00
0
4
IN
0:00:47:12
3
0:10:01:23
99
Page 100

Dubbing only desired scenes
– Digital program editing
Geselecteerde bandopnamen
kopiëren
– Digitale programmamontage
Erasing the programme you have set
Erase OUT first and then IN from the last set
programme.
(1)Turn the SEL/PUSH EXEC dial to select
UNDO, then press the dial.
(2)Turn the SEL/PUSH EXEC dial to select
EXECUTE, then press the dial.
The last set programme mark flashes, then the
setting is canceled.
To cancel erasing
Select RETURN in step 2.
Erasing all programmes
(1)Select VIDEO EDIT in the menu settings. Turn
the SEL/PUSH EXEC dial to select ERASE
ALL, then press the dial.
(2)Turn the SEL/PUSH EXEC dial to select
EXECUTE, then press the dial.
All the programme marks flash, then the
settings are cancelled.
To cancel erasing all programmes
Select RETURN in step 2.
To cancel a programme you have set
Press MENU.
The programme is stored in memory until the
tape is ejected.
Note
You cannot operate recording during Digital
program editing.
On a blank portion of the tape
You cannot set IN or OUT on a blank portion of
the tape.
If there is a blank portion between IN and
OUT on the tape
The total time code may not be displayed
correctly.
Annuleren van een afgebakende
scène
U kunt de laatst gekozen scène annuleren door
hiervan eerst het OUT eindpunt en dan het IN
startpunt te wissen.
(1)Draai aan de SEL/PUSH EXEC regelknop,
stel in op UNDO en druk dan de regelknop
in.
(2)Draai aan de SEL/PUSH EXEC regelknop,
stel in op EXECUTE en druk de regelknop in.
De laatste scènemarkering gaat eerst
knipperen op het scherm en daarna wordt de
markering gewist.
Bij nader inzien niet annuleren
Kies in stap 2 RETURN.
Annuleren van alle gemarkeerde
scènes
(1)Kies het onderdeel VIDEO EDIT in het
instelmenu. Draai aan de SEL/PUSH EXEC
regelknop, stel in op ERASE ALL en druk dan
de regelknop in.
(2)Draai aan de SEL/PUSH EXEC regelknop,
stel in op EXECUTE en druk de regelknop in.
Alle scènemarkeringen gaan eerst knipperen
op het scherm en daarna worden alle
markeringen gewist.
Bij nader inzien niet alle markeringen
annuleren
Kies in stap 2 RETURN.
Afsluiten van het markeren van scènes
Druk op de MENU toets.
Het samengestelde programma van de over te
nemen scènes blijft in het geheugen bewaard
totdat u de cassette verwijdert.
Opmerking
U kunt tussen de digitale programmamontage
door niet met de camcorder gaan opnemen.
100
Bij een blanco gedeelte van de band
U kunt geen IN startpunt of OUT eindpunt
afbakenen bij een onbespeeld gedeelte van de
band.
Als er een blanco passage is tussen het IN
startpunt en het OUT eindpunt
Dan kan de totale tijdcode niet juist worden
aangegeven.
 Loading...