

Sony DCRTRV950 User Manual
Using a “Memory Stick” – Introduction
Using a touch panel
Most operation buttons for use of a “Memory Stick” are displayed on the LCD screen.
Touch the LCD screen directly with your finger or the supplied stylus (DCR-TRV950
only) to operate each function.
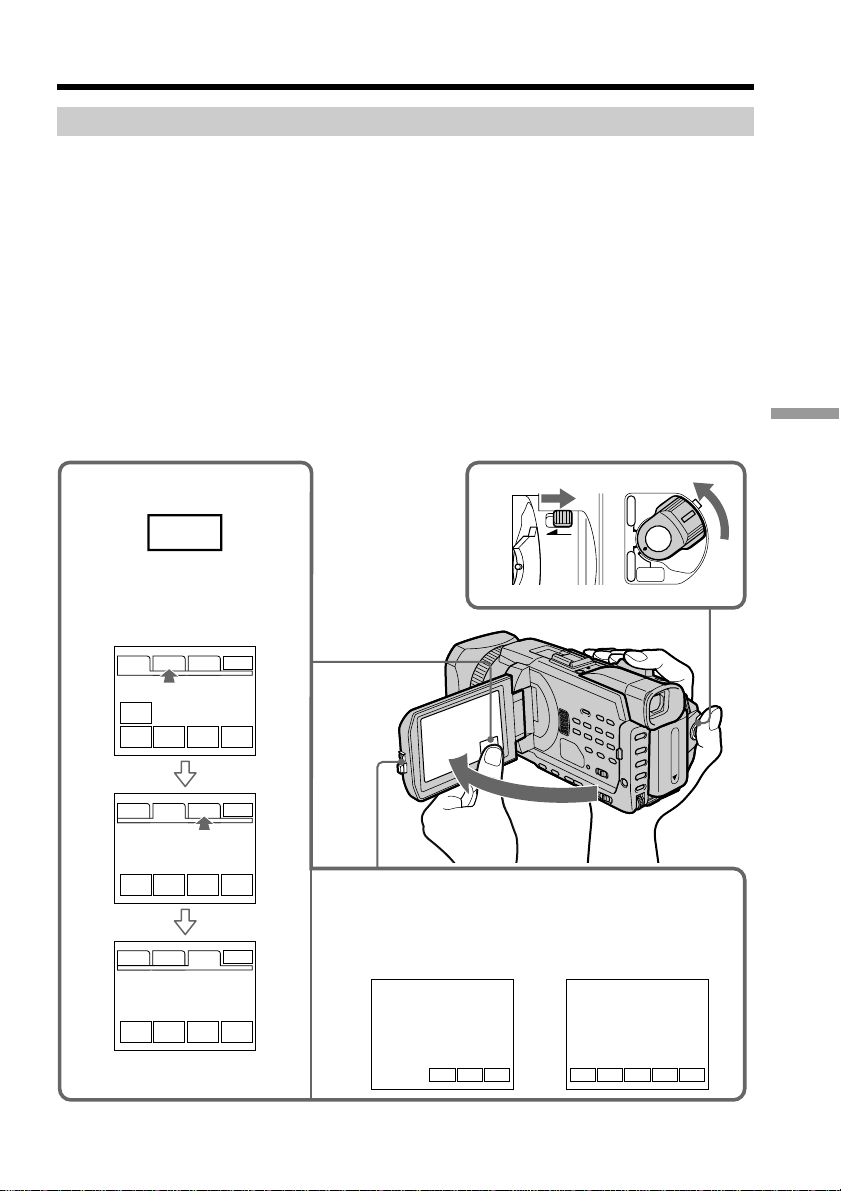
(1) Set the POWER switch to MEMORY/NETWORK (DCR-TRV950 only). Make
sure that the LOCK switch is set to the further side (unlock position).
(2) Press OPEN to open the LCD panel. Operation buttons appear on the LCD
screen. You can switch the memory playback/memory camera by pressing
PLAY/CAM.
(3) Press FN. Operation buttons appear on the LCD screen.
(4) Press PAGE2 to go to PAGE2. Operation buttons appear on the LCD screen.
(5) Press PAGE3 to go to PAGE3. Operation buttons appear on the LCD screen.
(6) Press a desired operation item.
Refer to relevant pages for each function.
“Memory Stick” Operations
3~6
FN
In the memory camera
PAGE1 PAGE2 PAGE3
SELF
TIMER
SPOT
PLAY
FOCUS
PAGE1 PAGE2 PAGE3
LCD
PLAY
BRT
PAGE1 PAGE2 PAGE3
PLAY
SLIDE
SHOW
EXIT
INDEX SPOT
METER
EXIT
INDEX
MEM
MIX
EXIT
INDEX
9PIC
PRINT
2
In the memory
camera
1
LOCK
In the memory
playback (still
image)
FNINDEXPLAY FNINDEXCAM
POWER
VCR
OFF(CHG)
CAMERA
MEMORY/
NETWORK
+–
129

Using a “Memory Stick” – Introduction
To return to FN
Press EXIT.
To execute settings
Press OK.
To cancel settings
Press OFF to return to PAGE1/PAGE2/PAGE3.
Notes
•When using the touch panel, press operation buttons with your thumb supporting the
LCD screen from the back side of it or press those buttons lightly with your index
finger.
•Do not press the LCD screen with sharp-pointed objects other than the supplied
stylus. (DCR-TRV950 only)
•Do not press the LCD screen too hard.
•Do not touch the LCD screen with wet hands.
•If FN is not on the LCD screen, touch the LCD screen lightly to make it appear. You
can control the display with DISPLAY/TOUCH PANEL on your camcorder.
•When operation buttons do not work even if you press them, an adjustment is
required (CALIBRATION) (p. 238).
•When the LCD screen gets dirty, clean it with the supplied cleaning cloth.
When executing each item
The green bar appears above the item.
If the items are not available
The color of the items changes to gray.
130
Press FN to display the following buttons:
In the memory camera
PAGE1 SELFTIMER, SPOT FOCUS, PLAY, INDEX, SPOT METER
PAGE2 LCD BRT, PLAY, INDEX, MEM MIX
PAGE3 SLIDE SHOW, PLAY, INDEX, 9PIC PRINT
In the memory playback
PAGE1 PB ZOOM, CAM, INDEX, DELETE, +,
PAGE2 LCD BRT, CAM, INDEX, +,
PAGE3 SLIDE SHOW, CAM, INDEX, 9PIC PRINT, +,
–
–
–
Using a “Memory Stick” – Introduction
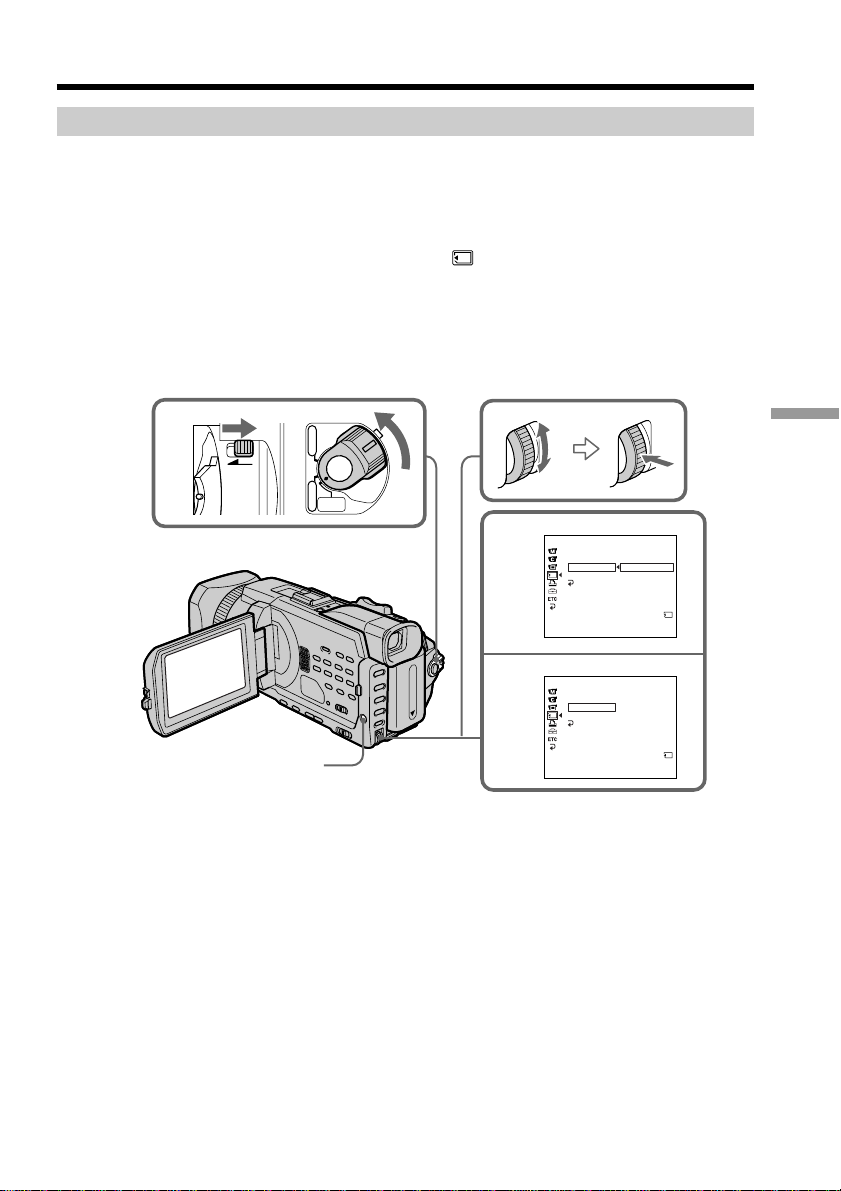
Selecting the still image quality
You can select the image quality in still image recording. The default setting is SUPER
FINE.
(1) Set the POWER switch to MEMORY/NETWORK (DCR-TRV950 only) or VCR.
Make sure that the LOCK switch is set to the further side (unlock position).
(2) Press MENU, then select STILL SET in
(p. 211).
(3) Turn the SEL/PUSH EXEC dial to select QUALITY , then press the dial.
(4) Turn the SEL/PUSH EXEC dial to select the desired image quality , then press
the dial.
with the SEL/PUSH EXEC dial
1
LOCK
MENU
POWER
VCR
OFF(CHG)
CAMERA
MEMORY/
NETWORK
3
4
MEMORY SET
STILL SET
BURST
QUALITY
IMAGESIZE
RETURN
[
MENU] : END
MEMORY SET
STILL SET
BURST
QUALITY
IMAGESIZE
RETURN
[
MENU] : END
SUPER FINE
FINE
STANDARD
REMAIN
12
STANDARD
REMAIN
36
“Memory Stick” Operations
131

Using a “Memory Stick” – Introduction
Image quality settings
Setting Meaning
SUPER FINE (SFN) This is the highest image quality in your camcorder.
FINE (FINE) Use this mode when you want to record high quality
STANDARD (STD) This is the standard image quality in your camcorder.
Note
In some cases, changing the image quality may not affect the image quality, depending
on the type of images you are shooting.
Differences in image quality
Recorded images are compressed in JPEG format before being stored in memory. The
memory capacity allotted to each image varies depending on the selected image quality
and image size. Details are shown in the table below. (You can select 1152 × 864 or 640 ×
480 image size in the menu settings.)
1152 × 864 image size
Image quality Memory capacity
SUPER FINE About 600 KB
FINE About 300 KB
STANDARD About 200 KB
The number of still images you can record is less than
in FINE mode. Super fine images are compressed to
about 1/3.
images. Fine images are compressed to about 1/6.
Standard images are compressed to about 1/10.
132
640 × 480 image size
Image quality Memory capacity
SUPER FINE About 190 KB
FINE About 100 KB
STANDARD About 60 KB
Image quality indicator
The image quality indicator is not displayed during playback.
When you select image quality
The number of images you can shoot in the currently selected image quality appears on
the screen.
Using a “Memory Stick” – Introduction
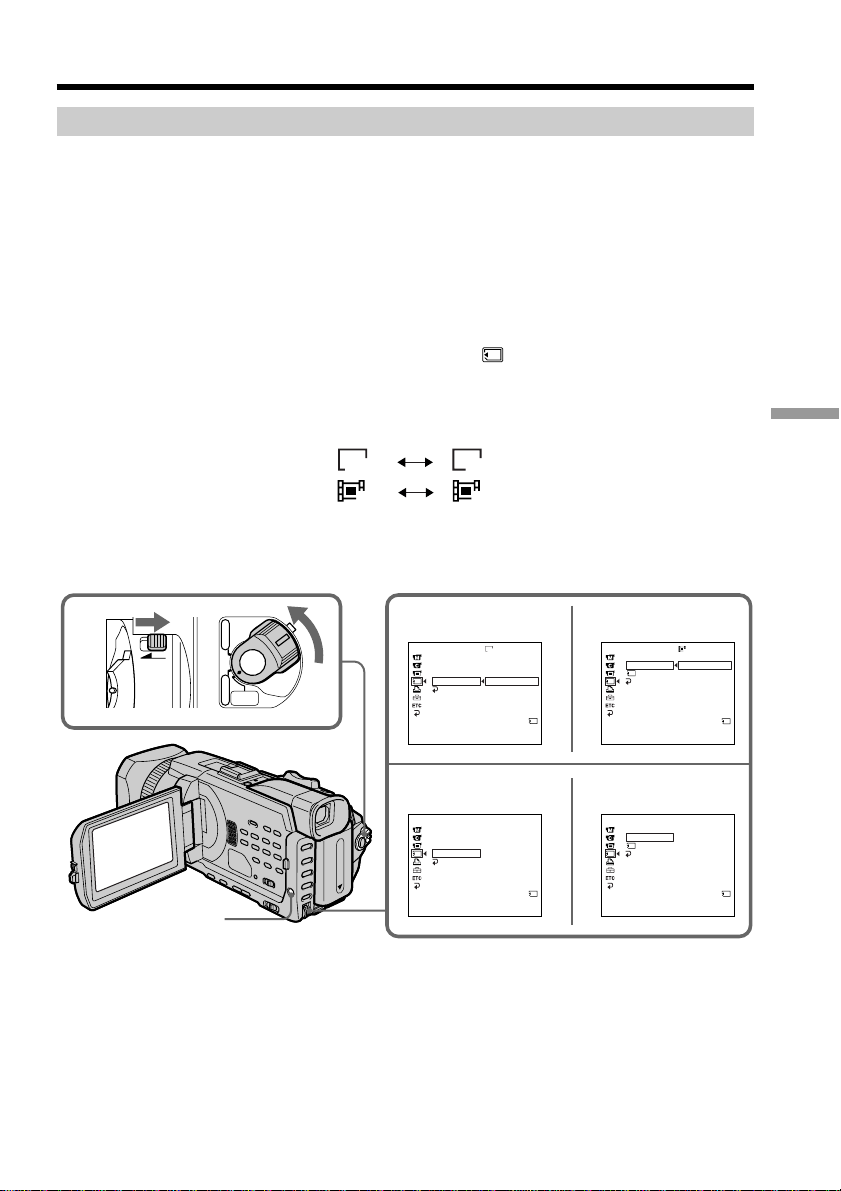
Selecting the image size
You can select either of two image sizes
Still images: 1152 × 864 or 640 × 480. (When the POWER switch is set to CAMERA
Moving pictures: 320 × 240 or 160 × 112
(1) Set the POWER switch to MEMORY/NETWORK (DCR-TRV950 only). Make
sure that the LOCK switch is set to the further side (unlock position).
(2) Press MENU, then turn the SEL/PUSH EXEC dial to select STILL SET (still
image) or MOVIE SET (moving picture) in
(3) Turn the SEL/PUSH EXEC dial to select IMAGESIZE, then press the dial.
(4) Turn the SEL/PUSH EXEC dial to select the desired image size, then press the
dial.
The indicator changes as follows:
or VCR, the image size is automatically set to 640 × 480.)
The default setting is 1152 × 864.
The default setting is 320 × 240.
Still images:
Moving pictures:
1152 640
320 160
, then press the dial (p. 211).
“Memory Stick” Operations
1
LOCK
MENU
POWER
VCR
OFF(CHG)
CAMERA
MEMORY/
NETWORK
STILL SET MOVIE SET
3
4
MEMORY SET
STILL SET
BURST
QUALITY
IMAGESIZE
RETURN
[
MEMORY SET
STILL SET
BURST
QUALITY
IMAGESIZE
RETURN
[
MENU] : END
STILL SET
MENU] : END
1152
1152 × 864
640 × 480
REMAIN
12
640 × 480
REMAIN
40
MEMORY SET
MOVIE SET
IMAGESIZE
REMAIN
RETURN
[
MENU] : END
MOVIE SET
MEMORY SET
MOVIE SET
IMAGESIZE
REMAIN
RETURN
[
MENU] : END
320
320 × 240
160 × 112
REMAIN
1min
160 × 112
REMAIN
5min
133
Using a “Memory Stick” – Introduction
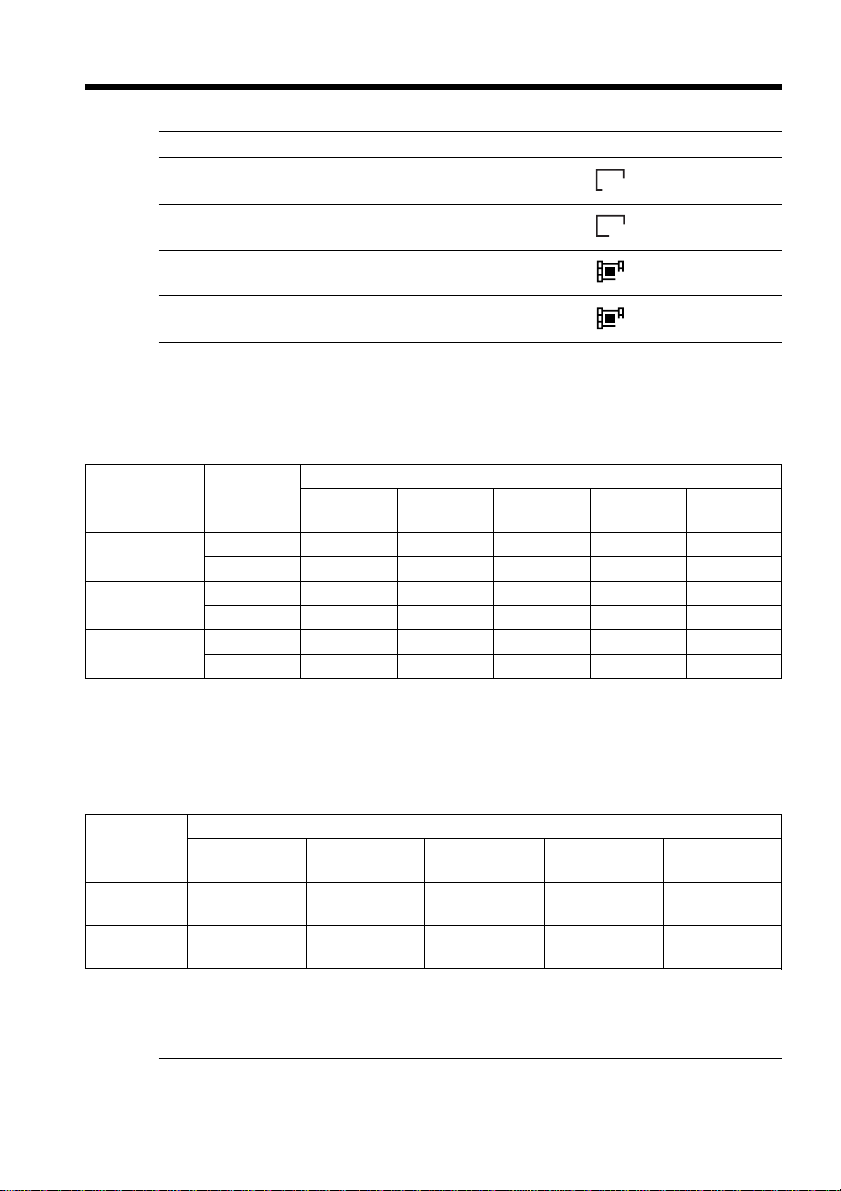
Image size settings
Setting Meaning Indicator
1152 × 864 Records 1152 × 864 still images.
640 × 480 Records 640 × 480 still images.
320 × 240 Records 320 × 240 moving pictures.
160 × 112 Records 160 × 112 moving pictures.
Approximate number of still images you can record on a
“Memory Stick”
The number of images you can record varies depending on which image quality and
image size you select and the complexity of the subject.
Type of the “Memory Stick”
Image quality Image size
SUPER FINE
FINE
STANDARD
1152 × 864 12 images 25 images 51 images 100 images 205 images
640 × 480 40 images 80 images 160 images 325 images 650 images
1152 × 864 25 images 50 images 100 images 205 images 415 images
640 × 480 80 images 160 images 325 images 650 images 1310 images
1152 × 864 37 images 74 images 150 images 300 images 600 images
640 × 480 120 images 240 images 485 images 980 images 1970 images
8MB 16MB 32MB 64MB 128MB
(supplied) (optional) (optional) (optional) (optional)
1152
640
320
160
134
Image size
320 × 240
160 × 112
Approximate time of moving pictures you can record on a
“Memory Stick”
The time of moving pictures you can record varies depending on which image size you
select and the complexity of the subject.
Type of the “Memory Stick”
8MB 16MB 32MB 64MB 128MB
(supplied) (optional) (optional) (optional) (optional)
1 min. 2 min. 5 min. 10 min. 21 min.
20 sec. 40 sec. 20 sec. 40 sec. 20 sec.
5 min. 10 min. 21 min. 42 min. 85 min.
20 sec. 40 sec. 20 sec. 40 sec. 20 sec.
The table above shows approximate number and times of still images and moving
pictures you can record on a “Memory Stick” formatted by your camcorder.
Note
When still images recorded on your camcorder in 1152 × 864 size are played back on
other equipment that does not support 1152 × 864 size, the full image may not appear,
or images in the reduced size may appear in the center of the screen.
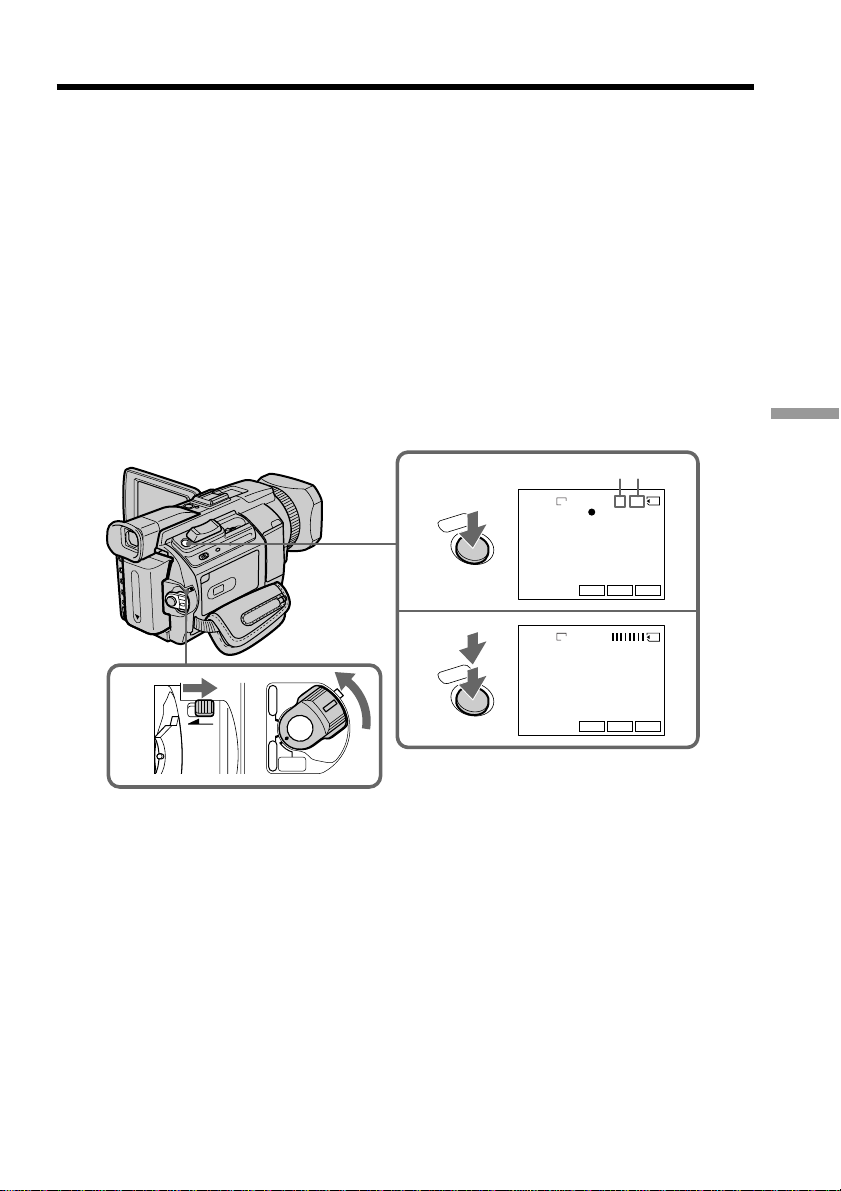
Recording still images on a “Memory
Stick”– Memory Photo recording
You can record still images on a “Memory Stick.”
Before operation
Insert a “Memory Stick” into your camcorder.
(1) Set the POWER switch to MEMORY/NETWORK (DCR-TRV950 only). Make
sure that the LOCK switch is set to the further side (unlock position).
(2) Press PHOTO lightly. The green z mark stops flashing, then lights up. The
brightness of the image and focus are adjusted, being targeted for the middle
of the image and are fixed. Recording does not start yet.
(3) Press PHOTO deeper.
The still image will be displayed after the shutter sounds.
Recording is complete when the bar scroll indicator disappears.
The image when you pressed PHOTO deeper will be recorded on the
“Memory Stick.”
“Memory Stick” Operations
[a][b]
SFN
1 / 12
1152
FN
INDEXPLAY
SFN
1152
FN
INDEXPLAY
1
LOCK
POWER
VCR
OFF(CHG)
CAMERA
MEMORY/
NETWORK
2
O
T
O
H
P
3
O
T
O
H
P
[a]: Number of recorded images
[b]: Approximate number of images can be
recorded on the “Memory Stick”
You can record still images on a “Memory Stick” in the tape
recording or recording standby
For the details, see p. 46.
135

Recording still images on a“Memory Stick”
– Memory Photo recording
When the POWER switch is set to MEMORY/NETWORK (DCR-TRV950 only)
The following functions do not work:
– Digital zoom
– Wide mode
– Fader
– Picture effect
– Digital effect
– Sports lesson of PROGRAM AE (The indicator flashes.)
– Title
While you are recording a still image
You can neither turn off the power nor press PHOTO.
When you press PHOTO on the Remote Commander
Your camcorder immediately records the image that is on the screen when you press
the button.
When you press PHOTO lightly in step 2
The image momentarily flickers. This is not a malfunction.
Recording data
The recording data (date/time or various settings when recorded) are not displayed
while recording. However, they are recorded automatically onto the “Memory Stick.”
To display the recording data, press the DATA CODE button during playback. You can
also use the Remote Commander for this operation (p. 41).
When the POWER switch is set to MEMORY/NETWORK (DCR-TRV950 only)
The angle of view is slightly larger compared with the angle of view when the POWER
switch is set to CAMERA.
136
Recording still images on a“Memory Stick”
– Memory Photo recording
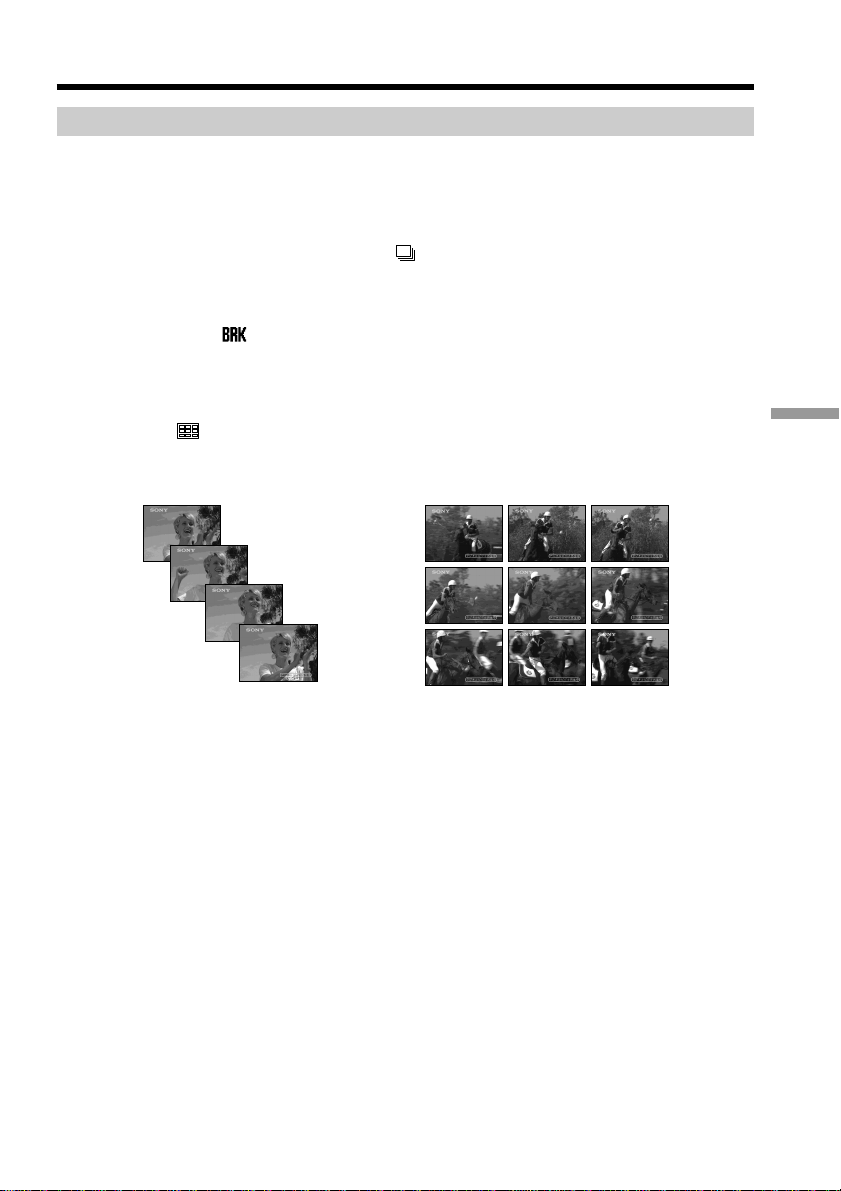
Recording images continuously
You can record still images continuously. Before recording, select one of the four modes
described below in the menu settings.
NORMAL [a]
Your camcorder shoots up to four still images in 1152 × 864 size or 13 still images in 640
× 480 size at about 0.5 sec intervals. ( )
EXP BRKTG (Exposure Bracketing)
Your camcorder automatically shoots three images at about 0.5 sec intervals at different
exposures. ( )
MULTI SCRN (Multi Screen) [b]
Your camcorder shoots nine still images at about 0.4 sec intervals and displays the
images on a single page divided into nine boxes. Still images are recorded in 640 × 480
size. ( )
[a] [b]
“Memory Stick” Operations
137

Recording still images on a “Memory Stick”
– Memory Photo recording
(1) Set the POWER switch to MEMORY/NETWORK (DCR-TRV950 only). Make
sure that the LOCK switch is set to the further side (unlock position).
(2) Press MENU, then select BURST while STILL SET is selected in
the dial (p. 211).
(3) Turn the SEL/PUSH EXEC dial to select the desired setting, then press the
dial.
(4) Press MENU to make the menu setting disappear.
(5) Press PHOTO deeper.
PHOTO
, then press
2
3
MEMORY SET
STILL SET
BURST
QUALITY
IMAGESIZE
RETURN
[
MENU] : END
MEMORY SET
STILL SET
BURST
QUALITY
IMAGESIZE
RETURN
OFF
OFF
NORMAL
EXP BRKTG
MULTI SCRN
MEMORY SET
STILL SET
BURST
QUALITY
IMAGESIZE
RETURN
[
MENU] : END
MEMORY SET
STILL SET
BURST
QUALITY
IMAGESIZE
RETURN
OFF
NORMAL
EXP BRKTG
MULTI SCRN
NORMAL
MENU
[
MENU] : END
[
MENU] : END
If the capacity of the “Memory Stick” becomes full
” FULL” appears on the screen, and you cannot record a still image on this “Memory
Stick.”
The number of still images in continuous shooting
The number of still images you can shoot continuously varies depending on the image
size and the capacity of the “Memory Stick.”
During recording still images continuously
The flash does not work.
The effect of exposure bracketing (EXP BRKTG)
The effect may not appear clearly on the LCD screen.
Checking images on a TV monitor or computer display for the expected effect is
recommended.
When selecting NORMAL
Recording continues up to the maximum number of still images during pressing
PHOTO deeper. Release PHOTO to stop recording.
138
When shooting with the self-timer or the Remote Commander
Your camcorder automatically records up to the maximum recordable number of still
images.
Recording still images on a “Memory Stick”
– Memory Photo recording
If there is space remaining on the “Memory Stick” for less than three photos
You cannot carry out the exposure bracketing (EXP BRKTG). “ FULL” is displayed
when you press PHOTO.
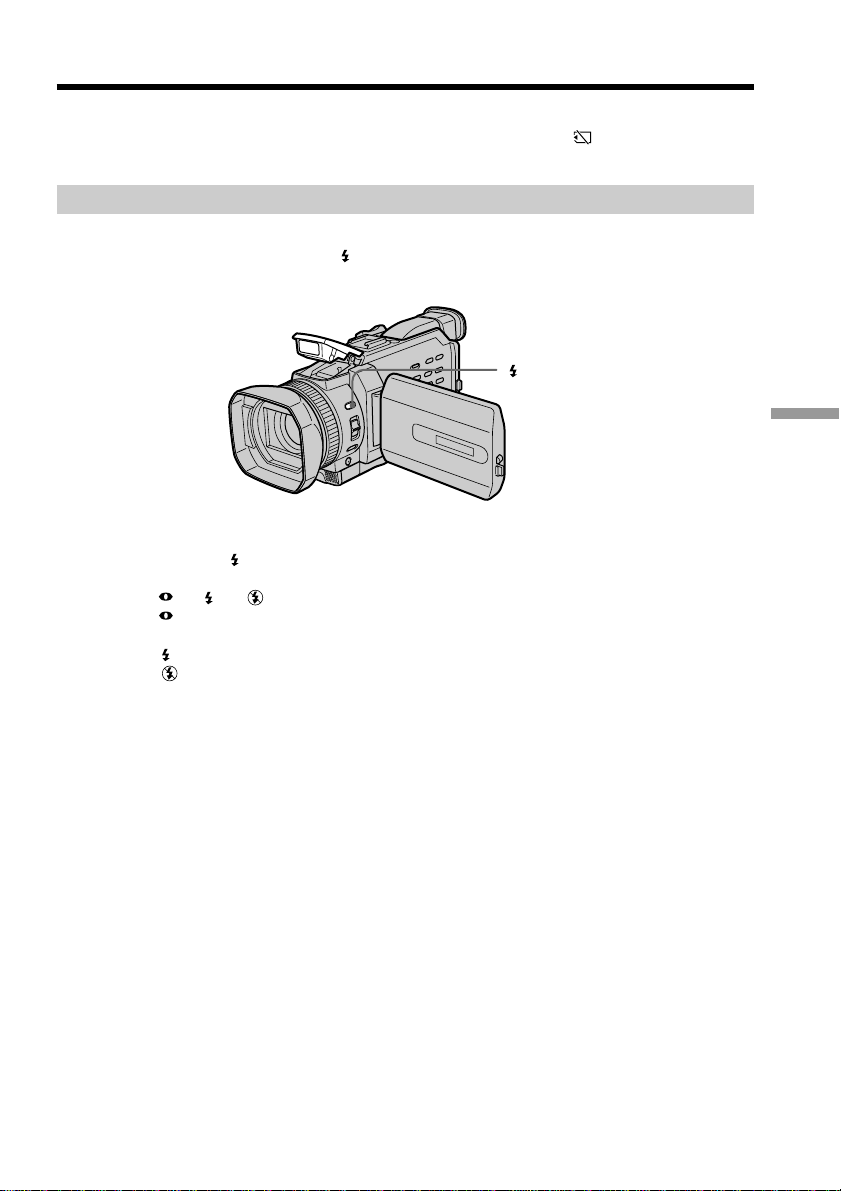
Recording images with the flash
The flash automatically pops up to strobe. The default setting is auto (no indicator). To
change the flash mode, press (flash) repeatedly until the flash mode indicator
appears on the screen.
Each press of (flash) changes the indicator as follows:
t t t (no indicator)
Auto red-eye reduction: The flash fires before recording to reduce the red-eye
phenomenon.
Forced flash: The flash fires regardless of the surrounding brightness.
No flash: The flash does not fire.
(flash)
“Memory Stick” Operations
The flash is automatically adjusted to the appropriate brightness. You can also change
FLASH LVL to the desired brightness in the menu settings (p. 208). Try recording
various images to find the most appropriate setting for FLASH LVL.
139

Recording still images on a “Memory Stick”
– Memory Photo recording
Notes
•The recommended shooting distance using the built-in flash is 0.8 m to 2.5 m (2 3/5
feet to 8 1/3 feet).
•Attaching the lens hood or a conversion lens (optional) may block the light from the
flash or cause lens shadow to appear.
•You cannot use an external flash (optional) and the built-in flash at the same time.
• (auto red-eye reduction) may not produce the desired effect depending on
individual differences, the distance to the subject, the subject not looking at the prerecording flash or other conditions.
•The flash effect cannot be obtained easily when you use forced flash in a bright
location.
•If it is not easy to focus on a subject automatically, for example, when recording in the
dark, use HOLOGRAM AF (p. 141) or the focal distance information (p. 77) for
focusing manually.
When the flashlight does not reach to the subjects
The color of the image may change.
If you leave your camcorder for five or more minutes after removing the power
supply
Your camcorder returns to the default setting (auto).
The flash does not fire even if you select auto and (auto red-eye reduction)
during the following operations:
– Spot light
– Shutter speed adjustment
– Sunset & moon of PROGRAM AE
– Landscape of PROGRAM AE
– Exposure
– Flexible Spot meter
140
When you use an external flash (optional) which does not have the auto red-eye
reduction
You cannot select the auto red-eye reduction.
During recording images continuously
The flash does not work.
Recording still images on a “Memory Stick”
– Memory Photo recording
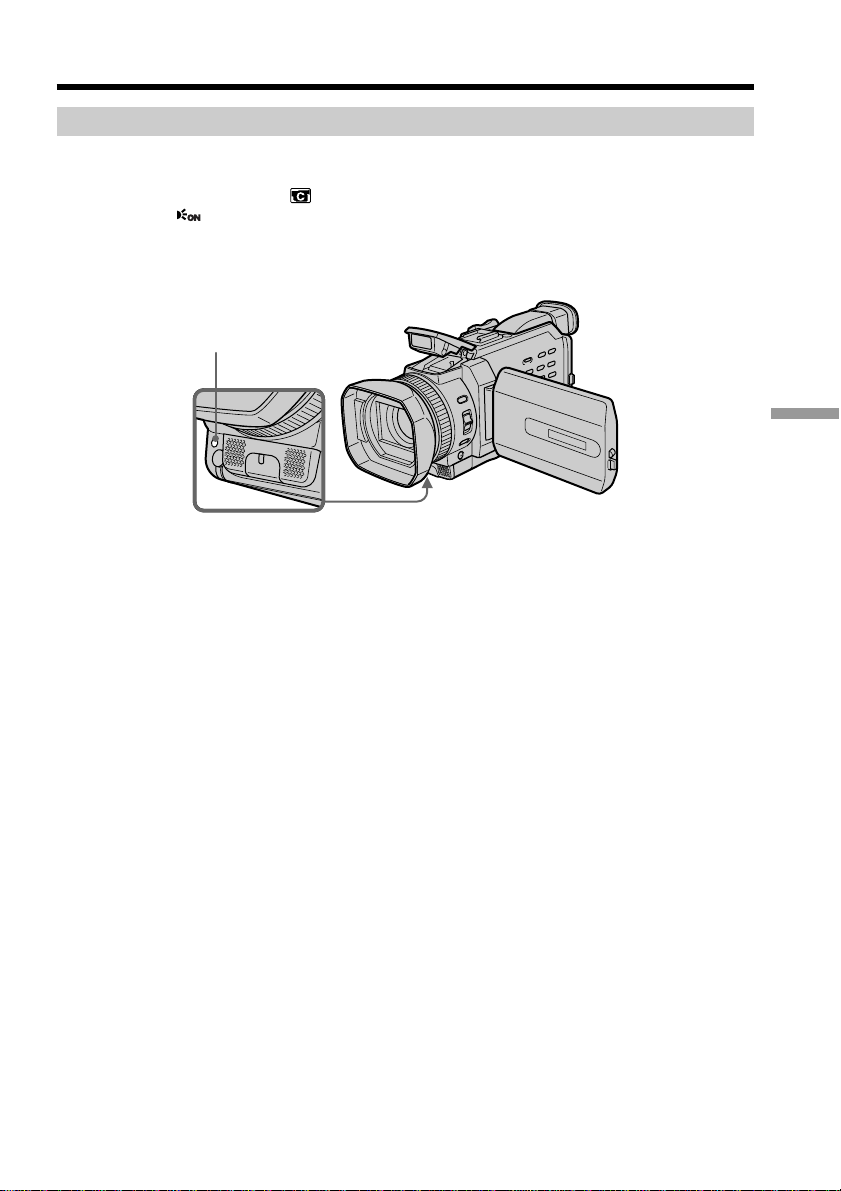
Shooting with an auxiliary light – HOLOGRAM AF
The HOLOGRAM AF is an auxiliary light source used for focusing on subjects in dark
places.
Set HOLOGRAM F in to AUTO in the menu settings. (The default setting is AUTO.)
When appears on the screen in a dark place, press PHOTO lightly. Then the
auxiliary light will automatically emit until the subject is focused.
HOLOGRAM AF emitter
About HOLOGRAM AF
“HOLOGRAM AF (Auto-Focus),” an application of laser holograms, is a new AF
optical system that enables still image shooting in dark places. Having gentler radiation
than conventional high-brightness LEDs or lamps, the system satisfies Laser Class 1 (*)
specification and thus maintains higher safety for human eyes.
No safety problems will be caused by directly looking into the HOLOGRAM AF emitter
at a close range. However, it is not recommended to do so, because you may experience
such effects like several minutes of image residual and dazzling, that you encounter
after looking into a flashlight.
“Memory Stick” Operations
* HOLOGRAM AF satisfies Class 1(time base 30 000 seconds), specified in all of JIS
(Japan), IEC(EU), and FDA(US) industry standards.
Complying with these standards identifies the laser product to be safe, under a
condition that a human looks at the laser light either directly or even through a lens
for 30 000 seconds.
141

Recording still images on a“Memory Stick”
– Memory Photo recording
Notes
•Attaching the lens hood or a conversion lens (optional) may obstruct the
HOLOGRAM AF light and make focusing difficult. We recommend removing the lens
hood or a conversion lens while shooting with the HOLOGRAM AF.
•If enough light does not reach the subject even if the HOLOGRAM AF emitter is
emitted (recommended shooting distance is 2.5 m (8 1/3 feet)), the subject will not be
focused.
•Focusing may be hampered if the light emitted from the HOLOGRAM AF is blocked
by an obstruction.
•Focus is achieved as long as HOLOGRAM AF light reaches to the subject even if its
light is slightly out of the middle position of the subject.
•If HOLOGRAM AF light is dim, it sometimes becomes difficult to focus. If this
happens, wipe the HOLOGRAM AF emitter with a soft, dry cloth.
The HOLOGRAM AF does not emit when:
– Flash is set to No flash
– Focus manually
– Spot Focus
– Sunset & moon of PROGRAM AE
– Landscape of PROGRAM AE
– Continuous photo recording
When you use the external flash (optional) as well
HOLOGRAM AF emits.
142
Recording still images on a “Memory Stick”
– Memory Photo recording
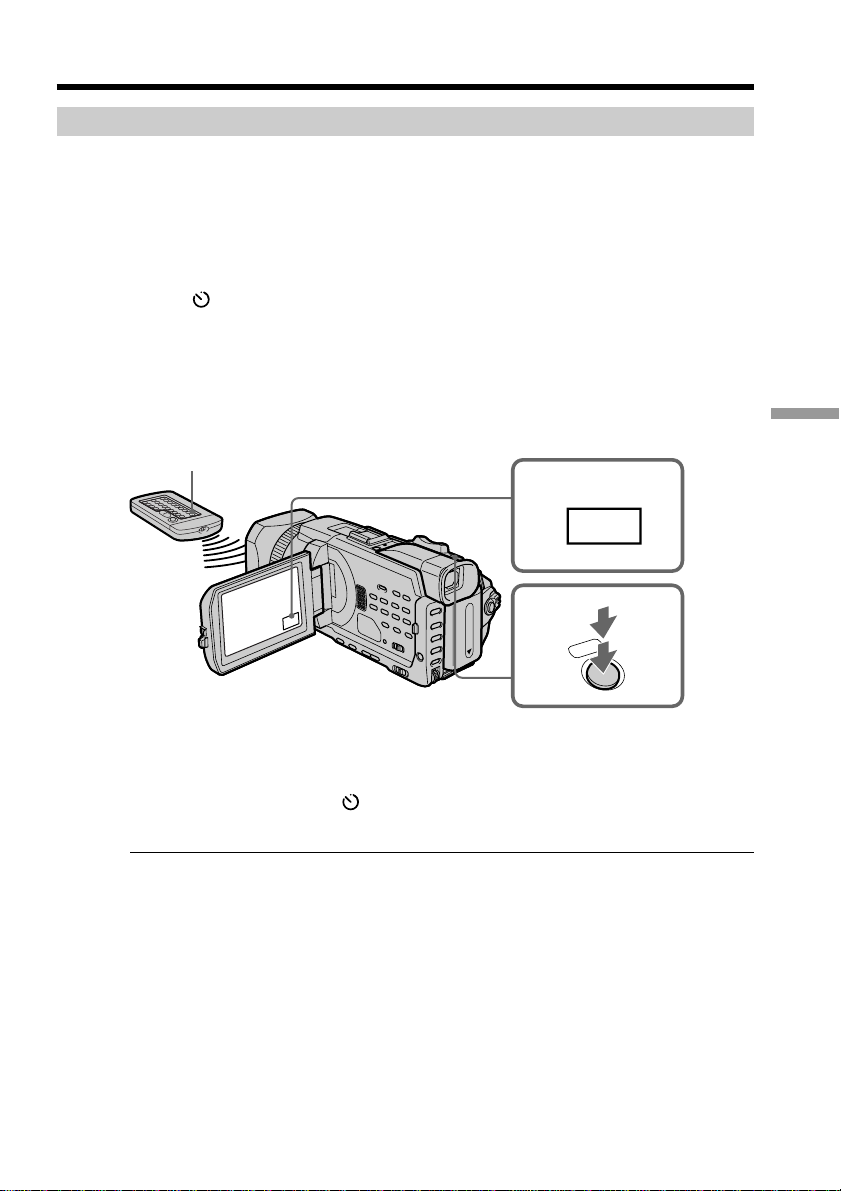
Self-timer memory photo recording
You can record images on a “Memory Stick” with the self-timer. You can also use the
Remote Commander for this operation.
(1) Set the POWER switch to MEMORY/NETWORK (DCR-TRV950 only). Make
sure that the LOCK switch is set to the further side (unlock position).
(2) Press FN to display PAGE1.
(3) Press SELFTIMER.
(self-timer) indicator appears on the screen.
The
(4) Press PHOTO deeper.
Self-timer starts counting down from 10 with a beep. In the last two seconds of
the countdown, the beep gets faster, then recording starts automatically.
PHOTO
“Memory Stick” Operations
2
FN
4
PHOTO
To cancel the self-timer
Press SELFTIMER so that the (self-timer) indicator disappears on the screen. You
cannot stop the countdown.
Note
The self-timer is automatically canceled when:
– Self-timer recording is finished.
– The POWER switch is set to OFF (CHG) or VCR.
143

Recording images from a tape as still
images
Your camcorder can read moving picture data recorded on a tape and record it as a still
image on a “Memory Stick.” Your camcorder can also capture moving picture data
through the input connector and record it as a still image on a “Memory Stick.”
Before operation
Insert a “Memory Stick” and the recorded tape into your camcorder.
(1) Set the POWER switch to VCR.
(2) Press N. Moving pictures recorded on the tape are played back.
(3) Press PHOTO lightly until the picture you want to capture from the tape
freezes and CAPTURE appears on the screen. Recording does not start yet.
To change from the selected image to another image, release PHOTO once and
press it lightly again.
(4) Press PHOTO deeper. The image displayed on the screen will be recorded on
the “Memory Stick.” Recording is complete when the bar scroll indicator
disappears.
2
REW FFPLAY
34
PHOTO
SFN
1 / 12
640
CAPTURE
PHOTO
FN
INDEXPB
[a] : Number of the recorded images
[b] : Approximate number of the images that can be recorded on the “Memory Stick”
144
[a] [b]
SFN
640
FN
INDEXPB

Recording images from a tape as still images
Image size of still images
Image size is automatically set to 640 × 480.
When the access lamp is lit or flashing
Do not shake or strike the unit. Also, do not turn the power off , eject the “Memory
Stick.” Otherwise, image data may become damaged.
If “ FORMAT ERROR” appears on the screen
The inserted “Memory Stick” is incompatible with your camcorder because its format
does not conform with your camcorder. Check the format of the “Memory Stick.”
If you press PHOTO lightly in the playback
Your camcorder stops momentarily.
Sound recorded on a tape
You cannot record audio from a tape.
Titles already recorded on cassettes
You cannot record titles on a “Memory Stick.” Titles do not appear while you are
recording a still image with PHOTO.
Recording date/time
The recording data (date/time) when it is recorded on a “Memory Stick” is recorded.
Various settings are not recorded.
Data codes recorded on a tape cannot be recorded on a “Memory Stick.”
When you press PHOTO on the Remote Commander
Your camcorder immediately records the image that is on the screen when you press
the button.
“Memory Stick” Operations
145
Recording images from a tape as still images
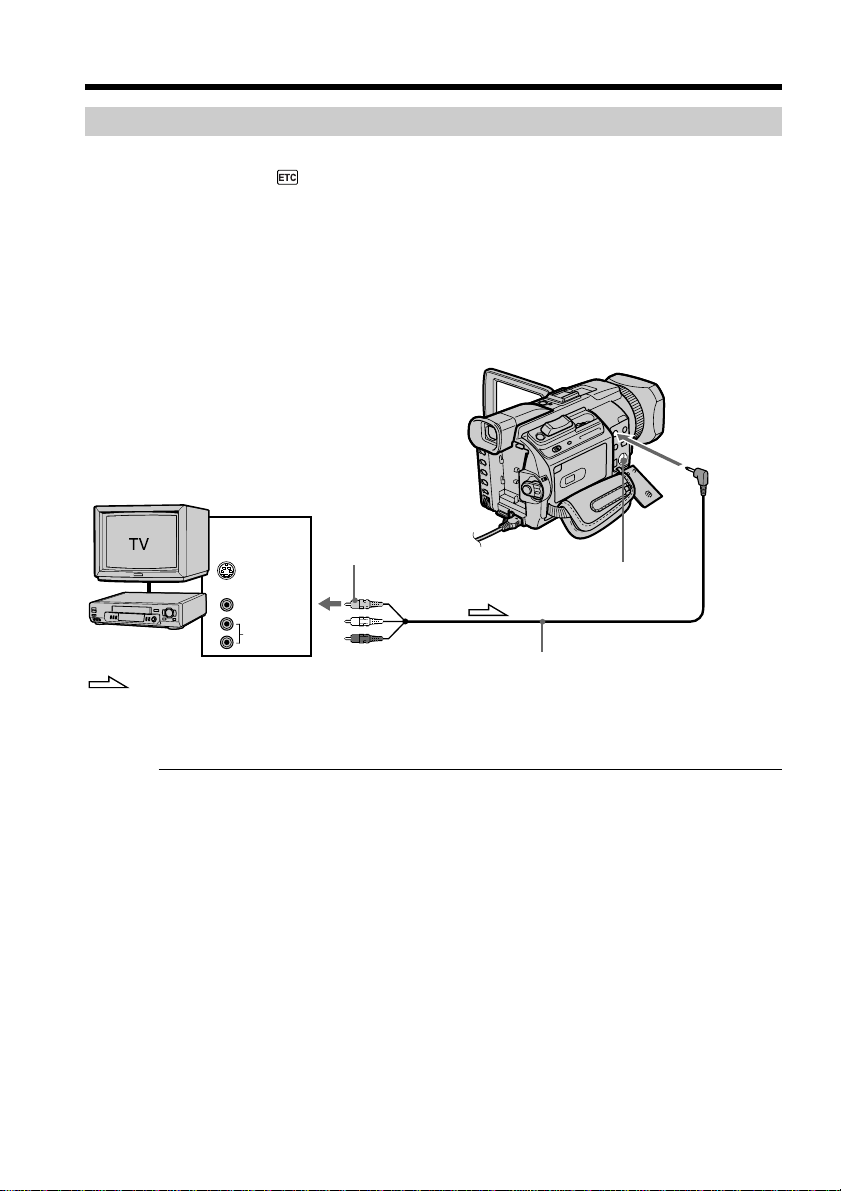
Recording a still image from external equipment
Before operation
Set DISPLAY in to LCD in the menu settings. (The default setting is LCD.)
(1) Set the POWER switch to VCR.
(2) Play back the recorded tape, or turn the TV on to see the desired program.
The image of the external equipment is displayed on the screen.
(3) Follow steps 3 and 4 on page 144.
Using the A/V connecting cable
VCR
: Signal flow
OUT
S VIDEO
VIDEO
AUDIO
Yellow
A/V connecting cable (supplied)
AUDIO/
VIDEO
S VIDEO
146
Connect the yellow plug of the A/V connecting cable to the video jack on the VCR or
the TV.
If your TV or VCR has an S video jack
Pictures can be reproduced more faithfully by using an S video cable (optional).
With this connection, you do not need to connect the yellow (video) plug of the A/V
connecting cable.
Connect an S video cable (optional) to the S video jacks of both your camcorder and the
TV or VCR.
Recording images from a tape as still images
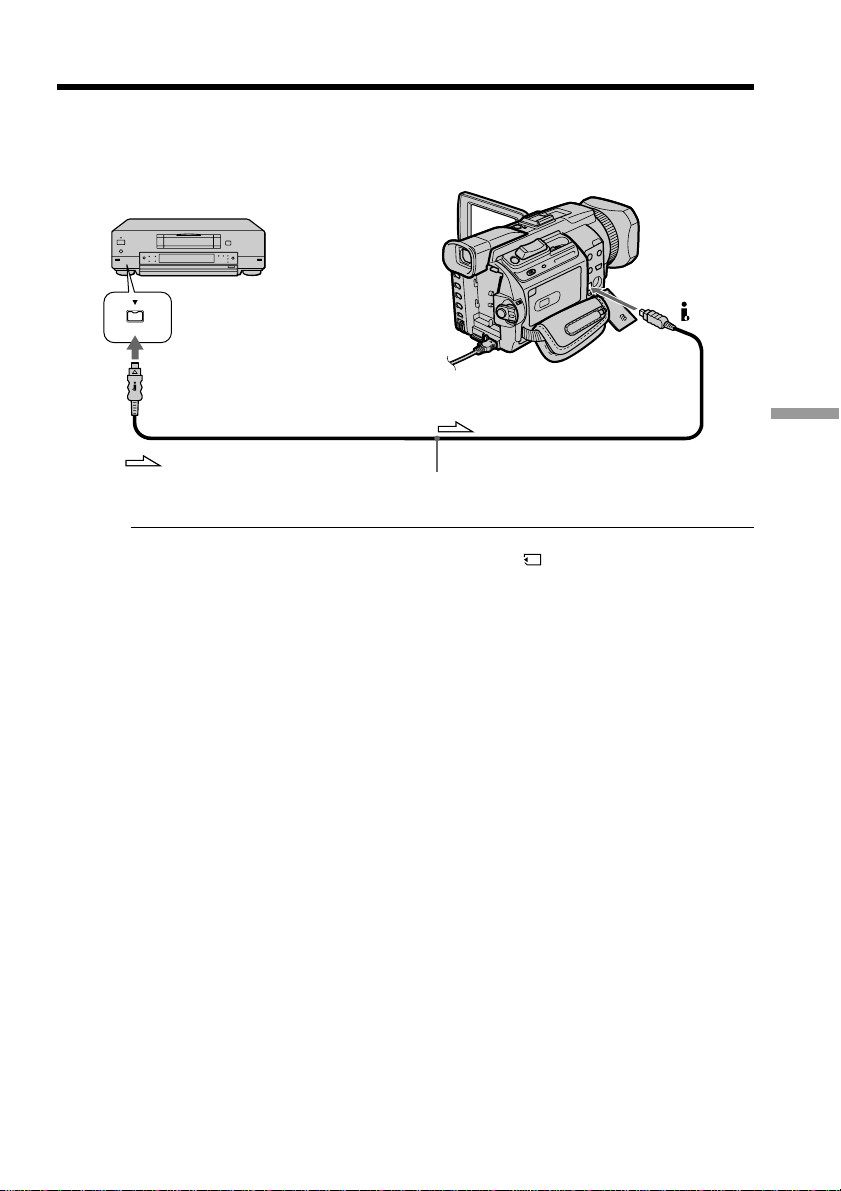
Using the i.LINK cable
DV
DV
DV OUT
: Signal flow
Note
In the following instances, recording is interrupted or “ REC ERROR” is displayed,
and recording is not possible. Reinsert the “Memory Stick” to record distortion-free
images.
– When recording on a tape in a poor recording state, for example, on a tape that has
been repeatedly used for dubbing.
– When attempting to input images that are distorted due to poor radio wave reception
when a TV tuner unit is in use.
i.LINK cable (optional)
“Memory Stick” Operations
147

Superimposing a still image in the
“Memory Stick” on an image
– MEMORY MIX
You can superimpose a still image you have recorded on the “Memory Stick” on the
moving picture you are recording. You can record the superimposed images on a tape
or a “Memory Stick.” (However, you can record only superimposed still images on the
“Memory Stick.”)
M. CHROM (memory chroma key)
You can swap a blue area of a still image such as an illustration or a frame with a
moving picture.
M. LUMI (memory luminance key)
You can swap a brighter area of a still image such as a handwritten illustration or title
with a moving picture. Record a title on the “Memory Stick” before a trip or event for
convenience.
C. CHROM (camera chroma key)
You can superimpose a moving picture on a still image such as an image can be used as
background. Shoot the subject against a blue background. The blue area of the moving
picture will be swapped with a still image.
M. OVERLAP* (memory overlap)
You can make a moving picture fade in on top of a still image recorded on the “Memory
Stick.”
148
M. CHROM
M C A M
C H R O M
M. LUMI
M C A M
L U M I
C. CHROM
C A M M
C H R O M
M. OVERLAP*
O V E R –
L A P
* The superimposed image using Memory overlap can be recorded on tapes only.
Still image Moving picture
Blue
Still image Moving picture
Still image Moving picture
Blue
Still image Moving picture
 Loading...