

Sony DCRTRV950 Users Manual
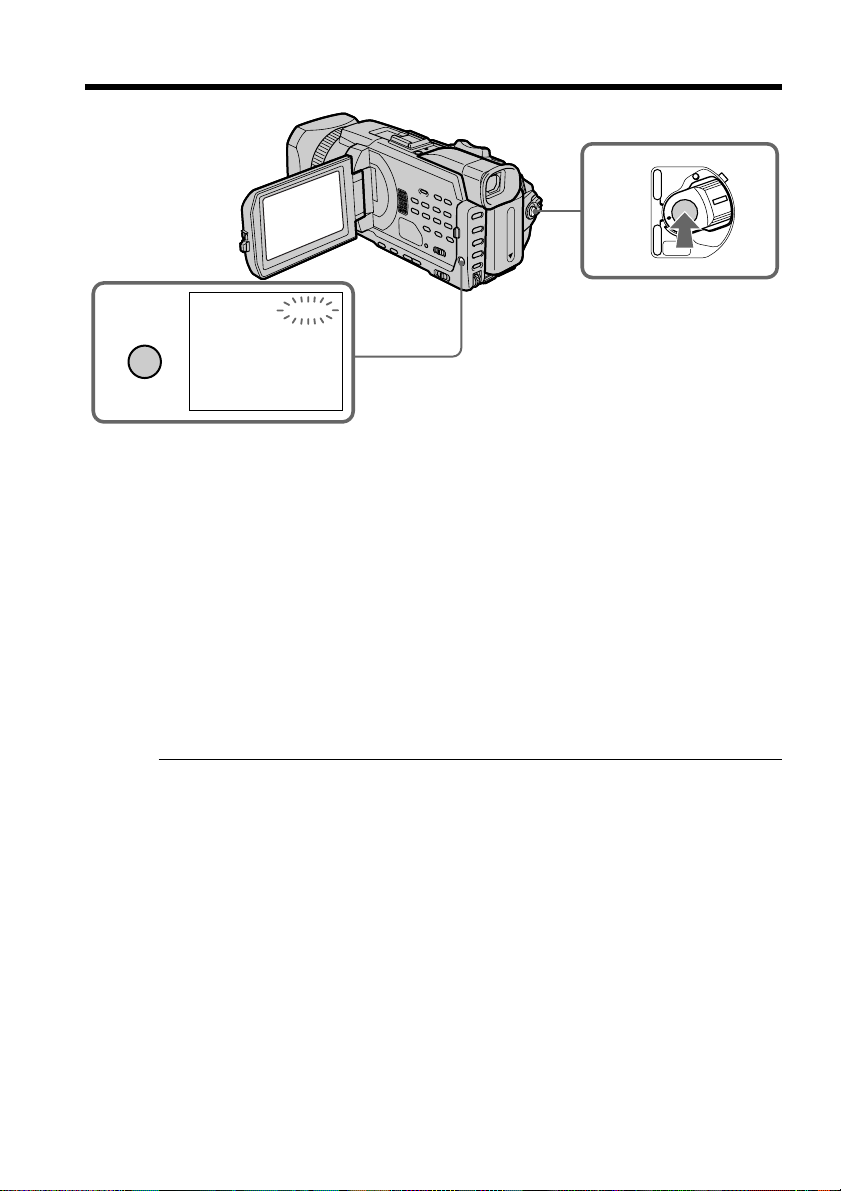
Shooting with the zebra pattern
You can set the camcorder to display a zebra pattern (diagonal stripes) in the portion of
the picture on the screen with a subject whose brightness exceeds a certain level. You
can check the picture level of a subject by displaying the zebra pattern. Use the zebra
pattern as a guide for adjusting the exposure so that you can get the desired picture.
The zebra pattern is not recorded in the tape or the “Memory Stick.”
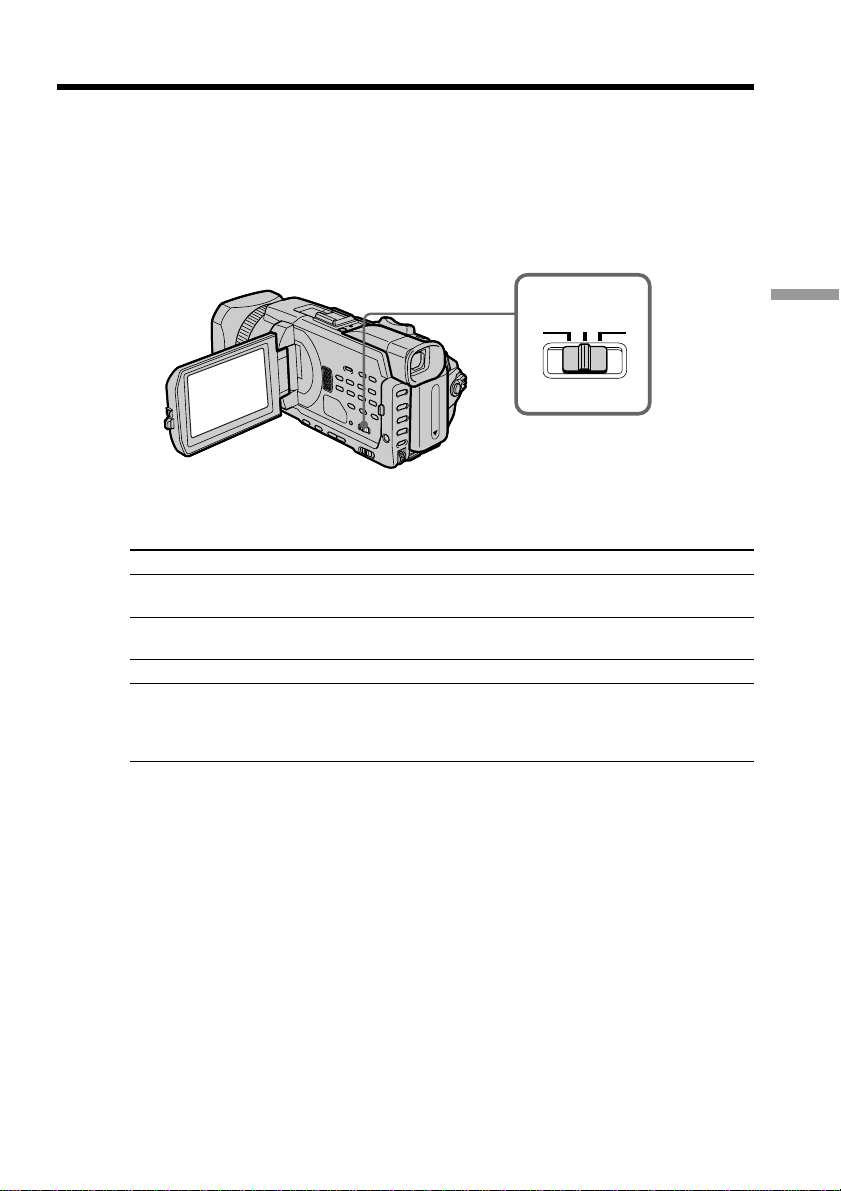
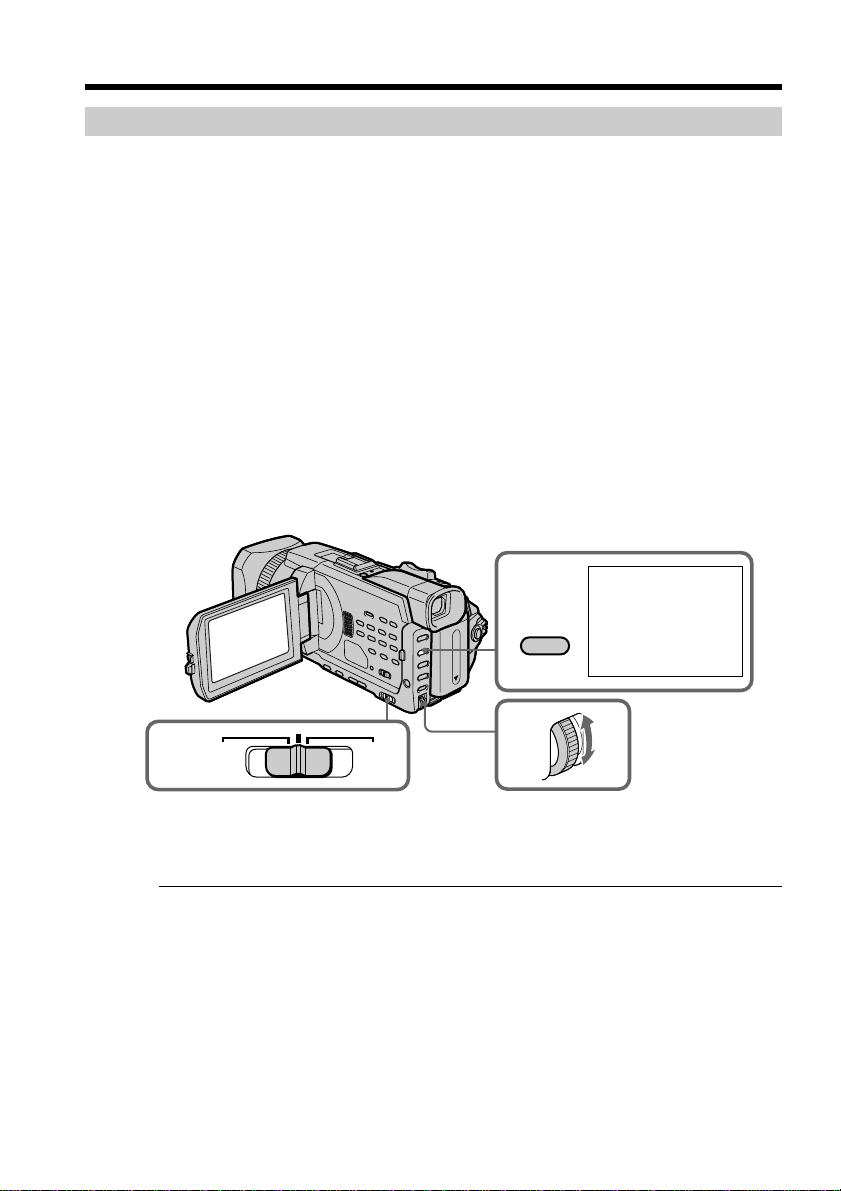
Set the ZEBRA selector to 70 or 100 while the POWER switch is set to CAMERA or
MEMORY/NETWORK (DCR-TRV950 only).
ZEBRA
OFF 70 100
Setting
70
100
OFF
Meaning
The zebra pattern appears in the portion of the picture on the screen with
a subject whose brightness is about 70 IRE.
The zebra pattern appears in the portion of the picture on the screen with
a subject whose brightness exceeds more than 100 IRE.
The zebra pattern does not appear on the screen.
To erase the zebra pattern
Set the ZEBRA selector to OFF.
When the ZEBRA selector is set to 100
The portion of the picture where zebra pattern appears is an area of high brightness and
overexposure.
Advanced Recording Operations
65
Using the color bar
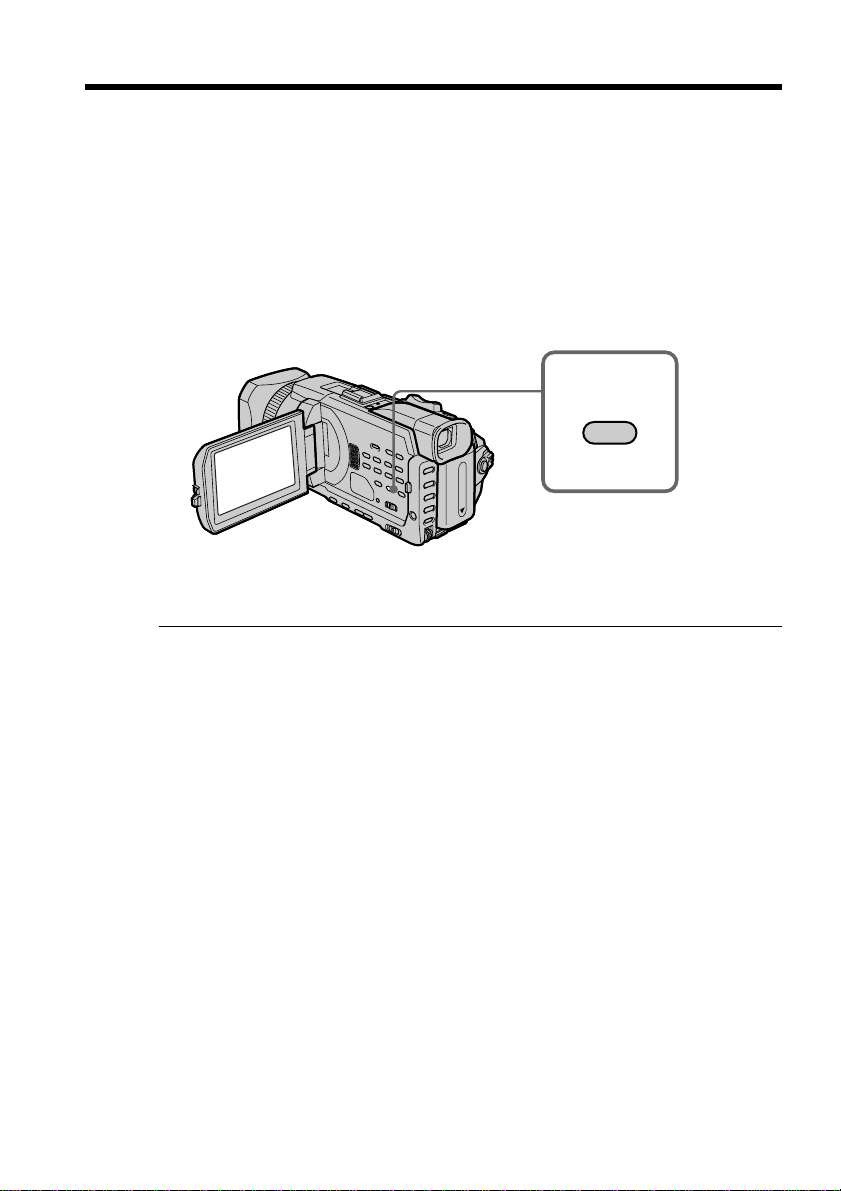
If you press COLOR BAR, the color bar is displayed on the screen.
Use the color bar in the following cases:
– At the beginning of the recording, the recorded images may be unstable. To avoid
this, record the color bar first and start recording the desired images when the
captured images become clear.
– To adjust screen color.
Press COLOR BAR while the POWER switch is set to CAMERA.
If you press COLOR BAR again the color bar disappears.
When you adjust color on the screen
Connect your camcorder to the TV (p. 45) and adjust image color on the TV screen.
COLOR BAR
66
While the color bar is displayed
The following functions do not work. However, the settings before the color bar is
displayed are retained.
– BACK LIGHT
– SPOT LIGHT
– Picture effect
– Digital effect
– PROGRAM AE
– Shutter speed adjustment
– White balance adjustment
– Exposure
– MEMORY MIX
While the color bar is displayed during Picture effect, Digital effect or MEMORY
MIX
These effects cannot be added on the color bar.
While using the fader
The color bar cannot be displayed.
Shooting with manual adjustment
AUTO LOCK selector
Set the selector as shown below to maintain or release the settings of the functions.
Manually adjusted functions are retained even if you set the AUTO LOCK selector to
AUTO LOCK. However, all functions will automatically return to the default settings
five minutes after removing the power supply.
AUTO LOCK [a]
Select this position to lock the PROGRAM AE, Shutter speed, White balance, Exposure
and Flexible spot meter functions in order to make these function automatically
adjusted. We recommend that you set the AUTO LOCK selector to AUTO LOCK if you
use the video flash light (optional).
AUTO LOCK release [b]
Select this position for setting the functions manually.
HOLD [c]
Select AUTO LOCK release [b], and set the functions manually. Select this position [c]
to maintain the settings.
[b]
[a] [c]
Advanced Recording Operations
AUTO
LOCK
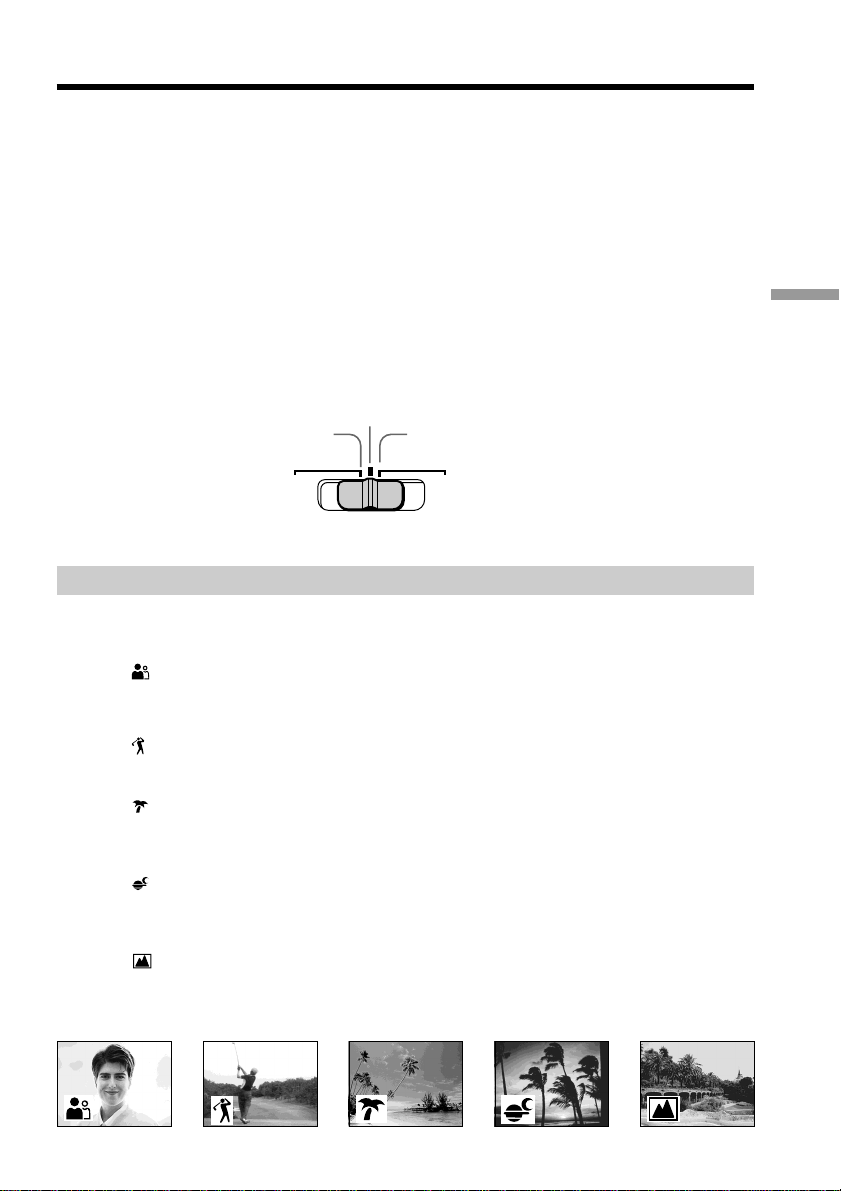
Using the PROGRAM AE
You can select the PROGRAM AE (Auto Exposure) to suit your specific shooting
requirements.
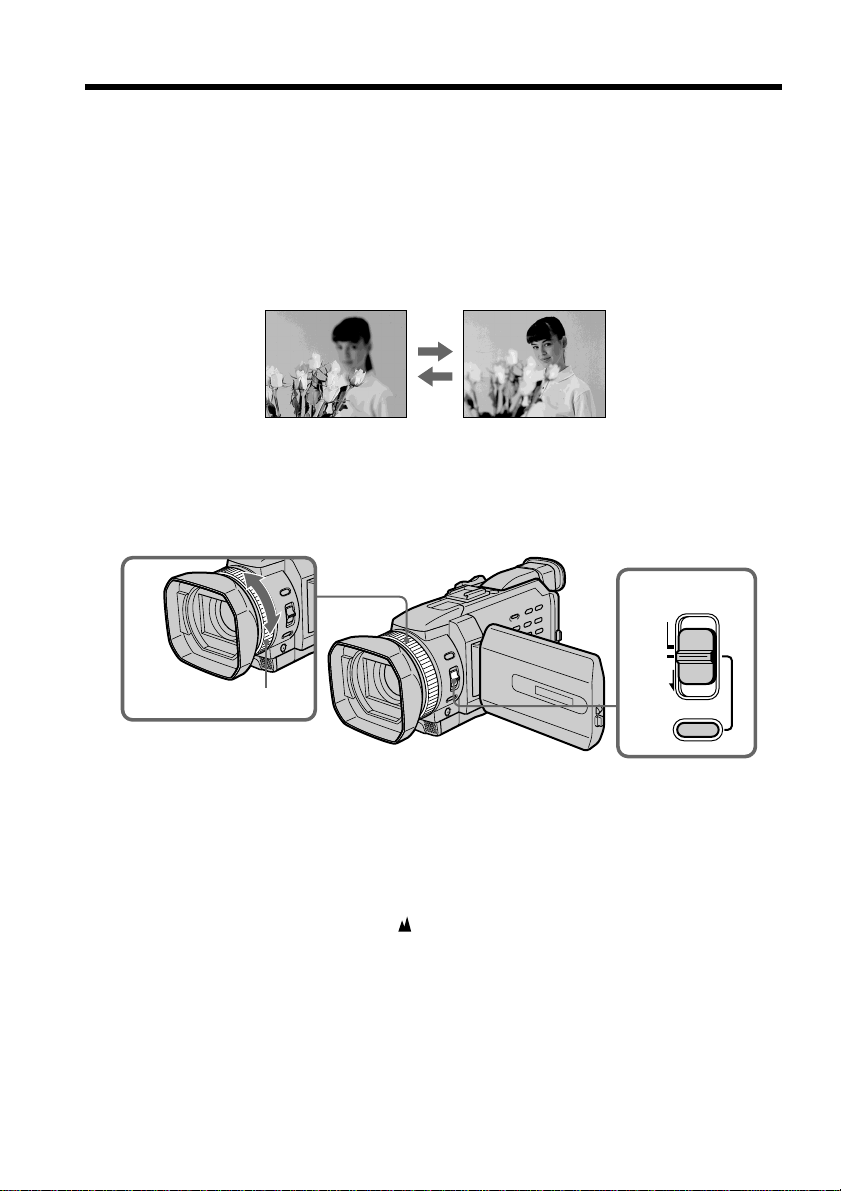
Soft portrait
This mode brings out the subject while creating a soft background for subjects such as
people or flowers.
Sports lesson
This mode minimizes camera-shake on fast-moving subjects such as in tennis or golf.
Beach & ski
This mode prevents people’s faces from appearing dark in strong light or reflected light,
such as at a beach in midsummer or on a ski slope.
Sunset & moon
This mode allows you to maintain atmosphere when you are recording sunsets, general
night views, fireworks displays and neon signs.
Landscape
This mode is for when you are recording distant subjects such as mountains, and
prevents your camcorder from focusing on glass or metal mesh in windows when you
are recording a subject behind glass or a screen.
HOLD
67
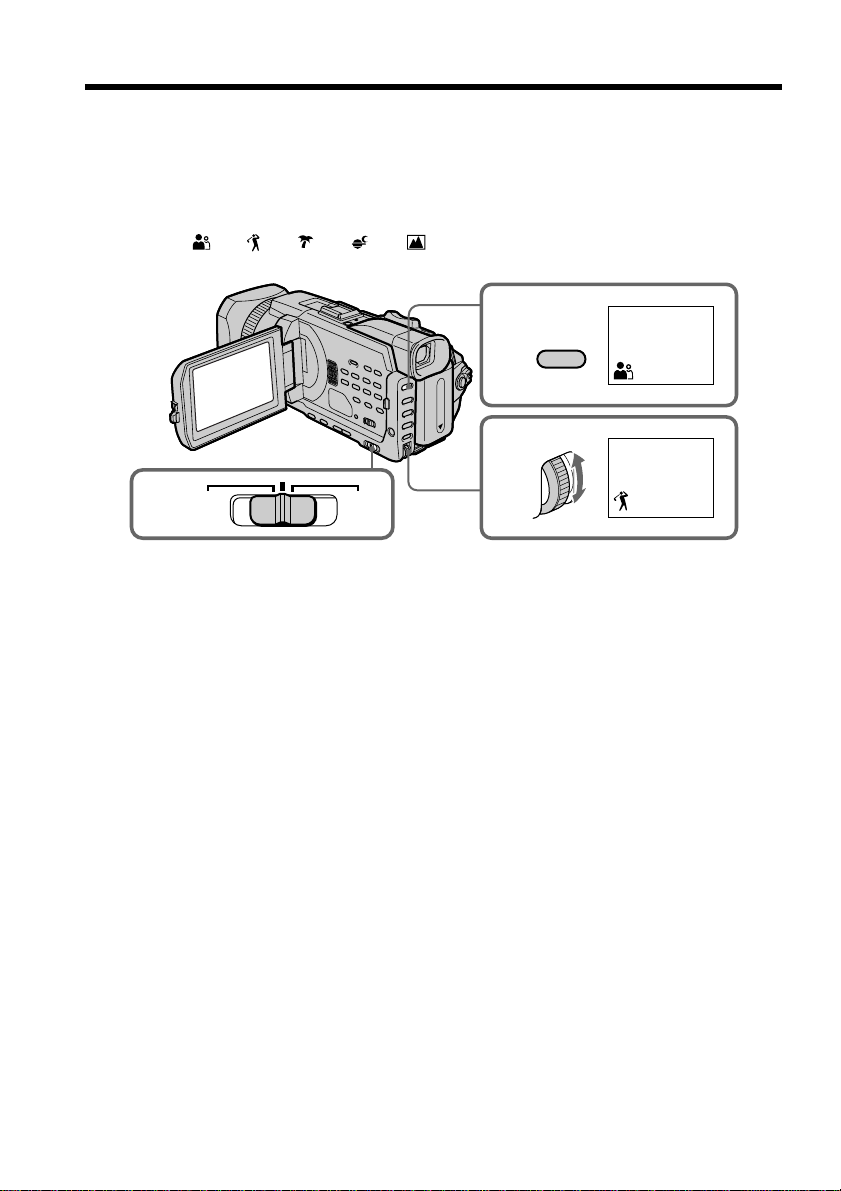
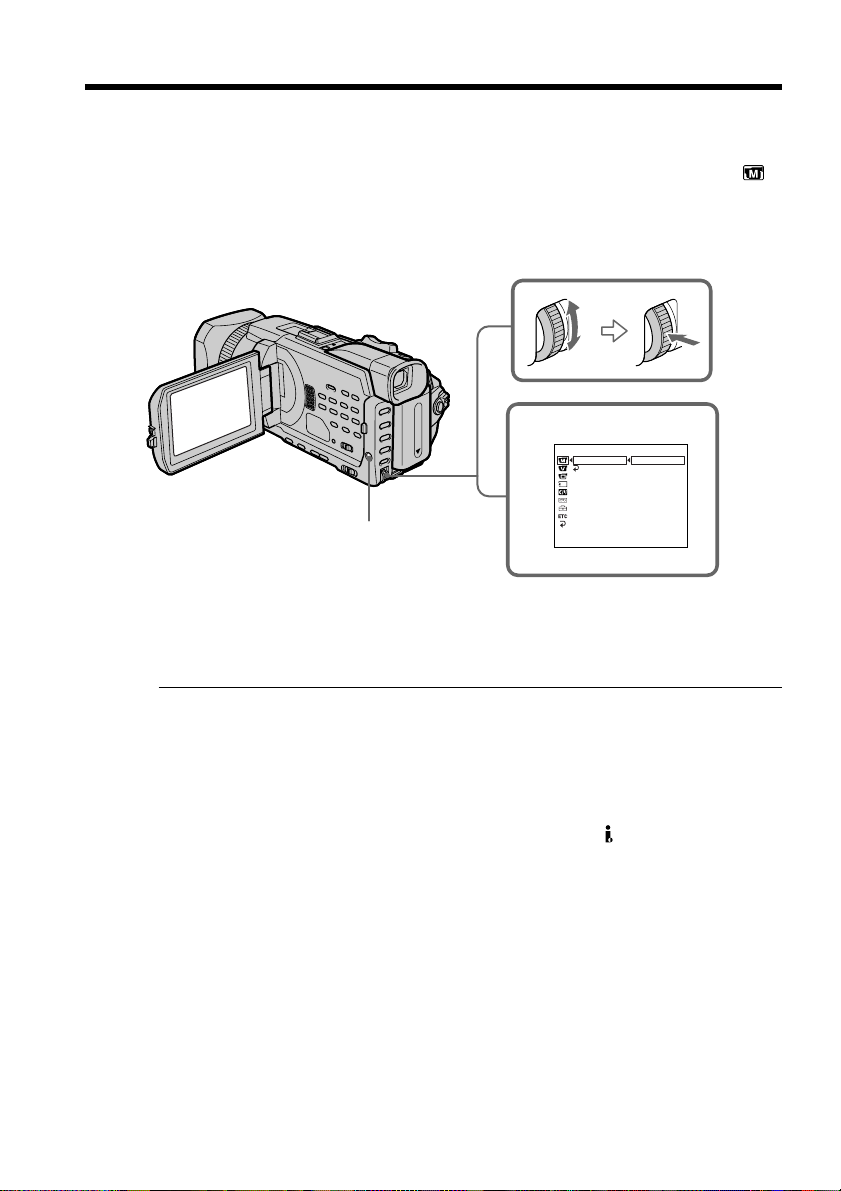
Shooting with manual adjustment
(1) Set the AUTO LOCK selector to the center (auto lock release) position while
the POWER switch is set to CAMERA or MEMORY/NETWORK(DCR-TRV950
only). (p. 67)
(2) Press PROGRAM AE.
(3) Turn the SEL/PUSH EXEC dial to select the desired mode, then press the dial.
The indicator changes as follows:
y y y y
2
PROGRAM
AE
3
AUTO
1
LOCK
To cancel the PROGRAM AE
Set the AUTO LOCK selector to the AUTO LOCK or press PROGRAM AE.
The PROGRAM AE indicator disappears.
HOLD
68

Shooting with manual adjustment
Notes
•Because your camcorder is set to focus only on subjects in the middle to far distance,
you cannot take close-ups in the following modes:
– Sports lesson
– Beach & ski
•Your camcorder is set to focus only on distant subjects in the following modes:
– Sunset & moon
– Landscape
•The following functions do not work in the PROGRAM AE:
– BOUNCE
– OLD MOVIE
– Shutter speed adjustment
– Spot focus
•When you set the POWER switch to MEMORY/NETWORK (DCR-TRV950 only),
Sports lesson does not work. (The indicator flashes.)
The PROGRAM AE does not work
When you are recording images on a “Memory Stick” using the MEMORY MIX. (The
indicator flashes.)
While WHT BAL is set to automatic adjustment
The white balance is adjusted even if the PROGRAM AE is selected.
You can adjust the following functions while using the PROGRAM AE
–Backlight
– Spot light
– Exposure
– Flexible Spot Meter
Advanced Recording Operations
When recording under a discharge tube such as a fluorescent lamp, sodium lamp
or mercury lamp
Flickering phenomenon whilch lights up or dims the screen, or the color change may
occur in the following modes. If this happens, turn the PROGRAM AE off.
– Soft portrait
– Sports lesson
69
Shooting with manual adjustment
Adjusting the shutter speed
You can adjust the shutter speed manually to suit your preference and with its shutter
speed fixed.
(1) Set the AUTO LOCK selector to the center (auto lock release) position while the
POWER switch is set to CAMERA or MEMORY/NETWORK(DCR-TRV950
only). (p. 67)
(2) Press SHUTTER SPEED. The shutter speed indicator appears on the screen.
(3) Turn the SEL/PUSH EXEC dial to select the desired speed. The available
shutter speed ranges from 1/4 to 1/10000. As you turn the dial, the shutter
speed changes as follows:
[CAMERA] 1/4 y 1/8 y 1/15 y 1/30 y ... y 1/4000 y 1/6000
y 1/10000
[MEMORY/NETWORK] 1/60 y 1/90 y 1/100 y 1/125 y 1/180
y 1/250 y 1/350 y 1/500
The shutter speed increases when a smaller number is selected. The size of the
picture displayed on the screen also increases. Conversely, the shutter speed is
slower when a larger number is selected. The picture displayed on the screen
will thus decrease in size.
2
SHUTTER
SPEED
60
70
AUTO
1
LOCK
To return to automatic shutter speed mode
Set the AUTO LOCK selector to AUTO LOCK or press SHUTTER SPEED. The shutter
speed indicator disappears.
Notes
•If you set the shutter speed value to 1/30 or smaller, You cannot use the flash and the
digital effect.
•The Shutter speed cannot be adjusted while you are using the following functions.
– PROGRAM AE
– Exposure
– Flexible spot meter
If you press PROGRAM AE
Shutter speed adjusted manually returns to the automatic shutter speed.
HOLD
3

Shooting with manual adjustment
When shooting at slow shutter speed
At slow shutter speed, automatic focus may be lost. Use a tripod and adjust the focus
manually.
When recording under a discharge tube such as a fluorescent lamp, sodium lamp
or mercury lamp
Flickering phenomenon whilch lights up or dims the screen, or the color change may
occur depending on the shutter speed.
When the POWER switch is set to MEMORY/NETWORK (DCR-TRV950 only)
Shutter speeds available in the MEMORY/NETWORK(DCR-TRV950 only) mode are
different from those in the CAMERA mode.
Even if you set the shutter speed faster than 1/500 or slower than 1/60 while the
POWER switch is set to CAMERA, the shutter speed setting is automatically reset to
1/500 or 1/60 respectively if you set the POWER switch to MEMORY/
NETWORK(DCR-TRV950 only).
Advanced Recording Operations
71
Shooting with manual adjustment
Adjusting the white balance
White balance adjustment makes white subjects look white and allows more natural
color balance for camera recording. You can obtain better results by adjusting the white
balance manually when lighting conditions change quickly or when recording
outdoors: e.g., neon signs, fireworks.
(1) Set the AUTO LOCK selector to the center (auto lock release) position while
the POWER switch is set to CAMERA or MEMORY/NETWORK (DCRTRV950 only). (p. 67)
(2) Press WHT BAL.
(3) Turn the SEL/PUSH EXEC dial to select the appropriate white balance mode
under the following conditions. As you turn the dial, the display changes as
follows:
(One-push white balance) y (Outdoor) y n (Indoor)
2
WHT BAL
72
1
Indicator
(One-push
white balance)
(Outdoor)
n (Indoor)
AUTO
LOCK
Shooting conditions
•Adjusting the white balance according to the light source. Follow the
procedure described on the next page to adjust the setting again.
•Recording a sunset/sunrise, just after sunset, just before sunrise, neon
signs, or fireworks
•Under a color matching fluorescent lamp
•Lighting condition changes quickly
•Too bright a place such as a photography studio
•Under sodium lamps or mercury lamps
HOLD
3

Shooting with manual adjustment
If you have selected in step 3
When you set the white balance to one-push white balance mode, the setting is locked
and maintained even if lighting conditions change. You can achieve recording with
natural colors without the image being affected by ambient light.
(1) Shoot a white object such as paper fully with displayed on the screen in the
recording standby.
(2) Press the SEL/PUSH EXEC dial.
The indicator flashes quickly. When the white balance has been adjusted and stored
in the memory, the indicator stops flashing. The setting will be maintained even after
removing the power supply.
To return to automatic adjustment
Set the AUTO LOCK selector to AUTO LOCK or press WHT BAL. The white balance
indicator disappears.
If the picture is being taken in a studio lit by TV lighting
We recommend that you record in the n (indoor) mode.
When you record under fluorescent lamp
Use the automatic white balance mode or the (one-push white balance) mode.
Your camcorder may not adjust the white balance correctly if you use the n (indoor)
mode.
Shooting when lighting conditions have changed
Readjust the white balance while the camcorder is in standby mode. White balance
cannot be adjusted in the (One-push white balance) mode during recording.
Advanced Recording Operations
If the indicator does not stop flashing after you press the SEL/PUSH EXEC dial
The white balance cannot be set. Use the automatic mode for recording.
In automatic white balance mode
Point your camcorder at a white subject for about 10 seconds after setting the POWER
switch to CAMERA to get a better adjustment when:
– You detach the battery for replacement.
– You bring your camcorder outdoors from the interior of a house, or vice versa.
73
Shooting with manual adjustment
Adjusting the exposure
You can manually adjust and set the exposure. Adjust the exposure manually in the
following cases:
– When you need a fine adjustment for the backlit subjects.
– When shooting subjects and dark backgrounds.
– When recording dark pictures (e.g. night scenes) faithfully.
(1) Set the AUTO LOCK selector to the center (auto lock release) position while
the POWER switch is set to CAMERA or MEMORY/NETWORK(DCR-TRV950
only). (p. 67)
(2) Press EXPOSURE. The exposure indicator appears.
(3) Turn the SEL/PUSH EXEC dial to adjust the brightness.
2
EXPOSURE
74
AUTO
1
LOCK
To return to automatic exposure
Set the AUTO LOCK selector to AUTO LOCK or press EXPOSURE. The exposure
indicator disappears.
When you adjust the exposure manually, the following functions do not work:
– Backlight
– Spot light
– Shutter speed adjustment
If you press PROGRAM AE
Your camcorder also returns to automatic exposure.
HOLD
3
Shooting with manual adjustment
Using the spot light-metering – Flexible Spot Meter
You can take a picture with the appropriate exposure automatically for just the point
you want to focus on and with its exposure fixed. Use the Flexible Spot Meter in the
following cases:
– When adjusting the exposure manually to shoot the backlit subjects.
– When there is strong contrast between the subject and background such as with a
subject that is on stage and lighted by a spotlight.
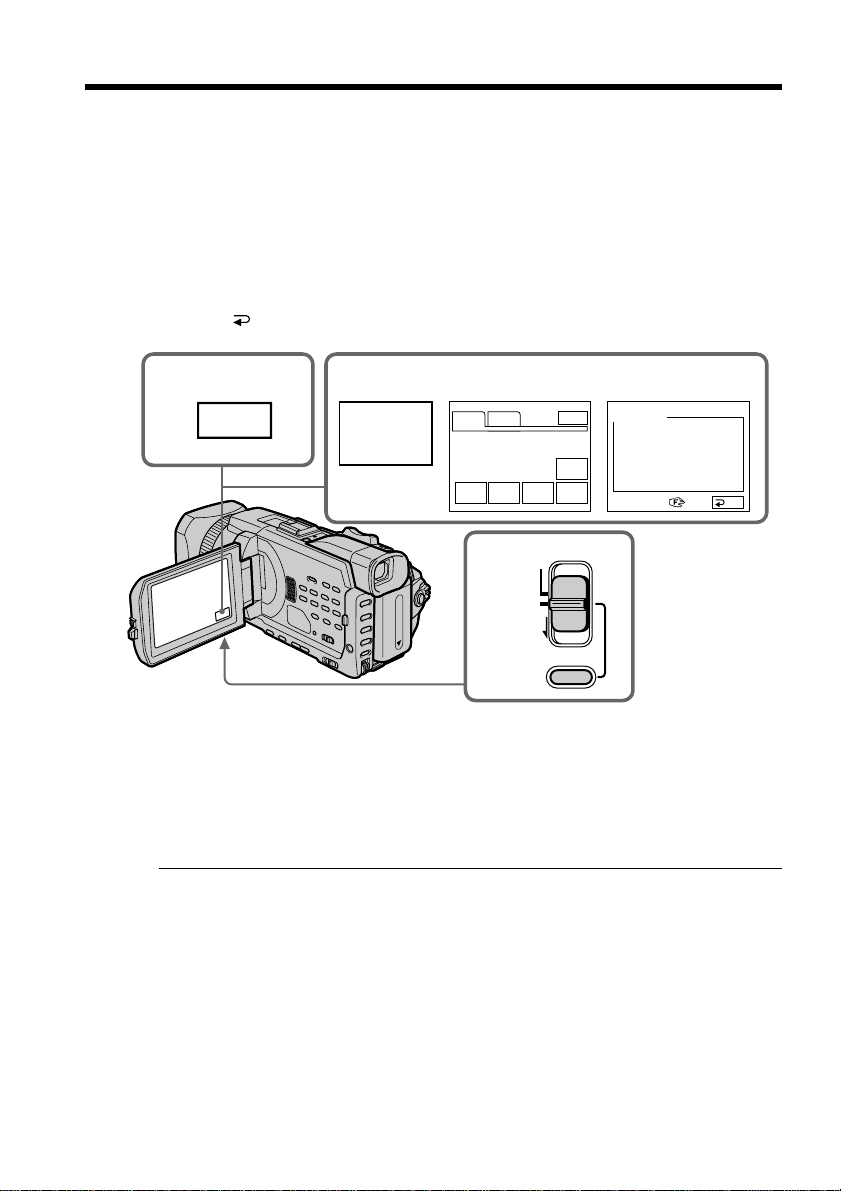
(1) Set the AUTO LOCK selector to the center (auto lock release) position while
the POWER switch is set to CAMERA or MEMORY/NETWORK (DCRTRV950 only). (p. 67)
(2) Press FN to display PAGE1.
(3) Press SPOT METER. The SPOT METER screen appears.
(4) Press the desired area in the frame on the LCD screen.
The SPOT METER indicator flashes on the LCD screen. The exposure of the
point you selected is adjusted.
(5) Press
2
OK to return to PAGE1.
3~5
FN
METER
SPOT
PAGE1 PAGE2
SPOT
DIG
FOCUS
EFFT
1
MEM
M I X
AUTO
LOCK
EXIT
END
SCH
SPOT
METER
SPOT METER
AUTO
OK
HOLD
Advanced Recording Operations
To return to FN
Press EXIT.
To return to automatic exposure
Set the AUTO LOCK selector to AUTO LOCK or press AUTO to return to PAGE1.
The following functions do not work during Flexible Spot Meter
– Backlight
– Spot light
– Shutter speed adjustment
If you press PROGRAM AE
Your camcorder also returns to automatic exposure.
75
Focusing manually
You can gain better results by manually adjusting the focus in the following cases.
Normally, focus is automatically adjusted.
•The autofocus is not effective when shooting:
– Subjects through glass coated with water droplets
– Horizontal stripes
– Subjects with little contrast with backgrounds such as walls and sky
•When you want to change the focus from a subject in the foreground to a subject in
the background.
•Shooting a stationary subject when using a tripod.
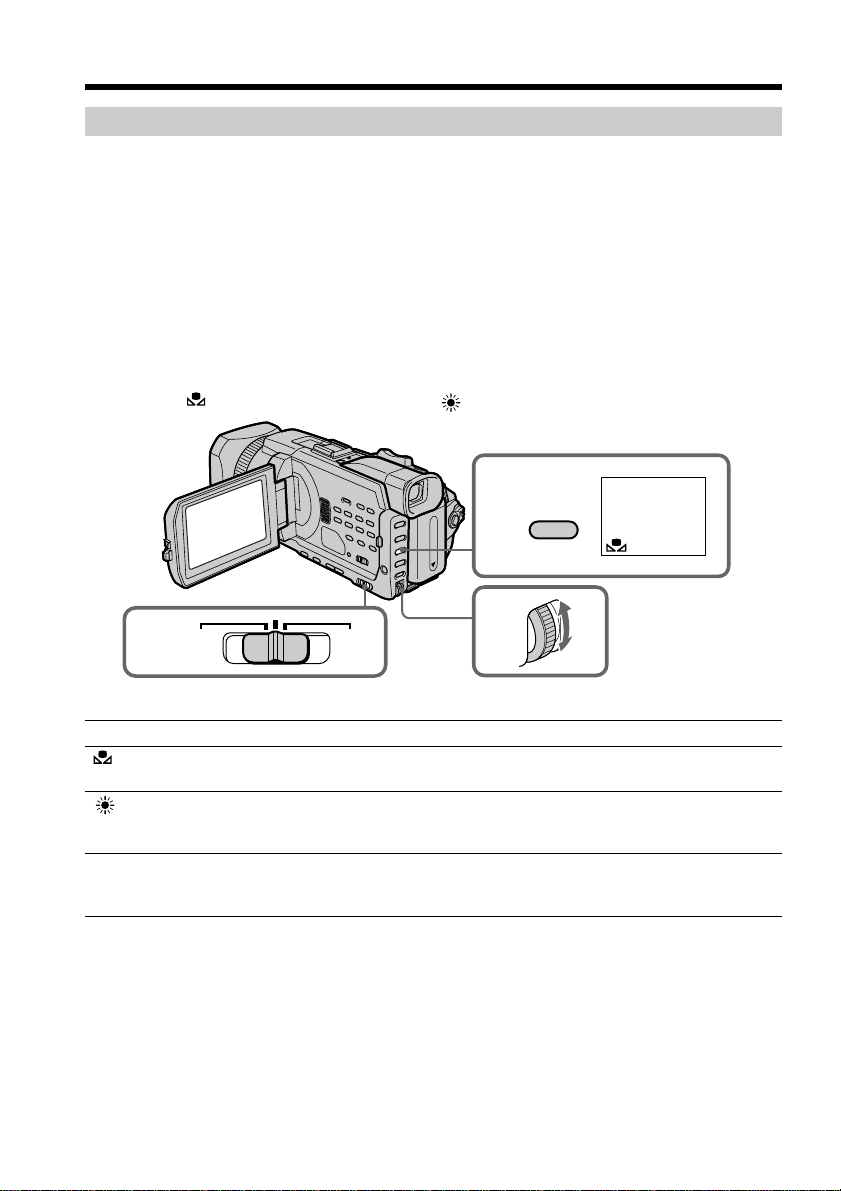
(1) Set FOCUS to MAN while the POWER switch is set to CAMERA or
MEMORY/NETWORK (DCR-TRV950 only).
The 9 indicator appears.
(2) Turn the focus ring to sharpen focus.
76
2
Focus ring
1
AUTO
MAN
INFINITY
FOCUS
PUSH AUTO
To return to the autofocus
Set FOCUS to AUTO.
To record distant subjects
When you set FOCUS to INFINITY, the focus changes to a setting appropriate for an
object in the far distance, and the indicator appears. When you release FOCUS, your
camcorder returns to the manual focus. Use this mode when your camcorder focuses on
near objects even though you are trying to shoot a distant object.
To shoot with auto focusing momentarily
Press PUSH AUTO.
The auto focus functions while you are pressing PUSH AUTO.
Use this button to focus on one subject and then another with smooth focusing.
When you release PUSH AUTO, manual focusing resumes.

Focusing manually
To focus precisely
It is easier to focus on subjects if you adjust the zoom to shoot at the “W” (wide-angle)
after focusing at the “T” (telephoto) position.
When you shoot close to the subject
Focus at the end of the “W” (wide-angle) position.
9 changes as follows:
when recording a distant subject
when the subject is too close to focus on
Focal distance information is displayed for about three seconds on the screen in
the following cases:
– When switching the focus adjustment mode from autofocus to manual
– When turning the focus ring
Focal distance information
– This information aids focusing if it is not easy to focus on the subject, for example,
when recording in the dark. Use this information as a rough guide to get a sharp
focus.
– You cannot get correct information if you have attached a conversion lens (optional)
to your camcorder.
Advanced Recording Operations
77
Using the spot focus – Spot Focus
You can take a picture with the appropriate focus automatically for just the point you
want to focus on and with its focus fixed.
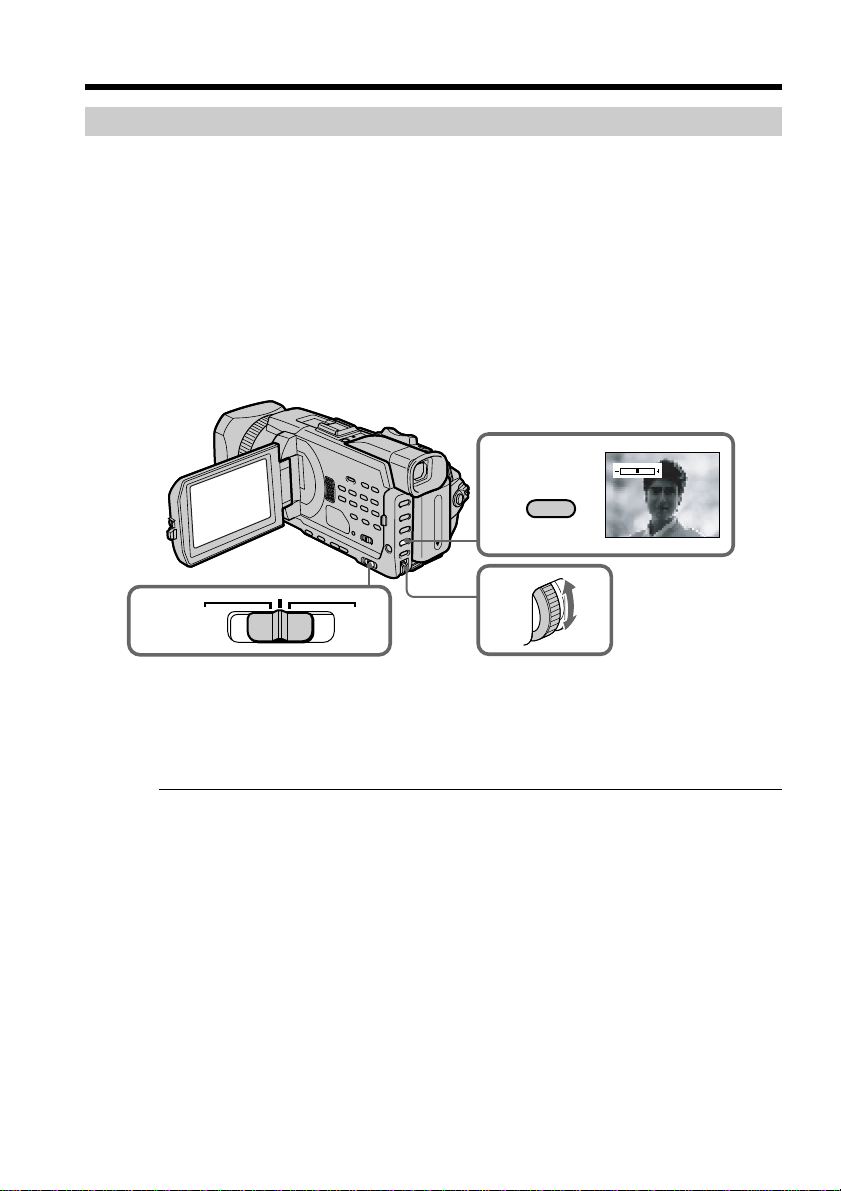
(1) Set FOCUS to MAN while the POWER switch is set to CAMERA or
MEMORY/NETWORK (DCR-TRV950 only).
(2) Press FN to display PAGE1.
(3) Press SPOT FOCUS. The SPOT FOCUS screen appears.
(4) Press the desired area in the frame on the LCD screen.
The SPOT FOCUS indicator flashes on the LCD screen. The spot focus of the
point you selected is adjusted.
(5) Press
OK to return to PAGE1.
2
FN
3~5
SPOT
FOCUS
To return to FN
Press EXIT.
To return to the autofocus
Set FOCUS to AUTO.
When Using PROGRAM AE
Spot focus do not work.
Focal distance information
It is not displayed on the screen.
PAGE1 PAGE2
SPOT
DIG
FOCUS
EFFT
1
INFINITY
MEM
M I X
AUTO
MAN
EXIT
END
SCH
SPOT
METER
FOCUS
PUSH AUTO
SPOT FOCUS
OK
78
Adjusting recording level manually – Sound
recording level
You can adjust the recording sound level. Use headphones to monitor the sound when
you adjust it.
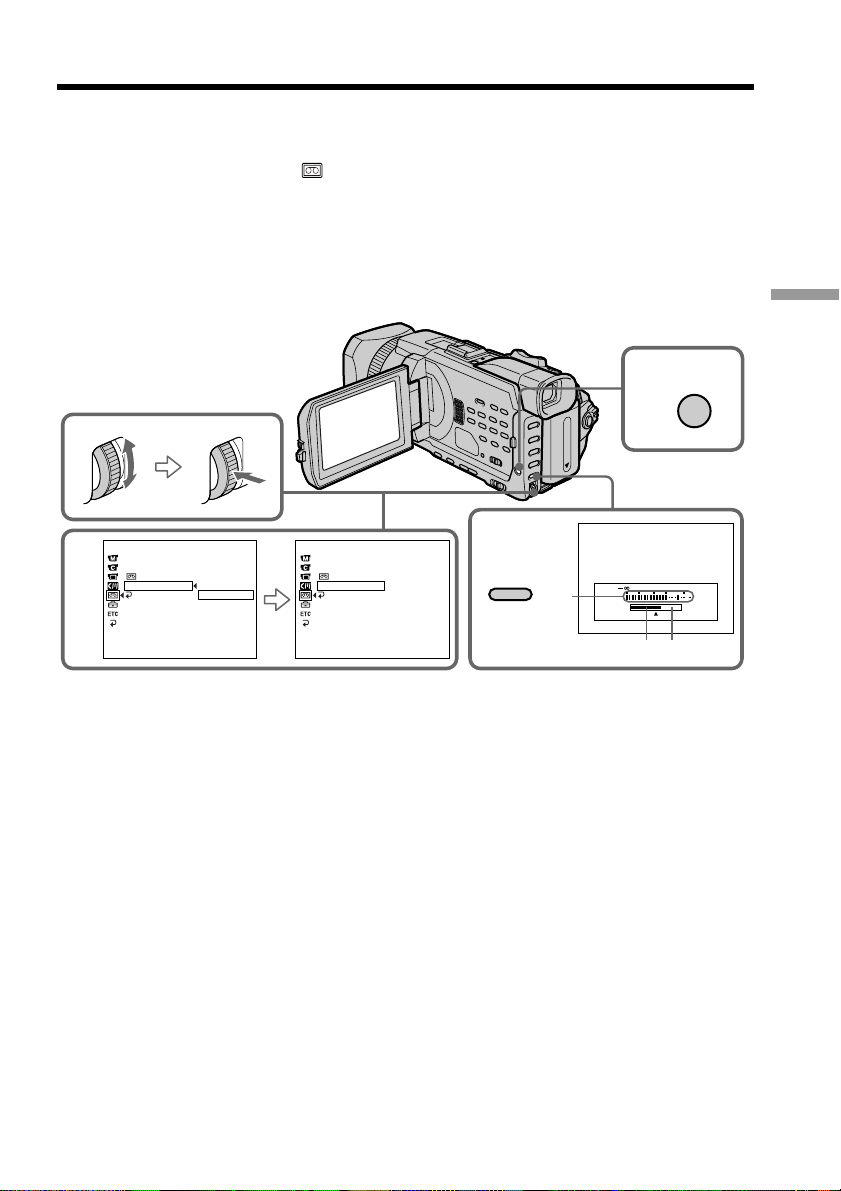
(1) Set MIC LEVEL in to MANUAL in the menu setting while the POWER
switch is set to CAMERA or VCR. (p. 214)
(2) Press MENU to erase the menu display.
(3) Press AUDIO LEVEL to display the recording level adjustment display in
standby mode.
(4) Turn the SEL/PUSH EXEC dial to adjust the recording level.
2
MENU
Advanced Recording Operations
1
TAPE SET
REC MODE
AUD
I
O MODE
REMA
M
I
C LEVEL
RETURN
[MENU] : END [MENU] : END
I
N
AUTO
MANUAL
TAPE SET
REC MODE
AUD
I
O MODE
REMA
M
I
C LEVEL
RETURN
[MENU] : END
[MENU] : END
I
N
MANUAL
[a] Recording level meter
[b]Decreases the recording level
[c] Increases the recording level
To clear the recording level adjustment display
Press AUDIO LEVEL.
To return to automatic recording sound level
Set MIC LEVEL to AUTO in the menu setting.
3
AUDIO LEVEL
[a]
30 20 12 0 dB
[b][c]
79

Adjusting recording level manually – Sound recording level
Notes on the manual adjustment
•The recording level setting is retained for about five minutes even after removing the
power supply.
•The recording level indicator appears at the lower-right on the screen.
The sound input through the AUDIO/VIDEO jack or the DV Interface
You cannot adjust the recording level.
When MIC LEVEL is set to AUTO
You cannot adjust the recording level, however, the recording level adjustment display
is displayed.
80
Interval recording
You can make a time-lapse recording by setting the camcorder to automatically record
and standby sequentially. You can achieve an excellent recording for flowering, gradual
appearances, etc., with this function.
Example
1 s 1 s
[a]
[b]
[c]
[a]REC TIME
[b]Waiting time
[c] INTERVAL
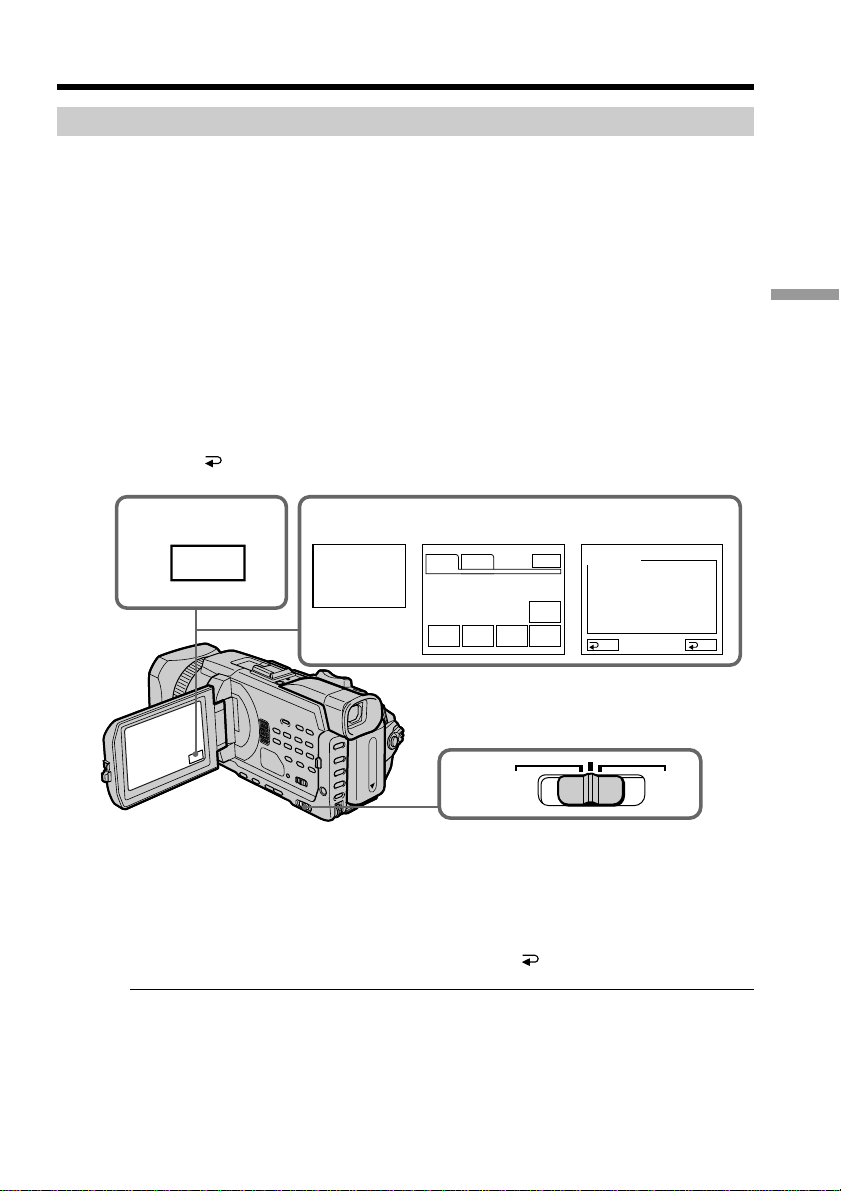
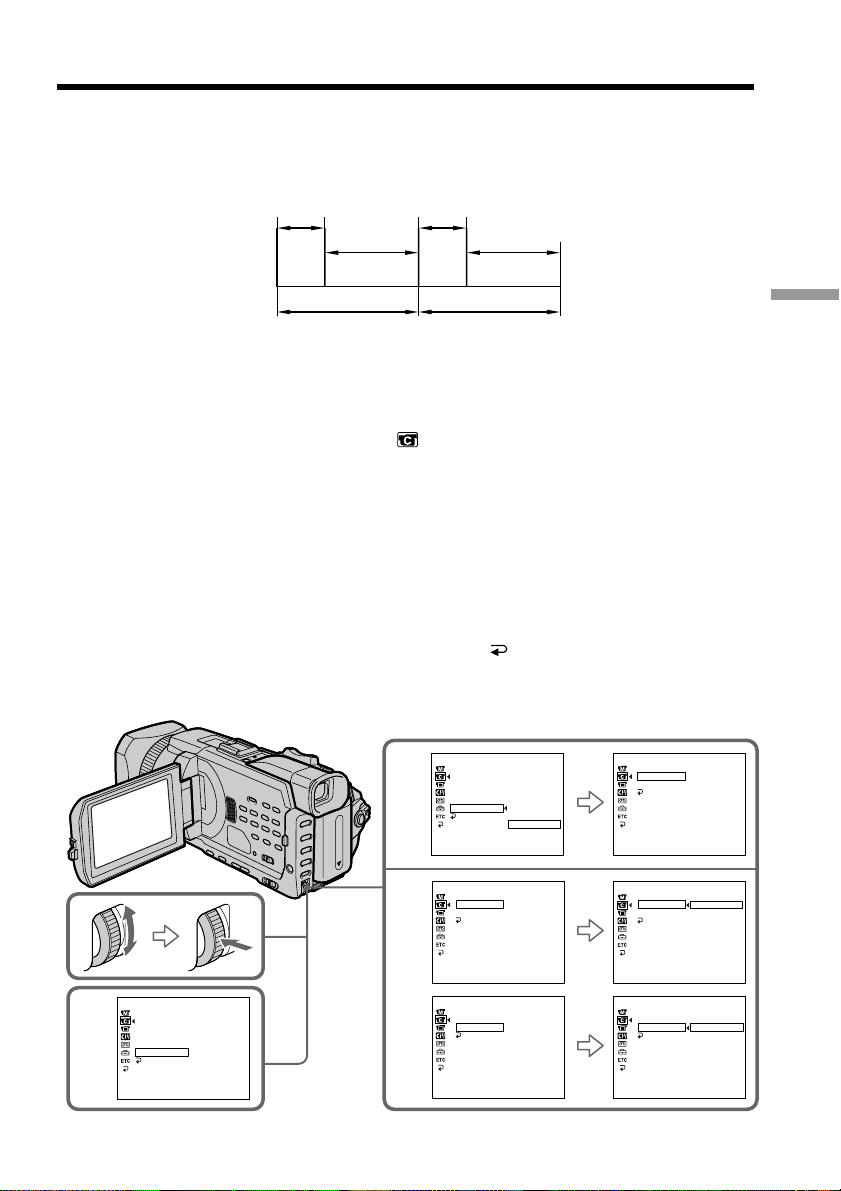
(1) In the standby, set INT. REC in to SET in the menu setting. (p. 209)
(2) Turn the SEL/PUSH EXEC dial to set INTERVAL and REC TIME.
1 Turn the SEL/PUSH EXEC dial to select INTERVAL, then press the dial.
2 Turn the SEL/PUSH EXEC dial to select the desired interval time, then
press the dial.
The time: 30SEC y 1MIN y 5MIN y 10MIN
3 Turn the SEL/PUSH EXEC dial to select REC TIME, then press the dial.
4 Turn the SEL/PUSH EXEC dial to select the desired recording time, then
press the dial.
The time: 0.5SEC y 1SEC y 1.5SEC y 2SEC
5 Turn the SEL/PUSH EXEC dial to select
(3) Turn the SEL/PUSH EXEC dial to select ON, then press the dial.
9 min 59 s
9 min 59 s
10 min10 min
RETURN, then press the dial.
Advanced Recording Operations
3
CAMERA SET
D ZOOM
PHOTO REC
16:9WIDE
STEADYSHOT
FRAME REC
INT. REC
RETURN
[
MENU] : END
CAMERA SET
D ZOOM
1
PHOTO REC
16:9WIDE
STEADYSHOT
FRAME REC
INT. REC
RETURN
[
MENU] : END
CAMERA SET
INT. REC
2
INTERVAL
REC TIME
RETURN
[
MENU] : END
STBY
ON
CAMERA SET
INT. REC
INTERVAL
REC TIME
RETURN
[
MENU] : END
ON
OFF
SET
30SEC
0.5SEC
STBY
STBY
STBY
CAMERA SET
INT. REC
INTERVAL
REC TIME
RETURN
[
MENU] : END
CAMERA SET
INT. REC
INTERVAL
REC TIME
RETURN
[
MENU] : END
CAMERA SET
INT. REC
INTERVAL
REC TIME
RETURN
[
MENU] : END
30SEC
30SEC
1MIN
5MIN
10MIN
0.5SEC
1SEC
1.5SEC
2SEC
STBY
STBY
STBY
(continued on the following page)
81
Interval recording
4
MENU
(4) Press MENU to erase the menu display. The INTERVAL indicator flashes.
(5) Press START/STOP to start interval recording. The INTERVAL indicator
lights up.
To cancel the interval recording
Perform either of the following:
– Set INT. REC to OFF in the menu settings.
– Set the POWER switch to other than CAMERA.
STBY
INTERVAL
5
POWER
VCR
OFF(CHG)
CAMERA
MEMORY/
NETWORK
82
To perform normal recording during the interval recording
Press START/STOP.
The interval indicator flashes. During the waiting time you can perform normal
recording only once.
To stop normal recording, press START/STOP again. Step4 is displayed on the screen.
On recording time
There may be a discrepancy in the recording time of up to +/– six frames from the
selected time.
When pressing START/STOP during recording time
Interval recording stops. To restart it, press START/STOP again.

Frame by frame recording
– Frame recording
You can make a recording with a stop-motion animated effect using frame recording.
To create this effect, alternately move the subject a little and make a frame recording.
We recommend that you use a tripod, and operate your camcorder using the Remote
Commander after step 3.
(1) In the standby, set FRAME REC in to ON in the menu setting. (p.209)
(2) Press MENU to erase the menu display.
The FRAME REC indicator lights up.
(3) Press START/STOP to start frame recording. Your camcorder makes a
recording for about six frames, and returns to recording standby.
(4) Move the subject, and repeat step 3.
MENU
3
POWER
VCR
OFF(CHG)
CAMERA
MEMORY/
NETWORK
Advanced Recording Operations
1
CAMERA SET
D ZOOM
PHOTO REC
16:9WIDE
STEADYSHOT
FRAME REC
INT. REC
RETURN
[MENU] : END
STBY
OFF
ON
CAMERA SET
D ZOOM
PHOTO REC
16:9WIDE
MENU
STEADYSHOT
FRAME REC
INT. REC
RETURN
[MENU] : END
STBY
ON
To cancel the frame recording
Perform either of the following:
– Set FRAME REC to OFF in the menu settings.
– Set the POWER switch to other than CAMERA.
Note
The remaining tape time is not indicated correctly if you use this function continuously.
When using the frame recording
The last recorded frame is longer than other frames.
83
— Advanced Playback Operations —
Playing back tapes with picture effect
During playback, you can process a scene using the following picture effect:
NEG. ART, SEPIA, B&W and SOLARIZE.
(1) In the playback or playback pause, press MENU, then select P EFFECT in
with the SEL/PUSH EXEC dial, then press the dial (p. 208).
(2) Turn the SEL/PUSH EXEC dial to select the desired mode, then press the dial.
For details of each picture effect, see page 58.
1
MANUAL SET
MENU
P EFFECT
RETURN
[
MENU] : END
OFF
NEG. ART
SEPIA
B&W
SOLARIZE
84
To cancel the picture effect
Set P EFFECT to OFF in the menu settings.
Notes
•You cannot process externally input scenes using picture effect.
•You cannot record images on a tape on your camcorder when you have processed the
image using the picture effect. However, you can record images on a “Memory Stick”
(p. 144, 156), or on a VCR using your camcorder as a player.
Pictures processed by picture effect
Pictures processed by picture effect are not output through the DV Interface.
When you set the POWER switch to OFF (CHG) or stop playing back
Picture effect is automatically canceled.
 Loading...