

Page 1

3-080-343-11 (1)
Network Function/
Application
Operating Instructions/
Mode d’emploi de
l’application/
fonction réseau
© 2003 Sony Corporation
Page 2

On trademarks
•“Memory Stick” and are registered trademarks of Sony Corporation.
•The BLUETOOTH trademarks are owned by their proprietor and used by Sony
Corporation under license.
•NetFront by Access Co., Ltd. is adopted for the Internet function of this product.
NetFront is a registered trademark of Access Co., Ltd in Japan.
Copyright © 1996 – 2003 ACCESS CO., LTD.
•Portions of the supplied software are based partially on the work of the Independent
JPEG Group.
All other product names mentioned herein may be the trademarks or registered
trademarks of their respective companies. Furthermore, “TM” and “®” are not
mentioned in each case in this manual.
No compensation for your recordings
Any recording contents or downloaded files cannot be compensated for being lost due
to recording/playback malfunction or storage media problems.
Precautions
•Before using the network function, make sure you set the clock on your camcorder.
For details, refer to the operating instructions of your camcorder. If you use the
network function without setting the clock, you may not be able to send/receive email
or view a web page.
•Do not remove the battery pack or disconnect the AC Adaptor while operating the
network function, or the setup for the network function may be lost. Also, exit the
network function when setting the POWER switch to OFF (CHG) or switching modes
in order to prevent the network function setup from being lost.
•It is recommended that you make backup copies of your email messages and your
network preferences. These may be lost from time to time due to memory corruption.
To save the network preferences, write them down on paper, or use “Setup memo,”
described (p. 110). Also, this data may be lost when the camcorder is repaired by
services.
•The reset button cannot reset the network preferences.
Note on network operation when using the battery pack
When the remaining battery power is insufficient for network operation, use the AC
Adaptor or replace the battery pack with a fully charged battery pack. Before
connecting the AC Adaptor or replacing the battery pack, be sure to exit wireless
connection using Bluetooth technology.
Note on the network function
Wireless connection function using Bluetooth technology is only available in the
following countries or areas:
Austria, Belgium, Denmark, Finland, France, Germany, Greece, Ireland, Italy,
Luxembourg, Netherlands, Norway, Portugal, Spain, Sweden, Switzerland and United
Kingdom. (As investigated by Sony Corporation on 1. 4. 2003)
When using the camcorder in a country or area not described above, wireless
connection using Bluetooth technology is available only in the country or area where
you purchased the camcorder.
For customers in CANADA
Operation is subject to the following two conditions: (1) this device may not cause
interference, and (2) this device must accept any interference, including interference
that may cause undesired operation of the device.
To prevent radio interference to the licensed service, this device is intended to be
operated indoors and away from windows to provide maximum shielding. Equipment
that is installed outdoors is subject to licensing.
2-GB
The illustrations in this manual may be different from the actual set for some
models.
The DCR-TRV80 is the model used for illustration purposes.
Page 3

Table of contents
Introduction
The network function on your camcorder
.................................................................. 4
The Bluetooth function on your
camcorder
(DCR-TRV80/TRV80E only) ............... 5
Basic operations of the
network function
On network operation.................................. 6
How to use the Network Menu.......... 6
How to use the stylus .......................... 7
Inputting characters ..................................... 8
How to input characters ...................... 8
The character input screen ................ 10
The available characters list .............. 11
Character input setting ...................... 16
Preparation for Network
Operation
Using the network functions .................... 17
Setting up USB devices ..............................18
Before connection ............................... 18
Connecting to a telephone line via
the USB-PSTN Modem Adaptor
........................................................ 19
Connecting to LAN with the
USB-Ethernet Adaptor ................ 21
Registering Bluetooth devices
(DCR-TRV80/TRV80E only) ............. 23
Before communication ....................... 23
Registering a Bluetooth device ......... 24
Using the Modem Adaptor with
Bluetooth Function ...................... 24
Changing the communication
devices........................................... 29
Deleting a registered Bluetooth
device from the list ...................... 29
Setting the Internet connection .................31
Internet service provider ................... 31
Setting the network preferences ...............32
Network Setup .................................... 32
Setting other preferences ................... 41
Network Operation
Using email.................................................. 44
Sending email...................................... 44
Using the address book ..................... 55
Receiving email ................................... 61
Deleting received email ..................... 66
Viewing web pages .................................... 68
Viewing web pages ............................ 68
How to use the menu bar of the
browser ......................................... 70
Storing a web page on a
“Memory Stick” – Page Memo
........................................................ 76
Shutting down the browser .............. 81
Bluetooth Application
Operation
Using as a Remote Camera
(DCR-TRV80/TRV80E only) ............. 82
Preparation .......................................... 82
Operating the Remote Camera ......... 83
Ending the Remote Camera .............. 84
Transferring still images with Bluetooth
function – Image Transport
(DCR-TRV80/TRV80E only) ............. 86
Sending a still image .......................... 86
Receiving still images ........................ 90
Additional Information
File storage destinations and file names
................................................................ 92
Troubleshooting.......................................... 93
Trouble accessing the Internet .......... 93
Trouble with email ............................. 94
Trouble viewing web pages .............. 95
Troubles about sending a still image
(DCR-TRV80/TRV80E only) ..... 96
Troubles about receiving a still
image (DCR-TRV80/TRV80E only)
........................................................ 97
Adjusting the LCD screen
(CALIBRATION) ......................... 98
Displaying information on your
camcorder ..................................... 99
Specifications............................................. 101
Messages .................................................... 102
General ............................................... 102
Email................................................... 103
Browser .............................................. 104
Sending a still image
(DCR-TRV80/TRV80E only) ... 105
Receiving a still image
(DCR-TRV80/TRV80E only) ... 105
Glossary ..................................................... 106
Setup memo ............................................... 110
Introduction
3-GB
Page 4
– Introduction –
The network function on your camcorder
Congratulations on your purchase of this Sony Handycam. Your Handycam can access
the Internet via a compatible communicating device, allowing you the following:
Sending/receiving
email
4-GB
Easy access to
the Internet
Sending/receiving email
You can send or receive email anytime, and attach still images and moving pictures to
email messages.
Easy access to the Internet
You can view a web page on the LCD screen of your camcorder.
Note
Set your camcorder’s clock before using the network functions. (The default setting is
OFF.) If you do not set the clock, you cannot send/receive email or view web pages.
Page 5
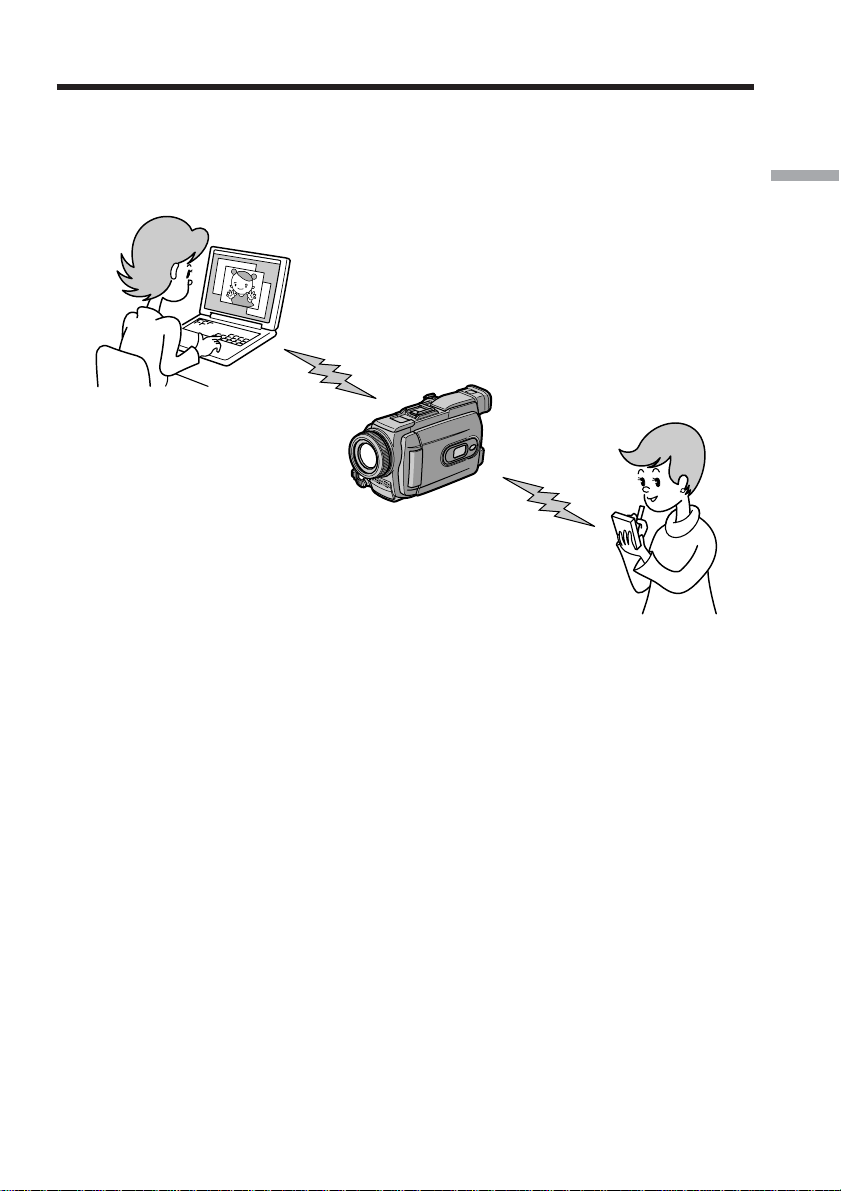
The Bluetooth function on your
camcorder
– DCR-TRV80/TRV80E only
Your camcorder is designed to communicate with another Bluetooth device, such as a
computer, or a PDA. Without connecting a cable, you can transfer still images, and can
use your camcorder as a remote camera to shoot remotely from a computer or a PDA.
Introduction
Using as a Remote Camera
You can operate your camcorder remotely from a BIP* compatible computer or PDA
with Bluetooth function.
Transferring still images – Image Transport
You can transfer still images between your camcorder and a BIP* compatible computer
or PDA with Bluetooth function.
* About BIP (Basic Imaging Profile)
The “Basic Imaging Profile” (BIP) is the Bluetooth specification used when transferring
images between Bluetooth devices. To connect with your camcorder, the Bluetooth
device must be compatible with the “Image Push Feature” or the “Remote Camera
Feature” of the “Basic Imaging Profile” (BIP). Before using the Bluetooth device, check
the BIP specifications of the device.
For details of Bluetooth Function, see page 23.
5-GB
Page 6
– Basic operations of the network function –
On network operation
This section describes the basic ways to operate your camcorder’s network function.
For details of how to hold your camcorder when operating the network function, refer
to the operating instructions supplied with your camcorder.
Note
Before using the network function, be sure to set the clock on your camcorder. For
details of clock setting, refer to “Setting the date and time” in the operating instructions
of your camcorder.
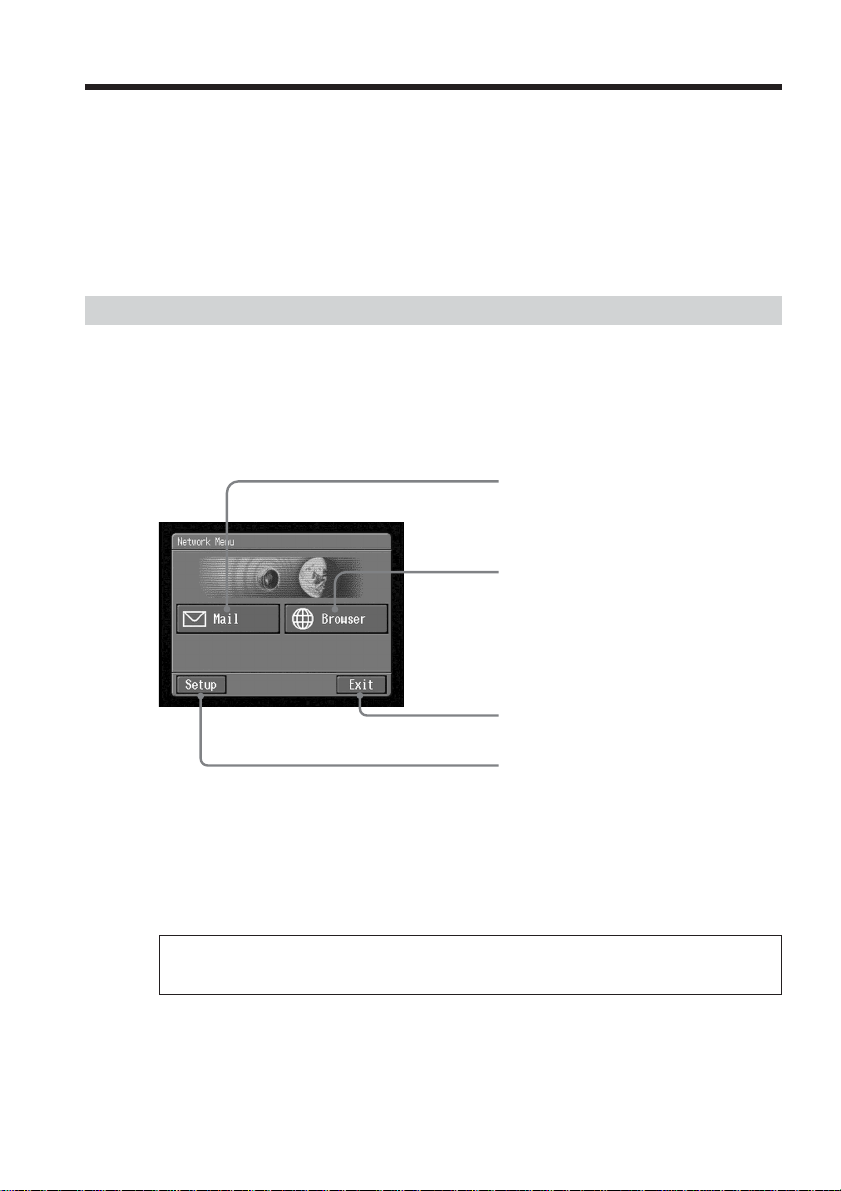
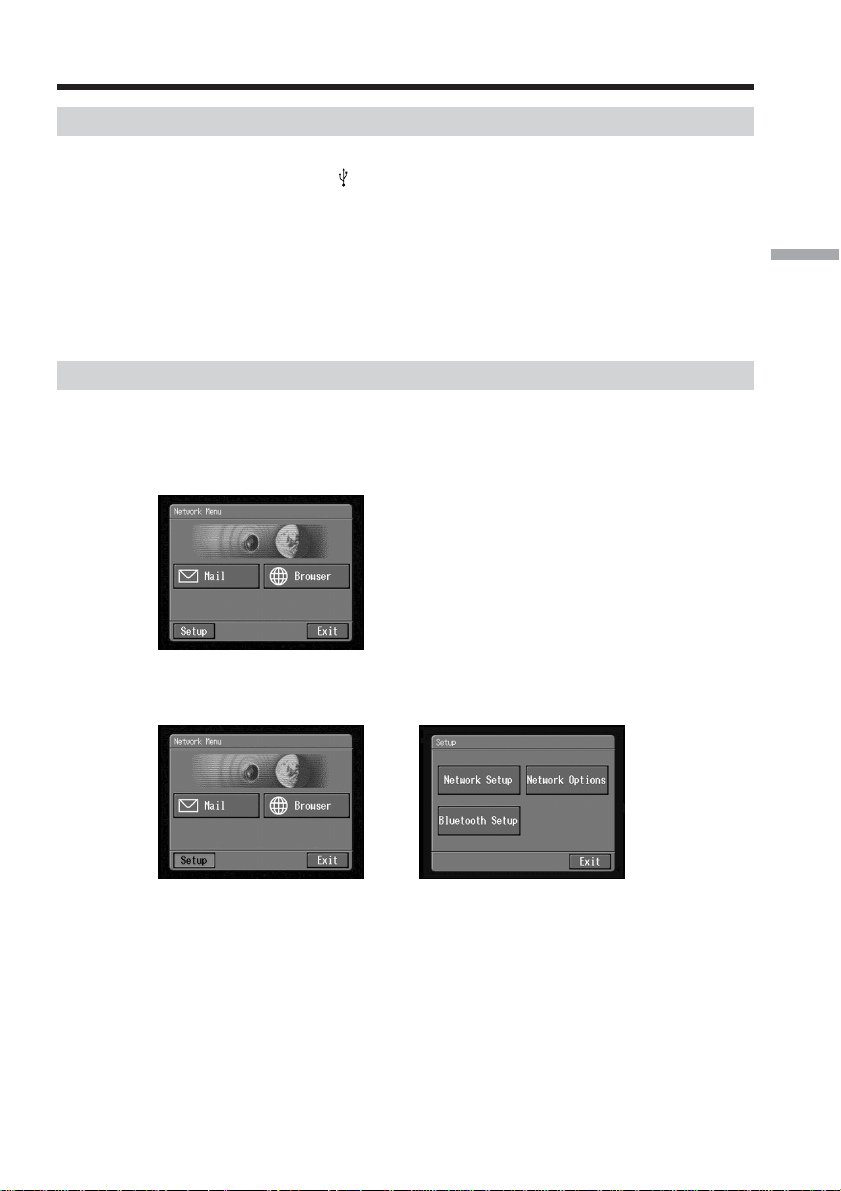
How to use the Network Menu
Tap the desired network function on Network Menu.
To display the Network Menu, set the POWER switch to MEMORY/NETWORK and
tap NETWORK.
For details, refer to “Accessing the network” in the operating instructions supplied with
your camcorder.
[a]
[b]
6-GB
[c]
[d]
[a]: For sending and/or receiving email, tap this button (p. 44).
[b]: For viewing a web page through the Internet, tap this button (p. 68).
[c]: For exiting the Network Menu, tap this button.
[d]: For changing the settings, tap this button.
The actual screens may differ from the illustrations in Network Function/
Application Operating Instructions.
Page 7

On network operation
How to use the stylus
The buttons required for operating your camcorder appear on the LCD screen. Operate
by pressing the buttons on the screen directly but lightly with the stylus supplied. In
this manual, pressing the buttons in this way using the stylus is referred to as
“tapping”.
Tap the desired button on the screen with the stylus.
The selected button turns orange.
Notes
•Use the stylus supplied to tap the LCD screen.
•Do not tap the LCD screen too hard.
•Do not touch the LCD screen with wet hands.
•When the LCD screen gets dirty, clean it with the supplied cleaning cloth.
•You cannot drag icons, as on a computer, by touching and sliding across your
camcorder screen with the stylus.
Basic operations of the network function
stylus
,
•Refer to the operating instructions supplied with your camcorder for the stylus holder
location. To avoid losing the stylus, we recommend that you always return it to the
holder after use.
7-GB
Page 8
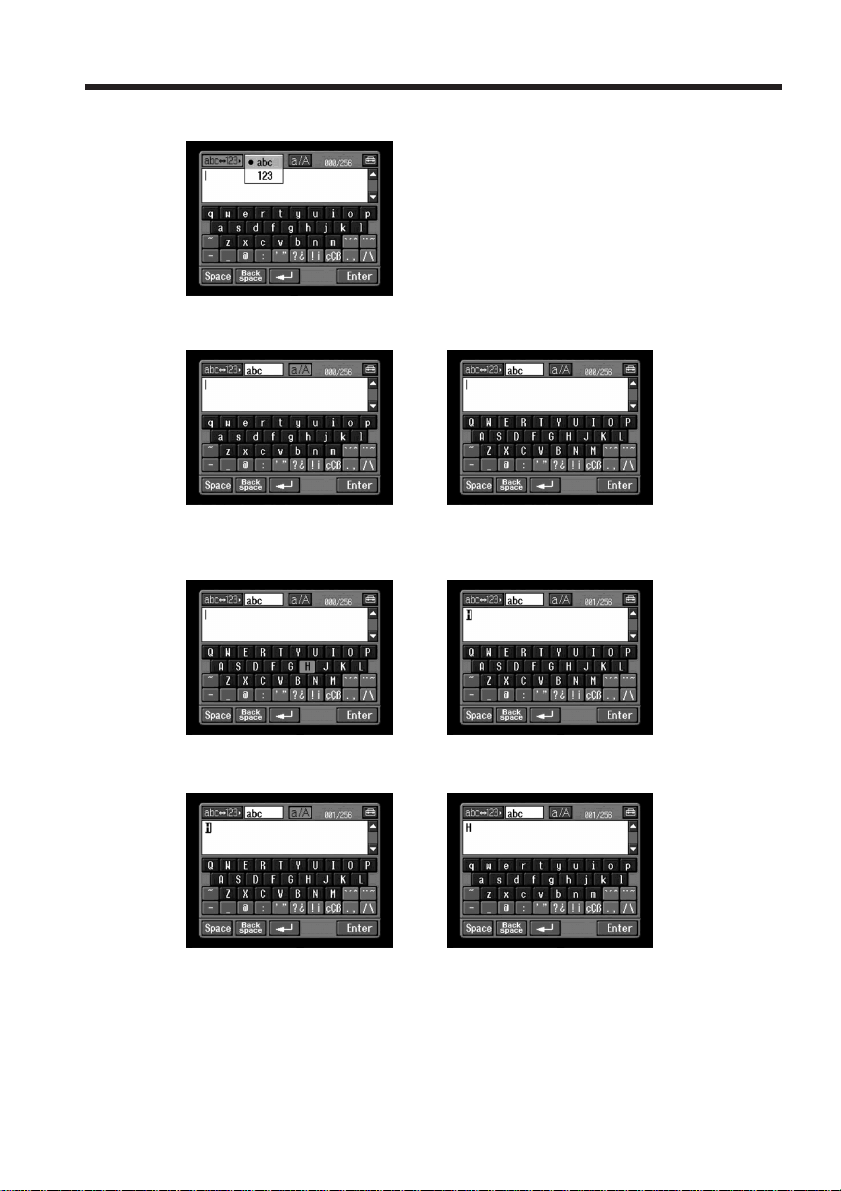
Inputting characters
How to input characters
You have to frequently enter characters, such as email addresses, or web pages
addresses (URLs), to use the network function. This section describes how to input
characters.
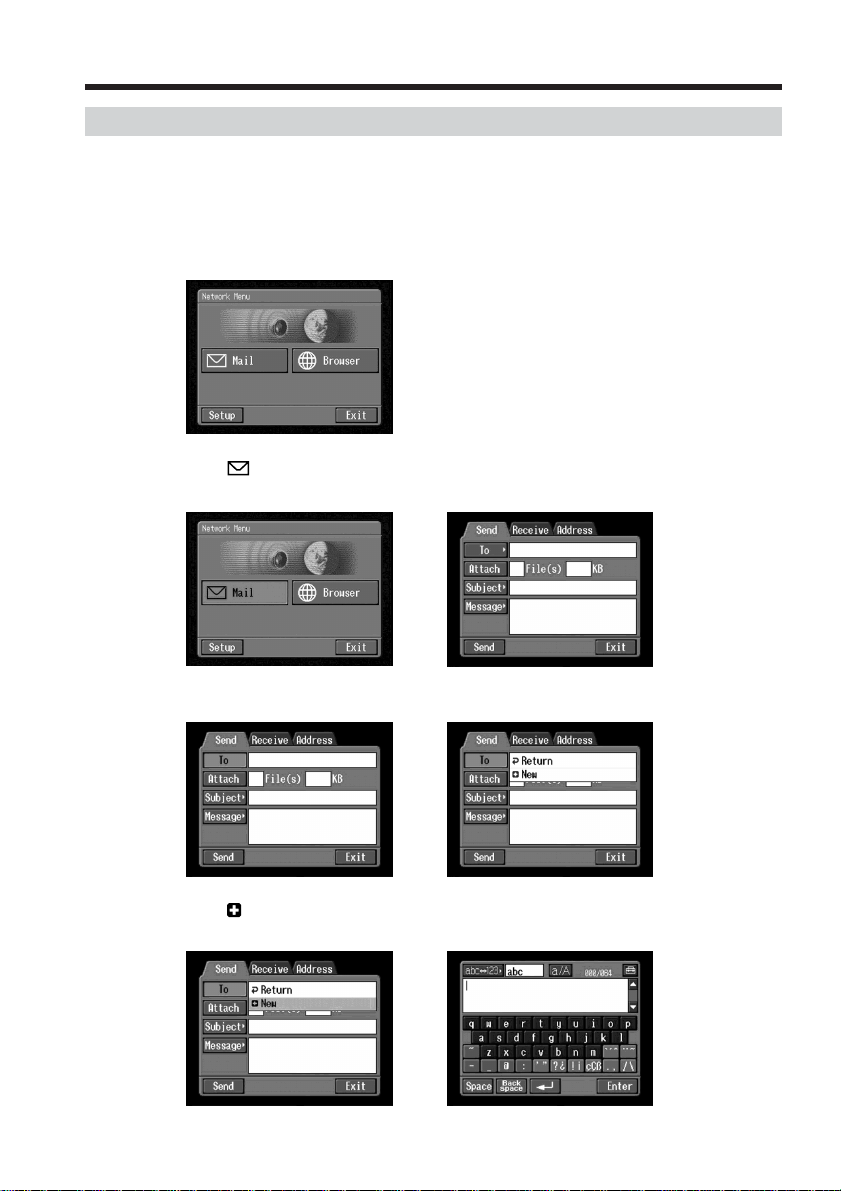
1
(1) Open the Network Menu.
For details of how to open the Network Menu, see page 6.
(2) Tap [
The Send screen appears.
Mail].
,
(3) Tap [To].
,
8-GB
(4) Tap [ New].
The character input screen appears.
,
Page 9
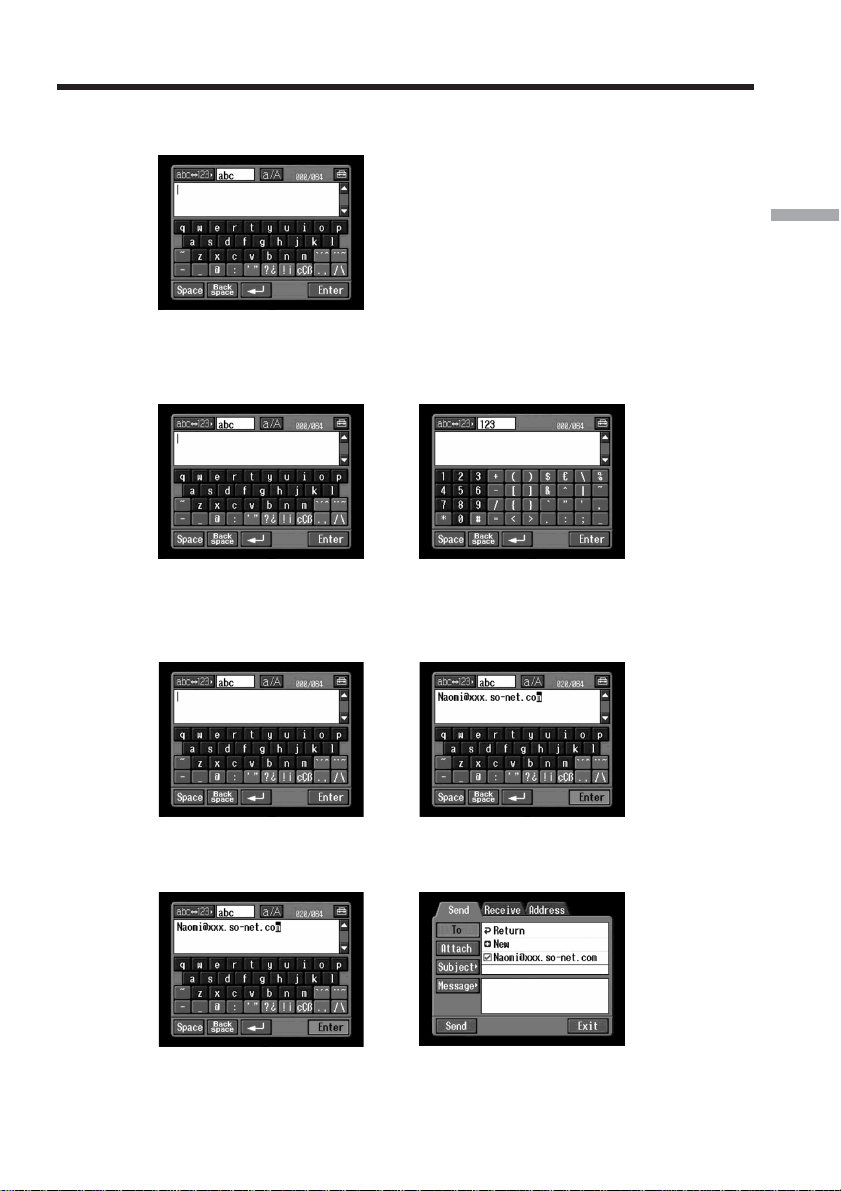
Inputting characters
2 Selecting the character type
Tap [abcy123], then tap the desired character type.
abc: When inputting alphabets.
123: When inputting numbers.
When you selected abc When you selected 123
3 Inputting characters
(1) Tap the characters you want to input.
Basic operations of the network function
,
(2) After you input the characters, tap [Enter].
The Send screen appears again.
,
9-GB
Page 10
Inputting characters
The character input screen
12
3
4
5
9
87
1 [abcy123] button
A list box appears when you tap the [abcy123] button. Tap the desired
type of character (alphabets or numbers) from the list box.
2 [a/A] button
[a/A] button appears when you input alphabets.
You can switch between upper case and lower case.
3 Input byte number/maximum byte number
4
5 Text area
6 [Enter] button
7
8 [Back space] button
Preferences
You can change the keyboard arrangement for alphabets.
If the text is long, you can scroll up or down by tapping v or V (scroll
buttons) to display the hidden text.
Tap this button to decide or close the character input screen.
button
Tap this button once to move the cursor to the next line.
Tap this button, and the letter just before the cursor is deleted. If you tap
the button for about three seconds, all the characters before the cursor are
deleted.
6
10-GB
9 [Space] button
Tap this button to insert a space.
Page 11

Inputting characters
The available characters list
When [abc] is selected
The alphabet keyboard has two types of arrangement (PC Style and Alphabetical
order). The default setting is PC Style. To change the keyboard settings, see page 16 for
details.
(PC Style) (Alphabetical order)
Alphabetical characters
abcdefghi j klm
nopqr stuvwxyz
ABCDEFGHI J KLM
NOPQR S TUVWXYZ
Symbol characters
The symbol characters below are input by a single tap:
~–_
The green keys input the symbol characters.
Each tap on the key changes the symbol characters in the following orders:
Key Character
` ´ ˆ
* a: à t á t â t a t... A: À t Á t  t A t...
e: è t é t ê t e t... E: È t É t Ê t E t...
i: ì t í t î t i t... I: Ì t Í t Î t I t...
o: ò t ó t ô t o t... O: Ò t Ó t Ô t O t...
u: ù t ú t û t u t... U: Ù t Ú t Û t U t...
y: ´y t y t... Y:
¨ ˜
* a: ä t ã t a t... A: Ä t à t A t...
e: ë t e t... E: Ë t E t...
i: ï t i t... I: Ï t I t...
n: ñ t n t... N: Ñ t N t...
o: ö t õ t o t... O: Ö t Õ t O t...
u: ü t u t... U: Ü t U t...
y: ÿ t y t...
’ ”
’ t ” t ’ t ...
? ¿
? t ¿ t ? t ...
! ¡
! t ¡ t ! t ...
ç Ç ß
ç t Ç t ß t ç t ...
. ,
. t , t . t ...
/ \
/ t \ t / t ...
@
Basic operations of the network function
:
´
t Y t...
Y
* You can input the alphabets with accent symbols. When you input the characters, tap
¨ ˜
` ´ ˆ
or
after inputting a, e, i, n, o, u, y, A, E, I, N, O, U or Y.
11-GB
Page 12
Inputting characters
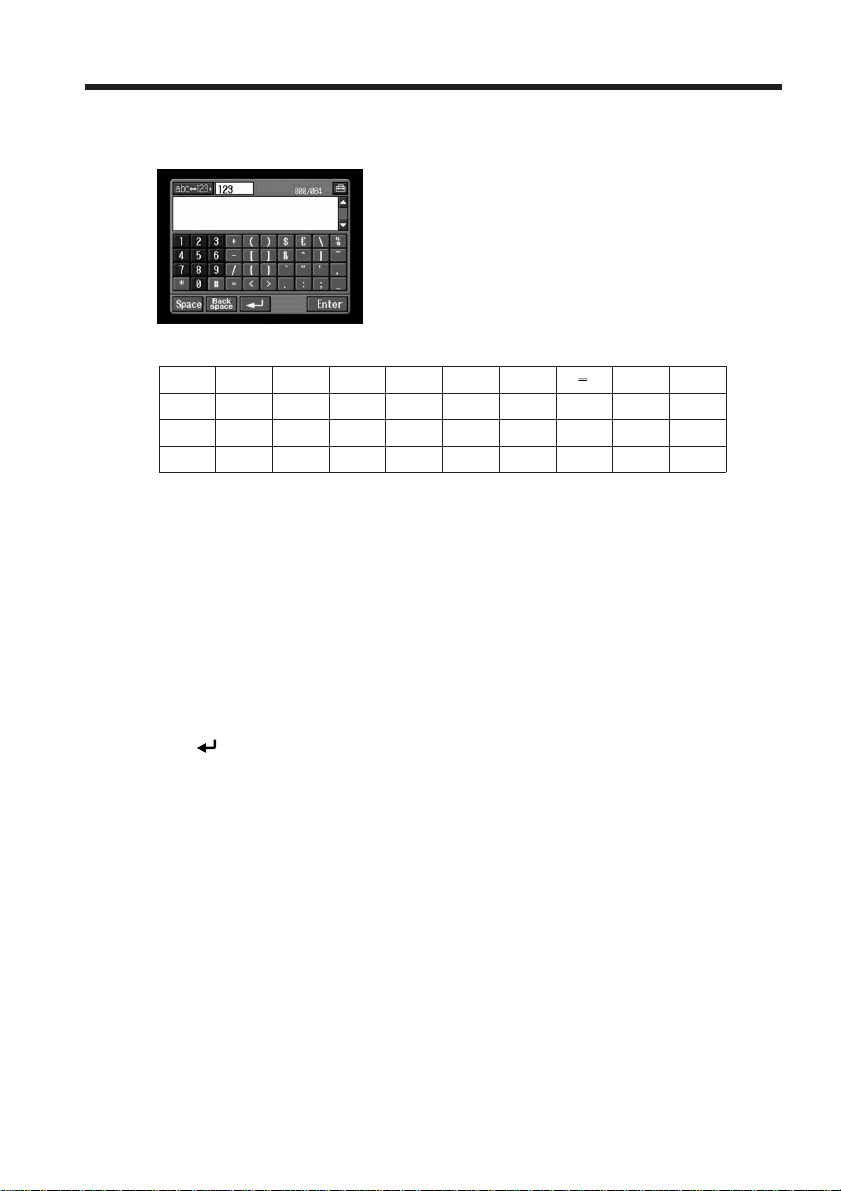
When [123] is selected
(Numerical order)
Numbers and symbol characters
123+()$
456–[ ]&ˆ|˜
789/{} ` ”’ ,
*0#=<>. : ; _
To switch between upper and lower case alphabet letters
Tap [a/A] to change the alphabetical keyboard, then enter characters.
To delete a character
Move the cursor with the stylus just to the right of the character that you want to delete,
and tap [Back space]. The character to the left of the cursor is deleted.
To add a character
Move the cursor with the stylus to the position at which you want to add a character,
then input characters.
C
\%
12-GB
To begin a new line
Tap [ ].
Page 13
Inputting characters
E.g., Enter “Hello” into the Subject item on the Send screen
1
(1) Open the Network Menu.
For details of how to open the Network Menu, see page 6.
(2) Tap [
The Send screen appears.
Mail].
,
2 Entering the subject of a message
(1) Tap [Subject].
Basic operations of the network function
(2) Tap [
New].
The character input screen appears.
,
13-GB
Page 14
Inputting characters
3
(1) Tap [abcy123], then tap [abc].
(2) Tap [a/A] to enable entry of upper-case letters.
,
(3) Tap [H].
“H” is entered.
,
14-GB
(4) Tap [a/A] to enable entry of lower-case letters.
,
Page 15

Inputting characters
(5) Tap [e].
“e” is entered.
,
(6) Tap [l], [l] and [o].
“llo” is entered.
,
(7) Tap [Enter].
“Hello” is entered and the Send screen appears again.
,
Basic operations of the network function
15-GB
Page 16

Inputting characters
Character input setting
Keyboard
When [abc] is selected on page 11, you can select between two types of keyboard
arrangement (PC Style or Alphabetical order). The default setting is PC Style.
1 Tap in the character input screen.
,
2 Tap the desired arrangement.
– PC Style (PC arrangement keyboard)
– Alphabetical order (ABC arrangement keyboard)
Alphabetical orderPC Style
16-GB
To switch the settings, tap on the upper right of the LCD screen.
Page 17
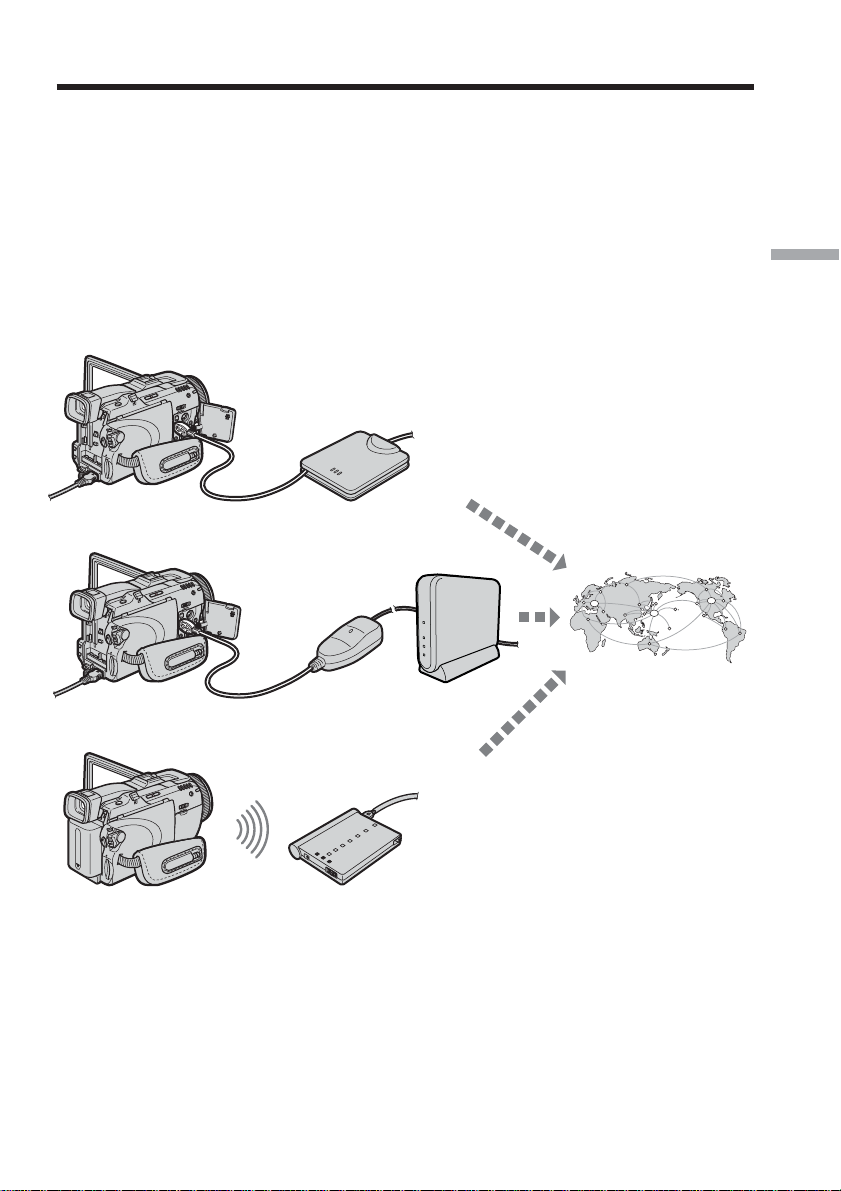
– Preparation for Network Operation –
Using the network functions
There are two network functions, namely email, and browser.
To fully enjoy the network functions, you have to finish setup tasks via your camcorder
(steps 1 and 2):
1 USB device Setup (p. 18) or Bluetooth device registration*
(p. 23)
2 Network Setup (p. 32)
* You can carry out Bluetooth device registration with the DCR-TRV80/TRV80E only.
Preparation for Network Operation
Your camcorder
Your camcorder
Your camcorder
USB-PSTN Modem
Adaptor (optional)
USB-Ethernet
Adaptor (optional)
Modem Adaptor with
Bluetooth Function (optional)
Router
(optional)
To the Internet via
your provider
17-GB
Page 18

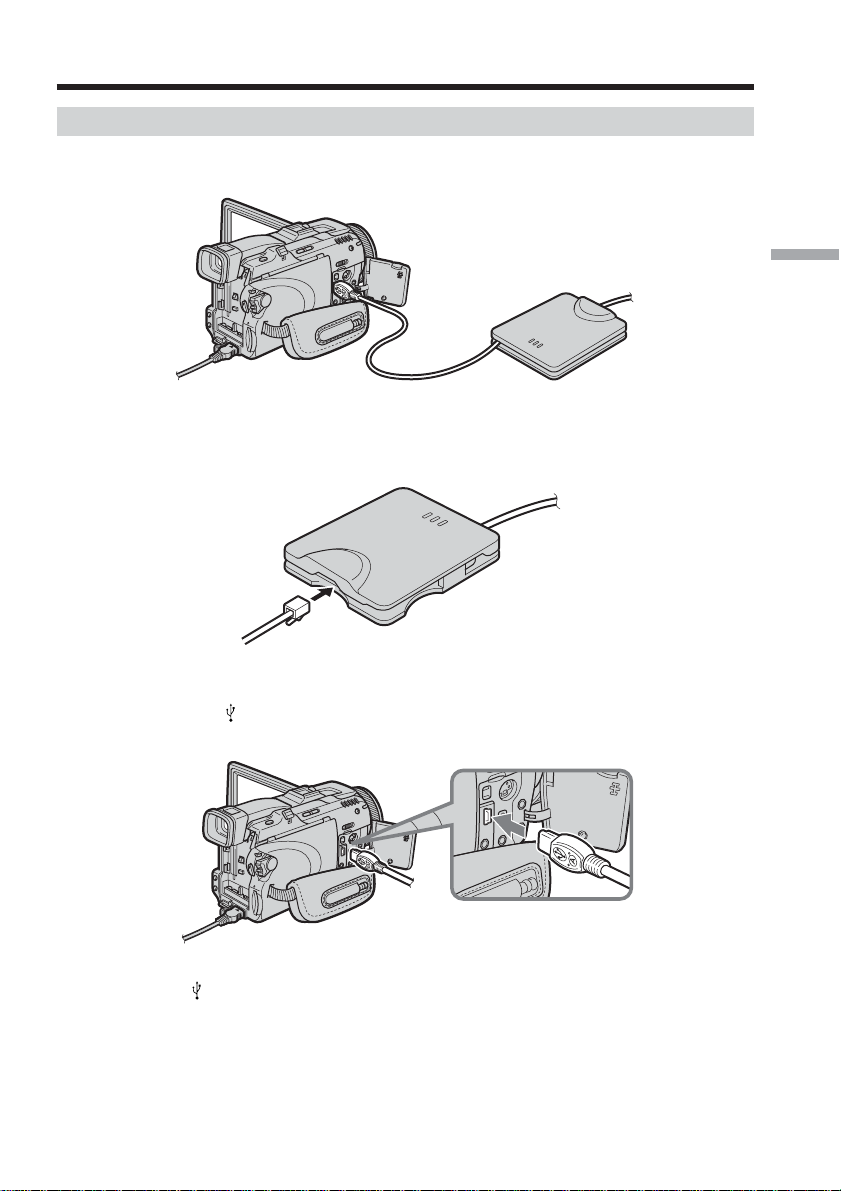
Setting up USB devices
Here we describe how to connect to the Internet with the USB devices.
There are two optional USB devices that can connect to your camcorder below:
– USB-PSTN Modem Adaptor (supplied to DCR-TRV39) (p. 19)
– USB-Ethernet Adaptor (p. 21)
For details of using these USB devices connected to your camcorder, refer also to the
operating instructions of the USB devices.
What is USB?
USB stands for Universal Serial Bus. It is the specification for connecting various data
communication devices such as computers and their peripherals, PDAs and mobile
phones.
Before connection
Priority sequence of communication devices
– DCR-TRV80/TRV80E only
When connected to a USB device but also within range of a Bluetooth device, your
camcorder automatically gives priority to communication with the USB device.
Notes
•Do not connect your camcorder with a USB device that is not a communication device.
Otherwise, “The Connected USB Device is not Compatible” appears on the screen and
your camcorder cannot communicate.
•Connect a USB device to your camcorder directly. Your camcorder cannot access the
Internet when connected through a USB hub.
•When using a Bluetooth device as a communication device, do not connect a USB
device to your camcorder (DCR-TRV80/TRV80E only).
18-GB
Page 19
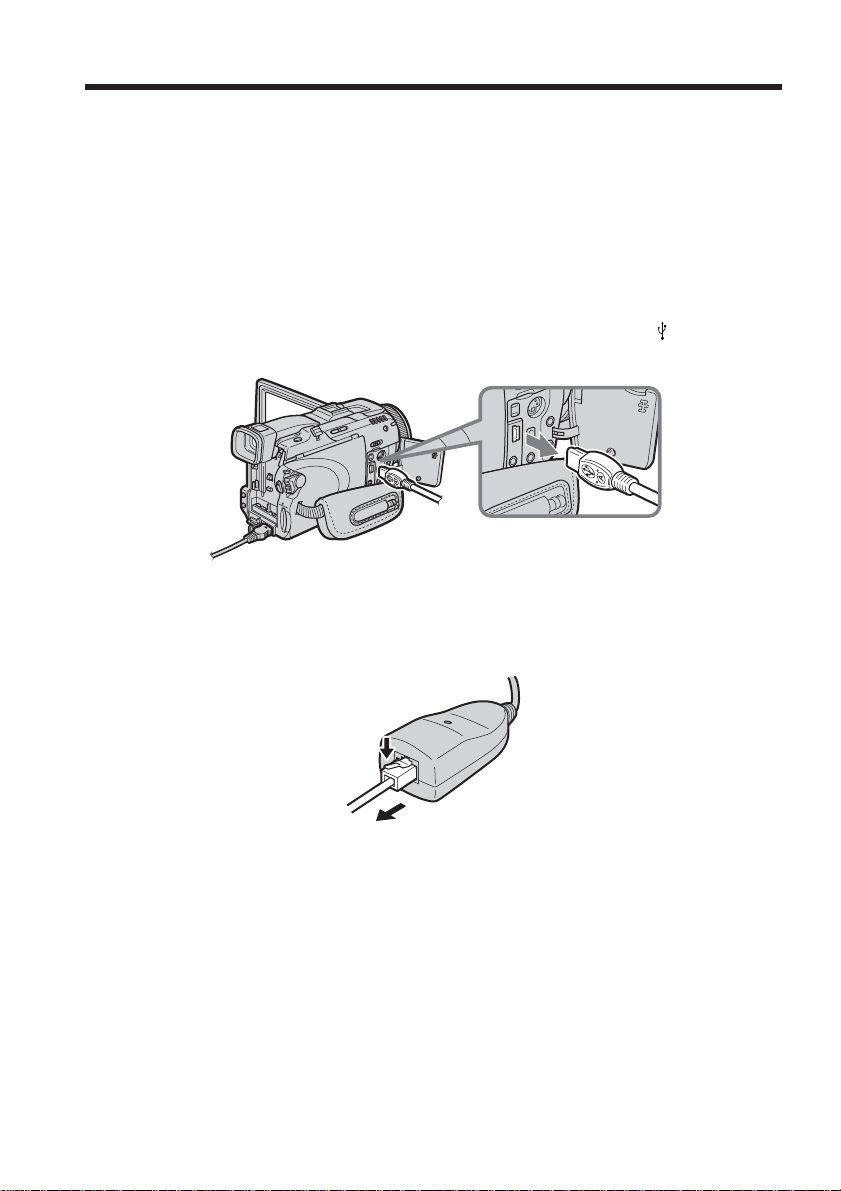
Setting up USB devices
Connecting to a telephone line via the USB-PSTN Modem Adaptor
Connect your camcorder to a telephone line via a USB Modem Adaptor to access the
Internet.
The following procedure shows you how to connect to a telephone line via the Sony
USB-PSTN Modem Adaptor.
(1) Connect the USB-PSTN Modem Adaptor to the telephone cord.
Preparation for Network Operation
(2) Open the jack cover of your camcorder.
(3) Connect
PSTN Modem Adaptor.
Tip
The
For details, refer to the operating instructions supplied with your camcorder.
(USB) jack of your camcorder and the USB connector of the USB-
(USB) jack location is different depending on the model.
19-GB
Page 20

Setting up USB devices
(4) Open the Network Menu.
For details of how to open the Network Menu, see page 6.
Note
Connect the USB-PSTN Modem Adaptor with your camcorder directly. Your camcorder
cannot access the Internet when connected through a USB hub.
To disconnect your camcorder from the telephone line
(1) Remove the USB connector of the USB-PSTN Modem Adaptor from (USB)
jack of your camcorder.
(2) Close the jack cover of your camcorder.
(3) Remove the telephone cord from the USB-PSTN Modem Adaptor.
20-GB
Page 21
Setting up USB devices
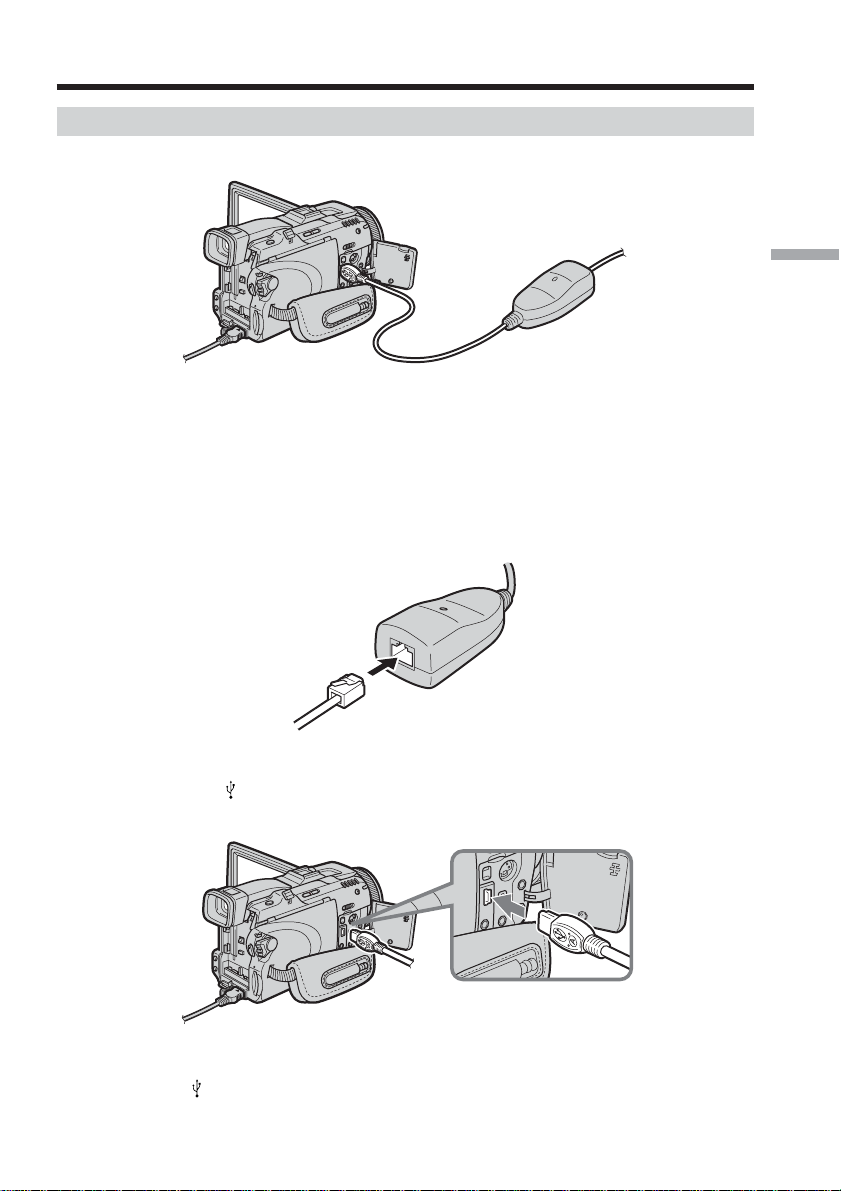
Connecting to LAN with the USB-Ethernet Adaptor
Connect your camcorder to the Internet via a LAN (Ethernet) adaptor.
The following procedure shows you how to connect to LAN via the Sony USB-Ethernet
Adaptor.
Notes
•You may not be able to use the email function, depending on your provider.
•If you use your camcorder in a company, for example, ask the network manager about
the proxy settings for the mail server and browser.
(1) Connect the USB-Ethernet Adaptor to a LAN cable.
Preparation for Network Operation
(2) Open the jack cover of your camcorder.
(3) Connect (USB) jack of your camcorder and the USB connector of the USB-
Ethernet Adaptor.
Tip
The
(USB) jack location is different depending on the model.
For details, refer to the operating instructions supplied with your camcorder.
21-GB
Page 22
Setting up USB devices
(4) Open the Network Menu.
For details of how to open the Network Menu, see page 6.
Notes
• Directly connect the USB-Ethernet Adaptor with your camcorder. Your camcorder
cannot access the Internet when connected through a USB hub.
• Do not connect an unspecified network or telephone cord to the USB-Ethernet
Adaptor. Doing so may cause a malfunction, overheating or fire. For details, refer to
the operating instructions supplied with the USB-Ethernet Adaptor.
To disconnect your camcorder from LAN
(1) Remove the USB connector of the USB Ethernet Adaptor from (USB) jack of
your camcorder.
(2) Close the jack cover of your camcorder.
(3) Remove the LAN cable from the USB Ethernet Adaptor.
22-GB
Page 23

Registering Bluetooth devices
– DCR-TRV80/TRV80E only
Before communication
What is Bluetooth wireless technology?
Bluetooth wireless technology allows communication between various Bluetooth
devices without using cables. Devices which can use this technology include PCs,
computer peripheral devices, PDAs, and mobile phones. This omnidirectional
communication system enables connection even if a Bluetooth device is in a bag, for
example, or there is an obstacle between the devices.
Also, the Bluetooth wireless technology has advanced security functions, such as
scrambled frequencies and data encryption.
Authentication
The authentication routine can block unspecified users’ access to this network. When
attempting communication with an unregistered Bluetooth device, the devices must
first be registered with each other by entering a common passkey to each device. When
connecting with a previously registered Bluetooth device, communication starts
without you entering the passkey.
Tip on “Passkey”
The passkey is a 1 to 16 character identification number needed to allow two
Bluetooth devices to communicate with each other. The connection will be
permitted after entering the passkey. This “Passkey” is sometimes referred to as
the “Bluetooth passkey”, “PIN”, “Bluetooth PIN”, etc.
Radio wave indication
indicates the radio wave status of the connected Bluetooth device. (Use this
indication as a guide.)
Preparation for Network Operation
23-GB
Page 24

Registering Bluetooth devices
Registering a Bluetooth device
To enable your camcorder to communicate with a Bluetooth device, the devices should
be registered with each other. Here we describe how to register the Sony Modem
Adaptor with Bluetooth Function. Once registration is complete, you do not have to
reregister the Bluetooth device as long as you do not cancel registration. You can
register up to three Bluetooth devices on your camcorder. Refer also to the operating
instructions supplied with your Bluetooth device.
For details of Bluetooth devices compatible with your camcorder, access the following
URL:
For customers in Canada
http://www.sony.ca/service/
For customers in the areas other than Canada
http://www.css.ap.sony.com/
Using the Modem Adaptor with Bluetooth Function
Connect your camcorder to a Bluetooth device by Bluetooth wireless technology.
Your camcorder
Notes
•When using Sony BTA-NW1/BTA-NW1A Modem Adaptor with Bluetooth Function,
place it so that there are no obstacles between your camcorder and the device. The
distance between the devices must be within 10 m (33 feet).
•The connection may be interrupted depending on the communication conditions.
•When your camcorder is connected to a USB device, your camcorder cannot
communicate via a Bluetooth device.
•Do not remove the battery pack while your camcorder is communicating with
Bluetooth devices. Doing so may cause malfunction of your camcorder.
Modem Adaptor with Bluetooth
Function (not supplied)
1 Preparing a Modem Adaptor with Bluetooth Function
Set a Modem Adaptor with Bluetooth Function to connection standby (BONDING). For
details, refer to the operating instructions supplied with your Modem Adaptor.
24-GB
Page 25
Registering Bluetooth devices
2 Specifying your Modem Adaptor with Bluetooth Function as the
connection device
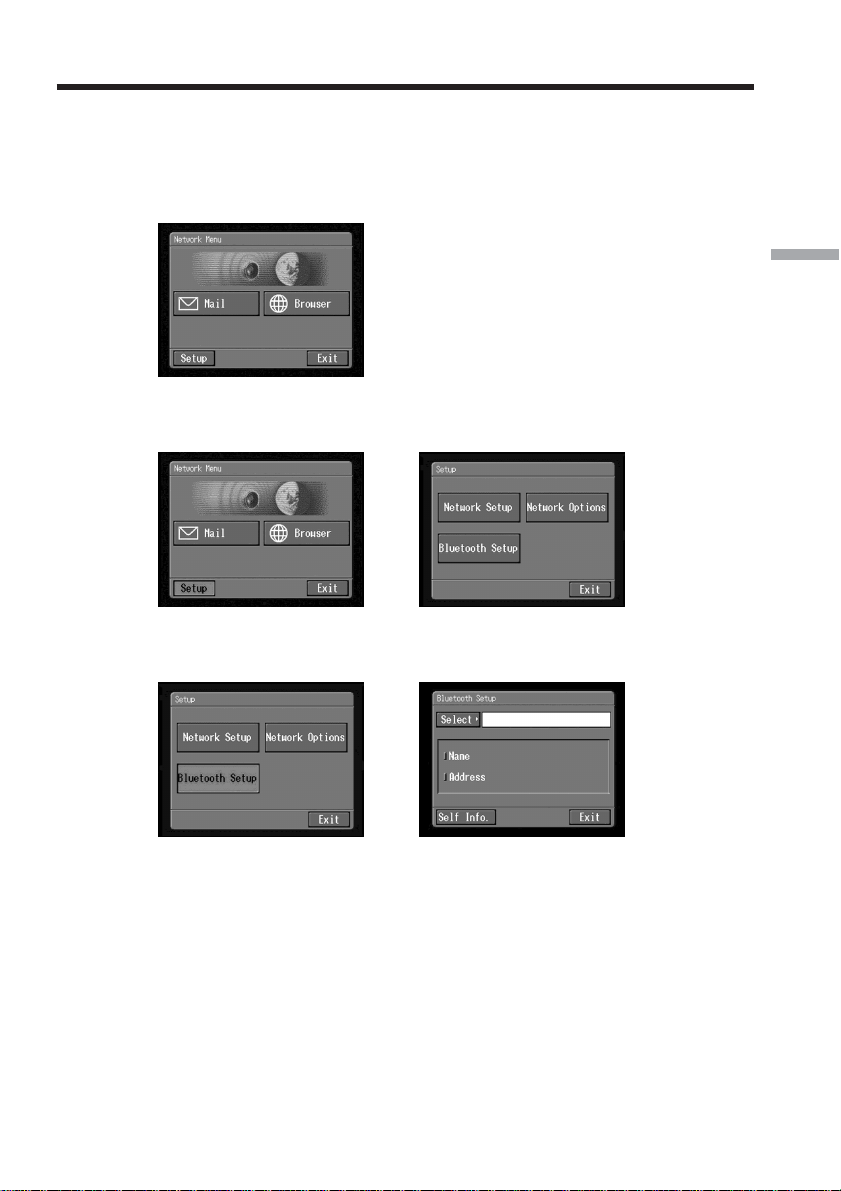
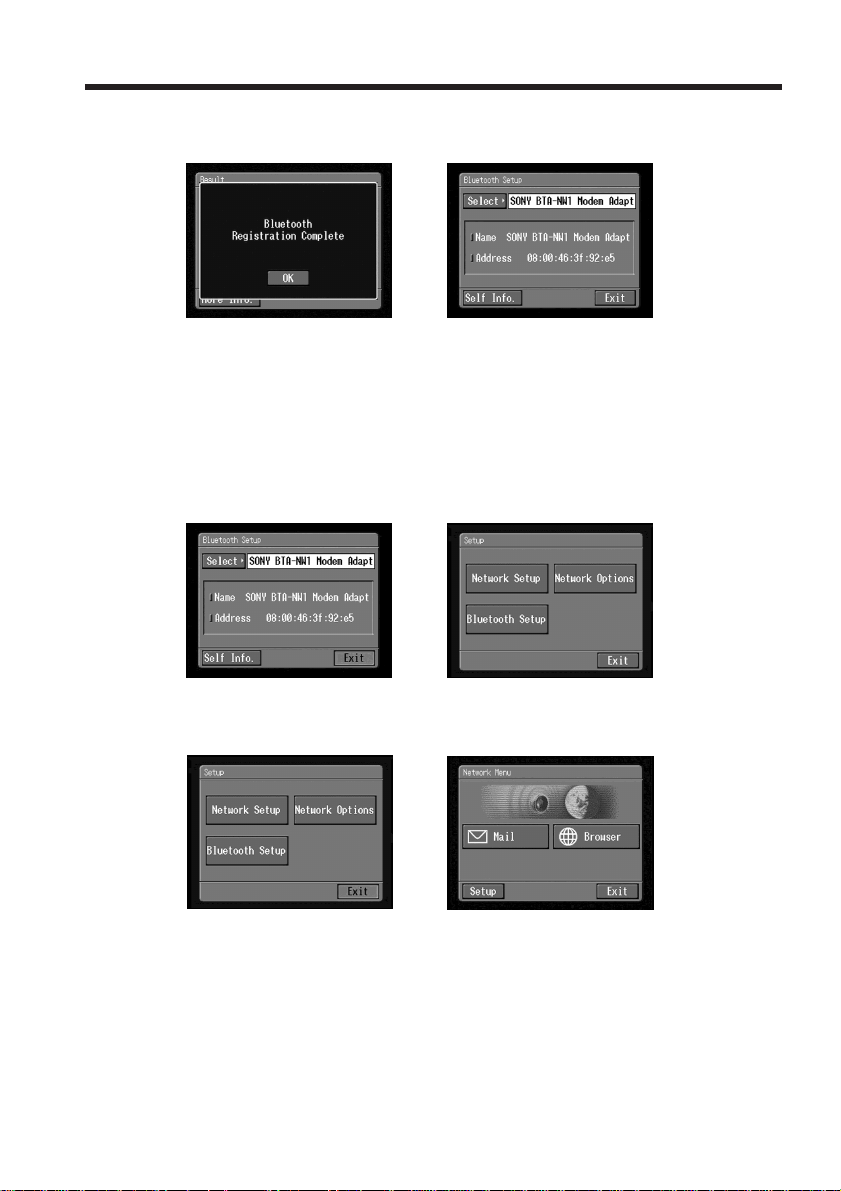
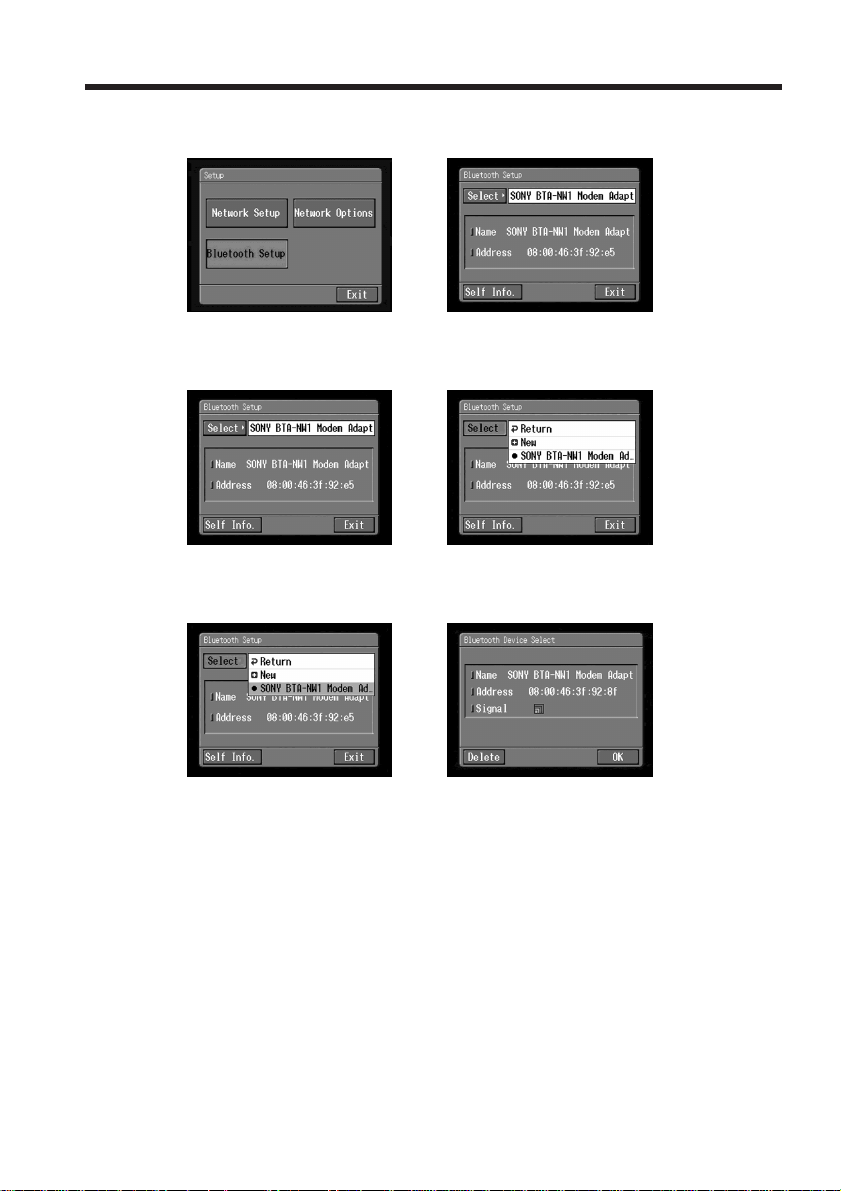
(1) Open the Network Menu.
For details of how to open the Network Menu, see page 6.
(2) Tap [Setup].
The Setup screen appears.
,
(3) Tap [Bluetooth Setup].
The Bluetooth Setup screen appears.
Preparation for Network Operation
,
25-GB
Page 26
Registering Bluetooth devices
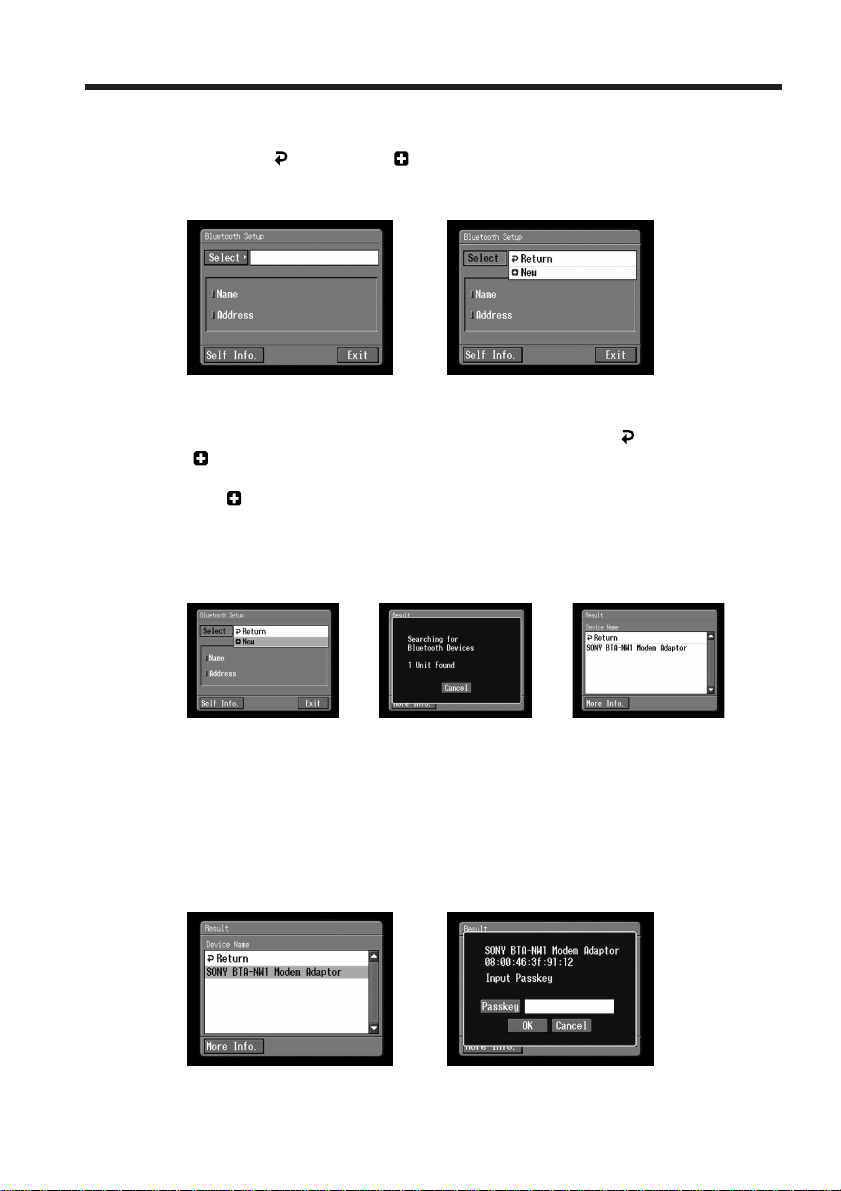
(4) Tap [Select].
The registered Bluetooth device list appears. When registering for the first
time, only [
recently used Bluetooth devices. You can select one of the three Bluetooth
devices from the list.
Tip
The most recently used Bluetooth device is listed next to [
New].
[
Return] and [ New] appear. The list shows up to three most
,
Return] and
(5) Tap [
New].
Your camcorder starts searching for Bluetooth devices. When the search is
complete, the available Bluetooth devices are listed.
If more than one Bluetooth devices with the same name appear, display each
Bluetooth device address by tapping [More Info.].
,,
Notes
•The search takes about 10 to 60 seconds. The time depends on the number of
Bluetooth devices around your camcorder.
•If the Bluetooth device you want to register is not found, follow the procedure
again from step 4.
(6) Tap the desired Bluetooth device.
The passkey input screen appears.
,
26-GB
Page 27
Registering Bluetooth devices
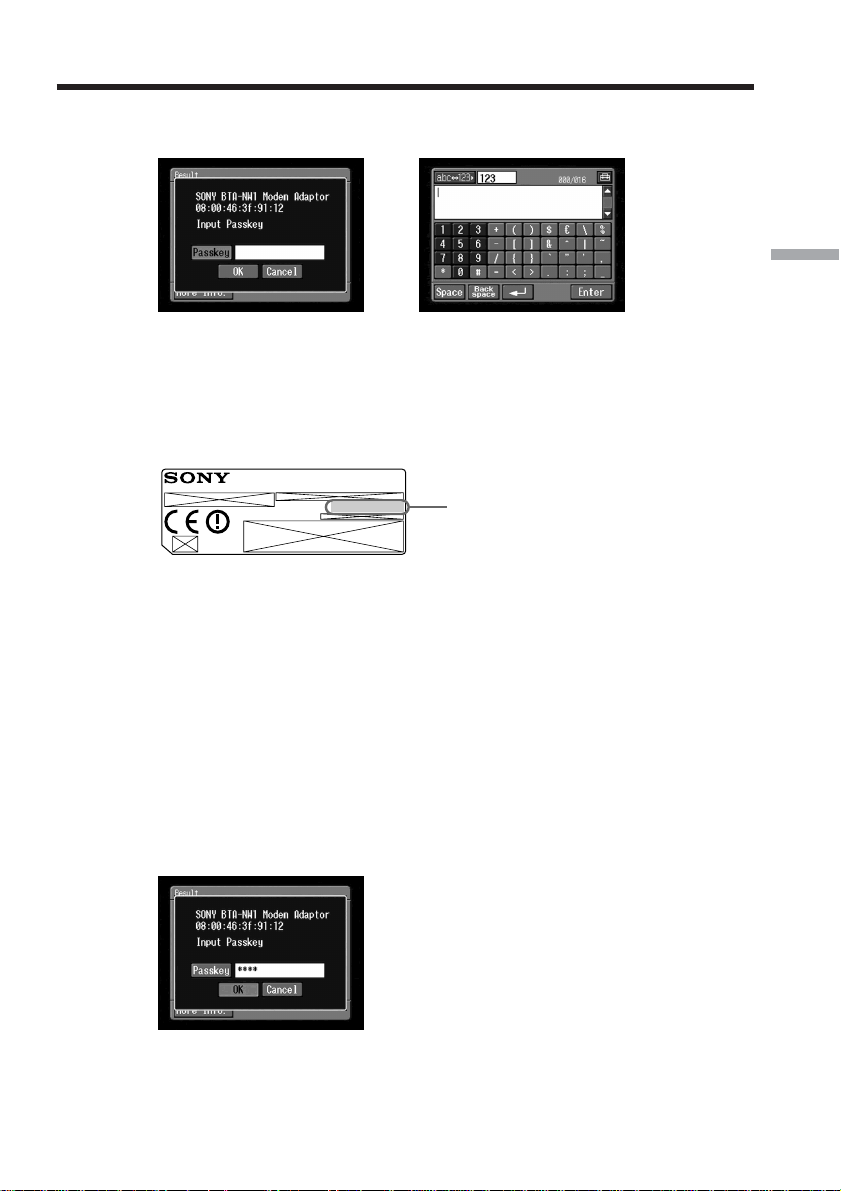
(7) Tap [Passkey].
The character input screen appears.
(8) Enter the passkey.
For details of how to input characters, see “How to input characters” (p. 8).
For example, when using the BTA-NW1/BTA-NW1A Modem Adaptor, the
passkey is the same as its serial number indicated on the label on the rear
panel.
MODEM ADAPTOR WITH BLUETOOTHTM FUNCTION
®
Tip on “Passkey”
The passkey is an identification number needed to allow two Bluetooth devices
to communicate with each other. The connection is permitted after you enter
the passkey. This “Passkey” is sometimes referred to as the “Bluetooth
passkey”, “PIN”, “Bluetooth PIN”, etc. For details, refer also to the operating
instructions supplied with the modem adaptor.
MODEL NO.
,
BTA-NW1
Preparation for Network Operation
Passkey
The number used when registering a
Bluetooth device
(9) Tap [Enter].
The passkey input screen appears again.
(10)Tap [OK].
When registration is complete, the Bluetooth Setup screen appears again and
the message “Bluetooth Registration Complete” appears.
27-GB
Page 28
Registering Bluetooth devices
(11)Tap [OK].
The selected Bluetooth device is specified.
Note
If the message “Bluetooth Registration Error Check the Passkey” appears, tap
[OK], then follow the procedure again from step 4.
(12)Tap [Exit].
The Setup screen appears again. For details of how to turn off the Modem
Adaptor with Bluetooth Function, refer to the operating instructions supplied
with your Modem Adaptor.
,
,
28-GB
(13)Tap [Exit].
The Network Menu appears again.
,
Registration is complete, and your camcorder can communicate with the selected
Bluetooth device.
Page 29
Registering Bluetooth devices
Changing the communication devices
Changing from a USB device to a Bluetooth device
Unplug the USB device from (USB) jack of your camcorder. When a Bluetooth device
is registered, your camcorder automatically selects the Bluetooth device as a
communication device.
Selecting other Bluetooth devices from the list
Tap the Bluetooth device you want to specify in step 4 of 2 on page 26. The device
information is indicated.
Tap [OK].
Deleting a registered Bluetooth device from the list
To delete a Bluetooth device from the list, follow the procedure below.
(1) Open the Network Menu.
For details of how to open the Network Menu, see page 6.
(2) Tap [Setup].
The Setup screen appears.
,
Preparation for Network Operation
29-GB
Page 30
Registering Bluetooth devices
(3) Tap [Bluetooth Setup].
The Bluetooth Setup screen appears.
(4) Tap [Select].
The Bluetooth device list appears.
(5) Tap the device you want to delete.
The name and address of the selected device are indicated.
,
,
30-GB
,
(6) Tap [Delete].
The selected device is deleted from the list.
Page 31

Setting the Internet connection
Internet service provider
To access the Internet, you have to sign up with an Internet service provider (ISP). The
provider acts as an intermediary between your camcorder and the Internet. After you
sign up with a provider, you can view various web pages through the Internet, and you
can send/receive email with your email address. The email address is a destination
address in email transmission. Various other services may be available depending on
your provider.
Notes
•A credit card number may be required to sign up with some providers.
•The connection fee differs depending on your provider.
•You cannot use the network function when using a provider that requires its own
exclusive browser software.
Preparation for Network Operation
31-GB
Page 32

Setting the network preferences
You have to access the Internet to view web pages, or send/receive email. This section
describes how to set the network preferences to access the Internet.
Network Setup
1 Selecting your environment
(1) Open the Network Menu.
For details of how to open the Network Menu, see page 6.
(2) Tap [Setup].
The Setup screen appears.
,
32-GB
(3) Tap [Network Setup].
The Network Setup screen appears.
,
If you use a dial-up connection, go to 2 on page 33.
If you use a LAN connection, go to 3 on page 36.
Page 33

Setting the network preferences
2 Setting your dial-up connection
Set your provider preferences depending on the requirements of your provider. If you
do not understand the setup items, consult your provider.
(1) Tap [Dial-Up Setup].
The Provider Setup : Custom screen appears.
,
(2) Tap [PPP].
Preparation for Network Operation
(3) Set the following items:
ID: Enter the login name you use for accessing your provider with a dial-up
connection.
Tip
This “ID” is sometimes referred to as the “user ID”, “login name”, “PPP
login name”, “network ID”, “account name”, “logon name”, “user name”,
etc.
Password: Enter the password you use for accessing your provider with a
dial-up connection (p. 106).
Tip
This “Password” is sometimes referred to as the “PPP password”, “network
password”, “connection password”, etc.
DNS1: Enter the DNS (Domain Name System) server address of your provider.
Tips
•This “DNS1” is sometimes referred to as the “name server”, “primary DNS
server”, “primary name server”, etc.
•This entry may be unnecessary, depending on your provider. For details,
consult your provider.
33-GB
Page 34

Setting the network preferences
DNS2: Enter the secondary DNS server address of your provider, if necessary.
This entry may be unnecessary, depending on your provider. For details,
consult your provider.
Tip
This “DNS2” is sometimes referred to as the “secondary DNS server”, etc.
TEL No. 1: Enter the telephone number of your most convenient access point
(p. 106).
TEL No. 2/TEL No. 3: Enter the second and third telephone numbers, if
necessary.
(4) Tap [Mail].
The Mail preference screen appears.
Note
The Mail preference screen and the Browser screen are shared by Dial-up
Setup and LAN Setup. You cannot set these two preferences at the same time.
34-GB
(5) Set up the following items:
User ID: Enter the user ID for accessing the POP server.
Password: Enter the password of your user ID for accessing the POP server.
Your user ID and password are required to use email.
Tip
This “Password” is sometimes referred to as the “mail password”, “mail
server password”, etc.
Address: Enter your email address (p. 107).
Tip
This “Address” is sometimes referred to as the “mail address”, “email
address”, etc.
POP: Enter the POP (Post Office Protocol) server address of your provider. The
POP server is for receiving email.
Tip
This “POP Server” is sometimes referred to as the “mail server”, “POP3
server”, etc.
Page 35

Setting the network preferences
SMTP: Enter the SMTP (Simple Mail Transfer Protocol) server address of your
provider. The SMTP server is for sending email.
Tip
This “SMTP Server” is sometimes referred to as the “mail server”, “SMTP
mail server”, etc. The SMTP server may be the same as the POP server,
depending on the provider.
APOP: Select whether you want to use APOP (p. 106).
(6) Tap [Browser].
The Browser screen appears.
Note
The Mail preference screen and the Browser screen are shared by Dial-up
Setup and LAN Setup. You cannot set these two preferences at the same time.
(7) Set up the following items:
Proxy: Enter the proxy server address of your provider.
Port: Enter the port number of the proxy server of your provider.
Tip
These entries may be unnecessary, depending on your provider. For details,
consult your provider.
(8) Tap [Exit].
Setup is complete, and the Network Setup screen appears again.
(9) Tap [Exit].
The Setup screen appears again.
Preparation for Network Operation
For a more detailed setup, go to “Setting other preferences” (p. 41).
35-GB
Page 36

Setting the network preferences
3 Setting your LAN connection
(1) Tap [LAN Set up] and tap [LAN].
The Provider Setup : Custom screen appears.
,
(2) Register your IP address.
To obtain your IP address automatically, confirm that [Auto Setting (DHCP)] is
selected and go to 4 (p. 39). You can confirm your detailed LAN settings by
tapping [Status]. To register your IP address manually, follow the procedure
below.
(3) Tap [Manual Setting].
a changes to
.
,
36-GB
(4) Tap [Setting].
The Custom : IP Address Setup screen appears.
,
Page 37

Setting the network preferences
(5) Tap [IP Address].
,
(6) Enter your IP address.
For details of how to input characters, see “How to input characters” (p. 8).
(7) Tap [Enter].
The Custom : IP Address Setup screen appears again.
,
(8) Tap [Subnetmask].
The character input screen appears.
Preparation for Network Operation
,
(9) Enter your subnet mask.
For details of how to input characters, see “How to input characters” (p. 8).
37-GB
Page 38

Setting the network preferences
(10)Tap [Enter].
The Custom : IP Address Setup screen appears again.
,
(11)Tap [Gateway].
The character input screen appears.
,
(12)Enter the gateway.
For details of how to input characters, see “How to input characters” (p. 8).
(13)Tap [Enter].
The Custom : IP Address Setup screen appears again.
38-GB
,
(14)Tap [Exit].
The Provider Setup : Custom screen appears again.
Page 39

Setting the network preferences
4 Setting the DNS server
To obtain your DNS information automatically, confirm that [Auto Setting (DHCP)] is
selected and tap [Exit]. You can confirm your detailed settings by tapping [Status]. To
set your DNS information manually, follow the procedure below.
(1) Confirm that [Manual Setting] is checked.
If [Manual Setting] is not checked, tap [Manual Setting] to check it.
a changes to
(2) Tap [Setting].
The Custom : DNS Server Setup screen appears.
.
,
(3) Tap [DNS1].
The character input screen appears.
Preparation for Network Operation
,
(4) Enter DNS1.
For details of how to input characters, see “How to input characters” (p. 8).
Tip
This “DNS1” is sometimes referred to as the “name server”, ”primary DNS server”,
“primary name server”, etc.
(5) Tap [Enter].
The Custom : DNS Server Setup screen appears again.
,
39-GB
Page 40

Setting the network preferences
(6) Tap [DNS2].
The character input screen appears.
,
Tips
•This entry may be unnecessary, depending on your provider. For details, consult
your provider.
•This “DNS2” is sometimes referred to as the “secondary DNS server”, etc.
(7) Enter DNS2.
For details of how to input characters, see “How to input characters” (p. 8).
(8) Tap [Enter].
The Custom : DNS Server Setup screen appears again.
,
40-GB
(9) Tap [Exit].
The Provider Setup : Custom screen appears again.
(10)Follow steps 4 to 9 on pages 34 to 35 for setting [Mail] and [Browser]
preferences.
Note
The Mail preference screen and the Browser screen are shared by Dial-up Setup
and LAN Setup. You cannot set these two preferences at the same time.
For a more detailed setup, go to “Setting other preferences” (p. 41).
Page 41
Setting the network preferences
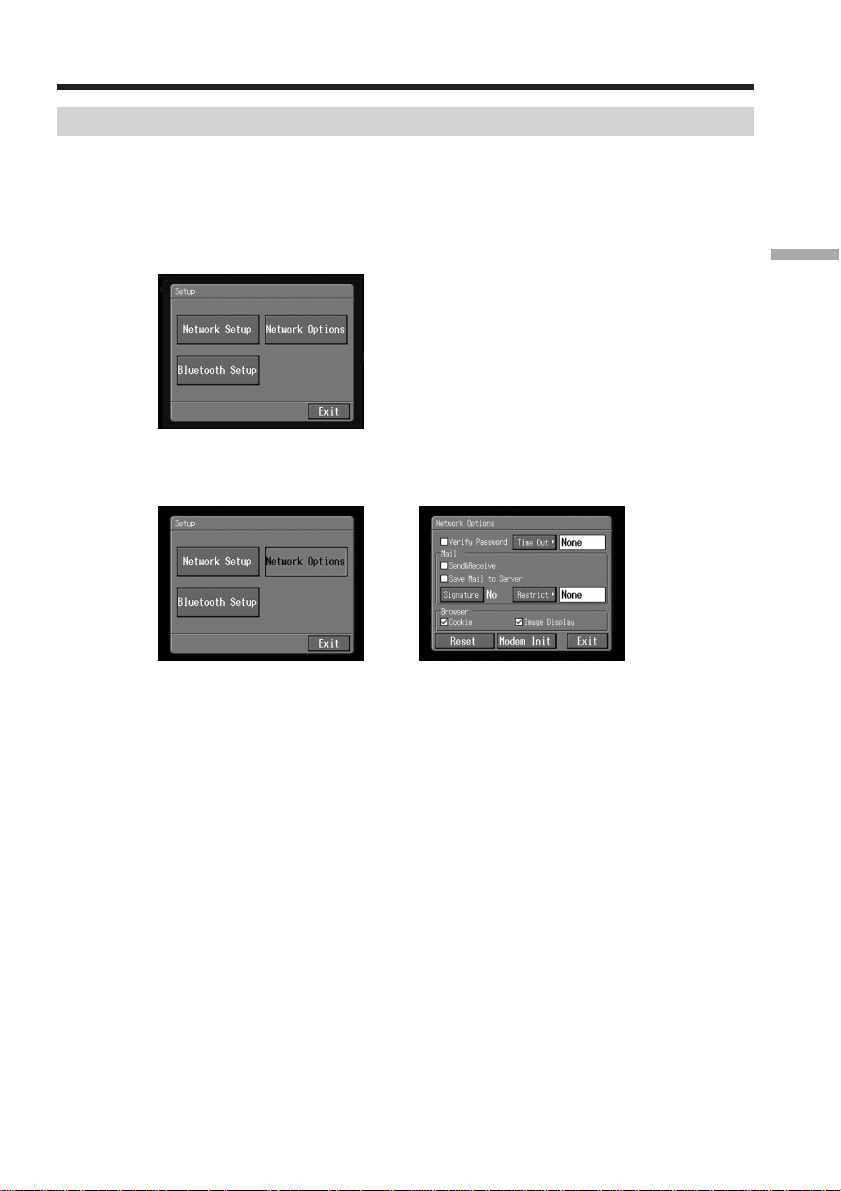
Setting other preferences
You can access the Internet with your camcorder using the default settings explained on
previous pages. It is not necessary to make the following settings, however, see the
following when any changes are necessary in the future.
(1) Open the Network Menu and tap [Setup].
The Setup screen appears.
(2) Tap [Network Options].
The Network Options screen appears.
,
Preparation for Network Operation
(3) Set up the following items:
Verify Password: Check this item to delete your PPP screen password. You
will have to enter your provider access password each time you access the
Internet, for example, when you use a dial-up connection to prevent anyone
else from connecting with your ID.
Time Out: Select whether the connection is to be automatically cancelled if no
communication is made for specific time (1 minute, 2 minutes, 5 minutes,
15 minutes, or 30 minutes) (When you use a LAN connection, the connection
is not disconnected automatically.).
Note
When you use a dial-up connection, the telephone line may not be
disconnected automatically when viewing certain web pages. In this case,
disconnect the telephone line manually (p. 81).
41-GB
Page 42

Setting the network preferences
Mail
Send&Receive: Select whether to check the email inbox after sending email.
Save Mail to Server: Select whether to keep copies of the messages on the
server.
Note
If you try to receive email without checking this item, email messages may
not be downloaded and may be lost from your server, depending on the
type of the received email. For details, see “Note on “Save Mail to Server””
(p. 43).
Signature: Set this item if you want to attach your signature to your email
(p. 54).
Restrict: Select whether to skip an email message if its file size is larger than
50KB, 200KB, or 500KB.
Browser
Cookie: Select whether to accept a cookie. If you do not want to send your
personal information, do not check this item. This item is checked by the
default setting.
Image Display: Select whether to display images on the screen when
viewing a web page. This item is checked by the default setting.
Reset: Reset all the items on the Network Options screen except “Signature”
and “Modem Init”.
Note
A verification message does not appear when you try to reset items.
42-GB
Modem Init: Set up the character string to be used for modem initialization. If
no setup is specified, you do not need to modify this item.
Note
If the setup is wrong, you cannot access the Internet. When you try to access
the Internet, the message “Connection Error No Response From PPP Server”
appears.
(4) Tap [Exit].
The Setup screen appears again.
Page 43

Setting the network preferences
Note on “Save Mail to Server”
When “Save Mail to Server” is not checked, copies of email messages received will not
be stored on your server. However, the error messages described in the table below will
appear, depending on the type of email messages.
Error message
Memory Stick Memory Full
1)
Cause and/or Corrective Actions
You received email when the “Memory Stick” was already
2)
full.
c Delete the email containing this error message, and
delete unnecessary email messages or image files in the
“Memory Stick,” then download your email again.
c Insert another “Memory Stick” that has enough
memory, then download your email again.
Mail Over Size Limit
•You received email larger than the size set in the item
“Restrict”.
2)
c You can download the email with a computer, etc.
c Delete the email, uncheck the item “Restrict”, and
download the email again.
•You received email with a message of 4,000 characters or
3)
more.
Attached Invalid File Deleted
c Your camcorder cannot receive an email message that
has 4,000 characters or more.
You received email that has an attached file with an invalid
file name extension.
3)
4)
c Your camcorder can receive only JPEG or MPEG files.
Folder No. Full
c Insert another “Memory Stick” that has enough
memory, then download your email again.
1)
These error messages are indicated in an email message.
2)
This email message is stored on the server even if you did not check the item “Save
Mail to Server”. You can retrieve it with a computer, etc.
3)
The previously downloaded email is not stored on the server if you did not check the
item “Save Mail to Server”. You cannot retrieve it with a computer, etc.
4)
For an email message that has a lot of line breaks, the number of available characters is
less than 4,000.
Preparation for Network Operation
43-GB
Page 44

– Network Operation –
Using email
This section describes the basic procedure for sending/receiving email via the Internet.
Email is very convenient, since you can send it anytime, and you can also send still
images and/or moving pictures stored in a “Memory Stick” by attaching them to email.
Sending email
By entering the destination email address, you can send an email message instantly.
1 Specifying a destination address
Be careful to enter the address correctly.
Tip
You can select an email address from the address book. For details, see “Selecting a
destination address from the address book” (p. 60).
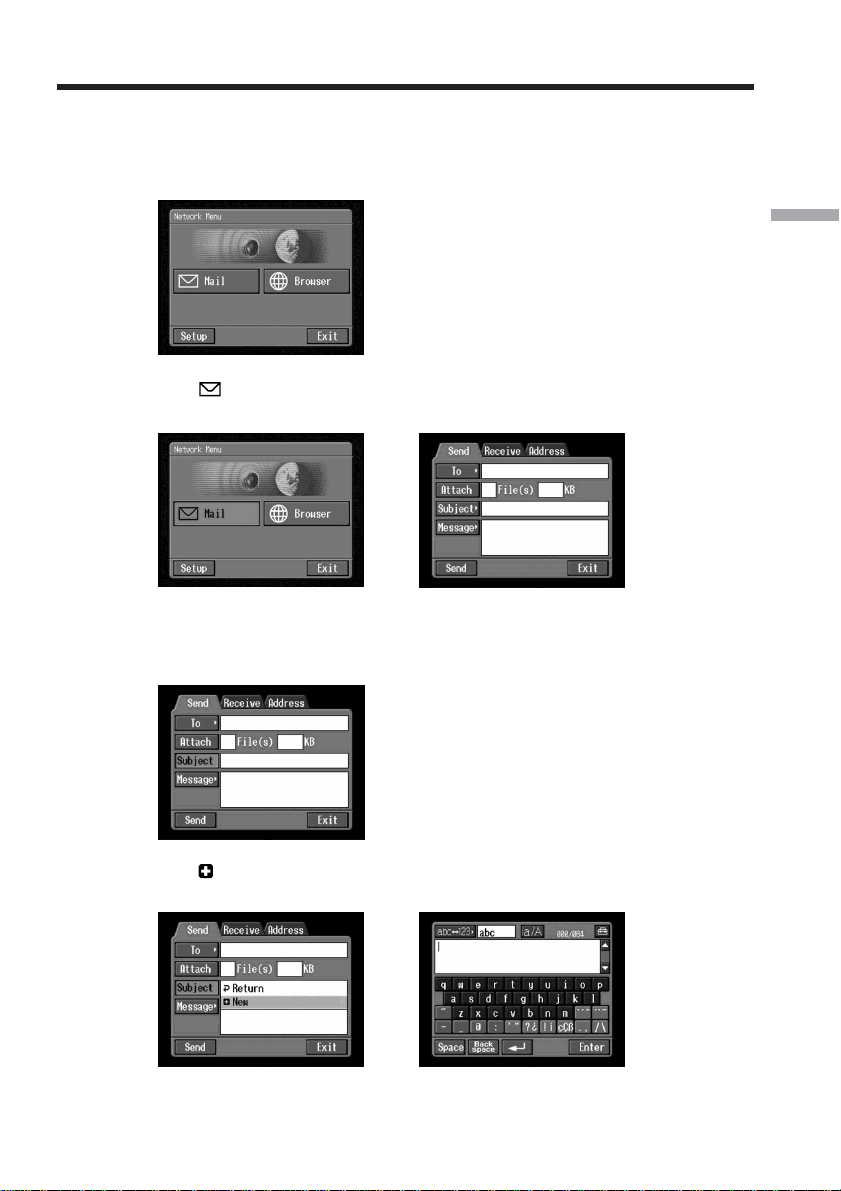
(1) Open the Network Menu.
For details of how to open the Network Menu, see page 6.
44-GB
(2) Tap [
The Send screen appears.
Mail].
,
Page 45

Using email
(3) Tap [To].
The address list appears. The list shows the six most recently used addresses in
the address book. For details of the address book, see “Using the address
book” (p. 55). If you want to select an address listed in the address book, go to
step 7.
,
Tips
•The most recently used address is listed under [ Return] and [ New].
•Addresses are listed in historical order.
(4) Tap [ New].
The character input screen appears.
,
(5) Enter the email address of an addressee.
For details of how to input characters, see “How to input characters” (p. 8).
(6) Tap [Enter].
The Send screen appears again. The new email address is listed and checked
).
(
Network Operation
,
Tip
You can correct or edit the email addresses in the address book. For details of
the address book, see “Editing or deleting the address book” (p. 58).
45-GB
Page 46

Using email
(7) If you want to send the email message to other addresses, tap other email
addresses.
Each tapped email address is checked (
).
(8) Tap [
Note
You can register up to 50 addresses in the address book. If you register a 51st address,
the least recently used address is overwritten. The message “Address Book Full
Overwrite the Data with Current Address?” appears for verification. If you want to
overwrite it, tap [OK]. Otherwise, tap [Cancel] and delete an unnecessary address from
the address book, then enter and register the new address.
Return].
The Send screen appears again.
46-GB
Page 47

Using email
2 Entering the subject of a message
(1) Tap [Subject].
The subject list appears. The list shows the six most recently used subjects.
,
If you want to use a subject shown on the list, tap it. After selecting the subject,
go to “3 Entering the text of a message” (p. 48).
Tip
The most recently selected subject is listed under [
You cannot edit or delete the subject.
Network Operation
Return] and [ New].
(2) Tap [
New].
The character input screen appears.
,
(3) Enter the subject.
For details of how to input characters, see “How to input characters” (p. 8).
Note
You can enter up to 24 characters in a subject.
(4) Tap [Enter].
The Send screen appears again.
,
47-GB
Page 48

Using email
3 Entering the text of a message
Enter the text of the message. You can select one of your six most recently written
messages from the message list and edit it.
(1) Tap [Message].
The message list appears.
The list shows previously written messages. Tap the message you want to use
from the list.
When the desired message is selected, tap [OK], and go to “4 Sending email”
(p. 49).
If you want to edit the selected text, tap [Edit]. The character input screen
appears. Go to step 3.
,
48-GB
(2) Tap [
New].
The character input screen appears.
,
(3) Enter your message.
For details of how to input characters, see “How to input characters” (p. 8).
Note
You can enter up to 512 characters in a message.
(4) Tap [Enter].
The Send screen appears again.
,
Page 49

Using email
4 Sending email
Tip
You can send email messages with your signature. For details, see “Attaching your
signature to messages” (p. 54).
(1) Select the still images and/or moving pictures to attach to the email message.
For details, see “Attaching still images and/or moving pictures to email”
(p. 52).
(2) Check the message.
For details, see “Checking or editing a message” (p. 50).
(3) Set a communication device to connection standby with your camcorder.
For details, refer to the operating instructions supplied with the
communication device.
(4) Tap [Send].
If you use a dial-up connection, dial the telephone number displayed on the
screen for verifying the connection. If you want to dial other telephone
numbers, tap [TEL No.] to display the list of registered telephone numbers.
Tap the desired telephone number to select it.
To connect to an outside line, for example in a hotel, check the item “Prefix”
and enter the prefix number.
When you use a LAN connection, the screen for verifying the connection may
not appear.
Network Operation
,
(5) Tap [Connect].
If you use a dial-up connection, your camcorder starts dialing the selected
telephone number. After sending email is complete, the message “Sending
Mail Complete” appears. If you use a dial-up connection, the telephone line is
automatically disconnected.
,
49-GB
Page 50

Using email
(6) Tap [OK].
The Send screen appears again.
To cancel sending email
While sending email, tap [Cancel].
Tip
You can have your camcorder check the email inbox automatically after sending email.
For details, see “Setting other preferences” (p. 41).
Checking or editing a message
(1) Follow steps 1 and 2 of 1 on page 44.
The Send screen appears.
(2) Tap [Message].
The message list appears.
50-GB
,
(3) Tap the message you want to check or edit.
The following screen appears.
,
Page 51

Using email
(4) Check or edit the message. If the message is long, tap the message area, then
tap the scroll button V to scroll the message.
To only check the message:
After checking the message, tap [OK]. The Send screen appears again.
To edit the message:
Follow steps 5 to 7 below.
(5) Tap [Edit].
The character input screen appears.
,
(6) Edit the message.
For details of how to input characters, see “How to input characters” (p. 8).
(7) Tap [Enter].
The Send screen appears again.
,
Network Operation
51-GB
Page 52

Using email
Attaching still images and/or moving pictures to email
You can send still images and/or moving pictures by attaching them to email messages.
Before operation
Insert the “Memory Stick” that contains the desired still images and/or moving pictures
into your camcorder.
(1) Finish the following procedure:
“1 Specifying a destination address” (p. 44)
“2 Entering the subject of a message” (p. 47)
“3 Entering the text of a message” (p. 48)
The Send screen appears.
(2) Tap [Attach].
The still images and/or moving pictures stored on the “Memory Stick” appear.
52-GB
,
Page 53

Using email
(3) Tap the desired still images or moving pictures you want to attach.
Selected still images or moving pictures are indicated by a check mark (
To page up or down the index list
Tap [<] or [,]. The next or previous page appears.
To cancel an image selection
Tap the still image or moving picture again. The check mark will disappear
from the still image or moving picture.
To cancel all the image selection
Tap [
(4) Repeat step 3 to select other still images and/or moving pictures to attach.
Notes
•You can attach up to 99 still images and/or moving pictures to an email message.
•The maximum total file size you can attach to an email message is 3MB (3,072KB).
).
Network Operation
CLR].
(5) Tap [ OK].
The Send screen appears again. The total number of selected still images
and/or moving pictures and the total file size are indicated.
,
(6) Follow the procedure described in “4 Sending email” (p. 49) from step 3.
Note
Sending email may take a while, depending on the size of the still image or moving
picture.
53-GB
Page 54

Using email
Attaching your signature to messages
You can attach your signature to the last column of the email message. You can enter
information such as your name, address and telephone number as a signature.
(1) Open the Network Menu.
For details of how to open the Network Menu, see page 6.
(2) Tap [Setup].
The Setup screen appears.
,
54-GB
(3) Tap [Network Options].
The Network Options screen appears.
,
(4) Tap [Signature].
The character input screen appears.
,
Page 55

Using email
(5) Enter your signature.
For details of how to input characters, see “How to input characters” (p. 8).
Note
You can enter up to 256 characters in a signature.
(6) Tap [Enter].
The setup of your signature is complete, and the Network Options screen
appears again. “Yes” is indicated next to [Signature].
(7) Tap [Exit].
The Setup screen appears again.
(8) Tap [Exit].
The Network Menu appears again.
Using the address book
Network Operation
,
Once you register frequently used email addresses in the address book, you can send
email without entering those email addresses manually.
Registering destination addresses in the address book
You can register up to 50 frequently used email addresses in the address book. Be sure
to enter the address correctly.
(1) Open the Network Menu.
For details of how to open the Network Menu, see page 6.
55-GB
Page 56

Using email
(2) Tap [ Mail].
If the Address screen does not appear, tap Address. The Address screen will
appear.
(3) Tap [New].
The Address Book : New screen appears.
(4) Tap [Name].
The character input screen appears.
,
,
56-GB
,
(5) Enter the destination name.
For details of how to input characters, see “How to input characters” (p. 8).
Note
You can enter up to 24 characters in the [Name] box.
Page 57

Using email
(6) Tap [Enter].
The Address Book : New screen appears again.
(7) Tap [Address].
The character input screen appears.
(8) Enter the email address.
For details of how to input characters, see “How to input characters” (p. 8).
(9) Tap [Enter].
The Address Book : New screen appears again.
,
Network Operation
,
(10)Tap [Return].
The Address screen appears again.
,
,
57-GB
Page 58

Using email
(11)Tap [Exit].
The Network Menu appears again.
Tips
•The addresses are listed in alphabetical order.
•When you reply to the address of a previously received email message (p. 64), the
address is automatically registered in the address book. To edit the address, see
“Editing or deleting the address book” below.
Editing or deleting the address book
You can edit or delete names or email addresses in the address book.
(1) Follow steps 1 and 2 in “Registering destination addresses in the address
book” (p. 55).
The Address screen appears.
58-GB
(2) Display the address you want to edit or delete by tapping
(3) Tap [Edit] to select the address.
The Address Book : Edit screen appears.
,
or .
Page 59

Using email
(4) Tap [Name] or [Address].
To edit the registered name, tap [Name], and to edit the registered address, tap
[Address].
The character input screen appears.
If you want to delete an address, tap [Delete]. When the verification screen
appears, tap [OK]. To stop deleting, tap [Cancel].
(5) Edit the name or address.
For details of how to input characters, see “How to input characters” (p. 8).
(6) Tap [Enter].
The Address Book : Edit screen appears again.
,
Network Operation
,
(7) Tap [Return].
The Address screen appears again.
(8) Check the name and address.
(9) Tap [Exit].
The Network Menu appears again.
,
59-GB
Page 60

Using email
Selecting a destination address from the address book
You can select a destination address from the address book.
(1) Follow steps 1 and 2 in “Registering destination addresses in the address
book” (p. 55).
The Address screen appears.
(2) Display the address you want to send email to by tapping
(3) Tap [->To].
The Send screen appears. The selected address is set as the destination address.
or .
,
(4) Follow the procedures described in “2 Entering the subject of a message”
(p. 47) through “4 Sending email” (p. 49), if you want to send email.
60-GB
Page 61

Using email
Receiving email
After receiving email, you can reply to it or forward it.
Before operation
•Release the lock on the “Memory Stick.”
•Insert a “Memory Stick” into your camcorder, for storing email.
Checking your email inbox
Tip
You can leave a copy of your incoming messages on the mail server even if you
download the message with your camcorder. For details, see “Setting other
preferences” (p. 41).
(1) Open the Network Menu.
For details of how to open the Network Menu, see page 6.
Network Operation
(2) Tap [
If the Receive screen does not appear, tap the Receive from Send, Receive and
Address. The Receive screen appears.
Mail].
,
(3) Set a communication device to connection standby with your camcorder.
For details, refer to the operating instructions supplied with the
communication device.
61-GB
Page 62

Using email
(4) Tap [Receive].
The screen for verifying the connection appears.
If you use a dial-up connection, dial the telephone number displayed on the
screen for verifying the connection. If you want to dial other telephone
numbers, tap [TEL No.] to display the list of the registered telephone numbers.
Tap the desired telephone number to select it.
To connect to an outside line, for example in a hotel, check the item “Prefix”
and enter the prefix number.
When you use a LAN connection, the screen for verifying the connection may
not appear.
(5) Tap [Connect].
If you use a dial-up connection, your camcorder starts dialing the selected
telephone number. If an email message has been sent to you, your camcorder
downloads it, and the message “Receiving Mail Complete” appears. If you use
a dial-up connection, tap [OK]. The telephone line is automatically
disconnected after email is received.
,
62-GB
,
(6) If an email message has been received, tap the area where the message is
displayed or [Message].
The message appears.
,
When two or more email messages are received, the number of email appears
above the message. (For example, No. 1/3 is the first of three email messages.)
To read the next email message, tap
.
Page 63

Using email
(7) Tap [Return].
The Receive screen appears again.
To cancel receiving email
Tap [Cancel] while downloading. Email you did not download remains on the mail
server.
If the message is long
Tap the scroll button V to scroll the message.
If a file is attached to the email message
Your camcorder can receive files with the following extensions: .jpg, .mpg, .jpeg, and
.mpeg. If you receive files other than these files, the message “Attached Invalid File
Deleted” is inserted in the email message. Your camcorder cannot play back an attached
still image or moving picture if the file is in an incompatible format.
To view an attached file
Exit the network function, then view the still image or moving picture following the
same procedure as that for viewing a still image or moving picture recorded on a
“Memory Stick.” For details of saving attached files, see page 92.
If no new messages have been sent to you
The message “No New Mail” appears.
URL included in an email message
If a URL (“http://...”) is typed in the message, tap it. The browser starts up
automatically and accesses the indicated web page.
Network Operation
Notes
•Up to 4,000 characters can be entered in an email message. If the number of characters
exceeds 4,000, the excess characters are deleted and a message telling you so appears
at the beginning of the text.
•The receiving procedure may take a while depending on the file size of the attached
still image or moving picture.
Tips
•You can have your camcorder check the email inbox automatically after sending
email. For details, see “Setting other preferences” (p. 41).
•You can skip an email message if its file size is larger than specified. For details, see
“Setting other preferences” (p. 41).
•The maximum number of characters for the subject and sender name of email is 24
each. You cannot read an email subject or sender name on your camcorder if it
contains more than 24 characters.
63-GB
Page 64

Using email
Sending your answer – Reply
You can reply to an email message promptly without entering the address.
(1) Display the Receive screen.
(2) Tap the area where the message is displayed or tap [Message].
The selected message is displayed.
(3) Tap [Reply].
The Send screen appears.
,
64-GB
,
Tip
“Re:” is added to the beginning of the subject line.
(4) Follow the procedure described in “3 Entering the text of a message”
(p. 48) to enter the text of the message.
Tip
You cannot quote a received email message.
(5) Follow the procedure from step 3 described in “4 Sending email” (p. 49).
Page 65

Using email
Forwarding a message to others – Forward
You can forward a received message to others.
(1) Display the Receive screen.
(2) Display the email containing the message that you want to forward by tapping
or .
(3) Tap the area where the message is displayed or tap [Message].
The selected message is displayed.
,
Network Operation
(4) Tap [Forward].
The Send screen appears.
,
Tips
•An attached file is not automatically forwarded. If you want to send an attached
file, see “Attaching still images and/or moving pictures to email” (p. 52).
•“Fw:” is added to the beginning of the subject line.
(5) Follow from step 3 described in “1 Specifying a destination address”
(p. 44) or “Selecting a destination address from the address book” (p. 60) to
specify the destination address.
65-GB
Page 66

Using email
(6) Follow the procedure described in “3 Entering the text of a message”
(p. 48) to modify the message.
Tip
You can enter up to 512 characters in a message. The excess characters are
deleted.
(7) Follow the procedure described in “4 Sending email” (p. 49) from step 3.
Deleting received email
You can receive and store up to 50 email messages on a “Memory Stick.” The 51st email
message cannot be received and an error message appears.
Before operation
•Release the lock on the “Memory Stick.”
•Insert the “Memory Stick” that contains the email message you want to delete into
your camcorder.
(1) Open the Network Menu.
For details of how to open the Network Menu, see page 6.
66-GB
(2) Tap [
Select Receive from Send, Receive and Address. The Receive screen appears.
Mail].
,
Page 67

Using email
(3) Select the email message you want to delete by tapping or .
The selected message appears.
(4) Tap [Delete].
The verification message “Delete This Mail?” appears.
(5) Tap [OK].
The selected email message is deleted.
To cancel deleting email
Tap [Cancel] in step 5.
,
Network Operation
,
67-GB
Page 68

Viewing web pages
A site that posts information on the Internet is called a “web page” or “web site”. You
can easily retrieve information by accessing a web site on the Internet.
Viewing web pages
1 Entering the URL needed to access the web page
Enter the address of the web page, then access the Internet. Be sure to enter the address
correctly.
Tip on URLs
A web site has a unique address on the Internet. The address is called a URL. This URL
is required to access a web site.
(1) Open the Network Menu.
For details of how to open the Network Menu, see page 6.
68-GB
(2) Tap [
(3) Tap (New URL).
Browser].
The following screen appears.
The character input screen appears.
,
,
Page 69

Viewing web pages
(4) Enter the URL.
For details of how to input characters, see “How to input characters” (p. 8).
(5) Set a communication device to connection standby with your camcorder.
For details, refer to the operating instructions supplied with the
communication device.
(6) Tap [Enter].
The screen for verifying the connection appears.
If you use a dial-up connection, dial the telephone number displayed on the
screen for verifying the connection. If you want to dial other telephone
numbers, tap [TEL No.] to display the registered telephone number list. Tap
the desired telephone number to select it.
To connect to an outside line, for example in a hotel, check the item “Prefix”
and enter the prefix number.
When you use a LAN connection, the screen for verifying the connection may
not appear.
Network Operation
,
(7) Tap [Connect].
If you use a dial-up connection, your camcorder starts dialing the selected
telephone number. After the connection is established, the web page selected
in step 4 is loaded.
,
(8) Operate the browser with the menu bar.
For details of the menu bar, see “How to use the menu bar of the browser”
(p. 70).
69-GB
Page 70

Viewing web pages
How to use the menu bar of the browser
When you access the Internet and view a web page, you can carry out various
operations with the menu bar. While the browser screen is displayed, tap
upper right of the LCD screen to display the menu bar.
menu
on the
To display the menu bar
Tap
The following menu bar appears.
To hide the menu bar
Tap
on the upper right of the LCD screen.
menu
menu
or on the menu bar. The menu bar disappears.
The buttons on the menu bar
Button Function
(Previous Page) Go to the previously viewed page.
(Next Page) Go to the next viewed page.
(Refresh) Refresh the current page.
(Stop) Stop loading the current page.
(Zoom) Change the page size.
(Help) Display the explanation of each button.
?
(Bookmark) Bookmark the current page. (Bookmarks are stored in
(New URL) Enter the URL of a web page.
(Page Memo) Store the current page on the “Memory Stick.” You can
(Page Information) Show the title and URL of the current page.
(Line Close) The connection is disconnected.
END
(End) Exit the browser.
Use this button if images or characters on the web page
are not displayed properly.
your camcorder.) Bookmarking is useful if you want to
revisit web pages at a later date.
view the page later without accessing the Internet.
Hide the menu bar.
70-GB
Page 71

Viewing web pages
When you fail to load a web page
The message [Loading Error] appears. Tap [OK], then tap
LCD screen, and tap
Note
The buttons may not function when viewing certain web pages.
END
in the menu bar. The Network Menu appears again.
Note on connection status indication
The connection status is indicated at the top of the screen. This item also shows the
connected time and the address of the web page. The connected time indicated should
only be used as a guide.
Off Line: being offline
Loading: Loading a web page
or
On Line: being online
or
Notes
•If the address is too long to display, it is not indicated in full. If you want to know the
entire address of the page, tap .
•A portion of the whole page appears on the screen.
•A large page takes more time to load, and its images or text may not be displayed
properly. This is not a malfunction of your camcorder.
•When you try to load a large page, the message “Data too Large for Full Display”
appears and the entire page may not be loaded.
•When viewing a scaled-down page, the screen may flicker or the colours may be
strange. This is not a malfunction of your camcorder.
•To prevent a malfunction, operate the menu bar buttons after the entire page is
loaded.
on the upper right of the
menu
Network Operation
Tip
You can access the web page from a bookmark. For details, see “3 Jumping to a web
page specified by a bookmark” (p. 75).
71-GB
Page 72

Viewing web pages
2 Bookmarking a web page – Bookmark
You can bookmark web pages you frequently access. You can bookmark up to 30 web
pages.
(1) Display the web page you want to bookmark.
(2) If the menu bar is not displayed, tap
The menu bar appears.
(3) Tap
(Bookmark).
The bookmark list appears.
on the upper right of the LCD screen.
menu
,
(4) Tap [ Add].
The bookmark is added, and the display returns to the web page.
72-GB
Notes
•When you use a dial-up connection, the telephone line may not be disconnected
automatically. If this happens, disconnect the telephone line manually (p. 81).
•You cannot bookmark a web page with a URL of more than 256 characters.
Page 73

Viewing web pages
To edit a bookmark
You can edit the title of a bookmark.
(1) Tap (Bookmark).
The bookmark list appears.
,
(2) Tap the bookmark you want to edit.
The title and URL are indicated.
,
(3) Tap [Edit].
The character input screen appears.
,
(4) Edit the name.
For details of how to input characters, see “How to input characters” (p. 8).
Network Operation
(5) Tap [Enter].
The title of the bookmark is modified.
(6) Tap [ Return].
The browser screen appears again.
,
73-GB
Page 74

Viewing web pages
To delete bookmarks
You can delete bookmarks. We recommend that you delete unnecessary bookmarks
since you can only store up to 30 bookmarks.
(1) Tap (Bookmark).
The bookmark list appears.
(2) Tap the bookmark you want to delete.
,
,
74-GB
(3) Tap [Delete].
The verification message “Delete This Bookmark?” appears.
,
(4) Tap [OK].
The selected bookmark is deleted.
,
To cancel deleting the bookmark
Tap [Cancel] in step 4.
Page 75

Viewing web pages
3 Jumping to a web page specified by a bookmark
(1) If the menu bar is not displayed, tap
The menu bar appears.
(2) Tap
(Bookmark).
The bookmark list appears.
,
(3) Tap the bookmark.
,
on the upper right of the LCD screen.
menu
Network Operation
(4) Set a communication device to connection standby with your camcorder.
For details, refer to the operating instructions supplied with the
communication device.
75-GB
Page 76

Viewing web pages
(5) Tap [Go].
The screen used for verifying the connection appears.
If you use a dial-up connection, dial the telephone number displayed on the
screen for verifying the connection. If you want to dial other telephone
numbers, tap [TEL No.] to display the registered telephone number list. Tap
the desired telephone number to select it.
To connect to an outside line, for example in a hotel, check the item “Prefix”
and enter the prefix number.
When you use a LAN connection, the screen for verifying the connection may
not appear.
(6) Tap [Connect].
If you use a dial-up connection, your camcorder starts dialing the selected
telephone number. After the connection is established, the web page specified
by the bookmark is displayed.
To select another bookmark
Tap [Return] in step 5. The bookmark list appears. Tap another bookmark.
,
Storing a web page on a “Memory Stick” – Page Memo
You can store your favourite web pages on a “Memory Stick.” Once you store the web
pages, you can view them without accessing the Internet.
You cannot store a web page with a URL of more than 256 characters.
Storing a web page on a “Memory Stick”
You can store up to 30 page memos on a “Memory Stick.”
Before operation
•Release the lock on the “Memory Stick.”
•Insert a “Memory Stick” into your camcorder, for storing web pages.
(1) Display the web page you want to store.
(2) If the menu bar is not displayed, tap
The menu bar appears.
76-GB
on the upper right of the LCD screen.
menu
Page 77

Viewing web pages
(3) Tap (Page Memo).
The page memo list appears.
(4) Tap [ Add].
The message “Saving Page Memo Do Not Remove Memory Stick” appears.
When the message disappears, storing is complete.
(5) The browser screen appears again.
To cancel storing the web page
While storing, tap [Cancel].
,
Network Operation
,
Note
You cannot store the web page while it is still being loaded.
Editing the title of a page memo
You can edit the title of a page memo stored on a “Memory Stick.”
Before operation
•Release the lock on the “Memory Stick.”
•Insert the “Memory Stick” that contains the page memo you want to edit into your
camcorder.
(1) If the menu bar is not displayed, tap
The menu bar appears.
on the upper right of the LCD screen.
menu
77-GB
Page 78

Viewing web pages
(2) Tap (Page Memo).
The page memo list appears.
(3) Tap the page memo you want to edit.
The title and URL of the selected page memo are indicated.
(4) Tap [Edit].
The character input screen appears.
,
,
78-GB
,
(5) Edit the name.
For details of how to input characters, see “How to input characters” (p. 8).
(6) Tap [Enter].
The title of the page memo is modified.
,
Page 79

Viewing web pages
(7) Tap [ Return].
The browser screen appears again.
To delete a page memo
You can delete page memos. We recommend that you delete unnecessary page memos
since you can only store up to 30 page memos.
Before operation
•Release the lock on the “Memory Stick.”
•Insert the “Memory Stick” that contains the page memo you want to delete into your
camcorder.
Network Operation
(1) If the menu bar is not displayed, tap
The menu bar appears.
(2) Tap
.
The page memo list appears.
menu
,
(3) Tap the page memo you want to delete.
The following screen appears.
on the upper right of the LCD screen.
,
79-GB
Page 80

Viewing web pages
(4) Tap [Delete].
The verification message “Delete This Page Memo Item?” appears.
(5) Tap [OK].
The selected page memo is deleted and the page memo list appears again.
,
(6) Tap [
Return].
The browser screen appears again.
To cancel deleting the page memo
Tap [Cancel] in step 5.
Displaying a web page stored in a page memo
You can display a page memo stored on a “Memory Stick.”
Before operation
Insert the “Memory Stick” that contains the page memo you want to display into your
camcorder.
(1) If the menu bar is not displayed, tap
The menu bar appears.
(2) Tap
.
The page memo list appears.
on the upper right of the LCD screen.
menu
80-GB
,
Page 81

Viewing web pages
(3) Tap the page memo you want to display.
,
(4) Tap [Open].
The web page stored in page memo appears.
To select another page memo
Tap [Return] in step 3. The page memo list appears. Tap another page memo.
Shutting down the browser
To finish viewing a web page
(1) Tap
(2) Tap
The browser is closed.
When you use a dial-up connection, the telephone line is disconnected
automatically.
on the upper right of the LCD screen to display the menu bar.
menu
END
.
To only disconnect the line
Tap . The line is disconnected.
Network Operation
Note
When shutting down the browser, a verification message may appear, depending on
your camcorder.
81-GB
Page 82

– Bluetooth Application Operation –
Using as a Remote Camera
– DCR-TRV80/TRV80E only
You can operate your camcorder remotely from a BIP compatible computer or PDA
with Bluetooth function.
You can use your camcorder as a remote camera and do the following:
•Recording the image with your camcorder while monitoring remotely with the screen
of a connected device
•Zoom (telephoto/wide)
•Recording a still image on “Memory Stick”
•Tape recording
•Pan/Tilt
(Using digital zoom function lets you perform Pan/Tilt even without a tripod, etc.)
The functions you can operate are different depending on the connected Bluetooth
device. For details, refer to the operating instructions of the connected Bluetooth device.
You can use your camcorder as a remote camera up to three hours.
Your camcorder automatically turns off after three hours.
Do not use your camcorder for hours as a surveillance camera and such.
Doing so may cause a malfunction.
Preparation
(1) Set the POWER switch of your camcorder to CAMERA.
82-GB
(2) Tap FN and select PAGE3.
(3) Tap RMT CAM.
The message “REMOTE CAMERA STANDBY” appears on the screen.
When the connection is established, “REMOTE CAMERA” appears on the
screen.
Tips
•Certain Bluetooth devices require authentication to connect to your camcorder. When
the passkey input screen appears on the screen of your camcorder, enter the passkey
into the connected device.
•When the message “REMOTE CAMERA STANDBY” on the screen is displayed for
five minutes and connection is still not established, the screen returns to PAGE3.
•The time limit for entering the passkey is 30 seconds. If it takes more than 30 seconds
to finish entering the passkey, a passkey error occurs, authentication fails and your
camcorder returns to connection standby.
Page 83

Using as a Remote Camera
Operating the Remote Camera
For details of operating the Remote Camera, refer to the operating instructions of the
connected Bluetooth device.
The following procedure shows you how to operate the Remote Camera function using
a Sony PDA with Remote Camera Ver.1.1 installed.
(4) Turn on the PDA.
(5) Start up Remote Camera Ver.1.1 on the PDA.
For details, refer to the operating instructions of the PDA.
(6) Tap “Search”.
The PDA starts searching for Bluetooth devices. When the search is complete,
the available Bluetooth devices are listed.
Bluetooth Application Operation
,
Tips
•To select from among previously connected devices, tap “Quick Search”. A list of
previously connected devices appears.
•If nothing appears in the list, tap “Find More” to start another search.
(7) Select your camcorder name (e.g. DCR-TRV80), and tap “OK”.
The PDA goes into the Remote Camera mode.
,
For details, refer to the operating instructions of the connected Bluetooth device.
83-GB
Page 84

Using as a Remote Camera
Ending the Remote Camera
(1) Tap END on the LCD screen of your camcorder to return to PAGE3.
(2) Tap EXIT on the LCD screen of your camcorder to return to FN.
Notes
•When START/STOP or PHOTO is pressed, melody or shutter sound is output even if
you set BEEP in to OFF in the menu settings.
•Camera recording lamp lights up during recording even if you set REC LAMP in
to OFF in the menu settings.
•You cannot select RMT CAM during the following operations:
– MEMORY MIX
– Tape recording
– Recording on “Memory Stick”
– Using USB Streaming function
•If you set Pan/Tilt to ON in RMTCAM SET in in the menu settings, you cannot
use the following:
– Digital zoom
– SteadyShot (The indicator flashes.)
•Remote Camera cannot be cancelled during the following. After finishing recording,
cancel Remote Camera.
– Tape recording
– Recording on the “Memory Stick”
Notes on Pan/Tilt
•The range in which Pan/Tilt can be performed varies depending on the zoom
position. (Changing the zoom from Wide to Tele gives a wider Pan/Tilt range.)
• If Pan/Tilt is set to ON in RMTCAM SET in in the menu settings when you turn
Remote Camera on or off, the zooming bar may appear in a different position. This is
not a malfunction.
•The picture quality deteriorates slightly. If low picture quality is a problem, set
Pan/Tilt to OFF in RMTCAM SET in in the menu settings on your camcorder, and
then try to operate the connected device again.
•Set Pan/Tilt to ON in RMTCAM SET in in the menu settings before operating
Remote Camera (The default setting is ON.). To change the Pan/Tilt setting during
remote operation of your camcorder, first quit Remote Camera and then change the
setting in the menu.
• When you exit Remote Camera after altering the view angle with Pan/Tilt operation,
the view angle returns to the centre.
•If you set the zoom to Tele and change the view angle, and then set the zoom to Wide,
the angle of view may return towards the centre.
• The Pan range with the zoom set to wide angle is narrower in Wide mode than usual.
84-GB
About Bluetooth devices you can connect
Refer to the following web page:
For customers in Canada
http://www.sony.ca/service/
For customers in the areas other than Canada
http://www.css.ap.sony.com/
Page 85

Using as a Remote Camera
Tips
•If you leave your camcorder on standby for more than five minutes:
– While using Remote Camera, your camcorder does not turn off.
– Standby is cancelled.
– Next time you record, it will take some time for recording to start.
•You can check the status of your camcorder from the connected device.
You can select DSPL ON or DSPL OFF in CAM INFO in RTMCAM SET in in the
menu settings.
This appears during tape recording
This appears when an error occurs on your
camcorder.
Examples:
– You tried to start tape recording without
inserting a cassette.
– You tried to record a still image on “Memory
Stick” without inserting a “Memory Stick.”
Bluetooth Application Operation
85-GB
Page 86

Transferring still images with Bluetooth
function – Image Transport
– DCR-TRV80/TRV80E only
You can transfer still images between your camcorder and Bluetooth devices that are
compatible with BIP.
Sending a still image
Before operation
•Insert the “Memory Stick” that contains a still image you want to send to other
Bluetooth device into your camcorder.
•Set a Bluetooth device to connection standby with your camcorder.
Tips
•You can send only JPEG files.
•The image may be resized or only sent as a thumbnail file, depending on the
Bluetooth device connected.
•The protect and print mark settings become invalid in images received by the
Bluetooth device.
•The file name and storage destination differ depending on the specifications of the
connected device.
(1) Set the POWER switch of your camcorder to MEMORY/NETWORK.
(2) Tap FN and select PAGE3.
86-GB
(3) Tap IMAGE TRANS.
(4) Tap PLAY.
The most recently recorded image is displayed.
Page 87

Transferring still images with Bluetooth function
– Image Transport
(5) Tap –/+ to display the desired still image.
–:To see the previous image
+:To see the next image
(6) Tap SEND.
The history of recently connected Bluetooth devices appears.
If the history does not appear, tap [Search].
,
Bluetooth Application Operation
The message “Searching for Bluetooth Devices” appears on the screen and
your camcorder starts searching for available Bluetooth devices. When the
search is complete, the list of available Bluetooth devices appears.
To display the addresses and the category of available devices, tap [More
Info.].
Search for the devices takes about 10 to 60 seconds.
If your camcorder cannot search any Bluetooth devices available, the list does
not appear. Check the devices, then tap [Search] again.
If you want to cancel the search, tap [Cancel].
87-GB
Page 88

Transferring still images with Bluetooth function
– Image Transport
(7) Tap the Bluetooth device that you want to send a still image to.
,
(8) Tap [OK].
Your camcorder starts sending the still image. If the Bluetooth authentication is
required, tap [Passkey] and enter the passkey within 30 seconds.
(9) Tap [OK].
The screen in step 5 appears again.
Viewing the history
(1) Set the POWER switch of your camcorder to MEMORY/NETWORK.
(2) Tap FN and select PAGE3.
88-GB
(3) Tap IMAGE TRANS.
(4) Tap LOG.
The history of up to 10 most recently used Bluetooth devices appears.
Tip
When you tap [More Info.], the device address and the device category appear on the
screen. To return to the previous screen, tap [More Info.] again.
Page 89

Transferring still images with Bluetooth function
– Image Transport
Deleting a Bluetooth device from the history
You can delete a Bluetooth device from the history.
(1) Follow steps 1 to 4 on page 88 and the Bluetooth Device History screen
appears.
The Connection Log screen appears.
(2) Tap the Bluetooth device that you want to delete from the history.
The Bluetooth Device screen appears.
,
Bluetooth Application Operation
(3) Tap [Delete].
The screen for verification appears.
,
(4) Tap [OK].
The selected Bluetooth device is deleted from the history.
,
Tip
If you delete the Bluetooth device from the history by mistake, you will have to
search for the device the next time you send a still image to the device.
89-GB
Page 90

Transferring still images with Bluetooth function
– Image Transport
Receiving still images
Tip
You can receive only JPEG files.
Before operation
•Release the lock on the “Memory Stick.”
•Insert a “Memory Stick” into your camcorder, for storing a still image.
(1) Set the POWER switch of your camcorder to MEMORY/NETWORK.
(2) Tap FN and select PAGE3.
(3) Tap IMAGE TRANS.
90-GB
(4) Tap RECV.
The message “Waiting for Connection” and information of your camcorder
appear.
If the Bluetooth authentication is required, tap [Passkey] and enter the passkey
within 30 seconds.
Page 91

Transferring still images with Bluetooth function
– Image Transport
(5) Tap [Cancel] after receiving still images.
The screen in step 4 appears again.
To cancel receiving still images
Tap [Cancel] in step 4. The received image files are not saved.
Tip
If you leave your camcorder on standby for more than five minutes, the existing
connection may be discontinued or a new connection may not be possible. In this case,
connect your camcorder to the device again.
Note
You cannot select IMAGE TRANS during the following operations:
– MEMORY MIX
– Recording on a “Memory Stick"
Bluetooth Application Operation
91-GB
Page 92

– Additional Information –
File storage destinations and file names
Files are grouped in the following folders. You can only view these folders on a
computer. The meanings of the file names are as follows.
ssss stands for any number within the range from 0001 to 9999.
Folder containing still image files,
moving picture files, files attached to
received email, files downloaded from
the Web, and files received by IMAGE
TRANS.
Folder containing the text data of email,
etc.
Folder containing files of page memo
(1), etc.
Folder containing files of page memo
(2), etc.
Folder File name Meaning
101MSDCF DSC0ssss.JPG Still image file
(–999MSDCF)
CAMNET01 RCV.MBX Incoming email list*
MEMOssss MEMOssss.HTM Page memo HTML file
* Do not delete these files. These are required files even though they cannot be verified
using a computer.
MOV0ssss.MPG Moving image file
NET0ssss.JPG Still image file over the network or Bluetooth
NET0ssss.MPG Moving image file over the network or Bluetooth
IMAGEMEM.CNF Page memo management file*
IMGssss.JPG Page memo still image file
IMGssss.GIF Page memo image file
IMGssss.PNG
IMGssss.XBM
92-GB
Tip
Images received by email or downloaded are stored in the folder set as the recording
folder. For details, refer to “Changing the recording folder” in the operating instructions
supplied with your camcorder.
Page 93

Troubleshooting
Trouble accessing the Internet
The message “...Incomplete” or “Authentication Error...” appears and your camcorder cannot
access the Internet.
c Check your setup by the procedure described in “Network Setup” (p. 32).
Your camcorder cannot access the Internet.
c Try accessing it again after a while.
The message “Line is Busy or Phone number may be Wrong” appears and your camcorder
cannot access the Internet.
c The telephone line of your provider is busy. Try connecting again after a while.
c The settings for the telephone number may be incorrect. Check the settings.
c The telephone signal type settings (tone/pulse) of the USB-PSTN Modem Adaptor or
the Modem Adaptor with Bluetooth Function may be wrong. Check the settings.
The message “Bluetooth Connection Error” appears and your camcorder cannot access the
Internet.
c Check that the Bluetooth device is turned on.
c Move the Bluetooth device closer to your camcorder.
The message “Phone Line Disconnected” appears.
c Data entry can be done offline. When your camcorder needs to connect with the site,
the screen for verifying the connection appears. Tap [Connect], then the connection
will be established again.
The message “Bluetooth Authentication Error Check the Certified Status” appears and your
camcorder cannot access the Internet.
c The Bluetooth device may have been deleted from the registration. Register it again
(p. 23).
Additional Information
The message “Bluetooth Connection Error Select Bluetooth Device” appears and your
camcorder cannot access the Internet.
c Check your setup by the procedure described in “Registering Bluetooth devices”
(p. 23).
The message “Low Battery” appears and your camcorder cannot access the Internet.
c Charge the battery pack or use the AC Adaptor, then connect again.
93-GB
Page 94

Troubleshooting
Trouble with email
The message “DNS Error The Requested URL Could Not Be Found” appears and your
camcorder cannot send or receive email.
c The DNS setup may be wrong. Check the PPP setting or LAN setting.
Your camcorder cannot send email.
c The clock of your camcorder is not set. Set the clock.
c Check your setup by the procedure described in “Network Setup” (p. 32).
c Try sending the email again after a while.
c If you use a LAN connection, you may not be able to use the email function,
depending on your provider.
Your camcorder cannot receive email.
c The clock of your camcorder is not set. Set the clock.
c Check your setup by the procedure described in “Network Setup” (p. 32).
c All of your downloaded email messages are stored in the “Memory Stick.” Insert a
new “Memory Stick” that has enough memory and download your email again. Also
check that the lock switch is released.
c You can restrict the file size of downloaded email messages. Check the setup of the
item “Restrict” on the Network Options screen.
c Up to 50 downloaded email messages can be stored in a “Memory Stick.” If you want
to store a 51st email message, delete unnecessary email or insert a new “Memory
Stick” that has enough memory, then download the email again.
c If you use a LAN connection, you may not be able to use the email function,
depending on your provider.
Not all of an email message can be received.
c The maximum size of an email is 4,000 characters. You cannot receive the entire text of
email that has more than 4,000 characters.
The message “PPP Authentication Error” appears.
c Check your setup by the procedure described in “Network Setup” (p. 32).
You received an email message sent from Mailer Daemon.
c Email you sent has not been delivered to the addressee. Check the email address. If
you receive an email message from Mailer Daemon and the destination address is
correct, the server may be down, or the email address may have been changed.
Attached files are not saved on the “Memory Stick.”
c Your camcorder can receive the following extensions: .jpg, .mpg, .jpeg and .mpeg.
Check the file type.
c The message “Folder No. Full” appears when the “Memory Stick” is full. Delete any
unnecessary data or insert another “Memory Stick”, and then try to receive email
again.
c All of your downloaded email messages are stored on the “Memory Stick.” Insert a
new “Memory Stick” that has enough memory and download the email again. Also,
check that the lock switch is released.
c You can restrict the file size of downloaded email messages. Check the item “Restrict”
on the Network Options screen.
94-GB
Page 95

Troubleshooting
Trouble viewing web pages
Images do not appear.
c Check the item “Image Display” on the Network Options screen.
Some or all of the web pages do not appear.
c A web page made with software such as Macromedia Flash may not be compatible
with the browser of your camcorder.
c The web page made with JavaScript and Java Applets cannot be executed with
incompatible commands.
It takes some time to load the web page.
c The web page may be busy. Try connecting through another provider or access point
or connect during off-peak times.
The web page is not loaded.
c When entering its URL
Check that the address is correct. (For example, did you enter “0” or “O”, “-”or “_” ?)
c When accessing through a bookmark or page memo
The address may have been changed or the link structure of the web site may have
been modified. If the link structure is modified, follow the address to its source. (For
example, when you cannot access “http://www.sony.co.jp/xxxx/”, then try to access
“http://www.sony.co.jp/”.)
The web page cannot be displayed.
c The item “Cookie” may not be checked. Check the item “Cookie” on the Network
Options screen (p. 42).
Additional Information
The cookie is not saved.
c Exit the network function, the cookie will be deleted.
The message “DNS Error The Requested URL Could Not Be Found” appears and the web
page is not displayed.
c The item “DNS” may not be set correctly. Check the setup of the PPP screen or LAN
screen.
c The item “Proxy” may not be set correctly. Check the setup of the Browser screen.
95-GB
Page 96

Troubleshooting
Troubles about sending a still image
– DCR-TRV80/TRV80E only
SEND does not function.
c A still image is not being played back.
c An invalid image is being played back.
The message “Bluetooth Authentication Error” appears, and you cannot send a still image.
c The authentication time limit (30 seconds) is over.
c You did not enter the correct passkey.
c The connected device was disconnected.
c The passkey you entered is wrong. Enter the correct passkey.
The message “Bluetooth Connection Error” appears, and you cannot send a still image.
c The Bluetooth device you want to connect to is not turned on.
c The Bluetooth device is too far from your camcorder.
c The radio waves between your camcorder and the connected device were blocked.
c The Bluetooth device you want to connect to is already connected to other devices.
c The connected device was disconnected.
c The Bluetooth device you want to connect to is not compatible with BIP.
The message “Bluetooth Communication Disconnected” or “Send Error” appears, and you
cannot send a still image.
c The connected Bluetooth device is turned off.
c The Bluetooth device is too far from your camcorder.
c The radio waves between your camcorder and the connected device were blocked.
c The connected device was disconnected.
c The Bluetooth device you want to connect to is not compatible with BIP.
c The connection was rejected by the connected Bluetooth device. Check the settings or
operations of the connected device.
c You sent the still image that the connected Bluetooth device cannot receive.
96-GB
Page 97

Troubleshooting
Troubles about receiving a still image
– DCR-TRV80/TRV80E only
The message “Bluetooth Authentication Error” appears, and you cannot receive a still
image.
c The authentication time limit (30 seconds) is over.
c You did not enter the correct passkey.
c The connected device disconnects or ends the connection.
c The passkey you entered is wrong. Enter the correct passkey.
The message “Bluetooth Communication Disconnected” or “Error Receiving” appears, and
you cannot send a still image.
c The connected Bluetooth device is turned off.
c The Bluetooth device is too far from your camcorder.
c The radio waves between your camcorder and the connected device were blocked.
c The connected device disconnects or ends the connection.
c The “Memory Stick” does not have enough capacity.
c The sent still image is not a JPG or JPEG file.
c The sent still image file is too large.
The message “Bluetooth connection Timeout” appears.
c If your camcorder does not receive any requests from the connected device for five
minutes, the connection is disconnected or the camera becomes non-connectable.
Connect your camcorder and the Bluetooth device again.
No request from the connected device.
c The device you want to connect with your camcorder is connected to other device.
Disconnect the connection and connect the device with your camcorder.
c The time limit was exceeded. Set your camcorder to connection standby again.
Additional Information
The received still image cannot be played back.
c Your camcorder may not be able to play back incompatible JPEG files or files recorded
by other devices properly.
c The still image is corrupted.
The index screen becomes blue.
c The received files do not have thumbnails.
97-GB
Page 98

Troubleshooting
Adjusting the LCD screen (CALIBRATION)
If the buttons on the touch panel do not work correctly, follow the procedure below.
(1) Set the POWER switch to OFF (CHG).
(2) Eject the tape from your camcorder, then disconnect any connecting cable from
your camcorder.
(3) Set the POWER switch to VCR while pressing DISPLAY/BATTERY INFO on
your camcorder, then keep pressing DISPLAY/BATTERY INFO on your
camcorder for about five seconds.
(4) Tap
Notes
•If you do not tap the right spot, you need to repeat step 4.
•You cannot calibrate the LCD screen when you close the LCD panel with the LCD
screen facing out.
For details of adjusting the LCD screen (CALIBRATION), refer to the operating
instructions supplied with your camcorder.
displayed on the screen with the supplied stylus.
The position of
changes.
CALIBRATE
98-GB
Page 99

Troubleshooting
Displaying information on your camcorder
You can check information of your camcorder on the LCD screen.
The Self Info. screen
The model name
Device Address
This is the unique address assigned to each
camcorder at the factory. This address is used
when exchanging information between
devices. This address cannot be modified.
(The number indicated on the illustration is
an example number.)
Device category
To display information of your camcorder from Network Menu
(1) Open the Network Menu.
For details of how to open the Network Menu, see page 6.
Additional Information
(2) Tap [Setup].
The Setup screen appears.
,
99-GB
Page 100

Troubleshooting
(3) Tap [Bluetooth Setup].
The Bluetooth Setup screen appears.
(4) Tap [Self Info.].
The Self Info. screen appears.
To return to the Bluetooth Setup screen
Tap [Exit].
To display information of your camcorder from the history
(1) Follow steps 1 to 4 on page 88 to display the Bluetooth Device History screen.
,
100-GB
(2) Tap [Self Info.].
The Self Info. screen appears.
To return to the Connection Log screen
Tap [Exit].
 Loading...