

Page 1
Introduction
About This Manual
General notes
Using this manual
Read Carefully
About trademarks
Warning
About pictures and images
Software Usage Contract
Chapter 1 Before Use
Chapter 2 Capture Environment
Chapter 3 Album Environment
Chapter 4 Movie Editing Environment
Chapter 5 Layout Environment
Chapter 6 Image Editor
Chapter 7 Video Disc Environment
Chapter 8 ImageMixer Easy Video
CD (Win)
Introduction About This Manual
General notes
● This manual is an HTML document which explains the functions of ImageMixer Ver.1.5 for
Sony (henceforth, 'ImageMixer').
This manual does not explain the basics of Windows or Macintosh operating systems. Basic
operations, such as working with individual windows, are based on general usage of Windows
and Macintosh.
● Screenshots may differ slightly depending on each company's bundling of this product.
● Most screenshots currently used in this manual relate to the Windows version. The screenshots
for Windows and Macintosh differ slightly. Moreover, images may vary according to monitor
specifications.
● Due to the fact that the most recent information related to this software has not been added to the
manual, please consult the Read Me file, included on the CD-ROM.
Using this manual
This manual explains all ImageMixer's many functions. Any item can be referenced by clicking the menu
(table of contents) displayed on left-hand side of the screen.
● Blue text indicates a link. Clicking it will display the relevant item.Once that item has been
displayed, the link will appear in purple text.
● The end of the page can be referenced by clicking .
● The beginning of the page can be referenced by clicking .
● The preceding page (or preceding item) can be referenced by clicking .
● The following page (or following item) can be referenced by clicking .
● Issues of particular importance are indicated in red text. Please read them carefully.
Homepage
The latest information on ImageMixer can be found on our home page:
http://www.ImageMixer.com/
Copyright © 2001-2002 PIXELA Corp. All rights reserved.
Page 2

Introduction Read Carefully
About trademarks
● 'Windows ®' is a registered trademark of Microsoft Corporation in the U.S. and other countries.
The official name of Windows is Microsoft ® Windows ® Operating System.
● Macintosh is a registered trademark of Apple Computer, Inc.
● In addition, the company names and brand names referenced in this manual are themselves the
trademarks, registered trademarks, and products of the respective companies.
Warning
1. All rights related to the user manual and software produced by our company (henceforth,
'product'), both of which are stored on the installation CD-ROM, belong solely to PIXELA
Corporation.
2. Unauthorized reproduction or reprinting of the contents of the product, or any portion thereof, is
strictly prohibited.
3. The contents of this product are subject to change without notice.
4. PIXELA Corp. offers no guarantees for this product. Moreover, PIXELA Corp. assumes no
responsibility for damage caused as the result of defects in this product (directly, indirectly, as a
special case or in inevitable cases) even once an announcement has been made that such damage
may occur. By the same token, PIXELA Corp. assumes no responsibility for costs incurred in the
reproduction or recovery of any lost computer programs or data, when such loss is associated
with the use of this computer program when included in another application.
All the rights to the picture data (including text characters) included in the product CD-ROM are
protected by accompanying copyrights based on the Copyright Act.
No persons other than the copyright holder may engage in the sale, rental, transfer, or
reproduction of this material without the consent of the copyright holder. Violations to the
Copyright Act are subject to criminal punishment. Use of the picture data on this CD-ROM is
permitted for individual use only.
The image data on this CD-ROM may not be duplicated for business purposes. Moreover, neither
corrected nor altered parts of the data may be used for business purposes.
About pictures and images
Page 3

● Keep in mind that pictures and images which may used with ImageMixer may be protected or
otherwise forbidden, irrespective of their purpose or use.
● As for general literary property, the approval of the rightful claimant of the work is required
except in the case of personal use.
● Duplicating any type of currency, negotiable instruments, securities, etc., is illegal and punishable
by law.
● Duplicating licenses, passports, various kinds of certificates, official documents, private
documents, etc., is illegal and punishable by law.
Copyright © 2001-2002 PIXELA Corp. All rights reserved.
Page 4

Introduction Software Product Use Consent Contract
You are permitted by PIXELA, Corp., according to the following use consent conditions of this use
consent contract (henceforth, "this contract") to the nonexclusive, nontransferable right to use the
software program (henceforth, "this program") and its add-ons, such as the user guide.
Consented matter
You are granted the nonexclusive, nontransferable right to install and use one copy of this program on a
single computer.
The primary user of this program may copy parts thereof for backup purposes, with all usage rights, as
set forth in this contract, remaining exclusive to the primary user.
Prohibited matter
This program cannot be used on a network. When it is used by two or more computers on a network, a
royalty is required to be paid to PIXELA, Corp. for each additional computer.
Third person use or the use of this program by the method of re-use consent, transfer, distribution, loan,
or others, is not allowed.
You may not correct, alter, reverse engineer, decompile, or disassemble all or part of this program. You
may not allow a third person to perform such an act.
Termination of contract
When a customer reproduces this program or its add-ons without permission or breaks the abovementioned consent conditions, this contract is automatically terminated, and other legal action may be
taken by PIXELA, Corp. Upon termination of this contract, this program, its add-ons, and all duplicates
thereof, shall be returned to PIXELA, Corp., or abandoned.
Page 5

Guarantee and exemption from responsibility
This program, its add-ons, and the productions thereof, may not conform to your specific purpose,
notwithstanding any representations, express or tacit. Moreover, PIXELA, Corp. does not guarantee that
the functions of this program will agree with your needs, or that there are neither discontinuities nor
errors in the functions of this program.
PIXELA, Corp. does not take any responsibility for direct or indirect loss or damage accompanying or
related to the use of this program, nor for any disputes arising between the customer and any third party
related to use of this program or caused by this program.
Copyright © 2001-2002 PIXELA Corp. All rights reserved.
Page 6
Introduction Chapter 1 Before Use
System Requirements
Windows
Macintosh
Uninstalling
Basic Operations
Starting ImageMixer
ImageMixer startup screen
Outline of tasks
Selector Bar
Status Bar
Exiting ImageMixer
Basic operations
Basic Terms
Chapter 2 Capture Environment
Chapter 3 Album Environment
Chapter 4 Movie Editing Environment
Chapter 5 Layout Environment
Chapter 6 Image Editor
Chapter 7 Video Disc Environment
Chapter 8 ImageMixer Easy Video
CD (Win)
1-1 System Requirements
In order for ImageMixer to work correctly, your computer must meet the following minimum system
requirements. Please confirm that your computer system meets these requirements before installing
ImageMixer.
Windows
OS
Microsoft ® Windows ® 98/Windows ® 98 Second
Edition/Windows ® Millennium Edition/Windows ® 2000
Professional/Windows ® XP Home Edition/Windows ® XP
Professional (IBM PC/AT compatible)
(In Windows ® 98 and Windows ® 98 Second Edition, DV
(IEEE1394) capturing is not supported. In Windows ® 98, USB
capturing is not supported)
CPU
Intel MMX ® Pentium ® 200MHz or faster. (Pentium ® III
500MHz or faster for capturing a movie via USB or IEEE1394.
Pentium ® III 800MHz or faster is recommended.)
Software DirectX 8.0a or later
Sound 16-bit stereo sound card with stereo speakers
Memory 64MB or more (128MB or more is recommended)
Hard Disk
Approx. 250MB for program, 1GB or more of free space
recommended for work space
However, when creating discs or disc images in video disc creation
mode, you must have available space 3 times or more that of the
disc to be created.
Graphics
4MB or more of VRAM, minimum of 800x600 at 16-bit hi-color
(65,000 colors); Direct Draw driver compatible
ImageMixer will not run correctly in a screen area of less than 800 x 600, or in
less than 256 colors.
Other
DirectX must be installed.
If the standard Windows fonts are not installed on the system,
characters will not be displayed correctly.
To install and use this software in Windows ® 2000 you must be
authorized as a Power User or Administrator; for Windows ® XP
you must be authorized as an Administrator.
Macintosh
Page 7

OS
Mac OS 8.5.1 or later (Mac OS X is not compatible)
Mac OS 8.6 or above is required for creating a disc image in the
Video Disc Environment.
CPU
iMac, eMac, iBook, PowerBookG3/G4, PowerMacG4 series
(G3 233MHz or better)
Memory 96MB or more (128MB or more is recommended)
Hard Disk
Approx. 200MB for program, 1GB or more of free space
recommended for work space.
However, when creating disc images in video disc creation mode,
you must have available space 3 times or more that of the disc to be
created.
Graphics
Minimum of 800x600 (32,000 colors)
ImageMixer will not run correctly in a screen area of less than 800 x 600, or in
less than 256 colors.
Other
Pre-installed QuickTime 4 or later.
To create a video disc, you will also need to have an environment
that can run a recording device and the writing software Roxio's
Toast.
USB or IEEE1394 capturing is not available with Macintosh.
Copyright © 2001-2002 PIXELA Corp. All rights reserved.
Page 8

1-2 Uninstalling
Windows
1. From the Start menu, point to settings 'Settings' and open the 'Control Panel.'
2. Double-click the [Add/Remove Programs] icon.
The Add/Remove Programs property dialog box is displayed.
3. Select ImageMixer from the list of programs and click the [Add/Remove] button.
4. Select the language of the currently installed version of ImageMixer and click [OK].
The uninstall process begins.
5. When the dialog box says 'uninstall successfully completed,' click the [OK] button.
In some cases captured files may remain after the uninstall process is completed. To delete all ImageMixer
information, delete the Program Files >Pixela > ImageMixer folder.
Macintosh
1. Drag the following folder to the Trash: 'System Folder: Preferences: IM Default Settings,
ImageMixerPreferencesFile, IMx_VCDSPreferenceFolder, IMx_VCDS.prf '.
2. Drag the 'ImageMixer' folder from the HDD to the Trash.
Copyright © 2001-2002 PIXELA Corp. All rights reserved.
Page 9

1-3-1 Basic Operations
Starting ImageMixer
Windows
ImageMixer can be started by clicking on the Start Menu and pointing to
Programs>Pixela>ImageMixer>ImageMixer Ver.1.5. for Sony
If a shortcut icon for ImageMixer was created at installation, an icon will be displayed on the desktop
(see the example at right). Double-clicking this icon will also start ImageMixer.
Additionally, you can refer to this manual by selecting Start>Programs>Pixela>ImageMixer>Help.
Macintosh
ImageMixer is started by double-clicking the ImageMixer icon (created during
installation) in the ImageMixer folder on the HDD.
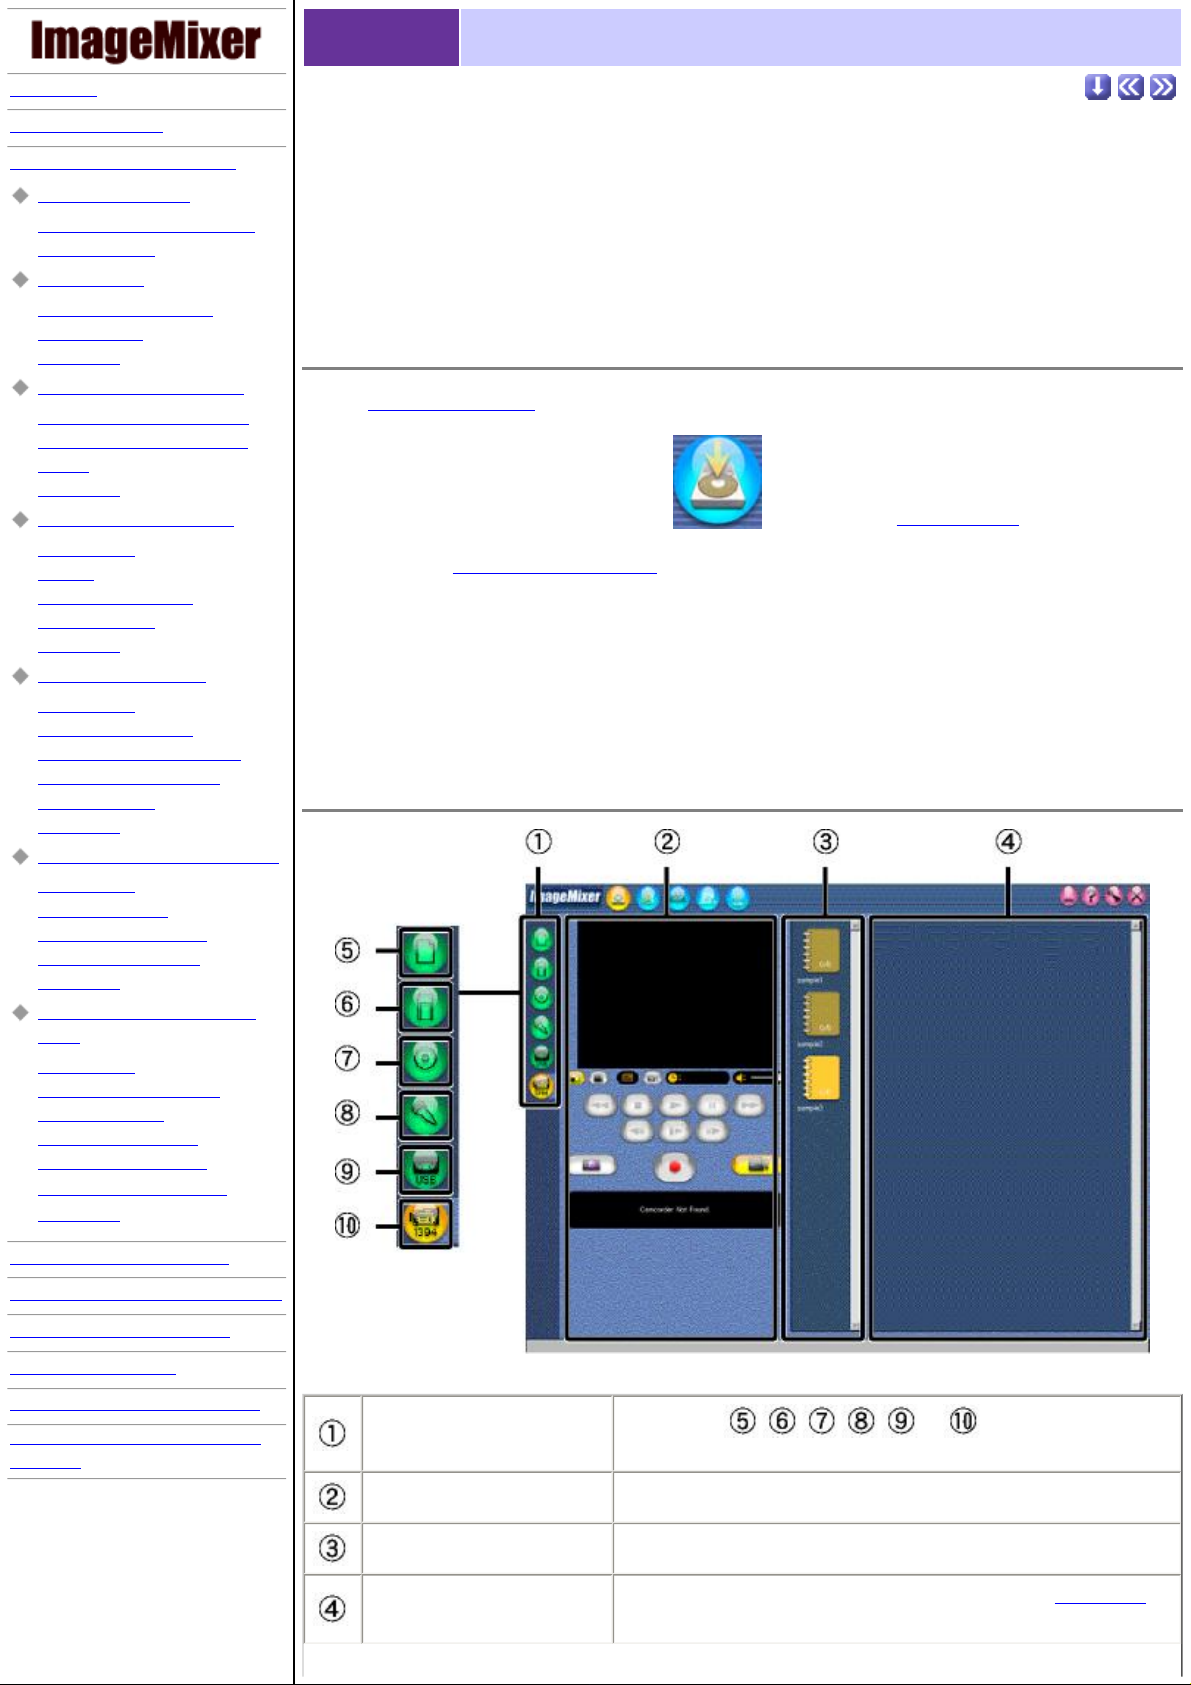
ImageMixer startup screen (The Main Selector)
The first window displayed when ImageMixer is started is called the Main Selector.
Page 10
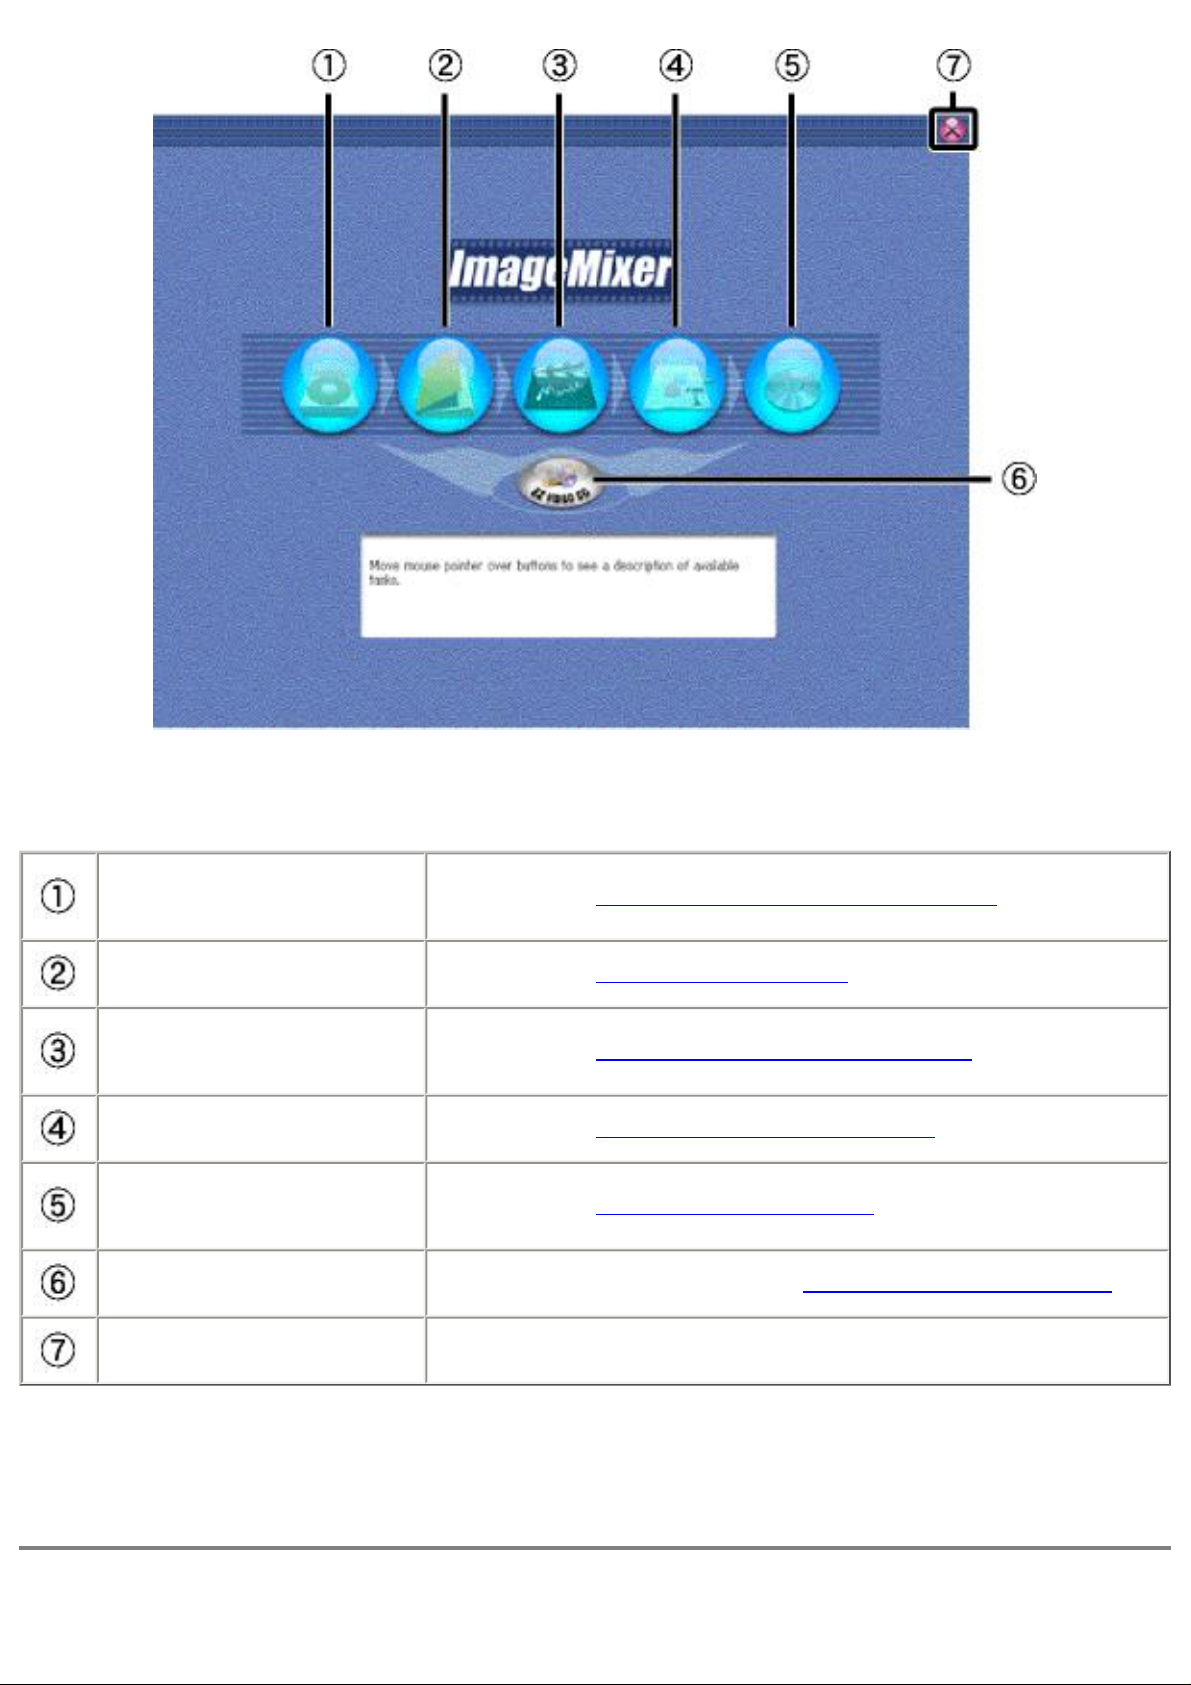
Capture Environment
button
Album Environment button
Movie Editing Environment
button
Layout Environment button
Video Disc Environment
button
Easy Video CD start button
Exit button Click to exit ImageMixer.
Click to begin
Click to begin
Click to begin
Click to begin
Click to begin
Click to begin tasks related to the
tasks related to capturing media files.
tasks related to albums.
tasks related to editing movie files.
tasks related to graphic layouts.
tasks related to video disc.
ImageMixer Easy Video CD.
Outline of tasks
Page 11

Tasks related to capturing media files (Capture Environment)
ImageMixer allows you to select which existing media you want to work with and import files from a
memory card, such as one which is inserted in a digital camera connected to your computer. You can
also record sound from audio CDs or by using a microphone. Capturing still shots or entire scenes from a
digital movie camera is also easy with ImageMixer. You can then use the main screen to confirm these
operations by double clicking the appropriate thumbnail and easily add media files to existing albums.
Tasks related to albums (Album Environment)
Albums help you organize media files to be used with ImageMixer. Available tasks include viewing still
images and movies, running slide shows, displaying information related to individual files, performing
file searches, and sorting files according to specific criteria. Using albums also means that you only need
manage those files that serve the purposes you define.
Tasks related to editing movie files (Movie Editing Environment)
ImageMixer is a powerful application when it comes to editing movie files. To create professional
quality movies, you can cut scenes, superimpose sound, add transition effects, and make custom tiles
appear in specific places in the media stream. Also, since ImageMixer saves movie files in MPEG1
format, there is no degradation of image quality, since unedited portions do not need to be rewritten to
disk.
Tasks related to graphic layouts (Layout Environment)
Creating customized labels for video cassettes, floppy disks, and other items is a snap with ImageMixer,
as is designing other two-dimensional images. You can also choose from a wide variety of designing
tools, such as those related to colors, text manipulation, shapes and textures.
Tasks related to editing still pictures (Image Editor)
Unlike conventional photographs, digital images can be altered in a variety of ways with ImageMixer,
including applying masks to certain sections of an image, adding filters, changing background
composition, etc.
Tasks related to video disk (Video Disc Environment)
You can create Video CDs with a slideshow format conforming to Video CD Ver 2.0 standards. The
system has playback control functions that allow you to change the playback order using the menu, and
supports playback of still images.
ImageMixer Easy Video CD (Windows only)
You can create Video CDs directly from digital movie camera images. The wizard format makes it easy
to operate.
Copyright © 2001-2002 PIXELA Corp. All rights reserved.
Page 12

1-3-2 Basic Operations
Selector Bar
The buttons located on this bar control the desired working environment and general actions associated
with the current environment.
Capture Environment
button
Album Environment button
Movie Environment button
Layout Environment button
Video Disc Creation button
Minimize button
Help button
Click to begin
Click to begin
Click to begin
Click to begin
Click to begin
Click to minimize the ImageMixer application window and
display it in the task bar. (Windows only)
Click to bring up this manual and get help using ImageMixer.
(Windows only)
tasks related to capturing media files.
tasks related to albums.
tasks related to editing movie files.
tasks related to graphic layouts.
tasks related to video disc.
Preferences button
Exit button Click to exit ImageMixer.
Click to confirm or make changes to settings related to the
currently selected mode.
Page 13

Status Bar
The bottom part of ImageMixer's application window is called the 'Status Bar.' When the mouse pointer
is placed over an object, an explanation of its function is displayed in the Status Bar.
Exiting ImageMixer
Clicking the Exit button on either the [Main Selector] or the [Selector Bar] will close the
ImageMixer application.
Copyright © 2001-2002 PIXELA Corp. All rights reserved.
Page 14

1-3-3 Basic Operations
Basic operations in ImageMixer
Selecting an album
Once you select the album you want to work with, its icon turns bright yellow, so you are able to easily
distinguish which album is currently active.
Selecting thumbnails
Thumbnails may be selected in a variety of ways.
● Selecting one thumbnail
Click to select.
● Selecting a series of thumbnails
Click the first thumbnail in the series, hold down the 'Shift' key, and then click the last thumbnail
of the series.
● Selecting only individual thumbnails
In Windows, click the thumbnails of your choice while holding down the 'Ctrl' key. In Macintosh,
use the 'Command' key.
● Selecting all thumbnails currently displayed
In Windows, hold down the 'Ctrl' key and press 'A.' In Macintosh, hold down the 'Command' key
and press 'A.'
Selecting objects
Objects in a certain layout may be selected in a variety of ways.
● Selecting one object
Click to select.
● Selecting only individual objects
In Windows, click the objects of your choice while holding down the 'Ctrl' key. In Macintosh, use
the 'Command' key.
● Selecting all objects in the layout
In Windows, hold down the 'Ctrl' key and press 'A.' In Macintosh, hold down the 'Command' key
and press 'A.'
● Canceling object selection
Click anywhere in the layout there is no object.
Selecting a color in Windows (See below for Macintosh.)
When selecting a color, the following dialog boxes are displayed.
Page 15
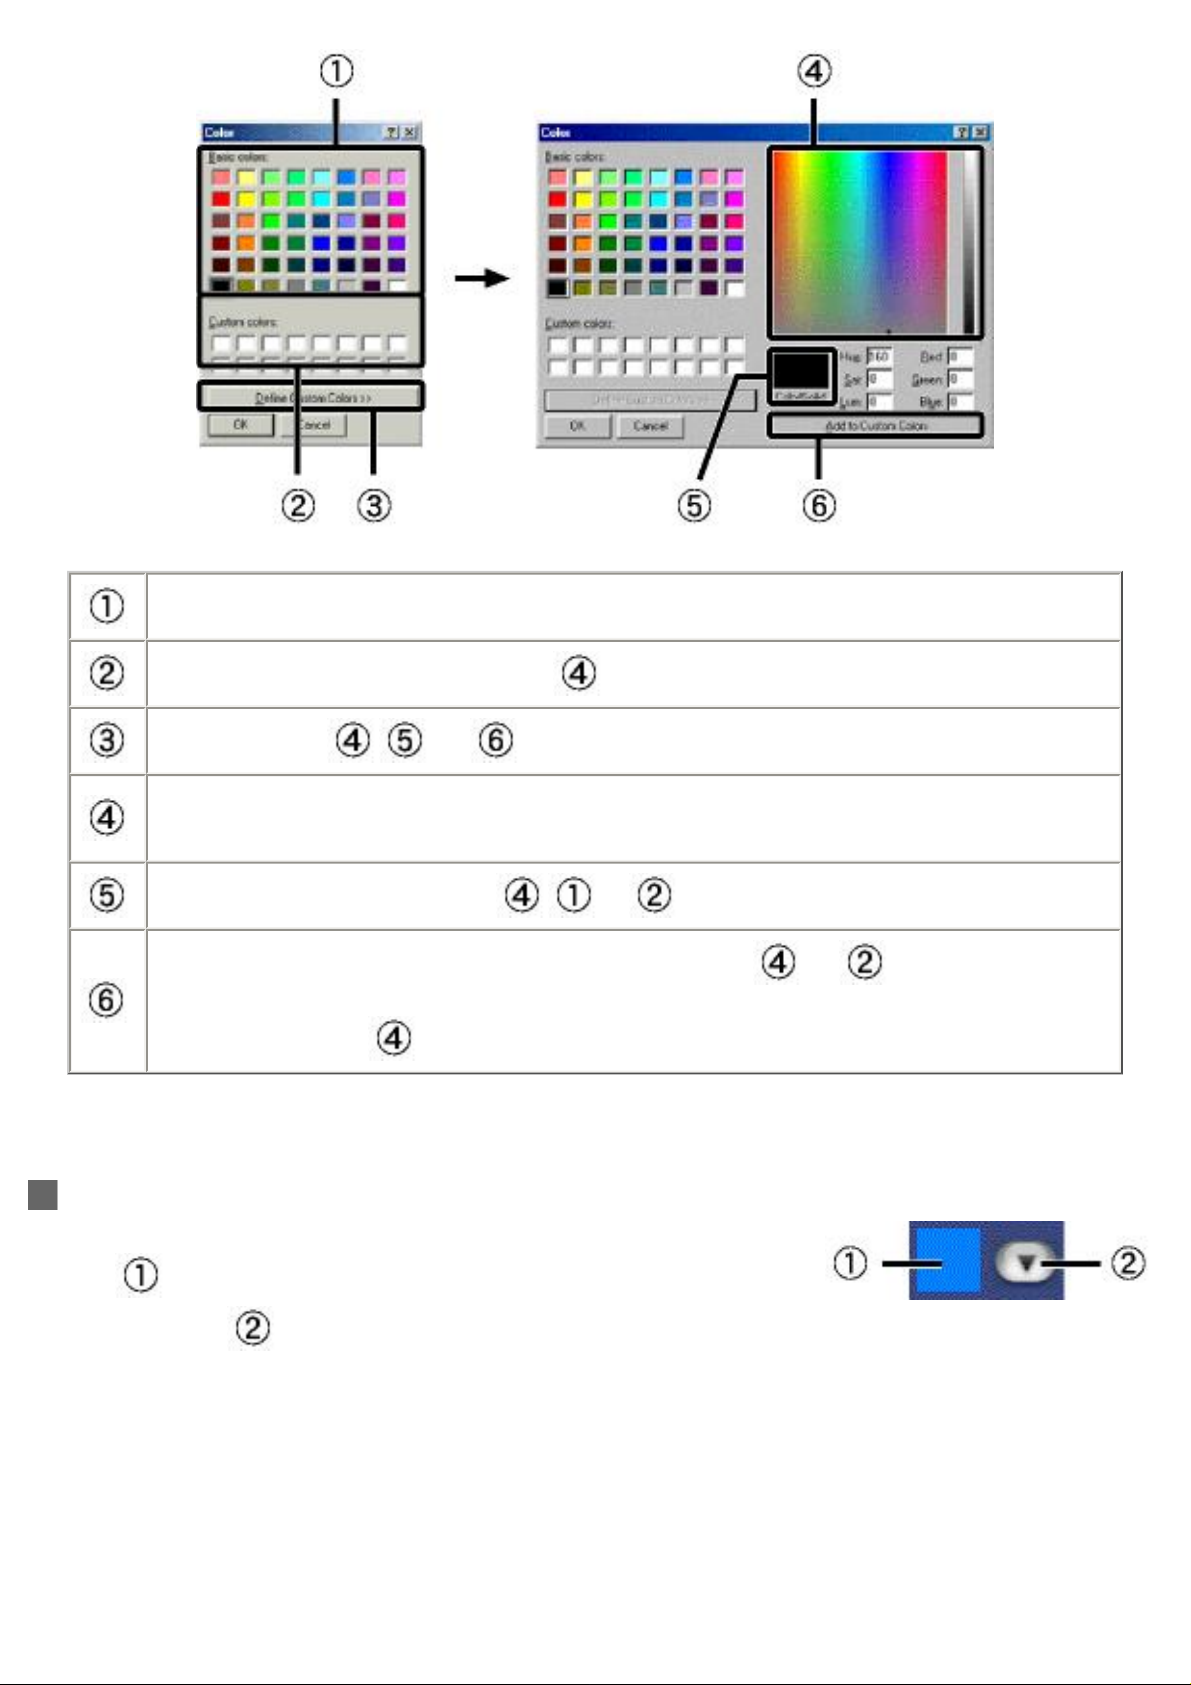
Click the color you wish to work with.
User-defined colors are displayed in . Click the color you wish to work with.
Click to display and .
A user-defined color can be created by clicking an area in the color spectrum or by
inputting digits.
The color currently specified in or is displayed here.
Click this button to add the color currently specified in to . Once any color on
the basic color palette or the custom color palette has been selected, the selected color
will be displayed in
.
Selecting a color in Macintosh
The following color select dialog boxes are displayed by doubleclicking
palette by clicking
. A color can be selected in the currently displayed color
.
Page 16
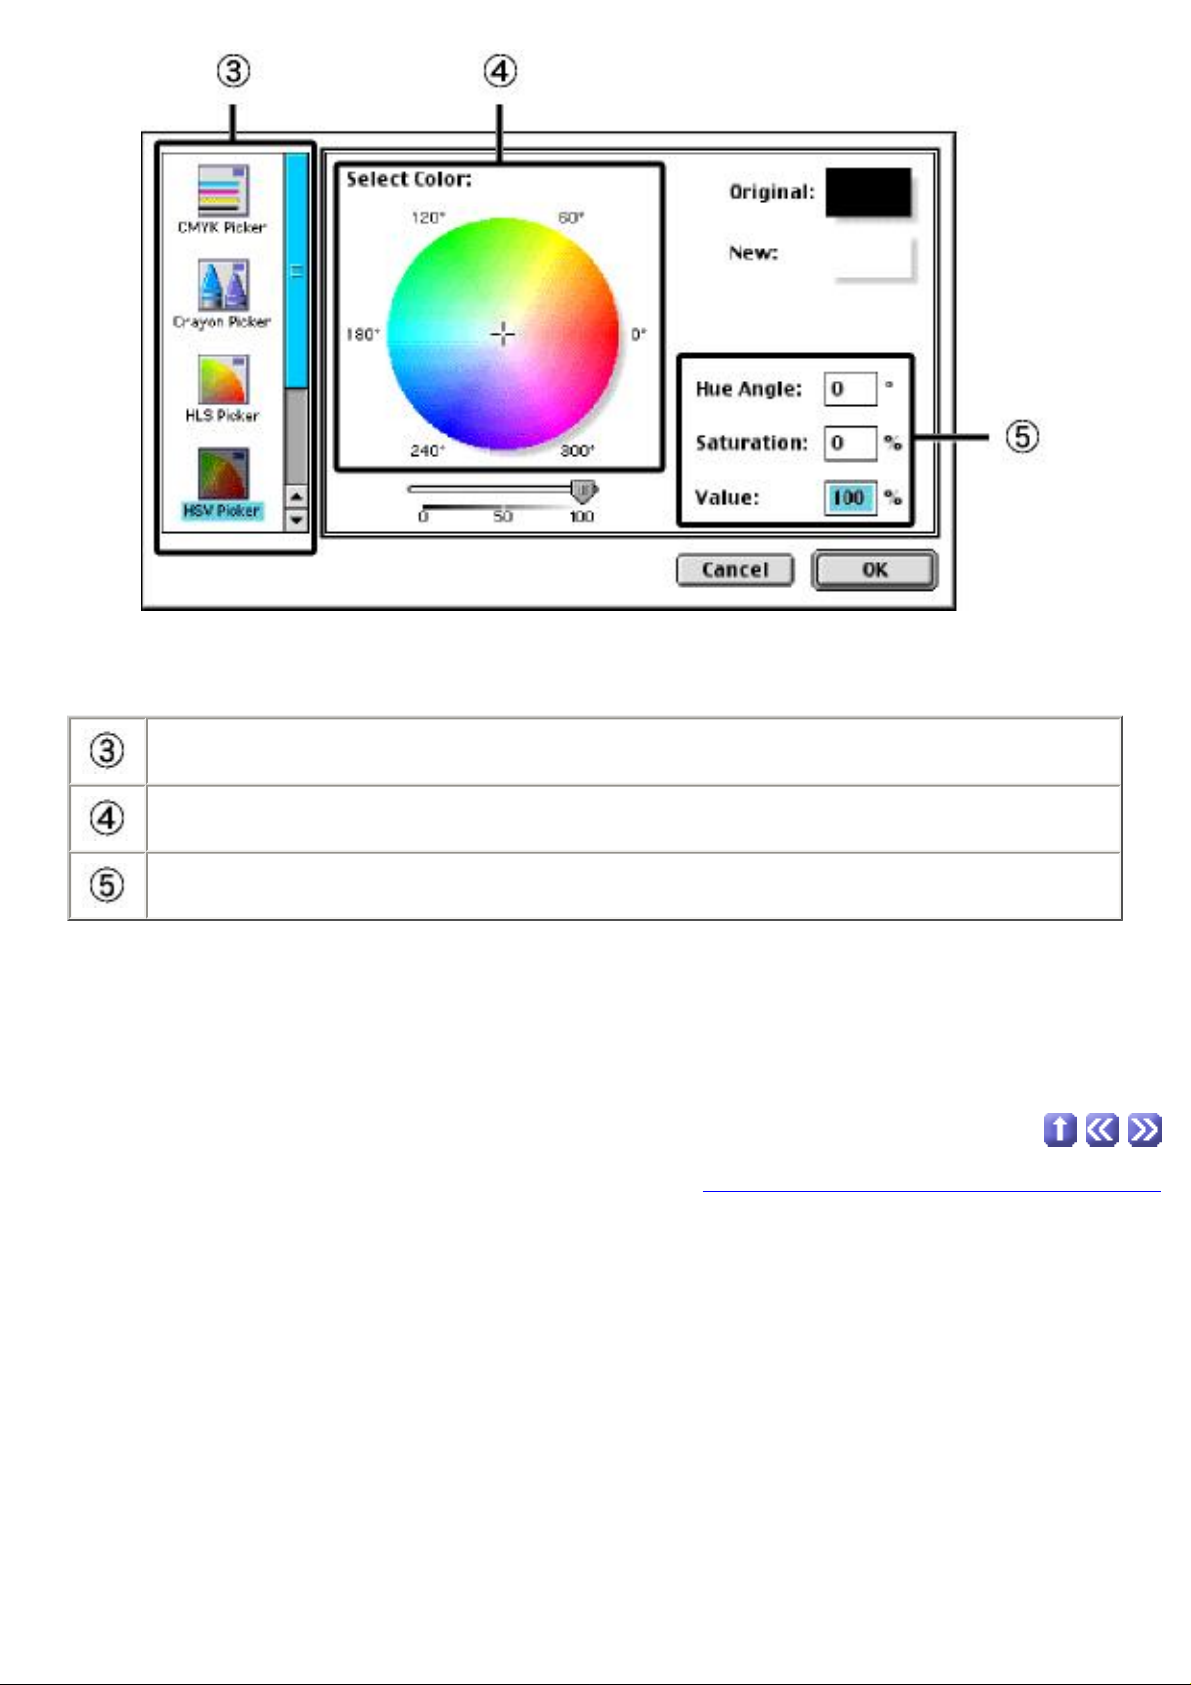
Click the color palette type you wish to work with.
Click an area in the color spectrum to specify a color.
Input digits to specify a color.
Copyright © 2001-2002 PIXELA Corp. All rights reserved.
Page 17

1-4 Basic Terms
Basic terms used in ImageMixer
IEEE1394
Also called 'I Triple E 1394,' this interface is best known for facilitating very fast data transfer speeds
(up to 400Mbps). It is used primarily as an output interface (DV connector) for digital video cameras or
hard disk drives. Other names for this interface include i.LINK (in Windows), and FireWire (in
Macintosh).
MPEG
MPEG stands for Moving Picture Experts Group. MPEG is an international data compression format for
digital movies and Hi-Fi audio. MPEG-1 is the approved format for Video CDs, and its brilliant
audio/video quality is comparable to that of VHS videotape. MPEG movies are stored as smaller files
than DV (digital video) movies of the same length, making it the standard movie format for Internetrelated activities. The MPEG-2 format also creates high quality images, but is used primarily for DVDs
and Digital Satellite Broadcasting.
Exif
Based originally on JPEG and TIFF file types, this format is used for still pictures taken with digital
cameras. Exif files contain detailed information (such as the date/time the photo was taken, image size,
shutter speed, etc.) on individual pictures.
MAPI
This is an acronym for "Messaging Application Programming Interface." It is the standard API
(application programming interface) specification recommended by Microsoft for e-mail related
activities. Usually, without MAPI, application software is unable to share data with other applications.
(This would mean, for example, that ImageMixer would only be able to exchange data within itself.) In
ImageMixer, MAPI acts as a sort of bridge between the ImageMixer application and your e-mail
software. When MAPI compatible e-mail software is used, layouts created in ImageMixer can be sent
via e-mail directly from the ImageMixer user interface.
MAPI compatible e-mail software includes Microsoft Outlook Express, Microsoft Exchange, Microsoft
Outlook 97/2000, Eudora Pro, and others. Questions regarding the MAPI compatibility of your e-mail
software should be addressed to the manufacturer.
When using Outlook Express
Depending on the version, you may need to set Outlook Express as the standard MAPI client.
Consult the Outlook Express user manual for instructions on MAPI client settings.
Capture
This refers to activities related to bringing in still pictures and movie files from sources such as disks,
cameras connected directly to your computer, and existing media, as would be the case in selecting and
Page 18

saving a single frame from a movie file. Capturing is also a term used in ImageMixer to refer to the
recording of sound, from audio CDs or through a microphone, as well as moving images via a video
camera connected directly to your computer.
Thumbnails
Thumbnails are small graphic representations of files which have been added to a
particular album. They are linked not only to the file on your computer, but also to
information pertaining to that file, such as name, size, save directory, etc. Windows
users might think of a thumbnail as a 'shortcut,' and Mac users may make a
relationship to the term 'alias.'
Source files
Once movies, still pictures and sounds are added to the yellow albums, they become album files. All the
information pertaining to album files is linked to their thumbnails.
Album files
Source files refer to the media stored on your computer. As opposed to album files or thumbnails, they
can be considered the 'original' data files.
Trimming
This task refers to getting rid of unnecessary portions of an object.
Transition
The point at which one movie scene ends and another one begins is called a transition.
Templates
Upon installing ImageMixer, you will have a number of pre-designed pictures which you may like to use
as backgrounds for your own layouts. These are called templates, and they may be accessed by clicking
the [Templates] button.
Templates can neither be changed in size, nor edited.
Custom templates
ImageMixer lets you save your own designs for use as backgrounds in future layouts. They may be
accessed by clicking the [Custom Templates] button.
Object
Figures, images, and text arranged in layouts are called objects.
Control point
Once an object in a particular layout is selected, the four corners surrounding the object are displayed as
control points. They can be dragged to change the size the object.
Page 19

Control points are displayed slightly differently in Windows and Macintosh.
Blocks
Blocks are the square areas which surround the control points.
Copyright © 2001-2002 PIXELA Corp. All rights reserved.
Page 20
Introduction
Chapter 1 Before Use
Chapter 2 Capture Environment
Capture Environment
Opening Capture Environment
Capture window
Capture Tasks
Import file mode display
Importing files
Preferences
Digital Camera Import Mode
Digital camera import display
Importing files from a digital
camera
Preferences
Audio CD Recording Mode
Control panel
Caution
Recording music files
Troubleshooting
Preferences
Sound Recording Mode
Control panel
Recording sound files
Recording sound files while
previewing movie images
Troubleshooting
Preferences
USB Device Capture Mode (Win)
Control panel
Connection status
Capturing movie scenes
Capturing still pictures
Preferences
DV Camcorder Capture Mode
(Win)
Control panel
Changing the display size
Connection status
DV cassette indication
Capturing movie scenes
Capturing still picture files
Preferences
Chapter 3 Album Environment
Chapter 4 Movie Editing Environment
Chapter 5 Layout Environment
Chapter 6 Image Editor
Chapter 7 Video Disc Environment
Chapter 8 ImageMixer Easy Video
CD (Win)
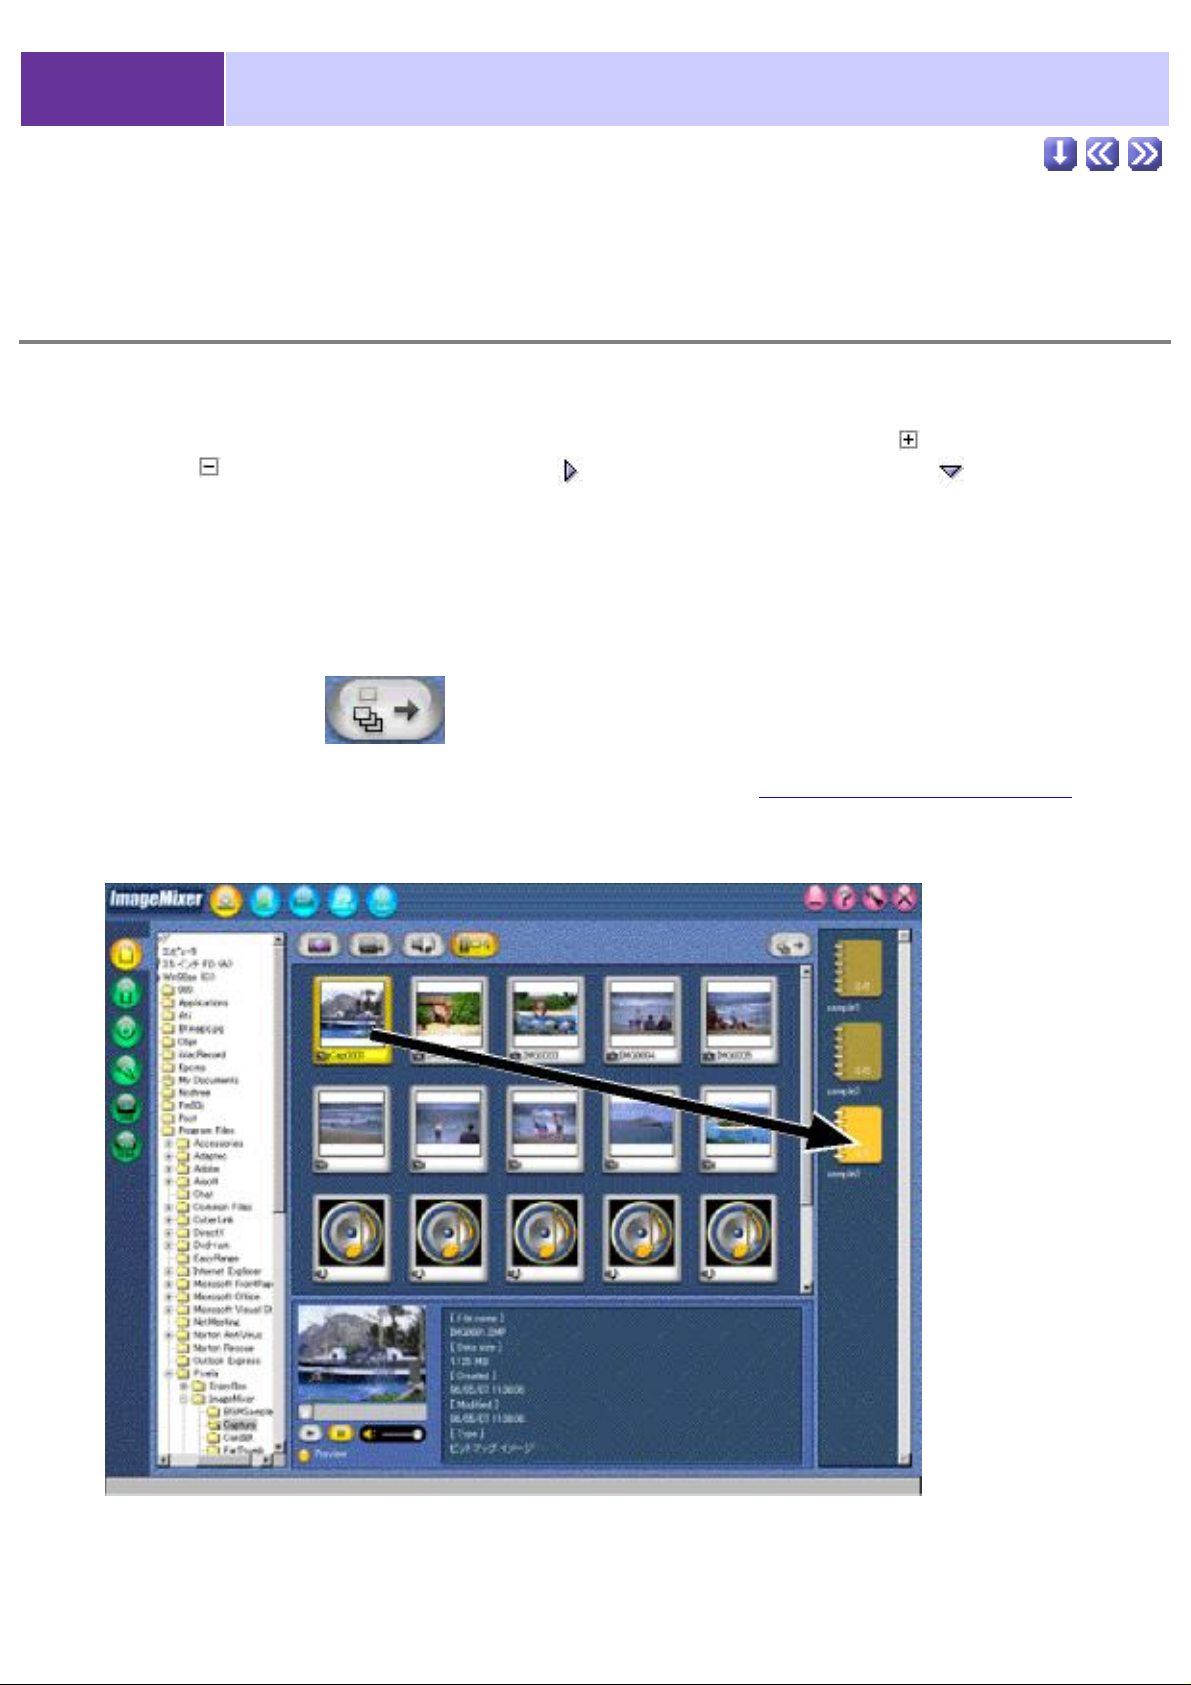
2-1 Capture Environment
ImageMixer allows you to select which existing media you want to work with and import files from a
memory card, such as one which is inserted in a digital camera connected to your computer. You can
also record sound from audio CDs or by using a microphone. Capturing still shots or entire scenes from a
digital movie camera is also easy with ImageMixer. You can then use the main screen to confirm these
operations by double clicking the appropriate thumbnail and easily add media files to existing albums.
Opening Capture Environment
1. Open ImageMixer.
2. Click the [Capture Environment]
button on the Main Selector.
3. Click the
Capture Mode Selector button which corresponds to the task you wish to perform.
The selected mode is displayed.
Capture window
Capture mode selector
Click either
or , depending on the
method by which you wish to bring in media.
Control panel This section changes depending on the mode selected.
Album list window Albums are displayed in a list.
Thumbnail list window
Depending on the capture mode selected, album file
thumbnails
are displayed in a list.
Page 21

Import File Mode button
Click to start
import file mode.
Digital Camera Import
Mode button
Click to start
digital camera import mode.
CD Recording Mode button
Click to start
CD recording mode.
Sound Recording Mode
button
Click to start
sound recording mode.
USB Device Capture Mode
button
Click to start
USB device capture mode. (Windows only)
DV Camcorder Capture
Mode button
Click to start
DV camcorder capture mode. (Windows only)
Copyright © 2001-2002 PIXELA Corp. All rights reserved.
Page 22
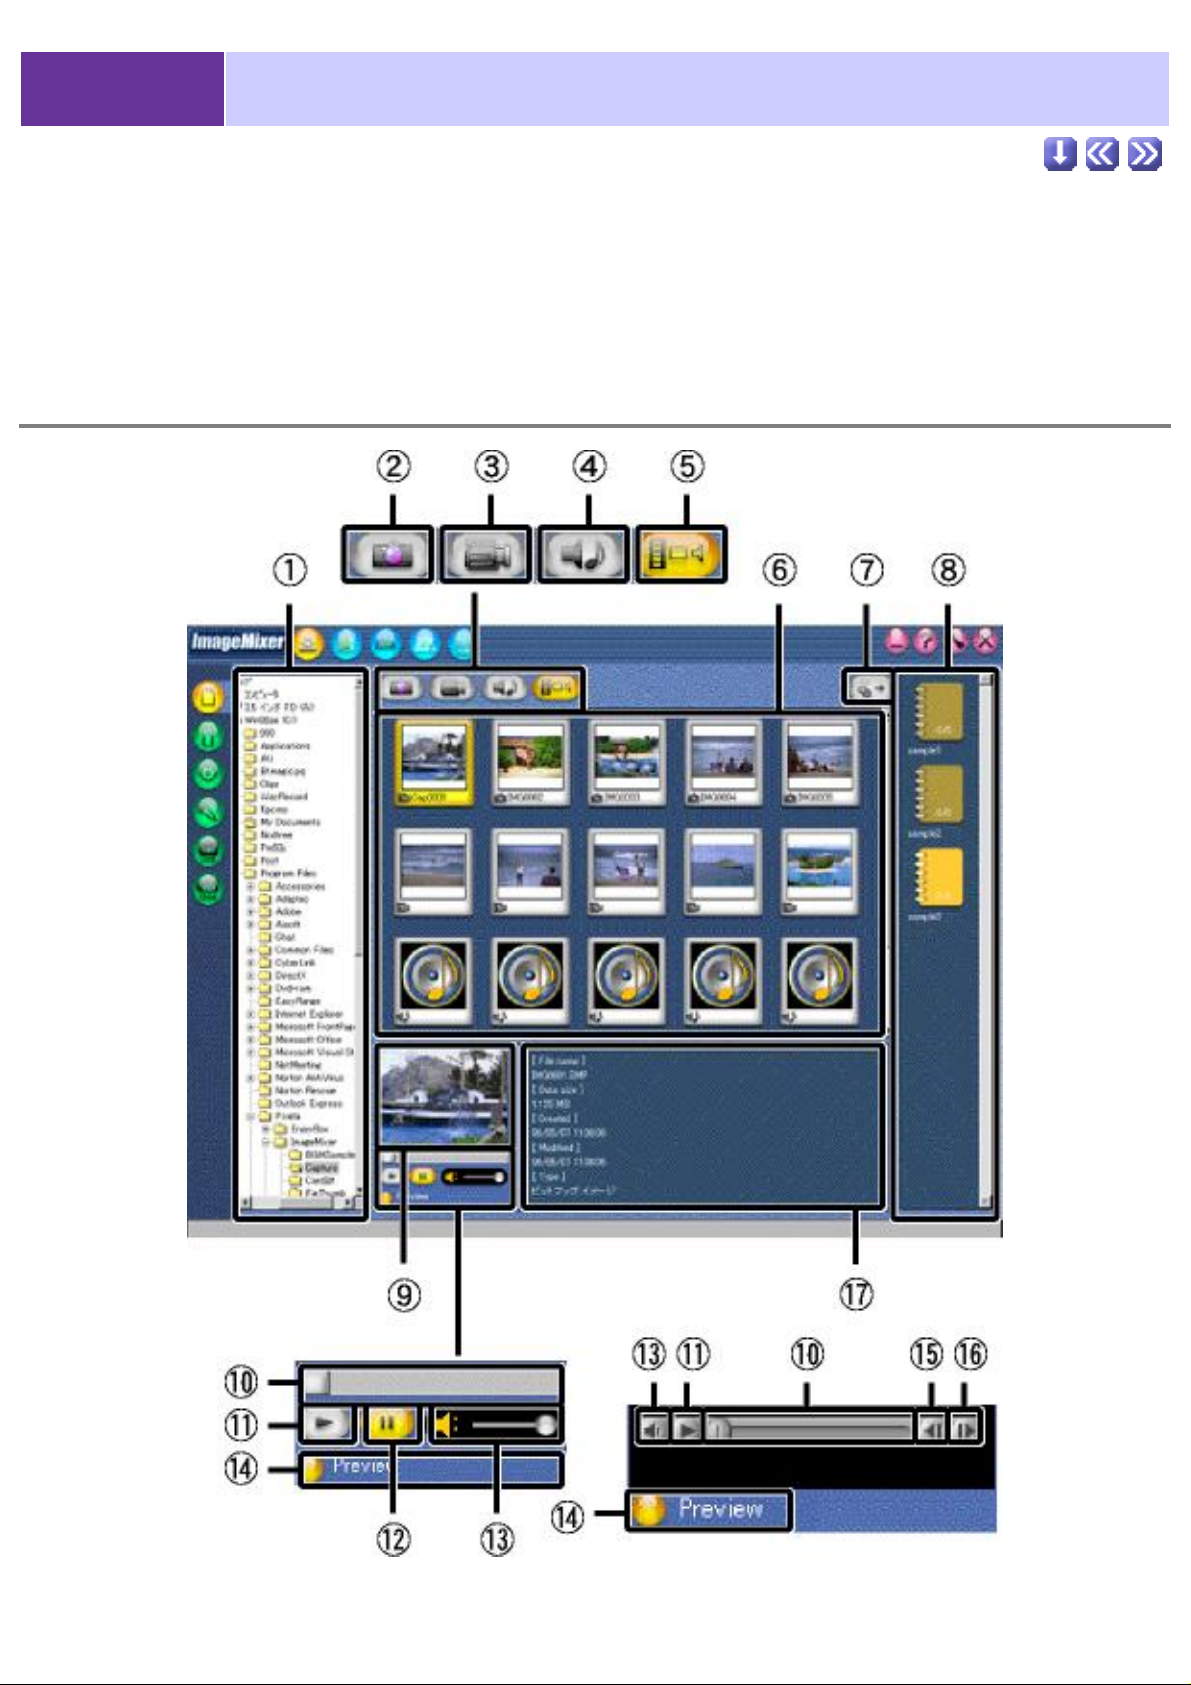
2-2-1 Capture Tasks
ImageMixer allows you to "drag and drop" media (still pictures, movies, and sound files) straight from
disks on your computer into albums of your choice.
Import file mode display
Page 23
and are displayed only when the displayed thumbnails are not those related to still
pictures.
Folder list window
Still Picture File Display
button
Movie File Display button
Sound File Display button
Display All Files button
Folders in the HDD and removable disks are displayed here in a
format which is similar to that of Explorer in Windows. In
Macintosh, this window resembles the Finder.
Click to display only thumbnails of still picture files in the
selected folder.
Click to display only thumbnails of movie files in the selected
folder.
Click to display only thumbnails of sound files in the selected
folder.
Click to display thumbnails of all media files in the selected
folder.
Here you can see thumbnails of those files in the selected folder
that can be added to albums. They appear according to the file
Thumbnail list window
type(s) sorted by selecting one of the following buttons:
or .
Click to add the selected thumbnail(s) to the album currently
Capture button
selected in the album list window.
Album list window Albums are displayed in a list.
Displays a preview of the source file and provides detailed file
information. In the case of movie files, the entire movie can be
Preview window
previewed in this window. The preview window is not displayed
when a sound file thumbnail is selected.
A single fame and its position in the movie can be previewed by
Play position slider
dragging the slider. This is not displayed when a still picture is
selected.
Play button Begins playback of the currently selected movie.
Pause button Pauses playback.
In Windows, adjust the volume by dragging the slider. In
Volume control
Macintosh, click to display a vertical volume slider. Adjust the
volume by dragging the slider up or down.
Page 24

Preview ON/OFF button Switches the preview display on or off.
Single Frame Rewind
Rewinds the movie frame by frame. (Macintosh only)
button
Single Frame Advance
Advances the movie frame by frame. (Macintosh only)
button
Information Display button Displays detailed information pertaining to the selected file.
Copyright © 2001-2002 PIXELA Corp. All rights reserved.
Page 25
2-2-2 Capture Tasks
Importing files
1. Select a disk/volume or folder from the folder list window.
Media files existing in a particular disk/volume or folder displayed in the folder list window can be added to
albums. They appear as thumbnails in the thumbnail list window. In Windows, click
and click
2. Select an album of your choice from the album list window.
This will be the album into which you will import files.
3. Select a thumbnail from the thumbnail list window.
More than one thumbnail may be selected at a time.
to close them. In Macintosh, click to open volumes or folders and click to close them.
to open disks or folders
4. Click the [Import] button.
The source file of the thumbnail selected in step 3 is added to the album selected in step 2. At this point, a copy of
the source file is created and saved into the directory designated in the
Files can also be imported by dragging and dropping thumbnails from the thumbnail list window into the desired
album. See below.
Capturing/Recording Preferences.
In Macintosh, it may be impossible to create thumbnails for files which cannot be opened by QuickTime Player.
Also, since Macintosh recognizes files by their contents rather than file extensions, some files may be added as
certain file type which is not in accordance with their file extension.
Page 26

Copyright © 2001-2002 PIXELA Corp. All rights reserved.
Page 27
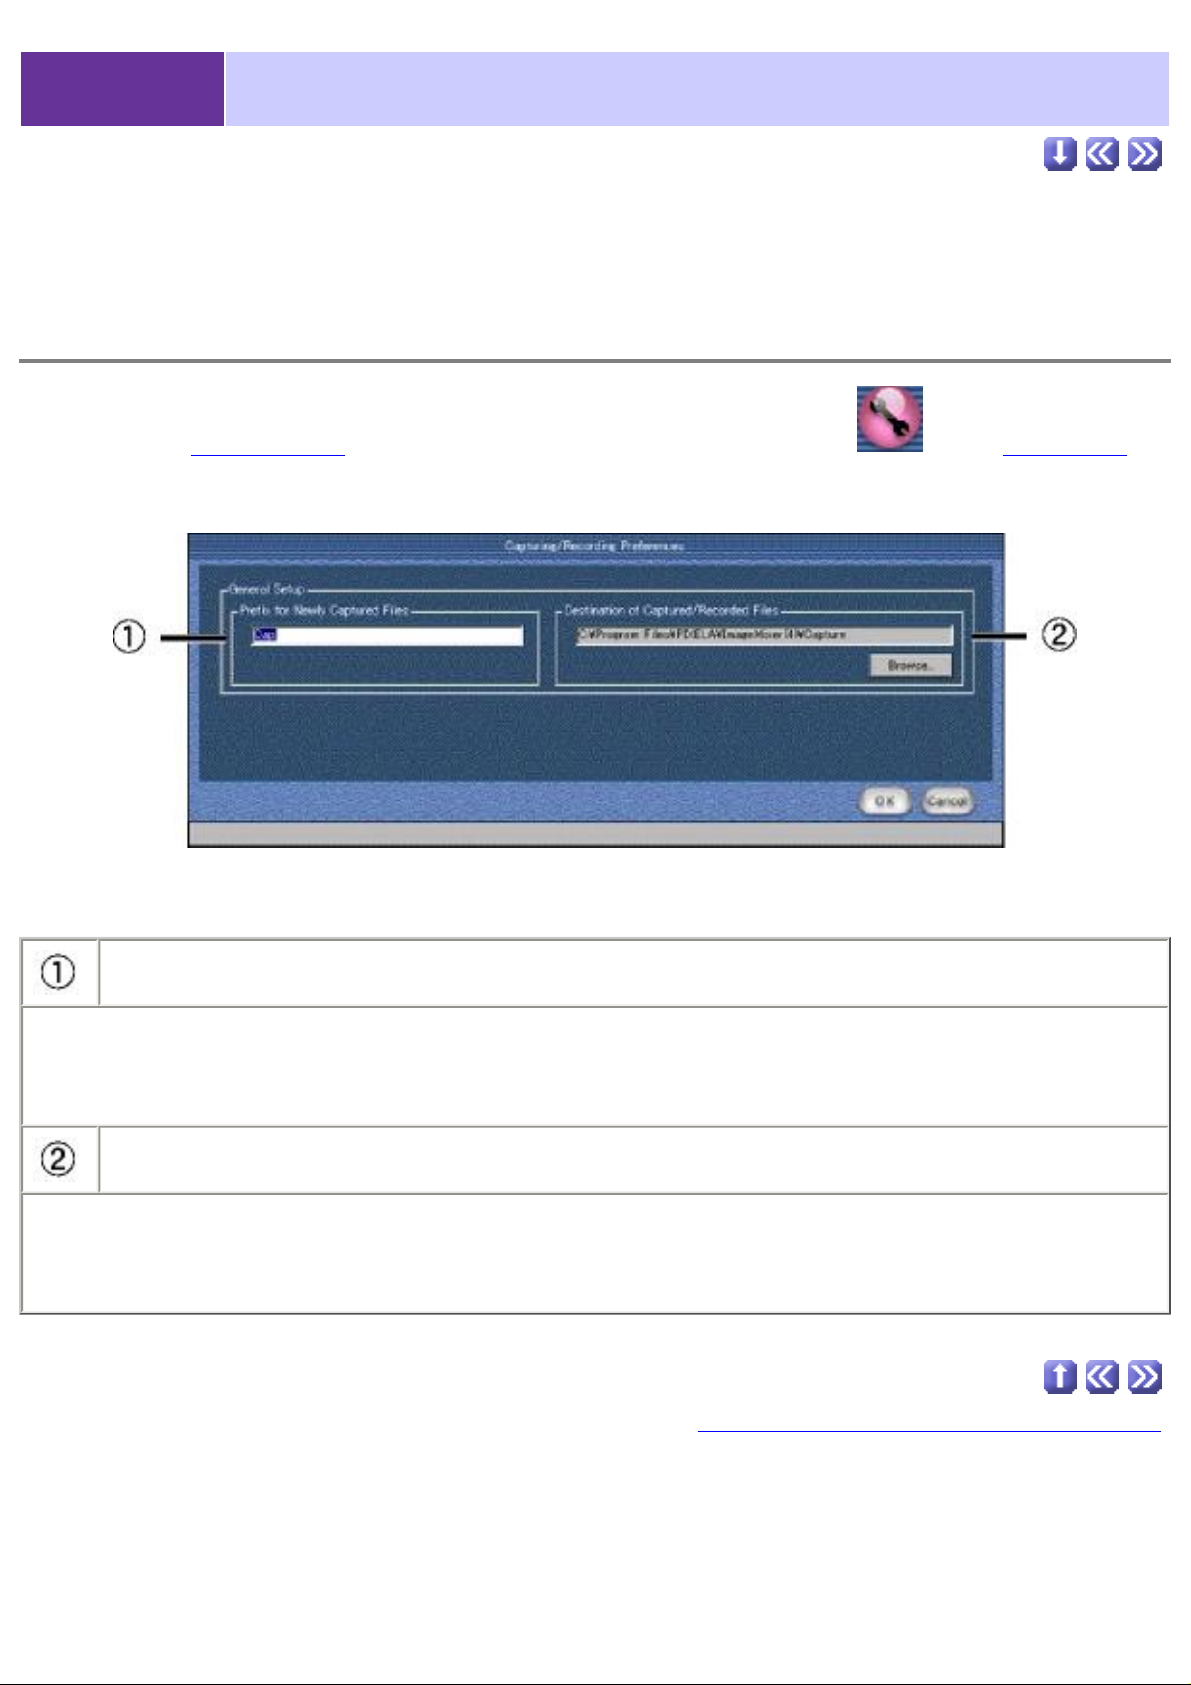
2-2-3 Capture Preferences
Sets the settings related to capture mode.
Preference window
Check that the Capture Mode is selected, then click the "Preferences" button on the selector bar to
display the preference window described below.
Prefix for Newly Captured Files
Input and set the prefix for names used for capture files.
For example, if you input "ABC," then the file names will be, in order of capture, "ABC0001",
"ABC0002", "ABC0003".
Destination of Captured/Recorded Files
Sets the location to which the file will be saved in capture mode.
To change the destination, click the "Browse" button, select the new destination folder and click the
"OK" button.
Copyright © 2001-2002, PIXELA Corp. All rights reserved.
Page 28
2-3-1 Digital Camera Import Mode
This mode allows you to import files from digital cameras and memory card reader devices.
This is possible when a removable disk is mounted.
Digital camera import display
Page 29
Select memory card menu
Refresh button
Digital cameras and memory cards connected directly to the PC
are displayed in a list.
Click to refresh the reading of data from the source currently
selected in .
Memory card list window
Comment input pane
Import button
Still Picture Display button
Movie Display button
Sound File display button
Display All button
Available memory cards and similarly formatted sources are
displayed here.
This pane allows you to add personalized comments which relate
directly to individual files, which later may be added to albums.
Click to copy the source files of the selected thumbnails to the
save location, and add them to the selected album.
Click to display only thumbnails of still picture files stored on the
selected memory card.
Click to display only thumbnails of movie files stored on the
selected memory card.
Click to display only thumbnails of sound files stored on the
selected memory card.
Click to display thumbnails of all media stored on the selected
memory card.
Small Thumbnail button Click to display small thumbnails in the thumbnail list window.
Click to display large size thumbnails in the thumbnail list
Large Thumbnail button
window.
Here you can see thumbnails of those files stored on the memory
card selected in
and which can be added to albums. They
Thumbnail list window
appear according to the file types sorted by selecting one of the
following buttons:
or .
Album list window Albums are displayed in a list.
Preview window
Refer to
file capture mode
Information Display button Displays information pertaining to the selected file.
Exif File Information
Displays file information pertaining to the selected
Exif file.
Display button
Exif Device Information
Display button
Displays
Exif camera information pertaining to the selected file.
Page 30

Exif Photo Information
Displays photo information pertaining to the selected
Exif file.
Display button
Displays file information depending on which of the following
Information display panel
buttons is currently active: or .
Copyright © 2001-2002 PIXELA Corp. All rights reserved.
Page 31

2-3-2 Digital Camera Import Mode
Importing files from a digital camera
Files from a digital camera memory card or removable disk may be imported as follows:
1. Select a digital camera from the menu
Memory cards and sources with digital camera memory card formatting are displayed in the memory card list
window.
.
2. Select a source from the memory card list window.
Thumbnails of the files in the selected source are displayed in the thumbnail list window.
3. Select a thumbnail from the thumbnail list window.
4. Comments for individual files may be added in the comment input pane.
5. Select a destination album from the album list window.
6. Click the [Import]
The source file of the thumbnail selected in step 3 is added to the album selected in step 5. At this point, a copy of
the source file is created and saved into the directory designated in the
Files can also be imported by dragging and dropping thumbnails from the thumbnail list window into the desired
album. See below.
button.
Capturing/Recording Preferences.
Page 32

Vertically oriented pictures are usually saved horizontally, though Exif files will contain information to the effect
that the picture was taken vertically. ImageMixer creates vertical thumbnails for those files in accordance with the
Exif information, even though they may have originally been saved as horizontal images.
Copyright © 2001-2002 PIXELA Corp. All rights reserved.
Page 33

2-3-3 Digital Camera Import Preferences
Sets the settings related to the digital camera import mode.
Preference Window
Check that the Digital Camera Import Mode is selected, then click the "Preferences" button on the
selector bar to display the preference window described below.
Prefix for Newly Captured Files
Input and set the prefix for names used for import files.
For example, if you input "ABC," then the file names will be, in order of import, "ABC0001",
"ABC0002", "ABC0003".
Destination of Captured/Recorded Files
Sets the location to which the file will be saved in import mode
To change the destination, click the "Browse" button, select the new destination folder and click the
"OK" button.
Copyright © 2001-2002, PIXELA Corp. All rights reserved.
Page 34

2-4-1 Audio CD Recording Mode
ImageMixer allows you to record CDs straight from your CD-ROM drive. Recorded files can be played
or added to a movie media stream.
Control panel
Audio CDs can be played or recorded using the control panel shown below.
Page 35

Audio CD mount indicator
In Macintosh, this is displayed when an audio CD is inserted into
the CD drive.
In Windows, this appears regardless of whether or not an audio
CD is present.
A list of available CD drives is displayed. Select the CD drive you
wish to record from. (Windows only)
Select CD drive menu
If 'Enable digital recording' is checked in the Capturing/Recording
Preferences, the CD drive is displayed according to its drive name. If the
setting above has not been made, the CD drive will appear according to its
path.
Track number display The number of the current track is displayed.
Time display Displays the accumulated time of the track being played.
Volume control Adjust the volume by dragging the slider.
Stop button Click to stop playback.
Play button Click to start playback.
Pause button Click to pause playback.
Click to record. While recording, this button functions as a stop
Record button
button.
Eject button Eject the audio CD from the CD drive. (Macintosh only)
The play position for beginning playback may be selected by
Play position slider
dragging the slider.
The track list pertaining to the currently present audio CD is
Track list pane
displayed here. In Windows the total time of each track is also
displayed.
Copyright © 2001-2002 PIXELA Corp. All rights reserved.
Page 36

2-4-2 Audio CD Recording Mode
Caution
Please take note of the following points before recording an audio CD.
Analog recording (Windows only)
● CDs mounted on an external drive can not be recorded.
● The output from the CD drive must be streamed through a sound card (meaning that the CD audio
output jacks are connected to the CD input jacks on the sound card). Sound quality may be of a
slightly lower quality than the original CD.
● When another sound recording application (wave form audio device, etc.) is running, it is
impossible to record with ImageMixer.
● Having more than one CD player open may cause problems, such as the track list not being
displayed. ImageMixer itself may also experience problems. Close other CD players before
recording with ImageMixer.
● To avoid any possibility that ImageMixer is unable to record in Windows, go to Control
Panel>System>Device Manager Tab>CD-ROM and select the brand name of the CD-ROM
device installed on your computer. From there, click the Properties button, and finally the
Properties tab. On this screen, make sure that there is no check next to "Enable digital CD audio
for this CD-ROM device."
Digital recording
● If digital recording from the CD drive is not possible, try analog recording.
Macintosh supports only digital recording
Recording in Macintosh
When another player is running, recording may not be possible. If [Auto Play] is selected in the
QuickTime settings, playback will begin shortly after an audio CD is inserted. ImageMixer functions,
such as Play and Record, are not available at this time. Change the settings of the relevant software to
disable the automatic play option.
In Windows, the recording mode can be changed via the Capturing/Recording Preferences.
Page 37

Copyright © 2001-2002 PIXELA Corp. All rights reserved.
Page 38

2-4-3 Audio CD Recording Mode
Recording music files
Follow these steps to record music from an audio CD.
The size of recorded sound files is approximately 10MB per minute of CD audio.
1. Insert the music CD in the CD drive.
If the CD plays automatically, stop playback and close the audio software.
2. Select an album.
Designate an album from the album list window into which to save the recorded sound files.
3. In Windows, select the CD drive from the select CD drive menu.
4. Select a track from the track list window.
5. If you wish to record only one portion of a track, cue up the track according to the
instructions below.
To record an entire track, go directly to the next step.
6. Click the [Play] button. Click the [Pause] button at the point you wish to begin
recording.
(Tracks may also be played by double-clicking the track number in the track list window.)
You may also choose to drag the slider to the desired record position.
7. Click the [Record] button.
ImageMixer will begin recording and stop at the end of the track.
To record another track, repeat the process. To stop recording, and thereby record only a portion of the track, see
below.
8. Click the [Stop] button at the point you wish to stop recording.
This step is necessary only if you wish to record a portion of the track.
The audio format of digitally recorded files is PCM, the sampling rate is 44.1KHz, and the bit rate is 16bit stereo.
In Windows, the file type of recorded files is WAVE. In Mac, AIFF files are created. Files are saved in the
location designated in the Capturing/Recording Preferences, but are, of course, added directly to the album
selected in step 2. To confirm successful recording of sound files, double-click their thumbnail icon in the
thumbnail list window.
Macintosh
Files are recorded is by dragging & dropping the track number from the track list window to the thumbnail list
window. Tracks are recorded individually.
save
Page 39

Copyright © 2001-2002 PIXELA Corp. All rights reserved.
Page 40

2-4-4 Audio CD Recording Mode
Troubleshooting
Unable to record sound files (analog recording in Windows).
(See section 2-4-2)
There may be a problem with a driver. There may also be a problem with the connection between the CD
drive and the sound card. If you expect this to be the case, contact the relevant manufacturer.
Track list not displayed.
Confirm that the correct CD drive is selected (Windows only), that the CD currently in the drive is an
audio CD, and that the CD drive is functioning properly.
Sound files were created, but cannot be played.
Check the speaker power and volume.
Note that the ImageMixer volume control works
independently of the volume control on the speakers.
In Windows, right click the speaker icon on the task bar
and select 'Open Volume Controls.' If 'CD Audio' is muted or if the volume is too low, adjust
accordingly and record again.
In Macintosh, open [Apple] menu>[Control Panels]>[Sound], to set the recording sound level.
The method for adjusting the volume may be different depending on your computer's configurations, in
which case we recommend that you consult the manufacturer's technical support center.
Recorded analog sound files contain noise and jump.
Check to see whether the volume level is too high.
Refer to 'Sound files were created, but cannot be played' above.
Also note that we do not recommend that you perform other tasks on your computer while recording is
taking place.
Recorded analog sound files jump. (analog recording)
Your computer hardware may be close to the minimum specifications required to run ImageMixer. Close
all other applications before starting ImageMixer and try again. (When the CPU and HDD are not being
used to run programs other than ImageMixer, system resources should not become depleted.
Sound is not recorded from the starting point (sound begins late).
Although recording commences when the [Record] button is clicked, sound is not always recorded from
this point. This is because there may be a time lag before play begins. It is therefore recommended that
you set the point at which to begin recording slightly before the point from which you wish to record.
Unnecessary portions can be cut in the
Movie Editing Environment.
Page 41

Copyright © 2001-2002 PIXELA Corp. All rights reserved.
Page 42

2-4-5 Audio CD Recording Preferences
Sets the settings related to the audio CD recording mode.
Preference window
Check that the Audio CD Recording Mode is selected, then click the "Preferences" button on the
selector bar to display the preference window described below.
Prefix for Newly Captured Files
Input and set the prefix for names used for recording files.
For example, if you input "ABC," then the file names will be, in order of recording, "ABC0001",
"ABC0002", "ABC0003".
Destination of Captured/Recorded Files
Sets the location to which recorded files and such will be saved in recording mode.
To change the destination, click the "Browse" button, select the new destination folder and click the
"OK" button.
Audio CD setting (Windows only)
Page 43

Sets the audio CD recording mode settings.
● Enable digital recording
By inserting a check, you can record from the pre-set CD in digital format. If the check is
removed, recording is done in analog format.
Copyright © 2001-2002, PIXELA Corp. All rights reserved.
Page 44

2-5-1 Sound Recording Mode
ImageMixer enables you to record sounds using a microphone or other sound output devices (such as a
TV, cassette tape player, etc.) connected to an audio input jack on your computer. Sound effects and
narration can be recorded, and then added to movies you create yourself with the ImageMixer software.
Control panel
From the control panel, you can record sounds using a microphone or other sound output device
connected to an audio input on your computer. You can also use the control panel (shown below) to
playback recorded sounds.
Preview window Displays a preview of the selected thumbnail.
Page 45

Playback position slider
The position at which you wish to begin playback can be selected
by dragging the slider.
Preview ON/OFF button Switches the preview display on or off.
Time display
Displays the accumulated time of the currently playing movie or
sound file.
Volume control Adjust volume by dragging the slider.
Stop button Click to stop playback.
Play button Click to start playback.
Pause button Click to pause playback.
Click to record. During recording, this button functions as a stop
Record button
button.
Copyright © 2001-2002 PIXELA Corp. All rights reserved.
Page 46

2-5-2 Sound Recording Mode
Recording sound files
Follow these steps to record music from a microphone or other sound output device, such as a TV,
cassette tape player, etc. The size of recorded sound files is approximately 10MB per minute of CD
audio.
1. Connect the microphone or other sound output device to the appropriate input jack on your
computer.
2. Select an album.
Select the album from the album list window into which you wish to save the recorded sound files.
3. Click the [Record] button.
4. Click the [Stop]
The audio format of digitally recorded files is PCM, the sampling rate is 44.1KHz, and the bit rate is 16bit stereo.
In Windows, the file type of recorded files is WAVE. In Mac, AIFF files are created. Files are saved in the
location designated in the Capturing/Recording Preferences, but are, of course, added directly to the album
selected in step 2. To confirm successful recording of sound files, double-click their thumbnail icon in the
thumbnail list window.
button at the point at which you wish to stop recording.
save
Recording sound files while previewing movie images
Recording sound with a microphone or other sound output device can be performed while previewing a
movie to which the sound will later be added. This is useful in synchronizing narration or background
music to specific scenes of a movie. The files can then be added to movies you create yourself with the
ImageMixer software.
1. Connect the microphone or other sound output device to the appropriate input jack on your
computer.
2. Select the thumbnail of the file to which the sound will later be added.
If necessary, change the currently selected album in the album list window.
3. Confirm that the [Preview On/Off] button is active (colored bright yellow).
Page 47

A preview of the file selected in step 2 will be displayed.
4. Confirm the "off" position of the volume control.
To prevent the original sound of the movie from interfering with the sound you are about to record, make sure that
the volume control slider indicates the lowest volume possible, effectively turning it off.
5. Select an album.
Select the album from the album list window into which you wish to save the recorded sound files.
6. Cue up the movie playback by clicking the [Play] button or by dragging the play
position slider to the point at which you later plan to add sound.
7. Click the [Record]
The movie will play and recording will start.
button.
8. Click the [Stop] button at the point you wish to stop recording.
The audio format of digitally recorded files is PCM, the sampling rate is 44.1KHz, and the bit rate is 16bit stereo.
In Windows, the file type of recorded files is WAVE. In Mac, AIFF files are created. Files are saved in the
location designated in the Capturing/Recording Preferences, but are, of course, added directly to the album
selected in step 2. To confirm successful recording of sound files, double-click their thumbnail icon in the
thumbnail list window.
Copyright © 2001-2002 PIXELA Corp. All rights reserved.
Save
Page 48

2-5-3 Sound Recording Mode
Troubleshooting
Sound files were created, but cannot be played.
Check the speaker power and volume.
Note that the ImageMixer volume control works
independently of the volume control on the speakers.
In Windows, right click the speaker icon on the task bar
and select 'Open Volume Controls.' If 'Line In' is muted or if the volume is too low, adjust accordingly
and record again.
In Macintosh, open [Apple] menu>[Control Panels]>[Sound], to set the recording sound level.
The method for adjusting the volume may be different depending on your computer's configurations, in
which case we recommend that you consult the manufacturer's technical support center.
Recorded analog sound files contain noise and jump.
Confirm that the CD recording volume is suitable.
Refer to 'Sound files were created, but cannot be played' above.
Also note that we do not recommend that you perform other tasks on your computer while recording is
taking place.
Recorded analog sound files jump.
Your computer hardware may be close to the minimum specifications required to run ImageMixer. Close
all other applications before starting ImageMixer and try again. (When the CPU and HDD are not being
used to run programs other than ImageMixer, system resources should not become depleted.
Due to the possibility of noise, etc., we do not recommend recording sounds with internal
microphones.
Copyright © 2001-2002 PIXELA Corp. All rights reserved.
Page 49

2-5-4 Sound Recording Preferences
Sets the settings related to the sound recording mode.
Preference window
Check that the Sound Recording Mode is selected, then click the "Preferences" button on the
selector bar to display the preference window described below.
Prefix for Newly Captured Files
Input and set the prefix for names used for recording files.
For example, if you input "ABC," then the file names will be, in order of recording, "ABC0001",
"ABC0002", "ABC0003".
Destination of Captured/Recorded Files
Sets the location to which the recorded files and such will be saved in recording mode.
To change the destination, click the "Browse" button, select the new destination folder and click the
"OK" button.
Copyright © 2001-2002, PIXELA Corp. All rights reserved.
Page 50

2-6-1 USB Device Capture Mode (Windows Only)
ImageMixer enables you to capture still pictures or movie scenes directly from devices connected to
your computer's USB port, such as a digital camera.
Control panel
Monitor window Displays images from the USB-connected device.
Volume control Adjust volume by dragging the slider.
Adjust image quality by dragging the slider. Move the slider to the
Image quality control
right to improve the image quality. Click on the "Default settings"
button to reset this setting to its initial value.
Page 51

Time display
Brightness control
Displays the current play time according to the counter on the
video camera.
Adjust image brightness by dragging the slider. Move the slider to
the right to increase the brightness. Click on the "Default settings"
button to reset this setting to its initial value.
Rewind button
Clicking this button will rewind the DV cassette inside the video
camera, as if you pushed the rewind button on the device itself.
Stop button Click to stop playback.
Play button Click to start playback.
Pause button Click to pause playback.
Clicking this button will fast forward the DV cassette inside the
Fast Forward button
video camera, as if you pushed the rewind button on the device
itself.
Single Frame Rewind
button
When the movie is paused, this button moves the movie backward
one frame at a time.
Single Frame Play button Plays the movie frame-by-frame (slow motion).
Single Frame Advance
button
When the movie is paused, this button moves the movie forward
one frame at a time.
Still Picture Capture button Click to enable the capturing of still pictures.
Motion Picture Capture
button
Capture button
Information display panel Indicates current operation and connection status of the device.
Connection status
Click to enable the capturing of movie scenes.
Click to capture either a still picture or a movie scene.
The function of this button depends on whether or is currently
active. Note that this button functions as the STOP button during movie scene
capturing.
Page 52

Connect the USB interface of the device (such as a digital video camera) to the USB port on the
computer. Set the device to display images through the USB connection. Consult the instruction manual
that came with your equipment for details on transferring images from your particular device.
If the connection between the PC and the device is working properly:
A blue monitor window is displayed. Depending on your selected task, the message in the information
display panel will read 'There is ... of free space in the destination directory,' (for capturing movie
scenes) or 'Ready to capture still picture.'
If there is a problem with the connection between the PC and the device:
A black monitor window will displayed. When the device is not ready to play or is not connected to the
PC correctly, the message on the information display panel will read 'Connection with the peripheral is
invalid. Please confirm the connection between your PC and the peripheral.'
Copyright © 2001-2002 PIXELA Corp. All rights reserved.
Page 53

2-6-2 USB Device Capture Mode (Windows Only)
Capturing movie scenes
Follow these steps to capture (record) a movie file from a USB-connected device.
1. Select an album.
Designate an album from the album list window into which to save the captured movie file.
2. Click the [Movie Scene Capture] button.
Capturing a movie scene is now possible.
3. Adjust sound volume if necessary.
This setting does not effect the original sound level of the captured movie scene.
4. Click the [Capture] button at the desired point to begin capturing.
5. Click the [Stop]
If the 'Capture as MPEG1' box is checked in the Capturing/Recording Preferences, the status box below will be
shown. After the capture is complete, the movie file will be automatically added to the album designated in step 1.
button at the point you wish to end the capture.
To view the newly captured file, double-click its thumbnail to open the view window. This function cannot be
used while capturing is in progress.
Capturing still pictures
Page 54

Follow these steps to capture a still picture from a USB-connected device.
1. Select an album.
Designate an album from the album list window into which to save the captured picture file.
2. Click the [Still Picture Capture ] button.
Capturing a still picture is now possible.
3. Click the [Capture] button.
After the capture is completed, the file will be automatically added to the album designated in step 1. To view the
captured file, double-click its thumbnail to open the
is in progress.
view window. This function cannot be used while capturing
Copyright © 2001-2002 PIXELA Corp. All rights reserved.
Page 55

2-6-3 USB Capture Preferences (Windows only)
Sets the settings related to the USB capture mode.
Preference window
Check that the USB Capture Mode is selected, then click the "Preferences" button on the selector
bar to display the preference window described below.
Prefix for Newly Captured Files
Input and set the prefix for names used for capture files.
For example, if you input "ABC," then the captured file names will be, in order of capture, "ABC0001",
"ABC0002", "ABC0003".
Destination of Captured/Recorded Files
Sets the location to which the captured files and such will be saved in capture mode.
To change the destination, click the "Browse" button, select the new destination folder and click the
"OK" button.
Movie Capture Settings
Page 56

Sets the settings for capturing moving picture files.
Capture as MPEG1
Normally moving pictures are captured as AVI format moving picture files, but you can capture
them as MPEG1 format moving picture files by inserting a check. The converting MPEG1 is
ImageMixer MPEG1.
Minimum amount of free disk space
The size of captured moving picture files becomes extremely large, so when you capture a lot of
moving picture files for a long time, the available hard disk space may get too low. To prevent
your available hard disk space from getting too low, you can set the amount of available hard
disk space that is not to be used when capturing moving picture files. This prevents the available
hard disk space from falling below the set value. You can set this either by selecting a value or
inputting a value.
Monitor capture mode
Insert a check to display the image being captured in the monitor window when moving pictures
are captured.
●
●
●
USB Capture Device Setting
● Sound device
In the USB Capture Mode, select from a list the audio capture driver to be used when capturing
from a device that supports moving picture playback through USB.
Only set this when you cannot do normal USB capture.
● Capture Using DV Cam.
Set whether or not to do capturing from the digital video camera's external input.
By inserting a check, you can capture the images from an analog image output device connected
to the digital video camera.
Copyright © 2001-2002, PIXELA Corp. All rights reserved.
Page 57

DV Camcorder Capture Mode (Windows
2-7-1
Only)
ImageMixer enables you to capture both still pictures and movie scenes a digital video cameras
connected to the IEEE1394 port of your computer.
Control panel
From the control panel, you can play or record media from a digital video camera connected to your PC.
Monitor window Displays the movie directly from the digital video camera.
Page 58

Small Monitor button Click to display the movie in the small monitor window.
Large Monitor button Click to display the movie in a large monitor window.
Cassette indicator
This icon becomes active (glows) when a DV cassette is present in
the digital video camera.
Click to refresh the connection between the PC and the digital
Refresh connection button
video camera.
Displays the current play time according to the counter on the
Time display
video camera.
Volume control Adjust the volume by dragging the slider.
Clicking this button will rewind the DV cassette inside the video
Rewind button
camera, as if you pushed the rewind button on the device itself.
Stop button Click to stop playback.
Play button Click to start playback.
Pause button Click to pause playback.
Clicking this button will fast forward the DV cassette inside the
Fast Forward button
video camera, as if you pushed the rewind button on the device
itself.
Single Frame Rewind
button
When the movie is paused, this button moves the movie backward
one frame at a time.
Single Frame Play button Plays the movie frame-by-frame (slow motion).
Single Frame Advance
button
When the movie is paused, this button moves the movie forward
one frame at a time.
Still Picture Capture button Click to enable the capturing of still pictures.
Click to capture either a still picture or a movie scene.
Capture button
The function of this button depends on whether or is currently
active. Note that this button functions as the STOP button during movie scene
capturing.
Movie Scene Capture
Click to enable the capturing of movie scenes.
button
Information display panel Indicates current operation and connection status of the device.
Page 59

Copyright © 2001-2002 PIXELA Corp. All rights reserved.
Page 60

DV Camcorder Capture Mode (Windows
2-7-2
Only)
Changing the display size
When capturing files from a digital video camera (DV camcorder), there are two monitor sizes from
which to choose:
Click the [small monitor]
size.
small monitor and large monitor.
button or the [large monitor] button to change the monitor
Connection status
Page 61

Connect your digital video camera to the IEEE1394 port on your PC and set it to play mode. That is,
your device should be set in the mode you would normally use to view scenes already recorded on the
tape inside the machine.
If the connection between the PC and the device is working properly:
A blue monitor window is displayed. Depending on your selected task, the message in the information
display panel will read 'There is ... of free space in the destination directory,' (for capturing movie
scenes) or 'Ready to capture still picture.'
If there is a problem with the connection between the PC and the device:
A black monitor window will be displayed. If the digital video camera is not properly connected to the
PC, or is not set to play mode, or if a DV cassette isn't present in the machine, the message on the
information display panel will say "Camcorder Not Found."
If there seems to a problem with the connection between the PC & the digital video camera, try clicking the [refresh
connection]
button.
DV cassette indication
When a DV cassette is present in the digital video camera, this icon becomes active (glows).
When a cassette is not present, the icon is inactive
(appears gray).
Copyright © 2001-2002 PIXELA Corp. All rights reserved.
Page 62

DV Camcorder Capture Mode (Windows
2-7-3
Only)
Capturing movie scenes
Follow the steps below to capture movie scenes.
1. Select an album.
Designate an album from the album list window into which to save the captured movie file.
2. Click the [Movie Scene Capture] button.
Capturing a movie scene is now possible.
3. Click the [Play] button to start the movie in the monitor window.
You can also fast forward, rewind, pause, etc., to find the point at which you plan to begin recording.
4. Adjust sound volume if necessary.
This setting does not effect the original sound level of the captured movie scene.
To prevent frame jumping on low-spec machines, it may be impossible to hear sound. In such cases, the volume
should be adjusted during playback.
5. Click the [Capture] button at the desired point to begin capturing.
6. Click the [Stop]
If the 'Capture as MPEG1' box is checked in the Capturing/Recording Preferences, the status box below will be
shown. After the capture is complete, the movie file will be automatically added to the album designated in step 1.
button at the point you wish to end the capture.
To view the newly captured file, double click its thumbnail to open the view window. This function cannot be
Page 63

used while capturing is in progress.
Capturing still picture files
You can capture a still picture by following the steps below.
1. Select an album.
Designate an album from the album list window into which to save the captured picture file.
2. Click the [Still Picture Capture ] button.
Capturing a still picture is now possible.
3. Click the [Play] button to start the movie in the monitor window.
You can also fast forward, rewind, pause, etc., to find the point at which you plan to begin recording.
4. Click the [Capture] button.
After the capture is completed, the file will be automatically added to the album designated in step 1. To look at
the captured file, double-click its thumbnail to open the
capturing is in progress.
view window. This function cannot be used while
Copyright © 2001-2002 PIXELA Corp. All rights reserved.
Page 64

DV Camcoder Capture Preferences (Windows
2-7-4
only)
Sets the settings related to the DV camcorder capture mode.
Preferences window
Check that the DV Camcorder Capture Mode is selected, then click the "Preferences" button on
selector bar to display the preference window described below.
the
Prefix for Newly Captured Files
Input and set the prefix for names used for capture files.
For example, if you input "ABC," then the captured file names will be, in order of capture, "ABC0001",
"ABC0002", "ABC0003".
Destination of Captured/Recorded Files
Sets the location to which the captured files and such will be saved in capture mode.
To change the destination, click the "Browse" button, select the new destination folder and click the
"OK" button.
Page 65

Still Picture Capture Settings
Sets the settings used when you capture still picture files. You can perform processing to make the files
suitable for use on a PC.
● Reduce interlace noise
For images taken with a digital video camera, a new image is displayed every 1/30th of a second,
similar to TV images. The format used does not rewrite a whole frame (one page of the screen)
all at once, but rather rewrites a frame's image one half at a time every 1/60th of a second. On a
PC, a frame screen is captured as a single page of still pictures. Because of this, if there is rapid
movement in the image, blurring can occur between the image halves. The processing done to
compensate for this blurring and create a file without jagged edges is interlace processing. If
interlace processing is done, one page of a frame image is created by using half the image to fill
in the gaps of the other half, so the resolution deteriorates compared to images not processed this
way. It is probably not necessary to do interlace processing when capturing images with little
movement.
● Lock aspect ratio
When the digital video camera uses the NTSC format, the captured still image file has a
resolution of 720 x 480 dots, which is longer vertically than the dots on a PC screen. The dots on
a PC screen form a square, so if the image is displayed as is on the PC, it will be stretched out
horizontally. This is similar to viewing a normal TV screen on a wide screen. Aspect conversion
corrects this problem. The number of horizontal dots is corrected from 720 to 640 to be able to
obtain an image with an accurate ratio. However, because the correction is done by reducing the
number of dots, the image quality deteriorates.
When the digital video camera uses the PAL format, the captured still image file has a resolution
of 720 x 576 dots, which is longer vertically than the dots on a PC screen. The dots on a PC
screen form a square, so if the image is displayed as is on the PC, it will be stretched out
vertically. Aspect conversion corrects this problem. The number of vertical dots is corrected
from 576 to 540 to be able to obtain an image with an accurate ratio. However, because the
correction is done by reducing the number of dots, the image quality deteriorates.
● Crop surroundings pixels according to settings below
Trims off the unnecessary parts around the frame. The values for trimming the top, bottom, right
and left are input in units of dots.
Movie Capture Settings
Page 66

Sets the settings for capturing moving picture files.
Capture as MPEG1
The files are normally captured as AVI format moving picture files, but you can capture them as
MPEG1 format moving picture files by inserting a check. The converting MPEG1 is ImageMixer
MPEG1.
Minimum amount of free disk space
The size of captured moving picture files becomes extremely large, so when you capture a lot of
moving picture files for a long time, the available hard disk space may get too low. To prevent
your available hard disk space from getting too low, you can set the amount of available hard
disk space that is not to be used when capturing moving picture files. This prevents the available
hard disk space from falling below the set value. You can set this either by selecting a value or
inputting a value.
Monitor capture mode
Insert a check to display the image being captured in the monitor window when moving pictures
are captured.
●
●
●
DVC capture settings
● Capture using DV Cam.
Set whether or not to do capturing from the digital video camera's external input.
Insert a check to capture the images from an analog image output device connected to the digital
video camera.
Copyright © 2001-2002, PIXELA Corp. All rights reserved.
Page 67

Introduction
Chapter 1 Before Use
Chapter 2 Capture Environment
Chapter 3 Album Environment
Opening Album Environment
Nomenclature
Thumbnails
Movie file thumbnails
Sound file thumbnails
Still picture file thumbnails
Album Menu
File Menu
Exporting Album Files
Context Menus
Thumbnail Views
Thumbnail view
Thumbnail/File information View
Thumbnail/Detailed file
information view
Image Editor
View/Play Window
Playing movies and sound files
(Win)
Playing movies and sound files
(Mac)
Viewing still pictures
Exporting Album Files
Exporting movies
Exporting pictures
Output to memory card
Printing Within the Album
Environment
Finding Specific Files
Search by file type
Search according to specific
criteria
Sort
Album Preferences
Chapter 4 Movie Editing Environment
Chapter 5 Layout Environment
Chapter 6 Image Editor
Chapter 7 Video Disc Environment
Chapter 8 ImageMixer Easy Video
CD (Win)
3-1 Album Environment
Albums help you organize media files to be used with ImageMixer. Available tasks include viewing still
images and movies, running slide shows, displaying information related to individual files, performing
file searches, and sorting files according to specific criteria. Using albums also means that you only need
manage those files that serve the purposes you define.
Opening Album Environment
1. Open ImageMixer.
2. Click the [Album Environment]
button on the Main Selector.
Nomenclature
Selector Bar
The buttons located on this bar control the desired working
environment and general actions associated with the current
environment.
Thumbnail Display buttons
These buttons change the way album file thumbnails are
displayed.
Album list window Existing albums (those you have created, etc.) are shown here.
Menu buttons
The
Album Menu button and the File Menu button are located
here.
Thumbnails
Thumbnails are the small graphic representations of files which
have been added to a particular album.
Page 68

Display Control buttons
Buttons for
sorting thumbnails are also located here.
Image Edit button
Allows the source file of a selected still picture thumbnail to be
edited.
Thumbnail list window
Thumbnails related to movies, still pictures, and sound files are
shown here. You can use the display control buttons to effectively
"filter out" those file types you do not wish to be displayed.
Copyright © 2001-2002 PIXELA Corp. All rights reserved.
Page 69

3-2 Thumbnails
Thumbnails are small graphic representations of files which have been added to a particular album.
Thumbnails for a selected album are displayed in the 'thumbnail list window.'
Movie file thumbnails
The graphic representation, or thumbnail image,
consists of the first frame of the movie.
The title of the movie is shown here.
This is the icon used for movie files.
Sound file thumbnails
This is the ImageMixer thumbnail image used for
sound media.
The title of the sound media is shown here.
This is the icon used for sound media.
Still picture file thumbnails
Page 70

The thumbnail image consists of a miniature image
of the picture itself.
The title of the still picture is shown here.
This is the icon used for still pictures.
Copyright © 2001-2002 PIXELA Corp. All rights reserved.
Page 71

3-3 Album Menu
Clicking this button displays the album menu.
Create new album
Creates a new album. Clicking this command displays the 'Save As' dialog box. Enter the file name,
define the destination directory, then click [Save]. The newly created album will appear in the album list
window.
Add album
Adds, or retrieves, a saved album which was previously removed. Clicking this command displays the
'Open' dialog box. Selecting and opening an album file here adds it to the other albums currently
displayed in the album list window.
Remove album
Removes the selected album from the album list window. Note that the album file itself is not deleted.
When an album has been deleted or moved from the directory in which it was saved, a question mark (?) will be displayed
on the album's icon. In this case,
remove the album and add it again.
Rename album
Page 72

Allows you to change an album's name. After selecting an album from the album list window and
clicking this command, a dialog box appears. Enter the new album name and click the [OK] button.
Backup album
Creates a duplicate file of the currently selected album. Clicking this command displays the 'Save As'
dialog box. Enter the file name, define the destination directory, then click [Save]. The newly created
backup album is displayed in the album list window.
A folder with the same name as the backup album is created in the destination directory. The backup
album file and backup files of the files added to the original album are saved in this folder.
In Windows, the album file and its thumbnails' source files are copied into the backup folder. In
Macintosh, the copies of the original source files are renamed with the prefix "BackUP," followed by
consecutive numbers.
Delete album
Deletes the selected album. Clicking this command displays a confirmation dialog box. Clicking the
[Yes] button deletes the selected album.
Only the album itself, and not the source files associated with it, is deleted.
Create album with selected thumbnails
Creates a new album with the selected source files (according to the currently selected thumbnails) as its
initial contents.
In Windows, clicking this menu item displays the 'Save As' dialog box. Enter the album file name, define
the destination directory, and then click [Save]. The newly created album is added to the album list
window.
In Macintosh, clicking this menu item creates an album with the selected thumbnail files and adds it to
the album list window.
Add thumbnail
Page 73

Adds thumbnails into the selected album. Clicking this command displays the 'Open' dialog box. Select
the directory in which the file you want to add is saved. Selecting and opening files adds them to the
album selected in the album list window. Thumbnails of the newly added files are then displayed in the
thumbnail list window.
Unlike adding thumbnails via the import file mode, this command does not create a copy of the thumbnail's source file.
When a thumbnail is added, its name is the same as that of its source file. Because ImageMixer manages thumbnail names
and source file names separately, they do not always have to be the same. Thumbnail names can be changed in the 'title'
field of the
menu.
In Macintosh, it may be impossible to create thumbnails for files which cannot be opened by QuickTime Player. Also,
since Macintosh recognizes files by their contents rather than file extensions, some files may be added as certain file type
which is not in accordance with their file extension.
Thumbnail/Detailed file information view. File names can be changed by the 'rename file' command in the file
Add folder contents
Adds all the importable files from a particular folder into the selected album. Clicking this command
displays the 'Browse for Folder' dialog box. After selecting the folder from which you would like to add
files, click [OK] in Windows, or click [Select] in Macintosh. Thumbnails of the newly added files are
then displayed in the thumbnail list window. Files from sub-folders can also be added by checking
'Include Sub-folders.'
Test thumbnail integrity
Since thumbnails are merely graphic representations of the actual files that exist on your computer, there
may be cases where the source file is changed (renamed, moved, etc.), thereby changing the information
which links it to its corresponding thumbnail in ImageMixer. To see if this is the case with any of the
thumbnails within a particular album, first select those you wish to check, and then click the 'Test
thumbnail integrity' command.
In Windows, when a file added in an album cannot be found because it has been deleted or moved from the directory in
which it was saved, a question mark (?) will be displayed on the file's thumbnail. This is not displayed in Macintosh.
Cut thumbnail
Page 74

Cuts, or removes, the currently selected thumbnail from the album. The cut thumbnail can then be pasted
into another album of your choice by selecting the 'Paste thumbnail' command.
Copy thumbnail
Copies the selected thumbnail. The cut thumbnail can then be pasted into another album of your choice
by selecting the 'Paste thumbnail' command.
Paste thumbnail
Pastes a cut or copied thumbnail into the album of your choice.
A cut or copied thumbnail cannot be pasted into an album in which a copy of that thumbnail already exists.
Delete thumbnail
Deletes the selected thumbnail from the album. Clicking this command displays a confirmation dialog
box. Clicking the [Yes] button deletes the selected thumbnail.
Only the thumbnail itself, and not the source file associated with it, is deleted.
Change size of thumbnails
Allows you to display either large or small thumbnails.
Copyright © 2001-2002 PIXELA Corp. All rights reserved.
Page 75

3-4 File Menu
Clicking this button displays the file menu.
Move
Moves the source file of the selected thumbnail. Clicking this command displays the 'Browse for Folder'
dialog box. Select the destination location and click [OK] to move the source file.
Copy
Copies the source file of the selected thumbnail. Clicking this command displays the 'Browse for Folder'
dialog box. Select the destination location and click [OK] to copy the thumbnail source file.
Delete
Deletes the source file of the selected thumbnail. Clicking this command displays a confirmation dialog
box. Clicking the [Yes] button deletes the selected source file.
View/Play
Clicking this command will allow pictures and movie files to be viewed and sound files to be played.
Display file location (Windows only)
Page 76

Displays the contents of the directory containing the source file of the selected thumbnail. This function
utilizes the standard Windows Explorer interface.
Rename file
Allows you to change the name of the source file associated with the selected thumbnail. Clicking this
command displays a dialog box. Enter the new name and click the [OK] button.
Thumbnail names cannot be changed through this operation. Change thumbnail names in the 'title' field of the
Thumbnail/Detailed file information view.
Edit Picture
Allows the source file of the selected still picture thumbnail to be edited.
The edited still picture is created as a new file and its thumbnail is automatically added to the album
when exiting the Image Editor. The original still picture file remains unchanged after editing. A
duplicate of the still picture file which is to be edited is created when Image Editor is started.
Export within album as new movie
Exporting is a term used to refer to the action of creating a new file according to a pre-designated format.
Clicking this command will not change the source file of the selected movie thumbnail. Rather,
ImageMixer will, regardless of the format of the original file, save the movie according to the settings
you define in the accompanying dialog box. After the process is complete, a thumbnail associated with
the new file will appear in the current album.
Export within album as new picture
Page 77

Exporting is a term used to refer to the action of creating a new file according to a pre-designated format.
Clicking this command will not change the source file of the selected picture thumbnail. Rather,
ImageMixer will, regardless of the format of the original file, save the picture according to the settings
you define in the accompanying dialog box. After the process is complete, a thumbnail associated with
the new file will appear in the current album.
Send mail (Windows only)
Enables e-mail to be sent by automatically activating the mail software and attaching the source file of
the thumbnail selected in the thumbnail list window to a new message.
In order to use this function your e-mail software must be MAPI compatible.
Output to memory card
Outputs a copy of the source file associated with the selected thumbnail to a memory card.
Print
Prints out the source file of the selected thumbnail. Clicking this command displays the Print Layout
Settings dialog box, providing you with a variety of options related to paper size, etc.
Run slide show
Page 78

Runs a slide show of still pictures as well as the first frame of movies according to the selected
thumbnails. Slide shows run according to settings you define in Album Preferences.
In Macintosh, these buttons are not displayed. The slide show can be ended by pressing the [Command (Apple)] key,
[.(period)] key or [Esc] key.
Play button Runs the slide show.
Stop button Stops the slide show.
Return
Stops the slide show and returns to
main screen of the Album
button
Environment.
Apply as wallpaper (Windows only)
Sets the source file of the selected still picture thumbnail as the desktop wallpaper.
When Active Desktop is on, files set as wallpaper will not be displayed. Make sure that Active Desktop is off.
Use as screen saver (Windows only)
Sets the source file of the selected movie thumbnail as the screen saver.
MPEG and AVI format files may be used as the screen saver.
Copyright © 2001-2002 PIXELA Corp. All rights reserved.
Page 79

3-5 Context Menus
Context menus provide a variety of commands related to working with thumbnails and their respective
source files. They can be displayed in Windows by right-clicking the thumbnail you wish to work with.
In Macintosh, hold down the control key while clicking the appropriate thumbnail.
Copy thumbnail
Copies the selected thumbnail. The cut thumbnail can then be pasted into another album of your choice
by clicking the 'Paste' command.
Paste thumbnail
Pastes a cut or copied thumbnail into an album of your choice.
A cut or copied thumbnail cannot be pasted into an album in which a copy of that thumbnail already exists.
Delete thumbnail
Deletes the selected thumbnail from the album. Clicking this command displays a confirmation dialog
box. Clicking the [Yes] button deletes the selected thumbnail.
Only the thumbnail itself, and not the source file associated with it, is deleted.
View/Play
Clicking this command will allow pictures and movie files to be viewed and sound files to be played.
Export within album as new picture
Page 80

Exporting is a term used to refer to the action of creating a new file according to a pre-designated format.
Clicking this command will not change the source file of the selected picture thumbnail. Rather,
ImageMixer will, regardless of the format of the original file, save the picture according to the settings
you define in the accompanying dialog box. After the process is complete, a thumbnail associated with
the new file will appear in the current album.
Export within album as new movie
Exporting is a term used to refer to the action of creating a new file according to a pre-designated format.
Clicking this command will not change the source file of the selected movie thumbnail. Rather,
ImageMixer will, regardless of the format of the original file, save the movie according to the settings
you define in the accompanying dialog box. After the process is complete, a thumbnail associated with
the new file will appear in the current album.
Print
Prints out the source file of the selected thumbnail. Clicking this command displays the Print Layout
Settings dialog box, providing you with a variety of options related to paper size, etc.
Send mail (Windows only)
Enables e-mail to be sent by automatically activating the mail software and attaching the source file of
the thumbnail selected in the thumbnail list window to a new message.
In order to use this function your e-mail software must be MAPI compatible.
Output to memory card
Outputs a copy of the source file associated with the selected thumbnail to a memory card.
Insert image as cover of album
Page 81

This command makes the currently selected thumbnail image appear as part of the icon of the currently
selected album.
Edit picture
Allows the source file of the selected still picture thumbnail to be edited.
The edited still picture is created as a new file and its thumbnail is automatically added to the album
when exiting the Image Editor. The original still picture file remains unchanged after editing. A
duplicate of the still picture file which is to be edited is created when Image Editor is started.
Copyright © 2001-2002 PIXELA Corp. All rights reserved.
Page 82

3-6 Thumbnail Views
Thumbnails of files existing in the currently selected album are displayed in the thumbnail list window.
There are a variety of views available, each with their own special properties.
Thumbnail view
Displays thumbnails existing in the selected album. This is the default view.
Thumbnail/File information view
Thumbnails are displayed in a list with accompanying file information relative to title, file
type, present location on your HDD, date created, date modified and any comments you may
have entered.
Thumbnail/Detailed file information view (Windows)
Page 83

Selecting individual thumbnails provides you with a wide variety of information, including
that which relates to Exif formatted files. In particular, these files contain all sorts of
information relative to specific dates/times, camera information, and camera settings. This
view also allows you to add your own information, such as titles and comments that will help you
remember certain details associated with individual files. A small preview pane (described below) is also
available.
Displays a preview of the selected thumbnail, though this monitor
Monitor
Play position slider
Play button
Preview ON/OFF button Turns the preview display on or off.
Pause button
Volume control
does not appear at all when the thumbnail corresponds to a sound
file.
The position at which you wish to begin playback can be set by
dragging the slider, though this slider does not appear at all when
the thumbnail corresponds to a still picture.
Begins playback, though this button does not appear at all when
the thumbnail corresponds to a still picture.
Pauses movie/sound playback, though this button does not appear
at all when the thumbnail corresponds to a still picture.
Drag the slider to adjust the volume of movie or sound files,
though this slider does not appear at all when the thumbnail
corresponds to a still picture.
Page 84

File Information Display
button
Displays file information relative to the selected file, including file
name, file type, and file location. You can also use fields here to
enter your own title or comments.
Detailed Information
Display button
Exif File Information
Display button
Camera Information
Display button (Exif files
only)
Photo Information Display
button (Exif files only)
Displays detailed information (
dimensions (in pixels), file data size, playing time, date added to
the current album, date modified, and file creation date.
Displays Exif file information relative to the selected file,
including a description of the image, date/time the picture was
taken, Exif version, image size, and whether or not the picture is
meant to appear vertically or horizontally (orientation).
Displays information relative to the camera with which the Exif
picture was originally taken, including the name of the camera
manufacturer, camera model, and the camera's maximum aperture
value.
Displays information relative to the settings under which the Exif
photograph itself was taken, including lens focal length, shutter
speed, aperture value, exposure value, exposure program, metering
mode, ISO, white balance, and whether or not a flash was used.
Exif files only), including image
Thumbnail/Detailed file information view (Macintosh)
Selecting individual thumbnails provides you with a wide variety of information, including
that which relates to Exif formatted files. In particular, these files contain all sorts of
information relative to specific dates/times, camera information, and camera settings. This
view also allows you to add your own information, such as titles and comments that will help you
remember certain details associated with individual files. A small preview pane (described below) is also
available.
Page 85

Displays a preview of the selected thumbnail, though this monitor
Monitor panel
Volume control
Preview ON/OFF Turns the preview display on or off.
does not appear at all when the thumbnail corresponds to a sound
file.
Drag the slider to adjust the volume of movie or sound files,
though this slider does not appear at all when the thumbnail
corresponds to a still picture.
Play button
Play position slider
Single Frame Rewind
button
Single Frame Advance
button
File Information Display
button
Begins playback, though this button does not appear at all when
the thumbnail corresponds to a still picture.
Pauses movie/sound playback, though this button does not appear
at all when the thumbnail corresponds to a still picture.
Rewinds the movie one frame at a time.
Advances the movie one frame at a time.
Displays file information relative to the selected file, including file
name, file type, and file location. You can also use fields here to
enter your own title or comments.
Page 86

Detailed Information
Display button
Exif File Information
Display button
Exif Device Information
Display button
Exif Photo Information
Display button
Displays detailed information (Exif files only), including image
dimensions (in pixels), file data size, playing time, date added to
the current album, date modified, and file creation date.
Displays Exif file information relative to the selected file,
including a description of the image, date/time the picture was
taken, Exif version, image size, and whether or not the picture is
meant to appear vertically or horizontally (orientation).
Displays information relative to the camera with which the Exif
picture was originally taken, including the name of the camera
manufacturer, camera model, and the camera's maximum aperture
value.
Displays information relative to the settings under which the Exif
photograph itself was taken, including lens focal length, shutter
speed, aperture value, exposure value, exposure program, metering
mode, ISO, white balance, and whether or not a flash was used.
Search mode
Displays a list of thumbnails and allows you to Search for a specific file or type of file within
those thumbnails according to the criteria you select in the accompanying pane.
Copyright © 2001-2002 PIXELA Corp. All rights reserved.
Page 87

3-7 View/Play Window
This window allows pictures and movie files to be viewed and sound files to be played. To bring up this
window, follow the steps below.
1. Select the thumbnail which corresponds to the file you want to view or play.
2. Clicked View/Play on the pull-down file menu or click View/Play from the context menu.
Files can also be viewed or played by double-clicking their corresponding thumbnail.
Playing movies and sound files (Windows)
View/Play window for movies and sound files.
Page 88

Display
Stop button Stops movie playback.
Movies are shown here. When playing sound files, an animated
speaker icon appears.
Play button
Pause button Pauses movie playback.
Play position slider
Display Previous button
Display Next button
Time display
Volume control Drag the slider to control volume.
Close button
Click to begin playback from the current position on the play
position slider.
Used to define the position at which to begin/resume playback by
dragging the slider. The corresponding frame is shown.
When two or more files have been selected for viewing, clicking
this button moves you to the previous file in the series.
When two or more files have been selected for viewing, clicking
this button moves you to the next file in the series.
Displays the accumulated play time of the movie or sound file
currently being played.
Closes the view/play window and returns to the main screen of the
Album Environment.
Playing movies and sound files (Macintosh)
View/Play window for movies and sound files.
Page 89

Display Movies are shown here.
Volume control Drag the slider to control volume.
Play button
Play position slider
Single Frame Rewind
button
Single Frame Advance
button
Close button
Click to begin playback from the current position on the play
position slider.
Used to define the position at which to begin/resume playback by
dragging the slider. The corresponding frame is shown.
Rewinds the movie one frame at a time.
Advances the movie one frame at a time.
Closes the view/play window and returns to the main screen of the
Album Environment.
Page 90

Viewing still pictures
View window for still pictures.
Display Displays the selected file(s).
Zoom In button Clicking this button enlarges the display size.
Zoom Out button Clicking this button reduces the display size.
Display Previous button
Display Next button
Close button
When two or more files have been selected for viewing, clicking
this button moves you to the previous file in the series.
When two or more files have been selected for viewing, clicking
this button moves you to the next file in the series.
Closes the view display and returns to the main screen of the
Album Environment.
Page 91

Copyright © 2001-2002 PIXELA Corp. All rights reserved.
Page 92

3-8 Exporting Album Files
Exporting is a term used to refer to the action of creating a new file according to a pre-designated format.
This action will not change the source file of the selected movie thumbnail. Rather, ImageMixer will,
regardless of the format of the original file, save the movie according to the settings you define in the
accompanying dialog box. After the process is complete, a thumbnail associated with the new file will
appear in the current album.
Exporting movies
Exported files will appear in the current album and their source files will be saved according to the
destination folder defined under 'Destination of exported files' in the Album Preferences.
1. Select the thumbnail of the movie file to be exported from the thumbnail list window. Click
'Export within album as new movie' in the pull-down
File Menu or the Context Menu.
Movie Format Settings dialog box will appear.
The
2. Define the file format options (described below) and click the [Export] button.
ImageMixer MPEG1 format:
Select the conversion quality.
Select [320 x 240] or [640 x 480] to convert a file at that size quality.
Select [Video CD] to convert a file to a file optimized for Video CD. NTSC is a video format
used in Japan and the U.S., and PAL is a video format used in China and Europe.
Select [For e-mail] to convert a file to a smaller file that can be attached to emails.
Select [DV/AVI] to convert a file to an AVI format file.
If you select [Custom], you can set the conversion file by clicking on the [+] button.
When using a moving picture file that has a non-standard frame size in Video CD creation, it will
be necessary to change the size. In this case, the image quality improves if you check [Use
interlace process in size changes]. However, file conversion takes longer when this process is
used, so only select it as needed. In addition, by checking [Maintain ratios in size conversions],
the file size is changed but the image angles of the moving picture file being converted are kept
the same. Because of this, black background is filled in as needed to make it a 4:3 ratio.
MPEG movie for Sony
Converted as MPEG movies for Sony cameras. Select from [MPEG movie for Sony 160×112
(QCIF)], [MPEG movie for Sony 160×112 (CV)], [MPEG movie for Sony 320×240 (CIF)],
[MPEG movie for Sony 320×240 (HQ)], [MPEG movie for Sony 640×480 (VGAL)].
Page 93

Movie Format Settings dialog box
Preview display
Play position slider
Play button
Pause button Pauses movie playback.
MPEG exporting options
for SONY
Allows you to preview the movie before proceeding with file
export.
Used to define the position at which to begin/resume preview by
dragging the slider. The corresponding frame is shown.
Click to begin preview from the current position on the play
position slider.
Defines size and quality options relative to the Sony MPEG movie
format. Note that when a low image quality is selected, the
compression speed (rate at which the file is exported) is relatively
fast, while the data size of the newly created (exported) picture is
relatively small. Conversely, when a higher image quality is
selected, the compression speed (rate at which the file is exported)
is relatively slow, while the data size of the newly created
(exported) picture is relatively large.
Volume control Drag the slider to control volume.
Export button Exports movie according to the format selected in or .
Page 94

MPEG exporting options
for ImageMixer
Defines quality options relative to the ImageMixer MPEG1 movie
format. Note that when a low image quality is selected, the
compression speed (rate at which the file is exported) is relatively
fast, while the data size of the newly created (exported) picture is
relatively small. Conversely, when a higher image quality is
selected, the compression speed (rate at which the file is exported)
is relatively slow, while the data size of the newly created
(exported) picture is relatively large.
Custom button
Use interpolation for
resizing images.
Maintain image aspect for
resizing images.
Close button
You can use this button when you select [Custom] in . Sets
the export settings.
Resizing movie by interpolation will improve image quality.
Resizing the movie images while maintaining the image aspect.
Closes the dialog box and returns to the main screen of the Album
Environment.
Exporting pictures
Exported files will appear in the current album and their source files will be saved according to the
destination folder defined under 'Destination of exported files' in the Album Preferences.
1. Select the thumbnail of the movie or still picture to be exported. Click 'Export within album
as new picture' in the pull-down
Still Picture Format Settings dialog box will appear.
The
2. When exporting a still picture from a movie file, select the desired frame by dragging the
play position slider.
3. Define the file format options (BMP for Windows, PICT for Macintosh, Exif or JPEG) and
click the [Export] button.
4. Once the file is exported, the dialog box will close and the new file will appear in the
thumbnail list window of the current album
File Menu or the Context Menu.
Still Picture Format Settings dialog box
Page 95

Preview display
Play position slider
Exif
BMP/PICT
JPEG
Allows you to preview the still picture before proceeding with file
exportation.
Used to select the frame of the movie from which you wish to
create (export) a new picture.
This is not displayed when exporting from a still picture.
Converts the selected movie or still picture file into the
Exif file
format used by digital cameras. Original size or 640 x 480 pixels
may be selected.
Exports the selected movie frame or still picture in BMP
(Windows) or PICT (Macintosh) format.
Exports the selected movie frame or still picture in JPEG format.
Note that when a low image quality is selected, the compression
speed (rate at which the file is exported) is relatively fast, while
the data size of the newly created (exported) picture is relatively
small. Conversely, when a higher image quality is selected, the
compression speed (rate at which the file is exported) is relatively
slow, while the data size of the newly created (exported) picture is
relatively large.
Export button Exports movie according to the defined format.
Page 96

Close button
Closes the view/play window and returns to the main screen of the
Album Environment.
Output to memory card
Outputs a copy of the source file of the selected thumbnail to a memory card.
1. Select the thumbnail to be output.
2. Click 'Output to memory card' in the pull-down
3. The
4. A progress bar is shown and the file is saved to the selected memory card.
Memory Card Output dialog box
Memory Card Output dialog box is displayed. Select a memory card present either in a
camera or in a memory card reader connected to your computer. Click the [Output] button.
File Menu or the Context Menu.
Page 97

Selection menu Defines the output destination.
Card Search button
Still Picture Display button
Movie Display button
Sound Display button
Display All Files button Displays thumbnails of all files in the thumbnail list window.
Searches for any memory cards present, either in a camera or in a
memory card reader connected to your computer.
Displays only thumbnails of still picture files in the thumbnail list
window.
Displays only thumbnails of movie files in the thumbnail list
window.
Displays only thumbnails of sound files in the thumbnail list
window.
Page 98

Memory card list window
Available memory cards are displayed in a list. Clicking a memory
card icon here displays all the relevant files as thumbnails in the
thumbnail list window. Note that files stored on floppy disks and
other similarly formatted media will appear here as well.
Thumbnail list window
Displays thumbnails of the files existing on the selected memory
card.
Refreshes (rereads) the data existing on the currently selected
Refresh button
memory card.
Outputs a copy of the file selected in the thumbnail list window to
Output button
the selected memory card.
Closes the memory card output dialog box and returns to the main
Close button
screen of the Album Environment.
Copyright © 2001-2002 PIXELA Corp. All rights reserved.
Page 99

3-9 Printing Within the Album Environment
Whether you would like to print out snap shots of your favorite pictures or create a physical record of
your album files, ImageMixer provides you with a variety of printing options, conveniently located
within the album environment. Furthermore, the printing process itself is made quite efficient by the fact
that you choose only those pictures you would like to print by simply selecting their corresponding
thumbnails.
When sound files are selected, the speaker icon (standard sound file thumbnail image) is printed. When movie files are
selected, only the first frame of the movie is printed.
1. Select the thumbnail(s) of the file(s) to be printed.
2. Click Print in the pull-down
3. The Print Layout Settings dialog box is displayed. After the options are set, click the [Print]
button to print out the selected file.
Brings up the Print Layout Settings dialog box.
Print.
Closes the Print Layout Settings dialog box and returns to the
main screen of the Album Environment.
File Menu or the Context Menu.
Print Layout Settings
Page 100

Defines the number of thumbnails
printed per page.
Defines the number of thumbnails
per page by columns and rows.
Index Printing
Prints thumbnails and
their source file names.
Example: 4 pictures per page.
Example: 2 columns, 3 rows per
page.
Information Printing
Prints thumbnails and
information pertaining
to their corresponding
source files.
Defines the number of thumbnails
printed per page.
Example: 2 pictures per page.
Only the file information that is
checked will be printed.
● File Name
● Title
● Type
● Location
● Image Size
● Date Created
● Date Modified
● Data Size
● Length
● Comments
 Loading...