

© 2004 Sony Corporation
Video Camera Recorder/Digital Video Camera Recorder
_U_lFJ_'cl_rn
videoHi8
CCD-TRV128/TRV228/TRV328/TRV428
Digital 8
DCR- TRV260/TRV265
Read this first
Before operating the unit, please read Ibis
masmal thoroughly, and retain it lbr future
reference.
WARNING
To prevent fire or shock hazard, do not
expose the unit to rain or moisture.
C_LEflON: TO REDUCE THE R_ _ B_E_'TR_ _'_q_
DO NOT P,_AOV E OOV_ {O R B_E_I_.
USEq_R_qC_BIJ_ PARTS IN_CE.
R_=Z_t SS_VK;ING TO QUAUFqBD 8_*'ICE pEr_CNNB_.
This symbol is intended to alert the
user to the presence of unin sulated
"dangerous voltage" within the
product's enclosure that may be of
sufficient magnitude to constitute a
risk of electric shock to persons.
This symbol is intended to alert the
user to the presence of important
operating mad maintenance
(servicing) instructions in the
literature accompanying the
appliance.
For customers in the U.S.A. and
CANADA
CAUTION
TO PREVENT ELECTRIC SltOCK, MATCH WIDE
BLADE OF PLUG TO WIDE SLOT, FULLY
INSERT.
RECYCLINGLITHIUM-IONBMTERIES
Litltium-lon batteries are
recyclable.
You can help preserve our
environment by retracing your
used rechargeable b_lteries to the
collection and recycling location
nearest you.
For more intb_Tn_tion regarding recycling of
rechargeable batteries, call toll free 1-800-822- 8837,
or visit h.p://www.rbrc.org/
Caution: Do nol handle damaged or leaking Lithium-
Ion batteries.
@
For customers in the U.S.A.
If you have any questions abou_ this product, you may
call:
Sony Customer Information Center 1-800-222-SONY
(7669)
The number below is for FCC related m_lter_ only.
Regulatory Information
Declaration of Conformity
Trade Name: SONY
Model No.: DCR TRV260
Responsible Party: Smay Electronics Inc.
Address: 680 Kinderkamack Road, Oradel[,
NJ 07649 U.S.A.
Telephone No.: 201 930-6972
This device complies with Part 15 of the FCC Rules.
Operation is subjeO to the following two conditions:
(1) This device may not cause harmful interference,
and (2) this device must accept any interfi:rence
received, including interference tha_ may cause
undesired operation.
Owner'sRecord
The mode! and serial numbers are located on the
bottom. Record the serial number ill the space
provided below. Refer to these numbers whenever you
call upon your Sony dealer regarding Otis produch
Model No. TRV
Serial No.
Model No.AC-
Serial No.
2
CAUTION
Yo_ _ c_u_i_nettthat_y ch_ges o_modific_rk_s
_ e_p_ss_ appmv_Jin_s man_ _ d wid y_ur
0 Note:
l}fis _mpm_t l_as l_mi t_sted _Id found to comply
with th_ 1_ _ _CI_s B _i_l de_ce, puget to
Part ] 5 of th_ FCC R_es.
m_!_o_. !l_is _i_pm_ g_e_tes, uses, and c_
_ mdlo _q_cy enemy _nd, if n_ i_s_![_ _d
h_m_ m_fference to _._io comm_ic_t_s.
However, _e_ is no g_n_e _ m_ffe_nee w_[I
_es causehar_ m_"_Pere_ceto _io or _etevlsion
_c_p6on, whi_ c_ be d_rmi_d _ _mmg _h_
eqmpm_t off _d o_, th_ u_er is encouraged _ _/to
co_ _h_in_:_e_ _ one ar more of _e
recorditag of such matarJals may be contra_ to the
copyright laws,
Notes on the LCD panel, viewfinder, and
lens
• Ihe I,t;l) screea and _e viewl_der _re
man_t_c_mred u_i_ exn_mely hlg_-preci_ion
technology, so over 9!/.99% oP_h_ pixe[s _r_
However, there may l_e some tiny black points a_d/
or brlgtlt points (whi_, red, bl_e, or gr_ela in _,'o1oi)
Nat appear co_stamly on Ne LCI) screen and Ne
v;gwt]_d_a
r_aesepointsare normal res_fl_ el'the man_t_a_mri_g
gm_'_ss and do not _ff_ct the rex:oNiitg i_ _ny way,
• E_:posi_g the LCI) s_reen, the viewfinder, or Ne lens
to direct su_llg_tr for long periods of time may _'al_ e
real fan¢4ions, Be cm_fM when g[aclng the camera
near a w_ndow or outdoors,
• I)o not alto at the sun. I)olng so might ca_e your
camcor_ler to malfangrion, Take pic_res of Ne sun
only N low [ig_It conditions, such as ar dllsk,
- In_a_ _he sep_o_ _ee_ _h_eqmpment and
r_x;eiver.
- Con_e_ _h_e_pm_nt _ _ o_[_ on _ ci_it
_ffe_ from _h_ to which _e r_eiver is
- Cons_t a So_ d_er or an _xp_ncefl _._ioY['V
_hm_';mn for hetp.
_l_e i_ta_ce c_ suppled m_t 1_ us_l _ _e
eqmFment in a_r m comply w_ _e I_its _r a
_ gloat d_'_ pu_ to Subp_ B of Pa_ 15 of FC("
R_es.
Notes on use
Note on a cassette tape
Yo_c_ u_ s_d _ _ [] and _I_SHI m
D_git_]_D videocassetteson yo_zcamc_der. See
page82_brdevils.
Notes on recording
• Before _ar ring ro r_cord, t_t _her_or_l[ng Nn_rio_t
to make sure fl_eNcmre aml so_nd are r_corfled
wi_o_t _y pr_blems,
• Competition for _h_con_ts of recordings cannot
be prodded, ev_ if recording or playback is not
pos_ble d_ to _ma[t_tction of fl_ec_co_t_, _.
• IV c_lo__ys_ms di_er d_ndim_ on _e ¢._y/
_gk_ns. l_ vi_ yo_ reco_ags o_a 1"%yo_nell
NI'SC system=basedI'_,
• l'elevision programs,films, video tapes, madother
ma_a_s may becop_vDgh_3,L_tho_zed
Note on connecting other device
Before ¢onn_ng yo_trcam_'_rflerto _er de_ce
such _ a VC_ ar a computer with m_UgB ar I,L[NK
cable, be sure _ _ser_ the c_ec_r p[_ in _e Froper
_lln_tlo_, F you in_ert _e connector p|ug forc]Ny i_
th_ wrong dir_on, _e _ermi_a[ m_ be d_maged,
_l_s m_ ca_e _ matfan_t_ of your camcarfle_
Notes on using this manual
• the images of the LCD so,teen and the _ewfkld_r
_efl on _is mabel ar_ c_pt_r_d us_ _ digilal still
camera, a_d thus m_ appear di_r_t from wh_t
yOU See,
• _ _s i_strutai_m mamla|, e_h mod_l is m_ated _s
CCD-YRV I28: H|m TRV128
CCD-YRV228: H|m TRV228
CCD-YRV328: H|m TRV328
CCD-rRV428: H|m TRV428
I)CR_]RV260: D ]RV260
I)CR_]_V265: D ]RV265
_ra_o_s with _o spe_]_c mod_l names are _r all
models,
_ra_o_s with _ecigc m_l m_mes_r_ for the
i_dicated m_Is one.
Befor_ you start r_adi_ this ma_al, che_'_k_
mod_ _am_ _f yollr camcord_r.
• e model _'R_]RV265.
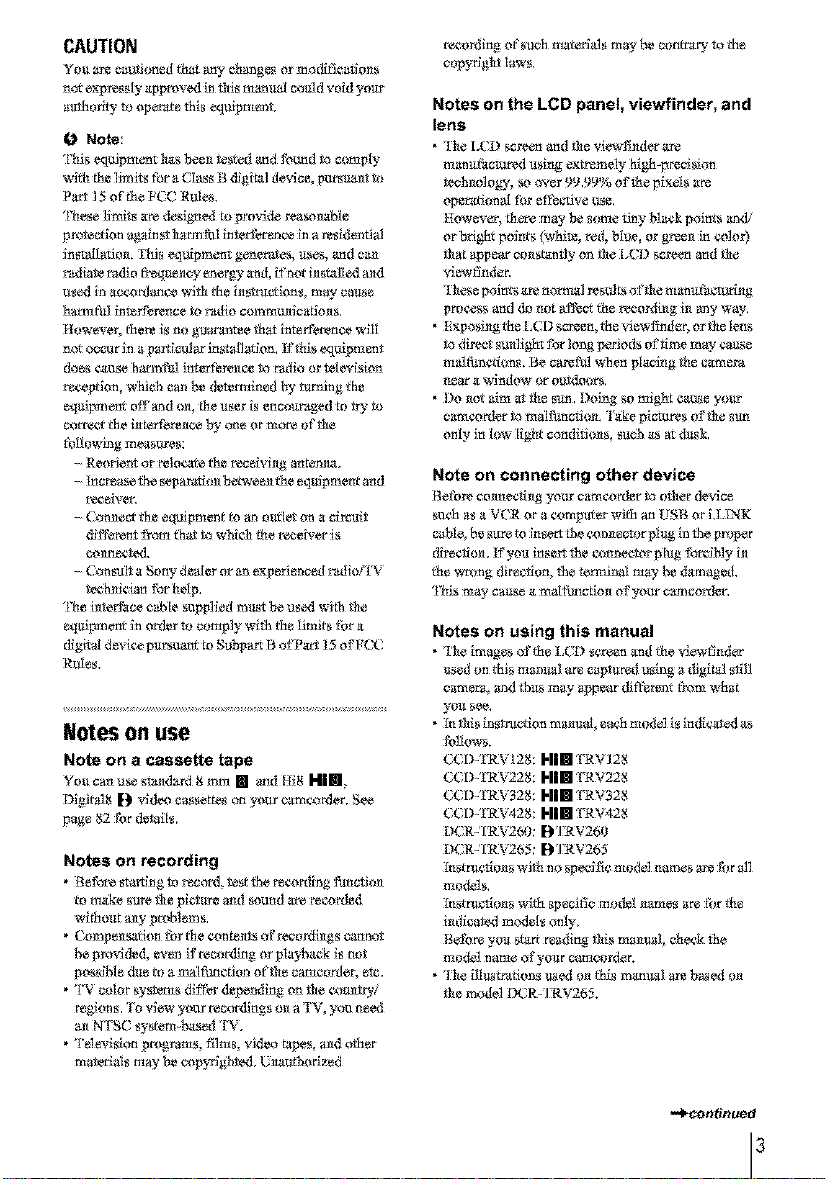
Notes on using the camcorder
• YOU ¢gn charu4_ tbe Iar_g_ to be u_ fbr sc_n
display o_ yo_ ¢*_mco_d_r (p, I9),
• Do _ot be[d _he cz_u¢_rd_r by th_ _][o_ug par_,
\
Viewfinder LCD panel
4

Table of Contents
((D-'fRV228: NIm 1'RV228 I)(R. FRV26g: D_R'V2(_0
(.(D-'fRV328: HIE=1'RV328 D(.R_TRV265; D_RV265
Read this first ............................................................................................. 2
Quick Start Guide
Recording movies on a tape ...................................................................... 8
Recording/Playing back with ease .......................................................... 10
Getting started
Step 1: Checking supplied items .............................................................. 11
Step 2: Charging the battery pack ............................................................ 12
Using an outside power source ................................................................................. 15
Step 3: Turning the power on ................................................................... 15
Step 4: Adjusting the LCD panel and viewfinder ...................................... 16
Adjusting the LCD panel ........................................................................................... 16
Adjusting the viewrmder ............................................................................................ 16
Step 5: Setting the date and time ............................................................. 17
Step 6: Inserting a cassette tape .............................................................. 18
Step 7: Setting the screen language ........................................................ 19
Recording
Recording movies .................................................................................... 21
Recording for a longer time ....................................................................................... 23
Using zoom ............................................................................................................... 23
Using the built_ T_light ................................................................................................ 23
Recordff_g in mirror mode ......................................................................................... 24
Superimposing the date and time or_ pictures (Hill TRV128t2281328/428) ............. 25
Recording still images- Tape photo recording (lyTRV260i265) ............. 25
Recording with ease - Easy Handycam .................................................. 26
Adjusting the exposure ............................................................................. 27
Adjusting the exposure for backlit subjects ............................................................... 27
Adjusting the exposure manually .............................................................................. 28
Recording in dark places - NightShot plus .............................................. 28
Adjusting the focus manually ................................................................... 29
Recording a picture using various effects ................................................ 30
Fading in and out ofa sos_e - FADER .................................................................... 30
=_ntinued
5
Superimposing a title ................................................................................ 31
Searching for the last scene of the most recent recording
- END SEARCH ................................................................................. 33
Playback
Viewing pictures recorded on a tape ........................................................ 34
Playing back in various modes .................................................................................. 35
Playing back with ease - Easy Handycam .............................................. 36
Various playback functions ...................................................................... 37
Display ng the screen indicators ................................................................................ 37
Display ng the date/time and camera scttir_gs data - Data code
(lyTRV2601265) .................................................................................................. 37
Playing the picture on a TV ...................................................................... 39
Locating a scene on a tape for playback (E)TRV265) ............................. 40
Searchir_g qu ckly for a desired scene - Zero set memory ........................................ 40
Searchir_g for a scer_e by date of record ng - Date search ....................................... 41
Searchir_g for a still imago - Photo search ................................................................ 41
Playing back still images in sequence - Photo scan ................................................. 42
6

O_ ¸ _ ' O_
Customizing Your
Camcorder
Troubleshooting
Troubleshooting 74
Warning indicators and messages ....79
Changing the menu settings .............. 43
Using the _i_ (MANUAL SET) menu
- PROGRAM AE/P EFFECT,
etc ................................................ 44
Using the _i_ (CAMERA SET} menu
- 16:9 WIDEiSTEADYSHOT,
etc ................................................ 47
Using the _i_ (PLAYER SET)/_ (VCR
SET) menu - HiFi SOUND/EDIT,
etc ........................................... 51
Using the _i_ (LCD SET) menu - LCD
B.L./LCD COLOR, etc.................. 53
Using the _ (TAPE SET) menu
-FRAME RECiINT,REC, etc....... 54
Using the [_ (SETUP MENU)- CLOCK
SETiUSB STREAM/_ LANGUAGE
etc 57
Using the _ (OTHERS) menu
- WORLD TIMENIDEO EDIT,
etc ...................................... 59
Dubbing/Editing
Connecting to a VCR 61
Dubbing to another tape .................... 63
Dubbing a tape easily- Easy Dubbing
(H| [] TRV128/228/328/428) ........ 64
Recording pictures from a VCR
([) TRV260/265) ........................... 68
Dubbing selected scenes from a tape
- Digital program editing
([) TRV260/265) ........................... 69
Additional Information
Using your camcorder abroad ........ 81
Usable cassette tapes ..................... 82
About the "InfoLITHIUM _battery
pack ............................................. 83
About i,LINK ..................................... 84
Maintenance and precautions ............ 85
Specification .............................. 66
Quick Reference
Identi_ing pa_sandcontrols ............. 91
Index .................................................. 96
For B IRV260/265:
Rel'er also to _,ther _xpemting _n#trttctkms
_upplied wi_ yo_ _m_order:
• _x_ti_g image_ wi_ your _mputer
"_Conapt_er A ppllcat_ Oulde
7

Quick Start Guide
Recordingmovies
"i/ Attach the charged battery pack to the camcorder.
To _harge t_ battery, s_e page 12,
_) Lift up the viewfinder O Slide the battery pack in the direction
of the arrow until it clicks,
Insert a cassette into the camcorder,
_) Slide the L_OPEN/
EJECT lever in the
direction of the arrow
to open the lid.
The ¢,assett_ cornp_rtmer=t
comes o_t a_tomat k'ally,
L_OPENiEJECT lever
8 QuickStart Guide
Insert the cassette with
its window-side facing
up, then push the center
of the back of the
cassette
Window-side
Press [PLY.
('los_ the cassette lid afar
fhe _assege cornpaa*ment
slides back inby it_el£

Start recording while checking the subject on the LCD screen,
['he &_te _md time is not set t_p _nthe default se_tit_g. 'Io set the d_te a_d dine, see page 17,
_) Remove the lens cap,
Ler=s cap is not at_=ed
when yoa ptlrebase yoar
camc_rder (p, 91),
Press OPEN and
open the LCD panel
While pressing the
green button, slide
the POWER switch
down to light up the
CAMERA lamp.
0
'Thepower tt_msor_.
Press REC START/
STOP.
R_'v'or_m g s_rts. "1'o
eharlge t*_st_tdby mode,
press REC START/STOP
ag_ti[L
View the recorded picture on the LCD screen,
_) Slide the POWER
switch repeatedly
until the PLAY/EDIT
lamp lights up.
0 Press _ (rewind).
0 Press _ (play) to
start the playback.
'to stop, press _,
['o tam offthe power, slide {he
POWER switch t_p tgl CHG)
OFF,

Recording/Playingback with ease
By s_ mhlng_oE_y Hmldycam o_rafion,rocord_ng/pl_ybask_rafio_
becomes_w_neaslen
Easy Handycam operatlc_ aIlows easy re_<_rdin_playback for even _rst
tlm_ _sers by providing only-the basic f_nctlc_s tbr moord_ng/playback.
Press EASY when recording/ ...................................................
playing back.
E_Y,g_op_o_0_o.o_ 0 ..........................................................
screen font size increases (0) &,tring r_v
Easy Handycam operation.
Easy Handycam
opera,on
ON
For details, see instructions fbr _:ach operation.
S*'e page 26 for receding, page 36 for playback.
10 Quick Start Guide
Gettingstarted
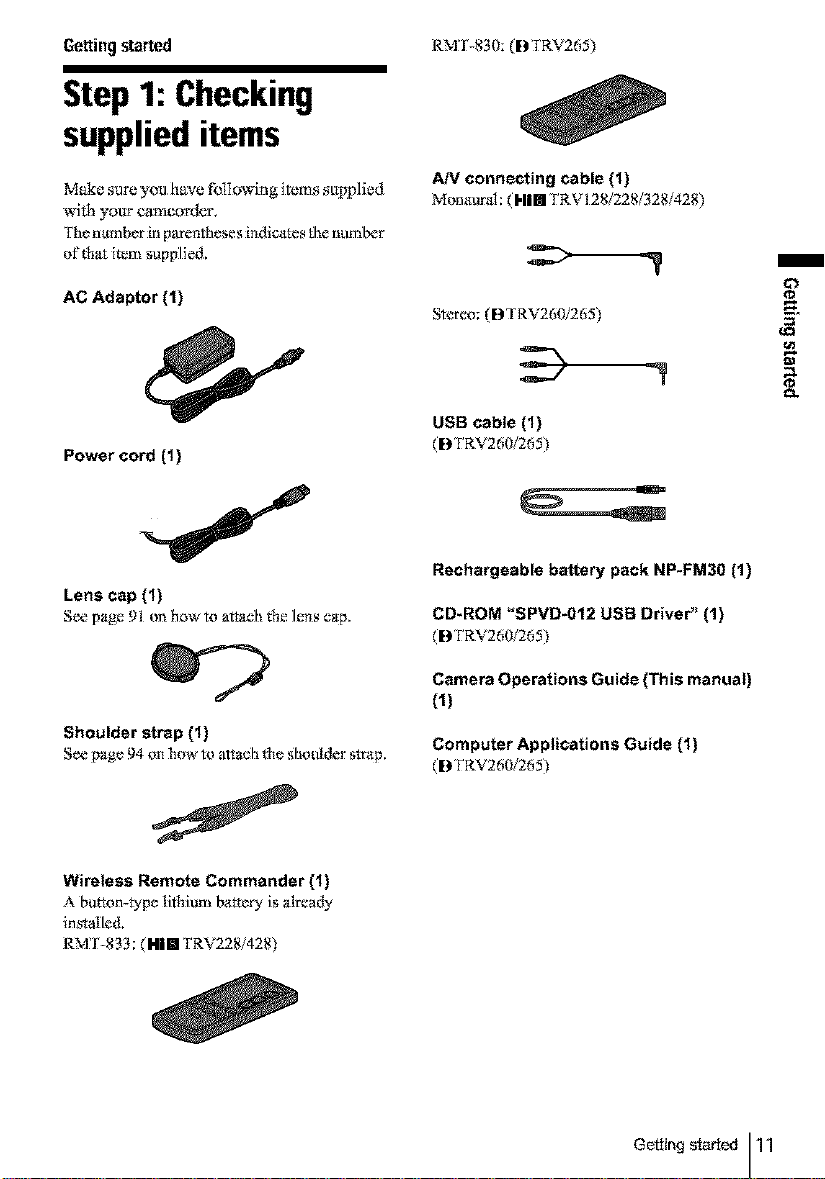
Step 1: Checking
supplied items
RM r-830; (D TRV265)
Make sum yon have fbl] owing items saI_lied
with yo_ camearder.
the number inpareritheses indicates the r_tm_b_r
of Nat item supplied.
AC Adaptor (t)
Power cord (1)
Lens cap (1)
Sse page })1 er* how to attach fhe lens cap,
Shoulder strap {1)
See pag_ 94 on hew to att_h the shoulder strap.
AN connecting cable (1)
Menaural: ( HI II TR V128/228/32g/42g)
Stereo: (BTRV260/265)
USB cable (1)
(E)TRV260/265)
Rechargeable battery pack NP*FM30 (1)
CD_ROM "SPVD*0t2 USB Driver" (1)
(BTRV260/265)
Camera Operations Guide {This manual)
(_)
Computer Applications Guide (1)
(B FRV260/265)
Wireless Remote Commander (1)
A brittle-type lithium ba_D" is alr_:ady
installe&
RM:r-833: (Him TRV228i42g)

Step 2: Chargingthe
battery pack
You can charge the battery by attaching the
"InfoLITHIUM" battery pack (M series)
to yoL[r camcorder.
0 Notes
• YOU cannol us_ batteries olher lhan lhe
"Int_)LITHI UM" baltery pack (M series) (p. 83).
• Do noz short-circuit the DC plug of the AC Adaptor
or battery termtaals with any metallic objects. This
may cause a malfunction.
• Use a nearby wall oatlet when using the AC
Adaptor. Disconnect the AC Adaptor from the wall
outlel immedialely if any malti_nction occurs.
Battery pack
DC IN jack
Attach the battery pack by sliding it in
the direction of the arrow until it
clicks.
3 With the • mark on the DC plug
facing up, connect the AC Adaptor to
the DC IN jack on your camcorder.
• mark
4 Connect the power cord to the AC
Adaptor.
Power cord
To the wall out[et
Lift up the viewfinder.
12 Getting started
AC Adaptor
Connect the power cord to the wall
outlet.
Slide the POWER switch up to (CHG)
OFF.
The CitG (charge) lamp lights up and
charging starts.
/ I _0 0
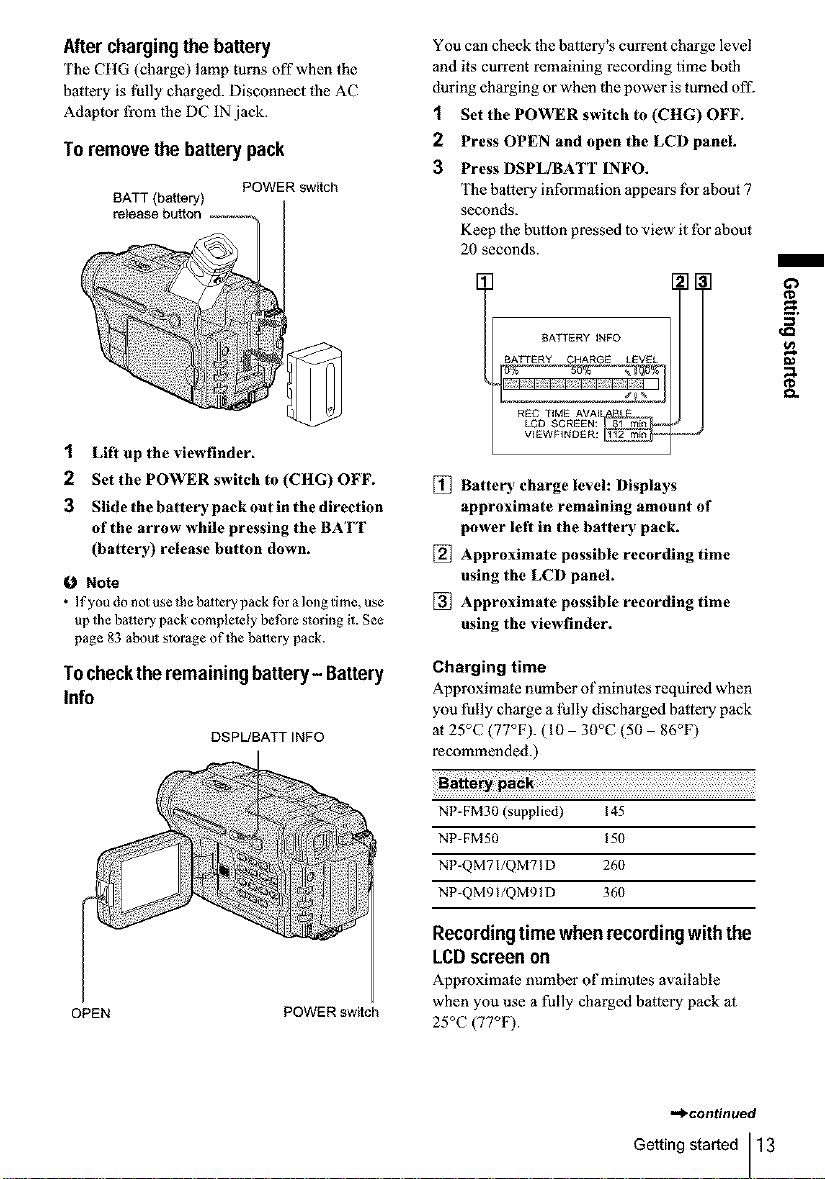
Afterchargingthebattery
The CItG (charge) lamp turns oft" when the
battery is fully charged. Disconnect 1he AC
Adaptor from 1he DC IN jack.
To removethe batterypack
POWER witch
1 Lift up the viewfinder.
2 Set the POWER switch to (CHG) OFF.
3 Slide the battery pack outin the direction
of the arrow while pressing the BATT
(battery) release button down.
f,_ Note
• If you do not use the baltery pack for a long time, use
up the battery pack completely before storing it. See
page 83 about storage oflhe battery pack.
Tochecktheremainingbattery- Battery
Info
DSPUBATTINFO
You can check the battery's current charge level
and its current remaining recording time both
during charging or when 1he power is turned off.
1 Set the POWER switch to (CHG) OFF.
2 Press OPEN and open the LCD panel.
3 Press DSPL/BATT INFO.
The battery information 3ppears tbr about 7
seconds.
Kc'ep the button pressed 1oview it for about
20 seconds.
BATTERY INFO
BATTERy CHARGE LEVEL
LCD SCREEN:
REC TIME AVA[_
VIEWFINDER:
[] Battery charge level: Displays
approximate remaining amount of
power left in the batter), pack.
[] Approximate possible recording time
using the LCD panel.
[] Approximate possible recording time
using the viewfinder.
Charging time
Approximate number of minutes required when
you fully charge a fully discharged battery pack
3t25°C(77°F).(IO 30°C(50 86°F)
recommended.)
Co
o.
OPEN
POWER switch
NP-FM30 (supplied) 145
NP-FM50 15(}
NP QM7I/QM7ID 26(}
NP QM9I/QM9ID 36(I
Recordingtime whenrecordingwiththe
LCD screen on
Approximate number of minutes available
when you use a fully charged battery pack 3t
25°C (77°F).
,_continued
Getting started 13

For NIm TRV 128/228/328/428:
For [],TRV260/265:
NP-FM30 115 55
(supplied)
NP-FM50 185 90
NP-QM71/ 445 220
QM71D
NP-QMgl/ 67(1 335
QM91D
For [)TRV260/265:
NP-FM30 90 50
(supplied)
NP-FM50 145 80
NP-QM71/ 355 220
QM71D
NP-QMgl/ 535 300
QM91D
Recordingtimewhenrecordingwiththe
viewfinder
Approximale number of minules available
when you use a fully charged battery pack at
25°C (77°F).
For It|m TRV 128/228/328/428:
NP-FM30 125 65
(supplied)
NP-FM50 200 105
NP-QM71/ 485 255
QM71D
NP-QM91/ 725 385
QMglD
* Approximale number of minutes when recording
while you repeatedly record, slart/stop, slide the
POWER switch to chmlge the power mode, and
zoom. The aoual baltery life may be shorter.
Playing time
Approximate number of minutes available
when you use a fully charged battery pack at
25°C (77°F).
For 11111 TRVI28/228/328/428:
NP-FM30 }15 185
(supplied)
NP-FM50 185 295
NP-QM71/ 445 715
QM71D
NP-QM91/ 670 1070
QMglD
NP-FM30 175 85
(supplied)
NP-FM50
NP-QM71/ 675 330
QM71D
NP-QM91/ I010 495
QM91D
28(1 135
14 Gettingstarted
For [}TRV260/265:
NP-FM30 100 150
(supplied)
NP-FM50 160 240
NP-QM71/ 390 580
QM71D
NP-QM91/ 585 865
QM91D

O Not_
• [he_v¢_rw£[l_tubes_ppli_f_om_Ieb_texypa_
w_t _e AC &d_p_r i_ ce_mect_d to _h_DC INjack
o_'yo_r camco_ eve_ if _ po_ er eo_ is
• _[_h_reco_ _ndplayback fir_ will be sh<_er
• _[_h_CHG (c_g_) li_rnpflashes d_rk_ _rgi_g, or
_h_batvs_ infbr_on _]1 _o_ be _t_ctly
dlsp_ayed m _iowk_ c_m_tlons.
- T_ b_ry p_k isnot _ch_ correctly.
- T_ b_te_ p_k isd_g_d.
- T_ b_te_ p_k is_ly dis_arged. _or Bakery
i_bm_rio_ oNy.)
Yoc can use the AC Adaptor as the power
source when ya_ do not want the battery to
ran out. While you are _ing the AC A&tpmr.
NC battery pack will not lose its charge even
when it is attached to yaar camcorder.
PRECAUTION
Even if your cierncorder is tm'r_ed of'g,AC power
(house cu!vent) is _till supplkxt to it while
contracted m the wNl outlet via the AC Adaptor,
Connect yol_r camcorder as shu_a_ in
_'Charging the Datterypack" (p 12)
Step3: Tumingthe
poweron
",'an nec,(iIDslide the POWER switch
repeatedly to select the desired power mode
to recor_ or play.
When using this can_eordar for the first time,
the [CLOCK SE'[] screen appears (p. 17).
While pressing the green button, slide tbe _.
POWER s_itch du_. =
Fh_ power tkcrn8orl,
To enter the recording or playk_g m(_te, slide
t_e switch repeatedly until Ne respeed_,e lanp ca.
for the desired power made lights tip.
• CAMERA mode: 1'o record on a rape,
• PI,AY ED[ Fmode: To play or edit pictures on
a tape.
, u u u u u u u u u u
To turn off the power
SlidethePOWER switchupto CHG) OFF,
CH_
o
_o
_o
¢u
Getting started 15
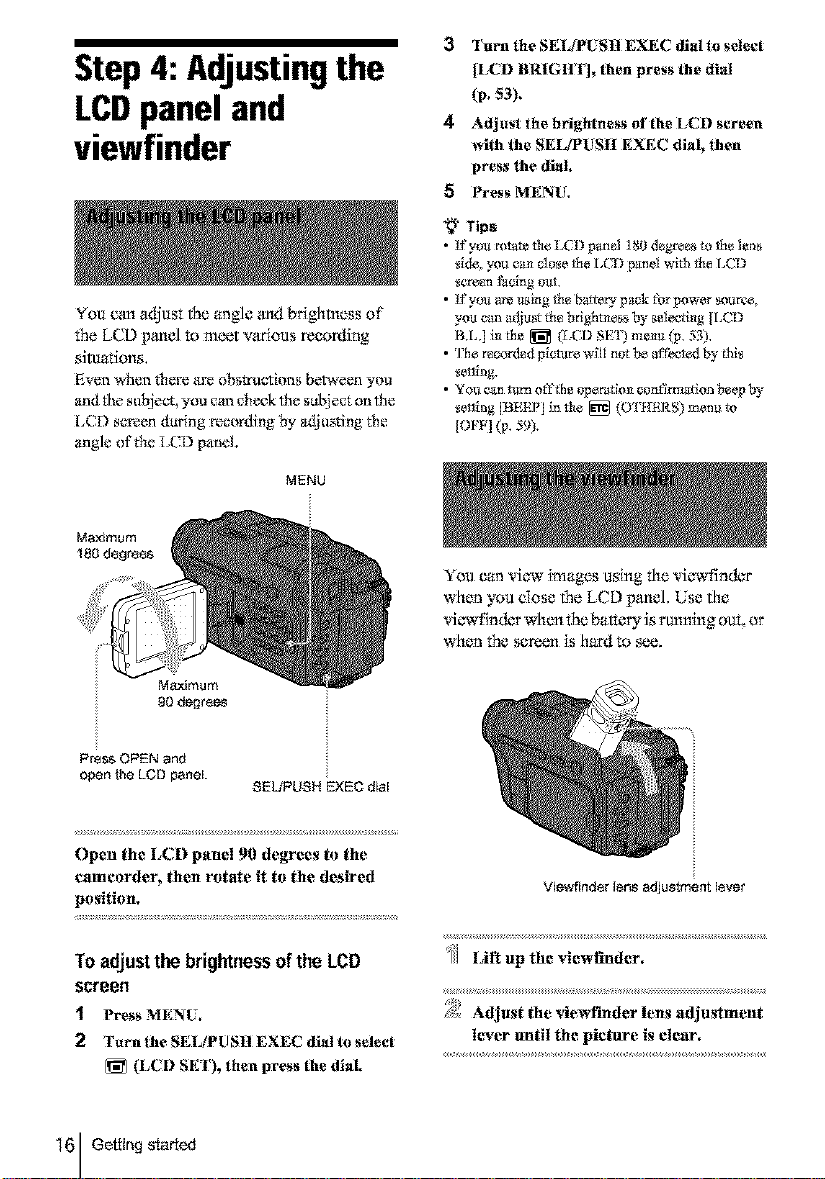
Step 4: Adjustingthe
LCDpanel and
viewfinder
You c_madjust the angle and brightness of
the LCD pamel to meet venous mooing
situations.
Evt2n when t|l_!_ a!_ li_s_u_R i(_r!8 between yi_u
and the subjec% you can ch*x'k the sabiect on th_
LCD s_reen daring !_'cording by adjusting Ne
angle of Ne LCD panel
MENU
Turn the SEIJPUSH I?XEC dial th select
[LCD BRIGIIT]_ then press the dial
(p,_3).
4 Adj_lst the bdghthess of the LCD screen
with the SEI_PUS[[ EXEC dial_ then
press the dial,
Press MENU,
_" Tips
• F yeu mea_ _Iie IA'I) p_rml ] 80 degrees m tim lens
_ide, you ca_ d e_e the I,UD paul[ with the I,CD
_¢Ixt_n _¢ing 01It,
• _you are using the belt¢_ pack fta power s_r_e,
y_u ran _ljust th_ brightness _ selec_i_ |I,CD
B.L.] i_ _h__ g:_;[_ SE_ m_u (p, 53),
• ]%_ r_corded picture wi[I n_t be aff_t_d _ thi_
_et/ing,
• ¥ o_ can tam off _he _ ceta_rmatlon bee_
[OVF](p.59).
You can view _mages uxlng the viewfind_r
when you cI_sc the LCD panel, Use the
viewfin_r when the betwry is rtm_ng o_t, _r
when the screen _sh_rd to see.
Press OPEN and
open the LCD pane[.
8EUPUSH EXEC dial
()pen the LCD panel 90 degrees to the
eamcerder, then rotate it to the desired
position.
To adjustthebrightnessof the LCD
SCtee_
1 Press MENU,
2 Turn the SEL/PU SIt EXEC dial to select
(LCD SE [')_then press the dial
16 Getting started
Viewfinder lens adjustment [ever
Lift up the viewRnder.
Adjust the view£mder tens adjustment
lever _ntil the picture is clear.

Step 5: Settingthe
date andtime
,- Press MENLL
Scqthe date and tlme when using fh_s
eamcordar for the first time. If you do not set
(he date and t_mu_the [CLOCK SEll semen
appears e_ry time you mrn on your
eameord_r,
O Not_
• [f you&_nor use your emmc<_r_lertbr about 3
months, the built -i_Ireehargeab[e button-_t_e
b_tery _s di_¢_rged a_d the date mad5m_
s_in_ m_ b_ d_ared f_m Re memory, In that
case, ¢l_rge the re_harg_aN_ b_ton_'pe batt_
@, 8_ and _henset _he date and _im__aln.
MENU
OPEN 8EL!PLISH POWER
EXEC dial switch
Nl_nu :Ng_
/]1 Turn the SELiPUSH EXEC dial to
select [] (SETUP MENU), then press
the dial,
Turn the SEIdPUSH EXEC dial to
select ]CLOCK SE'I], then press the
dial.
'_' Turn the SEIdPUSH EXEC dialto set
[YI_'e_r), then press the dial,
:] Tarn onyour e_meurder (p, 15),
z z z z z z z z z
Press OPEN gad open the LCD panel,
Prooeed to step 6 when you set fhe clock for
the first time.
You can set _my year up to the year 2079.
;_ Set IMI (month), ID] (day), [HI (hoar)
gad IM] (minute) in the sgme way"as
was done in step 6; then press the dial.
For midnight, set it to 12:00 AM,
For mid&_y set itto 12:00 PM.

To checkthe presetdateandtime
For Him FRVI28/228/328/428:
Press DATE to display the &i_e indicator,
Press TIME m display thetime ir_di_ator.
Press DATE {or DME) and theri press TIME
(or DATE) m simultan_x)usly display Ne date
and time indicator,
To hide the date aridJot time indicator, press
DA['E an_or TfME agNn,
Step6:Insertinga
cassettetape
Yon can rise s_'tlm_d8 mm [] and H{8 HID,
Diglml8 [_ v{_ easse_s on yonr camelot.
I_r &_aiIs on these c_ssetms (s_h as write-
protectlcm), See page 82.
!_ Notes
• Do not for_e the cassette i_to [h_eompartment, Fhis
m_ ¢_ttl_ a _[l_n #_tio_t of yol_r _am¢ord_r,
• For DTRV260/265:
]_ re¢_ling _me when you _e yot_r cementer is
M1f of _e ¸indicated _ime o_ Hi8 I'li [] tap_. _ yo_
_etec__e [LP] raod_ in t/a_men_ s_, _
reeordi_g dine i_ 3/'4 ot_tItei_dicawx_time on
t_8 HID _a_.
::JJ Slide the IL_ OPEN/EJECT Iever in
the direction of the arrow and open ['he
Iid,
I,_OPENiEJECT lever Lid
18 Getting started
The cassette compa_:ment automatically
comes ollt and opens up,

Insert a cassette _fl_ its _ndow_side
facing up,
Wi_do_-_id÷
Press _g_.
[he ca_sett_corn)a_m_:ni autorrmtically
slides back in,
Step7:SeRingthe
screenlanguage
Yu_ ea_ select the ]_mgt_ge re be _sedon the
LCD screen,
MENU
OPEN SEL!PUSH POWER
EXEC dial SwitCh
:'1 Turn on your eameorder,
), Press OPEN to open the LCD panel,
z
,- Press MENU,
4 Closethe lid,
Toelect the cassette
1 Slide the IL_ OPENIEJEC'I lever ia the
direction of the arrow and open the lid,
[he cassett_ corr_pa_r_n_ a_torrmtk*ally
corf!_s o_t,
2 Take out the cassette_then press _,
[he ca_sett_corr_pa_r_n_ a_torrmtically
slides back irL
3 Cit_sethe lid,
[_1 Turn the SEUIPUSH EXEC dial to
select [] (SETUP MENU), then press
the dial,
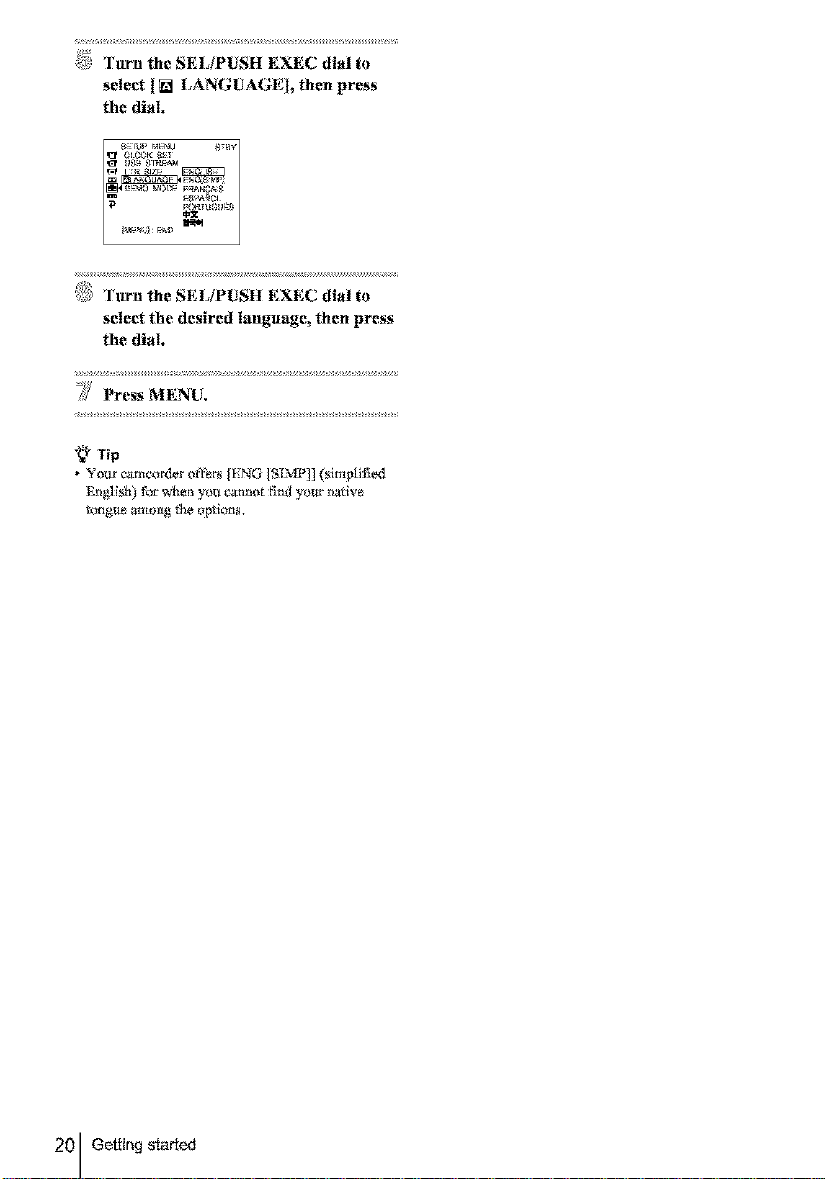
TurntheSELiPUSHEXECdial to
select {_ LANGUAGE], then press
the dial,
Turn the SELiPUSH EXEC dial to
select the desired I_nguage, then press
the dial
Y Press MENU.
• ¥ o_.tvc_mcoMer offers [I;MG [Six,CiVil(_[mplifi_
tongtm amol_g_h_options,

Recording
_, Press OPEN end open the LCD panel,
Recordingmovies
Befor_ reeor_ng, follow steps I to 7 in
"G_ng s_r_d" (p. I 1 - p. 191.
For I-Iim I'RVI 28/228/328/428:
Movies will be rec_rdcxl along with mona_al
sonnd.
For D FRV260/265:
Movies will be recited akmg with stereo
sound.
Oamera recording lamp
OPEN REC START!STOP POWER swath
O Note
• Far Him 1RVI28/228/328/428:
[_h_d_te is automatically recorded fbr Ig secoml8
_r you _t_rt recording (Atlto _te fanetlon). ]%is
ft_c_on wo_ arfly o_c_ a day. S_e p_ge 57 _r
details.
"_" Tip
• _eri_tnNng E_y Hamdy¢,_m operaIio_, even first
dine _t_ ca_trecord easily, For deLails, see page 26,
Slide the POWER s_teh until fl_e
CAMERA lamp lights up.
Your camcorder is set to the sh_dby mode.
s_itc_slidethePOWER_nil*
_ pressing the green
tc_l
_[
r r r r r r r rr r r r r r r r
[_1 Press REC START/STOP, __
Recording starts, [RE(] appears on the
[ CD ,¢rce_l arid the Camera r eeordi_lg lamp
Lights tip.
Press RE( STAR ['/S'IOP agaia to stop
recording.
To turn the power off
Slide _hePOWER switch up to CHG) OFF,
"_" Tip
• ff you do not use your eamcorder _br a Io_g time,
retr tore I_e cltss_tte _tnd_r_ it,
bu#_on.
::JJ Remove the lens cap, Pall the lens cap
string dow_ and attach it to the grip
belt,

Indicatorsdisplayedduringrecording
Fhe indicators will rmt be reco_cd or_ fhe tape,
For NIm TRVi 28/228/328/428;
For [t TRV260/265:
Data!time and _:amera settings data (p. 37) will
not be displayed during r_ordirig.
I_l la]
Ill8 format
This appears while !'ecordlng H2i8format
tapes,
'lime codN'l ape counter (hour: minute;
seeond)rl'ape photo recording
(i} Notes
• Before cha_gi_g _tIebatte_.g pack, slide the POWER
swimh up m (CHG) Ogb.
• t_ t_e default _g, if you do _ot _erate _he
_._m{;ord_r for r_tt_re tl_a.ll_bOllt 5 mhlu_ th_ p{_w_
wtll automafic_l_ mr_ offm preserve _ltery power
(IA.SHUT OFF], p. 59). To re_t re¢_ng, _lide
_e POWER swi_ {Io_ _ _[e_ CAV[ERA, and
d_en press REC STAR37StOP.
*_"Tips
• ]t_ ensure smot_[h_ansiti{m on a tape from Ne last
reeorde_ _cene m _e aext, nora _ _ll_wlng.
- I}o _ _ove _e cass_e. (t_he ptctrrrrrrrrrrrrrrrrrn_ewill 1_
recorded zo_tlttuou_ly wgho_t a ¸breakevea _he_
y_u t_rn _ p_w_r off.)
- Do _o_record pietar_ m SPmode a_d LP mode on
_e same _ape.
- Awtd stoppi_ _en ree_i_ _ movi_ in the I_P
mode.
• For [}TRV260/265:
t%_ r_zordlng time, date, and _ camera setti_g_
d_a are rezorded ax_toma_cal_ on _ lape without
l_ing disp_d o_ t_ _eree_. Y_u zmaview this
t_f_rmag_ {luri_ playbad_ by sele_ng II'*APA
CODE] {m_h_s_me_ _. 59).
Remaining battery time
The indicated time may not be correct
dapendir_g on the environment {}fuse,
W_en you opened or closed the i CD panel,
it takes about 1 mirmte to display the correct
remai*ting battery time.
Recording mode (SP or LP)
Recording stalus ([STB_J (standby) or
[RECI (recording))
Tape counter (bout: minute; second)
1'o so fhe e_tmter to 0:00:00, press
( OUNTER RESET (p. 93),
Ret_ording capacity
For NI['IRVI28/228/32g/428:
This appears _t'ter you insert a cassette and
record _br a while.
For [}TRV260/265:
This appears ag_er a while when you set the
POWER switch to CAMPNA a_*d iasert a
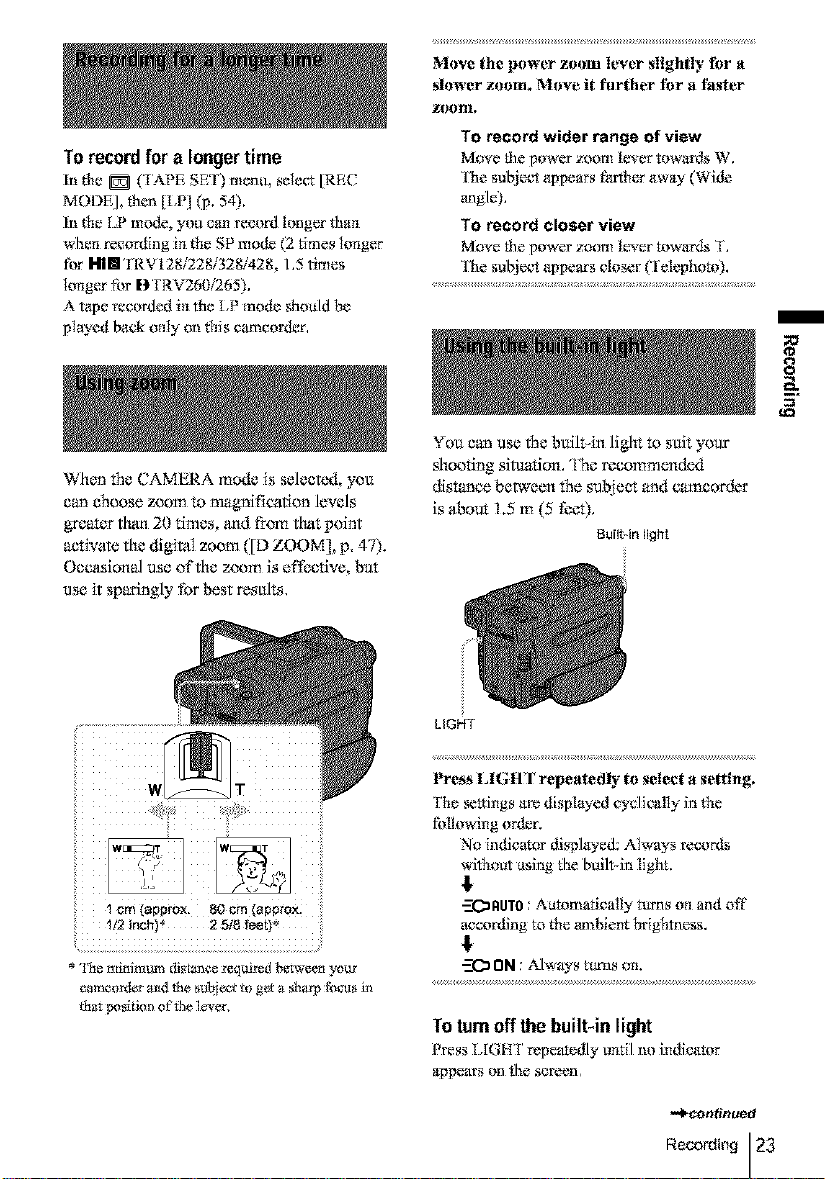
To recordfor a longer time
Inthe _ ('L&PE SE'/) menu, select [REC
MODE], then [£IP] (J_.542!.
In Ne [2 mode, you can record longer titan
when recording in Ne SP mode (2 times longer
for Nim TRV128/228/32gN28, 1.5 tN_es
longer tbr [_'rRV260/265).
A tape rt:corded in th* LP mode shollld be
played back only on fhis camcor_r,
When the CAMERA made _s salcetad, yoa
c_n choose zoom to magnification le_als
g=_aWrthan 20 times, and frc_'nthat point
acdvate tha digital zac_l ([D ZOOM], p. 47).
Occasional use oftha zoom is effeefivc_ k_lI
use _t sp_rlngly for best resale,
Move the power zoom lever slightly for a
slower zoem_ Move it further fer a f_er
zeenl,
To record wider range of view
l'he sal_i_'t appears £arther away (Wide
angle).
To record closer view
Move the power zoom lever mwa_,s T.
[he sul_iect appears closer Uelephoto).
You c_n use the built-in light to salt your
sh_fing si_fion. 'I5c meommend_l
distance between the subject and eamcor_r
isabout 1.5 m (5 feet),
Built-in light
_i: ii¸ i¸ Y i!
!_2inch)* 2 51gfeet)"
* ['he mltdmum dis[a_,_ req_md b_wee_ your
camcord_r and _he sut!j_c_ to get a sharp fbcus in
t[mr ix_sition of the ]ever,
LIGHT
Press LIGHT repeatedly to select a setting.
The settings am displayed cyclically in fhe
following order.
No indicator displayed: Always records
without asing _he bffflt-in light.
$
-._C_RUT0: Aatomatically _ns on and off
according m Ne ambignt brightness.
$
ON : Nlways turns on,
Toturnoffthe builbin light
Press t,lGtI'[ r_peatedly until im indicator
appears on [he screen,
-a_continued
Recording 23
O Notes
• Ih_ b_L_-in v_deol_ght _mlr_ wry bright ff_t,
whiCh i_pm4"e<fly_ th normal u_e. However,
_vo_d _mc_fly _immg th_ Iig_ _ _ subject'_ eyes
f_om very _[os_ m_e.
• The battery p_k dJschatge_ quickly while the b_il_-
th llght is mr_ o_.
• When yo_ de _ot u_ your e_mc_l_ _ _e bmlt-
th llgh_ o_"_n_ r_move the b_tt_2¢ pack _ avoid
mmlng _ _ bml_in llgh_ a¢_i_ntally.
• Wh_ _ick_d_ oc_'u_ w_il_ _o_ th the
-C_gUT0 mo_, press _.[G_t'[¸un_ -:]CaON
_ppe_t_.
_ROORAVL AE] orb_k light f_'_en white
_oofi_g th the --C_gUT0 mode.
• Fer [_TRV260/265:
T_ b_i_ [ig_ is t_ned eft during t_hei_temal
_imeof I_t_rvaIre_,_r_Ithg.
• When y_u _e _ _n_i_ ]e_ (_Ni_n_), l_g_
¸fromthe bui_in Ii_ is bI_k_ and may _t
illumthate the subj_ prop_rly.
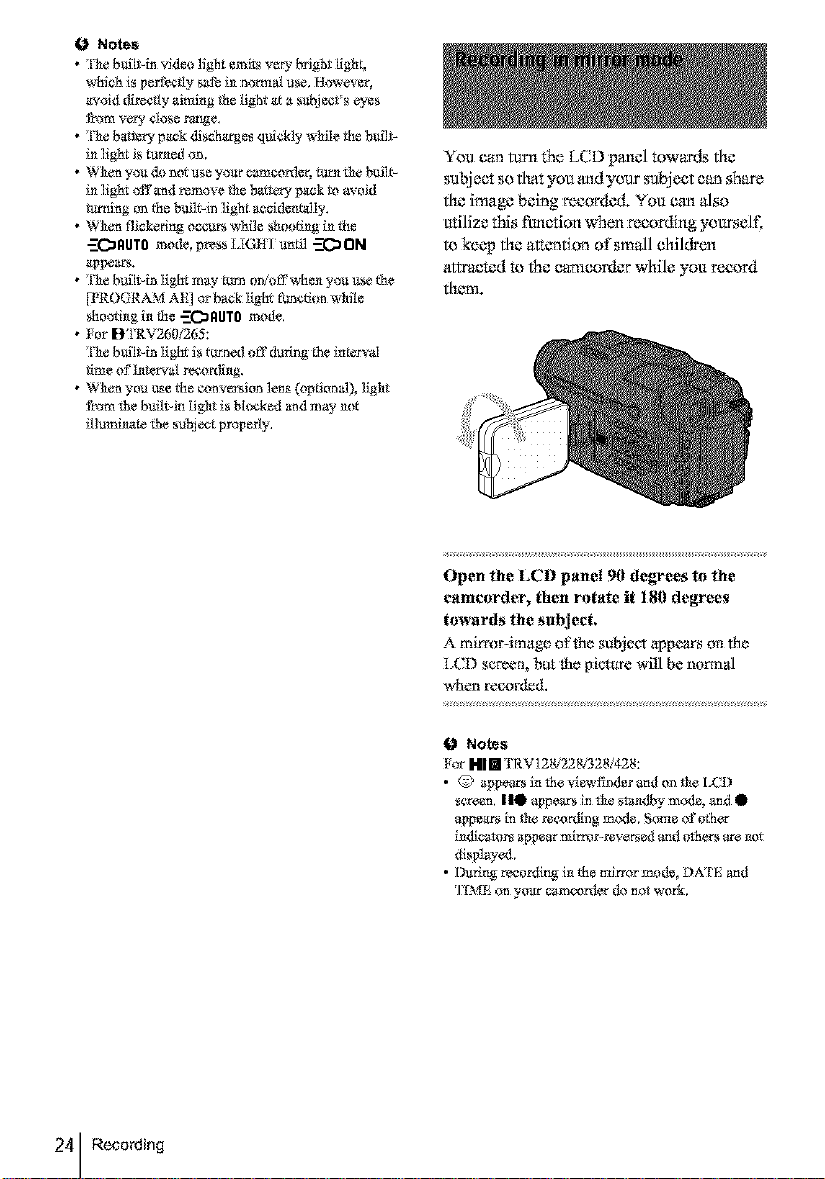
Yoo can turn the LCD pamel towards the
subject so that you andyour sobject can shm_
the image being recorded, You can also
utilize this fanedon when recording yourself,
to keep the attention of small children
atwaeted to the eamon_r while you record
thenl,
Open the LCD panel 90 degrees to the
eameorder, then rotate it 180 degree_
towards the subject.
A mirr_lr-image o_'the sul_iect appears on th_
LCI) screen but hhe picture will be normal
when recorded,
O No_s
For []1 [] rRV] 28/228_328/€28:
• @ appears th the viewfinder at_d on the IX?I)
_¢re_n. IIO appears in the _t_dby mode, an_ []
appears in the r_,_r_llng m_&. Som_ _ _£her
thdJ_t_rs _tpp_ar mlrmr_r_v_rs_d at_d _gh_rs are _t
displayed.
• Ilmi_ reee_i_ th the mirror m_de, DATE m_d
]TV[E on y_ur cameor_ler do _ot work.
You can record the da_ and/gr time
displayed on the screen superimposed on the
p_cmre,
DATE TIME
CCD-TRV428
Press DATE to record the date.
Press "lIME to record the time.
Press DATE (or TIME)., the_l press TIME
(or DATE) to record the date and time.
To 1"lidc_hedat_ aad time, g!_ss DAYE a_&'or
FIME again.
When you purchase your ca_corder, the clock
is n_t set up yet, Set the &_tea_dtime to your
loc_d time before using (p. 17),
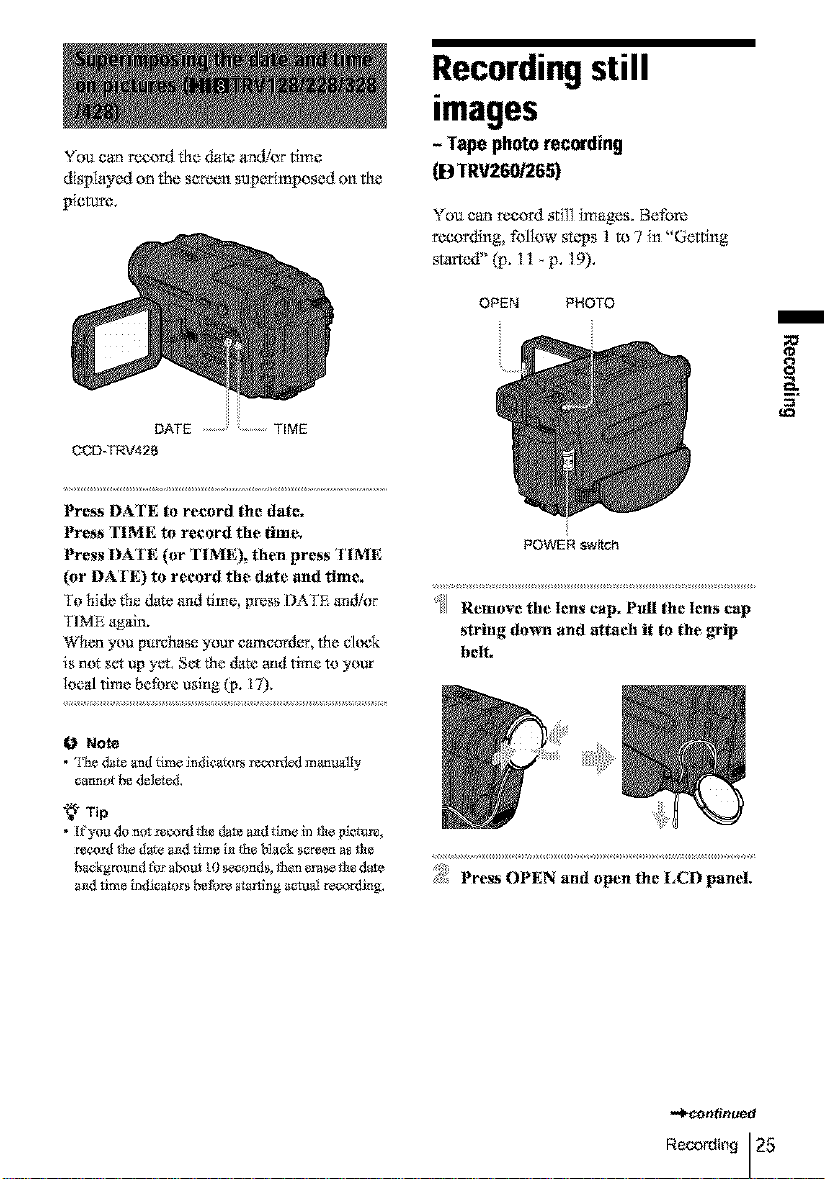
Recordingstill
images
- Tapephoto recording
(D TRV260/265)
Youcan record still images. Before
recording,follow st_,_s1 to 7 _n"Getting
sUmc,d" (p. 11 p, 19),
OPEN PHOTO
8
POWER swath
]l Remove the lens cap. pull the lens cap
string down and attach it to the grip
bell
0 Note
• _[_heda_ and time _ndicators rear,led marmally
catmot b_ del_&
"_" Tip
• If you dr) hilt r_cord the dale mad time in the pi_tlre,
recor_l the d_e mad _im_ th the Nack s_reen as the
background _ about I0 sec_mds, then _ase th_ date
mad _ime thdlc_tors b_re _ng _l reco_g.
Press ()PEN and open the I,CI) panel,

,- Slide the POWER s_tch to select the
CAMERA mode.
CHG
Recordingwith ease
- EasyHandycam
Slide ihe POWER
the green button
switch while pre88il]g
/_1 Press and hold PHOTO lightly.
You win hc,_r a smaN b_,wp so_md, and the
picture win become a stilI image.
Recording does not start at this point.
Press PHOTO fully
A shut, or sound is heard, _md the irrmge is
rtx'orded with sotmd for 7 sev'onds.
_lhe stil! irr_age is displayed on the screen
anfil rvx'ording is completed.
To turn the power off
Slidethe POWERswitch _p to (CHG) OFF.
0 Note
• I_ appears whe_ the tape photo re_'_rdi_g does
_or work_
"_" Tip
• You can record about 510 images in Ne SP mode
trod about 765 images m _e LP mode o_ a tape
which can record _r 60 mi_ute_ i_ _h__ m_,
With this Easy Handycam operation, most of
the camera settings am so*to at_tomatie
m_, only basic {hncticms become avai1_ible,
;md semen font size increases for easy
viewing. Even firsttime risers e;m enjoy easy
meordlng. Before recording, follow steps I m
7 in "Ge:t_ng s_d" _. Il _p. 19),
Came*_ recordin_ lamp EASY POWER switch
OPEN REC START/STOP
*_"Tip
• Buttons _t do not work d_r_g Easy Handy€am
opemt_onhave _dot beside Nero o_ your camc_rder.
Al_o,only men_ i_ _hatam avai]able dztrlngEasy
Hamlycam operation are di_=playedwhe_ MF_U is
presto&
::JlRemove the tens cap. Pull the lens cap
string dog_ and attach it to the grip
belt.
_- PressOPEN andepentheLCDpaneL
,- Slide the POWER switch to select the
CAMERA mode.
You can _vcord movies on!y.
, s s s s s s
/_1 Press EASY.
EASY" lights up in hlue.
EasyHandycam
operation
ON
l,_ _
Press REC START/STOP,
R_orffzrlg starts. IRE(] appears on fhe
[CD screen and the Camera recording lamp
Lights lip. Press REC START/S'IOP again
m stop re*ord.ing.
Adjustingthe
exposure
The exposure is adjusted automatically in the
de_tdt setting.
Toturnthe poweroff
Slide the POWER switch up to CttG) OFF.
Tocancel EasyHandycamoperation
Press EASY again.
0 No_
• Yo_ _'annot sw]tc_ frondto _Nsy Handy_'am
• F_r DIRV260/265:
D_ri_g Easy Ha_dy_m _vatlo_, you cmm_
co_e_ _h_ USB _*_bleto your _'atncord_
• F_r DIRV260/265:
Yo_ _'ann_ _]_e E_sy H_mdycam _km tog_er
wlt[_ _B Streaming.
• ALl _e setth_gs return _ thor deW,nits d_a_ E_y
Ha_d_am _eratit_. Pr_vlo_ly made se_s _r_
r_smred _,hen you cancel Easy Ha_dycam
op_raIio_.
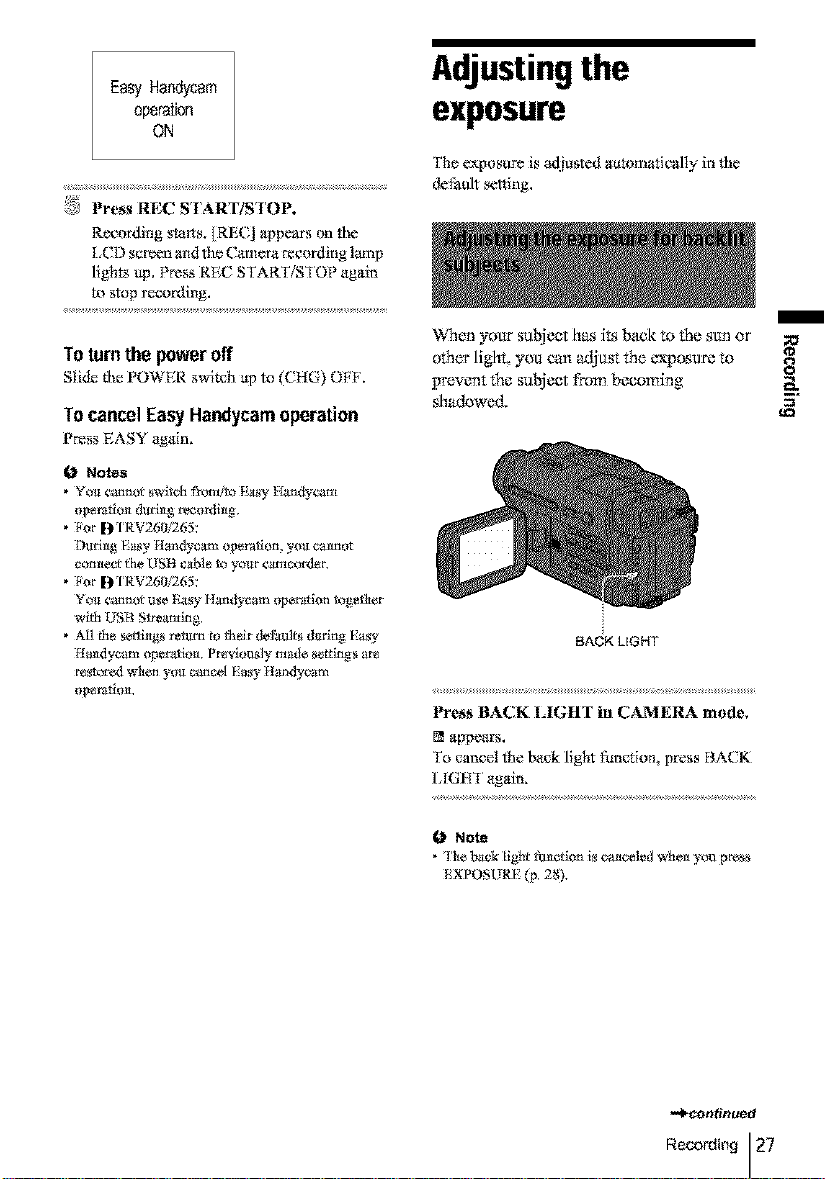
When yoar suNeet h_,s i_,sback to the sen or
o_er light, you can '_tjast the _posu_ to
prevent the suNeet from becoming __
shadowed. =
BACK LIGHT
Press BACK LIGHT in CAMERA mode,
appears.
To cancel the back light fanction, press BACK
L[GH'I again.
O Note
• ['he ha@ tight f_mct_onis cauaceledwhe_ yo_ press
¸EXPOSURE (p. 2S).
Recordingindark
places
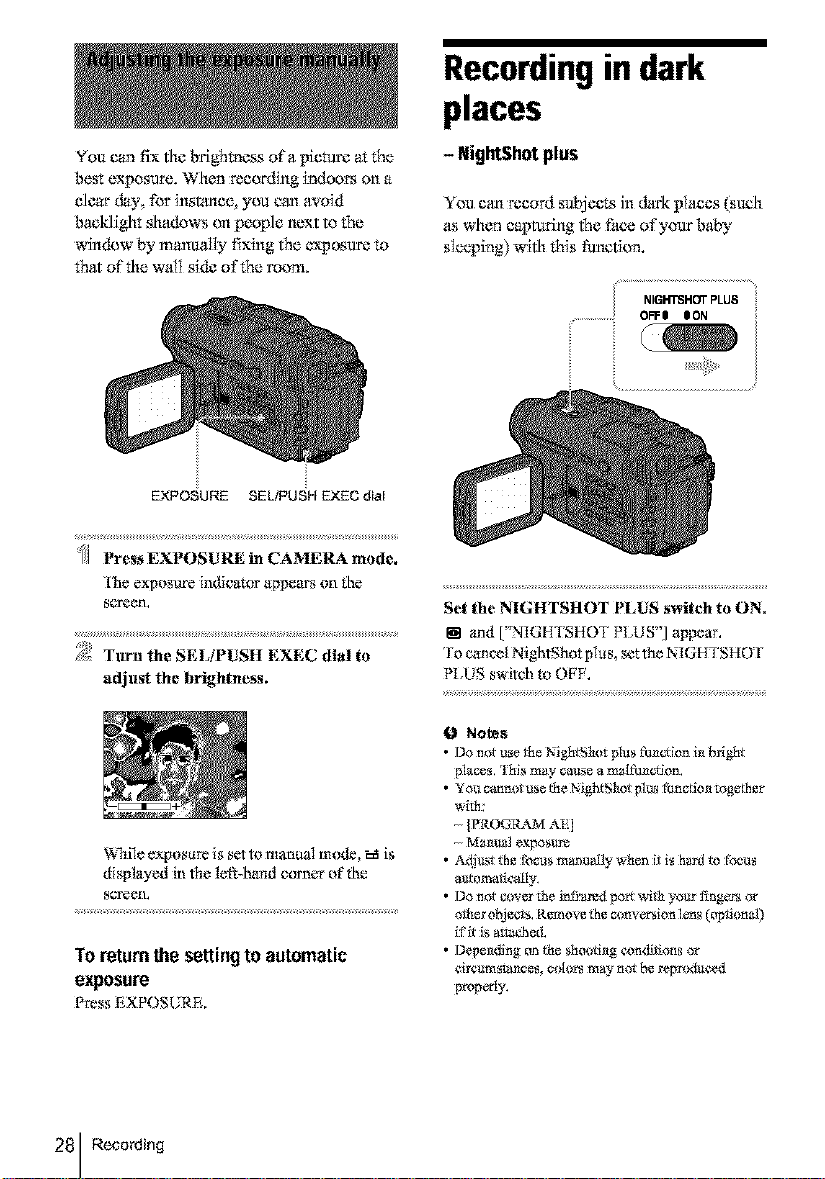
You can fix the brightness ofa picta_ at the
best exposure. When ree<_rdlnglairs on a
clear day_ for inslaaee you e_ avoid
baeklight shadows on people new to the
window by mart_Ily fixing the c_p_u_ to
that of the wall side of the roc_l.
EXPOSURE SELtPUSH EXEO dial
::Jl Press EXPOSURE in CAMERA mode,
['he exposure indicator appears on _[_e
8_£een,
Tl[rn the SELiPUSH EXEC dial to
adjllgt the brightness.
To returnthe settingtoautomatic
exposure
PressEXPOSURE.
- NightShutplus
You e_mrecord subjec_ in _rk places (saeh
as when capturing the fi_ceof your baby
sIeeping) with this th_cfi_.
i NIGHTSHOTPLU8
.................i! OFFe CON
Set the NIGHTSHOT PLUS switch to ON.
llm and [' NIGHI'SHOT PLUS"] appear.
To ¢_mcol Nig_tShot plus, set the NtGHTSHOT
NYUS switch to OFF.
(i_ Notes
• Do not u,_erite Ni_ttShor plus fc_aCLioni_ brig_tt
places, rhls may ca_e a ma[f_c_ion.
• ¥ou caun_ use the _igfitS_t pl_ _hn_t_ mg_her
wi_h:
- {PROGRAM A£]
- Ma_al expos_
• A_t _he_us m_m_ when it is h_ to _c_u_
a_omatieatly.
• Do _ cov_ _he in:_ared p_rt with yo_r fi_ger_ or
other objeots. R_;nove _hec_mversi<mlen_ (_ti_mal)
if _ is am_hed.
• Depending on _e _ooti_ ¢_ndJtlon_ or
dr¢_m_ces, e_r_ m_ not be ret_md_¢_y3
properly.

"_* Tip
_xlm_ _h_d_ _stan¢_u_i__e N_g_h_
I_ is_o_ 3 m_e_ (]0_. _you r_
suhj_c_i_d_k pl_s (suchas_i_ _z_n__r
moonlighfg_ IN,S,IJGH_7 m [OFF¸[m themenu
Adjusting the focus
manually
I%e focus _s adj _sted aammaticaIly _n the
default s_ng,
You can adjust the focus manual]y accard_ng
to the rec_rfling conditions.
Use this f_ncti<m in the following cases,
To rix,oN a _uhiect behind a window covered
with raindrops,
To record hori:t_ntal stripes.
To record a _ubiect win little c_ntrast
between the sul_j*x't arid its background.
When you want m Ncas or_ a sal_iect in the
backgrotm&
To record a stationary subject using a tripod,
8
FOCUS SELIPUSH EXEC
::Jl Press FOCUS in CAMERA mode,
V,_appears.
Turn the SEIdPUSH EXEC dial to
sharpen focus,
_ chtmges to I_ when the fbcas ctmnot be
adjusted any timber, (_g char_ges to -_
when gbe focas c_:_.nrmtbe adjusted any
closer.
dial
Tips for focusing manually
• It is easier to f(_cas or_the subject when
you _tse the z(K_m ftm¢6on. Move the
power ;'_om lever towards T (tclephoto)
to adjust the _bcas, and the_, t_wards W
bride _ngle) m *_it/st the zoom )'or
recording.
• When you wtmt to record tI close-up
irr_age of a suEt),x't, move the power _'oom
lever towards W ()vide ar*glN m thlly
magrtit}¢ the image, then a_iast the rheas.
To adjust the focus automatically
Press IrO(:l_S again.
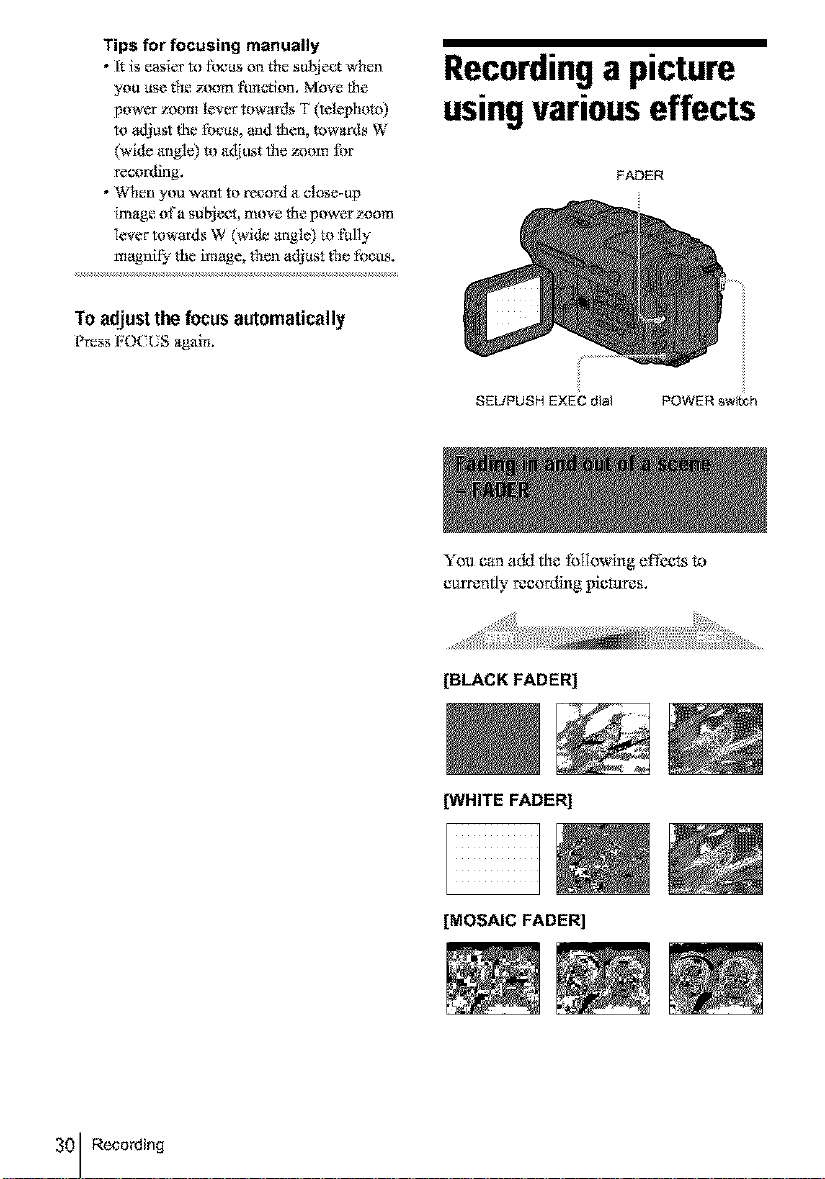
Recordinga picture
usingvariouseffects
FADER
8EUPUSH EXEC dial POWER switch
You c_n add the following effects to
c_r_mfly t_e_rd{ng pietu:res,
[BLACK FADER]
pNHITE FADER]
[MOSAIC FADER]
 Loading...