

Sony DCR-IP7E, PC120E User Manual

3-071-132-12 (1)
DCR-IP7BT/IP7E/
PC120BT/PC120E
Network Function Operating Instructions
Mode d’emploi de la fonction réseau
© 2001 Sony Corporation

On trademarks
•“Memory Stick” and are registered trademarks of Sony Corporation.
•The BLUETOOTH trademarks are owned by their proprietor and used by Sony
Corporation under license.
•NetFront by Access Co., Ltd. is adopted for the Internet function of this product.
NetFront is a registered trademark of Access Co., Ltd in Japan.
Copyright © 1996 – 2001 ACCESS CO., LTD.
•Portions of the supplied software are based in part on the work of the Independent
JPEG Group.
All other product names mentioned herein may be the trademarks or registered
trademarks of their respective companies. Furthermore, “™” and “®” are not
mentioned in each case in this manual.
No compensation for your recordings
Contents of the recording cannot be compensated for if recording or playback of
attached or downloaded files is not made due to a malfunction, problems with storage
media, etc.
Precautions
•Before using the network function, be sure to set up the clock of the camcorder. For
details, refer to the operating instructions of the camcorder. If you use the network
function without setting the clock, you may not be able to send or receive e-mail, or
view a Web page.
•Do not remove the battery pack or disconnect the AC power adaptor while in
NETWORK mode. The setup for the NETWORK mode may be lost. Also, exit the
NETWORK mode when setting the POWER switch to OFF (CHG) or switching the
mode.
•We recommend that you make backup copies of your e-mail messages and your
network preferences. These may be lost from time to time due to memory corruption.
To save the network preferences, write them down on paper, or use “Setup memo”,
described on page 77. Also, this data may be lost when the camcorder is repaired by
repair services.
•The reset button cannot reset the network preferences.
Note on network operation when using the battery pack
When the remaining battery time is insufficient in NETWORK mode, use the AC power
adaptor or replace the battery pack with a fully charged battery pack. Before connecting
the AC power adaptor or replacing the battery pack, be sure to exit the NETWORK
mode.
Note on the network function
The network function is only available in the following countries or areas:
Austria, Belgium, Denmark, Finland, France, Germany, Greece, Ireland, Luxembourg,
Netherlands, Norway, Portugal, Sweden, Switzerland, United Kingdom, and Spain. (As
investigated by Sony Corporation on 1. 8. 2001)
When using the camcorder in a country or area not described above, the network
function is available only in the country or area where you purchased the camcorder.
For customers in CANADA
Operation is subject to the following two conditions: (1) this device may not cause
interference, and (2) this device must accept any interference, including interference
that may cause undesired operation of the device.
To prevent radio interference to the licensed service, this device is intended to be
operated indoors and away from windows to provide maximum shielding. Equipment
that is installed outdoors is subject to licensing.
2-GB

Table of contents
Introduction
The network function on the camcorder ... 4
Overview of the Bluetooth wireless
technology .............................................. 5
Basic operations in the NETWORK
mode ........................................................6
How to use the Network Menu .......... 6
How to use the control button ............ 7
How to input characters ...................... 8
How to use the menu bar on the
browser ......................................... 13
Preparation
Registering a Bluetooth device .................15
When using the Modem Adaptor
with Bluetooth Function ............. 15
When the registration has failed ...... 19
Displaying information on your
camcorder ..................................... 19
Radio wave indication ....................... 20
Selecting other Bluetooth devices
from the list .................................. 20
Deleting a registered Bluetooth
device from the list ...................... 20
Setting network preferences ..................... 22
Setting your provider preferences ... 22
Setting network options preferences
........................................................ 26
Network Operation
Using e-mail ................................................ 29
Sending e-mail .................................... 29
Using the address book ..................... 40
Receiving e-mail ................................. 46
Deleting unnecessary e-mail ............. 52
Viewing Web pages.................................... 54
Viewing Web pages ........................... 54
Storing the Web page into a “Memory
Stick” – Page Memo .................... 61
Shutting down the browser .............. 66
Additional Information
File storage destinations and file
names .................................................... 67
Troubleshooting.......................................... 68
Trouble accessing the Internet .......... 68
Trouble with e-mail ............................ 68
Trouble viewing a Web page ............ 69
Specifications............................................... 71
Messages ......................................................72
General ................................................. 72
E-mail ................................................... 73
Browser ................................................ 73
Glossary ....................................................... 75
Setup memo................................................. 77
Introduction
3-GB
– Introduction –
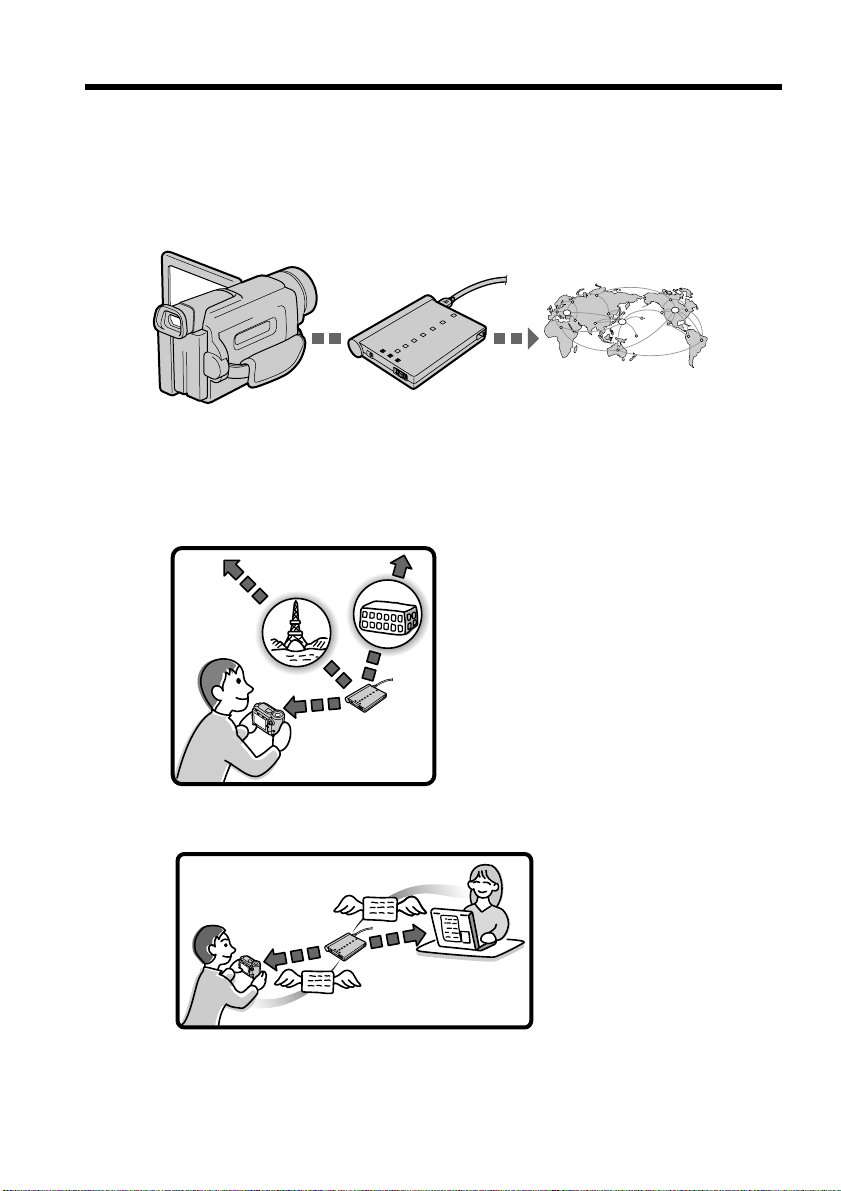
The network function on the camcorder
The camcorder can access the Internet through your provider using a dial-up
networking connection with a Bluetooth device. You can view a Web page, and send
and receive e-mail with the images recorded with your camcorder attached. Bluetooth
specification ver. 1.1 has been adopted for the communication system of the camcorder,
and compatible Bluetooth profiles are the “Generic Access Profile” and the “Dial-up
Networking Profiles”.
Your camcorder
as the Modem Adaptor
with Bluetooth function
• Access the Internet easily
• Send/receive your e-mail
To the InternetA Bluetooth device, such
You can view a Web page via the Internet.
You can send or receive e-mail
anytime, and attach images to email messages.
4-GB
Before using the network function, be sure to set up the clock of the camcorder. The
clock is not set up at the default setting.
You also have to set up the camcorder and the peripheral device, and make the required
registrations (Internet service provider sign-up, etc.)

Overview of the Bluetooth wireless
technology
What is the Bluetooth wireless technology?
The Bluetooth wireless technology allows communication between various Bluetooth
devices without using cables. Devices which can use this technology include PCs,
computer peripheral devices, PDAs, and mobile phones. This omnidirectional
communication system enables communication even if the Bluetooth device is in a bag
or there are obstacles between the devices.
Also, the Bluetooth wireless technology has advanced security functions, such as
scrambled frequencies and data encryption.
Authentication
The authentication routine can block unspecified users’ access to this network. When
attempting communication with an unregistered Bluetooth device, the devices must
first be registered with each other by entering a common passkey to each device. When
connecting with a previously registered Bluetooth device, communication starts
without entering the passkey.
Introduction
5-GB
Basic operations in the NETWORK mode
This section describes basic control ways to operate the camcorder, those which are
used for network operations.
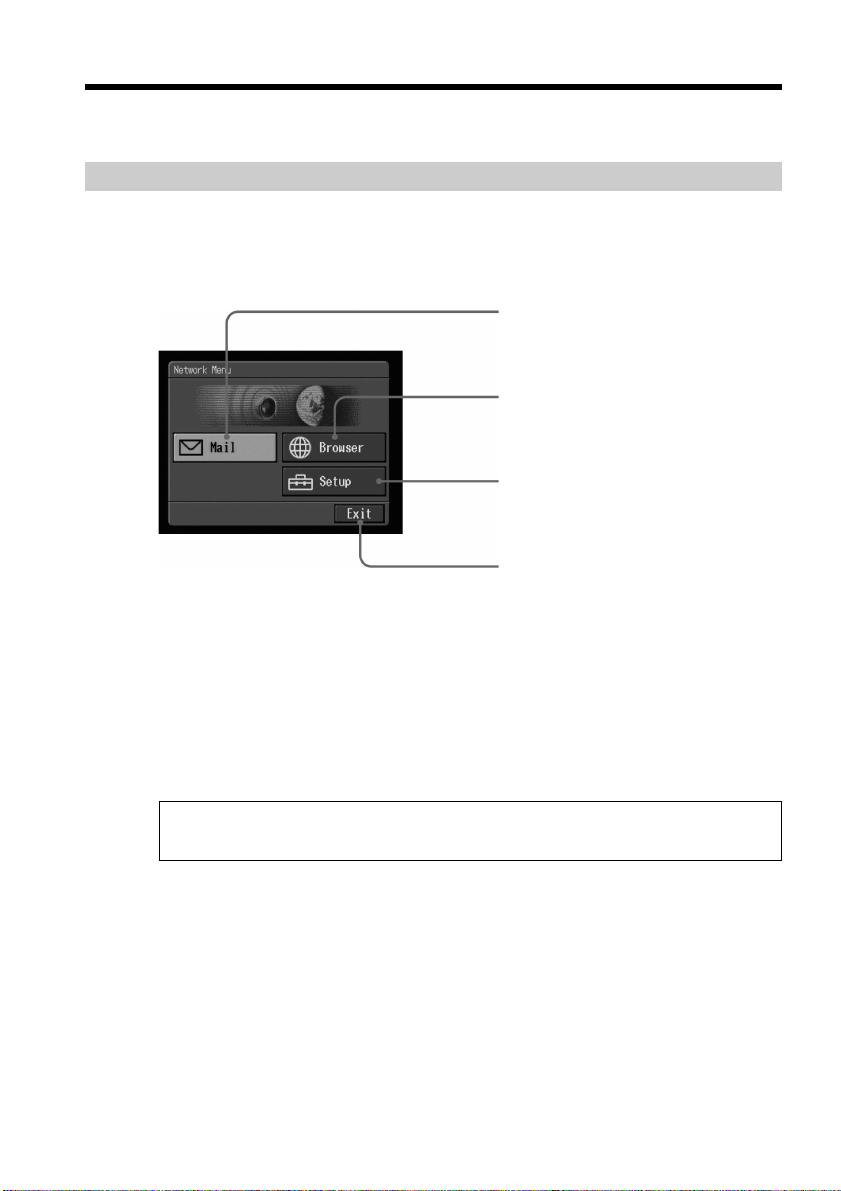
How to use the Network Menu
To access the Network Menu, refer to “Accessing the network” in the operating
instructions supplied with your camcorder.
[a]
[b]
[c]
[d]
6-GB
[a]: Send and receive e-mail. For details, see “Using e-mail” on page 29.
[b]: View a Web page through the Internet. For details, see “Viewing Web pages” on
page 54.
[c]: You have to make various settings using this menu before using the network
function. For details, see “Setting network preferences” on page 22.
[d]: Exit the NETWORK mode.
The actual screens may differ slightly from the illustrations in this network
function operating instructions.

Basic operations in the NETWORK mode
How to use the control button
Most of the network operations are carried out by the control button. Select a button on
the screen using the control button, then enter it by pressing the control button.
Note
The shape of the control button differs depending on your camcorder model.
(1) Press v/V/b/B on the control button repeatedly to select the desired button
displayed on the screen.
The selected button turns orange.
,
(2) Press the centre z on the control button to enter the setting.
,
Introduction
Repeat steps 1 and 2 to execute the function.
The procedure above is described as “Select [XXXX], then press the centre z on the
control button” in this network function operating instructions.
7-GB
Basic operations in the NETWORK mode
How to input characters
You have to frequently enter characters, such as e-mail addresses, or Web page
addresses (URL), to use the network function. This section describes how to input
characters.
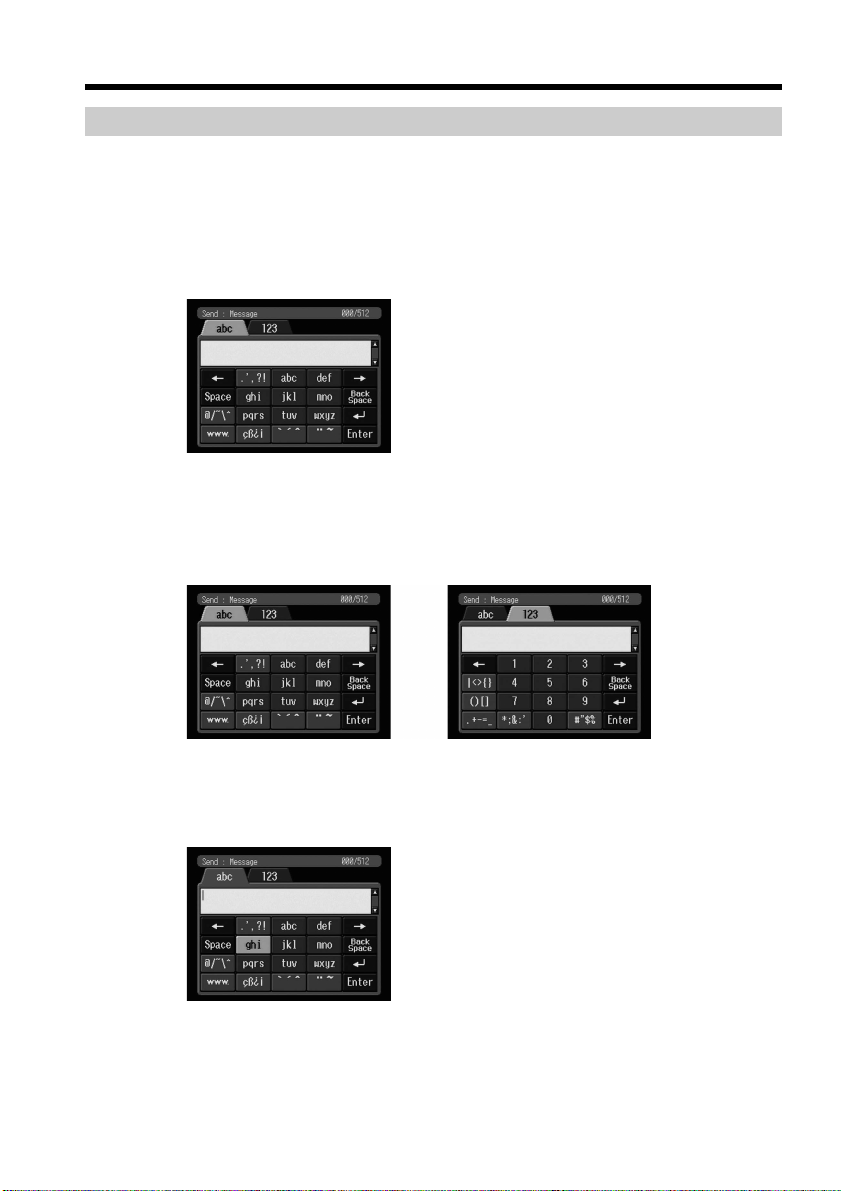
1 Selecting the character type
(1) Display the character input screen.
(2) Select either of the character type tabs.
abc: When inputting alphabetical characters.
123: When inputting numerical characters.
When you have selected abc When you have selected 123
2 Inputting characters
(1) Select the key which has the character you want to input.
8-GB

Basic operations in the NETWORK mode
(2) Press the centre z on the control button to enter the character.
Pressing it repeatedly selects the other characters on the key. When inputting
the same character or the other characters on the same key, select another key
using v/V/b/B on the control button, then select the previous key again. For
details on available characters, see the “The available characters list” on page
12.
(3) Repeat steps 1 and 2 to input characters.
(4) After you input the characters, select [Enter], then press the centre z on the
control button.
The screen which is displayed before you display the character input screen
appears.
Note
Even if you cancel the character input operation, select [Enter], then press the centre z
on the control button to exit the character input screen.
Introduction
To delete a character
Select [<] or [,]. Each time you press the centre z on the control button, the cursor is
moved to the left or right. Move the cursor to the right of the character at which you
want to delete, select [Back Space], then press the centre z on the control button. The
character at the left of the cursor is deleted.
To add a character
Select [<] or [,]. Each time you press the centre z on the control button, the cursor is
moved to the left or right. Move the cursor to the position at which you want to add a
character, then input characters.
To start a new line
Select [ ], then press the centre z on the control button.
9-GB
Basic operations in the NETWORK mode
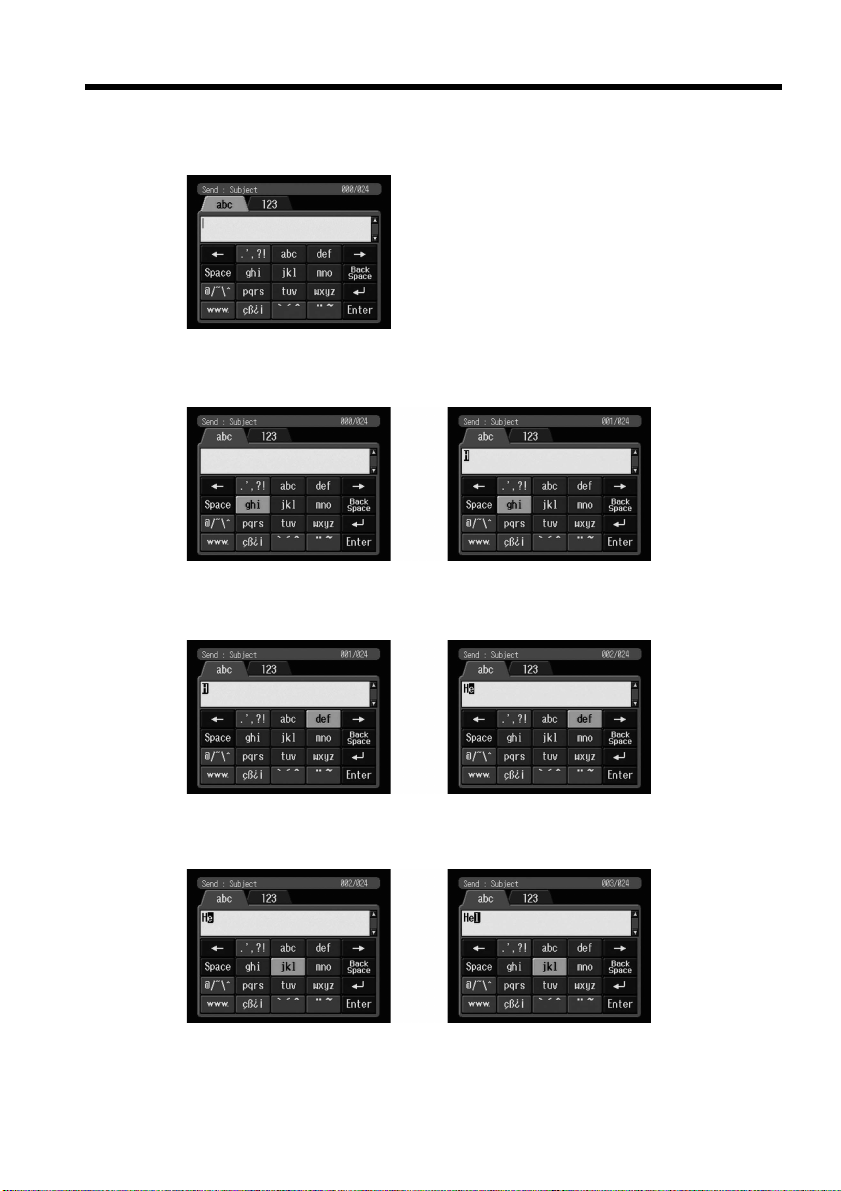
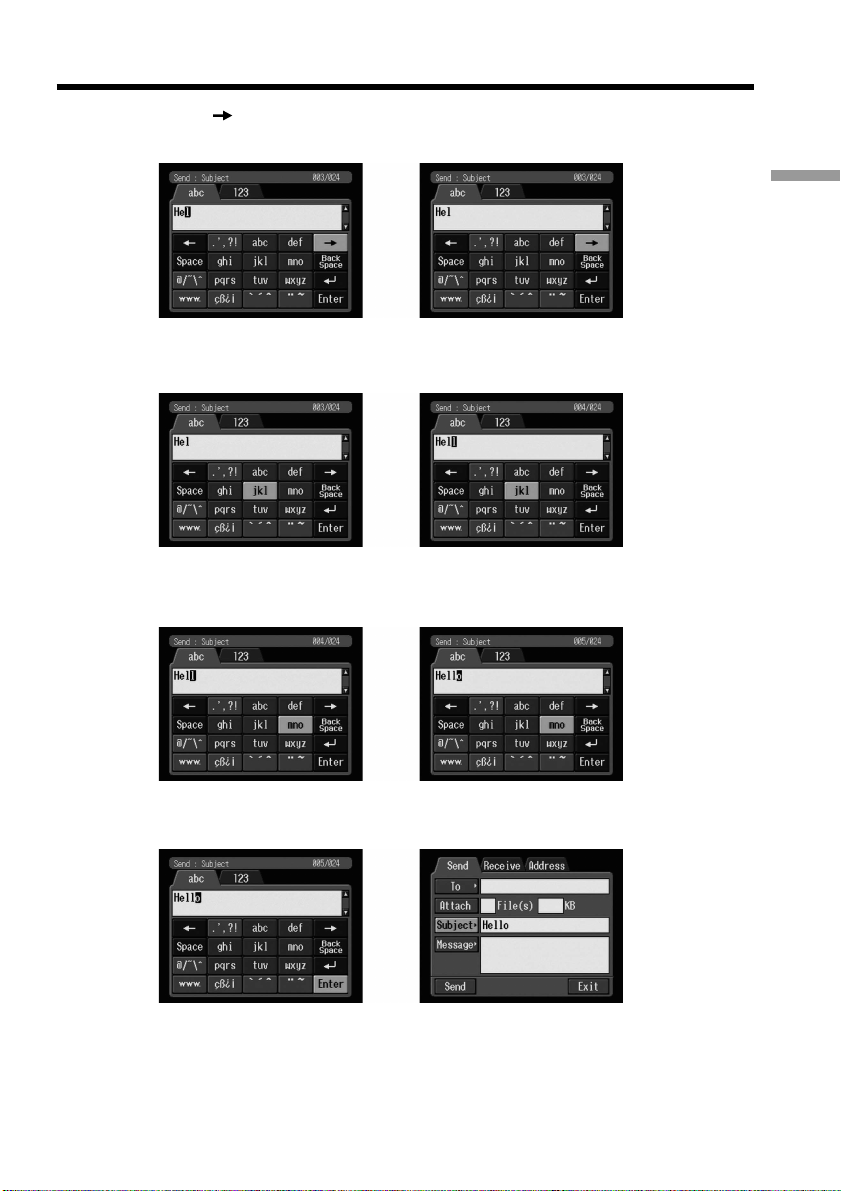
E.g., Enter “Hello” into the Subject item on the Send screen
(1) Select the abc tab.
(2) Select [ghi], then press the centre z on the control button five times.
“H” is entered.
,
(3) Select [def], then press the centre z on the control button twice.
“e” is entered.
10-GB
,
(4) Select [jkl], then press the centre z on the control button three times.
“l” is entered.
,
Basic operations in the NETWORK mode
(5) Select [ ], then press the centre z on the control button.
The cursor moves to the next position.
,
(6) Select [jkl], then press the centre z on the control button three times.
“l” is entered.
,
(7) Select [mno], then press the centre z on the control button three times.
“o” is entered.
Introduction
,
(8) Select [Enter], then press the centre z on the control button.
“Hello” is entered and the Send screen appears again.
,
11-GB
Basic operations in the NETWORK mode
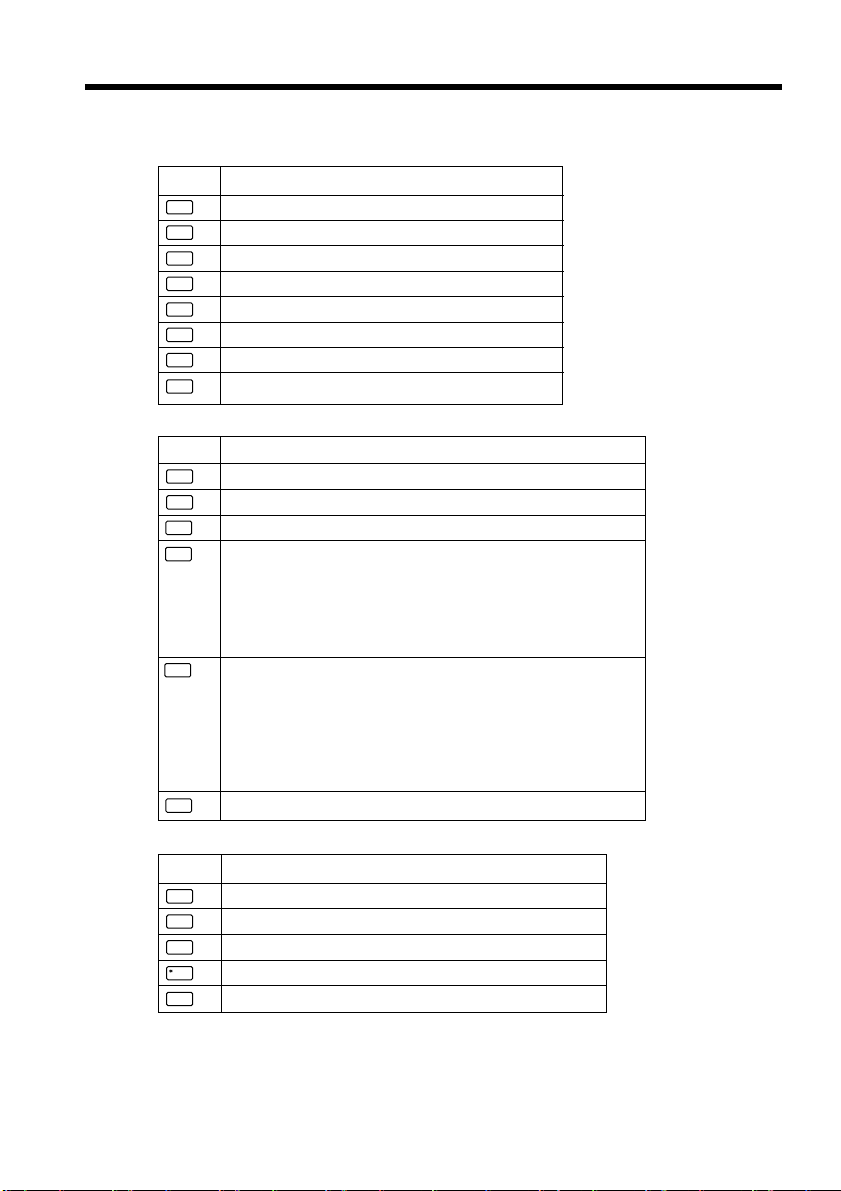
The available characters list
Alphabetical characters
Key Character
abc
a t b t c t A t B t C t a t...
def
d t e t f t D t E t F t d t...
ghi
g t h t i t G t H t I t g t...
jkl
j t k t l t J t K t L t j t...
mno
m t n t o t M t N t O t m t...
pqrs
p t q t r t s t P t Q t R t S t p t...
tuv
t t u t v t T t U t V t t t...
wxyz
w t x t y t z t W t X t Y t Z t w t...
Symbol characters (when selecting the abc tab)
Key Character
.’,?!
. t ' t , t ? t ! t . t...
@
/˜\^
@ t / t ~ t \ t ^ t @ t...
www.
www. t .com t .net t .html t www. t...
` ´ ˆ
a: à t á t â t a t à t... A: À t Á t  t A t À t...
e: è t é t ê t e t è t... E: È t É t Ê t E t È t...
i: ì t í t î t i t ì t... I: Ì t Í t Î t I t Ì t...
o: ò t ó t ô t o t ò t... O: Ò t Ó t Ô t O t Ò t...
u: ù t ú t û t u t ù t...U: Ù t Ú t Û t U t Ù t...
´y
y:
¨ ˜
a: ä t ã t a t ä t... A: Ä t à t A t Ä t...
e: ë t e t ë t... E: Ë t E t Ë t...
i: ï t i t ï t... I: Ï t I t Ï t...
o: ö t õ t o t ö t... O: Ö t Õ t O t Ö t...
u: ü t u t ü t... U: Ü t U t Ü t...
y: ÿ t y t ÿ t... n: ñ t n t ñ t...
N: Ñ t N t Ñ t...
¿¡
çß
ç t ß t ¿ t ¡ t Ç t ç t...
Y:
´
Y
12-GB
Symbol characters (when selecting the 123 tab)
Key Character
|<>{}
| t < t > t { t } t | t...
()[]
( t ) t [ t ] t ( t...
.+–=_
. t + t - t = t _ t . t...
∗
;&:’
#”$%
t ; t & t : t ' t ∗ t...
# t " t $ t % t # t...
Basic operations in the NETWORK mode
Numerical characters
Key Character
/
0
0
1
1
2
2
3
3
4
4
5
5
6
6
7
7
8
8
9
9
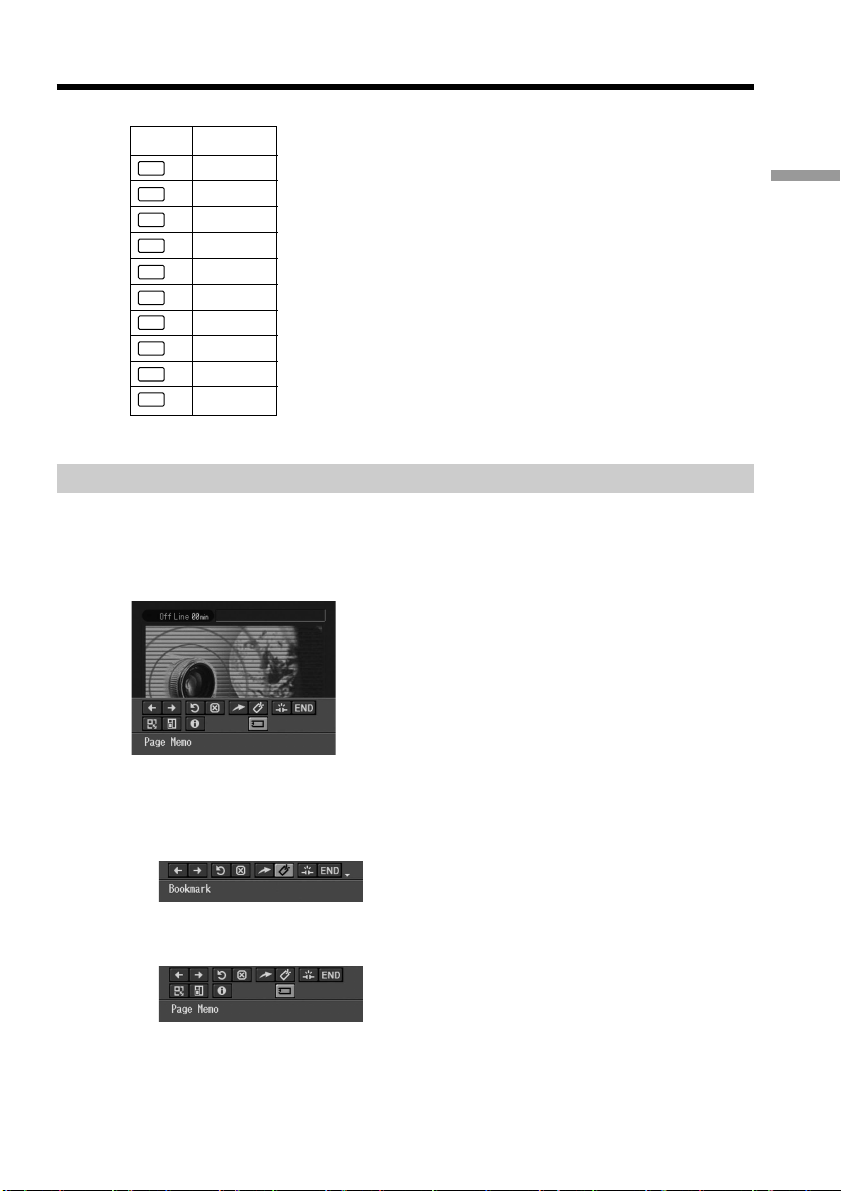
How to use the menu bar on the browser
When you access the Internet and view a Web page, you can carry out various
operations using the menu bar. While the browser screen is displayed, press BROWSER
MENU on the camcorder to display the menu bar. For details on how to use BROWSER
MENU, refer to the operating instructions of the camcorder.
Introduction
To show the menu bar
(1) Press BROWSER MENU on the camcorder.
The following menu bar appears.
(2) Press V on the control button.
The rest of the menu bar buttons appear.
To hide the menu bar
Press BROWSER MENU on the camcorder again. The menu bar disappears.
13-GB
Basic operations in the NETWORK mode
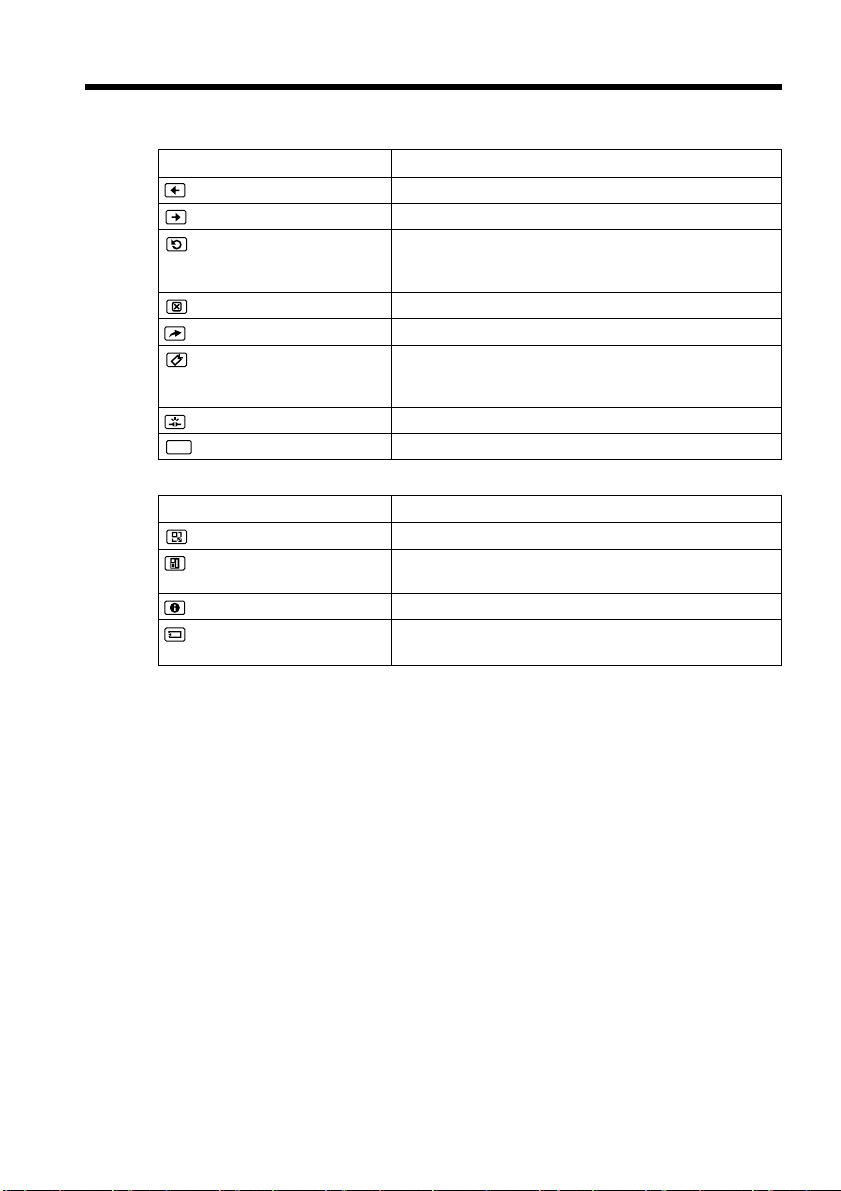
The buttons on the menu bar
The buttons on the upper level
Button Function
(Previous Page) Go to the previous page in your step.
(Next Page) Go to the next page in your step.
(Refresh) Refresh the current page.
(Stop) Stop loading the current page.
(New URL) Enter the URL of a Web page.
(Bookmark) Bookmark the current page. (Bookmarks are stored in the
(Line Close) Disconnect the phone line.
END
(END) Exit the browser.
The buttons on the lower level
Button Function
(Zoom) Change the page size.
(Frame Select) Change the frame on the page currently being viewed.
(Page Information) Show the title and URL of the current page.
(Page Memo) Store the current page in the “Memory Stick”. You can
Use this button when images or characters on the Web
page are not displayed properly.
camcorder.) Bookmarking is convenient to access
frequently-visited pages.
Use this button when the page has separate frames.
then view the page without accessing the Internet.
14-GB
Note
The buttons may not function, depending on the Web page being accessed.

– Preparation –
Registering a Bluetooth device
This section describes making a registration of a Bluetooth device. Here we describe the
procedure for registering the Sony Modem Adaptor with Bluetooth Function. Once the
registration is completed, the camcorder can connect to the Bluetooth device without
reregistering the device. Up to three Bluetooth devices can be registered. Also, refer to
the operating instructions supplied with the Bluetooth device.
For more information about Bluetooth devices compatible with the camcorder, access
the following URL:
•http://www.sony.ca/service
•http://www.sony-europe.com/imaging, then click “support”
•http://www.sony-asia.com.sg/helpdesk
Only for the DCR-IP7BT/PC120BT
The Sony BTA-NW1 Modem Adaptor with Bluetooth Function is supplied with the
DCR-IP7BT/PC120BT. This unit has already been registered to your DCR-IP7BT/
PC120BT.
Notes
•When using the Sony BTA-NW1 Modem Adaptor with Bluetooth Function, install it
in a location that has no obstacles between the camcorder and the device. The distance
between the devices must be within 10 m (33 feet).
•The connection may be interrupted depending on the conditions in which the
communication is taking place.
When using the Modem Adaptor with Bluetooth Function
Preparation
1 Preparing the Modem Adaptor with Bluetooth Function
Set the Modem Adaptor with Bluetooth Function to connection standby (BONDING).
For details, refer to the operating instructions supplied with the Modem Adaptor with
Bluetooth Function.
15-GB

Registering a Bluetooth device
2 Specifying the Modem Adaptor with Bluetooth Function as the
connection device
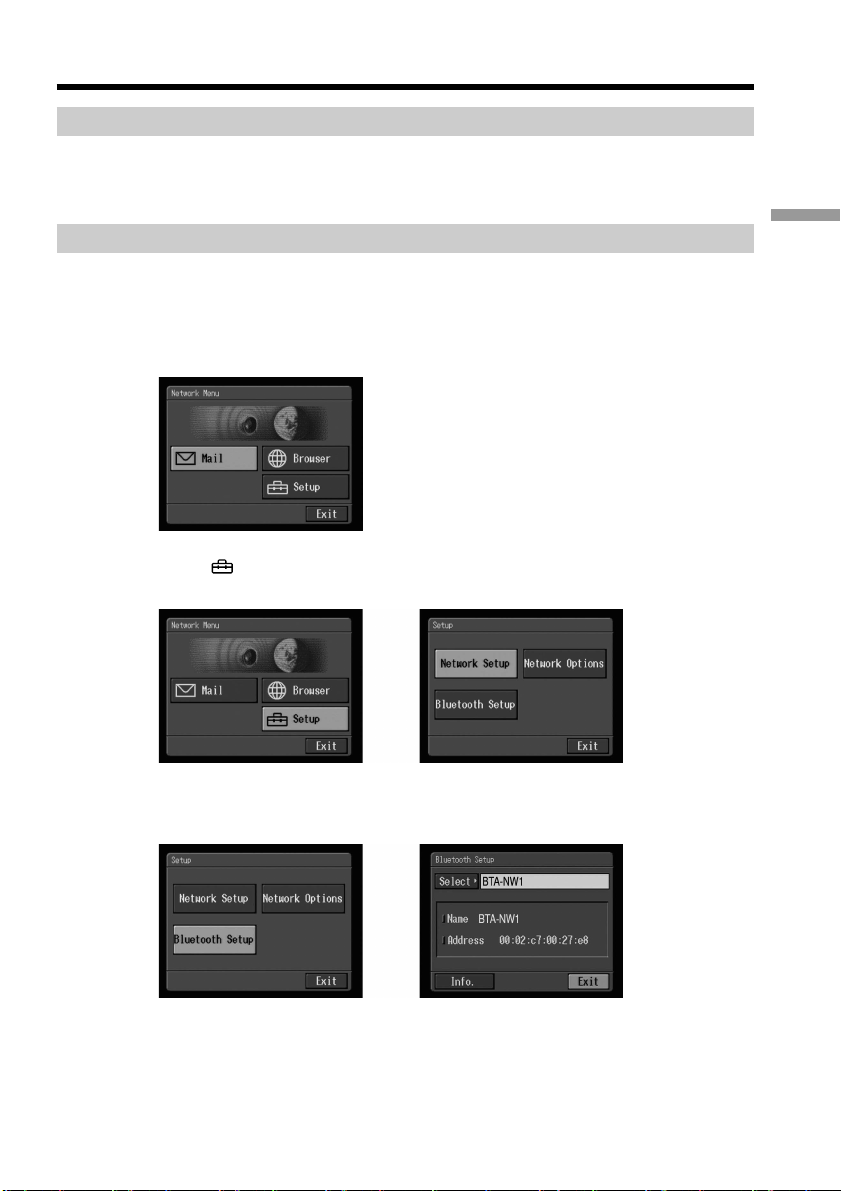
(1) Open the Network Menu.
For details on how to open the Network Menu, refer to “Accessing the
network” in the operating instructions supplied with your camcorder.
(2) Select [
The Setup screen appears.
Setup], then press the centre z on the control button.
,
(3) Select [Bluetooth Setup], then press the centre z on the control button.
The Bluetooth Setup screen appears.
,
16-GB
Registering a Bluetooth device
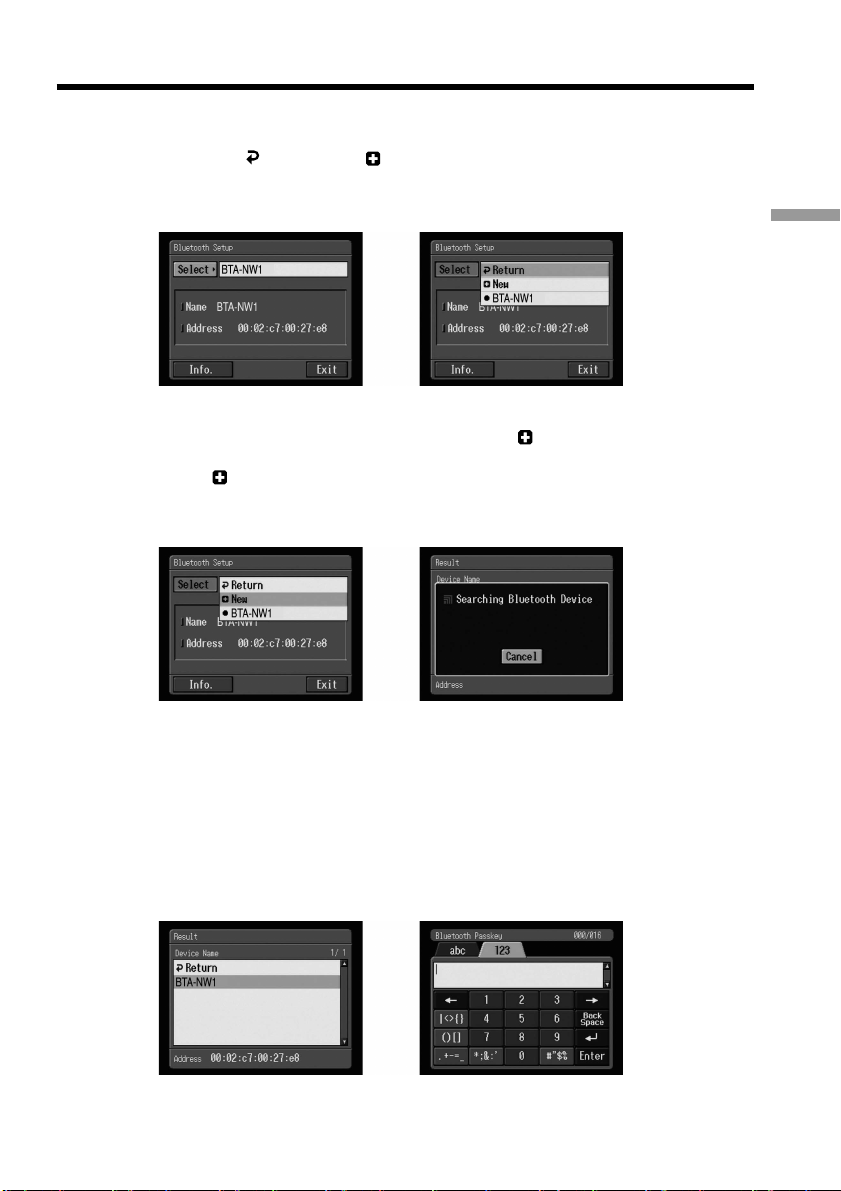
(4) Select [Select], then press the centre z on the control button.
The Bluetooth devices list appears. When making a registration for the first
time, only [
Bluetooth devices. When selecting a Bluetooth device on the list, see “Selecting
other Bluetooth devices from the list” on page 20.
Tip
The last-used Bluetooth device is listed next to [
Return] and [ New] are indicated. The list shows up to three
Preparation
,
New].
(5) Select [
The camcorder starts searching for the Bluetooth devices. When the searching
is completed, the available Bluetooth devices list appears.
New], then press the centre z on the control button.
,
Notes
•The search takes from about 10 to 60 seconds. The time depends on the number of
Bluetooth devices around the camcorder.
•If the Bluetooth device you want to register is not found, carry out the procedure
again from step 4.
(6) Select the desired Bluetooth device, then press the centre z on the control
button.
The character input screen appears.
,
17-GB

Registering a Bluetooth device
(7) Enter the passkey.
For details on how to input characters, see “How to input characters” on page
8.
For example, when using the BTA-NW1 Modem Adaptor with Bluetooth
Function, the passkey is its serial number which is indicated on the label on the
rear panel.
MODEL NO.
MODEM ADAPTOR WITH BLUETOOTHTM FUNCTION
®
Tip on “Passkey”
The passkey is an identification number needed to allow two Bluetooth devices
to communicate with each other. The connection will be permitted after
entering the passkey. This “Passkey” is also referred to as a “Bluetooth
passkey”, “PIN”, “Bluetooth PIN”, etc. For details, refer to the operating
instructions supplied with the Bluetooth adaptor.
(8) Select [Enter], then press the centre z on the control button.
After the registration is completed, the Bluetooth Setup screen appears again.
The selected Bluetooth device is specified.
BTA-NW1
Passkey
The number used when registering a
Bluetooth device
18-GB
,,
Note
When the message “Bluetooth Registration Error Check the Passkey” is
indicated, select [OK], then press the centre z on the control button. Carry out
the procedure again from step 4.
(9) Select [Exit], then press the centre z on the control button.
The Setup screen appears again. For details on how to turn off the Modem
Adaptor with Bluetooth Function, refer to the operating instructions supplied
with the Modem Adaptor with Bluetooth Function.
(10)Select [Exit], then press the centre z on the control button.
The Network Menu appears again.
Registering a Bluetooth device
When the registration has failed
Carry out the procedure described in “When using the Modem Adaptor with Bluetooth
Function ” on page 15 again from step 4.
Displaying information on your camcorder
You can display your camcorder information.
(1) Open the Network Menu.
For details on how to open the Network Menu, refer to “Accessing the
network” in the operating instructions supplied with your camcorder.
(2) Select [
The Setup screen appears.
Setup], then press the centre z on the control button.
,
(3) Select [Bluetooth Setup], then press the centre z on the control button.
The Bluetooth Setup screen appears.
Preparation
,
19-GB

Registering a Bluetooth device
(4) Select [Info.], then press the centre z on the control button.
The Bluetooth Setup: Self information screen appears.
The model name
This is the unique address assigned to each
camcorder at the factory. This address is used
when exchanging information between
devices. This address cannot be modified.
(The number indicated on the illustration is
an example number.)
To clear the Self Information screen
Select [Return], then press the centre z on the control button.
Radio wave indication
indicates the radio wave status of the connected Bluetooth device. (Use this
indication as a guide.)
Selecting other Bluetooth devices from the list
Select the Bluetooth device you want to specify, then press the centre z on the control
button in step 4 in “When using the Modem Adaptor with Bluetooth Function” on page
15. The device information is indicated. Select [Exit], then press the centre z on the
control button.
20-GB
Deleting a registered Bluetooth device from the list
Up to three Bluetooth devices can be registered on the camcorder. When deleting a
Bluetooth device from the list, follow the procedure below.
(1) Open the Network Menu.
For details on how to open the Network Menu, refer to “Accessing the
network” in the operating instructions supplied with your camcorder.

Registering a Bluetooth device
(2) Select [ Setup], then press the centre z on the control button.
The Setup screen appears.
,
(3) Select [Bluetooth Setup], then press the centre z on the control button.
The Bluetooth Setup screen appears.
,
(4) Select [Select], then press the centre z on the control button.
The Bluetooth devices list appears.
,
Preparation
(5) Select the device you want to delete, then press the centre z on the control
button.
The device name and address of the selected device are indicated.
,
(6) Select [Delete], then press the centre z on the control button.
The selected device is deleted from the list.
21-GB

Setting network preferences
You have to access the Internet to view a Web page, or send or receive your e-mail. This
section describes how to set network preferences to access the Internet.
Setting your provider preferences
Set your provider preferences according to the requirements of your provider. When
you do not understand the setup items, consult your provider.
(1) Open the Network Menu.
For details on how to open the Network Menu, refer to “Accessing the
network” in the operating instructions supplied with your camcorder.
(2) Select [
The Setup screen appears.
Setup], then press the centre z on the control button.
,
(3) Select [Network Setup], then press the centre z on the control button.
The Provider Setup: Custom screen appears.
If the PPP screen is not displayed, select the PPP tab.
,
22-GB

Setting network preferences
(4) Set up the following items:
ID: Enter the login name you use for accessing your provider using a dial-up
connection.
Tip on “ID”
This “ID” is also referred to as a “user ID”, “login name”, “PPP login name”,
“network ID”, “account name”, “logon name”, “user name”, etc.
Password: Enter the password you use for accessing your provider using a
dial-up connection.
Tip on “Password”
This “Password” is also referred to as a “PPP password”, “network
password”, “connection password”, etc.
Tip on dial-up connection
The dial-up connection is used to access the Internet using a phone line.
DNS1: Enter the DNS (Domain Name System) server address of your provider.
Tips on “DNS1”
•This “DNS1” is also referred to as a “name server”, “primary DNS server”,
“primary name server”, etc.
•This entry may be unnecessary, depending on the provider. For details, consult
your provider.
DNS2: Enter the secondary DNS server address of your provider, if necessary.
Tips on “DNS2”
•This “DNS2” is also referred to as a “secondary DNS server” etc.
•This entry may be unnecessary, depending on the provider. For details, consult
your provider.
Preparation
TEL No. 1: Enter the telephone numbers of your most convenient access
point.
Tip on access point
Most providers install access points in various areas. We recommend that you
select the most convenient access point which allows you to obtain the lowest
telephone charges.
TEL No. 2/TEL No. 3: Enter the second and third telephone numbers, if
necessary.
23-GB

Setting network preferences
(5) Select the Mail tab.
The Mail screen appears.
(6) Set up the following items:
User ID: Enter the user ID name you use for your provider.
Password: Enter the password of your user ID for accessing the POP server.
Your user ID and password are required to use e-mail.
Tip on “Password”
This “Password” is also referred to as a “mail password”, “mail server
password”, etc.
Address: Enter your e-mail address.
Tip on “Address”
This “Address” is also referred to as a “mail address”, “e-mail address”, etc.
POP Server: Enter the POP (Post Office Protocol) server address of your
provider. The POP server is for receiving e-mail.
Tip on “POP Server”
This “POP Server” is also referred to as a “mail server”, “POP3 server”, etc.
24-GB
SMTP Server: Enter the SMTP (Simple Mail Transfer Protocol) server address
of your provider. The SMTP server is for sending e-mail.
Tip on “SMTP Server”
This “SMTP Server” is also referred to as a “mail server”, “SMTP mail server”,
etc. The SMTP server may be the same as the POP server, depending on the
provider.
APOP: Select whether you want to use APOP.
Tip on “APOP”
APOP is an authentication protocol for security. When your provider supports
APOP, we recommend that you check this item. For more information on
whether the provider support APOP or not, consult your provider.

Setting network preferences
(7) Select the Browser tab.
The Browser screen appears.
(8) Set up the following items:
Proxy: Enter the proxy server address of your provider.
Port: Enter the port number of the proxy server of your provider. This entry
may be unnecessary, depending on your provider. For details, consult your
provider.
(9) Select [Exit], then press the centre z on the control button.
The setup is completed, and the Network Setup screen appears again.
(10)Select [Exit], then press the centre z on the control button.
The Setup screen appears again.
Preparation
25-GB

Setting network preferences
Setting network options preferences
For the network options setup, you can use the network function even if the network
options setup is left at the default settings. If you have set your preferences based on the
requirements of your provider, you can access the Internet without modifying the items
on the Network Options screen.
(1) Display the Setup screen.
(2) Select [Network Options], then press the centre z on the control button.
The Network Options screen appears.
,
26-GB
(3) Set up the following items:
Verify Password: Select whether password entry is required when you access
your provider. When you check this item, you have to enter your password
for accessing your provider each time you try to make a connection.
Note
When this item is checked:
– You cannot set your password for accessing your provider.
Tip on “Verify Password”
When you check this item, you have to enter your password for accessing your
provider each time you try to make a connection. This can prevent other
persons from connecting to your provider using your ID.
Time Out: Select whether the connection is automatically cancelled if no
communication is made for specific time (1 minute, 2 minutes, 5 minutes, 15
minutes, or 30 minutes).

Setting network preferences
Note
Although you have selected a specific time for the “Time Out” function, the
line connection may not be cancelled automatically, depends on the Web
page you access. In this case, you can cancel the line connection manually.
Mail
Send&Receive: Select whether to check the e-mail inbox after sending e-
mail.
Save Mail to Server: Select whether to keep copies of the messages on the
server.
Note
If you try to receive e-mail without checking this item, e-mail messages may
not be downloaded and may be lost from your server, depending on the
type of e-mail you receive. For details, see “Note on “Save Mail to Server””
on page 28.
Signature: Set up this item when you want to attach your signature to e-
mail.
Restrict: Select whether to skip an e-mail message if its file size is more than
50 KB, 200 KB, or 500 KB.
Browser
Cookie: Select whether to accept a cookie. When you do not want to send
your personal information, do not check this item. This item is checked at
the default setting.
Image Display: Select whether to display images on the screen when
viewing a Web page. This item is checked at the default setting.
Reset: Reset all the items on the Network Options screen except “Signature”
and “Modem Init”.
Note
A verification message does not appear when you try to reset items.
Preparation
Modem Init: Set up the character string to be used for modem initialization.
If no setup is specified, you do not need to modify this item.
Note
If the setup is wrong, the message “Connection Error No Response From
PPP Server” appears when you try to access the Internet and you will not be
able to access the Internet.
(4) Select [Exit], then press the centre z on the control button.
The Setup screen appears again.
27-GB

Setting network preferences
Note on “Save Mail to Server”
When “Save Mail to Server” is not checked, copies of e-mail messages received will not
be stored on your server. However, the following error messages described below
depend on the type of e-mail messages. See the table below.
Messages
Memory Stick Memory Full
1)
Cause and/or Corrective Actions
You tried to download e-mail when the “Memory Stick” is
already full.
2)
c Delete the e-mail, and delete unnecessary e-mail
messages or image files in the “Memory Stick”, then
download your e-mail again.
c Insert another “Memory Stick” that has sufficient
memory, then download your e-mail again.
Mail Over Size Limit
You tried to download e-mail whose size is over the size set
in the item “Restrict”.
2)
c You can download that e-mail using your computer etc.
c Delete the e-mail, and release the checkmark of the item
“Restrict”, then download that e-mail again.
Attached Invalid File Deleted
You downloaded e-mail that has an attached file whose file
name extension is invalid.
3)
c The camcorder cannot receive files other than those in
the JPEG or MPEG format.
Mail Over Size Limit
Memory Stick Directory Error
You downloaded an e-mail message whose the number of
characters of the message is more than 4000.
c The camcorder cannot receive an e-mail message that
has 4000 characters or more.
4)
3)
c Insert another “Memory Stick” that has sufficient
memory, then download your e-mail again.
1)
These error messages are indicated in a message.
2)
These e-mail messages are stored on the server even if you did not check the item
“Save Mail to Server”. You can retrieve that e-mail using your computer etc.
3)
The previously downloaded e-mail is not stored on the server if you did not check the
item “Save Mail to Server”. You cannot retrieve this e-mail using your computer etc.
4)
For e-mail messages that have lots of line break, the number of available characters is
less than 4000.
28-GB
— Network Operation—
Using e-mail
This section describes the basic usage of e-mail. E-mail is sent and received via the
Internet. E-mail is very convenient; you can send e-mail anytime, and you can also send
images stored in a “Memory Stick” by attaching them to e-mail.
Sending e-mail
By entering the e-mail address of the destination, you can send an e-mail message in a
moment.
1 Specifying the destination address
Be careful to enter the address correctly.
Tip
You can select the e-mail address from the address book. For details, see “Selecting the
destination address from the address book” on page 45.
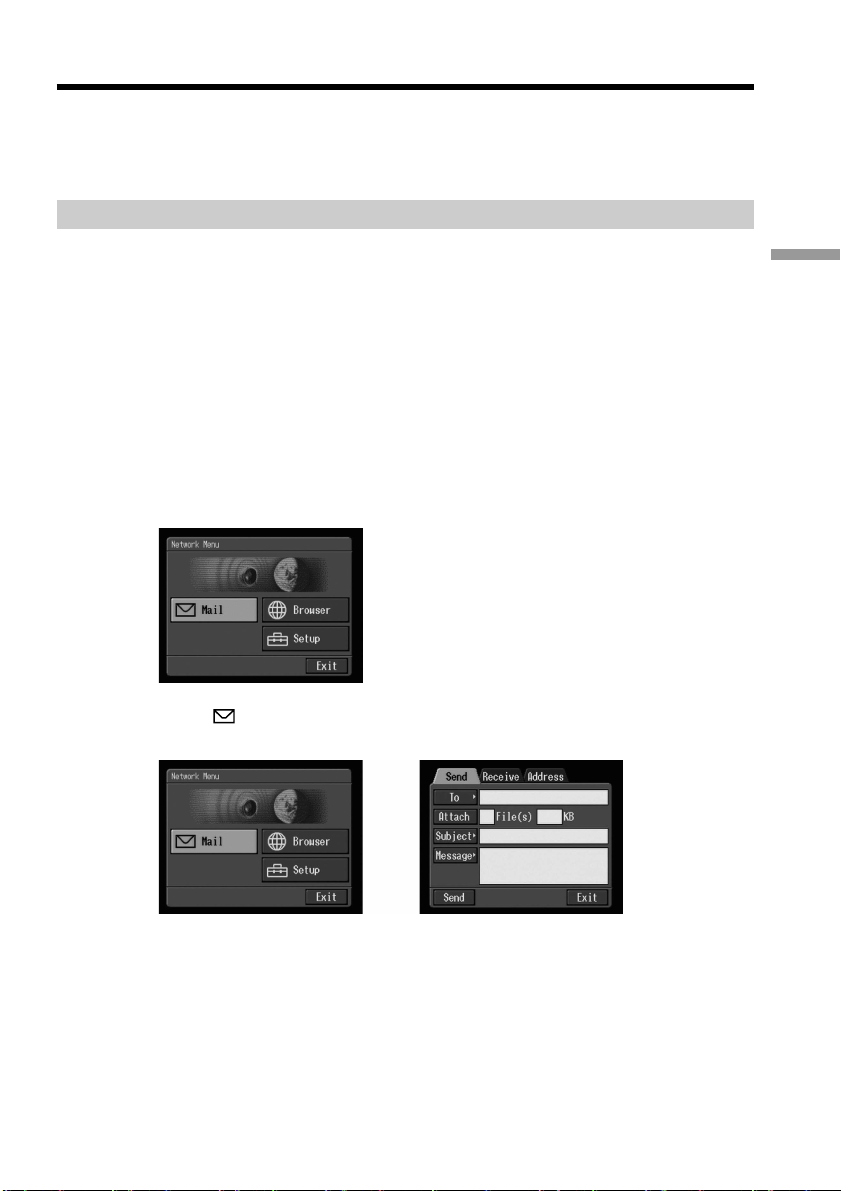
(1) Open the Network Menu.
For details on how to open the Network Menu, refer to “Accessing the
network” in the operating instructions supplied with your camcorder.
(2) Select [
The Send screen appears.
Mail], then press the centre z on the control button.
Network Operation
,
29-GB
Using e-mail
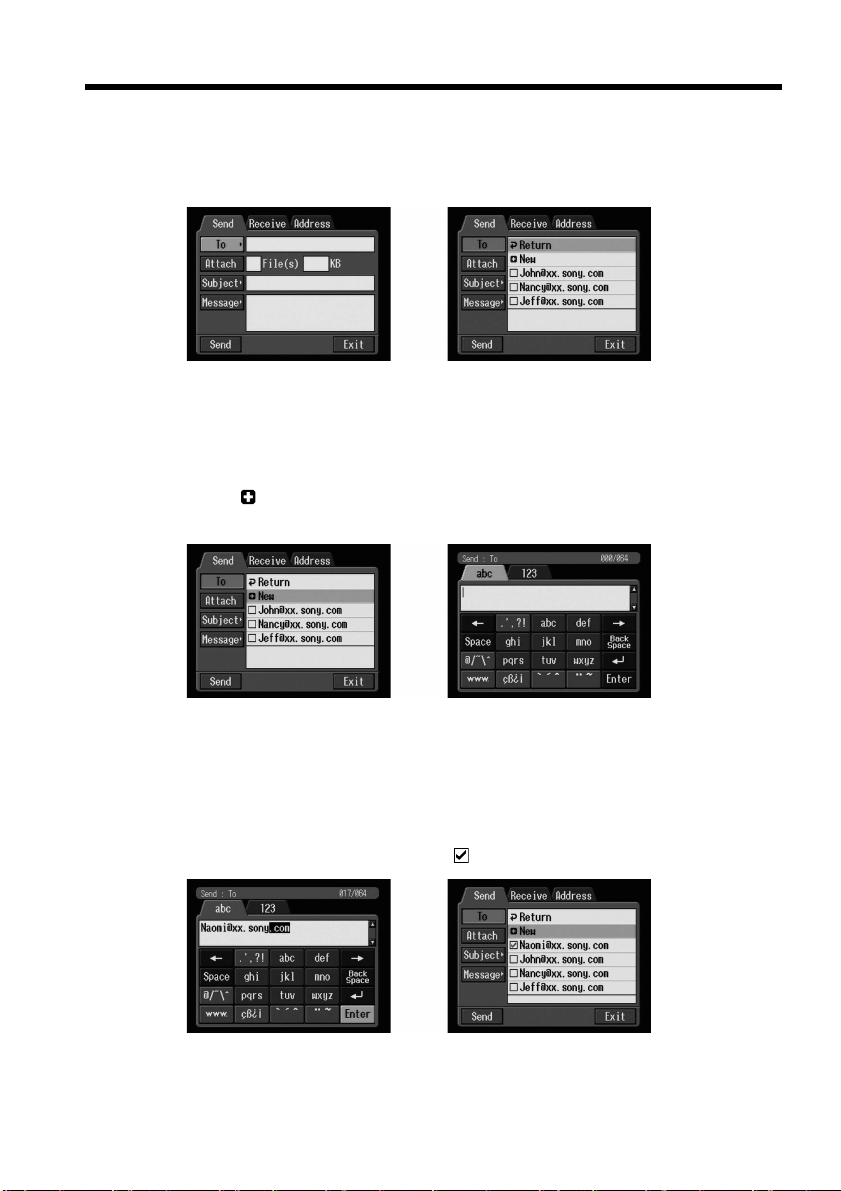
(3) Select [To], then press the centre z on the control button.
The address list appears. The list shows the addresses that are registered in the
address book. For details on the address book, see “Using the address book”
on page 40.
When you have selected an address listed in the address book, go to step 7.
Tips
•The last-used address is listed next to New.
•Addresses are listed in historical order.
(4) Select [ New], then press the centre z on the control button.
The character input screen appears.
,
,
30-GB
(5) Enter the e-mail address of an addressee.
For details on how to input characters, see “How to input characters” on page
8.
(6) Select [Enter], then press the centre z on the control button.
The Send screen appears again. The new e-mail address is listed and its check
box is indicated by the checkmark (
).
,
 Loading...