

Page 1

2-109-350-01
DVD
Home Theatre System
Operating Instructions
Betriebsanleitung
Mode d’emploi
GB
DE
FR
DAV -SB100
©2004 Sony Corporation
Page 2
Safety Precautions
WARNING:TO PREVENT FIRE OR ELECTRIC SHOCK
HAZARD, DO NOT EXPOSE THIS PRODUCT TO RAIN OR
MOISTURE.
WARNING:Do not install this equipment in a confined space
such as a book case or similar unit.
To prevent fire, do not cover the ventilation of the apparatus
with news papers, table-cloths, curtains, etc.And don’t place
lighted candles on the apparatus.
Don’t throw away the battery with general
house waste, dispose of it correctly as chemical
waste.
This appliance is classified as a CLASS 1
LASER product.The label is located on the
rear exterior.
CAUTION:
This DVD Receiver employs a Laser System.
To ensure proper use of this product, please read this owner’s
manual carefully and retain it for future reference. Should the
unit require maintenance, contact an authorized service location (see service procedure).
Performing controls, adjustments, or carrying out procedures
other than those specified herein may result in hazardous radiation exposure.
To prevent direct exposure to laser beam, do not try to open
the enclosure.Visible laser radiation when open. DO NOT
STARE INTO BEAM.
CAUTION: The apparatus should not be exposed to water
(dripping or splashing) and no objects filled with liquids, such
as vases, should be placed on the apparatus.
Precautions
Safety
• If anything falls into the cabinet, unplug the unit and have it
checked by qualified personnel before operating it any
further.
• The unit is not disconnected from the AC power source
(mains) as long as it is connected to the mains outlet, even if
the unit itself has been turned off.
• Unplug the unit from the wall outlet if you do not intend to
use it for an extended period of time.To disconnect the cord,
pull it out by the plug, never by the cord.
Installing
• Allow adequate air circulation to prevent internal heat
buildup.
• Do not place the unit on surfaces (rugs, blankets, etc.) or
near materials (curtains, draperies) that may block the ventilation slots.
• Do not install the unit near heat sources such as radiators, or
air ducts, or in a place subject to direct sunlight, excessive
dust, mechanical vibration, or shock.
• Do not install the unit in an inclined position. It is designed to
be operated in a horizontal position only.
•Keep the unit and discs away from equipment with strong
magnets, such as microwave ovens, or large loudspeakers.
• Do not place heavy objects on the unit.
• If the unit is brought directly from a cold to a warm location,
moisture may condense inside the DVD Home Theatre
System and cause damage to the lenses.When you first
install the unit, or when you move it from a cold to a warm
location, wait for about 30 minutes before operating the unit.
On power sources
•AC power cord must be changed only at the qualified service
shop.
On placement
• Place the receiver in a location with adequate ventilation to
prevent heat build-up in the system.
• At high volume, over long periods of time, the cabinet
becomes hot to the touch.This is not a malfunction.
However, touching the cabinet should be avoided.Do not
place the unit in a confined space where ventilation is poor
as this may cause overheating.
• Do not block the ventilation slots by putting anything on the
system.The receiver is equipped with a high power amplifier.
If the ventilation slots on the top surface are blocked, the unit
can overheat and malfunction.
• Do not place the system on a soft surface such as a rug
that might block the ventilation holes on the bottom.
• Do not place the system in a location near heat sources, or
in a place subject to direct sunlight, excessive dust, or
mechanical shock.
On operation
• If the system is brought directly from a cold to a warm location, or is placed in a very damp room, moisture may condense on the lenses inside the system. Should this occur,
the system may not operate properly. In this case, remove
the disc and leave the system turned on for about half an
hour until the moisture evaporates.
• When you move the system, take out any discs. If you don’t,
the disc may be damaged.
The nameplate is located on the rear of the unit.
IMPORTANT NOTICE
Caution:This system is capable of holding a still video
image or on-screen display image on your television screen
indefinitely. If you leave the still video image or on-screen
display image displayed on your TV for an extended period
of time you risk permanent damage to your television
screen. Projection televisions are especially susceptible to
this.
2
Page 3

Safety Precautions (Continued)
NOTES ON COPYRIGHTS:
It is forbidden by law to copy, broadcast, show, broadcast
via cable, play in public, or rent copyrighted material without
permission.
This product features the copy protection function developed by
Macrovision. Copy protection signals are recorded on some
discs.When recording and playing the pictures of these discs
on a VCR, picture noise will appear.
This product incorporates copyright protection technology that
is protected by method claims of certain U.S.patents and other
intellectual property rights owned by Macrovision Corporation
and other rights owners. Use of this copyright protection technology must be authorized by Macrovision Corporation, and is
intended for home and other limited viewing uses only unless
otherwise authorized by Macrovision Corporation. Reverse
engineering or disassembly is prohibited.
About the symbols for instruction
Indicates hazards likely to cause harm to the unit
itself or other material damage.
Note Indicates special operating features of this unit.
Tip Indicates tips and hints for making the task easier.
INTRODUCTION
3
Page 4

Table of Contents
Introduction
Safety Precautions. . . . . . . . . . . . . . . . . . . . . . . . 2-3
Table of Contents . . . . . . . . . . . . . . . . . . . . . . . . . . 4
Before Use . . . . . . . . . . . . . . . . . . . . . . . . . . . . . . 5-6
Playable Discs. . . . . . . . . . . . . . . . . . . . . . . . . . . 5
Precautions . . . . . . . . . . . . . . . . . . . . . . . . . . . . . 6
Notes on Discs . . . . . . . . . . . . . . . . . . . . . . . . . . 6
About Symbols . . . . . . . . . . . . . . . . . . . . . . . . . . 6
Front Panel Controls. . . . . . . . . . . . . . . . . . . . . . . . 7
Display Window Indicators . . . . . . . . . . . . . . . . . . . 8
Remote Control . . . . . . . . . . . . . . . . . . . . . . . . . . . . 9
Rear Panel Connections . . . . . . . . . . . . . . . . . . . . 10
Preparation
Connections . . . . . . . . . . . . . . . . . . . . . . . . . . . 11-15
Connecting to a TV . . . . . . . . . . . . . . . . . . . . . . 11
Connecting to External Equipment . . . . . . . . . . . 12
Antenna Connections. . . . . . . . . . . . . . . . . . . . . 13
Speaker System Connection . . . . . . . . . . . . . . . 14
Speaker Positioning. . . . . . . . . . . . . . . . . . . . . . 15
Selecting the Output/Input Source . . . . . . . . . . . . 16
Before Operation . . . . . . . . . . . . . . . . . . . . . . . 17-21
Mini Glossary for Audio Stream & Surround
Mode. . . . . . . . . . . . . . . . . . . . . . . . . . . . . . . . . 17
Sound Mode . . . . . . . . . . . . . . . . . . . . . . . . . . . 17
General Explanation. . . . . . . . . . . . . . . . . . . . . . 18
On-Screen Display. . . . . . . . . . . . . . . . . . . . . . . 18
Initial Settings . . . . . . . . . . . . . . . . . . . . . . . . 19-21
General Operation. . . . . . . . . . . . . . . . . . . . 19
Language . . . . . . . . . . . . . . . . . . . . . . . . . . 19
TV Aspect . . . . . . . . . . . . . . . . . . . . . . . . . . 19
Speaker Setup. . . . . . . . . . . . . . . . . . . . . . . 20
Others. . . . . . . . . . . . . . . . . . . . . . . . . . . . . 20
Parental Control. . . . . . . . . . . . . . . . . . . . . . 21
Area Code. . . . . . . . . . . . . . . . . . . . . . . . . . 21
Operation
DVD and Video CD Operation. . . . . . . . . . . . . . 22-24
Playing a DVD and Video CD. . . . . . . . . . . . . . . 22
General Features. . . . . . . . . . . . . . . . . . . . . . . . 22
Resume Function . . . . . . . . . . . . . . . . . . . . 22
Selecting Another TITLE . . . . . . . . . . . . . . . 22
Selecting Another CHAPTER/TRACK . . . . . 22
Search. . . . . . . . . . . . . . . . . . . . . . . . . . . . . 22
Still Picture . . . . . . . . . . . . . . . . . . . . . . . . . 22
Slow Motion. . . . . . . . . . . . . . . . . . . . . . . . . 23
Repeat . . . . . . . . . . . . . . . . . . . . . . . . . . . . 23
Time Search . . . . . . . . . . . . . . . . . . . . . . . . 23
Special DVD Features . . . . . . . . . . . . . . . . . . . . 24
Checking the contents of DVD Video disc:
Menus . . . . . . . . . . . . . . . . . . . . . . . . . . . . . 24
Camera Angle . . . . . . . . . . . . . . . . . . . . . . . 24
Changing the Audio Language. . . . . . . . . . . 24
Changing the Audio Channel . . . . . . . . . . . . 24
Subtitle . . . . . . . . . . . . . . . . . . . . . . . . . . . . 24
Audio CD and MP3 Disc Operation . . . . . . . . . 25-26
Playing an Audio CD and MP3 Disc . . . . . . . . . . 25
Notes on MP3 Files . . . . . . . . . . . . . . . . . . . . . . 25
Pause . . . . . . . . . . . . . . . . . . . . . . . . . . . . . 26
Selecting Another Track . . . . . . . . . . . . . . . . 26
Search. . . . . . . . . . . . . . . . . . . . . . . . . . . . . 26
Repeat . . . . . . . . . . . . . . . . . . . . . . . . . . . . 26
Changing the Audio Channel . . . . . . . . . . . . 26
JPEG File Operation . . . . . . . . . . . . . . . . . . . . . . . 27
Viewing JPEG Files on a Disc . . . . . . . . . . . . . . 27
Selecting Another Files . . . . . . . . . . . . . . . . 27
Still Picture . . . . . . . . . . . . . . . . . . . . . . . . . 27
To flip the picture . . . . . . . . . . . . . . . . . . . . . 27
To rotate picture. . . . . . . . . . . . . . . . . . . . . . 27
Notes on JPEG Files . . . . . . . . . . . . . . . . . . 27
Programmed Playback . . . . . . . . . . . . . . . . . . . . . 28
Programmed Playback with Audio CD
and MP3 Disc . . . . . . . . . . . . . . . . . . . . . . . . . . 28
Programmed Playback with Video CD . . . . . . . . 28
Speaker Setup . . . . . . . . . . . . . . . . . . . . . . . . . . . . 29
Additional Information. . . . . . . . . . . . . . . . . . . . . . 30
Sleep Timer Setting . . . . . . . . . . . . . . . . . . . . . . 30
Viewing the Playing Time and Remaining
Time in the Front Panlel Display. . . . . . . . . . . . . 30
Dimmer . . . . . . . . . . . . . . . . . . . . . . . . . . . . . . . 30
Muting . . . . . . . . . . . . . . . . . . . . . . . . . . . . . . . . 30
Using Headphone Jack . . . . . . . . . . . . . . . . . . . 30
Volume Control . . . . . . . . . . . . . . . . . . . . . . . . . 30
Using the Sound Effect . . . . . . . . . . . . . . . . . . . 30
Radio Operation . . . . . . . . . . . . . . . . . . . . . . . . 31-32
Presetting the Radio Stations. . . . . . . . . . . . . . . 31
Listening to the Radio . . . . . . . . . . . . . . . . . . . . 31
RDS Operation . . . . . . . . . . . . . . . . . . . . . . . . . 32
Controlling the TV with the Supplied Remote . . . 33
Controlling the TV . . . . . . . . . . . . . . . . . . . . . . . 33
Using the SONY TV DIRECT Function . . . . . . . . . 34
Preparation . . . . . . . . . . . . . . . . . . . . . . . . . . . . 34
Operation. . . . . . . . . . . . . . . . . . . . . . . . . . . . . . 34
Reference
Language Code List . . . . . . . . . . . . . . . . . . . . . . . 35
Area Code List. . . . . . . . . . . . . . . . . . . . . . . . . . . . 36
Troubleshooting . . . . . . . . . . . . . . . . . . . . . . . . 37-38
Specification . . . . . . . . . . . . . . . . . . . . . . . . . . . . . 39
Manufactured under license from Dolby Laboratories.“Dolby”,
“Pro Logic”, and the double-D symbol are trademarks of Dolby
Laboratories. Confidential Unpublished works. Copyright 19921997 Dolby Laboratories. All rights reserved.
Manufactured under license from Digital Theater Systems, Inc.
US Pat.No. 5,451,942 5,956,674, 5,974,380, 5,978,762 and
other worldwide patents issued and pending. “DTS” and “DTS
Digital Surround” are registered trademarks of Digital Theater
Systems, Inc. Copyright 1996, 2000 Digital Theater Systems,
Inc. All rights reser ved.
4
Page 5

Before Use
2
Playable Discs
DVD video discs
(8 cm / 12 cm disc)
Video CD (VCD)
(8 cm / 12 cm disc)
Audio CD
(8 cm / 12 cm disc)
In addition, this unit can play a DVD-R/-RW, SVCD and
CD-R or CD-RW that contains audio titles, MP3, or
JPEG files.
Notes
Depending on the conditions of the recording equip-
ment or the CD-R/RW (or DVD-R/-RW) disc itself,
some CD-R/RW (or DVD-R/-RW) discs cannot be
played on the unit.
DVD-RWs in VR (Video Recording) mode discs
cannot be played on the unit.
Do not attach any seal or label to either side (the
labeled side or the recorded side) of a disc.
Do not use irregularly shaped CDs (e.g., heart-
shaped or octagonal). It may result in malfunctions.
Notes on DVDs and Video CDs
Some playback operations of DVDs and Video CDs may
be intentionally fixed by software manufacturers. As this
unit plays DVDs and Video CDs according to disc content designed by the software manufacturer, some playback features of the unit may not be available or other
functions may be added.
Make sure to also refer to the instructions supplied with
the DVDs and Video CDs. Some DVDs made for business purposes may not be able to be played on the unit.
Disc-related terms
Title (DVD video discs only)
The main film content or accompanying feature content
or additional feature content, or music album.
Each title is assigned a title reference number enabling
you to locate it easily.
Chapter (DVD video discs only)
Sections of a picture or a musical piece that are smaller
than titles. A title is composed of one or several chapters. Each chapter is assigned a chapter number,
enabling you to locate the chapter you want.Depending
on the disc, chapters may not be recorded.
Track (Video CD and audio CD only)
Sections of a picture or a musical piece on a video CD
or an audio CD.Each track is assigned a track number,
enabling you to locate the track you want.
Index (Video CD)
A number that divides a track into sections to easily
locate the point you want on a VIDEO CD.Depending
on the disc, no indexes may be recorded.
Scene
On a video CD with PBC (Playback control) functions,
moving pictures and still pictures are divided into
sections called “Scenes”. Each scene is displayed in the
menu screen and assigned a scene number, enabling
you to locate the scene you want.
A scene is composed of one or several tracks.
File
Sections of a picture on a data CD containing JPEG
image files.
INTRODUCTION
Regional code of the DVD Receiver and DVDs
This DVD Receiver is designed and manufactured for
playback of region “2” encoded DVD software.The region
code on the labels of some DVDs indicates which type of
player can play those discs.This unit can only play DVDs
labeled “2” or “ALL”. If you try to play any other discs, the
message “Check Regional Code” will appear on the TV
screen. Some DVDs that have no region code
label may still be subject to area restrictions
and therefore not playable.
Types of video CDs
There are two types of video CDs:
Video CDs equipped with PBC (Version 2.0)
PBC (Playback control) functions allow you to interact
with the system via menus, search functions, or other
typical computer-like operations.Moreover, still pictures
of high resolution can be played if they are included in
the disc.
Video CDs not equipped with PBC (Version 1.1)
Operated in the same way as audio CDs, these discs
allow playback of video pictures as well as sound, but
they are not equipped with PBC.
IMPORTANT NOTE:
SPENT OR DISCHARGED BATTERIES MUST BE
RECYCLED OR DISPOSED OF IN A SAFE MANNER IN
COMPLIANCE WITH ALL APPLICABLE LAWS.
FOR DETAILED INFORMATION, CONTACT YOUR LOCAL
COUNTY SOLID WASTE AUTHORITY.
5
Page 6
Before Use (Continued)
Precautions
Handling the unit
When shipping the unit
The original shipping carton and packing materials may
come in handy. For maximum protection, re-pack the
unit as it was originally packed at the factory.
When setting up the unit
The picture and sound of a nearby TV, VCR, or radio
may be disturbed during playback.In this case, position
the unit away from the TV, VCR, or radio, or turn off the
unit after removing the disc.
To keep the exterior surfaces clean
Do not use volatile liquids, such as insecticide spray,
near the unit. Do not leave rubber or plastic products in
contact with the unit for a long period of time.They will
leave marks on the surface.
Cleaning the unit
To clean the cabinet
Use a soft, dry cloth. If the surfaces are extremely dirty,
use a soft cloth lightly moistened with a mild detergent
solution. Do not use strong solvents such as alcohol,
benzine, or thinner, as these might damage the surface
of the unit.
To obtain a clear picture
DVD Receiver
The
optical pick-up lens and disc drive parts are dirty or
worn, the picture quality will be poor.
Regular inspection and maintenance are recommended
after every 1,000 hours of use.(This depends on the
operating environment.)
For details, please contact your nearest dealer.
is a high-tech, precision device.If the
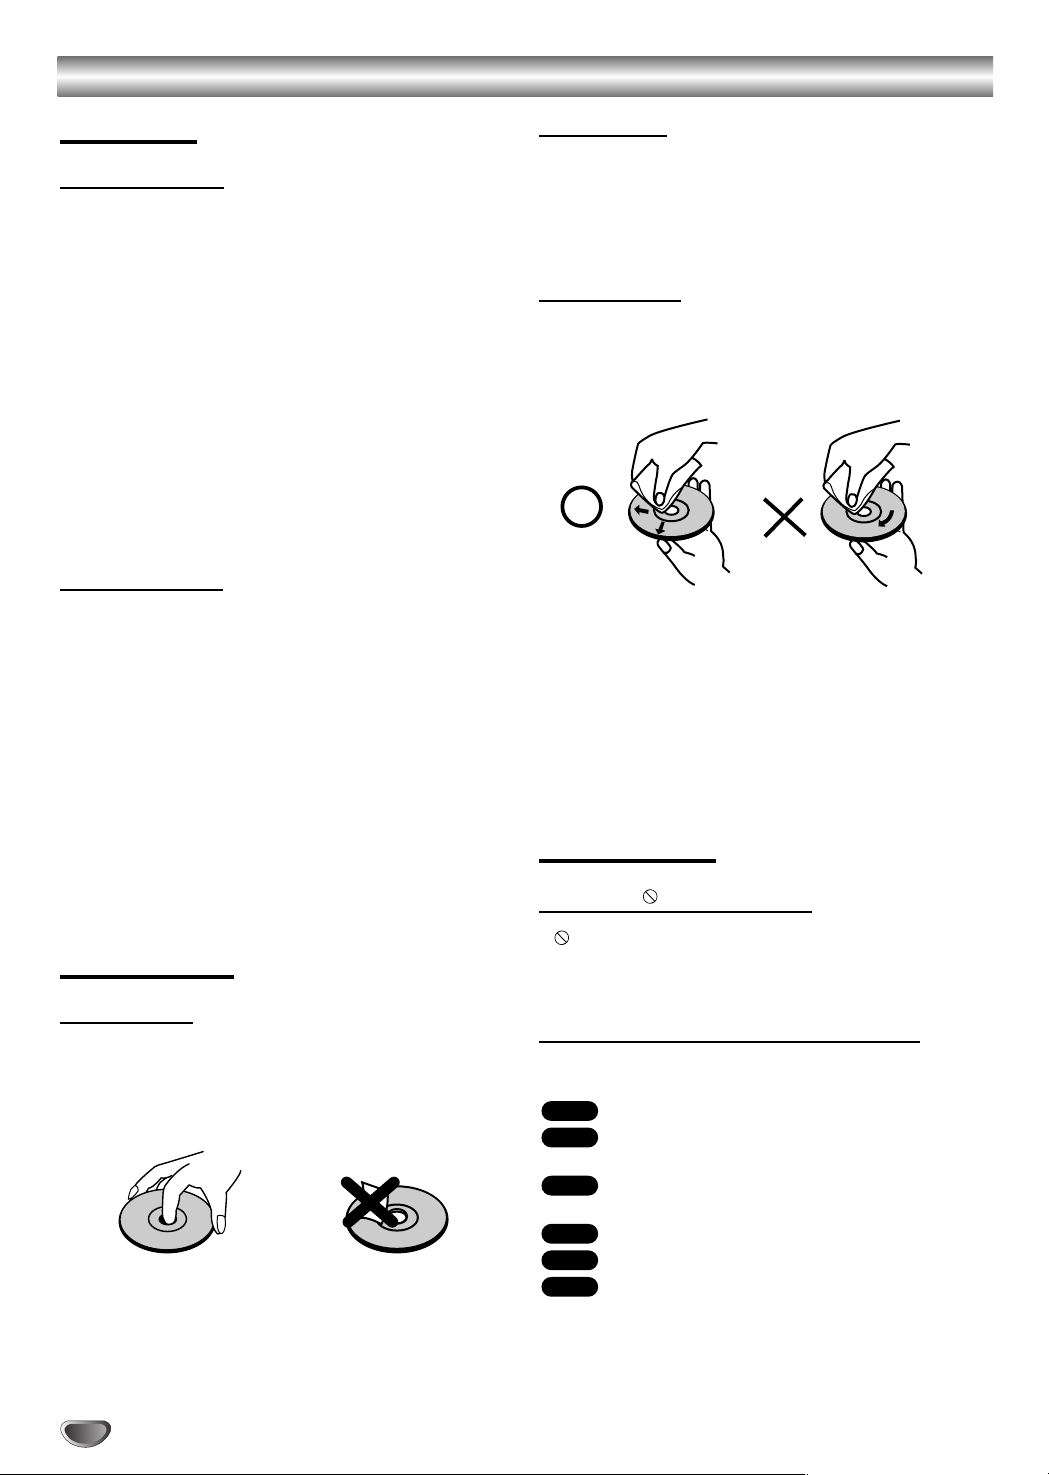
Notes on Discs
Disc Handling
Do not touch the playback side of the disc.
Hold the disc by the edges so that fingerprints will not
get on the surface.
Do not stick paper or tape on the disc.
Storing discs
After playing, store the disc in its case.
Do not expose the disc to direct sunlight or sources of
heat, or leave it in a parked car exposed to direct sunlight, as there may be a considerable temperature
increase inside the car.
Cleaning discs
Fingerprints and dust on the disc can distor t the picture
or reduce sound quality. Before playing, clean the disc
with a clean cloth.Wipe the disc from the centre outwards.
Do not use strong solvents such as alcohol, benzine,
thinner, commercially available cleaners, or anti-static
spray intended for vinyl records.
This system can only play back a standard circular disc.
Using neither standard nor circular discs (e.g., card,
heart, or star shape) may cause a malfunction.
Do not use a disc that has a commercially available
accessory attached, such as a label or ring.
About Symbols
About the symbol display
“ ” may appear on the TV screen during operation.
This icon means the function explained in this owner’s
manual is not available on that specific DVD video disc.
About the disc symbols for instructions
A section whose title has one of the following symbol is
applicable only to the disc represented by the symbol.
DVD
DVD Video discs
VCD2.0
Video CDs with the PBC (playback control)
function.
VCD1.1
Video CDs without the PBC (playback control)
function.
CD
Audio CDs.
MP3
MP3 disc.
JPEG disc.
JPEG
6
Page 7
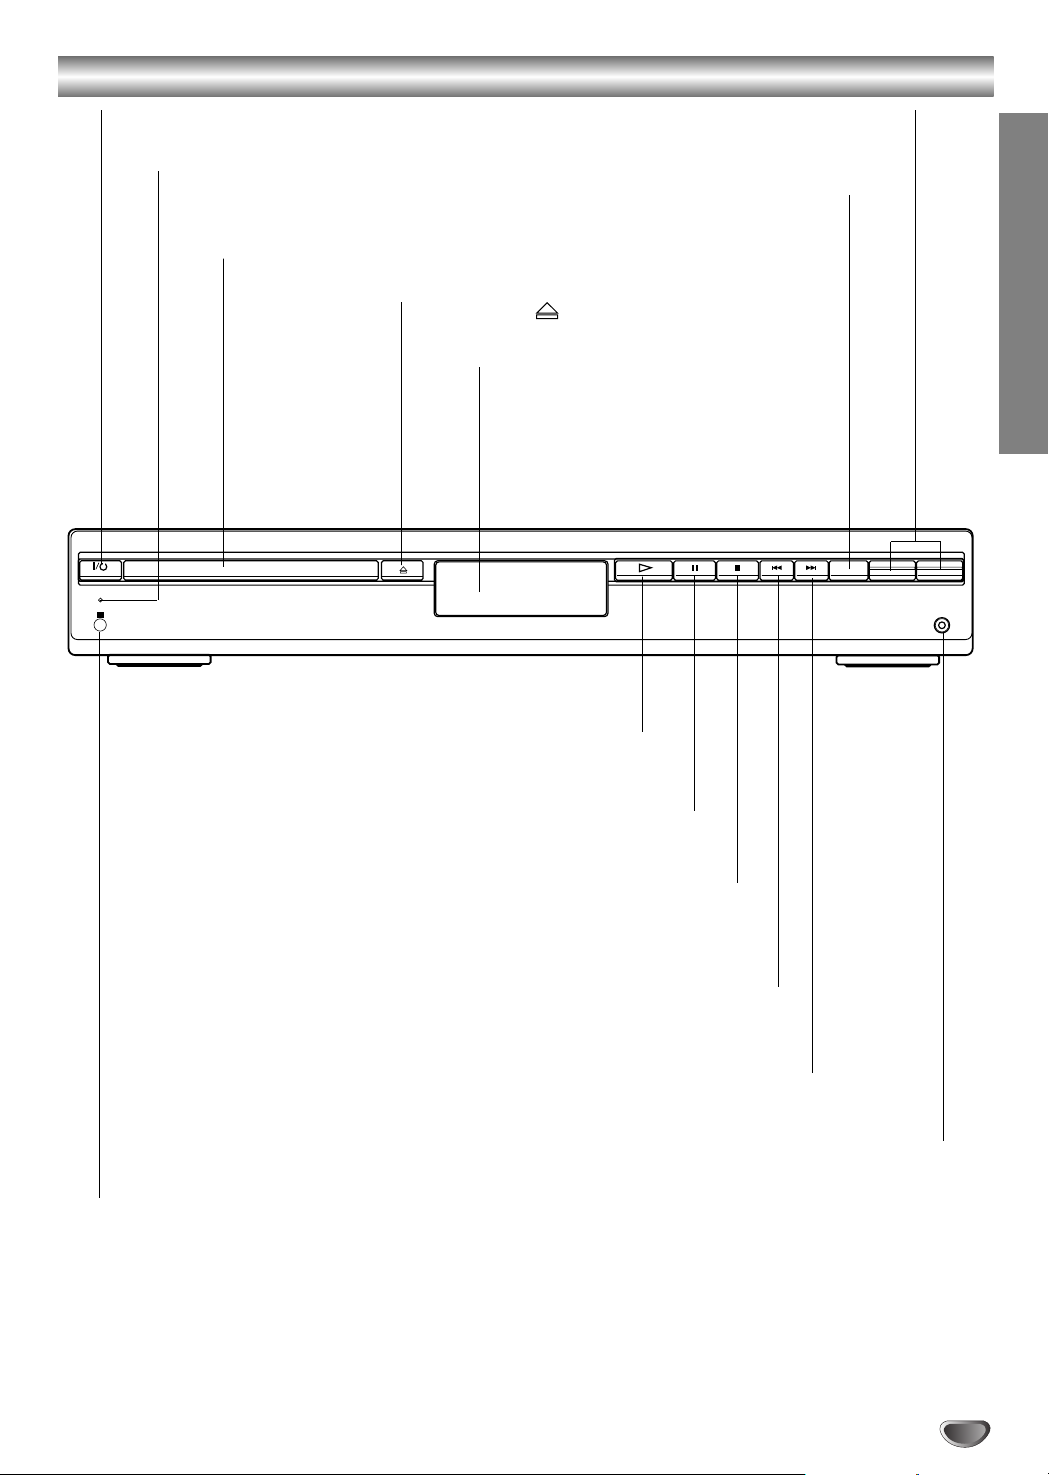
Front Panel Controls
STANDBY
IR
- PRESET +
-
VOLUME +
FUNCTION
PHONES
@ / 1 (POWER) indicator
Switches the DVD Receiver ON and OFF.
STANDBY indicator
Lights red when the receiver
is in Standby mode (off).
Disc T ray
Insert a disc here.
OPEN/CLOSE ( )
Opens or closes the disc tray.
Press “+” to increase volume or press “-” to
To select the Receiver’s source.
Display window
VOLUME Control
decrease the volume.
FUNCTION
(FM, AM, VIDEO, TV or
CD/DVD)
INTRODUCTION
Pause playback of a disc temporarily.
DVD: Go to beginning of current chapter/track or to previous
Remote Sensor
Point the DVD receiver remote control here.
PLAY (
To play back a disc.
Stops playback of a disc.
RADIO:
To select preset station you want.
DVD: Go to NEXT chapter/track.
RADIO:
To select preset station you want.
H)
PAUSE (XX)
STOP (xx)
Reverse SKIP (SS)
chapter/track.
Forward SKIP (
TT
)
PHONES
To connect headphones.
7
Page 8
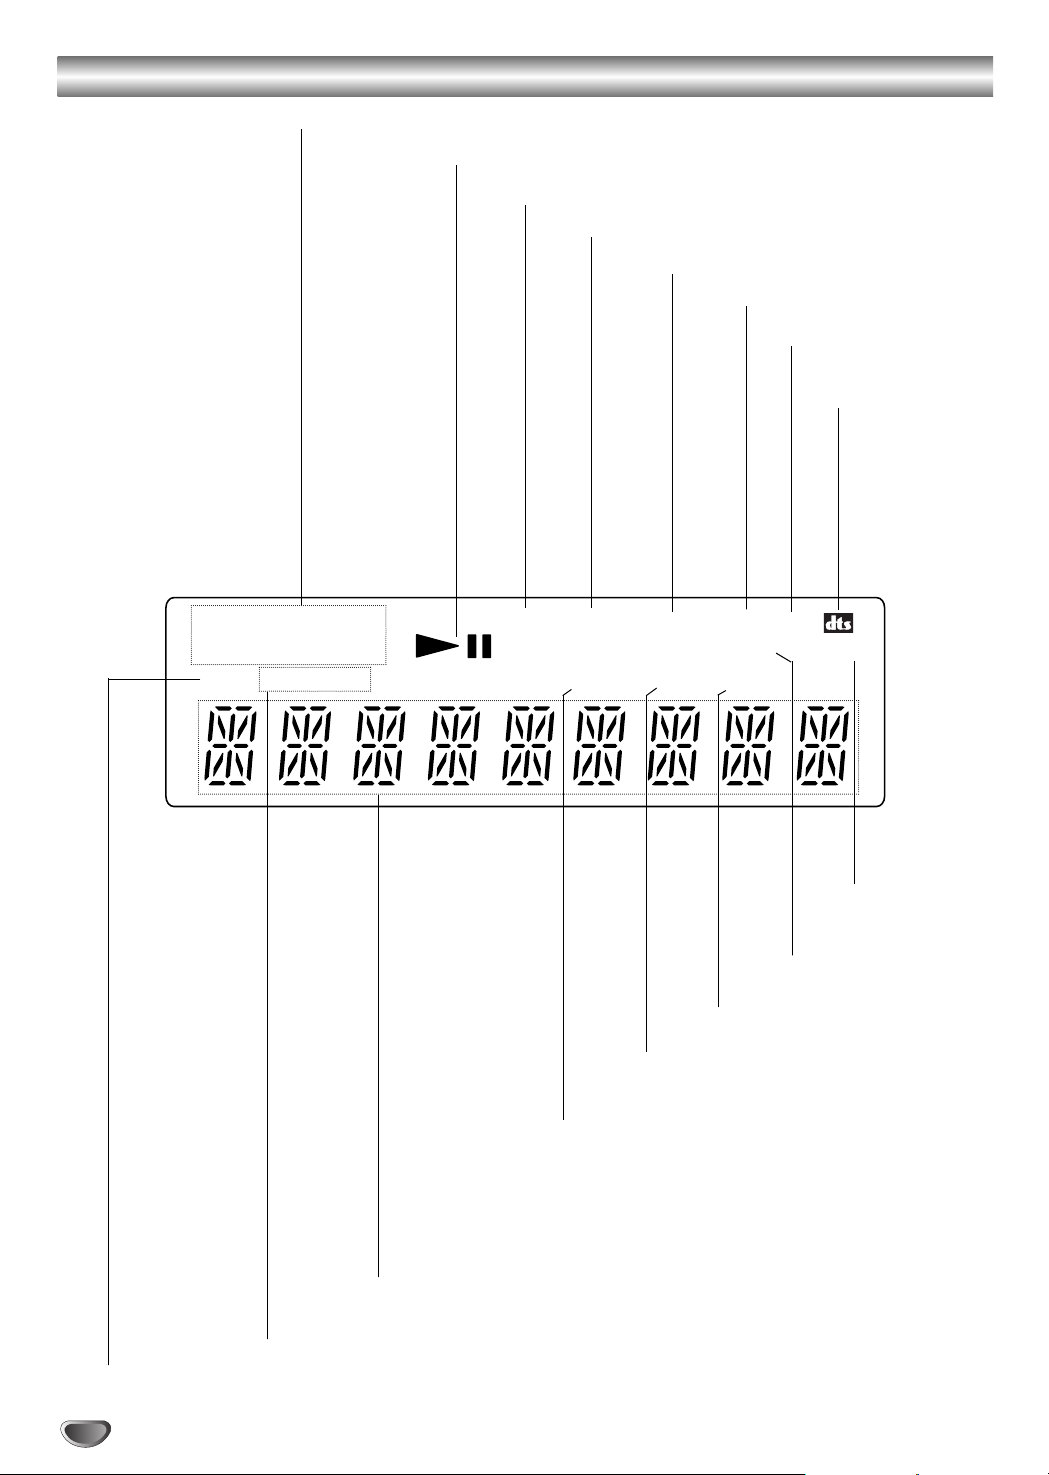
Display Window Indicators
Repeat playback mode indicators.
Playing status.
Indicates the unit is radio mode.
Indicates the unit is stereo mode.
CD disc inserted.
MP3 disc inserted.
Lights up when the unit
is DSGX ON mode.
Indicate current
surround format.
DISC
CHAP TITLE
REP 1ALBM
TRK
FM
AM
TUNED PBC SLEEP
VCD2.0 disc inserted.
Lights up when the DVD Receiver
tunes in a station.
MP3 CD ST DSGX
D
D
D
SLEEP timer indica-
D
PL II
D
Indicate current
surround format.
Indicates sound
fomat is DOLBY
PROLOGIC II.
Title indication
8
Total playing time/Elapsed time/Frequency/remaining time/ Current status/
Title number/Surround mode/Volume etc. indicators.
Indicates current chapter or
track number.
Page 9
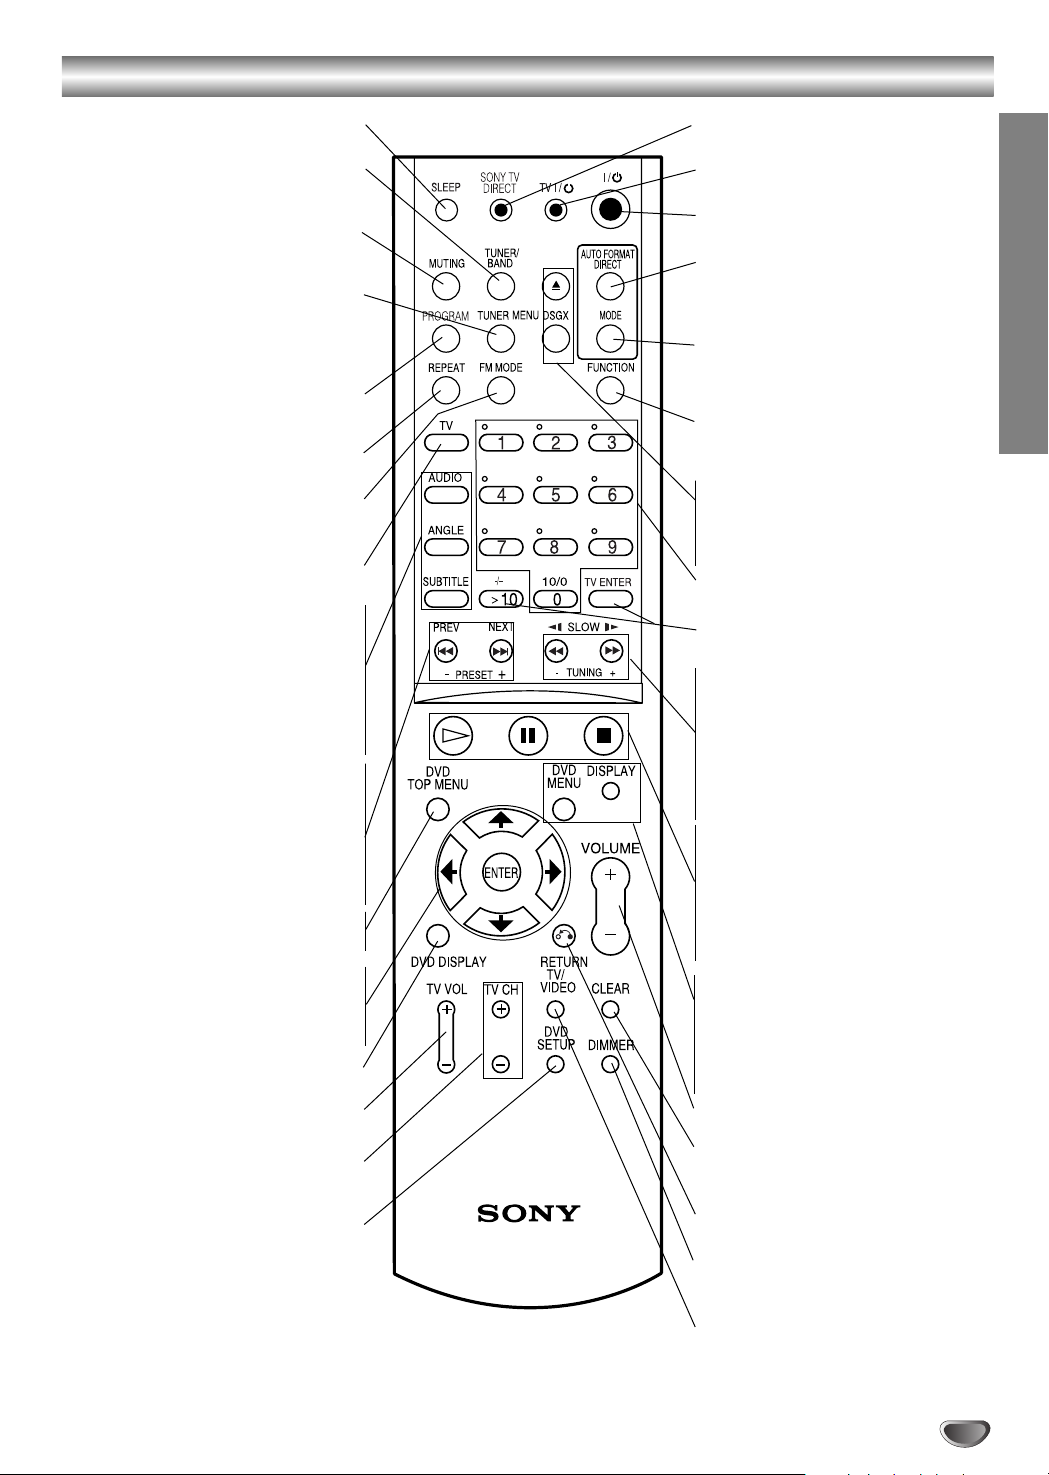
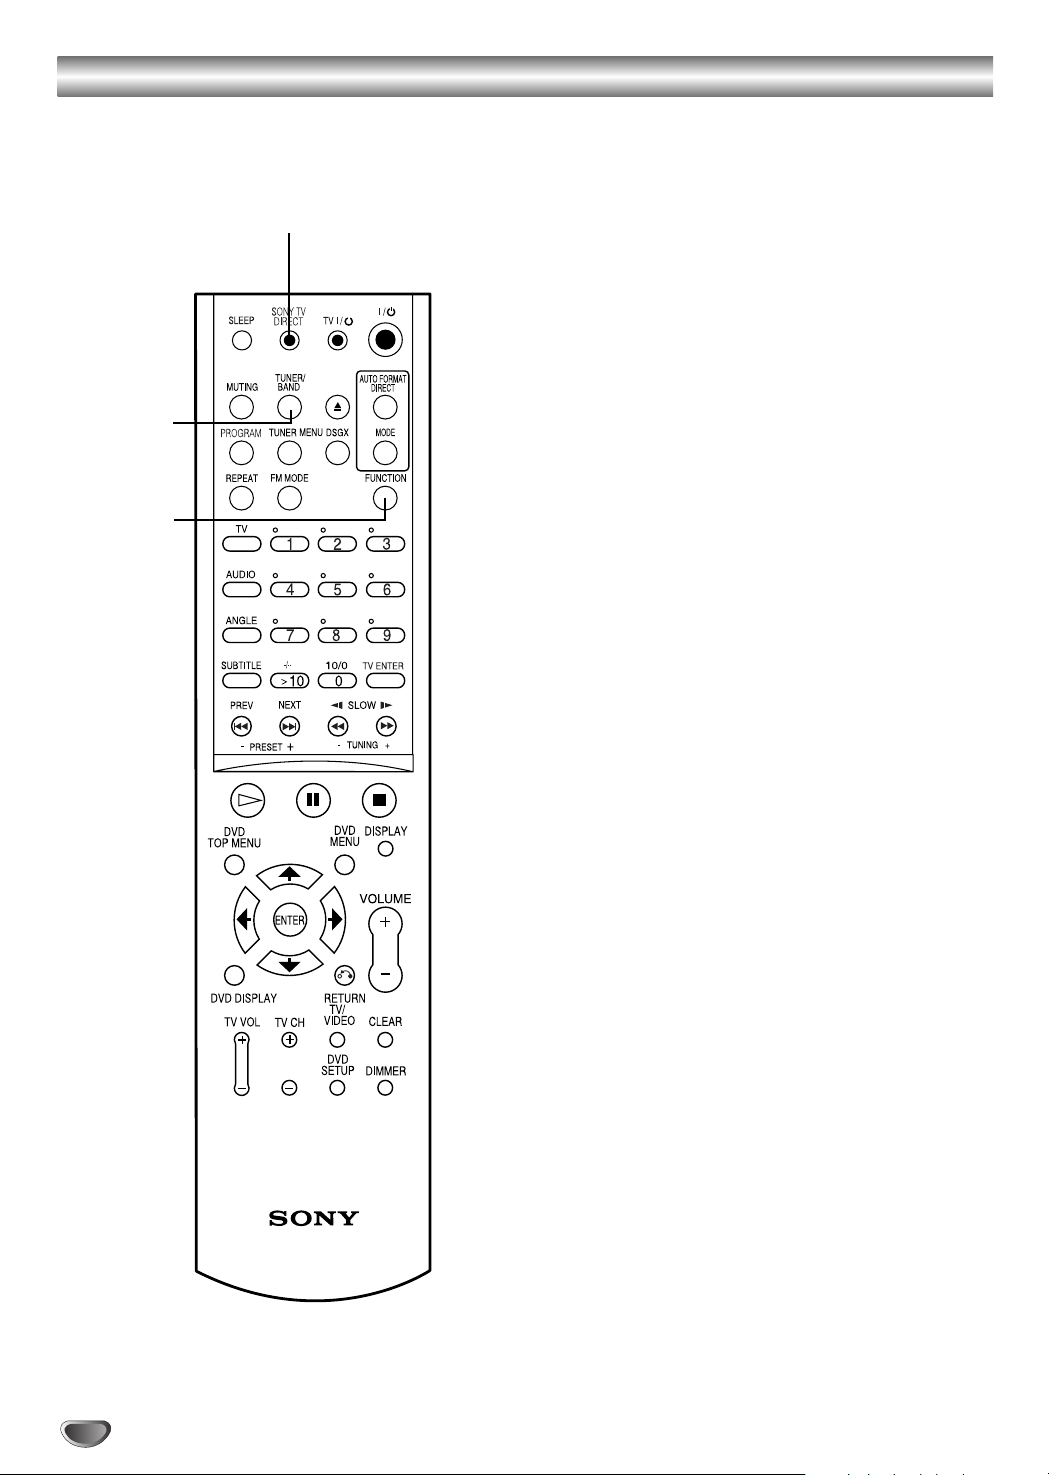
Remote Control
SLEEP
To place the unit in the Sleep mode.
TUNER/BAND
Selects the DVD Receiver’s tuner as the
listening choice. (FM and AM bands)
MUTING
Momentarily silence the speaker of the
DVD Receiver.
TUNER MENU
Memorize a radio station frequency
into the tuner.
Press to clear preset stations from the
tuner memory.
PROGRAM
Enters to the programme edit mode or
exits from that.
REPEAT
Repeat chapter, track, title, all.
FM MODE
To change between MONO and STEREO
modes.
TV
To control TVs with the Remote.
AUDIO
Selects an audio language (DVD) or an
audio channel (CD).
ANGLE
Selects a DVD camera angle if available.
SUBTITLE
Selects a subtitle language.
PREV/PRESET-
Go to beginning of current chapter or
track or go to previous chapter or track.
Select programme of Tuner.
NEXT/PRESET+
Go to next chapter or track.
Select programme of Tuner.
DVD T OP MENU
Displays the disc’s Title menu, if available.
B/b/V/v (left/right/up/down)
Selects an option in the menu.
ENTER
Acknowledges menu selection.
DVD DISPLAY
Accesses On-Screen display.
TV VOL +/–
Adjusts TV’s volume.
TV CH +/–
Selects TV’s channel.
DVD SETUP
Accesses or removes DVD setup menu.
SONY TV DIRECT
Select the output source to DVD directly.
TV @ / 1
Switches TV ON and OFF.
@ / 1
Switches DVD Receiver ON and OFF.
AUTO FORMAT DIRECT
Selects sound mode between A.F.D.
AUTO, PRO LOGIC, PLII MOVIE and
PLII MUSIC.
MODE
Selects sound mode between FLAT,
ROCK, POP, JAZZ, CLASSIC and
NEWS.
FUNCTION
To select the Receiver’s source.
(FM, AM, VIDEO, TV or CD/DVD)
ZZ
Opens and closes the disc tray.
DSGX
Switches DSGX ON and OFF.
0-9 numerical buttons
Selects numbered options in a menu.
>10/ TV ENTER
Used to control TV.
SLOW t/
For picture search or slow playback backward.
To tune in the desired station.
SLOW T/TUNING+
For picture search or slow playback
forward.
To tune in the desired station.
TUNING-
Playback Control Buttons
• H (PLAY)
Starts playback.
• X (PAUSE)
Pause playback or recording temporarily.
• x (STOP)
Stops playback.
DVD MENU
Accesses menu on a DVD disc.
DISPLAY
To display remaining time between
Chapter and title.
To check the RDS service programme (PS).
VOLUME (+/-)
Adjusts speaker volume.
CLEAR
Removes a track number on the program
menu.
RETURN
Returns the setup menu.
DIMMER
To change the brightness of the display
window.
TV/VIDEO
Selects the TV’s source.
INTRODUCTION
9
Page 10
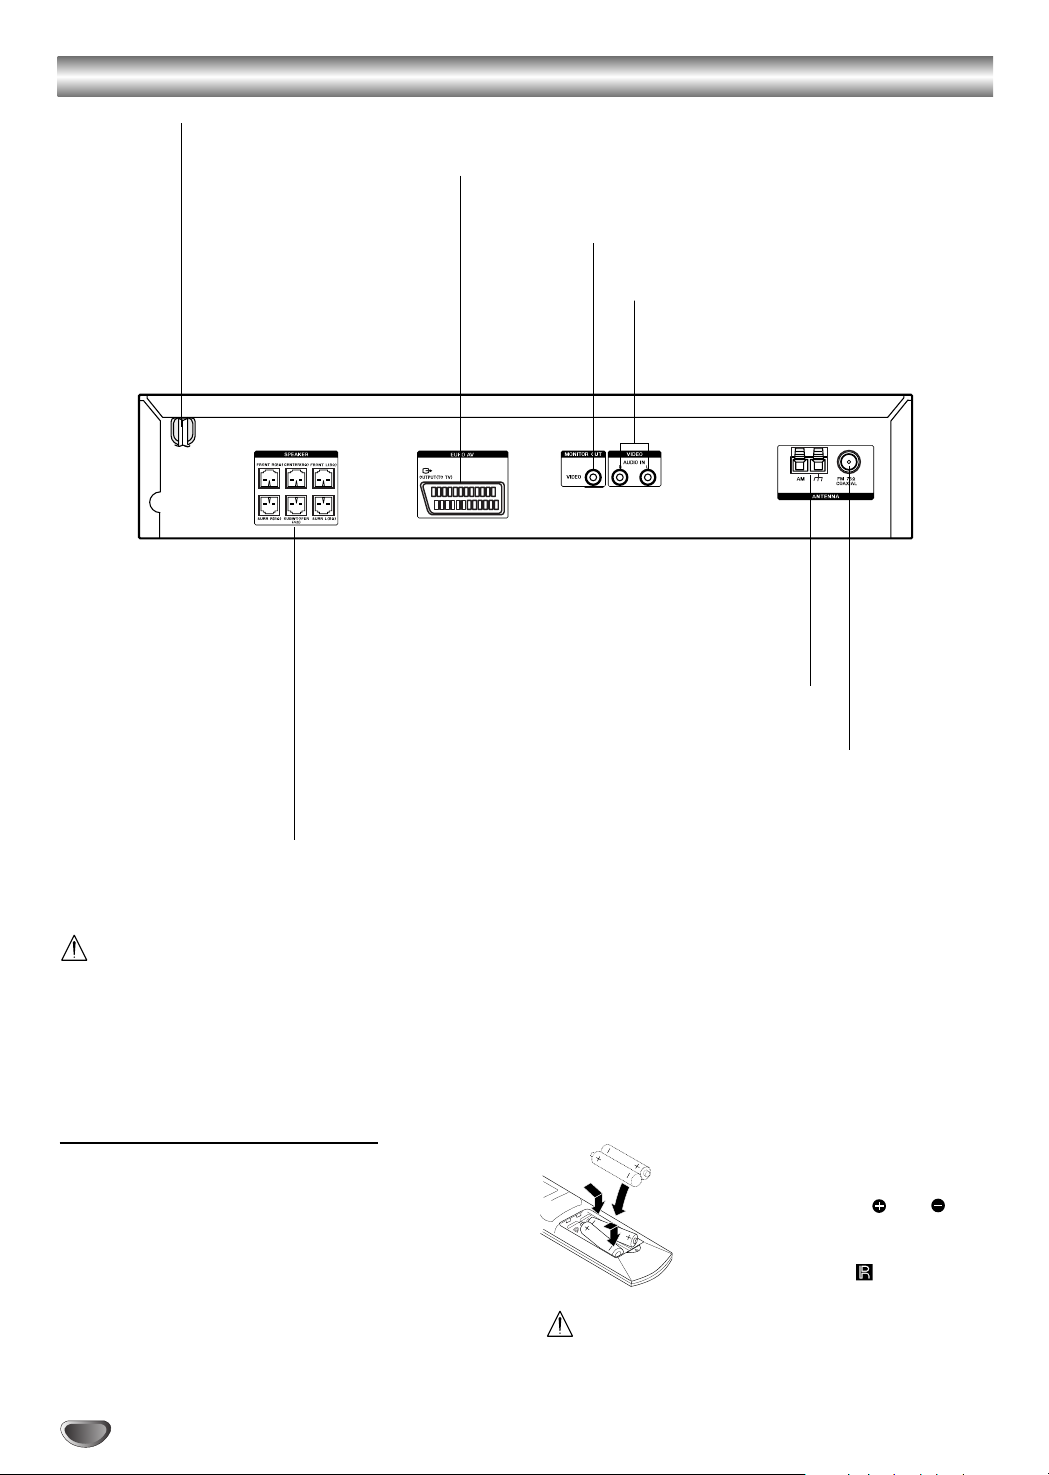
Rear Panel Connections
AC Power Cord
Plug into the power source.
EURO AV OUTPUT (TO TV)
Connect to your TV set.
MONITOR OUT (VIDEO)
Connect to a TV with video input.
VIDEO (AUDIO IN L/R)
Connect the audio output of an external
source (VCR, LD player, etc).
AM LOOP ANTENNA CONNECTORS
Connect the AM Loop antenna to this terminal.
SPEAKER CONNECTORS
Connect the six supplied speakers
to these terminals.
Do not touch the inner pins of the jacks on the rear
panel. Electrostatic discharge may cause permanent
damage to the unit.
Remote Control Operation Range
Point the remote control at the remote sensor and press
the buttons.
Distance: About 6m (20ft) from the front of the
remote sensor
Angle: About 30° in each direction of the front of the
remote sensor
FM ANTENNA CONNECTOR
Connect the FM antenna to this terminal.
Remote control battery installation
Detach the battery cover on the rear of
the remote control, and insert two R6
(size AA) batteries with and
aligned correctly.
When using the remote control, point it
at the remote sensor on the unit.
10
Do not mix old and new batteries.
Page 11
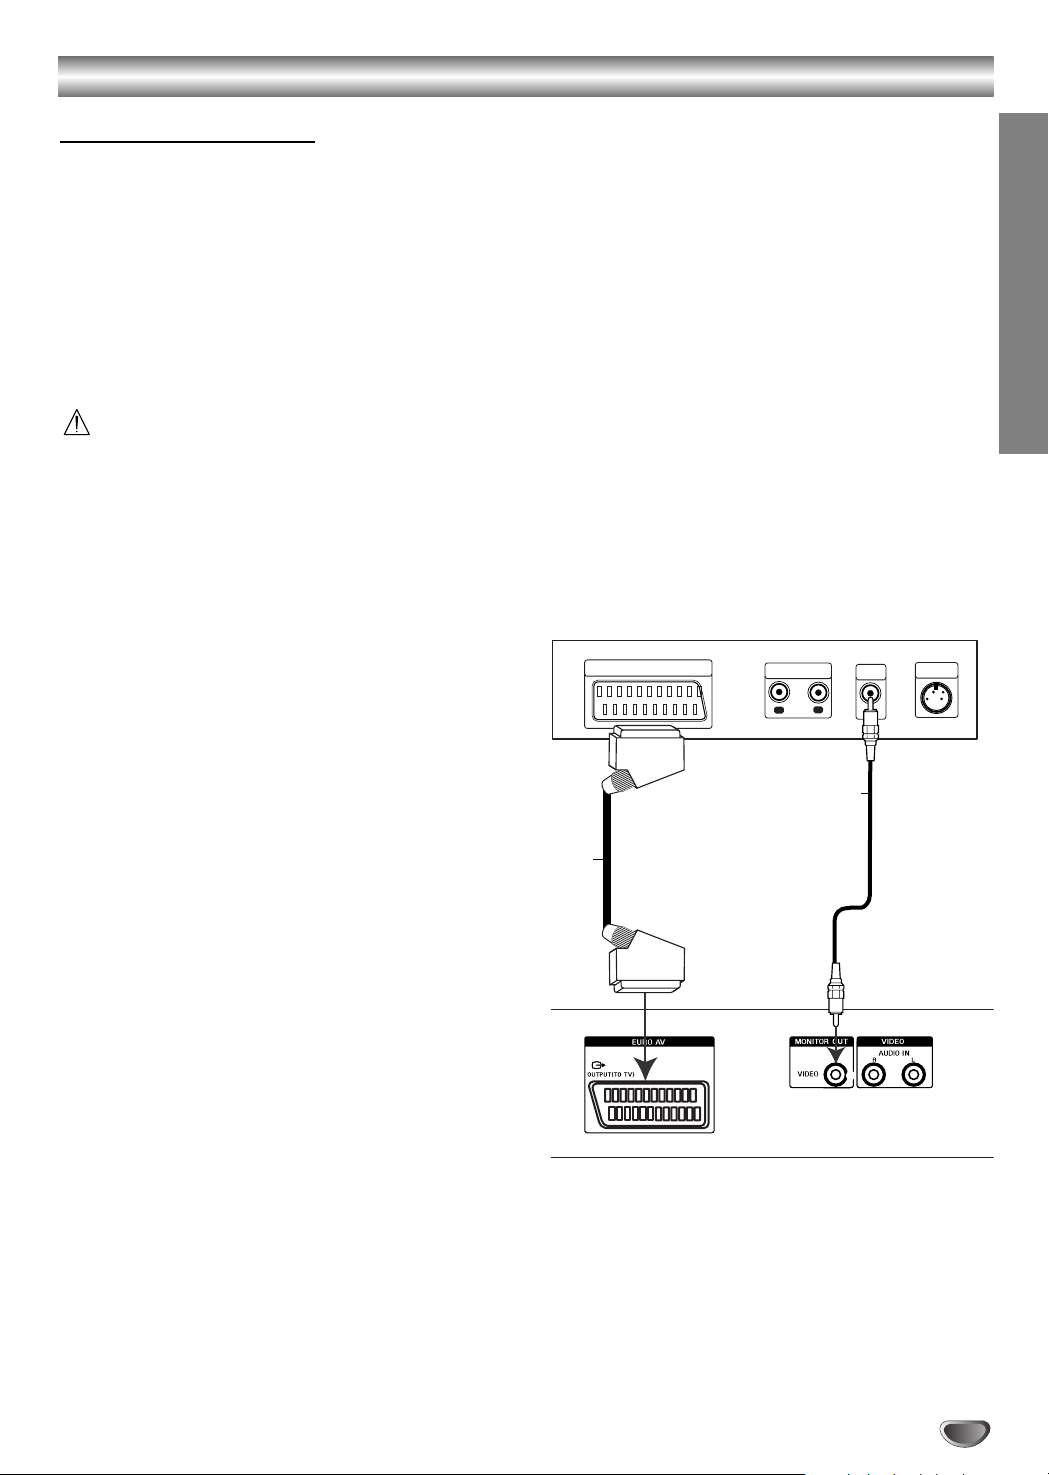
Connections
Connecting to a TV
Make one of the following connections, depending on
the capabilities of your existing equipment.
Tips
Depending on your TV and other equipment you
wish to connect, there are various ways you could
connect the
DVD Receiver
tions described below.
Please refer to the manuals of your TV, VCR or other
devices as necessary to make the best connections.
–
Make sure the DVD Receiver is connected directly to
the TV. Select the correct AV input on your TV.
– Do not connect your
VCR.The DVD image could be distorted by the copy
protection system.
Video connection
Connect the MONITOR OUT jack on the DVD Receiver
to the video in jack on the TV using the video cable
supplied (V).
SCART connection
Connect the EURO AV OUTPUT (TO TV) jack on the
DVD Receiver to the SCART IN jack on the TV using
the Scart cable (S).
. Use one of the connec-
DVD Receiver
to TV via your
Rear of TV
SCART INPUT
AUDIO INPUT
R
PREPARATION
VIDEO
INPUT
L
V
S-VIDEO
INPUT
Note
When you connect the
DVD Receiver
to your TV, be
sure to turn off the power and unplug both units from
the wall outlet before making any connections.
S
(not supplied) (not supplied)
Rear of DVD Receiver
11
Page 12
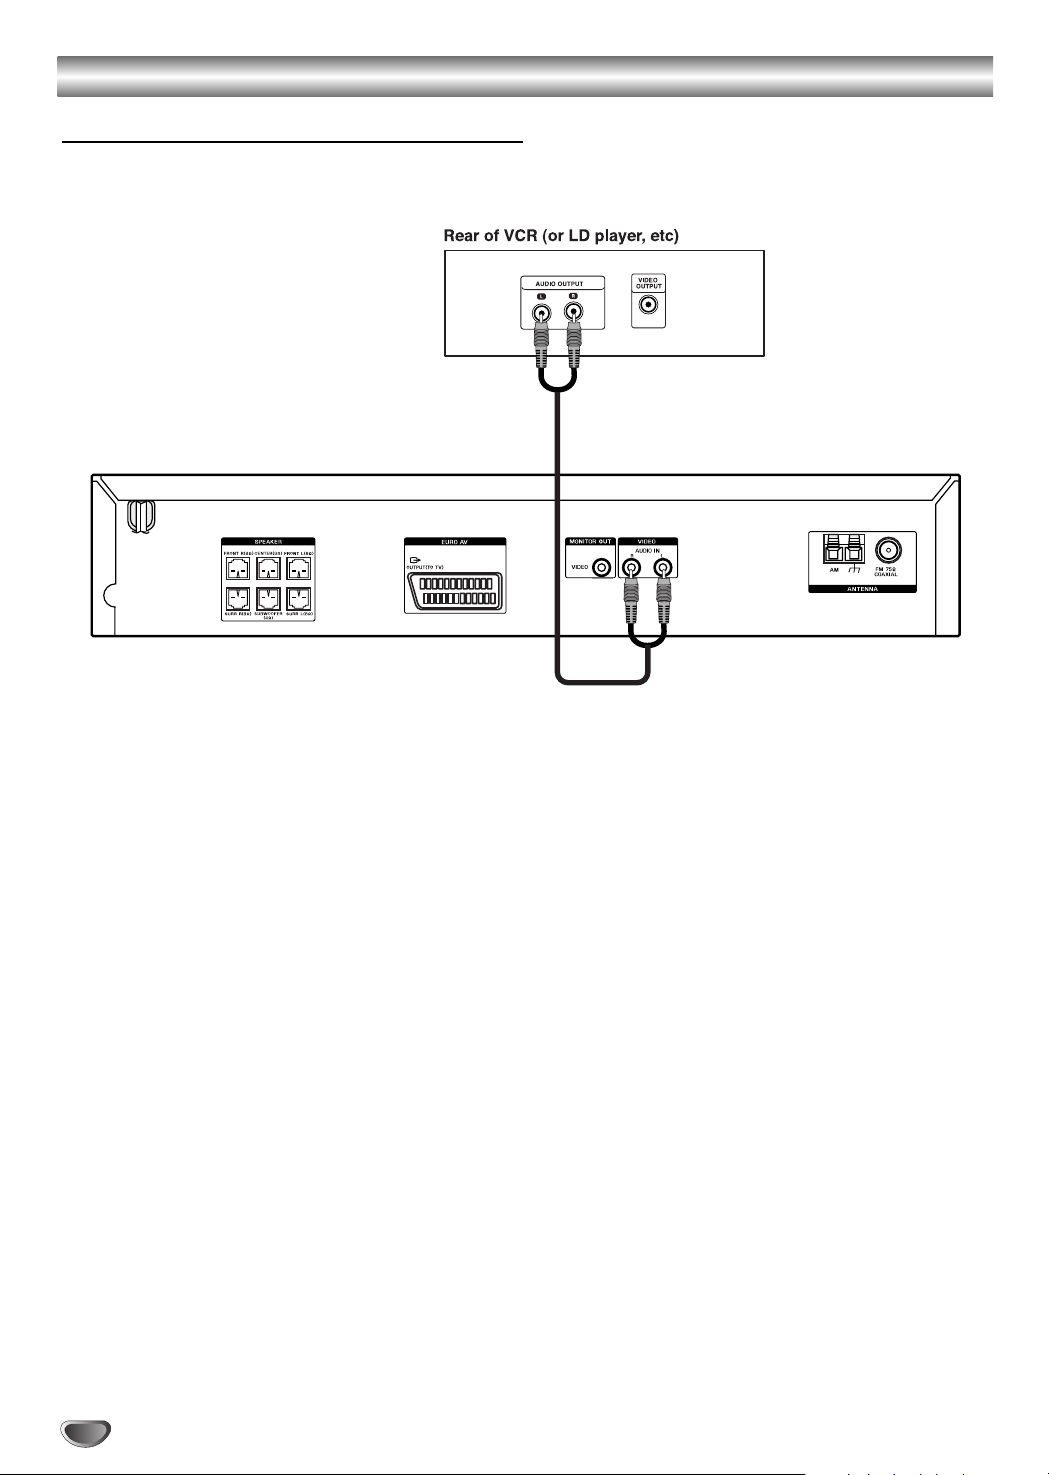
Connections (Continued)
Connecting to External Equipment
(not supplied)
Connection
Connect the VIDEO (AUDIO L/R) jacks on the DVD
Receiver to the AUDIO OUTPUT (L/R) jacks on the
VCR, LD player, etc using the audio cables.
Tip
Press FUNCTION on the remote control to select input
to these jacks.
VIDEO appears on the Display Window.
12
Page 13
Connections (Continued)
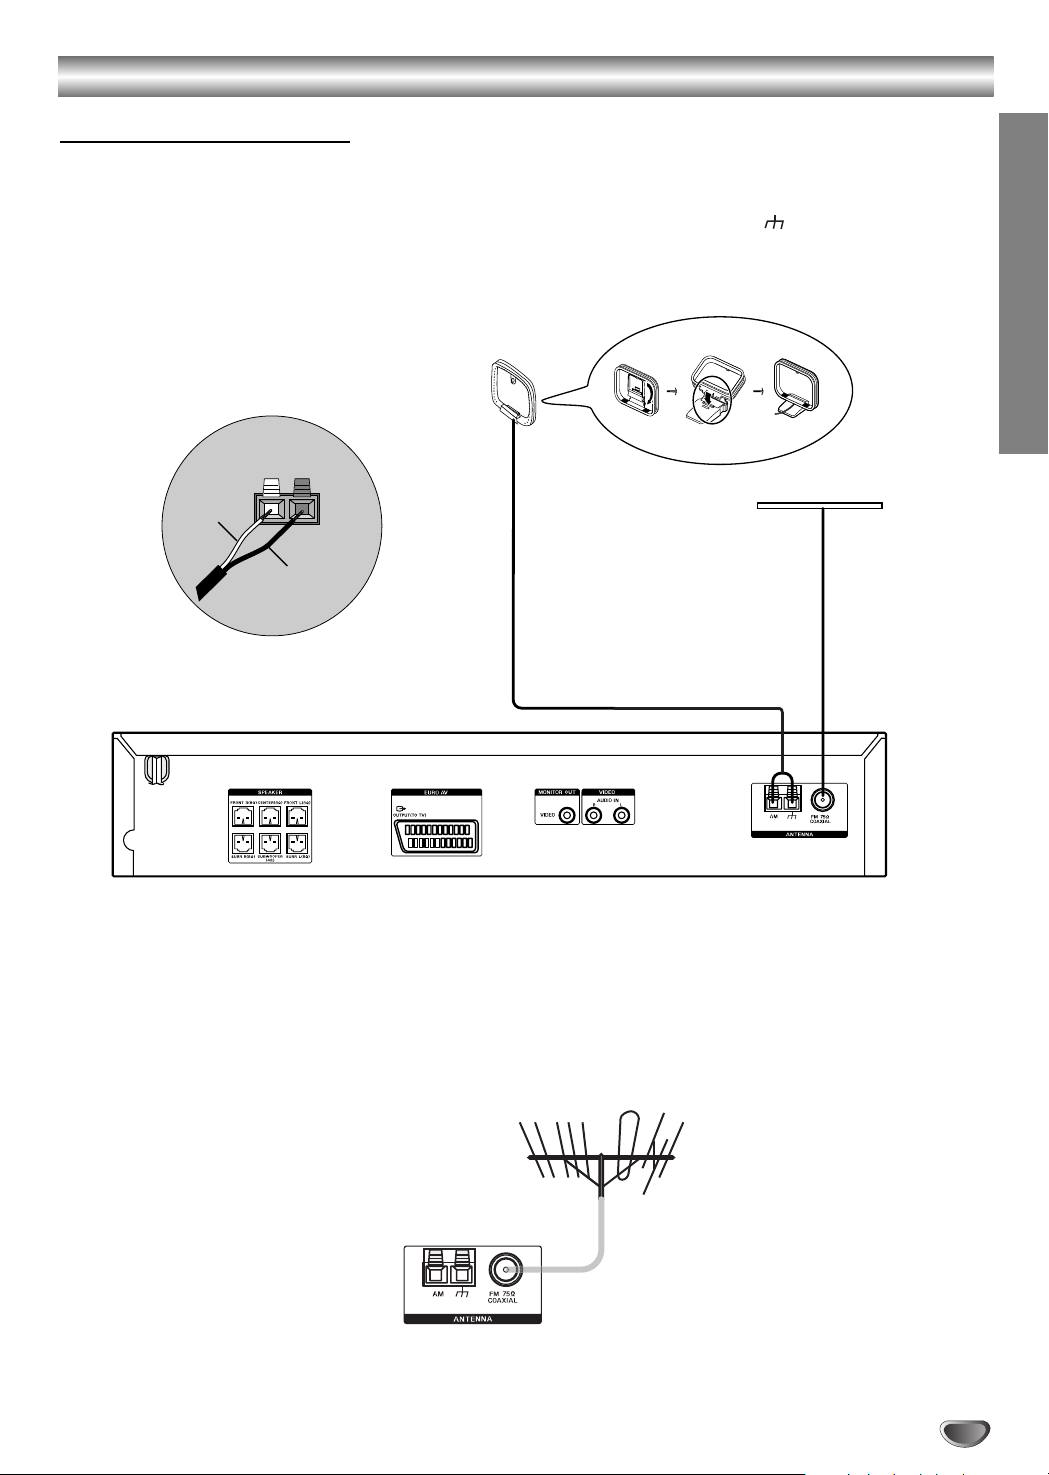
Antenna Connections
Connect the supplied FM/AM antenna for listening to the radio.
Connect the AM Loop antenna to the AM LOOP connector.
Connect the FM antenna to the FM 75 Ω COAXIAL connector.
When you connect the supplied AM Loop antenna, connect the black cord (B) to the terminal, and the white
cord (A) to the other terminal.
AM Loop antenna (supplied)
FM antenna (supplied)
A
B
Notes
To prevent noise pickup, keep the AM Loop antenna away from the DVD Receiver and other components.
Be sure to fully extend the FM antenna.
After connecting the FM antenna, keep it as horizontal as possible.
PREPARATION
Tip
If you have poor FM reception, use a 75Ω coaxial cable (not supplied) to connect the system to an outdoor FM
antenna as shown below.
13
Page 14
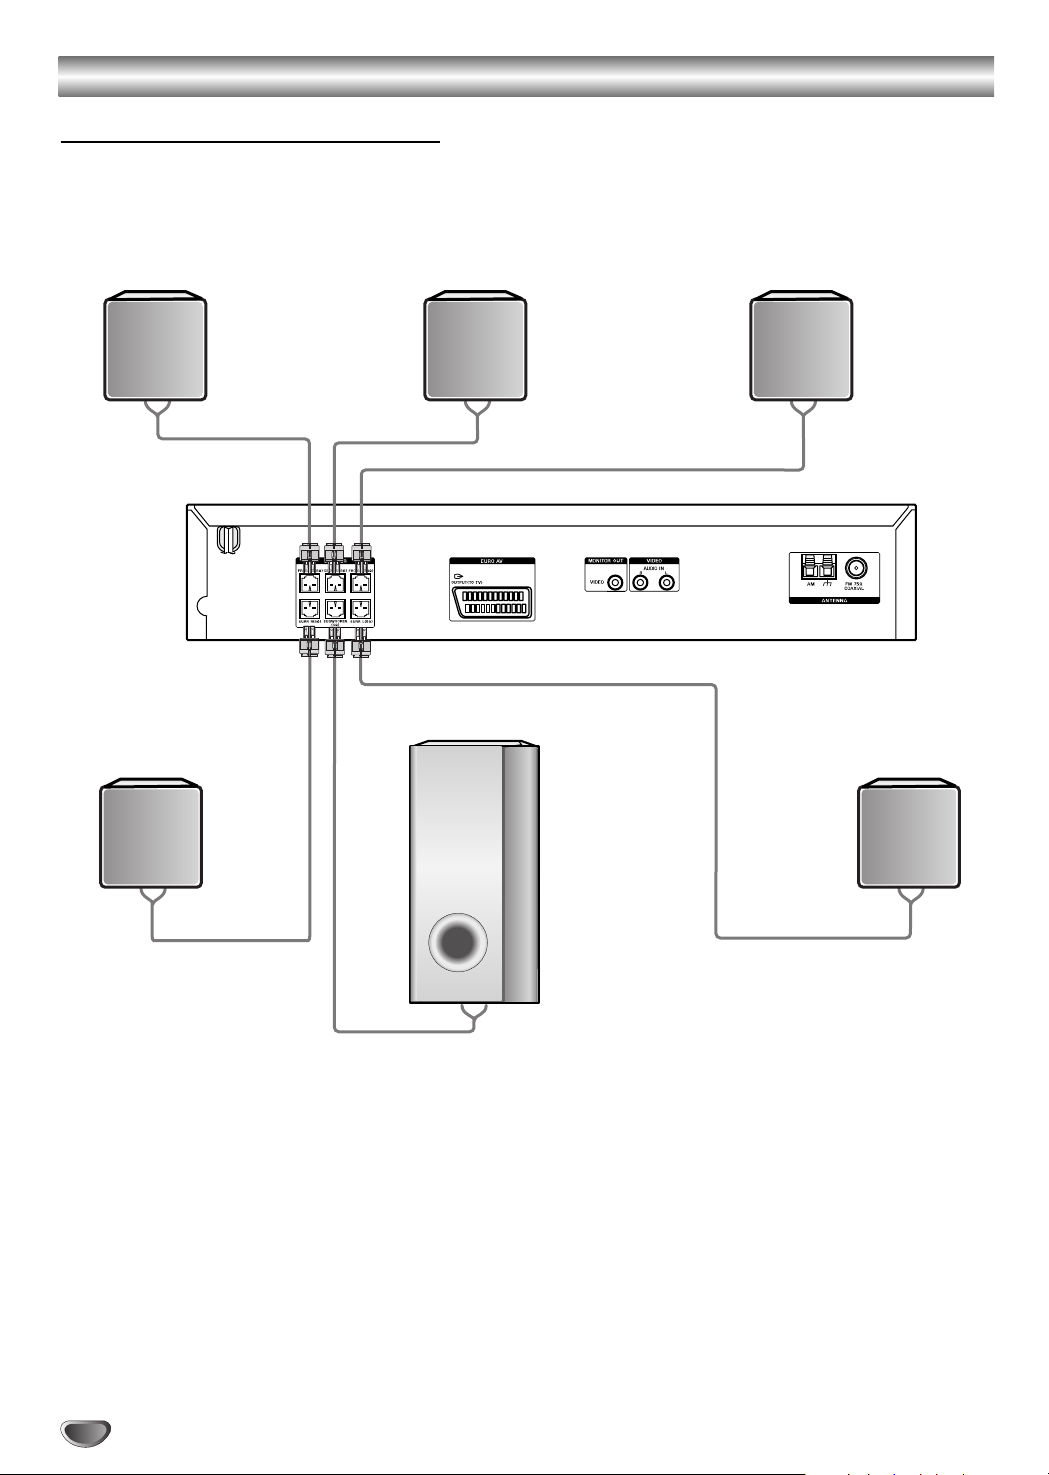
Connections (Continued)
Front speaker
(Right)
Front speaker
(Left)
Centre speaker
Surround speaker
(Right surround)
Subwoofer
Surround speaker
(Left surround)
Speaker System Connection
Connect the speakers using the supplied speaker cords.
To obtain the best possible surround sound, adjust the speaker parameters (volume, distance, etc.).
Notes
Be sure to match the speaker cable to the appropriate terminal on the components: + to + and – to –. If the cables are
reversed, the sound will be distorted and will lack base.
If you use front speakers with low maximum input rating, adjust the volume carefully to avoid excessive output on the speakers.
Do not disassemble the front covers of supplied speakers.
Speaker stand is optional.
14
Page 15
Connections (Continued)
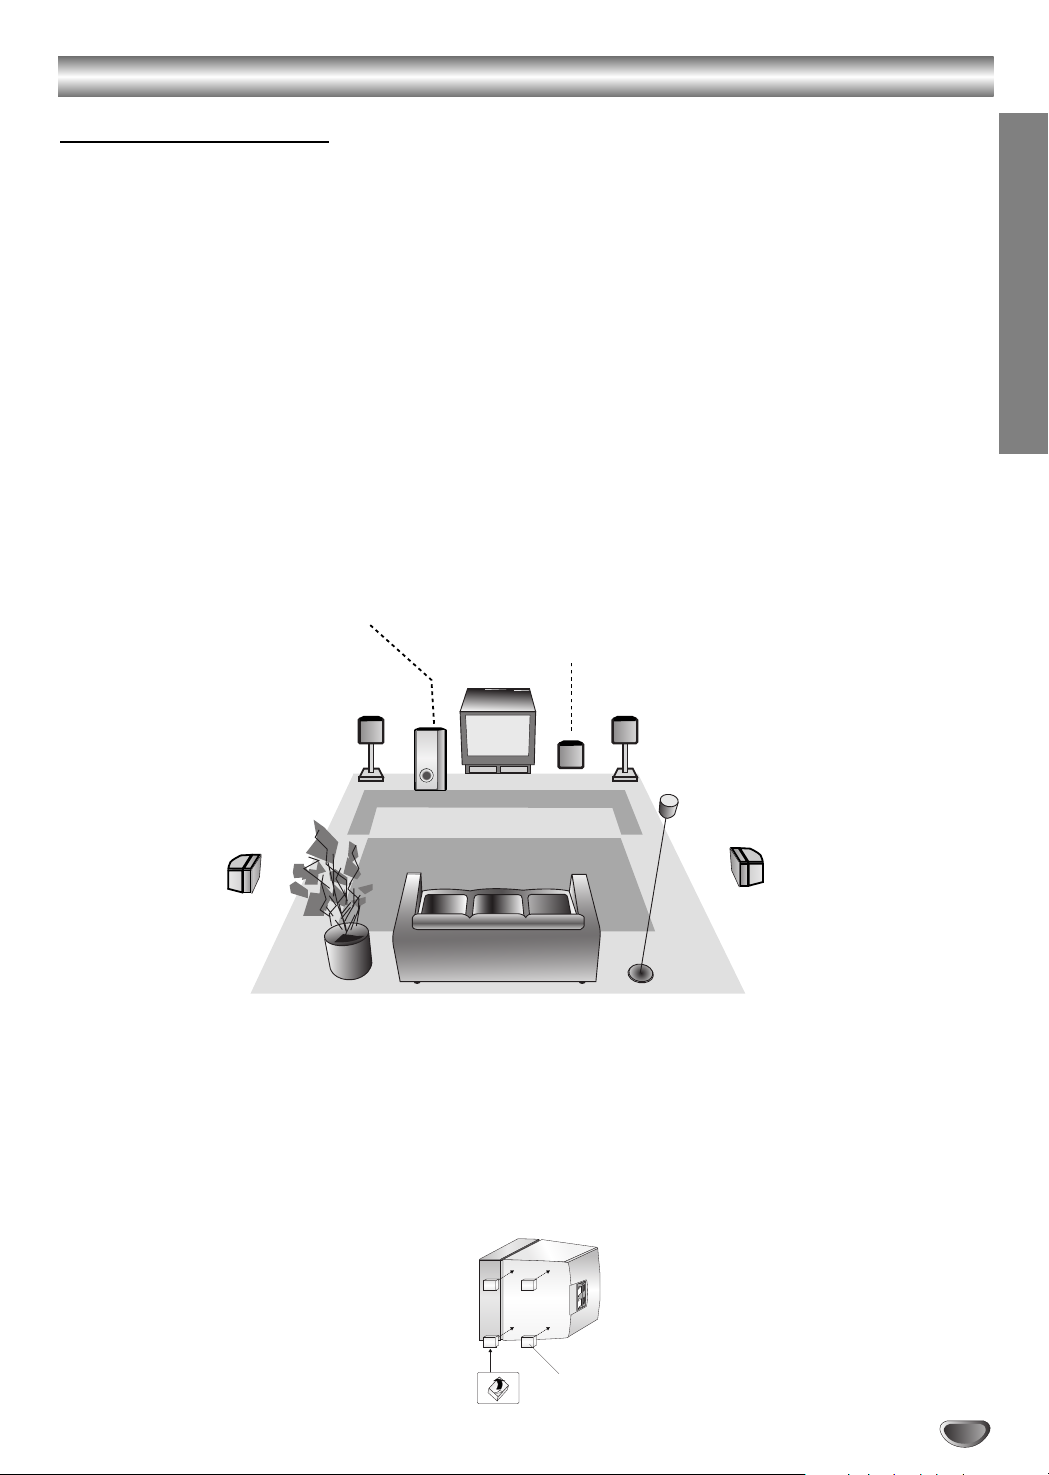
Speaker Positioning
In the case of normal position use the 6 speakers (2 front speakers, centre speaker, 2 surround speakers and
subwoofer).
If you want to play the excellent bass sound, DTS digital surround or Dolby Digital surround, you should connect a
subwoofer.
•Front speakers
According to your listening position set up the speakers for equal distance. And by hearing position set up the inter val between
speakers to 45 degree.
• Centre speaker
The centre speakers and front speakers are ideally the same height.But normally place it above or below the television.
• Surround speakers
Place left and right behind the listening area.These speakers recreate sound motion and atmosphere required for surround
sound playback.For best results, do not install the surround speakers too far behind the listening position and install them at or
above the level of the listener’s ears.It is also effective to direct the surround speakers towards a wall or ceiling to further
disperse the sound.
In the case of a smaller room size, if the audience is near to the rear wall set the surround speakers opposite each other, and
set the surround speakers above 60 - 90 cm than the listener’s ears.
• Subwoofer
This can be placed in any front position.
Subwoofer
Centre Speaker
PREPARATION
Front Speaker
(Left)
Surround Speaker
(Left)
Front Speaker
(Right)
Surround Speaker
(Right)
Speaker Positioning Example
Note
Speaker stand is optional.
To attach the foot pads
To prevent speaker vibration or movement while listening, attach the supplied foot pads to the speakers without
Subwoofer, as shown.
Foot pads
15
Page 16
Selecting the Output/Input Source
SONY TV DIRECT
TUNER/
BAND
FUNCTION
Follow these guidelines to select and switch among the
various DVD/VCR Receiver input and output sources:
• CD/DVD
To view output from the DVD:
Press SONY TV DIRECT on the remote.
The “CD/DVD” appears in the Display Window.
• TUNER FM/AM
To listen to AM/FM radio broadcasts:
Press TUNER/BAND to toggle between AM and FM
radio.The selected frequency appears in the display
window.
• INPUT SELECT
To listen to an audio source connected to the
AUDIO IN (L/R) jack of VIDEO:
Press FUNCTION on the remote control repeatedly.
The “VIDEO” appears in the Display Window.
Audio will come from an external source connected
to the AUDIO IN (L/R) jacks of VIDEO (for rear
panel).
To listen to an audio source connected to the
EURO AV OUTPUT (TO TV):
Press FUNCTION on the remote control repeatedly.
The “TV” appears in the Display Window.
Audio will come from an external source connected
to the EURO AV OUTPUT (TO TV) (for rear panel).
16
Page 17

Before Operation
Mini Glossary for Audio Stream &
Surround mode
DTS
Allows you to enjoy 5.1(or 6) discrete channels of high quality
digital audio from DTS program sources such as discs, DVD
and compact discs, etc.bearing the trademark. DTS Digital
Surround delivers up to 6 channels of transparent audio(which
means identical to the original masters) and results in exceptional clarity throughout a true 360 degree sound field. The
term DTS is a trademark of DTS Technology, LLC.
Manufactured under license from DTS Technology, LLC.
DOLBY DIGITAL
The Dolby Digital surround format lets you enjoy up to 5.1
channels of digital surround sound from a Dolby Digital program source. If you play DVDs with “ ” mark, you can enjoy
even better sound quality, greater spatial accuracy, and
improved dynamic range.
DOLBY PRO LOGIC
Use this mode when playing movie or Dolby Digital 2 channel
which carries the “ ” mark. This mode provides the effect
of being in a movie theatre or live concert house-an effect with
an intensity which can only be obtained through DOLBY PRO
LOGIC SURROUND. The effect of the front/back/left/right
movement of the sound image, as well as the sense of fixed
position in the sound image, is much clearer and more dynamic than before.
DOLBY PRO LOGIC II
Dolby Pro Logic II creates five full-bandwidth output channels
from two-channel sources.This is done using an advanced,
high-purity matrix surround decoder that extracts the spatial
properties of the original recording without adding any new
sounds or tonal colorations.
PLII MOVIE mode:
The Movie mode is for use with stereo television shows and all
programs encoded in Dolby Surround.The result is enhanced
soundfield directionality that approaches the quality of discrete
5.1-channel sound.
PLII MUSIC mode:
The Music mode is for use with any stereo music recordings.
Sound Mode
You can enjoy surround sound simply by selecting one
of the pre-programmed sound fields according to the
program you want to listen to.
A) By pressing MODE button
Each time you press MODE button, the sound mode is
changed in the following order;
FLAT → ROCK → POP → JAZZ → CLASSIC → NEWS →
FLAT ...
Tips
FLAT: Linear frequency response.
ROCK: Reproduces the acoustics of rock music.
POP: Reproduces the acoustics of pop music.
JAZZ: Reproduces the acoustics of a jazz club.
CLASSIC: Reproduces the acoustics of orchestral
music.
NEWS: Reproduces the acoustics of TV news sound.
B) By pressing AUTO FORMAT DIRECT button
Each time you press AUTO FORMAT DIRECT button,
the sound mode is changed in the following order;
A.F.D. AUTO → DOLBY PL → PLII MOVIE → PLII MUSIC →
A.F.D. AUTO ...
(This function available 2-channel mode only)
Notes
MP3 disc is not available.
This function is available during only playback mode.
Sound Mode is not applicable when headphone is used.
When DVD is inserted.
You can change the sound mode of DVD (Dolby Digital, DTS,
PRO LOGIC, etc) by pressing the AUDIO button on the remote
during playback.
Although the DVD contents differ from disc to disc, the following explains the basic operation when this feature is used.
Each time you press AUDIO button, the sound mode of DVD is
changed as the following order;
→→→
PREPARATION
A.F.D. AUTO
Software with multichannel surround audio signals is played
according to the way it was recorded.
Notes
This function is available during only playback mode.
A.F.D. AUTO is not applicable when headphone is used.
For your reference
•
The DVD Receiver memorizes the last mode
settings for each source individually.
•
You can identify the encoding format of program
software by looking at its packaging.
- Dolby Digital discs are labeled with the logo.
- Dolby Surround encoded programs are labeled with
the logo.
- DTS Digital Surround discs are marked with the
.
Note
Sound Mode is not applicable when headphone is used.
17
Page 18
Before Operation (Continued)
RESUME
OFF
ALL
TRACK
CHAPT
TITLE
1 /3
1 /12
0:20:09
1 ENG
D
5.1 CH
OFF
1 /1
AUTO
1 /3
AUTO
0:20:09
ST
General Explanation
This manual gives basic instructions for operating the
DVD Receiver.Some DVDs require specific operation or
allow only limited operation during playback.When this
occurs, the symbol appears on the TV screen, indicating that the operation is not permitted by the DVD
Receiver or is not available on the disc.
On-Screen Display
General playback status can be displayed on the TV
screen. Some items can be changed on the menu.
On-screen display operation
Press DVD DISPLAY during playback.
1
Press V/v to select an item.
2
The selected item will be highlighted.
Press B/b to change the setting of an item.
3
The number buttons can also be used for setting
numbers (e.g., title number).For some functions,
press ENTER to execute the setting.
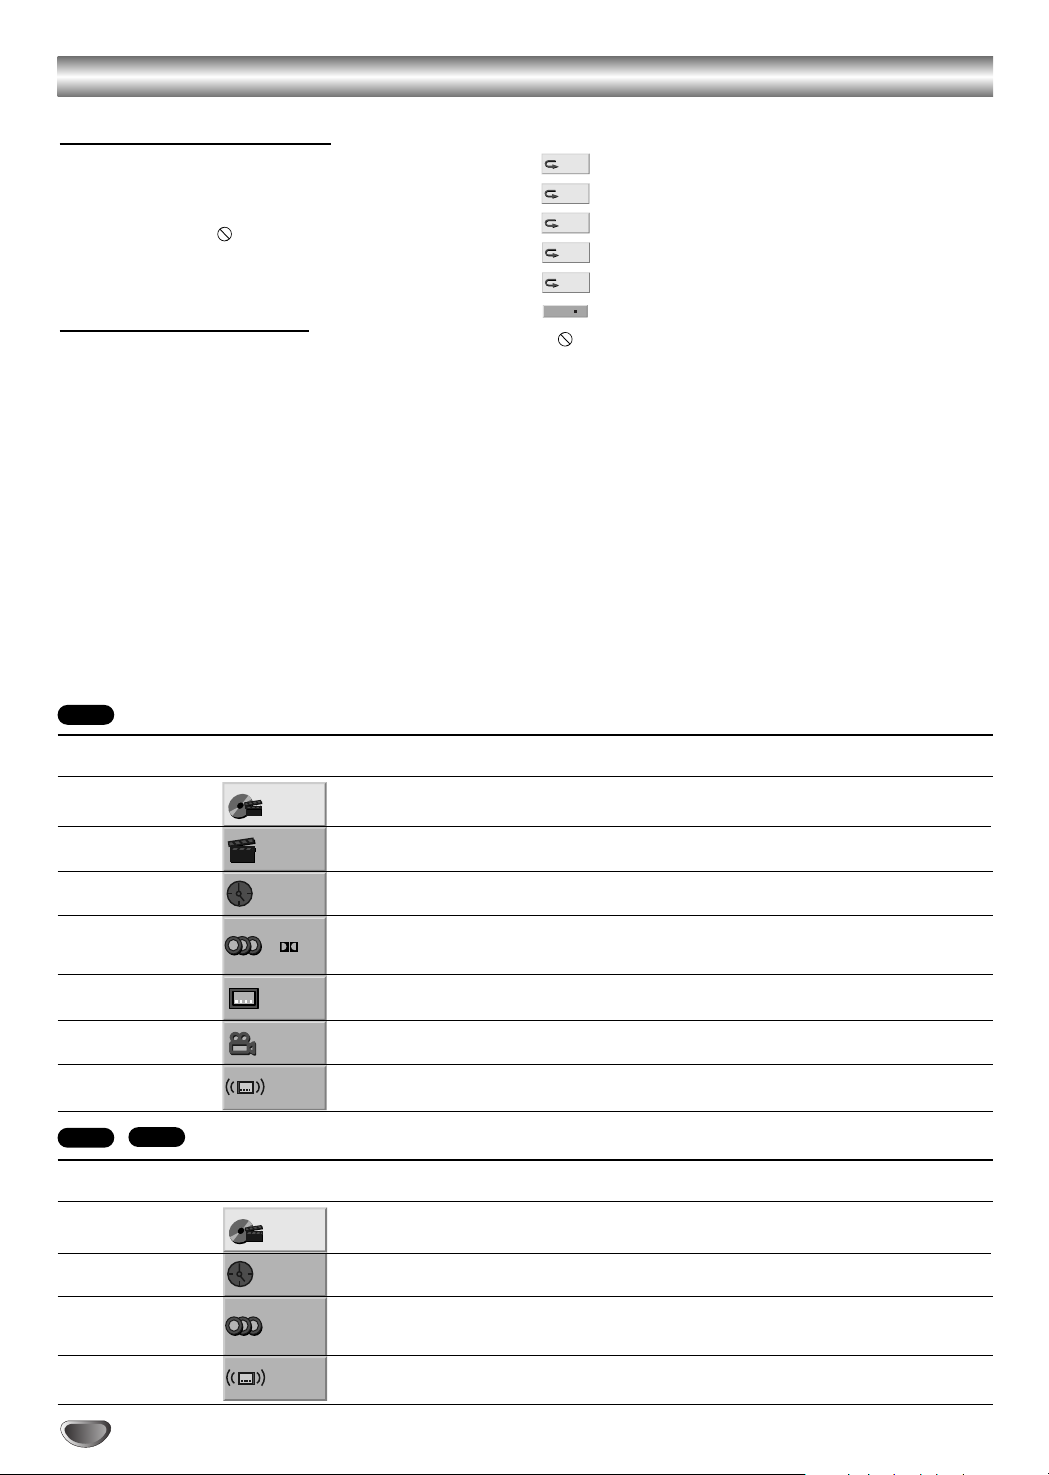
Temporary Feedback Field Icons
Repeat Title
Repeat Chapter
Repeat Track (non-PBC Video CDs, MP3, CD)
Repeat All Tracks (non-PBC Video CDs , MP3, CD)
Repeat Off
Resume play from this point
Action prohibited or not available
Notes
Some discs may not provide all of the features on the
on-screen display example shown below.
If no button is pressed for 10 seconds, the on-screen
display disappears.
DVD
Items
Title Number
Chapter Number
Time search
Audio language
and Digital Audio
Output mode
Subtitle language
Angle
Sound
VCD2.0
VCD1.1
Items
Track Number
Time
Audio Channel
Sound
Function (Press V/v to select desired item)
Shows the current title number and total number of titles,
and skips to the desired title number.
Shows the current chapter number and total number of
chapters, and skips to the desired chapter number.
Shows the elapsed playing time, and
searches the point directly from the elapsed time.
Shows the current audio soundtrack language,
encoding method, and channel number, and
changes the setting.
Shows the current subtitles language, and
changes the setting.
Shows the current angle number and total number of
angles, and changes the angle number.
Shows the current sound mode, and
changes the setting.
Function (Press V/v to select desired item)
Shows the current track number, total number of tracks, PBC
On mode or skips to the desired track number in the PBC Off
mode
Shows the elapsed playing time (Display only)
Shows the audio channel, and
changes the audio channel.
Shows the current sound mode, and
changes the setting.
Selection Method
B/ b
Numbers, ENTER
B/ b,./ >
Numbers, ENTER
Numbers, ENTER
AUTO FORMAT DIRECT
,or
B/ b
,or
AUDIO
B/ b
,or
SUBTITLE
B/ b
,or
ANGLE
or
Selection Method
B/ b
–
B/ b
AUDIO
,or
,or
Numbers, ENTER
AUTO FORMAT DIRECT
18
Page 19

Before Operation (Continued)
Initial Settings
You can set your personal preferences on the DVD
function mode.
Disc Audio
Disc Subtitle
Disc Menu
Rating
Area Code
TV Aspect
Menu Language
5.1 Speaker Setup
Others
General Operation
Press DVD SETUP.
1
The Setup menu appears.
Use V/v to select the desired option.
2
The screen will show the current setting for the
selected option, as well as alternate setting(s).
While the desired option is selected, press b,
3
then V/v to select the desired setting.
Press ENTER to confirm your selection.
4
Some options require additional steps.
Press DVD SETUP, RETURN, or H (PLAY) to
5
exit the setup menu.
Language
Disc Language
Select a language for the disc’s Menu, Audio, and
Subtitle features.
Original : The original language set for the disc is selected.
Other :To select another language, use number buttons to
enter the corresponding 4-digit number according to the
language code list on page 35. If you enter the wrong
language code, press CLEAR.
DVD
Disc Audio
Disc Subtitle
Disc Menu
Rating
Area Code
TV Aspect
Menu Language
5.1 Speaker Setup
Others
Original
English
French
German
Spanish
Italian
Dutch
Polish
Hungarian
Other — — — —
Original
English
French
German
Spanish
Italian
Dutch
Polish
Hungarian
Other — — — —
Menu Language
Select a language for the Setup menu.This is the menu
you see when you press DVD SETUP.
Disc Audio
Disc Subtitle
Disc Menu
Rating
Area Code
TV Aspect
Menu Language
5.1 Speaker Setup
Others
TV Aspect
DVD
4:3 Letterbox: Select when a standard 4:3 TV is con-
nected. Displays pictures with masking bars above and
below the picture.
4:3 Panscan: Select when a standard 4:3 TV is connected. Displays pictures cropped to fill your TV screen.
Both sides of the picture are cut off.
16:9 Wide: Select when a 16:9 wide TV is connected.
Disc Audio
Disc Subtitle
Disc Menu
Rating
Area Code
TV Aspect
Menu Language
5.1 Speaker Setup
Others
English
Spanish
French
German
Italian
Dutch
Portugues
4:3
Letterbox
4:3
Panscan
16:9
Wide
PREPARATION
Note
Disc Language selection may not work for some DVDs.
19
Page 20
Before Operation (Continued)
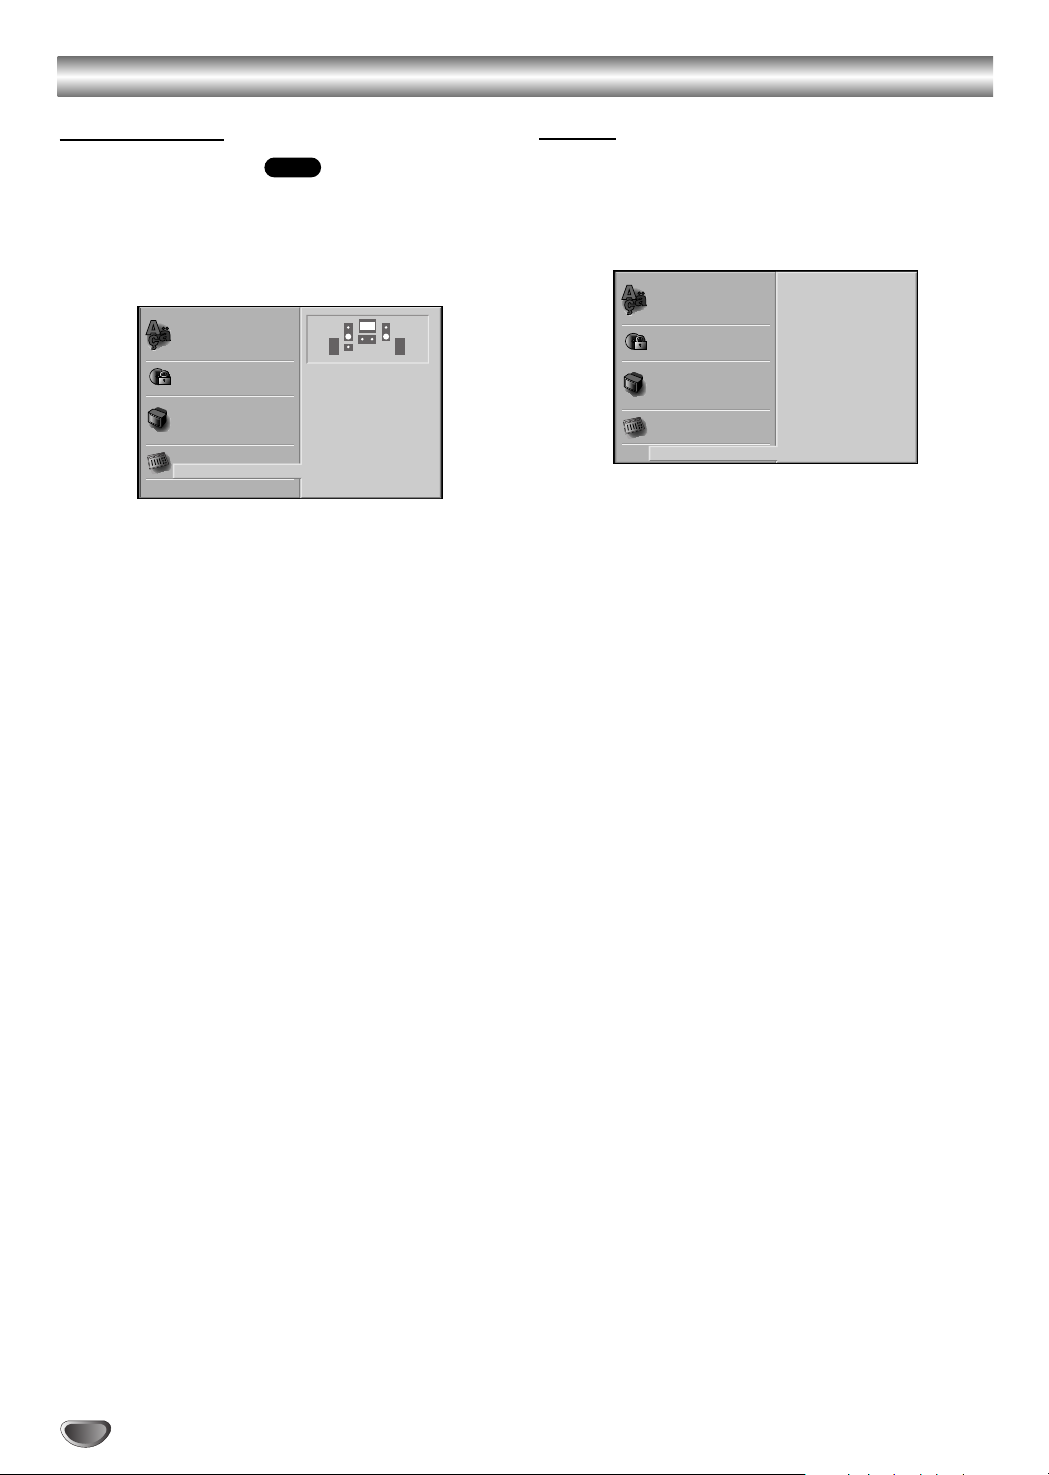
Speaker setup
5.1 Speaker Settings
Select speaker settings, including volume balance and
distance, or test the speaker settings.
Speaker settings are only active on the Analog MultiChannel Output. (See “Speaker Setup”, page 29.)
Disc Audio
Disc Subtitle
Disc Menu
Rating
Area Code
TV Aspect
Menu Language
5.1 Speaker Setup
Others
DVD
S S
Front L
Volume 0 dB
Size Small
Distance 0.3 m
Test
Return
Others
The DRC and PBC settings can be changed.
Press V/v to select the desired item and press
ENTER.The setting of the selected item is changed
between On and Off.
Disc Audio
Disc Subtitle
Disc Menu
Rating
Area Code
TV Aspect
Menu Language
5.1 Speaker Setup
Others
Dynamic Range Control (DRC)
With the DVD*1format, you can hear a program’s
soundtrack in the most accurate and realistic presentation possible, thanks to digital audio technology.
However, you may wish to compress the dynamic range
of the audio output (the difference between the loudest
sounds and the quietest ones).Then, you may listen to
a movie at a lower volume without losing clarity of
sound. Set DRC to On for this effect.
*1:Dolby Digital only
DRC
PBC
Off
On
Playback Control (PBC)
On: Video CDs with PBC are played according to the PBC.
Off: Video CDs with PBC are played the same way as Audio
CDs.
20
Page 21

Before Operation (Continued)
Parental Control
Rating
Movies on DVDs may contain scenes not suitable for
children.Therefore, discs may contain Parental Control
information that applies to the complete disc or to
certain scenes on the disc. These scenes are rated from
1 to 8, and alternatively, more suitable scenes are available for selection on some discs.Ratings are
country dependent. The Parental Control feature allows
you to prevent discs from being played by your children
or to have certain discs played with alternative scenes.
1
DVD
Disc Audio
Disc Subtitle
Disc Menu
Rating
Area Code
TV Aspect
Menu Language
5.1 Speaker Setup
Others
Select Rating on the setup menu using V/v
buttons on the setup menu.
While Rating is selected, press b.
8
7
6
5
4
3
2
1
Unlock
Change
2
When you have not entered a password yet.
3
Enter a 4-digit password using the number buttons
to create a personal 4-digit security password, then
press ENTER. Enter the 4-digit password again and
press ENTER to verify.
When you have already entered a password;
Enter a 4-digit password using the number
buttons to confirm the personal 4-digit security
password, then press ENTER.
If you make a mistake before pressing ENTER, press
CLEAR and enter 4-digit security password again.
Select a rating from 1 to 8 using V/v buttons.
4
One (1) has the least playback restrictions.
Eight (8) has the most playback restrictions.
Unlock: If you select Unlock, Parental Control is not
active.The disc will play in full.
Ratings 1 to 8: Some discs contain scenes not
suitable for children.If you set a rating for the DVD,
all disc scenes with the same rating or lower will be
played.Higher rated scenes will not be played
unless an alternative scene is available on the disc.
The alternative must have the same rating or a
lower one.If no suitable alternative is found, playback will stop. You must enter the 4-digit password
or change the rating level in order to play the disc.
Press ENTER to confirm your rating selection,
5
then press DVD SETUP to exit the menu.
Area Code
Enter the code of an area whose standards were used
to rate the DVD video disc, referring to the list (See
“Area Code List”, page 36.).
Select the Country Code option using the V/v
1
buttons on the setup menu.
While Country Code is selected, press b.
DVD
Disc Audio
Disc Menu
Rating
Area Code
TV Aspect
Menu Language
5.1 Speaker Setup
Others
Code Set
U SDisc Subtitle
2
Follow step 3 of “Rating” on left.
3
Select the first character using the V/v buttons.
4
Press b to shift to second character and select
5
the second character using V/v buttons.
Press ENTER to confirm your Country Code
6
selection, then press DVD SETUP to exit the
menu.
Note
Confirmation of the 4-digit password is necessary when
the password is changed (see Changing the 4-digit
password below ).
Changing the 4-digit password
1 Follow Steps 1-2 as shown above to the left (Rating).
2 Enter the old password, then press ENTER.
3 Select Change using V/v buttons then press ENTER.
4 Enter the new 4-digit password, then press ENTER.
5 Enter exactly the same password a second time and
verify by pressing ENTER.
6 Press DVD SETUP to exit the menu.
If you forget your 4-digit password
If you forget your password, to clear the current password follow the procedure below.
1 Press DVD SETUP to display the setup menu.
2 Enter the 6-digit number “210499”.
The 4-digit password is cleared.
3 Enter a new password as shown
(Rating).
above to the left
PREPARATION
21
Page 22

DVD and Video CD Operation
Playing a DVD and Video CD
Playback Setup
Turn on the TV and select the video input source con-
nected to the DVD Receiver.
Set the Output Source to CD/DVD as shown in Selecting
the Output/Input Source on page 16.
Press ZZto open the disc tray.
DVD
VCD1.1VCD2.0
1
Place a disc on the tray, with the label facing up.
2
When a double-sided DVD is inserted, make sure the
side you want to play is facing down.
Press ZZto close the tray.
3
“READING” appears in the display window, and playback starts automatically. If playback does not start,
H
press
In some cases, the disc menu might appear instead.
If a menu screen is displayed
A menu screen may appear automatically after loading a
DVD.
DVD
Use B/b/V/v buttons to select the title/chapter you want to
view, then press ENTER to start playback.
Press DVD TOP MENU or DVD MENU to return to the
menu screen.
VCD2.0
Use the number buttons to select the track you want to
view. Press RETURN to return to the menu screen.
Menu setting and the exact operating procedures for
using the menu may differ depending on the disc.Follow
the instructions on the each menu screen.
You also may set PBC to Off under setup.See page 20.
Notes
If Parental Control is set and the disc is not within the
Rating settings (not authorized), the 4-digit password
must be entered and/or the disc must be authorized (see
Parental Control, on page 21).
DVDs may have a Region Code.
Your DVD Receiver will not play discs that have a Region
Code different from your DVD Receiver.The Region
Code for this DVD Receiver is 2 (two).
Do not keep a fixed image displayed on the screen for a
long time.
General Features
Note
Unless stated otherwise, all operations described use the
remote control. Some features may also be available on
the Setup menu.
Resume Function
When you stop the disc. the player remembers the point
where you pressed x (STOP) and “RESUME x” appears
on the TV screen.Press
from this point.
22
(PLAY).
DVD
H
(PLAY) and play will resume
VCD1.1VCD2.0
CD
Tip
To play from the beginning of the disc, press x twice, then
press
H
(PLAY).
Notes
Depending on where you stopped the disc, the receiver
may not resume playback from exactly the same point.
The point where you stopped playing is cleared when:
- Press x in the STOP mode.
- Turn the power off .
- Open the disc tray.
Selecting Another TITLE
DVD
1 /3
If a disc has more than one title, you can select another
title as follows:
Press DVD DISPLAY. Use V/v to select title icon, then
press the appropriate number buttons (0-9), then use
ENTER to select a title number.
Press DVD DISPLAY, then use B/b to select a title number, then press ENTER.
Selecting Another CHAPTER/TRACK
DVD
VCD2.0
VCD1.1
1 /12
If a title on a disc has more than one chapter or a disc has
more than one track, you can move to another
chapter/track as follows:
Press PREV or NEXT briefly during playback to return
to the beginning of the current chapter/track or to select
the next chapter/track.
Press PREV twice briefly to step back to the previous
chapter/track.
To go directly to any chapter during playback,
press DVD DISPLAY. Use V/v to select chapter/track
icon.Then, enter the chapter/track number with the number buttons (0-9) or use B/b to select chapter.Then,
press ENTER.
Notes
For one-digit numbers, press the number buttons (1-9)
and wait that the operation is performed.
For two-digit numbers, press the number buttons
(0-9) in rapid succession.
On a Video CD with PBC, you must set PBC to Off on
the setup menu to use this function. See page 20.
Search
1 Press m
The DVD Receiver will now go into SEARCH mode.
2 Press m
DVD
or
M during playback.
or
M repeatedly to select the required
VCD1.1VCD2.0
speed: X2 b, 1 m, 2 m, 3 m (backward) or X2 B,
1 M, 2 M, 3 M (forward).
With a Video CD, the Search speed changes: 1 m, 2
m, 3 m (backward) or 1 M, 2 M, 3 M (forward).
3 To return to playback, press
Still Picture
DVD
H
1 Press X (PAUSE) during playback.
The DVD Receiver will go into PAUSE mode.
2 To return to playback, press or X (PAUSE) again or
(PLAY).
1 /3
(PLAY).
VCD1.1VCD2.0
H
Page 23
DVD and Video CD Operation (Continued)
General Features (Continued)
Slow Motion
DVD
1 Press X
(PAUSE) during playback.
The DVD Receiver will now go into PAUSE mode.
2 Press SLOW t or T during pause mode.
The DVD Receiver will enter SLOW mode.
3 Use SLOW t or T to select the required speed:
4 t, 3 t, 2 t or 1 t (backward), or 4 T, 3 T,
2 T or 1 T (forward).
4 To return to playback, press
Note
Slow motion playback in reverse is not applicable for
Video CD.
Repeat
DVD
DVD Video Discs - Repeat Chapter/Title/Off
1 Press REPEAT when playing a disc.
The Repeat icon appears on the TV screen.
2 Press REPEAT to select a desired repeat mode.
CHAPT
TITLE
• CHAPT: repeats the current chapter.
• TITLE: repeats the current title on a disc.
• OFF: does not play repeatedly.
Video CDs - Repeat Track/All/Off
1 Press REPEAT when playing a disc.
The Repeat icon appears on the TV screen.
2 Press REPEAT to select a desired repeat mode.
TRACK
ALL
VCD1.1VCD2.0
H (PLAY).
VCD1.1VCD2.0
OFF
OFF
Notes
On a Video CD with PBC, you must set PBC to Off on
the setup menu to use the Repeat function. See page
20.
When you press PREV twice or NEXT during Repeat
mode to go to previous track or next track, repeat
mode (Chapter repeat and Track repeat only) is
canceled.
Time Search
DVD
0:20:09
-:--:--
The Time Search function allows you to start playing at
any chosen time on the disc.
1 Press DVD DISPLAY during playback.The on-screen
display appears on the screen.
The Time Search box shows the elapsed playing time of the
current disc.
2 Within 10 seconds, use V/v to select the Time Search
icon in the on-screen display.
The “-:--:--” appears in the Time Search box.
3 Within 10 seconds, use the number buttons to enter
the required start time. Enter hours, minutes and seconds from left to right in the box.
If you enter the wrong numbers, press CLEAR to remove the
numbers you entered.Then enter the correct numbers.
4 Within 10 seconds, press ENTER.
Playback starts from the selected time on the disc. If you enter
an invalid time, playback will continue from the current point.
OPERATION
• TRACK: repeats the current track
• ALL: repeats all the tracks on a disc.
• OFF: does not play repeatedly.
23
Page 24

DVD and Video CD Operation (Continued)
General Features (Continued)
Special DVD Features
Checking the contents of DVD Video
discs: Menus
A DVD is divided into a lot of sections, which make up a
picture or music feature.These sections are called
“titles.” When you play a DVD which contains several
titles, you can select the title you want using DVD TOP
MENU.
When you play DVDs that allow you to select items such
as the language for the sound, select these items using
DVD MENU.
1 Press DVD TOP MENU or DVD MENU.
The disc’s menu appears on the TV screen.
The contents of the menu vary from disc to disc.
2 Press B/b/V/v or the number buttons to select the
item you want to play or change.
3 Press ENTER.
Camera Angle
DVD
1 /1
If the disc contains sequences recorded from different
camera angles, the angle icon appears on the TV
screen.You can then change the camera angle if you
wish.
Press ANGLE repeatedly during playback to select a
desired angle.
The number of the current angle appears on the display.
Changing the Audio Language
1 ENG
DVD
Press AUDIO repeatedly during playback to hear a
different audio language or audio track.
Changing the Audio Channel
Press AUDIO repeatedly during playback to hear a different audio channel (ST, LEFT or RIGHT).
Subtitle
Press SUBTITLE repeatedly during playback to see the
different subtitle languages.
Note
If appears, the feature is not available on the disc.
D
5.1 CH
VCD1.1VCD2.0
ST
LEFT
DVD
RIGHT
1 ENG
24
Page 25
Audio CD and MP3 Disc Operation
Program
CD
ST AUTO
0: 56: 18
TRACK01
TRACK02
TRACK03
TRACK04
TRACK05
TRACK06
TRACK07
TRACK08
Clear All
MP3
JPEG
Folder1
Folder2
Folder3
Folder4
Folder5
Folder6
Folder7
Folder8
MP3
OFF00:00
Program
Clear All
TRACK 1.mp3
TRACK 2.mp3
TRACK 3.mp3
TRACK 4.mp3
TRACK 5.mp3
TRACK 6.mp3
TRACK 7.mp3
TRACK 8.mp3
Program
MP3
OFF00:00
1
Clear All
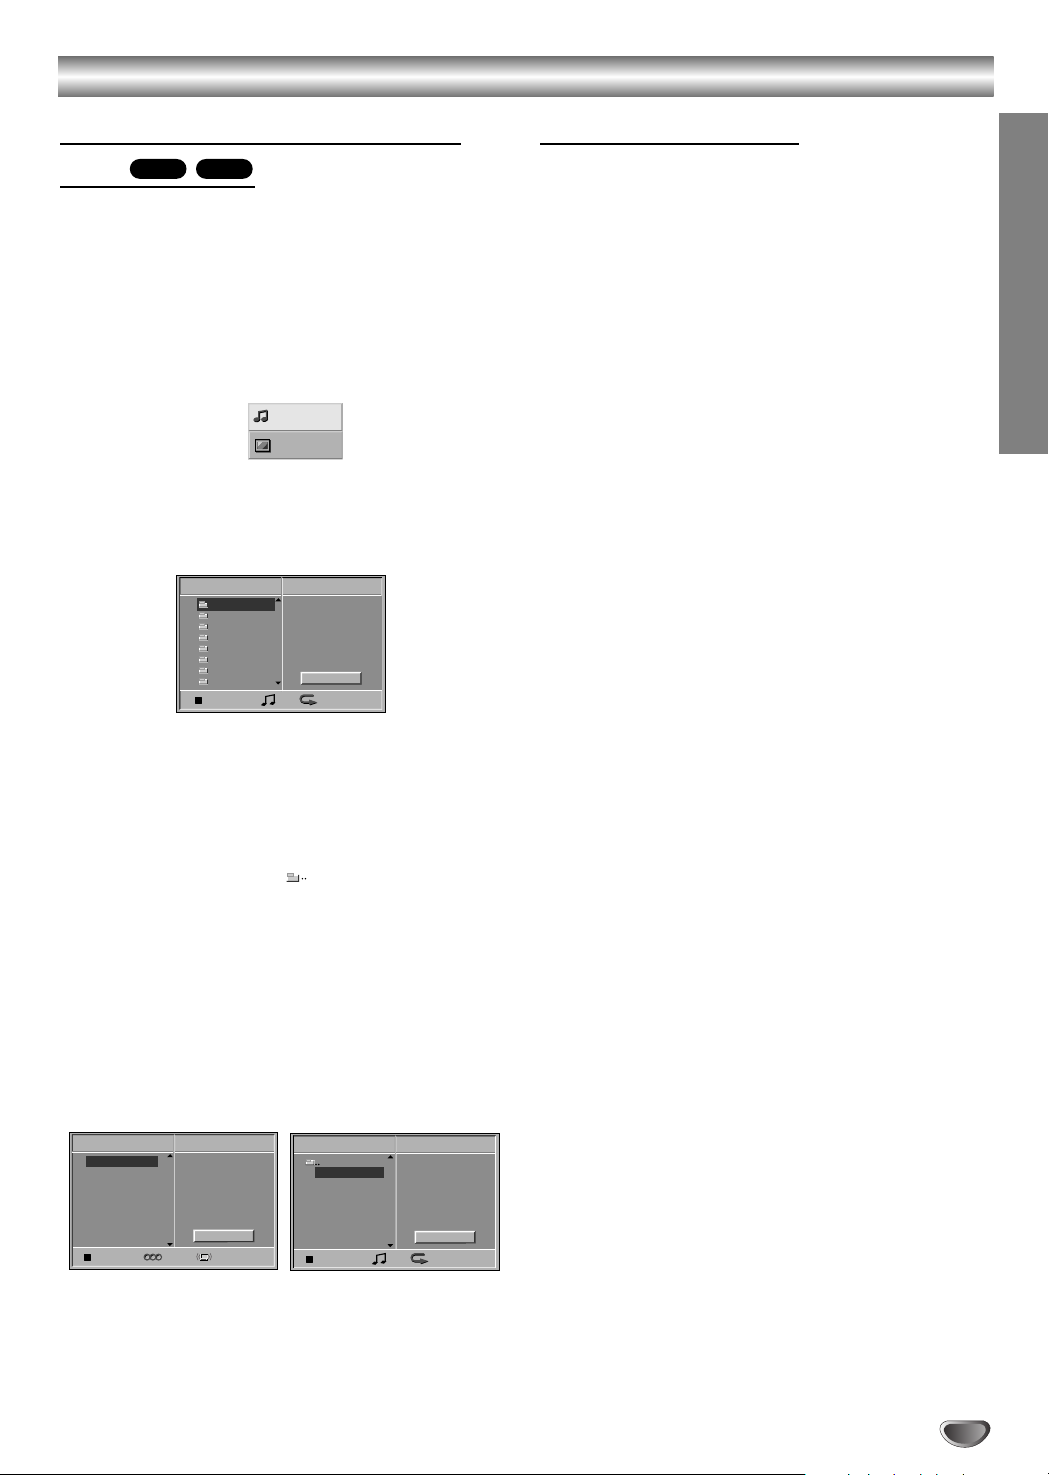
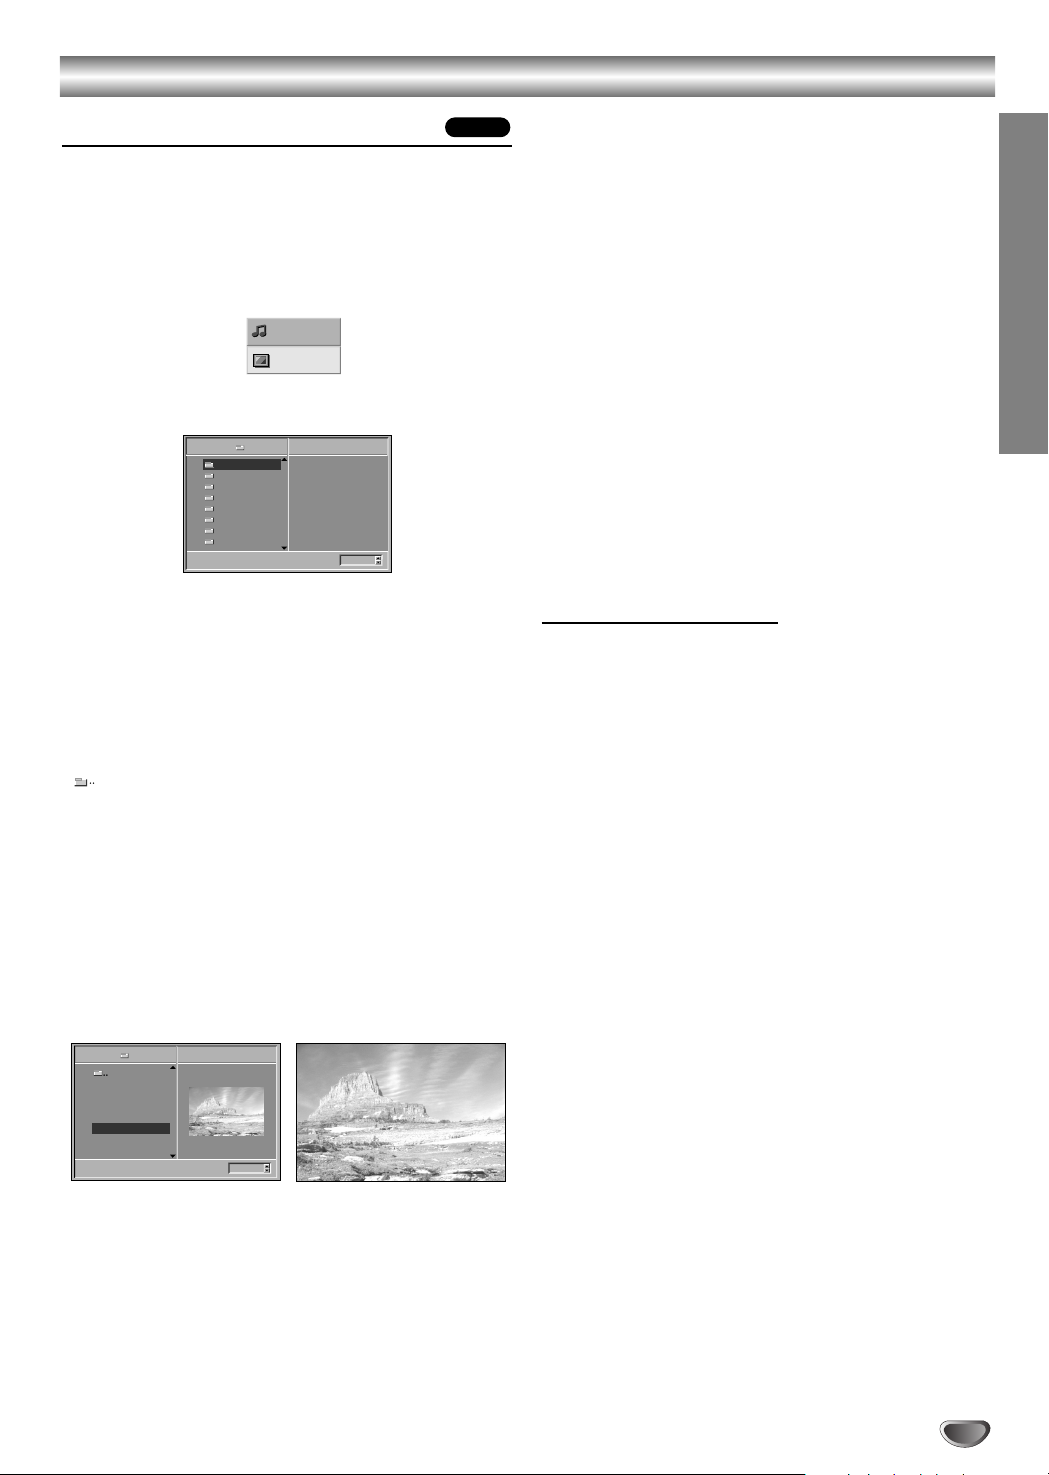
Playing an Audio CD and MP3
Disc
The DVD Receiver can play MP3 formatted recordings
on CD-ROM, CD-R or CD-RW discs.
Before playing MP3 disc, read the notes on MP3 files
on right.
Insert a disc and close the tray.
Audio CD: Audio CD menu appears on the TV
1
screen go to step 4.
MP3 disc: The MP3/JPEG select menu appears on
the TV screen.Go to step 2
Use V/v to select the MP3 then press ENTER.
The MP3 disc Menu appears on the TV screen.
2
Press RETURN to move to the MP3/JPEG select
menu.
Use V/v to select a folder, and ENTER.
A list of files in the folder appears.
3
If a list of files contains another folder, repeat step 3
once more.
Tip
If you are in a file list and want to return to the Folder
list, use the V/v to highlight and press ENTER to
return to the previous menu screen.
Use V/v to select a track then press H (PLAY)
or ENTER.
4
Playback starts.
During playback, the current track’s elapsed playing
time will appear in the display window and menu.
Playback will stop at the end of the disc.
Press DVD TOP MENU to move to the next page.
Press DVD MENU to move to the previous page.
Audio CD Menu MP3 disc Menu
MP3CD
Notes on MP3 Files
About MP3
An MP3 file is audio data compressed by using the
MPEG1 audio layer-3 file-coding scheme.We call
files that have the “.mp3” file extension “MP3 files”.
The DVD Receiver can not read an MP3 file that has
a file extension other than “.mp3”.
MP3 Disc compatibility with this DVD Receiver
is limited as follows:
Sampling Frequency :only at 44.1kHz
Bit rate : within 32 - 320kbps
CD-R physical format should be “ISO 9660”
If you record MP3 files using the software which
cannot create a FILE SYSTEM, it is impossible to
playback MP3 files.
A single session disc requires MP3 files in the first
track. If there is no MP3 file in the 1st track, it cannot
playback MP3 files.If you wish to playback MP3 files,
format all the data in the disc or use a new one.
File names should be named using 8 letters or less
and must incorporate “.mp3” extension
e.g.“********.mp3”.
Do not use special letters such as “/ : * ? “ < > ” etc.
Total number of files on the disc should be less than
650.
This DVD Receiver requires discs/recordings to meet
certain technical standards in order to achieve optimal
playback quality. Pre-recorded DVDs are automatically
set to these standards.There are many different types
of recordable disc formats (including CD-R containing
MP3 files).That require certain pre-existing conditions
(see above) to insure compatible playback.
Customers should also note that permission is
required in order to download MP3 files and music
from the Internet. Our company has no right to
grant such permission. Permission should always
be sought from the copyright owner.
OPERATION
5
Press x (STOP) to stop playback.
25
Page 26

Audio CD and MP3 Disc Operation (Continued)
Pause
MP3CD
1 Press X (PAUSE) during playback.
2 To return to playback, press X (PAUSE) again or
press H (PLAY).
Selecting Another Track
MP3CD
If a disc has more than one track, you can move to
another track as follows:
Press . or > br iefly during playback to go to the
next track or to return to the beginning of the current
track.
Press . twice briefly to step back to the previous
track.
On Audio CDs, to go directly to any track, enter the
track number using the number buttons (0-9) during
playback.
Note
For one-digit numbers, press the number buttons
(1-9) and wait that the operation is performed.
For two-digit numbers, press the number buttons (0-9)
in rapid succession.
Search
MP3CD
Repeat
MP3CD
1 Press REPEAT when playing a disc.
The Repeat icon appears on the TV screen.
2 Press REPEAT to select a desired repeat mode.
TRACK
ALL
OFF
• TRACK: repeats the current track
• ALL: repeats all the tracks on a disc.
• OFF: does not play repeatedly.
Note
When you press . twice or > during Repeat mode
to go to previous track or next track, repeat mode (Track
repeat only) is canceled.
Changing the Audio Channel
CD
Press AUDIO repeatedly during playback to hear a
different audio channel (ST, LEFT, or RIGHT).
1 Press m or M during playback.
The DVD Receiver will now go into SEARCH mode.
2 Press m or M repeatedly to select the required
speed: 1 m, 2 m, 3 m (backward) or 1 M, 2
M, 3 M (forward).
Search speed and direction are indicated on the menu
screen.
3 To return to playback, press H (PLAY).
26
Page 27
JPEG File Operation
Slide Speed
5/32 1024X768
Picture1.jpg
Picture2.jpg
Picture3.jpg
Picture4.jpg
Picture5.jpg
Picture6.jpg
Picture7.jpg
JPEG
Off
Folder1
5/32 Picture5.jpg1024X768
Slide Speed
Off
Folder1
Folder2
Folder3
Folder4
Folder5
Folder6
Folder7
Folder8
JPEG
MP3
JPEG
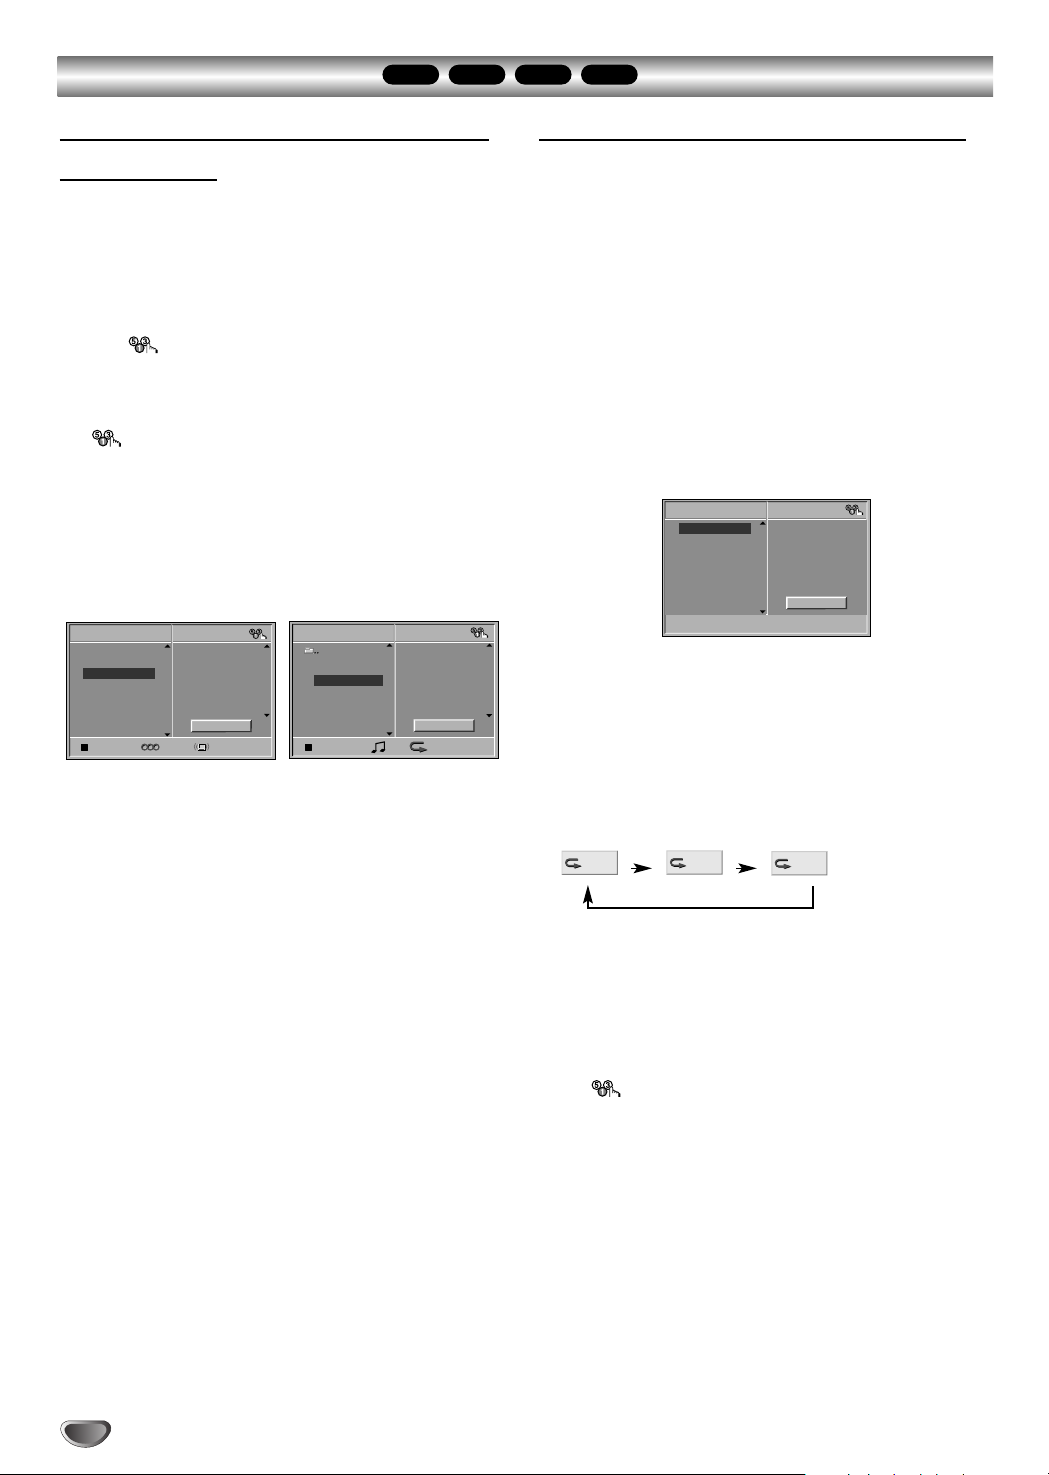
Viewing JPEG Files on a Disc
JPEG
This DVD Receiver can play discs with JPEG files.
Before playing JPEG files, read the notes on JPEG
Files on right.
Insert a disc and close the tray.
1
The MP3/JPEG select menu appears on the TV
screen.
Use V/v to select the JPEG then press ENTER.
2
The JPEG menu appears on the TV screen.
Use V/v to select a folder, and ENTER.
3
A list of files in the folder appears.
Press RETURN to move to the MP3/JPEG select
menu.
Tip
If you are in a file list and want to return to the Folder
list, use the V/v buttons on the remote to highlight
“
and press ENTER to return to the previous menu
”
screen.
Use V/v to select a file then press ENTER or
4
H (PLAY).
Viewing the file function starts.
While viewing a file, press RETURN to move to the
previous menu (JPEG menu).
Press DVD TOP MENU to move to the next page.
Press DVD MENU to move to the previous page.
Note
JPEG file that does not play is skipped.
Selecting another Files
Press . or > once while viewing a picture to
advance to the next file or to the previous file.
Still Picture
1 Press X (PAUSE) during slide show.
The DVD Receiver will now go into PAUSE mode.
2 To return to the slide show, press H (PLAY) or
X (PAUSE) again.
To flip the picture
Press V/v while showing a picture to flip the
picture horizontally or a vertically.
To rotate picture
Press B/b while showing a picture to rotate the
picture clockwise or counter clockwise.
Notes on JPEG Files
Depending upon the size and number of the JPEG
files, it could take a long time for the DVD Receiver to
read the disc’s contents.If you don’t see an on-screen
display after several minutes, some of the files are too
big — reduce the resolution of the JPEG files to less
than 2 mega pixels and burn another disc.
Total number of files and folders on the disc should be
less than 650.
Some disc may be incompatible due to different
recording format or condition of disc.
When you are using software to burn the jpeg files
into the CD-R, ensure that all the selected files have
the “.jpg” extensions when copying into the CD layout.
If the files have “.jpe” or “.jpeg” extensions, please
rename them as “.jpg” files.
File names without “.jpg” extension will not be able to
be read by this DVD Receiver, even though the files
are shown as JPEG image files in windows explorer.
OPERATION
Tip
There are three viewing Slide Speed options: Fast,
Normal, Slow, and Off. Use B/b to highlight the Slide
Speed then use V/v to select the option you want to
use, and press ENTER.
5
Press x (STOP) to stop viewing.
The JPEG menu appears.
27
Page 28
Programmed Playback
CD
VCD1.1VCD2.0
MP3
Programmed Playback with Audio CD
and MP3 Disc
The Program function enables you to store your favorite
tracks from any disc in the DVD Receiver memory.
Program can contain 30 tracks.
Press PROGRAM to enter the Program Edit
1
mode.
The mark will appear to the right of the word
Program on the right side of the menu screen.
Note
Press PROGRAM to exit the Program Edit mode;
the mark will disappear.
Select a track, then press ENTER to place the
2
selected track on the Program list.
Repeat step 2 to place additional tracks on the
3
Program list.
Audio CD menu MP3 disc Menu
CD
TRACK 1
TRACK 2
TRACK 3
TRACK 4
TRACK 5
TRACK 6
TRACK 7
TRACK 8
ST0: 56: 18
Program
TRACK 12
TRACK 8
TRACK 10
TRACK 3
Clear All
AUTO
MP3
TRACK 1
TRACK 2
TRACK 3
TRACK 4
TRACK 5
TRACK 6
TRACK 7
TRACK 8
Program
3
TRACK 8
TRACK 2
TRACK 4
TRACK 3
Clear All
OFF00:00
Programmed Playback with Video CD
Note
On a Video CD with PBC, you must set PBC to Off on the
setup menu to use the Program function. See page 20.
Insert Video CD and close the tray.
1
Press PROGRAM.
The VCD Program menu will appear.
2
Note
Press RETURN, PROGRAM or
Program menu.
Follow steps 2-6 of “Programmed Playback with
3
Audio CD and MP3 disc”on left.
“PROGRAM” appears on the TV screen.
VCD
TRACK 1
TRACK 2
TRACK 3
TRACK 4
TRACK 5
TRACK 6
TRACK 7
TRACK 8
To return normal playback from
4
programmed playback, press PROGRAM.
“PROGRAM” disappears on the TV screen.
Repeat Programmed Tracks
H (PLAY) to exit the
Program
Clear All
Press b.
The programmed track you selected last is highlighted on
4
the program list.
Press V/v to select the track you want to start
5
playing.
Press DVD TOP MENU to move to the next page.
Press DVD MENU to move to the previous page.
Press H (PLAY) or ENTER to start.
Playback begins in the order in which you programmed
6
the tracks and “PGM”appears on the menu screen.
Playback stops after all of the tracks on the Program list
have played once.
To return normal playback from pro-
7
grammed playback, press PROGRAM to
exit the Program Edit mode. Select a track
of CD (or MP3) list and then press ENTER
H (PLAY).
or
“PGM” indicator disappears in the display window.
28
1 Press REPEAT when playing the programmed tracks.
The Repeat icon appears on the TV screen.
2 Press REPEAT to select a desired repeat mode.
TRACK
ALL
OFF
• TRACK: repeats the current track
• ALL: repeats all tracks on the program list.
• OFF: does not play repeatedly.
Erasing a Track from Program List
1 Press PROGRAM during playback (Audio CD and
MP3 disc only) or stop to enter the Program Edit
mode.
The mark will appear.
2 Press b to move to the Program list.
3 Use V/v to select the track that you wish to erase
from the Program list.
4 Press CLEAR.
The track will be erased from the Program list.
Erasing the whole Program List
1 Follow steps 1-2 of “Erasing a Track from Program
List” as above.
2 Use V/v to select “Clear All”, then press ENTER.
The complete Program for the disc will be erased
Notes
The programs are cleared when the power is turn off.
The programs are cleared when the disc is removed.
The programs are cleared when another function mode
(VIDEO, FM, AM etc,.) is selected.
Page 29

Speaker Setup
Disc Subtitle
Disc Menu
Rating
Area Code
TV Aspect
Menu Language
5.1 Speaker Setup
Others
Disc Audio
S S
Front L
Volume 0 dB
Size Small
Distance 0.3 m
Test
Return
You can set your personal preferences on the DVD function
mode.
Adjust the following settings for the built-in 5.1 channel
surround decoder.
Press DVD SETUP.
1
The Setup menu appears.
Select “5.1 Speaker Setup” using the V/v
2
buttons on the setup menu.
While “5.1 Speaker Setup” is selected,
3
press b button.
Press b buttons to select the desired speaker.
4
Adjust options by using V/v/B/b buttons.
5
Distance
If you connected speakers to your DVD Receiver, setting the Distance lets the speakers (except subwoofer)
know how far the sound has to travel to reach your set
listening point.This allows the sound from each speaker
to reach the listener at the same time.
Note
You can not set the distance of subwoofer speaker.
Test
Press ENTER to test the signals of each speaker.
Adjust the volume to match the volume of test signals
memorized in the system.
Front Left (L) → Center → Front Right (R) →
Surround Right (R) → Surround Left (L) → Subwoofer
You can stop the test using V/v.
Return
Press ENTER to return to the previous menu.
OPERATION
Speaker selection
Select a speaker that you want to adjust.((Front speaker (Left), Front speaker (Right), Center Speaker,
Surround speaker (Left), Surround speaker (Right), or
Subwoofer))
Note
Certain speaker settings are prohibited by the Dolby
Digital licensing agreement.
Volume
Press B / b to adjust the output level of the selected
speaker.(-6dB ~ 6dB)
Size
Since the speaker settings are fixed, you cannot change
the settings.
Subwoofer’s size is fixed “Large”and the other
speaker’s size are fixed “Small”.
29
Page 30

Additional Information
Sleep Timer Setting
You can set the DVD Receiver to turn off automatically
at a specified time.
Press SLEEP to set the desired sleep time.
11
The SLEEP indicator and sleep time appears in the display window.
Each time you press SLEEP the setting changes
22
in the following order.
SLEEP 90 →80 →70 → 60→ 50 →40 → 30 →20 →10 →
OFF
Note
You can check the time remaining before the DVD
Receiver turns off.
Press SLEEP.The remaining time appears in the
Display Window.
Viewing the Playing Time and
Remaining Time in the Front Panel
Display
You can check the disc information, such as the remaining time, total number of titles in a DVD, or tracks in a
CD, VIDEO CD or MP3, using the front panel display.
Press DISPLAY on the remote .
Each time you press DISPLAY while playing the disc,
the display changes.
Notes
Depending on the type of disc being played and the playing
mode, the disc information may not be displayed.
This function is available during only playback mode.
Tips
When playing VIDEO CDs with PBC functions, only the play-
ing time of the scene is displayed.
The playing time and remaining time of the current chapter,
title, track, scene, or disc will also appear on your TV screen.
Dimmer
This function will change the brightness of the display
window on the front panel during in power-on status.
Press the DIMMER repeatedly.
Muting
Press MUTING to mute your unit.
You can mute your unit in order, for example, to answer
the telephone, “MUTING ON” indicator in the Display
Window. To exit mute mode, press MUTING again.
Using Headphone Jack
Connect a stereo headphone plug ( 3.5mm) into the
PHONES connector.
The speakers are automatically disconnected when you
plug in a headphone (not supplied).
Volume Control
You can adjust the volume by pressing VOLUME (-/+)
repeatedly.
Using the Sound Effect
This system provides you with sound effect, simply by
pressing a button. Choose sound to suit your needs.
Press DSGX on the remote.
The sound effect is activate.
DSGX
With DSGX on, bass frequencies are effectively
reinforced.
To turn off the sound effect
Press DSGX on the remote again.
Notes
When you connect headphones to the system, the DSGX
function does not work.
This function is available during only playback mode.
30
Page 31

Radio Operation
Presetting the Radio stations
You can preset 30 stations for FM and AM (MW).
Before tuning, make sure that you have turned down the
volume.
Press TUNER/BAND on the remote control until
11
FM or AM (MW) appears in the display window.
And then every time you press TUNER/BAND,
22
FM and AM (MW) changes alternately.
Press and hold TUNING - or + on the remote
33
control for about two seconds until the
frequency indication starts to change, then
release.
Scanning stops when the DVD/CDReceiver tunes in a
station. “TUNED” and “ST” (for stereo program)
appear in the Display Window.
Press TUNER MENU on the remote control.
A preset number will flash in the Display Window.
44
Press TUNING - or + on the remote control to
55
select the preset number you want.
Press TUNER MENU on the remote control
66
again.
The station is stored.
Repeat steps 3 to 6 to store other stations.
77
To tune in a station with a weak signal
Press TUNING - or + repeatedly in step 3 to tune in the
station manually.
To clear all the stored stations
Press and hold TUNER MENU for about two seconds
and “CLEAR ALL” is appeared in the display window
and then press TUNER MENU again, the stations are
cleared.
If you have accidentally entered into the "CLEAR
ALL" mode and you do not wish to clear the memory,
do not press any key. After a few seconds, the
"CLEAR ALL" display will go off by itself and change
to normal mode.
Listening to the Radio
Preset radio stations in the DVD Receiver’s memory first
(see “Presetting radio stations” on the left).
Press TUNER/BAND until AM (MW) or FM
11
appears in the Display Window.
The last received station is tuned in.
Press PRESET -/+ repeatedly to select the
22
preset station you want.
Each time you press the button, the DVD receiver tunes in
one preset station at a time.
Adjust the volume by pressing VOLUME + or -
33
repeatedly.
To turn off the radio
Press @ / 1 to turn the DVD Receiver off or select another function mode (CD/DVD, VIDEO or TV).
To listen to non-preset radio stations
Use manual or automatic tuning in step 2.
For manual tuning, press TUNING - or + on the
remote control repeatedly.
For automatic tuning, press and hold TUNING - or +
for about two seconds on the remote control.
To select a preset radio station directly
You can use the number buttons on the remote control
to select a preset radio station directly.
For example, to listen to preset station 4, press 4 on the
remote control.To listen to preset station 19, press 1
then 9 (within 3 seconds).
For your reference
If an FM program is noisy
Press FM MODE on the remote control so that “ST”
disappears in the display window. There will be no
stereo effect, but the reception will improve. Press
FM MODE again to restore the stereo effect.
To improve reception
Reorient the supplied antennas.
OPERATION
Note
If all stations have already been entered, the FULL
message will appear in the display window for a
moment and then a preset number will flash.
To change the preset number, follow the steps 5-6 as
above.
31
Page 32

Radio Operation (Continued)
RDS Operation
This unit is equipped with RDS (Radio Data System),
which brings a wide range of information to FM radio.
Now in use in many countries, RDS is a system for
transmitting station call signs or network information, a
description of station programme type text message
about the station or specifics of musical selection and
the correct time.
RDS T uning
When a FM station is tuned in and it contains RDS data,
the unit will automatically display the station’s name in
the Display Window as well as indicators for the RDS
services programme (PS) if transmitted by the station.
RDS Display
The RDS system is capable of transmitting a wide variety of information in addition to the initial call sign that
appears when a station is first tuned. In nor mal RDS
operation the display will indicate the station name.
Press and hold DISPLAY on the remote control enables
you to show the station name.
Note
If the RDS services programme (PS) is not being
transmitted, the Display Window will show a PS
NONE message.
32
Page 33

Controlling the TV with the Supplied Remote
You can control the sound level, input source, and
power switch of your TV with the supplied remote.
TV @ / 1
TV
Controlling the TV
You can control your TV using the buttons below.
By pressing You can
TV @ / 1 Turn the TV on or off.
TV/VIDEO Switch the TV’s input source
between the TV and other input
sources.
TV CH +/- Scans up or down through
memorized channels.
TV VOL +/- Adjust the volume of the TV.
Using the number buttons for controlling the
TV
When you set the remote to the TV mode, you can use
the number buttons for controlling the TV.
Press the TV buttons
The TV button turns red and the remote is set to the TV
mode.You can select the TV channels by using the
number buttons.
>10 is for selecting the channel number greater than 10.
To cancel the TV mode, press the TV button again.
Notes
Before adjusting the TV, press TV.
The TV button turns off when you do not operate the
remote for 10 seconds.
Depending on the TV, you may not be able to control
your TV or to use some of the buttons above.
OPERATION
TV/VIDEO
TV CH +/TV VOL +/-
Tip
Depending on the TV manufacture, the following method
works. For double-digit number, press -/-- first and then
number.(For example, for channel 25, press -/--, then 2
and 5.)
33
Page 34

Using the SONY TV DIRECT Function
SONY TV DIRECT allows you to turn on your SONY TV
and this system, change the system mode to “CD/DVD,”
and then switch the TV’s input source you set with one
button push.
SONY TV DIRECT
TV
Number buttons
By pressing Number TV’s input source
TV/VIDEO 0 No input source
(Default)
1 VIDEO1
2 VIDEO2
3 VIDEO3
4 VIDEO4
5 VIDEO5
6 VIDEO6
7 COMPONENT 1
INPUT
8 COMPONENT 2
INPUT
Press and hold TV CH + while entering the code
2
for transmit time (see table below) using the
number buttons.
The transmit time from the remote is selected.
If you successfully set the transmit time code, the
TV button flashes twice slowly. If the setting is
unsuccessful, the TV button flashes five times
quickly.
By pressing Number Transmit time
TV CH + 1 0.5 (Default)
21
3 1.5
42
5 2.5
63
7 3.5
84
TV/VIDEO
TV CH +/-
Preparation
Register the TV’s input source connected to this
system.
Press and hold TV/VIDEO while entering the
1
code for the TV’s input source to connect this
system (see table below) using the number
buttons.
TV’s input source is selected
If you successfully set the TV’s input source code,
the TV button flashes twice slowly. If the setting is
unsuccessful, the TV button flashes five times
quickly.
34
Operation
Point the remote to the direction of TV and this system,
then press SONY TV DIRECT once.
While transmitting the code from the remote, the TV button flashes.
Notes
The function is only for SONY TV series.
If this function does not work, change the transmit
time.The transmit time varies depending on the TV.
If distance between TV and this system is too far, this
function may not work. Install the system near the TV.
Keep the remote pointed in the direction of the TV
and this sysetm whlie the TV button is flashing.
Page 35

Language Code List
Enter the appropriate code number for the initial settings “Disc Audio”, “Disc Subtitle” and/or “Disc Menu”
(See page 19).
Code Language
6566 Abkhazian
6565 Afar
6570 Afrikaans
8381 Albanian
6577 Ameharic
6582 Arabic
7289 Armenian
6583 Assamese
6588 Aymara
6590 Azerbaijani
6665 Bashkir
6985 Basque
6678 Bengali; Bangla
6890 Bhutani
6672 Bihari
6682 Breton
6671 Bulgarian
7789 Burmese
6669 Byelorussian
7577 Cambodian
6765 Catalan
9072 Chinese
6779 Corsican
7282 Croatian
6783 Czech
6865 Danish
7876 Dutch
6978 English
6979 Esperanto
6984 Estonian
7079 Faroese
Code Language
7074 Fiji
7073 Finnish
7082 French
7089 Frisian
7176 Galician
7565 Georgian
6869 German
6976 Greek
7576 Greenlandic
7178 Guarani
7185 Gujarati
7265 Hausa
7387 Hebrew
7273 Hindi
7285 Hungarian
7383 Icelandic
7378 Indonesian
7365 Interlingua
7165 Irish
7384 Italian
7465 Japanese
7487 Javanese
7578 Kannada
7583 Kashmiri
7575 Kazakh
7589 Kirghiz
7579 Korean
7585 Kurdish
7679 Laothian
7665 Latin
7686 Latvian, Lettish
Code Language
7678 Lingala
7684 Lithuanian
7775 Macedonian
7771 Malagasy
7783 Malay
7776 Malayalam
7784 Maltese
7773 Maori
7782 Marathi
7779 Moldavian
7778 Mongolian
7865 Nauru
7869 Nepali
7879 Norwegian
7982 Oriya
8065 Panjabi
8083 Pashto, Pushto
7065 Persian
8076 Polish
8084 Portuguese
8185 Quechua
8277 Rhaeto-Romance
8279 Rumanian
8285 Russian
8377 Samoan
8365 Sanskrit
7168 Scots Gaelic
8382 Serbian
8372 Serbo-Croatian
8378 Shona
8368 Sindhi
Code Language
8373 Singhalese
8375 Slovak
8376 Slovenian
8379 Somali
6983 Spanish
8385 Sudanese
8387 Swahili
8386 Swedish
8476 Tagalog
8471 Tajik
8465 Tamil
8484 Tatar
8469 Telugu
8472 Thai
6679 Tibetan
8473 Tigrinya
8479 Tonga
8482 Turkish
8475 Turkmen
8487 Twi
8575 Ukrainian
8582 Urdu
8590 Uzbek
8673 Vietnamese
8679 Volapük
6789 Welsh
8779 Wolof
8872 Xhosa
7473 Yiddish
8979 Yoruba
9085 Zulu
REFERENCE
35
Page 36

Area Code List
Enter the appropriate code number for the initial setting “Area Code”(See page 21).
Code Area
AD Andorra
AE United Arab Emirates
AF Afghanistan
AG Antigua and Barbuda
AI Anguilla
AL Albania
AM Armenia
AN Netherlands Antilles
AO Angola
AQ Antarctica
AR Argentina
AS American Samoa
AT Austria
AU Australia
AW Aruba
AZ Azerbaidjan
BA Bosnia-Herzegovina
BB Barbados
BD Bangladesh
BE Belgium
BF Burkina Faso
BG Bulgaria
BH Bahrain
BI Burundi
BJ Benin
BM Bermuda
BN Brunei Darussalam
BO Bolivia
BR Brazil
BS Bahamas
BT Bhutan
BV Bouvet Island
BW Botswana
BY Belarus
BZ Belize
CA Canada
CC Cocos (Keeling) Islands
CF Central African Republic
CG Congo
CH Switzerland
CI Ivory Coast
CK Cook Islands
CL Chile
CM Cameroon
CN China
CO Colombia
CR Costa Rica
CS Former Czechoslovakia
CU Cuba
CV Cape V erde
CX Christmas Island
CY Cyprus
CZ Czech Republic
DE Germany
DJ Djibouti
DK Denmark
DM Dominica
DO Dominican Republic
DZ Algeria
EC Ecuador
EE Estonia
EG Egypt
EH Western Sahara
Code Area
ER Eritrea
ES Spain
ET Ethiopia
FI Finland
FJ Fiji
FK Falkland Islands
FM Micronesia
FO Faroe Islands
FR France
FX France (European
Territory)
GA Gabon
GB Great Britain
GD Grenada
GE Georgia
GF French Guyana
GH Ghana
GI Gibraltar
GL Greenland
GM Gambia
GN Guinea
GP Guadeloupe (French)
GQ Equator ial Guinea
GR Greece
GS S. Georgia & S. Sandwich
Isls.
GT Guatemala
GU Guam (USA)
GW Guinea Bissau
GY Guyana
HK Hong Kong
HM Heard and McDonald
Islands
HN Honduras
HR Croatia
HT Haiti
HU Hungary
ID Indonesia
IE Ireland
IL Israel
IN India
IO British Indian Ocean
Territory
IQ Iraq
IR Iran
IS Iceland
IT Italy
JM Jamaica
JO Jordan
JP Japan
KE Kenya
KG Kyrgyzstan
KH Cambodia6
KI Kiribati
KM Comoros
KN
Saint Kitts & Nevis Anguilla
KP North Korea
KR South Korea
KW Kuwait
KY Cayman Islands
KZ Kazakhstan
LA Laos
LB Lebanon
Code Area
LC Saint Lucia
LI Liechtenstein
LK Sri Lanka
LR Liberia
LS Lesotho
LT Lithuania
LU Luxembourg
LV Latvia
LY Libya
MA Morocco
MC Monaco
MD Moldavia
MG Madagascar
MH Marshall Islands
MK Macedonia
ML Mali
MM Myanmar
MN Mongolia
MO Macau
MP Northern Mariana Islands
MQ Martinique (French)
MR Mauritania
MS Montserrat
MT Malta
MU Mauritius
MV Maldives
MW Malawi
MX Mexico
MY Malaysia
MZ Mozambique
NA Namibia
NC New Caledonia (French)
NE Niger
NF Norfolk Island
NG Nigeria
NI Nicaragua
NL Netherlands
NO Norway
NP Nepal
NR Nauru
NU Niue
NZ New Zealand
OM Oman
PA Panama
PE Peru
PF Polynesia (French)
PG Papua New Guinea
PH Philippines
PK Pakistan
PL Poland
PM Saint Pierre and Miquelon
PN Pitcairn Island
PR Puerto Rico
PT Portugal
PW Palau
PY Paraguay
QA Qatar
RE Reunion (French)
RO Romania
RU Russian Federation
RW Rwanda
SA Saudi Arabia
SB Solomon Islands
Code Area
SC Seychelles
SD Sudan
SE Sweden
SG Singapore
SH Saint Helena
SI Slovenia
SJ Svalbard and Jan Mayen
Islands
SK Slovak Republic
SL Sierra Leone
SM San Marino
SN Senegal
SO Somalia
SR Suriname
ST Saint Tome and Principe
SU Former USSR
SV El Salvador
SY Syria
SZ Swaziland
TC Turks and Caicos Islands
TD Chad
TF French Southern
Territories
TG Togo
TH Thailand
TJ Tadjikistan
TK Tokelau
TM Turkmenistan
TN Tunisia
TO Tonga
TP East Timor
TR Turkey
TT Trinidad and Tobago
TV Tuvalu
TW Taiwan
TZ Tanzania
UA Ukraine
UG Uganda
UK United Kingdom
UM USA Minor Outlying
Islands
US United States
UY Uruguay
UZ Uzbekistan
VA Vatican City State
VC Saint Vincent &
Grenadines
VE Venezuela
VG Virgin Islands (British)
VI Virgin Islands (USA)
VN Vietnam
VU Vanuatu
WF Wallis and Futuna Islands
WS Samoa
YE Yemen
YT Mayotte
YU Yugoslavia
ZA South Africa
ZM Zambia
ZR Zaire
ZW Zimbabwe
36
Page 37

Troubleshooting
Check the following guide for the possible cause of a problem before contacting service.
Symptom
No power.
The power is on, but
the DVD Receiver does
not work.
No picture.
There is no sound or
only a very low-level
sound is heard.
The playback picture is poor.
The DVD Receiver does
not start playback.
Loud hum or noise is
heard.
Cause
• The power cord is disconnected.
• No disc is inserted.
• The TV is not set to receive DVD signal
output.
• The video cable is not connected
securely.
• The connected TV power is turned off.
• The equipment connected with the
audio cable is not set to receive DVD
signal output.
• The audio cables are not connected
securely.
• The power of the equipment connected
with the audio cable is turned off.
• The audio connecting cable is damaged.
• The disc is dirty.
• No disc is inserted.
• An unplayable disc is inserted.
• The disc is placed upside down.
• The disc is not placed within the guide.
• The disc is dirty.
•A menu is on the TV screen.
• The Rating level is set.
• The plugs and jacks are dir ty.
• The disc is dirty.
• The speakers and components are
connected poorly.
• The DVD Receiver is located too close
to the TV.
Correction
• Plug the power cord securely into the
wall outlet.
• Insert a disc. (Check that the DVD or,
audio CD indicator in the DVD display is
lit.)
• Select the appropr iate video input mode
on the TV so the picture from the DVD/
CD receiver appears on the TV screen.
• Connect the video cable into the jacks
securely.
•Turn on the TV.
• Select the correct input mode of the
audio receiver so you can hear the
sound from the DVD Receiver.
• Connect the audio cable into the jacks
securely.
•Turn on the equipment connected with
the audio cable.
• Replace it with new one.
• Clean the disc.
• Insert a disc. (Check that the DVD, or
audio CD indicator in the DVD display is
lit.)
• Insert a playable disc.(Check the disc
type, colour system and Regional code.)
• Place the disc with the playback side
down.
• Place the disc on the disc tray correctly
inside the guide.
• Clean the disc.
• Press the DVD SETUP button to turn off
the menu screen.
• Cancel the Rating function or change
the rating level.
• Wipe them with a cloth slightly moistened with alcohol.
• Clean the disc.
• Connect the speakers and components
securely.
•Move your TV away from the audio components.
REFERENCE
37
Page 38

Troubleshooting (Continued)
Symptom
Radio stations cannot
be tuned in.
The remote control
does not work properly.
The sound mode or Pro
Logic II mode cannot
be changed.
The front panel display
is too dim.
Cause
• The antenna is positioned or connected
poorly.
• The signal strength of the stations is too
weak (when tuning in with automatic
tuning).
• No stations have been preset or preset
stations have been cleared (when
tuning by scanning preset stations).
• The remote control is not pointed at the
remote sensor of the DVD Receiver.
• The remote control is too far from the
DVD Receiver.
• There is an obstacle in the path of the
remote control and the DVD/CD
receiver.
• The batter ies in the remote control are
flat.
• The system cannot change while playing a MP3 disc.
• Nothing is displayed on the front panel
display.
Correction
• Connect the antenna securely.
• Adjust the antennas and connect an
external antenna if necessary.
•Tune in the station manually.
• Preset the stations (page 31).
•Point the remote control at the remote
sensor of the DVD Receiver.
• Use the remote control within about 20
ft (6 m).
• Remove the obstacle.
• Replace the batter ies with new ones.
• Insert such a CD disc.
• Press DIMMER on the remote control.
38
Page 39

Specification
Power supply 220-240V AC, 50/60Hz
Power consumption 70W, No more than 1 W (220-240V AC) (at the power saving mode)
Mass 4.7 kg
External dimensions (W x H x D) 430 x 70 x 383.5 mm
[General]
Operating conditions Temperature: 5°C to 35°C, Operation status: Hor izontal
Operating humidity 5% to 85%
Laser Semiconductor laser, wavelength 650 nm for VCD and DVD,
Emission duration Continuous
Signal system PAL 625/50, NTSC 525/60
Frequency response (audio) 2 Hz ~ 20 kHz (±1.0 dB)
[CD/DVD][Video][Amplifier][Speakers]
Signal-to-noise ratio (audio) More than 75 dB (1 kHz, NOP, 20 kHz LPF/A-Filter)
Dynamic range (audio) More than 70 dB
Harmonic distortion (audio) 0.5 % (1 kHz, at 12W position) (20 kHz LPF/A-Filter)
Inputs VIDEO (AUDIO IN):
Video output 1.0 V (p-p), 75 Ω, negative sync., RCA jack
Tuning Range 87.5 - 108 MHz
Intermediate Frequency 10.7 MHz
[FM]
Signal-to Noise Ratio 60 dB (Mono)
[Tuner]
[Supplied
Tuning Range 522 - 1,611 kHz
AM
Intermediate Frequency 450 kHz
[MW]
Stereo mode 50W + 50W (8 Ω at 1 kHz, THD 10 %)
Surround mode Front:50W + 50W
(*
Depending on the sound mode
settings and the source, there
may be no sound output.)
Outputs PHONES: (32 Ω, 25mW)
Type 1 Way 1 Speaker 1 Way 1 Speaker
Impedance 8 Ω 4 Ω
Frequency Response 180 - 20,000 Hz 45 - 180 Hz
Rated Input Power 50W 80W
Max. Input Power 100W 160W
Net Dimensions (W x H x D) 98 x 102 x 106 mm 173 x 380 x 402 mm
Net Weight 0.6 kg 6.8 kg
• Speakers . . . . . . . . . . . . . . . . . . . . . . . . . .5 • Speaker cables . . . . . . . . . . . . . . . .6
• Subwoofer . . . . . . . . . . . . . . . . . . . . . . . . .1 • Size AA (R6) batteries . . . . . . . . . . .2
• Remote Commander (remote) RM-SS220 . .1 • AM loop antenna . . . . . . . . . . . . . . .1
• FM antenna . . . . . . . . . . . . . . . . . . . . . . . .1 • Foot pads . . . . . . . . . . . . . . . . . . . .20
• Speakers - Connection and • Operating Instructions . . . . . . . . . . .1
Accessories]
Installation (card) . . . . . . . . . . . . . . . . . . . .1
wavelength 780 nm for CD
REFERENCE
Sensitivity: 800 m V
Impedance: 50 kilohms
SCART (AUDIO IN):
Sensitivity: 800 m V
Impedance: 50 kilohms
EURO AV (TO TV)
Centre*: 50W
Surround*: 50W + 50W (8Ω at 1 kHz, THD 10 %)
Subwoofer*: 80W (4Ω at 50 Hz, THD 10 %)
Satellite Speaker (SS-TS9) Passive Subwoofer (SS-WS9)
❋ Designs and specifications are subject to change without notice.
39
Page 40

Sony Corporation
Printed in China
http://www.sony.net
Page 41

DVD
Heimkinosystem
Betriebsanleitung
DE
DAV -SB100
©2004 Sony Corporation
Page 42

Sicherheitshinweise
WARNUNG: UM FEUER- ODER STROMSCHLÄGE ZU
VERMEIDEN, DAS GERÄT NIEMALS REGEN ODER
FEUCHTIGKEIT AUSSETZEN.
WARNUNG:Stellen Sie das Gerät nicht an einem beengten
Ort auf, wie z. B. in einem Bücherregal o.ä.
Zur Ver meidung von Bränden die Belüftungsöffnungen des
Gerätes nicht mit Zeitungen, Tischdecken, Gardinen usw.
verdecken.Keine brennenden Kerzen auf das Gerät stellen.
Batterien nicht im normalen Hausmüll
entsorgen. Sie sollten in den Sondermüll
gegeben werden.
Dieses Gerät ist ein LASER-Produkt der
KLASSE 1. Das Etikett befindet sich
auf der Rückseite.
VORSICHT:
Dieser DVD-Receiver besitzt ein Laser-System.
Um das Gerät richtig zu verwenden, lesen Sie dieses
Benutzer-handbuch sorgfältig durch und bewahren Sie es auf.
Setzen Sie sich zur Wartung mit einem qualifizier ten
Servicebetrieb in Verbindung (siehe Serviceabschnitt).
Durch Bedienungen, Einstellungen oder Verfahren, die in
diesem Handbuch nicht erwähnt werden, können gefährliche
Strahlungen verursacht werden.
Um direkten Kontakt mit dem Laserstrahl zu vermeiden, darf
das Gehäuse nicht geöffnet werden. Ansonsten tritt eine
sichtbare Laserstrahlung ein. NIEMALS IN DEN LASER
BLICKEN.
VORSICHT: Das Geräte darf nicht mir Wasser (Tropfen oder
Spritzwasser) in Berührung kommen es sollten keine mit Wasser
gefüllten Behälter auf das Gerät gestellt werden, wie z. B.
Vasen.
Vorsichtshinweise
Sicherheit
• Falls ein Gegenstand auf das Gehäuse fällt, ziehen Sie den
Netzstecker und lassen Sie das Gerät vor dem erneuten
Betrieb von einem qualifizierten Techniker überprüfen.
• Das Gerät wird weiter mit Netzstrom versorgt, so lange es
am Netzstecker angeschlossen ist, selbst wenn das Gerät
ausgeschaltet wurde.
• Das Gerät sollte von der Steckdose getrennt werden, falls
es längere Zeit nicht betrieben wird. Das Netzkabel sollte nur
am Netzstecker abgezogen werden, niemals am Kabel
selbst.
Aufstellen
• Um eine Überhitzung des Gerätes zu vermeiden, muss eine
ausreichende Belüftung vorhanden sein.
• Das Gerät nicht auf weichen Flächen (Teppichen, Tüchern
usw.) oder in der Nähe von Stoffen (Gardinen) aufstellen,
um die Belüftungsöffnungen nicht zu verdecken.
• Das Gerät nicht in der Nähe von Wärmequellen wie z. B.
Heizungen oder Rohren oder an Orten mit direkter
Sonnen-einstrahlung, viel Staub oder Erschütterungen
aufstellen.
• Das Gerät nicht schräg aufstellen. Das Gerät sollte nur in
waagerechter Position betrieben werden.
• Gerät und Discs keinen starken Magnetfeldern aussetzen,
wie z. B. Mikrowellengeräte oder große Lautsprecher.
•Keine schweren Gegenstände auf das Gerät stellen.
•Wenn das Gerät von einem kalten an einen warmen Ort
gebracht wird, kann sich Feuchtigkeit im Innern des DVDHeimkinossystems bilden und die Linsen beschädigen.
Warten ie beim ersten Aufstellen oder beim Versetzen von
einem kalten an einen warmen Ort vor dem Betrieb ca. 30
Minuten.
Stromquellen
• Das Netzkabel darf nur von einem qualifizierten
Servicebetrieb ersetzt werden.
Aufstellort
• Den Receiver an einem ausreichend belüfteten Ort auf
stellen, um eine Überhitzung des Systems zu vermeiden.
• Das Gehäuse wird bei längerem Betrieb mit hoher
Lautstärke sehr warm. Dies ist keine Fehlfunktion.
Das Gehäuse sollte jedoch nicht berührt werden. Um eine
Überhitzung zu vermeiden, sollte das Gerät nicht an einem
beengten Ort mit schlechter Belüftung aufgestellt werden.
• Die Belüftungsöffnungen dürfen nicht durch Gegenstände
verdeckt werden.Der Receiver besitzt einen leistungsstarken
Verstärker. Bei verdeckten Belüftungsöffnungen kann das
Gerät überhitzen und Fehlfunktionen verursachen.
• Das System nicht auf eine weiche Oberfläche stellen, wie
z. B.einen Teppich, um die unteren Belüftungen nicht zu
verdecken.
• Das System nicht in der Nähe von Wärmequellen oder an
Orten mit direkter Sonneneinstrahlung, viel Staub
oder Erschütterungen aufstellen.
Betrieb
•Wenn das Gerät von einem kalten an einen warmen oder
einen sehr feuchten Raum gebracht wird, kann sich
Feuchtigkeit auf den Linsen des Systems bilden.In diesem
Fall funktioniert das Gerät u. U. nicht richtig. Entfernen Sie
dann die Disc und lassen Sie das System etwa eine halbe
Stunde lang eingeschaltet, bis die Feuchtigkeit trocknet.
• Nehmen Sie beim Transport ggf. die Disc heraus. Ansonsten
könnte die Disc beschädigt werden.
Das Hinweisschild befindet sich auf der Geräterückseite.
WICHTIGER HINWEIS
Vorsicht:Mit diesem System kann ein Standbild oder eine
On-Screen-Anzeige unbegrenzt lange auf dem Bildschirm angezeigt werden.Wenn ein Standbild bzw.
eine On-Screen-Anzeige länger auf dem Bildschirm
eingeblendet wird, kann der Bildschirm dauerhaft
beschädigt werden. Projektionsbildschirme sind für diesen
Effekt besonders anfällig.
2
Page 43

Sicherheitshinweise (Forts.)
HINWEISE ZU COPYRIGHTS:
Es ist gesetzlich verboten, copyrightgeschütztes Material
ohne Genehmigung zu kopieren, zu senden, vorzuführen,
über Kabel zu senden.
Dieses Gerät verfügt über eine Kopierschutzfunktion von
Macrovision. Einige Discs enthalten Kopierschutzsignale. Bei
der Aufnahme und Wiedergabe solcher Discs auf einem
Videorekorder erscheint das Bild verzerrt.
Dieses Gerät verfügt über eine Copyright-Schutztechnologie,
die durch bestimmte U.S.-Patente und andere Besitzrechte
der Macrovision Corporation und anderer Eigentümer
geschützt. Die Verwendung dieser Copyright-Schutztrchnologie muss von der Macrovision Corporation genehmigt werden
und dient ohne Genehmigung der Macrovision Corporation
ausschließlich zur privaten und anderer limitierter Vorführung.
Reverse-Engineering oder Zerlegung sind verboten.
In Anleitungen verwendete Symbole
Warnt vor Gefahren von Verletzungen und Sachbeschädigungen des Gerätes oder anderer
Gegenstände.
Hinweis Weist auf besondere Funktionen des Gerätes
hin.
Tipp Weist auf nützliche Tipps und Tricks hin.
EINFÜHRUNG
3
Page 44

Inhaltsverzeichnis
Einführung
Sicherheitshinweise. . . . . . . . . . . . . . . . . . . . . . . 2-3
Inhaltsverzeichnis . . . . . . . . . . . . . . . . . . . . . . . . . . 4
Vor dem Betrieb . . . . . . . . . . . . . . . . . . . . . . . . . . 5-6
Spielbare Discs . . . . . . . . . . . . . . . . . . . . . . . . . . 5
Vorsichtshinweise. . . . . . . . . . . . . . . . . . . . . . . . . 6
Hinweise zu Discs . . . . . . . . . . . . . . . . . . . . . . . . 6
Über Symbole . . . . . . . . . . . . . . . . . . . . . . . . . . . 6
Bedienelemente auf der Vorderseite. . . . . . . . . . . . 7
Anzeigen im Anzeigefenster. . . . . . . . . . . . . . . . . . 8
Fernbedienung . . . . . . . . . . . . . . . . . . . . . . . . . . . . 9
Anschlüsse auf der Rückseite . . . . . . . . . . . . . . . 10
Vorbereitung
Anschlüsse. . . . . . . . . . . . . . . . . . . . . . . . . . . . 11-15
Anschluss an ein TV-Gerät . . . . . . . . . . . . . . . . 11
Anschluss an externe Geräte . . . . . . . . . . . . . . . 12
Antennenanschlüsse . . . . . . . . . . . . . . . . . . . . . 13
Anschluss des Lautsprechersystems . . . . . . . . . 14
Aufstellen der Lautsprecher . . . . . . . . . . . . . . . . 15
Auswahl der Ausgangs-/Eingangsquelle . . . . . . . 16
Vor dem Betrieb . . . . . . . . . . . . . . . . . . . . . . . . 17-21
Kleines Glossar für Audio Stream- und Surround-
Mode. . . . . . . . . . . . . . . . . . . . . . . . . . . . . . . . . 17
Klangmodus. . . . . . . . . . . . . . . . . . . . . . . . . . . . 17
Allgemeine Beschreibung . . . . . . . . . . . . . . . . . . 18
On-Screen-Anzeige . . . . . . . . . . . . . . . . . . . . . . 18
Voreinstellungen . . . . . . . . . . . . . . . . . . . . . . 19-21
Allgemeiner Betrieb . . . . . . . . . . . . . . . . . . . 19
Sprache. . . . . . . . . . . . . . . . . . . . . . . . . . . . 19
Bildformat . . . . . . . . . . . . . . . . . . . . . . . . . . 19
Einrichtung der Lautsprecher . . . . . . . . . . . . 20
Andere . . . . . . . . . . . . . . . . . . . . . . . . . . . . 20
Kindersicherung. . . . . . . . . . . . . . . . . . . . . . 21
Gebietscode . . . . . . . . . . . . . . . . . . . . . . . . 21
Bedienung
DVD- und Video-CD-Betrieb . . . . . . . . . . . . . . . 22-24
Wiedergabe von DVD- und Video-CD. . . . . . . . . 22
Allgemeine Funktionen . . . . . . . . . . . . . . . . . . . . 22
Resume-Funktion . . . . . . . . . . . . . . . . . . . . 22
Wahl eines anderen TITELS. . . . . . . . . . . . . 22
Wahl eines anderen KAPITELS/TRACKS. . . 22
Suchlauf . . . . . . . . . . . . . . . . . . . . . . . . . . . 22
Standbild. . . . . . . . . . . . . . . . . . . . . . . . . . . 22
Zeitlupe . . . . . . . . . . . . . . . . . . . . . . . . . . . . 23
Wiederholen . . . . . . . . . . . . . . . . . . . . . . . . 23
Zeit-Suchlauf . . . . . . . . . . . . . . . . . . . . . . . . 23
Besondere DVD-Funktionen . . . . . . . . . . . . . . . 24
Überprüfen der Inhalte von DVD-
Video-Discs: Menüs . . . . . . . . . . . . . . . . . . . . . 24
Blickwinkel . . . . . . . . . . . . . . . . . . . . . . . . . 24
Ändern der Sprache. . . . . . . . . . . . . . . . . . . 24
Ändern des Tonkanals . . . . . . . . . . . . . . . . . 24
Untertitel . . . . . . . . . . . . . . . . . . . . . . . . . . . 24
Audio-CD- und MP3-Disc-Betrieb . . . . . . . . . 25-26
Wiedergabe einer Audio-CD und MP3-Disc . . . . 25
Hinweise zu MP3-Dateien . . . . . . . . . . . . . . . . . 25
Pause . . . . . . . . . . . . . . . . . . . . . . . . . . . . . 26
Auswahl eines anderen Tracks . . . . . . . . . . . 26
Suchlauf . . . . . . . . . . . . . . . . . . . . . . . . . . . 26
Wiederholen . . . . . . . . . . . . . . . . . . . . . . . . 26
Ändern des Tonkanals . . . . . . . . . . . . . . . . . 26
JPEG-Datei-Betrieb . . . . . . . . . . . . . . . . . . . . . . . 27
Anzeigen von JPEG-Dateien auf einer Disc . . . . 27
Auswahl einer anderen Datei . . . . . . . . . . . 27
Standbild. . . . . . . . . . . . . . . . . . . . . . . . . . . 27
Bild umdrehen . . . . . . . . . . . . . . . . . . . . . . . 27
Bild drehen . . . . . . . . . . . . . . . . . . . . . . . . . 27
Hinweise zu JPEG-Dateien . . . . . . . . . . . . . 27
Programmierte Wiedergabe. . . . . . . . . . . . . . . . . . 28
rogrammierte Wiedergabe einer
Audio-CD und MP3-Disc . . . . . . . . . . . . . . . . . . 28
Programmierte Wiedergabe einer Video-CD. . . . 28
Einrichtung der Lautsprecher. . . . . . . . . . . . . . . . 29
Zusätzliche Informationen. . . . . . . . . . . . . . . . . . . 30
Einstellen des Sleep-Timers. . . . . . . . . . . . . . . . 30
Spielzeit und verbleibende Spielzeit im
Bedienungsfeld anzeigen. . . . . . . . . . . . . . . . . . 30
Dimmer . . . . . . . . . . . . . . . . . . . . . . . . . . . . . . . 30
Stummschalten . . . . . . . . . . . . . . . . . . . . . . . . . 30
Verwenden der Kopfhörerbuchse . . . . . . . . . . . . 30
Lautstärkeregelung . . . . . . . . . . . . . . . . . . . . . . 30
Einsatz von Klangeffekten . . . . . . . . . . . . . . . . . 30
Radiobetrieb . . . . . . . . . . . . . . . . . . . . . . . . . . . 31-32
Speichern von Radiosendern . . . . . . . . . . . . . . . 31
Radio hören. . . . . . . . . . . . . . . . . . . . . . . . . . . . 31
RDS-Funktion . . . . . . . . . . . . . . . . . . . . . . . . . . 32
Bedienung des TV-Gerätes über mitgelieferte
Fernbedienung . . . . . . . . . . . . . . . . . . . . . . . . . . . 33
Bedienung des TV-Gerätes . . . . . . . . . . . . . . . . 33
Verwenden der SONY TV DIRECT-Funktion . . . . . 34
Vorbereitung . . . . . . . . . . . . . . . . . . . . . . . . . . . 34
Betrieb. . . . . . . . . . . . . . . . . . . . . . . . . . . . . . . . 34
Referenz
Liste der Sprachcodes . . . . . . . . . . . . . . . . . . . . . 35
Liste der Gebietscode. . . . . . . . . . . . . . . . . . . . . . 36
Fehlersuche . . . . . . . . . . . . . . . . . . . . . . . . . . . 37-38
Technische Daten . . . . . . . . . . . . . . . . . . . . . . . . . 39
Hergestellt mit Genehmigung der Dolby Laboratories.“Dolby”,
“Pro Logic” und das Doppel-D-Symbol sind Mar kenzeichen der
Dolby Laboratories.Vertrauliches, unveröffentlichtes
Dokument. Copyright 1992-1997 Dolby Laboratories. Alle
Rechte vorbehalten.
Hergestellt mit Genehmigung von Digital Theater Systems,
Inc.
US Pat.No. 5,451,942 5,956,674, 5,974,380, 5,978,762 und
weitere weltweite Patente ausgestellt und angemeldet.“DTS”
und “DTS Digital Surround” sind eingetragene Markenzeichen
von Digital Theater Systems, Inc. Copyright 1996, 2000 Digital
Theater Systems, Inc. Alle Rechte vorbehalten.
4
Page 45

Vor dem Betrieb
2
Spielbare Discs
DVD-Video-Discs
(8 cm / 12 cm disc)
Video-CD (VCD)
(8 cm / 12 cm disc)
Audio-CD
(8 cm / 12 cm disc)
Des weiteren können auf diesem Gerät DVD-R/-RW,
SVCD und CD-R bzw.CD-RW abgespielt werden, auf
denen Musiktitel, MP3- oder JPEG-Dateien enthalten
sind.
Hinweise
Abhängig von den Voraussetzungen des Aufnahme-
gerätes oder der CD-R/RW-Disc (bzw. DVD-R/-RW)
selbst können einige CD-R/RW-Discs (bzw. DVD-R/
-RW) mit diesem Gerät nicht wiedergegeben werden.
DVD-RW-Discs im VR-Modus (Videoaufzeichnung)
können mit diesem Gerät wiedergegeben werden.
Auf keiner der beiden Disc-Seiten dürfen Aufkleber
oder Etiketten befestigt werden.
Legen Sie keine ungleichmäßig geformten CDs
ein (z. B. herzförmig oder achteckig). Es können
Fehlfunktionen verursacht werden.
Hinweise zu DVDs und Video-CDs
Einige Wiedergabefunktionen für DVDs und VideoCDs werden von Softwareherstellern bewusst gesperrt.
Da mit diesem Gerät DVDs und Video-CDs gemäß den
vom Softwarehersteller entwickelten Disc-Inhalten ab-,
gespielt werden können, sind einige Wiedergabefunktionen nicht verfügbar bzw. es werden andere Funktionen
hinzugefügt.
Lesen Sie auch die Anleitungen der DVDs und VideoCDs. Einige geschäftliche DVDs können mit dem Gerät
u. U. nicht wiedergegeben werden.
Ländercode von DVD-Receiver und DVDs
Dieser DVD-Receiver wurde zur Wiedergabe von DVDSoftware mit dem Ländercode “2” entwickelt und
hergestellt. Der Ländercode auf den Etiketten einiger
DVDs gibt den Player typ an, auf dem diese
Discs abgespielt werden können. Auf diesem
Gerät können nur DVDs mit dem Code “2” bzw.
“ALL” abgespielt werden.
Bei anderen Discs wird die Meldung “Check
Regional Code” eingeblendet. Einige DVDs ohne
Ländercode-Etikett unterliegen u. U. Gebietsbeschränkungen und können nicht abgespielt werden.
Disc-Begriffe
Titel (nur DVD-Video-Discs)
Haupt-Filminhalte oder beigefügte Inhalte bzw.
Zusatzinhalte oder Musikalbum.
Jedem Titel ist eine Titel-Referenznummer zugewiesen,
die das Auffinden des Titels erleichtert.
Kapitel (nur DVD-Video-Discs)
Teile eines Films oder Musikstücks, die kleiner als Titel
sind. Ein Titel besteht aus einem oder mehreren
Kapiteln. Jedem Kapitel ist eine Kapitelnummer
zugewiesen, die das Auffinden des Kapitels ermöglicht.
Ab- hängig von der Disc können keine Kapitel
aufgenommen werden.
Track (nur Video-CD und Audio-CD)
Teile eines Films oder Musikstücks auf einer Videooder Audio-CD. Jedem Track ist eine Tracknummer
zugewiesen, die das Auffinden des Tracks ermöglicht.
Index (Video-CD)
Eine Nummer, die einen Track zum leichten Auffinden
von Punkten auf der VIDEO-CD in Ab- hängig von
teilt. Abhängig von der Disc können keine Indizes
aufgenommen werden.
Szene
Auf einer Video-CD mit PBC-Funktionen (Wiedergabesteuerung) werden bewegte Bilder und Standbilder in
“Szenen” unterteilt. Jede Szene wird auf dem Menübildschirm angezeigt und erhält eine Szenennummer,
die das Auffinden der Szene ermöglicht.
Eine Szene besteht aus einem oder mehreren Tracks.
Datei
Teile eines Films auf einer Daten-CD, in denen
JPEG-Bilddateien enthalten sind.
Arten von Video-CDs
Es gibt zwei Arten von Video-CDs:
Video-CDs mit PBC (Version 2.0)
PBC-Funktionen (Wiedergabesteuerung) ermöglichen
die Verständigung mit dem System über Menüs, Suchfunktionen oder anderen typischen Computervorgängen.
Zudem können u. U. auf der Disc enthaltene hochauflösende Standbilder angezeigt werden.
Video-CDs ohne PBC (Version 1.1)
Bedienung wie Audio-CDs.Mit diesen Discs können
Videofilme sowie Ton wiedergegeben werden, sie
besitzen jedoch kein PBC.
EINFÜHRUNG
WICHTIGER HINWEIS:
VERBRAUCHTE ODER LEERE BATTERIEN MÜSSEN
GESETZMÄßIG ZURÜCKGEFÜHRT ODER SICHER
ENTSORGT WERDEN.
GENAUERE INFORMATIONEN ERHALTEN SIE BEI
IHREM ÖRTLICHEN ENTSORGUNGSUNTERNEHMEN.
5
Page 46

Vor dem Betrieb (Forts.)
Vorsichtshinweise
Umgang mit dem Gerät
Transport des Gerätes
Der Transportkarton und die Verpackung könnten später
einmal nützlich sein.Verpacken Sie das Gerät zum
best-möglichen Schutz wieder in der Originalverpackung.
Aufstellen des Gerätes
Bild und Ton eines TV-Gerätes, Videorekorders oder
Radio in der Nähe könnten während der Wiedergabe
gestört werden. In diesem Fall sollte das Gerät nicht in
der Nähe dieser Geräte aufgestellt bzw.ausgeschaltet
werden.
Reinigung der äußeren Oberflächen
Verwenden Sie keine flüchtigen Flüssigkeiten wie
Insektenspray in der Nähe des Gerätes.Gummi- oder
Plastikteile solltendas Gerät nicht längere Zeit berühren.
Dadurch können Abdrücke auf der Oberfläche entstehen.
Reinigung des Gerätes
Reinigung des Gehäuses
Verwenden Sie ein weiches, trockenes Tuch.Verwenden Sie bei starken Verschmutzungen einen milden
Reiniger.Verwenden Sie keine starken Lösungen wie
Alkohol, Benzin oder Verdünner. Dadurch kann die
Oberfläche beschädigt werden.
Für ein klares Bild
Der DVD-Receiver ist ein High-Tech-Präzisionsgerät.
Die Bildqualität verschlechtert sich, wenn die Linse und
Teile des Disc-Laufwerks verschmutzt bzw.abgenutzt
sind.
Nach einer Betriebsdauer von 1000 Stunden sollte das
Gerät regelmäßig untersucht und gewartet werden.
(Abhängig von der Betriebsumgebung.)
Einzelheiten erhalten Sie bei Ihrem Händler.
Hinweise zu Discs
Umgang mit Discs
Berühren Sie niemals die Wiedergabeseite der Disc.
Halten Sie die Disc am Rand fest, um Fingerabdrücke
auf der Oberfläche zu vermeiden.
Keine Etiketten oder Klebeband aufkleben.
Aufbewahrung von Discs
Legen Sie die Disc nach der Wiedergabe in die Hülle.
Die Disc darf keiner direkten Sonneneinstrahlung oder
Wärmequellen ausgesetzt und niemals bei direkter
Sonneneinstrahlung im Auto gelassen werden, da die
Temperatur im Auto sehr hoch werden kann.
Reinigung von Discs
Durch Fingerabdrücke und Staub auf der Disc können
sich Bild- und Tonqualität verschlechtern. Reinigen Sie
die Disc vor der Wiedergabe von der Mitte zum
Rand mit einem sauberen Tuch ab.
Verwenden Sie keine starken Lösungen wie Alkohol,
Verdünner, handelsübliche Reiniger oder AntistatikSprays, die für Schallplatten bestimmt sind.
Auf diesem System können nur runde Discs abgespielt
werden. Discs mit anderen Formen (z. B. karten-, herzoder sternförmig) können Fehlfunktionen verursachen.
Verwenden Sie keine Discs mit angebrachten
Zubehörteilen, wie z. B. Etiketten oder Ringe.
Über Symbole
Über das Anzeigesymbol
Während des Betriebs wird u. U.das Zeichen “ ”
eingeblendet. Dieses Symbol gibt an, dass eine
Funktion im Handbuch für diese DVD-Video-Disc nicht
verfügbar ist.
In Anleitungen verwendete Disc-Symbole
Ein Abschnitt mit einem der folgenden Symbole im Titel
trifft nur für die durch das Symbol angezeigte Disc zu.
DVD
DVD-Video-Discs
VCD2.0
VCD1.1
JPEG
Video-CDs mit PBC-Funktion
(Wiedergabesteuerung).
Video-CDs ohne PBC-Funktion
(Wiedergabesteuerung).
CD
Audio-CDs.
MP3
MP3-Disc.
JPEG-Disc.
6
Page 47

Bedienelemente auf der Vorderseite
STANDBY
IR
- PRESET +
-
VOLUME +
FUNCTION
PHONES
@ / 1 (NETZ) Anzeige
Schaltet den DVD-Receiver EIN und AUS.
STANDBY-Anzeige
Leuchtet im Standby-Modus
des Receivers rot (aus).
Disc-Fach
Disc hier einlegen.
OPEN/CLOSE ( )
Öffnet bzw.schließt das Disc-Fach.
Lautstärkeregelung
Drücken Sie “+”zum Erhöhen und “-” zum
verringern der Lautstärke.
FUNCTION
Auswahl der Quelle des
Receivers.
(UKW , MW , VIDEO, TV oder
CD/DVD)
EINFÜHRUNG
Anzeigefenster
PLAY (
Zur Wiedergabe einer Disc.
Vorübergehende Pause der Disc-Wiedergabe.
Anhalten der Disc-Wiedergabe.
ÜBERSPRINGEN zurück (SS)
DVD: Zurück zum Anfang des aktuellen Kapitels/Tracks bzw.
zum vorherigen Kapitel/Track.
RADIO:
Auswahl des gewünschten Radiosenders.
ÜBERSPRINGEN vor (
DVD: Weiter zum NÄCHSTEN Kapitel/Track.
RADIO:
Auswahl des gewünschten Radiosenders.
Fernbedienungs-Sensor
Fernbedienung des DVD-Receivers auf diesen Bereich richten.
H)
PAUSE (XX)
STOP (xx)
TT
)
PHONES
Anschluss der Kopfhörer.
7
Page 48

Anzeigen im Anzeigefenster
Anzeigen für wiederholte Wiedergabe.
Wiedergabemodus.
Anzeige bei Radiobetrieb des Gerätes.
Anzeige bei Stereobetrieb des Gerätes.
CD-Disc eingelegt.
MP3-Disc eingelegt.
Leuchtet im DSGX ONModus des Gerätes.
Anzeige des
aktuellen
Surroundformats.
DISC
CHAP TITLE
REP 1ALBM
TRK
FM
AM
TUNED PBC SLEEP
VCD2.0-Disc eingelegt.
Leuchtet bei eingestelltem Radiosender des DVD-Receivers.
MP3 CD ST DSGX
D
D
D
Anzeige SLEEP-Timer
D
PL II
D
Anzeige für
DOLBY
PROLOGIC IIKlangformat.
Anzeige des aktuellen
Surroundformats.
Titelanzeige
8
Anzeigen für Gesamt-Spielzeit/verstrichene Spielzeit/ Frequenz/
verbleibende Spielzeit/aktuellen Status/Titelnummer/SurroundModus/Lautstärke usw.
Anzeige des Kapitels bzw.
der Track-Nummer.
Page 49

Fernbedienung
SLEEP
Gerät in den Sleep-Modus versetzen.
TUNER/BAND
Auswahl des Tuners als Quelle des
DVD-Receivers. (UKW und MW)
MUTING
Schaltet die Lautsprecher des DVD-
Receivers vorübergehend stumm.
TUNER MENU
Speichert eine Radiofrequenz
im Tuner.
Drücken, um voreingestellte Radiosender
aus dem Tuner-Speicher zu löschen.
PROGRAM
Wechselt zum bzw. beendet den Modus
Programm ändern.
REPEAT
Kapitel, Track, Titel, Alle wiederholen.
FM MODE
Wechselt zwischen MONO und
STEREO.
TV
Bedienung von TV-Geräten mit der
Fernbedienung.
AUDIO
Auswahl einer Sprache (DVD) bzw.
eines Tonkanals (CD).
ANGLE
Auswahl des DVD-Blickwinkels, falls
verfügbar.
SUBTITLE
Auswahl der Sprache für Untertitel.
PREV/PRESET-
Zurück zum Anfang des aktuellen
Kapitels/Tracks
bzw.zurück zum vorherigen
Kapitel/Track. Auswahl
des Tuner-Programms.
NEXT/PRESET+
Weiter zum nächsten Kapitel oder Track.
Auswahl des Tuner-Programms.
DVD T OP MENU
Zeigt das Titelmenü der Disc an, falls
vorhanden.
B/b/V/v (links/rechts/auf/ab)
Auswahl einer Option im Menü.
ENTER
Bestätigung einer Menüauswahl.
DVD DISPLAY
Ruft die On-Screen-Anzeige auf.
TV VOL +/–
Einstellen der Lautstärke des TV-Gerätes.
TV CH +/–
Auswahl des TV-Kanals.
DVD SETUP
Ein-/Ausblenden des DVD-Setup-Menüs.
SONY TV DIRECT
Auswahl der Ausgangsquelle direkt auf DVD.
TV @ / 1
Schaltet das TV-Gerät EIN und AUS.
@ / 1
Schaltet den DVD-Receiver EIN und AUS.
AUTO FORMAT DIRECT
Auswahl des Klangmodus zwischen
A.F.D. AUTO, PRO LOGIC,
PLII MOVIE und PLII MUSIC.
MODE
Auswahl des Klangmodus zwischen
FLAT, ROCK, POP, JAZZ, CLASSIC
und NEWS.
FUNCTION
Auswahl der Quelle des Receivers.
(UKW, MW, VIDEO, TV oder CD/DVD)
ZZ
Öffnet bzw.schließt das Disc-Fach.
DSGX
Schaltet DSGX EIN und AUS.
Nummerntasten 0-9
Auswahl von Aufzählungsoptionen in
einem Menü.
>10/ TV ENTER
Bedienung des TV-Gerätes.
SLOW t/
Bildsuche bzw.Zeitlupe rückwär ts.
Einstellung des gewünschten
Radiosenders.
SLOW T/TUNING+
Bildsuche bzw.Zeitlupe vorwärts.
Einstellung des gewünschten
Radiosenders.
TUNING-
Tasten zur Wiedergabesteuerung
• H (PLAY)
Wiedergabe starten.
• X (PAUSE)
Wiedergabe/Aufnahme vorübergehend
unterbrechen.
• x (STOP)
Wiedergabe anhalten.
DVD MENU
Ruft das Menü einer DVD-Disc auf.
DISPLAY
Anzeige der verbleibenden Spielzeit
zwischen Kapitel und Titel.
Prüfen des RDS-Serviceprogramms (PS).
VOLUME (+/-)
Einstellen der Lautstärke.
CLEAR
Löschen einer Track-Nummer aus dem
Programm-Menü.
DIMMER
Ändern der Helligkeit des Anzeigefensters.
RETURN
Zurück zum Setup-Menü.
TV/VIDEO
Auswahl der Quelle des TV-Gerätes.
EINFÜHRUNG
9
Page 50

Anschlüsse auf der Rückseite
Netzkabel
Anschluss an eine Steckdose.
ANSCHLÜSSE FÜR MW-BOGENANTENNE
EURO AV OUTPUT (TO TV)
Anschluss an ein TV-Gerät.
MONITOR OUT (VIDEO)
Anschluss an ein TV-Gerät mit Video-Eingang.
VIDEO (AUDIO IN L/R)
Anschluss an den Audio-Ausgang einer
externen Quelle (Videorekorder, LD-Player
usw.)
Anschluss der MW-Bogenantenne.
LAUTSPRECHERANSCHLÜSSE
Schließen Sie die sechs mitgelieferten
Lautsprecher an diese Anschlüssen an.
Berühren Sie nicht die inneren Stifte der Buchsen
auf der Rückseite. Durch elektrostatische
Entladungen
kann das Gerät dauerhaft beschädigt werden.
Reichweite der Fernbedienung
Richten Sie die Fernbedienung auf den Fernbedienungs-Sensor und drücken Sie die Tasten.
Entfernung: Bis ca. 6 m vom FernbedienungsSensor
Winkel: Ca. 30° in alle Richtungen vom
Fernbedienungs-Sensor
UKW-ANTENNENANSCHLUSS
Anschluss der UKW-Antenne.
Einlegen der Batterien in die Fernbedienung
Nehmen Sie die Batterieklappe von
der Rückseite der Fernbedienung ab
und legen Sie zwei R6-Batterien
(Größe AA) mit der richtigen Polung
und ein. Richten Sie die
Fernbedienung auf den
Fernbedienungs-Sensor des
Gerätes.
10
Alten und neue Batterien nicht zusammen verwenden.
Page 51

Anschlüsse
Anschluss an ein TV-Gerät
Nehmen Sie, abhängig von den Möglichkeiten Ihrer
Geräte, einen der folgenden Anschlüsse vor.
Tipps
Abhängig vom TV-Gerät sowie von den anderen
Geräten gibt es verschiedene Möglichkeiten zum
Anschluss des DVD-Receivers. Nehmen Sie einen
der folgenden Anschlüsse vor.
Zum Anschluss an ein TV-Gerät, einen Videorekorder,
oder andere Geräte lesen Sie die jeweiligen
Handbücher.
–
Der DVD-Receiver muss direkt über den richtigen AVEingang an das TV-Gerät angeschlossen werden.
– Der DVD-Receiver darf nicht über den Videorekorder
angeschlossen werden. Das DVD-Bild könnte durch
das Kopierschutzsystem verzerrt werden.
Video-Anschluss
Verbinden Sie die MONITOR OUT-Buchse des DVDReceivers über das Videokabel mit der Video-Eingangsbuchse des TV-Gerätes (V).
SCART-Anschluss
Verbinden Sie die EURO AV OUTPUT (TO TV)Buchse des DVD-Receivers über das Scart-Kabel
mit der Scart-Eingangsbuchse des TV-Gerätes (S).
SCART INPUT
AUDIO INPUT
R
VORBEREITUNG
VIDEO
INPUT
L
V
S-VIDEO
INPUT
Hinweis
Vor dem Anschluss des DVD-Receivers an ein TVGerät müssen der Netzstrom ausgeschaltet sowie
beide Geräte von der Steckdose getrennt werden.
S
(nicht enthalten) (nicht enthalten)
R ckseite des DVD-Receivers
11
Page 52

Anschlüsse (Forts.)
Anschluss an externe Geräte
Rückseite des Videorekorders
(oder LD-Players usw.)
(nicht enthalten)
Anschluss
Verbinden Sie die VIDEO (AUDIO L/R)-Buchsen des
DVD-Receivers über die Audiokabel mit den AudioAusgangsbuchsen (L/R) des Videorek., LD-Players usw.
Tipp
Drücken Sie FUNCTION auf der Fernbedienung, um
den Eingang auf diese Buchsen zu legen.
12
Page 53

Anschlüsse (Forts.)
Antennenanschlüsse
Schließen Sie zum Radioempfang die enthaltene UKW/MW-Antenne an.
Schließen Sie die MW-Bogenantenne an den Anschluss AM Loop an.
Schließen Sie die UKW-Antenne an den Anschluss FM 75Ω COAXIAL an.
Schließen Sie bei der enthaltenen MW-Bogenantenne das schwarze Kabel (B) an den Anschluss und das
weiße Kabel (A) an den anderen Anschluss an.
MW-Bogenantenne (enthalten)
UKW-Antenne (enthalten)
A
B
VORBEREITUNG
Hinweise
Um Störgeräusche zu vermeiden, platzieren Sie die MW-Bogenantenne nicht in der Nähe des DVD-Receivers und anderen
Geräten.
Die UKW-Antenne muss vollständig entfaltet werden.
Die UKW-Antenne sollte nach dem Anschluss so waagerecht wie möglich ausgerichtet werden.
Tipp
Verwenden Sie bei schlechtem UKW-Empfang ein 75Ω-Koaxialkabel (nicht enthalten) zum Anschluss des
Systems an eine Außenantenne, wie in der Abbildung gezeigt.
13
Page 54

Anschlüsse (Forts.)
Vorderer Lautsprecher
(Rechts)
Vorderer Lautsprecher
(Links)
Mittellautsprecher
Surround-Lautsprecher
(Surround rechts)
Subwoofer
Surround-Lautsprecher
(Surround links)
Anschluss des Lautsprechersystems
Schließen Sie die Lautsprecher über die mitgelieferten Lautsprecherkabel an.
Konfigurieren Sie die Lautsprecherparameter für einen optimalen Surround-Sound (Lautstärke, Entfernung usw.)
Hinweise
Die Lautsprecherkabel müssen an die richtigen Geräteanschlüsse angeschlossen werden: + an + und – an –. Bei
vertauschten Kabeln erscheint der Klang verzerrt und die Bässe werden verringert.
Erhöhen Sie die Lautstärke bei Front-Lautsprechern mit geringer Eingangsleistung nur langsam, um eine zu laute Ausgabe zu
vermeiden.
Die Vorderabdeckungen der Lautsprecher dürfen nicht entfernt werden.
Ein Lautsprecher-Standfuß kann zusätzlich erworben werden.
14
Page 55

Anschlüsse (Forts.)
Aufstellen der Lautsprecher
Normalerweise werden 6 Lautsprecher verwendet (2 vordere Lautsprecher, ein Mittellautsprecher, 2 SurroundLautsprecher und ein Subwoofer).
Für hervorragenden Bass-Klang, DTS Digital Surround oder Dolby Digital Surround sollte ein Subwoofer
angeschlossen werden.
•Vordere Lautsprecher
Stellen Sie die Lautsprecher je nach Zuhörerposition im gleichen Abstand auf. Stellen Sie je nach Hörrichtung einen Inter vall
von 45 Grad zwischen den Lautsprechern ein.
• Mittellautsprecher
Im Idealfall befinden sich die mittleren und vorderen Lautsprecher auf gleicher Höhe, meistens jedoch ober- oder unterhalb des
Fernsehers.
• Surround-Lautsprecher
Stellen Sie die Lautsprecher links und rechts hinter den Hörbereich. Diese Lautsprecher erzeugen bewegten sowie räumlichen
Klang zur Surround-Wiedergabe. Die Surround-Lautsprecher sollten optimalerweise nicht zu weit hinten platziert
werden, sondern in oder oberhalb der Ohrenhöhe des Zuhörers. Die Surround-Lautsprecher können auch auf eine Wand
oder Decke gerichtet werden, um den Klang weiter zu streuen.
Wenn sich der Zuhörer in kleineren Räumen in der Nähe der Rückwand befindet, platzieren Sie die Surround-Lautsprecher
einander gegenüberliegend sowie 60-90 cm oberhalb der Ohren des Zuhörers.
• Subwoofer
Der Subwoofer kann an einem beliebigen Ort in vorderer Position aufgestellt werden.
Subwoofer
Mittellautsprecher
VORBEREITUNG
Vorderer
Lautsprecher
(Links)
Surround-
Lautsprecher
(Links)
Vorderer
Lautsprecher
(Rechts)
Surround-
Lautsprecher
(Rechts)
Beispiel Lautsprecheraufstellung
Hinweis
Ein Lautsprecher-Standfuß kann zusätzlich erworben werden.
Befestigung der Lautsprecherfüße
Befestigen Sie zur Vermeidung von Vibrationen der Lautsprecher bei der Klangausgabe die mitgelieferten Füße
an den Lautsprechern, außer am Subwoofer, wie in der Abbildung gezeigt.
15
Page 56

Auswahl der Ausgangs-/Eingangsquelle
Folgen Sie den Anleitungen, um die verschiedenen
Ein-/Ausgangs-quellen des DVD-Receivers
auszuwählen und umzuschalten:
• CD/DVD
SONY TV DIRECT
TUNER/
BAND
FUNCTION
Ausgabe von DVD anz eigen:
Drücken Sie SONY TV DIRECT auf der
Fernbedienung.
Im Anzeigefenster erscheint “CD/DVD”.
• TUNER FM/AM
Empfang von MW-/UKW-Radiosendungen:
Drücken Sie TUNER/BAND, um zwischen MW- und
UKW- Empfang zu wechseln. Die gewählte Frequenz
erscheint im Anzeigefenster.
• INPUT SELECT
Ausgabe einer Audioquelle am Anschluss
AUDIO IN (L/R) von VIDEO:
Drücken Sie mehrmals FUNCTION auf der Fernbedienung. Im Anzeigefenster erscheint “VIDEO”.
Der Ton wird über eine externe Quelle an den
Anschlüssen AUDIO IN (L/R) von VIDEO
ausgegeben (Rückseite).
Ausgabe einer Audioquelle am Anschluss
EURO AV OUTPUT (TO TV):
Drücken Sie mehrmals FUNCTION auf der Fernbedienung. Im Anzeigefenster erscheint “TV”.
Der Ton wird über eine externe Quelle am Anschluss
EURO AV OUTPUT (TO TV) (Rückseite)
ausgegeben.
16
Page 57

Vor dem Betrieb
Kleines Glossar für Audio
Stream- und- Surround-Modus
DTS
Ermöglicht eine digitale 5.1 (bzw.6)-Kanal-Tonausgabe hoher
Qualität von DTS-Tonträgern mit diesem Logo, wie z. B.
Discs, DVDs und Compact-Discs usw.DTS DigitalSurround erzeugt eine transparente Tonausgabe auf bis zu 6
Kanälen (identisch mit den Originalaufnahmen) mit außerordentlicher Klarheit innerhalb eines 360-Grad Klangfeldes.
Der Begriff DTS ist ein Markenzeichen von DTS Technology,
LLC. Hergestellt mit Genehmigung von DTS Technology, LLC
DOLBY DIGITAL
Das Format Dolby Digital Surround ermöglicht die Ausgabe
von bis zu 5.1 Kanälen digitalem Surround-Sound eins
Dolby Digital- Tonträgers. Bei DVDs mit dem “ ” Logo
wird der Ton in höherer Tonqualität, genauerem räumlichen
Klang und verbessertem Dynamikbereich wiedergegeben.
DOLBY PRO LOGIC
In diesem Modus werden Filme oder Dolby Digital 2-Kanäle
mit dem “ ” Logo abgespielt. Dieser Modus vermittelt das
Gefühl, sich im Kino oder einem Konzertsaal zu befinden - ein
Effekt wie er nur über DOLBY PRO LOGIC SURROUND
erreicht werden kann. Der Effekt der Klangbewegung vor/
zurück/nach links/nach rechts sowie das Gefühl des
Dabeiseins mitten im Klangfeld ist sehr viel klarer und
dynamischer als zuvor.
DOLBY PRO LOGIC II
Dolby Pro Logic II gibt Zweikanal-Tonträger über fünf Ausgabekanäle mit voller Bandbreite wieder.Dieser Klang wird durch
einen professionellen Matrix-Surround-Dekoder höchster Reinheit erreicht, der die räumlichen Eigenschaften der Originalaufnahme ohne zusätzliche Töne oder Klangfarben erzeugt.
PLII MOVIE-Modus:
Der Spielfilm-Modus wird bei Stereo-Fernsehsendungen sowie
bei Dolby Surround-Sendungen eingesetzt. Dadurch wird ein
Klangfeld mit erweiterter Direktionalität erzeugt, das an die
Qualität von 5.1-Kanalton heranreicht.
PLII MUSIC-Modus:
Der Musik-Modus dient für alle Stereo-Musikaufnahmen.
Klangmodus
Sie können den Surround Sound aktivieren, indem
Sie eines der vorprogrammierten Klangfelder
auswählen, je nach gewünschtem Programm.
A) Durch Drücken der Taste MODE
Bei jedem Drücken von MODE wechselt der
Klangmodus in der folgenden Reihenfolge;
FLAT → ROCK → POP → JAZZ → CLASSIC → NEWS →
FLAT ...
Tipps
FLAT: Lineare Frequenzwiedergabe.
ROCK: Erzeugt den Klang von Rock-Musik.
POP: Erzeugt den Klang von Pop-Musik.
JAZZ: Erzeugt den Klang einer Jazz-Bar.
CLASSIC: Erzeugt den Klang von Orchestermusik.
NEWS: Erzeugt den Klang von Fernsehnachrichten.
B) Durch Drücken der Taste AUTO FORMAT DIRECT
Bei jedem Drücken von AUTO FORMAT DIRECT
wechselt der Klangmodus in der folgenden Reihenfolge;
A.F.D. AUTO → DOLBY PL → PLII MOVIE → PLII MUSIC →
A.F.D. AUTO ...
(Diese Funktion ist nur im 2-Kanal-Modus verfügbar)
Hinweise
Keine MP3-Discs.
Diese Funktion ist nur während der Wiedergabe verfügbar.
Der Klangmodus ist für Kopfhörer nicht verfügbar.
Beim Einlegen einer DVD.
Der Klangmodus einer DVD (Dolby Digital, DTS, PRO LOGIC
usw.) kann während der Wiedergabe durch Drücken von
AUDIO auf der Fernbedienung geändert werden.
Obwohl der DVD-Inhalt von Disc zu Disc verschieden ist, werden im Folgenden die Eigenschaften dieser Funktion erläutert.
Bei jedem Drücken von AUDIO ändert sich der Klangmodus
der DVD in der folgenden Reihenfolge;
→→→
VORBEREITUNG
A.F.D. AUTO
Software mit Mehrkanal-Surround Audio-Signalen wird wie
die Originalaufnahme wiedergegeben.
Hinweise
Diese Funktion ist nur während der Wiedergabe verfügbar.
A.F.D. AUTO ist für Kopfhörer nicht verfügbar.
Zur Information
•
Der DVD-Receiver speichert die letzten
Moduseinstellungen jeder einzelnen Quelle.
•
Das Kodierungsformat der Programm-Software
wird auf der Verpackung angegeben.
- Dolby Digital-Disc besitzen das Logo.
-Mit Dolby Surround kodierte Programme besitzen
das Logo.
- DTS Digital Surround-Discs besitzen die
Bezeichnung .
Hinweise
Der Klangmodus ist für Kopfhörer nicht verfügbar.
17
Page 58

Vor dem Betrieb (Forts.)
RESUME
OFF
ALL
TRACK
CHAPT
TITLE
1 /3
1 /12
0:20:09
1 ENG
D
5.1 CH
OFF
1 /1
AUTO
1 /3
AUTO
0:20:09
ST
Allgemeine Beschreibung
Dieses Handbuch enthält grundlegende Anleitungen
zum Betrieb des DVD-Receivers. Einige DVDs erfordern
eine andere Bedienung bzw.er lauben eine begrenzte
Bedienung während der Wiedergabe.In diesem Fall
erscheint das Symbol und zeigt an, dass diese
Funktion vom DVD Receiver/der Disc nicht unterstützt
wird.
On-Screen-Anzeige
Der Wiedergabestatus kann auf dem Bildschirm
angezeigt werden. Einige Optionen können im Menü
geändert werden.
Bedienung der On-Screen-Anzeige
Drücken Sie während der Wiedergabe DVD
1
DISPLAY.
Wählen Sie mit V/v eine Option aus.
2
Die ausgewählte Option wird markiert.
Ändern Sie mit B/b die Einstellung einer Option.
3
Zur Einstellung kann auch das Nummernfeld verwendet werden (z. B. Titelnummer). Drücken Sie bei
einigen Funktionen zur Ausführung auf ENTER.
DVD
Vorübergehende Bestätigungssymbole
Titel wiederholen
Kapitel wiederholen
Track wiederholen (Video-CDs ohne PBC,
MP3, CD)
Alle Tracks wiederholen (Video-CDs ohne PBC,
MP3, CD)
Wiederholung Aus
Wiedergabe von diesem Punkt aus fortsetzen
Vorgang nicht erlaubt oder nicht verfügbar
Hinweise
Einige Discs unterstützen nicht alle Funktionen der
On-Screen-Anzeige, wie im folgenden Beispiel.
Wird 10 Sekunden lang keine Taste gedrückt, wird
die On-Screen-Anzeige ausgeblendet.
Optionen
Titelnummer
Kapitelnummer
Zeit-Suchlauf
Sprache
und Digital AudioAusgabemodus
Sprache Untertitel
Blickwinkel
Klang
VCD2.0
VCD1.1
Optionen
Track-Nummer
Zeit
Tonkanal
Klang
Funktion
Zeigt die aktuelle Titelnummer sowie die Gesamtanzahl
der Titel an und springt zur gewünschten Titelnummer.
Zeigt die aktuelle Kapitelnummer sowie die Gesamtanzahl
der Kapitel an und springt zur gewünschten Kapitelnummer.
Zeigt die verstrichene Spielzeit und
sucht den Punkt direkt von der verstrichenen Spielzeit aus.
Zeigt die aktuelle Sprache der Tonspur,
die Kodiermethode sowie die Kanalnummer
an und ändert die Einstellung.
Zeigt die aktuelle Sprache der Untertitel an
und ändert die Einstellung.
Zeigt die aktuelle Blickwinkelnummer sowie die Gesamtanzahl der Blickwinkel an und ändert die Blickwinkelnummer .
Zeigt den aktuellen Klangmodus an
an und ändert die Einstellung.
(Wählen Sie die gewünschte Option mit V/v )
Funktion (Wählen Sie die gewünschte Option mit V/v)
Zeigt die aktuelle Track-Nummer, die gesamte Track-Anzahl,
PBC On-Modus an bzw.springt zur gewünschten TrackNummer im Modus PBC Off
Zeigt die verstrichene Spielzeit an (nur Anzeige)
Zeigt den Tonkanal an und
ändert den Tonkanal.
Zeigt den aktuellen Klangmodus an
an und ändert die Einstellung.
Auswahlmethode
B/ b
, oder
Nummern, ENTER
B/ b,./ >
Nummern, ENTER
Nummern, ENTER
B/ b
AUDIO
B/ b
SUBTITLE
B/ b
ANGLE
AUTO FORMAT DIRECT
oder
, oder
, oder
, oder
Auswahlmethode
B/ b
B/ b
AUDIO
, oder
–
, oder
Nummern, ENTER
AUTO FORMAT DIRECT
18
Page 59

Vor dem Betrieb (Forts.)
Voreinstellungen
Im DVD-Funktionsmodus können Sie ihre eigenen
Voreinstellungen vornehmen.
Allgemeiner Betrieb
Drücken Sie DVD SETUP.
1
Das Setup-Menü erscheint.
Wählen Sie mit V/v die gewünschte Option aus.
2
Die aktuelle Einstellung der gewählten Option und
alternative Einstellungen werden eingeblendet.
Wenn die gewünschte Option ausgewählt ist,
3
drücken Sie b und dann V/v zur Auswahl der
gewünschten Einstellung.
Drücken Sie zur Bestätigung der Auswahl
4
ENTER.
Für einige Optionen sind weitere Schritte erforderlich.
Drücken Sie DVD SETUP, RETURN oder H
5
(PLAY), um das Setup-Menü zu verlassen.
Sprache
Menü-Sprache
Wählen Sie eine Sprache für das Setup- Menü. Dieses
Menü wird nach Drücken von DVD SETUP angezeigt.
Gebietscode
Bildformat
4:3 Letterbox: Beim Anschluss an ein Standard 4:3-
TV-Gerät. Das angezeigte Bild besitzt schwarze Balken
oberhalb und unterhalb des Bildes.
4:3 Panscan: Beim Anschluss an ein Standard 4:3TV-Gerät. Das Bild wird verkleinert, um den Bildschirm
zu füllen. Beide Seiten des Bildes werden
abgeschnitten.
16:9 Wide: Breitformat: Beim Anschluss an ein 16:9-TVGerät.
DVD
4:3
4:3
16:9
Letterbox
Panscan
Wide
VORBEREITUNG
Disc-Sprache
Wählen Sie für die Menüs, die Tonausgabe und
die Untertitel der Disc eine Sprache aus.
Voreinstellung
gewählt.
Andere: Geben Sie für eine andere Sprache über das Num-
mernfeld die entsprechende 4-stellige Zahl für die jeweilige
Sprache laut Liste der Sprachcodes auf Seite 35 ein.
Drücken Sie bei falscher Eingabe CLEAR.
Hinweis
Die Sprachauswahl funktioniert bei einigen DVDs u. U.
nicht.
DVD
: Für die Disc ist die Originalsprache aus-
19
Page 60

Vor dem Betrieb (Forts.)
Einrichtung der Lautsprecher
5.1 Lautsprecher-Konfiguration
Konfigurieren Sie die Lautsprecher, einschl. LautstärkeBalance und Entfernung bzw. testen Sie die
Einstellungen. Lautsprecher-Einstellungen sind nur bei
der analogen Mehrkanal- Ausgabe wirksam
(s.“Einrichtung der Lautsprecher” S. 29.)
Front L
Entfernung
DVD
S S
0.3
Andere
Die DRC- und PBC-Einstellungen können geändert
werden.
Wählen Sie mit V/v eine gewünschte Option
und drücken Sie ENTER. Die ausgewählte Option
wird auf Ein bzw.Aus eingestellt.
Aus
DRC
Ein
PBC
Dynamic Range Control (DRC)
Im DVD*1-Format wird die Tonspur eines Programms
dank der digitalen Audio-Technologie möglichst getreu
und realistisch wiedergegeben. Sie können jedoch
den Dynamikbereich der Audio-Ausgabe komprimieren
(der Bereich zwischen den lautesten und den leisesten
Tönen). So können Sie einen Spielfilm ohne
Verlust der Tonqualität bei ger ingerer Lautstärke
anschauen. Stellen Sie dazu DRC auf Ein.
*1:Nur Dolby Digital
Playback Control (PBC)
Ein: Video-CDs mit PBC werden gemäß PBC wiedergegeben.
Aus: Video-CDs mit PBC werden wie Audio-CDs
wiedergegeben.
20
Page 61

Vor dem Betrieb (Forts.)
Kindersicherung
Freigabe
DVD-Spielfilme enthalten u.U. Szenen, die nicht für
Kinder geeignet sind. Daher besitzen einige Discs eine
Kinder-sicherung für die gesamte Disc oder für bestimmte Szenen auf der Disc. Diese Szenen sind von 1
bis 8 eingestuft, während unbedenklichere Szenen zur
Auswahl zur Verfügung stehen. Diese Freigaben sind
länderabhängig. Mit der Kindersicherung können Sie
verhindern, dass sich Ihre Kinder Discs anschauen
bzw.dass sie nur bestimmte Szenen anschauen können.
Wählen Sie über die Tasten V/v Einstufung im
1
Setup-Menü aus.
Drücken Sie bei der Auswahl Einstufung auf b.
DVD
8
7
6
5
4
3
2
1
2
Falls noch kein Kennwort eingegeben wurde.
3
Geben Sie über das Nummernfeld ein 4-stelliges
Kennwort ein, um das 4-stellige Sicherheitskennwort
zu erstellen und drücken Sie ENTER.Geben Sie
das Kennwort erneut ein und drücken Sie ENTER.
Falls bereits ein Kennwort eingegeben wurde;
Geben Sie zur Bestätigung des Sicherheits-kennworts über das Nummernfeld ein 4-stelliges
Kennwort ein und drücken Sie ENTER.
Drücken Sie bei falscher Eingabe und vor dem Drücken
von ENTER auf CLEAR und geben Sie das Kennwort
erneut ein.
Wählen Sie mit V/v eine Freigabe von 1 bis 8.
4
Eins (1) für geringe Einschränkungen.
Acht (8) für die meisten Einschränkungen.
Geöffnet: Die Kindersicherung wird deaktiviert und
die Disc wird vollständig wiedergegeben.
Einstufung 1 bis 8: Einige Discs enthalten
Szenen, die nicht für Kinder geeignet sind. Bei
Einstellung der Freigabe einer DVD werden alle
Szenen mitderselben Freigabe oder niedriger
gezeigt. Höher eingestufte Szenen werden nicht
gezeigt, falls keine Alternativszene verfügbar ist.
Diese Szene muss eine geeignete Freigabe
besitzen. Ansonsten wird die Wiedergabe angehalten. Um die Disc abzuspielen, geben Sie das
Kennwort ein oder ändern Sie die Freigabestufe.
Drücken Sie zur Bestätigung der
5
Freigabeauswahl ENTER und zum Verlassen des
Menüs DVD SETUP.
Gebietscode
Geben Sie den Code für das Land ein, in dem die
Freigabe für die DVD-Video-Disc angewendet wird
(siehe “Liste der Gebietscodes” auf Seite 36).
Wählen Sie im Setup-Menü mit V/v die Option
1
Gebietscode.
Drücken Sie bei gewähltem Gebietscode auf b.
DVD
U S
2
Führen Sie Schritt 3 unter “Kindersicherung”
3
links aus.
Wählen Sie mit V/v das erste Zeichen aus.
4
Wechseln Sie mit b zum nächsten Zeichen und
5
wählen Sie mit den Tasten V/v das zweite
Zeichen aus.
Drücken Sie zur Bestätigung der Auswahl des
6
Gebietscode ENTER und zum Verlassen des
Menüs auf DVD SETUP.
Hinweis
zur Änderung des Kennworts ist eine Bestätigung des
4-stelligen Kennworts erforderlich (siehe Ändern des
4-stelligen Kennworts im Folgenden).
Ändern des 4-stelligen Kennworts
1 Führen Sie die Schritte 1-2 weiter oben und links aus
(Freigabe).
2 Geben Sie das alte Kennwort ein und drücken Sie
ENTER.
3 Wählen Sie Change mit V/v und drücken Sie
ENTER.
4 Geben Sie ein neues Kennwort ein und drücken Sie
ENTER.
5 Geben Sie genau das gleiche Kennwort erneut ein
und Bestätigen Sie das Kennwort mit ENTER.
6 rücken Sie DVD SETUP, um das Menü zu verlassen.
Falls Sie das 4-stellige Kennwort vergessen
Falls Sie das Kennwort vergessen sollten, kann das
aktuelle Kennwort wie folgt zurückgesetzt werden.
1 Drücken Sie DVD SETUP, um das Menü auszurufen.
2 Geben Sie die 6-stellige Nummer “210499” ein.
Das 4-stellige Kennwort wird gelöscht.
3 Geben Sie ein neues Kennwort ein (s. weiter oben
und links [Einstufung]).
VORBEREITUNG
21
Page 62

DVD- und Video-CD-Betrieb
Wiedergabe von DVD- und Video-CD
Konfiguration der Wiedergabe
Schalten Sie das TV-Gerät ein und wählen Sie die am
DVD-Receiver angeschlossene Video-Eingangsquelle.
Stellen Sie CD/DVD als Ausgabequelle ein, wie unter
Ausgangs-/Eingangsquelle auswählen auf Seite 16
beschrieben.
Drücken Sie zum Öffnen des Disc-Fachs auf ZZ.
DVD
VCD1.1VCD2.0
1
Legen Sie eine Disc mit dem Etikett nach oben ein.
2
Legen Sie eine doppelseitige DVD mit der Seite nach
unten ein, die wiedergegeben werden soll.
Drücken Sie zum Schließen des Fachs auf ZZ.
Im Anzeigefenster wird “READING” angezeigt und die
3
Wiedergabe beginnt automatisch. Falls die Wiedergabe
nicht startet, drücken Sie H(PLAY).
In manchen Fällen wird hier das Disc-Menü angezeigt.
Falls der Menübildschirm erscheint
Nach dem Einlegen einer DVD wird u.U. automatisch
ein Menübildschirm eingeblendet.
DVD
Wählen Sie mit B/b/V/v den Titel/das Kapitel aus, das
gezeigt werden soll, und drücken Sie zur Wiedergabe
ENTER. Drücken Sie DVD TOP MENU bzw. DVD MENU,
um zum Menübildschirm zurückzukehren.
VCD2.0
Wählen Sie mit dem Nummernfeld den gewünschten Track
aus. Drücken Sie für den Menübildschirm RETURN.
Menüoptionen und Bedienung der Menüs sind je nach
Disc unterschiedlich. Folgen Sie den An- leitungen in
jedem Menübildschirm. Zudem können Sie PBC im
Setup einschalten. Siehe Seite 20.
Hinweise
Wenn die Disc bei aktivierter Kindersicherung nicht der
Freigabe (nicht freigegeben) entspricht, muss das
4-stellige Kennwort eingegeben und/oder die Disc
freigegeben werden (s. Kindersicherung auf S. 21).
DVDs besitzen u. U. einen Ländercode.
Auf dem DVD-Receiver können keine Discs abgespielt
werden, deren Ländercode von dem des DVDReceivers abweicht.Der Ländercode dieses DVDReceivers ist 2.
Ein Standbild darf nicht für eine längere Zeit auf dem
Bildschirm angezeigt werden.
Allgemeine Funktionen
Hinweis
Falls nicht anders angegeben erfolgt die Bedienung immer
über die Fernbedienung. Zudem stehen einige
Funktionen nicht im Setup-Menü zur Verfügung.
Resume-Funktion
DVD
VCD1.1VCD2.0
Beim Anhalten der Disc merkt sich der Receivers die
Stelle, an der x (STOP) edrückt wurde und “RESUME x”
erscheint auf dem Bildschirm. Drücken Sie
die Wiedergabe von diesem Punkt aus fortzusetzen.
22
H
(PLAY) , um
CD
Tipp
Um die Wiedergabe vom Anfang der Disc zu starten,
drücken Sie zweimal x und dann
H
(PLAY).
Hinweise
Abhängig vom Anhaltepunkt der Disc setzt der Receiver
die Wiedergabe u.U.nicht genau von diesem Punkt aus fort.
Dieser Punkt wird dann gelöscht, wenn:
- Sie im STOP-Modus auf x drücken.
- Sie das Gerät ausschalten.
- Sie das Disc-Fach öffnen.
Wahl eines anderen TITELS
DVD
1 /3
Bei mehreren Titeln auf einer Disc können Sie
wie folgt andere Titel auswählen:
Drücken Sie DVD DISPLAY.Wählen Sie mit V/vein
Titelsymbol. Drücken Sie dann die entsprechende
Nummer(0-9) und wählen Sie den Titel mit ENTER aus.
Drücken Sie DVD DISPLAY, wählen Sie mit B/b eine
Titelnummer aus und drücken Sie ENTER.
Wahl eines anderen KAPITELS/TRACKS
VCD1.1VCD2.0
M, um die
VCD1.1VCD2.0
1 /3
bzw.
M
DVD
VCD2.0
VCD1.1
1 /12
Wenn ein Titel auf der Disc mehr als ein Kapitel oder eine
Disc mehr als einen Track enthält, können Sie
wie folgt anderen Kapitel/Tracks auswählen:
Drücken Sie während der Wiedergabe kurz auf PREV
oder NEXT, um zum Anfang des aktuellen Kapitels/
Tracks oder zum nächsten Kapitel/Track zu gelangen.
Drücken Sie zweimal kurz auf PREV, um zum
vorherigen Kapitel/Track zu gelangen.
Um während der Wiedergabe direkt zu einem
Kapitel zu wechseln, drücken Sie DVD DISPLAY.Wählen
Sie mit V/v ein Kapitel-/Tracksymbol aus. Geben Sie
dann über die Tasten (0-9) eine Kapitel-/ Tracknummer
ein oder wählen Sie mit B/b ein Kapitel aus und drücken
Sie ENTER.
Hinweise
Drücken Sie bei einstelligen Nummern die Nummerntasten
(1-9) und warten Sie, dass die Funktion ausgeführt wird.
Drücken Sie bei zweistelligen Nummern die Tasten
(0-9) schnell hintereinander.
Bei einer Video-CD mit PBC muss für diese Funktion PBC
im Setup-Menü ausgeschaltet werden. Siehe Seite 20.
Suchlauf
DVD
1 Drücken Sie während der Wiedergabe m
Der DVD-Receiver wechselt in den SUCHEN-Modus.
2 Drücken Sie mehrmals m
bzw.
gewünschte Geschwindigkeit auszuwählen: X2 b, 1
m, 2 m, 3 m (zurück) oder X2 B, 1 M, 2 M, 3
M(vor).
Bei einer Video-CD ändert sich die Geschwindigkeit: 1
m, 2 m, 3 m (zurück) oder 1 M, 2 M, 3 M
(vor).
3 Drücken Sie H(PLAY) zum For tsetzen.
Standbild
DVD
1 Drücken Sie während der WiedergabeX (PAUSE).
Der DVD-Receiver wechselt in den PAUSE-Modus.
2 TDrücken Sie zum Fortsetzen der normalen Wiedergabe
erneut X (PAUSE) oder
H
(PLAY).
Page 63

DVD- und Video-CD-Betrieb (Forts.)
Allgemeine Funktionen (Forts.)
Zeitlupe
DVD
1 Drücken Sie während der Wiedergabe X (PAUSE).
Der DVD-Receiver wechselt in den PAUSE-Modus.
2 Drücken Sie im Pause-Modus auf SLOW t oder T.
Der DVD-Receiver wechselt in den SLOW-Modus.
3 Wählen Sie mit SLOW t oder T die gewünschte
Geschwindigkeit:
4 t, 3 t, 2 t oder 1 t (zurück), oder 4 T, 3 T,
2 T oder 1 T (vor).
4 Drücken Sie
H (PLAY) zum Fortsetzen.
Hinweis
Ein Suchlauf zurück in Zeitlupe ist bei Video-CDs
nicht möglich.
Wiederholen
DVD
DVD-Video-Discs - Wiederholen Kapitel/Titel/Aus
1 Drücken Sie während der Wiedergabe auf REPEAT.
Das Wiederholen-Symbol erscheint auf dem Bildschirm.
2 Drücken Sie REPEAT für den gewünschten
Wiederholungsmodus.
CHAPT
TITLE
• CHAPT: wiederholt das aktuelle Kapitel.
• TITLE: wiederholt den aktuellen Titel einer Disc.
• OFF: keine Wiederholung.
Video-CDs - Track/Alle/Keine wiederholen
1 Drücken Sie während der Wiedergabe auf REPEAT.
Das Wiederholen-Symbol erscheint auf dem Bildschirm.
2 Drücken Sie REPEAT für den gewünschten
Wiederholungsmodus.
TRACK
ALL
VCD1.1VCD2.0
VCD1.1VCD2.0
OFF
OFF
Hinweise
Bei einer Video-CD mit PBC muss PBC für die
Wiederholungsfunktion ausgeschaltet werden. Siehe
Seite 20.
Durch zweimaliges Drücken auf PREV oder auf NEXT
während der Wiederholung, um zum vorherigen/nächsten Track zu gelangen (nur bei Kapitel/Track wiederholen), wird der Wiedergabemodus beendet.
Zeit-Suchlauf
DVD
0:20:09
-:--:--
Mit der Zeit-Suchlauf-Funktion kann die Wiedergabe der
Disc von einem beliebigen Zeitpunkt aus gestartet
werden.
1 Drücken Sie während der Wiedergabe DVD DISPLAY.
Die On-Screen-Anzeige erscheint auf dem Bildschirm.
Im Zeit-Suchlauf-Feld wird die verstrichene Spielzeit der
aktuellen Disc angezeigt.
2 Wählen Sie mit V/v innerhalb von 10 Sekunden das
Zeit-Suchlauf-Symbol in der On-Screen-Anzeige aus.
“-:—:—” erscheint im Zeit-Suchlauf-Feld.
3 Geben Sie über das Nummernfeld innerhalb von 10
Sekunden die gewünschte Startzeit ein. Geben Sie
v.l.n.r.Stunden, Minuten und Sekunden an.
Drücken Sie bei falscher Eingabe auf CLEAR, um die eingegebenen Zahlen zu löschen und korrigieren Sie die Eingabe.
4 Drücken Sie innerhalb von 10 Sekunden ENTER.
Die Wiedergabe beginnt vom gewählten Zeitpunkt der Disc. Bei
ungültiger Zeit wird die Wiedergabe vom aktuellen Punkt fortgesetzt.
BEDIENUNG
• TRACK: wiederholt den aktuellen Track.
• ALL: wiederholt alle Tracks einer Disc.
• OFF: keine Wiederholung.
23
Page 64

DVD- und Video-CD-Betrieb (Forts.)
Allgemeine Funktionen (Forts.)
Besondere DVD-Funktionen
Überprüfen der Inhalte von DVDVideo-Discs: Menüs
Eine DVD wird in verschiedene Abschnitte unterteilt,
aus denen Bild- oder Musikinformationen entstehen.
Diese Abschnitte werden als “Titel” bezeichnet. Beim
Abspielen einer DVD mit mehreren Titeln kann ein Titel
über DVD TOP MENU gewählt werden.
Beim Abspielen von DVDs mit der Möglichkeit, z. B. die
Sprache des Tons auszuwählen, erfolgt die Auswahl
über DVD MENU.
1 Drücken Sie DVD TOP MENU oder DVD MENU.
Das Menü der Disc wird eingeblendet.
Verschiedene Discs besitzen unterschiedliche Menüs.
2 Wählen Sie mit B/b/V/v or oder über das
Nummernfeld die abzuspielende bzw.zu bearbeit
ende Komponente aus.
3 Drücken Sie ENTER.
Blickwinkel
DVD
1 /1
Falls die Disc Sequenzen enthält, die in verschiedenen
Kameraperspektiven aufgenommen wurden, erscheint
das Blickwinkel-Symbol auf dem Bildschirm. Die
Kameraperspektive kann dann beliebig geändert werden.
Drücken Sie während der Wiedergabe mehrmals
ANGLE, um einen Blickwinkel auszuwählen.
Die Nummer des aktuellen Blickwinkels erscheint in der
Anzeige.
Ändern der Sprache
1 ENG
DVD
Drücken Sie für andere Sprachen oder Audio-Tracks
während der Wiedergabe mehrmals auf AUDIO.
Ändern des Tonkanals
Drücken Sie für einen anderen Tonkanal während der
Wiedergabe mehrmals auf AUDIO (ST, LINKS oder
RECHTS).
Untertitel
D
5.1 CH
VCD1.1VCD2.0
ST
LEFT
DVD
RIGHT
1 ENG
Drücken Sie für verschiedene Untertitel-Sprachen
während der Wiedergabe mehrmals auf SUBTITLE.
Hinweis
Falls das Symbol rscheint, ist diese Funktion derzeit
bzw.auf dieser DVD nicht verfügbar.
24
Page 65

Audio-CD- und MP3-Disc-Betrieb
ST0: 56: 18
TRACK 1
TRACK 2
TRACK 3
TRACK 4
TRACK 12
TRACK 8
TRACK 10
TRACK 3
TRACK 5
TRACK 6
TRACK 7
TRACK 8
Programmieren
CD
AUTO
MP3
JPEG
TRACK 1
TRACK 2
TRACK 3
TRACK 4
TRACK 8
TRACK 2
TRACK 4
TRACK 3
TRACK 5
TRACK 6
TRACK 7
TRACK 8
MP3
Aus00:00
3
Programmieren
Folder1
Folder2
Folder3
Folder4
Folder5
Folder6
Folder7
Folder8
MP3
Aus00:00
Programmieren
Wiedergabe einer Audio-CD
und MP3-Disc
Mit dem DVD-Receiver können MP3-Aufnahmen auf
CD-ROM-, CD-R- oder CD-RW-Discs abgespielt werden. Lesen Sie vor dem Abspielen von MP3-Discs die
Hinweise zu MP3-Aufnahmen rechts.
Legen Sie eine Disc ein und schließen Sie das
Fach.
1
Audio-CD: Wenn das Audio-CD-Menü eingeblendet wird, fahren Sie mit Schritt 4 fort.
MP3-Disc: Das MP3/JPEG-Auswahlmenü wird
eingeblendet. Fahren Sie mit Schritt 2 fort.
Wählen Sie mit V/v eine MP3-Datei aus und
drücken Sie ENTER.
2
Das MP3-Disc-Menü wird eingeblendet.
Drücken Sie RETURN, um zum MP3/JPEGAuswahlmenü zurückzukehren.
Wählen Sie mit V/v einen Ordner und drücken
Sie ENTER.
3
Im Ordner erscheint eine Dateiliste.
Falls eine Dateiliste weitere Ordner enthält,wiederholen Sie Schritt 3.
Tipp
Um in einer Dateiliste zum vorherigen Ordner zu
gelangen, markieren Sie diesen mit V/v und drücken
Sie ENTER für den vorherigen Menübildschirm.
Wählen Sie mit V/v einen Track aus und
drücken Sie
4
Die Wiedergabe beginnt.
Während der Wiedergabe erscheint die
verstrichene Spielzeit des Tracks im Anzeigefenster
und Menü. Die Wiedergabe wird am Ende der Disc
angehalten.
Drücken Sie DVD TOP MENU für die nächste Seite.
Drücken Sie DVD MENU für die vorherige Seite.
Audio-CD-Menü MP3-Disc-Menü
H (PLAY) oder ENTER.
MP3CD
Hinweise zu MP3-Dateien
Über MP3
Eine MP3-Datei sind mithilfe des MPEG1 Audio
Layer-3-Dateikodierungs-Schema komprimierte
Audio-Daten. Dateien mit der Endung “.mp3” heißen
“MP3-Dateien”.
Der DVD-Receiver kann keine MP3-Dateien mit einer
anderen Endung als “.mp3” lesen.
Die Kompatibilität dieses DVD-Receivers mit
MP3-Discs unterliegt den folgenden
Beschränkungen:
Sampling-Frequenz:nur 44,1 kHz
Bitrate: von 32 bis 320 kbps
Die CD-R sollte das Format “ISO 9660” besitzen
Falls MP3-Dateien mit einer Software ohne DATEISYSTEM erzeugt werden, können keine MP3Dateien abgespielt werden.
Bei einer Single-Session-Disc müssen sich die MP3Dateienim ersten Track befinden. Ansonsten können
keine MP3-Dateien gespielt werden. Um MP3Dateien abzuspielen, formatieren Sie alle Disc-Daten
oder verwenden Sie eine neue Disc.
Dateinamen dürfen höchstens 8 Zeichen lang sein
und müssen die Erweiterung “.mp3” besitzen, z. B.
“********.mp3”.
Verwenden Sie keine Sonderzeichen wie “/ : * ? “ < > ”
usw .
Auf der Disc sollten nicht mehr als 650 Dateien
enthalten sein.
Für eine optimale Wiedergabequalität mit diesem DVDReceiver sollten Discs/Aufnahmen bestimmte
technische Standards aufweisen. Bespielte DVDs
erfüllen diese Standards. Es gibt eine Reihe von verschie-denen Formate für beschreibbare Discs (einschl.
CD-R mit MP3-Dateien). Zur Wiedergabe sind bestimmte Voraussetzungen erforderlich (siehe oben).
Es ist zu beachten, dass der Download von MP3Dateien und Musik aus dem Internet genehmigt
werden muss. Unser Unternehmen erteilt
solche Genehmigungen nicht. Sie sollte immer vom
Urheber eingeholt werden.
BEDIENUNG
Drücken Sie x (STOP) zum Anhalten der
Wiedergabe.
5
25
Page 66

Audio-CD- und MP3-Disc-Betrieb (Forts.)
Pause
MP3CD
1 Drücken Sie während der Wiedergabe X (PAUSE).
2 Drücken Sie zum Fortsetzen der normalen
Wiedergabe erneut X (PAUSE) oder drücken Sie
(PLAY).
Auswahl eines anderen Tracks
MP3
CD
Bei mehreren Tracks auf einer Disc können Sie wie
folgt einen anderen Track auswählen:
Drücken Sie während der Wiedergabe kurz auf .
oder >, um zum Anfang des aktuellen Tracks
zurückzukehren.
Drücken Sie zweimal kurz auf ., um zum
vorherigen Track zu springen.
Um bei Audio-CDs direkt zu einem Track zu wechseln, geben Sie die Track-Nummer während der
Wiedergabe über das Nummernfeld (0-9) ein.
Hinweis
Drücken Sie bei einstelligen Nummern die Nummerntasten
(1-9) und warten Sie, dass die Funktion ausgeführt wird.
Drücken Sie bei zweistelligen Nummern die Tasten
(0-9) schnell hintereinander.
H
Wiederholen
MP3CD
1 Drücken Sie während der Wiedergabe auf REPEAT.
Das Wiederholen-Symbol erscheint auf dem Bildschirm.
2 Drücken Sie REPEAT für den gewünschten
Wiederholungsmodus.
TRACK
ALL
OFF
• TRACK: wiederholt den aktuellen Track.
• ALL: rwiederholt alle Tracks einer Disc.
• OFF: keine Wiederholung.
Hinweis
Durch zweimaliges Drücken auf . oder auf >
während der Wiederholung, um zum vorherigen/nächsten Track zu gelangen (nur Track wiederholen) wird der
Wiederholungsmodus beendet.
Ändern des Tonkanals
CD
Drücken Sie für einen anderen Tonkanal während der
Wiedergabe mehrmals auf AUDIO (ST, LINKS oder
RECHTS).
Suchlauf
MP3CD
1 Drücken Sie während der Wiedergabe m bzw. M.
Der DVD-Receiver wechselt in den SUCHEN-Modus.
2 Drücken Sie mehrmals m oder M , um die
gewünschte Geschwindigkeit auszuwählen speed: 1
m, 2 m, 3 m (zurück) oder 1 M, 2 M, 3 M
(vor).
Geschwindigkeit und Richtung des Suchlaufs werden auf
dem Menübildschirm angezeigt.
3 Drücken Sie H (PLAY) zum Fortsetzen.
26
Page 67

JPEG-Datei-Betrieb
Slide Speed
5/32 1024X768
Picture1.jpg
Picture2.jpg
Picture3.jpg
Picture4.jpg
Picture5.jpg
Picture6.jpg
Picture7.jpg
JPEG
Off
Folder1
5/32 Picture5.jpg1024X768
Slide Speed
Off
Folder1
Folder2
Folder3
Folder4
Folder5
Folder6
Folder7
Folder8
JPEG
MP3
JPEG
Anzeigen von JPEG-Dateien auf einer
Disc
Auf diesem DVD/VCR-Receiver können Discs mit
JPEG-Dateien abgespielt werden. Lesen Sie zuvor die
Hinweise zu JPEG-Dateien rechts.
1
2
3
Tipp
Um in einer Dateiliste zum vorherigen Ordner zu
gelangen, wählen Sie mit V/v auf der
Fernbedienung das “
ENTER, um zum vorherigen Menü zurückzukehren.
4
Hinweis
Nicht angezeigte JPEG-Dateien werden übersprungen.
JPEG
Legen Sie eine Disc ein und schließen Sie das Fach.
Das MP3/JPEG-Auswahlmenü wird eingeblendet.
Wählen Sie mit V/v JPEG MP3-Datei aus und
drücken Sie ENTER.
Das JPEG-Menü wird eingeblendet.
Wählen Sie mit V/v einen Ordner und drücken Sie
ENTER.
Im Ordner erscheint eine Dateiliste.
Drücken Sie RETURN, um zum MP3/JPEGAuswahlmenü zurückzukehren.
aus und drücken Sie
”
Wählen Sie mit V/v teine Datei aus und drücken
Sie ENTER oder H (PLAY).
Die Anzeige beginnt.
Drücken Sie in der Bildanzeige auf RETURN, um
zum vorherigen Menü (JPEG-Menü) zu wechseln.
Drücken Sie DVD TOP MENU für die nächste Seite.
Drücken Sie DVD MENU für die vorherige Seite.
Auswahl einer anderen Datei
Drücken Sie einmal . bzw. > während einer
Bildanzeige, um zur nächsten bzw. vorherigen Datei zu
springen.
Standbild
1 Drücken Sie während der Slideshow X (PAUSE).
Der DVD-Receiver wechselt in den PAUSE-Modus.
2 Um die Slideshow fortzusetzen, drücken Sie
H
(PLAY) oder er neut X (PAUSE).
Bild umdrehen
Drücken Sie während einer Bildanzeige V/v, um das
Bild waagerecht bzw. senkrecht umzudrehen.
Bild drehen
Drücken Sie während einer Bildanzeige B/b , um das
Bild im/entgegen dem Uhrzeigersinn zu drehen.
Hinweise zu JPEG-Dateien
Abhängig von der Größe und Anzahl der JPEGDateien kann das Lesen der Disc einige Minuten
dauern. Wenn nach einigen Minuten keine Anzeige
erfolgt, sind einige Dateien zu groß.Verringern Sie die
Auflösung der JPEG-Dateien auf unter 2 Megapixel
und brennen Sie die Disc neu.
Auf der Disc sollten nicht mehr als 650 Dateien und
Ordner enthalten sein.
Einige Discs sind auf Grund verschiedener
Aufnahme-formate oder des Zustandes der DISC
nicht kompatibel.
Beim Brennen von JPEG-Dateien auf die CD-R mit
Hilfe einer Software müssen alle ausgewählten
Dateien zum Kopieren die Dateierweiterung ".jpg"
besitzen.
Dateien mit der Endung “.jpe” müssen nach nach
“.jpg” oder “.jpeg” umbenannt werden.
Dateien ohne die Endung “.jpg” oder “.jpeg” können
vondiesem DVD-Receiver nicht gelesen werden,
selbst sie im Windows Explorer als JPEG-Dateien
erscheinen.
BEDIENUNG
Tipp
Es gibt drei Anzeigegeschwindigkeiten: Schnell,
Normal, Langsam und Aus. Markieren Sie mit B/b die
Anzeigegeschwindigkeit und wählen Sie mit V/v die
gewünschte Option und drücken Sie ENTER.
5
Drücken Sie x (STOP) zum Anhalten der Anzeige.
Das JPEG-Menü erscheint.
27
Page 68

Programmierte Wiedergabe
CD
VCD1.1VCD2.0
MP3
Programmierte Wiedergabe einer
Audio-CD und MP3-Disc
Mit der Programmfunktion können Sie Ihre Lieblingstracks beliebiger Discs im DVD-Receiver speichern.
Es können 30 Tracks programmiert werden.
Drücken Sie PROGRAM, um den Modus
1
Programm bearbeiten aufzurufen.
Das erscheint rechts neben dem Wort Program auf
der rechten Menübildschirmseite.
Hinweis
Drücken Sie PROGRAM, um den Modus Programm
bearbeiten zu verlassen; das wird ausgeblendet.
Wählen Sie einen Track und drücken Sie ENTER,
2
um ihn in der Programmliste aufzunehmen.
Wiederholen Sie Schritt 2, um weitere Tracksin
3
die Programmliste einzutragen.
Audio-CD-Menü MP3-Disc-Menü
CD
TRACK 1
TRACK 2
TRACK 3
TRACK 4
TRACK 5
TRACK 6
TRACK 7
TRACK 8
Programmieren
TRACK 12
TRACK 8
TRACK 10
TRACK 3
ST0: 56: 18
AUTO
MP3
TRACK 1
TRACK 2
TRACK 3
TRACK 4
TRACK 5
TRACK 6
TRACK 7
TRACK 8
Drücken Sie b.
Der zuletzt gewählte programmierte Track wird in der
4
Programmliste markiert.
Wählen Sie mit V/v den Trac k aus, der-
5
wiedergegeben werden soll.
Drücken Sie DVD TOP MENU für die nächste Seite.
Drücken Sie DVD MENU für die vorherige Seite.
Drücken Sie zum Starten auf H (PLAY) oder
6
ENTER.
Die Wiedergabe startet in der programmierten Reihenfolge und “PGM”erscheint auf dem Menübildschirm.
DieDie Wiedergabe stoppt nach dem zuletzt programmierten Track in der Programmliste.
Um von der programmierten zurnormalen
7
Wiedergabe zu wechseln, drücken Sie PROGRAM, um den Modus zu beenden. Wählen
Sie einen Track der CD- (bzw.
MP3-) Liste oder drücken Sie
Die Anzeige “PGM” wird ausgeblendet.
28
Programmieren
TRACK 8
TRACK 2
TRACK 4
TRACK 3
Aus00:00
3
H (PLAY).
Programmierte Wiedergabe
einer Video-CD
Hinweis
Zur Programmierung muss bei einer Video-CD mit PBC
die Funktion PBC im Setup-Menü ausgeschaltet werden.
Siehe Seite 22.
Legen Sie eine Video-CD ein und schließen Sie
1
das Fach.
Drücken Sie PROGRAM.
2
Das VCD-Programm-Menü wird eingeblendet.
Hinweis
Drücken Sie RETURN, PROGRAM oder H (PLAY),
um das Programm-Menü zu verlassen.
Führen Sie die Schritte 2-6 unter
“Programmierte Wiedergabe einer Audio-CD
3
und MP3-Disc” links aus.
“Programmieren” wird eingeblendet.
CD
TRACK01
TRACK02
TRACK03
TRACK04
TRACK05
TRACK06
TRACK07
TRACK08
0: 56: 18
Um von der programmierten zur normalen
4
Wiedergabe zu wechseln, drücken Sie PROGRAM.
“Programmieren” wird ausgeblendet.
Programmierte T racks wiederholen
1 Drücken Sie während der Wiedergabe auf REPEAT.
Das Wiederholen-Symbol erscheint auf dem Bildschirm.
2 Drücken Sie REPEAT für den gewünschten
Wiederholungsmodus.
TRACK
ALL
• TRACK: wiederholt den aktuellen Track.
• ALL: wiederholt alle Tracks der Programmliste.
• OFF: keine Wiederholung.
Track aus der Programmliste löschen
1 Drücken Sie während der Wiedergabe (nur Audio-
CD und MP3-Disc) auf PROGRAM bzw. Stop, um
den Modus Programm bearbeiten aufzurufen.
Das wird eingeblendet.
2 Wählen Sie die Programmliste mit b aus.
3 Wählen Sie mit V/v den Track aus, der von der
Programmliste gelöscht werden soll.
4 Drücken Sie CLEAR.
Der Track wird aus der Programmliste gelöscht.
Gesamte Programmliste löschen
1 Führen Sie die Schritte 1-2 unter “Track aus der
Programmliste löschen” oben aus.
2 Wählen Sie mit V/v “Clear All” und drücken Sie ENTER.
Die gesamte Programmierung für diese Disc wird gelöscht.
Hinweise
Die Programme werden beim Ausschalten gelöscht.
Die Programmierung wird beim Auswerfen der Disc gelöscht.
Die Programmierung wird beim Auswählen eines anderen
Modus (VIDEO, FM, AM usw.) gelöscht.
Programmieren
ST AUTO
OFF
Page 69

Einrichtung der Lautsprecher
S S
Front L
Entfernung
0.3
Im DVD-Modus können Sie ihre eigenenVoreinstellungen
vornehmen.
Nehmen Sie für den integrierten 5.1-Kanal SurroundDecoder die folgenden Einstellungen vor.
Drücken Sie DVD SETUP.
1
Das Setup-Menü erscheint.
Wählen Sie mit den Tasten V/v “Lautspr. -Setup”
2
im Setup-Menü aus.
Drücken Sie die Taste b während “Lautspr. -
3
Setup” ausgewählt ist.
WWählen Sie mit b den gewünschten
4
Lautsprecher.
Stellen Sie die Optionen mit V/v/B/b ein.
5
Entfernung
Beim Anschluss der Lautsprecher an den DVD-Receiver
wird über die Einstellung festgelegt, wie viel
Weg-strecke der Ton zum Hörpunkt zurücklegen muss.
Dadurch erreichen die Tönen jedes Lautsprechers
mden Zuhörer gleichzeitig.
Hinweis
Die Entfernung des Subwoofers kann nicht eingestellt
werden.
Test
Drücken Sie ENTER zum Testen der Signale jedes
Lautsprechers.
Gleichen Sie die Lautstärke an die Lautstärke der
Testsignale des Systems an.
Vorne links (L) → Mitte → Vorne rechts (R) →
Surround rechts (R) → Surround links (L) →
Subwoofer
Der Test kann mit V/v angehalten werden.
Zurück
Drücken Sie ENTER für das vorherige Menü.
BEDIENUNG
Auswahl der Lautsprecher
Wählen Sie einen einzustellenden Lautsprecher.
(vorderer Lautsprecher [Links], vorderer Lautsprecher
[Rechts], Mittel-Lautsprecher, Surround-Lautsprecher
[Links] Surround-Lautsprecher [Rechts] oder
Subwoofer)
Hinweis
Bestimmte Lautsprecherkonfigurationen sind laut Dolby
Digital-Lizenzvereinbarung nicht zulässig.
Lautstärke
Drücken Sie B / b Ë, um den Ausgabepegel des
ausgewählten Lautsprechers einzustellen. (-6dB - 6dB)
Größe
Diese Lautsprecher-Einstellungen sind voreingestellt
und können nicht geändert werden.
Die Subwoofergröße ist auf “Groß”, die übrigen
Lautsprechergrößen sind auf “Klein” gesetzt.
29
Page 70

Zusätzliche Informationen
Einstellen des Sleep-Timers
Der DVD-Receiver kann zu einer bestimmten Zeit
automatisch ausgeschaltet werden.
Drücken Sie SLEEP für die gewünschte
11
Sleep-Zeit.
Die SLEEP-Anzeige die und Sleep-Zeit erscheinen im
Anzeigefenster.
Bei jedem Drücken von SLEEP ändert sich die
22
Einstellung in der folgenden Reihenfolge.
SLEEP 90 →80 →70 → 60→ 50 →40 → 30 →20 →10 →
OFF
Hinweis
Die verbleibende Dauer bis zum Ausschalten des
DVD-Receivers kann angezeigt werden.
Drücken Sie SLEEP. Die verbleibende Spielzeit
erscheint im Anzeigefenster.
Spielzeit und verbleibende Spielzeit im
Bedienungsfeld anzeigen
Im Bedienungsfeld können z.B. verbleibende Spielzeit,
Gesamtanzahl der Titel einer DVD oder Tracks auf einer
einer CD, VIDEO CD oder MP3-Disc angezeigt werden.
Drücken Sie DISPLAY auf der Fernbedienung.
Bei jedem Drücken von DISPLAY während der Wiederändert sich die Anzeige.
Dimmer
Ändert die Helligkeit des Anzeigefensters auf dem
Bedienungsfeld bei eingeschaltetem Gerät.
Drücken Sie mehrmals die Taste DIMMER.
Stummschaltung
Drücken Sie MUTING, um das Gerät stumm zu
schalten.
Das Gerät kann stumm geschaltet werden, falls z.B.
das Telefon klingelt.“MUTING ON” leuchtet im Anzeigefenster. Drücken Sie zum Beenden erneut auf MUTING.
Verwenden der Kopfhörerbuchse
Schließen Sie einen Stereo-Kopfhörerstecker (3,5 mm)
am PHONES-Anschluss an.
Die Lautsprecher werden beim Einstecken des Kopf-
hörers (nicht mitgeliefert) automatisch abgeschaltet.
Lautstärkeregelung
Die Lautstärke kann durch mehrmaliges Drücken von
VOLUME +/- eingestellt werden.
Einsatz von Klangeffekten
Dieses System stellt Klangeffekte per Knopfdruck
zur Verfügung. Wählen Sie einen beliebigen Klangeffekt.
Hinweis
Abhängig vom Disc-Typ und vom Wiedergabemodus
werden keine Disc-Informationen angezeigt.
Tipps
Bei der Wiedergabe von Video-CDs mit PBC-Funktionen
wird nur die Spielzeit der Szene angezeigt.
Spielzeit und verbleibende Spielzeit des aktuellen Kapitels,
Titels, Tracks der Szene oder der Disc werden ebenfalls
angezeigt.
Drücken Sie DSGX auf der Fernbedienung.
Der Klangeffekt ist aktiviert.
DSGX
Mit aktiviertem DSGX werden die Bassfrequenzen
effektiv verstärkt.
Drücken Sie zum Ausschalten
der Klangeffekte erneut auf DSGX.
Hinweise
Beim Anschluss von Kopfhörern an das System kann
die DSGX-Funktion nicht aktiviert werden.
Diese Funktion ist nur während der Wiedergabe verfügbar.
30
Page 71

Radiobetrieb
Speichern von Radiosendern
Es können 30 Sender für UKW und MW gespeichert
werden.Vor der Sendersuche muss die Lautstärke verringert werden.
Drücken Sie TUNER/BAND auf der
11
Fernbedienung, bis FM oder AM (MW) im
Anzeigefenster erscheint.
Bei jedem Drücken von TUNER/BANDwechseln
22
FM und AM (MW) hin und her.
Halten Sie TUNING - oder + auf der Fernbedie-
33
nung ca. zwei Sekunden lang
gedrückt, bis sich die Frequenzanzeig e änder t.
Lassen Sie jetzt die Taste los.
Die Sendersuche stoppt, wenn der DVD/CD-Receiver
einen Radiosender findet. Im Anzeigefenster erscheint
“TUNED” und “ST” (bei Stereo-Empfang).
Drücken Sie TUNER MENU auf der
44
Fernbedienung.
Im Anzeigefenster blinkt eine Sendernummer.
Drücken Sie TUNING - oder + auf der Fernbedie-
55
nung, um die Sendernummer auszuwählen.
Drücken Sie erneut TUNER MENU auf der
66
Fernbedienung.
Der Radiosender wird gespeichert.
Wiederholen Sie die Schritte 3 bis 6 für
77
weitere Sender.
Einen schwachen Radiosender einstellen
Drücken Sie in Schritt 3 mehrmals TUNING - oder +,
um den Radiosender manuell einzustellen.
Löschen aller gespeicherten Sender
Halten Sie die Taste TUNER MENU ca.zwei Sekunden
lang gedrückt. Im Anzeigefenster erscheint “CLEARALL”.
Drücken Sie zum Löschen der Sender nochmals
TUNER MENU.
IFalls der “CLEAR ALL”-Modus versehentlich
aufgerufen wurde und der Speicher nicht gelöscht
werden soll, drücken Sie keine Taste. Der Modus
“CLEAR ALL” wird nach einigen Sekunden
automatisch beendet.
Hinweis
Wenn alle Sender belegt sind, erscheint kurz
der Hinweis FULL im Anzeigefenster und eine
Sendernummer beginnt zu blinken.
Um die Sendernummer zu ändern, führen Sie die
vorherigen Schritte 5 und 6 durch.
Radio hören
Zuerst müssen Radiosender im DVD-Receiver
gespeichert werden (s. “Speichern von Radiosendern”
links).
Drücken Sie TUNER/BAND, bis AM (MW) oder
11
FM im Anzeigefenster erscheint.
Der zuletzt empfangene Sender wird eingestellt.
Drücken Sie mehrmals PRESET -/+, um den
22
gewünschten Radiosender auszuwählen.
Bei jedem Drücken der Taste werden alle Sender vom
DVD-Receiver nacheinander eingestellt.
Stellen Sie die Lautstärke durch mehrmaliges
33
Drücken von VOLUME + oder - ein.
Ausschalten des Radios
Drücken Sie @ / 1 , um den DVD-Receiver auszuschalten oder wählen Sie einen anderen Betriebsmodus
(CD/DVD, VIDEO oder TV).
Einstellen nicht gespeicherter Radiosender
Erfolgt manuell oder automatisch (siehe Schritt 2).
Drücken Sie zur manuellen Einstellung mehrmals
TUNING - oder + auf der Fernbedienung.
Halten Sie TUNING - oder + zum automatischen
Einstellen ca. zwei Sekunden lang gedrückt.
Direktwahl eines gespeicherter Radiosenders
Wählen Sie den gewünschten Radiosender direkt über
das Nummernfeld der Fernbedienung aus.
Um z. B. den Radiosender 4 einzustellen, drücken Sie 4
auf der Fernbedienung. Um den Sender 19 einzustellen, drücken Sie 1 und 9 (innerhalb von 3
Sekunden).
Zur Information
Bei Rauschen des UKW-Programms
Drücken Sie FM MODE auf der Fernbedienung, so
dass “ST” vom Anzeigefenster erlischt. Es ist kein
Stereo-Empfang möglich, der Empfang verbessert
sich jedoch. Drücken Sie für den Stereo-Empfang
erneut FM MODE.
Verbesserung des Empfangs
Richten Sie die vorhandenen Antennen neu aus.
BEDIENUNG
31
Page 72

Radiobetrieb (Forts.)
RDS-Funktion
Dieses Gerät besitzt eine RDS-Funktion (Radio Data
System) für eine Vielzahl von Informationen über den
UKW-Sender. In vielen Länder n ist RDS ein System für
die Übertragung von Sendernamen oder Netzwerkinformationen, Beschreibung der Programmart, Textmeldungen vom Sender oder bestimmte Möglichkeiten
zur Musikwahl sowie die genaue Uhrzeit.
RDS-Sendereinstellung
Wenn ein RDS-Radiosender eingestellt ist, zeigt das
Gerät automatisch den Namen des Radiosenders an
und die RDS-Anzeige sowie die Anzeigen für RDSServiceprogramme (PS) werden angezeigt.
RDS-Anzeige
Das RDS-System kann eine Vielzahl zusätzlicher Informationen zum Sendernamen übertragen, der beimersten Einstellen des Senders angezeigt wird. Im normalen RDS-Betrieb wird der Sendername
angezeigt.Durch Gedrückt halten von DISPLAY auf der
Fernbedienung wird der Sendername angezeigt.
Hinweis
Falls keine RDS-Serviceprogramme (PS) über-
tragen werden, erscheint die Meldung PS NONE
im Anzeigefenster.
32
Page 73

Bedienung des TV-Gerätes über mitgeliefer te Fernbedienung
Mit der enthaltenen Fernbedienung können Lautstärke,
Eingangsquelle und Netz des TV-Gerätes bedient
werden.
TV @ / 1
TV
Bedienung des TV-Gerätes
Das TV-Gerät wird mit folgenden Tasten bedient.
Tastendruck Funktion
TV @ / 1 TV-Gerät ein-/ausschalten.
TV/VIDEO Eingangsquelle des TV-Gerätes
zwischen TV und anderer Quelle
wählen.
TV CH +/- Suchlauf nach oben/unten
durch gespeicherte Kanäle.
TV VOL +/- TV-Lautstärke einstellen.
Bedienung des TV-Gerätes über das
Nummernfeld
Mit der Fernbedienung im TV-Modus kann der
Fernseher über das Nummernfeld bedient werden.
Drücken Sie die TV-Taste
Die TV-Taste leuchtet rot und die Fernbedienung befindet sich im TV-Modus. Über das Nummernfeld können
die TV-Kanäle ausgewählt werden.
>10 dient zur Eingabe von Kanalnummern größer als
10. Um den TV-Modus zu beenden, drücken Sie TV
erneut.
Hinweise
Drücken Sie vor der Bedienung des Fernsehers auf
TV.
Die TV-Taste erlischt wenn 10 Sekunden lang kein
Tastendruck erfolgt.
Abhängig vom TV-Gerät können Fernbedienung bzw.
einige Tasten nicht für das TV-Gerät verwendet
werden.
BEDIENUNG
TV/VIDEO
TV CH +/TV VOL +/-
Tipp
Abhängig vom TV-Gerät funktioniert folgendes
Verfahren. Drücken Sie bei zweistelligen Zahlen
zuerst -/— und dann die Zahl. (Drücken Sie für Kanal 25
z. B. -/—, dann 2 und 5.)
33
Page 74

Verwenden der SONY TV DIRECT-Funktion
Mit SONY TV DIRECT können Sie mit einem
Knopfdruck Ihren SONY Fernseher sowie dieses
System einschalten, das System auf “CD/DVD” einstellen und die Eingangs-quelle des TV-Gerätes wechseln.
SONY TV DIRECT
TV
Nummernfeld
Drücken der Nummer Eingangsquelle TV-Gerät
TV/VIDEO 0 Keine Eingangsquelle
(Standardeinstellung)
1 VIDEO1
2 VIDEO2
3 VIDEO3
4 VIDEO4
5 VIDEO5
6 VIDEO6
7 COMPONENT 1
INPUT
8 COMPONENT 2
INPUT
Halten Sie TV CH + g edrückt und geben Sie über
2
das Nummernfeld den Code für die Übertragungszeit ein (siehe folgende Tabelle).
Die Übertragungszeit der Fernbedienung ist aus
gewählt.
Bei erfolgreicher Eingabe des Codes für die Übertragungszeit blinkt die TV-Taste zweimal kurz
auf. Bei nicht erfolgter Eingabe blinkt die TV-Taste
fünf mal schnell auf.
TV/VIDEO
TV CH +/-
Vorbereitung
Anmelden der an dieses System angeschlossenen
Eingangsquelle des TV-Gerätes.
Halten Sie TV/VIDEO g edrückt und geben Sie
1
den Code der angeschlossenen Eingangsquelle
des TV-Gerätes (siehe folgende Tabelle) über
das Nummernfeld ein.
Die Eingangsquelle des TV-Gerätes ist ausgewählt
Bei der Eingabe des Codes für die Eingangsquelle
des TV-Gerätes blinkt die TV-Taste zweimal kurz
auf. Bei nicht erfolgter Eingabe blinkt die TV-Taste
fünf mal schnell auf.
Drücken der Nummer Übertragungszeit
TV CH + 1 0.5 (Standardeinstellung)
21
3 1.5
42
5 2.5
63
7 3.5
84
Bedienung
Richten Sie die Fernbedienung auf das TV-Gerät und
dieses System und drücken Sie SONY TV DIRECT.
Bei der Übertragung des Codes von der Fernbedienung blinkt die TV-Taste.
Hinweise
Diese Funktion ist nur für SONY TV-Geräte verfügbar.
Falls diese Funktion nicht funktioniert, ändern Sie
Übertragungszeit. Sie variiert abhängig vom TV-Gerät.
Wenn TV-Gerät und dieses System zu weit voneinan-
der entfernt sind, ist diese Funktion u. U. nicht
möglich.Verringern Sie den Abstand.
Richten Sie die Fernbedienung auf das TV-Gerät
und dieses System, während die TV-Taste blinkt.
34
Page 75

Liste der Sprachcodes
Geben Sie die entsprechende Codenummer für die Voreinstellungen “Disc-Audio”, “Disc-Untertitel” und/oder “DiscMenü” ein (Siehe Seite 19).
Code Sprache
6565 Afar
6566 Abchasisch
6570 Afrikaans
6577 Amharisch
6582 Arabisch
6583 Assamesisch
6588 Aymara
6590 Aserbaidschanisch
6665 Baschkirisch
6669 Weißrussisch
6671 Bulgarisch
6672 Bihari
6678 Bengalisch; Bangla
6679 Tibetisch
6682 Bretonisch
6765 Katalanisch
6779 Korsisch
6783 Tschechisch
6789 Walisisch
6865 Dänisch
6869 Deutsch
6890 Bhutanisch
6976 Griechisch
6978 Englisch
6979 Esperanto
6983 Spanisch
6984 Estnisch
6985 Baskisch
7065 Persisch
7073 Finnisch
7074 Fidschi
Code Sprache
7079 Färöisch
7082 Französisch
7089 Friesisch
7165 Irisch
7168 Schottisches Gälisch
7176 Galicisch
7178 Guarani
7185 Gujarati
7265 Haussa
7273 Hindi
7282 Kroatisch
7285 Ungarisch
7289 Armenisch
7365 Interlingua
7378 Indonesisch
7383 Isländisch
7384 Italienisch
7387 Hebräisch
7465 Japanisch
7473 Jiddisch
7487 Javanisch
7565 Georgisch
7575 Kasachisch
7576 Grönländisch
7577 Kambodschanisch
7578 Kanadisch
7579 Koreanisch
7583 Kaschmir
7585 Kurdisch
7589 Kirgisisch
7665 Lateinisch
Code Sprache
7678 Lingala
7679 Laotisch
7684 Litauisch
7686 Lettisch
7771 Malagassi
7773 Maori
7775 Mazedonisch
7776 Malajalam
7778 Mongolisch
7779 Moldawisch
7782 Marathi
7783 Malaiisch
7784 Maltesisch
7789 Burmesisch
7865 Nauruisch
7869 Nepalesisch
7876 Niederländisch
7879 Norwegisch
7982 Oriya
8065 Pandschabi
8076 Polnisch
8083 Paschtu
8084 Portugiesisch
8185 Quechua
8277 Rätoromanisch
8279 Rumänisch
8285 Russisch
8365 Sanskrit
8368 Sindhi
8372 Serbokroatisch
8373 Singhalesisch
Code Sprache
8375 Slowakisch
8376 Slowenisch
8377 Samoanisch
8378 Shona
8379 Somalisch
8381 Albanisch
8382 Serbisch
8385 Sudanesisch
8386 Schwedisch
8387 Suaheli
8465 Tamilisch
8469 Telugu
8471 Tadschikisch
8472 Thai
8473 Tigrinya
8475 Turkmenisch
8476 Tagalog
8479 Tongaisch
8482 Türkisch
8484 Tatarisch
8487 Twi
8575 Ukrainisch
8582 Urdu
8590 Usbekisch
8673 Vietnamesisch
8679 Volapük
8779 Wolof
8872 Xhosa
8979 Y oruba
9072 Chinesisch
9085 Zulu
REFERENZ
35
Page 76

Liste der Gebietscodes
Geben Sie die entsprechende Codenummer für die Voreinstellung “Gebietscode” ein (Siehe Seite 21).
Code Gebietcode
AD Andorra
AE Vereinigte Arabische Emirate
AF Afghanistan
AG Antigua und Barbuda
AI Anguilla
AL Albania
AM Armenien
AN Niederländische Antillen
AO Angola
AQ Antarktik
AR Argentinen
AS Amerikanisch Samoa
AT Österreich
AU Australien
AW Aruba
AZ Aserbaidschan
BA Bosnien-Herzegovina
BB Barbados
BD Bangladesch
BE Belgien
BF Burkina Faso
BG Bulgarien
BH Bahrain
BI Burundi
BJ Benin
BM Bermuda
BN Brunei Darussalam
BO Bolivien
BR Brasilien
BS Bahamas
BT Bhutan
BV Bouvetinsel
BW Botswana
BY Weißrussland
BZ Belize
CA Kanada
CC Kokos (Keeling) Inseln
CF Zentralafrikanische Republik
CG Kongo
CH Schweiz
CI Elfenbeinküste
CK Cook Inseln
CL Chile
CM Kamerun
CN China
CO Kolumbien
CR Costa Rica
Ehemalige Tschechoslowakei
cs
CU Kuba
CV Kap V erde
CX Weihnachtsinseln
CY Zypern
CZ Tschechische Republik
DE Deutschland
DJ Dschibuti
DK Dänemark
DM Dominica
DO Dominikanische Republik
DZ Algerien
EC Ekuador
EE Estland
EG Ägypten
EH Westsahara
Code Gebietcode
ER Eritrea
ES Spanien
ET Äthiopien
FI Finnland
FJ Fidschi
FK Falkland Inseln
FM Mikronesien
FO Farö Inseln
FR Frankreich
FX Frankreich (Europäisches
Territorium)
GA Gabun
GB Großbritannien
GD Grenada
GE Georgien
GF Französisch Guyana
GH Ghana
GI Gibraltar
GL Grönland
GM Gambia
GN Guinea
GP Guadeloupe (Französisch)
GQ Äquatorialguinea
GR Griechenland
GS S. Georgia & S. Sandwich
Inseln
GT Guatemala
GU Guam (USA)
GW Guinea Bissau
GY Guyana
HK Hong Kong
HM Heard und McDonald
Inseln
HN Honduras
HR Kroatien
HT Haiti
HU Ungarn
ID Indonesien
IE Irland
IL Israel
IN Indien
IO Britisches T erritorium im
Indischen Ozean
IQ Irak
IR Iran
IS Island
IT Italien
JM Jamaika
JO Jordanien
JP Japan
KE Kenia
KG Kirgisien
KH Kambodscha
KI Kiribati
KM Komoren
KN
Saint Kitts und Nevis Anguilla
KP Nordkorea
KR Südkorea
KW Kuwait
KY Cayman Inseln
KZ Kasachstan
LA Laos
LB Libanon
Code Gebietcode
LC Santa Lucia
LI Liechtenstein
LK Sri Lanka
LR Liberia
LS Lesotho
LT Litauen
LU Luxembourg
LV Lettland
LY Libyen
MA Marokko
MC Monacco
MD Moldavien
MG Madagaskar
MH Marschall-Inseln
MK Mazedonien
ML Mali
MM Myanmar
MN Mongolei
MO Macao
MP Nördlichen Marianeninseln
MQ Martinique (French)
MR Mauretanien
MS Montserrat
MT Malta
MU Mauritius
MV Malediven
MW Malawi
MX Mexiko
MY Malaysia
MZ Mosambik
NA Namibia
NC Neukaledonien
(Französisch)
NE Niger
NF Norfolkinsel
NG Nigeria
NI Nikaragua
NL Niederlande
NO Norwegen
NP Nepal
NR Nauru
NU Niue
NZ Neuseeland
OM Oman
PA Panama
PE Peru
PF Polynesien (Französisch)
PG Papua und Neuguinea
PH Philippinen
PK Pakistan
PL Poland
PM Saint Pierre und Miquelon
PN Pitcairninsel
PR Puerto Rico
PT Portugal
PW Palau
PY Paraguay
QA Katar
RE Reunion (Französisch)
RO Rumänien
RU Russische Föderation
RW Ruanda
SA Saudiarabien
Code Gebietcode
SB Solomoninseln
SC Seychellen
SD Sudan
SE Schweden
SG Singapur
SH Saint Helena
SI Slowenien
SJ Svalbard und Jan Mayen
Inseln
SK Slowakische Republik
SL Sierra Leone
SM San Marino
SN Senegal
SO Somalia
SR Suriname
ST Saint Tome und Principe
SU ehemalige UdSSR
SV El Salvador
SY Syrien
SZ Swasiland
TC Turks- und Caicosinseln
TD Tschad
TF Französische Südgebiete
TG Togo
TH Thailand
TJ Tadschikistan
TK Tokelau
TM Turkmenistan
TN Tunesien
TO Tonga
TP Osttimor
TR Türkei
TT Trinidad und Tobago
TV Tuvalu
TW Taiwan
TZ Tansania
UA Ukraine
UG Uganda
UK Vereinigtes Königreich
UM USA Minor Outlying
Inseln
US Vereinigte Staaten
UY Uruguay
UZ Usbekistan
VA Vatikan Stadtstaat
VC Saint Vincent und die
Grenadinen
VE Venezuela
VG Jungferninseln (Britisch)
VI Jungferninseln (USA)
VN Vietnam
VU Vanuatu
WF Wallis und Futuna Inseln
WS Samoa
YE Jemen
YT Mayotte
YU Jugoslawien
ZA Südafrika
ZM Sambia
ZR Zaire
ZW Simbabwe
36
Page 77

Fehlersuche
Versuchen Sie das Fehler-Symptom, dessen mögliche Ursache und Vorschläge zur Abhilfe in dieser List zu finden,
bevor Sie sich an eine Kundendienststelle wenden.
Symptom
Kein Strom.
Gerät ist eingeschaltet,
funktioniert aber nicht.
Kein Bild.
Es kommt kein Ton oder
nur ein ganz schwacher
Ton aus den
Lautsprechern.
Schlechte Bildqualität.
Wiedergabe nicht
möglich.
Ursache
• Netzkabel nicht eingesteckt
•Keine DVD/CD eingelegt
•Fernseher nicht auf DVD-Betrieb
umgeschaltet
• SCART-Kabel nicht r ichtig
angeschlossen
Fernseher nicht eingeschaltet.
•
Die angeschlossene Audio-Anlage ist
•
nicht auf DVD-Wiedergabe
umgeschaltet
• SCART- Kabel bzw.Tonleitungen sind
nicht richtig angeschlossen.
• Die angeschlossene Audio-Anlage ist
nicht eingeschaltet.
• Das Audio-Kabel ist beschädigt.
•Verschmutze DVD.
•Keine DVD/CD eingelegt.
.
Abhilfe
• Netzkabel in eine Steckdose stecken.
•DVD/CD einlegen. Beachten Sie die
Anzeige im Display des DVD/CDReceiver.
•
Fernseher entsprechend dessen
Bedienungsanleitung auf "Video-(oder DVD-)
Wiedergabe" umschalten.
• Kabelverbindung/Stecker auf korrekten
Sitz überprüfen.
•Fernseher einschalten.
•
Stellen Sie den Receiver/Verstär ker
entsprechend ein.
• Kabelverbindung/Stecker auf korrekten
Sitz überprüfen.
•Audio-Anlage einschalten.
• Ersetzen Sie es durch ein neues.
• Reinigen Sie die DVD.
•DVD/CD einlegen. Beachten Sie die
Anzeige im Display des DVD Receiver
REFERENZ
Es ist starkes Brummen
oder Rauschen zu
hören.
• Eine nicht abspielbare DVD ist
eingelegt.
• Disc liegt nicht in der Mulde der
Schublade.
• Disc liegt nicht in der Mulde der
Schublade
•Verschmutze DVD.
Ein Menü befindet sich auf dem Bildschirm.
•
• Die Jugendschutz-Funktion ist aktivier t.
• Die Stecker und Kabel sind verschmutzt.
• Die Disk ist verschmutzt.
Die Lautsprecher sind schlecht mit ihren
•
Zubehörteilen verbunden.
• Der DVD/CD-Receiver befindet sich zu
nahe am Fernseher.
Prüfen Sie das Disc-Format, das Fernseh-System
•
und den Regional-Code der DVD.
•Disc korrekt einlegen (Datenseite nach
unten).
•Disc korrekt einlegen
• Reinigen Sie die DVD.
•
Taste SETUP drücken, um das Menü auszublenden.
• Einstufung änder n oder Jugendschutz
deaktivieren.
• Wischen Sie sie mit einem Lappen ab,
den Sie leicht mit Alkohol angefeuchtet
haben.
• Reinigen Sie die Disk.
•Verbinden Sie die Lautsprecher sicher
mit den Zubehörteilen.
• Stellen Sie Fernseher und Audio-Teile
weiter auseinander.
37
Page 78

Fehlersuche (Forts.)
Symptom
Die Radiosender können
nicht eingestellt werden.
Die Fernbedienung
funktioniert nicht ordnungsgemäß.
Der Sound-Modus oder
Pro Logic II-Modus kann
nicht geändert werden.
Das Display auf der
Frontblende ist zu
schwach.
Ursache
• Die Antenne sind schlecht ausger ichtet
oder schlecht angeschlossen.
• Das Signal der Sender ist zu schwach
(bei automatischem Suchlauf).
• Es sind keine Sender eingespeicher t
worden oder die gespeicherten Sender
wurden gelöscht.
• Die Fernbedienung wird nicht auf das
IR-Fenster des Gerätes gerichtet.
• Die Fernbedienung ist zu weit vom
Gerät entfernt.
•
Es befindet sich ein Hindernis zwischen
Fernbedienung und DVD Receiver.
• Die Batter ien in der Fernbedienung sind
verbraucht.
•Während der Wiedergabe einer MP3
Disk kann das System nicht geändert
werden.
• Im Display auf der Frontblende wird
nichts angezeigt.
Abhilfe
• Schließen Sie die Antennen sicher an.
• Regulieren Sie die Antennen und
schließen Sie gegebenenfalls eine
externe Antenne an.
• Stellen Sie den Sender manuell ein.
• Speicher n Sie die Sender ein.
• Richten Sie die Fernbedienung direkt auf
das Gerät.
• Die Reichweite der Fernbedienung
beträgt ca. 6 Meter.
Achten Sie auf eine uneingeschränkte Sicht
•
zwischen Fernbedienung und DVD Receiver.
• Ersetzen Sie die Batterien.
• Legen Sie eine CD ein.
• Drücken Sie DIMMER auf der
Fernbedienung.
38
Page 79

Technische Daten
Netzteil 220-240V AC, 50/60Hz
Stromverbrauch 70W, Nicht mehr als 1 W (220-240V AC) (im Stromsparbetrieb)
Gewicht 4.7 kg
Äußere Abmessungen (B/H/T) 430 x 70 x 383.5 mm
Betriebsbedingungen Temperature: 5°C to 35°C, Betriebszustand: Horizontal
[Allgemein]
Luftfeuchtigkeit während des Betriebs 5% to 85%
Laser Halbleiterlaser, Wellenlänge 650 nm bei VCD und DVD,
Emissionsdauer Kontinuierlich
Signalsystem PAL 625/50, NTSC 525/60
Frequenzgang (Audio) 2 Hz ~ 20 kHz (±1.0 dB)
[CD/DVD][Video][Verstärker][Lautsprecher]
Störabstand (Audio) Mehr als 75 dB (1 kHz, NOP, 20 kHz LPF/A-Filter)
Dynamikbereich (Audio) Mehr als 70 dB
Klirrfaktor (Audio) 0.5 % (1 kHz, bei 12W) (20 kHz LPF/A-Filter)
Eingänge VIDEO (AUDIO IN):
Videoausgang 1.0 V (p-p), 75 Ω, negative sync., RCA-Buchse
Empfangsbereich 87.5 - 108 MHz
Zwischenfrequenz 10.7 MHz
[UKW]
Störabstand 60 dB (Mono)
[Tuner]
[Enthaltene
Empfangsbereich 522 - 1,611 kHz
AM
Intermediate Frequency 450 kHz
[MW]
Stereo-Modus 50W + 50W (8 Ω bei 1 kHz, THD 10 %)
Surround-Modus Vorn: 50W + 50W
(*
Abhängig von Klangmodus
Einstellungen und Quelle ist
keine Tonausgabe möglich)
Ausgänge KOPFHÖRER:(32 Ω, 25mW)
TypTyp 1 Wege 1 Lautsprecher Typ 1 Wege 1 Lautsprecher
Impedanz 8 Ω 4 Ω
Frequenzgang 180 - 20,000 Hz 45 - 180 Hz
Nenneingangsleistung 50W 80W
Max. Eingangsleistung 100W 160W
Abmessungen (B/H/T) 98 x 102 x 106 mm 173 x 380 x 402 mm
Gewicht 0.6 kg 6.8 kg
• Lautsprecher . . . . . . . . . . . . . . . . . . . . . . . .5 • Lautsprecher kabel . . . . . . . . . . . . .6
• Subwoofer . . . . . . . . . . . . . . . . . . . . . . . . .1 • Batterien Größe AA (R6) . . . . . . . . .2
•Fernbedienung RM-SS220 . . . . . . . . . . . . .1 • MW-Bogenantenne . . . . . . . . . . . . .1
• UKW-Antenne . . . . . . . . . . . . . . . . . . . . . .1 • Lautsprecherfüße . . . . . . . . . . . . . .20
• Lautsprecher - Anschluss und Montage • Betriebsanleitung . . . . . . . . . . . . . .1
Zubehörteile]
(Karte) . . . . . . . . . . . . . . . . . . . . . . . . . . . .1
Wellenlänge 780 nm bei CD
REFERENZ
Empfindlichkeit: 800 m V
Impedanz: 50 kilohms
SCART (AUDIO IN):
Empfindlichkeit: 800 m V
Impedanz: 50 kilohms
EURO AV (TO TV)
Mitte*: 50W
Surround*: 50W + 50W (8Ω bei 1 kHz, THD 10 %)
Subwoofer*: 80W (4Ω bei 50 Hz, THD 10 %)
Satellitenlautsprecher (SS-TS9) Passiver Subwoofer (SS-WS9)
❋ Ausführungen und Technische Daten können ohne vorherige Bekanntgabe geändert werden.
39
Page 80

Sony Corporation
Printed in China
http://www.sony.net
Page 81

Système cinéma maison
DVD
Mode d’emploi
FR
DAV -SB100
©2004 Sony Corporation
Page 82

Mesures de sécurité
AVERTISSEMENT: AFIN D’ÉVITER DES RISQUES
D’INCENDIE OU DE CHOC ÉLECTRIQUE, MAINTENEZ CE
PRODUIT À L’ABRI DE LA PLUIE ET DE L’HUMIDITÉ.
AVERTISSEMENT: N’installez pas cet équipement dans un
espace clos tel qu’une bibliothèque ou un mobilier similaire.
Pour éviter des incendies, ne couvrez pas l’orifice de
ventilation de l’appareil avec des journaux, des nappes, des
rideaux, etc. Et ne placez pas de bougies allumées sur
l’appareil.
Ne jetez pas les piles avec l’ordure générale de
la maison, en disposez correctement en tant
que déchet chimique.
Cet appareil est classé comme produit
LASER CLASSE 1. L’étiquette se trouve à
l’extérieur de la face arrière.
ATTENTION:
Ce lecteur de DVD emploi un Système Laser.
Pour garantir une utilisation correcte de ce produit, veuillez lire
attentivement ce manuel de l’utilisateur et le conserver pour
future consultation. Au cas où l’unité aurait besoin de
maintenance, contactez un point de service après-vente agréé
(voir procédure de service technique).
L’usage de commandes, réglages ou procédures d’utilisation
autres que ceux spécifiés ici peut résulter dans une exposition
dangereuse à la radiation.
Pour éviter l’exposition directe au faisceau laser, n’essayez pas
d’ouvrir le boîtier.Il y a de la radiation laser visible lorsqu’il est
ouvert. NE FIXEZ PAS LE REGARD SUR LE FAISCEAU.
ATTENTION: L’appareil ne doit pas être exposé à l’eau (par
mouillure ou éclaboussure) et aucun objet rempli de liquides,
comme par exemple une vase, ne devrait être placé sur
l’appareil.
Précautions
Sécurité
• Si un objet quelconque tombe à l’intérieur du boîtier,
débranchez l’unité et faites-la vérifier par du personnel qualifié avant de la rallumer.
•L’unité n’est pas mise hors tension que si elle est débranchée
de la prise de courant, même si l’interrupteur de est sur la
position Arrêt.
• Débranchez l’unité de la prise de courant si elle reste hors
usage pendant une longue période de temps. Pour débrancher le cordon d’alimentation, tirez de la fiche, jamais du cordon.
Installation
•Permettez une circulation d’air adéquate pour éviter l’augmentation de la chaleur intérieure.
• Ne placez pas l’unité sur des surfaces (tapis, couvertures,
etc.) ou près de matières (rideaux, draperies) susceptibles
d’obstruer les fentes de ventilation.
• N’installez l’unité près de sources de chaleur telles que des
radiateurs ou des conduits d’air, ni dans des endroits où elle
serait exposée à la lumière directe du soleil, à la poussière
excessive, aux vibrations mécaniques ou à des secousses.
• N’installez pas l’unité en position inclinée. Elle est conçue
pour fonctionner uniquement en position horizontale.
• Maintenez cette unité et les disques loin des appareils contenant des aimants puissants, comme par exemple les fours
à micro-ondes ou les gros haut-parleurs.
• Ne placez pas d’objets lourds sur l’unité.
• Si l’unité est déplacée d’un endroit froid à un endroit chaud,
l’humidité pourrait se condenser à l’intérieur du Système
Cinéma Maison DVD et endommager les lentilles. Lorsque
vous installez l’unité pour la première fois ou que vous venez
de la déplacer d’un endroit froid à un endroit chaud, attendez
environ 30 minutes avant d’allumer l’unité.
2
Sur les sources d’alimentation
• Le cordon d’alimentation en c.a. ne doit être remplacé que
par un centre de service technique qualifié.
Sur l’emplacement
• Placez le récepteur à un endroit à ventilation adéquate afin
d’éviter l’augmentation de la chaleur dans le système.
• Si l’unité marche pendant longtemps à volume fort, le boîtier
devient chaud. Ce n’est pas un dysfonctionnement.
Cependant, vous devriez éviter de toucher le boîtier. Ne
placez pas l’unité dans un espace clos où la ventilation serait
pauvre, ceci pouvant provoquer une surchauffe de l’unité.
• N’obstruez pas les fentes de ventilation en plaçant des objets
sur l’unité. Le récepteur est équipé d’un amplificateur à haute
puissance. Si les fentes de ventilation dans la surface
supérieure sont obstruées, l’unité peut surchauffer et marcher
mal.
• Ne placez pas ce système sur une surface suave, telle qu’un
tapis, qui pourrait obstruer les orifices de ventilation se trouvant dans la partie inférieure de l’unité.
• Ne placez pas ce système près de sources de chaleur, ni
dans des endroits où il serait exposé à la lumière directe du
soleil, à la poussière excessive ou à des secousses
mécaniques.
Sur le fonctionnement
• Si le système est déplacé d’un endroit froid à un endroit
chaud ou qu’il est placé dans une pièce très humide, l’humidité pourrait se condenser sur les lentilles à l’intérieur du système. Si cela arrive, le système pourrait ne pas marcher correctement. Dans ce cas, enlevez le disque et laissez le système éteint pendant environ une demi-heure jusqu’à ce que
l’humidité s’évapore.
• Lorsque vous déplacez le système, enlevez tous les disques.
Autrement, les disques pourraient en résulter endommagés.
La plaque indicatrice se trouve sur la face arrière de l’unité.
REMARQUE IMPORTANTE
Attention: Ce système est capable de maintenir indéfiniment,
sur l’écran de votre téléviseur, une image vidéo fixe ou une
image affichée à l’écran. Si vous laissez l’image vidéo fixe ou
l’image affichée à l’écran trop longtemps affichée sur votre
téléviseur, vous risquez d’endommager sérieusement l’écran
du téléviseur.Les téléviseurs à projection sont notamment
susceptibles à cet effet.
Page 83

Mesures de sécurité (Suite)
NOTES SUR LES DROITS D’AUTEUR:
Il est interdit par la loi de copier, faire des émissions, montrer,
transmettre via câble, lire en public ou louer le matériel protégé
par des droits d’auteur, sans autorisation.
Ce produit offre la fonction protection contre la copie
développée par Macrovision.Des signaux de protection contre
la copie sont enregistrés sur certains disques. Lors de
l’enregistrement et lecture des images de ces disques sur un
magnétoscope, des perturbations pourraient apparaître.
Ce produit incorpore de la technologie de protection aux droits
d’auteur préservée par des méthodes de revendication de
certains brevets d’invention américains et d’autres droits de
propriété intellectuelle détenus par Macrovision Corporation et
d’autres propriétaires des droits. L’usage de cette technologie
de protection aux droits d’auteur doit être autorisé par
Macrovision Corporation, et elle est réservée à un usage
domestiques et à d’autres usages de visionnement limités,
sauf accord de Macrovision Corporation autorisant d’autres
usages. L’ingénierie inverse ou le démontage sont interdits.
A propos des symboles utilisés dans
ce mode d’emploi
Signale des risques pouvant provoquer un dommage à l’unité elle-même ou d’autres dommages
matériels.
Remarque Signale des caractéristiques de
fonctionnement spéciales de cette unité.
Conseil Signale des conseils et des suggestions
pour rendre la tâche plus facile.
INTRODUCTION
3
Page 84

Table des matières
Introduction
Mesures de sécurité . . . . . . . . . . . . . . . . . . . . . . .2-3
Table des matières . . . . . . . . . . . . . . . . . . . . . . . . . .4
Avant la mise en service . . . . . . . . . . . . . . . . . . .5-6
Disques lisibles . . . . . . . . . . . . . . . . . . . . . . . . . .5
Précautions . . . . . . . . . . . . . . . . . . . . . . . . . . . . .6
Remarques concernant les disques . . . . . . . . . . . .6
À propos des symboles . . . . . . . . . . . . . . . . . . . . .6
Commandes sur le panneau avant . . . . . . . . . . . . .7
Voyants sur l’écran d’affichage . . . . . . . . . . . . . . . .8
Télécommande . . . . . . . . . . . . . . . . . . . . . . . . . . . . .9
Connexions sur le panneau arrière . . . . . . . . . . . .10
Préparation
Connexions . . . . . . . . . . . . . . . . . . . . . . . . . . . .11-15
Connexion à un téléviseur . . . . . . . . . . . . . . . . .11
Connexion à un équipement extérieur . . . . . . . . .12
Connexions à l’antenne . . . . . . . . . . . . . . . . . . . .13
Connexion aux enceintes acoustiques . . . . . . . .14
Mise en place des enceintes . . . . . . . . . . . . . . . .15
Sélection de la source de sortie/entrée . . . . . . . .16
Avant la mise en service . . . . . . . . . . . . . . . . . .17-21
Petit glossaire pour les modes Audio Stream et
Surround . . . . . . . . . . . . . . . . . . . . . . . . . . . . . .17
Mode sonore . . . . . . . . . . . . . . . . . . . . . . . . . . .17
Explication générale . . . . . . . . . . . . . . . . . . . . . .18
Affichage sur écran . . . . . . . . . . . . . . . . . . . . . . .18
Configuration initiale . . . . . . . . . . . . . . . . . . . .19-21
• Fonctionnement général . . . . . . . . . . . . . . . .19
• Langue . . . . . . . . . . . . . . . . . . . . . . . . . . . .19
• Format du téléviseur . . . . . . . . . . . . . . . . . . .19
• Configuration des enceintes . . . . . . . . . . . . .20
• Divers . . . . . . . . . . . . . . . . . . . . . . . . . . . . .20
• Contrôle parental . . . . . . . . . . . . . . . . . . . . .21
• Code de zone . . . . . . . . . . . . . . . . . . . . . . . .21
Fonctionnement
Fonctionnement avec des disques DVD et des CD
vidéo . . . . . . . . . . . . . . . . . . . . . . . . . . . . . . . . .22-24
Lecture d’un disque DVD et d’un CD vidéo . . . . .22
Caractéristiques générales . . . . . . . . . . . . . . . . .22
• Fonction Reprise . . . . . . . . . . . . . . . . . . . . . .22
• Sélection d’un autre TITRE . . . . . . . . . . . . .22
• Sélection d’un autre CHAPITRE/PISTE . . . .22
• Recherche . . . . . . . . . . . . . . . . . . . . . . . . . .22
• Arrêt sur image . . . . . . . . . . . . . . . . . . . . . .22
• Ralenti . . . . . . . . . . . . . . . . . . . . . . . . . . . . .23
• Répétition . . . . . . . . . . . . . . . . . . . . . . . . . .23
• Recherche par l’heure . . . . . . . . . . . . . . . . . .23
Caractéristiques spéciales du DVD . . . . . . . . . . .24
• Vérification du contenu des disques
DVD vidéo:menus . . . . . . . . . . . . . . . . . . . .24
• Prise de caméra . . . . . . . . . . . . . . . . . . . . .24
• Changement de la langue audio . . . . . . . . . .24
• Changement du canal audio . . . . . . . . . . . . .24
• Sous-titres . . . . . . . . . . . . . . . . . . . . . . . . . .24
Fonctionnement avec des CD audio et
des disques MP3 . . . . . . . . . . . . . . . . . . . . . . .25-26
Lecture d’un CD audio et d’un disque MP3 . . . . .25
Remarques concernant les fichiers MP3 . . . . . . .25
• Pause . . . . . . . . . . . . . . . . . . . . . . . . . . . . .26
• Sélection d’une autre piste . . . . . . . . . . . . . .26
• Recherche . . . . . . . . . . . . . . . . . . . . . . . . . .26
• Répétition . . . . . . . . . . . . . . . . . . . . . . . . . .26
• Changement du canal audio . . . . . . . . . . . . .26
Fonctionnement avec des fichiers JPEG . . . . . . . .27
Visionnement de fichiers JPEG
sur un disque . . . . . . . . . . . . . . . . . . . . . . . . . . .27
• Sélection d’un autre fichier . . . . . . . . . . . . . .27
• Arrêt sur image . . . . . . . . . . . . . . . . . . . . . . .27
• Pour déplacer l’image . . . . . . . . . . . . . . . . .27
• Pour pivoter l’image . . . . . . . . . . . . . . . . . . .27
• Remarques concer nant les fichiers JPEG . . .27
Lecture programmée . . . . . . . . . . . . . . . . . . . . . . .28
Lecture programmée des CD audio
et des disques MP3 . . . . . . . . . . . . . . . . . . . . . .28
Lecture programmée des CD vidéo . . . . . . . . . . .28
Configuration des enceintes . . . . . . . . . . . . . . . . .29
Information supplémentaire . . . . . . . . . . . . . . . . . .30
Configuration de la minuterie-sommeil . . . . . . . .30
Visionnement du temps de lecture et du temps . . .
restant sur l’écran du panneau avant . . . . . . . . . .30
Gradateur . . . . . . . . . . . . . . . . . . . . . . . . . . . . . .30
Silencieux . . . . . . . . . . . . . . . . . . . . . . . . . . . . .30
Utilisation de la prise écouteur . . . . . . . . . . . . . .30
Commande volume . . . . . . . . . . . . . . . . . . . . . .30
Utilisation de l’effet sonore . . . . . . . . . . . . . . . . . .30
Fonctionnement avec la radio . . . . . . . . . . . . . .31-32
Préréglage des stations radio . . . . . . . . . . . . . . .31
Écouter la radio . . . . . . . . . . . . . . . . . . . . . . . . .31
Fonctionnement du RDS . . . . . . . . . . . . . . . . . .32
Commander le téléviseur à l’aide de la
télécommande fournie . . . . . . . . . . . . . . . . . . . . . .33
Commander le téléviseur . . . . . . . . . . . . . . . . . . .33
Utilisation de la fonction SONY TV DIRECT . . . . . .34
Préparation . . . . . . . . . . . . . . . . . . . . . . . . . . . .34
Fonctionnement . . . . . . . . . . . . . . . . . . . . . . . . . .34
Référence
Liste des codes des langues . . . . . . . . . . . . . . . . .35
Liste des codes de zone . . . . . . . . . . . . . . . . . . . . .36
Dépannage . . . . . . . . . . . . . . . . . . . . . . . . . . . . .37-38
Spécifications . . . . . . . . . . . . . . . . . . . . . . . . . . . . .39
Fabriqué sous licence de Dolby Laboratories.“Dolby”, “Pro
Logic”, et le symbole double D sont des marques
commerciales déposées de Dolby Laboratories.Travaux
non publiés confidentiels.Copyright 1992-1997 Dolby
Laboratories.Tous droits réservés.
Fabriqué sous licence de Digital Theater Systems, Inc.
Brevets américains nº.5,451,942 5,956,674, 5,974,380,
5,978,762 et d’autres brevets accordés ou en instance
dans le monde entier.“DTS” et “DTS Digital Surround” sont
des marques commerciales déposées de Digital Theater
Systems, Inc. Copyright 1996, 2000 Digital Theater
Systems, Inc.Tous droits réservés.
4
Page 85

Avant la mise en service
2
Disques lisibles
Disques DVD vidéo
(disques de 8 cm / 12 cm)
CD vidéo (VCD)
(disques de 8 cm / 12 cm disc)
CD audio
(disques de 8 cm / 12 cm)
En outre, cette unité peut lire des disques DVD-R/-RW,
SVCD et CD-R ou CD-RW contenant des titres audio,
MP3 ou des fichiers JPEG.
Remarques
• En fonction des conditions de l’équipement
d’enregistrement ou du disque CD-R/RW (ou
DVD±R/±RW) lui-même, certains disques CD-R/RW
(ou DVD±R/±RW) pourraient ne pas être lus par cette
unité.
• Les disques DVD-RW enregistrés en mode EV
(enregistrement vidéo) ne peuvent pas être lus sur
cette unité.
• N’attachez aucun timbre ou étiquette sur aucune des
faces (la face étiquetée ou la face enregistrée) d’un
disque.
• N’utilisez pas des CD ayant des formes irrégulières
(p.ex., forme de coeur ou octogonale). Ceci pourrait
provoquer des dysfonctionnements.
Remarques concernant les disques DVD et les CD
vidéo
Certaines fonctions de lecture des disques DVD et des
CD vidéo peuvent être intentionnellement établies par
les fabricants de logiciel. Etant donné que cette unité lit
les disques DVD et CD vidéo suivant le contenu du
disque conçu par le fabriquant de logiciel, certaines
caractéristiques de lecture de l’unité pourraient ne pas
être disponibles ou d’autres fonctions pourraient être
ajoutées. Repor tez-vous aussi aux instructions fournies
avec les DVD et les CD vidéo. Cer tains DVD réalisés à
des fins commerciales pourraient ne pas être lus sur
cette unité.
Code régional du Récepteur DVD et des disques
DVD
Ce Récepteur DVD est conçu et fabr iqué pour lecture
du logiciel DVD codé Région 2.Le code région sur les
étiquettes de certains disques DVD indique quel type de
lecteur peut lire ces disques. Cette unité ne peut lire
que des disques DVD étiquetés 2 ou “ALL”(Toutes
zones). Si vous essayez de reproduire d’autres disques,
le message “Vérifiez le code région” (“Check
Regional Code “) s’affichera à l’écran du
téléviseur.Certains disques DVD n’ayant pas
d’étiquette indiquant le code région peuvent quand
même être soumis aux restrictions des régions et ils
pourraient, donc, ne pas être lisibles.
Termes concernant le disque
Titre (uniquement pour disques DVD vidéo)
Le contenu principal du film, les contenus
supplémentaires, les fonctions supplémentaires ou
l’album musique.Chaque titre est attribué à un numéro
de référence titre vous permettant de le repérer
facilement.
Chapitre (uniquement pour disques DVD vidéo)
Sections d’une pièce image ou d’une pièce musicale qui
sont plus petites que les titres. Un titre est composé
d’un ou plusieurs chapitres. Chaque chapitre est
attribué à un numéro de chapitre vous permettant de
repérer le chapitre désiré. En fonction du disque, les
chapitres pourraient ne pas être enregistrés.
Piste (uniquement pour CD vidéo et CD audio)
Sections d’une pièce image ou d’une pièce musicale
sur un CD vidéo ou un CD audio.Chaque piste est
attribuée à un numéro de piste vous permettant de
repérer la piste désirée.
Index (CD vidéo)
Un numéro qui divise une piste dans des sections afin
de repérer aisément le point désiré sur un CD vidéo.En
fonction du disque, les index pourraient ne pas être
enregistrés.
Scène
Sur un CD vidéo à fonction CML (commande manuelle
de lecture), les déplacements d’image et les arrêts sur
image sont divisés dans des sections appelées
“Scènes”. Chaque scène est affichée dans le menu
Scène et attribuée à un numéro de scène vous
permettant de repérer la scène désirée. Une scène peut
être composée d’une ou plusieurs pistes.
Fichier
Sections d’une pièce image sur un CD de données
contenant des fichiers image JPEG.
Types de CD vidéo
Il y a deux types de CD vidéo:
CD vidéo équipés de CML (Version 2.0)
Les fonctions CML (commande manuelle de lecture)
vous permettent d’interagir avec le système à l’aide des
menus, des fonctions de recherche ou d’autres
opérations caractéristiques d’un ordinateur.En plus, les
arrêts sur image à haute qualité peuvent être lus s’ils
sont inclus dans le disque.
CD Vidéo non équipés avec CML (Version 1.1)
Leur fonctionnement étant similaire à celui des CD
audio, ces disques permettent la lecture d’images vidéo
ainsi que du son, mais ils ne sont pas équipés de CML.
REMARQUE IMPORTANTE:
LES PILES DÉCHARGÉES OU ÉPUISÉS DOIVENT
TRE RECYCLÉES OU JETÉES D’UNE FAÇON
SÛRE, CONFORMÉMENT AUX LOIS APPLICABLES.
POUR DE PLUS AMPLES RENSEIGNEMENTS,
CONTACTEZ L’AUTORITÉ LOCALE EN MATIÈRE DE
DÉCHETS SOLIDES.
INTRODUCTION
5
Page 86

Avant la mise en service (suite)
Précautions
Manipulation de l’unité
Emballage de l’unité
Le carton et les matériaux d’emballage de la boîte
originale sont utiles. Pour une protection maximale,
emballez de nouveau l’unité comme elle était emballée
en usine.
Réglage de l’unité
L’image et le son d’un téléviseur, magnétoscope ou
radio proches au graveur de DVD peuvent être
dénaturés pendant la lecture. Dans ce cas, écarté
l’unité du téléviseur, du magnétoscope ou de la radio,
ou éteignez l’unité après en avoir enlevé le disque.
Pour maintenir la surface propre
N’utilisez pas de substances volatiles, tel qu’un
pulvérisateur insecticide, près de l’unité. Ne laissez pas
de produits en gomme ou en plastique en contact avec
l’unité pour une longue période de temps. Ils
laisseraient des marques sur la surface.
Nettoyage de l’unité
Pour nettoyer le boîtier
Utilisez un chiffon doux et sec. Si les surfaces sont
extrêmement sales, utilisez un chiffon doux à peine
humidifié avec une solution de détergent doux.N’utilisez
pas de produits dissolvants forts tels que l’alcool,
l’essence, le diluant, car ceci pourrait abîmer la surface
de l’unité.
Pour obtenir une image nette
Le récepteur DVD est un dispositif de précision à haute
technologie. Si la lentille de la tête de lecture et les
composants du lecteur des disques sont sales ou usés,
la qualité d’image sera pauvre.
Il est recommandé de faire des vérifications et des
entretiens réguliers toutes les 1000 heures d’utilisation
(Ceci dépend des conditions de l’entourage de
fonctionnement)
Pour plus de détails, veuillez contacter le revendeur le
plus proche.
Remarques concernant les disques
Manipulation des disques
Ne touchez pas la face lecture du disque.
Prenez le disque par les bords pour éviter que des
empreintes digitales restent sur la surface.
Ne collez pas de papier ou de ruban adhésif sur le
disque.
Stockage des disques
Après la lecture, stockez le disque dans sa caisse.
Ne l’exposez pas à la lumière directe du soleil ou à
d’autres sources de chaleur, ne le laissez pas dans une
automobile garée sous la lumière directe du soleil car la
température à l’intérieur de l’automobile pourrait
augmente considérablement.
Nettoyage des disques
La présence d’empreintes digitales ou de la poussière
sur le disque pourrait dénaturer l’image ou réduire la
qualité du son. Avant la lecture, nettoyez le disque à
l’aide d’un chiffon propre, en le frottant du centre vers la
périphérie.
N’utilisez des produits dissolvants forts tels que l’alcool,
l’essence, le diluant, les produits de nettoyage
disponibles dans le commerce ni un pulvérisateur
contre la statique destiné aux vieux disques en vinyle.
Ce système ne peut lire que des disques standard
circulaires.
L’utilisation de disques standard non circulaires (ayant
par exemple des formes de carte, de coeur ou d’étoile)
peut provoquer des dysfonctionnements.
N’utilisez pas des disques commercialisés ayant des
accessoires attachés tels que une étiquette ou un
anneau.
À propos des symboles
À propos du symbole affichage
Le symbole “ ” peut apparaître sur l’écran du
téléviseur pendant le fonctionnement.
Cette icône veut dire que la fonction expliquée dans ce
manuel de l’utilisateur n’est pas disponible pour ce
disque spécifique.
À propos des symboles concernant le disque
utilisés dans ce mode d’emploi
Une section dont le titre a l’un des symboles suivants
est applicable uniquement aux disques où ledit symbole
est représenté.
DVD
disques DVD vidéo.
VCD2.0
VCD1.1
JPEG
disques CD vidéo avec fonction CML (commande manuelle de lecture).
disques CD vidéo sans fonction CML (commande manuelle de lecture).
CD
disques CD audio.
MP3
disques contenant des fichiers MP3.
disques contenant des fichiers JPEG.
6
Page 87

Commandes sur le panneau avant
STANDBY
IR
- PRESET +
-
VOLUME +
FUNCTION
PHONES
Voyant @ / 1 (MARCHE)
Allume ou éteint le récepteur DVD.
Voyant VEILLE (ST ANDBY)
S’allume en rouge lorsque le
récepteur est en mode Veille.
Plateau à disques
Insérez ici un
disque.
Appuyez sur “+” pour faire augmenter le
OUVRIR/FERMER ( )
Ouvre ou ferme le plateau à
disques.
Écran d’affichage
LECTURE (PLAY) (
Pour lire un disque.
Commande VOLUME
volume ou sur “-”pour faire diminuer le
volume.
FONCTION (FUNCTION)
Pour sélectionner la source du
récepteur.
(FM, AM, MAGNÉTOSCOPE,
TÉLÉVISEUR ou CD/DVD)
INTRODUCTION
H)
Arrête temporairement la lecture d’un
PAUSE (XX)
disque.
ARRÊT (STOP) (xx)
Arrête la lecture d’un disque.
SAUT en retour (Reverse SKIP) (
SS
)
DVD: Va au début du chapitre/piste actuels ou au
chapitre/piste précédents.
RADIO: Pour sélectionner la station préréglée désirée.
TT
SAUT en avance (Forward SKIP) (
)
DVD: Va au chapitre/piste suivants.
RADIO: Pour sélectionner la station préréglée désirée.
ÉCOUTEUR (PHONES)
Pour y brancher le casque d’écoute.
Capteur infrarouge (IR)
Pointez la télécommande du récepteur DVD vers
ce capteur.
7
Page 88

Voyants sur l’écran d’affichage
Voyants du mode de lecture répétition.
État de la lecture.
Indique que l’unité est en mode radio.
Indique que l’unité est en mode stéréo.
Un disque CD est inséré.
Un disque MP3 est inséré.
S’allume lorsque l’unité
est en mode DSGX
activé.
Indique le format
surround actuel.
DISC
CHAP TITLE
REP 1ALBM
TRK
FM
AM
TUNED PBC SLEEP
Un disque CD-V 2.0 est inséré.
S’allume lorsque le récepteur DVD
syntonise une station.
MP3 CD ST DSGX
D
D
D
Voyant de la minuterie-sommeil.
D
PL II
D
IIndique que le
format du son
est DOLBY
PROLOGIC II.
Indique le format
surround actuel.
Voyant du titre
8
Voyants de temps de lecture total / temps écoulé / fréquence / temps
restant / état actuel / numéro de titre / mode surround / volume, etc.
Indique le numéro du chapitre ou
de la piste actuels.
Page 89

Télécommande
Pour mettre l’unité en mode Sommeil.
SLEEP
TUNER/BAND
Sélectionne le tuner du récepteur DVD
comme un choix d’écoute. (bandes FM et
AM)
MUTING
Annule momentanément le son des
enceintes du récepteur DVD.
TUNER MENU
Mémorise la fréquence d’une station
radio dans le tuner (syntoniseur).
Appuyez sur ce bouton pour effacer les
stations préréglées de la mémoire du
tuner.
PROGRAM
Entre au mode édition de programme ou
sort de ce mode-ci.
REPEAT
Répète un chapitre, une piste, un titre,
tous.
FM MODE
Pour changer entre les modes MONO et
STÉRÉO.
TV
Pour commander le téléviseur à l’aide de
la télécommande.
AUDIO
Sélectionne une langue audio (DVD) ou
un canal audio (CD).
ANGLE
Sélectionne une prise de caméra, si elle
est disponible, sur le disque DVD.
SUBTITLE
Sélectionne une langue pour les sous-
titres.
PREV/PRESET -
Va au début du chapitre ou de la piste
actuels ou au chapitre ou à la piste
précédents.
Sélectionne un programme du Tuner.
NEXT/PRESET +
Va au chapitre ou à la piste suivants.
Sélectionne un programme du Tuner.
DVD T OP MENU
Affiche le menu Titres du disque, s’il est
disponible.
B/b/V/v (gauche/droite/haut/bas)
Sélectionne une option dans le menu.
ENTER
Accepte la sélection du menu.
DVD DISPLAY
Accède à l’affichage sur écran.
TV VOL +/–
Règle le volume du téléviseur.
TV CH +/–
Sélectionne la chaîne de télévision.
DVD SETUP
Affiche ou supprime le menu de
configuration du DVD.
SONY TV DIRECT
Sélectionne directement la source de
sortie du DVD.
TV @ / 1
Allume ou éteint le téléviseur.
@ / 1
Allume ou éteint le récepteur DVD.
AUTO FORMAT DIRECT
Sélectionne le mode sonore parmi A.F.D.
AUTO, PRO LOGIC, PLII MOVIE et
PLII MUSIC.
MODE
Sélectionne un mode sonore parmi FLAT,
ROCK, POP, JAZZ, CLASSIC et NEWS.
FUNCTION
Pour sélectionner la source du récepteur.(FM, AM, VIDEO, TV ou CD/DVD)
ZZ
Ouvre et ferme le plateau à disques.
DSGX
Active ou désactive le mode DSGX.
Boutons numérotés 0-9
Sélectionne des options numériques
dans un menu.
>10/ TV ENTER
Utilisé pour commander le téléviseur.
SLOW t/
Pour recherche d’images ou lecture au
ralenti en retour.
Pour syntoniser la station désirée.
SLOW T/
Pour recherche d’images ou lecture au
ralenti en avance.
Pour syntoniser la station désirée.
TUNING-
TUNING+
Boutons des commandes de
lecture
• H (PLAY)
Fait démarrer la lecture.
• X (PAUSE)
Arrête momentanément la lecture ou
l’enregistrement.
• x (STOP)
Arrête la lecture.
DVD MENU
Accède au menu sur un disque DVD.
DISPLAY
Pour afficher le temps restant entre
chapitre et titre.
Pour vérifier le programme de la fonction
RDS (PS).
VOLUME (+/-)
Règle le volume des enceintes.
CLEAR
Enlève un numéro de piste du menu
programme.
RETURN
Revient au menu configuration.
DIMMER
Pour modifier la luminosité de l’écran
d’affichage.
TV/VIDEO
Sélectionne la source du téléviseur.
INTRODUCTION
9
Page 90

Connexions sur le panneau arrière
Cordon d’alimentation
Branchez au réseau.
SORTIE A/V EURO (AU TÉLÉVISEUR)
Connectez ici votre téléviseur.
CONNECTEURS DE L’ANTENNE CADRE AM
Branchez l’antenne cadre AM à cette borne.
SORTIE MONITEUR (VIDÉO)
Connectez à un téléviseur avec entrée vidéo.
VIDEO (AUDIO IN L/R)
Branchez la sortie audio d’une source
extérieure (magnétoscope, lecteur LD, etc.)
CONNECTEURS DES ENCEINTES
Branchez les six enceintes fournies
à ces bornes.
Ne touchez pas les broches intermédiaires des
prises du panneau arrière. Une décharge
d’électrostatique peut provoquer un dommage
permanent à l’unité.
Plage de fonctionnement de la télécommande
Pointez la télécommande vers le capteur et appuyez
sur les boutons.
• Distance: Environ 6m (20 pieds) à partir de la façade
du capteur infrarouge.
• Angle: Environ 30° dans toutes les directions à par tir
de la partie avant du capteur.
CONNECTEUR DE L’ANTENNE FM
Branchez l’antenne FM à cette borne.
Installation des piles de la télécommande
Détachez le couvercle du
compartiment des piles qui se trouve
dans la partie arrière de la
télécommande et insérez deux
piles R6 (AA) en respectant la
polarité.
Lorsque vous utilisez la
télécommande, pointez-la vers le
capteur de l’unité.
10
Ne mélangez pas de piles vieilles et neuves.
Page 91

Connexions
Connexion à un téléviseur
Effectuez l’une des connexions suivantes, en fonction des capacités de l’équipement existant.
Conseils
En fonction de votre téléviseur et de l’autre
équipement que vous désirez relier, il y a plusieurs
manières de connecter le récepteur DVD. Utilisez
l’une des connexions décrites ci-dessous.
Veuillez vous référer aux manuels de votre
téléviseur, magnétoscope ou d’autres dispositifs si
besoin pour effectuer les connexions les plus convenables.
– Assurez-vous que le récepteur DVD est relié directe-
ment au téléviseur.Sélectionnez l’entrée A/V correcte
sur votre TV.
– Ne reliez pas récepteur DVD au téléviseur via votre
magnétoscope. L’image pourrait être dénaturée par le
système de protection contre la copie.
Face arrière du téléviseur
Rear of TV
PRÉPARATION
Connexion vidéo
À l’aide du câble vidéo fourni (V), reliez la prise
SORTIE MONITEUR du récepteur DVD à la pr ise
entrée vidéo du téléviseur.
Connexion PÉRITEL
À l’aide du câble péritel (S), reliez la prise SORTIE
EURO AV (AU TÉLÉVISEUR) dans le récepteur DVD à
la prise ENTRÉE PÉRITEL du téléviseur.
Remarque
Lorsque vous reliez le récepteur DVD à votre téléviseur,
assurez-vous d’éteindre et de débrancher les deux
unités avant d’effectuer toute connexion.
SCART INPUT
(non fourni)
S
(not supplied) (not supplied)
Face arrière du récepteur DVD
Rear of DVD Receiver
AUDIO INPUT
R
VIDEO
INPUT
L
S-VIDEO
INPUT
V
(non fourni)
11
Page 92

Connexions (suite)
Connexion à un équipement extérieur
Face arrière du magnétoscope
(ou lecteur LD, etc.)
(non fourni)
(not supplied)
Connexion
À l’aide des câbles audio, reliez les prises VIDEO
(AUDIO G/D) du récepteur de DVD aux prises de
SORTIE AUTIO (G/D) du magnétoscope, du lecteur LD,
etc.
Conseil
Appuyez sur FUNCTION dans la télécommande pour
sélectionner l’entrée vers ces prises.
Le message VIDEO (VIDÉO) apparaîtra sur l’écran
d’affichage.
12
Page 93

Connexions
Connexions à l’antenne
Connectez l’antenne FM/AM fournie pour écouter la radio.
Branchez l’antenne cadre AM sur le connecteur ANTENNE CADRE AM (AM LOOP).
Branchez l’antenne FM sur le connecteur FM COAXIAL 75Ω.
Lorsque vous connectez l’antenne cadre AM fournie, reliez le câble noir (B) au borne , et le câble blanc (A) à
l’autre borne.
Antenne cadre AM (fournie)
AM Loop antenna (supplied)
Antenne FM (fournie)
FM antenna (supplied)
A
B
PRÉPARATION
Remarques
Pour prévenir la captation de bruits, maintenez l’antenne cadre AM loin du récepteur DVD et des autres composants.
Veillez à étendre complètement l’antenne filaire FM.
Une fois l’antenne FM connectée, maintenez-la aussi horizontale que possible.
Conseil
Si la réception FM est mauvaise, utilisez un câble coaxial 75Ω(non fourni) pour connecter le système à une antenne
FM extérieure comme montré ci-dessous.
13
Page 94

Connexions (suite)
Front speaker
(Right)
Front speaker
(Left)
Centre speaker
Surround speaker
(Right surround)
Subwoofer
Surround speaker
(Left surround)
Connexion aux enceintes acoustiques
À l’aide des câbles fournis pour les enceintes, reliez les enceintes.
Pour obtenir le meilleur son surround, réglez les paramètres des enceintes (volume, distance, etc.).
Enceinte frontale
Enceinte surround
(surround droit)
(droite)
Enceinte centrale
Caisson de graves
Enceinte frontale
(gauche)
Enceinte surround
(surround gauche)
Remarques
Assurez-vous de faire coïncider le câble de l’enceinte avec la borne appropriée dans les composants: (+) sur (+) et (–) sur (–).
Si les câbles sont inversés, le son sera dénaturé et perdra des graves.
Si vous utilisez des enceintes frontales ayant une commande du débit d’entrée, réglez le volume avec soin afin d’éviter une sortie excessive sur ces enceintes.
Ne démontez pas les couvercles avant des enceintes fournies.
Le pied de l’enceinte est optionnel.
14
Page 95

Connexions (suite)
Mise en place des enceintes
Pour une configuration normale, utilisez 6 enceintes (2 enceintes frontales, enceinte centrale, 2 enceintes arrière et
caisson de graves).
Si vous voulez entendre les excellents graves, le DTS digital surround ou le Dolby Digital surround, vous devrez
connecter un caisson de graves.
• Enceintes frontales
En fonction de la position d’écoute, installez les enceintes à la même distance.Et réglez les enceintes à 45 degrés par rappor t à
la position d’écoute.
• Enceinte centrale
L’idéal, c’est que l’enceinte centrale et les enceintes frontales soient à la même hauteur.Vous pouvez quand même placer l’enceinte centrale au-dessus ou au-dessous du téléviseur, comme montré ci-dessous.
• Enceinte surround
Placez les enceintes surround à gauche et à droite derrière la zone d’écoute principale. Ces enceintes reproduisent le mouvement du son et l’atmosphère nécessaires à la reproduction du son surround. si vous voulez obtenir les meilleurs résultats, n’installez pas les enceintes arrière trop loin derrière la position d’écoute et veillez à les installer au niveau ou au-dessus le niveau
des oreilles de l’auditoire. Il est aussi utile d’orienter les enceintes arrière vers un mur ou vers le toit pour disperser encore plus
le son. Si la pièce est trop petite et que l’audience est près du mur arrière, placez les enceintes arrière l’une en face de l’autre,
à une distance de 60 - 90 cm au-dessus des oreilles de l’auditoire.
• Caisson de graves
Il peut être placé à n’importe quelle position frontale.
Caisson de graves
Enceinte centrale
PRÉPARATION
Enceinte frontale
(gauche)
Enceinte surround
(gauche)
Enceinte frontale
(droite)
Enceinte surround
(droite)
Exemple de la mise en place des enceintes
Remarque
Le pied de l’enceinte est optionnel.
Pour attacher les coussinets aux pieds
Pour éviter la vibration de l’enceinte ou son mouvement lors de l’écoute, attachez les coussinets fournis aux
enceintes sans caisson de graves, comme montré.
Foot pads
Coussinets
15
Page 96

Sélection de la source de sortie/entrée
Suivez ces directives pour faire la sélection et alterner
parmi les diverses sources d’entrée et de sortie du
récepteur DVD/Magnétoscope.
• CD/DVD
SONY TV DIRECT
TUNER/
BAND
FUNCTION
Pour le visionnement d’une sortie à par tir du
DVD:
Appuyez sur SONY TV DIRECT dans la télécommande.
Le message “CD/DVD” apparaît sur l’écran
d’affichage.
• TUNER FM/AM
Pour écouter des émissions radio AM/FM:
Appuyez sur TUNER/BAND pour alterner entre radio
AM et FM. La fréquence sélectionnée apparaîtra sur
l’écran d’affichage.
• SÉLECTION DE L’ENTRÉE
Pour écouter une source audio connectée sur la
prise ENTRÉE AUDIO (G/D) VIDÉO:
Appuyez à plusieurs reprises sur FUNCTION dans la
télécommande. Le message “VIDEO” apparaîtra sur
l’écran d’affichage. Le son arrivera à partir d’une
source extérieure connectée sur la prise ENTRÉE
AUDIO (G/D) (dans le panneau arrière).
Pour écouter une source audio connectée sur la
prise SORTIE A/V EURO (AU TÉLÉVISEUR):
Appuyez à plusieurs reprises sur FUNCTION dans la
télécommande. Le message “VIDEO” apparaîtra sur
l’écran d’affichage. Le son arrivera à partir d’une
source extérieure connectée sur la prise SORTIE
A/V EURO (AU TÉLÉVISEUR) (dans le panneau
arrière).
16
Page 97

Avant la mise en service
Petit glossaire pour les modes Audio
Stream et Surround
DTS
Il vous permet de jouir de canaux indépendants 5.1 (ou 6)
à haute qualité audio numérique à partir des sources du
programme DTS telles que des disques DVD, des disques
compacts, etc., qui donne naissance à la marque
commerciale déposée. Le surround numérique DTS offre
jusqu’à 6 canaux de son transparent (ce qui suppose un
son identique à celui des bandes originales) et résulte dans
une netteté exceptionnelle à travers un champ acoustique
véritable de 360 degrés. Le terme DTS est une marque
commerciale déposée de DTS Technology, LLC. Fabriqué
sous licence de DTS Technology, LLC.
DOLBY DIGITAL
Le format Dolby Digital surround vous permet de jouir des
canaux 5.1 de son surround numérique à partir d’une
source de programme Dolby Digital.Si vous lissez des
disques DVD marqués “ “, vous pourrez jouir encore
une meilleure qualité du son, d’une plus grande fidélité et
d’une dynamique améliorée.
DOLBY PRO LOGIC
Utilisez ce mode pour la lecture de DVD d’images ou de 2
canaux Dolby Digital marqués “ “.Ce mode vous offre
l’effet d’être dans un cinéma ou dans une salle de concert
en direct, un effet avec une intensité qui ne peut être
obtenue que par le DOLBY PRO LOGIC SURROUND.
L’effet du mouvement avant/arrière/gauche/droite du son,
ainsi que la sensation d’une position fixe du son, sont plus
nets et encore plus dynamiques qu’avant.
DOLBY PRO LOGIC II
Dolby Pro Logic II crée cinq canaux de sortie à toute la
largeur de bande à partir de sources à deux canaux. Ceci
est réalisé en utilisant un décodeur surround évolué à
matrice à haut degré de pureté qui extrait les propriétés
spatiales de l’enregistrement original sans ajouter aucun
nouveau son ou coloration sonore.
Mode PLII MOVIE:
Le mode cinéma est conçu pour utilisation avec les émissions télévisées en mode stéréophonique et avec tous les
programmes codés avec Dolby Surround. Le résultat en
est une directionnalité renforcée du champ sonore, qui se
rapproche de la qualité du son offerte par un canal
indépendant 5.1.
Mode PLII MUSIC:
Le mode musique est conçu pour utilisation avec tout
enregistrement musique stéréo.
A.F.D. AUTO
Le logiciel ayant des signaux audio surround multicanaux
est lu suivant la manière dont il a été enregistré.
Remarques
Cette fonction n’est disponible qu’en mode lecture.
La fonction A.F.D.AUTOMATIQUE ne peut pas être
employé lorsque vous utilisez le casque d’écoute.
Mode sonore
Vous pouvez jouir du son surround tout simplement en
sélectionnant l’un des fichiers sonores préprogrammés
suivant le programme que vous voulez écouter.
A) En appuyant sur le bouton MODE
À chaque fois que vous appuyez sur le bouton MODE,
le mode sonore change selon l’ordre suivant:
FLAT → ROCK → POP → JAZZ → CLASSIC → NEWS →
FLAT ...
Conseils
FLAT: Réponse en fréquence linéaire.
ROCK: Reproduit l’acoustique de la musique rock.
POP: Reproduit l’acoustique de la musique pop.
JAZZ: Reproduit l’acoustique d’un club de jazz.
CLASSIC: Reproduit l’acoustique de la musique
orchestrale.
NEWS: Reproduit l’acoustique du son des jour naux
télévisés.
B) En appuyant sur le bouton AUTO FORMAT
DIRECT
À chaque fois que vous appuyez sur le bouton AUTO
FORMAT DIRECT, le mode sonore change selon
l’ordre suivant:
A.F.D. AUTO → DOLBY PL → PLII MOVIE → PLII MUSIC →
A.F.D. AUTO ...
(Cette fonction n’est disponible qu’en mode bicanal)
Remarques
Cette fonction n’est pas disponible pour les disques MP3.
Cette fonction n’est disponible qu’en mode lecture.
La sélection du mode sonore n’est pas possible lorsque
vous utilisez le casque d’écoute.
Lorsqu’un disque DVD est inséré.
YVous pouvez changer le mode sonore du DVD (Dolby Digital,
DTS, PRO LOGIC, etc.) au cours de la lecture en appuyant sur
le bouton AUDIO dans la télécommande.
Quoique le contenu du disque DVD diffère d’un disque à
l’autre, l’information suivante explique le fonctionnement de
base lorsque cette fonction est utilisée.
À chaque fois que vous appuyez sur le bouton AUDIO, le
mode sonore du DVD est modifié dans l’ordre suivant:
→→→
Pour votre référence
Le récepteur DVD mémorise les dernières config-
•
urations du mode pour chaque source individuellement.
•
Vous pouvez identifier le format de codage du
logiciel du programme en regardant sur son
emballage.
- Les disques à format Dolby Digital sont étiquetés
avec le logo .
- Les disques à format Dolby Surround sont étiquetés
avec le logo .
- Les disques à format DTS Digital Surround sont mar-
qués .
Remarque
Il n’est plus possible de choisir le mode acoustique lorsque
vous utilisez le casque d’écoute.
PRÉPARATION
17
Page 98

Avant la mise en service (suite)
RESUME
OFF
ALL
TRACK
CHAPT
TITLE
1 /3
1 /12
0:20:09
1 ENG
D
5.1 CH
OFF
1 /1
AUTO
1 /3
AUTO
0:20:09
ST
Explication générale
Ce manuel offre des instructions élémentaires pour
l’utilisation du récepteur DVD. Certains disques DVD
nécessitent d’une utilisation spécifique ou vous
permettent uniquement des opérations limitées au cours
de la lecture. Quand cela arrive, le symbole s’affiche
sur l’écran du téléviseur, vous indiquant que l’opération
n’est pas permise par le récepteur DVD ou qu’elle n’est
pas possible sur ce disque.
Affichage sur écran
Vous pouvez également utiliser les boutons numérotés
pour configurer des numéros (par ex., le numéro du
titre). Pour certaines fonctions, vous aurez à appuyer
sur ENTER pour rendre effective la configuration.
Fonctionnement de l’ affichage sur
écran
Appuyez sur DVD DISPLAY au cours de la lec-
1
ture.
Appuyez sur V/v pour sélectionner un élément.
2
L’élément sélectionné sera remarqué.
DVD
Appuyez sur B/b pour changer la configuration
d’un élément.
3
Vous pouvez également utiliser les boutons
numérotés pour configurer des numéros (par ex., le
numéro du titre). Pour certaines fonctions, vous
aurez à appuyer sur ENTER pour rendre effective
la configuration.
Icônes du champ feed-back temporaire
Répète le titre
Répète le chapitre
Répète la piste (CD vidéo sans CML, MP3,
CD)
Répète toutes les pistes (CD vidéo sans CML,
MP3, CD)
Répétition désactivée
Reprend la lecture à partir de ce point
Action interdite ou non disponible
Remarques
•
Certains disques pourraient ne pas offrir toutes les
fonctions indiquées comme exemple dans l’affichage
sur écran montré ci-dessous.
•
Si vous n’appuyez sur aucun bouton pendant 10 secondes, l’affichage sur écran disparaît.
Éléments
Numéro de titre
Numéro de chapitre
Recherche par
l’heure
Langue audio
et mode de sortie
de l’audio numérique
Langue des
Prise de caméra
Son
VCD2.0
VCD1.1
Éléments
Numéro de piste
Temps
Canal audio
Son
Fonction (Appuyez sur V/v pour sélectionner
l’élément désiré)
Montre le numéro du titre actuel et le nombre total de
titres, et saute vers le numéro de titre désiré.
Montre le numéro du chapitre actuel et le nombre total de
chapitres, et saute vers le numéro de chapitre désiré.
Montre le temps de lecture écoulé et cherche le point
désiré directement à partir du temps écoulé.
Montre la langue actuelle de la piste audio, la méthode de
codage et le numéro du canal, et modifie la configuration.
Montre la langue actuelle des sous-titres et modifie cette
configuration.
Montre le numéro de la prise de caméra actuelle et le
nombre total de prises de caméra, et modifie le numéro de
prise de caméra.
Montre le mode sonore actuel et modifie cette
configuration.
Fonction (Appuyez sur V/v pour sélectionner
l’élément désiré)
Montre le numéro de la piste actuelle et le nombre total de
pistes, le mode CML activé, ou saute vers le numéro de
piste désiré en mode CML désactivé.
Montre le temps de lecture écoulé (uniquement affichage)
Montre le canal audio et change le canal audio.
Montre le canal audio et change le canal audio.
Méthode de
sélection
B/ b
Numéros
B/ b,./ >
Numéros
Numéros
AUTO FORMAT DIRECT
,ou
, ENTER
, ENTER
, ENTER
B/ b
,ou
AUDIO
B/ b
,ou
SUBTITLE
B/ b
,ou
ANGLE
ou
Méthode de
sélection
B/ b
–
B/ b
AUDIO
,ou
, ENTER
,ou
Numéros
AUTO FORMAT DIRECT
18
Page 99

Avant la mise en service (suite)
Configuration initiale
Vous pouvez établir vos préférences personnelles en
mode de fonctionnement DVD.
Fonctionnement général
Appuyez sur DVD SETUP.
1
Le menu Configuration s’affiche.
Utilisez V/v pour sélectionner l’option désirée.
2
L’écran montrera la configuration actuelle pour l’option sélectionnée, ainsi que les autres configurations possibles.
Une fois l’option désirée sélectionnée, appuyez
3
sur b, puis sur V/v pour sélectionner la configuration désirée.
Appuyez sur ENTER pour confirmer votre sélec-
4
tion.
Certaines options supposent des pas supplémentaires.
Appuyez sur DVD SETUP, RETURN, ou H
5
(PLAY) pour sor tir du menu configuration.
Langue
Langue du disque
Sélectionnez une langue pour le menu, les fonctions
audio et les sous-titres du disque.
Original : La langue originale établie pour le disque est sélec-
tionnée.
Autre:Pour sélectionner une autre langue, utilisez les boutons
numérotés pour introduire 4 chiffres suivant le code figurant
dans la liste des codes de langues à la page 35. Si vous introduisez un code de langue erroné, appuyez sur CLEAR.
DVD
Langue du menu
Sélectionnez une langue pour le menu configuration.
C’est le menu que vous verrez si vous appuyez sur
DVD SETUP.
Code de zone
Format du téléviseur
Format Letterbox (“boîte aux lettres”) 4/3:
Sélectionnez cette option lorsque l’unité est connectée
à un téléviseur standard 4/3.
Affiche des images avec des bandes noires en haut et
en bas de l’image.
Format Pan & Scan (“recadrage automatique”) 4/3:
Sélectionnez cette option lorsque l’unité est connectée
à un téléviseur à format standard 4/3.
Les images affichées sont découpées pour qu’elles
rentrent dans l’écran du téléviseur.
Les deux côtés de l’image sont coupés.
Format large 16/9: Sélectionnez cette option lorsque
l’unité est connectée à un téléviseur à format large 16/9.
Disque Audio
Sous Titre Du Disque
Menu De Disque
Classement
Code de zone
Aspect TV
Langage Menu
Installation Enceintes
Autre
DVD
4/3
16/9
PRÉPARATION
Remarque
La sélection de la langue du disque pourrait ne pas
marcher pour certains disques DVD.
19
Page 100

Avant la mise en service (suite)
Configuration des enceintes
5.1 Configuration des enceintes
Sélectionnez la configuration des enceintes, y inclus le
volume, la balance et la distance, ou testez la
configuration des enceintes.
La configuration des enceintes n’est activée qu’en sortie
multicanal analogique (voir la section “Configuration des
enceintes” à la page 29.)
Disque Audio
Sous Titre Du Disque
Menu De Disque
Classement
Code de zone
Aspect TV
Langage Menu
Installation Enceintes
Autre
Avant G
Volume 0 dB
Taille Etroit
Distance 0.3m
Test
Retour
DVD
S S
Divers
Les configurations du contrôle de la dynamique (DRC)
et de la commande manuelle de lecture (CML) peuvent
être modifiées.
Appuyez sur V/v pour sélectionner l’élément désiré,
puis appuyez sur ENTER. La configuration de l’élément sélectionné change entre Activé et Désactivé.
Disque Audio
Sous Titre Du Disque
Menu De Disque
Classement
Code de zone
Aspect TV
Langage Menu
Installation Enceintes
Autre
Contrôle de la dynamique
Avec le format DVD*1, vous pouvez écouter la piste
audio du programme dans la présentation la plus fidèle
et réaliste possible, grâce à la technologie audio
numérique. Cependant, vous pourriez désirer
comprimer la dynamique de la sortie audio (la
différence entre les sons les plus forts et les plus
faibles).Dans ce cas-là, vous pouvez entendre un film
au plus bas volume sans perdre la clarté du son.
Réglez le Contrôle de la Dynamique sur la position
Activé pour obtenir cet effet.
*1: uniquement pour Dolby Digital
DRC
PBC
Arret
Marche
Commande manuelle de lecture (CML)
Marche: Les CD vidéo avec CML sont lus suivant la
CML.
Arret: Les CD vidéo avec CML sont lus de la même
manière que les CD audio.
20
 Loading...