

Page 1
DVD
©2004 Sony Corporation
DAV-SB100
Operating Instructions
GB
Manual de instrucciones
ES
Mode d’emploi
FR
2-048-709-31
Page 2
2
Safety Precautions
WARNING: Do not install this equipment in a confined space
such as a book case or similar unit.
To prevent fire, do not cover the ventilation of the apparatus
with news papers, table-cloths, curtains, etc. And don’t place
lighted candles on the apparatus.
Don’t throw away the battery with general
house waste, dispose of it correctly as chemical
waste.
This appliance is classified as a CLASS 1
LASER product. The label is located on the
rear exterior.
CAUTION:
This DVD Receiver employs a Laser System.
To ensure proper use of this product, please read this owner’s
manual carefully and retain it for future reference. Should the
unit require maintenance, contact an authorized service location (see service procedure).
Performing controls, adjustments, or carrying out procedures
other than those specified herein may result in hazardous radiation exposure.
To prevent direct exposure to laser beam, do not try to open
the enclosure. Visible laser radiation when open. DO NOT
STARE INTO BEAM.
CAUTION: The apparatus should not be exposed to water
(dripping or splashing) and no objects filled with liquids, such
as vases, should be placed on the apparatus.
Precautions
Safety
• If anything falls into the cabinet, unplug the unit and have it
checked by qualified personnel before operating it any
further.
• The unit is not disconnected from the AC power source
(mains) as long as it is connected to the mains outlet, even if
the unit itself has been turned off.
• Unplug the unit from the wall outlet if you do not intend to
use it for an extended period of time. To disconnect the cord,
pull it out by the plug, never by the cord.
Installing
• Allow adequate air circulation to prevent internal heat
buildup.
• Do not place the unit on surfaces (rugs, blankets, etc.) or
near materials (curtains, draperies) that may block the ventilation slots.
• Do not install the unit near heat sources such as radiators, or
air ducts, or in a place subject to direct sunlight, excessive
dust, mechanical vibration, or shock.
• Do not install the unit in an inclined position. It is designed to
be operated in a horizontal position only.
• Keep the unit and discs away from equipment with strong
magnets, such as microwave ovens, or large loudspeakers.
• Do not place heavy objects on the unit.
• If the unit is brought directly from a cold to a warm location,
moisture may condense inside the DVD Home Theatre
System and cause damage to the lenses. When you first
install the unit, or when you move it from a cold to a warm
location, wait for about 30 minutes before operating the unit.
On power sources
• AC power cord must be changed only at the qualified service
shop.
On placement
• Place the receiver in a location with adequate ventilation to
prevent heat build-up in the system.
• At high volume, over long periods of time, the cabinet
becomes hot to the touch. This is not a malfunction.
However, touching the cabinet should be avoided. Do not
place the unit in a confined space where ventilation is poor
as this may cause overheating.
• Do not block the ventilation slots by putting anything on the
system. The receiver is equipped with a high power amplifier.
If the ventilation slots on the top surface are blocked, the unit
can overheat and malfunction.
• Do not place the system on a soft surface such as a rug
that might block the ventilation holes on the bottom.
• Do not place the system in a location near heat sources, or
in a place subject to direct sunlight, excessive dust, or
mechanical shock.
On operation
• If the system is brought directly from a cold to a warm location, or is placed in a very damp room, moisture may condense on the lenses inside the system. Should this occur,
the system may not operate properly. In this case, remove
the disc and leave the system turned on for about half an
hour until the moisture evaporates.
• When you move the system, take out any discs. If you don’t,
the disc may be damaged.
The nameplate is located on the rear of the unit.
WARNING: TO PREVENT FIRE OR ELECTRIC SHOCK
HAZARD, DO NOT EXPOSE THIS PRODUCT TO RAIN OR
MOISTURE.
IMPORTANT NOTICE
Caution: This system is capable of holding a still video
image or on-screen display image on your television screen
indefinitely. If you leave the still video image or on-screen
display image displayed on your TV for an extended period
of time you risk permanent damage to your television
screen. Projection televisions are especially susceptible to
this.
Page 3

INTRODUCTION
3
Safety Precautions (Continued)
NOTES ON COPYRIGHTS:
It is forbidden by law to copy, broadcast, show, broadcast
via cable, play in public, or rent copyrighted material without
permission.
This product features the copy protection function developed by
Macrovision. Copy protection signals are recorded on some
discs. When recording and playing the pictures of these discs
on a VCR, picture noise will appear.
This product incorporates copyright protection technology that
is protected by method claims of certain U.S. patents and other
intellectual property rights owned by Macrovision Corporation
and other rights owners. Use of this copyright protection technology must be authorized by Macrovision Corporation, and is
intended for home and other limited viewing uses only unless
otherwise authorized by Macrovision Corporation. Reverse
engineering or disassembly is prohibited.
About the symbols for instruction
Indicates hazards likely to cause harm to the unit
itself or other material damage.
Note Indicates special operating features of this unit.
Tip Indicates tips and hints for making the task easier.
Page 4

4
Table of Contents
Introduction
Safety Precautions . . . . . . . . . . . . . . . . . . . . . . . . 2-3
Table of Contents . . . . . . . . . . . . . . . . . . . . . . . . . . 4
Before Use . . . . . . . . . . . . . . . . . . . . . . . . . . . . . . 5-6
Playable Discs . . . . . . . . . . . . . . . . . . . . . . . . . . . 5
Precautions . . . . . . . . . . . . . . . . . . . . . . . . . . . . . 6
Notes on Discs . . . . . . . . . . . . . . . . . . . . . . . . . . 6
About Symbols . . . . . . . . . . . . . . . . . . . . . . . . . . 6
Front Panel Controls . . . . . . . . . . . . . . . . . . . . . . . . 7
Display Window Indicators . . . . . . . . . . . . . . . . . . . 8
Remote Control . . . . . . . . . . . . . . . . . . . . . . . . . . . . 9
Rear Panel Connections . . . . . . . . . . . . . . . . . . . . 10
Preparation
Connections . . . . . . . . . . . . . . . . . . . . . . . . . . . 11-15
Connecting to a TV . . . . . . . . . . . . . . . . . . . . . . 11
Connecting to External Equipment . . . . . . . . . . . 12
Antenna Connections. . . . . . . . . . . . . . . . . . . . . 13
Speaker System Connection . . . . . . . . . . . . . . . 14
Speaker Positioning . . . . . . . . . . . . . . . . . . . . . . 15
Selecting the Output/Input Source . . . . . . . . . . . . 16
Before Operation . . . . . . . . . . . . . . . . . . . . . . . 17-21
Mini Glossary for Audio Stream & Surround
Mode . . . . . . . . . . . . . . . . . . . . . . . . . . . . . . . . . 17
Sound Mode . . . . . . . . . . . . . . . . . . . . . . . . . . . 17
General Explanation. . . . . . . . . . . . . . . . . . . . . . 18
On-Screen Display. . . . . . . . . . . . . . . . . . . . . . . 18
Initial Settings . . . . . . . . . . . . . . . . . . . . . . . . 19-21
General Operation . . . . . . . . . . . . . . . . . . . . 19
Language . . . . . . . . . . . . . . . . . . . . . . . . . . 19
TV Aspect . . . . . . . . . . . . . . . . . . . . . . . . . . 19
Speaker Setup. . . . . . . . . . . . . . . . . . . . . . . 20
Others . . . . . . . . . . . . . . . . . . . . . . . . . . . . . 20
Parental Control. . . . . . . . . . . . . . . . . . . . . . 21
Area Code . . . . . . . . . . . . . . . . . . . . . . . . . . 21
Operation
DVD and Video CD Operation. . . . . . . . . . . . . . 22-24
Playing a DVD and Video CD . . . . . . . . . . . . . . . 22
General Features . . . . . . . . . . . . . . . . . . . . . . . . 22
Resume Function . . . . . . . . . . . . . . . . . . . . 22
Selecting Another TITLE . . . . . . . . . . . . . . . 22
Selecting Another CHAPTER/TRACK . . . . . 22
Search. . . . . . . . . . . . . . . . . . . . . . . . . . . . . 22
Still Picture . . . . . . . . . . . . . . . . . . . . . . . . . 22
Slow Motion. . . . . . . . . . . . . . . . . . . . . . . . . 23
Repeat . . . . . . . . . . . . . . . . . . . . . . . . . . . . 23
Time Search . . . . . . . . . . . . . . . . . . . . . . . . 23
Special DVD Features . . . . . . . . . . . . . . . . . . . . 24
Checking the contents of DVD Video disc:
Menus . . . . . . . . . . . . . . . . . . . . . . . . . . . . . 24
Camera Angle . . . . . . . . . . . . . . . . . . . . . . . 24
Changing the Audio Language . . . . . . . . . . . 24
Changing the Audio Channel . . . . . . . . . . . . 24
Subtitle . . . . . . . . . . . . . . . . . . . . . . . . . . . . 24
Audio CD and MP3 Disc Operation . . . . . . . . . 25-26
Playing an Audio CD and MP3 Disc . . . . . . . . . . 25
Notes on MP3 Files . . . . . . . . . . . . . . . . . . . . . . 25
Pause . . . . . . . . . . . . . . . . . . . . . . . . . . . . . 26
Selecting Another Track . . . . . . . . . . . . . . . . 26
Search. . . . . . . . . . . . . . . . . . . . . . . . . . . . . 26
Repeat . . . . . . . . . . . . . . . . . . . . . . . . . . . . 26
Changing the Audio Channel . . . . . . . . . . . . 26
JPEG File Operation . . . . . . . . . . . . . . . . . . . . . . . 27
Viewing JPEG Files on a Disc . . . . . . . . . . . . . . 27
Selecting Another Files . . . . . . . . . . . . . . . . 27
Still Picture . . . . . . . . . . . . . . . . . . . . . . . . . 27
To flip the picture . . . . . . . . . . . . . . . . . . . . . 27
To rotate picture . . . . . . . . . . . . . . . . . . . . . . 27
Notes on JPEG Files . . . . . . . . . . . . . . . . . . 27
Programmed Playback . . . . . . . . . . . . . . . . . . . . . 28
Programmed Playback with Audio CD
and MP3 Disc . . . . . . . . . . . . . . . . . . . . . . . . . . 28
Programmed Playback with Video CD . . . . . . . . 28
Speaker Setup . . . . . . . . . . . . . . . . . . . . . . . . . . . . 29
Additional Information. . . . . . . . . . . . . . . . . . . . . . 30
Sleep Timer Setting . . . . . . . . . . . . . . . . . . . . . . 30
Viewing the Playing Time and Remaining
Time in the Front Panlel Display . . . . . . . . . . . . . 30
Dimmer . . . . . . . . . . . . . . . . . . . . . . . . . . . . . . . 30
Muting . . . . . . . . . . . . . . . . . . . . . . . . . . . . . . . . 30
Using Headphone Jack . . . . . . . . . . . . . . . . . . . 30
Volume Control . . . . . . . . . . . . . . . . . . . . . . . . . 30
Using the Sound Effect . . . . . . . . . . . . . . . . . . . 30
Radio Operation . . . . . . . . . . . . . . . . . . . . . . . . . . 31
Presetting the Radio Stations . . . . . . . . . . . . . . . 31
Listening to the Radio . . . . . . . . . . . . . . . . . . . . 31
Controlling the TV with the Supplied Remote . . . 32
Controlling the TV . . . . . . . . . . . . . . . . . . . . . . . 32
Using the SONY TV DIRECT Function . . . . . . . . . 33
Preparation . . . . . . . . . . . . . . . . . . . . . . . . . . . . 33
Operation. . . . . . . . . . . . . . . . . . . . . . . . . . . . . . 33
Reference
Language Code List . . . . . . . . . . . . . . . . . . . . . . . 34
Area Code List. . . . . . . . . . . . . . . . . . . . . . . . . . . . 35
Troubleshooting . . . . . . . . . . . . . . . . . . . . . . . . 36-37
Specification . . . . . . . . . . . . . . . . . . . . . . . . . . . . . 38
Manufactured under license from Dolby Laboratories. “Dolby”,
“Pro Logic”, and the double-D symbol are trademarks of Dolby
Laboratories. Confidential Unpublished works. Copyright 19921997 Dolby Laboratories. All rights reserved.
Manufactured under license from Digital Theater Systems, Inc.
US Pat. No. 5,451,942 5,956,674, 5,974,380, 5,978,762 and
other worldwide patents issued and pending. “DTS” and “DTS
Digital Surround” are registered trademarks of Digital Theater
Systems, Inc. Copyright 1996, 2000 Digital Theater Systems,
Inc. All rights reserved.
Page 5
5
INTRODUCTION
Before Use
Playable Discs
DVD video discs
(8 cm / 12 cm disc)
Video CD (VCD)
(8 cm / 12 cm disc)
Audio CD
(8 cm / 12 cm disc)
In addition, this unit can play a DVD-R/-RW, SVCD and
CD-R or CD-RW that contains audio titles, MP3, or
JPEG files.
Notes
Depending on the conditions of the recording equip-
ment or the CD-R/RW (or DVD-R/-RW) disc itself,
some CD-R/RW (or DVD-R/-RW) discs cannot be
played on the unit.
DVD-RWs in VR (Video Recording) mode discs
cannot be played on the unit.
Do not attach any seal or label to either side (the
labeled side or the recorded side) of a disc.
Do not use irregularly shaped CDs (e.g., heart-
shaped or octagonal). It may result in malfunctions.
Notes on DVDs and Video CDs
Some playback operations of DVDs and Video CDs may
be intentionally fixed by software manufacturers. As this
unit plays DVDs and Video CDs according to disc content designed by the software manufacturer, some playback features of the unit may not be available or other
functions may be added.
Make sure to also refer to the instructions supplied with
the DVDs and Video CDs. Some DVDs made for business purposes may not be able to be played on the unit.
Regional code of the DVD Receiver and DVDs
This DVD Receiver is designed and manufactured for
playback of region “3” encoded DVD software. The region
code on the labels of some DVDs indicates which type of
player can play those discs. This unit can only play DVDs
labeled “3” or “ALL”. If you try to play any other discs, the
message “Check Regional Code” will appear on the TV
screen. Some DVDs that have no region code
label may still be subject to area restrictions
and therefore not playable.
Disc-related terms
Title (DVD video discs only)
The main film content or accompanying feature content
or additional feature content, or music album.
Each title is assigned a title reference number enabling
you to locate it easily.
Chapter (DVD video discs only)
Sections of a picture or a musical piece that are smaller
than titles. A title is composed of one or several chapters. Each chapter is assigned a chapter number,
enabling you to locate the chapter you want. Depending
on the disc, chapters may not be recorded.
Track (Video CD and audio CD only)
Sections of a picture or a musical piece on a video CD
or an audio CD. Each track is assigned a track number,
enabling you to locate the track you want.
Index (Video CD)
A number that divides a track into sections to easily
locate the point you want on a VIDEO CD. Depending
on the disc, no indexes may be recorded.
Scene
On a video CD with PBC (Playback control) functions,
moving pictures and still pictures are divided into
sections called “Scenes”. Each scene is displayed in the
menu screen and assigned a scene number, enabling
you to locate the scene you want.
A scene is composed of one or several tracks.
File
Sections of a picture on a data CD containing JPEG
image files.
Types of video CDs
There are two types of video CDs:
Video CDs equipped with PBC (Version 2.0)
PBC (Playback control) functions allow you to interact
with the system via menus, search functions, or other
typical computer-like operations. Moreover, still pictures
of high resolution can be played if they are included in
the disc.
Video CDs not equipped with PBC (Version 1.1)
Operated in the same way as audio CDs, these discs
allow playback of video pictures as well as sound, but
they are not equipped with PBC.
3
IMPORTANT NOTE:
SPENT OR DISCHARGED BATTERIES MUST BE
RECYCLED OR DISPOSED OF IN A SAFE MANNER IN
COMPLIANCE WITH ALL APPLICABLE LAWS.
FOR DETAILED INFORMATION, CONTACT YOUR LOCAL
COUNTY SOLID WASTE AUTHORITY.
Page 6
6
Before Use (Continued)
Precautions
Handling the unit
When shipping the unit
The original shipping carton and packing materials may
come in handy. For maximum protection, re-pack the
unit as it was originally packed at the factory.
When setting up the unit
The picture and sound of a nearby TV, VCR, or radio
may be disturbed during playback. In this case, position
the unit away from the TV, VCR, or radio, or turn off the
unit after removing the disc.
To keep the exterior surfaces clean
Do not use volatile liquids, such as insecticide spray,
near the unit. Do not leave rubber or plastic products in
contact with the unit for a long period of time. They will
leave marks on the surface.
Cleaning the unit
To clean the cabinet
Use a soft, dry cloth. If the surfaces are extremely dirty,
use a soft cloth lightly moistened with a mild detergent
solution. Do not use strong solvents such as alcohol,
benzine, or thinner, as these might damage the surface
of the unit.
To obtain a clear picture
The
DVD Receiver
is a high-tech, precision device. If the
optical pick-up lens and disc drive parts are dirty or
worn, the picture quality will be poor.
Regular inspection and maintenance are recommended
after every 1,000 hours of use. (This depends on the
operating environment.)
For details, please contact your nearest dealer.
Notes on Discs
Disc Handling
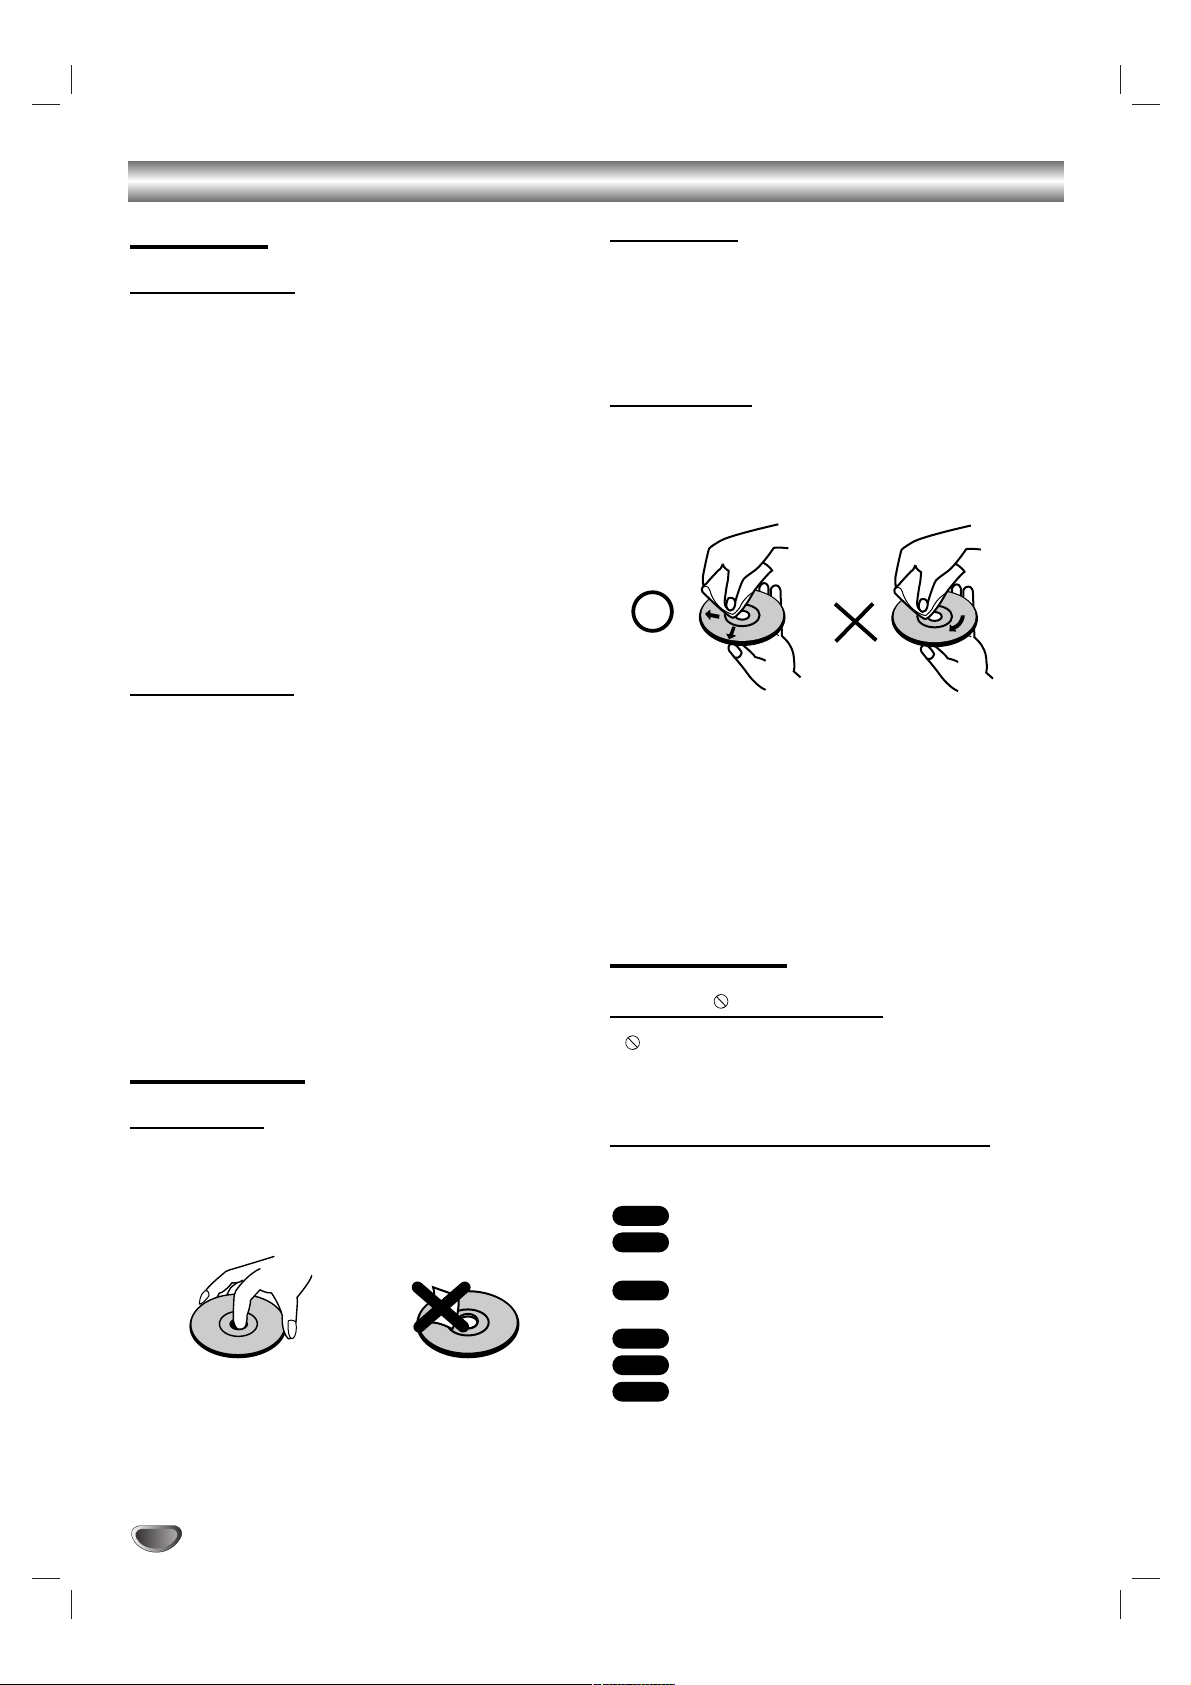
Do not touch the playback side of the disc.
Hold the disc by the edges so that fingerprints will not
get on the surface.
Do not stick paper or tape on the disc.
Storing discs
After playing, store the disc in its case.
Do not expose the disc to direct sunlight or sources of
heat, or leave it in a parked car exposed to direct sunlight, as there may be a considerable temperature
increase inside the car.
Cleaning discs
Fingerprints and dust on the disc can distort the picture
or reduce sound quality. Before playing, clean the disc
with a clean cloth. Wipe the disc from the centre outwards.
Do not use strong solvents such as alcohol, benzine,
thinner, commercially available cleaners, or anti-static
spray intended for vinyl records.
This system can only play back a standard circular disc.
Using neither standard nor circular discs (e.g., card,
heart, or star shape) may cause a malfunction.
Do not use a disc that has a commercially available
accessory attached, such as a label or ring.
About Symbols
About the symbol display
“ ” may appear on the TV screen during operation.
This icon means the function explained in this owner’s
manual is not available on that specific DVD video disc.
About the disc symbols for instructions
A section whose title has one of the following symbol is
applicable only to the disc represented by the symbol.
DVD Video discs
Video CDs with the PBC (playback control)
function.
Video CDs without the PBC (playback control)
function.
Audio CDs.
MP3 disc.
JPEG disc.
JPEG
MP3
CD
VCD1.1
VCD2.0
DVD
Page 7

INTRODUCTION
7
Front Panel Controls
STANDBY
IR
- PRESET +
-
VOLUME +
FUNCTION
PHONES
PAUSE (XX)
Pause playback of a disc temporarily.
OPEN/CLOSE ( )
Opens or closes the disc tray.
Remote Sensor
Point the DVD receiver remote control here.
Display window
Disc Tray
Insert a disc here.
@ / 1 (POWER) indicator
Switches the DVD Receiver ON and OFF.
STOP (xx)
Stops playback of a disc.
PLAY (
H)
To play back a disc.
Forward SKIP (
TT
)
DVD: Go to NEXT chapter/track.
RADIO:
To select preset station you want.
Reverse SKIP (SS)
DVD: Go to beginning of current chapter/track or to previous
chapter/track.
RADIO:
To select preset station you want.
VOLUME Control
Press “+” to increase volume or press “-” to
decrease the volume.
STANDBY indicator
Lights red when the receiver
is in Standby mode (off).
FUNCTION
To select the Receiver’s source.
(FM, AM, VIDEO, TV or
CD/DVD)
PHONES
To connect headphones.
Page 8
8
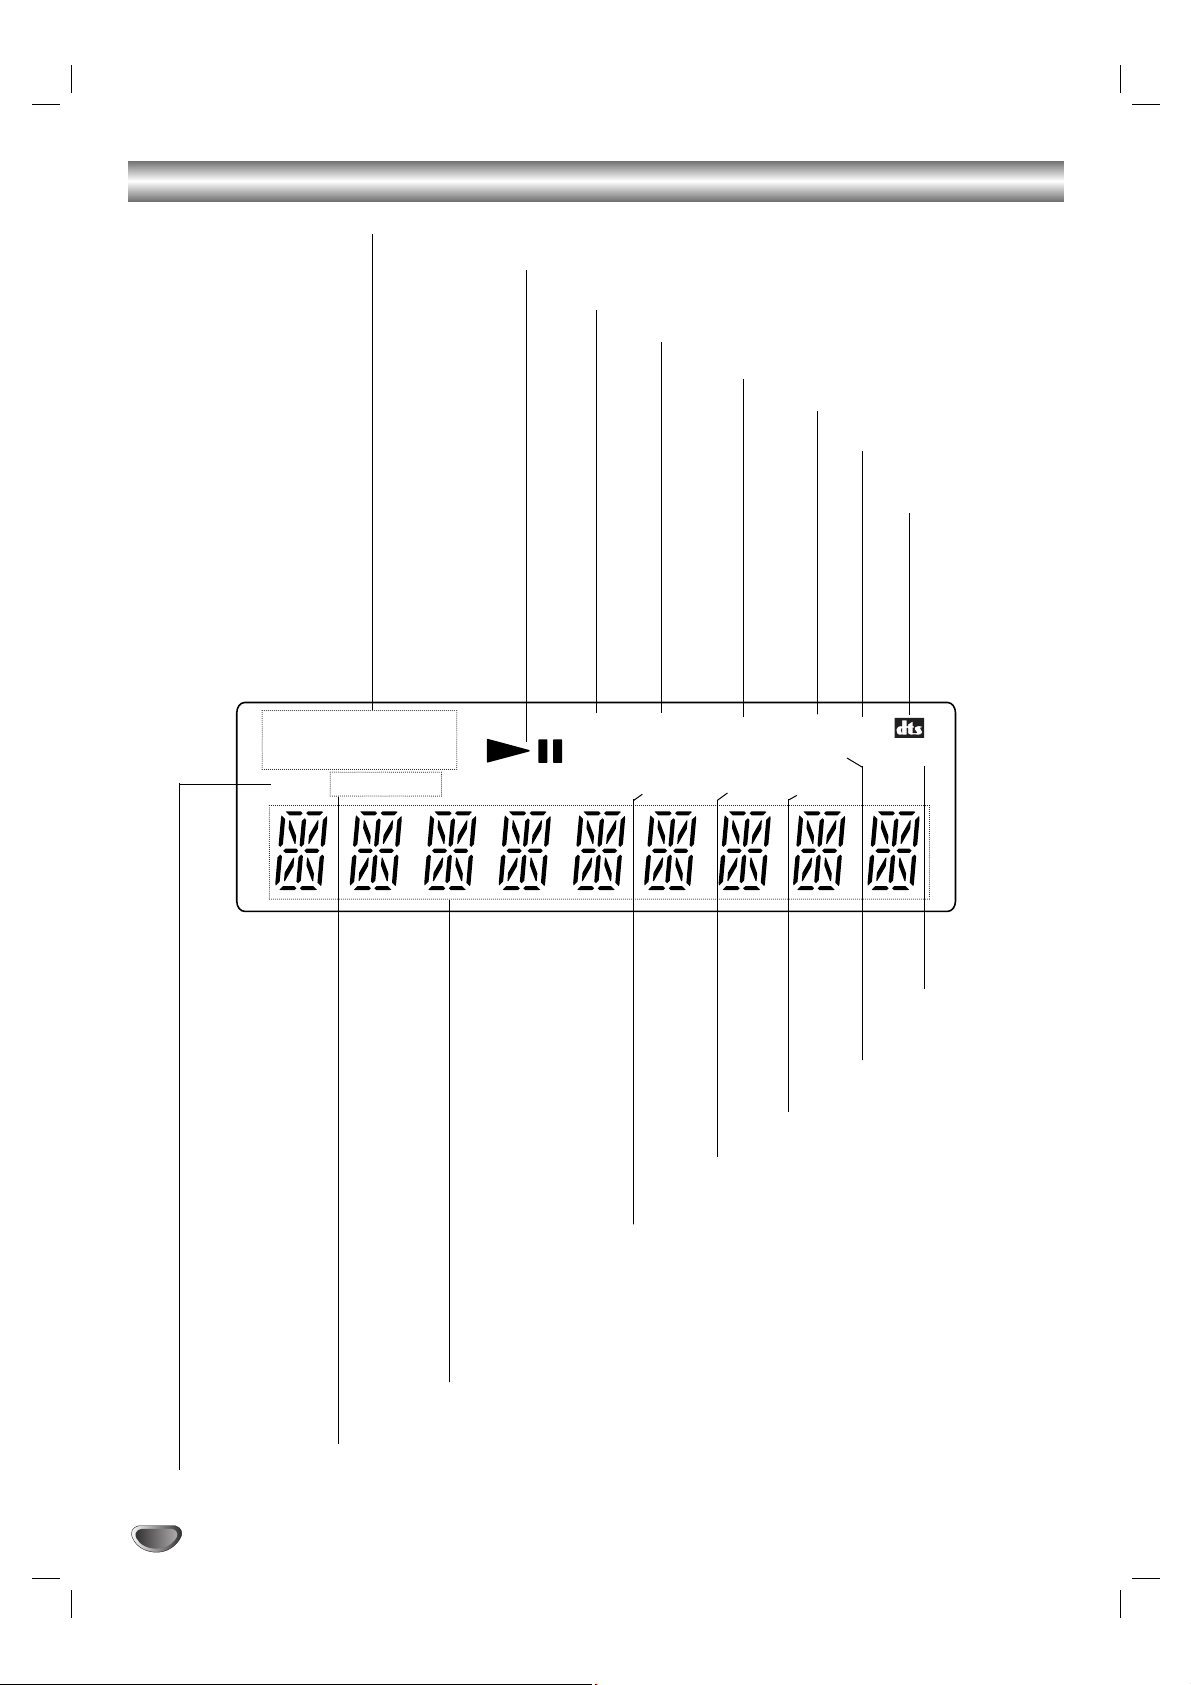
Display Window Indicators
Indicates current chapter or
track number.
Repeat playback mode indicators.
Total playing time/Elapsed time/Frequency/remaining time/ Current status/
Title number/Surround mode/Volume etc. indicators.
Indicates the unit is radio mode.
SLEEP timer indica-
Lights up when the DVD Receiver
tunes in a station.
CD disc inserted.
Indicates the unit is stereo mode.
Playing status.
MP3 disc inserted.
Lights up when the unit
is DSGX ON mode.
VCD2.0 disc inserted.
Indicate current
surround format.
Title indication
Indicates sound
fomat is DOLBY
PROLOGIC II.
Indicate current
surround format.
DISC
ALBM
CHAP TITLE
REP 1
TRK
FM
AM
TUNED PBC SLEEP
MP3 CD ST DSGX
D
D
D
D
PL II
D
Page 9
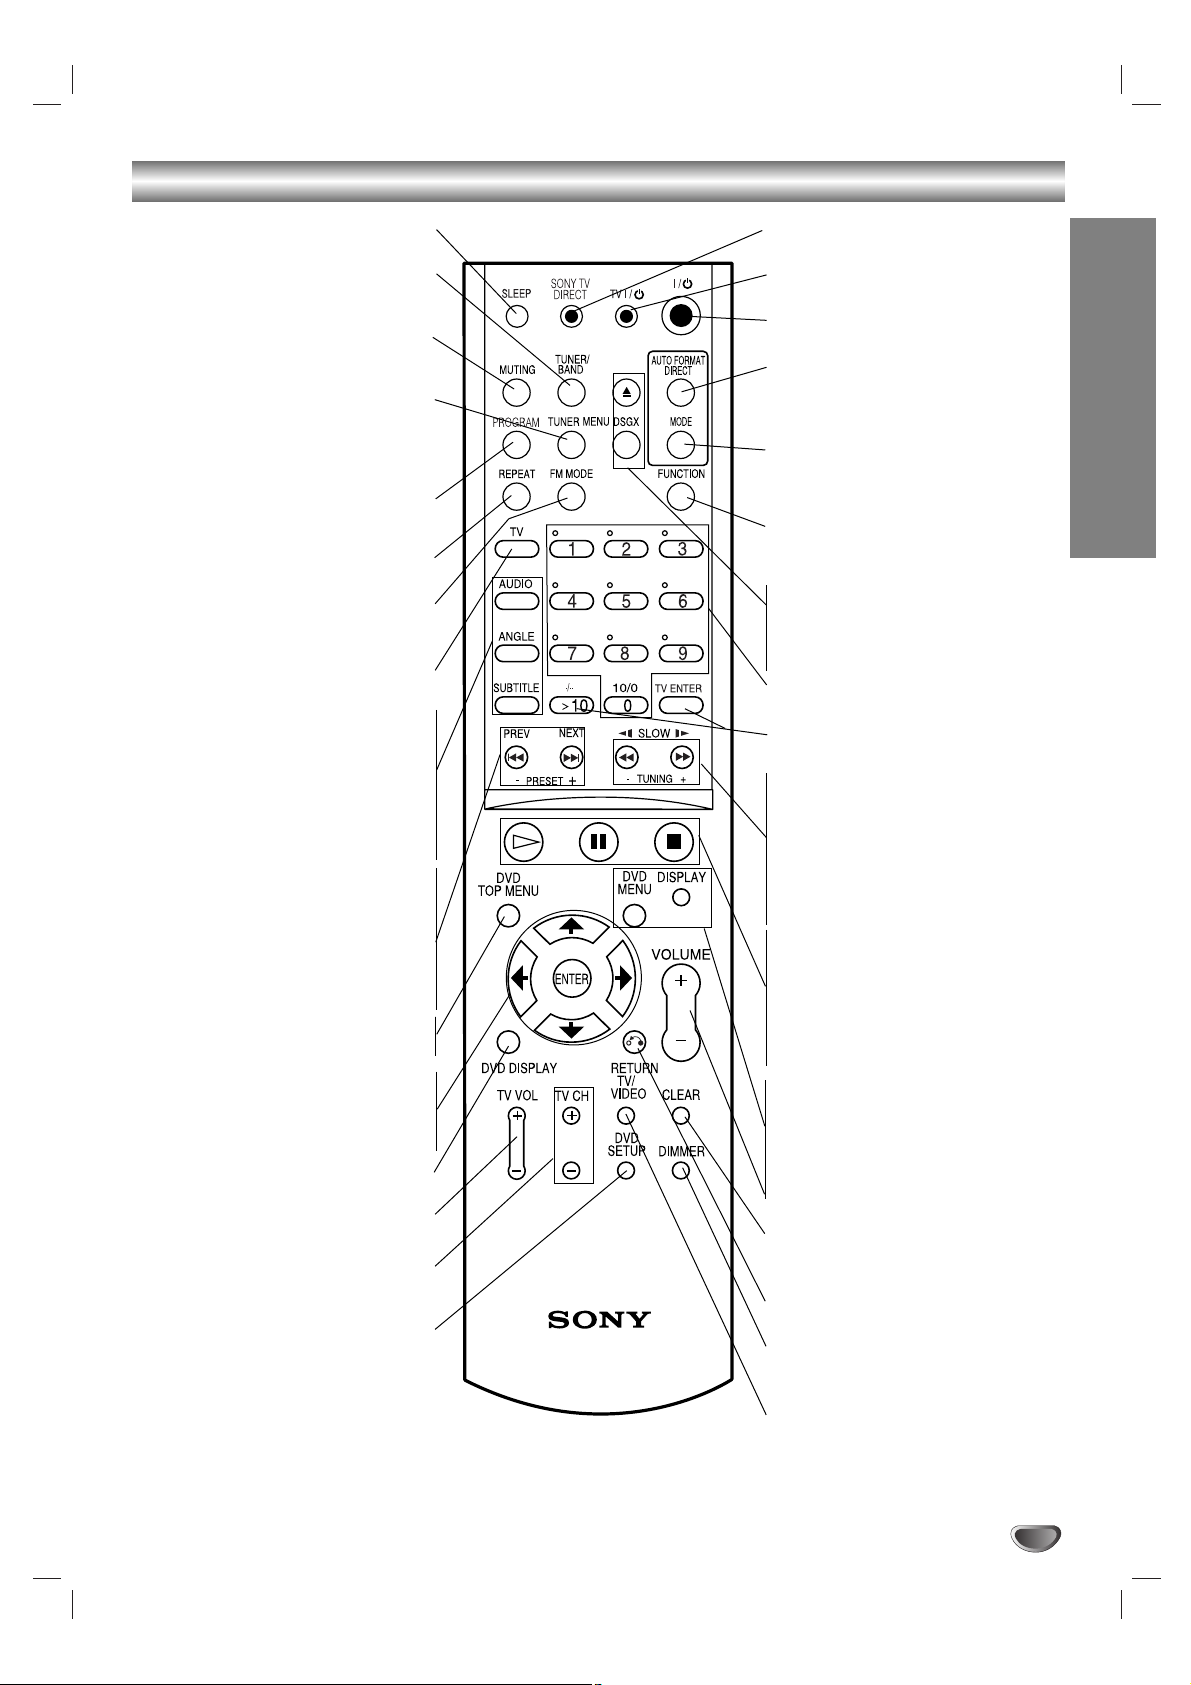
SONY TV DIRECT
Select the output source to DVD directly.
TV @ / 1
Switches TV ON and OFF.
@ / 1
Switches DVD Receiver ON and OFF.
AUTO FORMAT DIRECT
Selects sound mode between A.F.D.
AUTO, PRO LOGIC, PLII MOVIE and
PLII MUSIC.
MODE
Selects sound mode between FLAT,
ROCK, POP, JAZZ, CLASSIC and
NEWS.
FUNCTION
To select the Receiver’s source.
(FM, AM, VIDEO, TV or CD/DVD)
ZZ
Opens and closes the disc tray.
DSGX
Switches DSGX ON and OFF.
0-9 numerical buttons
Selects numbered options in a menu.
>10/ TV ENTER
Used to control TV.
SLOW t/
TUNING-
For picture search or slow playback backward.
To tune in the desired station.
SLOW T/TUNING+
For picture search or slow playback
forward.
To tune in the desired station.
Playback Control Buttons
• H (PLAY)
Starts playback.
• X (PAUSE)
Pause playback or recording temporarily.
• x (STOP)
Stops playback.
DVD MENU
Accesses menu on a DVD disc.
DISPLAY
To display remaining time between
Chapter and title.
VOLUME (+/-)
Adjusts speaker volume.
CLEAR
Removes a track number on the program
menu.
RETURN
Returns the setup menu.
DIMMER
To change the brightness of the display
window.
TV/VIDEO
Selects the TV’s source.
INTRODUCTION
9
Remote Control
SLEEP
To place the unit in the Sleep mode.
TUNER/BAND
Selects the DVD Receiver’s tuner as the
listening choice. (FM and AM bands)
MUTING
Momentarily silence the speaker of the
DVD Receiver.
TUNER MENU
Memorize a radio station frequency
into the tuner.
Press to clear preset stations from the
tuner memory.
PROGRAM
Enters to the programme edit mode or
exits from that.
REPEAT
Repeat chapter, track, title, all.
FM MODE
To change between MONO and STEREO
modes.
TV
To control TVs with the Remote.
AUDIO
Selects an audio language (DVD) or an
audio channel (CD).
ANGLE
Selects a DVD camera angle if available.
SUBTITLE
Selects a subtitle language.
PREV/PRESET-
Go to beginning of current chapter or
track or go to previous chapter or track.
Select programme of Tuner.
NEXT/PRESET+
Go to next chapter or track.
Select programme of Tuner.
DVD TOP MENU
Displays the disc’s Title menu, if available.
B/b/V/v (left/right/up/down)
Selects an option in the menu.
ENTER
Acknowledges menu selection.
DVD DISPLAY
Accesses On-Screen display.
TV VOL +/–
Adjusts TV’s volume.
TV CH +/–
Selects TV’s channel.
DVD SETUP
Accesses or removes DVD setup menu.
Page 10

10
Rear Panel Connections
Do not touch the inner pins of the jacks on the rear
panel. Electrostatic discharge may cause permanent
damage to the unit.
Remote Control Operation Range
Point the remote control at the remote sensor and press
the buttons.
Distance: About 6m (20ft) from the front of the
remote sensor
Angle: About 30° in each direction of the front of the
remote sensor
Remote control battery installation
Detach the battery cover on the rear of
the remote control, and insert two R6
(size AA) batteries with and
aligned correctly.
When using the remote control, point it
at the remote sensor on the unit.
Do not mix old and new batteries.
AC Power Cord
Plug into the power source.
SPEAKER CONNECTORS
Connect the six supplied
speakers to these terminals.
FM ANTENNA CONNECTORS
Connect the FM antenna to this terminal.
AM LOOP ANTENNA CONNECTORS
Connect the AM Loop antenna to this terminal.
VIDEO (AUDIO IN L/R)
Connect the audio output of an external
source (VCR, LD player, etc).
MONITOR OUT (VIDEO)
Connect to a TV with video input.
MONITOR S VIDEO OUT (DVD only)
Connect to a S Video Input on TV.
FOR DVD VIEWING ONLY.
COMPONENT VIDEO OUT (Y PB/C
B PR/CR)
Connect to a TV with Y P
B/CB PR/CR inputs.
FOR DVD VIEWING ONLY.
Page 11
PREPARATION
11
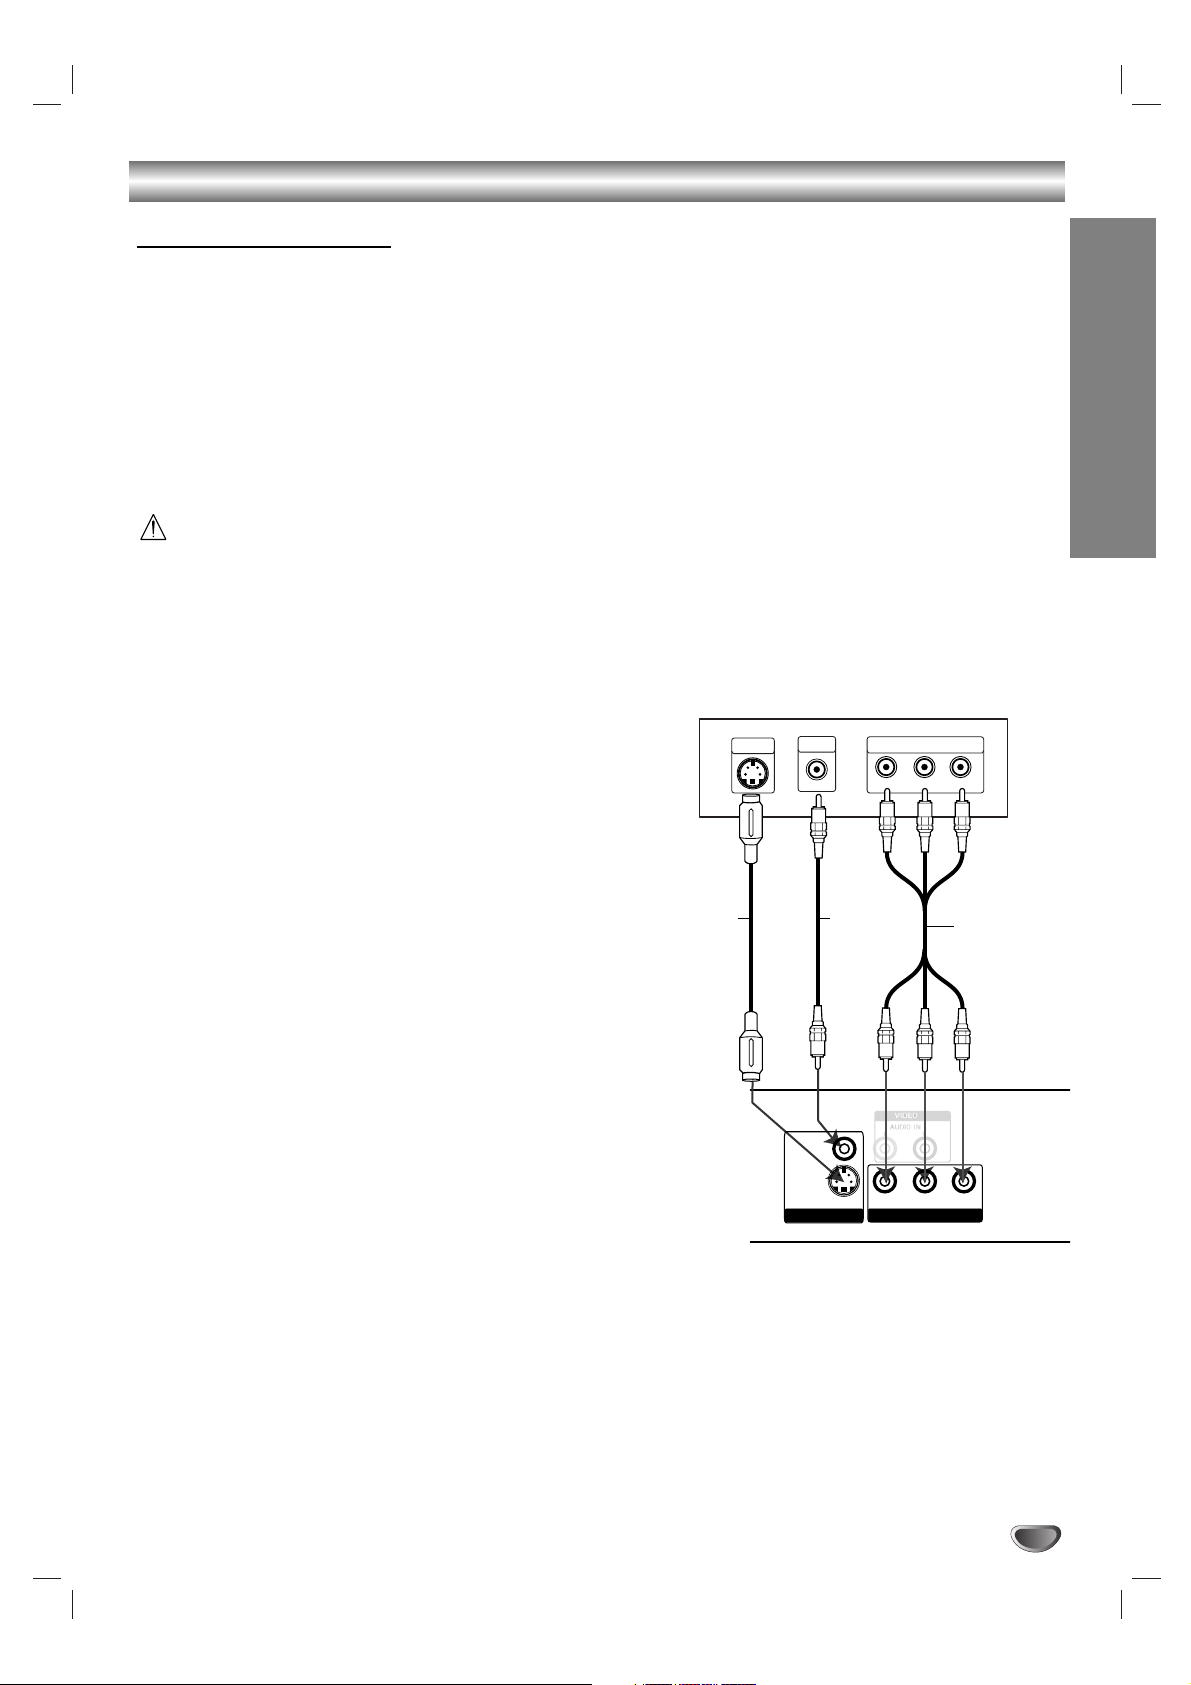
Connections
Make one of the following connections, depending on
the capabilities of your existing equipment.
Tips
Depending on your TV and other equipment you
wish to connect, there are various ways you could
connect the
DVD Receiver
. Use one of the connec-
tions described below.
Please refer to the manuals of your TV, VCR or other
devices as necessary to make the best connections.
–
Make sure the DVD Receiver is connected directly to
the TV. Select the correct AV input on your TV.
– Do not connect your
DVD Receiver
to TV via your
VCR. The DVD image could be distorted by the copy
protection system.
Video connection
Connect the MONITOR OUT VIDEO jack on the DVD
Receiver to the video in jack on the TV using the video
cable (V).
S-Video connection
Connect the S-VIDEO OUT jack on the DVD Receiver
to the S-Video in jack on the TV using the S-Video
cable (S).
Component Video (Color Stream®)
connection
Connect the COMPONENT VIDEO OUT jacks on the
DVD Receiver
to the corresponding in jacks on the TV
using the component (C).
Connecting to a TV
Rear of TV
S
(not supplied)
S-VIDEO
INPUT
VIDEO
INPUT
L
V
VIDEO
S VIDEO
(DVD ONLY)
Rear of DVD Receiver
COMPONENT VIDEO INPUT
Y
Pb
(not supplied)
Y
PB/CB PR/CR
COMPONENT VIDEO OUTMONITOR OUT
Pr
C
Page 12
12
Connections (Continued)
Connecting to External Equipment
Connection
Connect the VIDEO (AUDIO L/R) jacks on the DVD
Receiver to the AUDIO OUTPUT (L/R) jacks on the
VCR, LD player, etc. using the audio cables.
Tip
Press FUNCTION on the remote control to select input
to these jacks.
VIDEO appears on the Display Window.
(not supplied)
Page 13
PREPARATION
13
Connections (Continued)
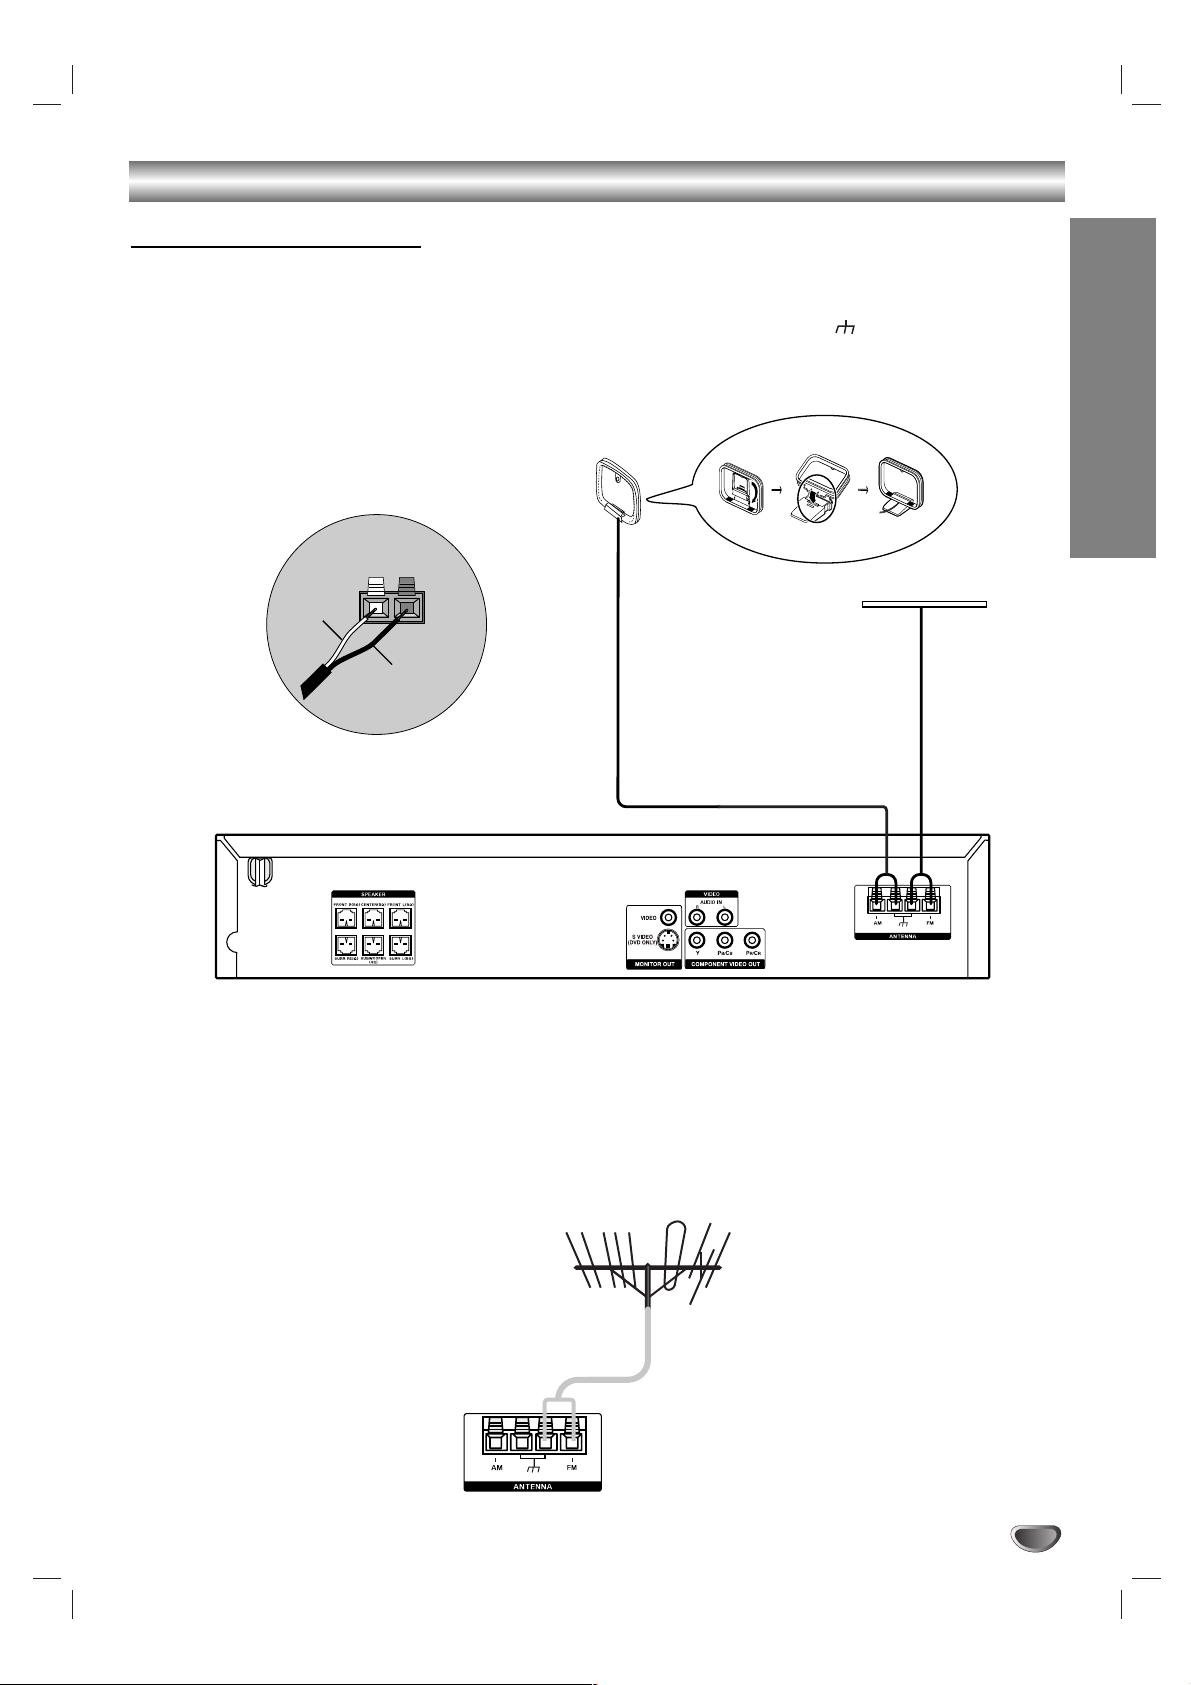
Antenna Connections
Connect the supplied FM/AM antenna for listening to the radio.
Connect the AM Loop antenna to the AM LOOP connector.
Connect the FM antenna to the FM 75 Ω connector.
When you connect the supplied AM Loop antenna, connect the black cord (B) to the terminal, and the white
cord (A) to the other terminal.
Notes
To prevent noise pickup, keep the AM Loop antenna away from the DVD Receiver and other components.
Be sure to fully extend the FM antenna.
After connecting the FM antenna, keep it as horizontal as possible.
Tip
If you have poor FM reception, use a 75Ω coaxial cable (not supplied) to connect the system to an outdoor FM
antenna as shown below.
AM Loop antenna (supplied)
FM antenna (supplied)
A
B
Page 14

14
Connections (Continued)
Front speaker
(Right)
Front speaker
(Left)
Centre speaker
Surround speaker
(Right surround)
Subwoofer
Surround speaker
(Left surround)
Speaker System Connection
Connect the speakers using the supplied speaker cords.
To obtain the best possible surround sound, adjust the speaker parameters (volume, distance, etc.).
Notes
Be sure to match the speaker cable to the appropriate terminal on the components: + to + and – to –. If the cables are
reversed, the sound will be distorted and will lack base.
If you use front speakers with low maximum input rating, adjust the volume carefully to avoid excessive output on the speakers.
Do not disassemble the front covers of supplied speakers.
Speaker stand is optional.
Page 15

PREPARATION
15
Connections (Continued)
Centre Speaker
Front Speaker
(Left)
Speaker Positioning Example
Surround Speaker
(Right)
Front Speaker
(Right)
Subwoofer
Speaker Positioning
In the case of normal position use the 6 speakers (2 front speakers, centre speaker, 2 surround speakers and
subwoofer).
If you want to play the excellent bass sound, DTS digital surround or Dolby Digital surround, you should connect a
subwoofer.
• Front speakers
According to your listening position set up the speakers for equal distance. And by hearing position set up the interval between
speakers to 45 degree.
• Centre speaker
The centre speakers and front speakers are ideally the same height. But normally place it above or below the television.
• Surround speakers
Place left and right behind the listening area. These speakers recreate sound motion and atmosphere required for surround
sound playback. For best results, do not install the surround speakers too far behind the listening position and install them at or
above the level of the listener’s ears. It is also effective to direct the surround speakers towards a wall or ceiling to further
disperse the sound.
In the case of a smaller room size, if the audience is near to the rear wall set the surround speakers opposite each other, and
set the surround speakers above 60 - 90 cm than the listener’s ears.
• Subwoofer
This can be placed in any front position.
Note
Speaker stand is optional.
To attach the foot pads
To prevent speaker vibration or movement while listening, attach the supplied foot pads to the speakers without
Subwoofer, as shown.
Surround Speaker
(Left)
Foot pads
Page 16
16
Selecting the Output/Input Source
Follow these guidelines to select and switch among the
various DVD/VCR Receiver input and output sources:
• CD/DVD
To view output from the DVD:
Press SONY TV DIRECT on the remote.
The “CD/DVD” appears in the Display Window.
• TUNER FM/AM
To listen to AM/FM radio broadcasts:
Press TUNER/BAND to toggle between AM and FM
radio. The selected frequency appears in the display
window.
• INPUT SELECT
To listen to an audio source connected to the
AUDIO IN (L/R) jack of VIDEO:
Press FUNCTION on the remote control repeatedly.
The “VIDEO” appears in the Display Window.
Audio will come from an external source connected
to the AUDIO IN (L/R) jacks of VIDEO (for rear
panel).
SONY TV DIRECT
TUNER/
BAND
FUNCTION
Page 17

PREPARATION
17
Before Operation
Mini Glossary for Audio Stream &
Surround mode
DTS
Allows you to enjoy 5.1(or 6) discrete channels of high quality
digital audio from DTS program sources such as discs, DVD
and compact discs, etc.bearing the trademark. DTS Digital
Surround delivers up to 6 channels of transparent audio(which
means identical to the original masters) and results in exceptional clarity throughout a true 360 degree sound field. The
term DTS is a trademark of DTS Technology, LLC.
Manufactured under license from DTS Technology, LLC.
DOLBY DIGITAL
The Dolby Digital surround format lets you enjoy up to 5.1
channels of digital surround sound from a Dolby Digital program source. If you play DVDs with “”mark, you can enjoy
even better sound quality, greater spatial accuracy, and
improved dynamic range.
DOLBY PRO LOGIC
Use this mode when playing movie or Dolby Digital 2 channel
which carries the “”mark. This mode provides the effect
of being in a movie theatre or live concert house-an effect with
an intensity which can only be obtained through DOLBY PRO
LOGIC SURROUND. The effect of the front/back/left/right
movement of the sound image, as well as the sense of fixed
position in the sound image, is much clearer and more dynamic than before.
DOLBY PRO LOGIC II
Dolby Pro Logic II creates five full-bandwidth output channels
from two-channel sources. This is done using an advanced,
high-purity matrix surround decoder that extracts the spatial
properties of the original recording without adding any new
sounds or tonal colorations.
PLII MOVIE mode:
The Movie mode is for use with stereo television shows and all
programs encoded in Dolby Surround. The result is enhanced
soundfield directionality that approaches the quality of discrete
5.1-channel sound.
PLII MUSIC mode:
The Music mode is for use with any stereo music recordings.
A.F.D. AUTO
Software with multichannel surround audio signals is played
according to the way it was recorded.
Notes
This function is available during only playback mode.
A.F.D. AUTO is not applicable when headphone is used.
Sound Mode
You can enjoy surround sound simply by selecting one
of the pre-programmed sound fields according to the
program you want to listen to.
A) By pressing MODE button
Each time you press MODE button, the sound mode is
changed in the following order;
FLAT → ROCK → POP → JAZZ → CLASSIC → NEWS →
FLAT ...
Tips
FLAT: Linear frequency response.
ROCK: Reproduces the acoustics of rock music.
POP: Reproduces the acoustics of pop music.
JAZZ: Reproduces the acoustics of a jazz club.
CLASSIC: Reproduces the acoustics of orchestral
music.
NEWS: Reproduces the acoustics of TV news sound.
B) By pressing AUTO FORMAT DIRECT button
Each time you press AUTO FORMAT DIRECT button,
the sound mode is changed in the following order;
A.F.D. AUTO → DOLBY PL → PLII MOVIE → PLII MUSIC →
A.F.D. AUTO ...
(This function available 2-channel mode only)
Notes
MP3 disc is not available.
This function is available during only playback mode.
Sound Mode is not applicable when headphone is used.
When DVD is inserted.
You can change the sound mode of DVD (Dolby Digital, DTS,
PRO LOGIC, etc) by pressing the AUDIO button on the remote
during playback.
Although the DVD contents differ from disc to disc, the following explains the basic operation when this feature is used.
Each time you press AUDIO button, the sound mode of DVD is
changed as the following order;
→→→
For your reference
•
The DVD Receiver memorizes the last mode
settings for each source individually.
•
You can identify the encoding format of program
software by looking at its packaging.
- Dolby Digital discs are labeled with the logo.
- Dolby Surround encoded programs are labeled with
the logo.
- DTS Digital Surround discs are marked with the
.
Note
Sound Mode is not applicable when headphone is used.
Page 18
18
Before Operation (Continued)
General Explanation
This manual gives basic instructions for operating the
DVD Receiver. Some DVDs require specific operation or
allow only limited operation during playback. When this
occurs, the symbol appears on the TV screen, indicating that the operation is not permitted by the DVD
Receiver or is not available on the disc.
On-Screen Display
General playback status can be displayed on the TV
screen. Some items can be changed on the menu.
On-screen display operation
1
Press DVD DISPLAY during playback.
2
Press V/v to select an item.
The selected item will be highlighted.
3
Press B/b to change the setting of an item.
The number buttons can also be used for setting
numbers (e.g., title number). For some functions,
press ENTER to execute the setting.
Temporary Feedback Field Icons
Repeat Title
Repeat Chapter
Repeat Track (non-PBC Video CDs, MP3, CD)
Repeat All Tracks (non-PBC Video CDs, MP3, CD)
Repeat Off
Resume play from this point
Action prohibited or not available
Notes
Some discs may not provide all of the features on the
on-screen display example shown below.
If no button is pressed for 10 seconds, the on-screen
display disappears.
RESUME
OFF
ALL
TRACK
CHAPT
TITLE
Items
Title Number
Chapter Number
Time search
Audio language
and Digital Audio
Output mode
Subtitle language
Angle
Sound
Function (Press V/v to select desired item)
Shows the current title number and total number of titles,
and skips to the desired title number.
Shows the current chapter number and total number of
chapters, and skips to the desired chapter number.
Shows the elapsed playing time, and
searches the point directly from the elapsed time.
Shows the current audio soundtrack language,
encoding method, and channel number, and
changes the setting.
Shows the current subtitles language, and
changes the setting.
Shows the current angle number and total number of
angles, and changes the angle number.
Shows the current sound mode, and
changes the setting.
Selection Method
B/ b
,or
Numbers, ENTER
B/ b,./ >
or
Numbers, ENTER
Numbers, ENTER
B/ b
,or
AUDIO
B/ b
,or
SUBTITLE
B/ b
,or
ANGLE
AUTO FORMAT DIRECT
1 /3
1 /12
0:20:09
1 ENG
D
5.1 CH
OFF
1 /1
AUTO
Items
Track Number
Time
Audio Channel
Sound
Function (Press V/v to select desired item)
Shows the current track number, total number of tracks, PBC
On mode or skips to the desired track number in the PBC Off
mode
Shows the elapsed playing time (Display only)
Shows the audio channel, and
changes the audio channel.
Shows the current sound mode, and
changes the setting.
Selection Method
B/ b
,or
Numbers, ENTER
–
B/ b
,or
AUDIO
AUTO FORMAT DIRECT
1 /3
AUTO
0:20:09
ST
VCD2.0
VCD1.1
DVD
Page 19
PREPARATION
19
Before Operation (Continued)
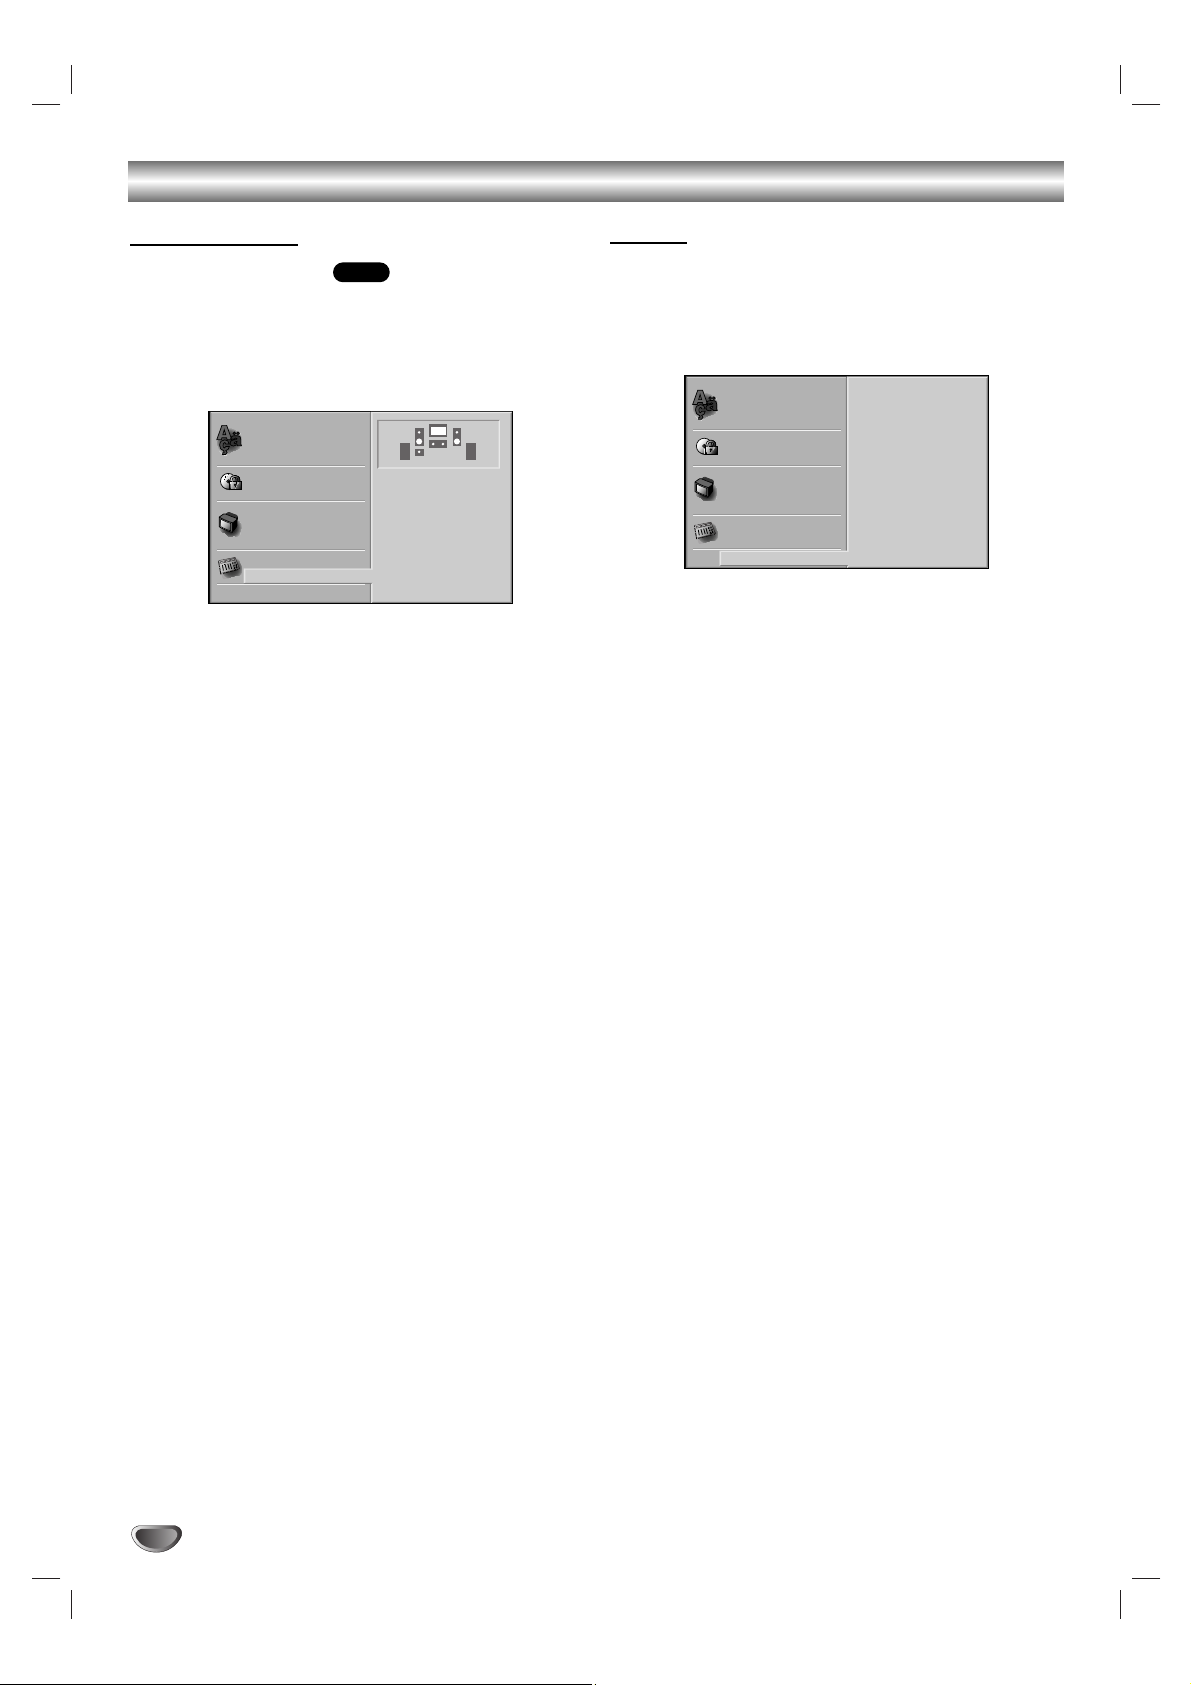
Initial Settings
You can set your personal preferences on the DVD
function mode.
General Operation
1
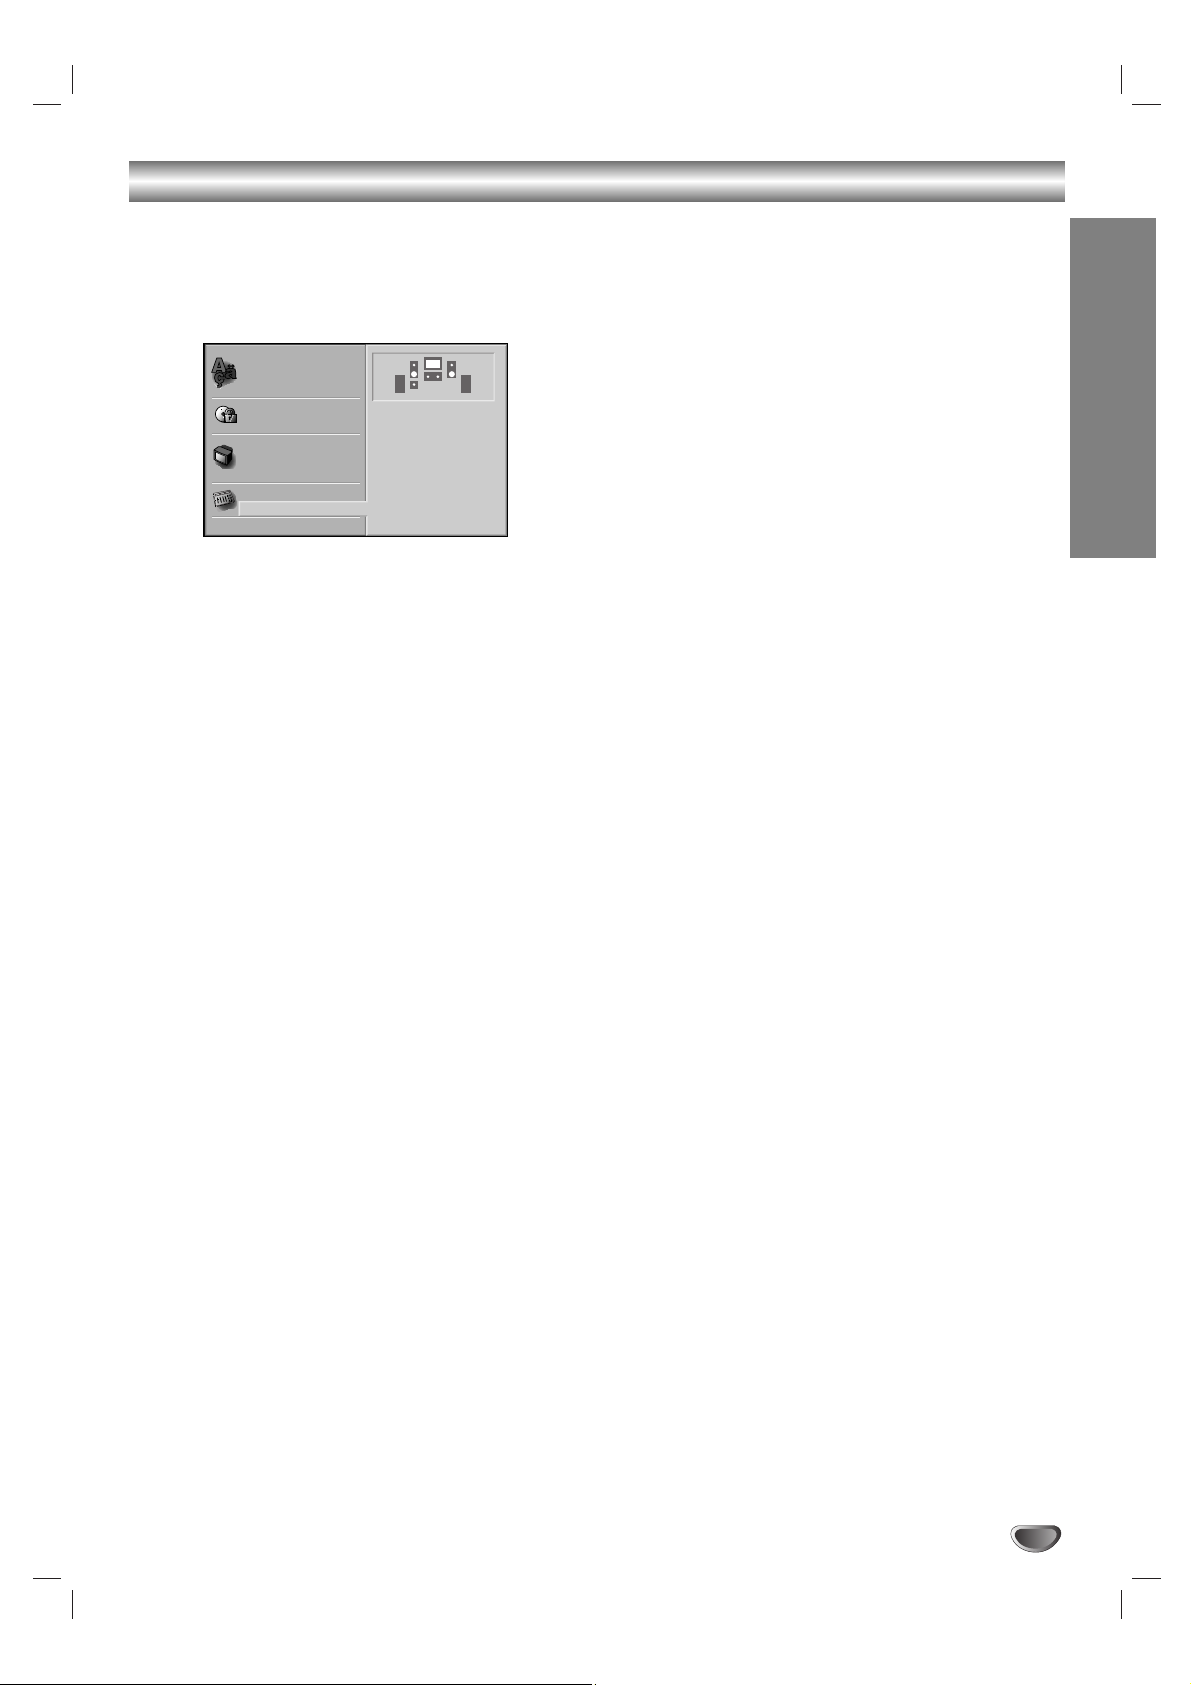
Press DVD SETUP.
The Setup menu appears.
2
Use V/v to select the desired option.
The screen will show the current setting for the
selected option, as well as alternate setting(s).
3
While the desired option is selected, press b,
then V/v to select the desired setting.
4
Press ENTER to confirm your selection.
Some options require additional steps.
5
Press DVD SETUP, RETURN, or H (PLAY) to
exit the setup menu.
Language
Disc Language
Select a language for the disc’s Menu, Audio, and
Subtitle features.
Original : The original language set for the disc is selected.
Other : To select another language, use number buttons to
enter the corresponding 4-digit number according to the
language code list on page 34. If you enter the wrong
language code, press CLEAR.
Note
Disc Language selection may not work for some DVDs.
Menu Language
Select a language for the Setup menu. This is the menu
you see when you press DVD SETUP.
TV Aspect
4:3 Letterbox: Select when a standard 4:3 TV is con-
nected. Displays pictures with masking bars above and
below the picture.
4:3 Panscan: Select when a standard 4:3 TV is connected. Displays pictures cropped to fill your TV screen.
Both sides of the picture are cut off.
16:9 Wide: Select when a 16:9 wide TV is connected.
DVD
DVD
Disc Audio
Disc Subtitle
Disc Menu
Rating
Area Code
TV Aspect
Menu Language
5.1 Speaker Setup
Others
Original
Chinese
English
French
German
Spanish
Italian
Korean
Polish
Other — — — —
Disc Audio
Disc Subtitle
Disc Menu
Rating
Area Code
TV Aspect
Menu Language
5.1 Speaker Setup
Others
Disc Audio
Disc Subtitle
Disc Menu
Rating
Area Code
TV Aspect
Menu Language
5.1 Speaker Setup
Others
Chinese
Chinese
English
4:3
4:3
16:9
Letterbox
Panscan
Wide
Disc Audio
Disc Subtitle
Disc Menu
Rating
Area Code
TV Aspect
Menu Language
5.1 Speaker Setup
Others
Original
Chinese
English
French
German
Spanish
Italian
Korean
Polish
Other — — — —
Page 20
20
Before Operation (Continued)
Speaker Setup
5.1 Speaker settings
Select speaker settings, including volume balance and
distance, or test the speaker settings.
Speaker settings are only active on the Analog MultiChannel Output. (See “Speaker Setup”, page 29.)
Others
The DRC and PBC settings can be changed.
Press V/v to select the desired item and press
ENTER. The setting of the selected item is changed
between On and Off.
Dynamic Range Control (DRC)
With the DVD*1format, you can hear a program’s
soundtrack in the most accurate and realistic presentation possible, thanks to digital audio technology.
However, you may wish to compress the dynamic range
of the audio output (the difference between the loudest
sounds and the quietest ones). Then, you may listen to
a movie at a lower volume without losing clarity of
sound. Set DRC to On for this effect.
*1: Dolby Digital only
Playback Control (PBC)
On: Video CDs with PBC are played according to the PBC.
Off: Video CDs with PBC are played the same way as Audio
CDs.
DVD
Disc Audio
Disc Subtitle
Disc Menu
Rating
Area Code
TV Aspect
Menu Language
5.1 Speaker Setup
Others
S S
Front L
Volume 0 dB
Size Small
Distance 0.3 m
Test
Return
Disc Audio
Disc Subtitle
Disc Menu
Rating
Area Code
TV Aspect
Menu Language
5.1 Speaker Setup
Others
DRC
PBC
Off
On
Page 21
PREPARATION
21
Before Operation (Continued)
Parental Control
Rating
Movies on DVDs may contain scenes not suitable for
children. Therefore, discs may contain Parental Control
information that applies to the complete disc or to
certain scenes on the disc. These scenes are rated from
1 to 8, and alternatively, more suitable scenes are available for selection on some discs. Ratings are
country dependent. The Parental Control feature allows
you to prevent discs from being played by your children
or to have certain discs played with alternative scenes.
1
Select Rating on the setup menu using V/v
buttons on the setup menu.
2
While Rating is selected, press b.
3
When you have not entered a password yet.
Enter a 4-digit password using the number buttons
to create a personal 4-digit security password, then
press ENTER. Enter the 4-digit password again and
press ENTER to verify.
When you have already entered a password;
Enter a 4-digit password using the number
buttons to confirm the personal 4-digit security
password, then press ENTER.
If you make a mistake before pressing ENTER, press
CLEAR and enter 4-digit security password again.
4
Select a rating from 1 to 8 using V/v buttons.
One (1) has the least playback restrictions.
Eight (8) has the most playback restrictions.
Unlock: If you select Unlock, Parental Control is not
active. The disc will play in full.
Ratings 1 to 8: Some discs contain scenes not
suitable for children. If you set a rating for the DVD,
all disc scenes with the same rating or lower will be
played. Higher rated scenes will not be played
unless an alternative scene is available on the disc.
The alternative must have the same rating or a
lower one. If no suitable alternative is found, playback will stop.You must enter the 4-digit password
or change the rating level in order to play the disc.
5
Press ENTER to confirm your rating selection,
then press DVD SETUP to exit the menu.
Area Code
Enter the code of an area whose standards were used
to rate the DVD video disc, referring to the list (See
“Area Code List”, page 35.).
1
Select the Area Code option using the V/v but-
tons on the setup menu.
2
While Area Code is selected, press b.
3
Follow step 3 of “Rating” on left.
4
Select the first character using the V/v buttons.
5
Press b to shift to second character and select
the second character using V/v buttons.
6
Press ENTER to confirm your Area Code
selection, then press DVD SETUP to exit the
menu.
Note
Confirmation of the 4-digit password is necessary when
the password is changed (see Changing the 4-digit
password below ).
Changing the 4-digit password
1 Follow Steps 1-2 as shown above to the left (Rating).
2 Enter the old password, then press ENTER.
3 Select Change using V/v buttons then press ENTER.
4 Enter the new 4-digit password, then press ENTER.
5 Enter exactly the same password a second time and
verify by pressing ENTER.
6 Press DVD SETUP to exit the menu.
If you forget your 4-digit password
If you forget your password, to clear the current password follow the procedure below.
1 Press DVD SETUP to display the setup menu.
2 Enter the 6-digit number “210499”.
The 4-digit password is cleared.
3 Enter a new password as shown
above to the left
(Rating).
DVD
DVD
Disc Audio
Disc Subtitle
Disc Menu
Rating
Area Code
TV Aspect
Menu Language
5.1 Speaker Setup
Others
8
7
6
5
4
3
2
1
Unlock
Change
Disc Audio
Disc Menu
Rating
Area Code
TV Aspect
Menu Language
5.1 Speaker Setup
Others
Code Set
U SDisc Subtitle
Page 22

22
DVD and Video CD Operation
Playing a DVD and Video CD
Playback Setup
Turn on the TV and select the video input source con-
nected to the DVD Receiver.
Set the Output Source to CD/DVD as shown in Selecting
the Output/Input Source on page 16.
1
Press ZZto open the disc tray.
2
Place a disc on the tray, with the label facing up.
When a double-sided DVD is inserted, make sure the
side you want to play is facing down.
3
Press ZZto close the tray.
“READING” appears in the display window, and playback starts automatically. If playback does not start,
press
H
(PLAY).
In some cases, the disc menu might appear instead.
If a menu screen is displayed
A menu screen may appear automatically after loading a
DVD.
Use B/b/V/v buttons to select the title/chapter you want to
view, then press ENTER to start playback.
Press DVD TOP MENU or DVD MENU to return to the
menu screen.
Use the number buttons to select the track you want to
view. Press RETURN to return to the menu screen.
Menu setting and the exact operating procedures for
using the menu may differ depending on the disc. Follow
the instructions on the each menu screen.
You also may set PBC to Off under setup. See page 20.
Notes
If Parental Control is set and the disc is not within the
Rating settings (not authorized), the 4-digit password
must be entered and/or the disc must be authorized (see
Parental Control, on page 21).
DVDs may have a Region Code.
Your DVD Receiver will not play discs that have a Region
Code different from your DVD Receiver. The Region
Code for this DVD Receiver is 3 (three).
Do not keep a fixed image displayed on the screen for a
long time.
General Features
Note
Unless stated otherwise, all operations described use the
remote control. Some features may also be available on
the Setup menu.
Resume Function
When you stop the disc. the player remembers the point
where you pressed x (STOP) and “RESUME x” appears
on the TV screen. Press
H
(PLAY) and play will resume
from this point.
Tip
To play from the beginning of the disc, press x twice, then
press
H
(PLAY).
Notes
Depending on where you stopped the disc, the receiver
may not resume playback from exactly the same point.
The point where you stopped playing is cleared when:
- Press x in the STOP mode.
- Turn the power off .
- Open the disc tray.
Selecting Another TITLE
If a disc has more than one title, you can select another
title as follows:
Press DVD DISPLAY. Use V/v to select title icon, then
press the appropriate number buttons (0-9), then use
ENTER to select a title number.
Press DVD DISPLAY, then use B/b to select a title number, then press ENTER.
Selecting Another CHAPTER/TRACK
If a title on a disc has more than one chapter or a disc has
more than one track, you can move to another
chapter/track as follows:
Press PREV or NEXT briefly during playback to return
to the beginning of the current chapter/track or to select
the next chapter/track.
Press PREV twice briefly to step back to the previous
chapter/track.
To go directly to any chapter during playback,
press DVD DISPLAY. Use V/v to select chapter/track
icon. Then, enter the chapter/track number with the number buttons (0-9) or use B/b to select chapter. Then,
press ENTER.
Notes
For one-digit numbers, press the number buttons (1-9)
and wait that the operation is performed.
For two-digit numbers, press the number buttons
(0-9) in rapid succession.
On a Video CD with PBC, you must set PBC to Off on
the setup menu to use this function. See page 20.
Search
1 Press m
or
M during playback.
The DVD Receiver will now go into SEARCH mode.
2 Press m
or
M repeatedly to select the required
speed: X2 b, 1 m, 2 m, 3 m (backward) or X2 B,
1 M, 2 M, 3 M (forward).
With a Video CD, the Search speed changes: 1 m, 2
m, 3 m (backward) or 1 M, 2 M, 3 M (forward).
3 To return to playback, press
H
(PLAY).
Still Picture
1 Press X (PAUSE) during playback.
The DVD Receiver will go into PAUSE mode.
2 To return to playback, press or X (PAUSE) again or
H
(PLAY).
VCD1.1VCD2.0
DVD
VCD1.1VCD2.0
DVD
VCD1.1
VCD2.0
DVD
DVD
CD
VCD1.1VCD2.0
DVD
VCD2.0
DVD
VCD1.1VCD2.0
DVD
1 /3
1 /12
1 /3
Page 23

OPERATION
23
DVD and Video CD Operation (Continued)
General Features (Continued)
Slow Motion
1 Press X
(PAUSE) during playback.
The DVD Receiver will now go into PAUSE mode.
2 Press SLOW t or T during pause mode.
The DVD Receiver will enter SLOW mode.
3 Use SLOW t or T to select the required speed:
4 t, 3 t, 2 t or 1 t (backward), or 4 T, 3 T,
2 T or 1 T (forward).
4 To return to playback, press
H (PLAY).
Note
Slow motion playback in reverse is not applicable for
Video CD.
Repeat
DVD Video Discs - Repeat Chapter/Title/Off
1 Press REPEAT when playing a disc.
The Repeat icon appears on the TV screen.
2 Press REPEAT to select a desired repeat mode.
• CHAPT: repeats the current chapter.
• TITLE: repeats the current title on a disc.
• OFF: does not play repeatedly.
Video CDs - Repeat Track/All/Off
1 Press REPEAT when playing a disc.
The Repeat icon appears on the TV screen.
2 Press REPEAT to select a desired repeat mode.
• TRACK: repeats the current track
• ALL: repeats all the tracks on a disc.
• OFF: does not play repeatedly.
Notes
On a Video CD with PBC, you must set PBC to Off on
the setup menu to use the Repeat function. See page
20.
When you press PREV twice or NEXT during Repeat
mode to go to previous track or next track, repeat
mode (Chapter repeat and Track repeat only) is
canceled.
Time Search
The Time Search function allows you to start playing at
any chosen time on the disc.
1 Press DVD DISPLAY during playback. The on-screen
display appears on the screen.
The Time Search box shows the elapsed playing time of the
current disc.
2 Within 10 seconds, use V/v to select the Time Search
icon in the on-screen display.
The “-:--:--” appears in the Time Search box.
3 Within 10 seconds, use the number buttons to enter
the required start time. Enter hours, minutes and seconds from left to right in the box.
If you enter the wrong numbers, press CLEAR to remove the
numbers you entered. Then enter the correct numbers.
4 Within 10 seconds, press ENTER.
Playback starts from the selected time on the disc. If you enter
an invalid time, playback will continue from the current point.
DVD
VCD1.1VCD2.0
DVD
VCD1.1VCD2.0
DVD
CHAPT
TITLE
TRACK
ALL
OFF
OFF
0:20:09
-:--:--
Page 24

24
DVD and Video CD Operation (Continued)
General Features (Continued)
Special DVD Features
Checking the contents of DVD Video
discs: Menus
A DVD is divided into a lot of sections, which make up a
picture or music feature. These sections are called
“titles.” When you play a DVD which contains several
titles, you can select the title you want using DVD TOP
MENU.
When you play DVDs that allow you to select items such
as the language for the sound, select these items using
DVD MENU.
1 Press DVD TOP MENU or DVD MENU.
The disc’s menu appears on the TV screen.
The contents of the menu vary from disc to disc.
2 Press B/b/V/v or the number buttons to select the
item you want to play or change.
3 Press ENTER.
Camera Angle
If the disc contains sequences recorded from different
camera angles, the angle icon appears on the TV
screen. You can then change the camera angle if you
wish.
Press ANGLE repeatedly during playback to select a
desired angle.
The number of the current angle appears on the display.
Changing the Audio Language
Press AUDIO repeatedly during playback to hear a
different audio language or audio track.
Changing the Audio Channel
Press AUDIO repeatedly during playback to hear a different audio channel (ST, LEFT or RIGHT).
Subtitle
Press SUBTITLE repeatedly during playback to see the
different subtitle languages.
Note
If appears, the feature is not available on the disc.
DVD
VCD1.1VCD2.0
DVD
DVD
1 /1
1 ENG
D
5.1 CH
ST
LEFT
RIGHT
1 ENG
Page 25
OPERATION
25
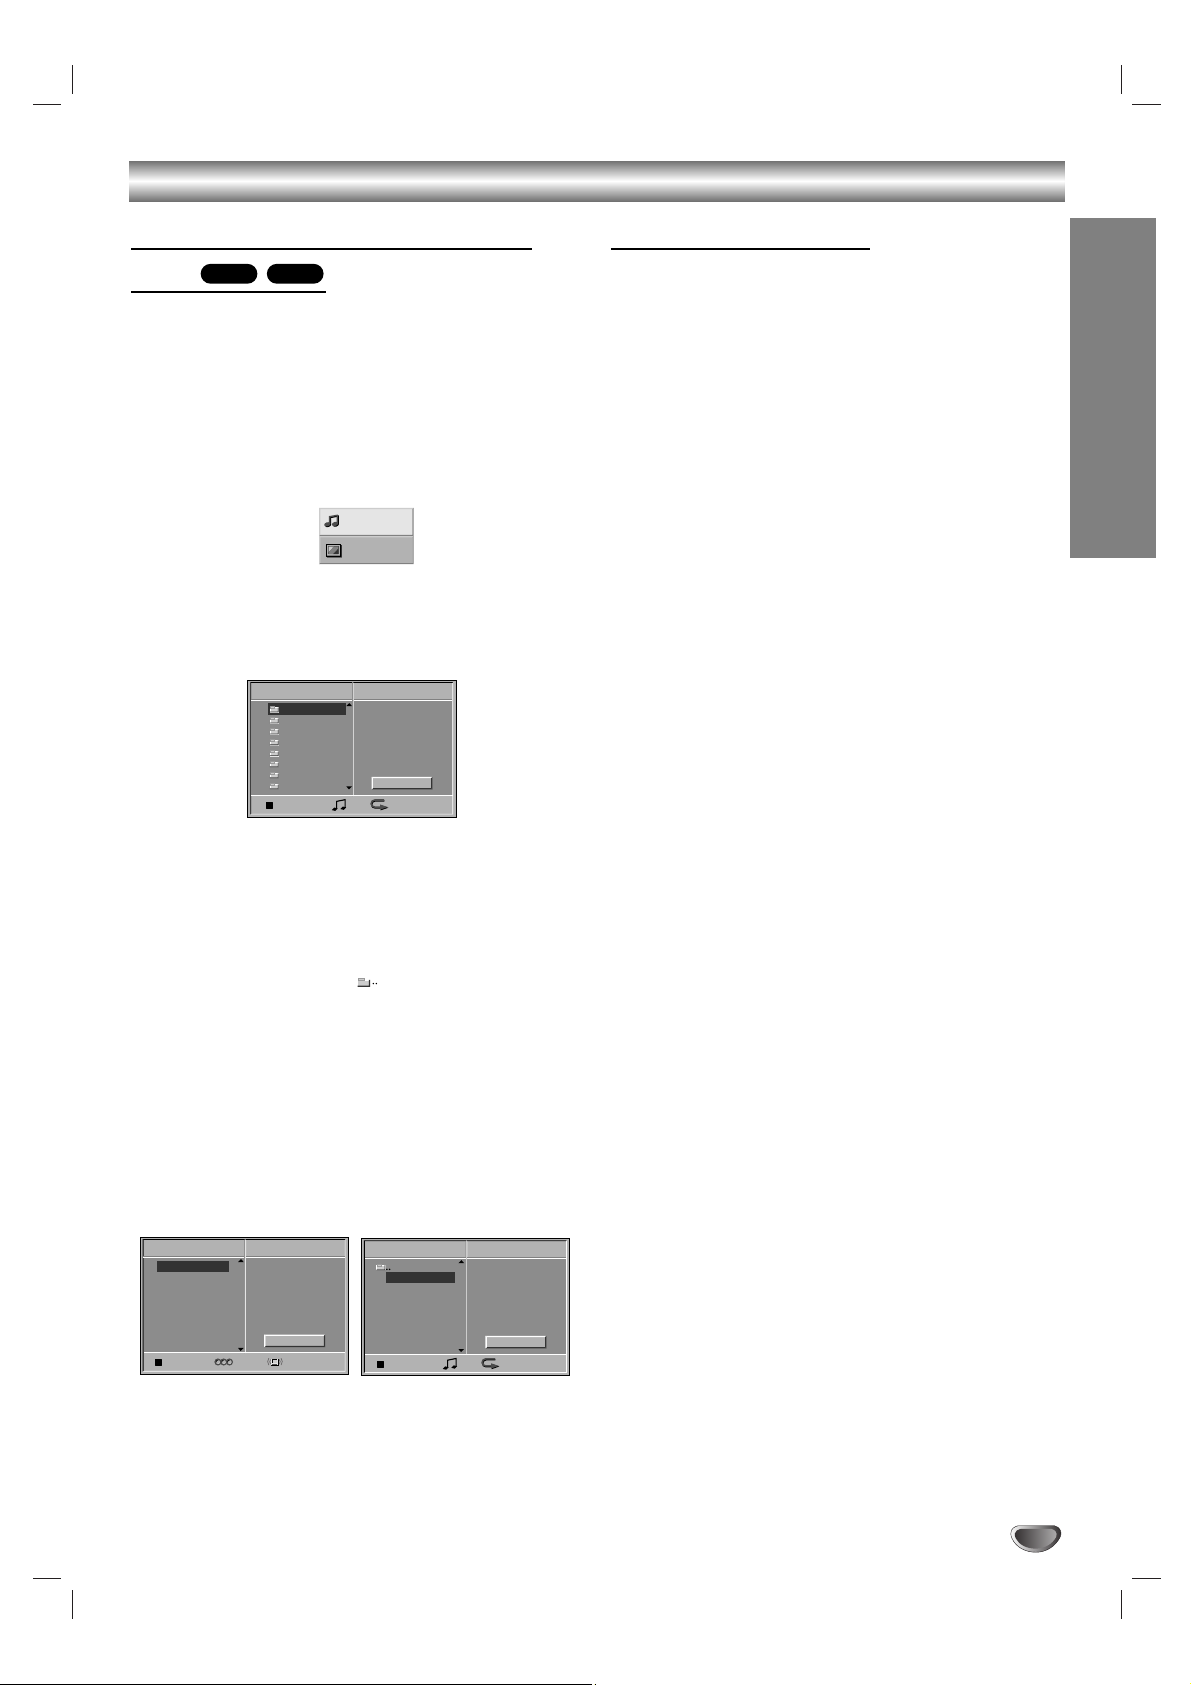
Audio CD and MP3 Disc Operation
Playing an Audio CD and MP3
Disc
The DVD Receiver can play MP3 formatted recordings
on CD-ROM, CD-R or CD-RW discs.
Before playing MP3 disc, read the notes on MP3 files
on right.
1
Insert a disc and close the tray.
Audio CD: Audio CD menu appears on the TV
screen go to step 4.
MP3 disc: The MP3/JPEG select menu appears on
the TV screen. Go to step 2
2
Use V/v to select the MP3 then press ENTER.
The MP3 disc Menu appears on the TV screen.
Press RETURN to move to the MP3/JPEG select
menu.
3
Use V/v to select a folder, and ENTER.
A list of files in the folder appears.
If a list of files contains another folder, repeat step 3
once more.
Tip
If you are in a file list and want to return to the Folder
list, use the V/v to highlight and press ENTER to
return to the previous menu screen.
4
Use V/v to select a track then press H (PLAY)
or ENTER.
Playback starts.
During playback, the current track’s elapsed playing
time will appear in the display window and menu.
Playback will stop at the end of the disc.
Press DVD TOP MENU to move to the next page.
Press DVD MENU to move to the previous page.
Audio CD Menu MP3 disc Menu
5
press x (STOP) to stop playback.
Notes on MP3 Files
About MP3
An MP3 file is audio data compressed by using the
MPEG1 audio layer-3 file-coding scheme. We call
files that have the “.mp3” file extension “MP3 files”.
The DVD Receiver can not read an MP3 file that has
a file extension other than “.mp3”.
MP3 Disc compatibility with this DVD Receiver
is limited as follows:
Sampling Frequency : only at 44.1kHz
Bit rate : within 32 - 320kbps
CD-R physical format should be “ISO 9660”
If you record MP3 files using the software which
cannot create a FILE SYSTEM, it is impossible to
playback MP3 files.
A single session disc requires MP3 files in the first
track. If there is no MP3 file in the 1st track, it cannot
playback MP3 files. If you wish to playback MP3 files,
format all the data in the disc or use a new one.
File names should be named using 8 letters or less
and must incorporate “.mp3” extension
e.g. “********.mp3”.
Do not use special letters such as “/ : * ? “ < > ” etc.
Total number of files on the disc should be less than
650.
This DVD Receiver requires discs/recordings to meet
certain technical standards in order to achieve optimal
playback quality. Pre-recorded DVDs are automatically
set to these standards. There are many different types
of recordable disc formats (including CD-R containing
MP3 files). That require certain pre-existing conditions
(see above) to insure compatible playback.
Customers should also note that permission is
required in order to download MP3 files and music
from the Internet. Our company has no right to
grant such permission. Permission should always
be sought from the copyright owner.
MP3CD
Program
CD
ST AUTO
0: 56: 18
TRACK01
TRACK02
TRACK03
TRACK04
TRACK05
TRACK06
TRACK07
TRACK08
Clear All
MP3
JPEG
Folder1
Folder2
Folder3
Folder4
Folder5
Folder6
Folder7
Folder8
MP3
OFF00:00
Program
Clear All
TRACK 1.mp3
TRACK 2.mp3
TRACK 3.mp3
TRACK 4.mp3
TRACK 5.mp3
TRACK 6.mp3
TRACK 7.mp3
TRACK 8.mp3
Program
MP3
OFF00:00
1
Clear All
Page 26

26
Audio CD and MP3 Disc Operation (Continued)
Pause
1 Press X (PAUSE) during playback.
2 To return to playback, press X (PAUSE) again or
press H (PLAY).
Selecting Another Track
If a disc has more than one track, you can move to
another track as follows:
Press . or > briefly during playback to go to the
next track or to return to the beginning of the current
track.
Press . twice briefly to step back to the previous
track.
On Audio CDs, to go directly to any track, enter the
track number using the number buttons (0-9) during
playback.
Notes
For one-digit numbers, press the number buttons
(1-9) and wait that the operation is performed.
For two-digit numbers, press the number buttons
(0-9) in rapid succession.
Search
1 Press m or M during playback.
The DVD Receiver will now go into SEARCH mode.
2 Press m or M repeatedly to select the required
speed: 1 m, 2 m, 3 m (backward) or 1 M, 2
M, 3 M (forward).
Search speed and direction are indicated on the menu
screen.
3 To return to playback, press H (PLAY).
Repeat
1 Press REPEAT when playing a disc.
The Repeat icon appears on the TV screen.
2 Press REPEAT to select a desired repeat mode.
• TRACK: repeats the current track
• ALL: repeats all the tracks on a disc.
• OFF: does not play repeatedly.
Note
When you press . twice or > during Repeat mode
to go to previous track or next track, repeat mode (Track
repeat only) is canceled.
Changing the Audio Channel
Press AUDIO repeatedly during playback to hear a
different audio channel (ST, LEFT, or RIGHT).
CD
MP3CD
MP3CD
MP3CD
MP3CD
TRACK
ALL
OFF
Page 27
OPERATION
27
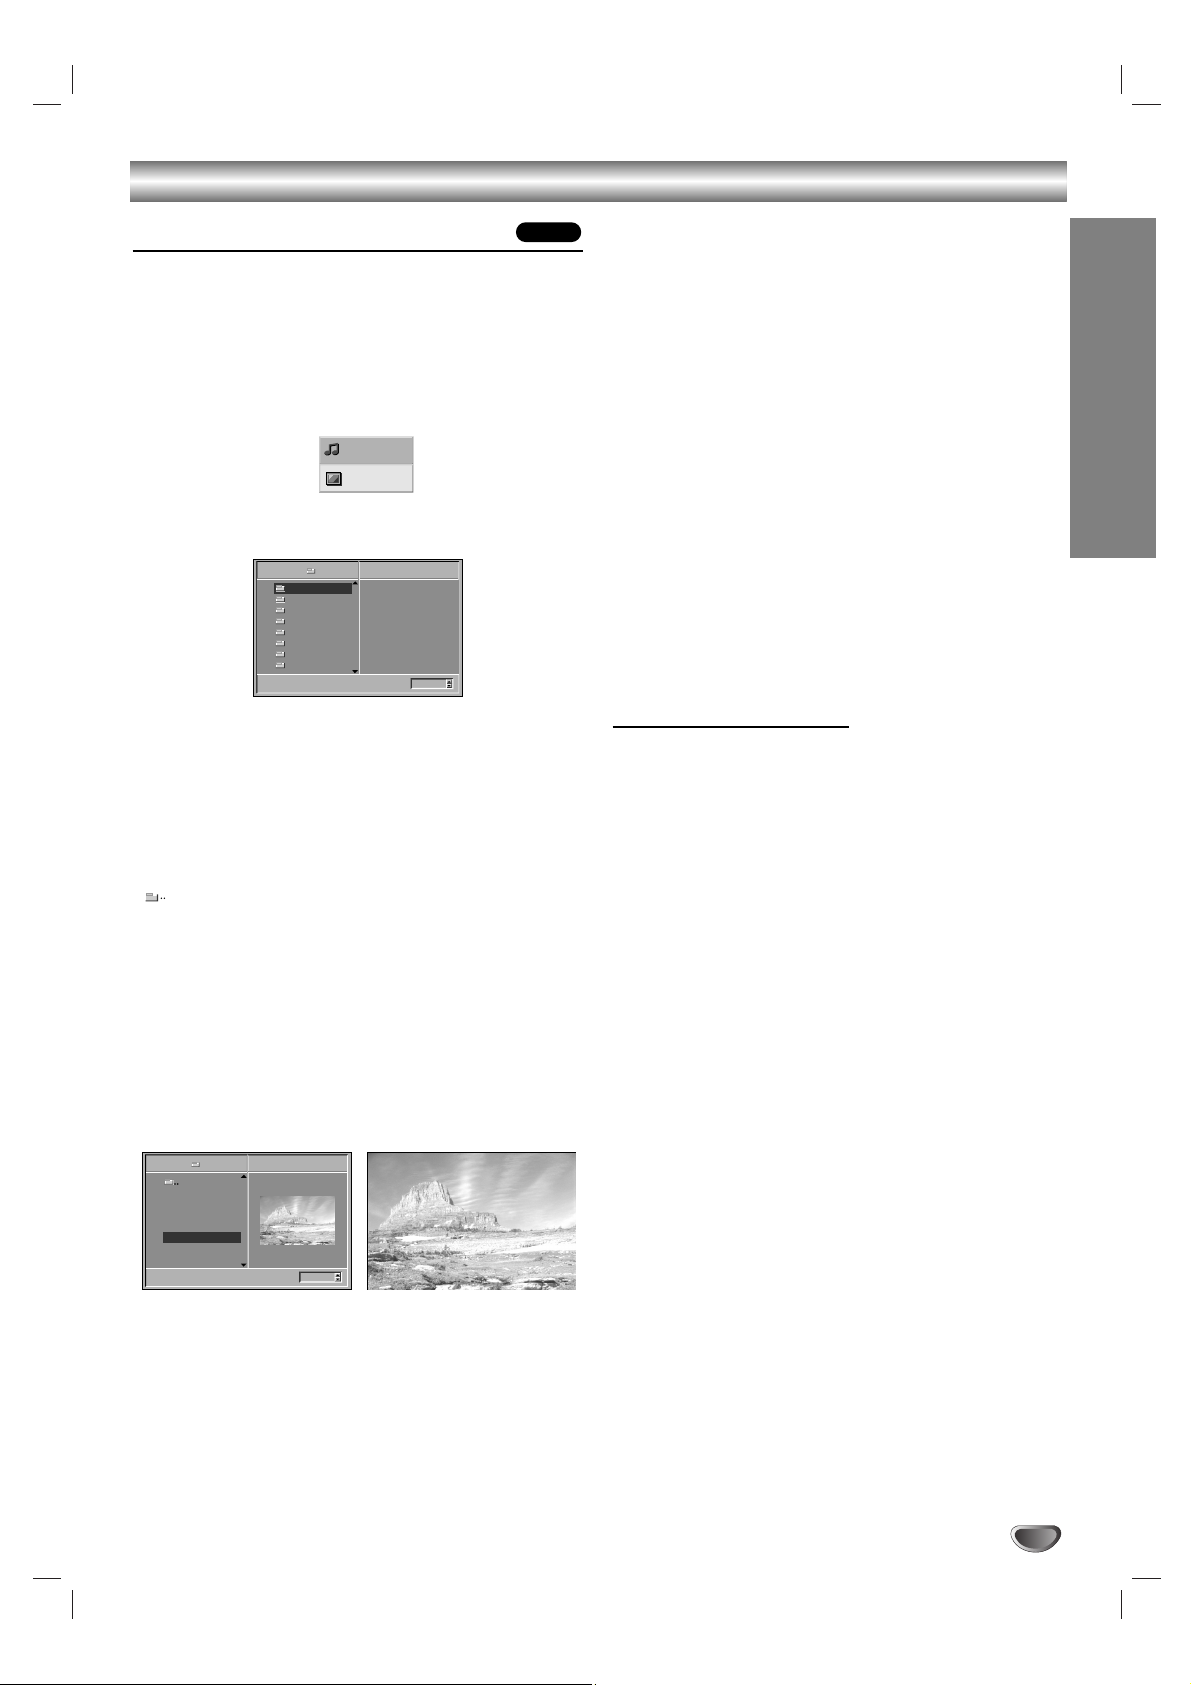
JPEG File Operation
Viewing JPEG Files on a Disc
This DVD Receiver can play discs with JPEG files.
Before playing JPEG files, read the notes on JPEG
Files on right.
1
Insert a disc and close the tray.
The MP3/JPEG select menu appears on the TV
screen.
2
Use V/v to select the JPEG then press ENTER.
The JPEG menu appears on the TV screen.
3
Use V/v to select a folder, and ENTER.
A list of files in the folder appears.
Press RETURN to move to the MP3/JPEG select
menu.
Tip
If you are in a file list and want to return to the Folder
list, use the V/v buttons on the remote to highlight
“
”
and press ENTER to return to the previous menu
screen.
4
Use V/v to select a file then press ENTER or
H (PLAY).
Viewing the file function starts.
While viewing a file, press RETURN to move to the
previous menu (JPEG menu).
Press DVD TOP MENU to move to the next page.
Press DVD MENU to move to the previous page.
Note
JPEG file that does not play is skipped.
Tip
There are three viewing Slide Speed options: Fast,
Normal, Slow, and Off. Use B/b to highlight the Slide
Speed then use V/v to select the option you want to
use, and press ENTER.
5
Press x (STOP) to stop viewing.
The JPEG menu appears.
Selecting another Files
Press . or > once while viewing a picture to
advance to the next file or to the previous file.
Still Picture
1 Press X (PAUSE) during slide show.
The DVD Receiver will now go into PAUSE mode.
2 To return to the slide show, press H (PLAY) or
X (PAUSE) again.
To flip the picture
Press V/v while showing a picture to flip the
picture horizontally or a vertically.
To rotate picture
Press B/b while showing a picture to rotate the
picture clockwise or counter clockwise.
Notes on JPEG Files
Depending upon the size and number of the JPEG
files, it could take a long time for the DVD Receiver to
read the disc’s contents. If you don’t see an on-screen
display after several minutes, some of the files are too
big — reduce the resolution of the JPEG files to less
than 2 mega pixels and burn another disc.
Total number of files and folders on the disc should be
less than 650.
Some disc may be incompatible due to different
recording format or condition of disc.
When you are using software to burn the jpeg files
into the CD-R, ensure that all the selected files have
the “.jpg” extensions when copying into the CD layout.
If the files have “.jpe” or “.jpeg” extensions, please
rename them as “.jpg” files.
File names without “.jpg” extension will not be able to
be read by this DVD Receiver, even though the files
are shown as JPEG image files in windows explorer.
JPEG
Slide Speed
5/32 1024X768
Picture1.jpg
Picture2.jpg
Picture3.jpg
Picture4.jpg
Picture5.jpg
Picture6.jpg
Picture7.jpg
JPEG
Off
Folder1
5/32 Picture5.jpg1024X768
Slide Speed
Off
Folder1
Folder2
Folder3
Folder4
Folder5
Folder6
Folder7
Folder8
JPEG
MP3
JPEG
Page 28
28
Programmed Playback
MP3
VCD1.1VCD2.0
CD
Programmed Playback with Audio CD
and MP3 Disc
The Program function enables you to store your favorite
tracks from any disc in the DVD Receiver memory.
Program can contain 30 tracks.
1
Press PROGRAM to enter the Program Edit
mode.
The mark will appear to the right of the word
Program on the right side of the menu screen.
Note
Press PROGRAM to exit the Program Edit mode;
the mark will disappear.
2
Select a track, then press ENTER to place the
selected track on the Program list.
3
Repeat step 2 to place additional tracks on the
Program list.
Audio CD menu MP3 disc Menu
4
Press b.
The programmed track you selected last is highlighted on
the program list.
5
Press V/v to select the track you want to start
playing.
Press DVD TOP MENU to move to the next page.
Press DVD MENU to move to the previous page.
6
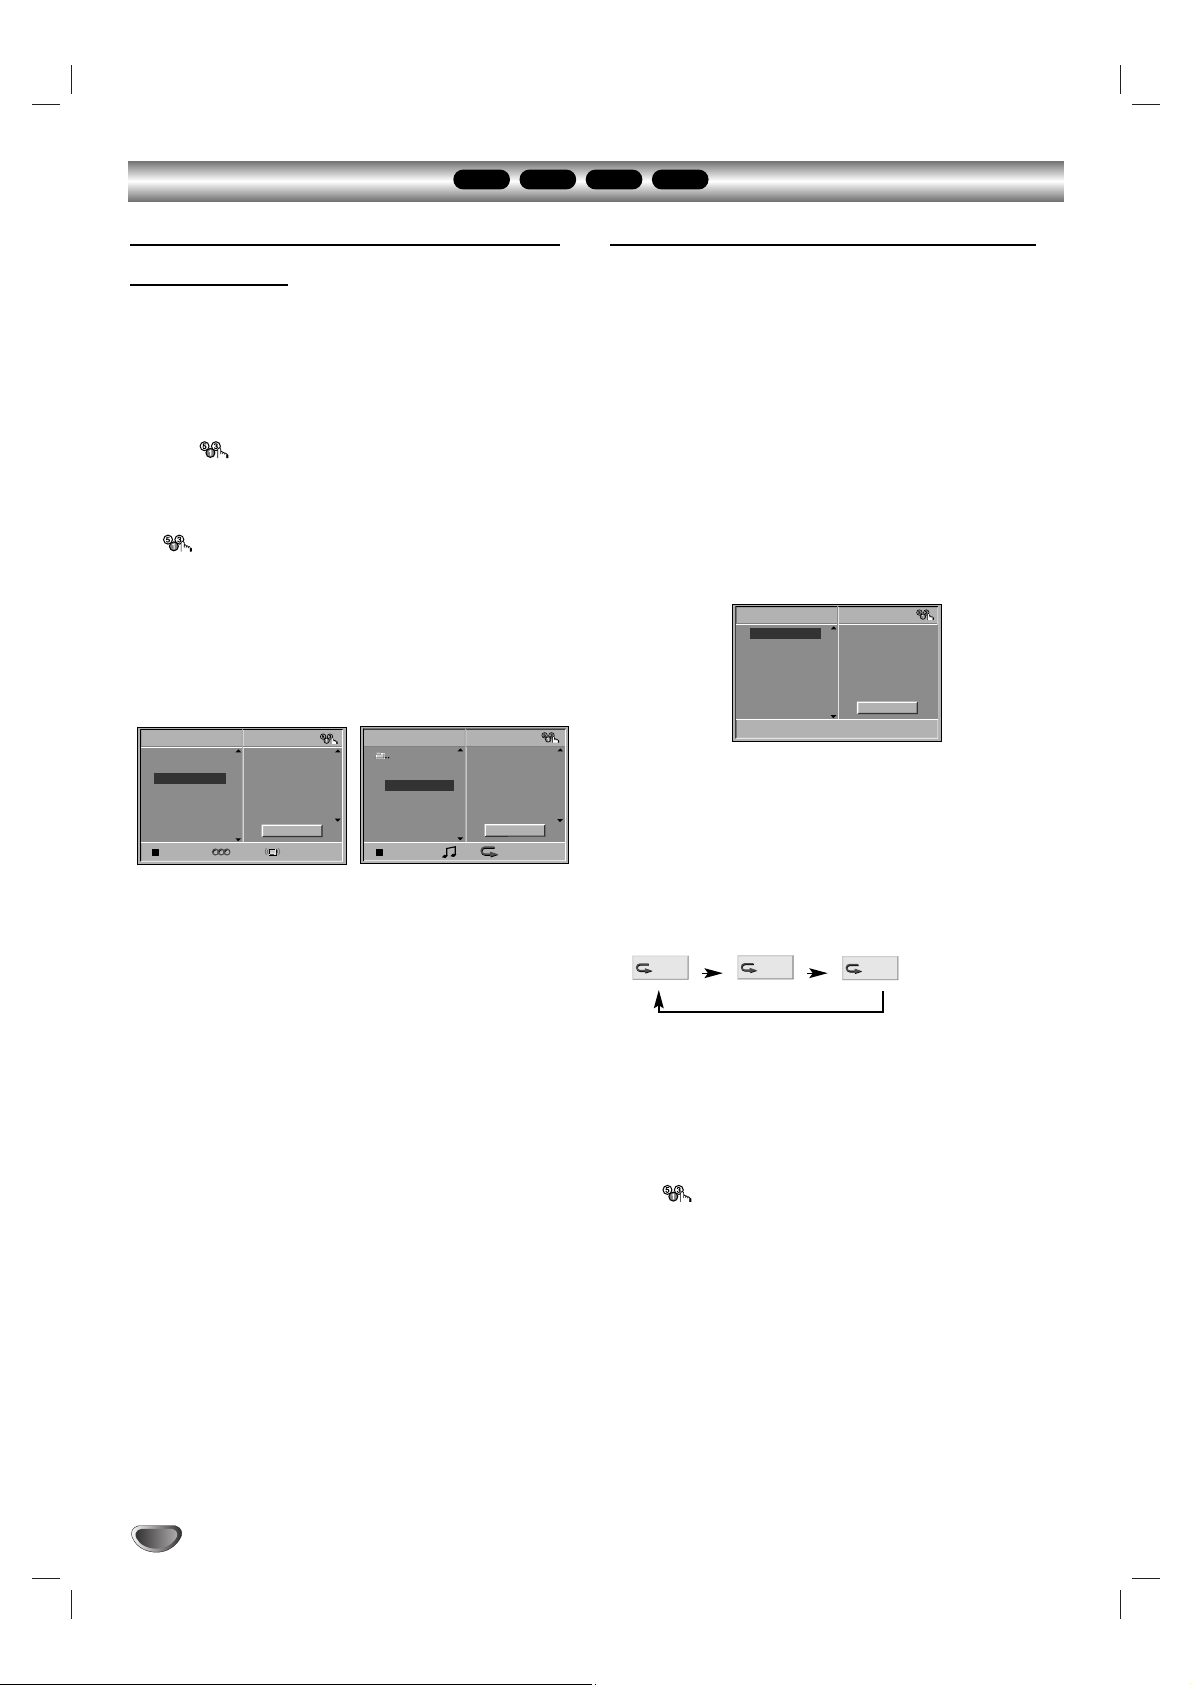
Press H (PLAY) or ENTER to start.
Playback begins in the order in which you programmed
the tracks and “PGM” appears on the menu screen.
Playback stops after all of the tracks on the Program list
have played once.
7
To return normal playback from programmed playback, press PROGRAM to
exit the Program Edit mode. Select a track
of CD (or MP3) list and then press ENTER
or
H (PLAY).
“PGM” indicator disappears in the display window.
Programmed Playback with Video CD
Note
On a Video CD with PBC, you must set PBC to Off on the
setup menu to use the Program function. See page 20.
1
Insert Video CD and close the tray.
2
Press PROGRAM.
The VCD Program menu will appear.
Note
Press RETURN, PROGRAM or
H (PLAY) to exit the
Program menu.
3
Follow steps 2-6 of “Programmed Playback with
Audio CD and MP3 disc” on left.
“PROGRAM” appears on the TV screen.
4
To return normal playback from
programmed playback, press PROGRAM.
“PROGRAM” disappears on the TV screen.
Repeat Programmed Tracks
1 Press REPEAT when playing the programmed tracks.
The Repeat icon appears on the TV screen.
2 Press REPEAT to select a desired repeat mode.
• TRACK: repeats the current track
• ALL: repeats all tracks on the program list.
• OFF: does not play repeatedly.
Erasing a Track from Program List
1 Press PROGRAM during playback (Audio CD and
MP3 disc only) or stop to enter the Program Edit
mode.
The mark will appear.
2 Press b to move to the Program list.
3 Use V/v to select the track that you wish to erase
from the Program list.
4 Press CLEAR.
The track will be erased from the Program list.
Erasing the whole Program List
1 Follow steps 1-2 of “Erasing a Track from Program
List” as above.
2 Use V/v to select “Clear All”, then press ENTER.
The complete Program for the disc will be erased
Notes
The programs are cleared when the power is turn off.
The programs are cleared when the disc is removed.
The programs are cleared when another function mode
(VIDEO, FM, AM etc,.) is selected.
CD
TRACK 1
TRACK 2
TRACK 3
TRACK 4
TRACK 5
TRACK 6
TRACK 7
TRACK 8
ST0: 56: 18
Program
TRACK 12
TRACK 8
TRACK 10
TRACK 3
Clear All
AUTO
MP3
TRACK 1.mp3
TRACK 2.mp3
TRACK 3.mp3
TRACK 4.mp3
TRACK 5.mp3
TRACK 6.mp3
TRACK 7.mp3
TRACK 8.mp3
Program
3
TRACK 8.mp3
TRACK 2.mp3
TRACK 4.mp3
TRACK 3.mp3
Clear All
OFF00:00
VCD
TRACK 1
TRACK 2
TRACK 3
TRACK 4
TRACK 5
TRACK 6
TRACK 7
TRACK 8
Program
Clear All
TRACK
ALL
OFF
Page 29
OPERATION
29
Speaker Setup
You can set your personal preferences on the DVD function
mode.
Adjust the following settings for the built-in 5.1 channel
surround decoder.
1
Press DVD SETUP.
The Setup menu appears.
2
Select “5.1 Speaker Setup” using the V/v
buttons on the setup menu.
3
While “5.1 Speaker Setup” is selected,
press b button.
4
Press b buttons to select the desired speaker.
5
Adjust options by using V/v/B/b buttons.
Speaker selection
Select a speaker that you want to adjust. ((Front speaker (Left), Front speaker (Right), Center Speaker,
Surround speaker (Left), Surround speaker (Right), or
Subwoofer))
Note
Certain speaker settings are prohibited by the Dolby
Digital licensing agreement.
Volume
Press B / b to adjust the output level of the selected
speaker. (-6dB ~ 6dB)
Size
Since the speaker settings are fixed, you cannot change
the settings.
Subwoofer’s size is fixed “Large” and the other
speaker’s size are fixed “Small”.
Distance
If you connected speakers to your DVD Receiver, setting the Distance lets the speakers (except subwoofer)
know how far the sound has to travel to reach your set
listening point. This allows the sound from each speaker
to reach the listener at the same time.
Note
You can not set the distance of subwoofer speaker.
Test
Press ENTER to test the signals of each speaker.
Adjust the volume to match the volume of test signals
memorized in the system.
Front Left (L) → Center → Front Right (R) →
Surround Right (R) → Surround Left (L) → Subwoofer
You can stop the test using V/v.
Return
Press ENTER to return to the previous menu.
Disc Subtitle
Disc Menu
Rating
Area Code
TV Aspect
Menu Language
5.1 Speaker Setup
Others
Disc Audio
S S
Front L
Volume 0 dB
Size Small
Distance 0.3 m
Test
Return
Page 30

30
Additional Information
Sleep Timer Setting
You can set the DVD Receiver to turn off automatically
at a specified time.
11
Press SLEEP to set the desired sleep time.
The SLEEP indicator and sleep time appears in the display window.
22
Each time you press SLEEP the setting changes
in the following order.
SLEEP 90 →80 → 70 → 60→ 50 → 40 → 30 → 20 →10 →
OFF
Note
You can check the time remaining before the DVD
Receiver turns off.
Press SLEEP. The remaining time appears in the
Display Window.
Viewing the Playing Time and
Remaining Time in the Front Panel
Display
You can check the disc information, such as the remaining time, total number of titles in a DVD, or tracks in a
CD, VIDEO CD or MP3, using the front panel display.
Press DISPLAY on the remote.
Each time you press DISPLAY while playing the disc,
the display changes.
Notes
Depending on the type of disc being played and the playing
mode, the disc information may not be displayed.
This function is available during only playback mode.
Tips
When playing VIDEO CDs with PBC functions, only the play-
ing time of the scene is displayed.
The playing time and remaining time of the current chapter,
title, track, scene, or disc will also appear on your TV screen.
Dimmer
This function will change the brightness of the display
window on the front panel during in power-on status.
Press the DIMMER repeatedly.
Muting
Press MUTING to mute your unit.
You can mute your unit in order, for example, to answer
the telephone, “MUTING ON” indicator in the Display
Window. To exit mute mode, press MUTING again.
Using Headphone Jack
Connect a stereo headphone plug ( 3.5mm) into the
PHONES connector.
The speakers are automatically disconnected when you
plug in a headphone (not supplied).
Volume Control
You can adjust the volume by pressing VOLUME (-/+)
repeatedly.
Using the Sound Effect
This system provides you with sound effect, simply by
pressing a button. Choose sound to suit your needs.
Press DSGX on the remote.
The sound effect is activate.
DSGX
With DSGX on, bass frequencies are effectively
reinforced.
To turn off the sound effect
Press DSGX on the remote again.
Notes
When you connect headphones to the system, the DSGX
function does not work.
This function is available during only playback mode.
Page 31

OPERATION
31
Radio Operation
Presetting the Radio stations
You can preset 30 stations for FM and AM (MW).
Before tuning, make sure that you have turned down the
volume.
11
Press TUNER/BAND on the remote control until
FM or AM (MW) appears in the display window.
22
And then every time you press TUNER/BAND,
FM and AM (MW) changes alternately.
33
Press and hold TUNING - or + on the remote
control for about two seconds until the
frequency indication starts to change, then
release.
Scanning stops when the DVD/CD Receiver tunes in a
station. “TUNED” and “ST” (for stereo program)
appear in the Display Window.
44
Press TUNER MENU on the remote control.
A preset number will flash in the Display Window.
55
Press TUNING - or + on the remote control to
select the preset number you want.
66
Press TUNER MENU on the remote control
again.
The station is stored.
77
Repeat steps 3 to 6 to store other stations.
To tune in a station with a weak signal
Press TUNING - or + repeatedly in step 3 to tune in the
station manually.
To clear all the stored stations
Press and hold TUNER MENU for about two seconds
and “CLEAR ALL” is appeared in the display window
and then press TUNER MENU again, the stations are
cleared.
If you have accidentally entered into the "CLEAR
ALL" mode and you do not wish to clear the memory,
do not press any key. After a few seconds, the
"CLEAR ALL" display will go off by itself and change
to normal mode.
Note
If all stations have already been entered, the FULL
message will appear in the display window for a
moment and then a preset number will flash.
To change the preset number, follow the steps 5-6 as
above.
Listening to the Radio
Preset radio stations in the DVD Receiver’s memory first
(see “Presetting radio stations” on the left).
11
Press TUNER/BAND until AM (MW) or FM
appears in the Display Window.
The last received station is tuned in.
22
Press PRESET -/+ repeatedly to select the
preset station you want.
Each time you press the button, the DVD receiver tunes in
one preset station at a time.
33
Adjust the volume by pressing VOLUME + or repeatedly.
To turn off the radio
Press @ / 1 to turn the DVD Receiver off or select another function mode (CD/DVD, VIDEO or TV).
To listen to non-preset radio stations
Use manual or automatic tuning in step 2.
For manual tuning, press TUNING - or + on the
remote control repeatedly.
For automatic tuning, press and hold TUNING - or +
for about two seconds on the remote control.
To select a preset radio station directly
You can use the number buttons on the remote control
to select a preset radio station directly.
For example, to listen to preset station 4, press 4 on the
remote control. To listen to preset station 19, press 1
then 9 (within 3 seconds).
For your reference
If an FM program is noisy
Press FM MODE on the remote control so that “ST”
disappears in the display window. There will be no
stereo effect, but the reception will improve. Press
FM MODE again to restore the stereo effect.
To improve reception
Reorient the supplied antennas.
Page 32

32
Controlling the TV with the Supplied Remote
You can control the sound level, input source, and
power switch of your TV with the supplied remote.
Controlling the TV
You can control your TV using the buttons below.
By pressing You can
TV @ / 1 Turn the TV on or off.
TV/VIDEO Switch the TV’s input source
between the TV and other input
sources.
TV CH +/- Scans up or down through
memorized channels.
TV VOL +/- Adjust the volume of the TV.
Using the number buttons for controlling the
TV
When you set the remote to the TV mode, you can use
the number buttons for controlling the TV.
Press the TV buttons
The TV button turns red and the remote is set to the TV
mode. You can select the TV channels by using the
number buttons.
>10 is for selecting the channel number greater than 10.
To cancel the TV mode, press the TV button again.
Notes
Before adjusting the TV, press TV.
The TV button turns off when you do not operate the
remote for 10 seconds.
Depending on the TV, you may not be able to control
your TV or to use some of the buttons above.
Tip
Depending on the TV manufacture, the following method
works. For double-digit number, press -/-- first and then
number. (For example, for channel 25, press -/--, then 2
and 5.)
TV @ / 1
TV/VIDEO
TV CH +/-
TV VOL +/-
TV
Page 33

OPERATION
33
Using the SONY TV DIRECT Function
SONY TV DIRECT allows you to turn on your SONY TV
and this system, change the system mode to “CD/DVD,”
and then switch the TV’s input source you set with one
button push.
By pressing Number TV’s input source
TV/VIDEO 0 No input source
(Default)
1 VIDEO1
2 VIDEO2
3 VIDEO3
4 VIDEO4
5 VIDEO5
6 VIDEO6
7 COMPONENT 1
INPUT
8 COMPONENT 2
INPUT
2
Press and hold TV CH + while entering the code
for transmit time (see table below) using the
number buttons.
The transmit time from the remote is selected.
If you successfully set the transmit time code, the
TV button flashes twice slowly. If the setting is
unsuccessful, the TV button flashes five times
quickly.
By pressing Number Transmit time
TV CH + 1 0.5 (Default)
21
3 1.5
42
5 2.5
63
7 3.5
84
Operation
Point the remote to the direction of TV and this system,
then press SONY TV DIRECT once.
While transmitting the code from the remote, the TV button flashes.
Notes
The function is only for SONY TV series.
If this function does not work, change the transmit
time. The transmit time varies depending on the TV.
If distance between TV and this system is too far, this
function may not work. Install the system near the TV.
Keep the remote pointed in the direction of the TV
and this sysetm whlie the TV button is flashing.
SONY TV DIRECT
TV/VIDEO
TV CH +/-
TV
Number buttons
Preparation
Register the TV’s input source connected to this
system.
1
Press and hold TV/VIDEO while entering the
code for the TV’s input source to connect this
system (see table below) using the number
buttons.
TV’s input source is selected
If you successfully set the TV’s input source code,
the TV button flashes twice slowly. If the setting is
unsuccessful, the TV button flashes five times
quickly.
Page 34

34
Language Code List
Enter the appropriate code number for the initial settings “Disc Audio”, “Disc Subtitle” and/or “Disc Menu”
(See page 19).
Code Language
6566 Abkhazian
6565 Afar
6570 Afrikaans
8381 Albanian
6577 Ameharic
6582 Arabic
7289 Armenian
6583 Assamese
6588 Aymara
6590 Azerbaijani
6665 Bashkir
6985 Basque
6678 Bengali; Bangla
6890 Bhutani
6672 Bihari
6682 Breton
6671 Bulgarian
7789 Burmese
6669 Byelorussian
7577 Cambodian
6765 Catalan
9072 Chinese
6779 Corsican
7282 Croatian
6783 Czech
6865 Danish
7876 Dutch
6978 English
6979 Esperanto
6984 Estonian
7079 Faroese
Code Language
7074 Fiji
7073 Finnish
7082 French
7089 Frisian
7176 Galician
7565 Georgian
6869 German
6976 Greek
7576 Greenlandic
7178 Guarani
7185 Gujarati
7265 Hausa
7387 Hebrew
7273 Hindi
7285 Hungarian
7383 Icelandic
7378 Indonesian
7365 Interlingua
7165 Irish
7384 Italian
7465 Japanese
7487 Javanese
7578 Kannada
7583 Kashmiri
7575 Kazakh
7589 Kirghiz
7579 Korean
7585 Kurdish
7679 Laothian
7665 Latin
7686 Latvian, Lettish
Code Language
7678 Lingala
7684 Lithuanian
7775 Macedonian
7771 Malagasy
7783 Malay
7776 Malayalam
7784 Maltese
7773 Maori
7782 Marathi
7779 Moldavian
7778 Mongolian
7865 Nauru
7869 Nepali
7879 Norwegian
7982 Oriya
8065 Panjabi
8083 Pashto, Pushto
7065 Persian
8076 Polish
8084 Portuguese
8185 Quechua
8277 Rhaeto-Romance
8279 Rumanian
8285 Russian
8377 Samoan
8365 Sanskrit
7168 Scots Gaelic
8382 Serbian
8372 Serbo-Croatian
8378 Shona
8368 Sindhi
Code Language
8373 Singhalese
8375 Slovak
8376 Slovenian
8379 Somali
6983 Spanish
8385 Sudanese
8387 Swahili
8386 Swedish
8476 Tagalog
8471 Tajik
8465 Tamil
8484 Tatar
8469 Telugu
8472 Thai
6679 Tibetan
8473 Tigrinya
8479 Tonga
8482 Turkish
8475 Turkmen
8487 Twi
8575 Ukrainian
8582 Urdu
8590 Uzbek
8673 Vietnamese
8679 Volapük
6789 Welsh
8779 Wolof
8872 Xhosa
7473 Yiddish
8979 Yoruba
9085 Zulu
Page 35

REFERENCE
35
Code Area
AD Andorra
AE United Arab Emirates
AF Afghanistan
AG Antigua and Barbuda
AI Anguilla
AL Albania
AM Armenia
AN Netherlands Antilles
AO Angola
AQ Antarctica
AR Argentina
AS American Samoa
AT Austria
AU Australia
AW Aruba
AZ Azerbaidjan
BA Bosnia-Herzegovina
BB Barbados
BD Bangladesh
BE Belgium
BF Burkina Faso
BG Bulgaria
BH Bahrain
BI Burundi
BJ Benin
BM Bermuda
BN Brunei Darussalam
BO Bolivia
BR Brazil
BS Bahamas
BT Bhutan
BV Bouvet Island
BW Botswana
BY Belarus
BZ Belize
CA Canada
CC Cocos (Keeling) Islands
CF Central African Republic
CG Congo
CH Switzerland
CI Ivory Coast
CK Cook Islands
CL Chile
CM Cameroon
CN China
CO Colombia
CR Costa Rica
CS Former Czechoslovakia
CU Cuba
CV Cape Verde
CX Christmas Island
CY Cyprus
CZ Czech Republic
DE Germany
DJ Djibouti
DK Denmark
DM Dominica
DO Dominican Republic
DZ Algeria
EC Ecuador
EE Estonia
EG Egypt
EH Western Sahara
Code Area
ER Eritrea
ES Spain
ET Ethiopia
FI Finland
FJ Fiji
FK Falkland Islands
FM Micronesia
FO Faroe Islands
FR France
FX France (European
Territory)
GA Gabon
GB Great Britain
GD Grenada
GE Georgia
GF French Guyana
GH Ghana
GI Gibraltar
GL Greenland
GM Gambia
GN Guinea
GP Guadeloupe (French)
GQ Equatorial Guinea
GR Greece
GS S. Georgia & S. Sandwich
Isls.
GT Guatemala
GU Guam (USA)
GW Guinea Bissau
GY Guyana
HK Hong Kong
HM Heard and McDonald
Islands
HN Honduras
HR Croatia
HT Haiti
HU Hungary
ID Indonesia
IE Ireland
IL Israel
IN India
IO British Indian Ocean
Territory
IQ Iraq
IR Iran
IS Iceland
IT Italy
JM Jamaica
JO Jordan
JP Japan
KE Kenya
KG Kyrgyzstan
KH Cambodia6
KI Kiribati
KM Comoros
KN
Saint Kitts & Nevis Anguilla
KP North Korea
KR South Korea
KW Kuwait
KY Cayman Islands
KZ Kazakhstan
LA Laos
LB Lebanon
Code Area
LC Saint Lucia
LI Liechtenstein
LK Sri Lanka
LR Liberia
LS Lesotho
LT Lithuania
LU Luxembourg
LV Latvia
LY Libya
MA Morocco
MC Monaco
MD Moldavia
MG Madagascar
MH Marshall Islands
MK Macedonia
ML Mali
MM Myanmar
MN Mongolia
MO Macau
MP Northern Mariana Islands
MQ Martinique (French)
MR Mauritania
MS Montserrat
MT Malta
MU Mauritius
MV Maldives
MW Malawi
MX Mexico
MY Malaysia
MZ Mozambique
NA Namibia
NC New Caledonia (French)
NE Niger
NF Norfolk Island
NG Nigeria
NI Nicaragua
NL Netherlands
NO Norway
NP Nepal
NR Nauru
NU Niue
NZ New Zealand
OM Oman
PA Panama
PE Peru
PF Polynesia (French)
PG Papua New Guinea
PH Philippines
PK Pakistan
PL Poland
PM Saint Pierre and Miquelon
PN Pitcairn Island
PR Puerto Rico
PT Portugal
PW Palau
PY Paraguay
QA Qatar
RE Reunion (French)
RO Romania
RU Russian Federation
RW Rwanda
SA Saudi Arabia
SB Solomon Islands
Code Area
SC Seychelles
SD Sudan
SE Sweden
SG Singapore
SH Saint Helena
SI Slovenia
SJ Svalbard and Jan Mayen
Islands
SK Slovak Republic
SL Sierra Leone
SM San Marino
SN Senegal
SO Somalia
SR Suriname
ST Saint Tome and Principe
SU Former USSR
SV El Salvador
SY Syria
SZ Swaziland
TC Turks and Caicos Islands
TD Chad
TF French Southern
Territories
TG Togo
TH Thailand
TJ Tadjikistan
TK Tokelau
TM Turkmenistan
TN Tunisia
TO Tonga
TP East Timor
TR Turkey
TT Trinidad and Tobago
TV Tuvalu
TW Taiwan
TZ Tanzania
UA Ukraine
UG Uganda
UK United Kingdom
UM USA Minor Outlying
Islands
US United States
UY Uruguay
UZ Uzbekistan
VA Vatican City State
VC Saint Vincent &
Grenadines
VE Venezuela
VG Virgin Islands (British)
VI Virgin Islands (USA)
VN Vietnam
VU Vanuatu
WF Wallis and Futuna Islands
WS Samoa
YE Yemen
YT Mayotte
YU Yugoslavia
ZA South Africa
ZM Zambia
ZR Zaire
ZW Zimbabwe
Area Code List
Enter the appropriate code number for the initial setting “Area Code” (See page 21).
Page 36

36
Troubleshooting
Check the following guide for the possible cause of a problem before contacting service.
Symptom
No power.
The power is on, but
the DVD Receiver does
not work.
No picture.
There is no sound or
only a very low-level
sound is heard.
The playback picture is poor.
The DVD Receiver does
not start playback.
Loud hum or noise is
heard.
Cause
• The power cord is disconnected.
• No disc is inserted.
• The TV is not set to receive DVD signal
output.
• The video cable is not connected
securely.
• The connected TV power is turned off.
• The equipment connected with the
audio cable is not set to receive DVD
signal output.
• The audio cables are not connected
securely.
• The power of the equipment connected
with the audio cable is turned off.
• The audio connecting cable is damaged.
• The disc is dirty.
• No disc is inserted.
• An unplayable disc is inserted.
• The disc is placed upside down.
• The disc is not placed within the guide.
• The disc is dirty.
• A menu is on the TV screen.
• The Rating level is set.
• The plugs and jacks are dirty.
• The disc is dirty.
• The speakers and components are
connected poorly.
• The DVD Receiver is located too close
to the TV.
Correction
• Plug the power cord securely into the
wall outlet.
• Insert a disc. (Check that the DVD or,
audio CD indicator in the DVD display is
lit.)
• Select the appropriate video input mode
on the TV so the picture from the DVD/
CD receiver appears on the TV screen.
• Connect the video cable into the jacks
securely.
• Turn on the TV.
• Select the correct input mode of the
audio receiver so you can hear the
sound from the DVD Receiver.
• Connect the audio cable into the jacks
securely.
• Turn on the equipment connected with
the audio cable.
• Replace it with new one.
• Clean the disc.
• Insert a disc. (Check that the DVD, or
audio CD indicator in the DVD display is
lit.)
• Insert a playable disc. (Check the disc
type, colour system and Regional code.)
• Place the disc with the playback side
down.
• Place the disc on the disc tray correctly
inside the guide.
• Clean the disc.
• Press the DVD SETUP button to turn off
the menu screen.
• Cancel the Rating function or change
the rating level.
• Wipe them with a cloth slightly moistened with alcohol.
• Clean the disc.
• Connect the speakers and components
securely.
• Move your TV away from the audio components.
Page 37

REFERENCE
37
Troubleshooting (Cont’d)
Symptom
Radio stations cannot
be tuned in.
The remote control
does not work properly.
The sound mode or Pro
Logic II mode cannot
be changed.
The front panel display
is too dim.
Cause
• The antenna is positioned or connected
poorly.
• The signal strength of the stations is too
weak (when tuning in with automatic
tuning).
• No stations have been preset or preset
stations have been cleared (when
tuning by scanning preset stations).
• The remote control is not pointed at the
remote sensor of the DVD Receiver.
• The remote control is too far from the
DVD Receiver.
• There is an obstacle in the path of the
remote control and the DVD/CD
receiver.
• The batteries in the remote control are
flat.
• The system cannot change while playing a MP3 disc.
• Nothing is displayed on the front panel
display.
Correction
• Connect the antenna securely.
• Adjust the antennas and connect an
external antenna if necessary.
• Tune in the station manually.
• Preset the stations (page 31).
• Point the remote control at the remote
sensor of the DVD Receiver.
• Use the remote control within about 20
ft (6 m).
• Remove the obstacle.
• Replace the batteries with new ones.
• Insert such a CD disc.
• Press DIMMER on the remote control.
Page 38

38
Specification
Power supply 220-240V AC, 50/60Hz
Power consumption 70W, No more than 1 W (220-240V AC) (at the power saving mode)
Mass 4.7 kg
External dimensions (W x H x D) 430 x 70 x 383.5 mm
Operating conditions Temperature: 5°C to 35°C, Operation status: Horizontal
Operating humidity 5% to 85%
Laser Semiconductor laser, wavelength 650 nm for VCD and DVD,
wavelength 780 nm for CD
Emission duration Continuous
Signal system PAL 625/50, NTSC 525/60
Frequency response (audio) 2 Hz ~ 20 kHz (±1.0 dB)
Signal-to-noise ratio (audio) More than 75 dB (1 kHz, NOP, 20 kHz LPF/A-Filter)
Dynamic range (audio) More than 70 dB
Harmonic distortion (audio) 0.5 % (1 kHz, at 12W position) (20 kHz LPF/A-Filter)
Inputs VIDEO (AUDIO IN):
Sensitivity: 800 m V
Impedance: 50 kilohms
Video output 1.0 V (p-p), 75 Ω, negative sync., RCA jack
S VIDEO OUT (Y) 1.0 V (p-p), 75 ohms, negative sync, Mini DIN 4-pin x 1
(C) 0.286 V (p-p) 75 ohms
COMPONENT VIDEO OUT (Y) 1.0 V (p-p), 75 ohms, negative sync, RCA jack x 1
(P
B/CB)/(PR/CR) 0.7 V (p-p), 75 ohms, RCA jack x 2
Tuning Range 87.5 - 108 MHz
Intermediate Frequency 10.7 MHz
Signal-to Noise Ratio 60 dB (Mono)
Tuning Range 522 - 1,611 kHz
Intermediate Frequency 450 kHz
Stereo mode 50W + 50W (8 Ω at 1 kHz, THD 10 %)
Surround mode Front: 50W + 50W (THD 10 %)
Centre*: 50W
Surround*: 50W + 50W (8Ω at 1 kHz, THD 10 %)
Subwoofer*: 80W (4Ω at 50 Hz, THD 10 %)
Output PHONES: (32 Ω, 25mW)
Satellite Speaker (SS-TS9) Passive Subwoofer (SS-WS9)
Type 1 Way 1 Speaker 1 Way 1 Speaker
Impedance 8 Ω 4 Ω
Frequency Response 180 - 20,000 Hz 45 - 180 Hz
Rated Input Power 50W 80W
Max. Input Power 100W 160W
Net Dimensions (W x H x D) 98 x 102 x 106 mm 173 x 380 x 402 mm
Net Weight 0.6 kg 6.8 kg
• Speakers . . . . . . . . . . . . . . . . . . . . . . . . . .5 • Speaker cables . . . . . . . . . . . . . . . .6
• Subwoofer . . . . . . . . . . . . . . . . . . . . . . . . .1 • Size AA (R6) batteries . . . . . . . . . . .2
• Remote Commander (remote) RM-SS220 . .1 • AM loop antenna . . . . . . . . . . . . . . .1
• FM antenna . . . . . . . . . . . . . . . . . . . . . . . .1 • Foot pads . . . . . . . . . . . . . . . . . . . .20
• Speakers - Connection and • Video cable . . . . . . . . . . . . . . . . . .1
Installation (card) . . . . . . . . . . . . . . . . . . . .1 • Operating Instructions . . . . . . . . . . .1
[General]
[CD/DVD][Video][Amplifier][Speakers]
[Supplied
Accessories]
❋ Designs and specifications are subject to change without notice.
(*
Depending on the sound mode
settings and the source, there
may be no sound output.)
[Tuner]
[FM]
AM
[MW]
Page 39

Sony Corporation Printed in China
http://www.sony.net
Page 40

Système cinéma maison
DVD
©2004 Sony Corporation
DAV-SB100
Mode d’emploi
FR
Page 41

2
Mesures de sécurité
AVERTISSEMENT: N’installez pas cet équipement dans un
espace clos tel qu’une bibliothèque ou un mobilier similaire.
Pour éviter des incendies, ne couvrez pas l’orifice de
ventilation de l’appareil avec des journaux, des nappes, des
rideaux, etc. Et ne placez pas de bougies allumées sur
l’appareil.
Ne jetez pas les piles avec l’ordure générale de
la maison, en disposez correctement en tant
que déchet chimique.
Cet appareil est classé comme produit
LASER CLASSE 1. L’étiquette se trouve à
l’extérieur de la face arrière.
ATTENTION:
Ce lecteur de DVD emploi un Système Laser.
Pour garantir une utilisation correcte de ce produit, veuillez lire
attentivement ce manuel de l’utilisateur et le conserver pour
future consultation. Au cas où l’unité aurait besoin de
maintenance, contactez un point de service après-vente agréé
(voir procédure de service technique).
L’usage de commandes, réglages ou procédures d’utilisation
autres que ceux spécifiés ici peut résulter dans une exposition
dangereuse à la radiation.
Pour éviter l’exposition directe au faisceau laser, n’essayez pas
d’ouvrir le boîtier. Il y a de la radiation laser visible lorsqu’il est
ouvert. NE FIXEZ PAS LE REGARD SUR LE FAISCEAU.
ATTENTION: L’appareil ne doit pas être exposé à l’eau (par
mouillure ou éclaboussure) et aucun objet rempli de liquides,
comme par exemple une vase, ne devrait être placé sur
l’appareil.
Précautions
Sécurité
• Si un objet quelconque tombe à l’intérieur du boîtier,
débranchez l’unité et faites-la vérifier par du personnel qualifié avant de la rallumer.
• L’unité n’est pas mise hors tension que si elle est débranchée
de la prise de courant, même si l’interrupteur de est sur la
position Arrêt.
• Débranchez l’unité de la prise de courant si elle reste hors
usage pendant une longue période de temps. Pour débrancher le cordon d’alimentation, tirez de la fiche, jamais du cordon.
Installation
• Permettez une circulation d’air adéquate pour éviter l’augmentation de la chaleur intérieure.
• Ne placez pas l’unité sur des surfaces (tapis, couvertures,
etc.) ou près de matières (rideaux, draperies) susceptibles
d’obstruer les fentes de ventilation.
• N’installez l’unité près de sources de chaleur telles que des
radiateurs ou des conduits d’air, ni dans des endroits où elle
serait exposée à la lumière directe du soleil, à la poussière
excessive, aux vibrations mécaniques ou à des secousses.
• N’installez pas l’unité en position inclinée. Elle est conçue
pour fonctionner uniquement en position horizontale.
• Maintenez cette unité et les disques loin des appareils contenant des aimants puissants, comme par exemple les fours
à micro-ondes ou les gros haut-parleurs.
• Ne placez pas d’objets lourds sur l’unité.
• Si l’unité est déplacée d’un endroit froid à un endroit chaud,
l’humidité pourrait se condenser à l’intérieur du Système
Cinéma Maison DVD et endommager les lentilles. Lorsque
vous installez l’unité pour la première fois ou que vous venez
de la déplacer d’un endroit froid à un endroit chaud, attendez
environ 30 minutes avant d’allumer l’unité.
Sur les sources d’alimentation
• Le cordon d’alimentation en c.a. ne doit être remplacé que
par un centre de service technique qualifié.
Sur l’emplacement
• Placez le récepteur à un endroit à ventilation adéquate afin
d’éviter l’augmentation de la chaleur dans le système.
• Si l’unité marche pendant longtemps à volume fort, le boîtier
devient chaud. Ce n’est pas un dysfonctionnement.
Cependant, vous devriez éviter de toucher le boîtier. Ne
placez pas l’unité dans un espace clos où la ventilation serait
pauvre, ceci pouvant provoquer une surchauffe de l’unité.
• N’obstruez pas les fentes de ventilation en plaçant des objets
sur l’unité. Le récepteur est équipé d’un amplificateur à haute
puissance. Si les fentes de ventilation dans la surface
supérieure sont obstruées, l’unité peut surchauffer et marcher
mal.
• Ne placez pas ce système sur une surface suave, telle qu’un
tapis, qui pourrait obstruer les orifices de ventilation se trouvant dans la partie inférieure de l’unité.
• Ne placez pas ce système près de sources de chaleur, ni
dans des endroits où il serait exposé à la lumière directe du
soleil, à la poussière excessive ou à des secousses
mécaniques.
Sur le fonctionnement
• Si le système est déplacé d’un endroit froid à un endroit
chaud ou qu’il est placé dans une pièce très humide, l’humidité pourrait se condenser sur les lentilles à l’intérieur du système. Si cela arrive, le système pourrait ne pas marcher correctement. Dans ce cas, enlevez le disque et laissez le système éteint pendant environ une demi-heure jusqu’à ce que
l’humidité s’évapore.
• Lorsque vous déplacez le système, enlevez tous les disques.
Autrement, les disques pourraient en résulter endommagés.
La plaque indicatrice se trouve sur la face arrière de l’unité.
AVERTISSEMENT: AFIN D’ÉVITER DES RISQUES
D’INCENDIE OU DE CHOC ÉLECTRIQUE, MAINTENEZ CE
PRODUIT À L’ABRI DE LA PLUIE ET DE L’HUMIDITÉ.
REMARQUE IMPORTANTE
Attention: Ce système est capable de maintenir indéfiniment,
sur l’écran de votre téléviseur, une image vidéo fixe ou une
image affichée à l’écran. Si vous laissez l’image vidéo fixe ou
l’image affichée à l’écran trop longtemps affichée sur votre
téléviseur, vous risquez d’endommager sérieusement l’écran
du téléviseur. Les téléviseurs à projection sont notamment
susceptibles à cet effet.
Page 42

INTRODUCTION
3
Mesures de sécurité (Suite)
NOTES SUR LES DROITS D’AUTEUR:
Il est interdit par la loi de copier, faire des émissions, montrer,
transmettre via câble, lire en public ou louer le matériel protégé
par des droits d’auteur, sans autorisation.
Ce produit offre la fonction protection contre la copie
développée par Macrovision. Des signaux de protection contre
la copie sont enregistrés sur certains disques. Lors de
l’enregistrement et lecture des images de ces disques sur un
magnétoscope, des perturbations pourraient apparaître.
Ce produit incorpore de la technologie de protection aux droits
d’auteur préservée par des méthodes de revendication de
certains brevets d’invention américains et d’autres droits de
propriété intellectuelle détenus par Macrovision Corporation et
d’autres propriétaires des droits. L’usage de cette technologie
de protection aux droits d’auteur doit être autorisé par
Macrovision Corporation, et elle est réservée à un usage
domestiques et à d’autres usages de visionnement limités,
sauf accord de Macrovision Corporation autorisant d’autres
usages. L’ingénierie inverse ou le démontage sont interdits.
A propos des symboles utilisés dans
ce mode d’emploi
Signale des risques pouvant provoquer un dommage à l’unité elle-même ou d’autres dommages
matériels.
Remarque Signale des caractéristiques de
fonctionnement spéciales de cette unité.
Conseil Signale des conseils et des suggestions
pour rendre la tâche plus facile.
Page 43

4
Table des matières
Introduction
Mesures de sécurité . . . . . . . . . . . . . . . . . . . . . . .2-3
Table des matières . . . . . . . . . . . . . . . . . . . . . . . . . .4
Avant la mise en service . . . . . . . . . . . . . . . . . . .5-6
Disques lisibles . . . . . . . . . . . . . . . . . . . . . . . . . .5
Précautions . . . . . . . . . . . . . . . . . . . . . . . . . . . . .6
Remarques concernant les disques . . . . . . . . . . . .6
À propos des symboles . . . . . . . . . . . . . . . . . . . . .6
Commandes sur le panneau avant . . . . . . . . . . . . .7
Voyants sur l’écran d’affichage . . . . . . . . . . . . . . . .8
Télécommande . . . . . . . . . . . . . . . . . . . . . . . . . . . . .9
Connexions sur le panneau arrière . . . . . . . . . . . .10
Préparation
Connexions . . . . . . . . . . . . . . . . . . . . . . . . . . . .11-15
Connexion à un téléviseur . . . . . . . . . . . . . . . . .11
Connexion à un équipement extérieur . . . . . . . . .12
Connexions à l’antenne . . . . . . . . . . . . . . . . . . . .13
Connexion aux enceintes acoustiques . . . . . . . .14
Mise en place des enceintes . . . . . . . . . . . . . . . .15
Sélection de la source de sortie/entrée . . . . . . . .16
Avant la mise en service . . . . . . . . . . . . . . . . . .17-21
Petit glossaire pour les modes Audio Stream et
Surround . . . . . . . . . . . . . . . . . . . . . . . . . . . . . .17
Mode sonore . . . . . . . . . . . . . . . . . . . . . . . . . . .17
Explication générale . . . . . . . . . . . . . . . . . . . . . .18
Affichage sur écran . . . . . . . . . . . . . . . . . . . . . . .18
Configuration initiale . . . . . . . . . . . . . . . . . . . .19-21
• Fonctionnement général . . . . . . . . . . . . . . . .19
• Langue . . . . . . . . . . . . . . . . . . . . . . . . . . . .19
• Format du téléviseur . . . . . . . . . . . . . . . . . . .19
• Configuration des enceintes . . . . . . . . . . . . .20
• Divers . . . . . . . . . . . . . . . . . . . . . . . . . . . . .20
• Contrôle parental . . . . . . . . . . . . . . . . . . . . .21
• Code de zone . . . . . . . . . . . . . . . . . . . . . . . .21
Fonctionnement
Fonctionnement avec des disques DVD et des CD
vidéo . . . . . . . . . . . . . . . . . . . . . . . . . . . . . . . . .22-24
Lecture d’un disque DVD et d’un CD vidéo . . . . .22
Caractéristiques générales . . . . . . . . . . . . . . . . .22
• Fonction Reprise . . . . . . . . . . . . . . . . . . . . . .22
• Sélection d’un autre TITRE . . . . . . . . . . . . .22
• Sélection d’un autre CHAPITRE/PISTE . . . .22
• Recherche . . . . . . . . . . . . . . . . . . . . . . . . . .22
• Arrêt sur image . . . . . . . . . . . . . . . . . . . . . .22
• Ralenti . . . . . . . . . . . . . . . . . . . . . . . . . . . . .23
• Répétition . . . . . . . . . . . . . . . . . . . . . . . . . .23
• Recherche par l’heure . . . . . . . . . . . . . . . . . .23
Caractéristiques spéciales du DVD . . . . . . . . . . .24
• Vérification du contenu des disques
DVD vidéo: menus . . . . . . . . . . . . . . . . . . . .24
• Prise de caméra . . . . . . . . . . . . . . . . . . . . .24
• Changement de la langue audio . . . . . . . . . .24
• Changement du canal audio . . . . . . . . . . . . .24
• Sous-titres . . . . . . . . . . . . . . . . . . . . . . . . . .24
Fonctionnement avec des CD audio et
des disques MP3 . . . . . . . . . . . . . . . . . . . . . . .25-26
Lecture d’un CD audio et d’un disque MP3 . . . . .25
Remarques concernant les fichiers MP3 . . . . . . .25
• Pause . . . . . . . . . . . . . . . . . . . . . . . . . . . . .26
• Sélection d’une autre piste . . . . . . . . . . . . . .26
• Recherche . . . . . . . . . . . . . . . . . . . . . . . . . .26
• Répétition . . . . . . . . . . . . . . . . . . . . . . . . . .26
• Changement du canal audio . . . . . . . . . . . . .26
Fonctionnement avec des fichiers JPEG . . . . . . . .27
Visionnement de fichiers JPEG
sur un disque . . . . . . . . . . . . . . . . . . . . . . . . . . .27
• Sélection d’un autre fichier . . . . . . . . . . . . . .27
• Arrêt sur image . . . . . . . . . . . . . . . . . . . . . . .27
• Pour déplacer l’image . . . . . . . . . . . . . . . . .27
• Pour pivoter l’image . . . . . . . . . . . . . . . . . . .27
• Remarques concernant les fichiers JPEG . . .27
Lecture programmée . . . . . . . . . . . . . . . . . . . . . . .28
Lecture programmée des CD audio
et des disques MP3 . . . . . . . . . . . . . . . . . . . . . .28
Lecture programmée des CD vidéo . . . . . . . . . . .28
Configuration des enceintes . . . . . . . . . . . . . . . . .29
Information supplémentaire . . . . . . . . . . . . . . . . . .30
Configuration de la minuterie-sommeil . . . . . . . .30
Visionnement du temps de lecture et du temps . . .
restant sur l’écran du panneau avant . . . . . . . . . .30
Gradateur . . . . . . . . . . . . . . . . . . . . . . . . . . . . . .30
Silencieux . . . . . . . . . . . . . . . . . . . . . . . . . . . . .30
Utilisation de la prise écouteur . . . . . . . . . . . . . .30
Commande volume . . . . . . . . . . . . . . . . . . . . . .30
Utilisation de l’effet sonore . . . . . . . . . . . . . . . . . .30
Fonctionnement avec la radio . . . . . . . . . . . . . . . .31
Préréglage des stations radio . . . . . . . . . . . . . . .31
Écouter la radio . . . . . . . . . . . . . . . . . . . . . . . . .31
Commander le téléviseur à l’aide de la
télécommande fournie . . . . . . . . . . . . . . . . . . . . . .32
Commander le téléviseur . . . . . . . . . . . . . . . . . . .32
Utilisation de la fonction SONY TV DIRECT . . . . . .33
Préparation . . . . . . . . . . . . . . . . . . . . . . . . . . . .33
Fonctionnement . . . . . . . . . . . . . . . . . . . . . . . . . .33
Référence
Liste des codes des langues . . . . . . . . . . . . . . . . .34
Liste des codes de zone . . . . . . . . . . . . . . . . . . . . .35
Dépannage . . . . . . . . . . . . . . . . . . . . . . . . . . . . .36-37
Spécifications . . . . . . . . . . . . . . . . . . . . . . . . . . . . .38
Fabriqué sous licence de Dolby Laboratories. “Dolby”, “Pro
Logic”, et le symbole double D sont des marques
commerciales déposées de Dolby Laboratories. Travaux
non publiés confidentiels. Copyright 1992-1997 Dolby
Laboratories. Tous droits réservés.
Fabriqué sous licence de Digital Theater Systems, Inc.
Brevets américains nº. 5,451,942 5,956,674, 5,974,380,
5,978,762 et d’autres brevets accordés ou en instance
dans le monde entier. “DTS” et “DTS Digital Surround” sont
des marques commerciales déposées de Digital Theater
Systems, Inc. Copyright 1996, 2000 Digital Theater
Systems, Inc. Tous droits réservés.
Page 44

5
INTRODUCTION
Avant la mise en service
Disques lisibles
Disques DVD vidéo
(disques de 8 cm / 12 cm)
CD vidéo (VCD)
(disques de 8 cm / 12 cm disc)
CD audio
(disques de 8 cm / 12 cm)
En outre, cette unité peut lire des disques DVD-R/-RW,
SVCD et CD-R ou CD-RW contenant des titres audio,
MP3 ou des fichiers JPEG.
Remarques
• En fonction des conditions de l’équipement
d’enregistrement ou du disque CD-R/RW (ou
DVD±R/±RW) lui-même, certains disques CD-R/RW
(ou DVD±R/±RW) pourraient ne pas être lus par cette
unité.
• Les disques DVD-RW enregistrés en mode EV
(enregistrement vidéo) ne peuvent pas être lus sur
cette unité.
• N’attachez aucun timbre ou étiquette sur aucune des
faces (la face étiquetée ou la face enregistrée) d’un
disque.
• N’utilisez pas des CD ayant des formes irrégulières
(p.ex., forme de coeur ou octogonale). Ceci pourrait
provoquer des dysfonctionnements.
Remarques concernant les disques DVD et les CD
vidéo
Certaines fonctions de lecture des disques DVD et des
CD vidéo peuvent être intentionnellement établies par
les fabricants de logiciel. Etant donné que cette unité lit
les disques DVD et CD vidéo suivant le contenu du
disque conçu par le fabriquant de logiciel, certaines
caractéristiques de lecture de l’unité pourraient ne pas
être disponibles ou d’autres fonctions pourraient être
ajoutées. Reportez-vous aussi aux instructions fournies
avec les DVD et les CD vidéo. Certains DVD réalisés à
des fins commerciales pourraient ne pas être lus sur
cette unité.
Code régional du Récepteur DVD et des disques
DVD
Ce Récepteur DVD est conçu et fabriqué pour lecture
du logiciel DVD codé Région 3. Le code région sur les
étiquettes de certains disques DVD indique quel type de
lecteur peut lire ces disques. Cette unité ne peut lire
que des disques DVD étiquetés 3 ou “ALL” (Toutes
zones). Si vous essayez de reproduire d’autres disques,
le message “Vérifiez le code région” (“Check
Regional Code “) s’affichera à l’écran du
téléviseur. Certains disques DVD n’ayant pas
d’étiquette indiquant le code région peuvent quand
même être soumis aux restrictions des régions et ils
pourraient, donc, ne pas être lisibles.
Termes concernant le disque
Titre (uniquement pour disques DVD vidéo)
Le contenu principal du film, les contenus
supplémentaires, les fonctions supplémentaires ou
l’album musique. Chaque titre est attribué à un numéro
de référence titre vous permettant de le repérer
facilement.
Chapitre (uniquement pour disques DVD vidéo)
Sections d’une pièce image ou d’une pièce musicale qui
sont plus petites que les titres. Un titre est composé
d’un ou plusieurs chapitres. Chaque chapitre est
attribué à un numéro de chapitre vous permettant de
repérer le chapitre désiré. En fonction du disque, les
chapitres pourraient ne pas être enregistrés.
Piste (uniquement pour CD vidéo et CD audio)
Sections d’une pièce image ou d’une pièce musicale
sur un CD vidéo ou un CD audio. Chaque piste est
attribuée à un numéro de piste vous permettant de
repérer la piste désirée.
Index (CD vidéo)
Un numéro qui divise une piste dans des sections afin
de repérer aisément le point désiré sur un CD vidéo. En
fonction du disque, les index pourraient ne pas être
enregistrés.
Scène
Sur un CD vidéo à fonction CML (commande manuelle
de lecture), les déplacements d’image et les arrêts sur
image sont divisés dans des sections appelées
“Scènes”. Chaque scène est affichée dans le menu
Scène et attribuée à un numéro de scène vous
permettant de repérer la scène désirée. Une scène peut
être composée d’une ou plusieurs pistes.
Fichier
Sections d’une pièce image sur un CD de données
contenant des fichiers image JPEG.
Types de CD vidéo
Il y a deux types de CD vidéo:
CD vidéo équipés de CML (Version 2.0)
Les fonctions CML (commande manuelle de lecture)
vous permettent d’interagir avec le système à l’aide des
menus, des fonctions de recherche ou d’autres
opérations caractéristiques d’un ordinateur. En plus, les
arrêts sur image à haute qualité peuvent être lus s’ils
sont inclus dans le disque.
CD Vidéo non équipés avec CML (Version 1.1)
Leur fonctionnement étant similaire à celui des CD
audio, ces disques permettent la lecture d’images vidéo
ainsi que du son, mais ils ne sont pas équipés de CML.
3
REMARQUE IMPORTANTE:
LES PILES DÉCHARGÉES OU ÉPUISÉS DOIVENT
TRE RECYCLÉES OU JETÉES D’UNE FAÇON
SÛRE, CONFORMÉMENT AUX LOIS APPLICABLES.
POUR DE PLUS AMPLES RENSEIGNEMENTS,
CONTACTEZ L’AUTORITÉ LOCALE EN MATIÈRE DE
DÉCHETS SOLIDES.
Page 45

6
Avant la mise en service (suite)
Précautions
Manipulation de l’unité
Emballage de l’unité
Le carton et les matériaux d’emballage de la boîte
originale sont utiles. Pour une protection maximale,
emballez de nouveau l’unité comme elle était emballée
en usine.
Réglage de l’unité
L’image et le son d’un téléviseur, magnétoscope ou
radio proches au graveur de DVD peuvent être
dénaturés pendant la lecture. Dans ce cas, écarté
l’unité du téléviseur, du magnétoscope ou de la radio,
ou éteignez l’unité après en avoir enlevé le disque.
Pour maintenir la surface propre
N’utilisez pas de substances volatiles, tel qu’un
pulvérisateur insecticide, près de l’unité. Ne laissez pas
de produits en gomme ou en plastique en contact avec
l’unité pour une longue période de temps. Ils
laisseraient des marques sur la surface.
Nettoyage de l’unité
Pour nettoyer le boîtier
Utilisez un chiffon doux et sec. Si les surfaces sont
extrêmement sales, utilisez un chiffon doux à peine
humidifié avec une solution de détergent doux. N’utilisez
pas de produits dissolvants forts tels que l’alcool,
l’essence, le diluant, car ceci pourrait abîmer la surface
de l’unité.
Pour obtenir une image nette
Le récepteur DVD est un dispositif de précision à haute
technologie. Si la lentille de la tête de lecture et les
composants du lecteur des disques sont sales ou usés,
la qualité d’image sera pauvre.
Il est recommandé de faire des vérifications et des
entretiens réguliers toutes les 1000 heures d’utilisation
(Ceci dépend des conditions de l’entourage de
fonctionnement)
Pour plus de détails, veuillez contacter le revendeur le
plus proche.
Remarques concernant les disques
Manipulation des disques
Ne touchez pas la face lecture du disque.
Prenez le disque par les bords pour éviter que des
empreintes digitales restent sur la surface.
Ne collez pas de papier ou de ruban adhésif sur le
disque.
Stockage des disques
Après la lecture, stockez le disque dans sa caisse.
Ne l’exposez pas à la lumière directe du soleil ou à
d’autres sources de chaleur, ne le laissez pas dans une
automobile garée sous la lumière directe du soleil car la
température à l’intérieur de l’automobile pourrait
augmente considérablement.
Nettoyage des disques
La présence d’empreintes digitales ou de la poussière
sur le disque pourrait dénaturer l’image ou réduire la
qualité du son. Avant la lecture, nettoyez le disque à
l’aide d’un chiffon propre, en le frottant du centre vers la
périphérie.
N’utilisez des produits dissolvants forts tels que l’alcool,
l’essence, le diluant, les produits de nettoyage
disponibles dans le commerce ni un pulvérisateur
contre la statique destiné aux vieux disques en vinyle.
Ce système ne peut lire que des disques standard
circulaires.
L’utilisation de disques standard non circulaires (ayant
par exemple des formes de carte, de coeur ou d’étoile)
peut provoquer des dysfonctionnements.
N’utilisez pas des disques commercialisés ayant des
accessoires attachés tels que une étiquette ou un
anneau.
À propos des symboles
À propos du symbole affichage
Le symbole “ ” peut apparaître sur l’écran du
téléviseur pendant le fonctionnement.
Cette icône veut dire que la fonction expliquée dans ce
manuel de l’utilisateur n’est pas disponible pour ce
disque spécifique.
À propos des symboles concernant le disque
utilisés dans ce mode d’emploi
Une section dont le titre a l’un des symboles suivants
est applicable uniquement aux disques où ledit symbole
est représenté.
disques DVD vidéo.
disques CD vidéo avec fonction CML (com-
mande manuelle de lecture).
disques CD vidéo sans fonction CML (com-
mande manuelle de lecture).
disques CD audio.
disques contenant des fichiers MP3.
disques contenant des fichiers JPEG.
JPEG
MP3
CD
VCD1.1
VCD2.0
DVD
Page 46

INTRODUCTION
7
Commandes sur le panneau avant
STANDBY
IR
- PRESET +
-
VOLUME +
FUNCTION
PHONES
PAUSE (XX)
Arrête temporairement la lecture d’un
disque.
OUVRIR/FERMER ( )
Ouvre ou ferme le plateau à
disques.
Capteur infrarouge (IR)
Pointez la télécommande du récepteur DVD vers
ce capteur.
Écran d’affichage
Plateau à disques
Insérez ici un
disque.
Voyant @ / 1 (MARCHE)
Allume ou éteint le récepteur DVD.
ARRÊT (STOP) (xx)
Arrête la lecture d’un disque.
LECTURE (PLAY) (
H)
Pour lire un disque.
SAUT en avance (Forward SKIP) (
TT
)
DVD: Va au chapitre/piste suivants.
RADIO: Pour sélectionner la station préréglée désirée.
SAUT en retour (Reverse SKIP) (
SS
)
DVD: Va au début du chapitre/piste actuels ou au
chapitre/piste précédents.
RADIO: Pour sélectionner la station préréglée désirée.
Commande VOLUME
Appuyez sur “+” pour faire augmenter le
volume ou sur “-” pour faire diminuer le
volume.
Voyant VEILLE (STANDBY)
S’allume en rouge lorsque le
récepteur est en mode Veille.
FONCTION (FUNCTION)
Pour sélectionner la source du
récepteur.
(FM, AM, MAGNÉTOSCOPE,
TÉLÉVISEUR ou CD/DVD)
ÉCOUTEUR (PHONES)
Pour y brancher le casque d’écoute.
Page 47

8
Voyants sur l’écran d’affichage
Indique le numéro du chapitre ou
de la piste actuels.
Voyants du mode de lecture répétition.
Voyants de temps de lecture total / temps écoulé / fréquence / temps
restant / état actuel / numéro de titre / mode surround / volume, etc.
Indique que l’unité est en mode radio.
Voyant de la minuterie-sommeil.
S’allume lorsque le récepteur DVD
syntonise une station.
Un disque CD est inséré.
Indique que l’unité est en mode stéréo.
État de la lecture.
Un disque MP3 est inséré.
S’allume lorsque l’unité
est en mode DSGX
activé.
Un disque CD-V 2.0 est inséré.
Indique le format
surround actuel.
Voyant du titre
IIndique que le
format du son
est DOLBY
PROLOGIC II.
Indique le format
surround actuel.
DISC
ALBM
CHAP TITLE
REP 1
TRK
FM
AM
TUNED PBC SLEEP
MP3 CD ST DSGX
D
D
D
D
PL II
D
Page 48

SONY TV DIRECT
Sélectionne directement la source de
sortie du DVD.
TV @ / 1
Allume ou éteint le téléviseur.
@ / 1
Allume ou éteint le récepteur DVD.
AUTO FORMAT DIRECT
Sélectionne le mode sonore parmi A.F.D.
AUTO, PRO LOGIC, PLII MOVIE et
PLII MUSIC.
MODE
Sélectionne un mode sonore parmi FLAT,
ROCK, POP, JAZZ, CLASSIC et NEWS.
FUNCTION
Pour sélectionner la source du récepteur.(FM, AM, VIDEO, TV ou CD/DVD)
ZZ
Ouvre et ferme le plateau à disques.
DSGX
Active ou désactive le mode DSGX.
Boutons numérotés 0-9
Sélectionne des options numériques
dans un menu.
>10/ TV ENTER
Utilisé pour commander le téléviseur.
SLOW t/
TUNING-
Pour recherche d’images ou lecture au
ralenti en retour.
Pour syntoniser la station désirée.
SLOW T/
TUNING+
Pour recherche d’images ou lecture au
ralenti en avance.
Pour syntoniser la station désirée.
Boutons des commandes de
lecture
• H (PLAY)
Fait démarrer la lecture.
• X (PAUSE)
Arrête momentanément la lecture ou
l’enregistrement.
• x (STOP)
Arrête la lecture.
DVD MENU
Accède au menu sur un disque DVD.
DISPLAY
Pour afficher le temps restant entre
chapitre et titre.
VOLUME (+/-)
Règle le volume des enceintes.
CLEAR
Enlève un numéro de piste du menu
programme.
RETURN
Revient au menu configuration.
DIMMER
Pour modifier la luminosité de l’écran
d’affichage.
TV/VIDEO
Sélectionne la source du téléviseur.
INTRODUCTION
9
Télécommande
SLEEP
Pour mettre l’unité en mode Sommeil.
TUNER/BAND
Sélectionne le tuner du récepteur DVD
comme un choix d’écoute. (bandes FM et
AM)
MUTING
Annule momentanément le son des
enceintes du récepteur DVD.
TUNER MENU
Mémorise la fréquence d’une station
radio dans le tuner (syntoniseur).
Appuyez sur ce bouton pour effacer les
stations préréglées de la mémoire du
tuner.
PROGRAM
Entre au mode édition de programme ou
sort de ce mode-ci.
REPEAT
Répète un chapitre, une piste, un titre,
tous.
FM MODE
Pour changer entre les modes MONO et
STÉRÉO.
TV
Pour commander le téléviseur à l’aide de
la télécommande.
AUDIO
Sélectionne une langue audio (DVD) ou
un canal audio (CD).
ANGLE
Sélectionne une prise de caméra, si elle
est disponible, sur le disque DVD.
SUBTITLE
Sélectionne une langue pour les sous-
titres.
PREV/PRESET -
Va au début du chapitre ou de la piste
actuels ou au chapitre ou à la piste
précédents.
Sélectionne un programme du Tuner.
NEXT/PRESET +
Va au chapitre ou à la piste suivants.
Sélectionne un programme du Tuner.
DVD TOP MENU
Affiche le menu Titres du disque, s’il est
disponible.
B/b/V/v (gauche/droite/haut/bas)
Sélectionne une option dans le menu.
ENTER
Accepte la sélection du menu.
DVD DISPLAY
Accède à l’affichage sur écran.
TV VOL +/–
Règle le volume du téléviseur.
TV CH +/–
Sélectionne la chaîne de télévision.
DVD SETUP
Affiche ou supprime le menu de
configuration du DVD.
Page 49

10
Connexions sur le panneau arrière
Ne touchez pas les broches intermédiaires des
prises du panneau arrière. Une décharge
d’électrostatique peut provoquer un dommage
permanent à l’unité.
Cordon d’alimentation
Branchez au réseau.
CONNECTEURS DES ENCEINTES
Branchez les six enceintes fournies à
ces bornes.
CONNECTEUR DE L’ANTENNE FM
Branchez l’antenne FM à cette borne.
CONNECTEURS DE L’ANTENNE CADRE AM
Branchez l’antenne cadre AM à cette borne.
Plage de fonctionnement de la télécommande
Pointez la télécommande vers le capteur et appuyez
sur les boutons.
• Distance: Environ 7m (23 pieds) à partir de la façade
du capteur infrarouge.
• Angle: Environ 30° dans toutes les directions à partir
de la partie avant du capteur.
Installation des piles de la télécommande
Détachez le couvercle du
compartiment des piles qui se trouve
dans la partie arrière de la
télécommande et insérez deux piles
R6 (AA) en respectant la polarité.
Lorsque vous utilisez la
télécommande, pointez-la vers le
capteur de l’unité.
Ne mélangez pas de piles vieilles et neuves.
VIDEO (AUDIO IN L/R)
Branchez la sortie audio d’une source
extérieure (magnétoscope, lecteur LD, etc.)
SORTIE MONITEUR (VIDÉO)
Connectez à un téléviseur avec entrée vidéo.
MONITOR S VIDEO OUT (DVD OUT)
Raccordez à une entrée S-Video du
téléviseur.
COMPONENT VIDEO OUT (Y P
B/CB PR/CR)
Raccordez à un téléviseur comportant des entrées
Y P
B/CB PR/CR.
Page 50

PRÉPARATION
11
Connexions
Effectuez l’une des connexions suivantes, en fonction des capacités de l’équipement existant.
Conseils
En fonction de votre téléviseur et de l’autre
équipement que vous désirez relier, il y a plusieurs
manières de connecter le récepteur DVD. Utilisez
l’une des connexions décrites ci-dessous.
Veuillez vous référer aux manuels de votre
téléviseur, magnétoscope ou d’autres dispositifs si
besoin pour effectuer les connexions les plus convenables.
– Assurez-vous que le récepteur DVD est relié directe-
ment au téléviseur. Sélectionnez l’entrée A/V correcte
sur votre TV.
– Ne reliez pas récepteur DVD au téléviseur via votre
magnétoscope. L’image pourrait être dénaturée par le
système de protection contre la copie.
Connexion vidéo
À l’aide du câble vidéo fourni (V), reliez la prise
SORTIE MONITEUR du récepteur DVD à la prise
entrée vidéo du téléviseur.
Connexion Vidéo-S
Connectez la prise SORTIE VIDEO-S de l’Amplisyn-toniseur DVD à la prise vidéo-S du téléviseur en
utilisant le câble vidéo-S (S).
Raccordement de Component Vidéo (Color
Stream®)
Branchez les prises jack de sortie périphérique vidéo
COMPONENT VIDEO OUT du l’Ampli-syntoniseur DVD
aux prises jack correspondantes du téléviseur au
moyen du câble Y Pb Pr cable (C).
Connexion à un téléviseur
Face arrière du téléviseur
(non fourni)
(non fourni)
Face arrière du récepteur DVD
Rear of TV
S-VIDEO
INPUT
VIDEO
INPUT
COMPONENT VIDEO INPUT
L
Y
Pr
Pb
S
(not supplied)
V
VIDEO
S VIDEO
(DVD ONLY)
Rear of DVD Receiver
Y
COMPONENT VIDEO OUTMONITOR OUT
C
(not supplied)
PB/CB PR/CR
Page 51

12
Connexions (suite)
Connexion à un équipement extérieur
Connexion
À l’aide des câbles audio, reliez les prises VIDEO
(AUDIO G/D) du récepteur de DVD aux prises de
SORTIE AUTIO (G/D) du magnétoscope, du lecteur LD,
etc.
Conseil
Appuyez sur FUNCTION dans la télécommande pour
sélectionner l’entrée vers ces prises.
Le message VIDEO (VIDÉO) apparaîtra sur l’écran
d’affichage.
Face arrière du magnétoscope
(ou lecteur LD, etc.)
(non fourni)
(not supplied)
Page 52

PRÉPARATION
13
Connexions
Connexions à l’antenne
Connectez l’antenne FM/AM fournie pour écouter la radio.
Branchez l’antenne cadre AM sur le connecteur ANTENNE CADRE AM (AM LOOP).
Branchez l’antenne FM sur le connecteur FM 75Ω.
Lorsque vous connectez l’antenne cadre AM fournie, reliez le câble noir (B) au borne , et le câble blanc (A) à
l’autre borne.
Remarques
Pour prévenir la captation de bruits, maintenez l’antenne cadre AM loin du récepteur DVD et des autres composants.
Veillez à étendre complètement l’antenne filaire FM.
Une fois l’antenne FM connectée, maintenez-la aussi horizontale que possible.
Conseil
Si la réception FM est mauvaise, utilisez un câble 75Ω(non fourni) pour connecter le système à une antenne FM
extérieure comme montré ci-dessous.
Antenne cadre AM (fournie)
Antenne FM (fournie)
AM Loop antenna (supplied)
FM antenna (supplied)
A
B
Page 53

14
Connexions (suite)
Front speaker
(Right)
Front speaker
(Left)
Centre speaker
Surround speaker
(Right surround)
Subwoofer
Surround speaker
(Left surround)
Connexion aux enceintes acoustiques
À l’aide des câbles fournis pour les enceintes, reliez les enceintes.
Pour obtenir le meilleur son surround, réglez les paramètres des enceintes (volume, distance, etc.).
Remarques
Assurez-vous de faire coïncider le câble de l’enceinte avec la borne appropriée dans les composants: (+) sur (+) et (–) sur (–).
Si les câbles sont inversés, le son sera dénaturé et perdra des graves.
Si vous utilisez des enceintes frontales ayant une commande du débit d’entrée, réglez le volume avec soin afin d’éviter une sortie excessive sur ces enceintes.
Ne démontez pas les couvercles avant des enceintes fournies.
Le pied de l’enceinte est optionnel.
Enceinte frontale
(droite)
Enceinte centrale
Enceinte frontale
(gauche)
Enceinte surround
(surround droit)
Caisson de graves
Enceinte surround
(surround gauche)
Page 54

PRÉPARATION
15
Connexions (suite)
Enceinte centrale
Enceinte frontale
(gauche)
Exemple de la mise en place des enceintes
Enceinte surround
(droite)
Enceinte frontale
(droite)
Caisson de graves
Mise en place des enceintes
Pour une configuration normale, utilisez 6 enceintes (2 enceintes frontales, enceinte centrale, 2 enceintes arrière et
caisson de graves).
Si vous voulez entendre les excellents graves, le DTS digital surround ou le Dolby Digital surround, vous devrez
connecter un caisson de graves.
• Enceintes frontales
En fonction de la position d’écoute, installez les enceintes à la même distance. Et réglez les enceintes à 45 degrés par rapport à
la position d’écoute.
• Enceinte centrale
L’idéal, c’est que l’enceinte centrale et les enceintes frontales soient à la même hauteur.Vous pouvez quand même placer l’en-
ceinte centrale au-dessus ou au-dessous du téléviseur, comme montré ci-dessous.
• Enceinte surround
Placez les enceintes surround à gauche et à droite derrière la zone d’écoute principale. Ces enceintes reproduisent le mouvement du son et l’atmosphère nécessaires à la reproduction du son surround. si vous voulez obtenir les meilleurs résultats, n’in-
stallez pas les enceintes arrière trop loin derrière la position d’écoute et veillez à les installer au niveau ou au-dessus le niveau
des oreilles de l’auditoire. Il est aussi utile d’orienter les enceintes arrière vers un mur ou vers le toit pour disperser encore plus
le son. Si la pièce est trop petite et que l’audience est près du mur arrière, placez les enceintes arrière l’une en face de l’autre,
à une distance de 60 - 90 cm au-dessus des oreilles de l’auditoire.
• Caisson de graves
Il peut être placé à n’importe quelle position frontale.
Remarque
Le pied de l’enceinte est optionnel.
Pour attacher les coussinets aux pieds
Pour éviter la vibration de l’enceinte ou son mouvement lors de l’écoute, attachez les coussinets fournis aux
enceintes sans caisson de graves, comme montré.
Enceinte surround
(gauche)
Coussinets
Foot pads
Page 55

16
Sélection de la source de sortie/entrée
Suivez ces directives pour faire la sélection et alterner
parmi les diverses sources d’entrée et de sortie du
récepteur DVD/Magnétoscope.
• CD/DVD
Pour le visionnement d’une sortie à partir du
DVD:
Appuyez sur SONY TV DIRECT dans la télécommande.
Le message “CD/DVD” apparaît sur l’écran
d’affichage.
• TUNER FM/AM
Pour écouter des émissions radio AM/FM:
Appuyez sur TUNER BAND pour alterner entre radio
AM et FM. La fréquence sélectionnée apparaîtra sur
l’écran d’affichage.
• SÉLECTION DE L’ENTRÉE
Pour écouter une source audio connectée sur la
prise ENTRÉE AUDIO (G/D) VIDÉO:
Appuyez à plusieurs reprises sur FUNCTION dans la
télécommande. Le message “VIDEO” apparaîtra sur
l’écran d’affichage. Le son arrivera à partir d’une
source extérieure connectée sur la prise ENTRÉE
AUDIO (G/D) (dans le panneau arrière).
SONY TV DIRECT
TUNER/
BAND
FUNCTION
Page 56

PRÉPARATION
17
Avant la mise en service
Petit glossaire pour les modes Audio
Stream et Surround
DTS
Il vous permet de jouir de canaux indépendants 5.1 (ou 6)
à haute qualité audio numérique à partir des sources du
programme DTS telles que des disques DVD, des disques
compacts, etc., qui donne naissance à la marque
commerciale déposée. Le surround numérique DTS offre
jusqu’à 6 canaux de son transparent (ce qui suppose un
son identique à celui des bandes originales) et résulte dans
une netteté exceptionnelle à travers un champ acoustique
véritable de 360 degrés. Le terme DTS est une marque
commerciale déposée de DTS Technology, LLC. Fabriqué
sous licence de DTS Technology, LLC.
DOLBY DIGITAL
Le format Dolby Digital surround vous permet de jouir des
canaux 5.1 de son surround numérique à partir d’une
source de programme Dolby Digital. Si vous lissez des
disques DVD marqués ““, vous pourrez jouir encore
une meilleure qualité du son, d’une plus grande fidélité et
d’une dynamique améliorée.
DOLBY PRO LOGIC
Utilisez ce mode pour la lecture de DVD d’images ou de 2
canaux Dolby Digital marqués ““. Ce mode vous offre
l’effet d’être dans un cinéma ou dans une salle de concert
en direct, un effet avec une intensité qui ne peut être
obtenue que par le DOLBY PRO LOGIC SURROUND.
L’effet du mouvement avant/arrière/gauche/droite du son,
ainsi que la sensation d’une position fixe du son, sont plus
nets et encore plus dynamiques qu’avant.
DOLBY PRO LOGIC II
Dolby Pro Logic II crée cinq canaux de sortie à toute la
largeur de bande à partir de sources à deux canaux. Ceci
est réalisé en utilisant un décodeur surround évolué à
matrice à haut degré de pureté qui extrait les propriétés
spatiales de l’enregistrement original sans ajouter aucun
nouveau son ou coloration sonore.
Mode PLII MOVIE:
Le mode cinéma est conçu pour utilisation avec les émissions télévisées en mode stéréophonique et avec tous les
programmes codés avec Dolby Surround. Le résultat en
est une directionnalité renforcée du champ sonore, qui se
rapproche de la qualité du son offerte par un canal
indépendant 5.1.
Mode PLII MUSIC:
Le mode musique est conçu pour utilisation avec tout
enregistrement musique stéréo.
A.F.D. AUTO
Le logiciel ayant des signaux audio surround multicanaux
est lu suivant la manière dont il a été enregistré.
Remarques
Cette fonction n’est disponible qu’en mode lecture.
La fonction A.F.D. AUTOMATIQUE ne peut pas être
employé lorsque vous utilisez le casque d’écoute.
Mode sonore
Vous pouvez jouir du son surround tout simplement en
sélectionnant l’un des fichiers sonores préprogrammés
suivant le programme que vous voulez écouter.
A) En appuyant sur le bouton MODE
À chaque fois que vous appuyez sur le bouton MODE,
le mode sonore change selon l’ordre suivant:
FLAT → ROCK → POP → JAZZ → CLASSIC → NEWS →
FLAT ...
Conseils
FLAT: Réponse en fréquence linéaire.
ROCK: Reproduit l’acoustique de la musique rock.
POP: Reproduit l’acoustique de la musique pop.
JAZZ: Reproduit l’acoustique d’un club de jazz.
CLASSIC: Reproduit l’acoustique de la musique
orchestrale.
NEWS: Reproduit l’acoustique du son des journaux
télévisés.
B) En appuyant sur le bouton AUTO FORMAT
DIRECT
À chaque fois que vous appuyez sur le bouton AUTO
FORMAT DIRECT, le mode sonore change selon
l’ordre suivant:
A.F.D. AUTO → DOLBY PL → PLII MOVIE → PLII MUSIC →
A.F.D. AUTO ...
(Cette fonction n’est disponible qu’en mode bicanal)
Remarques
Cette fonction n’est pas disponible pour les disques MP3.
Cette fonction n’est disponible qu’en mode lecture.
La sélection du mode sonore n’est pas possible lorsque
vous utilisez le casque d’écoute.
Lorsqu’un disque DVD est inséré.
YVous pouvez changer le mode sonore du DVD (Dolby Digital,
DTS, PRO LOGIC, etc.) au cours de la lecture en appuyant sur
le bouton AUDIO dans la télécommande.
Quoique le contenu du disque DVD diffère d’un disque à
l’autre, l’information suivante explique le fonctionnement de
base lorsque cette fonction est utilisée.
À chaque fois que vous appuyez sur le bouton AUDIO, le
mode sonore du DVD est modifié dans l’ordre suivant:
→→→
Pour votre référence
•
Le récepteur DVD mémorise les dernières configurations du mode pour chaque source individuellement.
•
Vous pouvez identifier le format de codage du
logiciel du programme en regardant sur son
emballage.
- Les disques à format Dolby Digital sont étiquetés
avec le logo .
- Les disques à format Dolby Surround sont étiquetés
avec le logo .
- Les disques à format DTS Digital Surround sont marqués .
Remarque
Il n’est plus possible de choisir le mode acoustique lorsque
vous utilisez le casque d’écoute.
Page 57

18
Avant la mise en service (suite)
Explication générale
Ce manuel offre des instructions élémentaires pour
l’utilisation du récepteur DVD. Certains disques DVD
nécessitent d’une utilisation spécifique ou vous
permettent uniquement des opérations limitées au cours
de la lecture. Quand cela arrive, le symbole s’affiche
sur l’écran du téléviseur, vous indiquant que l’opération
n’est pas permise par le récepteur DVD ou qu’elle n’est
pas possible sur ce disque.
Affichage sur écran
Vous pouvez également utiliser les boutons numérotés
pour configurer des numéros (par ex., le numéro du
titre). Pour certaines fonctions, vous aurez à appuyer
sur ENTER pour rendre effective la configuration.
Fonctionnement de l’ affichage sur
écran
1
Appuyez sur DVD DISPLAY au cours de la lecture.
2
Appuyez sur V/v pour sélectionner un élément.
L’élément sélectionné sera remarqué.
3
Appuyez sur B/b pour changer la configuration
d’un élément.
Vous pouvez également utiliser les boutons
numérotés pour configurer des numéros (par ex., le
numéro du titre). Pour certaines fonctions, vous
aurez à appuyer sur ENTER pour rendre effective
la configuration.
Icônes du champ feed-back temporaire
Répète le titre
Répète le chapitre
Répète la piste (CD vidéo sans CML, MP3,
CD)
Répète toutes les pistes (CD vidéo sans CML,
MP3, CD)
Répétition désactivée
Reprend la lecture à partir de ce point
Action interdite ou non disponible
Remarques
•
Certains disques pourraient ne pas offrir toutes les
fonctions indiquées comme exemple dans l’affichage
sur écran montré ci-dessous.
•
Si vous n’appuyez sur aucun bouton pendant 10 secondes, l’affichage sur écran disparaît.
RESUME
OFF
ALL
TRACK
CHAPT
TITLE
Éléments
Numéro de titre
Numéro de chapitre
Recherche par
l’heure
Langue audio
et mode de sortie
de l’audio numérique
Langue des
Prise de caméra
Son
Fonction (Appuyez sur V/v pour sélectionner
l’élément désiré)
Montre le numéro du titre actuel et le nombre total de
titres, et saute vers le numéro de titre désiré.
Montre le numéro du chapitre actuel et le nombre total de
chapitres, et saute vers le numéro de chapitre désiré.
Montre le temps de lecture écoulé et cherche le point
désiré directement à partir du temps écoulé.
Montre la langue actuelle de la piste audio, la méthode de
codage et le numéro du canal, et modifie la configuration.
Montre la langue actuelle des sous-titres et modifie cette
configuration.
Montre le numéro de la prise de caméra actuelle et le
nombre total de prises de caméra, et modifie le numéro de
prise de caméra.
Montre le mode sonore actuel et modifie cette
configuration.
Méthode de
sélection
B/ b
,ou
Numéros
, ENTER
B/ b,./ >
ou
Numéros
, ENTER
Numéros
, ENTER
B/ b
,ou
AUDIO
B/ b
,ou
SUBTITLE
B/ b
,ou
ANGLE
AUTO FORMAT DIRECT
1 /3
1 /12
0:20:09
1 ENG
D
5.1 CH
OFF
1 /1
AUTO
Éléments
Numéro de piste
Temps
Canal audio
Son
Fonction (Appuyez sur V/v pour sélectionner
l’élément désiré)
Montre le numéro de la piste actuelle et le nombre total de
pistes, le mode CML activé, ou saute vers le numéro de
piste désiré en mode CML désactivé.
Montre le temps de lecture écoulé (uniquement affichage)
Montre le canal audio et change le canal audio.
Montre le canal audio et change le canal audio.
Méthode de
sélection
B/ b
,ou
Numéros
, ENTER
–
B/ b
,ou
AUDIO
AUTO FORMAT DIRECT
1 /3
AUTO
0:20:09
ST
VCD2.0
VCD1.1
DVD
Page 58

PRÉPARATION
19
Avant la mise en service (suite)
Configuration initiale
Vous pouvez établir vos préférences personnelles en
mode de fonctionnement DVD.
Fonctionnement général
1
Appuyez sur DVD SETUP.
Le menu Configuration s’affiche.
2
Utilisez V/v pour sélectionner l’option désirée.
L’écran montrera la configuration actuelle pour l’op-
tion sélectionnée, ainsi que les autres configurations possibles.
3
Une fois l’option désirée sélectionnée, appuyez
sur b, puis sur V/v pour sélectionner la configu-
ration désirée.
4
Appuyez sur ENTER pour confirmer votre sélection.
Certaines options supposent des pas supplémentaires.
5
Appuyez sur DVD SETUP, RETURN, ou H
(PLAY) pour sortir du menu configuration.
Langue
Langue du disque
Sélectionnez une langue pour le menu, les fonctions
audio et les sous-titres du disque.
Original : La langue originale établie pour le disque est sélec-
tionnée.
Other: Pour sélectionner une autre langue, utilisez les boutons
numérotés pour introduire 4 chiffres suivant le code figurant
dans la liste des codes de langues à la page 34. Si vous introduisez un code de langue erroné, appuyez sur CLEAR.
Remarque
La sélection de la langue du disque pourrait ne pas
marcher pour certains disques DVD.
Langue du menu
Sélectionnez une langue pour le menu configuration.
C’est le menu que vous verrez si vous appuyez sur
DVD SETUP.
Format du téléviseur
Format Letterbox (“boîte aux lettres”) 4/3:
Sélectionnez cette option lorsque l’unité est connectée
à un téléviseur standard 4/3.
Affiche des images avec des bandes noires en haut et
en bas de l’image.
Format Pan & Scan (“recadrage automatique”) 4/3:
Sélectionnez cette option lorsque l’unité est connectée
à un téléviseur à format standard 4/3.
Les images affichées sont découpées pour qu’elles
rentrent dans l’écran du téléviseur.
Les deux côtés de l’image sont coupés.
Format large 16/9: Sélectionnez cette option lorsque
l’unité est connectée à un téléviseur à format large 16/9.
DVD
DVD
Original
Chinese
English
French
German
Spanish
Italian
Korean
Polish
Other — — — —
Original
Chinese
English
French
German
Spanish
Italian
Korean
Polish
Other — — — —
Disc Audio
Disc Subtitle
Disc Menu
Rating
Area Code
TV Aspect
Menu Language
5.1 Speaker Setup
Others
Disc Audio
Disc Subtitle
Disc Menu
Rating
Area Code
TV Aspect
Menu Language
5.1 Speaker Setup
Others
Disc Audio
Disc Subtitle
Disc Menu
Rating
Area Code
TV Aspect
Menu Language
5.1 Speaker Setup
Others
Disc Audio
Disc Subtitle
Disc Menu
Rating
Area Code
TV Aspect
Menu Language
5.1 Speaker Setup
Others
Chinese
Chinese
English
4:3
4:3
16:9
Letterbox
Panscan
Wide
Page 59

20
Avant la mise en service (suite)
Configuration des enceintes
5.1 Configuration des enceintes
Sélectionnez la configuration des enceintes, y inclus le
volume, la balance et la distance, ou testez la
configuration des enceintes.
La configuration des enceintes n’est activée qu’en sortie
multicanal analogique (voir la section “Configuration des
enceintesӈ la page 29.)
Divers
Les configurations du contrôle de la dynamique (DRC)
et de la commande manuelle de lecture (CML) peuvent
être modifiées.
Appuyez sur V/v pour sélectionner l’élément désiré,
puis appuyez sur ENTER. La configuration de l’élé-
ment sélectionné change entre Activé et Désactivé.
Contrôle de la dynamique
Avec le format DVD*1, vous pouvez écouter la piste
audio du programme dans la présentation la plus fidèle
et réaliste possible, grâce à la technologie audio
numérique. Cependant, vous pourriez désirer
comprimer la dynamique de la sortie audio (la
différence entre les sons les plus forts et les plus
faibles). Dans ce cas-là, vous pouvez entendre un film
au plus bas volume sans perdre la clarté du son.
Réglez le Contrôle de la Dynamique sur la position
Activé pour obtenir cet effet.
*1: uniquement pour Dolby Digital
Commande manuelle de lecture (CML)
On: Les CD vidéo avec CML sont lus suivant la CML.
Off: Les CD vidéo avec CML sont lus de la même
manière que les CD audio.
DVD
Disc Audio
Disc Subtitle
Disc Menu
Rating
Area Code
TV Aspect
Menu Language
5.1 Speaker Setup
Others
Front L
Volume 0 dB
Size Small
Distance 0.3 m
Test
Return
S S
Disc Audio
Disc Subtitle
Disc Menu
Rating
Area Code
TV Aspect
Menu Language
5.1 Speaker Setup
Others
DRC
PBC
Off
On
Page 60

PRÉPARATION
21
Avant la mise en service (suite)
Contrôle parental
Classification
Les films en DVD peuvent comprendre des scènes pas
convenables pour enfants. Par conséquent, les disques
peuvent avoir de l’information sur le Contrôle Parental
s’appliquant à l’ensemble du disque ou à certaines scènes
du disque. Ces scènes sont classifiées du niveau 1 au 8, et
alternativement, des scènes plus convenables sont
disponibles pour sélection sur certains disques. Les
classifications varient en fonction du pays. Le dispositif de
contrôle parental vous permet d’éviter la lecture de certains
disques par vos enfants ou de réaliser la lecture de certains
disques avec des scènes alternatives.
1
À l’aide des boutons V/v,sélectionnez l’option
Classement dans le menu de configuration.
2
Une fois l’option Classement sélectionnée,
appuyez sur b.
3
Lorsque vous n’avez pas encore introduit un
code d’accès:
À l’aide des boutons numérotés, introduisez un code
d’accès à 4 chiffres afin de créer un code de sécurité
personnel à 4 chiffres, puis appuyez sur ENTER.
Introduisez le code d’accès à 4 chiffres encore une fois
et appuyez sur ENTER pour vérification.
Lorsque vous avez déjà saisi un code d’accès:
À l’aide des boutons numérotés, introduisez un code
d’accès à 4 chiffres pour confirmer le code de sécurité
personnel à 4 chiffres, puis appuyez sur ENTER.
Si vous vous trompez de code avant d’avoir appuyé sur
ENTER, appuyez sur CLEAR et introduisez de nouveau le
code de sécurité personnel à 4 chiffres.
4
À l’aide des boutons V/v sélectionnez une classification parmi les niveaux 1 à 8. Le niveau
“un” (1) comporte les restrictions de lecture les
moins importantes. Le niveau “huit” (8) com-
porte les restrictions de lectures les plus importantes.
Debloque: Si vous sélectionnez Déverrouillage, le con-
trôle parental sera désactivé et le disque sera lu en
entier.
Niveaux de classification 1 à 8: Certains disques
contiennent des scènes non convenables pour enfants.
Si vous réglez une classification pour le DVD, toutes
les scènes du disque ayant la même classification ou
une classification plus basse seront lues. Les scènes
classifiées à un niveau plus haut ne seront pas lues à
moins qu’une scène alternative soit disponible sur le
disque. La scène alternative doit avoir la même
classification ou une classification plus basse. Si une
scène alternative non convenable est trouvée, la
lecture s’arrêtera. Vous devrez alors introduire le code
d’accès à 4 chiffres ou changer le niveau de
classification afin permettre la lecture du disque.
5
Appuyez sur ENTER pour confirmer votre sélection de classification, puis appuyez sur DVD
SETUP pour sortir du menu.
Code de zone
Introduisez le code de la région dont les standards
seront utilisés pour classifier le disque DVD vidéo. Pour
ce faire, reportez-vous à la liste (voir la section “Liste
des codes des zonesӈ la page 35).
1
À l’aide des boutons V/v ,sélectionnez l’option
Code de zone (Area Code) dans le menu configuration.
2
Une fois l’option Code de zone (Area Code)
sélectionnée, appuyez sur b.
3
Suivez le pas 3 de la section “Classement”à
gauche.
4
À l’aide des boutons V/v ,sélectionnez le pre-
mier caractère.
5
Appuyez sur b pour déplacer le curseur vers le
deuxième caractère et sélectionnez-le à l’aide
des boutons V/v.
6
Appuyez sur ENTER pour confirmer le Code de
zone (Area Code) choisi, puis appuyez sur DVD
SETUP pour sortir du menu.
Remarque
Lorsque vous modifiez le code d’accès à 4 chiffres, il
vous faudra le confirmer (voir la section “Changement
du code d’accès à 4 chiffres” ci-dessous).
Changement du code d’accès à 4 chiffres
1 Suivez les pas 1-2 comme montré ci-dessus à
gauche (Classement).
2 Introduisez l’ancien code d’accès, puis appuyez sur
ENTER.
3 À l’aide des boutons V/v, sélectionnez Changer, puis
appuyez sur ENTER.
4 Introduisez le nouveau code d’accès à 4 chiffres, puis
appuyez sur ENTER.
5 Introduisez exactement le même code d’accès une
deuxième fois, puis appuyez sur ENTER pour vérification.
6 Appuyez sur DVD SETUP pour sortir du menu.
Si vous oubliez votre code d’accès à 4 chiffres
Si vous oubliez votre code d’accès, pour effacer le code
d’accès actuel, suivez la procédure ci-dessous.
1 Appuyez sur DVD SETUP pour afficher le menu con-
figuration.
2 Introduisez le numéro à 6 chiffres “210499”.
Le code d’accès à 4 chiffres est effacé.
3 Introduisez un nouveau code d’accès comme montré
ci-dessus à gauche (Classement).
DVD
DVD
Disc Audio
Disc Subtitle
Disc Menu
Rating
Area Code
TV Aspect
Menu Language
5.1 Speaker Setup
Others
8
7
6
5
4
3
2
1
Unlock
Change
Disc Audio
Disc Menu
Rating
Area Code
TV Aspect
Menu Language
5.1 Speaker Setup
Others
Code Set
U SDisc Subtitle
Page 61

22
Fonctionnement avec des disques DVD et des CD vidéo
Lecture d’un disque DVD et d’un
CD vidéo
Configuration de la lecture
Allumez le téléviseur et sélectionnez la source d’entrée vidéo connectée au récepteur DVD.
Configurez la source de sortie à CD/DVD comme
montré dans la section “Sélection d’une source de
sortie/entré” à la page 16.
1
Appuyez surZZpour ouvrir le plateau à disques.
2
Insérez un disque dans le plateau à disques,
avec l’étiquette au-dessus.
Si vous insérez un disque DVD double couche,
assurez-vous de l’insérer avec la face que vous voulez
lire au-dessous.
3
Appuyez surZZpour fermer le plateau.
Le message
“READING”
apparaît sur l’écran d’affichage et la lecture démarre automatiquement. Si la
lecture ne démarre pas, appuyez sur H (PLAY).
Dans certains cas, c’est le menu du disque qui s’affiche à la place du message
“READING”
.
Si une fenêtre menu s’affiche
Une fenêtre menu peut apparaître automatiquement
après avoir inséré un disque DVD.
Utilisez les boutons
B/b/V/v
pour sélectionner le
titre/chapitre que vous voulez regarder, puis appuyez sur
ENTER pour démarrer la lecture
Appuyez sur DVD TOP MENU ou DVD MENU pour revenir
à la fenêtre menu.
Utilisez les boutons numérotés pour sélectionner la piste
que vous voulez regarder. Appuyez sur RETURN pour
revenir à la fenêtre menu.
La configuration du menu ainsi que les procédures de
fonctionnement exactes pour l’utilisation du menu peuvent varier en fonction du disque. Suivez les instructions
dans chaque fenêtre menu. Vous pouvez également configurer la CML sur la position Désactivée en bas de la
configuration. Voir la page 20.
Remarques
Si le Contrôle Parental est configuré et que le disque
n’est pas parmi les niveaux de classification autorisés
(pas autorisé), vous devrez introduire le code à 4 chiffres
et/ou autoriser le disque (voir “Contrôle Parental”à la
page 21).
Les DVD peuvent avoir un code région.
Votre récepteur DVD ne lira pas de disques ayant un
code région différent de celui de votre récepteur DVD. Le
code région pour ce récepteur DVD est 3.
Ne gardez pas longtemps une image fixe affichée à
l’écran.
Caractéristiques générales
Remarque
Sauf établit autrement, toutes les opérations décrites
demandent l’utilisation de la télécommande. Certaines
caractéristiques peuvent aussi être disponibles dans menu
configuration.
Fonction Reprise
Si vous arrêtez le disque, le lecteur se souvient du point
auquel vous avez appuyez sur
x
(STOP) et le message
“RESUME x”
s’affiche à l’écran du téléviseur. Appuyez sur
H (PLAY) et l’unité reprendra la lecture à partir de ce
point.
Conseil
Pour reproduire dès le début du disque, appuyez deux fois
sur
x
, puis appuyez sur H.
Remarques
En fonction du point où vous avez arrêté le disque, le
récepteur pourrait ne pas reprendre la lecture exactement à partir du même point.
Le point où vous avez arrêté la lecture est effacé
lorsque:
-
vous appuyez sur xen mode ARRET;
-
vous éteignez l’unité;
-
vous ouvrez le plateau à disques.
Sélection d’un autre TITRE
Si le disque a plus d’un titre, vous pouvez sélectionner
un autre titre comme suit:
Appuyez sur DVD DISPLAY. Utilisez les boutons
V/v
pour
sélectionner l’icône du titre, puis appuyez sur les boutons
numérotés (0-9) appropriés, ensuite utilisez le bouton
ENTER pour sélectionner le numéro du titre
.
Appuyez sur DVD DISPLAY, puis utilisez les boutons
B/b
pour sélectionner un numéro de titre, ensuite appuyez
sur ENTER.
Sélection d’un autre CHAPITRE/PISTE
Si le disque a plus d’un chapitre ou plus d’une piste,
vous pouvez choisir un autre chapitre ou une autre piste
comme suit:
Appuyez brièvement sur PREV ou NEXT au cours de la lecture pour revenir au début du chapitre/piste actuels ou pour
sélectionner le chapitre/piste suivants.
Appuyez deux fois sur PREV pour revenir au chapitre/piste
précédents.
Pour aller directement à un chapitre quelconque pendant la
lecture, appuyez sur DVD DISPLAY. Utilisez les boutons
V/v
pour sélectionner l’icône du chapitre ou de la piste. Ensuite,
introduisez le numéro de chapitre/piste à l’aide des boutons
numérotés (0-9) ou bien sélectionnez le chapitre à l’aide des
boutons
B/b
Puis, appuyez sur ENTER.
Remarques
Pour les numéros à un chiffre, appuyez sur les boutons
numérotés (1-9) et attendez pour que l'opération soit effectuée.
Pour des numéros à deux chiffres, appuyez sur les boutons numérotés (0-9) dans une succession rapide
.
Pour un CD vidéo à CML (commande manuelle de lecture), vous devez régler la fonction CML sur la position
Désactivé dans le menu Configuration pour utiliser la
fonction Répétition. Voir
la page 20.
Recherche
1
Appuyez surmouMau cours de la lecture.
Le récepteur DVD passera alors en mode RECHERCHE.
2
A
ppuyez à plusieurs reprises su
mouM
pour sélec-
tionner la vitesse requise:
X2 b, 1 m, 2 m, 3 m
(en
retour) ou
X2 B, 1 M, 2 M, 3 M
(en avance).
Avec un CD vidéo, la vitesse de recherche change:
1
m, 2 m, 3 m
(en retour) ou
1 M, 2 M, 3 M
(en
avance
)
.
3
Pour revenir à la lecture, appuyez sur H (PLAY)
.
Arrêt sur image
1
Appuyez sur (PAUSE) Xau cours de la lecture.
Le graveur passera maintenant en mode PAUSE.
2
Pour revenir à la lecture, appuyez encore une fois sur
X
(PAUSE) ou sur H (PLAY).
VCD1.1VCD2.0
DVD
VCD1.1VCD2.0
DVD
VCD1.1
VCD2.0
DVD
DVD
CD
VCD1.1VCD2.0
DVD
VCD2.0
DVD
VCD1.1VCD2.0
DVD
1 /3
1 /12
1 /3
Page 62

PRÉPARATION
23
Fonctionnement des disques DVD et des CD vidéo (suite)
Caractéristiques générales (suite)
Ralenti
1 Appuyez sur X (PAUSE) au cours de la lecture.
Le récepteur DVD se mettra alors en mode PAUSE.
2 Appuyez sur SLOW t ou T alors que l’unité est en
mode pause.
Le récepteur DVD se mettra alors en mode RALENTI.
3 Utilisez le bouton t ou T pour sélectionner la
vitesse requise: 4 t, 3 t, 2 t ou 1 t (en retour),
ou 4 T, 3 T,
2 T ou 1 T (en avance).
4 Pour revenir à la lecture, appuyez sur
H (PLAY).
Remarque
La lecture au ralenti en retour n’est pas possible sur
des CD vidéo.
Répétition
Disques DVD vidéo – Répéter
chapitre/titre/désactivé
1 Appuyez sur REPEAT au cours de la lecture d’un
disque.
L’icône Répétition s’affichera sur l’écran du téléviseur.
2 Appuyez sur REPEAT pour sélectionner le mode de
répétition désiré.
• CHAPITRE: répète le chapitre actuel.
• TITRE: répète le titre actuel du disque.
• DÉSACTIVÉ: ne lit pas à plusieurs reprises.
Disques CD vidéo - Répéter piste/tout/désactivé
1 Appuyez sur REPEAT au cours de la lecture d’un
disque.
L’icône Répétition s’affichera sur l’écran du téléviseur.
2 Appuyez sur REPEAT pour sélectionner le mode de
répétition désiré.
• PISTE: répète la piste actuelle.
• TOUT: répète toutes les pistes du disque.
• DÉSACTIVÉ: ne lit pas à plusieurs reprises.
Remarques
Pour un CD vidéo à CML (commande manuelle de
lecture), vous devez régler la fonction CML sur la
position Désactivé dans le menu Configuration pour
utiliser la fonction Répétition. Voir la page 20.
Si vous appuyez deux fois sur PREV ou NEXT en
mode Répétition pour aller à la piste précédente ou à
la piste suivante, le mode répétition (uniquement pour
la répétition d’un chapitre ou d’une piste) est annulé.
Recherche par l’heure
La fonction Recherche par l’heure vous permet de
démarrer la lecture à un moment choisi quelconque sur
le disque.
1 Appuyez sur DVD DISPLAY pendant la lecture.
L’affichage à l’écran s’affiche sur l’écran du téléviseur.
La boîte Recherche par l’heure montre le temps de lecture
écoulé du disque actuel.
2 Dans les 10 secondes, utilisez les boutons V/v pour
sélectionner l’icône Recherche par l’heure sur l’affichage à l’écran.
Le message “-:--:--” s’affiche sur la boîte Recherche par
l’heure.
3 Dans les 10 secondes, utilisez les boutons numérotés
pour introduire le temps de démarrage désiré.
Introduisez les heures, minutes et secondes de
gauche à droite dans la boîte.
Si vous introduisez des numéros incorrects, appuyez sur
CLEAR pour effacer les numéros introduits. Puis Introduisez
les numéros corrects.
4 Dans les 10 secondes, appuyez sur ENTER.
La lecture démarrera à partir de l’heure sélectionnée sur le
disque. Si vous introduisez une heure incorrecte, la lecture
continuera à partir du point actuel.
DVD
VCD1.1VCD2.0
DVD
VCD1.1VCD2.0
DVD
CHAPT
TITLE
TRACK
ALL
OFF
OFF
0:20:09
-:--:--
Page 63

24
Fonctionnement des disques DVD et des CD vidéo (suite)
Caractéristiques générales (suite)
Caractéristiques spéciales du
DVD
Vérification du contenu des disques
DVD vidéo: menus
Un disque DVD est divisé dans plusieurs sections, qui
composent une fonction image ou musique. Ces
sections sont appelées “titres”. Lorsque vous lissez des
disques DVD contenant plusieurs titres, vous pouvez
sélectionner le titre désiré à l’aide du bouton DVD TOP
MENU.
Lorsque vous lissez des disques DVD vous permettant
de sélectionner des éléments tels que la langue pour
l’audio, sélectionnez ces éléments à l’aide du bouton
DVD MENU.
1 Appuyez sur DVD TOP MENU ou DVD MENU.
Le menu du disque s’affiche à l’écran du téléviseur.
Les contenus du menu diffèrent d’un disque à l’autre.
2 Appuyez sur B/b/V/v or ou sur les boutons
numérotés pour sélectionner l’élément que vous
voulez lire ou changer.
3 Appuyez sur ENTER.
Prise de caméra
Si le disque contient des séquences enregistrées à
partir de différentes prises de caméra, l’icône des prises
de caméra s’affichera à l’écran du téléviseur. Vous
pouvez alors changer la prise de caméra si vous voulez
le faire.
Appuyez à plusieurs reprises sur ANGLE pendant la
lecture afin de sélectionner la prise de caméra
désirée.
Le numéro de la prise de caméra actuelle apparaît sur l’affichage.
Changement de la langue audio
Appuyez à plusieurs reprises sur AUDIO au cours de la
lecture pour écouter une langue audio ou une piste
audio différente.
Changement du canal audio
Appuyez à plusieurs reprises sur AUDIO au cours de la
lecture pour écouter un canal audio différent (ST
(stéréo), GAUCHE ou DROITE).
Sous-titres
Appuyez à plusieurs reprises sur SUBTITLE au cours
de la lecture pour voir les différentes langues des
soustitres.
Remarque
Si s’affiche, c’est la fonction utilisée à ce moment-là
ou avec ce disque DVD spécifique.
DVD
VCD1.1VCD2.0
DVD
DVD
1 /1
1 ENG
5.1 CH
D
ST
LEFT
RIGHT
1 ENG
Page 64

FONCTIONNEMENT
25
Fonctionnement avec des CD audio et des disques MP3
Lecture d’un CD audio et d’un
disque MP3
Le récepteur DVD peut lire des enregistrements en
format MP3 réalisés sur des disques CD-ROM, CD-R
ou CD-RW. Avant de lire des disques MP3, veuillez
consulter les remarques concernant les fichiers MP3 à
droite.
1
Insérez un disque et fermez le plateau à disques.
CD audio: Le menu du CD audio s’affiche sur
l’écran du téléviseur, passez au pas 4.
Disque MP3: Le menu de sélection MP3/JPEG
s’affiche sur l’écran du téléviseur, passez au pas 2
2
Utilisez les boutons V/v pour sélectionner le
disque MP3, puis appuyez sur ENTER.
Le menu du disque MP3 s’affiche sur l’écran du
téléviseur.
Appuyez sur RETURN pour vous déplacer vers le
menu de sélection MP3/JPEG.
3
Utilisez les boutons V/v pour sélectionner un
dossier, puis appuyez sur ENTER.
Une liste des fichiers dans le dossier s’affiche.
Si une liste de fichiers contient un autre dossier,
répétez le pas 3 encore une fois.
Conseil
Si vous êtes dans une liste de fichiers et que vous
voulez revenir sur la liste de dossiers, utilisez les
boutons V/v pour remarquer et appuyez sur ENTER
pour revenir à la fenêtre menu précédente.
4
Utilisez les boutons V/v pour sélectionner une
piste, puis appuyez sur
H (PLAY) ou ENTER.
La lecture démarre.
Pendant la lecture, le temps de lecture écoulé de la piste
en cours apparaîtra sur l’écran d’affichage et le menu.
La lecture s’arrêtera à la fin du disque.Appuyez sur DVD
TOP MENU pour vous déplacer vers la page suivante.
Appuyez sur DVD MENU pour vous déplacer vers la page
précéde
nte.
Menu du CD audio Menu du disque MP3
5
Appuyez sur x (STOP) pour arrêter la lecture.
Remarques concernant les fichiers
MP3
À propos des MP3
Un fichier MP3, ce sont des données audio comprimées suivant un schéma de codage de fichiers
audio du type couche 3 MPEG1. Nous appelons les
fichiers ayant une extension “.mp3” des “fichiers
MP3”.
Le récepteur DVD ne peut pas lire un fichier MP3
dont l’extension n’est pas “.mp3”.
La compatibilité des disques MP3 avec ce
graveur subi les contraintes suivantes :
Fréquence d’échantillonage : uniquement à 44.1kHz
Débit binaire : entre 32 - 320kbps
Le format physique des disques CD-R doit être “ISO
9660”.
Si vous enregistrez des fichiers MP3 à l’aide d’un
logiciel incapable de créer un SYSTÈME DE
FICHIERS, il sera impossible de lire ces fichiers MP3.
disque enregistré en mode disque entier (ou “disc-atonce”) nécessite des fichiers MP3 dans la première
piste. S’il n’y a pas de fichiers MP3 dans la première
piste, il est impossible de lire des fichiers MP3. Si
vous voulez lire des fichiers MP3, formatez toutes les
données sur le disque ou bien utilisez un disque neuf.
Les noms des fichiers doivent comporter 8 caractères
maximum et ils doivent incorporer l’extension “.mp3”,
par ex.: “********.mp3”.
N’employez pas de caractères spéciaux tels que “/ : *
? “ < > ”, etc.
Le nombre total des fichiers dans le disque doit être
inférieur à 650.
Ce récepteur DVD demande que les
disques/enregistrements respectent certains standards
techniques pour obtenir une qualité de lecture optimale.
Les DVD préenregistrés sont automatiquement
configurés suivant ces standards. Il y a différents types
de format pour les disques enregistrables (y compris les
CD-R contenant des fichiers MP3) qui exigent certaines
conditions préalables (voir ci-dessus) afin d’en assurer
une lecture compatible.
Il faut également remarquer que les clients doivent
avoir une permission pour télécharger des fichiers
MP3 et de la musique au moyen d’Internet. Notre
société n’a pas le droit d’accorder une telle
permission. Cette permission doit toujours être
obtenue auprès du propriétaire des droits d’auteur.
MP3CD
ST0: 56: 18
TRACK 1
TRACK 2
TRACK 3
TRACK 4
TRACK 12
TRACK 8
TRACK 10
TRACK 3
TRACK 5
TRACK 6
TRACK 7
TRACK 8
Program
CD
Clear All
AUTO
MP3
JPEG
TRACK 1.mp3
TRACK 2.mp3
TRACK 3.mp3
TRACK 4.mp3
TRACK 5.mp3
TRACK 6.mp3
TRACK 7.mp3
TRACK 8.mp3
Program
MP3
OFF00:00
1
Clear All
TRACK 1.mp3
TRACK 2.mp3
TRACK 3.mp3
TRACK 4.mp3
TRACK 8.mp3
TRACK 2.mp3
TRACK 4.mp3
TRACK 3.mp3
TRACK 5.mp3
TRACK 6.mp3
TRACK 7.mp3
TRACK 8.mp3
Program
MP3
OFF00:00
3
Clear All
Page 65

26
Fonctionnement avec des CD audio et des disques MP3 (suite)
Pause
1 Appuyez sur X (PAUSE) pendant la lecture.
2 Pour revenir à la lecture, appuyez encore une fois sur
X (PAUSE) ou sur
H (PLAY).
Sélection d’une autre piste
Si le disque a plus une piste, vous pouvez vous
déplacer vers une autre piste comme suit:
Appuyez brièvement sur . ou > au cours de la
lecture pour revenir au début de la piste actuelle.
Appuyez deux fois sur . pour revenir à la piste
précédente.
Dans les CD audio, pour aller directement à une piste
donnée pendant la lecture, introduisez le numéro de
piste à l’aide des boutons numérotés (0-9) au cours
de la lecture.
Remarque
Pour les numéros à un chiffre, appuyez sur les
boutons numérotés (1-9) et attendez pour que
l'opération soit effectuée.
Pour des numéros à deux chiffres, appuyez sur les
boutons numérotés (0-9) dans une succession rapide.
Recherche
1 Appuyez sur m ou M au cours de la lecture.
Le récepteur DVD passera alors en mode RECHERCHE.
2 Appuyez à plusieurs reprises sur m ou M pour
sélectionner la vitesse requise: 1 m, 2 m, 3 m
(en retour) ou 1 M, 2 M, 3 M (en avance).
La vitesse et la direction de recherche seront indiquées
dans la fenêtre menu.
3 Pour revenir à la lecture, appuyez sur H (PLAY).
Répétition
1 Appuyez sur REPEAT au cours de la lecture d’un
disque.
L’icône Répétition s’affichera sur l’écran du téléviseur.
2 Appuyez sur REPEAT pour sélectionner le mode de
répétition désiré.
• PISTE: répète la piste actuelle.
• TOUT: répète toutes les pistes du disque.
• DÉSACTIVÉ: ne lit pas à plusieurs reprises.
Remarque
Si vous appuyez deux fois sur . ou > en mode
Répétition pour aller à la piste précédente ou à la piste
suivante, le mode répétition (uniquement pour la
répétition d’une piste) est annulé.
Changement du canal audio
Appuyez à plusieurs reprises sur AUDIO au cours de la
lecture pour entendre un canal audio différent (ST
(stéréo), GAUCHE ou DROITE).
CD
MP3CD
MP3CD
MP3CD
MP3CD
TRACK
ALL
OFF
Page 66

FONCTIONNEMENT
27
Fonctionnement avec des fichiers JPEG
Visionnement des fichier
s JPEG sur un
disque
Ce récepteur DVD peut lire des disques contenant des
fichiers JPEG. Avant de lire des fichiers JPEG, veuillez
consulter les remarques sur les fichiers JPEG à droite.
1
Insérez un disque et fermez le plateau.
Le menu de sélection MP3/JPEG s’affiche sur
l’écran du téléviseur.
2
Utilisez les boutons V/v pour sélectionner
l’option JPEG, puis appuyez sur ENTER.
Le menu JPEG s’affiche sur l’écran du téléviseur.
3
Utilisez les boutons V/v pour sélectionner un
dossier, puis appuyez sur ENTER.
Une liste des fichiers dans le dossier s’affiche.
Appuyez sur RETURN pour vous déplacer vers le
menu de sélection MP3/JPEG.
Conseil
Si vous êtes dans une liste de fichiers et que vous voulez
revenir sur la liste de dossiers, utilisez les boutons V/v
dans la télécommande pour remarquer “
”
et appuyez
sur ENTER pour revenir à la fenêtre menu précédente.
4
Utilisez les boutons V/v pour sélectionner un
fichier, puis appuyez sur ENTER ou
H (PLAY).
La fonction Visionnement de Fichiers démarre. Lors
du visionnement d’un fichier, appuyez sur RETURN
pour vous déplacer vers le menu précédent (menu
JPEG).
Appuyez sur DVD TOP MENU pour vous déplacer vers la page suivante.
Appuyez sur DVD MENU pour vous déplacer vers la page
précédente.
Remarque
Un fichier JPEG qui ne peut pas être reproduit, sera sauté.
.
Conseil
Il y a trois options pour la vitesse de défilement du
visionnement: rapide, normale et lente. Cet élément
peut également être Désactivé. Utilisez les boutons B/b
pour remarquer Vitesse de Défilement, puis utilisez les
boutons V/v pour sélectionner l'option que vous voulez
utiliser, ensuite appuyez sur ENTER.
5
Appuyez sur x (STOP) pour arrêter le visionnement.
Le menu JPEG s'affiche
Sélection d’un autre fichier
Appuyez une fois sur . ou > au cours de la
lecture pour avancer vers le fichier suivant ou
précédent.
Arrêt sur image
1 Appuyez sur X (PAUSE) au cours de la présentation.
Le récepteur DVD passe maintenant en mode
PAUSE.
2 Pour revenir à la présentation, appuyez encore une
fois sur
H (PLAY) ou sur X (PAUSE).
Pour déplacer l’image
Appuyez sur V/v au cours du visionnement d’une image
pour la déplacer horizontalement ou verticalement.
Pour pivoter l’image
Appuyez sur B/b au cours du visionnement d’une image
pour la pivoter dans le sens des aiguilles d’une montre
ou dans le sens contraire.
Remarques concernant les
fichiers JPEG
En fonction de la taille et du nombre des fichiers
JPEG, il peut prendre longtemps pour que le lecteur
de DVD lisse les contenus du disque. Si vous ne
voyez pas l’affichage sur écran après plusieurs minutes, c’est peut être que certains fichiers sont trop
longs, faites diminuer la résolution des fichiers JPEG
au-dessus des 2 mégapixels et enregistrez un autre
disque.
Le nombre total des fichiers et des dossiers sur le
disque doit être inférieur à 650.
Certains disques peuvent être incompatibles en raison des différents formats d’enregistrement ou de leur
état.
Lorsque vous utilisez des logiciels pour enregistrer
des fichiers JPEG sur un disque CD-R, veillez à ce
que tous les fichiers sélectionnés aient l'extension
".jpg" avant de les copier dans la structure du CD.
Si les fichiers ont des extensions “.jpe” ou “.jpeg”,
veuillez les renommer comme des fichiers “.jpg”.
Les fichiers n’ayant pas l’extension “.jpg” ne peuvent
pas être lus par ce récepteur DVD, même si ces
fichiers sont montrés comme des fichiers d’image
JPEG sous Windows Explorer.
JPEG
Slide Speed
5/32 1024X768
Picture1.jpg
Picture2.jpg
Picture3.jpg
Picture4.jpg
Picture5.jpg
Picture6.jpg
Picture7.jpg
JPEG
Off
Folder1
5/32 Picture5.jpg1024X768
Slide Speed
Off
Folder1
Folder2
Folder3
Folder4
Folder5
Folder6
Folder7
Folder8
JPEG
MP3
JPEG
Page 67

Lecture programmée
MP3
VCD1.1VCD2.0
CD
Lecture programmée des CD audio et
des MP3
La fonction Programme vous permet de garder dans la
mémoire du récepteur DVD vos pistes favorites à partir
d’un disque quelconque.
La fonction Programme est capable de mémoriser 30
pistes.
1
Appuyez sur PROGRAM pour introduire le mode
Édition de programme.
La marque apparaîtra à droite du mot Programme
dans le côté droit de la fenêtre menu.
Remarque
Appuyez sur PROGRAM pour sortir du mode Édition de
programme; la marque disparaîtra.
2
Sélectionnez une piste, puis appuyez sur
ENTER pour insérer la piste sélectionnée dans
la liste programmée.
3
Répétez le pas 2 pour insérer d’autres pistes
dans la liste programmée.
Menu CD audio Menu disque MP3
4
Appuyez sur b.
La piste programmée que vous avez sélectionnée la
dernière est remarqué dans la liste programmée.
5
Appuyez sur V/v pour sélectionner la piste par
laquelle vous voulez faire démarrer la lecture.
Appuyez sur DVD TOP MENU pour vous déplacer vers la
page suivante.
Appuyez sur DVD MENU pour vous déplacer vers la page
précédente.
6
Appuyez sur H (PLAY) ou ENTER pour
démarrer.
La lecture démarre suivant l’ordre que vous avez programmé pour les pistes et le message “PROG” apparaît sur la
fenêtre menu.
La lecture s’arrête après avoir lu une fois la dernière piste
programmée de la liste programmée.
7
Pour revenir au mode de lecture normal à
partir de la lecture programmée, appuyez
sur PROGRAM pour sortir du mode Édition
de programme. Sélectionnez une piste
dans la liste du CD (ou MP3) et ensuite
appuyez sur ENTER ou
H (PLAY).
Le message “PGM” disparaît de la fenêtre menu.
Lecture programmée des CD vidéo
Remarque
Sur un CD Vidéo avec CML, vous devez régler la CML
sur la position Désactivé dans le menu configuration
pour utiliser la fonction Programme.Voir page 20.
1
Insérez un CD vidéo et fermez le plateau à disques.
2
Appuyez sur PROGRAM.
Le menu Programme CD-V s’affiche.
Remarque
Appuyez sur RETURN, PROGRAM ou H (PLAY) pour
sortir du menu Programme.
3
Suivez les pas 2-6 de la section “Lecture pro-
grammée des CD audio et des disques MP3”à
gauche.
Le message “PROGRAMME” s’affichera sur l’écran du
téléviseur.
4
Pour revenir au mode de lecture normal à partir de
la lecture programmée, appuyez sur PROGRAM.
Le message “PROGRAMME” disparaît de la fenêtre menu.
Répétition des pistes programmées
1 Appuyez sur REPEAT au cours de la lecture des
pistes programmées.
L’icône Répétition s’affichera sur l’écran du téléviseur.
2 Appuyez sur REPEAT pour sélectionner le mode de
répétition désiré.
• PISTE: répète la piste actuelle.
• TOUT: répète toutes les pistes de la liste program-
mée.
• DÉSACTIVÉ: ne lit pas à plusieurs reprises.
Effacement d’une piste de la liste programmée
1 Appuyez sur PROGRAM au cours de la lecture
(uniquement pour CD audio et disques MP3) ou sur
STOP pour passer au mode Édition de programme.
La marque apparaîtra.
2 Appuyez sur b pour vous déplacer vers la liste pro-
grammée.
3 Utilisez les boutons V/v pour sélectionner la piste que
vous voulez effacer de la liste programmée.
4 Appuyez sur CLEAR.
La piste sera alors effacée de la liste programmée.
Effacement de toute la liste programmée
1 Suivez les pas 1-2 de la section “Effacement d’une
piste de la liste programmée” ci-dessus.
2 Utilisez les boutons V/v pour sélectionner “Effacer
tout”, puis appuyez sur ENTER.
La liste programmée complète sera effacée du disque.
Remarques
Les programmes sont effacés lorsque l’appareil est mis hors
tension.
Les programmes sont effacés lorsque le disque est enlevé.
Les programmes sont effacés lorsqu’un autre mode de
fonctionnement (VIDÉO, FM, AM, etc.) est sélectionné.
28
CD
TRACK01
TRACK02
TRACK03
TRACK04
TRACK05
TRACK06
TRACK07
TRACK08
0: 56: 18
Program
Clear All
ST AUTO
MP3
Folder1
Folder2
Folder3
Folder4
Folder5
Folder6
Folder7
Folder8
Program
Clear All
OFF00:00
VCD
TRACK 1
TRACK 2
TRACK 3
TRACK 4
TRACK 5
TRACK 6
TRACK 7
TRACK 8
TRACK
ALL
Program
Clear All
OFF
Page 68

FONCTIONNEMENT
29
Configuration des enceintes
Vous pouvez établir vos préférences personnelles en
mode de fonctionnement DVD.
Réglez la configuration suivante pour le décodeur
surround à canal 5.1 incorporé.
1
Appuyez sur DVD SETUP.
Le menu configuration s’affiche.
2
À l’aide des boutons V/v ,sélectionnez l’option
“5.1 Speaker Setup” dans le menu configura-
tion.
3
Une fois l’option “5.1 Speaker Setup” sélectionnée, appuyez sur le bouton b.
4
Appuyez sur les boutons b pour sélectionner
l’enceinte désirée.
5
À l’aide des boutons V/v/B/b,réglez les
options.
Sélection de l’enceinte
Sélectionnez l’enceinte que vous voulez régler.
(enceinte frontale (gauche), enceinte frontale (droite),
enceinte centrale, enceinte surround (gauche), enceinte
surround (droite) ou caisson de graves).
Remarque
Certaines configurations des enceintes sont interdites
par le contrat de licence de Dolby Digital.
Volume
Appuyez sur B / b pour régler le niveau de sortie de
l’enceinte sélectionnée. (-6dB ~ 6dB).
Taille
Étant donné que la taille établit pour les enceintes est
fixe, vous ne pouvez pas changer cette configuration.
La taille du caisson de graves est fixée à “Large” et
celle des autres enceintes est fixée à “Petite”.
Distance
Si vous branchez les enceintes à votre récepteur DVD,
le réglage de la Distance permet aux enceintes
(excepté le caisson de graves) de savoir quelle est la
distance que le son doit parcourir pour arriver au point
d’écoute établi. Ceci permet au son de chaque enceinte
d’arriver à l’auditeur en même temps.
Remarque
Vous ne pouvez pas établir la distance de l’enceinte du
caisson de graves.
Test
Appuyez sur ENTER pour tester les signaux de chaque
enceinte. Réglez le volume pour faire coïncider le
volume des signaux testés mémorisés dans le système.
Frontale gauche (G) → Centrale → Frontale droite (D)
→ Surround droit (D) → Surround gauche (G) →
Caisson de graves
Vous pouvez arrêter le test en utilisant les boutons V/v.
Revenir
Appuyez sur ENTER pour revenir au menu précédent.
Disc Subtitle
Disc Menu
Rating
Area Code
TV Aspect
Menu Language
5.1 Speaker Setup
Others
Disc Audio
S S
Front L
Volume 0 dB
Size Small
Distance 0.3 m
Test
Return
Page 69

30
Information supplémentaire
Configuration de la minuterie-sommeil
Vous pouvez configurer ce récepteur DVD pour qu’il soit
automatiquement éteint à une heure donnée.
11
Appuyez sur SLEEP pour établir le temps d’arrêt désiré.
Les messages SLEEP et “minuterie-sommeil”
apparaissent sur l’écran d’affichage.
22
À chaque fois que vous appuyez sur SLEEP la
configuration change dans l’ordre suivant:
SLEEP 90 →80 → 70 → 60→ 50 → 40 → 30 → 20 →10 →
OFF
Remarque
Vous pouvez vérifier le temps restant avant que le
récepteur DVD ne s’arrête.
Appuyez sur SLEEP. Le temps restant apparaît sur
l’écran d’affichage.
Visionnement du temps de lecture et
du temps restant sur l’écran du
panneau avant
Vous pouvez vérifier l’information du disque, telle que le
temps restant, le nombre total de titres sur un DVD ou
les pistes d’un CD, d’un CD vidéo ou d’un MP3, en
utilisant l’écran du panneau avant.
Appuyez sur DISPLAY dans la télécommande.
À chaque fois que vous appuyez sur DISPLAY au cours
de la lecture d’un disque, l’affichage change comme
montré dans les graphiques.
Remarques
En fonction du type de disque en cours de lecture ainsi que
du mode de lecture, l’information du disque pourrait ne pas
être affichée.
Cette fonction n’est disponible qu’en mode lecture.
Conseils
Lors de la lecture des CD vidéo ayant les fonctions de CML
(commande manuelle de lecture), seul le temps de lecture
de la scène est affiché.
Le temps de lecture et le temps restant du chapitre en
cours, le titre, la piste, la scène ou le disque s’afficheront
également sur l’écran du téléviseur.
Gradateur
Cette fonction change la luminosité de l’écran
d’affichage sur le panneau avant pendant que l’unité est
allumée.
Appuyez à plusieurs reprises sur DIMMER.
Silencieux
Appuyez sur MUTING pour annuler le son de votre
unité.
Vous pouvez annuler le son de votre unité, par exemple,
pour répondre au téléphone, le message “MUTING ON”
(SILENCIEUX ACTIVÉ) apparaît sur l’écran d’affichage.
Pour rétablir le son, appuyez encore une fois sur
MUTING.
Utilisation de la prise écouteur
Branchez une fiche d’écouteur stéréo ( 3.5mm) sur la
prise ÉCOUTEUR (PHONES).
Les enceintes sont automatiquement débranchées
lorsque vous branchez le casque d’écoute (non fourni).
Commande Volume
Vous pouvez régler le volume en appuyant à plusieurs
reprises sur VOLUME (-/+).
Utilisation de l’effet sonore
Ce système vous permet d’utiliser des effets sonores,
rien qu’en appuyant sur un bouton. Choisissez le son
qui satisfait vos besoins.
Appuyez sur DSGX dans la télécommande.
L’effet sonore est activé.
DSGX
Avec le DSGX activé, les basses fréquences sont
effectivement renforcées.
Pour désactiver l’effet sonore
Appuyez encore une fois sur DSGX dans la
télécommande.
Remarques
Si vous branchez un casque d’écoute au système, la fonction DSGX ne marche pas.
Cette fonction n’est disponible qu’en mode lecture.
Page 70

FONCTIONNEMENT
31
Fonctionnement de la radio
Préréglage des stations radio
Vous pouvez prérégler 30 stations FM et AM (MW).
Avant de les syntoniser, assurez-vous d’avoir diminué le
volume.
11
Appuyez sur TUNER BAND dans la télécommande jusqu’à ce que le message FM ou AM
(MW) apparaisse sur l’écran d’affichage.
22
Et ensuite, à chaque fois que vous appuyez sur
TUNER BAND, les bandes FM et AM (MW)
changent de façon alternée.
33
Appuyez sur le bouton TUNING - ou + dans la
télécommande et maintenez-le enfoncé environ
deux secondes jusqu’à ce que le voyant de la
fréquence commence à changer, puis lâchez-le.
Le balayage s’arrête lorsque le récepteur DVD/CD syntonise une station. Les message “TUNED” (SYNTONISÉ)
et “ST” (pour programme stéréo) apparaissent sur l’écran
d’affichage.
Remarque
Le message ”TUNED” (SYNTONISÉ) ne s’affiche que
lorsqu’il s’agit d’un signal FM.
44
Appuyez sur TUNER MENU dans la télécommande.
Un numéro préréglé s’affichera momentanément sur
l’écran d’affichage.
55
Appuyez sur TUNING - ou + dans la télécommande pour sélectionner le numéro préréglé
désiré.
66
Appuyez encore une fois sur TUNER MENU
dans la télécommande.
La station est mémorisée.
77
Répétez les pas 3 à 6 pour mémoriser
d’autres stations.
Pour syntoniser une station dont le signal est
faible
Appuyez à plusieurs reprises sur TUNING - ou + afin de
syntoniser manuellement la station, comme indiqué au
pas 3.
Pour effacer les stations mémorisées
Appuyez sur le bouton TUNER MENU et maintenez-le
enfoncé pendant environ deux secondes, le message
“EFFACER TOUT” apparaîtra sur l’écran d’affichage,
ensuite appuyez encore une fois sur le boutons TUNER
MENU, toutes les stations seront alors effacées.
Si vous avez introduit accidentellement le mode “EFFAC-
ER TOUT” et que vous ne voulez pas effacer la mémoire,
n’appuyez sur aucun bouton. Après quelques secondes,
le message “EFFACER TOUT” disparaîtra de l’écran d’af-
fichage et l’unité reviendra au mode nor
mal.
Remarque
Si toutes les stations ont déjà été mémorisées, le message
COMPLET apparaît un moment sur l’écran d’affichage et
ensuite le numéro préréglé s’affiche momentanément.
Pour changer le numéro préréglé, suivez les pas 5-6
indiqués ci-dessus.
Écouter la radio
D’abord, préréglez les stations radio dans la mémoire
du récepteur DVD (voir la section “Préréglage des
stations radioӈ gauche).
11
Appuyez sur TUNER BAND dans la télécommande jusqu’à ce que le message AM (MW) ou
FM apparaisse sur l’écran d’affichage.
La dernière station reçue est syntonisée.
22
Appuyez à plusieurs reprises sur PRESET
-/+
pour sélectionner la station préréglée désirée.
À chaque fois que vous appuyez sur ce bouton, le récepteur DVD syntonise une station préréglée à la fois.
33
Réglez le volume en appuyant à plusieurs
reprises sur VOLUME + ou .
Pour éteindre la radio
Appuyez sur @ / 1 pour éteindre le récepteur DVD ou
bien sélectionnez un autre mode de fonctionnement
(CD/DVD, VIDÉO ou TV).
Pour écouter des stations radio non préréglées
Utilisez la syntonisation manuelle ou automatique
comme indiqué au pas 2.
Pour la syntonisation manuelle, appuyez à plusieurs
reprises sur TUNING - ou + dans la télécommande.
Pour la syntonisation automatique, appuyez sur TUNING - ou + dans la télécommande et maintenez-le
enfoncé pendant environ deux secondes.
Pour sélectionner directement une station
radio préréglée
Vous pouvez utiliser les boutons numérotés dans la
télécommande pour sélectionner directement une
station radio préréglée.
Par exemple, pour écouter la station préréglée 4,
appuyez sur 4 dans la télécommande. Pour écouter la
station préréglée 19, appuyez sur 1 puis sur 9 (dans les
3 secondes).
Pour votre référence
Si une station FM est bruyante/affectée de bruit
Appuyez sur FM MODE dans la télécommande de
telle façon que le message “ST” disparaisse de
l’écran d’affichage. Il n’y aura pas d’effet stéréo, mais
la réception sera améliorée. Appuyez encore une fois
sur FM MODE pour rétablir l’effet stéréo.
Pour améliorer la réception
Réorientez les antennes fournies.
Page 71

32
Commander le téléviseur à l’aide de la télécommande fournie
À l’aide de la télécommande, vous pouvez commander
le niveau du son, la source d’entrée et l’interrupteur de
marche de votre téléviseur.
Commander le téléviseur
Vous pouvez commander votre téléviseur à l’aide des
boutons ci-dessous.
En appuyant sur Vous pouvez
TV @ / 1 Allumer ou éteindre le téléviseur.
TV/VIDEO Basculer l’entrée du téléviseur
entre TV et d’autres sources
d’entrée..
TV CH +/- Faire un balayage vers le haut ou
vers le bas parmi les chaînes
mémorisées.
TV VOL +/- Régler le volume du téléviseur.
Utiliser les boutons numérotés pour
commander le téléviseur
Si vous réglez la commande en mode téléviseur, vous
pouvez utiliser les boutons numérotés pour commander
le téléviseur.
Appuyer sur les boutons du téléviseur
Le boutons TV devient rouge et la télécommande est
réglée en mode téléviseur. Vous pouvez sélectionner les
chaînes de télévision en utilisant les boutons
numérotés.
>10 sert à sélectionner les numéros de chaîne
audessus de 10.
Pour annuler le mode téléviseur, appuyez encore un fois
sur le bouton TV.
Remarques
• Avant de régler le téléviseur, appuyez sur TV.
• Le bouton TV est désactivé si vous n’utilisez pas la
télécommande pendant 10 secondes.
• En fonction du téléviseur, il pourrait être impossible de
commander votre téléviseur en utilisant certains des
boutons ci-dessus indiqués.
Conseil
En fonction du type de téléviseur, la méthode suivant
pourrait être utile. Pour un numéro à deux chiffres,
appuyez d’abord sur -/— et ensuite sur le numéro. (Par
exemple, pour le canal 25, appuyez sur -/—, puis sur 2
et sur 5.)
TV @ / 1
TV/VIDEO
TV CH +/-
TV VOL +/-
TV
Page 72

FONCTIONNEMENT
33
Utilisation de la fonction SONY TV DIRECT
SONY TV DIRECT vous permet d’allumer votre
téléviseur SONY et ce système, change le mode du
système vers “CD/DV D,” et ensuite bascule la source
d’entrée du téléviseur que vous avez établie en
appuyant sur un seul bouton.
En appuyant sur Numéro Source d’entrée du téléviseur
TV/VIDEO 0 Aucune source d’entrée
(par défaut)
1 VIDEO1
2 VIDEO2
3 VIDEO3
4 VIDEO4
5 VIDEO5
6 VIDEO6
7 ENTRÉE
COMPOSANT 1
8 ENTRÉE
COMPOSANT 2
2
Appuyez sur TV CH + et maintenez-le enfoncé
pendant que vous introduisez le code pour le
temps de transmission (voir la table ci-dessous)
en utilisant les boutons numérotés.
Le temps de transmission à partir de la télécommande est sélectionné.
Si vous réglez correctement le code du temps de
transmission, le bouton TV clignote lentement deux
fois. Si le réglage n’a pas réussi, le bouton TV clignote rapidement cinq fois.
En appuyant sur Numéro Temps de transmission
TV CH + 1 0.5
(par défaut)
21
3 1.5
42
5 2.5
63
7 3.5
84
Fonctionnement
Pointez la télécommande vers le téléviseur et ce
système, puis appuyez une fois sur SONY TV DIRECT.
Le bouton TV clignote lorsque vous transmettez le code
à partir de la télécommande.
Remarques
Cette fonction n’est disponible que pour les
téléviseurs des séries SONY.
Si cette fonction ne marche pas, changez le temps de
transmission. Le temps de transmission diffère en
fonction du téléviseur.
Si la distance entre le téléviseur et ce système est
trop importante, cette fonction pourrait ne pas
marcher. Installez le système près du téléviseur.
Maintenez la télécommande pointée vers le téléviseur
et ce système pendant que le bouton TV clignote.
SONY TV DIRECT
TV/VIDEO
TV CH +/-
TV
Boutons numérotés
Préparation
Enregistrez la source d’entrée du téléviseur connectée
à ce système.
1
Appuyez sur TV/VIDEO et maintenez-le enfoncé
pendant que vous introduisez le code pour la
source d’entrée du téléviseur pour connecter ce
système (voir la table ci-dessous) en utilisant
les boutons numérotés.
La source d’entrée du téléviseur est sélectionnée.
Si vous réglez correctement le code de la source
d’entrée du téléviseur, le bouton TV clignote lentement deux fois. Si le réglage n’a pas réussi, le
bouton TV clignote rapidement cinq fois.
Page 73

34
Liste des codes des langues
Introduisez le code numérique approprié pour la configuration initiale “Audio du disque”, “Sous-titres du disque”
et/ou “Menu du disque” (Voir la page 19).
Code Languges
6566 Abkhazian
6565 Afar
6570 Afrikaans
8381 Albanian
6577 Ameharic
6582 Arabic
7289 Armenian
6583 Assamese
6588 Aymara
6590 Azerbaijani
6665 Bashkir
6985 Basque
6678 Bengali; Bangla
6890 Bhutani
6672 Bihari
6682 Breton
6671 Bulgarian
7789 Burmese
6669 Byelorussian
7577 Cambodian
6765 Catalan
9072 Chinese
6779 Corsican
7282 Croatian
6783 Czech
6865 Danish
7876 Dutch
6978 English
6979 Esperanto
6984 Estonian
7079 Faroese
Code Languges
7074 Fiji
7073 Finnish
7082 French
7089 Frisian
7176 Galician
7565 Georgian
6869 German
6976 Greek
7576 Greenlandic
7178 Guarani
7185 Gujarati
7265 Hausa
7387 Hebrew
7273 Hindi
7285 Hungarian
7383 Icelandic
7378 Indonesian
7365 Interlingua
7165 Irish
7384 Italian
7465 Japanese
7487 Javanese
7578 Kannada
7583 Kashmiri
7575 Kazakh
7589 Kirghiz
7579 Korean
7585 Kurdish
7679 Laothian
7665 Latin
7686 Latvian, Lettish
Code Languges
7678 Lingala
7684 Lithuanian
7775 Macedonian
7771 Malagasy
7783 Malay
7776 Malayalam
7784 Maltese
7773 Maori
7782 Marathi
7779 Moldavian
7778 Mongolian
7865 Nauru
7869 Nepali
7879 Norwegian
7982 Oriya
8065 Panjabi
8083 Pashto, Pushto
7065 Persian
8076 Polish
8084 Portuguese
8185 Quechua
8277 Rhaeto-Romance
8279 Rumanian
8285 Russian
8377 Samoan
8365 Sanskrit
7168 Scots Gaelic
8382 Serbian
8372 Serbo-Croatian
8378 Shona
8368 Sindhi
Code Languges
8373 Singhalese
8375 Slovak
8376 Slovenian
8379 Somali
6983 Spanish
8385 Sudanese
8387 Swahili
8386 Swedish
8476 Tagalog
8471 Tajik
8465 Tamil
8484 Tatar
8469 Telugu
8472 Thai
6679 Tibetan
8473 Tigrinya
8479 Tonga
8482 Turkish
8475 Turkmen
8487 Twi
8575 Ukrainian
8582 Urdu
8590 Uzbek
8673 Vietnamese
8679 Volapük
6789 Welsh
8779 Wolof
8872 Xhosa
7473 Yiddish
8979 Yoruba
9085 Zulu
Page 74

RÉFÉRENCE
35
Code Zone
AD Andorra
AE United Arab Emirates
AF Afghanistan
AG Antigua and Barbuda
AI Anguilla
AL Albania
AM Armenia
AN Netherlands Antilles
AO Angola
AQ Antarctica
AR Argentina
AS American Samoa
AT Austria
AU Australia
AW Aruba
AZ Azerbaidjan
BA Bosnia-Herzegovina
BB Barbados
BD Bangladesh
BE Belgium
BF Burkina Faso
BG Bulgaria
BH Bahrain
BI Burundi
BJ Benin
BM Bermuda
BN Brunei Darussalam
BO Bolivia
BR Brazil
BS Bahamas
BT Bhutan
BV Bouvet Island
BW Botswana
BY Belarus
BZ Belize
CA Canada
CC Cocos (Keeling) Islands
CF Central African Republic
CG Congo
CH Switzerland
CI Ivory Coast
CK Cook Islands
CL Chile
CM Cameroon
CN China
CO Colombia
CR Costa Rica
CS Former Czechoslovakia
CU Cuba
CV Cape Verde
CX Christmas Island
CY Cyprus
CZ Czech Republic
DE Germany
DJ Djibouti
DK Denmark
DM Dominica
DO Dominican Republic
DZ Algeria
EC Ecuador
EE Estonia
EG Egypt
EH Western Sahara
Code Zone
ER Eritrea
ES Spain
ET Ethiopia
FI Finland
FJ Fiji
FK Falkland Islands
FM Micronesia
FO Faroe Islands
FR France
FX France (European
Territory)
GA Gabon
GB Great Britain
GD Grenada
GE Georgia
GF French Guyana
GH Ghana
GI Gibraltar
GL Greenland
GM Gambia
GN Guinea
GP Guadeloupe (French)
GQ Equatorial Guinea
GR Greece
GS S. Georgia & S. Sandwich
Isls.
GT Guatemala
GU Guam (USA)
GW Guinea Bissau
GY Guyana
HK Hong Kong
HM Heard and McDonald
Islands
HN Honduras
HR Croatia
HT Haiti
HU Hungary
ID Indonesia
IE Ireland
IL Israel
IN India
IO British Indian Ocean
Territory
IQ Iraq
IR Iran
IS Iceland
IT Italy
JM Jamaica
JO Jordan
JP Japan
KE Kenya
KG Kyrgyzstan
KH Cambodia6
KI Kiribati
KM Comoros
KN
Saint Kitts & Nevis Anguilla
KP North Korea
KR South Korea
KW Kuwait
KY Cayman Islands
KZ Kazakhstan
LA Laos
LB Lebanon
Code Zone
LC Saint Lucia
LI Liechtenstein
LK Sri Lanka
LR Liberia
LS Lesotho
LT Lithuania
LU Luxembourg
LV Latvia
LY Libya
MA Morocco
MC Monaco
MD Moldavia
MG Madagascar
MH Marshall Islands
MK Macedonia
ML Mali
MM Myanmar
MN Mongolia
MO Macau
MP Northern Mariana Islands
MQ Martinique (French)
MR Mauritania
MS Montserrat
MT Malta
MU Mauritius
MV Maldives
MW Malawi
MX Mexico
MY Malaysia
MZ Mozambique
NA Namibia
NC New Caledonia (French)
NE Niger
NF Norfolk Island
NG Nigeria
NI Nicaragua
NL Netherlands
NO Norway
NP Nepal
NR Nauru
NU Niue
NZ New Zealand
OM Oman
PA Panama
PE Peru
PF Polynesia (French)
PG Papua New Guinea
PH Philippines
PK Pakistan
PL Poland
PM Saint Pierre and Miquelon
PN Pitcairn Island
PR Puerto Rico
PT Portugal
PW Palau
PY Paraguay
QA Qatar
RE Reunion (French)
RO Romania
RU Russian Federation
RW Rwanda
SA Saudi Arabia
SB Solomon Islands
Code Zone
SC Seychelles
SD Sudan
SE Sweden
SG Singapore
SH Saint Helena
SI Slovenia
SJ Svalbard and Jan Mayen
Islands
SK Slovak Republic
SL Sierra Leone
SM San Marino
SN Senegal
SO Somalia
SR Suriname
ST Saint Tome and Principe
SU Former USSR
SV El Salvador
SY Syria
SZ Swaziland
TC Turks and Caicos Islands
TD Chad
TF French Southern
Territories
TG Togo
TH Thailand
TJ Tadjikistan
TK Tokelau
TM Turkmenistan
TN Tunisia
TO Tonga
TP East Timor
TR Turkey
TT Trinidad and Tobago
TV Tuvalu
TW Taiwan
TZ Tanzania
UA Ukraine
UG Uganda
UK United Kingdom
UM USA Minor Outlying
Islands
US United States
UY Uruguay
UZ Uzbekistan
VA Vatican City State
VC Saint Vincent &
Grenadines
VE Venezuela
VG Virgin Islands (British)
VI Virgin Islands (USA)
VN Vietnam
VU Vanuatu
WF Wallis and Futuna Islands
WS Samoa
YE Yemen
YT Mayotte
YU Yugoslavia
ZA South Africa
ZM Zambia
ZR Zaire
ZW Zimbabwe
Liste des codes des zones
Introduisez le code numérique approprié pour la configuration initiale “Code de zones” (Voir la page 21).
Page 75

36
Dépannage
Vérifiez le guide suivant pour découvrir la cause possible d’un problème avant de faire appel au service technique.
Symptôme
L’unité est hors tension.
Le récepteur DVD est
mis sous tension mais il
ne marche pas.
Absence d’image
Il n’y a pas de son ou
on n’entend qu’un très
bas niveau de son.
L’image lue est de mauvaise qualité
Le récepteur DVD ne
démarre pas la lecture.
On entend un
ronflement ou bruit fort.
Cause
• Le cordon d’alimentation est débranché.
• Aucun disque n’est inséré.
• Le téléviseur n’est pas réglé pour
recevoir la sortie de signal du DVD.
• Le câble vidéo n’est pas fermement
relié.
• Le téléviseur connecté est éteint.
• L’équipement connecté à l’aide du câble
audio n’est pas réglé pour recevoir la
sortie de signal du DVD.
• Les câbles audio ne sont pas fermement reliés.
• L’équipement connecté à l’aide du câble
audio est éteint.
•
Le câble audio de raccordement est endommagé.
• Le disque est sale.
• Aucun disque n’est inséré.
• Le disque inséré n’est pas lisible.
• Le disque est placé à l’envers.
• Le disque n’est pas inséré dans le
guide.
• Le disque est sale.
• Un menu est affiché sur l’écran du
téléviseur.
• Le niveau de classification a été choisi.
• Les fiches et les prises sont sales.
• Le disque est sale.
• Les enceintes et les composants sont
mal reliés.
• Le récepteur de DVD est placé trop près
du téléviseur.
Correction
• Branchez fermement le cordon d’alimentation sur la prise murale.
• Insérez un disque. (Vérifiez que le voyant du DVD ou du CD audio est allumé
sur l’écran d’affichage du récepteur
DVD)
•
Sélectionnez le mode d’entrée vidéo approprié sur le téléviseur de telle façon que l’image provenant du récepteur DVD/CD s’affiche sur l’écran du téléviseu
r.
• Reliez fermement le câble vidéo aux
prises
• Allumez le téléviseur.
•
Sélectionnez le mode d’entrée approprié
pour la réception audio de telle sorte de
pouvoir entendre le son provenant du
récepteur DVD.
• Reliez fermement le câble audio aux
prises.
• Allumez l’équipement connecté à l’aide
du câble audio.
•
Remplacez-le par un nouveau câble audio.
• Nettoyez le disque.
• Insérez un disque. (Vérifiez que le voy-
ant du DVD ou du CD audio est allumé
sur l’écran d’affichage du récepteur DV
D)
•
Insérez un disque lisible. (Vérifiez le type de
disque, le système couleur et le code régionale.)
• Insérez le disque avec la face lisible
audessous.
•
Veillez à insérez le disque dans le plateau à disque
et veillez correctement placé dans le guide
.
• Nettoyez le disque.
• Appuyez sur le bouton DVD SETUP
pour désactiver la fenêtre menu.
• Annulé la fonction classification ou
changez le niveau de classification.
• Frottez-les à l’aide d’un chiffon légèrement mouillé avec de l’alcool.
• Nettoyez le disque.
• Reliez fermement les enceintes et les
composants.
• Déplacez votre téléviseur loin des composants audio.
Page 76

RÉFÉRENCE
37
Dépannage (suite)
Symptôme
Il est impossible de syntoniser les stations
radio.
La télécommande ne
marche pas bien.
Le mode sonore ou le
mode Pro Logic II ne
peut pas être modifié.
L’affichage du panneau
avant est trop faible.
Cause
• L’antenne est mal positionnée ou reliée.
• L’intensité du signal des stations est trop
faible (pour les syntoniser automatiquement).
•
Il n’y a aucune station préréglée ou toutes les stations préréglées ont été effacées (lors de la syntonisation par balayage des stations préréglées).
• La télécommande n’est pas pointez vers
le capteur infrarouge du récepteur DVD.
• La télécommande est trop loin du récepteur DVD.
• Il y a un obstacle dans la trajectoire de
la télécommande et le récepteur
DVD/CD.
• Les piles dans la télécommande sont
déchargées.
• Le système ne peut pas changer au
cours de la lecture d’un disque MP3.
• Rien n’est affiché sur l’écran d’affichage
du panneau avant.
Correction
• Reliez fermement l’antenne.
• Réglez les antennes et connectez une
antenne extérieure si besoin.
• Syntonisez manuellement la station.
• Préréglez les stations (page 31).
• Pointez la télécommande vers le cap-
teur infrarouge du récepteur DVD.
• Utilisez la télécommande pas plus loin
des 20 pieds (6 m).
• Retirez l’obstacle.
• Remplacez ces piles par des piles
neuves.
• Insérez un disque CD.
• Appuyez sur DIMMER dans la télécom-
mande.
Page 77

38
Alimentation 220-240V c.a., 50/60Hz
Consommation 70W, pas plus de 1 W (220-240V c.a.) (en mode économiseur)
Poids 4.7 kg
Dimensions extérieures (L x H x P) 430 x 70 x 383.5 mm
Conditions de fonctionnement Température: 5°C à 35°C, position de fonctionnement: horizontale
Humidité de fonctionnement 5% à 85%
Laser Diode laser, longueur d’onde 650 nm pour CD-V et DVD, longueur
d’onde 780 nm pour CD
Durée de l’émission Ininterrompue
Système de codage PAL 625/50, NTSC 525/60
Réponse de fréquence (audio)
2 Hz ~ 20 kHz (±1.0 dB)
Rapport signal sur bruit (audio)
Plus de 75 dB (1 kHz, NOP, 20 kHz filtre LPF/A)
Dynamique (audio) Plus de 70 dB
Distorsion harmonique (audio) 0.5 % (1 kHz, sur la position 12W) (20 kHz filtre LPF/A)
Entrées VIDEO (ENTRÉE AUDIO):
Sensibilité: 800 m V
Impédance: 50 kilohms
Sortie vidéo 1.0 V (p-p), 75Ω, sync. négative, prise RCA
Sortie S-vidéo (Y) 1.0 V (p-p), 75 Ω, synchro négative., Mini DIN 4-pin x 1
(C) 0.3 V (p-p), 75 Ω
Composant sortie vidéo (Y) 1.0 V (p-p), 75 Ω, synchro négative., RCA
prise
x 1
(P
B)/(CB)/(PR)/(CR) 0.7 V (p-p), 75 Ω, RCA
prise
x 2
Plage de fréquences 87.5 - 108 MHz
Fréquence intermédiaire 10.7 MHz
Rapport signal sur bruit 60 dB (Mono)
Plage de fréquences 522 - 1,611 kHz
Fréquence intermédiaire 450 kHz
Mode stéréo 50W + 50W (8 Ω à 1 kHz, THD 10 %)
Mode surround Frontal: 50W + 50W
Central*: 50W
Surround*: 50W + 50W (8Ω à 1 kHz, THD 10 %)
Caisson de graves*: 80W (4Ω à 50 Hz, THD 10 %)
Sorties MONITEUR ÉCOUTEUR: (32 Ω, 25mW)
Enceinte satellite (SS-TS9) aisson de graves passif (SS-WS9)
Type 1 voie 1 enceinte 1 voie 1 enceinte
Impédance 8 Ω 4 Ω
Réponse de fréquence 180 - 20,000 Hz 45 - 180 Hz
Puissance d’entrée nominale 50W 80W
Puissance d’entrée maxi. 100W 160W
Dimensions nettes (L x H x P) 98 x 102 x 106 mm 173 x 380 x 402 mm
Poids net 0.6 kg 6.8 kg
• Enceintes . . . . . . . . . . . . . . . . . . . . . . . . . . . .5 • Câbles pour enceintes. . . . . . . . . . .6
• Caisson de graves . . . . . . . . . . . . . . . . . . . . .1 • Piles taille AA (R6) . . . . . . . . . . . . .2
• Télécommande (infrarouge) RM-SS220 . . . . .1 • Antenne cadre AM . . . . . . . . . . . . . .1
• Antenne FM . . . . . . . . . . . . . . . . . . . . . . . . . .1 • Coussinets . . . . . . . . . . . . . . . . . . .20
• Enceintes – Connexion et . . • Câble vídeo . . . . . . . . . . . . . . . . . . .1
installation (fiche) . . . . . . . . . . . . . . . . . . . . . .1 • Mode d’emploi . . . . . . . . . . . . . . . .1
Spécifications
[Général]
[CD/DVD][Magnétoscope]
[Amplificateur][Enceintes]
[Accessoires
fournis]
❋ Les modèles et les spécifications sont susceptibles d’être modifiés sans préavis.
(* En fonctions de la configuration du mode sonore et de la
source, il pourrait ne pas avoir
de sortie de son.)
[Tuner]
[FM]
AM
[MW]
Page 78

Sony Corporation
Printed in China
http://www.sony.net
Page 79

Sistema DVD Cine en
casa
©2004 Sony Corporation
DAV -SB100
Manual de instrucciones
ES
Page 80

2
Precauciones de seguridad
ADVERTENCIA: No instale el equipo en un espacio
reducido, como en una estantería o unidad similar.
Para evitar un incendio, no cubra la ventilación del aparato
con periódicos, manteles, cortinas, etc.Tampoco coloque
velas encendidas sobre el aparato.
No tire las pilas con los desperdicios
generales de la casa, deséchelas
correctamente con los desperdicios
químicos.
Este aparato está clasificado como un
producto CLASS 1 LASER. Esta
etiqueta se encuentra en la parte
posterior del exterior.
PRECAUCIÓN:
Este receptor DVD utiliza un sistema láser.
Para garantizar un uso adecuado de este producto, lea
detenidamente este manual de usuario y guárdelo para futuras
consultas. En caso de que la unidad necesite servicio de
reparación, póngase en contacto con un centro de servicio
autorizado (consulte el procedimiento para solicitar servicio
técnico).
El uso de los controles, ajustes o la realización de
procedimientos diferentes a los aquí especificados puede
provocar una exposición peligrosa a la radiación.
Para evitar una exposición directa al haz del láser, no intente
abrir la carcasa. La radiación del láser es visible al abrir. NO
MIRE FIJAMENTE AL HAZ.
PRECAUCIÓN: No deberá exponerse el aparato a agua (goteo
o salpicadura), ni colocar sobre el mismo objetos con líquido,
como jarrones.
Precauciones
Seguridad
• Si se introduce algún objeto en la cubierta, desenchufe la
unidad y póngase en contacto con personal cualificado para
que la revise antes de volver a utilizarla.
• La unidad no estará desconectada de la fuente de alimentación de CA (red eléctrica) mientras esté conectada al
tomacorriente de la pared, incluso si se ha apagado la
unidad.
• Desenchufe la unidad del tomacorriente de la pared (red
eléctrica) si no va a utilizarse durante un periodo de tiempo
prolongado.Para desconectar el cable, estire de la clavija y
no del cable.
Instalación
•Permita que haya una circulación de aire adecuada para evitar la acumulación de calor en el interior.
• No coloque la unidad sobre superficies (alfombras, mantas,
etc.) o cerca de materiales (cortinas, sábanas) que puedan
bloquear las ranuras de ventilación.
• No coloque la unidad cerca de fuentes de calor, como
radiadores, o conductos de aire, o en lugares expuestos a la
luz solar directa, polvo excesivo, vibraciones mecánicas o
golpes.
• No coloque la unidad en posición inclinada. Está diseñada
para funcionar únicamente en posición horizontal.
• Mantenga la unidad y los discos alejados de equipos con
imanes potentes, como hornos microondas o grandes
altavoces.
• No coloque objetos pesados sobre la unidad.
• Si traslada directamente la unidad de un lugar frío a uno
cálido, puede condensarse humedad en el interior del
sistema DVD Cine en casa y dañar la lente. Cuando instale la
unidad por primera vez, o si la traslada de un lugar frío a uno
cálido, espere aproximadamente 30 minutos antes de utilizar
la unidad.
Fuentes de alimentación
• El cable de alimentación de CA debe cambiarse únicamente
en un establecimiento cualificado.
Colocación
• Coloque el receptor en un lugar con ventilación adecuada
para evitar un calentamiento del sistema.
•A un volumen elevado durante largos periodos de tiempo, la
cubierta resulta caliente al tacto. No se trata de un mal
funcionamiento.
No obstante, debe evitar tocar la cubierta. No coloque la
unidad en un espacio reducido donde haya poca ventilación,
ya que puede producirse un sobrecalentamiento.
• No bloquee las ranuras de ventilación colocando objetos
sobre el sistema. El receptor está equipado con un
amplificador de alta potencia.
Si se bloquean las ranuras de ventilación de la superficie
superior, la unidad puede sobrecalentarse y producirse un
mal funcionamiento.
• No coloque el sistema sobre una superficie blanda, como
una alfombra, que pueda bloquear las ranuras de ventilación
de la parte inferior.
• No deje el sistema cerca de fuentes de calor, ni en un lugar
expuesto a la luz solar directa, polvo excesivo o golpes
mecánicos.
Funcionamiento
• Si traslada directamente el sistema de un lugar frío a uno
cálido, o si se coloca en una habitación muy húmeda, podrá
condensarse humedad en la lente del interior del sistema. Si
esto sucede, puede que el sistema no funcione
adecuadamente. En este caso, retire el disco y deje el
sistema encendido durante aproximadamente media hora
hasta que se evapore la humedad.
• Cuando mueva el sistema extraiga los discos. Si no lo hace,
los discos pueden dañarse.
La placa de características está situada en la parte posterior
de la unidad.
ADVERTENCIA: PARA REDUCIR EL RIESGO DE
INCENDIO O DESCARGA ELÉCTRICA, NO EXPONGA
ESTE PRODUCTO A LA LLUVIA NI A LA HUMEDAD.
AVISO IMPORTANTE
Precaución: Este sistema es capaz de mantener
indefinidamente una imagen de video fija o una visualización
en pantalla en su TV. Si deja la imagen de video fija o la
visualización en pantalla en su TV durante un periodo de
tiempo prolongado, es posible que se produzca un daño
permanente en la pantalla del TV. Los TV de proyección son
especialmente susceptibles a esto.
Page 81

INTRODUCCIÓN
3
Precauciones de seguridad (continuación)
NOTAS SOBRE LOS DERECHOS DE AUTOR:
La ley prohíbe la copia, transmisión, exhibición, transmisión
por cable, reproducción en público y el alquiler de mater
ial
con derechos de autor sin permiso.
Este producto dispone de la función de protección contra
copia desarrollada por Macrovision. Algunos discos
disponen de señales de protección contra copia. Al grabar
y reproducir las imágenes de dichos discos en una
videograbadora, aparecerá ruido de imagen.
Este producto incorpora tecnología de protección de los
derechos de autor amparada por demandas de patentes
de EE.UU.y otros derechos de propiedad intelectual
adquiridos por Macrovision Corporation y otros propietarios
de derechos. La utilización de esta tecnología de
protección de los derechos de autor debe ser autorizada
por Macrovision Corporation y está destinada únicamente
para uso doméstico y otras formas limitadas de visionado,
a menos que Macrovision Corporation lo autorice
expresamente.Está prohibida la ingeniería inversa o
desmontaje de la unidad.
Sobre los símbolos de las
instrucciones
Indica el posible riesgo de ocasionar daños a la propia
unidad u otros daños materiales.
Nota Indica las características de funcionamiento
especiales de esta unidad.
Consejo Indica consejos para hacer la tarea más sencilla.
Page 82

4
Índice
Introducción
Precauciones de seguridad . . . . . . . . . . . . . . . . . . . . . .2-3
Índice . . . . . . . . . . . . . . . . . . . . . . . . . . . . . . . . . . . . . . . .4
Antes del uso . . . . . . . . . . . . . . . . . . . . . . . . . . . . . . . . . .5-6
Discos reproducibles . . . . . . . . . . . . . . . . . . . . . . . . . . . .5
Precauciones . . . . . . . . . . . . . . . . . . . . . . . . . . . . . . . . .6
Notas sobre los discos . . . . . . . . . . . . . . . . . . . . . . . . . .6
Sobre los símbolos . . . . . . . . . . . . . . . . . . . . . . . . . . . . .6
Controles del panel frontal . . . . . . . . . . . . . . . . . . . . . . . . .7
Indicadores del visualizador . . . . . . . . . . . . . . . . . . . . . . .8
Control remoto . . . . . . . . . . . . . . . . . . . . . . . . . . . . . . . . . .9
Conexiones del panel posterior . . . . . . . . . . . . . . . . . . . .10
Preparación
Conexiones . . . . . . . . . . . . . . . . . . . . . . . . . . . . . . . . . .1-15
Conexión a un TV . . . . . . . . . . . . . . . . . . . . . . . . . . . . .11
Conexión a un equipo externo . . . . . . . . . . . . . . . . . . .12
Conexiones de las antenas . . . . . . . . . . . . . . . . . . . . . .13
Conexión del sistema de altavoces . . . . . . . . . . . . . . . .14
Posición de los altavoces . . . . . . . . . . . . . . . . . . . . . . .15
Selección de la fuente de entrada/salida . . . . . . . . . . . . .16
Antes del funcionamiento . . . . . . . . . . . . . . . . . . . . .17-21
Breve glosario sobre pistas de audio y modo surround .17
Modo de sonido . . . . . . . . . . . . . . . . . . . . . . . . . . . . . .17
Explicación general . . . . . . . . . . . . . . . . . . . . . . . . . . . .18
Visualización en pantalla . . . . . . . . . . . . . . . . . . . . . . . .18
Ajustes iniciales . . . . . . . . . . . . . . . . . . . . . . . . . . . .19-21
• Funcionamiento general . . . . . . . . . . . . . . . . . . .19
• Idioma . . . . . . . . . . . . . . . . . . . . . . . . . . . . . . . . .19
• Imagen . . . . . . . . . . . . . . . . . . . . . . . . . . . . . . . . .19
• Configuración de los altavoces . . . . . . . . . . . . . . .20
• Otros . . . . . . . . . . . . . . . . . . . . . . . . . . . . . . . . . .20
• Control paterno . . . . . . . . . . . . . . . . . . . . . . . . . .21
• Código de zona . . . . . . . . . . . . . . . . . . . . . . . . . .21
Funcionamiento
Funcionamiento de los discos DVD o CD de video . 22-24
Reproducción de un disco DVD o CD de video . . . . . .22
Funciones generales . . . . . . . . . . . . . . . . . . . . . . . . . . .22
• Función de reanudación . . . . . . . . . . . . . . . . . . . .22
• Selección de otro TÍTULO . . . . . . . . . . . . . . . . . .22
• Selección de otro CAPÍTULO/PISTA . . . . . . . . . .22
• Búsqueda . . . . . . . . . . . . . . . . . . . . . . . . . . . . . .22
• Imagen fija . . . . . . . . . . . . . . . . . . . . . . . . . . . . .22
• Cámara lenta . . . . . . . . . . . . . . . . . . . . . . . . . . . .23
• Repetición . . . . . . . . . . . . . . . . . . . . . . . . . . . . . .23
• Búsqueda por tiempo . . . . . . . . . . . . . . . . . . . . .23
Funciones especiales de los DVD . . . . . . . . . . . . . . . . .24
• Comprobación del contenido de los discos
DVD de video:Menús . . . . . . . . . . . . . . . . . . . . .24
• Ángulo de la cámara . . . . . . . . . . . . . . . . . . . . . .24
• Cambio del idioma de audio . . . . . . . . . . . . . . . .24
• Cambio del canal de audio . . . . . . . . . . . . . . . . .24
• Subtítulos . . . . . . . . . . . . . . . . . . . . . . . . . . . . . .24
Funcionamiento de los discos MP3 y CD de audio . .25-26
Reproducción de un disco MP3 o CD de audio . . . . . . .25
Notas sobre las grabaciones en MP3 . . . . . . . . . . . . . .25
• Pausa . . . . . . . . . . . . . . . . . . . . . . . . . . . . . . . . . .26
• Selección de otra pista . . . . . . . . . . . . . . . . . . . .26
• Búsqueda . . . . . . . . . . . . . . . . . . . . . . . . . . . . . . .26
• Repetición . . . . . . . . . . . . . . . . . . . . . . . . . . . . . .26
• Cambio del canal de audio . . . . . . . . . . . . . . . . .26
Funcionamiento de archivos JPEG . . . . . . . . . . . . . . . . .27
Visualización de archivos JPEG en un disco . . . . . . . .27
• Selección de otro archivo . . . . . . . . . . . . . . . . . .27
• Imagen fija . . . . . . . . . . . . . . . . . . . . . . . . . . . . .27
• Para darle la vuelta a la imagen . . . . . . . . . . . . .27
• Para girar la imagen . . . . . . . . . . . . . . . . . . . . . . .27
• Notas sobre los archivos JPEG . . . . . . . . . . . . . .27
Reproducción programada . . . . . . . . . . . . . . . . . . . . . . . .28
Repetición programada con un disco MP3 y
CD de audio . . . . . . . . . . . . . . . . . . . . . . . . . . . . . . . .28
Reproducción programada con un CD de video . . . . . .28
Configuración de los altavoces . . . . . . . . . . . . . . . . . . . .29
Información adicional . . . . . . . . . . . . . . . . . . . . . . . . . . .30
Ajuste del temporizador de apagado . . . . . . . . . . . . . .30
Visionado del tiempo de reproducción
y del tiempo restante en el visualizador del
panel frontal . . . . . . . . . . . . . . . . . . . . . . . . . . . . . . . . .30
Regulador de luz . . . . . . . . . . . . . . . . . . . . . . . . . . . . .30
Silenciamiento . . . . . . . . . . . . . . . . . . . . . . . . . . . . . . .30
Uso de la toma de auriculares . . . . . . . . . . . . . . . . . . .30
Control del volumen . . . . . . . . . . . . . . . . . . . . . . . . . . .30
Uso del efecto de sonido . . . . . . . . . . . . . . . . . . . . . . .30
Funcionamiento de la radio . . . . . . . . . . . . . . . . . . . . . . .31
Presintonización de las emisoras de radio . . . . . . . . . . .31
Cómo escuchar la radio . . . . . . . . . . . . . . . . . . . . . . . .31
Control del TV con el control remoto suministrado . . . 32
Control del TV . . . . . . . . . . . . . . . . . . . . . . . . . . . . . . . .32
Uso de la función SONY TV DIRECT . . . . . . . . . . . . . . . .33
Preparación . . . . . . . . . . . . . . . . . . . . . . . . . . . . . . . . 33
Funcionamiento . . . . . . . . . . . . . . . . . . . . . . . . . . . . . .33
Referencia
Lista de códigos de idioma . . . . . . . . . . . . . . . . . . . . . . 34
Lista de códigos de Región . . . . . . . . . . . . . . . . . . . . . . .35
Solución de problemas . . . . . . . . . . . . . . . . . . . . . . . .36-37
Especificaciones . . . . . . . . . . . . . . . . . . . . . . . . . . . . . . . .38
Este producto ha sido fabricado bajo licencia de Dolby
Laboratories.“Dolby”, “Pro Logic” y el símbolo de la doble D
son marcas comerciales de Dolby Laboratories.Trabajos
confidenciales no publicados.Copyright 1992-1997 Dolby
Laboratories.Todos los derechos reservados.
Fabricado bajo licencia de Digital Theater Systems, Inc.
Patente de EE.UU.nº 5.451,942 5.956,674, 5.974,380,
5.978,762 y otras patentes mundiales emitidas y pendientes.
”DTS” y “DTS Digital Surround” son marcas comerciales
registradas de Digital Theater Systems, Inc.Copyright 1996,
2000 Digital Theater Systems, Inc.Todos los derechos
reservados.
Page 83

5
INTRODUCCIÓN
Antes del uso
Discos reproducibles
Discos DVD de video
(disco de 8 cm/12 cm)
CD de video (VCD)
(disco de 8 cm/12 cm)
CD de audio
(disco de 8 cm/12 cm)
Además, esta unidad puede reproducir discos DVD-R/RW, SVCD y CD-R o CD-RW que contengan títulos de
audio, MP3 o archivos JPEG.
Notas
Algunos discos CD-R/RW (o DVD-R/-RW) no podrán
reproducirse en la unidad debido a las condiciones
del equipo de grabación o a los propios discos CDR/RW (o DVD-R/-RW)
.
Los discos DVD-RW grabados en modo VR
(grabación de video) no se pueden reproducir en esta
unidad.
No adhiera etiquetas ni adhesivos a ninguna cara
(cara etiquetada o grabada) de los discos.
No utilice discos compactos de formas irregulares
(p.ej., con forma de corazón u octagonales).Si lo
hace, puede producirse un funcionamiento defectuoso.
Notas sobre discos DVD y CD de video
Es posible que ciertas operaciones de reproducción de
los discos DVD y CD de video estén expresamente
determinadas por los fabricantes de software.
Puesto que esta unidad reproduce discos DVD y CD de
video de acuerdo con el contenido del disco diseñado
por el fabricante de software, es posible que no pueda
disponerse de ciertas funciones de reproducción de la
unidad o que se hayan añadido otras funciones.
Consulte también las instrucciones suministradas con
los discos DVD y CD de video. Es posible que algunos
discos DVD fabricados con finalidades de uso comercial
no puedan reproducirse en la unidad.
Código de región del receptor DVD y de los discos
DVD
Este receptor DVD está diseñado y fabricado para la
reproducción de software DVD codificado con código de
región “3”. El código de región especificado en las
etiquetas de ciertos discos DVD indica el tipo de
reproductor que puede reproducirlos. Esta unidad
puede reproducir solamente discos DVD con el código
“3” o “ALL”. Si intenta reproducir discos de otro
tipo, la pantalla del TV mostrará el mensaje
“Check Regional Code”. Algunos discos DVD
que no disponen de etiqueta del código de
región pueden todavía estar sujetos a restricciones de
la zona y, por lo tanto, no ser reproducibles.
Términos relacionados con los disco
Título (sólo discos DVD de video)
El contenido principal de la película o contenido de las
funciones acompañantes o contenido de las funciones
adicionales o álbum de música.
A cada título se le asigna un número de referencia de
título que le permite localizarlo fácilmente.
Capítulo (sólo discos DVD de video)
Secciones de una imagen o de una pieza musical más
pequeñas que los títulos. Un título se compone de uno
o varios capítulos.
A cada capítulo se le asigna un número, que permite
localizar el capítulo deseado.En algunos discos no
pueden grabarse capítulos.
Pista (sólo discos CD de video y CD de audio)
Secciones de una imagen o de una pieza musical en un
CD de video o CD de audio.A cada pista se le asigna
un número, que permite localizar la pista deseada.
Índice (CD de video)
Un número que divide una pista en secciones para
localizar fácilmente el punto que desee de un CD de
video.En algunos discos no pueden grabarse índices.
Escena
En un CD de video con funciones de PBC (control de
reproducción), las imágenes con movimiento y las
imágenes fijas se dividen en secciones llamadas
“escenas”. Cada escena aparece en la pantalla del
menú y se le asigna un número de escena,
permitiéndole localizar la escena deseada.
Una escena se compone de una o varias pistas.
Archivo
Secciones de una imagen en un CD de datos que
contiene archivos de imagen JPEG.
Tipos de discos CD de video
Hay dos tipos de discos CD de video:
CDs de video equipados con PBC (versión 2.0)
Las funciones de PBC (control de reproducción) le
permiten interactuar con el sistema mediante menús,
funciones de búsqueda u otras operaciones típicas con
computadora. Además, pueden reproducirse imágenes
fijas de alta resolución si están incluidas en el disco.
CDs de video no equipados con PBC (versión 1.1)
Funcionan del mismo modo que los CDs de audio.
Estos discos permiten la reproducción de imágenes de
video, así como sonido, pero no están equipados con
PBC.
3
NOTA IMPORTANTE:
LAS PILAS AGOTADAS O DESCARGADAS DEBEN
RECICLARSE O DESECHARSE DE MANERA
SEGURA EN CONFORMIDAD CON TODAS LAS
LEYES APLICABLES.
SI DESEA INFORMACIÓN DETALLADA, PÓNGASE
EN CONTACTO CON LA AUTORIDAD LOCAL
RESPONSABLE DE LOS RESIDUOS SÓLIDOS.
Page 84

6
Antes del funcionamiento (continuación)
Precauciones
Manejo de la unidad
Al transportar la unidad
Los materiales de embalaje y la caja de transporte
originales resultan útiles. Para obtener una máxima
protección, vuelva a embalar la unidad cómo fue
embalada originalmente en fábrica.
Al instalar la unidad
La imagen y el sonido de un TV, VCR o radio que se
encuentre cerca puede distorsionarse durante la
reproducción. En este caso, aleje la unidad de dichos
aparatos o apáguela una vez extraído el disco.
Para mantener limpias las superficies exteriores
No utilice líquidos volátiles, como aerosoles de
insecticida, cerca de la unidad. No deje productos de
caucho ni de plástico en contacto con la unidad durante
mucho tiempo.Si lo hace, dejarán marcas sobre la
superficie.
Limpieza de la unidad
Para limpiar la cubierta
Emplee un paño seco y suave.Si la superficie está muy
sucia, utilice un paño suave ligeramente humedecido
con una solución detergente poco concentrada. No
utilice disolventes fuertes, como alcohol, bencina o
diluyentes, ya que podrían dañar la superficie de la
unidad.
Para obtener imágenes nítidas
El receptor DVD es un dispositivo de alta tecnología y
precisión. Si la lente de lectura óptica y los
componentes de la unidad de disco están sucios o
gastados, la calidad de la imagen será mala.
Se recomienda realizar inspecciones y mantenimiento
de forma regular después de cada 1.000 horas de uso.
(Esto depende del entorno de funcionamiento).
Si desea más información, póngase en contacto con su
distribuidor más cercano.
Notas sobre los discos
Manejo de los discos
No toque la cara de reproducción del disco.
Sujete el disco por los bordes para no dejar huellas
dactilares en la superficie.
No pegue papel o cinta en el disco.
Almacenamiento de los discos
Después de la reproducción, guarde el disco en su
caja.
No exponga los discos a la luz solar directa ni a fuentes
de calor.Tampoco los deje en un automóvil aparcado
bajo la luz solar directa, ya que puede producirse un
considerable aumento de temperatura en el interior del
mismo.
Limpieza de los discos
La existencia de huellas dactilares y polvo en el disco
puede distorsionar la imagen o empeorar la calidad del
sonido.Antes de realizar la reproducción, limpie el disco
con un paño de limpieza. Hágalo desde el centro hacia
los bordes.
No utilice disolventes fuertes, como alcohol, bencina,
diluyentes, productos de limpieza disponibles en el
comercios ni aerosoles antiestáticos destinados a discos
de vinilo.
Este sistema sólo puede reproducir discos circulares
estándar.
Si utiliza discos que no sean circulares o estándar (p.ej.,
forma de tarjeta, corazón o estrella) puede producirse un
funcionamiento defectuoso.
No utilice discos con accesorios incorporados disponibles
en comercios, como una etiqueta o un anillo.
Sobre los símbolos
Sobre la visualización del símbolo
Puede que se visualice “ ” en la pantalla del TV
durante el funcionamiento.
Este icono significa que la función que se explica en
este manual de usuario no está disponible en ese disco
DVD de video específico.
Sobre los símbolos de los discos
para las instrucciones
Una sección cuyo título tenga uno de los siguientes
símbolos es aplicable sólo al disco representado por el
símbolo.
Discos DVD de video
CDs de video con la función PBC (control de la
reproducción).
CDs de video sin la función PBC (control de la
reproducción).
CDs de audio.
Disco MP3.
Disco JPEG.
JPEG
MP3
CD
VCD1.1
VCD2.0
DVD
Page 85

INTRODUCCIÓN
7
Controles del panel frontal
STANDBY
IR
- PRESET +
-
VOLUME +
FUNCTION
PHONES
PAUSA (XX)
Detiene temporalmente la reproducción de un disco.
ABRIR/CERRAR ( )
Abre o cierra la bandeja de discos.
Sensor remoto
Apunte aquí con el control remoto del receptor DVD.
Visualizador
Bandeja de discos
Inserte aquí un disco.
Indicador @ / 1 (ALIMENTACIÓN)
Enciende y apaga el receptor DVD.
PARADA (xx)
Detiene la reproducción de un disco.
REPRODUCCIÓN (
H)
Para reproducir un disco.
SALTO hacia adelante (
TT
)
DVD: Va al SIGUIENTE capítulo/pista.
RADIO: Para seleccionar la emisora presintonizada
que desee.
SALTO hacia atrás (
SS
)
DVD: Va al comienzo del capítulo/pista actual o al capítulo/pista
anterior.
RADIO: Para seleccionar la emisora presintonizada que desee.
Control VOLUME
Pulse “+” para subir el volumen o pulse “-”
para bajar el volumen.
Indicador STANDBY
Se ilumina cuando el receptor está
en modo de espera (apagado).
FUNCTION
Para seleccionar la fuente del
receptor.
(FM, AM, VIDEO, TV o CD/DVD)
PHONES
Para conectar los auriculares.
Page 86

8
Indicadores del visualizador
Indica el número de capítulo
o pista actual.
Indicadores del modo de reproducción repetida.
Indicadores de tiempo total de reproducción/tiempo
transcurrido/frecuencia/tiempo restante/estado actual/número de
título/modo surround/volumen, etc.
Indica que la unidad está en modo radio.
Indicador del temporizador de
apagado
Se ilumina cuando el receptor
DVD sintoniza una emisora.
Disco CD insertado.
Indica que la unidad está en modo estéreo.
Estado de la reproducción.
Disco MP3 insertado.
Se ilumina cuando la
unidad está en modo
DSGX ON.
Disco VCD2.0 insertado.
Indica el formato
surround actual.
Indicador de título
Indica che il
formato del
suono è DOLBY
PROLOGIC II.
Indica el formato
surround actual.
DISC
CHAP TITLE
FM
REP 1ALBM
TRK
AM
TUNED PBC SLEEP
MP3 CD ST DSGX
D
D
D
D
PL II
D
Page 87

SONY TV DIRECT
Selecciona directamente la fuente de
salida para el DVD.
TV @ / 1
Enciende y apaga el TV.
@ / 1
Enciende y apaga el receptor DVD.
AUTO FORMAT DIRECT
Selecciona el modo de sonido entre
A.F.D.
AUTO, PRO LOGIC, PLII MOVIE y PLII
MUSIC.
MODE
Selecciona el modo de sonido entre
FLAT,
ROCK, POP, JAZZ, CLASSIC y NEWS.
FUNCTION
Para seleccionar la fuente del receptor.
(FM, AM, VIDEO, TV o CD/DVD)
ZZ
Abre y cierra la bandeja de discos.
DSGX
Activa y desactiva DSGX.
Botones numéricos 0 -9
Selecciona opciones numeradas en un
menú.
>10/ TV ENTER
Se utiliza para controlar el TV.
SLOW t/
TUNING-
Para buscar imágenes o reproducir lentamente hacia atrás.
Para sintonizar la emisora deseada.
SLOW T/
TUNING+
Para buscar imágenes o reproducir lentamente hacia adelante.
Para sintonizar la emisora deseada.
Botones de control de la reproducción
• H (PLAY)(REPRODUCCIÓN)
Inicia la reproducción.
• X (PAUSE)(PAUSA)
Detiene temporalmente la reproducción
o la grabación.
• x (STOP)(PARADA)
Detiene la reproducción.
DVD MENU
Accede al menú de un disco DVD.
DISPLAY
Para visualizar el tiempo restante entre
capítulo y título.
VOLUME (+/-)
Ajusta el volumen de los altavoces.
CLEAR
Elimina un número de pista en el menú
del programa.
RETURN
Vuelve al menú de configuración.
DIMMER
Para cambiar la luminosidad del visualizador.
TV/VIDEO
Selecciona la fuente del TV.
INTRODUCCIÓN
9
Control remoto
SLEEP
Para poner la unidad en modo de apagado
.
TUNER/BAND
Selecciona el sintonizador del receptor
DVD y la opción de audición.(Bandas
AM y FM)
MUTING
Silencia momentáneamente el altavoz del
receptor DVD.
TUNER MENU
Memoriza la frecuencia de una emisora
de radio en el sintonizador.
Pulse para borrar emisoras
presintonizadas de la memoria del
sintonizador.
PROGRAM
Entra o sale del modo de edición de
programas.
REPEAT
Repite capítulo, pista, título, todo.
FM MODE
Para cambiar entre los modos MONO y
STEREO.
TV
Para controlar el TV con el control
remoto.
AUDIO
Selecciona un idioma de audio (DVD) o
un canal de audio (CD).
ANGLE
Selecciona un ángulo de la cámara para
el DVD, si está disponible.
SUBTITLE
Selecciona el idioma de los subtítulos.
PREV/PRESET-
Va al comienzo del capítulo o pista actual
o al capítulo o pista anterior.
Selecciona el programa del sintonizador.
NEXT/PRESET+
Va al siguiente capítulo o pista.
Selecciona el programa del sintonizador.
DVD T OP MENU
Muestra el menú del título del disco, si
está disponible.
B/b/V/v
(izquierda/derecha/arriba/abajo)
Selecciona una opción del menú.
ENTER
Confirma la selección del menú.
DVD DISPLAY
Accede a la visualización en pantalla.
TV VOL +/–
Ajusta el volumen del TV.
TV CH +/–
Selecciona un canal del TV.
DVD SETUP
Accede o sale del menú de configuración
del DVD.
Page 88

10
Conexiones del panel posterior
No toque las patillas interiores de las tomas del
panel posterior. Una descarga electrostática podría
dañar permanentemente la unidad.
Cable de alimentación de CA
Enchufe a la fuente de alimentación.
CONECTORES SPEAKER
Conecte los seis altavoces
suministrados a estos terminales.
CONECTOR FM ANTENNA
Conecte la antena de FM a este terminal.
CONECTORES AM LOOP ANTENNA
Conecte la antena de cuadro AM a este terminal.
Rango de funcionamiento del control remoto
Oriente el control remoto hacia el sensor remoto y
pulse los botones.
Distancia: Circa 7m dalla par te anteriore del sensore
remoto
Ángulo: Unos 30° a cada lado de la par te frontal del
sensor remoto
Instalación de las pilas del control remoto
Quite la tapa del portapilas de la par te
posterior del control remoto e inserte dos
pilas R6 (tamaño AA) asegurándose de
alinear las polaridades y
correctamente.
Cuando use el control remoto, apunte con
él al sensor remoto de la unidad.
No mezcle pilas usadas con nuevas.
VIDEO (AUDIO IN L/R)
Conecte la salida de audio de una fuente
externa (VCR, reproductor LD, etc.).
MONITOR OUT (VIDEO)
Conecte a un TV con entrada de video.
MONITOR S VIDEO OUT (DVD OUT)
Conecte a la entrada de Video-S en el
TV. SÓLO PARA VER DVDs.
COMPONENT VIDEO OUT (Y P
B/CB PR/CR)
Conecte a un TV que tenga entradas
Y PB/CB PR/CR.
Page 89

PREPARACIÓN
11
Conexiones
Realice una de las siguientes conexiones, dependien-
do de la capacidad del equipo existente.
Consejos
Dependiendo del TV y del otro equipo que desee
conectar, encontrará varios modos de conectar el
receptor DVD. Utilice una de las conexiones descritas
a continuación.
Consulte los manuales de su TV, VCR u otros
dispositivos, según considere necesario, para realizar
las mejores conexiones.
– Asegúrese de que el receptor DVD está conectado
directamente al TV. Seleccione la entrada AV correcta
de su TV.
– No conecte el receptor DVD a su TV a través de su
VCR. La imagen del DVD podría aparecer distorsionada por el sistema de protección contra copia.
Conexión del video
Conecte la toma MONITOR OUT del receptor DVD a la
toma de entrada de video del TV con el cable de video
suministrado (V).
Conexión de S-Video
Conecte la salida S-VIDEO OUT (Salida de S-Video)
del receptor DVD/CD a la toma de entrada de S-Video
de la TV utilizando el cable de S-Video (S).
Conexión de componente de video (Color Stream®)
Conecte la COMPONENT VIDEO OUT en el
receptor
DVD a la entrada correspondiente en la TV usando el
cable Y Pb Pr (C).
Conexión a un TV
Parte posterior del TV
(no suministrado)
(no suministrado)
Parte posterior del receptor DVD
Rear of TV
S-VIDEO
INPUT
S
(not supplied)
VIDEO
S VIDEO
(DVD ONLY)
VIDEO
INPUT
L
V
COMPONENT VIDEO INPUT
Y
Pb
(not supplied)
Y
PB/CB PR/CR
COMPONENT VIDEO OUTMONITOR OUT
Pr
C
Rear of DVD Receiver
Page 90

12
Conexiones (continuación)
Conexión a un equipo externo
Conexión
Conecte las tomas VIDEO (AUDIO L/R) del receptor
DVD a las tomas AUDIO OUTPUT (L/R) de la VCR,
reproductor LD, etc.con los cables de audio.
Consejo
Pulse FUNCTION en el control remoto para seleccionar
la entrada para estas tomas.
VIDEO aparecerá en el visualizador.
(no suministrado)
Parte Trasera del Vídeo (o Reproductor de LD, etc.)
(not supplied)
Page 91

PREPARACIÓN
13
Conexiones
Conexiones de las antenas
Conecte las antenas de AM/FM suministradas para escuchar la radio.
Conecte la antena de cuadro de AM al conector AM LOOP.
Conecte la antena de FM al conector FM 75 Ω.
Cuando conecte la antena de cuadro de AM suministrada, conecte el cable negro (B) al terminal y el cable
blanco (A) al otro terminal.
Notas
Para evitar que se recojan ruidos, mantenga la antena de cuadro de AM alejada del receptor DVD y de otros
componentes.
Asegúrese de extender totalmente la antena de FM.
Después de conectar la antena de FM, manténgala todo lo hor izontal que pueda.
Consejo
Si no tiene una buena recepción de FM, utilice un cable de 75 Ω (no suministrado) para conectar el sistema a una
antena de FM exterior como se muestra a continuación.
Antena de cuadro de AM
(suministrada)
Antena de FM (suministrada)
AM Loop antenna (supplied)
FM antenna (supplied)
A
B
Page 92

14
Conexiones (continuación)
Front speaker
(Right)
Front speaker
(Left)
Centre speaker
Surround speaker
(Right surround)
Subwoofer
Surround speaker
(Left surround)
Conexión del sistema de altavoces
Conecte los altavoces utilizando los cables de los altavoces suministrados.
Para lograr el mejor sonido surround posible, ajuste los parámetros de los altavoces (volumen, distancia, etc.).
Notas
Recuerde hacer coincidir el cable del altavoz con el terminal apropiado de los componentes: + con + y – con –. Si
se invierten los cables, se distorsionará el sonido y faltarán los bajos.
Si usa los altavoces frontales con una entrada máxima baja, ajuste el volumen con cuidado para evitar una salida
excesiva de los altavoces.
No desmonte las cubiertas frontales de los altavoces suministrados.
La base del altavoz es opcional.
Altavoz central
Altavoz frontal
(derecho)
Altavoz frontal
(izquierdo)
Altavoz surround
(surround izquierdo)
Altavoz surround
(surround derecho)
Realzador de graves
Page 93

PREPARACIÓN
15
Conexiones (continuación)
Altavoz central
Altavoz frontal
(izquierdo)
Ejemplo de posición de los altavoces
Altavoz surround
(derecho)
Altavoz frontal
(derecho)
Realzador de graves
Posición de los altavoces
En caso de posición normal, utilice los 6 altavoces (2 altavoces frontales, altavoz central, 2 altavoces surround y
realzador de graves).
Si desea reproducir el excelente sonido de graves, DTS digital surround o Dolby Digital surround, debe conectar un
realzador de graves.
• Altavoces frontales
De acuerdo con su posición de audición, configure los altavoces a la misma distancia.De acuerdo también con la posición de
audición, ajuste un intervalo entre los altavoces de 45 grados.
• Altavoz central
Lo ideal es que el altavoz central y los altavoces frontales estén a la misma altura. Colóquelos nor malmente por encima o por
debajo del TV.
• Altavoces surround
Coloque los altavoces derecho e izquierdo detrás del área de audición.Estos altavoces recrean un movimiento acústico y una
atmósfera necesarios para la reproducción de sonido surround.Para obtener el mejor resultado, no instale los altavoces surround demasiado alejados hacia atrás de la posición de audición. Instálelos al nivel o sobre el nivel de los oídos del oyente.
También le dará resultado dirigir los altavoces surround hacia una pared o techo para dispersar más el sonido.
En el caso de una sala de pequeño tamaño, si la audiencia está cerca de la pared posterior, coloque los altavoces surround
opuestos entre sí y a 60 - 90 cm por encima de los oídos del oyente.
• Realzador de graves
Puede colocarse en cualquier posición frontal.
Nota
La base de los altavoces es opcional.
Instalación de las almohadillas de la base
Para evitar vibraciones o movimientos de los altavoces durante la audición, instale las almohadillas suministradas
en los altavoces sin realzador de graves como se muestra.
Altavoz surround
(izquierdo)
Almohadillas de la base
Foot pads
Page 94

16
Selección de la fuente de entrada/salida
Siga los siguientes pasos para seleccionar y cambiar
entre las diferentes fuentes de entrada y salida del
receptor DVD/VCR:
• CD/DVD
Para visualizar la salida desde el DVD:
Pulse SONY TV DIRECT en el control remoto.
“CD/DVD”aparecerá en el visualizador.
• TUNER FM/AM
Para escuchar emisiones radiofónicas AM/FM:
Pulse TUNER/BAND para cambiar entre radio AM y
FM. La frecuencia seleccionada aparece en el
visualizador.
• INPUT SELECT
Para escuchar una fuente de audio conectada a
la toma AUDIO IN (L/R) de VIDEO:
Pulse repetidamente FUNCTION en el control
remoto.
“VIDEO” aparecerá en el visualizador.
El audio se emitirá desde una fuente externa
conectada a las tomas AUDIO IN (L/R) de VIDEO
(panel posterior).
SONY TV DIRECT
TUNER/
BAND
FUNCTION
Page 95

PREPARACIÓN
17
Antes del funcionamiento
Breve glosario sobre pistas de
audio y modo surround
DTS
Le permite disfrutar de canales 5.1 (ó 6) discretos de audio
digital de alta calidad desde fuentes de programas, tales
como discos, DVD y CD, etc., que llevan la marca
comercial. DTS Digital Surround ofrece 6 canales de audio
transparente (que significa que es idéntico al original) y
proporciona una claridad excepcional en un campo de
sonido real de 360 grados.El término DTS es una marca
comercial de DTS Technology, LLC.
Fabricado bajo licencia de DTS Technology, LLC.
DOLBY DIGITAL
El formato Dolby Digital Surround le permite disfrutar de
hasta 5.1 canales de sonido digital surround desde una
fuente de programa Dolby Digital.Si reproduce discos DVD
con la marca “ ”, podrá disfrutar incluso de una mejor
calidad de sonido, precisión espacial y gama dinámica.
DOLBY PRO LOGIC
Utilice este modo cuando reproduzca películas o Dolby
Digital de 2 canales con la marca “ ”. Este modo
proporciona un efecto como el de una sala de cine o un
concierto en directo, un efecto con una intensidad que sólo
puede obtenerse a través de DOLBY PRO LOGIC
SURROUND. El efecto del movimiento
frontal/posterior/derecha/izquierda de la imagen de sonido,
así como la sensación de un posición fija en la imagen de
sonido, es mucho más claro y dinámico que antes.
DOLBY PRO LOGIC II
Dolby Pro Logic II crea cinco canales de salida con
anchura de banda completa desde fuentes de dos canales.
Esto se produce utilizando un descodificador surround de
matriz de alta pureza que extrae las propiedades
espaciales de la grabación original sin añadir nuevos
sonidos o coloraciones tonales.
Modo PLII MOVIE:
El modo Movie se utiliza para programas de televisión
estéreo y todos los programas codificados en Dolby
Surround. El resultado es una direccionalidad del campo
de sonido mejorada que se acerca a la calidad del sonido
de 5.1 canales discretos.
Modo PLII MUSIC:
El modo Music se utiliza para cualquier grabación de
música estéreo.
A.F.D. AUTO
El software con señales de audio surround multicanal se
reproduce de acuerdo con la forma en que fue
grabado.
Notas
•
Questa funzione è disponibile solo in modalità di
riproduzione.
•
A.F.D.AUTO no puede aplicarse cuando se utilizan auriculares.
Modo de sonido
Puede disfrutar del modo de sonido surround
simplemente seleccionando uno de los campos de
sonido preprogramados de acuerdo con el programa
que desee escuchar.
A) Pulsando el botón MODE
Cada vez que pulse el botón MODE, el modo de sonido
cambiará en el siguiente orden:
FLAT → ROCK → POP → JAZZ → CLASSIC →
NEWS → FLAT ...
Consejos
FLAT:Respuesta de frecuencia lineal.
ROCK: Reproduce la acústica de la música rock.
POP: Reproduce la acústica de la música pop.
JAZZ: Reproduce la acústica de un club de jazz.
CLASSIC: Reproduce la acústica de la música
orquestal.
NEWS: Reproduce la acústica del sonido de las noti-
cias de TV.
B) Pulsando el botón AUTO FORMAT DIRECT
Cada vez que pulse el botón AUTO FORMAT DIRECT,
el modo de sonido cambiará en el siguiente orden:
A.F.D. AUTO → DOLBY PL → PLII MOVIE →
PLII MUSIC → A.F.D.AUTO ...
(Esta función sólo está disponible para el modo de 2 canales)
Notas
No está disponible para discos MP3.
Questa funzione è disponibile solo in modalità di
riproduzione.
El modo de sonido no puede aplicarse cuando se uti-
lizan auriculares.
Cuando se inserta un DVD.
Puede cambiar el modo de sonido de un DVD (Dolby
Digital, DTS, PRO LOGIC, etc.) pulsando el botón
AUDIO en el control remoto durante la reproducción.
Aunque el contenido de un DVD varía de disco a disco,
a continuación se explica el funcionamiento básico
cuando se utiliza esta función.
Cada vez que pulse el botón AUDIO, el modo de
sonido del DVD cambiará en el siguiente orden:
→→→
Para su referencia
•
El receptor DVD memoriza los últimos ajustes de modo
de cada fuente individualmente.
•
Puede identificar el formato de codificación del software
del programa mirando su envoltorio.
- Los discos Dolby Digital está etiquetados con el
logotipo .
- Los programas codificados Dolby Surround están
etiquetados con el logotipo .
- Los discos DTS Digital Surround están marcados
con
.
Nota
La modalità del suono non è applicabile se vengono
utilizzate le cuffie.
Page 96

18
Antes del funcionamiento (continuación)
Explicación general
Este manual ofrece instrucciones básicas para manejar
el receptor DVD. Algunos DVD requieren un
funcionamiento específico o permiten sólo
determinadas funciones durante su reproducción. En
ese caso, aparecerá el símbolo en la pantalla del TV,
indicando que el receptor DVD no permite la función o
que no está disponible en el disco.
Visualización en pantalla
El estado general de la reproducción puede mostrarse
en la pantalla del TV. Algunos elementos pueden
modificarse en el menú.
Funcionamiento de la visualización en
pantalla
1
Pulse DVD DISPLAY durante la reproducción.
2
Pulse V/v para seleccionar un elemento.
El elemento seleccionado se destacará.
3
Pulse B/b para cambiar el ajuste de un elemento.
Los botones numéricos también pueden utilizarse para
ajustar números (p.ej., número de título).Para algunas
funciones, pulse ENTER para ejecutar el ajuste.
Iconos temporales del campo de
retroalimentación
Repite un título
Repite un capítulo
Repite una pista (CDs de video sin PBC, MP3, CD)
Repite todas las pistas (CDs de video sin PBC,
MP3, CD)
Desactiva la repetición
Reanuda la reproducción desde este punto
Acción prohibida o no disponible
Notas
Es posible que algunos discos no dispongan de todas
las funciones que aparecen en el ejemplo de las visualizaciones en pantalla mostradas más abajo.
Si no pulsa ningún botón en 10 segundos, la visual-
ización en pantalla desaparecerá.
RESUME
OFF
ALL
TRACK
CHAPT
TITLE
Elementos
Número del título
Número del capítulo
Búsqueda por tiempo
Idioma de audio y audio
digital Modo de salida
Idioma de subtítulos
Ángulo
Sonido
Función (Pulse
V/v para seleccionar el elemento deseado)
Muestra el número del título actual y el número total de
títulos y salta al número del título deseado.
Muestra el número del capítulo actual y el número total de
capítulos y salta al número del capítulo deseado.
Muestra el tiempo de reproducción transcurrido y busca
directamente el punto desde el tiempo transcurrido.
Muestra el idioma de la banda sonora de audio actual,
método de codificación y número de canal, y cambia el
ajuste.
Muestra el idioma de los subtítulos actuales y cambia el
ajuste.
Muestra el número del ángulo actual y el número total de
ángulos y cambia el número del ángulo.
Muestra el modo del sonido actual y cambia el ajuste.
Método de selección
B
/ b,o
números, ENTER
B
/ b,
./ >
o
números, ENTER
Números, ENTER
B
/ b,o
AUDIO
B/ b
,o
SUBTITLE
B/ b
,o
ANGLE
AUTO FORMAT DIRECT
1 /3
1 /12
0:20:09
1 ENG
D
5.1 CH
OFF
1 /1
AUTO
Elementos
Número de la pista
Hora
Canal de audio
Sonido
Función (Pulse
V/v para seleccionar el elemento deseado)
Muestra el número de la pista actual, el número total de
pistas, el modo PBC On o salta al número de la pista
deseado en modo PBC Off
Muestra el tiempo de reproducción transcurrido (sólo
visualización)
Muestra el canal de audio y cambia el canal de audio.
Muestra el modo del sonido actual y cambia el ajuste.
Método de selección
B
/ b,o
números, ENTER
–
B/ b
,o
AUDIO
AUTO FORMAT DIRECT
1 /3
AUTO
0:20:09
ST
VCD2.0
VCD1.1
DVD
Page 97

PREPARACIÓN
19
Antes del funcionamiento (continuación)
Ajustes iniciales
Puede ajustar sus preferencias personales en el modo
de función DVD.
Funcionamiento general
1
Pulse DVD SETUP.
Aparece el menú de configuración.
2
Use V/v para seleccionar la opción deseada.
La pantalla mostrará el ajuste actual de la opción
seleccionada, así como los ajustes alternativos.
3
Mientras esté seleccionada la opción deseada,
pulse b y, a continuación, V/v para seleccionar
el ajuste deseado.
4
Pulse ENTER para confirmar su selección.
Algunas opciones requieren pasos adicionales.
5
Pulse DVD SETUP, RETURN o H (REPRODUCCIÓN) para salir del menú de configuración.
Idioma
Idioma del disco
Seleccione un idioma para el menú del disco y las
funciones de audio y subtítulos.
Original: Se selecciona el ajuste del idioma original del
disco.
Others: Para seleccionar otro idioma utilice los botones
para introducir el número de 4 dígitos correspondiente
de acuerdo con la lista de códigos de idioma de la
página 34. Si introduce un código de idioma incorrecto,
pulse CLEAR.
Nota
Es posible que la selección del idioma del disco no
funcione para algunos discos DVD.
Idioma del menú
Seleccione el idioma para el menú de configuración.
Este es el menú que aparece cuando pulsa DVD
SETUP.
Imagen
4:3 Letterbox: Selecciónelo cuando esté conectado un
TV estándar 4:3.
Muestra la imagen con barras que ocultan la parte
superior e inferior de la imagen.
4:3 Panscan: Selecciónelo cuando esté conectado un
TV estándar 4:3.
Muestra la imagen recortada para ajustarse a la
pantalla de su TV.
Ambos lados de la imagen están recortados.
16:9 Wide: Selecciónelo cuando esté conectado un TV
de pantalla panorámica16:9.
DVD
DVD
Disc Audio
Disc Subtitle
Disc Menu
Rating
Area Code
TV Aspect
Menu Language
5.1 Speaker Setup
Others
Disc Audio
Disc Subtitle
Disc Menu
Rating
Area Code
TV Aspect
Menu Language
5.1 Speaker Setup
Others
Original
Chinese
English
French
German
Spanish
Italian
Korean
Polish
Other — — — —
Original
Chinese
English
French
German
Spanish
Italian
Korean
Polish
Other — — — —
Disc Audio
Disc Subtitle
Disc Menu
Rating
Area Code
TV Aspect
Menu Language
5.1 Speaker Setup
Others
Disc Audio
Disc Subtitle
Disc Menu
Rating
Area Code
TV Aspect
Menu Language
5.1 Speaker Setup
Others
Chinese
Chinese
English
4:3
4:3
16:9
Letterbox
Panscan
Wide
Page 98

20
Antes del funcionamiento (continuación)
Configuración de los altavoces
5.1 Ajustes de los altavoces
Seleccione los ajustes de los altavoces, incluyendo el
balance de volumen y la distancia, o compruebe los
ajustes de los altavoces.
Los ajustes de los altavoces sólo están activos en la
salida analógica multicanal. (Consulte “Configuración de
los altavoces” en la página 29.)
Otros
Los ajustes de DRC y PBC pueden cambiarse.
Pulse V/v para seleccionar el elemento deseado y
pulse ENTER. El ajuste del elemento seleccionado
cambia entre On y Off.
Control de la gama dinámica (DRC)
Con el formato DVD*1, puede escuchar la banda sonora
de un programa con la presentación más realista y
precisa posible, gracias a la tecnología de audio digital.
Sin embargo, puede que prefiera comprimir la gama
dinámica de la salida de audio (la diferencia entre los
sonidos más altos y los más bajos). Así, podrá
escuchar una película a un volumen más bajo sin
perder la claridad del sonido. Ajuste DRC a On para
conseguir este efecto.
*1: Sólo Dolby Digital
Control de la reproducción (PBC)
On: Los CDs de video con PBC se reproducen de
acuerdo con el PBC.
Off: Los CDs de video con PBC se reproducen de la
misma forma que los CDs de audio.
DVD
Disc Audio
Disc Subtitle
Disc Menu
Rating
Area Code
TV Aspect
Menu Language
5.1 Speaker Setup
Others
S S
Front L
Volume 0 dB
Size Small
Distance 0.3 m
Test
Return
Disc Audio
Disc Subtitle
Disc Menu
Rating
Area Code
TV Aspect
Menu Language
5.1 Speaker Setup
Others
DRC
PBC
Off
On
Page 99

PREPARACIÓN
21
Antes del funcionamiento (continuación)
Control paterno
Clasificación
Las películas en DVD pueden contener escenas no aptas
para niños. Por lo tanto, los discos pueden contener
información de control paterno que se aplique a todo el
disco o a ciertas escenas del mismo. Estas escenas se
clasifican de 1 a 8 y, alternativamente, las escenas más
adecuadas quedan disponibles para su selección en
algunos discos. Las clasificaciones dependen del país. La
función de control paterno le permite impedir que sus hijos
reproduzcan los discos o que puedan reproducir discos
con escenas alternativas.
1
Seleccione Indice en el menú de configuración utilizando los botones V/v del menú de configuración.
2
Una vez seleccionado Indice, pulse b.
3
Si todavía no ha introducido una contraseña:
Introduzca una contraseña de 4 dígitos utilizando los
botones numéricos para crear una contraseña personal de seguridad de 4 dígitos y, a continuación, pulse
ENTER. Introduzca de nuevo la contraseña de 4 dígitos y pulse ENTER para verificar.
Si ya ha introducido una contraseña:
Introduzca una contraseña de 4 dígitos utilizando los
botones numéricos para confirmar la contraseña personal de seguridad de 4 dígitos y, a continuación,
pulse ENTER.
Si comete un error antes de pulsar ENTER, pulse
CLEAR e introduzca de nuevo la contraseña de
seguridad de 4 dígitos.
4
Seleccione una clasificación del 1 al 8 utilizando
los botones V/v.El uno (1) contiene la menor can-
tidad de restricciones en la reproducción.
El ocho (8) contiene la mayor cantidad de restricciones en la reproducción.
Desbloqueo: Si selecciona Unlock, no se activará el
control paterno. El disco se reproducirá completamente.
Clasificaciones 1 a 8: Algunos discos contienen
escenas no aptas para niños. Si configura una clasificación para el DVD, todas las escenas del disco con la
misma o menor clasificación se reproducirán. Las
escenas con una clasificación superior no se reproducirán a no ser que haya disponible una escena alternativa en el disco.
La escena alternativa debe llevar la misma clasificación o una inferior.Si no se encuentra una escena
alternativa adecuada, la reproducción se detendrá.
Deberá introducir una contraseña de 4 dígitos o cambiar el nivel de clasificación para reproducir el disco.
5
Pulse ENTER para confirmar su selección de clasificación y, a continuación, pulse DVD SETUP para
salir del menú.
Código de zona
Introduzca el código de una zona que utilice normas
para clasificar el disco DVD de video, consultando la
lista. (Consulte “Lista de códigos de zona” en la página
35).
1
Seleccione la opción Código de (Area Code)
zona utilizando los botones V/v del menú de
configuración.
2
Una vez seleccionado Código de zona (Area
Code), pulse b.
3
Siga el paso 3 de “Indice” a la izquierda.
4
Seleccione el primer carácter utilizando los
botones V/v.
5
Pulse b para pasar al segundo carácter y seleccione el segundo carácter utilizando los
botones V/v.
6
Pulse ENTER para confirmar la selección
Código de zona (Area Code) y, a continuación,
pulse DVD SETUP para salir del menú.
Nota
La confirmación de la contraseña de 4 dígitos es
necesaria cuando se cambia la contraseña (consulte
Cambio de la contraseña de 4 dígitos a continuación).
Cambio de la contraseña de 4 dígitos
1 Siga los pasos 1-2 como se muestra arriba a la
izquierda (Indice).
2 Introduzca la contraseña antigua y, a continuación,
pulse ENTER.
3 Seleccione Change utilizando los botones V/v y, a
continuación, pulse ENTER.
4 Introduzca la nueva contraseña de 4 dígitos y, a con-
tinuación, pulse ENTER.
5 Introduzca de nuevo exactamente la misma con-
traseña y confirme pulsando ENTER.
6 Pulse DVD SETUP para salir del menú.
Si olvida la contraseña de 4 dígitos
Si olvida su contraseña, para borrar la contraseña
actual, siga el siguiente procedimiento.
1 Pulse DVD SETUP para visualizar el menú de con-
figuración.
2 Introduzca el número de 6 dígitos “210499”.
La contraseña de 4 dígitos se borrará.
3 Introduzca una nueva contraseña como se muestra
arriba a la izquierda (Indice).
DVD
DVD
Disc Audio
Disc Subtitle
Disc Menu
Rating
Area Code
TV Aspect
Menu Language
5.1 Speaker Setup
Others
8
7
6
5
4
3
2
1
Unlock
Change
Disc Audio
Disc Menu
Rating
Area Code
TV Aspect
Menu Language
5.1 Speaker Setup
Others
Code Set
U SDisc Subtitle
Page 100

22
Funcionamiento de los discos DVD o CD de video
Reproducción de un disco DVD o
CD de video
Configuración de la reproducción
Encienda el TV y seleccione la fuente de entrada de video
conectada al receptor DVD.
Ajuste la fuente de salida a CD/DVD como se muestra en
Selección de la fuente de entrada/salida en la página 16.
1
Pulse ZZpara abrir la bandeja de discos.
2
Coloque un disco en la bandeja con la etiqueta
hacia arriba.
Cuando inserte un DVD de doble cara, asegúrese de que
la cara que desee reproducir esté colocada hacia abajo.
3
Pulse ZZpara cerrar la bandeja.
”READING” aparecerá en el visualizador y la reproducción
se iniciará automáticamente. Si la reproducción no se inicia, pulse H (REPRODUCCIÓN).
En algunos casos es posible que aparezca en su lugar el
menú del disco.
Si se visualiza una pantalla de menú
Es posible que aparezca automáticamente una pantalla de
menú después de insertar un DVD
Utilice los botones
B/b/V/v
para seleccionar el título/capítulo
que desee ver y, a continuación, pulse ENTER para iniciar la
reproducción.
Pulse DVD TOP MENU o DVD MENU para volver a la pantalla
de menú.
Utilice los botones numéricos para seleccionar la pista que
desee visualizar.Pulse RETURN para volver a la pantalla de
menú.
Los ajustes del menú y los procedimientos de funcionamien-
to precisos para utilizar el menú pueden cambiar dependiendo del disco.Siga las instrucciones en cada pantalla de
menú.
También podrá ajustar PBC a Off en el menú de configuración. Consulte la página 20.
Notas
Si el control pater no está ajustado y el disco no está dentro
de los ajustes de clasificación (no autorizado), deberá introducirse la contraseña de 4 dígitos y/o autorizarse el disco
(consulte Control paterno en la página 21).
Puede que los DVD tengan un código de región.
Su receptor DVD no reproducirá discos con un código de
región diferente al del receptor DVD. El código de región de
este receptor DVD es 3.
No mantenga una imagen fija en la pantalla durante un largo
periodo de tiempo.
Funciones generales
Nota
A menos que se indique lo contrario, todas las funciones
descritas se manejan desde el control remoto. Puede que
algunas funciones también estén disponibles en el menú de
configuración.
Función de reanudación
Cuando detiene el disco, el reproductor memoriza el punto en
que pulsó x(PARADA) y “RESUME x” aparece en la pantalla
del TV. Pulse H(REPRODUCCIÓN) y se iniciará la
reproducción desde este punto.
Consejo
Para reproducir desde el principio del disco, pulse dos veces
x
y, a continuación, pulse H.
Notas
Dependiendo del punto en que detuvo el disco, es posible
que el receptor no reanude la reproducción exactamente
desde el mismo punto.
El punto donde detuvo la reproducción se borra si:
-
Pulsa
x
en modo PARADA.
-
Apaga la unidad.
-
Abre la bandeja de discos.
Selección de otro TÍTULO
Cuando un disco tiene más de un título, puede seleccionar
otro título de la siguiente manera:
Pulse DVD DISPLAY.Utilice
V/v
para seleccionar el icono
de título, pulse los botones numéricos apropiados (0-9) y, a
continuación, utilice ENTER para seleccionar un número de
título.
Pulse DVD DISPLAY, utilice
B/b
para seleccionar un número
de título y, a continuación, pulse ENTER.
Selección de otro CAPÍTULO/PISTA
Cuando un título de un disco tiene más de un capítulo o más
de una pista, puede desplazarse a otro capítulo/pista de la
siguiente manera:
Pulse brevemente PREV o NEXT durante la reproducción
para volver al principio del capítulo/pista actual o para seleccionar el capítulo/pista siguiente.
Pulse brevemente PREV dos veces para volver al
capítulo/pista anterior.
Para ir directamente a cualquier capítulo durante la repro-
ducción, pulse DVD DISPLAY. Utilice
V/v
para seleccionar el
icono de capítulo/pista. A continuación, introduzca el número
de capítulo/pista utilizando los botones numéricos (0-9) o
utilice
B/b
para seleccionar el capítulo.A continuación,
pulse ENTER.
Notas
Para números de un solo dígito, presione los botones
numéricos (1-9) y espere a que la operación se lleve a cabo.
Para números de dos dígitos, pulse rápidamente los botones
numéricos (0-9).
En un CD de video con PBC, deberá ajustar PBC a Off en el
menú de configuración para utilizar esta función. Consulte la
página 20.
Búsqueda
1
Pulse
mo M
durante la reproducción.
El receptor DVD entrará ahora en modo BÚSQUEDA.
2
Pulse repetidamente
mo M
para seleccionar la veloci-
dad deseada:
X2 b, 1 m, 2 m, 3 m
(atrás)
o X2 B,
1 M, 2 M, 3 M
(adelante).
Con un CD de video, la velocidad de la búsqueda cambia:
1
m, 2 m, 3 m
(atrás)
o 1 M, 2 M, 3 M
(ade-
lante).
3
Para volver a la reproducción, pulse H
(REPRODUCCIÓN).
Imagen fija
1
Pulse X (PAUSA) durante la reproducción.
El receptor DVD entrará ahora en modo PAUSA.
2
Para volver a la reproducción, pulse de nuevo X(PAUSA) o
H (REPRODUCCIÓN).
VCD1.1VCD2.0
DVD
VCD1.1VCD2.0
DVD
VCD1.1
VCD2.0
DVD
DVD
CD
VCD1.1
VCD2.0
DVD
VCD2.0
DVD
VCD1.1VCD2.0
DVD
1 /3
1 /12
1 /3
 Loading...