

Page 1

FM/AM
Compact Disc
Player
Operating Instructions.
Owner's Record
The model and serial numbers are located on the bottom of the uitit.
Record the serial number in the space provided below.
Refer to these numbers whenever you call upon your Sony dealer regarding this
product.
Model No. CDX-C8850 Serial No.
For installation and connections, see the supplied installation/connections
manual.
»MU I
DIGITAL AUDIO
I TEXT
^ V^e Drive
CDX-C8850
© 1999 by Sony Corporation
Page 2

Warning
This equipment has been tested and found to
comply with the limits for a Class B digital
device, pursuant to Part 15 of the FCC Rules.
These limits are designed to provide
reasonable protection against harmful
interference in a residential installation. This
equipment generates, uses, and can radiate
radio frequency energy and, if not installed
and used in accordance with the instructions,
may cause harmful interference to radio
communications. However, there is no
guarantee that interference will not occur in a
particular installation. If this equipment does
cause harmful interference to radio or
television reception, which can be determined
by turning the equipment off and on, the user
is encouraged to try to correct the interference
by one or more of the following measures;
— Reorient or relocate the receiving antenna.
— Increase the separation between the
equipment and receiver.
— Coimect the equipment into an outlet on a
circuit different from that to which the
receiver is cotmected.
— Consult the dealer or an experienced radio/
TV technician for help.
You are cautioned that any changes or
modifications not expressly approved in this
manual could void your authority to operate
this equipment.
CAUTION
The use of optical instruments with this
product will increase eye hazard.
Welcome!
Thank you for purchasing the Sony Compact
Disc Player. This unit lets you enjoy a variety
of features by using either a supplied rotary
commander or a wireless remote.
In addition to the CD playback and radio
operations, you can expand your system by
connecting an optional CD/MD unit*'.
When you operate this unit or connected
optioiral CD unit with the CD TEXT function,
the CD TEXT information will appear in the
display when you play back a CD TEXT disc*^
*' You can connect to a CD changer and an MD
changer.
A CD TEXT disc is an audio CD that inciudes
information such as the disc name, artist name,
and track names.
This information is recorded on the disc.
You can select for the display language and
vocalized comments of the voice guide in
either English or French.
Voice Drive
Sony has developed a new function which
contributes to safer driving.
In addition to our unique rotary commander,
we now introduce a voice sensitive operating
system Voice Drive which gives the driver
voice control of the car audio.
Now, while keeping your eyes on the road,
you can command operations with Voice Drive
and confirm results with Voice Guide. ■
And you can also record your voice with the
voice memo function. It will take a note for
you when you see or think of something while
you are driving.
Voice guide for safe driving
This unit has a voice guide function*. When
the voice guide function is on, the unit gives
vocalized comments on functions
corresponding to the relevant button pushed.
These comments can be vocalized in either
English or French.
• Some optional power amplifiers may cause a
break at the beginning of vocalized comments.
When you connect an optional MD changer, the
sound from the first MD may contipue for a
short time even after the vocalized comments
about the second MD are announced.
Page 3

Table of Contents
This Unit Only
Location of controls
....................................
Getting Started
Resetting the unit
Detaching the front panel
Preparing the wireless remote
Preparing the rotary commander
Setting tire clock..........................................7
........................................
............................
.....................
.................
CD Player
Listening to a CD
Playing a CD in various modes
Creating a program
— CD Program Memory
........................................
.................
.......................
Radio
Memorizing stations automatically
— Best Tuning Memory (BTM)
Memorizing only the desired stations
Receiving the memorized stations
Storing the station names
— Station Memo
Locating a station by name
— List-up
....................................
.............................................
..........
........
..............
Voice Drive
Selecting a "V Drive" box for registration.15
Registering a vocal phrase
Requesting a registered source
.........................
.................
Voice Memo
Recording a voice memo.......................... 17
Playing back the voice memo
Erasing the voice memo
..................
...........................
10
10
12
15
17
18
18
other Functions
4
6
6
With Optional Equipment
7
CD/MD Unit
7
8
13
13
TVA/ideo
14
16
Using the rotary commander
Attenuating the sound...............................24
Changing the sound and display settings
Changing the equalizer display
Playing a CD or MD
Playing tracks repeatedly
— Repeat Play............................................27
Playing tracks in random order
*— Shuffle Play
Creating a program
— Program Memory...................................28
Labeling a CD
— Disc Memo
Locating a disc by name
— List-up....................................................31
Selecting specific tracks for playback
— Bank.......................................................32
Watching the TV.............................................33
Watching a video
Memorizing TV channels automatically
Memorizing only the desired TV channels ... 33
Storing the TV channel names........................34
Displaying the information stored on discs.. 34
Watching the TV or video while listening to a
CD or MD
— Simultaneous Play
.........................................
............................................
............................................
....................
................
.......................................
........
.................................
23
...
25
25
26
27
30
33
33
35
DSP
Setting the equalizer
Selecting the listening posifion
Selecting a soundstage menu
— Dynamic Soundstage Organizer
(DSO)....................................................20
Adjusting the balance (BAL)
Adjusting the fader (FAD)
Adjusting the volume of the subwoofer(s).... 22
Listening to each programme source in its
registered DSO
— Source Sound Memory (SSM)
....,...........................
................
....................
...^...................
.........
18
19
21
21
22
Additional Information
Precautions....................................................3r«
• Maintenance ...................................................3o
Dismounting the unit
Specifications................................................ 3S
Troubleshooting guide
.....................................
.................................
37
3'-*
Page 4

Location of controls
m mm
Refer to the pages for details.
P P EBED
D SEEK/AMS (seek/Automatic Music
Sensor/manual search/voice drive/voice
memo select) control
9, 10, 11, 13, 15, 18, 27, 28, 29, 32, 33
B MODE (band/unit select) button
12.13, 26, 28, 31, 33
B A (eject) button (located on the front
side of the unit behind by the front
panel) 8
□ SOURCE (TUNER/CO/MD/TV) button
8.12.13, 18, 19, 20, 21, 22, 2S, 26, 28,
31, 33, 35
B Dial (volume/DSO level/equalizer level/
listening position/front or rear speaker
volume/subwoofer volume/balance)
7, 8,14, 15,18, 19, 20, 21, 22, 30
Dial usually functions as a volume control
except in some adjusting modes,
B SOUND button 18,19,20,21,22
B DSPL/SA (display mode change/
spectrum analyzer) button
9,14,15,25,26,31’ .
B Display window
B Reset button (located on the front side
of the unit behind by the front panel)
6
IE
OPEN button 6, 8, 36
DO LIST button
Station Memo 14, 15, 34
Disc Memo 30, 31
List-up 31, 34
IE
OFF button* 6,8
Sensor for the wireless remote
IQ SHIFT button
PLAY MODE 10, 11, 12, 13, 14, 28, 29,
30, 33
REP 10, 27
SET UP 7, 9, 25, 26
SHUF 10,27
B During radio reception:
Number buttons 13
During CD/MD playback;
Direct disc selection buttons 27
During TV reception:
Number buttons 33
" Warning when installing in a car
without ACC (accessory) position
on the ignition key switch
Be sure to press (off) on the unit for
two seconds to turn off the clock display
after turned off the engine.
When you press (OFF) momentarily, the
■clock display does not turn off and this
causes battery wear.
Page 5
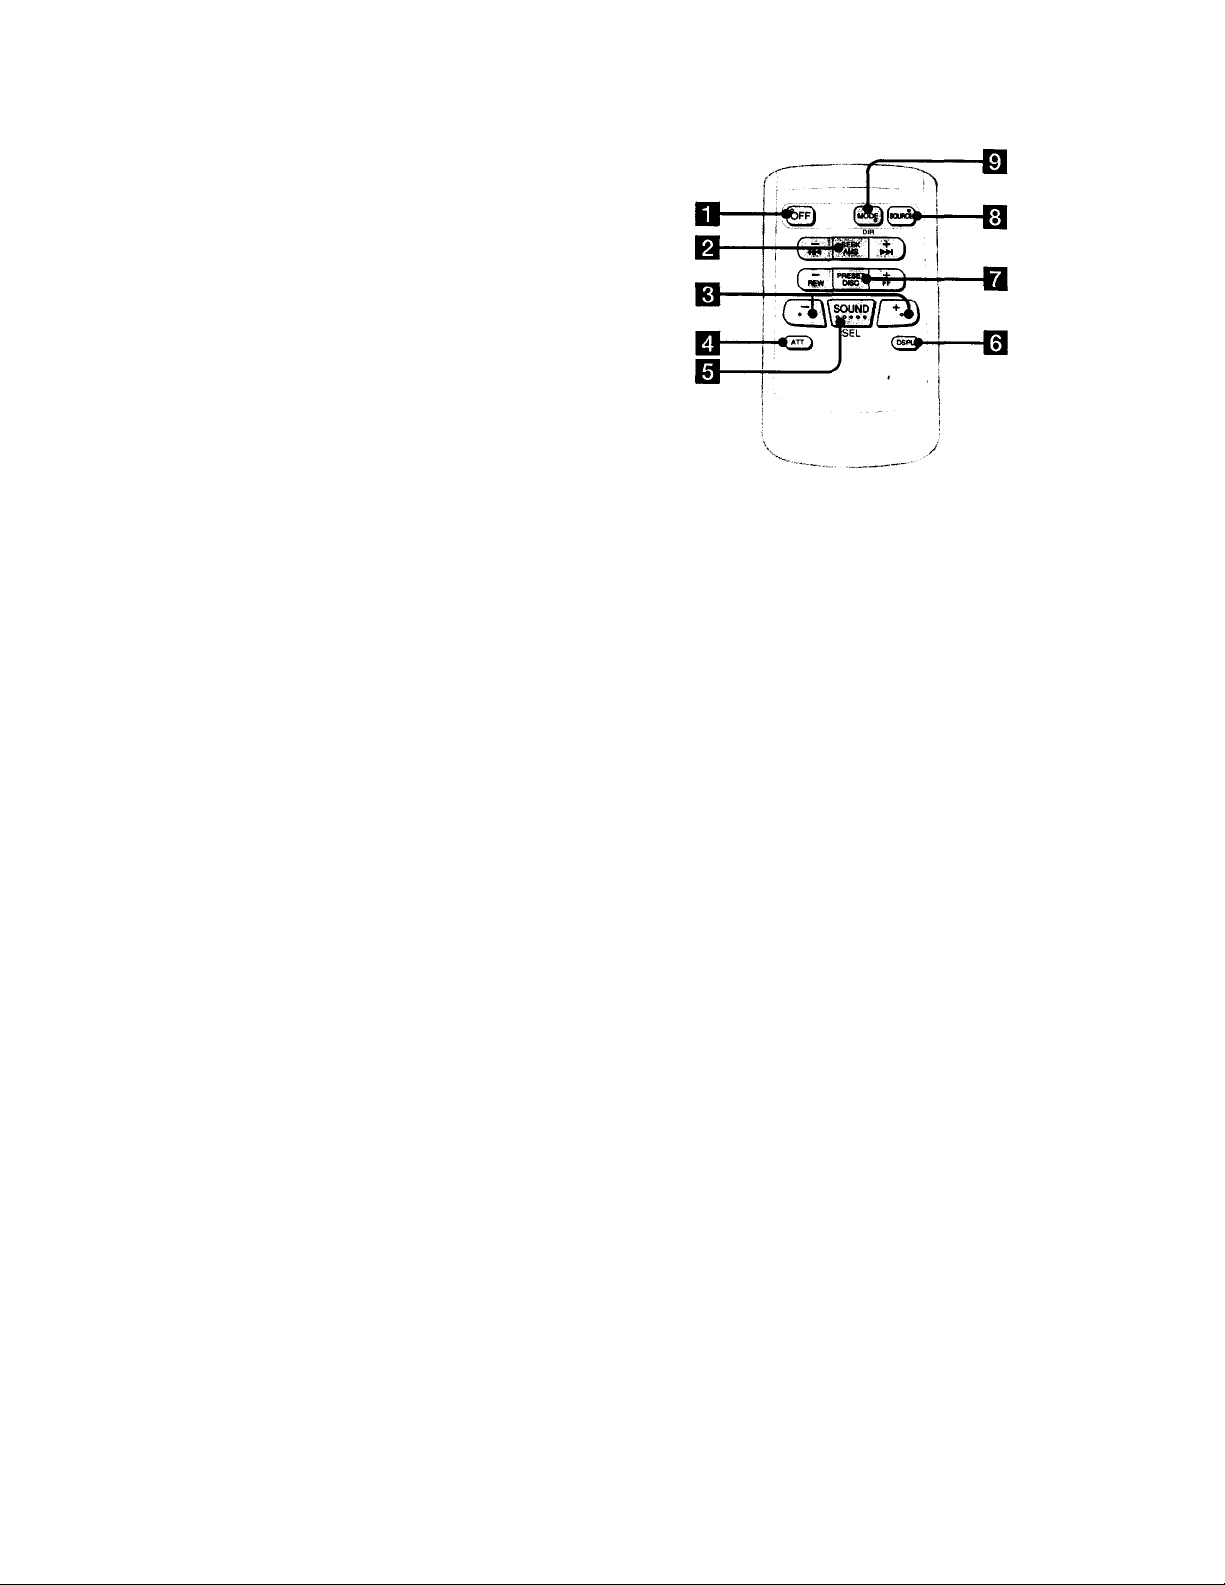
Wireless remote
(RM-X47)
The buttons of the wireless remote
have the same functions as those on
the unit.
D OFF button
B SEEK/AMS button
0 QCD
Q ATT button
0 SOUND/SEL button
buttons
0
DSPL button
□ PRESET/DISC button
You cannot do manual search and manual
tuning with the remote.
0 SOURCE button
0 MODE/DIR button
Page 6
Resetting the unit
Before operating the unit for the first time or
after replacing the car battery, you must reset
the unit.
Press the reset button with a pointed object,
such as a bail-point pen.
0‘
Reset button
Notes
• Pressing the reset button will erase the clock and
some memorized functions.
• When you connect the power supply cord to the
unit or reset the unit wait for about 10 seconds
before you insert a disc. If you insert a disc within
these W seconds, the unit will not be reset and
you will have to press the reset button again.
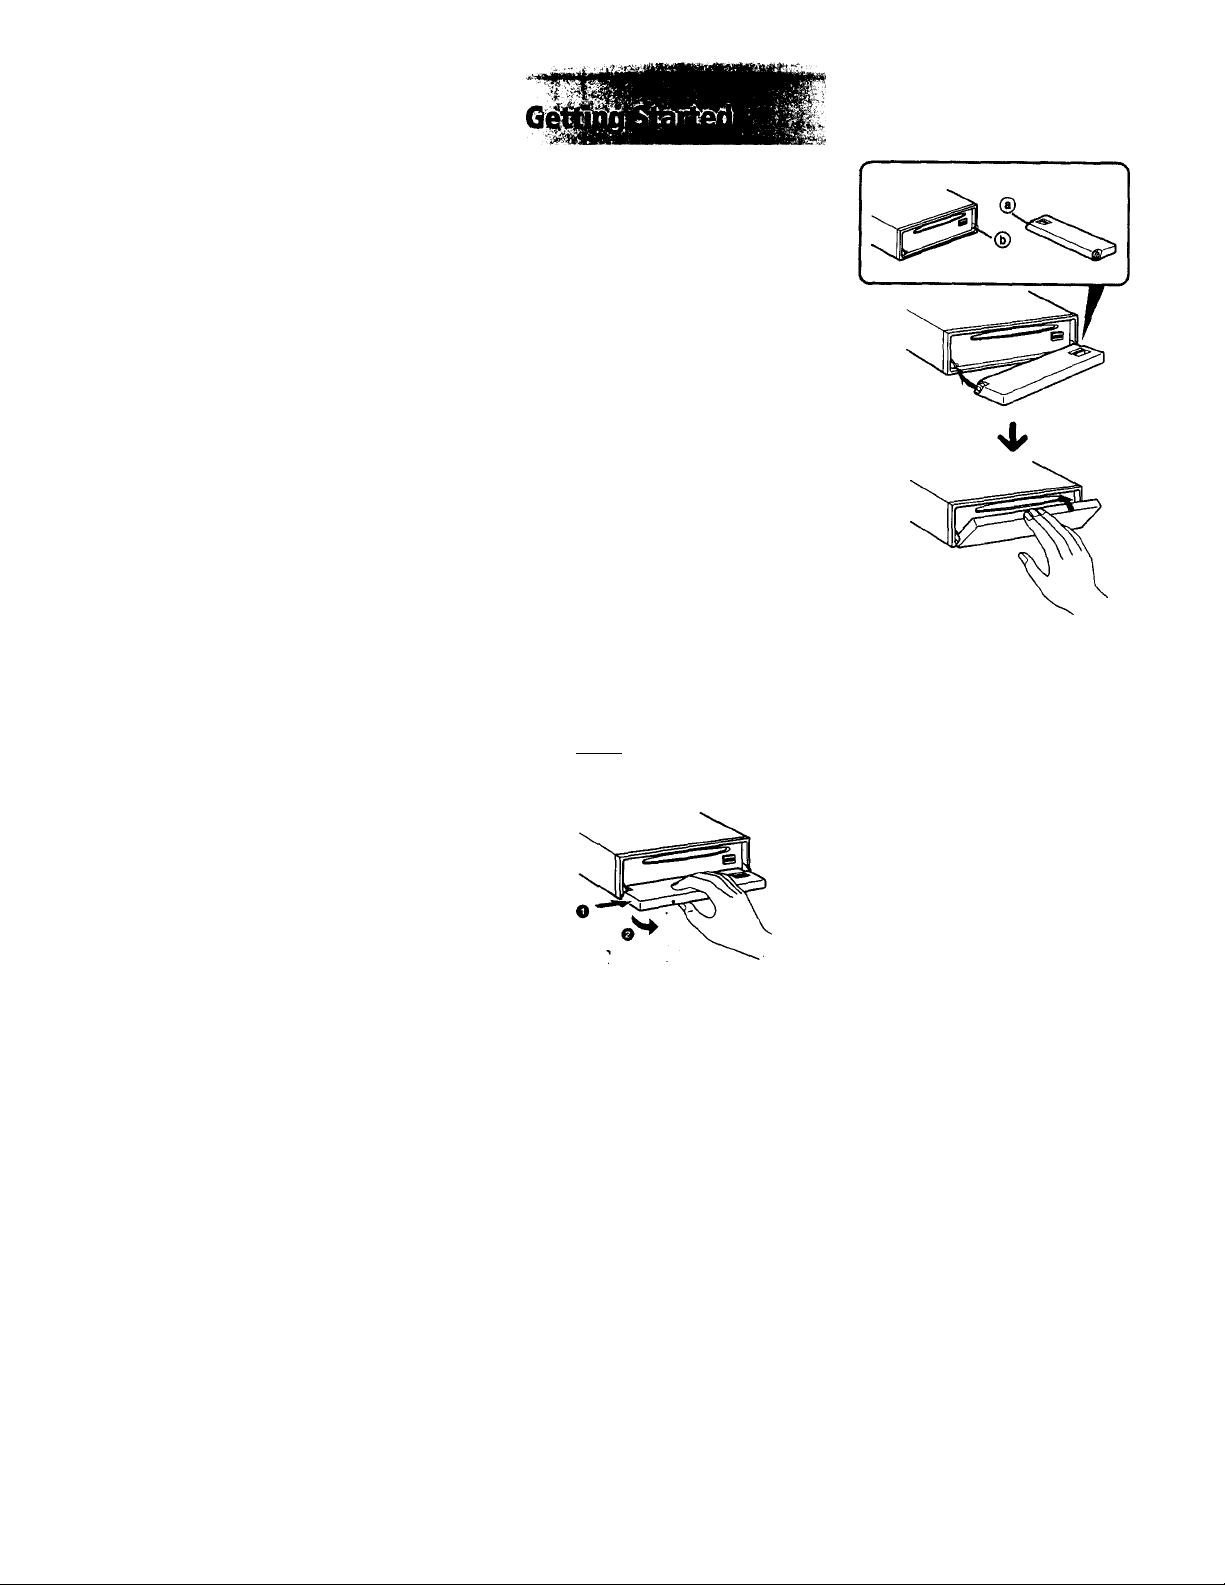
Detaching the front panei
You can detach the front panel of this unit to
prevent the unit from being stolen.
1 Press (oFf).
Press roPEN) to open the front panel,
then slide the front panel to the right
side, and pull out the left side of the
front panel.
Attaching the front panel
Place the hole ® in the front panel onto the
spindle (b) on the unit as illustrated, then push
the left side in.
Notes
• Be sure not to attach the front panel upside
down.
• Do not press the front panel hard against the
unit when attaching it. Press it lightly against the
unit
• Do not press hard or put excessive pressure on
the display windows of the front panel.
• Do not expose the front panel to direct sunlight,
heat sources such as hot air ducts, and do not
leave it in a humid place. Never leave it on the
dashboard of a car parked in direct sunlight
where there may be a considerable rise in
temperature.
Notes
• Do not put anything on the inner surface of the
front panel.
• Be sure not to drop the panel when detaching it
from the unit.
• If you detach the panel while the unit is still on,
the power will turn off automatically to prevent
the speakers from being damaged.
• When you carry the front panel with you, put it
in the supplied front panei case.
Caution alarm
If you turn the ignition key switch to the OFF
position without removing the front panel, the
caution alarm will beep for a few seconds.
Page 7
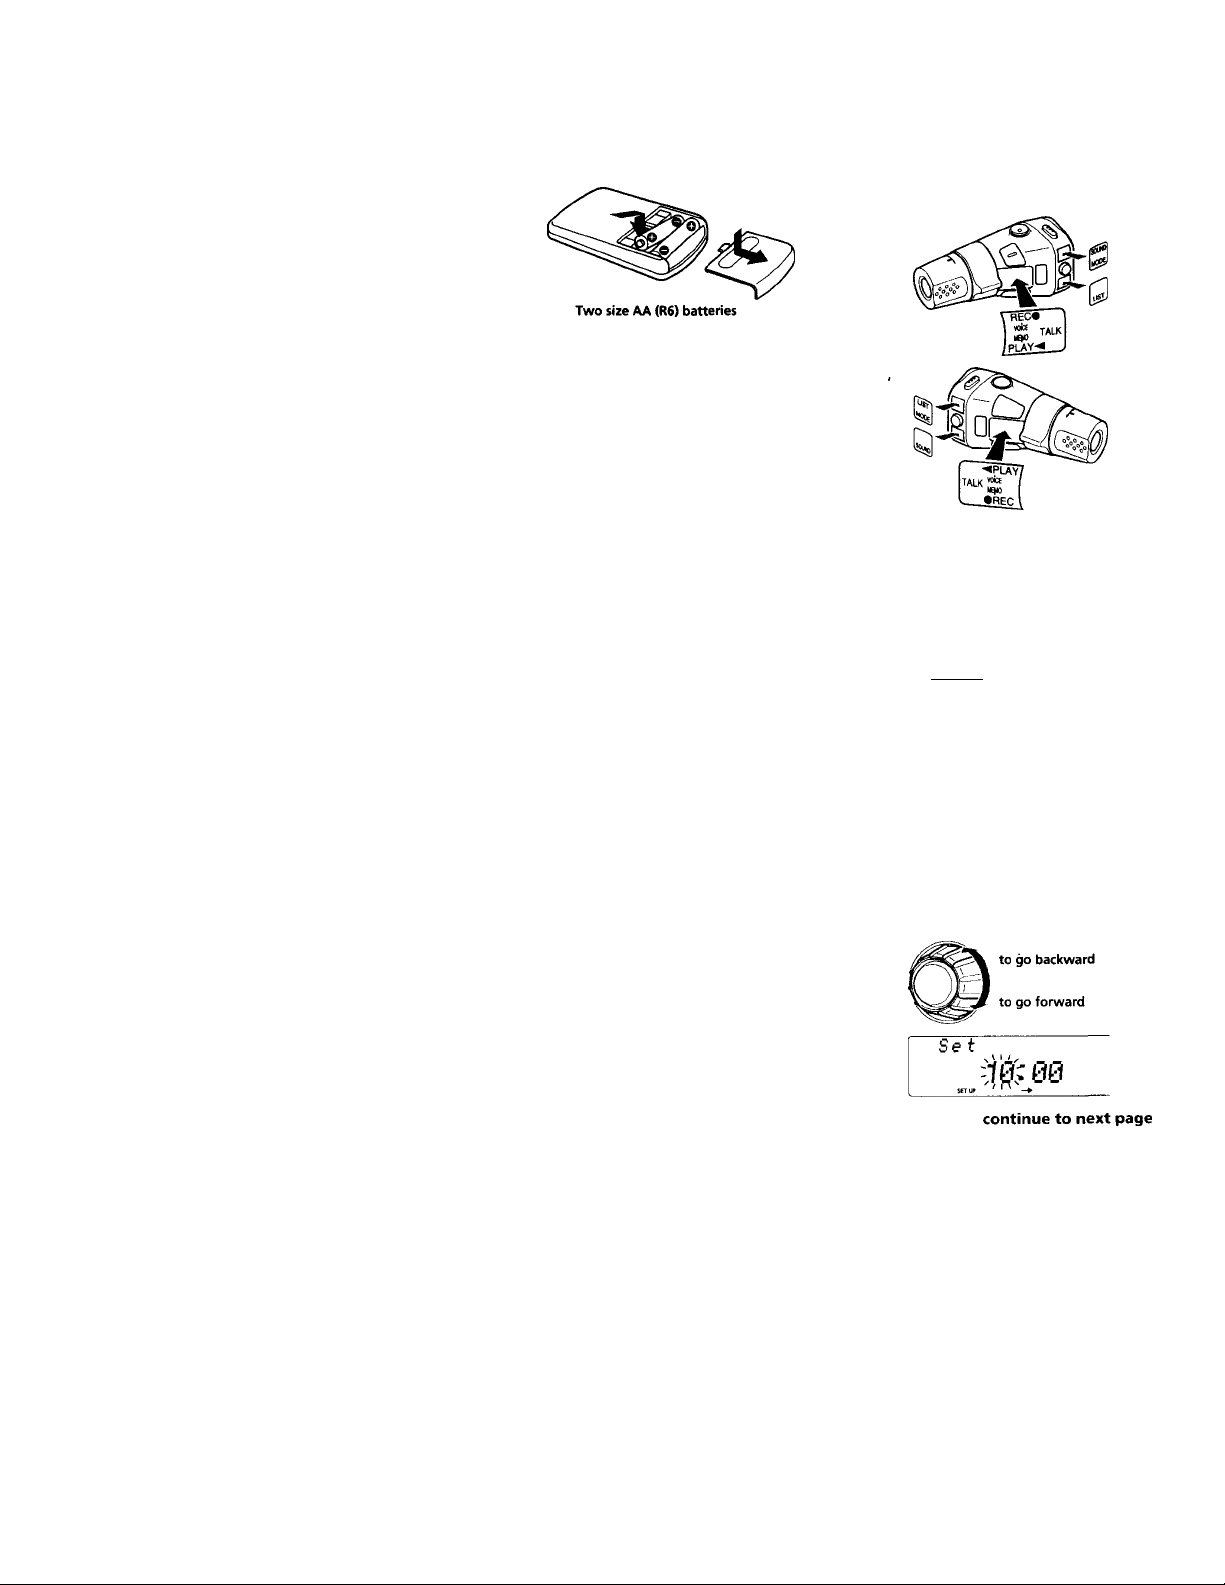
Preparing the wireless remote
Installing the batteries
Battery life is approx, six months although it
depends on the way of use.
Notes on batteries
To avoid damage from battery leakage and
subsequent corrosion:
— insert the batteries by matching the "+" and
on the batteries to the "+" and in
the battery compartment
— do not use an old battery with a new one,
or different types of batteries together
— remove the batteries when you do not use
the unit for a long period of time
— do not charge the batteries..
If any battery leakage occurs, replace the
batteries with new ones after cleaning the
battery compartment.
Notes on wireless remote
• Do not leave the wireless remote in a location
near any heat sources, or in a place subject to
direct sunlight (especially on the dashboard
in summer etc.).
• When you park your car in direct sunlight,
detach the wireless remote and place it in a
location such as the glove-box, where it will
not be subjected to direct sunlight.
Preparinq the rotary commander
When you mount the rotary commander,
attach the label shown in the illustration
below.
Setting the clock
The clock uses a 12-hour digital indication.
Example: To set the clock to 10:08
1 Press (SHIFT), then press (D (SET UP)
repeatedly until "Clock" appears.
Set
Clock
O Press ® (-►).
Set
if; 00
The hour digit flashes.
' —»
O Set the hour.
Page 8
i Press CD (-►).
SeT
10.-^^
The minute digits flash.
O Set the minute.
to go backward
to go forward
Set
2 Press (SHIFT).
10:08
The clock starts.
3 Press (SHIFT).
After the mode setting is complete, the
display returns to normal playback mode.
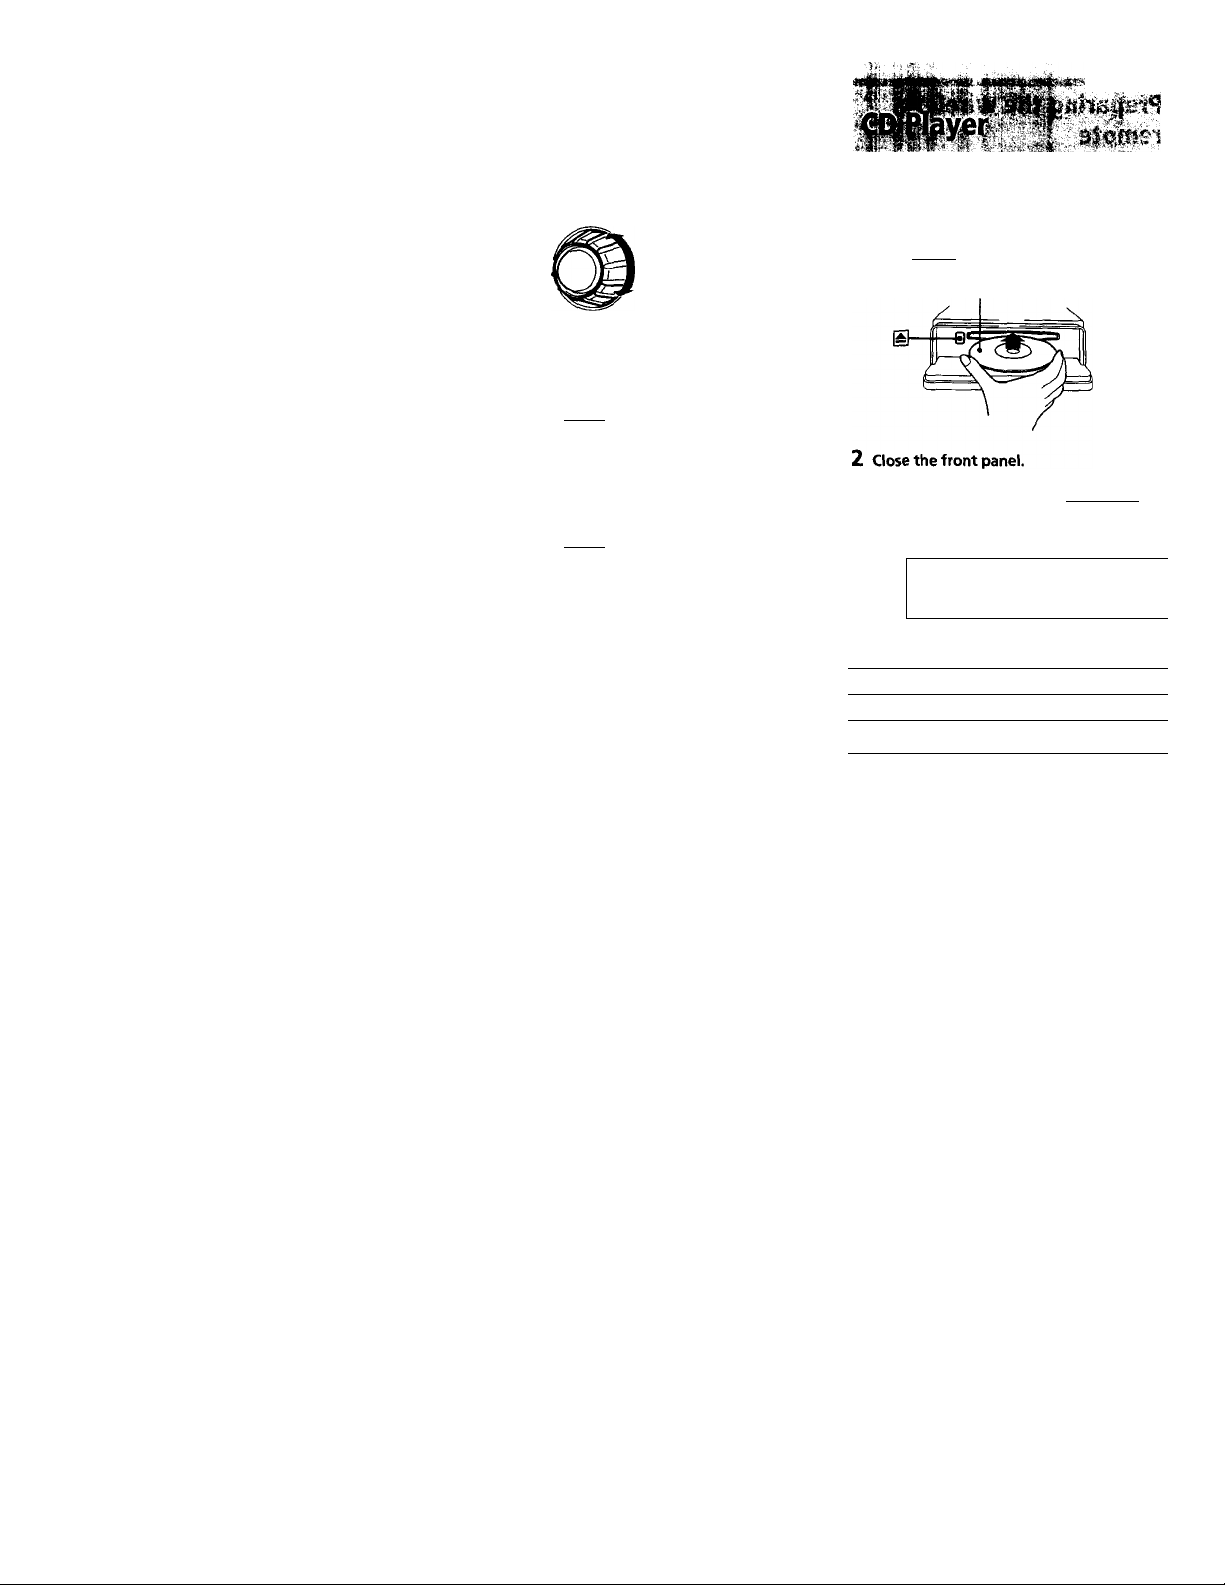
Listening to a CD
1 Press (¿PEN) and insert the CD.
Playback starts automatically.
If a CD is already inserted, press (SOURCE)
repeatedly until "CD" appears.
Labeled side up
Elapsed playing time
CD
13 12.15
Track number
To
Stop playback
Eject the CD
Press
CIE)
(OPEN ) then ±
8
Page 9

Changing the display item
Each time you press (DSPUSA). the item
changes as follows:
Elapsed playback time
Disc name’VArtist natne*^
Track name*'
_______
•' If you inserted a non-CD TEXT disc,
“NO D.Name" or “NO T.Name“ appears in the
display.
If you play a CD TEXT disc, the artist name
appears in the display after the disc name. (Only
for CD TEXT discs with the artist name.)
Clock
1
After if you select the desired item, the display
will be automatically change to the Motion
Display mode after a few seconds.
In the Motion Display mode, all the above
items are scrolled in the display one by one in
order.
Tip
The Motion Display mode can be turned off. (See
“Changing the sound and display settings" on
page 25).
You can label CD and CD TEXT discs with a
personalized name using the disc memo
function, refer to "Labeling a CD" (page 30).
However, if you use personalized labels, they
will always take priority over the original CD
TEXT information when such information is
displayed.
Tips
• if the name of the CD TEXT disc is too long, you
can scroll it across the display by pressing
(SHIFT), then (T) (*-).
• if you want to display the original CD TEXT
information after labeling the CD TEXT disc with
a personalized name, press (shift) , then ®
(-*).
Automatically scrolling a disc name
— Auto Scroll
If the disc name/artist name or track name on
a CD TEXT disc exceeds 10 characters and the
Auto Scroll function is on, the disc or artist
name automatically scrolls on the display as
follows:
• The disc name appears when the disc has
changed (if the disc name is selected).
• The track name appears when the track has
changed (if the track name is selected).
If you press (DSPL/SA) to change the display
item, the disc or track name of the CD TEXT
disc is scrolled automatically whether you set
the function on or off.
1 During playback, press iSHiFTi.
2 Press (D (SET UP) repeatedly until
"A.Scrl" appears.
3 Press (D (—►) to select "A.Scrl on."
4 Press (SHIFT).
To cancel Auto Scroll, select "A.Scrl off" in
step 3 above.
Note
For some CD TEXT discs with extremely many
characters, the following cases may happen:
— Some of the characters are not displayed.
— Auto Scroll does not work.
Locating a specific track
— Automatic Music Sensor (AMS)
During playback, push the SEEK/AMS
control up or down momentarily.
To locate succeeding
tracks
To locate preceding A ^
tracks V.
Locating a specific point in a track
— Manual Search
During playback, push the SEEK/AMS
control up or down and hold.
Release when you have found the
desired point.
To search forward
To search backward
Note
If or "-T-T-i-i" appears in the display, it
means you have reached the beginning or the end
of the disc and you cannot go any further.
Page 10

Playing a CD in various modes
You can play CDs in various modes:
• Repeat (Repeat Play) repeats the current
track.
• Shut (Shuffle Play) plays all the tracks in
random order.
Playing tracks repeatedly
— Repeat Play
1 During playback, press (shift).
2 Press (T> (REP) repeatedly until "Repeat
1" appears.
Creating a program
— CD Program Memory
You can play the tracks in any order you want
by making your own program. You can select
up to 24 tracks for a program. You can store
the programs in memory.
1 During CD playback, press (shift), then
press (D (PLAY MODE) for two seconds.
3
PUT MOM
2 Push the SEEK/AMS control up or down
to select the track you want.
□ I ♦- sen» PLAnwot
'Shift
©qjiaiaiMMiJLLlEroii;
Repeat Play starts.
3 Press (SHIFT).
To return to the normal playback mode, select
"Repeat off" in step 2 above.
Playing tracks in random order
— Shuffle Play
1 During playback, press (shift).
2 Press CD (SHUF) repeatedly until "Shut
1" appears.
Shuffle Play starts.
3 Press (SHIFT). -
To return to thp normal playback mode, select
"Shut off" in step 2 above.
3 Press CD (ENTER) momentarily.
~mr
+Enter+
CB
HJamt ^
4 To continue entering tracks, repeat steps
2 and 3.
5 When you finish selecting tracks, press
CD (PLAY MODE) for two seconds.
6 Press (SHIFT).
Notes
• "♦Wa/t* *" appears in the display while the unit is
reading the data.
• "*Mem Full*" appears in the display when you
try to enter more than 24 tracks into a program.
10
Page 11

Playing the stored program
1 Press (SHIFT).
2 Press CD (PLAY MODE) repeatedly until
*PGM” appears.
3 Press (E> (—*) repeatedly until “PGM on"
appears.
PGM on
Program Play starts.
4 Press (SHIFT).
To return to the normal playback mode, select
"PGM off" in step 3 above.
Note
"Not ready" appears in the display if a disc that
has no programed tracks is inserted.
Erasing an entire program
1 Press (SHIFT), then press ® (PLAY
MODE) for two seconds'. -
e— ruKHooe ^ \
2 Press ® (♦—) repeatedly until “DEL"
appears.
l-PGM PLL-~
e- ^ / //Ptftriwcci Ht n dfi* ^
3 Press (D (ENTER) for two seconds.
Adding tracks to a program
1 Press (SHIFT), then press (T) (PLAY
MODE) for two seconds.
CD
7
umoot
-( f
/ah»i \
2 Press (33 (•.-) or (D (-*) to select the
track slot number where you want to
insert a track.
Track slot number
t- Hi \ M
3 Push the SEEK/AMS control up or down
to select the track you want to insert.
4 Press (E) (ENTER) momentarily to enter
the track.
The current track is inserted in that slot
number and the succeeding tracks shift
down.
5 To continue inserting tracks, repeat steps
2 through 4.
Note
Once all 24 slots have been filled, "*Mem
Full*" appears In the display, and you cannot
insert more tracks.
6 When you finish inserting tracks, press
(4) (PLAY MODE) for two seconds.
7 Press (SHIFT).
5 p.ra
NO Bsts
The entire program is erased.
4 When you finish erasing programs, press
(3)
(PLAY MODE) for two seconds.
5 Press (SHIFT).
11
Page 12

Erasing tracks in a program
1 Press
2 Press CD (♦—) or CD (—►) to select the
3 Press CD (ENTER) for two seconds.
t
Shift ). then press
MODE) for two seconds.
2 'P.0I5
Puraoct
track you want to erase.
(T)
(PLAY
Track slot number
I/J
The track currently registered in slot 6.
When you erase a track from a slot number,
the succeeding tracks shift up to fill the gap.
DEL
-- P.06
pumoM mm
•.'•m ii * ' lij+i-
Radio
Memorizing stations
automatically
— Best Tuning Memory (BTM)
The unit selects the stations with the strongest
signals and memorizes them in the order of
their frequencies. You can store up to 10
stations on each band (FMl, FM2, and AM).
Caution
When tuning in stations while driving, use
Best Tuning Memory to prevent accidents.
Press (SOURCE) repeatedly to select the
tuner.
Each time you press (SOUBCE). the source
changes as follows:
CD TUNER
1 1 1 ! , ,,
4—
4 To continue erasing tracks, repeat steps
2 and 3.
5 When you finish erasing tracks, press Cl)
(PLAY MODE) for two seconds.
6 Press (SHIFT).
12
Press (MODE) repeatedly to select the
band.
Each time you press (MODE). the band
changes as follows:
----
► FMl
--------
► FM2
--------
► AM
3 Press (SHIFT), then press
MODE) repeatedly until “B.T.M" appears.
4 Press (D (—♦)■
The unit stores stations in the order of their
Cl)
(PLAY
frequencies on the number buttons.
A beep sounds when the setting is stored.
5 Press (SHIFT).
/Votes
• The unit does not store stations with weak
signals. If only a few stations are received, some
number buttons will retain their former setting.
• When a number is indicated in the display, the
unit starts storing stations from the one currently
displayed.
----
•
Page 13

Memorizing only the desired stations
You can preset up to 20 FM stations
(10 for FMl and 10 for FM2), and up to 10 AM
stations in the order of your choice.
1 Press (SOURCE) repeatedly to select the
tuner.
2 Press (MODE) repeatedly to select the
band (FM1, FM2, or AM).
3 Push the SEEK/AMS control up or down
to tune In the station you want to store
on the number button.
4 Press and hold the desired number
button (CD to (31)) until "MEM"
appears.
The number button indication appears in
the display.
Note
If you try to store another station on the same
number button, the previously stored station will
be erased.
Receiving the memorized stations
1 Press (SOURCE) repeatedly to select the
tuner.
If you cannot tune in a preset station
Push the SEEK/AMS control up or down
momentarily to search for the station
(automatic tuning).
Scanning stops when the unit receives a
station. Push the SEEK/AMS control up or
down repeatedly until the desired station is
received.
Note
If the automatic tuning stops too frequently, press
(SHIFT), then press (T) (play MODE) repeatedly
until “Local" (local seek mode) is displayed. Then
press <33 (—*) to select "Local on." Press ( shiftt.
Only the stations with relatively strong signals will
be tuned in.
Tip ‘
If you know the frequency of the station you want
to listen to, push the SEEKIAMS control up or
down and hold until the desired frequency
appears (manual tuning).
If FM stereo reception is poor
— Monaural Mode
1 Press (SHIFT), then press (T) (PLAY
MODE) repeatedly until "Mono" appears.
2 Press (D (—») repeatedly until "Mono
on" appears.
The soun<j improves, but becomes
monaural ("ST" disappears).
3 Press (SHIFT).
To return to the normal mode, select "Mono
off" in step 2 above.
2 Press (MODE) repeatedly to select the
band (FM1, FM2, or AM).
3 Press the number button (CD to (To))
momentarily where the desired station is
stored.
13
Page 14

If interference occurs during FM
reception
If there is interference from neighboring
stations^ follow the steps below and select
"Narrow". If interference is not a problem,
select "Wide" to maximize signal reception
and improve sound quality or "IF Auto "to
switch between "Narrow" and "Wide"
automatically.
1 Press (SHIFT) during FM reception.
2 Press ( LIST ) for two seconds.
FM1
Ф
3 Enter the characters.
O Rotate the dial clockwise to select the
desired characters.
(A-rB-*C-r-Z-rO-r1-*2-*
— 9—► + —►
--
2 Press (£) (PLAY MODE) repeatedly until
"IF Auto* appears.
3 Press CD (—►) repeatedly to select
desired setting.
--------
► IF Auto
-------------
Narrow -e-
► Wide
4 Press (SHIFT).
Changing the display item
Each time you press f PSPL/SA). the item
changes as follows;
I
----
► Station name*
I
-----------------------
• /fthe station name is not stored, 'NO Name"
appears in the display for one second.
---------------
Clock -a--------------------------1
► Frequency —i
After if you select the desired item, the display
will be automatically change to the Motion
Display mode after a few seconds.
In the Motion Display mode, all the above
items are scrolled in the display one by one in
order.
Tip
The Motion Display mode can be turned off. (See
"Changing the sound and display settings" on
page 25).
Storing the station names
—station Memo
You can assign a name to each radio station
and store it in'memory. The name of the
station currently tuned in appears in the
display. You can store up to eight characters
for a station.
Storing the station names
1 Tune in a station whose name you want
to store.
14
----------
TWl ®
Ш
-------
If you rotate the dial counterclockwise,
the characters appear in the reverse
order.
If you want to put a blank space
between characters, select"_" (imderbar).
I Press
(D
desired character.
(—►) after locating the
The flashing cursor moves to the next
space.
FM1
Ф
—
If you press (D (*—), the flashing cursor
moves to the left.
0
Repeat steps O and O to enter the
entire name.
4 To return to normal radio reception,
press ( LIST ) for two seconds.
Tip
To erase/correct a name, enter (under-bar) for
each character.
Displaying the station name
Press ( DSPDSA ) during radio reception.
FM1 Ф
3 NRKISS
Each time you press ( DSPUSA ). the item
changes as follows:
----
► Station name*--------► Frequency
■ Clock ■*-
If the station name is not stored, "NO
Name" appears in the display for one
second.
□
Page 15

Erasing the station name
1 Tune in any station and press ( list ) for
two seconds.
Voice Drive
2 Press ( DSPL/SA ) for two seconds.
The station name appears in the display.
3 Rotate the diai to seiect the name you
want to erase.
4 Press d) (ENTER) for two seconds.
The name is erased.
Repeat steps 3 and 4 if you want to erase
other names.
5 Press (XisT) for two seconds.
The unit returns to normal radio reception
mode.
Locating a station by name—List-up
1 Press (LIST) momentarily..
The name assigned to the current station
appears in the display.
LSI ®
3 I^RKISS
2 Press (LiSTl repeatedly until you find the
desired station.
3 Press ® (ENTER) to tune in the desired
station.
Note
After the station name or frequency has been
displayed for five seconds, the display return to
normal mode. To turn off the display, press
( DSPL/SA 1.
You can register an appropriate vocal phrase
for any source including CD/MD*, and the
radio station. Once the registration is
completed, you can request that source just by
pronouncing the registered vocal phrase for it
towards the supplied microphone. This unit
provides 12 "V Drive" boxes for
accommodating registered phrases.
* When you connect to a CDIMD changer with a
PCM (Program memory) function, you can
request a disc in the CDIMD changer.
Use the rotary commander to control this
function.
Seiecting a "V Drive" box
for registration
1 Play a CD or MD, or tune in a radio
station that you wish to register a
phrase for.
2 Press and hold (talk) on the rotary
commander until "V Drive" appears.
FUI
{•' Drive
Note
When the unit enters the setting mode, the
disc playback or the radio reception will be
suspended.
Tip
If the “V Drive" box selected in step 2 already
has a registered phrase, the source
corresponding to it will he played or tuned in.
3 Select a "V Drive" box for registration by
adjusting the SEEK/AMS control either
on the unit or the rotary commander.
F/11
y Drive
3
Tip
If you select an already registered box number,
the registered source will be played or tuned in
to.
15
Page 16
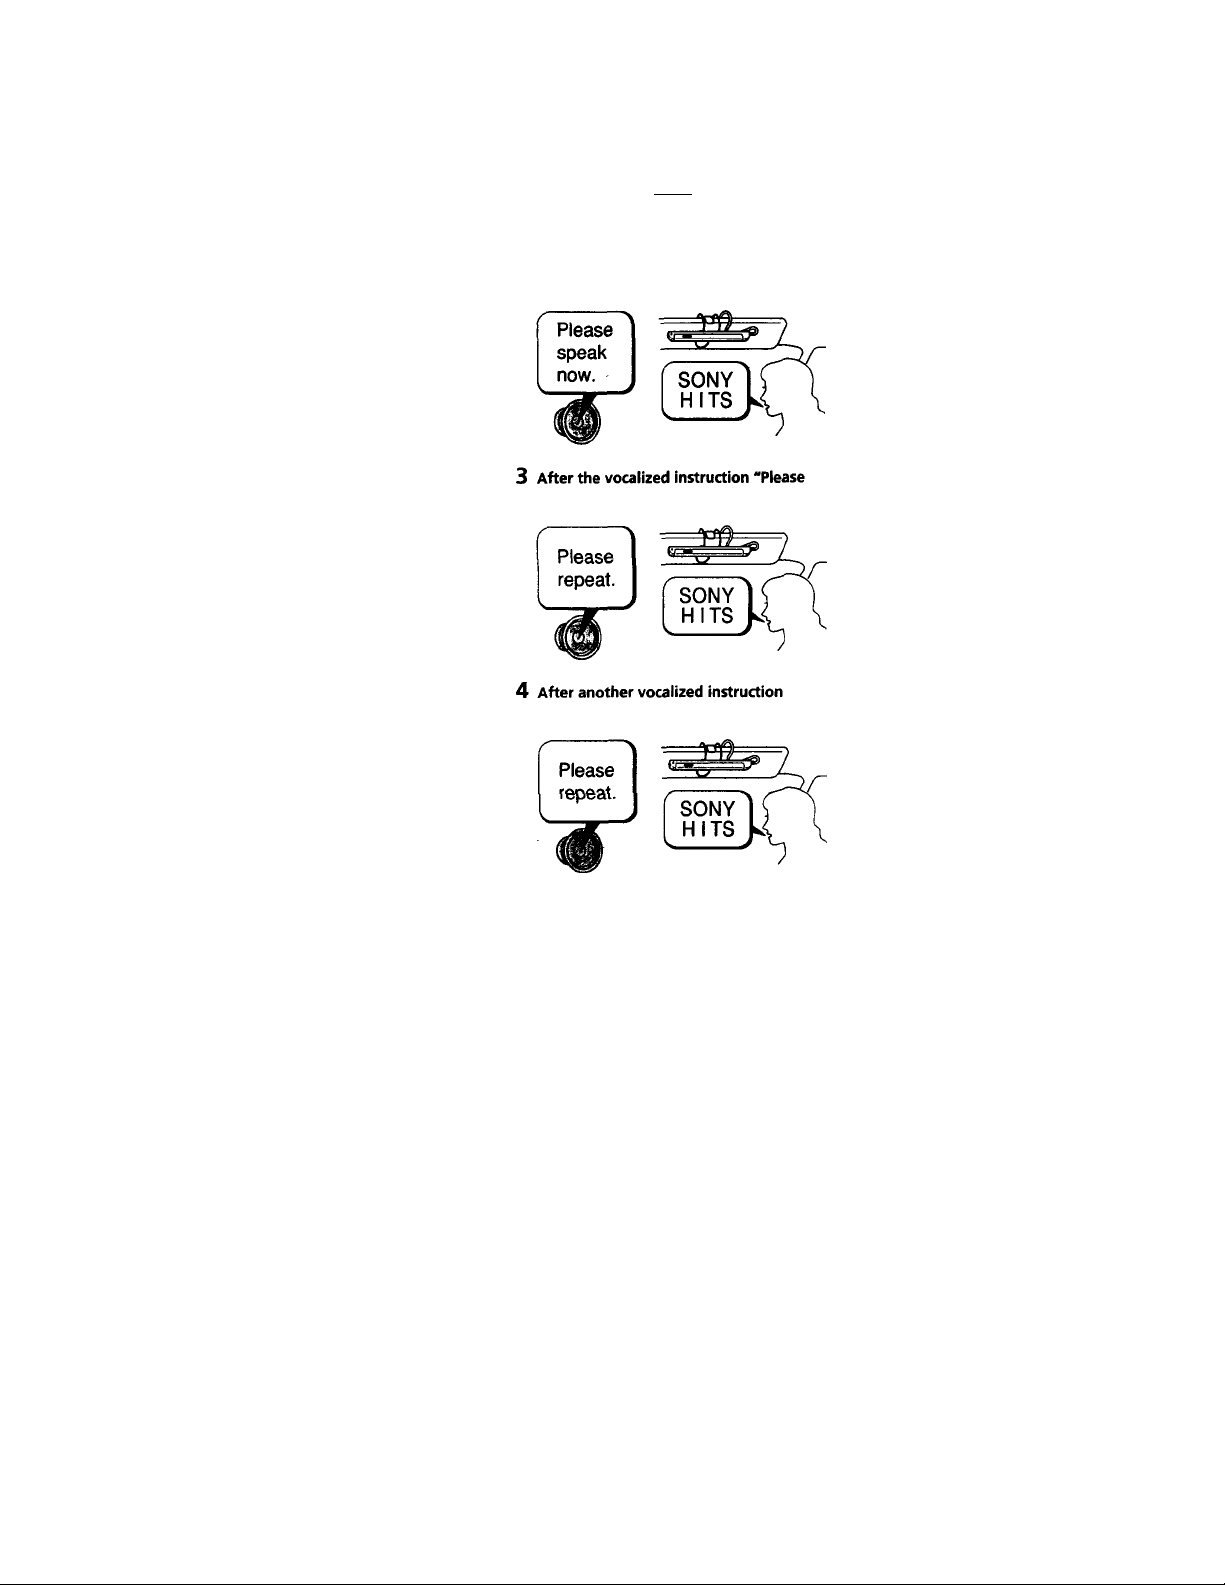
Registering a vocai phrase
1 Once all the steps of 'Selecting a *V
Drive' box for registration' are
completed, press (talk) on the rotary
commander.
After you hear the unit's vocalized
instruction 'Piease speak now.',
pronounce a desired phrase toward the
supplied microphone.
repeat.', pronounce the same phrase
again.
Notes
• Do not attempt to register while driving, as this
may create a traffic hazard.
• Be sure to reply after the unit's vocalized
instruction,
• When a beep sound is heard, the registration
failed. In this case, repeat the same process
starting from step 1.
• Do not use phrases of similar pronunciation such
as “Sony POPS 1 “ and “Sony POPS 2“, because
the unit may not be able to distinguish the
difference.
• After you hear the unit’s vocalized instruction,
reply within three seconds.
Tips
• When you register the phrases, pronounce them
clearly and loudly to make it easier for the unit
to recognize them.
• Registration should be made while the car is
parked with the engine running so that the unit
will recognize your voice more easily when you
are driving.
• Though the vocalized instructions are in English,
any language can be used for registration.
• The volume of the vocalized instructions can be
adjusted on the unit or by the rotary
commander.
'Please repeat.', pronounce the same
phrase one more time.
The unit records the vocal jjhrase in this step
in order to identify the registered phrase later.
When the unit answers "OK!", the registration
is completed.
16
Page 17

Requesting a registered
source
You can request a registered source while
listening to other sources or during the clock
display.
1 Press ( TALK ) on the rotary commander.
Please Spe
After you hear the unit's vocalized
instruction "Please speak now.",
pronounce the registered phrase such as
the disc name or the radio station.
Voice Memo
Voice Memo is a function that allows you to
record a voiced memorandum, such as the
name of a song heard on a radio program or an
idea which comes to mind. You can record up
to six voice memos with this function. Note
that each voice memo must be within 15
seconds.
MEMO 6^ MEM0 1
MEMO 5 I ( H MEMO 2
MEMO 4
You can record or play back the voice memo
when listening to any source or during the
clock display.
Use the rotary commander to control this
function.
MEM0 3
the phrase;
The unit will play the disc or tune in the
radio station.
When the unit fails to recognize the
phrase;
The unit replies "Please speak again."
In this case, repeat the same registered
phrase.
Notes
• When the unit fails to recognize the phrase three
times, a beep sounds and the unit returns to the
previous source. In this case, repeat the same
process starting from step 7.
• If it is noisy outside the car, the unit may not
recognize the registered phrase. In this case,
close the window and try again.
• If you are far from the microphone, speak louder
or come nearer to the microphone.
Tips
• If you do not reply within three seconds after the
vocalized instruction, the unit replies "Please
speak now. "
• When you are requesting a registered source,
pronounce clearly and loudly to make it easier
for the unit to recognise. ^
• When the unit has difficulty rècpgnizing the
phrase, register the vocal phrasé again.
Recording a voice memo
1 Press ( ReC) on the rotary commander
and voice your memorandum toward the
supplied microphone.
FM1
/ / f ! n ! ! ! I \ WWWW^
2 The recording is completed by pressing
Crec^ again or leaving the unit
untouched for 15 seconds.
Notes
• The voice memos are recorded as "MEMO 1",
"MEMO 2", etc.,...in the order they are recorded.
• When a beep sounds and "MEMO FULL"
appears, it means there is no room for additional
voice memos. In such a case, erase the older
recorded voice memos before recording new
ones.
I
! n n i f / / ^
* •
17
Page 18

Playing back the voice memo
1 Press (PLAY) on the rotary commander.
The playback starts from MEMO 1.
\ I ^//////
-Mn01 PLfiVi
2 Select the desired voice memo using the
SEEK/AMS control.
¡Mm03 PLOVi
/f/f!t!i! ! !
I \ \\\\\\\\
Setting the equalizer
You can select an equalizer curve for eight
music types (Rock, Vocal, Jazz, Classic,
Groove, Talk, Techno, and Custom).
You can store and adjust the equalizer settings
for frequency and level.
Selecting the equaiizer curve
1 Press (SOURCE) to select a source (tuner,
CD, or MD).
3 Adjust the volume on the main unit or
by using the rotary commander.
The unit automatically returns to the
previous source after playing back all of the
voice memos.
To interrupt the playback of a voice memo
Press ( PLAY) on the rotary commander.
Playback stops and the unit automatically
returns to the previous source.
Erasing the voice memo
1 Play back the voice memo to be erased.
2 Press and hold (play) on the rotary
commander until a beep sound is heard.
The voice memo will be erased and the
numbers of succeeding voice memos will
move up respectively.
S 9
Erasing ,
-MEMO 3"
^ G j
-MEMO-4" moves up
to-MEMO 3.-
2 Press (SOUND) repeatedly until "EQ"
appears.
EQ
1 Rock
3 Rotate the dial to select the desired
equalizer curve.
Rock • Vocal ► Jazz * Classic » Groove ^
Talk Techno Custom r off
To cancel the equalizing effect, select "off.'
After three seconds, the display return to
the normal playback mode.
Adjusting the equaiizer curve
1 Press (SOUND) for two seconds.
2 Press iSOUND) repeatedly until "EQ"
appears.
3 Rotate the dial to select the desired
equalizer curve.
Rock e—► Vocal ► Jazz e—♦ Classic *—*■ Groove«—*
Talk Techno ^ Custom off
4 Press (D (—►).
18
1
62Hz
Page 19

5 Press (D (■<-) or CD (-
desired frequency.
62 Hz «-► 157 Hz 396 Hz <-► 1.00 kHz .k-.
2.51 kHz w 6.34 kHz 16.0 kHz
6 Rotate the dial to select the desired
level.
►) to select the
If you want to change the equalizer curve to
be adjusted at this time, press CD (■^)
repeatedly until the equalizer curve name
appears to return to step 3.
To restore the factory-set equalizer curve,
press CD (ENTER) for two seconds.
7 Press t SOUND) for two seconds.
Selecting the listening position
3 Rotate the dial to select the desired
listening position.
All
► Front p Front-R *-♦ Front-L«
off
The listening positions appear in the order
shown above.
p Rear p
To cancel the POS mode, select "off."
After three seconds, the display returns to
the normal playback mode.
Adjusting the listening position
1 Press (SOUND) for two seconds.
2 Press (SOUND) repeatedly to select
"POS" appears.
3 Press CD (—»).
You can set a delayed time for the sound to
reach the listeners from the speakers.
In this way, the unit can simulate a natural
sound field so that you feel as if you are in the
centre of the sound field no matter where you
sit in the car.
Display
window
POS
All
POS
Front
POS
Front-R
POS ~
Froht-li
Rear
POS
off
Center of sound
field
Normal setting
(® + (D + @)
Front part
(®+@)
Right front (CD)
Left front ((D)
Rear part ((D)
Cancel
1 Press (SOURCE') to select a source (tuner,
CD, or MD).
2 Press (SOUND) repeatedly until "POS"
appears.
POS
1 ftll
L II
..............
R
4 Rotate the dial to adjust the center of
the sound field to the left or right.
Center moves to the L (left).
Center moves to the R (right).
To restore the factory-set listening position,
press (6^ (ENTER) for two seconds.
5 Press CD (—).
R
.......II.......
6 Rotate the dial to adjust the centre of
the sound field to the front or rear.
Center moves to the R (rear).
Center moves to the F (front).
To restore tlie factory-set listening position,
press (H) (ENTER) for two seconds.
F
7 Press CSOUND) for two seconds.
When the effect setting is complete, the
normal playback mode appears.
19
Page 20

Selecting a soundstage menu
— Dynamic Soundstage Organizer (DSO)
If your speakers are installed into the lower
part of the doors, the sound will come from
below and may not be clear.
The DSO (Dyriamic Soimdstage Organizer)
function creates a more ambient soimd as if
there were speakers in the dashboard (virtual
speakers).
You can adjust the sound to your own
preferences to reproduce the ambient qualities
of a concert hall or night club.
Soundstage menu
Memory presets Meaning
1 E-STD Virtual speakers (standard)
2 ES-CLUB Virtual speakers (standard)
3 ES-LIVE
4 E-WIDE Virtual speakers (wide)
5 EW-CLUB
6 EW-LIVE Virtual speakers (wide)
7 LIVE Reverberation
8 CLUB Initial reflection
off
■I- initial reflection
Virtual speakers (standard)
-I- reverberation
Virtual speakers (wide)
+ initial reflection
+ reverberation
Cancel
Selecting the DSO
1 Press (SOURCE) to select a source (tuner,
CD, or MD).
2 Press (SOUND) repeatedly until ”DSO"
appears.
DSO ®(55)
1 E-STD
3 Rotate the dial to select the desired DSO
mode.
1 E-STD 2 ES-CLUB ^ 3 ES-LIVE 4 E-WIDE
^ 5 EW-CLUB 6 EW-UVE 7 LIVE 8 CLUB
* off
To cancel the DSO mode, select "off."
After three seconds, the display returns to
the normal playback mode.
Adjusting the DSO mode
1 Press (SOUND) for two seconds.
2 Rotate the dial to select the desired DSO
mode.
1 E-S7D 2 ES-CLUB 3 ES-LIVE 4 E-WIDE
S EW-CLOB w 6 EW-UVE 7 LIVE 8 CLUB
p off
3 Press (D (—).
Image of virtual speakers
*' standard ’ -
*2 Wide
Acutual speakers position (lower part of the
front doors).'
20
1 Effect 2
4 Rotate the dial to select the desired
effect level.
► Effect 2 4—► Effect 3 4—, Effect 4 4
Effect 1 ^
Effects
If you want to change the DSO mode to be
adjusted at this time, press (£) (•«—) to
return to step 2.
To restore the factory-set equalizer curve,
press C§) (ENTER) for two seconds.
5 Press (SOUND) for two seconds.
When the effect setting is complete, the
normal playback mode appears.
Page 21

Adjusting the balance
(BAD
You can adjust the sound balance from the left
and right speakers.
1 Press (SOURCE) to select a source (tuner,
CD, or MD).
2 Press (SOUND) repeatedly until "BAL"
appears.
L
........//......
3 Rotate the dial to adjust the balance.
After three seconds, the display returns to
the normal playback mode.
R
Adjusting the fader (FAD)
Normally, with the DSP mode on, the volume
of the output sound from the front and rear
speakers is lowered automaHcally to improve
the efficiency of the listening position setting.
If you want to raise the front and rear speaker
volume, adjust the fader.
Selecting the cut-off frequency of the front/rear speakers
1 Press (SOUND) for two seconds.
2 Press ( SOUND ~) repeatedly to select “F" or “R.“
3 Press (D (-.).
HPF off
4 Rotate the dial to select the cut-off
frequency.
off 78 Hz .
t98Hz
If you want to adjust the volume of the
front or rear speakers at this time, press CD
(<—) and rotate the dial as in step 2 of
"Adjusting the fader (FAD)."
5 Press (SOUND) for two seconds.
When the effect setting is complete, the
normal playback mode appears.
99 Hz 125 Hz 157 Hz •
1 Press t SOURCE) to select a source (tuner,
CD, or MD).
2 Press (SOUND) repeatedly to select the
"F" for the front speakers or "R" for the
rear speakers.
F
B
............//.............
Rotate the dial to adjust the volume of
front/rear speakers..
Decreases speaker volume
Decreases speaker volume
After three seconds, the dismay returns to
the normal playback mode.
O
21
Page 22

Adjusting the volume of the subwoofer(s)
1 Press f source 1 to select a source (tuner,
CO, or MO).
2 Press f SOUND) repeatedly until 'SUB'
appears.
SUB ® @
a
........II----
3 Rotate the.dial to adjust the volume.
After three seconds, the display returns to
the normal playback mode.
Tip
When you rotate the dial to turn the volume all
the way down, 'Sub ATT' appears and the cutout
frequerKy of the subwoofer is disabled.
Adjusting the frequency of the subwoofer(s)
To match the characteristics of the cormected
subwoofer(s), you can cut out the unwanted
high and middle frequency signals entering
the subwoofer(s). By setting the cut-off
frequency (see the diagram below), the
subwoofer(s) will output only low frequency
signals so you can get a clearer sound image.
a
4 Rotate the dial to select the desired cut
off frequency.
The cut-off frequency in the display
changes as follows:
62 Hz 78 Hz <
»—off
If you want to adjust the volume of the
subwoofer(s), press d5 (♦—) and rotate the
dial as in step 3 of "Adjusting the volume
of the subwoofer(s)."
Press (SOUND) for two seconds.
After the frequency setting is complete, the
display returns to the normal playback
mode.
. 99 Hz »— 125 Hz —» 157 Hz
Listening to each programme source in its registered DSO
— Source Sound Memory (SSM)
Each time you return to the same source, you
can hear the same DSO menu and equalizer
curve registered for that source, even after
changing the programme source or turning the
unit off and then on again.
1 Press (SOUND) for two seconds.
2 Press (SOUND) repeatedly until "SUB"
appears.
3 Press ® (^) ■
m —
LPF off
22
Page 23

Using the rotary
commander
The rotary commaitder works by pressing
buttons and/or rotating controls.
You can also control the optional CD or MD
units with the rotary commander.
By pressing buttons (the SOURCE and MODE buttons)
By rotating the control (the SEEK/ AMS control)
Rotate the control momentarily and
release it to;
• Locate a specific track on a disc. Rotate
and hold the control until you locate the
specific point in a track, then release it to
start playback.
• Tune in stations automatically. Rotate and
hold the control to tune in a specific
station.
Each time you press C source ). the
source changes as follows:
TUNER -.CD — MD* TV*
* When an optional MD unit TV tuner or Video
is connected.
Pressing (mode') changes the operation
in the following ways;
• Tuner: FM1 FM2 AM
•CD unit; CD1-.CD2-. ...
• MDunit; MD1-.MD2-....
• TV/Video; TV —. Videol —» Video2 —....
By pushing in and rotating the control (the PRESET/DISC control)
Push in and rotate the control to:
• Receive the stations memorized on the
number buttons.
• Change the disc.
Other operations
Rotate the VOL control to
adjust the volume.
I
23
Page 24

Press iTjgD to display the
memorized names.
Press Cre5^ to record a voice memo.
Press and hold
(tALK) to select a
*V Drive' box for
registration.
Press to:
• Register a vocal
phrase.
• Request a
registered source.
Attenuating the sound
Press (ATT) on the rotary commander or
wireless remote.
"ATT on" appears momentarily.
To restore the previous volume level, press
' ) again.
Tip
When the interface cable of a car telephone Is
connected to the ATT lead, the unit decreases the
volume automatically when a telephone call comes
in (Telephone ATT function).
voice memo.
Press and hold (play) to erase
the voice memo.
__________
Changing the operative direction
The operative direction of controls is factoryset as in the illustration below.
If you need to mount the rotary commander on
the right side of the steering column, you can
reverse the operative direction.
Press (SOUND •) for two seconds while pushing the VOL control.
Tip
You can control the operative direction of controls
with the unit (page 25).
24
Page 25

Changing the sound and display settings
The following items can be set:
•Clock (page 7).
• D.Info (Dual Information) - to display the
clock and the play mode at the same time
(ON) or to display the information
alternately (OFF).
• SA (Spectrum Analyzer) - to change the
display pattern of the equalizer display.
• Amber/Green - to change the illumination
color to amber or green.
• Dimmer - to change the brightness of the
display.
— Select "Auto" to dim the display only
when you turn the lights on.
— Select "on" to dim the display.
— Select "off" to deactivate Dimmer.
• Contrast - to adjust the contrast if the
indications in the display are not
recognizable because of the unit's installed
position.
• Voice guide function for vocalized
comments.
— Select "Voice 1" to minimize the volume
of the guide.
— Select "Voice 2" to increase the volume
than "Voice\."
— Select "Voice 3" to maximize the volume
of the guide.
— Select "Voice off" to deactivate Voice
guide.
• Beep - to turn on or off the beeps.
• RM (Rotary Commander) - to change the
operative direction of the controls of the
rotary commander.
— Select "norm" to use the rotary
commander in the factory-set position.
— Select "rev" when you mount the rotary
commander on the right side of the
steering column.
• M.dspl (Motion Display) - to turn the motion
display to 1, 2, or off.
• English/French - to change the vocalized
comments of the voice guide and the display
language to English or French.
• A.Scrl (Auto Scroll) (page 9,26).
1 Press (SHIFT •)■
2 Press CD (SET UP) repeatedly until the
desired item appears.
Each time you press (D (SET UP), the item
changes as follows:
Clock —• D.Info* —» SA* —► Amber/Green —>
Dimmer —► Contrast —► Voice* —» Beep —* RM
—► M.dspl —► English/French —► A.Scrl*
* When you have not tune the station or there
is no CD/MD being piayed, these items will
not appear.
Note
The display item will differ depending on the
source.
3 Press CD (—*) to select the desired
setting (for example: on or off).
For the "Contrast" setting, pressing CD
(—►) makes the contrast higher, and
pressing (D (<—) makes the contrast lower.
Press (SHIFT).
After the mode setting is complete, the
display returns to normal playback mode.
Changing the equalizer display
You can change the equalizer display
according to the music you are listening to.
Selecting the display pattern
1 Press (SOURCE) to select a source (tuner,
CD, or MD).
2 Press (DSPUSA) for two seconds
repeatedly to select the desired display
pattern.
SA 1 -p SA 2 -p SA 3 -p SA 4 -p SA 5
—p SA auto —♦ SA off
• SA6
I
25
Page 26

With Op^oi
com
You can control up to seven CD and MD units
with this unit.
If you connect an optional CD unit with the
CD TEXT function, the CD TEXT information
will appear in the display when you play a CD
TEXT disc.
Playing a CD or MD
You can label CD and CD TEXT discs with a
personalized name using the disc memo
function, refer to "Labeling a CD" (page 30).
However, if you use personalized labels, they
will always take priority over the original CD
TEXT information when such information is
displayed.
Tips
• If the name of the MD or CD TEXT disc is too
long, you can scroll it across the display by
pressing (shift), then ® (*-).
• If you want to display the original CD TEXT
information after labeling the CD TEXT disc with
a personalized name, press t shift) , then ®
f—;.
1 Press (sooRCE) repeatedly to select the
CD or MD.
2 Press (MODE) until the desired unit appears.
CD/MD playback starts.
When a CD/MD unit is connected, all the
tracks play from the beginning.
Changing the display item
Each time you press (DSPL/SA) during CD,
CD TEXT, or MD playback, the item changes
as follows:
I
Elapsed playback time
Disc name*VArtist name*^
__________
*' If you have not labeled the disc or there is no
disc name prerecorded on the MD, “NO
D.Name" appears in the display.
*’ If you play a CD TEXT disc, the artist name
appears in the display after the disc name. (Only
for CD TEXT discs with the artist name.)
*’ If the track name of a CD TEXT disc or MD is not
prerecorded, “NO T.Name“ appears in the
display.
After if you select the desired item, the display
will be automatically change to the Motion
Display mode after a few seconds.
In the Motion Display mode, all the above
items are scrolled in the display one by one in
order.
Tip
The Motion Display mode can be turned off. (See
"Changing the sound and display settings" on
26
I
I
Track name*’
Clock
I
Automatically scrolling a disc name
— Auto Scroll
If the disc name/artist name or track name on
a CD TEXT disc or MD exceeds 10 characters
and the Auto Scroll function is on, the
following automatically scrolls on the display:
• The disc name appears when the disc has
changed (if the disc name is selected).
• The track name appears when the track has
changed (if the track name is selected).
If you press ( DSPL/SA) to change the display
item, the disc or track name of the MD or
CD TEXT disc is scrolled automatically
whether you set the function on or off.
1 During playback, press (shift).
2 Press CD (SET UP) repeatedly until
"A.Scrl” appears.
3 Press CD (—►) to select "A.Scrl on." 4 Press (SHIFT).
To cancel Auto Scroll, select "A.Scrl off" in
step 3 above.
Note
For some CD TEXT discs with a iot of characters,
the foliowing cases may happen:
— Some of the characters are not displayed.
— Auto Scroll does not work.
Page 27

Locating a specific track
— Automatic Music Sensor (AMS)
During playback, push the SEEK/AMS
control up or down once for each track
you want to skip.
To locate succeeding
tracks
To locate preceding I ^
tracks
Locating a specific point in a track
— Manual Search
During playback, push the SEEK/AMS
control up or down and hold.
Release when you have found the
desired point.
To search forward
To search backward
Locating a disc by disc number
— Direct Disc Selection
Press the number button {(T) to (To))
that corresponds with the desired disc
number.
The desired disc in the current unit begins
playback.
Playing tracks repeatedly
— Repeat Piay
You can select:
• Repeat 1 - to repeat a track.
• Repeat 2 - to repeat a disc.
1 During playback, press (shift).
2 Press (X) (REP) repeatedly until the
desired setting appears.
--------
► Repeat 1
----------------Repeat off <------------------
-----
► Repeat 2
----------
Repeat Play starts.
3 Press (SHIFT).
To return to normal playback mode, select
"Repeat off" in step 2 above.
Playing tracks in random
order — Shuffle Play
You can select:
• Shuf 1 - to play the tracks on the current disc
in random order.
• Shuf 2 - to play the tracks in the current unit
in random order.
• Shuf Ail - to play all the tracks in random
order.
1 During playback, press Cshift).
2 Press СЮ (SHUF) repeatedly until the
desired setting appears.
I—► shuf 1
I
--------------------
------
► shuf 2
Shuf off M'
-----
► Shuf A|l* —I
Shuffle Play starts.
* "Shuf All" is only available when you connect
one or more optional CD units, or when you
connect two or more optional MD units.
3 Press (SHIFT).
To return to normal playback mode, select
"Shuf off" in step 2 above.
27
Page 28

Creating a program
— Program Memory (CD/MD unit with the program memory function)
You can play tracks in the order you want by
making your own program. You can select up
to 24 tracks for a program. You can store the
programs in memory.
1 During CD/MD playback, press (shift).
then press (3) (PLAY MODE) for two
seconds.
Program edit mode
2 3
«- »»»DM
If you have labeled the disc, the bank edit
mode appears. Press ® (PLAY MODE) to
display "P" above.
2 Select the track you want.
O Press (SOURCE) repeatedly to select
CD or MD.
@ Press (MODE) repeatedly to select the
unit.
@ Press (SHIFT), then press the number
button to select the disc.
O Press (SHIFT).
0 Push the SEEK/AMS control up or
down to select the track.
3 Press (6) (ENTER) momentarily.
+Enter+
6 Press (SHIFT).
Notes
• "♦Wa/t* *" appears in the display while the unit is
reading the data, or when a disc has not been
put into the unit
• *'*Mem Full*" appears in the display when you
try to enter more than 24 tracks into a program.
Playing the stored program
Changing the disc order in the unit will not
affect program memory play.
1 Press (SHIFT).
2 Press ® (PLAY MODE) repeatedly until
"PGM" appears.
3 Press ® (—►) repeatedly until "PGM on"
appears.
PGM on
Program Play starts.
4 Press (SHIFT).
To return to normal playback mode, select
"PGM off" in step 3 above.
Notes
• If you press a number button during program
memory play, program memory play is
interrupted, and playback of the selected disc
starts.
• "NO Data" appears in the display if no track is
stored in the program.
• If a track stored into the program memory is not
in the disc magazine, the track will be skipped.
• When the disc magazine contains no tracks
stored into the program memory, or when the
program information has not been loaded yet,
"Not ready" appears.
3 ^
e- puviiooe
4 To continúe entering tracks, repeat steps
2 and 3.
5 When you finish entering tracks, press
® (PLAY MODE) for two seconds.
28
Page 29

Erasing an entire program
1 Press (SHIFT), then press (T) (PLAY
MODE) for two seconds.
I 7 -f.0e,i
If you have labeled the disc, the bank edit
mode appears. Press ® (PLAY MODE) to
display "P" above.
Adding tracks to a program
1 Press (SHIFT), then press (T) (PLAY
MODE) for two seconds.
...........„
•4—
______ __ __ _
PUYHOOe \
If you have labelled the disc, the bank edit
mode appears. Press (T) (PLAY MODE) to
display "P" above.
2 Press CD (<—) repeatedly until "DEL"
appears.
/ II,,
i-PGM ALL-:
e- ^ / / ffttulKM t-» \ \ OTI \ ^ ^
3 Press (T) (ENTER) for two seconds.
HO Uata
The entire program is erased.
4 When you finish erasing programs, press
(3)
(PLAY MODE) for two seconds.
5 Press (SHIFT).
2 Press (2) f'^) or (D (—») to select the
track slot number where you want to
insert a track.
Track slot number
3 Push the SEEK/AMS control up or down
to select the track you want to insert.
4 Press ® (ENTER) momentarily to enter
the track.
The current track is inserted in that slot
number and the succeeding tracks shift
down.
To continue inserting tracks, repeat steps 2
through 4.
Note
Once all 24 slots have been filled,
"*Mem Full*" appears in the display, and you
cannot insert more tracks.
5 When you finish inserting tracks, press
® (PLAY MODE) for two seconds.
6 Press (SHIFT).
29
Page 30

Erasing tracks in a program
1 Press (SHIFT), then press ® (PLAY
MODE) for two seconds.
3 2
If you have labelled the disc, the bank edit
mode appears. Press ® (PLAY MODE) to
display "P" above.
2 Press ® (•►-) or ® {—►) to select the
track you want to erase.
The track currently registered in slot 6.
Track slot number
3 Press ® (ENTER) for two seconds.
When you erase a track from a slot number,
the succeeding tracks shift up to fill the gap.
- -- P.06
4 7 06^c
4- fcariwt ^^ /ÉhÉi< N ^
4 To continue erasing tracks, repeat steps
2 and 3.
5 When you finish erasing tracks, press ®
(PLAY MODE) for two seconds.
6 Press (SHIFT).
Labeling a CD
— Disc Memo (CD unit with the custom file
function)
You can label each disc with a personalized
i\ame. You can enter up to eight characters for
a disc. If you label a CD, you can locate the
disc by name (page 31) and select the specific
tracks for playback (page 32).
1 Play the CD and press ( list ) for two
seconds.
CD2
T
2 Enter the characters.
O Rotate the dial clockwise to select the
desired characters.
(A-*B->C-*-Z-*0-*1-»2-*
CD2 ®(??)
If you rotate the dial counterclockwise,
the characters appear in the reverse
order.
If you want to put a blank space
between characters, select (underbar).
0
Press ® (—♦) after locating the
desired character.
The flashing cursor moves to the next
space.
CB2 ®(i'5
T Si
________
30
If you press ® (<—), the flashing cursor
moves to the left.
0 Repeat steps O and 0 to enter the
entire name.
3 To return to normal CD playback mode,
press (IlisT) for two seconds.
Tip
To erase or correct a name enter (under-bar)
for each character.
Page 31

Displaying the disc memo name
Press (DSPL/SA) during CD or CD TEXT disc playback.
CD 2
T
SCHUBERT
Each time you press (PSPL/SA) during CD
or CD TEXT disc playback, the item
changes as follows:
I
Elapsed playback time
I
Disc memo name
I
Track name* *
*
I
Clock
___________
* If you connect an optional CD unit with the
CD TEXT function, the CD TEXT information
win appear in the dispiay when you piayback
a CD TEXT disc.
After if you select the desired item, the display
will be automatically change to the Motion
Display mode after a few seconds.
In the Motion Display mode, all the above
items are scrolled in the display one by one in
order.
Tip
The Motion Display mode can be turned off. (See
"Changing the sound and display settings" on
page 25).
Erasing the disc memo
1 Press (SOURCE) repeatedly to select CD.
2 Press (MODE) repeatedly to select the CD
unit.
3 Press (LIST) for two seconds.
4 Press (DSPL/SA) for two seconds.
I
7 Press (LIST) for two seconds.
The unit returns to normal CD playback
mode.
Note
When the personaiized labei is erased, the original
CD TEXT information wili appear in the display.
Locating a disc by name
— List-up (CD unit with the custom fiie
function or MD unit)
You can use this function for discs that have
been assigned a custom name. For more
information on disc names, refer to "Labeling n
CD"' (page 30).
Press (LIST) momentarily.
1
The name assigned to the current disc
appears in the display.
LST ®
As
V W V «hT/ /
1 SCHUBERT;
^'11 I I I \ \
When you assign a disc memo label to a
CD TEXT disc, it takes priority over the
original CD TEXT information.
2 Press (LIST) repeatedly until you find the
desired disc.
3 Press (ENTER) to'play back the disc.
Notes
• After a disc name has been displayed for five
seconds, the display returns to normal playback
mode. To turn off the display, press (dspl/sa).
• The track names are not displayed during MD or
CD TEXT disc playback.
• If there are no discs in the magazine, "NO Disc"
appears in the display.
• If a disc has not been assigned a custom file,
“*** *‘*****'' appears in the display.
• If the disc information has not been read by the
unit. "?" appears in the display. To load the disc,
first press the number button, then choose the
disc that has not been loaded.
• The information appears only in upper case.
There are also some letters which cannot be
displayed (during MD or CD TEXT disc playback).
III//.
5 Rotate the dial to select the name you
want to erase.
6 Press CD (ENTER) for two seconds.
The name is erased.
Repeat steps 5 and 6 if you want to erase
other names.
31
Page 32

Selecting specific tracks
for playback
— Bank (CD unit with the custom file
function)
If you label the disc, you can set the unit to
skip tracks and play only the tracks you want.
Start playing the disc and press (shift).
Then press ® (PLAY MODE) for two
seconds.
Bank edit mode.
5 Play-
__________
VMmaf / I I
I
If you have not labeled the disc, the bank edit
mode does not appear and the program edit
mode appears. To return to normal playback
mode, press (7) (PLAY MODE) for two seconds.
2 Push the SEEK/AMS control up or down
to select the track number you want to
skip and press (X> (ENTER).
Playing the specific tracks only
You can select:
• Bank on - to play the tracks with the "Play"
setting.
• Bank inv (Inverse) - to play the tracks with
the "Skip" setting.
1 During playback, press (shift), then
press Ci) (PLAY MODE) repeatedly until
"Bank" appears.
2 Press (D (—►) to repeatedly until the
desired setting appears.
I
----
► Bank on-----► Bank inv
-----
► Bank off —|
CD2 ®(25)
Bank on
Playback starts from the track following the
current one.
3 Press (SHIFT).
To return to normal playing mode, select
"Bank off" in step 2 above.
S mfkiP3
njKmBir/ I I I
The indication changes from "Play" to
"Skip." If you want to return to"Play,"
press CD (ENTER) again.
•
3 Repeat step 2 to set the "Play" or "Skip"
mode on all the tracks.
4 Press ® (PLAY MODE) for two seconds.
The unit returns to normal CD playback
mode.
5 Press (SHIFT).
Notes
• You can set the “Play" and “Skip" mode on up
to 24 tracks.
• You cannot set the “Skip" mode on all the
tracks.
32
Page 33

With Optional Equipment
■nWVidpo
3 Press ® (—►).
The unit stores TV channels in the order of
their frequencies on the number buttons.
A beep sound and the setting is stored.
You can connect an optional TV tuner and TV
monitor with this unit.
Watching the TV
1 Press C SOURCE) repeatedly until "TV"
appears.
2 Push the SEEK/AMS control up or down
to select the desired TV band.
Watching a video
1 Press (SOURCE) repeatedly until
"TV" appears.
2 Press (MODE) repeatedly to select
"Video 1."
Play back the video.
Note
“Video 2“ appears if the VIDEO 2 terminal of the
TV monitor is selected.
Memorizing TV channels automatically
The unit selects the TV channels with the
strongest signals and memorizes them in the
order of their frequency.
4 Press (SHIFT).
Notes
• The unit does not store TV channels with weak
signals. If only a few TV channels are received,
some number buttons will remain empty.
• When a preset number is indicated in the display,
the unit starts storing TV channels from the one
currently displayed.
Memorizing only the desired TV channels
You can store up to 10 chcinnels on the number
buttons in the order of your choice.
1 Press {'SOURCE^ repeatedly until "TV"
appears.
2 Push the SEEK/AMS control up or down
to tune In the TV program you want to
store on the number button.
3 Press and hold the desired number
button (® to (3D) until you hear a
beep tone.
The number button indiccition appears in
the display.
Note
If you try to store another program on the same
number button, the previously stored program will
be erased.
Caution
When tuning in a station while driving, use
Best Tuning Memory to {prevent accidents.
1 Press (SOURCE) repeatedly until "TV"
appears.
2 Press (SHIFT), then press S) (PLAY
MODE) repeatedly until "Auto mem"
appears. - j
33
Page 34

storing the TV channel names
Follow the steps in “Storing the station
names' (page 14).
Displaying the TV or radio station names
Press CUlD momentarily during TV or
radio reception.
Example: When receiving the FM1 band
© Preset number
® Stored station names
@ Frequencies*
• If the name of a station is not stored, the
frequency of the station wiii be dispiayed
instead.
Notes
• it may take some time before ali indications
appear in the display.
• The TV monitor does not appear during list
dispiay.
• The contents of the preset memory cannot be
iisted when the unit is in the simultaneous play
mode (page 35).
Turning off the display
During radio reception, press ( list )
again.
During TV reception, the list display on the
TV monitor will automatically turn off after
a few seconds.
Displaying the information stored on discs
Press (LIST) momentarily during CD/MD
playback.
Example: When CD unit 1 is selected.
® Titles stored as custom files
© No disc is loaded*'
© No stored titles*^
® TOC information has not been identified
yet*’
*’ A blank space is displayed next to a disc
numbers representing empty slots in the disc
magazine.
•2 If a title is not registered in the custom file,
"******" is displayed.
If the disc information has not been read yet
is displayed.
Notes
• It may take some time until all indications appear
in the display.
• The TV program does not appear during list
display.
• The contents of the preset memory cannot be
listed when the unit is in the simultaneous play
mode.
Turning off the display
Press (LIST) again.
34
Page 35

Watching the TV or video while listening to a CD or
MD — Simultaneous Play
The simultaneous play function does not work
while you are listening to the radio,
Additional
Information
Precautions
1 Press (SOURCE) for two seconds.
S7ir
CD e
2 Press d) (♦-)■
"ШГ
3 Press ( SOURCE ) repeatedly to select a CD
orMD.
SML
m--
4 Press CE> (—►).
ТШГ
MD
5 Press ( SOURCE! repeatedly to select a TV
or video.
SML
6 Press (SOURCE) for two seconds.
Simultaneous Play starts.
If you want to change the sound to CD or MD
while watching the TV or video with its sound,
please follow the steps, but press CD (—*) in
step 2 and press (T) (<~) in step 4.
Returning to normal mode
To cancel the CD or MD, follow the steps
above and select in step 3.
». * I t *
• If your car was parked in direct sunlight
resulting in a considerable rise in
temperature inside the car, allow the unit to
cool off before operating it.
• If no power is being supplied to the unit,
check the connections first. If everything is in
order, check the fuse.
• If no sound comes from the speaker systems,
set the fader control to the center position.
• If your car is equipped with a power
antenna, it will extend automatically while
the unit is operating.
If you have any questions or problems
concerning your unit that are not covered in I
this manual, please consult your nearest Sony
dealer.
Notes on handling CDs
A dirty or defective disc may cause sound
dropouts while playing. To enjoy optimum
sound, handle the disc as follows.
Handle the disc by its edge. To keep the disc
dean, do not touch the surface.
Do not stick paper or tape on the labeled
surface.
continue to next page -
To cancel the TV or video,,follow the steps above and selectin step 5.
If you press the EJECT button on a CDIMD unit
while the unit is in simultaneous play mode.
Simultaneous Play is canceled.
35
Page 36

Do not expose the discs to direct suiUight or
heat sources such as hot air-ducts, or leave
them in a car parked in direct sunlight where
there can be a considerable rise in the
temperature inside the car.
Before playing, clean the discs with an optional
cleaning cloth. Wipe each disc from the center
out.
Do not use solvents such as benzine, thirmer,
commercially available cleaners or antistatic
spray intended for analog discs.
Maintenance
Fuse replacement
When replacing the fuse, be sure to use one
that matches the amperage described on the
fuse. If the fuse blows, check the power
connection and replace the fuse. If the fuse
blows again after replacement, there may be an
internal malfunction. In such a case, consult
your nearest Sony dealer.
Fuse (10 A)
Warning
Never use a fuse with an amperage rating
exceeding the one supplied with the unit as
this could damage the unit.
Note on moisture condensation
On a rainy day or in a very damp area,
moisture may condense on the lenses inside
the CD player. Should this occur, the unit will
not operate properly. In this case, remove the
disc and wait for about an hour until the
moisture evaporates.
36
Cleaning the connectors
The unit may not function properly if the
connectors between the unit and the front
panel are not clean. In order to prevent this,
open the front panel by pressing (OPEN), then
detach it and clean the connectors with a
cotton swab dipped in alcohol. Do not apply
too much force. Otherwise, the connectors may
be damaged.
Back of the front panel
Notes
• For safety, before cleaning the connectors, turn
off the engine and remove the key from the
ignition switch.
• Never touch the connectors directly with your
fingers or any metal device.
Page 37

Dismounting the unit
1 Press the dip inside the front cover with
a thin screwdriver, and gentiy pry the
front cover free.
2 Repeat step 1 on the left side.
The front cover is removed.
Use a thin screwdriver to push in the clip
on the ieft side of the unit, then puli out
the left side of the unit untii the catch
clears the mounting.
4 Repeat step 3 on the right side.
5 Slide the unit out of the mounting.
37
Page 38

Specifications
AUDIO POWER SPEanCATIONS
POWER OUTPUT AND TOTAL HARMONIC DISTORTION
19 watts per channel minitnvim continuous average power into
4 ohms, 4 channels driven from 20 Hz to 20 kHz with no more than
1 % total harmonic distortion.
other specifications CD player section
System
5ignal-to-noise ratio
Frequency response
Wow and flutter
Laser Diode Properties
Material
Wavelength
Emission Duration
Laser output power
This output is the value measured at a distance
of 200 mm from the objective lens surface on the
Optical Pick-up Block.
Compact disc digital audio
system
98 dB
10 - 20,000 Hz
Below measurable limit
GaAlAs
780 nm
Continuous
Less than 44.6 pW*
Tuner section
FM
Tuning range
Anterma terminal
Intermediate frequency
Usable sensitivity
Selectivity
Sigrul-to-noise ratio
Harmonic distortion at 1 kHz
Separation
Frequency response
AM
Tuning range
Antenna terminal
Intermediate frequency
Sensitivity
Power amplifier
Outputs
Speaker impedance 4-8 ohms
.Maximum power output
87.5 - 107.9 MHz
External antenna connector
10.7 MHz
8dBf
75 dB at 400 kHz
50 dB at 2(X3 kHz
65 dB (stereo),
68 dB (mono)
0.7 % (stereo),
0.4 % (mono)
35 dB at 1 kHz
30 -15,000 Hz
530 -1,710 kHz
External antenna connector
10.71 MHz/450 kHz
30 pV
section
Speaker outputs
(sure seal connectors)
45 W X 4 (at 4 ohms)
General
Outputs
Equalizer
Power requirements 12 V DC car battery
Dimensions Approx. 178 X 50 X 182 mm
Mounting dimensions
Mass Approx. 1.4 kg (3 lb. 1 oz.)
Supplied accessories Rotary commander (1)
Optional accessories BUS cable (supplied with
Optional equipment CD changer
Design and specifications are subject fo change
without notice.
Line outputs (3)
Power antenna relay
control lead
Power amplifier control
lead
Telephone ATT control
lead
Illumination control lead
±12 dB; fo = 62 Hz, 157 Hz,
396 Hz, 1.0 kHz, 2.51 kHz,
6.34 kHz, 16 kHz
(negative ground)
(7V»x2 x7>Ain.)
(w/h/d)
Approx. 182 X 53 X 163 mm
(7'A x 2 V« X 6'A in.)
(w/h/d)
Wireless remote RM-X47
Microphone (1)
Parts for installation and
connections (1 set)
Front panel case (1)
an RCA pin cord)
RC-61 (1 m), RC-62 (2 m)
CDX-828 (10 discs),
CDX-727 (10 discs)
MD changer
MDX-65
Other CD/MD changers
with the Sony-Bus system
Source selector
XA-C30
TV tuner
XT-40V, etc.
38
Page 39

Troubleshooting guide
The following checklist will help you remedy the problems you may encounter with your unit.
Before going through the checklist below, check the connection and operating procedures.
General
Problem
No sound.
The contents of the memory
have been erased.
Indications do not appear in the
display.
CD/MD playback
Problem
A disc cannot be loaded.
Playback does not begin.
A disc is automatically ejected. The ambient temperature exceeds 50°C (122°F).
The operation buttons do not
function.
The sound skips due to
vibration.
Cause/Solution
• Cancel the ATT function.
• Set the fader control to the center position for speaker
systems.
• Rotate the dial in a clockwise direction to adjust the volume.
• The power cord or battery has been disconnected.
• The reset button has been pressed.
—► Store again into the memory.
Remove the front pgnel and clean the connectors. See
"Cleaning the connectors" (page 36) for details.
Cause/Solution
• Another CD is already loaded.
• The CD is forcibly inserted upside down or in the wrong wav
(MD).
Defective MD or dusty CD.
Press the reset button.
• The unit is installed at an angle of more than 60°.
• The unit is not installed in a sturdy part of the car.
Radio reception
Problem Cause/Solution
Preset tuning is not possible. • Memorise the correct frequency.
Automatic tuning is not
possible.
The stations cannot be
received.
The sound is hampered by
noises. . ’ -
The "ST" indication flashes.
Interference occurs during Ft/I
reception. '
• The broadcast signal is too weak.
The broadcast signal is too weak.
—* Use manual tuning.
Connect an power antenna control lead (blue) or accessory
power supply lead (red) to the power supply lead of a car's
antenna booster.
(When your car has built-in FM/AM antenna in the rear/side
glass only.)
• Tune in the frequency accurately.
• The broadcast signal is too weak.
—► Set to the Mono mode (page 13).
The Wide mode is selected.
—♦ Set to the Narrow or IF Auto mode (page 14).
continue to next page -
39
Page 40

Voice drive/Voice memo
Problem
Registering a vocai phrase or
recording a voice memo is not
possible.
The unit often faiis or does not
succeed in recognizing the vocal
phrase.
Vocalized instructions are not
heard while the voice drive
function or the voice memo
function is engaged in another
operation.
DSP functions
Problem
No sound, or sound is too low.
Cause/Solution
The microphone is not connected properly.
—► Plug it in completely.
• The microphone may not be able to receive the driver's voice
depending on the installation location and direction due to
the microphone's sharp directivity.
—► Install the microphone properly. Be sure to adjust the
SONY mark facing towards the driver's mouth.
• The unit incorporates outside noises as a part of the vocal
phrase.
—► Close the window while registering a vocal phrase.
• You can make it easier for the unit to recognise the vocal
phrase by pronouncing the phrase clearly and loudly.
• The phrase that you pronounced is different from the
registered one.
—► Pronounce the registered phrase.
The volume setting is at the lowest.
—► Adjust the volume with the dial of the unit.
Cause/Solution
The volume of the speakers may have been automatically
lowered in order to maximize the effect of the listening
position adjustment.
—► Rotate the dial to adjust the balance.
The speaker balance can be set separately for DSP on mode
and DSP off mode (page 21).
40
Page 41

Error displays (when an optional CD/MD unit is connected)
The following indications will flash for about five seconds, and an alarm sound will be heard.
Display
NO Mag
NO Disc
NG Discs
Error*’
Blank*'
PushReset
Not Ready
HighTemp
*’ When an error occurs during'ptayback of an MD or CD, the disc number of the MD or CD does nor
appear in the display.
The disc number of the disc causing the error appears in the display.
If the above-mentioned solutions do not help improx'e the situation, consult your nearest Son\dealer.
Cause
The disc magazine is not inserted in
the CD/MD unit.
No disc is inserted in the CD/MD unit. Insert discs in the CD/MD unit.
A CD/MD cannot play because of
some problem.
A CD is dirty or inserted upside
down.*"
An MD does not play because of some
problem.*^
No tracks have been recorded on an
MD.*2
The CD/MD unit cannot be operated
because of some problem.
The lid of the MD unit is open or MDs
are not inserted properly.
The ambient temperature is more than
50°C (122°F).
Solution
Insert the disc magazine in the CD/
MD unit.
Insert another CD/MD.
Clean or insert the CD correctly.
Insert another MD.
Play an MD with tracks recorded on
it.
Press the reset button of the unit.
Close the lid or insert the MDs
properly.
Wait until the temperature goes
down below 50°C (122T).
41
Page 42

Sony^Mline http://www.world.sony.com/
Sony Corporation Printed in Japan
»1 - 3- 866-780-11« (1
Page 43

FMIAM
Compact Disc
Player
Installation/Connections
CDX-C8850
Sony Corporation © 1999 Printed m Japan
Page 44

Parts list
Caution
Cautionary notice for handling the bracket ®.
Handle the bracket carefully to avoid injuring your fingers.
I - 3- 866-782-11» (1)
Page 45

Connections
Cautions
• This unit is designed tor negtitive grmind 12 V DC operation only.
• Before making connections, disconnect the ground terminal of the car battery to a\’oid short circuits.
• Connect the yellow and red power input leads only after all other leads have been connected.
• Be sure to connect the red power input lead to the positive 12 V power terminal which is energized when
the ignition key is in the accessory position.
• Run all ground wires to a common ground point.
• Connect the yellow cord to a free car circuit rated higher than the unit's fuse rating. If you connect this
unit in series with other stereo components, the car circuit they are connected to must be rated higher
than the sum of the individual comp<inent's fuse rating. If there are no car circuits rated as high as the
unit's fuse rating, connect the unit directly to the battery. If no car circuits are a\ ailable for connecting
this unit, connect the unit to a car circuit rated higher than the unit's fuse rating in such a wa\' that if the
unit blows its fuse, no other circuits will he cut off.
• The use of optical instruments with this product will increase eye hazard.
Warning when installing in a car without ACC (accessory) position on the ignition key switch
Be sure to press (off) on the unit for two seconds to turn off the clock display after turned off the
engine.
When you press (OFF) momentarily, the clock display does not turn off and this causes batter\' wear.
Connection diagram
Equipment used in illustrations (not supilied)
Note
For connecting two or more changers, the source selector XA-C30 (optional) is necessary.
Reset button
When the installation and connections are o\ er, be sure to press the reset button vs ith a ball-point pen, etc.
Front speaker Active subwoofer
Rear speaker
/-vwvfWWVVVVA
pAAAIWIflAAAnAn
Power amplifier
CD/MD changer
Page 46

6^
Source selector
Page 47

Connection example
Page 48

Orange/white striped o
ILLUMINATION
ANT REM
Max. supply current 0.1 A
—■
Choke coil box
to a car's illumination signal
Be sure to connect the black ground to it first.
to the power antenna control lead or power supply lead of antenna
booster amplifier
/Votes
♦ It is not necessary to conn ect this lead if there is no po wer antenna
or antenna booster, or with a manu ally-operated telescopic antenn a.
• When your ca r has a built-in FM IAM antenna in the re arlside glass,
see "Notes on the control and power supp ly leads."
to the +12 V power terminal which is energized at the accessory
position of the ignition key switch
o
Notes
• If the re is n o a cce ssory p osition, connect to the *12 V power (bat tery)
term inal w hich is energized a t all times.
Be s ure to conne ct the bla ck gro und to it first.
• Wh en your c ar h as a built-in FM IA M antenn a in the rearlsid e g lass,
see "Notes on the control and power supp ly leads. “
o
to the +12 V power terminal which is energized at all times
Be sure to connect the black ground to it first.
e
to a metal point of the car
. First connect the black ground lead, then connect the yellow and red
power input reads.
Notes on the control and power supply leads
• The power antenna contro/ lead (blue) supplies +12 V DC when you turn on the tuner.
• When your car ha s a built-in F MIAM anten na in the rea rlside glass, it is ne cessary to co nnect the po we r
antenna contro/ lead (blue) or the accessory po wer in put lead (red) to th e p ow er term inal o f th e existing
antenna b ooster. For details, consult your dealer.
• A po wer antenna without relay box canno t be used with this unit.
Memory hold
connection
When the yellow power input lead is connected, pow er will alw ays be supplied to the memory circu it even
whe n the ignition key is turned off.
/Votes on speaker connection
• Befo re con necting the speakers, turn the unit off.
• Use speakers w ith an im pedan ce of 4 to 8 ohms, and w ith adequate power ha ndiing capacitie s. Otherw ise,
the spe akers may be damaged.
• Do n ot con nect the term inals of the spe aker system to t he car ch assis, a nd do no t conn ect the term inals o f
the right speaker with those of the left speaker.
• Do not atfempr to connect the speakers in para llei.
• Do not connect any active speak ers (with built-in amplifiers) to the speak er term inals of the unit. Doing so
may damage the active speakers. Therefore, be su re to connect passive spe akers to these term ina ls.
Page 49

Installation
Precautions
• Do not tamper with the four holes on the upper surface of the unit. They are used for tuner adjustments
to be made only by service technicians.
• Choose the installation location carefully so that the unit will not interfere with the driver while driving,
• Avoid installing the unit where it would be subject to high temperatures, such as from direct sunlight or
hot air from the heater, or where it would be subject to dust, dirt or excessive vibration.
How to detach and attach the front panel
Before installing the unit, detach the front panel.
To detach □
Before detaching the front panel, be sure to press (OFF) first. Then press (OPEN) to open the front panel, then
slide the front panel to the right side, and pull out the left side of the front panel.
Mounting example
Installation in the dashboard
• Use only the supplied mounting hardware for a safe and secure installation.
Mounting angle adjustment
Adjust the mounting angle to less than 60°,
To attach [3
place the hole 0 in the front panel onto the spindle © on the unit as illustrated, then push the left side in.
Page 50

Mounting the unit in a Japanese car
You may not be able to install this unit in some makes ol Japanese cars. In such a case, consult your Sony dealer.
To prevent m alfunction, insta ll o nly with the supplied screws (§).
Microphone precautions
• This system receives the driver's voice from the microphone. When it is noisy outside your car, shut the
windows. Engine noise may also prevent the system from recognizing the driver’s voice.
• This microphone can receive sound from one direction only (directional microphone), Therefore it is
important to install the microphone properly to ensure the driver's voice will be recei\ ed.
Installing the Microphone
Installation location
• Install the microphone underneath the sun visor in the pushed up position. Note that when the sun visor
is lowered, the microphone will not receive the driver’s voice.
• Install the microphone so that the arrow on the top points toward the driver.
• Consult your dealer when installing in a car equiped with an airbag system or shock absorbing device.
Secure the microphone's
cord as illustrated.
Be sure to leave some
slack in the microphone's
cord between the
microphone and the
holder ® as illustrated.
nstall the microphone'
,o that the arrow on
he top points toward
he driver.
Secure the microphone's
cord as illustrated.
Secure the wire to the windoW frame so that the
wire does not interfere with driving. Before
attaching the damp dean the surface
thoroughly.
Connecting the microphone
1 Connect the microphone to the MIC jack of the audio equipment. (Refer to the “Installation/
Connectinos" supplied with the unit as well.)
2 Bndle up the connecting cord of the microphone with other connecting cords of the audio
equipment by attaching the supplied cramper Be sure to leave some slack In the connecting
cord between the plug and the cramper.
When you leave your car
Hide the microphone over the sun visor as illustrated to protect the microphone from being stolen.
Page 51

Installing the rotary commander
Notes
• Choose the mounting location carefully so that the
rotary commander will not interfere with operating
the car.
• Do not install the rotary commander in a place
where it may jeopardize the safety of the (front)
passenger in any way.
• When installing the rotary commander, be sure not
to damage the electrical cables, etc. on the other
side of the mounting surface.
• Avoid installing the rotary commander where it may
be subject to high temperatures, such as from direct
sunlight or hot air from the heater, etc.
Example of a mounting location
Page 52

Warm the mounting surface and the double-sided
adhesive tape on the mounting hardware @ to the
temperature of 20°C (68°F) to 30°C (86°F), and attach the
mounting hardware to the mounting surface by
applying even pressure. Then screw it down with the
supplied screw ®.
.Attach a piece ot lioa\ \' duty tape, etc. on the other side of
the mounting surface to cover the protruding tip of the
screw so that thev will not interfere with anv electrical
cables, etc. inside the steering wheel column.
After installing the steering wheel column cover, attach the rotary commander to the
mounting hardware by aligning the four holes on the bottom of the rotary
commander with the four catches on the mounting hardware and sliding the rotary
commander until it locks into place as illustrated.
Note
If you are mounting the rotary commander to the steering wheel column, make sure that the
protruding tip of the screw on the inner surface of the column does not in any way hinder or
interfere with the movement of the rotating shaft, operative parts of the switches or the electrical
cables, etc. inside the column.
 Loading...