

Page 1

FM/MW/LW
Compact Disc
Player
3-864-436-11 (1)
Operating Instructions
Manual de instrucciones
Manual de instruções
Bruksanvisning
For installation and connections, see the supplied installation/connections
manual.
Para obtener información sobre la instalación y las conexiones, consulte el manual
de instalación/conexiones suministrado.
Para a instalação e as ligações, consulte o manual de instalação/ligações
fornecido.
Vi hänvisar till det medföljande häftet angående montering/anslutningar.
EN
ES
P
S
CDX-C880R
1998 by Sony Corporation
Page 2

Welcome !
Thank you for purchasing the Sony Compact
Disc Player. This unit lets you enjoy a variety
of features by using either a supplied rotary
commander or an optional wireless remote.
In addition to the CD playback and radio
operations, you can expand your system by
connecting an optional CD/MD unit*1.
When you operate this unit or a connected
optional CD unit with the CD TEXT function,
the CD TEXT information will appear in the
display when you play back a CD TEXT disc*2.
*1You can also connect a CD changer and an MD
changer.
2
A CD TEXT disc is an audio CD that includes
*
information such as the disc name, artist name
and track names.
These information is recorded on the disc.
Voice Drive
Sony has developed a new function which
EN
contributes to safer driving.
In addition to our unique rotary commander,
we now introduce a voice sensitive operating
system Voice Drive which gives the driver
voice control of the car audio.
Now, while keeping your eyes on the road,
you can command operations with Voice Drive
and confirm results with Voice Guide.
And you can also record your voice with the
voice memo function. It will take a note for
you when you see or think of something while
you are driving.
Voice guide for safe driving
This unit has a voice guide function*. When
the voice guide function is on, the unit gives
vocalized comments on functions
corresponding to the relevant button pushed.
* Some optional power amplifiers may cause a
break at the beginning of vocalized comments.
When you connect an optional MD changer, the
sound from the first MD may continue for a short
time even after the vocalized comments about
the second MD are announced.
2
Page 3

Table of Contents
This Unit Only
Location of controls ................................................. 4
Getting Started
Resetting the unit ................................................ 6
Detaching the front panel .................................. 6
Preparing the rotary commander ..................... 7
Setting the clock .................................................. 7
CD Player
Listening to a CD ................................................ 8
Playing a CD in various modes ...................... 10
Creating a programme
— CD Programme Memory ....................... 11
Radio
Memorising stations automatically
— Best Tuning Memory (BTM) ................. 13
Memorising only the desired stations............ 14
Receiving the memorised stations .................. 14
RDS
Overview of the RDS function ........................ 15
Displaying the station name............................ 15
Re-tuning the same programme automatically
— Alternative Frequencies (AF) ................ 15
Listening to traffic announcements ................ 17
Presetting the RDS stations with the AF and
TA data .......................................................... 18
Recording the traffic announcements
—Traffic Information Replay (TIR)........... 18
Locating a station by programme type .......... 20
Setting the clock automatically ....................... 21
Voice Drive
Selecting a “V Drive” box for registration..... 21
Registering a vocal phrase ............................... 22
Requesting a registered source ....................... 23
Voice Memo
Recording a voice memo .................................. 23
Playing back the voice memo .......................... 24
Erasing the voice memo ................................... 24
With Optional Equipment
CD/MD Unit
Playing a CD or MD ......................................... 27
Scanning the tracks
— Intro Scan ................................................. 28
Playing tracks repeatedly
— Repeat Play .............................................. 29
Playing tracks in random order
— Shuffle Play .............................................. 29
Creating a programme
— Programme Memory .............................. 29
Labelling a CD
— Disc Memo ............................................... 32
Locating a disc by name
— List-up ...................................................... 33
Selecting specific tracks for playback
— Bank .......................................................... 34
DSP
Selecting a surround menu.............................. 35
Storing a surround effect onto CDs
— Digital Signal Processor (DSP) Custom
File.................................................................. 36
Selecting the listening position ....................... 36
Adjusting the fader (FAD) ............................... 37
Adjusting the volume of the subwoofer(s).... 37
Adjusting the volume of the bass and
treble .............................................................. 38
Listening to each programme source in its
registered surround menu
— Last Sound Memory (LSM) ................... 39
Changing the line output level ....................... 39
Additional Information
Precautions......................................................... 39
Maintenance....................................................... 40
Dismounting the unit ....................................... 41
Specifications ..................................................... 42
Troubleshooting guide ..................................... 43
EN
Other Functions
Using the rotary commander .......................... 24
Adjusting the sound characteristics ............... 26
Attenuating the sound ..................................... 26
Changing the sound and display settings ..... 26
Adjusting the frequency of the
subwoofer(s) ................................................. 27
3
Page 4
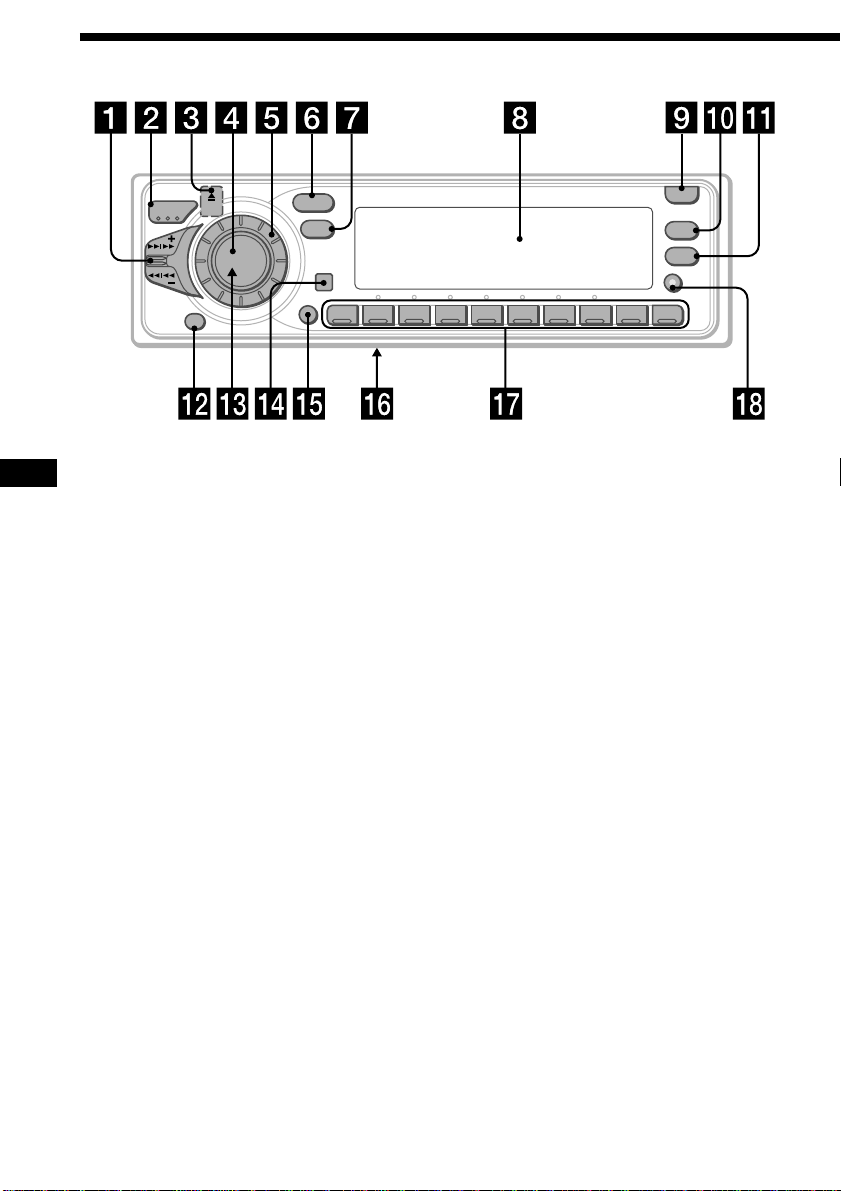
Location of controls
/
A
K
M
E
S
OFF
E
S
SOURCE
MODE
Refer to the pages for details.
EN
1 SEEK/AMS (seek/Automatic Music
Sensor/manual search) control
9, 11, 12, 14, 16, 19, 20, 21, 28, 29, 31, 34
2 MODE (band/unit select) button
13, 14, 27, 29, 33
3 6 (eject) button (located on the front
side of the unit hidden by the front
panel) 8
4 SOURCE (source select) button
8, 13, 14, 17, 24, 27, 29, 33, 35, 37, 38
5 Dial (volume/subwoofer volume/bass/
treble/left-right/rear-front control)
7, 26, 32, 33, 35, 36, 37, 38, 39
6 SOUND button 26, 35, 36, 37, 38, 39
7 DSPL (display mode change) button
9, 14, 15, 27, 28, 32, 33
8 Display window
9 OPEN button 6, 8, 40
!º PTY/LIST button
Disc Memo 32, 33
DSP Custom File 36
List-up 33
RDS Programme 20
!¡ AF/TA button 15, 16, 17, 18
SOUND
DSPL
SHIFT
12345678910
!™ OFF button 6, 8
!£ Reset button (located on the front side
of the unit behind by the front panel) 6
!¢ Sensor for the optional wireless remote
!∞ SHIFT button
PLAY MODE 10, 11, 12, 13, 14, 16, 18,
28, 29, 30, 31, 34
REP 10, 29
SET UP 7, 8, 9, 21, 26, 27, 28, 36, 39
SHUF 10, 29
!§ POWER SELECT switch (located on the
bottom of the unit)
See “POWER SELECT Switch” in the
Installation/Connections manual.
!¶ During radio reception:
Number buttons 14, 16
During CD/MD playback:
Direct disc selection buttons 28
!• TIR button 18, 19
OPEN
LIST
PTY
AF/TA
TIR
CDX-C880R
4
Page 5
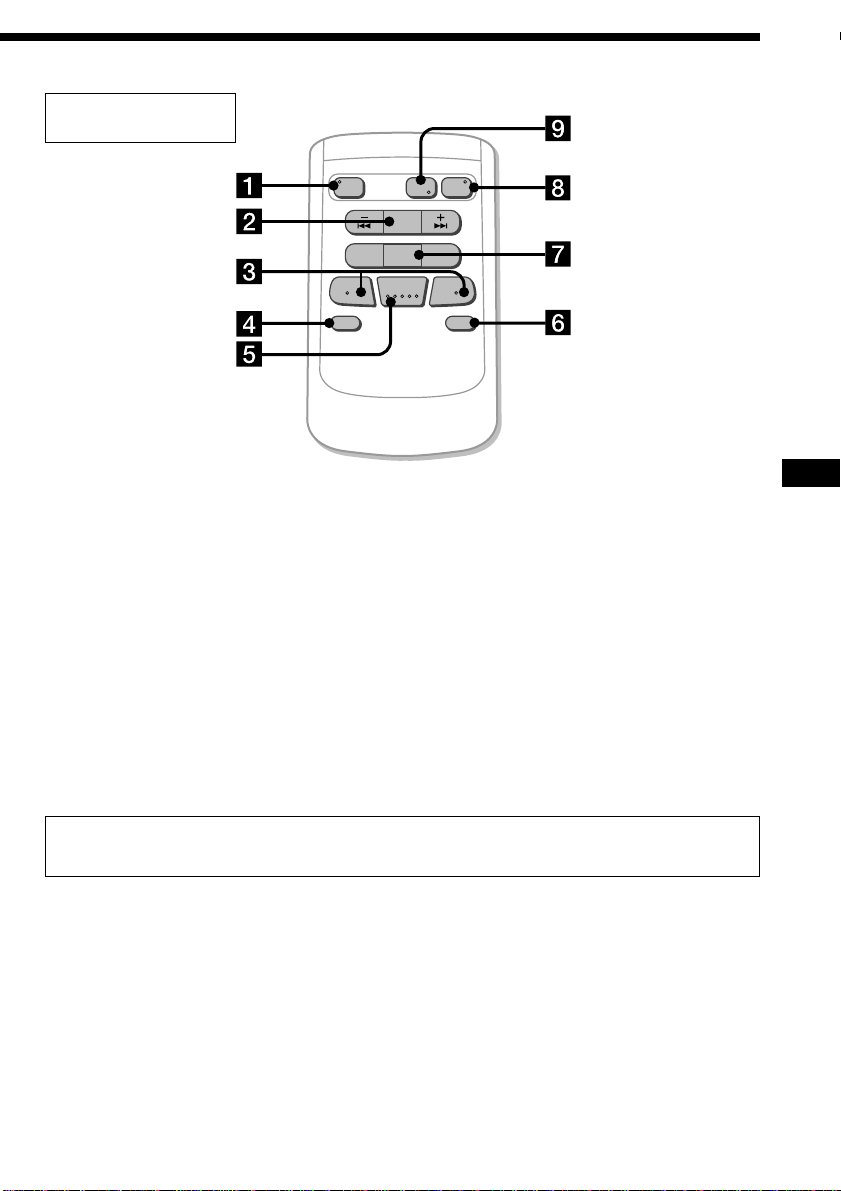
Optional wireless
remote (RM-X47)
OFF
–
ATT DSPL
The buttons of the wireless remote
control the same functions as those on
this unit.
1 OFF button
2 SEEK/AMS button
3 (–) (+) buttons
4 ATT button
5 SOUND/SEL button
6 DSPL button
REW
–
SOURCE
MODE
DIR
SEEK
AMS
+
PRESET
FF
DISC
SOUND
SEL
+
7 PRESET/DISC button
You cannot do manual search and manual
tuning with the remote.
8 SOURCE button
9 MODE/DIR button
(MODE) controls the same function on this
unit.
EN
When the POWER SELECT switch is set to the B position, the unit cannot be operated with the
wireless remote unless (SOURCE) on the unit is pressed or a CD is inserted to activate the unit
first.
5
Page 6
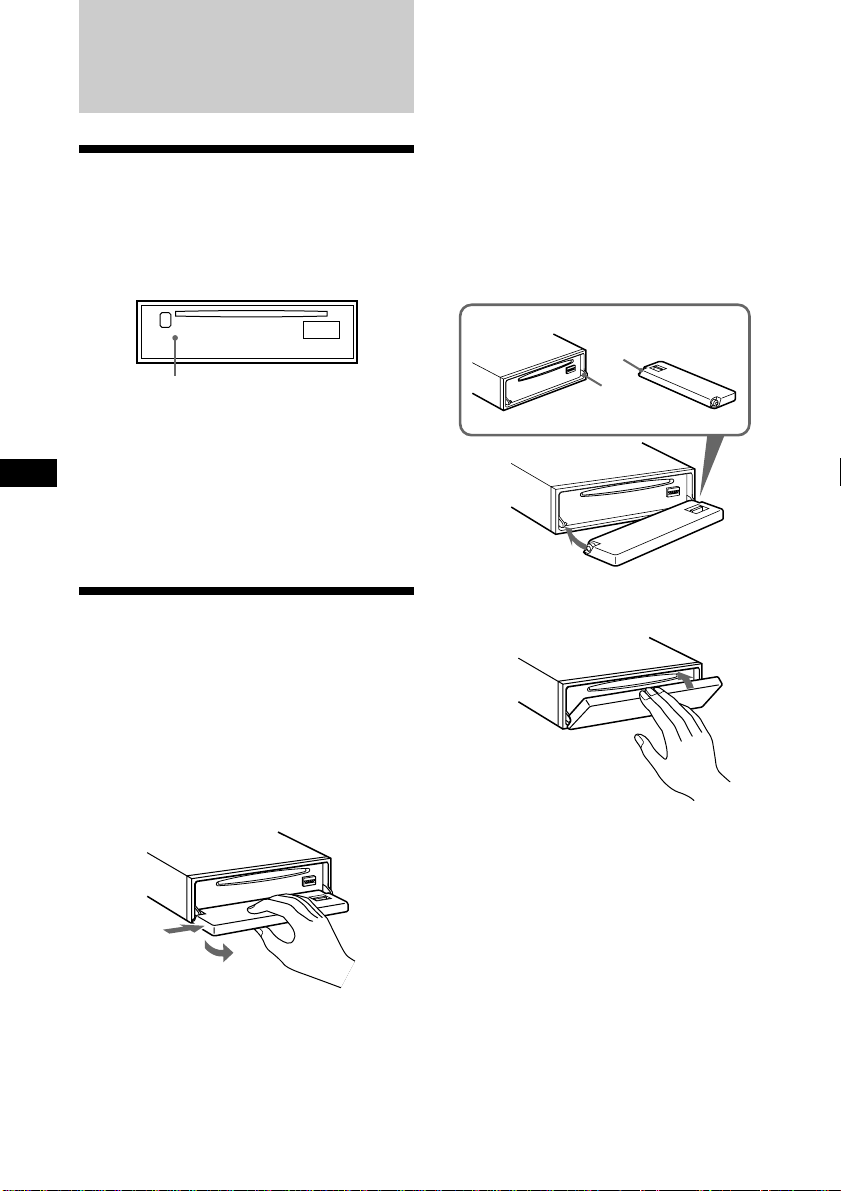
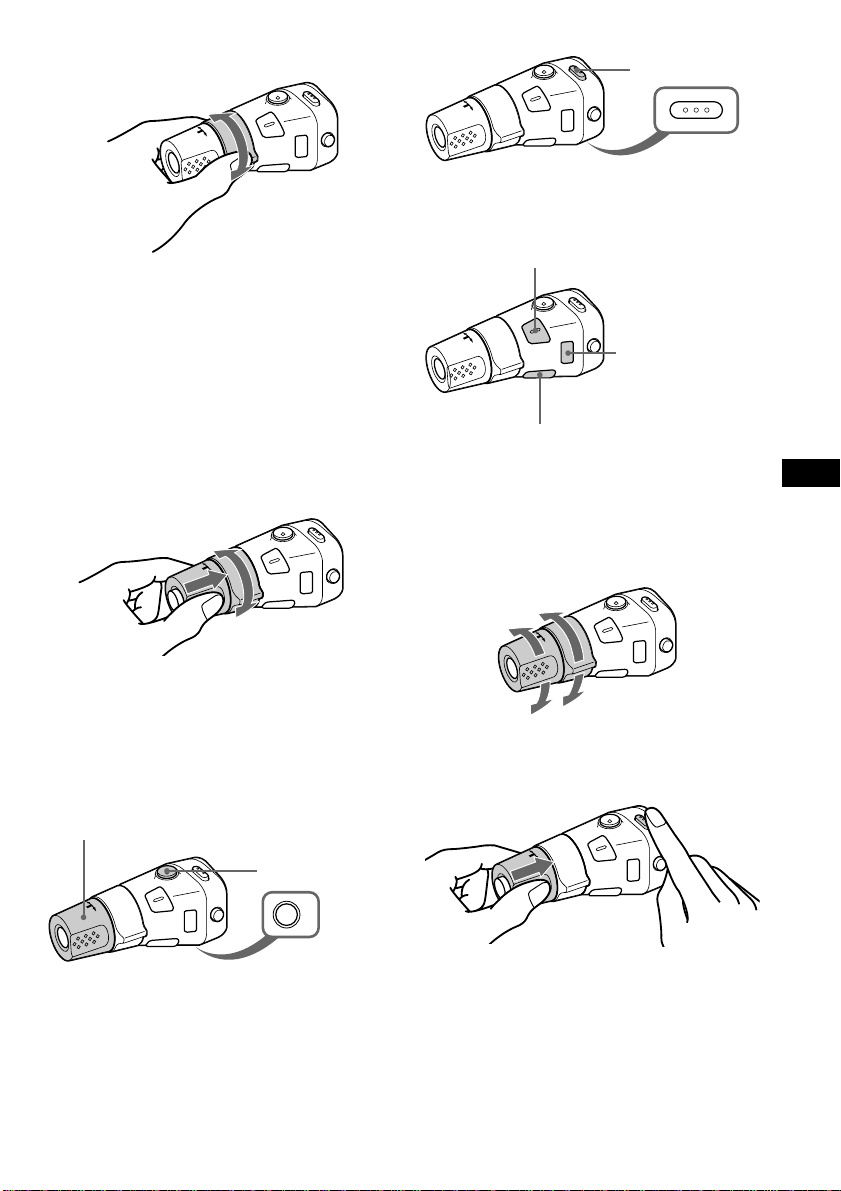
Getting Started
Resetting the unit
Before operating the unit for the first time or
after replacing the car battery, you must reset
the unit.
Press the reset button with a pointed object,
such as a ballpoint pen.
Reset button
Notes
• Pressing the reset button will erase the clock and
some memorised functions.
• When you connect the power supply cord to the
EN
unit or reset the unit, wait for about 10 seconds
before you insert a disc. If you insert a disc within
these 10 seconds, the unit will not be reset, and
you will have to press the reset button again.
Notes
• Do not place anything on the inner surface of
the front panel.
• Be sure not to drop the panel when detaching it
from the unit.
• If you detach the panel while the unit is still on,
the power will be turned off automatically to
prevent the speakers from being damaged.
• When you carry the front panel with you, put it
in the supplied front panel case.
Attaching the front panel
Place the hole a in the front panel onto the
spindle b on the unit as illustrated, then push
the left side in.
a
b
Detaching the front panel
You can detach the front panel of this unit to
protect the unit from being stolen.
1 Press (OFF).
2 Press (OPEN) to open the front panel,
then slide the front panel to the right
side, and pull out from the left side of
the front panel.
1
2
6
µ
Notes
• Be sure not to attach the front panel upside
down.
• Do not press the front panel hard against the
unit when attaching it. Press it lightly against the
unit.
• Do not press hard or put excessive pressure on
the display windows of the front panel.
• Do not expose the front panel to direct sunlight
or heat sources such as hot air ducts, and do not
leave it in a humid place. Never leave it on the
dashboard of a car parked in direct sunlight
where there may be a considerable rise in
temperature.
Page 7
Caution alarm
SET UP
SET UP
SET UP
SET UP
SET UP
SET UP
SET UP
If you turn the ignition key switch to the OFF
position without removing the front panel, the
caution alarm will beep for a few seconds
(only when the POWER SELECT switch is set
to the A position).
TIR indicator
If you pull out the ignition key while the TIR
function is on, the TIR indicator flashes a few
times. (only when the POWER SELECT switch
is set to the A position).
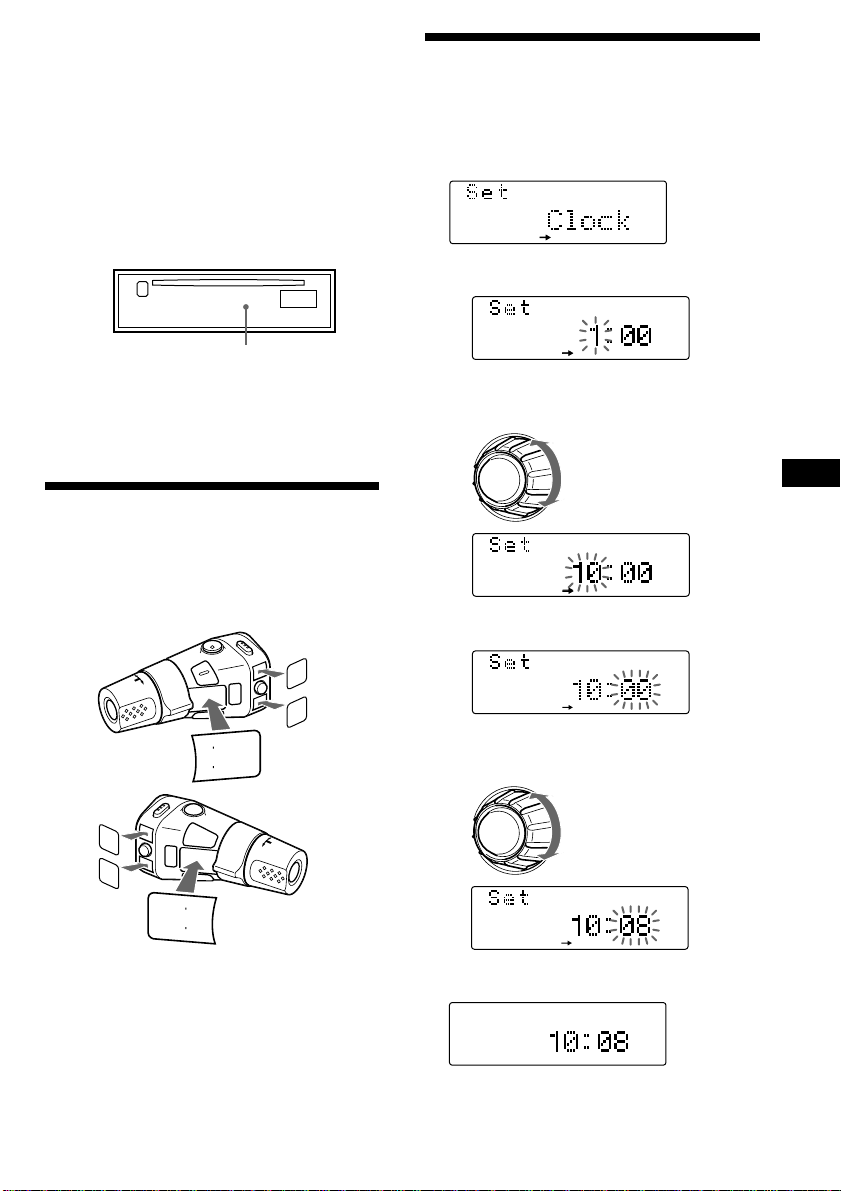
Setting the clock
The clock uses a 24-hour digital indication.
Example: To set the clock to 10:08
1 Press (SHIFT), then press (3) (SET UP).
1 Press (5) (n).
TIR indicator
For more information on the TIR function,
refer to “Recording the traffic announcements”
(page 18).
Preparing the rotary
commander
When you mount the rotary commander,
attach the labels as shown in the illustration
below.
UND
SO
MODE
LIST
LK
TA
L
IS
T
MODE
SOUND
TALK
r
REC
VOICE
MEMO
(
PLAY
(
P
LAY
V
O
IC
E
M
E
M
O
r
R
EC
The hour digit flashes.
2 Set the hour.
3 Press (5) (n).
The minute digits flash.
4 Set the minute.
to go backward
to go forward
to go backward
to go forward
EN
Getting Started
2 Press (SHIFT).
The clock starts.
continue to next page n
7
Page 8
3 Press (SHIFT).
TRACK
After the mode setting is complete, the
display return to normal playback mode.
Note
If the POWER SELECT switch on the bottom of the
unit is set to the B position, turn the power on
first, then set the clock.
EN
CD Player
Listening to a CD
1 Press (OPEN) and insert the CD.
Playback starts automatically.
Labelled side up
6
2 Close the front panel.
If a CD is already inserted, press (SOURCE)
repeatedly until “CD” appears.
Elapsed playing time
Track number
Note
To play back an 8 cm CD, use the optional Sony
compact disc single adapter (CSA-8).
To Press
Stop playback (OFF)
Eject the CD (OPEN) then 6
8
Page 9

Changing the displayed item
Each time you press (DSPL), the item changes
as follows:
Elapsed playback time
Disc name*
*1If you inserted a non-CD TEXT disc,
“NO D.Name” or “NO T.Name” appears in the
display.
2
If you play a CD TEXT disc, the artist name
*
appears in the display after the disc name. (Only
for CD TEXT discs with the artist name.)
3
All the items above are scrolled in the display
*
one by one in order.
$
$
1
/Artist name*
$
$
Clock
$
1
Track name*
MOTION DISPLAY*
2
3
You can label CD and CD TEXT discs with a
personalized name using the disc memo
function, refer to “Labelling a CD” (page 32).
However, if you use personalised labels, they
will always take priority over the original CD
TEXT information when such information is
displayed.
Tips
• If the name of the CD TEXT disc is too long, you
can scroll it across the display by pressing
(SHIFT), then (2) (N).
• If you want to display the original CD TEXT
information after labelling the CD TEXT disc with
a personalised name, press (SHIFT) , then (5)
(n).
Automatically scrolling a disc name
— Auto Scroll
If the disc name/artist name or track name on
a CD TEXT disc exceeds 10 characters and the
Auto Scroll function is on, the disc or artist
name automatically scrolls on the display as
follows:
• The disc name appears when the disc has
changed (if the disc name is selected).
• The track name appears when the track has
changed (if the track name is selected).
If you press (DSPL) to change the display
item, the disc or track name of the CD TEXT
disc is scrolled automatically whether you set
the function on or off.
1 During playback, press (SHIFT).
2 Press (3) (SET UP) repeatedly until
“A.Scrl” appears.
3 Press (5) (n) to select “A.Scrl on.”
4 Press (SHIFT).
To cancel Auto Scroll, select “A.Scrl off” in
step 3 above.
Note
For some CD TEXT discs with extremely many
characters, the following cases may happen:
— Some of the characters are not displayed.
— Auto Scroll does not work.
Locating a specific track
— Automatic Music Sensor (AMS)
During playback, push the SEEK/AMS
control up or down momentarily.
To locate succeeding
tracks
To locate
preceding tracks
Locating a specific point in a track
— Manual Search
During playback, push the SEEK/AMS
control up or down and hold.
Release when you have found the
desired point.
To search forward
To search backward
Note
If “
that means you have reached the beginning or the
end of the disc and you cannot go any further.
” or “ ” appears in the display,
EN
Getting Started/CD Player
9
Page 10
A
0
Playing a CD in various
/
DSPL
P
F
modes
Playing tracks repeatedly
— Repeat Play
1 During playback, press (SHIFT).
You can play CDs in various modes:
•Intro (Intro Scan) lets you play the first 10
seconds of all the tracks.
•Repeat (Repeat Play) repeats the current
track.
•Shuf (Shuffle Play) plays all the tracks in
random order.
Searching for the desired track
— Intro scan
1 Press (SHIFT).
Every time you press (SHIFT), only the
items you can select light up.
DSPL
SHIFT
SET UP PLAY MODE
1234567891
EN
2 Press (4) (PLAY MODE) repeatedly until
“Intro” appears.
Each time you press (4) (PLAY MODE),
the item changes as follows:
Intro ˜ PGM
PLAY MODE
3 Press (5) (n) to select “Intro on.”
REP SHUF
2 Press (7) (REP) repeatedly until ”Repeat
1“ appears.
SHIFT
SET UP PLAY MODE
12345678910
REP SHUF
Repeat Play starts.
3 Press (SHIFT).
To return to normal playback mode, select
“Repeat off” in step 2 above.
Playing tracks in random order
— Shuffle Play
1 During playback, press (SHIFT).
2 Press (8) (SHUF) repeatedly until ”Shuf
1“ appears.
SHIFT
SET UP PLAY MODE
12345678910
REP SHUF
Shuffle Play starts.
3 Press (SHIFT).
AF
A
PLAY MODE
Intro Scan starts.
4 Press (SHIFT).
To return to normal playback mode, select
“Intro off” in step 3 above.
10
To return to normal playback mode, select
“Shuf off” in step 2 above.
Page 11
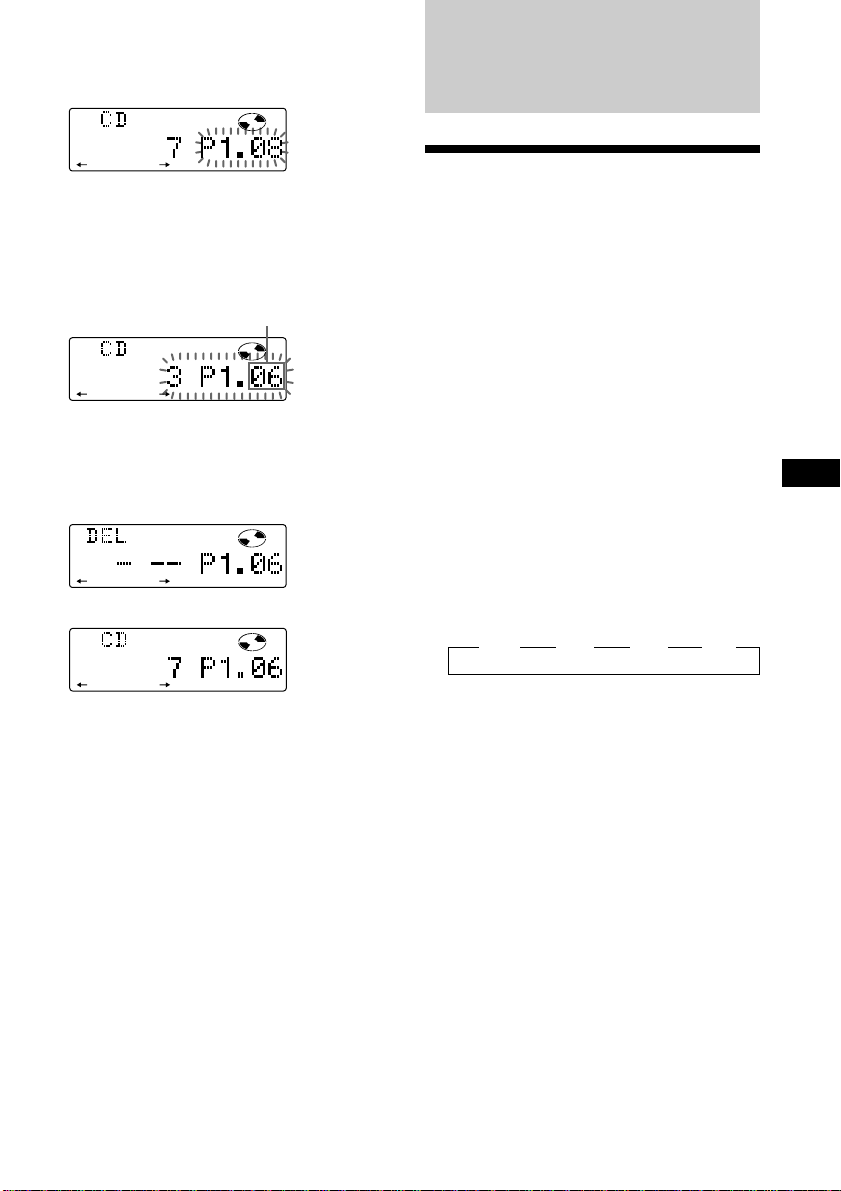
Creating a programme
PGM
1
PLAY MODE
PGM
2
PLAY MODE
PGM
1+2
PLAY MODE
PLAY MODE
— CD Programme Memory
You can play the tracks in the order you want
by making your own programme. You can
make two programmes: Programme 1 and
Programme 2. You can select up to 12 tracks
for each programme. You can store the
programmes in memory.
1 Press (SHIFT), then press (4) (PLAY
MODE) for two seconds.
TRACK
PLAY
“P 1” indicates Programme 1 is selected.
To select Programme 2, press (5) (n)
repeatedly until “P 2” appears.
MODE ENTER
Playing the stored programme
You can select:
•PGM 1 to play Programme 1.
•PGM 2 to play Programme 2.
•PGM 1+2 to play Programmes 1 and 2.
1 Press (SHIFT).
2 Press (4) (PLAY MODE) repeatedly until
“PGM” appears.
3 Press (5) (n) repeatedly until the
desired programme appears.
Programme 1 playback
µ
Programme 2 playback
2 Push the SEEK/AMS control up or down
to select the track you want.
3 Press (6) (ENTER) momentarily.
PLAY MODE ENTER
µ
TRACK
PLAY
MODE ENTER
4 To continue entering tracks, repeat steps
2 and 3.
5 When you finish selecting tracks, press
(4) (PLAY MODE) for two seconds.
6 Press (SHIFT).
Notes
• “*Wait*” appears in the display while the unit is
reading the data.
• “*Mem Full*” appears in the display when you
try to enter more than 12 tracks into a
programme.
EN
CD Player
µ
Programmes 1 and 2 playback
µ
Normal playback
Programme Play starts.
4 Press (SHIFT).
To return to normal playback mode, select
“PGM off” in step 3 above.
Note
“Not ready” appears in the display if no track is
stored in the programme.
continue to next page n
11
Page 12
Erasing an entire programme
PLAY
TRACK
MODE ENTER
1 Press (SHIFT), then press (4) (PLAY
MODE) for two seconds.
TRACK
PLAY
MODE ENTER
“P 1” indicates Programme 1 is selected.
Adding tracks to a programme
1 Press (SHIFT), then press (4) (PLAY
MODE) for two seconds.
“P 1 ” indicates Programme 1 is selected.
2 Press (2) (N) repeatedly until “DEL”
appears.
PLAY MODE ENTER
To delete Programme 2, press (5) (n)
repeatedly until “PGM 2” appears.
3 Press (6) (ENTER) for two seconds.
EN
PLAY MODE ENTER
The entire programme is erased.
4 When you finish erasing programmes,
press (4) (PLAY MODE) for two seconds.
5 Press (SHIFT).
To select Programme 2, press (5) (n)
repeatedly until “P 2” appears.
2 Press (2) (N) or (5) (n) to select the
track slot number where you want to
insert a track.
Track slot number
TRACK
PLAY
MODE ENTER
3 Push the SEEK/AMS control up or down
to select the track you want to insert.
4 Press (6) (ENTER) momentarily to enter
the track.
The current track in that slot number and
the succeeding tracks shift down.
5 To continue inserting tracks, repeat steps
2 through 4.
Note
Once all 12 slots have been filled, “*Mem
Full*” appears in the display, and you cannot
insert tracks.
6 When you finish inserting tracks, press
(4) (PLAY MODE) for two seconds.
12
7 Press (SHIFT).
Page 13
Erasing tracks in a programme
1 Press (SHIFT), then press (4) (PLAY
MODE) for two seconds.
TRACK
PLAY
MODE ENTER
“P 1” indicates Programme 1 is selected.
To select Programme 2, press (5) (n)
repeatedly until “P 2” appears.
2 Press (2) (N) or (5) (n) to select the
track you want to erase.
Track slot number
TRACK
PLAY
MODE ENTER
The track currently registered in slot 6 of
Programme 1.
3 Press (6) (ENTER) for two seconds.
When you erase a track from a slot number,
the succeeding tracks shift up to fill the gap.
DIS C TRACK
PLAY
MODE ENTER
µ
TRACK
PLAY
MODE ENTER
4 To continue erasing tracks, repeat steps
2 and 3.
5 When you finish erasing tracks, press (4)
(PLAY MODE) for two seconds.
6 Press (SHIFT).
Radio
Memorising stations
automatically
— Best Tuning Memory (BTM)
The unit selects the stations with the strongest
signals and memorises them in the order of
their frequencies. You can store up to 10
stations on each band (FM1, FM2, MW and
LW).
Caution
When tuning in stations while driving, use
Best Tuning Memory to prevent accidents.
1 Press (SOURCE) repeatedly to select the
tuner.
Each time you press (SOURCE), the source
changes as follows:
CD ˜ TUNER
2 Press (MODE) repeatedly to select the
band.
Each time you press (MODE), the band
changes as follows:
z FM1 z FM2 z MW z LW
3 Press (SHIFT), then press (4) (PLAY
MODE) repeatedly until “B.T.M” appears.
4 Press (5) (n).
The unit stores stations in the order of their
frequencies on the number buttons.
A beep sound and the setting is stored.
5 Press (SHIFT).
EN
CD Player/Radio
Notes
• The unit does not store stations with weak
signals. If only a few stations are received, some
number buttons will retain their former setting.
• When a number is indicated in the display, the
unit starts storing stations from the one currently
displayed.
13
Page 14

Memorising only the
desired stations
You can preset up to 20 FM stations (10 for
FM1 and FM2), and up to 10 LW stations in the
order of your choice.
1 Press (SOURCE) repeatedly to select the
tuner.
2 Press (MODE) repeatedly to select the
band (FM1, FM2, MW or LW).
3 Push the SEEK/AMS control up or down
to tune in the station you want to store
on the number button.
4 Press and hold the desired number
button ((1) to (10)) until “MEM”
appears.
The number button indication appears in
EN
the display.
Note
If you try to store another station on the same
number button, the previously stored station will
be erased.
Receiving the memorised
stations
1 Press (SOURCE) repeatedly to select the
tuner.
2 Press (MODE) repeatedly to select the
band (FM1, FM2, MW or LW).
3 Press the number button ((1) to (10))
momentarily where the desired station is
stored.
If you cannot tune in a preset
station
Push the SEEK/AMS control up or down
momentarily to search for the station
(automatic tuning).
Scanning stops when the unit receives a
station. Push the SEEK/AMS control up or
down repeatedly until the desired station is
received.
Note
If the automatic tuning stops too frequently, press
(SHIFT), then press (4) (PLAY MODE) repeatedly
until “Local” (local seek mode) is displayed. Then
press (5) (n) to select “Local on.” Press (SHIFT).
Only the stations with relatively strong signals will
be tuned in.
Tip
If you know the frequency of the station you want
to listen to push the SEEK/AMS control up or down
and hold until the desired frequency appears
(manual tuning).
If FM stereo reception is poor
— Monaural Mode
1 Press (SHIFT), then press (4) (PLAY
MODE) repeatedly until “Mono” appears.
2 Press (5) (n) repeatedly until “Mono
on“ appears.
The sound improves, but becomes
monaural (“ST” disappears).
3 Press (SHIFT).
To return to normal mode, select “Mono off”
in step 2 above.
Changing the display items
Each time you press (DSPL), the item changes
as follows:
z Frequency z Clock
MOTION DISPLAY* Z
* All the items above are scrolled in the display
one by one in order.
14
Page 15
RDS
Overview of the RDS
function
Radio Data System (RDS) is a broadcasting
service that allows FM stations to send
additional digital information along with the
regular radio programme signal. Your car
stereo offers you a variety of services. Here are
just a few: re-tuning the same programme
automatically, listening to traffic
announcements and locating a station by
programme type.
Notes
• Depending on the country or region, not all of
the RDS functions are available.
• RDS may not work properly if the signal strength
is weak or if the station you are tuned to is not
transmitting RDS data.
Changing the display item
Each time you press (DSPL), the item changes
as follows:
z Station Name (Frequency) z Clock
MOTION DISPLAY* Z
* All the items above are scrolled in the display
one by one in order.
Note
“NO Name” appears if the received station does
not transmit RDS data.
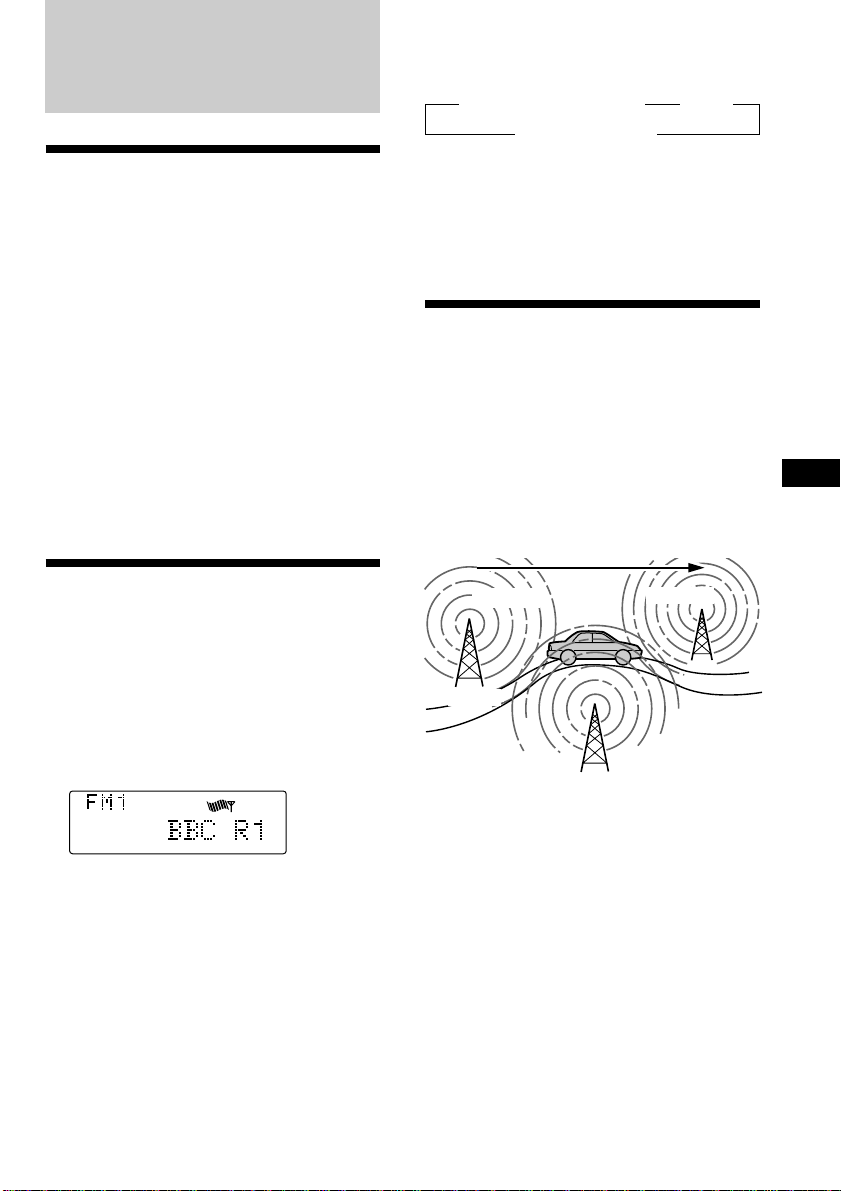
Re-tuning the same
programme automatically
— Alternative Frequencies (AF)
The Alternative Frequencies (AF) function
automatically selects and re-tunes the station
with the strongest signal in a network. By
using this function, you can continuously
listen to the same programme during a longdistance drive without having to re-tune the
station manually.
Frequencies change automatically.
EN
Radio/RDS
Displaying the station
name
The name of the current station lights up in the
display.
Select an FM station (page 13).
When you tune in an FM station that
transmits RDS data, the station name
appears in the display.
Note
The “*” indication means that an RDS station is
being received.
98.5MHz
Station
96.0MHz
102.5MHz
1 Select an FM station (page 13).
2 Press (AF/TA) repeatedly until “AF on”
appears.
The unit starts searching for an alternative
station with a stronger signal in the same
network.
Note
When there is no alternative station in the area
and you do not need to search for an alternative
station, turn the AF function off by pressing
(AF/TA) repeatedly until “AF TA off” appears.
continue to next page n
15
Page 16

Changing the display items
Each time you press (AF/TA), the item changes
as follows:
” AF on ” TA on ” AF TA on*
* Select this to turn on both the AF and TA
functions.
Notes
• “NO AF” and the station name flash alternately,
if the unit cannot find an alternative station in
the network.
• If the station name starts flashing after selecting
a station with the AF function on, this indicates
that no alternative frequency is available. Push
the SEEK/AMS control up or down while the
station name is flashing (within eight seconds).
The unit starts searching for another frequency
with the same PI (Programme Identification) data
(“PI seek” appears and no sound is heard). If the
unit cannot find another frequency, “NO PI”
appears, and the unit returns to the originally
selected frequency.
EN
Listening to a regional programme
The “REG on” (regional on) function lets you
stay tuned to a regional programme without
being switched to another regional station.
(Note that you must turn the AF function on.)
The unit is factory preset to “REG on,” but if
you want to turn off the function, do the
following.
AF TA off “
1 Press (SHIFT), then press (4) (PLAY
MODE) repeatedly until “REG” appears.
Local link function (United
Kingdom only)
The Local Link function lets you select other
local stations in the area, even though they are
not stored on your number buttons.
1 Press a number button ((1) to (10)) that
has a local station stored on it.
2 Within five seconds, press the number
button of the local station again.
3 Repeat this procedure until the desired
local station is received.
2 Press (5) (n) repeatedly until “REG off”
appears.
3 Press (SHIFT).
Note that selecting “REG off” might cause
the unit to switch to another regional
station within the same network.
To go back to regional on, select “REG on” in
step 2 above.
Note
This function does not work in the United
Kingdom and in some other areas.
16
Page 17

Listening to traffic
announcements
The Traffic Announcement (TA) and Traffic
Programme (TP) data let you automatically
tune in an FM station that is broadcasting
traffic announcements even though you are
listening to other programme sources.
Presetting the volume of traffic
announcements
You can preset the volume level of the traffic
announcements beforehand so you won’t miss
the announcement. When a traffic
announcement starts, the volume will be
automatically adjusted to the preset level.
1 Select the desired volume level.
Press (AF/TA) repeatedly until “TA on” or
“AF TA on” appears.
The unit starts searching for traffic
information stations. “TP” appears in the
display when the unit finds a station
broadcasting traffic announcements.
When the traffic announcement starts,
“TA” flashes. The flashing stops when the
traffic announcement is over.
Tip
If the traffic announcement starts while you are
listening to another programme source, the unit
automatically switches to the announcement and
goes back to the original source when the
announcement is over.
Notes
• “NO TP” flashes for five seconds if the received
station does not broadcast traffic
announcements. Then, the unit starts searching
for a station that broadcasts traffic
announcements.
• When “EON” appears with “TP” in the display,
the current station makes use of broadcast traffic
announcements by other stations in the same
network.
• While the unit is receiving the traffic
announcements, the voice drive function and
voice memo function do not work.
To cancel the current traffic
announcement
Press (AF/TA) or (SOURCE) momentarily.
To cancel all traffic announcements, turn off
the function by pressing (AF/TA) until “AF
TA off” appears.
2 Press (AF/TA) for two seconds.
”TA“ appears and the setting is stored.
Receiving emergency
announcements
If an emergency announcement comes in while
you are listening to the radio, the programme
will automatically switch to the
announcement. If you are listening to a source
other than the radio, the emergency
announcements will be heard if you set AF or
TA to on. The unit will then automatically
switch to these announcements no matter what
you are listening to at the time.
EN
RDS
17
Page 18
Presetting the RDS
REG
REG
REG
REG
REG
stations with the AF and
TA data
When you preset RDS stations, the unit stores
each station’s data as well as its frequency, so
you don’t have to turn on the AF or TA
function every time you tune in the preset
station. You can select a different setting (AF,
TA, or both) for individual preset station, or
the same setting for all preset stations.
Presetting the same setting for all
preset stations
1 Select an FM band (page 13).
2 Press (AF/TA) repeatedly to select either
“AF on,” “TA on” or “AF TA on” (for both
AF and TA functions).
EN
Note that selecting “AF TA off” stores not
only RDS stations, but also non-RDS
stations.
3 Press (SHIFT), then press (4) (PLAY
MODE) repeatedly until “B.T.M” appears.
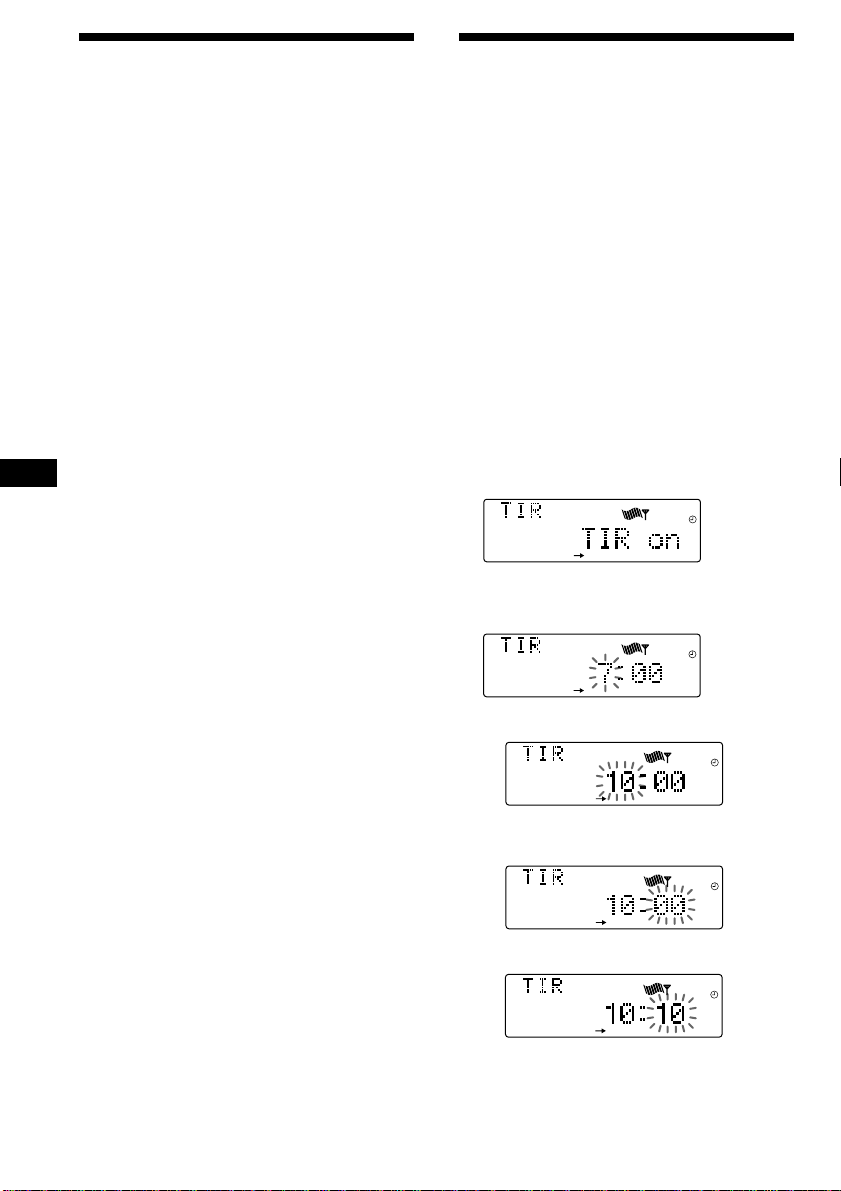
Recording the traffic
announcements
—Traffic Information Replay (TIR)
You can listen to the latest traffic
announcements by recording them. The unit
automatically records and stores up to eight
traffic announcements. If the recording
exceeds eight minutes, the recorded
announcements are updated, so you can
always hear the latest information.
The TIR function turns on the unit
automatically and records the traffic
announcements for up to two hours before and
after a preset time.
Presetting the time and the station
1 Press and hold (TIR) until “TIR” lights up
in the display.
2 Press (5) (n) repeatedly until “TIR on”
appears.
4 Press (5) (n) until “B.T.M” flashes.
5 Press (SHIFT).
Presetting different settings for
each preset station
1 Select an FM band, and tune in the
desired station.
2 Press (AF/TA) repeatedly to select either
“AF on,” “TA on” or “AF TA on” (for both
AF and TA functions).
3 Press and hold the desired number
button until “MEM” appears.
Repeat from step 1 for presetting other
stations.
Tip
If you want to change the preset AF and/or TA
setting after you tune in the preset station, you
can do so by turning the AF or TA function on or
off.
18
3 Press (TIR) repeatedly until the hour
indication appears.
1 Set the hour by rotating the dial.
2 Press (5) (n) until the minute digits
flash.
3 Set the minute by rotating the dial.
4 Press (TIR).
Page 19

5 Select the desired station by pressing the
preset number button or pushing the
SEEK/AMS control up or down.
6 Press (TIR) for two seconds to return to
the original display.
t lights up.
8
Playing back the recorded traffic
announcements
When there are recorded traffic
announcements you have not listened to yet,
t flashes.
1 Press (TIR).
The latest traffic announcement is played
back. To listen to the previous ones, press
(TIR) or push the SEEK/AMS control up.
To replay the announcements, push the
SEEK/AMS control down.
“NO Data” appears if no traffic
announcements were recorded.
The unit turns on automatically and stands
by for traffic announcements for four hours
(two hours before and after the preset
time).
If the preset station does not broadcast the
traffic announcement while searching, the
unit starts searching for other traffic
programme (TP) stations.
To cancel the TIR function
Select “TIR off” in step 2 above.
Tips
• While the unit is recording the traffic
announcement, t and “TA” flash.
• If the unit still cannot find a TP station, it starts a
new search every five minutes until it finds one.
• If you pull out the ignition key while the TIR
function is on, “TIR on” and t flash a few times.
Notes
• The unit also stands by for traffic
announcements for two hours after you turn off
the engine, as long as the TIR function is on.
• If you have a power aerial, it automatically
extends every time the unit searches for a traffic
programme station.
If you have a manual aerial, make sure that the
aerial is fully extended.
• If you do not use your car for about ten days, the
TIR function will turn off automatically to avoid
battery wear, even if the TIR function is on.
• While the unit is recording or playing back the
traffic announcements, the voice drive function
and voice memo function do not work.
2 Press (TIR) to go back to the original
programme.
EN
RDS
19
Page 20
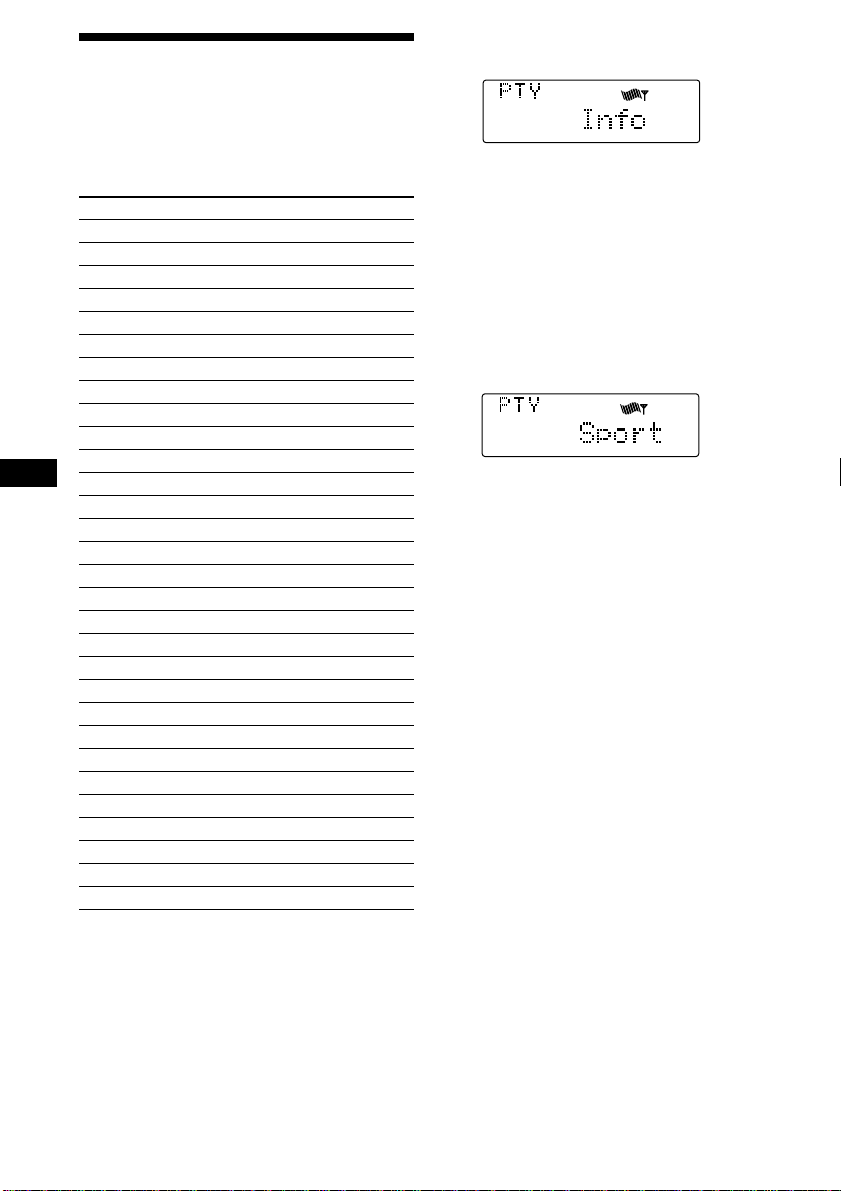
Locating a station by
programme type
You can locate the station you want by
selecting one of the programme types shown
below.
Programme types Display
News News
Current Affairs Affairs
Information Info
Sports Sport
Education Educate
Drama Drama
Culture Culture
Science Science
Varied Varied
Popular Music Pop M
Rock Music Rock M
EN
Middle of the Road Music M.o.R.M
Light Classical Light M
Classical Classics
Other Music Type Other M
Weather Weather
Finance Finance
Children’s programmes Children
Social Affairs Social A
Religion Religion
Phone In Phone In
Travel Travel
Leisure Leisure
Jazz Music Jazz
Country Music Country
National Music Nation M
Oldies Music Oldies
Folk Music Folk M
Documentary Document
Not specified None
1 Press (PTY/LIST) during FM reception
until “PTY” appears.
The current programme type name appears
if the station is transmitting the PTY data.
“- - - - -” appears if the received station is
not an RDS station, or if the RDS data has
not been received.
2 Press (PTY/LIST) repeatedly until the
desired programme type appears.
The programme types appear in the order
shown in the above table. Note that you
cannot select “None” (Not specified) for
searching.
3 Push the SEEK/AMS control up or down.
The unit starts searching for a station
broadcasting the selected programme type.
When the unit finds the programme, the
programme type appears again for five
seconds.
“NO” and the programme type appear
alternately for five seconds if the unit
cannot find the programme type. It then
returns to the previous station.
Note
You cannot use this function in some countries
where no PTY (Programme Type selection) data is
available.
20
Page 21
Setting the clock
VOICE
VOICE
automatically
Voice Drive
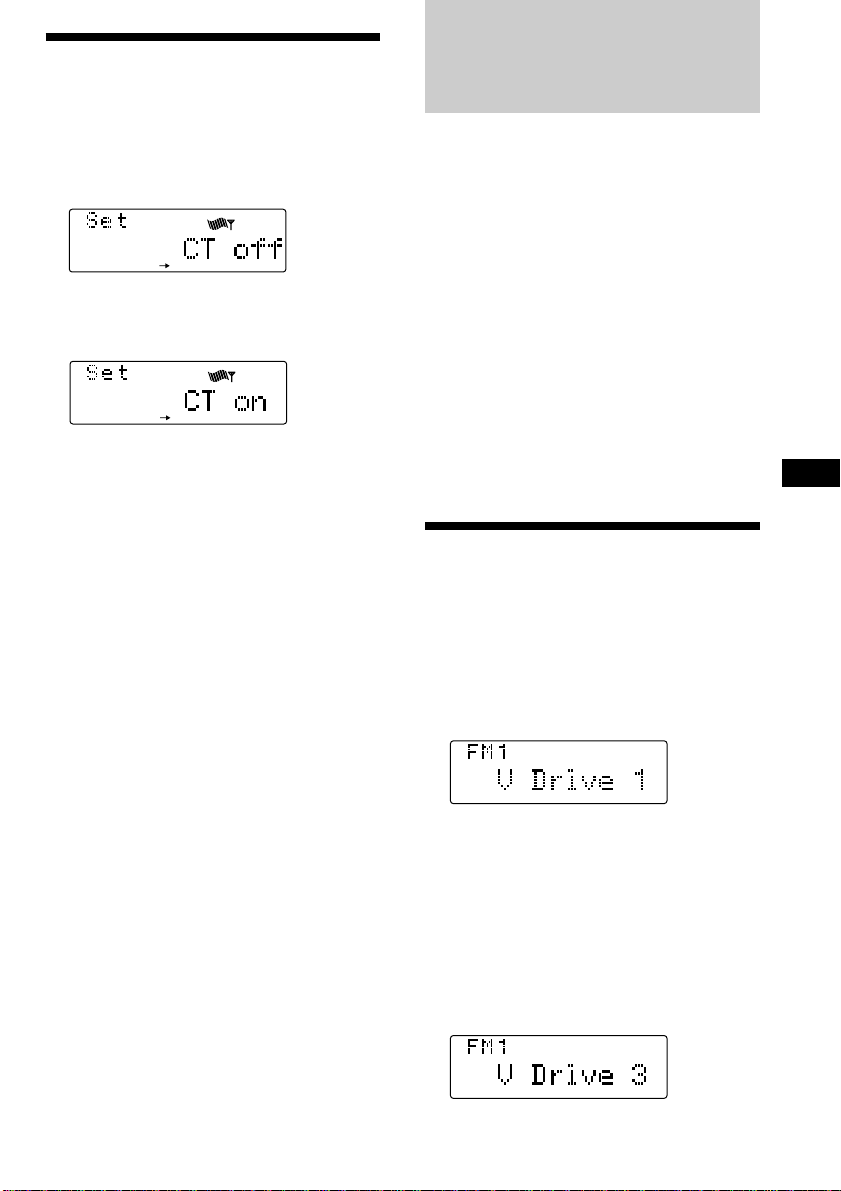
The CT (Clock Time) data from the RDS
transmission sets the clock automatically.
1 Press (SHIFT), then press (3) (SET UP)
repeatedly until “CT” appears.
SET UP
2 Press (5) (n) repeatedly until “CT on”
appears.
The clock is set.
SET UP
3 Press (SHIFT) to return to the normal
display.
To cancel the CT function
Select “CT off” in step 2 above.
Notes
• The CT function may not work even though an
RDS station is being received.
• There might be a difference between the time
set by the CT function and the actual time.
You can register an appropriate vocal phrase
for any source including CD/MD*, and the
radio station. Once the registration is
completed, you can request that source just by
pronouncing the registered vocal phrase for it
towards the supplied microphone. This unit
provides 12 “V Drive” boxes for
accommodating registered phrases.
* When you connect to a CD/MD changer with a
PGM (Programme memory) function, you can
request a disc in the CD/MD changer.
Use the rotary commander to control this
function.
Note
While the unit is receiving, recording, or playing
back the traffic announcements, the voice drive
function does not work.
Selecting a “V Drive” box
for registration
1 Play a CD or MD, or tune in a radio
station that you wish to register a
phrase for.
2 Press and hold (TALK) on the rotary
commander until “V Drive” appears.
EN
RDS/Voice Drive
Note
When the unit enters the setting mode, the disc
playback or the radio reception will be suspended.
Tip
If the “V Drive” box selected in step 2 already has
a registered phrase, the source corresponding to it
will be played or tuned in.
3 Select a “V Drive” box for registration by
adjusting the SEEK/AMS control either
on the unit or the rotary commander.
Tip
If you select an already registered box number, the
registered source will be played or tuned in to.
21
Page 22
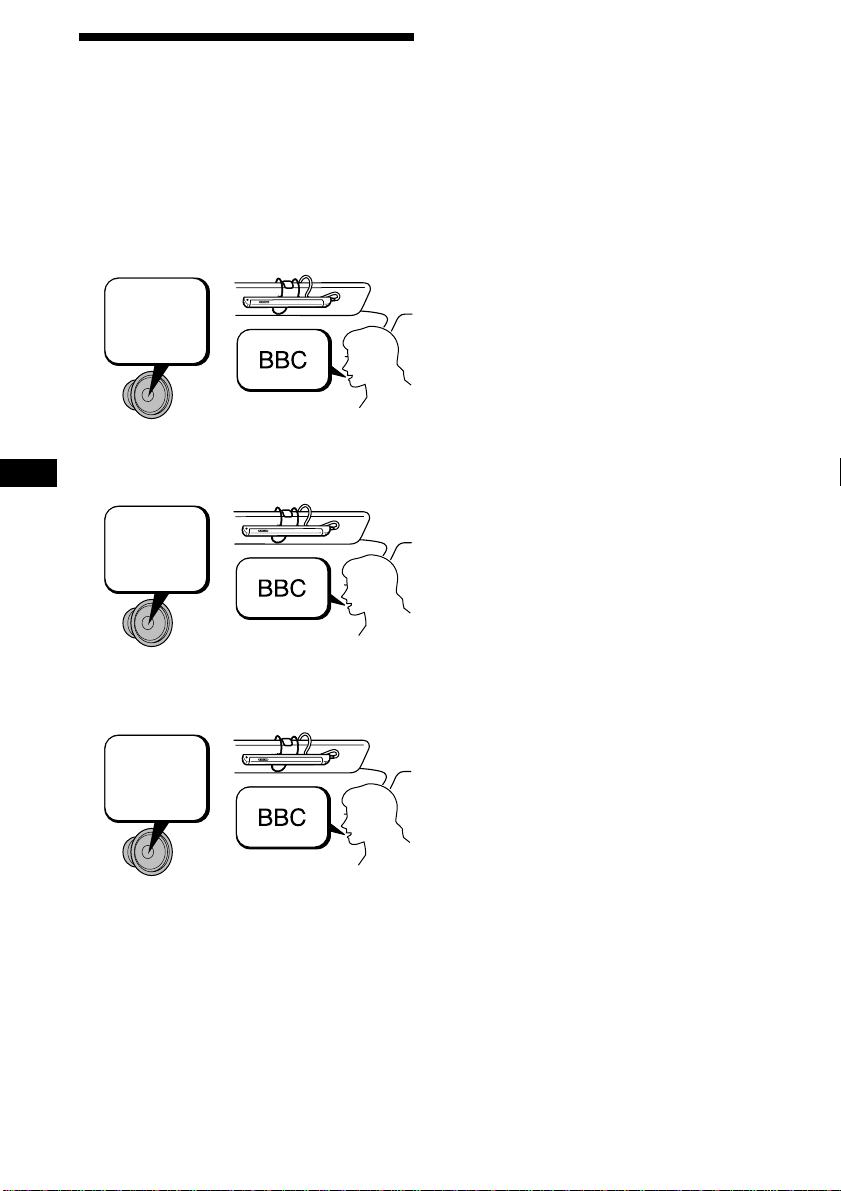
Registering a vocal phrase
1 Once all the steps of “Selecting a “V
Drive” box for registration” are
completed, press (TALK) on the rotary
commander .
2 After you hear the unit’s vocalized
instruction “Please speak now.”,
pronounce a desired phrase toward the
supplied microphone.
Please
speak
now.
3 After the vocalised instruction “Please
EN
repeat.”, pronounce the same phrase
again.
Please
repeat.
Notes
• Do not attempt to register while driving, as this
may create a traffic hazard.
• Be sure to reply after the unit's vocalised
instruction.
• When a beep sound is heard, the registration
failed. In this case, repeat the same process
starting from step 1.
• Do not use phrases of similar pronunciation such
as “Sony POPS 1” and “Sony POPS 2”, because
the unit may not be able to distinguish the
difference.
• After you hear the unit’s vocalised instruction,
reply within three seconds.
Tips
• When you register the phrases, pronounce them
clearly and loudly to make it easier for the unit
to recognise them.
• Registration should be made while the car is
parked with the engine running so that the unit
will recognise your voice more easily when you
are driving.
• Though the vocalised instructions are in English,
any language can be used for registration.
• The volume of the vocalised instructions can be
adjusted on the unit or by the rotary
commander.
4 After another vocalised instruction
“Please repeat.”, pronounce the same
phrase one more time.
Please
repeat.
The unit records the vocal phrase in this step
in order to identify the registered phrase later.
When the unit answers “OK!”, the registration
is completed.
22
Page 23
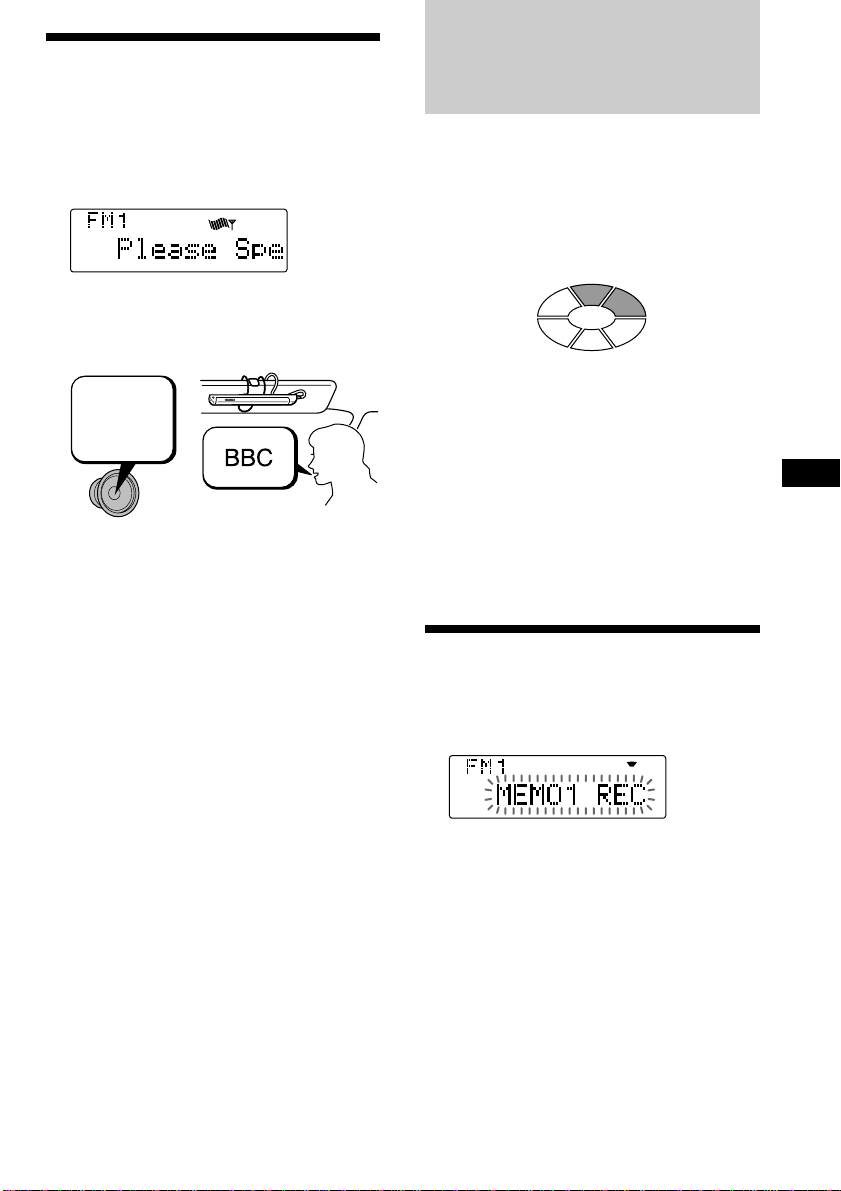
Requesting a registered
VOICE
source
Voice Memo
You can request a registered source while
listening to other sources or during the clock
display.
1 Press (TALK) on the rotary commander.
VOICE
2 After you hear the unit’s vocalised
instruction “Please speak now.”,
pronounce the registered phrase such as
the disc name or the radio station.
Please
speak
now.
3 When the unit successfully recognised
the phrase;
The unit will play the disc or tune in the
radio station.
When the unit fails to recognise the
phrase;
The unit replies “Please speak again.”
In this case, repeat the same registered
phrase.
Notes
• When the unit fails to recognise the phrase three
times, a beep sounds and the unit returns to the
previous source. In this case, repeat the same
process starting from step 1.
• If it is noisy outside the car, the unit may not
recognise the registered phrase. In this case,
close the window and try again.
• If you are far from the microphone, speak louder
or come nearer to the microphone.
Voice Memo is a function that allows you to
record a voiced memorandum, such as the
name of a song heard on a radio programme or
an idea which comes to mind. You can record
up to six voice memos with this function. Note
that each voice memo must be within 15
seconds.
MEMO 1
MEMO 6
MEMO 5
MEMO 4
You can record or play back the voice memo
when listening to any source or during the
clock display.
Use the rotary commander to control this
function.
Note
While the unit is receiving, recording, or playing
back the traffic announcements, the voice memo
function does not work.
MEMO 2
MEMO 3
Recording a voice memo
1 Press (REC) on the rotary commander
and voice your memorandum towards
the supplied microphone.
2 The recording is completed by pressing
(REC) again or leaving the unit
untouched for 15 seconds.
EN
Voice Drive/Voice Memo
Tips
• If you do not reply within three seconds after the
vocalised instruction, the unit replies “Please
speak now.”
• When you are requesting a registered source,
pronounce clearly and loudly to make it easier
for the unit to recognise.
• When the unit has difficulty recognising the
phrase, register the vocal phrase again.
Notes
• The voice memos are recorded as “MEMO 1”,
“MEMO 2”, etc.,…in the order they are recorded.
• When a beep sounds and “MEMO FULL”
appears, it means there is no room for additional
voice memos. In such a case, erase the older
recorded voice memos before recording new
ones.
23
Page 24
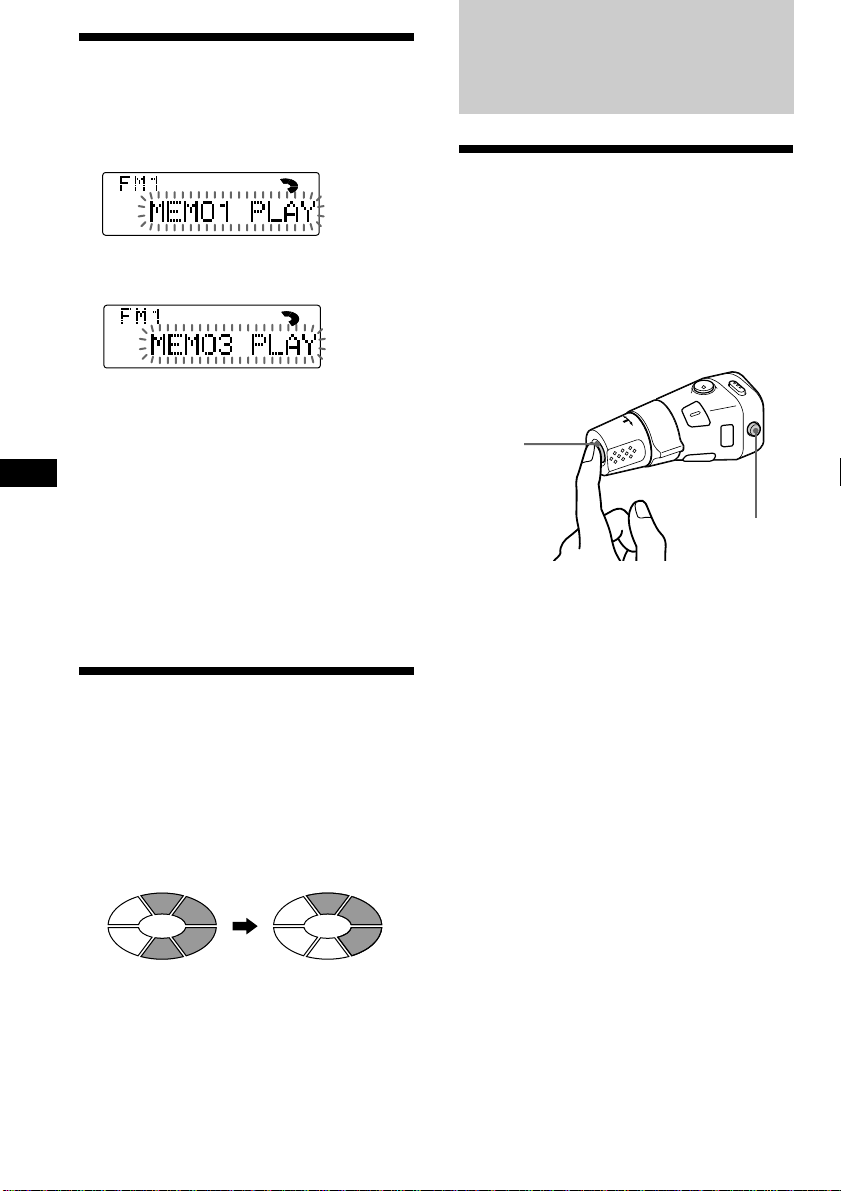
Playing back the voice
memo
1 Press (PLAY) on the rotary commander.
The playback starts from MEMO 1.
VOICE
2 Select the desired voice memo using the
SEEK/AMS control.
VOICE
3 Adjust the volume on the main unit or
by using the rotary commander.
The unit automatically returns to the
previous source after playing back all of the
EN
voice memos.
Other Functions
Using the rotary
commander
The rotary commander works by pressing
buttons and/or rotating controls.
You can control an optional CD or MD unit
with the rotary commander.
By pressing buttons (the SOURCE
and MODE buttons)
(SOURCE)
To interrupt the playback of a voice
memo
Press (PLAY) on the rotary commander.
Playback stops and the unit automatically
returns to the previous source.
Erasing the voice memo
1 Play back the voice memo to be erased.
2 Press and hold (PLAY) on the rotary
commander until a beep sound is heard.
The voice memo will be erased and the
numbers of succeeding voice memos will
move up respectively.
Erasing
“MEMO 3”
“MEMO 4” moves up
to “MEMO 3.”
(MODE)
Each time you press (SOURCE), the
source changes as follows:
TUNER n CD n MD
Pressing (MODE) changes the operation
in the following ways;
• Tuner : FM1 n FM2 n MW n LW
• CD unit : CD1 n CD2 n …
• MD unit : MD1 n MD2 n …
Tip
When the POWER SELECT switch is set to position
B, you can turn on this unit by pressing (SOURCE)
on the rotary commander.
24
Page 25
By rotating the control (the SEEK/
AMS control)
Rotate the control momentarily and
release it to:
•Locate a specific track on a disc. Rotate
and hold the control until you locate the
specific point in a track, then release it to
start playback.
•Tune in stations automatically. Rotate and
hold the control to tune in a specific
station.
By pushing in and rotating the
control (the PRESET/DISC control)
Press (SOUND) to
adjust the volume
and sound menu.
Press (LIST) to:
• Display the memorised names.
• Display the programme type.
Press (REC) to record a voice memo.
Press and hold
(TALK) to select a “V
Drive” box for
registration.
Press to :
• Register a vocal
phrase.
• Request a
registered source.
Press (PLAY) to play back the
voice memo.
Press and hold (PLAY) to erase
the voice memo.
Changing the operative direction
The operative direction of controls is factoryset as in the illustration below.
To increase
EN
Voice Memo/Other Functions
Push in and rotate the control to:
•Receive the stations memorised on the
number buttons.
•Change the disc.
Other operations
Rotate the VOL control to
adjust the volume.
Press (ATT) to
attenuate the
sound.
Press (OFF) to turn
off the unit.
To decrease
If you need to mount the rotary commander on
the right side of the steering column, you can
reverse the operative direction.
OFF
Press (SOUND) for two seconds while
pushing the VOL control.
Tip
You can control the operative direction of controls
with the unit (page 26).
25
Page 26

Adjusting the sound
characteristics
You can adjust the bass, treble, balance and
fader.
You can store the bass and treble levels
independently for each source.
1 Select the item you want to adjust by
pressing (SOUND) repeatedly.
VOL (volume) n SUB (subwoofer volume)
n BAS (bass) n TRE (treble)
n BAL (left-right) n FAD (rear-front)
2 Adjust the selected item by rotating the
dial.
Adjust within three seconds after selecting
the item. (After three seconds, the dial
function reverts volume control.)
EN
Attenuating the sound
Press (ATT) on the rotary commander or
optional wireless remote.
“ATT on” flashes momentarily.
To restore the previous volume level, press
(ATT) again.
Tip
The unit decreases the volume automatically when
a telephone call comes in (Telephone ATT
function).
•Contrast - to adjust the contrast if the
indications in the display are not
recognisable because of the unit’s installed
position.
•Voice guide function for vocalised comments.
— Select “Voice 1” to minimise the volume
of the guide.
— Select “Voice 2” to be louder the volume
than “Voice 1.”
— Select “Voice 3” to maximise the volume
of the guide.
— Select “Voice off” to deactivate Voice
guide.
•Beep - to turn on or off the beeps.
•RM (Rotary Commander) - to change the
operative direction of the controls of the
rotary commander.
— Select “norm” to use the rotary
commander as the factory-set position.
— Select “rev” when you mount the rotary
commander on the right side of the
steering column.
•Loud (Loudness) - to enjoy bass and treble
even at low volume. The bass and treble will
be reinforced.
•LPF (Low Pass Filter) (page 27)
•A.Scrl (Auto Scroll) (pages 9, 28)
1 Press (SHIFT).
2 Press (3) (SET UP) repeatedly until the
desired item appears.
Each time you press (3) (SET UP), the item
changes as follows:
Clock n CT n D.Info* n Amber/Green n
Dimmer n Contrast n Voice* n Beep n RM
n Loud* n LPF* n A.Scrl*
* When you have not tune the station or there
is no CD/MD being played, these items will
not appear.
Changing the sound and
display settings
The follow items can be set:
•Clock (page 7).
•CT (Clock Time) (page 21).
•D.Info (Dual Information) - to display the
clock and the play mode at the same time
(ON) or to display the information
alternately (OFF).
•Amber/Green - to change the illumination
colour to amber or green.
•Dimmer - to change the brightness of the
display.
— Select “Auto” to dim the display only
when you turn the lights on.
— Select “on” to dim the display.
— Select “off” to deactivate Dimmer.
26
Note
The displayed item will differ depending on
the source.
3 Press (5) (n) to select the desired
setting (for example: on or off).
For the “Contrast” setting, pressing (5)
(n) makes the contrast higher, and
pressing (2) ( N) makes the contrast lower.
4 Press (SHIFT).
After the mode setting is complete, the
display returns to normal playback mode.
Page 27
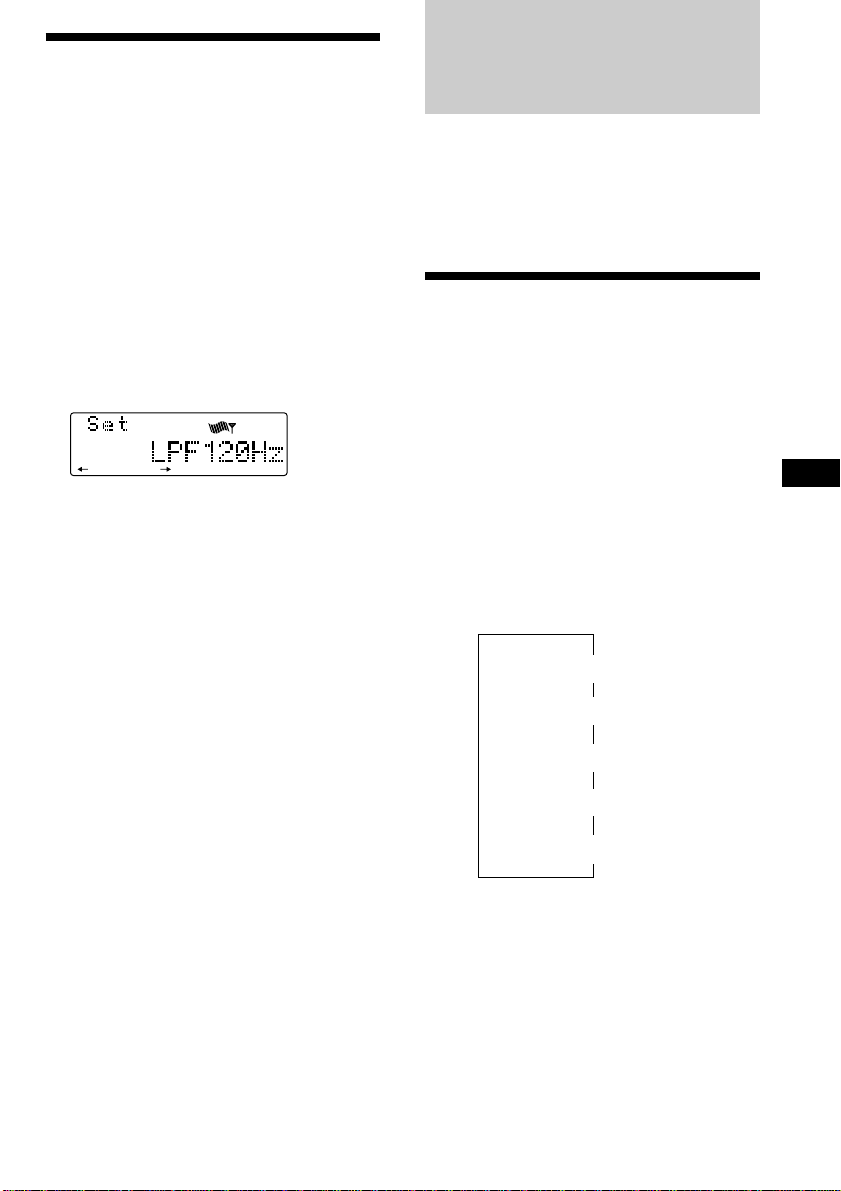
Adjusting the frequency
of the subwoofer(s)
To match the characteristics of the connected
subwoofer(s), you can cut out the unwanted
high and middle frequency signals entering
the subwoofer(s). By setting the cut-off
frequency, the subwoofer(s) will output only
low frequency signals for a clearer sound
image.
1 Press (SOURCE) to select a source (radio,
CD or MD).
2 Press (SHIFT), then press (3) (SET UP)
repeatedly until “LPF” appears.
3 Press (5) (n) or (2) (N) repeatedly to
select desired setting.
SET UP
Each time you press (5) (n) or (2) ( N),
the cut-off frequency in the display changes
as follows:
LPF off ˜ LPF 80 Hz ˜ LPF 120 Hz
4 Press (SHIFT).
When the frequency setting is complete, the
display returns to the normal playback
mode.
With Optional Equipment
CD/MD Unit
You can control up to 7 CD and MD units with
this unit.
If you connect an optional CD unit with the
CD TEXT function, the CD TEXT information
will appear in the display when you play a CD
TEXT disc.
Playing a CD or MD
1 Press (SOURCE) repeatedly to select the
CD or MD.
2 Press (MODE) until the desired unit
appears.
CD/MD playback starts.
When a CD/MD unit is connected, all the
tracks play from the beginning.
Changing the displayed item
Each time you press (DSPL) during CD, CD
TEXT or MD playback, the item changes as
follows:
Elapsed playback time
Disc name*
$
$
1
/Artist name*
$
$
Clock
$
3
Track name*
MOTION DISPLAY*
2
4
EN
Other Functions/CD/MD Unit
*1If you have not labelled the disc or if there is no
disc name prerecorded on the MD, “NO
D.Name” appears in the display.
2
If you play a CD TEXT disc, the artist name
*
appears in the display after the disc name. (Only
for CD TEXT discs with the artist name.)
3
If the track name of a CD TEXT disc or MD is not
*
prerecorded, “NO T.Name” appears in the
display.
4
AII the items above are scrolled in the display
*
one by one in order.
continue to next page n
27
Page 28

You can label CD and CD TEXT discs with a
personalised name using the disc memo
function; refer to “Labeling a CD” (page 32).
However, if you use personalised labels, they
will always take priority over the original CD
TEXT information when such information is
displayed.
Tips
• If the name of the MD or CD TEXT disc is too
long, you can scroll it across the display by
pressing (SHIFT), then (2) (N).
• If you want to display the original CD TEXT
information after labelling the CD TEXT disc with
a personalised name, press (SHIFT) , then (5)
(n).
Automatically scrolling a disc name
— Auto Scroll
If the disc name/artist name or track name on
a CD TEXT disc or MD exceeds 10 characters
and the Auto Scroll function is on,
automatically scrolls on the display as follows:
• The disc name appears when the disc has
EN
changed (if the disc name is selected).
• The track name appears when the track has
changed (if the track name is selected).
If you press (DSPL) to change the display
item, the disc or track name of the MD or CD
TEXT disc is scrolled automatically whether
you set the function on or off.
1 During playback, press (SHIFT).
2 Press (3) (SET UP) repeatedly until
“A.Scrl” appears.
Locating a specific track
— Automatic Music Sensor (AMS)
During playback, push the SEEK/AMS
control up or down once for each track
you want to skip.
To locate succeeding
tracks
To locate preceding
tracks
Locating a specific point in a track
— Manual Search
During playback, push the SEEK/AMS
control up or down and hold.
Release when you have found the
desired point.
To search forward
To search backward
Locating a disc by disc number
— Direct Disc Selection
Press the number button ((1) to (10))
that corresponds with the desired disc
number.
The desired disc in the current unit begins
playback.
3 Press (5) (n) to select “A.Scrl on.”
4 Press (SHIFT).
To cancel Auto Scroll, select “A.Scrl off” in
step 3 above.
Note
For some CD TEXT discs with a lot of characters,
the following cases may happen:
—Some of the characters are not displayed.
—Auto Scroll does not work.
28
Scanning the tracks
— Intro Scan
You can play the first 10 seconds of all the
tracks on the current disc.
1 During playback, press (SHIFT), then
press (4) (PLAY MODE) repeatedly until
“Intro” appears.
2 Press (5) (n) to select “Intro on.”
Intro Scan starts.
3 Press (SHIFT).
To return to normal playback mode, select
“Intro off” in step 2 above.
Page 29
Playing tracks repeatedly
PLAY MODE ENTER
— Repeat Play
You can select:
•Repeat 1 - to repeat a track.
•Repeat 2 - to repeat a disc.
1 During playback, press (SHIFT).
2 Press (7) (REP) repeatedly until the
desired setting appears.
z Repeat 1 z Repeat 2
Repeat off Z
Repeat Play starts.
3 Press (SHIFT).
To return to normal playback mode, select
“Repeat off” in step 2 above.
Playing tracks in random
order — Shuffle Play
You can select:
•Shuf 1 - to play the tracks on the current disc
in random order.
•Shuf All - to play all the tracks in random
order.
1 During playback, press (SHIFT).
2 Press (8) (SHUF) repeatedly until the
desired setting appears.
z Shuf 1 z Shuf All
Shuf off Z
Shuffle Play starts.
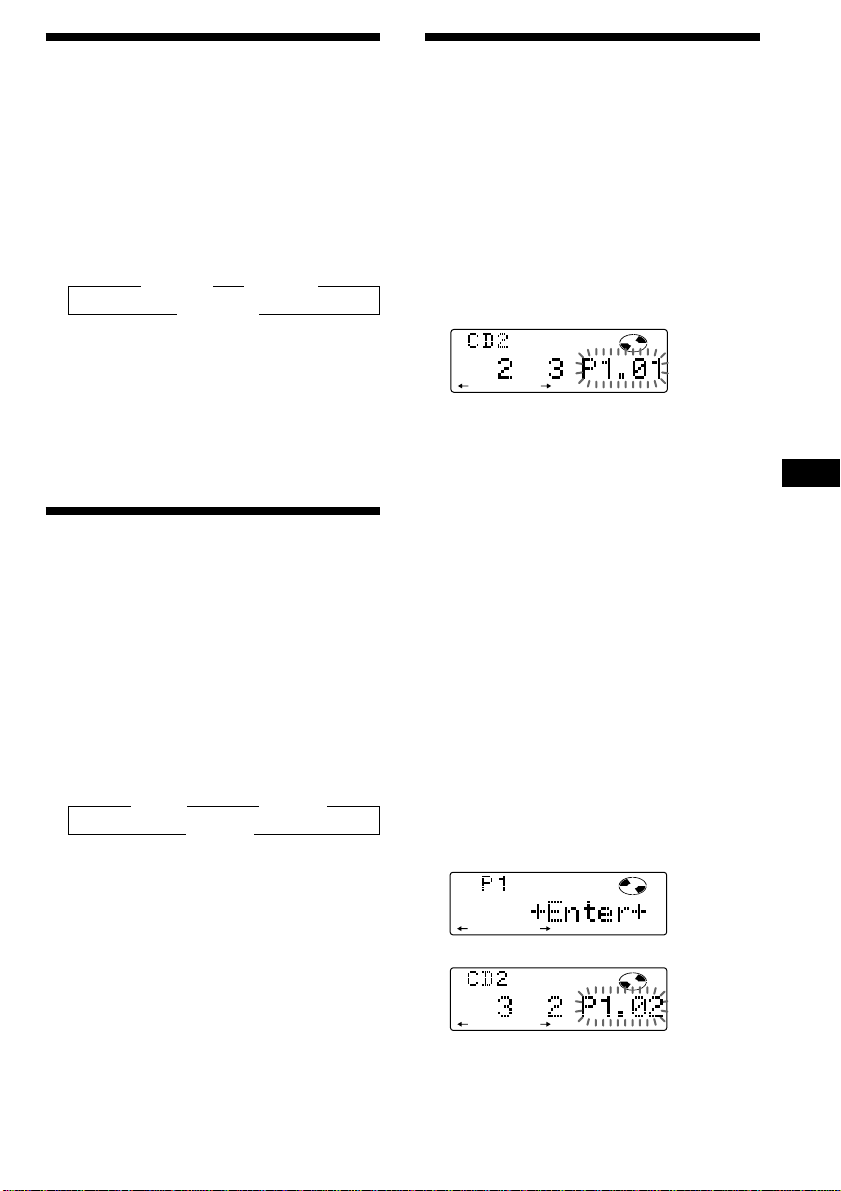
Creating a programme
— Programme Memory (CD/MD unit with
the programme memory function)
You can play tracks in any order you want by
creating and storing programmes in the unit's
memory. You can make two programmes:
Programme 1 and Programme 2. You can
select up to 12 tracks for each programme. You
can store the programmes in memory.
1 Press (SHIFT), then press (4) (PLAY
MODE) for two seconds.
Programme edit mode
DISC TRACK
PLAY
MODE ENTER
“P 1” indicates Programme 1 is selected.
If you have labelled the disc, the bank edit
mode appears. Press (4) (PLAY MODE) to
display “P 1” above.
To select Programme 2, press (5) (n)
repeatedly until “P 2” appears.
2 Select the track you want.
1 Press (SOURCE) repeatedly to select
CD or MD.
2 Press (MODE) repeatedly to select the
unit.
3 Press (SHIFT), then press the number
button to select the disc.
4 Press (SHIFT).
5 Push the SEEK/AMS control up or
down to select the track.
3 Press (6) (ENTER) momentarily.
EN
CD/MD Unit
3 Press (SHIFT).
To return to normal playback mode, select
“Shuf off” in step 2 above.
µ
DISC TRACK
PLAY
MODE ENTER
4 To continue entering tracks, repeat steps
2 and 3.
continue to next page n
29
Page 30
5 When you finish entering tracks, press
PLAY
DIS C TRACK
MODE ENTER
PLAY MODE ENTER
PLAY MODE ENTER
(4) (PLAY MODE) for two seconds.
6 Press (SHIFT).
Notes
• “*Wait*” appears in the display while the unit is
reading the data, or when a disc has not been
put into the unit.
• “*Mem Full*” appears in the display when you
try to enter more than 12 tracks into a
programme.
Erasing an entire programme
1 Press (SHIFT), then press (4) (PLAY
MODE) for two seconds.
“P 1” indicates Programme 1 is selected.
If you have labelled the disc, the bank edit
mode appears. Press (4) (PLAY MODE) to
display “P 1” above.
Playing the stored programme
Changing the disc order in the unit will not
affect programme memory play.
You can select:
•PGM 1 to play Programme 1.
•PGM 2 to play Programme 2.
•PGM 1+2 to play Programmes 1 and 2.
1 Press (SHIFT).
EN
2 Press (4) (PLAY MODE) repeatedly until
“PGM” appears.
3 Press (5) (n) repeatedly until the
desired programme appears.
z PGM 1 z PGM 2 z PGM 1+2
PGM off Z
Programme Play starts.
4 Press (SHIFT).
To go back to normal playback mode, select
“PGM off” in step 3 above.
Notes
• If you press a number button during programme
memory play, programme memory play is
interrupted, and playback of the selected disc
starts.
• “NO Data” appears in the display if no track is
stored in the programme.
• If a track stored into the programme memory is
not in the disc magazine, the track will be
skipped.
• When the disc magazine contains no tracks
stored into the programme memory, or when
the programme information has not been loaded
yet, “Not ready” appears.
2 Press (2) (N) repeatedly until “DEL”
appears.
To erase Programme 2, press (5) (n)
repeatedly until “PGM 2” appears.
3 Press (6) (ENTER) for two seconds.
The entire programme is erased.
4 When you finish erasing programmes,
press (4) (PLAY MODE) for two seconds.
5 Press (SHIFT).
30
Page 31

Adding tracks to a programme
PLAY
DIS C TRACK
MODE ENTER
PLAY
DIS C TRACK
MODE ENTER
PLAY
DIS C TRACK
MODE ENTER
1 Press (SHIFT), then press (4) (PLAY
MODE) for two seconds.
DIS C TRACK
PLAY
MODE ENTER
“P 1” indicates Programme 1 is selected.
If you have labelled the disc, the bank edit
mode appears. Press (4) (PLAY MODE) to
display “P 1” above.
To select Programme 2, press (5) (n)
repeatedly until “P 2” appears.
Erasing tracks in a programme
1 Press (SHIFT), then press (4) (PLAY
MODE) for two seconds.
“P 1” indicates Programme 1 is selected.
If you have labelled the disc, the bank edit
mode appears. Press (4) (PLAY MODE) to
display “P 1” above.
To select Programme 2, press (5) (n)
repeatedly until “P 2” appears.
2 Press (2) (N) or (5) (n) to select the
track slot number where you want to
insert a track.
Track slot number
DIS C TRACK
PLAY
MODE ENTER
3 Push the SEEK/AMS control up or down
to select the track you want to insert.
4 Press (6) (ENTER) momentarily to enter
the track.
The current track is inserted in that slot
number and the succeeding tracks shift
down.
To continue inserting tracks, repeat steps 2
through 4.
Note
Once all 12 slots have been filled,
“*Mem Full*” appears in the display, and you
cannot insert tracks.
5 When you finish inserting tracks, press
(4) (PLAY MODE) for two seconds.
6 Press (SHIFT).
2 Press (2) (N) or (5) (n) to select the
track you want to erase.
Track slot number
DIS C TRACK
PLAY
The track currently registered in slot 6 of
Programme 1.
MODE ENTER
3 Press (6) (ENTER) for two seconds.
When you erase a track from a slot number,
the succeeding tracks shift up to fill the gap.
µ
4 To continue erasing tracks, repeat steps
2 and 3.
5 When you finish erasing tracks, press (4)
(PLAY MODE) for two seconds.
6 Press (SHIFT).
EN
CD/MD Unit
31
Page 32

Labelling a CD — Disc Memo
DISC
(CD unit with the custom file function)
You can label each disc with a personalised
name. You can enter up to eight characters for
a disc. If you label a CD, you can locate the
disc by name (page 33) and select the specific
tracks for playback (page 34).
1 Play the CD and press (PTY/LIST) for two
seconds.
DISC
2 Enter the characters.
1 Rotate the dial clockwise to select the
desired characters.
(A n B n C n ··· Z n 0 n 1 n 2 n
··· 9 n + n – n * n / n \ n > n <
EN
n . n _ )
DISC
If you rotate the dial counterclockwise,
the characters appear in the reverse
order.
If you want to put a blank space
between characters, select “_” (underbar).
Displaying the disc memo name
Press (DSPL) during CD or CD TEXT disc
playback.
Each time you press (DSPL) during CD or
CD TEXT disc playback, the item changes
as follows:
Elapsed playback time
*1If you connect an optional CD unit with the
CD TEXT function, the CD TEXT information
will appear in the display when you playback
a CD TEXT disc.
*2All the items above are scrolled in the
display one by one in order.
$
$
Disc memo name
$
Track name*
MOTION DISPLAY*
1
$
Clock
$
2
2 Press (5) (n) after locating the
desired character.
The flashing cursor moves to the next
space.
DISC
If you press (2) (N), the flashing cursor
moves to the left.
3 Repeat steps 1 and 2 to enter the
entire name.
3 To return to normal CD playback mode,
press (PTY/LIST) for two seconds.
Tip
To erase or correct a name enter “_” (under-bar)
for each character.
32
Page 33

Erasing the disc memo
1 Press (SOURCE) repeatedly to select CD.
2 Press (MODE) repeatedly to select the CD
unit.
3 Press (PTY/LIST) for two seconds.
4 Press (DSPL) for two seconds.
5 Rotate the dial to select the name you
want to erase.
Locating a disc by name
— List-up (CD unit with the custom file
function or MD unit)
You can use this function for discs that have
been assigned a custom name. For more
information on disc names, refer to “Labeling a
CD” (page 32).
1 Press (PTY/LIST) momentarily.
The name assigned to the current disc
appears in the display.
6 Press (6) (ENTER) for two seconds.
The name is erased.
Repeat steps 5 and 6 if you want to erase
other names.
7 Press (PTY/LIST) for two seconds.
The unit returns to normal CD playback
mode.
Note
When the personalised label is erased, the original
CD TEXT information will appear in the display.
ENTER
When you assign a disc memo label to a CD
TEXT disc, it takes priority over the original
CD TEXT information.
2 Press (PTY/LIST) repeatedly until you
find the desired disc.
3 Press (6) (ENTER) to play back the disc.
Notes
• After a disc name has been displayed for five
seconds, the display goes back to normal
playback mode. To turn off the display, press
(DSPL).
• The track names are not displayed during MD or
CD TEXT disc playback.
• If there are no discs in the magazine, “NO Disc”
appears in the display.
• If a disc has not been assigned a custom file,
“********” appears in the display.
• If the disc information has not been read by the
unit, “?” appears in the display. To load the disc,
first press the number button, then choose the
disc that has not been loaded.
• The information appears only in upper case.
There are also some letters which cannot be
displayed (during MD or CD TEXT disc playback).
EN
CD/MD Unit
33
Page 34

Selecting specific tracks
BANK
PLAY MODE
for playback
— Bank (CD unit with the custom file
function)
If you label the disc, you can set the unit to
skip tracks and play only the tracks you want.
1 Start playing the disc and press (SHIFT).
Then press (4) (PLAY MODE) for two
seconds.
Bank edit mode.
DIS C TRACK
PLAY
MODE ENTER
Note
If you have not labelled the disc, the bank edit
mode does not appear and the programme
edit mode appears. To go back to normal
playback mode, press (SHIFT).
EN
2 Push the SEEK/AMS control up or down
to select the track number you want to
skip and press (6) (ENTER).
DIS C TRACK
PLAY
MODE ENTER
Playing the specific tracks only
You can select:
•Bank on - to play the tracks with the “Play”
setting.
•Bank inv (Inverse) - to play the tracks with
the “Skip” setting.
1 During playback, press (SHIFT), then
press (4) (PLAY MODE) repeatedly until
“Bank” appears.
2 Press (5) (n) to repeatedly until the
desired setting appears.
z Bank on z Bank inv z Bank off
Playback starts from the track following the
current one.
3 Press (SHIFT).
To return to normal play mode, select “Bank
off“ in step 2 above.
The indication changes from “Play” to
“Skip.” To return the indication to“Play,”
press (6) (ENTER) again.
3 Repeat step 2 to set the “Play” or “Skip”
mode on all the tracks.
4 Press (4) (PLAY MODE) for two seconds.
The unit returns to normal CD playback
mode.
5 Press (SHIFT).
Notes
• You can set the “Play” and “Skip” mode for up
to 24 tracks.
• You cannot set the “Skip” mode for all the
tracks.
34
Page 35

DSP
SUR
SUR
SUR
SUR
3 Rotate the dial to select the desired
surround menu.
The surround menu appears in the order
shown above.
The optional XDP-U50D lets you add some
effects to the sound field of the currently
selected source.
The followings are the operating instructions
for the XDP-U50D.
When the XDP-210EQ is connected to the unit,
refer to the instructions manual supplied to the
XDP-210EQ.
Note
If you connect the optional digital preamplifier
XDP-U50D/210EQ, the voice guide function will not
work.
Selecting a surround menu
You can select a desired surround menu to
best fit the audio source. The following menus
can simulate different sound fields and
enhance the sound so that you feel as if you
are in a live concert.
Surround menu
HALL Concert hall
JAZZ Jazz club
DISCO Disco with thick walls
THEATER Movie theater
PARK Big open space
LIVE Live concert
OPERA Opera house
CHURCH Church/chapel with a lot of
STADIUM Open-air concert in a
CELLAR Cellar with a lot of
DEFEAT Normal sound without any
reverberation
stadium
reverberation
DSP effects
After three seconds, the display returns to
the normal playback mode.
Adjusting the effect level
1 Press (SOURCE) to select a source (tuner,
CD or MD).
2 Press (SOUND) for two seconds.
3 Rotate the dial to select until the desired
surround menu appears.
EN
CD/MD Unit/DSP
4 Press (5) ( n).
5 Rotate the dial to adjust the level.
You can adjust the level from 0 to 100%.
Increase the level to enhance the effect.
6 Press (SOUND) for two seconds.
1 Press (SOURCE) to select a source (tuner,
CD, or MD).
2 Press (SOUND) repeatedly until “SUR”
appears.
35
Page 36

Storing a surround effect
onto CDs
— Digital Signal Processor (DSP) Custom
File (CD unit the with custom file function)
Once you have registered the desired surround
menu onto the discs, you can enjoy the same
surround menu every time you play them.
(Only when you have labelled a disc by the
Custom File function.)
1 Press (PTY/LIST) for two seconds.
2 Press (PTY/LIST) until the surround menu
appears.
DSP custom file mode
3 Rotate the dial to select the desired
EN
surround menu.
4 Press (PTY/LIST) for two seconds.
After the effect setting is complete, the
display returns to the normal playback
mode.
Selecting the listening
position
You can set a delayed time for the sound to
reach the listeners from the speakers.
In this way, the unit can simulate a natural
sound field so that you feel as if you are in the
centre of the sound field no matter where you
sit in the car.
Display
window
LP1
21
3
All
LP2
Front
LP3
Front R
LP4
Front L
LP5
Rear
1 Press (SOUND) momentarily until “LP1”
appears.
Centre of sound
field
Normal setting
(1 + 2 + 3)
Front part
(1 + 2)
Right front (2)
Left front (1)
Rear part (3)
Playing the disc with the stored
surround menu
1 Press (SHIFT), then press (4) (PLAY
MODE) repeatedly until “D.File”
appears.
2 Press (5) ( n) to select “D.File on.”
After five seconds, the display returns to
normal playback mode.
3 Press (SHIFT).
To cancel to play the disc with stored surround
menu, select “D.File off” in step 2 above.
Changing the stored surround
effect
Play the disc whose surround mode you want
to change, and follow the steps of “Storing the
surround effect onto the CDs.”
Erasing the stored surround effect
Select “DEFEAT” in step 3 of “Storing the
surround effect onto the CDs.”
36
2 Rotate the dial to select the desired
listening position.
The listening positions appear in the order
shown above.
After three seconds, the display returns to
the normal playback mode.
Page 37

Adjusting the listening position
1 Press (SOUND) for two seconds.
2 Press (SOUND) repeatedly until the
desired listening position appears.
3 Press (5) ( n).
Adjusting the fader (FAD)
Normally, with the DSP mode on, the volume
of the output sound from the rear speakers is
lowered automatically to improve the
efficiency of the listening position setting. If
you want to raise the rear speaker volume,
adjust the fader.
1 Follow steps 1 to 3 of “Selecting a
surround menu” (page 35).
4 Rotate the dial to adjust the centre of
the sound field to the left or right. Then
set the centre of the sound field.
Centre moves to the L (left).
Centre moves to the R (right).
5 Press (5) ( n).
6 Rotate the dial to adjust the centre of
the sound field to the front or rear.
Centre moves to the R (rear).
Centre moves to the F (front).
7 Press (SOUND) for two seconds.
When the effect setting is complete, the
normal playback mode appears.
2 Press (SOUND) repeatedly until “FAD”
appears.
3 Rotate the dial to adjust the fader.
Decreases front speaker volume
Increases front speaker volume
After three seconds, the display returns to
the normal playback mode.
Adjusting the volume of
the subwoofer(s)
1 Press (SOURCE) to select a source (tuner,
CD, or MD).
2 Press (SOUND) repeatedly until “SUB”
appears.
3 Rotate the dial to adjust the volume.
After three seconds, the display returns to
the normal playback mode.
Tip
When you rotate the dial to turn the volume all
the way down, “Sub ATT” appears and the cutout
frequency of the subwoofer is disabled.
continue to next page n
EN
DSP
37
Page 38

Adjusting the frequency of the
subwoofer(s)
To match the characteristics of the connected
subwoofer(s), you can cut out the unwanted
high and middle frequency signals entering
the subwoofer(s). By setting the cut-off
frequency (see the diagram below), the
subwoofer(s) will output only low frequency
signals so you can get a clearer sound image.
Cut-off frequency
Level
Adjusting the volume of
the bass and treble
You can adjust the volume of the bass and
treble to best fit the acoustic characteristics
inside your car.
1 Press (SOURCE) to select a source (tuner,
CD, or MD).
2 Press (SOUND) repeatedly until “BAS” or
“TRE” appears.
3 Rotate the dial to adjust the volume.
After three seconds, the display returns to
the normal playback mode.
62 125 198
1 Press (SOURCE) to select a source (tuner,
CD, or MD).
EN
2 Press (SOUND) for two seconds.
3 Press (SOUND) repeatedly until “SUB”
appears.
4 Rotate the dial to select the desired cut-
off frequency.
The cut-off frequency in the display
changes as follows.
62 n 78 n 99 n 125* n 157 n 198 Hz
Factory-set frequency
*
5 Press (SOUND) for two seconds.
After the frequency setting is complete, the
display returns to the normal playback
mode.
Tip
Each time you press (5) (n), the mode changes
between subwoofer volume adjusting mode and
the cut-off frequency adjusting mode.
Frequency (Hz)
Adjusting the turn-over frequency
You can adjust the bass and treble turn-over
frequencies.
Turn-over frequency
Frequency (Hz)
1 Press (SOURCE) to select a source (tuner,
CD, or MD).
2 Press (SOUND) for two seconds.
3 Press (SOUND) repeatedly until “BAS” or
“TRE” appears.
Bass adjusting mode
Treble adjusting mode
Tip
Each time you press (5) (n), the mode
changes between the turn-over frequency
adjusting mode and the bass and treble volume
adjusting mode.
38
Page 39

4 Rotate the dial to select the turn-over
frequency.
The turn-over frequencies change as
follows:
Bass:
198 Hz n 250 Hz n 314 Hz* n 396 Hz
Treble:
2.0 kHz n 3.1 kHz* n 4.0 kHz n 5.0 kHz
Factory-set frequency
*
5 Press (SOUND) for two seconds.
The display returns to the normal playback
mode.
Listening to each
programme source in its
registered surround menu
— Last Sound Memory (LSM)
Each time you return to the same source, you
can hear the same surround effect registerd for
that source, even after changing the
programme source or turning the unit off and
then on again.
Changing the line output
level
You can change the line output level if you
hear distortion or other noise.
Additional
Information
Precautions
• If your car was parked in direct sunlight
resulting in a considerable rise in
temperature inside the car, allow the unit to
cool off before operating it.
• If no power is being supplied to the unit,
check the connections first. If everything is in
order, check the fuse.
• If no sound comes from the speakers of
two-speaker systems, set the fader control to
the centre position.
•If your car is equipped with a power aerial, it
will extend automatically while the unit is
operating.
If you have any questions or problems
concerning your unit that are not covered in
this manual, please consult your nearest Sony
dealer.
Notes on handling CDs
A dirty or defective disc may cause sound
dropouts while playing. To enjoy optimum
sound, handle the disc as follows.
Handle the disc by its edge. To keep the disc
clean, do not touch the surface.
EN
DSP/Additional Information
1 Press (SHIFT), then press (3) (SET UP)
until “L.out” appears.
2 Press (5) ( n) to select the desired
setting (–10 dB or –16 dB).
3 Press (SHIFT).
Do not stick paper or tape on the labelled
surface.
continue to next page n
39
Page 40

Do not expose the discs to direct sunlight or
heat sources such as hot air-ducts, or leave
them in a car parked in direct sunlight where
there can be a considerable rise in the
temperature inside the car.
Before playing, clean the discs with an optional
cleaning cloth. Wipe each disc from the centre
out.
Do not use solvents such as benzine, thinner,
commercially available cleaners or antistatic
spray intended for analog discs.
EN
Maintenance
Fuse replacement
When replacing the fuse, be sure to use one
that matches the amperage described on the
fuse. If the fuse blows, check the power
connection and replace the fuse. If the fuse
blows again after replacement, there may be an
internal malfunction. In such a case, consult
your nearest Sony dealer.
Fuse (10 A)
Warning
Never use a fuse with an amperage rating
exceeding the one supplied with the unit as
this could damage the unit.
Note on moisture condensation
On a rainy day or in a very damp area,
moisture may condense on the lenses inside
the CD player. Should this occur, the unit will
not operate properly. In this case, remove the
disc and wait for about an hour until the
moisture evaporates.
When you play 8 cm CDs
Use the optional Sony compact disc single
adapter (CSA-8) to protect the CD player from
being damaged.
Cleaning the connectors
The unit may not function properly if the
connectors between the unit and the front
panel are not clean. To prevent this, open the
front panel by pressing (OPEN), then detach it
and clean the connectors with a cotton swab
dipped in alcohol. Do not apply too much
force. Otherwise, the connectors may be
damaged.
Main unit
Back of the front panel
Notes
• For safety, before cleaning the connectors, turn
off the engine and remove the key from the
ignition switch.
• Never touch the connectors directly with your
fingers or any metal device.
40
Page 41

Dismounting the unit
1 Press the clip inside the front cover with
a thin screwdriver, and gently the front
cover free.
2 Repeat step 1 on the left side.
The front cover is removed.
3 Use a thin screwdriver to push in the clip
on the left side of the unit, then pull out
the left side of the unit until the catch
clears the mounting.
4 Repeat step 3 on the right side.
5 Slide the unit out of the mounting.
EN
Additional Information
41
Page 42

Specifications
CD player section
System Compact disc digital audio
Signal-to-noise ratio 100 dB
Frequency response 10 – 20,000 Hz
Wow and flutter Below measurable limit
system
Tuner section
FM
Tuning range 87.5 – 108.0 MHz
Aerial terminal External antenna connector
Intermediate frequency 10.7 MHz
Usable sensitivity 8 dBf
Selectivity 75 dB at 400 kHz
Signal-to-noise ratio 65 dB (stereo),
Harmonic distortion at 1 kHz
Separation 35 dB at 1 kHz
Frequency response 30 – 15,000 Hz
EN
MW/LW
Tuning range MW: 531 – 1,602 kHz
Aerial terminal External antenna connector
Intermediate frequency 10.71 MHz/450 kHz
Sensitivity MW: 30 µV
50 dB at 200 kHz
68 dB (mono)
0.7 % (stereo),
0.4 % (mono)
LW: 153 – 281 kHz
LW: 50 µV
Power amplifier section
Outputs Speaker outputs
Speaker impedance 4 – 8 ohms
Maximum power output 45 W × 4 (at 4 ohms)
(sure seal connectors)
General
Outputs Line outputs (4)
Tone controls Bass ±8 dB at 100 Hz
Power requirements 12 V DC car battery
Dimensions Approx. 178 × 50 × 182 mm
Mounting dimensions Approx. 182 × 53 × 163 mm
Mass Approx. 1.5 kg
Supplied accessories Rotary commander (1)
Optional accessories Wireless remote RM-X47
Optional equipment CD changer
Power antenna relay
control lead
Power amplifier control
lead
Telephone ATT control
lead
Treble ±8 dB at 10 kHz
(negative ground)
(w/h/d)
(w/h/d)
Microphone (1)
Parts for installation and
connections (1 set)
Front panel case (1)
BUS cable (supplied with
an RCA pin cord)
RC-61 (1 m), RC-62 (2 m)
Compact disc single
adapter CSA-8
CDX-805 (10 discs),
CDX-715 (10 discs)
MD changer
MDX-62
Digital equalizer
preamplifier
XDP-210EQ
Source selector
XA-C30
42
Design and specifications are subject to change
without notice.
Page 43

Troubleshooting guide
The following checklist will help you remedy the problems you may encounter with your unit.
Before going through the checklist below, check the connection and operating procedures.
General
Problem
No sound.
The contents of the memory
have been erased.
Indications do not appear in the
display.
CD/MD playback
Problem
A disc cannot be loaded.
Playback does not begin.
A disc is automatically ejected.
The operation buttons do not
function.
The sound skips due to
vibration.
Cause/Solution
•Cancel the ATT function.
•Set the fader control to the centre position for two-speaker
systems.
•Rotate the dial in a clockwise direction to adjust the volume.
• The power cord or battery has been disconnected.
• The reset button has been pressed.
n Store again into the memory.
Remove the front panel and clean the connectors. See “Cleaning
the connectors” (page 40) for details.
Cause/Solution
•Another CD is already loaded.
•The CD is forcibly inserted upside down or in the wrong way
(MD).
Defective MD or dusty CD.
The ambient temperature exceeds 50°C.
Press the reset button.
• The unit is installed at an angle of more than 60°.
• The unit is not installed in a sturdy part of the car.
EN
Additional Information
Radio reception
Problem
Preset tuning is not possible.
Automatic tuning is not
possible.
The “ST” indication flashes.
Cause/Solution
• Memorise the correct frequency.
• The broadcast signal is too weak.
The broadcast signal is too weak.
n Use manual tuning.
•Tune in the frequency accurately.
•The broadcast signal is too weak.
n Set to the MONO mode (page 14).
continue to next page n
43
Page 44

RDS fuctions
Problem
A SEEK starts after a few
seconds of listening.
No traffic announcements.
PTY displays “NONE.”
Voice drive/ Voice memo
Problem
Registering a vocal phrase or
recording a voice memo is not
possible.
The unit often fails or does not
succeed in recognising the vocal
phrase.
EN
Vocalized instructions are not
heard while the voice drive
function or the voice memo
function is engaged in another
operation.
Cause/Solution
The station is non-TP or has a weak signal.
n Press (AF/TA) to select “AF TA off” appears.
•Activate “TA.”
•The station does not broadcast any traffic announcements
despite being TP.
n Tune to another station.
The station does not specify the programme type.
Cause/Solution
The microphone is not connected properly.
n Plug it in completely.
•The microphone may not be able to receive the driver’s voice
depending on the installation location and direction due to the
microphone’s sharp directivity.
n Install the microphone properly. Be sure to adjust the
SONY mark facing towards the driver’s mouth.
•The unit incorporates outside noises as a part of the vocal
phrase.
n Close the window while registering a vocal phrase.
•You can make it easier for the unit to recognise the vocal
phrase by pronouncing the phrase clearly and loudly.
•The phrase that you pronounced is different from the
registered one.
n Pronounce the registered phrase.
The volume setting is at the lowest.
n Adjust the volume with the dial of the unit.
44
Page 45

Error displays (when an optional CD/MD unit is connected)
The following indications will flash for about five seconds, and an alarm sound will be heard.
Display
NO Mag
NO Disc
NG Discs
Error
Blank
PushReset
Not Ready
HighTemp
*1 When an error occurs during playback of an MD or CD, the disc number of the MD or CD does not appear
in the display.
2
The disc number of the disc causing the error appears in the display.
*
If the above-mentioned solutions do not help improve the situation, consult your nearest Sony
dealer.
Cause
The disc magazine is not inserted in
the CD/MD unit.
No disc is inserted in the CD/MD unit.
A CD/MD cannot play because of
some problem.
A CD is dirty or inserted upside
2
down.*
1
*
An MD does not play because of some
problem.*
No tracks have been recorded on an
1
*
MD.*
The CD/MD unit cannot be operated
because of some problem.
The lid of the MD unit is open or MDs
are not inserted properly.
The ambient temperature is more than
50°C.
2
2
Solution
Insert the disc magazine in the CD/
MD unit.
Insert discs in the CD/MD unit.
Insert another CD/MD.
Clean or insert the CD correctly.
Insert another MD.
Play an MD with tracks recorded on
it.
Press the reset button of the unit.
Close the lid or insert the MDs
properly.
Wait until the temperature goes down
below 50°C.
EN
Additional Information
45
Page 46

¡Bienvenido!
Enhorabuena por la adquisición del
reproductor de discos compactos Sony. Esta
unidad le permitirá disfrutar de varias
funciones mediante el uso de un mando
rotativo suministrado o un mando a distancia
inalámbrico opcional.
Además de las operaciones de reproducción de
discos compactos y de la radio, es posible
ampliar el sistema mediante la conexión de
una unidad*1 de CD/MD opcional.
Si utiliza esta unidad o conecta una unidad de
CD opcional con la función CD TEXT, el visor
mostrará la información CD TEXT al
reproducir discos CD TEXT*2.
*1Es posible realizar la conexión a un cambiador
de CD o de MD.
2
Un disco CD TEXT es un CD de audio que
*
contiene información, como el título del disco,
nombre del cantante y títulos de los temas.
Esta información está registrada en el disco.
Voice Drive
ES
Sony ha desarrollado una nueva función que
contribuye a una conducción más segura.
Además del mando rotativo único de Sony,
Sony introduce un sistema activado por voz
(Voice Drive) que proporciona al conductor el
control oral del sistema de audio del
automóvil.
A partir de ahora, mientras conduce, podrá
solicitar operaciones con la función Voice
Drive y confirmar los resultados con Voice
Guide (Guía Oral).
Igualmente, puede grabar su voz con la
función de memorando oral, que le permite
tomar notas orales cuando vea o piense en algo
mientras conduce.
Guía oral para una conducción
segura
Esta unidad dispone de una función de guía
oral*. Cuando dicha función se encuentra
activada, la unidad ofrece comentarios orales
sobre las funciones correspondientes a los
botones pulsados.
* Ciertos amplificadores opcionales de potencia
pueden causar una interrupción al principio de
comentarios vocales.
Si conecta un cambiador opcional de MD, es
posible que el sonido del primer MD continúe
durante un corto espacio de tiempo incluso
después de anunciarse los comentarios vocales
sobre el segundo MD.
2
Page 47

Indice
Sólo esta unidad
Localización de los controles ................................. 4
Procedimientos iniciales
Restauración de la unidad ................................. 6
Extracción del panel frontal............................... 6
Preparación del mando rotativo ....................... 7
Ajuste del reloj ..................................................... 7
Reproductor de discos
compactos
Reproducción de discos compactos ................. 8
Reproducción de discos compactos en
diversos modos ............................................ 10
Creación de un programa
— Memoria de programa de CD ............... 11
Radio
Memorización automática de emisoras
— Memorización de la mejor sintonía
(BTM) ............................................................. 13
Memorización de las emisoras deseadas ....... 14
Recepción de emisoras memorizadas ............ 14
RDS
Descripción general de la función RDS ......... 15
Visualización del nombre de la emisora........ 15
Resintonización automática del mismo
programa
— Frecuencias alternativas (AF)................ 15
Recepción de anuncios de tráfico ................... 17
Programación de emisoras RDS con los datos
AF y TA ......................................................... 18
Grabación de anuncios de tráfico
— Repetición de información de tráfico
(TIR) ............................................................... 18
Localización de emisoras mediante el tipo de
programa....................................................... 20
Activación por voz ............................................ 21
Activación por voz
Selección de una posición “V Drive” para
registrar una frase ........................................ 21
Registro de una frase oral ................................ 22
Solicitud de una fuente registrada ................. 23
Memorando oral
Grabación de un memorando oral ................. 23
Reproducción de memorandos orales ........... 24
Borrado de un memorando oral ..................... 24
Otras funciones
Uso del mando rotativo ................................... 24
Ajuste de las características de sonido ........... 26
Atenuación del sonido ..................................... 26
Cambio de los ajustes de sonido y
visualización ................................................. 26
Ajuste de la frecuencia de los altavoces
potenciadores de graves ............................. 27
Equipo opcional
Unidad de CD/MD
Reproducción de discos compactos (CD) o de
minidiscos (MD) .......................................... 27
Exploración de temas
— Exploración de introducción ................. 28
Reproducción repetida de temas
— Reproducción repetida........................... 29
Reproducción de temas en orden aleatorio
— Reproducción aleatoria .......................... 29
Creación de un programa
— Memoria de programa ........................... 29
Asignación de títulos a los discos compactos
— Memorando de discos ............................ 32
Localización de discos mediante el título
— Función de listado .................................. 33
Selección de temas específicos para su
reproducción
— Función de banco .................................... 34
DSP
Selección de un menú de sonido periférico .. 35
Almacenamiento del efecto de sonido periférico
en los discos compactos
—Archivo personalizado del Procesador
digital de señales (DSP) .......................... 36
Selección de la posición de escucha ............... 36
Ajuste del equilibrio entre los altavoces
(FAD) ............................................................. 37
Ajuste del volumen de los altavoces
potenciadores de graves ............................. 37
Ajuste del volumen de los graves y los agudos
........................................................................ 38
Escucha de cada fuente de programa con el
menú de sonido periférico registrado
— Memoria del último sonido (LSM) ....... 39
Cambio del nivel de salida de línea ............... 39
Información complementaria
Precauciones ...................................................... 39
Mantenimiento .................................................. 40
Desmontaje de la unidad ................................. 41
Especificaciones................................................. 42
Guía de solución de problemas ...................... 43
ES
3
Page 48

Localización de los controles
SOUND
/
A
K
M
E
S
OFF
E
S
SOURCE
DSPL
SHIFT
12345678910
MODE
Consulte las páginas indicadas para obtener más información.
1 Control SEEK/AMS (búsqueda/sensor de
ES
música automático/búsqueda manual)
9, 11, 12, 14, 16, 19, 20, 22, 28, 29, 31, 34
2 Botón MODE (selección de unidad/
banda) 13, 14, 27, 29, 33
3 Botón 6 (expulsión) (situado en la parte
frontal de la unidad oculta por el panel
frontal) 8
4 Botón SOURCE (selección de fuente)
8, 13, 14, 17, 24, 27, 29, 33, 35, 37, 38
5 Dial (control de volumen/volumen de
potenciación de graves/graves/agudos/
izquierdo-derecho/delantero-trasero)
7, 26, 32, 33, 35, 36, 37, 38, 39
6 Botón SOUND 26, 35, 36, 37, 38, 39
7 Botón DSPL (cambio del modo de
indicación) 9, 14, 15, 27, 28, 32, 33
8 Visor
9 Botón OPEN 6, 8, 40
!º Botón PTY/LIST
Memorando de discos 32, 33
Archivo personalizado 36
Función de listado 33
Programa RDS 20
!¡ Botón AF/TA 15, 16, 17, 18
OPEN
LIST
PTY
AF/TA
TIR
CDX-C880R
!™ Botón OFF 6, 8
!£ Botón de restauración (situado en el
lado frontal de la unidad, oculto por el
panel frontal) 6
!¢ Receptor para el mando a distancia
inalámbrico opcional
!∞ Botón SHIFT
PLAY MODE 10, 11, 12, 13, 14, 16, 18,
28, 29, 30, 31, 34
REP 10, 29
SET UP 7, 8, 9, 21, 26, 27, 28, 36, 39
SHUF 10, 29
!§ Selector POWER SELECT (situado en la
parte inferior de la unidad)
Consulte “Selector POWER SELECT” en el
manual de instalación y conexiones.
!¶ Durante la recepción de radio:
Botones numéricos 14, 16
Durante la reproducción de CD/MD:
Botones de selección directa de disco
28
!• Botón TIR 18, 19
4
Page 49

Mando a distancia
inalámbrico opcional
(RM-X47)
OFF
–
ATT DSPL
Botones con la misma función a los de
esta unidad.
1 Botón OFF
2 Botón SEEK/AMS
3 Botones (–) (+)
4 Botón ATT
5 Botón SOUND/SEL
6 Botón DSPL
REW
–
SOURCE
MODE
DIR
SEEK
AMS
+
PRESET
FF
DISC
SOUND
SEL
+
7 Botón PRESET/DISC
No es posible realizar la búsqueda manual ni
la sintonización manual con el mando a
distancia.
8 Botón SOURCE
9 Botón MODE/DIR
Funciona como el botón (MODE) de esta
unidad.
ES
Si el selector POWER SELECT está ajustado en la posición B, no será posible emplear la unidad
con el mando a distancia inalámbrico, a menos que pulse (SOURCE) en dicha unidad o que
inserte un CD para que ésta se active en primer lugar.
5
Page 50

Procedimientos iniciales
Restauración de la unidad
Antes de utilizar la unidad por primera vez o
después de sustituir la batería del automóvil,
es necesario restaurar dicha unidad.
Pulse el botón de restauración con un objeto
puntiagudo, como un bolígrafo.
Botón de restauración
Notas
• Al pulsar el botón de restauración se borrarán los
ajustes del reloj y algunas funciones
memorizadas.
• Cuando conecte el cable de suministro de
alimentación a la unidad o restaure ésta, espere
unos 10 segundos antes de insertar un disco. Si
ES
inserta un disco antes de que transcurran los 10
segundos, la unidad no se restaurará y será
necesario volver a pulsar el botón de
restauración.
Notas
• No coloque nada en la superficie interior del
panel frontal.
• Tenga cuidado para que el panel no se caiga
cuando lo extraiga de la unidad.
• Si extrae el panel con la alimentación conectada,
ésta se desconectará automáticamente para
evitar que se dañen los altavoces.
• Para transportar el panel frontal, métalo en la
caja para el mismo suministrada.
Fijación del panel frontal
Coloque el orificio a del panel frontal en el eje
b de la unidad como se ilustra y, a
continuación, presione sobre el lado izquierdo
para introducirlo.
a
b
Extracción del panel frontal
Es posible extraer el panel frontal de esta
unidad con el fin de evitar su robo.
1 Pulse (OFF).
2 Pulse (OPEN)para abrir el panel frontal,
a continuación deslícelo hacia el lado
derecho y tire de la parte izquierda de
dicho panel.
1
2
6
µ
Notas
• Asegúrese de no fijar el panel frontal al revés.
• No ejerza excesiva presión sobre el panel al
fijarlo a la unidad. Presiónelo ligeramente.
• No sujete con demasiada fuerza ni presione
excesivamente sobre el visor del panel frontal.
• No exponga el panel frontal a la luz solar directa,
a fuentes térmicas, como conductos de aire
caliente, ni lo deje en un lugar húmedo. No lo
deje nunca sobre el salpicadero de un automóvil
aparcado bajo la luz solar directa, ya que podría
producirse un considerable aumento de
temperatura.
Page 51

SET UP
SET UP
SET UP
SET UP
SET UP
SET UP
Alarma de precaución
SET UP
Si gira el interruptor de la llave de encendido a
la posición OFF sin haber extraído el panel
frontal, la alarma de precaución emitirá pitidos
durante unos segundos (sólo si el selector
POWER SELECT está ajustado en la posición
A).
Indicador TIR
Si extrae la llave de encendido mientras la
función TIR está activa, el indicador TIR
parpadeará varias veces (sólo si el selector
POWER SELECT está ajustado en la posición
A).
Ajuste del reloj
El reloj dispone de una indicación digital de 24
horas.
Ejemplo: Para ajustar el reloj a las 10:08
1 Pulse (SHIFT) y, a continuación, (3) (SET
UP).
1 Pulse (5) (n).
Indicador TIR
Para obtener más información sobre la función
TIR, consulte “Grabación de anuncios de
tráfico” (página 18).
Preparación del mando rotativo
Cuando monte el mando rotativo, adhiera la
etiqueta en la posición indicada en la siguiente
ilustración.
SOUND
MODE
LIST
LK
TA
L
IS
M
O
D
SOUND
r
REC
VOICE
MEMO
(
PLAY
T
E
(
P
LA
Y
V
O
IC
E
TALK
M
E
M
O
r
R
E
C
Los dígitos de la hora parpadean.
2 Ajuste la hora.
para retroceder
para avanzar
3 Pulse (5) (n).
Los dígitos de los minutos parpadean.
4 Ajuste los minutos.
para retroceder
para avanzar
ES
Procedimientos iniciales
2 Pulse (SHIFT).
El reloj se pone en funcionamiento.
continúa en la página siguiente n
7
Page 52

3 Pulse (SHIFT).
TRACK
Una vez finalizado el ajuste de modo, el
visor vuelve a la indicación de modo de
reproducción normal.
Nota
Si el selector POWER SELECT de la parte inferior de
la unidad se ajusta en la posición B, active
primero la alimentación y, a continuación, ajuste el
reloj.
Reproductor de discos compactos
Reproducción de discos compactos
1
Pulse (OPEN) e inserte el CD.
La reproducción se iniciará de forma
automática.
Lado de la etiqueta hacia arriba
6
ES
2 Cierre el panel frontal.
Si ya hay un CD insertado, pulse (SOURCE)
varias veces hasta que aparezca “CD”.
Tiempo de reproducción transcurrido
Número de tema
Nota
Si desea reproducir un CD de 8 cm, utilice el
adaptador opcional para discos compactos sencillos
Sony (CSA-8).
Para Pulse
Detener la reproducción (OFF)
Expulsar el CD
(OPEN)
continuación 6
y a
8
Page 53

Cambio de los elementos mostrados
Cada vez que pulse (DSPL), los elementos
cambiarán de la siguiente forma:
$
Tiempo de reproducción transcurrido
Título del disco*1/Nombre del cantante*
$
$
Título del tema*
Reloj
MOTION DISPLAY*
*1Si ha insertado un disco que no sea CD TEXT, el
visor mostrará “NO D.Name” o “NO T.Name”.
*2Si reproduce un disco CD TEXT, aparece el
nombre del cantante en el visor después del
título del disco (sólo discos CD TEXT) que
incluyen nombres de cantante.
3
Todos los elementos anteriores se desplazan por
*
el visor uno por uno en orden.
1
$
$
3
2
Puede asignar un nombre personalizado para
discos CD y CD TEXT con la función de
memorando de discos. Consulte “Asignación
de títulos a los discos compactos” (página 32).
No obstante, si utiliza nombres
personalizados, siempre tendrán prioridad
sobre la información CD TEXT original al
mostrarse tal información.
Consejos
• Si el título del disco CD TEXT es demasiado largo,
puede hacer que se desplace por el visor
pulsando (SHIFT) y, a continuación, (2) (N).
• Si desea mostrar la información CD TEXT original
después de etiquetar el disco CD TEXT con un
nombre personalizado, pulse (SHIFT) y, a
continuación, (5) (n).
Desplazamiento automático del
título de un disco
— Desplazamiento automático
Si el título del disco/nombre del cantante o el
título del tema de un disco CD TEXT tiene más
de 10 caracteres y la función de
desplazamiento automático está activada, esta
función realiza el desplazamiento automático
por el visor de la siguiente forma:
• El título del disco aparece al cambiar éste (si se
ha seleccionado el título de disco).
• El título del tema aparece al cambiar éste (si se
ha seleccionado el título de tema).
Si pulsa (DSPL) para cambiar el elemento
mostrado, el título del disco o del tema del
disco CD TEXT se desplaza automáticamente
tanto si activa como si desactiva la función.
1 Durante la reproducción, pulse (SHIFT).
2 Pulse (3) (SET UP) varias veces hasta
que aparezca “A.Scrl”.
3 Pulse (5) (n) para seleccionar “A.Scrl
on”.
4 Pulse (SHIFT).
Para cancelar la función de desplazamiento
automático, seleccione “A.Scrl off” en el paso
3 anterior.
Nota
Para algunos discos CD TEXT con un gran número
de caracteres, pueden ocurrir los siguientes casos:
— Algunos de los caracteres no se muestran.
— La función de desplazamiento automático no
funciona.
Localización de un tema específico
— Sensor de música automático (AMS)
Durante la reproducción, desplace
momentáneamente el control SEEK/AMS
hacia arriba o abajo.
Para localizar temas
posteriores
Para localizar temas
anteriores
Localización de un punto específico
de un tema — Búsqueda manual
Durante la reproducción, desplace el
control SEEK/AMS hacia arriba o abajo y
manténgalo en esa posición. Suéltelo
cuando localice la parte que desee.
Para buscar hacia
delante
Para buscar hacia
atrás
Nota
Si “
significa que ha alcanzado el principio o el final
del disco y no será posible pasar al siguiente.
” o “ ” aparece en el visor
ES
Procedimientos iniciales/Reproductor de discos compactos
9
Page 54

Reproducción de discos
F
DSPL
A
0
DSPL
PT
T
T
compactos en diversos
modos
Es posible reproducir discos compactos en los
siguientes modos:
•Exploración de introducción (Intro), que
permite reproducir los 10 primeros segundos
de todos los temas.
•Reproducción repetida (Repeat), que permite
repetir el tema actual.
•Reproducción aleatoria (Shuf), que permite
reproducir todos los temas en orden
aleatorio.
Reproducción repetida de temas
— Reproducción repetida
1 Durante la reproducción, pulse (SHIFT).
2 Pulse (7) (REP) varias veces hasta que
aparezca “Repeat 1”.
SHIFT
SET UP PLAY MODE
1234567891
REP SHUF
Se inicia la reproducción repetida.
3 Pulse (SHIFT).
Búsqueda de temas determinados
— Exploración de introducciones
1 Pulse (SHIFT).
Cada vez que pulse (SHIFT), se iluminarán
sólo los elementos que pueden
seleccionarse.
ES
SHIFT
SET UP PLAY MODE
12345678910
2 Pulse (4) (PLAY MODE) varias veces
hasta que aparezca “Intro”.
Cada vez que pulse (4) (PLAY MODE), los
elementos cambiarán de la siguiente forma:
Intro ˜ PGM
PLAY MODE
3 Pulse (5) (n) para seleccionar “Intro
on”.
PLAY MODE
Se inicia la exploración de introducción.
REP SHUF
Para volver al modo normal de reproducción,
seleccione “Repeat off” en el anterior paso 2.
Reproducción de temas en orden
aleatorio — Reproducción aleatoria
1 Durante la reproducción, pulse (SHIFT).
A
2 Pulse (8) (SHUF) varias veces hasta que
aparezca “Shuf 1”.
SHIFT
SET UP PLAY MODE
12345678910
Se inicia la reproducción aleatoria.
3 Pulse (SHIFT).
Para volver al modo normal de reproducción,
seleccione “Shuf off” en el anterior paso 2.
AF/
REP SHUF
4 Pulse (SHIFT).
Para volver al modo de reproducción normal,
seleccione “Intro off” en el paso 3.
10
Page 55

Creación de un programa
PGM
1
PLAY MODE
PGM
2
PLAY MODE
PGM
1+2
PLAY MODE
PLAY MODE
— Memoria de programa de CD
Es posible reproducir los temas en el orden
que desee mediante la creación de su propio
programa. Pueden crearse dos programas:
Programa 1 y Programa 2, y para cada uno de
ellos se pueden seleccionar hasta 12 temas. Los
programas creados pueden almacenarse en la
memoria.
1 Pulse (SHIFT), y a continuación, (4)
(PLAY MODE) durante dos segundos.
TRACK
PLAY
MODE ENTER
“P 1” indica que se ha seleccionado el
programa 1.
Reproducción del programa
almacenado
Es posible seleccionar lo siguiente:
•PGM 1 para reproducir el programa 1.
•PGM 2 para reproducir el programa 2.
•PGM 1+2 para reproducir los programas 1 y
2.
1 Pulse (SHIFT).
2 Pulse (4) (PLAY MODE) varias veces
hasta que aparezca “PGM”.
3 Pulse (5) (n) varias veces hasta que
aparezca el programa que desee.
Reproducción del programa 1
Para seleccionar el programa 2, pulse (5)
(n) varias veces hasta que aparezca “P 2”.
2 Desplace el control SEEK/AMS hacia
arriba o abajo para seleccionar el tema
que desee.
3 Pulse (6) (ENTER) durante un instante.
PLAY MODE ENTER
µ
TRACK
PLAY
MODE ENTER
4 Para continuar insertando temas, repita
los pasos 2 y 3.
5 Cuando finalice la selección de temas,
pulse (4) (PLAY MODE) durante dos
segundos.
6 Pulse (SHIFT).
Notas
• El mensaje “*Wait*” aparece en el visor mientras
la unidad lee los datos.
• El visor mostrará “*Mem Full*” si intenta
introducir más de 12 temas en un programa.
Reproducción del programa 2
Reproducción de los programas 1 y 2
Reproducción normal
µ
µ
µ
Se inicia la reproducción del programa.
4 Pulse (SHIFT).
Para volver al modo de reproducción normal,
seleccione “PGM off” en el paso 3.
Nota
Si no se han almacenado temas en el programa, el
visor mostrará el mensaje “Not ready”.
continúa en la página siguiente n
ES
Reproductor de discos compactos
11
Page 56

Borrado de todo el programa
PLAY
TRACK
MODE ENTER
1 Pulse (SHIFT) y, a continuación, (4)
(PLAY MODE) durante dos segundos.
TRACK
PLAY
MODE ENTER
“P 1” indica que se ha seleccionado el programa 1.
2 Pulse (2) (N) varias veces hasta que
aparezca “DEL”.
Adición de temas al programa
1 Pulse (SHIFT) y, a continuación, (4)
(PLAY MODE) durante dos segundos.
“P 1” indica que se ha seleccionado el
programa 1.
Para seleccionar el programa 2, pulse
(5) (n) varias veces hasta que aparezca
“P 2”.
PLAY MODE ENTER
Para eliminar el programa 2, pulse (5) (n)
varias veces hasta que aparezca “PGM 2”.
3 Pulse (6) (ENTER) durante dos segundos.
PLAY MODE ENTER
ES
El programa completo se borrará.
4 Una vez finalizado el proceso de borrado
de programas, pulse (4) (PLAY MODE)
durante dos segundos.
5 Pulse (SHIFT).
2 Pulse (2) (N) o (5) (n) para seleccionar
el número de celda en el que desee
insertar un tema.
Número de celda de tema
TRACK
PLAY
MODE ENTER
3 Desplace el control SEEK/AMS hacia
arriba o abajo para seleccionar el tema
que desee insertar.
4 Pulse (6) (ENTER) durante un instante
para introducir el tema.
El tema que se encuentre en ese número de
celda y los temas posteriores se desplazarán
hacia abajo.
5 Para continuar insertando temas, repita
los pasos 2 a 4.
Nota
Una vez llenas las 12 celdas, el mensaje “*Mem
Full*” aparece en el visor y no será posible
insertar más temas.
6 Al finalizar el proceso de inserción de
temas, pulse (4) (PLAY MODE) durante
dos segundos.
12
7 Pulse (SHIFT).
Page 57

Borrado de los temas del programa
1 Pulse (SHIFT) y, a continuación, (4)
(PLAY MODE) durante dos segundos.
TRACK
PLAY
MODE ENTER
“P 1” indica que se ha seleccionado el
programa 1.
Para seleccionar el programa 2, pulse
(5) (n) varias veces hasta que aparezca
“P 2”.
2 Pulse (2) (N) o (5) (n) para seleccionar
el tema que desee borrar.
Número de celda de tema
TRACK
PLAY
MODE ENTER
Tema actualmente registrado en la celda 6 del
programa 1.
3 Pulse (6) (ENTER) durante dos segundos.
Cuando se borra un tema de una celda, los
temas siguientes se desplazan hacia arriba
para ocupar su lugar.
Radio
Memorización automática
de emisoras
— Memorización de la mejor sintonía (BTM)
Esta unidad selecciona las emisoras de señal
más intensa y las memoriza por orden de
frecuencia. Es posible almacenar hasta 10
emisoras de cada banda (FM1, FM2, MW y
LW).
Precaución
Para sintonizar emisoras durante la
conducción, utilice la función de
memorización de la mejor sintonía para evitar
accidentes.
1 Pulse (SOURCE) varias veces para
seleccionar el sintonizador.
Cada vez que pulse (SOURCE), la fuente
cambia de la siguiente forma:
CD ˜ TUNER
ES
Reproductor de discos compactos/Radio
DIS C TRACK
PLAY
MODE ENTER
µ
TRACK
PLAY
MODE ENTER
4 Para continuar borrando temas, repita
los pasos 2 y 3.
5 Una vez finalizado el proceso de borrado
de temas, pulse (4) (PLAY MODE)
durante dos segundos.
6 Pulse (SHIFT).
2 Pulse (MODE) varias veces para
seleccionar la banda.
Cada vez que pulse (MODE), la banda
cambia de la siguiente forma:
z FM1 z FM2 z MW z LW
3 Pulse (SHIFT) y, a continuación, (4)
(PLAY MODE) varias veces hasta que
aparezca “B.T.M”.
4 Pulse (5) (n).
La unidad almacena en los botones
numéricos las emisoras por orden de
frecuencia.
La unidad emite un pitido y el ajuste se
almacena.
5 Pulse (SHIFT).
Notas
• La unidad no almacena emisoras de señales
débiles. Si se reciben pocas emisoras, algunos
botones numéricos conservarán sus parámetros
anteriores.
• Si el visor muestra algún número, la unidad
almacenará las emisoras a partir del mostrado en
el visor.
13
Page 58

Memorización de las emisoras deseadas
Es posible almacenar un máximo de 20
emisoras de cada banda (10 de FM1 y FM2 y 10
de LW) en el orden que desee.
1 Pulse (SOURCE) varias veces para
seleccionar el sintonizador.
2 Pulse (MODE) varias veces para
seleccionar la banda (FM1, FM2, MW o
LW).
3 Desplace el control SEEK/AMS hacia
arriba o abajo para sintonizar la emisora
que desee almacenar en el botón
numérico.
4 Pulse y mantenga pulsado el botón
numérico que desee (de (1) a (10))
hasta que aparezca “MEM”.
ES
En el visor aparecerá la indicación del
botón numérico.
Nota
Si almacena otra emisora en el mismo botón
numérico, la emisora previamente almacenada se
borrará.
Si no puede sintonizar una emisora
programada
Desplace momentáneamente el control
SEEK/AMS hacia arriba o abajo para
buscar la emisora (sintonización
automática).
La exploración se detiene al recibirse una
emisora. Desplace el control SEEK/AMS
hacia arriba o abajo varias veces hasta
recibir la emisora que desee.
Nota
Si la sintonización automática se detiene con
demasiada frecuencia, pulse (SHIFT) y, a
continuación, (4) (PLAY MODE) varias veces hasta
que el visor muestre “Local” (modo de búsqueda
local). A continuación, pulse (5) (n) para
seleccionar “Local on”. Pulse (SHIFT).
Sólo se sintonizarán las emisoras de señal
relativamente intensa.
Consejo
Si conoce la frecuencia de la emisora que desea
escuchar, desplace el control SEEK/AMS hacia
arriba o abajo y manténgalo en esa posición hasta
que aparezca la frecuencia que desee
(sintonización manual).
Si la recepción de FM en estéreo es
de mala calidad — Modo monofónico
1 Pulse (SHIFT) y, a continuación, (4)
(PLAY MODE) varias veces hasta que
aparezca “Mono”.
Recepción de emisoras memorizadas
1 Pulse (SOURCE) varias veces para
seleccionar el sintonizador.
2 Pulse (MODE) varias veces para
seleccionar la banda (FM1, FM2, MW o
LW).
3 Pulse durante un instante el botón
numérico ((1) a (10)) en el que esté
almacenada la emisora que desee.
14
2 Pulse (5) (n) varias veces hasta que
aparezca “Mono on”.
El sonido mejorará, aunque será monofónico
(la indicación “ST” desaparecerá).
3 Pulse (SHIFT).
Para volver al modo normal, seleccione
“Mono off” en el paso 2.
Cambio de la indicación del visor
Cada vez que pulse (DSPL), los elementos
cambiarán de la siguiente forma:
z Frecuencia z Reloj
MOTION DISPLAY* Z
* Todos los elementos anteriores se desplazan por
el visor uno por uno en orden.
Page 59

RDS
Descripción general de la función RDS
Cambio de los elementos
mostrados
Cada vez que pulse (DSPL), los elementos
cambiarán de la siguiente forma:
z Nombre de la emisora (Frecuencia)
MOTION DISPLAY* Z Reloj Z
* Todos los elementos anteriores se desplazan por
el visor uno por uno en orden.
El sistema de datos de radio (RDS) es un
servicio de radiodifusión que permite a las
emisoras de FM transmitir información digital
complementaria junto con las señales normales
de programas de radio. Este sistema estéreo
para automóvil ofrece, entre otros, los
siguientes servicios: resintonización
automática del mismo programa, recepción de
anuncios de tráfico y localización de emisoras
mediante el tipo de programa.
Notas
• La disponibilidad de todas las funciones RDS está
determinada por el país o la región.
• La función RDS puede no activarse
correctamente si la señal es débil o si la emisora
sintonizada no transmite datos RDS.
Visualización del nombre de la emisora
El nombre de la emisora actual se ilumina en el
visor.
Seleccione una emisora de FM
(página 13).
Al sintonizar una emisora de FM que
transmita datos RDS, el nombre de la
misma se ilumina en el visor.
Nota
Aparecerá “NO Name” si la emisora recibida no
transmite datos RDS.
Resintonización
automática del mismo
programa
— Frecuencias alternativas (AF)
La función de frecuencias alternativas (AF)
selecciona y resintoniza automáticamente la
emisora de señal más intensa dentro de una
red. Mediante el uso de esta función, es posible
escuchar continuamente el mismo programa
durante un largo viaje sin necesidad de volver
a sintonizar la emisora manualmente.
Las frecuencias cambian automáticamente.
98,5MHz
Emisora
96,0MHz
102,5MHz
ES
Radio/RDS
Nota
La indicación “*” significa que se recibe una
emisora RDS.
1 Seleccione una emisora de FM
(página 13).
2 Pulse (AF/TA) varias veces hasta que
“AF on” se ilumine en el visor.
La unidad comienza a buscar una emisora
alternativa de señal más intensa dentro de
la misma red.
Nota
Si no existe ninguna emisora alternativa en la zona
y no es necesario buscarla, desactive la función AF
pulsando (AF/TA) varias veces hasta que aparezca
“AF TA off”.
continúa en la página siguiente n
15
Page 60

Cambio de los elementos del visor
Cada vez que pulse (AF/TA), los elementos
visualizados cambian de la siguiente forma:
” AF on ” TA on ” AF TA on*
AF TA off “
* Seleccione este elemento para activar las
funciones AF y TA.
Notas
• La indicación “NO AF” y el nombre de la emisora
parpadean alternativamente si la unidad no
encuentra una emisora alternativa en la red.
• Si el nombre de la emisora comienza a parpadear
después de seleccionar una emisora con la
función AF activada, significa que no hay
disponible ninguna frecuencia alternativa.
Desplace el control SEEK/AMS hacia arriba o
abajo mientras el nombre de la emisora
parpadea (sin superar un espacio de ocho
segundos). La unidad inicia la búsqueda de otra
frecuencia con los mismos datos PI (Identificación
de programa) (se muestra “PI seek” y no se
recibe sonido). Si la unidad no consigue
encontrar otra frecuencia, se muestra “NO PI” y
la unidad vuelve a la frecuencia originalmente
seleccionada.
ES
Recepción de programas regionales
La función de activación regional (“REG on”)
de esta unidad permite permanecer en la
sintonía de un programa regional sin cambiar
a otra emisora. (Observe que es necesario
activar la función AF.) El ajuste de fábrica de la
unidad es “REG on”. No obstante, si desea
desactivar la función, realice lo siguiente:
Función de enlace local (sólo Reino
Unido)
La función de enlace local permite seleccionar
otras emisoras locales de la zona, aunque no
estén almacenadas en los botones numéricos.
1 Pulse un botón numérico ((1) a (10)) en
el que haya almacenado una emisora
local.
2 En un intervalo de cinco segundos,
vuelva a pulsar el botón numérico de la
emisora local.
3 Repita este procedimiento hasta recibir
la emisora local que desee.
1 Pulse (SHIFT) y, a continuación, (4)
(PLAY MODE) varias veces hasta que
aparezca “REG”.
2 Pulse (5) (n) varias veces hasta que
aparezca “REG off”.
3 Pulse (SHIFT).
Observe que al seleccionar “REG off” la
unidad podría cambiar a otra emisora
regional de la misma red.
Para volver a la activación regional, seleccione
“REG on” en el anterior paso 2.
Nota
Esta función no se activa en el Reino Unido ni en
determinadas zonas.
16
Page 61

Recepción de anuncios de tráfico
Los datos de anuncios de tráfico (TA) y de
programas de tráfico (TP) permiten sintonizar
automáticamente una emisora de FM que esté
emitiendo anuncios de tráfico, aunque esté
escuchando otras fuentes de programa.
Programación del volumen de los
anuncios de tráfico
Es posible programar previamente el nivel de
volumen de los anuncios de tráfico, de forma
que éstos no pasen inadvertidos. Al comenzar
un anuncio, el volumen se ajustará
automáticamente al nivel programado.
1 Seleccione el nivel de volumen que
desee.
Pulse (AF/TA) varias veces hasta que “TA
on” o “AF TA on” se ilumine en el visor.
La unidad comienza a buscar emisoras que
emitan información sobre tráfico. “TP” se
ilumina en el visor al encontrar una emisora
que emita anuncios de tráfico.
Al iniciarse el anuncio de tráfico, “TA”
parpadea. Esta indicación deja de
parpadear cuando el anuncio finaliza.
Consejo
Si el anuncio de tráfico comienza mientras escucha
otra fuente de programa, la unidad cambia
automáticamente al anuncio y vuelve a la fuente
original al finalizar éste.
Notas
• “NO TP” parpadea durante cinco segundos si la
emisora recibida no emite anuncios de tráfico. A
continuación, la unidad comienza a buscar una
emisora que emita dichos anuncios.
• Si la indicación “EON” aparece junto con “TP” en
el visor, significa que la emisora actual utiliza la
emisión de anuncios de tráfico de otras emisoras
de la misma red.
• Mientras la unidad recibe anuncios de tráfico, las
funciones de activación por voz y de memorando
oral no se activan.
Para cancelar el anuncio de tráfico
actual
Pulse (AF/TA) o (SOURCE) durante un
instante.
Para cancelar todos los anuncios de tráfico,
desactive la función pulsando (AF/TA)
hasta que “AF TA off” se ilumine.
2 Pulse (AF/TA) durante dos segundos.
Se muestra “TA” y se almacena el ajuste.
Recepción de anuncios de urgencia
Si se emite un anuncio de urgencia mientras
escucha la radio, el programa cambiará
automáticamente al anuncio. Si escucha una
fuente que no sea la radio, es posible recibir
anuncios de urgencia si activa la función AF o
TA. En este caso, la unidad cambiará
automáticamente a dichos anuncios
independientemente de lo que esté escuchando
en ese momento.
ES
RDS
17
Page 62

Programación de emisoras
REG
REG
REG
REG
REG
RDS con los datos AF y TA
Al programar las emisoras RDS, la unidad
almacena los datos de cada emisora, así como
su frecuencia, de forma que no sea necesario
activar la función AF o TA cada vez que
sintonice la emisora programada. Es posible
seleccionar un ajuste diferente (AF, TA o
ambos) para cada emisora programada, o bien
el mismo para todas.
Programación del mismo ajuste para
todas las emisoras programadas
1 Seleccione una banda de FM (página 13).
2 Pulse (AF/TA) varias veces para
seleccionar “AF on”, “TA on” o “AF TA
on” (tanto para la función AF como para
la TA).
Observe que si selecciona “AF TA off” se
almacenarán tanto las emisoras RDS como
ES
las que no lo son.
3 Pulse (SHIFT), y a continuación, (4)
(PLAY MODE) varias veces hasta que
aparezca “B.T.M”.
4 Pulse (5) (n) hasta que “B.T.M”
parpadee.
5 Pulse (SHIFT).
Grabación de anuncios de
tráfico
— Repetición de información de tráfico (TIR)
Es posible escuchar el último anuncio de
tráfico mediante la grabación de éstos. Cada
vez que comience un anuncio de tráfico, la
unidad graba y almacena automáticamente
hasta ocho anuncios. Si la grabación sobrepasa
cuatro minutos, los anuncios grabados se
actualizan, por lo que siempre puede escuchar
la información más reciente.
La función TIR conectará automáticamente la
alimentación de la unidad y grabará los
anuncios sobre el tráfico durante un máximo
de dos horas antes y después de la hora
programada.
Programación de la hora y de la
emisora
1 Pulse y mantenga pulsado (TIR) hasta
que “TIR” se ilumine en el visor.
2 Pulse (5) (n) varias veces hasta que “TIR
on” se ilumine.
3 Pulse (TIR) varias veces hasta que
aparezca la indicación de hora.
Programación de ajustes diferentes
para cada emisora programada
1 Seleccione una banda de FM y sintonice
la emisora que desee.
2 Pulse (AF/TA) varias veces para
seleccionar “AF on”, “TA on” o “AF TA
on” (tanto para la función AF como para
la TA).
3 Pulse y mantenga pulsado el botón
numérico que desee hasta que aparezca
“MEM”.
Repita el procedimiento a partir del paso
1 para programar otras emisoras.
Consejo
Si desea cambiar el ajuste AF y/o TA predefinido
después de sintonizar la emisora memorizada,
active o desactive la función AF o TA.
18
1 Gire el dial para ajustar la hora.
2 Pulse (5) (n) hasta que el dígito de
los minutos parpadee.
3 Gire el dial para ajustar los minutos.
4 Pulse (TIR).
Page 63

5 Pulse el botón numérico de programación
o desplace el control SEEK/AMS hacia
arriba o abajo para seleccionar la emisora
que desee.
6 Pulse (TIR) durante dos segundos para
volver a la indicación original.
t se encenderá.
La unidad se activa automáticamente y
entra en el modo de espera de anuncios de
tráfico durante cuatro horas (dos horas
antes y después de la hora programada).
Si la emisora memorizada no transmite
anuncios sobre el tráfico durante la
búsqueda, buscará otras emisoras de
programa de tráfico (TP).
Para cancelar la función TIR
Seleccione “TIR off” en el anterior paso 2.
Consejos
• Mientras la unidad esté grabando anuncios sobre
el tráfico, parpadearán t y “TA”.
• Si aún así no encuentra una emisora TP, realizará
la búsqueda cada cinco minutos hasta encontrar
una.
• Si extrae la llave de encendido mientras la
función TIR está activada, las indicaciones “TIR
on” y t parpadean varias veces.
Notas
• La unidad también entrará en el modo de espera
de anuncios de tráfico durante dos horas después
de apagar el motor, siempre que la función TIR
esté activada.
• Si dispone de una antena motorizada, ésta se
extenderá automáticamente cada vez que la
unidad busque emisoras de programa de tráfico.
Si la antena es manual, compruebe que la misma
se encuentra totalmente extendida.
• Si no utiliza el automóvil durante diez días
aproximadamente, la función TIR se desactivará
automáticamente para evitar el desgaste de la
batería, aunque dicha función se encuentre
activada.
• Mientras la unidad graba o reproduce los
anuncios de tráfico, las funciones de activación
por voz y de memorando oral no se activan.
Reproducción de los anuncios de
tráfico grabados
Cuando haya anuncios sobre el tráfico
grabados que no haya escuchado todavía,
parpadeará t.
1 Pulse (TIR).
Se reproduce el último anuncio. Para
escuchar los anteriores, pulse (TIR) o
desplace el control SEEK/AMS hacia
arriba. Para volver a reproducir los
anuncios, desplace el control SEEK/AMS
hacia abajo.
El mensaje “NO Data” aparece si no se han
grabado anuncios.
2 Pulse (TIR) para retroceder al programa
original.
ES
RDS
19
Page 64

Localización de emisoras mediante el tipo de programa
Es posible localizar la emisora que desee
mediante la selección de uno de los tipos de
programa que aparecen a continuación.
Tipos de programa Indicación
Noticias News
Temas de actualidad Affairs
Información Info
Deportes Sport
Educación Educate
Drama Drama
Cultura Culture
Ciencia Science
Variedades Varied
Música pop Pop M
Música rock Rock M
Música ligera M.o.R.M
ES
Clásica ligera Light M
Clásica Classics
Otros tipos de música Other M
Información meteorológica Weather
Economía Finance
Programas infantiles Children
Asuntos sociales Social A
Religión Religion
Conversación telefónica Phone In
Viajes Travel
Ocio Leisure
Música jazz Jazz
Música country Country
Música nacional Nation M
Melodías de ayer Oldies
Música folk Folk M
Documentales Document
Sin especificar None
1 Pulse (PTY/LIST) durante la recepción de
FM hasta que “PTY” se ilumine en el
visor.
El nombre del tipo de programa actual
aparece si la emisora transmite datos PTY.
Aparece “- - - - -” si la emisora recibida no
es RDS o si no se reciben los datos RDS.
2 Pulse (PTY/LIST) varias veces hasta que
aparezca el tipo de programa que desee.
Los tipos de programa aparecen en el orden
mostrado en la anterior tabla. Observe que
no es posible seleccionar “None” (sin
especificar) para realizar la búsqueda.
3 Desplace el control SEEK/AMS hacia
arriba o abajo.
La unidad comienza a buscar una emisora
que transmita el tipo de programa
seleccionado. Al encontrarla, el tipo de
programa vuelve a aparecer durante cinco
segundos.
Si la unidad no encuentra el tipo de
programa, “NO” y dicho tipo de programa
aparecen alternativamente durante cinco
segundos. A continuación, la unidad vuelve
a la emisora anterior.
Nota
No es posible utilizar esta función en los países en
los que no se disponga de datos PTY (selección de
tipo de programa).
20
Page 65

Ajuste automático del
VOICE
reloj
Activación por voz
Los datos de hora (CT) de las transmisiones
RDS ajustan el reloj automáticamente.
1 Pulse (SHIFT) y, a continuación, (3) (SET
UP) varias veces hasta que aparezca
“CT”.
SET UP
2 Pulse (5) ( n) varias veces hasta que
aparezca “CT on”.
El reloj se ajusta.
SET UP
3 Pulse (SHIFT) para volver a la indicación
normal.
Para cancelar la función CT
Seleccione “CT off” en el anterior paso 2.
Notas
• La función CT puede no activarse aunque se
reciba una emisora RDS.
• Es posible que la hora real y la ajustada mediante
la función CT no coincidan.
Es posible registrar una frase oral apropiada
para cualquier fuente incluidos CD/MD* y
emisoras de radio. Una vez finalizado el
registro, puede solicitar la fuente que desee
repitiendo en el micrófono suministrado la
frase oral registrada. Esta unidad dispone de
12 casillas “V Drive” para alojar las frases
registradas.
* Si conecta un cambiador de CD/MD con función
PGM (Memoria de programa), podrá solicitar
discos de dicho cambiador de CD/MD.
Utilice el mando rotativo para controlar esta
función.
Nota
Mientras la unidad recibe, graba o reproduce los
anuncios de tráfico, la función de activación por
voz no se activará.
Selección de una posición
“V Drive” para registrar
una frase
1 Reproduzca un CD o MD o sintonice una
emisora de radio para la que desee
registrar una frase.
ES
RDS/Activación por voz
2 Pulse y mantenga pulsado (TALK) en el
mando rotativo hasta que aparezca “V
Drive”.
Nota
Cuando la unidad entra en el modo de ajuste, se
suspende la reproducción del disco o la recepción
de la radio.
Consejo
Si la posición “V Drive” seleccionada en el paso 2
ya tiene una frase registrada, se sintonizará o se
reproducirá la fuente correspondiente.
continúa en la página siguiente n
21
Page 66

3 Seleccione una posición “V Drive” para el
registro ajustando el control SEEK/AMS
en la unidad o bien con el mando
rotativo.
VOICE
Consejo
Si selecciona un número de posición ya registrado,
se sintonizará o se reproducirá la fuente
registrada.
Registro de una frase oral
1 Después de llevar a cabo todos los pasos
de “Selección de una posición “V Drive”
para el registro”, pulse (TALK) en el
mando rotativo.
2 Después de oír la instrucción vocalizada
“Please speak now” de la unidad,
ES
pronuncie la frase que desee, hablando
hacia el micrófono suministrado.
Please
speak
now.
La unidad graba la frase oral en este paso con
el fin de identificar posteriormente la frase
registrada.
Cuando la unidad responda “OK!”, el registro
se habrá completado satisfactoriamente.
Notas
• No intente registrar frases mientras conduce, ya
que ello podría ser peligroso.
• Asegúrese de responder a las instrucciones
vocalizadas de la unidad.
• Si la unidad emite un pitido, el registro ha
fallado. En este caso, repita el procedimiento
desde el paso 1.
• No utilice frases con una pronunciación similar,
como “Sony POPS 1” y “Sony POPS 2”, ya que la
unidad puede no distinguir entre ellas.
• Después de oír la instrucción vocalizada de la
unidad, responda en un plazo de tres segundos.
Consejos
• Al registrar las frases, hable alto y claro para que
la unidad pueda reconocerlas fácilmente.
• Es conveniente registrar las frases con el
automóvil estacionado y el motor en marcha
para que la unidad pueda reconocer su voz con
más facilidad mientras conduce.
• Aunque las instrucciones vocalizadas están en
inglés, es posible utilizar cualquier idioma para
registrar frases.
• El volumen de las instrucciones vocalizadas
puede ajustarse en la unidad o con el mando
rotativo.
3 Después de la instrucción vocalizada
“Please repeat”, vuelva a pronunciar la
misma frase.
Please
repeat.
4 Después de oír nuevamente la
instrucción vocalizada “Please repeat”,
pronuncie la misma frase una vez más.
Please
repeat.
22
Page 67

Solicitud de una fuente
VOICE
registrada
Memorando oral
Es posible solicitar una fuente registrada
mientras escucha otras fuentes o mientras la
indicación de reloj se encuentra en el visor.
1 Pulse (TALK) en el mando rotativo.
VOICE
2 Después de oír la instrucción vocalizada
“Please speak now” de la unidad,
pronuncie la frase registrada, como el
nombre de un disco o emisora de radio.
Please
speak
now.
3 Si la unidad reconoce correctamente la
frase;
La unidad reproducirá el disco o
sintonizará la emisora de radio.
Si la unidad no reconoce la frase;
La unidad responde “Please speak again”.
En este caso, repita la misma frase
registrada.
Notas
• Si la unidad no consigue reconocer la frase tres
veces, emitirá un pitido y volverá a la fuente
anterior. En este caso, repita el mismo
procedimiento desde el paso 1.
• Si hay mucho ruido fuera del automóvil, es
posible que la unidad no reconozca la frase
registrada. En este caso, cierre la ventanilla y
vuelva a intentarlo.
• Si se encuentra lejos del micrófono, hable más
fuerte o acérquese al micrófono
Consejos
• Si no responde en tres segundos después de oír
la instrucción oral, la unidad contestará “Please
speak now.”
• Al solicitar una fuente registrada, hable alto y
claro para que la unidad reconozca la frase
fácilmente.
• Si la unidad tiene dificultades para reconocer la
frase, vuelva a registrarla.
Esta función permite grabar un memorando
oral, como el título de una canción que oye en
un programa de radio o una idea que se le
ocurre. Es posible grabar hasta seis
memorandos orales con esta función. Tenga
presente que cada memorando oral debe tener
una duración inferior a 15 segundos.
MEMO 1
MEMO 6
MEMO 5
MEMO 4
Es posible grabar o reproducir el memorando
oral mientras escucha cualquier fuente o
mientras la indicación de reloj se encuentra en
el visor.
Utilice el mando rotativo para controlar esta
función.
Nota
Mientras la unidad recibe, graba o reproduce los
anuncios de tráfico, la función de memorando oral
no se activará.
MEMO 2
MEMO 3
Grabación de un
memorando oral
1 Pulse (REC) en el mando rotativo y
hable hacia el micrófono suministrado.
2 Para finalizar la grabación, pulse (REC)
de nuevo o deje la unidad sin tocar
durante 15 segundos.
Notas
• Los memorandos orales se graban como “MEMO
1”, “MEMO 2”, etc. en orden cronológico.
• Cuando la unidad emite un pitido y aparece la
indicación “MEMO FULL”, no hay espacio para
memorandos adicionales. En este caso, borre los
memorandos más antiguos antes de grabar
otros.
ES
Activación por voz/Memorando oral
23
Page 68

Reproducción de
memorandos orales
1 Pulse (PLAY) en el mando rotativo.
La reproducción se inicia desde MEMO 1.
Otras funciones
VOICE
2 Seleccione el memorando oral que desee
con el control SEEK/AMS.
VOICE
3 Ajuste el volumen en la unidad principal
o con el mando rotativo.
La unidad vuelve automáticamente a la
fuente anterior después de reproducir todos
los memorandos de voz.
ES
Para interrumpir la reproducción
de un memorando oral
Pulse (PLAY) en el mando rotativo.
La reproducción se detiene y la unidad vuelve
automáticamente a la fuente anterior.
Borrado de un
memorando oral
1 Reproduzca el memorando oral que
desee borrar.
2 Pulse y mantenga pulsado (PLAY) en el
mando rotativo hasta que oiga un pitido.
Uso del mando rotativo
Este mando funciona mediante la pulsación de
botones y/o el giro de controles.
Es posible controlar una unidad de CD o MD
opcional con el mando rotativo.
Mediante la pulsación de los
botones SOURCE y MODE
(SOURCE)
(MODE)
Cada vez que pulse (SOURCE), la fuente
cambiará de la siguiente forma:
TUNER n CD n MD
Al pulsar (MODE), el funcionamiento
cambiará de la siguiente forma;
• Sintonizador : FM1 n FM2 n MW n LW
• Unidad de CD : CD1 n CD2 n …
• Unidad de MD : MD1 n MD2 n …
Consejo
Si el selector POWER SELECT se ha ajustado en la
posición B, podrá activar la unidad pulsando
(SOURCE) en el mando rotativo.
El memorando oral se borrará y la numeración
de los memorandos subsiguientes se ajustará
para reflejar el cambio.
Borrado de
"MEMO 3"
"MEMO 4" pasa a ser
"MEMO 3"
24
Page 69

Mediante el giro del control SEEK/
AMS
Gire el control momentáneamente y
suéltelo para:
•Localizar un tema específico de un disco.
Gire y mantenga girado el control hasta
localizar el punto específico de un tema y,
a continuación, suéltelo para iniciar la
reproducción.
•Sintonizar emisoras automáticamente.
Gire y mantenga girado el control para
sintonizar una determinada emisora.
Pulse (SOUND) para
ajustar el menú de
sonido y el volumen.
Pulse (LIST) para:
• Mostrar los nombres memorizados.
• Mostrar el tipo de programa.
Pulse (REC) para grabar un memorando oral.
Pulse y mantenga
pulsado (TALK) para
seleccionar una
casilla “V Drive” para
el registro.
Púlselo para:
• Registrar frases
orales.
• Solicitar fuentes
Pulse (PLAY) para reproducir
el memorando oral.
Pulse y mantenga pulsado
(PLAY) para borrar el
memorando oral.
registradas.
Mediante la presión y giro del
control PRESET/DISC
Presione y gire el control para:
•Recibir emisoras memorizadas en los
botones numéricos.
•Cambiar el disco.
Otras operaciones
Gire el control VOL para
ajustar el volumen.
Pulse (ATT) para
atenuar el sonido.
Pulse (OFF)
para desactivar
la unidad.
Cambio de la dirección de
funcionamiento
ES
Memorando oral/Otras funciones
La dirección de funcionamiento de los
controles está ajustada de fábrica como se
muestra en la siguiente ilustración.
Para aumentar
Para disminuir
Si necesita montar el mando rotativo en el lado
derecho de la columna de dirección, puede
invertir la dirección de funcionamiento.
OFF
Pulse (SOUND) durante dos segundos al
tiempo que presiona el control VOL.
Consejo
Es posible controlar la dirección de funcionamiento
de los controles con la unidad (página 26).
25
Page 70

Ajuste de las
características de sonido
Es posible ajustar los graves, los agudos, el
balance y el equilibrio entre altavoces e,
igualmente, almacenar para cada fuente un
nivel de graves y agudos.
1 Pulse (SOUND) varias veces para
seleccionar el elemento que desee ajustar.
VOL (volumen) n SUB (volumen de
potenciación de graves) n BAS (graves) n
TRE (agudos) n BAL (izquierdo y
derecho) n FAD (delantero y trasero)
2 Gire el dial para ajustar el elemento
seleccionado.
Realice el ajuste antes de que transcurran
tres segundos después de seleccionar el
elemento. (Transcurridos tres segundos, la
función del dial vuelve a ser la de control
de volumen.)
ES
Atenuación del sonido
Pulse (ATT) en el mando rotativo o en el
inalámbrico opcional.
La indicación “ATT on” parpadea
momentáneamente.
Para restaurar el nivel de volumen anterior,
vuelva a pulsar (ATT).
Consejo
La unidad reducirá automáticamente el volumen
cuando entre una llamada telefónica (función de
atenuación para teléfono).
Cambio de los ajustes de
sonido y visualización
Es posible seleccionar diversos modos.
•Clock (Reloj) (página 7).
•CT (Hora del reloj) (página 21).
•D.Info (información dual), que permite
mostrar simultáneamente el reloj y el modo
de reproducción (ON) o la información de
forma alternativa (OFF).
•Amber/Green, que permite cambiar el color
de iluminación entre ámbar o verde.
•Dimmer (Atenuador), que permite cambiar el
brillo del visor.
— Seleccione “Auto” para atenuar el brillo
del visor sólo al encender las luces.
— Seleccione “on” para atenuar el brillo del
visor.
— Seleccione “off” para desactivar el
Atenuador.
•Contrast para ajustar el contraste si las
indicaciones del visor no son visibles debido
a la posición de instalación de la unidad.
•Función de guía oral para los comentarios
vocalizados.
— Seleccione “Voice 1” para minimizar el
volumen de la guía oral
— Seleccione “Voice 2” para aumentar el
volumen con respecto a “Voice 1”.
— Seleccione “Voice 3” para maximizar el
volumen de la guía oral.
— Seleccione “Voice off” para desactivar la
guía oral
•Beep, que permite activar o desactivar los
pitidos.
•RM (Mando rotativo), que permite cambiar la
dirección de funcionamiento de los controles
del mando rotativo.
— Seleccione “norm” para utilizar el mando
rotativo en la posición ajustada de
fábrica.
— Seleccione “rev” si monta el mando
rotativo en el lado derecho de la columna
de dirección.
•Loud (Sonoridad), que permite disfrutar de
buena calidad de graves y agudos incluso a
bajo volumen, reforzando estos sonidos.
•LPF (Filtro de paso bajo) (página 27).
•A.Scrl (Desplazamiento automático)
(página 9, 28).
1 Pulse (SHIFT).
2 Pulse (3) (SET UP) varias veces hasta que
aparezca el elemento que desee.
Cada vez que pulse (3) (SET UP), los
elementos cambian de la siguiente forma:
Clock n CT n D.Info* n Amber/Green n
Dimmer n Contrast n Voice* n Beep n RM
n Loud* n LPF* n A.Scrl*
* Si no ha sintonizado la emisora o no ha
reproducido ningún CD/MD, no aparecerán
estos puntos.
Nota
El elemento mostrado variará en función de la
fuente.
26
Page 71

3 Pulse (5) ( n) para seleccionar el ajuste
que desee (por ejemplo, on u off).
Con respecto al ajuste “Contrast”, al pulsar
(5) (n) el contraste aumenta, mientras que
al pulsar (2) (N) disminuye.
4 Pulse (SHIFT).
Una vez finalizado el ajuste de modo, el
visor vuelve a la indicación de modo de
reproducción normal.
Equipo opcional
Unidad de CD/MD
Es posible controlar un máximo de 7 unidades
de CD y MD con esta unidad.
Si conecta una unidad opcional de CD con
función CD TEXT, la información CD TEXT
aparecerá en el visor al reproducir un disco CD
TEXT.
Ajuste de la frecuencia de
los altavoces
potenciadores de graves
Para adaptarse a las características de los
altavoces potenciadores de graves conectados,
es posible interrumpir las señales de frecuencia
alta y media que se introducen en dichos
altavoces. Mediante el ajuste de la frecuencia
de corte, los altavoces potenciadores de graves
emitirán sólo señales de baja frecuencia de
forma que pueda obtenerse un sonido más
nítido.
1 Pulse (SOURCE) para seleccionar una
fuente (radio, reproductor de discos
compactos o reproductor de minidiscos).
2 Pulse (SHIFT) y, a continuación, (3) (SET
UP) varias veces hasta que aparezca
“LPF”.
3 Pulse (5) ( n) o (2) ( N) varias veces
para seleccionar el ajuste que desee.
SET UP
Cada vez que pulse (5) (n) o (2) (N), la
frecuencia de corte cambia en el visor de la
siguiente forma:
LPF off ˜ LPF 80 Hz ˜ LPF 120 Hz
Reproducción de discos
compactos (CD) o de
minidiscos (MD)
1 Pulse (SOURCE) varias veces para
seleccionar CD o MD.
2 Pulse (MODE) hasta que aparezca la
unidad que desee.
Se inicia la reproducción de CD/MD.
Si una unidad de CD/MD se encuentra
conectada, todos los temas se reproducen
desde el principio.
Cambio de los elementos del visor
Cada vez que pulse (DSPL) durante la
reproducción de CD, CD TEXT o MD, el
elemento cambiará de la siguiente forma:
Tiempo de reproducción transcurrido
Título del disco*
$
$
1
/Nombre del cantante*
$
Título del tema*
$
Reloj
$
MOTION DISPLAY*
2
3
4
ES
Otras funciones/Unidad de CD/MD
4 Pulse (SHIFT).
Una vez finalizado el ajuste de frecuencia,
el visor volverá a la indicación de modo de
reproducción normal.
*1Si no ha asignado título al disco o no ha
registrado en el MD previamente ningún título
de CD, el visor mostrará “NO D.Name”.
2
Si reproduce un disco CD TEXT, el nombre del
*
cantante aparecerá en el visor después del título
del disco. (Sólo para discos CD TEXT con nombre
del cantante)
*3Si el título del tema de un disco CD TEXT o de
un MD no se ha registrado previamente, el visor
mostrará “NO T.Name”.
4
Todos los elementos anteriores se desplazan por
*
el visor uno por uno en orden.
27
Page 72

Puede asignar un nombre personalizado para
discos CD y CD TEXT con la función de
memorando de discos. Consulte “Asignación
de títulos a los discos compactos” (página 32).
No obstante, si utiliza nombres
personalizados, siempre tendrán prioridad
sobre la información CD TEXT original al
mostrarse tal información.
Consejos
• Si el título del MD o del disco CD TEXT es
demasiado largo, puede hacer que se desplace
por el visor pulsando (SHIFT) y, a continuación,
(2) (N).
• Si desea mostrar la información CD TEXT original
después de etiquetar el disco CD TEXT con un
nombre personalizado, pulse (SHIFT) y, a
continuación, (5) (n).
Desplazamiento automático del
título de un disco
— Desplazamiento automático
Si el título del disco/nombre del cantante o el
título del tema de un disco CD TEXT o de un
MD tiene más de 10 caracteres y la función de
desplazamiento automático está activada, esta
función realiza el desplazamiento automático
ES
por el visor de la siguiente forma:
• El título del disco aparece al cambiar éste (si se
ha seleccionado el título de disco).
• El título del tema aparece al cambiar éste (si se
ha seleccionado el título de tema).
Si pulsa (DSPL) para cambiar el elemento
mostrado, el título del disco o del tema del MD
o del disco CD TEXT se desplaza
automáticamente tanto si activa como si
desactiva la función.
Localización de un tema específico
— Sensor de música automático (AMS)
Durante la reproducción, desplace el
control SEEK/AMS hacia arriba o abajo
una vez por cada tema que desee omitir.
Para localizar
temas posteriores
Para localizar temas
anteriores
Localización de un punto específico
de un tema — Búsqueda manual
Durante la reproducción, desplace el
control SEEK/AMS hacia arriba o abajo y
manténgalo en esa posición. Suéltelo
cuando localice la parte que desee.
Para buscar hacia
delante
Para buscar
hacia atrás
Localización de discos mediante el
número de disco
— Selección directa de disco
Pulse el botón numérico ( (1) a (10))
correspondiente al número de disco que
desee.
Se inicia la reproducción del disco que se
encuentra en la unidad actual.
1 Durante la reproducción, pulse (SHIFT).
2 Pulse (3) (SET UP) varias veces hasta que
aparezca “A.Scrl”.
3 Pulse (5) ( n) para seleccionar “A.Scrl
on”.
4 Pulse (SHIFT).
Para cancelar la función de desplazamiento
automático, seleccione “A.Scrl off” en el paso
3 anterior.
Nota
Para algunos discos CD TEXT con un gran número
de caracteres, pueden ocurrir los siguientes casos:
—Algunos de los caracteres no se muestran.
—La función de desplazamiento automático no
funciona.
28
Exploración de temas
— Exploración de introducción
Es posible reproducir los primeros 10
segundos de todos los temas del disco actual.
1 Durante la reproducción, pulse (SHIFT) y,
a continuación, (4) (PLAY MODE) varias
veces hasta que aparezca “Intro”.
2 Pulse (5) ( n) para seleccionar “Intro
on”.
La exploración de introducción se iniciará.
3 Pulse (SHIFT).
Para volver al modo de reproducción normal,
seleccione “Intro off” en el paso 2 anterior.
Page 73

Reproducción repetida de
PLAY MODE ENTER
PLAY
DIS C TRACK
MODE ENTER
temas — Reproducción repetida
Es posible seleccionar:
•Repeat 1 para repetir un tema.
•Repeat 2 para repetir un disco.
1 Durante la reproducción, pulse (SHIFT).
2 Pulse (7) (REP) varias veces hasta que
aparezca el ajuste que desee.
z Repeat 1 z Repeat 2
Repeat off Z
Se inicia la reproducción repetida.
3 Pulse (SHIFT).
Para volver al modo de reproducción normal,
seleccione “Repeat off” en el paso 2 anterior.
Reproducción de temas en
orden aleatorio
— Reproducción aleatoria
Es posible seleccionar:
•Shuf 1 para reproducir los temas del disco
actual en orden aleatorio.
•Shuf All para reproducir todos los temas en
orden aleatorio.
1 Durante la reproducción, pulse (SHIFT).
2 Pulse (8) (SHUF) varias veces hasta que
aparezca el ajuste que desee.
z Shuf 1 z Shuf All
Shuf off Z
Se inicia la reproducción en orden aleatorio.
Creación de un programa
— Memoria de programa (Unidad de CD/
MD con función de memoria de programa)
Los temas pueden reproducirse en el orden
deseado mediante la creación de un programa
propio. Pueden crearse dos programas:
Programa 1 y Programa 2, pudiendo incluir en
cada uno de ellos hasta 12 temas. Los
programas pueden almacenarse en la
memoria.
1 Pulse (SHIFT) y, a continuación, (4)
(PLAY MODE) durante dos segundos.
Modo de edición de programa
DIS C TRACK
PLAY
MODE ENTER
“P 1” indica que se ha seleccionado el
programa 1.
Si ha asignado un título al disco, aparece el
modo de edición de banco. Pulse (4)
(PLAY MODE) para que aparezca “P 1”.
Para seleccionar el programa 2, pulse (5)
(n) varias veces hasta que aparezca “P 2”.
2 Seleccione el tema que desee.
1 Pulse (SOURCE) varias veces para
seleccionar el CD o el MD.
2 Pulse (MODE) varias veces para
seleccionar la unidad.
3 Pulse (SHIFT) y, a continuación, el
botón numérico para seleccionar el
disco.
4 Pulse (SHIFT).
5 Desplace el control SEEK/AMS hacia
arriba o abajo para seleccionar el
tema.
3 Pulse (6) (ENTER) durante un instante.
ES
Unidad de CD/MD
3 Pulse (SHIFT).
Para volver al modo de reproducción normal,
seleccione “Shuf off” en el paso 2 anterior.
µ
4 Para continuar el proceso de introducción
de temas, repita los pasos 2 y 3.
continúa en la página siguiente n
29
Page 74

5 Una vez finalizado el proceso de
PLAY
DISC TRACK
MODE ENTER
PLAY MODE ENTER
PLAY MODE ENTER
introducción de temas, pulse (4) (PLAY
MODE) durante dos segundos.
6 Pulse (SHIFT).
Notas
• El mensaje “*Wait*” aparecerá en el visor
mientras la unidad lee los datos, o cuando no se
ha introducido ningún disco en la unidad.
• El visor mostrará “*Mem Full*” si intenta
introducir más de 12 temas en un programa.
Reproducción del programa
almacenado
El cambio del orden de los discos en la unidad
no afectará a la reproducción de la memoria de
programa.
Es posible seleccionar:
•PGM 1 para reproducir el programa 1.
•PGM 2 para reproducir el programa 2.
•PGM 1 + 2 para reproducir los programas 1 y
2.
ES
1 Pulse (SHIFT).
2 Pulse (4) (PLAY MODE) varias veces
hasta que aparezca “PGM”.
3 Pulse (5) ( n) varias veces hasta que
aparezca el programa que desee.
z PGM 1 z PGM 2 z PGM 1+2
PGM off Z
Se inicia la reproducción del programa.
Borrado de todo el programa
1 Pulse (SHIFT) y, a continuación, (4)
(PLAY MODE) durante dos segundos.
“P 1” indica que se ha seleccionado el
programa 1.
Si ha asignado un título al disco, aparece el
modo de edición de banco. Pulse (4)
(PLAY MODE) para que aparezca “P 1”.
2 Pulse (2) ( N) varias veces hasta que
aparezca “DEL”.
Para eliminar el programa 2, pulse (5) (n)
varias veces hasta que aparezca “PGM 2”.
3 Pulse (6) (ENTER) durante dos segundos.
El programa se borrará por completo.
4 Una vez finalizado el proceso de borrado
de programas, pulse (4) (PLAY MODE)
durante dos segundos.
5 Pulse (SHIFT).
4 Pulse (SHIFT).
Para volver al modo de reproducción normal,
seleccione “PGM off” en el paso 3 anterior.
Notas
• Si pulsa un botón numérico durante la
reproducción de memoria de programa, ésta se
interrumpirá y se iniciará la reproducción del
disco seleccionado.
• Si no hay temas almacenados en el programa, el
visor mostrará “NO Data”.
•Si un tema almacenado en la memoria de
programa no está incluido en el cargador de
discos, dicho tema se omitirá.
• Si el cargador de discos no contiene ningún tema
almacenado en la memoria de programa, o si la
información de programa no se ha introducido
aún, el visor mostrará “Not ready”.
30
Page 75

Adición de temas al programa
PLAY
DIS C TRACK
MODE ENTER
PLAY
DIS C TRACK
MODE ENTER
PLAY
DIS C TRACK
MODE ENTER
1 Pulse (SHIFT) y, a continuación, (4)
(PLAY MODE) durante dos segundos.
DIS C TRACK
PLAY
MODE ENTER
“P 1” indica que se ha seleccionado el
programa 1.
Si ha asignado un título al disco, aparece el
modo de edición de banco. Pulse (4)
(PLAY MODE) para que aparezca “P 1”.
Para seleccionar el programa 2, pulse (5)
(n) varias veces hasta que aparezca “P 2”.
Borrado de temas del programa
1 Pulse (SHIFT) y, a continuación, (4)
(PLAY MODE) durante dos segundos.
“P 1” indica que se ha seleccionado el
programa 1.
Si ha asignado un título al disco, aparece el
modo de edición de banco. Pulse (4)
(PLAY MODE) para que aparezca “P 1”.
Para seleccionar el programa 2, pulse (5)
(n) varias veces hasta que aparezca “P 2”.
2 Pulse (2) ( N) o (5) ( n) para seleccionar
el número de celda de tema en el que
desee insertar el tema.
Número de celda de tema
DIS C TRACK
PLAY
MODE ENTER
3 Desplace el control SEEK/AMS hacia
arriba o abajo para seleccionar el tema
que desee insertar.
4 Pulse (6) (ENTER) durante un instante
para introducir el tema.
El tema actual que se encuentre en ese
número de celda y los temas posteriores se
desplazarán hacia abajo.
Para continuar el proceso de inserción de
temas en el programa, repita los pasos 2 a 4.
Nota
Una vez rellenas las 12 celdas, el mensaje
“*Mem Full*” aparecerá en el visor y no será
posible insertar más temas.
5 Una vez finalizado el proceso de
inserción de temas, pulse (4) (PLAY
MODE) durante dos segundos.
6 Pulse (SHIFT).
2 Pulse (2) ( N) o (5) ( n) para seleccionar
el tema que desee borrar.
Número de celda de tema
DIS C TRACK
PLAY
MODE ENTER
Tema actualmente registrado en la celda 6 del
programa 1.
3 Pulse (6) (ENTER) durante dos segundos.
Si borra un tema de un número de celda, los
temas posteriores se desplazarán hacia
arriba para llenar el espacio.
µ
4 Para continuar el proceso de borrado de
temas, repita los pasos 2 y 3.
5 Una vez finalizado dicho proceso, pulse
(4) (PLAY MODE) durante dos segundos.
6 Pulse (SHIFT).
ES
Unidad de CD/MD
31
Page 76

Asignación de títulos a los
DISC
discos compactos
— Memorando de discos (Unidad de CD con
función de archivo personalizado)
Es posible asignar un título personalizado a
cada disco, utilizando un máximo de ocho
caracteres para cada uno de éstos. La
asignación de títulos permitirá localizar los
discos por el nombre (página 33) y seleccionar
los temas específicos que se quieran reproducir
(página 34).
1 Reproduzca el CD y pulse (PTY/LIST)
durante dos segundos.
DISC
2 Introduzca los caracteres.
1 Gire el dial en el sentido de las agujas
del reloj para seleccionar los
ES
caracteres que desee.
(A n B n C n ··· Z n 0 n 1 n 2 n
··· 9 n + n – n * n / n \ n > n <
n . n _ )
Consejo
Para borrar o corregir un título, introduzca “_”
(barra inferior) por cada carácter.
Visualización del nombre del
memorando de discos
Pulse (DSPL) durante la reproducción de
un CD o de un disco CD TEXT.
Cada vez que pulse (DSPL) durante la
reproducción de un CD o de un disco CD
TEXT, los elementos cambiarán de la
siguiente forma:
Tiempo de reproducción transcurrido
Nombre del memorando de discos
$
$
$
Título del tema*
$
Reloj
$
MOTION DISPLAY*
1
2
DISC
Si gira el dial en el sentido contrario a
las agujas del reloj, los caracteres
aparecerán en orden inverso.
Si desea introducir un espacio en blanco
entre caracteres, seleccione “_” (barra
inferior).
2 Pulse (5) ( n) después de localizar el
carácter que desee.
El cursor parpadeante se desplaza al
espacio siguiente.
DISC
Si pulsa (2) (N), el cursor parpadeante
se desplaza al lado izquierdo.
3 Repita los pasos 1 y 2 para
introducir el título completo.
3 Para volver al modo normal de
reproducción de CD, pulse (PTY/LIST)
durante dos segundos.
32
*1Si conecta una unidad de CD opcional con la
función CD TEXT, aparecerá en el visor la
información de CD TEXT cuando reproduzca
un disco CD TEXT.
*2Todos los elementos anteriores se desplazan
por el visor uno por uno en orden.
Page 77

Borrado del memorando de discos
1 Pulse (SOURCE) varias veces para
seleccionar CD.
2 Pulse (MODE) varias veces para
seleccionar la unidad de CD.
3 Pulse (PTY/LIST) durante dos segundos.
4 Pulse (DSPL) durante dos segundos.
5 Gire el dial para seleccionar el nombre
que desee borrar.
6 Pulse (6) (ENTER) durante dos segundos.
El nombre se borrará.
Repita los pasos 5 y 6 para borrar otros
nombres.
7 Pulse (PTY/LIST) durante dos segundos.
La unidad vuelve al modo normal de
reproducción de CD.
Nota
Si se borra el nombre personalizado, el visor
mostrará la información CD TEXT original.
Localización de discos
mediante el título
— Función de listado (Unidad de CD con
función de archivo personalizado o unidad
de MD)
Esta función puede utilizarse con discos a los
que se ha asignado un título personalizado.
Para obtener más información sobre los títulos
de disco, consulte “Asignación de títulos a los
discos compactos” (página 32).
1 Pulse (PTY/LIST) durante un instante.
El título asignado al disco actual aparece en
el visor.
ENTER
Si asigna una etiqueta de memorando de
discos a un disco CD TEXT, tendrá
prioridad sobre la información CD TEXT
original.
2 Pulse (PTY/LIST) varias veces hasta
encontrar el disco deseado.
3 Pulse (6) (ENTER) para reproducir el
disco.
ES
Unidad de CD/MD
Notas
• Después de aparecer un título de disco durante
cinco segundos, el visor vuelve a la indicación de
modo de reproducción normal. Para desactivar la
indicación, pulse (DSPL).
• Los títulos de tema no aparecen durante la
reproducción de un MD o de un disco CD TEXT.
• Si no hay discos en el cargador, el visor mostrará
“NO Disc”.
• Si no se ha asignado ningún nombre
personalizado a un disco, el visor mostrará
“********”.
• Si la unidad no ha leído la información de discos,
el visor mostrará “?”. Para introducir el disco,
pulse en primer lugar el botón numérico y, a
continuación, seleccione el disco que no se ha
introducido.
• La información aparece sólo en letras
mayúsculas. Hay también ciertas letras que no es
posible mostrar (durante la reproducción de un
MD o de un disco CD TEXT).
33
Page 78

Selección de temas
BANK
PLAY MODE
específicos para su
reproducción
— Función de banco (Unidad de CD con
función de archivo personalizado)
Si asigna títulos a los discos, podrá programar
la unidad para que omita temas y reproducir
sólo los temas deseados.
Reproducción sólo de temas
específicos
Es posible seleccionar:
•Bank on para reproducir los temas con el
ajuste “Play”.
•Bank inv (Inverso) para reproducir los temas
con el ajuste “Skip”.
1 Durante la reproducción, pulse (SHIFT) y,
a continuación, (4) (PLAY MODE) varias
veces hasta que aparezca “Bank”.
1 Reproduzca el disco, pulse (SHIFT) y, a
continuación, (4) (PLAY MODE) durante
dos segundos.
Modo de edición de banco
DIS C TRACK
PLAY
MODE ENTER
Nota
Si no ha asignado títulos a los discos, el modo
de edición de banco no aparecerá, mostrando
en su lugar el modo de edición de programa.
ES
Para volver al modo de reproducción normal,
pulse (SHIFT).
2 Desplace el control SEEK/AMS hacia
arriba o abajo para seleccionar el número
de tema que desee omitir y, a
continuación, pulse (6) (ENTER).
DIS C TRACK
PLAY
MODE ENTER
La indicación cambia de “Play” a “Skip”. Si
desea volver al modo “Play”, vuelva a
pulsar (6) (ENTER).
3 Repita el paso 2 para definir el modo
“Play” o “Skip” en todos los temas.
2 Pulse (5) ( n) varias veces hasta que
aparezca el ajuste que desee.
z Bank on z Bank inv z Bank off
La reproducción se inicia a partir del tema
siguiente.
3 Pulse (SHIFT).
Para volver al modo normal de reproducción,
seleccione “Bank off” en el anterior paso 2.
4 Pulse (4) (PLAY MODE) durante dos
segundos.
La unidad vuelve al modo normal de
reproducción de CD.
5 Pulse (SHIFT).
Notas
• Es posible definir los modos “Play” y “Skip” para
un máximo de 24 temas.
• No es posible definir el modo “Skip” para todos
los temas.
34
Page 79

DSP
SUR
SUR
SUR
SUR
La unidad opcional XDP-U50D permite aplicar
algunos efectos especiales al campo sonoro de
la fuente seleccionada.
Las siguientes instrucciones de empleo son
para la unidad XDP-U50D.
Si conecta la XDP-210EQ a la unidad, consulte
el manual de instrucciones suministrado con la
XDP-210EQ.
Nota
Si conecta el preamplificador digital opcional XDPU50D/210EQ, no podrá utilizar la función de guía
oral.
Selección de un menú de
sonido periférico
Es posible seleccionar el menú de sonido
periférico que mejor se adapte a la fuente de
audio. Los siguientes menús pueden simular
diferentes campos sonoros y potenciar el
sonido de forma que se obtenga la sensación
de encontrarse en un concierto en directo.
2 Presione (SOUND) varias veces hasta que
aparezca “SUR”.
3 Gire el dial para seleccionar el menú de
sonido periférico que desee.
El menú de sonido periférico aparece en el
orden mostrado anteriormente.
Transcurridos tres segundos, el visor
vuelve al modo de reproducción normal.
Ajuste del nivel de efecto
1 Presione (SOURCE) para seleccionar una
fuente (sintonizador, CD o MD).
2 Presione (SOUND) durante dos
segundos.
3 Gire el dial para realizar la selección
hasta que aparezca el menú de sonido
periférico que desee
ES
Unidad de CD/MD/DSP
Menú de sonido periférico
HALL Sala de conciertos
JAZZ Club de jazz
DISCO Discoteca con paredes
THEATER Cine
PARK Gran espacio abierto
LIVE Concierto en directo
OPERA Ópera
CHURCH Iglesia/capilla con mucha
STADIUM Concierto al aire libre en un
CELLAR Bodega con mucha
DEFEAT Sonido normal sin efectos
gruesas
reverberación
estadio
reverberación
DSP
1 Presione (SOURCE) para seleccionar una
fuente (sintonizador, CD o MD).
4 Presione (5) ( n).
5 Gire el dial para ajustar el nivel.
Es posible ajustar el nivel entre 0 y 100%.
Aumente el nivel para potenciar el efecto.
6 Presione (SOUND) durante dos
segundos.
35
Page 80

Almacenamiento del
efecto de sonido periférico
en los discos compactos
— Archivo personalizado del Procesador
digital de señales (DSP) (unidad de CD con
función de archivo personalizado)
Una vez registrado el menú de sonido
periférico que desee en los discos, podrá
disfrutar del mismo menú cada vez que
reproduzca esos discos (sólo si ha asignado
nombre a los discos mediante la función de
archivo personalizado).
1 Presione (PTY/LIST) durante dos
segundos.
Cambio del efecto de sonido
periférico almacenado
Reproduzca el disco cuyo modo de sonido
periférico desee cambiar y realice los pasos
descritos en “Almacenamiento del efecto de
sonido periférico en los discos compactos”.
Eliminación del efecto de sonido
periférico almacenado
Seleccione “DEFEAT” en el paso 3 de
“Almacenamiento del efecto de sonido
periférico en los discos compactos”.
Selección de la posición
de escucha
2 Presione (PTY/LIST) hasta que aparezca
el menú de sonido periférico.
Modo de archivo personalizado DSP
ES
3 Gire el dial para seleccionar el menú de
sonido periférico que desee.
4 Presione (PTY/LIST) durante dos
segundos.
Una vez realizado el ajuste de efecto, el
visor vuelve al modo de reproducción
normal.
Reproducción del disco con el menú
de sonido periférico almacenado
1 Presione (SHIFT) y, a continuación, (4)
(PLAY MODE) varias veces hasta que
aparezca “D.File”.
2 Presione (5) ( n) para seleccionar “D.File
on”.
Transcurridos cinco segundos, el visor
vuelve al modo normal de reproducción.
3 Presione (SHIFT).
Para cancelar la reproducción del disco con el
menú de sonido periférico almacenado,
seleccione “D.File off” en el paso 2.
Puede ajustar un tiempo de retardo para que el
sonido llegue a los oyentes desde los altavoces.
De esta forma, la unidad puede simular un
campo sonoro natural, de forma que obtenga
la sensación de encontrarse en el centro de
dicho campo independientemente de dónde se
siente dentro del automóvil.
Centro del campo
sonoro
Ajuste normal
(1 + 2 + 3)
Parte frontal
(1 + 2)
Parte frontal
derecha (2)
Parte frontal
izquierda (1)
Parte posterior
(3)
3
Visor
LP1
21
All
LP2
Front
LP3
Front R
LP4
Front L
LP5
Rear
1 Presione (SOUND) momentáneamente
hasta que aparezca “LP1”.
2 Gire el dial para seleccionar la posición
de escucha que desee.
Las posiciones de escucha aparecen en el
orden mostrado anteriormente.
Transcurridos tres segundos, el visor
vuelve al modo de reproducción normal.
36
Page 81

Ajuste de la posición de escucha
1 Presione (SOUND) durante dos
segundos.
Ajuste del equilibrio entre
los altavoces (FAD)
2 Presione (SOUND) varias veces hasta que
aparezca la posición de escucha que
desee.
3 Presione (5) ( n).
4 Gire el dial para ajustar el centro del
campo sonoro hacia la izquierda o
derecha. A continuación, ajuste dicho
centro.
El centro se desplaza hacia la
izquierda (L).
El centro se desplaza hacia la
derecha (R).
5 Presione (5) ( n).
6 Gire el dial para ajustar el centro del
campo sonoro en la parte frontal o en la
posterior.
El centro se desplaza hacia la
parte posterior (R).
El centro se desplaza hacia la
parte frontal (F).
7 Presione (SOUND) durante dos
segundos.
Una vez finalizado el ajuste de efecto,
aparecerá el modo normal de reproducción.
Normalmente, con el modo DSP activado, el
volumen del sonido de salida de los altavoces
disminuye automáticamente para mejorar la
eficacia del ajuste de posición de escucha. Si
desea aumentar el volumen del altavoz
posterior, ajuste el equilibrio entre los
altavoces.
1 Realice los pasos 1 a 3 de “Selección de
un menú de sonido periférico” (página
35).
2 Presione (SOUND) varias veces hasta que
aparezca “FAD”.
3 Gire el dial para ajustar el equilibrio
entre los altavoces.
Disminuye el volumen del
altavoz frontal
Aumenta el volumen del
altavoz frontal
Transcurridos tres segundos, el visor
vuelve al modo de reproducción normal.
Ajuste del volumen de los
altavoces potenciadores
de graves
1 Presione (SOURCE) para seleccionar una
fuente (sintonizador, CD o MD).
2 Presione (SOUND) varias veces hasta que
aparezca “SUB”.
3 Gire el dial para ajustar el volumen.
Transcurridos tres segundos, el visor
vuelve al modo normal de reproducción.
ES
DSP
Consejo
Si gira el dial para disminuir el volumen por
completo, aparecerá “Sub ATT” y se desactivará la
frecuencia de corte del altavoz potenciador de
graves.
continúa en la página siguiente n
37
Page 82

Ajuste de la frecuencia de los
altavoces potenciadores de graves
Para adaptarse a las características de los
altavoces potenciadores de graves conectados,
es posible interrumpir las señales de frecuencia
media y alta no deseadas que se introducen en
dichos altavoces. Mediante el ajuste de la
frecuencia de corte (consulte el diagrama que
aparece a continuación), los altavoces
potenciadores de graves emitirán solamente
las señales de baja frecuencia para obtener una
imagen de sonido más nítida.
Nivel
Frecuencia de corte
Ajuste del volumen de los
graves y los agudos
Es posible ajustar el volumen de los graves y
los agudos que mejor se adapte a las
características acústicas del interior del
automóvil.
1 Presione (SOURCE) para seleccionar una
fuente (sintonizador, CD o MD).
2 Presione (SOUND) varias veces hasta que
aparezca “BAS” o “TRE”.
3 Gire el dial para ajustar el volumen.
Transcurridos tres segundos, el visor
vuelve al modo de reproducción normal.
62 125 198
Frecuencia (Hz)
1 Presione (SOURCE) para seleccionar una
ES
fuente (sintonizador, CD o MD).
2 Presione (SOUND) durante dos
segundos.
3 Presione (SOUND) varias veces hasta que
aparezca “SUB”.
4 Gire el dial para seleccionar la frecuencia
de corte que desee.
La frecuencia de corte cambia en el visor de
la siguiente forma:
62 n 78 n 99 n 125* n 157 n 198 Hz
Frecuencia ajustada en fábrica
*
5 Presione (SOUND) durante dos
segundos.
Una vez realizado el ajuste de frecuencia, el
visor vuelve al modo de reproducción
normal.
Consejo
Cada vez que pulse (5) (n), el modo cambia entre
el de ajuste del volumen del altavoz potenciador
de graves y el de ajuste de la frecuencia de corte.
Ajuste del giro de frecuencia
Es posible ajustar los giros de frecuencia de los
graves y los agudos.
Giro de frecuencia
Frecuencia (Hz)
1 Presione (SOURCE) para seleccionar una
fuente (sintonizador, CD o MD).
2 Presione (SOUND) durante dos
segundos.
3 Presione (SOUND) varias veces hasta que
aparezca “BAS” o “TRE”.
Modo de ajuste de graves
Modo de ajuste de agudos
Consejo
Cada vez que pulse (5) (n), el modo cambia
entre el de ajuste del giro de frecuencia y el de
ajuste del volumen de graves y agudos.
38
Page 83

4 Gire el dial para seleccionar el giro de
frecuencia.
Los giros de frecuencia cambian de la
siguiente forma:
Graves:
198 Hz n 250 Hz n 314 Hz* n 396 Hz
Agudos:
2,0 kHz n 3,1 kHz* n 4,0 kHz n 5,0 kHz
Frecuencia ajustada de fábrica
*
5 Presione (SOUND) durante dos
segundos.
El visor vuelve al modo normal de
reproducción.
Escucha de cada fuente de
programa con el menú de
sonido periférico
registrado
— Memoria del último sonido (LSM)
Cada vez que recupere la misma fuente, podrá
escuchar el mismo efecto de sonido periférico
registrado para esa fuente, incluso después de
cambiar la fuente de programa o de apagar y
volver a encender la unidad.
Cambio del nivel de salida
de línea
Es posible cambiar el nivel de salida de línea si
se producen distorsiones u otros ruidos.
Información
complementaria
Precauciones
• Si aparca el automóvil bajo la luz solar
directa y se produce un considerable
aumento de temperatura en su interior, deje
que la unidad se enfríe antes de utilizarla.
• Si la unidad no recibe alimentación,
compruebe las conexiones en primer lugar. Si
todo está en orden, examine el fusible.
•Si los altavoces no emiten sonido con un
sistema de 2 altavoces, ajuste el control de
equilibrio entre altavoces en la posición
central.
•Si el automóvil dispone de antena
motorizada, ésta se extenderá
automáticamente mientras la unidad se
encuentre en funcionamiento.
Si desea realizar alguna consulta o solucionar
algún problema referentes a la unidad que no
aparezcan en este manual, póngase en contacto
con el proveedor Sony más próximo.
Nota sobre el manejo de discos
compactos
Si el disco está sucio o es defectuoso, puede
producirse pérdida de sonido durante la
reproducción. Para disfrutar de buena calidad
de sonido, maneje el disco como se explica a
continuación.
Cójalo por los bordes. Para mantenerlo limpio,
no toque la superficie.
ES
DSP/Información complementaria
1 Presione (SHIFT) y, a continuación, (3)
(SET UP) hasta que aparezca “L.out”.
2 Presione (5) ( n) para seleccionar el
ajuste que desee (–10 dB o –16 dB).
3 Presione (SHIFT).
No adhiera papel ni cinta adhesiva en la
superficie de la etiqueta.
continúa en la página siguiente n
39
Page 84

No exponga los discos a la luz solar directa ni
a fuentes de calor, como conductos de aire
caliente, ni los deje en un automóvil aparcado
a la luz solar directa, ya que puede producirse
un considerable aumento de temperatura en su
interior.
Antes de realizar la reproducción, limpie los
discos con un paño opcional de limpieza desde
el centro hacia los bordes.
No utilice disolventes, como bencina,
diluyentes o productos de limpieza
disponibles en las tiendas del ramo, ni
aerosoles antiestáticos destinados a discos
analógicos.
ES
Notas sobre condensación de
humedad
En los días lluviosos o en zonas muy húmedas,
puede condensarse humedad en las lentes del
interior del reproductor de discos compactos.
Si esto ocurre, la unidad no funcionará
correctamente. En este caso, extraiga el disco y
espere una hora aproximadamente hasta que
la humedad se evapore.
Mantenimiento
Sustitución del fusible
Cuando sustituya el fusible, compruebe que
utiliza uno con el amperaje especificado en el
fusible. Si éste se funde, compruebe la
conexión de alimentación y sustitúyalo. Si una
vez sustituido vuelve a fundirse, es posible
que exista un funcionamiento defectuoso
interno. En este caso, póngase en contacto con
el proveedor Sony más próximo.
Fusible (10 A)
Advertencia
No utilice nunca un fusible de amperaje
superior al del suministrado con la unidad, ya
que ésta podría dañarse.
Limpieza de los conectores
La unidad puede no funcionar correctamente
si los conectores de la misma y del panel
frontal están sucios. Con el fin de evitarlo, abra
el panel frontal pulsando (OPEN); a
continuación, sepárelo y limpie los conectores
con un bastoncillo humedecido en alcohol. No
aplique demasiada presión, ya que los
conectores podrían dañarse.
Reproducción de discos compactos
de 8 cm
Utilice el adaptador opcional para discos
compactos de Sony (CSA-8) para evitar que el
reproductor de discos compactos se dañe.
40
Unidad principal
Parte posterior del panel frontal
Notas
• Como medida de seguridad, antes de limpiar los
conectores, apague el motor y extraiga la llave
del interruptor de encendido.
• No toque nunca los conectores directamente con
los dedos o con cualquier dispositivo metálico.
Page 85

Desmontaje de la unidad
1 Presione el clip del interior de la cubierta
frontal con un destornillador fino y abra
dicha cubierta.
2 Repita el paso 1 en el lado izquierdo.
La cubierta frontal podrá extraerse.
3 Emplee un destornillador fino para
introducir el clip de la parte izquierda de
la unidad; a continuación, tire del lado
izquierdo de la unidad hasta que el
enganche salga del marco.
ES
Información complementaria
4 Repita el paso 3 en el lado derecho.
5 Saque la unidad del marco.
41
Page 86

Especificaciones
Sección del reproductor de discos
compactos
Sistema Audiodigital de discos
Relación señal-ruido 100 dB
Respuesta de frecuencia 10 – 20.000 Hz
Fluctuación y trémolo Inferior al límite medible
compactos
Sección del sintonizador
FM
Gama de sintonización 87,5 – 108,0 MHz
Terminal de antena Conector de antena externa
Frecuencia intermedia 10,7 MHz
Sensibilidad utilizable 8 dBf
Selectividad 75 dB a 400 kHz
Relación señal-ruido 65 dB (estéreo),
Distorsión armónica a 1 kHz
Separación 35 dB a 1 kHz
Respuesta de frecuencia 30 – 15.000 Hz
MW/LW
ES
Gama de sintonización MW: 531 – 1.602 kHz
Terminal de antena Conector de antena externa
Frecuencia intermedia 10,71 MHz/450 kHz
Sensibilidad MW: 30 µV
50 dB a 200 kHz
68 dB (mono)
0,7 % (estéreo),
0,4 % (mono)
LW: 153 – 281 kHz
LW: 50 µV
Sección del amplificador de
potencia
Salidas Salidas de altavoz
Impedancia de altavoz 4 – 8 ohmios
Salida máxima de potencia
(conectores de sellado
seguro)
45 W × 4 (a 4 ohmios)
Generales
Salidas Salidas de línea (4)
Controles de tono Graves ±8 dB a 100 Hz
Requisitos de alimentación
Dimensiones Aprox. 178 × 50 × 182 mm
Dimensiones de montaje Aprox. 182 × 53 × 163 mm
Masa Aprox. 1,5 kg
Accesorios suministrados
Accesorios opcionales Mando a distancia
Equipo opcional Cambiador de CD
Cable de control de relé de
antena motorizada
Cable de control de
amplificador de potencia
Cable de control de
atenuación para teléfono
Agudos ±8 dB a 10 kHz
Batería de automóvil de
12 V CC (toma a tierra
negativa)
(an/al/prf)
(an/al/prf)
Mando a distancia rotativo
(1)
Micrófono (1)
Componentes para
instalación y conexiones
(1 juego)
Estuche para el panel
frontal (1)
inalámbrico RM-X47
Cable BUS (suministrado
con un cable de pines
RCA)
RC-61 (1 m), RC-62 (2 m)
Adaptador de discos
compactos sencillos CSA-8
CDX-805 (10 discos),
CDX-715 (10 discos)
Cambiador de MD
MDX-62
Preamplificador
ecualizador digital
XDP-210EQ
Selector de fuente
XA-C30
42
Diseño y especificaciones sujetos a cambios sin
previo aviso.
Page 87

Guía de solución de problemas
La siguiente lista de comprobaciones resulta útil para solucionar los problemas que puedan
producirse al utilizar la unidad.
Antes de consultar la lista que aparece a continuación, compruebe los procedimientos de conexión y
funcionamiento.
Generales
Problema
Ausencia de sonido.
Se ha borrado el contenido de
la memoria.
El visor no muestra
indicaciones.
Causa/Solución
•Cancele la función ATT.
•Ajuste el control de equilibrio entre los altavoces en la posición
central para sistemas de 2 altavoces.
•Gire el dial en sentido de las agujas del reloj para ajustar el
volumen.
•Ha desconectado el cable de alimentación o la batería.
•Ha pulsado el botón de restauración.
n Vuelva a realizar el almacenamiento en la memoria.
Retire el panel frontal y limpie los conectores. Para obtener más
información, consulte el apartado “Limpieza de los conectores”
(página 40).
Reproducción de CD/MD
Problema
No es posible insertar un disco.
La reproducción no se inicia.
El disco se expulsa
automáticamente.
Los botones de funcionamiento
no se activan.
El sonido se omite debido a
vibraciones.
Recepción de radio
Problema
No es posible realizar la
sintonización de programación.
No es posible realizar la
sintonización automática.
La indicación “ST” parpadea.
Causa/Solución
•Ya hay un CD insertado.
•Ha insertado el CD al revés a la fuerza o de la forma incorrecta
(MD).
Disco defectuoso (MD) o con polvo (CD).
La temperatura ambiental es superior a 50°C.
Pulse el botón de restauración.
• Ha instalado la unidad en un ángulo superior a los 60°.
• No ha instalado la unidad en una parte segura del automóvil.
Causa/Solución
• Memorice la frecuencia correcta.
• La emisión es demasiado débil.
La emisión es demasiado débil.
n Utilice la sintonización manual.
•Sintonice la frecuencia con precisión.
•La emisión es demasiado débil.
n Realice el ajuste en el modo monofónico MONO
(página 14).
continúa en la página siguiente n
ES
Información complementaria
43
Page 88

Funciones RDS
Problema
La búsqueda se inicia después
de unos segundos de escucha.
Causa/Solución
La emisora no es TP o se trata de una señal débil.
n Pulse (AF/TA) hasta que aparezca “AF TA off”.
Ausencia de anuncios de tráfico.
PTY muestra “NONE”.
Activación por voz/Memorando oral
Problema
No es posible registrar frases
orales o grabar memorandos.
La unidad falla a menudo o no
reconoce satisfactoriamente la
frase oral.
ES
Las instrucciones orales no se
oyen mientras la función de
activación por voz o la de
memorando oral está
realizando otra operación.
•Active “TA”.
•La emisora no emite anuncios de tráfico a pesar de ser TP.
n Sintonice otra emisora.
La emisora no especifica el tipo de programa.
Causa/Solución
El micrófono no está conectado correctamente.
n Enchúfelo por completo.
•Es posible que el micrófono no pueda recibir la voz del
conductor en función de la dirección y lugar de instalación
debido a la aguda directividad de dicho micrófono.
n Instale éste correctamente. Asegúrese de ajustar la marca
SONY orientada hacia la boca del conductor.
•La unidad incorpora ruidos del exterior como parte de la frase
oral.
n Cierre las ventanillas mientras registra frases orales.
•Puede facilitar que la unidad reconozca la frase oral
pronunciándola alto y claro.
•La frase pronunciada difiere de la registrada
n Diga la frase registrada.
El ajuste del volumen se encuentra en el nivel más bajo.
n Ajuste el volumen con el dial de la unidad.
44
Page 89

Indicaciones de error (cuando se ha conectado una unidad de CD/MD opcional)
Las siguientes indicaciones parpadearán durante cinco segundos aproximadamente y se oirá una
alarma.
Indicación
NO Mag
NO Disc
NG Discs
Error
Blank
PushReset
Not Ready
HighTemp
*1Si se produce un error durante la reproducción de un MD o de un CD, el número del MD o del CD no
aparecerá en el visor.
*2El visor mostrará el número del disco que causa el error.
Causa
No ha insertado el cargador de discos
en la unidad de CD/MD.
No ha insertado ningún disco en la
unidad de CD/MD.
No es posible reproducir un CD/MD
debido a algún problema.
Un CD está sucio o insertado al
1
*
1
*
2
revés.*
No es posible reproducir un MD
debido a algún problema.*
No ha grabado ningún tema en el
2
MD.*
No es posible emplear la unidad de
CD/MD debido a algún problema.
La tapa de la unidad de minidiscos
está abierta o los minidiscos no se han
insertado correctamente.
La temperatura ambiente es superior a
50°C.
2
Solución
Inserte el cargador de discos en la
unidad de CD/MD.
Inserte los discos en la unidad de CD/
MD.
Inserte otro CD/MD.
Limpie el CD o insértelo
correctamente.
Inserte otro MD.
Reproduzca un MD con temas
grabados.
Pulse el botón de restauración de la
unidad.
Cierre la tapa o inserte los minidiscos
correctamente.
Espere hasta que la temperatura
descienda por debajo de 50°C.
ES
Información complementaria
Si el problema no se soluciona con las sugerencias anteriormente enumeradas, póngase en contacto
con el proveedor Sony más próximo.
45
Page 90

Bem vindo!
Obrigado por ter adquirido o leitor de discos
compactos da Sony. Este aparelho está
equipado com uma vasta gama de funções que
podem ser controladas através do comando
rotativo fornecido ou de um comando sem fios
opcional.
Além da reprodução de CDs e do rádio, pode
ainda aumentar a versatilidade do seu sistema
ligando um dispositivo*1 de CD/MD opcional.
Quando reproduzir um disco CD TEXT*2, a
informação CD TEXT aparecerá no visor. O
mesmo acontecerá se ligar um dispositivo de
CD opcional equipado com a função CD
TEXT.
*1Pode ligar a um dispositivo de CD ou de MD.
2
O disco CD TEXT é um CD de áudio que inclui
*
informações, como os nomes do disco, do artista
e das faixas.
Estas informações são gravadas no disco.
Voice Drive
A Sony desenvolveu um novo sistema que
contribui para uma condução mais segura.
P
Para além do seu comando rotativo único, a
Sony introduziu um sistema operativo
activado por voz “Voice Drive” que permite ao
condutor comandar vocalmente o sistema
áudio do automóvel.
Agora, com a função Voice Drive
(Reconhecimento da voz), pode comandar as
operações de funcionamento e confirmar os
resultados através do Voice Guide (Guia de
voz).
Também pode gravar a sua voz com a função
Memorando oral. Utilize esta função para
registar coisas que veja ou de que se lembre
enquanto conduz.
Guia activado por voz para uma
condução segura
Este aparelho está equipado com uma função
de guia de voz*. Se activar este guia de voz, o
aparelho transmite informações orais sobre as
funções que correspondem ao botão em que
carregou.
* Alguns amplificadores podem provocar um corte
de som no início das informações orais.
Se ligar um carregador de MD opcional, pode
continuar a ouvir o som do primeiro MD durante
alguns segundos mesmo depois do início das
instruções orais referentes ao segundo MD.
2
Page 91

Índice
Este aparelho
Localização das teclas ............................................. 4
Como começar
Reinicializar o aparelho...................................... 6
Retirar o painel frontal ....................................... 6
Preparar o comando rotativo ............................ 7
Acertar o relógio.................................................. 7
Leitor de CDs
Ouvir um CD ....................................................... 8
Reproduzir um CD em vários modos ............ 10
Criar um programa
— Memória de programas de CD ............. 11
Rádio
Memorização automática de estações
— Memória da Melhor Sintonia (BTM).... 13
Memorização das estações pretendidas ........ 14
Recepção das estações memorizadas ............. 14
RDS
Panorâmica da função RDS ............................. 15
Visualização do nome da estação ................... 15
Re-sintonização automática do mesmo
programa
— Frequências Alternativas (AF) .............. 15
Ouvir informações sobre a situação
do trânsito ..................................................... 17
Pré-programação das estações RDS através
dos dados AF e TA ...................................... 18
Gravar as informações sobre o trânsito
— Repetição das informações sobre o
trânsito (TIR) ................................................ 18
Localização de uma estação através do tipo
de programa ................................................. 20
Acerto automático do relógio.......................... 21
Reconhecimento da voz
Selecccionar uma caixa “V Drive”
para registo ................................................... 21
Registar uma frase ............................................ 22
Pedir a fonte registada...................................... 23
Memo oral
Gravar um memo oral ...................................... 23
Ouvir o memo oral............................................ 24
Apagar um memo oral ..................................... 24
Outras funções
Utilização do comando rotativo ..................... 24
Regulação das características de som ............ 26
Redução do som ................................................ 26
Alteração das programações do visor
e do som ........................................................ 26
Regular a frequência dos sub woofers ........... 27
Equipamento opcional
Dispositivo de CD/MD
Reprodução de um CD ou MD ....................... 27
Leitura óptica das faixas
— Pesquisa sequencial ................................ 28
Reprodução repetitiva das faixas
— Reprodução repetitiva............................ 29
Reprodução das faixas por ordem aleatória
–– Reprodução aleatória ............................. 29
Criação de um programa
— Memória do programa ........................... 29
Identificação de CD
— Lista de títulos ......................................... 32
Localização de um disco pelo nome
— Listagem ................................................... 33
Selecção das faixas específicas para reprodução
— Banco ........................................................ 34
DSP
Seleccionar o modo de som ambiente ............ 35
Memorizar o efeito de som ambiente nos CD
— Processador de sinal digital (DSP)
Ficheiro personalizado ................................ 36
Seleccionar a posição de audição .................... 36
Regular o fader (FAD) ...................................... 37
Regular o volume de som do(s) altifalante(s)
secundário(s) de graves .............................. 37
Regular do volume dos graves e
dos agudos .................................................... 38
Ouvir cada fonte de programa no modo de som
ambiente registado
— Memória de último som (LSM) .................. 39
Mudar o nível de saída da linha ..................... 39
Informação adicional
Precauções .......................................................... 39
Manutenção ....................................................... 40
Desmontagem do aparelho ............................. 41
Especificações .................................................... 42
Guia de resolução de problemas .................... 43
P
3
Page 92

Localização das teclas
SOUND
/
A
K
M
E
S
OFF
E
S
SOURCE
DSPL
SHIFT
12345678910
MODE
Para mais informações, consulte as respectivas páginas.
1 Controlo SEEK/AMS (procura/Sensor de
Música Automático/pesquisa manual)
9, 11, 12, 14, 16, 19, 20, 22, 28, 29, 31, 34
P
2 Tecla MODE (seleccionar banda/
unidade) 13, 14, 27, 29, 33
3 6 Tecla (ejectar) (localizada na parte da
frente do aparelho escondido pelo
painel frontal) 8
4 Tecla SOURCE (selecção da fonte)
8, 13, 14, 17, 24, 27, 29, 33, 35, 37, 38
5 Botão (volume/volume do subwoofer/
graves/agudos/esquerda
-direita/frente-atrás) 7, 26, 32, 33, 35,
36, 37, 38, 39
6 Tecla SOUND 26, 35, 36, 37, 38, 39
7 Tecla DSPL (alteração do modo do visor)
9, 14, 15, 27, 28, 32, 33
8 Visor
9 Botão OPEN 6, 8, 40
!º Tecla PTY/LIST
Lista de títulos 32, 33
DSP Ficheiro personalizado 36
Listagem 33
Programa RDS 20
!¡ Tecla AF/TA 15, 16, 17, 18
OPEN
LIST
PTY
AF/TA
TIR
CDX-C880R
!™ Tecla OFF 6, 8
!£ Tecla de reincialização (localizada na
parte da frente do aparelho, por trás do
painel frontal) 6
!¢ Receptor para o telecomando sem fio
opcional
!∞ Tecla SHIFT
PLAY MODE 10, 11, 12, 13, 14, 16, 18,
28, 29, 30, 31, 34
REP 10, 29
SET UP 7, 8, 9, 21, 26, 27, 28, 36, 39
SHUF 10, 29
!§ Interruptor POWER SELECT (localizado
na base do aparelho)
Consulte “Interruptor POWER SELECT”
no manual Instalação/Ligações.
!¶ Durante a recepção de rádio:
Teclas numéricas 14, 16
Durante a reprodução de CD/MD:
Teclas de selecção directa de
discos 28
!• Botão TIR 18, 19
4
Page 93

Telecomando
opcional sem fios
(RM-X47)
SOURCE
OFF
ATT DSPL
MODE
DIR
SEEK
AMS
PRESET
DISC
SOUND
SEL
+
FF
+
–
REW
–
Teclas do telecomando sem fio com
funções idênticas às do aparelho
principal.
1 Tecla OFF
2 Tecla SEEK/AMS
3 Teclas (–) (+)
4 Tecla ATT
5 Tecla SOUND/SEL
7 Tecla PRESET/DISC
Não pode efectuar a pesquisa manual e a
sintonização manual com o telecomando.
8 Tecla SOURCE
9 Tecla MODE/DIR
Funciona como (MODE) neste aparelho.
6 Tecla DSPL
Se regular o interruptor POWER SELECT para a posição B, só pode controlar o aparelho com o
telecomando sem fios se carregar em (SOURCE) do aparelho ou se introduzir primeiro um CD
para activar o aparelho.
P
5
Page 94

Como começar
Reinicializar o aparelho
O aparelho tem que ser reinicializado antes de
ser utilizado pela primeira vez ou após a
substituição da bateria do automóvel.
Para fazê-lo, carregue na tecla reinicialização
com um objecto ponteagudo (por exemplo,
uma esferográfica).
Tecla de reinicialização
Notas
• Quando carregar no botão de reinicialização
desactiva o relógio e algumas das funções
memorizadas.
• Quando ligar o cabo de alimentação ou
reinicializar o aparelho, aguarde cerca de 10
segundos antes de introduzir um disco. Se
P
introduzir um disco nestes 10 segundos, o
aparelho não é reinicializado e é necessário
carregar novamente no botão de reinicialização.
Notas
• Não coloque nada na superfície interna do painel
frontal.
• Não deixe cair o painel ao retirá-lo do aparelho.
• Se retirar o painel enquanto o aparelho estiver
ligado, a corrente desliga-se automaticamente
para evitar danos nos altifalantes.
• Se transportar o painel frontal, coloque-o na
caixa fornecida.
Colocar o painel frontal
Introduza o eixo b do aparelho no orifício a
do painel frontal como se mostra na ilustração
e empurre o lado esquerdo para dentro.
a
b
µ
Retirar o painel frontal
Pode retirar o painel deste aparelho para evitar
que seja roubado.
1 Carregue em (OFF).
2 Carregue em (OPEN) para soltar o painel
frontal e empurre-o para a direita.
Depois puxe o lado esquerdo do painel
para fora.
1
2
6
Notas
• Quando colocar o painel frontal no aparelho,
certifique-se de que o mesmo se encontra na
posição correcta.
• Não faça muita pressão sobre o painel frontal
quando o colocar no aparelho. Para o encaixar,
basta uma leve pressão.
• Não carregue nem faça demasiada pressão sobre
o visor do painel frontal.
• Não exponha o painel frontal à incidência directa
dos raios solares, a fontes de calor como
condutas de ar quente nem à humidade. Nunca o
deixe sobre o tablier de um automóvel
estacionado ao sol, porque pode ocorrer um
aumento considerável da temperatura no
interior do automóvel.
Page 95

SET UP
SET UP
SET UP
SET UP
SET UP
SET UP
SET UP
Alarme de advertência
Se rodar a chave de ignição para a posição
OFF, sem retirar o painel frontal, o alarme de
advertência é activado e ouve-se um sinal
sonoro durante alguns segundos (só quando o
interruptor POWER SELECT estiver na
posição A).
Indicador TIR
Se retirar a chave da ignição com a função TIR
activada, o indicador TIR pisca várias vezes.
(só quando o interruptor POWER SELECT
estiver na posição A).
Indicador TIR
Para obter mais informações sobre a função
TIR, consulte “Gravar as informações sobre o
trânsito” (página 18).
Acertar o relógio
O relógio tem uma indicação digital de 24
horas.
Por exemplo: acerte-o para as 10:08
1 Carregue em (SHIFT) e depois em (3)
(SET UP).
1 Carregue em (5) (n).
Os algarismos das horas começam a piscar.
2 Acerte a hora.
sentido regressivo
Preparar o comando
rotativo
Quando montar o comando rotativo, cole a
etiqueta apresentada na figura abaixo.
SOUND
MODE
LIST
LK
TA
LIS
MODE
S
O
U
r
REC
VOICE
MEMO
(
PLAY
T
N
D
(
PLAY
VO
ICE
TALK
M
EM
O
rREC
sentido progressivo
P
Como começar
3 Carregue em (5) (n).
Os algarismos dos minutos começam a piscar.
4 Acerte os minutos.
sentido regressivo
sentido progressivo
2 Carregue em (SHIFT).
O relógio começa a funcionar.
contínua na próxima página n
7
Page 96

3 Carregue em (SHIFT).
TRACK
Quando terminar a programação, o visor
volta ao modo de reprodução normal.
Nota
Se o interruptor POWER SELECT que se encontra
na parte inferior do aparelho estiver regulado
para a posição B, ligue primeiro a corrente e
depois acerte o relógio.
P
Leitor de CDs
Ouvir um CD
1 Carregue em (OPEN) e coloque o CD.
A reprodução inicia-se automaticamente.
Etiqueta virada para cima
6
2 Feche o painel frontal.
Se já tiver introduzido um CD, carregue várias
vezes em (SOURCE) até que a indicação “CD”
apareça no visor.
Tempo de reprodução decorrido
Número da faixa
Nota
Para reproduzir um CD de 8 cm, utilize o
adaptador opcional para discos compactos da Sony
(CSA-8).
Para Carregue em
Parar a reprodução (OFF)
Ejectar o CD (OPEN) e depois em 6
8
Page 97

Alterar os elementos no visor
Sempre que carregar em (DSPL), o elemento
altera da seguinte maneira:
Tempo de reprodução decorrido
Nome do disco*
∗1Se introduziu um disco não CD TEXT, aparece no
visor “NO D.Name” ou “NO T.Name”.
2
Se tiver identificado o CD, o nome do artista
∗
aparece no visor a seguir à indicação do nome
do disco. (Apenas para os discos CD TEXT com o
nome do artista.)
∗3Todos os elementos desfilam um por um e por
ordem no visor.
$
$
1
/Nome do artista*
$
Nome da faixa*
$
Relógio
$
MOTION DISPLAY*
2
1
3
Para atribuir um nome personalizado a CDs e
discos CD TEXT com a função de lista de
títulos do disco, consulte “Identificação de
CD” (página 32).
No entanto, se utilizar etiquetas
personalizadas, estas têm sempre prioridade
sobre a informação CD TEXT original, se esta
for mostrada.
Sugestões
• Se o nome do disco CD TEXT for demasiado
comprido, pode fazê-lo desfilar no visor
carregando em (SHIFT) e depois em (2) (N).
• Se, depois de identificar um disco CD TEXT com
um título pessoal, quiser ver as informações CD
TEXT originais carregue em (SHIFT) e depois em
(5) (n).
Percorrer automaticamente um
nome de disco — Auto Scroll
Se o nome do disco/nome do artista ou da
faixa de um disco CD TEXT exceder 10
caracteres e a função Auto Scroll estiver
activada, os nomes desfilam automaticamente
no visor da forma seguinte:
• O nome do disco aparece quando o disco mudar
(se o nome do disco estiver seleccionado).
• O nome da faixa aparece quando a faixa mudar
(se o nome da faixa estiver seleccionado).
Se carregar em (DSPL) para alterar o elemento
do visor, o nome do disco ou da faixa do disco
CD TEXT desfila automaticamente quer a
função Auto Scroll esteja activada ou não.
1 Durante a reprodução, carregue em
(SHIFT).
2 Carregue várias vezes em (3) (SET UP)
até que a indicação “A.Scrl” apareça no
visor.
3 Carregue em (5) (n) para seleccionar
“A.Scrl on”.
4 Carregue em (SHIFT).
Para cancelar a função Auto Scroll, seleccione
“A.Scrl off” no passo 3.
Nota
Se os discos CD TEXT tiverem muito mais caracteres
do que os suportados, pode acontecer o seguinte:
— Alguns dos caracteres não aparecem.
— A função Auto Scroll não funciona.
Localizar uma faixa específica
— Sensor de Música Automático (AMS)
Durante a reprodução, empurre
levemente o controlo SEEK/AMS
para cima ou para baixo.
Para localizar as
faixas seguintes
Para localizar as
faixas anteriores
Localizar um ponto específico
numa faixa — Pesquisa Manual
Durante a reprodução, empurre o
controlo SEEK/AMS para cima ou para
baixo sem largar. Solte o controlo
quando encontrar o ponto pretendido.
Para localizar as
faixas seguintes
Para localizar as
faixas anteriores
Nota
Se a indicação “
no visor, isso significa que chegou ao início ou ao
fim do disco e que não pode avançar mais.
” ou “ ” aparecer
P
Como começar/Leitor de CDs
9
Page 98

Reproduzir um CD em
F
DSPL
PT
T
T
DSPL
A
0
vários modos
Pode reproduzir os CDs em vários modos:
• Intro (Pesquisa Sequencial) permite
reproduzir os primeiros 10 segundos de
todas as faixas.
• Repeat (Reprodução Repetitiva) repete a
faixa actual.
• Shuf (Reprodução Aleatória) reproduz todas
as faixas por ordem aleatória.
Pesquisa da faixa pretendida
— Intro scan
1 Carregue em (SHIFT).
Sempre que carregar em (SHIFT), só os
elementos que é possível seleccionar
aparecem iluminados no visor.
SHIFT
SET UP PLAY MODE
12345678910
2 Carregue várias vezes em (4) (PLAY
P
MODE) até que a indicação “Intro”
apareça no visor.
Sempre que carregar em (4) (PLAY
MODE), os elementos mudam da seguinte
forma:
Intro ˜ PGM
PLAY MODE
3 Carregue em (5) (n) para seleccionar
“Intro on”.
REP SHUF
Reproduzir faixas repetidamente
— Reprodução repetitiva
1 Durante a reprodução, carregue em
(SHIFT).
2 Carregue várias vezes em (7) (REP) até
que a indicação “Repeat 1” apareça no
visor.
SHIFT
SET UP PLAY MODE
1234567891
O aparelho inicia a reprodução repetitiva.
3 Carregue em (SHIFT).
Para voltar ao modo de reprodução normal,
seleccione “Repeat off” no ponto 2 acima.
A
Reproduzir faixas por ordem
aleatória
— Reprodução aleatória
1 Durante a reprodução, carregue em
(SHIFT).
2 Carregue várias vezes em (8) (SHUF) até
que a indicação “Shuf 1” apareça no
visor.
SHIFT
O aparelho inicia a reprodução aleatória.
SET UP PLAY MODE
12345678910
REP SHUF
AF/
REP SHUF
PLAY MODE
O aparelho inicia a reprodução Intro Scan.
4 Carregue em (SHIFT).
Para voltar ao modo de reprodução normal,
seleccione “Intro off” no passo 3.
10
3 Carregue em (SHIFT).
Para voltar ao modo de reprodução normal,
seleccione “Shuf off” no ponto 2 acima.
Page 99

Criar um programa
PGM
1
PLAY MODE
PGM
2
PLAY MODE
PGM
1+2
PLAY MODE
PLAY MODE
— Memória de programas de CD
Pode reproduzir as faixas pela ordem
pretendida criando o seu próprio programa.
Pode criar dois programas: Programa 1 e
Programa 2. Pode seleccionar um máximo de
12 faixas para cada programa. Pode memorizar
os programas.
Reproduzir o programa
memorizado
Pode seleccionar:
• PGM 1 para reproduzir o Programa 1.
• PGM 2 para reproduzir o Programa 2.
• PGM 1 e 2 para reproduzir os Programas
1 e 2.
1 Carregue em (SHIFT).
1 Carregue em (SHIFT) e depois em (4)
(PLAY MODE) durante dois segundos.
TRACK
PLAY
MODE ENTER
A indicação “P 1” mostra que o Programa 1
está seleccionado.
Para seleccionar o Programa 2, carregue
várias vezes em (5) (n) até que apareça a
indicação “P 2”.
2 Empurre o controlo SEEK/AMS para cima
ou para baixo para seleccionar a faixa
que pretende memorizar.
3 Carregue levemente em (6) (ENTER).
PLAY MODE ENTER
µ
TRACK
PLAY
MODE ENTER
4 Para continuar a introduzir faixas, repita
os passos 2 e 3.
2 Carregue várias vezes em (4) (PLAY
MODE) até que apareça a indicação
“PGM” no visor.
3 Carregue várias vezes em (5) (n) até
que apareça o programa pretendido.
Reprodução do Programa 1
Reprodução do Programa 2
Reprodução dos Programas 1 e 2
Reprodução normal
O leitor inicia a reprodução programada.
µ
µ
µ
P
Leitor de CDs
5 Quando terminar de seleccionar faixas,
carregue em (4) (PLAY MODE) durante
dois segundos.
6 Carregue em (SHIFT).
Notas
• A indicação “*Wait*” aparece no visor enquanto
o aparelho estiver a ler os dados.
• A indicação “*Mem Full*” aparece no visor
quando tentar memorizar mais de 12 faixas num
programa.
4 Carregue em (SHIFT).
Para voltar ao modo de reprodução normal,
seleccione “PGM off” no passo 3.
Nota
A indicação “Not ready” aparece no visor, se não
existirem faixas memorizadas no programa.
contínua na próxima página n
11
Page 100

Apagar todo o programa
PLAY
TRACK
MODE ENTER
1 Carregue em (SHIFT) e depois em (4)
(PLAY MODE) durante dois segundos.
TRACK
PLAY
MODE ENTER
A indicação “P 1” mostra que o Programa 1
está seleccionado.
2 Carregue várias vezes em (2) (N) até
aparecer a indicação “DEL” no visor.
Acrescentar faixas a um programa
1 Carregue em (SHIFT) e depois em (4)
(PLAY MODE) durante dois segundos.
A indicação “P 1” mostra que o Programa 1
está seleccionado.
Para seleccionar o Programa 2, carregue
várias vezes em (5) (n) até que a
indicação “P 2” apareça no visor.
PLAY MODE ENTER
Para apagar o Programa 2, carregue várias
vezes em (5) (n) até que a indicação
“PGM 2” apareça no visor.
3 Carregue em (6) (ENTER) durante dois
segundos.
PLAY MODE ENTER
P
Todo o programa é apagado.
4 Quando terminar de apagar os
programas, carregue em (4) (PLAY
MODE) durante dois segundos.
5 Carregue em (SHIFT).
2 Carregue em (2) (N) ou (5) (n) para
seleccionar o número de posição em que
pretende inserir uma faixa.
Número da ranhura da faixa
TRACK
PLAY
MODE ENTER
3 Empurre o controlo SEEK/AMS para cima
ou para baixo para seleccionar a faixa
que pretende inserir.
4 Carregue levemente em (6) (ENTER) para
introduzir a faixa.
A faixa que se encontra no número da
posição e as faixas seguintes deslocam-se
para baixo.
5 Para continuar a introduzir faixas no
programa, repita os passos 2, 3 e 4.
Nota
Uma vez preenchidas as 12 posições, a
indicação “*Mem Full*” aparece no visor e não
poderá introduzir mais faixas.
6 Quando terminar, carregue em (4) (PLAY
MODE) durante dois segundos.
7 Carregue em (SHIFT).
12
 Loading...