

Page 1

SONY:
FM/AM
Compact Disc
Player
Operating Instructions.
Owner's Record
The mociel and serial numbers are located on the bottom of the unit.
Record the serial number in the space provided below.
Refer to these numbers whenever you call upon your Sony dealer regarding this
product.
Model No. CDX-C880 Serial No.
For installation and connections, see the supplied installation/connections
manual.
nCOMPACT
MS©
PIG TAL AUDIO
I TEXT I
DUE
________________________________
CDX-C880
® 1998 by Sony Corporation
Page 2

Warning
I lus t\juipmnU !\.js l«'sU\l aiui loinui to
compiv with thr Imiits l.u a C lass H Jiptl.il
drvKV. pursuant In I’at I 1'> o( tiu* IX V KuKs
I lu'Si' ilinils .1f t’ (i) ptiivui«.*
tvasonahin proU'vtuin apainst harnilul
inlcrk'RMKV in a rosu.icn(ia) instalhition. ] his
ot]uipmonl gcMU’rati's, usos, am.1 can radíalo
radio froquoncv onota;\’ and, it not installod
and usovi in aocordanco with tho inslniotions,
may causi’ liarmiul intorforonoo (*) radio
communications. Hovvovor, tiiero is no
guarantee that interference will not occur in a
particular installation. If this equipment does
cause harmful interforence to radio or
television reception, whicli can be determined
by turning the equipment off and on, the user
is encouraged to tr\’ to correct tlie interference
by one or more of the following measures.
— Reorient or relocate the receiving antenna.
— Increase the separation between the
equipment and receiver.
— Connect the equipment into an outlet on a
circuit different from that to which the
receiver is connected.
— Consult the dealer or an experienced radio/
TV technician for help.
You are cautioned that any changes or
modifications not expressly approved in this
manual could void your authority to operate
this equipment.
Welcome !
Ik.mk s v'u tor purcluising i!k* Sony Co
l^i.sc Pi.n er. rhis unit lets vou enjoy a \
ol ((Mtiirvs In' using (.‘itluT a .supplied f'
yomnumder or an optional wireless ron
In addition to the CD playback and rad
ojvrations, you can expand your systei-
connecting an optional CD / MD unif*'.
If you operate this unit or connect an oy
CD unit with the CD TEXT function, tin
CD TEXT’ information will appear in tin.
display when you play back a CD TEXl
' You can connect to a CD changer and an
changer.
■ A CD TEXT disc is an audio CD that indud
information such as the disc name, artist /
and track names.
These information is recorded on the disc
Voice guide for safe driving
This unit has a voice guide function*. Wh
the voice guide function is on, the unit gi'
vocalized comments on functions
corresponding to the relevant'button pusl
Some optional power amplifiers may cause
break at the beginning of vocalized commi
When you connect an optional MD change
sound from the first MD may continue for i
short time even after the vocalized commei
about the second MD are announced.
CAUTION
The use of optica! instruments with this
product will increase eye hazard.
BBE*
With the BBE, you can obtain edged bass
which naturally makes the sound clear. Wl
reproducing an original sound, the treble n
be masked with the bass as the treble tend I
delay compared with the bass, resulting in
unclear sound. The BBE reproduces almost
original sound by adjusting the sound balai
The BBE is manufactured by Sony Corporatic
under license from BBE Sound, Inc. It is cove/
by U.S. Patent No.4,638,258 and No.4,482,86
The word "BBE" and the BBE Symbol are the
trademarks of BBE Sound, Inc.
Page 3
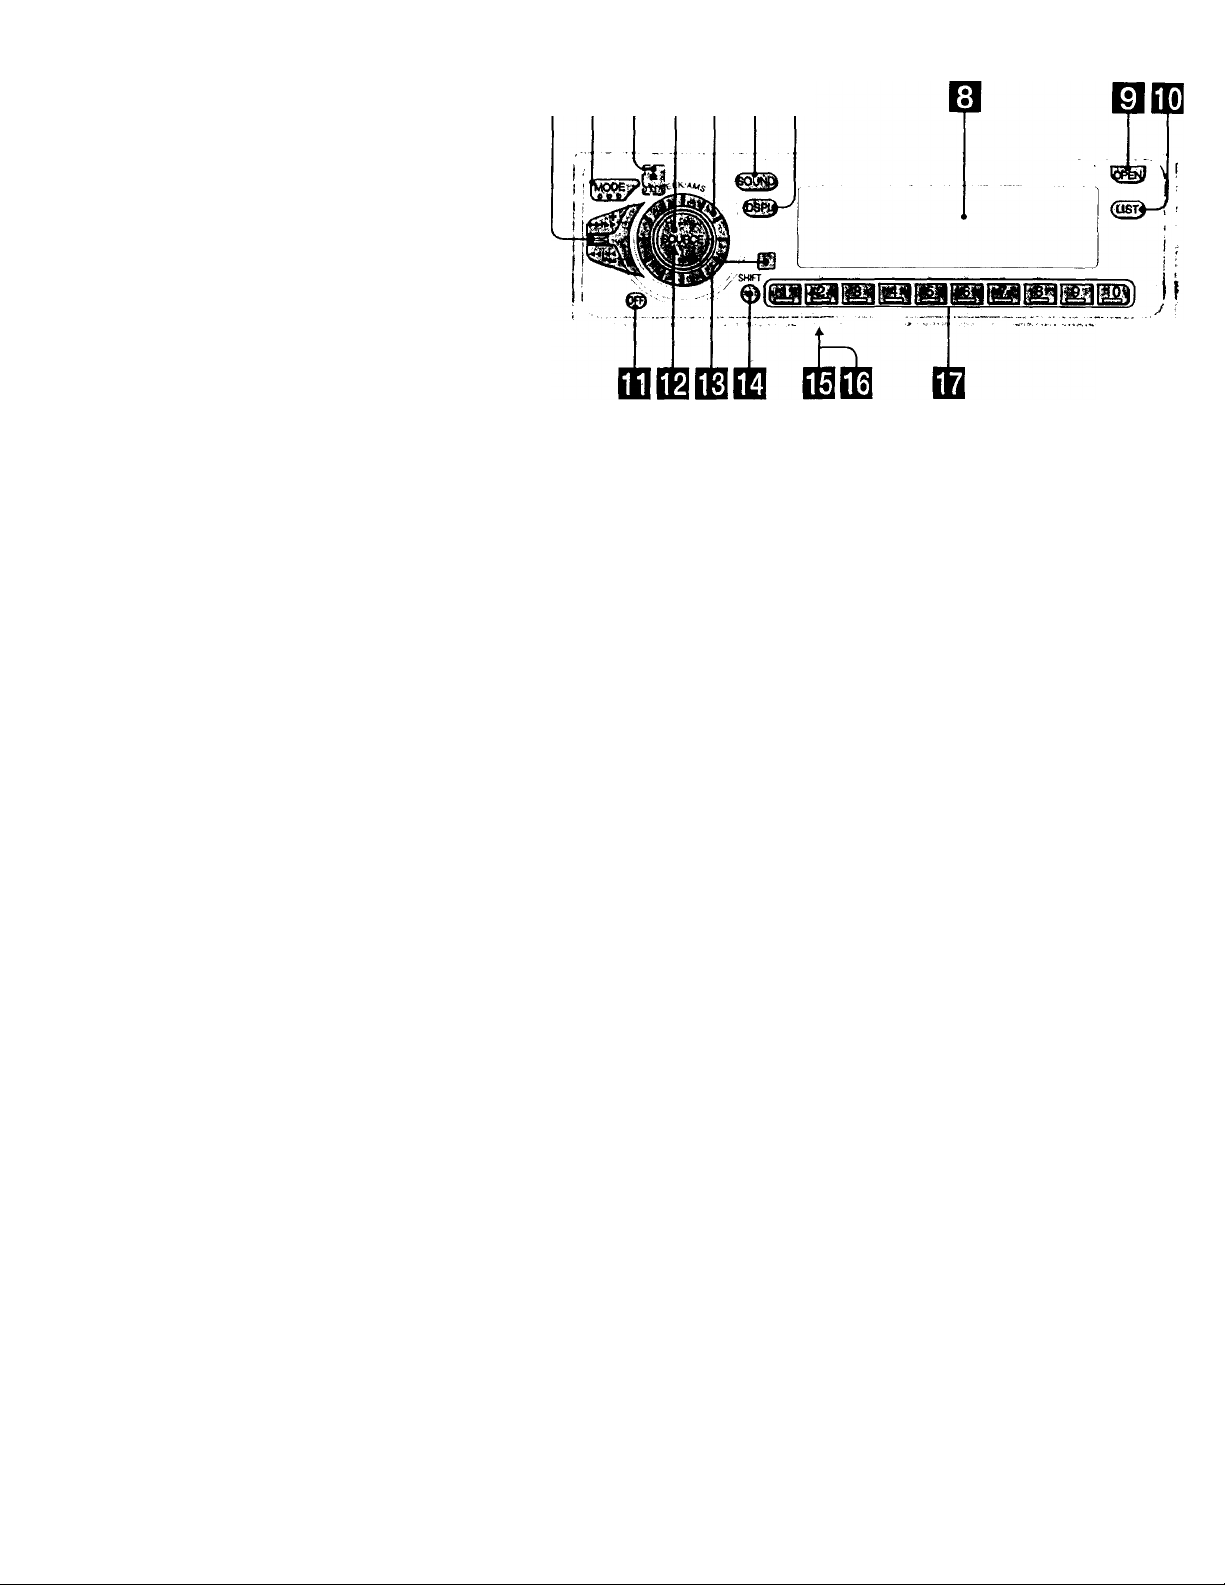
Location of controls
OBEIQBBH
Refer to the pages for details.
CDX-C680
D SEEK/AMS (seek/Automatic Music
Sensor/manuat search) control
9, 10, 12, 13, 14, 20, 21, 22, 25, 31
B MODE (band/unit select) button
13, 19, 21, 24, 31
0 ± (eject) button (located on the front
side of the unit hidden by the front
panel) 8
0 SOURCE (TUNER/CD/MD/TV) button
8, 13, 18, 19, 21, 24, 26, 27, 29, 30, 31, 33
0
Dial (volume/subwoofer volume/bass/
treble/left-right/rear-front control)
7, 15, 17, 23, 24, 26, 27, 28, 29, 30
0 SOUND button 17, 26, 27, 28, 29, 30
B DSPL (display mode change) button
8, 9, 14, 15, 19, 24, 25
B Display window
0 OPEN button 6, 8, 34
[B LIST button
Station Memo 14, 15, 32
Disc Memo 23, 24
List-up 15, 25
DSP Custom File 27
ED OFF button 6,8
EE Reset button (located on the front si^
of the unit behind by the.front panel
EE] Receptor for the optional wireless
remote
EE SHIFT button
PLAY MODE 9, 10, 11,12, 13, 14, 20,
22, 23, 25, 26, 27, 31
REP 10, 20
SETUP 7, 9, 18, 19, 30
SHUF 10,20
EE POWER SELECT switch (located on th<
bottom of the unit)
See "POWER SELECT Switch" in the
Installation/Connections manual.
EE LINE-OUT/IN SELECT switch (located c
the bottom of the unit)
See "LINE-OUT/IN SELECT switch" in
the Installation/Connections manual.
EB During radio reception:
Number buttons 13
During CD/MD playback:
Direct disc selection buttons 20, 21
During TV reception:
Number buttons 31
Page 4

Table of Contents
This Unit Oniy
ot contr«.ils
........................................
Getting Started
Resetting tlu' unit
Detaching tiie front panel
I’reparing the rotarv annmaruler
Setting the clock .......................................... 7
.........................................
.............._............
.................
CD Player
Listening to a CD .........................................8
[’laving a CD in various modes .................*4
Creating a program
— CD IVogram Memory ..................... 10
Radio
Memorizing stations automatically
— Best Tuning Memory (BTM)
Memorizing only the desired stations........ 13
Receiving the memorized stations
Storing the station names
—Station Memo
Locating a station by name
— List-up............................................... 15
....................................
...........
.............
other Functions
Using the rotary commander
Adjusting the sound characteristics
Attenuating the sound
Changing the sound and display settings
Adjusting the frequency of the
subwoofer(s).......................................... 18
.....................
...........
...............................
....
13
13
14
16
17
17
18
With Optional Equipment
4
h
6
7
CD/MD Unit
l>l.iying.iCDorMl) .................................. 1^»
Scanning the tracks
— Intro Scan............................................ 20
Playing tracks rcpoatedlv
— Repeat Play......................................... 20
Plaving tracks in random order
— Shuffle Play....................................... 20
Creating a program
— Program Memory
Labeling a CD
— Disc Memo
Locating a disc by name
— List-up
Selecting sp>ecific tracks for playback
— Bank.................................................... 25
................................................
..............................
.........................................
21
23
25
DSP
Selecting a surround menu'
Storing a surround effect onto CDs
— Digital Signal Processor (DSP) Custom
File...........................................................27
Selecting the listening position
Adjusting the fader (FAD)...........................29
Adjusting the volume of the subwoofer(s).... 29
Adjusting the volume of the bass and
treble........................................................30
Listening to each program source in its
registered surround menu
— Last Sound Memory (LSM)
Changing the line output level
..........................
....................
...............
.....................
26
28
30
30
TVAAideo
Watching the TV .........................................31
Watching a video
Memorizing TV channels automatically
Memorizing only the desired TV channels ... 31
Storing the TV channel names
Displaying the information stored on discs ... 32
Watching the TV or video while listening to a
CD or MD
— Simultaneous Play...............................33
.........................................
.....
....................
31
31
32
Additional Information
Precautions
Maintenance
Dismounting the unit...................................35
Specifications
Troubleshooting guide
..................................................
................................................
..............................................
................................
33
34
36
37
Page 5

Optional wireless
remote (RM-X47)
Er
EF
■Hf^
The buttons of the wireless remote
work the same functions as those on
this unit.
D OFF button
B SEEK/AMS button
El CE) C±) buttons
B ATT button
B SOUND/SEL button
B DSPL button
D
7
.Q2B
H PRES ET/DISC button
You cannot do manual search and manual
tuning with the remote.
B SOURCE button
B MODE/DIR button
( MODE) controls the same function on this
unit.
When the POWER SELECT switch is set to the © position, the unit cannot be operated with the
wireless remote unless (source ) on the unit is pressed or a CD is inserted to activate the unit
first. *
Page 6
Ibi
Getting Started
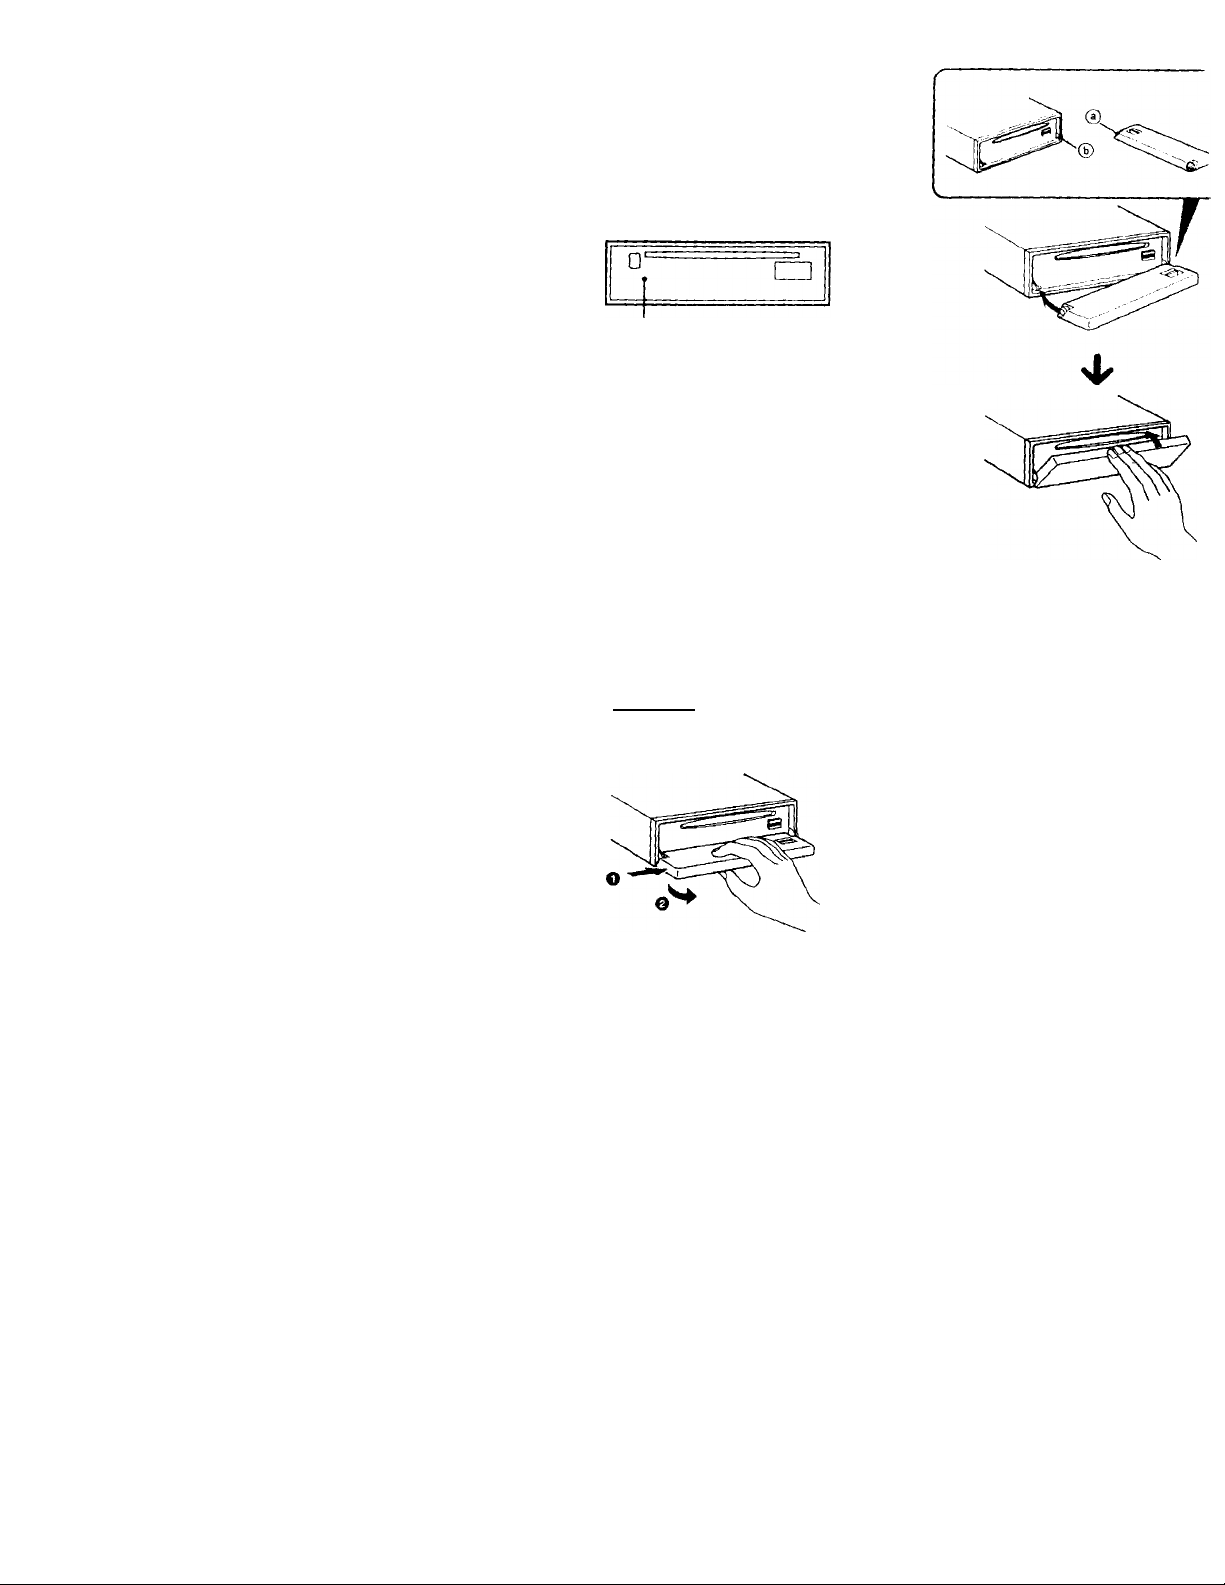
Resetting the unit
Ik'foro operating the unit for the first time or
after replacing the car battery, you most reset
the unit.
I’ress the reset button with a pointed object,
such as a ballpoint pen.
Reset button
Notes
• Pressing the reset button will erase the dock and
some memorized functions.
• When you connect the power suppiy cord to the
unit or reset the unit, wait for about W seconds
before you insert a disc. If you insert a disc Within
these 10 seconds, the unit will not be reset end
you will have to press the reset button again.
I’l.ux' lire holt’ ® in ihc Invìi p.incl tip
spimllc (b) on tl AC mill .is lilusli .Ik'd, ti
ilio loll side in
Detaching the front panel
You can detach the front panel of this unit to
prevent the unit from being stolen.
1 Press (OFF).
2 Press (OPEN) to open the front panel,
then slide the front panel to the right
side, and pull out the left side of the
front panel.
Notes
• Do not put anything on the inner surface of the
front panel.
• Be sure not to drop the panel when detaching it
from the unit.
• If you detach the panel white the unit is still on,
the power will turn off automatically to prevent
the speakers from being damaged.
• When you carry the front panel with you, put it
in the supplied front panel case.
Notes
• Be sure not to attach the front panel upside
down.
• Do not press the front panel hard against tf
unit when attaching it Press it lightly again
unit.
• Do not press hard or put excessive pressure
the display windows of the front panel.
• Do not expose the front panel to direct sum
heat sources such as hot air ducts, and do n<
leave it in a humid place. Never leave it on t
dashboard of a car parked in direct sunlight
where there may be a considerable rise in
temperature.
Caution alarm
If you turn the ignition key switch to the C
position without removing the front panel
caution alarm will beep for a few seconds
(only when the POWER SELECT switch is
to the ® position).
Page 7
Preparinq
command
Will'll yiHi mount llio rotary I'ommandiT,
attach the label shown m the illustration
below.
the rotary
er
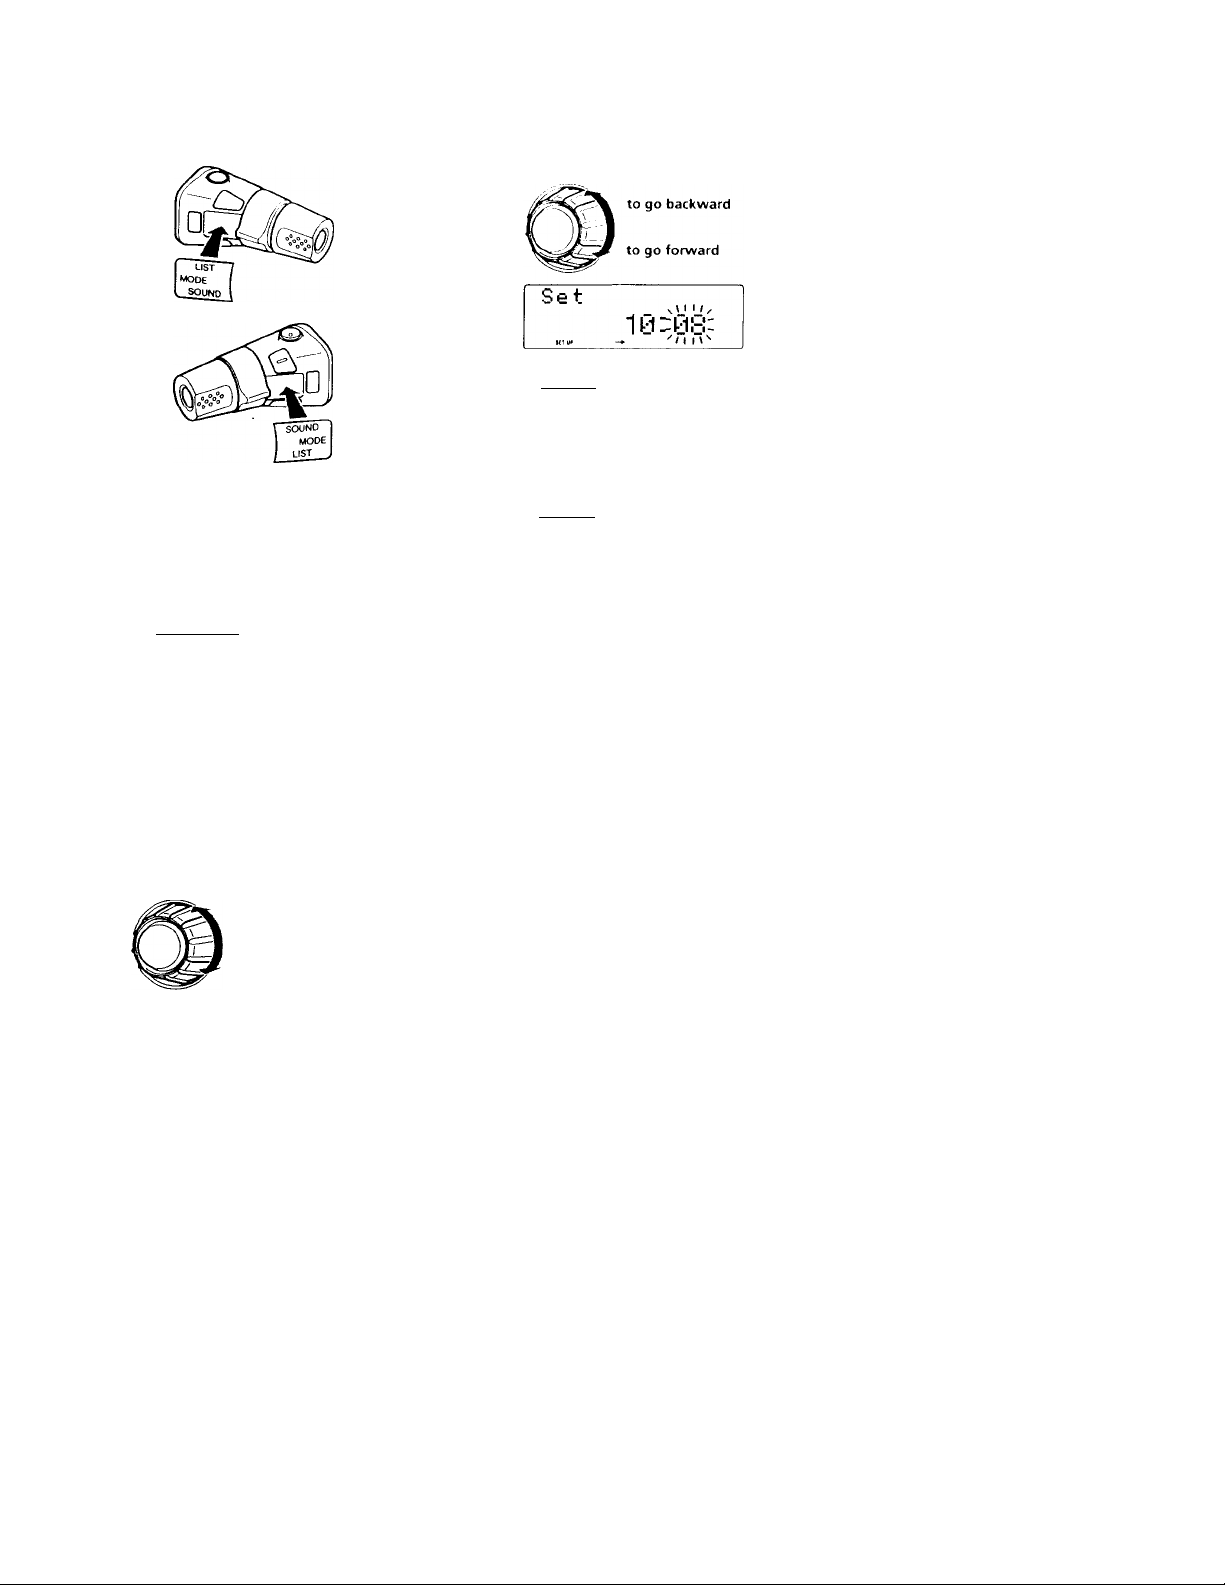
Setting the clock
The clock uses a 12-hour digital indication.
Example: Set the clock to 10:08
1 Press (SHIFT), then press d3 (SET UP).
Set
Clock
O Press {
bet
1 0 -00:
rhe minuti’ iligils Hash
O Set the minute.
2 Press (SHIFT).
10:0S
The clock starts.
3 Press (SHIFT).
After the mode setting is complete, the
display goes back to normal playback
mode.
Note
If the POWER SELECT switch on the bottom of the
unit is set to the © position, turn the power on
first, then set the clock.
lO
mi
O
(D
a>
Q.
O Press CE> (—►)•
Set
The hour digit flashes.
O Set the hour.
to go backward
to go forward
Set
:1y,^yy
^_J ' - -
:1: yu
_______
Page 8

Ies
CD Player
Listening to a CD
1 Press (OPEN) and insert the CD.
Labelled side up
2 Close the front panel.
Playback starts automatically.
[f a CD is already inserted, press (SOURCE)
repeatedly until "CD" appears.
Elapsed piayin9 time
CD
05
Track number
Note
To play back an 8 cm (3 in.) CD, use the optional
Sony compact disc single adapter (CSA-8).
Changing the displayed item
l ach Unu’ \ou ptvss v^SPL"^, the Uom char
Elapsed playback time
Disc name*'/Artist name'
MOTION DISPLAY*'
*' If you inserted a non-CD TEXT disc,
"NO D.Name" or "NO T.Name" appears in tl
display.
'- If you play a CD TEXT disc, the artist name
appears in the display after the disc name. (C
for CD TEXT discs with the artist name.)
All the items above are scrolled in the display
one by one in order.
I
Track name''
Clock
I
You can label CD and CD TEXT discs with a
personalized name using the disc memo
function, refer to "Labeling a CD" (page 23).
However, if you use jaersonalized labels, the
will always take priority over the original Cl
TEXT information when such information is
displayed.
Tips
• If the name of the CD TEXT disc is too long, yoi
can scroll it across the display by pressing
(SHiFTi. then (CD (<—).
• If you want to display the original CD TEXT
information after labelling the CD TEXT disc wi
a personalized name, press ( shift) , then (S)
(-).
8
To
Stop playback
Eject the CD
Press
(OF0
(OPEN) then ±
Page 9
If the disc name/.irtist name or track name on
a CD TEXT disc exceeds 10 characters and the
Auto Scroll function ¡son, automatically
scrolls on the display as follows:
• The disc name appears when the disc has
changed (if the disc name is selected).
• The track name appears when the track has
changed (if the track name is selected).
If you press (DSPL ) to change the display
item, the disc or track name of the CD TEXT
disc is scrolled automatically whether you set
the function on or off.
1 During playback, press f shift).
2 Press (D (SET UP) repeatedly until
“A.Scrl" appears.
riaymg a m various
modes
You can play CDs in various modes:
• Intro (Intro Scan) lots you play the first 10
seconds of all the tracks.
• Repeat (Repeat Play) repeats the current
track.
• Shuf (Shuffle Play) plays all the tracks in
random order.
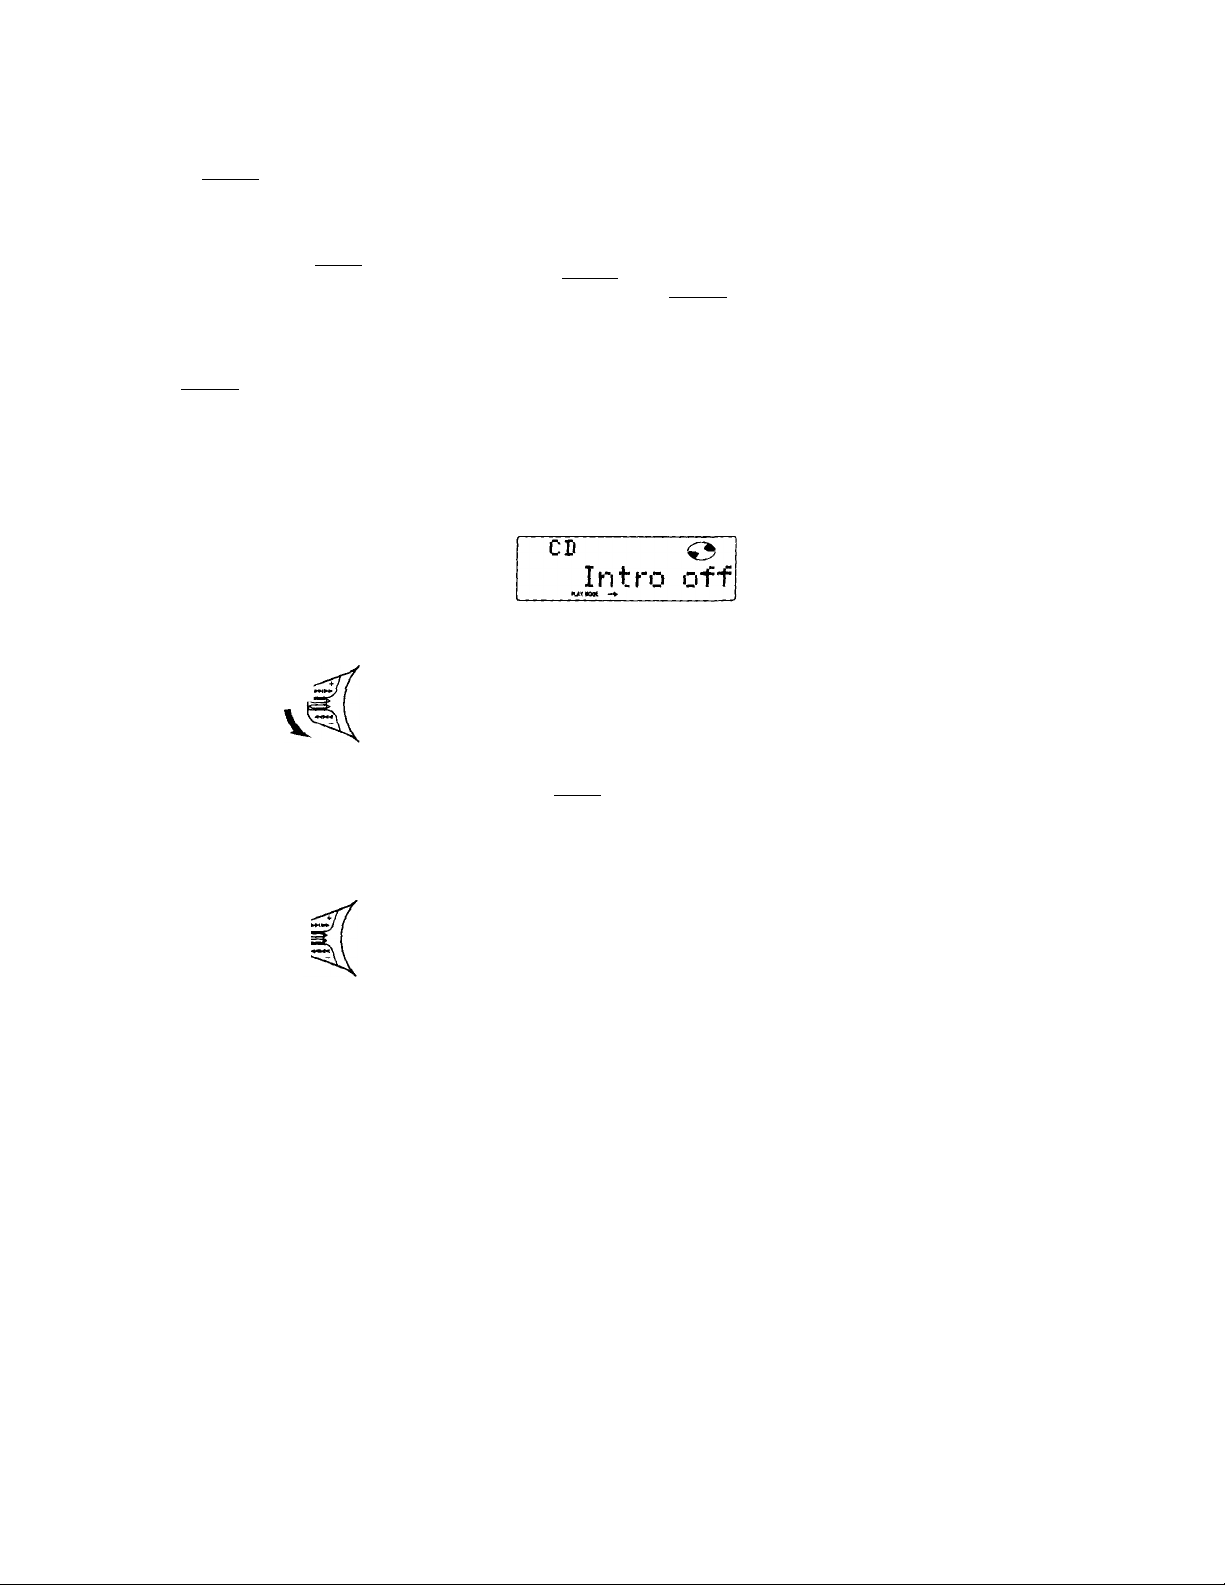
Searching for the desired track
— Intro scan
1 Press (SHIFT).
Every time you press (SHIFT), only the
items you can select light up.
_______________
3 Press CD (—*) to select "A.Scrl on."
4 Press (SHIFT).
To cancel Auto Scroll, select "A.Scrl off" in
step 3 above.
Note
For some CD TEXT discs with extremely many
characters, the following cases may happen:
— Some of the characters are not displayed.
—Auto Scroll does not work.
Locating a specific track
— Automatic Music Sensor (AMS)
During playback, push the SEEK/AMS
control up or down momentarily.
To locate succeeding ^
tracks f ,
To locate
preceding tracks
Locating a specific point in a track
— Manual Search
During piayback, push the SEEK/AMS
control up or down and hold. Release
when you have found the desired point.
To search forward t
□
2 Press (T) (PLAY MODE) repeatedly until
“Intro" appears.
Each time you press (J) (PLAY MODE),
the item changes as follows;
Intro PGM
3 Press (D (—►) to select "Intro on."
CD
Intro on
Intro Scan starts.
4 Press (SHIFT).
To go back to normal playback mode, select
"Intro off" in step 3 above.
sc
n
o
2
o>
rt>
To search backward
Note
If "i-i-i-i- " or " -iTi-i' appears in the display,
that means you have reached the beginning or the
end of the disc and you cannot go any further.
Page 10

Playing tracks repeatedly
— Repeat Play
1 During playback, press (SHifr).
2 Press (X) (REP) repeatedly until “Repeat
1" appears.
□
Repeat Play starts.
3 Press (shTfT).
'¡'o go back to normal playback mode, select
"Repeat off" in step 2 above.
Creating a program
— CD Program Memory
^ (>u can play (he tracks in the order yon
bv making your own program. You can
two pmgranis: iYogram 1 and Program
caiA select up to 12 tracks for each progra
Vt>u can store the programs in mcmor\’.
1 Press CsHiFT), then press (T) (PLAY
MODE) for two seconds.
cn
-► < 1 1 I 11 I I n'
"P 1" indicates Program 1 is selected.
To select Program 2, press (5]) (—»)
repeatedly until "P 2" appears.
I j iTt^i /
3 0^
llBi
Playing tracks in random order
— Shuffle Play
1 During playback, press (shifts.
2 Press (T) (SHUF) repeatedly until “Shuf
1" appears.
Shuffle Play starts.
3 Press (SHIFT)-
To go back to normal playback mode, select
"Shuf off" in step 2 above.
2 Push the SEEK/AMS control up or do
to select the track you want.
3 Press (D (ENTER) momentarily.
PI
+Enter+
CD
4 To continue entering tracks, repeat st
2 and 3.
5 When you finish selecting tracks, pres
(3) (PLAY MODE) for two seconds.
6 Press 1
Notes
♦ "•Wait*" appears in the display white the un.
reading the data.
♦ “•Mem Full*" appears in the display when yo
try to enter more than 12 tracks into a progrt
m« i M I rf-rl / ,
3
► Hr(i / 1 i n I f i I \ ^
10
Page 11

. svuicu (Jiuyidcn
You Clin soled:
• I’GM 1 to play Program 1.
• PGM 2 to play Program 2.
• PGM 1+2 to play Programs 1 and 2.
1 Press esHiFT).
2 Press (T) (PLAY MODE) repeatedly until
"PGM" appears.
3 Press CD (—♦) repeatedly until the
desired program appears.
Program 1 playback
CD
(UrUOOE —►
Program 2 playback
PGM
'I'
CD
MTHOt —►
Programs 1 and 2 playback
PGM
CD
PGM
•uiaoK -♦
Normal playback
'1'
CD
PGM
furwof -♦
1
•-I
1+2
off
trasing an entire program
1 Press (SHIFT). then press ® (PLAY
MODE) for two seconds.
CD
1" indicates Program 1 is selected.
. o 111 iTr-Ci t/l
«mrI MII(I((\'
2 Press CD {+-) repeatedly until "DEL"
appears.
DEL
vM II11111111 iT+rC
I I I IM<I 1 I I I I 1 I'
To delete Program 2, press CD (-+)
repeatedly until "PGM 2" appears.
3 Press CD (ENTER) for two seconds.
PI
HO Data
The entire program is erased.
4 When you finish erasing programs, press
CD (PLAY MODE) for two seconds.
5 Press (SHIFT).
BaiM
Pi
D
2
Dl
Program Play starts.
4 Press (SHIFT).
To go back to normal playback mode, select
"PGM off" in step 3 above.
/Vote '
"Not ready" appears in the display if no track is
stored in the program.
11
Page 12

Adding tracks to a program
1 Press SMiM , then press ('MPLAY
MODE) for two seconds.
n ^
I I t I iTt f I /
•V., .. 11 11IIt f I / ,
4 1.0;5
.* ..rrC / ( I I I I M I '
“PI" indicates Program 1 is selected.
To.sok'Ct I’ri^^r.un 2, press C0
repcMtodlv until "P 2" appears.
cirdsiny iracKb
1 Press sni( 1then press *4'^ (PLAY
MODE) for two seconds.
CD
“P 1" indicates Program ^ is selected.
.soloct IVogram 2. press ®
repeatedly until "P 2" appears.
s; 01111%
^ _
f'l.yy
««-r< /1 I I I I M M ^
llBi
2 Press ® (♦—) or (T) (—*) to select the
track slot number where you want to
insert a track.
Track slot number
CD
^ II I M I
-Z PI.I05
1m 111111111'>
M»/
3 Push the SEEK/AMS control up or down
to select the track you want to insert.
4 Press dC (ENTER) momentarily to enter
the track.
The current track in that slot number and
the succeeding tracks shift down.
5 To continue inserting tracks, repeat steps
2 through 4.
Note
Once all 12 slots have been filled, "*Mem
Full*" appears in the display, and you cannot
insert tracks.
6 When you finish inserting tracks, press
(T) (PLAY MODE) for two seconds.
7 Press CsHiFT).
2 Press @ (*—) or CE) ( —* ) to select the
track you want to erase.
Track slot number
'-T .A,!
lOI
___
-*< I rri I I I I I I I I n>
The track currently registered in slot 6 of
Program 1.
............
...
3 Pi.i3
3 Press ® (ENTER) for two seconds.
When you erase a track from a slot numb
the succeeding tracks shift up to fill the g
DEL
- -- FI.06
CD
nwM
7 P1.06
4 To continue erasing tracks, repeat step?
2 and 3.
5 When you finish erasing tracks, press C
(PLAY MODE) for two seconds.
6 Press (SHIFT).
12
Page 13

Radio
Memorizing stations automatically
— Best Tuning Memory (BTM)
The unit selects the stations with the strongest
signals and memorizes them in the order of
their frequencies. You can store up to 10
stations on each band (FMl, FM2 and AM).
Caution
When tuning in stations while driving, use
Best Tuning Memory to prevent accidents.
Press (SOURCE) repeatedly to select the
1
tuner.
Each time you press (SOURCE), the source
changes as follows:
CD TUNER
Press (MODE) repeatedly to select the
band.
Each time you press ( k/iode ), the band
changes as follows:
---
► FMl
-------
► FM2
------
► AM
---
3 Press (SHIFT), then press ® (PLAY
MODE) repeatedly until "B.T.M" appears.
4 Press ® (—►).
The unit stores stations in the order of their
frequencies on the number buttons.
A beep sound and the setting is stored.
Memorizing only the
desired stations
You can store up to 10 stations on each band
(20 for FMl and FM2, 10 for AM) in the order
of your choice.
1 Press (SOURCE) reoeatedlv to select the
tuner.
2 Press (MODE) reoeatedlv to select the
band (FMl, FM2 or AM).
3 Push the SEEK/AMS control up or down
to tune in the station you want to store
on the number button.
4 Press and hold the desired number
button (CD to (TbY) until "MEM"
appears.
The number button indication appears in
the display.
Note
If you try to store another station on the same
number button, the previously stored station will
be erased.
Receiving the memorized
stations
1 Press (SOURCE) repeatedly to select the
tuner.
2 Press (MODE) repeatedly to select the
band (FM1, FM2 or AM).
IBU
n
O
2
0>
rD
Q-
o’
5 Press (SHIFT).
Notes
• The unit does not store stations with weak
signals. If only a few stations are received, some
number buttons wilt retain their former setting.
• When a number is indicated in the display, the
unit starts storing stations from the one currently
displayed.
3 Press the number button ((T) to (W))
momentarily where the desired station is
stored.
13
Page 14

Ì
Ua
station
Push the SEEK/AMS control up or down
momentarily to search for the station
(automatic tuning),
Scanaing slops when tho unit nvon i'S a
station. I’usli the SEEK / AMS control up or
down rcpeati'dlv until the desired station is
roceivod.
Note
If the automatic tuning stops too frequentty, press
(SHIFT), then press C£) (PLAY MODE) repeatedly
until “Local" (local seek mode) is displayed. Then
press CS) (—^) to select “Localon.“ Press (shift).
Only the stations with relatively strong signals will
be tuned in.
Tip
If you know the frequency of the station you wanf
to listen to push the SEEK/AMS control up or down
and hold until thé desired frequency appears
(manual tuning).
If FM stereo reception is poor
— Monaural Mode
1 Press (SHIFT), then press (T) (PLAY
MODE) repeatedly until "Mono" appears.
Press (33 (—►) repeatedly until "Mono on" appears.
The sound improves, but becomes
monaural ("ST" disappears).
reception
If tlu'rc IS inlLTferonco troni neightxirinj
st.Uions, tiillow the steps below and sob
\arrow I) interferi’ncc' is not .i probU
select "Wide" to maximize signal recepì
.iiul im[iro\'e stiund i,]uali(y or "IP Auto
switch between "Narrow" and "Wide"
.lutomaticalli’.
1 Press (SHIFT} during FM reception.
2 Press (4} (PLAY MODE) repeatedly
“IF Auto" appears.
3 Press (5} (—♦) repeatedly to select
desired setting.
--------
► IF Auto -----------► Wide -
Narrow -4
4 Press (ЩнШТ).
Changing the displayed items
Each time you press C bSPL). the item char
as follows;
------
► Frequency
‘ All the items above are scrolled in the display
one by one in order.
-------------
MOTION DISPLAY* •<-
► Clock—
3 Press (SHIFT).
To go back to normal mode, select "Mono off"
in step 2 above.
14
Storing the station name
—station Memo
You can assign a name to each radio station
and store it in memory. The name of the
current station appears in the display. You (
store up to eight characters for each station.
Storing the station names
1 Tune in a station whose name you wa
to store.
2 Press ( LIST ) for two seconds.
FMI
N 1 /
/ 1-^
Page 15

O Rotate the dial clockwise to select the
desired characters.
(A — B-»C— Z — 0-*1 — 2-*
FM1
If you rotate the dial countcrcloekwiso,
the characters appear in the reverse
order.
If you want to put a blank space
between characters, select (under
bar).
O Press (D (—►) after locating the
desired character.
The flashing cursor moves to the next
space.
FM1
If you press (15 (*—), the flashing cursor
moves to the left.
W*T
*1''.
erasing tne station name
1 Tune in any station and press (TisT) for
two seconds.
2 Press (DSPL) for two seconds.
The station name appears in the display.
3 Rotate the dial to select the name you
want to erase.
4 Press (15 (ENTER) for two seconds.
The name is erased.
^ Repeat steps 3 and 4 if you want to erase
other names.
5 Press ( LIST ) for two seconds.
The unit returns to normal radio reception
mode.
Locating a station by name-List-up
Bam
73
Oi
Q.
O Repeat steps O and O to enter the
entire name.
4 To return to normal radio reception,
press ( LIST ) for two seconds.
Tip
To erase/correct a name, enter (under-bar) for
each character.
Displaying the station name
Press (DSPL) during radio reception.
FM1 «ttr
3 WRKISS
Each time you press ( DSPL), the item
changes as follows:
—► Station name*'
MOTION DISPLAY*" <
*' If the station name is not stored, “NO
Name' appears in the display for one
second.
♦" All the items above are scrolled in the
display one by one in order.
----
► Frequency
----
■ Clock<-
ncri,-^
----
---------
1 Press (LIST) momentarily.
The name assigned to the current station
appears in the display.
LST
3 WRKISS
2 Press (LIST) repeatedly until you find the
desired station.
3 Press (D (ENTER) to tune in the desired
station.
Note
After the station name or frequency has been
displayed for five seconds, the display goes back to
normal mode. To turn off the display, press
CBSPL).
1
1
15
Page 16

other Functions
Using the rotary commander
The rotary commaiidor works bv pressini;
buttons and/or rotating controls.
You can control an optional CD or MD unit
with the rotary commander.
By pressing buttons (the SOURCE and MODE buttons)
Each time you press (sources the
source changes as follows;
► TV*
TUNER -► CD
* When an optional MD unit, TV tuner or Video
is connected.
Pressing Cmode) changes the operation in the following ways;
•Tuner: FM1-»FM2—»AM
• CD unit: CD1—CD2-» ...
•MDunit: MD1-• MD2 —►...
• TVA/ideo: TV —► Videol — Video2 — ...
■ MD*
wy ■ VF «.«a VV/|ILfC»| \inti
AMS control)
Rotate the control momentarily and
release it to:
• Locate a specific track on a disc. Rot.
and hold the control until you locate
specific point in a track, then release
start playback.
•Tune in statirins automatically. Rotat
hold the control to tunc in a specific
station.
By pushing in and rotating the control (the PRESET/DISC control
Push in and rotate the control to:
• Receive the stations memorized on tht
number buttons.
• Change the disc.
Other operations
Rotate the VOL control to
adjust the volume.
Tip
When the POWER SELECT switch is set to position
O, you can turn on this unit by pressing ( source/
on the rotary commander.
16
Page 17

Kress t.buuNU; to adjust the
volume and sound menu.
Changing the operative direction
The operative direction of controls is factoryset as in the illustration below.
If you need to mount the rotary commander on
the right side of the steering column, you can
reverse the operative direction.
Adjusting the sound characteristics
You can adjust the bass, treble, balance and
fader.
bach source can store the bass and treble levels
respectively.
1 Select the item you want to adjust by
pressing ( sound ) repeatedly.
VOL (volume) SUB (subwoofer volume)
—► BAS (bass) —► TRE (treble)
—► BAL (left-right) —* FAD (rear-front)
2 Adjust the selected item by rotating the
dial.
Adjust within three seconds after selecting
the item. (After three seconds, the dial
functions as the volume control.)
Attenuating the sound
Press (ATT) on the rotary commander or
optional wireless remote.
"ATT on" flashes momentarily.
To restore the previous volume level, press
(ATT) again.
ISBI
c
3
a
o
3
Press (SOUND) for two seconds while pushing the VOL control.
Tip
You can control the operative direction of controls
with the unit (page 18).
Tip
The unit decreases the volume automatically when
a telephone call comes in (Telephone ATT function).
17
Page 18

m
18
Changing the sound and
display settings
> ou Clin set:
• Clock (piigc
• D.Into (nu.il Inloiiii.itum) - to displnx' the
clock iind the pl.t\ mode at the same time
(ON) or to display the information
alternately (Cll-T).
• Atnber/Creen ' to elianpe the illuminatii'n
color to atnber or green.
• Dimmer to - change the brightness of the
display.
— Select "Auto" to dim the display only
when you turn the lights on.
— Select "on" to dim the display.
• Contrast to acfjust the contrast if the
indications in the display are not
recognizable because of the unit's installed
position.
• Voice guide function for vocalized
comments.
— Select "Voice 1" to turn the voice guide to
minimum volume.
— Select "Voice 2" to turn the voice guide to
middle volume.
— Select "Voice 3" to turn the voice guide to
maximum volume,
— Select "Voice off" to cancel the voice
guide function.
• Beep to turn on or off the beeps.
• RM (Rotary Commander) - to change the
operative direction of the controls of the
rotary commander.
— Select "norm" to use the rotary
commander as the factory-set position.
— Select "rev" when you mount the rotary
commander on the right side of the
steering column.
• BBE to - enjoy bass and treble even at low
volume. The bass and treble will be
reinforced.
— Select "BBE 1" to reinforce the bass and
treble.
— Select "BBE 2" to reinforce the bass and
treble more effective than "BBE 1."
— Select "BBE off" to deactivate BBE.
• DF (Digital Filter) - to select the type of filter
you want, you can adjust the sound to much
your unit, your speaker, the music source,
etc.
— The digital filter appear its presetted
when you select "normal."
— The pre-ringing and post-ringing will be
minimize when you select "slow."
• LPF (Low Pass Filter).
• A.Scrl (Auto Scroll) (page 9, 19).
1 Press ('SHIFT).
/ Press (SET UP) repeatedly until ti ■
desired item appears.
I .\vU Ume wHi press v 3 ' (SE i I I’), iUv
v h.lilies as toliows;
Clock ♦ O.Info*' -► Amber/Green —* Dimi
♦ Contrast ♦ Voice*' —• Beep RM —• i
. DF*' — LPF*' A.Scrl*'
•' When you have not tune the station or
IS no CD/MD being played, these items i
nof appear.
•- DF does not work when the disc playba-
optional CD/MD changer.
Notes
• The displayed item will differ depending on
source.
• If an optional digital preamplifier is conneef-
the unit, BBE and Voice guide function does
works.
3 Press ()D (—►) to select the desired
setting (for example: on or off).
For the "Contrast" setting, pressing
(—►) makes the contrast higher, and -- ,
pre.ssing d} («—) makes the contrast lo'
4 Press fSHIFT).
After the mode setting is complete, the
display goes back to normal playback
mode.
Adjusting the frequency of the subwoofer(s)
To match the characteristics of the connecte
subwoofer(s), you can cut out the unwanter
high and middle frequency signals entering
the subwoofer(s). By setting the cut-off
frequency, the subwoofer(s) will output on
low frequency signals so you can get a clear
sound image.
1 Press (source) to select a source (rad
CD or MD).
2 Press (SHIFT), then press (j3) (SET UP)
repeatedly until "LPF" appears.
3 Press CD (—*) ot CD (-^) repeatedly tc
select desired setting.
Each time you press (T) (—►) or (D) (■<—),
the cut-off frequency in the display chanj
as follows:
LPF off LPF 80 Hz • • LPF 120 Hz
4 Press (SHIFT).
When the frequency setting is complete, t
display goes back to the normal playback
mode.
Page 19

With Optional Equipment
CD/MD Unit
You can control up to 7 CD and MD units with
this unit.
If you connect an optional CD unit with the
CD TEXT function, the CD TEXT information
will appear in the display when you play back
a CD TEXT disc.
Playing a CD or MD
Yi>u can label CD and CD I EX I discs with a
personalized name using the disc memo
function, refer to "Labeling a CD" (page 23).
I lowever, if you use personalized labels, they
will always take priority over the original CD
TEXT information when such information is
displayed.
rips
• if the name of the MD or CD TEXT disc is too
long, you can scroll It across the display by
pressing (shift), then CD (^).
• If you want to display the original CD TEXT
information after labelling the CD TEXT disc with
a personalized name, press ( shift) , then CD
1 Press (SOURCE) repeatedly to select the
CD or MD.
2 Press (MODE) until the desired unit
appears.
CD/MD playback starts.
When a CD/MD unit is connected, all the
tracks play from the beginning.
Changing the displayed item
Each time you press ( DSPL ) during CD,
CD TEXT or MD playback, the item changes as
follows:
Elapsed playback time
Disc name*VArtist name*^
1
▼
Track name*’
i
Clock
i .
MOTION DISPLAY**
•' If you have not labeled the disc or there is no
disc name prerecorded on the MD, "NO
D.Name" appears in the display.
*- If you play a CD TEXT disc, the artist name
appears in the display after the disc name. (Only
for CD TEXT discs with the artist name.)
If the track name of a CD TEXT disc or MD is not
prerecorded, "NO T.Name" appears in the
display.
** All the items above are scrolled in the display
one by one in order.
Automatically scrolling a disc name
— Auto Scroll
If the disc name/artist name or track name on
a CD TEXT disc or MD exceeds 10 characters
and the Auto Scroll function is on,
automatically scrolls on the display as follows:
• The disc name appears when the disc has
changed (if the disc name is selected).
• The track name appears when the track has
changed (if the track name is selected).
If you press (DSPL) to change the display
item, the disc or track name of the MD or
CD TEXT disc is scrolled automatically
whether you set the function on or off.
1 Durina Diavback. Dress (shift).
2 Press d) (SET UP) repeatedly until
"A.Scrl" appears.
3 Press (T) (—►) to select "A.Scrl on."
4 Press (SHIFT).
To cancel Auto Scroll, select "A.Scrl off" in
step 3 above.
Note
For some CD TEXT discs with a lot of characters,
the following cases may happen:
■ — Some of the characters are not displayed.
— Auto Scroll does not work.
13
r+
c
3
a
o
3
C
19
Page 20

Locating a specific track
— Automatic Music Sensor (AMS)
During playback, push the SEEK/AMS
control up or down once for each track
you want to skip.
To locate succeeding
tracks
To locate preceding % v
tracks
Locating a specific point in a track
— Manual Search
During playback, push the SEEK/AMS
control up or down and hold.
Release when you have found the
desired point.
To search forward
Playing tracks repeatedly
— Repeat Play
't iHi L\in sok'i't:
• IxL'poat I - rt'poal a track.
• Ropoat 2 - Ici repeat v\ disc.
1 During playback, press CshifT),
2 Press CD (REP) repeatedly until the
desired setting appears.
--------
► Repeat 1
---------------
Repeat Play start.s.
3 Press ('shTfDi.
----
► Repeat 2 —
Repeat off <
------------
I
To search backward
Locating a disc by disc number
— Direct Disc Selection
Press the number button that
corresponds with the desired disc
number.
The desired disc in the current unit begins
playback.
Scanning the tracks
— Intro Scan
You can play the first 10 seconds of all the
tracks on the current disc.
1 During playback, press (shift), then
press CD (PLAY MODE) repeatedly until
"Intro" appears.
2 Press CD (—►) to select "Intro on."
Intro Scan starts.
3 Press CSHIFT) .
To return to normal playback mode, select
"Intro off" in step 2 above.
To go back to normal playback mode, select
"Repeat off" in step 2 above.
Playing tracks in random
order — Shuffle Play
You can select:
• Shut 1 - to play the tracks on the current dis
in random order.
• Shuf All - to play all the tracks in random
order.
1 During playback, press (shift).
2 Press CD) (SHUF) repeatedly until the
desired setting appears.
------
► Shuf 1
Shuffle Play starts.
3 Press (shift).
To return to normal playback mode, select
"Shuf off" in step 2 above.
----------
■ Shuf off <-
► Shuf All
---
20
Page 21

Creating a program
— Program Memory (CD/MD unit with the program memory function)
You can play tracks in the order you want by
making your own program. You can make two
programs: Program 1 and Program 2. You can
select up to 12 tracks for each program. You
can store the programs in memory.
5 When you finish entering tracks, press
(iC) (PLAY MODE) for two seconds.
6 Press (SHIFT).
Notes
• appears in the display while the unit is
reading the data, or when a disc has not been
put into the unit.
• ’'*Mem Full*" appears in the display when you
try to enter more than 12 tracks into a program.
1 Press (SHIFT), then press Cl) (PLAY
MODE) for two seconds.
Program edit mode
CD2
oitc ma o I I « I I / y
2
purmoc uno / I i I I 1 M
"PI" shows Program 1 is selected.
If you have labelled the disc, the bank edit
mode appears. Press (4) (PLAY MODE) to
display "P 1" above.
To select Program 2, press (5) (—►)
repeatedly until "P 2" appears.
iTh-Pi,
2 Select the track you want.
O Press (SOURCE) repeatedly to select
CD or MD.
O Press (MODE) repeatedly to select the
unit.
i Press (SHIFT), then press the number
button to select the disc.
O Press (SHIFT).
O Push the SEEK/AMS control up or
down to select the track.
3 Press CD (ENTER) momentarily.
CD2
PUTMK
till iTt-ri /
/ I M I ( I I i
Playing the stored program
changing the disc order In the unit will not
aflfet program memory play.
You can select:
•PGM 1 - to play Program 1.
•PGM 2 - to play Program 2.
•PGM 1+2 - to play Programs 1 and 2.
1 'Press (SHIFT).
Press CD (PLAY MODE) repeatedly until
"PGM" appears. ^
Press CD (—►) repeatedly until the
desired program appears.
■ PGM 1
Program Play starts.
---
► PGM 2
- PGM off <-
----
► PGM 1+2
4 Press (SHIFT).
To go back to normal playback mode, select
"PGM off" in step 3 above.
Notes
• If you press a number button during program
memory play, program memory play Is
interrupted, and piayback of the seiected disc
starts.
• "WO Data " appears in the display if no track is
stored in the program.
• If a track stored into the program memory is not
in the disc magazine, the track will be skipped.
• When the disc magazine contains no tracks
' stored into the program memory, or when the
program information has not been loaded yet,
"Not ready" appears.
C2
o
c
3
4 To continue entering tracks, repeat steps
2 and 3.
21
Page 22

Erasing an entire program
1 Press vSui' 1 , then press J' (PLAY
MODE) for two seconds.
CD2
^ o'' I' ” "' ^
4 7 f1.ua
-• .«-»< M I i I M I I
"P 1" indicates Program 1 is selected.
Acfding tracks to a program
1 Press I.SH" I \ then press (4^ (PLAY
MODE) for two seconds.
CD2
I«- •«.-« O I ‘ ' I r « -t I / _
4 7f1.0:E:
-► ,.ry( / M I I II I M
“P 1" indicates Program 1 is selected.
o
ft
It you hcu o labollod ihc' disc, tlu' bank edit
nuido appears. Press (4^ (I’l .A'i MODI') to
display ‘T 1" abtu'e.
2 Press CD (-^) repeatedly until "DEL"
appears.
DEL
i
|b
To erase Program 2, press (s) (~‘)
repeatedly until "PGM 2" appears.
3 Press ® (ENTER) for two seconds.
. \ • I I I r t t I I I I 1T4/.
k/IJA I I M M<I M 1 m
P1
P6N1—:
HO Data
The entire program is erased.
4 When you finish erasing programs, press
(4) (PLAY MODE) for two seconds.
5 Press (SHIFT).
li \'ou have labelled the disc, the bank i
mode appears. Press (T) (PLAY MODI
display "P P' above.
To select Program 2, press (5) (—*)
repeatedly until "P 2" appears.
2 Press CD (-^) or (D (—►) to select tht
track slot number where you want tc
insert a track.
Track slot number
1111 UJ II " " I
£ Pl.E
' M'frI rti itfi’i 111111111 O
i-U
3 Push the SEEK/AMS control up or dov
to select the track you want to insert.
4 Press CD (ENTER) momentarily to ent
the track.
The current track is inserted in that slot
number and the succeeding tracks shift
down.
To continue inserting tracks, repeat step
through 4.
Note
Once all J2 slots have been filled,
"*Mem Full* " appears in the display, and yc
cannot insert tracks.
el
r'
22
5 When you finish inserting tracks, pres;
CD (PLAY MODE) for two seconds.
6 Press (SHIFT).
<1
Si
:(
3(
Page 23

Erasing tracks in a program
1 Press (SHIFT), then press (3) (PLAY
MODE) for two seconds.
CD2
“P 1" indicates Program 1 is selected.
If you have labelled (he disc, the bank edit
mode appears. Press (3) (PLAY MODE) to
display "P 1" above.
To select Program 2, press (¿) (—►)
repeatedly until "P 2" appears.
iwd X \ I < I I fT-i I I ,
2 f 1.0i
i«i(i / II II I n M ^
2 Press (D (•^) Of CD (—*) to select the
track you want to erase.
Track slot number
1111 m 1111111
^ WWI rt I I run)
The track currently registered in slot 6 of
Program 1.
3 Pl.ig
tMul
3 Press CD (ENTER) for two seconds.
When you erase a track from a slot number,
the succeeding tracks shift up to fill the gap.
DEL
— P1.06
CD2
4
E«Tti n H I I I t I W
4 To continue erasing tracks, repeat steps ,
2 and 3.
5 When you finish erasing tracks, press Cl)
(PLAY MODE) for two seconds.
6 Press (SHIFT).
i I
« I I 1 I T-i I #
7 f'1.0t^
Labeling a CD
— Disc Memo (CD unit with the custom file function)
You can label each disc with a personalized
name. You can enter up to eight characters for
a disc. If you label a CD, you can locate the
disc by name (page 25) and select the specific
tracks for playback (page 25).
1 Play the CD and press ( list ) for two
seconds.
CD2
1
2 Enter the characters.
O Rotate the dial clockwise to select the
desired characters.
(A-rB-rC-»-Z->0-r1 — 2->
— 9—► + —»--—►<
CD2
«•C V I /
1 tS:
If you rotate the dial counterclockwise,
the characters appear in the reverse
order.
If you want to put a blank space
between characters, select (under
bar).
© Press CD (—►) after locating the
desired character.
The flashing cursor moves to the next
space.
CD 2;^
1 Si/.
If you press CD) (■*-—), the flashing cursor
moves to the left.
O Repeat steps O and © to enter the
entire name.
n
O
O
c
3
3 To return to normal CD playback mode,
press (LIST) for two seconds.
Tip
To erase/correct a name enter (under-bar) for
each character.
23
Page 24

Displaying the disc memo name
Press V iisi’i ^ during CD or CD TEXT disc
playback.
CD2
1 SCHUBERT
Each time you press (PSPQ during CP (>r
Cl^ TEXT disc playback, the item changes
as k>Ilows;
Elapsed playback time
Erasing the disc memo
1 Press ^souhc:l ' repeatedly to selec
2 Press ^MC3Dii') repeatedly to select tl
unit.
3 Press c LIST) for two seconds.
4 Press Ci§PD for two seconds.
5 Rotate the dial to select the name yi
want to erase.
Disc memo name
i
Track name*'
I
Clock
MOTIOn DISPLAY*^
*' If you connect an optional CD unit with the
CD TEXT function, the CD TEXT information
will appear in the display when you playback
a CD TEXT disc.
All the items above are scrolled in the
display one by one in order.
6 Press (5) (ENTER) for two seconds.
The name is era.sed.
Repeal steps .S and 6 if you want to era
other names.
7 Press (TuST~) for two seconds.
The unit returns to normal CD playbac
mode.
Note
When the personalized label is erased, the on
CD TEXT information wilt appear in the displa "
24
Page 25

a ui>C uy fldfllC
— List-up (CO unit with the custom file function or MD unit)
You can use this function for discs that have
boon assigned a custom name. For more
information on disc names, refer to "Labeling a
CD" (page 23).
1 Press C LIST ) momentarily.
The name assigned to the currenLdisc
appears in the display.
When you assign a disc memo label to a
CD TEXT disc, it takes priority over the
original CD TEXT information.
2 Press CSID repeatedly until you find the
desired disc.
3 Press CD (ENTER) to play back the disc.
Notes
• After a disc name has been displayed for five
seconds, the display goes back to normal
playback mode. To turn off the display, press
(dIpl).
• The track names are not displayed during MD or
CD TEXT disc playback.
• If there are no discs in the magazine, “NO Disc"
appears in the display.
• If a disc has not been assigned a custom file,
“********“ appears in the display.
• If the disc information has not been read by the
unit, appears in the display. To load the disc,
first press the number button, then choose the
disc that has not been loaded.
• The information appears only in upper case.
There are also some letters which cannot be
displayed (during MD or CD TEXT disc playback).
^eieciing speeme iracKS
for playback
— Bank (CD unit with the custom file
function)
If you label the disc, you can set the unit to
skip tracks and play only the tracks you want.
Start playing the disc and press (shift).
Then press CD (PLAY MODE) for two
seconds.
Bank edit mode.
CD2
Note
If you have not labeled the disc, the bank edit
mode does not appear and the program edit
mode appears. To go back to normal playback
mode, press f shift).
Push the SEEK/AMS control up or down
to select the track number you want to
skip and press (£) (ENTER).
CB2
■J
SUTIIQM
The indication changes from "Play" to
"Skip." If you want to return to'Tlay,"
press CD (ENTER) again.
Repeat step 2 to set the
mode on all the tracks.
4 Press CD (PLAY MODE) for two seconds.
The unit returns to normal CD playback
mode.
V I M
1-Play-
J-t-iXL.
3-SkiP;
"Play" or "Skip"
n
O
O
c
5 Press -
Notes
• You can set the “Play" and "Skip" mode on up
to 24 tracks.
i You cannot set the "Skip" mode on all the
tracks.
25
Page 26

Playing the specific tracks only
^ ou can soloct:
• I'ank on - to [■>la\' the lrack> with tlu' ri.n '
sotting.
• Bank inv (Inverse) - to play the tracks witli
the "Skip” setting.
1 During playback, press CshTfT), then
press (2) (PLAY MODE) repeatedly until
"Bank" appears.
2 Press CD (—>) to repeatedly until the
desired setting appears.
-► Bank on
CD1 O
Playback starts from the track following the
current one.
^ 3 ^
To go back to normal playing mode, select
"Bank off" in step 2 above.
---
► Bank inv
Ban k on
---
► Bank off
with Optional Equipment
DSP
I he optional Xni’-U.SOI) lets \'ou add som.
etieets to the Siuind field ot the current I v
selected source.
Note
If you connect the optional digital preamplifie
XDP-U50D/2WEQ, the voice guide function wi
work.
n Selecting a surround me
You can select a desired surround menu to
best fit the audio source. The following me
can simulate different sound fields and
enhance the sound so that you can feel a.s i
you are in a live concert.
Surround menu
HALL
JAZZ
DISCO Disco with thick walls
THEATER Movie theater
PARK Big open space
LIVE
OPERA Opera house
CHURCH Church / chapel with a lot
STADIUM Open-air concert in a
CELLAR Cellar with a lot of
DEFEAT Normal sound without ar.
Concert hall
Jazz club
Live concert
reverberation
stadium
reverberation
DSP effects
26
1 Press (SOURCE) to select a source (tur
CD or MD).
2 Press (SOUND) repeatedly until "SUR"
appears.
:SLlRi
-DEFEAT-
3 Rotate the dial to select the desired
surround menu.
The surround menu appears in the order
shown above.
After three seconds, the display goes bad
to the normal playback mode.
Page 27

Adjusting the effect level
1 Press (SOURCE) to select a source (tuner,
CD or MD).
2 Press (SOUND) for two seconds.
-DEFEAT-
3 Rotate the dial to select until the desired
surround menu appears.
Storing a surround effect
onto CDs
— Digital Signal Processor (DSP) Custom
File (CD unit the with custom file function)
Once you have registered the desired surround
menu onto the discs, you can enjoy the same
surround menu every time you play them.
(Only when you have labeled a disc by the
Custom File function.)
t“Press (LIST) for two seconds.
HALL
4 Press (5) (—*).
■'Til Ml«'
EFFECT 90.^;
5 Rotate the dial to adjust the level.
You can adjust the level from 0 to 100%.
Increase the level to enhance the effect.
EFFECT 30^
6 Press (SOUND) for two seconds.
2 Press (LIST) until the surround menu
appears.
DSP custom file mode
CD1
-DEFEAT-
Rotate the dial to select the desired
surround menu.
4 Press (LIST) for two seconds.
After the effect setting is complete, the
display goes back to the normal playback
mode.
Playing the disc with the stored
surround menu
1 Press (SHIFT), then press (J) (PLAY
MODE) repeatedly until "D.File"
appears.
2 Press CD (—►) to select "D.File on."
After five seconds, the display goes back to
normal playback mode.
3 Press (SHIFT).
To cancel to play the disc with stored surround
menu, select "D.File off" in step 2 above.
n
D
o
c
g
ct
D
Changing the stored surround effect
Play the disc whose surround mode you want
to change, and follow the steps of "Storing the
surround effect onto the CDs."
Erasing the stored surround effect
Select "DEFEAT" in step 3 of "Storing the
surround effect onto the CDs."
27
Page 28

Selecting the listening
position
^ ou Ciiti set the' tunc lor the sound to rc.uh the
listeners troin the sf>eakers.
The unit can simulate a natural sound lield so
that you can feel as it you are in the center of
the sound field wherever you sit in the car.
Display
window
LP2
Front '
LP3
Front R,.
U>4
front L
■^544:^1
Rear
Center of sound
field
Normal setting
(© + ®+®)
Front part
(®+ @)
Right front (®)
Left front (0)
Rear part (®)
4 Rotate the dial to adjust the center c
the sound field to the left or right. T
set the center of the sound field.
Center moves to the L (left
Center moves to the R (rig
5 Press cD (—►).
LP1
R II
..........
6 Rotate the dial to adjust the center o'
the sound field to the front or rear.
Center moves to the R (rear
Center moves to the F (fror
F
Lsi
1 Press (SOUND) momentarily until "LPI"
appears.
LP1
All
2 Rotate the dial to select the desired
listening position.
The listening positions appear in the order
shown above.
After three seconds, the display goes back
to the normal playback mode.
Adjusting the listening position
1 Press (souND~) for two seconds.
2 Press (sound) repeatedly until the
desired listening position appears.
3 Press CD (—►)■
LP1
L II R
7 Press (SOUND) for two seconds.
When the effect setting is complete, the
normal playback mode appears.
28
Page 29

Adjusting the fader (FAD)
Normally, with the DSl’ mode on, the volume
of the output sound from the rear speakers is
lowered automatically to improve the
efficiency of the listening position setting. If
you want to raise the rear speaker volume,
adjust the fader.
1 Follow steps 1 to 3 of "Selecting a
surround menu" (page 26).
2 Press (SOUND) repeatedly until "FAD"
appears.
3 Rotate the dial to adjust the fader.
Decreases front speaker volume
Increases front speaker volume
Adjusting the frequency of the
subwoofer(s)
To match the characteristics of the connected
subwoofer(s), you can cut out the unwanted
high and middle frequency signals entering
the subwoofer(s). By setting the cut-off
frequency (see the diagram below), the
subwoofer(s) will output only low frequency
signals so you can get a clearer sound image.
62 125 19S
Frequency (Hz)
1 Press (SOURCE) to select a source (tuner,
CD or MD).
After three seconds, the display goes back
to the normal playback mode.
Adjusting the volume of the subwoofer(s)
1 Press (SOURCE) to select a source (tuner,
CD or MD).
2 Press (SOUND) repeatedly until
appears.
3 Rotate the dial to adjust the volume.
After three seconds, the display goes back
to the normal playback mode.
Tip
When you rotate the dial to turn the volume all
the way down, "Sub mute" appears and the
cutout frequency of the subwoofer is disabled.
SUB"
2 Press (SOUND) for two seconds.
3 Press (SOUND) repeatedly until “SUB*
appears.
C.off125Hz
4 Rotate the dial to select the desired cut
off frequency.
The cut-off frequency in the display
changes.
62 -► 78 —. 99 125» -
* Factory-set frequency
5 Press (SOUND) for two seconds.
After the frequency setting is complete, the
display goes back to the normal playback
mode.
157— 198 Hz
o
I/»
“D
29
Page 30

|hKi
Adjusting the volume of the bass and treble
'l ini l.in .ul|ust till' I'lllunu' of till' bliss illlll
tri'blo to host lit till’ iii'iHistii' I'liiir.ii'ti’ristu s
insilil' \*our I’.ir,
1 Press to select a source (tuner,
CD or MD).
2 Press (souNcT) repeatedly until "BAS" or
"TRE" appears.
3 Rotate the dial to adjust the volume.
After three seconds, the display goes bach
to the normal playback mode.
Adjusting the turn-over frequency
You can adjust the bass and treble turn-over
frequencies.
Turn-over frequency
Frequency (Hz)
4 Rotate the dial to select the turn-oi ■
frequency.
The turn o\ er ttvquencK's I'li.inqe ,i^
lollows:
Bass: ^
198 Hz . 250 Hz .314 Hz' . 396 Hz
Treble;
2 0 kHz -. 3.1 kHz' . 4 0 kHz 5.0 kHz
' i\u‘tor\'-si’t frequi’iici'
5 Press (SOUND) for two seconds.
rhe display goes back to the normal ^
playback mode.
Listening to each progr
source in its registered
surround menu
— Last Sound Memory (LSM)
You can listen to the same source always
same surround menu even after changing
program source or turning the unit on am
again.
1 Press (SOURCE) to select a source (tuner,
CD or MD).
2 Press (SOUND) for two seconds.
3 Press (SOUND) repeatedly until "BAS" or
'TRE" appears.
Bass adjusting mode
BAS
314 Hz
Treble adjusting mode
TRE
3.1kHz
30
Changing the line outpi level
You can change the line output level if yoi
hear distortion or other noise.
1 Press (SHIFT), then press СЮ (SET Ul
until "L.out" appears.
2 Press (D (—►) to select the desired
setting (-10 dB or -16 dB).
3 Press (SHIFT).
Page 31

With Optional Equipment
TV/Video
3 Press (T) (^).
The unit stores TV channels in the order of
their frequencies on the number buttons.
A beep sound and the setting is stored.
You can connect an optional TV tuner and TV
monitor with this unit.
Watching the TV
1 Press (SOURCE) repeatedly until "TV"
appears.
2 Push the SEEK/AMS control up or down
to select the desired TV band.
Watching a video
1 Press ( SOURCE) repeatedly until
"TV" appears.
2 Press (MODE) repeatedly to select
"Video 1."
Play back the video.
Note
“Video 2" appears if the VIDEO 2 terminal of the
TV monitor is selected.
Memorizing TV channels
automatically
The unit selects the TV channels with the
strongest signals and memorizes them in the
order of their frequency.
4 Press (SHIFT).
Notes
• The unit does not store TV channels with weak
signals. If only a few TV channels are received,
some number buttons will remain empty.
• When a preset number is indicated in the display,
the unit starts storing TV channels from the one
currently displayed.
Memorizing only the
desired TV channels
You can store up to 10 channels on the number
buttons in the order of your choice.
1 Press (SOURCE) repeatedly until "TV"
appears.
2 Push the SEEK/AMS control up or down
to tune in the TV program you want to
store on the number button.
3 Press and hold the desired number
button (CD to (To)) until you hear a
beep tone.
The number button indication appears in
the display.
Note
if you try to store another program on the same
number button, the previously stored program will
be erased.
a.
n
o
Caution
When tuning in a station while driving, use
Best Tuning Memory to prevent accidents.
1 Press (SOURCE) repeatedly until "TV"
appears.
2 Press (SHIFT), then press CD (PLAY
MODE) repeatedly until "Auto mem"
appears.
31
Page 32

storing the TV channel names
Follow the steps in "Storing the station
names" (page 14).
Displaying the TV or radio station names
Press CyED momentarily during TV or
radio reception.
Example: When receiving the FM1 band
® Preset number
(D Stored station names
@ Frequencies*
• if the name of a station is not stored, the
frequency of that station will be displayed
instead.
Notes
• It may take some time before all indications
appear in the display.
• The TV monitor does not appear during list
display.
• The contents of the preset memory cannot be
listed when the unit is in the simultaneous play
mode (page 33).
Turning off the display
During radio reception, press (ust)
again.
During TV reception, the list display on the
TV monitor will automatically turn oft after
a few seconds.
Displaying the information stored on discs
Press VhiSlJ) momentarily during CD/M playback.
Example: When CD unit 1 is selected.
® Disc numbers
@ Titles stored as custom files
@ No disc is loaded*’
® No stored titles*^
d) TOC information has not been identifie«
yet*’
*' A blank space is displayed next to a disc
numbers representing empty slots in the disc
magazine.
*-’ If a title is not registered in the custom file,
"****** " is displayed.
*’ If the disc information has not been read yet,
is displayed.
Notes
• It may take some time until all indications appe.
in the display.
• The TV program does not appear during list
display.
• The contents of the preset memory cannot be
listed when the unit is In the simultaneous play
mode.
Turning off the display
Press ( LIST ) again.
32
Page 33

Watching the TV or video
while listening to a CD or
MD — Simultaneous Play
The simultaneous play function does not work
while you are listening to the radio.
Additional
Information
Precautions
1 Press ( SOURCE ) for two seconds.
SML
s' I I
'J' i--?
2 Press®!*-).
SML
s'"//
'IU\'
3 Press ( SOURCE ) repeatedly to select a CD
or MD.
SML
s' I U,
'MDc
4 Press ® (—►).
SML
s'l
MD :
-► ^/1 I 'S
5 Press ( SOURCE) repeatedly to select a TV
or video.
SML
s' I I
ND
6 Press ( SOURCE) for two seconds.
Simultaneous Play starts.
• If your car was parked in direct sunlight
resulting in a considerable rise in
temperature inside the car, allow the unit to
cooj^ff before operating it.
• If no power is being supplied to the unit,
check the connections first. If everything is in
order, check the fuse.
• If no sound comes from the speakers of
two-speaker systems, set the fader control to
the centre position.
• If your car is equipped with a power
ante'nna, it will extend automatically while
the unit is operating.
If you have any questions or problems
concerning your unit that are not covered in
this manual, please consult your nearest Sony
dealer.
Notes on handling CDs
A dirty or defective disc may cause sound
dropouts while playing. To enjoy optimum
sound, handle the disc as follows.
Handle the disc by its edge. To keep the disc
clean, do not touch the surface.
Do not stick paper or tape on the labelled
surface.
I
Q.
0)
O
>
CL
a.
o
D
Ù)
s
o'
lOt'
,\»'i
»e'
If you want to change the sound to CD or MD
while watching the TV or video with its sdUnd,
please follow the steps, but press ®) (—►) in
step 2 and press ®) (<—) in step 4.
Returning to normal mode
To cancel the CD or MD, follow the steps above and select -- in step 3.
To cancel the TV or video, follow the steps above and selectin step 5.
Note
If you press the EJECT button on a CD/MD unit
v^He the unit is in simultaneous play mode.
Simultaneous Play is canceled.
continue to next page -
33
0
(S)
Page 34

1 ’’v» n\'l V'\ pv'-'l’ 1 iìr J io ^iirv'v't NVin libili
luMl svHllOfs Sluh JS Ilo! .ili (.UkIn. or
(Ili-m in .1 i.ii p.iiki-ii in JiiiVt siinlii;lit uhi-n
llu-ri- i'.in hi- <1 i'onsKli-r.ibli- riM- in tlu(i’m[ior,lluro insiiii- (Ih- c.ir.
Boforc playing, doan tho discs with an optional
cleaning cloth. Wipe each disc from the center
out.
Do not use solvents such as benzine, thinner,
commercially available cleaners or antistatic
spray intended for analog discs.
Maintenance
Fuse replacement
when repl.it'ing the fuse, lx- sure to use oi
th.ll ni.it. iii'.s tile .iniperagi.- di-scribei.1 on t
liise. It llu- fuse blows, check the power
eoniu'ction and replace the fuse. If the fuM
blows agiiin after replacement, there may
internal maltuMCtion. In such a case, consu
x our nearest Sony dealer.
Fuse (10 A)
Warning
Never use a fuse with an amperage rating
exceeding the one supplied with the unit a
this could damage the unit.
Note on moisture condensation
On a rainy day or in a very damp area.
moisture may condense on the lenses inside
the CD player. Should this occur, the unit will
not operate properly. In this case, remove the
disc and wait for about an hour until the
moisture evaporates.
When you play 8 cm (3 in.) CDs
Use the optional Sony compact disc single
adapter (CSA-8) to protect the CD player from
being damaged.
Cleaning the connectors
The unit may not function properly if the
connectors between the unit and the front
panel are not clean. To prevent this, open tl
front panel by pressing (OPEN), thendetac
and clean the connectors with a cotton swa!
dipped in alcohol. Do not apply too much
force. Otherwise, the connectors may be
damaged.
Back of the front panel
Notes
• For safety, before cleaning the connectors, tur
off the engine and remove the key from the
ignition switch.
• Never touch the connectors directly with your
fingers or any metal device.
34
Page 35

Dismounting the unit
1 Press the clip inside the front cover with
a thin screwdriver, and lever the front
cover free.
2 Repeat step 1 on the left side.
The front cover is removed.
3 Use a thin screwdriver to push in the clip
on the left side of the unit, then pull out
the left side of the unit until the catch
clears the mounting.
4 Repeat step 3 on the right side.
5 Slide the unit out of the mounting.
>
Q.
Q.
o'
o
35
Page 36

Specifications
AUDIO POWER SPECIFICATIONS
POWER OUTPUT AND TOTAL HARMONIC DISTORTION
IP watts per channel minimum continuous average power into
4 ohms, 4 channels driven from 20 Hz to 20 kHz with no more
1 % total harmonic distortion.
Other specifications CD player section
System
Signal-to-noisc ralio
I roi-iiioncy response
Wo\N’ and flutter
Laser Diode I’roperlies
Material
Wavelength
Lmission Duration
I-aser output power
* This output is the value measured at a distance
of 200 mm from the objective lens surface on the
Optical Pick-up Block.
Compact disc digital audio Outputs
system
100 dO
10 - 20,(X)0 Hz
Below measurable limit
GaAlAs
780 nm
Continuous
Less than 44.6 Tone controls
Tuner section
FM
Tuning range 87.5 - 107.9 M Hz (7’/ 4x2’ /8X6 '/On
Antenna terminal External antenna connector (w/h/d)
Intermediate frequency
Usable sensitivity
Selectivity 75 dB at 400 kHz
Signal-to-noise ratio
Harmonic distortion at 1 kHz BUS cable (supplied ^
Separation
Frequency response 30 - 15,000 Hz
10.7 MHz
8dBf
50 dB at 200 kHz
65 dB (stereo),
68 dB (mono)
0.7 % (stereo).
0.4 % (mono)
35 dB at 1 kHz
AM
Tuning range
Antenna terminal External antenna connector
intermediate frequency 10.7] MHz/450 kHz
Sensitivit\' 30 iiV
530 - 1,710 kHz
Power amplifier section
Outputs
speaker impedance
Maximum power output 45 W X 4 (at 4 ohms)
Speaker outputs
(sure seal connectors)
4-8 ohms
General
HQ output
Line outputs (3)
I’ower antenna ri’Lu
control lead
Power am plificT con
lead
Telephone A PI coni
load
Illumination control ,
Bass ±8 dB at 100 H/
Power requirements
Dimensions
Mounting dimensions Approx. 182 X 53 X 1«
Mass
Supplied accessories
Optional accessories
Optional equipment
Treble ±8 dB at 10 k!
12 V DC car batter)'
(negative ground)
Approx. 178 X 50 X 1
(7'/8X2 x7'/4in.)
(w/h/d)
Approx. 1.4 kg (3 lb.
Rotary commander (
Parts for installation
connections (1 set)
Front panel case (1)
Wireless remote RM'
an RCA pin cord)
RC-61 (1 m), RC-62 (:
Compact disc single
adapter CSA-8
CD changer
CDX-805 (10 discs),
CDX'715 (10 discs).
CDX-T65 (6 discs),
CDX-T62 (6 discs)
MD changer
MDX-62
Digital equalizer pream
XDP-210EQ
Source selector
XA-C30
TV tuner
XT-40Y, etc.
36
Design and specifications are subject to chang
without notice.
Page 37

Troubleshooting guide
The following checklist will help you remedy the problems you may encounter with your unit.
Before going through the checklist below, check the connection and operating procedures.
General
Problem
No sound.
The contents of the memory
have been erased.
Indications do not appear in the
display.
CD/MD playback
Problem
A disc cannot be loaded.
Playback does not begin.
A disc is automatically ejected.
The operation buttons do not
function.
The sound skips due to
vibration.
Cause/Solution
•Cancel the ATT function.
• Set the fader control to the center position for two-speaker
systems.
• Rotate the dial in a clockwise direction to adjust the volume.
• The power cord-or battery has been disconnected.
• The reset button has been pressed.
—► Store again into the memory.
Remove the front panel and clean the connectors. See "Cleaning
the connectors" (page 34) for details.
Cause/Solution
• Another CD is already loaded.
• The CD is forcibly inserted upside down or in the wrong way
(MD).
Defective MD or dusty CD.
The ambient temperature exceeds 50°C (122°F).
Press the reset button.
• The unit is installed at an angle of more than 60°.
• The unit is not installed in a sturdy part of the car.
>
Q.
Q.
o'
ZJ
Radio reception
Problem
Preset tuning is not possible. • Memorise the correct frequency.
Automatic tuning is not
possible.
The "ST" indication flashes.
Cause/Solution
• The broadcast signal is too weak.
The broadcast signal is too weak.
—► Use manual tuning.
'• Tuné in the frequency accurately.
• The broadcast signal is too weak.
—► Set to the MONO mode (page 14).
DSP functions
Problem Cause/Solution
No sound, or sound is too low.
The volume of the rear speakers may have been automatically
lowered in order to maximize the effect of the listening position
adjustment.
—► Rotate the dial in a clockwise direction to adjust the balance.
The speaker balance can be set separately for DSP on mode
and DSP off mode (page 28).
37
Page 38

Error displays (when an optional CD/MD unit is connected)
1 1h' iolKuN’ing inditeitions wilt lijsh lor liw M'tonds, .1 lui an alarm .sound will be hoard
Display Cause
NO Mag
NO Disc
NG Discs
Error”
Blank”
Push Reset
Not Rea<dy
HighTemp
•' when an error occurs during playback of an MD or CD, the disc number of the MD or CD does not appi
in the display.
The disc number of the disc causing the error appears in the display.
If the above-mentioned solutions do not help improve the situation, consult your nearest Sony
dealer.
The disc magazine is not inserted in
the 0)/Mi^ unit.
No disc is inserted in the CO / MO unit.
A CD/MD cannot play because of
some problem.
A CD is dirty or insortod upside
down.*^
An MD does not play because of some
problem.*^
No tracks have been recorded on an
MD.*^
The CD/MD unit cannot be operated
because of some problem.
The lid of the MD unit is open or MDs
are not inserted properly.
The ambient temperature is more than
50“C (122°F).
Solution
Insert the disc magazine in the Cl
MD unit.
Insert discs in the CD/MD unit.
In.sert another CD/MD.
Clean or insert tile CD correctly.
Insert another MD.
Flay an MD with tracks recorded i
it.
Press the reset button of the unit.
Close the lid or insert the MDs
properly.
Wait until the temperature goes di
below 50°C (122°F).
38
 Loading...