

Page 1
Compact Disc
Player
3-866-363-23 (1)
Operating Instructions
Mode d’emploi
GB
FR
CDP-CX350
1999 by Sony Corporation
Page 2
WARNING
Welcome!
About This Manual
To prevent fire or shock
hazard, do not expose
the unit to rain or
moisture.
To avoid electrical shock,
do not open the cabinet.
Refer servicing to
qualified personnel only.
This appliance is classified as a CLASS 1
LASER product.
The CLASS 1 LASER PRODUCT
MARKING is located on the rear
exterior.
Thank you for purchasing the Sony
Compact Disc Player. Before operating
the unit, please read this manual
thoroughly and retain it for future
reference.
The instructions in this manual are for
model CDP-CX350.
Conventions
• Instructions in this manual describe
the controls on the player.
You can also use the controls on the
remote if they have the same or
similar names as those on the player.
• The following icons are used in this
manual:
Indicates that you can do the
task using the remote.
Indicates hints and tips for
making the task easier.
This equipment is intended for home
entertainment purposes only. The
warranty shall be invalidated if used
in commercial environments, such as
by disc jockeys, etc., even within the
Warranty Period.
For the customers in Canada
CAUTION
TO PREVENT ELECTRIC SHOCK, DO
NOT USE THIS POLARIZED AC PLUG
WITH AN EXTENSION CORD,
RECEPTACLE OR OTHER OUTLET
UNLESS THE BLADES CAN BE FULLY
INSERTED TO PREVENT BLADE
EXPOSURE.
GB
2
Page 3

TABLE OF CONTENTS
Getting Started
Unpacking............................................................................................................................. 4
Hooking Up the System...................................................................................................... 4
About the Supplied Remote Commander........................................................................ 5
Setting Up the Remote ........................................................................................................ 6
Connecting Another CD Player ......................................................................................... 9
Inserting CDs...................................................................................................................... 10
Playing a CD.......................................................................................................................... 12
Playing CDs
Using the Display .............................................................................................................. 14
Locating a Specific Disc .................................................................................................... 16
Specifying the Next Disc to Play ..................................................................................... 18
Playing the Disc Which was Just Inserted – Easy Play ................................................ 18
Locating a Specific Track or a Point in a Track ............................................................. 19
Playing Repeatedly............................................................................................................ 21
Playing in Random Order (Shuffle Play) ....................................................................... 21
Creating Your Own Program (Program Play)............................................................... 22
Playing Using a Timer....................................................................................................... 26
Controlling Another CD Player (Advanced Mega Control) ....................................... 27
Fading In or Out................................................................................................................. 28
Playing Alternately (No-Delay Play/X-Fade Play) ...................................................... 29
Controlling the Player by Another unit.......................................................................... 29
GB
Storing Information About CDs (Custom Files)
What You Can Do With the Custom Files ..................................................................... 30
Labeling Discs (Disc Memo)............................................................................................. 30
Storing Custom File Information Using a Keyboard.................................................... 34
Storing Specific Tracks (Delete Bank) ............................................................................. 34
Grouping Discs (Group File)............................................................................................ 35
Storing Your Favorite Tracks (Hit List) .......................................................................... 38
Additional Information
Precautions ......................................................................................................................... 40
Notes on CDs...................................................................................................................... 40
Troubleshooting ................................................................................................................. 41
Specifications ...................................................................................................................... 41
Index.......................................................................................................................................... 42
GB
3
Page 4
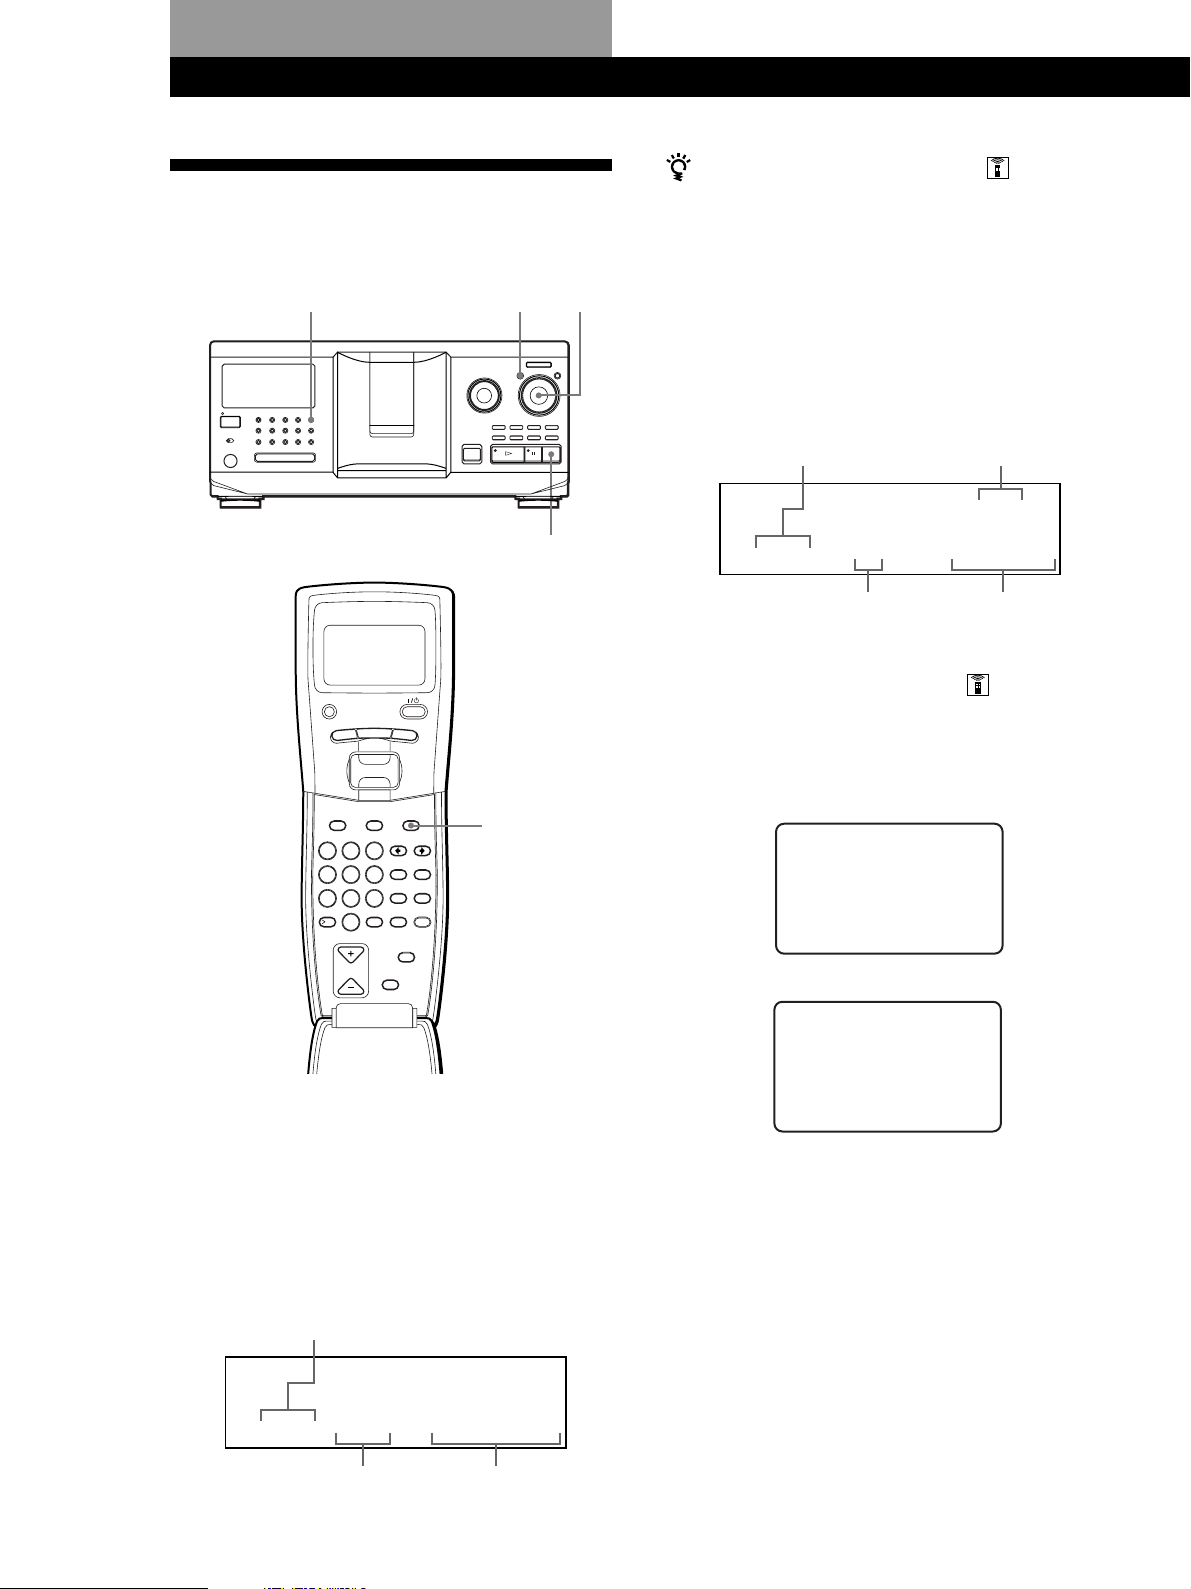
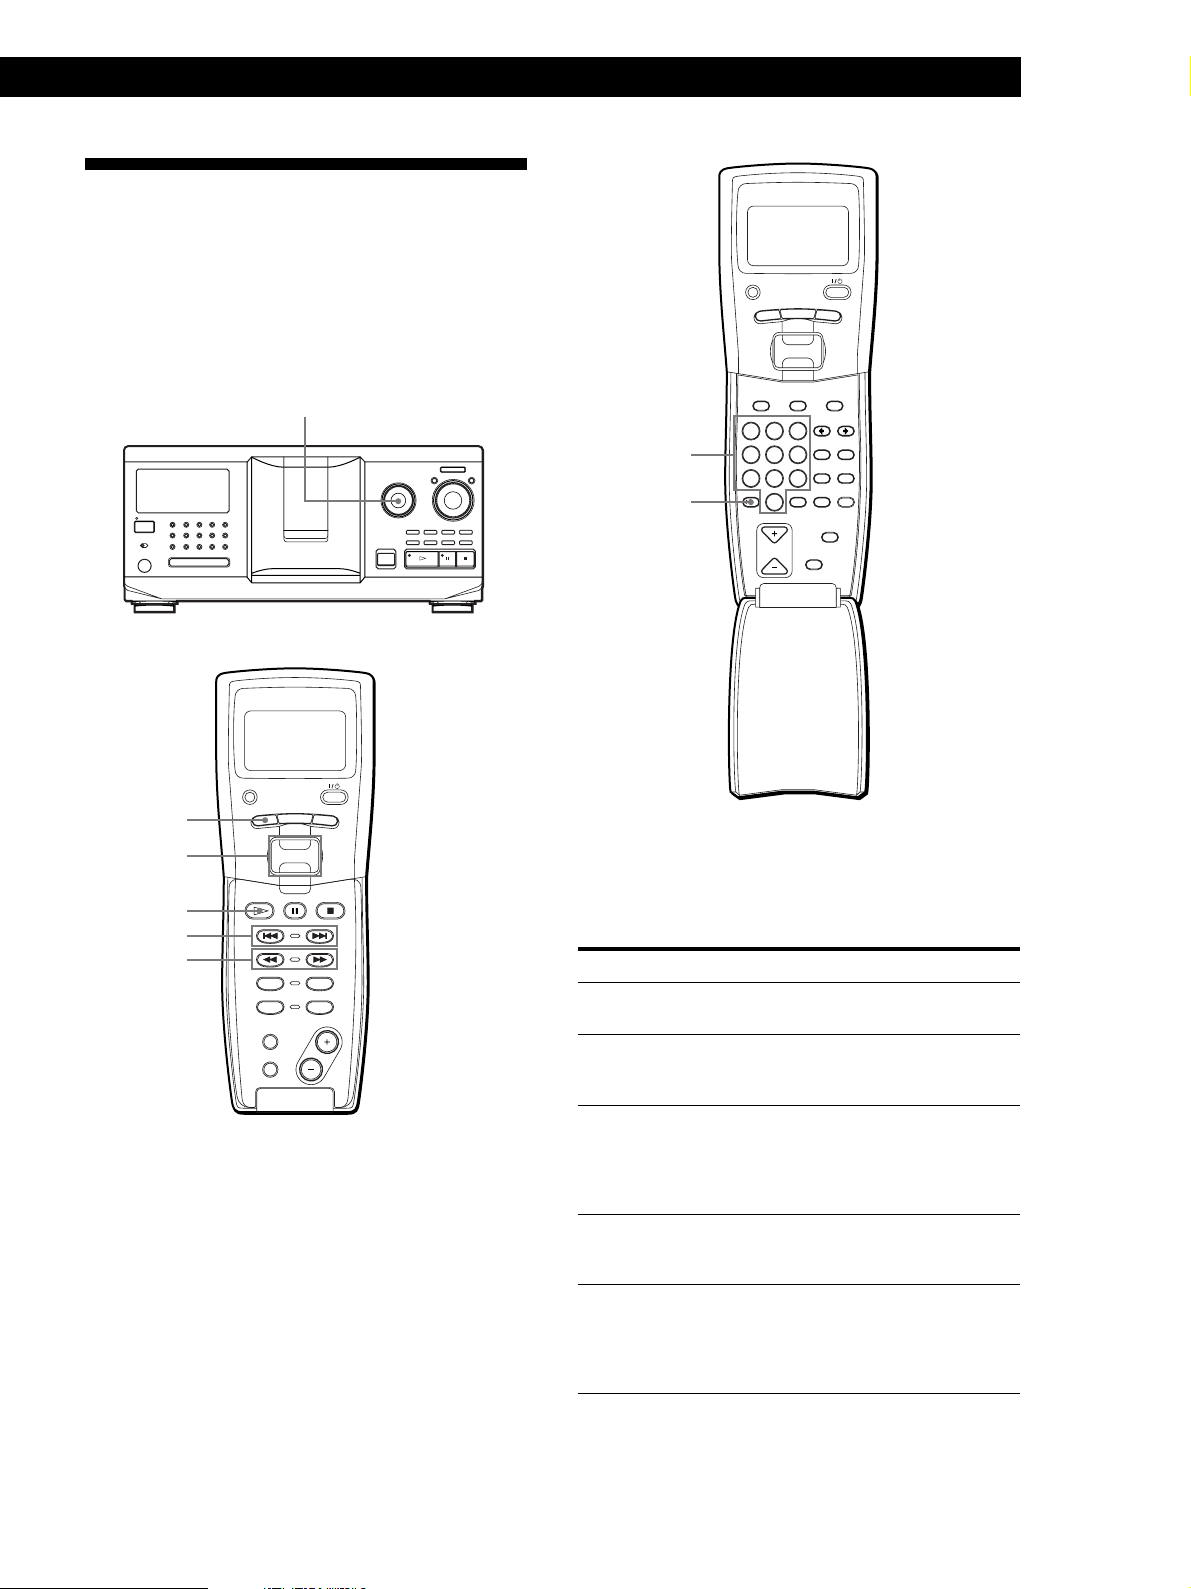
Getting StartedGetting Started
Unpacking
Check that you received the following items:
• Audio cord (1)
• CD booklet holders (3) and label (1)
• Remote commander (remote) (1)
• Size AA (LR6) batteries (3)
How to use the CD booklet holder
The CD booklet holder helps you locate discs easily.
After you have inserted discs into the player, you can put
the CD booklet (which comes with a CD) into the
supplied holder. Put two CD booklets facing back to back
into a pocket. Stick the number label on each pocket,
matching the number of the disc slot where you have
inserted the disc. You can put up to 300 CD booklets into
the holders.
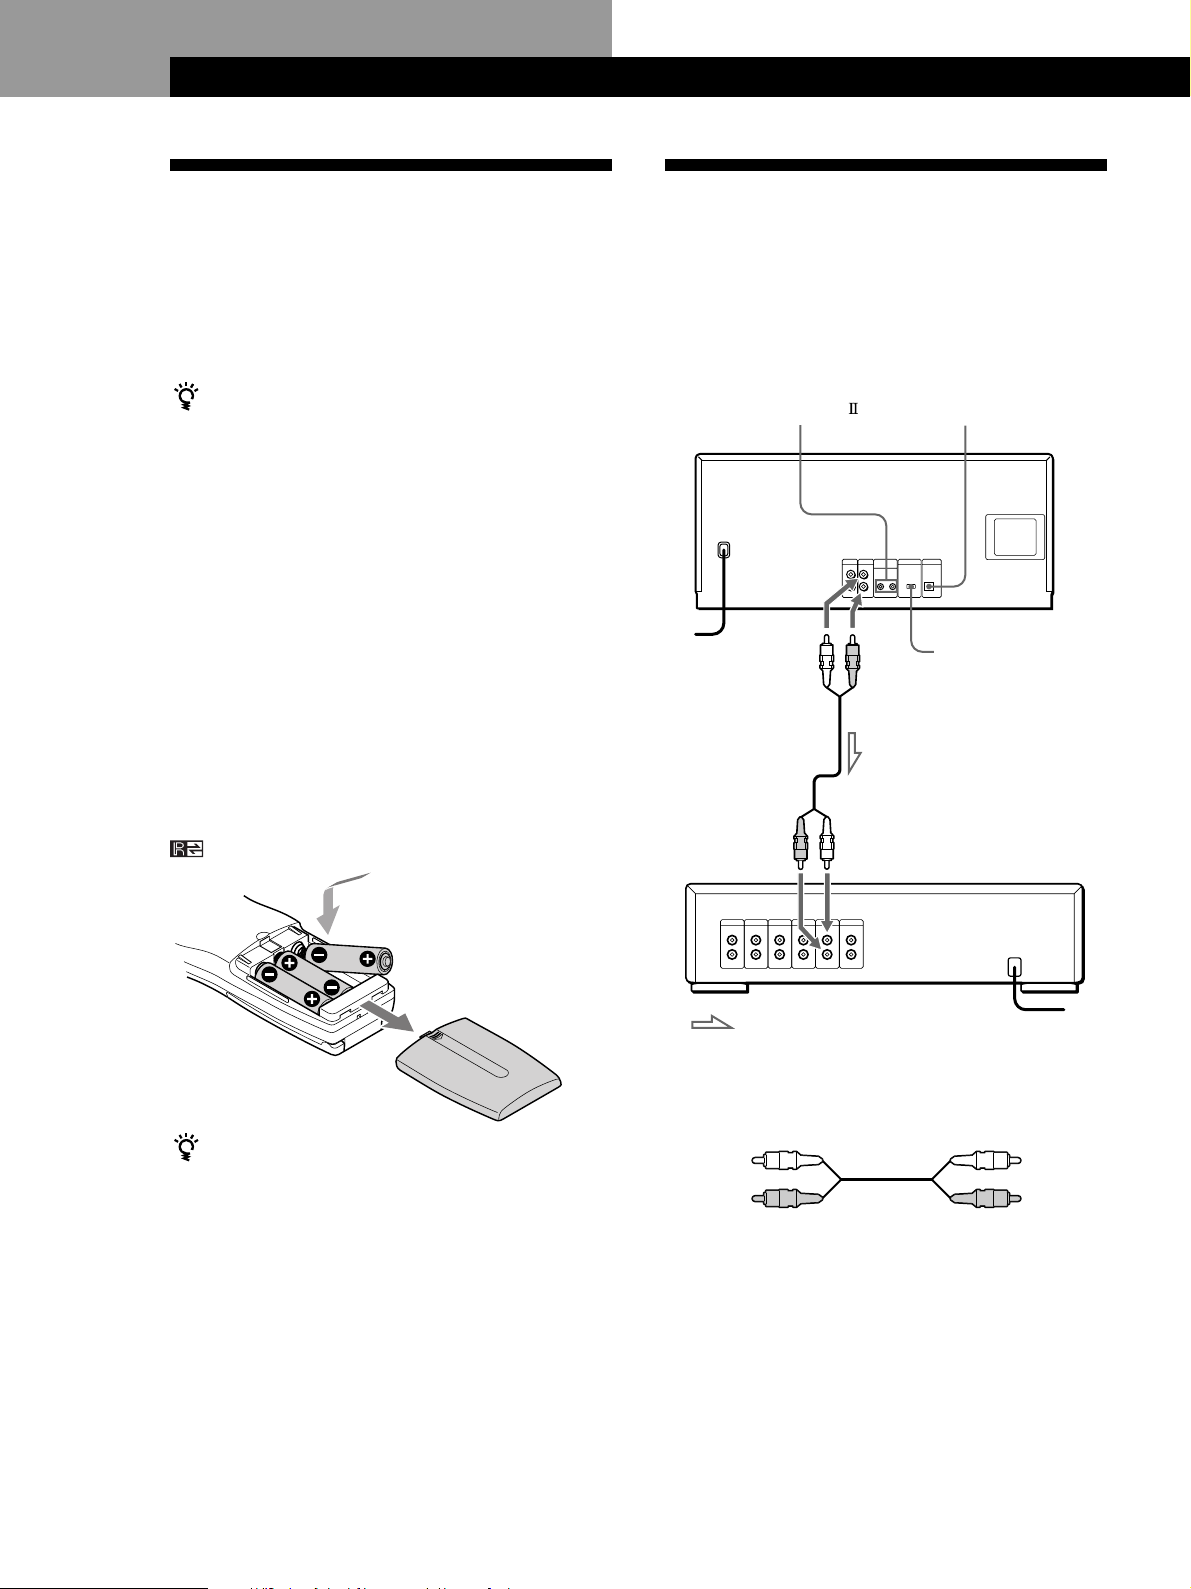
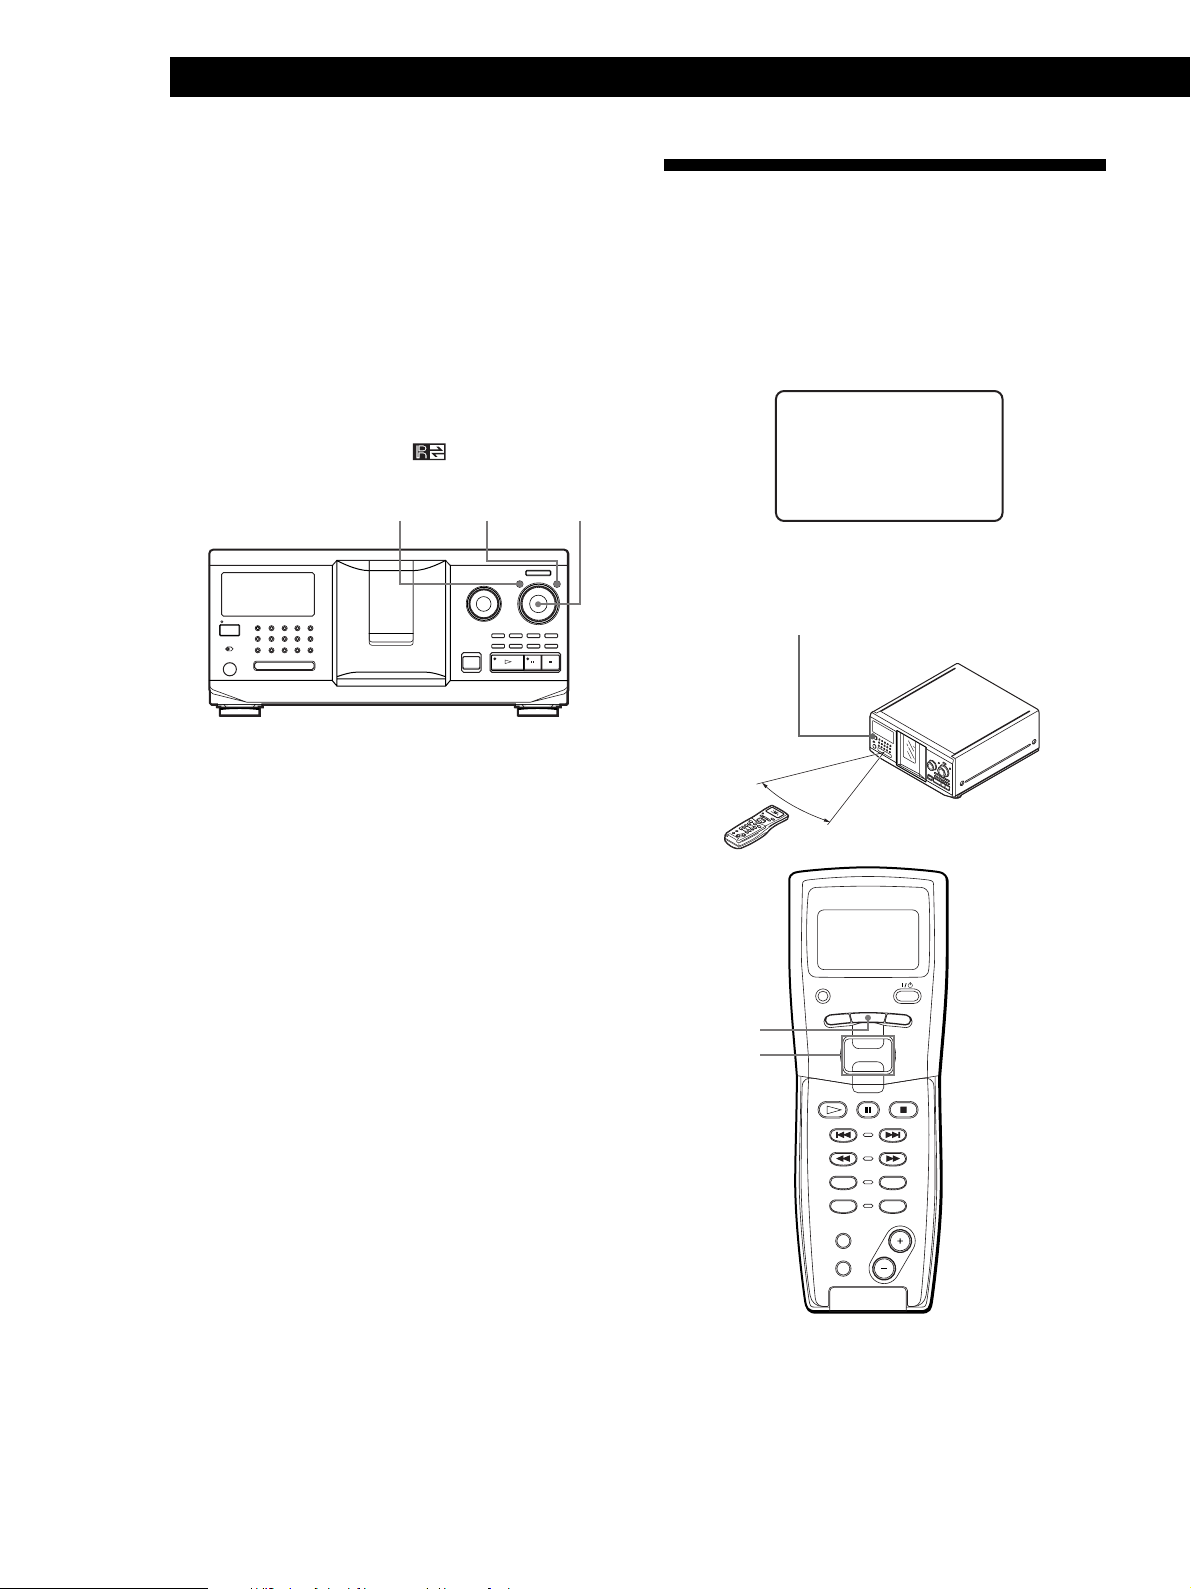
Inserting batteries into the remote
You can control the player using the supplied remote.
Insert three size AA (LR6) batteries (supplied) by
matching the + and – ends on the batteries to the
diagram inside the battery compartment.
Insert the negative (–) end first, then push in and down
until the positive (+) end clicks into position.
When using the remote, point it at the remote sensor
on the player.
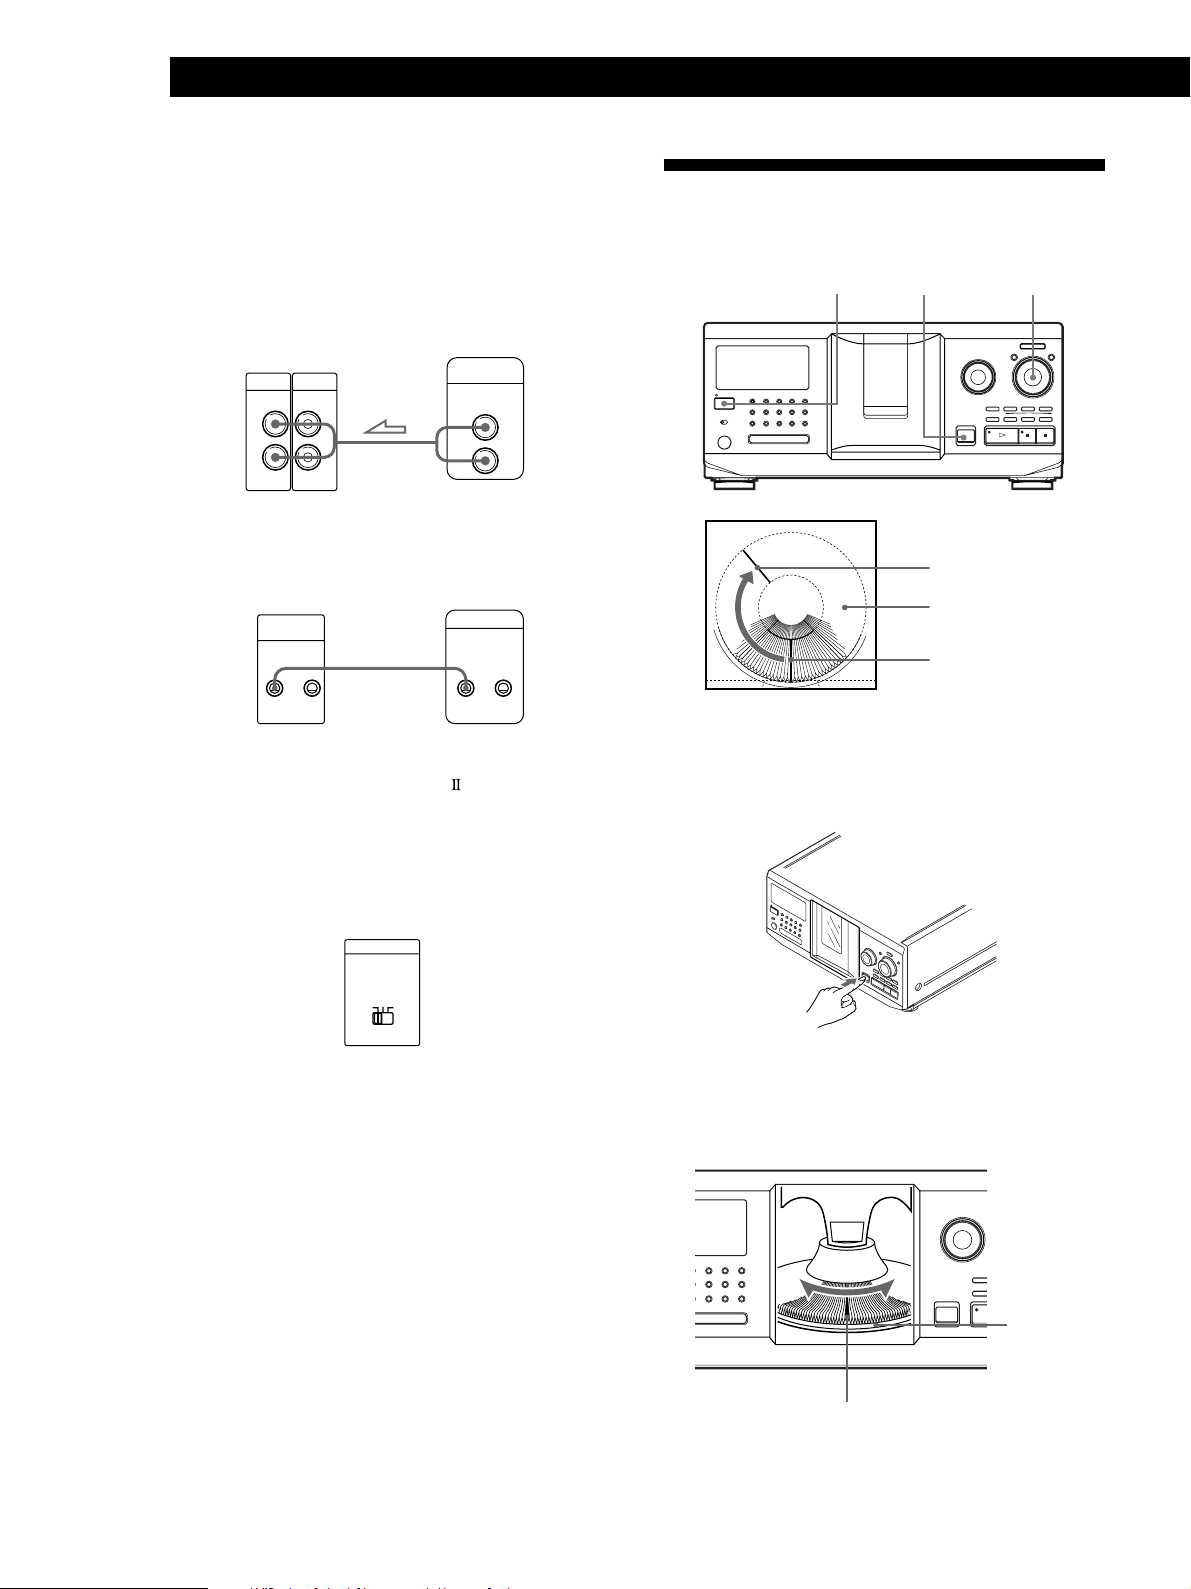
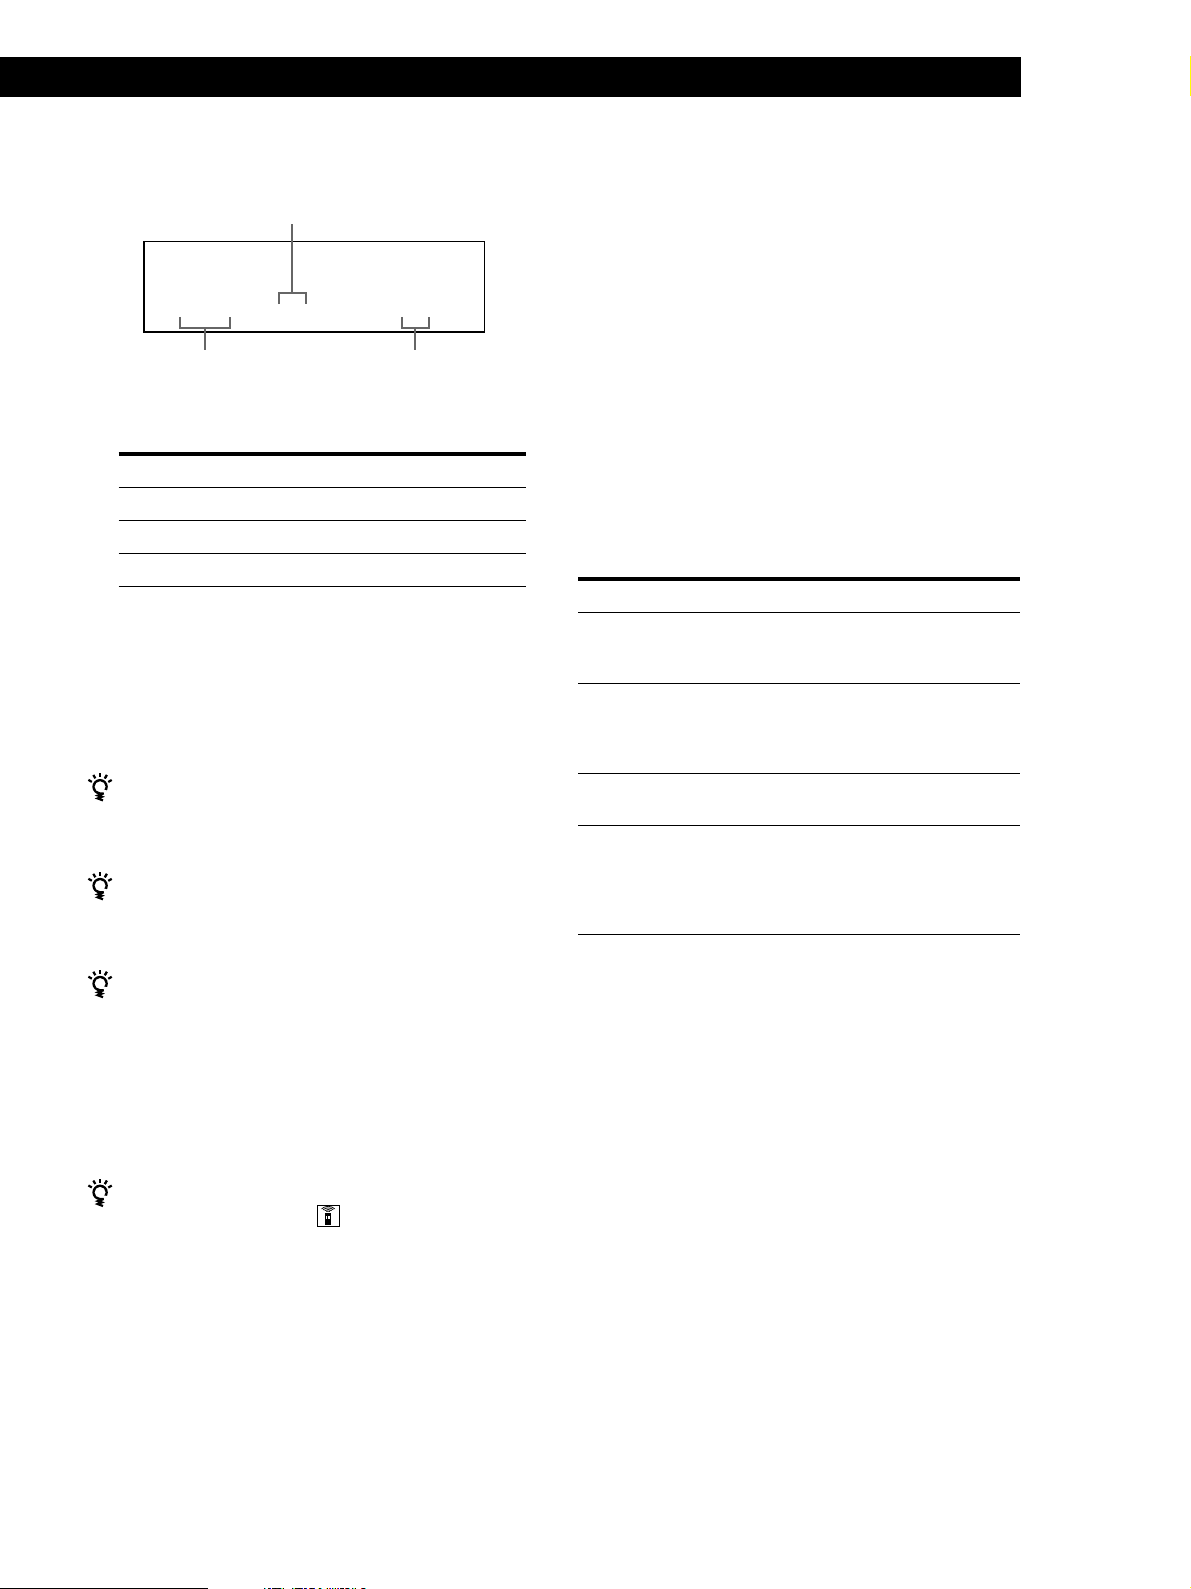
Hooking Up the System
Overview
This section describes how to hook up the CD player to
an amplifier. Be sure to turn off the power of each
component before making the connections.
CONTROL A1
To an AC outlet
To line output (L)
To audio input
DIGITAL OUT
(OPTICAL)
CD player
COMMAND MODE
To line output (R)
Amplifier
: Signal flow
To an AC outlet
What cords will I need?
Audio cord (1) (supplied)
When to replace batteries
If i flashes in the remote’s display, replace all the
batteries with new alkaline batteries. Use of battery types
other than alkaline batteries, such as manganese
batteries, may not last longer than the alkaline batteries.
The loaded memory in the remote will be retained for a
few minutes while you replace the batteries.
White
(L)
Red
(R)
White
(L)
Red
(R)
Notes
• Do not leave the remote near an extremely hot or humid
place.
• Do not drop any foreign object into the remote casing,
particularly when replacing the batteries.
• Do not expose the remote sensor to direct sunlight or leave
too near lighting apparatuses. Doing so may cause a
malfunction.
• If you do not use the remote for an extended period of time,
remove the batteries to avoid possible damage from battery
GB
4
leakage and corrosion.
Page 5
Getting Started
Playing CDsGetting Started
Hookups
When connecting the audio cord, be sure to match the
color-coded cords to the appropriate jacks on the
components: Red (right) to Red and White (left) to
White. Be sure to make connections firmly to avoid
hum and noise.
CD player
LINE2ND CD
IN OUT
L
R
L
R
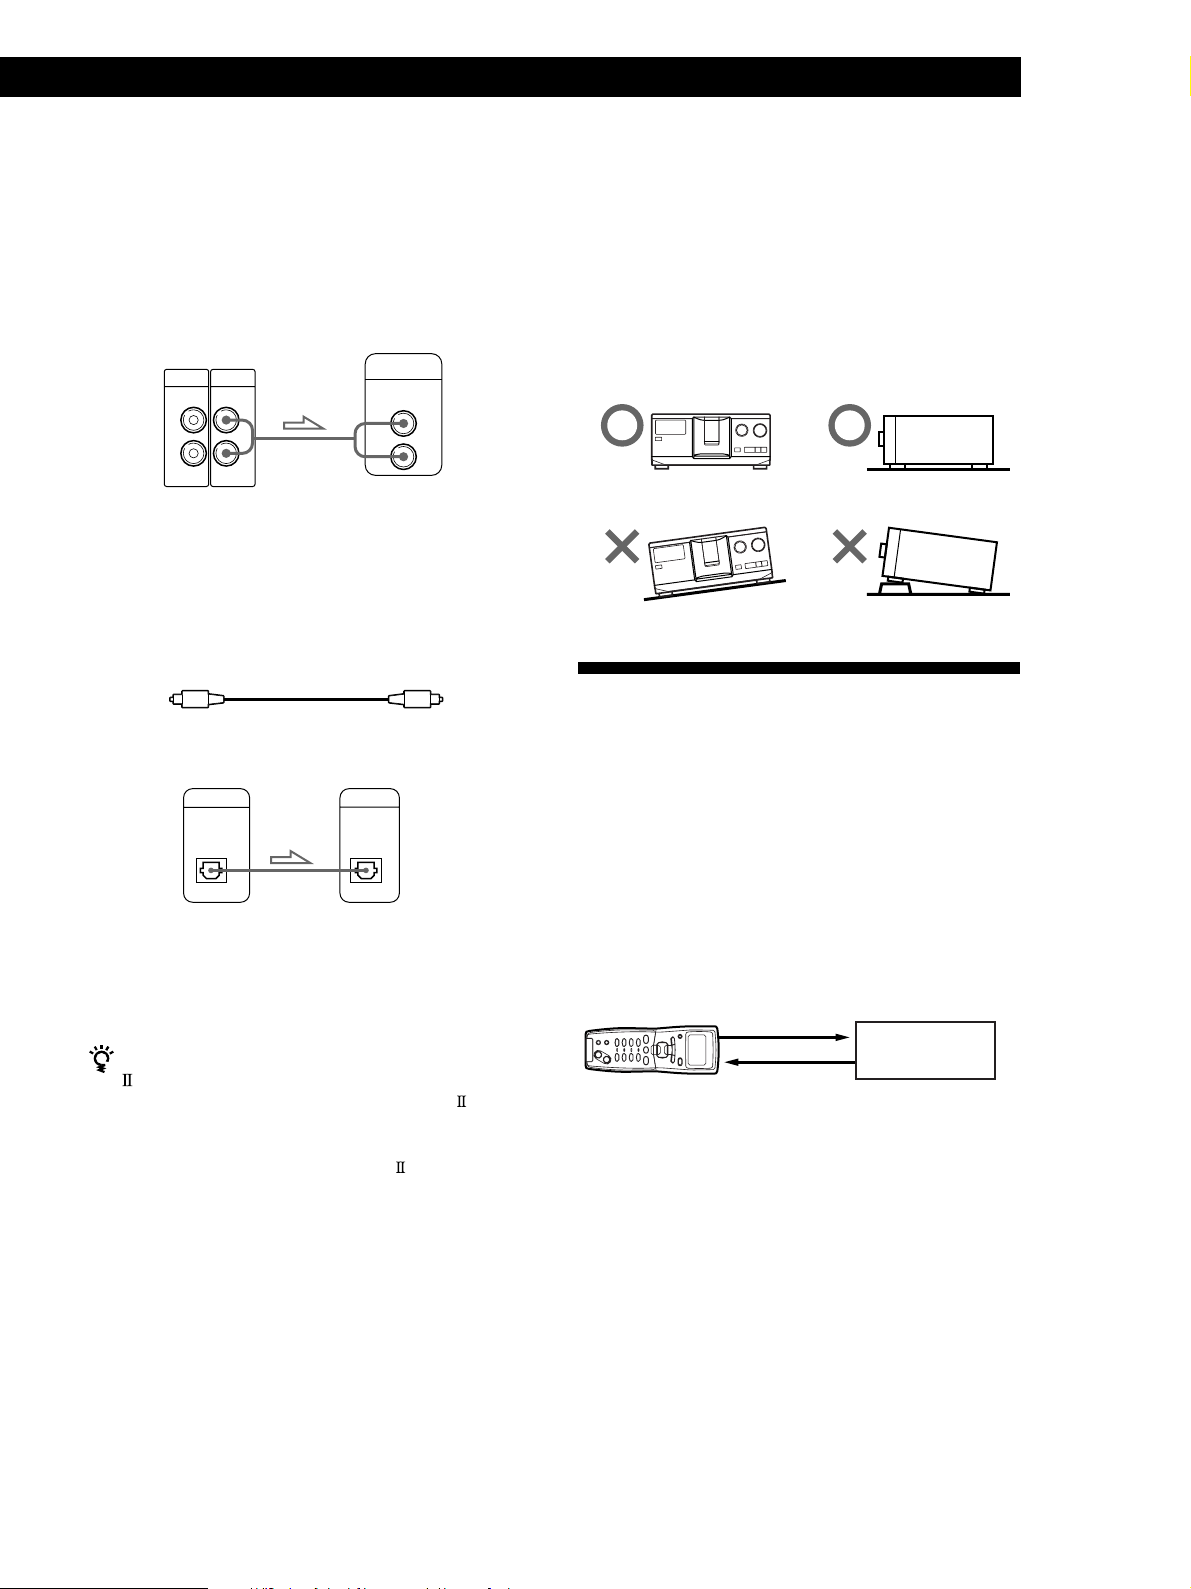
• If you have a digital component such as a digital
amplifier, D/A converter, DAT or MD
Connect the component via the DIGITAL OUT (OPTICAL)
connector using an optical cable (not supplied). Take off the
cap and plug in the optical cable.
POC-15
Optical cable (not supplied)
Amplifier
INPUT
CD
L
R
Connecting the AC power cord
Connect the AC power cord to a wall outlet.
Note on placement of the player
Be sure to place the player in a flat, horizontal place.
If the player is left in a slanted position, it may cause a
malfunction or damage the player.
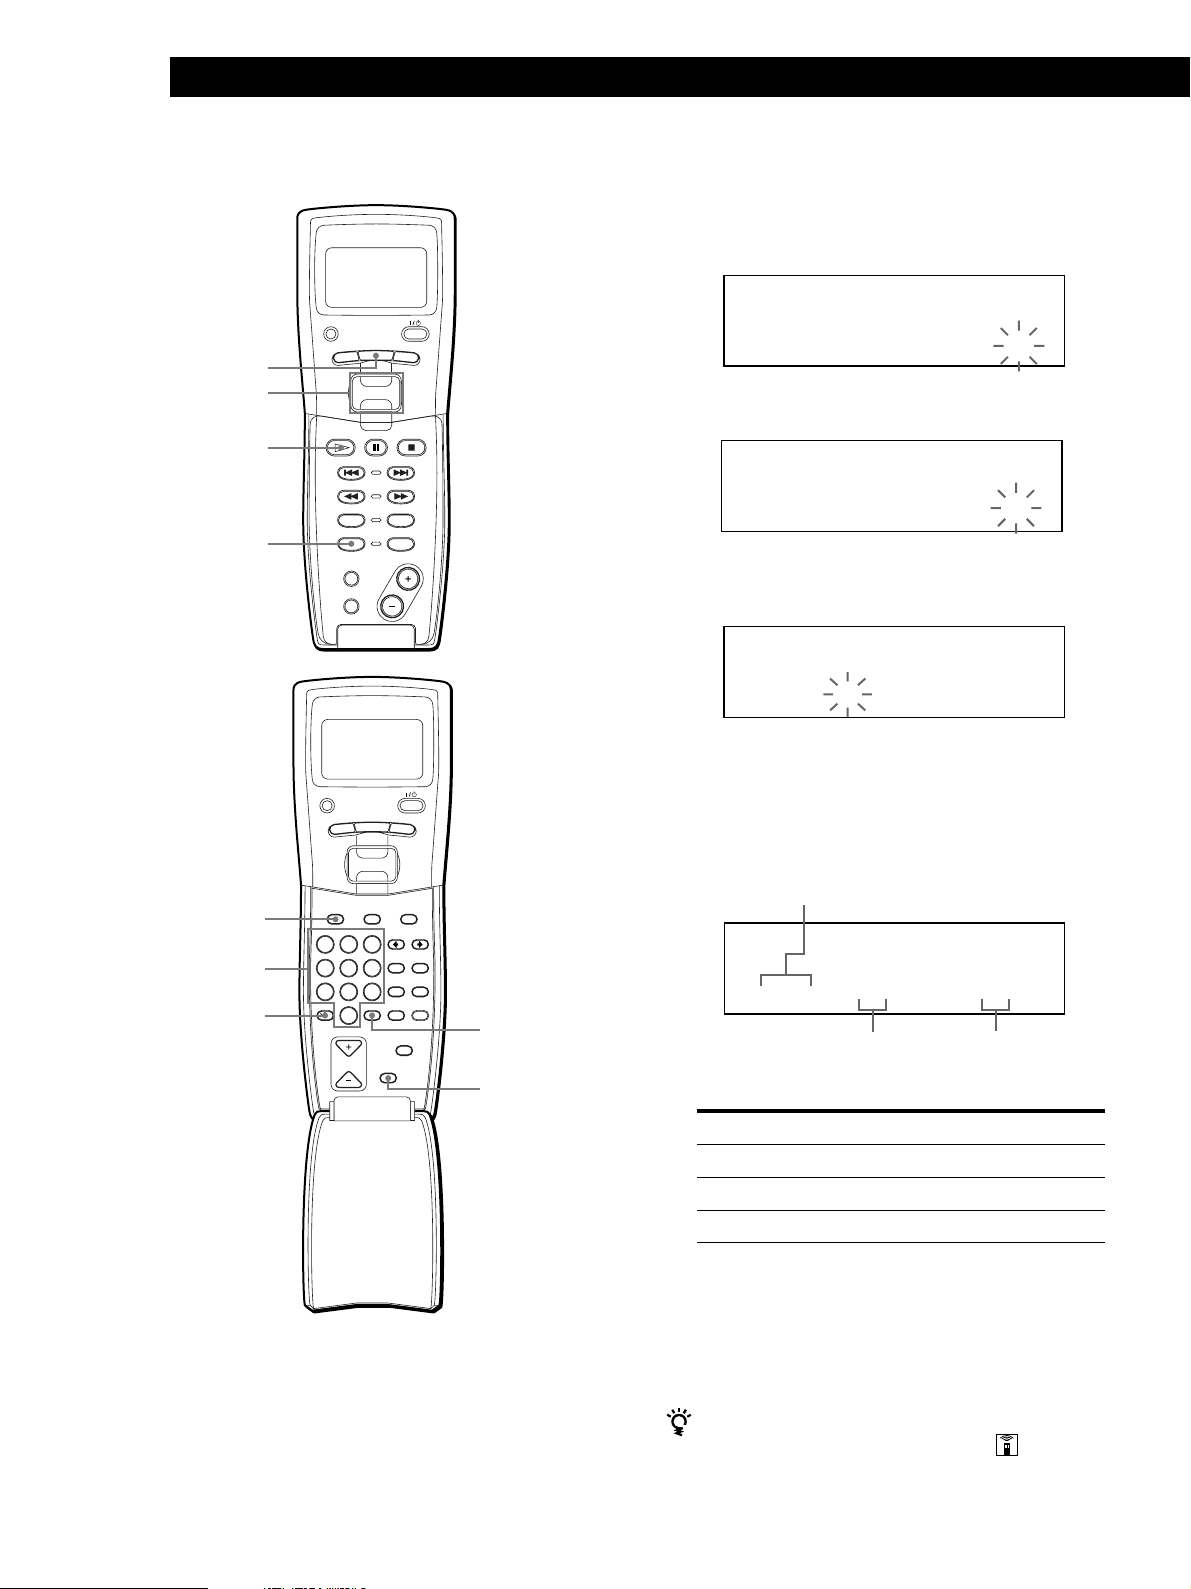
About the Supplied Remote
Commander
CD player
DIGITAL OUT
OPTICAL
Digital component
DIGITAL INPUT
OPTICAL
Note
When you connect via the DIGITAL OUT (OPTICAL)
connector, noise may occur when you play CD software
other than music, such as a CD-ROM.
If you have a Sony component with the CONTROL A1
jack
Connect the component via the CONTROL A1 jack.
You can simplify the operation of audio systems
composed of separate Sony components. For details, refer
to the supplementary “CONTROL A1 Control
System” instructions.
Understanding the 2 way remote system
This remote operates under a 2 way remote system.
With the 2 way remote system, the component
responds to signals sent from the remote by sending
additional signals (information about the status of the
component, text data, etc.) back to the remote. Thus,
operations are performed as a result of communication
between the remote and the component.
Component
When using a home entertainment system comprised
of several components compatible with the 2 way
remote system, please restrict 2 way remote system
operation to a single component. Normally, turn off the
2 way remote system on all components except the
receiver. If you would like to turn off the player’s 2
way remote system, see “Turning off a player‘s
response to remote signals” on page 6.
GB
5
Page 6
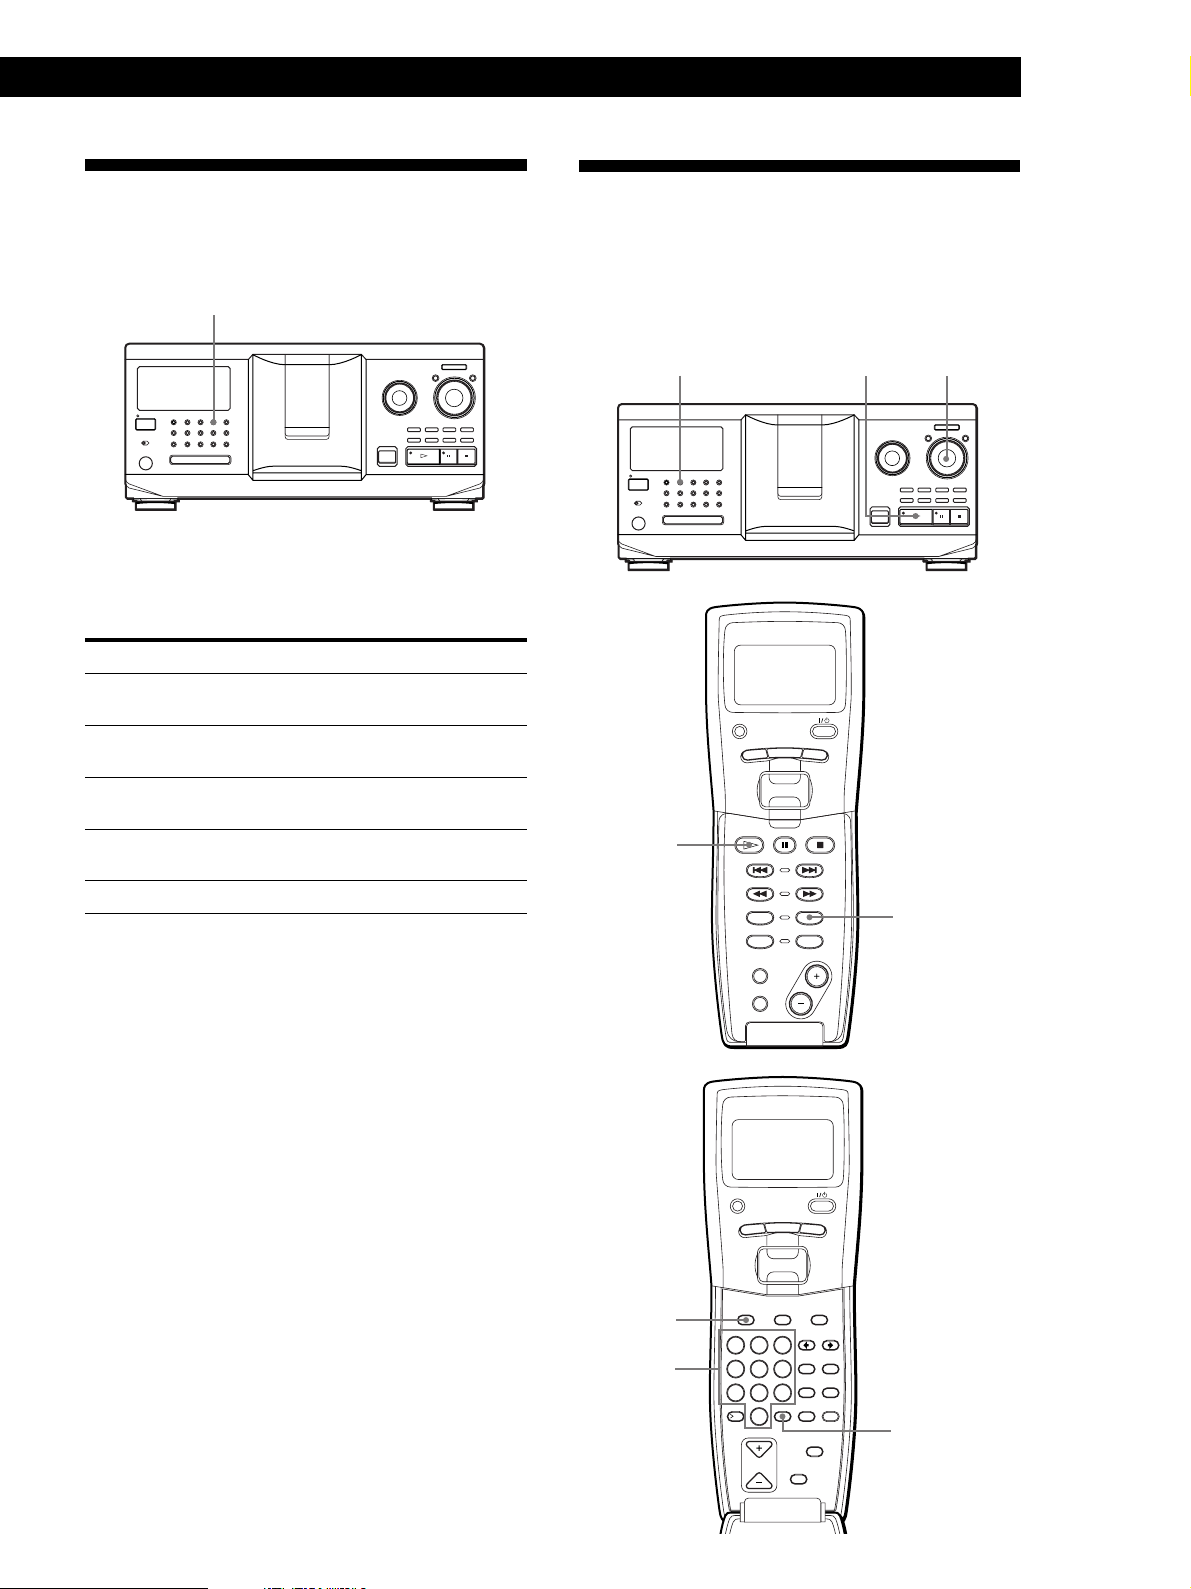
Getting Started
an ' t recei ve
elPaseturn
to a main unit
hi
C
tsREMOTE
Turning off the player’s response to remote
signals
Setting Up the Remote
To use the remote supplied with another component
compatible with the 2 way remote system, you must
turn off this player’s response to signals of the remote
supplied with this player.
Set the 2 way remote system to off when:
• you use the remote as RM-TP501, RM-TP501E,
RM-LJ301 supplied with the receiver/amplifier (you
can operate Disc 1 to Disc 200 only).
• you use the remote with the
mark supplied with
the receiver/amplifier.
MENU/NO YES
I / u
JOG
+100
1 Press MENU/NO.
This section describes how to prepare the supplied
remote for operation.
Press I/u on the player to turn the player on.
If the following message appears in the remote’s
display while setting up the remote, point the remote
at the player as illustrated below.
Note that the display disappears automatically if you
don’t proceed for more than a few moments.
I/u
30°
2 Turning the JOG dial until “2WAY OFF ?” appears
in the display window.
3 Press YES.
When you connect the player to CDP-CX260 or CDPCX88ES, press OPERATE on the transmitter/receiver
to turn it off, and set the 2 way remote system of the
player to on.
To return to normal setting
After following steps 1 and 2, and “2WAY ON ?” is displayed,
then press YES.
Notes
• When you use the remote to operate more than one unit,
position the units so that each unit can receive the signals of
the remote.
• When you use this player with a receiver/amplifier, turn
the receiver/amplifier on when using this player.
MENU
Easy scroll
key
PLAYER SELECT
TRACK
CONTINUE
PROGRAM
MEMO SCAN
TIME/TEXT
MENU
PUSH ENTER
DISC
SKIP
BACK
SHUFFLE
REPEAT
GB
6
Page 7
Getting Started
Player check
Memo l o ad i ng
Memo r y c l ea r
Contrast adjust
CD1
aster player
= CD1/300d iscs
M
CD1
aster player
= CD1/300d iscs
= CD3/ 51d iscs
nd
M
2 player
CD1
Memo se a r c h
Program play
Pr ogram i nput
Group se lec t
CD1
Player check
Memo l o ad i n g
Memo r y c l ea r
Contrast adjust
CD1
Playing CDsGetting Started
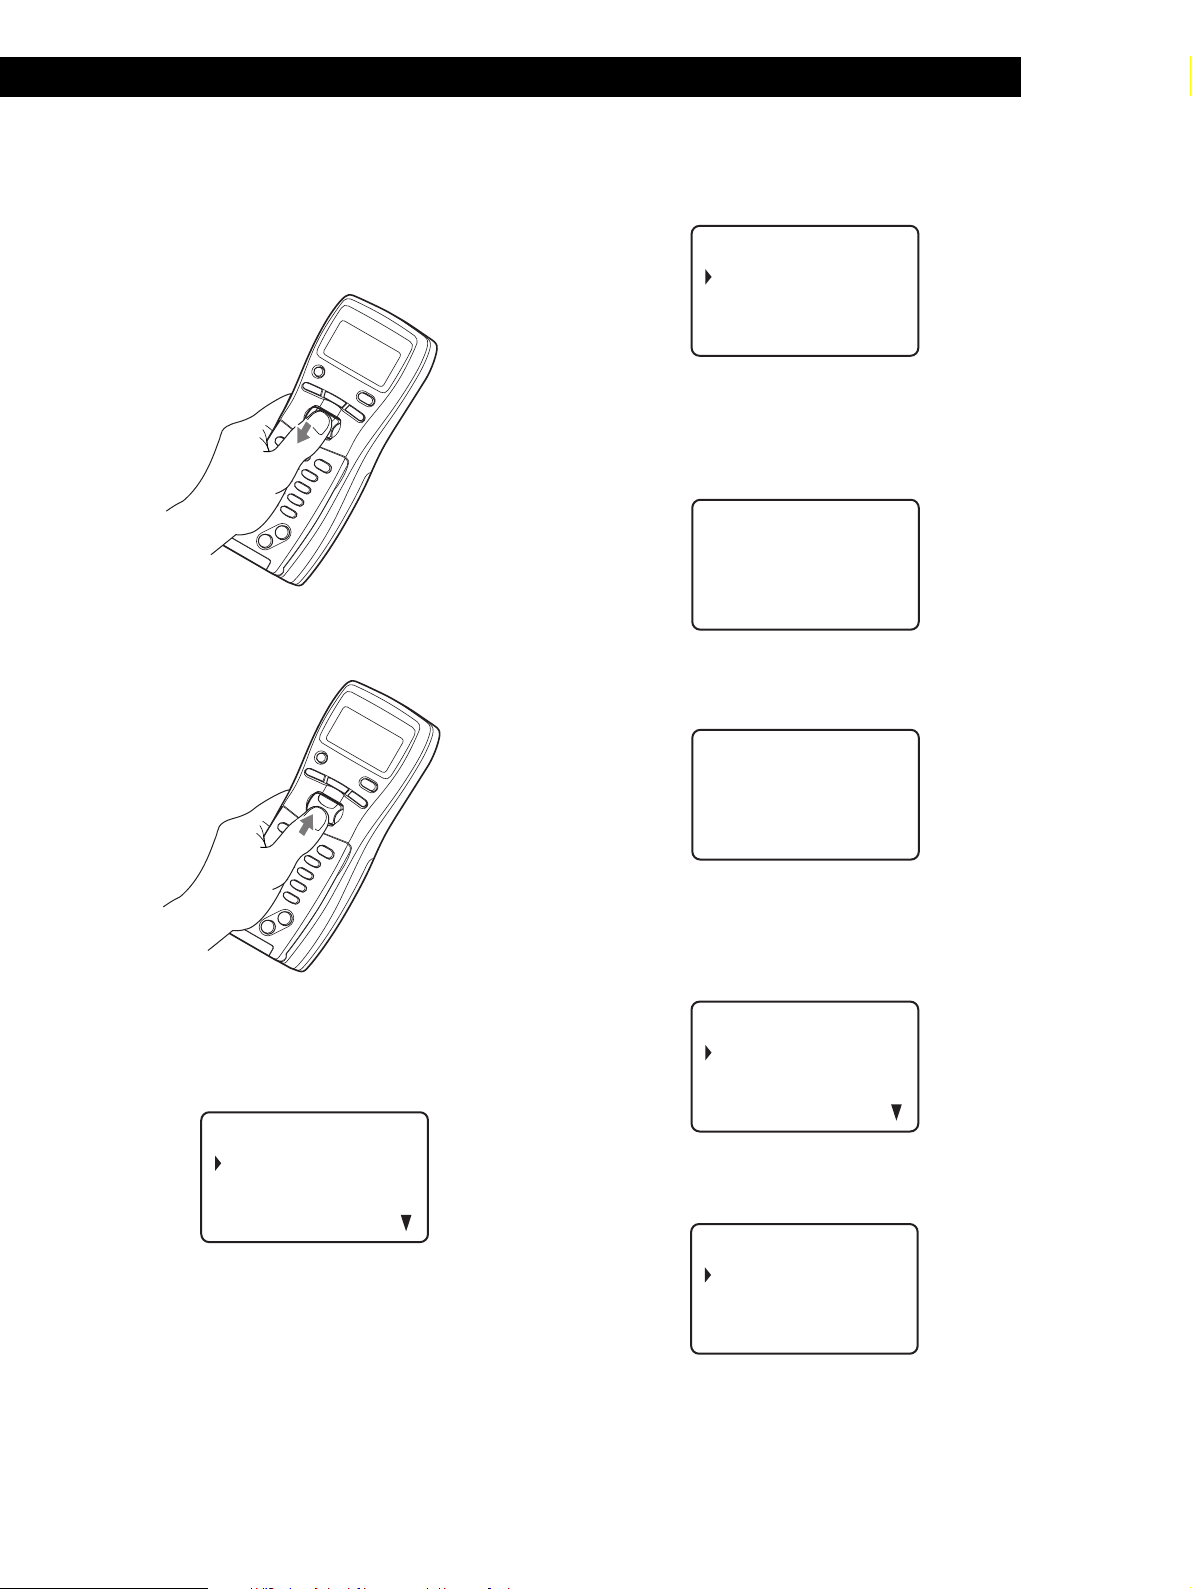
How to move the cursor in the remote’s
display
To move the cursor down, push the Easy scroll key
downward as illustrated below.
To move the cursor up, push the Easy scroll key
upward as illustrated below.
2 Move the cursor (”) to “Set up” by using the Easy
scroll key, then press the Easy scroll key.
3 Move the cursor to “Player check,” then press the
Easy scroll key.
The display shows the disc data in the player after
“Now player checking...” appears.
When you connect another CD player, the disc
data in the second CD player also appears.
Storing disc data in the remote
1 Press MENU.
Note the $ mark indicates that the menu
continues.
Press the Easy scroll key downward to see the
next items.
CD1
Memo se a r c h
Program play
Pr ogram i nput
Group se lec t
Loading the Disc Memo
1 Press MENU.
2 Move the cursor (”) to “Set up” by using the Easy
scroll key, then press the Easy scroll key.
(Continued)
GB
7
Page 8
Getting Started
Player check
Memo l o ad i ng
Memo r y c l ea r
Contrast adjust
CD1
ON TR AST
AD J UST
adjus
on
C
ctrast
t
CD1
Memo se a r c h
Program play
Pr ogr am i nput
Group se lec t
CD1
CD B a c k l i gh t
OF F
ON
L
CD1
3 Move the cursor to “Memo loading,” then press
the Easy scroll key.
CD1
Al l memo data
Master player
Group memo
When you connect another CD player, “2nd
player” also appears.
4 When you want to load all Disc Memos (the master
player’s, second CD player’s*, and both player’s
Group Memo data), move the cursor to
“All memo data,” then press the Easy scroll key.
The remote starts reading all memo data. The
loading time may take a few moments. Point the
remote at the player while loading the data.
* The second CD player’s Disc Memo data must be
loaded to the master player before you load the
data to the remote.
Keep the remote 1 – 2 m away from the player while
loading the data.
2 Move the cursor (”) to “Set up” by using the Easy
scroll key, then press the Easy scroll key.
3 Move the cursor to “Contrast adjust,” then press
the Easy scroll key.
4 Adjust the contrast by pressing the Easy scroll key
up or down and holding until the desired level of
contrast is attained.
5 Press the Easy scroll key.
CD1
ster player
Ma
memo LOADING
S
DI C140
When you want to load each Disc Memo data
independently, move the cursor to the data you
want to load, then press the Easy scroll key.
5 When the remote finishes reading the data,
“Memo loading complete” appears in the remote’s
display.
Adjusting the display contrast of the
remote
1 Press MENU.
CD1
Memo se a r c h
Program play
Pr ogr am i nput
Group se lec t
Turning off the LCD back light
You can conserve the remote’s power by turning off
the LCD (Liquid Crystal Display) back light.
1 Press MENU.
2 Move the cursor (”) to “Back light mode” by using
the Easy scroll key, then press the Easy scroll key.
3 Move the cursor to “OFF,” then press the Easy
scroll key.
8
GB
Note
If you erase all the data stored in the remote (page 9), follow
the procedure above to turn the back light off again .
Page 9
Erasing all data stored in the remote
1 Press MENU.
CD1
Memo se a r c h
Program play
Pr ogram i nput
Group se lec t
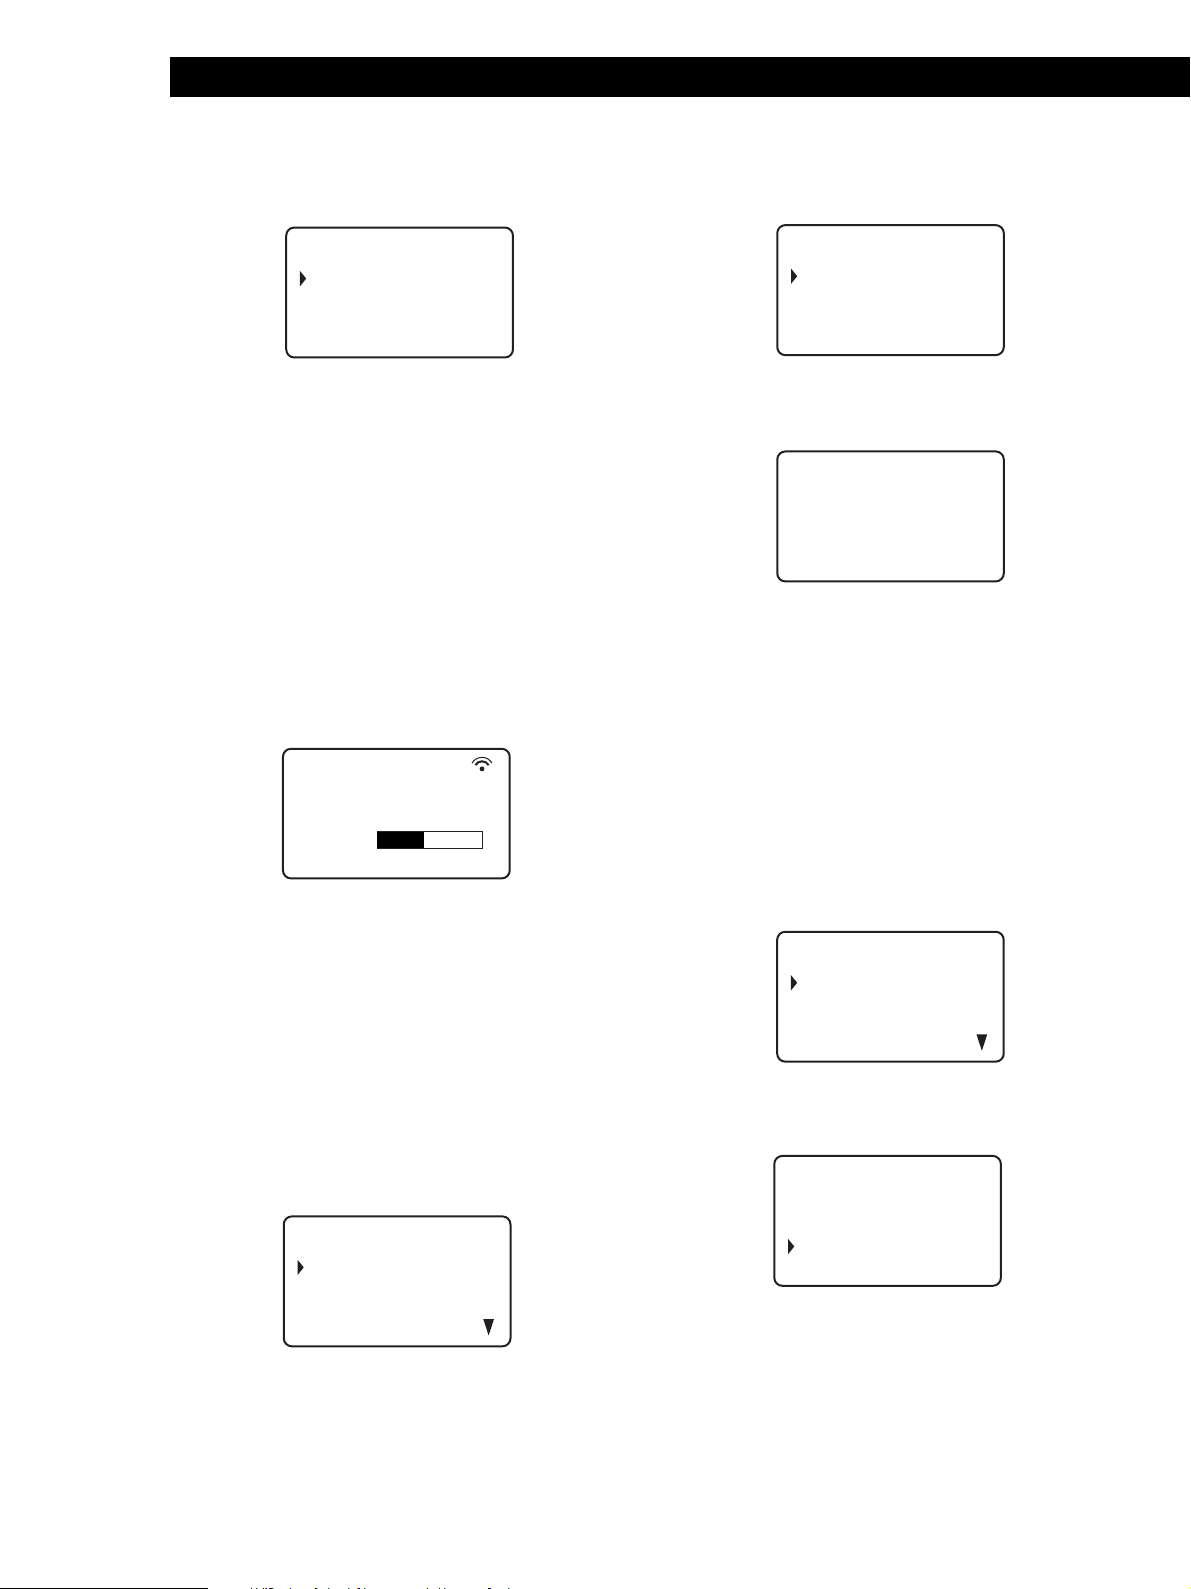
2 Move the cursor (”) to “Set up” by using the Easy
scroll key, then press the Easy scroll key.
Getting Started
Playing CDsGetting Started
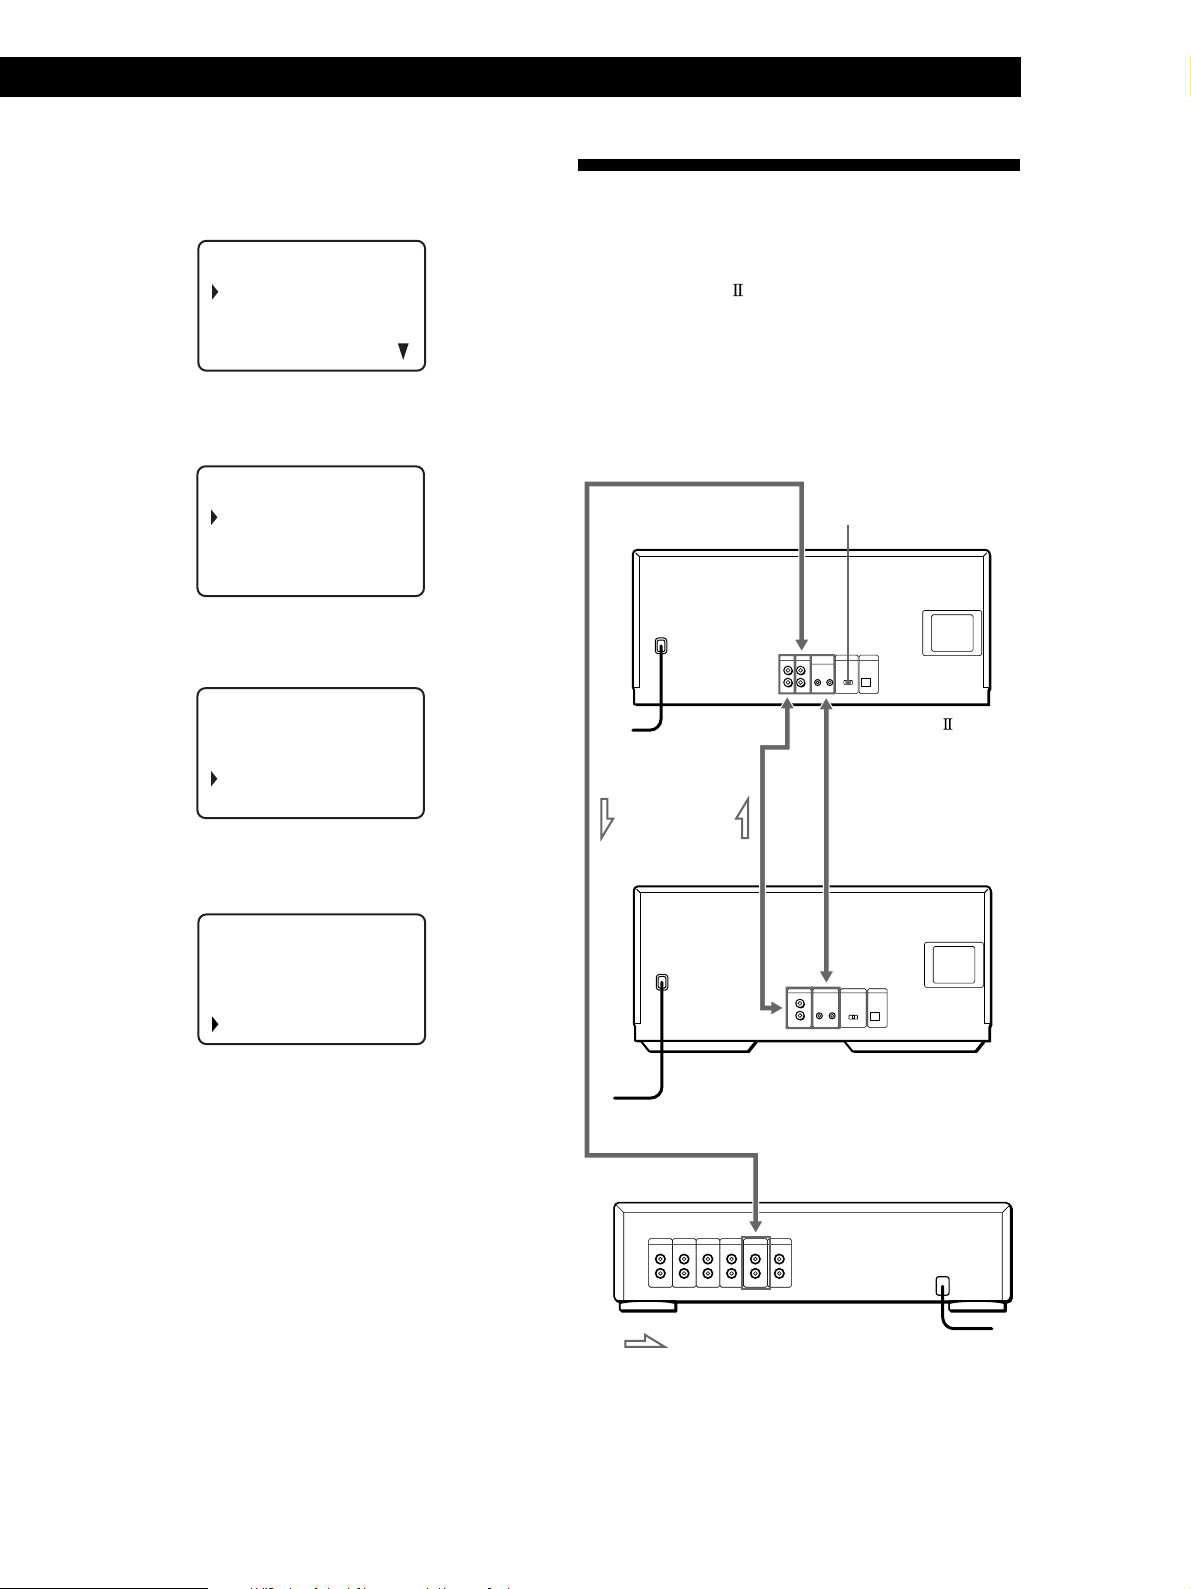
Connecting Another CD Player
If you have a Sony CD player in which 5, 50, 200, or
300 discs can be inserted and which is equipped with
the CONTROL A1
command mode of that player can be set to CD 3, you
can control that player as the second player with this
unit. After connecting this unit and an amplifier, follow
the procedure below.
Be sure to turn off the power of each player before
making this connection.
(or CONTROL A1) jack and the
CD1
Player check
Memo l o ad i ng
Contrast adjust
Memo r y c l ea r
3 Move the cursor to “Memory clear,” then press the
Easy scroll key.
CD1
Al l memory
clear OK?
no
yes
4 If you want to erase all stored data, move the
cursor to “yes,” then press the Easy scroll key.
CD1
Al l memory
clear OK?
no
yes
To LINE OUT
To an AC outlet
To 2ND CD IN
To audio output
COMMAND MODE
CDP-CX350
CONTROL A1
CDP-CX230, etc.
To CONTROL A1
5 “All memory clear!” appears in the display when
all data is erased.
To an AC outlet
: Signal flow
To audio input
Amplifier
To an AC outlet
(Continued)
GB
9
Page 10
Getting Started
What cords will I need?
• Audio cord (1) (Use the cord supplied with the player to be
connected.)
• Monaural (2P) mini-plug cord (1) (not supplied)
Inserting CDs
You can insert up to 300 discs into this player.
1 Connect the players with an audio cord (see also
“Hookups” on page 5).
CDP-CX350
LINE2ND CD
IN OUT
L
R
L
R
CDP-CX230, etc.
LINE OUT
L
R
2 Connect the players with a monaural (2P) mini-
plug cord.
CDP-CX350
CONTROL A1II
CDP-CX230, etc.
CONTROL A1
For details on this connection, refer to the
supplementary “
CONTROL A1 Control System”
instructions.
3 Set the COMMAND MODE selector of this player
to CD 1 or CD 2, and set the command mode of the
second player to CD 3.
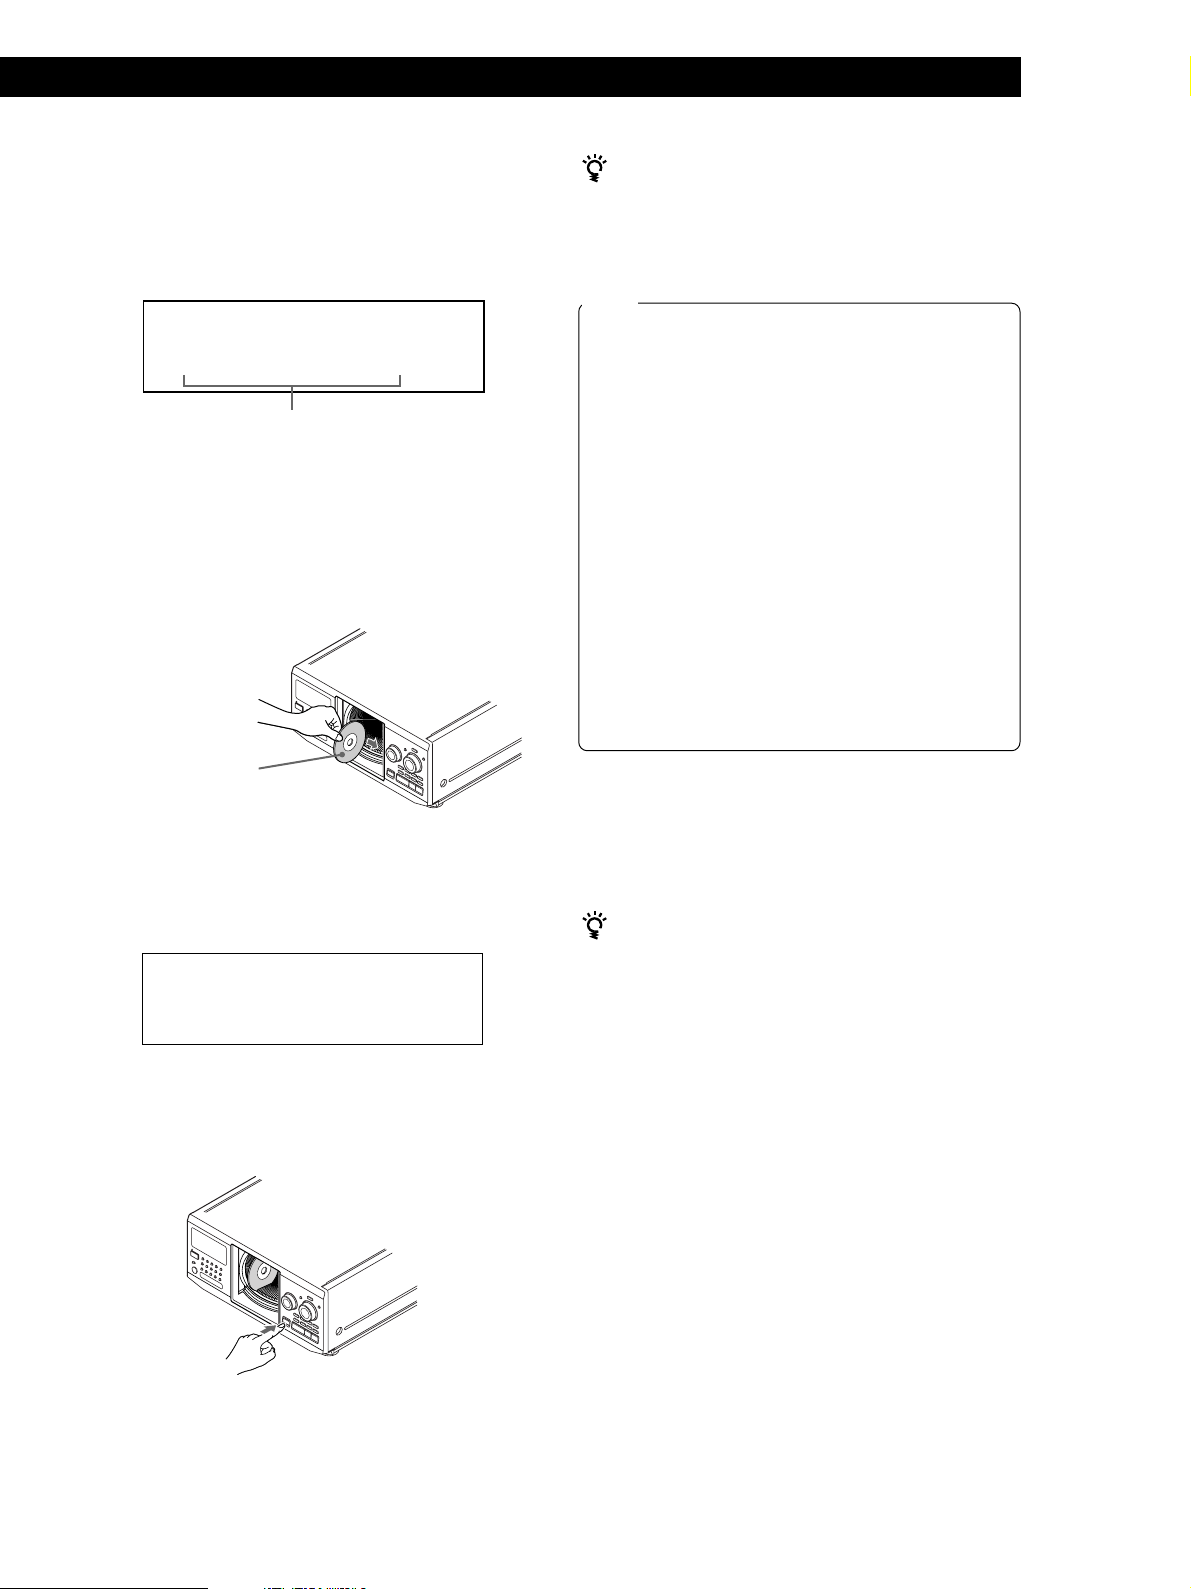
OPEN/CLOSE
I/u
I / u
Playing position
Rotary table
Loading position
JOG
+100
1 Press I/u to turn on the player.
2 Open the front cover by pressing OPEN/CLOSE.
COMMAND MODE
CD
132
For details on how to operate the second player,
see “Controlling Another CD Player” on page 27
and “Playing Alternately” on page 29.
4 Connect the AC power cord of both players to AC
outlets.
Notes
• Do not connect a player other than that you intend to use as
the second player to the 2ND CD IN jacks of this player.
• When connecting a second CD player, do not connect the
DIGITAL OUT (OPTICAL) connector of this unit to the
amplifier.
• If you connect another CD player after you have already set
up the remote, follow “Setting Up the Remote” on page 6 to
set up the remote again.
• To operate the second CD player with the remote, press
PLAYER SELECT on the remote to select the second player.
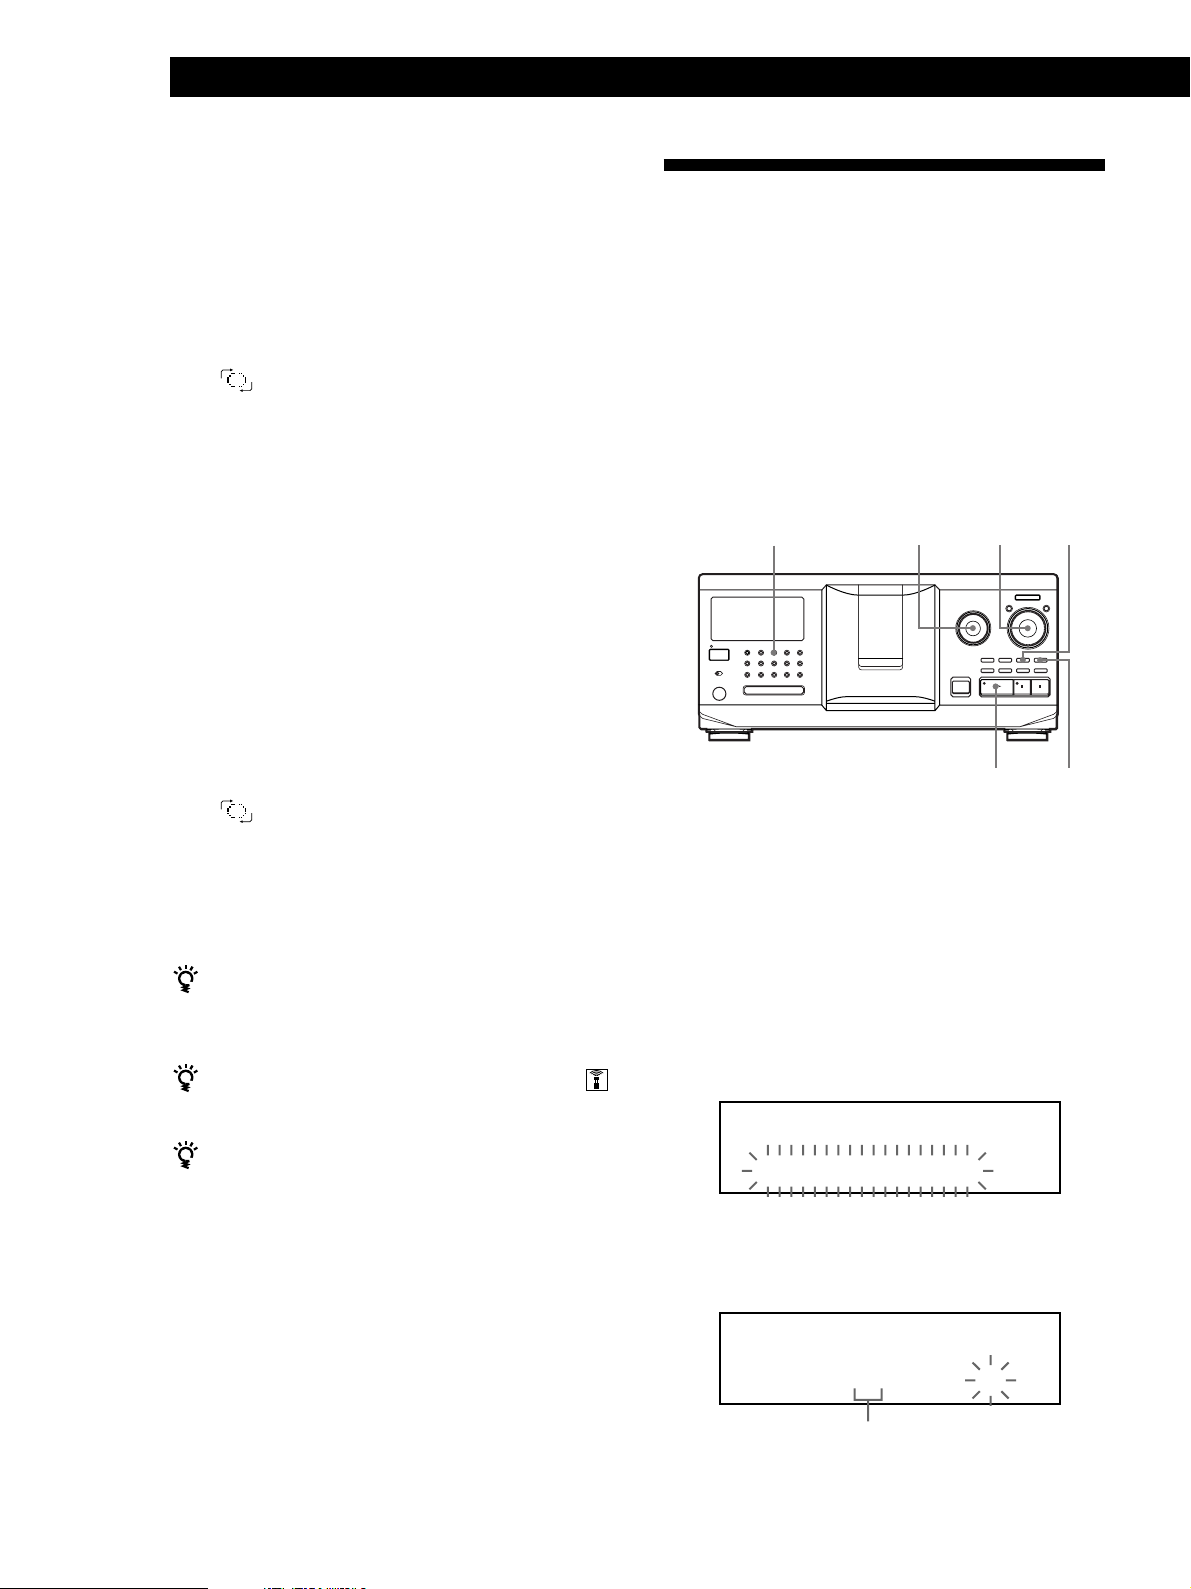
3 Turn the JOG dial until you find the disc slot
where you want to insert a disc, while checking the
disc number (written beside every slot and also
indicated in the display).
+100
I / u
Disc number
Disc slot at the loading position
10
GB
Page 11
Getting Started
Playing CDsGetting Started
The disc number at the loading position appears in
the display. If the disc has a Disc Memo (see page
30), the Disc Memo appears instead of the disc
number. As you turn the JOG dial, the disc number
or the Disc Memo changes.
ALL
DISCS
CD1
DISC
02
*DISC-20*
Disc number or the Disc Memo
You can classify discs into eight groups by using
the Group File function. This feature lets you easily
find the disc you want to play. For details, see
“Grouping Discs” on page 35.
4 Insert a disc with the label side facing right.
The supplied CD booklet holders help you locate a
disc easily
You can store up to 300 CD booklets. Insert a booklet and
stick the number label on the pocket matching the
number of the disc slot where you have inserted the disc.
Notes
• Do not insert an empty 8 cm (3-inch) CD adaptor (CSA-8). It
may damage the player.
• Do not attach anything such as seals or sleeves to CDs. It
may damage the player or the disc.
• If you drop a disc into the player and/or the CD won’t
go into the slot correctly, consult your nearest Sony
dealer.
• When transporting the player, remove all discs from the
player.
• Make sure to insert the disc at a right angle to the rotary
table, otherwise damage to the player and/or the disc
could result. If the disc is not inserted into the slot
completely, reinsert the disc.
• Make sure the rotary table comes to a complete stop
before inserting or removing discs.
The front panel closes automatically when you press
·. Be careful not to put your hand into the player after
pressing · otherwise your hand may be caught in the
front panel.
With the label side
facing right
After inserting the disc, you can input the original
disc titles instead of the disc numbers (see
“Labeling Discs” on page 30) to locate it easily
whenever you want to play it.
ALL DISCS
CD1
DISC
20
SONYHITS
5 Repeat Steps 3 and 4 to insert more discs.
6 Close the front cover by pressing OPEN/CLOSE.
Removing CDs
After following Steps 1 to 3 of “Inserting CDs” on page
10, remove the discs. Then close the front cover.
To remove discs easily
After following steps 1 to 3 of “Inserting CDs” on page
10, press p (DISC EJECT). The disc in the selected slot
moves up and you can remove the disc easily. When you
press p again, the disc returns back to the normal
position. If the disc does not return back to the normal
position, reinsert the disc.
The rotary table turns and the disc slot at the
loading position is set to the playing position.
Always keep the front cover closed except when
inserting or removing discs.
11
GB
Page 12
Basic Operations
Playing a CD
23
STANDBY
CONTINUE
I / u
GROUP 1
TIMER
GROUP 5
OFF PLAY
KEYBOARD
• See page 5 for hookup
information.
• Make sure you have inserted the
discs correctly as indicated on
page 10.
• You can play all the tracks on a
disc in the original order
(Continuous Play). You can also
play up to 300 discs
consecutively.
You can turn on the player
by pressing I/u on the
remote
SHUFFLE
GROUP 2
GROUP 6
PROGRAM
GROUP 3
GROUP 7
REPEAT
GROUP 4
GROUP 8
1
2
3
TIME/TEXT
HIT LIST
GROUP FILE
4/55
+100
MENU/NO YES
MEMO SEARCH
X-FADE
DISC/CHARACTER
PUSH ENTER
CHECK
NO DELAY
CLEAR
FADER
DISC EJECT
≠ AMS ±
PUSH ENTER
EASY PLAY
MEGA CONTROL
OPEN/
CLOSE
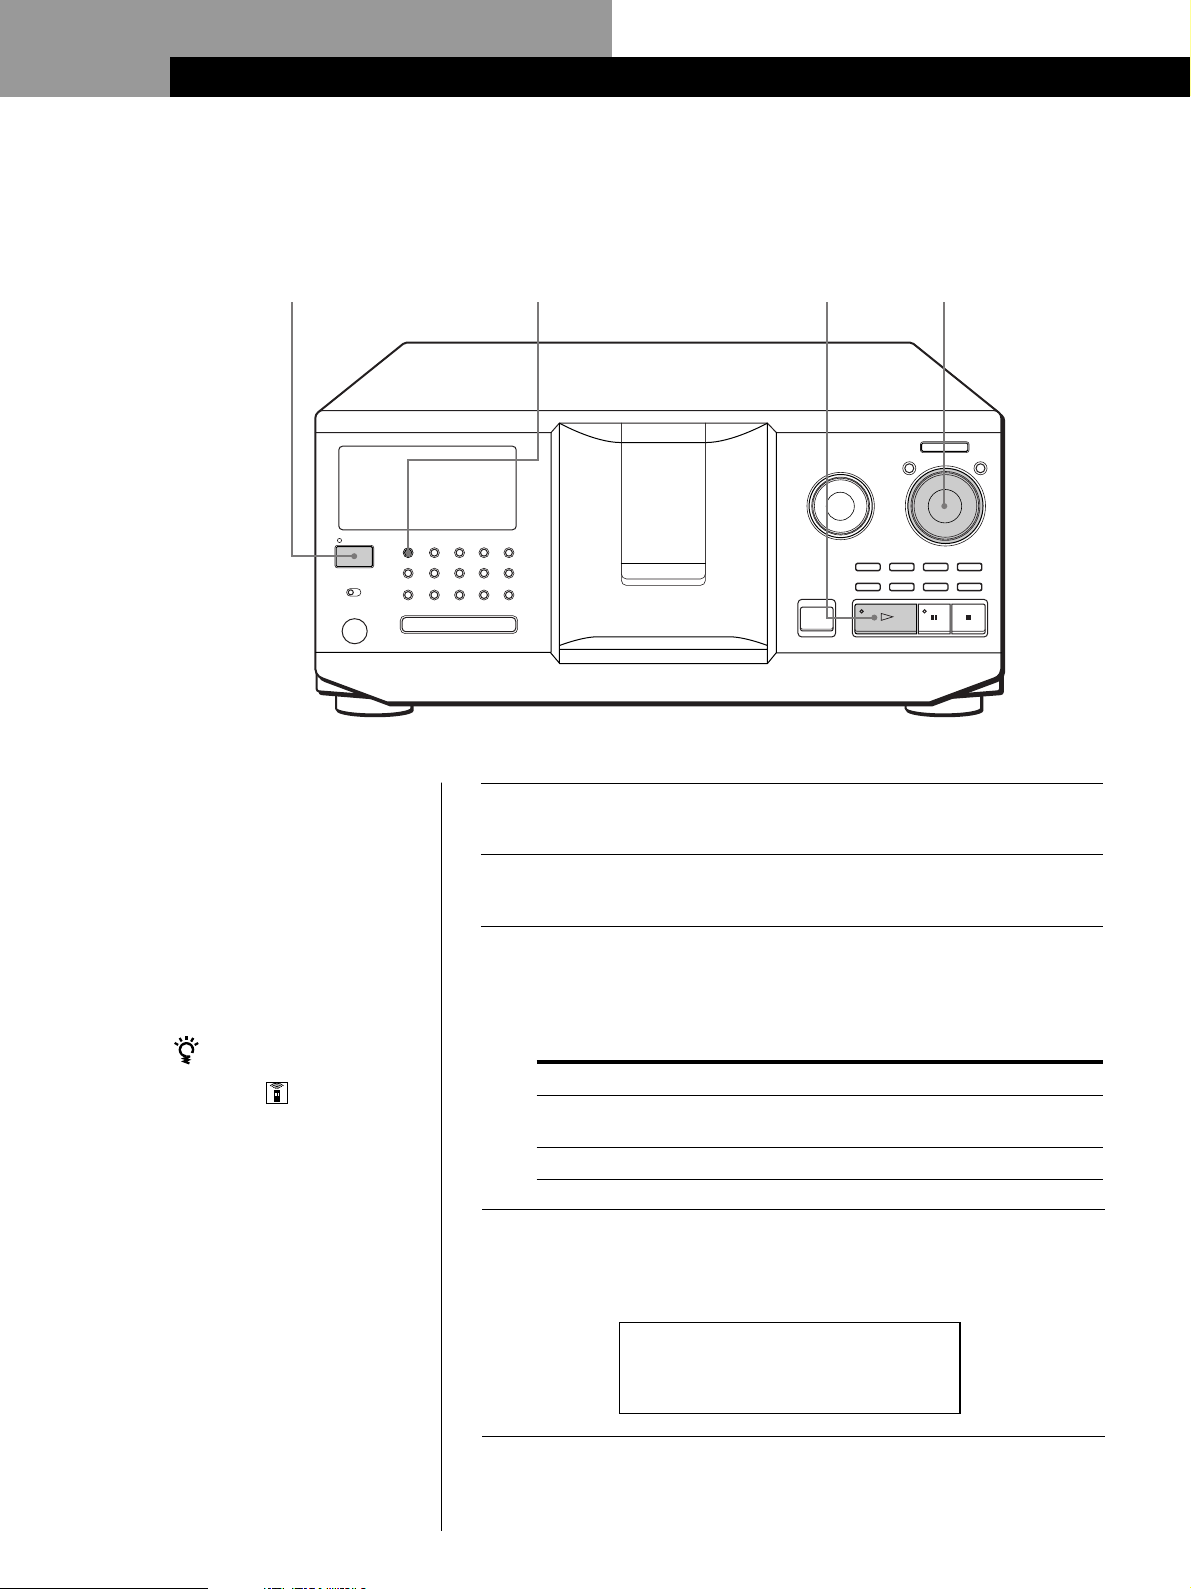
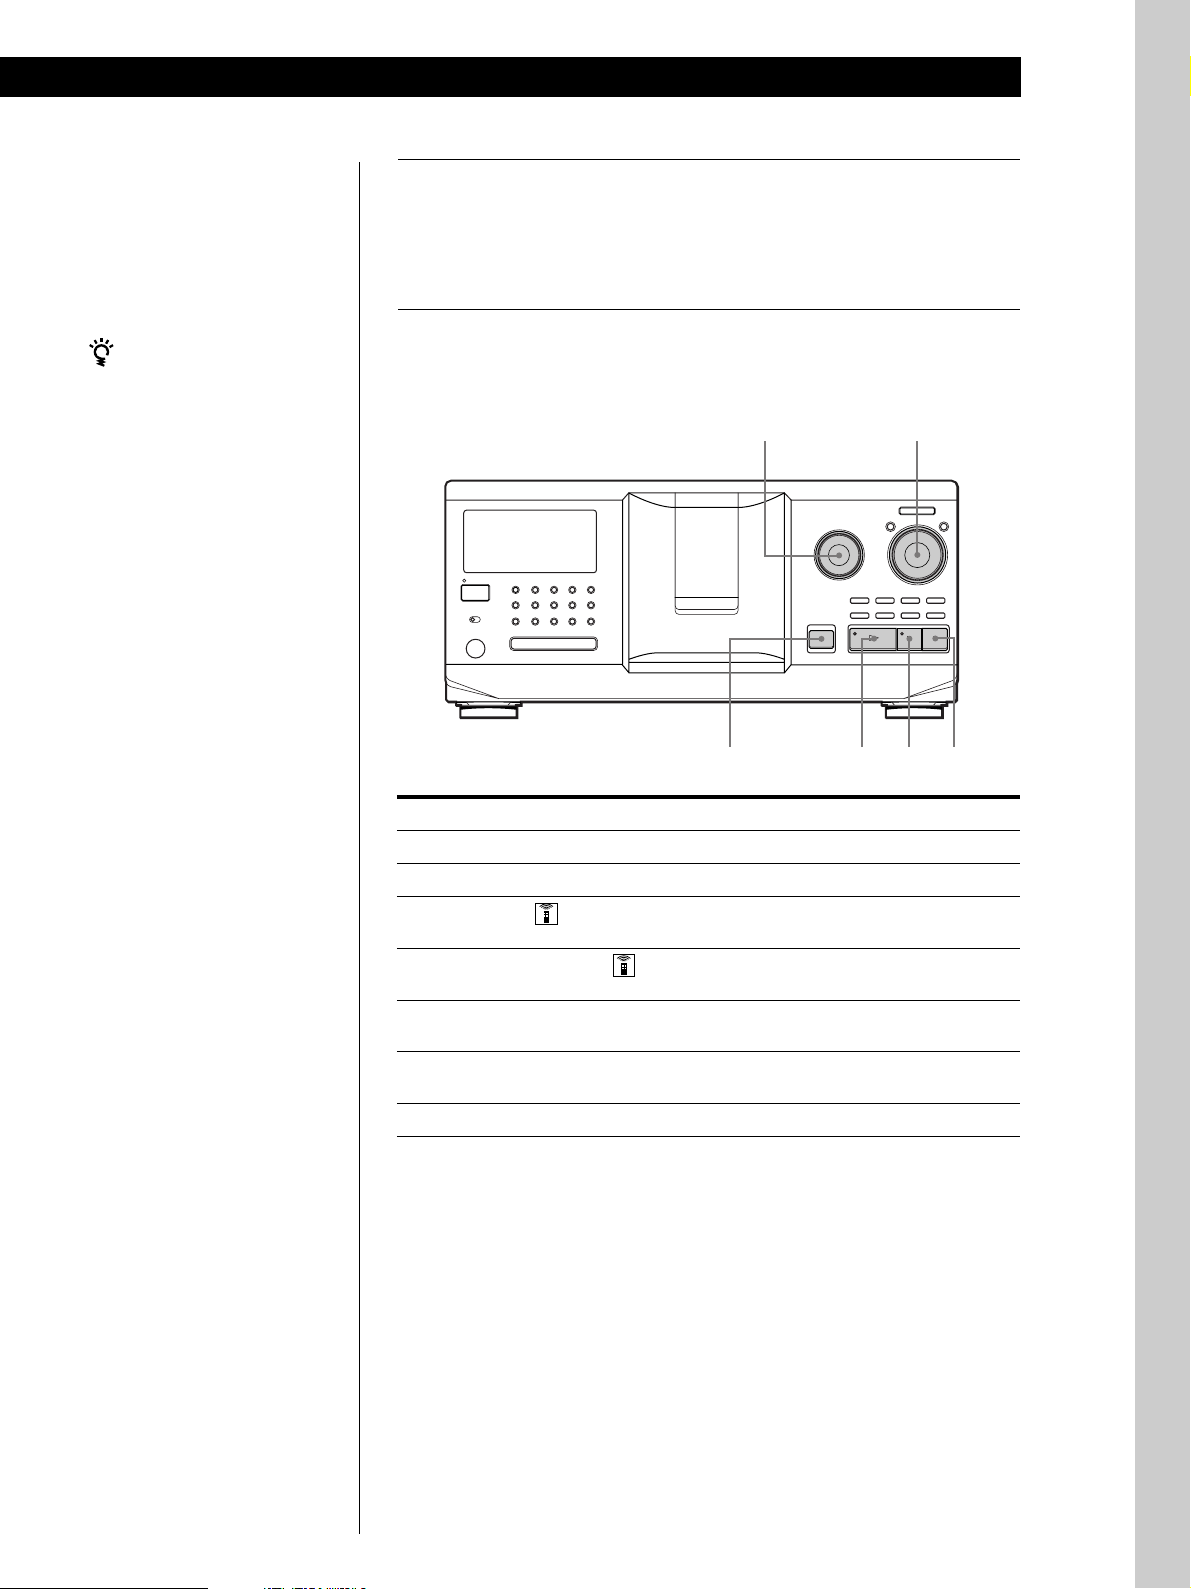
Turn on the amplifier and select the CD player position.
Press I/u to turn on the player.
Press CONTINUE to select ALL DISCS or 1 DISC Continuous
Play mode.
Each time you press CONTINUE, “ALL DISCS” or “1 DISC”
appears alternately in the display.
When you select
ALL DISCS
1 DISC
The player plays
All discs in the player consecutively in the order of
disc number. Empty disc slots are skipped.
Only the one disc you have selected
12
GB
Turn the JOG dial until the desired disc number or Disc Memo
(see page 30) appears in the display to select the first disc (ALL
4
DISCS) or the disc you want (1 DISC).
ALL
DISCS
CD1
DISC
02
*DISC-20*
Page 13
Basic Operations
Basic Operations
Push the JOG dial or press · to start playing.
The selected disc is set to the playing position, and the player
5
plays all the discs from the selected one (ALL DISCS) or all the
tracks once (1 DISC).
Adjust the volume on the amplifier.
When you turn off the player
The player remembers the
last playing disc and the
play mode (Continuous,
Shuffle, or Program (see
pages 21 and 22)). When you
turn on the player again,
therefore, the player plays
the same disc in the same
play mode.
To stop playback
Press p.
STANDBY
CONTINUE
SHUFFLE
PROGRAM
REPEAT
I / u
GROUP 1
TIMER
GROUP 5
OFF PLAY
KEYBOARD
To
Pause
Resume playing after pause
Go to the next disc
Go back to the preceding disc
Go to the next track
Go back to the preceding track
Stop playing and remove the disc
TIME/TEXT
GROUP 2
GROUP 3
GROUP 4
HIT LIST
GROUP 6
GROUP 7
GROUP 8
GROUP FILE
≠ AMS ±
OPEN/CLOSE
CLOSE
≠ AMS ±
PUSH ENTER
OPEN/
JOG
+100
MENU/NO YES
DISC/CHARACTER
PUSH ENTER
EASY PLAY
MEMO SEARCH
CHECK
MEGA CONTROL
X-FADE
NO DELAY
·P
You need to
Press P
Press P or ·
Press DISC SKIP + once.
Hold down the button to skip other discs.
Press DISC SKIP – once.
Hold down the button to skip other discs.
Turn the ≠ AMS ± dial clockwise
by one click
Turn the ≠ AMS ± dial
counterclockwise by one click
Press OPEN/CLOSE
DISC EJECT
CLEAR
FADER
Basic Operations
p
13
GB
Page 14
Playing CDsPlaying CDs
isc20
* DISC-
2*0
D
CD1
isc20
* DISC-20*
( TRACK 1 )
ra
D
Tck1
CD1
Using the Display
You can check information about the disc using the
display.
When you want to check another disc
Press DISC SKIP +/– on the remote in the stop mode to
select the disc you want to check. The total number of
tracks and the total playing time of the selected disc
appear momentarily.
I / u
TIME/TEXT
PLAYER SELECT
TRACK
DISC HIGH-LIGHT
ABC&!?
1
JKL
GHI
4
TUV
PRS
7
QZ
10
DISC SKIP
MENU
PUSH ENTER
GROUP
DEF MEMO INPUT
3
2
MNO
6
5
WXY
9
8
ENTER DEL
10/0
CLEAR
BACK
CAPS HIT LIST
SPACE X-FADE
NO DELAY
CHECK
MENU/NO
HIGH-LIGHT
JOG
Display information of the playing disc
+100
p
While playing a disc, the display shows the current disc
number, track number, playing time of the track, and
the next disc number.
Current disc number
ALL DISCS
CD1
DISC
TRACK
Next disc number
NEXT
DISC
83
MIN
SEC
20 1 0.28
Current track number
Playing time of the track
Remote’s display information
While in stop mode, the remote’s display shows the
current disc number. While in play mode, the current
track number also appears.
While in stop mode
While in play mode
14
GB
Checking the total number and playing
time of the tracks
Select the disc you want to check, and press
TIME/TEXT .
The display shows the current disc number, total
number of tracks, and total playing time of the disc.
Current disc number
ALL DISCS
CD1
DISC
TRACK
MIN
20 10 60.48
Total number of tracks
Total playing time
Note
While in stop mode, the Disc Memo appears if you labeled the
disc (see page 30).
While in play mode, the track title appears (up to the 13th
character) when you select a CD TEXT disc (see pages 15 and
30).
20
SEC
Page 15
Playing CDsGetting Started
Playing CDsPlaying CDs
Checking the information of CD TEXT discs
CD TEXT discs have information, such as the disc titles
or artist names, memorized in a blank space on the
discs where, on normal discs, there is no information.
The display shows the CD TEXT information of the
disc so that you can check the current disc title, artist
name and track title. When the player detects a CD
TEXT disc, “CD TEXT” appears in the display. If your
CD TEXT disc has multi-language capacity, “MULTI
CD TEXT” appears in the display. If you want to check
the information in another language, refer to “Selecting
the language of the CD TEXT information” on page 15.
Display information in stop mode
The display shows the disc title. When you press
TIME/TEXT, the artist name scrolls in the display. If
you press TIME/TEXT again, the display shows the
current disc number, total number of tracks, and total
playing time of the disc momentarily. Then the display
shows the disc title again.
ALL DISCS
CD TEXT
CD1
DISC
SONYHITS
Display information while playing a disc
Each time you press TIME/TEXT, the display shows
the information as shown below.
To play disc highlights Z
Some CD TEXT discs have a feature to play only the
highlights of the discs.
During stop mode, press HIGH-LIGHT on the remote to start
playing disc highlights.
“Hi LIGHT” flashes while playing disc highlights.
If you press HIGH-LIGHT while selecting discs without this
feature, “NO HIGHLIGHT” appears in the display.
Selecting the language of the CD TEXT
information
You can select the language used to display the CD
TEXT information when you select a CD TEXT disc
with multi-language information.
Once you select the language, the display shows the
information in the selected language until you turn off
the player. If the player cannot read the language
memorized in a CD TEXT disc, “other lang.” appears.
1 Press MENU/NO in stop mode.
“Select lang.?” flashes.
ALL
DISCS
MULTI CD TEXT
CD1
21
Select lang.?
2 Push the JOG dial.
The current operating language flashes.
The current disc
number, track
number and
playing time
appear.
The current disc
title or disc
number appears.
The current track
title appears.
ALL DISCS
CD TEXT
CD1
DISC
TRACK
MIN
12 1 1.52
Press TIME/TEXT.
ALL DISCS
CD TEXT
CD1
DISC
SONYHITS
Press TIME/TEXT.
ALL DISCS
CD TEXT
CD1
TRACK
HitechBlues
This information also appears when
the player locates the track.
Press TIME/TEXT.
13
13
13
NEXT
DISC
NEXT
DISC
NEXT
DISC
SEC
Notes
• If the disc title and track title have more than 13 characters,
only the first 13 characters appear in the display.
• The track title appears only when the current disc is a CD
TEXT disc or the current title has a HIT TITLE (only when
the player is in the Hit List mode) (see page 39).
ALL
DISCS
MULTI CD TEXT
CD1
21
English ?
3 Turn the JOG dial until the language you want
appears in the display.
4 Push the JOG dial to select the language.
“Reading text” appears momentarily, then the
display shows the information in the selected
language.
To check the current language
1 Press MENU/NO while playing a CD TEXT disc.
“Show lang.?” flashes.
2 Push the JOG dial.
The current language appears momentarily.
You can also check the current language while selecting a CD
TEXT disc without multi-language information.
Note
If you select a CD TEXT disc which does not contain the
information of the selected language, the display shows the
information in another language according to the disc’s
priority.
15
GB
Page 16

Playing CDs
Locating a Specific Disc
The characters which are displayed as the first
character.
≠ AMS ±
I / u
+100
MEMO SEARCH
JOG
+100
Locating a disc on the player
Turn the JOG dial until the desired disc number or
Disc Memo (see page 30) appears in the display. Push
the JOG dial to start play.
To skip discs quickly
Press +100. Each time you press +100, the player skips
100 discs.
Locating a disc searching for a specific Disc
Memo (Memo Search)
A B C D E F G H I J K L M N O P Q R S T U V W X
Y Z 0 1 2 3 4 5 6 7 8 9
If “NOT FOUND” appears in the display while
inputting the first character with the ≠ AMS
± dial, no disc has been labeled using the input
character.
Notes
• When searching for input characters, blanks and
symbols before the first character in the Disc Memo are
ignored.
• When searching for input characters, upper and lower
cases cannot be differentiated.
3 Push the JOG dial to select the disc.
In Program Play mode, the disc will be added to
the end of the program.
To cancel Memo Search
Press MEMO SEARCH again.
You can search for and locate a desired disc by the first
character of the Disc Memo (see page 30). The Memo
Search function can display the Disc Memo in
alphabetical order.
1 Press MEMO SEARCH.
“MEMO SEARCH” appears in the display.
2 Turn the JOG dial to find the desired disc.
As you turn the JOG dial, the Disc Memos starting
with the input character appear in the display.
ALL DISCS
CD1
S
SONYHITS
First character
16
GB
Page 17
Playing CDsGetting Started
05:* DISC-5*
06:* DISC-6*
07:* DISC-7*
08:* DISC-8*
CD1
Playing CDsPlaying CDs
Locating a disc directly using the remote
PLAYER SELECT
MENU
PUSH ENTER
DISC
SKIP
BACK
SHUFFLE
REPEAT
MENU
Easy scroll
key
·
MEMO SCAN
TRACK
CONTINUE
PROGRAM
MEMO SCAN
TIME/TEXT
Locating a disc directly observing the
remote’s display
1 Move the cursor (”) to the desired disc by using
the Easy scroll key.
2 Press the Easy scroll key or ·.
If the player has no disc in the slot you selected,
“NO DISC!!!” appears.
Notes
• The Shuffle or Program Play mode (pages 21 and 22) will be
canceled when you locate a disc by observing the remote’s
display.
• If the MEGA CONTROL button, GROUP 1 – 8 buttons, or
the HIT LIST button is lit, you cannot locate a disc by
observing the remote’s display.
PLAYER SELECT
MENU
PUSH ENTER
GROUP
DEF MEMO INPUT
3
2
MNO
6
5
WXY
9
8
ENTER DEL
10/0
CLEAR
BACK
CAPS HIT LIST
SPACE X-FADE
NO DELAY
CHECK
DISC
Number
buttons
TRACK
DISC HIGH-LIGHT
ABC&!?
1
JKL
GHI
4
TUV
PRS
7
QZ
10
DISC SKIP
1 Press DISC.
2 Press the number button of the disc.
Example: To enter number 35
Press 3, then 5.
ENTER
Locating a disc scanning each Disc Memo
(Memo Scan)
You can locate a desired disc quickly by scanning the
Disc Memos (see page 30) in the display.
Note that you cannot use this function in the ALL
DISCS Shuffle Play mode.
1 Press MEMO SCAN.
“MEMO SCAN” appears in the display, and the
Disc Memos scroll in the display.
2 Press · when the Disc Memo of the desired disc
appears.
The disc is set to the playing position, and the
player starts playing.
In Program Play mode, the disc will be added to
the end of the program if you press ENTER instead
of ·.
Note
If “NO ENTRY” appears in the display, no disc has been
labeled with the Disc Memo. Try the Memo Scan function
again after labeling the discs.
3 Press ENTER to start play.
17
GB
Page 18
Playing CDs
Locating a disc using the Disc Memo data
on the remote
You can search for and locate a desired disc by using
the Disc Memo data on the remote.
Before following the procedure below, be sure to load
the Disc Memo data into the remote’s memory (see
page 7).
1 Press MENU.
2 Move the cursor (”) to “Memo search” by using
the Easy scroll key, then press the Easy scroll key.
Specifying the Next Disc to
Play
You can specify the next disc to play while playing a
disc in Continuous or 1 DISC Shuffle Play mode.
While playing a disc, turn the JOG dial. “NEXT DISC”
appears in the display and the disc number or Disc
Memo (see page 30) changes as you turn the JOG dial.
When the desired disc number or Disc Memo appears
in the display, stop turning the JOG dial.
3 Push the Easy scroll key up or down until the first
character in the Disc Memo of the CD you want
appears.
CD1
ear ch l et t er
S
A
Each time you push the Easy scroll key up or
down, the characters appear in the following
order.
A B C D E F G H I J K L M N O P Q R S T U V W X
Y Z 0 1 2 3 4 5 6 7 8 9
4 Press the Easy scroll key to input the character you
want.
The display shows the Disc Memos starting with
the input character. The second CD player’s disc
numbers are displayed in reverse contrast.
CD1
ALL DISCS
CD1
NEXT DISC
38
NEXT
DISC
*DISC-38*
Next disc number or
the Disc Memo
After the current disc is played, the next disc you have
specified starts playing.
If you want to skip to the next disc right away, push
the JOG dial while playing the current disc.
To cancel the disc you have specified
Press CONTINUE twice.
Playing the Disc Which was
Just Inserted – Easy Play
You can play the disc which was just inserted only by
pressing one button.
1 Open the front cover by pressing OPEN/CLOSE.
18
GB
13:Hi techBlues
06:Hello
-end-
If “not found” appears after inputting the first
character, no disc has been labeled using the input
character.
5 Move the cursor to the disc number you want to
play, then press the Easy scroll key.
2 Press EASY PLAY.
Slot 1 moves into loading position.
3 Insert the disc in slot 1.
4 Press EASY PLAY.
The EASY PLAY button is lit and the player starts
playing the disc in slot 1.
Note
The Easy Play function can only play the disc in slot 1.
To cancel the Easy Play function
Press p.
Page 19
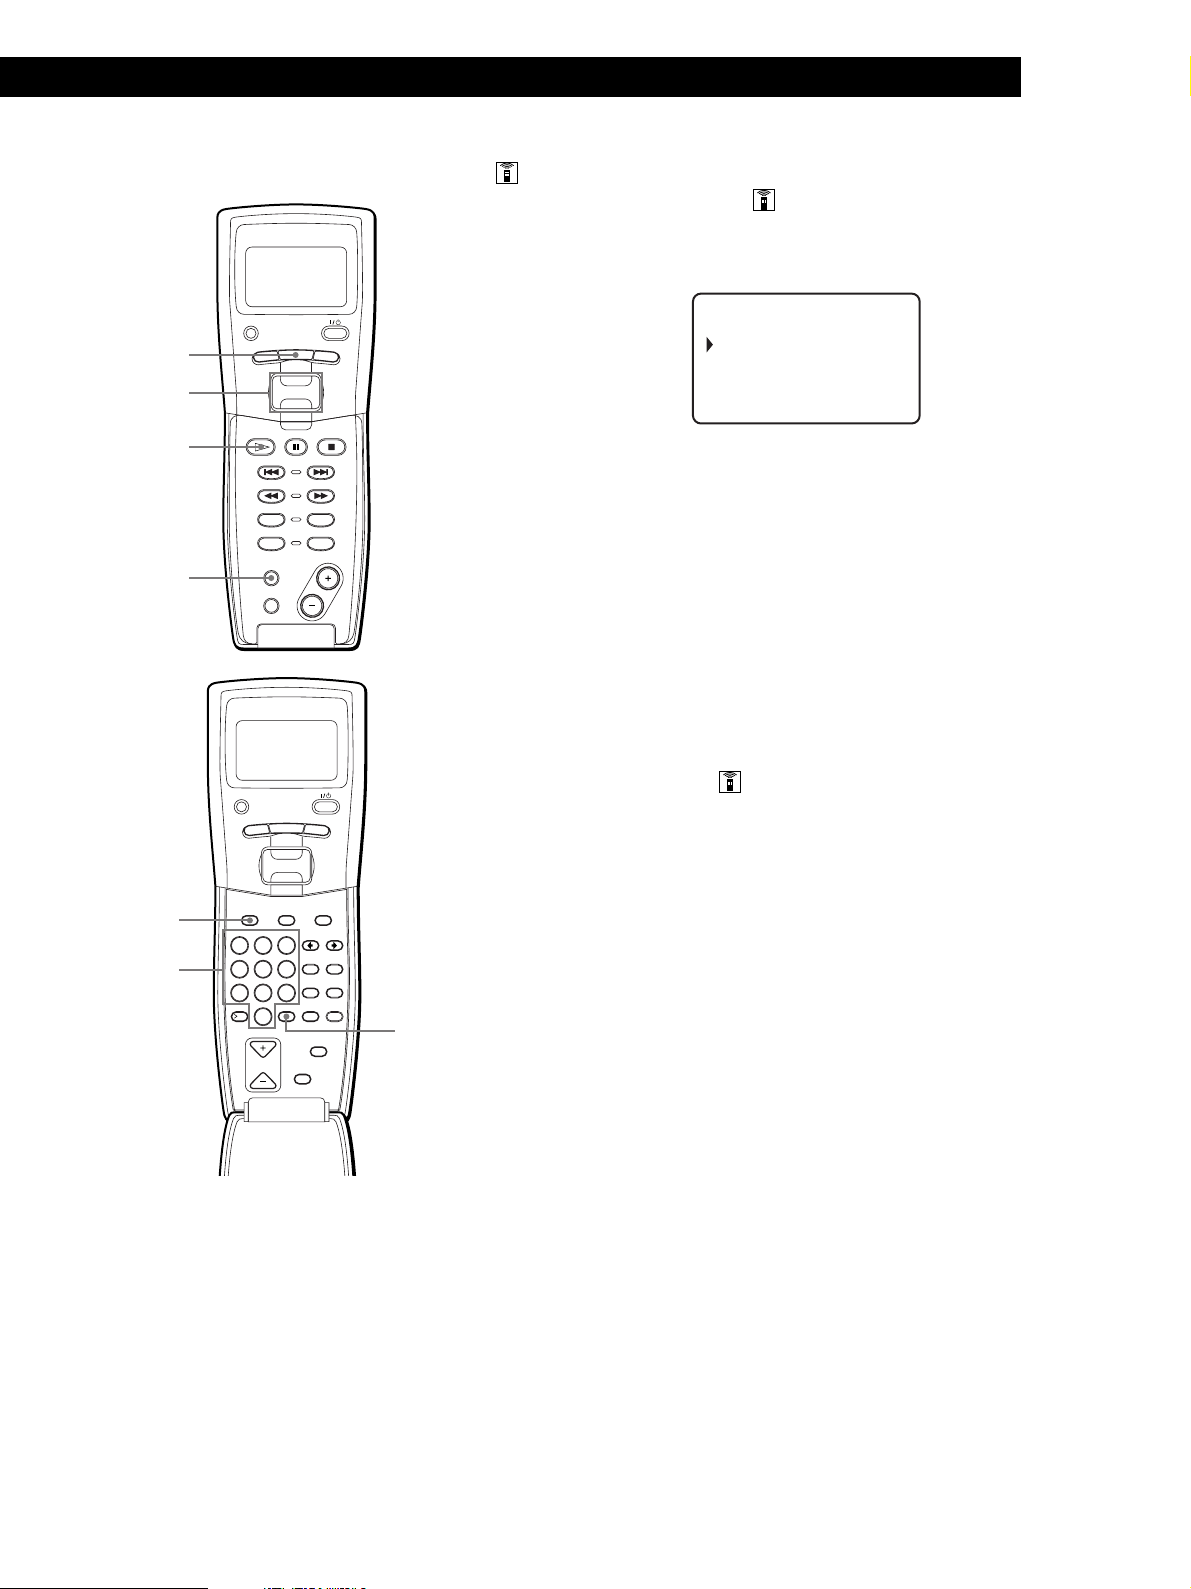
Locating a Specific Track or a
Point in a Track
Playing CDsGetting Started
Playing CDsPlaying CDs
You can quickly locate any track while playing a disc
by using the ≠ AMS ± (AMS: Automatic Music
Sensor) dial or by using the =/+ buttons on the
remote. You can also locate a specific point in a track
while playing a disc.
≠ AMS ±
+100
I / u
PLAYER SELECT
MENU
TRACK
Easy scroll
key
·
=/+
0/)
TRACK
CONTINUE
PROGRAM
MEMO SCAN
TIME/TEXT
PUSH ENTER
DISC
SKIP
BACK
SHUFFLE
REPEAT
PLAYER SELECT
MENU
Number
buttons
>10
TRACK
DISC HIGH-LIGHT
ABC&!?
1
JKL
GHI
4
TUV
PRS
7
QZ
10
DISC SKIP
PUSH ENTER
GROUP
DEF MEMO INPUT
3
2
MNO
6
5
WXY
9
8
ENTER DEL
10/0
CLEAR
BACK
CAPS HIT LIST
SPACE X-FADE
NO DELAY
CHECK
Locating a specific track or a point in a
track
To locate
the next or
succeeding tracks
the current or
preceding tracks
a specific track
directly Z
a point in a track
while monitoring the
sound Z
a point in a track
quickly by observing
the display Z
You need to
Turn the ≠ AMS ± dial
clockwise until you find the track
Turn the ≠ AMS ± dial
counterclockwise until you find the
track
Press the number button of the track
on the remote. When you directly
locate a track numbered over 10, press
>10 first, then the corresponding
number buttons.
Press 0 (backward)/) (forward)
on the remote and hold down until
you find the point
Press 0 (backward)/) (forward)
on the remote and hold down until
you find the point during pause. You
will not hear the sound during the
operation.
Note
If “– OVER –” appears in the display, the disc has reached the
end while you were pressing ). Turn the ≠ AMS ±
dial counterclockwise or press 0 to go back.
19
GB
Page 20
Playing CDs
Locating a specific track or a point in a
track observing the remote’s display
1 During stop mode, press TRACK.
CD1
Di sc123
* DISC- 123*
1 . ( T RACK 1 )
2 . ( T RACK 2 )
2 Move the cursor (”) to a desired track by using the
Easy scroll key.
CD1
3 . ( T RACK 3 )
4 . ( T RACK 4 )
5 . ( T RACK 5 )
6 . ( T RACK 6 )
3 Press the Easy scroll key or ·.
Note
When you select a CD TEXT disc, track titles appear in Step 2
instead of the track numbers.
20
GB
Page 21
Playing CDs
GROUP
ENTER DEL
CLEAR
DISC SKIP
CHECK
NO DELAY
SPACE X-FADE
CAPS HIT LIST
DISC HIGH-LIGHT
3
DEF MEMO INPUT
6
MNO
9
WXY
2
ABC&!?
5
JKL
8
TUV
10/0
10
QZ
1
4
GHI
7
PRS
MENU
PUSH ENTER
TRACK
PLAYER SELECT
BACK
Playing CDsGetting Started
Playing CDs
Playing Repeatedly
You can play discs or tracks repeatedly in any play
mode.
REPEAT
+100
I / u
Press REPEAT while playing a disc.
“REPEAT” appears in the display. The player repeats
the discs/tracks as follows:
When the disc is played in
ALL DISCS Continuous Play
(page 12)
1 DISC Continuous Play
(page 12)
ALL DISCS Shuffle Play
(page 22)
1 DISC Shuffle Play
(page 22)
Program Play (page 22)
To cancel Repeat Play
Press REPEAT twice.
The player repeats
All tracks on all discs
All tracks on the current disc
All tracks on all discs in
random order
All tracks on the current disc
in random order
The same program
Playing in Random Order
(Shuffle Play)
You can have the player “shuffle” the tracks and play
in random order. The player shuffles all the tracks on
all discs or on the disc you specify.
REPEAT
·
BACK
JOG
+100
SHUFFLE
SHUFFLE
I / u
·
PLAYER SELECT
TRACK
CONTINUE
PROGRAM
MEMO SCAN
TIME/TEXT
MENU
PUSH ENTER
DISC
SKIP
SHUFFLE
Repeating the current track
You can repeat the current track.
While the track you want is being played, press
REPEAT repeatedly until “REPEAT 1” appears in the
display.
To cancel Repeat 1
Press REPEAT.
DISC
Number
buttons
ENTER
21
GB
Page 22
Playing CDs
Playing all tracks on all discs in random
order
1 Press SHUFFLE.
“ALL DISCS” and “SHUFFLE” appear in the
display.
2 Push the JOG dial or press ·.
ALL DISCS Shuffle Play starts.
” appears in the display while the player is
“
“shuffling” the discs or the tracks.
Creating Your Own Program
(Program Play)
You can arrange the order of the tracks and/or discs to
create three different programs which are stored
automatically. A program can contain up to 32 “steps”;
one “step” may contain a track or a whole disc.
You can make programs using the controls on the
remote as well as ones on the player. However, the
programming procedures are different.
Playing all tracks on a specified disc in
random order
1 Press SHUFFLE twice.
“1 DISC” and “SHUFFLE” appear in the display.
2 Turn the JOG dial until the desired disc number
appears in the display.
When using the remote, first press DISC, then
press the number button of the disc.
3 Push the JOG dial or press ·.
When using the remote, press ENTER.
1 DISC Shuffle Play starts.
” appears in the display while the player is
“
“shuffling” the tracks.
To cancel Shuffle Play
Press CONTINUE.
You can start Shuffle Play while playing
Press SHUFFLE, and Shuffle Play starts from the current
track.
You can go to the next disc during 1 DISC Shuffle Play
Press DISC SKIP +.
You can specify the next disc to play during 1 DISC
Shuffle Play
Turn the JOG dial to specify the next disc. After all the
tracks on the current disc are played in random order,
the next disc starts playing. If you want to skip to the
next disc right away, push the JOG dial while playing the
current disc.
Creating a program on the player
PROGRAM
I / u
≠ AMS ±
·
JOG
CHECK
+100
CLEAR
1 Press PROGRAM until the desired program
number (PROGRAM 1, 2, or 3) appears in the
display.
If a program is already stored in the selected
program number, the last step of the program
appears in the display. When you want to erase the
whole program, hold down CLEAR until
“CLEAR” appears in the display (see page 23).
2 Turn the JOG dial until the desired disc number
appears in the display.
PROGRAM
1
CD1
DISC
20
*DISC-20*
3 To program a whole disc, skip this step.
Turn the ≠ AMS ± dial until the desired
track number appears in the display.
22
GB
Notes
• You cannot specify the next disc to play during ALL DISCS
Shuffle Play.
• Even if you press p or turn off the player during ALL
DISCS Shuffle Play, the player remembers which discs or
tracks were played and which were not. Therefore, if you
want to start ALL DISCS Shuffle Play again from the
beginning, be sure to repeat the procedure from Step 1.
PROGRAM
1
CD1
DISC
TRACK
20 3 1
Track number
20
STEP
Page 23
Playing CDs
Playing CDsGetting Started
Playing CDs
4 Push the JOG dial.
The track being programmed
PROGRAM
1
CD1
DISC
TRACK
20
STEP
20 3 1
The disc being
programmed
5 To program other discs/tracks, do the following:
To program
All tracks of another disc(s)
Other tracks on the same disc
Other tracks on other discs
6 Push the JOG dial or press · to start Program
Play.
To cancel Program Play
Press CONTINUE.
The programs remain even after Program Play ends
When you push the JOG dial or press · in Program
Play mode, you can play the same program again.
When you press PROGRAM to select Program Play
during Continuous or Shuffle Play
The program will be played after the current track.
Playing order
Repeat Steps
2 and 4
3 and 4
2 to 4
Checking the programmed order
You can check your program before or after you start
playing.
Press CHECK.
Each time you press this button, the display shows the
disc and track number of each step in the programmed
order. (When a whole disc is programmed as one step,
“ALL” appears instead of the track number.) After the
last step in the program, the display shows “– END –”
and returns to the original display.
Changing the programmed order
You can change your program before you start playing.
To
Erase a track or disc
Erase the last track or
disc in the program
Add tracks or discs to the
end of the program
Change the whole
program completely
You need to
Press CHECK until the track or
disc you don’t want appears in
the display, then press CLEAR
Press CLEAR. Each time you
press the button, the last
programmed track or disc will be
cleared.
Follow the programming
procedure
Hold down CLEAR until
“CLEAR” appears in the display
to erase the whole program, then
create a new program following
the programming procedure
The program remains until erased
Even if you replace discs, the programmed disc and track
numbers remain. Therefore, the player will play the new
existing disc and track numbers. However, the
programed disc and track numbers that are not found in
the player or on the disc are deleted from the program,
and the rest of the program is played in the programmed
order.
You can select the program number (PROGRAM 1,2,
or 3) by using the remote
Press PROGRAM on the remote repeatedly until the
desired program number appears in the display.
Note
If you press one of the GROUP 1 – 8 buttons to start Group
Play, Program Play will be canceled (see page 36).
Erasing the program stored in memory
1 Press PROGRAM repeatedly in the stop mode
until the program number (PROGRAM 1, 2, or 3)
you want to erase appears in the display.
2 Hold down CLEAR until “CLEAR” appears in the
display.
23
GB
Page 24
Playing CDs
Creating a program using the remote Z
PLAYER SELECT
MENU
MENU
Easy scroll
key
·
PROGRAM
TRACK
CONTINUE
PROGRAM
MEMO SCAN
TIME/TEXT
PUSH ENTER
DISC
SKIP
BACK
SHUFFLE
REPEAT
1 Press PROGRAM until the program number you
want (PROGRAM 1, 2, or 3) appears in the display.
2 Press DISC.
PROGRAM
1
CD1
02
DISC-[ _]
3 Press the number button of the disc.
PROGRAM
1
CD1
02
DISC-[ 20]
4 To program a whole disc, press ENTER and go to
Step 6.
PROGRAM
1
DISC
CD1
TRACK
02
STEP
20 -- 1
DISC
Number
buttons
>10
PLAYER SELECT
MENU
TRACK
PUSH ENTER
GROUP
DISC HIGH-LIGHT
DEF MEMO INPUT
ABC&!?
2
1
MNO
JKL
GHI
5
4
WXY
TUV
PRS
8
7
QZ
ENTER DEL
10
10/0
DISC SKIP
3
6
9
CLEAR
BACK
CAPS HIT LIST
SPACE X-FADE
NO DELAY
CHECK
ENTER
CLEAR
5 First press >10 then press the number button of the
track.
When the disc has less than 10 tracks, press 10/0
first then press the corresponding number to enter
a track number from 1 to 9.
The disc being programmed
PROGRAM
1
DISC
TRACK
20
STEP
20 3 1
The track being programmed
6 To program other discs/tracks, do the following:
To program
All tracks of another disc(s)
Other tracks on the same disc
Other tracks on other discs
7 Press ENTER or · to start Program Play.
Playing order
Repeat Steps
2 to 4
5
2 to 5
24
To cancel Program Play
Press CONTINUE.
You can check or change the program by pressing the
CHECK or CLEAR button on the remote
See page 23.
GB
Page 25
Playing CDs
Memo se a r c h
Program play
Pr ogr am inpu t
Group se lec t
CD1
:AProgramA
B:Program B
C:Program C
D:Program D
CD1
Playing CDsGetting Started
Playing CDs
Creating a program observing the remote’s
display Z
You can create up to eight programs in the remote’s
memory, each containing up to 32 steps by observing
the remote’s display.
1 Press MENU.
CD1
Memo se a r c h
Program play
Pr ogr am inpu t
Group se lec t
2 Move the cursor (”) to “Program input” by using
the Easy scroll key, then press the Easy scroll key.
CD1
:AProgramA
B:Program B
C:Program C
D:Program D
3 Move the cursor to the program you want to
create, then press the Easy scroll key.
CD1
[
Program A
1:
2:
3:
]
6 Repeat Steps 4 and 5 to program more tracks or
discs.
To finish creating a program, press MENU. To play the
program you create, see “Playing the program you
create observing the remote’s display” on page 25.
To erase a track or disc, move the cursor to the step
you want to erase in Step 3, then press CLEAR.
To change a disc or track you programed, move the
cursor to the step you want to change in Step 3, then
press the Easy scroll key. Select a new disc or track
following Steps 4 and 5.
You can label the program in Step 3
Move the cursor (”) to the program you want to label by
pressing the Easy scroll key up, then press the Easy scroll
key.
The flashing cursor (“) appears. Input the character you
want following the procedure in “Labeling discs
observing the remote’s display” on page 32.
Note
You cannot program the second player’s tracks by using the
remote.
Playing the program you create observing
the remote’s display Z
1 Press MENU.
4 Press the Easy scroll key.
CD1
[
Program A
Step1
Disc56 TRK-ALL
* DISC-56*
5 Select the desired disc by pushing the Easy scroll
key up or down.
To program a whole disc, press the Easy scroll key
again.
To program a certain track of the disc, select the
desired track by pushing the Easy scroll key up or
down, then press the Easy scroll key.
CD1
[
Program A
Step1
Disc56 TRK-5
* DISC-56*
]
2 Move the cursor (”) to “Program play” by using
the Easy scroll key, then press the Easy scroll key.
(Continued)
]
GB
25
Page 26
Playing CDs
3 Select the desired program by pressing the Easy
scroll key up or down, then press Easy scroll key.
Playing Using a Timer
CD1
Program
data t r ansfer
CD1
Disc4
* DISC4*
Track1
( TRACK 1 )
Program Play starts when the player finishes
loading the program data from the remote.
If the player fails in loading, the following
message appears. Press the Easy scroll key again.
data t r ansfer
fai lure !
Try again !
You can start playing a disc at any given time by
connecting a timer (not supplied). Refer also to the
instructions for the timer if you need help.
TIMER Play mode buttons
+100
I / u
1 Press one of the play mode buttons to select the
desired play mode.
2 Set TIMER on the player to PLAY.
3 Set the timer to the desired time.
The player turns off. When the set time comes, the
player turns on and starts playing.
4 After you have used the timer, set TIMER on the
player to OFF.
Note
The program you create using the remote is stored in the
player as PROGRAM 1. Note that the PROGRAM 1 you had
created before is erased.
26
GB
Page 27

Controlling Another CD Player
CD3/ 200di scs
2nd pl ayer
2nd PLAYER CD3
(Advanced Mega Control)
Playing CDs
Playing CDsGetting Started
Playing CDs
1 Press MEGA CONTROL on this player.
The MEGA CONTROL button and “2nd” in the
display light up. The display shows the current
disc number or Disc Memo of the second player.
This unit can control a second CD player (see
“Connecting Another CD Player” on page 9).
Even when a second CD player is connected, the
controls on both of the units will function. When you
press the play button on either unit, the operating
player stops and the idle player starts.
Make sure “2nd DETECTED” appears in this player’s
display after turning on both players.
Note that, depending on the player, you may not be
able to operate all the functions of the second CD
player.
The controls indicated in the illustration below are effective
while the MEGA CONTROL button is lit.
Play mode buttons
(CONTINUE/SHUFFLE/
PROGRAM/REPEAT)
I / u
≠ AMS ±
MENU/NO
JOG
+100
ALL DISCS
CD1
2nd DISC
4
*DISC-4*
Current disc number or the Disc Memo
2 Select the desired play mode.
To program tracks, use the controls on the second
player.
3 Press · on this player to start playing.
The play starts and the display shows the current
disc, track numbers, and the playing time of the
track.
While the MEGA CONTROL button is lit, you can
control the second player with the controls on this
player.
To control the master player again
Press MEGA CONTROL. The MEGA CONTROL button goes
off and you can control the master player.
To control the master player again by using the remote, you
have to reselect the master player by pressing
PLAYER SELECT on the remote.
PLAYER
SELECT
·
=/+
0/)
MEGA CONTROL
PLAYER SELECT
MENU
TRACK
CONTINUE
PROGRAM
MEMO SCAN
TIME/TEXT
PUSH ENTER
DISC
SKIP
BACK
SHUFFLE
REPEAT
·
P
p
P
p
To control the second player directly using the supplied
remote Z
While the MEGA CONTROL button is off, press PLAYER
SELECT repeatedly until “2nd player” appears in the remote’s
display.
27
GB
Page 28

Playing CDs
Loading the Disc Memos of the second CD
player
Fading In or Out
If the second CD player has the Disc Memo function
(see page 30), you can load the Disc Memos of the
second CD player into this player’s memory and
display them on this player.
1 Press MENU/NO.
2 Turn the JOG dial until “LOAD 2ndMEMO?”
flashes in the display.
ALL DISCS
CD1
LOAD 2ndMEMO?
3 Push the JOG dial.
This player starts loading. (Loading takes about
one minute.)
Note
If each Disc Memo of the second CD player has more than 13
characters, only the first 13 characters of that Disc Memo is
loaded into this player.
Labeling discs of the second CD player
You can manually fade the sound in or out to prevent
tracks from starting or ending abruptly.
Note that you cannot use this effect when you use the
DIGITAL OUT (OPTICAL) connector.
FADER
+100
I / u
To
Start play fading in
End play fading out
Note
Fading lasts for about 5 seconds.
Press FADER
During pause. “FADE” appears in
the display and the Q indication
flashes. The play fades in.
When you want to start fading out.
“FADE” appears in the display and
the q indication flashes. The play
fades out and the player pauses.
You can label discs of the second CD player or change
the Disc Memos loaded from the second CD player.
1 Press MEGA CONTROL.
The MEGA CONTROL button lights up.
2 Turn the JOG dial to select the disc you want to
assign a Disc Memo to.
If the disc slot you select does not have any disc,
“NO DISC” appears in the display and you cannot
assign a Disc Memo.
3 Press MENU/NO.
“MEMO IN ?” appears.
4 Push the JOG dial.
5 Input the new Disc Memo following the procedure
in “Labeling Discs” on page 30.
Note
The new Disc Memos are stored on this player’s memory, so
you cannot display them on the second CD player.
28
GB
Page 29

Playing Alternately (No-Delay
Play/X-Fade Play)
Playing CDs
Playing CDsGetting Started
Playing CDs
3 Press · to start playing.
The MEGA CONTROL button lights up while the
track in the second player is selected.
When you connect the second player, you can play
tracks in this player and those from the second player
alternately from any play mode (see “Connecting
Another CD Player” on page 9).
Select one of the following methods:
• No-Delay Play: The current player changes at each
track. Each time the current player changes to the
other player, the other player starts play without a
break in sound immediately after the current player
ends play. The other player skips the lead-in portion
and starts playing from where the sound actually
begins.
• X-Fade Play: The current player changes at each
track or at the specified interval. You can select the
interval, 30, 60 or 90 seconds. Each time the current
player changes to the other player, the sound from
both players is mixed. The current player ends play
by fading out, and the other player starts play by
fading in.
X-FADE NO DELAY
+100
I / u
To cancel No-Delay/X-Fade Play
Press the corresponding button repeatedly until
“NO DELAY” or “X-FADE” disappears from the display. The
current player continues playing.
You can change the method (No-Delay or X-Fade)
during play
Press the corresponding button (NO DELAY or X-FADE)
following the procedure in Step 2.
You can start X-Fade at any point of the track
Press FADER during X-Fade Play.
Even after you have set the X-Fade mode and started
X-Fade play, you can start X-Fade manually at any point
you like. Note that you cannot do this operation while
the sound from both players is mixed.
Notes
• The play starts from the second player if you start play
while the MEGA CONTROL button is lit.
• When one player has played all the discs or tracks in the
player ahead of the other player, the play stops.
• Do not use the controls on the second player during
No-Delay/X-Fade Play. They may not work correctly.
·
1 Select the desired play mode for each player.
2 When you select No-Delay Play
Press NO DELAY.
“NO DELAY” appears in the display.
When you select X-Fade Play
Press X-FADE.
“X-FADE” appears in the display.
Each time you press the X-FADE button, the
indication appears as follows:
n X-FADE off n at track end n after 30 sec
after 90 sec N after 60 sec N
To change the current player each time a whole
track is finished, select “at track end.”
To change the current player at the specified
interval, press X-FADE repeatedly until the
interval you want appears in the display.
Controlling the Player by
Another Unit
When you connect the player to a Sony MD deck
compatible with the Mega Control function or operate
a Sony MD deck by using the computer software like
“MD Editor,” you must set the player as shown below:
1 Press MENU/NO.
2 Turn the JOG dial until “CONTROL A1 ?” appears
in the display window.
3 Press YES.
To return to normal setting
After following steps 1 and 2, and “CONTROL A1 ?” is
displayed, then press YES.
Notes
• You can perform the operation above correctly only when
you operate Disc 1 to Disc 200.
• You cannot operate this player correctly from another
player which does not have the CONTROL A1 jack. In
this case, operate the other player from this player.
29
GB
Page 30

Storing Information About CDs (Custom Files)
Storing Information About CDs (Custom Files)
What You Can Do With the
Custom Files
The player can store three types of information called
“Custom Files” for each disc. Once you have stored
Custom Files for a disc, the player automatically recalls
what you have stored whenever you select the disc.
Note that Custom Files will be erased if you do not use
the player for about one month.
You can store this information:
When you use
Disc Memo (page 30)
Delete Bank (page 34)
Group File (page 35)
Where are Custom Files stored?
Custom Files are stored not on the disc, but in the
player’s memory. Therefore you cannot use Custom
Files when you play the disc on other players.
You can
Label discs using up to 13
characters
Delete unwanted tracks and store
only the tracks you want
Group discs in up to eight groups,
to locate them easily
Labeling Discs (Disc Memo)
You can label discs using up to 13 characters and have
the player display the Disc Memo each time you select
the disc. The Disc Memo can be anything you like, such
as a title, musician’s name, category or date of
purchase.
When you select a CD TEXT disc
The disc title is automatically stored as the Disc Memo.
If the disc title has more than 13 characters, only the first
13 characters of the disc title are stored (see page 15).
When you replace a disc with a CD TEXT disc, the disc
title of the CD TEXT disc is also stored automatically.
Note that you cannot change the Disc Memo of the
CD TEXT disc.
You can label discs while the front cover is open
Labeling discs on the player
MENU/NO
I / u
YES
JOG
+100
If you replace discs you have filed in the
Custom Files
The Custom File information you have stored remains,
since the Custom File information is assigned to each
slot. Erase all the Custom Files (Disc Memo, Delete
Bank, and Group File) of the old disc, and then file the
new disc information in the Custom Files.
Erasing all Custom Files of all discs
Turn off the player. While holding down CLEAR, press
I/u to turn on the player. “ALL ERASE” appears in
the display, and all Custom Files are erased.
≠ AMS ±
CLEAR
1 Turn the JOG dial until the disc number to which
you want to assign a Disc Memo appears in the
display.
When you label a disc with the front cover closed,
the disc number of the disc at the playing position
appears.
When you label a disc with the front cover open,
the disc number at the loading position appears.
2 Press MENU/NO.
“MEMO IN ?” flashes.
3 Push the JOG dial.
The flashing cursor (
) appears.
30
GB
Page 31

Storing Information About CDs (Custom Files)
4 Turn the JOG dial until the desired character
appears in the display.
The cursor disappears and the first space for the
Disc Memo flashes.
As you turn the JOG dial clockwise, the characters
appear in the following order. Turn the JOG dial
counterclockwise to go in reverse order.
(space) A B C D E F G H I J K L M N O P Q R S T U
V W X Y Z a b c d e f g h i j k l m n o p q r s t u v w
x y z 0 1 2 3 4 5 6 7 8 9 ! " # $ % & ' ( ) * + , – . / : ; <
= > ? @ _
ALL DISCS
CD1
DISC
AB
S
5 Push the JOG dial to select the character.
The selected character lights up, and the flashing
cursor appears to indicate the next space to be
input.
ALL DISCS
CD1
DISC
AB
S
To make a correction
Press CLEAR and begin again by inputting the correct
characters.
Changing the Disc Memo
1 Follow Steps 1 to 3 in “Labeling discs on the
player” on page 30 to select the Disc Memo you
want to change.
2 Turn the ≠ AMS ± dial to move the cursor to
the position you want to change.
When the cursor position is on a character, the
character flashes but when the cursor position is
on the blank space, the cursor (
display.
To change characters
Turn the JOG dial until the desired character appears in
the display.
To add characters
Push the JOG dial. The new blank space appears next to
the selected character, then turn the JOG dial until the
desired character appears in the display.
To erase characters
Press CLEAR. The selected character disappears.
To erase all characters for the current Disc Memo
Press and hold CLEAR for few seconds.
All input characters for the current Disc Memo are
erased.
) appears in the
3 Repeat step 2 to change more characters.
6 Repeat Steps 4 and 5 to input more characters.
7 Press YES to store the Disc Memo.
The display shows the Disc Memo.
ALL DISCS
CD1
DISC
20
SONYHITS
Repeat Steps 1 to 7 to assign Disc Memos to other
discs.
To change the character type quickly while input
characters
Press TIME/TEXT in step 4 above. The character on the
cursor changes to the first character of each character
type.
Each time you press TIME/TEXT, the character type
changes as follows:
n A n a n 0 n ! n (space)
4 Press YES to store the Disc Memo.
Erasing the Disc Memo
1 Follow Steps 1 to 3 in “Labeling discs on the
player” on page 30 to select the Disc Memo you
want to erase.
2 Press and hold CLEAR for few seconds.
3 Press YES.
The Disc Memo disappears.
31
GB
Page 32

Storing Information About CDs (Custom Files)
GROUP
ENTER DEL
CLEAR
DISC SKIP
CHECK
NO DELAY
SPACE X-FADE
CAPS HIT LIST
DISC HIGH-LIGHT
3
DEF MEMO INPUT
6
MNO
9
WXY
2
ABC&!?
5
JKL
8
TUV
10/0
10
QZ
1
4
GHI
7
PRS
i sc memo i nput
sDi c6:
(AB)
D
[]
CD1
Labeling discs observing the remote’s
display Z
PLAYER SELECT
MENU
TRACK
BACK
MENU
Easy scroll
PUSH ENTER
key
GROUP
Number
buttons
DISC HIGH-LIGHT
DEF MEMO INPUT
ABC&!?
3
2
1
MNO
JKL
GHI
6
5
4
WXY
TUV
PRS
9
8
7
QZ
ENTER DEL
10
10/0
DISC SKIP
CAPS HIT LIST
SPACE X-FADE
NO DELAY
CHECK
CLEAR
MEMO INPUT
?//
CAPS
SPACE
ENTER
CLEAR
1 Press MENU.
4 Press CAPS to find the desired letter type.
Each time you press the button, the letter type
changes cyclically among capital letters (AB), small
letters (ab), and numbers (12). To select a symbol,
you have to select the capital or small letter type.
Letter type
5 To input a letter, press the number button
corresponding to the desired letter (indicated
beside each number button).
The cursor disappears and the first space for the
Disc Memo flashes.
Each time you press the button, the letter changes
cyclically among the ones indicated beside the
button.
To input symbols, press the number button 1
repeatedly until the desired symbol appears in the
display.
CD1
Memo se a r c h
Program play
Pr ogr am inpu t
Group se lec t
2 Move the cursor (”) to “Disc memo input” by
using the Easy scroll key, then press the Easy scroll
key.
CD1
i sc memo i nput
01:* DISC-1*
02D: * DISC-2*
03:* DISC-3*
3 Move the cursor to the disc you want to assign a
Disc Memo, then press the Easy scroll key.
The flashing cursor (“) appears.
i sc memo i nput
D
sDi c6:
[
GB
32
CD1
(AB)
]
Characters assigned to
each number button
Example: To select the letter E
Press the number button 3 twice.
n D n E n F
Press 3. Press 3.
Press 3.
To insert a space, press SPACE once.
To input a number, press CAPS twice to change
the letter type, then press the desired number
button.
Page 33

Storing Information About CDs (Custom Files)
6 Press another number button or the
MEMO INPUT / button to go to the next space,
then repeat Steps 4 to 6 to input more characters.
7 Press the Easy scroll key or ENTER when you
finished inputting characters.
“Transmit to SET?” appears in the display.
CD1
06:EMOTIONS
rTansmit toSET?
yes
no
Press the Easy scroll key or ENTER to load the
Disc Memo to the player.
If you do not want to load the Disc Memo to the
player, move the cursor to “no,” then press the
Easy scroll key.
Repeat Steps 1 to 7 to assign Disc Memos to other
discs.
If you make a mistake while inputting the
character(s)
To correct all the characters which have been input
Press CLEAR. All the characters are erased. Input the
correct character from the beginning.
To correct the character currently being input
1 Press DEL to delete the incorrect character.
2 Input the correct character.
To insert a character between the input characters
Press MEMO INPUT ? or / until the cursor moves
next to the point you want to insert, and enter the
character.
To correct a character which has been input
1 Press MEMO INPUT ? or / until the cursor moves
next to the incorrect character.
CD1
i sc memo i nput
D
sDi c6:
[
SO
NY B
2 Press DEL to delete the incorrect character.
i sc memo i nput
D
sDi c6:
[
3 Input the correct character.
SO
NY
T
T
(AB)
]
CD1
(AB)
]
33
GB
Page 34

Storing Information About CDs (Custom Files)
Storing Custom File
Information Using a Keyboard
You can store the Disc Memo for each disc, one by one,
using an IBM-compatible PC keyboard* (not supplied).
* Power consumption must be 120 mA or less.
Keyboard jack
+100
I / u
1 Connect a keyboard to the keyboard jack on the
front panel of the player.
I / u
Storing Specific Tracks
(Delete Bank)
You can delete unwanted tracks and store only the
tracks you want. When you select the disc containing a
Delete Bank, the player will play only the remaining
tracks.
CONTINUE
I / u
SHUFFLE
1 Press CONTINUE or SHUFFLE before you start
playing.
2 Turn the JOG dial to select the disc.
JOG
CHECK
+100
CLEAR
2 After selecting the desired disc on the player, press
the Enter key.
3 Input the desired characters, then press the Enter
key to store the information.
You can delete all characters of selected item
While holding down the Shift key, press the Delete key.
Notes
• If the cursor keys do not work correctly and you cannot
complete the task using the keyboard, disconnect the
keyboard then reconnect it to the player and try again.
• If the keyboard is not the USA model, the characters may be
input differently from those on the keys.
The USA keyboard layout is shown below.
~
'
1!2@3#4$5%6^7&89(0)-
WERT YU I OPQ
Shift
SDFGHJKLA
XCVBNM<>Z
Caps Lock
Ctrl Alt Alt Ctrl
+
=
}
{
]
[
Enter
?
Shift
3 Press CHECK repeatedly until the track you want
to delete appears in the display.
ALL DISCS
DISC
CD1
TRACK
20
201ON
4 Press CLEAR.
“DELETE FILE” and “OFF” appear in the display.
ALL DISCS
DISC
CD1
TRACK
20
201OFF
If you want to recover the track, press CLEAR
again.
5 Repeat Steps 3 and 4 to delete more tracks.
You can recover all the tracks you have deleted
Hold down CLEAR until “ALL ON” appears in the
display.
Note
The deleted tracks are skipped even in the Shuffle or Program
Play mode (when the whole disc containing a Delete Bank is
programmed as one step).
34
GB
Page 35

Storing Information About CDs (Custom Files)
Grouping Discs (Group File)
You might find that too many discs make it hard to
find the disc you want. This player has a feature that
lets you classify discs into eight groups. Each disc can
be put into only one group.
Once you classify discs, you can enjoy Continuous,
Shuffle, or Repeat Play within a certain group (Group
Play).
CONTINUE
SHUFFLE
≠ AMS ±
MENU/NO
+100
JOG
Labeling groups (Group Memo)
You can label the preset group number anything you
like, such as a category, using up to 13 characters.
Note that you cannot store the Group Memo if you
have not assigned any disc to the group.
1 Press MENU/NO.
“MEMO IN ?” flashes.
2 Turn the JOG dial until the group number you
want to label appears in the display, and then push
the JOG dial.
The flashing cursor (
) appears.
I / u
GROUP 1 – 8 CLEAR
GROUP FILE
·
Assigning discs to groups
1 Press CONTINUE or SHUFFLE before you start
playing.
2 Turn the JOG dial to select the disc you want to
assign to a group.
3 Press GROUP FILE.
“Select G1 – G8” appears in the display.
4 Press one of the GROUP 1 – 8 buttons to which
you want to assign the disc.
“GROUP FILE” and the group number appear in
the display and the disc is assigned to that group.
3 Turn the JOG dial until the desired character
appears in the display.
The cursor disappears and the first space for the
Group Memo flashes.
As you turn the JOG dial clockwise, the characters
appear in the following order. Turn the JOG dial
counterclockwise to go in reverse order.
(space) A B C D E F G H I J K L M N O P Q R S T U
V W X Y Z a b c d e f g h i j k l m n o p q r s t u v w
x y z 0 1 2 3 4 5 6 7 8 9 ! " # $ % & ' ( ) * + , – . / : ; <
= > ? @ _
4 Push the JOG dial to select the character.
The selected character lights up, and the flashing
cursor appears to indicate the next space to be
input.
To make a correction
Press CLEAR and begin again by inputting the correct
characters.
5 Repeat Steps 3 and 4 to input more characters.
See also “Labeling discs on the player” on page 30
for details.
Deleting discs from a group
• To delete a disc from a group
1 Turn the JOG dial until the disc number you want
to delete from the group appears in the display.
2 Press GROUP FILE.
“Select G1 – G8” appears in the display.
3 Press CLEAR.
“GROUP ERASE” appears in the display.
• To delete all discs from a group, press CLEAR while
holding down whichever GROUP 1 – 8 button you
want to clear.
6 Press YES to store the Group Memo.
35
GB
Page 36

Storing Information About CDs (Custom Files)
Changing the Group Memo
1 Follow Steps 1 and 2 in “Labeling groups” on page
35 to select the Group Memo you want to change.
2 Turn the ≠ AMS ± dial to move the cursor to
the position you want to change.
When the cursor position is on the character, the
character flashes and the cursor position is on the
blank space, the cursor (
display.
To change characters
Turn the JOG dial until the desired character appears in
the display.
To add characters
Push the JOG dial. The new blank space appears next to
the selected character, then turn the JOG dial until the
desired character appears in the display.
To erase characters
Press CLEAR. The selected character disappears.
) appears in the
3 Repeat step 2 to change more characters.
4 Press YES to store the Group Memo.
Erasing the Group Memo
1 Follow Steps 1 and 2 in “Labeling groups” on page
35 to select the Group Memo you want to erase.
2 Press and hold CLEAR for few seconds.
3 Press YES.
The Group Memo disappears.
Playing discs in a group on the player
(Group Play)
You can enjoy Continuous or Shuffle Play within a
group.
1 Select the desired play mode before you start
playing.
When you select
ALL DISCS
Continuous Play
1 DISC Continuous
Play
ALL DISCS Shuffle
Play
1 DISC Shuffle Play
The player plays
All tracks on all discs in the
group consecutively
All tracks on the specified disc
in the group consecutively
All tracks on all discs in the
group in random order
All tracks on the specified disc
in the group in random order
2 Press one of the GROUP 1 – 8 buttons to select the
group and press ·.
Group Play starts from the first disc that
corresponds to the Group Play number found after
the disc you are currently playing. If the disc you
are currently playing is in the selected group,
Group Play starts from that disc.
To cancel Group Play
Press the GROUP 1 – 8 button which you have selected.
“GROUP OFF” appears in the display.
During Group Play, you can locate a desired disc
within a group by scanning or searching Disc Memos
See “Locating a disc searching for a specific Disc Memo”
on page 16 and “Locating a disc scanning each Disc
Memo” on page 17.
36
GB
Page 37

Storing Information About CDs (Custom Files)
Memo se a r c h
Program play
Pr ogr am inpu t
Group se lec t
CD1
G1 : Gr oup 1
G2 : HI T SONGS
G3 : P I ANO SONATA
CD1
You can specify the disc to play when starting Group
Play
After selecting the group, turn the JOG dial to select the
disc, then push the JOG dial or press ·.
Note
If “NO ENTRY” appears in the display, no disc has been put
into the selected group.
Starting Group Play observing the remote’s
display Z
PLAYER SELECT
MENU
PUSH ENTER
DISC
SKIP
SHUFFLE
REPEAT
BACK
BACK
TRACK
MENU
Easy scroll
key
·
CONTINUE
PROGRAM
MEMO SCAN
TIME/TEXT
1 Before you start playing, press MENU.
2 Move the cursor (”) to “Group select” by using the
Easy scroll key, then press the Easy scroll key.
3 Move the cursor to the desired group.
4 Press the Easy scroll key then press · to start
playing.
To cancel Group Play, move the cursor to
“Group OFF,” then press BACK to go back to the menu
display. You can also cancel Group Play by pressing
the GROUP button.
You can specify the disc by pressing the
DISC SKIP +/– button
GROUP
PLAYER SELECT
MENU
TRACK
PUSH ENTER
GROUP
DISC HIGH-LIGHT
DEF MEMO INPUT
ABC&!?
3
2
1
MNO
JKL
GHI
6
5
4
WXY
TUV
PRS
9
8
7
QZ
ENTER DEL
10
10/0
DISC SKIP
CAPS HIT LIST
SPACE X-FADE
CHECK
CLEAR
Note
When you control another CD player using the remote’s
display (see page 27), you may not be able to start Group Play,
depending on the player. In this case, first press GROUP, then
press the desired number button (1 – 8) and press ENTER.
BACK
NO DELAY
GB
37
Page 38

Storing Information About CDs (Custom Files)
Storing Y our Favorite T r acks
(Hit List)
You can store the tracks you play frequently and select
those tracks by checking the track numbers or titles
(see page 39) in the Hit List.
You can put up to 32 tracks in the Hit List.
I / u
HIT LIST
≠ AMS ±
PLAYER SELECT
MENU
TRACK
PUSH ENTER
MENU/NO
·
BACK
JOG
+100
CLEAR
PLAYER SELECT
MENU
TRACK
DISC HIGH-LIGHT
ABC&!?
1
JKL
GHI
4
TUV
PRS
7
QZ
10
DISC SKIP
PUSH ENTER
GROUP
DEF MEMO INPUT
3
2
MNO
6
5
WXY
9
8
ENTER DEL
10/0
CLEAR
BACK
CAPS HIT LIST
SPACE X-FADE
NO DELAY
CHECK
Putting tracks into the Hit List
HIT LIST
ENTER
CLEAR
·
=/+
CONTINUE
PROGRAM
MEMO SCAN
TIME/TEXT
DISC
SKIP
SHUFFLE
REPEAT
Press HIT LIST while playing your favorite track.
The “HIT” indication and “List in” appear in the
display.
Notes
• When you input the 33rd track into the Hit List, the 32nd
track will be replaced.
• You cannot store the tracks from a second CD player.
Playing tracks in the Hit List
1 Press HIT LIST before you start playing.
The HIT LIST button lights up and “HIT LIST”
appears in the display.
2 Turn the JOG dial or the ≠ AMS ± dial until
the desired track appears in the front panel
display.
3 Push the JOG dial or press · to start playing.
When using the remote, press ENTER.
38
GB
Page 39

Storing Information About CDs (Custom Files)
The Hit List remains until erased
Even if you replace discs, the Hit List you create remains.
Therefore, the player will substitute the new existing
tracks into the Hit List.
Note
The track you select in Step 2 will be listed as the first track in
the Hit List, and you cannot arrange the order of the tracks in
the Hit List.
Deleting tracks from the Hit List
1 Follow Steps 1 and 2 in “Playing tracks in the Hit
List” on page 38.
2 Press CLEAR.
The selected track is deleted from the Hit list.
Deleting all tracks of the Hit List
When the HIT LIST button lights up, hold down
CLEAR while in stop mode until “CLEAR” appears.
Labeling tracks in the Hit List (Hit Title)
You can label tracks in the Hit List in either of the two
methods described below.
4 Push the JOG dial to select the character.
The selected character lights up, and the flashing
cursor appears to indicate the next space to be
input.
To make a correction
Press CLEAR and begin again by inputting the correct
characters.
5 Repeat Steps 3 and 4 to input more characters.
See also “Labeling discs on the player” on page 30
for details.
6 Press YES to store the Hit Title.
Labeling tracks while in stop mode
1 While the HIT LIST button is lit, select the track
you want to assign by turning the JOG dial or the
≠ AMS ± dial.
2 Press MENU/NO.
The flashing cursor (
) appears in the display.
3 Follow Steps 3 to 6 in “Labeling tracks while in
play mode” to input the characters.
Labeling tracks while in play mode
1 Press MENU/NO while playing a track in the Hit
List.
“HIT MEMO ?” appears in the display.
2 Push the JOG dial.
The flashing cursor (
) appears in the display.
3 Turn the JOG dial until the desired character
appears in the display.
The selected character for the Hit Title flashes.
As you turn the JOG dial clockwise, the characters
appear in the following order. Turn the JOG dial
counterclockwise to go in reverse order.
(space) A B C D E F G H I J K L M N O P Q R S T U
V W X Y Z a b c d e f g h i j k l m n o p q r s t u v w
x y z 0 1 2 3 4 5 6 7 8 9 ! " # $ % & ' ( ) * + , – . / : ; <
= > ? @ _
You can store a CD TEXT disc’s track titles in the Hit
List
The CD TEXT disc’s track title is stored as a Hit Title
automatically when the track is put into the Hit List.
39
GB
Page 40

Additional Information
Additional Information
Precautions
On transportation
• When transporting the player, open the front cover then
remove all the discs from the player and turn the power off.
On safety
• Caution — The use of optical instruments with this product
will increase eye hazard.
• Should any solid object or liquid fall into the cabinet,
unplug the player and have it checked by qualified
personnel before operating it any further.
On power sources
• Before operating the player, check that the operating
voltage of the player is identical with your local power
supply. The operating voltage is indicated on the nameplate
at the rear of the player.
• The player is not disconnected from the AC power source
(mains) as long as it is connected to the wall outlet, even if
the player itself has been turned off.
• If you are not going to use the player for a long time, be
sure to disconnect the player from the wall outlet. To
disconnect the AC power cord (mains lead), grasp the plug
itself; never pull the cord.
• AC power cord must be changed only at the qualified
service shop.
On placement
• Place the player in a location with adequate ventilation to
prevent heat build-up in the player.
• Do not place the player on a soft surface such as a rug that
might block the ventilation holes on the bottom.
• Do not place the player in a location near heat sources, or in
a place subject to direct sunlight, excessive dust or
mechanical shock.
If you have any questions or problems concerning your
player, please consult your nearest Sony dealer.
Notes on CDs
On handling CDs
• To keep the disc clean, handle the disc carefully.
• Do not stick paper or tape on the disc.
• Do not expose the disc to direct sunlight or heat sources
such as hot air ducts, nor leave it in a car parked in direct
sunlight as there can be considerable rise in temperature
inside the car.
• After removing a disc from the disc slot, store the disc in its
case.
On cleaning
• Before playing, clean the disc with a cleaning cloth. Wipe
the disc from the center out.
40
GB
On operation
• If the player is brought directly from a cold to a warm
location, or is placed in a very damp room, moisture may
condense on the lenses inside the player. Should this occur,
the player may not operate properly. In this case, leave the
player turned on for about an hour until the moisture
evaporates.
On adjusting volume
• Do not turn up the volume while listening to a portion with
very low level inputs or no audio signals. If you do, the
speakers may be damaged when a peak level portion is
played.
On cleaning
• Clean the cabinet, panel and controls with a soft cloth
slightly moistened with a mild detergent solution. Do not
use any type of abrasive pad, scouring powder or solvent
such as alcohol or benzine.
• Do not use solvents such as benzine, thinner, commercially
available cleaners or anti-static spray intended for vinyl
LPs.
Page 41
Additional Information
Troubleshooting
If you experience any of the following difficulties while
using the player, use this troubleshooting guide to help
you remedy the problem. Should any problem persist,
consult your nearest Sony dealer.
There is no sound.
/Check that the player is connected securely.
/Make sure you operate the amplifier correctly.
The CD does not play.
/There is no CD in a slot (“–NO DISC–”
appears).
Insert a CD.
/Insert the CD with the label side facing right.
/Clean the CD (see page 40).
/Moisture has condensed inside the player. Open
the front cover and leave the player turned on
for about an hour (see page 40).
The remote does not function.
/Remove obstacles in the path of the remote and
the player.
/Point the remote at the remote sensor
the player.
/Be sure to set up the remote correctly.
/Replace all the batteries in the remote with new
ones if i appears in the remote’s display.
on
Specifications
Compact disc player
Laser Semiconductor laser (λ = 780 nm)
Laser output Max 44.6 µW*
Frequency response 20 Hz to 20 kHz ±0.5 dB
Signal-to-noise ratio More than 108 dB
Dynamic range More than 93 dB
Harmonic distortion Less than 0.0045 %
Channel separation More than 100 dB
Outputs
Jack
type
LINE OUT
DIGITAL OUT
(OPTICAL)
Phono
jacks
Optical
output
connector
General
Emission duration: continuous
* This output is the value measured at
a distance of 200 mm from the
objective lens surface on the Optical
Pick-up block with 7 mm aperture.
Maximum
output
level
2 V
(at 50 kilohms)
–18 dBm
Load impedance
Over 10 kilohms
Wave length: 660 nm
The player functions incorrectly.
/The microcomputer chips may be operating
incorrectly. Disconnect the AC power cord, then
connect it back to the wall outlet to reset the
player.
Power requirements
Where purchased
Canada
Europe
Power consumption 13 W
Dimensions (approx.) 430 × 189 × 484 mm (17 × 7 1/2 × 19 1/8 in.)
(w/h/d) incl. projecting parts
Mass (approx.) 8.5 kg (18 lbs 12 oz)
Power requirements
120 V AC, 60 Hz
220 –230 V AC, 50/60 Hz
Supplied accessories
See page 4.
Design and specifications are subject to change without notice.
41
GB
Page 42

Additional Information
Index
Index
A, B
Advanced Mega Control 27
AMS 19
Automatic Music Sensor 19
C
CD TEXT 15
Changing
Disc Memo 31
Group Memo 36
Connecting 5
another CD player 9
Continuous Play 12
CONTROL A1
X-Fade Play 29
Custom Files
Delete Bank 34
Disc Memo 30
Group File 35
Hit List 38
what you can do with 30
D
Delete Bank 34
Disc Memo 30
E
Erasing
Custom Files 30
Delete Bank 34
Disc Memo 31
Group Memo 36
Hit List 39
programs 23, 25
remote’s memory 9
F
Fading 28
G
Grouping Discs 35
H
Handling CDs 40
Hit List 38
Hookups
overview 4
I
Inserting CDs 10
J, K
JOG dial 10
L
Labeling a disc 30
Locating
a specific point 19
a specific track 19
by monitoring 19
by observing the display 20
directly 17
discs 16
using AMS 19
M
Memo Scan 17
Memo Search 16
N, O
No-Delay Play 29
5
P, Q
Playback
Continuous Play 12
Easy Play 18
Group Play 36
Program Play 22
Repeat Play 21
Shuffle Play 21
Program
changing 23, 25
checking 23
erasing 23, 25
R
Remote control 4, 6
Repeating 21
Rotary table 10
S
Searching. See Locating
Selecting a disc 16
Selecting the language 15
Shuffle Play
on all discs 22
on one disc 22
Specifying the next disc 18
Storing
information about CDs 30
specific tracks 34
Names of controls
Buttons
BACK 37
CAPS 32
CHECK 23, 34
CLEAR 22, 31, 35, 39
CONTINUE 12, 22
DEL 33
DISC 17, 22, 24
DISC SKIP +/– 13
EASY PLAY 18
ENTER 17, 24, 38
GROUP 37
GROUP 1 – 8 35
GROUP FILE 35
HIGH-LIGHT 15
HIT LIST 38
MEGA CONTROL 27
MEMO INPUT ?// 33
MEMO SCAN 17
MEMO SEARCH 16
MENU 7
MENU/NO 6, 15, 28, 30, 35, 39
NO DELAY 29
Number 17
OPEN/CLOSE 10
PLAYER SELECT 10, 27
PROGRAM 22, 24
REPEAT 21
SHUFFLE 22
SPACE 32
TIME/TEXT 14, 31
TRACK 20
X-FADE 29
YES 6, 31, 35, 36, 39
≠ AMS ± 13
· 13
P 13
p 13
=/+ 19
0/) 19
>10 19, 24
+100 16
Switches
TIMER 26
I/u 6
Jacks
CONTROL A1 5
LINE OUT 10
2ND CD IN 9
Connectors
T
Timer Play 26
Total playing time 14
Troubleshooting 41
U, V, W, X, Y, Z
Unpacking 4
DIGITAL OUT (OPTICAL) 5
Others
COMMAND MODE
selector 10
Disc slots 10
Display 14
Easy scroll key 7
Front cover 10
JOG dial 10
Remote’s display 7
Rotary table 10
4
42
GB
Page 43

Additional Information
43
GB
Page 44

AVERTISSEMENT
Bienvenue!
A propos de ce
Pour prévenir tout risque
d’incendie ou
d’électrocution, installez
cet appareil à l’abri de la
pluie ou de l’humidité.
Pour prévenir tout risque
de décharge électrique,
abstenez-vous d’ouvrir le
boîtier.
Confiez l’entretien de
votre lecteur
exclusivement à un
personnel qualifié.
Cet appareil entre dans la catégorie des
produits LASER DE CLASSE 1.
L’etiquette indiquant l’appartenance de
ce lecteur à la classe 1 est apposée au dos
du boîtier.
Nous vous remercions d’avoir fait
l’acquisition de ce lecteur de disques
compacts Sony. Avant d’utiliser cet
appareil, nous vous recommandons de
lire attentivement ce manuel et de le
conserver afin de pouvoir le consulter
ultérieurement.
mode d’emploi
Les instructions contenues dans le
présent mode d'emploi concernent le
modèle CDP-CX350.
Conventions
• Les instructions fournies dans ce
manuel portent sur les commandes du
lecteur.
Vous pouvez également utiliser les
commandes que comporte votre
télécommande si celles-ci portent le
même nom ou un nom similaire à
celles de votre lecteur de disques
compacts.
• Les symboles qui suivent apparaissent
dans ce manuel:
Ce symbole indique que vous
pouvez effectuer l’opération
correspondante en vous
servant de la télécommande.
Ce symbole indique un conseil
ou une astuce facilitant
l’opération envisagée.
Cet équipement est exclusivement
conçu pour un usage domestique. La
garantie qui couvre ce matériel sera
invalidée en cas d’utilisation dans un
environnement commercial par des
animateurs, disc jockeys, etc., même
pendant la période couverte par la
garantie.
Pour les utilisateurs au Canada
ATTENTION
POUR PREVENIR LES CHOCS
ELECTRIQUES, NE PAS UTILISER
CETTE FICHE POLARISEE AVEC UN
PROLONGATEUR, UNE PRISE DE
COURANT OU UNE AUTRE SORTIE
DE COURANT, SAUF SI LES LAMES
PEUVENT ETRE INSEREES A FOND
SANS EN LAISSER AUCUNE PARTIE A
DECOUVERT.
FR
2
Page 45

TABLE DES MA TIERES
Préparation
Déballage............................................................................................................................... 4
Raccordement du système.................................................................................................. 4
A propos de la télécommande fournie ............................................................................. 5
Préparation de la télécommande....................................................................................... 6
Raccordement d’un autre lecteur CD ............................................................................... 9
Introduction des disques compacts................................................................................. 10
Lecture d’un disque compact...................................................................................... 12
Lecture de disques compacts
Utilisation de la fenêtre d’affichage ................................................................................ 14
Localisation d’un disque déterminé................................................................................ 16
Spécification du disque suivant à reproduire................................................................ 18
Lecture du disque que vous venez d’introduire – Lecture simple............................. 18
Localisation d’une plage déterminée ou d’un passage sur une plage ....................... 19
Lecture répétée ................................................................................................................... 21
Lecture des plages dans un ordre quelconque (lecture aléatoire) .............................. 21
Création de programmes musicaux personnalisés (lecture programmée) ............... 22
Lecture par programmateur............................................................................................. 26
Commander un autre lecteur CD (Advanced Mega Control) .................................... 27
Fondu enchaîné d’entrée ou de sortie............................................................................. 28
Lecture alternée (lecture alternée sans transition/enchaînée) .................................... 29
Commander le lecteur au départ d’un autre appareil.................................................. 29
GB
FR
Mémorisation d’informations relatives aux CD (fichiers personnalisés)
Que pouvez-vous faire avec les fichiers personnalisés ................................................ 30
Identification des disques (mémo de disque)................................................................ 30
Mémorisation des informations des fichiers personnalisés au moyen d’un clavier ... 34
Mémorisation de plages spécifiques (bloc de suppression) ........................................ 34
Groupement de disques (fichier de groupe).................................................................. 35
Mémorisation de vos plages préférées (liste des hits).................................................. 38
Informations complémentaires
Précautions ......................................................................................................................... 40
Remarques sur les disques compacts.............................................................................. 40
Dépannage .......................................................................................................................... 41
Spécifications ...................................................................................................................... 41
Index.................................................................................................................. Couverture dos
FR
3
Page 46
Préparation
Préparation
Déballage
Assurez-vous que les accessoires suivants vous ont été
livrés:
• Câble audio (1)
• Porte-livrets de CD (3) et étiquette (1)
• Télécommande (1)
• Piles AA (LR6) (3)
Comment utiliser le porte-livrets de CD
Le porte-livrets de CD vous aide à retrouver facilement
un disque. Lorsque vous avez introduit un disque dans le
lecteur, vous pouvez placer le livret du CD (remis avec
tous les CD) dans le support fourni. Placez deux livrets
de CD dos à dos dans une pochette. Collez l’étiquette
numérotée sur chaque pochette en faisant correspondre
le numéro avec le logement dans lequel vous avez
introduit le disque. Vous pouvez introduire jusqu’à 300
livrets de CD dans le porte-livrets.
Installation des piles dans la télécommande
Vous pouvez commander le lecteur au moyen de la
télécommande fournie. Introduisez trois piles AA (LR6)
(fournies) en faisant correspondre les pôles + et – au
schéma figurant à l’intérieur du compartiment à piles.
Introduisez d’abord les piles par le pôle négatif (–) et
enfoncez-les ensuite jusqu’à ce que le côté positif (+)
s’encliquette en position.
Lorsque vous utilisez la télécommande, dirigez-la vers
le capteur de télécommande
du lecteur.
Raccordement du système
Présentation
Cette section décrit le raccordement du lecteur de
disques compacts à un amplificateur. Avant de réaliser
la connexion, n’oubliez pas de mettre hors tension tous
les appareils concernés.
CONTROL A1
Vers une prise
murale
Vers la sortie de
ligne (L)
DIGITAL OUT
(OPTICAL)
Lecteur CD
COMMAND MODE
Vers la sortie de ligne (R)
Amplificateur
Vers une prise murale
Blanc
(L)
Rouge
(R)
Quand faut-il remplacer les piles ?
Si l’indication i se met à clignoter dans la fenêtre
d’affichage de la télécommande, remplacez toutes les
piles par de nouvelles piles alcalines. L’emploi de piles
autres qu’alcalines, comme des piles au manganèse, peut
raccourcir la durée de vie.
Les données enregistrées dans la mémoire de la
télécommande sont sauvegardées pendant quelques
minutes le temps que vous remplaciez les piles.
Vers l’entrée audio
: Sens du signal
Câbles de connexion indispensables
Câble audio (1) (fourni)
Blanc
(L)
Rouge
(R)
Remarques
• N’abandonnez pas la télécommande à proximité d’une
source de chaleur importante ou dans un endroit humide.
• Ne laissez s’introduire aucun corps étranger dans le boîtier
de la télécommande et en particulier lors du remplacement
des piles.
• N’exposez pas le capteur de télécommande à la lumière
directe du soleil ou d’un luminaire. Vous risquez sinon de
provoquer un dysfonctionnement.
• Si vous n’utilisez pas la télécommande pendant une
période prolongée, retirez les piles afin de prévenir tout
risque de détérioration engendrée par une fuite des piles et
la corrosion subséquente.
FR
4
Page 47

Préparation
Raccordement
Lors du raccordement du câble audio, assurez-vous
que le code de couleur des fiches correspond à celui
des prises appropriées sur les différents appareils
raccordés : le rouge (droit) sur le rouge et le blanc
(gauche) sur le blanc. Assurez-vous de la qualité des
connexions afin de prévenir les bruits de souffle et les
parasites.
Lecteur CD
LINE2ND CD
IN OUT
L
R
L
R
• Si vous disposez d’un appareil numérique comme un
amplificateur numérique, un convertisseur A/N, une
platine DAT ou MD
Raccordez l’appareil via le connecteur DIGITAL OUT
(OPTICAL) au moyen d’un câble optique (non fourni).
Retirez le capuchon et branchez le câble optique.
POC-15
Amplificateur
INPUT
CD
L
R
Branchement du cordon d’alimentation
Branchez le cordon d’alimentation sur une prise
murale.
Remarque sur l’installation du lecteur
Installez le lecteur sur une surface plane et horizontale.
Si le lecteur est incliné, il risque de présenter des
dysfonctionnements ou de subir des dommages.
A propos de la télécommande
Câble optique (non fourni)
Lecteur CD
DIGITAL OUT
OPTICAL
Appareil numérique
DIGITAL INPUT
OPTICAL
Remarque
Si vous effectuez le raccordement via le connecteur
DIGITAL OUT (OPTICAL), des parasites peuvent se
produire lorsque vous activez la lecture d’un disque
compact autre que musical, comme un CD-ROM.
Si vous disposez d’un appareil Sony doté d’une prise
CONTROL A1
Raccordez l’appareil via la prise CONTROL A1 . Vous
pouvez simplifier l’utilisation de chaînes audio
composées d’appareils Sony séparés. Pour plus de
détails, reportez-vous aux instructions complémentaires
“Système de commande CONTROL A1 ”.
fournie
Comment fonctionne le système de
télécommande bidirectionnel
Cette télécommande fonctionne à l’aide d'un système
de commande à distance bidirectionnel. Avec ce
système de télécommande bidirectionnel, le composant
répond aux signaux envoyés par la télécommande en
renvoyant des signaux supplémentaires (informations
sur le statut du composant, données textuelles, etc.) à la
télécommande. Les opérations sont donc exécutées
comme résultat d’une communication entre la
télécommande et le composant.
Composant
Lorsque vous employez un système non professionnel
constitué de plusieurs composants compatibles avec le
système de télécommande bidirectionnel, restreignez le
fonctionnement du système de télécommande
bidirectionnel à un seul composant. En principe,
désactivez le système de télécommande bidirectionnel
sur tous les composants à l’exception du récepteur.
Pour désactiver le système de télécommande
bidirectionnel du lecteur, voir “Désactivation de la
réponse du lecteur aux signaux de commande à
distance” à la page 6.
FR
5
Page 48

Préparation
an ' t rece ive
elPaseturn
to a main unit
hi
C
tsREMOTE
Désactivation de la réponse du lecteur aux
signaux de commande à distance
Pour utiliser la télécommande fournie avec un autre
composant compatible avec le système de
télécommande bidirectionnel, vous devez désactiver la
réponse de ce lecteur aux signaux de commande à
distance fournie qui l'accompagne.
Désactivez le système de télécommande bidirectionnel
lorsque:
• vous employez une télécommande RM-TP501, RMTP501E, RM-LJ301 fournie avec le récepteur/
amplificateur (vous ne pouvez commander que les
disques 1 à 200) ;
• vous employez la télécommande identifiée par le
logo
fournie avec le récepteur/amplificateur.
Préparation de la
télécommande
Cette section décrit comment préparer la télécommande
pour pouvoir commander le lecteur à distance.
Appuyez sur la touche I/u du lecteur pour le mettre
sous tension.
Si le message suivant apparaît dans la fenêtre
d’affichage de la télécommande pendant la
configuration de la télécommande, dirigez la
télécommande vers le lecteur comme illustré cidessous.
MENU/NO YES
I / u
JOG
+100
1 Appuyez sur MENU/NO.
2 Tournez le disque JOG jusqu’à ce que “2WAY OFF
?” apparaisse dans la fenêtre d’affichage.
3 Appuyez sur YES.
Si vous raccordez le lecteur à un CDP-CX260 ou CDPCX88ES, appuyez sur la touche OPERATE du
transmetteur/récepteur pour le désactiver et activez le
système de télécommande bidirectionnel du lecteur.
Pour restaurer le réglage normal
Après avoir exécuté les étapes 1 et 2 et que “2WAY ON ?” est
affiché, appuyez sur YES.
Remarques
• Si vous employez la télécommande pour commander
plusieurs appareils, positionnez les appareils de façon à ce
que chaque appareil puisse recevoir les signaux de la
télécommande.
• Si vous employez ce lecteur avec un récepteur/
amplificateur, mettez le récepteur/amplificateur sous
tension quand vous utilisez ce lecteur.
Faites attention que la fenêtre d’affichage disparaît
automatiquement si vous n’effectuez aucune opération
pendant un certain moment.
I/u
30°
PLAYER SELECT
MENU
TRACK
MENU
Touche de
défilement
rapide
CONTINUE
PROGRAM
MEMO SCAN
TIME/TEXT
PUSH ENTER
DISC
SKIP
BACK
SHUFFLE
REPEAT
FR
6
Page 49

Préparation
Player check
Memo l o ad i ng
Memo r y c l ea r
Contrast adjust
CD1
aster player
= CD1/300d i scs
M
CD1
aster player
= CD1/300d iscs
= CD3/ 51d iscs
nd
M
2 player
CD1
Memo se a r c h
Program play
Pr ogram i nput
Group se lec t
CD1
Player check
Memo l o ad i ng
Memo r y c l ea r
Contrast adjust
CD1
Comment déplacer le curseur dans la
fenêtre d’affichage de la télécommande
Pour déplacer le curseur vers le bas, poussez la touche
de défilement rapide vers le bas comme illustré
ci-dessous.
Pour déplacer le curseur vers le haut, poussez la touche
de défilement rapide vers le haut comme illustré cidessous.
2 Déplacez le curseur (”) sur “Set up” à l’aide de la
touche de défilement rapide et appuyez ensuite
sur la touche de défilement rapide.
3 Déplacez le curseur sur “Player check” et appuyez
ensuite sur la touche de défilement rapide.
La fenêtre d’affichage indique les données de
disque du lecteur après que
“Now player checking...” est apparu.
Si vous raccordez un autre lecteur CD, les données
de disque du second lecteur CD apparaissent
également.
Mémorisation de données de disque dans
la télécommande
1 Appuyez sur MENU.
Faites attention que le symbole $ indique que le
menu comporte une suite.
Poussez la touche de défilement rapide vers le bas
pour consulter les paramètres suivants.
CD1
Memo se a r c h
Program play
Pr ogram i nput
Group se lec t
Chargement du mémo de disque
1 Appuyez sur MENU.
2 Déplacez le curseur (”) sur “Set up” à l’aide de la
touche de défilement rapide et appuyez ensuite
sur la touche de défilement rapide.
(suite)
FR
7
Page 50

Préparation
Player check
Memo l o ad i ng
Memo r y c l ea r
Contrast adjust
CD1
ON TR AST
AD J UST
adjus
on
C
ctrast
t
CD1
Memo se a r c h
Program play
Pr ogr am inpu t
Group se lec t
CD1
CD B a c k l i gh t
OF F
ON
L
CD1
3 Déplacez le curseur sur “Memo loading” et
appuyez ensuite sur la touche de défilement
rapide.
CD1
Al l memo data
Master player
Group memo
Si vous raccordez un autre lecteur CD, l’indication
“2nd player” s’affiche également.
4 Si vous voulez charger tous les mémos de disque
(du lecteur maître, du second lecteur CD* et les
données de mémo de groupe des deux lecteurs),
déplacez le curseur sur “All memo data” et
appuyez ensuite sur la touche de défilement
rapide.
La télécommande entame la lecture de toutes les
données de mémo. Le chargement des données
peut prendre un certain temps. Dirigez la
télécommande vers le lecteur pendant que vous
chargez les données.
* Les données des mémos de disque du second lecteur
CD doivent être chargées sur le lecteur maître avant
d’être chargées sur la télécommande.
Maintenez la télécommande à 1 – 2 m du lecteur
pendant que vous chargez les données.
CD1
ster player
memo LOADING
SMaDI C140
2 Déplacez le curseur (”) sur “Set up” à l’aide de la
touche de défilement rapide et appuyez ensuite
sur la touche de défilement rapide.
3 Déplacez le curseur sur “Contrast adjust” et
appuyez ensuite sur la touche de défilement
rapide.
4 Réglez le contraste en poussant la touche de
défilement rapide vers le haut ou vers le bas et
maintenez-la jusqu’à obtention du niveau de
contraste voulu.
5 Appuyez sur la touche de défilement rapide.
Désactivation du rétro-éclairage LCD
Vous pouvez préserver l’alimentation de la
télécommande en désactivant le rétro-éclairage de
l’affichage à cristaux liquides (LCD).
5 Lorsque la télécommande a terminé la lecture des
Réglage du contraste de la fenêtre
d’affichage de la télécommande
1 Appuyez sur MENU.
8
FR
Si vous voulez charger séparément les données
mémo de chaque disque, déplacez le curseur sur
les données à charger et appuyez ensuite sur la
touche de défilement rapide.
données, l’indication “Memo loading complete”
apparaît dans la fenêtre d’affichage de la
télécommande.
CD1
Memo se a r c h
Program play
Pr ogr am inpu t
Group se lec t
1 Appuyez sur MENU.
2 Déplacez le curseur (”) sur “Back light mode” à
l’aide de la touche de défilement rapide et
appuyez ensuite sur la touche de défilement
rapide.
3 Déplacez le curseur sur “OFF” et appuyez ensuite
sur la touche de défilement rapide.
Page 51

Remarque
Si vous effacez toutes les données mémorisées dans la
télécommande (page 9), appliquez la procédure ci-dessus
pour réactiver le rétro-éclairage.
Effacement de toutes les données
mémorisées dans la télécommande
1 Appuyez sur MENU.
CD1
Memo se a r c h
Program play
Pr ogr am i nput
Group se lec t
Préparation
Raccordement d’un autre
lecteur CD
Si vous disposez d’un lecteur CD Sony dans lequel
vous pouvez introduire 5, 50, 200, ou 300 disques et
doté d’une prise CONTROL A1
et si le mode de commande de ce lecteur peut être réglé
sur CD 3, alors vous pouvez commander ce lecteur
comme le second lecteur à l’aide de cet appareil.
Appliquez la procédure ci-dessous après avoir
raccordé cet appareil et un amplificateur.
N’oubliez pas de mettre tous les appareils hors tension
avant de procéder à ce raccordement.
Vers LINE OUT
(ou CONTROL A1)
2 Déplacez le curseur (”) sur “Set up” à l’aide de la
touche de défilement rapide et appuyez ensuite
sur la touche de défilement rapide.
CD1
Player check
Memo l o ad i ng
Contrast adjust
Memo r y c l ea r
3 Déplacez le curseur sur “Memory clear” et
appuyez ensuite sur la touche de défilement
rapide.
CD1
Al l memory
clear OK?
no
yes
4 Si vous voulez effacer toutes les données
mémorisées, déplacez le curseur sur “yes” et
appuyez ensuite sur la touche de défilement
rapide.
Vers une prise murale
Vers 2ND CD IN
Vers la sortie audio
COMMAND MODE
CDP-CX350
CONTROL A1
CDP-CX230, etc.
Vers CONTROL A1
Vers CONTROL A1
CD1
Al l memory
clear OK?
no
yes
5 Le message “All memory clear!” apparaît dans la
fenêtre d’affichage et toutes les données sont
effacées.
Vers une prise murale
: Sens du signal
Vers l’entrée
audio
Amplificateur
Vers une prise murale
(suite)
FR
9
Page 52

Préparation
Câbles de connexion indispensables
• Câble audio (1) (Utilisez le câble fourni avec le lécteur à
raccorder.)
• Câble à minifiche monaural (2 broches) (1) (non fourni)
Introduction des disques
compacts
1 Raccordez les lecteurs au moyen d’un câble audio
(voir également “Raccordement” à la page 5).
CDP-CX350
LINE2ND CD
IN OUT
L
R
L
R
CDP-CX230, etc.
LINE OUT
L
R
2 Raccordez les lecteurs au moyen d’un câble à
minifiche monaural (2 broches).
CDP-CX350
CONTROL A1II
CDP-CX230, etc.
CONTROL A1
Pour plus de détails sur ce raccordement, reportezvous aux instructions complémentaires “Système
de commande CONTROL A1
”.
3 Réglez le sélecteur COMMAND MODE de ce
lecteur sur CD 1 ou CD 2 et le mode de commande
du second lecteur sur CD 3.
COMMAND MODE
CD
132
Vous pouvez introduire jusqu’à 300 disques compacts
dans ce lecteur.
OPEN/CLOSE
I/u
I / u
Position de lecture
Plateau rotatif
Position de
chargement
JOG
+100
1 Appuyez sur I/u pour mettre le lecteur sous
tension.
2 Ouvrez le volet frontal en appuyant sur OPEN/
CLOSE.
10
FR
Pour plus de détails sur l’exploitation du second
lecteur, voir “Commander un autre lecteur CD” à
la page 27 et “Lecture alternée” à la page 29.
4 Branchez le cordon d’alimentation des deux
lecteurs sur des prises murales.
Remarques
• Ne raccordez pas aux prises 2ND CD IN de ce lecteur un
autre lecteur que celui que vous comptez employer comme
second lecteur.
• Si vous raccordez un second lecteur CD, ne raccordez pas le
connecteur DIGITAL OUT (OPTICAL) de cet appareil à
l’amplificateur.
• Si vous raccordez un autre lecteur CD après avoir déjà
configuré la télécommande, appliquez la procédure de
“Préparation de la télécommande” à la page 6 pour
reconfigurer la télécommande.
• Pour commander le second lecteur CD à l’aide de la
télécommande, appuyez sur la touche PLAYER SELECT de
la télécommande pour sélectionner le second lecteur.
3 Tournez le disque JOG jusqu’à ce que vous ayez
trouvé le logement de disque dans lequel vous
voulez introduire un disque, tout en contrôlant le
numéro de disque (inscrit sur le côté de tous les
logements ainsi que dans la fenêtre d’affichage).
+100
I / u
Numéro de
disque
Logement de disque en position de chargement
Page 53

Préparation
Le numéro du disque en position de chargement
apparaît dans la fenêtre d’affichage. Si le disque
comporte un mémo de disque (voir page 30), c’est
le mémo du disque qui s’affiche au lieu du numéro
du disque. Le numéro ou le mémo du disque
change lorsque vous tournez le disque JOG.
ALL
DISCS
CD1
DISC
02
*DISC-20*
Numéro de disque ou mémo de disque
Vous pouvez classer les disques dans huit groupes
différents au moyen de la fonction de fichier de
groupe. Cette fonction vous permet de trouver
plus facilement le disque que vous voulez écouter.
Pour plus de détails, voir “Groupement de
disques” à la page 35.
4 Introduisez un disque avec la face imprimée
orientée vers la droite.
Avec la face
imprimée orientée vers la droite
Le porte-livrets de CD fourni vous aide à localiser
rapidement les disques
Vous pouvez y ranger jusqu’à 300 livrets de CD.
Introduisez un livret et apposez l’étiquette numérotée sur
le film de la pochette de manière à pouvoir localiser
rapidement les disques.
Remarques
• N’introduisez pas d’adaptateur pour CD de 8 cm (3 pouces)
(CSA-8) sans CD. Vous risquez sinon d’endommager le
lecteur.
• Ne fixez rien sur les CD, comme un adhésif ou une
pochette. Vous risquez sinon d’endommager le lecteur ou le
disque.
• Si vous laissez tomber un disque dans le lecteur et/ou si
le disque n’entre pas correctement dans le logement,
consultez votre revendeur Sony.
• Lorsque vous transportez le lecteur, retirez-en tous les
disques.
• Introduisez les disques à angle droit dans le plateau
rotatif, faute de quoi vous risquez d’endommager le
lecteur et/ou les disques. Si les disques ne sont pas
complètement introduits dans la fente, réintroduisez-les.
• Attendez que le plateau rotatif soit à l’arrêt complet
avant d’introduire ou de retirer des disques.
Le volet frontal se referme automatiquement lorsque
vous appuyez sur ·. Veillez à ne pas introduire la
main à l’intérieur du lecteur après que vous avez
appuyé sur la touche ·, car vous risquez de vous
coincer les doigts derrière le volet frontal.
Lorsque vous avez introduit un disque, vous
pouvez introduire le titre original du disque au
lieu du numéro du disque (voir “Identification des
disques” à la page 30) de façon à pouvoir le
localiser plus facilement lorsque vous voulez
l’écouter.
ALL DISCS
CD1
DISC
20
SONYHITS
5 Répétez les étapes 3 et 4 pour introduire d’autres
disques.
6 Refermez le volet frontal en appuyant sur
OPEN/CLOSE.
Retrait de disques compacts
Après avoir appliqué les étapes 1 à 3 de la procédure
“Introduction des disques compacts” à la page 10,
retirez les disques. Refermez ensuite le volet frontal.
Pour retirer des disques facilement
Après avoir exécuté les étapes 1 à 3 de la procédure
“Introduction des disques compacts” à la page 10,
appuyez sur p (DISC EJECT). Le disque dans le
logement sélectionné se soulève et vous pouvez le retirer
facilement. Si vous appuyez à nouveau sur la touche p,
le disque revient à la position normale. Si le disque ne
revient pas en position normale, réintroduisez-le.
Le plateau rotatif tourne et le logement de disque
qui se trouve en position de chargement passe en
position de lecture.
Le volet frontal doit toujours rester fermé, sauf
pour l’introduction ou le retrait de disques.
11
FR
Page 54

Opérations de base
Lecture d’un disque compact
2
STANDBY
I / u
TIMER
OFF PLAY
KEYBOARD
• Reportez-vous à la page 5 pour
les informations relatives au
raccordement.
• Assurez-vous que vous avez
correctement introduit les
disques comme indiqué à la
page 10.
• Vous pouvez reproduire toutes
les plages d’un disque dans
l’ordre original (lecture
continue). Vous pouvez
également reproduire jusqu’à
300 disques consécutivement.
Vous pouvez mettre le lecteur
sous tension en appuyant sur
la touche I/u de la
télécommande
CONTINUE
GROUP 1
GROUP 5
SHUFFLE
GROUP 2
GROUP 6
PROGRAM
GROUP 3
GROUP 7
REPEAT
GROUP 4
GROUP 8
TIME/TEXT
HIT LIST
GROUP FILE
3
OPEN/
CLOSE
≠ AMS ±
PUSH ENTER
EASY PLAY
MEGA CONTROL
4/55
+100
MENU/NO YES
DISC/CHARACTER
PUSH ENTER
MEMO SEARCH
CHECK
X-FADE
NO DELAY
DISC EJECT
Mettez l’amplificateur sous tension et sélectionnez la position
1
de lecteur CD.
Appuyez sur I/u pour mettre le lecteur sous tension.
2
Appuyez sur CONTINUE pour sélectionner le mode de lecture
3
continue ALL DISCS ou 1 DISC.
Chaque fois que vous appuyez sur CONTINUE, les indications
“ALL DISCS” et “1 DISC” apparaissent alternativement dans la
fenêtre d’affichage.
Si vous sélectionnez
ALL DISCS
1 DISC
Le lecteur reproduit
Consécutivement tous les disques du lecteur dans
l’ordre des numéros des disques. Le lecteur saute les
logements de disque vides.
Uniquement le disque que vous avez sélectionné.
CLEAR
FADER
12
FR
Tournez le disque JOG jusqu’à ce que le numéro ou le mémo du
disque voulu (voir page 30) apparaît dans la fenêtre d’affichage
4
pour sélectionner le premier disque (ALL DISCS) ou le disque
de votre choix (1 DISC).
ALL
DISCS
CD1
DISC
02
*DISC-20*
Page 55

Opérations de base
Poussez sur le disque JOG ou appuyez sur · pour démarrer
la lecture.
5
Le disque sélectionné se met en position de lecture et le lecteur
reproduit une fois tous les disques à partir du disque
sélectionné (ALL DISCS) ou toutes les plages du disque (1
DISC).
Réglez le volume sur l’amplificateur.
Lorsque vous mettez le lecteur
hors tension
Le lecteur mémorise le
dernier disque reproduit
ainsi que le mode de lecture
(continue, aléatoire ou
programmée (voir pages 21
et 22)). Lorsque vous
remettrez ensuite le lecteur
sous tension, il sera prêt à
reproduire le même disque
dans le même mode de
lecture.
Pour arrêter la lecture
Appuyez sur p.
STANDBY
CONTINUE
SHUFFLE
PROGRAM
REPEAT
I / u
GROUP 1
TIMER
GROUP 5
OFF PLAY
KEYBOARD
Pour
Activer une pause de lecture
Reprendre la lecture après une pause
Passer au disque suivant
Revenir au disque précédent
Passer à la plage suivante
Revenir à la plage précédente
Arrêter la lecture et retirer le disque
TIME/TEXT
GROUP 2
GROUP 3
GROUP 4
HIT LIST
GROUP 6
GROUP 7
GROUP 8
GROUP FILE
≠ AMS ±
MENU/NO YES
≠ AMS ±
PUSH ENTER
EASY PLAY
MEMO SEARCH
MEGA CONTROL
X-FADE
OPEN/
CLOSE
OPEN/CLOSE
·
Vous devez
Appuyer sur P
Appuyer sur P ou ·
Appuyer une fois sur DISC SKIP +.
Maintenez la touche enfoncée pour
sauter plusieurs disques.
Appuyer une fois sur DISC SKIP –.
Maintenez la touche enfoncée pour
sauter plusieurs disques.
Tourner le disque ≠ AMS ± d’un
clic dans le sens horaire
Tourner le disque ≠ AMS ± d’un
clic dans le sens antihoraire
Appuyer sur OPEN/CLOSE
JOG
+100
DISC/CHARACTER
PUSH ENTER
CHECK
CLEAR
NO DELAY
FADER
DISC EJECT
Pp
Opérations de base
13
FR
Page 56
Lecture de disques compactsLecture de disques compacts
isc20
* DISC-
2*0
D
CD1
isc20
* DISC-20*
( TRACK 1 )
ra
D
Tck1
CD1
Utilisation de la fenêtre
d’affichage
La fenêtre d’affichage vous permet de contrôler une
série d’informations concernant le disque sélectionné.
Pour vérifier un autre disque
Appuyez sur la touche DISC SKIP +/– de la
télécommande en mode d’arrêt pour sélectionner le
disque à vérifier. Le nombre total de plages et la durée
totale de lecture du disque sélectionné s’affichent
momentanément.
I / u
TIME/TEXT
PLAYER SELECT
TRACK
DISC HIGH-LIGHT
ABC&!?
1
JKL
GHI
4
TUV
PRS
7
10
DISC SKIP
MENU
PUSH ENTER
GROUP
DEF MEMO INPUT
2
MNO
5
WXY
8
QZ
ENTER DEL
10/0
3
6
9
CLEAR
BACK
CAPS HIT LIST
SPACE X-FADE
NO DELAY
CHECK
MENU/NO
HIGH-LIGHT
JOG
Informations affichées pendant la lecture
d’un disque
+100
p
Pendant la lecture d’un disque, la fenêtre d’affichage
indique le numéro du disque, le numéro de la plage, la
durée de lecture de la plage et le numéro du disque
suivant.
Numéro du disque en cours
ALL DISCS
CD1
DISC
Numéro du disque suivant
TRACK
MIN
NEXT
DISC
83
SEC
20 1 0.28
Numéro de la plage en cours
Informations affichées sur la télécommande
En mode d’arrêt, la fenêtre d’affichage de la
télécommande indique le numéro du disque en cours.
En mode de lecture, le numéro de la plage en cours
s’affiche également.
En mode d’arrêt
Durée de lecture
de la plage
14
FR
Vérification du nombre total et de la durée
totale de lecture des plages
Sélectionnez le disque à vérifier et appuyez sur
TIME/TEXT.
La fenêtre d’affichage indique le numéro du disque en
cours, le nombre total de plages et la durée totale de
lecture du disque.
Numéro du disque en cours
ALL DISCS
CD1
DISC
TRACK
20 10 60.48
Nombre total de plages
20
MIN
Durée totale de lecture
SEC
En mode de lecture
Remarque
En mode d’arrêt, le mémo de disque apparaît si vous avez
identifié le disque (voir page 30).
En mode de lecture, c’est le titre de la plage qui apparaît
(jusqu’au 13e caractère) lorsque vous sélectionnez un disque
CD TEXT (voir pages 15 et 30).
Page 57

Lecture de disques compacts
Vérification des informations des disques
CD TEXT
Les disques CD TEXT comportent des informations
telles que le titre du disque ou le nom des artistes. Elles
sont enregistrées dans une zone libre sur laquelle ne se
trouve aucune information sur un disque normal. La
fenêtre d’affichage indique les informations CD TEXT
du disque de façon à ce que vous puissiez vérifier le
titre du disque en cours, de la plage en cours et le nom
de l’artiste. Lorsque vous sélectionnez un disque
CD TEXT, l’indication “CD TEXT” apparaît dans la
fenêtre d’affichage. Si votre disque CD TEXT est doté
d’une capacité multilingue, “MULTI CD TEXT”
apparaît dans la fenêtre d’affichage. Si vous voulez
vérifier les informations dans une autre langue,
reportez-vous à la section “Sélection de la langue
d’affichage des informations CD TEXT” à la page 15.
Informations affichées en mode d’arrêt
La fenêtre d’affichage indique le titre du disque.
Lorsque vous appuyez sur TIME/TEXT, le nom de
l’artiste défile dans la fenêtre d’affichage. Si vous
appuyez encore une fois sur TIME/TEXT, la fenêtre
d’affichage indique momentanément le numéro du
disque en cours, le nombre total de plages et la durée
totale de lecture du disque. La fenêtre d’affichage
indique ensuite à nouveau le titre du disque.
ALL DISCS
CD TEXT
CD1
DISC
SONYHITS
Informations affichées pendant la lecture d’un
disque
Chaque fois que vous appuyez sur TIME/TEXT, la
fenêtre d’affichage indique les informations concernant
le disque comme illustré ci-dessous.
Le numéro du
disque en cours,
le numéro de la
plage et la durée
de lecture
apparaissent.
Le titre ou le
numéro du disque
en cours apparaît.
Le titre de la
plage en cours
apparaît.
Remarques
• Si le titre du disque et de la plage comportent plus de 13 caractères,
seuls les 13 premiers caractères apparaissent dans la fenêtre
d’affichage.
• Le titre de la plage n'apparaît que si le disque en cours est un disque
CD TEXT ou si le titre en cours comporte un HIT TITLE
(uniquement si le lecteur se trouve en mode Hit List) (voir page 39).
ALL DISCS
CD TEXT
DISC
CD1
TRACK
MIN
13
NEXT
DISC
SEC
12 1 1.52
Appuyez sur
TIME/TEXT.
ALL DISCS
CD TEXT
DISC
CD1
13
NEXT
DISC
SONYHITS
Appuyez sur
TIME/TEXT.
ALL DISCS
CD TEXT
CD1
TRACK
13
NEXT
DISC
HitechBlues
Cette information s’affiche également
lorsque le lecteur localise la plage.
Appuyez sur
TIME/TEXT.
Pour reproduire les thèmes d’un disque Z
Certains disques CD TEXT sont dotés d’une fonction de
reproduction des thèmes des disques.
En mode d’arrêt, appuyez sur la touche HIGH-LIGHT de la
télécommande pour démarrer la lecture des thèmes du
disque.
L’indication “Hi LIGHT” clignote pendant la lecture des
thèmes d’un disque.
Si vous appuyez sur HIGH-LIGHT en sélectionnant des
disques qui ne sont pas dotés de cette fonction, l’indication
“NO HIGHLIGHT” apparaît dans la fenêtre d’affichage.
Sélection de la langue d’affichage des
informations CD TEXT
Vous pouvez sélectionner la langue d’affichage des
informations CD TEXT lorsque vous sélectionnez un
disque CD TEXT doté d’informations multilingues.
Lorsque vous avez sélectionné la langue de votre choix,
la fenêtre d’affichage indique les informations dans la
langue désignée jusqu’à ce que vous mettiez le lecteur
hors tension. Si le lecteur ne peut lire la langue
mémorisée sur un disque CD TEXT, le message
“other lang.” apparaît.
1 Appuyez sur MENU/NO en mode d’arrêt.
Le message “Select lang.?” se met à clignoter.
ALL
DISCS
MULTI CD TEXT
CD1
21
Select lang.?
2 Poussez sur le disque JOG.
La langue d’exploitation en cours se met à
clignoter.
ALL
DISCS
MULTI CD TEXT
CD1
21
English ?
3 Tournez le disque JOG jusqu’à ce que la langue de
votre choix apparaisse dans la fenêtre d’affichage.
4 Poussez sur le disque JOG pour sélectionner la
langue.
Le message “Reading text” apparaît
momentanément et la fenêtre d’affichage indique
ensuite les informations dans la langue
sélectionnée.
Pour vérifier la langue en cours
1 Appuyez sur MENU/NO pendant la lecture d’un disque
CD TEXT.
Le message ”Show lang.?” se met à clignoter.
2 Poussez sur le disque JOG.
La langue en cours s’affiche momentanément.
Vous pouvez également vérifier la langue en cours lors de la
sélection d’un disque CD TEXT sans informations
multilingues.
Remarque
Si vous sélectionnez un disque CD TEXT qui ne contient pas
d’informations dans la langue sélectionnée, la fenêtre
d’affichage indique les informations dans une autre langue
suivant les priorités définies par le disque.
15
FR
Page 58

Lecture de disques compacts
Localisation d’un disque
Les caractères qui sont affichés comme le premier
caractère.
déterminé
≠ AMS ±
I / u
+100
MEMO SEARCH
Localisation d’un disque sur le lecteur
Tournez le disque JOG jusqu’à ce que le numéro ou le
mémo du disque (voir page 30) apparaisse dans la
fenêtre d’affichage. Poussez sur le disque JOG pour
démarrer la lecture.
Pour sauter des disques rapidement
Appuyez sur +100. Chaque fois que vous appuyez sur
+100, le lecteur saute 100 disques.
JOG
+100
A B C D E F G H I J K L M N O P Q R S T U V W X
Y Z 0 1 2 3 4 5 6 7 8 9
Si “NOT FOUND” apparaît dans la fenêtre
d’affichage pendant la saisie du premier caractère
à l’aide du disque ≠ AMS ±, cela signifie
qu’aucun disque n’a été identifié avec ce caractère.
Remarques
• Lors d’une recherche de caractère, les espaces blancs et
les symboles figurant devant le premier caractère du
mémo de disque sont ignorés.
• Lors d’une recherche de caractère, le système n’opère
aucune différence entre les majuscules et les
minuscules.
3 Poussez sur le disque JOG pour sélectionner le
disque.
En mode de lecture programmée, le disque est
ajouté à la fin du programme.
Pour annuler la recherche de mémo
Appuyez à nouveau sur MEMO SEARCH.
Localisation d’un disque en recherchant un
mémo de disque spécifique (recherche de
mémo)
Vous pouvez rechercher et localiser un disque à l'aide
du premier caractère du mémo de disque (voir page
30). La fonction de recherche de mémo peut afficher les
mémos de disque par ordre alphabétique.
1 Appuyez sur MEMO SEARCH.
L’indication “MEMO SEARCH” apparaît dans la
fenêtre d’affichage.
2 Tournez le disque JOG pour localiser le disque
voulu.
Lorsque vous tournez le disque JOG, les mémos de
disque commençant par le caractère introduit
apparaissent dans la fenêtre d’affichage.
ALL DISCS
CD1
S
SONYHITS
Premier caractère
16
FR
Page 59

Lecture de disques compacts
05:* DISC-5*
06:* DISC-6*
07:* DISC-7*
08:* DISC-8*
CD1
Localisation directe d’un disque avec la
télécommande
PLAYER SELECT
MENU
MENU
Touche de
défilement
rapide
·
MEMO SCAN
TRACK
CONTINUE
PROGRAM
MEMO SCAN
TIME/TEXT
PUSH ENTER
DISC
SKIP
BACK
SHUFFLE
REPEAT
Localisation directe d’un disque en
observant la fenêtre d’affichage de la
télécommande
1 Déplacez le curseur (”) sur le disque voulu à l’aide
de la touche de défilement rapide.
2 Appuyez sur la touche de défilement rapide ou sur
·.
S’il n’y a pas de disque dans le logement
sélectionné sur le lecteur, l’indication
“NO DISC!!!” apparaît.
Remarques
• Le mode de lecture aléatoire ou programmée (pages 21 et
22) est désactivé lorsque vous localisez un disque
directement en observant la fenêtre d’affichage de la
télécommande.
• Si la touche MEGA CONTROL, les touches GROUP 1 – 8 ou
la touche HIT LIST est allumée, vous ne pouvez pas
localiser de disque en observant la fenêtre d’affichage de la
télécommande.
PLAYER SELECT
MENU
DISC
Touches
numériques
TRACK
DISC HIGH-LIGHT
ABC&!?
1
JKL
GHI
4
TUV
PRS
7
QZ
10
DISC SKIP
PUSH ENTER
GROUP
DEF MEMO INPUT
3
2
MNO
6
5
WXY
9
8
ENTER DEL
10/0
CLEAR
BACK
CAPS HIT LIST
SPACE X-FADE
NO DELAY
CHECK
1 Appuyez sur DISC.
2 Appuyez sur la touche numérique correspondant
au disque.
Exemple: Pour introduire le numéro 35
Appuyez sur 3 et puis sur 5.
3 Appuyez sur ENTER pour démarrer la lecture.
ENTER
Localisation d’un disque en explorant
chaque mémo de disque (exploration des
mémos)
Vous pouvez localiser un disque rapidement en
explorant les mémos de disque (voir page 30) dans la
fenêtre d’affichage.
Faites attention que vous ne pouvez pas utiliser cette
fonction dans le mode de lecture aléatoire ALL DISCS.
1 Appuyez sur MEMO SCAN.
L’indication “MEMO SCAN” apparaît dans la
fenêtre d’affichage et les mémos de disque défilent
dans la fenêtre d’affichage.
2 Appuyez sur · lorsque le mémo du disque voulu
apparaît.
Le disque est amené en position de lecture et le
lecteur démarre la lecture.
En mode de lecture programmée, le disque est
ajouté à la fin du programme si vous appuyez sur
ENTER au lieu de ·.
Remarque
Si l’indication “NO ENTRY” apparaît dans la fenêtre
d’affichage, cela signifie qu’aucun disque n’a été identifié par
ce mémo. Réactivez la fonction d’exploration des mémos
après avoir identifié les disques.
17
FR
Page 60

Lecture de disques compacts
Localisation d’un disque à l’aide des mémos
de disque de la télécommande
Vous pouvez rechercher et localiser un disque
déterminé au moyen des mémos de disque de la
télécommande.
Avant d’appliquer la procédure ci-dessous, n’oubliez
pas de charger les données des mémos de disque dans
la mémoire de la télécommande (voir page 7).
1 Appuyez sur MENU.
2 Déplacez le curseur (”) sur “Memo search” à l’aide
de la touche de défilement rapide et appuyez
ensuite sur la touche de défilement rapide.
3 Poussez la touche de défilement rapide vers le
haut ou vers le bas jusqu’à ce que le premier
caractère du mémo de disque du CD voulu
apparaisse.
CD1
ear ch l et t er
S
A
Spécification du disque
suivant à reproduire
Vous pouvez spécifier le disque suivant à reproduire
pendant la lecture d’un disque en mode de lecture
continue ou de lecture aléatoire 1 DISC.
Pendant la lecture d’un disque, tournez le disque JOG.
L’indication “NEXT DISC” apparaît dans la fenêtre
d’affichage et le numéro ou le mémo de disque (voir
page 30) change quand vous tournez le disque JOG.
Lorsque le numéro ou le mémo du disque voulu
apparaît dans la fenêtre d’affichage, cessez de tourner
le disque JOG.
ALL DISCS
CD1
NEXT DISC
38
NEXT
DISC
*DISC-38*
Numéro du disque suivant
ou mémo de disque
Lorsque la lecture du disque en cours est terminée, la
lecture du disque suivant que vous avez spécifié
démarre.
Si vous voulez passer directement au disque suivant,
poussez sur le disque JOG pendant la lecture du disque
en cours.
18
FR
Chaque fois que vous poussez la touche de
défilement rapide vers le haut ou vers le bas, les
caractères apparaissent dans l’ordre suivant.
A B C D E F G H I J K L M N O P Q R S T U V W X
Y Z 0 1 2 3 4 5 6 7 8 9
4 Appuyez sur la touche de défilement rapide pour
introduire le caractère voulu.
La fenêtre d’affichage de la télécommande indique
les mémos de disque commençant par le caractère
que vous avez introduit. Les numéros des disques
du second lecteur CD sont affichés en brillance
inversée.
CD1
13:Hi techBlues
06:Hello
-end-
Si le message “not found” apparaît après que vous
avez introduit le premier caractère, cela signifie
qu’aucun disque n’a été identifié au moyen de ce
caractère.
5 Déplacez le curseur sur le numéro du disque que
vous voulez écouter et appuyez ensuite sur la
touche de défilement rapide.
Pour annuler le disque que vous avez spécifié
Appuyez deux fois sur CONTINUE.
Lecture du disque que vous
venez d’introduire – Lecture
simple
Vous pouvez reproduire le disque que vous venez
d'introduire en appuyant sur une seule touche.
1 Ouvrez le volet frontal en appuyant sur OPEN/
CLOSE.
2 Appuyez sur EASY PLAY.
Le logement 1 se place en position de chargement.
3 Introduisez le disque dans le logement 1.
4 Appuyez sur EASY PLAY.
La touche EASY PLAY s’allume et le lecteur
démarre la lecture du disque dans le logement 1.
Remarque
La fonction de lecture simple agit uniquement sur le disque
qui se trouve dans le logement 1.
Pour désactiver la fonction de lecture simple
Appuyez sur p.
Page 61

Localisation d’une plage
déterminée ou d’un passage
Lecture de disques compacts
sur une plage
Vous pouvez localiser rapidement une plage pendant
la lecture d'un disque à l'aide du disque ≠ AMS
± (AMS: détecteur automatique de musique) ou des
touches =/+ de la télécommande.
Vous pouvez également localiser un passage spécifique
d’une plage pendant la lecture d’un disque.
≠ AMS ±
+100
I / u
PLAYER SELECT
MENU
TRACK
Touche de
défilement
rapide
·
=/+
0/)
TRACK
CONTINUE
PROGRAM
MEMO SCAN
TIME/TEXT
PUSH ENTER
DISC
SKIP
BACK
SHUFFLE
REPEAT
PLAYER SELECT
MENU
Touches
numériques
>10
TRACK
DISC HIGH-LIGHT
ABC&!?
1
JKL
GHI
4
TUV
PRS
7
QZ
10
DISC SKIP
PUSH ENTER
GROUP
DEF MEMO INPUT
3
2
MNO
6
5
WXY
9
8
ENTER DEL
10/0
CLEAR
BACK
CAPS HIT LIST
SPACE X-FADE
NO DELAY
CHECK
Localisation d’une plage déterminée ou
d’un passage sur une plage
Pour localiser
l’une des plages
suivantes
la plage en cours ou
l’une des précédentes
directement une
plage déterminée Z
un passage d’une
plage tout en
contrôlant le son Z
rapidement un
passage d’une plage
tout en contrôlant la
fenêtre d’affichage
Z
Procédez comme suit
Tournez le disque ≠ AMS ±
dans le sens horaire jusqu'à ce que
vous ayez trouvé la plage.
Tournez le disque ≠ AMS ±
dans le sens antihoraire jusqu'à ce que
vous ayez trouvé la plage.
Appuyez sur la touche numérique de
la télécommande correspondant à la
plage voulue. Pour localiser
directement une plage portant un
numéro supérieur à 10, appuyez
d’abord sur >10 et ensuite sur les
touches numériques correspondantes.
Appuyez sur 0 (arrière)/)
(avant) sur la télécommande et
maintenez la touche enfoncée jusqu’à
ce que vous trouviez le passage voulu
Appuyez sur 0 (arrière)/)
(avant) sur la télécommande et
maintenez la touche enfoncée jusqu’à
ce que vous trouviez le passage
voulu. Durant cette opération, vous
n’entendez pas le son.
Remarque
Si l’indication “– OVER –” apparaît dans la fenêtre d’affichage,
cela signifie que vous avez atteint la fin du disque lorsque vous
appuyiez sur la touche ). Tournez le disque ≠ AMS ±
dans le sens antihoraire ou appuyez sur 0 pour revenir en
arrière.
19
FR
Page 62

Lecture de disques compacts
Localisation d’une plage déterminée ou
d’un passage sur une plage en observant la
fenêtre d’affichage de la télécommande
1 En mode d’arrêt, appuyez sur TRACK.
CD1
Di sc123
* DISC- 123*
1 . ( T RACK 1 )
2 . ( T RACK 2 )
2 Déplacez le curseur (”) sur la plage voulue à l’aide
de la touche de défilement rapide.
CD1
3 . ( T RACK 3 )
4 . ( T RACK 4 )
5 . ( T RACK 5 )
6 . ( T RACK 6 )
3 Appuyez sur la touche de défilement rapide ou sur
·.
Remarque
Si vous sélectionnez un disque CD TEXT, les titres des plages
apparaissent à l’étape 2 au lieu des numéros des plages.
20
FR
Page 63

Lecture de disques compacts
GROUP
ENTER DEL
CLEAR
DISC SKIP
CHECK
NO DELAY
SPACE X-FADE
CAPS HIT LIST
DISC HIGH-LIGHT
3
DEF MEMO INPUT
6
MNO
9
WXY
2
ABC&!?
5
JKL
8
TUV
10/0
10
QZ
1
4
GHI
7
PRS
MENU
PUSH ENTER
TRACK
PLAYER SELECT
BACK
Playing CDsGetting Started
Playing CDs
Lecture répétée
Vous pouvez activer la lecture répétée de disques ou
des plages dans n’importe quel mode de lecture.
REPEAT
+100
I / u
Appuyez sur REPEAT pendant la lecture d’un disque.
L’indication “REPEAT” apparaît dans la fenêtre
d’affichage. Le lecteur répète la lecture des disques/
plages de la façon suivante:
Si le disque est reproduit
en mode de
Lecture continue ALL DISCS
(page 12)
Lecture continue 1 DISC
(page 12)
Lecture aléatoire ALL DISCS
(page 22)
Lecture aléatoire 1 DISC
(page 22)
Lecture programmée (page 22)
Pour désactiver la lecture répétée
Appuyez deux fois sur REPEAT.
Le lecteur répète
Toutes les plages de tous les
disques
Toutes les plages du disque
en cours
Toutes les plages de tous les
disques dans un ordre
aléatoire
Toutes les plages du disque
en cours dans un ordre
aléatoire
Le même programme
Lecture des plages dans un
ordre quelconque (lecture
aléatoire)
Vous pouvez programmer le lecteur pour qu’il
“mélange” les plages et les reproduise dans un ordre
aléatoire. Le lecteur mélange toutes les plages de tous
les disques ou d’un disque que vous spécifiez.
SHUFFLE
I / u
·
PLAYER SELECT
TRACK
CONTINUE
PROGRAM
MEMO SCAN
TIME/TEXT
MENU
PUSH ENTER
DISC
SKIP
·
BACK
SHUFFLE
REPEAT
JOG
+100
SHUFFLE
Répétition de la plage en cours
Vous pouvez répéter la lecture de la plage en cours.
Pendant la lecture de la plage de votre choix, appuyez
plusieurs fois de suite sur REPEAT jusqu’à ce que
l’indication “REPEAT 1” apparaisse dans la fenêtre
d’affichage.
Pour désactiver la lecture “Repeat 1”
Appuyez sur REPEAT.
DISC
Touches
numériques
ENTER
21
FR
Page 64

Lecture de disques compacts
Lecture de toutes les plages de tous les
disques dans un ordre aléatoire
1 Appuyez sur SHUFFLE.
Les indications “ALL DISCS” et “SHUFFLE”
apparaissent dans la fenêtre d’affichage.
2 Poussez sur le disque JOG ou appuyez sur ·.
La lecture aléatoire ALL DISCS démarre.
L’indication “ ” apparaît dans la fenêtre
d’affichage pendant que le lecteur “mélange” les
disques ou les plages.
Lecture de toutes les plages d’un disque
spécifié dans un ordre aléatoire
Création de programmes
musicaux personnalisés
(lecture programmée)
Vous pouvez agencer l’ordre des plages et/ou des
disques de façon à créer trois programmes de lecture
différents qui sont mémorisés automatiquement. Un
programme peut contenir 32 “phases” - une “phase”
pouvant contenir une plage ou tout un disque.
Vous pouvez créer vos programmes en utilisant les
commandes du lecteur proprement dit ou de la
télécommande. Les procédures de programmation sont
cependant différentes.
1 Appuyez deux fois sur SHUFFLE.
Les indications “1 DISC” et “SHUFFLE”
apparaissent dans la fenêtre d’affichage.
2 Tournez le disque JOG jusqu’à ce que le numéro
du disque voulu apparaisse dans la fenêtre
d’affichage.
Si vous utilisez la télécommande, appuyez d’abord
sur DISC et puis sur la touche numérique
correspondant au disque voulu.
3 Poussez sur le disque JOG ou appuyez sur ·.
Si vous utilisez la télécommande, appuyez sur
ENTER.
La lecture aléatoire 1 DISC démarre.
L’indication “
d’affichage pendant que le lecteur “mélange” les
plages.
Pour désactiver la lecture aléatoire
Appuyez sur CONTINUE.
Vous pouvez activer la lecture aléatoire en cours de
lecture
Appuyez sur SHUFFLE et la lecture aléatoire démarre à
partir de la plage en cours.
Vous pouvez passer au disque suivant en cours de
lecture aléatoire 1 DISC
Appuyez sur DISC SKIP +.
” apparaît dans la fenêtre
Création d’un programme musical sur le
lecteur
CHECK
PROGRAM
I / u
≠ AMS ±
JOG
+100
· CLEAR
1 Appuyez sur PROGRAM jusqu’à ce que le numéro
de programme voulu (PROGRAM 1, 2 ou 3)
apparaisse dans la fenêtre d’affichage.
Si un programme a déjà été mémorisé sous le
numéro de programme sélectionné, la dernière
phase du programme apparaît dans la fenêtre
d’affichage. Si vous voulez effacer la totalité du
programme, maintenez la touche CLEAR enfoncée
jusqu’à ce que l’indication “CLEAR” apparaisse
dans la fenêtre d’affichage (voir page 23).
2 Tournez le disque JOG jusqu’à ce que le numéro
du disque de votre choix apparaisse dans la fenêtre
d’affichage.
22
FR
Vous pouvez spécifier le prochain disque à reproduire
en cours de lecture aléatoire 1 DISC
Tournez le disque JOG pour spécifier le disque suivant.
Lorsque toutes les plages du disque en cours ont été
reproduites dans un ordre aléatoire, la lecture du disque
suivant démarre. Si vous voulez passer directement au
disque suivant, poussez sur le disque JOG pendant la
lecture du disque en cours.
Remarques
• Vous ne pouvez pas spécifier le prochain disque à
reproduire en cours de lecture aléatoire ALL DISCS.
• Même si vous appuyez sur p ou si vous mettez le lecteur
hors tension en cours de lecture aléatoire ALL DISCS, le
lecteur mémorise les disques et les plages qui ont été
reproduits et ceux qui ne l’ont pas encore été. Par
conséquent, si vous voulez redémarrer la lecture aléatoire
ALL DISCS depuis le début, vous devez recommencer la
procédure à partir de la 1re étape.
PROGRAM
1
CD1
DISC
20
*DISC-20*
3 Pour programmer un disque en entier, passez cette
étape.
Tournez le disque ≠ AMS ± jusqu'à ce que le
numéro de la plage voulue apparaisse dans la
fenêtre.
PROGRAM
1
DISC
CD1
TRACK
20
STEP
20 3 1
Numéro de la plage
Page 65

Lecture de disques compacts
Playing CDsGetting Started
Playing CDs
4 Poussez sur le disque JOG.
Numéro de la plage en cours de programmation
PROGRAM
1
CD1
DISC
TRACK
20
STEP
20 3 1
Disque en cours de
programmation
5 Pour programmer d’autres disques/plages,
appliquez la procédure suivante :
Pour programmer
Toutes les plages d’(un)
autre(s) disque(s)
D’autres plages du même
disque
D’autres plages d’autres
disques
6 Poussez sur le disque JOG ou appuyez sur ·
pour démarrer la lecture programmée.
Pour annuler la lecture programmée
Appuyez sur CONTINUE.
Les programmes restent en mémoire même après la
fin de la lecture programmée
Vous pouvez recommencer la lecture du même
programme en poussant sur le disque JOG ou en
appuyant sur · en mode de lecture programmée.
Si vous appuyez sur PROGRAM pendant la lecture
continue ou la lecture aléatoire
Le programme musical est reproduit après la plage en
cours.
Les programmes restent en mémoire jusqu’à ce que
vous les effaciez
Même si vous remplacez des disques, les numéros de
disques et de plages restent programmés. Le lecteur ne
reproduit donc que les numéros des nouveaux disques et
des nouvelles plages. Les numéros de disques qui ne se
trouvent pas dans le lecteur ou de plages qui ne se
trouvent pas sur un disque sont effacés du programme et
le reste du programme musical est reproduit dans l’ordre
programmé.
Vous pouvez sélectionner le numéro de programme
(PROGRAM 1,2 ou 3) au moyen de la télécommande
Appuyez plusieurs fois de suite sur la touche PROGRAM
de la télécommande jusqu’à ce que le numéro du
programme voulu apparaisse dans la fenêtre d’affichage.
Ordre de lecture
Répétez les étapes
2 et 4
3 et 4
2 à 4
Vérification de la séquence de
programmation
Vous pouvez vérifier votre programme musical avant
ou après d’en démarrer la lecture.
Appuyez sur CHECK.
Chaque fois que vous appuyez sur cette touche, la
fenêtre d’affichage indique les numéros de disque et de
plage de chaque phase dans l’ordre programmé. (Si
vous avez programmé un disque entier comme une
seule phase, c’est l’indication “ALL” qui s’affiche au
lieu d’un numéro de plage.) Après la dernière phase
du programme, la fenêtre d’affichage indique
“– END –” et revient au mode d’affichage de départ.
Modification de la séquence de
programmation
Vous pouvez modifier votre programme musical avant
d’en démarrer la lecture.
Pour
Supprimer une plage ou
un disque
Supprimer la dernière
plage ou le dernier
disque du programme
Ajouter des plages ou
des disques à la fin du
programme
Changer complètement
tout le programme
Vous devez
Appuyer sur CHECK jusqu’à ce
que la plage ou le disque à effacer
apparaisse dans la fenêtre
d’affichage frontale et appuyer
ensuite sur CLEAR
Appuyer sur CLEAR. Chaque fois
que vous appuyez sur cette
touche, la dernière plage ou le
dernier disque est effacé.
Appliquer la procédure de
programmation
Maintenir la touche CLEAR
enfoncée jusqu’à ce que
l’indication “CLEAR” apparaisse
dans la fenêtre d’affichage pour
effacer complètement le
programme, et créer ensuite un
nouveau programme en
appliquant la procédure de
programmation
Effacement des programmes musicaux
mémorisés
1 Appuyez plusieurs fois de suite sur PROGRAM en
mode d’arrêt jusqu’à ce que le numéro du
programme à effacer (PROGRAM 1, 2 ou 3)
apparaisse dans la fenêtre d’affichage.
2 Maintenez la touche CLEAR enfoncée jusqu’à ce
que l’indication “CLEAR” apparaisse dans la
fenêtre d’affichage.
Remarque
Si vous appuyez sur l’une des touches GROUP 1 – 8 pour
démarrer la lecture de groupe, la lecture programmée est
annulée (voir page 36).
23
FR
Page 66

Lecture de disques compacts
Création d’un programme musical au
moyen de la télécommande Z
PLAYER SELECT
MENU
PUSH ENTER
MENU
PUSH ENTER
DISC
SKIP
BACK
SHUFFLE
REPEAT
BACK
MENU
Touche de
défilement
rapide
·
PROGRAM
TRACK
CONTINUE
PROGRAM
MEMO SCAN
TIME/TEXT
PLAYER SELECT
TRACK
1 Appuyez sur PROGRAM jusqu’à ce que le numéro
de programme voulu (PROGRAM 1, 2 ou 3)
apparaisse dans la fenêtre d’affichage.
2 Appuyez sur DISC.
PROGRAM
1
CD1
02
DISC-[ _]
3 Appuyez sur la touche numérique correspondant
au disque de votre choix.
PROGRAM
1
CD1
02
DISC-[ 20]
4 Pour programmer un disque en entier, appuyez
sur ENTER et passez à l’étape 6.
PROGRAM
1
CD1
DISC
TRACK
02
STEP
20 -- 1
5 Appuyez d’abord sur >10 et ensuite sur la touche
numérique correspondant à la plage.
Si le disque comporte moins de 10 plages, appuyez
d’abord sur 10/0 et ensuite sur la touche
numérique correspondante pour introduire un
numéro de plage de 1 à 9.
Disque en cours de programmation
24
FR
DISC
Touches
numériques
>10
GROUP
DISC HIGH-LIGHT
DEF MEMO INPUT
ABC&!?
3
2
1
MNO
JKL
GHI
6
5
4
WXY
TUV
PRS
9
8
7
QZ
ENTER DEL
10
10/0
DISC SKIP
CAPS HIT LIST
SPACE X-FADE
CHECK
CLEAR
NO DELAY
ENTER
CLEAR
PROGRAM
1
DISC
TRACK
20
STEP
20 3 1
Numéro de la plage en
cours de programmation
6 Pour programmer d’autres disques/plages,
procédez comme suit:
Pour programmer
Toutes les plages d’(un)
autre(s) disque(s)
D’autres plages du même
disque
D’autres plages d’autres
disques
7 Appuyez sur ENTER ou · pour démarrer la
lecture programmée.
Pour annuler la lecture programmée
Appuyez sur CONTINUE.
Vous pouvez vérifier ou modifier le programme en
appuyant sur la touche CHECK ou CLEAR de la
télécommande
Voir page 23.
Ordre de lecture
Répétez les étapes
2 à 4
5
2 à 5
Page 67

Lecture de disques compacts
[
Program A
]
Step1
Disc56 TRK-5
* DISC-56*
CD1
Playing CDsGetting Started
Playing CDs
Création d’un programme musical tout en
observant la fenêtre d’affichage de la
télécommande Z
Vous pouvez créer dans la mémoire de la
télécommande huit programmes comprenant jusqu’à
32 phases tout en observant la fenêtre d’affichage de la
télécommande.
1 Appuyez sur MENU.
CD1
Memo se a r c h
Program play
Pr ogram i nput
Group se lec t
2 Déplacez le curseur (”) sur “Program input” à
l’aide de la touche de défilement rapide et
appuyez ensuite sur la touche de défilement
rapide.
CD1
:AProgramA
B:Program B
C:Program C
D:Program D
3 Déplacez le curseur sur le programme que vous
voulez créer et appuyez ensuite sur la touche de
défilement rapide.
CD1
[
Program A
]
1:
2:
3:
4 Appuyez sur la touche de défilement rapide.
CD1
[
Program A
Step1
Disc56 TRK-ALL
* DISC-56*
]
5 Sélectionnez le disque voulu en poussant la touche
de défilement rapide vers le haut ou vers le bas.
Pour programmer un disque complet, appuyez à
nouveau sur la touche de défilement rapide.
Pour programmer une plage déterminée d’un
disque, sélectionnez la plage voulue en poussant la
touche de défilement rapide vers le haut ou vers le
bas et appuyez ensuite sur la touche de défilement
rapide.
6 Répétez les étapes 4 et 5 pour programmer
d’autres plages ou disques.
Pour terminer la procédure de création d’un
programme, appuyez sur MENU. Pour reproduire le
programme que vous venez de créer, voir “Lecture du
programme que vous avez créé en observant la fenêtre
d’affichage de la télécommande” à la page 26.
Pour effacer une plage ou un disque, déplacez le
curseur sur la phase que vous voulez effacer à l’étape 3
et appuyez ensuite sur CLEAR.
Pour changer un disque ou une plage que vous avez
programmé, déplacez le curseur sur la phase que vous
voulez effacer à l’étape 3 et appuyez ensuite sur la
touche de défilement rapide. Sélectionnez un nouveau
disque ou une nouvelle plage en appliquant les étapes
4 et 5.
Vous pouvez identifier le programme à l’étape 3
Déplacez le curseur (”) sur le programme que vous
voulez identifier en poussant la touche de défilement
rapide vers le haut et appuyez ensuite sur la touche de
défilement rapide.
Le curseur clignotant (“) apparaît. Introduisez les
caractères voulus en suivant la procédure
d’“Identification des disques en observant la fenêtre
d’affichage de la télécommande” à la page 32.
Remarque
Vous ne pouvez pas programmer de plages sur le second
lecteur à l’aide de la télécommande.
FR
25
Page 68

Lecture de disques compacts
Lecture du programme que vous avez créé
en observant la fenêtre d’affichage de la
télécommande Z
1 Appuyez sur MENU.
CD1
Memo se a r c h
Program play
Pr ogr am inpu t
Group se lec t
2 Déplacez le curseur (”) sur “Program play” à
l’aide de la touche de défilement rapide et
appuyez ensuite sur la touche de défilement
rapide.
CD1
:AProgramA
B:Program B
C:Program C
D:Program D
3 Sélectionnez le programme voulu en poussant la
touche de défilement rapide vers le haut ou vers le
bas et appuyez ensuite sur la touche de défilement
rapide.
CD1
Remarque
Le programme musical que vous venez de créer à l’aide de la
télécommande est mémorisé dans le lecteur sous
PROGRAM 1. Faites attention que le PROGRAM 1 que vous
aviez créé précédemment est effacé.
Lecture par programmateur
Vous pouvez démarrer la lecture d’un disque à l’heure
de votre choix en raccordant un programmateur (non
fourni). En cas de difficulté, consultez le mode
d’emploi fourni avec le programmateur.
TIMER Touches de mode de lecture
+100
I / u
1 Appuyez sur l’une des touches de mode de lecture
pour sélectionner le mode de lecture voulu.
2 Réglez le commutateur TIMER du lecteur sur
PLAY.
Program
data t r ansfer
CD1
Disc4
* DISC4*
Track1
( TRACK 1 )
La lecture programmée démarre lorsque le lecteur
a terminé de charger les données de
programmation de la télécommande.
Si le téléchargement des données de la
télécommande par le lecteur échoue, le message
suivant apparaît. Appuyez à nouveau sur la
touche de défilement rapide.
data t r ansfer
fai lure !
3 Réglez le programmateur sur l’heure de votre
choix.
Le lecteur se met hors tension. A l’heure
programmée, le lecteur se met sous tension et
démarre la lecture.
4 Lorsque vous en avez terminé avec le
programmateur, réglez le commutateur TIMER du
lecteur sur la position OFF.
26
Try again !
FR
Page 69

Commander un autre lecteur
CD3/ 200di scs
2nd pl ayer
2nd PLAYER CD3
CD (Advanced Mega Control)
Cet appareil peut commander un second lecteur CD
(voir “Raccordement d’un autre lecteur CD” à la
page 9).
Même lorsqu’un second lecteur CD est raccordé, les
commandes des deux appareils restent opérationnelles.
Si vous appuyez sur la touche de lecture de l’un des
deux appareils, le lecteur en train de fonctionner
s’arrête et le lecteur libre démarre.
Assurez-vous que “2nd DETECTED” apparaît dans la
fenêtre d’affichage de ce lecteur après que vous avez
mis les deux lecteurs sous tension.
Faites attention que, suivant les lecteurs, il se peut que
vous ne puissiez pas exploiter toutes les fonctions du
second lecteur CD.
Les commandes indiquées dans les illustrations ci-dessous
sont actives lorsque la touche MEGA CONTROL est allumée.
Touches de mode de lecture
(CONTINUE/SHUFFLE/
PROGRAM/REPEAT)
≠ AMS ±
MENU/NO
JOG
Lecture de disques compacts
Playing CDsGetting Started
Playing CDs
1 Appuyez sur la touche MEGA CONTROL de ce
lecteur.
La touche MEGA CONTROL et l’indication “2nd”
dans la fenêtre d’affichage s’allument. La fenêtre
d’affichage indique le numéro ou le mémo du
disque en cours sur le second lecteur.
ALL DISCS
CD1
2nd DISC
4
*DISC-4*
Numéro du disque en cours ou mémo de disque
2 Sélectionnez le mode de lecture voulu.
Pour programmer des plages, utilisez les
commandes du second lecteur.
3 Appuyez sur la touche · de ce lecteur pour
démarrer la lecture.
La lecture démarre et la fenêtre d’affichage indique
les numéros de disque et de plage en cours ainsi
que la durée de lecture de la plage.
Lorsque la touche MEGA CONTROL est allumée,
vous pouvez commander le second lecteur au
moyen des commandes de ce lecteur.
I / u
PLAYER
SELECT
·
=/+
0/)
MEGA CONTROL
PLAYER SELECT
MENU
PUSH ENTER
DISC
SKIP
BACK
SHUFFLE
REPEAT
TRACK
CONTINUE
PROGRAM
MEMO SCAN
TIME/TEXT
+100
pP·
Pour commander à nouveau le lecteur maître
Appuyez sur MEGA CONTROL. La touche MEGA
CONTROL s’éteint et vous pouvez commander le lecteur
maître.
Pour commander à nouveau le lecteur maître au moyen de la
télécommande, vous devez resélectionner le lecteur maître en
appuyant sur la touche PLAYER SELECT de la
télécommande.
Pour commander directement le second lecteur à l’aide de
la télécommande fournie Z
Alors que la touche MEGA CONTROL est désactivée,
appuyez plusieurs fois de suite sur PLAYER SELECT jusqu’à
ce que l’indication “2nd player” apparaisse dans la fenêtre
d’affichage de la télécommande.
P
p
27
FR
Page 70

Lecture de disques compacts
Téléchargement des mémos de disque du
second lecteur CD
Si le second lecteur CD est doté de la fonction de mémo
de disque (voir page 30), vous pouvez télécharger les
mémos de disque du second lecteur CD dans la
mémoire de ce lecteur et les afficher sur ce lecteur.
1 Appuyez sur MENU/NO.
2 Tournez le disque JOG jusqu’à ce que l’indication
“LOAD 2ndMEMO?” clignote dans la fenêtre
d’affichage.
Fondu enchaîné d’entrée ou de
sortie
Vous pouvez activer manuellement un fondu enchaîné
d’entrée ou de sortie du son afin d’éviter que les plages
ne commencent et ne s’arrêtent abruptement.
Faites attention que vous ne pouvez pas utiliser cet
effet si vous avez établi le raccordement via le
connecteur DIGITAL OUT (OPTICAL).
FADER
ALL DISCS
CD1
LOAD 2ndMEMO?
3 Poussez sur le disque JOG.
Ce lecteur entame le téléchargement. (Le
téléchargement dure environ une minute.)
Remarque
Si un mémo de disque du second lecteur CD compte plus de
13 caractères, seuls les 13 premiers caractères de ce mémo de
disque sont chargés sur ce lecteur.
Identification des disques du second
lecteur CD
Vous pouvez identifier les disques du second lecteur
CD ou modifier les mémos de disque chargés depuis le
second lecteur CD.
1 Appuyez sur MEGA CONTROL.
La touche MEGA CONTROL s’allume.
I / u
Pour
Démarrer la lecture en
fondu enchaîné
d’entrée
Terminer la lecture en
fondu enchaîné de
sortie
Remarque
Le fondu enchaîné dure environ 5 secondes.
Appuyez sur FADER
En cours de pause. “FADE” apparaît
dans la fenêtre d’affichage et
l’indication Q se met à clignoter. La
lecture en fondu enchaîné d’entrée
est activée.
Lorsque vous voulez activer le
fondu enchaîné de sortie. “FADE”
apparaît dans la fenêtre d’affichage
et l’indication q se met à clignoter.
La lecture se termine en fondu
enchaîné de sortie et le lecteur passe
en mode de pause.
+100
28
FR
2 Tournez le disque JOG pour sélectionner le disque
auquel vous voulez assigner un mémo de disque.
Si le logement de disque que vous avez sélectionné
ne comporte pas de disque, l’indication
“NO DISC” apparaît dans la fenêtre d’affichage et
vous ne pouvez pas assigner de mémo de disque.
3 Appuyez sur MENU/NO.
L’indication “MEMO IN ?” apparaît.
4 Poussez sur le disque JOG.
5 Introduisez le nouveau mémo de disque en
appliquant la procédure d’“Identification des
disques” à la page 30.
Remarque
Comme les nouveaux mémos de disque sont enregistrés dans
la mémoire de ce lecteur, vous ne pouvez pas les afficher sur
le second lecteur CD.
Page 71

Lecture alternée (lecture
alternée sans transition/
enchaînée)
Si vous raccordez un second lecteur, vous pouvez
reproduire alternativement des plages de ce lecteur et
ceux du second lecteur dans n’importe quel mode de
lecture (voir “Raccordement d’un autre lecteur CD” à
la page 9).
Sélectionnez l’une des méthodes suivantes:
• Lecture alternée sans transition (No-Delay Play):
Le lecteur en cours change à chaque plage. Chaque
fois que le lecteur en cours change pour l’autre
lecteur, l’autre lecteur démarre immédiatement la
lecture sans qu’il y ait une interruption du son après
la fin de la lecture sur le lecteur en cours. L’autre
lecteur saute l’amorce et démarre la lecture là où le
son commence réellement.
• Lecture alternée enchaînée (X-Fade Play): Le
lecteur en cours change à chaque plage ou à un
intervalle déterminé. Vous pouvez sélectionner
l’intervalle (30, 60 ou 90 secondes). Chaque fois que
le lecteur en cours change pour l’autre lecteur, le son
des deux lecteurs est mixé. La lecture se termine en
fondu enchaîné de sortie sur le lecteur en cours et
démarre en fondu enchaîné d’entrée sur l’autre
lecteur.
I / u
X-FADE NO DELAY
+100
Lecture de disques compacts
Playing CDsGetting Started
Playing CDs
3 Appuyez sur · pour démarrer la lecture.
La touche MEGA CONTROL s’allume pendant la
sélection de la plage sur le second lecteur.
Pour désactiver la lecture alternée sans transition/
enchaînée
Appuyez plusieurs fois de suite sur la touche correspondante
jusqu’à ce que l’indication “NO DELAY” ou “X-FADE”
disparaisse de la fenêtre d’affichage. Le lecteur en cours
poursuit la lecture.
Vous pouvez changer la méthode (lecture alterneé
sans transition ou lecture alterneé enchaînée) en
cours de lecture
Appuyez sur la touche correspondante (NO DELAY ou
X-FADE) suivant la procédure présentée à l’étape 2.
Vous pouvez démarrer la lecture alternée enchaînée à
n’importe quel endroit de la plage
Appuyez sur FADER en cours de lecture alternée
enchaînée.
Même après que vous avez activé le mode de lecture
alternée enchaînée et démarré la lecture alternée
enchaînée, vous pouvez démarrer manuellement le mode
de lecture alternée enchaînée à n’importe quel endroit.
Attention que vous ne pouvez pas exécuter cette
opération pendant que le son des deux lecteurs est mixé.
Remarques
• La lecture commence à partir du second lecteur si vous la
démarrez alors que la touche MEGA CONTROL est
allumée.
• Lorsque l’un des lecteurs a terminé la lecture de toutes les
plages ou de tous les disques qu’il contient avant l’autre
lecteur, la lecture s’arrête.
• N’utilisez pas les commandes du second lecteur en cours de
lecture alternée sans transition/enchaînée. Elles risquent de
ne pas opérer correctement.
·
1 Sélectionnez le mode de lecture voulu sur chaque
lecteur.
2 Si vous sélectionnez la lecture alternée sans
transition
Appuyez sur NO DELAY.
L’indication “NO DELAY” apparaît dans la fenêtre
d’affichage.
Si vous sélectionnez la lecture alternée
enchaînée
Appuyez sur X-FADE.
L’indication “X-FADE” apparaît dans la fenêtre
d’affichage.
Chaque fois que vous appuyez sur la touche
X-FADE, l’indication apparaît selon la séquence
suivante:
n X-FADE off n at track end n after 30 sec
after 90 sec N after 60 sec N
Pour changer le lecteur en cours chaque fois
qu’une plage complète est terminée, sélectionnez
“at track end”.
Pour changer le lecteur en cours à un intervalle
spécifié, appuyez plusieurs fois de suite sur
X-FADE jusqu’à ce que l’intervalle voulu
apparaisse dans la fenêtre d’affichage.
Commander le lecteur au
départ d’un autre appareil
Si vous raccordez le lecteur à une platine MD Sony
compatible avec la fonction Mega Control ou si vous
commandez une platine MD Sony à l’aide d’un logiciel
informatique tel que “MD Editor”, vous devez
configurer le lecteur comme indiqué ci-dessous:
1 Appuyez sur MENU/NO.
2 Tournez le disque JOG jusqu’à ce que “CONTROL
A1 ?”apparaisse dans la fenêtre d’affichage .
3 Appuyez sur YES.
Pour revenir au réglage normal
Après avoir exécuté les étapes 1 et 2 et que “CONTROL A1 ?”
s’affiche, appuyez sur YES.
Remarques
• Vous ne pouvez exécuter correctement l’opération ci-dessus
que si vous exploitez les disques 1 à 200.
• Vous ne pouvez pas commander correctement ce lecteur au
départ d’un autre lecteur qui ne comporte pas de prise
CONTROL A1 . Dans ce cas, commandez l’autre lecteur
au départ de ce lecteur.
29
FR
Page 72

Mémorisation d’informations relatives aux CD (fichiers personnalisés)
Mémorisation d’informations relatives aux CD (fichiers personnalisés)
Que pouvez-vous faire avec les
fichiers personnalisés
Le lecteur peut mémoriser trois types d’informations
désignés “fichiers personnalisés” pour chaque disque.
Lorsque vous avez mémorisé des fichiers personnalisés
pour un disque, le lecteur rappelle automatiquement
les informations que vous avez mémorisées chaque fois
que vous sélectionnez ce disque. Faites attention que
les fichiers personnalisés s’effacent si vous n’utilisez
pas le lecteur pendant environ un mois.
Vous pouvez mémoriser les informations
suivantes:
Lorsque vous activez
Mémo de disque
(page 30)
Bloc de suppression
(page 34)
Fichier de groupe
(page 35)
Vous pouvez
Identifier des disques au moyen
de 13 caractères
Supprimer certaines plages et
mémoriser uniquement les plages
que vous voulez
Grouper des disques en huit
groupes et les localiser ainsi
facilement
Identification des disques
(mémo de disque)
Vous pouvez identifier les disques au moyen de 13
caractères et faire afficher les mémos de disque par le
lecteur chaque fois que vous sélectionnez ces disques.
Un mémo de disque peut être tout ce que vous voulez
comme un titre, le nom d’un artiste, une catégorie
musicale ou encore la date d’achat.
Lorsque vous sélectionnez un disque CD TEXT
Le titre du disque est automatiquement mémorisé
comme le mémo de disque.
Si le titre du disque comprend plus de 13 caractères, seuls
les 13 premiers caractères du titre du disque sont
mémorisés (voir page 15).
Lorsque vous remplacez un disque par un disque CD
TEXT, le titre du disque CD TEXT est également
mémorisé automatiquement.
Faites attention que vous ne pouvez pas changer le
mémo de disque pour un disque CD TEXT.
Vous pouvez identifier des disques pendant que le
volet frontal est ouvert
30
FR
Où sont mémorisés les fichiers
personnalisés?
Les fichiers personnalisés ne sont pas enregistrés sur le
disque, mais dans la mémoire du lecteur. Cela signifie
que vous ne pouvez pas utiliser les fichiers personnalisés
lorsque vous reproduisez un disque sur un autre lecteur.
Si vous remplacez des disques enregistrés
dans les fichiers personnalisés
Les informations mémorisées dans le fichier
personnalisé restent en mémoire puisque les
informations relatives à chaque fichier personnalisé
sont assignées aux différents logements. Effacez tous
les fichiers personnalisés (mémo de disque, bloc de
suppression, et fichier de groupe) de l’ancien disque et
mémorisez les informations du nouveau disque dans
les fichiers personnalisés.
Suppression de tous les fichiers
personnalisés de tous les disques
Mettez le lecteur hors tension. Tout en maintenant la
touche CLEAR enfoncée, appuyez sur I/u pour mettre
le lecteur sous tension. L’indication “ALL ERASE”
apparaît dans la fenêtre d’affichage et tous les fichiers
personnalisés sont effacés.
Identification des disques sur le lecteur
MENU/NO YES
I / u
≠ AMS ±
JOG
+100
CLEAR
1 Tournez le disque JOG jusqu’à ce que le numéro du
disque auquel vous souhaitez assigner un mémo de
disque apparaisse dans la fenêtre d’affichage.
Lorsque vous identifiez un disque alors que le
volet frontal est fermé, c’est le numéro du disque
qui se trouve en position de lecture qui apparaît.
Lorsque vous identifiez un disque alors que le volet
frontal est ouvert, c’est le numéro du disque qui se
trouve en position de chargement qui apparaît.
2 Appuyez sur MENU/NO.
L’indication “MEMO IN ?” se met à clignoter.
3 Poussez sur le disque JOG.
Le curseur clignotant (
) apparaît.
Page 73

Mémorisation d’informations relatives aux CD (fichiers personnalisés)
4 Tournez le disque JOG jusqu’à ce que le caractère
voulu apparaisse dans la fenêtre d’affichage.
Le curseur disparaît et le premier espace pour le
mémo de disque se met à clignoter.
Lorsque vous tournez le disque JOG dans le sens
horaire, les caractères apparaissent dans l’ordre
suivant. Tournez le disque JOG dans le sens
antihoraire pour les faire défiler dans l’ordre
inverse.
(espace) A B C D E F G H I J K L M N O P Q R S T U
V W X Y Z a b c d e f g h i j k l m n o p q r s t u v w
x y z 0 1 2 3 4 5 6 7 8 9 ! " # $ % & ' ( ) * + , – . / : ; <
= > ? @ _
ALL DISCS
CD1
DISC
AB
S
5 Poussez sur le disque JOG pour sélectionner le
caractère de votre choix.
Le caractère sélectionné s’allume et le curseur
clignotant apparaît pour indiquer l’espace suivant.
ALL DISCS
CD1
DISC
AB
S
Pour effectuer une correction
Appuyez sur CLEAR et recommencez en introduisant les
caractères corrects.
Changement du mémo de disque
1 Exécutez les étapes 1 à 3 de la procédure
“Identification des disques sur le lecteur” à la page
30 pour sélectionner le mémo de disque que vous
voulez modifier.
2 Tournez le disque ≠ AMS ± pour déplacer le
curseur sur la position que vous voulez modifier.
Lorsque le curseur s'est positionné sur un
caractère, le caractère se met à clignoter. Lorsque le
curseur se positionne sur un espace blanc, le
curseur (
Pour changer des caractères
Tournez le disque JOG jusqu’à ce que le caractère voulu
apparaisse dans la fenêtre d’affichage.
Pour ajouter des caractères
Poussez sur le disque JOG. Un nouvel espace blanc
apparaît à côté du caractère sélectionné, et tournez
ensuite le disque JOG jusqu’à ce que le caractère voulu
apparaisse dans la fenêtre d’affichage.
Pour supprimer des caractères
Appuyez sur CLEAR. Le caractère sélectionné disparaît.
Pour effacer tous les caractères du mémo de disque
en cours
Maintenez CLEAR enfoncé pendant quelques secondes.
Tous les caractères introduits pour le mémo de disque en
cours sont effacés.
) apparaît dans la fenêtre d'affichage.
6 Répétez les étapes 4 et 5 pour introduire d’autres
caractères.
7 Appuyez sur YES pour mémoriser le mémo de
disque.
La fenêtre d’affichage indique le mémo de disque.
ALL DISCS
CD1
DISC
20
SONYHITS
Répétez les étapes 1 à 7 pour assigner des mémos à
d’autres disques.
Pour changer le type de caractère rapidement en
cours de saisie
Appuyez sur TIME/TEXT à l'étape 4 ci-dessus. Le
caractère du curseur change pour le premier caractère de
chaque type de caractère.
Chaque fois que vous appuyez sur TIME/TEXT, le type
de caractère change comme suit :
n A n a n 0 n ! n (espace)
3 Répétez l’étape 2 pour changer d’autres caractères.
4 Appuyez sur YES pour enregistrer le mémo de
disque.
Suppression d’un mémo de disque
1 Appliquez les étapes 1 à 3 de la procédure
d’“Identification des disques sur le lecteur” à la
page 30 pour sélectionner le mémo de disque que
vous voulez effacer.
2 Maintenez CLEAR enfoncé pendant quelques
secondes.
3 Appuyez sur YES.
Le mémo de disque disparaît.
31
FR
Page 74

Mémorisation d’informations relatives aux CD (fichiers personnalisés)
GROUP
ENTER DEL
CLEAR
DISC SKIP
CHECK
NO DELAY
SPACE X-FADE
CAPS HIT LIST
DISC HIGH-LIGHT
3
DEF MEMO INPUT
6
MNO
9
WXY
2
ABC&!?
5
JKL
8
TUV
10/0
10
QZ
1
4
GHI
7
PRS
i sc memo i nput
sDi c6:
(AB)
D
[]
CD1
Identification des disques en observant la
fenêtre d’affichage de la télécommande Z
PLAYER SELECT
MENU
TRACK
BACK
MENU
Touche de
PUSH ENTER
défilement
GROUP
rapide
Touches
numériques
DISC HIGH-LIGHT
DEF MEMO INPUT
ABC&!?
3
2
1
MNO
JKL
GHI
6
5
4
WXY
TUV
PRS
9
8
7
QZ
ENTER DEL
10
10/0
DISC SKIP
CAPS HIT LIST
SPACE X-FADE
CHECK
CLEAR
NO DELAY
MEMO INPUT
?//
CAPS
SPACE
ENTER
CLEAR
1 Appuyez sur MENU.
CD1
Memo se a r c h
Program play
Pr ogr am inpu t
Group se lec t
4 Appuyez sur CAPS pour sélectionner le type de
caractère voulu.
Chaque fois que vous appuyez sur cette touche, le
type de caractère change de façon cyclique dans
l’ordre suivant: lettres majuscules (AB), lettres
minuscules (ab) et chiffres (12). Pour sélectionner
un symbole, vous devez sélectionner les
majuscules ou les minuscules.
Type de caractère
5 Pour introduire une lettre, appuyez sur la touche
numérique correspondant à la lettre voulue
(indiquée à côté de chaque touche numérique).
Le curseur disparaît et le premier espace pour le
mémo de disque se met à clignoter.
Chaque fois que vous appuyez sur cette touche, le
caractère change de façon cyclique entre ceux qui
sont indiqués à côté de la touche.
Pour introduire des symboles, appuyez plusieurs
fois de suite sur la touche numérique 1 jusqu’à ce
que le symbole voulu apparaisse dans la fenêtre
d’affichage.
2 Déplacez le curseur (”) sur “Disc memo input” à
l’aide de la touche de défilement rapide et
appuyez ensuite sur la touche de défilement
rapide.
CD1
i sc memo i nput
01:* DISC-1*
02D: * DISC-2*
03:* DISC-3*
3 Déplacez le curseur sur le disque auquel vous
FR
32
voulez assigner un mémo de disque et appuyez
ensuite sur la touche de défilement rapide.
Le curseur clignotant (“) apparaît.
CD1
i sc memo i nput
D
sDi c6:
[
(AB)
]
Caractères assignés
à chaque touche
numérique
Exemple: Pour sélectionner la lettre E
Appuyez deux fois sur la touche
numérique 3.
n D n E n F
Appuyez sur 3. Appuyez sur 3.
Appuyez sur 3.
Pour insérer un espace, appuyez une fois sur
SPACE.
Pour introduire un numéro, appuyez deux fois sur
CAPS pour changer le type de caractère et
appuyez ensuite sur la touche numérique voulue.
Page 75

Mémorisation d’informations relatives aux CD (fichiers personnalisés)
6 Appuyez sur une autre touche numérique ou sur
la touche MEMO INPUT / pour passer à l’espace
suivant et répétez ensuite les étapes 4 à 6 pour
introduire d’autres caractères.
7 Appuyez sur la touche de défilement rapide ou
ENTER lorsque vous avez terminé la saisie des
caractères.
Le message “Transmit to SET?” apparaît dans la
fenêtre d’affichage.
CD1
06:EMOTIONS
rTansmit toSET?
yes
no
Appuyez sur la touche de défilement rapide ou
ENTER pour télécharger le mémo de disque sur le
lecteur.
Si vous ne voulez pas charger le mémo de disque
sur le lecteur, déplacez le curseur sur “no” et
appuyez ensuite sur la touche de défilement
rapide.
Répétez les étapes 1 à 7 pour assigner des mémos
de disque à d’autres disques.
Pour corriger un caractère en cours de saisie
1 Appuyez sur DEL pour effacer le caractère incorrect.
2 Introduisez le caractère correct.
Pour insérer un caractère entre des caractères
introduits
Appuyez sur MEMO INPUT ? ou / jusqu’à ce que le
curseur se déplace à l’endroit d’insertion et tapez ensuite
le caractère.
Si vous avez fait une erreur en introduisant un
caractère
Pour corriger tous les caractères introduits
Appuyez sur CLEAR. Tous les caractères sont effacés.
Réintroduisez les caractères corrects à partir du début.
Pour corriger un caractère qui a été introduit
1 Appuyez sur MEMO INPUT ? ou / jusqu’à ce que
le curseur se déplace sur le caractère incorrect suivant.
CD1
i sc memo i nput
D
sDi c6:
[
SO
NY B
2 Appuyez sur DEL pour effacer le caractère incorrect.
i sc memo i nput
D
sDi c6:
[
SO
NY
T
T
(AB)
]
CD1
(AB)
]
3 Introduisez le caractère correct.
33
FR
Page 76
Mémorisation d’informations relatives aux CD (fichiers personnalisés)
Mémorisation des informations
des fichiers personnalisés au
moyen d’un clavier
Vous pouvez mémoriser le mémo de disque pour
chaque disque au moyen d’un clavier* d’ordinateur
IBM ou compatible (non fourni).
* D’une consommation électrique de 120 mA ou moins.
Prise pour clavier
+100
I / u
1 Raccordez un clavier à la prise pour clavier du
panneau frontal du lecteur.
I / u
Mémorisation de plages
spécifiques (bloc de
suppression)
Vous pouvez supprimer les plages jugées indésirables
et ne mémoriser que les plages que vous voulez
écouter. Lorsque vous sélectionnez un disque
comportant un bloc de suppression, vous ne pouvez
reproduire que les plages restantes.
CONTINUE
I / u
SHUFFLE
1 Appuyez sur CONTINUE ou SHUFFLE avant de
démarrer la lecture.
CHECK
JOG
+100
CLEAR
34
FR
2 Après avoir sélectionné le disque voulu sur le
lecteur, appuyez sur la touche Enter.
3 Introduisez les caractères voulus et appuyez
ensuite sur la touche Enter pour mémoriser les
informations.
Vous pouvez effacer tous les caractères du paramètre
sélectionné
Tout en maintenant la touche Shift enfoncée, appuyez sur
la touche Delete.
Remarques
• Si les touches curseur ne fonctionnent pas correctement et si
vous ne pouvez pas terminer l’opération au moyen du
clavier, déconnectez le clavier et reconnectez-le ensuite au
lecteur et réessayez.
• Si le clavier n’est pas de type “USA”, il se peut que des
caractères différents de ceux indiqués sur les touches soient
introduits.
Le clavier de type “USA” est illustré ci-dessous.
~
'
1!2@3#4$5%6^7&89(0)-
WERT YU I OPQ
Shift
SDFGHJKLA
XCVBNM<>Z
Caps Lock
Ctrl Alt Alt Ctrl
+
=
}
{
]
[
Enter
?
Shift
2 Tournez le disque JOG pour sélectionner le disque.
3 Appuyez plusieurs fois de suite sur CHECK
jusqu’à ce que la plage à supprimer apparaisse
dans la fenêtre d’affichage.
ALL DISCS
DISC
CD1
TRACK
20
201ON
4 Appuyez sur CLEAR.
Les indications “DELETE FILE” et “OFF”
apparaissent dans la fenêtre d’affichage.
ALL DISCS
DISC
CD1
TRACK
20
201OFF
Pour restaurer la plage, appuyez à nouveau sur
CLEAR.
5 Répétez les étapes 3 et 4 pour supprimer d’autres
plages.
Vous pouvez restaurer toutes les plages que vous
avez supprimées
Maintenez la touche CLEAR enfoncée jusqu’à ce que
l’indication “ALL ON” apparaisse dans la fenêtre
d’affichage.
Remarque
Les plages supprimées sont omises même dans les modes de
lecture aléatoire et programmée (si le disque comportant un
bloc de suppression a été programmé en entier comme une
phase).
Page 77

Mémorisation d’informations relatives aux CD (fichiers personnalisés)
Identification des groupes (mémo de
Groupement de disques
groupe)
(fichier de groupe)
Si vous estimez qu’un trop grand nombre de disques
complique la recherche d’un disque particulier, sachez
que ce lecteur est doté d’une fonction qui vous permet
de classer les disques en huit groupes. Un disque ne
peut être classé que dans un seul groupe.
Lorsque vous avez classé des disques, vous pouvez
activer les modes de lecture continue, aléatoire ou
répétée dans un groupe déterminé (lecture de groupe).
CONTINUE
SHUFFLE
I / u
GROUP 1 – 8
GROUP FILE
MENU/NO≠ AMS ±
·
Classement des disques par groupes
1 Appuyez sur CONTINUE ou SHUFFLE avant de
démarrer la lecture.
2 Tournez le disque JOG pour sélectionner le disque
à classer dans un groupe.
3 Appuyez sur GROUP FILE.
Le message “Select G1 – G8” apparaît dans la
fenêtre d’affichage.
4 Appuyez sur l’une des touches GROUP 1 – 8
suivant le groupe dans lequel vous souhaitez
classer le disque.
L’indication “GROUP FILE” et le numéro du
groupe apparaissent dans la fenêtre d’affichage et
le disque est classé dans ce groupe.
Suppression de disques d’un groupe
JOG
+100
CLEAR
Vous pouvez identifier un numéro de groupe
présélectionné comme vous le voulez, par exemple une
catégorie, au moyen de 13 caractères.
Faites attention que vous ne pouvez pas mémoriser de
mémo de groupe si vous n’avez assigné aucun disque à
ce groupe.
1 Appuyez sur MENU/NO.
“MEMO IN ?” clignote.
2 Tournez le disque JOG jusqu’à ce que le numéro
du groupe à identifier apparaisse dans la fenêtre
d’affichage et poussez ensuite sur le disque JOG.
Le curseur clignotant ( ) apparaît.
3 Tournez le disque JOG jusqu’à ce que le caractère
voulu apparaisse dans la fenêtre d’affichage.
Le curseur disparaît et le premier espace pour le
mémo de groupe se met à clignoter.
Lorsque vous tournez le disque JOG dans le sens
horaire, les caractères apparaissent dans l’ordre
suivant. Tournez le disque JOG dans le sens
antihoraire pour les faire défiler dans l’ordre
inverse.
(espace) A B C D E F G H I J K L M N O P Q R S T
U V W X Y Z a b c d e f g h i j k l m n o p q r s t u v
w x y z 0 1 2 3 4 5 6 7 8 9 ! " # $ % & ' ( ) * + , – . / : ;
< = > ? @ _
4 Poussez sur le disque JOG pour sélectionner le
caractère de votre choix.
Le caractère sélectionné s’allume et le curseur
clignotant apparaît pour indiquer l’espace suivant.
Pour effectuer une correction
Appuyez sur CLEAR et recommencez en introduisant les
caractères corrects.
5 Répétez les étapes 3 et 4 pour introduire d’autres
caractères.
Pour plus de détails, voir également “Identification
des disques sur le lecteur” à la page 30.
• Pour supprimer un disque dans un groupe
1 Tournez le disque JOG jusqu’à ce que le numéro
du disque que vous voulez supprimer du groupe
apparaisse dans la fenêtre d’affichage.
2 Appuyez sur GROUP FILE.
Le message “Select G1 – G8” apparaît dans la
fenêtre d’affichage.
3 Appuyez sur CLEAR.
L’indication “GROUP ERASE” apparaît dans la
fenêtre d’affichage.
• Pour supprimer tous les disques d’un groupe en
même temps, appuyez sur CLEAR tout en
maintenant enfoncée la touche GROUP 1 – 8
correspondant au groupe à effacer.
6 Appuyez sur YES pour mémoriser le mémo de
groupe.
35
FR
Page 78

Mémorisation d’informations relatives aux CD (fichiers personnalisés)
Changement du mémo de groupe
1 Exécutez les étapes 1 et 2 de la procédure
“Identification des groupes” à la page 35 pour
sélectionner le mémo de groupe que vous voulez
modifier.
2 Tournez le disque ≠ AMS ± pour déplacer le
curseur sur la position que vous voulez modifier.
Lorsque le curseur s’est positionné sur un
caractère, le caractère se met à clignoter. Lorsque le
curseur se positionne sur un espace blanc, le
curseur (
Pour changer des caractères
Tournez le disque JOG jusqu’à ce que le caractère voulu
apparaisse dans la fenêtre d’affichage.
Pour ajouter des caractères
Poussez sur le disque JOG. Un nouvel espace blanc
apparaît à côté sur caractère sélectionné, et tournez
ensuite le disque JOG jusqu’à ce que le caractère voulu
apparaisse dans la fenêtre d’affichage.
Pour supprimer des caractères
Appuyez sur CLEAR. Le caractère sélectionné disparaît.
) apparaît dans la fenêtre d’affichage.
3 Répétez l'étape 2 pour changer d'autres caractères.
4 Appuyez sur YES pour enregistrer le mémo de
groupe.
Suppression du mémo de groupe
Lecture de disques dans un groupe (lecture
de groupe)
Vous pouvez activer la lecture continue ou aléatoire
dans un groupe.
1 Sélectionnez le mode de lecture de votre choix
avant de démarrer la lecture.
Si vous
sélectionnez
Lecture continue
ALL DISCS
Lecture continue
1 DISC
Lecture aléatoire
ALL DISCS
Lecture aléatoire
1 DISC
Le lecteur reproduit
Consécutivement toutes les plages de
tous les disques du groupe
Consécutivement toutes les plages du
disque spécifié dans le groupe
Toutes les plages de tous les disques
du groupe dans un ordre aléatoire
Toutes les plages du disque spécifié
dans le groupe dans un ordre aléatoire
2 Appuyez sur l’une des touches GROUP 1 – 8 pour
sélectionner le groupe et appuyez sur ·.
La lecture de groupe démarre à partir du premier
disque correspondant au numéro de lecture de
groupe suivant le disque en cours de lecture. Si le
disque en cours de lecture fait partie du groupe
sélectionné, la lecture de groupe commence à
partir de ce disque.
Pour annuler la lecture de groupe
Appuyez sur la touche GROUP 1 – 8 du groupe sélectionné.
L’indication “GROUP OFF” apparaît dans la fenêtre
d’affichage.
36
FR
1 Appliquez les étapes 1 et 2 de la procédure
d’“Identification des groupes” à la page 35 pour
sélectionner le mémo de groupe à supprimer.
2 Maintenez CLEAR enfoncé pendant quelques
secondes.
3 Appuyez sur YES.
Le mémo de groupe disparaît.
En lecture de groupe, vous pouvez localiser un disque
déterminé dans un groupe en explorant ou en
recherchant les mémos de disque
Voir “Localisation d’un disque en recherchant un mémo
de disque spécifique” à la page 16 et “Localisation d’un
disque en explorant chaque mémo de disque” à la page
17.
Page 79

Mémorisation d’informations relatives aux CD (fichiers personnalisés)
Memo se a r c h
Program play
Pr ogr am inpu t
Group se lec t
CD1
G1 : Gr oup 1
G2 : HI T SONGS
G3 : P I ANO SONATA
CD1
Vous pouvez spécifier le disque à reproduire lorsque
vous démarrez la lecture de groupe
Après avoir sélectionné le groupe, tournez le disque JOG
pour sélectionner le disque et poussez ensuite sur le
disque JOG ou appuyez sur ·.
Remarque
Si l’indication “NO ENTRY” apparaît dans la fenêtre
d’affichage, cela signifie qu’aucun disque n’a été classé dans le
groupe sélectionné.
Démarrer la lecture de groupe en observant
la fenêtre d’affichage de la télécommande
Z
PLAYER SELECT
MENU
PUSH ENTER
DISC
SKIP
SHUFFLE
REPEAT
BACK
BACK
TRACK
MENU
Touche de
défilement
rapide
·
CONTINUE
PROGRAM
MEMO SCAN
TIME/TEXT
1 Avant de démarrer la lecture, appuyez sur MENU.
2 Déplacez le curseur (”) sur “Group select” à l’aide
de la touche de défilement rapide et appuyez
ensuite sur la touche de défilement rapide.
3 Déplacez le curseur sur le groupe voulu.
4 Appuyez sur la touche de défilement rapide et
appuyez ensuite sur · pour démarrer la lecture.
Pour annuler la lecture de groupe, déplacez le curseur
sur “Group OFF” et appuyez ensuite sur BACK pour
revenir à l’écran de menu. Vous pouvez également
annuler la lecture de groupe en appuyant sur la touche
GROUP.
Vous pouvez spécifier le disque en appuyant sur la
touche DISC SKIP +/–
GROUP
PLAYER SELECT
MENU
TRACK
PUSH ENTER
GROUP
DISC HIGH-LIGHT
DEF MEMO INPUT
ABC&!?
3
2
1
MNO
JKL
GHI
6
5
4
WXY
TUV
PRS
9
8
7
QZ
ENTER DEL
10
10/0
DISC SKIP
BACK
CAPS HIT LIST
SPACE X-FADE
CHECK
CLEAR
NO DELAY
Remarque
Lorsque vous commandez un autre lecteur CD en observant
la fenêtre d’affichage de la télécommande (voir page 27), il se
peut que, suivant le lecteur, vous ne puissiez pas démarrer la
lecture de groupe. Dans ce cas, appuyez d’abord sur GROUP
et puis sur la touche numérique voulue (1 – 8). Appuyez
ensuite sur ENTER.
37
FR
Page 80

Mémorisation d’informations relatives aux CD (fichiers personnalisés)
Mémorisation de vos plages
préférées (liste des hits)
Vous pouvez mémoriser les plages que vous écoutez le
plus fréquemment et sélectionner immédiatement ces
plages en contrôlant les numéros ou les titres des
plages (voir page 39) dans la liste des hits.
Vous pouvez programmer 32 plages dans la liste des
hits.
I / u
·
=/+
HIT LIST
≠ AMS ±
PLAYER SELECT
MENU
TRACK
PUSH ENTER
CONTINUE
PROGRAM
DISC
MEMO SCAN
SKIP
TIME/TEXT
MENU/NO
·
BACK
SHUFFLE
REPEAT
JOG
+100
CLEAR
PLAYER SELECT
MENU
TRACK
DISC HIGH-LIGHT
ABC&!?
1
JKL
GHI
4
TUV
PRS
7
QZ
10
DISC SKIP
PUSH ENTER
GROUP
DEF MEMO INPUT
3
2
MNO
6
5
WXY
9
8
ENTER DEL
10/0
CLEAR
BACK
CAPS HIT LIST
SPACE X-FADE
NO DELAY
CHECK
HIT LIST
ENTER
CLEAR
Classement de plages dans la liste des hits
Appuyez sur la touche HIT LIST pendant la lecture de
vos plages préférées.
L’indication “HIT” et le message “List in” apparaissent
dans la fenêtre d’affichage.
Remarques
• Si vous introduisez une 33e plage dans la liste des hits, la
32e plage est remplacée.
• Vous ne pouvez pas mémoriser les plages d’un second
lecteur CD.
38
Lecture de plages de la liste des hits
1 Appuyez sur HIT LIST avant de démarrer la lecture.
La touche HIT LIST s’allume et l’indication
“HIT LIST” apparaît dans la fenêtre d’affichage.
2 Tournez le disque JOG ou le disque ≠ AMS
± jusqu’à ce que la plage voulue apparaisse
dans la fenêtre d’affichage du panneau frontal.
3 Poussez sur le disque JOG ou appuyez sur ·
pour démarrer la lecture.
Si vous utilisez la télécommande, appuyez sur
ENTER.
FR
Page 81

Mémorisation d’informations relatives aux CD (fichiers personnalisés)
La liste des hits reste en mémoire jusqu’à ce que vous
l’effaciez
Même si vous remplacez des disques, la liste des hits que
vous avez créée reste enregistrée dans la mémoire. Le
lecteur substitue par conséquent les nouvelles plages
dans la liste des hits.
Remarque
La plage que vous avez sélectionnée à l’étape 2 est classée
comme la première plage de la liste des hits et vous ne pouvez
pas agencer l’ordre des plages dans la liste des hits.
Suppression de plages de la liste des hits
1 Appliquez les étapes 1 et 2 de la procédure de
“Lecture de plages de la liste des hits” à la page 38.
2 Appuyez sur CLEAR.
La plage sélectionnée est supprimée de la liste des
hits.
Suppression de toutes les plages de la liste
des hits
Lorsque la touche HIT LIST s’allume, maintenez la
touche CLEAR enfoncée en mode d’arrêt jusqu’à ce que
l’indication “CLEAR” apparaisse.
3 Tournez le disque JOG jusqu’à ce que le caractère
voulu apparaisse dans la fenêtre d’affichage.
Le caractère sélectionné pour Hit Title se met à
clignoter.
Lorsque vous tournez le disque JOG dans le sens
horaire, les caractères apparaissent dans l’ordre
suivant. Tournez le disque JOG dans le sens
antihoraire pour les faire défiler dans l’ordre
inverse.
(espace) A B C D E F G H I J K L M N O P Q R S T U
V W X Y Z a b c d e f g h i j k l m n o p q r s t u v w
x y z 0 1 2 3 4 5 6 7 8 9 ! " # $ % & ' ( ) * + , – . / : ; <
= > ? @ _
4 Poussez sur le disque JOG pour sélectionner le
caractère de votre choix.
Le caractère sélectionné s’allume et le curseur
clignotant apparaît pour indiquer l’espace suivant.
Pour effectuer une correction
Appuyez sur CLEAR et recommencez en introduisant les
caractères corrects.
5 Répétez les étapes 3 et 4 pour introduire d’autres
caractères.
Pour plus de détails, voir également “Identification
des disques sur le lecteur” à la page 30.
Identification des plages de la liste des hits
(titre des hits)
Vous pouvez identifier des plages dans la liste des hits
suivant l’une des deux méthodes décrites ci-dessous.
Identification des plages en mode de lecture
1 Appuyez sur MENU/NO pendant la lecture d’une
plage de la liste des hits.
L’indication “HIT MEMO ?” apparaît dans la
fenêtre d’affichage.
2 Poussez sur le disque JOG.
Le curseur clignotant (
d’affichage.
) apparaît dans la fenêtre
6 Appuyez sur YES pour mémoriser le titre d’un hit.
Identification de plages en mode d’arrêt
1 Pendant que la touche HIT LIST est allumée,
sélectionnez la plage que vous voulez assigner en
tournant le disque JOG ou ≠ AMS ±....
2 Appuyez sur MENU/NO.
Le curseur clignotant (
d’affichage.
) apparaît dans la fenêtre
3 Appliquez les étapes 3 à 6 de la procédure
d’“Identification des plages en mode de lecture”
pour introduire les caractères.
Vous pouvez mémoriser les titres des plages d’un
disque CD TEXT dans la liste des hits.
Le titre de plage du disque CD TEXT est
automatiquement enregistré comme titre d'un hit lorsque
la plage est introduite dans la Hit List.
39
FR
Page 82

Informations complémentaires
Informations complémentaires
Précautions
Sécurité
• Attention — L’utilisation d’instruments optiques avec cet
appareil augmente le risque de blessures aux yeux.
• Si des liquides ou des solides venaient à tomber dans le
châssis, débranchez le lecteur et faites-le vérifier par un
personnel qualifié avant de le remettre en service.
Transport
• Lorsque vous transportez le lecteur, appuyez sur OPEN
pour retirer tous les disques du lecteur et mettez-le hors
tension.
Si vous avez des questions ou des problèmes
concernant votre lecteur, consultez votre revendeur
Sony.
Alimentation
• Avant de faire fonctionner le lecteur, vérifiez si la tension
de service du lecteur est identique à la tension
d’alimentation secteur locale. La tension de service est
spécifiée sur la plaquette signalétique située à l’arrière du
lecteur.
• Le lecteur n’est pas déconnecté de la source d’alimentation
(secteur) aussi longtemps qu’il reste branché sur la prise
murale, même si le lecteur proprement dit a été mis hors
tension.
• Débranchez le lecteur de la prise murale si vous prévoyez
de ne pas l’utiliser pendant une période prolongée. Pour
débrancher le cordon d’alimentation (secteur), saisissez-le
par la fiche. Ne tirez jamais sur le cordon proprement dit.
• Le cordon d’alimentation ne peut être remplacé que dans
un centre de service après-vente agréé uniquement.
Installation
• Installez le lecteur dans un endroit suffisamment ventilé de
manière à éviter toute surchauffe interne.
• N’installez pas le lecteur sur des surfaces molles comme
une nappe qui risquerait d’obstruer les orifices de
ventilation du dessous.
• N’installez pas l’appareil à proximité de sources de chaleur
ou dans un endroit soumis au rayonnement direct du soleil,
à de la poussière en excès ou à des vibrations mécaniques.
Fonctionnement
• Si le lecteur est transporté directement d’un endroit froid
dans un endroit chaud, ou est placé dans un local très
humide, de l’humidité risque de se condenser sur les
objectifs à l’intérieur du lecteur. Si cela se produit, le lecteur
risque de ne pas fonctionner correctement. Dans ce cas,
laissez le lecteur sous tension pendant environ une heure
jusqu’à ce que toute l’humidité se soit évaporée.
Remarques sur les disques
compacts
Manipulation des disques compacts
• Pour que les disques restent propres, manipulez-les avec
soin.
• Ne collez pas de papier ni de bande adhésive sur les
disques.
• N’exposez pas les disques au rayonnement direct du soleil
ou à des sources de chaleurs telles que des conduits d’air
chaud. De même, ne les laissez pas dans une voiture
parquée en plein soleil où la température à l’intérieur de
l’habitacle risque d’augmenter dans des proportions
considérables.
• Après avoir retiré un disque d’un logement, rangez-le dans
son boîtier.
Entretien des disques compacts
• Avant d’écouter un disque, nettoyez-le à l’aide d’un chiffon
de nettoyage. Essuyez les disques en allant du centre vers
l’extérieur.
40
FR
Réglage du volume
• N’augmentez pas le volume lorsque vous écoutez un
passage avec de très faibles niveaux d’entrée ou sans signal
audio. Vous risquez sinon d’endommager les haut-parleurs
au moment de la reproduction d’un passage caractérisé par
un niveau de crête.
Entretien
• Nettoyez le châssis, le panneau et les commandes à l’aide
d’un chiffon doux légèrement imprégné d’une solution
détergente neutre. N’utilisez pas de tampons abrasifs, de
poudre à récurer ni de solvants puissants tels que de
l’alcool ou de la benzine.
• N’utilisez pas de solvants tels que de la benzine, du diluant,
des nettoyants disponibles dans le commerce ou des sprays
antistatiques destinés aux disques analogiques en vinyle.
Page 83

Informations complémentaires
Dépannage
Si vous rencontrez l’une des difficultés suivantes lors
de l’utilisation du lecteur, consultez ce guide de
dépannage pour tenter de remédier au problème
survenu. Si le problème persiste, consultez votre
revendeur Sony.
Il n’y a pas de son.
/Vérifiez si le lecteur est correctement raccordé.
/Assurez-vous que l’amplificateur fonctionne
correctement.
La lecture du disque ne démarre pas.
/Aucun CD n’a été introduit dans l’un des
logements (l’indication “–NO DISC–” apparaît).
Introduisez un CD.
/Introduisez le CD avec la face imprimée vers la
droite.
/Nettoyez le CD (voir page 40).
/De l’humidité s’est condensée à l’intérieur du
lecteur. Appuyez sur OPEN et laissez le lecteur
sous tension pendant environ une heure (voir
page 40).
La télécommande ne fonctionne pas.
/Ecartez les obstacles situés entre la
télécommande et le lecteur.
/Dirigez la télécommande vers le capteur de
télécommande
/Vérifiez si vous avez correctement configuré la
télécommande.
/Remplacez les deux piles de la télécommande
lorsque l’indication i apparaît dans la fenêtre
d’affichage de la télécommande.
du lecteur.
Spécifications
Lecteur de disques compacts
Laser Semi-conducteur à laser (λ = 780 nm)
Puissance de sortie laser Max 44,6 µW*
Réponse en fréquence 20 Hz à 20 kHz ±0,5 dB
Rapport signal/bruit Plus de 108 dB
Plage dynamique Plus de 93 dB
Distorsion harmonique Moins de 0,0045 %
Séparation des canaux Plus de 100 dB
Sorties
Type de
prise
LINE OUT
DIGITAL OUT
(OPTICAL)
Prises
phono
Connecteur
de sortie
optique
Caractéristiques générales
Puissance de raccordement
Lieu d‘achat
Canada
Europe
Durée d’émission: continue
* Cette puissance est la valeur mesurée
à une distance de 200 mm de la
surface de la lentille de l’objectif du
bloc optique avec une ouverture de
7 mm.
Niveau de
sortie
maximum
2 V
(à 50 kilohms)
–18 dBm
Impédance de
charge
Plus de 10 kilohms
Longueur d’onde:
660 nm
Puissance de raccordement
120 V AC, 60 Hz
220 –230 V AC, 50/60 Hz
Le lecteur ne fonctionne pas correctement.
/Il se peut que la puce du micro-ordinateur
fonctionne incorrectement. Débranchez le
cordon d’alimentation et rebranchez-le ensuite
sur la prise pour réinitialiser le lecteur.
Consommation électrique 13 W
Dimensions (approx.) 430 × 189 × 484 mm (17 × 7 1/2 × 19 1/8 in
(l/h/p) pouce) parties saillantes comprises
Masse (approx.) 8,5 kg (18 lbs 12 oz)
Accessoires fournis
Voir page 4.
La conception et les spécifications sont sujettes à modifications
sans préavis.
41
FR
Page 84

Index
Index
A
Advanced Mega Control 27
AMS 19
B
Bloc de suppression 34
C
CD TEXT 15
Changement
mémo de disque 31
mémo de groupe 36
CONTROL A1
D
Déballage 4
Dépannage 41
Détecteur automatique de
musique (AMS) 19
Disque JOG 10
Durée totale de lecture 14
E
Exploration des mémos 17
F
Fichiers personnalisés
bloc de suppression 34
que pouvez-vous en
faire 30
fichier de groupe 35
liste des hits 38
mémo de disque 30
Fondu enchaîné 28
G, H
Groupement de disques 35
I, J, K
Identification d’un disque 30
Introduction des CD 10
L
Lecture
lecture aléatoire 21
lecture continue 12
lecture de groupe 36
lecture programmée 22
lecture répétée 21
lecture simple 18
Lecture aléatoire
de tous les disques 22
d’un disque 22
5
Lecture alternée sans transition
(No-Delay) 29
Lecture alternée enchaînée
(X-Fade) 29
Lecture continue 12
Lecture par
programmateur 26
Liste des hits 38
Localisation
avec l’AMS 19
de disques 16
directe 17
d’un passage
spécifique 19
d’une plage spécifique 19
en contrôlant le son 19
en observant la fenêtre
d’affichage 20
M, N, O
Manipulation des CD 40
Mémo de disque 30
Mémorisation
de plages spécifiques 34
d’informations relatives
aux CD 30
P, Q
Plateau rotatif 10
Programme
modification 23, 25
effacement 23, 25
vérification 23
R
Raccordement 5
d’un autre lecteur CD 9
Raccordement
présentation 4
Recherche. Voir Localisation
Recherche de mémos 16
Répétition 21
S
Sélection de la langue
d’affichage 15
Sélection d’un disque 16
Spécification du disque
suivant 18
Suppression
bloc de suppression 34
fichiers personnalisés 30
liste des hits 39
mémo de disque 31
mémo de groupe 36
mémoire de la
télécommande 9
programmes 23, 25
T, U, V, W, X, Y, Z
Télécommande 4, 6
Nom des commandes
Touches
BACK 37
CAPS 32
CHECK 23, 34
CLEAR 22, 31, 35, 39
CONTINUE 12, 22
DEL 33
DISC 17, 22, 24
DISC SKIP +/– 13
EASY PLAY 18
ENTER 17, 24, 38
GROUP 37
GROUP 1 – 8 35
GROUP FILE 35
HIGH-LIGHT 15
HIT LIST 38
MEGA CONTROL 27
MEMO INPUT ?// 33
MEMO SCAN 17
MEMO SEARCH 16
MENU 7
MENU/NO 6, 15, 28, 30, 35, 39
NO DELAY 29
Numériques 17
PLAYER SELECT 10, 27
PROGRAM 22, 24
REPEAT 21
SHUFFLE 22
SPACE 32
TIME/TEXT 14, 31
TRACK 20
X-FADE 29
YES 6, 31, 35, 36, 39
≠ AMS ± 13
· 13
P 13
p 13
=/+ 19
0/) 19
§ 10
>10 19, 24
+100 16
Commutateurs
TIMER 26
I/u 6
Prises
CONTROL A1 5
LINE OUT 10
2ND CD IN 9
Connecteurs
DIGITAL OUT (OPTICAL) 5
Autres
Disque JOG 10
Fenêtre d’affichage 14
Fenêtre d’affichage de la
télécommande 7
Logements de disque 10
Plateau rotatif 10
Sélecteur
COMMAND MODE 10
Touche de défilement rapide 7
Volet frontal 10
4
Sony Corporation Printed in Malaysia
 Loading...