

Page 1
Compact Disc
Player
3-862-563-21 (1)
Operating Instructions
Mode d’emploi
Manual de instrucciones
EN
F
ES
P
CDP-CX240
CDP-CX220
1998 by Sony Corporation
Page 2
WARNING
To prevent fire or shock
hazard, do not expose the unit
to rain or moisture.
To avoid electrical shock, do
not open the cabinet. Refer
servicing to qualified
personnel only.
The laser component in this product
is capable of emitting radiation
exceeding the limit for Class 1.
This appliance is classified as a CLASS 1
LASER product. The CLASS 1 LASER
PRODUCT MARKING is located on the
rear exterior.
The following caution label is located
inside of the unit.
For the customers in Canada
CAUTION
TO PREVENT ELECTRIC SHOCK,
DO NOT USE THIS POLARIZED AC
PLUG WITH AN EXTENSION
CORD, RECEPTACLE OR OTHER
OUTLET UNLESS THE BLADES
CAN BE FULLY INSERTED TO
PREVENT BLADE EXPOSURE.
Welcome!
Thank you for purchasing the Sony
Compact Disc Player. Before operating
the unit, please read this manual
thoroughly and retain it for future
reference.
About This Manual
The instructions in this manual are for
models CDP-CX240 and CDP-CX220.
The CDP-CX240 is the model used for
illustration purposes.
Any difference in operation is clearly
indicated in the text, for example,
“CDP-CX240 only.”
Conventions
• Instructions in this manual describe
the controls on the player.
You can also use the controls on the
remote if they have the same or
similar names as those on the player.
• The following icons are used in this
manual:
Indicates that you can do the
task using the remote.
WARNING
To prevent shock hazard, do not insert
the plug cut off from the mains lead into
a socket outlet. This plug cannot be used
and should be destroyed.
This equipment is intended for home
entertainment purposes only. The
warranty shall be invalidated if used
in commercial environments, such as
by disc jockeys, etc., even within the
Warranty Period.
Indicates hints and tips for
making the task easier.
EN
2
Page 3

TABLE OF CONTENTS
Getting Started
Unpacking............................................................................................................................ 4
Hooking Up the System..................................................................................................... 4
Connecting Another CD Player (CDP-CX240 only) ...................................................... 6
Inserting CDs....................................................................................................................... 7
Playing a CD......................................................................................................................... 10
Playing CDs
Using the Display ............................................................................................................ 12
Locating a Specific Disc .................................................................................................. 13
Specifying the Next Disc to Play ................................................................................... 15
Locating a Specific Track or a Point in a Track ............................................................ 15
Playing Repeatedly........................................................................................................... 16
Playing in Random Order (Shuffle Play) ...................................................................... 16
Creating Your Own Program (Program Play).............................................................. 17
Playing Using a Timer (CDP-CX240 only) .................................................................... 19
Controlling Another CD Player (Advanced Mega Control) (CDP-CX240 only)..... 20
Fading In or Out (CDP-CX240 only).............................................................................. 21
Playing Alternately (No-Delay Play/X-Fade Play) (CDP-CX240 only) ................... 22
EN
Storing Information About CDs (Custom Files)
What You Can Do With the Custom Files .................................................................... 23
Labeling Discs (Disc Memo)............................................................................................ 23
Storing Custom File Information Using a keyboard (CDP-CX240 only).................. 26
Storing Specific Tracks (Delete Bank) ............................................................................ 26
Grouping Discs (Group File)........................................................................................... 27
Storing Your Favorite Tracks (Hit List) (CDP-CX240 only) ....................................... 28
Additional Information
Precautions ........................................................................................................................ 30
Notes on CDs..................................................................................................................... 30
Troubleshooting ................................................................................................................ 31
Specifications ..................................................................................................................... 31
Index.......................................................................................................................................... 32
EN
3
Page 4
Getting Started
Getting Started
Unpacking
Check that you received the following items:
• Audio cord (1)
• Monaural (2P) mini-plug cord (connecting cord for
CONTROL A1) (1) (supplied for Canadian models
only)
• Remote commander (remote) (1)
• Sony SUM-3 (NS) batteries (2)
• CD booklet holders (2) and label (1)
How to use the CD booklet holder
The CD booklet holder helps you locate the disc easily.
After you have inserted discs into the player, you can put
the CD booklet (which comes with a CD) into the
supplied holder. Put two CD booklets facing back to back
into a pocket. Stick the number label on each pocket,
matching the number of the disc slot where you have
inserted the disc. You can put up to 200 CD booklets into
the holders.
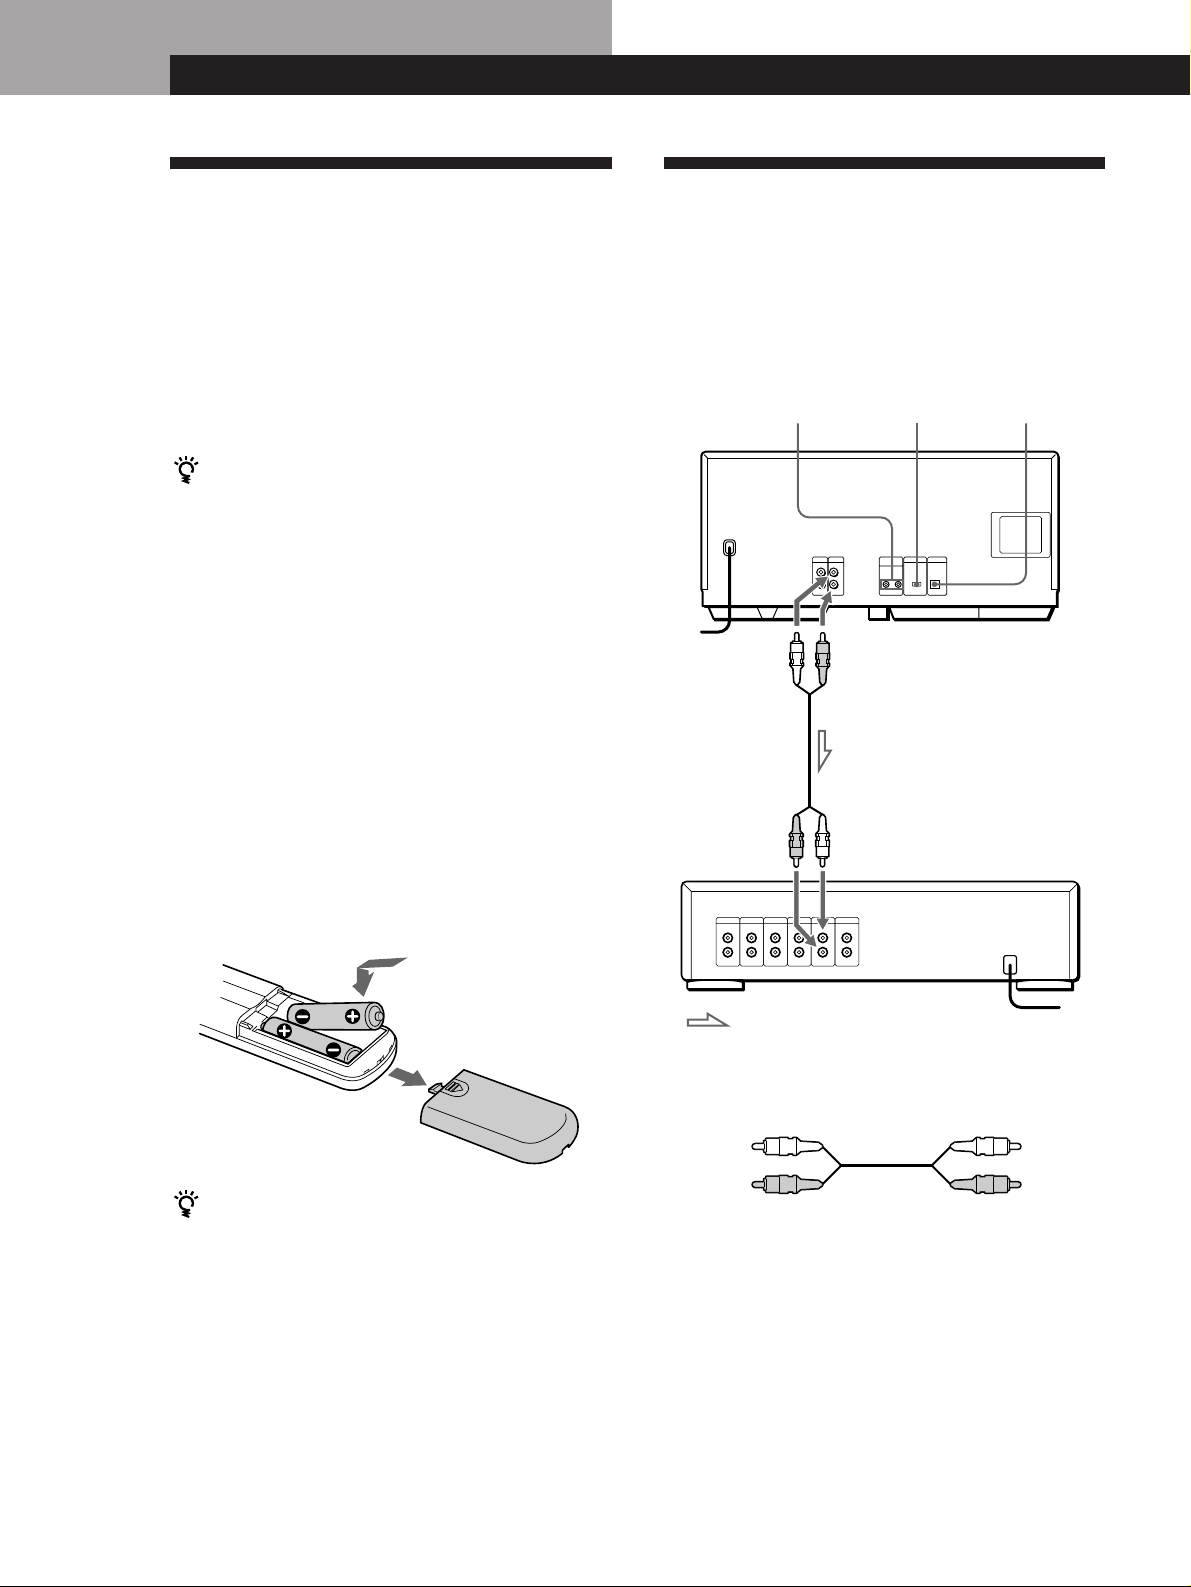
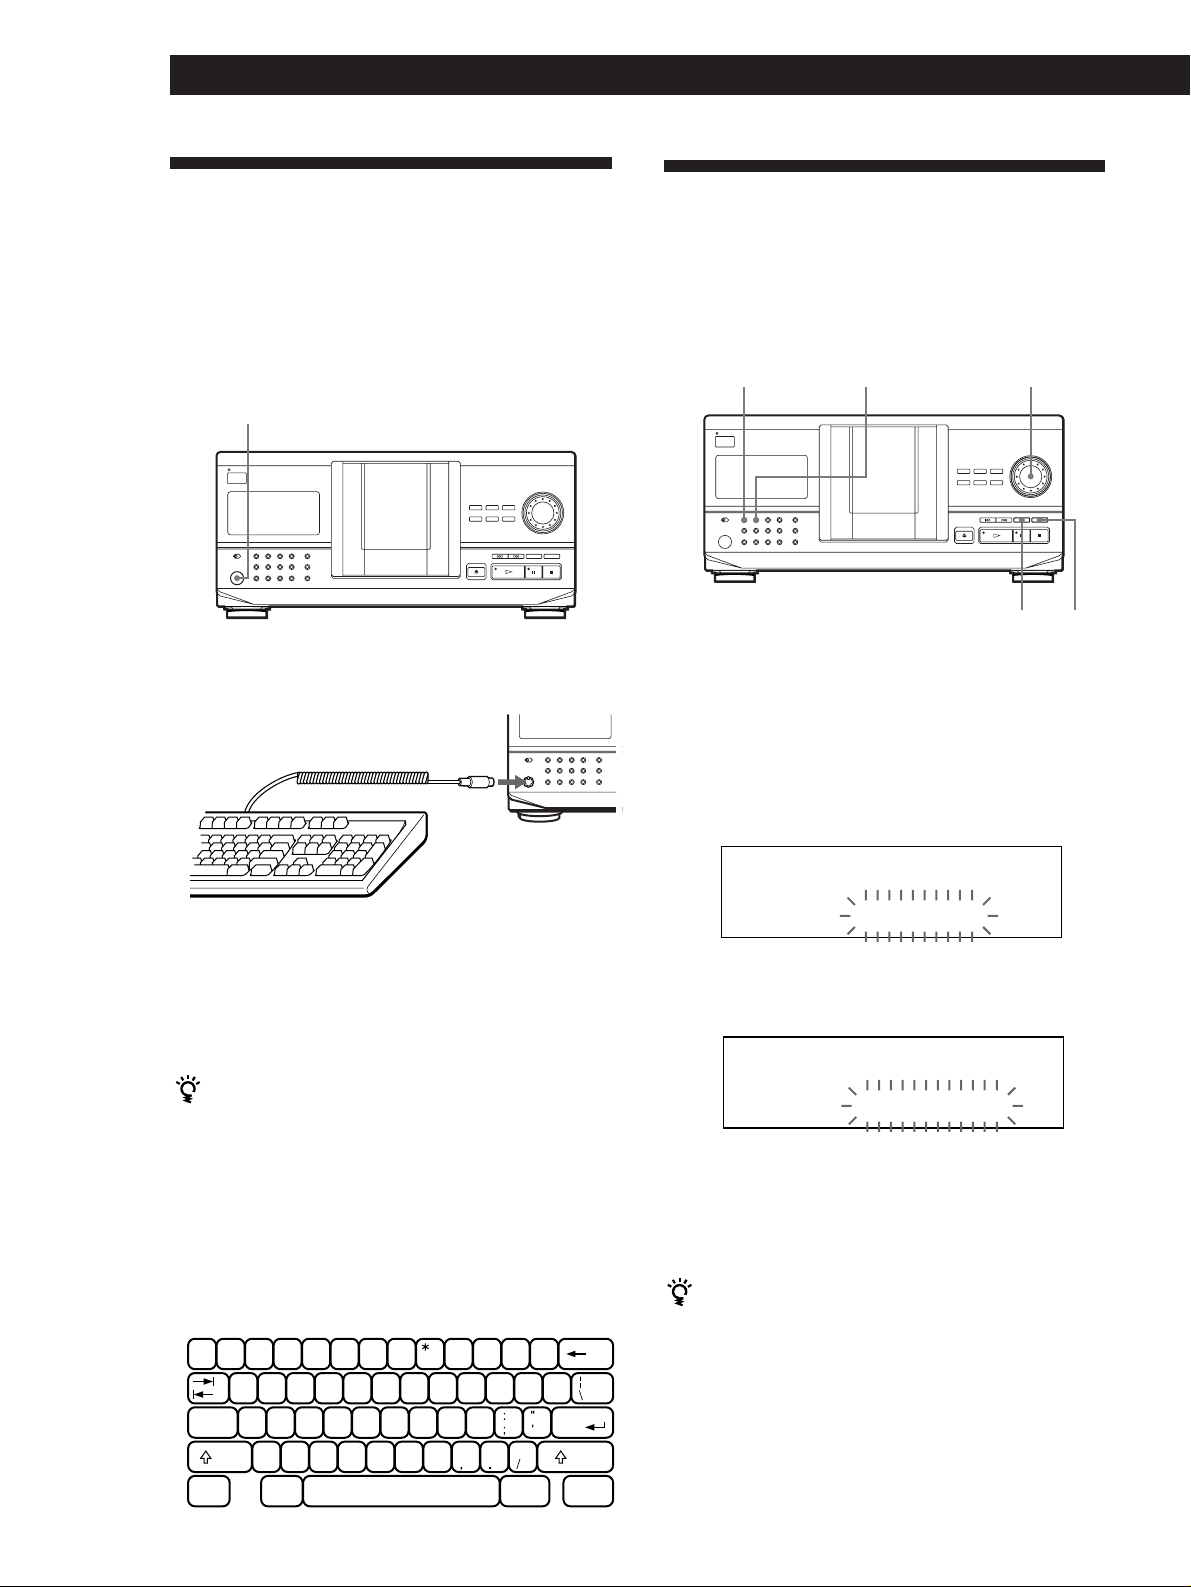
Inserting batteries into the remote
You can control the player using the supplied remote.
Insert two size AA (R6) batteries by matching the +
and – on the batteries to the diagram inside the battery
compartment.
Insert the negative (–) end first, then push in and down
until the positive (+) end clicks into position.
When using the remote, point it at the remote sensor g
on the player.
Hooking Up the System
Overview
This section describes how to hook up the CD player to
an amplifier. Be sure to turn off the power of each
component before making the connections.
S-LINK/
CONTROL A1
To an AC outlet
To line output (L)
To audio input
COMMAND
MODE
To line output (R)
DIGITAL OUT
(OPTICAL)
CD player
Amplifier
: Signal flow
To an AC outlet
What cords will I need?
Audio cord (1) (supplied)
When to replace batteries
With normal use, the batteries should last for about six
months. When the remote no longer operates the player,
replace all the batteries with new ones.
White
(L)
Red
(R)
White
(L)
Red
(R)
Notes
• Do not leave the remote near an extremely hot or humid
place.
• Do not drop any foreign object into the remote casing,
particularly when replacing the batteries.
• Do not expose the remote sensor to direct sunlight or
lighting apparatuses. Doing so may cause a malfunction.
• If you do not use the remote for an extended period of time,
remove the batteries to avoid possible damage from battery
EN
4
leakage and corrosion.
Page 5
Getting Started
Playing CDsGetting Started
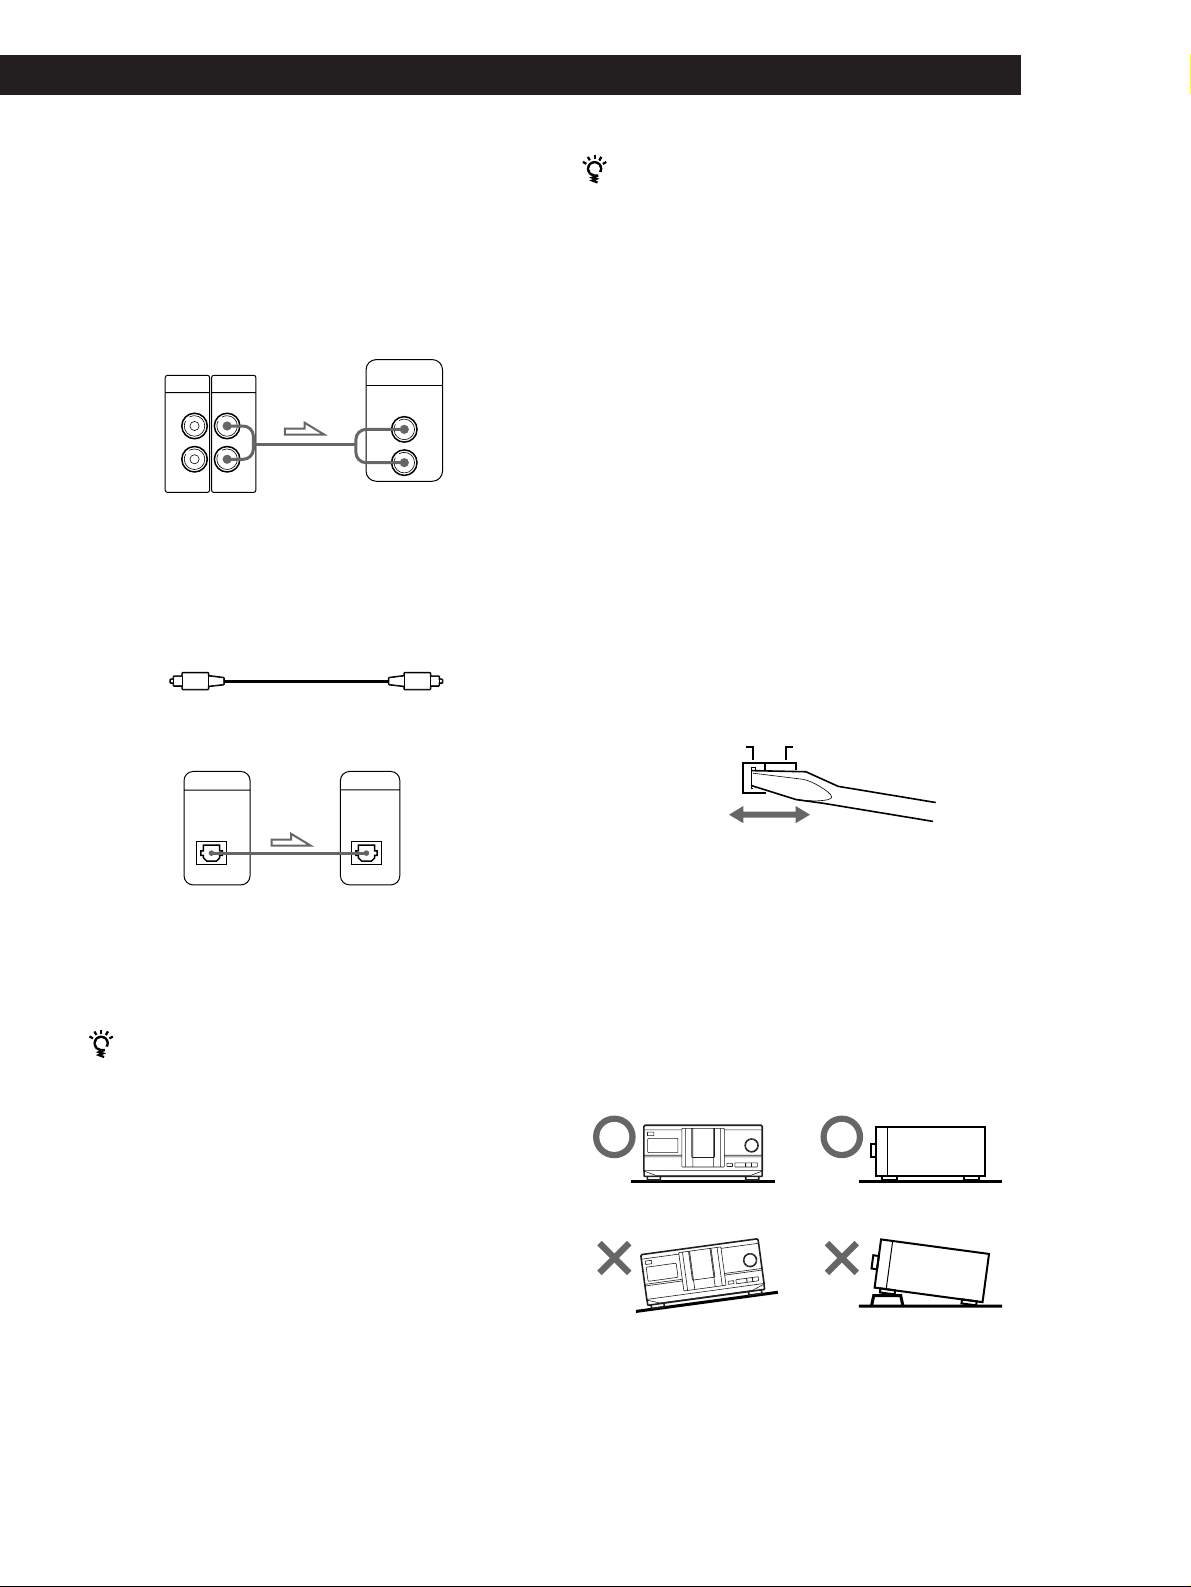
Hookups
When connecting the audio cord, be sure to match the
color-coded cord to the appropriate jacks on the
components: Red (right) to Red and White (left) to
White. Be sure to make connections firmly to avoid
hum and noise.
CD player
LINE2ND CD
IN OUT
L
R
L
R
• If you have a digital component such as a digital
amplifier, D/A converter, DAT or MD
Connect the component via the DIGITAL OUT (OPTICAL)
connector using an optical cable (not supplied). Take off the
cap and plug in the optical cable.
POC-15
Optical cable (not supplied)
Amplifier
INPUT
CD
L
R
When using another Sony CD player together with
this player
You can make the supplied remote effective only for this
player.
• When using the player equipped with the
COMMAND MODE selector:
Set the COMMAND MODE selector of this player to
CD 1 and that of another player to CD 2 or CD 3. Then
set the CD 1/2/3 switch on the remote supplied for
each player accordingly.
• When using the player not equipped with the
COMMAND MODE selector:
The command mode of the player without the
COMMAND MODE selector is set to CD 1. Set the
COMMAND MODE selector of this player to CD 2,
and set the CD 1/2/3 switch on the remote to CD 2.
Setting the voltage selector (voltage
selector equipped models only)
Check that the voltage selector on the rear panel of the
player is set to the local power line voltage. If not, set
the selector to the correct position using a screwdriver
before connecting the AC power cord to a wall outlet.
CD player
DIGITAL OUT
OPTICAL
Digital component
DIGITAL INPUT
OPTICAL
Note
When you connect via the DIGITAL OUT (OPTICAL)
connector, noise may occur when you play CD software
other than music, such as a CD-ROM.
If you have a Sony component with the CONTROL A1
jack
Connect the component via the CONTROL A1 jack. You
can simplify the operation of audio systems composed of
separate Sony components. For details, refer to the
supplementary “S-LinkTM/CONTROL-A1 Control
System” instructions.
220 - 240 V110 - 120 V
Connecting the AC power cord
Connect the AC power cord to a wall outlet.
Note on placement
Be sure to place the player on a horizontal place.
If the player is slanted, it may cause malfunction or
damage the player.
EN
5
Page 6

Getting Started
Connecting Another CD Player
(CDP-CX240 only)
If you have a Sony CD player equipped with the
CONTROL A1 jack and the command mode of that
player can be set to CD 3, you can control that player as
the second player with this unit. After connecting this
unit and an amplifier, follow the procedure below.
Be sure to turn off the power of each player before
making this connection.
To LINE OUT
COMMAND
MODE
CDP-CX240
What cords will I need?
• Audio cord (1) (Use the cord supplied with the player to be
connected.)
• Monaural (2P) mini-plug cord (1) (supplied for Canadian
models only)
1 Connect the players with an audio cord (see also
“Hookups” on page 5).
CDP-CX240
LINE2ND CD
IN OUT
L
R
L
R
CDP-CX200, etc.
LINE OUT
L
R
2 Connect the players with a monaural (2P) mini-
plug cord.
To an AC outlet
To 2ND CD IN
To audio output
To an AC outlet
To S-LINK/CONTROL A1
To CONTROL A1
To audio input
CDP-CX200, etc.
Amplifier
CDP-CX240
S-LINK
CONTROL A1
CDP-CX200, etc.
CONTROL A1
For details on this connection, refer to the
supplementary “S-Link
TM
/CONTROL-A1 Control
System” instructions.
3 Set the COMMAND MODE selector of each
player.
Set the COMMAND MODE selector of this player
to CD 1 or CD 2, and set that of the second player
to CD 3.
COMMAND MODE
CD
132
For details on how to operate the second player,
see “Controlling Another CD Player” on page 20
and “Playing Alternately” on page 22.
4 Connect the AC power cord of both players to AC
outlets.
: Signal flow
EN
6
To an AC outlet
Notes
• Do not connect a player other than that you use as the
second player to the 2ND CD IN jacks of this player.
• When connecting a second CD player, do not connect the
DIGITAL OUT (OPTICAL) connector of this unit to the
amplifier.
Page 7
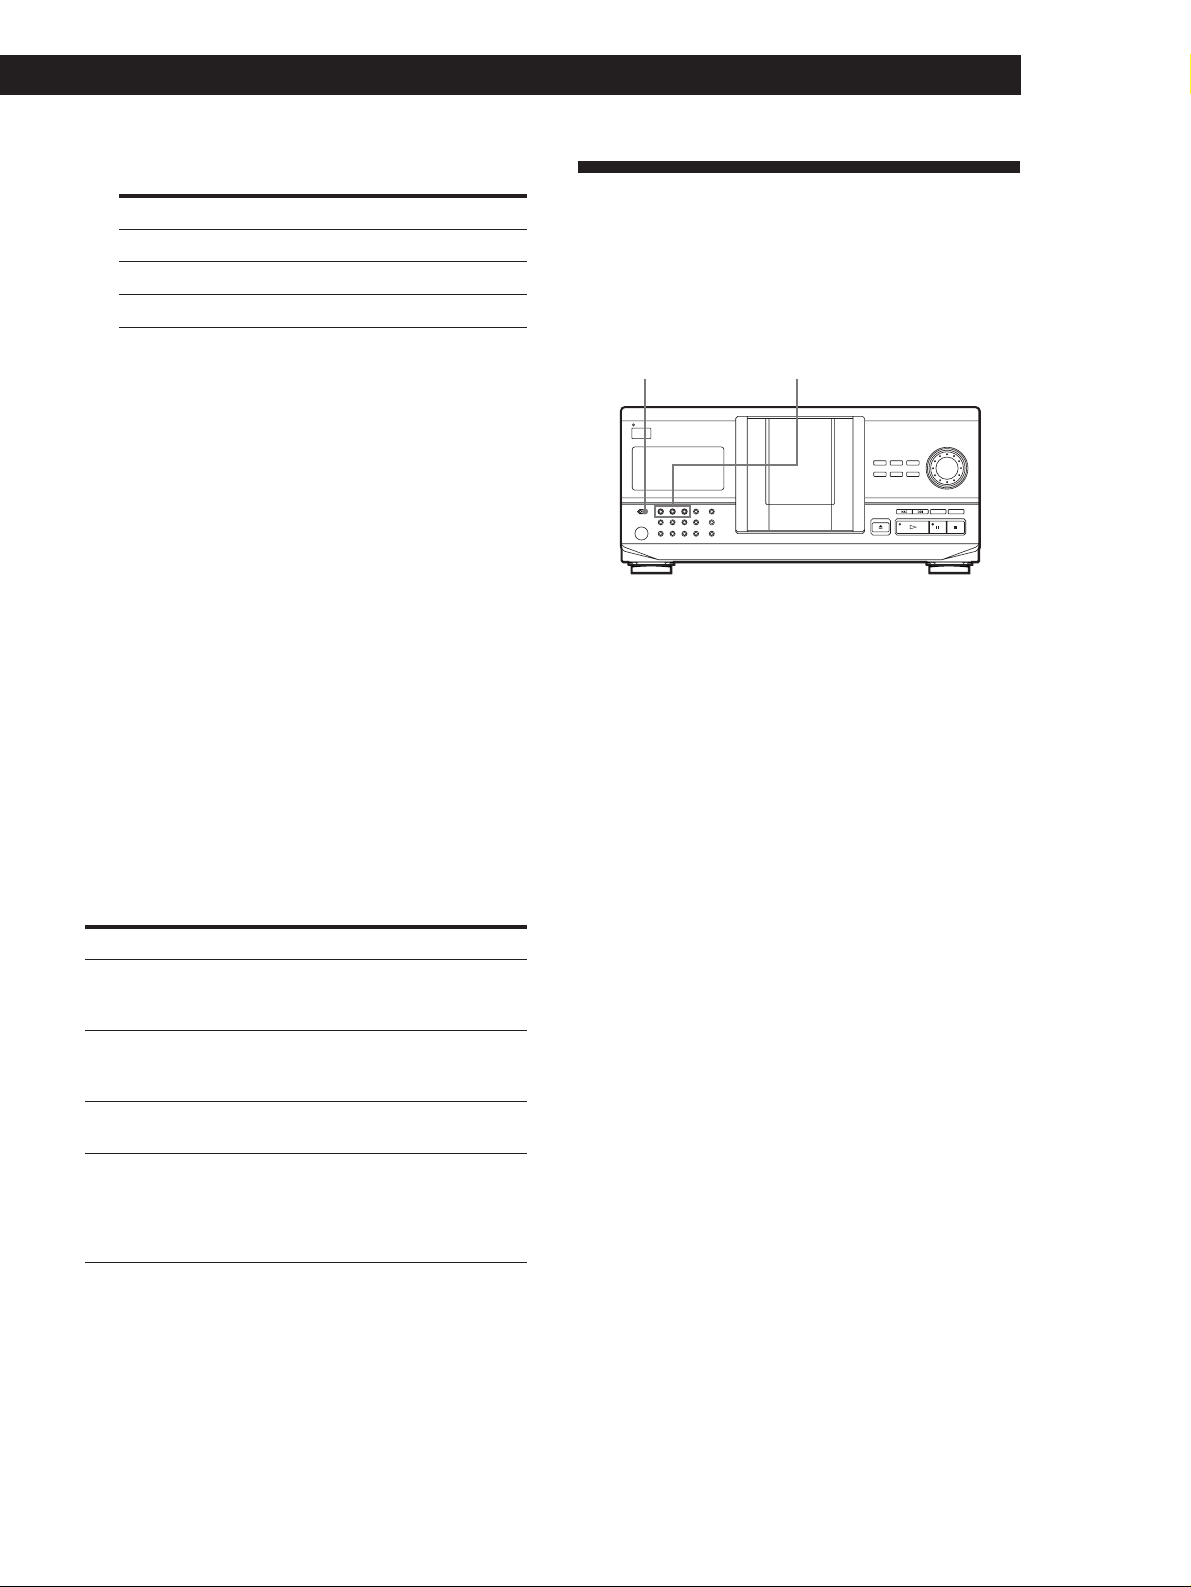
Inserting CDs
You can insert up to 200 discs into this player.
Getting Started
Playing CDsGetting Started
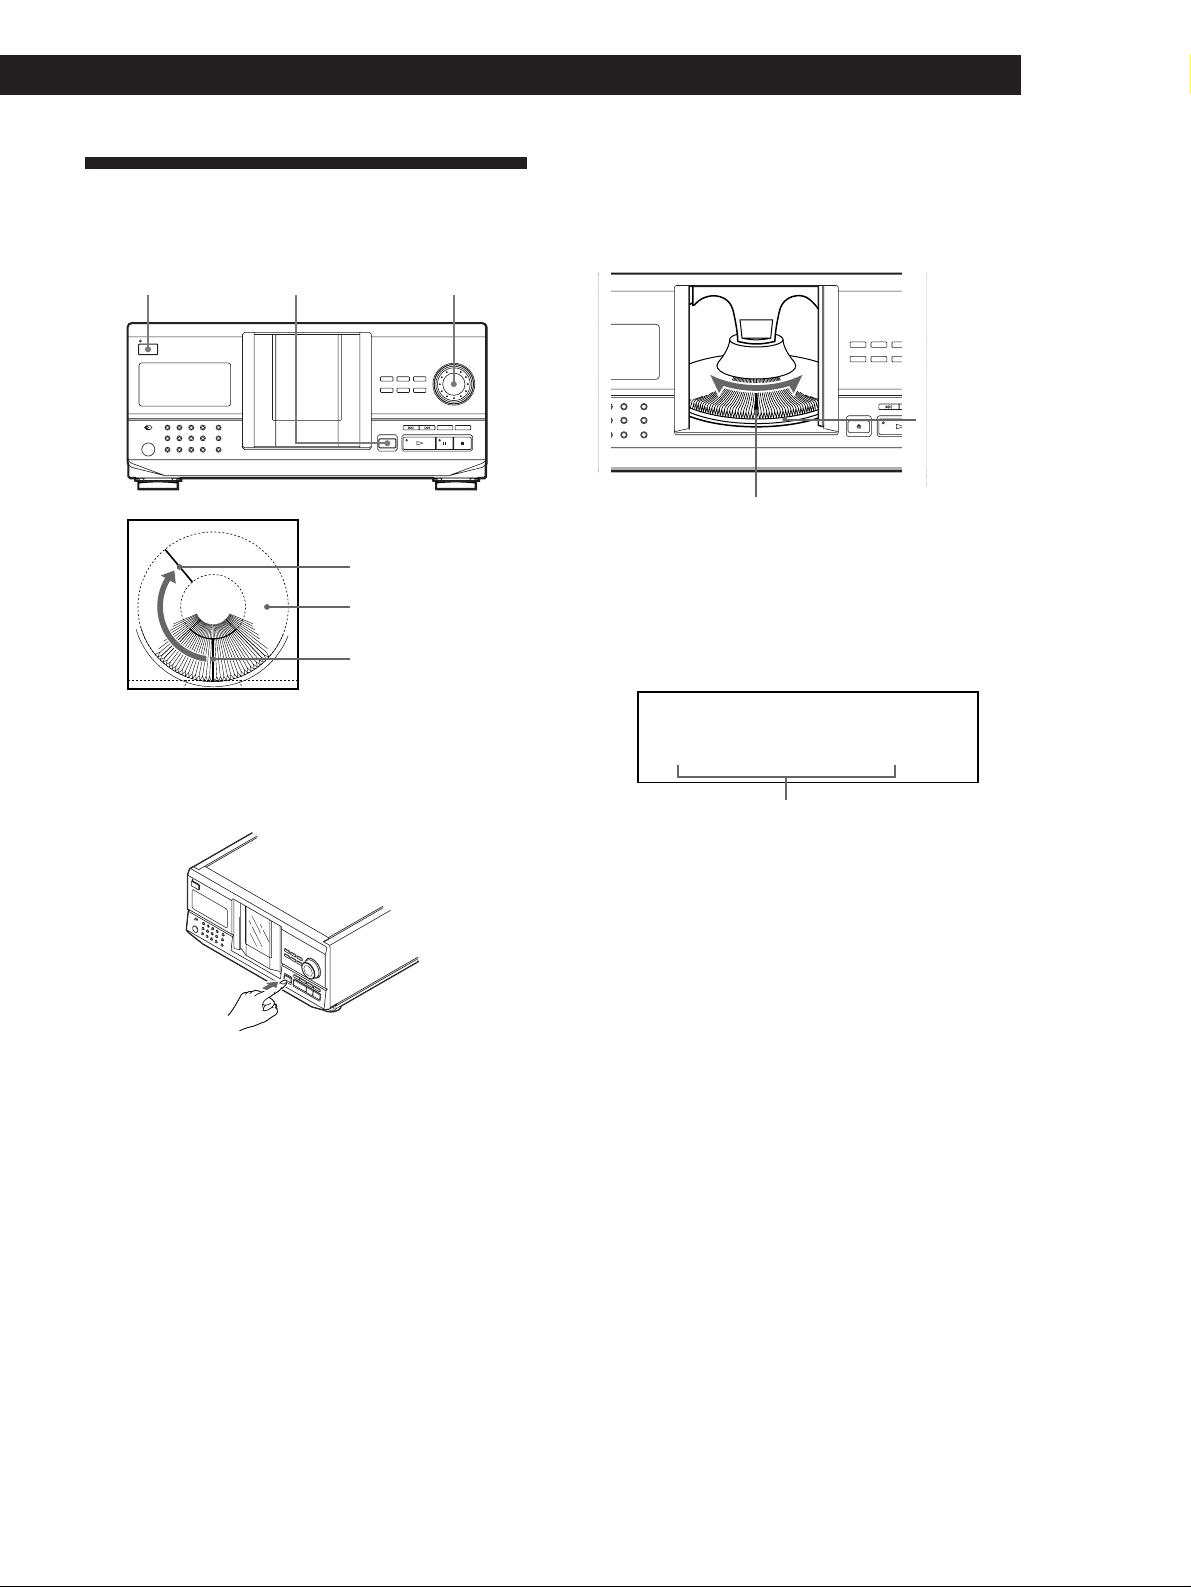
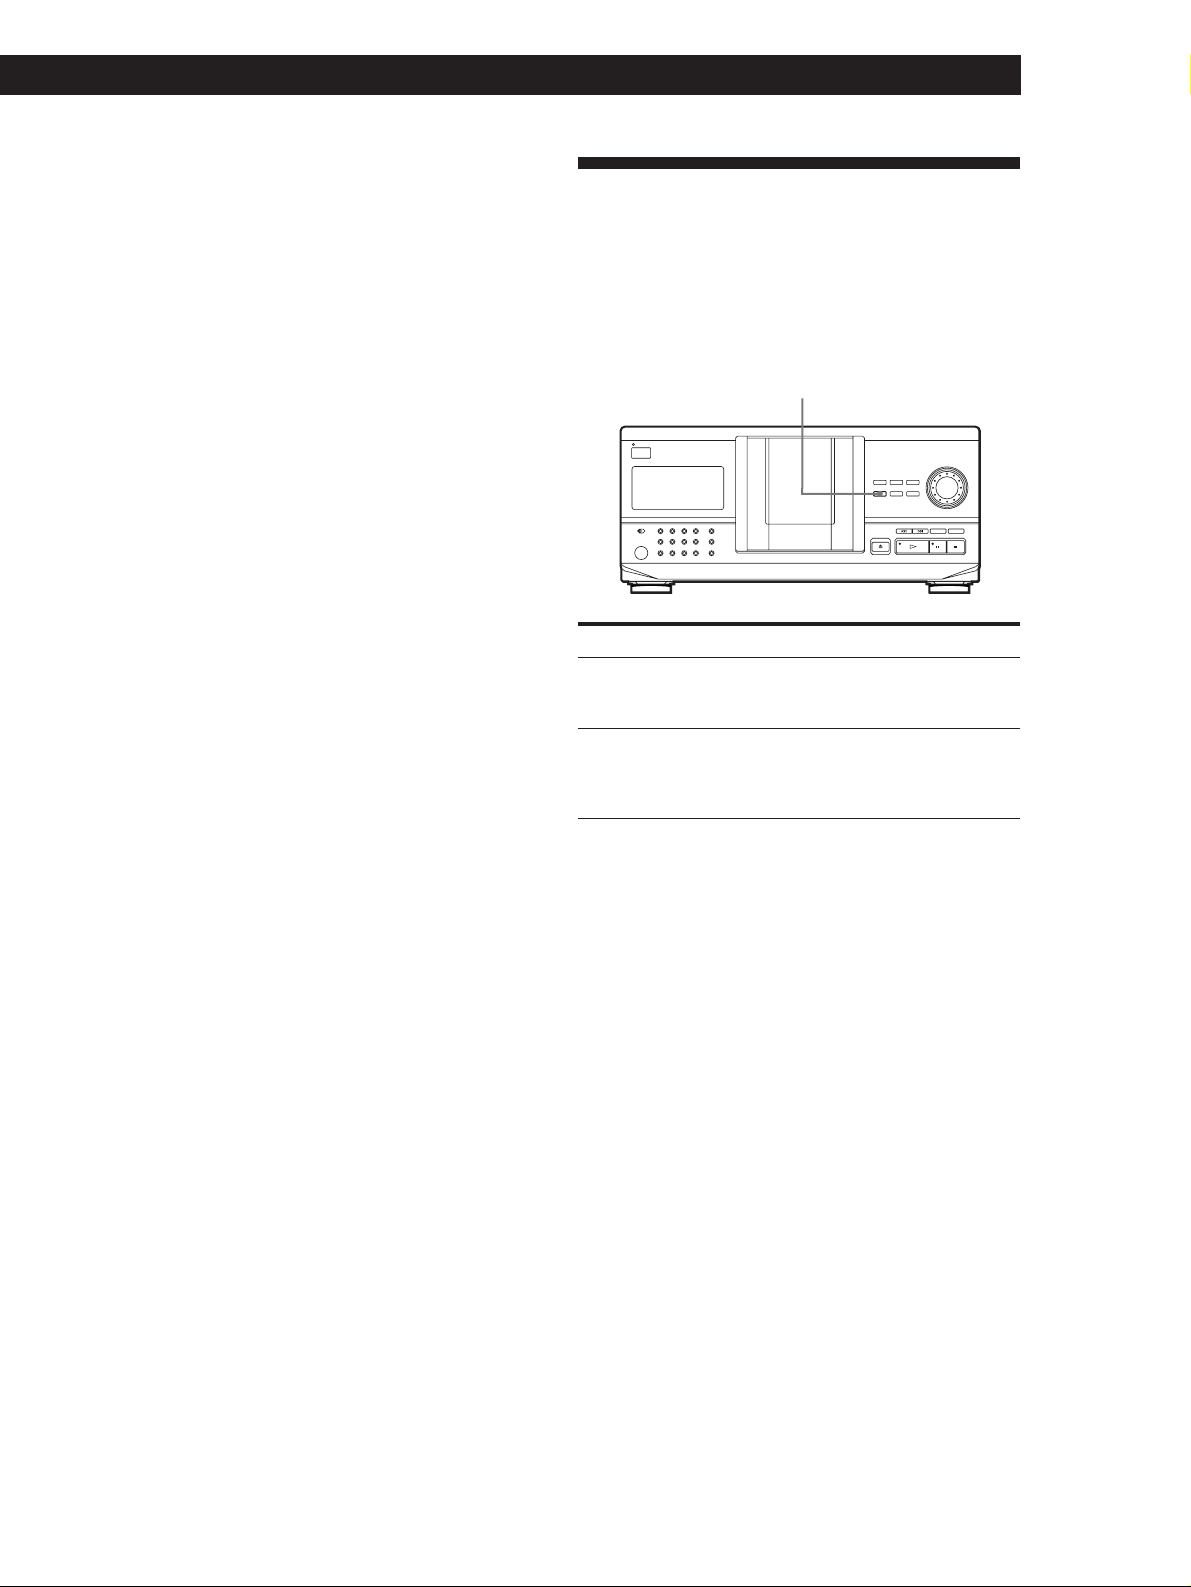
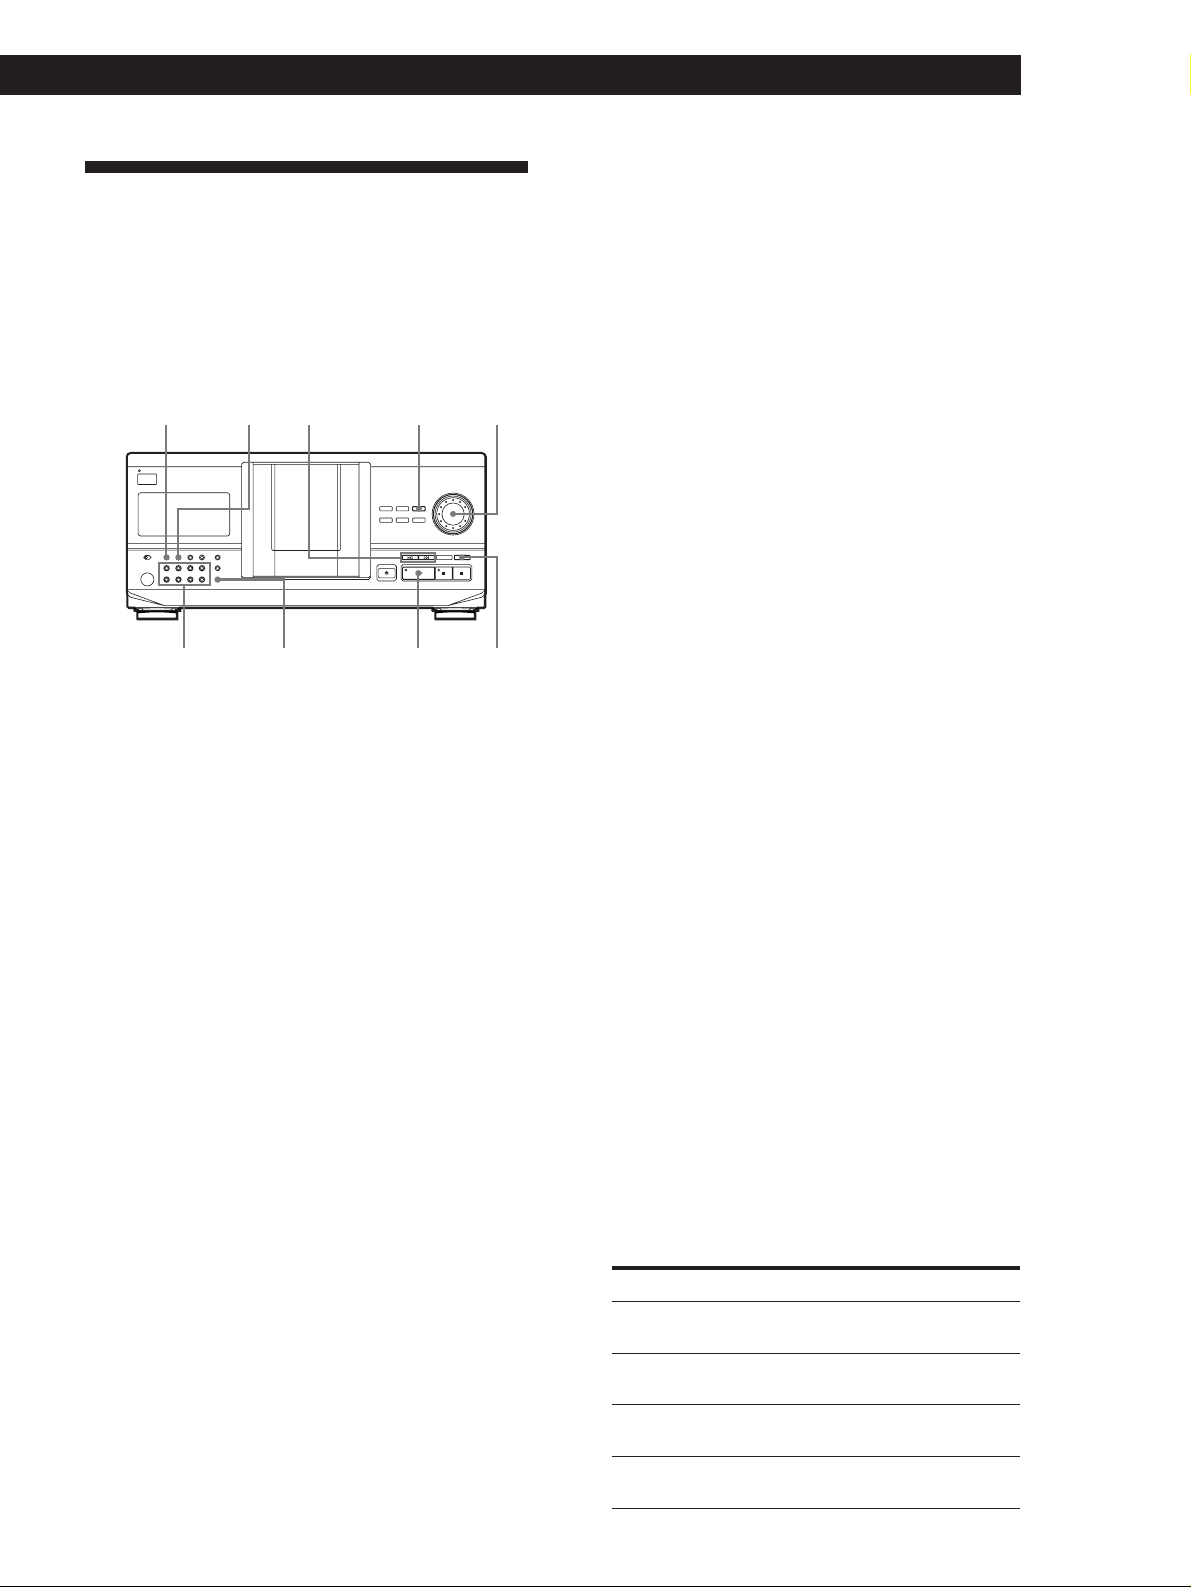
3 Turn the JOG dial until you find the disc slot
where you want to insert a disc, while checking the
disc number (written beside every slot and also
indicated in the display).
I/u
§ OPEN/CLOSE
Playing position
Rotary table
Loading position
JOG
1 Press I/u to turn on the player.
2 Open the front cover by pressing § OPEN/
CLOSE.
Disc number
Disc slot at the loading position
The disc number at the loading position appears in
the display.* If the disc has the Disc Memo (see
page 23), the Disc Memo appears instead of the
disc number. As you turn the JOG dial, the disc
number or the Disc Memo changes.
ALL
DISCS
CD1
DISC
02
*DISC-20*
Disc number or the Disc Memo
You can classify discs into eight groups by using
the Group File function. This feature lets you easily
find the disc you want to play. For details, see
“Grouping Discs” on page 27.
* If you have already inserted discs, the disc number at
the playing position appears. When you turn the JOG
dial, the displayed disc number changes to the one at
the loading position.
(Continued)
EN
7
Page 8
Getting Started
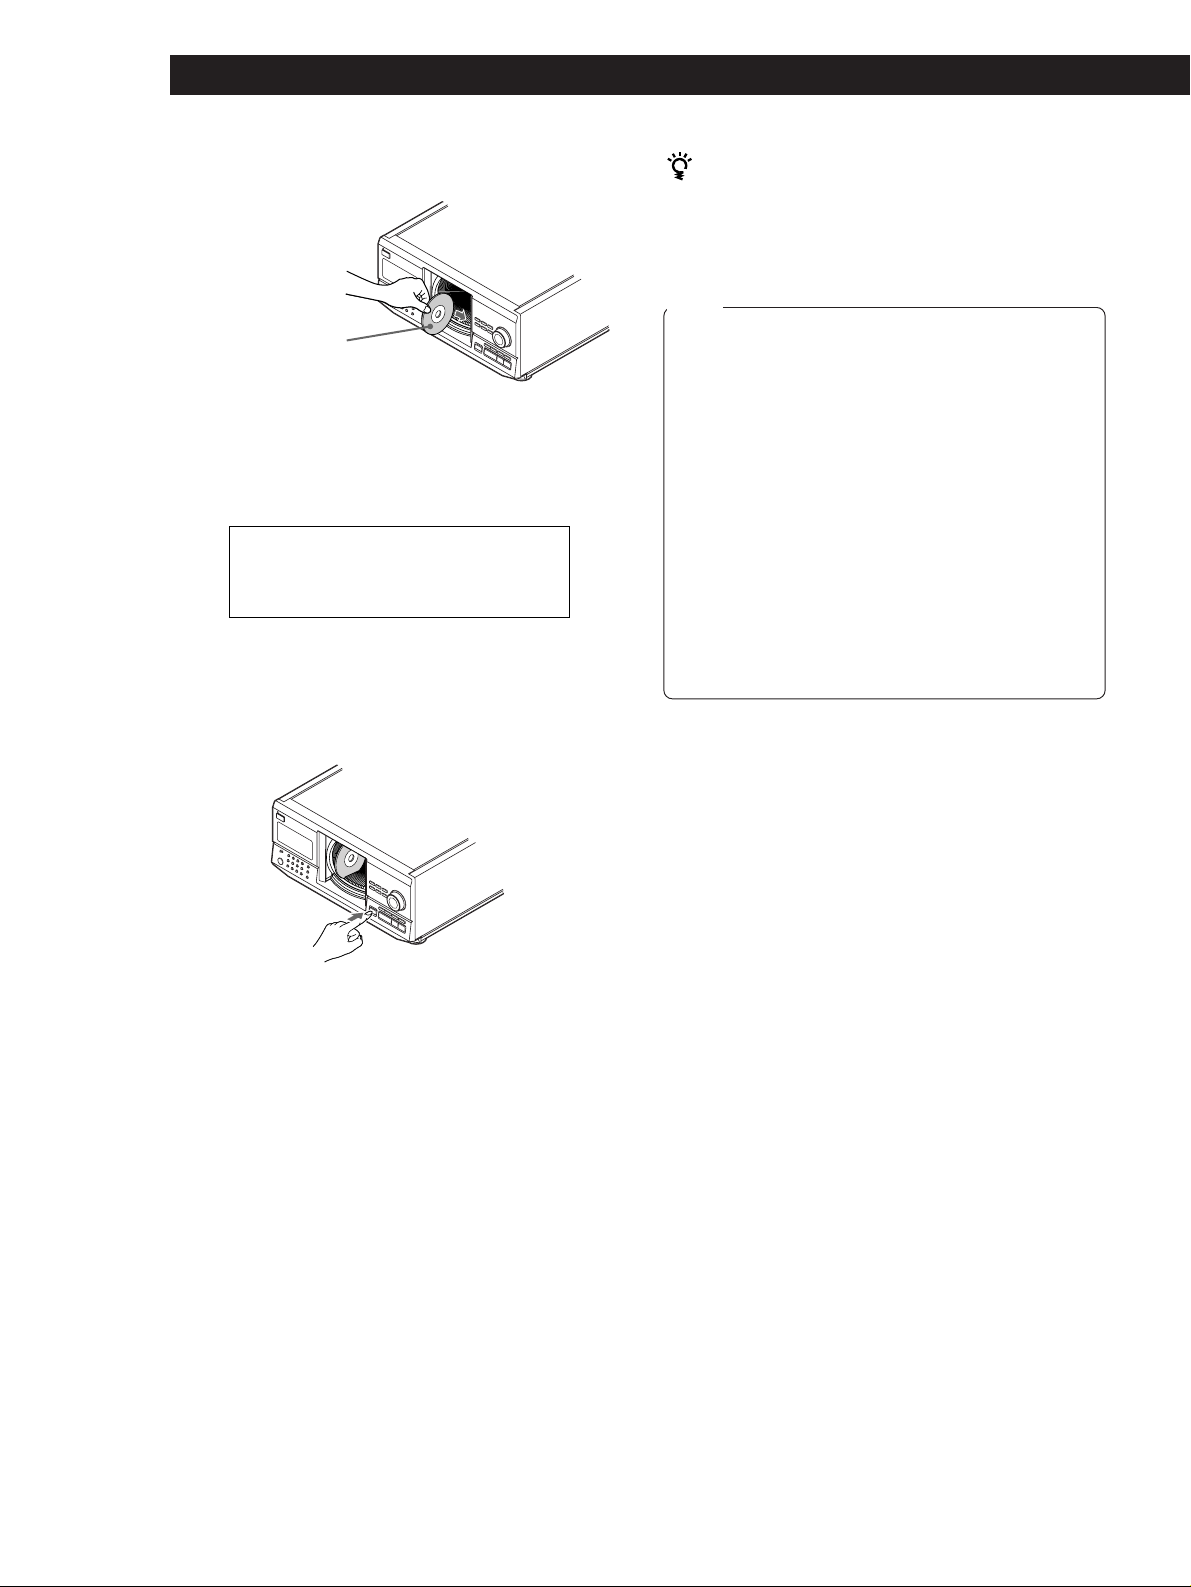
4 Insert a disc with the label side facing right.
With the label side
facing right
After inserting the disc, you can input the original
disc titles instead of the disc numbers (see
“Labeling Discs” on page 23) to locate it easily
when you start playing.
ALL DISCS
CD1
DISC
20
SONYHITS
5 Repeat Steps 3 and 4 to insert more discs.
6 Close the front cover by pressing § OPEN/
CLOSE.
The supplied CD booklet holders help you locate a
disc
You can store up to 200 CD booklets. Insert a booklet and
stick the number label on the film of a pocket and the
booklet so that you can locate the disc easily.
Notes
• Do not insert an empty 8 cm (3-inch) CD adaptor (CSA-8). It
may damage the player.
• Do not attach anything such as seals or sleeves to CDs. It
may damage the player or the disc.
• If you drop a disc into the player and the CD won’t go
into the slot correctly, consult your nearest Sony dealer.
• When transporting the player, remove all discs from the
player.
• Make sure you have inserted the disc into each slot at a
right angle to the rotary table. If the disc is not put in
straight, it may damage the player or the disc.
• Make sure the rotary table comes to a complete stop
before inserting or removing discs.
The front panel closes automatically when you press
·. Be careful not to put your hand into the player after
pressing · otherwise your hand may be caught in the
front panel.
The rotary table turns and the disc slot at the
loading position is set to the playing position.
Always close the front cover except when you
insert or remove discs.
EN
8
Page 9

Removing CDs
After following Steps 1 to 3 of “Inserting CDs” on page
7, remove the discs. Then close the front cover.
Getting Started
Playing CDsGetting Started
EN
9
Page 10
Basic Operations
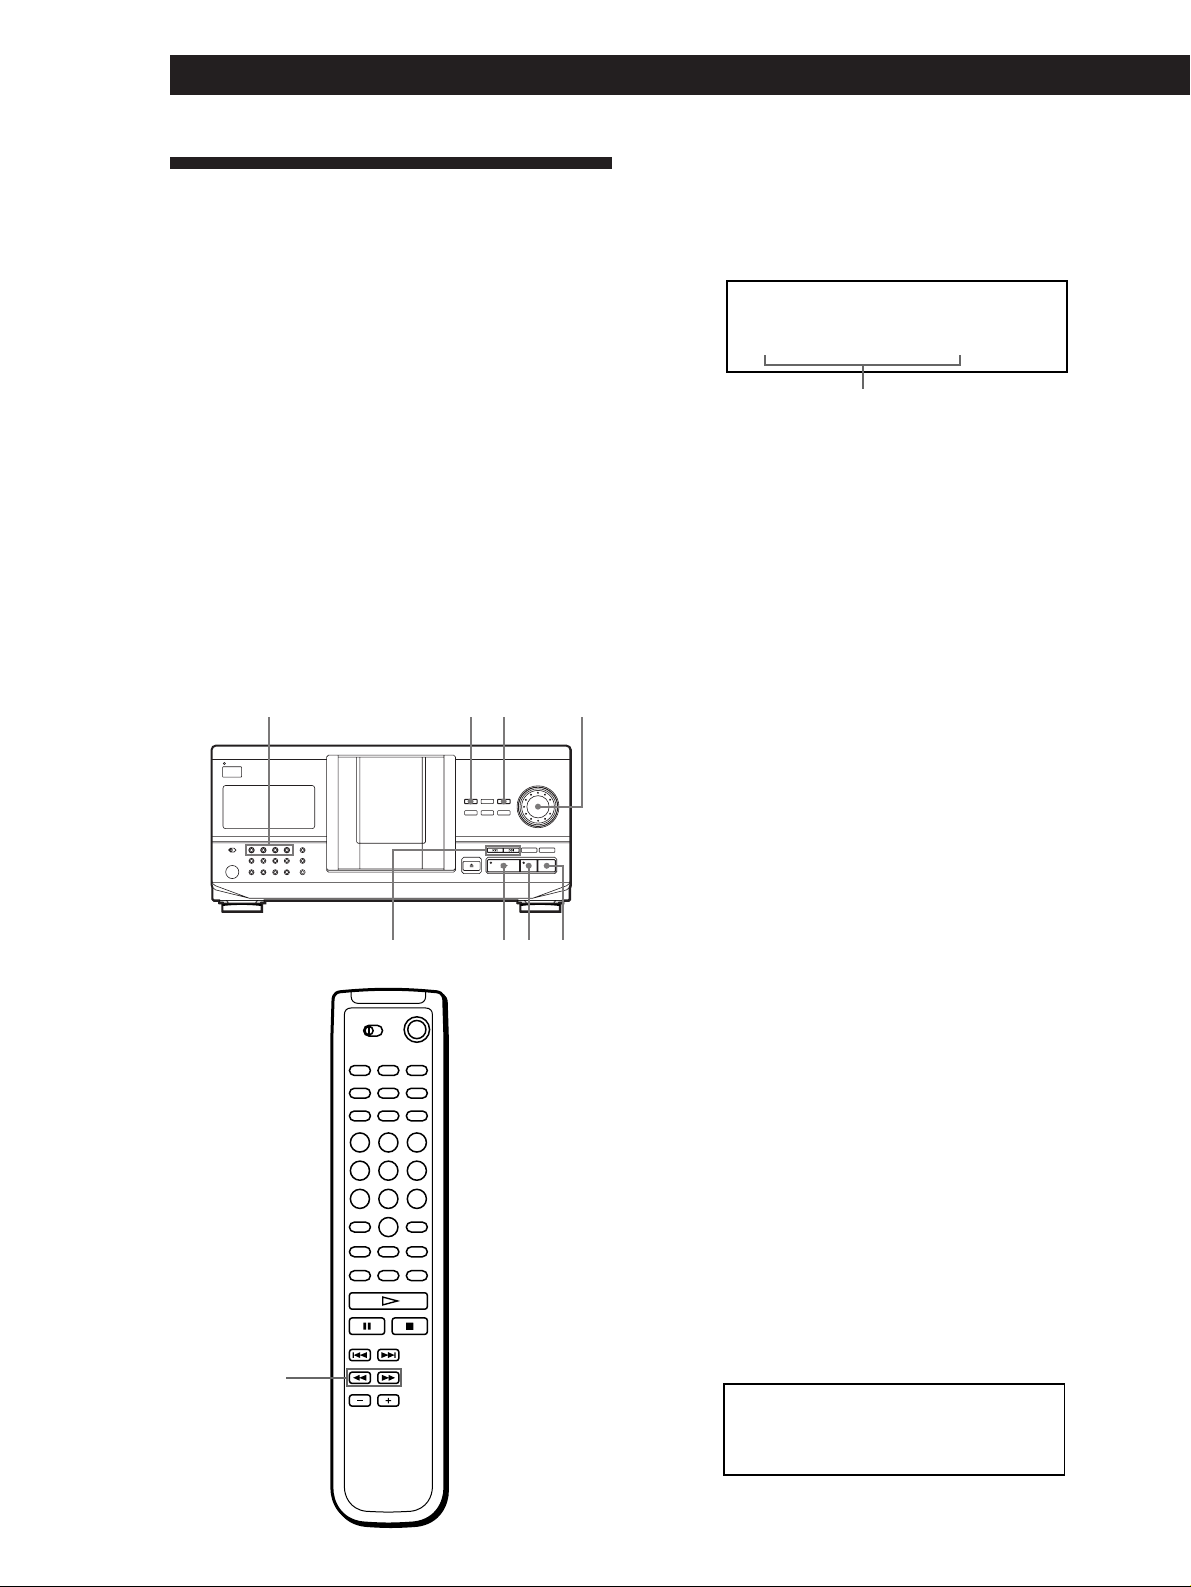
Playing a CD
23
STANDBY
I / u
CONTINUE
TIMER
OFF PLAY
GROUP 1
KEY BOARD
GROUP 5
KEYBOARD
• See pages 4 – 5 for the hookup
information.
• Make sure you have inserted the
discs correctly as indicated on
pages 7 – 8.
• You can play all the tracks on a
disc in the original order
(Continuous Play). You can also
play up to 200 discs
consecutively.
You can turn on the player
by pressing I/u on the
remote Z
SHUFFLE
GROUP 2
GROUP 6
PROGRAM
GROUP 3
GROUP 7
REPEAT
GROUP 4
GROUP 8
X-FADE
4/5
INPUT
MEMO SEARCH
AMS
DISC/CHARACTER
PUSH ENTER
CHECK CLEAR
TIME/TEXT
HIT LIST
GROUP FILE
5
MEGA CONTROL
FADER NO DELAY
OPEN/CLOSE
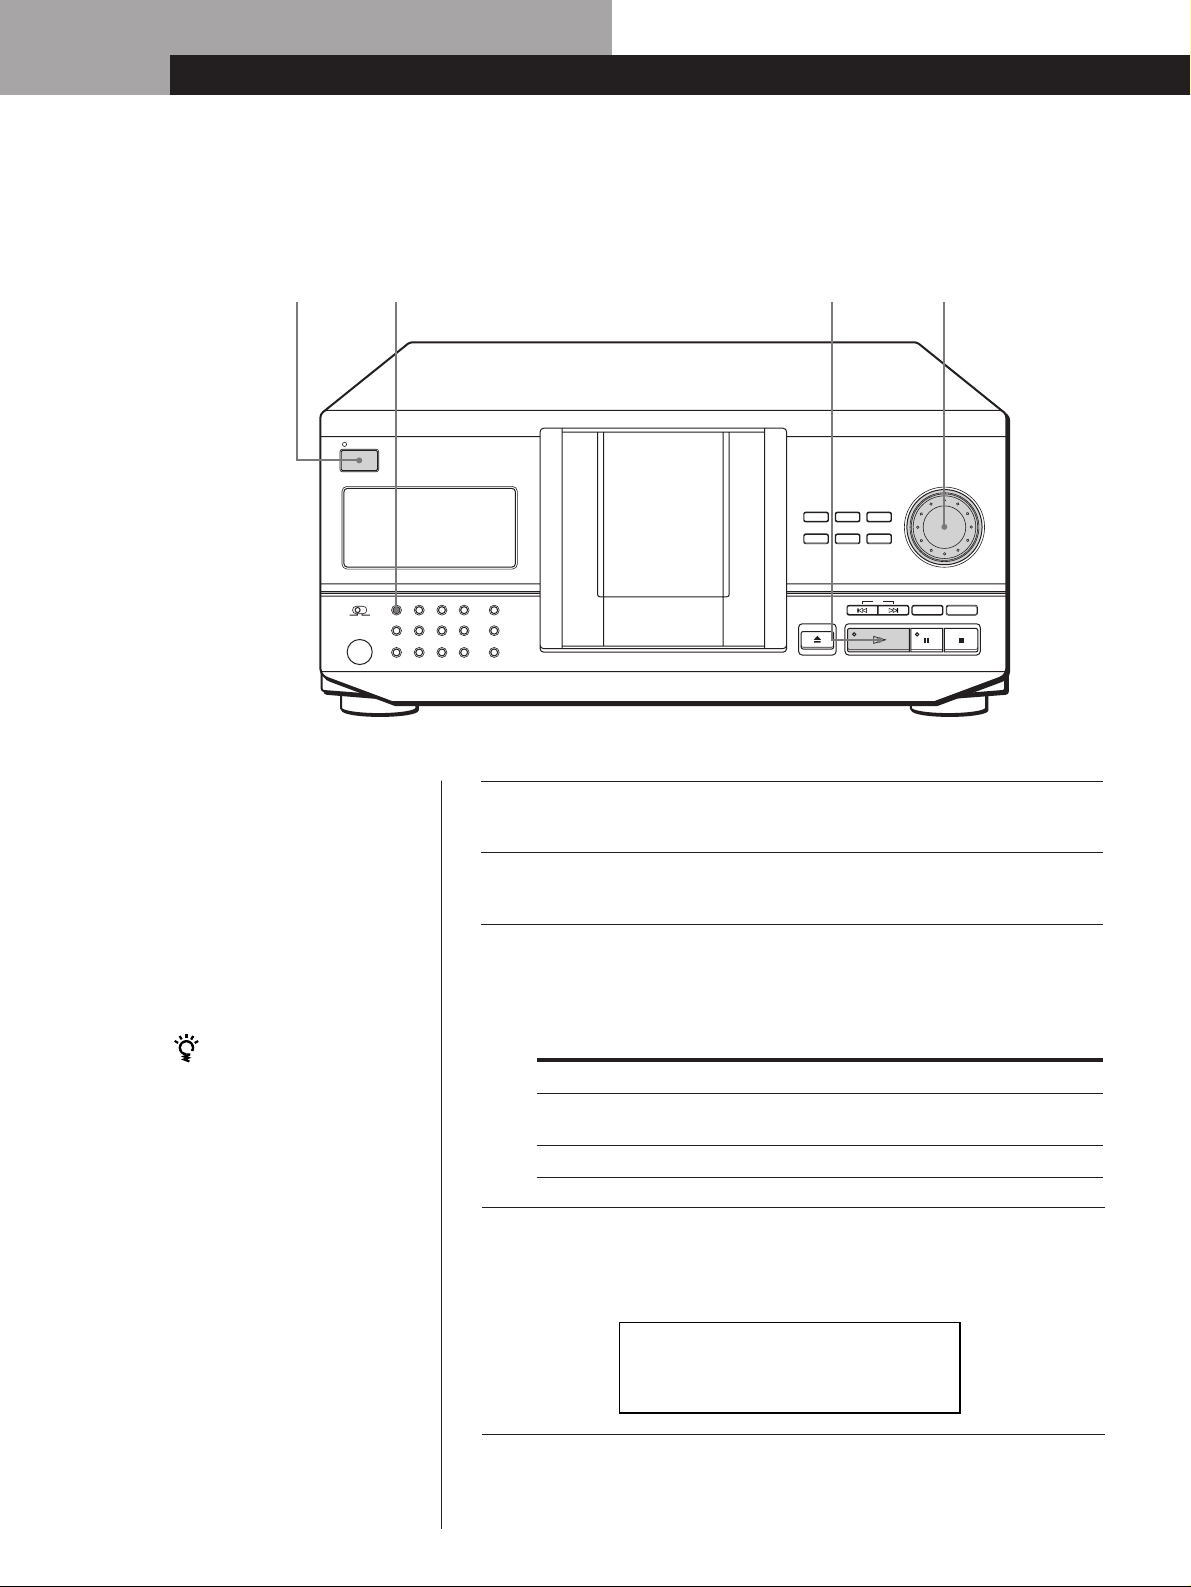
Turn on the amplifier and select the CD player position.
1
Press I/u to turn on the player.
2
Press CONTINUE to select ALL DISCS or 1 DISC Continuous
Play mode.
3
Each time you press CONTINUE, “ALL DISCS” or “1 DISC”
appears in the display.
When you select
ALL DISCS
1 DISC
The player plays
All discs in the player consecutively in the order of
disc number. Empty disc slots are skipped.
Only one disc you have selected
10
EN
Turn the JOG dial until the disc number or the Disc Memo (see
page 23) you want appears in the display to select the first disc
4
(ALL DISCS) or the disc you want (1 DISC).
ALL DISCS
CD1
DISC
20
*DISC-20*
Page 11
Basic Operations
Basic Operations
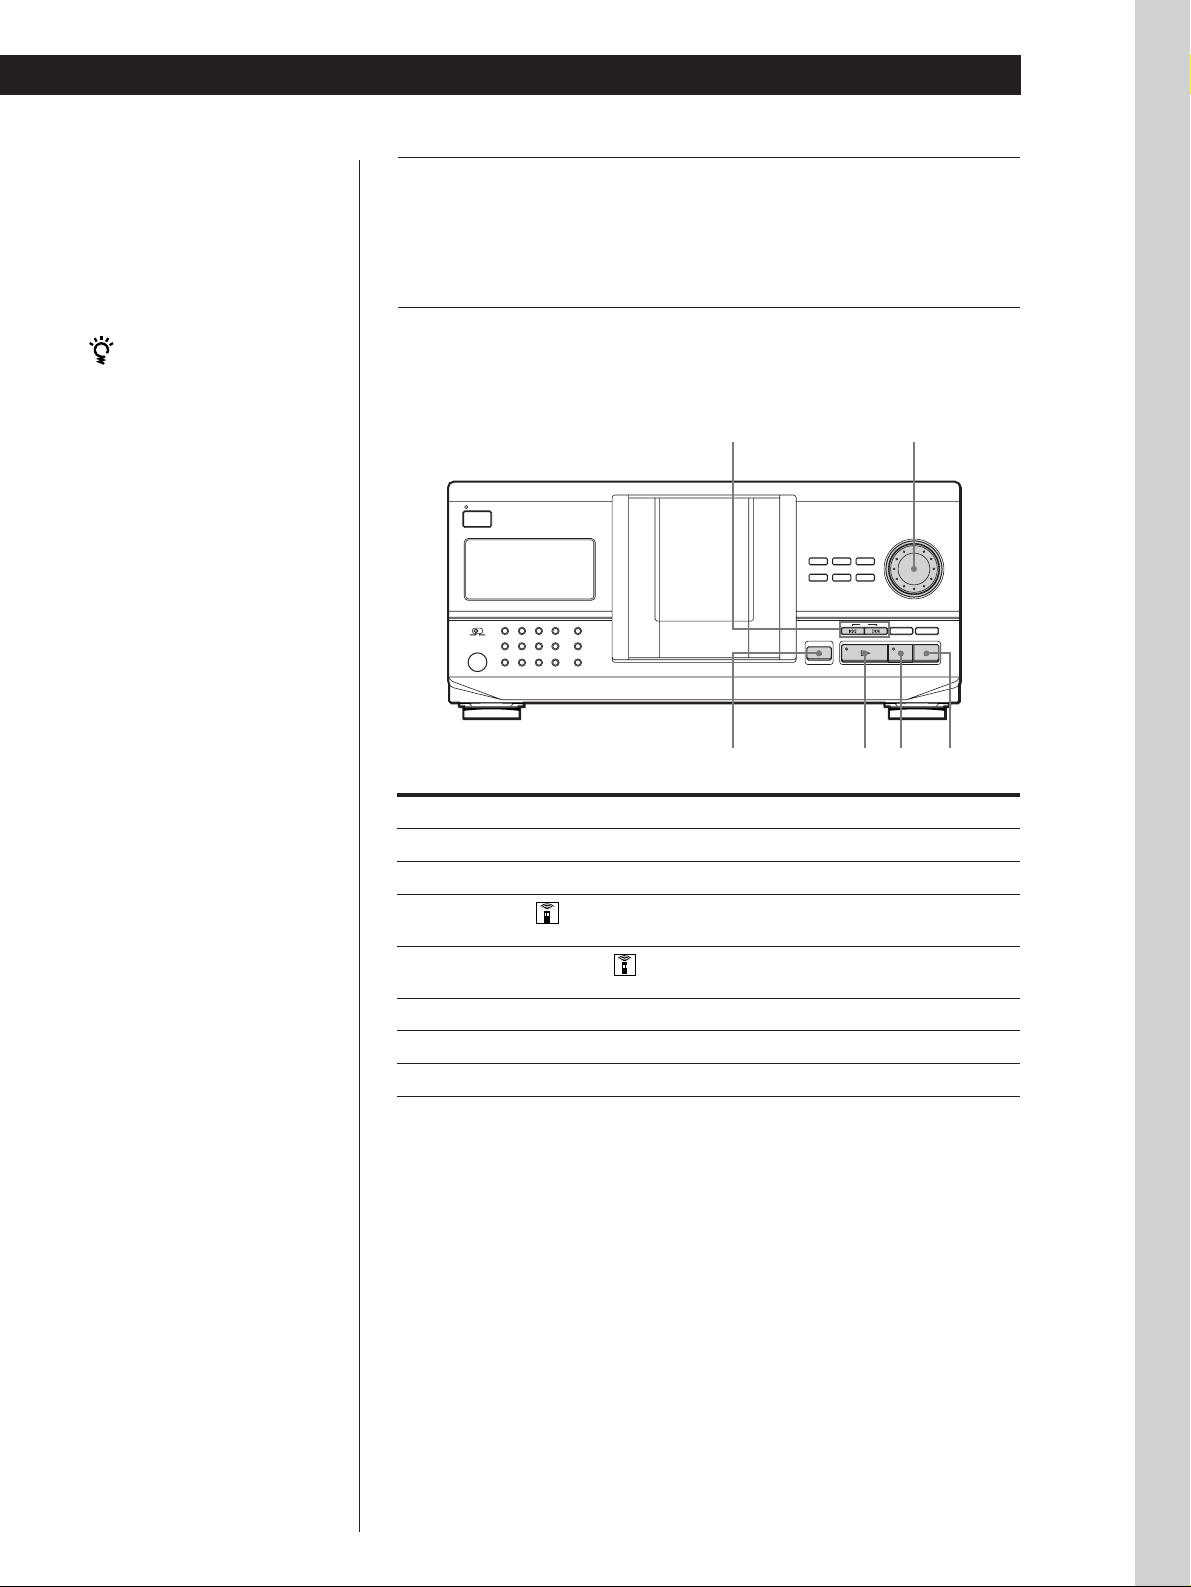
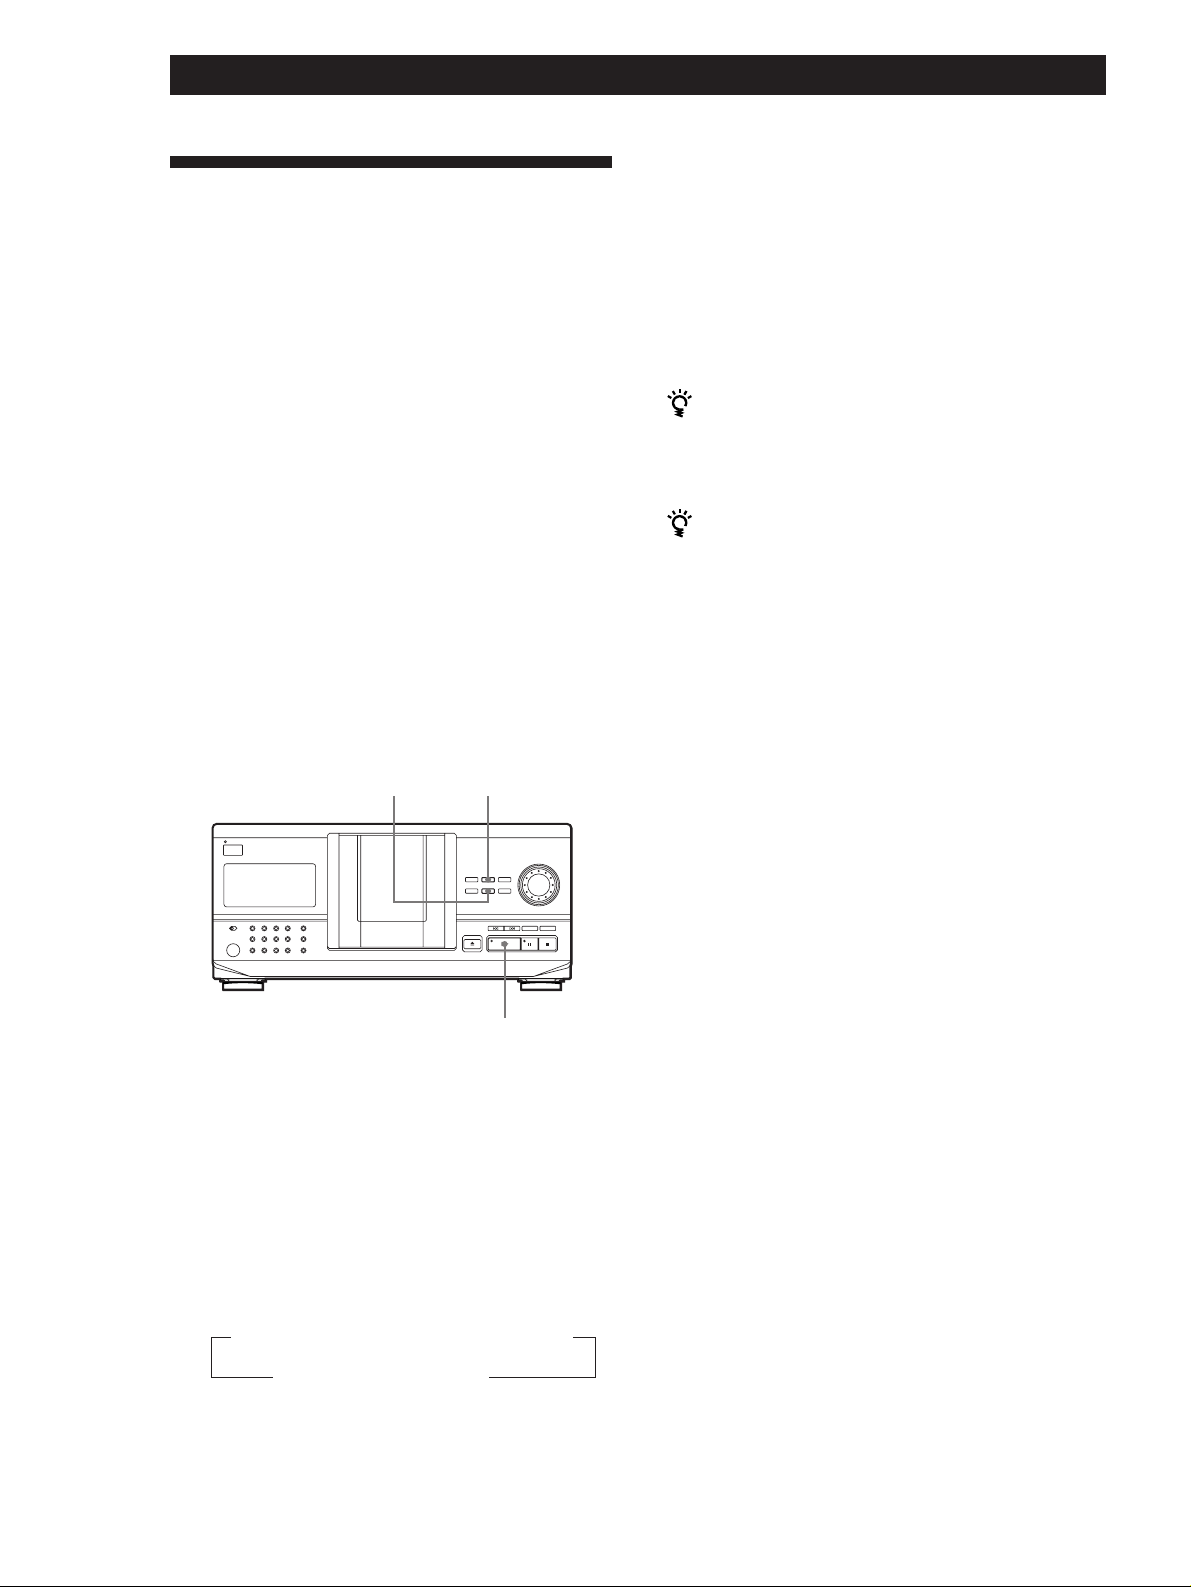
Push the JOG dial or press · to start playing.
The selected disc is set to the playing position, and the player
5
plays all the discs from the selected one (ALL DISCS) or all the
tracks once (1 DISC).
Adjust the volume on the amplifier.
When you turn off the player
The player remembers the
last playing disc and the
play mode (Continuous,
Shuffle (see page 16) or
Program (see page 17)).
When you turn on the
player again, therefore, the
player plays the same disc in
the same play mode.
To stop playback
Press p.
STANDBY
I / u
CONTINUE
SHUFFLE
PROGRAM
REPEAT
TIMER
OFF PLAY
GROUP 1
KEY BOARD
GROUP 5
KEYBOARD
To
Pause
Resume playing after pause
Go to the next disc
Go back to the preceding disc
Go to the next track
Go back to the preceding track
Stop playing and remove the disc
TIME/TEXT
GROUP 2
GROUP 3
GROUP 4
HIT LIST
GROUP 6
GROUP 7
GROUP 8
GROUP FILE
≠/±
X-FADE
MEGA CONTROL
FADER NO DELAY
MEMO SEARCH
OPEN/CLOSE
§ OPEN/CLOSE
·P p
You need to
Press P
Press P or ·
Press DISC SKIP + once.
Hold down the button to skip discs.
Press DISC SKIP – once.
Hold down the button to skip discs.
Press ±
Press ≠
Press § OPEN/CLOSE
JOG
DISC/CHARACTER
INPUT
PUSH ENTER
AMS
CHECK CLEAR
Basic Operations
11
EN
Page 12
Playing CDs
Playing CDs
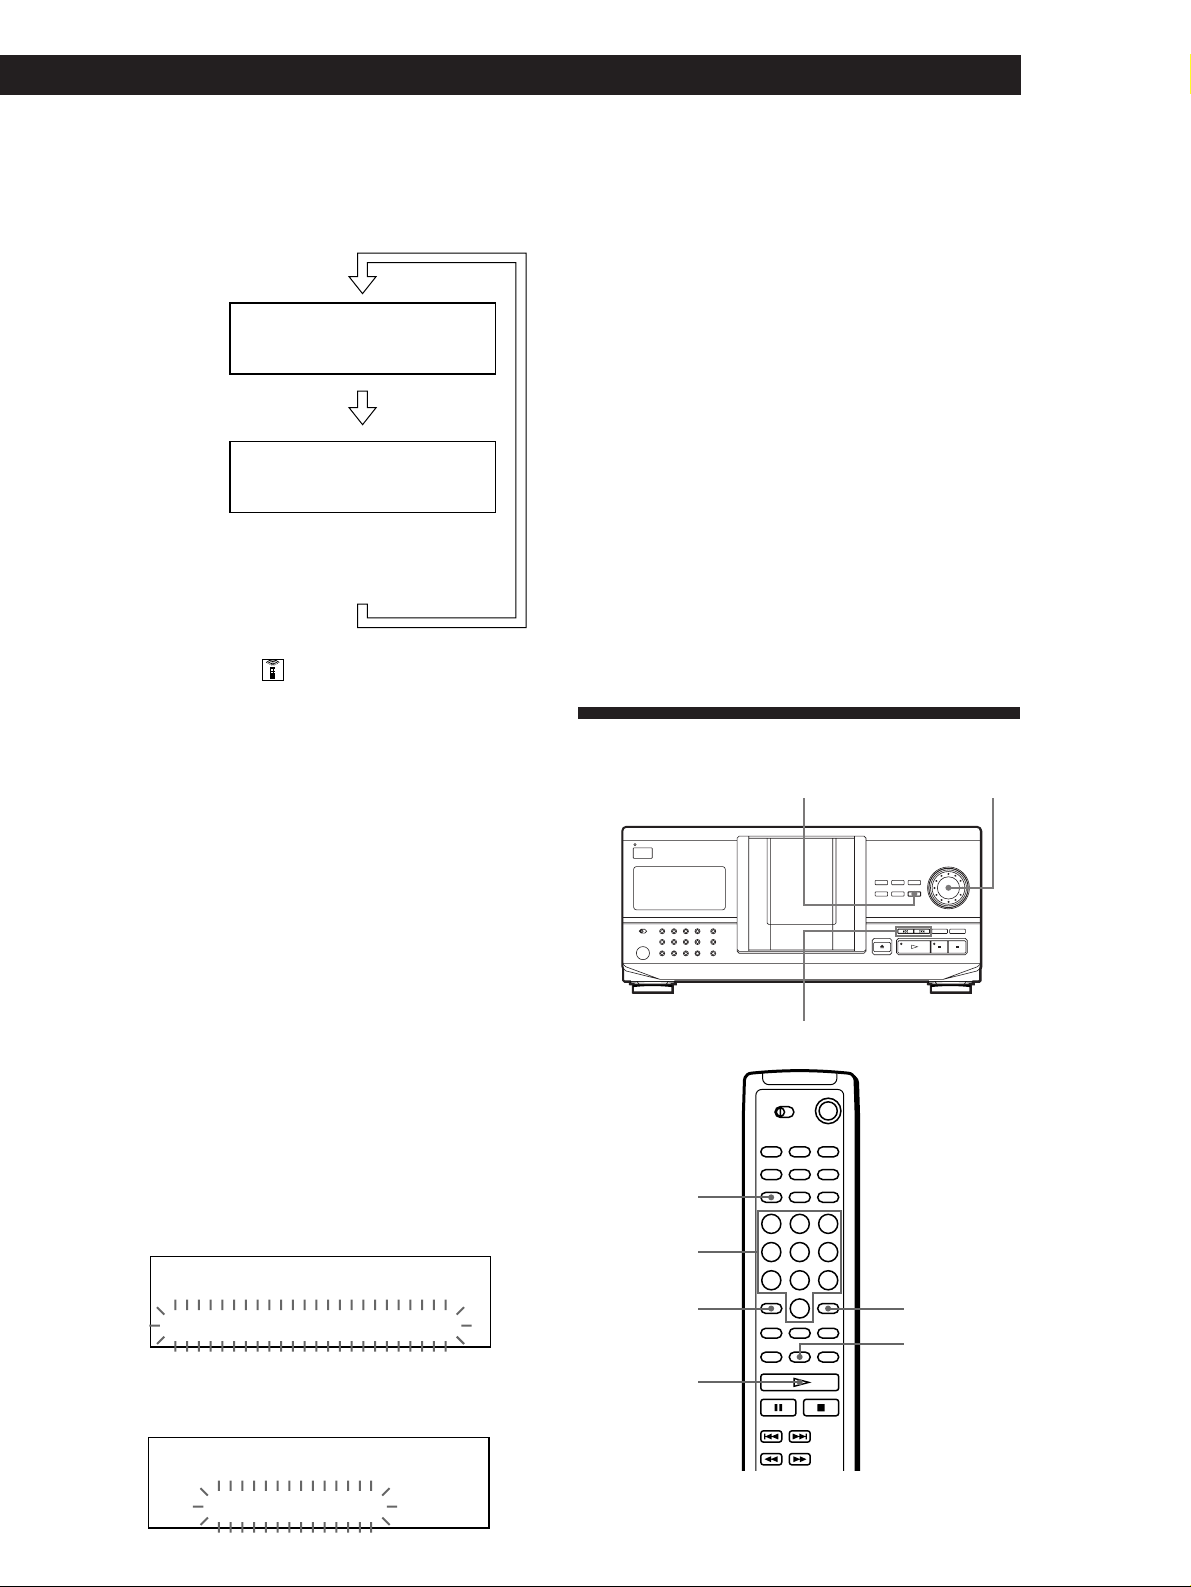
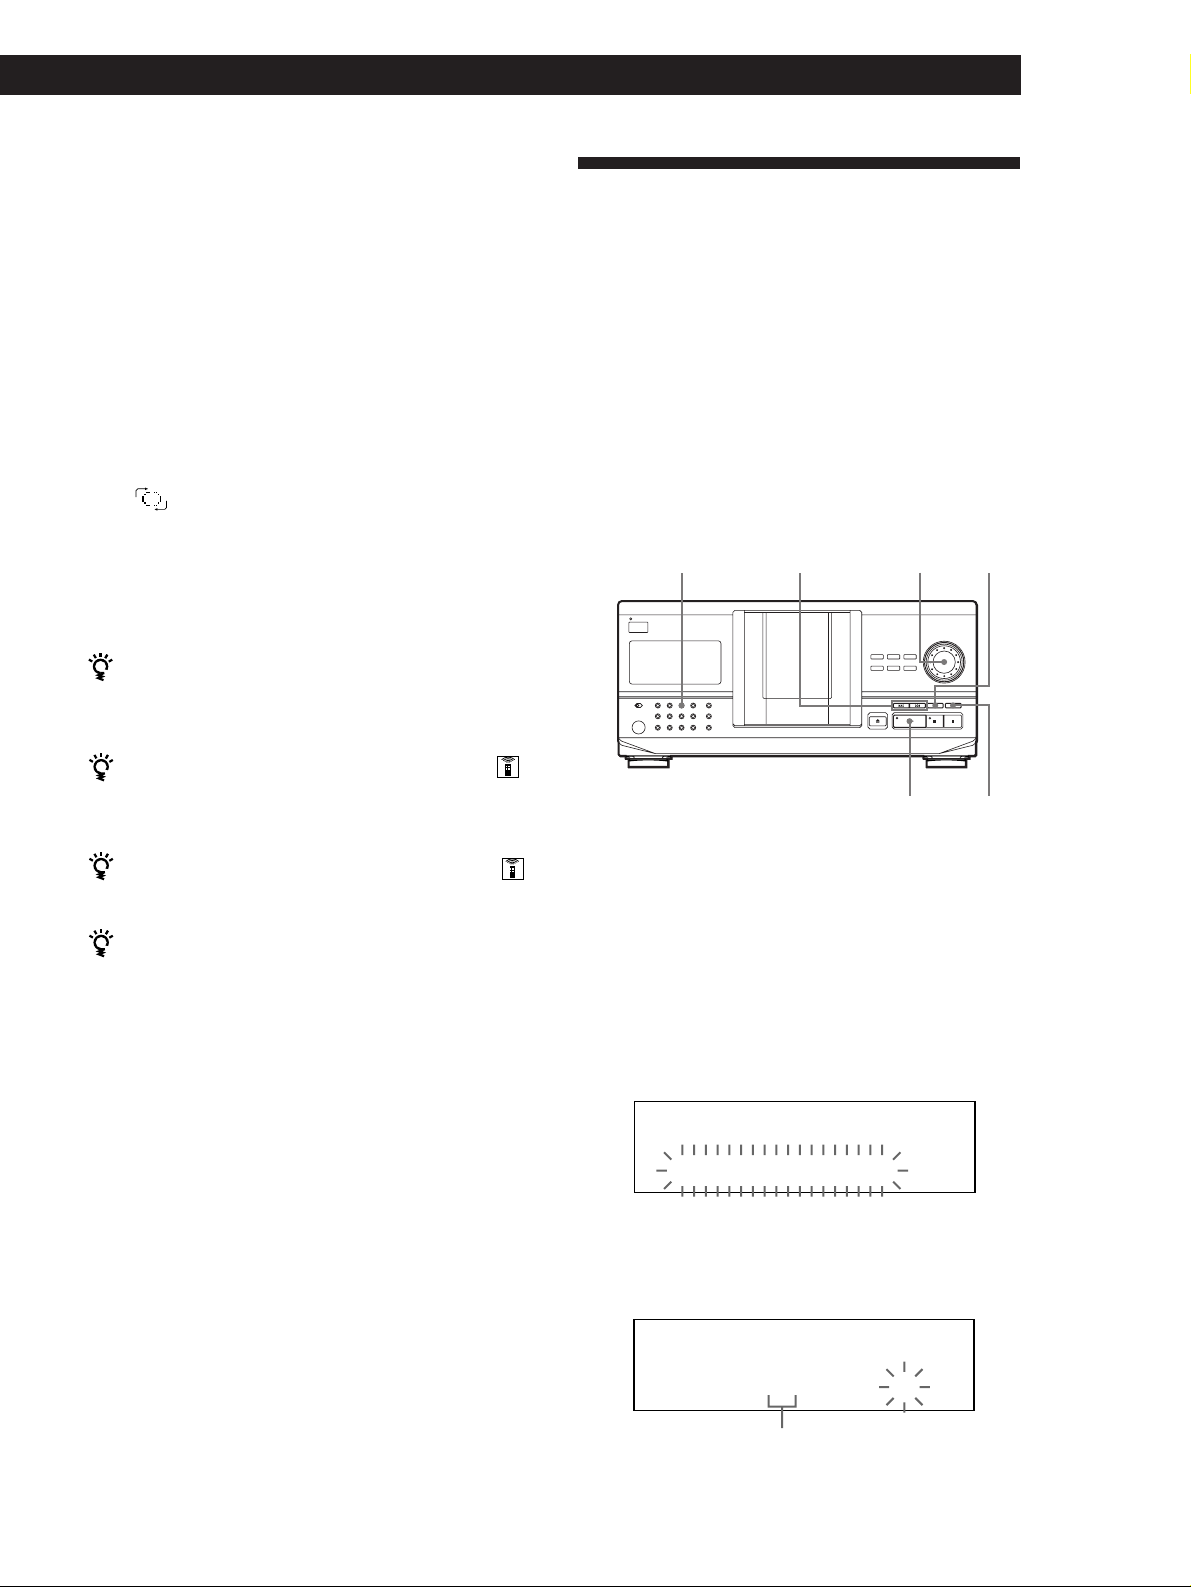
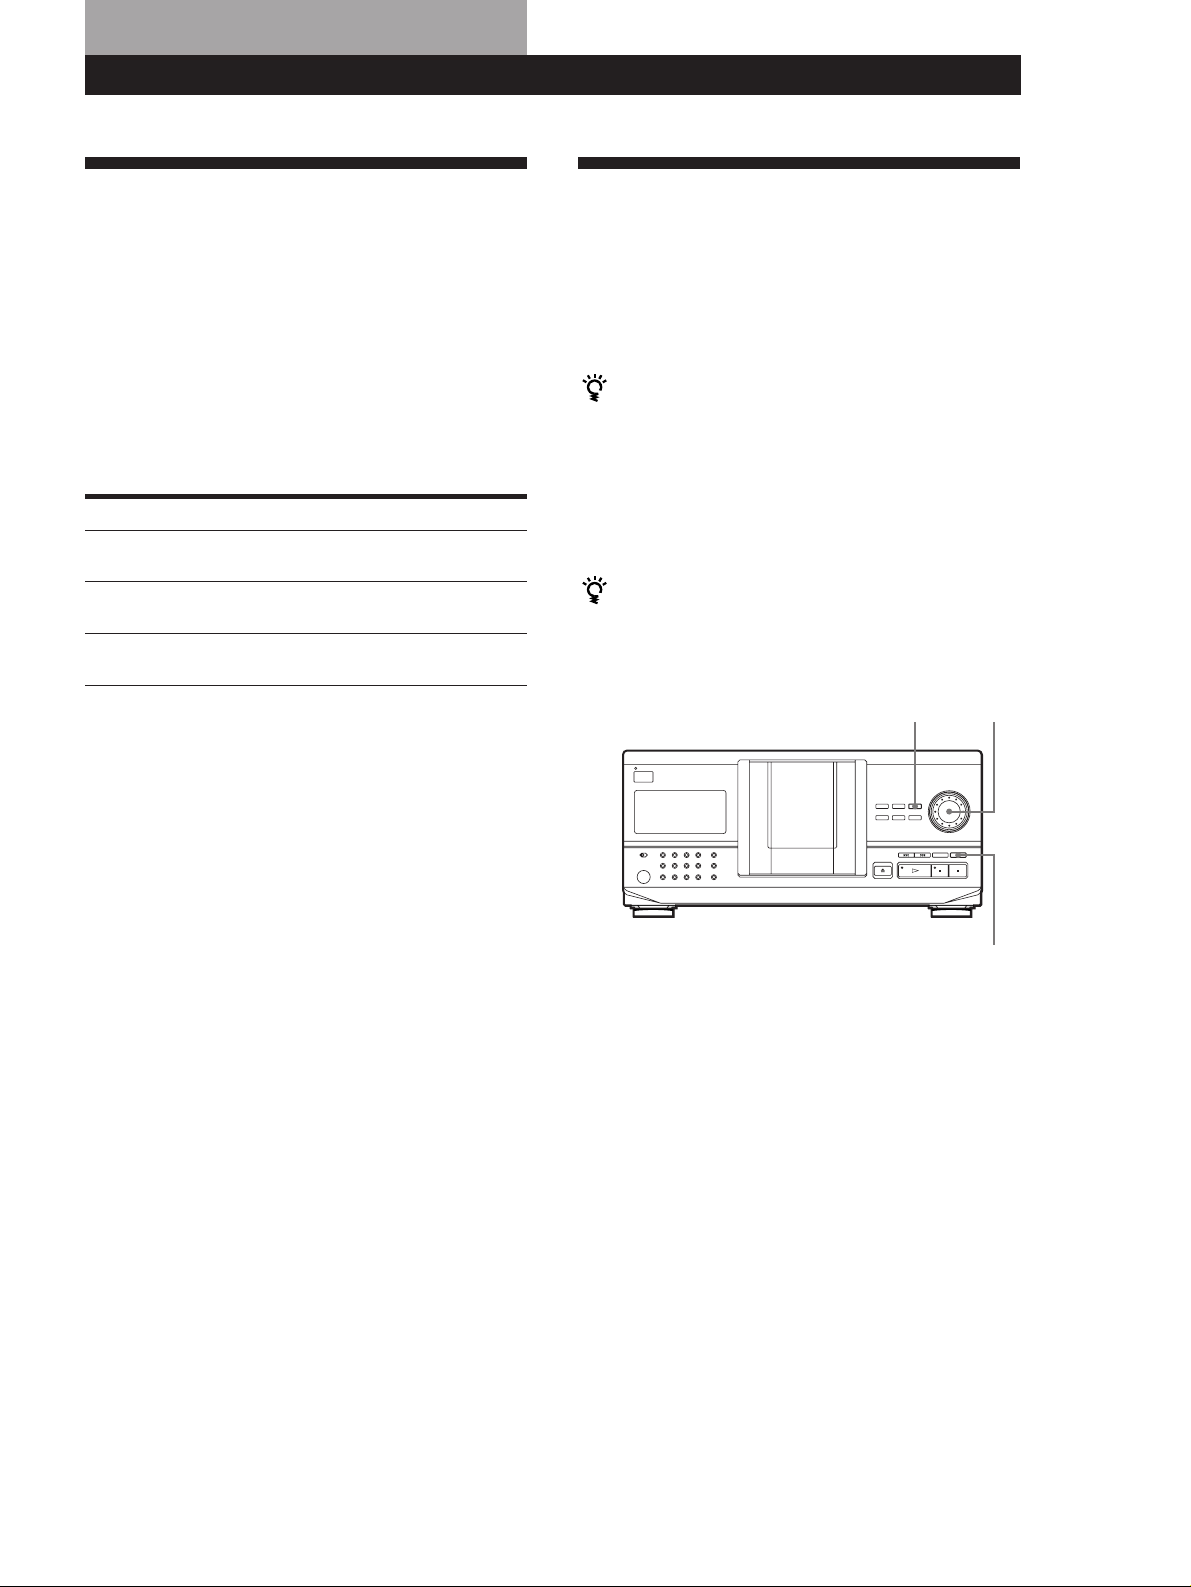
Using the Display
You can check information about the disc using the
display.
TIME/TEXT
INPUT
JOG
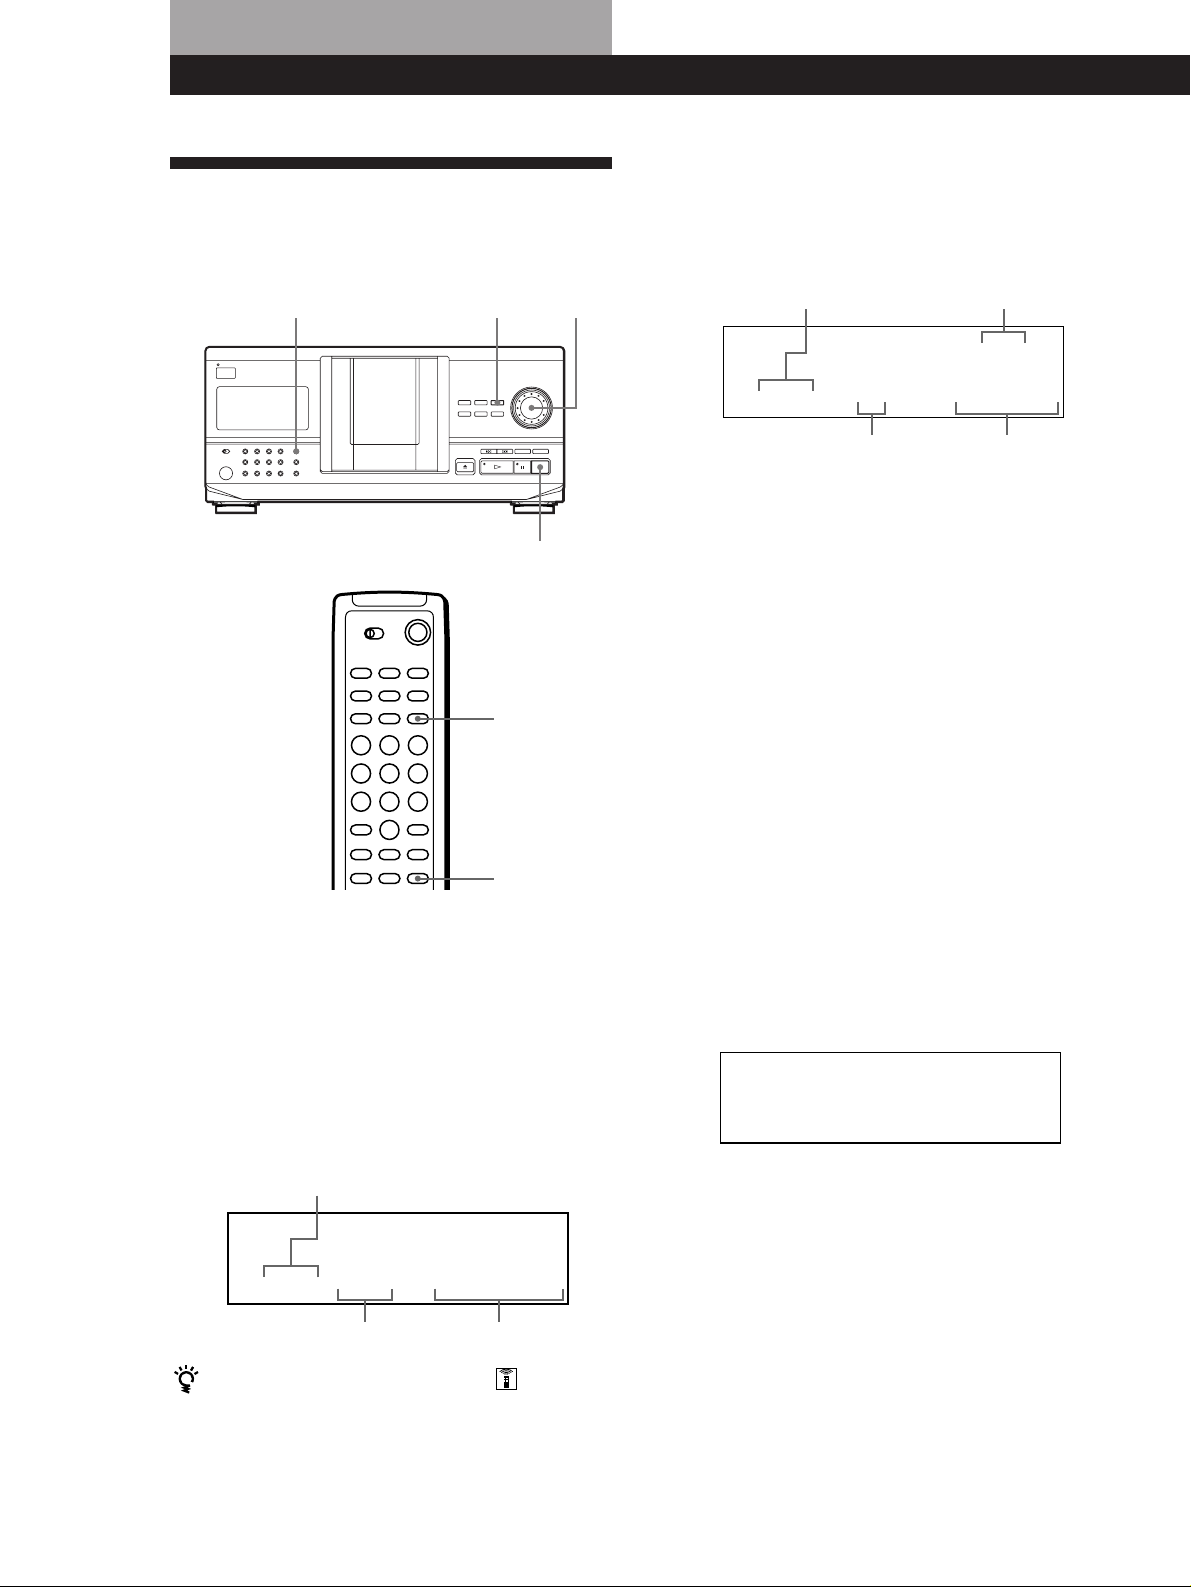
Display information while playing a disc
While playing a disc, the display shows the current disc
number, track number, playing time of the track and
the next disc number.
Current disc number
ALL DISCS
CD1
DISC
TRACK
Next disc number
NEXT
DISC
83
MIN
SEC
20 1 0.28
p
TIME/TEXT
HIGH-LIGHT
Checking the total number and playing
time of the tracks
Select the disc you want to check, and push the JOG
dial in the Continuous Play mode. As the player starts
play automatically, press p to stop, and then
TIME/TEXT.
The display shows the current disc number, total
number of tracks and total playing time of the disc.
Current track number
Playing time of the track
Checking the information of CD TEXT discs
CD TEXT discs have information, such as the disc titles
or artist names, memorised in a blank space on the
discs where, on normal discs, there is no information.
The display shows the CD TEXT information of the
disc so that you can check the current disc title, artist
name and track title. When the player detects CD TEXT
discs, the “CD TEXT” indication appears in the
display. If your CD TEXT disc has multi language
capacity, “MULTI CD TEXT” indication appears in the
display. If you want to check the information in
another language, refer to “Selecting the language of
the CD TEXT information” on page 13.
Display information before you start playing
The display shows the disc title. When you press
TIME/TEXT, the artist name scrolls in the display. If
you press TIME/TEXT again, the display shows the
current disc number, total number of tracks and total
playing time of the disc momentarily. Then the display
shows the disc title again.
ALL DISCS
CD TEXT
CD1
DISC
SONYHITS
12
EN
Current disc number
ALL DISCS
DISC
CD1
TRACK
MIN
20
SEC
20 10 60.48
Total number of tracks
When you want to check another disc
Press DISC SKIP on the remote in the stop mode to select
the disc you want to check. The total number of tracks
and the total playing time of the selected disc appear for
a while.
Total playing time
Page 13
Playing CDs
Playing CDsGetting Started
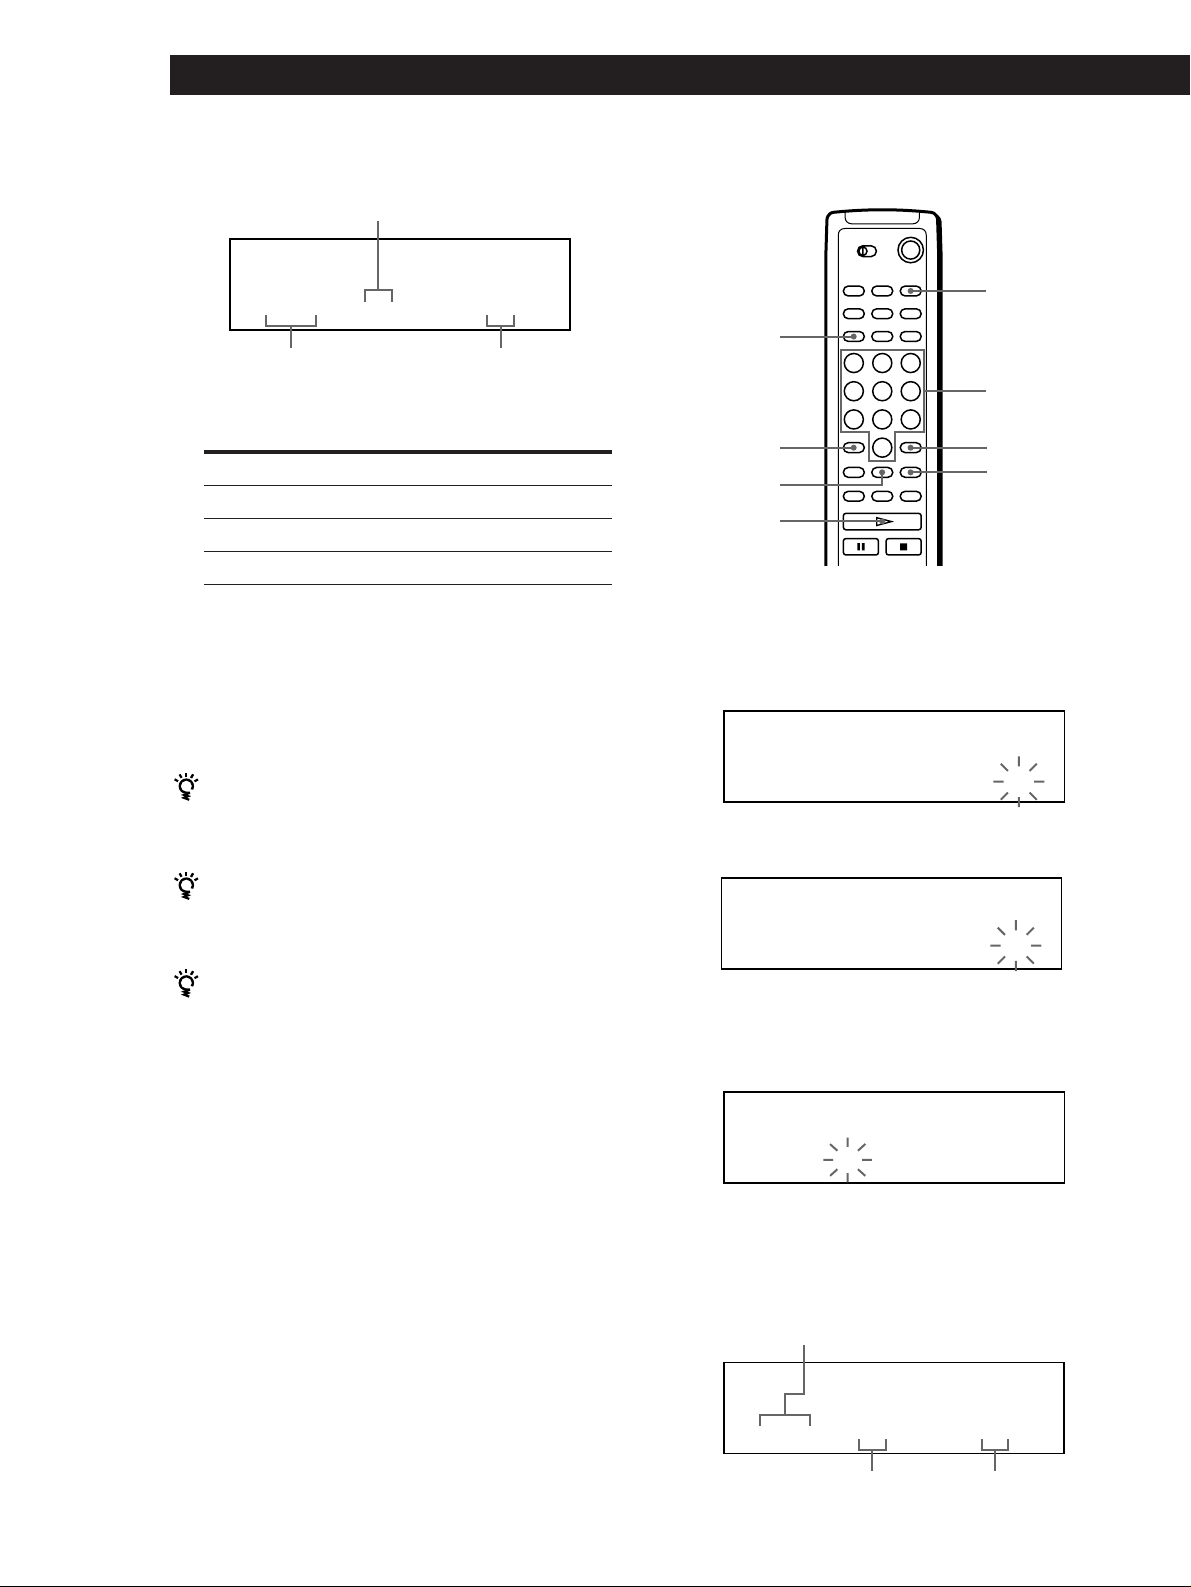
Display information while playing a disc
Each time you press TIME/TEXT, the display shows
the information as shown below.
The current disc
number, track
number and
playing time
appear.
The current track
title appears.
ALL DISCS
CD TEXT
DISC
CD1
TRACK
MIN
13
12 1 1.52
Press
ALL DISCS
CD TEXT
CD1
TRACK
13
HitechBlues
This information also appears when
the player locates the track.
Press
NEXT
DISC
NEXT
DISC
SEC
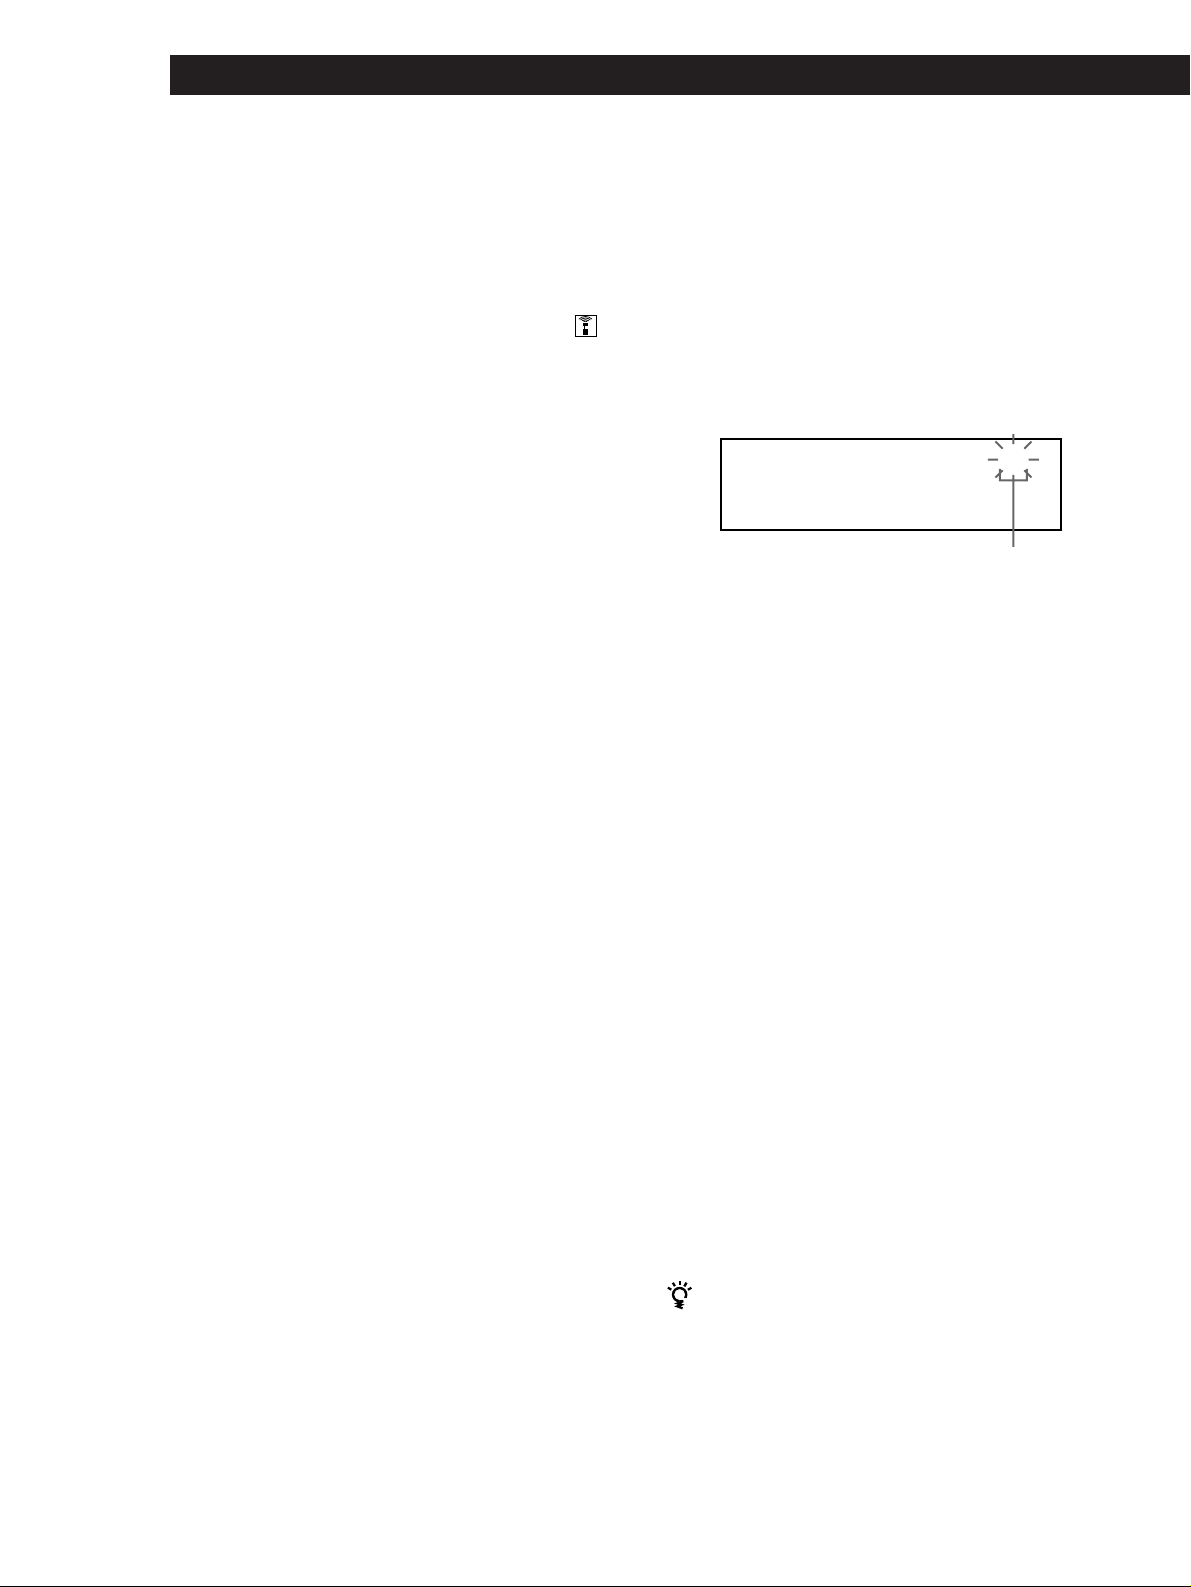
To play disc highlights
Some CD TEXT discs have a feature to play only the
highlights of the discs.
Press HIGH-LIGHT on the remote to start playing disc
highlights in the stop mode.
“Hi LIGHT” indication in the display flashes while playing
disc highlights.
If you press HIGH-LIGHT while selecting discs without this
feature, “NO HIGHLIGHT” appears in the display.
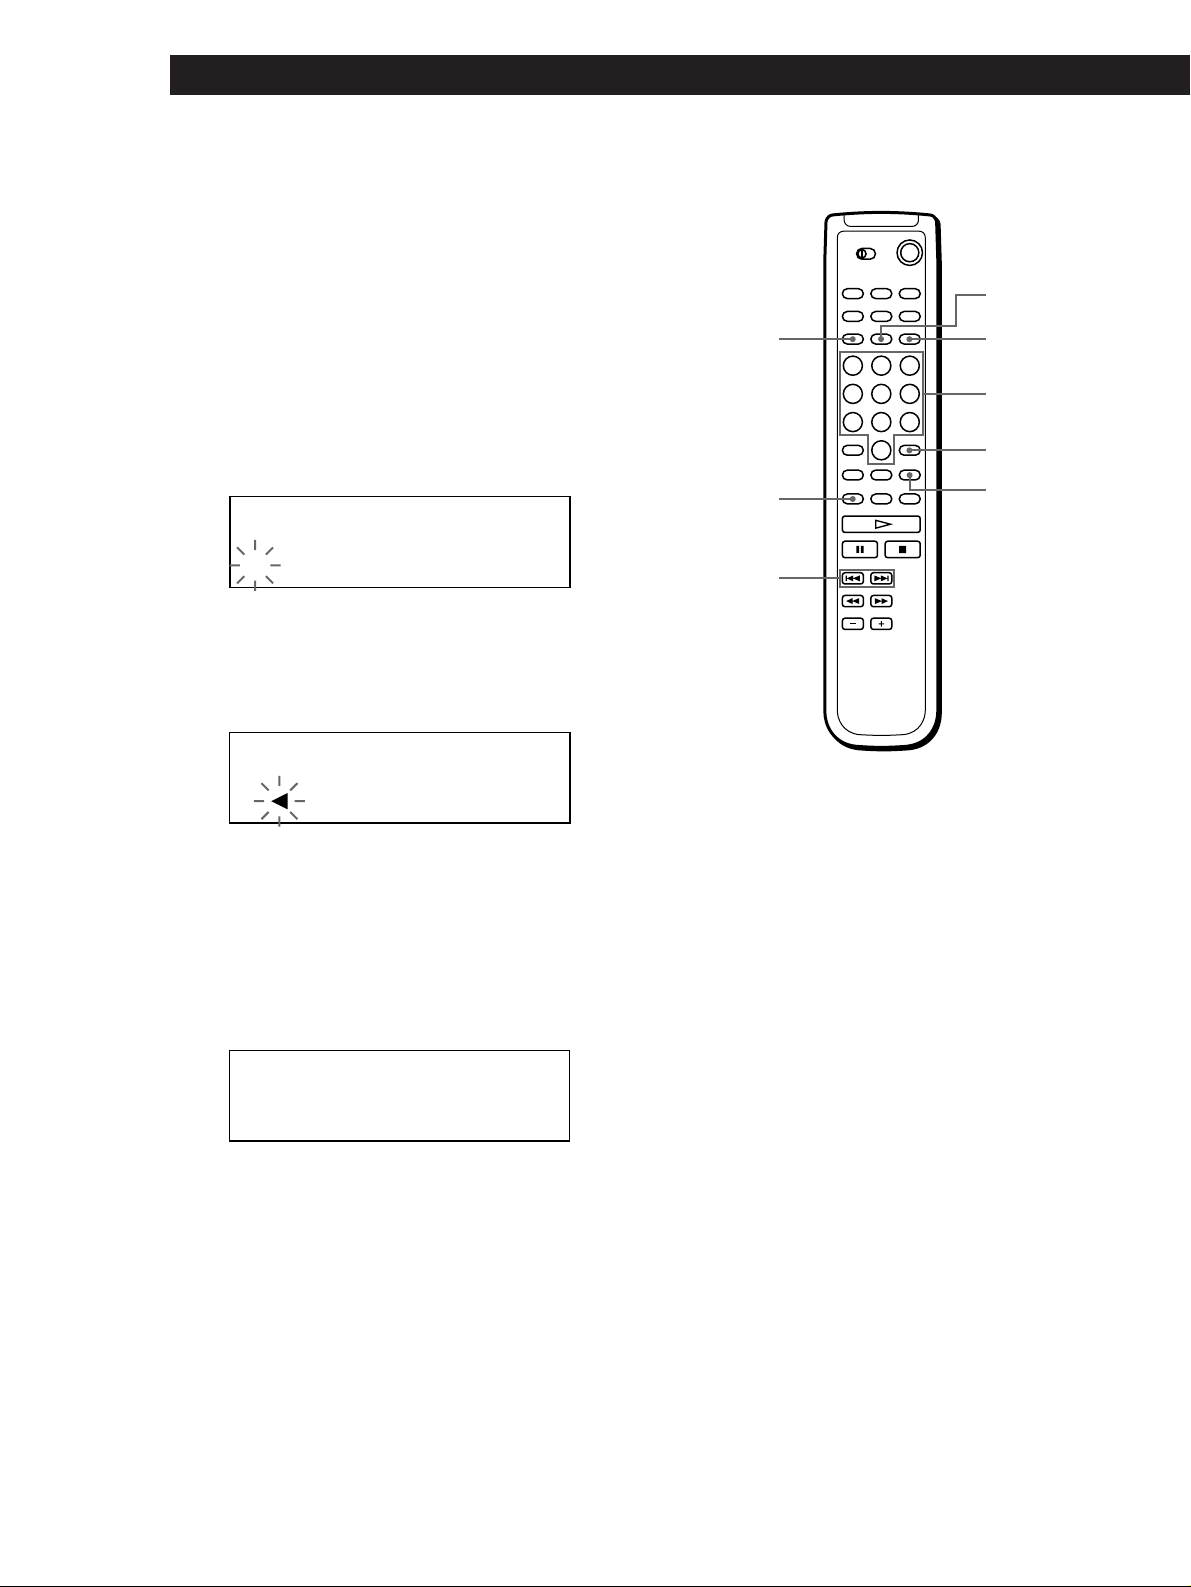
3 Turn the JOG dial until the language you want
appears in the display.
4 Push the JOG dial to select the language.
“Reading Text” appears momentarily, then the
display shows the information in the selected
language.
To check the current language
1 Press INPUT while playing a CD TEXT disc.
“Show lang.” flashes.
2 Push the JOG dial.
The current language appears momentarily.
You can also check the current language while selecting a CD
TEXT disc without multi-language information.
Note
If you select a CD TEXT disc which does not contain the
information of the selected language, the display shows the
information in another language according to the disc’s
priority.
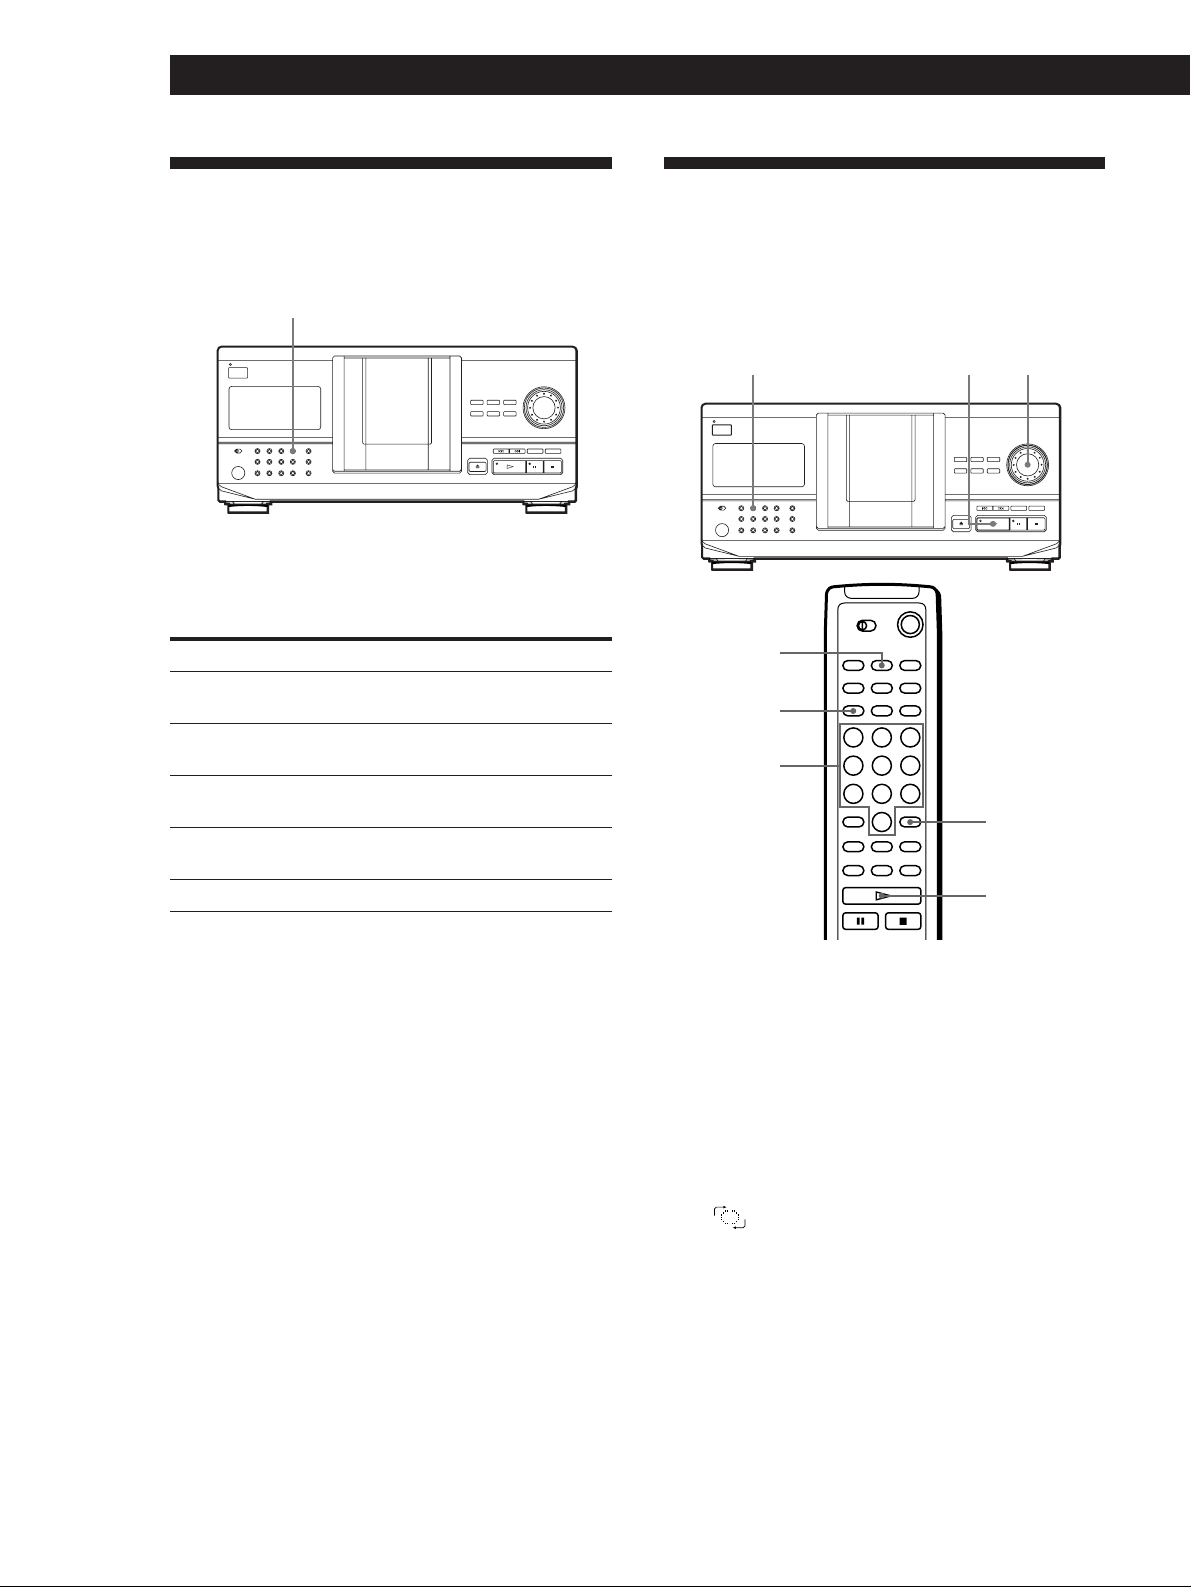
Locating a Specific Disc
MEMO SEARCH
JOG
Selecting the language of the CD TEXT
information
You can select the language used to display the CD
TEXT information when you select a CD TEXT disc
with multi-language information.
Once you select the language, the display shows the
information in the selected language until you turn off
the player. If the player cannot read the language
memorized in a CD TEXT disc, the player shows
“(other lang.).”
1 Press INPUT in stop mode.
“Select lang.” flashes.
ALL
DISCS
MULTI CD TEXT
CD1
21
Select lang.
2 Push the JOG dial.
The current operating language flashes.
ALL
DISCS
MULTI CD TEXT
CD1
21
DISC
Number
buttons
>10
·
≠/±
ENTER
MEMO SCAN
English
(Continued)
13
EN
Page 14
Playing CDs
Selecting a disc on the player
Turn the JOG dial until the disc number or Disc Memo
(see page 23) you want appears in the display. Push the
JOG dial to start play.
Selecting a disc directly using the remote
1 Press DISC.
2 Press the number button of the disc.
Example: To enter number 35
Press 3 then 5.
To enter number 100
Press 1, then 10/0 twice.
3 Press ENTER to start play.
Locating a disc by scanning each Disc
Memo (Memo Scan) Z
You can locate a disc you want to play quickly by
scanning the Disc Memos (see page 23) in the display .
Note that you cannot use this function in the ALL
DISCS Shuffle Play mode.
1 Press MEMO SCAN.
“MEMO SCAN” appears in the display, and the
Disc Memos scroll in the display.
2 Press · when the Disc Memo of the disc you
want to play appears.
The disc is set to the playing position, and the
player starts playing.
In Program Play mode, the disc will be added to
the end of the program if you press ENTER instead
of ·.
Locating a disc by searching a specific Disc
Memo (Memo Search)
You can search and locate a disc you want by inputting
the first character used in the Disc Memo (see page 23).
1 Press MEMO SEARCH.
“MEMO SEARCH” appears in the display.
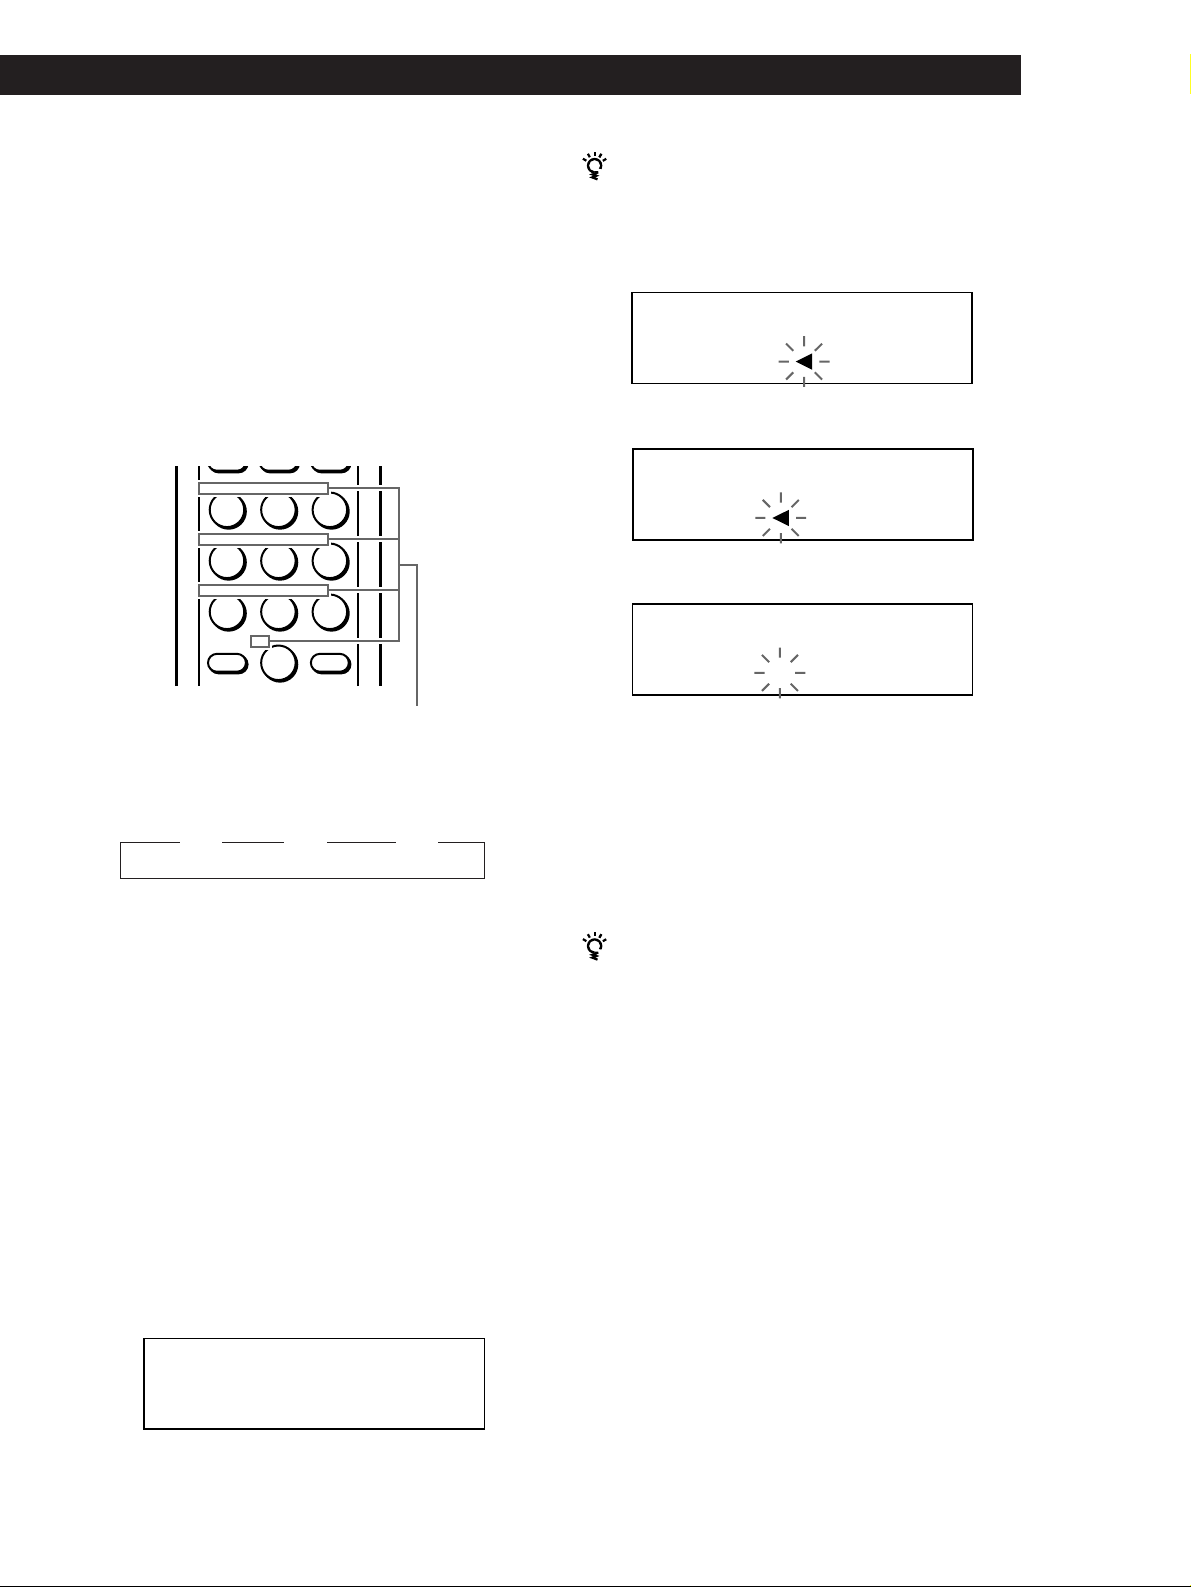
2 Press ≠/± repeatedly to input the first
character.
ALL DISCS
CD1
S
SONYHITS
Input character
Each time you press ≠/±, the characters
appear in the following order.
A B C D E F G H I J K L M N O P Q R S T U V W X
Y Z 0 1 2 3 4 5 6 7 8 9
If “NOT FOUND” appears in the display while
inputting the first character with the ≠/±
buttons, no disc has been labeled using the input
character.
Notes
• When searching input characters, blanks and symbols
before the first character in the Disc Memo are ignored.
• When searching input characters, upper and lower
cases cannot be differentiated.
3 Turn the JOG dial to find the disc you want.
As you turn the JOG dial, the Disc Memos starting
with the input character appear in the display.
4 Push the JOG dial to select the disc.
14
EN
Note
If “NO ENTRY” appears in the display, no disc has been
labeled with the Disc Memo. Try the Memo Scan function
again after labeling the discs.
In Program Play mode, the disc will be added to
the end of the program.
To cancel Memo Search
Press MEMO SEARCH again.
If there is no more Disc Memo starting with the input
character in Step 3
The input character changes to the next one when you
turn the JOG dial.
Page 15

Specifying the Next Disc to
Play
You can specify the next disc to play while playing a
disc in Continuous or 1 DISC Shuffle Play mode.
Playing CDs
Playing CDsGetting Started
While playing a disc, turn the JOG dial. “NEXT DISC”
appears in the display and the disc number or Disc
Memo (see page 23) changes as you turn the JOG dial.
When the disc number or Disc Memo you want
appears in the display, stop turning the JOG dial.
ALL DISCS
CD1
NEXT DISC
38
NEXT
DISC
*DISC-38*
Next disc number or
the Disc Memo
After the current disc is played, the next disc you have
specified starts playing.
If you want to skip to the next disc right away, push
the JOG dial while playing the current disc.
To cancel the disc you have specified
Press CONTINUE twice.
Locating a Specific Track or a
Point in a Track
You can quickly locate any track while playing a disc
using the ≠/± (AMS: Automatic Music Sensor)
buttons or number buttons on the remote. You can also
locate a specific point in a track while playing a disc.
≠/±
Number
buttons
>10
=/+
0/)
To locate
the next or
succeeding tracks
the current or
preceding tracks
a specific track
directly Z
a point in a track
while monitoring the
sound Z
a point in a track
quickly by observing
the display Z
Press
± repeatedly until you find the
track
≠ repeatedly until you find the
track
The number button of the track on the
remote
0 (backward)/) (forward) on the
remote and hold down until you find
the point
0 (backward)/) (forward) on the
remote and hold down until you find
the point during pause. You will not
hear the sound during the operation.
When you directly locate a track numbered over 10 Z
Press >10 first, then the corresponding number buttons
on the remote.
Note
If “– OVER –” appears in the display, the disc has reached the
end while you were pressing ) on the remote. Press ≠ or
0 on the remote to go back.
15
EN
Page 16
Playing CDs
Playing Repeatedly
You can play discs/tracks repeatedly in any play
mode.
REPEAT
Press REPEAT while playing a disc.
“REPEAT” appears in the display. The player repeats
the discs/tracks as follows:
When the disc is played in
ALL DISCS Continuous Play
(page 10)
1 DISC Continuous Play
(page 10)
ALL DISCS Shuffle Play
(page 16)
1 DISC Shuffle Play
(page 17)
Program Play (page 17)
The player repeats
All tracks on all discs
All tracks on the current disc
All tracks on all discs in
random order
All tracks on the current disc
in random order
The same program
Playing in Random Order
(Shuffle Play)
You can have the player “shuffle” the tracks and play
in random order. The player shuffles all the tracks on
all discs or on the disc you specified.
SHUFFLE
SHUFFLE
DISC
Number
buttons
·
JOG
ENTER
·
16
EN
To cancel Repeat Play
Press REPEAT twice.
Repeating the current track
You can repeat only the current track.
While the track you want is being played, press
REPEAT repeatedly until “REPEAT 1” appears in the
display.
To cancel Repeat 1
Press REPEAT.
Playing all tracks on all discs in random
order
1 Press SHUFFLE.
“ALL DISCS” and “SHUFFLE” appear in the
display.
2 Push the JOG dial or press ·.
ALL DISCS Shuffle Play starts.
” appears in the display while the player is
“
“shuffling” the discs or the tracks.
Page 17
Playing all tracks on a specified disc in
random order
1 Press SHUFFLE twice.
“1 DISC” and “SHUFFLE” appear in the display.
2 Turn the JOG dial until the disc number you want
appears in the display.
When using the remote, press DISC first and then
press the number button of the disc.
3 Push the JOG dial or press ·.
When using the remote, press ENTER.
1 DISC Shuffle Play starts.
” appears in the display while the player is
“
“shuffling” the tracks.
Playing CDs
Playing CDsGetting Started
Creating Your Own Program
(Program Play)
You can arrange the order of the tracks and/or discs to
create three different programs and programs are
stored automatically. A program can contain up to 32
“steps” — one “step” may contain a track or a whole
disc.
You can make programs using the controls on the
remote as well as ones on the player. However, the
programming procedures are different.
Creating a program on the player
To cancel Shuffle Play
Press CONTINUE.
You can start Shuffle Play while playing
Press SHUFFLE, and Shuffle Play starts from the current
track.
You can directly select a disc for 1 DISC Shuffle Play
See “Selecting a disc directly using the remote” on page
14.
You can go to the next disc during 1 DISC Shuffle Play
Press DISC SKIP +.
You can specify the next disc to play during 1 DISC
Shuffle Play
Turn the JOG dial to specify the next disc. After all the
tracks on the current disc are played in random order,
the next disc starts playing. If you want to skip to the
next disc right away, push the JOG dial while playing the
current disc.
Notes
• You cannot specify the next disc to play during ALL DISCS
Shuffle Play.
• Even if you press p or turn off the player during ALL
DISCS Shuffle Play, the player remembers which discs/
tracks were played and which were not. Therefore, if you
want to start ALL DISCS Shuffle Play again from the
beginning, be sure to repeat the procedure from Step 1.
PROGRAM
≠/±
JOG
·
CHECK
CLEAR
1 Press PROGRAM until the program number you
want (PROGRAM 1, 2 or 3) appears in the display.
If a program is already stored in the selected
program number, the last step of the program
appears in the display. When you want to erase the
whole program, hold down CLEAR until
“CLEAR” appears in the display (see page 19).
2 Turn the JOG dial until the disc number you want
appears in the display.
PROGRAM
1
CD1
DISC
20
*DISC-20*
3 To program a whole disc, skip this step. Press
≠/± until the track number you want
appears in the display.
PROGRAM
1
CD1
DISC
TRACK
20 3 1
Track number
20
STEP
(Continued)
17
EN
Page 18
Playing CDs
4 Push the JOG dial.
The track being programmed
PROGRAM
1
DISC
CD1
TRACK
20
STEP
20 3 1
The disc being
programmed
5 To program other discs/tracks, do the following:
To program
All tracks of another disc(s)
Other tracks on the same disc
Other tracks on other discs
6 Push the JOG dial or press · to start Program
Play.
To cancel Program Play
Press CONTINUE.
Playing order
Repeat Steps
2 and 4
3 and 4
2 to 4
Creating a program using the remote Z
PROGRAM
DISC
Number
buttons
>10
CHECK
·
ENTER
CLEAR
1 Press PROGRAM until the program number you
want (PROGRAM 1, 2 or 3) appears in the display.
2 Press DISC.
PROGRAM
1
CD1
02
The programs remain even after Program Play ends
When you push the JOG dial or press ·, you can play
the same program again.
When you press PROGRAM to select Program Play
during Continuous or Shuffle Play
The program will be played after the current track.
The program remains until you erase them
Even if you replace discs, the programmed disc and track
numbers remain. So, the player plays only the existing
disc and track numbers. However, the disc and track
numbers that are not found in the player or on the disc
are deleted from the program, and the rest of the
program is played in the programmed order.
Note
If you press one of the GROUP 1 – 8 buttons to start Group
Play, Program Play will be canceled (see page 27).
DISC-[ _]
3 Press the number button of the disc.
PROGRAM
1
CD1
02
DISC-[ 20]
4 To program a whole disc, press ENTER and go to
Step 6.
Press >10.
PROGRAM
1
DISC
CD1
TRACK
02
STEP
20 -- 1
5 Press the number button of the track.
When the disc has more than 10 tracks, press 0 first
then press the corresponding number to enter a
track number from 1 to 9.
The disc being programmed
18
EN
PROGRAM
1
DISC
TRACK
20 3 1
The track being programmed
20
STEP
Playing order
Page 19
6 To program other discs/tracks, do the following:
To program
All tracks of another disc(s)
Other tracks on the same disc
Other tracks on other discs
Repeat Steps
2 to 4
5
2 to 5
Playing CDs
Playing CDsGetting Started
Playing Using a Timer
(CDP-CX240 only)
You can start playing a disc at any time you want by
connecting a timer (not supplied). Please also refer to
the instructions for the timer if you need help.
7 Press · to start Program Play.
To cancel Program Play
Press CONTINUE.
Checking the programmed order
You can check your program before or after you start
playing.
Press CHECK.
Each time you press this button, the display shows the
disc and track number of each step in the programmed
order. (When a whole disc is programmed as one step,
“ALL” appears instead of the track number.) After the
last step in the program, the display shows “– END –”
and returns to the original display.
Changing the programmed order
You can change your program before you start playing.
To
Erase a track or disc
Erase the last track or
disc in the program
Add tracks or discs to the
end of the program
Erase the whole program
completely
You need to
Press CHECK until the track or
disc you do not want appears in
the display, then press CLEAR
Press CLEAR. Each time you
press the button, the last track or
disc will be cleared.
Follow the programming
procedure
Hold down CLEAR until
“CLEAR” appears in the display
to erase the whole program, then
create a new program following
the programming procedure
TIMER Play mode buttons
1 Press one of the play mode buttons to select the
play mode you want.
2 Set TIMER on the player to PLAY.
3 Set the timer to the time you want.
The player turns off. When the set time comes, the
player turns on and starts playing.
4 After you have used the timer, set TIMER on the
player to OFF.
Erasing the program stored in memory
1 Press PROGRAM repeatedly in the stop mode
until the program number (PROGRAM 1, 2 or 3)
you want to erase appears in the display.
2 Hold down CLEAR until “CLEAR” appears in the
display.
19
EN
Page 20
Playing CDs
Controlling Another CD Player
(Advanced Mega Control)
(CDP-CX240 only)
This unit can control a second CD player (see
“Connecting Another CD Player” on page 6).
Even when a second CD player is connected, the
controls on both of the units will function. When you
press the play button on either unit, the operating
player stops and the resting player starts.
Make sure “2nd DETECTED” appears in this player’s
display after turning on both players.
Note that depending on the player, you may not be
able to operate all the functions of the second CD
player.
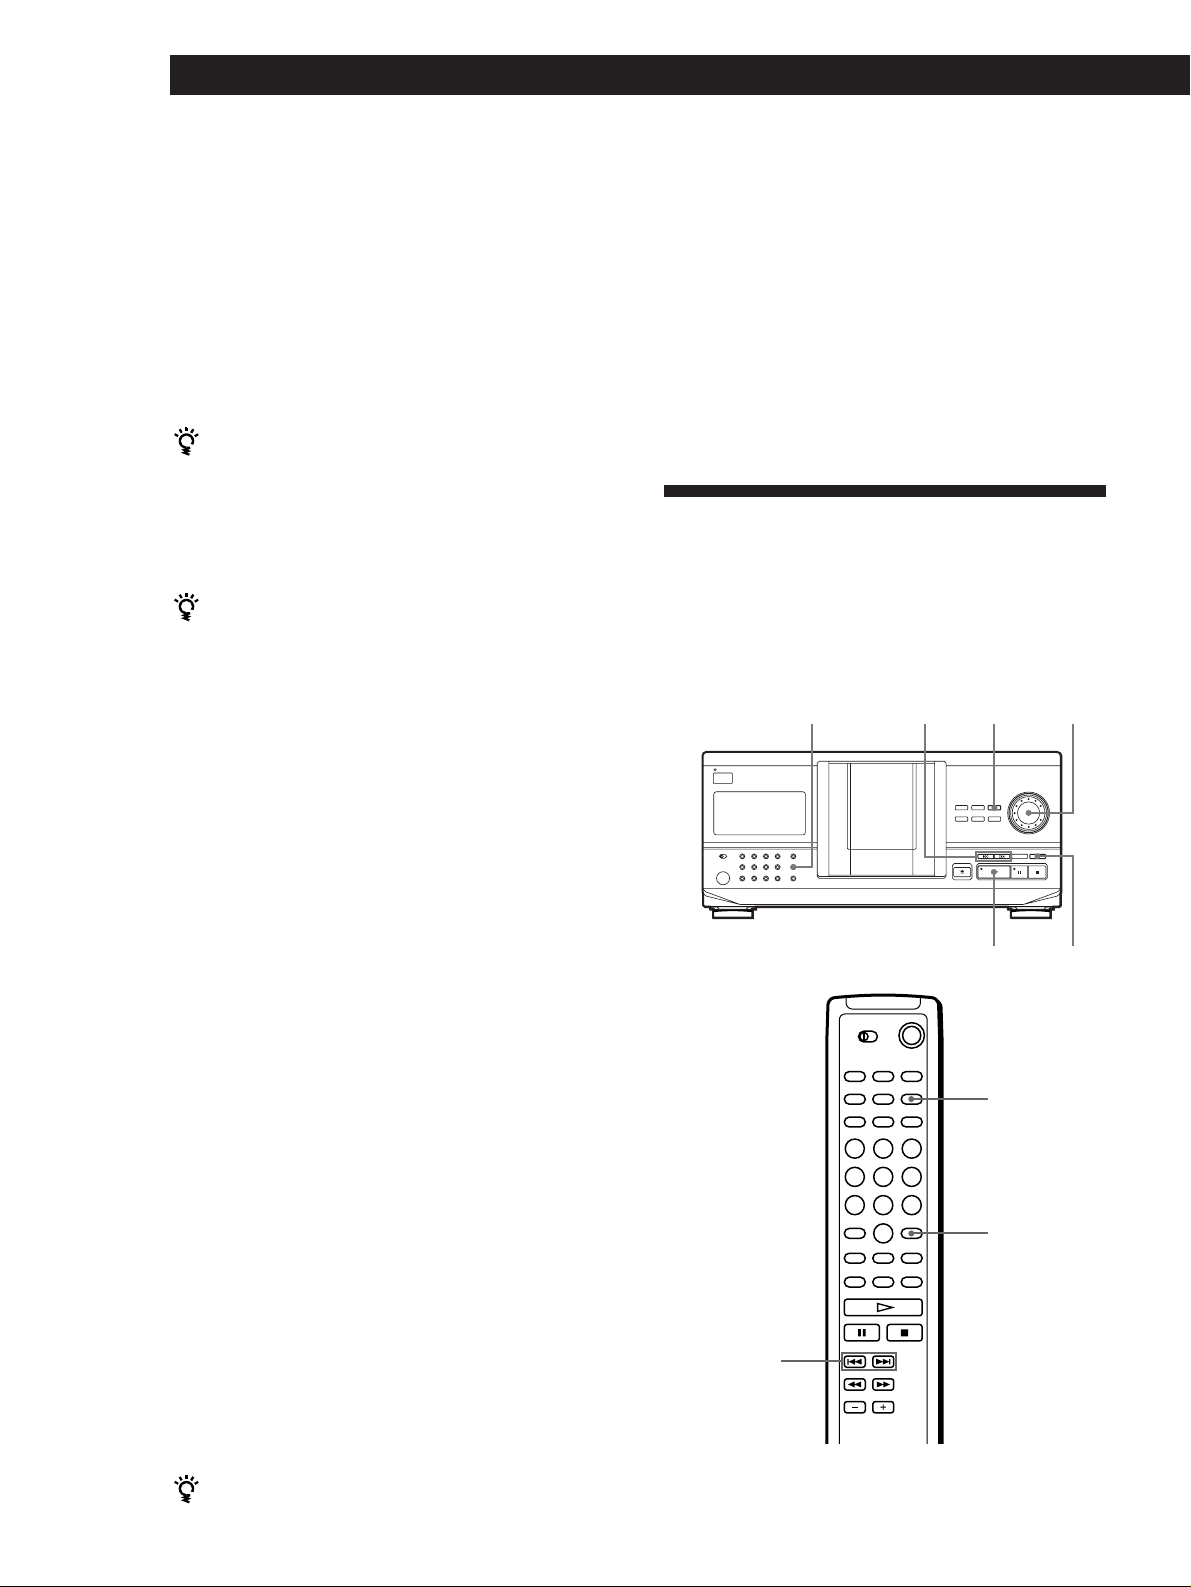
The controls indicated in the illustration below are effective
while the MEGA CONTROL button is lit.
Play mode buttons
(CONTINUE/SHUFFLE/
PROGRAM/REPEAT)
MEGA CONTROL
INPUT
JOG
1 Press MEGA CONTROL on this player.
The MEGA CONTROL button and “2nd” in the
display light up. The display shows the current
disc number or disc memo of the second player.
ALL DISCS
CD1
2nd DISC
4
*DISC-4*
Current disc number or the Disc Memo
2 Select the play mode you want.
To program tracks, use the controls on the second
player.
You cannot change the second CD player’s ALL
DISCS Play mode to 1 DISC Play mode, and vice
versa, by using the play mode button on this
player.
3 Press · on this player to start playing.
The play starts and the display shows the current
disc and track numbers and the playing time of the
track.
While the MEGA CONTROL button is lit, you can
control the second player with the controls on this
player.
0/)
≠/±
·
To control the second player directly using the supplied
remote
Set CD 1/2/3 on the remote to CD 3 which is the same
position as the COMMAND MODE selector on the rear panel
of the second player.
pP
To control this player again
Press MEGA CONTROL. The MEGA CONTROL button goes
off and you can control this player.
Loading the Disc Memos of the second CD
player
If the second CD player has the Disc Memo function
(see page 23), you can load the Disc Memos of the
second CD player to this player’s memory and display
them on this player.
1 Press INPUT.
2 Turn the JOG dial until “LOAD 2ND MEMO”
appears in the display.
ALL DISCS
CD1
20
LOAD 2ND MEMO
EN
Page 21
3 Push the JOG dial.
This player starts loading. (Loading takes about
one minute.)
Playing CDs
Playing CDsGetting Started
Fading In or Out (CDP-CX240
only)
Note
If each Disc Memo of the second CD player has more than 13
characters, the first 13 characters of each are loaded to this
player.
Labeling discs of the second CD player
You can label discs of the second CD player or change
the Disc Memos loaded from the second CD player.
1 Press MEGA CONTROL.
The MEGA CONTROL button lights up.
2 Turn the JOG dial to select the disc you want to
assign a Disc Memo to.
If the disc slot you select does not have any disc,
“NO DISC” appears in the display and you cannot
assign a Disc Memo.
3 Press INPUT.
“DISC MEMO” appears.
4 Push the JOG dial.
5 Input the new Disc Memo following the procedure
in “Labeling Discs” on pages 23 to 25.
You can manually fade the sound in or out to prevent
tracks from starting or ending abruptly.
Note that you cannot use this effect when you use the
DIGITAL OUT (OPTICAL) connector.
FADER
To
Start play fading in
End play fading out
Note
Fading lasts for about 5 seconds.
Press FADER
During pause. “FADE” appears in
the display and the Q indication
flashes. The play fades in.
When you want to start fading out.
“FADE” appears in the display and
the q indication flashes. The play
fades out and the player pauses.
Note
The new Disc Memos are stored on this player’s memory, so
you cannot display them on the second CD player.
21
EN
Page 22
Playing CDs
Playing Alternately (No-Delay
Play/X-Fade Play) (CDP-CX240
3 Press · to start playing.
The MEGA CONTROL button lights up while the
track in the second player is selected.
only)
When you connect the second player, you can play
tracks in this player and those in the second player
alternately in any play mode (see “Connecting Another
CD Player” on page 6).
Select one of the following methods:
• No-Delay Play: The current player changes at each
track. Each time the current player changes to the
other player, the other player starts play without a
break in sound immediately after the current player
ends play. The other player skips the lead-in portion
and starts playing from where the sound actually
begins.
• X-Fade Play: The current player changes at each
track or at the specified interval. You can select the
interval among 30, 60 and 90 seconds. Each time the
current player changes to the other player, the sound
from both players is mixed. The current player ends
play by fading out, and the other player starts play
by fading in.
NO DELAY
X-FADE
To cancel No-Delay/X-Fade Play
Press the corresponding button repeatedly until
“NO DELAY” or “X-FADE” disappears from the display. The
current player continues playing.
You can change the method (No-Delay or X-Fade)
during play
Press the corresponding button (NO DELAY or X-FADE)
following the procedure in Step 2.
You can start X-Fade whenever you like
Press FADER during X-Fade Play.
Even after you have set the X-Fade mode and started XFade play, you can start X-Fade manually at any point
you like. Note that you cannot do this operation while
the sound from both players is mixed.
Notes
• The play starts from the second player if you start play
while the MEGA CONTROL button is lit.
• When one player has played all the discs/tracks in the
player ahead of the other player, the play stops.
• Do not use the controls on the second player during
No-Delay/X-Fade Play. They may not work correctly.
22
·
1 Select the play mode you want on each player.
2 When you select No-Delay Play
Press NO DELAY.
“NO DELAY” appears in the display.
When you select X-Fade Play
Press X-FADE.
“X-FADE” appears in the display.
Each time you press the X-FADE button, the
indication appears as follows:
n X-FADE off n at track end n after 30 sec
after 90 sec N after 60 sec N
To change the current player each time a whole
track is finished, select “at track end.”
To change the current player at the specified
interval, press X-FADE repeatedly until the
interval you want appears in the display.
EN
Page 23
Storing Information About CDs (Custom Files)
Storing Information About CDs (Custom Files)
Storing Information About CDs (Custom Files)Storing Information About CDs (Custom Files)Storing Information About CDs (Custom Files)Storing Information About CDs (Custom Files)
Storing Information About CDs (Custom Files)
Storing Information About CDs (Custom Files)
Locating a Scene or Track You Want
Locating a Scene or Track You Want
What You Can Do With the
Custom Files
The player can store two types of information called
“Custom Files” for each disc. Once you have stored
Custom Files for a disc, the player automatically recalls
what you have stored whenever you select the disc.
Note that Custom Files will be erased if you do not use
the player for about one month.
You can store this information:
When you use
Disc Memo (page 23)
Delete Bank (page 26)
Group File (page 27)
Where are Custom Files stored?
You can
Label discs using up to 13
characters
Delete unwanted tracks and store
only the tracks you want
Group discs up to eight groups to
locate them easily
Labeling Discs (Disc Memo)
You can label discs using up to 13 characters and have
the player display the Disc Memo each time you select
the disc. The Disc Memo can be anything you like, such
as a title, musician’s name, category or date of
purchase.
When you select a CD TEXT disc
The disc title is stored as the Disc Memo automatically.
If the disc title has more than 13 characters, the first 13
characters of the disc title are stored (see page 12).
When you replace a disc with a CD TEXT disc, the disc
title of the CD TEXT disc is also stored automatically.
Note that you cannot change the Disc Memo of the
CD TEXT disc.
You can label discs while the front cover is open
Labeling discs on the player
JOGINPUT
Custom Files are stored not on the disc, but in the
player’s memory. It means you cannot use Custom
Files when you play the disc on other players.
If you replace discs you have filed in the
Custom Files
The Custom File information you have stored remains,
since each Custom File information is assigned to each
slot. Erase all Custom Files (Disc Memo, Delete Bank
and Group File) of the old disc, and then file the new
disc information in the Custom Files.
Erasing all Custom Files of all discs
Turn off the player. While holding down CLEAR, press
I/u to turn on the player. “ALL ERASE” appears in
the display, and all Custom Files will be erased.
CLEAR
1 Turn the JOG dial until the disc number to which
you want to assign a Disc Memo appears in the
display.
When you label a disc with the front cover closed,
the disc number of the disc at the playing position
appears.
When you label a disc with the front cover open,
the disc number at the loading position appears.
2 Press INPUT.
“DISC MEMO” flashes.
3 Push the JOG dial.
The flashing cursor (“) appears.
(Continued)
23
EN
Page 24
Storing Information About CDs (Custom Files)
4 Turn the JOG dial until the character you want
appears in the display.
The cursor disappears and the first space for the
Disc Memo flashes.
As you turn the JOG dial clockwise, the characters
appear in the following order. Turn the JOG dial
counterclockwise to go back to the previous
character.
(space) A B C D E F G H I J K L M N O P Q R S T U
V W X Y Z a b c d e f g h i j k l m n o p q r s t u v w
x y z 0 1 2 3 4 5 6 7 8 9 ! " # $ % & ' ( ) * + , – . / : ; <
= > ? @ [ \ ] ^ _ ` { | } ⁄
ALL DISCS
CD1
DISC
AB
S
5 Push the JOG dial to select the character.
The selected character lights up, and the flashing
cursor appears to indicate the next space to be
input.
ALL DISCS
CD1
AB
S
If you have made a mistake
Press CLEAR and begin again by inputting the correct
characters.
6 Repeat Steps 4 and 5 to input more characters.
7 Press INPUT to store the Disc Memo.
The display shows the Disc Memo.
ALL DISCS
CD1
DISC
20
SONYHITS
Labeling discs using the remote Z
SPACE
DISC/CAPS
MEMO INPUT
=/+
DEL
Number
buttons
ENTER
CLEAR
1 Press DISC/CAPS.
2 Press the number button of the disc you want to
assign a Disc Memo, and then ENTER.
3 Press MEMO INPUT.
The flashing cursor (“) appears.
4 Press DISC/CAPS to find the letter type you want.
Each time you press the button, the letter type
changes cyclically among capital letters (AB), small
letters (ab) and numbers (12). To select a symbol,
you have to select the capital or small letter type.
The selected letter type appears in the upper right
of the display.
24
Repeat Steps 1 to 7 to assign Disc Memos to other
discs.
EN
Page 25
Storing Information About CDs (Custom Files)
Storing Information About CDs (Custom Files)Storing Information About CDs (Custom Files)Storing Information About CDs (Custom Files)Storing Information About CDs (Custom Files)
Storing Information About CDs (Custom Files)
Storing Information About CDs (Custom Files)
Locating a Scene or Track You Want
Locating a Scene or Track You Want
5 To input a letter, press the number button
corresponding to the letter you want (indicated
beside each number button).
The cursor disappears and the first space for the
Disc Memo flashes.
Each time you press the button, the letter changes
cyclically among the ones indicated beside the
button.
To input symbols, press the number button 1
repeatedly until the symbol you want appears in
the display.
ABC DEF&!?
JKL MNOGHI
TUV WXYPRS
QZ
>
10
Example: To select the letter E
Press the number button 3 twice.
n D n E n F
Press 3. Press 3.
ENTER
Characters assigned to
each number button
Press 3.
If you have made a mistake while inputting the
character
To correct the character which has been input
1 Press = or + until the cursor moves next to the
incorrect character.
ALL DISCS
CD1
DISC
AB
SONYHE S
2 Press DEL to delete the incorrect character.
ALL DISCS
AB
DISC
SONYH S
3 Input the correct character.
ALL DISCS
CD1
DISC
AB
SONYHITS
To correct the character currently being input
1 Press DEL to delete the incorrect character.
2 Input the correct character.
To insert a character between the input characters
Press = or + until the cursor moves next to the
point you want to insert, and enter the character.
To insert a space, press SPACE once.
To input a number press the number button you
want.
6 Press ENTER to select the character.
The selected character lights up, and the flashing
cursor appears to indicate the next space to be
input.
You can also go to the next space by pressing other
number buttons.
7 Repeat Steps 4 through 6 to input more characters.
8 Press MEMO INPUT to store the Disc Memo.
The Disc Memo lights up in the display.
ALL DISCS
CD1
DISC
20
SONYHITS
Repeat Steps 1 through 8 to assign Disc Memos to
other discs.
You can label discs of the second CD player
See “Labeling discs of the second CD player” on page 21.
Erasing the Disc Memo
1 Follow Steps 1 through 3 in “Labeling discs on the
player” on page 23 to select the Disc Memo you
want to erase.
2 Press CLEAR.
The Disc Memo disappears.
25
EN
Page 26
Storing Information About CDs (Custom Files)
Storing Custom File
Information Using a Keyboard
(CDP-CX240 only)
You can store the Disc Memo for one disc sequentially
using an IBM-compatible PC keyboard* (not supplied).
* Power consumption must be 120 mA or less.
Keyboard jack
1 Connect a keyboard to the keyboard jack on the
front panel of the player.
Storing Specific Tracks
(Delete Bank)
You can delete unwanted tracks and store only the
tracks you want. When you select the disc containing a
Delete Bank, you can play only the remaining tracks.
CONTINUE
SHUFFLE
1 Press CONTINUE or SHUFFLE before you start
playing.
2 Turn the JOG dial to select the disc.
JOG
CHECK
CLEAR
2 After selecting the disc you want on the player,
press the Enter key.
3 Input the characters you want, then press the Enter
key or Esc key to store the information.
You can delete all characters of selected item
While holding down the Shift key, press the Delete key.
Notes
• If the cursor keys do not work correctly and you cannot
complete the task using the keyboard, disconnect the
keyboard then reconnect it to the player.
• If the keyboard is not the USA model, the characters may be
input differently from those on the keys.
The USA keyboard layout is shown below.
~
'
1!2@3#4$5%6^7&89(0)-
WERT YU I OPQ
SDFGHJKLACaps Lock
Shift
Ctrl Alt Alt Ctrl
XCVBNM<>Z
+
=
}
{
]
[
Enter
?
Shift
3 Press CHECK repeatedly until the track you want
to delete appears in the display.
ALL DISCS
DISC
CD1
TRACK
20
201ON
4 Press CLEAR.
“DELETE FILE” and “OFF” appear in the display.
ALL DISCS
DISC
CD1
DELETE FILE
20
TRACK
20 1 OFF
If you want to recover the track, press CLEAR
again.
5 Repeat Steps 3 and 4 to delete more tracks.
You can recover all the tracks you have deleted
Hold down CLEAR until “ALL ON” appears in the
display.
Note
The deleted tracks are skipped even in the Shuffle or Program
Play mode (when the whole disc containing a Delete Bank is
programmed as one step).
26
EN
Page 27
Storing Information About CDs (Custom Files)
Storing Information About CDs (Custom Files)Storing Information About CDs (Custom Files)Storing Information About CDs (Custom Files)Storing Information About CDs (Custom Files)
Storing Information About CDs (Custom Files)
Storing Information About CDs (Custom Files)
Grouping Discs (Group File)
You might find that too many discs make it hard to
find the disc you want. This player has a feature that
lets you classify discs into eight groups. One disc can
be put into only one group.
Once you classify discs, you can enjoy Continuous,
Shuffle or Repeat Play only within a certain group
(Group Play).
SHUFFLECONTINUE
GROUP 1 – 8 CLEAR
≠/±
GROUP FILE
INPUT
·
JOG
Locating a Scene or Track You Want
Locating a Scene or Track You Want
3 Turn the JOG dial until the character you want
appears in the display.
The cursor disappears and the first space for the
Group Memo flashes.
As you turn the JOG dial clockwise, the characters
appear in the following order. Turn the JOG dial
counterclockwise to go back to the previous
character.
(space) A B C D E F G H I J K L M N O P Q R S T U
V W X Y Z a b c d e f g h i j k l m n o p q r s t u v w
x y z 0 1 2 3 4 5 6 7 8 9 ! " # $ % & ' ( ) * + , – . / : ; <
= > ? @ [ ¥ ] ^ _ \ { | } ⁄
4 Push the JOG dial to select the character.
The selected character lights up, and the flashing
cursor appears to indicate the next space to be
input.
If you have made a mistake
Press CLEAR and begin again by inputting the correct
characters.
Assigning discs to groups
1 Press CONTINUE or SHUFFLE before you start
playing.
2 Turn the JOG dial to select the disc you want to
assign to a group.
3 Press GROUP FILE.
“Select G1 – G8” appears in the display.
4 Press one of the GROUP 1 – 8 buttons to which
you want to put the disc.
“GROUP FILE” and the group number appear in
the display and the disc is assign to that group.
Labeling groups (Group Memo)
You can change the preset group number to anything
you like, such as a category, using up to 13 characters.
Note that you cannot store the Group Memo if you
have not assign any disc to the group.
1 Press INPUT.
2 Turn the JOG dial until the group number you
want to label appears in the display, and then push
the JOG dial.
The flashing cursor (“) appears.
5 Repeat Steps 3 and 4 to input more characters.
See also “Labeling discs on the player” on page 23
for details.
6 Press INPUT to store the Group Memo.
Erasing the Group Memo
1 Follow Steps 1 and 2 in “Labeling groups” to select
the Group Memo you want to erase.
2 Press CLEAR.
The Group Memo disappears.
Playing discs in a group (Group Play)
You can enjoy Continuous or Shuffle Play within a
group.
1 Select the play mode you want before you start
playing.
When you select
ALL DISCS
Continuous Play
1 DISC Continuous
Play
ALL DISCS Shuffle
Play
1 DISC Shuffle Play
The player plays
All tracks on all discs in the
group consecutively
All tracks on the specified disc
in the group consecutively
All tracks on all discs in the
group in random order
All tracks on the specified disc
in the group in random order
(Continued)
27
EN
Page 28
Storing Information About CDs (Custom Files)
2 Press one of the GROUP 1 – 8 buttons to select the
group and press ·.
Group Play starts from the disc which is the most
upward number and located closest to the playing
position. If the disc at the playing position is put
into the selected group, the play starts from that
disc.
To cancel Group Play
Press one of the GROUP 1 – 8 buttons you have selected.
“GROUP OFF” appears in the display.
You can start Group Play with the remote Z
1 Before you start playing, press GROUP.
2 Press the number button of the group you want to
play, then press ENTER.
3 Press ·.
To cancel Group Play, press GROUP.
You can specify the disc to play when starting Group
Play
After selecting the group, turn the JOG dial to select the
disc, then push the JOG dial or press ·.
When using the remote, press DISC SKIP repeatedly
until the disc number you want appears in the display,
then press press ENTER.
Deleting discs from a group
• To delete a disc from a group
1 Turn the JOG dial until the disc number you want
to delete from the group appears in the display.
2 Press GROUP FILE.
“Select G1 – G8” appears in the display.
3 Press CLEAR.
“GROUP ERASE” appears in the display.
• To delete all discs from a group at once
While holding down one of the GROUP 1 – 8 buttons
you want to clear, press CLEAR.
Storing Y our Favorite T r acks
(Hit List) (CDP-CX240 only)
You can store the tracks you play frequently and select
those tracks immediately by checking the track
numbers or titles (see page 29) in the Hit List.
You can put up to 32 tracks in the Hit List.
HIT LIST
≠/±
INPUT
JOG
Note
If “NO ENTRY” appears in the display, no disc has been put
into the selected group.
Locating a disc within a group by scanning
each Disc Memo Z
You can locate a disc you want to play within a specific
group quickly by scanning the Disc Memo in the
display and then start Group Play.
Note that you cannot use this function in the ALL
DISCS Shuffle and Program play mode.
1 Press GROUP first, then the number button of the
group you want.
2 Press ENTER.
The group name appears in the display.
3 Press MEMO SCAN.
“MEMO SCAN” appears in the display.
The Disc Memos of the discs in the selected group
scroll in the display.
4 Press ENTER or · when the Disc Memo of the
disc you want appears.
Group Play starts form the selected disc.
=/+
·
HIT LIST
ENTER
CLEAR
28
EN
You can jump to the next or preceding Disc Memo
while scanning
Press ≠ or ±.
Page 29

Storing Information About CDs (Custom Files)
Storing Information About CDs (Custom Files)Storing Information About CDs (Custom Files)Storing Information About CDs (Custom Files)Storing Information About CDs (Custom Files)
Storing Information About CDs (Custom Files)
Storing Information About CDs (Custom Files)
Locating a Scene or Track You Want
Locating a Scene or Track You Want
Putting tracks into the Hit List
Press HIT LIST while playing your favorite track.
“HIT” indication and “List in” appear in the display.
Playing tracks in the Hit List
1 Press HIT LIST before you start playing.
The HIT LIST button lights up and “HIT LIST”
appears in the display.
2 Turn the JOG dial or press ≠/± until the
track you want appears in the front panel display.
3 Push the JOG dial or press · to start playing.
When using the remote, press ENTER.
The Hit List remains until you erase them
Even if you replace discs, the Hit List you create remains.
So, the player plays only the existing track.
Notes
• You cannot arrange the order of the tracks in the Hit List.
• The track you select in Step 2 will be listed as the first track
in the Hit List.
• If you input the 33rd track into the Hit List, the 32nd track
will be replaced.
• You cannot store the tracks from a second CD player.
3 Turn the JOG dial until the character you want
appears in the display.
The cursor disappears and the first space for the
Hit Title flashes.
As you turn the JOG dial clockwise, the characters
appear in the following order. Turn the JOG dial
counterclockwise to go back to the previous
character.
(space) A B C D E F G H I J K L M N O P Q R S T U
V W X Y Z a b c d e f g h i j k l m n o p q r s t u v w
x y z 0 1 2 3 4 5 6 7 8 9 ! " # $ % & ' ( ) * + , – . / : ; <
= > ? @ [ ¥ ] ^ _ \ { | } ⁄
4 Push the JOG dial to select the character.
The selected character lights up, and the flashing
cursor appears to indicate the next space to be
input.
If you have made a mistake
Press CLEAR and begin again by inputting the correct
characters.
5 Repeat Steps 3 and 4 to input more characters.
See also “Labeling discs on the player” on page 23
for details.
6 Press INPUT to store the Hit Title.
Deleting tracks from the Hit List
1 Follow Steps 1 and 2 in “Playing tracks in the Hit
List.”
2 Press CLEAR.
The selected track is deleted from the Hit list.
Deleting all tracks of the Hit List
Hold down CLEAR while in stop mode until “CLEAR”
appears.
Labeling tracks in the Hit List (Hit Title)
You can label tracks in the Hit List in either of two
methods described below.
Labeling tracks while in play mode
1 Press INPUT while playing a track in the Hit List.
“Hit Title” appears in the display.
Labeling tracks while in stop mode
1 Select the track you want to assign by turning the
JOG dial or press ≠/±.
2 Press INPUT.
The flashing cursor (“) appears in the display.
3 Follow Steps 3 to 6 in “Labeling tracks while in
play mode” to input the characters.
You can store the CD TEXT disc’s track titles in the Hit
List
Push the JOG dial twice (while in play mode) or press
INPUT twice (while in stop mode) when the track title
appears in Step 2.
2 Push the JOG dial.
The flashing cursor (“) appears in the display.
29
EN
Page 30

Additional Information
Additional Information
Precautions
On transportation
• When transporting the player, open the front cover then
remove all the discs from the player and turn the power off.
On safety
• Caution — The use of optical instruments with this product
will increase eye hazard.
• Should any solid object or liquid fall into the cabinet,
unplug the player and have it checked by qualified
personnel before operating it any further.
On power sources
• Before operating the player, check that the operating
voltage of the player is identical with your local power
supply. The operating voltage is indicated on the nameplate
at the rear of the player.
• The player is not disconnected from the AC power source
(mains) as long as it is connected to the wall outlet, even if
the player itself has been turned off.
• If you are not going to use the player for a long time, be
sure to disconnect the player from the wall outlet. To
disconnect the AC power cord (mains lead), grasp the plug
itself; never pull the cord.
• AC power cord must be changed only at the qualified
service shop.
• The unswitched socket outlets remain live, independently
of power switch setting, at all times when the unit is
connected to the AC power supply.
On placement
• Place the player in a location with adequate ventilation to
prevent heat build-up in the player.
• Do not place the player on a soft surface such as a rug that
might block the ventilation holes on the bottom.
• Do not place the player in a location near heat sources, or in
a place subject to direct sunlight, excessive dust or
mechanical shock.
If you have any questions or problems concerning your
player, please consult your nearest Sony dealer.
Notes on CDs
On handling CDs
• To keep the disc clean, handle the disc carefully.
• Do not stick paper or tape on the disc.
• Do not expose the disc to direct sunlight or heat sources
such as hot air ducts, nor leave it in a car parked in direct
sunlight as there can be considerable rise in temperature
inside the car.
• After removing a disc from the disc slot, store the disc in its
case.
On cleaning
• Before playing, clean the disc with a cleaning cloth. Wipe
the disc from the center out.
30
EN
On operation
• If the player is brought directly from a cold to a warm
location, or is placed in a very damp room, moisture may
condense on the lenses inside the player. Should this occur,
the player may not operate properly. In this case, leave the
player turned on for about an hour until the moisture
evaporates.
On adjusting volume
• Do not turn up the volume while listening to a portion with
very low level inputs or no audio signals. If you do, the
speakers may be damaged when a peak level portion is
played.
On cleaning
• Clean the cabinet, panel and controls with a soft cloth
slightly moistened with a mild detergent solution. Do not
use any type of abrasive pad, scouring powder or solvent
such as alcohol or benzine.
• Do not use solvents such as benzine, thinner, commercially
available cleaners or anti-static spray intended for vinyl
LPs.
Page 31

Playing CDs in Various Modes
Additional Information
Additional Information
Additional Information
Troubleshooting
If you experience any of the following difficulties while
using the player, use this troubleshooting guide to help
you remedy the problem. Should any problem persist,
consult your nearest Sony dealer.
There is no sound.
/Check that the player is connected securely.
/Make sure you operate the amplifier correctly.
The CD does not play.
/There is no CD in a slot (“–NO DISC–”
appears).
Insert a CD.
/Insert the CD with the label side facing right.
/Clean the CD (see page 30).
/Moisture has condensed inside the player. Open
the front cover and leave the player turned on
for about an hour (see page 30).
The remote does not function.
/Remove obstacles in the path of the remote and
the player.
/Point the remote at the remote sensor g on the
player.
/Replace all the batteries in the remote with new
ones if they are weak.
/Set the CD 1/2/3 switch on the remote
according to the position of the COMMAND
MODE selector displayed in the front panel
display (see page 5).
The player functions incorrectly.
/The microcomputer chips may be operating
incorrectly. Disconnect the AC power cord, then
connect it back to the wall outlet to reset the
player.
Specifications
Compact disc player
Laser Semiconductor laser (λ = 780 nm)
Laser output Max 44.6 µW*
Frequency response 20 Hz to 20 kHz ±0.5 dB
Signal-to-noise ratio CDP-CX240: More than 107 dB
Dynamic range More than 98 dB
Harmonic distortion Less than 0.0045 %
Channel separation CDP-CX240: More than 100 dB
Outputs
Jack
type
LINE OUT
DIGITAL OUT
(OPTICAL)
Phono
jacks
Optical
output
connector
General
Power requirements
Where purchased
Canada
Europe/Certain countries in
Asia
Other countries
Emission duration: continuous
* This output is the value measured at
a distance of 200 mm from the
objective lens surface on the Optical
Pick-up block with 7 mm aperture.
CDP-CX220: More than 105 dB
CDP-CX220: More than 97 dB
Maximum
output
level
2 V
(at 50 kilohms)
–18 dBm
Load impedance
Over 10 kilohms
Wave length: 660 nm
Power requirements
120 V AC, 60 Hz
220 V – 230 V AC, 50/60 Hz
110 V – 120 V or 220 V – 240 V
AC, adjustable, 50/60 Hz
Power consumption 12 W
Dimensions (approx.) When the front cover is closed
(w/h/d) 430 × 200 × 480 mm (17 × 7 7/8 × 19 in.)
incl. projecting parts
Mass (approx.) 9.5 kg (21 lbs)
Supplied accessories
Audio cord (2 phono plugs – 2 phono plugs) (1)
Monaural (2P) mini-plug cord (1) (supplied for Canadian
models only)
Remote commander (remote) (1)
Sony SUM-3 (NS) batteries (2)
CD booklet holders (2) and label (1)
Design and specifications are subject to change without notice.
31
EN
Page 32

Additional Information
Index
Index
A, B
Advanced Mega Control 20
AMS 15
Automatic Music Sensor 15
C
CD TEXT 12
Connecting 4
another CD player 6
Continuous Play 10
CONTROL A1 5
X-Fade Play 22
Custom Files
Delete Bank 26
Disc Memo 23
Group File 27
Hit List 28
what you can do with 23
D
Delete Bank 26
Disc Memo 23
E
Erasing
Custom Files 23
Delete Bank 26
Disc Memo 25
Group Memo 27
programs 19
F
Fading 21
G
Grouping Discs 27
H
Handling CDs 30
Hookups
overview 4
I
Inserting CDs 7
J, K
JOG dial 7
L
Labeling a disc 23
Locating
a specific point 15
a specific track 15
by monitoring 15
by observing the display 15
directly 15
discs 14
using AMS 15
M
Memo Scan 14
Memo Search 14
N, O
No-Delay Play 22
P, Q
Playback
Continuous Play 10
Group Play 27
Program Play 17
Repeat Play 16
Shuffle Play 16
Program
changing 19
checking 19
erasing 19
R
Remote control 4
Repeating 16
Rotary table 7
S
Searching. See Locating
Selecting a disc 14
Selecting the language 13
Shuffle Play
on all discs 16
on one disc 17
Specifying the next disc 15
Storing
information about CDs 23
specific tracks 26
T
Timer Play 19
Total playing time 12
Troubleshooting 31
U, V, W, X, Y, Z
Unpacking 4
Names of controls
Buttons
CHECK 19, 26
CLEAR 17, 25, 26
CONTINUE 15
X-FADE 22
DEL 25
DISC 14, 18
DISC/CAPS 24
DISC SKIP 11
ENTER 14, 18, 28
GROUP 28
GROUP 1 – 8 27
GROUP FILE 27
HIGH-LIGHT 13
HIT LIST 29
INPUT 24, 29
MEGA CONTROL 21
MEMO INPUT 24
MEMO SCAN 14
MEMO SEARCH 14
NO DELAY 22
Number 14, 15
§ OPEN/CLOSE 7
PROGRAM 17
REPEAT 16
SHUFFLE 16
SPACE 25
TIME/TEXT 12
≠/± 11
· 11
P 11
p 11
=/+ 15
0/) 15
>10 15
Switches
CD 1/2/3 5
TIMER 19
I/u 7
Jacks
LINE OUT 5
S-LINK/CONTROL A1 4
2ND CD IN 6
Connectors
DIGITAL OUT (OPTICAL) 5
Others
COMMAND MODE selector 5
Disc slots 7
Display 12
Front cover 7
JOG dial 7
Rotary table 7
g 4
32
EN
Page 33

Playing CDs in Various Modes
Additional Information
Additional Information
Additional Information
33
EN
Page 34

AVERTISSEMENT
Pour prévenir tout risque
d’incendie ou d’électrocution,
installez cet appareil à l’abri de
la pluie ou de l’humidité.
Pour prévenir tout risque de
décharge électrique, abstenezvous d’ouvrir le boîtier.
Confiez l’entretien de votre
lecteur exclusivement à un
personnel qualifié.
N’installez pas cet appareil
dans un endroit clos, comme
dans une bibliothèque ou une
armoire intégrée.
Cet appareil entre dans la catégorie des
produits LASER DE CLASSE 1.
L’ETIQUETTE INDIQUANT
L’APPARTENANCE DE CE LECTEUR
A LA CLASSE 1 est apposée au dos du
boîtier.
L’étiquette de mise en garde qui suit est
apposée à l’intérieur de l’appareil.
Pour les utilisateurs au Canada
ATTENTION
POUR PREVENIR LES CHOCS
ELECTRIQUES, NE PAS UTILISER
CETTE FICHE POLARISEE AVEC
UN PROLONGATEUR, UNE PRISE
DE COURANT OU UNE AUTRE
SORTIE DE COURANT, SAUF SI
LES LAMES PEUVENT ETRE
INSEREES A FOND SANS EN
LAISSER AUCUNE PARTIE A
DECOUVERT.
Bienvenue!
Nous vous remercions d’avoir fait
l’acquisition de ce lecteur de disques
compacts Sony. Avant d’utiliser cet
appareil, nous vous recommandons de
lire attentivement ce manuel et de le
conserver afin de pouvoir le consulter
ultérieurement.
A propos de ce
manuel
Les instructions fournies dans ce manuel
se rapportent aux modèles CDP-CX240
et CDP-CX220. Le CDP-CX240 est le
modèle utilisé dans les illustrations.
Toute différence d’utilisation est
clairement mentionnée dans le texte, par
exemple, “CDP-CX240 uniquement”.
Conventions
• Les instructions fournies dans ce
manuel portent sur les commandes du
lecteur.
Vous pouvez également utiliser les
commandes que comporte votre
télécommande si celles-ci portent le
même nom ou un nom similaire à
celles de votre lecteur de disques
compacts.
• Les symboles qui suivent apparaissent
dans ce manuel:
Ce symbole indique que vous
pouvez effectuer l’opération
correspondante en vous servant
de la télécommande.
Ce symbole indique un conseil
ou une astuce facilitant
l’opération envisagée.
Cet équipement est exclusivement
conçu pour un usage domestique. La
garantie qui couvre ce matériel sera
invalidée en cas d’utilisation dans un
environnement commercial par des
animateurs, disc jockeys, etc., même
pendant la période couverte par la
garantie.
F
2
Page 35

TABLE DES MA TIERES
Préparation
Déballage............................................................................................................................... 4
Raccordement du système.................................................................................................. 4
Connexion d’un autre lecteur CD (CDP-CX240 uniquement) ...................................... 6
Introduction des disques compacts................................................................................... 7
Lecture d’un disque compact....................................................................................... 10
Lecture des disques compacts
Utilisation de l’écran d’affichage..................................................................................... 12
Localisation d’un disque déterminé................................................................................ 13
Spécification du prochain disque sélectionné ............................................................... 15
Localisation d’une plage spécifique ou d’un passage sur une plage quelconque ... 15
Lecture répétée ................................................................................................................... 16
Lecture dans un ordre quelconque (lecture aléatoire) ................................................. 16
Création de programmes musicaux personnalisés (lecture programmée) ............... 17
Lecture à l’aide d’un programmateur (CDP-CX240 uniquement) ............................. 19
Contrôle d’un autre lecteur CD (fonction Mega Control avancée)
(CDP-CX240 uniquement)................................................................................................ 20
Fondu enchaîné d’entrée ou de sortie (CDP-CX240 uniquement) ............................. 21
Lecture alternée (Lecture sans transition/Lecture enchaînée)
(CDP-CX240 uniquement)................................................................................................ 22
F
Enregistrement d’informations relatives aux disques compacts
(fichiers personnalisés)
Emploi des fichiers personnalisés ................................................................................... 23
Identification des disques (mémo de disque)................................................................ 23
Mémorisation des informations de fichier personnalisé à l’aide d’un clavier
(CDP-CX240 uniquement) ................................................................................................ 26
Mémorisation de plages spécifiques (bloc de suppression) ........................................ 26
Groupement de disques (fichier de groupe).................................................................. 27
Mémorisation de vos plages préférées (Hit List) (CDP-CX240 uniquement)........... 28
Informations complémentaires
Précautions ......................................................................................................................... 30
Remarques concernant les disques compacts................................................................ 30
Dépannage .......................................................................................................................... 31
Spécifications ...................................................................................................................... 31
Index........................................................................................................................................... 32
F
3
Page 36

Préparation
Préparation
Déballage
Assurez-vous que les accessoires qui suivent vous ont
été livrés:
• Câble audio (1)
• Câble à minifiche (2 broches) monaural (câble de
connexion pour CONTROL A1) (1) (fourni
uniquement avec les modèles pour le Canada)
• Commande à distance (télécommande) (1)
• Piles Sony SUM-3 (NS) (2)
• Porte-livrets de CD (2) et étiquette (1)
Utilisation du porte-livret pour disques compacts
Le porte-livrets pour CD vous aide à localiser facilement
un disque. Une fois que vous avez introduit les disques
dans le lecteur, vous pouvez placer le livret du CD (qui
accompagne le CD) dans le porte-livrets fourni. Placez
deux livrets de CD dos à dos dans une pochette. Collez
l’étiquette numérotée sur chaque pochette en faisant
correspondre le numéro du logement de disque où vous
avez introduit le disque. Vous pouvez placer jusqu’à 200
livrets de CD dans le porte-livrets.
Introduction des piles dans le boîtier de la
télécommande
La télécommande fournie avec l’appareil permet de
contrôler à distance le fonctionnement du lecteur.
Insérez deux piles (R6) format AA en faisant
correspondre le + et le – des piles avec le schéma
illustré à l’intérieur du compartiment à piles.
Insérez tout d’abord le côté négatif (–), puis
introduisez-le et poussez-le vers le bas jusqu’à ce que le
côté positif (+) se mette en position. Lorsque vous
utilisez la télécommande, orientez-la vers le capteur de
télécommande g du lecteur.
Remarques
• Ne pas abandonner la télécommande à proximité d’une
source de chaleur importante ou d’un endroit humide.
• Ne laisser tomber aucun corps étranger dans le boîtier de la
télécommande en particulier lors du remplacement des piles.
• Ne pas exposer le capteur de télécommande à la lumière
directe du soleil ou à celle que diffusent les appareils
d’éclairage. Toute exposition de cette nature risque de
perturber le fonctionnement de la télécommande.
• Si vous n’utilisez pas la télécommande pendant une période
prolongée, retirez les piles afin de prévenir tout risque de
détérioration engendrée par la corrosion ou une fuite
éventuelle des piles.
Raccordement du système
Vue d’ensemble
Ce chapitre est consacré au raccordement du lecteur de
disques compacts à un amplificateur. Avant de réaliser
la connexion, n’oubliez pas de mettre hors tension
chacun des appareils concernés.
Lecteur de
disques
compacts
Vers une prise
murale
Vers la sortie
de ligne (L)
S-LINK/
CONTROL A1
COMMAND
MODE
Vers la sortie de
ligne (R)
DIGITAL OUT
(OPTICAL)
Vers l’entrée
Remplacement des piles
Dans des conditions d’utilisation normales, les piles
devraient durer environ six mois. Si la télécommande
n’agit plus sur le lecteur, remplacez-les toutes
simultanément par de nouvelles piles.
audio
: Sens du signal
vers une prise murale
Amplificateur
Câbles de raccordement indispensables
Câble audio (1) (fourni)
Blanc
(L)
Rouge
F
4
(R)
Blanc
(L)
Rouge
(R)
Page 37

Préparation
Raccordements
Lors du raccordement d’un câble audio, assurez-vous
que les codes couleur du câble correspondent aux
prises appropriées sur les différentes unités raccordées:
rouge (droit) sur rouge et blanc (gauche) sur blanc.
Assurez-vous de la qualité des connexions afin de
prévenir la manifestation de ronflement ou de
parasites.
Lecteur de
disques compacts
LINE2ND CD
IN OUT
L
R
L
R
• Si votre installation comporte une unité numérique telle
qu’un amplificateur, un convertisseur numérique/
analogique, un magnétophone DAT ou un lecteur de
minidisques
Raccordez l’unité via le connecteur DIGITAL OUT
(OPTICAL) au moyen d’un câble optique (non fourni).
Retirez le capuchon et branchez le câble optique.
POC-15
Câble optique (non fourni)
Lecteur de
disques compacts
DIGITAL OUT
OPTICAL
Amplificateur
INPUT
CD
L
R
Unité numérique
DIGITAL INPUT
OPTICAL
Si vous utilisez un autre lecteur de CD Sony avec ce
lecteur
Vous ne pouvez utiliser la télécommande fournie qu’avec
ce lecteur.
• Si vous utilisez un lecteur équipé du sélecteur
COMMAND MODE:
Réglez le sélecteur COMMAND MODE de ce lecteur
sur CD 1 et celui d’un autre lecteur sur CD 2 ou CD 3.
Réglez ensuite le commutateur CD 1/2/3 de la
télécommande fournie pour chaque lecteur.
• Si vous utilisez un lecteur sans sélecteur COMMAND
MODE:
Le mode de commande du lecteur sans sélecteur
COMMAND MODE est réglé sur CD 1. Réglez le
sélecteur COMMAND MODE de ce lecteur sur CD 2 et
le commutateur CD 1/2/3 de la télécommande sur
CD 2.
Réglage du sélecteur de tension (modèles
équipés d’un sélecteur de tension
uniquement)
Vérifiez si le sélecteur de tension sur le panneau arrière
du lecteur est réglé sur la tension secteur locale. Si ce
n’est pas le cas, réglez le sélecteur sur la position
appropriée à l’aide d’un tournevis avant de brancher le
cordon d’alimentation sur une prise d’alimentation.
220 - 240 V110 - 120 V
Remarque
Si vous raccordez une unité par l’intermédiaire du
connecteur DIGITAL OUT (OPTICAL), certains parasites
sont susceptibles de se manifester lors de la lecture d’un
support informatique tel qu’un CD-ROM sur lequel sont
enregistrées d’autres données que les informations
musicales que contient un disque compact.
Si vous avez raccordé un composant Sony par le biais
de la prise CONTROL A1
Branchez ce composant via la prise CONTROL A1. Vous
pouvez simplifier l’opération des systèmes audio
constitués de plusieurs composants Sony séparés. Pour
plus de détails, reportez-vous aux instructions
supplémentaires “S-LinkTM/CONTROL-A1 Control
System”.
Connexion du cordon d’alimentation
secteur
Branchez le cordon d’alimentation secteur sur une
prise murale.
Remarque sur l’installation
Installez le lecteur sur une surface horizontale.
Si le lecteur est incliné, le lecteur risque de présenter un
dysfonctionnement ou de subir des dommages.
F
5
Page 38

Préparation
Connexion d’un autre lecteur
CD (CDP-CX240 uniquement)
Si vous disposez d’un lecteur CD Sony équipé d’une
prise CONTROL A1 et que le mode de commande de
ce lecteur peut être réglé sur CD 3, vous pouvez
contrôler ce lecteur comme second lecteur avec cet
appareil. Après avoir branché cet appareil et un
amplificateur, suivez la procédure ci-dessous.
Mettez les deux lecteurs hors tension avant d’effectuer
les connexions.
Vers LINE OUT
COMMAND
MODE
CDP-CX240
Cordons nécessaires
• Cordon audio (1) (Utilisez le cordon fourni avec le lecteur à
raccorder.)
• Cordon de minifiche monaural (2P) (1) (fourni uniquement
avec les modèles pour le Canada)
1 Raccordez les lecteurs au moyen d’un cordon
audio (voir également “Raccordements” à la page
5).
CDP-CX240
LINE2ND CD
IN OUT
L
R
L
R
CDP-CX200, etc.
LINE OUT
L
R
2 Raccordez les lecteurs au moyen d’un cordon de
minifiche monaural (2P).
Vers une prise
secteur
Vers 2ND CD IN
Vers la sortie
audio
Vers une prise
secteur
Vers S-LINK/CONTROL A1
Vers CONTROL A1
Vers l’entrée
audio
CDP-CX200, etc.
Amplificateur
CDP-CX240
S-LINK
CONTROL A1
CDP-CX200, etc.
CONTROL A1
Pour plus de détails sur cette connexion, reportezvous aux instructions supplémentaires “S-Link
TM
CONTROL-A1 Control System”.
3 Réglez le sélecteur COMMAND MODE de chaque
lecteur.
Mettez le sélecteur COMMAND MODE de ce
lecteur sur CD 1 ou CD 2 et mettez celui du second
lecteur sur CD 3.
COMMAND MODE
CD
132
Pour plus de détails sur l’utilisation du second
lecteur, reportez-vous à “Contrôle d’un autre
lecteur CD” à la page 20 et “Lecture alternée” à la
page 22.
/
4 Branchez le cordon d’alimentation des deux
: Sens du signal
F
6
Vers une prise
secteur
lecteurs aux prises secteur.
Remarques
• Ne branchez pas d’autre lecteur que celui que vous utilisez
comme second lecteur aux prises 2ND CD IN de ce lecteur.
• Si vous raccordez un second lecteur CD, ne branchez pas le
connecteur DIGITAL OUT (OPTICAL) de cet appareil à
l’amplificateur.
Page 39

Introduction des disques
compacts
Vous pouvez introduire jusqu’à 200 disques dans ce
lecteur.
Préparation
3 Tournez le disque JOG jusqu’à ce que vous
trouviez le logement de disque dans lequel vous
désirez introduire un disque tout en vérifiant le
numéro de disque (inscrit à côté de chaque
logement ainsi que dans la fenêtre d’affichage).
I/u
Position de lecture
Magasin rotatif
Position de
chargement
JOG§ OPEN/CLOSE
1 Appuyez sur la touche I/u pour mettre le lecteur
sous tension.
2 Ouvrez le capot frontal en appuyant sur
§ OPEN/CLOSE.
Numéro de
disque
Logement de disque en position de chargement
Le numéro du disque en position de chargement
apparaît dans la fenêtre d’affichage.* Si le disque
possède un mémo (voir page 23), le mémo de
disque s’affiche au lieu du numéro de disque. Le
numéro de disque ou le mémo de disque change
lorsque vous tournez le disque JOG.
ALL
DISCS
CD1
DISC
02
*DISC-20*
Numéro de disque ou mémo de disque
Vous pouvez classer les disques en huit groupes
maximum à l’aide de la fonction Fichier de groupe.
Cette fonction vous permet de retrouver
rapidement le disque que vous voulez écouter.
Pour plus de détails, reportez-vous à la section
“Groupement de disques” à la page 27.
* Si vous avez déjà introduit des disques, le numéro du
disque en position de lecture apparaît. Lorsque vous
tournez le disque JOG, le numéro de disque affiché
change pour celui qui se trouve en position de
chargement.
(suite)
F
7
Page 40

Préparation
4 Introduisez un disque avec le côté imprimé vers la
droite.
Le côté étiqueté
orienté vers la droite
Après avoir introduit le disque, vous pouvez
introduire les titres originaux des disques au lieu
des numéros de disques (voir “Identification des
disques” à la page 23) de manière à les localiser
rapidement lorsque vous démarrez la lecture.
ALL DISCS
CD1
DISC
20
SONYHITS
5 Répétez les étapes 3 et 4 pour introduire d’autres
disques.
6 Refermez le capot frontal en appuyant sur
§ OPEN/CLOSE.
Le porte-livrets de CD fourni vous permet de localiser
un disque
Vous pouvez placer jusqu’à 200 livrets de CD. Insérez un
livret et collez l’étiquette numérotée sur le film d’une
pochette et le livret de manière à pouvoir localiser le
disque rapidement.
Remarques
• N’introduisez pas d’adaptateur pour CD de 8 cm
(CSA-8) sans CD. Il risque de causer des dégâts à
l’intérieur du lecteur.
• Ne fixez rien aux CD comme des adhésifs ou une
pochette, car vous risqueriez d’endommager le
lecteur ou le disque.
• Si vous laissez tomber un disque dans le lecteur et si le
CD n’entre pas correctement dans le logement, consultez
votre revendeur Sony.
• Lorsque vous transportez le lecteur, retirez tous les
disques du lecteur.
• Veillez à introduire les disques dans les logements
perpendiculairement au magasin rotatif. Si les disques
ne sont pas introduits verticalement, vous risquez
d’endommager le lecteur ou les disques.
• Assurez-vous que le magasin rotatif est complètement
arrêté avant d’introduire ou de retirer les disques.
Le panneau avant se ferme automatiquement lorsque
vous appuyez sur ·. Ne laissez pas vos doigts à
l’intérieur du lecteur après avoir appuyé sur ·, sinon
votre main risque d’être prise par le panneau avant.
Le magasin rotatif tourne et le logement de disque
en position de chargement passe en position de
lecture.
Refermez toujours le capot frontal, sauf lorsque
vous introduisez ou que vous retirez des disques.
F
8
Page 41

Retrait de disques compacts
Après avoir exécuté les opérations 1 à 3 indiquées au
paragraphe “Introduction des disques compacts”
présenté à la page 7, retirez les disques puis refermez le
capot frontal.
Préparation
F
9
Page 42

Opérations de base
Lecture d’un disque compact
2 3 4/5
STANDBY
I / u
CONTINUE
TIMER
OFF PLAY
KEY BOARD
KEYBOARD
• Reportez-vous aux pages 4 – 5
pour les informations relatives
au raccordement.
• Assurez-vous que vous avez
correctement introduit les
disques, comme indiqué à la
pages 7 – 8.
• Vous pouvez jouer toutes les
plages d’un disque dans l’ordre
original (lecture continue). Vous
avez également la possibilité de
jouer successivement les 200
disques que peut contenir le
magasin.
Vous pouvez mettre le lecteur
sous tension en appuyant sur
la touche I/u de la
télécommande
GROUP 1
GROUP 5
SHUFFLE
GROUP 2
GROUP 6
PROGRAM
GROUP 3
GROUP 7
REPEAT
GROUP 4
GROUP 8
5
DISC/CHARACTER
X-FADE
MEGA CONTROL
FADER NO DELAY
TIME/TEXT
HIT LIST
GROUP FILE
OPEN/CLOSE
Mettez l’amplificateur sous tension et sélectionnez la position
du lecteur de disques compacts.
1
Appuyez sur la touche I/u pour mettre le lecteur de disques
compacts sous tension.
2
Appuyez sur CONTINUE pour sélectionner le mode
ALL DISCS ou 1 DISC Continuous Play.
3
Chaque fois que vous appuyez sur CONTINUE, “ALL DISCS”
ou “1 DISC” apparaît dans la fenêtre d’affichage.
Si vous sélectionnez
l’option
ALL DISCS
1 DISC
Le lecteur reproduit
Consécutivement tous les disques du lecteur en
respectant l’ordre de leur numérotation. L’appareil
“saute” les logements de disque vides.
Uniquement le disque que vous avez sélectionné
INPUT
MEMO SEARCH
AMS
PUSH ENTER
CHECK CLEAR
10
Tournez le disque JOG jusqu’à ce que le numéro de disque ou
le mémo de disque voulu (voir page 23) apparaisse dans la
4
fenêtre d’affichage pour sélectionner le premier disque
(ALL DISCS) ou un disque déterminé (1 DISC).
ALL DISCS
CD1
DISC
20
*DISC-20*
F
Page 43

5
Opérations de base
Basic Operations
Poussez sur le disque JOG ou appuyez sur · pour entamer la
lecture.
Le disque sélectionné est placé en position de lecture et le
lecteur reproduit une fois tous les disques à partir du disque
sélectionné (ALL DISCS) ou toutes les plages du disque (1 DISC).
Réglez le volume sur l’amplificateur.
Mise hors tension du lecteur
Le lecteur mémorise le titre
et le numéro du dernier
disque joué ainsi que le
mode de lecture (continue,
aléatoire (voir page 16) ou
programmée (voir page 17)).
Ainsi, lorsque vous remettez
le lecteur sous tension, celuici joue le même disque en
appliquant le même mode
de lecture.
Pour interrompre la lecture
Appuyez sur la touche p.
STANDBY
I / u
CONTINUE
SHUFFLE
PROGRAM
REPEAT
TIMER
OFF PLAY
GROUP 1
KEY BOARD
GROUP 5
KEYBOARD
Si vous souhaitez
Marquer une pause
Reprendre la lecture après une pause
Passer au disque suivant
Revenir au disque précédent
Passer à la plage suivante
Revenir à la plage précédente
Interrompre la lecture et retirer le disque
TIME/TEXT
GROUP 2
GROUP 3
GROUP 4
HIT LIST
GROUP 6
GROUP 7
GROUP 8
GROUP FILE
≠/±
MEGA CONTROL
FADER NO DELAY
OPEN/CLOSE
§ OPEN/CLOSE
JOG
DISC/CHARACTER
X-FADE
INPUT
MEMO SEARCH
PUSH ENTER
AMS
CHECK CLEAR
·P p
Vous devez
Appuyer sur P
Appuyer sur P ou ·
Appuyer une fois sur DISC SKIP +.
Maintenez la touche enfoncée pour sauter
les disques.
Appuyer une fois sur DISC SKIP –.
Maintenez la touche enfoncée pour sauter
les disques.
Appuyer sur ±
Appuyer sur ≠
Appuyer sur § OPEN/CLOSE
Opérations de base
11
F
Page 44

Lecture des disques compacts
Lecture des disques compacts
Utilisation de l’écran
d’affichage
L’écran d’affichage permet de vérifier une série
d’informations concernant le disque sélectionné.
Vérification des caractéristiques d’un autre disque
Appuyez sur la touche DISC SKIP de la télécommande
en mode d’arrêt pour sélectionner le disque dont vous
souhaitez vérifier les caractéristiques. Le nombre total de
plages et le temps de lecture total du disque sélectionné
s’affichent brièvement à l’écran.
TIME/TEXT
INPUT
TIME/TEXT
HIGH-LIGHT
JOG
p
Vérification du nombre total de plages et
de leur temps de lecture
Sélectionnez le disque que vous souhaitez vérifier et
appuyez sur le disque JOG en mode de lecture continue.
Comme le lecteur démarre automatiquement la lecture,
appuyez sur p pour l’arrêter et ensuite sur TIME/TEXT.
La fenêtre d’affichage indique le numéro du disque en
cours, le nombre total de plages et le temps de lecture
total du disque.
Numéro du disque en cours
ALL DISCS
DISC
CD1
TRACK
MIN
20
SEC
20 10 60.48
Nombre total de plages
Temps de lecture total
Informations affichées pendant la lecture
d’un disque
Pendant la lecture d’un disque, la fenêtre d’affichage
indique le numéro du disque en cours, le numéro de la
plage, le temps de lecture de la plage et le numéro du
disque suivant.
Numéro du disque en cours
ALL DISCS
CD1
DISC
Numéro du disque suivant
TRACK
MIN
NEXT
DISC
83
SEC
20 1 0.28
Numéro de la plage en cours Temps de lecture de la plage
Vérification des informations des disques
CD TEXT
Les disques CD TEXT comportent des informations
telles que le titre du disque ou le nom des artistes. Elles
sont enregistrées dans une zone libre sur laquelle ne se
trouve aucune information sur un disque normal. La
fenêtre d’affichage indique les informations CD TEXT
du disque de façon à ce que vous puissiez vérifier le
titre du disque en cours, le nom de l’artiste et le titre de
la plage en cours. Lorsque le lecteur détecte un disque
CD TEXT, l’indication “CD TEXT” apparaît dans la
fenêtre d’affichage. Si votre disque CD TEXT est doté
d’une capacité multilingue, l’indication “MULTI CD
TEXT” apparaît dans la fenêtre d’affichage. Si vous
voulez vérifier les informations dans une autre langue,
reportez-vous à la section “Sélection de la langue
d’affichage des informations CD TEXT” à la page 13.
Affichage des informations pendant la lecture
La fenêtre d’affichage indique le titre du disque.
Lorsque vous appuyez sur TIME/TEXT, le nom de
l’artiste défile dans la fenêtre d’affichage. Si vous
appuyez à nouveau sur la touche TIME/TEXT, la
fenêtre d’affichage indique brièvement le numéro du
disque en cours, le nombre total de plages et la durée
totale de lecture du disque. La fenêtre d’affichage
indique ensuite à nouveau le titre du disque.
ALL DISCS
CD TEXT
CD1
DISC
SONYHITS
12
F
Page 45

Lecture des disques compacts
Playing CDsGetting Started
Affichage des informations pendant la lecture
Chaque fois que vous appuyez sur TIME/TEXT, la
fenêtre d’affichage indique les informations comme cidessous.
Le numéro du
disque, le numéro
de la plage et le
temps de lecture
s’affichent.
Le titre de la
plage en cours
s’affiche.
ALL DISCS
CD TEXT
DISC
CD1
TRACK
MIN
13
12 1 1.52
Appuyez
ALL DISCS
CD TEXT
CD1
TRACK
13
HitechBlues
Ces informations sont également
affichées lorsque le lecteur
recherche la plage.
Appuyez
NEXT
DISC
SEC
NEXT
DISC
Pour reproduire les thèmes d’un disque
Certains disques CD TEXT sont dotés d’une fonction de
reproduction des thèmes du disque.
Appuyez sur HIGH-LIGHT de la télécommande pour
entamer la lecture des thèmes du disque en mode d’arrêt.
L’indication “Hi LIGHT” clignote dans la fenêtre d’affichage
pendant la lecture des thèmes d’un disque.
Si vous appuyez sur HIGH-LIGHT pendant la sélection de
disques sans cette fonction, “NO HIGHLIGHT” apparaît dans
la fenêtre d’affichage.
3 Tournez le disque JOG jusqu’à ce que la langue
voulue apparaisse dans la fenêtre d’affichage.
4 Poussez sur le disque JOG pour sélectionner la
langue.
L’indication “Reading Text” s’affiche brièvement
et la fenêtre d’affichage indique ensuite les
informations dans la langue sélectionnée.
Pour vérifier la langue en cours
1 Appuyez sur INPUT pendant la lecture d’un disque CD
TEXT.
“Show lang.” clignote.
2 Poussez sur le disque JOG.
La langue en cours apparaît brièvement.
Vous pouvez également vérifier la langue en cours lorsque
vous sélectionnez un disque CD TEXT sans informations
multilingues.
Remarque
Si vous sélectionnez un disque CD TEXT qui ne contient pas
d’informations dans la langue sélectionnée, la fenêtre
d’affichage indique les informations dans une autre langue en
fonction des priorités programmées sur le disque.
Localisation d’un disque
déterminé
MEMO SEARCH
JOG
Sélection de la langue d’affichage des
informations CD TEXT
Vous pouvez sélectionner la langue utilisée pour
l’affichage des informations CD TEXT lorsque vous
sélectionnez un disque CD TEXT doté d’informations
multilingues.
Lorsque vous avez sélectionné la langue, la fenêtre
d’affichage indique les informations dans la langue
souhaitée jusqu’à ce que vous mettiez le lecteur hors
tension. Si le lecteur ne peut lire la langue mémorisée
sur un disque CD TEXT, le lecteur affiche le message
“(other lang.)”.
1 Appuyez sur INPUT en mode d’arrêt.
“Select lang.” clignote.
ALL
DISCS
MULTI CD TEXT
CD1
21
Select lang.
2 Poussez sur le disque JOG.
La langue d’exploitation en cours se met à clignoter.
ALL
DISCS
MULTI CD TEXT
CD1
21
DISC
Touches
numériques
>10
·
≠/±
ENTER
MEMO SCAN
English
(suite)
13
F
Page 46

Lecture des disques compacts
Sélection d’un disque sur le lecteur
Tournez le disque JOG jusqu’à ce que le numéro de
disque ou le mémo de disque (voir page 23) souhaité
apparaisse dans la fenêtre d’affichage. Appuyez sur le
disque JOG pour entamer la lecture.
Sélection d’un disque au moyen de la
télécommande
1 Appuyez sur DISC.
2 Appuyez sur la touche numérique correspondant
au disque.
Exemple: Pour entrer le numéro 35
Appuyez sur 3 et puis sur 5.
Pour entrer le nombre 100
Appuyez sur 1, puis deux fois sur 10/0.
3 Appuyez sur ENTER pour démarrer la lecture.
Recherche d’un disque par l’exploration des
titres mémorisés (exploration des mémos)
Localisation d’un disque en recherchant un
mémo disque spécifique (recherche mémo)
Vous pouvez rechercher et localiser un disque en
introduisant le premier caractère du mémo du disque
(voir page 23).
1 Appuyez sur MEMO SEARCH.
L’indication “MEMO SEARCH” apparaît dans la
fenêtre d’affichage.
2 Appuyez plusieurs fois de suite sur ≠/±
pour introduire le premier caractère.
ALL DISCS
CD1
S
SONYHITS
Introduisez le caractère
Chaque fois que vous appuyez sur ≠/±, les
caractères apparaissent selon la séquence suivante.
A B C D E F G H I J K L M N O P Q R S T U V W X
Y Z 0 1 2 3 4 5 6 7 8 9
Vous pouvez localiser rapidement un disque que vous
voulez reproduire en explorant les mémos de disque
(voir page 23) dans la fenêtre d’affichage.
Faites attention que vous ne pouvez pas utiliser cette
fonction en mode de lecture aléatoire ALL DISCS.
1 Appuyez sur MEMO SCAN.
L’indication “MEMO SCAN” apparaît dans la
fenêtre d’affichage et le mémo du disque défile
dans la fenêtre d’affichage.
2 Appuyez sur la touche · lorsque le titre de
mémo du disque que vous voulez jouer apparaît à
l’écran.
Le disque correspondant est amené en position de
lecture; le lecteur entame la lecture.
En mode de lecture programmée, le disque est
ajouté à la fin de la séquence de programmation si
vous appuyez sur ENTER au lieu de ·.
Remarque
Si “NO ENTRY” apparaît à l’écran, cela signifie qu’aucun
disque n’a été étiqueté avec le mémo de disque. Faites une
nouvelle tentative après avoir étiqueté les disques.
Si l’indication “NOT FOUND” apparaît dans la
fenêtre d’affichage lors de la saisie du premier
caractère à l’aide des touches ≠/±, cela
signifie qu’aucun disque n’a été identifié au moyen
du caractère introduit.
Remarques
• Lors de la recherche de caractères, les blancs et les
symboles précédant le premier caractère du mémo de
disque sont ignorés.
• Lorsque vous introduisez les caractères, les majuscules
et les minuscules ne peuvent être différenciées.
3 Tournez le disque JOG pour retrouver le disque de
votre choix.
Lorsque vous tournez le disque JOG, les mémos
disque commençant par le caractère introduit
apparaissent dans la fenêtre d’affichage.
4 Appuyez sur le disque JOG pour sélectionner le
disque.
En mode de lecture programmée, le disque est
ajouté à la fin de la séquence de programmation.
Pour désactiver la recherche mémo
Appuyez à nouveau sur MEMO SEARCH.
14
S’il n’y a plus de mémo de disque commençant par le
caractère entré à l’étape 3
Le caractère introduit est remplacé par le suivant lorsque
vous tournez le disque JOG.
F
Page 47

Spécification du prochain
disque sélectionné
Vous pouvez spécifier le prochain disque à reproduire
pendant la lecture d’un disque dans les modes de
lecture continue ou de lecture aléatoire 1 DISC.
Pendant la lecture d’un disque, tournez le disque JOG.
L’indication “NEXT DISC” apparaît dans la fenêtre
d’affichage et le numéro du disque ou le mémo de
disque (voir page 23) change à mesure que vous
tournez le disque JOG.
Lorsque le numéro du disque ou le mémo de disque
voulu apparaît dans la fenêtre d’affichage, cessez de
tourner le disque JOG.
ALL DISCS
CD1
NEXT DISC
38
NEXT
DISC
*DISC-38*
Numéro du disque ou du
mémo de disque suivant
La lecture du disque suivant débute au terme de la
lecture du disque en cours.
Si vous désirez passer directement au disque suivant,
appuyez sur le disque JOG pendant la lecture du
disque en cours.
Pour annuler la sélection du disque spécifié
Appuyez deux fois sur la touche CONTINUE.
Localisation d’une plage
Lecture des disques compacts
Touches
numériques
>10
=/+
0/)
Pour localiser
la ou les plages
suivantes
la plage en cours de
lecture ou les plages
précédentes
directement une
plage spécifique
Z
un passage d’une
plage donnée tout en
contrôlant le son Z
rapidement un
passage déterminé
d’une plage en
contrôlant la fenêtre
d’affichage Z
Playing CDsGetting Started
Appuyez sur la touche
± de manière répétée jusqu’à ce
que vous trouviez la plage
≠ de manière répétée jusqu’à ce
que vous trouviez la plage
numérique correspondant à la plage
sur la télécommande
0 (arrière)/)(avant) de la
télécommande et maintenez-la
enfoncée jusqu’à ce que vous
localisiez l’endroit
0 (arrière)/) (avant) de la
télécommande et maintenez-la
enfoncée jusqu’à ce que vous
localisiez l’endroit en mode de pause.
Vous n’entendrez aucun son en cours
d’opération.
spécifique ou d’un passage sur
une plage quelconque
Vous pouvez localiser rapidement toute plage d’un
disque en cours de lecture à l’aide des touches
≠/± (AMS: Détecteur automatique de musique)
ou des touches numériques de la télécommande. Vous
avez également la possibilité de localiser un passage
spécifique d’une plage donnée sans devoir interrompre
la lecture du disque concerné.
≠/±
Lorsque vous localisez directement une plage
supérieure à 10 Z
Appuyez d’abord sur >10, puis sur les touches
correspondantes de la télécommande.
Remarque
Si “– OVER –” apparaît dans la fenêtre d’affichage, cela
signifie que le disque est arrivé en fin de lecture pendant que
vous appuyiez sur la touche ) de la télécommande.
Appuyez sur la touche ≠ ou 0 de la télécommande pour
revenir en arrière.
15
F
Page 48

Lecture des disques compacts
Lecture répétée
Vous pouvez réitérer la lecture de plusieurs disques/
plages quel que soit le mode de lecture choisi.
REPEAT
Appuyez sur la touche REPEAT lorsqu’un disque est
en cours de lecture.
Le message “REPEAT” s’affiche à l’écran. Le lecteur
répète la lecture des disques/plages comme suit:
Si le disque est reproduit
en mode de
lecture continue ALL DISCS
(page 10)
lecture continue 1 DISC
(page 10)
lecture aléatoire ALL DISCS
(page 16)
lecture aléatoire 1 DISC
(page 17)
lecture programmée
(page 17)
Le lecteur répète la lecture
De toutes les plages de tous
les disques
De toutes les plages du disque
en cours de lecture
De toutes les plages de tous
les disques dans un ordre
aléatoire
De toutes les plages du disque
en cours de lecture dans un
ordre aléatoire
Du même programme
Lecture dans un ordre
quelconque (lecture aléatoire)
Vous pouvez régler le lecteur pour qu’il “mélange” les
plages et les reproduise dans un ordre aléatoire. Le
lecteur reproduit dans un ordre aléatoire toutes les
plages de tous les disques ou d’un disque que vous
spécifiez.
·
JOGSHUFFLE
SHUFFLE
DISC
Touches
numériques
ENTER
·
16
Pour annuler une lecture répétée
Appuyez deux fois sur REPEAT.
Lecture de toutes les plages de tous les
disques dans un ordre aléatoire
Lecture répétée de la plage en cours
Vous pouvez uniquement répéter la lecture de la plage
en cours.
Pendant la lecture de la plage voulue, appuyez
plusieurs fois de suite sur REPEAT jusqu’à ce que
l’indication “REPEAT 1” apparaisse dans la fenêtre
d’affichage.
Pour annuler le mode de lecture Repeat 1
Appuyez sur REPEAT.
F
1 Appuyez sur SHUFFLE.
“ALL DISCS” et “SHUFFLE” apparaissent dans la
fenêtre d’affichage.
2 Poussez sur le disque JOG ou appuyez sur ·.
La lecture aléatoire ALL DISCS démarre.
“
” apparaît dans la fenêtre d’affichage pendant
que le lecteur “mélange” les disques ou les plages.
Page 49

Lecture de toutes les plages d’un disque
spécifique dans un ordre aléatoire
1 Appuyez deux fois sur SHUFFLE.
“1 DISC” et “SHUFFLE” apparaissent dans la
fenêtre d’affichage.
2 Tournez le disque JOG jusqu’à ce que le numéro
du disque voulu apparaisse dans la fenêtre
d’affichage.
Si vous utilisez la télécommande, appuyez d’abord
sur DISC et ensuite sur la touche numérique
correspondant au disque voulu.
3 Poussez sur le disque JOG ou appuyez sur ·.
Si vous utilisez la télécommande, appuyez sur
ENTER.
La lecture aléatoire 1 DISC démarre.
“
” apparaît dans la fenêtre d’affichage
pendant que le lecteur “mélange” les plages.
Lecture des disques compacts
Playing CDsGetting Started
Création de programmes
musicaux personnalisés
(lecture programmée)
Vous pouvez agencer l’ordre des plages et/ou des
disques de façon à créer trois différents programmes qui
seront mémorisés automatiquement. Un programme
peut contenir jusqu’à 32 “phases” — une “phase”
pouvant contenir une plage ou l’intégralité du disque.
Vous pouvez créer des programmes à l’aide des
commandes de la télécommande comme avec celles du
lecteur. Les procédures de programmation sont
cependant différentes.
Création d’un programme sur le lecteur
PROGRAM
≠/±
JOG
CHECK
Pour annuler la lecture aléatoire
Appuyez sur CONTINUE.
Vous pouvez démarrer la lecture aléatoire en cours
de lecture
Appuyez sur SHUFFLE et la lecture aléatoire commence
à partir de la plage en cours.
Vous pouvez sélectionner directement un disque pour
la lecture aléatoire 1 DISC
Reportez-vous à la section “Sélection d’un disque au
moyen de la télécommande” à la page 14.
Vous pouvez passer au disque suivant en cours de
lecture aléatoire 1 DISC
Appuyez sur la touche DISC SKIP +.
Vous pouvez spécifier le prochain disque à reproduire
lorsque vous êtes en mode de lecture aléatoire 1 DISC
Tournez le disque JOG pour spécifier le disque suivant.
Lorsque toutes les plages du disque en cours ont été
reproduites dans un ordre aléatoire, la lecture du disque
suivant démarre. Si vous désirez passer directement au
disque suivant, appuyez sur le disque JOG pendant la
lecture du disque en cours.
·
CLEAR
1 Appuyez sur PROGRAM jusqu’à ce que le numéro
de programme que vous désirez (PROGRAM 1, 2
ou 3) apparaisse dans la fenêtre d’affichage.
Si un programme est déjà mémorisé sous le
numéro de programme sélectionné, la dernière
phase du programme apparaît dans la fenêtre
d’affichage. Si vous désirez supprimer l’intégralité
du programme, maintenez la touche CLEAR
enfoncée jusqu’à ce que “CLEAR” apparaisse dans
la fenêtre d’affichage (voir page 19).
2 Tournez le disque JOG jusqu’à ce que le numéro du
disque voulu apparaisse dans la fenêtre d’affichage.
PROGRAM
1
CD1
DISC
20
*DISC-20*
Remarques
• Vous ne pouvez pas sélectionner le disque suivant à
reproduire après avoir lancé une lecture aléatoire de
l’ensemble des disques (ALL DISCS).
• Même si vous appuyez sur p ou que vous mettez le lecteur
hors tension pendant la lecture aléatoire ALL DISCS, le
lecteur mémorise les disques/plages reproduits et ceux qui
ne le sont pas. Par conséquent, si vous souhaitez répéter la
lecture aléatoire ALL DISCS depuis le début, reprenez la
procédure depuis l’étape 1.
3 Pour programmer un disque entier, sautez cette
étape. Appuyez sur ≠/± jusqu’à ce que le
numéro de la plage voulue apparaisse dans la
fenêtre d’affichage.
PROGRAM
1
DISC
CD1
TRACK
20
STEP
20 3 1
Numéro de plage
(suite)
17
F
Page 50

Lecture des disques compacts
4 Poussez sur le disque JOG.
La plage programmée
PROGRAM
1
CD1
DISC
TRACK
20
STEP
20 3 1
Séquence de lectureLe disque programmé
5 Pour programmer d’autres disques/plages,
procédez comme suit:
Pour programmer
Toutes les plages d’un ou de
plusieurs autres disques
D’autres plages sur le même disque
D’autres plages sur d’autres disques
6 Poussez sur le disque JOG ou appuyez sur ·
pour démarrer la lecture programmée.
Pour annuler une lecture programmée
Appuyez sur la touche CONTINUE.
Répétez les étapes
2 et 4
3 et 4
2 à 4
Création d’un programme à l’aide de la
télécommande
PROGRAM
DISC
Touches
numériques
>10
CHECK
·
ENTER
CLEAR
1 Appuyez sur PROGRAM jusqu’à ce que le numéro
de programme que vous désirez (PROGRAM 1, 2
ou 3) apparaisse dans la fenêtre d’affichage.
2 Appuyez sur DISC.
PROGRAM
1
CD1
02
Les programmes restent mémorisés même au terme
de leur lecture respective
Vous pouvez reproduire à nouveau le même programme
en poussant sur le disque JOG ou en appuyant sur ·.
Si vous appuyez sur PROGRAM pour sélectionner la
lecture programmée en cours de lecture continue ou
aléatoire
Le programme sera reproduit après la plage en cours.
Le programme reste dans la mémoire jusqu’à ce que
vous l’effaciez
Si vous changez des disques, les numéros de disque et de
plage programmés restent dans la mémoire. Le lecteur ne
joue donc que les numéros de disque et de plage
existants. Néanmoins, les numéros de disque et de plage
sans correspondance au niveau du lecteur ou des disques
de substitution sont effacés du programme concerné. Le
lecteur exécute le reste du ou des programmes dans
l’ordre prévu.
Remarque
Si vous appuyez sur l’une des touches GROUP 1 – 8 pour
démarrer la lecture de groupe, la lecture programmée est
annulée (voir page 27).
DISC-[ _]
3 Appuyez sur la touche numérique du disque.
PROGRAM
1
CD1
02
DISC-[ 20]
4 Pour programmer un disque complet, appuyez sur
ENTER et passez à l’étape 6.
Appuyez sur >10.
PROGRAM
1
DISC
CD1
TRACK
02
STEP
20 -- 1
5 Appuyez sur la touche numérique correspondant à
la plage.
Lorsque le disque comporte plus de 10 plages,
appuyez d’abord sur 0, puis appuyez sur le
numéro correspondant pour introduire un numéro
de plage compris entre 1 et 9.
Le disque programmé
PROGRAM
1
DISC
TRACK
20
STEP
20 3 1
18
Séquence de lectureLa plage programmée
F
Page 51

Lecture des disques compacts
Playing CDsGetting Started
6 Pour programmer d’autres disques/plages,
procédez comme suit:
Pour programmer
Toutes les plages d’un ou de
plusieurs autres disques
D’autres plages sur le même disque
D’autres plages sur d’autres disques
Répétez les étapes
2 à 4
5
2 à 5
7 Appuyez sur · pour lancer la lecture du
programme.
Pour annuler la lecture du programme
Appuyez sur CONTINUE.
Vérification de la séquence programmée
Vous pouvez contrôler votre programme avant ou
après en avoir lancé l’exécution.
Appuyez sur CHECK.
Chaque fois que vous appuyez sur cette touche, la
fenêtre d’affichage indique le numéro du disque et de
la plage de chaque étape dans l’ordre programmé. (Si
un disque complet a été programmé en une étape,
l’indication “ALL” s’affiche au lieu du numéro de
plage.) Après la dernière étape de la programmation, la
fenêtre d’affichage indique “– END –” et revient à
l’affichage de départ.
Effacer le programme sauvegardé dans la
mémoire
1 Appuyez plusieurs fois de suite sur PROGRAM en
mode d’arrêt jusqu’à ce que le numéro de
programme (PROGRAM 1, 2 ou 3) que vous
désirez supprimer apparaisse dans la fenêtre
d’affichage.
2 Maintenez la touche CLEAR enfoncée jusqu’à ce
que le message “CLEAR” apparaisse à l’écran.
Lecture à l’aide d’un
programmateur
(CDP-CX240 uniquement)
Vous pouvez entamer la lecture d’un disque à
n’importe quel moment en branchant un
programmateur (non fourni). Veuillez également vous
référer aux instructions relatives au programmateur si
vous avez besoin d’aide.
TIMER Touches de mode de lecture
Modification de la séquence programmée
Vous pouvez modifier votre programme avant d’en
lancer l’exécution.
Pour
Effacer une plage ou un
disque
Effacer la dernière plage
ou le dernier disque du
programme
Ajouter diverses plages
ou divers disques à la fin
du programme
Effacer le programme
dans son intégralité
Vous devez
Appuyer sur la touche CHECK
jusqu’à ce que la piste ou le disque
que vous souhaitez éliminer
apparaisse à l’écran avant
d’appuyer sur la touche CLEAR
Appuyer sur la touche CLEAR.
Chaque fois que vous appuyez sur
cette touche, la dernière plage ou le
dernier disque programmé sera
effacé.
Respecter la procédure de
programmation
Maintenir CLEAR enfoncé jusqu’à
ce que “CLEAR” apparaisse à
l’écran pour effacer toute la
programmation puis créer un
nouveau programme en respectant
la procédure de programmation
1 Appuyez sur l’une des touches de mode de lecture
pour sélectionner le mode de lecture que vous
désirez.
2 Mettez TIMER du lecteur sur PLAY.
3 Réglez le programmateur sur l’heure que vous
désirez.
Le lecteur se met hors tension. Lorsque l’heure
réglée arrive, le lecteur se met sous tension et la
lecture débute.
4 Après avoir utilisé le programmateur, mettez
TIMER du lecteur sur OFF.
19
F
Page 52

Lecture des disques compacts
Contrôle d’un autre lecteur CD
(fonction Mega Control
avancée) (CDP-CX240
1 Appuyez sur MEGA CONTROL sur ce lecteur.
La touche MEGA CONTROL et “2nd” s’allument
dans la fenêtre d’affichage. La fenêtre d’affichage
indique le numéro du disque en cours ou le mémo
de disque sur le second lecteur.
uniquement)
Cet appareil peut contrôler un second lecteur CD (voir
“Connexion d’un autre lecteur CD” à la page 6).
Même lorsqu’un second lecteur CD est raccordé, les
commandes des deux appareils seront opérantes.
Lorsque vous appuyez sur la touche de lecture de l’un
des deux lecteurs, le lecteur en cours de fonctionnement
s’arrête et le lecteur au repos se met en route.
Assurez-vous que le message “2nd DETECTED”
apparaît dans la fenêtre d’affichage de ce lecteur après
avoir mis les deux lecteurs sous tension.
Faites attention que, suivant le lecteur, il est possible
que vous ne puissiez pas commander toutes les
fonctions du second lecteur CD.
Les commandes indiquées dans l’illustration ci-dessous sont
opérantes pendant que la touche MEGA CONTROL est
allumée.
Touches de mode de lecture
(CONTINUE/SHUFFLE/
PROGRAM/REPEAT)
MEGA
CONTROL
INPUT
JOG
ALL DISCS
CD1
2nd DISC
4
*DISC-4*
Numéro du disque en cours
ou mémo de disque
2 Sélectionnez le mode de lecture que vous désirez.
Pour programmer des plages, utilisez les
commandes du second lecteur.
Vous ne pouvez pas changer le mode de lecture
ALL DISCS du second lecteur CD pour le mode de
lecture 1 DISC, et inversement, au moyen de la
touche de mode de lecture de ce lecteur.
3 Appuyez sur · sur ce lecteur pour entamer la
lecture.
La lecture commence et la fenêtre d’affichage
indique les numéros du disque en cours et de la
plage ainsi que la durée de lecture de la plage.
Lorsque la touche MEGA CONTROL est allumée,
vous pouvez contrôler le second lecteur au moyen
des commandes de ce lecteur.
0/)
≠/±
Pour contrôler le second lecteur directement à l’aide de la
télécommande fournie
Réglez CD 1/2/3 de la télécommande sur CD 3, qui
correspond à la position du sélecteur COMMAND MODE
situé sur le panneau arrière du second lecteur.
pP·
Pour à nouveau commander ce lecteur
Appuyez sur MEGA CONTROL. La touche MEGA
CONTROL s’éteint et vous pouvez commander ce lecteur.
Chargement des mémos de disque du
second lecteur CD
Si le second lecteur CD est doté de la fonction Disc
Memo (voir page 23), vous pouvez charger les mémos
des disques du second lecteur CD dans la mémoire de
ce lecteur et les afficher sur ce lecteur.
1 Appuyez sur INPUT.
20
F
Page 53

2 Tournez le disque JOG jusqu’à ce que “LOAD 2ND
MEMO” apparaisse dans la fenêtre d’affichage.
Lecture des disques compacts
Playing CDsGetting Started
Fondu enchaîné d’entrée ou de
ALL DISCS
CD1
LOAD 2ND MEMO
3 Poussez sur le disque JOG.
Ce lecteur démarre le chargement. (Le chargement
prend environ une minute.)
Remarque
Si les mémos des disques du second lecteur CD comportent
plus de 13 caractères, seuls les 13 premiers caractères de
chacun d’entre eux sont chargés sur ce lecteur.
Identification des disques du second
lecteur CD
Vous pouvez identifier les disques du second lecteur
CD ou changer les mémos de disque chargés depuis le
second lecteur CD.
1 Appuyez sur MEGA CONTROL.
La touche MEGA CONTROL s’allume.
2 Tournez le disque JOG pour sélectionner le disque
auquel vous voulez assigner un mémo de disque et
puis poussez sur le disque JOG.
Si la fente de disque sélectionnée ne contient pas
de disque, l’indication “NO DISC” apparaît dans la
fenêtre d’affichage et vous ne pouvez pas assigner
de mémo de disque.
3 Appuyez sur INPUT.
L’indication “DISC MEMO” apparaît.
sortie (CDP-CX240 uniquement)
Vous pouvez activer manuellement un fondu enchaîné
d’entrée ou de sortie pour le son afin d’éviter que les
plages commencent et se terminent de manière
abrupte.
Attention que vous ne pouvez pas activer cet effet si
vous utilisez le connecteur DIGITAL OUT (OPTICAL).
FADER
Pour
Activer un fondu
enchaîné d’entrée
Activer un fondu
enchaîné de sortie
Remarque
Le fondu enchaîné dure environ 5 secondes.
Appuyez sur FADER
En mode de pause. L’indication
“FADE” apparaît dans la fenêtre
d’affichage et l’indication Q se met
à clignoter. La lecture démarre en
fondu enchaîné.
Lorsque vous voulez activer le
fondu enchaîné de sortie.
L’indication “FADE” apparaît dans
la fenêtre d’affichage et l’indication
q se met à clignoter. La lecture se
termine en fondu enchaîné de sortie
et le lecteur passe en mode de pause.
4 Poussez sur le disque JOG.
5 Introduisez le nouveau mémo de disque en
appliquant la procédure d’ “Identification des
disques” des pages 23 à 25.
Remarque
Comme les nouveaux mémos de disque sont enregistrés dans
la mémoire de ce lecteur, vous ne pouvez pas les afficher sur
le second lecteur CD.
21
F
Page 54

Lecture des disques compacts
Lecture alternée (Lecture sans
transition/Lecture enchaînée)
(CDP-CX240 uniquement)
Lorsque vous connectez le second lecteur, vous pouvez
reproduire des plages de ce lecteur et d’autres du
second lecteur de manière alternée dans n’importe quel
mode de lecture (voir “Connexion d’un autre lecteur
CD” à la page 6).
Sélectionnez l’une des méthodes suivantes:
• Lecture sans transition (No-Delay Play): le lecteur en
cours change à chaque plage. Chaque fois que le
lecteur en cours passe au lecteur suivant, l’autre
lecteur commence la lecture sans interruption du
son, immédiatement après que le lecteur en cours
s’est arrêté de reproduire la plage. L’autre lecteur
saute la portion d’introduction et commence la
lecture là où commence réellement le son.
• Lecture enchaînée (X-Fade Play): le lecteur en cours
change à chaque plage ou à l’intervalle spécifié. Vous
pouvez sélectionner l’intervalle parmi 30, 60 et 90
secondes. Chaque fois que le lecteur en cours passe à
l’autre lecteur, le son des deux lecteurs est mixé. La
plage du lecteur en cours se termine en fondu et la
plage de l’autre lecteur commence en fondu.
NO DELAY
X-FADE
2 Lorsque vous sélectionnez la lecture sans transition
Appuyez sur NO DELAY.
Le message “NO DELAY” apparaît dans la fenêtre
d’affichage.
Lorsque vous sélectionnez la lecture enchaînée
Appuyez sur X-FADE.
Le message “X-FADE” apparaît dans la fenêtre
d’affichage.
Chaque fois que vous appuyez sur la touche
X-FADE, l’indication apparaît comme suit:
n X-FADE off n at track end n after 30 sec
after 90 sec N after 60 sec N
Pour permuter de lecteur chaque fois qu’une plage
entière est terminée, sélectionnez “at track end”.
Pour permuter de lecteur après un intervalle
spécifié, appuyez plusieurs fois sur X-FADE
jusqu’à ce que l’intervalle désiré apparaisse dans la
fenêtre d’affichage.
3 Appuyez sur · pour entamer la lecture.
La touche MEGA CONTROL s’allume pendant
que la plage du second lecteur est sélectionnée.
Pour annuler la lecture sans transition/enchaînée
Appuyez plusieurs fois sur la touche correspondante jusqu’à
ce que “NO DELAY” ou “X-FADE” disparaisse de la fenêtre
d’affichage. Le lecteur en cours continue la lecture.
·
1 Sélectionnez le mode de lecture que vous désirez
sur chaque lecteur.
Vous pouvez changer de méthode (lecture sans
transition ou lecture enchaînée) pendant la lecture
Appuyez sur la touche numérique correspondante
(NO DELAY ou X-FADE) en suivant la procédure de
l’étape 2.
Vous pouvez démarrer la lecture alternée en fondu
quand vous voulez
Appuyez sur FADER en cours de lecture enchaînée.
Même après que vous avez réglé le mode de lecture
enchaînée et démarré la lecture enchaînée, vous pouvez
démarrer la lecture enchaînée manuellement à n’importe
quel moment. Faites attention que vous ne pouvez pas
exécuter cette opération si le son des deux lecteurs est
mixé.
Remarques
• La lecture démarre sur le second lecteur si vous entamez la
lecture lorsque la touche MEGA CONTROL est allumée.
• Lorsqu’un lecteur a reproduit tous les disques/plages du
lecteur avant l’autre lecteur, la lecture s’arrête.
• N’utilisez pas les commandes du second lecteur pendant la
lecture sans transition/enchaînée. Il se peut qu’elles ne
fonctionnent pas correctement.
22
F
Page 55

Enregistrement d’informations relatives aux disques compacts (fichiers personnalisés)
Enregistrement d’informations relatives aux disques compacts (fichiers personnalisés)
Emploi des fichiers
personnalisés
Le lecteur peut mémoriser pour chaque disque deux
types d’informations désignées “Fichiers
personnalisés”. Lorsque vous avez mémorisé des
fichiers personnalisés pour un disque, le lecteur
rappelle automatiquement ce que vous avez mémorisé
chaque fois que vous sélectionnez le disque. Faites
attention que les fichiers personnalisés s’effacent si
vous n’utilisez pas le lecteur pendant environ un mois.
Vous pouvez enregistrer les informations
suivantes:
Lorsque vous activez
Mémo de disque
(page 23)
Bloc de suppression
(page 26)
Fichier de groupe
(page 27)
Vous pouvez
Identifier des disques au moyen de
13 caractères
Supprimer des plages indésirables et
ne mémoriser que les plages voulues
Grouper des disques en huit
groupes de façon à pouvoir les
localiser aisément
Identification des disques
(mémo de disque)
Vous pouvez identifier les disques au moyen de 13
caractères et faire afficher le mémo de disque par le
lecteur chaque fois que vous sélectionnez le disque. Le
mémo de disque peut être une appellation au choix,
par exemple un titre, le nom d’un musicien, une
catégorie ou encore la date d’achat.
Lorsque vous sélectionnez un disque CD TEXT
Le titre du disque est mémorisé automatiquement
comme le mémo du disque.
Si le titre du disque comporte plus de 13 caractères, ce
sont les 13 premiers caractères du titre qui sont
mémorisés (voir page 12).
Si vous remplacez un disque par un disque CD TEXT, le
titre du disque CD TEXT est mémorisé automatiquement
aussi.
Faites attention que vous ne pouvez pas changer le
mémo d’un disque CD TEXT.
Vous pouvez identifier des disques lorsque le capot
frontal est ouvert
Support d’enregistrement des fichiers
personnalisés
Les fichiers personnalisés ne sont pas enregistrés sur le
disque, mais dans la zone de mémoire du lecteur. En
d’autres termes, vous ne pouvez pas utiliser les fichiers
personnalisés si vous jouez ce disque sur un autre
lecteur.
Si vous remplacez des disques enregistrés
dans les fichiers personnalisés
Les informations concernant les fichiers personnalisés
que vous avez sauvegardées restent dans la mémoire
puisque les informations relatives aux fichiers
personnalisés sont toutes assignées aux différents
logements. Effacez tous les fichiers personnalisés
(mémo de disque, bloc de suppression et fichier de
groupe) de l’ancien disque et sauvegardez ensuite les
nouvelles informations sur les disques dans les fichiers
personnalisés.
Suppression de tous les fichiers
personnalisés de tous les disques
Mettez le lecteur hors tension. Tout en maintenant la
touche CLEAR enfoncée, appuyez sur I/u pour mettre
le lecteur sous tension. L’indication “ALL ERASE”
apparaît dans la fenêtre d’affichage et tous les fichiers
personnalisés sont effacés.
Identification des disques sur le lecteur
INPUT
JOG
CLEAR
1 Tournez le disque JOG jusqu’à ce que le numéro
du disque auquel vous voulez attribuer un mémo
apparaisse dans la fenêtre d’affichage.
Si vous identifiez un disque lorsque le capot
frontal est fermé, c’est le numéro du disque en
position de lecture qui apparaît.
Si vous identifiez un disque lorsque le capot
frontal est ouvert, c’est le numéro du disque en
position de chargement qui apparaît.
2 Appuyez sur INPUT.
“DISC MEMO” clignote.
3 Poussez sur le disque JOG.
Le curseur clignotant (“) apparaît.
(suite)
23
F
Page 56

Enregistrement d’informations relatives aux disques compacts (fichiers personnalisés)
4 Tournez le disque JOG jusqu’à ce que le caractère
voulu apparaisse dans la fenêtre d’affichage.
Le curseur disparaît et le premier espace pour le
mémo de disque clignote.
Si vous tournez le disque JOG dans le sens horaire,
les caractères s’affichent dans l’ordre suivant.
Tournez le disque JOG dans le sens antihoraire
pour revenir au caractère précédent.
(espace) A B C D E F G H I J K L M N O P Q R S T
U V W X Y Z a b c d e f g h i j k l m n o p q r s t u v
w x y z 0 1 2 3 4 5 6 7 8 9 ! " # $ % & ' ( ) * + , – . / : ;
< = > ? @ [ \ ] ^ _ ` { | } ⁄
ALL DISCS
CD1
DISC
AB
S
5 Appuyez sur le disque JOG pour sélectionner le
caractère.
Le caractère sélectionné s’allume et le curseur
clignotant apparaît pour indiquer l’espace suivant
à compléter.
Identification de disques à l’aide de la
télécommande Z
SPACE
DISC/CAPS
MEMO INPUT
=/+
DEL
Touches
numériques
ENTER
CLEAR
ALL DISCS
CD1
AB
S
Si vous avez fait une erreur
Appuyez sur CLEAR et introduisez les caractères
corrects.
6 Répétez les étapes 4 et 5 pour introduire d’autres
caractères.
7 Appuyez sur INPUT pour mémoriser le mémo de
disque.
La fenêtre d’affichage indique le mémo de disque.
ALL DISCS
CD1
DISC
20
SONYHITS
Répétez les étapes 1 à 7 pour attribuer des mémos
à d’autres disques.
1 Appuyez sur DISC/CAPS.
2 Appuyez sur la touche numérique du disque
auquel vous voulez attribuer un mémo et appuyez
ensuite sur ENTER.
3 Appuyez sur MEMO INPUT.
Le curseur clignotant (“) apparaît.
4 Appuyez sur DISC/CAPS pour sélectionner la
police de caractères de votre choix.
Chaque fois que vous appuyez sur cette touche, la
police de caractères change selon la séquence
suivante: majuscules (AB), minuscules (ab) et
chiffres (12). Pour sélectionner un symbole, vous
devez sélectionner les lettres majuscules ou
minuscules. Le type de lettre sélectionné apparaît
dans le coin supérieur droit de la fenêtre
d’affichage.
24
F
Page 57

Enregistrement d’informations relatives aux disques compacts (fichiers personnalisés)
5 Pour introduire une lettre, appuyez sur la touche
numérique correspondant à la lettre voulue
(indiquée à côté de chaque touche numérique).
Le curseur disparaît et le premier espace pour le
mémo de disque apparaît.
Chaque fois que vous appuyez sur la touche, les
lettres figurant à côté de la touche changent de
façon cyclique.
Pour introduire des symboles, appuyez plusieurs
fois de suite sur la touche numérique 1 jusqu’à ce
que le symbole apparaisse dans la fenêtre
d’affichage.
ABC DEF&!?
JKL MNOGHI
TUV WXYPRS
QZ
>
10
Caractères attribués à chaque touche numérique
Exemple: Pour sélectionner la lettre E
Appuyez deux fois sur la touche
numérique 3.
n D n E n F
Appuyez sur 3. Appuyez sur 3.
Appuyez sur 3.
Pour insérer un espace, appuyez une fois sur
SPACE.
ENTER
Si vous avez fait une erreur lors de la saisie des
caractères
Pour corriger un caractère qui a été introduit
1 Appuyez sur = ou + jusqu’à ce que le curseur se
place en regard du caractère incorrect.
ALL DISCS
CD1
DISC
AB
SONYHE S
2 Appuyez sur DEL pour effacer le caractère incorrect.
ALL DISCS
AB
DISC
SONYH S
3 Introduisez le caractère correct.
ALL DISCS
CD1
DISC
AB
SONYHITS
Pour corriger le caractère pendant la saisie
1 Appuyez sur DEL pour effacer le caractère incorrect.
2 Introduisez le caractère correct.
Pour insérer un caractère entre les caractères
introduits
Appuyez sur = ou + jusqu’à ce que le curseur se
place à l’endroit où vous voulez insérer un caractère et
introduisez-le.
Pour introduire un nombre, appuyez sur la touche
numérique voulue.
6 Appuyez sur ENTER pour sélectionner le caractère.
Le caractère sélectionné s’allume et le curseur
clignotant apparaît pour indiquer l’espace suivant
à compléter.
Vous pouvez également passer à l’espace suivant
en appuyant sur d’autres touches numériques.
7 Répétez les étapes 4 à 6 pour introduire d’autres
caractères.
8 Appuyez sur MEMO INPUT pour enregistrer le
mémo de disque.
Le mémo de disque s’allume dans la fenêtre
d’affichage.
ALL DISCS
CD1
DISC
20
SONYHITS
Répétez les étapes 1 à 8 pour attribuer des mémos
de disque à d’autres disques.
Vous pouvez identifier des disques du second lecteur
CD
Voir “Identification des disques du second lecteur CD” à
la page 21.
Suppression du mémo de disque
1 Suivez les étapes 1 et 3 de “Identification de
disques sur le lecteur” à la page 23 pour
sélectionner le mémo de disque que vous désirez
supprimer.
2 Appuyez sur CLEAR.
Le mémo de disque disparaît.
25
F
Page 58

Enregistrement d’informations relatives aux disques compacts (fichiers personnalisés)
Mémorisation des informations
de fichier personnalisé à l’aide
d’un clavier (CDP-CX240
uniquement)
Vous pouvez mémoriser séquentiellement le mémo de
disque pour un disque au moyen d’un clavier* pour PC
compatible avec IBM (non fourni).
* La consommation électrique doit être de 120 mA ou moins.
Prise pour clavier
1 Raccordez un clavier à la prise pour clavier sur le
panneau avant du lecteur.
Mémorisation de plages
spécifiques (bloc de
suppression)
Vous pouvez supprimer les plages indésirables et
mémoriser uniquement les plages que vous voulez
écouter. Lorsque vous sélectionnez un disque
comprenant un bloc de suppression, vous ne pouvez
reproduire que les plages restantes.
CONTINUE
SHUFFLE
1 Appuyez sur CONTINUE ou SHUFFLE avant
d’entamer la lecture.
2 Tournez le disque JOG pour sélectionner le disque.
JOG
CHECK
CLEAR
26
3 Appuyez plusieurs fois de suite sur CHECK
jusqu’à ce que la plage à supprimer apparaisse
dans la fenêtre d’affichage.
ALL DISCS
CD1
2 Après avoir sélectionné le disque que vous désirez
sur le lecteur, appuyez sur la touche Enter.
3 Entrez les caractères que vous désirez, puis
appuyez sur la touche Enter ou la touche Esc pour
mémoriser les informations.
Vous pouvez supprimer tous les caractères de
l’élément sélectionné
Tout en maintenant la touche Shift enfoncée, appuyez sur
la touche Delete.
DISC
201ON
4 Appuyez sur CLEAR.
“DELETE FILE” et “OFF” apparaissent dans la
fenêtre d’affichage.
ALL DISCS
DISC
20 1 OFF
TRACK
DELETE FILE
CD1
TRACK
Si vous souhaitez restaurer la plage, appuyez à
Remarques
• Si les touches de curseur ne fonctionnent pas correctement
et que vous ne pouvez pas terminer la tâche au moyen du
clavier, débranchez le clavier, puis rebranchez-le au lecteur.
• Si le clavier n’est pas un modèle américain, il est possible
que les caractères entrés diffèrent des caractères affichés sur
les touches.
La configuration du clavier américain est représentée cidessous.
~
'
1!2@3#4$5%6^7&89(0)-
WERT YU I OPQ
Shift
SDFGHJKLA
XCVBNM<>Z
Caps Lock
F
Ctrl Alt Alt Ctrl
+
=
}
{
]
[
Enter
?
Shift
nouveau sur CLEAR.
5 Répétez les étapes 3 et 4 pour supprimer d’autres
plages.
Vous pouvez restaurer toutes les plages que vous
avez supprimées
Maintenez la touche CLEAR enfoncée jusqu’à ce que
“ALL ON” apparaisse dans la fenêtre d’affichage.
Remarque
Les plages supprimées sont omises dans les modes de lecture
aléatoire ou programmée (si la totalité du disque comprenant
un bloc de suppression a été programmé comme une seule
phase).
20
20
Page 59

Enregistrement d’informations relatives aux disques compacts (fichiers personnalisés)
3 Tournez le disque JOG jusqu’à ce que le caractère
Groupement de disques
(fichier de groupe)
Vous pourriez penser qu’un trop grand nombre de
disques complique la recherche d’un disque
particulier. Ce lecteur dispose d’une fonction vous
permettant de classer les disques en huit groupes. Un
disque ne peut être classé que dans un seul groupe.
Lorsque vous avez classé des disques, vous pouvez
activer les modes de lecture continue, aléatoire ou
répétée dans un groupe déterminé (lecture de groupe).
SHUFFLECONTINUE
≠/±
INPUT
JOG
voulu apparaisse dans la fenêtre d’affichage.
Le curseur disparaît et le premier espace pour le
mémo de groupe apparaît.
Lorsque vous tournez le disque JOG dans le sens
horaire, les caractères apparaissent dans l’ordre
suivant. Tournez le disque JOG dans le sens
antihoraire pour revenir au caractère précédent.
(espace) A B C D E F G H I J K L M N O P Q R S T
U V W X Y Z a b c d e f g h i j k l m n o p q r s t u v
w x y z 0 1 2 3 4 5 6 7 8 9 ! " # $ % & ' ( ) * + , – . / : ;
< = > ? @ [ ¥ ] ^ _ \ { | } ⁄
4 Poussez sur le disque JOG pour sélectionner le
caractère.
Le caractère sélectionné s’allume et le curseur
clignotant apparaît pour indiquer l’espace suivant.
Si vous avez commis une erreur
Appuyez sur CLEAR et recommencez en introduisant les
bons caractères.
GROUP 1 – 8 CLEARGROUP FILE
·
Classement des disques par groupes
1 Appuyez sur CONTINUE ou SHUFFLE avant
d’entamer la lecture.
2 Tournez le disque JOG pour sélectionner le disque
à classer dans un groupe.
3 Appuyez sur GROUP FILE.
“Select G1 – G8” apparaît dans la fenêtre
d’affichage.
4 Appuyez sur l’une des touches GROUP 1 – 8
suivant le groupe dans lequel vous voulez classer
le disque.
“GROUP FILE” et le numéro de groupe
apparaissent dans la fenêtre d’affichage et le
disque est assigné à ce groupe.
Identification des groupes (mémo de
groupe)
Vous pouvez changer le numéro de groupe
présélectionné selon vos préférences, par exemple une
catégorie, en utilisant 13 caractères maximum.
1 Appuyez sur INPUT.
2 Tournez le disque JOG jusqu’à ce que le numéro
du groupe que vous voulez identifier apparaisse
dans la fenêtre d’affichage et poussez ensuite sur le
disque JOG.
Le curseur clignotant (“) apparaît.
5 Répétez les étapes 3 et 4 pour introduire d’autres
caractères.
Pour plus de détail, voir également “Identification
des disques sur le lecteur” à la page 23.
6 Appuyez sur INPUT pour introduire le mémo de
groupe.
Effacer le mémo de groupe
1 Appliquez les étapes 1 et 2 de la procédure
“Identification des groupes” pour sélectionner le
mémo de groupe que vous voulez effacer.
2 Appuyez sur CLEAR.
Le mémo de groupe disparaît.
Lecture de disques dans un groupe (lecture
de groupe)
Vous pouvez activer les modes de lecture continue ou
aléatoire dans un groupe.
1 Sélectionnez le mode de lecture que vous désirez
avant de commencer la lecture.
Lorsque vous
sélectionnez
Lecture continue
ALL DISCS
Lecture continue
1 DISC
Lecture aléatoire
ALL DISCS
Lecture aléatoire
1 DISC
Le lecteur reproduit
consécutivement toutes les plages de
tous les disques
consécutivement toutes les plages
du disque spécifié dans le groupe
toutes les plages de tous les disques
du groupe dans un ordre aléatoire
toutes les plages du disque spécifié
dans le groupe dans un ordre
aléatoire
(suite)
27
F
Page 60

Enregistrement d’informations relatives aux disques compacts (fichiers personnalisés)
2 Appuyez sur l’une des touches GROUP 1 – 8 pour
sélectionner le groupe et puis sur ·.
La lecture de groupe démarre à partir du disque
dont le numéro est le plus élevé et est situé le plus
près de la position de lecture. Si le disque à la
position de lecture figure également dans le groupe
sélectionné, la lecture démarre à partir de ce disque.
Pour annuler la lecture de groupe
Appuyez sur l’une des touches GROUP 1 – 8 que vous avez
sélectionnées. L’indication “GROUP OFF” apparaît dans la
fenêtre d’affichage.
Vous pouvez démarrer la lecture de groupe à l’aide
de la télécommande Z
1 Avant de démarrer la lecture, appuyez sur GROUP.
2 Appuyez sur la touche numérique correspondant au
groupe dont vous voulez démarrer la lecture et puis
sur ENTER.
3 Appuyez sur ·.
Pour annuler la lecture de groupe, appuyez sur GROUP.
Vous pouvez spécifier le disque à reproduire lors du
démarrage de la lecture de groupe
Après avoir sélectionné le groupe, tournez le disque JOG
pour sélectionner le disque et poussez ensuite sur le
disque JOG ou appuyez sur ·.
Si vous utilisez la télécommande, appuyez plusieurs fois
de suite sur DISC SKIP jusqu’à ce que le numéro du
disque voulu apparaisse dans la fenêtre d’affichage, et
appuyez ensuite sur ENTER.
4 Appuyez sur ENTER ou · lorsque le mémo du
disque voulu s’affiche.
La lecture de groupe démarre à partir du disque
sélectionné.
Vous pouvez passer au mémo de disque suivant ou au
précédent pendant l’exploration
Appuyez sur ≠ ou ±.
Supprimer des disques d’un groupe
• Pour supprimer un disque d’un groupe
1 Tournez le disque JOG jusqu’à ce que le numéro
du disque que vous voulez supprimer du groupe
apparaisse dans la fenêtre d’affichage.
2 Appuyez sur GROUP FILE.
“Select G1 – G8” apparaît dans la fenêtre d’affichage.
3 Appuyez sur CLEAR.
“GROUP ERASE” apparaît dans la fenêtre
d’affichage.
• Pour supprimer tous les disques d’un groupe en
même temps
Tout en maintenant la touche GROUP 1 – 8 du
groupe que vous voulez vider, appuyez sur CLEAR.
Mémorisation de vos plages
préférées (Hit List)
(CDP-CX240 uniquement)
28
Remarque
Si l’indication “NO ENTRY” apparaît dans la fenêtre
d’affichage, cela signifie qu’il n’y a aucun disque dans le
groupe sélectionné.
Localisation d’un disque dans un groupe en
Vous pouvez mémoriser les plages que vous écoutez
fréquemment et sélectionner ces plages
immédiatement en consultant les numéros ou titres des
plages (voir page 29) dans la liste des hits.
La liste des hits vous permet de mémoriser jusqu’à 32
plages.
HIT LIST
≠/±
INPUT
JOG
explorant les mémos de tous les disques Z
Vous pouvez localiser rapidement dans un groupe un
disque que vous voulez écouter en faisant défiler les
mémos des disques dans la fenêtre d’affichage et
ensuite démarrer la lecture de groupe.
Faites attention que vous ne pouvez pas utiliser cette
fonction dans les modes de lecture aléatoire
ALL DISCS et de lecture programmée.
1 Appuyez d’abord sur GROUP et puis sur la touche
numérique correspondant au groupe voulu.
·
CLEAR
HIT LIST
2 Appuyez sur ENTER.
Le nom du groupe apparaît dans la fenêtre
d’affichage.
3 Appuyez sur MEMO SCAN.
L’indication “MEMO SCAN” apparaît dans la
fenêtre d’affichage.
Les mémos des disques du groupe sélectionné
F
défilent dans la fenêtre d’affichage.
=/+
ENTER
Page 61

Enregistrement d’informations relatives aux disques compacts (fichiers personnalisés)
Placement de plages dans la liste des hits
Appuyez sur HIT LIST pendant la lecture de votre
plage favorite.
L’indication “HIT” et “List in” apparaissent dans la
fenêtre d’affichage.
Lecture des plages de la liste des hits
1 Appuyez sur HIT LIST avant d’entamer la lecture.
La touche HIT LIST s’allume et “HIT LIST”
apparaît dans la fenêtre d’affichage.
2 Tournez le disque JOG ou appuyez sur ≠/±
jusqu’à ce que la plage que vous désirez apparaisse
dans la fenêtre d’affichage du panneau avant.
3 Appuyez sur le disque JOG ou appuyez sur ·
pour démarrer la lecture.
Lors de l’utilisation de la télécommande, appuyez
sur ENTER.
La liste des hits reste jusqu’à ce que vous les
supprimiez
Même si vous remplacez les disques, la liste de hits que
vous créez reste. Ainsi, le lecteur reproduit uniquement
la plage existante.
Remarques
• Vous ne pouvez pas agencer l’ordre des plages dans la liste
des hits.
• La plage que vous sélectionnez à l’étape 2 sera affichée
comme première plage de la liste des hits.
• Si vous entrez une 33ème plage dans la liste, la 32ème plage
sera remplacée.
• Vous ne pouvez pas mémoriser les plages d’un deuxième
lecteur de CD.
Suppression des plages de la liste des hits
1 Suivez les étapes 1 et 2 de “Lecture des plages de
la liste des hits”.
2 Appuyez sur CLEAR.
La plage sélectionnée est supprimée de la liste des
hits.
Suppression des plages de la liste des hits
Identification des plages en mode d’arrêt
1 Appuyez sur INPUT pendant la lecture d’une
plage dans la liste des hits.
“Hit Title” apparaît dans la fenêtre d’affichage.
2 Appuyez sur le disque JOG.
Le curseur clignotant (“) apparaît dans la fenêtre
d’affichage.
3 Tournez le disque JOG jusqu’à ce que le caractère
que vous désirez apparaisse dans la fenêtre
d’affichage.
Le curseur disparaît et le premier espace du titre
du hit clignote.
A mesure que vous tournez le disque JOG dans le
sens des aiguilles d’une montre, les caractères
apparaissent dans l’ordre suivant. Tournez le
disque JOG dans le sens contraire des aiguilles
d’une montre pour retourner au caractère
précédent.
(espace) A B C D E F G H I J K L M N O P Q R S T
U V W X Y Z a b c d e f g h i j k l m n o p q r s t u v
w x y z 0 1 2 3 4 5 6 7 8 9 ! " # $ % & ' ( ) * + , – . / : ;
< = > ? @ [ ¥ ] ^ _ \ { | } ⁄
4 Appuyez sur le disque JOG pour sélectionner le
caractère.
Le caractère sélectionné s’allume et le curseur
clignotant apparaît pour indiquer l’espace suivant
à entrer.
Si vous avez commis une erreur
Appuyez sur CLEAR et recommencez en introduisant les
caractères correctement.
5 Répétez les étapes 3 and 4 pour introduire d’autres
caractères.
Reportez-vous également à “Identification de
disques sur le lecteur” à la page 23 pour plus de
détails.
6 Appuyez sur INPUT pour mémoriser le titre du hit.
Identification des plages en mode d’arrêt
1 Sélectionnez la plage que vous désirez assigner en
tournant le disque JOG ou appuyez sur ≠/±.
2 Appuyez sur INPUT.
Le curseur clignotant (“) apparaît dans la fenêtre
d’affichage.
Maintenez la touche CLEAR enfoncée en mode d’arrêt
jusqu’à ce que “CLEAR” apparaisse.
Identification des plages de la liste des hits
(Hit Title)
Vous pouvez identifier les plages dans la liste des hits
selon l’une des deux méthodes décrites ci-dessous.
3 Suivez les étapes 3 à 6 de “Identification des plages
en mode de lecture” pour introduire d’autres
caractères.
Vous pouvez mémoriser les titres des plages d’un
disque CD TEXT dans la liste des hits
Appuyez deux fois sur le disque JOG (en mode de
lecture) ou appuyez deux fois sur INPUT (en mode
d’arrêt) lorsque le titre de la plage apparaît à l’étape 2.
29
F
Page 62

Informations complémentaires
Informations complémentaires
Précautions
Mesures de sécurité
• Attention — L’utilisation d’instruments d’optique avec cet
appareil accentue les risques pour les yeux.
• Si un objet ou un liquide quelconque pénètre à l’intérieur
du boîtier, débranchez le lecteur et abstenez-vous de le
réutiliser avant de l’avoir fait contrôler par un personnel
qualifié.
Remarques concernant l’entretien
• Nettoyez le boîtier, la console et les commandes à l’aide
d’un chiffon doux humecté d’une solution détergente
neutre. Ne pas utiliser de tampon abrasif, de poudre à
récurer ou de solvant tel que l’alcool ou le benzène.
Remarques concernant le transport de l’appareil
• Lors du transport du lecteur, ouvrez le capot frontal et
retirez tous les disques du lecteur et mettez le lecteur hors
tension.
Remarques concernant l’alimentation
• Avant d’utiliser le lecteur, assurez-vous que la tension
d’exploitation de l’appareil est identique à celle de
l’alimentation secteur locale. La tension d’exploitation est
indiquée sur la plaque signalétique fixée au dos du lecteur.
• Le lecteur reste branché sur l’alimentation secteur tant qu’il
est raccordé à la prise murale, même si l’appareil
proprement dit a été préalablement mis hors service.
• Si vous n’avez pas l’intention d’utiliser le lecteur avant
longtemps, débranchez le lecteur de la prise murale. Pour
déconnecter le cordon d’alimentation secteur, saisissezvous de la fiche mâle; ne tirez jamais sur le cordon.
• Le cordon d’alimentation secteur ne doit être changé que
dans un atelier qualifié.
• Les prises non raccordées restent toujours alimentées, quel
que soit le réglage du commutateur d’alimentation, lorsque
l’appareil est raccordé au secteur.
Remarques concernant l’installation de l’appareil
• Installez le lecteur dans un lieu suffisamment ventilé afin
de prévenir tout risque d’élévation excessive de la
température à l’intérieur du boîtier.
• Ne pas installer le lecteur sur une surface souple telle qu’un
tapis dans la mesure où les ouïes de ventilation situées sur
la base de l’appareil risquent d’être obstruées.
• Ne pas installer le lecteur à proximité de sources de chaleur
ou dans un endroit excessivement poussiéreux, soumis à la
lumière directe du soleil ou à des vibrations ou des chocs
mécaniques importants.
Fonctionnement
• Si le système est transporté directement d’un endroit froid
dans un endroit chaud ou est placé dans une pièce très
humide, de l’humidité risque de se condenser sur les
lentilles à l’intérieur du lecteur. Si cela se produit, le lecteur
risque de ne pas fonctionner correctement. Dans ce cas,
laissez le lecteur sous tension pendant une heure jusqu’à ce
que l’humidité se soit évaporée.
Si vous éprouvez la moindre difficulté concernant
l’utilisation de votre lecteur, n’hésitez pas à consulter
votre revendeur Sony.
Remarques concernant les
disques compacts
Remarques concernant la manipulation des disques
compacts
• Manipulez le disque avec soin pour éviter de le salir.
• Ne pas coller de papier ou de ruban adhésif sur les disques.
• Ne pas exposer les disques à la lumière directe du soleil ou
à des sources de chaleur telles que les conduits d’air chaud;
ne pas les abandonner dans une voiture garée au soleil car
la température est susceptible d’atteindre un niveau élevé à
l’intérieur de l’habitacle.
• Lorsque vous retirez un disque d’un logement, rangez-le
dans son étui.
Remarques concernant l’entretien des disques compacts
• Avant de jouer un disque, nettoyez-le à l’aide d’un chiffon
prévu à cet effet. Essuyez chaque disque en allant du centre
vers la périphérie.
30
Remarques concernant le réglage du volume sonore
• N’augmentez pas le volume lorsque vous écoutez un
passage caractérisé par un niveau d’entrée très faible ou
l’absence de tout signal sonore. Sinon, vous risquez
d’endommager les hauts-parleurs lors de la lecture d’un
passage présentant un niveau d’entrée très élevé.
F
• Ne pas utiliser de solvants tels que le benzène, les diluants
pour peinture (thinner), les détergents disponibles dans le
commerce ou les bombes antistatiques destinées aux
disques noirs en vinyle.
Page 63

Playing CDs in Various Modes
Informations complémentaires
Informations complémentaires
Informations complémentaires
Dépannage
Si vous éprouvez l’une quelconque des difficultés qui
suivent lorsque vous utilisez ce lecteur, consultez ce
guide de dépannage pour résoudre le problème
rencontré. Si une défaillance quelconque persiste,
consultez votre revendeur Sony.
Absence de son.
/Assurez-vous que le lecteur est correctement
raccordé.
/Assurez-vous que vous utilisez correctement
l’amplificateur.
La lecture du disque sélectionné ne débute pas.
/Aucun CD n’a été introduit dans l’un des
logements (“–NO DISC–” apparaît).
Introduisez un CD.
/Introduisez le disque compact en veillant à ce
que le côté étiqueté soit orienté vers la droite.
/Nettoyez le disque compact (voir page 30).
/De l’humidité s’est condensée à l’intérieur du
lecteur. Ouvrez le capot frontal et laissez le
lecteur sous tension pendant environ une heure
(voir page 30).
La télécommande ne fonctionne pas.
/Eliminez les obstacles situés sur la trajectoire
qui relie la télécommande au lecteur.
/Orientez la télécommande vers le capteur de
télécommande g du lecteur.
/Si les piles de la télécommande sont faibles,
remplacez-les toutes simultanément par de
nouvelles piles.
/Réglez le commutateur CD 1/2/3 de la
télécommande en fonction de la position du
sélecteur COMMAND MODE affichée dans la
fenêtre d’affichage du panneau frontal (voir
page 5).
Le lecteur fonctionne incorrectement.
/Il se peut que la puce du micro-ordinateur
fonctionne incorrectement. Débranchez le
cordon d’alimentation et rebranchez-le ensuite
sur la prise murale pour réinitialiser le lecteur.
Spécifications
Lecteur de disques compacts
Laser Laser à semi-conducteur (λ = 780 nm)
Puissance de sortie laser moins de 44,6 µW*
Réponse en fréquence 20 Hz à 20 kHz ±0,5 dB
Rapport signal/bruit CDP-CX240: Plus de 107 dB
Plage dynamique Plus de 98 dB
Distorsion harmonique Moins de 0,0045%
Bande de séparation CDP-CX240: Plus de 100 dB
Sorties
Type de
fiche
LINE OUT
DIGITAL OUT
(OPTICAL)
Fiches
phono
Connecteur
de sortie
optique
Généralités
Alimentation
Lieu d’acquisition
Canada
Europe
Autres pays
Puissance absorbée 12 W
Dimensions (approx.) Lorsque le capot frontal est fermé
(l/h/p) 430 × 200 × 480 mm
Durée d’émission : continue
* Cette puissance est la valeur mesurée
à une distance de 200 mm de la
surface de la lentille de l’objectif du
bloc optique avec une ouverture de
7 mm.
CDP-CX220: Plus de 105 dB
CDP-CX220: Plus de 97 dB
Niveau de sortie
maximum
2 V
(à 50 kohms)
–18 dBm
Alimentation
120 V CA, 60 Hz
220 – 230 V CA, 50/60 Hz
110 – 120 V ou 220 – 240 V CA,
commutable, 50/60 Hz
(17 × 7 7/8 × 19 de pouce) parties
saillantes incluses
Impédance de
charge
Plus de 10 kohms
Longueur d’onde:
660 nm
Poids (approx.) 9,5 kg (21 livres)
Accessoires fournis
Câble audio (2 fiches phono – 2 fiches phono) (1)
Cordon de minifiche monaural (2P) (1) (fourni
uniquement avec les modèles pour le Canada)
Commande à distance (télécommande) (1)
Piles Sony SUM-3 (NS) (2)
Porte-livrets de CD (1) et étiquette (1)
La conception et les spécifications de cet appareil sont sujettes à
modification sans préavis.
31
F
Page 64

Informations complémentaires
Index
32
Identification des
commandes
Touches
CHECK 19, 26
CLEAR 17, 25, 26
CONTINUE 15
X-FADE 22
DEL 25
DISC 14, 18
DISC/CAPS 24
DISC SKIP 11
ENTER 14, 18, 28
GROUP 28
GROUP 1 – 8 27
GROUP FILE 27
HIGH-LIGHT 13
HIT LIST 29
INPUT 24, 29
MEGA CONTROL 21
MEMO INPUT 24
MEMO SCAN 14
MEMO SEARCH 14
NO DELAY 22
Numériques 14, 15
§ OPEN/CLOSE 7
PROGRAM 17
REPEAT 16
SHUFFLE 16
SPACE 25
TIME/TEXT 12
≠/± 11
· 11
P 11
p 11
=/+ 15
0/) 15
>10 15
Commutateurs
CD 1/2/3 5
TIMER 19
I/u 7
Index
A
AMS 15
B
Bloc de suppression 26
C
CD TEXT 12
Connexion 4
d’un autre lecteur CD 6
CONTROL A1 5
D
Déballage 4
Détecteur automatique de
musique (AMS) 15
Disque JOG 7
E
Exploration des mémos 14
F
Fichiers personnalisés
Bloc de suppression 26
Fichier de groupe 27
Mémo de disque 23
possibilités d’utilisation 23
Liste de hits 28
Fondu enchaîné 21
G, H
Groupement de disques 27
Guide de dépannage 31
I, J, K
Identification d’un disque 23
Introduction des CD 7
M, N, O
Magasin rotatif 7
Manipulation des CD 30
Mega Control avancée 20
Mémo de disque 23
Mémorisation
de plages spécifiques 26
des informations concernant
le CD 23
P, Q
Programme
modifier 19
supprimer 19
vérifier 19
R
Raccordements
aperçu 4
Recherche. Voir Localisation
Recherche mémo 14
Répétition 16
S
Sélection de la langue 13
Sélection d’un disque 14
Spécification du disque
suivant 15
Suppression
Bloc de suppression 26
Fichiers personnalisés 23
Mémo de disque 25
Mémo de groupe 27
programmes 19
T, U, V, W, X, Y, Z
Télécommande 4
Temps de lecture total 12
L
Lecture
lecture aléatoire 16
lecture continue 10
lecture de groupe 27
lecture programmée 17
lecture répétée 16
Lecture aléatoire
de tous les disques 16
d’un seul disque 17
Lecture continue 10
Lecture du programmateur 19
Lecture enchaînée 22
Lecture sans transition 22
Localisation
à l’aide de la fonction
AMS 15
des disques 14
directe 15
d’un endroit spécifique 15
d’une plage spécifique 15
tout en contrôlant 15
tout en observant la fenêtre
F
d’affichage 15
Prises
LINE OUT 5
S-LINK/CONTROL A1 4
2ND CD IN 6
Connecteurs
DIGITAL OUT (OPTICAL) 5
Divers
Capot frontal 7
Disque JOG 7
Fenêtre d’affichage 12
Logements de disques 7
Magasin rotatif 7
Sélecteur COMMAND
MODE 5
g 4
Page 65

Playing CDs in Various Modes
Informations complémentaires
Informations complémentaires
Informations complémentaires
33
F
Page 66

ADVERTENCIA
Bienvenido
Acerca de este
Para prevenir el riesgo de
incendio o descarga eléctrica,
no exponga la unidad a la
lluvia ni a la humedad.
Para evitar que se produzcan
descargas eléctricas, no abra la
unidad. Solicite la asistencia de
personal cualificado
exclusivamente.
No instale la unidad en un
espacio cerrado, como una
estantería para libros o un
armario empotrado.
Este aparato está clasificado como un
producto LASER de CLASE 1 (CLASS 1
LASER PRODUCT), que se indica en la
parte trasera exterior de la unidad.
Felicitaciones por adquirir el reproductor
de discos compactos Sony. Antes de
utilizar la unidad, lea detenidamente el
manual completo y consérvelo para
futuras consultas.
manual
Las instrucciones de este manual son
para los modelos CDP-CX240 y
CDP-CX220. En las ilustraciones aparece
el modelo CDP-CX240.
Las diferencias de funcionamiento se
indican claramente en el texto, por
ejemplo “Sólo CDP-CX240”.
Convenciones
• Las instrucciones de este manual
describen los controles del
reproductor.
También es posible utilizar los
controles del mando a distancia si
tienen los mismos nombres o similares
a los del reproductor.
• En el manual se emplean los
siguientes iconos:
Indica que es posible realizar la
tarea con el mando a distancia.
Indica los consejos y sugerencias
para realizar las tareas con
mayor facilidad.
La siguiente etiqueta de advertencia se
encuentra en el interior de la unidad.
Este equipo se ha creado sólo con
fines de entretenimiento doméstico.
La garantía no cubrirá los daños si se
emplea en entornos comerciales, por
disc jockeys, por ejemplo, incluso
dentro del periodo de garantía.
ES
2
Page 67

INDICE
Procedimientos iniciales
Desembalaje .......................................................................................................................... 4
Conexión del sistema .......................................................................................................... 4
Conexión de otro reproductor de CD (Sólo CDP-CX240) .............................................6
Inserción de discos compactos...........................................................................................7
Para reproducir un CD..................................................................................................... 10
Reproducción de discos compactos
Uso del visor ...................................................................................................................... 12
Localización de un disco específico ............................................................................... 13
Especificación del siguiente disco para reproducirlo .................................................. 15
Localización de un tema o un punto específico del tema ........................................... 15
Reproducción repetida..................................................................................................... 16
Reproducción en orden aleatorio (Reproducción aleatoria) ...................................... 16
Creación de programas (Reproducción de programas) .............................................. 17
Reproducción con temporizador (Sólo CDP-CX240) .................................................. 19
Control de otro reproductor de CD (Mega Control avanzado)
(Sólo CDP-CX240)............................................................................................................. 20
Aparición y desaparición gradual del sonido (Sólo CDP-CX240) ............................. 21
Reproducción alternativa (Reproducción sin demora/X-Fade)
(Sólo CDP-CX240)............................................................................................................. 22
ES
Almacenamiento de información acerca de los discos compactos
(archivos personalizados)
Funciones de los archivos personalizados .................................................................... 23
Etiquetado de discos (Memo de disco).......................................................................... 23
Almacenamiento de información de archivo personalizado mediante un teclado
(Sólo CDP-CX240)............................................................................................................. 26
Almacenamiento de temas específicos (Banco de borrado) ....................................... 26
Agrupación de discos (Archivo de grupo) ................................................................... 27
Almacenamiento de temas favoritos (Lista de éxitos) (Sólo CDP-CX240) ............... 28
Información adicional
Precauciones ...................................................................................................................... 30
Notas sobre los discos compactos .................................................................................. 30
Solución de problemas ..................................................................................................... 31
Especificaciones ................................................................................................................ 31
Indice alfabético.................................................................................... Cubierta posterior
ES
3
Page 68

Procedimientos iniciales
Procedimientos iniciales
Desembalaje
Compruebe que se han incluido los siguientes
elementos:
• Cable de audio (1)
• Cable de minienchufe monofónico (2P) (cable de
conexión para CONTROL A1) (1) (sólo se suministra
con los modelos canadienses)
• Mando a distancia (control remoto) (1)
• Pilas Sony SUM-3 (NS) (2)
• Catálogos de portadas de CD (2) y etiqueta (1)
Notas
• No deje el mando a distancia cerca de lugares
extremadamente calientes o húmedos.
• No deje caer ningún objeto en el compartimiento del mando
a distancia, en particular, al sustituir las pilas.
• No exponga el sensor remoto a la luz directa del sol ni a
aparatos de iluminación, ya que podría producirse un
funcionamiento incorrecto.
• Si no va a utilizar el mando a distancia durante varios días,
retire las pilas para evitar un posible daño debido a fugas y
corrosión.
Uso del catálogo de portadas de CD
El catálogo de portadas de CD le ayuda a localizar
fácilmente los discos. Después de insertar discos en el
reproductor, puede colocar la portada que acompaña al
CD en el catálogo suministrado. Sitúe dos portadas de
CD con la parte frontal hacia fuera en una ranura. Fije la
etiqueta con el número en cada ranura, haciéndola
coincidir con el número de la ranura donde haya
insertado el disco. Es posible colocar hasta 200 portadas
de CD en el catálogo.
Inserción de pilas en el mando a distancia
Es posible controlar el reproductor utilizando el mando
a distancia suministrado. Inserte dos pilas de tamaño
AA (R6), haciendo coincidir las polaridades + y – de las
pilas con el diagrama del interior del compartimiento
para pilas.
Inserte el extremo negativo (–) en primer lugar y
presione sobre la pila hasta que el extremo positivo (+)
encaje en su sitio. Cuando utilice el mando a distancia,
apúntelo al sensor remoto g del reproductor.
Conexión del sistema
Descripción general
En esta sección se describe cómo conectar el
reproductor de CD a un amplificador. Asegúrese de
desactivar la alimentación de cada componente antes
de realizar la conexión.
DIGITAL OUT
(OPTICAL)
Reproductor
de CD
A entrada de audio
A una toma de CA
A salida de línea (L)
S-LINK/
CONTROL A1
A salida de línea (R)
COMMAND
MODE
Amplificador
Sustitución de pilas
Con uso normal, las pilas deben durar alrededor de seis
meses. Cuando el mando a distancia no controle el
reproductor, sustituya todas las pilas por unas nuevas.
: Flujo de señales
A una toma de CA
Cables necesarios
Cable de audio (1) (suministrado)
Blanco
(L)
Rojo
(R)
ES
4
Blanco
(L)
Rojo
(R)
Page 69

Procedimientos iniciales
Playing CDsGetting Started
Conexiones
Al conectar el cable de audio, haga coincidir los colores
de los cables con las tomas adecuadas de los
componentes: rojo (derecha) con rojo, y blanco
(izquierda) con blanco. Compruebe que se han
realizado las conexiones firmemente para evitar que se
produzca ruido de fondo.
Reproductor
de CD
LINE2ND CD
IN OUT
L
R
L
R
• Si dispone de un componente digital, como un
amplificador digital, convertidor D/A, DAT o MD
Conecte el componente mediante el conector DIGITAL OUT
(OPTICAL) utilizando un cable óptico (no suministrado).
Retire la tapa y enchufe el cable óptico.
POC-15
Cable óptico (no suministrado)
Reproductor
de CD
DIGITAL OUT
OPTICAL
Amplificador
INPUT
CD
L
R
Componente
digital
DIGITAL INPUT
OPTICAL
Si emplea otro reproductor de CD Sony junto con
éste
El mando a distancia suministrado sólo funcionará con
este reproductor.
• Si emplea un reproductor equipado con el selector
COMMAND MODE:
Ajuste el selector COMMAND MODE de este
reproductor en CD 1 y el del otro reproductor en
CD 2 o CD 3. A continuación, ajuste adecuadamente el
interruptor CD 1/2/3 del mando a distancia
suministrado para cada reproductor.
• Si emplea un reproductor desprovisto del selector
COMMAND MODE:
El modo de mando del reproductor sin selector
COMMAND MODE se ajusta en CD 1. Defina el
selector COMMAND MODE de este reproductor en
CD 2 y el interruptor CD 1/2/3 del mando a distancia
en CD 2.
Ajuste del selector de tensión (sólo los
modelos que disponen de él)
Compruebe que el selector de tensión situado en la
parte posterior del reproductor está ajustado a la
tensión de la línea de alimentación local. Si no es así,
sitúe el selector en la posición correcta mediante un
destornillador antes de conectar el cable de
alimentación de CA a una toma mural.
220 - 240 V110 - 120 V
Nota
Al realizar la conexión mediante el conector
DIGITAL OUT (OPTICAL), puede producirse ruido al
reproducir software en lugar de música, como por ejemplo
un CD-ROM.
Si dispone de un componente Sony con toma
CONTROL A1
Conéctelo mediante la toma CONTROL A1. Puede
simplificar el funcionamiento de los sistemas de audio
compuestos por componentes Sony independientes. Para
más información, consulte las instrucciones
complementarias “S-Link/CONTROL-A1 Control
System”.
Conexión del cable de alimentación de CA
Conecte el cable de alimentación de CA a la toma de
red.
Nota sobre la ubicación
Asegúrese de colocar el reproductor en un lugar de
superficie horizontal. Si lo coloca en posición inclinada,
puede causar fallos de funcionamiento o daños al
reproductor.
ES
5
Page 70

Procedimientos iniciales
Conexión de otro reproductor
de CD (Sólo CDP-CX240)
Si dispone de un reproductor de CD Sony equipado
con la toma CONTROL A1 y el modo de mando del
mismo puede ajustarse en CD 3, podrá controlar dicho
reproductor como secundario junto con esta unidad.
Una vez conectados esta unidad y un amplificador,
siga el procedimiento que aparece a continuación.
Asegúrese de desactivar la alimentación de los
reproductores antes de realizar esta conexión.
A LINE OUT
COMMAND
MODE
CDP-CX240
Cables necesarios
• Cable de audio (1) (Emplee el cable suministrado con el
reproductor que vaya a conectar.)
• Cable de minienchufe monofónico (2P) (1) (sólo se
suministra con los modelos canadienses)
1 Conecte los reproductores con un cable de audio
(consulte también “Conexiones” en la página 5).
CDP-CX240
LINE2ND CD
IN OUT
L
R
L
R
CDP-CX200, etc.
LINE OUT
L
R
2 Conecte los reproductores con un cable de
minienchufe monofónico (2P).
A una toma de CA
A 2ND CD IN
A salida de audio
A una toma de CA
A S-LINK/CONTROL A1
CDP-CX200, etc.
A CONTROL A1
A entrada de audio
Amplificador
CDP-CX240
S-LINK
CONTROL A1
CDP-CX200, etc.
CONTROL A1
Para obtener más información sobre esta conexión,
consulte las instrucciones complementarias
“S-Link/CONTROL-A1 Control System”.
3 Ajuste el selector COMMAND MODE de cada
reproductor.
Ajuste el selector COMMAND MODE de este
reproductor en CD 1 o CD 2, y el del segundo en
CD 3.
COMMAND MODE
CD
132
Para obtener más información sobre cómo utilizar
el segundo reproductor, consulte “Control de otro
reproductor de CD” en la página 20 y
“Reproducción alternativa” en la página 22.
4 Conecte el cable de alimentación de CA de ambos
reproductores a tomas de CA.
A una toma de CA: Flujo de señales
Notas
• No conecte un reproductor que no sea el que utiliza como
secundario a las tomas 2ND CD IN de este reproductor.
• Cuando conecte un segundo reproductor de CD, no conecte
el conector DIGITAL OUT (OPTICAL) de esta unidad al
amplificador.
ES
6
Page 71

Inserción de discos compactos
Es posible insertar hasta 200 discos compactos en este
reproductor.
Procedimientos iniciales
Playing CDsGetting Started
3 Gire el selector JOG hasta que encuentre la ranura
en la que desee insertar un disco, mientras
comprueba el número de disco (escrito junto a
cada ranura e indicado también en el visor).
I/u
§ OPEN/CLOSE
Posición de
reproducción
Soporte giratorio
Posición de carga
JOG
1 Pulse I/u para activar el reproductor.
2 Para abrir la cubierta frontal, pulse § OPEN/
CLOSE.
Número de
disco
Ranura de disco en la posición de carga
El número de disco que se encuentra en la posición
de carga aparece en el visor.* Si el disco dispone de
memo de disco (consulte la página 23), aparecerá
éste en lugar del número de disco. Al girar el
selector JOG, cambiará el número o el memo de
disco.
ALL
DISCS
CD1
DISC
02
*DISC-20*
Número o memo de disco
Es posible clasificar los discos en ocho grupos con
la función Archivo de grupo, que permite
encontrar fácilmente el disco que desee reproducir.
Para obtener más información, consulte
“Agrupación de discos” en la página 27.
* Si ya ha insertado los discos, aparecerá el número de
disco que se encuentre en la posición de reproducción.
Si gira el selector JOG, el número de disco mostrado
cambiará por el que se encuentra en la posición de
carga.
(continúa)
ES
7
Page 72

Procedimientos iniciales
4 Inserte un disco con la cara etiquetada hacia la
derecha.
Con la cara etiquetada
hacia la derecha
Después de insertar el disco, es posible introducir
los títulos originales de los discos en lugar de los
números (consulte “Etiquetado de discos” en la
página 23) para localizarlo con facilidad al iniciar
la reproducción.
ALL DISCS
CD1
DISC
20
SONYHITS
5 Repita los pasos 3 y 4 para insertar más discos.
6 Cierre la cubierta frontal pulsando § OPEN/
CLOSE.
El catálogo de portadas de CD suministrado facilita la
localización de los discos
Es posible almacenar hasta 200 portadas de CD. Inserte
una portada y fije la etiqueta con el número en la ranura
y en la portada para poder localizar el disco fácilmente.
Notas
• No inserte un adaptador para discos compactos
(CSA-8) de 8 cm sin un CD. Puede dañar el
reproductor.
• No fije nada, como por ejemplo fundas, en los discos
compactos, ya que puede dañar el reproductor o el
disco.
• Si cae un disco en el reproductor y el CD no se introduce
correctamente en la ranura, póngase en contacto con el
proveedor Sony más próximo.
• Al transportar el reproductor, retire todos los discos del
mismo.
• Compruebe que ha insertado los discos en las ranuras en
ángulo recto con respecto al soporte giratorio. De no ser
así, el reproductor o el disco pueden dañarse.
• Compruebe que el soporte giratorio se encuentra
completamente parado antes de insertar o extraer discos.
El panel frontal se cierra de forma automática al pulsar
·. Tenga cuidado para no introducir la mano en el
reproductor después de pulsar ·; de lo contrario,
podría pillársela con el panel frontal.
El soporte giratorio rota y la ranura de disco que se
encuentre en la posición de carga se ajusta en la de
reproducción.
Cierre siempre la cubierta frontal excepto al
insertar o retirar discos.
ES
8
Page 73

Extracción de discos compactos
Después de realizar los pasos de 1 a 3 de “Inserción de
discos compactos” en la página 7, retire los discos. A
continuación, cierre la cubierta frontal.
Procedimientos iniciales
Playing CDsGetting Started
ES
9
Page 74

Operaciones básicas
Para reproducir un CD
3
STANDBY
I / u
CONTINUE
TIMER
OFF PLAY
GROUP 1
KEY BOARD
GROUP 5
KEYBOARD
• Consulte las páginas 4 – 5 para
información sobre las
conexiones.
• Compruebe que ha insertado los
discos correctamente como se
indica en las páginas 7 – 8.
• Es posible reproducir todos los
temas de un disco en el orden
original (reproducción continua),
así como reproducir hasta 200
discos consecutivamente.
Es posible activar el
reproductor pulsando I/u en
el mando a distancia
SHUFFLE
GROUP 2
GROUP 6
PROGRAM
GROUP 3
GROUP 7
REPEAT
GROUP 4
GROUP 8
TIME/TEXT
HIT LIST
GROUP FILE
5
MEGA CONTROL
FADER NO DELAY
OPEN/CLOSE
4/52
DISC/CHARACTER
X-FADE
INPUT
MEMO SEARCH
PUSH ENTER
AMS
CHECK CLEAR
Encienda el amplificador y seleccione la posición del
1
reproductor de CD.
Pulse I/u para activar el reproductor.
2
Pulse CONTINUE para seleccionar el modo de reproducción
3
continua ALL DISCS (todos los discos) o 1 DISC (un disco).
Cada vez que pulse CONTINUE, aparece la indicación
“ALL DISCS” o “1 DISC” en el visor.
Al seleccionar
ALL DISCS
1 DISC
La unidad reproduce
Todos los discos del reproductor consecutivamente por
orden de número de disco. Las ranuras de disco vacías
se omiten.
Sólo un disco seleccionado
10
Gire el selector JOG hasta que el visor muestre el número o
memo de disco (consulte la página 23) deseado con el fin de
4
seleccionar el primer disco (ALL DISCS) o el que desee
(1 DISC).
ALL DISCS
CD1
DISC
20
*DISC-20*
ES
Page 75

Operaciones básicas
Presione el selector JOG o pulse · para iniciar la
5
reproducción.
El disco seleccionado se ajusta en la posición de reproducción y
el reproductor inicia la reproducción de todos los discos a partir
del disco seleccionado (ALL DISCS) o todos los temas una vez
(1 DISC).
Ajuste el volumen en el amplificador.
Al desactivar el reproductor
El reproductor recuerda el
último disco reproducido y
el modo de reproducción
(continuo, aleatorio
(consulte la página 16) o de
programas (consulte la
página 17)). Al volver a
activar el reproductor, éste
reproduce el mismo disco en
el mismo modo.
Para detener la reproducción
Pulse p.
STANDBY
I / u
CONTINUE
SHUFFLE
PROGRAM
REPEAT
TIMER
OFF PLAY
GROUP 1
KEY BOARD
GROUP 5
KEYBOARD
Para
Realizar una pausa
Reanudar la reproducción
después de la pausa
Ir al disco siguiente
Volver al disco anterior
Ir al siguiente tema
Volver al tema anterior
Detener la reproducción y retirar el disco
TIME/TEXT
GROUP 2
GROUP 3
GROUP 4
HIT LIST
GROUP 6
GROUP 7
GROUP 8
GROUP FILE
§ OPEN/CLOSE
≠/±
MEGA CONTROL
FADER NO DELAY
OPEN/CLOSE
X-FADE
INPUT
MEMO SEARCH
AMS
JOG
DISC/CHARACTER
PUSH ENTER
CHECK CLEAR
·P p
Es necesario
Pulsar P
Pulsar P o ·
Pulsar DISC SKIP + una vez.
Mantenga el botón pulsado para omitir
discos.
Pulsar DISC SKIP – una vez.
Mantenga el botón pulsado para omitir
discos.
Pulsar ±
Pulsar ≠
Pulsar § OPEN/CLOSE
Operaciones básicas
11
ES
Page 76

Reproducción de discos compactos
Reproducción de discos compactos
Uso del visor
Visualización de información durante la
reproducción de un disco
Es posible comprobar información sobre el disco
utilizando el visor.
TIME/TEXT
INPUT
TIME/TEXT
HIGH-LIGHT
JOG
p
Comprobación del número total y de la
duración de reproducción de los temas
Seleccione el disco que desee comprobar, y presione el
selector JOG en el modo de reproducción continua.
Cuando el reproductor inicie automáticamente la
reproducción, pulse p para detenerlo y, a
continuación, TIME/TEXT.
El visor muestra el número de disco actual, el número
total de temas y el tiempo total de reproducción del
disco.
Mientras se reproduce un disco, el visor muestra el
número de disco actual, el número de tema, el tiempo
de reproducción del tema y el número del disco
siguiente.
Número de disco actual
ALL DISCS
CD1
DISC
Número de disco siguiente
TRACK
MIN
NEXT
DISC
83
SEC
20 1 0.28
Número de tema
actual
Comprobación de la información de los
discos CD TEXT
Los discos CD TEXT contienen información, como los
títulos de los discos o los nombres de los artistas,
memorizada en un espacio en blanco donde los discos
normales no contienen ninguna información. El visor
muestra la información CD TEXT del disco de forma
que sea posible comprobar el título del disco y tema
actuales y el nombre del artista. Cuando el reproductor
detecta los discos CD TEXT, aparece en el visor la
indicación “CD TEXT”. Si el disco CD TEXT tiene
capacidad multilingüe, el visor muestra la indicación
“MULTI CD TEXT”. Si desea ver la información en
otro idioma, consulte “Selección del idioma de la
información de CD TEXT” en la página 13.
Visualización de información antes de iniciar la
reproducción
El visor muestra el título del disco. Si pulsa
TIME/TEXT, el nombre del cantante se desplaza por el
visor. Si vuelve a pulsar TIME/TEXT, el visor mostrará
el número de disco actual, el número total de temas y
el tiempo total de reproducción del disco. El visor
vuelve a mostrar el título del disco después de unos
instantes.
Tiempo de reproducción
del tema
12
Número de disco actual
ALL DISCS
CD1
DISC
TRACK
MIN
20
SEC
ALL DISCS
CD TEXT
CD1
DISC
SONYHITS
20 10 60.48
Número total
de temas
Si desea comprobar otro disco
Pulse DISC SKIP en el mando a distancia en el modo de
parada para seleccionar el disco que desee comprobar. El
número total de temas y la duración total de
ES
reproducción del disco seleccionado se muestran durante
unos segundos.
Duración total de
reproducción
Page 77

Reproducción de discos compactos
Playing CDsGetting Started
Visualización de información durante la
reproducción del disco
Cada vez que pulse TIME/TEXT, el visor mostrará la
información como se muestra a continuación.
Aparecen el
número de disco
actual, número
de tema y tiempo
de reproducción.
Aparece el título
de tema actual.
ALL DISCS
CD TEXT
DISC
CD1
TRACK
MIN
13
12 1 1.52
Pulse
ALL DISCS
CD TEXT
CD1
TRACK
13
NEXT
DISC
NEXT
DISC
SEC
HitechBlues
Esta información también
aparece cuando el reproductor
localiza el tema.
Pulse
Para reproducir el estribillo de los temas
Determinados discos CD TEXT disponen de una función que
permite reproducir sólo el estribillo de los temas.
Pulse HIGH-LIGHT en el mando a distancia para iniciar la
reproducción de los estribillos de los temas en el modo de
parada.
La indicación “Hi LIGHT” del visor parpadea durante la
reproducción de los estribillos.
Si pulsa HIGH-LIGHT mientras selecciona discos sin esta
función, “NO HIGHLIGHT” aparecerá en el visor.
3 Gire el selector JOG hasta que aparezca en el visor
el idioma que desee.
4 Presione el selector JOG para seleccionar el idioma.
Aparece momentáneamente la indicación
“Reading Text” y, a continuación, el visor muestra
la información en el idioma seleccionado.
Para comprobar el idioma actual
1 Pulse INPUT durante la reproducción de un disco
CD TEXT.
Parpadea la indicación “Show lang.”.
2 Presione el selector JOG.
Se muestra el idioma actual momentáneamente.
También es posible comprobar el idioma actual al seleccionar
un disco CD TEXT sin información multilingüe.
Nota
Si selecciona un disco CD TEXT que no contiene información
en el idioma seleccionado, el visor muestra la información en
otro idioma, según las prioridades establecidas para el disco.
Localización de un disco
específico
MEMO SEARCH
JOG
Selección del idioma de la información de
CD TEXT
Es posible seleccionar el idioma utilizado para mostrar
la información CD TEXT al elegir un disco CD TEXT
con información multilingüe.
Una vez seleccionado el idioma, el visor muestra la
información en el idioma seleccionado hasta que se
apague el reproductor. Si el reproductor no puede leer
el idioma memorizado en un disco CD TEXT, mostrará
“(other lang.)”.
1 Pulse INPUT en el modo de parada.
Parpadea la indicación “Select lang.”.
ALL
DISCS
MULTI CD TEXT
CD1
21
Select lang.
2 Presione el selector JOG.
Parpadea el idioma actual.
ALL
DISCS
MULTI CD TEXT
CD1
21
English
DISC
Botones
numéricos
>10
·
≠/±
ENTER
MEMO SCAN
(continúa)
13
ES
Page 78

Reproducción de discos compactos
Selección de discos en el reproductor
Gire el selector JOG hasta que el número o memo de
disco que desee (consulte la página 23) aparezca en el
visor. Presione el selector JOG para iniciar la
reproducción.
Selección de discos directamente con el
mando a distancia
1 Pulse DISC.
2 Pulse el botón numérico del disco.
Ejemplo: Para introducir el número 35
Pulse 3 y 5.
Para introducir el número 100
Pulse 1 y, a continuación, pulse 10/0 dos
veces.
3 Pulse ENTER para iniciar la reproducción.
Localización de un disco explorando cada
memo de disco (Exploración de memos)
Es posible localizar rápidamente un disco que desea
reproducir explorando los memos de disco (consulte la
página 23) en el visor.
Observe que no es posible emplear esta función en el
modo de reproducción aleatoria ALL DISCS.
Localización de un disco mediante la
búsqueda de un memo de disco
determinado (Búsqueda de memos)
Es posible buscar y localizar los discos que desee
mediante la introducción del primer carácter empleado
en el memo de disco (consulte la página 23).
1 Pulse MEMO SEARCH.
Aparece “MEMO SEARCH” en el visor.
2 Pulse ≠/± varias veces para introducir el
primer carácter.
ALL DISCS
CD1
S
SONYHITS
Carácter introducido
Cada vez que pulse ≠/±, los caracteres
aparecerán en el orden siguiente.
A B C D E F G H I J K L M N O P Q R S T U V W X
Y Z 0 1 2 3 4 5 6 7 8 9
Si “NOT FOUND” aparece en el visor mientras
introduce el primer carácter con los botones
≠/± significa que no se ha asignado etiqueta
a ningún disco con el carácter introducido.
1 Pulse MEMO SCAN.
“MEMO SCAN” aparece en el visor y los memos
de disco se desplazan por el visor.
2 Pulse · cuando aparezca el memo del disco que
desee reproducir.
El disco se sitúa en la posición de reproducción y
se inicia ésta.
En el modo de reproducción de programas, el
disco se añadirá al final del programa si pulsa
ENTER en lugar de ·.
Nota
Si aparece “NO ENTRY” en el visor, significa que no se ha
asignado etiqueta con el memo de disco. Vuelva a utilizar la
función de exploración de memos después de asignar etiqueta
a los discos.
Notas
• Al buscar caracteres introducidos, no se tienen en
cuenta los espacios en blanco ni los símbolos situados
delante del primer carácter en el memo del disco.
• Al buscar caracteres introducidos, no se hace
distinción entre mayúsculas y minúsculas.
3 Gire el selector JOG para localizar el disco que
desee.
Al girar el selector JOG, los memos de discos que
empiezan con el carácter introducido aparecen en
el visor.
4 Presione el selector JOG para seleccionar el disco.
En el modo de reproducción de programas, el
disco se añadirá al final del programa.
Para cancelar la búsqueda de memos
Vuelva a pulsar MEMO SEARCH.
Si no queda ningún memo de disco que comience por
el carácter introducido en el paso 3
Pasará al siguiente carácter al girar el selector JOG.
14
ES
Page 79

Especificación del siguiente
disco para reproducirlo
Es posible especificar el disco que se desea reproducir a
continuación mientras se reproduce un disco en el
modo de reproducción aleatoria 1 DISC o continua.
Mientras se reproduce un disco, gire el selector JOG.
Aparece la indicación “NEXT DISC” en el visor y el
número o memo de disco (consulte la página 23)
cambia conforme gira el selector JOG.
Cuando aparezca en el visor el número o memo de
disco que desee, deje de girar el selector JOG.
ALL DISCS
CD1
NEXT DISC
38
NEXT
DISC
*DISC-38*
Número del disco siguiente
o memo de disco
Después de reproducir el disco actual, se inicia la
reproducción del siguiente disco especificado.
Si desea pasar al siguiente disco inmediatamente,
presione el selector JOG mientras se reproduce el disco
actual.
Para cancelar el disco especificado
Pulse dos veces CONTINUE.
Localización de un tema o un
punto específico del tema
Es posible localizar con rapidez cualquier tema durante
la reproducción de un disco utilizando los botones
≠/± (AMS: Sensor automático de música) o los
botones numéricos del mando a distancia. También es
posible localizar un punto concreto de un tema
mientras se reproduce un disco.
≠/±
Reproducción de discos compactos
Botones
numéricos
>10
=/+
0/)
Para localizar
Los temas siguientes
o posteriores
Los temas actuales o
anteriores
Un tema específico
directamente
Z
Un punto de un tema
mientras controla el
sonido Z
Un punto de un tema
rápidamente
observando el visor
Z
Pulse
± varias veces hasta que encuentre
el tema
≠ varias veces hasta que encuentre
el tema
El botón numérico del tema en el
mando a distancia
0 (hacia atrás)/) (hacia delante)
en el mando a distancia y manténgalo
pulsado hasta que encuentre el punto
0 (hacia atrás)/) (hacia delante)
en el mando a distancia y manténgalo
pulsado hasta que encuentre el punto
durante la pausa. El sonido no se
escuchará durante la operación.
Playing CDsGetting Started
Para localizar directamente un tema de número
superior a 10 Z
Pulse primero >10 y, a continuación, los botones
numéricos correspondientes en el mando a distancia.
Nota
Si aparece la indicación “– OVER –” en el visor, el disco ha
llegado al final mientras pulsaba ) en el mando a distancia.
Pulse ≠ o 0 en el mando para retroceder.
≠/±
15
ES
Page 80

Reproducción de discos compactos
Reproducción repetida
Es posible reproducir discos/temas de forma repetida
en cualquier modo de reproducción.
REPEAT
Pulse REPEAT mientras reproduce un disco.
“REPEAT” aparece en el visor. El reproductor repite
los discos/temas como se indica a continuación:
Cuando el disco se
reproduce
De forma continua
(ALL DISCS) (página 10)
De forma continua (1 DISC)
(página 10)
De forma aleatoria
(ALL DISCS) (página 16)
De forma aleatoria (1 DISC)
(página 17)
En el modo de programas
(página 17)
El reproductor repite
Todos los temas de todos los
discos
Todos los temas del disco
actual
Todos los temas de todos los
discos en orden aleatorio
Todos los temas del disco
actual en orden aleatorio
El mismo programa
Reproducción en orden
aleatorio
(Reproducción aleatoria)
El reproductor puede establecer el orden aleatorio de
los temas y reproducirlos arbitrariamente.
El reproductor establece el orden aleatorio de todos los
temas de todos los discos o del disco que especifique.
·
JOGSHUFFLE
SHUFFLE
DISC
Botones
numéricos
ENTER
16
Para cancelar la reproducción repetida
Pulse REPEAT dos veces.
·
Para repetir el tema actual
Reproducción de todos los temas de todos
Es posible repetir sólo el tema actual.
Mientras se reproduce el tema que desee, pulse
REPEAT varias veces hasta que aparezca “REPEAT 1”
en el visor.
Para cancelar Repeat 1
Pulse REPEAT.
ES
los discos en orden aleatorio
1 Pulse SHUFFLE.
Aparecen en el visor las indicaciones “ALL DISCS”
y “SHUFFLE”.
2 Presione el selector JOG o pulse ·.
Se inicia la reproducción aleatoria de todos los
discos (ALL DISCS).
Aparece “
reproductor “rastrea” los discos o temas.
” en el visor mientras el
Page 81

Reproducción de todos los temas de un
disco especificado en orden aleatorio
1 Pulse SHUFFLE dos veces.
Aparecen las indicaciones “1 DISC” y “SHUFFLE”.
2 Gire el selector JOG hasta que aparezca en el visor
el número de disco que desee.
Si emplea el mando a distancia, pulse DISC
primero y, a continuación, el botón numérico
correspondiente al disco.
3 Presione el selector JOG o pulse ·.
Si utiliza el mando a distancia, pulse ENTER.
Se inicia la reproducción aleatoria de un disco
(1 DISC).
Aparece “
reproductor “rastrea” los temas.
Para cancelar la reproducción aleatoria
Pulse CONTINUE.
” en el visor mientras el
Reproducción de discos compactos
Playing CDsGetting Started
Creación de programas
(Reproducción de programas)
Es posible establecer el orden de los temas y/o discos
para crear tres programas diferentes, que se almacenan
de forma automática. Un programa puede contener
hasta 32 “pasos”, y un “paso” puede contener un tema
o bien un disco entero.
Puede crear programas utilizando los controles del
mando de distancia o bien del reproductor. Sin
embargo, los procedimientos de programación son
diferentes en cada caso.
Creación de programas en el reproductor
≠/±
JOGPROGRAM
CHECK
Es posible iniciar la reproducción aleatoria durante la
reproducción
Pulse SHUFFLE. La reproducción aleatoria se inicia
desde el tema actual.
Es posible seleccionar un disco directamente para
reproducción aleatoria (1 DISC)
Consulte “Selección de discos directamente con el mando
a distancia” en la página 14.
Es posible ir al disco siguiente durante la
reproducción aleatoria de un disco (1 DISC)
Pulse DISC SKIP +.
Es posible especificar la reproducción del siguiente
disco durante la reproducción aleatoria de un disco
(1 DISC)
Gire el selector JOG para especificar el siguiente disco.
Una vez reproducidos en orden aleatorio todos los temas
del disco actual, se iniciará la reproducción del siguiente
disco. Si desea pasar inmediatamente al siguiente disco,
presione el selector JOG mientras se reproduce el disco
actual.
Notas
• No es posible especificar el disco siguiente para
reproducirlo durante la reproducción aleatoria de todos los
discos (ALL DISCS).
• Aunque pulse p o desactive el reproductor durante la
reproducción aleatoria ALL DISCS, éste recuerda los
discos/temas reproducidos y los no reproducidos. De este
modo, si desea volver a iniciar la reproducción aleatoria
ALL DISCS desde el principio, asegúrese de repetir el
procedimiento desde el paso 1.
·
1
Pulse PROGRAM hasta que aparezca en el visor el
número de programa que desee (PROGRAM 1, 2 o 3).
Si ya se ha almacenado un programa con el
número de programa seleccionado, aparece en el
visor el último paso del mismo. Si desea borrar
todo el programa, mantenga pulsado CLEAR hasta
que aparezca en el visor la indicación “CLEAR”
(consulte la página 19).
CLEAR
2 Gire el selector JOG hasta que aparezca en el visor
el número de disco que desea.
PROGRAM
1
CD1
DISC
20
*DISC-20*
3 Para programar un disco completo, omita este
paso. Pulse ≠/± hasta que el número de
tema que desea aparezca en el visor.
PROGRAM
1
DISC
CD1
TRACK
20
STEP
20 3 1
Número de tema
(continúa)
17
ES
Page 82

Reproducción de discos compactos
4 Presione el selector JOG.
El tema que se está programando
PROGRAM
1
DISC
CD1
TRACK
20
STEP
20 3 1
El disco que se está
programando
5 Para programar otros discos/temas, realice lo
siguiente:
Para programar
Todos los temas de otro disco
o discos
Otros temas del mismo disco
Otros temas de otros discos
6 Presione el selector JOG o pulse · para iniciar la
reproducción de programa.
Orden de
reproducción
Repita los pasos
2 y 4
3 y 4
De 2 a 4
Creación de un programa utilizando el
mando a distancia
PROGRAM
DISC
Botones
numéricos
>10
CHECK
·
1
Pulse PROGRAM hasta que aparezca en el visor el
ENTER
CLEAR
número de programa que desee (PROGRAM 1, 2 o 3).
2 Pulse DISC.
Para cancelar la reproducción del programa
Pulse CONTINUE.
Los programas se conservan incluso después de
finalizar su reproducción
Al presionar el selector JOG o pulsar ·, puede volver a
reproducir el mismo programa.
Al pulsar PROGRAM para seleccionar la reproducción
de programa durante la reproducción continua o
aleatoria
El programa se reproducirá después del tema actual.
Los programas se conservan hasta que se borran
Si sustituye discos, se conservan los números de disco y
tema programados. De este modo, el reproductor sólo
reproduce los números de disco y tema existentes. No
obstante, los números de disco y tema que no se
encuentran en el reproductor o en el disco se borran del
programa y el resto de éste se reproduce en el orden
programado.
Nota
Si pulsa uno de los botones GROUP 1 – 8 para iniciar la
reproducción de grupo, la de programa se cancelará (consulte
la página 27).
PROGRAM
1
CD1
02
DISC-[ _]
3 Pulse el botón numérico del disco.
PROGRAM
1
CD1
02
DISC-[ 20]
4 Para programar un disco completo, pulse ENTER y
vaya al paso 6.
Pulse >10.
PROGRAM
1
CD1
DISC
TRACK
02
STEP
20 -- 1
5 Pulse el botón numérico del tema.
Si el disco tiene más de 10 temas, pulse 0 y, a
continuación, el número correspondiente para
introducir un número de tema de 1 a 9.
El disco que se está programando
18
PROGRAM
1
DISC
TRACK
20
STEP
20 3 1
El tema que se
ES
está programando
Orden de
reproducción
Page 83

Reproducción de discos compactos
Playing CDsGetting Started
6 Para programar otros discos/temas, realice lo
siguiente:
Para programar
Todos los temas de otro disco
o discos
Otros temas del mismo disco
Otros temas de otros discos
Repita los pasos
De 2 a 4
5
De 2 a 5
7 Pulse · para iniciar la reproducción del
programa.
Para cancelar la reproducción del programa
Pulse CONTINUE.
Comprobación del orden programado
Es posible comprobar el programa antes o después de
iniciar la reproducción.
Pulse CHECK.
Cada vez que pulse este botón, el visor muestra el
número de tema y disco de cada paso en el orden
programado (al programar un disco completo como un
paso, aparece “ALL” en lugar del número de tema).
Después del último paso del programa, el visor
muestra “– END –” y vuelve al visor original.
Borrado de programas almacenados en
memoria
1 Pulse PROGRAM varias veces en el modo de
parada hasta que aparezca en el visor el número de
programa que desee borrar (PROGRAM 1, 2 o 3).
2 Mantenga pulsada el botón CLEAR hasta que
aparezca la indicación “CLEAR” en el visor.
Reproducción con
temporizador
(Sólo CDP-CX240)
Para iniciar la reproducción a la hora que desee, puede
conectar un temporizador (no suministrado). Consulte
también las instrucciones del temporizador para
obtener ayuda.
TIMER
Botones de modo de reproducción
Cambio del orden programado
Es posible cambiar el programa antes de iniciar la
reproducción.
Para
Borrar un tema o disco
Borrar el último tema o
disco del programa
Añadir temas o discos al
final del programa
Borrar todo el programa
completamente
Es preciso
Pulsar CHECK hasta que el tema
o disco que no desee aparezca en
el visor y, a continuación, pulsar
CLEAR
Pulsar CLEAR. Cada vez que
pulse el botón, se borrará el
último tema o disco.
Realizar el procedimiento de
programación
Mantener pulsado CLEAR hasta
que aparezca “CLEAR” en el visor
para borrar todo el programa y, a
continuación, crear un nuevo
programa siguiendo el
procedimiento de programación
1 Pulse uno de los botones de modo de reproducción
para seleccionar el modo que desee.
2 Ajuste TIMER en PLAY en el reproductor.
3 Ajuste la hora que desee en el temporizador.
El reproductor se apaga. A la hora definida, el
reproductor se enciende y se inicia la
reproducción.
4 Después de utilizar el temporizador, ajuste TIMER
en OFF en el reproductor.
19
ES
Page 84

Reproducción de discos compactos
Control de otro reproductor de
CD (Mega Control avanzado)
(Sólo CDP-CX240)
1 Pulse MEGA CONTROL en este reproductor.
Se iluminan el botón MEGA CONTROL y “2nd”
en el visor.
El visor muestra el número de disco o memo de
disco actual del segundo reproductor.
Esta unidad puede controlar un segundo reproductor
de CD (consulte “Conexión de otro reproductor de
CD” en la página 6).
Aunque un segundo reproductor de CD se encuentre
conectado, los controles de ambas unidades
funcionarán. Al pulsar el botón de reproducción de
cualquier unidad, el reproductor que se encuentre en
funcionamiento se detendrá y se activará el que no se
encuentre activo.
Compruebe que “2nd DETECTED” aparece en el visor
de este reproductor después de encender los dos.
Tenga presente que según el reproductor, es posible
que no pueda controlar todas las funciones del
segundo reproductor de CD.
Los controles indicados en la siguiente ilustración son
efectivos mientras el botón MEGA CONTROL se encuentre
iluminado.
Botones de modo de
reproducción
(CONTINUE/SHUFFLE/
PROGRAM/REPEAT)
MEGA
CONTROL
INPUT
JOG
ALL DISCS
CD1
2nd DISC
4
*DISC-4*
Número o memo de disco actual
2 Seleccione el modo de reproducción que desee.
Para programar los temas, utilice los controles del
segundo reproductor.
No es posible cambiar el modo de reproducción
ALL DISCS del segundo reproductor de CD al
modo 1 DISC, y viceversa, mediante el botón de
modo de reproducción de este reproductor.
3 Pulse · en este reproductor para iniciar la
reproducción.
La reproducción se inicia y el visor muestra los
números de tema y disco actuales y el tiempo de
reproducción del tema.
Mientras el botón MEGA CONTROL se encuentre
iluminado, podrá controlar el segundo reproductor
con los controles de este reproductor.
Para controlar directamente el segundo reproductor con
el mando a distancia suministrado
Ajuste CD 1/2/3 del mando a distancia en CD 3, que es la
misma posición que la del selector COMMAND MODE del
panel posterior del segundo reproductor.
20
Para volver a controlar este reproductor
≠/±
·
pP
Pulse MEGA CONTROL. El botón MEGA CONTROL se
apaga y será posible controlar este reproductor.
Carga de los memos de disco del segundo
reproductor de CD
Si el segundo reproductor de CD tiene la función de
memo de discos (consulte la página 23), puede cargar
los memos de disco del segundo reproductor de CD en
la memoria de este reproductor y visualizarlos con
éste.
1 Pulse INPUT.
0/)
ES
Page 85

2 Gire el selector JOG hasta que aparezca
“LOAD 2ND MEMO” en el visor.
Reproducción de discos compactos
Playing CDsGetting Started
Aparición y desaparición
ALL DISCS
CD1
LOAD 2ND MEMO
3 Presione el selector JOG.
Este reproductor inicia la carga (esta operación
tarda un minuto aproximadamente).
Nota
Si cada memo de disco del segundo reproductor de CD tiene
más de 13 caracteres, se cargan los 13 primeros caracteres de
cada uno en este reproductor.
Etiquetado de los discos del segundo
reproductor de CD
Es posible asignar etiquetas a los discos del segundo
reproductor de CD o cambiar los memos de disco
cargados desde dicho reproductor.
1 Pulse MEGA CONTROL.
Se ilumina el botón MEGA CONTROL.
2 Gire el selector JOG para seleccionar el disco al que
desee asignar un memo.
Si la ranura de disco que ha seleccionado no tiene
ningún disco, aparece “NO DISC” en el visor y no
es posible asignar un memo de disco.
gradual del sonido
(Sólo CDP-CX240)
Es posible definir una aparición o desaparición gradual
del sonido para evitar que los temas comiencen o
finalicen de forma brusca.
Tenga presente que no es posible utilizar esta función
al emplear el conector DIGITAL OUT (OPTICAL).
FADER
Para
Iniciar la reproducción
con aparición gradual
del sonido
Finalizar la
reproducción con
desaparición gradual
del sonido
Pulse FADER
Durante la pausa. Aparece “FADE”
en el visor y parpadea la indicación
Q. La reproducción se inicia de
forma gradual.
Cuando desee iniciar la
desaparición gradual. Aparece
“FADE” en el visor y parpadea la
indicación q. La reproducción
finaliza de forma gradual y el
reproductor se detiene.
3 Pulse INPUT.
Aparece la indicación “DISC MEMO”.
4 Presione el selector JOG.
5 Introduzca el nuevo memo de disco siguiendo el
procedimiento descrito en “Etiquetado de discos”
en las páginas 23 a 25.
Nota
Los nuevos memos de disco se almacenan en la memoria de
este reproductor, de modo que no es posible verlos con el
segundo reproductor de CD.
Nota
La aparición y desaparición gradual tiene una duración
aproximada de 5 segundos.
21
ES
Page 86

Reproducción de discos compactos
Reproducción alternativa
(Reproducción sin demora/
X-Fade) (Sólo CDP-CX240)
Si conecta el segundo reproductor, podrá reproducir
alternativamente los temas de este reproductor y los del
segundo en cualquier modo de reproducción (consulte
“Conexión de otro reproductor de CD” en la página 6).
Seleccione uno de los siguientes métodos:
• Reproducción sin demora: El reproductor actual cambia
en cada tema. Cada vez que dicho reproductor cambie
al otro, éste inicia la reproducción sin interrupción del
sonido inmediatamente después de que el
reproductor actual finalice la reproducción. El otro
reproductor omite el espacio en blanco entre temas e
inicia la reproducción a partir del punto en el que
realmente comienza el sonido.
• Reproducción X-Fade: El reproductor actual cambia en
cada tema o en el intervalo especificado. Es posible
seleccionar el intervalo entre 30, 60 y 90 segundos.
Cada vez que el reproductor actual cambie al otro, el
sonido de ambos se mezclará. El reproductor actual
finaliza la reproducción disminuyendo el sonido
gradualmente, mientras que el otro la inicia
aumentando el sonido gradualmente.
NO DELAY
X-FADE
2 Si selecciona la reproducción sin demora
Pulse NO DELAY.
“NO DELAY” aparece en el visor.
Si selecciona la reproducción X-Fade
Pulse X-FADE.
“X-FADE” aparece en el visor.
Cada vez que pulse el botón X-FADE, la indicación
aparecerá de la siguiente forma:
n X-FADE off n at track end n after 30 sec
after 90 sec N after 60 sec N
Para cambiar el reproductor actual cada vez que
finalice un tema completo, seleccione
“at track end”.
Para que el reproductor actual cambie en el
intervalo especificado, pulse X-FADE varias veces
hasta que el intervalo que desee aparezca en el
visor.
3 Pulse · para iniciar la reproducción.
El botón MEGA CONTROL se ilumina mientras el
tema del segundo reproductor se encuentra
seleccionado.
Para cancelar la reproducción sin demora/X-Fade
Pulse varias veces el botón correspondiente hasta que
“NO DELAY” o “X-FADE” desaparezca del visor. El
reproductor actual continúa la reproducción.
·
1 Seleccione el modo de reproducción que desee en
cada reproductor.
Es posible cambiar el método (sin demora o X-Fade)
durante la reproducción
Pulse el botón correspondiente (NO DELAY o X-FADE)
siguiendo el procedimiento descrito en el paso 2.
Puede iniciar la reproducción X-Fade en cualquier
momento
Pulse FADER durante la reproducción X-Fade.
Incluso después de definir el modo X-Fade e iniciar la
reproducción X-Fade, es posible iniciar este tipo de
reproducción en cualquier momento. Tenga presente que
no es posible realizar esta operación mientras el sonido
de ambos reproductores está mezclado.
Notas
• La reproducción se realizará a partir del segundo
reproductor si la inicia mientras el botón MEGA CONTROL
se encuentra iluminado.
• Cuando un reproductor ha reproducido todos los discos o
temas y el otro reproductor también, la reproducción se
detiene.
• No utilice los controles del segundo reproductor durante la
reproducción sin demora/X-Fade, ya que es posible que no
funcionen correctamente.
22
ES
Page 87

Almacenamiento de información acerca de los discos compactos (archivos personalizados)
Almacenamiento de información acerca de los discos compactos (archivos personalizados)Almacenamiento de información acerca de los discos compactos (archivos personalizados)
Storing Information About CDs (Custom Files)
Locating a Scene or Track You Want
Locating a Scene or Track You Want
Funciones de los archivos
personalizados
El reproductor puede almacenar dos tipos de
información, denominada “archivos personalizados”,
para cada disco. Una vez almacenados éstos para los
discos, el reproductor recupera automáticamente la
información almacenada cuando seleccione el disco.
Tenga en cuenta que los archivos personalizados se
borrarán si no utiliza el reproductor durante un mes
aproximadamente.
Es posible almacenar esta información:
Si emplea
Memo de disco
(página 23)
Banco de borrado
(página 26)
Archivo de grupo
(página 27)
Es posible
Asignar etiqueta a los discos
empleando un máximo de 13
caracteres
Eliminar los temas que no desee y
almacenar sólo los que desee
Agrupar discos en un máximo de
ocho grupos para localizarlos
fácilmente
Etiquetado de discos
(Memo de disco)
Es posible asignar etiquetas a los discos empleando un
máximo de 13 caracteres y hacer que el reproductor
muestre el memo de disco cada vez que seleccione el
disco. Dicho memo puede ser lo que desee, como un
título, el nombre del cantante, la categoría o la fecha de
adquisición.
Si selecciona un disco CD TEXT
El título del disco se almacena automáticamente como
memo de disco.
Si dicho título tiene más de 13 caracteres, se almacenarán
los primeros 13 caracteres de éste (consulte la página 12).
Si sustituye un disco por otro CD TEXT, el título del
disco CD TEXT también se almacenará automáticamente.
Observe que no es posible cambiar el memo del disco
CD TEXT.
Es posible asignar etiquetas a los discos mientras la
cubierta frontal está abierta
¿Dónde se almacenan los archivos
personalizados?
Los archivos peronalizados no se almacenan en los
discos, sino en la memoria del reproductor. Esto
significa que no es posible utilizar archivos
personalizados si reproduce el disco en otros
reproductores.
Si sustituye discos archivados en los
archivos personalizados
La información de los archivos personalizados
almacenados se conserva, ya que la información de
cada archivo se asigna a una posición. Borre todos los
archivos personalizados (Memo de disco, Banco de
borrado y Archivo de grupo) del disco antiguo y, a
continuación, archive la información del disco nuevo
en los archivos personalizados.
Borrado de todos los archivos
personalizados de todos los discos
Desactive el reproductor. Mientras mantiene pulsado
CLEAR, pulse I/u para activar dicho reproductor.
“ALL ERASE” aparecerá en el visor y todos los
archivos personalizados se borrarán.
Etiquetado de discos en el reproductor
JOGINPUT
CLEAR
1 Gire el selector JOG hasta que el visor muestre el
número de disco al que desee asignar un memo de
disco.
Si asigna una etiqueta a un disco con la cubierta
frontal cerrada, aparecerá el número del disco que
se encuentre en la posición de reproducción.
Si asigna una etiqueta a un disco con la cubierta
frontal abierta, aparecerá el número del disco que
se encuentre en la posición de carga.
2 Pulse INPUT.
Parpadea “DISC MEMO”.
3 Presione el selector JOG.
Aparece el cursor parpadeante (“).
(continúa)
23
ES
Page 88

Almacenamiento de información acerca de los discos compactos (archivos personalizados)
4 Gire el selector JOG hasta que el visor muestre el
carácter que desee.
El cursor desaparece y el primer espacio del memo
de disco parpadea.
Al girar el selector JOG en el sentido de las agujas
del reloj, los caracteres aparecen en el siguiente
orden. Gire dicho selector en sentido contrario a
las agujas del reloj para retroceder al carácter
anterior.
(espacio) A B C D E F G H I J K L M N O P Q R S T
U V W X Y Z a b c d e f g h i j k l m n o p q r s t u v
w x y z 0 1 2 3 4 5 6 7 8 9 ! " # $ % & ' ( ) * + , – . / : ;
< = > ? @ [ \ ] ^ _ ` { | } ⁄
ALL DISCS
CD1
DISC
AB
S
5 Presione el selector JOG para seleccionar el
carácter.
El carácter seleccionado se ilumina y el cursor
parpadeante aparece para indicar el espacio
siguiente que va a introducirse.
Etiquetado de discos con el mando a
distancia
SPACE
DISC/CAPS
MEMO INPUT
=/+
DEL
Botones
numéricos
ENTER
CLEAR
ALL DISCS
CD1
AB
S
Si comete un error
Pulse CLEAR y vuelva a comenzar la operación
introduciendo los caracteres correctos.
6 Repita los pasos 4 y 5 para introducir más
caracteres.
7 Pulse INPUT para almacenar el memo de disco.
El visor muestra el memo de disco.
ALL DISCS
CD1
DISC
20
SONYHITS
Repita los pasos 1 a 7 para asignar memos de disco
a otros discos.
1 Pulse DISC/CAPS.
2 Pulse el botón numérico del disco al que desee
asignar un memo de disco y, a continuación,
ENTER.
3 Pulse MEMO INPUT.
Aparece el cursor parpadeante (“).
4 Pulse DISC/CAPS para localizar el tipo de letra
que desee.
Cada vez que pulse el botón, el tipo de letra
cambiará cíclicamente entre letras mayúsculas
(AB), minúsculas (ab) y números (12). Para
seleccionar un símbolo, es necesario elegir el tipo
de letra mayúsculas o minúsculas. El tipo de letra
elegido aparece en la parte superior derecha del
visor.
24
ES
Page 89
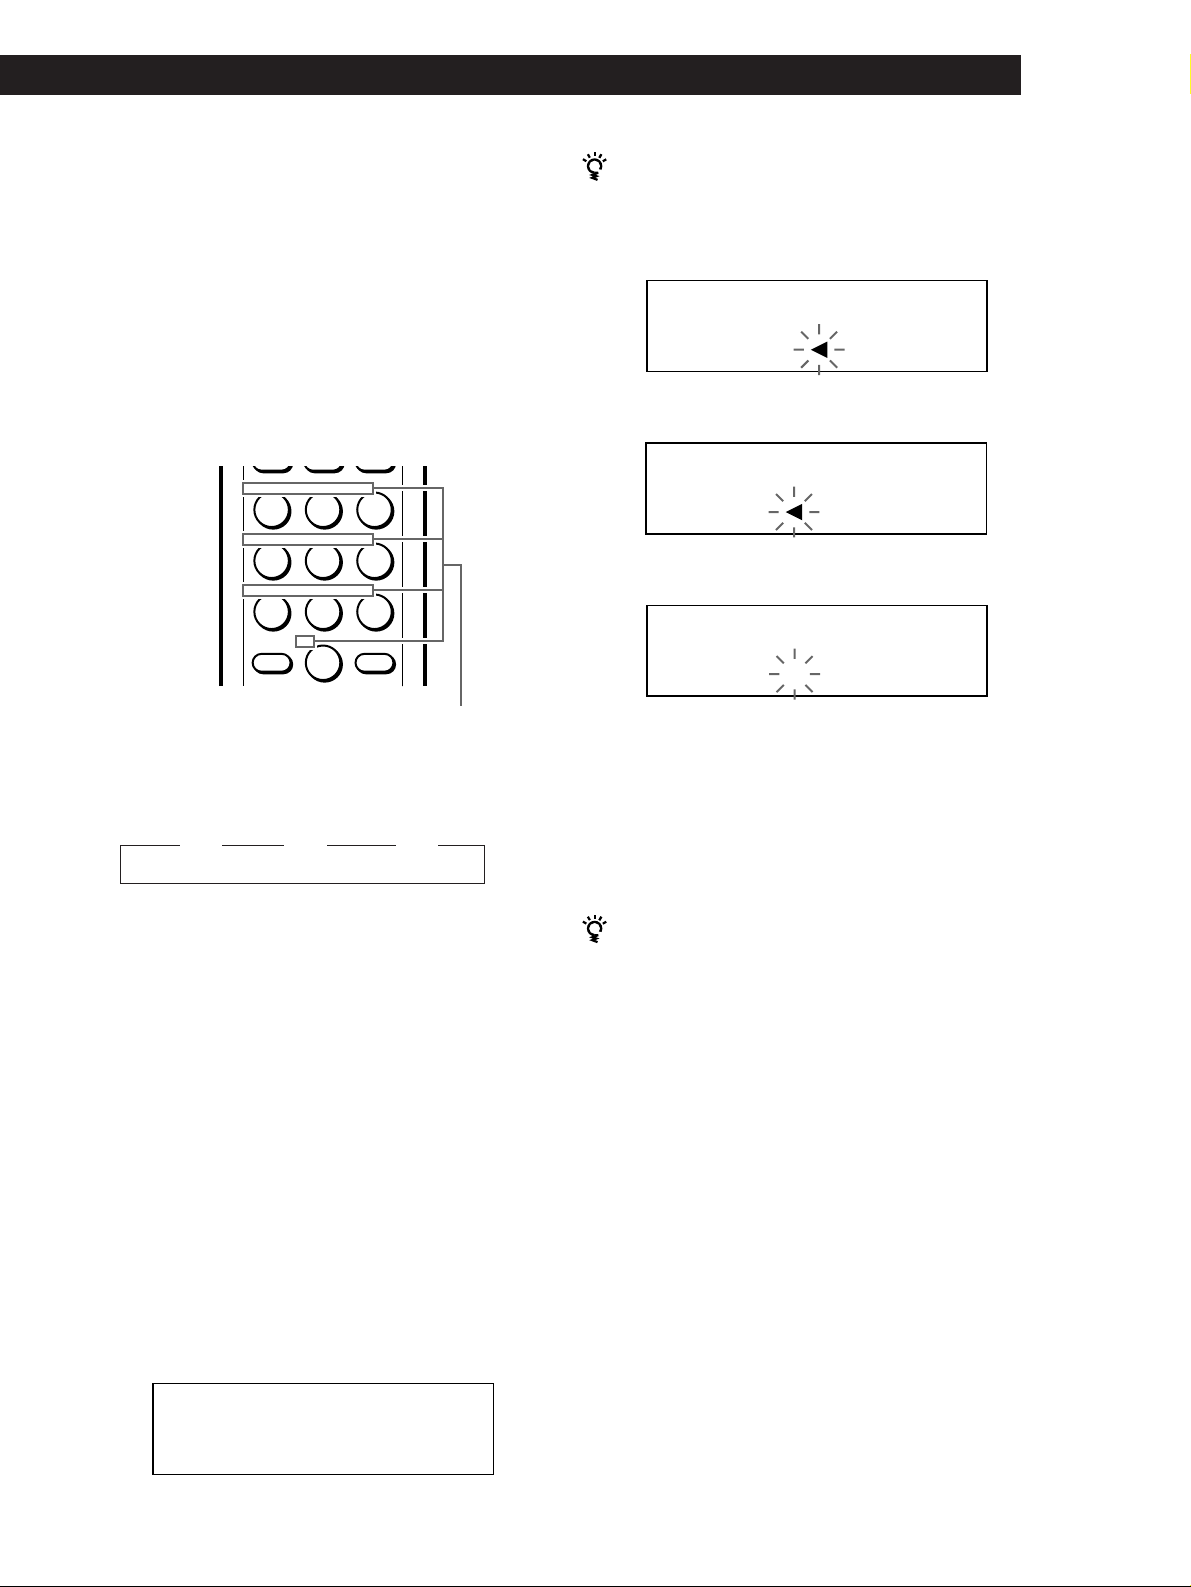
Almacenamiento de información acerca de los discos compactos (archivos personalizados)
Almacenamiento de información acerca de los discos compactos (archivos personalizados)
Storing Information About CDs (Custom Files)
Locating a Scene or Track You Want
Locating a Scene or Track You Want
5 Para introducir una letra, pulse el botón numérico
correspondiente a la letra que desee (indicada
junto a cada botón numérico).
El cursor desaparece y el primer espacio del memo
de disco parpadea.
Cada vez que pulse el botón, el carácter cambia
cíclicamente entre los que se indican junto al
botón.
Para introducir símbolos, pulse el botón numérico
1 varias veces hasta que el visor muestre el símbolo
que desee.
ABC DEF&!?
JKL MNOGHI
TUV WXYPRS
QZ
>
10
Ejemplo: Para seleccionar la letra E
Pulse dos veces el botón numérico 3.
n D n E n F
Pulse 3. Pulse 3.
Pulse 3.
ENTER
Caracteres asignados a cada
botón numérico
Si comete un error mientras introduce el carácter
Para corregir el carácter introducido
1 Pulse = o + hasta que el cursor se sitúe junto al
carácter incorrecto.
ALL DISCS
CD1
DISC
AB
SONYHE S
2 Pulse DEL para eliminar el carácter incorrecto.
ALL DISCS
AB
DISC
SONYH S
3 Introduzca el carácter correcto.
ALL DISCS
CD1
DISC
AB
SONYHITS
Para corregir el carácter que introduce actualmente
1 Pulse DEL para eliminar el carácter incorrecto.
2 Introduzca el carácter correcto.
Para insertar un carácter entre los introducidos
Pulse = o + hasta que el cursor se sitúe junto al
punto que desee insertar e introduzca el carácter.
Para insertar un espacio, pulse SPACE una vez.
Para introducir un número, pulse el botón
numérico que desee.
6 Pulse ENTER para seleccionar el carácter.
El carácter seleccionado se ilumina y el cursor
parpadeante aparece para indicar el espacio
siguiente que va a introducirse.
También es posible pasar al espacio siguiente
pulsando otros botones numéricos.
7 Repita los pasos 4 a 6 para introducir más
caracteres.
8 Pulse MEMO INPUT para almacenar el memo de
disco.
El memo de disco se ilumina en el visor.
ALL DISCS
CD1
DISC
20
SONYHITS
Repita los pasos 1 a 8 para asignar memos a otros
discos.
Es posible etiquetar los discos del segundo
reproductor de CD
Consulte “Etiquetado de los discos del segundo
reproductor de CD” en la página 21.
Borrado del memo de disco
1 Realice los pasos 1 a 3 de “Etiquetado de discos en
el reproductor” en la página 23 para seleccionar el
memo de disco que desee eliminar.
2 Pulse CLEAR.
El memo desaparecerá.
25
ES
Page 90

Almacenamiento de información acerca de los discos compactos (archivos personalizados)
Almacenamiento de
información de archivo
personalizado mediante un
teclado (Sólo CDP-CX240)
Es posible almacenar el memo de discos para un disco
de forma secuencial mediante el uso de un teclado de
PC compatible IBM* (no suministrado).
* El consumo de energía no debe pasar de 120 mA.
Toma de teclado
1 Conecte un teclado mediante la toma de teclado
del panel frontal del reproductor.
Almacenamiento de temas
específicos
(Banco de borrado)
Es posible eliminar los temas que no desee y almacenar
sólo los que desee. Si selecciona un disco que contenga
un banco de borrado, podrá reproducir sólo los temas
restantes.
CONTINUE
SHUFFLE
1 Pulse CONTINUE o SHUFFLE antes de iniciar la
reproducción.
JOG
CHECK
CLEAR
26
2 Gire el selector JOG para seleccionar el disco.
3 Pulse CHECK varias veces hasta que el visor
muestre el tema que desee eliminar.
2 Después de seleccionar el disco que desee en el
reproductor, pulse la tecla Enter.
ALL DISCS
CD1
DISC
TRACK
201ON
20
3 Introduzca los caracteres que desee y pulse la tecla
Enter o Esc para almacenar la información.
Es posible borrar todos los caracteres del elemento
seleccionado
Mientras mantiene pulsada la tecla Shift, pulse la tecla
Delete.
4 Pulse CLEAR.
“DELETE FILE” y “OFF” aparecen en el visor.
ALL DISCS
DISC
DELETE FILE
CD1
TRACK
20
20 1 OFF
Notas
• Si las teclas del cursor no funcionan correctamente y no
consigue realizar la tarea con el teclado, desconéctelo y
vuelva a conectarlo al reproductor.
• Si el teclado no es el modelo para EE.UU., es posible que los
caracteres que aparecen en las teclas no correspondan a los
introducidos.
A continuación se muestra el formato del teclado para
EE.UU.
~
'
1!2@3#4$5%6^7&89(0)-
WERT YU I OPQ
Shift
SDFGHJKLA
XCVBNM<>Z
Caps Lock
ES
Ctrl Alt Alt Ctrl
+
=
}
{
]
[
Enter
?
Shift
Si desea recuperar el tema, vuelva a pulsar
CLEAR.
5 Repita los pasos 3 y 4 para eliminar más temas.
Es posible recuperar todos los temas eliminados
Mantenga pulsado CLEAR hasta que “ALL ON”
aparezca en el visor.
Nota
Los temas eliminados se omitirán aunque realice la
reproducción en los modos aleatorio o de programa (si el
disco completo que contenga un banco de borrado se
programa como un paso).
Page 91

Almacenamiento de información acerca de los discos compactos (archivos personalizados)
Almacenamiento de información acerca de los discos compactos (archivos personalizados)
Storing Information About CDs (Custom Files)
Locating a Scene or Track You Want
Locating a Scene or Track You Want
3 Gire el selector JOG hasta que aparezca en el visor
Agrupación de discos
(Archivo de grupo)
Tal vez descubra que le resulta difícil encontrar el disco
que desea entre tantos discos. Este reproductor cuenta
con una función que permite clasificar los discos en
ocho grupos. Un disco puede incluirse en un solo
grupo.
Tras clasificar los discos, puede disfrutar sólo de la
reproducción continua, aleatoria o repetida dentro de
un grupo determinado (Reproducción de grupo).
el carácter que desee.
El cursor desaparece y el primer espacio del memo
de grupo parpadea.
Conforme gira el selector JOG hacia la derecha, los
caracteres aparecen en el orden que se muestra a
continuación. Gire el selector JOG hacia la
izquierda para volver al carácter anterior.
(espacio) A B C D E F G H I J K L M N O P Q R S T
U V W X Y Z a b c d e f g h i j k l m n o p q r s t u v
w x y z 0 1 2 3 4 5 6 7 8 9 ! " # $ % & ' ( ) * + , – . / : ;
< = > ? @ [ ¥ ] ^ _ \ { | } ⁄
SHUFFLECONTINUE
GROUP 1 – 8 CLEARGROUP FILE
≠/±
INPUT
·
JOG
Asignación de discos a grupos
1 Pulse CONTINUE o SHUFFLE antes de iniciar la
reproducción.
2 Gire el selector JOG para seleccionar el disco que
desee asignar a un grupo.
3 Pulse GROUP FILE.
Aparece “Select G1 – G8” en el visor.
4 Pulse uno de los botones GROUP 1 – 8, según el
grupo en el que desee incluir el disco.
Aparecen “GROUP FILE” y el número de grupo en
el visor y el disco se asigna a ese grupo.
Etiquetado de grupos (Memo de grupo)
Puede cambiar el número de grupo predefinido a lo
que desee, por ejemplo una categoría, con un máximo
de 13 caracteres.
Tenga en cuenta que no es posible almacenar el memo
de grupo si no ha asignado ningún disco al grupo.
1 Pulse INPUT.
2 Gire el selector JOG hasta que aparezca en el visor
el número de grupo al que desee asignar la
etiqueta y, a continuación, presione el selector
JOG.
Aparece el cursor parpadeante (“).
4 Presione el selector JOG para seleccionar el carácter.
El carácter seleccionado se ilumina y el cursor
parpadeante aparece para indicar el siguiente
espacio que va a introducirse.
Si comete un error
Pulse CLEAR y vuelva a empezar, introduciendo los
caracteres apropiados.
5 Repita los pasos 3 y 4 para introducir más caracteres.
Para obtener más información, consulte “Etiquetado
de discos en el reproductor” en la página 23.
6 Pulse INPUT para almacenar el memo de grupo.
Borrado del memo de grupo
1 Siga los pasos 1 y 2 de “Etiquetado de grupos” para
seleccionar el memo de grupo que desee borrar.
2 Pulse CLEAR.
Desaparece el memo de grupo.
Reproducción de discos de un grupo
(Reproducción de grupo)
Puede disfrutar de la reproducción continua o aleatoria
dentro de un grupo.
1 Seleccione el modo de reproducción que desee
antes de iniciar la reproducción.
Al seleccionar
Reproducción
continua de todos los
discos (ALL DISCS)
Reproducción
continua de un disco
(1 DISC)
Reproducción
aleatoria de todos los
discos (ALL DISCS)
Reproducción
aleatoria de un disco
(1 DISC)
El aparato reproduce
Todos los temas de todos los
discos del grupo de forma
consecutiva
Todos los temas del disco
especificado en el grupo de
forma consecutiva
Todos los temas de todos los
discos del grupo en orden
aleatorio
Todos los temas del disco
especificado en el grupo en
orden aleatorio
(continúa)
27
ES
Page 92

Almacenamiento de información acerca de los discos compactos (archivos personalizados)
2 Pulse uno de los botones GROUP 1 – 8 para
seleccionar el grupo y pulse ·.
La reproducción de grupo se inicia desde el disco
con el número más próximo, y que esté situado
más cerca de la posición de reproducción. Si el
disco que se encuentra en la posición de
reproducción se incluye en el grupo seleccionado,
la reproducción se inicia desde ese disco.
Para cancelar la reproducción de grupo
Pulse uno de los botones GROUP 1 – 8 que haya seleccionado.
Aparece “GROUP OFF” en el visor.
Es posible iniciar la reproducción de grupo con el
mando a distancia Z
1 Antes de iniciar la reproducción, pulse GROUP.
2 Pulse el botón numérico del grupo que desee
reproducir y, a continuación, pulse ENTER.
3 Pulse ·.
Para cancelar la reproducción de grupo, pulse GROUP.
Puede especificar el disco que desee reproducir al
iniciar la reproducción de grupo
Después de seleccionar el grupo, gire el selector JOG para
elegir el disco y, a continuación, presione el selector JOG
o pulse ·.
Si utiliza el mando a distancia, pulse DISC SKIP varias
veces hasta que aparezca en el visor el número del disco
que desee y, a continuación, pulse ENTER.
4 Pulse ENTER o · cuando aparezca el memo del
disco que desee.
La reproducción de grupo se inicia desde el disco
seleccionado.
Es posible pasar al memo de disco siguiente o
anterior durante la exploración
Pulse ≠ o ±.
Borrado de discos de un grupo
• Para borrar un disco de un grupo
1 Gire el selector JOG hasta que aparezca en el visor
el número del disco que desee borrar del grupo.
2 Pulse GROUP FILE.
Aparece la indicación “Select G1 – G8” en el visor.
3 Pulse CLEAR.
Aparece “GROUP ERASE” en el visor.
• Para borrar todos los discos del grupo de forma
simultánea
Mientras mantiene pulsado uno de los botones
GROUP 1 – 8 que desee borrar, pulse CLEAR.
Almacenamiento de temas
favoritos (Lista de éxitos)
(Sólo CDP-CX240)
Nota
Si aparece la indicación “NO ENTRY” en el visor, no se ha
incluido ningún disco en el grupo seleccionado.
Localización de un disco dentro de un
grupo explorando todos los memos de
disco
Es posible localizar un disco que desea reproducir
dentro de un grupo específico explorando rápidamente
el memo de disco en el visor y, a continuación, iniciar
la reproducción de grupo.
Tenga presente que no es posible utilizar esta función
en el modo de reproducción aleatoria de todos los
discos (ALL DISCS) ni en el modo de reproducción de
programa.
1 Pulse GROUP primero y, a continuación, el botón
numérico del grupo que desee.
2 Pulse ENTER.
El número de grupo aparece en el visor.
Es posible almacenar los temas que reproduzca con
más frecuencia y seleccionarlos de forma inmediata
marcando los números o títulos de los mismos
(consulte la página 29) en la lista de éxitos.
Puede incluir hasta 32 temas en la lista de éxitos.
HIT LIST
≠/±
INPUT
·
HIT LIST
ENTER
JOG
CLEAR
28
3 Pulse MEMO SCAN.
Aparece la indicación “MEMO SCAN” en el visor.
Los memos de los discos del grupo seleccionado se
ES
desplazan por el visor.
=/+
Page 93

Almacenamiento de información acerca de los discos compactos (archivos personalizados)
Almacenamiento de información acerca de los discos compactos (archivos personalizados)
Storing Information About CDs (Custom Files)
Locating a Scene or Track You Want
Locating a Scene or Track You Want
Inclusión de temas en la lista de éxitos
Pulse HIT LIST mientras reproduce su tema favorito.
Aparecen en el visor las indicaciones “HIT” y “List in”.
Reproducción de los temas de la lista de
éxitos
1 Pulse HIT LIST antes de iniciar la reproducción.
Se ilumina el botón HIT LIST y aparece en el visor
la indicación “HIT LIST”.
2 Gire el selector JOG o pulse ≠/± hasta que
aparezca en el visor del panel frontal el tema que
desee.
3 Presione el selector JOG o pulse · para iniciar la
reproducción.
Si utiliza el mando a distancia, pulse ENTER.
La lista de éxitos se conserva hasta que se borre
Incluso si sustituye los discos, se guarda la lista de éxitos
que ha creado. De este modo, el reproductor sólo
reproduce el tema existente.
Notas
• No es posible definir el orden de los temas de la lista de
éxitos.
• El tema que seleccione en el paso 2 aparecerá como primer
tema de la lista de éxitos.
• Si introduce un 33º tema en la lista de éxitos, se sustituirá el
32º tema.
• No es posible almacenar temas de un segundo reproductor
de CD.
Borrado de temas de la lista de éxitos
Asignación de etiquetas a los temas en modo de
reproducción
1 Pulse INPUT mientras reproduce un tema de la
lista de éxitos.
Aparece “Hit Title” en el visor.
2 Presione el selector JOG.
Aparece el cursor parpadeante (“) en el visor.
3 Gire el selector JOG hasta que aparezca en el visor
el carácter que desee.
El cursor desaparece y parpadea el primer espacio
del título.
Conforme gira el selector JOG en el sentido de las
agujas del reloj, los caracteres aparecen en el orden
que se muestra a continuación. Gire el selector JOG
en sentido contrario para volver al carácter
anterior.
(espacio) A B C D E F G H I J K L M N O P Q R S T
U V W X Y Z a b c d e f g h i j k l m n o p q r s t u v
w x y z 0 1 2 3 4 5 6 7 8 9 ! " # $ % & ' ( ) * + , – . / : ;
< = > ? @ [ ¥ ] ^ _ \ { | } ⁄
4 Presione el selector JOG para seleccionar el
carácter.
Se ilumina el carácter seleccionado y aparece el
cursor parpadeante para indicar el siguiente
espacio que debe introducirse.
Si comete un error
Pulse CLEAR y vuelva a empezar, introduciendo los
caracteres apropiados.
5 Repita los pasos 3 y 4 para introducir más
caracteres.
Para obtener más información, consulte
“Etiquetado de discos en el reproductor” en la
página 23.
1 Siga los pasos 1 y 2 de “Reproducción de los temas
de la lista de éxitos”.
2 Pulse CLEAR.
Se borra el tema seleccionado de la lista de éxitos.
Borrado de todos los temas de la lista de
éxitos
Mantenga pulsado CLEAR en modo de parada hasta
que aparezca “CLEAR”.
Asignación de etiquetas a los temas de la
lista de éxitos (Títulos de éxitos)
Es posible asignar etiquetas a los temas de la lista de
éxitos utilizando los dos métodos que se describen a
continuación.
6 Pulse INPUT para almacenar el título.
Asignación de etiquetas a temas en el modo de
parada
1 Seleccione el tema que desee girando el selector
JOG o pulse ≠/±.
2 Pulse INPUT.
Aparece en el visor el cursor parpadeante (“).
3 Siga los pasos 3 a 6 de “Asignación de etiquetas a
temas en el modo de reproducción” para
introducir los caracteres.
Es posible almacenar los títulos de los temas del
disco CD TEXT en la lista de éxitos
Presione el selector JOG dos veces (durante el modo de
reproducción) o pulse INPUT dos veces (durante el
modo de parada) cuando el título del tema aparezca en el
paso 2.
29
ES
Page 94

Información adicional
Información adicional
Precauciones
Seguridad
• Precaución — El uso de instrumentos ópticos con este
producto aumentará el riesgo de daños oculares.
• Si cae algún objeto sólido o se vierte líquido en la unidad,
desenchufe el reproductor y solicite el servicio de personal
cualificado antes de utilizarlo de nuevo.
Transporte
• Si va a transportar el reproductor, abra la cubierta frontal,
extraiga todos los discos del mismo y desactive la
alimentación.
Si tiene alguna duda o problema en relación con el
reproductor, póngase en contacto con el proveedor
Sony más cercano.
Fuentes de alimentación
• Antes de utilizar el reproductor, compruebe que el voltaje
sea idéntico al del suministro de alimentación local. El
voltaje se indica en la placa de identificación situada en la
parte posterior del reproductor.
• El reproductor no está desconectado de la fuente de
alimentación de CA mientras esté conectado a la toma de
red, incluso si se ha desactivado.
• Si no va utilizar el reproductor durante varios días,
asegúrese de desconectarlo de la toma de red. Para
desconectar el cable de alimentación de CA, tire del
enchufe, nunca del propio cable.
• El cable de alimentación de CA solamente deberá ser
reemplazado en un taller de servicio técnico cualificado.
• Las salidas de los enchufes sin interruptor siempre reciben
corriente, independientemente de la posición del
interruptor de alimentación, cuando la unidad se encuentra
conectada a la fuente de alimentación de CA.
Localización
• Sitúe el reproductor en un lugar que ofrezca el tipo de
ventilación adecuado con el fin de evitar el recalentamiento
interno de la unidad.
• No sitúe el reproductor sobre una superficie inestable,
como una alfombra, que pueda bloquear los orificios de
ventilación de la parte inferior.
• No sitúe el reproductor cerca de fuentes de calor ni lo
exponga a la luz directa del sol, a polvo excesivo o a golpes
mecánicos.
Notas sobre los discos
compactos
Manejo de los discos compactos
• Para mantener limpio el disco, manéjelo con cuidado.
• No pegue papel ni cinta adhesiva en el disco.
• No exponga los discos a la luz directa del sol ni los sitúe
cerca de fuentes de calor, como conductos de aire caliente.
Asimismo, no los deje en un coche aparcado y expuesto a la
luz directa del sol, ya que la temperatura interior del coche
puede sufrir un considerable aumento.
• Después de extraer un disco de la ranura, guárdelo en su
caja.
Limpieza
• Antes de la reproducción, limpie el disco con un paño
suave. Limpie el disco desde el centro hacia afuera.
30
Funcionamiento
• Si traslada el reproductor de un lugar frío a otro cálido, o lo
coloca en una habitación muy húmeda, la humedad se
puede condensar en las lentes del reproductor. Si ocurre
esto, el reproductor no funcionará correctamente. En este
caso, deje el reproductor encendido durante una hora hasta
que se evapore la humedad.
• No utilice disolventes, como bencina o diluyente de
pintura, limpiadores comerciales o sprays antiestáticos para
LPs de vinilo.
Ajuste del volumen
• No eleve el volumen mientras escucha una parte con
entradas de nivel muy bajo o cuando no se emitan señales
de audio. En caso contrario, pueden dañarse los altavoces
cuando se reproduzca una parte con un nivel muy alto.
Limpieza
• Limpie la unidad, el panel y los controles con un paño
suave ligeramente humedecido en una solución limpiadora
no abrasiva. No utilice ningún tipo de estropajo, detergente
ES
en polvo ni de diluyente, como alcohol o bencina.
Page 95

Playing CDs in Various Modes
Información adicional
Solución de problemas
Si tiene alguna de las siguientes dificultades al utilizar
el reproductor, consulte esta guía de solución de
problemas para corregirlos. Si no desaparece el
problema, póngase en contacto con el proveedor Sony
más cercano.
Ausencia de sonido.
/Compruebe que el reproductor está firmemente
conectado.
/Compruebe que está utilizando el amplificador
correctamente.
No se reproduce el CD.
/No hay ningún CD en la ranura (“–NO DISC–”
aparece).
Inserte uno.
/Inserte el CD con el lado de la etiqueta a la
derecha.
/Limpie el CD (consulte la página 30).
/Se ha condensado humedad en el interior del
reproductor. Abra la cubierta frontal y deje el
reproductor encendido durante
aproximadamente una hora (consulte la
página 30).
Especificaciones
Reproductor de discos compactos
Láser Semiconductor (λ = 780 nm)
Salida de láser Máx 44,6 µW*
Respuesta de frecuencias De 20 Hz a 20 kHz ±0,5 dB
Relación señal-ruido CDP-CX240: Superior a 107 dB
Rango dinámico Superior a 98 dB
Distorsión armónica Inferior a 0,0045%
Separación de canales CDP-CX240: Superior a 100 dB
Salidas
Tipo de
toma
LINE OUT
DIGITAL OUT
(OPTICAL)
Tomas
fono
Conector de
salida óptico
Duración de emisión: continua
*Esta salida es el valor medido a una
distancia de 200 mm de la superficie
de la lente del bloque de recogida
óptico con una apertura de 7 mm.
CDP-CX220: Superior a 105 dB
CDP-CX220: Superior a 97 dB
Nivel máximo
de salida
2 V
(a 50 kOhmios)
–18 dBm
Impedancia de carga
Superior a
10 kOhmios
Longitud de onda:
660 nm
El mando a distancia no funciona.
/Elimine los obstáculos entre el mando a
distancia y el reproductor.
/Apunte el mando a distancia hacia el sensor de
control remoto g del reproductor.
/Sustituya todas las pilas del mando a distancia
por unas nuevas si emiten una señal débil.
/Ajuste el interruptor CD 1/2/3 del mando a
distancia de acuerdo con la posición del selector
COMMAND MODE mostrada en el visor del
panel frontal (consulte la página 5).
El reproductor no funciona correctamente.
/Es posible que los chips del microordenador no
funcionen correctamente. Desconecte el cable de
alimentación de CA y, a continuación, vuelva a
conectarlo a la toma mural para restaurar el
reproductor.
Generales
Requisitos de alimentación
Adquirido en
Canadá
Europa
Otros países
Consumo 12 W
Dimensiones (aprox.) Con la cubierta frontal cerrada
(an/al/f) 430 × 200 × 480 mm incluidas las partes
Masa (aprox.) 9,5 kg
Requisitos de alimentación
120 V CA, 60 Hz
220 V – 230 V CA, 50/60 Hz
110 V – 120 V o 220 V – 240 V
CA, ajustable, 50/60 Hz
salientes
Accesorios suministrados
Cable de audio (2 enchufes fono – 2 enchufes fono) (1)
Cable de minienchufe monofónico (2P) (sólo se suministra
con los modelos canadienses) (1)
Mando a distancia (control remoto) (1)
Pilas SUM-3 (NS) Sony (2)
Catálogo de portadas de discos compactos (2) y etiqueta
(1)
El diseño y las especificaciones están sujetos a cambios sin previo
aviso.
31
ES
Page 96

Información adicional
Indice alfabético
Indice alfabético
A
Agrupación de discos 27
Almacenamiento
de información sobre discos
compactos 23
de temas específicos 26
AMS 15
Aparición y desaparición
gradual del sonido 21
Archivos personalizados
Archivo de grupo 27
Banco de borrado 26
Funciones 23
Lista de éxitos 28
Memo de disco 23
B
Banco de borrado 26
Búsqueda. Consulte
Localización
Búsqueda de memos 14
C
CD TEXT 12
Conexión 4
otro reproductor de CD 6
Conexiones
descripción general 4
CONTROL A1 5
Control remoto 4
D
Desembalaje 4
E, F, G, H
Eliminación
archivos personalizados 23
banco de borrado 26
memo de disco 25
memo de grupo 27
programa 19
Especificación del siguiente
disco 15
Etiquetado de discos 23
Exploración de memos 14
I, J, K
Inserción de discos
compactos 7
L
Localización
controlando el sonido 15
de discos 14
de un punto específico 15
de un tema específico 15
directamente 15
mediante AMS 15
observando el visor 15
M, N, O
Manejo de discos
compactos 30
Mega Control avanzado 20
Memo de disco 23
P, Q
Programa
cambio 19
comprobación 19
eliminación 19
R
Repetición 16
Reproducción
aleatoria 16
continua 10
de grupo 27
de programas 17
repetida 16
Reproducción aleatoria
de todos los discos 16
de un disco 17
Reproducción con
temporizador 19
Reproducción continua 10
Reproducción sin demora 22
Reproducción X-Fade 22
S
Selección de discos 14
Selección del idioma 13
Selector JOG 7
Sensor de música
automático 15
Solución de problemas 31
Soporte giratorio 7
T, U, V, W, X, Y, Z
Tiempo total de
reproducción 12
Nombres de los controles
Botones
CHECK 19, 26
CLEAR 17, 25, 26
CONTINUE 15
X-FADE 22
DEL 25
DISC 14, 18
DISC/CAPS 24
DISC SKIP 11
ENTER 14, 18, 28
GROUP 28
GROUP 1 – 8 27
GROUP FILE 27
HIGH-LIGHT 13
HIT LIST 29
INPUT 24, 29
MEGA CONTROL 21
MEMO INPUT 24
MEMO SCAN 14
MEMO SEARCH 14
NO DELAY 22
Numéricos 14, 15
§ OPEN/CLOSE 7
PROGRAM 17
REPEAT 16
SHUFFLE 16
SPACE 25
TIME/TEXT 12
≠/± 11
· 11
P 11
p 11
=/+ 15
0/) 15
>10 15
Interruptores
CD 1/2/3 5
TIMER 19
I/u 7
Tomas
LINE OUT 5
S-LINK/CONTROL A1 4
2ND CD IN 6
Conectores
DIGITAL OUT (OPTICAL) 5
Otros
Cubierta frontal 7
Ranuras de disco 7
Selector COMMAND
MODE 5
Selector JOG 7
Soporte giratorio 7
Visor 12
g 4
32
ES
Sony Corporation Printed in Malaysia
 Loading...