

Sonova USA DSF5K User Manual

www.Phonak.com
www.DynamicSoundField.com
029-0710-02/V1.00/2009-12/A+W Printed in Switzerland
© Phonak AG All rights reserved
!
User Guide

2
1. Welcome 5
2. Installation 7
3. General recommendations 8
4. Equipment and accessories 9
5. Important Dynamic SoundField figures 11
5.1 inspiro operating and charging time 11
5.2 Operating range 11
5.3 Transmission technology 12
6. Controls 13
6.1 On the inspiro transmitter 13
6.2 On the DigiMaster 5000 loudspeaker 14
6.3 The Status Indicator of the DigiMaster 5000 15
7. Getting started 18
7.1 Charging inspiro 19
7.2 Low battery alarms 21
7.3 Wearing inspiro 22
Contents

3
7.4 Wearing EasyBoom 26
7.5 Switching ON inspiro 28
7.6 Activating the key pad lock 29
7.7 Switching ON DigiMaster 5000 30
7.8 Muting the microphone 33
8. Adjusting the volume of Dynamic SoundField 34
9. Connecting a Smartboard 35
10. DynaMic and accessories 36
10.1 Controls 38
10.2 Charging DynaMic 39
10.3 Vibration alarm indication 42
10.4 Switching ON DynaMic 43
10.5 Using DynaMic 46
11. The MultiTalker Network in school 49
11.1 Initiating a MultiTalker Network 50
11.2 How to use a MultiTalker Network 52

4
Content
12. Troubleshooting inspiro 56
13. Troubleshooting DynaMic 58
14. Dynamic SoundField pairing instructions 60
15. Important notices 62
16. Service and warranty 64
17. Declaration of conformity 65
18. Information and explanation of symbols 67
19. Personal notes 70

5
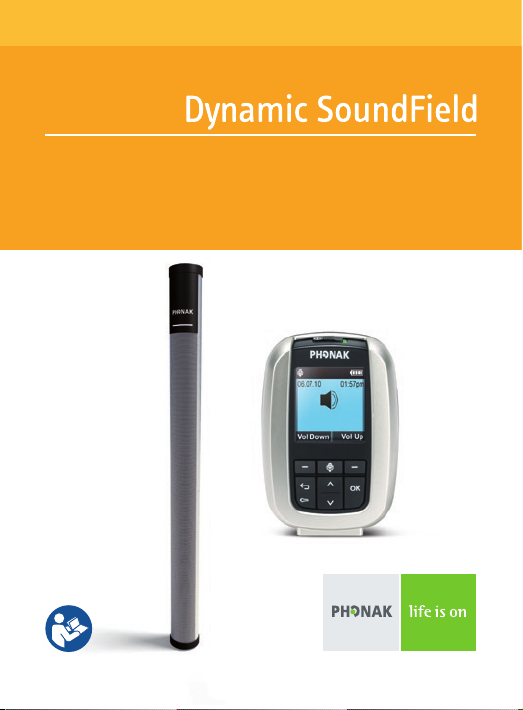
1. Welcome
For the best possible learning experience children must
be able to hear the teacher’s voice clearly in class, but
unfortunately this is not always possible. Factors such
as classroom noise, the distance between teacher and
students, and challenging classroom acoustics can make
understanding the teacher difficult, even for children
with normal hearing. For teachers meanwhile, noisy
classrooms mean raising the voice to be heard, which
in turn often leads to vocal hoarseness, pain and in
the case of temporary voice loss, time off work.
Dynamic SoundField significantly improves the
listening and learning performance of schoolchildren,
while also saving the voices of the teachers.
Dynamic SoundField is brought to you by Phonak.
Phonak is the world leader in hearing and communication
technology, innovation and reliability based in Switzerland.
With proper care and usage, Dynamic SoundField will
support your communication needs for many years.
Phonak - life is on www.phonak.com

6
Further resources
To find out more about Dynamic SoundField in general,
we recommend visiting the following websites:
www.eschooldesk.com
This is a special website dedicated to providing
support to Dynamic SoundField users. It includes
short movies and further troubleshooting advice.
www.phonak.com
This is the Phonak home page. Go to the product
section and click on Dynamic SoundField.
The following symbol appears in this user guide:
Important notes for all users
1. Welcome

7
The installation procedure of the Dynamic SoundField
is described in a separate installation instruction
which is available online. Please check the green
download section on
www.DynamicSoundField.com
2. Installation

8
1. Activate the inspiro transmitter‘s KeyPad lock
2. Speak in a natural voice into the EasyBoom
microphone
3. Do not increase your voice level if the surrounding
noise increases. The transmitter‘s Dynamic features
will increase your voice automatically
4. Activate the inspiro‘s Mic mute for private
conversation
5. Charge the inspiro transmitter every night
6. Switch OFF the DigiMaster 5000 loudspeaker when
not in use
3. General recommendations
9
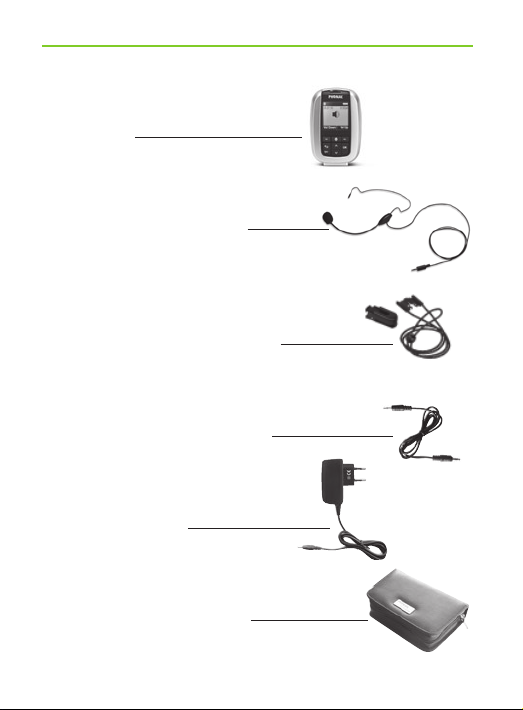
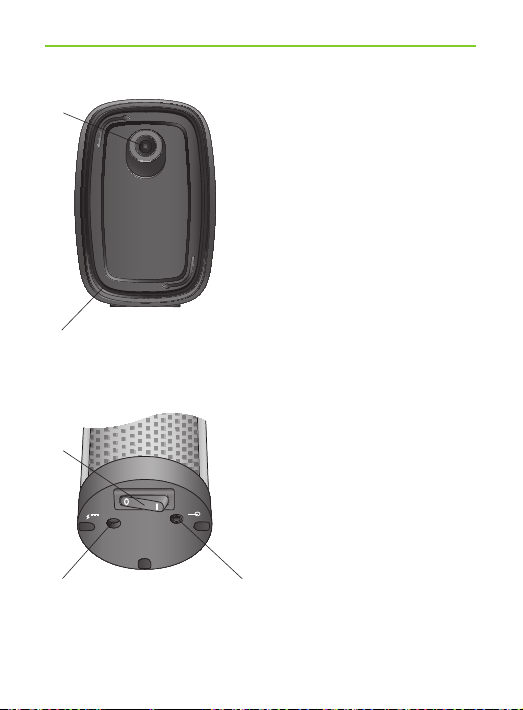
/ inspiro
0 EasyBoom microphone
1 inspiro wearing options:
Belt clip and lavalier cord
2 Audio cable (1 m/3 feet)
3 Charging unit
4 Home and travel case
4. Equipment and accessories
10
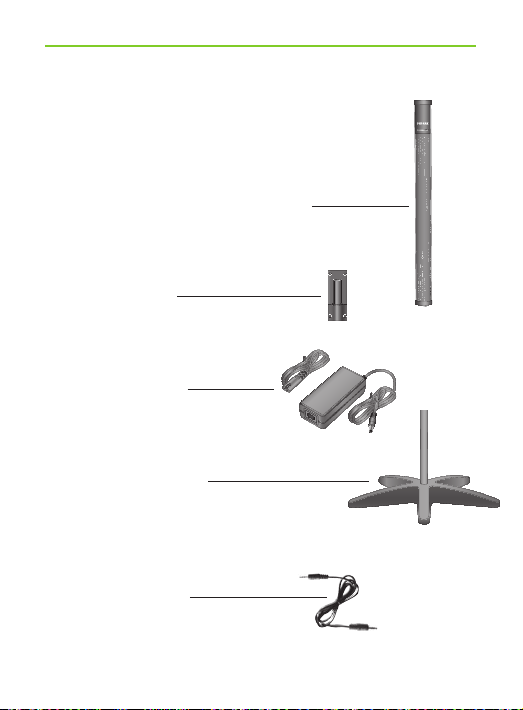
5 DigiMaster 5000 loudspeaker
6 Wall fi xation
7 Power supply
8 Optional: Stand
9 Optional: Audio cable
(3 m /10 feet)
4. Equipment and accessories

11
5.1 inspiro operating and charging time
Operating time of the inspiro transmitter when
the battery is fully charged:
approx. 9 hours (if the inspiro is emitting to
the loudspeaker and to FM receivers in parallel, the
operating time is reduced to about 7–8 hours)
Charging time for an 80% charge:
approx. 1 hour
Charging time for a 100% charge:
approx. 2 hours
5.2 Operating range
Dynamic SoundField has been designed for use in
classrooms with a maximum size of 8 x 10 meters /
24 x 30 feet.
5. Important Dynamic SoundField
figures

12
5. Important Dynamic SoundField figures
5.3 Transmission technology
Digital on 2.4 GHz
The digital signal sent from the transmitter to the
loudspeaker cannot be overheard by other equipment.
The number of active Dynamic SoundField systems
in a school building is unlimited. Dynamic SoundField
systems cannot disturb each other.
Automatic frequency hopping eliminates interference
issues, allowing Dynamic SoundField to coexist
alongside a school‘s WiFi and Bluetooth networks.
13
6. Controls
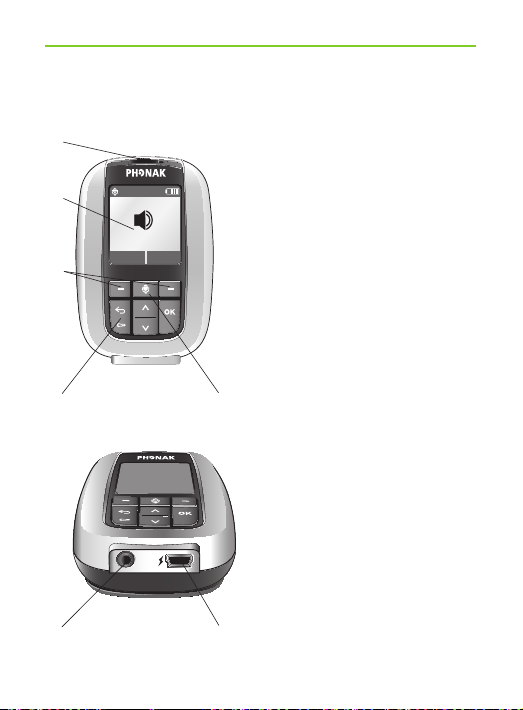
6.1 On the inspiro transmitter
inspiro
/ ON / OFF slider
0 Color LCD
1 Soft Keys
2 Keypad lock key
3 Microphone
mute key
4 3.5 mm audio input
5 mini-USB for
charging
Rebecca Woods
Monitor
01.10.2008 01:57pm
Sync
H33
Vol Down
06.07.10 01:57pm
Vol Up
/
0
1
2
4
3
5
14
6 Button to attach
the belt clip and
the lavalier
7 Cable wrapper
6.2 On the DigiMaster 5000 loudspeaker
Loudspeaker base
/ ON/ OFF switch
0 Power socket
1 3.5 mm audio input
6
7
6. Controls
19V
AUDIO
3.2A
/
01
15
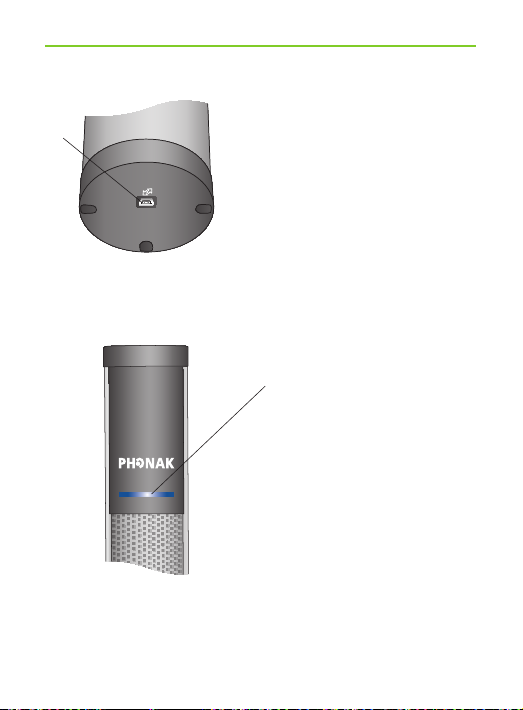
Loudspeaker top
2 mini-USB
6.3 The Status indicator of the DigiMaster 5000
The status indicator on the DigiMaster 5000 loudspeaker
provides immediate feedback to the teacher.
2
Status indicator

16
Constant blue light:
Standard operating mode
The inspiro transmitter and the DigiMaster 5000
loudspeaker are ON, paired and working in normal
operating mode.
Blue blinking light:
Power-saving stand-by mode
If the inspiro transmitter has been switched OFF,
DigiMaster 5000 recognizes this immediately and
switches itself automatically to power-saving stand-by
mode. It switches automatically back to standard
operating mode as soon as the inspiro transmitter is
switched ON. Stand-by mode will also be activated
if the transmitter is out of range.
Constant green light:
Mic muted on inspiro
Check your inspiro and activate the microphone by
pressing the Mic button.
6. Controls

17
Yellow blinking light:
inspiro not paired
The yellow blinking light appears if no inspiro has been
paired. Check chapter 14.
Green blinking light:
Firmware upgrade in process
Appears when a firmware upgrade is in process via
the mini USB connection at the top of the DigiMaster
5000 loudspeaker.
Constant red light:
DigiMaster 5000 needs a re-start
Switch the loudspeaker OFF and, after a few seconds,
ON again. If the red light still appears, contact your
local sales person.

18
7. Getting Started
If Dynamic SoundField has been installed according to
the separate installation instructions, the DigiMaster
5000 loudspeaker has been either mounted on the wall
or on the stand, and the loudspeaker is connected to
the mains. In addition, your inspiro has already been
paired with the DigiMaster 5000 loudspeaker.
The pairing information is stored in the inspiro and
in the DigiMaster 5000 unit. The pairing information
remains even if the loudspeaker is removed from
the mains or the inspiro is switched off, or the battery
from the inspiro is removed.
The pairing needs to be re-done after a firmware upgrade
of the DigiMaster 5000, the inspiro or both. Please
check chapter 14 in this document or in the separate
installation instructions for pairing advice.
19
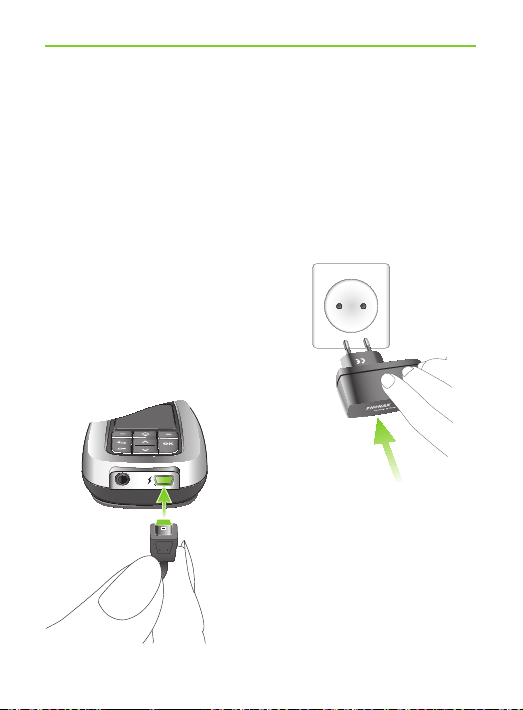
7.1 Charging inspiro
inspiro contains a built-in re-chargeable state-of-the
art lithium polymer battery with fast-charge capability.
A fully-discharged battery will charge to 80% in one
hour and 100% in 2 hours.
Select an easily accessible
socket outlet and plug
the charging unit into the
socket outlet.
Connect the mini-USB
plug from the charging
unit to the inspiro.
20
Use only the original Phonak charging unit for
the inspiro.
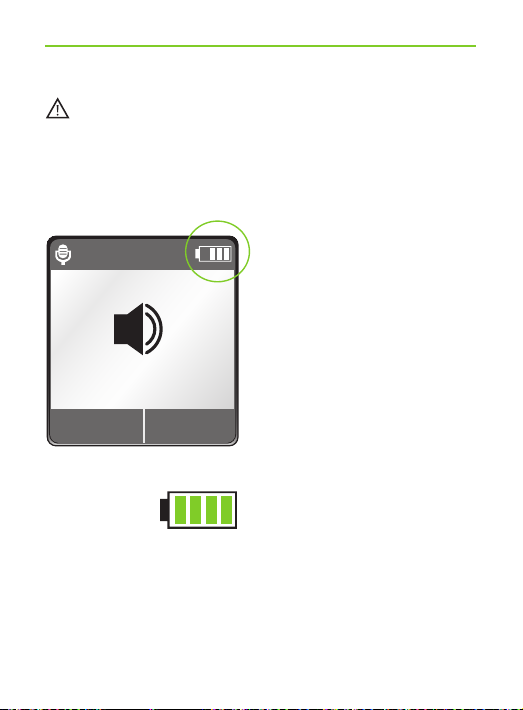
The elements within the battery symbol flash during
charging. The battery cannot be over-charged.
If the charging unit is
removed from the inspiro,
the segments in the
battery symbol show the
actual capacity.
If the battery is fully
charged, the battery
symbol in the LCD
shows four segments.
Fig. 1a
01:57pm
Vol Down
06.07.10
Vol Up
7. Getting Started

21
7.2 Low battery alarms
inspiro provides an automatic vibration alarm to
signify if the battery is low.
Approximately 1 hour before battery is empty:
The vibrating alarm is activated. Check the message
on the LCD and follow the instructions.
Approximately 15 minutes before battery is empty:
If inspiro has not been charged after the first alarm,
the second vibrating alarm is automatically activated
before the battery is completely exhausted. Check
the message on the LCD and follow the instructions.
If the battery is not charged at that time, inspiro
automatically switches OFF 15 minutes later.
If the battery is completely exhausted, there will be no
segments in the battery symbol and the battery symbol
in the LCD will change from white to red.
 Loading...