

Page 1
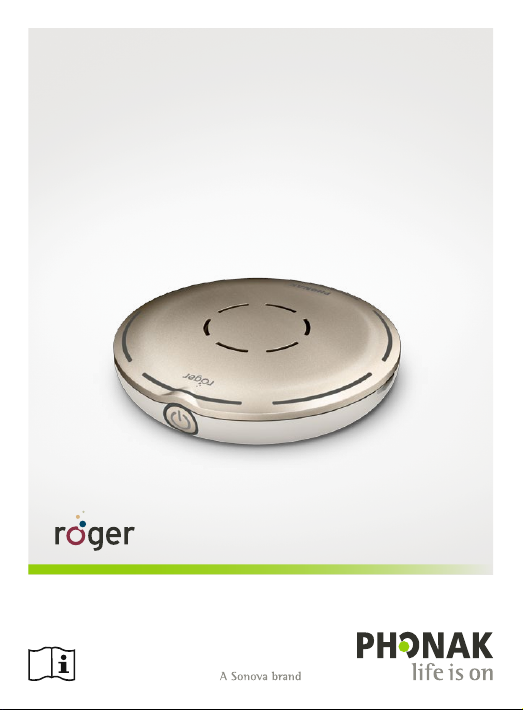
Roger Select
User Guide
™
Page 2

Contents
1. Welcome
2. Getting to know your Roger Select
2.1 Device description
2.2 Accessories
2.3 Indicator lights
3. Getting started
3.1 Charging your Roger microphone
3.2 Switching Roger Select on
3.3 Connecting Roger Select to your hearing aids
4. Using your Roger Select to hear better
4.1 Hearing better at a table
4.2 Hearing a distant talker better
5. Listening to TV or other audio devices
5.1 Setting up the docking station
5.2 Listening to the TV using the docking station
6. Listening to a portable audio device
7. Making phone calls using Bluetooth®
wireless technology
7.1 What is Bluetooth?
7.2 Pair Roger Select with your phone/computer
7.3 Making phone calls
7.4 Further Bluetooth options
4
5
6
8
10
12
12
14
15
18
18
21
24
24
26
28
30
30
33
34
36
Page 3

8. Additional functions
8.1 Mute
8.2 Disconnecting Roger devices (NewNet)
8.3 Reset
8.4 Clear list of paired Bluetooth devices
9. Using Roger Select with other Roger
microphones
9.1 Connecting with other microphones
9.2 Using multiple microphones
10. Troubleshooting
11. Service and Warranty
11.1 Local warranty
11.2 International warranty
11.3 Warranty limitation
12. Compliance information
13. Information and explanation of symbols
14 Important safety information
14.1 Hazard warnings
14.2 Product safety information
14.3 Other important information
38
38
38
39
39
40
40
42
43
48
48
48
49
50
54
57
57
60
61
Page 4

1. Welcome
Your Roger Select has been developed by Phonak – the
world leader in hearing solutions based in Zurich,
Switzerland.
This premium product is the result of decades of research
and expertise and is designed to keep you connected to
the beauty of sound! We thank you for making such
a great choice and wish you many years of listening
pleasure.
Please read the user guide carefully to make sure that
you understand and get the best out of your Roger Select.
For more information about features and benets, simply
contact your hearing care professional.
Phonak – life is on
www.phonak.com
4
Page 5
2. Getting to know your Roger Select
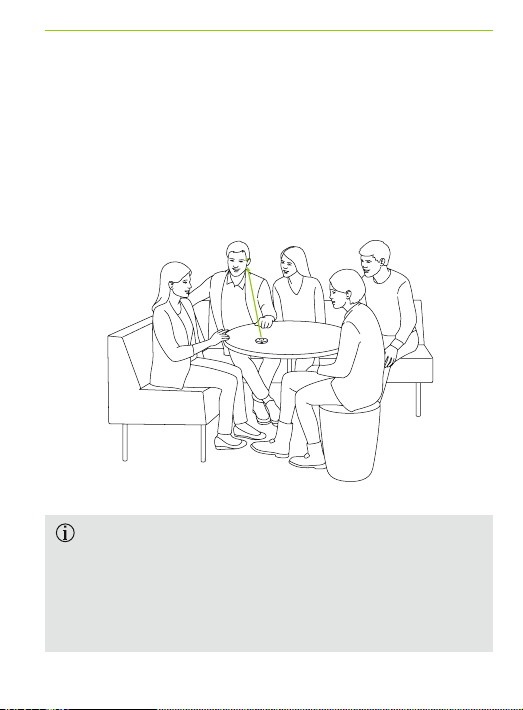
Roger Select is a microphone that picks up the voice of a
speaker and sends it wirelessly directly into your ears. You
can place Roger Select in the middle of a table e.g. in a
restaurant, or it can be worn by a single person i.e. to hear
a distant talker.
Your Roger Select typically works within a range of
up to 10 meters / 33 feet to your hearing aids. Note
that human bodies and walls may reduce this
distance. The furthest range is possible when you
can see your Roger Select (i.e. line of sight).
5
Page 6
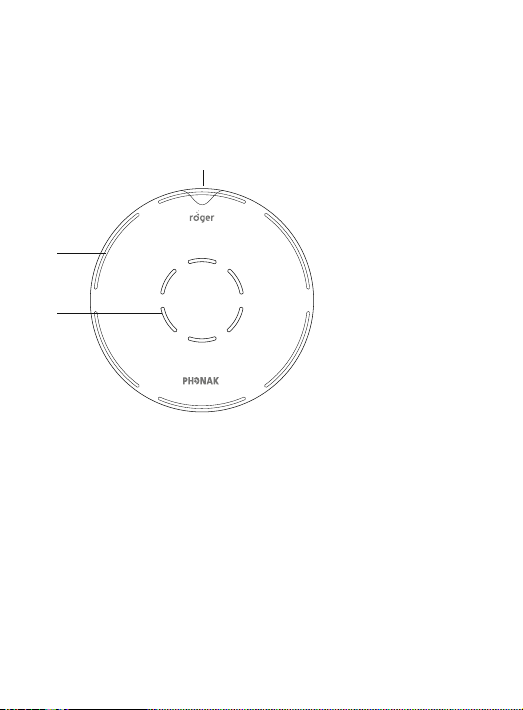
2.1 Device description
1
5
2
1 On/o button incl. battery status light
2 Microphones and center indicator lights
3 Center touch key
4 Six steering touch keys
5 Microphone mode indicator lights
6
➃
➃
➃
➃
➂
➃
➃
Page 7
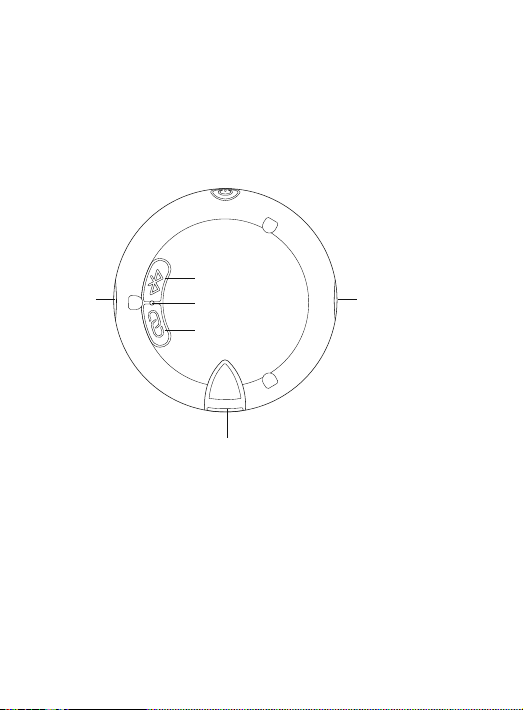
6
10 10
6 Bluetooth button
7 Back indicator light
8 Connect button
9 Micro-USB socket
10 Slots for lanyard and clip
7
8
9
7
Page 8
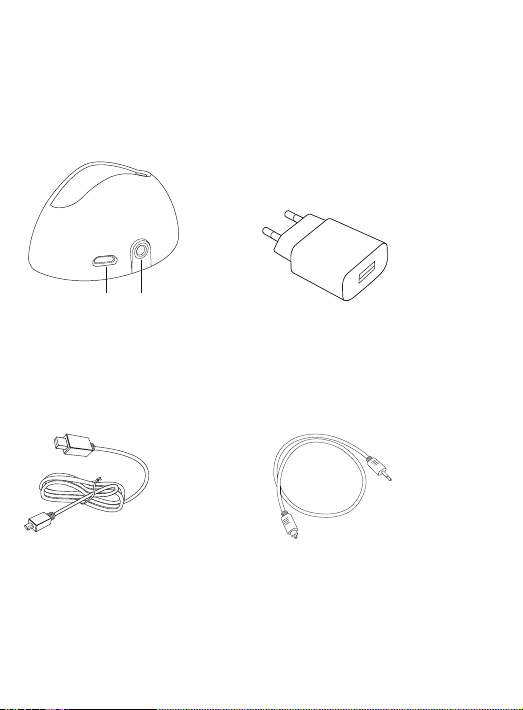
2.2 Accessories
1 2
Docking station External power supply
1 External power supply input
2 Digital/analog audio input
USB cable Digital audio cable
8
Page 9
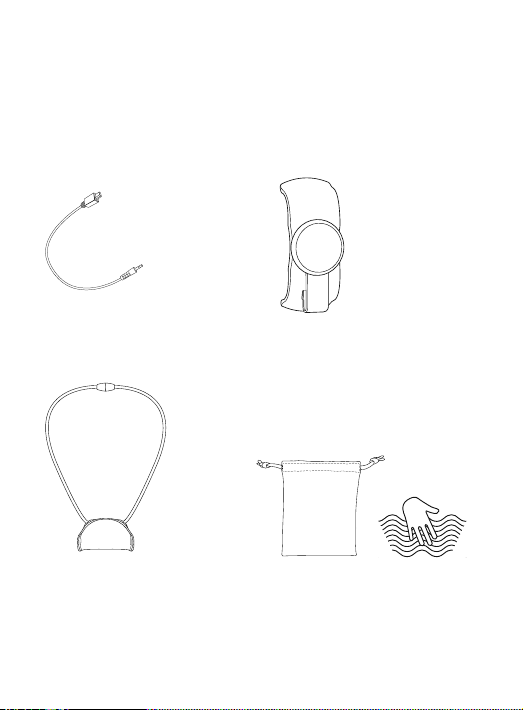
Analog audio cable Magnetic clip
Lanyard Pouch
9
Page 10
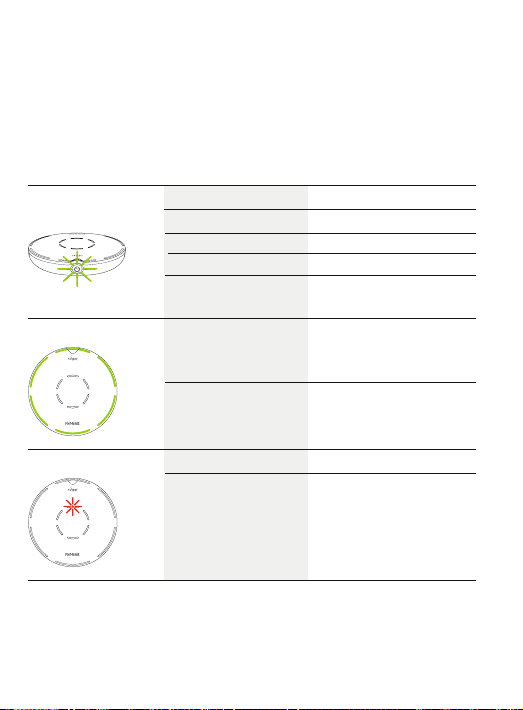
2.3 Indicator lights
Battery status
Microphone mode
Mute
10
Green fast blinking
Green solid
Green slow blinking
Orange blinking
Red blinking
Green all six
segments
Green one to ve
segments
Red solid
Red blinking
Charging
Fully charged
Switched on, battery full
Battery half full
Battery empty, charge
Roger Select
Microphone in all
directions (all-around)
active)
Microphone in selected
directions active
Microphone muted
Unmute not possible,
another Roger Select in
the same network is
active
Page 11
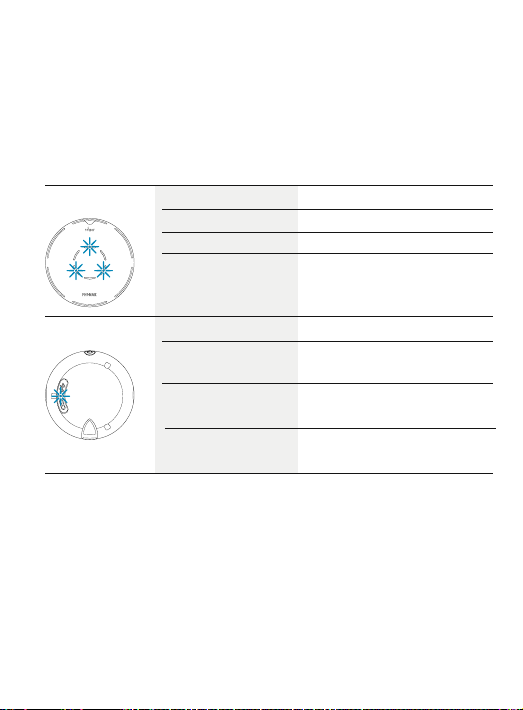
Bluetooth
Blue slow blinking
Blue double blinking
Blue solid
Blue fast blinking
Bluetooth standby mode
Incoming call
Active call
Network issue, please press
the connect button
Connect
Blue blinking
Solid green
Red double blinking
Red triple long
blinking
Connecting or pairing mode
Connecting / pairing
successful
Connect timeout, move
devices closer
Device not compatible
11
Page 12
3. Getting started
3.1 Charging your Roger microphone
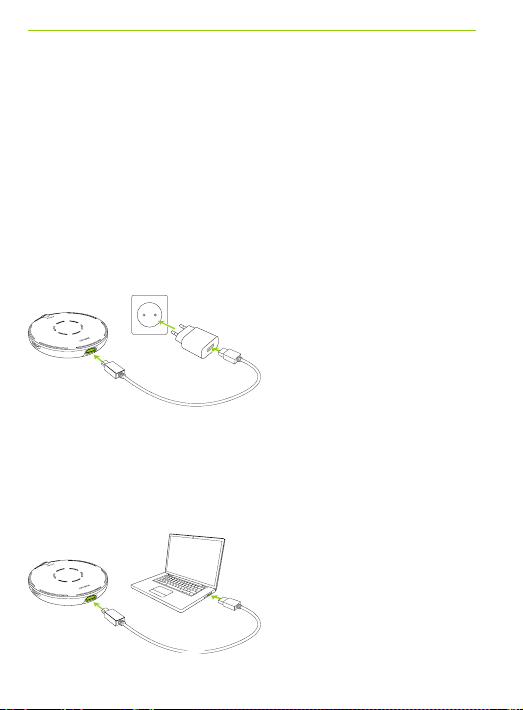
There are three ways to charge your Roger microphone:
A) Using external power supply: Plug the smaller end of
the charging cable into your Roger microphone. Plug the
larger end of the cable into the external power supply.
Plug the external power supply into a wall outlet.
B) From computer or tablet: Plug the smaller end of the
charging cable into your Roger microphone. Plug the
larger end of the cable into the USB port on your
computer and switch your computer on.
12
Page 13
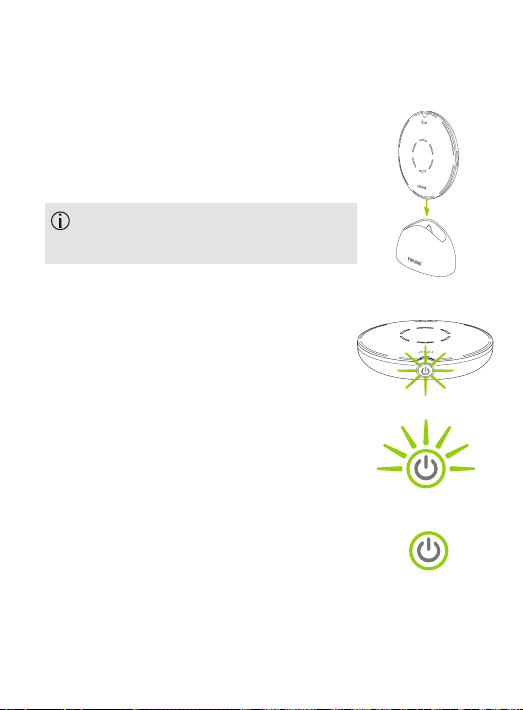
C) Via docking station: Slot the Roger
Select into the docking station.
Please read chapter 5.1 to setup
the docking station.
Battery status light during charging
The battery status light around the
on/o button will blink green until your
Roger microphone is fully charged.
When fully charged the battery status
light will remain solid green .
Charging
Fully charged
13
Page 14
3.2 Switching Roger Select on
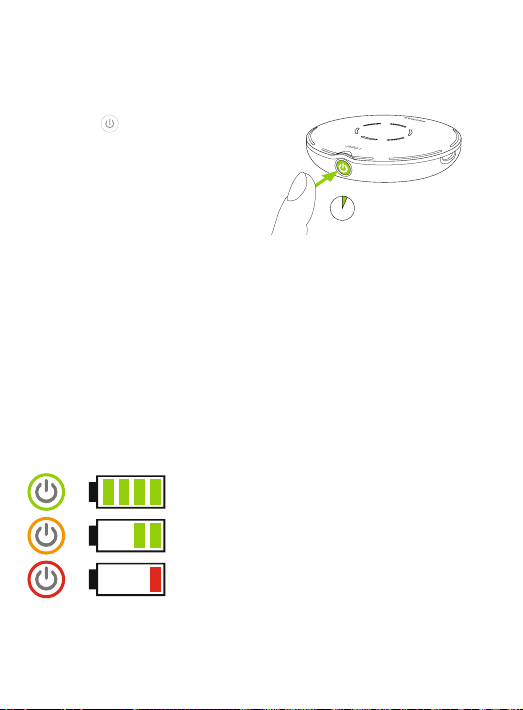
1s
Press the button 1 second
until the microphone mode
indicator light up.
Battery status light after switching on
When your Roger microphone is switched on, the battery
status light around the on/o button will blink softly. A
green blinking light means that the battery is fully
charged. A fully charged device lasts for approximately 8
hours. An orange blinking light means the battery is half
full. If the indicator light starts to blink red, you should
charge your Roger microphone immediately.
Please charge your Roger microphone
14
Page 15
3.3 Connecting Roger Select to your hearing aids
Please make sure you have obtained Roger receiver(s)
from your hearing care professional. There are a variety of
receiver(s) options available.
Your hearing care professional may already have
connected your Roger microphone to your Roger
receiver(s). If this is not the case, connect the Roger
receiver(s) as follows:
15
Page 16
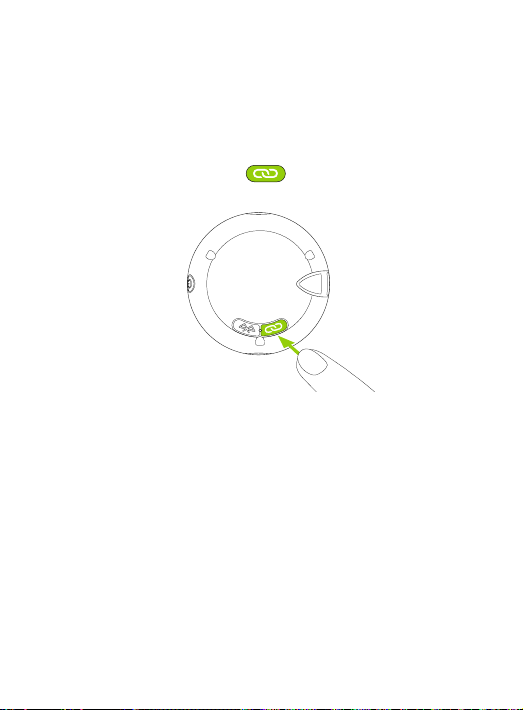
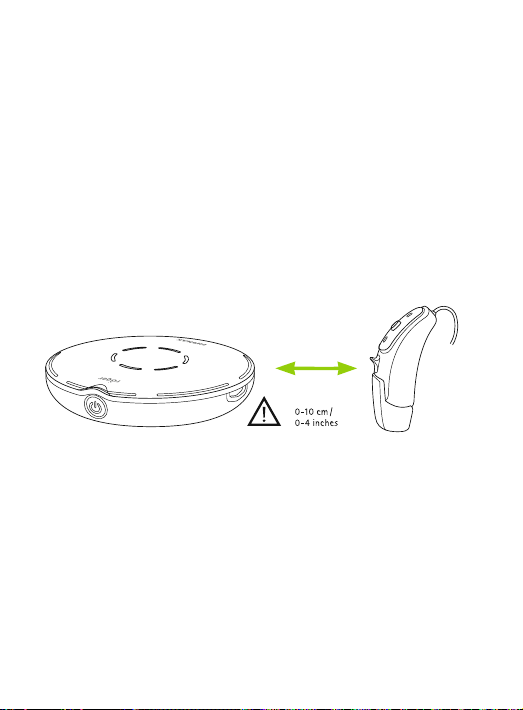
1. Turn on your Roger microphone and Roger receiver.
2. Hold your Roger microphone within 10 cm / 4 inches
from the Roger receiver or hearing aid.
3. Press the Connect button on your Roger
microphone.
The back indicator light will turn green for two seconds to
conrm a successful connection.
16
Page 17
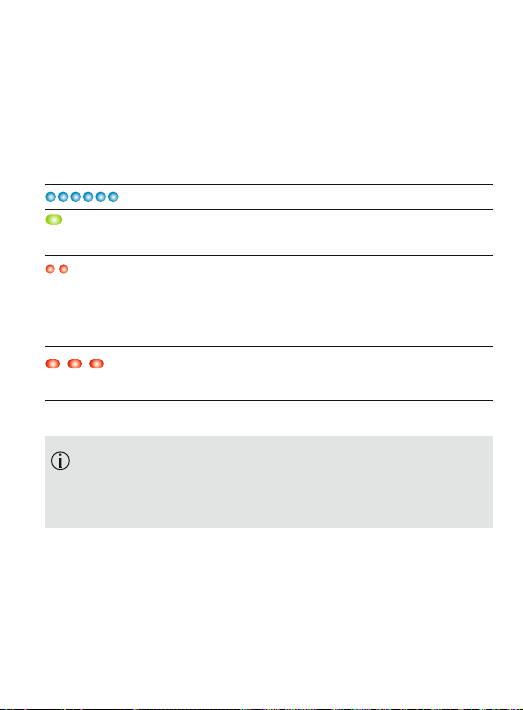
Connect status lights
After pressing the Connect button, the following feedback
may be given by the back indicator light:
Connecting
Connection was successful – your Roger receiver is
connected to your Roger microphone.
Your Roger microphone could not nd a Roger receiver.
Move the devices closer to your Roger receiver and
make sure the Roger receiver is powered on. Then try to
connect again.
The Roger receiver is not compatible with your
Roger microphone.
You can connect an unlimited number of Roger
receivers to your Roger microphone, simply repeat
step 2 and 3 for any other Roger receiver.
17
Page 18
4. Using your Roger Select to
hear better
Roger Select is a versatile, intelligent product. It detects
which situation you are in and adapts its microphone
settings automatically to provide you the best speech
understanding possible.
For best speech understanding, always bring your
Roger microphone as close to the conversation
partner(s) as possible.
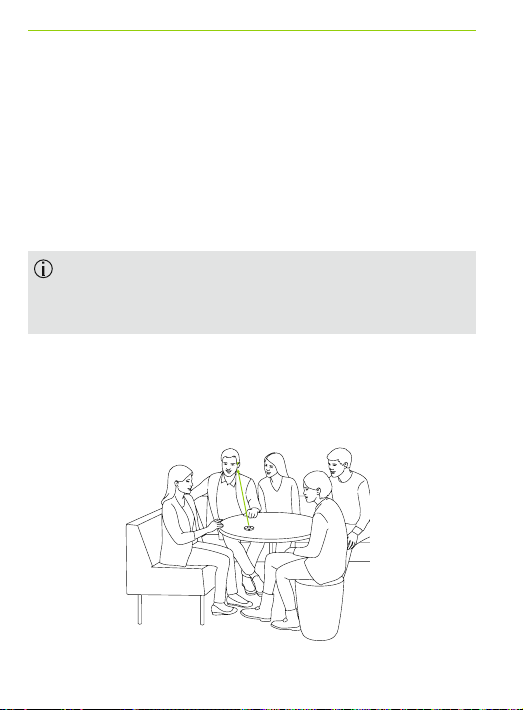
4.1. Hearing better at a table
Place your Roger microphone in the middle of a table to
listen to a group of people.
18
Page 19
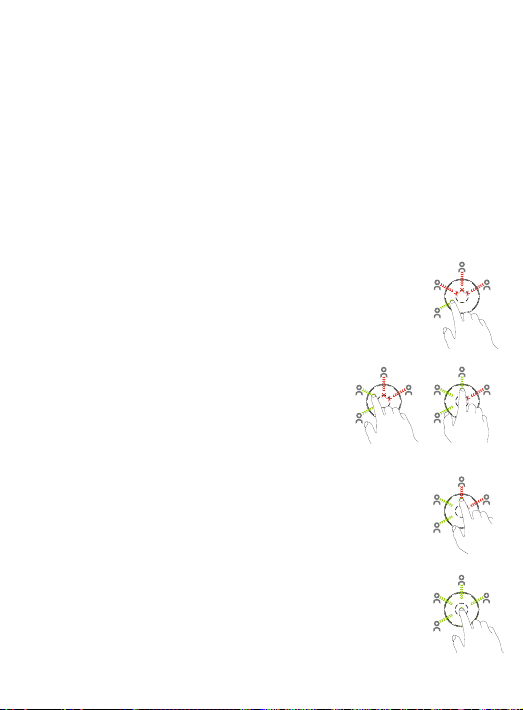
Your Roger microphone will activate an all-around
microphone. When a talker speaks, your Roger
microphone will focus its microphone to the talker
and reduce the background noise.
If two or more people are speaking at
the same time, you may tap a
segment to focus on a specic
person.
You can add other people by tapping
additional segments.
Tapping an activated segment again
will deactivate the selected direction.
To hear the whole group again, tap
the center touch key.
19
Page 20
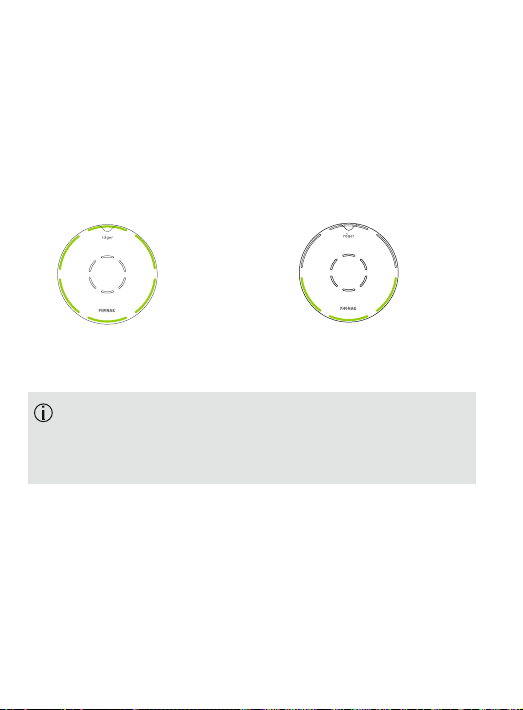
Microphone mode indicator lights
Each time you tap or move the device, the microphone
mode indicator lights shows the active segments. The
lights will fade out after a couple of seconds to save
battery power.
All six directions are active Selected directions active only
In case there is no table, you can also hold your
Roger microphone in your open palm. You can use the
same functions as if it would be on the table.
20
Page 21
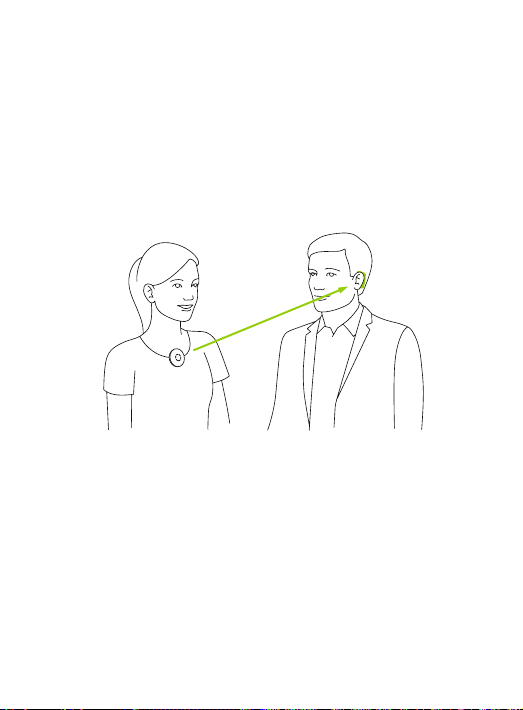
4.2 Hearing a distant talker better
Roger Select allows you to hear a single conversation
partner over distance or in very noisy environments. In
typical conditions, you may hear the talker even if they
are 10 meter/30 feet away from you.
Attach the clip or lanyard before you give the device to
the talker. Your Roger microphone automatically activates
the appropriate microphone mode.
21
Page 22
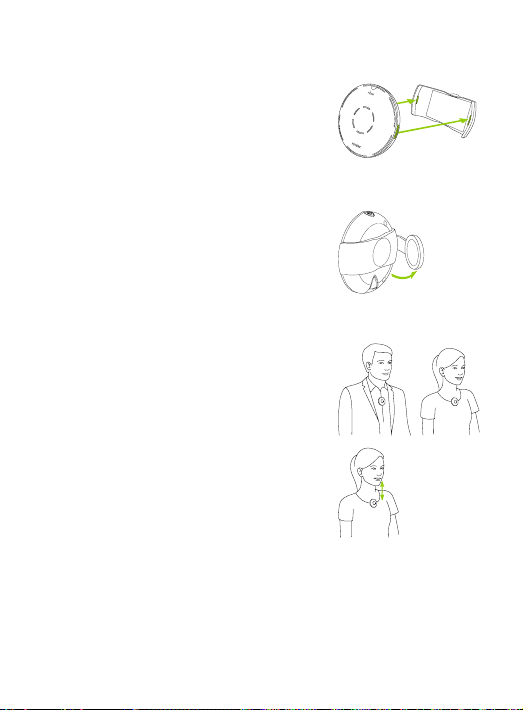
Using the clip
1) Attach the clip to your Roger
microphone. Make sure the clip
clicks into the small slots on the
side of your Roger microphone.
2) Open the magnetic clip.
3) Attach the clip to the talker’s shirt.
For best results, make sure your Roger
microphone is worn in the middle of
the chest, approx. 20 cm/8 inches
from the mouth.
22
20 cm/
8 inches
Page 23
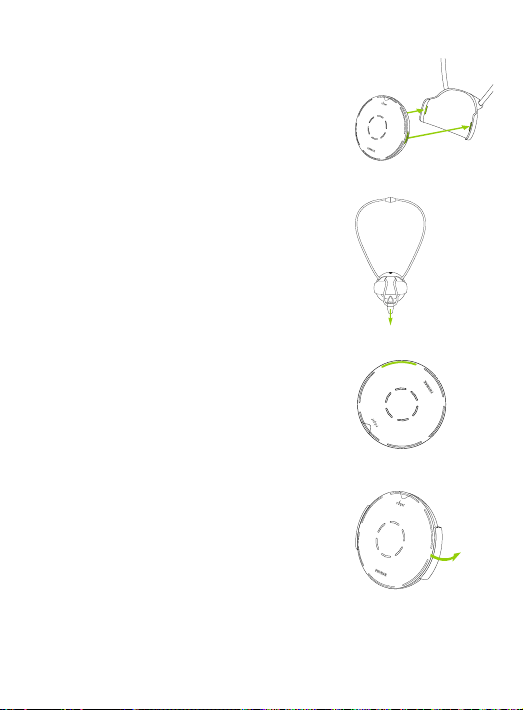
Using the lanyard
1) Attach the lanyard to your Roger
microphone. Make sure the lanyard
clicks into the small slots on the
side of your Roger microphone.
2) Hang the lanyard around the neck
of the talker and adjust the length
so that your Roger microphone is
within 20 cm/8 inches of the
mouth.
Microphone mode indicator lights
When Roger Select is worn by a talker,
the top microphone mode indicator
light will light up.
Removing the clip or lanyard
Press one side of the clip or lanyard to
detach it from your Roger microphone.
23
Page 24
5. Listening to TV or other
audio devices
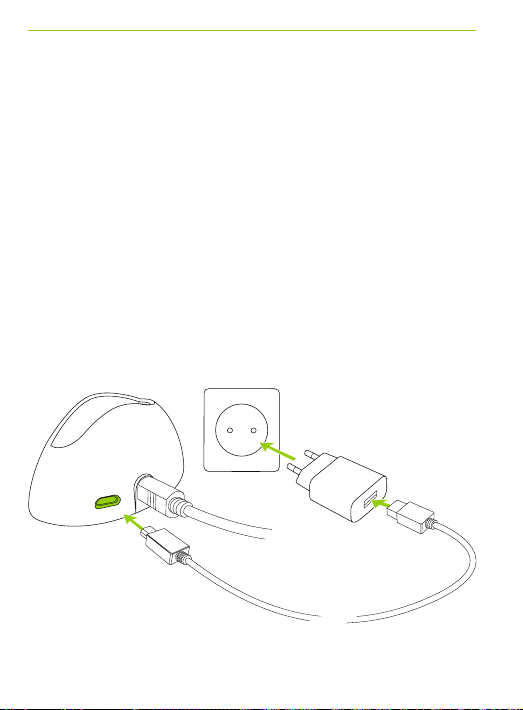
5.1 Setting up the docking station
1) Insert the smaller end of the USB cable into the socket
of the docking station.
2) Insert the larger end of the USB cable in the external
power supply.
3) Plug the external power supply into the wall outlet.
24
Page 25
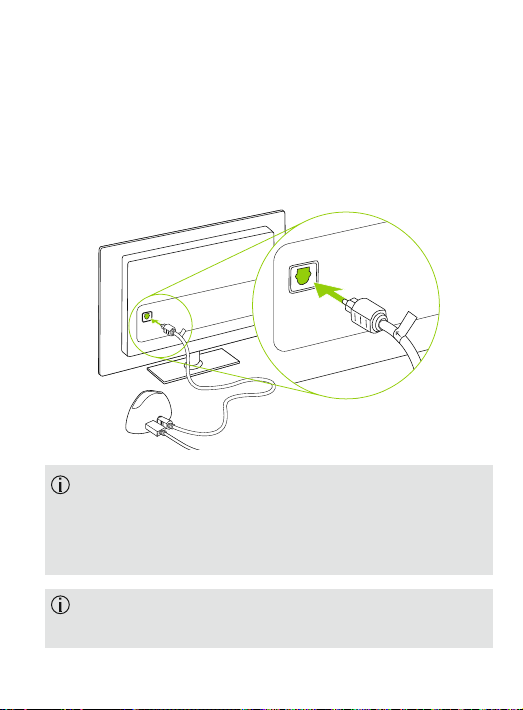
4) Connect the free end of the optical (Toslink) cable
OPTICAL
DIGITAL
AUDIO OUT
TV
OPTICAL
DIGITAL
AUDIO OUT
TV
into the optical OUTPUT of your TV or alternative
audio device.
OPTICAL
OPTICAL
DIGITAL
DIGITAL
AUDIO OUT
AUDIO OUT
TV
TV
If your TV or alternative audio device does not have
optical audio output, you can alternatively use the
headphone output. Please visit Phonak.com and look
for the Roger Select product page.
Protect your eyes of the optical light from the optical
Toslink cable when plugged into the device or TV.
25
Page 26
5.2 Listening to the TV using the docking station
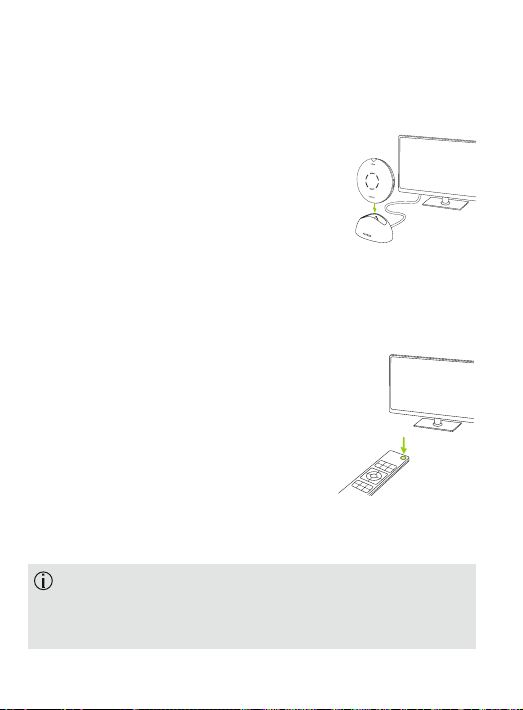
1) Insert your Roger microphone into
the docking station. When it is placed
into the docking station, it will
automatically turn o.
2) Switch on your TV (or alternative
audio device). Your Roger microphone
will automatically transmit the audio
signal to your ears.
To end the transmission of the audio
signal, simply switch o the TV (or
alternative audio device) or take your
Roger microphone out of the docking
station.
By pressing the center touch key, you can activate/
deactivate the microphones of your Roger microphone
(omnidirectional mic only).
26
Page 27
Mute indicator lights
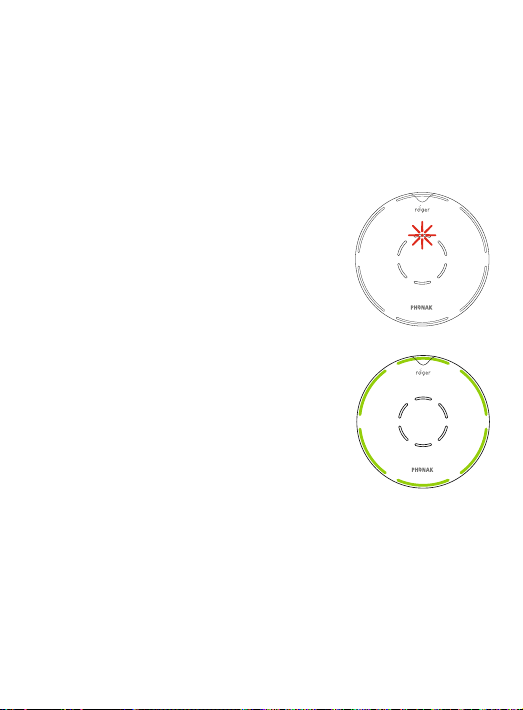
When your Roger microphone is placed in the docking
station and transmitting audio, the center red indicator
light appears.
Your Roger microphone transmits
audio signals while its microphone
is muted.
While transmitting audio, your Roger
microphone also sends its microphone
signal in parallel.
27
Page 28
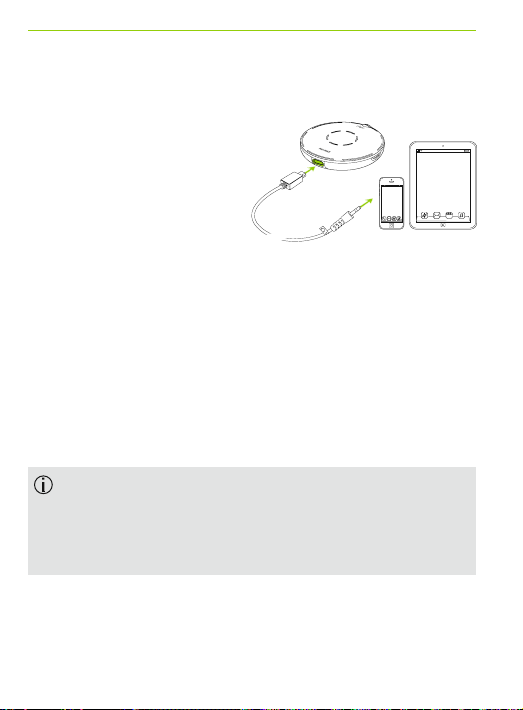
6. Listening to a portable
audio device
1) Make sure you have
switched on your
Roger microphone.
2) Plug the rectangular
end of the short audio cable into your Roger
microphone.
3) Plug the round end of the short audio cable into the
headphone output of your portable device.
4) Start the music or music app on your portable
audio device.
Your Roger microphone will automatically mute
when you plug the audio cable. You can activate the
microphone by pressing the center touch key. Now you
will hear the audio device and microphones in parallel.
To end the transmission of the audio signal, simply
unplug the audio cable or switch your Roger microphone
o.
28
Page 29
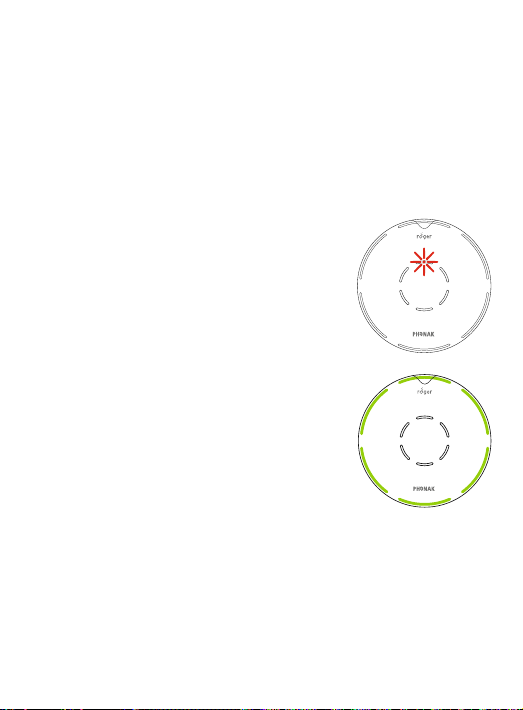
Mute indicator lights
When the audio cable is plugged into your Roger
microphone, the center red indicator light appears.
Your Roger microphone transmits
audio signals while its microphone is
muted.
While transmitting audio, your Roger
microphone also sends its microphone
signal in parallel.
29
Page 30
7. Making phone calls using
Bluetooth® wireless technology
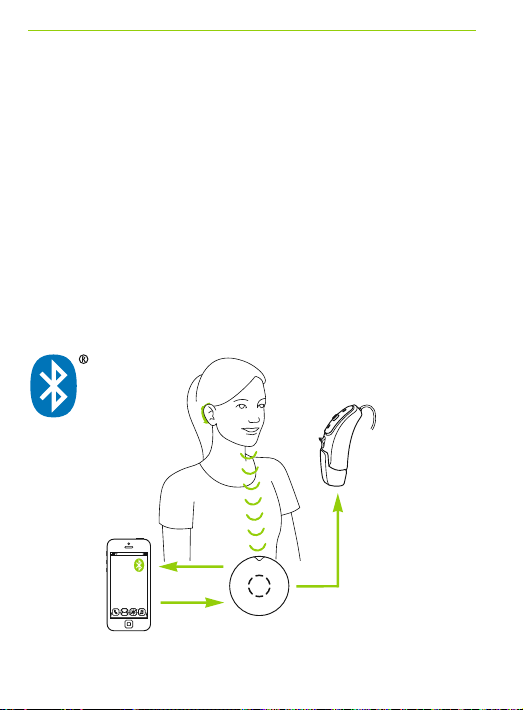
Roger Select allows you to connect to Bluetooth wireless
technology enabled products such as cell phones,
smartphones, landline phones, tablets and computers to
make and receive phone calls.
7.1 What is Bluetooth?
Bluetooth provides a way to make phone calls with
Bluetooth wireless technology enabled devices.
30
Page 31

What Bluetooth devices can I use with my
Roger Select?
First, check whether the device you wish to use
has Bluetooth wireless technology. Look for the Bluetooth
symbol on the device or in its user guide.
Second, the possible applications of a Bluetooth device
are dened by ‘proles’. The device you wish to use with
your Roger microphone must support either the ‘Headset’
or ‘Hands Free’ prole (HS /HFP).
Bluetooth device compatibility
If a problem occurs with the connection between your
Bluetooth device and your Roger microphone, or if you
are unsure about your device`s Bluetooth capabilities,
please consult your device`s user guide or ask your dealer.
The Bluetooth® word mark and logos are registered trademarks owned by Bluetooth SIG, Inc.
and any use of such marks by Phonak Communications AG is under license. Other trademarks
and trade names are those of their respective owners.
31
Page 32

Bluetooth operating range
Your Roger microphone supports Bluetooth Class 2
operation up to a range of 3 meters (10 ft).
Line-of-sight between your Roger microphone and your
phone/computer is not required. However, the following
factors may negatively aect the range achieved:
• Interference with other devices in the environment.
• The Bluetooth device with which you are connecting
may only support a more limited range.
32
Page 33
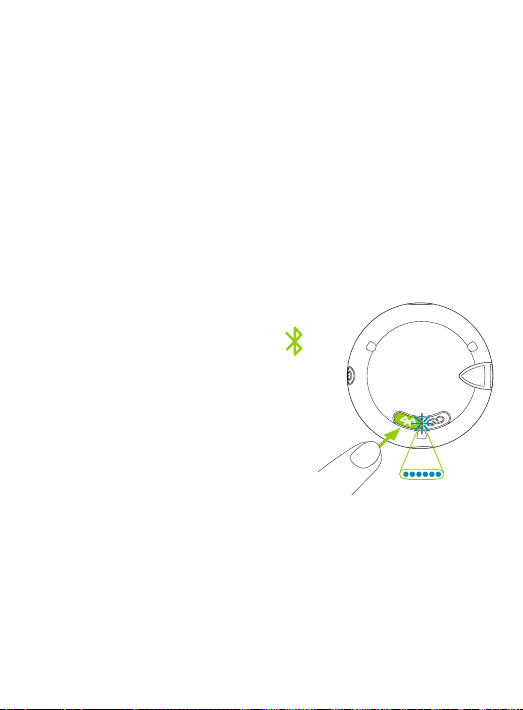
7.2 Pair Roger Select with your phone/computer
1) Turn on your Roger microphone and your
phone/computer. Place them next to each other.
2) Ensure that your phone’s/computer‘s Bluetooth
setting is enabled.
3) On your phone/computer choose SEARCH or SCAN to
search for Bluetooth devices or audio enhancements.
4) To initiate the pairing process
on your Roger microphone,
press the Bluetooth button
for 2 seconds until the back
indicator light starts to blink
blue.
5) Your phone/computer should
present a list of the Bluetooth
devices it has detected. Choose
Roger Select from this list and
conrm that you want to establish a connection.
33
Page 34
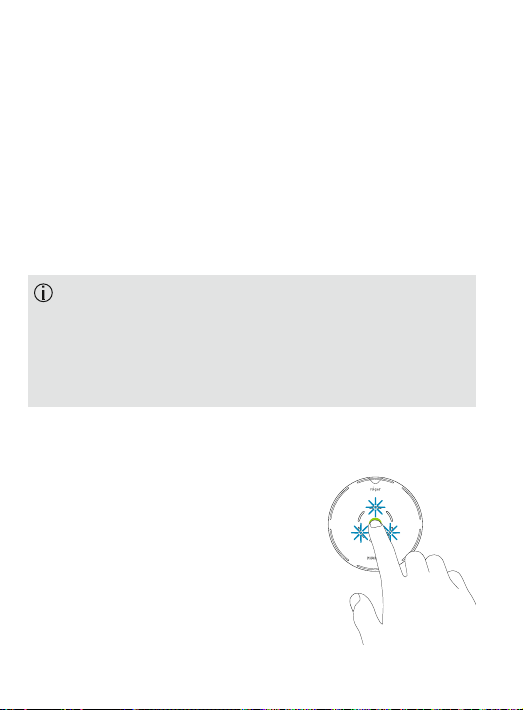
6) Your Roger microphone should now be paired to your
phone/computer and the indicator light will stop
blinking.
7) To add another Bluetooth device, briey press the
Bluetooth button [Bluetooth symbol] until the back
indicator light starts to blink blue again and repeat
step 2 to 6.
Your phone/computer may then ask you to enter
a passcode. If so, enter ‘0000’ (four zeros). Some
phones/computers may ask which Bluetooth service
you want to enable, select Headset audio device and
microphones in parallel.
7.3 Making phone calls
Accepting incoming calls
When you receive a phone call, your
Roger microphone Bluetooth light
indicator will start ashing blue.
To accept an incoming call, press the
center touch key.
34
Page 35
Making phone calls
Use your phone‘s/computer’s keypad to enter the number
or the contact you want to call and press the call button.
You will hear the ringing tone in your hearing
aids shortly afterwards.
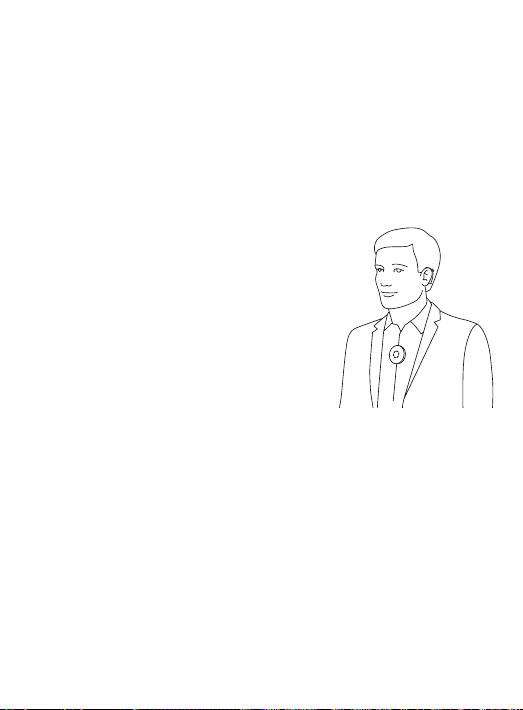
Speaking into your Roger
microphone during the call
For best results it is recommended to
wear your Roger microphone on
your chest during the phone call.
Alternatively, you can place your
Roger microphone on the table in
front of you.
Ending a phone call
To end a call, tap and hold the center touch key or end the
call on your phone device.
35
Page 36

Rejecting a call
If you prefer not to answer an incoming call, tap and hold
the center touch key for 2 seconds until the blue light
stops ashing. Using your phone/computer to reject the
call will have the same eect.
Mute call
To mute your voice, tap the center touch key. The red
mute indicator light will light up.
7.4 Further Bluetooth options
Keeping Roger Select in Bluetooth standby mode
Once you have paired your Roger microphone with a
Bluetooth device, its Bluetooth feature will be enabled.
Now you have two options to switch o your Roger
microphone:
A. Press and hold the on/o button will switch
o your Roger microphone and the Bluetooth feature.
You will not be able to make a phone call. When
you switch on your Roger microphone again,
Bluetooth will also be enabled again.
36
Page 37
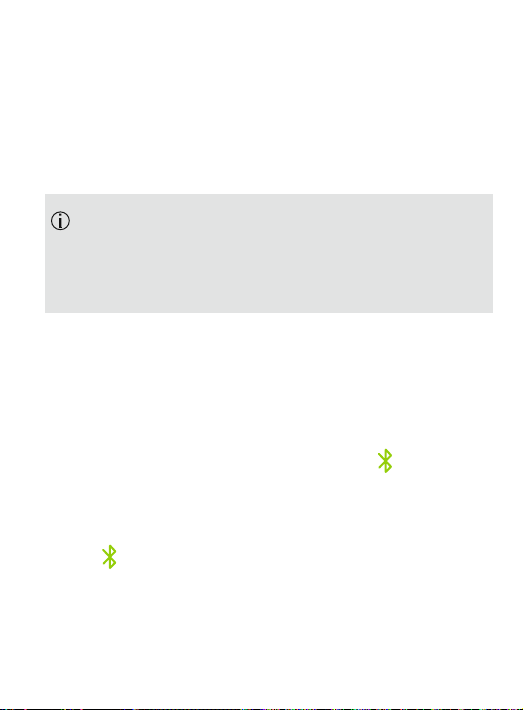
B. Briey pressing the on/o button will put your Roger
microphone into Bluetooth standby mode. This means
your Roger microphone microphone is switched o
but you can still receive an incoming phone call.
In Bluetooth standby mode, the battery of your Roger
microphone is drained. It is recommended to switch
o your Roger microphone completely if you are not
expecting to make phone calls.
Disabling / Enabling Bluetooth
If you are not using your Roger microphone’s Bluetooth
function for a long time, you can disable Bluetooth by
pressing and holding the Bluetooth button for two
seconds until the blue back indicator light fades o.
To re-activate Bluetooth, press and hold the Bluetooth
button for two seconds until the blue back indicator
light fades on.
37
Page 38
8. Additional functions
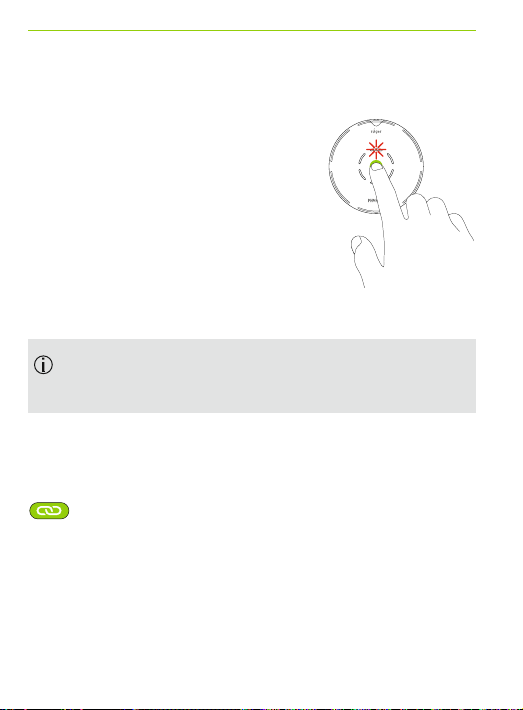
8.1 Mute
To mute the your Roger microphone,
tap the center touch key of the
device once or twice until the center
red indicator light appears.
Tap the center touch key or any of
the six steering touch key to
re-activate Roger Select’s microphone.
When the device is worn by a talker, the mute
function cannot be used.
8.2 Disconnecting Roger devices (NewNet)
To disconnect your Roger microphone from any
connected receivers or other Roger microphones,
hold the Connect button for 7 seconds. The back
indicator light will turn orange when your Roger
microphone has been disconnected from all connected
devices.
38
Page 39

8.3 Reset
If your Roger microphone stops responding to commands,
you can reset it by pressing the on/o and connect
buttons together for 10 seconds.
8.4 Clear list of paired Bluetooth devices
To disconnect your Roger microphone from all paired
Bluetooth devices, press and hold the Connect button
and Bluetooth button for seven seconds. The back
indicator light will turn orange when the list of paired
Bluetooth devices has been cleared.
39
Page 40
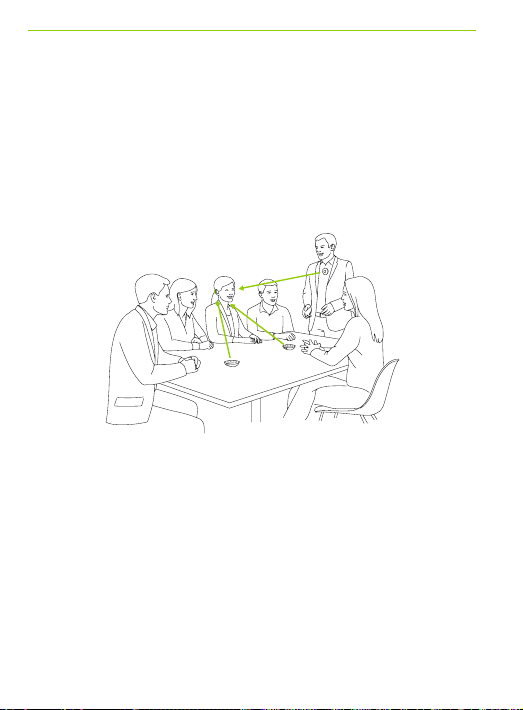
9. Using Roger Select with other
Roger microphones
Roger Select can be combined with other Roger
microphones, e.g. Roger Table Mic II. Using multiple
microphones allows you to hear a bigger group or
multiple distant speakers.
9.1. Connecting with other microphones
To connect another microphone to your Roger Select,
follow these steps:
1) Turn on both microphones.
2) Hold the two microphones close together
(within 10 cm/4 inches).
3) Press the Roger Select’s Connect button.
40
Page 41
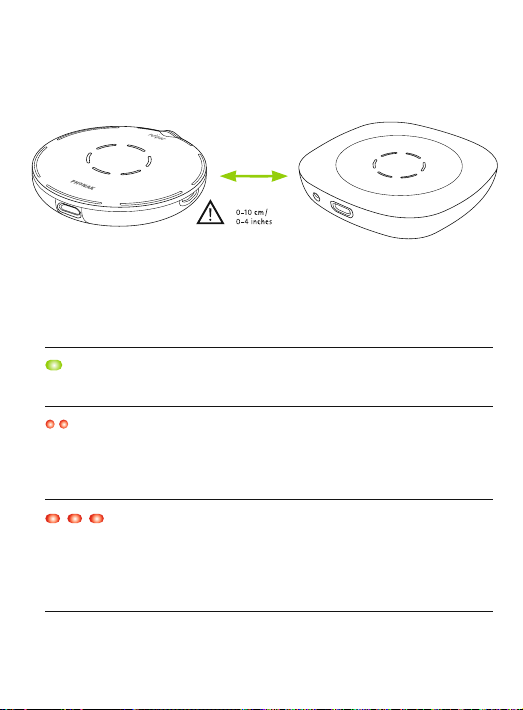
Connect status light
After pressing the Connect button, the following feedback
may be given by the back indicator light:
Connection was successful - the other Roger microphone
is now connected to your Roger Select.
Roger Select could not nd another Roger microphone.
Move Roger Select closer to the other Roger microphone
and make sure both microphones are switched on. Then
try Connect again.
The other Roger microphone is not compatible with your
Roger Select or the other Roger Select’s Bluetooth is still
enabled. Please update the software of your Roger
microphones or disable Bluetooth on the secondary
Roger Select.
41
Page 42

9.2. Using multiple microphones
When Roger Select is used with other microphones, it has
to be worn by a talker on the chest. When you place
Roger Select on the table, it will mute automatically.
Unmuting Roger Select will mute the other microphones
that are connected with the Roger Select. Muting Roger
Select or wearing it on the chest will reactive the other
microphones again.
42
Page 43

10. Troubleshooting
Problem Causes Solutions
I cannot
switch my
Roger
microphone
on
I cannot hear
from my
Roger
microphone
The battery is empty Charge your Roger
Your Roger
microphone is
muted (red LED)
Wrong direction
is selected
Your Roger
receivers are not
connected to your
Roger microphone
Your Roger receiver
is not working
Your hearing aids
are not set to the
correct program
microphone for at least two
hours
Unmute your Roger
microphone by pressing the
center touch key
Tap on the segment that is in
the direction of the talker
Hold your Roger microphone
close to each Roger receiver
or Roger compatible hearing
aid and press the Connect
button
Make sure you have attached
the Roger receiver to your
hearing aid and that it is
powered on
Check that your hearing aids
are set to the correct
program (Roger/FM/DAI/EXT)
43
Page 44

Problem Causes Solutions
I can hear the
talker but I cannot
understand
what he / she says
I keep losing the
audio signal
I hear too much
noise
The microphone
is too far from
the talker
The microphone
openings are covered
by ngers
The microphone
openings are covered
by dirt
Wrong direction
is selected
Distance between you
and your Roger
microphone is too far
There are obstacles
between you and
your Roger
microphone
Noise is picked
up by your Roger
microphone
Move your Roger
microphone closer to
the talker‘s mouth
Hold the microphone
in a way that the
microphone openings
are not covered
Clean the microphone
openings
Tap on the segment
that is in the direction
of the talker
Move closer to your
Roger microphone
Try to be line of sight
to your Roger
microphone or go
closer to your Roger
microphone
Tap the segment in the
direction of the talker
to reduce background
noise
44
Page 45

Problem Causes Solutions
I do not like to
hear my own voice
over my Roger
microphone
The volume of my
multimedia device
is too low
I cannot hear my
multimedia device
My Roger
microphone has
stopped working
and does not react
to any button
presses
My Roger
microphonedoes
not pair with the
cell phone
Your voice is picked
up by your Roger
microphone
Incorrect volume
settings
The audio source
is muted
your Roger
microphone is
switched o
The audio cable is not
plugged correctly
Software issue Reboot your Roger
A code is required to
pair your Roger
microphone
Your phone may not
support your Roger
microphone
Tap the segment in the
direction of the talker
to minimize your own
voice pickup
Increase volume of
your audio source
Unmute the audio
source
Switch on your Roger
microphone
Plug the audio cable
correctly
microphone
by simultaneously
pressing the on/o and
Connect button for
10 seconds
Roger Select pairing
code is ‘0000’ (four
zeros)
Ask your phone
dealer if your phone is
compatible with your
Roger microphone‘s
Bluetooth version
45
Page 46

Problem Causes Solutions
I keep losing the
signal during a
Bluetooth phone call
I receive a call but I
cannot accept the call
on my Roger
microphone
The caller can hear
me but I cannot hear
the caller
Distance between
your Roger
microphone and
your phone/
computer is too
far
The phone’s
Bluetooth is
disabled
Your Roger
microphone‘s
Bluetooth is
disabled
The distance
between your
Roger
microphone and
your phone/
computer is too
far
The call is not
forwarded to
your Roger
microphone
Move your phone/
computer closer to your
Roger microphone
Enable your phone’s/
computer‘s Bluetooth
feature
(see your device’s
user guide
Enable Bluetooth by
pressing the Bluetooth
button for 2 seconds.
Bring your phone/
computer
and your Roger
microphone closer
together
Press the Bluetooth or
headset icon on your
phone/computer to
transfer the phone to
your Roger microphone
46
Page 47

Problem Causes Solutions
The person on the
phone is having
diculty hearing me
your Roger
microphone is too
far from your
mouth
Your Roger
microphone
is muted
Wear your Roger
microphone on your
chest or place it on the
desk in front of you
Tap the center touch
key to unmute your
Roger microphone
47
Page 48

11. Service and warranty
11.1 Local warranty
Please ask the hearing care professional, where you
purchased your devices, about the terms of the local
warranty.
11.2 International warranty
Phonak oers a one year limited international warranty,
valid as of the date of purchase. This limited warranty
covers manufacturing and material defects. The warranty
is valid only if proof of purchase is shown.
The international warranty does not aect any legal
rights that you might have under applicable national
legislation governing sale of consumer goods.
48
Page 49

11.3 Warranty limitation
This warranty does not cover damage from improper
handling or care, exposure to chemicals, immersion in
water or undue stress. Damage caused by third parties
or non-authorized service centers renders the warranty
null and void. This warranty does not cover any services
performed by a hearing care professional in his/her
oce.
Serial number:
Date of purchase:
Authorized hearing care professional
(stamp/signature):
49
Page 50
12. Compliance information
Europe:
Declaration of Conformity
Hereby Phonak Communications AG declares that this
product is in compliance with the Radio Equipment
Directive 2014/53/EU. The full text of the EU Declaration
of Conformity can be obtained from the manufacturer or
the local Phonak representative or at www.phonak.com
Operation frequency: 2400 – 2483.5 MHz
Power level: < 100 mW
Australia/New Zealand:
Indicates a device’s compliance with applicable
Radio Spectrum Management’s (RSM) and
Australian Communications and Media
Authority (ACMA) regulatory arrangements for
the legal sale in New Zealand and Australia.
The compliance label R-NZ is for radio products
supplied in the New Zealand market under
conformity level A1.
50
Page 51

Notice 1:
This device complies with Part 15 of the FCC Rules and
with Industry Canada’s li¬cense exempt RSS standard(s).
Operation is subject to the following two conditions:
1) this device may not cause interference, and
2) this device must accept any in¬terference, including
interference that may cause undesired operation of
the device.
Notice 2:
Changes or modications made to this device not
expressly approved by Phonak Communications AG
may void the FCC authorization to operate this device.
Notice 3:
The device has been tested and found to comply with
the limits for a Class B digital device, pursuant to Part 15
of the FCC Rules and ICES-003 of Industry Canada.
These limits are designed to provide reasonable protection
against harmful interference in a residential installation.
The device generates uses and can radiate radio frequency
energy and, if not installed and used in accordance with
51
Page 52

the instructions, may cause harmful interference to
radio communications. However, there is no guarantee
that interference will not occur in a particular
installation. If the device does cause harmful
interference to radio or television reception, which can
be determined by turning the device o and on, the
user is encouraged to try to correct the interference by
one of the following measures:
– Reorient or relocate the receiving antenna.
– Increase the separation between the device
and receiver.
– Connect the device into an outlet on a
circuit dierent from that to which the receiver is
connected.
– Consult the dealer or an experienced radio/TV
technician for help.
52
Page 53

Notice 4:
Japanese Radio Law Compliance. Business Law
Compliance. This device is granted pursuant to the
Japanese Radio Law (電波法)and the Japanese
Telecommunications Business Law (電気通信事業法)
This device should not be modied (otherwise the granted
designation number will become invalid).
Notice 5:
FCC / Industry Canada RF Radiation Exposure Statement
This device complies with FCC RF radiation exposure limits
set forth for an uncontrolled environment. This
transmitter must not be co-located or operating in
conjunction with any other antenna or transmitter.
53
Page 54
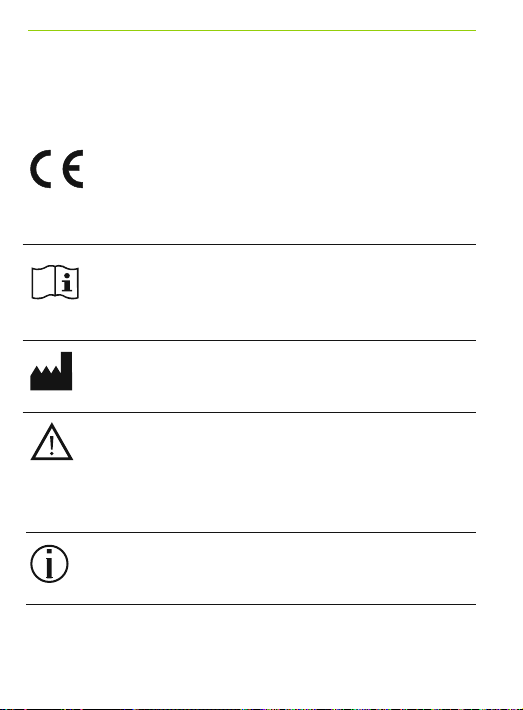
13. Information and explanation
of symbols
The CE symbol is confirmation by
Phonak Communications AG that this
product is in compliance with the Radio
Equipment Directive 2014/53/EU.
This symbol indicates that it is important
for the user to read and take into account
the relevant information in this user guide.
Indicates the device manufacturer.
This symbol indicates that it is
important for the user to pay attention to
the relevant warning notices in this user
guide.
Important information for handling
and product safety.
54
Page 55
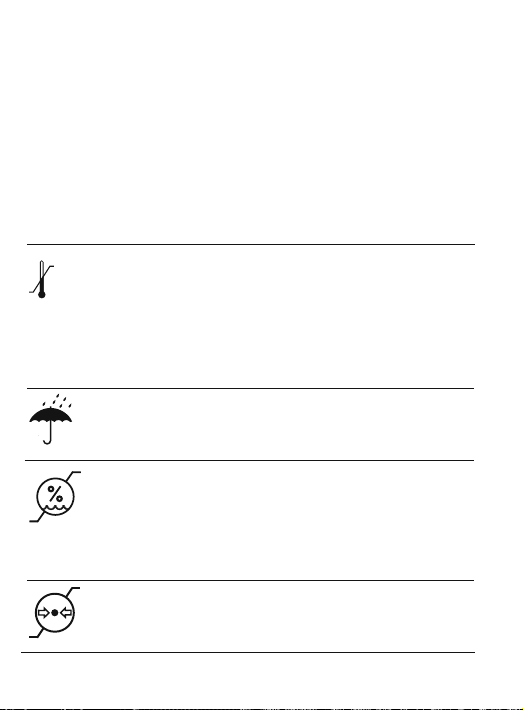
Operating
conditions
The device is designed such that it
functions without problems or
restrictions if used as intended, unless
otherwise noted in this user guide.
Temperature transport and storage:
–20° to +60° Celsius (–4° to +140°
Fahrenheit). Temperature operation:
0° to +40° Celsius
(+32° to +104° Fahrenheit).
Keep dry.
Humidity during transportation and
storage: <90% (non-condensing).
Humidity operation: <90%
(non-condensing).
Atmospheric pressure:200 hPa to
1500 hPa.
55
Page 56
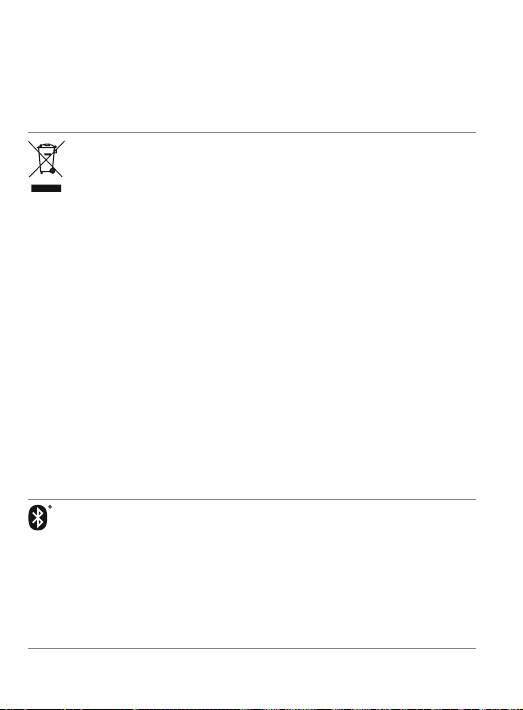
This symbol on the product or its
packaging means that it should not be
disposed of with your other household
waste. it is your responsibility to dispose
of your waste equipment separately
from the municipal waste stream. The
correct disposal of your old appliance
will help prevent potential negative
consequences for the environment and
human health. This product has an
embedded, nonreplaceable battery. Do not
attempt to open the product or remove the
battery as this may cause injury and damage
the product. Please contact the local
recycling facility for removal of the battery.
The Bluetooth® word mark and logos are
registered trademarks owned by Bluetooth
SIG, Inc. and any use of such marks by
Phonak Communication AG is under license.
Other trademarks and trade names are
those of their respective owners.
56
Page 57

14. Important safety information
Please read the information on the following pages before
using your device.
14.1 Hazard warnings
This device is not for children below 36 months.
It contains small parts that can cause choking,
if swallowed by children. Keep out of reach of
children and mentally challenged people or pets.
If swallowed, consult a physician or hospital
immediately.
The device may generate magnetic elds. If any
inuence of the Roger Select on the Implantable
Device (e.g. pacemakers, debrillators, etc.) is
experienced, stop using the Roger Select and contact
your doctor and /or the manufacturer of the
Implantable device for advice.
57
Page 58

Use only hearing aids that have been specially
programmed for you by your hearing care
professional.
Dispose of electrical components in accordance with
your local regulations.
Changes or modications to any of the devices
that were not explicitly approved by Phonak
Communication AG are not permitted.
Only use accessories approved by
Phonak Communication AG.
For safety reasons, only use chargers supplied by
Phonak Commnications AG or stabilized chargers with
a rating of 5 VDC, min. 500 mA.
Do not use the device in explosive areas
(mines or industrial areas with danger of explosions,
oxygen rich environments or areas where ammable
anesthetics are handled) or where electronic
equipment is prohibited.
58
Page 59

Opening the device might damage it. If problems
occur which cannot be resolved by following the
remedy guidelines in the troubleshooting section of
this user guide, consult your hearing care professional.
When operating machinery, ensure that no parts of
your device can get caught in the machine.
Do not charge device while it is on your body.
59
Page 60

14.2 Product safety information
Protect the device connectors, plugs, power supply
from dirt and debris.
Do not use excessive force when connecting your
device to its dierent cables.
Protect the device from excessive moisture (bathing
or swimming areas) and heat sources (radiator).
Protect the device from excessive shock and
vibration.
Clean the device using a damp cloth. Never use
household cleaning products (washing powder,
soap, etc.) or alcohol to clean them. Never use a
microwave or other heating devices to dry the device.
X-ray radiation, CT or MRI scans may destroy or
adversely aect the correct functioning of the
device.
60
Page 61

If the device has been dropped or damaged, if it
overheats, has a damaged cord or plug, or has been
dropped into liquid, stop using your device and
contact authorized service centre.
14.3 Other important information
Protect your eyes of the optical light from the optical
Toslink cable when plugged into the device or TV.
High-powered electronic equipment, larger electronic
installations and metallic structures may impair and
signicantly reduce the operating range.
Device collects and stores internal technical data.
This data may be read by a hearing care professional
in order to check the device, as well as to help you use
your device correctly.
The digital signal sent from the device to a connected
receiver cannot be overheard by other devices which
are not in the microphone’s network.
61
Page 62

Notes
Page 63

Page 64

Phonak Communications AG
Länggasse 17
CH-3280 Murten
Switzerland
www.phonak.com
029-0550-02/V1.00/2017-11/na © 2017 Sonova AG All rights reserved
 Loading...