


MOD. ECOGENIC
|
|
Robot Aspirador |
INSTRUCCIONES DE USO |
Robot Vacuum |
INSTRUCTIONS FOR USE |
Robot Aspirateur |
MODE D’EMPLOI |
Staubsaugerroboters |
GEBRAUCHSANLEITUNG |
Robô Aspirador |
INSTRUÇÕES DE USO |
Robot Aspirapolvere |
ISTRUZIONI PER L’USO |
Stofzuigerrobot |
GEBRUIKSAANWIJZING |
Robotického Vysava |
NÁVOD K POUZITÍ |
Robota Odkurzacz |
INSTRUKCJA OBS UGI |
Robotického Vysáva a |
NÁVOD NA POUŽITIE |
Robot Porszívó |
HASZNÁLATI UTASÍTÁS |
Robot |
|
Robot Usisava |
UPUTE ZA UPOTREBU |
Aspiratorului Robot |
INSTRUC IUNI DE UTILIZARE |
Solac is a registered Trade Mark |
11/10 |

5-16 |
• |
ESPAÑOL |
es |
17-25 |
• |
ENGLISH |
en |
26-35 |
• |
FRANÇAIS |
fr |
36-46 |
• |
DEUTSCH |
de |
47-57 |
• |
PORTUGUÊS |
pt |
58-67 |
• |
ITALIANO |
it |
68-77 |
• |
NEDERLANDS |
nl |
78-86 |
• |
ESKY |
cs |
87-96 |
• |
POLSKI |
pl |
97-105 |
• |
SLOVEN INA |
sk |
106-115 |
• |
MAGYAR |
hu |
116-126 |
• |
! " |
bg |
127-135 |
• |
HRVATSKA |
hr |
136-145 |
• |
ROMÂN# |
ro |


. ESPAÑOL
INDICACIONES DE SEGURIDAD
•Lea completamente estas instrucciones antes de utilizar su aparato.
•Este manual es parte integrante del producto. Consérvelo en un lugar seguro para futuras consultas.
•Este aparato es sólo para uso doméstico, no industrial. Cualquier uso diferente al indicado podría ser peligroso (por ejemplo, aspiración de líquidos, polvo de obra, cemento, etc).
•Los niños deberían ser supervisados para asegurar que no juegan con el aparato.
•Este aparato no está destinado para ser utilizado por personas (incluidos niños) cuyas
capacidades físicas, sensoriales o mentales estén reducidas, o carezcan de experiencia o conocimiento, salvo si han tenido supervisión o instrucciones relativas al es uso del aparato por una persona responsable de su seguridad.
•No realice ninguna modificación ni reparación en el aparato. Ante cualquier anomalía en el cable u otra parte del aparato, no lo use y acuda a un servicio de asistencia autorizado.
•No utilice piezas o accesorios no suministrados o recomendados por SOLAC.
•Antes de enchufar el aparato a la red eléctrica, compruebe que el voltaje indicado coincide con el de su hogar.
•Desenchufe y apague el aparato antes de desmontar o montar piezas y realizar cualquier tarea de mantenimiento o limpieza. Desenchúfelo también en caso de apagón.
•No cuelgue el aparato por el cable. Desenchufe el aparato tirando siempre de la clavija, nunca del cable.
•Evite que el cable de alimentación entre en contacto con aristas cortantes o superficies calientes. No deje el cable colgando por el borde de la mesa o encimera, para evitar que los niños tiren de él y hagan caer el aparato.
dNo sumerja nunca el aparato en agua u otro líquido, ni lo introduzca en el lavavajillas.
•No toque el aparato con las manos húmedas cuando esté en funcionamiento.
•Mantenga su robot aspirador alejado de focos de calor.
•No utilice nunca el robot aspirador sin el depósito de suciedad o el filtro de protección correctamente colocado.
•Mantenga siempre despejado el módulo de aspiración.
•Mantenga el pelo, ropa, dedos o cualquier otra parte del cuerpo alejada del módulo de aspiración, de los rodillos y de las ruedas.
•No utilice el aspirador para limpiar animales.
•No utilice el aparato en espacios cerrados donde se acumulen vapores explosivos o tóxicos.
•No use el aparato nunca sobre superficies mojadas ni en el exterior.
•Cada cierto tiempo compruebe el estado del adaptador, cable y conexión.
•Evite posibles salpicaduras en la base de carga, en el adaptador o el cable de conexión.
•No utilice la base de carga ni el adaptador cerca de bañeras, lavabos, duchas u otros recipientes que contengan agua, mientras están siendo utilizados.
•Utilice únicamente el adaptador suministrado.
INDICACIONES DE SEGURIDAD |
7 |

•No toque el adaptador ni la base de carga con las manos húmedas cuando esté enchufado.
•Nunca deje el adaptador o base de carga funcionando sobre una superficie o trapo húmedo.
•No se siente sobre el aparato ni se ponga delante de él, podría causar daños materiales en el aparato.
•Compruebe que en el suelo no hay hilos, cables u otros objetos de longitud mayor de 150mm, ya que podrían engancharse los rodillos.
q¡¡ATENCION!!: Cuando desee desprenderse del aparato, NUNCA lo deposite en la basura, sino que acuda al PUNTO LIMPIO o de recogida de residuos más cercano a su domicilio, para su posterior tratamiento. De esta manera, esta contribuyendo al cuidado del medio ambiente.
COMPONENTES PRINCIPALES
1 |
Cuerpo principal |
16 |
Sensor infrarrojos |
2 |
Control remoto |
17 |
Asa |
3 |
Base de carga automática |
18 |
Parachoques frontal |
4 |
Aislador de espacios |
19 |
Conector adaptador batería |
5 |
Adaptador |
20 |
Interruptor de funcionamiento |
6 |
Cepillo de limpieza |
21 |
Panel pulsadores de control |
7 |
Filtro (dos unidades) |
22 |
Rodillo de goma |
8 |
Cepillo lateral (dos unidades) |
23 |
Rodillo central |
9 |
Mopa |
24 |
Ruedas laterales |
10 |
Accesorio mopa |
25 |
Sensores antichoque |
11 |
Deposito suciedad |
26 |
Conectores de contacto a |
12 |
Pulsador desbloqueo depósito suciedad |
|
base de carga |
13 |
Pulsador desbloqueo módulo aspiración |
27 |
Sensores detector escalera |
14 |
Pestaña filtro |
28 |
Rueda delantera |
15 |
Módulo aspiración |
29 |
Lámpara UV |
PREPARACIÓN DEL APARATO. RECARGA DEL ROBOT DE ASPIRACIÓN
Utilice sólo el adaptador y la base de carga suministrado, no emplee ningún otro.
El tiempo de carga es de aproximadamente 5 horas para 60/90 min de autonomía. Para la primera carga, cargue la batería durante toda la noche.
COMPONENTES PRINCIPALES DE LA BASE DE CARGA (A)
1A LED decorativo
2A Interruptor LED decorativo
3A Señal de transmisión
4A LED de encendido
5A Indicador de carga
6A Conectores de contacto
7A Conector adaptador
CARGA MEDIANTE BASE DE CARGA (Fig. 1)
No sitúe ningún objeto y evite que haya obstáculos o muebles alrededor de la base de carga (Vea distancias recomendadas en la figura).
El robot no encontrará la base de carga en caso de que haya obstáculos. Coloque la base de carga en un área despejada.
8 |
COMPONENTES PRINCIPALES |


Recomendaciones para alargar la vida de las baterías
•No deje el adaptador conectado durante largos períodos de tiempo. Desconéctelo cuando finalice la recarga.
•No almacene ni recargue el aparato cerca de radiadores u otras fuentes de calor, o expuesto a la luz solar directa.
•No recargue el aparato en lugares sucios o húmedos, y procure que la temperatura ambiente esté comprendida entre 15ºC y 35ºC.
•Cada pocos meses, descargue las baterías por completo y a continuación recárguelas. Para descargarlas, haga funcionar el aparato sin cable hasta que se detenga y con la base de carga desconectada. A continuación recargue las baterías como se explica más atrás.
•Para almacenar el aparato durante un largo periodo de tiempo, se recomienda cargar la batería completamente y posteriormente retirarla para almacenarla en un lugar fresco y seco.
UTILIZACIÓN DEL APARATO
No aspire nunca ceniza encendida, astillas u objetos puntiagudos ni líquidos.
No aspire cerillas encendidas ni colillas. Tampoco aspire materiales tóxicos (amoniaco...).
Retire completamente todos los elementos que sirvieron para su transporte y embalaje.
No utilice el robot aspirador entre mesas pequeñas, sillas o espacios muy pequeños,podría dañar el aparato.
PANEL DE CONTROL DEL ROBOT ASPIRADOR
Puesta en marcha/Parada del robot aspirador
Pulsador carga:
Se ilumina al pulsarlo, se apaga cuando el robot se conecta con la base de carga.
Indicador de carga:
Durante la carga parpadea, una vez finalizada la carga se ilumina de forma permanente
Lámpara Ultravioleta:
Se ilumina al pulsarlo, la lámpara de desinfección actuará mientras el robot esté en funcionamiento.
10 |
UTILIZACIÓN DEL APARATO |
1Retire del suelo todos los objetos que podrían romperse o dañar el robot aspirador (lámparas, botellas..).
2Compruebe que el depósito de suciedad (11) está correctamente colocado. Vea el apartado (“LIMPIEZA Y CONSERVACIÓN”).
3Coloque el aislador de espacios (4) donde desee para evitar el paso del robot por una zona concreta. Vea el apartado (“AISLADOR DE ESPACIOS”).
4Ponga en funcionamiento el robot aspirador. Para ello coloque el interruptor de funcionamiento (20) en la posición ON.
5 Asegúrese de que el robot de limpieza está cargado.
Si el LED indicador de carga del panel de control del robot  parpadea ponga a cargar el robot aspirador. Vea el apartado (“PREPARACIÓN DEL APARATO. RECARGA DEL ROBOT DE ASPIRACIÓN”).
6 |
Si desea utilizar el robot aspirador en modo automático programe su funcionamiento |
|
|
|
mediante el control remoto. Vea el apartado (“CONTROL REMOTO”). |
|
|
|
es |
||
7 |
Pulse el pulsador |
del panel del robot. |
|
El robot aspirador comenzará a trabajar según sus patrones de limpieza.
Si lo desea, controle sus movimientos o funciones mediante los botones del control remoto, vea el apartado (“CONTROL REMOTO”) o mediante los pulsadores de control en el panel del cuerpo del robot aspirador.
Si desea una esterilización del área frente, presione la tecla UV.
Esta función está especialmente indicada para personas alérgicas o para los hogares donde viven mascotas, puesto que esteriliza el suelo de virus y bacterias.
8 Pulse nuevamente el pulsador |
para hacer una parada temporal en el proceso de |
limpieza. |
|
9Si no desea una limpieza semanal programada apague el aparato tras la limpieza.
Para ello, coloque el interruptor de funcionamiento (20) en la posición OFF o pulse el botón encendido/apagado  del control remoto.
10 Desconecte la base de carga de la red.
AISLADOR DE ESPACIOS
COMPONENTES PRINCIPALES (B)
1B Interruptor Encendido & Longitud de aislador de espacios
 Apagado
 Alcance bajo = 4 m
 Alcance medio = 6 m
  Alcance alto = 8 m
2B LED de encendido
3B Cabezal de transmisión de proximidad
4B Cabezal de transmisión del aislador de espacios
5B Tapa de compartimiento de baterías
6B Desbloqueo tapa de baterías
FUNCIONAMIENTO
Coloque el aislador de espacios al mismo nivel en la superficie donde vaya a utilizar el robot aspirador.
Coloque el aislador de espacios y la base de carga a una distancia mayor a 3m, de lo contrario podría haber interferencia.
No coloque la base de carga dentro del alcance de la señal del aislador de espacios.
AISLADOR DE ESPACIOS |
11 |

El cabezal de transmisión de proximidad (3B) evita el impacto entre el robot de aspiración y el aislador de espacios, impidiendo que se acerque a una distancia inferior a 0,5-1m de distancia.
1 Asegúrese de que las baterías no están descargadas.
2Coloque el aislador de espacios delimitando la zona en la que no desee que entre. (fig. 3).
3Retire los objetos que se encuentren frente al aislador de espacios para evitar un mal funcionamiento.
4 Elija la longitud del aislador de espacios deseada. Para ello, desplace el interruptor (B) escogiendo alcance bajo  , medio
  o alto
  .
.
Utilice la longitud de aislador adecuada, la duración de la batería depende de la distancia de transmisión seleccionada.
El LED de encendido (2B) parpadeará cada 8 segundos hasta que se agote la batería.
5 Compruebe que el robot aspirador no puede atravesar la frontera creada por el aislador de espacios.
6 Coloque el interruptor (B) en la posición de apagado  cuando no sea necesaria el aislador de espacios.
Se pueden producir algunas diferencias en la dirección de la señal de infrarrojos del aislador de espacios y la distancia de recepción del robot, debido al movimiento del robot durante su uso. Este diferencia puede variar dependiendo del entorno de trabajo y del nivel de carga del robot y del aislador de espacios.
CONTROL REMOTO
COMPONENTES (C)
1 |
Encendido/apagado robot aspirador |
5 Display (fig. 4) |
||||
|
|
|
2 |
Botones dirección |
a |
Icono “transmitiendo señal” |
|
||||||
|
|
|||||
|
3 |
Botón de confirmación |
b |
Días de la semana |
||
|
||||||
4 |
Teclas control |
c |
Día actual de la semana |
|||
|
|
|
|
Puesta en marcha /domingo |
d |
Hora |
|
|
|
|
Parada provisional /lunes |
e |
Icono error |
|
|
|
|
f |
Icono funciones |
|
|
|
|
|
|
||
Configuración hora /martes
Carga /miércoles
Programación /jueves
Limpieza rápida /viernes
Limpieza tras carga /sábado
Limpieza lenta /todos los días
PROGRAMACIÓN
Sincronización del control remoto y el robot aspirador (fig. 5)
Sincronice el control remoto y el robot aspirador antes del primer uso y después de tareas de mantenimiento. Para ello:
1 Compruebe que el robot aspirador y el control remoto tienen suficiente batería.
2Apague el robot aspirador. Para ello coloque el interruptor de funcionamiento (20) en la posición OFF.
12 |
CONTROL REMOTO |

3 Presione el botón |
durante más de 4 segundos. Vuelva a colocar el interruptor de |
|
funcionamiento (20) en la posición ON sin soltar el botón |
. |
|
Cuando la sincronización se haya llevado a cabo correctamente el robot emitirá dos pitidos.
Configuración fecha y hora (fig. 6)
Es necesario memorizar la hora y el día de la semana actual para que el robot comience a trabajar en el momento esperado.
1 Pulse el botón  . Se accede al ajuste del día de la semana.
2Pulse el botón del día correspondiente al día de la semana actual (SU= domingo, MO= lunes, TU= martes, WE= miércoles, TH= jueves, FR= viernes, SA= sábado).
3 |
Pulse las flechas |
|
|
para moverse por los campos “hora” y “minutos”. |
|
|||
|
|
|
||||||
|
|
|
||||||
|
Pulse la flechas |
|
|
para seleccionar la hora y los minutos actuales. |
|
|||
|
|
|
|
|||||
4 |
Pulse |
para confirmar la selección. |
|
|||||
es |
||||||||
Pulse |
si desea cancelar la configuración. |
|||||||
|
||||||||
Programación limpieza semanal automática (fig. 7)
Con el robot aspirador apagado.
1 Pulse el botón  del control remoto.
2Pulse el botón del día correspondiente al día de la semana que desea programar. Seleccione uno, varios o todos los días de la semana. Los días seleccionados parpadean.
3Pulse las flechas  para programar la hora exacta de limpieza. Pulse la flechas “arriba” y “abajo” para seleccionar la hora y minutos.
4 Pulse |
para confirmar la selección. |
Pulse el botón encendido/apagado  si desea cancelar la configuración.
Para que el robot aspirador se ponga en funcionamiento en el momento esperado este
debe estar encendido. El interruptor de funcionamiento (20) en la posición ON y  iluminado.
FUNCIONES ADICIONALES
Función FULL GO
Seleccionando esta función el robot aspirador quedará programado para continuar limpiando una vez se haya cargado completamente.
1 Presione el botón |
. El robot aspirador debe estar encendido. |
Se iluminará FULL GO en el display del control remoto. El robot aspirador buscará la base de carga antes de que se termine la batería y comenzará a limpiar automáticamente cuando se haya cargado completamente.
Función VELOCIDAD
1 |
Presione el botón |
para elegir limpieza rápida. |
Se iluminará FAST en el display del control remoto. |
||
2 |
Presione el botón |
para elegir limpieza lenta. |
Se iluminará SLOW en el display del control remoto.
CÓDIGOS DE ERROR
Si el robot no funciona correctamente debido a una de las siguientes circunstancias, todos los pulsadores del panel de control del robot parpadearan simultáneamente.
CONTROL REMOTO |
13 |

1 |
Pulse el botón |
del control remoto. Asegúrese de que la señal del control remoto |
||
|
está en el campo de acción del aparato. |
|
||
En la pantalla del control remoto aparecerá el icono de error |
junto a uno de los |
|||
|
código de error descritos a continuación. |
|
||
2 Lleve a cabo las acciones descritas a continuación según el error mostrado. |
||||
CÓDIGO CAUSA DEL FALLO |
RESOLUCIÓN |
|
||
ERROR |
|
|
|
|
E01 |
Sensores detector escalera Limpie los sensores (27) |
|
||
E02 |
Rodillo central |
|
Retire la suciedad y el pelo atrapado en el rodillo (23) |
|
E03 |
Batería baja |
|
Cargue la batería |
|
E04 |
Ruedas laterales |
Retire la suciedad y el pelo atrapado en las ruedas |
||
E05 |
Depósito de suciedad |
Coloque correctamente el depósito de suciedad (11) |
||
Si el fallo persiste después de hacer estas comprobaciones, no lo use y acuda a un servicio de asistencia autorizado. No realice ninguna modificación ni reparación en el aparato.
LIMPIEZA Y CONSERVACIÓN
Antes de cualquier operación de mantenimiento o limpieza del aparato asegúrese de que el interruptor de funcionamiento (20) se encuentra en la posición OFF y de que no se encuentra conectado a la red.
Asegúrese de que los elementos lavados están completamente secos antes de montarlos.
No sumerja nunca el módulo de aspiración (15) en agua u otro líquido, ni lo introduzca en el lavavajillas. No utilice productos abrasivos ni disolventes.
Para una mayor eficacia del robot aspirador se aconseja vaciar el depósito de suciedad y limpiar el filtro cada 3 usos.
VACIADO DEL DEPÓSITO DE SUCIEDAD (11)
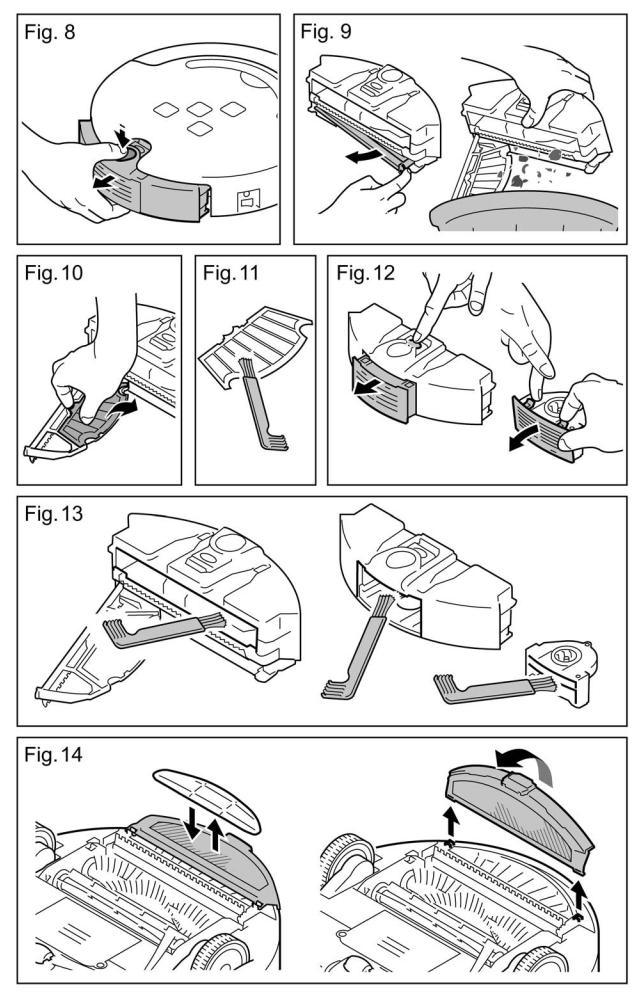
1Mantenga pulsado el pulsador de desbloqueo (12). Extraiga el depósito de suciedad (11). (fig. 8)
2Coloque el depósito sobre el cubo de la basura, abra el soporte del filtro tirando de la pestaña (14) y vacíe su contenido sobre el cubo de la basura. (fig. 9)
LIMPIEZA Y SUSTITUCIÓN DEL FILTRO (7)
Se recomienda revisar el filtro periódicamente para comprobar su correcto funcionamiento.
Lleve a cabo una limpieza del filtro si detecta una disminución en la capacidad de succión del aparato.
Una o dos veces al año, dependiendo de la intensidad de uso del aparato, es recomendable sustituir el filtro.
1Extraiga el depósito de suciedad tal y como se muestra en “VACIADO DEL DEPÓSITO DE SUCIEDAD (11)”
2Separe el filtro (7). Presione el soporte semicircular con una mano para sacar el filtro usado del soporte. (fig. 10)
3Sacuda suavemente el filtro de salida contra la pared del cubo de basura para desprender el exceso de suciedad y polvo.
14 |
LIMPIEZA Y CONSERVACIÓN |

No utilice nunca el robot aspirador sin el filtro (7).
4 Limpie el filtro con el cepillo de limpieza (6) (fig. 11).
5 Vuelva a colocar en su alojamiento el filtro limpio o si fuera necesario un nuevo filtro.
LIMPIEZA DEL DEPÓSITO DE SUCIEDAD (11)
1 Presione el pulsador (13). El módulo de aspiración (15) queda liberado (fig. 12). 2 Dé la vuelta al módulo de aspiración, libere las dos pestañas y extraiga la tapa. 3 Limpie el interior del depósito con el cepillo de limpieza (6) (fig. 13).
4 Limpie el módulo de aspiración (15) y el dispositivo de admisión y expulsión de aire con el cepillo de limpieza (fig. 13).
No limpie el módulo de aspiración con agua.
5Coloque el depósito de suciedad en el cuerpo del aparato. Empuje el depósito hacia el cuerpo hasta que escuche un clic indicador de que el depósito ha quedado correctamente fijado al cuerpo.
es
LIMPIEZA Y SUSTITUCIÓN DE LA MOPA (9)
No utilice la mopa sobre alfombras, moquetas o suelos que no estén completamente lisos.
1En estos casos retire el soporte mopa (10). Gire el soporte mopa y desacople las pestañas derecha e izquierda (fig. 14).
2 Para sustituir la mopa (9) tire de ella y coloque una nueva en su lugar (fig.14).
DESMONTAJE Y LIMPIEZA DE LOS CEPILLOS
Para una mayor eficacia del robot aspirador se aconseja limpiar los rodillos y cepillos cada 3 usos.
Rodillos (22) y (23)
1 |
Desplace la pestaña hacia atrás y levante la palanca de sujeción (fig.15). |
Los rodillos quedan liberados. |
|
2 |
Extraiga los rodillos (22) y (23). |
3 |
Limpie los rodillos con el cepillo de limpieza (6) (fig.16). |
4Coloque de nuevo los rodillos y coloque la palanca de sujeción, presionando hasta que oiga un clic indicador de que se ha fijado correctamente.
Cepillo lateral (8)
Limpie el cepillo lateral con regularidad para evitar el mal funcionamiento del robot aspirador.
1 Retire con las manos el pelo y polvo que haya quedado atrapado en el cepillo lateral. 2 Si la suciedad se hubiera quedado muy enredada en el cepillo córtela con una tijera.
Si fuera necesario desenrosque el tornillo y extraiga el cepillo lateral (8) del cuerpo para una limpieza más eficaz (fig.17).
3 Vuelva a colocar el cepillo lateral en su alojamiento.
DESMONTAJE Y LIMPIEZA DE LAS RUEDAS
Ruedas Laterales
1 Desenrosque los dos tornillos de la ruedas (fig.18). 2 Extraiga las ruedas de su alojamiento y límpielas.
No limpie las ruedas con agua, aceite o grasa.
LIMPIEZA Y CONSERVACIÓN |
15 |

Coloque de nuevo las ruedas en su alojamiento y enrosque los tornillos con ayuda de un destornillador.
Rueda frontal
En caso de que la rueda frontal se haya quedado atascada o no gire libremente, extraígala para su limpieza (fig.18).
1 Tire de la rueda con ayuda de alguna herramienta que haga palanca.
2 Para volver a colocarla tras su limpieza, presione la rueda en su alojamiento.
LIMPIEZA DE LOS SENSORES ANTICHOQUE (25) Y SENSORES DE ESCALERA (27)
Mantenga los infrarrojos limpios para que el robot aspirador pueda funcionar correctamente.
1 Limpie los sensores con un algodón o un paño suave (fig.19).
LIMPIEZA DEL APARATO
Asegúrese de que no entra agua en el interior del aparato.
Limpie el aparato antes del primer uso, inmediatamente después de cada uso y tras un largo periodo de tiempo sin usar. Así asegurará un correcto funcionamiento del mismo y prolongará su vida útil.
1Limpie el exterior del aparato con un paño húmedo. No utilice productos abrasivos ni disolventes.
SUSTITUCIÓN DE LAS BATERÍAS
SUSTITUCIÓN DE LAS BATERÍAS DEL AISLADOR DE ESPACIOS (Fig. 20)
1 Gire el desbloqueo de la tapa de baterías (6B) hasta que se libere la tapa (5B).
2 Coloque las baterías en el compartimiento destinado a tal fin. Compruebe que los electrodos positivos y negativos se encuentran en correcto estado.
Extraiga las baterías sino se va a utilizar el aspirador durante un largo periodo de tiempo.
SUSTITUCIÓN DE LAS BATERÍAS DEL CONTROL REMOTO (Fig. 21)
1 Abra la tapa del compartimento de baterías.
2 Coloque las baterías en el compartimiento destinado a tal fin. Compruebe que los electrodos positivos y negativos se encuentran en correcto estado.
Extraiga las baterías sino se va a utilizar el aspirador durante un largo periodo de tiempo.
16 |
SUSTITUCIÓN DE LAS BATERÍAS |

. ENGLISH
SAFETY INDICATIONS
•Read these instructions carefully before using the appliance.
•This manual is an integral part of the product. Keep it in a safe place for future reference.
•This appliance is exclusively for household use and not for industrial use. It is dangerous to use it for any purpose other than the one indicated (e.g. vacuuming liquids, dust from construction work, cement, etc.)
•Children must be supervised to ensure they do not play with the appliance.
•This appliance is not to be used by persons (or children) whose physical, sensorial or mental capacities are impaired, or who have no experience or knowledge, unless supervised or instructed in the use of the appliance by a person responsible for their safety.
•Do not make any modifications or repairs to the appliance. In the event of any anomaly
in the cord or any other part of the appliance, do not use it and take it to an authorised en service centre.
•Do not use any parts or accessories not supplied or recommended by SOLAC.
•Before plugging the appliance into the mains, check that the indicated voltage is the same as in your home.
•Turn off and unplug the appliance before dismantling or assembling parts and prior to any maintenance or cleaning operation. Also unplug it in the case of a power cut.
•Do not use the cord to hang up the appliance. Always unplug the appliance by pulling on the plug, and not the cord.
•Make sure the cord does not come into contact with sharp edges or hot surfaces. Do not leave the cord hanging over the edge of a table or worktop, to prevent children from pulling it and causing the appliance to fall.
d Never immerse the appliance in water or any other liquid, and do not put it in the dishwasher.
• Never handle the vacuum cleaner or the plug with wet hands.
•Keep your robot vacuum cleaner away from heat.
•Never use the robot vacuum cleaner without the dustbin or the protective filter adequately fitted.
•Always keep the vacuum module clear.
•Keep hair, clothes, fingers and any other body areas away from the vacuum module, rollers and wheels.
•Do not use the vacuum cleaner to clean animals.
•Do not use the appliance in confined spaces where explosive or toxic vapours can build up.
•Do not use the appliance on wet surfaces or outdoors.
•Check the condition of the power cord, mains adaptor and connection at regular intervals.
•Avoid splashing the charging station, adaptor or power cord.
•Do not use the charging station or adaptor near a bathtub, wash basin, shower or anything else containing water while in use.
•Only use the adaptor supplied.
•Do not touch the adaptor or charging station with wet hands when it is plugged into the mains.
•Never leave the appliance or charging station on a wet surface or cloth when switched on.
SAFETY INDICATIONS |
17 |

•Do not sit on the appliance or stand in front of it, as this could cause material damage to the appliance.
•Make sure that there are no wires, cables or other objects longer than 150 mm on the floor, as they could entangle the rollers.
qCAUTION! When you want to dispose of the appliance, NEVER throw it in the rubbish bin. Take it to the CLEAN POINT or waste collection centre closest to your home for processing. You will thus be helping to take care of the environment.
MAIN COMPONENTS
1 |
Main body |
16 |
Infrared sensor |
2 |
Remote control |
17 |
Handle |
3 |
Automatic charging station |
18 |
Front bumper |
4 |
Virtual barrier |
19 |
Battery adaptor connector |
5 |
Adaptor |
20 |
Operating switch |
6 |
Cleaning brush |
21 |
Control button panel |
7 |
Filter (two units) |
22 |
Rubber roller |
8 |
Side brush (two units) |
23 |
Central roller |
9 |
Mop |
24 |
Side wheels |
10 |
Mop accessory |
25 |
Collision sensors |
11 |
Dustbin |
26 |
Charging station contact |
12 |
Dustbin release button |
|
connectors |
13 |
Vacuum module release button |
27 |
Stair detector sensors |
14 |
Filter tab |
28 |
Front wheel |
15 |
Vacuum module |
29 |
UV lamp |
PREPARING THE APPLIANCE CHARGING THE ROBOT VACUUM
Only use the adaptor and charging station supplied. Do not use any others.
The charging time is approximately 5 hours for 60-90 min of operation. The first time you charge the battery, leave it to charge overnight.
MAIN COMPONENTS OF CHARGING STATION (A)
1A |
Decorative LED |
5A |
Charge indicator |
2A |
Decorative LED switch |
6A |
Contact connectors |
3A |
Transmission signal |
7A |
Adaptor connector |
4A |
LED ON light |
|
|
CHARGING USING THE CHARGING STATION (Fig. 1)
Do not place any objects near the charging station and ensure that the surrounding area is free from items of furniture or obstacles (see recommended distances in the diagram).
The robot will not find the charging station if there are obstacles. Place the charging station in a clear, unobstructed area.
The robot will not find the charging station if the infrared signal transmitter (3A) is covered.
1 Place the charging station on a clean floor and against a vertical wall. 2 Connect the adaptor (7A) to the charging station connector.
3 Plug the adaptor into the mains.
The LED ON light (4A) will light up red.
18 |
MAIN COMPONENTS |

•When storing the appliance for a long period of time, we recommend you fully charge the battery and then remove it for storage in a cool, dry place.
USING THE APPLIANCE
This appliance has been specially designed to vacuum floors and carpeted floors.
This appliance is intended for daily floor maintenance, avoiding the accumulation of dirt and appearance of fluff.
Never vacuum live ash, splinters or other sharp objects, or liquids.
Never vacuum lit matches or cigarette butts. Do not vacuum toxic material (e.g. ammonia).
Completely remove all the elements used for transportation and packaging.
Do not use the robot vacuum cleaner between small tables, chairs or very small spaces, as this could damage the appliance.
The robot vacuum cleaner uses cleaning settings to effectively clean the whole floor: Spiral movement for more intense cleaning where dirt has been detected, wall following for cleaning the perimeter of the room and room-crossing to ensure a full clean.
The robot vacuum cleaner will take approximately 45 minutes to clean an average-sized room, passing over the same area several times to ensure the whole surface is cleaned.
ROBOT VACUUM CONTROL PANEL
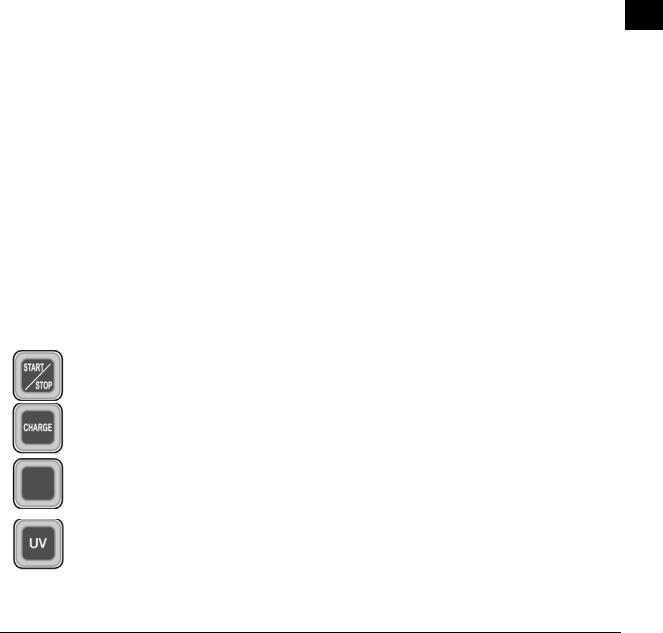
Start/Stop robot vacuum
Charge button:
Lights up when pressed, turns off when the robot connects to the charging station.
Charge indicator:
Flashes during charging. It remains lit when charging is complete.
Ultra-violet lamp:
Lights up when pressed, the disinfection lamp will operate while the robot is cleaning.
1Remove all objects that could break or damage the robot vacuum from the floor (e.g. lamps, bottles).
2Check that the dustbin (11) is adequately fitted. See the section (“CLEANING AND STORAGE”).
3Place the virtual barrier (4) where you like to prevent the robot entering a specific area. See the section (“VIRTUAL BARRIER”).
4Start up the robot vacuum cleaner. To do so, set the operating switch (20) to the ON position.
5 Ensure that cleaning robot is charged. |
|
If the LED indicator light on the robot’s control panel |
flashes, set up the robot |
vacuum to charge. See the section (“PREPARING THE APPLIANCE. CHARGING THE ROBOT VACUUM”)
6If you want to use the robot vacuum in automatic mode, programme its operation using the remote control. See the section (“REMOTE CONTROL”).
7 Press the button on the robot’s panel.
The robot vacuum will then start to operate, following its cleaning patterns.
20 |
USING THE APPLIANCE |

If you wish, you can control its movements or functions using the remote control buttons (please refer to the “REMOTE CONTROL” section), or using the buttons of the control panel on the robot vacuum's body.
Press the UV key, if you want to sterilise the front area.
This function is particularly recommended for people suffering from allergies and for homes with pets, as it sterilises the floor against viruses and bacteria.
8 Press the |
button again to pause the cleaning process. |
9If you do not want a programmed weekly clean, turn off the appliance after cleaning.
To do so, set the operating switch (20) to the OFF position or press the ON/OFF button  on the remote control.
10 Unplug the charging station from the mains.
VIRTUAL BARRIER
MAIN COMPONENTS (B)
1B ON switch & Length of virtual barrier
 Off
Off
 Short range = 4 m
 Medium range = 6 m
  Long range = 8 m
2B LED ON light
3B Proximity sensor head
4B Virtual barrier sensor head
5B Battery compartment cover
6B Battery cover clip
en
OPERATION
Use the virtual barrier to define the desired cleaning area, preventing the robot from entering unnecessary or unwanted areas.
Use this to prevent the robot entering areas with cables or a particular room.
Place the virtual barrier at the same level on the surface where you are going to use the robot vacuum.
Place the virtual barrier and the charging station at a distance of more than 3 m apart, to prevent interferences.
Do not place the charging station within range of the virtual barrier’s signal.
The proximity sensor head (3B) prevents impact between the robot vacuum and the virtual barrier, preventing it from coming within a distance of less than 0.5-1 m from it.
1 Make sure that the batteries are not discharged.
2Position the virtual barrier so that it blocks the area you do not want the robot vacuum to enter. (fig. 3).
3Remove any objects that may be in front of the virtual barrier, to prevent its inadequate operation.
4 Choose the desired length of the virtual barrier. To do so, set the switch (B) to choose short  , medium
  or long
  range.
Use the appropriate barrier length. The battery’s duration depends on the selectedsensor distance.
5 Check that the robot vacuum cannot cross the boundary created by the virtual barrier. 6 Set switch (B) to the OFF position , when the virtual barrier is not required.
Some differences may occur in the direction of the virtual barrier’s infrared signal and the robot's reception range, due to the movement of the robot during while in use. This difference may vary depending on the work environment and the charging level of the robot and the virtual barrier.
VIRTUAL BARRIER |
21 |

REMOTE CONTROL
COMPONENTS (C)
1 |
Robot vacuum ON/OFF |
5 Display (fig. 4) |
||||
|
|
|
2 |
Direction buttons |
a |
Transmitting signal” icon |
|
||||||
|
|
|||||
|
3 |
Confirmation button |
b |
Programmed days of the week |
||
|
||||||
4 |
Control keys |
c |
Programmed days of the week |
|||
|
|
|
|
Start/Sunday |
d |
Time |
|
|
|
|
Provisional stop/Monday |
e |
Error icon |
|
|
|
|
f |
Function icon |
|
|
|
|
|
|
||
Time setting/Tuesday
Charge/Wednesday
Timer/Thursday
Fast clean/Friday
Clean after charging/Saturday
Slow clean/every day
TIMER
Synchronisation of the Remote Control and the Robot Vacuum (fig. 5)
Synchronise the remote control and the robot vacuum before first use and following maintenance operations. To do so:
1Check that the batteries of the robot vacuum and the remote control are sufficiently charged.
2 Turn the robot off. To do so, set the operating switch (20) to the OFF position.
3 Press the |
button for more than 4 seconds. Return the operating switch (20) to the |
|
ON position, without releasing the |
button. |
|
When the synchronisation has been properly performed, the robot will emit two beeps.
Setting Day and Time (fig. 6)
To ensure that the robot starts operating at the expected time, the current day of the week and time must be saved.
1 Press the  button. This opens the day setting function.
2Press the button of the day corresponding to the current day of the week (SU= Sunday,
MO= Monday, TU= Tuesday, WE= Wednesday, TH= Thursday, FR= Friday, SA= Saturday).
3Press the  arrows to move through the “hour” and “minutes” fields. Press the
  arrows to select the current “hour” and “minutes”.
4 Press |
to confirm the selection. |
Press |
if you want to cancel the setting. |
Scheduling Automatic Weekly Cleaning (fig. 7)
With the robot turned off.
1 Press the  button of the remote control.
2Press the button of the day corresponding to the day of the week you want to programme. Select one, several or all the days of the week. The selected days will flash.
3Press the  arrows to set the exact cleaning time. Press the “up” and “down” arrows to select the hour and minutes.
22 |
REMOTE CONTROL |

4 Press |
to confirm the selection. |
Press the ON/OFF button  if you want to cancel the setting.
For the robot vacuum to start up at the planned time, it must be switched on. The operating switch (20) in the ON position and  lit.
lit.
ADDITIONAL FUNCTIONS
FULL GO Function
If this function is selected, the robot vacuum is programmed to continue cleaning once it is fully charged.
1 Press the |
button. The robot vacuum must be switched on. |
FULL GO will light up in the remote control display. The robot vacuum will search for the charging station before the battery runs out and will automatically start cleaning when it is fully charged.
SPEED Function
1 Press the  button to choose fast clean.
FAST will light up in the remote control display. en
2 Press the  button to choose slow clean.
SLOW will light up in the remote control display.
ERROR CODES
If the robot is not functioning properly due to one of the following circumstances, all of the robot’s control panel buttons will flash simultaneously.
1 Press the  button of the remote control. Ensure that the remote control signal is within the active range of the appliance.
The error icon will appear in the remote control display beside one of the error codes described below.
2 Perform the actions described below depending on the error displayed.
ERROR CODE CAUSE OF THE FAILURE |
SOLUTION |
|
E01 |
Stair detector sensors |
Clean the sensors (27). |
E02 |
Central roller |
Remove any dirt and hair trapped in the roller (23). |
E03 |
Low battery |
Charge the battery. |
E04 |
Side wheels |
Remove any dirt and hair trapped in the wheels. |
E05 |
Dustbin |
Fit adequately the dustbin (11). |
If the failure persists after fulfilling these actions, do not use it and take it to an authorised assistance service. Do not modify or repair the appliance.
STORAGE AND STORAGE
Make sure that all washed elements are completely dry prior to assembly.
STORAGE AND STORAGE |
23 |

For best performance of the robot vacuum, we recommend that you clean the dustbin and clean the filter after every 3 uses.
EMPTYING THE DUSTBIN (11)
1 Keep the release button (12) pressed down. Remove the dustbin (11). (fig. 8)
2Place the dustbin over a rubbish bin, pull the tab (14) to open the filter holder and empty the contents into the rubbish bin. (fig. 9)
FILTER CLEANING AND REPLACEMENT (7)
It is advisable to inspect the filter regularly, to check that it is working properly.
Clean the filter thoroughly if you detect a reduction in the appliance’s vacuuming capacity.
It is advisable to replace the filter once or twice a year, depending on how often the appliance is used.
1 Empty the dustbin as shown in the “EMPTYING THE DUSTBIN (11)” section.
2Remove the filter (7). Press the semi-circular holder with one hand to remove the used filter from the holder (fig. 10)
3 Gently shake the removed filter against the side of the rubbish bin to dislodge excess dust and dirt.
Never use the robot vacuum without the filter (7).
4 Clean the filter using the cleaning brush (6) (fig. 11).
5 Return the clean filter, or new filter if necessary, to its holder.
CLEANING THE DUSTBIN (11)
1 Press the button (13). This releases the vacuum module (15) (fig. 12).
2 Turn the vacuum module round, release the two tabs and remove the lid. 3 Clean the interior of the bin using the cleaning brush (6) (fig. 13).
4 Use the cleaning brush to clean the vacuum module (15) and the air intake and outlet unit (fig. 13).
Do not clean the vacuum module with water.
5Fit the dustbin into the body of the appliance. Press on the bin until you hear a click, which indicates that it is properly fitted to the body.
MOP CLEANING AND REPLACEMENT (9)
Do not use the mop on rugs, carpets or floors that are not completely smooth.
1In such cases, remove the mop attachment (10). Turn the mop attachment and undo the left and right tabs (fig. 14).
2 To replace the mop (9), pull it out and put a new one in its place (fig.14).
REMOVAL AND CLEANING OF BRUSHES
For best performance of the robot vacuum, we recommend that you clean the rollers and brushes after every 3 uses.
Rollers (22) and (23)
1 Push the tab back and lift and fastening bar (fig.15).
The rollers will be released.
2 Remove the rollers (22) and (23).
3 Clean the rollers using the cleaning brush (6) (fig.16).
4Re-insert the rollers and replace the fastening bar, pressing it until you hear a click, which indicates that it is fitted properly
24 |
STORAGE AND STORAGE |

Side Brush (8)
Clean the side brush regularly to prevent malfunctioning of the robot vacuum.
1 Use your hands to remove any hair and dust trapped in the side brush. 2 If the dirt is very tangled around the brush, cut it using scissors.
If necessary, unscrew the screw and remove the side brush (8) from the body for more effective cleaning (fig.17).
3 Return the side brush to its housing.
REMOVAL AND CLEANING OF WHEELS
Side Wheels
1 Unscrew the screws of the wheels (fig.18).
2 Remove the wheels from their housing and clean them.
Do not clean the wheels with water, oil or grease.
Return the wheels to their housing and screw down the screws using a screwdriver.
Front Wheel
If the front wheel is jammed or does not rotate freely, remove it for cleaning (fig.18). 1 Remove the wheel with the help of a tool that serves as a lever.
2 To replace it after cleaning, press the wheel into its housing.
en
CLEAN THE COLLISION SENSORS (25) AND STAIR SENSORS (27)
Keep the infrareds clean so that the robot vacuum can operate correctly.
1 Clean the sensors with a piece of cotton or a soft cloth (fig.19).
CLEANING THE APPLIANCE
Check that no water enters the appliance.
Clean the appliance after using it for the first time, immediately after each use and after a long period without use. You will thus ensure the correct operation of the appliance and prolong its useful life.
1 Clean the outside of the appliance with a damp cloth. Do not use abrasive products or solvents.
REPLACING THE BATTERIES
REPLACING THE BATTERIES OF THE VIRTUAL BARRIER (Fig. 20)
1 Turn battery cover lock (6B) until the cover is released (5B).
2 Place the batteries in the compartment intended for this purpose. Check that the positive and negative electrodes are in the proper positions.
Remove the batteries if you are not going to use the robot vacuum for a long period of time.
REPLACING THE BATTERIES OF THE REMOTE CONTROL (Fig. 21)
1 Open the battery compartment cover.
2 Place the batteries in the compartment intended for this purpose. Check that the positive and negative electrodes are in the proper positions.
Remove the batteries if you are not going to use the robot vacuum for a long period of time.
REPLACING THE BATTERIES |
25 |

. FRANÇAIS
INSTRUCTIONS DE SÉCURITÉ
•Lisez attentivement ce mode d'emploi avant d'utiliser l'appareil.
•Ce manuel fait partie du produit. Conservez-le dans un lieu sûr afin de pouvoir le consulter ultérieurement.
•Cet appareil est destiné uniquement à un usage domestique, non industriel. Tout usage autre que celui indiqué pourrait s’avérer dangereux (par exemple, aspiration de liquides, poussière suite à des travaux, ciment, etc.).
•Les enfants doivent être surveillés afin de s’assurer qu’ils ne jouent pas avec l’appareil.
•À moins d’avoir été supervisées ou d’avoir reçu les instructions d’usage de la personne responsable de leur sécurité, les personnes (y compris des enfants) aux capacités physiques, sensorielles ou mentales réduites, ou manquant d’expérience ou de connaissance, ne doivent pas utiliser cet appareil.
•Ne modifiez ni ne réparez jamais l’appareil. Si vous constatez une anomalie sur le cordon ou une autre partie de l’appareil, ne l’utilisez pas et amenez-le à un centre de service technique agréé.
•N’utilisez pas de pièces ni d'accessoires non fournis ou recommandés par SOLAC.
•Avant de brancher l’appareil au secteur, vérifiez que la tension indiquée correspond bien à celle de votre logement.
•Éteignez et débranchez l’appareil avant de démonter ou de monter des pièces, et d’effectuer toute opération d’entretien ou de nettoyage. Débranchez-le également en cas de coupure de courant.
•N’accrochez pas l'appareil par le cordon. Débranchez l’appareil en tirant toujours sur la prise, jamais sur le cordon.
•Prenez garde à ce que le cordon d'alimentation n'entre pas en contact avec des éléments tranchants ou des surfaces chaudes. Ne laissez pas le cordon pendre au bord de la table ou du plan de travail afin d’éviter que les enfants ne tirent dessus et ne le fassent tomber.
d Ne trempez pas l'appareil dans l'eau ou dans tout autre liquide et ne le mettez pas au lave-vaisselle.
• Ne saisissez pas l’aspirateur ou la prise avec les mains mouillées.
•Tenez votre robot aspirateur éloigné de toute source de chaleur.
•N’utilisez jamais le robot aspirateur si le bac à poussière ou le filtre de protection n’est pas correctement placé.
•Le module d’aspiration doit toujours être dégagé.
•N’approchez pas le module d’aspiration, les rouleaux et les roues à proximité de cheveux, vêtements, doigts ou toute autre partie du corps.
•N'utilisez pas l’aspirateur pour laver des animaux.
•N’utilisez pas l’appareil dans des espaces fermés où des vapeurs explosives ou toxiques sont accumulées.
•Ne l'utilisez jamais sur des surfaces mouillées ni à l'extérieur.
•Vérifiez régulièrement l’état de l’adaptateur, du câble et du branchement.
•Évitez d’éclabousser le support de charge, l’adaptateur ou le câble de connexion.
•N’utilisez pas le support de charge ni l’adaptateur près d'une baignoire, d'un lavabo, d'une douche ou d'autres récipients contenant de l'eau en cours d'utilisation.
•Utilisez uniquement l’adaptateur fourni.
26 |
INSTRUCTIONS DE SÉCURITÉ |

•Ne touchez pas l’adaptateur ni le support de charge avec les mains humides lorsqu’ils sont branchés.
•Ne laissez jamais l’adaptateur ou le support de charge fonctionner sur une surface ou un chiffon humide.
•Ne vous asseyez pas devant l’appareil et ne vous placez pas devant lui, afin d’éviter tout incident.
•Vérifiez l’absence de fils, câbles ou autres objets d’une longueur supérieure à 15 cm sur le sol, afin d’éviter le blocage des rouleaux.
qATTENTION ! : Pour mettre l’appareil au rebut, NE LE JETEZ JAMAIS à la poubelle ; déposez-le dans un POINT DE RECYCLAGE ou à la déchetterie la plus proche afin qu’il y soit recyclé. Vous contribuerez ainsi à la préservation de l’environnement.
PRINCIPAUX ÉLÉMENTS
1 |
Corps principal |
16 |
Capteur à infrarouges |
|
|
2 |
Télécommande |
17 |
Poignée |
|
|
3 |
Support de charge automatique |
18 |
Pare-chocs frontal |
|
|
fr |
|||||
4 |
Isolateur d’espaces |
19 |
Connecteur adaptateur batterie |
||
5 |
Adaptateur |
20 |
Interrupteur marche/arrêt |
|
|
6 |
Brosse de nettoyage |
21 |
Panneau des touches de |
|
|
7 |
Filtre (deux unités) |
|
contrôle |
|
|
8 |
Brosse latérale (deux unités) |
22 |
Rouleau en caoutchouc |
|
|
9 |
Serpillère |
23 |
Rouleau central |
|
|
10 |
Accessoire serpillère |
24 |
Roues latérales |
|
|
11 |
Bac à poussière |
25 |
Capteurs antichocs |
|
|
12 |
Bouton déblocage bac à poussière |
26 |
Connecteurs de contact au |
|
|
13 |
Bouton déblocage module aspiration |
|
support de charge |
|
|
14 |
Languette filtre |
27 |
Capteurs détecteur escalier |
|
|
15 |
Module d’aspiration |
28 |
Roue avant |
|
|
|
|
29 |
Lampe UV |
|
PRÉPARATION DE L'APPAREIL. RECHARGE DU ROBOT ASPIRATEUR
Utilisez uniquement l’adaptateur et le support de charge fournis.
Le temps de charge est d’environ 5 heures pour une autonomie de 60/90 minutes. Avant d’utiliser l’appareil pour la première fois, chargez la batterie toute une nuit.
COMPOSANTS PRINCIPAUX DU SUPPORT DE CHARGE (A)
1A Témoin lumineux à DEL décoratif
2A Interrupteur témoin lumineux à DEL décoratif
3A Signal de transmission
4A Témoin à DEL de fonctionnement
5A Témoin de charge
6A Connecteurs de contact
7A Connecteur de l’adaptateur
CHARGE PAR SUPPORT DE CHARGE (Fig. 1)
Ne placez aucun objet et évitez la présence d’obstacles ou de meubles autour du support de charge (voir distances recommandées sur le schéma).
Le robot ne trouvera pas le support de charge en présence d’obstacles. Placez le support de charge sur une surface dégagée.
PRINCIPAUX ÉLÉMENTS |
27 |

Recommandations pour augmenter la durée des batteries
•Ne laissez pas l’adaptateur branché pendant de longues périodes. Débranchez-le à l’issue du chargement.
•Ne stockez ni ne rechargez l’appareil près de radiateurs ou d’autres sources de chaleur, et ne le laissez pas exposé à la lumière directe du soleil.
•Ne rechargez pas l’appareil dans des endroits sales ou humides, et faites en sorte que la température ambiante soit comprise entre 15ºC et 35ºC.
•Tous les trois ou quatre mois, déchargez complètement la batterie puis rechargez-la. Pour la décharger, faites fonctionner l’appareil sans câble jusqu’à ce qu’il s’arrête (le support de charge doit être débranché). Ensuite, rechargez la batterie comme expliqué plus haut.
•Pour stocker l’appareil pendant une longue période, chargez la batterie complètement puis retirez-la de l’appareil et conservez-la dans un endroit frais et sec.
FONCTIONNEMENT DE L’APPAREIL
Cet appareil a été conçu exclusivement pour nettoyer les sols et les moquettes par aspiration.
Cet appareil est destiné à l’entretien quotidien du sol, afin d’éviter l’apparition de fr moutons et l’accumulation de poussière.
N'aspirez jamais de cendres incandescentes, de braises, d’objets pointus ou de liquides.
N’aspirez jamais d’allumettes allumées ni de mégots. N’aspirez pas non plus de substances toxiques (ammoniaque, etc.).
Retirez complètement tous les éléments ayant servi à transporter et à emballer l’appareil.
N’utilisez pas le robot aspirateur entre des petites tables, des petites chaises ou des espaces très réduits, afin d’éviter d’endommager l’appareil.
Le robot aspirateur utilise des paramètres de nettoyage destinés à nettoyer la totalité du sol de façon efficace :
Mouvement en spirale pour un nettoyage plus intense à des endroits particulièrement sales, contournement de murs pour nettoyer le périmètre de la pièce, nettoyage de la pièce en diagonale pour assurer un nettoyage complet.
Le robot aspirateur nettoie une pièce de taille moyenne en 45 minutes environ ; il passe plusieurs fois sur la même zone pour assurer le nettoyage de toute la surface.
TABLEAU DE CONTRÔLE DU ROBOT ASPIRATEUR
Mise en marche/arrêt du robot aspirateur
Bouton de charge :
Il s’allume lorsqu’on appuie sur le bouton, et s’éteint lorsque le robot se connecte au support de charge.
Témoin de charge :
Il clignote pendant la charge et reste allumé de façon permanente à l’issue de la charge.
Lampe ultraviolette :
Elle s’allume lorsque le bouton est activé ; la lampe de désinfection fonctionnera pendant les opérations de nettoyage du robot.
1Retirez du sol tous les objets susceptibles de se briser ou d’endommager le robot aspirateur (lampes, bouteilles, etc.).
FONCTIONNEMENT DE L’APPAREIL |
29 |

2Vérifiez que le bac à poussière (11) est placé correctement. Reportez-vous au paragraphe (« Nettoyage et stockage »).
3Placez l’isolateur d’espaces (4) de votre choix pour éviter le passage du robot dans une zone spécifique. Reportez-vous au paragraphe (« ISOLATEUR D’ESPACES »).
4Allumez le robot aspirateur. Pour ceci, placez l’interrupteur marche/arrêt (20) en position ON.
5 |
Assurez-vous que le robot de nettoyage est chargé. |
|
|
Si le témoin lumineux à DEL de charge du tableau de contrôle du robot |
clignote, |
||
|
placez le robot aspirateur en charge. Reportez-vous au paragraphe (« PRÉPARATION |
||
|
DE L’APPAREIL. RECHARGE DU ROBOT ASPIRATEUR »). |
|
|
6 |
Si vous souhaitez utiliser le robot aspirateur en mode automatique, programmez son |
||
|
fonctionnement au moyen |
de la télécommande. Reportez-vous au |
paragraphe |
|
(« TÉLÉCOMMANDE »). |
|
|
7 |
Appuyez sur le bouton |
du tableau de commandes du robot. |
|
Le robot aspirateur commencera à travailler selon ses schémas de nettoyage.
Si vous le souhaitez, contrôlez ses mouvements ou ses fonctions par les touches de la télécommande ; reportez-vous au paragraphe (« TÉLÉCOMMANDE ») ou utilisez les boutons de contrôle du panneau de commandes du corps du robot aspirateur.
Vous souhaitez stériliser une zone frontale, appuyez sur la touche UV.
Cette fonction est spécialement utile pour les personnes allergiques, ou dans les logements où vivent des animaux domestiques : elle permet de stériliser la pièce en éliminant les virus et les bactéries du sol.
8 Appuyez à nouveau sur le bouton |
pour interrompre momentanément le processus |
de nettoyage. |
|
9Si vous ne souhaitez pas effectuer un nettoyage hebdomadaire programmé, éteignez
l’appareil après le nettoyage. Pour ceci, placez l’interrupteur de marche/arrêt (20) en position OFF ou appuyez sur la touche marche/arrêt  de la télécommande.
10 Débranchez le support de charge du secteur.
ISOLATEUR D’ESPACES
PRINCIPAUX COMPOSANTS (B)
1B Interrupteur marche et |
2B |
Témoin de fonctionnement à DEL |
longueur d’isolateur d’espaces |
3B |
Tête de transmission de proximité |
Éteint |
4B |
Tête de transmission de l’isolateur |
Portée inférieure = 4 m |
|
d’espaces |
Portée moyenne = 6 m |
5B |
Couvercle du compartiment des piles |
Portée élevée = 8 m |
6B |
Déblocage couvercle des piles |
FONCTIONNEMENT
Utilisez l’isolateur d’espaces pour limiter la zone de nettoyage du robot à la zone de votre choix, afin d’éviter que le robot ne pénètre dans des espaces que vous ne souhaitez pas nettoyer.
Utilisez cette fonction pour éviter l’accès à une pièce pourvue de câbles ou à une pièce en particulier.
Placez l’isolateur d’espaces sur le même niveau que celui où vous souhaitez utiliser le robot aspirateur.
Placez l’isolateur d’espaces et le support de charge à une distance supérieure à 3 mètres, afin d’éviter les interférences.
Ne placez pas le support de charge dans le rayon de portée de l’isolateur d’espaces.
30 |
ISOLATEUR D’ESPACES |
 Loading...