

Page 1
TR
EN
FR
NL
DE
ES
RU
UA
AR
HR
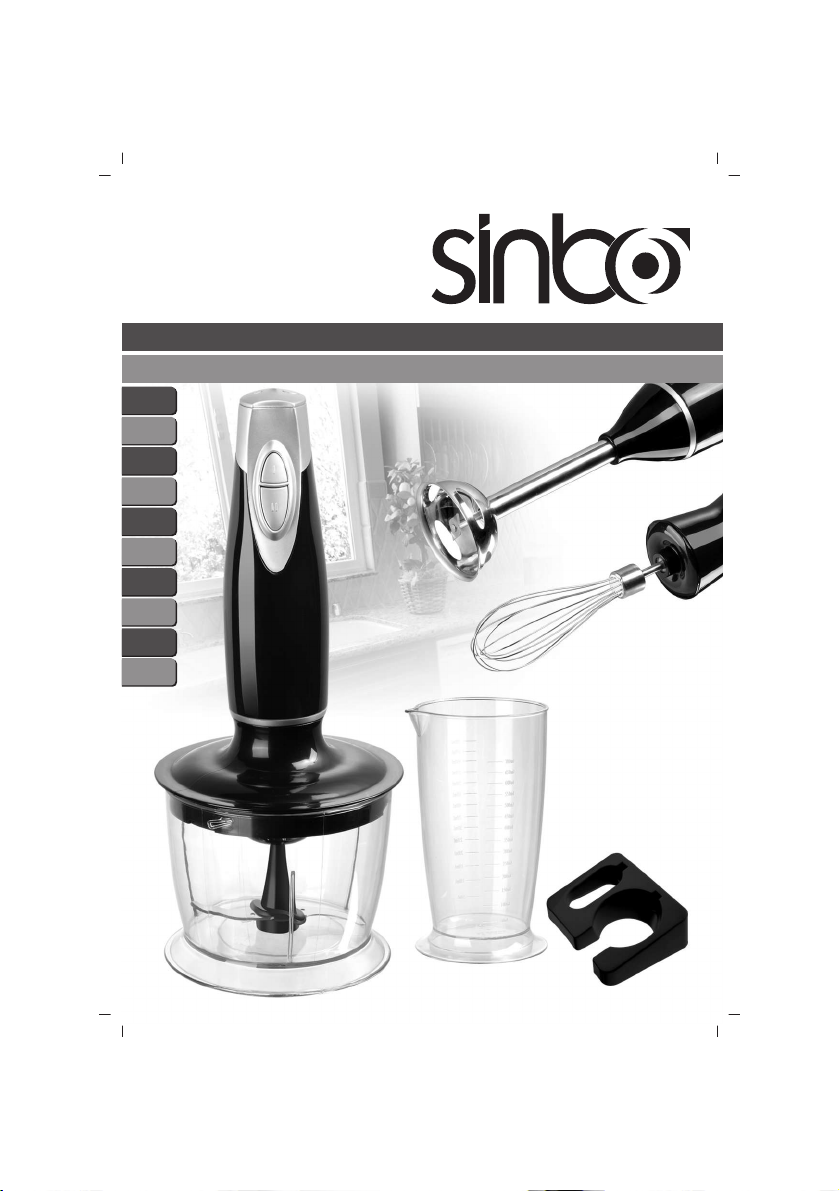
SHB 3029 KARIfiTIRICI
KULLANMA KILAVUZU
Page 2

De¤erli Müflterimiz,
Ürün seçiminde S‹NBO'yu tercih etti¤iniz için teflekkür ederiz.
Uzun ve verimli bir kullan›m için cihaz› kullanmadan önce bu k›lavuzu özellikle güvenlik
talimatlar›na dikkat ederek okuman›z› ve devaml› suretle saklaman›z› tavsiye ederiz.
Sayg›lar›m›zla,
Sinbo Küçük Ev Aletleri
S‹NBO SHB 3029
KARIfiTIRICI
KULLANIM KILAVUZU
AC230V, 50Hz, 300W
Cihazla oynamamalarını güvenceye almak için çocuklar gözetim altında tutulmalıdır.
Bu ürün (çocuklar dahil ) fiziksel hassasiyeti az, zihinsel olarak yetersiz, deneyimsiz ve yeterli bilgiye
sahip olmadan yada kendilerinin güvenli¤inden sorumlu olan kifliler tarafından bu ürünü kullanmak
için gerekli talimatlar verilmemifl kiflilerin kullanımına uygun de¤ildir.
Children being supervised not to play with the appliance.
This appliance is not intended for use by persons (including children) with reduced physical, sensory
or mental capabilities, or lack of experience and knowledge, unless they have been given supervision
or instruction concerning use of the appliances by a person responsible for their safety. Children
should be supervised to ensure that they do not play with the appliance.
- 1 -
Page 3

ÖNEML‹ UYARILAR
• Bakım, Onarım ve Kullanımda Uyulması Gereken Kurallar
Her türlü elektrikli cihaz kullan›l›rken afla¤›daki genel güvenlik kurallar›na uyulmas›
gerekmektedir.
1. Tüm talimatlar› okuyun.
2. Kullanmaya bafllamadan önce, cihaz›n anma plakas› üzerinde belirtilen voltaj ile
evinizdeki voltaj›n birbirine uyup uymad›¤›n›z kontrol edin.
3. Hiçbir cihaz› kablosu veya fifli hasar gördükten sonra veya cihazda bir ar›za olufltu¤unda
veya cihaz düfltükten ya da herhangi bir flekilde hasar gördükten sonra kullanmay›n.
Kontrol edilmesi, onar›lmas›, elektriksel veya mekanik ayarlamalar›n›n yap›lmas› için
cihaz› en yak›n servis merkezine götürün.
4. Güç kablosu hasar gördü¤ünde, herhangi bir tehlike oluflumuna karfl› kablonun üretici
firma, servis merkezi veya yetkili bir teknisyen taraf›ndan de¤ifltirilmesi gerekir.
5. Cihaz› kullanmad›¤›n›z zamanlarda, parçalar›n› takarken veya ç›kar›rken ve
temizlemeden önce cihaz›n fiflini prizden ç›kar›n.
6. Kablonun tezgah veya masan›n kenarlar›na tak›lmamas›na ve s›cak yüzeylere temas
etmemesine dikkat edin.
7. Blender setinin üst k›s›mlar›n›, elektrik floku riskine karfl› suya sokmay›n.
8. Cihaz çocuklar taraf›ndan veya onlar›n yan›nda kullan›l›rken yak›n gözetim gereklidir.
9. Hareket eden parçalara kesinlikle dokunmay›n.
10. Kiflisel yaralanma riskini veya blender setine zarar gelmesini önlemek için, blender
çal›fl›rken kar›flt›rma kab›n›n içine ellerinizi veya mutfak aletlerini sokmay›n. Sadece
blender çal›flmad›¤› zaman, bir spatula kullanabilirsiniz.
11. Bu cihaz buz parçalamak veya sert ve kuru maddeleri kar›flt›rmak için kullan›lamaz,
aksi halde b›çaklar körleflebilir.
12. Yaralanma riskini önlemek için, kaseyi yerine iyice yerlefltirmeden önce b›çaklar›
gövdeye kesinlikle yerlefltirmeyin.
13. Cihaz› çal›flt›rmadan önce mutlaka kapa¤›n›n yerine güvenli flekilde kilitlendi¤inden
emin olun.
14. Üretici firma taraf›ndan önerilmeyen aksesuarlar›n kullan›m› kiflisel yaralanmalara
neden olabilir.
15. Cihaz›, kullan›m amac›n›n d›fl›nda bir amaçla kullanmay›n.
16. D›fl mekanlarda kullanmay›n.
17. Bu k›lavuzu saklay›n.
SADECE EV ‹Ç‹ KULLANIMI ‹Ç‹ND‹R
- 2 -
Page 4

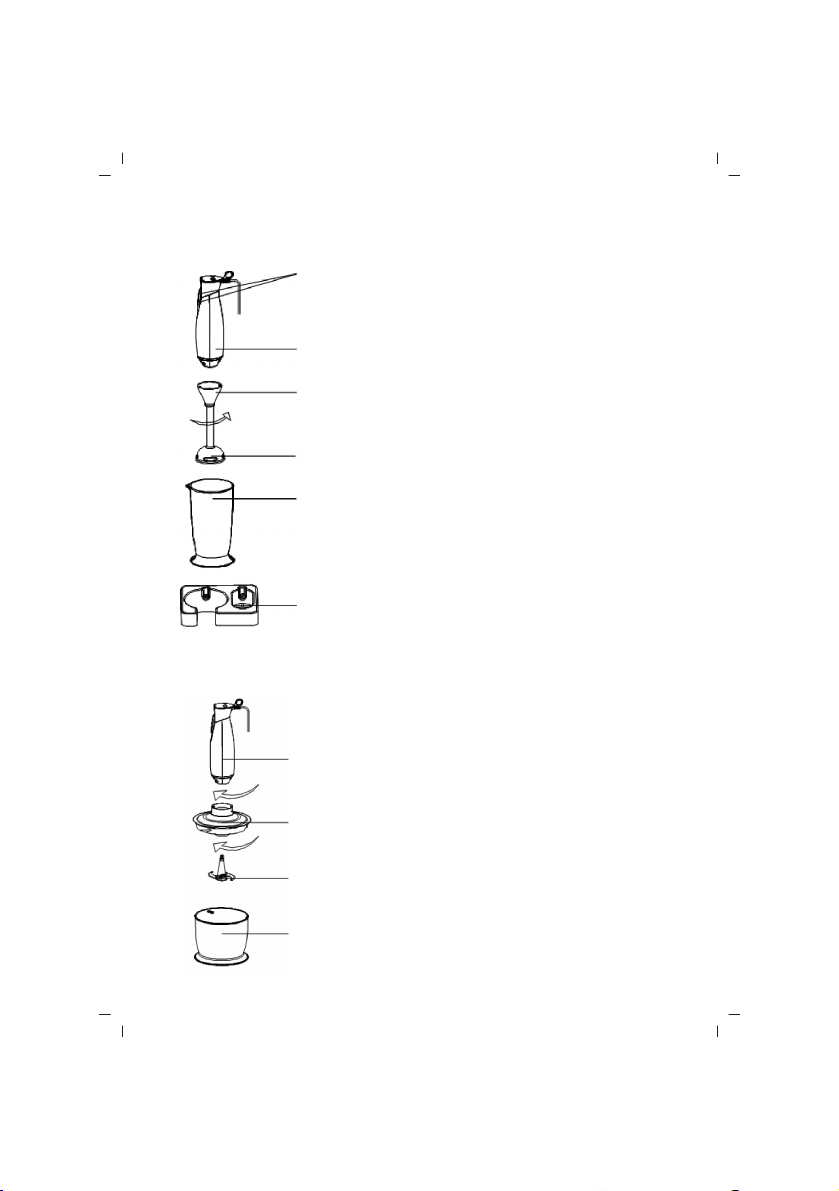
C‹HAZIN TANITIMI
(Meyve ve sebze kar›flt›rmak için uygundur)
Düflük ve Yüksek H›z anahtar›
(yukar›dan afla¤›ya)
Motor Ünitesi
Ç›kar›labilir Gövde
Kilit
AKSEUARLARI TANIMA - PARÇALAYICI
(Et parçalamak ve sar›msak ezmek için kullan›l›r.)
Kilit
Kilit
Motor ünitesine kilitlemek için saat yönünün tersine,
kilidi açmak için saat yönünde çeviriniz.
Bݍak
Kase
Maksimum kapasite: 700ml
Ölçüm yapmak ve küçük miktarlarda ifllenmifl g›da
haz›rlamak için idealdir.
Duvar aparat›
Blenderi veya ç›kar›labilir gövdeyi kulland›ktan sonra
büyük deli¤e asabilirsiniz.
Motor Ünitesi
Parçalay›c› kapa¤› motor ünitesine kilitlemek için saat
yönünde çevirin
Ç›kar›labilir Parçalay›c› Kapa¤›
Parçalay›c› kase ile kilitlemek için saat yönünde, kilidi açmak
için ters yönde çevirin.
Ç›kar›labilir Parçalama B›ça¤›
B›ça¤›n kenar› çok keskindir. Kesik oluflmamas› için tutarken
dikkatli olunuz.
Her zaman plastik milden tutunuz.
Kase
Parçalay›c› kapa¤›n› takmadan önce yiyecekleri kaseye
yerlefltirin.
- 3 -
Page 5

C‹HAZIN TANITIMI
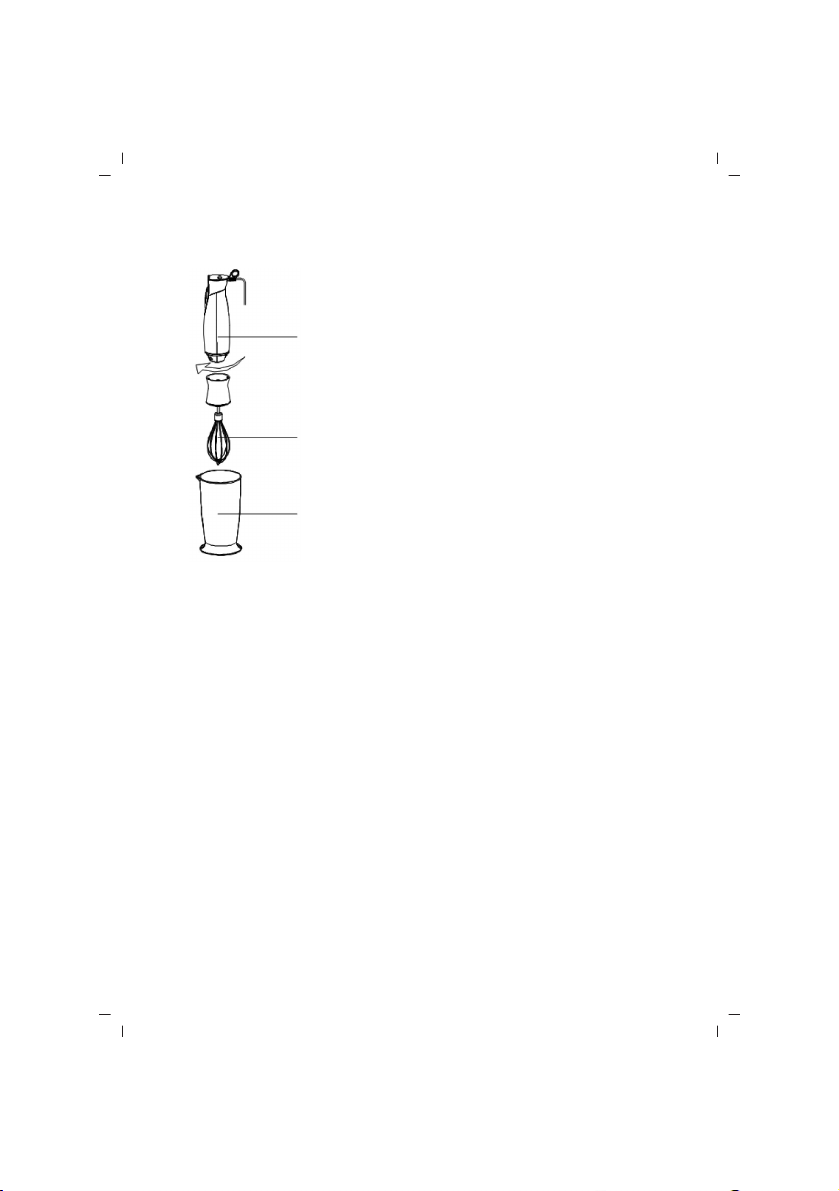
AKSESUARLARI TANIMA - ÇIRPICI
(Yumurta ç›rpmak için uygundur)
Motor Ünitesi
Ç›rp›c›y› motor ünitesine kilitlemek için üniteyi saat
Kilit
C‹HAZIN KULLANIMI
• Ba¤lantı veya Montajın Nasıl Yapılaca¤ını Gösterir fiema ile Ba¤lantı veya Montajın
Kimin Tarafından Yapılaca¤ına (tüketici, yetkili servis) iliflkin bilgiler
Cihaz›n›zla birlikte gelen aksesuarları kolayl›kla kendiniz tak›p ç›kartabilirsiniz.
Olası bir arıza durumunda cihazın içini açmayınız. En yak›n yetkili servise baflvurunuz.
* ‹lk kullan›mdan önce, blender setinizi “H›zl› temizleme” bölümünde anlat›ld›¤› gibi
temizleyin.
* Malzeme koymadan cihaz› çal›flt›rma süresi 15 saniyeyi geçmemelidir.
Önemli: B›çaklar çok keskindir, bu nedenle tutarken dikkatli olmal›s›n›z. Herhangi bir
aparat› takmadan veya ç›karmadan önce portatif blender setinin fiflini prizden ç›karmay›
unutmay›n.
yönünde çevirin.
Ǜrpma teli
Yumurta ç›rpmak için kullan›l›r.
Yumurtan›n beyaz›n› ç›rparak krema yapabilirsiniz.
Kase
Kasenin içine bir kerede 2 yumurta beyaz› koyabilirsiniz.
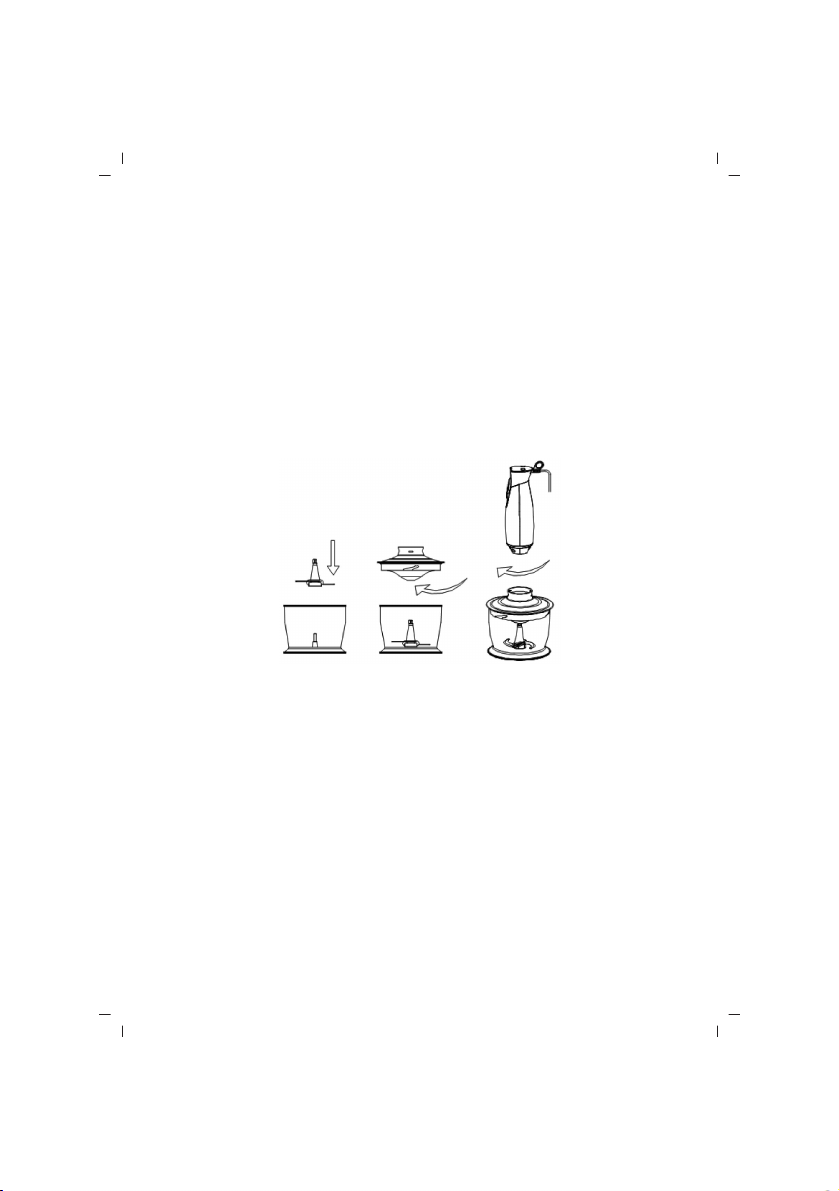
BLENDER ‹Ç‹N TAL‹MATLAR
Yüksek h›z seviyesinde, bir kerede maksimum çal›flt›rma süresi 1 dakikay› geçmemelidir
ve ard arda 2 turdan sonra 10 dakika beklenmelidir.
1. Ç›kar›labilir mili motor ünitesine takmak için mili, yerine oturana kadar saat yönünün
tersine çevirin. Ç›karmak için de, ters yöne çevirin.
2. Portatif blender setinin fiflini prize tak›n.
3. Portatif blender setini yiyeceklerin üzerine indirin ve motor ünitesinin üstündeki anahtar
butona bas›n.
4. Blender setini durdurmak için, anahtar butonu serbest b›rak›n.
- 4 -
Page 6

C‹HAZIN KULLANIMI
PARÇALAYICI ‹Ç‹N TAL‹MATLAR
Yüksek h›z seviyesinde, bir kerede maksimum çal›flt›rma süresi 10 dakikay› geçmemelidir
ve ard arda 2 turdan sonra 1 dakika beklenmelidir.
1. Parçalay›c› kasesini temiz ve düz bir zemine koyun.
2. Paslanmaz çelik b›ça¤›, fiekil 1’de gösterildi¤i gibi parçalay›c› kasesine tak›n.
3. Yiyece¤i parçalay›c› kasesine yerlefltirin.
Not: Etin kemiklerini ay›r›n, küçük parçalara bölün ve sonra kaseye yerlefltirin. Her
ç›rpma ifllemi için maksimum et miktar› 200 gram› geçmemelidir.
4. Kapa¤›, parçalay›c› kasesine tak›n ve yerine kilitlenene kadar saat yönünde çevirin
(fiekil 2). Kapa¤› ç›karmak için, saat yönünün tersine çevirin.
5. Parçalay›c›n›n üst parças›n›, parçalay›c› kapa¤›n›n deli¤inden geçirin ve kilitlemek için
saat yönünde çevirin (fiekil 3).
6. Cihaz›n fiflini prize tak›n ve çal›flt›rmak için anahtar butona bas›n.
7. Cihaz› durdurmak için anahtar butonu serbest b›rak›n.
* Yaralanma riskini önlemek için, kase yerine iyice oturmadan önce kesici b›çaklar›
kesinlikle gövdeye yerlefltirmeyin.
* Cihaz› çal›flt›rmadan önce, parçalay›c› kapa¤›n›n yerine güvenli flekilde kilitlendi¤inden
emin olun.
Kilit
Kilit
fiekil 1 fiekil 2 fiekil 3
YUMURTA ÇIRPICI ‹Ç‹N TAL‹MATLAR
Yüksek h›z seviyesinde, bir kerede maksimum çal›flt›rma süresi 1 dakikay› geçmemelidir
ve ard arda 10 turdan sonra 2 dakika beklenmelidir.
1. Yumurta beyaz› ç›rp›c›y› motor ünitesine takmak için ç›rpma telini, yerine iyice oturana
kadar saat yönünün tersine çevirin. Ç›karmak için de ters yönde çevirin.
2. Portatif blender setinin fiflini prize tak›n.
3. Yumurta beyaz›n› kasenin içine koyun. Genellikle, iki yumurta sar›s› yeterlidir.
4. Portatif blender setini yiyeceklerin üzerine indirin ve motor ünitesinin üstündeki anahtar
butona bas›n.
5. Blender setini durdurmak için, anahtar butonu serbest b›rak›n.
- 5 -
Page 7
KULLANIM HATALARINA ‹L‹fiK‹N B‹LG‹LER
Cihazınızı, beyan edilen voltaj ile çal›flt›r›n›z.Bulundu¤unuz yerin voltaj›n›n uygun olup
olmad›¤›n› kontrol ediniz.
Güç kablosunun ar›zalanmas› durumunda tehlikelerin önlenmesi için kablo üretici, servis
merkezi ya da benzer bir ehliyetli kifli taraf›ndan de¤ifltirilmelidir. Ar›za durumunda cihaz›
kendiniz sökmeye kalk›flmay›n›z, bak›m merkezimiz ya da sat›fl sonras› hizmet merkezimiz
ile ba¤lant›ya geçiniz.
Cihaz› kendiniz onarmaya kalk›flmay›n›z. Meydana gelebilecek ar›zalardan firmam›z
kesinlikle sorumlu de¤ildir, ve cihaz›n›z garanti kapsam› d›fl›nda ifllem görecektir.
TAfiIMA ESNASINDA
• Ürünü düflürmeyiniz,
• Darbelere maruz kalmamas›n› sa¤lay›n›z,
• S›k›flmamas›n›, ezilmemesini sa¤lay›n›z,
• Ambalaj üzerindeki iflaretlemelere uyunuz.
• Orjinal ambalajıyla taflımaya özen gösteriniz.
ÇEVRE VE ‹NSAN SA⁄LI⁄I
Çevre korumas›na siz de katk›da bulunabilirsiniz!
Lütfen yerel düzenlemelere uymay› unutmay›n: Çal›flmayan
elektrikli cihazlar›, uygun elden ç›karma merkezlerine götürün.
Kullanım sırasında insan ve çevre sa¤lı¤ına tehlikeli veya zararlı olabilecek bir durum
söz konusu de¤ildir.
TEM‹ZL‹K VE BAKIM
• Tüketicinin Kendi Yapabilece¤i Bakım, Onarım veya Ürünün Temizli¤ine ‹liflkin Bilgiler
Bu cihaz yaln›zca evde kullan›ma yöneliktir.
1. Cihaz›n fiflini prizden ç›kar›n ve ayr›labilir gövdeyi ç›kar›n.
Not: Blender setinin ayr›labilir gövdesini suya sokmay›n, çünkü mil yata¤› üzerindeki
ya¤lama suyla akabilir.
2. Ayr›labilir kol suyun alt›nda, afl›nd›r›c› temizleyiciler veya
deterjan kullanmadan y›kay›n. Temizledikten sonra içine
giren sular›n akmas› için ayr›labilir kolu ters çevirin.
Bu parça bulafl›k makinesinde y›kanmaya uygundur.
3. Kaseyi, kab›, ç›rp›c›y› ve b›ça¤› sabunlu ›l›k suda y›kay›n.
Kab›n ve ç›rp›c›n›n plastik bileflenleri bulafl›k makinesinde
y›pranabilece¤i için, bulafl›k makinesinde y›kanmalar› önerilmez.
4. Motor ünitesini nemli bir bezle silin. Elektrik floku riskine karfl›,
motor ünitesini kesinlikle suya sokmay›n.
5. Cihaz› iyice kurulay›n.
Uyar›: B›çaklar çok keskin oldu¤undan, tutarken dikkatli olun.
6. Blender milini motor ünitesine geri tak›n ve sonra ters flekilde duvar deste¤ine tak›n
(fiekil 4) veya yerden kazanmak için as›n.
- 6 -
fiekil 4
Page 8
TEM‹ZL‹K VE BAKIM
HIZLI TEM‹ZL‹K
‹fllem ad›mlar› aras›nda, portatif blender setini al›n ve yar›s› suyla dolu olan bir fincan›n
içine koyup birkaç saniye çal›flt›r›n.
• Periyodik Bakım Gerektirmesi Durumunda, Periyodik Bakımın Yapılaca¤ı Zaman
Aralıkları ile Kimin Tarafından Yapılması Gerekti¤ine ‹liflkin Bilgiler
Cihaz periyodik bak›m gerektirmez.
Düzenli olarak temizli¤inin yapılmasında fayda vardır.
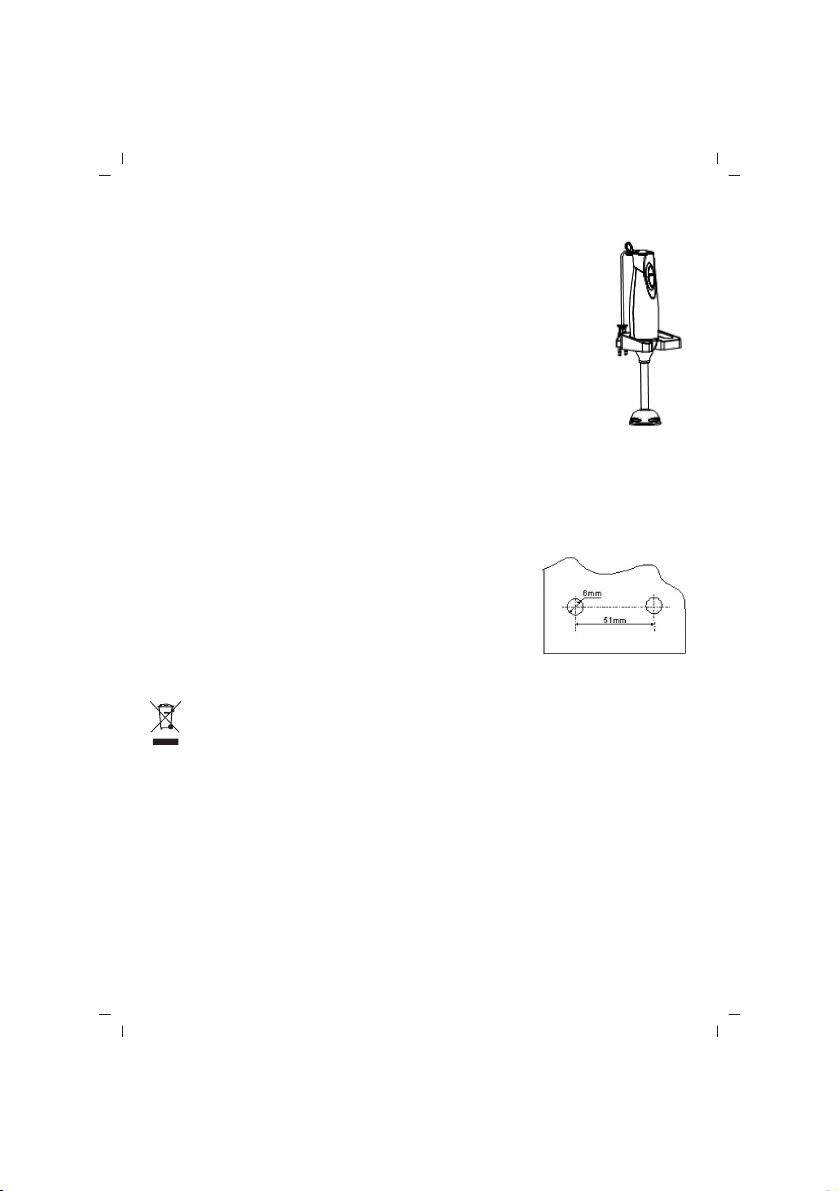
DUVAR DESTE⁄‹N‹ SAB‹TLEME
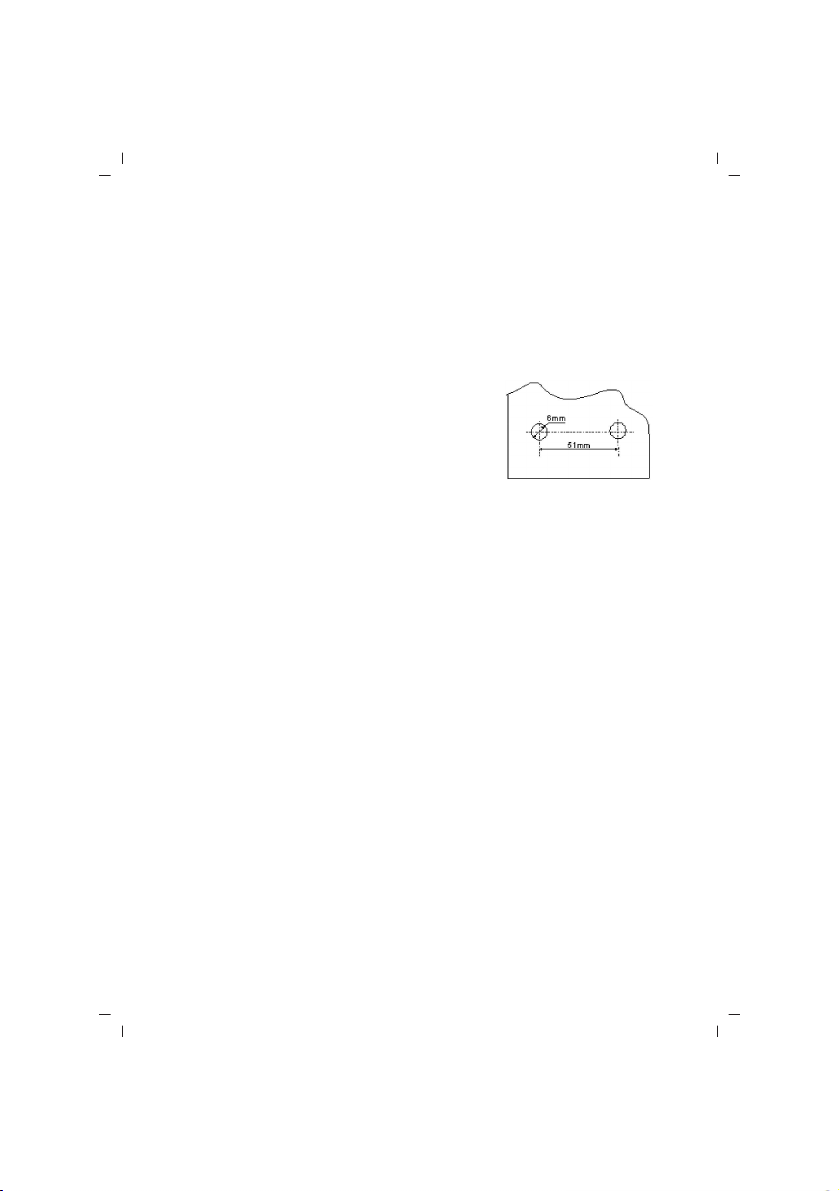
Duvar deste¤ini afla¤›daki gibi sabitleyebilirsiniz:
1. Duvara iki tane ayn› delikten aç›n ve fiekil 5’te
verilen boyutlara birebir uyun.
2. Deliklerin içine iki adet plastik dübeli çekiçle çak›n.
3. ‹ki adet vidayla duvar deste¤ini sabitleyin.
SORUN G‹DERME
Güç kablosunun fiflinde ar›za varsa tehlikeye maruz kalmamak için bunu kesinlikle
kendiniz de¤ifltirmeye kalk›flmay›n›z. Cihaz› yetkili Teknik Destek Merkezine götürünüz.
Ayn› durum di¤er sorunlar için de geçerlidir.
SATIfi SONRASI H‹ZMETLER‹
Bu cihaz kullan›c› taraf›ndan de¤ifltirilebilen parçalara sahip de¤ildir. Ünitenin çal›flmamas›
durumunda flu ad›mlar› izleyin.
1. Talimatlar›n do¤ru biçimde izlendi¤ini denetleyin.
2. Ana kayna¤›nda ifllevselli¤ini denetleyin.
Cihaz hâlâ çal›flm›yorsa, sat›n ald›¤›n›z yere geri götürün.
Güç kablosu hasar görmüflse, tehlikeleri önlemek için, cihaz üreticisine iade edilmelidir.
Kendi kendinize tamir etmeye KALKIfiMAYIN.
fiu talimatlar› izleyin:
1. Dikkatlice, tercihen orijinal kutusuna paketleyin.
Ünitenin temiz oldu¤undan emin olun.
2. Tüm yaz›flmalarda, ad›n›z›, adresinizi ve ürünün model numaras›n› belirtin.
3. ‹ade etme nedeninizi belirtin.
4. Garanti kapsam›ndaysa, nereden, ne zaman al›nd›¤›n› belirtin ve sat›n alma kan›t›n›
ekleyin (örn. kasa fifli).
fiekil 5
- 7 -
Page 9

ENGLISH
SINBO SHB 3029
BLENDER
INSTRUCTION MANUAL
AC230V, 50Hz, 300W
IMPORTANT SAFETY INSTRUCTIONS
While operating electrical appliances basic safety precautions including the following
should always be observed.
1. Read all instructions.
2. Please ensure that the voltage on the rating plate of the appliance conforms to the
mains voltage at your house before operating the device.
3. In the case that power cable or plug is damaged or if the device malfunctions or it was
dropped or otherwise damaged do not attempt to operate the unit. Take appliance to
nearest service center for examination, repair, electrical or mechanical adjustments.
4. If the power cable of the appliance is damaged, the cable must be replaced by the
manufacturing company, authorized service center or equivalent authorized technician.
5. Always unplug the unit when it will not be used for extended periods, before installing
or removing its parts and before cleaning the unit.
6. Make sure that the power cable does not get pinched by table or sharp edges and
contact with hot surfaces.
7. Do not immerse the housing of the blender set in water to prevent the risk of electric
shock.
8. Close supervision is imperative while the appliance is used by or near children.
9. Do not touch rotating parts.
10. Keep hands and kitchen utensils out of the blender container while operating the
blender to reduce the risk of personal injury or damage to the blender. You can use a
scraper when the blender is not operating.
11. The appliance cannot be used for crushing ice or blending hard and dry materials,
otherwise the blades may become blunt.
12. To reduce the risk of injury, do not cutting blades on base without first placing bowl
properly in place.
13. Ensure that the cover is locked in its place securely before operating the device.
14. Usage of attachments which are not recommended by the manufacturer may cause
injury.
15. Do not use the appliance for purposes other than it is designed for.
16. Do not use the appliance outdoors.
17. Keep this manual.
ONLY INTENDED FOR DOMESTIC USE
- 8 -
Page 10

KNOWING YOUR BLENDER SET
(Ideal for blending fruit and vegetables)
Low and High Speed switch
(from top to bottom)
Motor Unit
Removable Housing
Lock
KNOWING THE ACCESSORIES - CHOPPER
(Used for mincing meat and making garlic paste.)
Lock
Lock
Turn counter-clockwise to lock to the motor unit, turn
clockwise to unlock.
Blade
Bowl
Maximum capacity: 700ml
Ideal for measuring and preparing small amounts of food.
Wall mounting bracket
You can hang the blender or removable housing to the
large hole after using.
Motor Unit
Turn the chopper lid counter-clockwise to lock it to the motor
unit.
Removable Chopper Lid
Turn the chopper clockwise to lock it to the bowl, turn it in
adverse direction to unlock.
Removable Chopper Blade
The edge of blade is very sharp. Handle carefully to prevent
cutting yourself.
Always grab the plastic shaft.
Bowl
Place food into the bowl before attaching the chopper lid.
- 9 -
Page 11
KNOWING YOUR BLENDER SET
KNOWING THE ATTACHMENTS - BEATER
(It is used to whisk egg)
Motor Unit
Lock
KNOWING THE BLENDER SET
* Please clean the the blender set thoroughly as indicated in chapter “Quick Cleaning”
prior to first use.
* Do not operate the unit for more than 15 seconds before putting any ingredients in it.
Important: Blades are very sharp, handle with care. Ensure that the hand-held blender
is unplugged from the power outlet before assembling or removing any attachments.
BLENDER INSTRUCTIONS
Maximum operation duration per time may not exceed 1 minute and 10 minute rest time
must be maintained after 2 consecutive cycles.
1. To assemble the detachable shaft with the motor unit, turn the shaft counter-clockwise
direction until tightened. Turn it the other way for removal.
2. Plug the handheld blender set to the mains.
3. Lower the hand-held blender into food and press the switch at the top of the motor
unit.
4. In order to stop the blender set release the switch.
Turn the unit clockwise to lock the beater to the motor unit.
Beater
It is used to whisk eggs.
You can obtain a cream by whisking the egg white.
Bowl
You can put white of 2 eggs in the bowl at once.
CHOPPER INSTRUCTIONS
Maximum operation duration per time may not exceed 1 minute and 10 minute rest time
must be maintained after 2 consecutive cycles.
1. Place the chopper bowl on a clean and level surface.
2. Assemble the stainless steel blade into the chopper bowl, as shown in Figure 1.
- 10 -
Page 12
CHOPPER INSTRUCTIONS
3. Add the ingredients to the chopper bowl.
Note: Bone the meat, cut in small chunks and place them in the bowl. Maximum meat
quantity shall not exceed 200 grams per each chopping cycle.
4. Attach the lid onto the chopper bowl and turn it in clockwise direction until it locks
into its position (Figure 2). Turn the lid counterclockwise for removal.
5. Insert the top part of the chopper through the hole of the chopper lid and turn it
clockwise to lock (Figure 3).
6. Plug the cable of the device to the socket and press the power button to operate.
7. Release the switch to stop the unit.
* To prevent the risk of injury, do not assemble the cutting blades on base without first
placing bowl properly in its place.
* Ensure that the cover is locked in its place securely before operating the device.
Lock
Lock
Fig 1 Fig 2 Fig 3
BEATER INSTRUCTIONS
Maximum operation duration per time may not exceed 1 minute and 10 minute rest time
must be maintained after 2 consecutive cycles.
1. To assemble the egg white beater to the motor unit, turn the beater counterclockwise
until tightened. Turn it the other way for removal.
2. Plug the handheld blender set to the mains.
3. Pour the egg white in the bowl. Generally white of 2 eggs is sufficient.
4. Lower the hand-held blender into food and press the switch at the top of the motor
unit.
5. In order to stop the blender set release the switch.
CLEANING AND MAINTENANCE
1. Unplug the appliance and remove the removable housing.
Note: Do not immerse the removable housing of the blender set in water, otherwise,
lubrication on the shaft bearing may wash off with water.
-11 -
Page 13
CLEANING AND MAINTENANCE
2. You can wash the removable shaft under water without using abrasive
cleaning agents or detergent. Turn the shaft upside down upon cleaning
to drain off the water.
This part is dishwasher safe.
3. Wash the bowl, cup, beater and blade in warm soapy water.
Since the plastic components of the bowl and beater can be deformed in
dishwasher, it is not recommended to wash them in dishwasher.
4. Wipe the motor unit with a damp cloth. Never immerse the motor unit
in water to prevent the risk of electric shock.
5. Dry the unit thoroughly.
Warning: Blades are very sharp, handle carefully.
6. Assemble the blender shaft to the motor unit again and place it on the
wall mounted bracket upside down (Figure 4) or hang it to save space.
QUICK CLEANING
Between processing steps take the handheld blender set and immerse in a cup filled
with water up to its half and operate for a few seconds.
INSTALLING THE WALL BRACKET
You can install the wall bracket as follows:
1. Drill two identical holes in the wall observing the dimensions
indicated in figure 5.
2. Place the two plastic dowels inside the holes using a hammer.
3. Fix the wall bracket using two screws.
ENVIRONMENT FRIENDLY DISPOSAL
You can contribute to environmental protection!
Please follow the local regulations: Take the inoperable electrical devices to
appropriate disposal centers.
Fig 4
Fig 5
- 12 -
Page 14

FRANÇAIS
SINBO SHB 3029
MIXEUR
MODE D'EMPLOI
AC230V, 50Hz, 300W
CONSIGNES IMPORTANTES DE SÉCURITÉ
Vous devez absolument considérer les précautions principales de sécurité y compris les
articles ci-dessous lors de l’utilisation des appareils électriques.
1.Lisez les instructions en entier.
2.Avant de commencer à utiliser, vérifiez si le voltage indiqué sur la plaque nominale de
l’appareil correspond bien au voltage de votre résidence.
3.N’utilisez aucun appareil si le cordon ou la fiche électrique a été détériorée ou si une
panne a lieu ou si l’appareil a été fait tombé ou endommagé d’une façon ou d’une autre.
Déposez l’appareil au centre de service agréé le plus proche pour qu’il soit contrôlé, réparé
et que les ajustements électriques ou mécaniques s’effectuent.
4.En cas de dysfonctionnement du cordon d’alimentation, afin d’éviter les dangers ; le
cordon doit être remplacé par la société fabricante, le centre de service ou par un technicien
autorisé.
5.Débranchez la fiche électrique de l’appareil pendant que vous ne l’utilisez pas, lorsque
vous y montez des pièces ou vous en démontez des pièces, et avant le nettoyage.
6.Veillez à ce que le cordon ne se coince pas aux bords de l’établi ou de la table et qu’il ne
soit pas en contact avec des surfaces chaudes.
7.Afin d’éviter tout risque de choc électrique, n’introduisez pas les parties supérieures du
mixeur dans l’eau.
8.Une surveillance attentive est nécessaire lorsque l’appareil est utilisé par les enfants ou
près d’eux.
9.Ne touchez jamais les pièces mobiles.
10.Pour prévenir les risques de brûlures personnelles ou tout endommagement que peut
subir le set de mixeur, n’introduisez pas vos mains ni aucun outil de cuisine dans le récipient
de mixage lorsque le mixeur fonctionne. Vous pouvez utiliser une spatule uniquement
lorsque le mixeur ne fonctionne pas.
11.Cet appareil ne peut pas être utilisé pour morceler des glaces ou pour mixer des
matériels durs et secs, sinon les lames peuvent devenir ternes.
12.Pour prévenir tout risque de blessures, n’installez jamais les lames au corps avant
d’avoir bien installé le récipient à sa place.
13.Assurez-vous que le couvercle est correctement verrouillé à sa place avant de mettre
l’appareil en marche.
14.L’usage des accessoires qui ne sont pas conseillés par le fabricant peut causer des
blessures personnelles.
15.N’utilisez pas l’appareil à des fins autres que celles pour les quelle il est prévu.
16.N’utilisez pas dans des endroits de plein air.
17.Conservez ce manuel.
UNIQUEMENT POUR USAGE DOMESTIQUE
- 13 -
Page 15
PRENEZ CONNAISSANCE DE VOTRE MIXEUR
(Convenable pour mixer des fruits et des légumes)
Commutateur de Vitesse Lente et Rapide
(Du haut vers le bas)
Unité de Moteur
Corps démontable
Verrou
PRENEZ CONNAISSANCE DES PIÈCES - DÉCHIQUETEUSE
(S’utilise pour déchiqueter la viande et écraser l’ail).
Verrou
Verrou
Faites tourner dans le sens antihoraire, pour verrouiller à
l’unité de moteur, et dans le sens horaire pour déverrouiller.
Lame
Récipient
Capacité maximum : 700ml
Idéal pour faire du mesurage et pour préparer des aliments
traités en petite quantité.
Outil Mural
Après avoir utilisé le mixeur ou le corps démontable, vous
pouvez suspendre au grand trou.
Unité de Moteur
Faites tourner le couvercle déchiqueteur dans le sens horaire
pour le verrouiller à l’unité de moteur.
Couvercle Déchiqueteur Amovible
Faites tourner dans le sens horaire pour verrouiller avec le
récipient déchiqueteur, et dans le sens antihoraire pour
déverrouiller.
Lame Déchiqueteuse Amovible
Le bord de la lame est très coupant. Soyez prudent lorsque
vous tenez pour éviter de vous couper.
Saisissez toujours du mille en plastique.
Récipient
Installez les aliments dans le récipient avant de monter le
couvercle déchiqueteur.
- 14 -
Page 16

PRENEZ CONNAISSANCE DE VOTRE MIXEUR
PRENEZ CONNAISSANCE DES PIÈCES - FOUETTEUR
(Convenable pour fouetter les œufs)
Unité de Moteur
Verrou
EMPLOI DU SET DE MIXEUR
* Avant la première utilisation, nettoyez votre set de mixeur tel que décrit sous le chapitre
de « Nettoyage rapide »
* La durée de fonctionnement ne doit pas dépasser les 15 secondes si aucun ingrédient
n‘a été mis.
Important : Les lames sont très coupantes, de ce fait vous devez être prudent lorsque
vous les tenez. N’oubliez pas de débrancher la fiche électrique du mixeur portatif avant
d’y monter un outil ou d’en démonter un.
INSTRUCTIONS POUR LE MIXEUR
La durée maximum de fonctionnement ne doit pas être plus de 1 minute lorsque la
vitesse est au niveau rapide et il convient d’attendre pendant 10 minute après 2 tours
de suite.
1.Pour monter le mille amovible à l’unité de moteur, faites tourner le mille dans le sens
antihoraire jusqu'à ce qu’il s’installe à sa place. Et faites tourner dans l'autre sens pour
démonter.
2.Branchez la fiche électrique du set de mixeur portatif à la prise de courant.
3.Faites descendre le set de mixeur portatif sur les aliments et appuyez sur le bouton
commutateur qui se trouve sur l’unité de moteur.
4.Laissez libre le bouton commutateur pour arrêter le set de mixeur.
Faites tourner l’unité dans le sens horaire pour verrouiller
le fouetteur à l’unité de moteur.
Fouet
(S’utilise pour fouetter des œufs)
Vous pouvez faire de la mousse en fouettant le blanc de
l’œuf.
Récipient
Vous pouvez mettre 2 blancs d’œuf à la fois dans le récipient.
- 15 -
Page 17

INSTRUCTIONS POUR LA DÉCHIQUETEUSE
La durée maximum de fonctionnement ne doit pas être plus de 1 minute lorsque la
vitesse est au niveau rapide et il convient d’attendre pendant 10 minute après 2 tours
de suite.
1.Posez le récipient déchiqueteur sur une surface propre et plate.
2.Montez la lame en acier inoxydable au récipient de déchiquetage tel que décrit sur
l’illustration 1.
3.Installez les aliments dans le récipient de déchiquetage.
Remarque : Séparez les os de la viande, coupez la viande en petits morceaux puis
installez-les dans le récipient. La quantité maximum de viande ne doit pas dépasser les
200 grammes pour chaque opération de battement.
4.Montez le couvercle au récipient de déchiquetage et faites-le tourner dans le sens
horaire jusqu'à ce qu’il se verrouille à sa place (illustration 2). Et faites tourner dans le
sens antihoraire pour démonter le couvercle.
5.Faites passer la pièce supérieure de la déchiqueteuse par le trou du couvercle de la
déchiqueteuse et faites tourner dans le sens horaire pour verrouiller (illustration 3).
6.Branchez la fiche électrique de l’appareil à la prise de courant et appuyez sur le bouton
commutateur pour mettre en marche.
7.Laissez libre le bouton commutateur pour arrêter l’appareil.
* Pour prévenir tout risque de blessures, n’installez jamais les lames coupantes au corps
avant d’avoir bien installé le récipient à sa place.
* Assurez-vous que le couvercle de la déchiqueteuse est correctement verrouillé à sa
place avant de mettre l’appareil en marche.
Verrou
Verrou
Illustration 1 Illustration 2 Illustration 3
INSTRUCTIONS POUR FOUETTEUR D’ŒUFS
La durée maximum de fonctionnement ne doit pas être plus de 1 minutes lorsque la
vitesse est au niveau rapide et il convient d’attendre pendant 10 minute après 2 tours
de suite.
1.Pour monter le fouetteur de blanc d’œuf à l’unité de moteur, faites tourner le fouet
dans le sens antihoraire jusqu'à ce qu’il s’installe bien à sa place. Et faites tourner dans
l'autre sens pour démonter.
- 16 -
Page 18

INSTRUCTIONS POUR FOUETTEUR D’ŒUFS
2.Branchez la fiche électrique du set de mixeur portatif à la prise de courant.
3.Mettez le blanc de l’œuf dans le récipient. Souvent, deux œufs sont suffisants.
4.Faites descendre le set de mixeur portatif sur les aliments et appuyez sur le commutateur
qui se trouve sur l’unité de moteur.
5.Laissez libre le bouton commutateur pour arrêter le set de mixeur.
NETTOYAGE ET ENTRETIEN
1.Débranchez la fiche électrique de l'appareil de la prise et retirez le corps
démontable.
Remarque : N’immergez pas le corps démontable du set de mixeur dans l’eau
car la lubrification qui se trouve sur le lit de mille peut couler avec l’eau.
2.Lavez le manche détachable sous l’eau sans utiliser de nettoyants abrasifs
ou de détergent.
Après avoir nettoyé, retournez le manche détachable à l'envers pour faire couler
l’eau qui est entrée dedans.
Cette pièce est lavable dans le lave-vaisselle.
3.Lavez le récipient, le contenant, le fouetteur et la lame à l’eau chaude
savonneuse.
Étant donné que les composants en plastiques du contenant et du fouetteur
peuvent s’abîmer, il est déconseillé qu’ils soient lavés dans le lave-vaisselle.
4.Nettoyez l’unité de moteur en l’essuyant avec un chiffon humide. Pour éviter tout risque de
choc électrique, n’immergez jamais l’unité de moteur dans l’eau.
5.Asséchez bien l’appareil.
Avertissement : Étant donné que les lames sont très coupantes, soyez prudent en les tenant.
6.Montez à nouveau le mille de mixeur à l'unité de moteur et puis attachez-le au support de
mur (illustration 4) ou encore suspendez-le pour gagner de la place.
NETTOYAGE RAPIDE
Entre les pas d’opération, prenez le set de mixeur portatif et faites-le fonctionner pendant
quelques secondes en le mettant dans une tasse remplie à moitié d'eau.
FIXATION DU SUPPORT MURAL
Vous pouvez fixer le support mural comme ci-dessous :
1.Faites deux trous identiques dans le mur et
respectez tout à fait les dimensions indiquées dans l’illustration 5.
2.Fichez deux chevilles en plastiques avec un marteau dans les trous.
3.Immobilisez le support mural avec deux vis.
MISE AU REBUT DE FAÇON RESPECTUEUSE ENVERS L’ENVIRONNEMENT
Vous aussi vous pouvez contribuer à la protection de l’environnement.
Veuillez ne pas oublier de respecter les réglementations locales. Déposez vos appareils
électriques qui ne fonctionnent plus aux centres d'élimination appropriés.
Illustration 4
Illustration 5
- 17 -
Page 19

NEDERLANDS
SINBO SHB 3029
BLENDER
GEBRUIKSHANDLEIDING
AC230V, 50Hz, 300W
BELANGRIJKE VEILIGHEIDSINSTRUCTIES
Bij het gebruik van elektrische apparaten moeten altijd volgende essentiële
veiligheidsvoorschriften worden in acht genomen.
1. Lees aandachtig de volledige handleiding.
2. Controleer, voordat u het apparaat op het stroomnet aansluit, of de plaatselijke
netspanning overeenkomt met de voltage die vermeld is op het typeplaatje.
3. Gebruik het apparaat niet ingeval het snoer, de stekker of het apparaat zelf beschadigd
of defect is, gevallen is of niet normaal functioneert; breng het naar een bevoegde Service
om het te laten nazien, herstellen of afstellen.
4. Neem altijd de stekker uit het stopcontact als het apparaat niet wordt gebruikt, voor
het monteren of demonteren van onderdelen en voor reiniging.
5. Laat het snoer niet over de rand van tafel of aanrecht hangen of in aanraking komen
met hete oppervlakken.
6. Dompel de bovendelen van het blenderstel niet in water of een andere vloeistof om
gevaar van elektrische schok te voorkomen.
7. Houd nauwlettend toezicht als het apparaat gebruikt wordt door of in de buurt van
kinderen.
8. Raak bewegende delen nooit aan.
9. Om persoonlijk letsel en beschadiging van de blender te vermijden, steek nooit uw
hand of enig keukengerei in de mengkom terwijl het apparaat functioneert. Alleen als
het apparaat uitgeschakeld is kunt u een spatel gebruiken.
10. Gebruik dit apparaat niet om ijs te verbrijzelen of om harde, droge ingrediënten te
mengen want dan worden de messen bot.
11. Om gevaar te vermijden, bevestig de messen pas aan de romp nadat de mengbeker
goed geplaatst is.
12. Zorg dat het deksel goed vast zit voordat u het apparaat inschakelt.
13. Gebruik van accessoires die niet door de fabrikant zijn aanbevolen kan persoonlijk
letsel tot gevolg hebben.
14. Gebruik het apparaat uitsluitend voor het bestemde doel.
15. Gebruik het apparaat niet buitenhuis.
16. Bewaar deze handleiding zorgvuldig.
UITSLUITEND VOOR HUISHOUDELIJK GEBRUIK
- 18 -
Page 20

LEER UW BLENDERSET KENNEN
(Geschikt om groenten en fruit te mengen)
Lage en Hoge snelheidschakelaar
(van boven naar onder)
Motorunit
Demontabele Romp
Vastzetten
LEER DE ACCESSOIRES KENNEN - HAKAPPARAAT
(Geschikt om vlees te hakken en look te verbrijzelen)
Vastzetten
Vastzetten
Bevestig aan de motor unit door in tegengestelde richting van
het uurwerk te draaien, Demonteer in de richting van het
uurwerk.
Mes
Mengbeker
Maximum capaciteit: 700ml
Ideaal voor gebruik als maatbeker of om kleine hoeveelheden
voedsel te mengen.
Wandhouder
De blender of demontabele romp kunnen na gebruik in de
wandhouder worden opgehangen.
Motorunit
Draai in de richting van het uurwerk om het hakdeksel aan
de motorunit te bevestigen.
Afneembaar Hakdeksel
Bevestig op de hakkom in de richting van het uurwerk,
verwijder in tegengestelde richting.
Uitneembaar Hakmes
De messen zijn heel scherp. Wees voorzichtig bij het hanteren
om geen letsel op te lopen. Grijp alleen vast aan de plastic spil.
Hakkom
Doe de ingrediënten in de kom vooraleer u het hakmes
aanbrengt.
- 19 -
Page 21

LEER UW BLENDERSET KENNEN
LEER DE ACCESSOIRES KENNEN - KLOPPER
(Geschikt om eieren te kloppen)
Motorunit
Vastzetten
GEBRUIK VAN DE BLENDERSET
* Maak voor elk gebruik de blenderset schoon zoals uitgelegd onder “Snelle reiniging”.
* Laat het apparaat niet langer dan 15 seconden werken zonder ingrediënten.
Belangrijk: De messen zijn heel scherp, wees voorzichtig bij het hanteren. Neem altijd
de stekker uit het stopcontact voordat u een hulpstuk monteert of demonteert.
INSTRUCTIES VOOR DE BLENDER
Het apparaat mag niet langer dan 1 minuut ononderbroken op hoge snelheid worden
gebruikt en tussen 2 opeenvolgende bewerkingen moet er 10 minuut worden gewacht
om het te laten afkoelen.
1. Om de demontabele as op de motorunit te monteren, draai ze tegen het uurwerk in
tot ze vastzit. Draai in tegengestelde richting om de as te demonteren.
2. Steek de stekker in het stopcontact.
3. Houd de blender met het voetstuk in het voedsel en druk de schakeltoets in die zich
op de motorunit bevindt om het apparaat in werking te zetten.
4. Laat de schakeltoets los om het apparaat uit te schakelen.
Draai in de richting van het uurwerk om de klopper aan
de motorunit te bevestigen.
Klopgarde
Te gebruiken om eieren te kloppen.
Eiwit kunt u hiermee tot sneeuw kloppen.
Beker
In de beker kan in één keer het wit van 2 eieren tot
sneeuw worden geklopt.
INSTRUCTIES VOOR HET HAKAPPARAAT
Het apparaat mag niet langer dan 1 minuut onafgebroken op hoge snelheid worden
gebruikt en tussen 2 achtereenvolgende bewerkingen moet er 10 minuut worden gewacht
om het te laten afkoelen.
1. Plaats de hakkom op een reine en vlakke bodem.
- 20 -
Page 22

INSTRUCTIES VOOR HET HAKAPPARAAT
2. Monteer het roestvrijstalen mes in de hakkom zoals getoond in Fig. 1.
3. Doe het voedsel dat moet worden gehakt in de kom.
Opmerking: Ontbeen het vlees en snijd het in kleine blokjes voordat u het in de kom doet.
Bewerk niet meer dan 200 gram vlees per keer.
4. Plaats het deksel op de hakkom, draai vast in de richting van het uurwerk (Fig. 2). Om
het deksel te verwijderen draait u in tegengestelde richting.
5. Bevestig via de opening in het deksel de romp van de handblender met de bovenzijde
van het hakmes en draai vast in de richting van het uurwerk (Fig. 3).
6. Steek de stekker in het stopcontact en druk de schakelknop in om het apparaat in
werking te zetten.
7. Laat de schakeltoets los om het apparaat uit te schakelen.
* Bevestig het hakmes in geen geval aan de romp voordat de hakkom goed en stabiel
geïnstalleerd is, om letselgevaar te voorkomen.
* Controleer of het deksel van de hakkom goed vastzit vooral u het apparaat inschakelt.
Vastzetten
Vastzetten
Figuur 1
INSTRUCTIES VOOR DE EIERKLOPPER
Het apparaat mag niet langer dan 1 minuten onafgebroken 10 op hoge snelheid worden
gebruikt en tussen 2 opeenvolgende bewerkingen moet er één minuut worden gewacht
om het te laten afkoelen.
1. Om de eiwitklopper aan de motorunit te bevestigen, draai de klopgarde in tegengestelde
richting van het uurwerk tot hij goed vastzit. Om hem te demonteren draait u in
tegenovergestelde richting.
2. Steek de stekker in het stopcontact.
3. Doe het eiwit in de mengbeker. In de mengbeker kunnen in een keer, twee eiwitten
worden geklopt.
4. Houd het apparaat met de kloproede in het eiwit en druk de schakeltoets in die zich
op de motorunit bevindt om het apparaat in werking te zetten.
5. Laat de schakeltoets los om het apparaat uit te schakelen.
Figuur 2 Figuur 3
- 21 -
Page 23

REINIGING EN ONDERHOUD
1. Haal de stekker uit het stopcontact en demonteer de afneembare romp.
Opmerking: Was de demontabele romp van het blenderapparaat niet
met water want hierdoor zou de smeerolie van het lager kunnen uitlopen.
2. Was de demontabele as onder de kraan en gebruik geen schurend of
bijtend detergent. Draai ondersteboven om te laten uitlekken.
Dit onderdeel mag in de vaatwasser.
en het mes in lauw zeepwater.
Was de kom en de klopgarde bij voorkeur met de hand om de
plastic componenten tegen slijtage te beschermen.
schoon met een vochtige doek. Dompel de
Motorunit nooit in water om een elektrische schok te voorkomen.
5. Droog alle onderdelen van het apparaat goed af.
Let op: Wees voorzichtig bij het hanteren van de messen, ze zijn heel
scherp
6. Monteer de as van de blender terug op de motorunit en plaats het apparaat in de
wandhouder (Fig.4) of hang het ondersteboven op om plaats te winnen.
SNELLE REINIGING
Tussen twee bewerkingen in kunt u de blender in een half met water gevulde kop enkele
seconden aanzetten om te reinigen.
DE HOUDER AAN DE WAND MONTEREN
Monteer de houder aan de wand als volgt:
1. Boor twee identieke gaten in de muur, getrouw aan de
afmetingen in Fig. 5.
2. Bevestig in beide gaten een plastic plug met behulp
een hamer.
3. Bevestig de houder met twee schroeven.
MILIEUVRIENDELIJKE AFVOER
Draag bij tot de bescherming van het milieu!
Eerbiedig de plaatselijke voorschriften: Gelieve elektrische apparaten die u niet
meer gebruikt in te leveren op het door de lokale overheden aangewezen
verzamelpunt.
Figuur 4
Figuur 5
- 22 -
Page 24

DEUTSCH
SINBO SHB 3029 MIXSTAB
BEDIENUNGSANLEITUNG
AC230V, 50Hz, 300W
WICHTIGE SICHERHEITSBEDINGUNGEN
Bevor das elektrische Gerät benutzt wird müssen die unten aufgeführten
Grundbedingungen in Bezug auf die Sicherheit unbedingt eingehalten werden:
1. Lesen Sie die Anleitungen vollständig durch.
2. Bevor sie das Gerät benützen überzeugen sie sich das die Wattleistung ihrer Stromquelle
mit der angebenden Watteinheit auf der Kennzeichenplakette ihres Gerätes überein
stimmen
3. Verwenden sie kein Gerät dessen Kabel eine Beschädigung erlitten hat oder wenn das
Gerät eine Funktionsstörung aufweisen sollte, oder wenn das Gerät herunter gefallen
ist. Um das Gerät kontrollieren zulassen, mechanische oder elektrische Einstellungen
vornehmen zu lassen wenden sie sich an ihren zuständigen Service.
4. Um bei beschädigten Kabeln einer Gefahr vor zu wirken sollte das Kabel nur vom
Hersteller, dem zuständigen Service oder einer anderen zuständigen Person gewechselt
werden
5. Wird das Gerät nicht benützt, oder wenn sie Teile aufstecken oder abnehmen sollten
sie den Stecker aus der Stromquelle ziehen.
6. Achten sie darauf, dass das Kabel nicht über Arbeitsflächen oder Tischkanten hängt
oder mit heißen Oberflächen in Berührung kommt.
7. Tauchen sie den oberen Teil des Mixstabes nicht in das Wasser, es besteht die Gefahr
eines elektrischen Schocks
8. Um zu verhindern das Kinder mit dem Gerät spielen, sollte man eine entsprechende
Vorrichtung.
9. Berühren sie auf keinen Fall Teile die in Bewegung sind
10. Um Verletzungsrisiken zu vermeiden oder zu verhindern dass der Mixerstab beschädigt
wird sollten sie auf keinen Fall ihre Hände oder Küchenutensilien während das Gerät
läuft in die Schüssel stecken. Sollte der Mixstab nicht arbeiten können sie eine
Küchenspachtel benützen
11. Dieses Gerät ist nicht geeignet um Eis zu zerkleinern oder Trockengut zu vermischen,
die Messer können stumpf werden.
12. Um Verletzungen vor zu beugen bringen sie die Schneidemesser nicht an bevor sie
die Schüssel fest gemacht haben.
13. Bevor sie das Gerät laufen lassen überzeugen sie sich das die Verschlussstelle
ordnungsgemäß verschlossen wurde.
14. Zubehör das von der Firma nicht empfohlen wurde kann zu Verletzungen
15. Das Gerät darf nicht zweckentfremdet benütz werden.
16. Benutzen Sie das Gerät nicht im Freien
17. Bewahren Sie diese Anleitung auf.
NUR FÜR DEN HÄUSLICHEN GEBRAUCH
- 23 -
Page 25

LERNEN SIE IHR MIXSTAB-SET KENNEN
(Ist geeignet für Obst und Gemüse)
Geschwindigkeitseinstellung
(oben / unten)
Motoreinheit
Abnehmbares Teil
Vastzetten
ZUBEHÖR -ZERKINERER
(Zum Zerkleinern von Fleisch und Knoblauch.)
Verschluss
Verschluss
Um es an die Motoreinheit anzuschließen den gegengesetzten
Uhrzeigersinn drehen, um den Verschluss zu öffnen in
Richtung Uhrzeigersinn drehen.
Messer
Schüssel
Maximale Kapazität: 700 ml
Ideal für Messungen und zum Verarbeiten von geringen Mengen
Wandhaltung
Sie können den Mixstab oder die abnehmbare
Motoreinheit aufhängen
Motoreinheit
Um den Zerkleinerer an die Motoreinheit anzuschließen drehen
sie gegen den Uhrzeigersinn.
Abnehmbares Teil des Zerkleinerers
Um dieses Teil anzuschließen im Uhrzeigersinn drehen um es
abzunehmen gegen den Uhrzeigersinn drehen.
Abnehmbares Messer des Zerkleinerers
Die Messerränder sind sehr scharf, seien sie vorsichtig wenn sie
es berühren. Nehmen sie nur das Plastikteil in die Hand.
Schüssel
Bevor sie den Zerkleinerer aufsetzen füllen sie die Schüssel.
- 24 -
Page 26

ZUBEHÖR - MIXER
(Geeignet zum verquirlen von Eiern)
Motoreinheit
Verschluss
BENÜTZUNG DES MIXER SETS
* Vor der ersten Benützung sollten sie das Set so reinigen wie es in dem “Schnellreinigung”
Abschnitt beschrieben wird.
* Nachdem sie die Zutaten eingefüllt haben sollten sie nicht länger als 15 Sekunden
warten.
Wichtig: Die Messer sind sehr scharf, seien sie vorsichtig wenn sie die Messer halten
Bevor sie ein Zubehör an den Mixerstab anschließen vergessen sie nicht den Stecker
aus der Stromquelle zu ziehen.
HINWEISE ZUR BENÜTZUNG DES MIXERSTABES
In der höchsten Geschwindigkeitsstufe sollte das Gerät nicht länger als 1 Minute lang
arbeiten. Zwischen verschiedenen Arbeitsgängen sollten sie 1 Minute warten.
1. Um die abnehmbare Spindel an die Motoreinheit anzuschließen drehen sie in de
Uhrzeigersinn bis diese einrastet. Um sie wieder abzunehmen drehen sie in die
gegengesetzte Richtung.
2. Schließen sie das handhabliche Mixer Set an die Stromquelle an.
3. Tauchen sie den Mixerstab in die Zutaten die sie aufgefüllt haben und drücken sie auf
die Taste auf der Motoreinheit.
4. Um den Mixer zu stoppen lassen sie die Taste los.
5. HINWEISE ZUR BENÜTZUNG DES ZERKLEINERERS
In der höchsten Geschwindigkeitsstufe sollte das Gerät nicht länger als 1 Minute lang
arbeiten. Zwischen verschiedenen Arbeitsgängen sollten sie 1 Minute warten.
Um den Mixer an die Motoreinheit anzuschließen drehen
sie gegen den Uhrzeigersinn.
Mixer
Sie können damit Eier verquirlen oder das Eiweiß zu
Schnee schlagen.
Schüssel
Geeignet zum verquirlen von zwei Eiern
- 25 -
Page 27

HINWEISE ZUR BENÜTZUNG DES MIXERSTABES
1. Stellen sie die Schüssel des Zerkleinerers auf einen sauberen und ebenen Untergrund.
2. Stecken sie das rostfreie Stahlmesser wie auf “Beschreibung “1’ gezeigt wird an die
Einheit an.
3. Füllen sie die Zutaten in die Schüssel.
Hinweis: Entfernen sie eventuelle Knochen aus dem Fleisch und teilen sie das Fleisch
in kleine Stücke. Bei einem Arbeitsgang sollten nicht mehr als 200 Gramm verarbeitet
werden.
4. Stecken sie das Verschlussteil des Zerkleinerers auf die Schüssel und drehen sie in
Richtung Uhrzeigersinn bis er einrastet (Beschreibung 2). Um den Verschluss wieder
abzunehmen drehen sie in die entgegengesetzte Richtung.
5. Schieben sie den Stab des Zerkleinerers durch die Öffnung an dem Verschlussteil und
drehen sie in Richtung Uhrzeigersinn (Beschreibung3).
6. Stecken sie das Gerät an die Stromquelle an und drücken sie die Taste um den
Arbeitsvorgang zu starten.
7. Um den Arbeitsvorgang zu unterbrechen oder zu stoppen lassen sie die Taste wieder
aus.
* Um Verletzungen zu vermeiden überzeugen sie sich das die Schüssel entsprechend
angebracht ist, erst dann sollten sie die Messer aufsetzen.
* Überzeugen sie sich das die Schüssel eingerastet ist erst dann sollten sie den
Arbeitsbeginn starten
Verschluß
Verschluß
Beschreibung 1
HINWEISE ZUR BENÜTZUNG DES MIXERS
In der höchsten Geschwindigkeitsstufe sollte das Gerät nicht länger als 1 Minute lang
arbeiten. Zwischen verschiedenen Arbeitsgängen sollten sie 10 Minute warten.
1. Um den Mixer an die Motoreinheit anzuschließen drehen sie das Teil bis es einrastet
in Richtung Uhrzeigersinn. Um das Teil wieder abzunehmen drehen sie es in die
gegengesetzte Richtung.
2. Schließen sie das Mixer Set an die Stromquelle an.
3. Geben sie das Eiweiß in die Schüssel. Die Kapazität der Schüssel reicht für zwei Eiweiß
4. Tauchen sie den Mixer in die Zutaten und drücken sie die Taste auf der Motoreinheit.
5. Um den Arbeitsvorgang zu unterbrechen oder zu stoppen lassen sie die Taste los.
Beschreibung 2
Beschreibung 3
- 26 -
Page 28

REINIGEN UND WARTEN
1. Ziehen sie den Stecker des Gerätes aus der Stromquelle und nehmen sie das Portative
Teil ab.
Hinweis: Tauchen sie das abnehmbare Teil nicht unter das Wasser da
sonst die geölten Stellen des Spindellagers auslaufen könnten.
2. Das andere Teil sollten sie nicht mit scharfen Reinigungsmittel
reinigen, nach der Reinigung drehen sie das Gerät um damit das
Wasser ablaufen kann.
Sie können dieses Teil auch in der Spülmaschine waschen.
3. Die Schüssel und den Mixer, dass Messer können sie mit
normalem Spülmittel und warmen Wasser waschen
Da die Verbindungsteile der Schüssel und des Mixers aus Plastik sind
Sollten sie nicht in der Spülmaschine gewaschen werden da
dies zu verfrühten Verschleißerscheinungen führen könnte.
4. Die Motoreinheit sollten sie nur mit einem feuchten Lappen abwischen.
Um das Risiko eines elektrischen Schlages zu vermeiden tauchen sie dieses Teil auf
keinen Fall unter das Wasser.
5. Trocknen sie das Gerät gut ab.
Hinweis: Die Messer sind sehr scharf, seien sie sehr vorsichtig beim festhalten.
6. Setzen sie die Spindel des Mixers auf die Motoreinheit und hängen sie das Gerät dann
in die dafür vorgesehene Haltung (Beschreibung 4)
SCHNELLE REINIGUNG
Zwischen den Arbeitsgängen können sie den Mixerkopf in einem Gefäß das halb mit
Wasser gefüllt ist eintauchen und für ein paar Sekunden laufen lassen.
BEFESTIGUNG DER WANDHALTERUNG
Die Halterung können sie wie beschrieben an der
Wand befestigen (Beschreibung 5).
1. Bohrer sie parallel zwei Löcher in die Wand deren
Durchmesser so sind wie es auf Bild 5 gezeigt wird.
2. Versenken sie zwei Dübel in den Löchern
3. Befestigen sie die Haltung mit zwei Schrauben fest an der
Wand.
4. BITTE ENSORGEN SIE DAS GERÄT UMWELTFREUNDLICH
Unterstützen sie ihre Umwelt!
Bitte halten sie sich an ihre regionalen Vorschriften: Übergeben sie nicht mehr
benützte elektrische Geräte an zuständige Entsorgungsstellen
Figuur 4
Figuur 5
- 27 -
Page 29

ESPANOL
SINBO SHB 3029
BATIDORA
GUÍA DEL USO
AC230V, 50Hz, 300W
INSTRUCCIONES IMPORTANTES DE LA SEGURIDAD
Cuando está utilizando las máquinas eléctricas tiene que tener en cuenta las precauciones
básicas de la seguridad incluso las siguientes:
1. Lee toda de las instrucciones.
2. Antes de empezar a utilizar controle que los voltajes de su casa y de la etiqueta de la
máquina son los mismos.
3. No intenta utilizar ningún máquina, si su cable o enchufe se avería o hay una avería
en la máquina o se cae. Para control, reparación, ajustes eléctricos o mecánicos lleve
la máquina al centro del servicio más cercano.
4. Cuando el cable de energía se daña, el cable se debe cambiar por el fabricante, centro
del servicio o un técnico autorizado para evitar los peligros.
5. Cuando no se utiliza la máquina, cuando está montando o desmontando las piezas,
antes de limpiar desenchufe la máquina.
6. Tenga cuidado que el cable no se cuelga de los bordes de encimera o mesa o no toque
a las superficies calientes.
7. No mete las partes superiores del set de batidora en agua para evitar el choque de
electricidad.
8. Cuando está utilizando la máquina cerca de los niños o por los niños, hay que hacer
la vigilancia cercana.
9. No toque a las piezas móviles.
10. Para evitar herirse o daños del set de batidora, cuando la batidora está funcionándose
no mete sus manos o materiales de cocina en la caja de mezclar. Puede utilizar una
espátula solo cuando la batidora no está funcionándose.
11. Esta máquina no se puede utilizar para romper los hielos o mezclar los materiales
duros, si se utiliza, los cuchillos se pueden deformar.
12. Para evitar el riesgo de herirse antes de fijar la escudilla, no fija los cuchillos al
cuerpo nunca.
13. Antes de hacer funcionar la máquina siempre comprueba que la tapa se cierre
seguramente.
14. Uso de los accesorios no recomendados por la firma fabricante pueden causar a
herirse.
15. No utilice la máquina por un objeto excepto el objeto de su uso.
16. No utilice en la fuera.
17. Guarde este guía.
ES SOLO PARA USO DOMESTICO
- 28 -
Page 30

INTRODUCCIÓN DE SET DE BATIDORA
(Es ideal para mezclar frutar y verduras)
Llave de la velocidad baja y alta
(desde arriba hacia abajo)
Unidad de motor
Cuerpo desmontable
Cerradura
INTRODUCCIÓN DE LOS ACCESORIOS- PICADORA
(Se utiliza para picar la carne y aplastar ajo)
Cerradura
Cerradura
Para cerrar a la unidad del motor girar hacia la dirección
contraria del reloj, para abrir la cerradura girar hacia la
dirección del reloj.
Cuchillo
Escudilla
Capacidad máxima: 700ml
Es ideal para hacer la medición y preparar los alimentos
procesados en las cantidades menores.
Aparato de pared
Puede colgar la batidora y cuerpo desmontable al hueco
grande después del uso.
Unidad del motor
Para cerrar la tapa de picadora a la unidad del motor girar
hacia la dirección del reloj.
Tapa desmontable de picadora
Para cerrar con la escudilla de picadora girar hacia la dirección
del reloj, para abrir la cerradura girar hacia la dirección
contraria.
Cuchillo desmontable de picadora
El borde del cuchillo es muy cortante. Para evitar cortes tenga
cuidada para cogerlo.
Siempre coge por el eje plástico.
Escudilla
Antes de montar la tapa de picadora haga situar los alimentos
a la escudilla.
- 29 -
Page 31

INTRODUCCIÓN DE SET DE BATIDORA
INTRODUCCIÓN DE LOS ACCESORIOS- BATIDOR
(Es ideal para batir los huevos)
Unidad del motor
Cerradura
USO DEL SET DE BATIDORA
* Antes del primer uso, limpie su set de batidora como se explica en la sección de
“Limpieza rápida”.
* La duración de funcionamiento de la máquina sin poner material al dentro no se debe
superar 15 segundos.
Importante: Los cuchillos son muy cortantes, por eso tenga cuidado. Antes de montar
o desmontar cualquier accesorio no olvide desenchufar la batidora portátil.
INSTRUCCIONES PARA LA BATIDORA
En el nivel de la velocidad alta, la duración de funcionamiento sin parada no se debe
superar 1 minuto y después de 2 rotos consecutivos se debe esperar por 10 minuto.
1. Para montar el eje desmontable gira hacia la dirección contraria del reloj hasta que
se fija a su lugar. Para desmontar gira hacia la dirección contraria.
2. Enchufe el set portátil de batidora.
3. Haga bajar el set portátil de la batidora sobre los alimentos y pulse el botón de llave
que está encima de la unidad del motor.
4. Para hacer parar el set de batidora, deje libre el botón de llave.
Para cerrar el batidor a la unidad del motor girar hacia
la dirección del reloj.
Alambre de batidor
Se utiliza para batir los huevos.
Puede hacer crema por batir el blanco del huevo.
Escudilla
Puede poner 2 blancos de huevos en una vez dentro de la
escudilla.
INSTRUCCIONES PARA LA PICADORA
En el nivel de la velocidad alta, la duración de funcionamiento sin parada no se debe
superar 1 minuto y después de 2 rotos consecutivos se debe esperar por 10 minuto.
1. Haga situar la escudilla de picadora encima de una superficie limpia y recta.
- 30 -
Page 32

INSTRUCCIONES PARA LA PICADORA
2. Monte el cuchillo de acero inoxidable a la escudilla de picadora como se muestra en
la figura 1.
3. Fije el alimento dentro de la escudilla de picadora.
Nota: Quitar los huesos de carne, cortar a las piezas pequeñas y fijar dentro de la
escudilla. Para cada proceso de picar la cantidad máxima de carne no se debe superar
200 gramos.
4. Monte la tapa a la escudilla de picadora y gira hacia la dirección del reloj hasta que
se cierre a su lugar (Figura 2). Para desmontar la tapa, gira hacia la dirección contraria.
5. Haga pasar la pieza superior de picadora por el hueco de la tapa de picadora y para
cerrar gira hacia la dirección del reloj (Figura 3).
6. Enchufe la máquina y para funcionar pulse el botón de llave.
7. Para hacer parar la máquina deje libre el botón de llave.
* Para evitar el riesgo de herirse no fija los cuchillos cortantes al cuerpo nunca antes
de fijar la escudilla a su lugar correctamente.
* Tiene que estar seguro que la tapa de picadora se cierre a su lugar seguramente antes
de hacer funcionar la máquina.
Cerradura
Cerradura
Figura 1
INSTRUCCIONES PARA EL BATIDOR DE LOS HUEVOS
En el nivel de la velocidad alta, la duración de funcionamiento sin parada no se debe
superar 1 minuto y después de 2 rotos consecutivos se debe esperar por 10 minuto.
1. Para montar el batidor de blanco de huevo a la unidad del motor gira el alambre de
batidor hacia la dirección contraria del reloj hasta que se fije a su lugar completamente.
Para desmontar gira hacia la dirección contraria del anterior.
2. Enchufe el set portátil de batidora.
3. Ponga el blanco del huevo dentro de la escudilla. Generalmente dos yemas de huevos
es suficiente.
4. Haga bajar el set portátil de la batidora sobre los alimentos y pulse el botón de llave
que está encima de la unidad del motor.
5. Para hacer parar el set de batidora, deje libre el botón de llave.
Figura 2 Figura 3
- 31 -
Page 33

LIMPIEZA Y MANTENIMIENTO
1. Desenchufe la máquina y desmonte el cuerpo desmontable.
Nota: No mete el cuerpo desmontable del set de batidora en agua, porque
el aceite encima del encaje del eje se puede quitar por el agua.
2. Lava el brazo desmontable por agua sin utilizar los limpiadores abrasivos
o detergentes. Después de limpiar gira el brazo inverso para quitar el agua
que se queda. Esta pieza se puede lavar por lavavajillas.
3. Lava la escudilla, caja, batidor y cuchillo por agua caliente enjabonado.
No se recomienda lavar por lavavajillas porque las piezas plásticas de la
caja y batidor se pueden deformar.
paño húmedo. Para evitar el choque de electricidad no mete la unidad del
motor en agua nunca.
Nota: Los cuchillos son muy cortantes, tenga cuidado para cogerlos.
6. Monte el eje del batidora a la unidad del motor de nuevo y luego cuelga al apoyo de
pared en la forma inversa (Figura 4) o cuelga para el ahorro de lugar.
LIMPIEZA RÁPIDA
Entre los pasos de proceso, coge el set portátil de batidora y ponga medio de un vaso
dentro de la batidora y haga funcionar por unos segundos.
FIJAR EL APOYO DE PARED
Puede fijar el apoyo de pared como la siguiente forma:
1. Haga dos huecos mismos en la pared y tenga en cuenta los
tamaños que se indican en la figura 5.
plástico en los huecos con un martillo.
3. Fije el apoyo de pared por dos tornillos.
TIRAR SENSITIVO AL MEDIOAMBIENTE
¡Puede compartir a la protección del medioambiente!
Por favor no olvide respetar a las disposiciones locales:
Lleve las máquina eléctricas no funcionadas a los centros de retiro.
Figura 4
Figura 5
- 32 -
Page 34

- 33 -
Page 35

- 34 -
Page 36

- 35 -
Page 37

- 36 -
Page 38

- 37 -
Page 39

No: 1-3029-08102013
- 38 -
Page 40

- 39 -
Page 41

Page 42

Page 43

Page 44

Page 45

Page 46

:1-3029-08102013
- 45 -
Page 47

- 46 -
Page 48

- 47 -
Page 49

- 48 -
Page 50

- 49 -
Page 51

- 50 -
Page 52

- 51 -
Page 53

HRVATSKI
SINBO SHB 3029
ˇ
STAPNI MIKSER
UPUTE ZA UPORABU
AC230V, 50Hz, 300W
BITNA SIGURNOSNA UPOZORENJA
Kod uporabe elektriˇcnih ured¯aja potrebno je imati u vidu osnovne sigurnosne mjere
zaˇstite ukljuˇcivˇsi i sljede´ce:
1. Proˇcitajte ove upute za uporabu.
2. Prije poˇcetka uporabe provjerite da li nazivni napon naveden na informacijskoj ploˇcici
odgovara naponu u vaˇsem domu.
3. Ne koristite nijedan ured¯aj s oˇste´cenim kabelom ili utikaˇcem, ured¯aj na kom postoji
neki kvar, ured¯aj koji je pao na pod ili je oˇste´cen na neki drugi naˇcin. Za ispitivanje ,
opravku i elektriˇcno ili mehaniˇcko podeˇsavanje molimo vas da ured¯aj odnesete u ovlaˇsteni
servisni centar.
4. Za izbjegavanje svake vrste opasnosti oˇste´ceni kabel treba da zamjeni proizvod¯aˇc
kabela, ovlaˇsteni servisni centar ili struˇcni tehniˇcar.
5. Kada ured¯aj nije u uporabi, prije postavljanja ili odvajanja dijelova i prije ˇciˇs´cenja
izvucite utikaˇc iz utiˇcnice.
6. Kabel ne smije visiti preko rubova stola ili radne povrˇsine. Zaˇstitite kabel od vru´cih
povrˇsina.
7. Gornji dio ˇstapnog miksera ne uranjajte u vodu. Opasnost od strujnog udara!
8. Uporaba ured¯aja od strane djece ili u blizini djece zahtjeva veliki oprez.
9. Nipoˇsto ne dodirujte dijelove u pokretu.
10. Za izbjegavanje rizika od osobne ozljede ili nanoˇsenja ˇstete ured¯aju, u vrijeme rada
ured¯aja u posudu za mijeˇsanje nipoˇsto ne ume´cite ruke ili kuhinjski pribor. Kada ured¯aj
ne radi moˇzete koristiti spatulu.
11. Ovaj ured¯aj nije mogu´ce koristiti za drobljenje leda ili mijeˇsanje tvrdih i suhih sastojaka.
U suprotnom moˇze do´ci do tupljenja noˇzeva.
12. Za izbjegavanje rizika od ozljede, nipoˇsto ne stavljajte noˇz prije postavljanja posude.
13. Prije pokretanja ured¯aja uvjerite se da je poklopac pravilno zatvoren.
14. Uporaba pribora koji ne preporuˇcuje proizvod¯aˇc moˇze uzrokovati osobne ozljede.
15. Ured¯aj ne koristite u neke druge svrhe osim u svhu za koju je namjenjen.
16. Ne koristite na vanjskim povrˇsinama.
17. Saˇcuvajte ovo uputstvo za uporabu.
SAMO ZA KU´CANSKU UPORABU
- 52 -
Page 54

OPIS APARATA
(Pogodan za mijeˇsanje vo´ca i povr´ca)
Gumb za nisku i visoku brzinu
(od vrha ka dnu)
Motorna jedinica
Odvojiva noga
Za spajanje na motornu jedinicu okrenite u smjeru
Brava
SJECKALICA -OPIS DIJELOVA
(koristi se za sjeckanje mesa i drobljenje ˇceˇsnjaka)
Brava
Brava
suprotnom smjeru kazaljke na satu, za odvajanja od motorne
jedinice okrenite u smjeru kazaljke na satu.
Noˇz
Posuda
Maksimalni kapacitet: 700ml
Idealna za mjerenje i obradu male koliˇcine hrane.
Zidni Nosaˇc
ˇ
Stapni mikser ili odvojivu nogu nakon uporabe moˇzete
umetnuti u veliku rupu.
Motorna Jedinica
Poklopac sjeckalice okrenite u smjeru kazaljke na satu i
spojite s motornom jedinicom.
Odvojiv poklopac sjeckalice
Poklopac okrenite u smjeru kazaljke na satu i spojite s
posudom, za odvajanje poklopca od posude okrenite u
suprotnom smjeru.
Odvojiv noˇz sjeckalice
Rubovi noˇza su jako oˇstri. Budite jako oprezni kod drˇzanja noˇza.
Noˇz uvijek uzimajte za plastiˇcnu osovinu.
Posuda
Prije postavljanja poklopca sjeckalice umetnite hranu u posudu.
- 53 -
Page 55

OPIS APARATA
MIJEˇSALICA-OPIS DIJELOVA
(Pogodna za tuˇcenje jaja)
Motorna Jedinica
Metlicu za mu´cenje okrenite u smjeru kazaljke na sati i
Brava
RUKOVANJE ˇSTAPNIM MIKSEROM
* Prije prve uporabe ˇstapni mikser i njegove dijelove operite na naˇcin opisan u poglavlju
“Brzo ˇciˇs´cenje”.
* Prije nego umetnete sastojke ukljuˇcite ured¯aj da radi na prazno ne viˇse od 15 sekundi.
Bitno: Noˇzevi su jako oˇstri, budite jako oprezni kada ih drˇzite. Prije postavljanja ili odvajanja
bilo kog dijela miksera obavezno izvucite utikaˇc iz utiˇcnice.
UPUTE ZA MIKSER
Maksimalno vrijeme rada miksera s visokom brzinom ne treba da bude duˇze od 1 minute.
Nakon 2 uzastopna kruga ostavite mikser da se odmori 10 minutu.
Odvojivu nogu okrenite u smjeru suprotnom smjeru kazaljke na satu i spojite s motornom
jedinicom. Za odvajanje okrenite u suprotnom smjeru.
1. Utikaˇc prijenosnog ˇstapnog miksera umetnite u utiˇcnicu.
2. Prijenosni ˇstapni mikser spustite na hranu i pritisnite na gumb za pokretanje koji se
nalazi na motornoj jedinici.
3. Za zaustavljanje ˇstapnog miksera otpustite gumb.
spojite s motornom jedinicom.
Metlica za tuˇcenje
Koristi se za tuˇcenje jaja.
Uz pomo´c ove metlice moˇzete tu´ci bjelanjke i pripremati
kreme.
Posuda
U posudu moˇzete staviti 2 bjelanjka u isto vrijeme.
UPUTE ZA SJECKALICU
Maksimalno vrijeme rada sjeckalice s visokom brzinom ne treba da bude duˇze od 1
minute. Nakon 2 uzastopna kruga ostavite mikser da se odmori 10 minutu.
1. Posudu sjeckalice postavite na ˇcistu i ravnu povrˇsinu.
2. Noˇz od nehrd¯aju´ceg ˇcelika umetnite u posudu kao ˇsto je prikazano na Slici 1.
- 54 -
Page 56

UPUTE ZA SJECKALICU
3. Umetnite hranu u posudu sjeckalice.
Napomena: Meso odvojite od kostiju, izreˇzite na manje komade i stavite u posudu.
Maksimalna koliˇcina mesa, pri jednoj obradi, ne smije prelaziti 200 gr.
4. Poklopac stavite na posudu i okrenite u smjeru kazaljke na satu sve dok se ne zatvori.
(Slika 2). Za odvajanje poklopca okrenite u suprotnom smjeru.
5. Motornu jedinicu umetnite u otvor na poklopcu sjeckalice i stegnite okretanjem u
smjeru kazaljke na satu (Slika 3).
6. Umetnite utikaˇc u utiˇcnicu i pritisnite gumb za pokretanje ured¯aja.
7. Za zaustavljanje ured¯aja otpustite gumb.
* Za izbjegavanje rizika od ozljede, prvo postavite posudu pa tek onda smjestite noˇz.
* Prije pokretanja ured¯aja uvjerite se da je poklopac sjeckalice dobro zatvoren.
Brava
Brava
Slika 1
UPUTE ZA METLICU
Maksimalno vrijeme rada miksera s visokom brzinom ne treba da bude duˇze od 1 minute.
Nakon 2 uzastopna kruga ostavite mikser da se odmori 10 minutu.
1. Metlicu za tuˇcenje bjelanjaka okrenite u smjeru suprotnom smjeru kazaljke na satu i
spojite s motornom jedinicom. Za odvajanje okrenite u suprotnom smjeru.
2. Utikaˇc prijenosnog miksera umetnite u utiˇcnicu.
3. Bjelanjke stavite u posudu. Dovoljna su dva jaja.
4. Mikser s metlicom spustite u posudu i pritisnite na gumb za pokretanje ured¯aja.
5. Za zaustavljanje miksera otpustite gumb.
ˇCIˇS´
CENJE I ODRˇZAVANJE
1. Izvucite utikaˇc iz utiˇcnice i odvojite ku´ciˇste s motorom.
Napomena: Odvojivo ku´ciˇste ˇstapnog miksera ne uranjajte u vodu jer ulje kojim je
podmazano leˇziˇste osovine moˇze iscuriti s vodom.
2. Odvojivu nogu moˇzete oprati pod vodom. Ne koristite abrazivna
sredstva za ˇciˇs´cenje i deterdˇzente.Nakon pranja odvojivu nogu okrenite
Slika 2 Slika 3
- 55 -
Page 57

ˇCIˇS´
CENJE I ODRˇZAVANJE
naopako kako bi iscurila voda koja je pranjem uˇsla u unutraˇsnjost.
Ovaj dio moˇzete prati i u stroju za pranje posud¯a.
3. Posudu, zdjelu, metlicu i noˇz operite u mlakoj vodi s deterdˇzentom.
Ne preporuˇcuje se pranje posude i metlice u stroju za pranje posud¯a zbog
toga ˇsto moˇze do´ci do oˇste´cenja plastiˇcnih dijelova.
4. Motornu jedinicu obriˇsite vlaˇznom krpom. Za izbjegavanje rizika od
strujnog udara motornu jedinicu nipoˇsto ne uranjajte u vodu.
5. Ured¯aj dobro posuˇsite.
Upozorenje: Noˇzevi su jako oˇstri, budite jako oprezni.
6. Nogu miksera postavite na ku´ciˇste i smjestite na zidni nosaˇc (slika 4).
BRZO ˇCIˇS´CENJE
Ako nogu miksera ˇzite oˇcistiti u vrijeme uporabe u tom sluˇcaju u dublju posudu s ˇcistom
vodom umetnite polovinu miksera, samo nogu, i ured¯aj ukljuˇcite da radi nekoliko sekundi.
FIKSIRANJE ZIDNOG NOSAˇCA
Zidni nosaˇc fiksirajte na zid na sljede´ci naˇcin:
1. Probuˇsite dvije rupe iste veliˇcine na zidu i pridrˇzavajte se
dimenzija koje su date na Slici 5.
2. U rupe umetnite dva plastiˇcna tipla i zakucajte ˇceki´cem.
3. Zidni nosaˇc priˇcvrstite na zid sa dva vijka.
PRAVILNO ZBRINJAVANJE-PRIJATELJ OKOLIˇSA
I vi moˇzete doprinjeti zaˇstiti i oˇcuvanju ˇzivotnog okoliˇsa.!
Molimo vas da ne zaboravite da slijedite lokalne propise: Dotrajale stare elektriˇcne
i elektronske ured¯aje odnesite i predajte u odgovaraju´ce sabirne centre.
Slika 4
Slika 5
- 56 -
Page 58

- GARANT‹ fiARTLARI -
1) Garanti süresi,mal›n teslim tarihinden itibaren bafllar ve 2 y›ld›r.
2) Mal›n bütün parçalar› dahil olmak üzere tamam› Firmam›z›n garanti kapsam›ndad›r.
3) Mal›n garanti süresi içerisinde ar›zalanmas› durumunda, tamirde geçen süre garanti
süresine eklenir. Mal›n tamir süresi, 20 iflgününü geçemez. Bu süre mala iliflkin ar›zan›n
servis istasyonuna, servis istasyonunun olmamas› durumunda, mal›n sat›c›s›, bayii,
acentesi, temsilcili¤i, ithalatç›s› veya imalatç›s›-üreticisinden birine bildirim tarihinden
itibaren bafllar. Tüketicinin ar›za bildirimini; telefon, faks, e-posta, iadeli taahhütlü mektup
veya benzeri bir yolla yapmas› mümkündür. Ancak, uyuflmazl›k halinde ispat yükümlülü¤ü
tüketiciye aittir. Mal›n ar›zas›n›n 10 ifl günü içerisinde giderilememesi halinde, imalatç›üretici veya ithalatç›; mal›n tamiri tamamlan›ncaya kadar, benzer özelliklere sahip baflka
bir mal› tüketicinin kullan›m›na tahsis etmek zorundad›r.
4) Mal›n garanti süresi içerisinde gerek malzeme ve iflçilik, gerekse montaj hatalar›ndan
dolay› ar›zalanmas› halinde, iflçilik masraf›, de¤ifltirilen parça bedeli ya da baflka herhangi
bir ad alt›nda hiçbir ücret talep etmeksizin tamiri yap›lacakt›r.
5) Tüketicinin onar›m hakk›n› kullanmas›na ra¤men mal›n;
• Tüketiciye teslim edildi¤i tarihten itibaren, garanti süresi içinde kalmak kayd›yla, bir y›l
içerisinde en az dört defa veya imalatç›-üretici ve/veya ithalatç› taraf›ndan belirlenen
garanti süresi içerisinde alt› defa ar›zalanmas›n›n yan› s›ra, bu ar›zalar›n maldan
yararlanamamay› sürekli k›lmas›,
• Tamiri için gereken azami süresinin afl›lmas› ,
• Firman›n servis istasyonunun, servis istasyonunun mevcut olmamas› halinde s›rayla
sat›c›s›, bayii, acentesi temsilcili¤i ithalatç›s› veya imalatç›-üreticisinden birisinin
düzenleyece¤i raporla ar›zan›n tamirini mümkün bulunmad›¤›n›n belirlenmesi, durumlar›nda
tüketici mal›n ücretsiz de¤ifltirilmesini, bedel iadesi veya ay›p oranda bedel indirimi talep
edebilir.
6) Mal›n kullanma k›lavuzunda yer alan hususlara ayk›r› kullan›lmas›ndan kaynaklanan
ar›zalar garanti kapsam› d›fl›ndad›r.
7) Garanti Belgesi ile ilgili olarak ç›kabilecek sorunlar için Gümrük ve Ticaret Bakanl›¤›
Tüketicinin Korunmas› ve Piyasa Gözetimi Genel Müdürlü¤ü’ne baflvurabilir.
‹THALATÇI F‹RMA
DE‹MA ELEKTROMEKAN‹K ÜRÜNLER ‹NfiAAT SPOR MALZEMELER‹ ‹MALAT SAN. VE T‹C. A.fi.
Cihangir Mh. Güvercin Cd. No:4 Haramidere Mevkii Avcılar - ‹stanbul - Türkiye
Ça¤rı Merkezi: 444 66 86
www.sinbo.com.tr - info@sinbo.com.tr
- 57 -
Page 59

- SHB 3029 KARIfiTIRICI -
- GARANT‹ BELGES‹ -
Garanti Belge No : 105029
SSHY Belge No : 35274
‹THALATÇI F‹RMA
Ünvanı : DE‹MA ELEKTROMEKAN‹K ÜRÜNLER‹ ‹Nfi. SPOR MALZ.
‹MALAT SAN. ve T‹C. A.fi.
Adresi : Cihangir Mah. Güvercin Cad. No:4 Haramidere Mevkii
Avc›lar / ‹STANBUL
Tel. : Ça¤rı Merkezi: 444 66 86
Yetkili Kifli :
Yönetim Kurulu Baflkan›
Ürünün Cinsi : KARIfiTIRICI
Markası : S‹NBO
Modeli : SHB 3029
Alt Modeli : Bandrol ve Seri No :
Teslim Tarihi ve Yeri :
Garanti Süresi : 2 Yıldır
Azami Tamir Süresi : 20 ‹fl Günü
Kullanım Ömrü : Bakanl›kça belirlenen ve ilan edilen kullan›m ömrü 7 y›ld›r.
(Ürünün fonksiyonlar›n› yerine getirebilmesi için gereken yedek parça temin süresi)
SATICI F‹RMA
Ünvanı :
Adresi :
Tel.Fax :
Fatura Tarihi ve No :
Teslim Tarihi ve Yeri :
‹mza ve Kafle :
Bu bölüm, ürünü sat›n ald›¤›n›z Yetkili Sat›c› taraf›ndan imzalanacak ve kaflelenecektir.
Bu belgenin kullan›lmas›na; 4077 say›l› Tüketicinin Korunması Hakkında Kanun ve bu Kanun’a dayan›larak yürürlü¤e konulan Garanti Belgesi
Uygulama Esaslar›na Dair Yönetmelik uyar›nca, TC Gümrük ve Ticaret Bakanlı¤ı, Tüketicinin Korunması ve Piyasa Gözetimi Genel Müdürlü¤ü
tarafından izin verilmifltir.
Garanti Belge Onay Tarihi : 07/09/2011
Garanti Belge Vize Tarihi : 23/08/2013
SSHY Belge Onay Tarihi : 04/04/2012
- 58 -
Page 60

MÜfiTER‹ H‹ZMETLER‹
De¤erli Müflterimiz,
En uygun fiyata en iyi ürünü vermenin yan› s›ra; en iyi hizmeti vermenin de
önemli oldu¤una inan›yoruz. Bu nedenle siz bilinçli tüketicilere daha yak›n
olabilmek için, internet adresimizdeki eriflim formlar›n›n yan› s›ra, tüketici
dan›flma hattımızı da hizmetinize açm›fl durumday›z.
TÜKET‹C‹
DANIfiMA HATTI
444 66 86
Tüketici Dan›flma Hattımızı,
- Hafta içi her gün 08.00-18.00 saatleri aras›nda arayabilir; istek, öneri ve
flikayetlerinizi firmam›za iletebilirsiniz.
Tüketicinin Dikkatine:
Ürünlerimizle ilgili hizmetleri tam olarak alabilmek için afla¤›daki önerilere
uyman›z› rica ederiz:
1. Ürünü ald›¤›n›zda Garanti Belgesini mutlaka yetkili sat›c›n›za onaylatt›r›n›z.
2. Ürünü kullanma k›lavuzunda belirtilen hususlara göre kullan›n›z.
3. Ürününüzle ilgili hizmet talebiniz oldu¤unda yukar›daki telefon
numaralar›ndan, Tüketici Danıflma Hattına baflvurunuz.
4. Ürünü promosyon arac›l›¤› ile edinmiflseniz, ürüne ait garanti belgesini en
yak›n yetkili servisimize giderek onaylatt›r›n›z.
5. Teknik servisteki ifliniz bitti¤inde "Yetkili Servis Hizmet Fifli" almay›
unutmay›n›z. Alaca¤›n›z bu Hizmet Fifli, ileride ürününüzde meydana
gelebilecek herhangi bir sorunda size yarar sa¤layacakt›r.
www.sinbo.com.tr
0800 211 50 21
KAPIDAN KAPIYA
ÜCRETS‹Z
SERV‹S
Kap›dan Kap›ya Ücretsiz Servis Kampanyam›z dâhilinde Yurtiçi Kargo Firmas› ile iflbirli¤i içerindeyiz. Tüketicimiz
taraf›ndan sat›n al›nan ürünün fiyat› ne olursa olsun, Tüketicimiz ürün ile ilgili garanti kapsam›na giren herhangi
bir problem yaflad›¤›nda, 444 66 86 numaral› Tüketici Danıflma Hattımızı aramas› ve kay›t b›rakmas› yeterlidir.
Bu süreçten sonra Tüketicimizin ürünü ücretsiz olarak Yurtiçi Kargo taraf›ndan Tüketicimizin bulundu¤u adresten
al›n›p, 10• ifl günü içerisinde ürün çal›fl›r bir vaziyette, yine Tüketicimize Yurtiçi Kargo arac›l›¤› ile adresine teslim
edilmektedir. 10 ifl günü içerisinde sorunu çözülemeyen ürünler ise, yenisi ve/veya bir üst modeli ile de¤ifltirilmektedir.
Tüm bu süreçte Tüketicilerimizden hiçbir ücret talep edilmemektedir.
(•Ürünün servis garanti süresi, Yurtiçi Kargo ürünü Sinbo Fabrikas›’na teslim ettikten sonra bafllar.)
- 59 -
10 GÜNDE
TESL‹MAT
GARANT‹S‹
(•)
Page 61

- TEDAR‹KÇ‹ F‹RMA / EXPORTER United Favour Development Limited
Unit B, 10/F Lee May Building 788-790
Nathan Road, Mongkok, Kowloon, HK.
- UYGUNLUK BEYANI / CE TÜV Rheinland Product Safety GmbH
Am Grauen Stein,D-51105 Köln
Germany
EEE Yönetmeli¤ine uygundur.
AEEE Yönetmeli¤ine uygundur.
Made in P.R.C.
‹mal Y›l› : 2013
 Loading...