

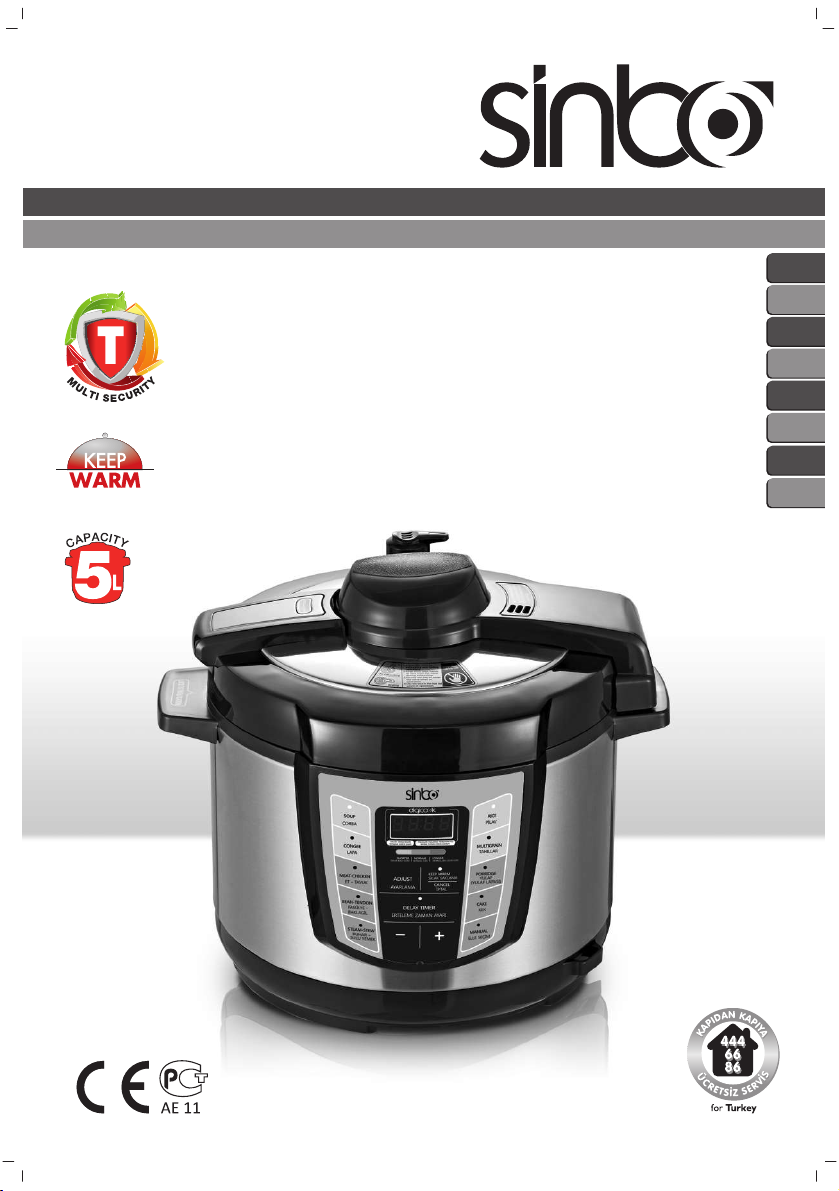
Page 1
SCO 5033 ELEKTR‹KL‹ DÜDÜKLÜ TENCERE
KULLANMA KILAVUZU
TR
EN
HR
RU
PER
ES
UA
AR
Page 2
- 1 -
Page 3

TÜRKÇE / G‹R‹fi
De¤erli Müflterimiz,
Ürün seçiminde S‹NBO’yu tercih etti¤iniz için teflekkür ederiz.
Uzun ve verimli bir kullan›m için cihaz› kullanmadan önce bu k›lavuzu özellikle güvenlik talimatlar›na
dikkat ederek okuman›z› ve devaml› suretle saklaman›z› tavsiye ederiz.
Sayg›lar›m›zla,
Sinbo Küçük Ev Aletleri
S‹NBO SCO 5033
ELEKTR‹KL‹ DÜDÜKLÜ TENCERE
KULLANIM TAL‹MATI
Metnin içinde yer alan resimler yaln›zca referans araçl›d›r, elinizdeki ürünün kendisi dikkate al›nmal›d›r.
Model: SCO 5033
Güç Kayna¤›: 230V~50Hz
Güç: 900W
Hacim: 5L
‹ç haznenin çap›: 22cm
Çal›flma bas›nc›: 0-70kPa
S›n›r bas›nç: 90kPa
Is›tma s›cakl›¤›: 60-80˚C
D‹KKAT!!
Ürünün üzerinde bulunan iflaretlemelerde veya ürünle verilen di¤er bas›l› dökümanlarda beyan edilen de¤erler,
ilgili standartlara göre laboratuar ortam›nda elde edilen de¤erlerdir. Bu de¤erler, ürünün kullan›m ve ortam
flartlar›na göre de¤iflebilir.
ÜRÜN TAL‹MATI
Art›k yemeklerinizi daha iyi, daha h›zl› ve daha sa¤l›kl› bir flekilde piflireceksiniz. Elektrikli Düdüklü Tencere buhar›
içine hapsederek yeme¤i daha yüksek s›cakl›kta ve daha h›zl› piflirerek besin ö¤elerinin kaybolmamas›n› sa¤lar. Piflirme
iflleminde daha az su kullan›l›r ve yeme¤in dokusu ve tad› çok daha etkileyici olur. Kolay kullan›ml› ayar dü¤melerine,
geri say›ml› zamanlay›c›ya ve tüm garnitürleriyle birlikte tencere rostosu yapabilecek büyüklükte bir piflirme haznesine
sahiptir. Keyfini ç›kar›n!
Kendini kan›tlam›fl 10 güvenlik mekanizmas› ve patentli teknolojiler ile benzersiz bir güvenlik sistemine sahiptir. Bunlar
aras›nda kapak kapama kilit pimi, elektronik bas›nç ve s›cakl›k kontrolü, yemek yanma tespiti ve otomatik kapanma,
afl›r› bas›nç bask› plakas›, s›cakl›k ve elektriksel ak›m k›s›tlama sigortas› yer almaktad›r.
‹LK KULLANIMDAN ÖNCE
Cihaz› ilk kez kullanmaya bafllamadan önce tüm aksesuarlar› ambalajdan ç›kar›n›z ve bu K›lavuzu dikkatli bir flekilde
okuyunuz, kullan›m talimat›na ve yaralanma ya da hasar tehlikesini önlemeye yönelik uyar›lara dikkat ediniz.
Children being supervised not to play with the appliance.
This appliance is not intended for use by persons (including children) with reduced physical, sensory or mental
capabilities, or lack of experience and knowledge, unless they have been given supervision or instruction concerning
use of the appliances by a person responsible for their safety. Children should be supervised to ensure that they
do not play with the appliance.
Cihazla oynamamalarını güvenceye almak için çocuklar gözetim altında tutulmalıdır.
Bu ürün (çocuklar dahil ) fiziksel hassasiyeti az, zihinsel olarak yetersiz, deneyimsiz ve yeterli bilgiye sahip olmadan
yada kendilerinin güvenli¤inden sorumlu olan kifliler tarafından bu ürünü kullanmak için gerekli talimatlar verilmemifl
kiflilerin kullanımına uygun de¤ildir.
- 2 -
Page 4

GÜVENL‹K UYARILARI
• Bakım, Onarım ve Kullanımda Uyulması Gereken Kurallar
1. Ak›ll› düdüklü tencereyi kullanmaya bafllamadan önce bu Kullan›m K›lavuzunu dikkatli bir flekilde okuyunuz.
2. Cihaz› dengeli olmayan yüzeyler üzerine yerlefltirmeyiniz. Cihaz› gazete ka¤›d›, strafor ya da cihaz›n alt›ndaki
havaland›rma deli¤inin kapanmas›na neden olacak herhangi bir cisim üzerinde kullan›lmas› kesinlikle yasakt›r. Aksi
takdirde ak›ll› düdüklü tencere afl›r› ›s›nmaya maruz kalacakt›r. Ak›ll› düdüklü tencereyi kullanmak için sa¤lam ve alev
almayacak bir yüzey üzerine yerlefltiriniz.
3. Cihaz› su, ya¤ s›çrayabilecek ya da atefle maruz kalabilecek bir yerde kullanmay›n›z. Cihaz› do¤ruda günefl ›fl›¤›na
maruz kalan bir yerde kullanmay›n›z.
4. Güç kablosunu kolayl›kla aya¤›n›za tak›labilecek bir yere b›rakmay›n›z.
5. Cihaz çocuklar›n yak›n›nda kullan›l›yorken yetiflkinler taraf›ndan gözetim yap›lmal›d›r. Bu cihaz çocuklar taraf›ndan
kullan›lmamal›d›r.
6. Ak›ll› düdüklü tencereyi, güç kablosunu ya da fifli suya ya da herhangi baflka bir s›v›ya sokmay›n›z.
7. Ak›ll› düdüklü tencereyi kurcalamay›n›z ya da ak›ll› düdüklü tencerede onaylanmayan yedek parçalar kullanmay›n›z,
aksi takdirde elektrik floku, yang›n, yaralanma ya da maddi hasar gibi tehlikeler ortaya ç›kabilir.
8. Cihazda yulaf ezmesi ya da di¤er tah›l türlerini piflirmeyiniz. Bu tür g›dalar fliflme, köpükleflme ve püskürme e¤ilimi
göstererek t›kanma önleyici sistemin t›kanmas›na yol açabilir.
9. ‹ç haznenin içerisine koydu¤unuz g›da ya da s›v›lar›n azami seviye iflaretini aflmamas›na dikkat ediniz. Cihaz›n afl›r›
miktarda doldurulmas› bas›nç tahliye valflar›n›n t›kanmas›na ve afl›r› bas›nç oluflmas›na neden olabilir.
10. Ak›ll› düdüklü tencere çal›fl›yorken cihaz› hareket ettirmeyiniz ya da kapa¤›n› zorla açmaya kalk›flmay›n›z. Kapa¤›
döndürürken zorlan›yorsan›z bu durum tencerenin içinde halen bas›nç bulundu¤unu gösterir.
11. Hafllanma tehlikesine maruz kalmamak için cihaz çal›fl›yorken ellerinizi ve yüzünüzü buhar ç›k›fl valf›na, flamand›ral›
valf ya da kapa¤›n di¤er metal parçalar›na do¤ru tutmay›n›z.
12. Piflirme ifllemi tamamland›ktan hemen sonra iç hazneyle ve kapakla temas etmeyiniz. ‹ç hazne ve kapak uzun bir
süre boyunca s›cak kal›r.
13. Cihaz›n fifli tak›l› durumdayken hiçbir parçay› temizlemeyiniz ya da sökmeyiniz.
14. Düdüklü tencereyi tasarlanm›fl kullan›m amac› d›fl›nda kullanmay›n›z.
15. Bu ak›ll› düdüklü tencere yaln›zca evde ve kapal› alanda kullan›ma yöneliktir. Aç›k alanlarda kullanmay›n›z.
16. Ak›ll› düdüklü tencereyi ya¤da k›zartma ya da bas›nçl› ya¤da k›zartma yapma amac›yla kullanmay›n›z. Aksi takdirde
yang›n ve di¤er ciddi zararlara neden olabilecek tehlikeli durumlar meydana gelebilir.
17. ‹ç haznenin deforme olmas›na neden olmamak için iç hazneyi kesinlikle baflka bir cihaz üzerine yerlefltirmeyiniz.
18. Piflirme s›ras›nda ak›ll› düdüklü tencerenin bafl›ndan ayr›lmay›n›z.
19. Cihaz› kullanmaya bafllamadan önce bas›nç tahliye valf›n› t›kal› olmamas› için kontrol ediniz.
20. En iyi sonuçlar› elde etmek için kuru malzemeleri ak›ll› düdüklü tencerede piflirmeye bafllamadan önce ›slat›n›z.
21. S›cak su ya da yiyeceklerle dolu ak›ll› düdüklü tencereyi tafl›rken çok dikkatli olunuz.
TAL‹MATI MUHAFAZA ED‹N‹Z
YALNIZCA EV ‹Ç‹ KULLANIMA YÖNEL‹KT‹R
ÖZEL KABLO TAKIMI TAL‹MATI
Kablonun uzun olmas› dolanma ve tak›lma gibi nedenlerden do¤abilecek riskleri önlemek için güç kablosu k›sa
tutulmufltur. Elektriksel de¤erleri cihaz›n elektriksel de¤erleriyle ayn› oldu¤u takdirde ve tezgah ya da masa kenar›ndan
sarkmas›, çocuklar taraf›ndan çekilmesi, kazayla tak›lma riskine izin verilmemesi flart›yla cihazla birlikte daha uzun
kablolar ya da uzatma kablolar› kullan›labilir.
UYARILAR
Cihaz› her kullanmadan önce t›kanma önleyici sistemi, flamand›ral› valf› ve bas›nç tahliye valf›n›n engellenmedi¤inden
emin olunuz, iç haznenin ve ›s›tma plakas›n›n yüzeyini siliniz ve yabanc› maddelerden ar›nd›r›n›z, bas›nç tahliye valf›n›n
yal›t›m konumda bulundu¤undan emin olunuz.
Piflirme iflleminden sonra, tencerenin bir süre so¤umas›n› bekleyiniz ve bas›nç tahliye valf›n› kullanarak bas›nc›
azalt›n›z. Tencerenin kapa¤›n› açarken son derece dikkatli olunuz. Cihaz›n içerisinde kalan buhar ciddi yan›klara neden
olabilir.
Kablonun ya da fiflin hasar görmesi ya da ak›ll› düdüklü tencerenin ar›zalanmas› durumunda cihaz› çal›flt›rmay› derhal
durdurunuz; Sorun Gider ve Garanti Servis bölümlerini okuyunuz.
Fifli prize tam olarak tak›n›z. Fiflin prize tam olarak tak›lmamas› durumunda elektrik floku ve k›sa devre tehlikesi
meydana gelebilir. Fifli düzenli olarak temizleyiniz. Yang›n riskine neden olmamak için fiflteki kirlenme ya da ›slakl›k
mutlaka giderilmelidir. Cihaz kullan›mda de¤ilken fifli prizden ç›kar›n›z.
Contalarda deformasyona neden olmamaya dikkat edilmelidir. Aksi takdirde cihaz düzgün bir flekilde çal›flmaz.
- 3 -
Page 5
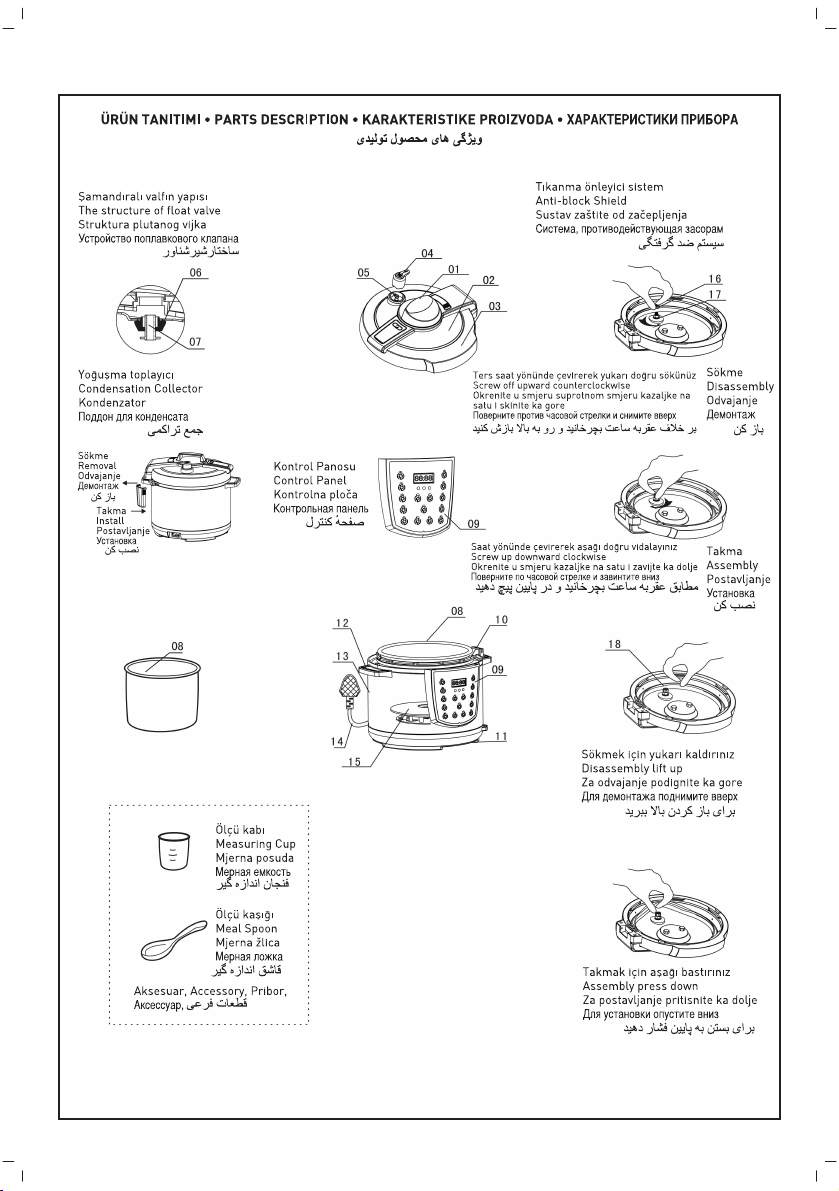
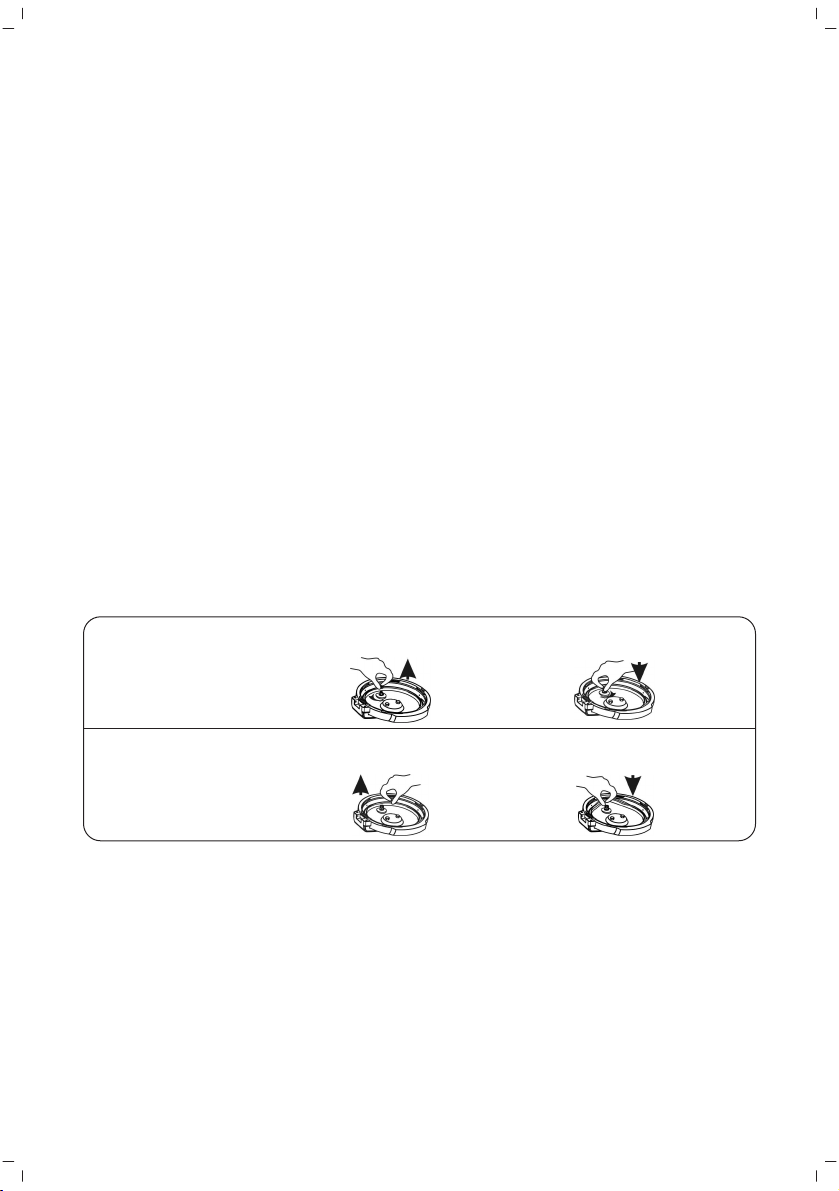
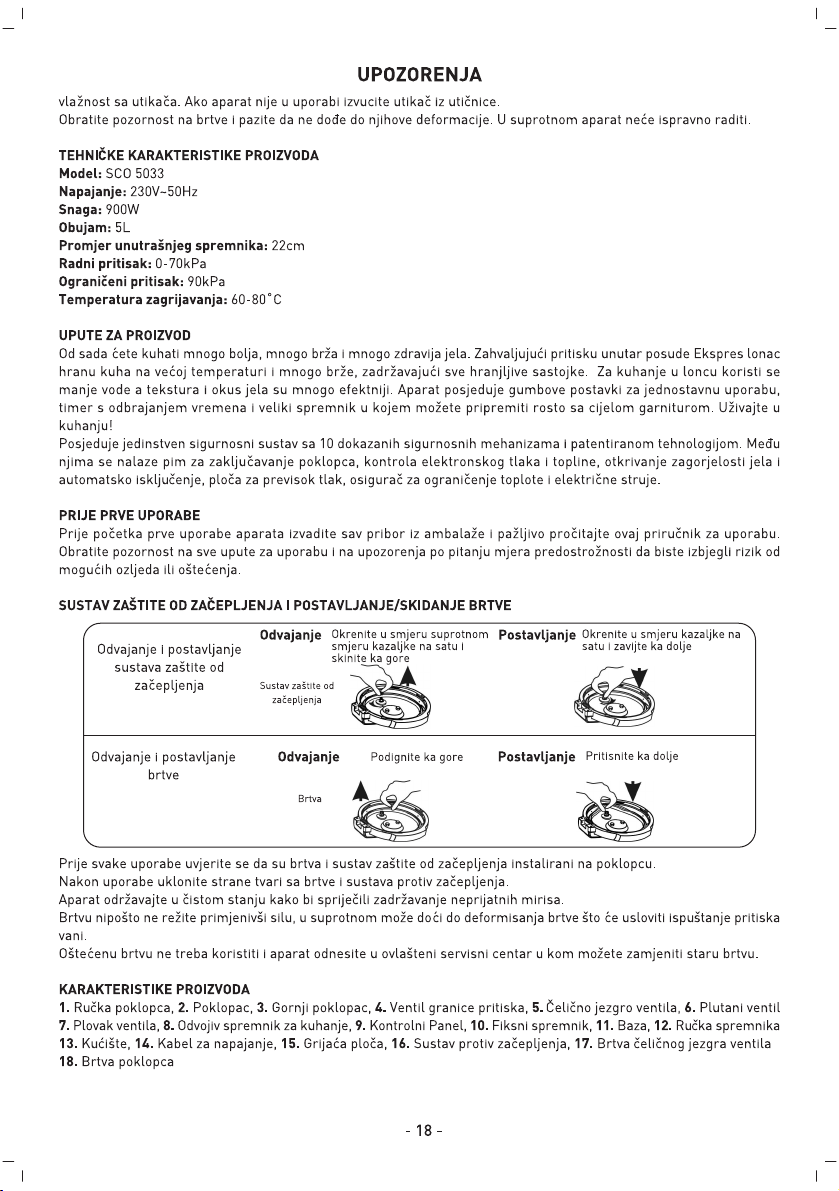
TIKANMA ÖNLEY‹C‹ S‹STEM VE CONTANIN SÖKÜLMES‹/TAKILMASI
T›kanma önleyici sistemin
sökülmesi ve tak›lmas›
Contan›n sökülmesi
Ters saat yönünde çevirerek
Sökme
yukar› do¤ru sökünüz
T›kanma
Önleyici
Sistem
Yukarı kaldırınız
Sökme Takma
Takma
Saat yönünde çevirerek
afla¤› do¤ru vidalay›n›z
Afla¤ı bastırınız
ve tak›lmas›
Conta
Her kullan›mdan önce contan›n ve t›kanma önleyici sistemin kapa¤a tak›ld›¤›ndan emin olunuz.
Kullan›mdan sonra conta ve t›kanma önleyici sistemdeki yabanc› maddeleri temizleyiniz.
Kokular› önlemek için cihaz› temiz tutunuz.
Contay› kesinlikle güç uygulayarak kesmeyiniz, aksi takdirde conta deforme olarak bas›nc›n d›flar› s›zmas›na neden
olabilir.
Hasarl› durumdaki contay› kullanmaya devam etmeyiniz, de¤ifltirme ifllemi için cihaz› yetkili servis merkezine götürünüz.
ÜRÜNÜN TANITIMI
1. Kapak Tutaca¤›, 2. Kapak, 3. Üst Kapak, 4. Bas›nç S›n›r Valf›, 5. Çelik Valf Göbe¤i, 6. fiamand›ral› Valf, 7. Valf
fiamand›ras›, 8. Ç›kar›labilir Piflirme Haznesi, 9. Kontrol Panosu, 10. Sabit Hazne, 11. Taban Ünitesi, 12. Hazne Tutaca¤›
13. Gövde, 14. Güç Kablosu, 15. Is›tma Plakas›, 16. T›kanma Önleyici Sistem, 17. Çelik Valf Göbe¤inin Contas›
18. Kapa¤›n Contas›
EMN‹YETL‹ KAPAK AÇMA
1. Güç ba¤lant›s›n› kesiniz ya da fifli çekiniz.
2. Bas›nc› tahliye ediniz
A: H›zl› açma (s›v› olmayan yiyecekler)
-Tahliye valf›n› tahliye konumuna getiriniz.
-fiamand›ral› valf tam olarak afla¤› inene kadar tencereyi daha h›zl› so¤utmak için kapa¤›n üstüne ›slak havlu koyunuz.
B: Normal açma
3. Kapa¤› aç›n›z
-Kapak tutaca¤›n› kavray›n›z, kapa¤› kilit açma konumuna getirene kadar ters saat yönünde çeviriniz ve kapa¤›
yukar› do¤ru kald›rarak aç›n›z.
-Hazne içerisindeki bas›nç tamamen azalana kadar kadar kapa¤› açmay›n›z.
-Bas›nç Tahliye Valf› bas›nç tahliyesi yaparken valf› kesinlikle çekmeyiniz.
-S›v› yemekler piflirirken (congee ve yap›flkan s›v›lar) piflirme ifllemi bittikten hemen sonra bas›nc› tahliye etmek
için kesinlikle Bas›nç Tahliye Valf›n› açmay›n›z, aksi takdirde s›cak yeme¤in s›v›s› Bas›nç Tahliye Valf›ndan s›çrayarak
yan›klara neden olabilir. Güç kayna¤› ba¤lant›s›n› kesti¤inizden emin olunuz.
-Büyük miktarlarda yemek pifliriyorken piflirme iflleminden hemen sonra bas›nc› tahliye etmeye kalk›flmay›n›z.
Bas›nc› tahliye etmeden önce yeme¤in bir miktar so¤umas›n› beklemeniz tavsiye edilir.
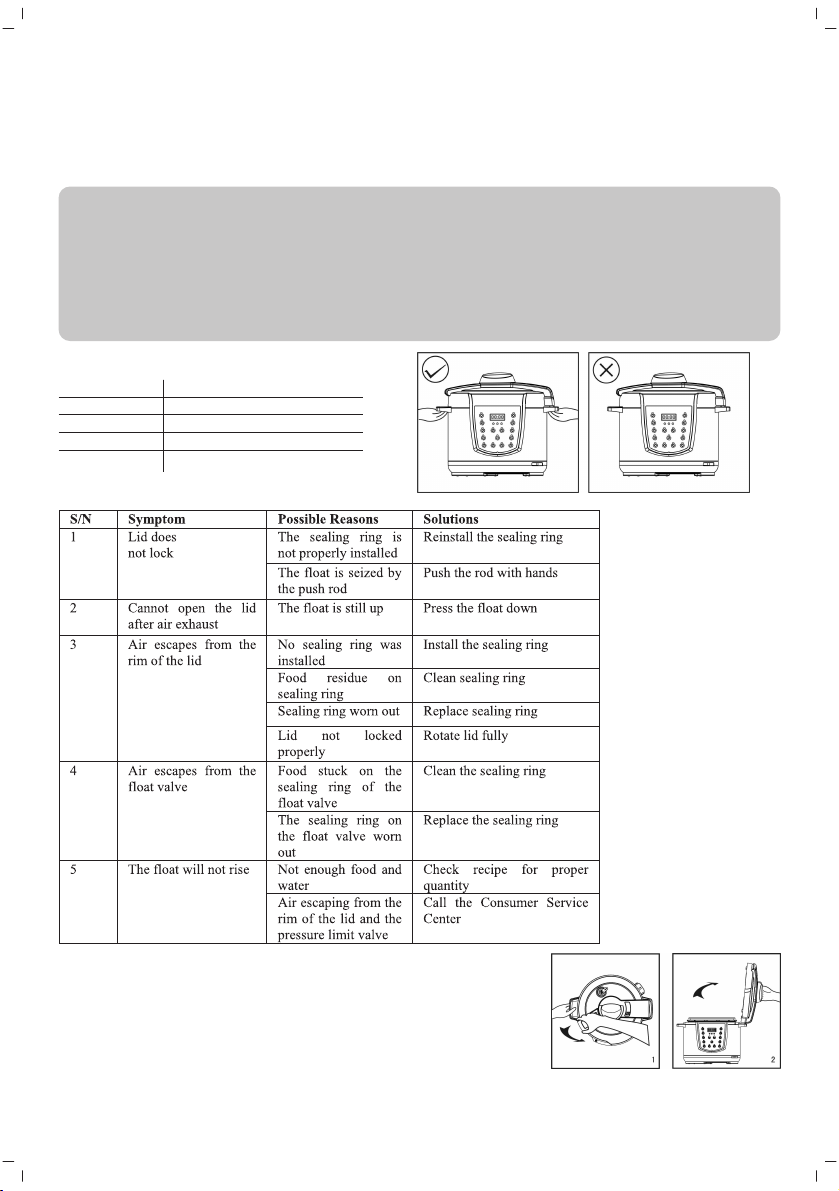
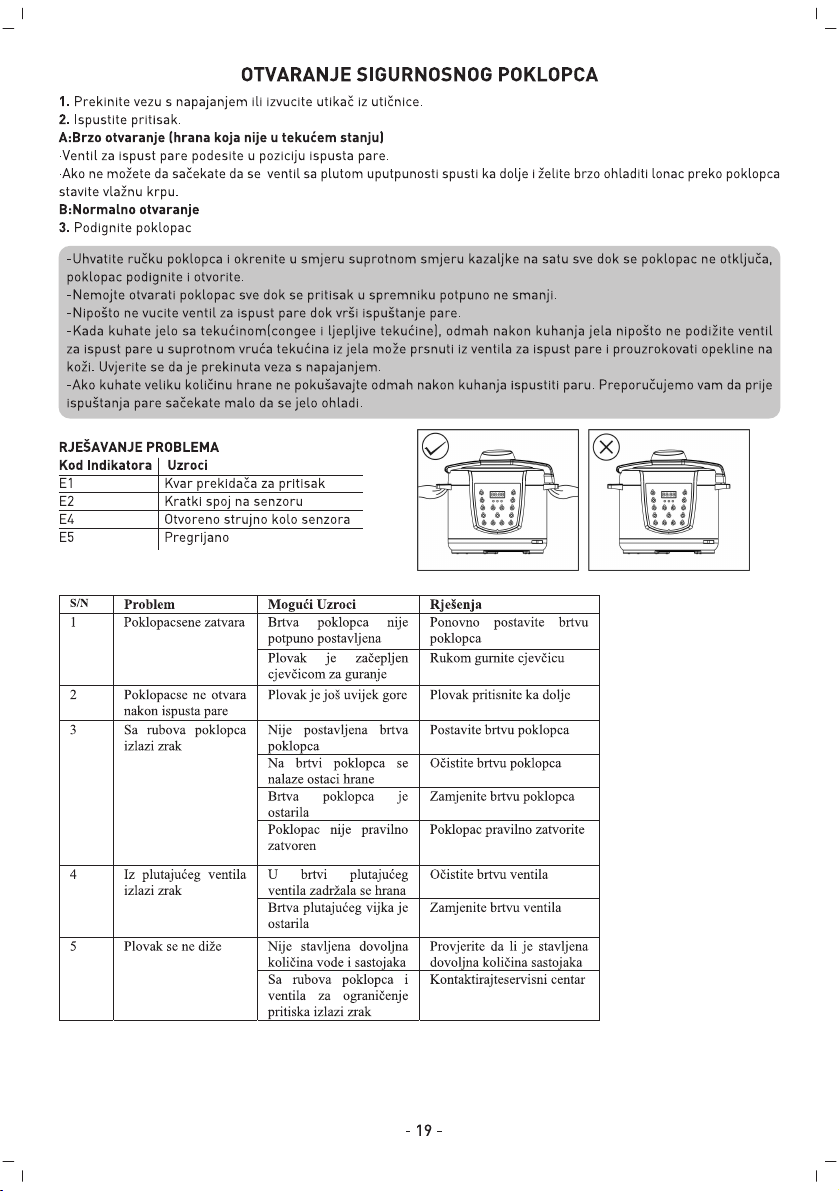
SORUN G‹DERME
Gösterge Kodu Nedenleri
E1 Bas›nç flalteri ar›zas›
E2 Sensörde k›sa devre
E4 Sensör devresi aç›k
E5 Afl›r› ›s›nma
- 4 -
Page 6
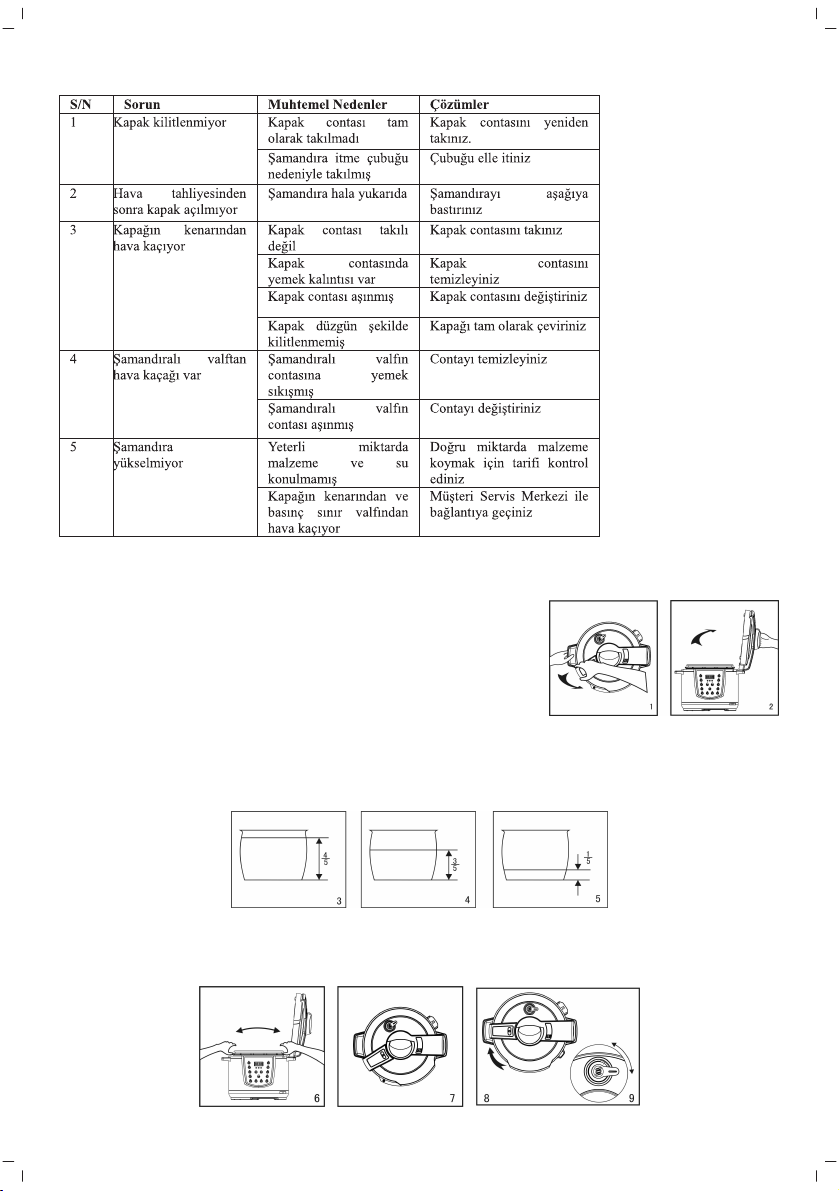
SORUN G‹DERME
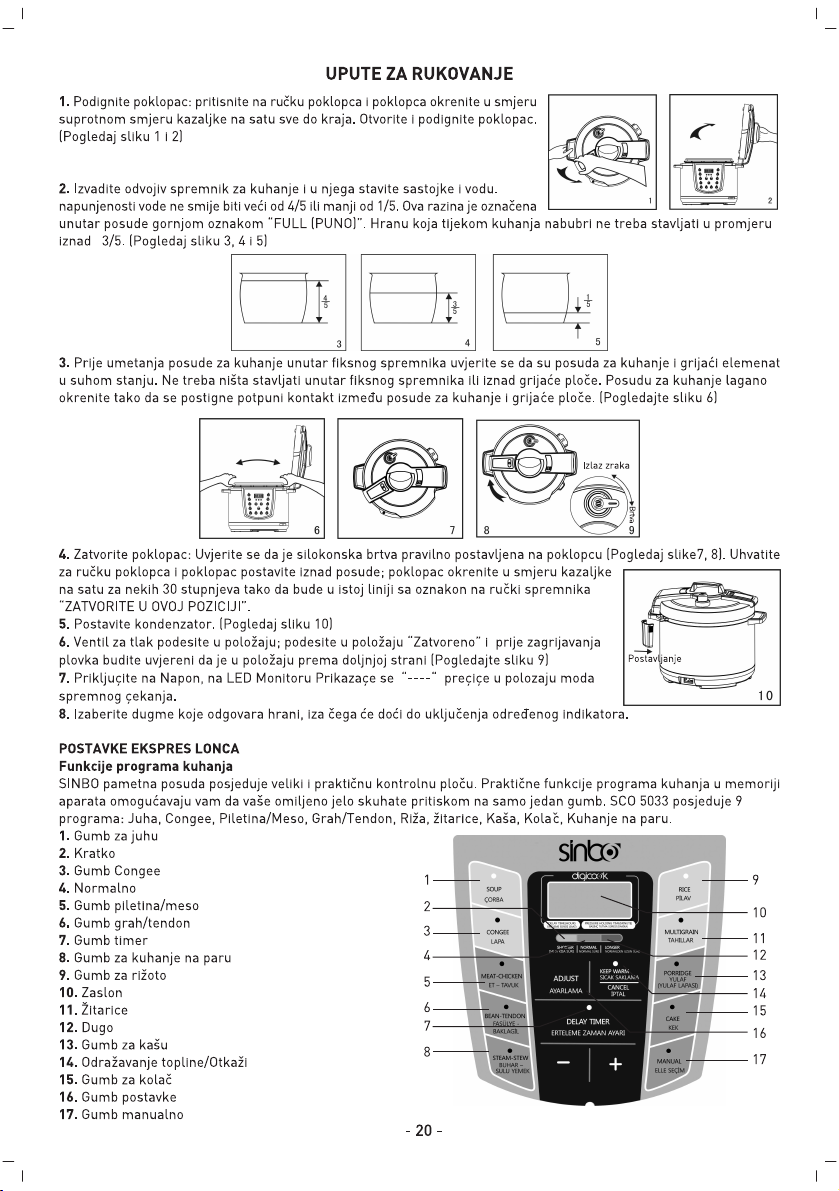
C‹HAZIN KULLANIMI
• Ba¤lantı veya Montajın Nasıl Yapılaca¤ını Gösterir fiema ile Ba¤lantı veya Montajın Kimin Tarafından Yapılaca¤ına
(tüketici, yetkili servis) iliflkin bilgiler
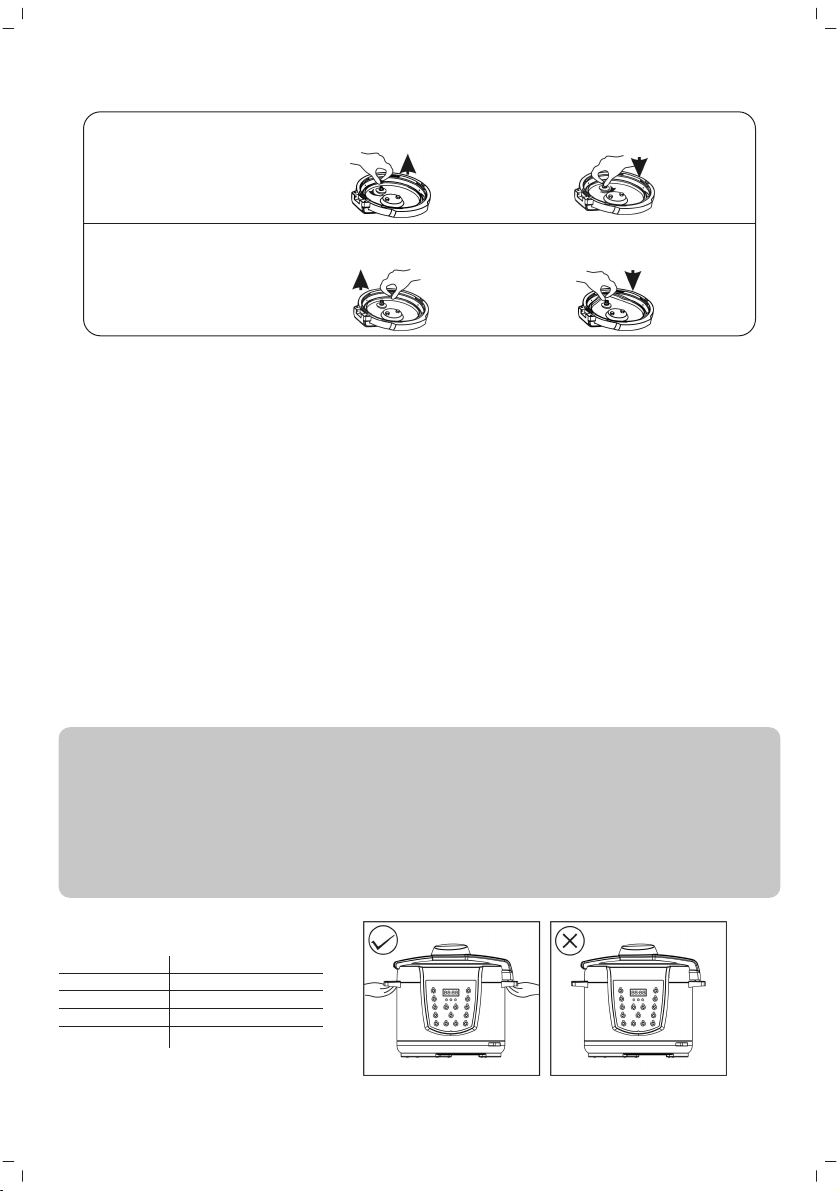
1. Kapa¤› aç›n›z: Kapak tutaca¤›na bast›r›n›z ve kapa¤› s›n›r noktaya kadar ters
saat yönünde çevirerek aç›n›z ve yukar› kald›r›n›z. (Bkz. fiekil 1 ve 2)
2. Ç›kar›labilir piflirme haznesini ç›kar›n›z ve içine malzemelerle suyu koyunuz.
Tencerenin doluluk oran› 4/5’ten daha fazla ya da 1/5’ten daha az olmamal›d›r. Bu seviye tencerenin içinde “FULL
(TAM)” ibaresiyle gösterilen üst çizgiyle belirtilmektedir. Piflirme s›ras›nda fliflen pirinç ve sebze gibi malzemeler
piflirirken tencereyi 3/5 seviyesinden daha fazla doldurmay›n›z. (Bkz. resim 3, 4 ve 5)
3. Piflirme haznesini sabit haznenin içine koymadan önce ç›kar›labilir piflirme haznesinin ve ›s›tma plakas›n›n kuru
oldu¤undan emin olunuz. Sabit hazne içerisine ya da ›s›tma plakas› üzerine herhangi bir fley koymay›n›z. Piflirme
haznesini ›s›tma plakas›yla tam olarak temas edecek flekilde hafifçe döndürünüz. (Bkz. flekil 6)
Hava ç›k›fl
Conta
- 5 -
Page 7
C‹HAZIN KULLANIMI
4. Kapa¤› kapat›n›z: Silikon Contan›n kapak içerisine düzgün olarak oturdu¤undan emin olunuz. (Bkz. flekil 7, 8). Kapak
tutaca¤›n› tutunuz ve kapa¤› tencerenin üstüne yerlefltiriniz; kapak, hazne sap› üzerindeki “BU KONUMA K‹L‹TLEY‹N‹Z”
iflaretiyle ayn› hizaya gelene kadar kapa¤› saat yönüne do¤ru yaklafl›k 30 derece çeviriniz.
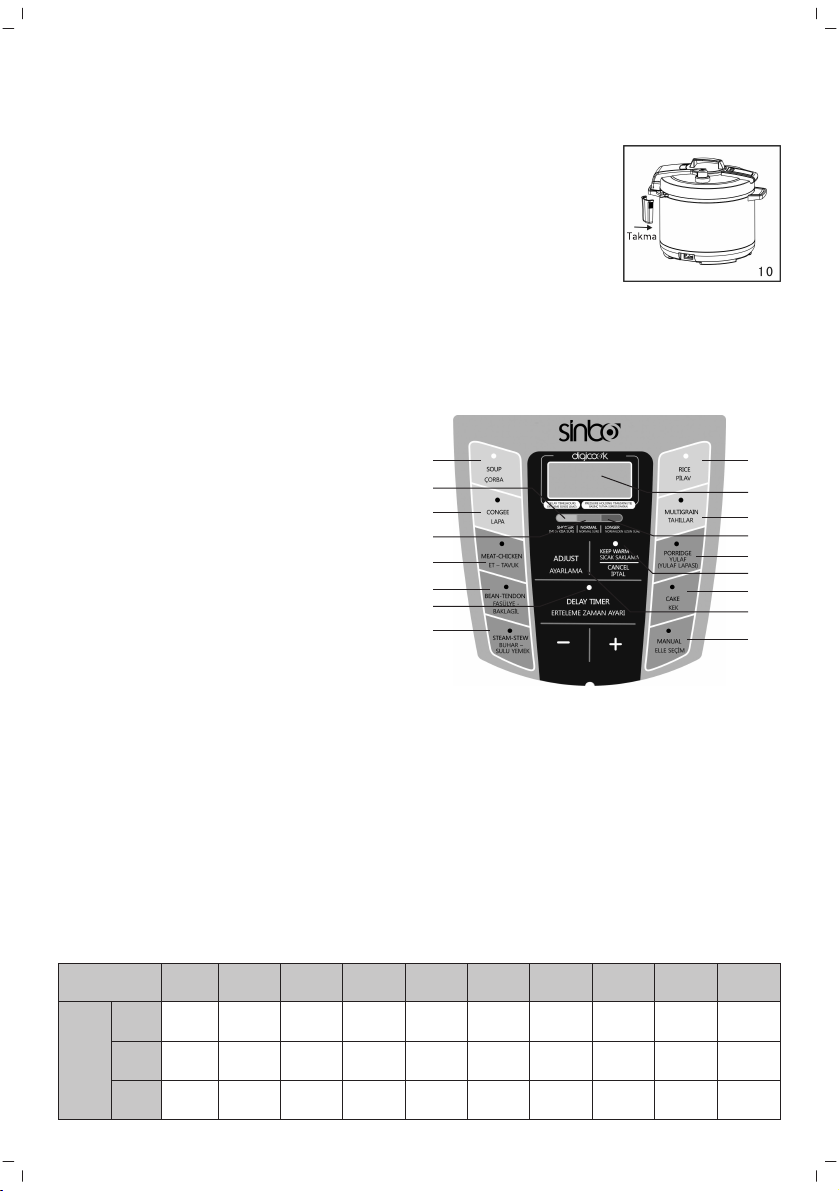
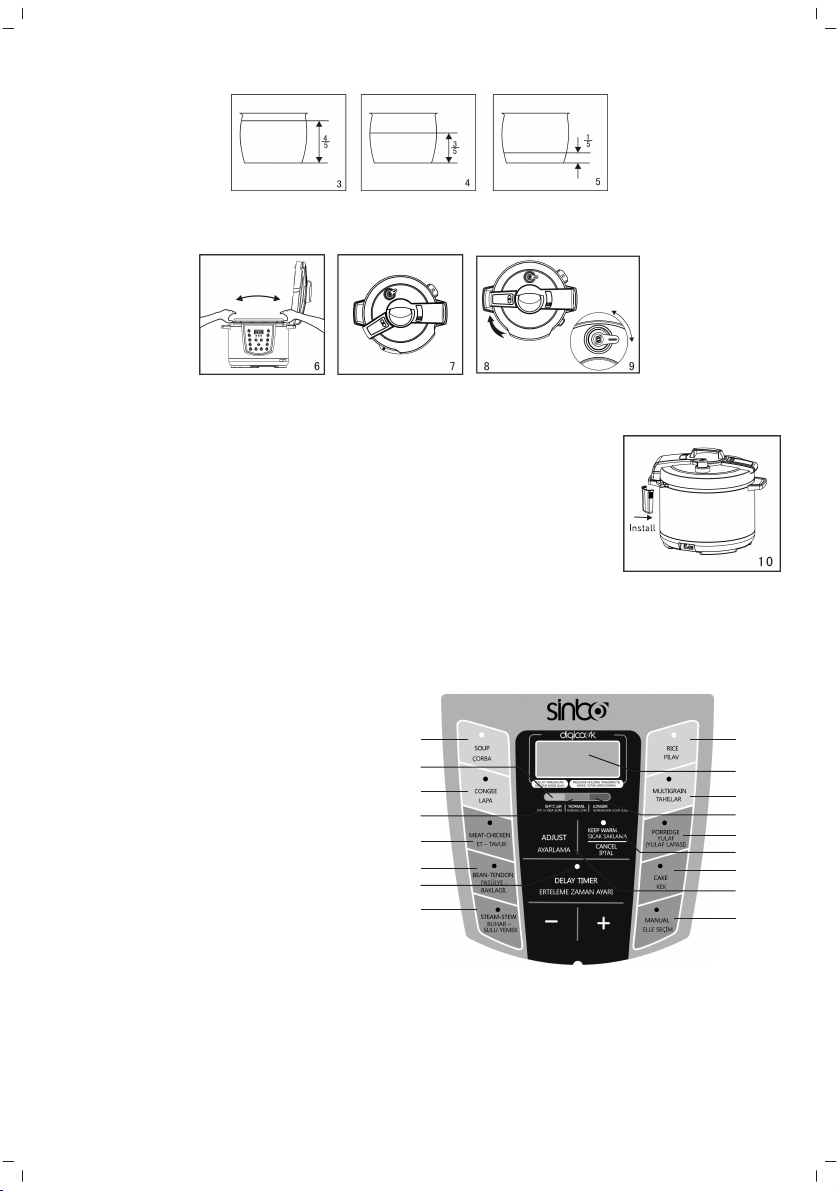
5. Yo¤uflma toplay›c›s›n› tak›n›z. (Bkz. Resim 10)
6. Bas›nç valf›n› konuma getiriniz; ''Mühürleme'' konumuna getiriniz ve flatörün ›s›nmadan
önce afla¤› do¤ru konumda oldu¤undan emin olunuz (Bak›n›z resim 9)
7. Güce ba¤lay›n›z, LED Ekran›nda ”----“ gösterilecektir ve haz›rda bekleme konumuna
geçecektir.
8. Yiyece¤e göre karfl›l›k gelen butonu seçiniz ve ilgili gösterge yanacakt›r.
DÜDÜKLÜ TENCERE AYARI
Piflirme Program› ‹fllevleri
S‹NBO ak›ll› tencere büyük ve kullan›c› dostu bir kontrol panosu kullanmaktad›r. Cihaz›n belle¤indeki kullan›fll› program
ifllevleri en sevdi¤iniz yemekleri tek bir program ifllev tufluna basarak piflirebilmenizi sa¤lar. SCO 5033 9 adet programa
sahiptir:
Çorba, Lapa, Tavuk/Et, Fasulye/Tendon, Pilav, Tah›llar, Lapa, Kek, Buharl› Piflirme.
1. Çorba tuflu
2. K›sa
3. Lapa tuflu
4. Normal
5. Tavuk/Et tuflu
6. Fasulye/Tendon Tuflu
7. Zamanlay›c› tuflu
8. Buharl› piflirme tuflu
9. Pilav tuflu
10. Ekran
11. Tah›llar
12. Uzun
13. Yulaf/Yulaf Lapası tuflu
14. S›cak Tutma/‹ptal
15. Kek tuflu
16. Ayar tuflu
17. Manüel tuflu
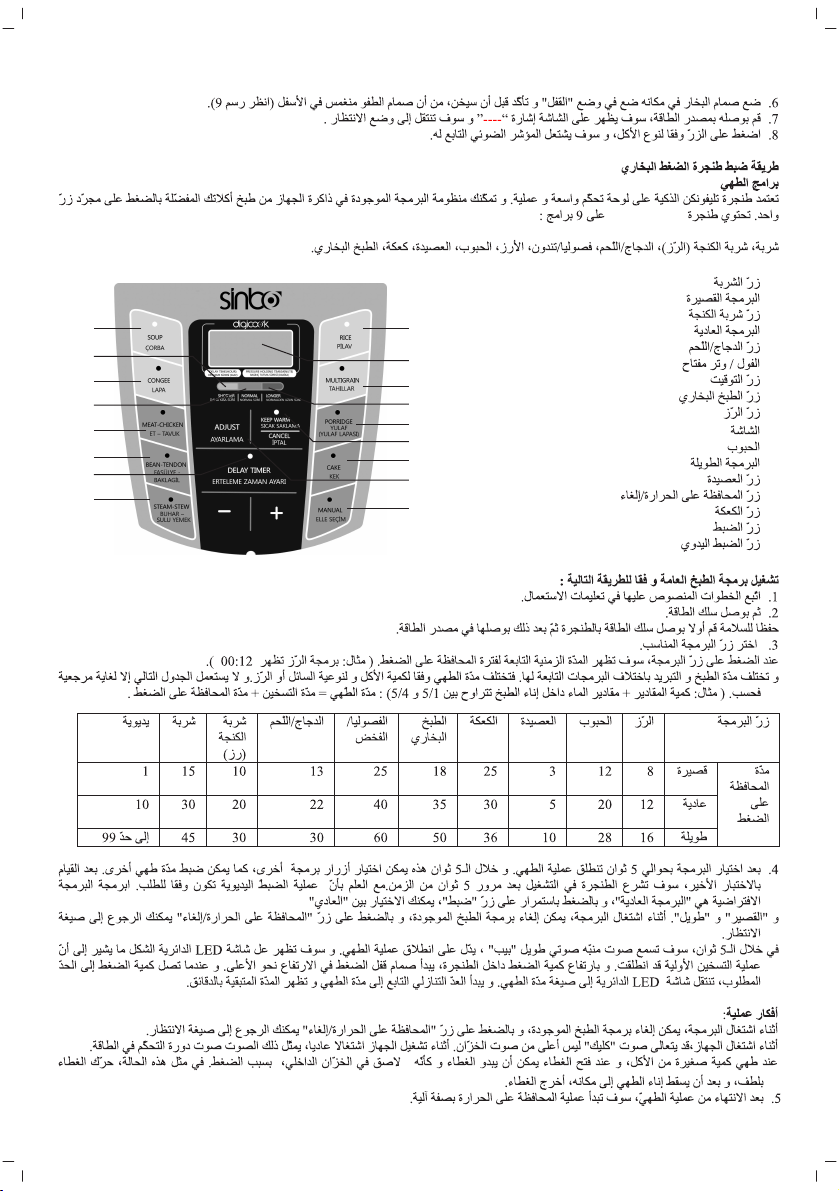
1
2
3
4
5
6
7
8
9
10
11
12
13
14
15
16
17
Genel piflirme program› afla¤›daki prosedüre göre çal›fl›r:
1. Kullan›m Talimat›ndaki ad›mlar› izleyiniz.
2. Güç kablosunu ba¤lay›n›z.
Güvenli¤in sa¤lanmas› için ilk olarak güç kablosunu tencereye ba¤laman›z ve daha sonra fifli prize takman›z tavsiye
edilir.
3. Bir piflirme program› ifllev tuflu seçiniz.
Bir ifllev tufluna bas›ld›¤› zaman ilgili ifllevin göstergesinde bas›nç tutma süresi gösterilir. (ör: pilay ifllevinde 00:12
gösterilir)
Piflirme ve so¤uma süresi farkl› program seçimlerine ba¤l› olarak de¤ifliklik gösterir.
Piflirme süresi yiyecek miktar›na, s›v›ya ve pirincin dokusuna ba¤l› olarak de¤ifliklik gösterir. Afla¤›da yer alan piflirme
süresi tablosu yaln›zca referans amaçl›d›r.
(ör: malzeme miktar› + su iç haznenin içindeki ölçe¤in 1/5 ila 4/5 seviyeleri aras›ndad›r):
Piflirme süresi= ›s›tma süresi + bas›nç tutma süresi
‹fllev Tuflu Pilav Tahıllar Lapa Kek
Kısa
Bas›nç
Tutma
Süresi
(dk.)
Normal
8 12 3 25 18 25 13 10 15 1
12 20 5 30 35 40 22 20 30 10
16 28 10 36 50 60 30 30 45 99’a
Uzun
Piflirme
Fasulye/
Tendon
Tavuk/
Et
Lapa Çorba Manuel
kadar
Buharlı
- 6 -
Page 8

C‹HAZIN KULLANIMI
4. Bir ifllev seçildikten 5 saniye sonra piflirme ifllemi bafllar. Bir program ifllev tufluna bas›ld›ktan 5 saniye sonra dahi
baflka ifllev tufllar› seçebilir ve süre ayarlamas› yapabilirsiniz. Nihai seçiminizi yapt›ktan 5 saniye sonra tencere çal›flmaya
bafllayacakt›r. Ayarlama ifllemi iste¤e ba¤l› bir ad›md›r.
Varsay›lan süre “Normal” olmaktad›r; “Ayar” tufluna sürekli olarak basarak “Normal”, “K›sa” “Uzun” modlar› aras›nda
seçim yapabilirsiniz.
Çal›flma s›ras›nda yürürlükte olan mevcut piflirme program›n› iptal edebilir ve “S›cak tutma/‹ptal” tufluna basarak
bekleme moduna geri dönebilirsiniz.
5 saniye içerisinde piflirme iflleminin bafllad›¤›n› gösteren uzun bir "bip" sesi iflitilecektir. Dairesel LED ekranda ön
›s›tma iflleminin yürürlükte oldu¤u görüntülenir.
Tencere içindeki bas›nç artmaya bafllad›kta bas›nç kilit pimi valf› yukar› ç›kmaya bafllar.
Tencere içerisindeki bas›nç istenen seviyeye ulaflt›¤›nda dairesel LED ekran piflirme süresini görüntüleme moduna
geçer. Piflirme süresi için geri say›m bafllar ve kalan süre dakikalar halinde gösterilir.
‹pucu:
Piflirme ifllemi yürürlükteyken mevcut piflirme program›n› iptal edebilir ve “S›cak tutma/‹ptal” tufluna basarak bekleme
moduna geri dönebilirsiniz.
Çal›flma s›ras›nda hazneden yüksek olmayan bir ‘klik’ sesi gelebilir. Bu, cihaz›n normal çal›flmas› s›ras›nda güç
döngüsünü kontrolü yapt›¤› zaman ç›kan bir sestir.
Az miktarda yemek piflirildi¤i zaman kapak aç›ld›¤›nda iç hazne kapa¤a bas›nç nedeniyle yap›flm›fl gibi görünebilir. Bu
durumda kapa¤› hafifçe sallay›n›z ve iç hazne yerine geri düfltükten sonra kapa¤› ç›kar›n›z.
5. Piflirme ifllemi sonras›nda tencere otomatik olarak s›cak tutma ifllevini bafllat›r.
‹lgili ifllev göstergesi söner. Tencere ‘bip’ sesiyle uyar› verir.
Tencerenin s›cak tutma ifllevini gerçeklefltirdi¤ini göstermek üzere “S›cak Tutma” göstergesi yanar. Piflirme sonucunun
olumsuz flekilde etkilenmemesi için piflmifl pilav›n uzun süre boyunca “S›cak Tutma” modunda b›rak›lmamas› tavsiye
edilir..
P‹fi‹RME SÜRES‹ AYARI
1. Kullan›m Talimat›ndaki ad›mlar› izleyiniz.
2. ‹lgili piflirme program› tufluna bas›n›z. Program seçimi yapmak için Piflirme Program› ‹fllevleri bölümüne bak›n›z.
3. Adjust'' (Ayarlama) tufluna basarak piflirmeyi ayarlay›n›z, e¤er ''Adjust'' tufluna sürekli bas›l›rsa LED ekran paneli
devir halinde ''shorter”, ”Normal”, ”Longer” (daha k›sa, normal, daha uzun) gösterecektir. ''shorter”, ”Normal”,
”Longer”dan biri seçildi¤inde, karfl›l›k gelen piflirme süresi LED ekran panelinde görünecektir. Tüm piflirme programlar›n›n
“Adjust” fonksiyonu bulunmaktad›r. Farkl› piflirme programlar› için Adjust piflirme süresi farkl›d›r.
4. Piflirme ifllemi sonras›nda tencere otomatik olarak s›cak tutma moduna girer. “S›cak Tutma” göstergesi yanar ve
tencere s›cak tutma moduna girer .
ÖN AYARLI ZAMANLAYICI ‹fiLEV‹
Sinbo ak›ll› düdüklü tencere 24 saate kadar ertelemeli zamanlay›c› ifllevine sahiptir.
‹puçlar›:
-Zamanlay›c›n›n 12 saatten daha k›sa bir süreye ayarlanmas› tavsiye edilir.
-Zamanlay›c› erteleme süresinin uzun olmas› ve oda s›cakl›¤›n›n yüksek olmas› durumunda kolay bayatlayabilir
malzemeler oda s›cakl›¤›nda uzun süre kald›klar› için tazeliklerini yitirebilirler.
-Pilav, uzun süre suda kald›¤›nda afl›r› oranda yumuflayabilir. Ayr›ca pilav›n dibinin tutmas›na da neden olabilir.
ZAMANLAYICI ERTELEME ‹fiLEV‹
1. S‹NBO tencere Zamanlay›c› erteleme ve Piflirme Programlar›
- ‹flletim Talimat›nda listesi verilen ad›m› takip ediniz.
- Program seçiminden sonra 5 saniye içinde Gecikme bitifl süresini ayarlamak için “Delay Timer” ve “+” veya “-“ tufluna
bas›n›z. “Delay Timer” (Gecikme Sayac›) tufluna bas›n›z, ekranda 2 saat (2:00) olarak fabrika ayar› Bitifl süresi
görünecektir. Yeflil ›fl›k yan›p sönmeye bafllayacakt›r.
“Delay Timer” fonksiyonunun iki seçene¤i vard›r:
Ilk olarak “Delay Time” bas›n›z, ekranda 2:00 görünecektir, 2 basama¤› yan›p sönecektir, “+” veya “-“ tufluna basarak
sure 0 ile 24 saat aras›nda 1 saat art›fl veya azalma gösterecektir.
Ayn› zamanda ikinci olarak “Delay Timer” bas›n›z, 2:00 üzerindeki 00 basamaklar› yan›p sönecektir. “+” veya “-“ tufluna
basarak 0 ile 59 dakika aras›nda 1 dakika sure art›fl› veya azalmas› görünecektir.
“Delay Timer” tufluna dairesel basarak ihtiyac›n›z olan saatleri veya dakikalar› seçiniz.
- 7 -
Page 9

C‹HAZIN KULLANIMI
Amaçlad›¤›n›z sure görüntülenene kadar “+” veya “-“ tufluna basmay› tekrarlay›n›z.
Gecikme Sayac›n› 0 ile 24 saat aras›nda seçebilirsiniz. Sayac›n art›fl› 24:00'e gelince duracakt›r.
Gecikme Sayac› ayar› sabit olarak 5 saniye sonar ekranda görünecektir. “Delay Timer” ›fl›¤› sabit olacak ve ekranda
Gecikme Sayac› geri say›m› görüntülenecektir.
2. Yiyecek gecikme sayac› 0'a dogru geri saymaya bafllad›¤›nda piflirilmelidir. F›r›n, piflirme iflleminden sonra otomatik
olarak S›cak Tutma fonksiyonuna geçecektir. Uzun süreli s›cak tutma ifllemi tavsiye edilmez.
-Piflirme Bitifl Süresi çeflitli nedenlerden dolay› tam ayarland›¤› gibi olmayabilir. Piflirme ifllemi ayarlanan süreden
önce tamamland›¤› takdirde tencere “s›cak tutma” moduna girer.
UYARI: Et, kanatl› hayvanlar, bal›k, peynir ve di¤er süt ürünleri gibi kolay bayatlayan malzemeler normal oda s›cakl›¤›nda
2 saat 32°C seviyesinin üstündeki oda s›cakl›klar›nda 2 saatten daha uzun bir süre bekletilmemelidir.
MANUEL P‹fi‹RME SÜRES‹ AYARI
Piflirme süresi, tencerenin yeme¤i iç bas›nç istenen seviyeye ulaflt›ktan sonra piflirdi¤i süredir. “Manüel” tuflu, piflirme
süresini hazne içerisindeki malzeme ve s›v› miktar›na ba¤l› olarak özellefltirebilmenizi sa¤lar. Piflirme süresi ayr›ca
yemekte tercih etti¤iniz doku ve yumuflakl›¤a ba¤l› olarak da ayarlanabilir. Genellikle, hazneye daha fazla malzeme
ve s›v› konuldu¤unda piflirme iflleminin tam olarak gerçeklefltirilmesi için daha fazla süreye ihtiyaç duyulur.
1. Kullan›m Talimat›ndaki ad›mlar› izleyiniz.
2. Piflirme süresini ayarlamak için tufla bas›n›z.
“+” ya da “-” tufluna her bas›ld›¤›nda piflirme süresi 1'er dakika artt›r›l›r ya da azalt›l›r.
Süre, dakika olarak istenilen de¤ere ulaflana kadar “+” ya da “-” tufluna basmaya devam ediniz. Azami piflirme süresi
99 dakikad›r.
-Zamanlay›c› erteleme ifllevini kullanmak gerekiyorsa tufla bas›ld›ktan sonra 5 saniye içerisinde “Zamanlay›c› erteleme”
tufluna basarak zamanlay›c› erteleme de¤erini ayarlay›n›z. Zamanlay›c› Erteleme ifllevi ya da zamanlay›c› erteleme
ayar› bölümüne bak›n›z.
-Zamanlay›c› ertelemesini ayarlad›ktan sonra yeflil gösterge ›fl›¤› 5 saniye boyunca yan›p sönecektir.
-"Zamanlay›c›” gösterge ›fl›¤› sürekli olarak yand›¤›nda zamanlay›c› ertelemesi geri say›m yapmaya bafllar.
3. Piflirme tamamland›
Piflirme ifllemi tamamland›¤›nda bir “bip” sesi iflitilir. K›rm›z› “Manüel” gösterge ›fl›¤› söner ve “S›cak Tutma” tuflunun
üstündeki sar› gösterge ›fl›¤› yanar.
Tencere otomatik olarak s›cak tutma moduna geçer. S›cak tutma ifllemine ihtiyaç duyulmuyorsa “S›cak Tutma/‹ptal”
tufluna basarak s›cak tutma ifllevini iptal ediniz. Kapa¤› Emniyetli Kapak Açma yöntemini uygulayarak aç›n›z.
SICAK TUTMA ‹fiLEV‹
Piflirme iflleminden sonra seçili ifllev göstergesi ›fl›¤› (k›rm›z›) söner. Tencere ayn› zamanda ‘bip’ sesiyle uyar› verir.
Sar› “S›cak Tutma” gösterge ›fl›¤› yanarak tencerenin “S›cak Tutma” moduna girdi¤ini gösterir. Bekleme modundayken
s›cak tutma ifllevine “S›cak Tutma/‹ptal” tufluna bas›larak girilebilir.
“S›cak Tutma” modu s›cakl›¤› 60-80°C’dir (140-176°F);
Yeme¤in dokusunu ve lezzetini olumsuz bir flekilde etkileyebilece¤i için s›cak tutma ifllevinin süresinin uzun tutulmas›
tavsiye edilmez.
D‹KKAT:
Bas›nç tahliye valf›n› tutmay›n›z. D›flar› s›cak buhar/s›v› ç›k›fl› olabilir.
Ellerinizi ve yüzünüzü buhar deliklerinden uzak tutunuz ve iç hazneyi ç›kar›rken ya da herhangi bir s›cak parçayla
temas ederken f›r›n eldiveni kullan›n›z ve kapa¤› kesinlikle zorlayarak açmaya kalk›flmay›n›z. Kapak ancak bas›nç
tahliye edildikten sonra aç›lacakt›r. Buhar nedeniyle yanma tehlikesine maruz kalmamak için kapa¤› kendinizden
uza¤a do¤ru aralayarak aç›n›z.
TAfiIMA VE NAKL‹YE ESNASINDA
• Ürünü düflürmeyiniz,
• Darbelere maruz kalmamas›n› sa¤lay›n›z,
• S›k›flmamas›n›, ezilmemesini sa¤lay›n›z,
• Ambalaj üzerindeki iflaretlemelere uyunuz.
• Orjinal ambalajıyla taflımaya özen gösteriniz.
- 8 -
Page 10

ÇEVRE VE ‹NSAN SA⁄LI⁄I
Çevre korumas›na siz de katk›da bulunabilirsiniz!
Lütfen yerel düzenlemelere uymay› unutmay›n: Çal›flmayan
elektrikli cihazlar›, uygun elden ç›karma merkezlerine götürün.
Kullanım sırasında insan ve çevre sa¤lı¤ına tehlikeli veya zararlı olabilecek bir durum söz konusu de¤ildir.
KULLANIM HATALARINA ‹L‹fiK‹N B‹LG‹LER
Cihazınızı, beyan edilen voltaj ile çal›flt›r›n›z.Bulundu¤unuz yerin voltaj›n›n uygun olup olmad›¤›n› kontrol ediniz.
Güç kablosunun ar›zalanmas› durumunda tehlikelerin önlenmesi için kablo üretici, servis merkezi ya da benzer bir
ehliyetli kifli taraf›ndan de¤ifltirilmelidir. Ar›za durumunda cihaz› kendiniz onarmaya kalk›flmay›n›z. Meydana gelebilecek
ar›zalardan firmam›z kesinlikle sorumlu de¤ildir, ve cihaz›n›z garanti kapsam› d›fl›nda ifllem görecektir.
TEM‹ZL‹K VE BAKIM
• Tüketicinin Kendi Yapabilece¤i Bakım, Onarım veya Ürünün Temizli¤ine ‹liflkin Bilgiler
1. Temizlemeden önce fifli prizden ç›kar›n›z.
2. Cihaz›n d›fl gövdesini ka¤›t havlu ya da mikrofiber temizlik bezi gibi yumuflak bir bezle silerek temizleyiniz.
Cihaz›n d›fl ana gövdesini suya sokmay›n›z ya da üstüne su dökmeyiniz.
3. Yo¤uflma toplay›c›s›n› ç›kar›p temizledikten sonra yeniden yerine tak›n›z. Merkez çemberi ›slak bir havlu yard›m›yla
temizleyiniz.
4. Kapa¤›n alt›n›, kapak contas›n›, bas›nç s›n›r valf›n›, t›kanma önleyici sistemi, hava tahliye valf›n› ve flamand›ral› valf›
suyla durulay›n›z. ‹yice kurulay›n›z.
5. Tencereyi bir sünger ya da metal olmayan yumuflak bir f›rça yard›m›yla elde silerek temizleyiniz.
‹ç kaplaman›n zarar görmemesine dikkat ediniz.
Ürünün kullan›m güvenli¤ini sa¤lamak için düzenli bak›m ifllemi yap›lmas› gerekmektedir.
Afla¤›daki durumlarda, belirtilen eylemleri gerçeklefltiriniz
Çözümler
-Güç kablosu ve fifl esneme, deformasyon, renk bozulmas›, hasara vb. maruz kalm›fl.
-Güç kablosunun ya da fiflin bir k›sm› normalden daha fazla ›s›n›yor.
-Elektrikli düdüklü tencere anormal flekilde ›s›n›yor ve yan›k kokusu yay›yor.
-Cihaza güç verildi¤inde ola¤and›fl› sesler ya da titreflimler meydana geliyor.
-Bir an önce ürünü kullanmay› b›rak›p en yak›n yetkili servis merkezine ulaflt›r›n›z.
-Fiflte ya da prizde tozlanma ya da kirlenme var
-Tozu ya da kiri kuru bir f›rça yard›m›yla gideriniz.
BAKIM
• Periyodik Bakım Gerektirmesi Durumunda, Periyodik Bakımın Yapılaca¤ı Zaman Aralıkları ile Kimin Tarafından
Yapılması Gerekti¤ine ‹liflkin Bilgiler
Cihaz periyodik bak›m gerektirmez.
Her kullan›mdan sonra temizli¤inin yap›lmas›nda fayda vard›r.
- 9 -
Page 11

ENGLISH
SINBO SCO 5033 INTELLIGENT PRESSURE COOKER
INSTRUCTION MANUAL
Pictures in the text are for reference only, and an actual object shall be based on.
IMPORTANT SAFEGUARDS
1. Before using this intelligent pressure cooker, please read this User's Manual carefully.
2. DO NOT place the unit on an unstable location. It is strictly prohibited to use it on a
newspaper, foam or other object that may easily block the vent hole at the bottom. The intelligent pressure cooker
will overheat. Place the intelligent pressure cooker on a solid and non-flammable surface in operation.
3. DO NOT use it in a place which is near water, oil splash, or fire. Avoid using it in a place
exposed directly to sunshine.
4. DO NOT hang the power cord on a location which may easily tripped over.
5. Close adult supervision must be provided when this appliance is used near children. The unit is not intended for use
by children.
6. DO NOT immerse the intelligent pressure cooker, power cord or plug in water or other liquid.
7. DO NOT temper the intelligent pressure cooker or use unauthorized replacement parts for the intelligent pressure
cooker, as this may cause electric shock, fire, personal injury, and/or property damage.
8. DO NOT cook foods such as oatmeal or other cereals in the unit. These foods tend to foam, froth and sputter and
may clog the anti-block shield.
9. DO NOT fill more than the MAX level inside the inner pot with food or liquid. Overfilling
may cause a risk of clogging the pressure release valves and developing excess pressure.
10. DO NOT move intelligent pressure cooker or force to open the cover when the unit is in operation. If the cover is
difficult to rotate, this indicates that the cooker is still pressurized.
11. DO NOT place your hands or face over the exhaust valve, the float valve or the metal
parts of the cover to avoid scalding when the unit is in operation.
12. DO NOT touch the inner pot and cover right after cooking. The inner pot and cover remain hot for a long period of
time.
13. DO NOT clean or removing parts while power cord is plugged in.
14. DO NOT use the pressure cooker for other than intended use.
15. This intelligent pressure cooker is for indoor household use only. DO NOT use it outdoors.
16. DO NOT use the intelligent pressure cooker to deep fry or pressure fry. It is dangerous and may cause fire or other
serious damage.
17. DO NOT place the inner pot on other appliance for heating to avoid deformation.
18. DO NOT let the intelligent pressure cooker unattended while cooking.
19. Always check the pressure release valves clogging before use.
20. For best results, soak the dry foods before cooking them in the intelligent pressure cooker.
21. Extreme caution must be used when moving a intelligent pressure cooker containing
hot liquids or foods.
Please Save These Instructions for Reference.
SPECIAL CORD SET INSTRUCTIONS
A short cord is provided to reduce the hazard resulting from becoming entangled in or tripping over a longer cord.
Longer cords and extension cords are available and may be used if the marked electrical rating of the longer cord is
at least as great as the electrical rating of the appliance, and if care is taken to arrange the longer cord so that it will
not drape over the counter top or table top where it can be pulled on by children or tripped over accidentally.
PRECAUTIONS
Before use each time, be sure to check the anti-block shield, float valve and pressure release valve for obstruction,
wipe the surface of the inner pot and the heating plate to confirm they are free of any foreign object, make sure the
pressure release valve is in sealing location.
After cooking, wait until the cooker cools down for a while and release the pressure using pressure release valve. Use
extreme caution when opening the Cover. Serious burns can result from stream inside the unit.
If a part such as wire or plug is damaged or the intelligent pressure cooker malfunctions, stop the operation immediately
and consult the Troubleshooting and Warrantee Service sections.
Insert the plug into socket firmly. Incomplete insertion may cause electric shock, short
circuit. Regular cleaning of plug. Any dirt or water attached to the insert shall be removed
- 10 -
Page 12
PRECAUTIONS
as it may cause fire. When not in use, unplug the cord from the power outlet.
Care must be taken on the seals to avoid deformation. Fail to do so may prevent the
product from working properly.
PRODUCT SPECIFICATIONS
Model: SCO 5033
Power Supply: 230V~50Hz
Power: 900W
Volume: 5L
Caliber of inner pot: 22cm
Working pressure: 0-70kPa
Limit pressure: 90kPa
Warm temperature: 60-80˚C
PRODUCT INSTRUCTIONS
You're about to experience a better , faster, and healthier way of cooking. Our Electric Pressure Cooker seals in steam
to cook hotter and faster, and it seals in nutrients as well. Cook in less water and experience textures and tastes that
are simply sensational. Features easy touch-button settings, a countdown timer, and a cooking pot big enough for a
pot roast with all the fixings. Enjoy!
We assures unprecedented safety with 10 proven safety mechanisms and patented technologies. The range from lid
close lock pin, electronic pressure and temperature control, dry burn detection and automatic shutoff, over-pressure
crush plate, to temperature and electrical current limiting fuse.
BEFORE FIRST USE
Before first use, please take out all accessories from the package and read this Manual carefully, pay particular
attention to operational instructions and cautions to avoid any injury or property damage.
DISASSEMBLY/ASSEMBLY OF ANTI BLOCK SHIELD AND SEAL
Disasembly and assembly
of Anti Block shield
Disassembly and
Disasembly
Anti Block
Shield
Disasembly Assembly
Screw off upward
counterclockwise
Lift up
Assembly
Screw up downward
clockwise
Press down
Assembly of seal
Seal
Prior to each use, inspect to make sure the seal and anti-block shield are mounted in the lid.
After use, remove any foreign object from the seal and anti-block shield.
Keep clean to avoid odor.
Never pull the seal by force, as pull deformation may affect sealing and pressure effect.
A damaged seal should not be used, and unit shall be sent to the service center for replacement.
PARTS DESCRIPTION
1. Lid Handle, 2. Lid, 3. Top Cover, 4. Pressure Limit Valve, 5. Steel Valve Core, 6. Float Valve, 7. Floating Valve,
8. Removable Cooking Pot, 9. Control Panel, 10. Stationary Pot, 11. Base, 12. Pot Handle, 13. Housing, 14. Power
Cable, 15. Heating Plate, 16. Anti Block Shield, 17. Sealing Ring of Steel Valve Core, 18. Sealing Ring of Lid
Safe Lid Opening
1. Disconnects the power or the power plug.
2. Releasing pressure
- 11 -
Page 13
SAFE LID OPENING
A: Quick opening (for non-fluid food)
-Slide the exhaust valve to the Release position.
-Put a wet towel on the lid to cool faster until the float valve falls fully.
B: Normal opening
3. Open the lid
-Hold the lid handle, turn the lid anti-clockwise till the unlock position and lift the lid up to open.
-Do not open the lid until pressure inside the pot is completely released.
-Never pull out the Pressure Release Valve when it is releasing pressure.
-For fluid foods(congee and sticky liquid, do not slide the Pressure Release Valve for releasing pressure when
cooking is just finished, otherwise the hot food fluid may spill from the Pressure Release Valve and cause bodily
burn. Be sure to disconnect the power supply.
-When Large quantity of food is cooked, do not try to release the pressure immediately after cooking. It is
recommended to let the food cool down for a while before releasing the pressure.
TROUBLESHOOTINGS
Indicator Code Reasons
E1 Pressure switch Malfunction
E2 Short circuit of Sensor
E4 Circuit open of Seonso
E5 Overheating
OPERATING INSTRUCTIONS
1. Open the lid: Close upon the lid handle and countdown clockwise removal
the lid to the limit space, then lift the lid.(see picture 1 & 2)
2. Take out the removable cooking pot, put food and water in it.
cooker over 4/5 or less 1/5 full. This is indicated on the upper line of the inside
of the cooker identified with the word "FULL”. For rice and vegetables that expand during cooking, DO NOT fill over
3/5. (see picture 3 & 4 & 5)
- 12 -
Page 14
OPERATING INSTRUCTIONS
3. Make sure dry the removable cooking pot and heating plate before putting the cooking pot into stationary pot. Don't
put anything into stationary pot and heating plate. Please rotate cooking pot lightly into good contact with heating plate.
(see picture 6)
Exhausting
Sealing
4. Close the lid: Make sure Silicone Gasket is seated properly inside Lid. (see picture 7,8)Hold the lid handle and put
the lid on the cooker, rotate the lid clockwise approximately 30 degrees until the lid is aligned with the “LOCK TO THIS
LOCATION” mark on the pot handle.
5. Install the condensation collector.(see picture 10)
6. Put the pressure valve into position; set it to the’Seal’ position and make sure the floater
is in the down position before heating (See picture 9)
7. Connect to the power, the LED Display show ”----“ and it enter into stand-by state.
8. Choose corresponding button according to food, and the relative indicator will be on.
PRESSURE COOKER SETTING
Cooking Program Functions
The SINBO intelligent cooker uses a large and user-friendly control panel. The convenient built-in program functions
allow you to cook your favorite food with a press of a program function key. SCO 5033 includes 9 programs:
Soup, Congee, Chicken/Meat, Bean/Tendon, Rice, Multigrain, Porridge, Cake, Steam.
1. Soup key
2. Shorter
3. Congee key
4. Normal
5. Chicken/Meat Key
6. Bean/Tendon Key
7. Timer key
8. Steam key
9. Rice key
10. Display
11. Multigrain
12. Longer
13. Porridge key
14. Keep Warm/Cancel
1
2
3
4
5
6
7
8
9
10
11
12
13
14
15
16
17
15. Cake key
16. Adjust key
17. Manual key
The general cooking program usage procedure is as follows:
1. Follow steps in Operating Instructions.
2. Connect power cord.
To ensure safety, it is recommended to connect the power cord to the cooker first and then connect the plug to the
power outlet.
3. Select a cooking program function key.
- 13 -
Page 15

PRESSURE COOKER SETTING
Once a function key is pressed, the indicator of a corresponding function will show pressure-holding time.(e.g. rice
function shows 00:12)
Cooking and cooling time may vary depending on different cooking program selections.
Cooking time may vary slightly with the quantity of food and liquid and textures of rice. The cooking time table below
is for reference only.
(e.g. food amount + water reaches scale between 1/5 to 4/5 inside the inner pot):
Cooking time= heating time + pressure-holding time
Function
Key
Pressure
Holding
Time
(Min)
Rice Multigrain Porridge Cake Steam
Shorter
Normal
Longer
8 12 3 25 18 25 13 10 15 1
12 20 5 30 35 40 22 20 30 10
16 28 10 36 50 60 30 30 45 Up to99
4. Cooking starts 5 seconds after the selection of a function Within 5 seconds after pressing a program function key,
you can still select any other function keys and adjust duration levels. The cooker will start work in 5 seconds after
the final selection. Adjust is an optional step.
Duration default is “Normal”;press the “Adjust” key continuously, to select Among ”Normal””Shorter” and “Longer”
modes.
During the operation, you can cancel current cooking program in progress and return to standby mode by pressing
the “Keep-Warm/Cancel” key.
Within 5 seconds, a long audible beep will sound to indicate the cooking process has started. A circular motion LED
display indicates the pre-heating is in progress.
As the pressure increases inside the cooker, the pressure lock pin avlve will pop up.
Once the pressure inside the cooker reaches the desired level, the circular display on LED panel will change to the
cooking time display. The cooking time counts down to indicate the remaining time in the unit of minute.
Tip:
While the cooking is in progress, you can cancel the current cooking program and return to Standby mode by pressing
the “Keep Warm/Cancel” key.
During operation, the pot may make low click sound. This is from the normal operation of the unit controlling the
power cycle.
When cooking with a small quantity of food, the inner pot may appear to be stuck on the lid by pressure when the lid
is opened. In this case, shake the lid slightly, and then remove the lid after the inner pot falls back into its position.
5. After cooking, the cooker starts the keep warm function automatically.
The corresponding function indicator goes out. The cooker makes a audible beep.
The “Keep-Warm” indicator is on to show the cooker is in the keeping warm function. It is not recommended to leave
the cooked rice in “Keep-Warm” state for too long as it may affect the cooking result.
Bean/
Tendon
Meat/
Chicken
Congee Soup Manual
ADJUST COOK TIME
1. Follow steps listed in the Operating Instruction.
2. Select a corresponding program key. Refer to Cooking Program Functions for program selection.
3. Adjust cook by pressing the”Adjust” key, If the “Adjust”key is press continuously, the LED display panel displays”
shorter”,”Normal”, ”Longer” in cycle. When one of Shorter, Normal and Longer is selected, the corresponding cook
time appears on the LED display panel. All cooking programs have the “Adjust” function available. The Adjust cook
time for different cooking programs are different.
4. After cooking, the cooker will go into the keep warm function automatically. The “Keep Warm ”indicator comes on
and the cooker starts the keep warm function.
PRESET TIMER FUNCTION
The SINBO intelligent pressure cooker has a delay timer function of up to 24 hours.
Tips:
-Timer is recommended to be set less than 12 hours.
- 14 -
Page 16

PRESET TIMER FUNCTION
-In case of a long timer delay and warm room temperature, the perishable food may
not be fresh after the long delay time set at the room temperature.
-Cooked rice may yield overly soft texture due to long soaking time. It may also cause
burning of rice at the bottom layer burned.
DELAY TIMER FUNCTION
1.SINBO cooker Delay Timer setting with Cooking Programs
-Follow Step listed in the Operation Instructions.
-Within 5 seconds after program selection, Press “Delay Timer” and “+” or “-“ key set a Delay end time. Press the
“Delay Timer” key, the screen displays show default End time starting with 2Hours (2:00 display).The green light starts
to flash.
The “Delay Timer” function have two choices:
-First press “Delay Time”, the screen show 2:00 on Display, 2 digit will flash, by press the “+” or “-“ key, the time
increase or decrease by 1hour from 0 to 24 hours.
At the same time, second press the “Delay Timer”, the 00 digits on 2:00 display will flash. By press “+” or “-“ key, the
time increase or decrease by 1 minute from 0 to 59 minutes
By circle pressing the “Delay Timer” key to choose hour or minutes you need.
Repeat press the “+” or “-“ key, until the intend timer you need is displayed.
-You can choose the Delay Timer from 0 to 24 hours. The Timer will stop increasing when it reaches 24:00.
-The Delay timer setting will steady show on the Display after 5 seconds. The “Delay Timer” light is stable and the
display starts to show Delay Timer countdown.
2. The food should be started to cook when the delay Timer counts down 0. The cooker will enter into Keep Warm
function automatically after cooking. Keeping warm for longer time is not recommended.
-Cooking End Time may not be exact as set due to various reasons. If cooking completes before the set time, the cooker
will then enter into "keep warm" function.
CAUTION: Perishable foods such as meat, poultry, fish, cheese and other dairy products cannot be left at room
temperature for more than 2 hours or no longer than 1 hour if the room temperature is above 32 ºC.
MANUAL COOK TIME SETTING
Cook time is the amount of time the pot cooks the food after the inside pressure reaches the desired level. The "Manual"
key offers you the option to further customize the cook time depending on the quantity of food and fluid in the pot.
Cook time can also be set based on your own preference for the desirable texture and tenderness of the food. Generally,
the more quantity of food and fluid are put in the pot, the more time it requires to fully cook.
1. Follow steps listed in Operating Instructions.
2. Press the key to set the cook time.
Each press on the "+"or"-"key increases or decreases the cook time by 1minute.
Repeat press the "+"or"-"key until it reaches the desirable amount of time in minutes. The maximum cook time is
99minutes.
-If the delayed timer function is required, press the "Delay timer" key to set the delay timer value within 5 seconds
of last key press. Refer to Delay Timer function or setting the delay timer.
-After setting the delay timer, the green indicator flashes for 5 seconds.
-When the "Timer” indicator light is solid, the delay timer starts to count down.
3. Cooking complete
There is an audible beep when cooking is completed. The red "Manual" indicator light comes off, and the yellow
indicator light on the "Keep Warm" key comes on.
The cooker automatically goes into keep warm state. If keep warm is not needed, press the "Keep Warm/Cancel" key
to cancel the keep warm function. Open the lid according to the Safe Lid Opening method.
KEEP WARM FUNCTION
After cooking, the selected cooking function indicator light (red) will come off. The cooker also gives an audible beep.
The yellow “Keep-Warm” indicator light will be on to indicate that the cooker starts the “Keep-Warm” function. In the
standby mode, the keep warm function can be started by pressing the "Keep Warm/Cancel" Key.
The “Keep-Warm” state temperature is 60-80°C(140-176°F);
Keeping warm for a longer time is not recommended, as it may negatively affect the texture or the taste of the food
- 15 -
Page 17

WARNING
Do not hold the pressure release valve. Hot steam/liquid may be ejected.
Keep hands and face away from steam vents, use pot holders when removing the inner pot or touching any hot items,
and never force the lid open. The lid will only open once the pressure is released. Remove the lid by lifting it away from
you to avoid being burned by the steam.
CLEANING METHODS AND CARE
1. Unplug the power cord before cleaning.
2. Clean the outer body with a soft cloth such as a paper towel or microfiber cloth.
Do not immerse the outer body in water or pour water into it.
3. Remove and clean the condensation collector, then reinstall it. Clean the center ring with a wet towel.
4. Rinse with water the underside of the lid including the sealing ring, pressure limit valve, anti-block shield, air
escape and float valve. Dry completely.
5. To hand clean the cooking pot, use a sponge or a soft nonmetal brush and wipe.
Be careful not to damage the inside coating.
Regular care or maintenance is essential in ensuring that this product is safe for use.
When the following circumstances take place Solutions
-Power cord and plug suffer from expansion, deformation,discoloration, damages, etc.
-A portion of power cord or the plug gets hotter than usual.
-Electric pressure cooker heats abnormally, emitting a burnt smell.
-When power-on, these are unusual sounds or vibrations.
·Stop use the product immediately,send it back to your nearest customer service center.
·There is dust or dirt on the plug or socket
·Remove dust or dirt with a dry brush.
- 16 -
Page 18
Page 19
Page 20
Page 21
Page 22

Page 23

Page 24

Page 25

- 24 -
Page 26

- 25 -
Page 27

- 26 -
Page 28

- 27 -
Page 29

- 28 -
Page 30

- 29 -
Page 31

- 30 -
Page 32

No: 1-5033-22102012
- 31 -
Page 33

- 32 -
Page 34

- 33 -
SCO 5033
Page 35

- 34 -
Page 36

- 35 -
Page 37

SCO 5033
SINBO SCO 5033
- 36 -
Page 38

- 37 -
SINBO SCO 5033
SINBO SCO 5033
Page 39

- 38 -
Page 40

ESPANOL
SINBO SCO 5033 OLLA INTELIGENTE A PRESIÓN
INSTRUCCIÓN PARA EL USO
Los imagenes incluidos en el texto tienen objetivo de referencia solamente, debe tener en consideración el producto mismo
en su mano.
LOS AVISOS IMPORTANTES DE SEGURIDAD
1. Leer con cuidado este Manuel de Uso antés de usar la olla inteligente a presión.
2. No colacar el aparato sobre los superficies no equilibrados. Es definivitivamente prohibido usar el aparato sobre cualquier
objeto que causará la apretura de la ventalación de bajo del aparato como papel de periódico ú estrafor. Colacar la Olla
inteligente a presión sobre un superficie que no estellará en IIamas y que sea fuerte para usar la.
3. No usar el aparato en unlugar que se echar agua, aceite o ser expuesto al fuego. No usar el aparato en un lugar que será
expuesto a la luz solar directamente.
4. No dejar el cable de la energía en un lugar que se podrá estar unido a Su pie facilmente.
5. Durante el uso del aparato cerca de los niños debe ser vigilado por los adutos. Este aparato no debe usar por los niños.
6. No sumergir la olla inteligente a presión, el cable de la energía o la ficha en agua o en algún otro líguido.
7. No tratar de curiosear la olla a presión inteligente o no usar piezas no confirmados en la olla inteligente a presión sino
se podrán ocurrir peligros como shock eléctrico, incendio ú daño financiero.
8. No cocinar puré de avena ú otros yipos de granos en el aparato. Estos tipos de comidas pueden causar que se obturará
el sistema que evita por medio de inflarse, dehacer burbujas y de arrojar.
9. Tener cuidado para no exceder las comidas o líguidos que se habían puesto dentro del depósito interno el nivel máximo.
Llenar excesivo el aparato puedo causar que sean obturado las válvulas de la presión para la evacuación y que se ocurra
presión excesiva.
10. No mover el aparato durante el funcionamiento de la olla a presión inteligente o nointentar a abrirla con fuerza. En caso
de ser difícil girar la tapa, éso muestra que todavía encuentran presión en la olla.
11. No poner sus manos y cara hacia la válvula con baliza ú otras piezas metálicas de la tapa durante el funcionamiento
del aparato para no ser expuesto al peligro de hervirse.
12. No tener contacto el depósito interno y la yapa después de la completación del proceso de cocinar. El depósito interno
y la tapa se conservan sus calores durante mucho tiempo.
13. No limpiar o desmontar ninguna pieza mientrás estaba enchufado el aparato.
14. No usar la olla de presión inteligente fuera de su objetivo diseñado.
15. Esta olla de presión inteligente solamente es parar el uso doméstico y en campos cerrados. No usarlo a fuera.
16. No usar la olla inteligente de presión para hacer fritura con a ceite de presión. En caso contrario Se pueden ocurrir
situaciones peligroras que podrán causar incendios y daños serios.
17. Definitivamente no colocar el depósito sobre aparato para no causar que será deformarse el depósito interno.
18. No dejar sin vigilancia la olla a presión durante la cocina.
19. Controlar la válvula de presión para descarga que no sea obturado antés de empezar a usar aparato.
20. Antés de cocinar los ingredients secos en la olla inteligente a presión, mojarlos para obtener mejores resultados.
21. Tener mucho cuidado durante la transportación con comidos calientes o agua caliente.
Conservar esta instrucción para consultarlo en el futuro.
INSTRUCCIÓN PARA EL SET DEL CABLE PARTICULAR
El cable de la energía es corto para evitar los riesgosque se podrán causar por ser largo como unirse. Se pueden usar más
largos cables o cables de la extensión con el aparato con una condición no ser permitido a caer del lado de la mesa o del
mostrador, a tirar por los niños o el riesgo de ser unído accidentalmente en caso de ser lo mismo los valores eléctricos
con los valores eléctricos del aparato.
AVISOS
Antes de usar el aparato cada vez, estar seguro que la válvula de presión para descargarse, la válvula con baliza y el sistema
preventivo de obstrucción, limpiarlos superficies del depósito interno y de la placa de calentamiento y eliminar las sustancias
extranjeras, estar seguro que la válvula de presión para descargarse está en situación del aislamiento.
Después del proceso de cocinar espera que la olla se enfríe y reducir la presión usando la válvula de presión para
descargarse. Tener mucho cuidado cuando usted está abriendo la yapa de la olla.El vapor en el aparato puede causar
quemas en serie.
En caso de ser dañado el cable o el enchufe o averíado la olla a presión inteligente, inmediatamente parar la olla; leer las
secciones de eliminar problemas Servicio de Garantía. Desenchufar completamente En caso de no ser enchufado Se podrán
ocurrir peligros del shock eléctrico y cortocircuito. Limpiar el enchufe regularmente. Para no causar el riesgo del incendio,
se debe eliminar ha humedad y ensuciamiento del enchufe. Desenchufar mientras no está usado el enchufe. Se debe tener
cuidado que no se causará deformación en las juntas. En caso contrario el aparato no funciona bien.
- 39 -
Page 41

Estructura de la válvula con baliza
CARACTERÍSTICAS DEL PRODUCTO
Sistema preventiva
de la obstruccion
Recolector de la condensación
Desmontaje
Montaje
Olla de la
medición
Cuchara de la
medición
Panel de Control
Desmontar hacia arriba girando
hacia la dirección contraria del reloj
Montaje Tornillar hacia abajo
girando hacia la dirección del reloj
Levantar arriba para
desmontar
Desmontaje
Montaje
Acesorio
Presionar a bajo para montar
- 40 -
Page 42

CARACTERÍSTICAS TÉCNICAS DEL PRODUCTO
Modelo : SCO 5033
Fuente de la energía : AC230V, 50Hz
Energía : 900W
Volumen : 5L
Diamentrodel depósito interno : 22cm
Presión del funcionamiento : 0-70kPa
Presión límite : 90kPa
Temperatura de la calefacción : 60-80˚C
INSTRUCCIÓN DEL PRODUCTO
Ya usted cocinará sus comidas mejor, más rápido y en forma más saludable. La olla a presión inteligente adquiere
que no se de saparecerán los elementos de la alimentación cocinando más rápido y en más alta temperatura la comida
en cerrando el uapor a dentro.
Se usa menos agua durante el proceso de cocinar y el tejido y gusto de la comida son más atractivos. Tiene botones
de ajuste para usar fácilmente calculador de tiempo contando atrás y depósito para cocinar tan grande para hacer
carne asada en la olla junto todas las guarniciones. Qué se divierten !
Tiene un sistema de seguridad única con las tecnologías de plante y 10 mecanismos de seguridad probado sí mismo
Entre éstos se incluyen la clavija de cerradura para cerrar la tapa, control de la temperatura y de la presión electrónica,
determinación de la quema de comidas y cerradura autamática, placa de la presión excesiva, seguro de la limitación
del circuito eléctrico.
ANTÉS DEL PRIMER USO
Quitar todas los acesorios antés de usar el aparato por primera vez y leer este Manual con cuidado, tener mucha
consideración ante los para evitar el peligro del daño, relacinados con la instrucción del uso y sufrimientos de heridas.
MONTAJE/DESMONTAJE DE LA JUNTA Y DEL SISTEMA QUE EV‹TA LA OBSTRUCCIÓN
Desmontaje y montaje
del sistema que evita
la obstrucción
Desmontaje
Sistema para evitar
la obstrucción
Desmontar hacia arriba
giranda a la dirección
contraria del reloj
Montaje
Tornillar hacia a bajo
girando a la misma dirección
del reloj
Desmontaje y montaje
Desmontaje Montaje
Levantar arriba
Presionar abajo
de la Junta
Junta
Estar seguro que es fuado a la tapa la junta y el sistema que evita la obstrucción antés de cada uso.
Limpiar las sustancias extranjeras en el sistema que evitan la obstrucción y en la junta después del uso.
Conservar la limpieza del aparato para evitar los olores.
No cortar la junta definitivamente aplicando fuerza, en caso contrario la junta puede causar echa fuera de formando
la junta.
No continuar a usar la junta dañada, Ileuarla al centro del servicio autorizado para recambiarla.
1. Mango de la tapa, 2. Tapa, 3. Tapa superior, 4. Válvula del límite de la presión, 5. Cuerpo de la válvula de acero
6. Válvula con baliza, 7. Baliza de la válvula, 8. Depósito desmontable para cocinar, 9. Tabla del Control, 10. Depósito
fijo, 11. Unidad de base, 12. Mango del depósito, 13. Cuerpo, 14. Cable de la energía, 15. Placa para calentar
16. Sistema para evitar la obstrucción, 17. Junta del Cuerpo de la válvula de acero, 18. Junta de tapa
ABRIR LA TAPA CON SEGURIDAD
A. Abrir rápido ( las comidas no líguidos)
Ajustar la válvula para descargar en la posición de descargar.
Poner una toalla mojada sobre la tapa para hacer enfriar más rápida hasta que baje completamente la válvula con
baliza.
- 41 -
Page 43

ABRIR LA TAPA CON SEGURIDAD
B. Abrir en la forma normal
3. Abrir la tapa.
Coger el mango de la tapa, girar la tapa hacia la dirección contraria del reloj hasta que se ajuste hacia la posición para
abrir la cerradura y abrir la tapa levantándola hacia arriba.
• No abrir la tapa hasta que se reduzca completamente la presión en el depósito.
• Definitivamente no tirar la válvula mientrás descargando la presión la válvula para descargarse la presión
• No abrir La Válvula para Descargarse la Presión definitivamente para descargar la presión después de la
completación del proceso de cocinar durante la cocina de las comidas líguidas ( congee y Iiquida ), En caso contrario
el Iiquido de la comida caliente puede cusar quemaduras echando de la válvula para descargarse la presión. Estar
seguro que es cortado la conección de la energía.
• No intentar a descargarse la presión recién después del proceso de cocinar mientras cocinaba grandes cantidades
de comidas. Se recomienda que se espere enfriarse la comida un poco antés de descargarse la presión.
ELIMINAR PROBLEMAS
Código de indicador Causas
E 1 Avería del interruptor
E 2 Corto Circuido en el Sensor
E 4 El circuito del Sensor es funcionado
E 5 Calentamiento excesivo
INSTRUCCIÓN PARA EL USO
1. Abrir la tapa : Pulsar al mango de la tapa y abrir la tapa girando hacia la
dirección contraria del reloj hasta el punto del límite y levantarla arriba (
Consultar Figuras 1 y 2 )
2. Quitar el depósito para cocinar desmontable y poner los ingredientes y agua
dentro del mismo.
La proporción de la plenitud dela olla no debe ser más de 4/5 o menos de 1/5.
Este nivel es expresado por la línea
- 42 -
Page 44

INSTRUCCIÓN PARA EL USO
marcado por la frase “ FULL (COMPLETO ) “dentro de la olla. No IIenar la olla más del nivel 3/5 mientras cocinaban
ingredientes como arroz y vegetales que se engordan durante la cocina. ( Consultar las figuras 3,4 y 5 ).
3. Estar seguro que el depósito desmontable para cocinar y la placa del calentamiento son secos antés de meter el
depósito para cocinar en el depósito fijo. No meter nada a dentrodel depósito fijo ú sore la placa del calentamiento.
Girar un poco el depósito para cocinar en forma de tener contacto con la placa del calentamiento. ( Consultar la figura
6 )
Salida del
aire
Junta
4. Cerrar la tapa : Estar seguro que la junta de la silicona es colocado bien a dentro de la
tapa ( Consultar las figuras 7,8 ). Coger el mango de la tapa y colocar la tapa sobre la
olla; girar aproximadamente 30 grados la tapa hacia la dirección del reloj hasta que se
alcance al mismo nivel con la marca “ CERRAR EN ESTA POSICIÓN “ SOBRE EL MANGO
DEL DEPÓSITO.
5. Fijar el recolector de la condensación ( Consultar a la figura 10 )
6. Ajustar la válvula de la Presión en la posición; Ajustar a la posición de “ Sellar “ y estar seguro que flator está en
la posición abajo antés de calentarse ( Consultar a la figura 9 ).
7. Conectar con la energía, se aparecerá ”----“ en la Pantalla LED y se convertrá en la posición de esperarlista.
8. Seleccionar el botón equivalente de la comida y el indicador correspondiente se encenderá.
Fijar
AJUSTE DE LA OLLA A PRESIÓN
Los funciones del Programa para cocinar
La olla inteligente de SINBO se usa una tabla del control grande y amigo del/de la usador/a. Suministra que usted
podrá cocinar pulsando al botón del funcionamiento de un solo programa las comidas favoritas de usted los
funcionamientos prácticos en la memoria del aparato. SCO 5033 tiene 9 programas:
Sopa Congee, Pollo,/Carne, Judía/Tendon, Arroz, granos, comida hecha con granos aguada, torta, cocinar vaporizado.
1. Botón de sopa
2. Corto
3. Botón de Congee
4. Normal
5. Botón de Pollo/carne
6. Botón de judía/Tendon
7. Botón para cocinar vaporizado
8. Botón de arroz
9. Pantalla
10. Granos
11. Largo
12. Botón para la comida hecha con granos aguada
13. Consevar caliente/cancelar
14. Botón de la torta
1
2
3
4
5
6
7
8
9
10
11
12
13
14
15
16
17
15. Botón del ajuste
16. Botón de manual
- 43 -
Page 45

AJUSTE DE LA OLLA A PRESIÓN
El programa en general para cocinar funciona de acuerdo con el procedimiento siguiente :
1. Seguir los pasos incluidos en la instruccón del uso.
2. Conectar el cable de la energía.
Se recomienda que se conectará usted el cable de la energía a la olla primero para garantizar la seguridad y después
enchufar después la ficha.
3. Seleccionar un botón del funcionamiento del programa para cocinar.
Al pulsar a un botón del funcionamiento Se expresa al plazo de la conser vación de la presión en el indicador del
funcionamientocorrespondiente. ( por ejemplo se expresa 00:12 en el funcionamiento de arroz )
El plazo de cocinar y enfriar se varia de acuerdo con las selecciones de los programas diferentes.
El plazo de cocinar se varia de acuerdo con la cantidad de comidas, del líquido y del tejido de arroz. La tabla siguiente
sobre los plazos para cocinar es solamente por motivo de la referencia.
(por ejemplo: la cantidad de los ingredientes + agua está entre los niveles 1/5 y 4/5 de la medida dentro del depósito
interno: Plazo para cocinar= el plazo del calentamiento + plazo de la conservación de la presión
Botón del
funcionamiento
Arroz Granos
Kısa
8 12 3 25 18 25 13 10 15 1
Comida
hecha con
granos
aguada
Torta
Cocinar
vaporizado
Judía/
Tendon
Pollo/
carne
Congee Sopa Manal
(Minuto)
Plazo de
de la presión
conservación
Normal
Largo
12 20 5 30 35 40 22 20 30 10
16 28 10 36 50 60 30 30 45 Hasta 99
4. Se inicia el proceso de la cocina después de 5 segundos después de seleccionar un funcionamiento. Usted puede
Selecciona otros botones del funcionamiento y hacer ajuste del plazo también después de 5 segundos después de
pulsar a un botón de funcionamiento de un programa. Después de 5 segundos de hacer su selección final, la olla
empezará a funcionar. El proceso del ajuste es un paso dependiente de su deseo.
El plazo Supuesto es “ Normal “, Usted puede seleccionar entre los modos “ Nornal, “Corto” , “Largo” pulsando
continuamente al botón de ajuste “.
Usted puede cancelar el presente programa de cocina vigente durante el funcionamiento y puede regresar al modo
de esperar pulsando al botón de la “ Conser uación del calor/cancelar”.
Se oirá una voz”bip” larga que se expide elinicio de la cocina durante 5 segundos. Se visualiza que sea vigente el
proceso precalentamiento en la pantalla cirlular de LED.
Al iniciar al aumento de la presión dentro de la olla, la válvula del pin para la cerradura de la presión. Empieza a subir
arriba.Al alcanzar al nivel deseado la presión dentro de la olla la Pantalla led circular se pasa al modo de la visualización
para la cocina de la led circular. Se empieza cotar atrás para el plazo de la cocina y el plazo restante es expresado
en minutos.
El Cluedo
Usted puede cancelar el programa presente para cocinar en el momento de Ser vigente el proceso de cocinar y
regresar al modo de esperar pulsando al botón de “ Conservar el calor/cancelar”.
Se puede oir una voz “ klik” no muy alta del depósito durante el funcionamiento. Ésto, es una voz oida cuando se realiza
el control del ciclo del poder durante el funcionamiento normal del aparato.
Cuando Se cocina comida de poca cantidad, Se puede ver comosifuera pegada el depósito interno a la tapa cuando
se abre la tapa. En este caso mover la tapa un poco y quitar la tapa depués de caer el depósito interno en su lugar.
5. Despuésdel proceso de la cocina la olla empieza el funcionamiento de conservar caliente automático.
Se apaga el indicador correspondiente. La olla avisa por medio de la voz “ bip “.
El indicador de” conservar caliente” para mostrar que sea realizado el funcionamientode consevar caliente de la olla.
Se recomienda que no se dejerá en el modo de “ conservar caliente “ durante largo plazo el arroz cocinado para no
afectar en forma negativa el resultado de la cocina.
AJUSTE DEL PLAZO DE COCINAR
1. Seguir los pasos incluidos en la instrucción del uso.
2. Pulsar al botón del programa correspondiente para cocinar. Consultar a la Sección sobre los funcionamientos del
Programa de cocinar para seleccionar el programa.
3. Ajustar la cocina pulsando al botón de “ Adjust + ( ajuste ) “, Si se pulsa al botón de “ adjus + (Ajuste) continuamente,
- 44 -
Page 46

AJUSTE DEL PLAZO DE COCINAR
Se mostrará el panel de la pantalla LED enciclo “más” corto “, “normal”, “más largo” ( shorter, normal, longer ). En
caso de seleccionar uno de “ shorter (más corto)”, “ normal (normal)”, “longer” (más largo)”, Se aparecerá en el panal
de la pantalla LED el plazo equivalente de cocinar. Todos los programas de cocinar tienen el funcionamiento de “
Adjus+ (ajuste)”. El plazo Adjus + (Ajuste ) para cocinar es diferente para diferentes programas de cocinar.
4. Después del proceso de cocinar la olla pasa al modo de conservar caliente automático. Se enciende el indicador
de “ conservar caliente “ y la olla se pasa al modo de “ conservar caliente “
EL FUNCIONAMIENTO DE CALCULADOR DE TIEMPO PRE-AJUSTADO
La olla a presión inteligente de SINBO, teine el funcionamiento de calculador de tiempo que prorroga hasta 24 horas.
Cluedos :
• Se recomienda que se ajustará el calculador de tiempo menos de 12 horas.
• En caso de ser largo el plazo de la prorroga del calculador de tiempo y Ser alto la temperatura del tiempo, los
ingredientes que se enranciarán fácilmente, pueden perder sus frescuras por motivo de quedarse durante largo bajo
la temperatura de tiempo.
Arroz puede ensuavecer excesivo en caso de esperar mucho en agua. Además puede causar que Se pegará y quemará
también.
EL FUNCIONAMIENTO DE LA PRORROGA DEL CALCULADOR DE TIEMPO
1. Ajuste del Contador de la Prorroga del horno SINBO con programas de cocinar
- Seguir los pasosincluidos en la lista expresada en le instrucción del funcionamiento.
- Después de seleccionar el pragrama puslar al botón de “ prorrogar el Calculador de Tiempo” y “+” o “-” para ajustar
el plazo de la completación de de prorroga en 5 segundos. Pulsar al botón “ Contador de Prorroga “ , Se aparecerá
el plazo de la Completación del ajuste de la fábrica como 2 horas ( 2:00) en la pantalla. Se iniciará encender y apgar
la luz verde.
El funcionamiento del “ Calculador de Tiempo “ tiene dos opciones:
Primero, puslar a “ prorrogar tiempo”, se aparecerá 2:00 en la pantalla, orden 2 se encenderá y apagará, se
mostaráaumento y reducción por 1 hora entre 0 (cero) y 24 el plazo pulsando botones “ + “ o “-”.
Seleccionar las horas o minutos necesarios pulsando circularmente al botón “ calculador de tiempo”.
Repetir puslar “+” o “-” hasta que se visualice el plazo del objetivo.
Usted puede seleccionar el contador de prorroga entre O y 21 horas. El aumento del contador Se parará al alcanzar
a 24:00. El contador de la prorroga se aparecerá durante 5 segundos en la pantalla Sonar fijo. La Luz del contadorde
la prorroga se Visualiza la cuenta hacia atrás del Contador de la prorroga en la pantalla.
2. la comida debe ser cocinado al iniciar a contar hacia 0 (cero) el contador de la prorroga.
El horno pasará al funcionamiento de conservar Caliente automáticamente después del funcionamiento de cocinar.
No se recomienda un proceso de conservar caliente durante largo plazo.
• El plazo de la completación de la cocino no puede ser exacto como ajustado por motivo de varias causas. En caso
de ser completado el funcionamiento de cocinar antés del plazo ajustado, la olla pasa al modo ”conservar caliente”.
AVISO : Los ingredientes enranciables fácilmente como carne, animales alados, pescado, queso y otros productos de
lecha no deben ser esperado durante 2 horas en la temperatura normal de tiempo, más de 2 horas en las temperaturas
Superiores del nivel de 32˚C.
AJUSTE DEL PLAZO DE COCINAR MANUAL
El plazo de cocinar es el plazo que la olla cocina la comida después de alcanzar al nivel deseada la presión interna.
El botón de “manual” adquiere que el plazo de cocinar podra hacer un carácter propio dependiente de la cantidad
de los ingredientes y Iíquido en el depósito El plazo de cocinar también Se podrá ajustar dependiente del tejido y
blandura deseada en la comida. Generalmente se necesita más tiempo para realizarse completamente el proceso de
cocinor al poner más ingredientes y Iíquido en el depósito.
1. Seguir los pasos incluidos en la Instrucción Para el Uso.
2. Pulsar botón para ajustar el plazo de cocinar
El plazo de cocinar aumenta o reduce 1 minuto al puslar cada vez al botón “+” o “-”.Continuar a puslar al botón “+” o
“-” hasta alcanzar al valor deseado el plazo como minuto. El plazo máximo para cocinar es 99 minutos.
. En caso de ser necesario usar el funcionamiento de prorrogar el contador de tiempo, ajustar el valor de la prorroga
del contador de tiempo pulsando al botón “ prorroga del contador de tiempo” en 5 segundos después de puslar al
botón. Consultar a la sección del funcionamiento de la prorroga del contador de tiempo ú al ajuste del prorroga del
- 45 -
Page 47

AJUSTE DEL PLAZO DE COCINAR MANUAL
contador de tiempo.
• Después de ajustar la prorroga del contador de tiempo, la luz verde de indicadora se encendera
3. Es completado cocinar
Al completar el proceso de cocinar Se escucha una voz de “bip”. Apaga la luz roja de “manual” y enciende la luz
amarilla sobre el botón de “conservar caliente”.
La olla pasa al modo de conservar caliente automáticamente. En caso de no Ser necesaria el proceso de consevar
caliente, Cancelar el funcionamiento de conservar caliente pulsando al botón “ conservar caliente/cancelar”. Abrir
la tapa aplicando el método de Abrir La tapa Seguro.
EL FUNCIONAMIENTO DE CONSERVAR CALIENTE
Después del funcionamiento de Cocinar, se apaga la luz indicadora del funcionamiento seleccionado (roja). La olla
da al mismo tiempo un aviso por medio de la voz “bip”. La luz amarila indicadora de “ conseruar caliente “ muestra
encendiendo que sea pasado la olla al modo de “conservar caliente”. Se puede pasa al funcionamiento de conservar
caliente durante el modo de esperar pulsando al botón “ conservar caliente/cancelar”.
La temperatura del modo de “ conservar caliente” es 60-80˚C (140-176˚F).
No se recomienda que sea largo el plazo del funcionamiento de conservar caliente por motivo de influir negativamente
el gusto y el tejido de la comida.
OJO :
No coger la vávula de descargarse a presión.Puede ser salida hacia fuera de vapor/Iíquido. Guardar la distancia entre
los agujeros del vapor y de sus manos y cara usar guante para horno teniendo en contacto con cualquiere pieza
calienteo quitando el depósito interno y definitivamente no intertar a abrir con fuerza la tapa. La tapa solamente Se
abrirá después de descargarse la presión. Abrir la tapa separando hacia lejos de sí mismo para no ser expuesto al
peligro de quema por motivo del vapor.
LOS MÉTODOS DE LA LIMPIEZA Y EL MANTENIMIENTO
1. Desenchufar antés de limpiar el aparato.
2. Limpiar el cuerpo externo del aparato usando una tela suave toalla de papel o tela de limpiez a de microfibra.
No sumergir en agua el cuerpo externo principal del aparato ú no echar agua sobre el mismo.
3. fijar en su lugar otra vez el recolector de la condensación quitándolo y limpiándolo. Limpiar el circulo central por
medio de una toalla mojada.
4. Aclarar de bajo de la tapa, junta de la tapa, válvula del límite de la presión, el sistema preventivo de obstrucción,
válvula de baliza con agua. Secar los bien.
5. Limpiar la olla por medio de un cepillo suave no metálico ú por medio de un esponje. Tener cuidado a a no ser
dañado la cubierta interna.
Es necesaria hacerel proceso del mantenimiento regularmente para adquirir la seguridad del uso del producto
Realizar los actos expresados a sus lados en casos en siguientes:
• El cable de la energía y el enchufe son expuestos a estirarse, deformación, deterioro del color, daño y asimilados.
• Una parte del cable de la energía y del enchufe se calentan más de normal.
• La olla eléctrica a presión calenta extraordinariamente y extiente olor de quema.
• Al enchufar el aparato se oye voces extraordinarios y se ocurren vibraciones.
- ‹nmedia tamente dejar a usarlo y Llevarlo al centro del Servicio autorizado más cerca.
• Hay ensuciamiento ú polvo en el enchufe o en la ficha
- Eliminar el polvo ú la mancha por la ayuda de un cepillo seco.
- 46 -
Page 48

Page 49

Page 50

Page 51

Page 52

Page 53

Page 54

Page 55

Page 56

1-5033-22102012
- 55 -
Page 57

- 56 -
Page 58

SINBO SCO 5033
- 57 -
SINBO SCO 5033
Page 59

- 58 -
Page 60

- 59 -
Page 61

- 60 -
Page 62
SINBO SCO 5033
.1
.2
1
2
3
4
5
6
7
8
9
10
11
12
13
14
15
16
17
.3
.4
.5
.6
.7
.8
.9
.10
.11
.12
.13
.14
.15
.16
.17
- 61 -
Page 63

- 62 -
Page 64

- 63 -
Page 65

MÜfiTER‹ H‹ZMETLER‹
De¤erli Müflterimiz,
En uygun fiyata en iyi ürünü vermenin yan› s›ra; en iyi hizmeti vermenin de
önemli oldu¤una inan›yoruz. Bu nedenle siz bilinçli tüketicilere daha yak›n
olabilmek için, internet adresimizdeki eriflim formlar›n›n yan› s›ra, tüketici
dan›flma hattımızı da hizmetinize açm›fl durumday›z.
TÜKET‹C‹
DANIfiMA HATTI
444 66 86
Tüketici Dan›flma Hattımızı,
- Hafta içi her gün 08.00-18.00 saatleri aras›nda arayabilir; istek, öneri ve
flikayetlerinizi firmam›za iletebilirsiniz.
Tüketicinin Dikkatine:
Ürünlerimizle ilgili hizmetleri tam olarak alabilmek için afla¤›daki önerilere
uyman›z› rica ederiz:
1. Ürünü ald›¤›n›zda Garanti Belgesini mutlaka yetkili sat›c›n›za onaylatt›r›n›z.
2. Ürünü kullanma k›lavuzunda belirtilen hususlara göre kullan›n›z.
3. Ürününüzle ilgili hizmet talebiniz oldu¤unda yukar›daki telefon
numaralar›ndan, Tüketici Danıflma Hattına baflvurunuz.
4. Ürünü promosyon arac›l›¤› ile edinmiflseniz, ürüne ait garanti belgesini en
yak›n yetkili servisimize giderek onaylatt›r›n›z.
5. Teknik servisteki ifliniz bitti¤inde "Yetkili Servis Hizmet Fifli" almay›
unutmay›n›z. Alaca¤›n›z bu Hizmet Fifli, ileride ürününüzde meydana
gelebilecek herhangi bir sorunda size yarar sa¤layacakt›r.
KAPIDAN KAPIYA
MERKEZ
TEKN‹K SERV‹S
(0212) 422 94 94
www.sinbo.com.tr
0800 211 50 21
7 GÜNDE
ÜCRETS‹Z
SERV‹S
Kap›dan Kap›ya Ücretsiz Servis Kampanyam›z dâhilinde Yurtiçi Kargo Firmas› ile iflbirli¤i içerindeyiz. Tüketicimiz
taraf›ndan sat›n al›nan ürünün fiyat› ne olursa olsun, Tüketicimiz ürün ile ilgili garanti kapsam›na giren herhangi
bir problem yaflad›¤›nda, 444 66 86 numaral› Tüketici Danıflma Hattımızı aramas› ve kay›t b›rakmas› yeterlidir.
Bu süreçten sonra Tüketicimizin ürünü ücretsiz olarak Yurtiçi Kargo taraf›ndan Tüketicimizin bulundu¤u adresten
al›n›p, 7* ifl günü içerisinde ürün çal›fl›r bir vaziyette, yine Tüketicimize Yurtiçi Kargo arac›l›¤› ile adresine teslim
edilmektedir. 7 ifl günü içerisinde sorunu çözülemeyen ürünler ise, yenisi ve/veya bir üst modeli ile de¤ifltirilmektedir.
Tüm bu süreçte Tüketicilerimizden hiçbir ücret talep edilmemektedir.
(*Ürünün servis garanti süresi, Yurtiçi Kargo ürünü Sinbo Fabrikas›’na teslim ettikten sonra bafllar.)
- 64 -
TESL‹MAT
(*)
GARANT‹S‹
Page 66

- GARANT‹ fiARTLARI -
1) Garanti süresi,mal›n teslim tarihinden itibaren bafllar ve 2 y›ld›r.
2) Mal›n bütün parçalar› dahil olmak üzere tamam› Firmam›z›n garanti kapsam›ndad›r.
3) Mal›n garanti süresi içerisinde ar›zalanmas› durumunda, tamirde geçen süre garanti
süresine eklenir. Mal›n tamir süresi, 20 iflgününü geçemez. Bu süre mala iliflkin ar›zan›n
servis istasyonuna, servis istasyonunun olmamas› durumunda, mal›n sat›c›s›, bayii, acentesi,
temsilcili¤i, ithalatç›s› veya imalatç›s›-üreticisinden birine bildirim tarihinden itibaren bafllar.
Tüketicinin ar›za bildirimini; telefon, faks, e-posta, iadeli taahhütlü mektup veya benzeri bir
yolla yapmas› mümkündür. Ancak, uyuflmazl›k halinde ispat yükümlülü¤ü tüketiciye aittir.
Mal›n ar›zas›n›n 10 ifl günü içerisinde giderilememesi halinde, imalatç›-üretici veya ithalatç›;
mal›n tamiri tamamlan›ncaya kadar, benzer özelliklere sahip baflka bir mal› tüketicinin
kullan›m›na tahsis etmek zorundad›r.
4) Mal›n garanti süresi içerisinde gerek malzeme ve iflçilik, gerekse montaj hatalar›ndan
dolay› ar›zalanmas› halinde, iflçilik masraf›, de¤ifltirilen parça bedeli ya da baflka herhangi
bir ad alt›nda hiçbir ücret talep etmeksizin tamiri yap›lacakt›r.
5) Tüketicinin onar›m hakk›n› kullanmas›na ra¤men mal›n;
• Tüketiciye teslim edildi¤i tarihten itibaren, garanti süresi içinde kalmak kayd›yla, bir y›l
içerisinde en az dört defa veya imalatç›-üretici ve/veya ithalatç› taraf›ndan belirlenen garanti
süresi içerisinde alt› defa ar›zalanmas›n›n yan› s›ra, bu ar›zalar›n maldan yararlanamamay›
sürekli k›lmas›,
• Tamiri için gereken azami süresinin afl›lmas› ,
• Firman›n servis istasyonunun, servis istasyonunun mevcut olmamas› halinde s›rayla sat›c›s›,
bayii, acentesi temsilcili¤i ithalatç›s› veya imalatç›-üreticisinden birisinin düzenleyece¤i raporla
ar›zan›n tamirini mümkün bulunmad›¤›n›n belirlenmesi, durumlar›nda tüketici mal›n ücretsiz
de¤ifltirilmesini, bedel iadesi veya ay›p oranda bedel indirimi talep edebilir.
6 ) Mal›n kullanma k›lavuzunda yer alan hususlara ayk›r› kullan›lmas›ndan kaynaklanan
ar›zalar garanti kapsam› d›fl›ndad›r.
7 ) Garanti Belgesi ile ilgili olarak ç›kabilecek sorunlar için Gümrük ve Ticaret Bakanl›¤›
Tüketicinin Korunmas› ve Piyasa Gözetimi Genel Müdürlü¤ü’ne baflvurabilir.
‹THALATÇI F‹RMA / IMPORTER
DE‹MA ELEKTROMEKAN‹K ÜRÜNLER ‹NfiAAT SPOR MALZEMELER‹ ‹MALAT SAN. VE T‹C. A.fi.
Cihangir Mh. Güvercin Cd. No:4 Haramidere Mevkii Avcılar - ‹stanbul - Türkiye
Tel : (0212) 422 94 94 & Fax : (0212) 422 03 49
www.sinbo.com.tr & info@sinbo.com.tr
- 65 -
Page 67

- SCO 5033 ELEKTR‹KL‹ DÜDÜKLÜ TENCERE -
- GARANT‹ BELGES‹ -
Garanti Belge No : 87091
SSHY Belge No : 35274
‹THALATÇI F‹RMA
Ünvanı : DE‹MA ELEKTROMEKAN‹K ÜRÜNLER‹ ‹Nfi. SPOR MALZ.
‹MALAT SAN. ve T‹C. A.fi.
Adresi : Cihangir Mah. Güvercin Cad. No:4 Haramidere Mevkii
Avc›lar / ‹STANBUL
Tel. : 0212 422 94 94 & Fax: 0212 422 03 49
Yetkili Kifli :
Yönetim Kurulu Baflkan›
Ürünün Cinsi : ELEKTR‹KL‹ DÜDÜKLÜ TENCERE
Markası : S‹NBO
Modeli : SCO 5033
Alt Modeli : Bandrol ve Seri No :
Teslim Tarihi ve Yeri :
Garanti Süresi : 2 Yıldır
Azami Tamir Süresi : 20 ‹fl Günü
Kullanım Ömrü : Bakanl›kça belirlenen ve ilan edilen kullan›m ömrü 10 y›ld›r.
(Ürünün fonksiyonlar›n› yerine getirebilmesi için gereken yedek parça temin süresi)
Garanti Belge Onay Tarihi : 13/07/2010
Garanti Belge Vize Tarihi : 21/06/2012
SSHY Belge Onay Tarihi : 04/04/2012
SATICI F‹RMA
Ünvanı :
Adresi :
Tel.Fax :
Fatura Tarihi ve No :
Teslim Tarihi ve Yeri :
‹mza ve Kafle :
Bu bölüm, ürünü sat›n ald›¤›n›z Yetkili Sat›c› taraf›ndan imzalanacak ve kaflelenecektir.
Bu belgenin kullan›lmas›na; 4077 say›l› Tüketicinin Korunması Hakkında Kanun ve bu Kanun’a dayan›larak yürürlü¤e konulan Garanti Belgesi
Uygulama Esaslar›na Dair Yönetmelik uyar›nca, TC Gümrük ve Ticaret Bakanlı¤ı, Tüketicinin Korunması ve Piyasa Gözetimi Genel Müdürlü¤ü
tarafından izin verilmifltir.
- 66 -
Page 68

Made in P.R.C.
‹mal Y›l› : 2012
- TEDAR‹KÇ‹ F‹RMA / EXPORTER United Favour Development Limited
Unit B, 10/F Lee May Building 788-790
Nathan Road, Mongkok, Kowloon, HK.
- UYGUNLUK BEYANI / CE CONFORMITY Standard Technology Union(GZ) Co., Ltd.
No.202, Building A, Yushu Industrial Park
Science City, Guangzhou, Guangdong,
China
STUGZESO110112391HS
EEE Yönetmeli¤ine uygundur.
 Loading...