

Page 1
SCO 5023 ELEKTR‹KL‹ P‹fi‹R‹C‹
KULLANMA KILAVUZU
TR
EN
FR
NL
ES
RU
HR
AR
Page 2

De¤erli Müflterimiz,
Tebrikler. Çok iyi bir tercih yapt›n›z!
Alm›fl oldu¤unuz ürün üstün tasar›ma sahip kaliteli bir üründür.
Bu cihaz› tam anlam›yla ve güvenli bir flekilde kullanabilmek için bu kullan›m k›lavuzunu
lütfen dikkatli bir flekilde okuyunuz.
Sayg›lar›m›zla,
Sinbo Küçük Ev Aletleri
This appliance is not intended for use by persons (including children) with reduced physical,
sensory or mental capabilities, or lack of experience and knowledge, unless they have
been given supervision or instruction concerning use of the appliances by a person
responsible for their safety. Children should be supervised to ensure that they do not play
with the appliance.
This appliance is intended to be used in household and similar applications such as:
- staff kitchen areas in shops, offices and other working environments;
- farm houses;
- by clients in hotels, motels and other residential type environments;
- bed and breakfast type environments.
Bu ürün (çocuklar dahil ) fiziksel hassasiyeti az, zihinsel olarak yetersiz, deneyimsiz ve
yeterli bilgiye sahip olmadan yada kendilerinin güvenli¤inden sorumlu olan kifliler tarafından
bu ürünü kullanmak için gerekli talimatlar verilmemifl kiflilerin kullanımına uygun de¤ildir.
- 1 -
Page 3

ÖNEML‹ UYARILAR
• Bakım, Onarım ve Kullanımda Uyulması Gereken Kurallar
Elektrikli cihazlar› kullan›rken temel güvenlik önlemlerini mutlaka göz önünde
bulundurman›z gerekmektedir:
1. Cihaz› kullanmadan önce tüm talimat› okuyunuz.
2. S›cak yüzeylerle temas etmeyiniz. Yaln›zca tutacak ya da saplardan tutunuz.
3. Cihaz› çal›flt›rmadan önce tüm plastik ambalaj malzemelerini ve di¤er malzemeleri
ç›kar›n›z.
4. Cihaz› kullanmaya bafllamadan önce ç›kar›labilir tüm aksesuarlar› y›kay›n›z.
5. Üretim ya da ambalajlama s›ras›nda ürüne bulaflan ya¤lar›n giderilmesi için ürünü ilk
kez kullanmadan önce 10 dakika boyunca en yüksek s›cakl›k seviyesinde çal›flt›r›n›z.
6. Elektrik flokuna maruz kalmamak için kabloyu, fifli ya da cihaz› suya ya da herhangi
baflka bir s›v›ya sokmay›n›z.
7. Herhangi bir makine çocuklar taraf›ndan ya da çocuklar›n yak›n›nda kullan›l›yorken
çok dikkatli olunuz.
8. Cihaz kullan›lmad›¤› zamanlarda ya da temizlenmeden önce fiflten çekilmelidir.
Parçalar› söküp takmadan önce cihaz›n so¤umas›n› bekleyiniz.
9. Kablosu ya da fifli ar›zalanm›fl olan, normal flekilde çal›flmayan, ar›zal› ya da hasarl›
cihaz› kullanmaya kalk›flmay›n›z. ‹nceleme, onar›m ya da ayarlama ifllemi için cihaz›
yetkili servis merkezine götürünüz.
10. Cihaz üreticisi taraf›ndan tavsiye edilmeyen aksesuarlar›n kullan›lmas› yaralanmaya
neden olabilecekleri için tavsiye edilmemektedir.
11. Aç›k alanlarda kullanmay›n›z.
12. Kablonun masa ya da tezgah kenar›ndan sarkmamas› ya da s›cak yüzeylerle temas
etmemesi gerekir.
13. Cihaz› s›cak gazlar›n ya da elektrikli ocaklar ya da s›cak f›r›nlar›n yak›n›na ya da içine
koymay›n›z.
14. Kabloyu cihaza ba¤lad›ktan sonra fifli prize tak›n›z.
Cihaz›n güç ba¤lant›s›n› kesmek için ilk önce cihaz› KAPALI konuma getirip daha sonra
fifli prizden ç›kar›n›z.
15. Yang›n ve elektrik flokuna neden olabilecekleri için büyük boyutlu yiyecekleri ya da
metal mutfak gereçlerini cihaza sokmay›n›z.
16. Çal›flma s›ras›nda cihaz›n örtülmesi ya da perde, örtü, duvar ve benzeri yan›c›
malzemelere temas etmesi durumunda yang›n tehlikesi ortaya ç›kabilir.
17. Cihaz› metal ovma teliyle temizlemeyiniz. Ovma telinin parçalar› koparak elektrikli
parçalara temas edebilir ve elektrik floku riskine neden olabilir.
18. Cihaz› ›s›ya karfl› dayan›kl› bir yüzeye yerlefltiriniz.
19. Cihaz ve cihaz›n etraf›ndaki cisimler aras›nda kalan asgari mesafe 20 cm’den az
olmamal›d›r.
20. Metal ya da cam d›fl›ndaki malzemelerden üretilmifl kaplar› kullan›rken son derece
dikkatli olunmal›d›r.
21. F›r›n kullan›lm›yorken içinde üreticinin tavsiye etti¤i aksesuarlar d›fl›nda herhangi
- 2 -
Page 4

ÖNEML‹ GÜVENL‹K UYARILARI
bir malzeme saklamay›n›z.
22. F›r›n›n içine ka¤›t, karton, plastik ve benzeri malzemeler koymay›n›z.
21. Cihaz›n bafl›ndan kesinlikle ayr›lmay›n›z.
BU C‹HAZ YALNIZCA EVDE KULLANIMA YÖNEL‹KT‹R! BU TAL‹MATI MUHAFAZA ED‹N‹Z!
C‹HAZIN ÖZELL‹KLER‹
Kömürlefltirmeden Piflirme - Turbo F›r›n, piflirme ifllemini s›cak havan›n dolafl›m›n›
sa¤layarak gerçeklefltirir ve yiyecekleri eflit bir flekilde piflirerek kömürleflmelerin
oluflmas›na neden olmaz.
Kullan›m› Kolay - F›r›n içerisinde dolaflan hava yiyece¤i eflit bir flekilde piflirece¤i ya da
k›zartaca¤› için piflirme ifllemi s›ras›nda yiyece¤i döndürmek gerekmez.
Enerji Tasarrufu Sa¤lar - Turbo F›r›n, afl›r› piflirmenin ve gereksiz elektrik tüketiminin
önlenmesi için zamanlay›c› ve termostatla donat›lm›flt›r.
Tamamen fieffaf Kapak - Turbo F›r›n›n kapa¤› piflirme iflleminin kolayl›kla izlenebilmesi
için ›s›ya dayan›kl› fleffaf camdan üretilmifltir.
Lezzeti Korur - F›r›n içinde dolaflan s›cak hava nemin ve lezzetin d›flar› ç›karak
kaybolmamas›n› sa¤lar.
Temizlemesi Kolay - Tüm parçalar kolayl›kla temizlenebilmektedir. Nemli bir bezle
silerek temizleyiniz.
TEKN‹K ÖZELL‹KLER
• Çok ifllevli: K›zartma, ›zgara, buharda piflirme, buz çözme
• Kapasite: 12 L
• Daha h›zl› piflirme için halojen ›s›t›c›
• Eflit düzeyde piflirme için s›cak hava dolafl›m›
• S›ca¤a karfl› dayan›kl› cam kap
• 60 dakikal›k zamanlay›c›
• De¤iflken ›s›tma s›cakl›¤›: 100˚C – 250˚C
• Aksesuarlar: Alt raf, üst raf, mafla, makas mafla, buhar çana¤ı, flifl ve geniflletme halkası
• Güç: 1200 W
• Ürünün etiketinde yazan voltaj de¤erinin evinizdeki güç kayna¤›yla ayn› oldu¤undan
emin olunuz.
TASARIM VE TEKN‹K ÖZELL‹KLERDE ÖNCEDEN B‹LD‹R‹M YAPILMAKSIZIN DE⁄‹fi‹KL‹⁄E
G‹D‹LEB‹L‹R!
D‹KKAT!!
Ürünün üzerinde bulunan iflaretlemelerde veya ürünle verilen di¤er bas›l› dökümanlarda
beyan edilen de¤erler, ilgili standartlara göre laboratuar ortam›nda elde edilen
de¤erlerdir. Bu de¤erler, ürünün kullan›m ve ortam flartlar›na göre de¤iflebilir.
- 3 -
Page 5

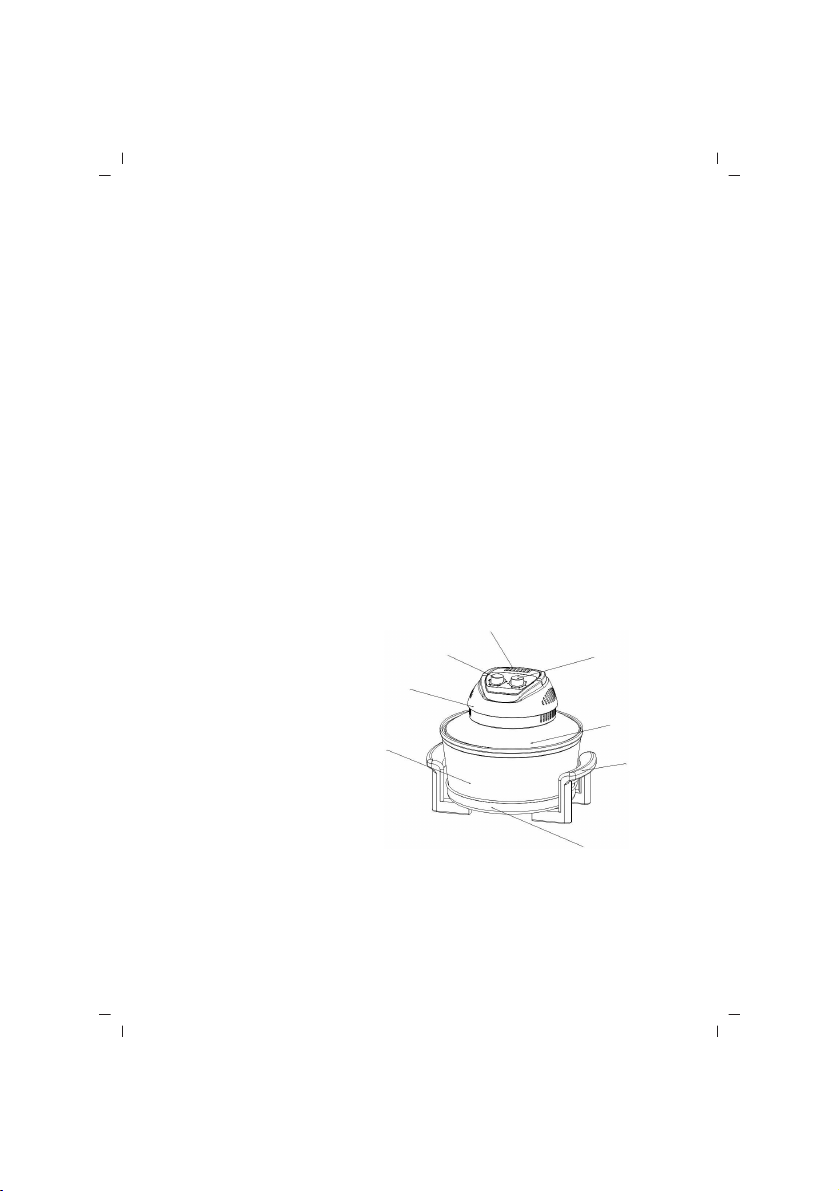
C‹HAZIN TANITIMI
1. Sap
2. Zamanlay›c›
3. Karoser
4. Cam Kap
5. Is› Regülatörü
6. Cam Kapak
7. U fiekilli Sap
8. Alt tepsi
C‹HAZIN KULLANIMI
• Ba¤lantı veya Montajın Nasıl Yapılaca¤ını Gösterir fiema ile Ba¤lantı veya Montajın
Kimin Tarafından Yapılaca¤ına (tüketici, yetkili servis) iliflkin bilgiler
1. Güç kablosunun prize tak›l› olmad›¤›ndan emin olunuz. Cam piflirme kab›n› temizleyiniz.
NOT: Piflirme ifllemi s›ras›nda kap çok ›s›n›r. Turbo F›r›n› mutlaka ›s›ya dayan›kl› bir
yüzeye yerlefltiriniz.
2. Piflirme raf›n› cam kaba yerlefltiriniz. Hava dolafl›m›n›n en iyi flekilde sa¤lanmas› için
yiyecekleri raf›n ortas›na yerlefltiriniz.
NOT: Yiyecekler ve cam kab›n alt k›sm› aras›nda mutlaka 1 santimetre kadar bir boflluk
b›rak›n›z.
3. Cam kab›n üstünü cam kapakla kapat›n›z ve kapa¤›n yerine do¤ru flekilde oturdu¤undan
emin olunuz.
4. Güç kablosunu prize tak›n›z.
5. Otomatik termostat kontrolünü istenilen s›cakl›¤a ayarlay›n›z.
6. Zamanlay›c›y› ayarlamak için referans tablosundan yararlan›n›z.
NOT: ‹stenilen s›cakl›¤a ulafl›ld›¤›nda dü¤menin yan›ndaki s›cakl›k gösterge lambas›
otomatik olarak sönecektir.
7. Piflirme süresi dolduktan sonra Turbo F›r›n otomatik olarak kapanacakt›r.
8. Yiyeceklerin f›r›nda yaklafl›k 3-5 dakika dinlenmesine izin veriniz.
9. Cam kapak kald›r›ld›ktan sonra güvenlik flalteri otomatik olarak devreye girecek be
güç ba¤lant›s› tamamen kesilecektir.
10. Güç kablosunu prizden çekiniz.
11. Turbo F›r›n 10 dakikadan daha k›sa sürecek bir piflirme ifllemi için kullan›lacaksa
zamanlay›c›y› ilk önce yaklafl›k 20 dakikaya ayarlay›n›z ve daha sonra istenilen süreye
getiriniz.
3
4
1
2
5
6
7
8
- 4 -
Page 6

P‹fi‹RME REFERANS TABLOSU
SICAKLIK Y‹YECEK M‹KTAR SÜRE
180˚C/350˚F – 200˚C/400˚F Bütün Piliç 2 kg 35 dakika
180˚C/350˚F – 200˚C/400˚F Dilimlenmifl Et 0,5 kg 7 – 8 dakika
180˚C/350˚F – 200˚C/400˚F Tavuk budu 8 adet 15 dakika
230˚C/450˚F – 260˚C/500˚F Bal›k 10 adet 7 – 8 dakika
180˚C/350˚F – 200˚C/400˚F Deniz tara¤› 0,5 kg 5-7 dakika
230˚C/450˚F – 260˚C/500˚F Karides 0,5 kg 5 dakika
230˚C/450˚F – 260˚C/500˚F Koçanl› m›s›r 4 adet 10 dakika
230˚C/450˚F – 260˚C/500˚F Patates 0,5 kg 25 dakika
150˚C/300˚F – 180˚C/350˚F Kekler 1 tepsi 20 dakika
230˚C/450˚F – 260˚C/500˚F Jumbo karides 4 adet 15 dakika
230˚C/450˚F – 260˚C/500˚F Yengeç 0,5 kg 10 dakika
TURBO FIRINDA P‹fi‹RME
IZGARA VE KIZARTMA:
Turbo F›r›nda k›zartma ya da ›zgara yapmak için s›cakl›k 230°C - 250°C olarak
ayarlanmal›d›r. Yiyecekler ›s› kayna¤›na yak›n olmas› için ikili raf›n üstüne yerlefltirilmelidir.
Füme lezzeti elde etmek için cam kab›n alt›na ceviz ya da mesquite a¤ac› füme s›v›s›
dökünüz. Baharatlar ve çeflniler etin yüzeyine serpilmelidir.
Bal›k ya da ya¤s›z et pifliriyorken raf›n ya da ›zgaran›n üstüne ya¤ püskürtünüz. Ya da
yiyece¤i raf›n üzerine yerlefltirmeden önce f›rçayla ya¤ sürünüz. Bu ifllem yiyece¤in
›zgaraya yap›flmas›n› önleyecektir.
Daha güzel k›zarm›fl yüzeyler elde etmek için kal›n biftekler gibi etlerin her iki yüzünü
de k›zart›n›z.
ROSTOLAMA:
Damlayan ya¤lar› tutmak için cam kab›n alt›n› alüminyum folyoyla kaplay›n›z. Hava
dolafl›m›n› kolaylaflt›rmak için alt raf› kullan›n›z. Hava dolafl›m› etin eflit derecede piflmesini
sa¤layacak ve etin suyunu etin içine hapsedecektir. Eti çevirmenize ya da suyuyla tekrar
›slatman›za gerek yoktur.
Bir et termometresinin kullan›lmas› tavsiye edilir. Termometreniz yoksa referans piflirme
tablosunu kullanabilir ya da belirtilen de¤erlerden 10°C ç›kararak geleneksel f›r›nlar
için kullan›lan tablolardan yararlanabilirsiniz.
BÜTÜN P‹L‹Ç KIZARTMA:
Pilici iyice y›kay›n›z ve fazla ya¤lar›n› ve istenmeyen k›s›mlar› kesip at›n›z. ‹stedi¤iniz
baharatlarla çeflnilendiriniz. Sar›msak, karabiber gibi baharatlar ve tuz kullanman›z
tavsiye edilir. K›zartma iflleminden önce birkaç saat bekleyerek baharatlar›n ya da
terbiyenin ete ifllemesine izin veriniz. Damlayan ya¤lar› tutmak için cam kab›n alt›n›
alüminyum folyoyla kaplay›n›z. Pilici 200°C’de her yar›m kilo için yaklafl›k 10 dakika
boyunca pifliriniz. Daha sonra, derisinin gevrekleflmesi için s›cakl›¤› 5-10 dakika boyunca
için 250°C’ye ç›kar›n›z.
- 5 -
Page 7

TURBO FIRINDA P‹fi‹RME
BÜTÜN ROSTO P‹fi‹RME:
Rostoyu, ya¤l› k›sm› yukar›da kalacak flekilde alt raf›n ortas›na yerlefltiriniz. Rosto piflirme
s›cakl›¤› genellikle geleneksel f›r›nlarda kullan›landan ›s›dan 10°C daha düflüktür. Piflirme
süresi rostonun türüne ve büyüklü¤üne göre de¤ifliklik gösterir.
1-1,5 K‹LO A⁄IRLI⁄INDAK‹ ETLER ‹Ç‹N SICAKLI⁄I 200°C’YE AYARLAYINIZ VE AfiA⁄IDA
BEL‹RT‹LEN SÜRELERE GÖRE P‹fi‹R‹N‹Z:
ET‹N TÜRÜ DAK‹KA
Kemiksiz rozbif (Bütün Rosto) Az piflmifl 15 – 20 dakika
Rozbif Kaburga Rosto (But ya da Sa¤r›) Az piflmifl 15 – 20 dakika
Kemikli But (‹yi Piflmifl) Orta 12 – 15 dakika
Kemikli kontrfile ‹yi piflmifl 25 – 30 dakika
‹PUÇLARI:
Üstü kapal› olmayan yemeklerin Turbo F›r›nda piflirilme s›cakl›¤› genelde 5°C ila 10°C
daha düflüktür. Turbo F›r›n kullan›rken ön ›s›tmaya gerek duyulmaz. Kek piflirilirken
tepsinin kenarlar›na yak›n olan k›s›mlar daha önce piflerken kekin orta k›sm› ›slak kal›r.
Bu nedenle kek piflirmek için genifl katmanl› kek kal›plar› yerine ortas› boflluklu kek
kal›plar› kullanman›z› tavsiye ederiz. Küçük kekler piflirmek için muffin kal›plar› idealdir.
P‹fi‹RME SÜRELER‹ VE SICAKLIK TABLOSU:
Y‹YECEK SICAKLIK SÜRE
Browni 150˚C / 300˚F 18-20 dakika
Po¤aça 200˚C / 400˚F 10-12 dakika
Kek (katman) 150˚C / 300˚F 18-20 dakika
Kek (somun) 150˚C / 300˚F 30-35 dakika
M›s›r ekme¤i 180˚C / 350˚F 18-20 dakika
Kurabiye 160˚C / 320˚F 8-10 dakika
Muffin 180˚C / 350˚F 12-15 dakika
Pay/turta: Turta 200˚C / 400˚F 8-10 dakika
dolgulu (üstü hamursuz) 160˚C / 320˚F 25-30 dakika
dolgulu (üstü hamurlu) 180˚C / 350˚F 35-40 dakika
Ekmek / Sandviç ekme¤i 180˚C / 350˚F 12-15 dakika
Somun ekmek 160˚C / 320˚F 25-30 dakika
Orta piflmifl 20 – 25 dakika
‹yi piflmifl 25 – 30 dakika
Orta piflmifl 20 – 25 dakika
‹yi piflmifl 25 – 30 dakika
- 6 -
Page 8

KULLANIM HATALARINA ‹L‹fiK‹N B‹LG‹LER
Cihazınızı, beyan edilen voltaj ile çal›flt›r›n›z.Bulundu¤unuz yerin voltaj›n›n uygun olup
olmad›¤›n› kontrol ediniz.
Güç kablosunun ar›zalanmas› durumunda tehlikelerin önlenmesi için kablo üretici, servis
merkezi ya da benzer bir ehliyetli kifli taraf›ndan de¤ifltirilmelidir. Ar›za durumunda cihaz›
kendiniz sökmeye kalk›flmay›n›z, bak›m merkezimiz ya da sat›fl sonras› hizmet merkezimiz
ile ba¤lant›ya geçiniz.
Cihaz› kendiniz onarmaya kalk›flmay›n›z. Meydana gelebilecek ar›zalardan firmam›z
kesinlikle sorumlu de¤ildir, ve cihaz›n›z garanti kapsam› d›fl›nda ifllem görecektir.
TAfiIMA VE NAKL‹YE ESNASINDA
• Ürünü düflürmeyiniz,
• Darbelere maruz kalmamas›n› sa¤lay›n›z,
• S›k›flmamas›n›, ezilmemesini sa¤lay›n›z,
• Ambalaj üzerindeki iflaretlemelere uyunuz.
• Orjinal ambalajıyla taflımaya özen gösteriniz.
‹NSAN SA⁄LI⁄I VE ÇEVREYE SAYGI
Bu iflaret, ürünün AB genelinde di¤er ev at›klar›yla birlikte elden ç›kar›lmamas›
gerekti¤ini göstermektedir. Çevre ve insan sa¤l›¤›n›n kontrolsüz flekilde elden
ç›kar›lm›fl olan at›klar nedeniyle zarar görmesini önlemek amac›yla, malzeme
kaynaklar›n›n sürdürülebilir yeniden kullan›m›n› sa¤lamak için cihaz›n geri dönüflümünü
sa¤lay›n›z. Kullan›lm›fl cihazlar›n›z› lütfen iade ve toplama merkezlerine ulaflt›r›n›z ya da
ürünün sat›n al›nd›¤› ma¤azayla ba¤lant›ya geçiniz. Bu yerler ürünü teslim al›p çevreye
duyarl› bir flekilde geri dönüflümlerini sa¤layabilirler.
TEM‹ZL‹K VE BAKIM
• Tüketicinin Kendi Yapabilece¤i Bakım, Onarım veya Ürünün Temizli¤ine ‹liflkin Bilgiler
1. Temizlemeden önce mutlaka fifli prizden ç›kar›n›z.
2. Cihaz› temizlemeden ya da muhafaza etmeye bafllamadan önce so¤umas›n› bekleyiniz.
3. Turbo F›r›n› temiz tutmak için ›l›k ve nemli bir bezle silerek temizlemeniz yeterlidir.
4. S›çram›fl kirleri nemli sabunlu bir bez yard›m›yla ovarak ç›kar›n›z.
C‹HAZI KES‹NL‹KLE SUYA SOKMAYINIZ!
5. Temizlik için afl›nd›r›c› temizlik maddeleri ve ovma teli kullanmay›n›z.
6. Ya¤ filtresi doldu¤u takdirde vidalar›n› gevfletip filtreyi d›flar› ç›kar›n›z. Sabunlu s›cak
suyla y›kay›n›z, iyice durulay›n›z ve Turbo F›r›na geri takmadan önce kurutunuz.
7. Aksesuarlar s›cak sabunlu suyla ya da bulafl›k makinesinde y›kanabilir D‹KKAT
BAKIM
• Periyodik Bakım Gerektirmesi Durumunda, Periyodik Bakımın Yapılaca¤ı Zaman
Aralıkları ile Kimin Tarafından Yapılması Gerekti¤ine ‹liflkin Bilgiler
Cihaz periyodik bakım gerektirmemektedir.
- 7 -
Page 9

‹PUÇLARI
P‹fi‹RME ‹fiLEM‹ SIRASINDA TURBO FIRININ MOTOR GÖVDES‹ ÇOK ISINIR. C‹HAZI
YALNIZCA SAPLARINDAN TUTUNUZ.
TURBO FIRINI KULLANDIKTAN HEMEN SONRA PLAST‹K, V‹N‹L YA DA C‹LALI AHfiAP
YÜZEYLERE YERLEfiT‹RMEY‹N‹Z. C‹HAZI HAREKET ETT‹RMEDEN ÖNCE TAMAMEN
SO⁄UMASINI BEKLEY‹N‹Z.
TURBO FIRINI YANICI MADDELER‹N YAKININDA KULLANMAYINIZ.
C‹HAZI F‹fiTEN ÇEKMEK ‹Ç‹N F‹fi‹ KAVRAYINIZ, KABLOYU TUTARAK ÇEKMEY‹N‹Z.
TURBO FIRINI KES‹NL‹KLE SUYA SOKMAYINIZ.
SATIfi SONRASI H‹ZMETLER‹
Bu cihaz kullan›c› taraf›ndan de¤ifltirilebilen parçalara sahip de¤ildir. Ünitenin çal›flmamas›
durumunda flu ad›mlar› izleyin.
1. Talimatlar›n do¤ru biçimde izlendi¤ini denetleyin.
2. Ana kayna¤›nda ifllevselli¤ini denetleyin.
Cihaz hâlâ çal›flm›yorsa, sat›n ald›¤›n›z yere geri götürün.
Güç kablosu hasar görmüflse, tehlikeleri önlemek için, cihaz üreticisine iade edilmelidir.
Kendi kendinize tamir etmeye KALKIfiMAYIN.
fiu talimatlar› izleyin:
1. Dikkatlice, tercihen orijinal kutusuna paketleyin.
Ünitenin temiz oldu¤undan emin olun.
2. Tüm yaz›flmalarda, ad›n›z›, adresinizi ve ürünün model numaras›n› belirtin.
3. ‹ade etme nedeninizi belirtin.
4. Garanti kapsam›ndaysa, nereden, ne zaman al›nd›¤›n› belirtin ve sat›n alma kan›t›n›
ekleyin (örn. kasa fifli).
AB-ÜRÜN UYGUNLU⁄U BEYANI
Bu ürün afla¤›daki AB güvenlik direktiflerinin temel gerekliliklerine uygundur:
• EMC Direktifi 2004/108/EC
• Alçal voltaj direktifi 2006/95/EC
• WEEE direktifi 2002/96/EC
- 8 -
Page 10

ENGLISH
SINBO SCO 5023 CONVECTION OVEN
INSTRUCTION MANUAL
INTRO
THE DEAR BUYER!
Congratulations. You made a good choice!
You became the owner of production, which offers progressive design and high quality.
For full and safely usage of the given device, please, closely read the instruction manual.
IMPORTANT SAFEGUARDS
When using electrical appliances. basic safety precautions should always be followed
including the following:
1. Read all instructions before operating.
2. Do not touch hot surfaces. Use handles or knobs.
3. Remove all packaging plastics and other materials from unit before operating.
4. Wash all removable accessories before using for the first time.
5. Unit should be turned on to MAX temperature for 10 minutes for the first time to burn
off any access manufacturing or packaging oils.
6. To protect against electrical shock, do not immerse cord, plug or appliance itself in
water or other liquids.
7. Close supervision is necessary when appliance is used by or near children.
8. Unplug from outlet when not in use and before cleaning. Allow to cool before putting
on or taking off parts.
9. Do not operate any appliance with a damaged cord or plug or after the appliance
malfunctions or has been damaged in any manner. Return the appliance to the nearest
authorized service facility for examination, repair or adjustment.
10. The use of accessory attachments not recommended by the appliance manufacturer
may cause injuries.
11. Do not use outdoors.
12. Do not let cord hang over edge of table or counter or touch hot surfaces.
13. Do not place on or near a hot gas or electric burner. or in a heated oven.
14. Always attach plug to appliance first, then plug cord into wall outlet
To disconnect, turn any control to OFF position, then remove plug from wall outlet.
15. Oversized foods or metal utensils must not be inserted in the appliance as they may
cause a fire or risk of electrical shock.
16. A fire may occur if the appliance is covered or touching flammable material including
curtains, draperies, walls and the like when in operation.
17. Do not clean with metal scouring pads. Pieces can break off the pad and touch
electrical parts, involving a risk of electrical shock.
18. Place the appliance on a heat resistance surface.
19. Minimum distance between appliance and the surrounding objects must not be less
than 20 cm.
- 9 -
Page 11
IMPORTANT SAFEGUARDS
20. Extreme caution should be exercised when using containers constructed of other
material other than metal or glass.
21. Do not store any materials other than manufacturer's recommended accessories in
this oven when not in use.
22. Do not place any of the following materials in the oven: Paper. cardboard. plastic and
the like.
21. Never leave the unit unattended.
THIS PRODUCT IS FOR HOUSEHOLD USE ONLY! SAVE THESE INSTRUCTIONS!
FEATURES
No Burnt Residue - The Turbo Oven cooks with circulating hot air which will cook food
evenly, but never produces any burnt residue.
Easy to Operate - No need to rotate food during cooking, the circulating hot air will roast,
bake or steam food evenly.
Power Saving - The Turbo Oven is equipped with a timer and built-in thermostat to
minimize over-cooking and over usage of electric power.
Completely Transparent - The Turbo Oven is constructed entirely of heat-resistant clear
glass for easy viewing of cooking process.
Flavor Seal - Moisture and flavor is always sealed in due to the hot circulating cooking
air.
Easy to Clean - All parts are easy to clean. Simply use a damp cloth.
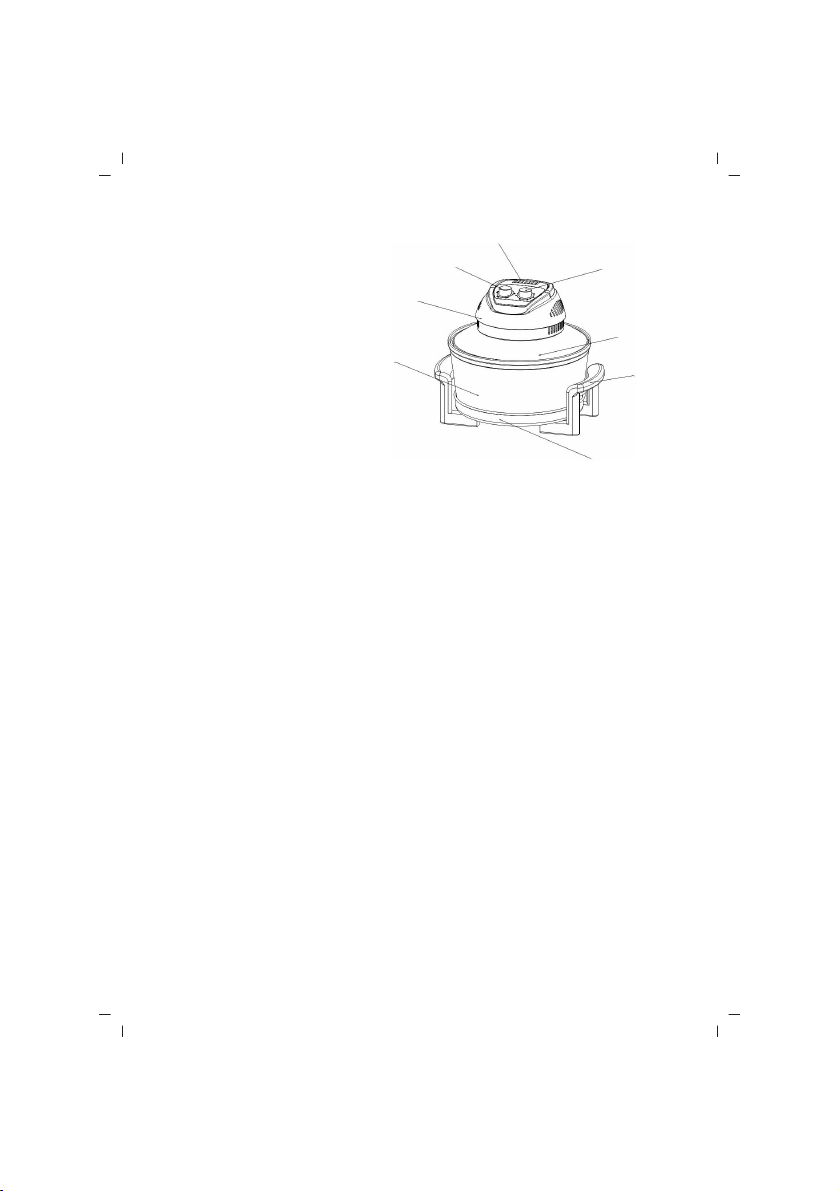
UNIT DESCRIPTION
1. Handle
2. Timer
3. Body
4. Glass Bowl
5. Temperature Regulator
6. Glass Lid
7. U Shape Handle
8. Bottom plate
USING YOUR TURBO OVEN
1. Make sure the power cord is unplugged. Clean the main cooking glass container.
NOTE: During the cooking process, the container gets very hot. Make sure to always
place the Turbo Oven on a heat resistant surface.
2. Place the cooking rack into the glass container. Place food onto the rack in the center
to receive the best air circulation.
3
4
1
2
5
6
7
8
- 10 -
Page 12

USING YOUR TURBO OVEN
NOTE: Always allow ?” between the food and the bottom of the glass container.
3. Cover the glass container with the glass cover, making sure it is sitting correctly.
4. Plug in the power cord to a wall outlet.
5. Turn the automatic thermostat control to the desired temperature.
6. Use the reference table as a guide to set the timer to the desired time.
NOTE: When the desired temperature is reached, the temperature indicator light around
the knob will shut off automatically.
7. The Turbo Oven will automatically shut off when the cooking time has elapsed.
8. Let food sit for approximately 3-5 minutes covered.
9. After lifting up the glass cover, the safety switch will automatically restore and the
power will be completely disconnected.
10. Unplug the power cord from the wall outlet.
11. If cooking in the Turbo Oven for less than 10 minutes, always turn the timer to
approximately 20 minutes first and then turn it back to the desired time.
COOKING REFERENCE TABLE
TEMPERATURE FOOD QUANTITY TIME
180˚C/350˚F – 200˚C/400˚F Whole Chicken 4.5 Ibs. 35 minutes
180˚C/350˚F – 200˚C/400˚F Sliced Pork 1 lb. 7 – 8 minutes
180˚C/350˚F – 200˚C/400˚F Drumsticks 8 pcs 15 minutes
230˚C/450˚F – 260˚C/500˚F Fish 10 pcs 7 – 8 minutes
180˚C/350˚F – 200˚C/400˚F Clams 1 lb. 5-7 minutes
230˚C/450˚F – 260˚C/500˚F Shrimp 1 lb, 5 minutes
230˚C/450˚F – 260˚C/500˚F Corn on the Cob 4 pcs 10 minutes
230˚C/450˚F – 260˚C/500˚F Potatoes 1 lb. 25 minutes
150˚C/300˚F – 180˚C/350˚F Cakes I pan 20 minutes
230˚C/450˚F – 260˚C/500˚F Red Prawns 4 pcs 15 minutes
230˚C/450˚F – 260˚C/500˚F Crab 1 lb. 10 minutes
COOKING IN THE TURBO OVEN
GRILLING & BROILING:
To broil or grill in your Turbo Oven, the temperature should be set at 230˚ - 250˚C. Food
should be placed onto the double rack to bring it closer to the heat source. Add hickory
liquid smoke or mesquite to the bottom of the glass container to get a smoky flavor. Any
seasonings should be applied to the surface of the meat.
If you are cooking fish or lean meat, spray cooking oil onto the rack or grill. Or brush
with cooking oil prior to arrange the food on the rack. This will prevent the food from
sticking to the grill.
For browner or more seared surfaces, broil on both sides of the meat such as with thick
steaks.
- 11 -
Page 13

COOKING IN THE TURBO OVEN
ROASTING:
Line the bottom of the glass container with aluminum foil to catch any fat or grease
drippings. To let the hot cooking air to freely circulate, use the lower rack. The circulating
air cooks meat evenly and seals in the juice. Turning and basting is not necessary.
A meat thermometer is suggested. But in its absence, you can use the reference cooking
chart or follow a chart given for conventional or regular ovens, and subtract 10˚C.
ROASTING WHOLE CHICKENS:
Rinse chicken thoroughly and clip away at any excess fats or unwanted parts. Add desired
seasonings. Spices such as garlic, black pepper and salt are suggested. Before roasting,
allow seasonings or marinades to penetrate for a few hours. The bottom of the glass
container should be lined with aluminum foil to catch any fat or grease drippings. Roast
the chicken for approximately 10 minutes per lib. at 200°C. Increase the temperature to
250°C for additional 5-10 minutes for crispier skin.
WHOLE ROASTS:
With fatty portion of the roast facing upward, place the roast directly onto the center of
the lower rack. Temperature for roasting is usually 10°C less than for regular conventional
roasting. Cooking time depends on type and size of the roast.
FOR MEATS WEIGHING 2-3 Ibs ., SET TEMPERATURE AT 200'C AND COOK AT THE
BELOW TIMES:
TYPE OF MEAT MINUTES
Beef. boneless (Whole Roast) Rare - 15-20 minutes
Beef. Rib Roast (Rump or Chuck) Rare - 15-20 minutes
Ham with Bone (Full cooked) Medium-12-15 minutes
Pork Loin (Boneless) Well- 20-25 minutes
Loin with bone Well- 25-30 minutes
Pork Ribs Well- 20-25 minutes
Medium - 20-25 minutes
Well Done - 25-30 minutes
Medium - 20-25 minutes
Well Done - 25-30 minutes
TIPS:
The temperature for cooking uncovered dishes is usually 5˚ to 10˚C lower in the Turbo
Oven. No preheating is necessary when using the Turbo Oven. Ordinarily, the center of
cake bailer will be moist, while the sections closest to the rim of the pan will be done
first. For this reason, a bundt cake pan or tube pan is better to use for baking than the
larger layered cake pans. Cupcake/ muffin pans are ideal for small batches.
- 12 -
Page 14

BAKING TIMES AND TEMPERATURE CHART
FOOD TEMPERATURE TIME
Brownies 150˚C / 300˚F 18-20 minutes
Buns 200˚C / 400˚F 10-12 minutes
Cakes (layer) 150˚C / 300˚F 18-20 minutes
Cakes (loaf) 150˚C / 300˚F 30-35 minutes
Corn bread 180˚C / 350˚F 18-20 minutes
Cookies 160˚C / 320˚F 8 -10 minutes
Muffins 180˚C / 350˚F 12-15 minutes
Pies/pastries: Pie crust 200˚C / 400˚F 8-10 minutes
w/ filling (no top crust) 160˚C / 320˚F 25-30 minutes
w/ filling (w/ top crust) 180˚C / 350˚F 35-40 minutes
Breads / Rolls 180˚C / 350˚F 12-15 minutes
Loaf of bread 160˚C / 320˚F 25-30 minutes
HOW TO CLEAN
1. Always unplug the power cord before cleaning.
2. Always allow the entire appliance to cool down completely before cleaning or storing.
3. To keep the Turbo Oven clean, just wipe clean with a warm damp cloth.
4. If there are any splatters, use a damp soapy cloth to scrub at the spot.
NEVER IMMERSE THE UNIT IN WATER!
5. Do not use abrasive cleaners or scouring pads to clean.
6. When the grease filter becomes too greasy, remove by turning the screws and lifting
the filter out. Wash it thoroughly in hot soapy water, rinse well and dry thoroughly before
returning it to the Turbo Oven.
7. Any accessories can be washed in hot soapy water or in the dishwasher. CAUTION
TIPS:
THE TURBO OVEN'S MOTOR HOUSING BECOMES VERY HOT WHEN IT IS IN THE COOKING
PROCESS. ALWAYS HOLD THE UNIT BY THE HANDLES.
DO NOT PLACE THE TURBO OVEN IMMEDIATELY AFTER USE ON ANY SURFACES SUCH
AS PLASTIC, VINYL OR VARNISHED WOOD. ALWAYS ALLOW THE UNIT TO COMPLETELY
COOL BEFORE MOVING.
DO NOT USE THE TURBO OVEN NEAR FLAMMABLE SUBSTANCES.
WHEN UNPLUGGING THE UNIT, ALWAYS UNPLUG USING THE PLUG PIECE, NOT BY
PULLING ON THE CORD.
NEVER IMMERSE THE TURBO OVEN IN WATER.
- 13 -
Page 15

SPECIFICATION
• Multifunctional: Roast, grill, bake, steam, defrost
• Capacity: 12 L
• Halogen heater for faster cooking
• Hot air circulation for even cooking
• High-strength heat proof glass bowl
• Timer for 60 min.
• Variable heating temperature: 100˚C – 250˚C
• Accessories including: Low rack, high rack, tong, scissor tong, steam dish, skewers
and extender ring
• Power: 1200 W
DESIGN AND SPECIFICATIONS ARE SUBJECT TO CHANGE WITHOUT NOTICE!
- 14 -
Page 16

FRANÇAIS
SINBO SCO 5023 FOUR À CONVECTION
MODE D'EMPLOI
INTRODUCTION
CHER CLIENT!
Félicitations. Vous avez fait un très bon choix!
Le produit que vous venez d’acheter est un produit de haute qualité ayant une excellente
conception. Veuillez lire attentivement ce manuel pour pouvoir utiliser cet appareil
correctement et d’une façon sécuritaire.
CONSIGNES IMPORTANTES DE SÉCURITÉ
Vous devez absolument prendre en considération les précautions principales de sécurité
lorsque vous utilisez les appareils électriques:
1. Lisez le manuel en entier avant toute utilisation de l’appareil.
2. Ne contactez pas les surfaces chaudes. Saisissez uniquement des poignées et des
manches.
3. Retirez tout matériel d’emballage en plastique et autres matériels avant de mettre
l’appareil en marche.
4. Lavez tous les accessoires amovibles avant de ne commencer à utiliser l’appareil.
5. Afin de supprimer toute huile ayant pu se souiller au produit lors de la production ou
de l’emballement, veuillez faire fonctionner le produit à la température maximum pendant
10 minutes avant la première utilisation.
6. Afin d’éviter de subir un choc électrique, n’immergez pas le cordon, la fiche ou l’appareil
dans l’eau ou dans tout autre liquide.
7. Soyez très prudent lorsqu’une machine quelle conque est utilisée par ou près des
enfants.
8. L’appareil doit être débranché lorsque vous n’en faites pas usage ou avant tout
nettoyage. Attendez que l’appareil refroidisse avant de monter ou de démonter les pièces.
9. Ne tentez pas d’utiliser un appareil dont le cordon d’alimentation ou la fiche électrique
est détériorée, un appareil qui ne fonctionne pas normalement, qui est en panne ou un
appareil endommagé. Remettez l’appareil au centre de service agréé pour examen,
réparation ou ajustement.
10. L’usage des accessoires qui ne sont pas conseillés par le fabricant est déconseillé
étant donné que cela peut causer une blessure.
11. N’utilisez pas dans des espaces libres.
12. Le cordon ne doit ni pendre du bord de la table ou de l’établi et ni être en contact
avec des surfaces chaudes.
13. N’apposez pas l’appareil dans ou près de gaz chauds ou des chauffes électriques ou
des fours chauds.
14. Branchez la fiche électrique à la prise de courant après avoir branché le cordon à
l’appareil.
- 15 -
Page 17

CONSIGNES IMPORTANTES DE SÉCURITÉ
Pour couper la connexion d’alimentation de l’appareil, positionnez d’abord l’appareil sur
« ARRÊT » et débranchez ensuite la fiche électrique de la prise de courant.
15. Étant donné qu’ils peuvent donner lieu à un incendie et à un choc électrique,
n’introduisez pas les aliments de grande dimension ou les outils de cuisine qui sont en
métal.
16. Un danger d’incendie peur se produire en cas de couverture de l’appareil lors du
fonctionnement ou de contact de l’appareil avec un rideau, une couverture, un mur ou
matériels similaires inflammables. .
17. Ne nettoyez pas l’appareil avec des pailles de fer. Les pièces de la paille de fer
peuvent se détacher et entrer en contact avec les pièces électriques et donc causer un
risque de choc électrique.
18. Installez l’appareil sur une surface résistante contre la chaleur.
19. La distance minimum entre l’appareil et les objets se trouvant autour de l’appareil
ne doit pas être moins de 20 cm.
20. Vous devez être extrêmement prudent lorsque vous utilisez des récipients en métal
ou des récipients fabriqués d’autres matériels que le verre.
21. Ne gardez pas de matériels en dehors de ceux conseillés par le fabricant dans le
four lorsque vous ne faites pas usage du four.
22. Ne mettez pas de papier, de carton, du plastique ou de matériels similaires à l’intérieur
du four.
21. Ne vous absentez jamais du lieu où l’appareil se trouve.
CET APPAREIL EST DESTINÉ UNIQUEMENT À L’USAGE DOMESTIQUE! CONSERVEZ CE
MANUEL!
PARTICULARITÉS
Cuisson sans carboniser – Le Four Turbo réalise l’opération de cuisson en assurant la
circulation de l’air chaud et cuit les aliments d’une façon égale sans cause de carbonisation.
Facile à utiliser – Étant donné que l’air circulant dans le four va cuire ou rôtir l’aliment
d’une façon égale il n’y a pas besoin de tourner le repas lors de l’opération de cuisson.
Économise de l’énergie – Le Four Turbo est doté d’un chronomètre et d’un thermostat
afin d’éviter une cuisson excessive et d’éviter la consommation inutile d’électrique.
Couvercle complètement transparent – Le couvercle du Four Turbo est fabriqué d’une
vitre de verre transparent résistant contre la chaleur en vue de permettre d’observer
facilement l’opération de cuisson.
Préserve la saveur – L’air chaud circulant dans le four permet de ne pas perdre la saveur
en empêchant l’humidité de fuir.
Facile à nettoyer – Toutes les pièces peuvent être facilement nettoyées. Nettoyez en
essuyant avec chiffon humide.
- 16 -
Page 18
DESCRIPTION DE L’APPAREIL
1. Manche
2. Chronomètre
3. Carrosserie
4. Récipient en verre
5. Régulateur de la température
6. Couvercle en verre
7. Manche en forme de U
8. Plateau inférieur
UTILISATION DU FOUR TURBO
1. Assurez-vous que le cordon d’alimentation n’est pas branché à la prise de courant.
Nettoyez le récipient de cuisson en verre.
REMARQUE: Le récipient chauffe beaucoup lors de l’opération de cuisson. Placez
absolument le Four Turbo sur une surface résistante contre la chaleur.
2. Installez le récipient de cuisson en verre sur l’étagère. Pour assurer une meilleure
circulation d’air, placez les aliments au milieu de l’étagère.
REMARQUE: Laissez absolument une espace environ de 1 centimètre entre les aliments
et la partie inférieure du récipient en verre.
3. Couvrez le dessus du récipient en verre avec le couvercle en verre et assurez-vous
que le couvercle est correctement installé.
4. Branchez le cordon d’alimentation à la prise de courant.
5. Réglez le contrôle de thermostat automatique à la température souhaitée.
6. Servez-vous du tableau de référence pour régler le chronomètre.
REMARQUE: Une fois que la température souhaitée est obtenue, la lampe indicatrice se
trouvant à côté du bouton s’éteindra automatiquement.
7. Une fois que la durée de cuisson sera terminée, le Four Turbo s’arrêtera
automatiquement.
8. Laissez les aliments se reposer dans le four pendant environ 3-5 minutes.
9. Une fois que le couvercle en verre est soulevé, l’interrupteur de sécurité s’activera
automatiquement et la connexion d’alimentation se coupera entièrement.
10. Débranchez le cordon d’alimentation de la prise.
11. Dans le cas où le Four Turbo va être utilisé pour une opération de cuisson de moins
de 10 minutes, réglez le chronomètre d’abords à environ 20 minutes et mettez après à
la durée souhaitée.
3
4
1
2
5
6
7
8
- 17 -
Page 19

TABLEAU DE RÉFÉRENCE DE CUISSON
TEMPÉRATURE ALIMENT QUANTITÉ DURÉE
180˚C/350˚F – 200˚C/400˚F Poulet Entier 2 kg 35 minutes
180˚C/350˚F – 200˚C/400˚F Viande tranchée 0,5 kg 7 – 8 minutes
180˚C/350˚F – 200˚C/400˚F Cuisse de poulet 8 unités 15 minutes
230˚C/450˚F – 260˚C/500˚F Poisson 10 unités 7 – 8 minutes
180˚C/350˚F – 200˚C/400˚F Clam 0,5 kg 5-7 minutes
230˚C/450˚F – 260˚C/500˚F Crevettes 0,5 kg 5 minutes
230˚C/450˚F – 260˚C/500˚F Maïs en épis 4 unités 10 minutes
230˚C/450˚F – 260˚C/500˚F Pommes de terre 0,5 kg 25 minutes
150˚C/300˚F – 180˚C/350˚F Cakes 1 plateau 20 minutes
230˚C/450˚F – 260˚C/500˚F Crevettes Jumbo 4 unités 15 minutes
230˚C/450˚F – 260˚C/500˚F Crabe 0,5 kg 10 minutes
CUISSON AU FOUR TURBO
GRIL ET RÔTISSAGE:
Pour faire du rôtissage ou du gril au Four Turbo, la température doit être réglée à 230°C
- 250°C. Les aliments doivent être installés sur l’étagère à deux pour être près de la
source de chaleur. Pour obtenir la saveur de fumée versez du liquide de fumée d’arbre
de mesquite ou de noix au dessous du récipient en verre. Les épices et les assaisonnements
doivent être parsemés sur la surface de la viande.
Faites pulvérisez de l’huile sur l’étagère ou sur le gril lorsque vous cuisinez du poisson
ou de la viande non grasse. Ou bien étalez de l’huile sur l’étagère à l’aide d’une brosse
avant de n’y installer l’aliment. Cette opération empêchera l’aliment de coller au gril.
Pour obtenir des surfaces mieux grillées, faites griller toutes les deux faces des viandes
comme les biftecks épais.
RÔTISSAGE:
Couvrez le dessous du récipient en verre avec une feuille d’aluminium pour retenir les
gouttes de graisse qui y tombent. Utilisez l’étagère inférieure pour faciliter la circulation
de l’air. La circulation d’air va faire cuire la viande de façon identique et va enfermer le
jus de la viande à l’intérieur de la viande. Vous n’avez pas besoin de retourner la viande
ou de la remouiller avec son jus.
Il est conseillé d’utiliser un thermomètre de viande. Si vous ne disposez pas d’un
thermomètre, vous pouvez utiliser le tableau de référence de cuisson ou utiliser les
tableaux préparés pour les fours conventionnels en soustrayant 10°C des valeurs
indiquées.
RÔTIR UN POULET ENTIER:
Lavez bien le poulet puis coupez et jetez les graisses excédantes et les parties non
souhaitées. Assaisonnez avec les épices que vous désirez. Nous vous conseillons d’utiliser
des épices comme l’ail, le poivre et du sel. Permettez les épices ou le dressage s’imprégner
- 18 -
Page 20

CUISSON AU FOUR TURBO
dans la viande en attendant quelques heures avant le rôtissage. Couvrez le dessous du
récipient en verre avec une feuille d’aluminium pour retenir les gouttes de graisse qui
y tombent. Faites cuire le poulet à 200°C pendant environ 10 minutes pour chaque demikilo. Ensuite pour que la peau devienne croustillante, faites augmenter la température
à 250°C pendant 5-10 minutes.
CUISSON DE RÔTI ENTIER:
Installez le rôti au milieu de l’étagère inférieure de façon à ce que la partie grasse reste
en haut. La température de cuisson de rôti est généralement 10°C plus basse que les
températures utilisées aux fours conventionnels. La durée de cuisson varie selon le type
et la grandeur du rôti.
POUR LES VIANDES QUI PÈSENET DE 1-1,5 K‹LOS, RÉGLEZ LA TEMPÉRATURE À 200°C
ET FAITES CUIRE SELON LES DURÉES INDIQUÉES CI-DESSOUS :
TYPE DE VIANDE MINUTES
Rosbif sans os (Rôti entier) Saignant 15 – 20 minutes
Rosbif de Rôti de Côte (Cuisse ou Croupe) Saignant 15 – 20 minutes
Cuisse avec os (Bien cuit) Cuit 12 – 15 minutes
Contre-filet avec os Bien cuit 25 – 30 minutes
INDICES:
La température de cuisson des repas dont le dessus n’est pas couvert dans le Four Turbo
est généralement 5°C à 10°C plus basse. L’utilisation de Four Turbo ne nécessite pas
de préchauffage. Lors d’une cuisson de cake, les parties du plateau qui sont près des
bords cuisent plus vite pendant que la partie centrale du cake reste mouillée. De ce fait,
lorsque vous faites cuire un cake, nous vous conseillons d’utiliser une moule à cake dont
la partie centrale est vide plutôt que des moules à couche large. Les moules de muffin
sont idéales pour cuisiner des petits cakes.
Cuit 20 – 25 minutes
Bien cuit 25 – 30 minutes
Cuit 20 – 25 minutes
Bien cuit 25 – 30 minutes
DURÉES DE CUISSON ET TABLEAU DE TEMPÉRATURES:
ALIMENT TEMPÉRATURE DURÉE
Farfadet 150˚C / 300˚F 18-20 minutes
Pâtisserie 200˚C / 400˚F 10-12 minutes
Cake (couche) 150˚C / 300˚F 18-20 minutes
Cake (rectangulaire) 150˚C / 300˚F 30-35 minutes
Pain de maïs 180˚C / 350˚F 18-20 minutes
Macaron 160˚C / 320˚F 8-10 minutes
- 19 -
Page 21

DURÉES DE CUISSON ET TABLEAU DE TEMPÉRATURES
Muffin 180˚C / 350˚F 12-15 minutes
Tarte/Tourte: Tourte 200˚C / 400˚F 8-10 minutes
Fourré (sans pâte au dessus) 160˚C / 320˚F 25-30 minutes
Fourré (avec pâte au dessus) 180˚C / 350˚F 35-40 minutes
Pain / Pain de sandwich 180˚C / 350˚F 12-15 minutes
Pain rectangulaire 160˚C / 320˚F 25-30 minutes
NETTOYAGE
1. Débranchez absolument la fiche électrique de la prise de courant avant le nettoyage.
2. Attendez que l’appareil refroidisse avant de ne le nettoyer ou de ne le ranger.
3. Pour tenir le Four Turbo propre, il suffit de nettoyer en essuyant avec un chiffon tiède
et humide.
4. Vous pouvez enlever les tâches éclaboussées en frottant avec un chiffon humide et
savonneux.
N’IMMERGEZ JAMAIS L’APPAREIL DANS L’EAU!
5. N’utilisez pas de produits nettoyants abrasifs ou de pailles de fer pour le nettoyage.
6. Dans le cas où le filtre d’huile est plein, faites ressortir le filtre en dévissant les vis.
Lavez avec de l’eau chaude savonneuse, rincez bien et faites sécher avant de le remonter
au Four Turbo.
7. Les accessoires peuvent être lavés à l’eau chaude savonneuse ou au lave-vaisselle.
ATTENTION:
LE BLOC MOTEUR DU FOUR TURBO CHAUFFE BEAUCOUP LORS DE L’OPÉRATION DE
CUISSON. SAISISSEZ L’APPAREIL UNIQUEMENT DES MANCHES.
N’APPOSEZ PAS LE FOUR TURBO SUR DES SURFACES EN PLASTIQUE, EN VINYLE OU
EN BOIS VERNI JUSTE APRÈS L’AVOIR UTILISÉ. ATTENDEZ QUE L’APPAREIL REFROIDISSE
COMPLÈTEMENT AVANT DE NE LE FAIRE BOUGER.
N’UTILISEZ PAS LE FOUR TURBO À PROXIMITÉ DES MATÉRIAUX COMBUSTIBLES.
SAISISSEZ LA FICHE POUR DÉBRANCHER L’APPAREIL, NE TIREZ PAS DU CORDON.
NE PLONGEZ JAMAIS LE FOUR TURBO DANS L’EAU.
SPECIFICATIONS TECHNIQUES
• Multifonctionnel: Rôtissage, gril, cuisson à vapeur, décongélation.
• Capacité: 12 L
• Chauffage halogène pour une cuisson plus rapide
• Circulation d’air chaud pour une cuisson de niveau identique
• Récipient résistant contre la chaleur
• Chronomètre de 60 minutes
• Température de chauffage variable: 100˚C – 250˚C
• Accessoires: étagère inférieure, étagère supérieure, pince, ciseaux pince, plat de la
vapeur, brochettes et la bague d'extension
• Puissance: 1200 W
TOUTE MODIFICATION PEUT SE FAIRE CONCERNANT LA CONCEPTION ET LES
SPECIFICATIONS TECNIQUES SANS PRÉAVIS!
- 20 -
Page 22

NEDERLANDS
SINBO SCO 5023 CONVECTIEOVEN
GEBRUIKSHANDLEIDING
INLEIDING
BESTE KLANT!
Felicitaties. U hebt een voortreffelijke keuze gemaakt!
Dit door u aangekocht apparaat is een product van vooruitstrevende technologie en hoge
kwaliteit. Om ten volle van dit apparaat te genieten en het op een veilige manier te
kunnen gebruiken verzoeken wij u deze handleiding aandachtig door te nemen.
BELANGRIJKE VEILIGHEIDSINSTRUCTIES
Bij het gebruik van elektrische apparaten moeten altijd volgende essentiële
veiligheidsregels in acht worden genomen:
1. Lees aandachtig de volledige handleiding.
2. Raak de hete oppervlakken van het apparaat niet aan. Grijp het apparaat uitsluitend
vast bij de handgreep of bij het handvat.
3. Verwijder alle verpakkingsmateriaal en stickers van het apparaat.
4. Demonteer en was alle afneembare onderdelen van het apparaat.
5. Sommige onderdelen van dit product zijn in de fabriek beschermd met een dun laagje
smeerolie. Laat het product gedurende 10 minuten in MAX stand verwarmen om overtollige
olie te verbranden.
6. Dompel het apparaat, snoer of stekker nooit in water of in een andere vloeistof om
het gevaar van een elektrische schok te voorkomen.
7. Let bijzonder goed op ingeval het apparaat door of in aanwezigheid van kinderen wordt
gebruikt.
8. Neem altijd de stekker uit het stopcontact als het apparaat niet wordt gebruikt en voor
reiniging. Laat het apparaat afkoelen voor u onderdelen monteert of demonteert.
9. Gebruik nooit apparaten waarvan snoer of stekker beschadigd is, die zelf beschadigd
of defect zijn of niet normaal functioneren. Breng ze naar een bevoegde Service voor
nazicht en/of herstel.
10. Gebruik nooit accessoires die niet door de fabrikant zijn aanbevolen om letsel te
voorkomen.
11. Gebruik het apparaat niet buitenhuis.
12. Laat het snoer niet over de randen van tafel of aanrecht hangen of in aanraking
komen met hete oppervlakken.
13. Plaats het apparaat of voldoende afstand van warmtebronnen zoals elektrisch vuur
of warme oven en stel het niet bloot aan hete dampen.
14. Verbind eerst het snoer met het apparaat en steek vervolgens de stekker in het
stopcontact.
SCHAKEL altijd eerst het apparaat UIT voordat u de stekker uit het stopcontact haalt.
15. Plaats geen te grote stukken voedsel en geen metalen keukengerei in de oven om
brand en elektrische schok te vermijden.
- 21 -
Page 23

BELANGRIJKE VEILIGHEIDSINSTRUCTIES
16. Bedek de oven niet terwijl hij functioneert en vermijd alle contact met gordijnen,
kleedjes, muur e.d. brandbare materialen om brandgevaar te voorkomen.
17. Reinig het apparaat nooit met metalen schuursponsjes. Een eventueel in de oven
achterblijvend stukje metaaldraad zou door contact met de elektrische elementen een
elektrisch schok kunnen veroorzaken.
18. Installeer het apparaat op een hittebestendige bodem.
19. Laat minstens 20 cm afstand tussen het apparaat en omringende voorwerpen.
20. Wees uiterst voorzichtig bij het gebruik van schotels of kommen van ander materiaal
dan metaal of glas.
21. Berg in de oven, terwijl hij niet in gebruik is, uitsluitend de door de fabrikant aanbevolen
accessoires op.
22. Berg in de oven geen papier, karton, plastic of degelijke materialen op.
21. Houd altijd toezicht terwijl het apparaat in werking is.
DIT APPARAAT IS UITSLUITEND BESTEMD VOOR HUISHOUDELIJK GEBRUIK! BEWAAR
DEZE HANDLEIDING ZORGVULDIG!
KENMERKEN
Turbo systeem, voedselbereiding zonder verbranding – door circulatie van warme lucht
ontstaat in de oven een gelijkmatige temperatuur waardoor het voedsel op korte tijd gaar
wordt zonder dat het aan de buitenkant verbrandt.
Eenvoudig gebruik- door warme luchtcirculatie waardoor het voedsel, zonder dat het
tussendoor moet worden omgekeerd, aan alle kanten gelijkmatig gaar wordt.
Energiebesparend – de Turbo Oven, voorzien van timer en thermostaat, vermijdt overmatige
bereiding en onnodig elektriciteitsverbruik.
Volledig transparant – de Turbo Oven is gefabriceerd van hittebestendig transparant glas
zodat het bereidingsproces gemakkelijk controleerbaar is.
Smaakbehoudend – De in de oven circulerende warme lucht voorkomt vocht- en
smaakverlies. Eenvoudig te reinigen - Alle onderdelen kunnen gemakkelijk worden
gereinigd. Gewoon schoonmaken met een vochtige doek.
BESCHRIJVING VAN HET APPARAAT
1. Handgreep
2. Timer
3. Behuizing
4. Glazen kookpot
5. Temperatuurregelaar
6. Glazen deksel
7. U-vormig handvat
8. Onderplaat
3
4
- 22 -
1
2
5
6
7
8
Page 24

GEBRUIK VAN DE TURBO OVEN
1. Vergewis u ervan dat de stekker uit het stopcontact is gehaald. Reinig de glazen
kookpot. OPMERKING: Gedurende de bereiding wordt de kookpot heet. Installeer de
Turbo Oven altijd op een hittebestendig oppervlak.
2. Bevestig het kookrek in de kookpot. Leg de voedselingrediënten in het midden van het
rek om optimale luchtcirculatie te bekomen.
OPMERKING: Laat een afstand van minstens 1 centimeter tussen de eetwaren en de
onderkant van de glazen kookpot.
3. Sluit af met het glazen deksel en controleer of het deksel degelijk is geplaatst en goed
vast zit.
4. Steek de stekker in het stopcontact.
5. Regel de thermostaat op de gewenste temperatuur.
6. Stel de tijdsregeling in aan de hand van de referentietabel.
OPMERKING: Als de ingestelde temperatuur bereikt is zal het indicatielampje van de
verwarming automatisch uitgaan.
7. Als de bereidingstijd verlopen is zal de Turbo Oven automatisch worden uitgeschakeld.
8. Laat het gerecht nog 3 tot 5 minuten in de oven rusten.
9. Vanaf het ogenblik dat u het deksel oplicht zal de beveiligingsschakelaar automatisch
in werking treden en het apparaat volledig van de stroombron ontkoppelen.
10. Neem de stekker uit het stopcontact.
11. Ingeval u in de Turbo Oven een voedselbereiding van minder dat 10 minuten wilt
verrichten, draai de timer dan eerst tot 20 minuten en vervolgens terug naar de gewenst
tijdspanne.
REFERENTIETABEL VOOR BEREIDINGEN IN UW TURBO OVEN
TEMPERATUUR VOEDSEL HOEVEEL-HEID
BEREIDINGS-TIJD
180˚C/350˚F – 200˚C/400˚F Hele kip 2 kg 35 minuten
180˚C/350˚F – 200˚C/400˚F Vlees in plakken 0,5 kg 7 – 8 minuten
180˚C/350˚F – 200˚C/400˚F Kippenboutjes 8 stuks 15 minuten
230˚C/450˚F – 260˚C/500˚F Vis 10 stuks 7 – 8 minuten
180˚C/350˚F – 200˚C/400˚F Mosselen 0,5 kg 5-7 minuten
230˚C/450˚F – 260˚C/500˚F Garnalen 0,5 kg 5 minuten
230˚C/450˚F – 260˚C/500˚F Maïskolven 4 stuks 10 minuten
230˚C/450˚F – 260˚C/500˚F Aardappelen 0,5 kg 25 minuten
150˚C/300˚F – 180˚C/350˚F Cakejes 1 schaal 20 minuten
230˚C/450˚F – 260˚C/500˚F Steurgarnalen 4 stuks 15 minuten
230˚C/450˚F – 260˚C/500˚F Krab 0,5 kg 10 minuten
KOKEN IN DE TURBO OVEN
GRILLEREN EN BRADEN:
Om in de Turbo Oven te braden of te grilleren moet de temperatuur worden ingesteld
- 23 -
Page 25

KOKEN IN DE TURBO OVEN
op 230°C - 250°C. Het voedsel moet op het dubbele rek geplaatst worden om het dichter
bij de hittebron te brengen. Om een rooksmaak te verkrijgen kan eventueel een scheutje
vloeibare rook - hickory of mesquite – op de bodem van de kookpot worden gegoten.
Specerijen en smaakversterkers kunnen naar believen op het vlees worden gestrooid.
Als u vis of vetvrij vlees gaat bereiden moet u het rek of rooster eerst met een weinig
olie bespuiten of met een in olie gedompeld penseeltje inwrijven. Op die manier voorkomt
u dat het voedsel aan het rooster gaat kleven.
Om een mooi egaal gebakken resultaat te bereiken bv. voor dikke plakken beefsteak, is
het aan te raden het vlees aan beide kanten te laten bruinen.
ROOSTEREN:
Bedek de bodem van de glazen kookpot met aluminium folio om afdruipend vet op te
vangen. Gebruik het onderste rek om de luchtcirculatie te vergemakkelijken. Door de
luchtcirculatie zal het vlees gelijkmatig worden geroosterd en blijft het sap in het vlees
opgesloten. Omkeren van het vlees of bevochtiging met water is overbodig.
Wij raden u aan gebruik te maken van een vleesthermometer of bij gebrek hieraan de
aanwijzingen van de referentietabel te volgen. U kunt ook steunen op de aanwijzingen
van een traditionele oventabel maar dan moet u de aldaar aangeduide temperatuurwaarden
met 10˚C verminderen.
.
EEN HELE KIP BRADEN:
Was de kip en snijd overtollig vet en alle ongewenste delen weg. Gebruik knoflook, zout,
peper en andere specerijen naar believen om uw kip op smaak te brengen. Laat de
specerijen of de marinade enkele uren intrekken voordat u aan de bereiding begint.
Bedek de bodem van de glazen kookpot met aluminium folio om afdruipend vet op te
vangen. Bereid de kip op een temperatuur van 200°C en reken een kooktijd van ongeveer
10 minuten per halve kilo. Verhoog daarna de temperatuur tot 250°C en laat nog 5-10
minuten braden, zodat het vel broos wordt.
ROASTBEEF BRADEN:
Leg de roastbeef met de vette kant naar boven in het midden van het onderste rek. De
bereidingstemperatuur ligt ongeveer 10°C lager dan de tempeatuur die voor een
traditionele oven vereist is. De bereidingstijd verschilt naargelang de aard en de grootte
van het vlees.
VOOR EEN GEBRAAD VAN 1-1,5 KILO RADEN WIJ U AAN DE TEMPERATUUR IN TE
STELLEN OP 200°C EN VOOR DE BEREIDINGSTIJD DE AANWIJZINGEN TE VOLGEN VAN
ONDERSTAANDE TABEL:
VLEESSOORT BEREIDINGSTIJD
Roastbeef (heel gebraad – uitgebeend) Licht gebraden 15 – 20 minuten
- 24 -
Medium 20 – 25 minuten
Goed doorbraden 25 – 30 minuten
Page 26

KOKEN IN DE TURBO OVEN
Rib- of staartstuk (heel gebraad – niet uitgebeend) Licht gebraden 15 – 20 minuten
Lamsbout – niet uitgebeend (Goed doorbraden) Medium 12 – 15 minuten
Contrafilet Goed doorbakken 25 – 30 minuten
WENKEN:
Onbedekt voedsel kan in de Turbo Oven meestal op 5°C tot 10°C lagere temperatuur
worden bereid. Een Turbo Oven moet niet worden voorverwarmd. Bij het bakken van
een cake zijn de buitenkanten al vlug gaar terwijl het middendeel nog vochtig is. Het is
daarom aan te raden voor een grote cake een ringvorm te gebruiken. Om kleine cakes
te bakken zijn muffinvormpjes ideaal.
BEREIDINGSTIJDEN EN TEMPERATURENTABEL:
GEBAK TEMPERATUUR BAKTIJD
Browni 150˚C / 300˚F 18-20 minuten
Po¤aça 200˚C / 400˚F 10-12 minuten
Cake (ringvorm) 150˚C / 300˚F 18-20 minuten
Cake (grote springvorm) 150˚C / 300˚F 30-35 minuten
Maïsbrood 180˚C / 350˚F 18-20 minuten
Koekjes 160˚C / 320˚F 8-10 minuten
Muffin 180˚C / 350˚F 12-15 minuten
Vlaai-/Taartbodem 200˚C / 400˚F 8-10 minuten
Gevuld - onbedekt 160˚C / 320˚F 25-30 minuten
Gevuld met deeg bedekt 180˚C / 350˚F 35-40 minuten
Broodje / Sandwich 180˚C / 350˚F 12-15 minuten
Brood 160˚C / 320˚F 25-30 minuten
REINIGING
1. Neem altijd de stekker uit het stopcontact voordat u het apparaat gaat reinigen.
2. Laat het apparaat afkoelen voordat u het reinigt of opbergt.
3. Om de Turbo Oven te onderhouden is het voldoende als u hem na gebruik reinigt met
een lauwe vochtige doek.
4. Wrijf bevuiling en spatten schoon met een ingezeepte vochtige doek.
DOMPEL HET APPARAAT NOOIT IN WATER!
5. Gebruik geen bijtende of schurende reinigingsmiddelen op schuursponsjes.
6. Als de vetfilter volzit, draai de schroefjes los en neem hem uit het apparaat. Was
grondig in warm zeepwater, spoel goed na en droog af vooraleer u hem opnieuw in de
oven monteert.
7. Accessoires kunnen in de vaatwasser of met de hand in warm zeepwater gewassen
worden.
- 25 -
Medium 20 – 25 minuten
Goed doorbraden 25 – 30 minuten
Page 27

WENKEN
DE MOTORBEHUIZING VAN DE TURBO OVEN WORDT HEET TIJDENS DE BEREIDING.
NEEM HET APPARAAT ALLEEN VAST AAN HET HANDVAT OF DE HANDGREEP.
PLAATS DE TURBO OVEN NIET OP EEN MET PLASTIC, VYNIL OF GEPOLIJST HOUT
BEKLEED OPPERVLAK DADELIJK NA GEBRUIK; WACHT TOT HET APPARAAT VOLKOMEN
AFGEKOELD IS VOORALEER HET TE VERPLAATSEN. GEBRUIK DE TURBO OVEN ALLEEN
OP VEILIGE AFSTAND VAN BRANDBARE MATERIALEN. TREK NOOIT AAN HET SNOER,
GRIJP ALTIJD DE STEKKER VAST OM HEM UIT HET STOPCONTACT TE HALEN.
DOMPEL DE TURBO OVEN NOOIT IN WATER OF IN EEN ANDERE VLOEISTOF.
TECHNISCHE SPECIFICATIES
• Multifunctioneel: Braden, grilleren, bakken, stomen, ontvriezen
• Inhoudscapaciteit: 12 L
• Halogeen verwarming voor snellere bereiding
• Warme luchtcirculatie voor gelijkmatig gaar worden van het voedsel
• In hoogste mate hittebestendige glazen kookpot.
• 60 minuten timer
• Verstelbare temperatuur: 100˚C – 250˚C
• Hulpstukken: Onderste rek, bovenste rek, grijptang, schaar grijptang, stoom schotel,
spiesjes en extender ring
• Vermogen: 1200 W
ONTWERP EN TECHNISCHE SPECIFICATIES KUNNEN ZONDER VOORAFGAANDE
KENNISGEVING WORDEN GEWIJZIGD!
- 26 -
Page 28

ESPANOL
SINBO SCO 5023 HORNO CON CONVECCIÓN
GUÍA DEL USO
INTRODUCCIÓN
ESTIMADO CLIENTE
Felicitaciones. ¡Ha hecho muy buena elección!
El producto comprado es un producto calificado que tiene un diseño alto.
Para utilizar esta máquina completamente y seguramente por favor lee el guía del uso
cuidadamente.
LAS NORMAS IMPORTANTES DE LA SEGURIDAD
Cuando está utilizando las máquinas eléctricas tiene que tener en cuenta las siguientes
precauciones básicas de la seguridad absolutamente.
1. Lee la instrucción antes de utilizar la máquina.
2. No toque a las superficies calientes. Solo coge por los mangos.
3. Antes de hacer funcionar la máquina tire todos los materiales plásticas de embalaje
y otros materiales.
4. Antes de empezar a utilizar la máquina lave todas las piezas desmontables.
5. Para eliminar los aceites que se quedan durante la fabricación y proceso de embalaje,
antes del primer uso del producto haga funcionar la máquina por 10 minutos en el nivel
más alto de la temperatura.
6. Para evitar el choque de la electricidad no mete el cable, enchufe o la máquina en el
agua.
7. Tenga mucho cuidado cuando cualquier máquina se utiliza por los niños o cerca de
ellos.
8. Cuando la máquina no se utiliza o antes de limpiar, tiene que desenchufarla. Antes
de montar o desmontar la máquina espere que la máquina se enfría.
9. No intenta utilizar la máquina si su cable o enchufe está averiado o si la máquina no
se funciona correctamente. Lleve la máquina al centro autorizado del servicio para el
proceso de control, reparación o configuración.
10. No se recomienda utilizar los accesorios no recomendados por el fabricante porque
pueden causar a herirse.
11. No utilice en la fuera.
12. El cable no se debe colgar del borde de encimera o no se debe tocar a las superficies
calientes.
13. No haga situar la máquina en un lugar cerca de los hornos de gas, hornos eléctricas
o dentro de ellos.
14. Después de conectar el cable a la máquina, enchufe la máquina.
Para cortar la conexión de la máquina, por lo primero haga la máquina APAGADO y luego
desenchufe la máquina.
15. No mete los materiales de cocina o los alimentos del grande tamaño en la máquina
porque puede causar al choque de electricidad e incendio.
- 27 -
Page 29

LAS NORMAS IMPORTANTE DE LA SEGURIDAD
16. Durante el funcionamiento si la máquina se cierra o se toca a cortina, muro o
materiales inflamables, se puede ocurrir el peligro de incendio.
17. No limpie la máquina por el alambre de metal. Las piezas del alambre se puede
tocar a las piezas eléctricas y puede causar al riesgo del choque de la electricidad.
18. Haga situar la máquina encima de una superficie resistente contra el calor.
19. La distancia entre la máquina y los materiales en el entorno de la máquina no se
debe menos de 20cm.
20. Cuando está utilizando los materiales producidos por los materiales excepto metal
o cristal tiene que tener mucho cuidado.
21. Si no utiliza el horno no guarda los materiales no recomendados por el fabricante
dentro del horno.
¡ESTA MÁQUINA ES SOLO PARA EL USO DOMESTICO! ¡GUARDE ESTA INSTRUCCIÓN!
CÁRACTERISTICAS
Cocción sin carbonizar-Horno turbo, realiza el proceso de cocción por suministrar la
circulación del aire y no se causa a la carbonización de los alimentos por cocer
equilibradamente.
Fácil de Usar- No necesita hacer girar el alimento durante el proceso de cocción porque
el aire que se circula en el horno cuece o freí el alimento equilibradamente.
Suministra ahorro de energía- El horno turbo tiene un programador del tiempo y
termostato para evitar el consumo no necesario y cocción excesivo.
Tapa transparente en total- La tapa del horno turbo se ha producido por cristal
transparente resistente al calor para mirar el proceso de cocción fácilmente.
Guarda el sabor- El aire circulando dentro del horno suministra que la humedad y sabor
no se salen fuera.
Fácil de usar-Todas las piezas se pueden limpiar fácilmente. Limpie por un paño húmedo.
INTRODUCCIÓN DE LA MÁQUINA
1. Mango
2. Programador del tiempo
3
3. Carrocería
4. Encaje de cristal
5. Reguladora de calor
4
6. Tapa de cristal
7. Mango en la forma de U
8. Bandeja inferior
USO DEL HORNO TURBO
1. Tiene que estar seguro que el cable de energía está enchufado. Limpie el encaje cristal
de cocción.
NOTA: Durante el proceso de cocción el encaje se caliente mucho. Haga situar el horno
- 28 -
1
2
5
6
7
8
Page 30

USO DEL HORNO TURBO
turbo en una superficie resistente.
2. Haga situar la repisa de cocción en el encaje de cristal. Para suministrar la circulación
del aire de mejor forma haga situar los alimentos en el medio de la repisa.
NOTA: Deje una distancia de 1 centímetros entre los alimentos y el encaje de cristal.
3. Cierre la parte superior del encaje de cristal por la tapa de cristal y tiene que estar
seguro que la tapa se fija a su lugar correctamente.
4. Enchufe el cable de energía.
5. Configure el control del termostato automático a la temperatura querida.
6. Para configurar el programador del tiempo utilice la tabla de referencia.
NOTA: Cuando se llega a la temperatura querida la luz indicador de la temperatura se
apaga.
7. Después de la duración de cocción el horno turbo se apaga automáticamente.
8. Permite que los alimentos se descansan por 3-5 minutos.
9. Después de levantar la tapa de cristal circuito de seguridad se funciona automáticamente
y la conexión de energía se apaga completamente.
10. Desenchufe el cable de energía.
11. Si el horno turbo se funcionará por menos de 10 minutos, por lo primero configura
el programador del tiempo a 20 minutos y luego lleva a la duración querida.
TABLA DE REFERENCIA DE COCCIÓN
TEMPERATURA ALIMENTO CANTIDAD DURACIÓN
180˚C/350˚F – 200˚C/400˚F Pollo Completo 2 kg 35 minutos
180˚C/350˚F – 200˚C/400˚F Carne rebanado 0,5 kg 7 – 8 minutos
180˚C/350˚F – 200˚C/400˚F Pierna de pollo 8 unidades 15 minutos
230˚C/450˚F – 260˚C/500˚F Pescado 10 unidades 7 – 8 minutos
180˚C/350˚F – 200˚C/400˚F Almeja 0,5 kg 5-7 minutos
230˚C/450˚F – 260˚C/500˚F Gamba 0,5 kg 5 minutos
230˚C/450˚F – 260˚C/500˚F Olote de maíz 4 unidades 10 minutos
230˚C/450˚F – 260˚C/500˚F Patatas 0,5 kg 25 minutos
150˚C/300˚F – 180˚C/350˚F Bizcochos 1 bandeja 20 minutos
230˚C/450˚F – 260˚C/500˚F Gamba Jumbo 4 unidades 15 minutos
230˚C/450˚F – 260˚C/500˚F Cangrejo 0,5 kg 10 minutos
COCCIÓN EN EL HORNO TURBO
PARRILA y FREIDURA
Para hacer parilla o freidura en el horno turbo la temperatura se debe configurar a
230oC-250oC. Los alimentos se deben situar encima de la repisa doble para que están
cerca de la fuente de calor.
Para obtener el sabor de ahumado haga verter el líquido del nogal o mesquite debajo
del encaje de cristal.
Las especias se deben poner encima de carne.
- 29 -
Page 31

COCCIÓN EN EL HORNO TURBO
Cuando está cociendo pescado o carne sin aceite, ponga aceite encima de parilla. O antes
de hacer situar el alimento encima de repisa ponga aceite por el cepillo. Este proceso
evita que el alimento se pegue a la parilla.
Para obtener los alimentos freídos mejor, haga freír las dos caras de las carnes.
ROSTO
Para hacer dejar los aceites goteados, cierre la parte inferior del encaje de cristal por
papel de aluminio. Para facilitar la circulación del aire utilice la repisa inferior. La
circulación del aire suministra la cocción en el nivel equilibrado y hace dejar el agua de
carne dentro de carne. No necesita girar la carne o calentar el agua otra vez.
Se recomienda utilizar un termómetro de carne. Si no tiene el termómetro, puede utilizar
la tabla de referencia de cocción o puede utilizar las tablas de los hornos clásicos por
aumentar por 10oC.
FREÍR EL POLLO COMPLETO:
Lava el pollo bien y corte los aceites excesivos y las partes que no se quieren. Ponga las
especias queridas. Se recomienda las especias como ajo, pimienta y sal. Antes del
proceso de freidura permite que las especias traten a la carne por esperar por unas
horas. Para hacer parar los aceitas goteados cierre el encaje de cristal por papel de
aluminio. Coci el pollo en 200oC por 10 minutos por cada media kilogramos. Luego,
aumente la temperatura a 250oC para hacer crujiente su piel por 5-10 minutos.
COCER ROSTO COMPLETO:
Haga situar el rosto como su parte aceitado se queda arriba en el centro de repisa
inferior. La temperatura de la cocción del rosto es menos 10oC de la temperatura que
se utiliza en los hornos clásicos. La duración de la cocción se varia depende del tipo del
rosto y su tamaño.
PARA LAS CARNES DEL PESO DE 1.1,5KG, CONFIGURE LA TEMPERATURA A 200OC y
COCI SEGÚN LAS SIGUIENTES DURACIONES:
TIPO DE CARNE MINUTO
Rosbif sin hueso(Rosto completo) Cocinado poco 15 – 20 minutos
Rosto de rosbif de costilla(pierna o ancas) Cocinado poco 15 – 20 minutos
Pierna con hueso (cocinado bien) Medio 12 – 15 minutos
Lomo con hueso Cocinado bien 25 – 30 minutos
Cocinado medio 20 – 25 minutos
Cocinado bien 25 – 30 minutos
Cocinado medio 20 – 25 minutos
Cocinado bien 25 – 30 minutos
- 30 -
Page 32

INDICIOS
La temperatura de cocción de los alimentos no cerrados en el horno turbo es menos 510˚C del horno clásico. Cuando está utilizando el horno turbo no necesita precalentamiento.
Cuando está cociendo bizcocho, las partes que están cerca de los bordes de la bandeja
se cuecen más pronto y el centro se queda mojado. Por eso para cocer el bizcocho
recomendamos utilizar los moldes que tienen huecos en el centro en el lugar de los
moldes de las capas anchas. Para cocer los bizcochos pequeños los moldes de muffin
son ideales.
LAS DURACIONES DE COCER Y TABLA DE TEMPERATURAS
ALIMENTO TEMPERATURA DURACIÓN
Browni 150˚C / 300˚F 18-20 minutos
Bollo 200˚C / 400˚F 10-12 minutos
Bizcocho (capa) 150˚C / 300˚F 18-20 minutos
Bizcocho (hogaza) 150˚C / 300˚F 30-35 minutos
Pan de maíz 180˚C / 350˚F 18-20 minutos
Galleta 160˚C / 320˚F 8-10 minutos
Muffin 180˚C / 350˚F 12-15 minutos
Tarta 200˚C / 400˚F 8-10 minutos
relleno (superior sin pasta) 160˚C / 320˚F 25-30 minutos
relleno (superior con pasta) 180˚C / 350˚F 35-40 minutos
Pan / Pan de bocadillo 180˚C / 350˚F 12-15 minutos
Pan redonda 160˚C / 320˚F 25-30 minutos
LIMPIEZA
1. Antes de limpiar desenchúfela absolutamente.
2. Antes de limpiar o guardar la máquina espere que se enfría.
3. Para guardar el horno turbo limpio, limpiar por un paño húmedo y fresco es suficiente.
4. Limpie los sucios por un paño enjabonado húmedo.
NO METE LA MÁQUINA EN EL AGUA ABSOLUTAMENTE.
5. No utilice los materiales abrasivos y alambre para la limpieza.
6. Si el filtro de aceite se llena tire el filtro por aflojar el tornillo. Lava por el agua
enjabonado caliente, aclara bien y seca antes de montar al horno turbo.
7. Los accesorios se pueden lavar por el agua caliente enjabonado o dentro de lavavajillas.
ATENCIÓN.
INDICIOS:
DURANTE EL PROCESO DE COCCIÓN, EL CUERPO DEL MOTOR DEL HORNO TURBO SE
CALIENTE MUCHO. COGE LA MÁQUINA SOLO POR SUS MANGOS.
DESPUÉS DE UTILIZAR EL HORNO TURBO NO HAGA SITUAR ENCIMA DE LAS
SUPERFICIES PLÁSTICAS, DE VINILO O PULIDO. ANTES DE HACER MOVER LA MÁQUINA
ESPERE QUE SE ENFRÍE TOTALMENTE.
- 31 -
Page 33

INDICIOS
NO UTILICE EL HORNO TURBO CERCA DE LOS MATERIALES INFLAMABLES.
PARA DESENCHUFAR LA MÁQUINA COGE EL ENCHUFE, NO TIRE POR COGER EL CABLE.
NO METE EL HORNO TURBO EN EL AGUA NUNCA.
CARACTERÍSTICAS TÉCNICAS
* Multi-función: Freidura, parilla, cocer en el vapor, romper el hielos
* Capacidad: 12 lts
* Para la cocción más rápida, calentador halógeno
* Para la cocción en el nivel equilibrio, circulación del aire caliente
* Encaje de cristal resistente al calor
* Programador del tiempo de 60 minutos
* Temperatura variable de calentamiento: 100˚C-250˚C
* Accesorios: Repisa inferior, repisa superior y tenazas, tijeras pinzas, plato de vapor,
pinchos y el anillo de extensión
* Energía: 1200W
- 32 -
Page 34

RUSSIAN
- 33 -
Page 35

4
- 34 -
1
2
3
5
6
7
8
Page 36

- 35 -
Page 37

- 36 -
Page 38

- 37 -
Page 39

- 38 -
Page 40

- 39-
Page 41

4
3
- 40 -
1
2
5
6
7
8
Page 42

- 41-
Page 43

- 42-
Page 44

- 43-
Page 45

- 44-
Page 46

HRVATSKI
SINBO SCO 5023 KONVENCIONALNA PE´CNICA
UPUTSTVO ZA UPORABU
UVOD
ˇ
STOVANI KUPCI!
ˇ
Cestitamo. Napravili ste pravi odabir!
Proizvod koji ste kupili je proizvod vrhunskog dizajna i visoke kvalitete.
Za sigurnu i potpunu uporabu ovog ured¯aja molimo vas da prije poˇcetka koriˇstenja
temeljno proˇcitate ovo uputstvo za uporabu.
BITNA SIGURNOSNA UPOZORENJA
Kod uporabe elektriˇcnih ured¯aja potrebno se pridrˇzavati temeljnih sigurnosnih naputaka
1. Prije poˇcetka koriˇstenja proˇcitajte sve upute za uporabu.
2. Ne dodirujte vru´ce povrˇsine. Ured¯aj uzimajte jedino za ruˇcku ili drˇsku.
3. Prije pokretanja ured¯aja uklonite svu plastiˇcnu ambalaˇzu i ostali materijal.
4. Prije poˇcetka upotrebe operite sav odvojivi pribor ured¯aja.
5. Prije poˇcetka uporabe ukljuˇcite pe´cnicu da radi 10 minuta na najviˇsoj temperaturi u
cilju uklanjanja ulja koja su se od ambalaˇze zadrˇzala na proizvodu.
6. Za izbjegavanje rizika od strujnog udara kabel, utikaˇc ili ured¯aj ne uranjajte u vodu ili
neke druge teku´cine.
7. Koriˇstenje bilo kog stroja od strane ili u blizini djece zahtjeva veliki nadzor i oprez.
8. Prije poˇcetka ˇciˇs´cenja i kada ne koristite ured¯aj obavezno izvucite utikaˇc iz utiˇcnice.
Prije postavljanja ili odvajanja dijelova saˇcekajte da se ured¯aj ohladi.
9. Ne pokuˇsavajte koristiti ured¯aj s oˇste´cenim kabelom, ured¯aj koji neispravno radi,
oˇste´cen ili pokvaren ured¯aj. Za ispitivanje, opravku ili podeˇsavanje ured¯aj odnesite u
ovlaˇsteni servisni centar.
10. Ne savjetujemo vam uporabu dijelova i pribora kojeg ne preporuˇcuje proizvod¯aˇc jer
to moˇze uzrokovati ozljede
11. Ne koristite na otvorenim prostorima.
12. Kabel ne smije visiti preko rubova stola ili radne povrˇsine. Zaˇstite kabel od kontakta
s vru´cim povrˇsinama.
13. Ured¯aj ne stavljajte u blizini vru´cih plinskih ili elektriˇcnih ˇstednjaka.
14. Nakon ˇsto prikljuˇcite kabel na ured¯aj ukljuˇcite utikaˇc u utiˇcnicu.
Ako ˇzelite ured¯aj iskljuˇciti iz izvora za napajanje najprije gumb na ured¯aju podesite u
poziciju ISKLJUˇCENO a nakon toga izvadite utikaˇc iz utiˇcnice.
15. Velike komade hrane ili metalni kuhinjski pribor ne stavljajte u pe´cnicu jer mogu
uzrokovati pojavu poˇzara ili strujnog udara.
16. Nipoˇsto ne prekrivajte ured¯aj dok radi. Isto tako u sluˇcaju da ukljuˇcen ured¯aj dod¯e
u kontakt sa zavjesom, prekrivaˇcem, zidom ili drugim sliˇcnim zapaljim materijalima
postoji opasnost od izbijanja poˇzara.
17. Ured¯aj nikada ne ˇcistite metalnom ˇzicom. Dijelovi metalne ˇzice mogu se odkinuti i
- 45 -
Page 47

BITNI SIGURNOSNI NAPUTCI
do´ci u kontakt s elektriˇcnim dijelovima ˇsto stvara rizik od pojave strujnog udara.
18. Ured¯aj postavite naspram povrˇsine otporne na toplinu.
19. Minimalno rastojanje izmed¯u ured¯aja i objekata u njegovom okruˇzenju treba da bude
20 cm.
20.Budite jako oprezni kod koriˇstenja posuda koje nisu od metala ili stakla.
21. Kada pe´cnicu ne koristite ne stavljajte u njenu unutraˇsnjost niˇsta osim pribora kojeg
preporuˇcuje proizvod¯aˇc.
22. U pe´cnicu ne stavljajte papir, karton, plastiku ili sliˇcan materijal.
21. Nipoˇsto se ne odvajajte od ukljuˇcenog ured¯aja.
OVAJ URE–DAJ JE NAMJENJEN SAMO ZA KU´CANSKU UPORABU! SAˇCUVAJTE OVO
UPUTSTVO ZA UPORABU!
KARAKTERISTIKE
Peˇcenje hrane a da ne zagori - Turbo Pe´cnica, omogu´cava kruˇzenje toplog zraka i
ravnomjerno peˇcenje hrane sa svih strana ne dozvoljavaju´ci da vam hrana izgori.
Lako uporabljiva- Zahvaljuju´ci funkciji kruˇzenja toplog zraka unutar pe´cnice vaˇsa hrana
´ce biti ravnomjerno zapeˇcena ili isprˇzena bez dodatne potrebe za okretanjem.
ˇ
Stedi Energiju - Turbo Pe´cnica je opremljena mjeraˇcem vremena(timer) i termostatom
zahvaljuju´ci kojima se sprijeˇcava prekomjerno peˇcenje i bespotrebna potroˇsnja energije.
Potpuno Prozirni Poklopac -Poklopac Turbo Pe´cnice je proizveden od prozirnog stakla
otpornog na toplinu koji pruˇza mogu´cnost jednostavnog pra´cenja funkcije peˇcenja.
ˇ
Cuva Okus - Topli zrak koji kruˇzi unutar pe´cnice zadrˇzava soˇcnost i okus hrane.
Lako se ˇcisti - Svi dijelovi se mogu jednostavno oˇcistiti. Za ˇciˇs´cenje koristite vlaˇznu krpu.
OPIS URED–AJA
1. Ruˇcka
2. Mjeraˇc vremena(Timer)
3. Kariserija
4. Staklena posuda
5. Regulator Topline
3
4
1
2
5
6
7
6. Stakleni poklopac
7. Ruˇcka u obliku slova U
8
8. Donji pladanj
RUKOVANJE TURBO PE´CNICOM
1. Uvjerite se da kabel za napajanje nije ukljuˇcen u utiˇcnicu. Oˇcistite staklenu posudu za
peˇcenje.
- 46 -
Page 48

RUKOVANJE TURBO PE´CNICOM
NAPOMENA: U vrijeme peˇcenja posuda se jako zagrijava. Turbo Pe´cnicu obavezno
postavite na povrˇsinu koja je otporna na toplinu.
2. Staklenu posudu postavite na reˇsetku. Kako biste omogu´cili najbolje kruˇzenje zraka
hranu stavite na sredinu reˇsetke.
NAPOMENA: Izmed¯u hrane i donjeg dijela staklene posude treba da postoji praznina od
najmanje 1 centimetra.
3. Staklenu posudu zatvorite staklenim poklopcem i uvjerite se da se poklopac pravilno
uklopio na svoje mjesto.
4. Kabel za napajanje umetnite u utiˇcnicu.
5. Automatski termostat podesite na ˇzeljenu temperaturu.
6. Za podeˇsavanje timera posluˇzite se podacima navedenim u tabeli.
NAPOMENA: Nakon ˇsto pe´cnica dostigne potrebnu temepraturu svjetle´ci indikator, koji
se nalazi pored gumba, automatski ´ce se iskljuˇciti.
7. Po zavrˇsetku vremena peˇcenja Turbo Pe´cnica ´ce se automatski iskljuˇciti.
8. Ostavite hranu da odstoji 3-5 minuta u pe´cnici.
9. Nakon podizanja staklenog poklopca automatski se ukljuˇcuje sigurnosni prekidaˇc i
upotpunosti se prekida veza s napajanjem.
10. Izvucite kabel iz utiˇcnice.
11. Ako Turbo pe´cnicu koristite manje od 10 minuta timer najprije podesite na 20 minuta
a nakon toga podesite na ˇzeljeno vrijeme.
TABELA PEˇCANJA
TEMPERATURA HRANA KOLIˇCINA VRIJEME
180˚C/350˚F - 200˚C/400˚F Pile Cijelo 2 kg 35 minuta
180˚C/350˚F - 200˚C/400˚F Izrezano meso 0,5 kg 7 - 8 minuta
180˚C/350˚F - 200˚C/400˚F Pile´ci bataci 8 komada 15 minuta
230˚C/450˚F - 260˚C/500˚F Riba 10 komada 7 - 8 minuta
180˚C/350˚F - 200˚C/400˚F Rak 0,5 kg 5-7 minuta
230˚C/450˚F - 260˚C/500˚FˇSkampi 0,5 kg 5 minuta
230˚C/450˚F - 260˚C/500˚F Kukuruz u klipu 4 komada 10 minuta
230˚C/450˚F - 260˚C/500˚F Kumpir 0,5 kg 25 minuta
150˚C/300˚F - 180˚C/350˚F Kolaˇci 1 pladanj 20 minuta
230˚C/450˚F - 260˚C/500˚F Jumbo ˇskampi 4 komada 15 minuta
230˚C/450˚F - 260˚C/500˚F Rak 0,5 kg 10 minuta
PEˇCENJE U TURBO PE´CNICI
ROˇSTILJ I PRˇZENJE:
Ako u Turbo Pe´cnici ˇzelite prˇziti ili pe´ci na roˇstilju temperatura treba da bude podeˇsena
na 230°C - 250°C. Kako bi hrana bila blizu izvora toplote treba je staviti na dupli raf. Da
biste dobili okus dimljenog mesa na dno staklene posude uspite dimljenu teku´cinu od
oraha ili mesquite stabla. Zaˇcine i dodatke poprskajte po mesu.
- 47 -
Page 49

PEˇCENJE U TURBO PE´CNICI
Ako peˇcete ribu ili nemasno meso na reˇsetku ili roˇstilj poprskajte ulje. Ili prije postavljanja
hrane reˇsetku premaˇzite ˇcetkicom umoˇcenom u ulje. Na taj naˇcin hrana se ne´ce zalijepiti
za reˇsetku. Ako ˇzelite lijepo zapaˇcen odrezak potrebno ga je okrenuti da se zapeˇce s obje
strane.
PEˇCENJE:
Za zadrˇzavanje masno´ce koja kapa s mesa na dno staklene posude postavite aluminijsku
foliju. Za olakaˇsavanje kruˇzenja zraka koristite donju reˇsetku. Zahvaljuju´ci zraku koji
kruˇzi meso ´ce biti lijepo zapaˇceno sa svih strana zadrˇza´ce soˇcnost. Nema potrebe da
meso okre´cete ili ponovno navlaˇzite vodom.
Preporuˇcujemo vam uporabu termometra za meso. Ako nemate termometar pridrˇzavajte
se uputa navedenih u tabeli za prˇzenje ili se moˇzete posluˇziti tabelom koja se koristi za
tradicionalne pe´cnice s tim ˇsto ´cete temperaturu pove´cati za 10°C viˇse od odred¯ene
vrijednosti.
PEˇCENJE CIJELOG PILETA:
Pile dobro operite i uklonite viˇsak masno´ce odstranivˇsi neˇzeljene dijelove. Zaˇcinite
zaˇcinima poˇzelji. Preporuˇcujemo vam uporabu zaˇcina poputˇceˇsljaka, crnog papra i soli.
Prije poˇcetka peˇcenja saˇcekajte nekoliko sati da meso dobro upije sve zaˇcine.Ako ˇzelite
zadrˇzati masno´cu koja kapa sa mesa na dno staklene posude postavite aluminijsku foliju.
Pile pecite na temperaturi od 200°C i to oko 10 minuta za pola kg. Nakon toga ako ˇzelite
hrskavu koricu temepraturu pove´cajte na 250°C i tako pecite joˇs 5-10 minuta.
PEˇCENJE CIJELOG ODRESKA:
Odrezak stavite na sredinu donje reˇsetke tako da masna strana bude okrenuta ka gore.
Temperatura peˇcenja odreska obiˇcno je niˇza za 10 stupnjeva od temperature peˇcenja u
tradicionalnoj pe´cnici. Vrijeme peˇcenja zavisi od vrste i veliˇcine odreska.
ZA MESO TEˇZINE 1-1,5 KG TEMPERATURU PODESITE NA 200°C I PECITE PREMA DOLJE
NAZNAˇCENOM VREMENU:
VRSTA MESA MINUTA
Roastbeef bez kostiju(cijeli roastbeef) Malo-peˇcen 15 - 20 minuta
Goved¯e peˇcenje s rebara (But ili straˇznjica) Malo-peˇceno 15 - 20 minuta
But s kostima (Dobro peˇcen) Srednje 12 - 15 minuta
Goved¯e peˇcenje s kostima Dobro peˇcena 25 - 30 minuta
Srednje-peˇcen 20 - 25 minuta
Dobro-peˇcen 25 - 30 minuta
Srednje-peˇceno 20 - 25 minuta
Dobro-peˇceno 25 - 30 minuta
- 48 -
Page 50

SAVJETI
Temperatura peˇcenja hrane koja nije prekrivena u Turbo Pe´cnici obiˇcno je niˇza za 5°C
do 10°C. Pri koriˇstenju Turbo Pe´cnice nije potrebno pred zagrijavanje. Kod peˇcenja
kolaˇca(kuglofa) najprije ´ce biti ispeˇceni dijelovi oko rubova pladnja a sredina ´ce ostati
vlaˇzna.
Zbog toga vam za peˇcenje kolaˇca, umjesto klasiˇcnih posuda, preporuˇcujemo uporabu
kalupa sa ˇsupljom sredinom. Za peˇcenje sitnih kolaˇca idealni su kalupi za muffin.
TABELA TEMPERATURE I VREMENA PEˇCENJA:
HRANA TEMPERATURA VRIJEME
Browni 150˚C / 300˚F 18-20 minuta
Zemiˇcka 200˚C / 400˚F 10-12 minuta
Kolaˇc (na katove) 150˚C / 300˚F 18-20 minuta
Kolaˇc s orasima 150˚C / 300˚F 30-35 minuta
Kukuruzni kruh 180˚C / 350˚F 18-20 minuta
Gurabije 160˚C / 320˚F 8-10 minuta
Muffin 180˚C / 350˚F 12-15 minuta
Torta 200˚C / 400˚F 8-10 minuta
S kremom (bez tijesta odozgo) 160˚C / 320˚F 25-30 minuta
S kremom(s tijestom odozgo) 180˚C / 350˚F 35-40 minuta
Kruh / Kruh za sendviˇce 180˚C / 350˚F 12-15 minuta
Somun-kruh 160˚C / 320˚F 25-30 minuta
ˇCIˇS´
CENJE
1. Prije poˇcetka ˇciˇs´cenja obavezno izvucite utikaˇc iz utiˇcnice.
2. Prije poˇcetka ˇciˇs´cenja ili odlaganja saˇcekajte da se ured¯aj ohladi.
3. Za odrˇzavanje Turbo Peˇcnice u ˇcistom stanju dovoljno je da je oˇcistite vlaˇznom krpom
uz koriˇstenje blagog deterdˇzenta za sud¯e.
4. Prljavˇstinu moˇzete oˇcistiti vlaˇznom krpicom umoˇcenom u rastvor blagog deterdˇzenta.
URED–AJ NIPOˇSTO NE URANJAJTE U VODU!
5. Ne koristite abrazivna sredstva za ˇciˇs´cenje i metalne ˇzice koje mogu uzrokovati
ogrebotine.
6. Odvijte vijke napunjenog filtera za ulje i izvadite. Operite u toploj vodi s deterdˇzentom
i isperite. Prije ponovnog stavljanja u pe´cnicu dobro posuˇsite.
7. Pribor pe´cnice moˇzete prati u toploj vodi s deterdˇzentom i u perilici za sud¯e.
SAVJETI:
U VRIJEME PEˇCENJA KU´CIˇSTE MOTORA TURBO PE´CNICE SE JAKO ZAGRIJE. URE–DAJ
DRˇZITE ISKLJUˇCIVO ZA RUˇCKE. TURBO PE´CNICU ODMAH NAKON KORIˇSTENJA NE
STAVLJAJTE NA PLASTIˇCNU, GUMENU ILI LAKIRANU DRVENU POVRˇSINU. PRIJE
POMJERANJA URE–DAJA SAˇCEKAJTE DA SE UPOTPUNOSTI OHLADI. TURBO PE´CNICU
NE KORISTITE U BLIZINI ZAPALJIVIH TVARI. KADA URED–AJ ISKLJUˇCUJETE IZ IZVIORA
- 49 -
Page 51

SAVJETI
ZA NAPAJANJE NIPOˇSTO NE VUCITE ZA KABEL VE´C UHVATITE ZA GLAVU UTIKAˇCA I
IZVUCITE. TURBO PE´CNICU NIPOˇSTO NE URANJAJTE U VODU ILI NEKE DRUGE TEKU´CINE.
TEHNIˇCKE KARAKTERISTIKE
• Multi-funkcionalna: Prˇzenje, roˇstilj, peˇcenje na pari, odmrzavanje
• Kapacitet: 12 L
• Halogeni grijaˇc za mnogo brˇze peˇcenje
• Kruˇzenje toplog zraka za ravnomjerno peˇcenje
• Stakleni poklopac otporan na toplinu
• Timer 60 minuta
• Promjenjiva temperatura grijanja: 100˚C - 250˚C
• Pribor: donja polica, gornja polica i stezaljka za okretanje, ˇskarasto, parni jelo, kos i
produˇzivaˇc prsten
• Snaga: 1200 W
MOGU´CE SU IZMJENE U DIZAJNU I TEHNIˇCKIM KARAKTERISTIKA BEZ PRETHODNOG
OBAVJEˇSTENJA!
- 50 -
Page 52

ADANA-SEYHAN-DORUK SO⁄UTMA -REfiATBEY MAH. AV. MEHMET ERO⁄LU CAD. NO:8-TEL.:0322 458 55 14 ADANA-KOZAN-DURAN
YETK‹L‹ SERV‹SLER L‹STES‹
SO⁄UTMA-CUMHUR‹YET MH. DEDEO⁄LU SK. S‹S. APT.- TEL.:0322 516 57 78 ADANA-SEYHAN-DÜZOVA ELEKTR‹K - KÜÇÜK SAAT
MEYDANI HILAL HAN IS MRK NO 32 - TEL.:0322 363 67 87 ADANA-SEYHAN-ÖZER ELEKTRON‹K - OBALAR CAD. SAL‹H ZEK‹ BUGAY ‹fi
HANI NO:11 - TEL.:0322 352 25 75 ADANA-SEYHAN-SER‹N ELEKTRON‹K - MAHFESI⁄MAZ MH. KENAN EVREN BULV. 21.SK. KAROL S‹T.
E BLOK NO:2/A - TEL.:0322 233 74 84 ADANA-CEYHAN-URANYUM ELEKTRON‹K - ‹NÖNÜ BULVARI NO: 172 - TEL.:0322 611 29 95
ADANA-CEYHAN-CEYHAN ELEKTRON‹K - BÜYÜKKIRIM MH. MEHMET fiER‹F Y‹⁄‹T CD. 4.SK. NO:3/B TEL. : 0322 613 45 96 ADIYAMANYILDIRIM SERV‹S - BAHÇEL‹EVLER MH. 177 SK. NO:2 - TEL.:0416 214 40 83 ADIYAMAN-KAHTA-ELK. EV ALET. TAM‹RC‹S‹-FAT‹H MH.
ZAFER CD. NO:20 - TEL.:0416 725 99 89 ADIYAMAN-ÜNAL ELEKTRON‹K-BAHÇEL‹EVLER MAH. ESK‹ KAHTA CAD. NO:11/A-TEL.:0416
216 75 56 ADIYAMAN-BEYAZ EfiYA TAM‹R‹-ÇATI MH. BADEM SK. NO:11 BESN‹ TEL.: 0416 318 32 00 AFYON-EM‹N ELEKTRON‹K-ENST‹TÜ
CAD. NO:19-TEL.:0272 215 43 32 AFYON-D‹NAR-GÖKÇEO⁄LU ELEKTR‹K-EMN‹YET MH. YEN‹YOL CD. 146 BLOK NO:4-TEL.: 0272 353 53
44 A⁄RI-PATNOS-ACELE PEfi‹N ELEKTRON‹K-BUHARA SOK. NO:12-TEL.:0472 616 46 08 A⁄RI-ÖZPAK ELEKTRONIK-ESKI VAN CAD
NO: 341 Ömer Hamam Yan›-TEL.:0472 216 53 14 AKSARAY-‹T‹NA ELEKTR‹K-TAfi PAZARI MH. fiEH‹T HAT‹P UÇKUN SK. ESK‹ TERM‹NAL
ÇIKIfiI NO:9/A-TEL.:0382 212 63 99 AMASYA-KUTUP TEKN‹K SO⁄UTMA-GÖKMEDRESE MAH. M.K.P. CAD. HAM‹TBATIR APT. NO:115/ATEL.:0358 212 61 66 AMASYA-SULUOVA-ÇALIfiKAN ELEKTRON‹K-ÖZEL ‹DARE ‹fi HANI NO:121-TEL.:0358 417 18 64 AMASYA-FLAfi
ELEKTRON‹K-YÜZEVLER MAH.TORUMTAY SOK. NO:25 DEM‹RD‹fi APT. ALTI-TEL.:0358 212 33 71 ANKARA-PURSAKLAR-DEM‹R TEKN‹K-
MERKEZ MH. MEL‹KfiAH CD.NO:11/A-TEL.:0312 328 1122 ANKARA-YEN‹MAHALLE-ERDO⁄DU SO⁄UTMA-ÇARfiI MH. DAMLADOL SK.
NO:74/C-TEL.:0312 315 60 25 ANKARA-KEÇ‹ÖREN-VEFA ELEKTRON‹K-PINARBAfiI MH. AfiIK PAfiA CD. NO: 67/C-TEL.:0312 380 42 30
ANKARA-MAMAK-YÜCEL ELEKTRON‹K-ASIM GÜNDÜZ CD. 20/D-TEL.:0312 365 14 14 ANKARA-ÇANKAYA-GÖKSEL ELEKTRON‹K-21.CD.
KARTAL KAYA APT. NO:29/A KIRKKONAKLAR-TEL.:0312 496 42 53 ANKARA-ÇANKAYA-ATC ‹LET‹fi‹M-SELAN‹K CAD. NO: 31/3-TEL.:
0312 419 82 70 ANKARA-GÖLBAfiI-BEKS SERV‹S H‹ZMETLER‹-SE⁄MENLER MAH. CEMAL GÜRSEL CAD. NO:51/A-TEL.:0312 484 21 19
ANKARA-BEYPAZARI-DO⁄AN TEKN‹K-KAYHAN GÜVEN CD. NO:22/C-TEL.:0312 762 89 19 ANKARA-S‹NCAN-Y‹⁄‹T TEKN‹K ONARIM-
M.Ç.M. 12. CADDE GÜLSUYU SK. NO:5/21-TEL.:0312 264 10 31ANKARA-KEÇ‹ÖREN-MERT TEKN‹K SERV‹S-ÖZYURT CD. NO:27/A AKTEPETEL.: 0312 380 00 22 ANKARA-ERYAMAN-ARSLANLAR ELEKTRON‹K-GÜZELKENT MAH.ÇARfiI ARYA 511 SK. NO:40-TEL.:0312 279 16
41 ANTALYA-KUMLUCA-AKGÜL TEKN‹K SERV‹S H‹ZMETLER‹-ADNAN MENDERES BULV.KAVAKLI KUYU CAD. YED‹TEPELER KAR.SULAR
APT.NO:9-TEL.:0242 887 53 80 ANTALYA-CANKALP ELEKTRON‹K-TUZCULAR MAH. ‹MARET SOK. FARAÇLAR PASJ.NO:11-TEL.:0242
242 31 35 ANTALYA-MANAVGAT-ÖNAL ‹LET‹fi‹M-AfiA⁄I PAZARCI MH. ‹BRAH‹M SÖZEN CD. fiELALE PSJ.NO: 18 1006 SK. TEL.:0242 742
35 36 ANTALYA-ALANYA-Ç‹NTAfi ELEKTRON‹K-SARAY MH. ATATÜRK CD. HACI HAMD‹ O⁄LU SK.NO: 20/A-TEL.:0242 513 88 85 ANTALYA-
MERKEZ-BÜYÜKGEB‹Z ELEKTROMEKAN‹K GÜVENL‹K-MUSTAFA GÖKSU-KIZILSARAY MH. DOLAPLIDERE CD. 80 SK. ÇAKMAK ‹fi HANI
NO: 8/5-6 TEL. :0242 243 33 90 ARDAHAN-YILDIRIM ELEKTR‹K-ATATÜRK CAD.NO:69-TEL.:0478 211 28 58 ARTV‹N-ARTV‹N ELEKTR‹K-
HALKEVI CADDESI NO: 12-TEL.: 0466 212 10 82 AYDIN-YILMAZ ELEKTRON‹K-KURTULUS MH. GARAJ CD. NO:5/B-TEL.:0256 212 00 35
AYDIN-SÖKE-ÖZLEM ELEKTRON‹K-YEN‹ CAM‹ MH. SEK‹LER CD. NO: 47-TEL.:0256 518 26 40 AYDIN-NAZ‹LL‹-BARIN ELEKTRON‹K-
ALTINTAfi MH. HÜRR‹YET CD. NO:161 B-TEL.: 0256 315 43 21 BALIKES‹R-BANDIRMA-ANIL SO⁄UTMA-GÜNAYDIN MAH. 2.OKUL
CAD.NO:16/A-TEL.:0266 713 56 78 BALIKES‹R-EDREM‹T-ÖZER TEKN‹K-CAM‹ VASAT MH. PARK CD. NO:12/A-TEL.:0266 373 12 44
BALIKES‹R-BURHAN‹YE-U⁄UR TEKN‹K SO⁄UTMA-MAHKEME MH. M‹THATPAfiA CD. NO: 68-TEL.:0266 412 86 89 BALIKES‹R-KILIÇ
ELEKTRON‹K-YEN‹ ÇARfiI BASIN SOK. NO: 4/B-TEL.:0266-241 87 54 BALIKES‹R-GÖNEN-GÜRSES ELEKTRON‹K-MALKOÇ MAH.MÜFTÜ
fiEVKET CAD. 76.SOK. NO:2/B-TEL.:0266 762 01 28 BALIKES‹R-BANDIRMA-D‹J‹TAL ELEKTRON‹K-17 EYLÜL MAH.HAVUZLU BAHÇE
SK.NO:8/A-TEL.:0266 715 16 46 BALIKES‹R-ERDEK-MERT TEKN‹K-YALI MH. HÜKÜMET CD. NO:55-TEL.:0266 845 61 10-97 BARTIN-
MARTI ELEKTRON‹K-HENDEKYANI CAD. ORTA MAH.101/B - BARTIN-TEL.:0378 228 34 22 BATMAN-fiAH‹NLER ELEKTRON‹K-CUMHUR‹YET
CD. NO:20 2000 ‹fi MERKEZ‹ KARfiISI-TEL.:0488 213 17 02 B‹LEC‹K-EDEBAL‹ TEKN‹K-‹ST‹KLAL MH V.REF‹K A ÖZTÜRK CD NO: 1/ATEL.:0228 212 46 80 B‹NGÖL-KARLIOVA-MEHMET KARTAL - KARTAL ELEKTRON‹K-CUMHUR‹YET CD. NO:8-TEL.:0426 511 26 39 B‹NGÖL-
S‹MGE ELEKTRON‹K- YEN‹fiEH‹R MH. YEfi‹M SK. BO⁄ATEK‹N APT ALTI NO:14/C-TEL.:0426 213 77 56 B‹TL‹S-AHLAT-U⁄UR SO⁄UTMA-
TOK‹ KONUTLARI YUKARI ÇARfiI-TEL.:0434 412 41 72 B‹TL‹S-D‹ZAYN ELEKTR‹K-NUR CAD. EREM CENTER ‹fi MERKEZ‹KAT:2 NO:5TEL.:0434 226 74 43 BOLU-BEST ELEKTRON‹K-TABAKLAR MAH.CUMHUR‹YET CAD.NO:28/B-TEL.:0374 218 12 25 BURSA-OSMANGAZ‹-
AKYÜZ ELEKTRON‹K-ÇIRPAN MH. UYSAL SK. NO:13/B-TEL.:0224 254 60 76 BURSA-GEML‹K-AC‹L TV TAM‹R SERV‹S‹-DEM‹R SUBAfiI
MH. FIRIN SK. NO:7-TEL.:0224 514 71 20 BURSA-MUDANYA-ER T‹CARET-ÖMERBEY MH. CAM‹ SK. SU APT. NO:30-TEL.:0224 544 86 16
BURSA-MUSTAFAKEMALPAfi-AGUfi ELEKTR‹K-HAMZABEY MAHALLESI PAZARYERI SOKAK NO: 2/A-TEL.:0224 613 19 99 BURSA‹NEGÖL-S.B.S ELEKTRON‹K-OSMAN‹YE MH.DERE SK. N:25/D-TEL.:0224 715 48 94 BURSA-KARACABEY-GÜRKAN T‹CARET-RUNGUÇPAfiA
MH. 14. SK. NO:11-TEL.: 0224 676 66 80 BURSA-N‹LÜFER-ÖZME TEKN‹K-KARAMAN MH. BAYINDIR SK. NO:4/B CARREFOUR KARfiISITEL.: 0224 249 12 48 ÇANAKKALE-ÇAN-TÜRKER ELEKTRON‹K-CUMHUR‹YET MAH. ÇANAKKALE CAD.NO:41-TEL.:0286 416 13 89
ÇANAKKALE-GEL‹BOLU-GÜVEN ELEKTRON‹K-YAZICIZADE MAH. M‹RALAY fiEF‹K AKER CAD. 2. SOK NO:4 / A TEL.:0286 566 90 70
ÇANAKKALE-MERKEZ-SAM ELEKTRON‹K-‹SMETPAfiA MH. ARSLANCA SK.-TEL.:0286 212 35 59 ÇANKIRI-B‹LG‹ÇLER ELEKTRON‹K-
BUGDAY PAZARI MH. A.TALAT ONAY BULVARI SAIM A⁄A S‹T. B/BLOK TEL.:0376 213 48 19 ÇORUM-H‹T‹T SO⁄UTMA-YEN‹YOL MH. MÜFTÜ
AHMET GÖKEfiME SK. NO: 5 / I-TEL.:0364 225 70 58 ÇORUM-U⁄UR ELEKTRON‹K-ÜÇTUTLAR MAH. FAT‹H CAD. 5.SOK.EYÜP SULTAN
APT. NO:1/C-TEL.:0364 227 44 91 ÇORUM-ÖMÜR ELEKTRON‹K-CENG‹ZTOPEL CAD. NO:2/F-TEL.:0364 224 68 09 ÇORUM-ALACA-EROL
ELEKTRON‹K-AYHAN MH. ANKARA CD. NO:18-TEL.:0364 411 42 03 ÇORUM-GÜNDÜZ BEYAZ EfiYA SERV‹S‹-SUNGURLU-SUNGURO⁄LU
MH. ÇANKIRI CD. NO: 46-TEL.:0364 311 31 13 DEN‹ZL‹-KARDELEN SO⁄UTMA-EMEK CD. NO: 30-TEL.:0258 241 67 31 DEN‹ZL‹-ÖZ
ELEKTRON‹K-ÇAYBAfiI CD. ÜNAL APT. NO: 28-TEL.:0258 261 29 25 DEN‹ZL‹-MERKEZ-ÇA⁄LAYAN SO⁄UTMA-TOPRAKLIK MH. TURAN
GÜNEfi CD.NO:34 TEL. : 0258 242 85 86 D‹YARBAKIR-B‹SM‹L-fiIK ELEKTR‹K-KURTULUfi MH. AHMET AR‹F BULVARI NO: 19/F-TEL.:0412
415 05 94 D‹YARBAKIR-‹LKADIM T‹CARET-BATIKENT S‹T. A/5 BLOK ALTI NO:1 SA⁄LIK OCA⁄I YANIBA⁄LAR-TEL.:0412 235 70 89
D‹YARBAKIR-AZ‹Z ELEKTRON‹K-HATBOYU CD. 469. SK. GÜNEfi 2 APT. NO:3/B-TEL.:0412 223 33 46 D‹YARBAKIR-S‹LVAN-DIGITAL
ELEKTRONIC-KALE MH. SAM‹ SEÇK‹N CD. NO:9/B-TEL.:0412 711 44 14 D‹YARBAKIR-JAPON RECEP-YENI MAH 19 MAYIS CAD NO74-
- 51 -
Page 53

TEL.:0412 511 24 10 D‹YARBAKIR-BA⁄LAR-AZ‹Z ELEKTRON‹K-HATBOYU CD. 469 SK. NO:3/B-TEL.: 0412 236 81 10 DÜZCE-ENSAR TEK
YETK‹L‹ SERV‹SLER L‹STES‹
SU S‹STEMLER‹-AZM‹N‹LL‹ MH. AYDINPINAR CD. SERHAT SK.NO:1/B-TEL.:0380 514 34 12 DÜZCE-BULUfi ELEKTRON‹K-CED‹D‹YE
MAH. M‹MAR S‹NAN CAD.-TEL.: 0380 514 66 81 ED‹RNE-UZUNKÖPRÜ-GÜVEN TEKN‹K-GAZ‹ CAD. YUSUF SOK. YURDACAN PASAJI NO:7TEL.:0284 513 89 66 ED‹RNE-YILDIZ SO⁄UTMA-1.MURAT MH. GÜNGÖR MAZLUM CAD. SERHAT S‹TES‹ B/BLOK 35/A-TEL.:0284 235 37
63 ED‹RNE-KEfiAN-MUTLU TEKN‹K-YUKARI ZAFER‹YE MH. ‹LYASBEY CD. NO:32/B-TEL.:0284 715 22 71ELAZI⁄-ÖZDEV TEKN‹K -
‹ZZETPAfiA MAH.KAZIM BAYER CAD.NO:24/A-TEL.:0424 238 51 67 ELAZI⁄-YILMAZ BOB‹NAJ-YEN‹ MAH. KEMAL fiEDELE CAD. NO: 12/ETEL.:0424 212 08 96 ELAZI⁄-GÜNEfi ELEKTRON‹K-KÜLTÜR MAH. VAL‹ FAHR‹BEY CAD.NO:113/D-TEL.:0424 233 10 18 ERZ‹NCAN-
AYDINLAR ELEKTR‹K-‹NÖNÜ MAH. MERKEZ ÇARfiISI 15.SK NO:5 -TEL.:0446 223 59 76 ERZ‹NCAN-REFAH‹YE-B‹LG‹N ELEKTRON‹K-
ERZ‹NCAN CAD. BELED‹YE ‹fi HANI-TEL.:0446 611 26 10 ERZURUM-OLTU-GÜVEN ELEKTRON‹K-Z‹YABEY CAD. BELED‹YE PSJ. NO:6TEL.:0442 816 42 23 ERZURUM-AT‹LAY ELEKTRON‹K-KONGRE CAD. HASIRHAN PASJ. NO:87-TEL.:0442 213 30 60 ERZURUM-‹SP‹R-
YILMAZ ELEKTRON‹K-Z‹YAPAfiA CD. AfiA⁄I MH. NO:186-TEL.:0442 451 40 95 ESK‹fiEH‹R-ARZU ELEKTRON‹K-DEL‹KL‹TAfi MH. GÜRMAN
SOK. NO:37/B-TEL.:0222 234 87 15 ESK‹fiEH‹R-S‹VR‹H‹SAR-DERMAN ELEKTRON‹K-CAM‹KEB‹R MH. YUNUSEMRE CD. NO:7-TEL.:0222
711 22 60 GAZ‹ANTEP-ELEKTR‹KL‹ EV ALETLER‹ TAM‹RC‹S‹-MÜTERC‹M ASIM CAD. KÖRÜKÇÜ SOK. NO:8/A-TEL.:0342 231 00 73
GAZ‹ANTEP-ISLAH‹YE-YILMAZ SO⁄UTMA-AYDINLIK MH. GÖZ CAD.ÜNLÜ S‹TES‹ NO: 2-TEL.:0342 862 12 20 GAZ‹ANTEP-‹K‹ZO⁄LU
ELEKTRON‹K-BEY MAH. EBLEHAN ÇARfiISI NO:12/A-TEL.:0342 230 71 00 GAZ‹ANTEP-N‹Z‹P-ÇAPAN TEKN‹K-CUMHUR‹YET MAH.
MERMER SOK. NO:10-TEL.:0342 517 51 66 G‹RESUN-BULANCAK-YÜKSEL SO⁄UTMA-‹HSAN‹YE MH. CEMAL GÜRSEL. CD. NO: 257TEL.:0454 318 17 28 G‹RESUN-U⁄UR ELEKTRON‹K-HACI HÜSEY‹N MH. GAZ‹ CD. NO: 185 / 1-TEL.:0454 212 00 90 GÜMÜfiHANE-
GÜMÜfiHANE SERV‹S‹-HASANBEY MH. HASANBEY CD.NO:17/A-TEL.:0456 213 51 54 HATAY-SAMANDA⁄-GÜNEfi ELEKTR‹K-ATATÜRK
MAH. ‹SKELE CAD. HAYÜK PSJ NO:38-TEL.:0326 512 71 04 HATAY-KIRIKHAN-SEREN MAK‹NA-BARBAROS MAH. BOZTEPE CAD. NO:23/BTEL.:0326 344 32 49 HATAY-ANTAKYA-SER‹ SO⁄UTMA-KURTULUfi CD. NO:51/C-TEL.:0326 213 28 32 HATAY-ERZ‹N-YEL‹Z BOB‹NAJ-
MUSTAFAL‹ MH. ‹STASYON CD. NO: 143-TEL.:0326 68148 32 HATAY-REYHANLI-BAfi TEKN‹K SO⁄UTMA-ATATÜRK CD. DÖ⁄ÜCÜLER
‹fiHANI NO:1 -TEL.:0326 413 44 04 HATAY-REYHANLI-ÖZ ‹fi SO⁄UTMA-CUMHUR‹YET MH. TAYFUR SÖKMEN CD. NO:26/B TEL. : 0326
413 21 22 HATAY-DÖRTYOL-FAT‹H ELEKTRON‹K-SANAY‹ MH. EVREN CD. YEN‹ S‹NEMA KARfiISI NO:15 - TEL.:0326 712 86 46 HATAY-
‹SKENDERUN-GÜL‹STAN ELEKTRON‹K-KURTULUfi MH. fi.O⁄UZ YENER CD. NO:64/C-TEL.:0326 613 50 64 I⁄DIR-PARLAK TEKN‹K-
TOPÇULAR CD. NO:34-TEL.:0476 227 47 51 ISPARTA-ÖZSOYLAR SO⁄UTMA-YAYLA MAH. ‹SMETPAfiA CAD. NO: 60 fi‹FA TIP MERKEZ‹
ALTI-TEL.:0246 223 13 61 ‹ÇEL-ERDEML‹-ESEN ELEKTR‹K-MERKEZ MAH. ATATÜRK CAD. NO:11-TEL.:0324 515 68 87 ‹ÇEL-MEZ‹TL‹-
AKN‹SAN SO⁄UTMA&ELEKTRON‹K-GMK.BUL. FAT‹H MH. 18 SK.ÖZÜDO⁄RU S‹T. 3/A-TEL.:0324 359 64 34 ‹ÇEL-PINAR ELEKTRON‹K-
MAHMUD‹YE MH. 108. CD. NO:32/B-TEL.:0324 336 82 98 ‹ÇEL-TARSUS-MERT ELEKTRON‹K-GAZ‹LER MAH. ATATÜRK BULV. NO:119TEL.:0324 626 83 98 ‹ÇEL-TARSUS-TEKN‹K ‹fi ELEKTR‹K T‹C.-ATATÜRK CAD. U⁄UR ‹fi HANI NO:1-TEL.:0324 6242797 ‹ÇEL-ANAMUR-
ÇEL‹K ELEKTRON‹K-BAHÇE MH. ORMAN ‹fiLETMES‹ ALTI NO:61/B-TEL.:0324 814 85 90 ‹ÇEL-HAKAN ELEKTRON‹K-BAHÇEL‹EVLER
MH. 1809 SK. D‹NL‹ APT.ALTI NO:3/B-TEL.:0324 328 03 25 ‹ÇEL-S‹L‹FKE-SADIK ELEKTR‹K-GÖKSU MAH. O⁄UZKAAN CAD. DERYALAR
APT.NO:22/B-TEL.:0324 714 05 54 ‹STANBUL-ATAfiEH‹R-VURAL ELEKTRON‹K-KARAMAN Ç‹FTL‹K YOLU NO:12(ESK‹ PTT HAST. KARfiISI)
‹ÇERENKÖY TEL. : 0216 575 63 35 ‹STANBUL-fi‹fiL‹-YILKA T‹CARET-SEYMEN SOK. NO:27/A KURTULUfi-TEL.:0212-233 80 53 ‹STANBUL-
KÜÇÜKÇEKMECE-ÇA⁄DAfi SERV‹S-CENNET MAH.Y.KEMAL BEYATLI CAD.NO:14/D-TEL.:0212 579 35 30 ‹STANBUL-ZEYT‹NBURNUKARDEfiLER SO⁄UTMA-SEY‹T N‹ZAM MAH. fiEH‹T ERKAN ALYANAK SOK.NO:11-TEL.:0212 546 57 36 ‹STANBUL-ESENLER-YILDIRIM
ELEKTRON‹K-KAZIM KARABEK‹R MAH. 2.SOK. NO:10 -TEL.:0212 611 10 76 ‹STANBUL-EM‹NÖNÜ-IRMAK DIfi T‹CARET-TAHTAKALE CD.
TAHTAKALE T‹CARET MERKEZ‹ NO:34 2.BODRUM NO:204 -TEL.:0212 520 55 80 ‹STANBUL-ÜMRAN‹YE-GÜL-SER TEKN‹K SERV‹S-
NAMIK KEMAL MH. SÜTCÜ ‹MAM CD. SÜTÇÜ ÇIKMAZI NO:6/1- TEL.:0216 335 60 19 ‹STANBUL-ÜMRAN‹YE-GÖZDE ELEKTRON‹K-
ATATÜRK MH. ALEMDA⁄ CD. YILDIZ SK. NO:12/A-TEL.: 0216 329 57 03 ‹STANBUL-MALTEPE-GÜR TEKN‹K SERV‹S-BA⁄DAT CD. BOLAYIR
SK. NO:3/A-TEL.:0216 352 25 20 ‹STANBUL-BEYL‹KDÜZÜ-SC ELEKTRON‹K-GÜZELYURT MH. M‹MAR S‹NAN CD. NO:71-TEL.:0212 852
34 45 ‹STANBUL-GAZ‹OSMANPAfiA-DEDEO⁄LU ELEKTR‹K-2124 SOK NO:4 SULTANÇ‹FTL‹⁄‹-TEL.:0212 594 50 91 ‹STANBUL-TUZLA-
AKIN ISI TEKN‹K SERV‹S-YAYLA MH. F.ÇAKMAK CD. ‹SMA‹L A⁄A SK. NO:11 TEL.:0216 395 66 62 ‹STANBUL-SARIYER-H‹SAR SERV‹S
1-NUR‹PAfiA CD NO\48A BA⁄LAR MEVK‹ YEN‹KÖY-TEL.:0212 223 27 96 ‹STANBUL-SARIYER-H‹LAL SO⁄UTMA-KAPTAN SK. NO:2-
TEL.:0212 218 45 61 ‹STANBUL-BÜYÜKÇEKMECE-AYGÜL DEKORASYON-19 MAYIS MH. OSMAN GAZ‹ CD. NO: 7-TEL.:0212 881 33 18
‹STANBUL-GAZ‹OSMANPAfiA-ÇAM TEKN‹K-ISLAMBEY MAH NECIP FAZIL CAD 257 SK NO:25-TEL.:0212 597 86 62 ‹STANBULKÜÇÜKÇEKMECE-YILDIZ ELEKTR‹K SO⁄UTMA-HALKALI CD. ANADOLU PSJ. NO: 185-TEL.:0212 580 76 02 ‹STANBUL-KÜÇÜKÇEKMECEBATI TEKN‹K-GÜLTEPE MH. DEL‹ORMAN CD. NO:75 SEFAKÖY-TEL.:0212 599 36 79 ‹STANBUL-BAYRAMPAfiA-ÖZKAN ELEKTRON‹K-
KARTALTEPE MH. B‹LGEHAN CD. NO:36-TEL.:0212 564 33 46 ‹STANBUL-GAZ‹OSMANPAfiA-TOROS ELEKTRON‹K-MERKEZ MH. BA⁄LAR
CD. NO:77-TEL.:0212 563 50 38 ‹STANBUL-fi‹fiL‹-CHIP ELEKTRON‹K-BOZKURT CAD.NO: 235-TEL.:0212 231 65 43 ‹STANBUL-GÜNGÖREN-
YÜKSEL ELEKTRON‹K-M.FEVZ‹ ÇAKMAK MAH.‹NÖNÜ CAD.NO: 138-TEL.:0212-504 61 42 ‹STANBUL-BEYO⁄LU-TOLGA ELEKTRON‹K-
CAM‹ KEB‹R MH. DEREBOYU CAD. NO:28 KASIMPAfiA-TEL.:0212 235 65 34 ‹STANBUL-AVCILAR-NUR ELEKTRON‹K-DEN‹ZKÖfiKLER
MAH.DERYA SOK. NO:36/1-TEL.:0212 694 12 82 ‹STANBUL-BA⁄CILAR-ÇA⁄LAYAN ELEKTRON‹K-‹STOÇ 25.ADA NO.:109-TEL.:0212 659
92 49 ‹STANBUL-KADIKÖY-UMUT ELEKTRON‹K-HAL‹TA⁄A CAD. CELAL MUHTAR SOK. NO:20/2-TEL.:0216 346 39 78 ‹STANBUL-
ZEYT‹NBURNU-UZMAN ELEKTRON‹K-YEN‹DO⁄AN MH. 42.SK NO:50-TEL.:0212 582 36 37 ‹STANBUL-KADIKÖY-MICROSYSTEM
ELEKTRON‹K-1. ORTA SK. NO:18/1 GÖZTEPE-TEL.:0216 411 91 50 ‹STANBUL-MALTEPE-BEYDA⁄I TEKN‹K ELEKTRON‹K-BA⁄LARBAfiI
MAH. ‹NÖNÜ CAD.-TEL.:0216 457 63 34 ‹STANBUL-BA⁄CILAR-KUMRU ELEKTRON‹K-KEMALPAfiA MAH. NAMIK KEMAL CAD. NO: 126TEL.:0212 429 34 19 ‹STANBUL-BAKIRKÖY-‹K‹ZLER ELEKTRON‹K-SAKIZA⁄A MH. BERR‹NC‹N‹ SK. NO:16/A-TEL.:0212 543 85 83
‹STANBUL-ÜSKÜDAR-KÖYLÜBAY ELEKTRON‹K-ALBAY HÜSAMETT‹N ERTÜRK SK. NO:7/A ÇENGELKÖY TEL.:0216 318 35 13 ‹STANBULÜSKÜDAR-AKÇEL‹K T‹CARET-M‹MAR S‹NAN MH. ‹SMA‹L DÜMBÜLLÜ SK. NO:9/A TEL.:0216 342 99 22 ‹STANBUL-KADIKÖY-TELV‹D
ELEKTRON‹K-MAZHAR OSMAN SOK FERAH APT NO:24/A FENERYOLU-TEL.:0216 414 66 00 ‹STANBUL-‹K‹TELL‹-BARIfi TEKN‹K-ATATÜRK
MH. ‹K‹TELL‹ CD. DURAK SK. NO:18 TEL. : 0212 471 04 76 ‹STANBUL-K.ÇEKMECE-ENG‹N ELEKTRON‹K-TEVF‹K BEY MH. MERKEZ CD.
- 52 -
Page 54

ORK‹DE SOK. NO: 3 /1-TEL.:0212 598 44 76 ‹STANBUL-BAHÇEL‹EVLER-SEV-CAN DAYANIKLI TÜK.MALLARI.-YILDIRIM BEYAZIT CD
YETK‹L‹ SERV‹SLER L‹STES‹
.ZAFER MH. TÜRKBEY‹ SK. NO:6/2-3-TEL.:0212 552 45 87 ‹STANBUL-fi‹fiL‹-IfiIK ELEKTRON‹K-AYAZA⁄A MASLAK ATATÜRK CD NO: 25TEL.:0212 289 76 94 ‹STANBUL-PEND‹K-GÖKHAK ELEKTRON‹K-BATI MH. SABR‹ TAfiKIN CD. SEB‹L SK. NO:4/1 TEL. : 0216 354 07 00
‹STANBUL-G.O.PAfiA-ATILIM ELEKTRON‹K-CEBEC‹ MAH. 2472 SOK: NO:14/A SULTANÇ‹FTL‹⁄‹- TEL.:0212 475 85 62 ‹STANBULGÜNGÖREN-NUR ELEKTR‹K ELEKTRON‹K-MERKEZ MH. ASALET CD. NO: 22/D-TEL.:0212 641 42 09 ‹STANBUL-BEYKOZ-ULUDO⁄AN
ELEKTRON‹K-KAYABAfiI ÇIKMAZI NO: 4/B PAfiABAHÇE-TEL.:0216 322 85 85 ‹STANBUL-KARTAL-ÖZO⁄LU ELEKTRON‹K-KIZILAY BULVARI
CD. BAHADIR SK. 4/A-TEL.:0216 387 18 87 ‹STANBUL-FAT‹H-SOYLU TEKN‹K-HIRKA‹ fiER‹F CAM‹ ARKASI ESK‹ AL‹PAfiA CD. NO: 26TEL.:0212 631 85 88 ‹STANBUL-FAT‹H-IRMAK DIfi T‹CARET-HACI KADIN CD. NO:15 K.M. PAfiA TEL.: 0212 589 75 27 ‹STANBUL-S‹L‹VR‹-
PDS ELEKTRON‹K-P.M. PAfiA MH. HACI PERVANE CD. NO:35/B -TEL.:0212 728 76 75 ‹STANBUL-GÜLTEPE-B‹L‹M ELEKTRON‹K-
HARMANTEPE MH. ABD‹ ‹PEKÇ‹ CD. NO:14/D -TEL.:0212 278 72 27 ‹ZM‹R-KARfiIYAKA-AYSER ELEKTR‹KL‹ EV ALETLER‹-ZÜBEYDE
HANIM CADDES‹ NO:87/A-TEL.:0232 366 19 19 ‹ZM‹R-BERGAMA-GEZG‹N SERV‹S-K.KEMALBEY CAD. NO:82-84-TEL.:0232 633 35 15
‹ZM‹R-KONAK-TUNCA ELEKTR‹K-76 SK 10/A GÜZELYALI-TEL.:0232 246 40 62 ‹ZM‹R-ÇAMD‹B‹-KUDRET ELEKTRON‹K-BURAK RE‹S
CAD. NO: 239/A-TEL.:0232 435 81 36 ‹ZM‹R-MENEMEN-AY ELEKTRON‹K-DR. SELAHATT‹N ÖZKURT CD. NO:22/B-TEL.:0232 832 02 31
‹ZM‹R-KONAK-S‹STEM ELEKTRON‹K-2414 SK. NO:10 GÜLTEPE-TEL.:0232 469 72 69 ‹ZM‹R-KARfiIYAKA-LEVENT ELEKTR‹K
LABORATUVARI-1710 SK. NO:70/B ESHOT SOKA⁄I-TEL.:0232 381 14 42 ‹ZM‹R-KARfiIYAKA-ASMERKEZ T‹CARET-ESK‹ TRAMVAY CD.
1675. SK. NO:78/1B ALAYBEY-TEL.:0232 364 33 73 ‹ZM‹R-BORNOVA-ACEM ELEKTRON‹K-552/2 SK. NO: 4/A-TEL.:0232 339 73 31 ‹ZM‹RKONAK-KILIÇ ELEKTRON‹K-BARBAROS HAYRETT‹N PAfiA CD. NO:62/1 LEVENT-TEL.:0232 433 15 19 ‹ZM‹R-URLA-‹LTER ELEKTRON‹K‹ZM‹R 75. YILl CADDES‹NO:81/C-D-TEL.:0232 754 44 44 ‹ZM‹R-BUCA-ÇA⁄LAR ELEKTRON‹K-670/1 SK. NO:57/B-TEL.:0232 276 27 77
‹ZM‹R-YEfi‹LYURT-UMUT ELEKTR‹K & ELEKTRON‹K-YILDIZ CAD. NO: 152/A-TEL.:0232 244 65 77 ‹ZM‹R-ÖDEM‹fi-MURAT ELEKTRON‹K-
UMURBEY MH. SANAY‹ S‹T. 9.SK NO: 10 -TEL.:0232 544 41 98 KAHRAMANMARAfi-AKSUNGUR ELEKTR‹K-UZUNOLUK CAD. 20.SOKAK
NO:20/A-TEL.:0344 212 77 50 KAHRAMANMARAfi-KALE ELEKTRON‹K-FEVZ‹PAfiA MH. UZUNLUK CD.-TEL.: 0344 225 07 94 KARABÜK-
SAFRANBOLU-MEHMET SA⁄LAM - GÖKAY TEKN‹K-‹NÖNÜ MH. ESK‹ BA⁄LAR SK. NO:13-TEL.:0370 712 24 97 KARABÜK-ACAR
ELEKTRON‹K-VAKIF ‹fi HANI KAT:2 EMN‹YET MÜDÜRLÜ⁄Ü YANI-TEL.:0370 424 32 00 KARAMAN-ÖZ AS SO⁄UTMA-ABBAS MH. MUT
CD. NO: 82/A TEL. : 0338 214 56 74 KARS-AYDIN ELEKTRON‹K-KAZIM KARABEK‹R ‹fiHANI KAT:2 NO: 125 -TEL.:0474 212 87 82
KASTAMONU-TAfiKÖPRÜ-DE⁄‹fi‹M ELEKTR‹K-TABAKHANE MH. ATATÜRK CD. NO:55/A-TEL.:0366 417 42 04 KASTAMONU-TOSYADO⁄Ufi ELEKTRON‹K-VAKIF SK. 15/A-TEL.:0366 313 42 59 KASTAMONU-HARUN TELEKOMÜN‹KASYON-‹NÖNÜ MAHALLES‹ AFfi‹NBEY
SOKAK NO:8/B-TEL.:0366 212 33 66 KAYSER‹-MEL‹KGAZ‹-AKTÜRK BEYAZ EfiYA SERV‹S‹-AYDINLIKEVLER MH.FIRAT CD.KR‹STAL APT.AB NO.17 TEL.:0352 332 08 25 KAYSER‹-MEL‹KGAZ‹-AKIfi ELEKTRON‹K-ÇORAKÇILAR MH. CENG‹Z TOPEL CD.NO:20/B-TEL.:0352 320
14 00 KAYSER‹-DEVEL‹-U⁄UR SO⁄UTMA-HARMAN MAHALLES‹ BELED‹YE PASAJ‹ ÜZER‹ NO: 15-TEL.:0352 621 56 31 KAYSER‹-SÖNMEZ
ELEKTRON‹K-CAM‹ KEB‹R MAH. BASMANE SOK. NO:16/A-TEL.:0352 231 69 62 KAYSER‹-ZERO COMPUTER-SAHAB‹YE MH. METE CD.
fiAH‹R SATO⁄LU SK. SATO⁄LU AP D: 1-TEL.:0352 232 15 34 KIRIKKALE-MERKEZ-BULUT ELEKTR‹K B‹LG‹SAYAR-B.HAYRETT‹N CAD.
NO:9/C-TEL.:0318 212 31 73 KIRKLAREL‹-MERKEZ-BUSE ELEKTRON‹K-KARACA ‹BRAH‹M MH. KAPAN CAM‹ SK. ACUN PSJ. NO:23TEL.:0288 212 73 57 KIRKLAREL‹-LÜLEBURGAZ-BUSE ELEKTRON‹K-YILMAZ MH. ESK‹ KIRKLAREL‹ CD. EFSANE DÜ⁄ÜN SALONU YANI
NO:36/A TEL.: 0288 412 88 92 KIRfiEH‹R-GARANT‹ ELEKTRON‹K-ANKARA CD. C‹NGÖZ BEBE ARKASI YA⁄MUR ‹fiHANI NO:9/B-TEL.:0386
214 02 18 K‹L‹S-FLAfi ELEKTRON‹K-fiEH‹TLER PARKI KARfiISI NO:63/1-TEL.: 0348 814 55 28 KOCAEL‹-DORUK TEKN‹K H‹Z. -KARABAfi
MH. CENG‹Z TOPEL CD. MÜNECC‹M AR‹F SK. NO:6/A -TEL.:0262 331 11 66 KOCAEL‹-KARAMÜRSEL-KILINÇ ELEKTRON‹K-‹NÖNÜ CD.
M.YASEF SK. NO:10/M-TEL.:0262 452 55 55 KOCAEL‹-D‹LOVASI-SAMET ELEKTRON‹K-BA⁄DAT CAD NO: 42/2-TEL.:0262 754 79 86
KOCAEL‹-DARICA-KARDEfiLER ELEKTRON‹K-KAZIM KARABEK‹R MH. MEVALANA CAD. NO: 1/A-TEL.:0262 656 27 88 KOCAEL‹-GEBZEYILDIRIM ELEKTRON‹K-H. HAL‹L MH. 1209 SK. NO:13/C-TEL.:0262 641 35 88KONYA-BEYfiEH‹R-SELV‹ SO⁄UTMA-HACI ARMA⁄AN MH.
ANTALYA CD. NO:108/F-TEL.:0332 512 40 10 KONYA-SELÇUKLU-SAF‹R SO⁄UTMA-FER‹T PAfiA MH. GÜNEY SK. NO:3/F KULE S‹TE
C‹VARI-TEL.:0332 236 36 75 KONYA-ERKAM SO⁄UTMA-KARAKURT MH. FURKAN DEDE CD.ASBAfiKAN SK. NO:13/B-TEL.:0332 350 00
32 KONYA-ÖZCAN SO⁄UTMA VE ISITMA LTD fiT‹-N‹fiANTAfiIMH. HULUS‹ BAYBAL CD. NO:36/A-TEL.:0332 236 33 37 KONYA-SELÇUKLU-
KONSEY SOGUTMA VE ISITMA-KÜÇÜK ‹HSAN‹YE MH. fiA‹R GUBAR‹ SK.B‹NSA S‹TES‹ ALTI NO : 15 TEL.:0332 321 21 22 KONYA-AKfiEH‹REROL ELEKTRON‹K-MEYDAN MAH. ÇOCUK PARKI KOD NO:38-TEL.:0332 812 61 12 KONYA-MERAM-GÜRKAN TEKN‹K-‹HT‹YARETT‹N
MH.SIRÇALI MEDRESE CAD.‹BN‹B‹B‹ SK. NO:1/B-TEL.:0332-351 02 03 KONYA-SEYD‹fiEH‹R-TUNCER ELEKTRON‹K-KIBRIS CD. NO:26TEL.:0332 582 93 92 KONYA-DURMAZLAR ELEKTR‹K-ANKARA-KONYA CAD. NO:67-TEL.:0332 673 28 48 KONYA-ERE⁄L‹-ERDEM‹R
TEKN‹K-ÜÇ GÖZ MH. KIBRIS CD.EL‹T APT. NO:3 TEL.: 0332 713 02 53 KÜTAHYA-EL‹FO⁄LU ELEKTR‹K-FAT‹H SULTAN MEHMET BULVARI
DUAGÜR CAM‹‹ ALTI 43/B-TEL.:0274 226 32 80 MALATYA-YUVAM ELEKTRON‹K-‹ST‹KLAL MH. FUZUL‹ CD.‹MAMO⁄LU SK. NO:1-TEL.:0422
322 52 88 MALATYA-HAL‹M ELEKTRON‹K-SARAY MH. DEVECEL SK. NO:3-TEL.:0422 321 86 08MAN‹SA-SOMA-GÜRMAK TEKN‹K-
KURTULUfi MH. ‹DMAN SK. NO:47/A-TEL.:0236 613 66 56 MAN‹SA-SAL‹HL‹-AYKAR SO⁄UTMA- BEfiEYLÜL MH. BELED‹YE CD. NO:TEL.:2430236 714 88 68 MAN‹SA-AY ELEKTRON‹K MAN‹SA fiB.-YARHASANLAR MAH. ESK‹ HASA⁄A 2306 SOK.NO: 18/A-TEL.:0236 237 30 62-63
MAN‹SA-BURCU ELEKTRON‹K-TUNCA MAH. KURTULUfi CAD. NO:54-TEL.:0236-234 57 42 MAN‹SA-TURGUTLU-EM‹N ELEKTRON‹K-
ALTAY MH. SEV‹NÇ SK. NO:25-TEL.:0236 313 28 35 MAN‹SA-SARUHANLI-fiEN SO⁄UTMA-ATATÜRK MH. 7 EYLÜL CD. NO: 21/B-TEL.:0236
357 12 00 MAN‹SA-KULA-ERDAL KARAHAN-TERMO D‹NAM‹K-CAM‹‹ CED‹T MH. 62 SK. NO:67-TEL.:0236 816 70 99 MARD‹N-M‹DYAT-
SA⁄LAM ELEKTRON‹K-ESNAF SANATKARLAR KRED‹ KOOP. KARfiISI 2.CD.NO:56-TEL.:0482 462 33 90 MARD‹N-KIZILTEPE-‹BRAH‹MO⁄LU
ISITMA-fiANLIURFA CAD. ECE PASAJI NO:7-TEL.:0482 312 55 99 MARD‹N-DER‹K-UZAY ELEKTRON‹K-BELED‹YE MEYDANI NO:36-
TEL.:0482 251 34 35 MARD‹N-YEN‹fiEH‹R-MERKEZ TEKN‹K-KARAYOLLARI ARKASI BARIfi CAD GÜNAYDIN APT ALTI-TEL.:0482 212 83
06 MARD‹N-NUSAYB‹N-BÜDÜN ELEKTRON‹K-ZEYNEL AB‹D‹N MH. Ç‹LEK SK NO: 1/B-TEL.:0482 415 61 98 MU⁄LA-FETH‹YE-ANADOLU
TEKN‹K SERV‹S-ÖLÜDEN‹Z YOLU ÜZER‹ BAHA fiIKMAN CD.NO:157-TEL.:0252 611 39 12 MU⁄LA-M‹LAS-AFfi‹N YILDIRIM - TEKN‹K
SO⁄UTMA-HACI ‹LYAS MAH. PAZAR SOK.NO:14-TEL.:0252 512 14 45 MU⁄LA-YATA⁄AN-ASTEKN‹K ISITMA SO⁄UTMA SERV‹S‹-YEN‹ MH.
152. SK. NO:8-TEL.:0252 572 56 31 MU⁄LA-DALAMAN-ÖZKAN TEKN‹K SO⁄UTMA-MERKEZ MAHALLES‹ ATATÜRK CD.NO:56-TEL.:0252
- 53 -
Page 55

692 25 25 MU⁄LA-ELBO ELEKTR‹K ELEKTRON‹K-ORHAN‹YE MH. HÜRR‹YET CAD. NO:1/6-TEL.:0252 214 18 84 MU⁄LA-DATÇA-MEL‹H
YETK‹L‹ SERV‹SLER L‹STES‹
ELEKTRON‹K-‹SKELE MH. AMBARCA CD. NO:17-TEL.:0252 712 02 30 MU⁄LA-MARMAR‹S-‹LKSEL ELEKTRON‹K-YEN‹ YOL CD. N0:51/9-
TEL.:0252 412 62 60 MU⁄LA-URLA-STAR ELEKTRON‹K-‹N‹fiD‹B‹ CAD NO 1/C AKYAKA BELDES‹-TEL.:0252 243 40 42 MUfi-HAfi‹MO⁄LU
EK‹C‹ ELEKTRON‹K-HAfi‹MO⁄ULLARI EK‹C‹ ‹fi HANI BELED‹YE CD.NO:20/A-TEL.:0436 212 38 80 N‹⁄DE-HUZUR ELEKTR‹K-ILHANLI
MAH ÖZKUL MARKET KARSISI ÖZKILIÇ AP ALTI NO: 43-TEL.:0388 233 54 05 ORDU-TEK ISITMA SO⁄UTMA-SAKARYA MAH YENI KUMRU
CAD NO: 111-TEL.:0452 423 84 49 ORDU-HAZAR SO⁄UTMA-YEN‹ MAH. 26.SOK NO:17-TEL.:0452 214 04 49 ORDU-ÜNYE-STAR TEKN‹K-
KALEDERE MH. 20TEMMUZ CD. NO:16-TEL.:0452 324 82 51 ORDU-MERKEZ-M‹KRO ELEKTRON‹K-YEN‹ MH. 319 SK. NO:18 -TEL.: 0452
223 13 49 OSMAN‹YE-MODERN ELEKTRON‹K-ORTAOKUL CD. K‹fi‹O⁄LU ÇARfiISI NO:15-TEL.:0328 812 82 84 R‹ZE-ÇAYEL‹-ÖZER TEKN‹K-
MAKSUT ÖZER-EMNIYET MÜD.KARfiISI fiA‹RLER YOLU ÜZERI NO:3/2B-TEL.:0464 532 63 81 R‹ZE-CEVAH‹R ELEKTRON‹K-TOPHANE
MAH. ATATÜRK CAD. ‹fi PASAJI-TEL.:0464 213 16 17 SAKARYA-ADAPAZARI-ÇINAR ELEKTRON‹K-KÖMÜR PAZARI CAD. NO: 15 ATEL.:0264 271 39 12 SAMSUN-ÇARfiAMBA-ÖZKAN SO⁄UTMA-ORTA MH. TUNCAY KOCABAfi SK. NO:85-TEL.:0362 832 28 90 SAMSUN-
BAFRA-KARATAfi T‹CARET-KIZILIRMAK MH. F.ÇAKMAK SK. NO:18/A-TEL.: 0362 543 04 91 SAMSUN-GÜLTEK‹N SERV‹S-ATATÜRK
BULVARI NO.285-TEL.:0362 437 33 82 SAMSUN-DEN‹Z ELEKTRON‹K-KADIKÖY MH. OSMAN‹YE CD. NO: 68-TEL.:0362 432 44 80 S‹‹RT-
ERYILMAZ ELEKTRON‹K-CUMHUR‹YET CAD. NO:25 ULUCAM‹ KARfiISI-TEL.:0484 224 03 92 S‹NOP-ADA EV ALETLER‹-CAM‹ KEB‹R MH.
TÜTÜNCÜ SK. NO: 16-TEL.:0368 260 12 64 S‹NOP-AYANCIK-YILKAY SO⁄UTMA-YALI MH. DR.AZM‹ HAMZAO⁄LU CD. NO:46-TEL.:0368
613 52 12 S‹NOP-BOYABAT-ÖZTÜRK BEYAZ EfiYA BAKIM SERV‹S-GÖKDERE MH.YUSUF KEMAL BEY CD.NO:24-TEL.:0368 315 61 21
S‹VAS-EKOL ELEKTRON‹K-H‹KMET IfiIK CD.NALBANTLAR BAfiI KAVfiA⁄I NO:1/D-TEL.:0346 223 44 96 fiANLIURFA-SURUÇ-IfiIK SO⁄UTMA
TEKN‹KERL‹⁄‹-D‹K‹L‹ MH. Z‹YARET CD. NO:10-TEL.:0414 612 17 25 fiANLIURFA-AKTAfi ELEKTRON‹K-ASFALT CD. N0.22/F-TEL.:0414
217 14 87 fiANLIURFA-B‹REC‹K-YARAfiIR SO⁄UTMA-MEYDAN MAH 10 TEMMUZ CAD KÖPRÜ ÇIKIfiI NO : 9-TEL.:0414 652 36 38 fiIRNAKS‹LOP‹-ABAY ELEKTRON‹K-2. CADDE S‹EMENS BAY‹‹ KARfiISI-TEL.:0486 518 50 99 fiIRNAK-ULUDERE-ÜRÜN ELEKTRON‹K-CUMHUR‹YET
CD. PTT YANI-TEL.:0486 351 28 22 TEK‹RDA⁄-HAYRABOLU-POYRAZ TEKN‹K-H‹SAR MAH. ADELET SK. NO:24-TEL.:0282 315 55 48
TEK‹RDA⁄-SARAY-BATI TEKN‹K-YEN‹ MH. TAKS‹M CD. NO:9 TEL.:0282 768 69 34 TEK‹RDA⁄-MURATLI-AKAN ELEKTRON‹K-MURAD‹YE
MH. NAZIM SAV CD. NO:30/A-TEL.:0282 361 28 17 TEK‹RDA⁄-ÇORLU-FULL TEKN‹K-MUH‹TT‹N MH. F‹K‹R SK. NO:12/B-TEL.:0282 652
28 68 TEK‹RDA⁄-ARI ELEKTRON‹K-AYDO⁄DU MH. fiEH‹TLER CD. NO: 33/A-TEL.:0282 263 40 61 TEK‹RDA⁄-MALKARA-KER‹MO⁄ULLARI
T‹CARET-YEN‹MAHALLE GÜLDESTE SOK. NO: 4/B-TEL.:0282 427 16 61 TEK‹RDA⁄-ÇERKEZKÖY-ÇA⁄RI ELEKTRON‹K-G.O. PAfiA MH.
SAYAR SK. KARDEfiLER APT. NO:5 -TEL.:0282 726 02 66 TOKAT-ERBAA-H‹DRO ELEKT‹R‹K-CUMHUR‹YET MH. GAZ‹ BULVARI NO:144TEL.:0356 715 56 01 TOKAT-C‹HAN ELEKTRON‹K-G.O.PAfiA BULVARI S‹VAS CAD. NO:290/A- TEL.:0356 214 00 74 TOKAT-TURHAL-GÜÇLÜ
SO⁄UTMA-CELAL MH. TUNA SK. NO:11-TEL.: 0356 276 39 66 TOKAT-CEM TEKN‹K SO⁄UTMA-SO⁄UKPINAR MH. GOP BULVARI 241/A
GÖKÇE PASAJI NO:14-TEL.:0356 212 37 57 TRABZON-ÇIRAK TEKN‹K-FAT‹H MH. AYASOFYA CD. NO: 57 MÜZE KARfiISI-TEL.:0462 229
66 44 TRABZON-AKÇAABAT-ATOM ELEKTR‹K-ORTA MH. ERENLER SK. NO:5 -TEL.:0462 228 12 58 TRABZON-YET-SAN ELEKTRON‹K-
FAT‹H MH. FAT‹H CD. COfiKUNER PASAJI NO:2/B-TEL.:0462 223 15 04 TRABZON-ARAKLI-fiENGÜL TEKN‹K-BA⁄KUR ÇARfiISI NO: 10 /
A-TEL.:0462 721 74 11 UfiAK-MERKEZ-KOÇ SO⁄UTMA- ‹fiL‹CE MH. ADAfi SK. NO:29/E -TEL.:0284 513 89 66 VAN-ERC‹fi-ÖZKANAT
TAM‹RAT-EMN‹YET KARAKOL ARKASI NO:3-TEL.:0432 351 95 40 VAN-EB‹NÇ TEKN‹K-SIHKE CAD ATEfi SOK. NO 10-TEL.:0432 214 31
37 VAN-BURHAN AYDIN - ÖZ USTA TAM‹RAT-KÜLTÜR MERKEZ‹ C‹VARI DEM‹RC‹LER 1. SK. NO:1/C-TEL.:0432 216 34 58 YALOVA-
ALTINOVA-DO⁄AN TEKN‹K SO⁄UTMA-CUMHUR‹YET MH.MERKEZ DURAK KARfiISI NO:29A-TEL.:0226 461 26 21 YALOVA-TINAZTEPE
ELEKTR‹K-‹STANBUL CD. BORA SK. NO: 14-TEL.:0226 812 01 60 YOZGAT-AKDA⁄MADEN‹-AYDIN SO⁄UTMA-AHISHAVI MH. 2. HANLAR
SK. NO :10-TEL.:0354 314 64 12 YOZGAT-ÖNDER ELEKTRON‹K-UN PAZARI NO:14-TEL.:0354 212 79 67 YOZGAT-SORGUN-KARDEfiLER
ELEKTRON‹K-CUMHUR‹YET CD. NO:29 1/C-TEL.:0354 415 45 79 ZONGULDAK-KRD ERE⁄L‹-UZMAN ELEKTRON‹K-ERDEM‹R CAD NO:130-
TEL.:0372 316 31 28 ZONGULDAK-MERKEZ-EMEK ELEKTRON‹K-PAP‹LA ‹fi HANI ZEM‹N KAT NO:9 SO⁄UKSU-TEL.:0372 251 67 31
- 54 -
Page 56

MÜfiTER‹ H‹ZMETLER‹
De¤erli Müflterimiz,
En uygun fiyata en iyi ürünü vermenin yan› s›ra; en iyi hizmeti vermenin de
önemli oldu¤una inan›yoruz. Bu nedenle siz bilinçli tüketicilere daha yak›n
olabilmek için, internet adresimizdeki eriflim formlar›n›n yan› s›ra, tüketici
dan›flma hatlar›m›z› da hizmetinize açm›fl durumday›z.
TÜKET‹C‹
DANIfiMA HATTI
444 66 86
MERKEZ
TEKN‹K SERV‹S
(0212) 422 94 94
www.sinbo.com.tr
Dan›flma Hatlar›m›z›,
- Hafta içi her gün 08.30-18.00 saatleri aras›nda arayabilir; istek, öneri ve
flikayetlerinizi firmam›za iletebilirsiniz.
Tüketicinin Dikkatine:
Ürünlerimizle ilgili hizmetleri tam olarak alabilmek için afla¤›daki önerilere
uyman›z› rica ederiz:
1. Ürünü ald›¤›n›zda Garanti Belgesini mutlaka yetkili sat›c›n›za onaylatt›r›n›z.
2. Ürünü kullanma k›lavuzu esaslar›na göre kullan›n›z.
3. Ürününüzle ilgili hizmet talebiniz oldu¤unda yukar›daki telefon
numaralar›ndan, Tüketici ‹liflkileri Merkezi'ne baflvurunuz.
4. Ürünü promosyon arac›l›¤› ile edinmiflseniz, ürüne ait garanti belgesini en
yak›n yetkili servisimize giderek onaylatt›r›n›z.
5. Teknik servisteki ifliniz bitti¤inde "Hizmet Fifli" almay› unutmay›n›z.
Alaca¤›n›z bu fifl, ileride ürününüzde meydana gelebilecek herhangi bir
sorunda size yarar sa¤layacakt›r.
6. Cihaz›n›z ilk çal›flt›rmada çal›flm›yor veya ar›zal› ise, size en yak›n S‹NBO
Yetkili Servisine baflvurabilir veya S‹NBO Dan›flma Hatlar›ndan yard›m
alabilirsiniz.
- 55 -
Page 57

- GARANT‹ fiARTLARI -
1. Garanti süresi, mal›n teslim tarihinden itibaren bafllar ve 2 y›ld›r.
2. Mal›n bütün parçalar› dahil(kullan›m hatalar›ndan kaynaklanan k›r›lmalar hariç) olmak üzere tamam› firmam›z›n
garantisi kapsam›ndad›r.
3. Mal›n garanti süresi içerisinde ar›zalanmas› durumunda, tamirde geçen süre garanti süresine eklenir. Mal›n tamir
süresi en fazla 30 ifl günüdür. Bu süre, mala iliflkin ar›zan›n servis istasyonuna servis istasyonunun olmamas›
durumunda, mal›n sat›c›s›, bayii, acentas›,temsilcili¤i, ithalatç›s› veya imalatç›s›-üreticisinden birisine bildirim tarihinden
itibaren bafllar. Mal›n ar›zas›n›n 15 ifl günü içerisinde giderilmemesi halinde, imalatç›-üretici veya ithalatç›; mal›n
tamiri tamamlan›ncaya kadar, benzer özelliklere sahip baflka mal› tüketicinin kullan›m›na tahsis etmek zorundad›r.
4. Mal›n garanti süresi içerisinde, gerek malzeme ve iflçilik, gerekse montaj hatalar›ndan dolay› ar›zalanmas› halinde,
iflçilik masraf›, de¤ifltirilen parça bedeli ya da baflka herhangi bir ad alt›nda hiçbir ücret talep etmeksizin tamiri
yap›lacakt›r.
5. Tüketicinin onar›m hakk›n› kullanmas›na ra¤men mal›n;
-Tüketiciye teslim edildi¤i tarihten itibaren, belirlenen garanti süresi içinde kalmak kayd›yla,bir y›l içerisinde; ayn›
ar›zan›n ikiden fazla tekrarlanmas› veya farkl› ar›zalar›n dörtten fazla meydan gelmesi veya belirlenen garanti süresi
içerisinde farkl› ar›zalar›n toplam›n›n alt›ndan fazla olması unsurlar›n›n yan›s›ra, bu ar›zalar›n maldan yararlanamamay›
sürekli k›lmas›,
-Tamiri için gereken azami sürenin afl›lmas›,
-Firman›n servis istasyonunun, servis istasyonunun mevcut olmamas› halinde s›rayla sat›c›s›, bayii, acentesi temsilcili¤i,
ithalatç›s› veya imalatç› - üreticisinden birisine düzenleyece¤i raporla ar›zan›n tamirine mümkün bulunmad›¤›n›n
belirlenmesi,durumlar›nda, tüketici mal›n ücretsiz de¤ifltirilmesini, bedel iadesi veya ay›p oran›nda bedel indirimi
talep edebilir.
6. Mal›n kullanma k›lavuzunda yer alan hususlara ayk›r› kullan›lmas›ndan kaynaklanan ar›zalar garanti kapsam›
d›fl›ndad›r.
7. Garanti Belgesi ile ilgili olarak ç›kabilecek sorunlar için Sanayi ve Ticaret Bakanl›¤› Tüketicinin ve Rekabetin
Korunmas› Genel Müdürlü¤ü’ne baflvurulabilir.
‹THALATÇI F‹RMA
DE‹MA ELEKTROMEKAN‹K ÜRÜNLER ‹NfiAAT SPOR MALZEMELER‹ ‹MALAT SAN. VE T‹C. A.fi.
Cihangir Mh. Güvercin Cd. No:4 Haramidere Mevkii Avcılar - ‹stanbul - Türkiye
Tel : (0212) 422 94 94 & Fax : (0212) 422 03 49
www.sinbo.com.tr - info@sinbo.com.tr
- 56 -
Page 58

- SCO 5023 ELEKTR‹KL‹ P‹fi‹R‹C‹ -
- GARANT‹ BELGES‹ -
Garanti Belge No : 77484
SSHY Belge No : 25551
‹THALATÇI F‹RMA
Ünvanı : DE‹MA ELEKTROMEKAN‹K ÜRÜNLER‹ ‹Nfi. SPOR MALZ.
‹MALAT SAN. ve T‹C. A.fi.
Adresi : Cihangir Mah. Güvercin Cad. No:4 Haramidere Mevkii
Avc›lar / ‹STANBUL
Tel. : 0212 422 94 94 & Fax: 0212 422 03 49
Yetkili Kifli :
Yönetim Kurulu Baflkan›
Ürünün Cinsi : ELEKTR‹KL‹ P‹fi‹R‹C‹
Markası : S‹NBO
Modeli : SCO 5023
Alt Modeli : Bandrol ve Seri No :
Teslim Tarihi ve Yeri :
Garanti Süresi : 2 Yıldır
Azami Tamir Süresi : 30 ‹fl Günü
Kullanım Ömrü : Bakanl›kça belirlenen ve ilan edilen kullan›m ömrü 7 y›ld›r.
(Ürünün fonksiyonlar›n› yerine getirebilmesi için gereken yedek parça temin süresi)
SATICI F‹RMA
Ünvanı :
Adresi :
Tel.Fax :
Fatura Tarihi ve No :
Teslim Tarihi ve Yeri :
‹mza ve Kafle :
Bu bölüm, ürünü sat›n ald›¤›n›z Yetkili Sat›c› taraf›ndan imzalanacak ve kaflelenecektir.
Bu belgenin kullan›lmas›na; 4077 say›l› Tüketicinin Korunması Hakkında Kanun ve bu Kanun’a dayan›larak yürürlü¤e konulan Garanti Belgesi
Uygulama Esaslar›na Dair Tebli¤ uyar›nca, TC Sanayi ve Ticaret Bakanl›¤› Tüketicinin ve Rekabetin Korunmas› Genel Müdürlü¤ü tarafından
izin verilmifltir.
Garanti Belge Onay Tarihi : 31/12/2009
SSHY Belge Onay Tarihi : 30/03/2010
- 57 -
Page 59

- 58 -
Page 60

Made in P.R.C.
‹mal Y›l› : 2010
- TEDAR‹KÇ‹ F‹RMA / EXPORTER United Favour Development Limited
Unit B, 10/F Lee May Building 788-790
Nathan Road, Mongkok, Kowloon, HK.
- UYGUNLUK BEYANI / CE NS Technology Co., Ltd.
Chenwu Industrial Zone, Houjie Town
Dongguan City, Guangdong, China
NSS-H10051425
EEE Yönetmeli¤ine uygundur.
 Loading...