

Page 1
C
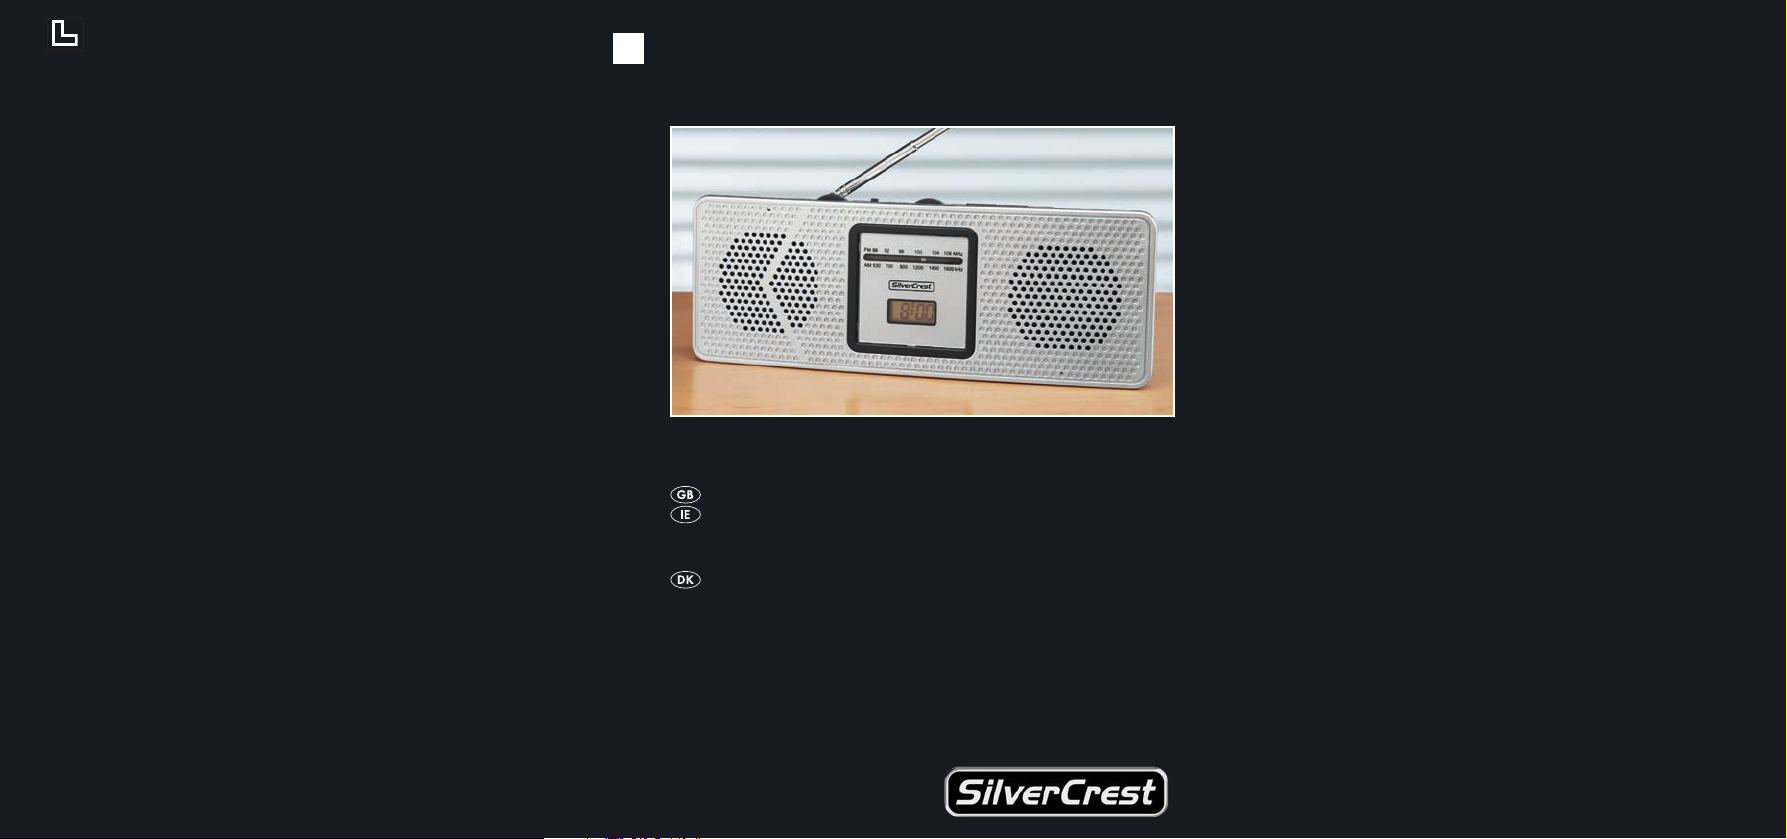
ALARM RADIO
KH 2411
ALARM RADIO
Operating instructions
RADIO MED VÆKKEUR
Betjeningsvejledning
KOMPERNASS GMBH · BURGSTRASSE 21 · D-44867 BOCHUM
www.kompernass.com
ID-Nr.: KH2411-2/09-V2
Page 2
KH 2411
A
B
C
q
w
uiyrt
e
o
a
s
Page 3
CONTENT PAGE
Intended use 2
Items supplied 2
Technical data 2
Appliance description 2
Safety instructions 2
Inserting the batteries 3
Setting up 3
Reception mode 3
Adjusting the time functions 4
Cleaning and storage 5
Maintenance 5
Disposal 6
Importer 6
Warranty and Service 6
Read the operating instructions carefully before using the appliance
for the first time and preserve this booklet for later reference. Pass the
manual on to whomsoever might acquire the scale at a later date.
- 1 -
Page 4

ALARM RADIO KH2411
Intended use
This appliance is intended for the reception of public radio transmissions
and for the amplification of sound signals from external playback devices
such as iPod, MP3 and CD players in domestic environments.
It is not intended for use in premises with high humidity or in commercial and industrial applications.
Items supplied
1 x Appliance
1 x Operating instruction
• Check to ensure that the appliance is undamaged, all component parts
are present and that packaging remnants are removed from it.
- 2 -
Page 5

Technical data
Reception range FM: 87,5 – 108 MHz
Reception range AM: 526,5 – 1606,5 kHz
Output level: approx. 500 mW
Audio connection: 3,5mm Jackplug
incl. firmly assembled cable
Batteries: 3 x 1.5 V Type “AAA”
Operating Temperature
Range : +5° – +40°C
Humidity: 5 – 90%
(No condensation)
Dimensions (LxWxH): 208 x 78 x 56 mm
Weight : approx. 255 g
CE- Conformity
This device has been tested and approved in accordance with the basic
requirements and other relevent regulations of the EMC Directive
2004/108/EC.
- 3 -
Page 6
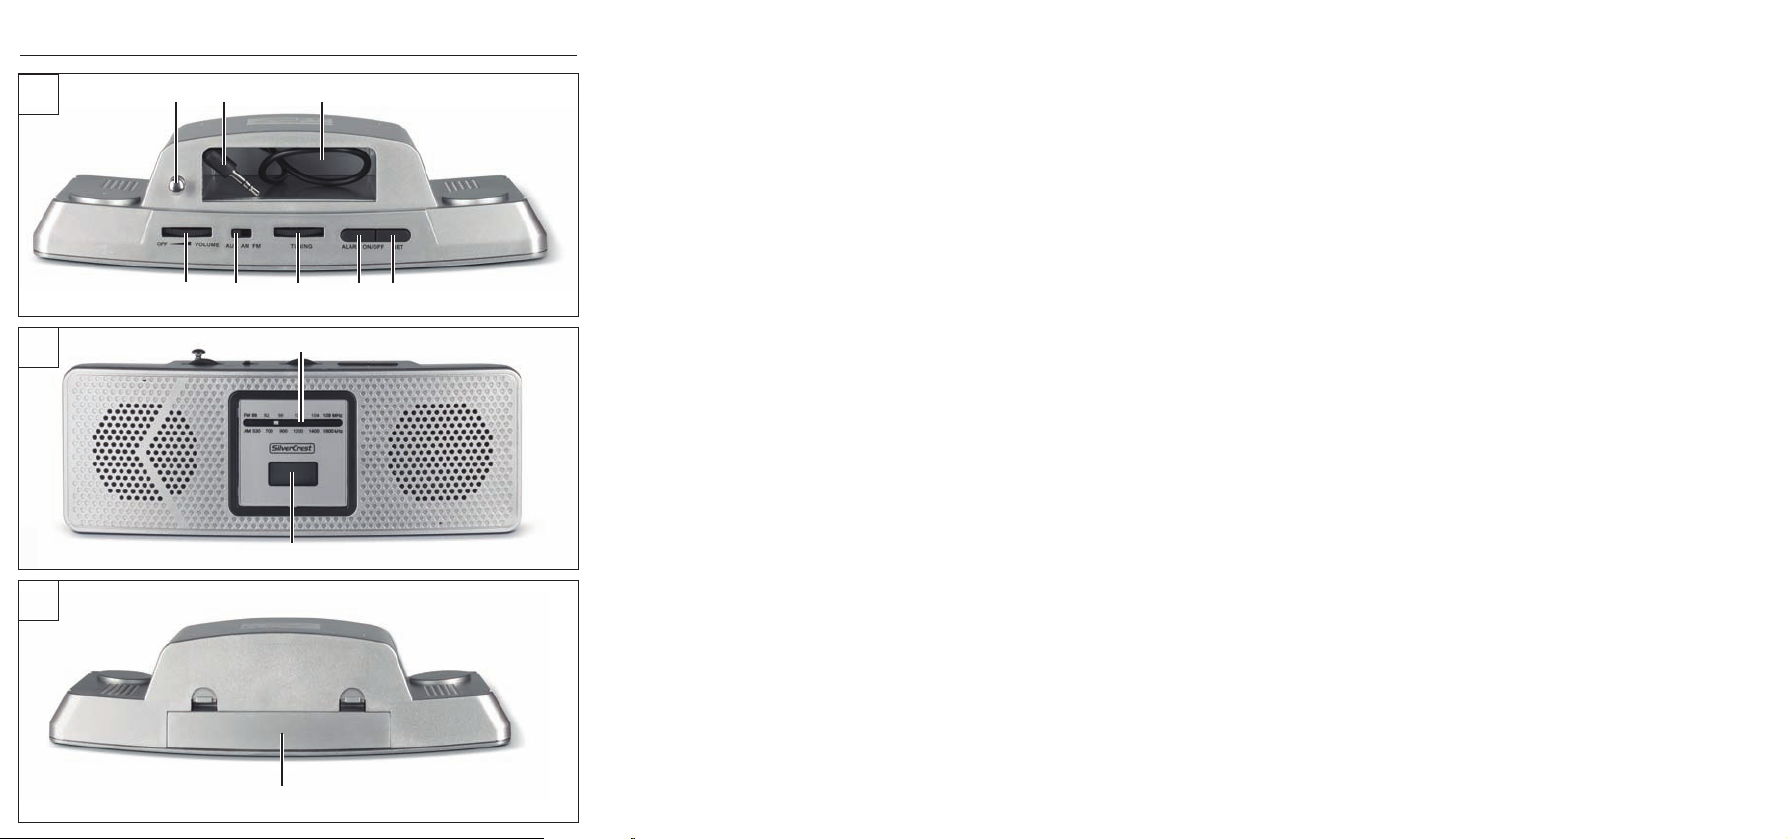
Appliance description
Fig. A:
Telescopic antenna
Connection cable for external audio device
Compartment for external audio device
“SET” button
“TUNING” tuning regulator
Slider switch AUX - AM - FM
Button “ALARM ON/OFF”
“OFF VOLUME” Regulator for volume, On/Off
Fig. B:
Frequency scale
Display
Fig. C:
Battery compartment cover
Safety instructions
• If you do not intend to use the appliance for an extended period,
remove the batteries – batteries can discharge themselves and then
leak.
• Should the batteries leak: Clean the battery compartment with a dry
cloth whilst wearing protective gloves. Use ONLY the type of battery
detailed in the Technical Data as replacements for discharged batteries.
• Always exchange all batteries at the same time. Always use batteries
of the same type as replacements.
- 4 -
Page 7

• Keep batteries and cells away from small children. Should a battery
be swallowed, seek medical attention IMMEDIATELY, as life is at
risk.
• Check to ensure that the appliance is in a service-able condition before taking it into use. Should there be visible damage to the appliance, do not take it into use.
• Do not attempt to recharge batteries. There is a chance that they
could explode!
• Ensure that no direct sources of heat (e.g. radiators) can have an
effect on the device, it is not subject to direct sunlight, contact with
sprayed or dripping water is avoided (do not place waterfilled objects, for example flower vases, on or next to the device) and that
no open fire sources (e.g. burning candles) are placed on or close
to the device. Also, avoid penetration by foreign objects.
• Do not permit small children to play with the plastic packaging.
There is a risk of suffocation!
Inserting the batteries
• Open the battery compartment cover and insert 3 x 1.5 V batteries
of the type AAA/Micro. Comply with the polarity markings indicated
in the battery compartment.
• Close the battery compartment. The device is now ready for use.
Setting up
• Draw out the telescopic antenna .
• Should you wish to playback an external audio device over the
radio, connect it with the connection cable
- 5 -
at the rear.
Page 8

• If the external audio device (e.g. iPod, MP3 player) fits into the
compartment
at the rear, it can be placed there. Failing this, the
pocket can also be useful as a tidy for writing implements and
other utensils on the desk.
Reception mode
a) Switching the appliance on/off, sound volume
• To switch the device on, turn the regulator “VOLUME”
stop position “OFF” to the right. It can also be used to adjust the
sound volume level. With this you can also regulate the sound
volume.
• To switch the device off, turn the regulator “VOLUME”
the left, until it engages in the stop position “OFF”.
b) Adjusting the reception
• Select the reception range AM or FM by placing the slider switch
into the appropriate position.
• Then search for the desired radio station by slowly turning the tuning regulator “TUNING”
until you have clear reception.
• You can read off the currently selected frequency from the frequency scale
, the unit for VHF is shown in “MHz” (Megahertz), for
medium wave it is shown in “kHz” (Kilohertz).
c) Playback of an external audio device
• If an external audio device is connected, place the slider switch
into the position “AUX”.
• Then start the playback on your external device.
from the
wholly to
- 6 -
Page 9

Adjusting the time functions
a) Programming the alarm time
• Press the button “ALARM ON/OFF”
blink and the indicator “AL ” (Alarm time) appears.
• Press once again on the button “ALARM ON/OFF”
the figure for the hours (e.g. “1: A ”) is shown in the display and, at
the same time, the indicator “AL ” (Alarm time).
• Press repeatedly on the button “SET”
is shown in the display, e.g. “7: A ”. The letter “A ” behind the figure
means “AM” (forenoon), “P ” means “PM” (afternoon).
• Press again on the “ALARM ON/OFF”
res for the minutes are shown in the display (e.g. “:00 ”) and, at the
same time, the indicator “AL ” (Alarm time).
• Press repeatedly on the button “SET”
figure has been programmed in, e.g. “ :30 ”.
b) Setting the date
• Press again on the “ALARM ON/OFF”
number for the month is shown in the display, e.g. “1 ”.
• Press repeatedly on the button “SET”
programmed in, e.g. “12 ”.
• Press again on the “ALARM ON/OFF”
number for the day is shown in the display, e.g “ 1”.
• Press repeatedly on the button “SET”
programmed in, e.g. “ 31”.
. In the display all positions
, until only
until the correct hour figure
button, until only the figu-
until the correct minute
button until only the
, until the month has been
button until only the
, until the date has been
- 7 -
Page 10

c) Setting the clock
• Press once again on the button “ALARM ON/OFF”
, until only
the figure for the hours is shown in the display, e.g. “1: A ”. Make
sure that the indicator “AL ” does not appear, as you would then be
setting the alarm time, not the time display itself.
• Press repeatedly on the button “SET”
, until the required hour figu-
re is shown, e.g. “10: A ”. The letter “A ” behind the figure means
“AM” (forenoon), “P ” means “PM” (afternoon) and “H ” indicate
the 24 hour display.
• Press again on the “ALARM ON/OFF”
button until only the num-
ber for the minutes is shown in the display, e.g. “:01 ”. Make sure
that the indicator “AL ” does not appear, as you would then be
setting the alarm time, not the time display itself.
• Press repeatedly on the button “SET”
until the required minute
figure has been programmed in, e.g. “15 ”.
d) Starting the clock
• Press the button “ALARM ON/OFF”
, to accept the programmed
minutes and to display the time, e.g. “ 10:15 ”.
• Press the button “SET”
the clock. As a control, the double-point in the display
, to accept the displayed time and to start
starts to
blink.
e) Alarm function and hour signal
• Press the button “ALARM ON/OFF”
. In the display all positions
blink and the indicator “AL ” (Alarm time) appears.
• To switch the alarm function on, repeatedly press the button “SET”
until three lines are shown above the colon in the display. To
switch the alarm function off, repeatedly press the button until the
three lines are no longer indicated.
- 8 -
Page 11

• To have a signal tone sound on every full hour, press repeatedly the
button “SET”
the signal tone function back off, once again press these buttons
repeatedly until the bell symbol is no longer shown.
f) To leave the adjustment mode
• Press repeatedly on the “ALARM ON/OFF”
is displayed.
• With the button “SET”
When everything is programmed as described, a signal tone will
sound at the programmed alarm time and continue until you press any
button. For as long as the alarm function remains activated, the appliance will repeat the alarm notification every day.
until a bell symbol appears in the display. To switch
button until the time
you can review all of your programmings.
Cleaning and storage
• Clean the appliance with a dry or lightly moistened cloth only. To
avoid potential damage to the surfaces, do not use any detergents
or abrasive cleaning agents.
• If you do not intend to use the appliance for longer than a year, remove the batteries. Store the appliance in a dry location.
- 9 -
Page 12

Maintenance
• NEVER open any of the coverings on the appliance. Arrange for
the appliance to be repaired by specialists only.
• The appliance is maintenance-free. No form of maintenance, either
on or in the appliance, is intended for execution by the user. In the
event of malfunction or apparent damage, make contact with Customer Services.
Disposal
Disposing of the appliance
Do not dispose of the appliance in your normal domestic
waste. Dispose of the appliance through an approved dispo-
sal centre or at your community waste facility.
This appliance is subject to the European Guidelines 2002/96/EC.
Observe the currently applicable regulations. In case of doubt, please
contact your waste disposal centre.
Disposal of batteries/accumulators
Used batteries/accumulators may not be disposed of in household
waste. Every consumer is legally obliged to dispose of batteries at a
collection site of his community/city district or at a retail store. The
purpose of this obligation is to ensure that batteries are disposed of in
a non-polluting manner. Only dispose of batteries when they are fully
discharged.
Disposal of packaging
Dispose of the packaging materials in an environmentally
responsible manner.
- 10 -
Page 13

Importer
KOMPERNASS GMBH
BURGSTRASSE 21
D-44867 BOCHUM
www.kompernass.com
Warranty and Service
This product comes with a 3-year warranty as of the date of purchase.
This appliance has been manufactured with care and meticulously examined before delivery. Please retain your receipt as proof of purchase.
In the case of a warranty claim, please make contact by telephone
with our service department. Only in this way can a post-free
despatch for your goods be assured.
The warranty covers only claims for material and maufacturing defects,
not for wearing parts or for damage to fragile components, e.g. buttons or batteries. The appliance is intended for domestic use only, NOT
for commercial purposes. If this product has been subjected to improper or inappropriate handling, abuse, or modifications not carried out
by one of our authorised sales and service outlets, the warranty will be
considered void. Your statutory rights are not restricted in any way by
this warranty.
- 11 -
Page 14

DES Ltd
Units 14-15
Bilston Industrial Estate
Oxford Street
Bilston
WV14 7EG
Tel.: 0870/787-6177
Fax: 0870/787-6168
e-mail: support.uk@kompernass.com
Kompernass Service Ireland
Tel: 1850 930 412
Standard call rates apply. Mobile operators may vary.
(0,082 EUR/Min.)
e-mail: support.ie@kompernass.com
- 12 -
Page 15

INDHOLDSFORTEGNELSE SIDE
Anvendelsesformål 14
Medfølger ved køb 14
Tekniske data 15
Beskrivelse af radioen 16
Sikkerhedsanvisninger 16
Indsætning af batterier 17
Opstilling 17
Modtagefunktion 18
Indstilling af urfunktioner 19
Rengøring og opbevaring 21
Vedligeholdelse 21
Bortskaffelse 22
Importør 22
Garanti og service 23
Læs betjeningsvejledningen igennem før første brug, og opbevar den
til senere brug. Lad vejledningen følge med, hvis apparatet gives videre til andre."
- 13 -
Page 16

RADIO MED VÆKKEUR KH2411
Anvendelsesformål
Denne radio er beregnet til modtagelse af almindelige, godkendte radiostationer samt til afspilning af eksterne afspilningsapparater som iPod,
MP3- og CD-afspillere i private hjem.
Denne radio er ikke beregnet til anvendelse i rum med høj luftfugtighed
og ikke til erhvervsmæssige eller industrielle områder.
Medfølger ved køb
1 x radio
1x betjeningsvejledning
• Kontroller, at produktet ikke er beskadiget, og at alle dele og rester
af emballage er fjernet fra produktet.
- 14 -
Page 17

Tekniske data
Modtageområde FM: 87,5 – 108 MHz
Modtageområde AM: 526,5 – 1606,5 kHz
Udgangseffekt: ca. 500 mW
Audiotilslutning: 3,5 mm jackstik
inkl. ledning fast monteret
Batterier: 3 x 1,5 V type “AAA”
Temperaturområde
for funktion : +5° – +40°C
Fugt: 5 – 90%
(ingen kondensdannelse)
Mål (LxBxH): 208 x 78 x 56 mm
Vægt : ca. 255 g
CE-konformitet
Denne radio er kontrolleret og godkendt med hensyn til overensstemmelse med de grundlæggende krav og andre relevante forskrifter i EMCdirektivet 2004/108/EC.
- 15 -
Page 18

Beskrivelse af radioen
Billed A:
Teleskopantenne
Tilslutningskabel til eksternt audioapparat
Rum til eksternt audioapparat
Taste “SET”
Taste “ALARM ON/OFF”
Indstillingsknap “TUNING”
Skydekontakt AUX - AM - FM
Indstilling “OFF VOLUME” lydstyrke, On/Off
Billed B:
Frekvensskala
Display
Billed C:
Låg til batterirum
Sikkerhedsanvisninger
• Tag batterierne ud, hvis du ikke bruger radioen i længere tid –
batterierne aflades af sig selv og kan derefter lække.
• Hvis batterierne lækker: Tag beskyttelseshandsker på, og rengør
batterirummet med en tør klud. Brug kun nye batterier af den type,
som er angivet i de tekniske data.
• Udskift altid alle batterier samtidigt. Brug altid batterier af samme
type ved udskiftning.
• Hold batterier og akkuer uden for børns rækkevidde. Søg omgående lægehjælp, hvis batterier sluges, da det medfører livsfare.
- 16 -
Page 19

• Kontrollér, at radioen er i perfekt stand, før den anvendes. Hvis der
kan ses tydelige skader, må radioen ikke anvendes længere.
• Prøv ikke på at genoplade batterierne. Eksplosionsfare!
• Sørg for, at der ikke er direkte varmekilder (f.eks. radiatorer), der
påvirker apparatet, at der ikke falder direkte sollys på apparatet, at
kontakt med sprøjte- eller drypvand undgås (stil ikke genstande fyldt
med vand som f.eks. vaser på eller ved siden af apparatet) samt at
der ikke står åbne brandkilder (f.eks. brændende stearinlys) på eller ved siden af apparatet. Undgå, at der kommer fremmedlegemer
ind i apparatet.
• Lad ikke små børn lege med emballeringsfolierne. Der er fare for
kvælning!
Indsætning af batterier
• Åbn batterirummets låg , og sæt 3 x 1,5 V batterier af typen
AAA/ Micro ind. Sørg for, at polerne, som er angivet i batterirummet, vender rigtigt.
• Luk batterirummet igen. Nu er apparatet klar til brug.
Opstilling
• Træk teleskop-antennen ud.
• Hvis du vil afspille et eksternt audioapparat via radioen, skal du
slutte det til med tilslutningsledningen
• Hvis det eksterne audioapparat passer ind i rummet
den (f.eks. iPod, MP3-afspiller), kan du stille det der. Ellers kan dette
rum bruges til kuglepenne og diverse ting og sager på skrivebordet.
på bagsiden.
på bagsi-
- 17 -
Page 20

Modtagefunktion
a) Tænd/sluk for radioen, lydstyrke
• For at tænde for apparatet skal du dreje indstillingsknappen
“VOLUME”
indstille lydstyrken med den. Du kan også indstille lydstyrken med
denne knap.
• For at slukke for apparatet skal du dreje indstillingen “VOLUME”
helt til venstre, indtil den går i hak i hvilestillingen “OFF”.
b) Indstilling af modtagelsen
• Vælg modtageområdet AM eller FM ved at stille skydekontakten
på den ønskede position.
• Find derefter en radiostation ved at dreje langsomt på indstillingsregulatoren “TUNING”
• På frekvensskalaen
for ultrakortbølger i “MHz” (megahertz) eller for mellembølger i “kHz”
(kilohertz).
c) Afspilning af eksternt audioapparat
• Hvis du har tilsluttet et eksternt audioapparat, skal du stille skydekontakten
• Start derefter afspilningsmodus på det eksterne audioapparat.
til højre ud af hvilestillingen "OFF". Du kan også
, indtil du får en klar modtagelse.
kan du aflæse den indstillede frekvens, enheden
på positionen “AUX”.
- 18 -
Page 21

Indstilling af urfunktioner
a) Programmering af alarmtid
• Tryk på knappen “ALARM ON/OFF”
lige pladser, og visningen “AL ” (alarmtid) kommer frem.
• Tryk igen på tasten “ALARM ON/OFF”
for timer, der vises i displayet (f.eks. “1: A “) og samtidig visningen
“AL “ (alarmtid).
• Tryk på tasten “SET”
, til timetallet er rigtigt indstillet, f.eks. “7: A ”.
Bogstavet “A ” bag tallet betyder “AM” (om formiddagen), “P ”
betyder “PM” (om eftermiddagen).
• Tryk igen på “ALARM ON/OFF”- knappen
minutterne vises (f.eks. “ :00 ”) og samtidigt visningen “AL ” (alarmtid).
• Tryk på tasten “SET”
, til minuttallet er rigtigt indstillet, f.eks.
“ :30 “.
b) Indstilling af dato
• Tryk igen på “ALARM ON/OFF”- knappen
måneden vises, f.eks. “1 ”.
• Tryk på tasten “SET”
, til måneden er rigtigt indstillet, f.eks. “12 “.
• Tryk igen på “ALARM ON/OFF”- knappen
dagen vises, f.eks. “1 ”.
• Tryk på tasten “SET”
, til dagen er rigtigt indstillet, f.eks. “31 “.
. I displayet blinker samt-
, til det kun er tallene
, indtil kun tallene for
, indtil kun tallet for
, indtil kun tallet for
- 19 -
Page 22

c) Indstilling af klokkeslæt
• Tryk igen på tasten “ALARM ON/OFF”
, til det kun er tallene for
timerne, der vises i displayet f.eks. “1: A ”. Det er vigtigt, at visnin-
gen “AL ” ikke vises, for så indstiller du ikke uret, men alarmtiden.
• Tryk på tasten “SET”
, til timetallet er rigtigt indstillet, f.eks. “10: A ”.
Bogstavet “A “ bag tallet betyder “AM” (om formiddagen), “P “ bety-
der “PM” (om eftermiddagen) og “H “ står for 24 timers visning.
• Tryk igen på “ALARM ON/OFF”- knappen
, indtil det kun er talle-
ne for minutterne, der vises, f.eks. “:01 ”. Det er vigtigt, at visningen
“AL ” ikke vises, for så indstiller du ikke uret, men alarmtiden.
• Tryk på tasten “SET”
, til minuttallet er rigtigt indstillet, f.eks.
“ :15 “.
d) Start for uret
• Tryk på knappen “ALARM ON/OFF”
for at overføre minutterne
og få vist det indstillede klokkeslæt, f.eks. “ 10:15 ”.
• Tryk på knappen “SET”
for at overføre det indstillede klokkeslæt
og starte uret. Til kontrol begynder dobbeltpunktet i displayet
blinke.
e) Alarmfunktion og timetal
• Tryk på knappen “ALARM ON/OFF”
.I displayet blinker samtlige
pladser, og visningen “AL ” (alarmtid) kommer frem.
• For at aktivere alarmfunktionen skal du trykke på tasten “SET”
indtil der vises tre linjer over dobbeltpunktet i displayet. For at
deaktivere alarmfunktionen igen skal du trykke på tasten, indtil de
tre linjer ikke vises længere.
at
,
- 20 -
Page 23

• Hvis du ønsker at høre et timesignal for hver hele time, skal du trykke
på knappen “SET”
For at deaktivere timesignalet igen, skal du trykke på disse knapper
igen, indtil klokkesymbolet ikke vises længere i displayet.
f) Sådan forlades indstillingsmodus
• Tryk på “ALARM ON/OFF”- knappen
• Med knappen “SET”
Når alt er indstillet som forklaret, lyder der et bip-signal på det programmerede alarmtidspunkt, indtil du trykker på en af knapperne. Så
længe alarmfunktionen er aktiveret, gentager radioen alarmen hver
dag.
, indtil der vises et klokkesymbol i displayet.
, indtil klokkeslættet vises.
kan du bladre gennem alle indstillinger.
Rengøring og opbevaring
• Rengør kun radioen med en tør eller let fugtig klud. Undgå skureeller rengøringsmidler, så overfladen ikke beskadiges.
• Hvis du ikke skal bruge radioen i længere tid, f.eks. et år, skal du
tage batterierne ud. Opbevar radioen et tørt sted.
Vedligeholdelse
• Åbn aldrig dele på radioen. Få altid reparationer udført af en fagmand.
• Radioen er vedligeholdelsesfri. Der skal ikke udføres nogen form for
arbejde på eller i produktet. Henvend dig til kundeservice ved
fejlfunktioner eller synlige skader.
- 21 -
Page 24

Bortskaffelse
Bortskaffelse af radioen
Smid aldrig radioen ud med husholdningsaffaldet. Borts-
kaf radioen hos et godkendt affaldsfirma eller på dit kommunale affaldsanlæg. Radioen er underkastet det europæiske direktiv 2002/96/EC. Følg de aktuelt gældende regler. Kontakt
affaldsordningen, hvis du er i tvivl.
Bortskaffelse af batterier/akkuer
Batterier/akkuer må ikke smides ud med husholdningsaffaldet. Alle forbrugere er lovmæssigt forpligtet til at aflevere batterier/akkuer på det
kommunale indsamlingssted eller i de respektive forretninger. Denne
forpligtelse hjælper med til, at batterier / akkuer kan afleveres til miljøskånsom destruktion. Levér kun batterier/genopladelige batterier tilbage i afladet tilstand.
Bortskaffelse af emballage
Aflever alle emballagematerialer, så de bortskaffes miljørigtigt.
Importør
KOMPERNASS GMBH
BURGSTRASSE 21
D–44867 BOCHUM
www.kompernass.com
- 22 -
Page 25

Garanti og service
Du får 3 års garanti fra købsdatoen på dette produkt. Produktet er produceret omhyggeligt og kontrolleret samvittighedsfuldt før levering. Opbevar kassebonen som bevis for købet. I garantitilfælde bedes du
kontakte dit servicested pr. telefon. Kun på denne måde garanteres
det, at tilsendelsen af varen er gratis. Garantien gælder kun for materiale- eller fabrikationsfejl, men ikke for sliddele eller skrøbelige dele
som f.eks. kontakten eller akkumulatorer. Produktet er kun beregnet til
privat og ikke til erhvervsmæssigt brug. Ved misbrug og uhensigtsmæssig behandling, anvendelse af vold og ved indgreb, som ikke er foretaget af vores autoriserede service-afdeling, ophører garantien. Dine juridiske rettigheder indskrænkes ikke ved denne garanti.
Kompernass Service Danmark
Hornbækvej 473
DK-3080 Tikøb
Tel.: +45 4975 8454
Fax: +45 4975 8453
e-mail: support.dk@kompernass.com
- 23 -
 Loading...