

Page 1
BásCula de COCIna
BIlanCIa da CuCIna
BásCula de COCIna
Instrucciones de utilización y de seguridad
BIlanCIa da CuCIna
Indicazioni per l’uso e per la sicurezza
Balança de COzInHa
Instruções de utilização e de segurança
KItCHen sCale
Operation and Safety Notes
KüCHenWaaGe
Bedienungs- und Sicherheitshinweise
IAN 107261
Page 2

ES Instrucciones de utilización y de seguridad Página 4
IT / MT Indicazioni per l’uso e per la sicurezza Pagina 19
PT Instruções de utilização e de segurança Página 34
GB / MT Operation and Safety Notes Page 49
DE / AT / CH Bedienungs- und Sicherheitshinweise Seite 63
Page 3
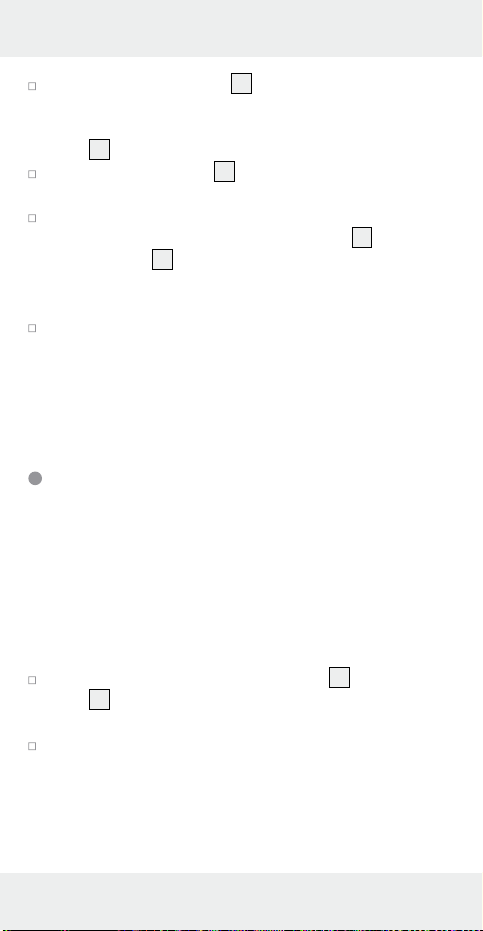
A
1
2
7
6 4
5
B
3
8
9
3
Page 4

Uso adecuado ................................................Página 5
Descripción de las piezas ...................... Página 5
Características técnicas ........................... Página 5
Volumen de suministro ........................... Página 6
Indicaciones de seguridad
Indicaciones generales de seguridad ................... Página 6
Indicaciones de seguridad sobre las pilas ........... Página 9
Antes de poner en funcionamiento
Colocar / quitar las pilas .......................................Página 10
Ajustar la hora ........................................................ Página 11
Cómo instalar la balanza ...................................... Página 11
Foma de utilización
Cómo ajustar la unidad de medida y pesar ........ Página 12
Cómo pesar con la función TARA ......................... Página 13
Retirar parte del producto pesado .......................Página 14
Ajustar el temporizador ......................................... Página 14
Salir del modo “peso” ........................................... Página 15
Indicación de temperatura .................................... Página 15
Solucionar problemas ............................. Página 16
Limpieza, cuidados
y conservación ............................................... Página 16
Deshecho del producto ........................... Página 17
Garantía .............................................................. Página 18
4 ES
Page 5
Báscula de cocina
Uso adecuado
Este aparato está diseñado para pesar alimentos en pequeñas
cantidades, ya que está pensado para un uso doméstico. La
balanza digital de cocina sirve para pesar líquidos o sustancias
sólidas que no sean corrosivos ni abrasivos. El producto está
diseñado para su uso en el ámbito doméstico, no está concebido
para fines médicos o comerciales.
Descripción de las piezas
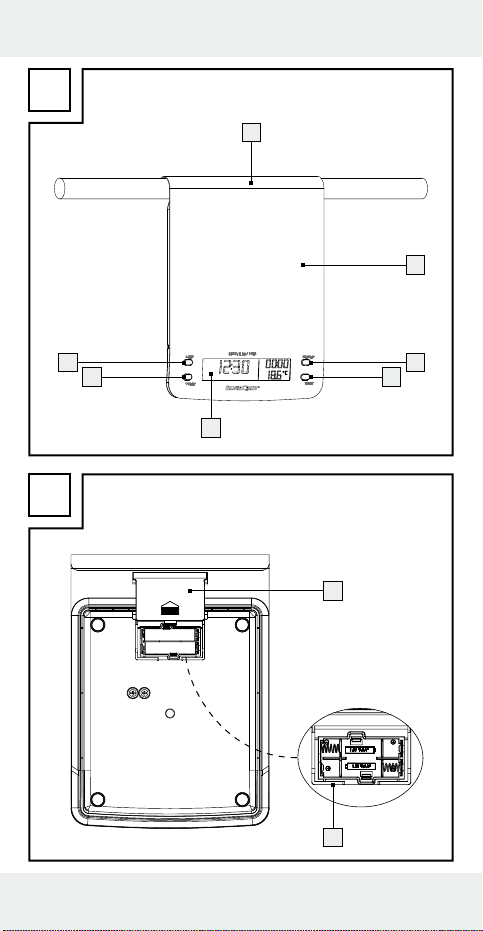
1
Gancho
2
Plato de pesaje
3
Botón ON / OFF (encendido / apagado)
4
Botón T-SET (temporizador / ajuste de la hora)
5
Pantalla LCD
6
Botón ▼UNIT (ajuste unidad de medida)
7
Botón ▲Z / T (cero / tara)
8
Tapa del compartimento para pilas
9
Compartimento para pilas
Características técnicas
Fuente de alimentación: 2 x 1,5 V AAA
Indicación de temperatura: 0–40 °C, con una tolerancia
de ±2 °C
Rango de pesado: 0–5000 g, capacidad de
lectura 1 g
5 ES
Page 6

Volumen de suministro
1 balanza digital de cocina
2 pilas 1,5 V
1 manual de instrucciones
AAA
Indicaciones de seguridad
¡CONSERVE TODAS LAS INDICACIONES DE SEGURIDAD Y ADVERTENCIAS
POR SI NECESITA CONSULTARLAS
MÁS ADELANTE!
Indicaciones generales
de seguridad
¡PELI-
GRO DE MUERTE O ACCI-
DENTE PARA BEBÉS Y NIÑOS!
Nunca deje a los niños con el material
de embalaje sin vigilancia. Existe peligro de asfixia. A menudo, los niños no
son conscientes del peligro. Mantenga el
material de embalaje fuera del alcance
de los niños.
6 ES
Page 7

¡PELIGRO DE
MUERTE! Las pilas podrían ser ingeri-
das, lo cual podría resultar mortal. Si se
ingiriese una pila, habría que solicitar
asistencia médica inmediatamente.
Este producto puede ser utilizado por
niños mayores de 8 años, así como por
personas con capacidades físicas, sensoriales o mentales reducidas o que
cuenten con poca experiencia y/o falta
de conocimientos, siempre y cuando se
les haya enseñado cómo utilizar el aparato de forma segura y hayan comprendido los peligros que pueden resultar
de un mal uso del mismo. No permita
que los niños jueguen con el aparato.
La limpieza y el mantenimiento no
podrán llevarse a cabo por niños sin
vigilancia.
¡PRECAUCIÓN! No cargue la
5 kg
balanza con más de 5 kg. El
producto podría dañarse.
Proteja el producto de carga / descarga
electrostática. Esto podría causar el
7 ES
Page 8
impedimento de intercambio de datos, lo
que produciría fallos en la pantalla LCD.
Antes de utilizar el producto compruebe
la integridad del mismo. De ninguna
manera ponga en funcionamiento un
aparato averiado.
Bajo ninguna
circunstancia debe abrir la carcasa del
producto. Esto puede producir lesiones
y / o daños en el producto. Las reparaciones deben ser realizadas únicamente
por personal técnico electricista.
Asegúrese de que todo el que utilice el
producto haya leído en primer lugar el
manual de instrucciones y que está capacitado para usarlo de forma segura.
Coloque la balanza sobre una base
plana, horizontal y fija.
Las funciones del producto pueden
verse obstruidas por campos de interferencias magnéticos. Si ocurriera esto,
retire brevemente las pilas del aparato y
vuelva a colocarlas.
8 ES
Page 9
¡APTO PARA ALIMENTOS!
Este producto no afecta al sabor
ni al olor de los alimentos.
Indicaciones de seguridad
sobre las pilas
Retire las pilas del aparato si no va a
utilizarlo durante un período de tiempo
prolongado.
¡PRECAUCIÓN! ¡PELIGRO DE EX-
PLOSIÓN! ¡Nunca recargue las pilas!
¡Al colocar las pilas asegúrese de que
la polaridad sea la correcta! Esta está
indicada en el compartimento de las
pilas.
En caso de que sea necesario, limpie
los contactos de las pilas y del aparato
antes de colocar las pilas.
Extraiga siempre inmediatamente las
pilas agotadas del aparato. ¡Existe un
alto riesgo de sulfatación!
¡Las pilas no deben desecharse junto
con la basura doméstica!
9 ES
Page 10
Todos los usuarios están obligados por
ley a desechar las pilas de forma adecuada.
Mantenga las pilas fuera del alcance
de los niños, no las tire al fuego, no las
ponga en cortocircuito y no intente
desmontarlas.
De no observarse estas indicaciones,
las baterías podrían descargarse más
allá de su tensión final. En este caso
existe riesgo de sulfatación. En caso de
que se haya derramado el líquido de las
pilas dentro del aparato, sáquelas inmediatamente para evitar daños en el
mismo.
Evite el contacto con la piel, ojos y mu-
cosas. Si entra en contacto con el ácido
de las pilas, lave la parte afectada con
abundante agua y / o consulte con un
médico.
Antes de poner en funcionamiento
Colocar / quitar las pilas
Retire la tapa del compartimento de las pilas 8 de la
parte inferior del producto.
10 ES
Page 11
Si es necesario, saque las pilas usadas.
Coloque dos pilas 1,5 V AAA en el compartimento
de las pilas
9
.
Nota: Asegúrese de que la polaridad es la correcta.
Esta está indicada en el compartimento de las pilas.
Vuelva a cerrar el compartimento de las pilas.
El aparato se encuentra en modo “hora” y está listo para
usarse.
Ajustar la hora
Antes de utilizarlo por primera vez y cada vez que cambie las
pilas tendrá que ajustar la hora.
Una vez que coloque las pilas el indicador de las horas
empezará a parpadear. Pulse el botón ▲Z / T
botón ▼UNIT
6
para ajustar la hora.
Pulse el botón T-SET 4 para pasar al indicador de los
minutos.
Pulse el botón ▲Z / T o el botón ▼UNIT para ajustar los
minutos.
Pulse el botón T-SET. Ya está ajustada la hora.
Nota: si necesita volver a cambiar la hora pulse prolon-
gadamente el botón T-SET hasta que el indicador de las
horas empiece a parpadear. Siga el mismo procedimiento indicado anteriormente.
7
o el
Cómo instalar la balanza
Coloque el aparato sobre una superficie plana y antides-
lizante.
Nota: ya que las superficies de los muebles están com-
puestas de muy diversos materiales y se tratan con
11 ES
Page 12
diferentes tipos de productos, no podemos garantizar que
alguno de estos compuestos no dañen o reblandezcan
los pies de goma de la balanza. Si es necesario puede
colocar una superficie antideslizante bajo los pies del
aparato.
Nota: retire el plástico protector del plato de pesaje
2
Foma de utilización
Cómo ajustar la unidad
de medida y pesar
Puede elegir entre el sistema métrico o el sistema anglosajón de
unidades. Para pesar de 0 a 999 g se utilizará el gramo como
unidad de medida y para pesar de 0 a 15,9 oz se utilizará la
onza. Para pesar a partir de 1000 g se utilizará el kilo como
unidad de medida y a partir de 16 oz se mostrará el peso en
lb:oz. Además también se pueden pesar líquidos pulsando el
botón ▼UNIT
Usando el sistema métrico:
– Milimetros (ml) de agua: aparecerá la palabra
– Millimetros (ml) de leche: aparecerá la palabra
6
.
“WATER” en la
pantalla LCD.
“MILK” en la pantalla
LCD.
.
Usando el sistema anglosajón de unidades:
– Onza líquida (fl. oz) para agua: aparecerá la palabra
“WATER” en la
pantalla LCD.
– Onza líquida (fl. oz) para leche: aparecerá la palabra
“MILK” en la pantalla
LCD.
12 ES
Page 13
Pulse el botón ON / OFF 3. El aparato está en modo
“peso”. Podrá ver la unidad de medida seleccionada
debajo o a la derecha del indicador de peso en la pantalla
5
LCD
.
Pulse el botón ▼UNIT 6 durante 2 segundos para
modificar la unidad de medida (g / lb‘oz).
La pantalla LCD marcará un peso de “0”. Coloque un
recipiente adecuado en el plato de pesaje
botón ▲Z / T
7
. La pantalla LCD volverá a marcar un
2
y pulse el
peso de “0”. La balanza no tendrá en cuenta el peso del
recipiente.
Coloque el producto que quiera pensar en el recipiente.
La pantalla LCD mostrará el peso de este producto.
Nota: la pantalla LCD volverá al modo “hora” si después
de 2 minutos no se ha pulsado ningún botón o si el peso
del producto no ha cambiado.
Cómo pesar con la función TARA
Puede volver a poner la balanza a “0” para seguir pesando
otros productos.
Nota: podrá ver un símbolo con forma de circulo a la izquierda
de la pantalla cuando encienda el aparato. Esto significa que
el indicador de peso está a cero. El símbolo desaparecerá en
cuanto empiece a utilizar la función TARA.
Para ello pulse una vez el botón ▲Z / T 7. En la pantalla
5
LCD
aparecerá la palabra “TARE”. La pantalla LCD
volverá a marcar un peso de “0”.
Coloque en el recipiente el siguiente producto que quiera
pesar. La pantalla LCD mostrará el peso del nuevo producto.
Nota: puede repetir estos pasos tantas veces como desee.
Nunca pesé más de 5 kg en la balanza.
13 ES
Page 14
Retire el recipiente con el producto del plato de pesaje.
Pulse el botón ▲Z / T. La pantalla LCD volverá a marcar
un peso de “0”.
Retirar parte del producto pesado
Pulse el botón ▲Z / T 7. En la pantalla LCD 5 aparecerá
la palabra “TARE”. La pantalla LCD volverá a marcar un
peso de “0”.
Saque la cantidad que desee del producto que ya ha
pesado. El peso que ha retirado aparecerá en la pantalla
de la balanza con un valor negativo.
Nota: puede repetir estos pasos tantas veces como desee.
Retire el recipiente con el producto del plato de pesaje.
Pulse el botón ▲Z / T. La pantalla LCD volverá a marcar
un peso de “0”.
Ajustar el temporizador
Puede utilizar el temporizador tanto en el modo “hora” como
en el modo “peso”. Establezca la duración que desee con el
temporizador. Una vez pase el tiempo establecido la balanza
emitirá una señal sonora. El temporizador se muestra como
una cuenta atrás.
Pulse una vez el botón T-SET 4 si la balanza está en
modo “hora” o dos veces si está en modo “peso”. En la
pantalla LCD
5
aparecerá un símbolo con forma de
campana.
Nota: con el temporizador puede ajustar los segundos
con precisión. Pulse prolongadamente el botón ▲Z / T
o el botón ▼UNIT
6
para que el indicador de tiempo
avance más rápido.
14 ES
7
Page 15
Pulse el botón ▲Z / T o el botón ▼UNIT, para que el
indicador de tiempo avance 10 minutos.
Pulse una vez el botón T-SET. Pulse el botón ▲Z / T o el
botón ▼UNIT para que el indicador de tiempo avance
1 minuto.
Pulse una vez el botón T-SET. Pulse el botón ▲Z / T o el
botón ▼UNIT para que el indicador de tiempo avance
10 segundos.
Pulse una vez el botón T-SET. Pulse el botón ▲Z / T o el
botón ▼UNIT para que el indicador de tiempo avance
1 segundo.
Pulse el botón T-SET para comenzar la cuenta atrás del
temporizador.
Nota: puede reiniciar el temporizador. Para ello pulse
el botón T-SET.
Una vez haya pasado el tiempo indicado en el tempori-
zador escuchará una señal. Para apagar la señal pulse
cualquier botón.
Salir del modo “peso”
Nota: el aparato se cambiará automáticamente al modo
“hora” si permanece inutilizado durante unos 2 minutos.
Pulse el botón ON / OFF 3 para cambiar al modo
“hora” manualmente.
Indicación de temperatura
La temperatura se mostrará en °C en la zona inferior derecha
de la pantalla LCD
5
.
15 ES
Page 16
Solucionar problemas
– Si la pantalla 5 muestra error (“Err”) significa que la
balanza está sobrecargada. Retire el peso sobrante. Nunca
cargue la balanza con más de 5 kg.
– Si en la pantalla puede leer “Lo” significa que las pilas
están descargadas. Cambie las pilas.
Nota: la indicación “Lo” solo se muestra en el modo “peso”.
– Si la pantalla muestra la indicación “UNST” espere unos
segundos.
– Si el aparato no funciona como debería cambie las pilas.
Nota: El aparato contiene componentes electrónicos
sensibles. Por ello podría sufrir interferencias por otros
equipos de transmisión por radio que se encuentren en
las proximidades. Si se muestran indicaciones de error en
la pantalla, retire aparatos de este tipo que se encuentren
en las inmediaciones. Las descargas electrostáticas pueden
provocar perturbaciones en el funcionamiento. En caso
de producirse este tipo de anomalías, retire unos instantes
las pilas e introdúzcalas de nuevo.
Limpieza, cuidados y conservación
Nota: para una buena conservación del aparato puede
utilizar el gancho
1
para colgarlo en la pared (ver fig. A).
No utilice en ningún caso líquidos o productos de limpieza,
ya que estos dañarían el aparato.
Limpie el aparato sólo por fuera y con un paño suave,
seco y sin pelusas.
Si el aparato está muy sucio puede utilizar un paño y agua
con jabón o un producto especial para limpiar acero.
16 ES
Page 17
Deshecho del producto
El embalaje está compuesto por materiales no
contaminantes que pueden ser eliminados en el
centro de reciclaje local.
Para obtener información sobre las posibilidades de deshacerse
del producto cuando ya no sirva, acuda a la administración
de su comunidad o ciudad.
En beneficio del medio ambiente no tire el producto
junto con la basura doméstica cuando ya no le
sea útil. Deséchelo adecuadamente. Diríjase a la
administración competente para obtener información
sobre los puntos de recogida de residuos y sus horarios.
Las pilas defectuosas o usadas deben reciclarse según lo
indicado en la directiva 2006 / 66 / EC. Para ello devuelva
las pilas y / o el aparato en los puntos de recogida indicados.
¡Daños en el medio ambiente por
un reciclaje indebido de las pilas!
Pb
Las pilas no deben eliminarse junto con los residuos domésticos.
Pueden contener metales pesados tóxicos que deben tratarse
conforme a la normativa aplicable a los residuos especiales. Los
símbolos químicos de los metales pesados son: Cd = Cadmio,
Hg = Mercurio, Pb = Plomo. Las pilas deben reciclarse en un
punto de recolección específico para ello.
17 ES
Page 18
Garantía
El aparato ha sido fabricado cuidadosamente siguiendo
exigentes normas de calidad y ha sido probado antes de su
entrega. En caso de defecto del producto, usted tiene derechos legales frente al vendedor del mismo. Nuestra garantía
(abajo indicada) no supone una restricción de dichos derechos legales.
Este aparato tiene una garantía de 3 años a partir de la fecha de compra. El plazo de garantía comienza a partir de la
fecha de compra. Por favor, conserve adecuadamente el justificante de compra original. Este documento se requerirá como
prueba de que se realizó la compra.
Si en el plazo de tres años a partir de la fecha de compra se
produce un fallo de material o fabricación en este producto,
repararemos el producto o lo sustituiremos gratuitamente por
un producto nuevo (según nuestra elección). La garantía quedará anulada si el producto resulta dañado o es utilizado o
mantenido de forma inadecuada.
La garantía cubre defectos de materiales o de fabricación.
Esta garantía no cubre aquellos componentes del producto
sometidos a un desgaste normal y que, por ello, puedan considerarse piezas de desgaste (por ej. las pilas). Tampoco cubre daños de componentes frágiles como, por ejemplo, los
interruptores, baterías y piezas de cristal.
18 ES
Page 19

Utilizzo conforme all’impiego .......... Pagina 20
Descrizione dei componenti ...............Pagina 20
Dati Tecnici ......................................................... Pagina 20
Fornitura .............................................................Pagina 21
Avvertenze di sicurezza
Avvertenze generali di sicurezza .......................... Pagina 21
Avvertenze di sicurezza per le batterie ................ Pagina 24
Prima della messa in funzione
Inserimento / sostituzione delle batterie ................ Pagina 25
Impostazione dell’orario ........................................ Pagina 26
Posizionare l’apparecchio ..................................... Pagina 26
Uso
Impostazione dell’unità di misura e pesatura ......Pagina 27
Pesare il prodotto (funzione taratura) ................... Pagina 28
Rimuovere il prodotto pesato ................................ Pagina 28
Impostazione Timer ................................................ Pagina 29
Disattivazione della funzione di pesatura ............ Pagina 30
Visualizzazione della temperatura .......................Pagina 30
Rimozione degli errori ............................ Pagina 30
Pulizia, manutenzione e custodia ..... Pagina 31
Smaltimento ..................................................... Pagina 31
Garanzia ............................................................. Pagina 32
19 IT/MT
Page 20
Bilancia da cucina
Utilizzo conforme all’impiego
Questo apparecchio è destinato alla pesatura di determinate
quantità di alimenti in ambiente domestico e dispone anche
di una funzione di taratura. La bilancia digitale da cucina è
destinata alla pesatura di liquidi non corrosivi, aggressivi o
abrasivi e solidi. Il prodotto è previsto esclusivamente per uso
personale, non per l’utilizzo commerciale o in ambito medico.
Descrizione dei componenti
1
Staffa di sospensione
2
Piatto della bilancia
3
Tasto sensore ON- / OFF
4
Tasto T-SET (Impostazione Timer / ora)
5
Display LC
6
Tasto ▼°UNIT (commutatore unità di misura)
7
Tasto ▲°Z / T (ZERO / TARA)
8
Coperchio vano pile
9
Vano pile
Dati Tecnici
Alimentazione: 2 pile x 1,5 V AAA
Indicatore di temperatura: 0–40 °C, con una tolleranza
di ±2 °C
Range di pesatura: 0–5000 g, in passi da 1 g
20 IT/MT
Page 21
Fornitura
1 Bilancia da cucina digitale
2 Batterie 1,5 V
1 Manuale di istruzioni
AAA
Avvertenze di sicurezza
CONSERVARE TUTTE LE ISTRUZIONI DI
SICUREZZA E TUTTI GLI AVVISI PER IL
FUTURO!
Avvertenze generali
di sicurezza
PERI-
COLO PER L’INCOLUMITÀ
DEI BAMBINI! Non lasciare mai i
bambini incustoditi con il materiale per
imballaggio. Sussiste un pericolo di
soffocamento a causa di tale materiale.
Spesso, i bambini sottovalutano i pericoli. Tenere il materiale per imballaggio
sempre fuori della portata dei bambini.
PERICOLO DI
MORTE! L’eventuale ingestione di batte-
rie può rappresentare un pericolo
21 IT/MT
Page 22
mortale. Qualora una batteria sia stata
ingerita, chiedere subito l’intervento di
un medico.
Quest‘apparecchio può essere utiliz-
zato da bambini di età superiore agli
8 anni, da persone con capacità fisiche,
sensoriali o mentali ridotte o da persone
inesperte solo se supervisionate o preventivamente istruite sull’utilizzo in sicurezza del prodotto e solo se informate
dei pericoli legati al prodotto stesso.
Non lasciare che i bambini giochino
con l‘apparecchio. La pulizia e la manutenzione non devono essere eseguite
dai bambini senza supervisione.
ATTENZIONE! Non caricare
5 kg
la bilancia con un peso superiore ai 5 kg. Il prodotto potrebbe venire
danneggiato.
Evita cariche / scariche elettrostatiche.
Queste possono causare un impedimento dello scambio di dati interni e
quindi generare errori nel display LC.
Prima dell’uso, controllare che il prodotto
non sia danneggiato. Non mettete in
22 IT/MT
Page 23
nessun caso in funzione un apparecchio
danneggiato.
Non aprire mai
l‘alloggiamento del prodotto. Ciò potrebbe
portare a pericolo di lesioni e / o danni
al prodotto. Fare eseguire eventuali riparazioni solamente da un elettricista.
Assicurarsi che tutti gli utilizzatori del
prodotto abbiano letto le istruzioni e
siano in grado di utilizzare il prodotto in
modo sicuro.
Posizionare l’apparecchio su una base
piana, stabile e orizzontale.
Le funzioni del prodotto potrebbero
essere disattivate a causa dalle interferenze magnetiche. In questo caso, rimuovere le batterie per un tempo breve
e reinserirle.
IDONEO PER ALIMENTI! Le
caratteristiche del sapore e
dell‘odore non vengono pregiu-
dicate mediante questo prodotto.
23 IT/MT
Page 24
Avvertenze di sicurezza
per le batterie
Rimuovere le batterie dall’apparecchio
se non vengono utilizzate per molto
tempo.
ATTENZIONE! PERICOLO DI
ESPLOSIONE! Non ricaricare mai le
batterie!
Prestare attenzione alla polarità corretta
delle batterie quando esse vengono inserite! Questa viene indicata sullo scompartimento batteria.
Se necessario, pulire i contatti della
batteria e dell’apparecchio prima di
inserire le batterie.
Rimuovere immediatamente le batterie
esaurite dall’apparecchio. Persiste il
pericolo di perdite!
Non smaltire le batterie nei rifiuti dome-
stici!
Ogni consumatore è obbligato ai
termini di legge a smaltire la batteria
secondo le regole vigenti!
24 IT/MT
Page 25

Tenere le batterie fuori dalla portata dei
bambini, non gettare le batterie nel
fuoco, non cortocircuitarle e non aprirle.
In caso di inosservanza delle indicazioni
le batterie potrebbero scaricarsi oltre la
tensione finale. Persiste il pericolo di
perdite. Se le batterie inserite nel vostro
apparecchio dovessero aver perso del
liquido, rimuoverle subito per prevenire
danni all’apparecchio!
Evitare il contatto con pelle, occhi e
mucose. In caso di contatto con l’acido
della batteria, sciacquare abbondantemente il punto interessato e / o consultare un medico!
Prima della messa in funzione
Inserimento / sostituzione delle batterie
Rimuovere il coperchio del vano pile 8 nella parte
posteriore del prodotto.
Rimuovere le batterie eventualmente scariche.
Inserire 2 batterie AAA da 1,5 V nel vano pile 9.
Nota: fare attenzione alla polarità corretta delle pile.
Questa viene indicata sullo scompartimento batteria.
Chiudere nuovamente il vano portabatterie.
L’apparecchio si trova in modalità ora ed è pronto per l’uso.
25 IT/MT
Page 26

Impostazione dell’orario
Prima del primo utilizzo e dopo la sostituzione delle batterie,
è necessario impostare l’ora.
Il display con l’indicazione delle ore lampeggia non
appena le batterie vengono inserite. Premere il tasto sensore
7
▲Z / T
Premere il tasto T-SET 4 per passare alla visualizzazione
dei minuti.
Premere il tasto ▲Z / T o il tasto▼UNIT, per ottenere
l’impostazione dei minuti.
Premere il tasto T-SET. L’orario è impostato.
Nota: se fosse necessario modificare l’ora, tenere pre-
muto il tasto sensore T-SET fino a quando l’indicazione
dell’ora lampeggia. Procedere come descritto.
o il tasto ▼UNIT 6 per impostare l’ora.
Posizionare l’apparecchio
Collocare la bilancia su una superficie piana e antisdrucciolo.
Nota: poiché le superfici dei mobili sono costituite da
diversi materiali e vengono trattati con i più svariati prodotti
per la cura, non si può escludere completamente che alcune
di queste sostanze contengano componenti in grado di
aggredire e deteriorare i piedini di gomma. Collocare
eventualmente una superficie antisdrucciolo sotto i piedi
dell’apparecchio.
Nota: Rimuovere la pellicola di copertura dal piatto
della bilancia
2
.
26 IT/MT
Page 27

Uso
Impostazione dell’unità
di misura e pesatura
Si può scegliere tra il sistema metrico decimale e quello angloamericano. Da 0 g a 999 g l’unità viene visualizzata in g, da
0 oz a -15,9 oz viene visualizzata in oz. Da 1000 g l’unità
viene visualizzata in kg, da 16 oz viene visualizzata in lb:oz.
Inoltre, si possono pesare liquidi premendo il tasto ▼UNIT
6
.
Nel sistema metrico:
– millimetri (ml) acqua: la dicitura “WATER” appare
sul display LC.
– millimetro (m) latte: la dicitura “MILK” compare
sul display LC.
Nel sistema angloamericano:
– once liquide (fl ´oz) acqua: la dicitura “WATER” appare
sul display LC.
– once liquide (fl ´oz) latte: la dicitura ”MILK” compare
sul display LC.
Premere il tasto ON / OFF 3. L’apparecchio si trova in
modalità peso. L’unità di misura impostata compare sotto o a
destra accanto all’indicazione del peso nel display LC
Tenere premuto il tasto ▼UNIT 6 per circa 2 secondi
per cambiare l’unità di misura (g / lb‘oz).
Nel display LC la bilancia indica peso “0” . Collocare
sul piatto della bilancia
idoneo e premere il tasto ▲Z / T
visualizzato nuovamente peso “0”. Il peso del recipiente /
contenitore non viene visualizzato.
Versare il prodotto da pesare nel recipiente / contenitore.
Il display LC visualizzerà il peso del prodotto da pesare.
2
un recipiente / contenitore
7
. Sul display LC verrà
5
.
27 IT/MT
Page 28

Nota: L’indicazione del display LC passa nuovamente
alla modalità ora se dopo circa 2 minuti non si premono
tasti o se non si pesa nulla.
Pesare il prodotto (funzione taratura)
Per pesare altre quantità è possibile posizionare nuovamente
la bilancia su “0”.
Nota: sul display LC compare a sinistra un simbolo circolare
non appena l’apparecchio viene acceso. Adesso l’indicatore
si trova nella posizione standard zero. Il simbolo circolare svanisce non appena si utilizza la funzione taratura.
Premere una volta il tasto ▲Z / T 7. L’indicatore “TARE”
appare sul display LC
sul display LC.
Versare l’altra quantità da pesare nel contenitore / reci-
piente. Sul display LC si visualizza il peso del prodotto.
Nota: è possibile ripetere il processo più volte. Tuttavia,
non collocare mai più di 5 kg sulla bilancia.
Rimuovere il recipiente / il contenitore dal piatto della
bilancia. Premere il tasto ▲°Z / T. La bilancia indica un
peso “0” sul display LC.
5
. La bilancia indica un peso “0”
Rimuovere il prodotto pesato
Premere il tasto ▲Z / T 7. La dicitura “TARE” appare sul
display LC
Prelevare la quantità desiderata di prodotto pesare. La
quantità di prodotto prelevato è indicata sul display LC
come valore negativo.
Nota: è possibile ripetere il processo più volte.
28 IT/MT
5
. La bilancia indica un peso “0” sul display LC.
Page 29

Rimuovere il recipiente / contenitore e il prodotto da pesare
dal piatto della bilancia. Premere il tasto ▲°Z / T. La bilancia
indica un peso “0” sul display LC.
Impostazione Timer
Il timer può essere utilizzato in modalità ora o di pesatura. Il
timer permette di impostare un determinato periodo di tempo.
Allo scadere di questo periodo impostato, viene emesso un
segnale acustico. Il tempo impostato scorre a ritroso.
Premere il tasto T-SET-Taste 4 una volta in modalità ora e
7
o il tasto
5
appare
due volte in modalità pesatura. Sul display LC
il simbolo della campanella.
Nota: è possibile impostare l’orario con precisione al
secondo. Tenere premuto il tasto ▲Z / T
▲UNIT
6
affinché l’indicatore del tempo sul display LC
scorra più velocemente.
Premere il tasto ▲Z / T o ▼ il tasto UNIT per impostare la
decina di minuti desiderata.
Premere il tasto T-SET una volta. Premere il tasto ▲Z / T o
il tasto ▲UNIT per impostare l’unità di minuti desiderata.
Premere il tasto T-SET-una volta. Premere il tasto ▲Z / T- o
▲UNIT per impostare la decina di secondi desiderata.
Premere una volta il tasto T-SET Premere il tasto ▲Z / T- o
▲UNIT per impostare l’unità di secondo desiderata.
Premere il tasto T-SET per iniziare il countdown.
Nota: è possibile azzerare il timer. A tale scopo, premere
il tasto T SET.
Se il tempo impostato è scaduto, viene emesso un segnale
acustico. Spegnere il segnale acustico premendo un
qualsiasi tasto sensore.
29 IT/MT
Page 30

Disattivazione della funzione di pesatura
Nota: L’apparecchio passa automaticamente alla modalità
ora se non è utilizzato per 2 minuti.
Premere il tasto ON- / OFF 3, per passare manualmente
alla modalità ora.
Visualizzazione della temperatura
Il display LC 5 mostra la temperatura in °C in basso a destra.
Rimozione degli errori
– Se il display LC 5 mostra “Err” significa che la bilancia
è sovraccarica. Rimuovere il prodotto da pesare. Non
pesare mai più di 5 kg sulla bilancia.
– Se il display LC mostra “Lo”, le batterie si scaricano.
Sostituire le pile.
Nota: La dicitura “Lo” appare soltanto in modalità peso.
– Se il display LC mostra “UNST”,aspettare alcuni secondi.
– Se l’apparecchio non funziona come previsto, sostituire le
batterie.
Nota: L’apparecchio contiene componenti elettronici sen-
sibili. E’ quindi possibile che apparecchi di trasmissione
radio eventualmente posti nelle immediate vicinanze lo
disturbino. Qualora sul display si visualizzassero errori,
rimuovere tali apparecchi dalle immediate vicinanze
dell’apparecchio. Scariche elettrostatiche possono provocare disturbi di funzionamento. In caso di tali disturbi di
funzionamento rimuovere brevemente le batterie e in
seguito inserirle di nuovo.
30 IT/MT
Page 31

Pulizia, manutenzione e custodia
Indicazione: per conservare la bilancia, sospenderla tramite
l’apposito dispositivo di sospensione
A).
Non fare mai uso di liquidi e di detergenti che potrebbero
danneggiare l’apparecchiatura.
Pulire l’apparecchio solo esternamente con un panno sof-
fice, asciutto e privo di peli.
In caso di sporco ostinato, utilizzare un panno inumidito
con acqua e sapone o utilizzare un detergente speciale
per l’acciaio inox.
1
integrato (vedi figura
Smaltimento
L’imballaggio è composto da materiali ecologici
che possono essere smaltiti presso i siti di
riciclaggio locali.
Informarsi presso l’amministrazione comunale o locale circa le
possibilità di uno smaltimento non dannoso per l’ambiente.
Non gettare il prodotto usurato tra i rifiuti domestici
ma, per motivi di tutela dell’ambiente, provvedere
al suo corretto smaltimento. Per conoscere gli orari
di accesso e i centri di raccolta rivolgersi all’amministrazione locale competente in materia.
Le batterie difettose o usate devono essere riciclate ai sensi della
Direttiva 2006 / 66 / EC. Smaltire le batterie e / o l’apparecchio
presso i punti di raccolta indicati.
31 IT/MT
Page 32

Vi possono essere conseguenze negative
per l’ambiente a seguito di uno smaltimento
Pb
non corretto delle batterie!
Le batterie non devono essere smaltite nei rifiuti domestici.
Possono contenere una varietà di metalli pesanti tossici da
smaltire come rifiuti tossici. I simboli chimici dei metalli pesanti
sono i seguenti: Cd = Cadmio, Hg = mercurio, Pb = piombo.
Consegnare quindi le batterie usate presso un punto di raccolta
comunale.
Garanzia
L‘apparecchio è stato prodotto secondo severe direttive di
qualità e controllato con premura prima della consegna. In
caso di difetti del prodotto, l‘acquirente può far valere i propri
diritti legali nei confronti del venditore. Questi diritti legali non
vengono limitati in alcun modo dalla garanzia di seguito riportata.
Se entro tre anni dalla data di acquisto di questo prodotto si
rileva un difetto di materiale o di fabbricazione, il prodotto
verrà riparato o sostituito gratuitamente, a nostra discrezione.
Il termine di garanzia ha inizio a partire dalla data di acquisto. Conservare lo scontrino di acquisto originale in buone
condizioni. Questo documento servirà a documentare l‘avvenuto acquisto.
L‘apparecchio da Lei acquistato dà diritto ad una garanzia di
3 anni a partire dalla data di acquisto. La presente garanzia
decade nel caso di danneggiamento del prodotto, di utilizzo
o di manutenzione inadeguati.
32 IT/MT
Page 33

La prestazione di garanzia vale sia per difetti di materiale che
per difetti di fabbricazione. La presente garanzia non si
estende a parti del prodotto soggette a normale usura e che
possono essere identificate, pertanto, come parti soggette a
usura (p. es., le batterie), né a danni su parti staccabili, come
interruttore, batterie o simili, realizzate in vetro.
33 IT/MT
Page 34

Utilização correcta .....................................Página 35
Descrição das peças .................................. Página 35
Dados técnicos ............................................... Página 35
Material fornecido......................................Página 36
Indicações de segurança
Indicações gerais de segurança ........................... Página 36
Indicações de segurança referentes às pilhas ..... Página 39
Antes da utilização
Inserir / Substituir pilhas ......................................... Página 40
Ajustar a hora.........................................................Página 41
Instalar o aparelho ................................................Página 41
Operação
Configurar unidade de massa e pesar ................. Página 42
Função Tara (“tarar”) ............................................ Página 43
Retirar objectos pesados ....................................... Página 43
Regular temporizador ............................................ Página 44
Desligar a função de pesagem ............................. Página 45
Indicação de temperatura ..................................... Página 45
Resolução de problemas ......................Página 45
Limpeza, conservação,
armazenamento ..........................................Página 46
Eliminação .........................................................Página 46
Garantia .............................................................. Página 47
34 PT
Page 35

Balança de cozinha
Utilização correcta
Este aparelho destina-se à pesagem e pesagem adicional de
alimentos, em uso doméstico. A balança de cozinha serve
para determinar o peso e / ou o volume de líquidos ou sólidos
não agressivos, não corrosivos e não abrasivos. Este artigo
serve apenas para um uso pessoal e não foi concebido para
um uso medicinal ou comercial.
Descrição das peças
1
Cabide
2
Prato de pesagem
3
Botão ON / OFF (“LIGADO / DESLIGADO”)
4
Botão T-SET (Temporizador / definições do relógio)
5
Visor LC
6
▼Botão UNIT (“Ajuste da unidade de medição”)
7
▲Botão Z / T (Zero / Tara)
8
Tampa do compartimento das pilhas
9
Compartimento das pilhas
Dados técnicos
Alimentação da tensão: 2 x 1,5 V , AAA
Indicação de temperatura: 0–40 °C com uma tolerância
de ±2 °C
Amplitude de pesagem: 0–5000 g em intervalos de 1 g
35 PT
Page 36

Material fornecido
1 balança de cozinha digital
2 pilhas de 1,5 V
1 manual de instruções
AAA
Indicações de segurança
GUARDE TODAS AS INDICAÇÕES DE
SEGURANÇA E INSTRUÇÕES PARA FUTURAS UTILIZAÇÕES!
Indicações gerais
de segurança
PERIGO DE
MORTE E DE ACIDENTES
PARA BEBÉS E CRIANÇAS!
Nunca deixe crianças sem vigilância
com o material da embalagem. Existe
perigo de asfixia através do material de
embalagem. As crianças subestimam
frequentemente os perigos. Mantenha o
material da embalagem fora do
alcance das crianças.
36 PT
Page 37

PERIGO DE MORTE! As
pilhas podem ser engolidas, o que
constitui perigo de morte. Se uma pilha
for engolida, deve procurar imediatamente ajuda médica.
Ente aparelho pode ser utilizado por
crianças a partir dos 8 anos, assim
como por pessoas com capacidades
físicas, sensoriais ou mentais reduzidas
ou deficiências na experiência e.ou conhecimento se for vigiadas ou instruídas
em relação ao uso seguro do aparelho
e se compreenderem os perigos que
daí possam resultar. As crianças não
devem brincar com o aparelho. A limpeza e a manutenção de utilização não
devem ser realizadas por crianças sem
vigilância.
CUIDADO! Não sobrecarre-
5 kg
gue a balança com mais de
5 kg. O produto poderá ficar danificado.
Proteja o produto contra cargas / descar-
gas electroestáticas. Elas podem provocar um impedimento na troca de dados
37 PT
Page 38

interna, dando origem a uma mensagem
de erro no monitor LCD.
Antes da colocação em funcionamento,
verifique o produto quanto a danos.
Nunca coloque uma balança danificada em funcionamento.
Nunca abra a carcaça do
produto. Isto pode resultar em ferimen-
tos e em danos no produto. As reparações devem ser efectuadas apenas por
um electricista.
Certifique-se de que as pessoas que
utilizarem o produto leram o manual de
instruções e estão capacitadas a utilizá-lo
de forma segura.
Coloque a balança sobre uma superfí-
cie firme, plana e horizontal.
As funções do produto podem ser preju-
dicadas por campos magnéticos. Nesse
caso, retire brevemente as pilhas do
produto e volte a introduzi-las.
SEGURO PARA ALIMEN-
TOS! O sabor e o odor natural
dos alimentos não são afectados por
este artigo.
38 PT
Page 39

Indicações de segurança
referentes às pilhas
Retire as pilhas do aparelho se este não
for utilizado durante muito tempo.
CUIDADO! PERIGO DE EXPLOSÃO!
Nunca recarregue as pilhas!
Ao colocar as pilhas, tenha em atenção
a polaridade correcta! Esta é indicada
no compartimento das pilhas.
Se necessário, limpe os contactos das
pilhas e do aparelho antes da sua
colocação.
Retire de imediato as pilhas gastas do
aparelho. Existe um elevado risco de
derrame!
As pilhas não devem ser depositadas
no lixo doméstico!
Cada consumidor é legalmente obrigado
a eliminar correctamente as pilhas!
Mantenha as pilhas longe do alcance
das crianças, não as atire para o fogo,
proteja-as contra curto-circuitos e não
as desmonte.
As pilhas não devem ser depositadas
no lixo doméstico! Neste caso, existe
39 PT
Page 40

perigo de derrame. Caso as pilhas
comecem a derramar dentro do seu
aparelho, retire-as imediatamente, de
forma a evitar danos neste!
Evite o contacto com a pele, os olhos e
mucosas. No caso de contacto com o
ácido da pilha, lave a zona afectada
com bastante água e / ou consulte um
médico!
Antes da utilização
Inserir / Substituir pilhas
Remova a tampa do compartimento das pilhas 8 na
parte traseira.
Se necessário, retire as pilhas gastas.
Coloque duas pilhas 1,5 V (AAA) novas no comparti-
mento das pilhas
Nota: verifique se a polaridade é a correcta. Esta é
indicada no compartimento das pilhas.
Volte a fechar o compartimento de pilhas.
9
.
O aparelho encontra-se agora no modo de relógio e está
operacional.
40 PT
Page 41

Ajustar a hora
Antes da primeira utilização e após a mudança das pilhas é
necessário ajustar a hora.
O indicador de horas pisca mal tenham sido inseridas as
pilhas. Prima o botão ▲Z / T
para ajustar as horas.
Prima a tecla T-SET 4 para aceder à indicação dos
minutos.
Prima o botão ▲Z / T ou o botão ▼UNIT para ajustar
os minutos.
Prima o botão T SET. A hora está agora ajustada.
Nota: Coso precise re-ajustar a hora prima e mantenha
premido o botão T-SET, até piscar no visor a indicação
da hora. Siga o processo acima descrito.
7
ou o botão ▼UNIT 6
Instalar o aparelho
Coloque o aparelho numa superfície plana, antiderrapante.
Nota: Como a superfície de móveis é constituída pelos
mais diversos materiais e é tratada com os mais diversos
produtos, não se pode excluir a possibilidade de alguns
destes materiais conterem substâncias que agridam e
amoleçam os pés de borracha. Caso seja necessário
coloque uma base anti-derrapante por baixo dos pés
do aparelho.
Nota: remova a película protectora do prato de
pesagem
2
.
41 PT
Page 42

Operação
Configurar unidade de massa e pesar
Pode escolher entre o sistema métrico ou anglo-americano. A
amplitude de pesagem entre 0 g e 999 g é indicada na unidade
de massa g e de 0 oz a 15,9 oz em oz. A amplitude a partir
de 1000 g é indicada na unidade de massa kg e a partir de
16 oz em lb. Pode igualmente pesar líquidos premindo a tecla
6
UNIT
No sistema métrico:
– Milímetros (ml) Água: A indicação “WATER” surge
– Milímetros (ml) Leite: A indicação “MILK” surge no
No sistema anglo-americano:
– Onça líquida (fl.oz) Água: A indicação “WATER” surge
– Onça líquida (fl.oz) Leite: A indicação “MILK” surge no
.
no visor LC.
visor LC.
no visor LC.
visor LC.
Prima o botão ON / OFF 3. O aparelho encontra-se agora
no Modo de pesagem. A unidade de massa escolhida
surge do lado inferior direito ao lado da unidade de peso
no visor LC
Pressione e mantenha pressionado o botão UNIT 6 por
aprox. 2 segundos para mudar a unidade de peso (g / lb'oz).
No visor LC é indicado um peso de “0”. Coloque uma
taça / um recipiente adequado sobre o prato de pesagem 2
e prima a tecla ▲Z / T 7. No visor LC é novamente
indicado um peso de “0”. O peso da taça / do recipiente
não é indicado.
Coloque depois o produto a pesar na taça / no recipiente.
No visor LCD é indicado o peso do objecto.
5
.
42 PT
Page 43

Nota: A indicação no visor LC volta ao modo de relógio
se durante 2 minutos não for premida nenhuma tecla ou
o peso indicado não se alterar.
Função Tara (“tarar”)
Pode repor o aparelho repetidamente a “0” para pesar outros
objectos.
Nota: É apresentado um símbolo circular no visor LC quando
se liga o aparelho. A indicação encontra-se agora no ponto
neutro standard. O símbolo circular apaga-se logo que é usada
a função TARA.
Pressione para isso uma vez o botão ▲Z / T-7. Surge a
indicação “TARA” no visor LC
indicado um peso de “0”.
Coloque depois o seguinte produto a pesar na taça / no
recipiente. No visor LCD é indicado o peso do objecto
adicionado.
Nota: Pode repetir este processo múltiplas vezes. Não
coloque porém nunca mais do que 5 kg sobre o aparelho.
Remova a taça / o recipiente e os objectos pesados do
prato de pesagem. Prima o botão ▲Z / T. No visor LC é
novamente indicado um peso de “0”.
5
. No visor LC é novamente
Retirar objectos pesados
Prima o botão ▲Z / T 7. Surge a indicação “TARA” no
visor LC
de “0”.
Remova a quantidade desejada do objecto a pesar. O
peso do material retirado é indicado no visor LC como
valor negativo.
5
. No visor LC é novamente indicado um peso
43 PT
Page 44

Nota: Pode repetir este processo múltiplas vezes.
Remova a taça / o recipiente e os objectos pesados do
prato de pesagem. Prima o botão ▲°Z / T. No visor LC é
novamente indicado um peso de “0”.
Regular temporizador
O temporizador pode ser usado no Modo de relógio ou no
Modo de pesagem. Defina com o temporizador um tempo
específico. É emitido um sinal sonoro quando decorrido esse
tempo. O tempo escolhido decorre em forma de contagem
decrescente.
Prima a tecla T-SET 4 uma vez no Modo de relógio ou
duas vezes no Modo de pesagem. No visor LC
o símbolo de sino.
Nota: Pode ajustar o tempo ao segundo. Prima e mantenha
premido o botão ▲Z / T
7
, ou UNIT 6 para o tempo
no visor LC correr mais rapidamente.
Prima a tecla ▲Z / T ou UNIT para ajustar o tempo em
passos de 10 minutos.
Prima uma vez a tecla T-SET. Prima a tecla ▲Z / T ou
▼UNIT para ajustar o tempo em passos de 1 minuto.
Prima uma vez a tecla T-SET. Prima a tecla ▲Z / T ou
▼UNIT para ajustar o tempo em passos de 10 segundos.
Prima uma vez a tecla T-SET. Prima a tecla ▲Z / T ou
▼UNIT para ajustar o tempo em passos de 1 segundo.
Prima o botão T-SET para iniciar a contagem decrescente.
Nota: Pode repor o temporizador. Para tal prima o botão
T-SET.
Assim que a contagem decrescente chegar ao fim, é
emitido um sinal sonoro. Prima qualquer botão para
terminar o sinal sonoro.
5
aparece
44 PT
Page 45

Desligar a função de pesagem
Nota: O aparelho passa automaticamente ao Modo de
relógio se não o usar durante 2 minutos.
Prima a tecla ON / OFF 3 para voltar manualmente ao
Modo de relógio.
Indicação de temperatura
A temperatura é indicada no canto inferior direito do visor
5
LC
em °C .
Resolução de problemas
– Se o visor LC 5 indica “Err” o aparelho está sobrecarre-
gado. Remova a sobrecarga. Não coloque nunca mais
do que 5 kg sobre o aparelho.
– Se o visor LC indicar “Lo” as pilhas estão descarregadas.
Substitua as pilhas.
Nota: A indicação “Lo” surge apenas no Modo de
pesagem.
– Se o visor LC indicar “UNST”, espere alguns segundos.
– Se o aparelho não funcionar como esperado, troque as
pilhas.
Nota: O aparelho contém componentes electrónicos
sensíveis. Por isso, é possível que aparelhos com radiotransmissão na proximidade imediata deste interfiram
com o seu funcionamento. Caso surjam indicações de
erro no visor, afaste tais aparelhos da proximidade do
aparelho. Cargas electroestáticas podem causar interferências no funcionamento. No caso de interferências no
funcionamento deste tipo, retire as pilhas durante um
curto espaço de tempo e volte a colocá-las.
45 PT
Page 46

Limpeza, conservação, armazenamento
Nota: Pode guardar o aparelho usando o cabide 1 para o
pendurar (ver fig. A).
Nunca utilize líquidos ou detergentes, pois estes danificam
o aparelho.
Limpe o aparelho apenas por fora com um pano seco,
macio e sem fios.
Em caso de maior sujidade, utilize um pano com água e
sabão ou um detergente para aço inox.
Eliminação
A embalagem é feita de materiais não poluentes
que podem ser eliminados nos contentores de
reciclagem locais.
As possibilidades de reciclagem dos artigos utilizados poderão
ser averiguadas no seu Município ou Câmara Municipal.
Não deposite o produto utilizado no lixo doméstico,
a favor da protecção do ambiente. Elimine-o de
forma responsável. Pode informar-se no seu município sobre os locais de recolha adequados e o seu
período de funcionamento.
As pilhas avariadas ou gastas têm de ser recicladas de acordo
com a directiva 2006 / 66 / EC. Entregue as pilhas e / ou o
aparelho nos locais específicos destinados à sua recolha.
46 PT
Page 47

Danos ambientais devido à eliminação
incorrecta das pilhas!
Pb
As pilhas não podem ser eliminadas no lixo doméstico. Podem
conter metais pesados nocivos e estão sujeitas à regulação
de lixos tóxicos. Os símbolos químicos dos metais pesados
são os seguintes: Cd = cádmio, Hg = mercúrio, Pb = chumbo.
Como tal, deposite as pilhas utilizadas num ponto de recolha
adequado do seu município.
Garantia
O aparelho foi cuidadosamente fabricado segundo rigorosas
directivas de qualidade e meticulosamente testado antes da
sua distribuição. Em caso de falhas deste aparelho, possui direitos legais relativamente ao vendedor do aparelho. Os seus
direitos legais não estão limitados pela garantia representada
de seguida.
Tem sobre este aparelho 3 anos de garantia a partir da data
de compra. A validade da garantia inicia-se com a data de
compra. Guarde o talão da caixa como comprovativo da
compra. Esse documento é necessário para comprovar a
compra.
Caso num espaço de tempo de 3 anos a partir da data da
compra deste aparelho surja um erro de material ou de fabrico, o aparelho será reparado ou substituído por nós – segundo a nossa escolha – e sem qualquer custo. Esta garantia
expira se o aparelho estiver danificado, se não for devidamente utilizado ou se não for efectuada a devida manutenção.
47 PT
Page 48

A garantia é válida em caso de defeitos de material ou de
fabrico. Esta garantia não é extensível a componentes do produto que se desgastam com o uso e que, por isso, podem ser
consideradas peças de desgaste (por ex.º pilhas) ou a danos
em peças frágeis, por ex.º interruptores, baterias ou peças de
vidro.
48 PT
Page 49

Intended Use ...................................................... Page 50
Description of parts and features ..... Page 50
Technical data .................................................... Page 50
Scope of delivery............................................ Page 51
Safety advice
General Safety Instructions ...................................... Page 51
Safety instructions for batteries................................. Page 53
Before use
Inserting / replacing the batteries ............................. Page 55
Adjusting the time ...................................................... Page 55
Setting up the appliance ........................................... Page 56
Operation
Setting the units of weight and weighing ................. Page 56
Tare (TARE function) ................................................. Page 57
Removing weighed product ..................................... Page 58
Setting the timer ......................................................... Page 58
Switching off the weighing function ......................... Page 59
Temperature display ................................................. Page 59
Troubleshooting .............................................. Page 60
Cleaning, care and storage ................... Page 60
Disposal .................................................................. Page 61
Warranty ............................................................... Page 61
49 GB/MT
Page 50

Kitchen Scale
Intended Use
This product is suitable for weighing and tare weighing of typical
domestic quantities of foodstuffs. The digital kitchen scales are
used to determine the weight and / or volume of non-aggressive,
non-corrosive and non-abrasive liquids or solids. The product
is for private use only and is not intended for medical or
commercial use.
Description of parts and features
1
Suspension bracket
2
Balance tray
3
ON / OFF button
4
T-SET button (timer / adjustment of clock)
5
LC display
6
▼UNIT button (adjustment of the measurement unit)
7
▲Z / T button (ZERO / TARE)
8
Battery compartment cover
9
Battery compartment
Technical data
Power supply : 2 x 1.5 V AAA
Temperature display: 0–40 °C, to an accuracy of ±2 °C
Weighing range: 0–5000 g, in 1 g intervals
50 GB/MT
Page 51

Scope of delivery
1 Digital kitchen scale
2 Batteries 1.5 V
1 Operating manual
AAA
Safety advice
PLEASE RETAIN ALL SAFETY INFORMATION AND INSTRUCTIONS FOR
FUTURE REFERENCE!
General Safety Instructions
RISK OF
FATAL INJURY AND
ACCIDENTS FOR INFANTS AND
SMALL CHILDREN! Never leave chil-
dren unsupervised with the packaging
materials. The packaging material presents a danger of suffocation. Children
often underestimate dangers. Always
keep children away from the packaging
material.
RISK OF FATAL
INJURY! Batteries could be swallowed,
which could pose a lethal hazard. If a
51 GB/MT
Page 52

battery has been swallowed, seek
medical help immediately.
This appliance can be used by children
aged from 8 years and above and persons with reduced physical, sensory or
mental capabilities or lack of experience
and knowledge if they have been given
supervision or instruction concerning
use of the appliance in a safe way and
understand the hazards involved. Children
shall not play with the appliance. Cleaning and user maintenance shall not be
made by children without supervision.
CAUTION! Do not load the
5 kg
scales beyond 5 kg. Otherwise
the product may be damaged.
Protect the product from electrostatic
charge / discharge. This could hinder
the internal data exchange, which can
cause errors in the LC display readout.
Check the product for damage before
use. Never use a damaged product.
Never open the
housing of the product.
52 GB/MT
Page 53

This can result in injury and damage to
the product. Repairs must only be carried out by a qualified electrician.
Make sure that anyone intending to use
the product has read the operating
manual and is capable of operating the
product safely.
Place the product on a solid, horizontal
and flat surface.
Magnetic fields may cause the product to
function incorrectly. If this happens, briefly
remove the batteries from the product
and then re-insert them.
FOOD SAFE! This product has
no adverse effect on taste or
smell.
Safety instructions
for batteries
Remove the batteries from the device if
they have not been used for a long period.
CAUTION! EXPLOSION HAZARD!
The batteries must never be recharged!
53 GB/MT
Page 54

When inserting the batteries, ensure the
correct polarity! This is shown inside the
battery compartment.
If necessary, clean the contacts on the
batteries and on the device itself before
inserting them.
Remove spent batteries immediately
from the device. There is an increased
danger of leaks!
Batteries must not be disposed of in the
normal domestic waste!
Every consumer is legally obliged to dis-
pose of batteries in the proper manner!
Keep batteries away from children; do
not throw them in the fire, short-circuit
them or take them apart.
If the above instructions are not complied
with, the batteries may discharge themselves beyond their minimum voltage.
There is then a danger of leaking. If the
batteries have leaked inside your appliance, you should remove them immediately in order to prevent damage to the
appliance!
54 GB/MT
Page 55

Avoid contact with the skin, eyes and
mucous membranes. Any parts of the
body coming into contact with battery
acid should be rinsed off with copious
amounts of water and / or contact a
doctor!
Before use
Inserting / replacing the batteries
Remove the battery compartment cover 8 from the
back of the appliance.
If necessary, remove the spent batteries.
Insert 2 x 1.5 V AAA batteries into the battery
compartment
Note: Ensure the correct polarity. This is shown inside
the battery compartment.
Close the battery compartment again.
The appliance is now in the time mode, and ready for use.
9
.
Adjusting the time
The clock must be adjusted before using for the first time and
after the batteries have been changed.
55 GB/MT
Page 56

As soon as the batteries have been inserted, the hour display
begins to flash. To set the hour press the ▲Z / T button
or the ▼UNIT button
Press the T-SET button 4, to go to the minute display.
Press the ▲Z / T button or ▼UNIT button to set the minutes.
Press the T-SET button. The clock is now set.
Note: If you need to reset the time, press and hold the
T-SET button until the time display flashes. Proceed as
described above.
6
.
Setting up the appliance
Place the appliance on a flat, non-slip surface.
Note: Because furniture surfaces are made of a variety
of materials and treated with very different products, it
cannot be ruled out that some of these materials may
contain chemicals that will attack and soften the rubber
feet. If necessary, place an anti-slip mat under the feet of
the appliance.
Note: Remove the protective film from the balance tray
Operation
Setting the units of weight and
weighing
7
2
.
You can choose between metric and imperial / avoirdupois units
of weight. For the range 0 g–999 g, the unit of weight is in g;
from 0 oz–15.9 oz, the unit of weight is shown in oz. For the
range from 1000 g upwards, the unit of weight is in kg; from
16 oz the unit of weight is shown in lb:oz. Likewise, you can
weigh liquids, in which case press the ▼UNIT button
56 GB/MT
6
.
Page 57

In the metric system:
– Millimetre (ml) water: “WATER” is shown in the
LC display.
– Millimetre (ml) milk: “MILK” is shown in the
LC display.
In the imperial / avoirdupois system:
– Fluid ounces (fl. oz) water: “WATER” is shown in the
LC display.
– Fluid ounces (fl. oz) milk: “MILK” is shown in the
LC display.
Press the ON / OFF button 3. The appliance is now in
weighing mode. The set unit of weight appears under to
the right of the weight in the LC display
5
.
Press and hold the ▼UNIT button 6 for about 2 seconds
to change the unit of weight (g / lb’oz).
The weight “0” is shown in the LC display. Place a suitable
bowl or container on the balance tray
▲Z / T button
7
. Again, the weight “0” is shown in
2
and press the
the LC display. The weight of the bowl / container is not
displayed.
Place the product to be weighed in the bowl / container.
The weight of the product is shown in the LC display.
Note: If no button is pressed for 2 minutes, or the weight
is not changed, the readout in the LC display always returns
to the time mode.
Tare (TARE function)
You can set the appliance to “0” again, so that you can weigh
out another product.
Note: A small circle-symbol appears in the left of the LC display
as soon as the appliance is switched on. The display is now in
57 GB/MT
Page 58

the standard zero-setting. The circle-symbol disappears as
soon as the TARE function is used.
To do this press the ▲Z / T button 7 once. The message
“TARE” appears in the LC display
“0” is shown in the LC display.
Place the next product to be weighed in the bowl / container.
The weight of the newly added product is shown in the
LC display.
Note: You can repeat this process many times. Never
place more than 5 kg onto the appliance.
Remove the bowl / container and the weighed product
from the balance tray. Press the ▲Z / T button. Again, the
weight “0” is shown in the LC display.
5
. Again, the weight
Removing weighed product
Press the ▲Z / T button 7. The message “TARE” appears
in the LC display
the LC display.
Remove the desired amount of the weighed product.
The weight of the product is shown in the LC display as
a negative value.
Note: You can repeat this process many times.
Remove the bowl / container and the weighed product
from the balance tray. Press the ▲Z / T button. Again,
the weight “0” is shown in the LC display.
5
. Again, the weight “0” is shown in
Setting the timer
The timer can be used in the clock and weighing modes. Set
the timer for a defined time period. A signal sounds at the end
of the period. The set time runs as a countdown.
58 GB/MT
Page 59

Press the T-SET button 4 once in the clock mode or
twice in the weighing mode. A bell-symbol appears in the
LC display
5
.
Note: You can set the time period precisely to the second.
Press and hold the ▲Z / T button
7
or ▼UNIT button 6,
so that the time readout in the LC display runs faster.
Press the ▲Z / T button or ▼UNIT button to set the time in
10 minute intervals.
Press the T-SET button once. Press the ▲Z / T button or
▼UNIT button to set the time in 1 minute intervals.
Press the T-SET button once. Press the ▲Z / T button or
▼UNIT button to set the time in 10 second intervals.
Press the T-SET button once. Press the ▲Z / T button or
▼UNIT button in set time in 1 second intervals.
Press the T-SET button to start the countdown.
Note: You can reset the timer. To do this press the T-SET
button.
A signal sounds as soon as set time period has elapsed.
Press any button to switch off the signal.
Switching off the weighing function
Note: If the appliance has not been used for about 2 minutes,
it switches automatically to the time mode.
Press the ON / OFF button 3 to return manually to the
time mode.
Temperature display
The temperature is shown in °C in the lower right of the
LC display
5
.
59 GB/MT
Page 60

Troubleshooting
– If the LC display 5 shows “Err”, there is too much weight
on the appliance. Remove the excess load. Never place a
load of more than 5 kg onto the appliance.
– If the LC display shows “Lo”, the batteries are discharged.
Change the batteries.
Note: The message “Lo” only appears in the weighing
mode.
– If the LC display shows “UNST”, wait for a few seconds.
– If the appliance does not work as expected, change the
batteries.
Note: The device contains delicate electronic components.
This means that if it is placed near an object that transmits
radio signals, it could cause interference. If the display indicates a problem, move such objects away from it. Electrostatic discharges can lead to malfunctions. In the case
of such malfunctions remove the batteries briefly and then
insert them again.
Cleaning, care and storage
Note: For storage you can hang the appliance using the
1
hanger
Under no circumstances should you use liquids or detergents,
The appliance should only be cleaned on the outside with
For stubborn dirt use a cloth with soapy water or stainless
(see Fig. A).
as these will damage the appliance.
a soft, dry and lint-free cloth.
steel cleaner.
60 GB/MT
Page 61

Disposal
The packaging is made entirely of recyclable
materials which you can dispose of at your local
recycling facilities.
Contact your local waste disposal authority for more details
on how to dispose of the product when it is no longer needed.
To help protect the environment, please dispose the
product properly, and not in the household waste,
when it has reached the end of its useful life. Contact
your municipal authorities for information regarding
collection points and their opening hours.
Faulty or used batteries must be recycled in accordance with
Directive 2006 / 66 / EC. Return batteries and / or the equipment
through the collection facilities provided.
Environmental damage through incorrect
disposal of the batteries!
Pb
Never dispose of batteries in your household waste. They may
contain toxic heavy metals and are subject to hazardous waste
regulations. The chemical symbols of the heavy metals are:
Cd = cadmium, Hg = mercury, Pb = lead. Therefore dispose
of used batteries through your local collection site.
Warranty
The device has been manufactured to strict quality guidelines
and meticulously examined before delivery. In the event of
product defects you have legal rights against the retailer of
this product. Your legal rights are not limited in any way by
our warranty detailed below.
61 GB/MT
Page 62

The warranty for this device is 3 years from the date of purchase. Should this device show any fault in materials or manufacture within three years from the date of purchase, we will
repair or replace it - at our choice - free of charge to you.
The warranty period begins on the date of purchase. Please
keep the original sales receipt in a safe location. This document is required as your proof of purchase. This warranty becomes void if the device has been damaged or improperly
used or maintained.
The warranty applies to faults in material or manufacture. This
warranty does not cover product parts subject to normal wear,
thus possibly considered consumables (e.g. batteries) or for
damage to fragile parts, e.g. switches, rechargeable batteries
or glass parts.
62 GB/MT
Page 63

Bestimmungsgemäßer Gebrauch ..... Seite 64
Teilebeschreibung .......................................... Seite 64
Technische Daten ............................................ Seite 64
Lieferumfang ...................................................... Seite 65
Sicherheitshinweise
Allgemeine Sicherheitshinweise ............................... Seite 65
Sicherheitshinweise zu Batterien .............................. Seite 68
Vor der Bedienung
Batterien einlegen / wechseln ................................... Seite 69
Uhrzeit einstellen ....................................................... Seite 70
Gerät aufstellen ......................................................... Seite 70
Bedienung
Gewichtseinheit einstellen und wiegen .................... Seite 71
Zuwiegen (TARA-Funktion) ....................................... Seite 72
Wiegegut entnehmen ............................................... Seite 73
Timer einstellen .......................................................... Seite 73
Wiege-Funktion ausstellen ........................................ Seite 74
Temperatur-Anzeige .................................................. Seite 74
Fehler beheben ................................................ Seite 74
Reinigung, Pflege, Aufbewahrung .... Seite 75
Entsorgung ........................................................... Seite 75
Garantie ................................................................. Seite 76
63 DE/AT/CH
Page 64

Küchenwaage
Bestimmungsgemäßer Gebrauch
Dieses Gerät ist zum Wiegen und Zuwiegen haushaltsüblicher
Mengen von Lebensmitteln bestimmt. Die digitale Küchenwaage
dient zur Ermittlung des Gewichts von nicht aggressiven, nicht
ätzenden und nicht schleifenden Flüssigkeiten oder Feststoffen.
Das Produkt ist nur zur Eigenanwendung, nicht für den medizinischen oder kommerziellen Gebrauch vorgesehen.
Teilebeschreibung
1
Aufhängebügel
2
Wiegeteller
3
ON- / OFF-Taste (EIN / AUS)
4
T-SET-Taste (Timer / Einstellung der Uhr)
5
LC-Display
6
▼UNIT-Taste (Einstellung der Messeinheit)
7
▲Z / T-Taste (ZERO / TARA)
8
Batteriefachdeckel
9
Batteriefach
Technische Daten
Spannungsversorgung: 2 x 1,5 V AAA
Temperaturanzeige: 0–40 °C, mit einer Toleranz von ±2 °C
Wiegebereich: 0–5000 g, in 1 g-Schritten
64 DE/AT/CH
Page 65

Lieferumfang
1 Digitale Küchenwaage
2 Batterien 1,5 V
1 Bedienungsanleitung
AAA
Sicherheitshinweise
BEWAHREN SIE ALLE SICHERHEITSHINWEISE UND ANWEISUNGEN FÜR DIE
ZUKUNFT AUF!
Allgemeine
Sicherheitshinweise
LEBENS-
UND UNFALL
KLEINKINDER UND KINDER!
GEFAHR FÜR
Lassen
Sie Kinder niemals unbeaufsichtigt mit
dem Verpackungsmaterial. Es besteht
Erstickungsgefahr durch Verpackungsmaterial. Kinder unterschätzen häufig
die Gefahren. Halten Sie Kinder stets
vom Verpackungsmaterial fern.
65 DE/AT/CH
Page 66

LEBENSGEFAHR!
Batterien können verschluckt werden,
was lebensgefährlich sein kann. Ist eine
Batterie verschluckt worden, muss sofort
medizinische Hilfe in Anspruch genommen werden.
Dieses Gerät kann von Kindern ab
8 Jahren und darüber sowie von Personen mit verringerten physischen, sensorischen oder mentalen Fähigkeiten oder
Mangel an Erfahrung und Wissen benutzt werden, wenn sie beaufsichtigt
oder bezüglich des sicheren Gebrauchs
des Gerätes unterwiesen wurden und
die daraus resultierenden Gefahren
verstehen. Kinder dürfen nicht mit dem
Gerät spielen. Reinigung und Benutzerwartung dürfen nicht von Kindern ohne
Beaufsichtigung durchgeführt werden.
VORSICHT! Belasten Sie die
5 kg
Waage nicht über 5 kg. Das
Produkt könnte beschädigt werden.
Schützen Sie das Produkt vor elektrosta-
tischer Ladung / Entladung. Diese könnten eine Behinderung des internen
66 DE/AT/CH
Page 67

Datenaustausches verursachen, was
Fehler im LC-Display erzeugt.
Kontrollieren Sie das Produkt vor der
Inbetriebnahme auf Beschädigungen.
Nehmen Sie ein beschädigtes Produkt
nicht in Betrieb.
Öffnen Sie niemals
das Gehäuse des Produktes. Verletzun-
gen und Beschädigungen am Produkt
können die Folge sein. Lassen Sie Reparaturen nur von einer Elektrofachkraft
durchführen.
Gehen Sie sicher, dass jeder, der das
Produkt nutzt, die Bedienungsanleitung
gelesen hat und in der Lage ist, das
Produkt sicher zu bedienen.
Platzieren Sie das Produkt auf einer
festen, waagerechten und flachen
Unterlage.
Die Funktionen des Produktes können
durch magnetische Störfelder behindert
werden. Entfernen Sie in diesem Fall
kurz die Batterien aus dem Produkt und
setzen Sie sie erneut ein.
67 DE/AT/CH
Page 68

LEBENSMITTELECHT!
Geschmacks- und Geruchseigenschaften werden durch dieses Produkt
nicht beeinträchtigt.
Sicherheitshinweise
zu Batterien
Entfernen Sie die Batterien, wenn sie
längere Zeit nicht verwendet worden
sind, aus dem Gerät.
VORSICHT! EXPLOSIONSGE-
FAHR! Laden Sie Batterien niemals
wieder auf!
Achten Sie beim Einlegen auf die rich-
tige Polarität! Diese wird im Batteriefach
angezeigt.
Reinigen Sie Batterie- und Gerätekontakt
vor dem Einlegen, falls erforderlich.
Entfernen Sie erschöpfte Batterien
umgehend aus dem Gerät. Es besteht
erhöhte Auslaufgefahr!
Batterien gehören nicht in den Hausmüll!
Jeder Verbraucher ist gesetzlich verpflichtet
Batterien ordnungsgemäß zu entsorgen!
,
68 DE/AT/CH
Page 69

Halten Sie Batterien von Kindern fern,
werfen Sie Batterien nicht ins Feuer,
schließen Sie Batterien nicht kurz und
nehmen Sie sie nicht auseinander.
Bei Nichtbeachtung der Hinweise können
die Batterien über ihre Endspannung hinaus entladen werden. Es besteht dann
die Gefahr des Auslaufens. Falls die
Batterien in Ihrem Gerät ausgelaufen
sein sollten, entnehmen Sie diese sofort,
um Schäden am Gerät vorzubeugen!
Vermeiden Sie den Kontakt mit Haut,
Augen und Schleimhäuten. Bei Kontakt
mit Batteriesäure spülen Sie die betroffene Stelle mit reichlich Wasser ab
und / oder suchen Sie einen Arzt auf!
Vor der Bedienung
Batterien einlegen / wechseln
Nehmen Sie den Batteriefachdeckel 8 auf der Rückseite
des Produktes ab.
Entnehmen Sie ggf. die verbrauchten Batterien.
Setzen Sie 2 x 1,5 V AAA Batterien in das Batterie-
9
fach
ein.
69 DE/AT/CH
Page 70

Hinweis: Achten Sie auf die richtige Polarität. Diese wird
im Batteriefach angezeigt.
Schließen Sie das Batteriefach wieder.
Das Gerät befindet sich nun im Uhrzeit-Modus und ist einsatzbereit.
Uhrzeit einstellen
Vor der ersten Bedienung und nach dem Wechsel der Batterien
muss die aktuelle Uhrzeit eingestellt werden.
Sobald die Batterien eingelegt sind, blinkt die Stunden-
Anzeige. Drücken Sie die ▲Z / T-Taste
▼UNIT-Taste
Drücken Sie die T-SET-Taste 4, um in die Minuten-Anzeige
zu gelangen.
Drücken Sie die ▲Z / T-Taste oder ▼UNIT-Taste, um die
Minuten einzustellen.
Drücken Sie die T-SET-Taste. Die Uhrzeit ist nun eigestellt.
Hinweis: Müssen Sie die Uhrzeit erneut einstellen, drücken
und halten Sie die T-SET-Taste, bis die Stunden-Anzeige
blinkt. Verfahren Sie wie zuvor beschrieben.
6
, um die Stunden einzustellen.
7
oder die
Gerät aufstellen
Stellen Sie das Gerät auf eine ebene, rutschfeste Fläche.
Hinweis: Da Möbeloberflächen aus verschiedenen
Materialien bestehen und mit unterschiedlichsten Pflegemitteln behandelt werden, kann es nicht völlig ausgeschlossen
werden, dass manche dieser Stoffe Bestandteile enthalten,
die die Gummifüße angreifen und aufweichen. Legen Sie
gegebenenfalls eine rutschfeste Unterlage unter die Füße
des Gerätes.
70 DE/AT/CH
Page 71

Hinweis: Entfernen Sie die Schutzfolie von dem Wiege-
2
teller
.
Bedienung
Gewichtseinheit einstellen und wiegen
Sie können zwischen dem metrischen und angloamerikanischen
Maßsystem wählen. Für den Bereich von 0 g–999 g wird die
Gewichtseinheit in g, von 0oz -15,9oz in oz angezeigt. Für den
Bereich ab 1000g wird die Gewichtseinheit in kg, ab 16 oz
in lb:oz angezeigt. Ebenso können Sie Flüssigkeiten wiegen,
indem Sie die ▼UNIT-Taste
Im metrischen System:
– Millimeter (ml) Wasser: Die Anzeige „WATER“ erscheint
– Millimeter (ml) Milch: Die Anzeige „MILK“ erscheint
Im Anglo-Amerikanischen System:
– Flüssigunze (fl ´oz) Wasser: Die Anzeige „WATER“ erscheint
– Flüssigunze (fl ´oz) Milch: Die Anzeige „MILK“ erscheint
6
drücken.
im LC-Display.
im LC-Display.
im LC-Display.
im LC-Display.
Drücken Sie die ON- / OFF-Taste 3. Das Gerät befindet
sich nun im Wiege-Modus. Die eingestellte Gewichtseinheit
erscheint unter oder rechts neben der Gewichtsanzeige im
LC-Display
5
.
Drücken und halten Sie die ▼UNIT-Taste 6 für ca. 2 Sekun-
den, um die Gewichtseinheit (g / lb‘oz) zu wechseln.
71 DE/AT/CH
Page 72

Im LC-Display wird ein Gewicht von „0“ angezeigt. Stellen
Sie eine geeignete Schale / einen Behälter auf den Wiege-
2
teller
und drücken Sie die ▲Z / T-Taste 7. Im LC-Display
wird nun wieder ein Gewicht von „0“ angezeigt. Das
Gewicht der Schale / des Behälters wird nicht angezeigt.
Legen Sie das Wiegegut in die Schale / den Behälter. Im
LC-Display wird das Gewicht des Wiegeguts angezeigt.
Hinweis: Die Anzeige des LC-Displays kehrt wieder in
den Uhrzeit-Modus zurück, wenn nach ca. 2 Minuten keine
Taste gedrückt wird oder sich das aktuelle gemessene
Gewicht nicht ändert.
Zuwiegen (TARA-Funktion)
Sie können das Gerät wiederholt auf „0“ zurücksetzen, um
weiteres Wiegegut zu wiegen.
Hinweis: Im LC-Display erscheint links ein Kreis-Symbol,
sobald das Gerät eingeschaltet wird. Die Anzeige befindet
sich nun in der Standard-Nullstellung. Das Kreis-Symbol erlischt,
sobald Sie die TARA-Funktion verwenden.
Drücken Sie dazu die ▲Z / T-Taste 7 einmal. Die Anzeige
„TARE“ erscheint im LC-Display
wieder ein Gewicht von „0“ angezeigt.
Legen Sie das weitere Wiegegut in die Schale / den Behälter.
Im LC-Display wird das Gewicht des neu hinzugefügten
Wiegeguts angezeigt.
Hinweis: Sie können diesen Vorgang mehrmals wieder-
holen. Stellen Sie jedoch nie mehr als 5 kg auf das Gerät.
Entnehmen Sie die Schale / den Behälter und das Wiegegut
von dem Wiegeteller. Drücken Sie die ▲Z / T-Taste. Im
LC-Display wird wieder ein Gewicht von „0“ angezeigt.
5
. Im LC-Display wird
72 DE/AT/CH
Page 73

Wiegegut entnehmen
Drücken Sie die ▲Z / T-Taste 7. Die Anzeige „TARE“
erscheint im LC-Display
5
. Im LC-Display wird wieder ein
Gewicht von „0“ angezeigt.
Entnehmen Sie eine gewünschte Menge des Wiegeguts.
Das Gewicht des entnommenen Wiegeguts erscheint im
LC-Display als negativer Wert.
Hinweis: Sie können diesen Vorgang mehrmals wieder-
holen.
Entnehmen Sie die Schale / den Behälter und das Wiegegut
von dem Wiegeteller. Drücken Sie die ▲Z / T-Taste. Im
LC-Display wird wieder ein Gewicht von „0“ angezeigt.
Timer einstellen
Der Timer kann im Uhren- und Wiege-Modus benutzt werden.
Legen Sie mit dem Timer eine bestimmte Zeitdauer fest. Am
Ende der Zeitdauer ertönt ein Signalton. Die eingestellte Zeit
läuft wie ein Countdown.
Drücken Sie die T-SET-Taste 4 einmal im Uhren-Modus
oder zweimal im Wiege-Modus. Im LC-Display
das Glockensymbol.
Hinweis: Sie können die Zeitdauer auf die Sekunde genau
einstellen. Drücken und halten Sie die ▲Z / T-Taste
▼UNIT-Taste
6
, damit die Zeit-Anzeige im LC-Display
schneller läuft.
Drücken Sie die ▲Z / T-Taste oder ▼UNIT-Taste, um die
Zeit in 10-Minuten-Schritten einzustellen.
Drücken Sie die T-SET-Taste einmal. Drücken Sie die
▲Z / T-Taste oder ▼UNIT-Taste, um die Zeit in 1-MinuteSchritten einzustellen.
5
erscheint
7
oder
73 DE/AT/CH
Page 74

Drücken Sie die T-SET-Taste einmal. Drücken Sie die
▲Z / T-Taste oder ▼UNIT-Taste, um die Zeit in 10-SekundenSchritten einzustellen.
Drücken Sie die T-SET-Taste einmal. Drücken Sie die
▲Z / T-Taste oder ▼UNIT-Taste, um die Zeit in 1-SekundeSchritten einzustellen.
Drücken Sie die T-SET-Taste, um den Countdown zu starten.
Hinweis: Sie können den Timer zurücksetzen. Drücken
Sie dazu die T-SET-Taste.
Sobald die eingestellte Zeitdauer abgelaufen ist, ertönt
ein Signalton. Schalten Sie den Signalton aus, indem Sie
eine beliebige Taste drücken.
Wiege-Funktion ausstellen
Hinweis: Das Gerät schaltet sich automatisch in den Uhrzeit-
Modus, wenn Sie es für ca. 2 Minuten nicht benutzen.
Drücken Sie die ON- / OFF-Taste 3, um manuell in den
Uhrzeit-Modus zurückzukehren.
Temperatur-Anzeige
Die Temperatur wird unten rechts im LC-Display 5 in °C
dargestellt.
Fehler beheben
– Zeigt das LC-Display 5 „Err“ an, ist das Gerät überlastet.
Entfernen Sie die Überlast. Belasten Sie das Gerät nie mit
mehr als 5 kg.
– Zeigt das LC-Display „Lo“ an, sind die Batterien entladen.
Wechseln Sie die Batterien aus.
74 DE/AT/CH
Page 75

Hinweis: Die Anzeige „Lo“ erscheint nur im Wiege-
Modus.
– Zeigt das LC-Display „UNST“ an, warten Sie für einige
Sekunden.
– Funktioniert das Gerät nicht wie erwartet, wechseln Sie
die Batterien aus.
Hinweis: Das Gerät enthält empfindliche elektronische
Bauteile. Daher ist es möglich, dass es durch Funkübertragungsgeräte in unmittelbarer Nähe gestört wird. Treten
Fehlanzeigen im Display auf, entfernen Sie solche Geräte
aus der Umgebung des Gerätes. Elektrostatische Entladungen können zu Funktionsstörungen führen. Entfernen Sie
bei solchen Funktionsstörungen kurzzeitig die Batterien
und setzen Sie sie erneut ein.
Reinigung, Pflege, Aufbewahrung
Hinweis: Zur Aufbewahrung können Sie das Gerät mit Hilfe
des Aufhängebügels
Verwenden Sie in keinem Fall Flüssigkeiten und keine
Reinigungsmittel, da diese das Gerät beschädigen.
Reinigen Sie das Gerät nur äußerlich mit einem weichen,
trockenen und fusselfreien Tuch.
Verwenden Sie bei stärkerer Verschmutzung ein Tuch und
Seifenwasser oder Edelstahlreiniger.
1
aufhängen (siehe Abb. A).
Entsorgung
Die Verpackung besteht aus umweltfreundlichen
Materialien, die Sie über die örtlichen Recyclingstellen entsorgen können.
75 DE/AT/CH
Page 76

Möglichkeiten zur Entsorgung des ausgedienten Produkts
erfahren Sie bei Ihrer Gemeinde oder Stadtverwaltung.
Werfen Sie Ihr Produkt, wenn es ausgedient hat, im
Interesse des Umweltschutzes nicht in den Hausmüll,
sondern führen Sie es einer fachgerechten Entsorgung
zu. Über Sammelstellen und deren Öffnungszeiten
können Sie sich bei Ihrer zuständigen Verwaltung
informieren.
Defekte oder verbrauchte Batterien müssen gemäß Richtlinie
2006 / 66 / EC recycelt werden. Geben Sie Batterien und / oder
das Gerät über die angebotenen Sammeleinrichtungen zurück.
Umweltschäden durch falsche
Entsorgung der Batterien!
Pb
Batterien dürfen nicht über den Hausmüll entsorgt werden.
Sie können giftige Schwermetalle enthalten und unterliegen
der Sondermüllbehandlung. Die chemischen Symbole der
Schwermetalle sind wie folgt: Cd = Cadmium, Hg = Quecksilber,
Pb = Blei. Geben Sie deshalb verbrauchte Batterien bei einer
kommunalen Sammelstelle ab.
Garantie
Das Produkt wurde nach strengen Qualitätsrichtlinien sorgfältig
produziert und vor Anlieferung gewissenhaft geprüft. Im Falle
von Mängeln dieses Produkts stehen Ihnen gegen den Verkäufer des Produkts gesetzliche Rechte zu. Diese gesetzlichen
Rechte werden durch unsere im Folgenden dargestellte
Garantie nicht eingeschränkt.
76 DE/AT/CH
Page 77

Sie erhalten auf dieses Gerät 3 Jahre Garantie ab Kaufdatum.
Die Garantiefrist beginnt mit dem Kaufdatum. Bitte bewahren
Sie den Original Kassenbon gut auf. Diese Unterlage wird als
Nachweis für den Kauf benötigt.
Tritt innerhalb von drei Jahren ab dem Kaufdatum dieses
Produkts ein Material- oder Fabrikationsfehler auf, wird das
Produkt von uns – nach unserer Wahl – für Sie kostenlos repariert
oder ersetzt. Diese Garantie verfällt, wenn das Produkt beschädigt, nicht sachgemäß benutzt oder gewartet wurde.
Die Garantieleistung gilt für Material- oder Fabrikationsfehler.
Diese Garantie erstreckt sich nicht auf Produktteile, die normaler Abnutzung ausgesetzt sind (z. B. Batterien) und daher als
Verschleißteile angesehen werden können oder für Beschädigungen an zerbrechlichen Teilen, z. B. Schalter, Akkus oder
die aus Glas gefertigt sind.
77 DE/AT/CH
Page 78

OWIM GmbH & Co. KG
Stiftsbergstraße 1
D-74167 Neckarsulm
Model-No.: Z31183
Version: 04 / 2015
Estado de las informaciones · Versione delle
informazioni · Estado das informações · Last
Information Update · Stand der Informationen:
12 / 2014 · Ident.-No.: Z31183122014-5
IAN 107261
5
 Loading...