

Page 1
LI-ION RECHARGEABLE HANDHELD
VACUUM CLEANER SAS 7.4 LI A2
LI-ION RECHARGEABLE HANDHELD
VACUUM CLEANER
Operating instructions
LITIJ-IONSKI AKUMULATORSKI
ROČNI SESALNIK
Navodila za uporabo
RUČNÝ VYSÁVAČ
S LÍTIUM-IÓNOVOU BATÉRIOU
Návod na obsluhu
IAN 89291
LI-ION AKKUS KÉZI PORSZÍVÓ
Használati utasítás
RUČNÍ VYSAVAČ
Návod k obsluze
LI-IONEN-AKKU-HANDSTAUBSAUGER
Bedienungsanleitung
Page 2
Before reading, unfold the page containing the illustrations and familiarise yourself with all functions of
the device.
Olvasás előtt kattintson az ábrát tartalmazó oldalra és végezetül ismerje meg a készülék mindegyik
funkcióját.
Pred branjem odprite stran s slikami in se nato seznanite z vsemi funkcijami naprave.
Před čtením si otevřete stranu s obrázky a potom se seznamte se všemi funkcemi přístroje.
Pred čítaním si odklopte stranu s obrázkami a potom sa oboznámte so všetkými funkciami prístroja.
Klappen Sie vor dem Lesen die Seite mit den Abbildungen aus und machen Sie sich anschließend mit allen
Funktionen des Gerätes vertraut.
GB Operating instructions Page 1
HU Használati utasítás Oldal 9
SI Navodila za uporabo Stran 17
CZ Návod k obsluze Strana 25
SK Návod na obsluhu Strana 33
DE / AT / CH Bedienungsanleitung Seite 41
Page 3
q
0
9
8
7
1
2
3
4
6
5
Page 4

Content Page
Intended Usage 2
Important safety instructions 2
Items supplied 3
Appliance description 3
Technical data 4
Before taking into use 4
Information about the batteries 4
Installation of the wall holder 4
Charging 5
Operation 5
Cleaning 6
Disposal 6
Warranty and Service 7
Importer 7
- 1 -
Page 5
Li-Ion Rechargeable
Handheld Vacuum
Cleaner
Congratulations on the purchase of your new
appliance.
You have clearly decided in favour of a quality product. These operating instructions are a part of this
product. They contain important information in regard
to safety, use and disposal. Before using the product,
familiarise yourself with all of these operating and
safety instructions. Use the product only as described
and only for the specified areas of application. In addition, pass these documents on, together with the
product, to any future owner.
Intended Usage
• To avoid risks, arrange for damaged power cables
and/or plugs to be replaced as soon as possible
by a qualified specialist or by our Customer
Services.
• Arrange for repairs to be carried out only by
specialist workshops. Under no circumstances
should you open the appliance yourself. Interferences that are not carried out by a specialist
workshop could lead to physical injuries.
• Before switching the hand vacuum cleaner on,
ensure that the mains voltage corresponds to
the voltage indicated in the technical data for
the appliance.
• Never touch the power supply or the appliance
with wet or damp hands.
• Do not use the power adapter with an extension
cable; connect the power adapter directly to
a power socket.
This cordless hand-held vacuum cleaner may only
be used to vacuum dry or wet surfaces resp. dry or
wet materials and fluids. People or animals may not
be vacuumed with this appliance. Any other usage
of, or modification to, the appliance is deemed to be
improper usage and carries the risk of serious personal injury. The manufacturer accepts no liability
for damages that result from improper use of the appliance or are caused by the incorrect operation of
it. The appliance is not intended for commercial use.
Important safety instructions
To avoid potentially fatal electric
shocks:
• Do not charge or use the appliance outdoors.
• Never use the hand vacuum cleaner if the cable,
plug or casing are damaged.
To avoid the risk of injury:
• Do not change any accessories while the appliance is switched on.
• Do not use the hand vacuum for vacuuming
up sharp objects or glass shards.
• Never vacuum up burning matches, glowing
ashes or cigarette butts.
• Do not use the hand vacuum for vacuuming up
chemical products, stone dust, gypsum, cement
or similar particles.
• This appliance is not suitable for use with inflammable and explosive substances or chemical
and aggressive liquids.
• Always store the appliance indoors. To prevent
accidents, keep the appliance in a dry location
when not in use.
• Under extreme conditions, leaks in the battery cells
may occur. In the event that battery fluid comes
into contact with skin or eyes, the affected area
must be rinsed off with water immediately.
Contact a physician.
- 2 -
Page 6

Tips for safety:
• This appliance is not intended for use by individuals
(including children) with restricted physical, physiological or intellectual abilities or deficiences in
experience and/or knowledge unless they are
supervised by a person responsible for their safety
or receive from this person instruction in how the
appliance is to be used. Children should be supervised to ensure that they do not play with the
appliance.
• Use only accessory parts recommended by the
manufacturer.
• The power adapter may not be used for other
purposes. Never carry the wall holder or the
power adapter by the cable. Do not pull on the
cable when you want to move the appliance.
• Always grip the power plug to disconnect the
appliance from the power supply.
• Always be sure to keep the hand vacuum away
from heating elements, ovens or other heated
appliances and surfaces.
• Always make certain that the ventilation slits are
open. A blocked ventilation circuit can result in
overheating and damage to the appliance.
• This product contains rechargeable batteries.
Do not thow the batteries into a fire and do
not subject them to high temperatures.
There is the risk of an explosion!
• Take special care when using the hand vacuum
on stairs.
• Do not use the hand vacuum without the dust
filter inserted.
• Do not use the power adapter for a different product and do not attempt to charge this appliance
with a different charging station. Use only the
charging station supplied with this appliance.
• Never try to recharge non-rechargeable batteries.
Items supplied
Li-Ion Rechargeable Handheld Vacuum Cleaner
Crevice nozzle
Wet suction nozzle
Wall holder
Assembly material
Power transformer
Operating instructions
Check the items supplied directly after unpacking
for completeness.
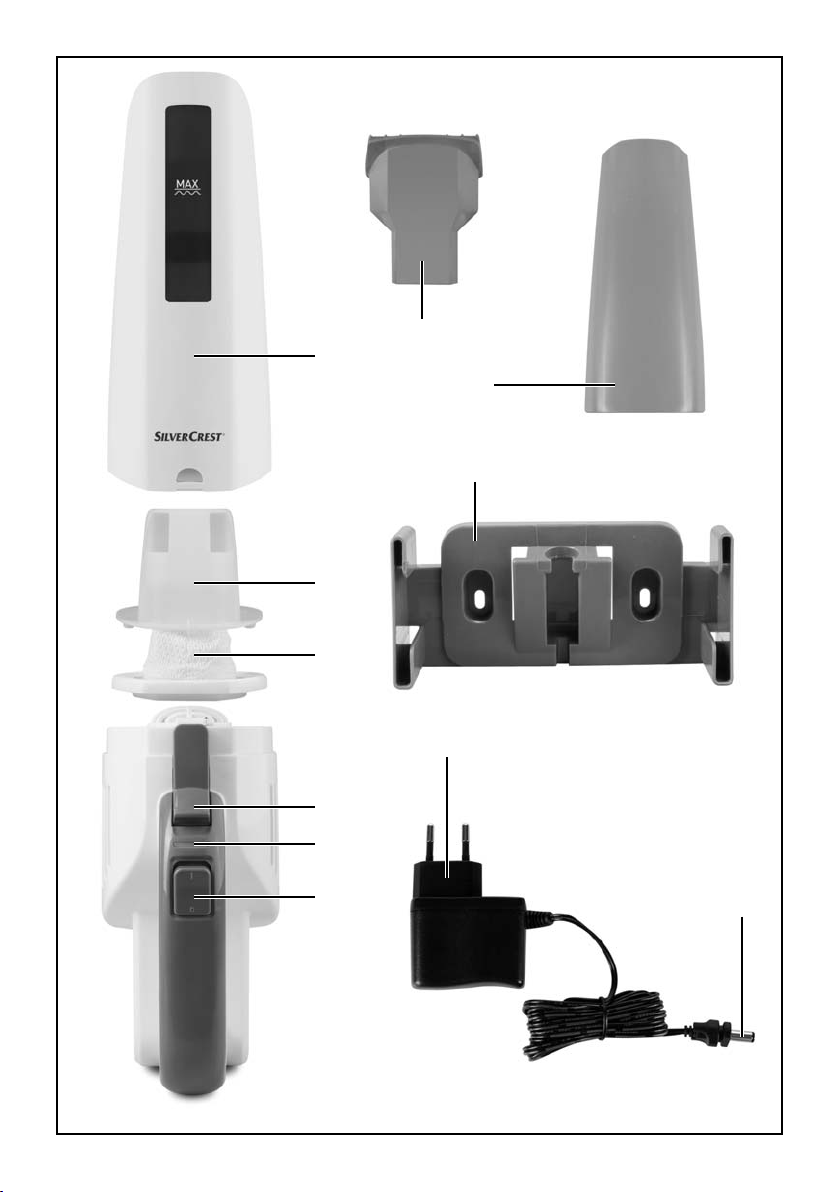
Appliance description
1 Wet suction nozzle
2 Crevice nozzle
3 Wall holder
4 Power adapter
5 Barrel plug
6 On/Off switch
7 Charge indicator lamp
8 Unlocking button
9 Dust filter bag
0 Dust filter
q Dirt container
Note:
This appliance is supplied with non-charged batteries.
The batteries must be charged for 24 hours before
the first use.
- 3 -
Page 7
Technical data
Information about the batteries
Power adapter 4
Input voltage /
- current: 100 - 240 V ~, 50/60 Hz
max. 300 mA
Output voltage/
- current: 9,6 V / 300 mA
Protection class: II /
Type designation: SAS 7.4 LI A2-1
AApppplliiaannccee
Input voltage 7,4 V
BBaatttteerriieess
Capacity: 1300 mAh
Batteries: 7,4 V
(2 x 3.7 V Lithium-Ion
Batteries)
Before taking into use
• Remove all packaging materials from the appliance, particularly the protective cap over the On/Off
switch 6.
• Place the dirt container q onto the motor block:
• Slide the plastic tab on the underside of the
handheld vacuum cleaner into the recess in the
dirt container q.
• Press the unlocking button 8 and slide the dirt
container q onto the motor block at the same
time.
• Let go of the unlocking button 8 so that the lok-
king mechanism engages in the recess.
The dirt container q is now sitting securely on
the motor block.
1. This hand-held vacuum cleaner is powered by
rechargeable lithium-ion batteries.
Before using the cableless hand vacuum cleaner
for the first time, the batteries must be charged
for at least 24 hours.
2. The batteries reach their full capacity after a
charging period of 24 hours. For care of the batteries we recommend the following: after the batteries are charged, remove the power adapter 4
from the mains power socket. Reconnect the
power adapter 4 again with the mains power
socket when the suction power of the appliance
is noticeably weaker.
Installation of the wall holder
Mortal danger!
Ensure that there are no power cables or other conduits or pipes in the wall at the location where you
intend to bore the holes for the wall holder 3.
It would be a potentially fatal risk to bore into a
current carrying electric cable!
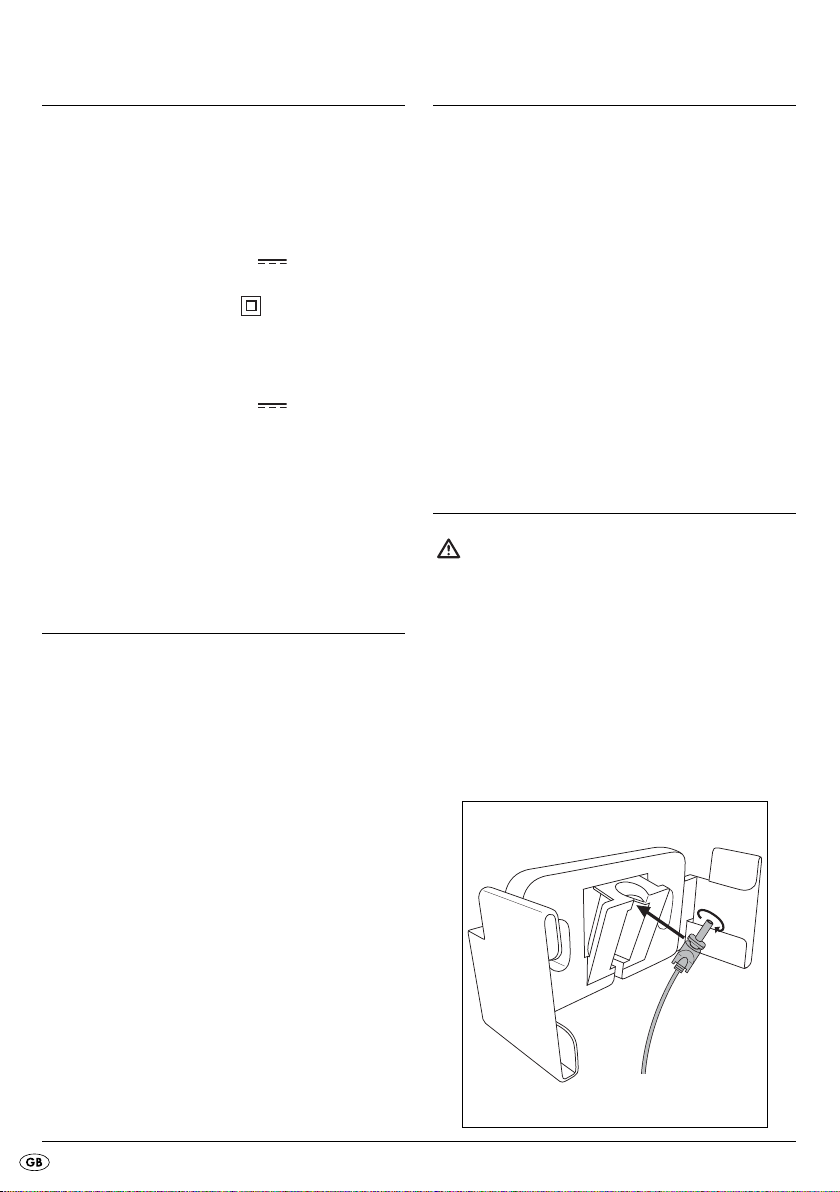
1. Place the barrel plug 5 of the power adapter 4
into the wall holder 3 as shown in the diagramme.
Secure the barrel plug 5 by turning it.
- 4 -
Page 8
2. Select a suitable installation location for the wall
holder 3: It should present no problem with
taking the hand vacuum cleaner out of it and a
mains power socket for the power adapter 4
must be accessible.
3. Bore two holes with a spacing of approx. 68 mm.
Use the wall holder 3 to mark the boreholes:
this will ensure the spacing is correct. The boreholes must be suitable for 5 mm wallplugs.
4. Insert the wallplugs into the boreholes and, using the
screws, firmly screw the wall holder 3 to the wall.
5. You can place the nozzles on the lateral accessories holder.
6. Connect the power adapter 4 to a mains power
socket.
Charging
• When charging is complete, which with fully
discharged batteries can take approx. 5 hours,
the appliance automatically switches to a trickle
charge (maintenance function). Nevertheless, in
order to avoid possible damage to the batteries,
do not leave the appliance permanently connected to the power adapter 4.
• First recharge the batteries when the suction
power of the hand vacuum cleaner is noticeably
weaker and the charge indicator lamp 7 green
is blinking.
Note:
The hand vacuum cleaner can also be charged
directly via the power adapter 4. For this, remove
the barrel plug 5 with a slight twist from the wall
holder 3 and insert it into the socket on the hand
vacuum cleaner.
Note:
Check to ensure that the on/off switch 6 has been
slid back (to the position "0") before starting the
charging process.
• Place the hand vacuum cleaner from above into
the wall holder 3, so that the barrel plug 5
slips into the socket on the hand vacuum cleaner.
The charge indicator lamp 7 flashes red and
the charging process begins.
Important:
• When the hand vacuum again has enough energy to vacuum, the charge indicator lamp 7
glows green. This does not mean that the batteries are fully charged. When the charge indicator lamp 7 glows green, it means the batteries
are charged to about 80%.
Operation
Warning!
The suction opening must always be open and
unblocked. Blockages lead to overheating and damage to the motor.
Tips:
• Make certain that the dust filter 0 is always
inserted before using the appliance.
• As the maximum, suck up only as much liquid as
will fill the dirt container q to the MAX mark.
1. Take the hand vacuum cleaner from the wall holder 3 or, if you do not use the wall holder 3,
remove the barrel plug 5 from the socket.
2. If required, place the appropriate nozzle into the
suction opening:
• the crevice nozzle 2, to clean narrow and
difficult to reach locations.
• the wet suction nozzle 1 to vacuum liquids up.
- 5 -
Page 9
Note:
After you have vacuumed up liquids, immediately
clean the dirt container q. Otherwise bacteria and
microbes could form in it! Ensure that the dust filter
bag 9 is completely dry before using the appliance
again.
3. To switch the appliance on, slide the on/off
switch 6 forwards. The charge indicator lamp 7
lights up green.
4. When you have finished using it, slide the on/
off switch 6 to the rear.
Note:
Place the hand vaccum cleaner into the wall
holder 3 and start the charging process when
the suction power is noticeably weaker and the
charge indicator lamps 7 green is blinking.
Cleaning
6. Place the dust filter 0 back into the dirt container q. Ensure that the dust filter 0 is seated
squarely and that the rubber lip seals the dirt
container q.
7. Replace the dirt container q back onto the
motor block:
• Push the plastic nose on the underside of the
hand vacuum cleaner into the recess on the
dirt container q.
• Press the unlocking button 8 and, at the same
time, slide the dirt container q onto the motor
block.
• Release the unlocking button 8 so that the
restraint grips into the recess. The dirt container q now sits firmly on the motor block.
8. Clean the housing and both nozzles with a lightly
moistened cloth. For stubborn soiling use a mild
detergent on the cloth.
9. Dry all parts thoroughly before reusing the appliance or putting it into storage.
To achieve the best results, empty the dirt container q
and clean the dust filter 0 after every use.
Important:
Do not use aggressive, chemical or abrasive cleaning
agents. These could damage the surfaces of the appliance.
1. To open the dirt container q, press the unlocking
button 8 and remove the dirt container q.
2. Remove the dust filter 0 from the dirt container q.
3. Empty the dirt container q.
4. Pull the dust filter bag 9 with its mounting out of
the dust filter 0.
5. Rinse the dust filter bag 9 in cold water and
then wait until it is completely dry again before
you place it back into the dust filter 0. Do not
dry it with hot air.
Disposal
Do not dispose of this appliance in your
normal domestic waste. This product is
subject to the provisions of European
Directive 2002/96/EC.
The appliance and the batteries must be disposed
of separately.
1. Unscrew all the cross-head screws on the motor
block and take it apart.
2. Cut the connection cable from the battery and
remove the battery from the appliance.
Dispose of the appliance through an approved disposal centre or at your community waste facility.
Observe the currently applicable regulations.
In a case of doubt, please contact your waste disposal centre.
- 6 -
Page 10

Disposal of batteries/cells
Used batteries/cells may not be disposed
of in house-hold waste. Every consumer is
statutorily obliged to dispose of batteries
at a collection site of his community/city
district or at a retail store.
The purpose of this obligation is to ensure that batteries
are disposed of in a non-polluting manner. Only dispose of batteries/cells when they are fully discharged.
Dispose of all packaging materials in an
environmentally friendly manner.
Warranty and Service
The warranty for this appliance is for 3 years from
the date of purchase. The appliance has been manufactured with care and meticulously examined before delivery.
Please retain your receipt as proof of purchase. In
the event of a warranty claim, please make contact
by telephone with our Service Department. Only in
this way can a post-free despatch for your goods be
assured.
The warranty covers only claims for material and maufacturing defects, but not for transport damage, for
wearing parts or for damage to fragile components,
e.g. buttons or batteries. This product is for private
use only and is not intended for commercial use.
The warranty is void in the case of abusive and improper handling, use of force and internal tampering not
carried out by our authorized service branch. Your
statutory rights are not restricted in any way by this
warranty.
The warranty period will not be extended by repairs
made under warranty. This applies also to replaced
and repaired parts. Any damage and defects extant
on purchase must be reported immediately after unpacking the appliance, at the latest, two days after
the purchase date. Repairs made after the expiration of the warranty period are subject to payment.
Service Great Britain
Tel.: 0871 5000 720 (£ 0.10/Min.)
E-Mail: kompernass@lidl.co.uk
IAN 89291
Hotline availability:
Monday to Friday 08:00 - 20:00 (CET)
Importer
KOMPERNASS GMBH
BURGSTRASSE 21
44867 BOCHUM, GERMANY
www.kompernass.com
- 7 -
Page 11

- 8 -
Page 12

Tartalomjegyzék Oldalszám
Rendeltetésszerű használat 10
Fontos biztonsági utasítások 10
Tartozékok 11
A készülék leírása 11
Műszaki adatok 12
Az első használat előtt 12
Az akkukra vonatkozó tájékoztató 12
A fali tartó felszerelése 12
Feltöltés 13
Működtetés 13
Tisztítás 14
Ártalmatlanítás 14
Garancia és szerviz 15
Gyártja 15
- 9 -
Page 13
Li-ion akkus
kézi porszívó
Gratulálunk!
Vásárlásával kiváló minőségű termék mellett döntött. Az összeszerelés és az üzembevétel előtt ismerkedjen meg a termékkel. Ehhez figyelmesen olvassa
el az alábbi összeszerelési leírást és a biztonsági
tudnivalókat. Csak a leírtak szerint és a megadott célokra használja a terméket. Őrizze meg ezt a leírást. A
készülék harmadik személynek történő továbbadásakor adja a termékhez valamennyi leírást is.
Rendeltetésszerű használat
A morzsaporszívót csak száraz vagy nedves felületek
ill. száraz vagy nedves dolgok vagy folyadékok felszívására szabad használni. Nem szabad emberre
vagy állatra irányítani. A készülék minden más felhasználása vagy átalakítása nem rendeltetésszerűnek
minősül és balesetveszélyes. A gyártó nem vállal
felelősséget olyan károkért, amelyek a nem rendeltetésszerű használat vagy a helytelen kezelés miatt
keletkeztek.
A készülék nem alkalmas iparszerű használatra.
Fontos biztonsági utasítások
Életveszélyes áramütés
elkerülése érdekében:
• Ne töltse ill. használja a készüléket a szabadban.
• A kézi porszívót soha ne használjuk, ha a vezeték,
dugó vagy a külső burkolat meg van sérülve.
• A sérült hálózati kábelt vagy csatlakozót a veszély
elkerülése érdekében azonnal cseréltesse ki szakemberrel.
• Csak szakemberrel végeztessen javítást. Semmi
esetre se szerelje szét egymaga a készüléket.
Az olyan beavatkozások, melyet nem szakértő
cég végez, sérülést okozhatnak.
• A készülék bekapcsolása előtt győződjön meg
arról, hogy a készülék műszaki adatain megjelölt
feszültség megfelel-e a hálózati feszültségnek.
• Ne fogja meg a hálózati részt vagy a készüléket
vizes vagy nedves kézzel.
• Ne használja a hálózati részt hosszabbítóval,
hanem közvetlenül csatlakoztassa a konnektorba.
A sérülésveszély elkerülése
érdekében:
• Ne cseréljen tartozékot a készüléken működés
közben.
• Ne szippantson fel a morzsaporszívóval hegyes
tárgyakat vagy üvegszilánkokat.
• Soha ne szippantson fel égő gyufát, parazsat
vagy cigarettacsikket.
• Ne használja a morzsaporszívóval vegyi anyag,
kőpor, gipsz, cement vagy más részecskeszerű
anyag felporszívózására.
• A készülék nem alkalmas gyúlékony és robbanékony anyagok vagy vegyi és agresszív folyadék
felporszívózására.
• A készüléket mindig zárt helyen tárolja. A balesetek elkerülése végett a készüléket használat
után száraz helyen tárolja.
• Extrém körülmények között az elemek szivároghatnak. Ha a folyadék érintkezésbe kerül a bőrrel
vagy a szembe jutna, az érintett testrészt azonnal
öblítsük ki vagy öblítsük le tiszta vízzel. Forduljon
orvoshoz.
- 10 -
Page 14
Így cselekszik helyesen:
• A készülék nem alkalmas arra, hogy olyan személyek (ideértve a gyermekeket is) használják,
akiket testi, érzékszervi vagy elmebeli képességeik
vagy tapasztalatuk és ismeretük hiánya megakadályoznának abban, hogy biztonságosan
használják a készüléket, kivéve, ha a biztonságukról gondoskodó felügyelettel vannak, vagy
ha előtte felvilágosították őket a készülék használatáról. Vigyázni kell a gyermekekre, hogy
ne játsszanak a készülékkel.
• Csak olyan tartozékokat használjon, amelyet
a gyártó ajánl.
• A tápegységet nem szabad más célokra felhasználni. A fali tartót vagy a tápegységet soha ne
a vezetéknél hordozza. Ne a kábelnél húzza
meg a készüléket, ha arrébb szeretné tenni.
• Mindig a hálózati csatlakozónál fogva húzza
ki a konnektorból a készüléket.
• Mindenképpen ügyeljen arra, hogy a morzsaporszívóval ne legyen fűtőtest, sütő vagy más forró
készülék vagy felület közelében.
• Mindig ügyeljen rá, hogy a szellőzőnyílások
szabadon legyenek. A levegőmozgás akadályoztatása a készülék felhevüléséhez és sérüléséhez vezethet.
• A termék újratölthető NiMH-akkumulátorokat
tartalmaz. Ne dobja az akkukat tűzba és ne
tegye ki őket magas hőmérsékletnek.
Robbanásveszély áll fenn!
• A kézi porszívó lépcsőn való használatakor
legyen különösen körültekintő.
• Ne használja a morzsaporszívóval behelyezett
porszűrő nélkül.
• A hálózati részt ne használja más készülékhez és
ne próbálja meg ezt a készüléket másik töltőállomással feltölteni. Csak a csomagban található
tápegységet használja!.
• Ne próbáljon fel nem újratölthető elemet feltölteni.
Tartozékok
Li-ion akkus kézi porszívó
réstisztító fúvóka
nedves szívófej
fali tartó
szerelőanyag
tápegység
Használati utasítás
Közvetlenül kicsomagolás után ellenőrizze a szállítás terjedelmét, hogy hiánytalan-e.
A készülék leírása
1 nedves szívófej
2 réstisztító szívófej
3 fali tartó
4 tápegység
5 csatlakozó
6 kapcsoló
7 töltést jelző ellenőrző lámpa
8 kireteszelő gomb
9 porszűrő tasak
0 porszűrő
q szennyeződéstároló
Tudnivaló:
A készülék akkuja kiszállításkor nincsen feltöltve.
A készülék első használata előtt 24 órán át fel kell
tölteni őket.
- 11 -
Page 15

Műszaki adatok
TTááppeeggyysséégg
Bemeneti feszültség/
- áram: 100 - 240 V ~, 50/60 Hz
Kimeneti feszültség/
- áram: 9,6 V / 300 mA
Védettségi osztály : II/
Típusmegjelölés: SAS 7.4 LI A2-1
KKéésszzüülléékk
Bemeneti feszültség 7,4 V
AAkkkkuukk
Kapacitás: 1300 mAh
Elem: 7,4 V
4
max. 300 mA
(2 x 3,7 V lítium ion akku)
Az első használat előtt
• Távolítsa el az összes csomagolóanyagot a
készülékről, különösen a védősapkát a be-/kikapcsolóról 6.
• Helyezze a portartályt q a motor egységre:
• Tolja bele a műanyag bütyköt a kézi porszívó
alján a portartály q mélyedésébe.
• Nyomja meg a kireteszelő gombot 8 és
egyidejűleg tolja rá a portartályt q a motor
egységre.
• Engedje el a kireteszelő gombot 8, hogy a
retesz a mélyedésbe érjen. A portartály q
ekkor szorosan illeszkedik a motor egységre.
Az akkukra vonatkozó
tájékoztató
1. A morzsaporszívó újratölthető lítium ion akkuval
üzemel.
Mielőtt a kézi porszívót először használná,
legalább 24 órán át töltse az akkukat.
2. Az akkuk teljes kapacitásukat 24 órás feltöltési
idő után érik el. Az akkuk ápolásához az alábbit
javasoljuk: csak akkor húzza ki a tápegységet 4
a konnektorból, ha fel vannak töltve az akkuk.
Csak akkor dugja vissza a tápegységet 4 a
konnektorba, ha a készülék szívóteljesítménye
érezhetően alábbhagy.
A fali tartó felszerelése
Életveszély!
Győződjön meg arról, hogy a falon azon a helyen,
ahova ki szeretné fúrni a tartóhoz 3 való lyukakat,
nem húzódik villanyvezeték, másfajta vezeték vagy
cső. Életveszélyes lehet, ha belefúr egy áramot vezető
vezetékbe!
1. Dugja be a tápegység 4 csatlakozóját 5 az
alábbi ábra alapján a fali tartóba 3.
A csatlakozót 5 elfordítva rögzítse.
- 12 -
Page 16

2. Keressen a fali tartónak 3 egy megfelelő helyet:
a morzsaporszívót minden további nélkül ki kell
tudni húzni belőle és a tápegységhez 4 legyen
egy konnektor a közelben.
3. Fúrjon két lyukat egymástól kb. 68 mm távolságra.
Használja a fali tartót 3 a lyukak bejelölésére:
így pontosan mérheti le a távolságot. A furatokat
5 mm-es dübelekhez fúrjuk ki.
4. Dugja a dübeleket a lyukakba és a csavarok
segítségével csavarozza fel a fali tartót 3.
5. A szívófejeket az oldalsó tartozéktartóra lehet
feldugni.
6. Dugja be a tápegységet 4 a konnektorba.
Feltöltés
• Ha a töltés befejeződött, mely teljesen üres akku
esetén 5,5 - 6,5 óráig is eltarthat, a készülék
magától fenntartó töltésre kapcsol át (ápolási
funkció). Ennek ellenére ne hagyja a tápegységet 4 mindig csatlakoztatva, mert így elromolhatnak az akkuk.
• Csak akkor töltse fel az akkut, ha a morzsaporszívó érezhetően gyengébben szív és a töltésellenőrző lámpa 7 zölden villog.
Tudnivaló:
A morzsaporszívót közvetlenül a tápegységen 4
is lehet tölteni. Ehhez vegye ki a csatlakozót 5
elcsavarva a fali tartóból 3 és dugja a morzsa-
porszívón lévő aljzatba.
Tudnivaló:
Bizonyosodjon meg róla, hogy a Be-/Kikapcsoló
gomb 6 „0” helyzetben van-e, mielőtt megkezdené
a töltést.
• A morzsaporszívót fentről tegye be a fali tartóba 3, hogy a csatlakozót 5 a morzsaporszívón lévő aljzatba csússzon.
A töltésellenőrző lámpa 7 pirosan villog és a
töltés megkezdődik.
Fontos:
• Ha a kézi porszívóban elég energia van szívni,
a töltésjelző lámpa 7 zölden világít. Ez nem jelenti azt, hogy az elemek teljesen fel vannak töltve. Ha a töltésjelző lámpa 7 zölden világít, az
elemek kb. 80%-ban fel vannak töltve.
Működtetés
Figyelem!
A szívónyílás mindig legyen szabadon és ne legyen
eldugulva. A dugulás túlhevüléshez és a motor sérüléséhez vezethet.
Tudnivalók:
• Ügyeljen arra, hogy a porszűrő 0 mindig
be legyen helyezve, mielőtt használná a gépet.
• Legfeljebb csak annyi folyadékot szívjon fel,
amíg a szennytartály q a MAX jelölésig nem
töltődik fel.
1. Vegye le a morzsaporszívót a fali tartóról 3
vagy ha nem használja a fali tartót 3, húzza
ki a csatlakozót 5 az aljzatból.
2. Ha szeretné, tegye a megfelelő szívófejet a
szívónyílásra:
• a réstisztító szívófejet 2, ha szűk, vagy nagyon
nehezen elérhető helyet tisztít.
• a nedves szívófejet 1, ha folyadékot szeretne
felszívni.
- 13 -
Page 17

Tudnivaló:
A folyadék felszívása után azonnal tisztítsa ki a
portartályt q. Különben baktériumok és bacilusok
keletkezhetnek! Ügyeljen arra, hogy a porszűrő tasak 9 mindig teljesen száraz legyen, mielőtt újra
használná a készüléket.
3. A készülék bekapcsolásához nyomja előre a
be-/kikapcsoló gombot 6. A töltésellenőrző
lámpa 7 zölden villan fel.
4. Használat után tolja hátra a be-/kikapcsoló
gombot 6.
Tudnivaló:
Helyezze a morzsaporszívót a fali tartóba 3
és akkor kezdje a töltést, ha a morzsaporszívó
érezhetően gyengébben szív és a töltésellenőrző
lámpa 7 zölden villog.
Tisztítás
A legjobb eredmény elérése érdekében ürítse ki
a portartályt q és tisztítsa meg a porszűrőt 0
minden használat után.
6. Helyezze vissza a porszűrőt 0 a portartályba q.
Ügyeljen arra, hogy a porszűrő 0 egyenesen
legyen és a portartály q gumiszegély záródjon.
7. Helyezze vissza a portartályt q a motor egységre:
• Tolja a morzsporszívó alján lévő műanyag
fület a portartályon q lévő mélyedésbe.
• Nyomja meg a kireteszelő gombot 8 és egy-
szerre tolja a portartályt q a motor egységre.
• Engedje el a kireteszelő gombot 8, hogy a
retesz a mélyedésbe érjen. A portartályt q
ekkor szorosan illeszkedik a motor egységre.
8. A készülékházat és a két szívófejet kissé megnedvesített ronggyal tisztítsa. Makacs szennyeződések esetén tegyen enyhe tisztítószert a megnedvesített kendőre.
9. Alaposan szárítson meg valamennyi alkatrészt,
mielőtt újra használná vagy eltenné a helyére.
Ártalmatlanítás
Semmi esetre se dobja a készüléket a
háztartási hulladékba. Ez a termék a
2002/96/EC európai irányelv hatálya
alá tartozik.
Fontos:
Ne használjon súroló, maró vagy vegyi tisztítószereket,
mert az kárt tehet a készülék felületében.
1. Ha ki szeretné nyitni a portartályt q, nyomja
meg a kireteszelő gombot 8 és vegye ki a
portartályt q.
2. Vegye ki a porszűrőt 0 a portartályból q.
3. Ürítsa ki a portartályt q.
4. A porszűrő zsákot 9 a tartóval együtt húzza ki
a porszűrőből 0.
5. Hideg vízzel öblítse ki a porszűrő zsákot 9 és
várja meg, amíg teljesen megszárad, mielőtt újra
betenné a porszűrőbe 0. Ne szárítsa forró levegőn.
A készüléket és az akkut egymástól külön ártalmatlanítsa.
1. Ehhez oldja ki a motorblokkon lévő valamennyi
csavart és szedje szét.
2. Vágja le az akku csatlakozókábelét és vegye
ki az akkut a készülékből.
A készüléket engedélyeztetett hulladékgyűjtő helyen vagy a helyi hulladékeltávolító üzemnél tudja
kidobni.
Vegye figyelembe az érvényben lévő idevonatkozó
előírásokat.
Ha kérdése merülne fel, vegye fel a kapcsolatot a
hulladékfeldolgozó vállalattal.
- 14 -
Page 18

Az elemek/akkuk ártalmatlanítása
Az elemeket/akkukat nem szabad a háztartási hulladékba dobni. Valamennyi felhasználó törvényes kötelessége az elemeket és
akkukat városa ill. városrésze gyűjtőhelyén
vagy a kereskedelemben leadni.
Ez a kötelezettség azt a célt szolgálja, hogy az elemek/akkuk környezetkímélő ártalmatlanításra kerülhessenek. Az elemeket és akkukat csak lemerült állapotban adják le.
Valamennyi csomagolóanyagot juttasson el
a környezetbarát hulladékhasznosítóhoz.
Garancia és szerviz
A készülékre 3 év garanciát adunk a vásárlás dátumától számítva. A készüléket gondosan gyártottuk,
és szállítás előtt lelkiismeretesen ellenőriztük.
Kérjük, a vásárlás igazolására őrizze meg a pénztári blokkot. Kérjük, garanciaigény esetén vegye fel
a kapcsolatot telefonon az Ön közelében lévő szervizzel. Csak ebben az esetben garantálhatjuk, hogy
ingyen tudja beküldeni az árut.
A garancia csak anyag- és gyártási hibára vonatkozik, nem pedig szállítási kárra, kopásra vagy törékeny részek (pl. kapcsoló vagy elem) sérülésére. A termék kizárólag magánhasználatra, nem üzleti
használatra készült.
A garancia érvényét veszti visszaélésszerű vagy
szakavatatlan kezelés, erőszak alkalmazása vagy
olyan beavatkozások esetén, amelyeket nem engedélyeztetett szervizelő üzleteink hajtottak végre. Az
ön törvényes jogait ez a garancia nem korlátozza.
A garanciaidő nem hosszabbodik a jótállással. Ez
a kicserélt vagy javított alkatrészekre is érvényes.
Az esetlegesen már a megvételkor meglévő károkat
és hiányosságokat azonnal kicsomagolás után, legkésőbb két nappal a vétel dátumától számítva jelezni kell. A garanciális idő lejárta után esedékes javítások térítéskötelesek.,
Szerviz Magyarország
Tel.: 0640 102785
E-Mail: kompernass@lidl.hu
IAN 89291
Az ügyfélszolgálati forródrót elérhetősége:
hétfőtől péntekig 8.00 és 20.00 óra között
(közép-európai idő szerint)
Gyártja
KOMPERNASS GMBH
BURGSTRASSE 21
44867 BOCHUM, GERMANY
www.kompernass.com
- 15 -
Page 19

- 16 -
Page 20

Kazalo vsebine Stran
Predvidena uporaba 18
Pomembni varnostni napotki 18
Vsebina kompleta 19
Opis naprave 19
Tehnični podatki 20
Pred prvo uporabo 20
Informacije o akumulatorjih 20
Montaža stenskega držala 20
Polnjenje 21
Uporaba 21
Čiščenje 22
Odstranitev 22
Proizvajalec 23
Servis 23
Garancijski list 23
- 17 -
Page 21

Litij-ionski akumulatorski ročni sesalnik
Iskrene čestitke ob nakupu vaše nove naprave.
Odločili ste se za kakovosten izdelek. Ta navodila
za uporabo so sestavni del vašega izdelka. Vsebujejo pomembne napotke za njegovo varnost, uporabo in odstranitev. Preden izdelek začnete uporabljati, si preberite vse napotke za njegovo varno
uporabo. Izdelek uporabljajte samo na opisani način in le za navedena področja uporabe. Ob predaji
naprave tretji osebi zraven priložite tudi vso dokumentacijo.
Predvidena uporaba
Baterijski ročni sesalnik se sme uporabljati samo za
sesanje suhih ali mokrih površin oziroma suhih ali
mokrih materialov za sesanje in tekočin. Ljudi ali živali se s to napravo ne sme posesati. Vsaka druga
vrsta uporabe ali sprememba naprave velja za nepredvideno in pomeni bistveno nevarnost nezgod.
Proizvajalec ne odgovarja za škodo, ki bi nastala
zaradi nepredvidene ali napačne uporabe.
Naprava ni predvidena za obrtno uporabo.
Pomembni varnostni napotki
Da se izognete smrtni nevarnosti
zaradi električnega udara:
• Naprave ne polnite ali uporabljajte na prostem.
• Ročnega sesalnika nikoli ne uporabljajte, če so
kabel, vtič ali ohišje poškodovani.
• Poškodovane omrežne vtiče ali omrežne kable
naj vam takoj zamenja pooblaščeno strokovno
osebje, da se izognete nevarnosti.
• Napravo dajte v popravilo ustreznemu strokovnemu servisu. Naprave nikoli ne odpirajte sami.
Posegi, ki jih ni izvedlo strokovno podjetje, lahko
privedejo do poškodb.
• Pred vklopom naprave se prepričajte, da napetost, navedena v tehničnih podatkih naprave, odgovarja omrežni napetosti.
• Omrežnega napajalnika ali naprave nikoli ne
prijemajte z mokrimi rokami.
• Omrežnega napajalnika ne uporabljajte s podaljškom za kabel, temveč omrežni napajalnik
neposredno priključite v vtičnico.
Preprečevanje nevarnosti poškodb:
• Med delovanjem naprave ne zamenjujte delov
pribora.
• Ročnega sesalnika ne uporabljajte za sesanje
ostrih predmetov ali črepinj.
• Nikoli ne sesajte gorečih vžigalic, tlečega pepela
ali cigaretnih ogorkov.
• Ročnega sesalnika ne uporabljajte za sesanje
kemičnih izdelkov, kamnitega praha, mavca,
cementa ali drugih podobnih delcev.
• Naprava ni primerna za vnetljive in eksplozivne
snovi ali kemične in agresivne tekočine.
• Napravo zmeraj hranite v zaprtih prostorih.
Za preprečevanje nezgod napravo po uporabi
shranite na suhem kraju.
• Pod ekstremnimi pogoji lahko pride do nastanka
mest puščanja na celicah akumulatorja. Ob stiku
tekočine s kožo ali očmi je treba prizadeto mesto
takoj splahniti s čisto vodo. Pojdite k zdravniku.
- 18 -
Page 22

Tako ravnate varno:
• Ta izdelek ni namenjen temu, da bi ga uporabljale osebe (tudi otroci ne) z omejenimi fizičnimi,
zaznavnimi ali duševnimi sposobnostmi ali s pomanjkljivimi izkušnjami in/ali znanjem, razen
pod nadzorom osebe, ki je zanje odgovorna ali
jim je dala navodila v zvezi z uporabo izdelka.
Otroke je treba nadzorovati, da preprečite igro
z napravo.
• Uporabljajte samo dele pribora, ki jih priporoča
proizvajalec.
• Omrežni napajalnik se ne sme uporabljati za
druge namene. Stenskega držala ali omrežnega
napajalnika nikoli ne prenašajte z držanjem za
kabel. Ne vlecite za kabel, če napravo želite
premakniti.
• Zmeraj primite za omrežni vtič, da napravo ločite
od oskrbe s tokom.
• Nujno pazite, da ročnega sesalnika ne odložite
poleg radiatorjev, peči ali drugih segretih naprav
ali površin.
• Zmeraj preverite, ali so prezračevalne reže proste.
Blokiran krogotok zraka lahko privede do pregretja in poškodbe naprave.
• Ta izdelek vsebuje akumulatorje za polnjenje.
Akumulatorjev ne vrzite v ogenj in jih ne izpostavljajte visokim temperaturam.
Obstaja nevarnost eksplozije!
• Bodite še posebej pozorni, ko ročni sesalnik
uporabljate na stopnicah.
• Ročnega sesalnika ne uporabljajte brez vstavljenega filtra za prah.
• Omrežnega napajalnika ne uporabljajte za kakšen
drug proizvod in ne poskušajte te naprave polniti
z drugo polnilno postajo. Uporabljajte samo
omrežni napajalnik, priložen tej napravi.
• Nikoli ne poskušajte polniti baterij, ki niso
namenjene za polnjenje.
Vsebina kompleta
Litij-ionski akumulatorski ročni sesalnik
Šoba za reže
Šoba za mokro sesanje
Stensko držalo
Montažni material
Omrežni napajalnik
Navodila za uporabo
Takoj po razpakiranju preverite celotnost vsebine
kompleta.
Opis naprave
1 Šoba za mokro sesanje
2 Šoba za reže
3 Stensko držalo
4 Omrežni napajalnik
5 Votli vtič
6 Stikalo za vklop/izklop
7 Kontrolna lučka polnjenja
8 Tipka za sprostitev
9 Vrečka filtra za prah
0 Filter za prah
q Zbiralnik umazanije
Napotek:
Naprava se dobavi s praznimi akumulatorji. Pred
prvo uporabo je akumulatorje najprej treba polniti
24 ur.
- 19 -
Page 23

Tehnični podatki
Informacije o akumulatorjih
OOmmrreežžnnii nnaappaajjaallnniikk
Vhodna napetost/
- tok: 100 - 240 V ~, 50/60 Hz
Izhodna napetost/
- tok: 9,6 V / 300 mA
Razred zaščite: II/
Oznaka tipa: SAS 7.4 LI A2-1
NNaapprraavvaa
Vhodna napetost 7,4 V
AAkkuummuullaattoorrjjii
Kapaciteta: 1300 mAh
Akumulator: 7,4 V
4
najv. 300 mA
(2 x 3,7 V litijev akumulator)
Pred prvo uporabo
• Z naprave odstranite ves embalažni material, še
posebej zaščitni pokrov nad stikalom za
vklop/izklop 6.
• Na motorni blok namestite zbiralnik umazanije q:
• Plastični nastavek na spodnji strani ročnega
sesalnika potisnite v odprtino na zbiralniku
umazanije q.
• Pritisnite tipko za sprostitev 8 in istočasno po-
tisnite zbiralnik umazanije q na motorni blok.
• Tipko za sprostitev 8 spustite, tako da se za-
pora namesti v odprtino. Zbiralnik umazanije q
je sedaj trdno pritrjen na motorni blok.
1. Ročni sesalnik za prah se napaja z litijevimi
akumulatorji, ki se lahko ponovno napolnijo.
Preden ročni sesalnik uporabite prvič, morate
akumulatorje polniti najmanj 24 ur.
2. Akumulatorji svojo polno kapaciteto dosežejo po
času polnjenja 24 ur. Za vzdrževanje akumulatorjev vam priporočamo naslednje: ko so ti napolnjeni, omrežni napajalnik 4 potegnite iz omrežne
vtičnice. Omrežni napajalnik 4 v omrežno vtič-
nico priključite šele, ko se sesalna moč naprave
bistveno zmanjša.
Montaža stenskega držala
Smrtna nevarnost!
Zagotovite, da se v steni ne nahajajo električni kabli
ali druge napeljave ter cevi, in sicer na mestu, kjer
želite izvrtati luknje za stensko držalo 3. Če navrtate
električno napeljavo pod tokom, s tem povzročite
smrtno nevarnost!
1. Vstavite votli vtič 5 omrežnega napajalnika 4
v stensko držalo 3, kot je prikazano na spodnji
sliki. Votli vtič 5 pritrdite, tako da ga zasukate.
- 20 -
Page 24

2. Za stensko držalo 3 poiščite primerno mesto za
montažo: pomembno je, da ročni sesalnik lahko
brez težav potegnete iz držala, za omrežni napajalnik 4 pa mora biti v bližini na razpolago
dostopna omrežna vtičnica.
3. Izvrtajte dve luknji v razdalji ca. 68 mm. Uporabite
stensko držalo 3 za zarisovanje lukenj: tako je
razdalja pravilno določena. Izvrtati morate dve
luknji, primerni za 5mm stenske vložke.
4. Stenske vložke vtaknite v izvrtine in stensko
držalo 3 privijte s pomočjo vijakov.
5. Šobe lahko nataknete na stranska držala za pribor.
6. Vtaknite omrežni napajalnik 4 v omrežno vtičnico.
Polnjenje
Napotek:
Prepričajte se, da je stikalo za vklop/izklop 6 po-
tisnjeno nazaj (v položaj „0”), preden začnete
s polnjenjem.
• Ročni sesalnik za prah od zgoraj vstavite v stensko
držalo 3, tako da votli vtič 5 zdrsne v vtičnico
na ročnem sesalniku.
Kontrolna lučka polnjenja 7 zasveti rdeče in
postopek polnjenja se začne.
Pomembno:
• Ko ima ročni sesalnik spet dovolj energije za sesanje, kontrolna lučka polnjenja 7 sveti zeleno. To
ne pomeni, da so akumulatorji dokončno napolnjeni. Ko kontrolna lučka polnjenja 7 zasveti zeleno,
so akumulatorji napolnjeni do pribl. 80 %.
• Ko je postopek polnjenja zaključen, ta lahko pri
popolnoma praznih akumulatorjih traja od pribl.
5 ur, potem se naprava samodejno preklopi v način ohranjanja polnitve (funkcija nege). Vseeno
naprave ne puščajte trajno priključene na omrežnem napajalniku 4, da se izognete morebitnim
poškodbam akumulatorjev.
• Akumulatorje ponovno napolnite šele, ko sesalna
zmogljivost ročnega sesalnika za prah postane
opazno šibkejša in kontrolna lučka polnjenja 7
utripa zeleno.
Napotek:
Ročni sesalnik lahko polnite tudi neposredno s pomočjo omrežnega napajalnika 4. V ta namen votli
vtič 5 z rahlim obratom odstranite iz stenskega držala 3 in ga vtaknite v vtičnico na ročnem sesalniku.
Uporaba
Pozor!
Sesalna odprtina mora biti ves čas prosta in ne sme
biti zamašena. Zamašitve privedejo do pregretja in
poškodbe motorja.
Napotki:
• Pazite na to, da je filter za prah 0 zmeraj vstavljen, preden napravo uporabite.
• Posesajte samo toliko tekočine, da je zbiralnik
umazanije q napolnjen največ do oznake
MAX.
1. Ročni sesalnik vzemite iz stenskega držala 3,
oziroma, če stenskega držala 3 ne uporabljate,
votli vtič 5 potegnite iz vtičnice.
2. Po želji vstavite primerno šobo v sesalno odprtino:
• šobo za reže 2 za čiščenje tesnih, nedostopnih
mest.
• šobo za mokro sesanje 1 za sesanje tekočin.
- 21 -
Page 25

Napotek:
Potem ko ste posesali tekočine, takoj očistite zbiralnik
umazanije q. Drugače pride do razvoja bakterij in
klic! Pazite na to, da je vrečka filtra za prah 9 popolnoma suha, preden napravo začnete ponovno
uporabljati.
3. Za vklop naprave potisnite stikalo za vklop/
izklop 6 naprej. Kontrolna lučka polnjenja 7
zasveti zeleno.
4. Po uporabi stikalo za vklop/izklop 6 potisnite
nazaj.
Napotek:
Ročni sesalnik za prah namestite v stensko držalo 3
in začnite s postopkom polnjenja, ko sesalna
zmogljivost postane opazno šibkejša in kontrolna
lučka polnjenja 7 utripa zeleno.
Čiščenje
Za najboljše rezultate zbiralnik umazanije q spraznite
in očistite filter za prah 0 po vsaki uporabi.
Pomembno:
Za čiščenje ne uporabljajte nobenih agresivnih,
kemičnih ali ostrih sredstev. Taka sredstva poškodujejo površino naprave.
1. Za odpiranje zbiralnika umazanije q pritisnite
tipko za sprostitev 8 in zbiralnik umazanije q
odstranite.
2. Filter za prah 0 vzemite iz zbiralnika umazanije q.
3. Zbiralnik umazanije q spraznite.
4. Potegnite vrečko filtra za prah 9 s pripadajoč-
im držalom iz filtra za prah 0.
5. Vrečko filtra za prah 9 splahnite v mrzli vodi in
počakajte, da se v celoti posuši, preden jo ponovno vstavite v filter za prah 0. Vrečke ne sušite z vročim zrakom.
6. Filter za prah 0 ponovno vstavite v zbiralnik
umazanije q. Pazite na to, da je filter za prah 0
vstavljen ravno in da gumijast rob zatesni zbiralnik
umazanije q.
7. Zbiralnik umazanije q ponovno namestite na
motorni blok:
• Potisnite plastični nastavek na spodnji strani
ročnega sesalnika v odprtino na zbiralniku
umazanije q.
• Pritisnite tipko za sprostitev 8 in istočasno po-
tisnite zbiralnik umazanije q na motorni blok.
• Tipko za sprostitev 8 spustite, tako da zapora
seže v odprtino. Zbiralnik umazanije q je sedaj
trdno pritrjen na motorni blok.
8. Ohišje in obe šobi očistite z rahlo navlaženo
krpo. V primeru trdovratne umazanije na krpo
dajte še blago sredstvo za čiščenje.
9. Vse dele temeljito obrišite, preden napravo
ponovno uporabite ali shranite.
Odstranitev
Naprave nikakor ne odvrzite v običajne
hišne smeti. Za ta izdelek velja evropska direktiva 2002/96/EC.
Napravo in akumulator morate odstraniti ločeno
drug od drugega.
1. V ta namen odvijte vse križne vijake na motornem bloku in tega razstavite.
2. Odrežite priključni kabel akumulatorja in akumulator vzemite iz naprave.
Napravo oddajte pri podjetju, registriranem za predelavo odpadkov, ali pri svojem komunalnem podjetju za predelavo odpadkov.
Upoštevajte trenutno veljavne predpise.
V primeru dvoma se obrnite na svoje podjetje za
predelavo odpadkov.
- 22 -
Page 26

Odstranitev baterij in akumulatorjev
Baterij/akumulatorjev ne smete odvreči v
hišne smeti. Vsak potrošnik je po zakonu
dolžan, baterije/akumulatorje oddajati na
ustreznem zbirališču v svoji občini/četrti ali
v trgovini.
Ta obveza služi temu, da se baterije/akumulatorji
lahko oddajo za okolju prijazno odstranjevanje.
Baterije/akumulatorje oddajajte le v izpraznjenem
stanju.
Embalažo oddajte za okolju primerno
odstranitev.
Proizvajalec
KOMPERNASS GMBH
BURGSTRASSE 21
44867 BOCHUM, GERMANY
www.kompernass.com
Servis
Servis Slovenija
Tel.: 080080917
E-Mail: kompernass@lidl.si
IAN 89291
Dosegljivost telefonske sluÏbe za stranke:
Od ponedeljka do petka od 8:00 do 20:00
(po srednjeevropskem času)
Garancijski list
1. S tem garancijskim listom jamčimo Kompernass
GmbH, da bo izdelek v garancijskem roku ob
normalni in pravilni uporabi brezhibno deloval in
se zavezujemo, da bomo ob izpolnjenih spodaj
navedenih pogojih odpravili morebitne pomanjkljivosti in okvare zaradi napak v materialu
ali izdelavi oz. po svoji presoji izdelek zamenjali
ali vrnili kupnino.
2. Garancija je veljavna na ozemlju Republike
Slovenije.
3. Garancijski rok za proizvod je 3 leta od dneva
nabave.
4. Kupec je dolžan okvaro javiti pooblaščenemu
servisu oz. se informirati o nadaljnjih postopkih
na zgoraj navedeni telefonski številki. Svetujemo
vam, da pred tem natančno preberete navodila
o sestavi in uporabi izdelka.
5. Kupec je dolžan pooblaščenemu servisu predložiti garancijski list in račun, kot potrdilo in dokazilo
o nakupu.
6. V primeru, da proizvod popravlja nepooblaščeni
servis ali oseba, kupec ne more uveljavljati zahtevkov iz te garancije.
7. Vzroki za okvaro oz. nedelovanje izdelka morajo
biti lastnosti stvari same, in ne vzroki, ki so zunaj
proizvajalčeve oz. prodajalčeve sfere. Kupec ne
more uveljavljati zahtevkov iz te garancije, če se
ni držal priloženih navodil za sestavo in uporabo
izdelka ali, če je izdelek kakorkoli spremenjen
ali nepravilno vzdrževan.
8. Jamčimo servisiranje in rezervne dele za minimalno dobo, ki je zahtevana s strani zakonodaje.
9. Obrabni deli oz. potrošni material so izvzeti iz
garancije.
10. Vsi potrebni podatki za uveljavljanje garancije se nahajajo na dveh ločenih dokumentih
(garancijski list, račun).
11. Ta garancija proizvajalca ne izključuje pravic
potrošnika, ki izhajajo iz odgovornosti prodajalca za napake na blagu.
Prodajalec:
Lidl d.o.o.k.d., Pod lipami 1, SI-1218 Komenda
- 23 -
Page 27

- 24 -
Page 28

Obsah Strana
Účel použití 26
Důležitá bezpečnostní upozornění 26
Obsah dodávky 27
Popis přístroje 27
Technické údaje 28
Před prvním uvedením do provozu 28
Informace k akumulátorům 28
Montáž držáku na stěnu 28
Nabíjení 29
Obsluha 29
Čištění 30
Likvidace 30
Záruka a servis 31
Dovozce 31
- 25 -
Page 29

Ruční vysavač s
Li-Ion akumulátorem
Gratulujeme Vám k zakoupení nového přístroje.
Vaším nákupem jste si vybrali kvalitní výrobek. Návod k obsluze je součástí tohoto výrobku. Obsahuje
důležité pokyny a upozornění ohledně bezpečnosti,
použití a likvidace. Před použitím výrobku si dobře
přečtěte provozní a bezpečnostní pokyny. Výrobek
používejte pouze předepsaným způsobem a v uvedených oblastech použití. Při předávání výrobku třetím osobám předávejte i tyto podklady.
Účel použití
• Poškozenou napájecí zástrčku nebo napájecí
kabel nechte okamžitě vyměnit autorizovaným
odborným personálem, aby se tak zabránilo
nebezpečí.
• Opravy nechte provádět pouze odbornou firmou.
Za žádných okolností přístroj neotvírejte. Zásahy
a opravy, které nebyly prováděny odbornou firmou,
mohou vést ke zranění.
• Před zapnutím přístroje se sami přesvědčte o tom,
zda napětí, uvedené v technických údajích přístroje, odpovídá napětí ve Vaší síti.
• Nedotýkejte se adaptéru nebo přístroje mokrý-
ma nebo vlhkýma rukama.
• Nepoužívejte adaptér s prodlužovacím kabelem,
spojte adaptér přímo se zásuvkou.
Ruční aku vysavač se smí používat k vysávání suchých nebo mokrých povrchů resp. pro suché nebo
mokré odsávání nebo kapalin. Prach z lidí a zvířat se
nesmí tímto přístrojem vysávat. Jakékoli jiné použití
nebo úprava přístroje jsou zakázány a představují závažné nebezpečí poranění. Výrobce neodpovídá za
škody vzniklé použitím k jinému účelu nebo za škody
vzniklé nesprávnou obsluhou.
Přístroj není určen pro průmyslové použití.
Důležitá bezpečnostní
upozornění
Abyste zabránili nebezpečí ohrožení
života elektrickým proudem:
• Nenabíjejte, resp. nepoužívejte přístroj venku.
• Ruční vysavač nikdy nepoužívejte, je-li poškozen
kabel, zástrčka nebo tělo přístroje.
Abyste se vyhnuli nebezpečí
poranění:
• Nevyměňujte příslušenství na přístroji, dokud je
vysavač v provozu.
• Nepoužívejte ruční vysavač k vysávání špičatých
předmětů nebo skleněných střepů.
• Nikdy nevysávejte hořící zápalky, žhavý popel
nebo cigaretové nedopalky.
• Nepoužívejte ruční vysavač k vysávání chemických
produktů, kamenného prachu, sádry, cementu
nebo jiných podobných částic.
• Přístroj není vhodný pro vysávání hořlavých a výbušných látek a ani pro vysávání chemických a
žíravých kapalin.
• Přístroj uchovávejte vždy v uzavřených místnostech.
Abyste zabránili nehodám, uchovávejte přístroj
po použití na suchém místě.
• Za extrémních podmínek mohou akumulátorové
články vytéct. Při zasažení očí nebo kůže kapalinou musí být zasažené místo ihned vypláchnuto,
resp. opláchnuto čistou vodou. Vyhledejte lékaře.
- 26 -
Page 30

Bezpečnostní pokyny:
• Tento přístroj není určen k tomu, aby jej používaly
osoby (včetně dětí), které mají omezené fyzické,
senzorické nebo duševní schopnosti či nedostatek
zkušeností a/nebo znalostí, ledaže by jej používaly pod bezpečnostním dohledem zodpovědné
osoby nebo by od ní obdržely pokyny, jak přístroj
používat. Děti by měly být pod dohledem, abyste
měli jistotu, že si s přístrojem nehrají.
• Používejte jen příslušenství doporučené výrobcem.
• Napájecí adaptér se nesmí používat pro jiné
účely. Držák an stěnu nebo napájecí část nikdy
nenoste na kabelu. Chcete-li přístroj přemístit,
nikdy jej netahejte za kabel.
• Chcete-li přístroj odpojit od napájení, uchopte
zástrčku a vytáhněte ji ze zásuvky.
• Bezpodmínečně dbejte na to, abyste ruční vysavač
neodstavili vedle topných těles, pečicích trub
nebo jiných zahřátých spotřebičů nebo ploch.
• Dbejte na to, aby větrací štěrbiny byly stále volné.
Zablokovaný oběh vzduchu může vést k přehřátí
a poškození přístroje.
• Tento výrobek obsahuje znovunabíjecí akumulátory. Neodhazujte akumulátory do ohně a nevystavujte je vysokým teplotám.
Hrozí nebezpečí výbuchu!
• Postupujte velmi opatrně, používáte-li vysavač
na schodech.
• Nepoužívejte vysavač bez nasazeného prachového filtru.
• Nepoužívejte adaptér pro jiný výrobek a nepokoušejte se nabíjet tento přístroj jinou nabíječkou.
Používejte pouze napájecí adaptér dodaný s tímto
přístrojem.
• Nikdy se nepokoušejte opět nabíjet nenabíjecí
akumulátory.
Obsah dodávky
Ruční vysavač s Li-Ion akumulátorem
Spárová hubice
Nasávací hubice zamokra
Držák na stěnu
Montážní materiál
Síťový adaptér
Návod k obsluze
Ihned po vybalení zkontrolujte rozsah dodávky na
kompletnost.
Popis přístroje
1 nasávací hubice zamokra
2 hubice
3 držák na stěnu
4 síťový adaptér
5 nástrčná zástrčka
6 přepínač zap/vyp
7 kontrolka nabití
8 uvolňovací tlačítko
9 sáček pro prachový filtr
0 prachový filtr
q nádoba na nečistoty
Poznámka:
Přístroj se dodává s nenabitými akumulátory. Před
prvním použitím přístroje se akumulátory nejprve
musí 24 hodin nabíjet.
- 27 -
Page 31

Technické údaje
Informace k akumulátorům
SSííťťoovvýý aaddaappttéérr
Vstupní napětívstupní
proud: 100 - 240 V ~, 50/60 Hz
Výstupní napětívýstupní
proud: 9,6 V / 300 mA
Třída ochrany: II/
Označení typu: SAS 7.4 LI A2-1
PPřřííssttrroojj
Vstupní napětívstupní 7,4 V
AAkkuummuullááttoorryy
Kapacita: 1300 mAh
Baterie: 7,4 V
4
max. 300 mA
(2 x 3,7 V lithium-ionový
akumulátor)
Před prvním uvedením
do provozu
• Odstraňte z přístroje veškerý obalový materiál,
zvláště ochrannou krytku na zapínači/vypínači 6.
• Nasaďte nádobu na nečistoty q na motorový
blok:
• Posuňte plastový výstupek na spodní straně ru-
čního vysavače do vyhloubeniny na nádobě
na nečistoty q.
• Stiskněte odblokovací tlačítko 8 a současně
nasuňte nádobu na nečistoty q na motorový
blok.
• Odblokovací tlačítko 8 pusťte, aby západka
mohla zapadnout do vyhloubeniny. Nádoba
na nečistoty q sedí nyní pevně na motorovém
bloku.
1. Ruční vysavač je napájen dobíjecím lithium-iontovým akumulátorem.
Než použijete ruční vysavač poprvé, musí se
akumulátory nabíjet alespoň 24 hodin.
2. Akumulátory dosáhnou svou plnou kapacitu po
době nabíjení 24 hodin. K péči akumulátorů doporučujeme následující: Poté, co jsou akumulátory úplně nabité, vytáhněte napájení 4 z elektrikké zásuvky. Napájení 4 zastrčte opět do
elektrické zásuvky až tehdá, když citelně poklesne sací výkon přístroje.
Montáž držáku na stěnu
Nebezpečí života!
Ujistěte se, zda se ve stěně, do které chcete navrtat
díry pro držák na stěnu 3 nenachází žádná elek-
trická vedení nebo jiná vedení či potrubí. Hrozí
nebezpečí života, jestli-že navrtáte vedení ,vedoucí
proud!
1. Zastrčte nástrčnou zástrčku 5 napájecího adap-
téru 4 do držáku na stěnu 3 tak, jak je znázorněno na následujícím obrázku. Nástrčnou
zástrčku 5 upevněte zakroucením.
- 28 -
Page 32

2. Vyhledejte vhodné místo pro montáž držáku
na stěnu 3: Ruční vysavač se musí dát z něj
snadno vytáhnout a elektrická zásuvka musí
být dostupná pro napájecí adaptér 4.
3. Vyvrtejte dva otvory ve vzdálenosti cca 68 mm.
K označení děr využijte nástěnný držák 3:
Tím zajistíte jejich správné vyměření. Díry se musí
vhodně vyvrtat pro 5 mm hmoždinky.
4. Zastrčte hmoždinky do vyvrtaných děr a zašroubujte nástěnný držák 3 pomocí šroubů napevno.
5. Trysky a hubice můžete také nastrčit na boční
držák příslušenství.
6. Zastrčte napájecí adaptér 4 do elektrické zástrčky.
Nabíjení
• Po dokončení nabíjení, které při úplném vybití
akumulátoru může trvat cca. 5 hodiny, se přístroj
automaticky přepne na dobíjení (udržovací funkce).Pro zabránění případného poškození
nenechávejte přesto přístroj trvale zapojen do
napájecího adaptéru 4.
• Akumulátory nabijte až poté, když se znatelně
sníží sání vysavače a kontrolka nabíjení 7 bliká
zeleně.
Poznámka:
Ruční vysavač lze také nabíjet přímo napájecím
adaptérem 4. Vytáhněte k tomu nástrčnou zástrčku 5
lehkým pootočením z nástěnného držáku 3 a zastrčte
ji do zdířky na ručním vysavači.
Poznámka:
Ujistěte se, že hlavní vypínač 6 je posunut dozadu
(poloha „0”), než začnete s nabíjením.
• Zastrčte ruční vysavač do nástěnného držáku 3
seshora tak, aby nástrčná zástrčka 5 zaskočila do
zdířky na ručním vysavači.Kontrolka nabíjení 7 bliká červeně a začne proces nabíjení.
Důležité:
• Jakmile je ruční vysavač opět dostatečně zásobován energií k vysávání, svítí kontrolní světlo nabíjení 7 zeleně. To neznamená, že jsou akumulátory plně nabité. Jakmile se kontrolní světlo
nabíjení 7 rozsvítí zeleně, jsou akumulátory na-
bité na cca. 80%.
Obsluha
Pozor!
Sací otvor musí být neustále volný a nesmí být ucpaný.
Ucpání vede k přehřátí a poškození motoru.
Upozornění:
• Ubezpečte se, zda je prachový filtr 0 vždy
vložený, než začnete přístroj používat.
• Nasejte maximálně pouze tolik kapaliny, dokud
se nádoba na špínu q nenaplní až po označení
MAX.
1. Sejměte ruční vysavač z nástěnného držáku 3,
nebo, pokud nástěnný držák 3 nepoužíváte,
vytáhněte nástrčnou zástrčku 5 ze zdířky.
2. Nasaďte dle potřeby vhodnou trysku/hubici do
sacího otvoru:
• Spárovou hubici 2 pro čištění a vysávání úz-
kých, těžce dosažitelných míst.
• Nasávací hubici zamokra 1 k vysátí kapalin.
- 29 -
Page 33

Upozornění:
Poté, co jste vysáli kapalinu, vyčistěte okamžitě
nádobu na nečistoty q. Jinak se mohou vytvořit
bakterie a choroboplodné zárodky! Dbejte na to,
aby sáček pro prachový filtr 9 byl před opětným
použitím přístroje zcela suchý.
3. Pro zapnutí přístroje posuňte zapínač/vypínač 6
dopředu. Kontrolka nabíjení 7 svítí zeleně.
4. Po použití posuňte zapínač/vypínač 6 dozadu.
Upozornění:
Zastrčte ruční vysavač do nástěnného držáku 3
a zapněte proces nabíjení pouze tehdy, pokud se
výrazně sníží sací výkon a kontrolka nabíjení 7
bliká zeleně.
Čištění
Pro dosažení nejlepších výsledků vyprázdněte prachovou nádobu q a vyčistěte prachový filtr 0 po
každém použití.
Důležité:
Nepoužívejte žádné abraziva, nebo agresivní nebo
chemické čisticí prostředky.Tyto napadnou povrch
přístroje a mohly by jej poškodit.
1. Pro otevření nádoby na nečistoty q stiskněte
odblokovací tlačítko 8 a odeberte nádobu na
nečistoty a prach q.
2. Vyjměte prachový filtr 0 z nádoby na nečistoty
a prach q.
3. Nádobu na nečistoty a prach q vyprázdněte.
4. Vytáhněte sáček prachového filtru 9 s jeho drž-
ákem z prachového filtru 0.
5. Opláchněte sáček prachového filtru 9 ve studené vodě a vyčkejte, dokud není tento úplně suchý, než jej vložíte zpět do prachového filtru 0.
Nesušte jej horkým vzduchem.
6. Prachový filtr 0 opět nasaďte do nádoby na
nečistoty a prach q. Dbejte při tom na to, aby
prachový filtr 0 dosedal přímo a pryžové chlop-
ně uzavíraly nádobu na nečistoty q.
7. Nasaďte nádobu na nečistoty a prach q opět
na motorový blok:
• Zasuňte plastový výstupek na spodní straně
ručního vysavače do vyhloubeniny na nádobě
na nečistoty a prach q.
• Stiskněte odblokovací tlačítko 8 a posouvejte
současně nádobu na nečistoty a prach q na
motorový blok.
• Odblokovací tlačítko 8 opět pusťte, aby zablo-
kování mohlo zapadnout do vyhloubeniny.
Nádoba na nečistoty a prach q dosedá nyní
pevně na motorový blok.
8. Kryt a obě hubice otřete lehce navlhčeným hadříkem. Při silnějším znečistění dejte na
hadřík trochu jemného čistícího prostředku.
9. Všechny součásti řádně vysušte, než budete přístroj opět používat nebo než jej uschováte.
Likvidace
Přístroj v žádném případě neodhazujte
do obvyklého domovního odpadu.
Tento výrobek podléhá evropské
směrnici 2002/96/EC.
Přístroj a akumulátor se musí likvidovat odděleně.
1. Za tím účelem uvolněte všechny křížové šrouby
na bloku motoru a rozeberte jej.
2. Odřežte přípojný kabel a vyjměte akumulátor
z přístroje.
Přístroj předejte k likvidaci odborné firmě či jej
odevzdejte v místním recyklačním zařízení.
Dodržujte aktuálně platné předpisy.
V případě pochyb se poraďte s recyklační firmou.
- 30 -
Page 34

Likvidace baterií/akumulátorů
Baterie/akumulátory nesmějí přijít do domovního odpadu. Každý spotřebitel je ze
zákona povinen baterie a akumulátory
odevzdat na sběrném místě v obci nebo
městské čtvrti, kde bydlí.
Tato povinnost slouží k tomu, aby byly baterie/
akumulátory odevzdány k ekologické likvidaci.
Baterie/akumulátory odevzdávejte pouze zcela
vybité.
Servis Česko
Tel.: 800143873
E-Mail: kompernass@lidl.cz
IAN 89291
Dostupnost horké linky:
pondělí až pátek 8:00 hod. – 20:00 hod. (SEČ)
Dovozce
Také všechny obalové materiály zlikvidujte
v souladu s ekologickými předpisy.
Záruka a servis
Na tento přístroj platí tříletá záruka od data zakoupení. Přístroj byl vyroben s nejvyšší pečlivostí a před
odesláním prošel výstupní kontrolou.
Uschovejte si, prosím, pokladní lístek jako doklad o
nákupu. V případě uplatňování záruky kontaktujte
telefonicky Vaší servisní službu. Pouze tak může být
zajištěno bezplatné zaslání Vašeho zboží.
Záruka se vztahuje pouze na chyby materiálu nebo
výrobní závady, ale ne na škody,vzniklé při přepravě, ne na součásti, podléhající rychlému opotřebení
nebo na poškození křehkých dílů, jako jsou např.
spínače nebo akumulátory. Výrobek je určen pouze
pro privátní použití, ne průmyslové.
Při nesprávném a neodborném využívání, při použití
násilí a při zásazích, které nebyly provedeny našimi
autorizovanými servisními provozovnami, záruční
nároky zanikají. Vaše práva vyplývající ze zákona
touto zárukou nejsou omezena.
Záruční doba se zárukou neprodlouží. Toto platí
také pro náhradní díly a opravené součásti. Případné škody a vady, existující už při koupi, se musí hlásit ihned po vybalení, nejpozději však
do dvou dnů od data nákupu. Po uplynutí záruční
doby se provedené opravy musí zaplatit.
KOMPERNASS GMBH
BURGSTRASSE 21
44867 BOCHUM, GERMANY
www.kompernass.com
- 31 -
Page 35

- 32 -
Page 36

Obsah Strana
Používanie v súlade s určením 34
Dôležité bezpečnostné pokyny 34
Obsah dodávky 35
Opis prístroja 35
Technické údaje 36
Pred prvým uvedením do prevádzky 36
Informácie o akumulátoroch 36
Montáž nástenného držiaka 36
Nabíjanie 37
Ovládanie 37
Čistenie 38
Likvidácia 38
Záruka a servis 39
Dovozca 39
- 33 -
Page 37

Ručný vysávač s lítiumiónovou batériou
Srdečne vám gratulujeme ku kúpe tohto nového
prístroja.
Rozhodli ste sa tým pre vysokokvalitný výrobok. Návod na používanie je súčasťou tohto výrobku. Obsahuje dôležité pokyny týkajúce sa bezpečnosti, používania a likvidácie zariadenia. Pred používaním
tohto výrobku sa oboznámte so všetkými pokynmi
na ovládanie a bezpečnostnými pokynmi. Výrobok
používajte iba tak, ako je tu opísané a iba v tých
oblastiach použitia, ktoré sú tu uvedené. Pri odovzdávaní výrobku tretej osobe s ním odovzdajte aj
všetky podklady.
Používanie v súlade s určením
Tento ručný vysávač sa smie používať len na vysávanie suchých alebo mokrých povrchov, resp. na
vysávanie suchých alebo mokrých predmetov alebo
tekutín. Tento prístroj nemožno používať na čistenie
ľudí ani zvierat. Akýkoľvek iný spôsob používania
alebo prebudovanie prístroja sa považuje za nezodpovedajúce určeniu a je skrytým zdrojom nebezpečenstva úrazu. Výrobca neručí za škody,
ktoré sú spôsobené nesprávnou obsluhou alebo
používaním na iné než určené účely.
Prístroj nie je určený na priemyselné použitie.
Dôležité bezpečnostné pokyny
Aby ste zabránili poraneniu v dôsledku úrazu elektrickým prúdom:
• Nenabíjajte, ani nepoužívajte tento prístroj vonku.
• Nikdy nepoužívajte ručný vysávač, ak je poško-
dený kábel, zástrčka alebo kryt.
• Poškodenú sieťovú šnúru alebo zástrčku nechajte
ihneď vymeniť autorizovanému odborníkovi, aby
ste sa vyhli ohrozeniu bezpečnosti.
• Opravy zverte len do rúk odborníkom. V žiadnom
prípade prístroj neotvárajte sami. Zásahy, ktoré
robí niekto iný než odborná prevádzka, môžu
viesť k úrazom.
• Pred zapnutím ručného vysávača sa presvedčte, či
napätie uvedené v technických údajoch prístroja
zodpovedá napätiu v sieti.
• Nedotýkajte sa sieťového adaptéra alebo
prístroja mokrými alebo vlhkými rukami.
• Nepoužívajte sieťový adaptér s predlžovacím
káblom, ale pripojte sieťový adaptér priamo do
zásuvky.
Aby ste zabránili poraneniam:
• Nevymieňajte príslušenstvo, keď je prístroj
v prevádzke.
• Nepoužívajte ručný vysávač na vysávanie ostrých predmetov alebo sklenených črepín.
• Nikdy nevysávajte horiace zápalky, tlejúci popol
alebo cigaretové ohorky.
• Nepoužívajte ručný vysávač na vysávanie chemických látok, kamenného prachu, sadry, cementu
alebo podobných látok.
• Prístroj nie je vhodný na vysávanie horľavých
a výbušných látok ani chemických alebo agresívnych tekutín.
• Prístroj vždy skladujte v uzavretých priestoroch.
Aby sa zabránilo nehodám, prístroj po použití
uschovávajte na suchom mieste.
• Za extrémnych podmienok môže dochádzať
k úniku tekutiny z akumulátorových článkov. Pri
kontakte tekutiny s pokožkou alebo očami je
potrebné postihnuté miesto okamžite opláchnuť,
príp. vypláchnuť čistou vodou. Vyhľadajte lekára.
- 34 -
Page 38

Zaistenie bezpečného používanie:
• Tento prístroj nie je určený na to, aby ho používali
osoby (vrátane detí) s obmedzenými fyzickými,
zmyslovými alebo duševnými schopnosťami, alebo
s nedostatkom skúseností alebo nedostatkom
znalostí, len za predpokladu, že budú pod dohľadom osoby zodpovednej za ich bezpečnosť, alebo
od nej dostanú pokyny, ako sa má prístroj používať.
Na deti treba dohliadať, aby sa zabezpečilo,
že sa nebudú hrať s prístrojom.
• Používajte iba také príslušenstvo, ktoré odporúča
výrobca.
• Sieťový adaptér sa nesmie používať na iné účely.
Nikdy nenoste nástenný držiak ani sieťový adaptér za kábel. Neťahajte za kábel, ak chcete odpojiť prístroj zo zásuvky.
• Keď chcete prístroj oddeliť od sieťového napájania elektrickým prúdom, vždy uchopte sieťový
adaptér.
• Bezpodmienečne dbajte na to, aby ste neukladali
ručný vysávač vedľa ohrievacích telies, sporákov
alebo iných zohriatych prístrojov alebo plôch.
• Dbajte vždy na to, aby vetracie otvory zostali
voľné. Blokovaný kolobeh vzduchu môže viesť
k prehriatiu a poškodeniu prístroja.
• Tento výrobok obsahuje akumulátory. Neodhadzujte akumulátory do ohňa a nevystavujte ich
vysokým teplotám.
Hrozí nebezpečenstvo výbuchu!
• Buďte zvlášť opatrní, keď používate ručný vysávač
na schodoch.
• Nepoužívajte ručný vysávač bez nasadeného
prachového filtra.
• Nepoužívajte sieťový adaptér na iný výrobok
a neskúšajte nabíjať tento prístroj pomocou inej
nabíjačky. Používajte iba sieťový adaptér, ktorý
bol dodaný spolu s týmto prístrojom.
• Nikdy sa nepokúšajte nabiť nenabíjateľné batérie.
Obsah dodávky
Ručný vysávač
Štrbinová hubica
Hubica na mokré vysávanie
Nástenný držiak
Montážny materiál
Sieťový adaptér
Návod na používanie
Ihneď po vybalení skontrolujte obsah dodávky, či v
nej nič nechýba. Odstráňte z prístroja všetky obalové materiály, predovšetkým ochranný kryt nad vypínačom.
Opis prístroja
1 Hubica na mokré vysávanie
2 Štrbinový nástavec
3 Nástenný držiak
4 Sieťový adaptér
5 Dutinový konektor
6 Vypínač
7 Kontrolka nabíjania
8 Uvoľňovacie tlačidlo
9 Vrecko s prachovým filtrom
0 Prachový filter
q Nádoba na nečistoty
Upozornenie:
Prístroj sa dodáva s nenabitými akumulátormi. Pred
prvým použitím prístroja sa akumulátory musia najskôr
nabíjať po dobu 24 hodín.
- 35 -
Page 39

Technické údaje
Informácie o akumulátoroch
SSiieeťťoovvýý aaddaappttéérr
Napájanie: 100 - 240 V ~, 50/60 Hz
Výstupné napätie: 9,6 V / 300 mA
Trieda ochrany : II/
Typové označenie: SAS 7.4 LI A2-1
PPrrííssttrroojj
Napájanie: 7,4 V
AAkkuummuullááttoorryy
Kapacita: 1300 mAh
Akumulátor: 7,4 V
4
max. 300 mA
(2 x 3,7 V lítium-iónový
akumulátor)
Pred prvým uvedením
do prevádzky
• Z prístroja odstráňte všetky obalové materiály,
predovšetkým krytku na zapínači/vypínači 6.
• Nádobu na nečistoty q nasaďte na blok motora.
• Plastovú hubicu na spodnej strane ručného vy-
sávača zasuňte do otvoru na nádobe na nečistoty q.
• Stlačte uvoľňovacie tlačidlo 8 a súčasne s
tým nasuňte nádobu na nečistoty q na blok
motora.
• Pustite uvoľňovacie tlačidlo 8, aby aretačné
zariadenie vošlo do výrezu. Nádoba na nečistoty q teraz pevne sedí na bloku motora.
1. V ručnom vysávači sú použité lítium-iónové akumulátory.
Pred prvým použitím ručného vysávača sa akumulátory musia nabíjať minimálne po dobu 24
hodín.
2. Akumulátory dosiahnu svoju plnú kapacitu po
nabíjaní trvajúcom 24 hodín. Pokiaľ ide o starostlivosť o akumulátory, odporúčame toto: Po
nabití akumulátorov vytiahnite sieťový adaptér 4
z elektrickej zásuvky. Sieťový adaptér 4
zasuňte znova do elektrickej zásuvky až potom,
keď sací výkon prístroja znateľne poklesne.
Montáž nástenného držiaka
Smrteľné nebezpečenstvo!
Overte si, či nie sú na miestach, kde chcete vŕtať diery
pre nástenný držiak 3, žiadne elektrické alebo iné
vedenia alebo rúry. Ak by ste pri vŕtaní narazili na
elektrické vedenie, hrozí vám smrteľné nebezpečenstvo!
1. Vložte dutinový konektor 5 sieťového adaptéra 4
do nástenného držiaka 3 tak, ako je vidieť
na nasledujúcom obrázku. Upevnite dutinový
konektor 5 tým, že ho otočíte.
- 36 -
Page 40

2. Nájdite vhodné miesto pre montáž nástenného
držiaka 3: Ručný vysávač sa z neho musí dať
bez problémov vytiahnuť a sieťová zásuvka musí
byť v dosahu sieťového adaptéra 4.
3. Vyvŕtajte dva otvory vo vzdialenosti asi 68 mm
od seba. Použite nástenný držiak 3 na ich vy-
značenie: tak správne odmeriate odstup. Priemer
a dĺžka otvorov musia byť vhodné pre 5 mm
hmoždinky.
4. Zasuňte hmoždinky do otvorov a dodanými
skrutkami pevne naskrutkujte nástenný držiak 3.
5. Hubice môžete nasadiť na bočné držiaky príslušenstva.
6. Zasuňte sieťový adaptér 4 do elektrickej zásuvky.
Nabíjanie
• Keď nabíjanie skončí, čo môže trvať pri celkom
vybitých akumulátoroch cca 5 hodiny, prepne sa
prístroj automaticky do udržiavacieho režimu nabíjania. Napriek tomu nenechávajte prístroj neustále pripojený k sieťovému adaptéru 4, aby ste
sa vyhli prípadnému poškodeniu akumulátorov.
• Akumulátory znova nabite až vtedy, keď sací
výkon vysávača citeľne poklesne a kontrolka
nabíjania 7 bliká zeleno.
Upozornenie:
Ručný vysávač sa môže nabíjať aj priamo cez sieťový
adaptér 4. Ak to chcete urobiť, vyberte dutinový
konektor 5 miernym otočením z nástenného držia-
ka 3 a zasuňte ho priamo do zásuvky na ručnom
vysávači.
Upozornenie:
Predtým než začnete prístroj nabíjať, uistite sa, že
vypínač 6 je posunutý dozadu (poloha „0”).
• Nasaďte ručný vysávač zhora do nástenného
držiaka 3 tak, aby sa dutinový konektor 5
zasunul do zásuvky vo vysávači.
Kontrolka nabíjania 7 sa rozbliká červeno
a začne nabíjanie.
Dôležité upozornenie:
• Keď má ručný vysávač znova dosť energie na
vysávanie, rozsvieti sa kontrolka nabíjania 7 ze-
leno. To neznamená, že sú akumulátory plne nabité. Keď kontrolka nabíjania 7 svieti zeleno, sú
akumulátory nabité asi na 80 %.
Ovládanie
Pozor!
Sací otvor musí byť vždy voľný a nesmie byť zapchatý.
Upchatie vedie k prehriatiu a poškodeniu motora.
Pokyny:
• Dbajte na to, aby bol prachový filter 0 vložený
vždy už predtým, než začnete prístroj používať.
• Vysávať môžete len také množstvo tekutín, kým
nie je nádoba na nečistoty q zaplnená po
značku MAX.
1. Dajte ručný vysávač dolu z nástenného držiaka 3
alebo, ak nepoužívate nástenný držiak 3, vy-
tiahnite dutinový konektor 5 zo zásuvky.
2. Ak potrebujete, nasaďte patričnú hubicu do
sacieho otvoru:
• štrbinová hubica 2 - na čistenie úzkych, ťažko
dostupných miest.
• hubica na mokré vysávanie 1 - na vysávanie
tekutín.
- 37 -
Page 41

Upozornenie:
Ak ste vysávali tekutiny, ihneď po vysávaní vyčistite
nádobu na nečistoty q. V opačnom prípade by sa
tam zhromažďovali baktérie a choroboplodné zárodky! Dajte pozor na to, aby vrecko na prachový
filter 9 bolo úplne suché predtým, než začnete
prístroj znova používať.
3. Ak chcete prístroj zapnúť, posuňte vypínač 6
dopredu. Kontrolka nabíjania 7 sa rozsvieti
zeleno.
4. Po použití posuňte vypínač 6 dozadu.
Upozornenie:
Keď sací výkon citeľne poklesne a kontrolka nabíjania 7 bliká zeleno, nasaďte ručný vysávač
do nástenného držiaka 3 a spusťte nabíjanie.
Čistenie
6. Znova vložte prachový filter 0 do nádoby na
nečistoty q. Dajte pozor na to, aby prachový
filter 0 zapadol rovno a zatvoril sa gumový
záhyb na prachovom filtri q.
7. Znova nasaďte nádobu na nečistoty q na
blok motora:
• Zasuňte plastový výčnelok na spodnej strane
ručného vysávača do výrezu na nádobe na
nečistoty q.
• Stlačte uvoľňovacie tlačidlo 8 a zároveň na-
suňte nádobu na čistenie q na blok motora.
• Pusťte uvoľňovacie tlačidlo 8, aby aretačné
zariadenie vošlo do výrezu. Nádoba na nečistoty q teraz pevne sedí na bloku motora.
8. Kryt a obe hubice čistite len mierne navlhčenou
handrou. V prípade odolnejších nečistôt môžete
pridať na utierku jemný čistiaci prostriedok.
9. Poriadne vysušte všetky diely predtým, než prístroj
znova použijete alebo odložíte.
Aby bolo vysávanie čo najúčinnejšie, po každom
použití vyprázdnite nádobu na nečistoty q a vyčistite prachový filter 0.
Dôležité upozornenie:
Nepoužívajte žiadne drhnúce, agresívne ani chemické
čistiace prostriedky. Tieto môžu rozrušiť povrchové
časti prístroja.
1. Ak chcete otvoriť nádobu na nečistoty q, stlačte
uvoľňovacie tlačidlo 8 a vyberte nádobu na
nečistoty q.
2. Vyberte prachový filter 0 z nádoby na
nečistoty q.
3. Vyprázdnite nádobu na nečistoty q.
4. Vytiahnite vrecko prachového filtra 9 za jeho
držiak z prachového filtra 0.
5. Opláchnite vrecko prachového filtra 9 v studenej vode a vyčkajte, kým celkom nevyschne, až
potom ho vložte do prachového filtra 0. Nesušte ho horúcim vzduchom.
Likvidácia
Prístroj v žiadnom prípade nevyhadzujte
do bežného domového odpadu. Tento
výrobok podlieha európskej smernici
2002/96/EC.
Prístroj a akumulátor sa musia likvidovať oddelene.
1. Za tým účelom uvoľnite všetky krížové skrutky
na bloku motora a rozoberte ho.
2. Odstrihnite pripojovací kábel akumulátora a vyberte akumulátor z prístroja.
Zlikvidujte prístroj v príslušnom zariadení (firme)
na likvidáciu odpadu.
Dodržte pritom aktuálne platné predpisy.
V prípade pochybností sa spojte so zariadením na
likvidáciu odpadu.
- 38 -
Page 42

Likvidácia batérií a akumulátorov
Batérie a akumulátory sa nesmú vyhadzovať do domového odpadu. Každý spotrebiteľ je zo zákona povinný, odovzdať batérie
alebo akumulátory v zbernom stredisku v
obci alebo mestskej štvrti alebo v obchode.
Táto povinnosť má prispieť k ekologickej likvidácii
batérií a akumulátorov. Batérie a akumulátory
odovzdávajte len vo vybitom stave
Servis Slovensko
Tel.: 0850 232001
E-Mail: kompernass@lidl.sk
IAN 89291
Dostupnosť hotline:
pondelok až piatok od 8:00 hod. - 20:00 hod.
(SEČ)
Všetok baliaci materiál zlikvidujte ekologikkým spôsobom.
Záruka a servis
Na tento prístroj máte trojročnú záruku od dátumu
nákupu. Prístroj bol starostlivo vyrobený a pred expedíciou dôkladne vyskúšaný. Uschovajte si, prosím, účtenku ako dôkaz o nákupe. V prípade uplatňovania záruky sa spojte s opravovňou telefonicky.
Len tak sa dá zabezpečiť bezplatné zaslanie tovaru.
Záruka platí len na chyby materiálu a výroby, nie
na poškodenia spôsobené prepravou, opotrebením
ani na poškodenia krehkých častí, ako sú spínače
alebo akumulátory.
Výrobok je určený výlučne na súkromné používanie
a nie na komerčné účely.
Záruka prestáva platiť pri zaobchádzaní nezodpovedajúcom účelu, pri neprimeranom zaobchádzaní,
pri používaní násilia a pri zásahoch, ktoré neurobil
nami autorizovaný servis. Práva vyplývajúce zo zákona nie sú touto zárukou obmedzené.
Záručná doba sa nepredlžuje o dobu trvania záručných opráv. To platí aj na vymenené alebo opravené diely. Prípadné poškodenia a nedostatky zistené
už pri nákupe musíte ohlásiť ihneď po vybalení, najneskoršie však do dvoch dní od dátumu zakúpenia.
V prípade opráv spadajúcich do obdobia po uplynutí záručnej doby ste povinní uhradiť vzniknuté
náklady.
Dovozca
KOMPERNASS GMBH
BURGSTRASSE 21
44867 BOCHUM, GERMANY
www.kompernass.com
- 39 -
Page 43

- 40 -
Page 44

Inhaltsverzeichnis Seite
Bestimmungsgemäßer Gebrauch 42
Wichtige Sicherheitshinweise 42
Lieferumfang 43
Gerätebeschreibung 43
Technische Daten 44
Vor der ersten Inbetriebnahme 44
Informationen zu den Akkus 44
Montage des Wandhalters 44
Aufladen 45
Bedienen 45
Reinigen 46
Entsorgen 46
Garantie und Service 47
Importeur 47
- 41 -
Page 45

Li-Ionen-AkkuHandstaubsauger
Herzlichen Glückwunsch zum Kauf Ihres neuen
Gerätes.
Sie haben sich damit für ein hochwertiges Produkt
entschieden. Die Bedienungsanleitung ist Bestandteil dieses Produkts. Sie enthält wichtige Hinweise
für Sicherheit, Gebrauch und Entsorgung. Machen
Sie sich vor der Benutzung des Produkts mit allen
Bedien- und Sicherheitshinweisen vertraut. Benutzen
Sie das Produkt nur wie beschrieben und für die angegebenen Einsatzbereiche. Händigen Sie alle
Unterlagen bei Weitergabe des Produkts an Dritte
mit aus.
Bestimmungsgemäßer
Gebrauch
Der Handstaubsauger darf nur zum Saugen von
trockenen oder nassen Oberflächen bzw. trockenem oder nassem Sauggut oder Flüssigkeiten eingesetzt werden. Menschen oder Tiere dürfen mit diesem Gerät nicht abgesaugt werden. Jede andere
Verwendung oder Veränderung des Gerätes gilt als
nicht bestimmungsgemäß und birgt erhebliche Unfallgefahren. Der Hersteller haftet nicht für Schäden,
die durch nicht bestimmungsgemäßen Gebrauch
oder falsche Bedienung verursacht werden.
Das Gerät ist nicht für den gewerblichen Gebrauch
bestimmt.
Wichtige Sicherheitshinweise
Um Lebensgefahr durch
elektrischen Schlag zu vermeiden:
• Laden bzw. verwenden Sie dieses Gerät nicht im
Freien.
• Den Handstaubsauger niemals gebrauchen,
wenn Kabel, Stecker oder Gehäuse beschädigt
sind.
• Lassen Sie beschädigte Netzstecker oder Netzkabel sofort von autorisiertem Fachpersonal austauschen, um Gefährdungen zu vermeiden.
• Lassen Sie Reparaturen nur von einer Fachwerkstatt durchführen. Öffnen Sie unter keinen Umständen selbst das Gerät. Eingriffe, die nicht
durch einen Fachbetrieb vorgenommen wurden,
können zu Verletzungen führen.
• Überzeugen Sie sich vor dem Einschalten des
Gerätes, dass die in den technischen Daten des
Gerätes verzeichnete Spannung der Netzspannung entspricht.
• Fassen Sie das Netzteil oder das Gerät nicht mit
nassen oder feuchten Händen an.
• Verwenden Sie das Netzteil nicht mit einem
Verlängerungskabel, sondern verbinden Sie
das Netzteil direkt mit einer Steckdose.
Um Verletzungsgefahr zu
vermeiden:
• Wechseln Sie keine Zubehörteile aus, wenn das
Gerät in Betrieb ist.
• Benutzen Sie den Handstaubsauger nicht zum
Aufsaugen von spitzen Gegenständen oder
Glasscherben.
• Niemals brennende Streichhölzer, glimmende
Asche oder Zigarettenstummel aufsaugen.
• Gebrauchen Sie den Handstaubsauger nicht
zum Aufsaugen von chemischen Produkten,
Steinstaub, Gips, Zement, oder anderen
ähnlichen Partikeln.
• Das Gerät ist nicht für entflammbare und explosive Stoffe oder chemische und aggressive Flüssigkeiten geeignet.
• Lagern Sie das Gerät immer in geschlossenen
Räumen. Um Unfälle zu verhindern, bewahren
Sie das Gerät nach Gebrauch an einem
trockenen Ort auf.
• Unter extremen Bedingungen können Leckagen
an den Akkuzellen auftreten. Bei Kontakt der
Flüssigkeit mit Haut oder Augen ist die betreffende Stelle sofort mit sauberem Wasser aus- bzw.
abzuspülen. Suchen Sie einen Arzt auf.
- 42 -
Page 46

So verhalten Sie sich sicher:
• Dieses Gerät ist nicht dafür bestimmt, durch
Personen (einschließlich Kinder) mit eingeschränkten physischen, sensorischen oder
geistigen Fähigkeiten oder mangels Erfahrung
und/oder mangels Wissen benutzt zu werden,
es sei denn, sie werden durch eine für ihre
Sicherheit zuständige Person beaufsichtigt oder
erhielten von ihr Anweisungen, wie das Gerät zu
benutzen ist. Kinder sollten beaufsichtigt werden,
um sicherzustellen, dass sie nicht mit dem Gerät
spielen.
• Verwenden Sie nur Zubehörteile, die vom
Hersteller empfohlen werden.
• Das Netzteil darf nicht für andere Zwecke benutzt werden. Tragen Sie den Wandhalter oder
das Netzteil niemals am Kabel. Ziehen Sie nicht
am Kabel, wenn Sie das Gerät verstellen wollen.
• Fassen Sie immer den Netzstecker an, um das
Gerät von der Stromversorgung zu trennen.
• Achten Sie unbedingt darauf, dass Sie den
Handstaubsauger nicht neben Heizkörpern,
Backöfen oder anderen erhitzten Geräten oder
Flächen abstellen.
• Achten Sie immer darauf, dass die Lüftungsschlitze frei sind. Ein blockierter Luftkreislauf
kann zur Überhitzung und Beschädigung des
Gerätes führen.
• Dieses Produkt enthält wiederaufladbare Akkus.
Werfen Sie die Akkus nicht ins Feuer und setzen
Sie sie nicht hohen Temperaturen aus.
Es besteht Explosionsgefahr!
• Üben Sie besondere Sorgfalt aus, wenn Sie den
Handstaubsauger auf Treppen benutzen.
• Benutzen Sie den Handstaubsauger nicht ohne
eingesetzten Staubfilter.
• Benutzen Sie das Netzteil nicht für ein anderes
Produkt und versuchen Sie nicht, dieses Gerät
mittels einer anderen Ladestation aufzuladen.
Verwenden Sie nur das mit diesem Gerät
gelieferte Netzteil.
• Versuchen Sie niemals, nicht wiederaufladbare
Batterien aufzuladen.
Lieferumfang
Li-Ionen-Akku-Handstaubsauger
Fugendüse
Nasssaugdüse
Wandhalter
Montagematerial
Netzteil
Bedienungsanleitung
Kontrollieren Sie direkt nach dem Auspacken den
Lieferumfang auf Vollständigkeit.
Gerätebeschreibung
1 Nasssaugdüse
2 Fugendüse
3 Wandhalter
4 Netzteil
5 Hohlstecker
6 Ein-/Ausschalter
7 Ladekontrollleuchte (rot/grün)
8 Entriegelungstaste
9 Staubfilter-Beutel
0 Staubfilter
q Schmutzbehälter
Hinweis:
Das Gerät wird mit nicht geladenen Akkus geliefert.
Vor dem ersten Gebrauch des Gerätes sind die
Akkus zunächst für 24 Stunden zu laden.
- 43 -
Page 47

Technische Daten
NNeettzztteeiill
4
Eingangsspannung/
- strom: 100 - 240 V ~, 50/60 Hz
max. 300 mA
Ausgangsspannung/
- strom: 9,6 V / 300 mA
Schutzklasse: II /
Typenbezeichnung: SAS 7.4 LI A2-1
GGeerräätt
Eingangsspannung: 7,4 V
AAkkkkuuss
Kapazität: 1300 mAh
Akku: 7,4 V
(2 x 3,7 V LithiumIonen-Akku)
Vor der ersten Inbetriebnahme
• Entfernen Sie alle Verpackungsmaterialien vom
Gerät, insbesondere die Schutzkappe über dem
Ein-/Ausschalter 6.
• Setzen Sie den Schmutzbehälter q auf den Mo-
torblock:
• Schieben Sie die Plastik-Nase an der Untersei-
te des Handstaubsaugers in die Aussparung
am Schmutzbehälter q.
• Drücken Sie die Entriegelungstaste 8 und schie-
ben Sie gleichzeitig den Schmutzbehälter q
auf den Motorblock.
• Lassen Sie die Entriegelungstaste 8 los, so
dass die Verriegelung in die Aussparung
greift. Der Schmutzbehälter q sitzt nun fest
auf dem Motorblock.
Informationen zu den Akkus
1. Der Handstaubsauger wird mit wiederaufladbaren Lithium-Ionen-Akkus betrieben.
Bevor Sie den Handstaubsauger zum ersten
Mal verwenden, müssen die Akkus für mindestens 24 Stunden geladen werden.
2. Die Akkus erreichen ihre volle Kapazität nach
einer Aufladezeit von 24 Stunden. Zur Pflege
der Akkus empfehlen wir folgendes: Ziehen Sie,
nachdem die Akkus geladen sind, das Netzteil 4
aus der Netzsteckdose. Verbinden Sie das Netzteil 4 erst wieder mit der Netzsteckdose, wenn
die Saugleistung des Handstaubsaugers spürbar
schwächer wird.
Montage des Wandhalters
Lebensgefahr!
Stellen Sie sicher, dass sich keine Stromleitungen
oder andere Leitungen oder Rohre in der Wand befinden, in der Sie die Löcher für den Wandhalter 3
bohren wollen. Es besteht Lebensgefahr, wenn Sie
eine stromführende Leitung anbohren!
1. Setzen Sie den Hohlstecker 5 des Netzteils 4
wie auf der nachfolgenden Abbildung gezeigt in
den Wandhalter 3 ein. Fixieren Sie den Hohlstecker 5, indem Sie ihn drehen.
- 44 -
Page 48

2. Suchen Sie einen geeigneten Montageplatz für
den Wandhalter 3: Der Handstaubsauger muss
problemlos aus ihm herausgezogen werden können und eine Netzsteckdose muss für das Netzteil 4 erreichbar sein.
3. Bohren Sie zwei Löcher im Abstand von
ca. 68 mm. Benutzen Sie den Wandhalter 3
zum Anzeichnen der Löcher: so ist der Abstand
korrekt abgemessen. Die Bohrlöcher müssen passend für 5 mm-Dübel gebohrt werden.
4. Stecken Sie die Dübel in die Löcher und schrauben Sie den Wandhalter 3 mit Hilfe der Schrauben fest.
5. Sie können die Düsen auf die seitlichen Zubehörhalter aufstecken.
6. Stecken Sie das Netzteil 4 in eine Netzsteckdose ein.
Aufladen
Hinweis:
Vergewissern Sie sich, dass der Ein-/Ausschalter 6
nach hinten geschoben ist (Position „0”), bevor Sie
mit dem Laden beginnen.
• Setzen Sie den Handstaubsauger von oben in
den Wandhalter 3, so dass der Hohlstecker 5
in die Buchse am Handstaubsauger rutscht. Die
Ladekontrollleuchte 7 blinkt rot auf und der
Ladevorgang beginnt.
Wichtig:
• Wenn der Handstaubsauger wieder genug Energie hat, um zu saugen, leuchtet die Ladekontrollleuchte 7 grün. Dies bedeutet nicht, dass die
Akkus voll geladen sind. Wenn die Ladekontrollleuchte 7 grün aufleuchtet, sind die Akkus zu
ca. 80% geladen.
• Ist der Ladevorgang abgeschlossen, welcher bei
komplett entladenen Akkus ca. 5 Stunden dauern kann, schaltet das Gerät automatisch in die
Erhaltungsladung (Pflegefunktion). Lassen Sie
dennoch das Gerät nicht permanent am Netzteil
4 angeschlossen, um eventuelle Beschädigungen der Akkus zu vermeiden.
• Laden Sie die Akkus erst wieder auf, wenn die
Saugleistung des Handstaubsaugers spürbar
schwächer wird und die Ladekontrollleuchte 7
grün blinkt.
Hinweis:
Der Handstaubsauger kann auch direkt über das
Netzteil 4 geladen werden. Entnehmen Sie dafür
den Hohlstecker 5 durch eine leichte Drehung aus
dem Wandhalter 3 und stecken Sie ihn in die
Buchse am Handstaubsauger.
Bedienen
Achtung!
Die Saugöffnung muss jederzeit frei und darf nicht
verstopft sein. Verstopfungen führen zu Überhitzung
und Beschädigung des Motors.
Hinweise:
• Achten Sie darauf, dass der Staubfilter 0 immer
eingesetzt ist, bevor Sie das Gerät verwenden.
• Saugen Sie maximal nur so viel Flüssigkeit auf,
bis der Schmutzbehälter q bis zur MAX-Markie-
rung gefüllt ist.
1. Nehmen Sie den Handstaubsauger von dem
Wandhalter 3 herunter, oder, wenn Sie den
Wandhalter 3 nicht benutzen, ziehen Sie den
Hohlstecker 5 aus der Buchse.
2. Setzen Sie, wenn gewünscht, die passende Düse
in die Saugöffnung:
• die Fugendüse 2, um enge, schwer zu errei-
chende Stellen zu reinigen.
• die Nasssaugdüse 1, um Flüssigkeiten aufzu-
saugen.
- 45 -
Page 49

Hinweis:
Reinigen Sie, nachdem Sie Flüssigkeiten aufgesaugt
haben, sofort den Schmutzbehälter q. Ansonsten
bilden sich Bakterien und Keime! Achten Sie darauf,
dass der Staubfilter-Beutel 9 vollständig getrocknet
ist, bevor Sie das Gerät wieder benutzen.
3. Um das Gerät einzuschalten, schieben Sie den
Ein-/Ausschalter 6 nach vorne. Die Ladekontrollleuchte 7 leuchtet grün auf.
4. Nach Gebrauch schieben Sie den Ein-/Ausschalter 6 nach hinten.
Hinweis:
Setzen Sie den Handstaubsauger in den Wandhalter 3 und beginnen Sie mit dem Ladevorgang,
wenn die Saugleistung spürbar schwächer wird und
die Ladekontrollleuchte 7 grün blinkt.
Reinigen
Um beste Ergebnisse zu erzielen, leeren Sie den
Schmutzbehälter q und reinigen Sie den Staubfilter 0 nach jedem Gebrauch.
6. Setzen Sie den Staubfilter 0 wieder in den
Schmutzbehälter q ein. Achten Sie darauf, dass
der Staubfilter 0 gerade sitzt und die Gummilip-
pe den Schmutzbehälter q verschließt.
7. Setzen Sie den Schmutzbehälter q wieder auf
den Motorblock:
• Schieben Sie die Plastik-Nase an der Untersei-
te des Handstaubsaugers in die Aussparung
am Schmutzbehälter q.
• Drücken Sie die Entriegelungstaste 8 und schie-
ben Sie gleichzeitig den Schmutzbehälter q
auf den Motorblock.
• Lassen Sie die Entriegelungstaste 8 los, so
dass die Verriegelung in die Aussparung
greift. Der Schmutzbehälter q sitzt nun fest
auf dem Motorblock.
8. Reinigen Sie das Gehäuse und die beiden Düsen mit einem leicht angefeuchteten Tuch. Bei
hartnäckigen Verschmutzungen geben Sie ein
mildes Reinigungsmittel auf das Tuch.
9. Trocknen Sie alle Teile gut ab, bevor Sie das Gerät wieder verwenden oder verstauen.
Entsorgen
Wichtig:
Benutzen Sie keine aggressiven, chemischen oder
scheuernde Reinigungsmittel. Diese greifen die
Oberfläche des Gerätes an.
1. Um den Schmutzbehälter q zu öffnen, drücken
Sie die Entriegelungstaste 8 und nehmen Sie
den Schmutzbehälter q ab.
2. Entnehmen Sie den Staubfilter 0 aus dem
Schmutzbehälter q.
3. Entleeren Sie den Schmutzbehälter q.
4. Ziehen Sie den Staubfilter-Beutel 9 mit seiner
Halterung aus dem Staubfilter 0.
5. Spülen Sie den Staubfilter-Beutel 9 in kaltem
Wasser aus und warten Sie, bis dieser wieder
vollständig trocken ist, bevor Sie ihn wieder in
den Staubfilter 0 einsetzen. Trocknen Sie ihn
nicht mit heißer Luft.
Werfen Sie das Gerät keinesfalls in den
normalen Hausmüll. Dieses Produkt
unterliegt der europäischen Richtlinie
2002/96/EC.
Das Gerät und der Akku müssen getrennt
voneinander entsorgt werden.
1. Lösen Sie hierzu alle Kreuzschrauben am Motorblock und nehmen Sie ihn auseinander.
2. Schneiden Sie das Anschlusskabel des Akkus ab
und nehmen Sie den Akku aus dem Gerät.
Entsorgen Sie das Gerät über einen zugelassenen
Entsorgungsbetrieb oder über Ihre kommunale
Entsorgungseinrichtung.
Beachten Sie die aktuell geltenden Vorschriften.
Setzen Sie sich im Zweifelsfall mit Ihrer Entsorgungseinrichtung in Verbindung.
- 46 -
Page 50

Batterien/Akkus entsorgen
Batterien/Akkus dürfen nicht im Hausmüll
entsorgt werden. Jeder Verbraucher ist
gesetzlich verpflichtet, Batterien/Akkus bei
einer Sammelstelle seiner Gemeinde/sei-
nes Stadtteils oder im Handel abzugeben.
Diese Verpflichtung dient dazu, dass Batterien/
Akkus einer umweltschonenden Entsorgung zugeführt werden können. Geben Sie Batterien/Akkus
nur im entladenen Zustand zurück.
Service Deutschland
Tel.: 01805 772 033 (0,14 EUR/Min. aus dem dt.
Festnetz, Mobilfunk max. 0,42 EUR/Min.)
E-Mail: kompernass@lidl.de
IAN 89291
Service Österreich
Tel.: 0820 201 222 (0,15 EUR/Min.)
E-Mail: kompernass@lidl.at
IAN 89291
Führen Sie alle Verpackungsmaterialien
einer umweltgerechten Entsorgung zu.
Garantie und Service
Sie erhalten auf dieses Gerät 3 Jahre Garantie ab
Kaufdatum. Das Gerät wurde sorgfältig produziert
und vor Anlieferung gewissenhaft geprüft.
Bitte bewahren Sie den Kassenbon als Nachweis
für den Kauf auf. Bitte setzen Sie sich im Garantiefall mit Ihrer Servicestelle telefonisch in Verbindung.
Nur so kann eine kostenlose Einsendung Ihrer Ware
gewährleistet werden.
Die Garantieleistung gilt nur für Material- oder
Fabrikationsfehler, nicht aber für Transportschäden,
Verschleißteile oder für Beschädigungen an zerbrechlichen Teilen, z. B. Schalter oder Akkus. Das
Produkt ist lediglich für den privaten und nicht für
den gewerblichen Gebrauch bestimmt.
Bei missbräuchlicher und unsachgemäßer Behandlung, Gewaltanwendung und bei Eingriffen, die
nicht von unserer autorisierten Service-Niederlassung vorgenommen wurden, erlischt die Garantie.
Ihre gesetzlichen Rechte werden durch diese
Garantie nicht eingeschränkt.
Die Garantiezeit wird durch die Gewährleistung
nicht verlängert. Dies gilt auch für ersetzte und reparierte Teile. Eventuell schon beim Kauf vorhandene
Schäden und Mängel müssen sofort nach dem
Auspacken gemeldet werden, spätestens aber zwei
Tage nach Kaufdatum. Nach Ablauf der Garantiezeit anfallende Reparaturen sind kostenpflichtig.
Service Schweiz
Tel.: 0842 665566 (0,08 CHF/Min.,
Mobilfunk max. 0,40 CHF/Min.)
E-Mail: kompernass@lidl.ch
IAN 89291
Erreichbarkeit Hotline:
Montag bis Freitag von 8:00 Uhr - 20:00 Uhr (MEZ)
Importeur
KOMPERNASS GMBH
BURGSTRASSE 21
44867 BOCHUM, DEUTSCHLAND
www.kompernass.com
- 47 -
Page 51

KOMPERNASS GMBH
BURGSTRASSE 21
44867 BOCHUM
DEUTSCHLAND / GERMANY
www.kompernass.com
Last Information Update · Információk állása · Stanje informacij
Stav informací · Stav informácií · Stand der Informationen:
04 / 2013 · Ident.-No.: SAS7.4LIA2-032013-3
IAN 89291
4
 Loading...