

Page 1

Instruction Manual
DV-767
Page 2

1 Introduction
Thank you for choosing our SilverCrest DV-767 multifunctional digital camera. To take advantage
of all the options offered by this camera, we recommend that you read the instructions in this
manual before using the device, even if you are familiar with electronic devices. Pay particular
attention to the “Important Safety Notice” chapter on page 3. Keep this manual safe for future
reference. If you sell or pass the device on, ensure that you also include this instruction manual.
2 Copyright
The content of this manual cannot be reproduced, copied or duplicated in any electronic,
mechanical, magnetic, optic, chemical, manual or any other form without permission from our
company. Nor can it be stored in a search engine or translated into another language.
Microsoft® and Windows® are registered trademarks of the Microsoft Corporation. Pentium® is a
registered trademark of the Intel Corporation. Adobe Photoshop® is a registered trademark of
Adobe Systems Incorporated. Skype® is a registered trademark of Skype Limited.
3 Declaration
The descriptions and features in this manual serve only as general notes, and do not represent a
guarantee. In order to be able to offer you a product of the highest quality, we retain the right to
make improvements or alterations without giving advanced notice.
For all product descriptions and operational instructions, the German version is ultimately the valid
reference should other language versions contain deviations.
4 Manufacturer Information
JNC Datum Tech GmbH
Benzstraße 33
71083 Herrenberg
Germany
Page 3

5 Table of Contents
1 Introduction.................................................................................................2
2 Copyright .....................................................................................................2
3 Declaration..................................................................................................2
4 Manufacturer Information ..........................................................................2
5 Table of Contents .......................................................................................1
6 Important Safety Notice..............................................................................3
7 Included in Delivery....................................................................................5
8 Operational Controls..................................................................................7
9 Display.........................................................................................................8
10 Basic Functions..........................................................................................9
10.1 Battery 9
10.2 Switching Camera On/Off 10
10.3 LCD Display 11
10.4 Navigation 11
10.5 SD Memory Card 12
10.6 Headphones 13
10.7 Flashlight 13
11 Video Capture ...........................................................................................14
11.1 Zoom 14
11.2 Auxiliary Light 14
11.3 Capture Settings 14
12 Video Playback .........................................................................................17
12.1 Volume 17
12.2 Deleting Videos 17
12.3 Playback Settings 17
13 Taking Photographs.................................................................................19
13.1 Zoom 19
13.2 Capture Mode 19
13.3 Flash 19
13.4 Capture Settings 20
14 Image Playback.........................................................................................23
14.1 Zoom 23
14.2 Deleting Photos 23
14.3 Playback Settings 23
15 Voice Recording .......................................................................................24
16 Playback Voice Recording ......................................................................25
16.1 Delete Voice Recording 25
16.2 Playback Settings 25
17 Playback MP3 Files ..................................................................................27
17.1 Play/Pause 27
17.2 Volume 27
17.3 Next Track / Previous Track 27
17.4 Repeat / Random 27
17.5 Delete MP3 Files 27
1
Page 4

18 Settings .....................................................................................................28
18.1 Set Clock 28
18.2 Auto OFF 28
18.3 Beep 28
18.4 USB Mode 29
18.5 Logo 29
18.6 Language 29
18.7 Video Out (Video-Out Signal) 29
18.8 Memory 29
18.9 Format 29
18.10 Default Setting 30
18.11 Digital Zoom 30
19 Output to an AV Device............................................................................31
19.1 System Requirements 31
19.2 Connecting to the AV Device 31
19.3 Starting the AV Output 31
19.4 Ending the AV Output 31
20 Capturing from an AV Device..................................................................32
20.1 System Requirements 32
20.2 Connecting to the AV Device 32
20.3 AV Capture 32
20.4 Capture Settings 32
20.5 Auto Start 33
20.6 Auto Stop 33
21 Printing Directly with PictBridge.............................................................34
21.1 System Requirements 34
21.2 Connecting to the Printer 34
21.3 Printing Photos 34
22 Computer Installation...............................................................................35
22.1 System Requirements 35
22.2 Connecting to the Computer 35
22.3 Driver Installation 35
22.4 Transferring Photos, Videos and Voice Recordings 40
22.5 Using the DV-767 as a Webcam 40
22.6 Using the DV-767 as a Video Camera 41
22.7 Disconnecting from the Computer 42
22.8 Formatting the Memory 43
23 Technical Data ..........................................................................................44
24 Technical Help ..........................................................................................45
24.1 White Balance (WB) 45
24.2 EV Bias 45
24.3 Range of Exposure Measure 45
25 Disposal.....................................................................................................46
25.1 Batteries 46
25.2 Device 46
26 Trouble-Shooting......................................................................................47
2
Page 5

6 Important Safety Notice
Please read and observe the following notes carefully!
You must not take the camera apart, modify or repair it.
Never open the casing of the camera or the adapter; they do not contain serviceable parts!
Opening the casing increases the risk of death by electric shock.
If the camera has been dropped, or the casing has been damaged, switch the device off.
Note on isolation from supply: If the camera is connected via the mains adapter, the On/Off
switch does not completely isolate the device from the mains supply. In order to completely
isolate the device from the electricity supply, you must remove the plug from the socket. For this
reason, the camera should be set up in such a way that unhindered access to the mains socket
is available, and that the plug can, in case of an emergency, be removed immediately. To
eliminate the risk of fire, the plug should always be removed from the socket before a long
period without use, such as during a holiday. Isolate the camera from the mains supply before
storms or thunderstorms, in which there is a risk of lightning.
Take caution with the power cable: Only ever touch the power cable at the plug. Do not pull on
the cable itself, and never touch the power cable with wet hands, as this can cause a short
circuit or electric shock. Do not place either the device or pieces of furniture on the power cable,
and ensure that it is never jammed. Never get the power cable in a knot, or interconnect it with
other cables. The power cable should be positioned in such a way that nobody stands on it. A
damaged power cable can cause fire or electric shock. Check the power cable from time to
time. Should it be damaged, contact your nearest authorized customer service centre or your
dealer to get it replaced.
Keep your camera and, in particular, the accessories out of reach of children. Never allow
children to use electrical devices unsupervised. Children cannot always correctly identify
danger. Batteries can be fatal if swallowed. Keep the batteries out of reach of young children. If
a battery has been swallowed, seek medical assistance immediately. Packaging foil must also
be kept away from children. This could cause suffocation.
The camera and its components must not be exposed to dripping or splashed water. In addition,
no objects or containers that are filled with liquid, such as vases or glasses, must be placed on
the camera. Take particular care in rain, snow, on the beach, or near to water.
Do not use the camera in areas with high levels of humidity, moisture, smoke or dust.
Do not leave the camera in places where the temperature can rise dramatically (such as in a
vehicle). This could damage the casing and the internal components, and could cause fire.
Ensure that the camera is not too close to any direct heat sources (such as radiators) or
magnetic fields (such as loud speakers), and that it is not placed in direct sunlight for any
lengthy periods of time.
Do not place any naked flames (such as candles) or objects filled with liquid (such as vases) on
or next to the camera.
Only place the camera on stable surfaces. Otherwise the camera could fall or topple over and
cause injuries or be damaged. Do not allow the camera to fall or bang into things, and handle it
carefully.
Ensure that the display is not exposed to any impact. This could damage the glass in the
monitor or the liquid could leak out. If the liquid gets in your eyes, on your skin or on clothes,
you must wash it off immediately with clean water. If the liquid gets in your eyes, seek medical
assistance immediately.
Do not turn the camera volume up too high. This could damage your hearing.
Be particularly careful in potentially dangerous situations (such as when driving, cycling, or
jogging), or temporarily stop using the headphones. If your headphones are designed to allow
you to hear external noise, you should still only ever set the volume loud enough so that you do
not block out external noises.
We advise against using headphones when driving a car or other vehicle. Please drive carefully
and cautiously. If you notice that the device distracts you when driving, turn it off.
A risk of explosion exists if the batteries are not replaced properly. Read the Important
3
Page 6
Information When Using Batteries on page 9.
Dispose of your batteries in accordance with the battery regulations. The end user is
obliged to return old batteries to a distributor, or to a returns location established for this
purpose by the legal waste disposal company. (See page 46)
Dispose of your camera and battery in
accordance with regulation 2002/96/EC (see page
46). The camera must not be disposed of in the
household waste.
4
Page 7
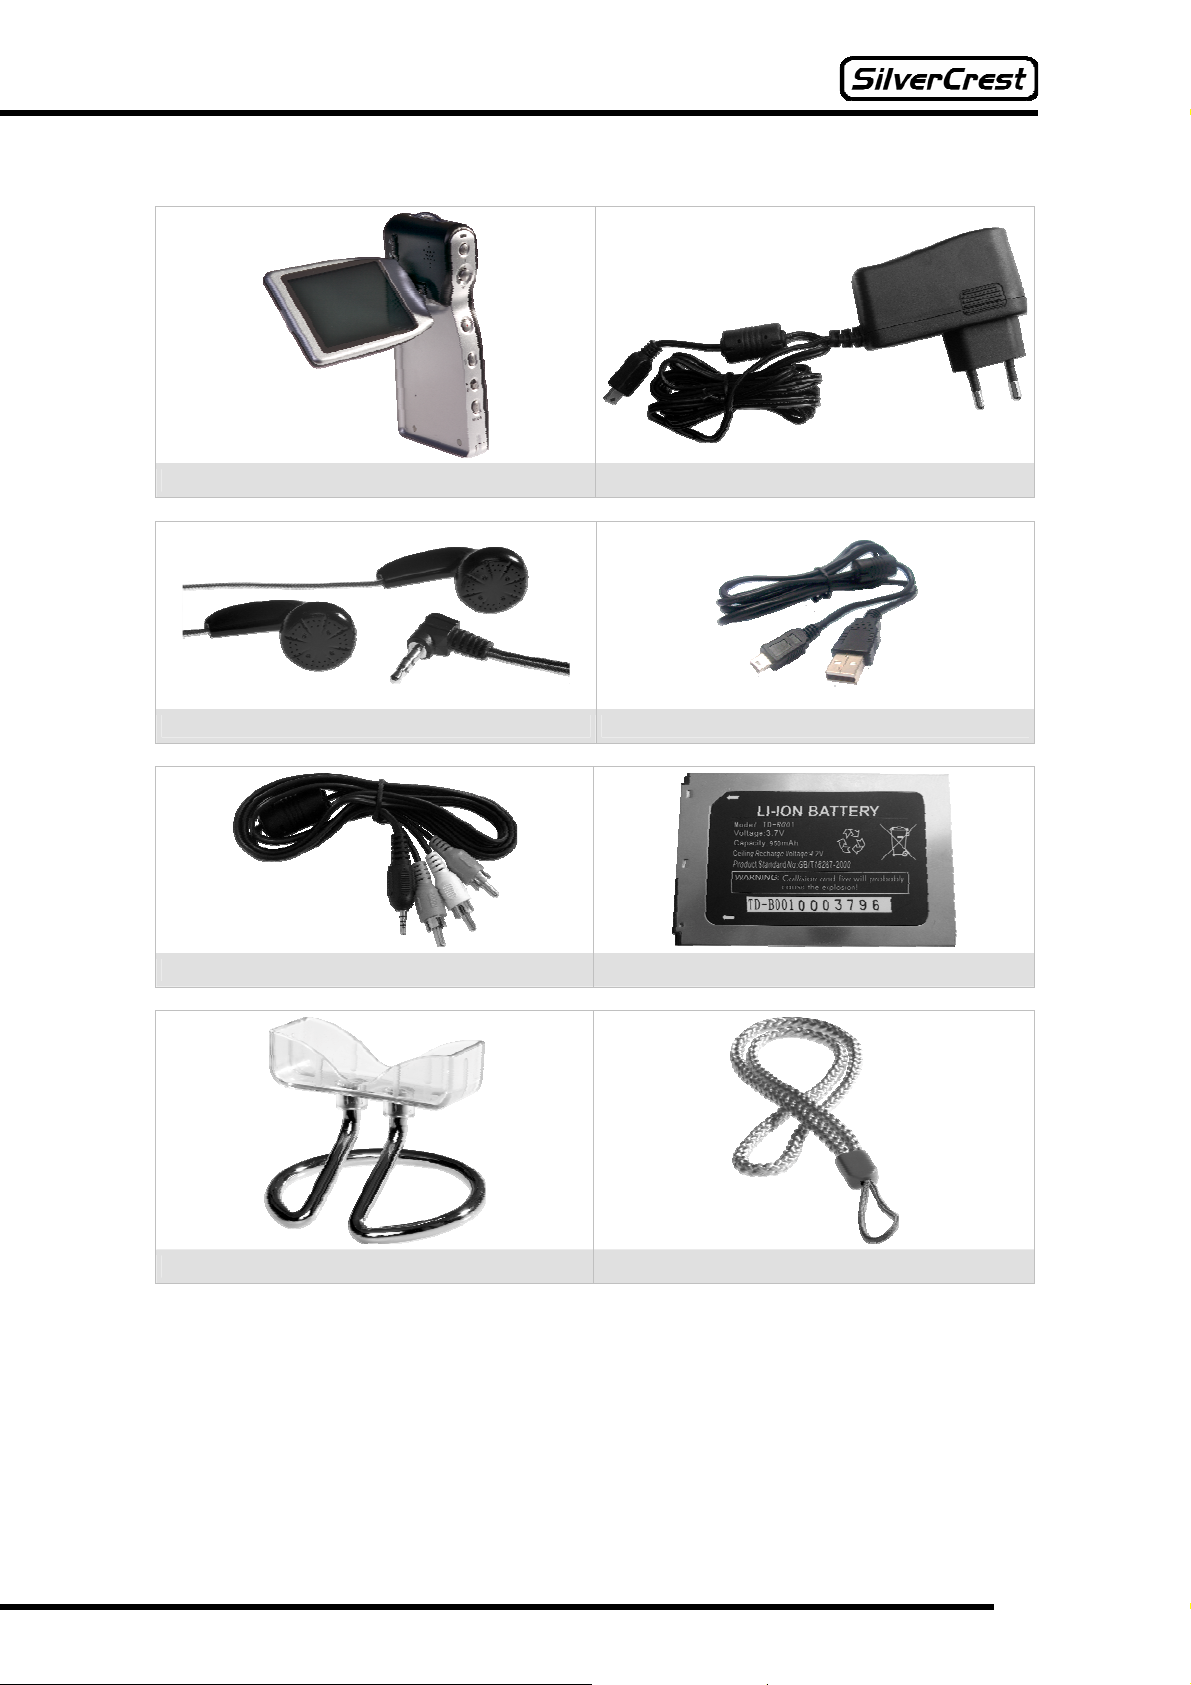
7 Included in Delivery
1. Multi-Functional Camera DV-767 2. Mains Adapter
3. Headphones 4. USB Cable
5. AV Cable 6. Battery
7. Support 8. Strap
5
Page 8
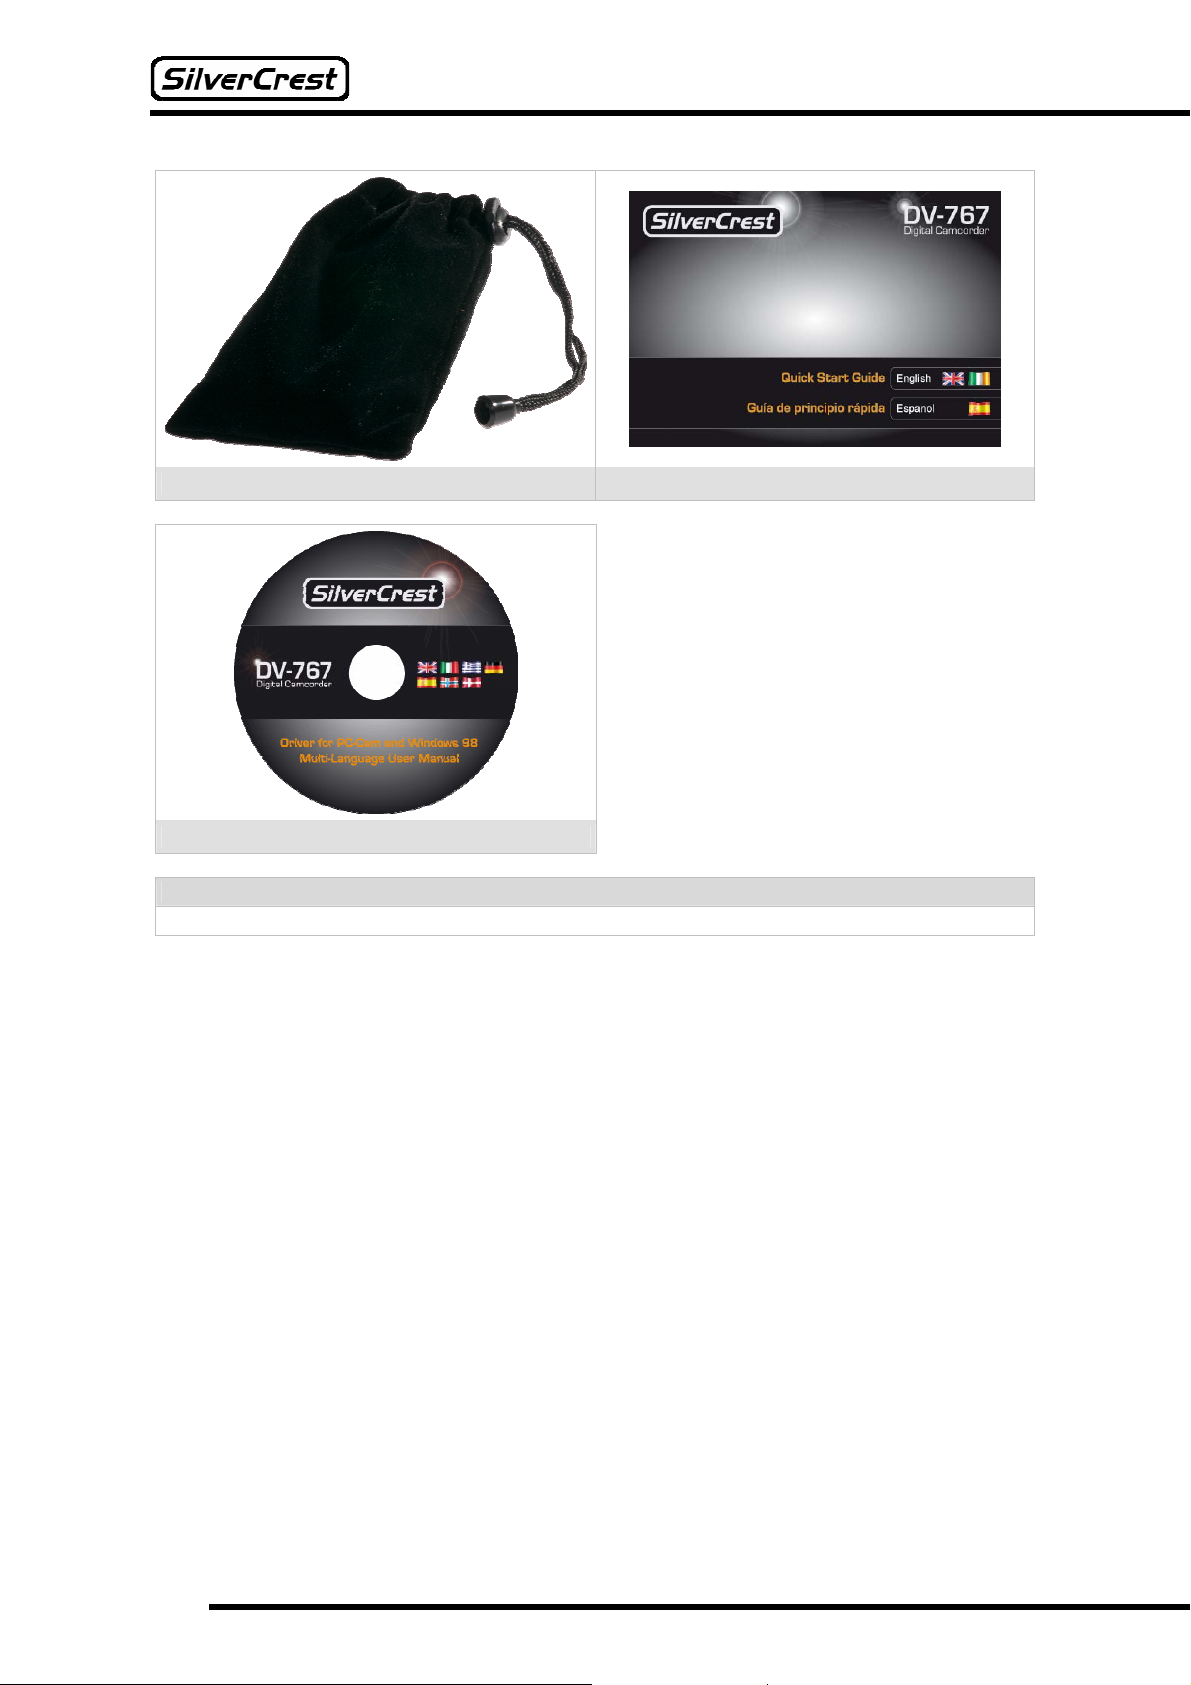
9. Protective Bag 10. Quick Start Guide
11. CD
Remark:
We reserve the right to change the design and technical data without notice.
6
Page 9
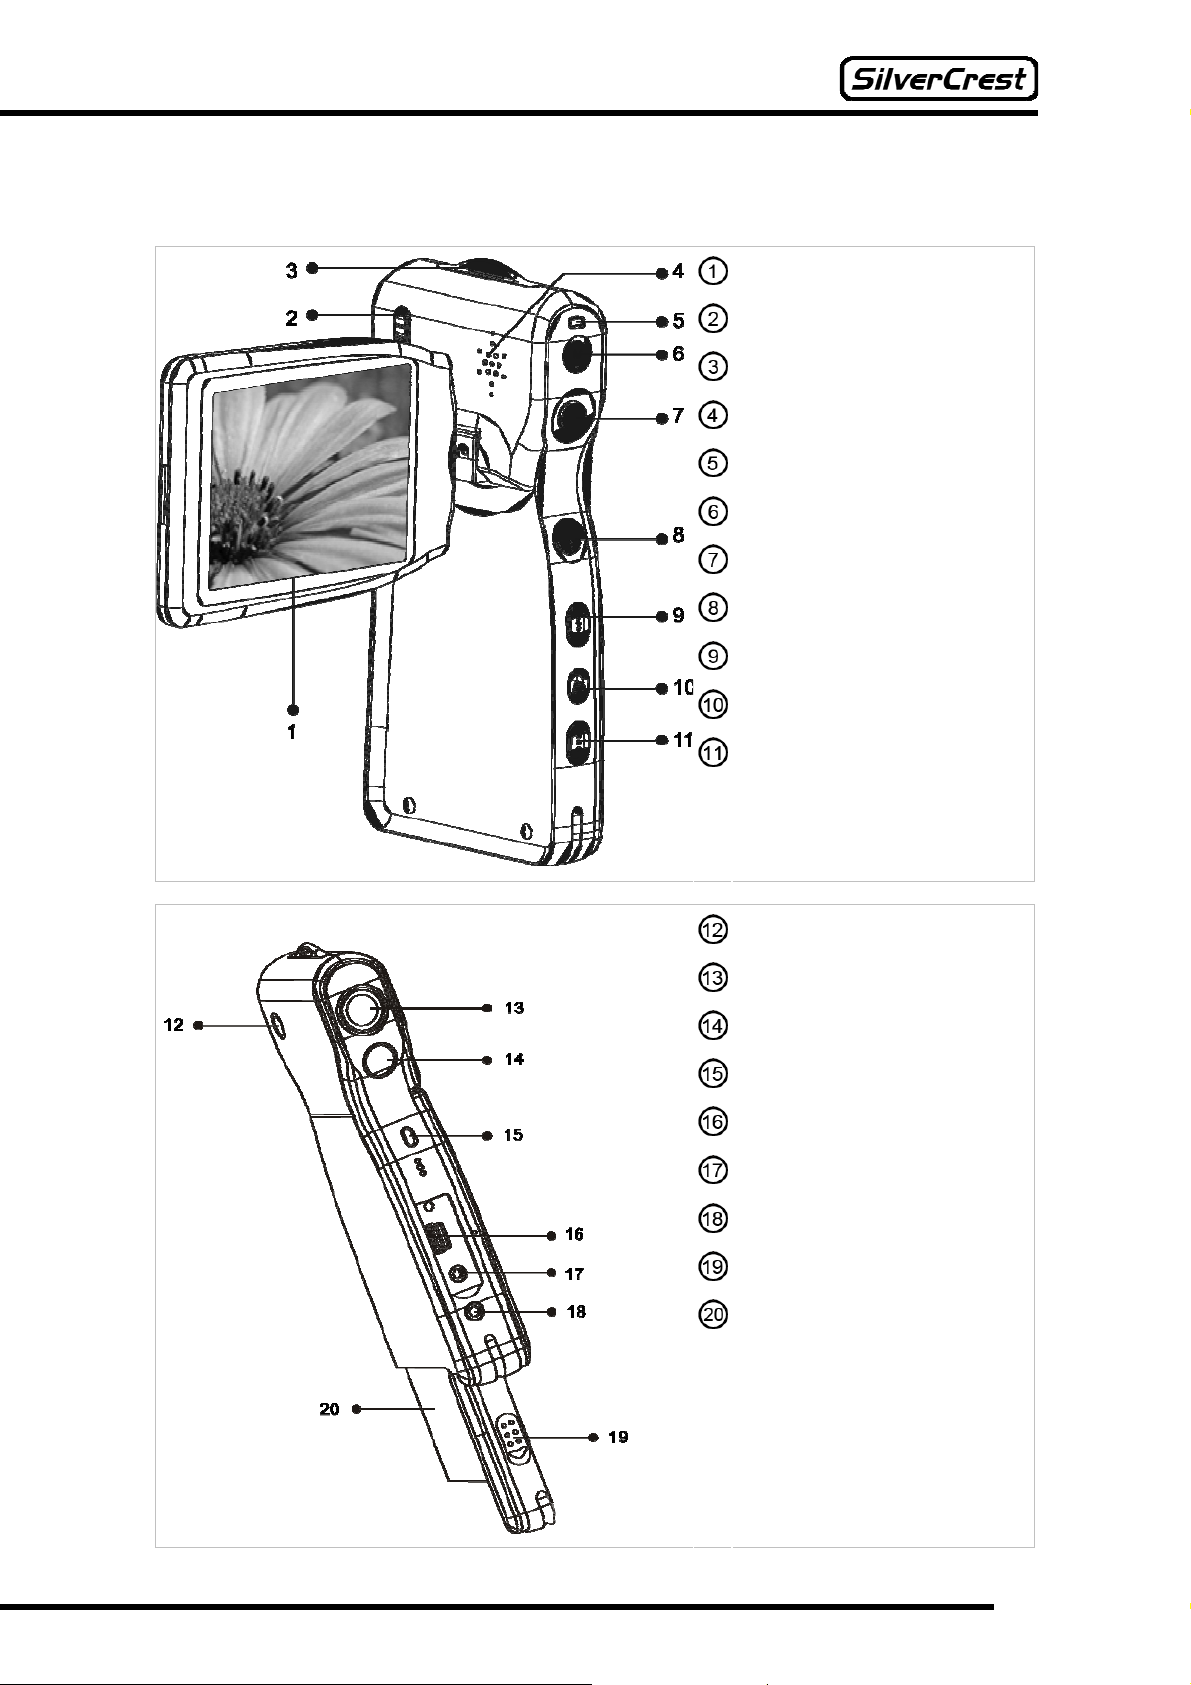
8 Operational Controls
LCD Display
Macro Button
Eyelet for Strap
Loud Speaker
Function Display
Menu Button
Navigation Button
Capture Button
Flash/Delete Button
Switch for Capture/Playback Mode
Mode Button
On/Off Button
Camera Lens
Flash
Capture Display
USB Connection and Charge Socket
AV Input
AV Output, Headphones Socket
Battery Cover
Battery
7
Page 10
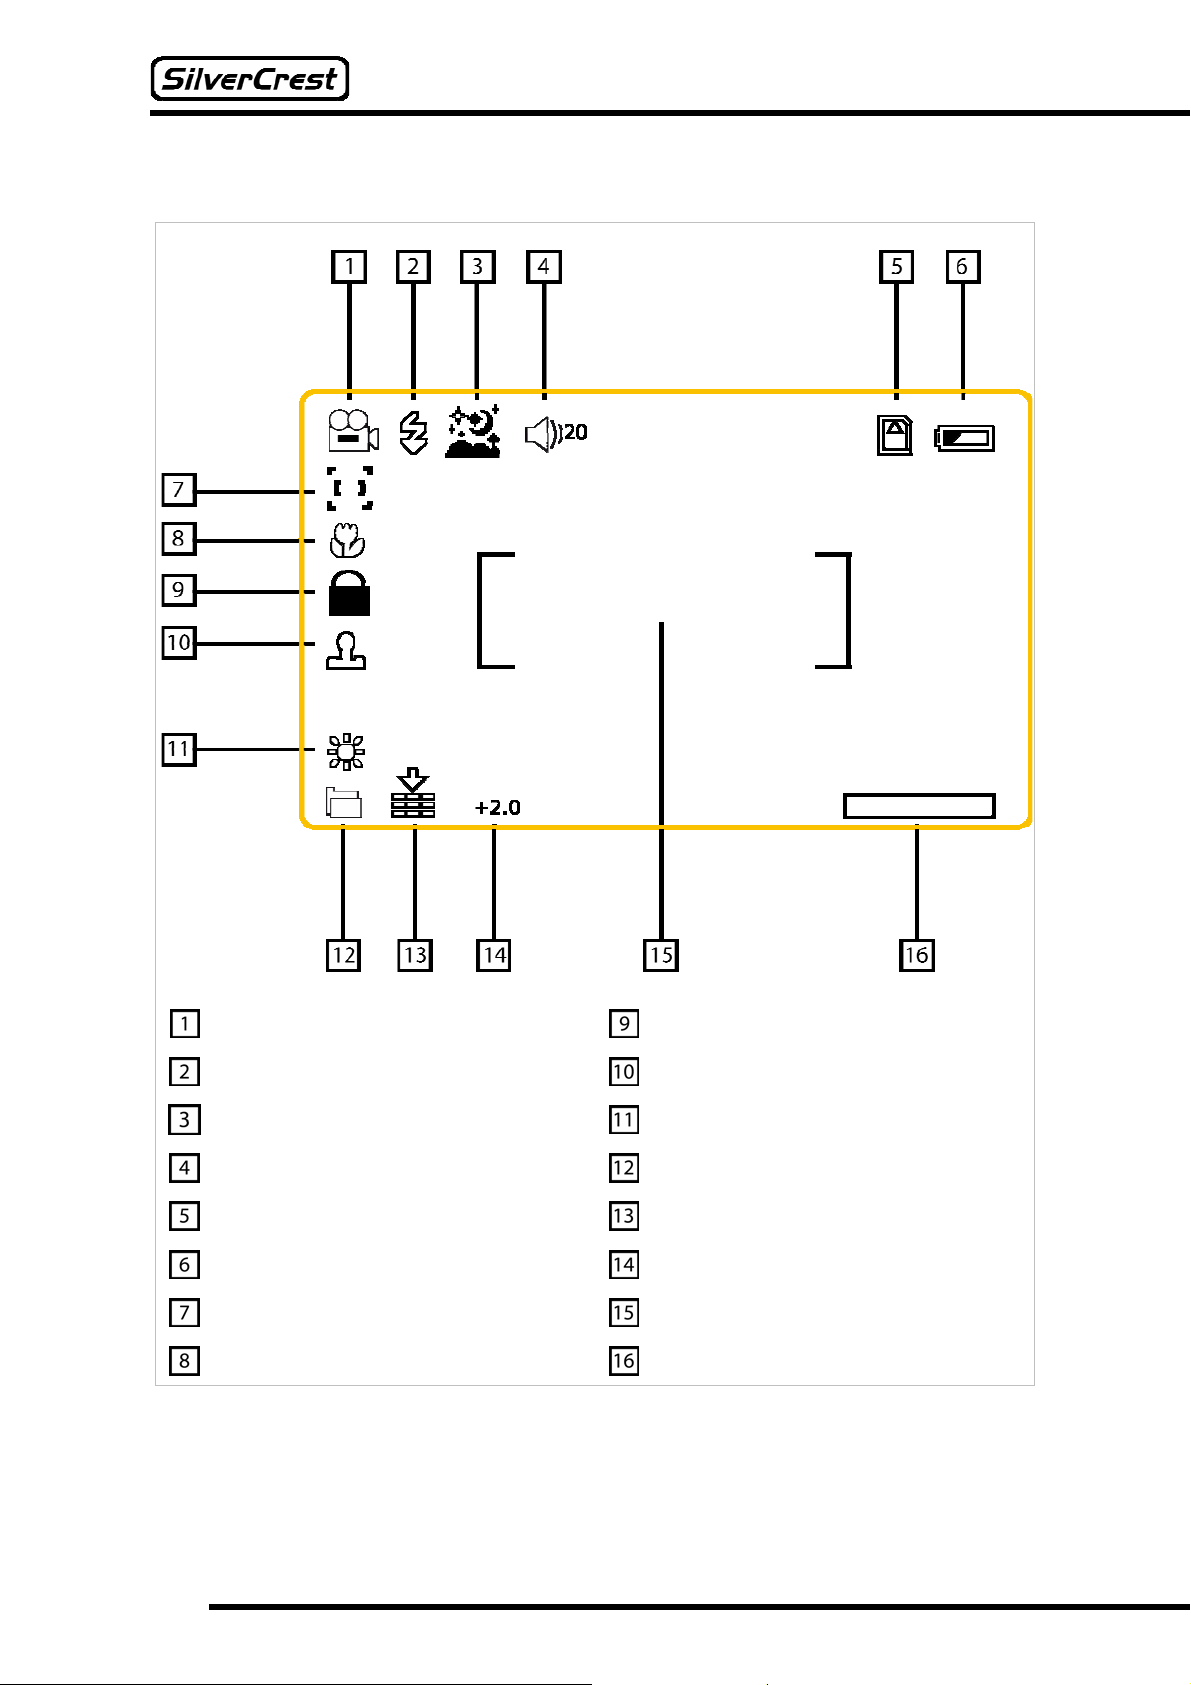
9 Display
Mode (here: Video Mode)
Flash (here: Flash On)
Night Mode
Volume
SD Card
Battery
Metering
Macro Mode
Erase Protection
Date Stamp
White Balance (here: Sunlight)
File Size (here: 10 Megapixels)
Quality (here: Fine)
EV Bias (here: +2.0)
Centre Mark
Info Area
8
Page 11
A
10 Basic Functions
You can use your 8in1 multifunctional SilverCrest DV-767 camera as a digital video camera, digital
photo camera, MP3 player, MPEG4 video player, AV recorder, for voice recordings, as a webcam,
and as a data storage medium. How to use these functions is described in the following document,
starting on page 14. Firstly, however, you should familiarize yourself with basic functions such as
inserting and loading the battery, switching the device on and off, navigation, inserting the memory
card, and so on.
10.1 Battery
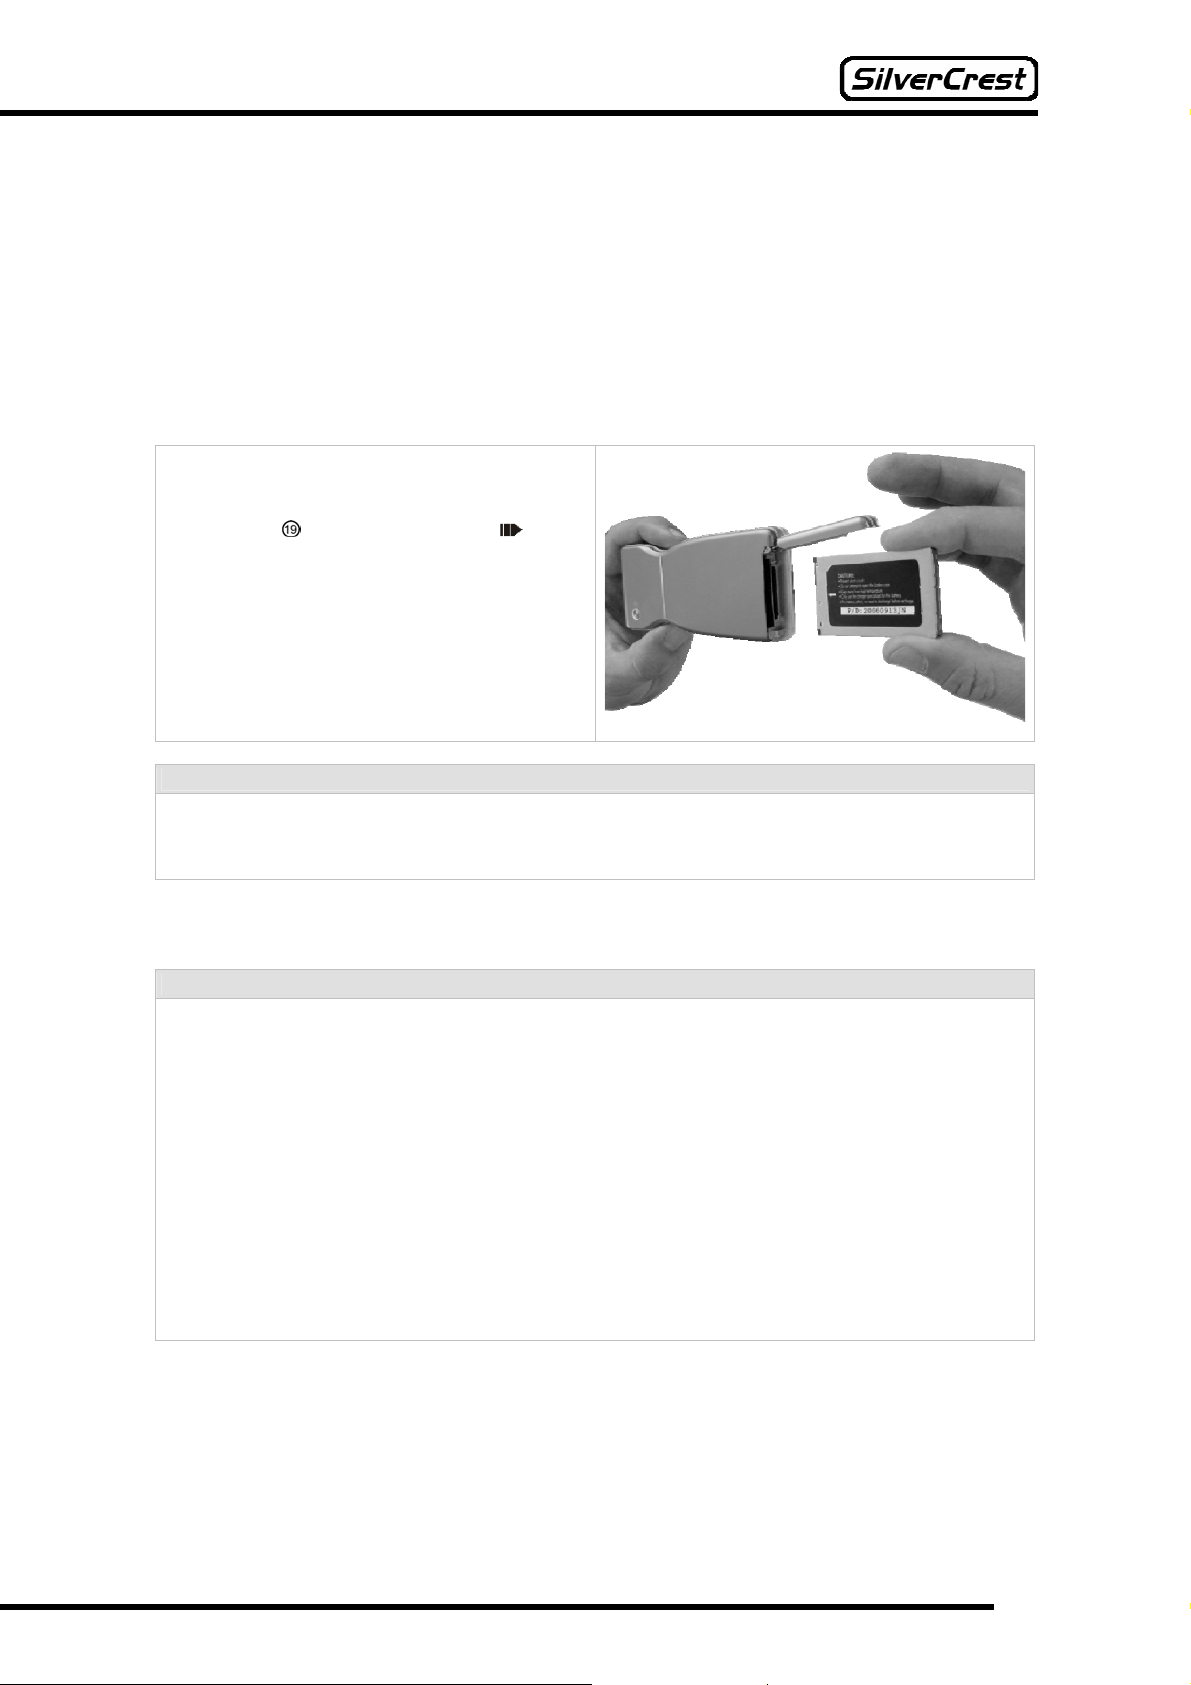
Inserting the Battery
Ensure that the device is switched off and is not
connected to the mains supply or a computer.
Open the battery case by sliding back the
battery cover
Insert the rechargeable battery so that the
battery’s connecting contacts point in the
direction of the device, and are located on the
side of the battery case hinges. Ensure that the
rechargeable battery locks into place. Finally,
close the battery cover.
in the direction shown .
Note:
To increase the life of your battery, you can save energy in the following ways:
Only use the camera rarely as a flashlight (see page 13).
Activate the automatic switch-off function (see page 28).
Please pay attention to the following information regarding the battery, and the note on the disposal
of batteries on page 46.
Important Battery Information:
lways observe the correct polarity when inserting the battery. Only replace the battery with
another battery of the same or comparable type. A risk of explosion exists if the battery is not
replaced properly.
Batteries can be fatal if swallowed. Keep the battery out of reach of young children. If a battery
has been swallowed, seek medical assistance immediately.
Do not place the battery on a flame or source of heat. Never short-circuit the battery. Do not try
to use force to open the battery. This can result in the battery exploding, and can cause
serious injury.
Never change the batteries in surroundings that could potentially cause an explosion. When
inserting or removing the battery, sparks may occur, which could cause an explosion. Areas in
which a risk of explosion exists are often, but not always, indicated as such. These include fuel
areas, such as below deck in a boat, fuel transfer points, fuel storage areas, areas in which the
air contains chemicals or particles, such as grain, dust or metal powder, as well as all other
areas in which you are usually advised to turn off your vehicle’s engine.
See also the note on the disposal of batteries on page 46.
9
Page 12

Note:
A symbol displays the battery status on the LCD screen as follows:
Battery symbol is green, the battery is fully charged. You can use the video camera
normally.
Battery symbol is yellow, the battery is sufficiently charged. You can use the camera
normally.
Battery symbol is red, the battery is half charged. Recharge the battery soon.
Battery symbol is red, the battery is empty. The message Out of Battery is displayed,
and the camera switches itself off. Recharge the battery before continuing to use the
device.
Charging the Battery
There are two options for charging the camera’s battery. You can charge the battery via the mains
adapter supplied, or via the computer.
Charging via the Mains Adapter:
Switch your camera off. Open the cover on the front of the camera and insert the mini USB plug
of the mains adapter (model number: DVS-120A15FEU) into the camera’s USB port
the other end of the mains adapter to the mains supply. As soon as the charging process
begins, the Charging display
Charging via the Computer:
Switch your camera off. Open the cover on the front of the camera and insert the mini USB plug
of the USB connection cable into the camera’s USB socket
connection cable into a free USB socket on your computer. Your computer must be switched on
in order to charge the camera. As soon as the charging process begins, the Charging display
lights up red.
Caution:
In order to avoid overloading, do not use a USB hub on your computer to charge your camera. In
case of overloading, the connected devices may no longer function properly, or your computer
may be damaged. If in doubt, use the mains adapter provided to charge your camera.
As soon as the charging process is completed, the Charging display
battery was completely empty, this can take up to 3 hours.
Note
Always connect the cable to the camera before connecting it to the mains supply or your
computer.
The battery supplied has an output voltage of 3.7V and a current of 900mAh. Only use the
battery supplied.
Ensure that the cover of the USB connection on the front of the device is always closed when
you are not using the USB connection. This prevents the connection from becoming dirty.
Remove Battery
Ensure that the device is switched off and is not connected to the mains supply or the computer.
Open the battery case by sliding back the battery cover
battery by sliding it toward the battery cover and tipping the camera to remove the battery. Finally,
close the battery cover.
. Connect
lights up red.
. Insert the other end of the USB
lights up green. If the
in the direction shown . Release the
10.2 Switching Camera On/Off
To switch the DV-767 on, press the On/Off button for 1 – 2 seconds, until the function display
lights up green. When you release the button, the device switches on. After a short start-up
procedure it is ready for use.
To switch the camera off, press and release the On/Off button
.
10
Page 13
10.3 LCD Display
The camera has a rotating LCD display . When opening and closing the display, you can rotate it
by up to 90 degrees, and once open you can rotate it 180 degrees forwards and 90 degrees
backwards. You can watch the image on the LCD display whilst recording. You can also view
previous recordings on the screen.
Caution
Never force the LCD display to rotate or use excessive force. This could damage the camera.
Never watch long videos on the LCD display, as this could damage your eyes. Instead,
connect the camera to a TV (see page 31).
10.4 Navigation
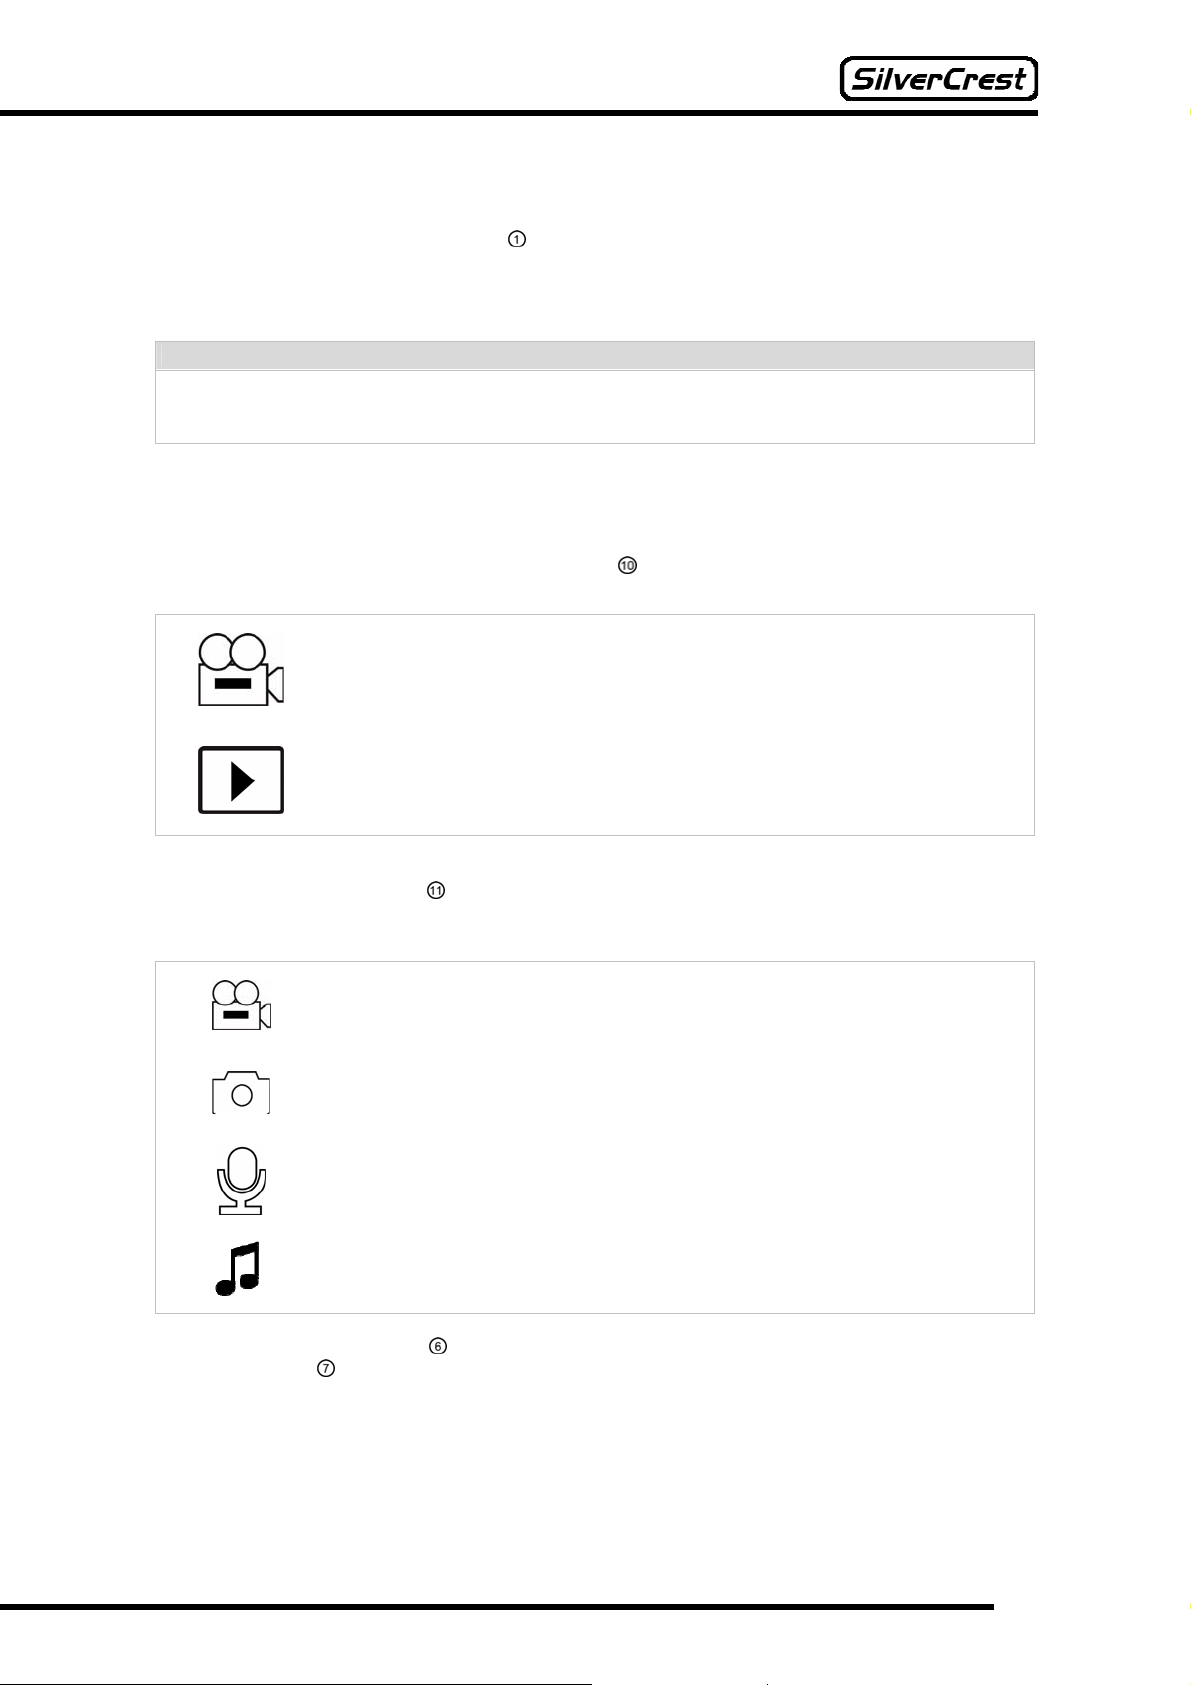
Playback / Capture Mode
You can use the Capture / Playback Mode button
mode.
to set your camera to Capture or Playback
In Capture mode, you can use your camera to record videos, take
photographs, and record speech.
In Playback mode, you can view photographs or videos, and can play back
voice recordings or MP3 files.
Video / Photo / Voice Mode
You can use the Mode button
to define which format (video, photo or voice) you wish to capture
or play back. In Playback mode, you can also play MP3 files. However, it is not possible to capture
MP3 files.
Video Mode
Photo Mode
Voice Mode
MP3 Mode
You can use the Menu button
Navigation button
to choose between Setup and the photo/video settings.
to access the camera’s main menu. From there, you can use the
11
Page 14
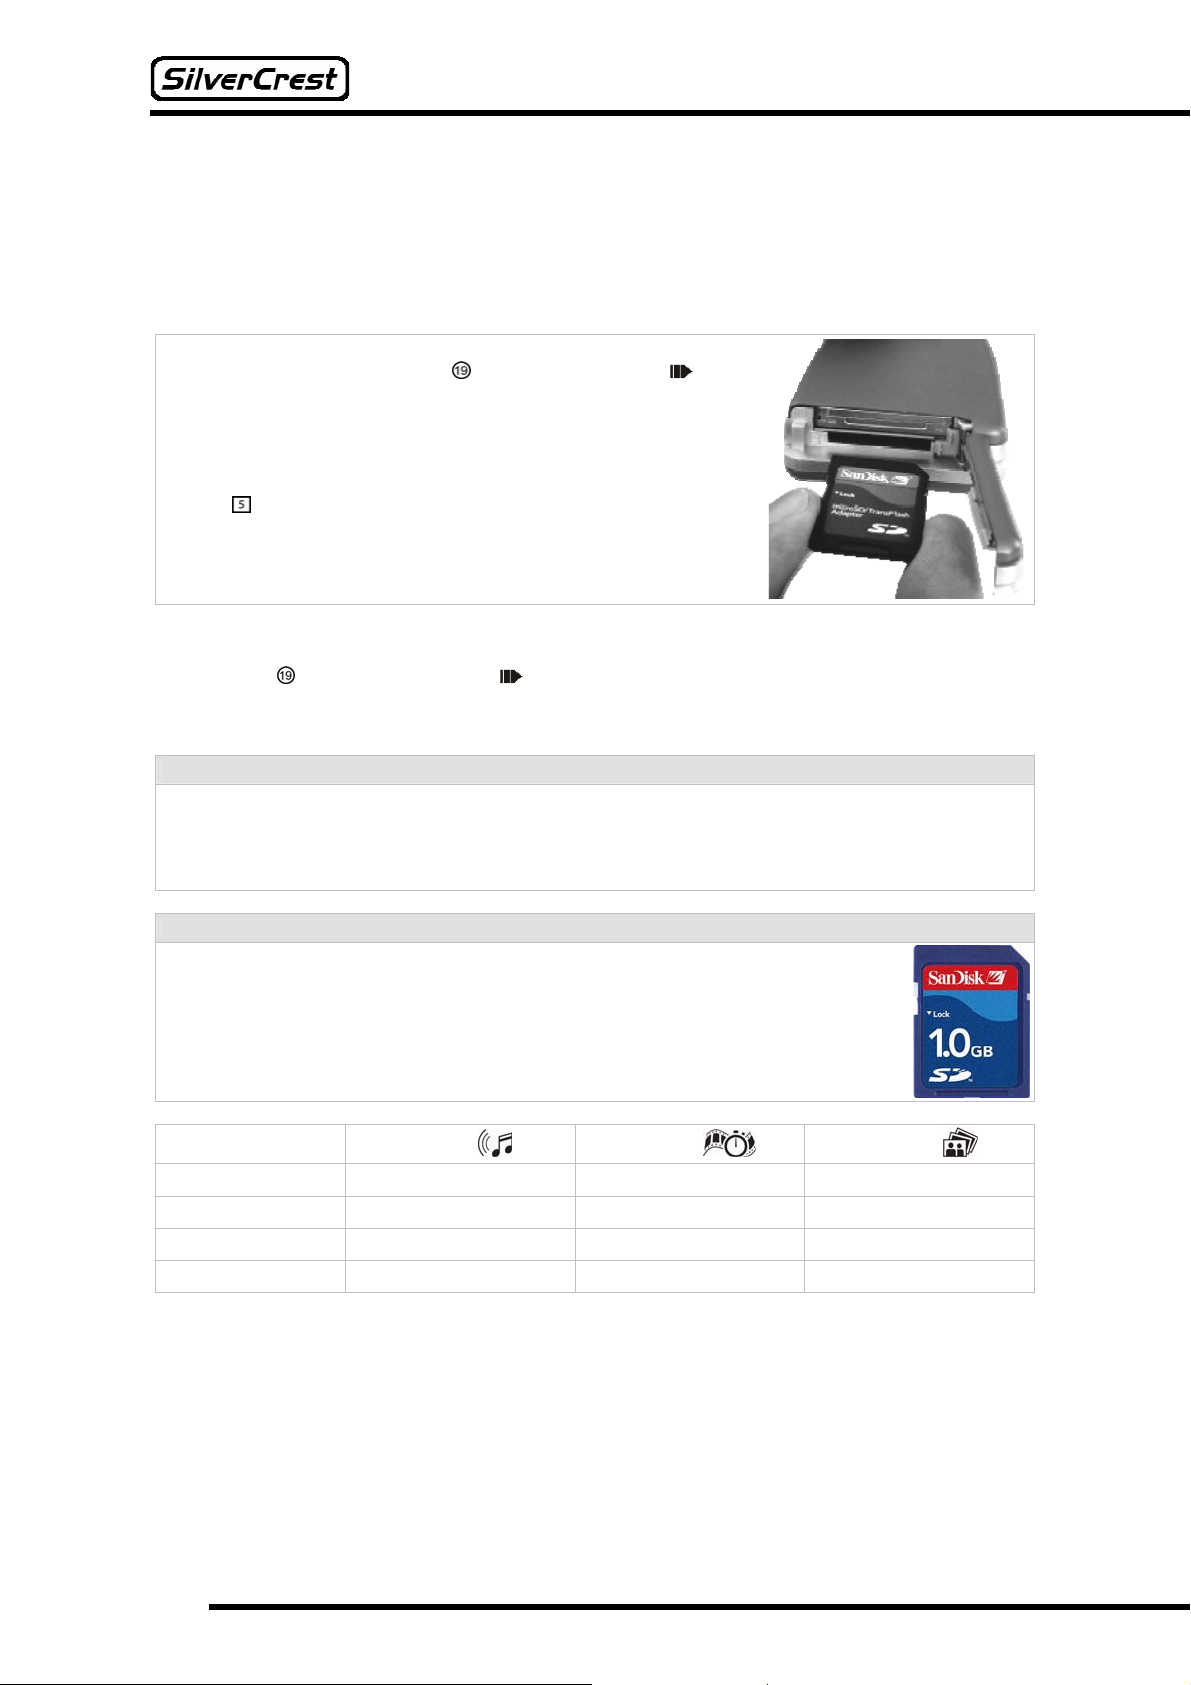
10.5 SD Memory Card
The camera has an integrated memory of 64MB. You can enhance the memory capacity of your
camera by using an SD card with a maximum 2GB of memory. This SD card is not included.
Using an SD Memory Card
To use an SD card, first switch off the camera. Open the battery
case by sliding the battery cover
Now slide the SD card, as shown in the diagram, into the slot
under the battery case until you hear the card click into place.
Close the battery case.
Once you have switched the camera back on, the camera
automatically switches to the SD card and the memory card
symbol
appears in the display. To find out how to change the
camera’s memory location, read section “ Memory” on page 29.
in the direction shown .
Removing an SD Memory Card
To remove the card again, first switch off the camera. Open the battery case by sliding back the
battery cover
in the direction shown .
Now push the card slightly into the camera until the card clicks and the closing mechanism is
released. You can now remove the card from the camera. Now close the battery cover.
Caution
Only insert or remove an SD card when the camera is switched off.
Never remove the SD card whilst data is being transferred between a PC and the camera. This
can result in a loss of data or damage to the device. The manufacturer accepts no liability for
damage caused by improper usage.
Notes on the Memory Card:
Only use SD cards.
You should always format an SD card before using it for the first time.
If you cannot specify the SD card in your camera, or the card is not recognized,
then it may be necessary to format the card. To do this, insert the SD card in the
device, connect your camera to your PC, and format the SD card. Proceed as
described in the chapter “Formatting the Memory “ on page 43.
Memory Size Music
64MB
512 MB
1 GB
2 GB
1:
1 track = 4 minutes with 128
kb/s
1
Videos2 Photos3
15 Tracks 20 Minutes 20 Pictures
120 Tracks 160 Minutes 160 Pictures
240 Tracks 320 Minutes 320 Pictures
480 Tracks 640 Minutes 640 Pictures
2:
MPEG4 with 384 kb/s
3:
1600x1200 pixels, 5:1
compression
12
Page 15

10.6 Headphones
The camera has a built-in loudspeaker for playing back audio data. Alternatively, you can
connect the headphones included to the video and audio output using the mini phone jack.
Caution
Only use the headphones provided.
Listening to loud volumes for long periods can damage hearing.
If you can hear a buzzing or background noise in your ears (ringing), turn the volume down or
stop using the headphones.
You should not turn the volume up so high that you cannot perceive what is going on around
you.
Be particularly careful in potentially dangerous situations (such as when driving, cycling, or
jogging), or temporarily stop using the headphones.
10.7 Flashlight
You can also use your camera’s built-in flash as a flashlight. To do this, the device must be
switched on. The flash stays illuminated for as long as you keep the Flash button
Note:
Use this function sparingly, as the flash uses a lot of power.
pressed.
13
Page 16

A
11 Video Capture
Switch the camera on and use the Capture / Playback switch to select Capture.
When you switch the camera on, the system automatically selects the Video mode. If you are in a
different mode, you can switch to Video mode by pressing the Mode button
button
LCD display
In the bottom right of the display (symbol
determined solely by the remaining memory available.
Press the Capture button
displayed in red. Press the Capture button
Tips for a Better Video:
Do not make any sudden movements with the camera. This will help to avoid blurred pictures.
Never switch between landscape and portrait format whilst recording.
Keep the camera upright whilst filming. This way you achieve a 4:3 image format, as with
as often as necessary until the symbol for video capture appears at the top left of the
.
) the remaining capture time is displayed. This is
to start the capture. In the display , the length of the recording is now
again to stop the capture.
commercial televisions.
. Press the Mode
11.1 Zoom
During the video capture, you can zoom in on (magnify) or zoom out from (reduce) your subject.
Push the Navigation button
c to zoom in (T stands for “telephoto”)
d to zoom out (W stands for “wide angle”)
To use the zoom function, the digital zoom must be enabled, for further information see the section
titled “Digital Zoom” on page 30.
Tips for a Better Video:
void using the zoom function whilst recording (only use one zoom setting when filming), as the
image is not entirely in focus when zooming in/out.
in the following directions:
11.2 Auxiliary Light
You can use the auxiliary light to brighten the scene whilst capturing a video. Before you start
filming, press the Flash button
the light off.
Note:
If the battery is not charged sufficiently, you cannot use this function.
once to activate the light. Press the same button again to switch
11.3 Capture Settings
To optimize your capture, the DV-767 offers various optional settings, such as image size, image
quality, contrast, etc.
Note:
If some settings are unclear, or you are unfamiliar with them, please read the “Technical Help ”
chapter on page 45.
14
Page 17

To change settings, set your camera to Capture mode (see page 14) and activate the video
function (see page 14). Press the Menu button
Navigation button
(d and c) to select the following settings:
to go to the settings menu. You can now use the
Size
By using the Navigation button
image size (symbol
):
(e and f) you can choose the following settings for the
“QVGA” (Quarter Video Graphics Array): The image resolution is 320 x 240 pixels (0.07 mega
pixels). This makes it only a quarter of the size of the VGA.
“VGA” (Video Graphics Array): The image resolution is 640 x 480 pixels (0.03 mega pixels).
Note:
Select “QVGA” if you wish to film a long video, but only have a limited amount of memory. Select
“VGA” if you wish to film a video in high quality.
Quality
By using the Navigation button
compression rate (symbol
(e and f) you can choose the following settings for the
):
“Normal“: maximum compression rate (lower memory consumption, poore st qual ity)
“Fine“: medium compression rate
“Super“: lowest compression rate (highest memory consumption, best quality)
Note:
For the best quality of image, select “Super”. If you wish to use as little memory as possible,
select “Normal”. The “Fine“ setting is between the “Super“ and “Normal” settings.
WB (White Balance)
By using the Navigation button
(e and f) you can choose between the different types
of WB. The effects of the respective settings are shown immediately in the display. Once you have
found a suitable setting, you can return to the settings by pressing the Navigation button
following WB settings are available (symbol
):
. The
“Auto”: The camera automatically sets the white balance.
“Sunlight“: The camera semi-automatically sets the white balance. The camera assumes that
the surroundings are sunny.
“Tungs“: The camera semi-automatically sets the white balance. The camera assumes that the
surroundings are lit by light bulbs.
“Fluor“: The camera semi-automatically sets the white balance. The camera assumes that the
surroundings are lit by fluorescent lights.
“Cloudy“: The camera semi-automatically sets the white balance. The camera assumes that the
surroundings are overcast or that it is dusk.
15
Page 18

Note:
The semi-automatic white balance with the settings “Sunlight”, “Tungs”, “Fluor” and “Cloudy” is
always preferable to the fully-automatic white balance.
For further information on the white balance, please read the “White Balance (WB) ” chapter
on page 45.
EV Bias
You can use the Navigation button
to +2.0 for the manual EV bias. The effects of the respective settings are shown immediately in the
display. Once you have found a suitable setting, you can return to the settings by pressing the
Navigation button
„0,0“: no manual correction
“+0.3” to “+2.0”: the image becomes lighter
“-0.3” to “-2.0”: the image becomes darker
Note:
For example, use the EV bias for recordings facing into light (“+2.0).
For further information on EV bias, please read the “EV Bias” chapter on page 45.
Metering
You can use the Navigation button
the lighting is to be measured. The following settings are available (symbol
“Centre“: the lighting is measured in a large area in the middle of the image
“Spot“: the lighting is measured on a small point in the middle of the image
“Matrix“: The lighting is measured at several, equally-distributed points in the image
Note:
For further information on EV bias, please read the “EV Bias” chapter on page 45.
Image Stabilizer
By using the Navigation button
stabilizer.
Note:
To achieve better image capture, we recommend that you activate the image stabilizer.
. The following values for the EV bias are available (symbol ):
(e and f) to select between twelve values from –2.0
(e and f) to define the area of the image, in which
):
(e and f) you can activate or deactivate the digital image
16
Page 19

12 Video Playback
Switch the camera on and use the Capture / Playback switch to select Playback. To get to the
Video mode, press the Mode button
mode appears at the top left of the LCD display
Once in Video Playback mode, preview images of your videos are displayed. You can use the
Navigation button
To play back one of these preview images, select the preview image and press the Navigation
button
button
the screen, you can see which of your videos is being displayed.
Use the Capture button
return to the preview mode.
. The video is now displayed on the entire display screen. You can use the Navigation
(e and f) to display the next or previous video in full-screen mode. In the upper area of
(e and f) to select between these videos.
to start and stop a video recording. Press the Navigation button to
12.1 Volume
as often as necessary until the symbol for the Video
.
When viewing a video in full-screen mode, you can alter the volume. Push the Navigation button
in the following directions:
c to increase the volume (up to a maximum of 35)
d to reduce the volume.
On the display, the symbol
shows the volume selected.
12.2 Deleting Videos
You have two options for deleting videos from your camera:
If you are in the Video Playback mode, you can use the Navigation button
that you wish to delete. If you now press the Flash/Delete button
Delete?” is displayed. By using the Navigation button
options “Yes” and “No”. Choose “Yes” and press the Navigation button
the current video, or choose “No” and press the Navigation button
the current video.
If you are in Playback mode, pressing the Menu button
change various settings (for more information, read the point “Delete” on page 24). Choose the
menu point “Delete”. The question “Really Delete?” is displayed. By using the Navigation button
(e and f) you can choose between the options “Yes” and “No”. Choose “Yes” and press the
Navigation button
Navigation button
if you wish to delete the current video, or choose “No” and press the
if you do not wish to delete the current video.
(e and f) you can choose between the
takes you to a menu, in which you can
, then the question “Really
if you do not wish to delete
to select the video
if you wish to delete
12.3 Playback Settings
To change settings, set your camera to
Playback mode (see page 11) and activate the
Video mode (see page 11). Press the Menu
button
can use the Navigation button
choose between the following settings.
to go to the settings menu. Here, you
(d and c) to
17
Page 20

Delete
This setting allows you to delete the video currently selected.
If you select the “Delete” setting, then the question “Really Delete?” is displayed. By using
the Navigation button
“Yes” and press the Navigation button
press the Navigation button
Delete All
This setting allows you to delete all your saved videos in one go.
If you select the “Delete All” setting, then the question “Really Delete?” is displayed. By
using the Navigation button
Choose “Yes” and press the Navigation button
“No” and press the Navigation button
Protect
This setting allows you to protect individual videos from deletion.
If you select the “Protect” setting, then the question “Protect File?” is displayed. By using the
Navigation button
and press the Navigation button
press the Navigation button
Once you have protected a video, then the text “File is protected” is displayed next time you
attempt to delete it (see page 24). When playing the video, the Deletion Protection symbol
displayed on the left edge of the screen.
To remove the erase protection from an image, choose the “Protect” setting again. The question
“Unprotect File?” is displayed. Choose between the options “Yes” and “No” as described above.
Slide Show
This setting allows you to show all your videos one after another.
When you select this setting, the camera activates the sequence, starting with the video currently
selected, and repeats all your videos until you stop the playback by pressing the Menu button
(e and f) you can choose between the options “Yes” and “No”. Choose
if you wish to delete the current video, or choose “No” and
if you do not wish to delete the current video.
(e and f) you can choose between the options “Yes” and “No”.
if you wish to delete all your videos, or choose
if you do not wish to delete your videos.
(e and f) you can choose between the options “Yes” and “No”. Choose “Yes”
if you wish to protect the current video, or choose “No” and
if you do not wish to protect the current video.
is
.
18
Page 21

A
13 T aking Photographs
Switch the camera on and use the Capture / Playback switch to select Capture. Press the Mode
button
LCD display
In the bottom right corner of the display (symbol
already captured, and how many remaining images are available in the current quality.
Press the Capture button
13.1 Zoom
When taking photographs, you can zoom in on (magnify) or zoom out from (reduce) your subject.
Push the Navigation button
c to zoom in (T stands for “telephoto”)
d to zoom out (W stands for “wide angle”)
The right side of the display now shows a graphic, which allows you to find out to what degree you
are currently zooming.
To use the zoom function, the digital zoom must be activated. For more information see “Digital
Zoom“ hapter on page 30.
as often as necessary until the symbol for photo capture appears at the top left of the
.
), you are shown how many photos you have
to take a photograph.
in the following directions:
13.2 Capture Mode
If you are 30 – 40cm away from your subject, you will get a better result by using the
camera in Macro mode. To do this, move the switch
symbol
activated.
For all other distances, move the switch up to the symbol for normal capture.
appears on the left of the camera display when the Macro mode is
down to the Macro symbol. The
13.3 Flash
By pressing the Flash button more than once, you can select various options for the flash. The
following options are available (symbol
Flash off: the flash is switched off
utomatic flash: the camera uses the light conditions to decide whether or not a flash
is required.
Flash on: The flash is switched on, and is triggered at each capture.
):
19
Page 22

13.4 Capture Settings
To optimize your capture, the DV-767 offers various optional settings, such as image size, image
quality, white balance etc.
Note:
If some settings are unclear or you are unfamiliar with them, please read the “Technical Help ”
chapter on page 45.
To change settings, set your camera to Capture mode (see page 11) and activate the photo
function (see page 11). Press the Menu button
navigation key
Cap Mode
By using the Navigation button
options. The following options are available:
“Single“: The camera takes one photograph when you press the Capture button
“SelfCap“: Selecting this mode activates the autotimer function. If you press the Capture button
the camera emits a peep for a few seconds before the capture is triggered.
“Sequence“: When you press the Capture button
photographs.
“Panorama“: If you select this mode, you can merge two captures in one image. When you
press the Capture button
displayed in a slightly transparent form on the left half of the display. You can now find another
subject, whose right half is saved in the right half of the image when you press the Capture
button
Note:
The “Sequence” and “Panorama” modes only work if you have set a resolution smaller than 10M
(0.3M, 1.3M, 3.0M or 5.0M) under the “Size” capture setting. If this is not the case, then the error
messages “No sequence” or “Cannot photograph” are displayed. In the following section, “Size”,
describes how to set the resolution.
Size
By using the Navigation button
Here you can select between resolutions of 0.3, 1.3, 3.0, 5.0 and 10 mega pixels (MP) (symbol
The higher the resolution, the more memory the images take up.
Note:
When using a resolution of 10 mega pixels, the “Sequence” and “Panorama” capture modes are
not available.
(d and c) to select the following settings:
(e and f) you can choose between the different capture
once, the camera saves the left half of the image. This is now
again.
(e and f) you can set the resolution for your images.
to go to the settings menu. You can now use the
.
, the camera takes a series of three
).
20
Page 23

Quality
By using the Navigation button
compression rate (symbol
(e and f) you can choose the following settings for the
):
“Normal“: maximum compression rate (lower memory consumption, poore st qual ity)
“Fine“: medium compression rate
“Super“: lowest compression rate (highest memory consumption, best quality)
Note:
For the best possible quality of image, select “Super”. If you wish to use as little memory as
possible, select “Normal”. The “Fine“ setting is between the “Super“ and “Normal” settings.
WB (White Balance)
By using the Navigation button
(e and f) you can choose between the different types
of WB. The effects of the respective settings are shown immediately in the display. Once you have
found a suitable setting, you can return to the settings by pressing the Navigation button
following WB settings are available (symbol
):
. The
“Auto”: The camera automatically sets the white balance.
“Sunlight“: The camera semi-automatically sets the white balance. The camera assumes that
the surroundings are sunny.
“Tungs“: The camera semi-automatically sets the white balance. The camera assumes that the
surroundings are lit by light bulbs.
“Fluor“: The camera semi-automatically sets the white balance. The camera assumes that the
surroundings are lit by fluorescent lights.
“Cloudy“: The camera semi-automatically sets the white balance. The camera assumes that the
surroundings are overcast or that it is dusk.
Note:
The semi-automatic WB with the settings “Sunlight”, “Tungs”, “Fluor” and “Cloudy” is always
preferable to the fully-automatic WB.
For further information on the WB, please read the “White Balance (WB)” chapter on page 45.
EV Bias
You can use the Navigation button
(e and f) to select between twelve values from –2.0
to +2.0 for the manual EV bias. The effects of the respective settings are shown
immediately in the display. Once you have found a suitable setting, you can return to the settings
by pressing the Navigation button
. The following values for the EV bias are available:
„0,0“: no manual correction
“+0.3” to “+2.0”: the image becomes lighter
“-0.3” to “-2.0”: the image becomes darker
Note:
For example, use the EV bias for recordings with a back light (“+2.0).
For further information on EV bias, please read the “EV Bias” chapter on page 45.
Date Stamp
You can use the Navigation button
Stamp on your photos. Press the Navigation button
(e and f) to define whether or not you want a Date
to confirm your selection. If you select the
“On” option, then the date, on which the photo was taken, is displayed in the bottom right of the
screen. If the Date Stamp is activated, then the symbol
is displayed.
21
Page 24

Metering
You can use the Navigation button
the lighting is to be measured. The following settings are available (symbol
“Centre“: the lighting is measured in a large area in the middle of the image
“Spot“: the lighting is measured on a small point in the middle of the image
“Matrix“: The lighting is measured at several, equally-distributed points in the image
Press the Navigation button
Note:
For further information on EV bias, please read the “EV Bias” chapter on page 45.
Best Shot
By using the Navigation button
options (symbol
“Normal“: Choose this option if you are in surroundings in which the lighting conditions are
similar to daylight.
“Night“: Choose this option if you are in surroundings in which the lighting conditions are similar
to nighttime conditions.
Press the Navigation button
):
to confirm your selection.
to confirm your selection.
(e and f) to define the area of the image, in which
):
(e and f) you can choose between the following
22
Page 25

14 Image Playback
Switch the camera on and use the Capture / Playback switch to select Playback. To get to the
Photo mode, press the Mode button
mode appears at the top left of the LCD display
Once in Photo Playback mode, preview images of your images are displayed. You can use the
Navigation button
To display one of your preview images on the full screen, select the image and press the
Navigation button
Navigation button
symbol (
Press the Navigation button
) in the bottom right of the screen shows you which of your images is being displayed.
(e and f) to select between these videos.
. The image is now displayed on the entire display screen. You can use the
(e and f) to display the next or previous image in full-screen mode. The
again to return to the preview mode.
14.1 Zoom
If you display an image in full-screen mode, you can zoom in on, or out from your image. Push the
Navigation button
c to zoom in
d to zoom out
An image in the top left of the display shows which area of your image is being magnified. You can
adjust this whilst in full-screen mode by pressing the Navigation button
following directions:c, d, e and f). Press the Navigation button
in the following directions:
as often as necessary until the symbol for the Photo
.
, and then moving it in the
to return to Zoom mode.
14.2 Deleting Photos
You have two options for deleting photos from your camera:
If you are in the Photo Playback mode, you can use the Navigation button
that you wish to delete. If you now press the Flash/Delete button
Delete?” is displayed. By using the Navigation button
options “Yes” and “No”. Choose “Yes” and press the Navigation button
the current photo, or choose “No” and press the Navigation button
the current photo.
If you are in Playback mode, pressing the Menu button
change various settings (for more information, read the point ”Delete” on page 24). Choose the
menu point “Delete”. The question “Really Delete?” is displayed. By using the Navigation button
(e and f) you can choose between the options “Yes” and “No”. Choose “Yes” and press the
Navigation button
Navigation button
if you wish to delete the current photo, or choose “No” and press the
if you do not wish to delete the current photo.
(e and f) you can choose between the
takes you to a menu, in which you can
, then the question “Really
if you do not wish to delete
to select the photo
if you wish to delete
14.3 Playback Settings
To change settings, set your camera to
Playback mode (see page 11) and activate the
photo mode (see page 11). Press the Menu
button
can use the Navigation button
choose between the following settings.
to go to the settings menu. Here, you
(d and c) to
23
Page 26

Delete
This setting allows you to delete the photo currently selected.
If you select the “Delete” setting, then the question “Really Delete?” is displayed. By using
the Navigation button
“Yes” and press the Navigation button
press the Navigation button
Delete All
This setting allows you to delete all your saved photos in one go.
If you select the “Delete All” setting, then the question “Really Delete?” is displayed. By
using the Navigation button
Choose “Yes” and press the Navigation button
“No” and press the Navigation button
Protect
This setting allows you to protect individual photos from deletion.
If you select the “Protect” setting, then the question “Protect File?” is displayed. By using the
Navigation button
and press the Navigation button
press the Navigation button
Once you have protected a photo, then the text “File is protected” is displayed next time you
attempt to delete it (see page 24). When displaying the photo, the Deletion Protection symbol
displayed on the left edge of the screen.
To remove the deletion protection from a photo, choose the “Protect” setting again. The question
“Unprotect File?” is then displayed. Choose between the options “Yes” and “No” as described
above.
Print
If you have connected your camera to a printer (see point “Printing Directly with PictBridge”
on page 34), then you can use this menu point to print the selected photo. Press f on the
Navigation button
printing process.
Slide Show
This setting allows you to show all your images one after the other.
When you select this setting, the camera starts the slide show, beginning with the photo currently
selected, and repeats all your photos until you stop the playback by pressing the Menu button
(e and f) you can choose between the options “Yes” and “No”. Choose
if you wish to delete the current photo, or choose “No” and
if you do not wish to delete the current photo.
(e and f) you can choose between the options “Yes” and “No”.
if you wish to delete all your photos, or choose
if you do not wish to delete your photos.
(e and f) you can choose between the options “Yes” and “No”. Choose “Yes ”
if you wish to protect the current photo, or choose “No” and
if you do not wish to protect the current photo.
is
to change settings, and then f again on the Navigation button to start the
.
15 V oice Recording
Switch the camera on and use the Capture / Playback switch to select Capture. Press
the Mode button
left of the LCD display
In the bottom right of the display (symbol
determined solely by the remaining memory available.
Press the Capture button
displayed in red. Press the Capture button
24
as often as necessary until the symbol for voice recording appears at the top
.
) the remaining capture time is displayed. This is
to start the capture. In the display , the length of the recording is now
to stop the capture.
Page 27

16 Playback Voice Recording
Switch the camera on and use the Capture / Playback switch to select Playback. To get to the
voice mode, press the Mode button
appears at the top left of the LCD display
Once in voice mode, you can use the direction buttons on the Navigation button
between your voice recordings. Press
You can playback your voice recording by pressing the Capture button
Press the Navigation button
to return to the main menu of the Voice Recording Playback mode.
16.1 Delete Voice Recording
There are two ways to delete voice recordings from the camera.
If you are in the Voice Recording Playback mode, you can use the Navigation button
the voice recording that you wish to delete. If you now press the Flash/Delete button
question “Really Delete?” is displayed. By using the Navigation button
choose between the options “Yes” and “No”. Choose “Yes” and press the Navigation button
you wish to delete the current photo, or choose “No” and press the Navigation button
do not wish to delete the current photo.
If you are in Playback mode, pressing the Menu button
change settings. (For more information, see the point “
Delete ” on page 25). Select the “Delete” menu point. The question “Really Delete?” is
displayed. By using the Navigation button
“Yes” and “No”. Choose “Yes” and press the Navigation button
current photo, or choose “No” and press the Navigation button
current photo.
as often as necessary until the symbol for the voice mode
.
to switch
to select a voice recording.
.
to select
, then the
(e and f) you can
if
if you
takes you to a menu, in which you can
(e and f) you can choose between the options
if you wish to delete the
if you do not wish to delete the
16.2 Playback Settings
To change settings, set your camera to
Playback mode (see page 11) and activate the
voice recording mode (see page 11). Press the
Menu button
Here, you can use the Navigation button
and c) to choose between the following
settings.
Delete
This setting allows you to delete the voice recording currently selected.
If you select the “Delete” setting, then the question “Really Delete?” is displayed. By using
the Navigation button
Choose “Yes” and press the Navigation button
choose “No” and press the Navigation button
recording.
Delete All
This setting allows you to delete all your saved voice recordings in one go.
If you select the “Delete All” setting, then the question “Really Delete?” is displayed. By using the
Navigation button
and press the Navigation button
press the Navigation button
to go to the settings menu.
(d
(e and f) you can choose between the options “Yes” and “No”.
if you wish to delete the current recording, or
if you do not wish to delete the current
(e and f) you can choose between the options “Yes” and “No”. Choose “Yes ”
if you wish to delete all your recordings, or choose “No” and
if you do not wish to delete your recordings.
25
Page 28

Protect
This setting allows you to protect individual voice recordings from being deleted.
If you select the “Protect” setting, then the question “Protect File?” is displayed. By using the
Navigation button
and press the Navigation button
press the Navigation button
Once you have protected a recording, then the text “File is protected” is displayed next time you
attempt to delete it (see page 24). When displaying the voice recording, the Deletion Protection
symbol
To remove the deletion protection from a recording, choose the “Protect” setting again. The
question “Unprotect File?” is displayed. Choose between the options “Yes” and “No” as described
above.
Slide Show
This setting allows you to play back all your voice recordings, one after the other. When
you select this setting, the camera begins the sequence of recordings, starting with the recording
currently selected. To stop the slide show, press the Menu button
is displayed on the left edge of the screen.
(e and f) you can choose between the options “Yes” and “No”. Choose “Yes ”
if you wish to protect the current recording, or choose “No” and
if you do not wish to protect the current recording.
.
26
Page 29

17 Playback MP3 Files
Switch the camera on and use the Capture / Playback switch to select Playback. To
get to the MP3 mode, press the Mode button
for the MP3 mode appears at the top left of the LCD display .
Once in MP3 Playback mode, the MP3 titles saved on your camera are displayed. You can use the
Navigation button
Navigation button
(d and c) to move between the MP3 titles. To play a MP3 title, press the
. To pause the playback, press the Navigation button again.
17.1 Play/Pause
Pressing the Capture button starts an MP3 title. Press the Capture button again to pause the
playback.
17.2 Volume
as often as necessary until the symbol
By using the Navigation button (d and c) you can set the volume.
17.3 Next Track / Previous Track
By using the Navigation button (e and f) you can jump to the previous or next track.
17.4 Repeat / Random
By repeatedly pressing the Menu button , you can switch between the different playback modes.
The following modes are available:
Play all tracks once.
Repeat: Only the current track is repeated.
Infinite loop: All tracks are played in a set sequence, in an infinite loop.
Random: The tracks are played in a random order.
17.5 Delete MP3 Files
If you are in the MP3 Playback mode, you can delete an MP3 file by selecting the desired track
from the track list and then pressing the Flash/Delete button
displayed. By using the Navigation button
and “No”. Choose “Yes” and press the Navigation button
or choose “No” and press the Navigation button
Note:
Files with the attribute “Write Protected” cannot be deleted.
Files with the attribute “Hidden” are not displayed in the track list.
(e and f) you can choose between the options “Yes”
if you do not wish to delete the selected track.
. The question “Really Delete?” is
if you wish to delete the selected track,
27
Page 30

18 Settings
This chapter describes how you can change
general camera settings, such as the time and
language. In order to change these settings, the
camera must be switched on. It can, however,
be in any mode. Press the Menu button
display the settings menu. If the light marking
on the top edge of the screen is on the left side,
then press f on the Navigation button
switch to the right entry “Setup”.
The menu above is displayed. You can use the
Navigation button
between the following settings.
(d and c) to choose
to
to
18.1 Set Clock
This setting allows you to set the date and time.
By using the Navigation button
hour and minute. Choose c or d to set the values.
(e and f) you can switch between year, month, day,
18.2 Auto OFF
With this setting you can set the camera to switch itself off if not in use after a certain amount of
time.
You can use the Navigation button (e and f) to select the following time periods: 3min, 5min,
8min and Off
18.3 Beep
This setting allows you to activate or deactivate the beep made by the camera when
certain buttons are pressed, such as when taking a photo.
To do this, use the Navigation button
deactivate it.
(e and f) to select “On”, to activate the beep, and “Off”, to
28
Page 31

18.4 USB Mode
In this setting you can use the Navigation button (e and f) to define the USB mode for
the desired function.
If you want to use the camera as a webcam (see page 40) or as a video camera (see page 41),
select the “Webcam” option.
If you want to use the camera as a mass storage device (for example, to transfer data to the
computer), select the “MSDC” option (Mass Storage Device Class).
If you want to connect the camera directly to a printer that is compatible with PictBridge, choose the
“PictBridge” option.
Note:
If you connect the camera to a computer and choose the “MSDC” setting in USB mode, ensure
that only the memory defined in the “Memory” setting is visible on your PC. For more details, read
the “Memory” section on page 29 and “Transferring Photos, Videos and Voice Recordings” on
page 39.
18.5 Logo
In this setting you can define whether or not the start logo is to be displayed when you switch the
camera on.
Use the e and f buttons and press the Navigation button
displayed, or “Off”, if it is not to be displayed.
to choose “On”, if the logo is to be
18.6 Language
In this setting you can define the language, in which text is to appear on the display.
Use the Navigation button
Italian, Greek, Norwegian, and Danish
(e and f) to select from the following languages: English, Spanish,
18.7 Video Out (Video-Out Signal)
In this setting you can set the video output signal.
By using the Navigation button
“PAL”. In order to see the image on the connected device (for example, a TV) you must select the
format supported by your device. In most cases this is “PAL”.
(e and f) you can choose between the options “NTSC” and
18.8 Memory
This setting allows you to define the data storage medium, to which your photos, videos, etc. are to
be saved.
By using the Navigation button
(internal memory) and “SD card” (removable memory card).
Note:
If you connect the camera to a PC, then only the memory that you defined in the “Memory” setting
is visible. For more details, read the “Transferring Photos, Videos and Voice Recordings” section
on page 39.
(e and f) you can choose between the options “Internal”
18.9 Format
This setting allows you to format the data memory, which you defined in the “Memory”
setting (see page 29).
To do this, push the Navigation button
displayed. Choose “Yes” and press the Navigation button
choose “No” and press the Navigation button
Caution:
By formatting the memory, you will lose all the data you saved previously.
to the right (f). The question “Really Delete?” is
if you wish to format the memory, or
if you do not wish to delete the memory.
29
Page 32

18.10 Default Setting
This setting allows you to reset all settings to the default setting.
To do this, push the Navigation button
displayed. Choose “Yes” and press the Navigation button
choose “No” and press the Navigation button
to the right (f). The question “Reset Settings?” is
if you wish to reset all the settings, or
if you do not wish to reset the settings.
18.11 Digital Zoom
By using the Navigation button (e and f) you can activate or deactivate the digital zoom. It is
not possible to use the zoom function if you select “Off”.
30
Page 33

19 Output to an AV Device
You can also reroute your camera’s display through an AV device (such as a television). This
allows you to view your photos or videos comfortably on a large display, or to show them to larger
groups.
19.1 System Requirements
Your device must have a RCA-type AV port.
For example, if you only have a TV with a scart
connection, then you must have a scart / RCA
adapter (see right). This adapter is not
included, but can be purchased from specialist
electronics outlets.
19.2 Connecting to the AV Device
Insert the phone jack of the AV cable included into AV output socket on the front of the device.
Insert the three RCA plugs into your device’s AV input socket. The video signal is sent through the
yellow plug, and the audio signal is sent through the red and white plugs.
Note:
If you are using a scart / RCA adapter, ensure that the switch (if there is one) is set to “Signal In”.
19.3 Starting the AV Output
Switch your AV device on and set it to AV In. For more details, read the operating instructions for
your AV device.
When you have switched on the camera, the
image on the right is shown on the camera’s
display. Press:
e on the Navigation button
transfer audio to your AV device (for
example, to play voice recordings or MP3
tracks)
f on the Navigation button
audio and video to your AV device (for
example, to view photos or videos)
Confirm your selection by pressing the
Navigation button
.
to only
to transfer
If you select the second setting, then your camera’s display switches off and the display on your AV
device is activated. It displays the menu for your camera. Use your camera as normal.
19.4 Ending the AV Output
If you want to end the AV output, simply remove the AV cable from the camera’s AV output
socket
. The camera switches off automatically. To continue using the camera, switch it back on.
31
Page 34

20 Capturing from an AV Device
If you have an AV device (such as a TV or a DVD player), you can connect it to the camera and
record the video signal being sent (for example, the television program).
20.1 System Requirements
Your device must have a RCA-type AV output.
For example, if you only have a TV with a scart
connection, then you must have a scart / cinch
adapter (see right). This adapter is not
included, but can be purchased from specialist
electronics outlets.
20.2 Connecting to the AV Device
Insert the phone jack of the AV cable included into AV input socket under the cover on the front
of the device. Insert the three RCA plugs into your AV device’s AV output socket. The video signal
is sent through the yellow plug, and the audio signal is sent through the red and white plugs.
Note:
If you are using a scart / RCA adapter, ensure that the switch (if there is one) is set to “Signal
Out”.
20.3 AV Capture
Switch your AV device on and start playback. Now set the Mode switch to Capture and switch
the camera on. You can now see the image from your AV device on the camera’s display. You can
use the Capture button
auxiliary light when recording an AV signal.
Comment:
The recording is in MPEG-4 format, and is only restricted by the amount of free memory.
to start and stop the recording. You cannot use the zoom function or the
20.4 Capture Settings
To change settings, set your camera to the
Capture mode for AV signals, as described
above. Press the Menu button
settings menu. Here, you can use the
Navigation button
between the following settings.
(d and c) to choose
to get to the
32
Page 35

20.5 Auto Start
This setting allows you to automatically start recording from an AV source at a defined point in
time. Use the Navigation button
to switch between year, month, day, hour and minute, and then use the Navigation button
(f) to select the time. Use the Navigation button (e and f)
again
(c and d) to enter the desired value.
Comment:
In order for this function to work properly, it is important that you have set the time and date
correctly (see page 28).
20.6 Auto Stop
This setting allows you to automatically stop recording from an AV source at a defined point in time.
Use the Navigation button
switch between year, month, day, hour and minute, and then use the Navigation button
and d) to enter the desired value.
Comment:
In order for this function to work properly, it is important that you have set the time and date
correctly (see page 28).
(f) to select the time. Use the Navigation button (e and f) to
again (c
33
Page 36

21 Printing Directly with PictBridge
The DV-767 camera meets the PictBridge standard, which makes it possible to print photos directly
from the camera, without having to use a computer. This is primarily recommended for quick, oneoff printing.
21.1 System Requirements
The printer must meet the PictBridge standard
and have a USB connection. You can tell
whether your printer supports this standard by
the PictBridge logo, or by reading your printer’s
manual.
21.2 Connecting to the Printer
Switch the camera on and set the USB mode
to PictBridge (see page 29). Now use the USB
cable to connect your camera to your printer,
without switching the camera off.
21.3 Printing Photos
Set your camera to Playback mode and switch to Photo mode. Select the photo to be printed, and
press the Menu button
then press the Navigation button
process.
. Use the Navigation button (d) to switch to the “Print” menu point and
(f) to change settings and (f) again to start the printing
34
Page 37

22 Computer Installation
22.1 System Requirements
Operating System: Windows® 98SE, Me, 2000, XP or Vista
CPU: Pentium III 500 MHz or above
RAM: 64MB RAM (128 MB is recommended)
Hard Drive: 50 MB of free memory
Interface: USB 2.0 (compatible with USB 1.1)
CD ROM Drive: Yes, if the operating system is Windows 98 SE
22.2 Connecting to the Computer
Lift the protective lid on the front of the device and connect the camera as shown in the following
images:
1. Insert the small plug (mini USB) of the
connection cable into the camera’s USB socket
.
Note:
If you use a USB hub (a multiple USB port adaptor), it is possible that your computer does not
recognize the camera. In this case, connect the USB cable directly to your PC.
2. Insert the large end of the connection cable
into a free USB socket on your computer.
22.3 Driver Installation
To transfer your photos, videos or voice recordings to a computer with Microsoft Windows ME,
2000, XP or Vista, you do not need to manually install a driver. The device is set up the first time it
is used
Recordings” on page 39.
If you want to use your camera as a webcam or video camera on a computer with Microsoft
Windows ME, 2000, XP or Vista, then you must manually install the driver. This is described below
for Windows Vista, Windows ME, 2000, XP, and Windows 98SE.
. For more information, see the paragraph “Transferring Photos, Videos and Voice
35
Page 38

Microsoft Windows Vista
1. Insert the CD provided. The automatic
playback starts. Click on [AUTORUN.EXE].
3. Press [Continue]. 4. Choose “USB Driver” and then press
2. Select the installation language and press
[OK].
[Continue].
3. Check your entries and choose [Install]. 4. Choose [Finish] to complete the installation.
Note:
For information on how to use the camera with a computer, read page 40 in the chapter “Using
the DV-767 as a Webcam ”, and page 41 in the chapter “Using the DV-767 as a Video Camera ”.
36
Page 39

Microsoft Windows ME, 2000, XP
1. Insert the CD provided. If you have activated
the Auto Start function on your computer, and
the window shown above is displayed, choose
[Cancel].
3. After a short time an unknown device is
recognized and the window shown above, with
the title “New Hardware Search Assistant”, is
displayed. Choose the menu point “No. Not this
time” and then press [Continue].
2. Switch the camera on and set the USB mode
to Webcam (see page 29). Connect your
camera to your computer without switching
the camera off (see page 35).
4. Choose “Install Software from a List or
Specified Source (for advanced users)” and
then choose [Continue].
5. Select “Removable Storage” and then click
[Continue].
6. The system searches for the driver on the
CD.
37
Page 40

7. Choose [Continue Installation] to confirm this
dialog.
The installation described
above must be executed
twice. Once for the driver
as a Digital Camera and
once for the driver as a
Video Camera.
8. After a short time the installation is complete
and the DV-767 is ready to be used as a digital
camera.
Note:
For information on how to use the camera with a computer, read “Usi ng the DV -767 as a Webcam
“ on page 40, and “Using the DV-767 as a Video Camera “ on page 41.
38
Page 41

Microsoft Windows 98 SE Installation
If you want to use your camera on a computer with a Microsoft Windows 98 SE operating system,
then you must install the driver from the CD ROM included with the camera.
To do this, first use the USB cable to connect the camera to your computer. Then follow the steps
described below.
1. The window shown above is displayed. Now
insert the Driver CD ROM provided and click on
[Continue >].
3. Select “CD ROM Drive” and then click
[Continue >].
2. Select “Find the most suitable driver for this
device” and then click on [Continue >].
4. Click [Continue >].
5. The installation is complete. Click [Finish]. 6. My Computer.
The camera is now recognized and a new removable disk drive appears in My Computer. The drive
letters displayed may differ, depending on the number of drives on your system.
39
Page 42

22.4 Transferring Photos, Videos and Voice Recordings
Note:
If your operating system is Windows 98, please read the chapter “Driver Installation ” on page 35.
If you want to transfer data (photos, videos, voice recordings, MP3 files) between the camera and
your computer, then you must first define the memory you want to access. For more information on
this option, read “ Memory” on page 29.
Switch the camera on and set the USB mode
to “MSDC” (see page 29). Use the USB cable
to connect your camera to your computer
without switching the camera off. (See page
35).
The MSDC USB mode is the standard setting.
This means that you must only execute the
aforementioned step if you have used your
camera as a webcam or video camera, or have
printed photos using PictBridge.
If you have correctly connected the camera to your computer, a new removable medium drive
appears in “My Computer”. You can now use this removable drive as a normal drive. You can copy,
delete or rename files as normal. If necessary, read the operating instructions for your operating
system.
Caution:
To prevent data loss, you should never disconnect your camera from your computer whilst saving
or writing data. To connect the camera from your computer, follow the instructions on page 42.
22.5 Using the DV-767 as a Webcam
Note:
Before using the DV-767 as a webcam for the first time, read the chapter “Driver Installation ” on
page 35.
If you have correctly installed the driver for the
DV-767, then you can, for example, use the
camera as a webcam for applications such as
Skype (see image on right) or other video
conference systems. This software is not
included.
To use the camera as a webcam, switch it on
and set the USB mode to Webcam (see page
29). Connect your camera to your computer
without switching the camera off. (See page
35). It is then available as a webcam for all
programs.
Note:
Use the support provided to position the camera on the table in front of you.
40
Page 43

22.6 Using the DV-767 as a Video Camera
Note:
Before using the DV-767 as a video camera for the first time, read the chapter “Driver Installation ”
on page 35.
If you have correctly installed the driver for the
DV-767, then you can use the camera as a
video camera. This allows you, for example, to
import recordings directly into graphic
applications like Adobe Photoshop. This
software is not included.
To use the camera as a webcam, switch it on
and set the USB mode to Webcam (see page
29). Connect your camera to your computer
without switching the camera off. (See page
35). It is then available as a webcam for all
programs.
Note:
The camera is installed with Windows as a WIA device (Windows Image Acquisition). This
standard interface allows you to exchange data between graphic software and devices like the
digital camera. This means that the DV-767 can be used with all graphics programs that support
WIA.
41
Page 44

a
22.7 Disconnecting from the Computer
If you have connected the camera, as a mass storage medium, to your computer (USB mode:
MSDC), then you should never disconnect the camera without first safely removing the hardware
from your operating system. Failure to do this could result in the loss of data or damage to your
camera’s memory.
For Windows 98SE, Me, 2000
Use the button
For Windows XP:
to switch your camera off before you remove the USB connection cable.
1. Double click on the “Safely Remove
Hardware” symbol (it may be necessary to show
inactive symbols).
3. In the “Safely Remove Hardware” window,
select the “USB mass storage device” and click
on [OK].
2. In the “Safely Remove Hardware” window,
select the “USB mass storage device” and click
on [Close].
4. A message is displayed, which informs you
that you can now remove the device. Remove
your camera from the USB connection.
42
Page 45

For Windows Vista:
1. Double click on the “Safely Remove
Hardware” symbol (it may be necessary to show
inactive symbols).
3. In the “Safely Remove Hardware” window,
select the “USB mass storage device” and click
on [OK].
2. In the “Safely Remove Hardware” window,
select the “USB mass storage device” and click
on [Stop].
4. A message is displayed, which informs you
that you can now remove the device. Remove
your camera from the USB connection.
22.8 Formatting the Memory
If you want to remove the entire contents of your camera, or files have been damaged, it can be
advisable to format the internal memory.
In some cases it can also be necessary to format new SD memory cards before using them for the
first time in your camera. You should always try this if your camera does not recognize an inserted
SD card.
To format the memory, connect the camera to your computer and open “My Computer”. Right-click
on the drive to be formatted, and choose “Format”. Select FAT32 as the file system, and then the
default settings for all other parameters.
Caution:
If you are not certain about executing the steps described above, read the help for your operating
system or consult a specialist. A mistake during formatting can result in the computer being
unusable.
43
Page 46

23 Technical Data
Image sensor: 1/1.8“ 5 mega pixels (2592x1944) CMOS
LCD Display: 2.5“ LTPS LCD, 0.23 mega pixels (960x240)
Lens: f=8.22mm F=2.8
Focus distance: Long shots: 1.5m – unlimited,
Macro shots: 30 - 40cm
Exposure shutter: Automatic
Exposure time: 1/15~1/2000 second
Manual exposure correction: -2.0..0..+2.0 (in 10 steps)
WB: Auto, Sunlight, Cloudy, Neon Light, Internal Light
Zoom: 8x digital zoom
Autotimer: 10 seconds
Image acquisition:
Resolution: 3648x2736 (10M), 2560x1920 (5M), 2048x1536 (3M),
1280x960 (1.3M), 640x480 (0.3M)
Image format: JPEG
Video resolution:
Resolution: 320 x 240 or 640 x 480
Video format: ISO MPEG-4, 30 frames per second, 800-2000 kbps
Audio format: 4-bit ADPCM, 44,1KHz, 177kbps, mono
Duration: Only restricted by memory capacity
Voice recordings:
Audio format: WAV 16-bit PCM, 8kHz, 128kbps, mono
Duration: Only restricted by memory capacity
Line-in recording:
Audio format: WAV 4-bit ADPCM, 16kHz – 44,1kHz, 120 – 358kbps, stereo
Duration: Only restricted by memory capacity
MP3 playback:
Audio format: MP3
Internal memory: 64MB memory, 54MB is free
External memory: SD memory card
Requirements for direct printing: PictBridge
Video output: NTSC or PAL
Integrated loudspeaker: Mono
Integrated microphone: Mono
Connections:
Mains supply: mini USB
Data transfer: mini USB
AV input 2.5mm mini-jack
AV output / headphones 2.5mm mini-jack
Mains adapter:
Input: 100-240V~ (AC), 50/60Hz, 0.5A
Output: 5.0V (DC), 1.2A
Model number: MU12-2050120-C5
Battery (Li-Ion):
Output: 3.7V, 950mAh
Model number: TD-B001
Dimensions: 115 x 56 x 20mm
Weight: 145g
44
Page 47

24 Technical Help
This chapter explains some technical terms. No claims are made regarding completeness and
accuracy.
24.1 White Balance (WB)
The WB (white balance) is used to set the colour temperature. This adjusts the camera so that it is
ideally suited for the light conditions in the desired location. If this WB is fully automatic, then the
camera looks for a white area (or similar) in the picture and uses this as a basis to calibrate all
other colours. In reality, this area is seldom white. More often than not it is simply the lightest area
in the screen. This often results in colour fog. Using semi-automatic WB (setting the camera to
certain, defined lighting conditions) can often reduce this colour fog. However, this only works with
standard lighting conditions. In mixed light it can lead to poor results.
24.2 EV Bias
You can use the EV bias to manually change the predefined exposure value for the exposure
meter. This correction makes the image/video lighter or darker than predefined by the shutter. As a
rule, the shutter priority is not optimal in the following cases, and requires the exposure to be
manually corrected:
Back light: If the object being captured is illuminated by back light (for example, a portrait with
the sunset in the background), a shutter priority normally results in the image being too dark. A
longer exposure (such as +2) generates a better image.
High-key image: In the case of light objects in front of a light background, an automatic
exposure generally results in a gray image. A longer exposure (such as +2) generates a better
image.
Low-key image: In the case of dark objects in front of a dark background, an automatic
exposure generally results in a gray image. A shorter exposure (such as -2) generates a better
image.
24.3 Range of Exposure Measure
The DV-767 camera has a shutter priority, which undertakes the appropriate exposure for the
image/video. For this, the camera measures the brightness at various points on the image to
determine the exposure time. In normal cases, the image should be exposed in such a way that the
subject is well lit. As the subject is usually located in the centre of the image, the “Centre” setting is
suitable for almost all captures. If the subject in the centre of the image is very small, then the
exposure can only be measured at one point in the centre of the image (“Spot” setting). If, on the
other hand, the exposure measurement should be distributed over the entire image, then you
should select the “Matrix” setting. This setting delivers good results for images that are equally
illuminated.
45
Page 48

25 Disposal
25.1 Batteries
Please bear in mind that the end user is obliged to return old batteries to a distributor or to a
returns location established for this purpose by the legal waste disposal company.
25.2 Device
Your consumer electronics device is subject to the 2002/96/EC European directive on disposal of
electrical and electronic equipment.
You are forbidden to dispose of your device in the
household waste.
For information on the disposal of old devices,
contact your local government, the waste
management administration, or the shop from
which you purchased this product.
You can hand your device in to local collection
points free of charge.
Disposing of old devices correctly helps to prevent
damage to the environment and reduces health
risks.
46
Page 49

A
26 T rouble-Shooting
Problem Cause Solution
Insert the battery correctly (see
page 9).
Use the mains supply or USB
cable to charge the battery (see
page 10).
Use the mains supply or USB
cable to charge the battery (see
page 10).
Set Auto Off to meet your
requirements (see page 28).
Do not use the video camera in
extreme temperatures.
If the battery only stays
charged for a very short time
after you have charged it, you
must replace the mains
adapter. To do this, contact the
customer hotline (see the back
of the manual).
Change the battery. To do this,
contact the customer hotline
(see the back of the manual).
Only use the device seldom, in
order to save electricity.
Switch to Capture mode (see
page 11).
Delete data from your storage
medium or transfer data to your
PC (see page 39).
Insert an empty storage
medium into the device (see
page 12).
Camera cannot be switched
on.
The device switches on, but
then switches off again after
a short time.
The camera switches itself
off automatically.
The battery runs down too
quickly.
The camera does not take a
photo after the capture
button has been pressed.
Battery not correctly inserted.
Battery not charged.
The battery is not charged
sufficiently.
uto Off is activated, and the
camera switches off automatically
after a predefined time.
The ambient temperature is too
low.
The battery is overcharged.
The battery has exceeded its
lifetime.
The device has been used too
often as a flashlight (this uses too
much power).
The camera is not in Capture
mode.
The memory is full.
The lens is dirty.
The image is out of focus.
The flash is not working. The flash is switched off.
The date and time are not
displayed correctly.
The Capture Distance switch is
not in its normal position.
The quality is set too low.
The date and time have not been
set. The camera uses its standard
time.
Clean the lens with a soft, dry
cloth.
Set the Capture Distance
switch
Set the quality to “Super” (see
page 15).
Set the Flash mode to
“Automatic” (see page 19).
Set the date and time (see
page 28).
to its normal position.
47
Page 50

Problem Cause Solution
The colour of the photos is
abnormal.
The photo display is not
correct.
The image is too light or too
dark.
The LCD screen is not clear. The LCD screen is dirty.
Photos, videos or voice
recordings cannot be
transferred to the computer.
No sound is coming out of
the headphones.
The LCD display is not
showing any contents.
The camera will not transfer
any MP3 / WMA files.
The computer does not
recognize the camera.
The white balance (WB) settings
are incorrect.
Reset the WB (see page 21).
The photo could be damaged. Run a check on your computer.
The EV bias is set incorrectly.
Reset the EV bias (see page
21).
Clean the screen with a clean,
dry cloth.
The cable is not connected
correctly.
Check the cable connection.
The operating system is not
Windows
98/98SE/2000/ME/XP/Vista, or
the computer does not have a
Install Windows
98/98SE/2000/ME/XP/Vista
and a USB connection.
USB connection.
No USB driver has been installed
with Windows 98.
The headphones cable is loose.
The battery is empty.
The device is switched off.
The display is broken.
Install the Windows98 USB
driver from the CD (see page
39).
Connect the headphones
correctly.
Charge the battery (see page
10.
Switch to the device on (see
page 10).
Contact the customer hotline
(see the back of the manual).
The device is in AV Out mode. Read page 31.
Use the mains supply or USB
The battery is empty.
cable to charge the battery (see
page 10).
The USB cable is not connected.
The USB cable is faulty.
Connect the USB cable (see
page 35).
Contact the customer hotline
(see the back of the manual).
Delete data from your storage
The memory is full.
medium or transfer data to your
PC (see 39).
Connect your camera directly
A USB hub is interconnected.
to the computer and, if
necessary, remove all USB
hubs from your computer.
The USB plug has a loose
connection.
Reinsert the plug. If this does
not solve the loose connection,
exchange the cable.
48
 Loading...